Journey: Heart of Gaia Walkthrough, Guide, & Tips
Journey: Heart of Gaia Walkthrough

Welcome to the Journey: Heart of Gaia Walkthrough
After being kidnapped, Liz must free the Underworld from the tyranny of Scartaris Umbra.
Whether you use this document as a reference when things get difficult or as a road map to get you from beginning to end, we’re pretty sure you’ll find what you’re looking for here.
This document contains a complete Journey: Heart of Gaia game walkthrough featuring annotated screenshots from actual gameplay!
We hope you find this information useful as you play your way through the game. Use the walkthrough menu below to quickly jump to whatever stage of the game you need help with.
Remember to visit the Big Fish Games Forums if you find you need more help. Have fun!
This walkthrough was created by BrownEyedTigre, and is protected under US Copyright laws. Any unauthorized use, including re-publication in whole or in part, without permission, is strictly prohibited.
General Tips

- This is the official guide for Journey: Heart of Gaia.
- In this guide, solutions will be provided for both Advanced and Casual Modes; some solutions are the same for both modes.
- Select Menu – Options (1) to adjust the Sound, Graphics, Custom Cursor, and Resolution.
- You may select between Casual and Advanced Mode.
- Honors can be earned. Your progress can be checked by selecting the Atlas and then selecting Honors.
- Select the Question Mark in the upper right to get the objectives for the puzzles.
- Puzzles may be skipped and reset.
- Select the Hint button (2) on the bottom right to get a hint.
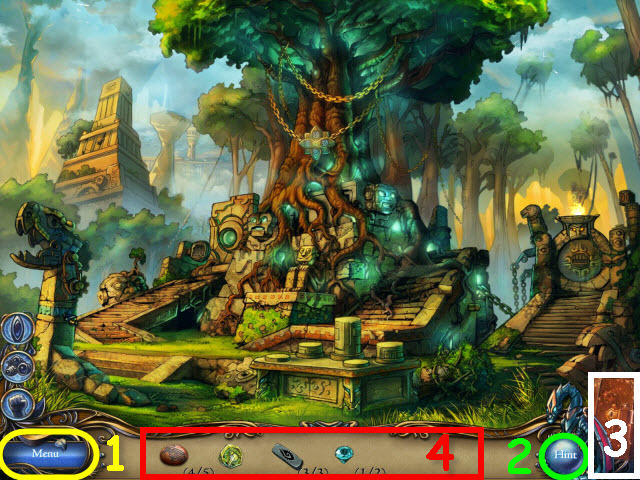
- Select the Atlas (3) which is acquired in the mushroom forest to check your progress and travel to other locations.
- Inventory items (4) will be marked in all CAPS in the strategy guide.
Chapter 1 – Mushroom Forest
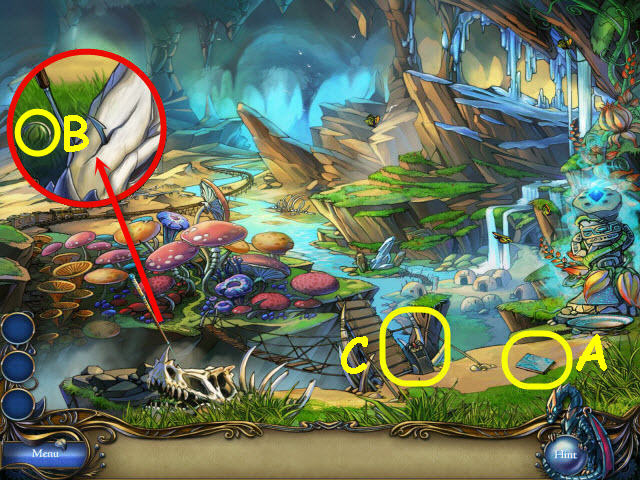
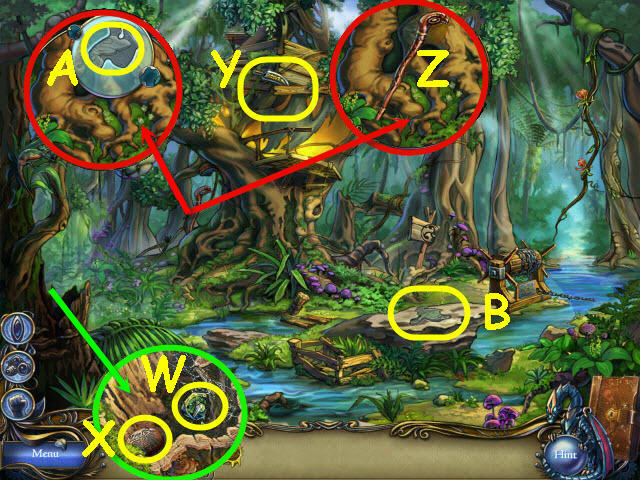
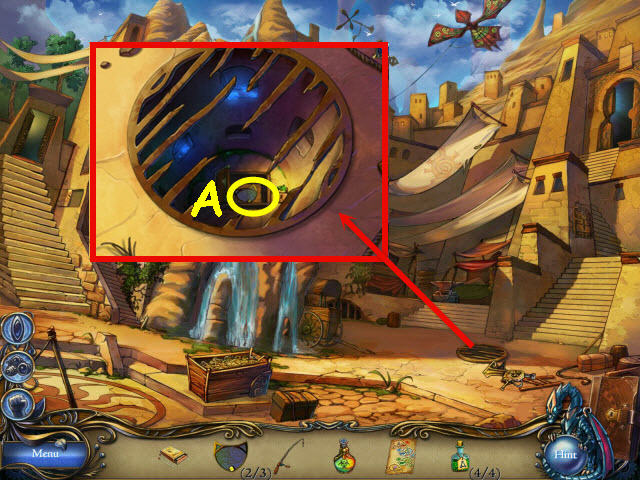
- Take the IMAGE PART 1/3 (A).
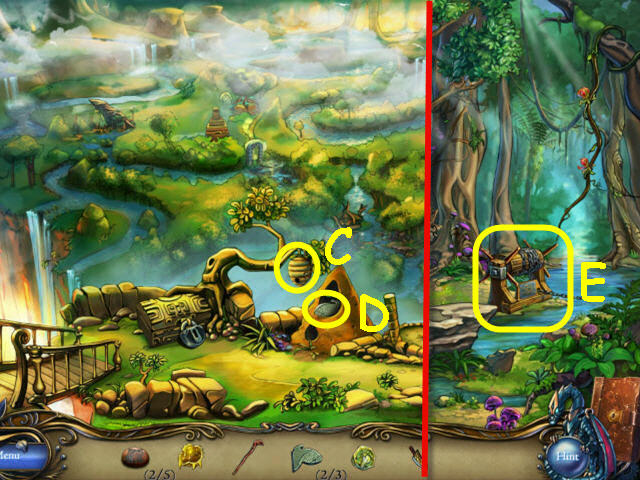
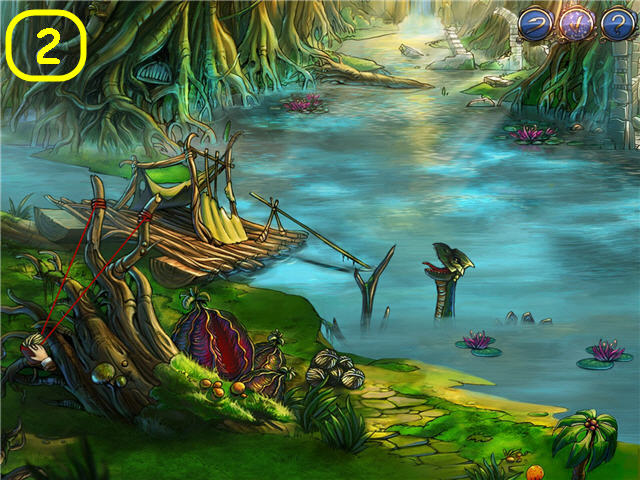
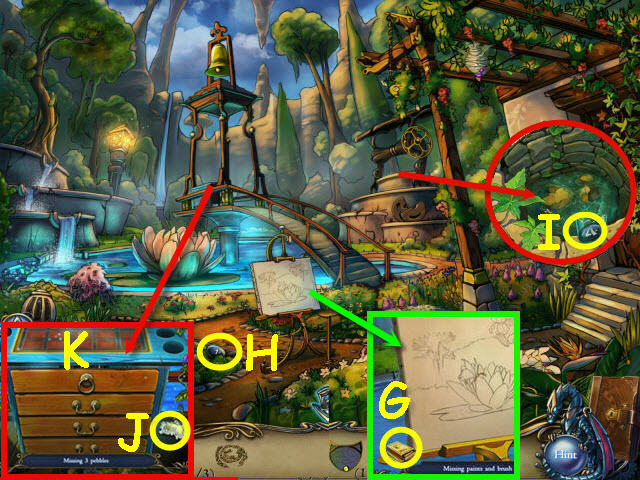
- Examine the hook; take the NATURE ORB 1/6 (B).
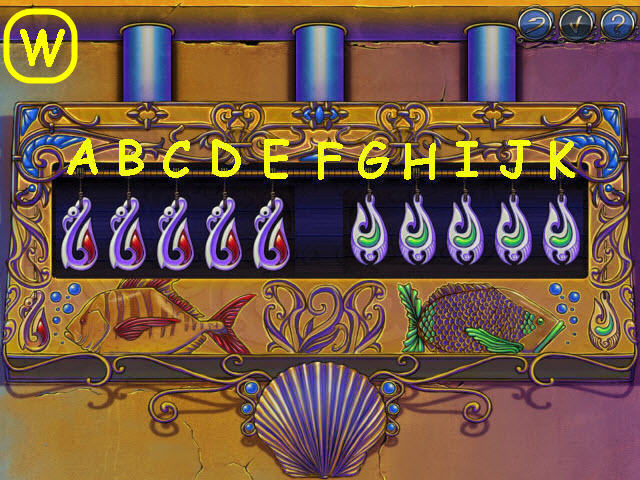
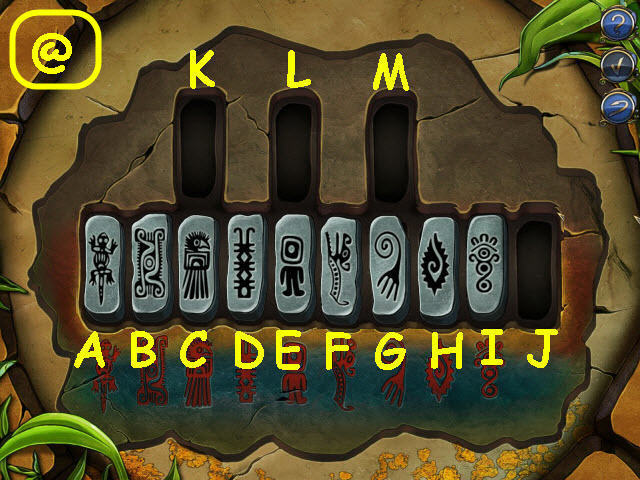
- Examine the bridge control to trigger a puzzle (C).
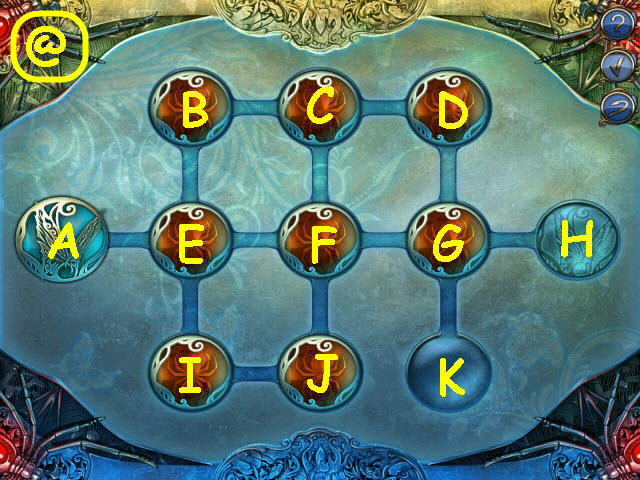
- Move the butterfly from the left to the right.
- To solve the puzzle, slide the following; G – H, G – K, C – D, E – B, J – I, F – J, E – A, B – C, E – B, J – I, F – J, D – C, G – H, G – D, E – A, G – K, and G – H (@).
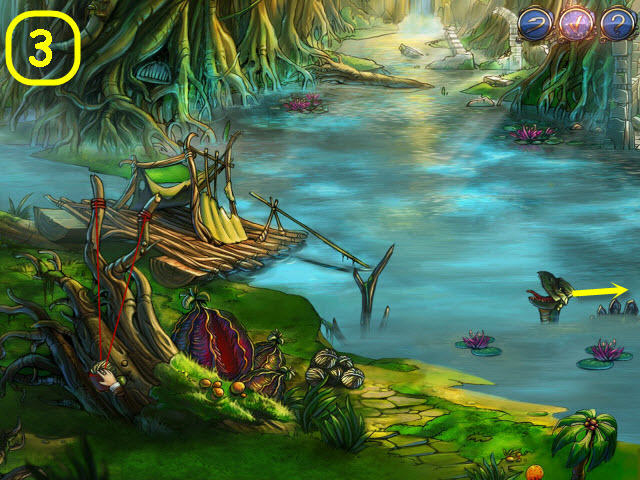
- Cross the bridge to the mushroom forest.
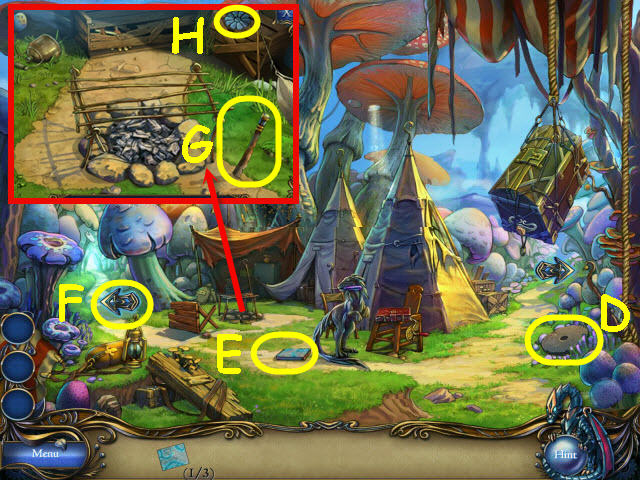
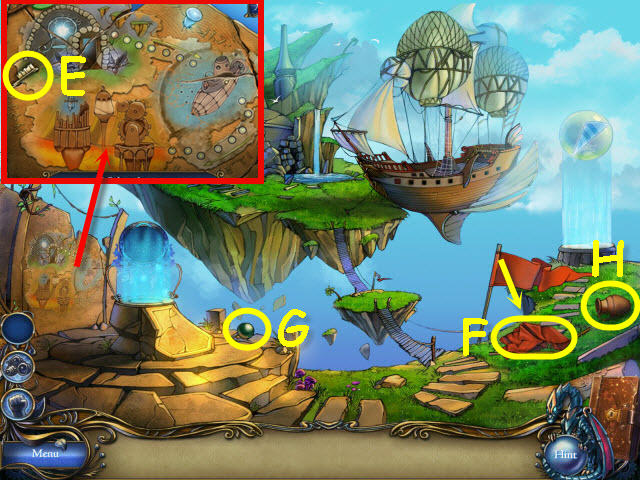
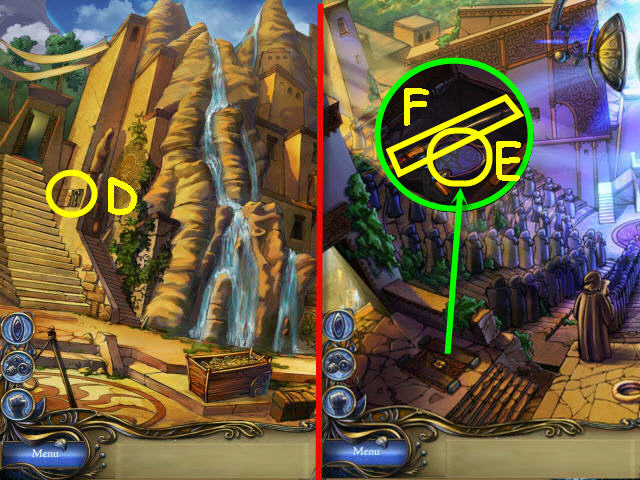
- Take the GRINDSTONE 1/2 (D).
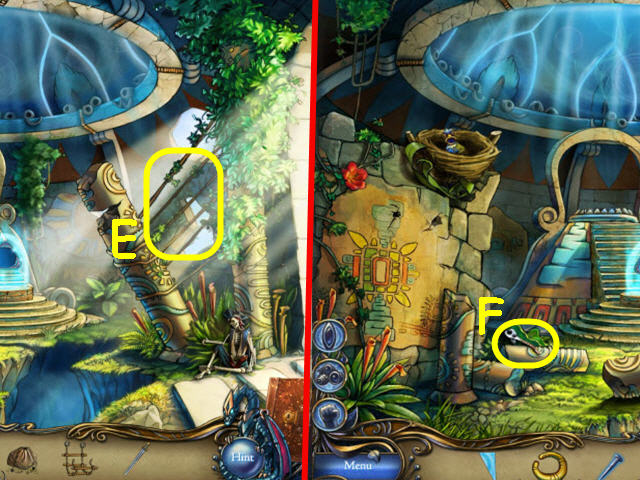
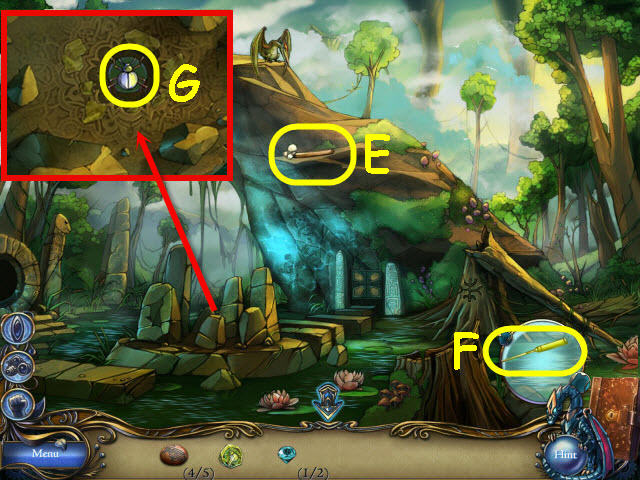
- Touch the hungry dino; take the IMAGE PART 2/3 (E).
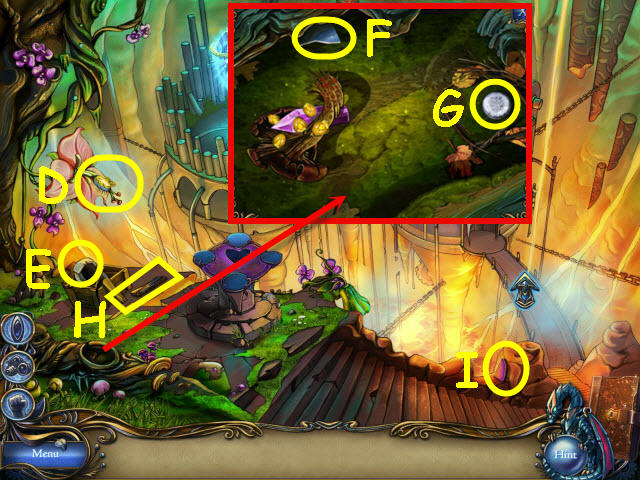
- Attempt to go up the left path (F).
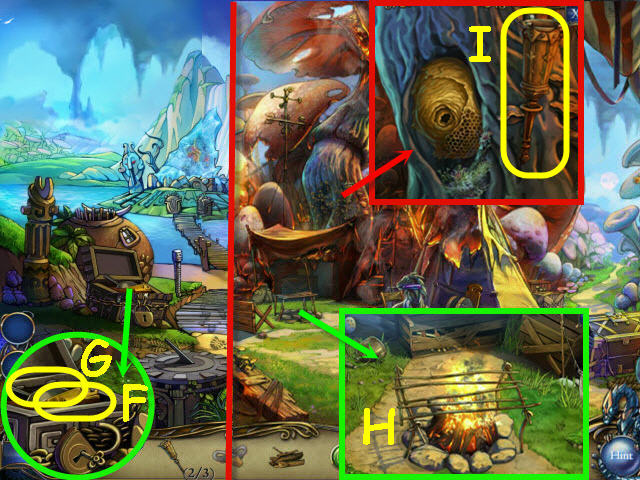
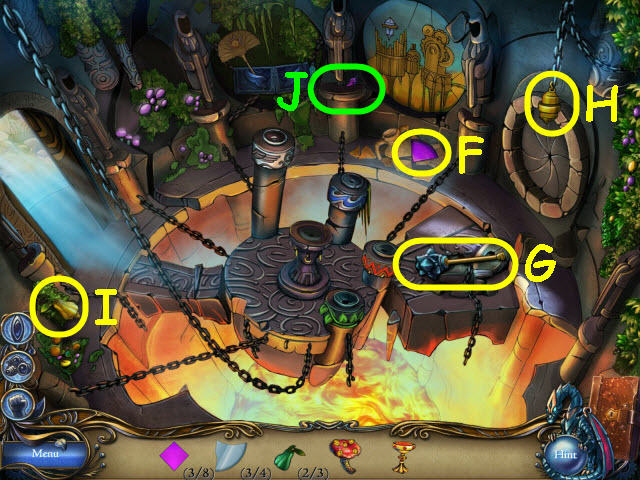
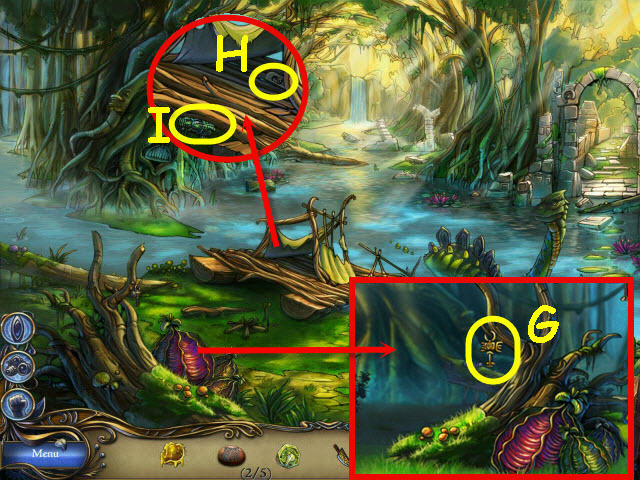
- Examine the campfire; take the BLUNT MACHETE (G) and the STONE FLOWER 1/3 (H).
- Go up the right path to the abandoned settlement.
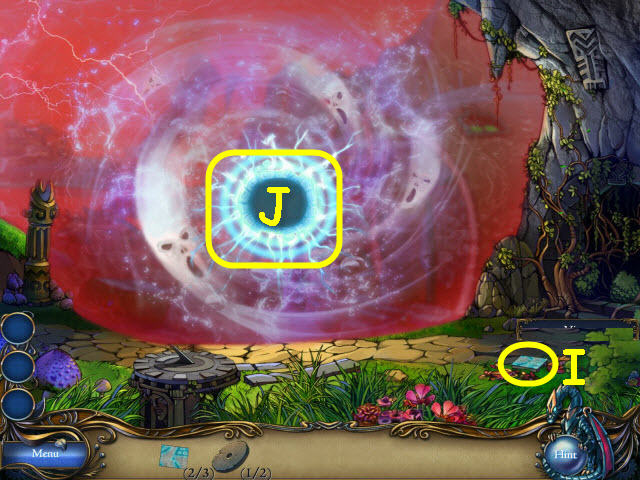
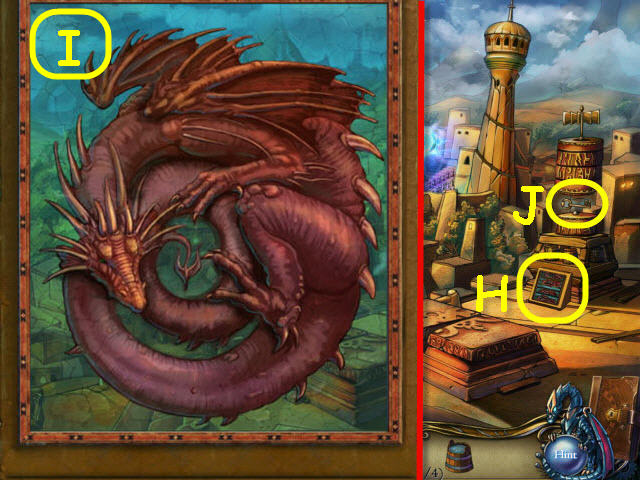
- Move the heap of leaves; take the IMAGE PART 3/3 (I).
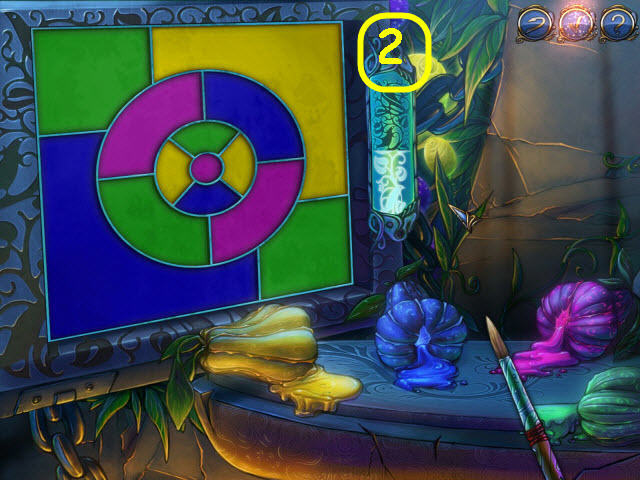
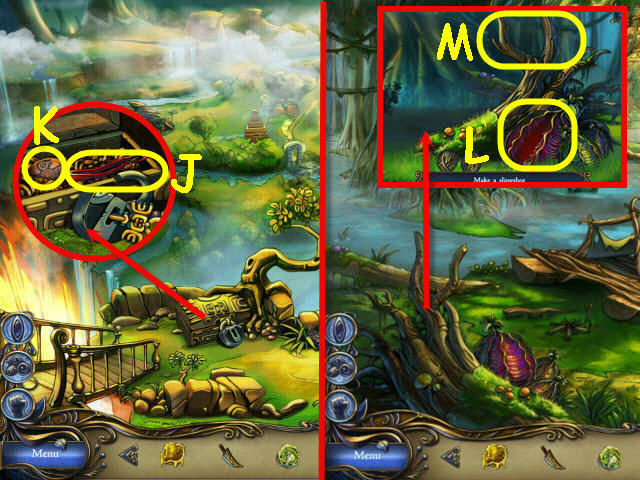
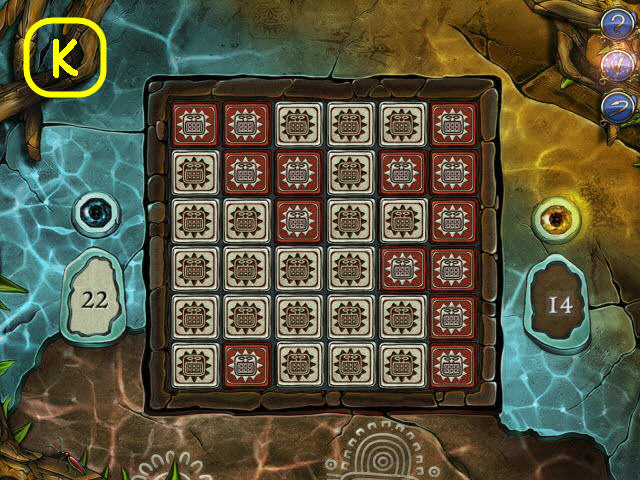
- Examine the floating fresco and place the 3 IMAGE PARTS in the spaces to trigger a puzzle (J).
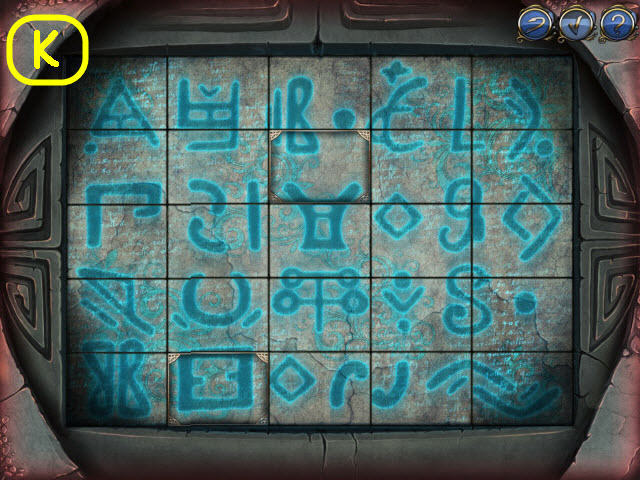
- Complete the fresco.
- Each square has 4 different patterns; press on them to change.
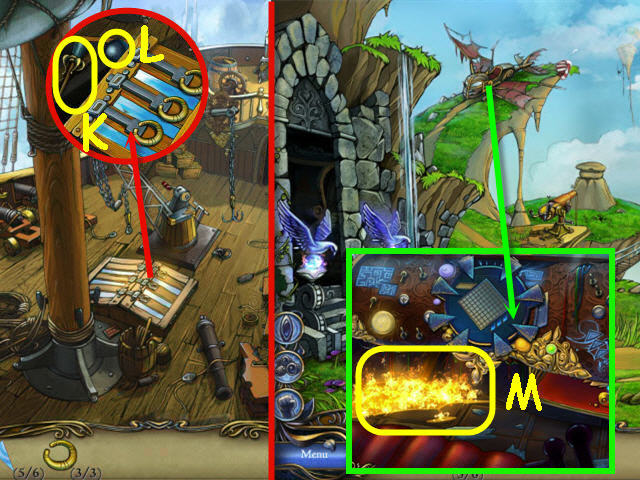
- See screenshot for solution (K).
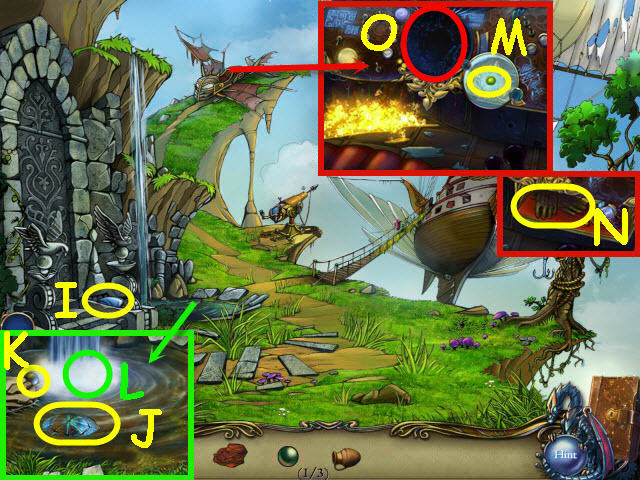
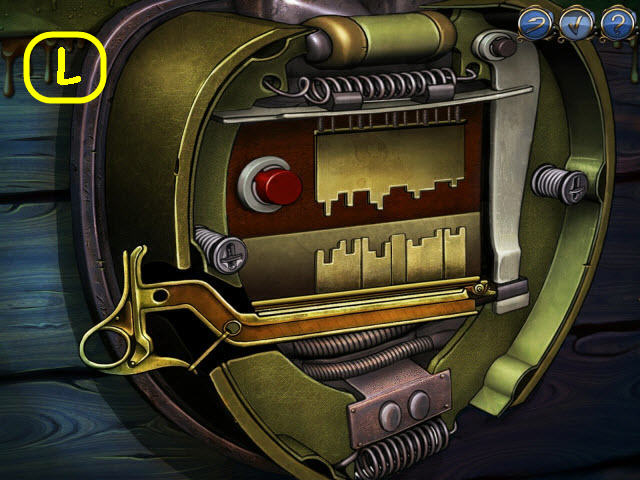
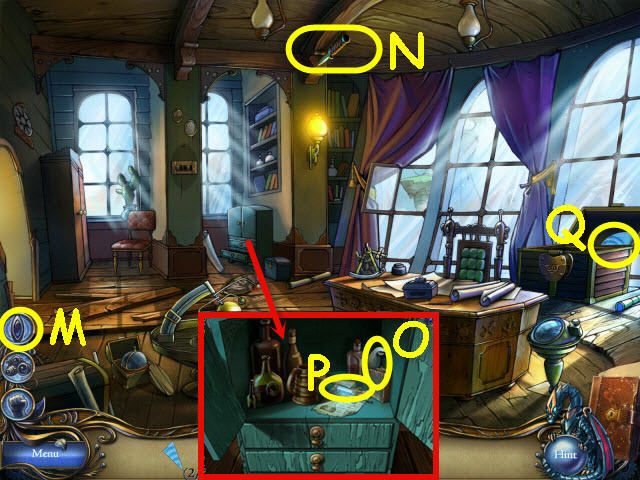
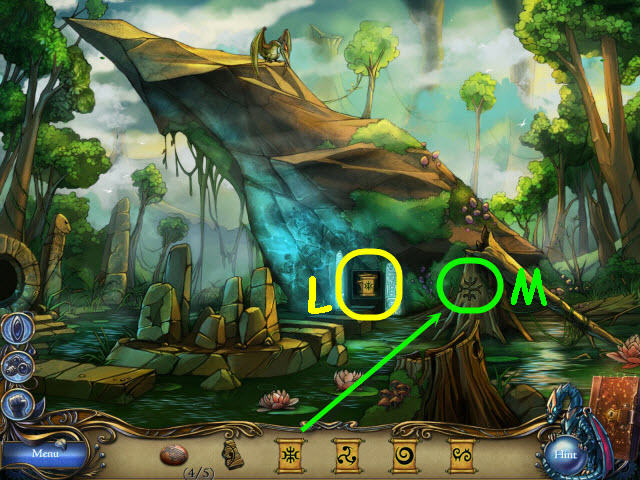
- Take the GRINDSTONE 2/2 (L) and the TORCH 1/3 (M).
- Back out to the mushroom forest.
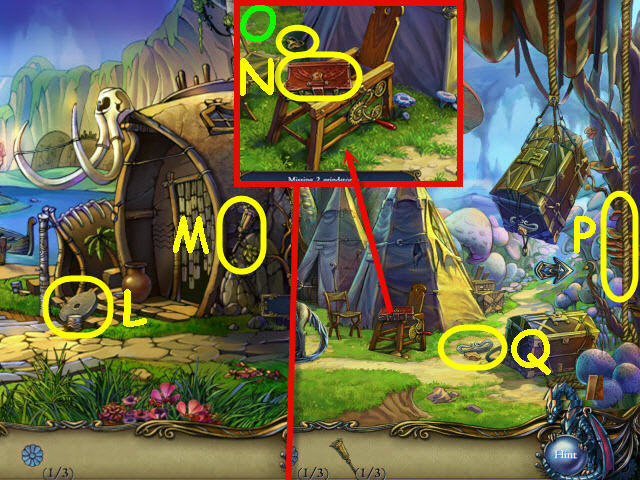
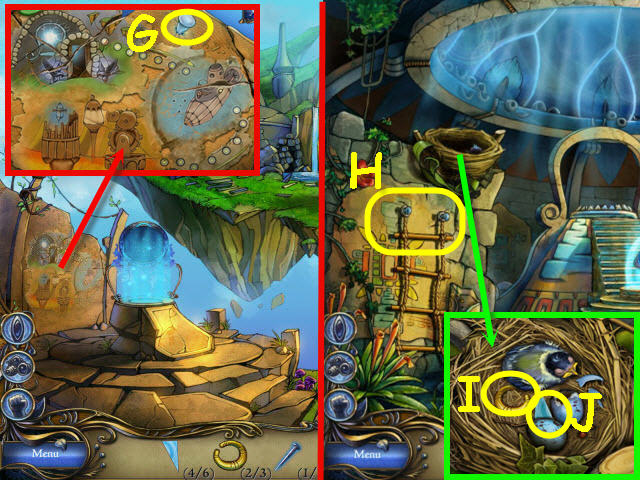
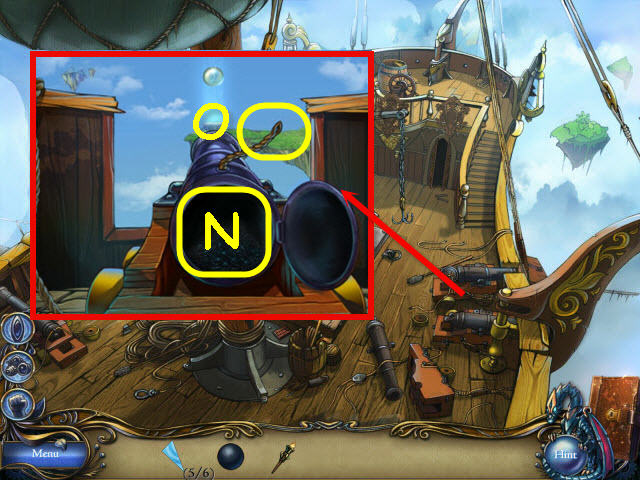
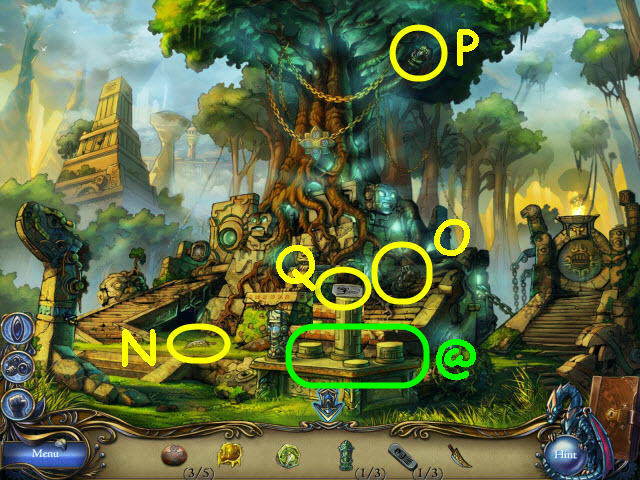
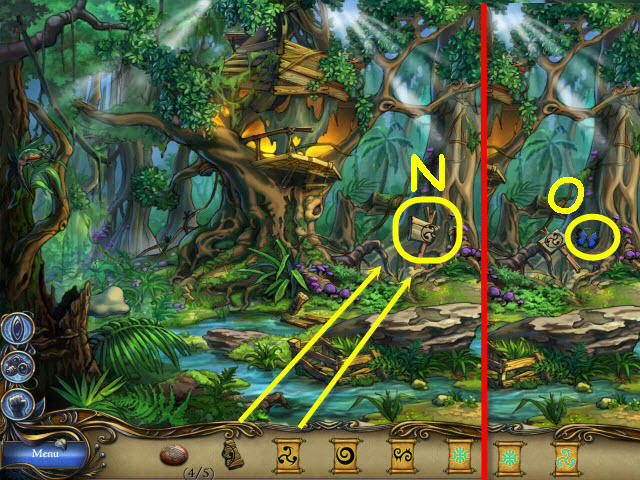
- Examine the grinding machine; take the atlas (N) which will be added to the lower right of the task bar. You can now travel to available locations by selecting the atlas and then selecting the desired location.
- Take the GOLDEN LEAF (O).
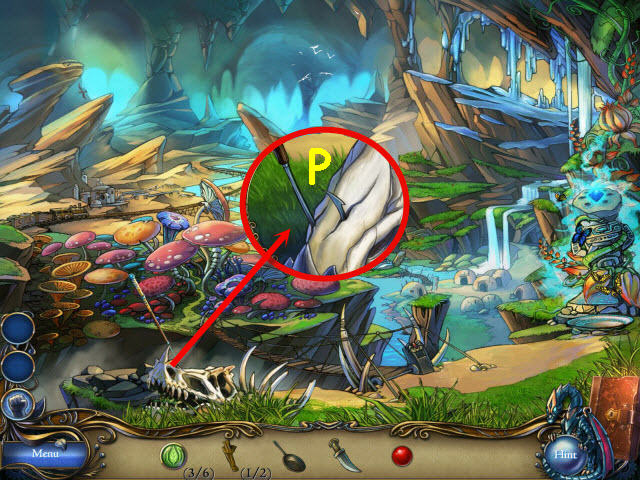
- Place the 2 GRINDSTONES on the broken grinding machine; sharpen the BLUNT MACHETE on it to create a SHARP MACHETE.
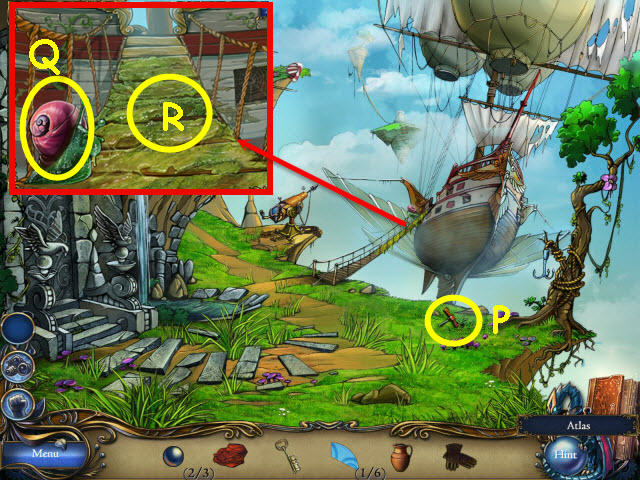
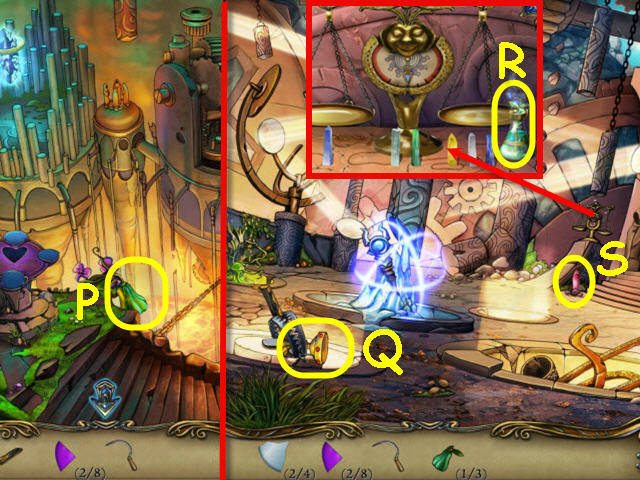
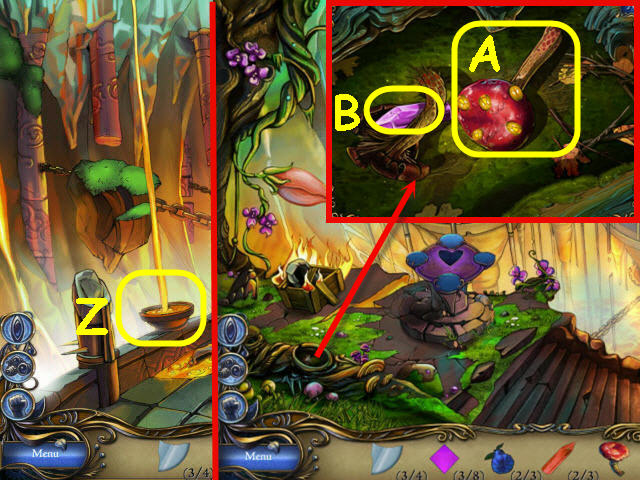
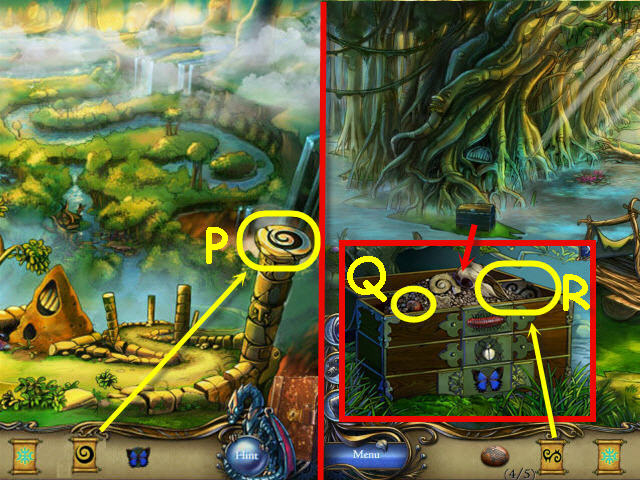
- Use the SHARP MACHETE on the rope (P); take the FLINT (Q).
- Go to the abandoned settlement.
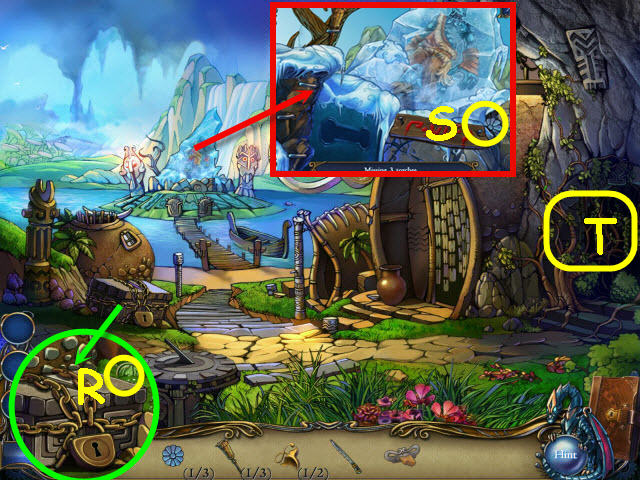
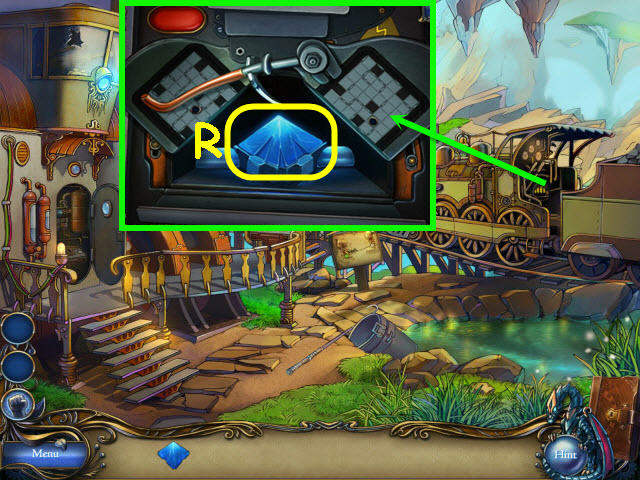
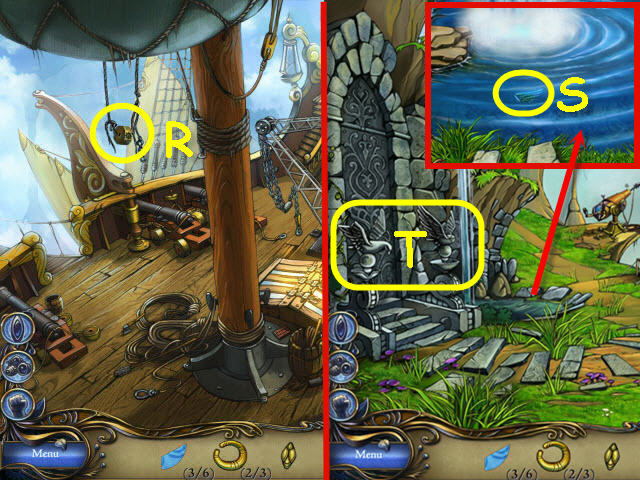
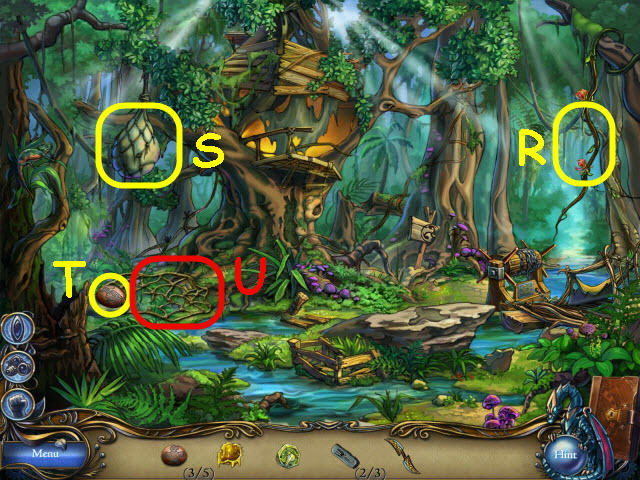
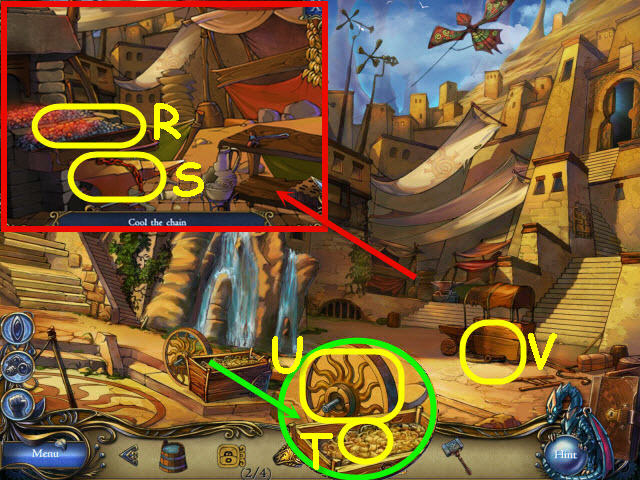
- Examine the chest; take the NATURE ORB 2/6 (R).
- Examine the frozen giant; take the STONE FLOWER 2/3 (S).
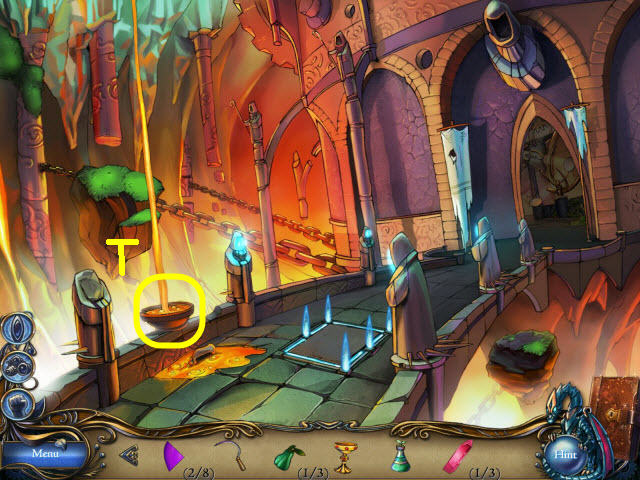
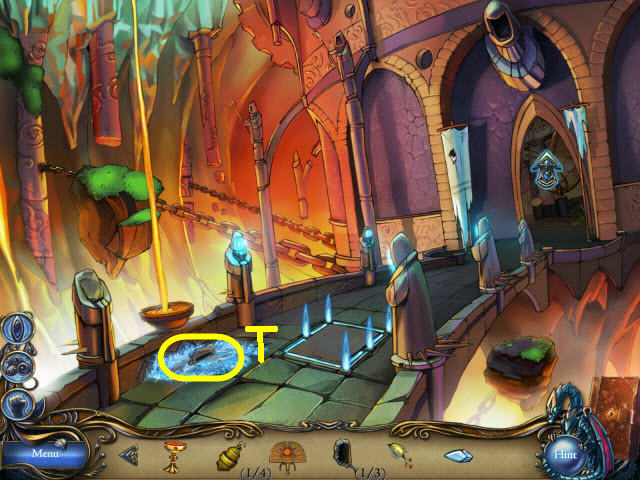
- Use the SHARP MACHETE on the vines to get DRY VINES (T).
- Go right into the crystal cave.
- Select the four dim crystals to brighten them (1 – 4).
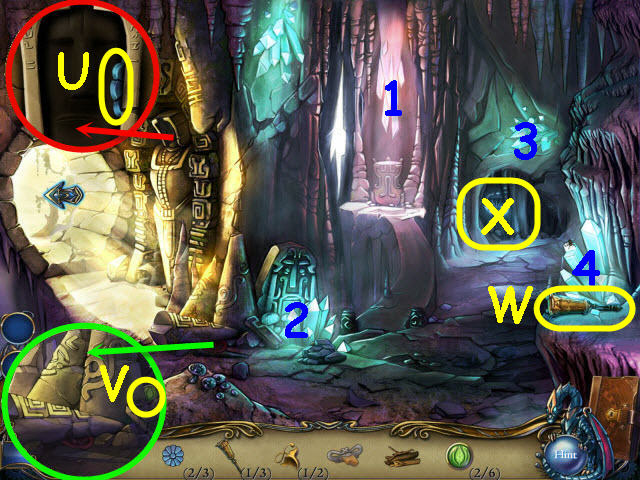
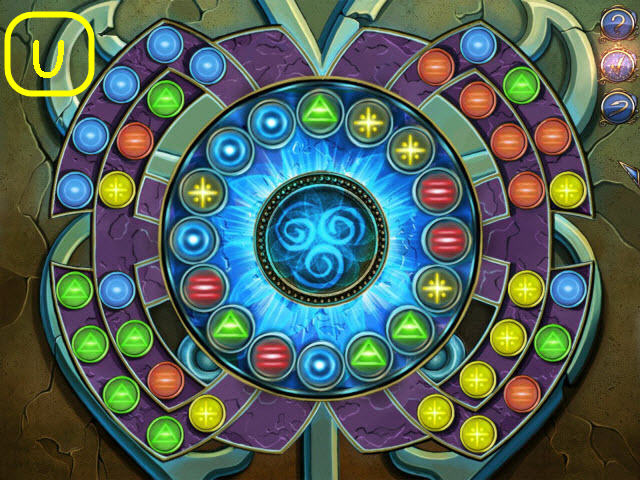
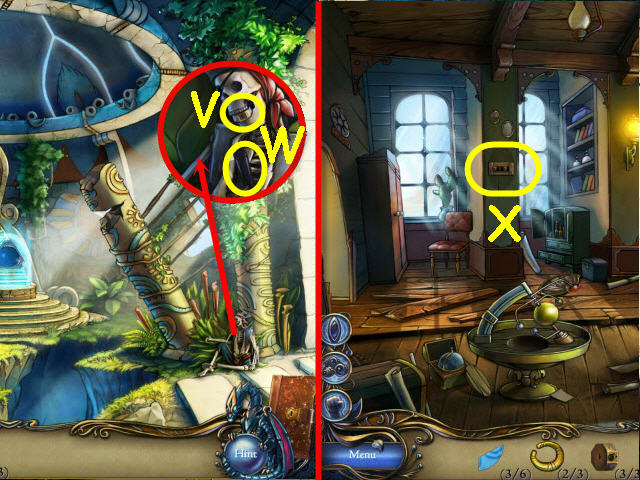
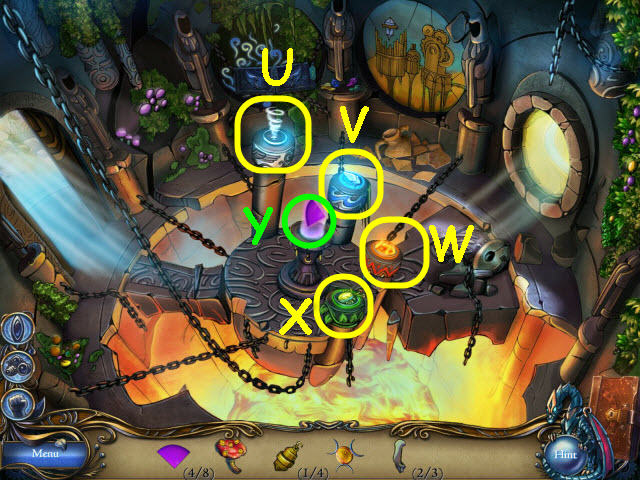
- Examine the statue face; take the STONE FLOWER 3/3 (U).
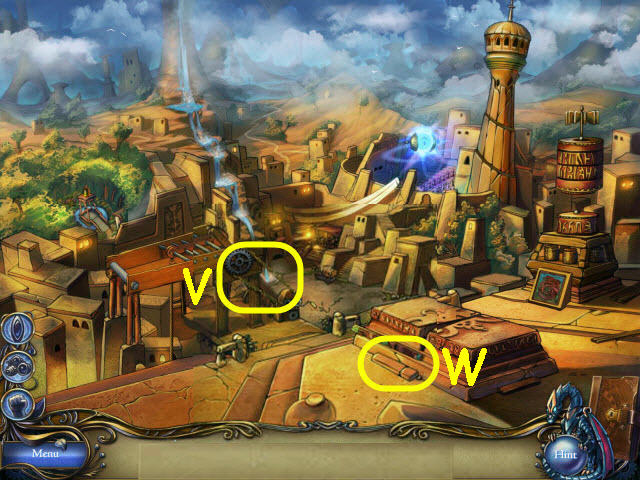
- Examine the huge boulder; take the NATURE ORB 3/6 (V).
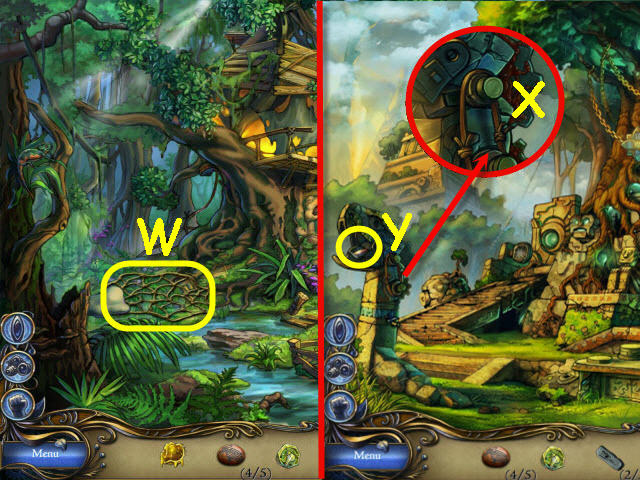
- Take the TORCH 2/3 (W).
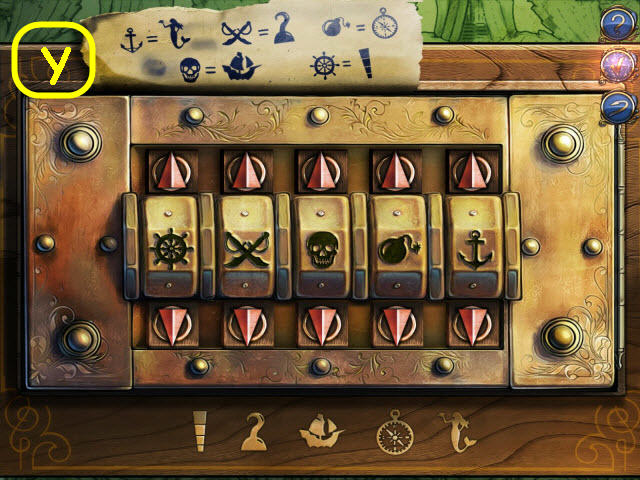
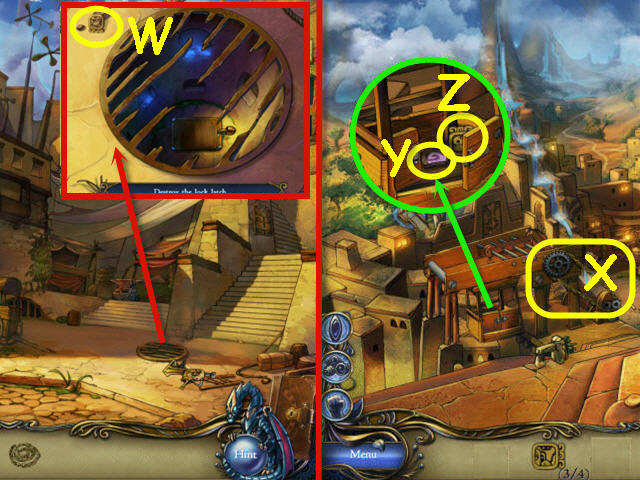
- Examine the wall bas-relief and place the 3 STONE FLOWERS in the spaces to trigger a puzzle (X).
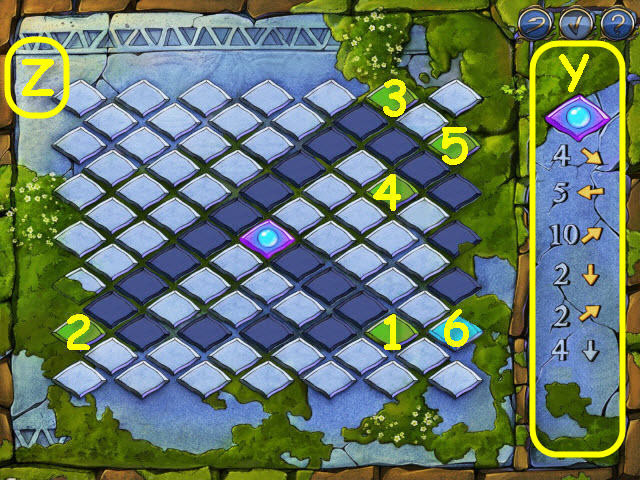
- Press the squares according to the code (Y).
- See screenshot for order of squares (Z).
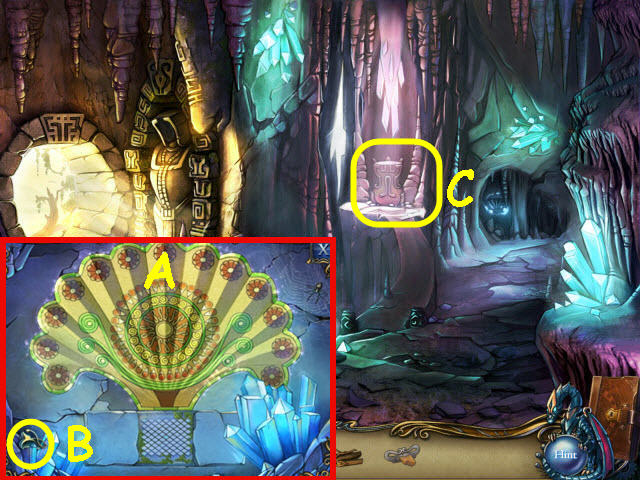
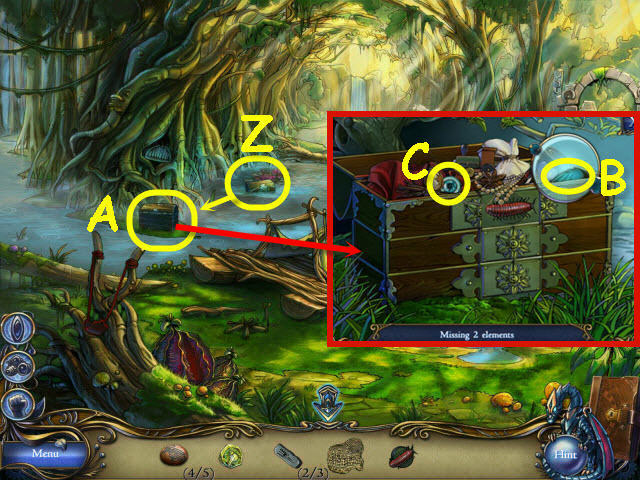
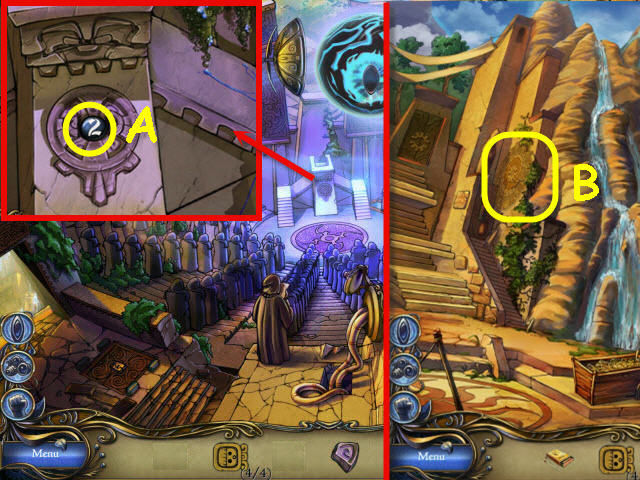
- Take the FAN (A) and the GOLDEN LEAF 2/2 (B) after completing the puzzle.
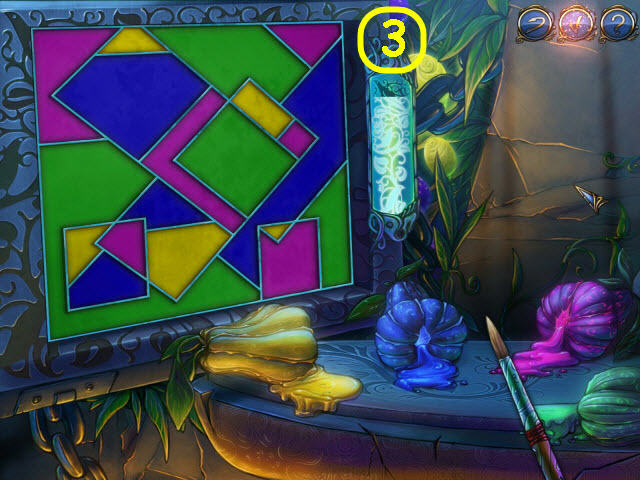
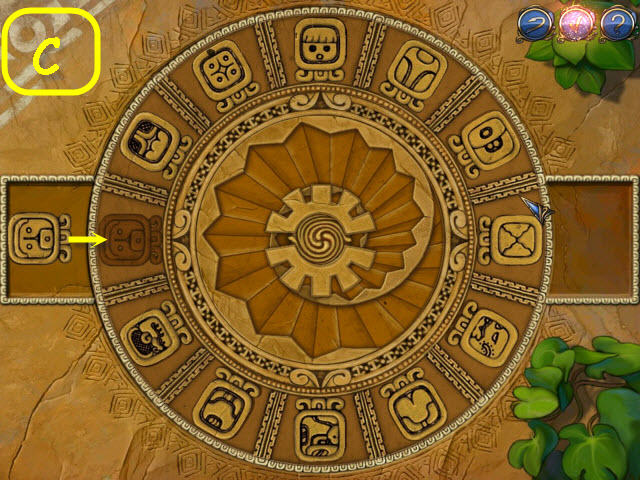
- Examine the pedestal and place the 2 GOLDEN LEAVES in the spaces to trigger a puzzle (C).
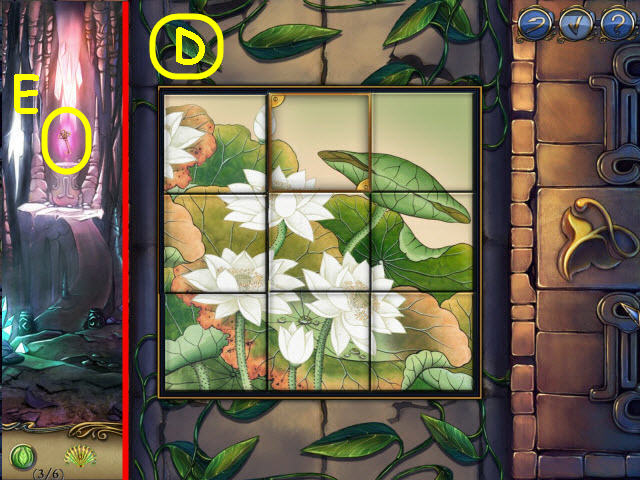
- Switch the pieces to complete the picture.
- See screenshot for solution (D).
- Take the KEY (E).
- Go to the abandoned settlement.
- Examine the chest and use the KEY on the lock; take the MASK HALF 1/2 (F) and FRYING PAN (G).
- Back out.
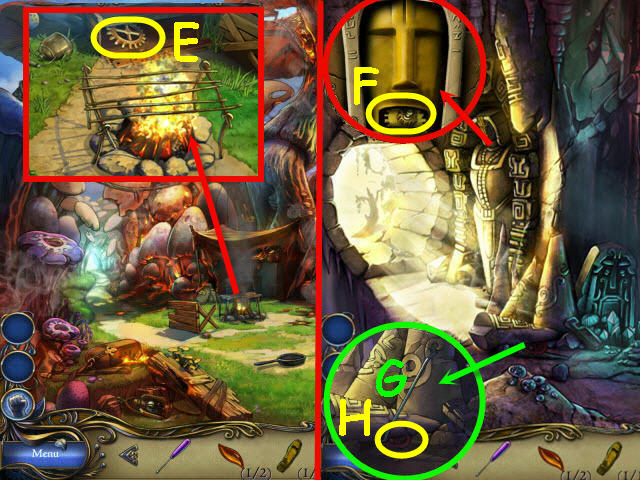
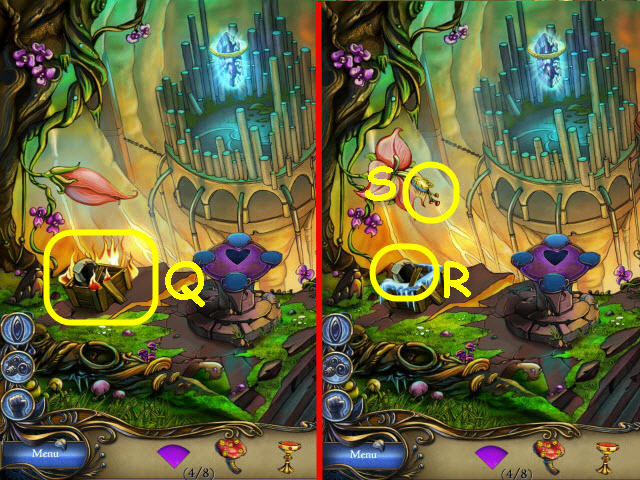
- Examine the campfire and use the DRY VINES, FLINT, and the FAN on it (H).
- Examine the beehive; take the TORCH 3/3 (I).
- Go right to the abandoned settlement.
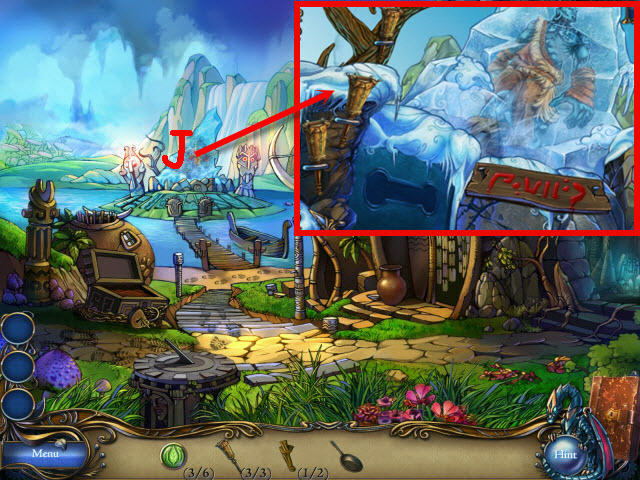
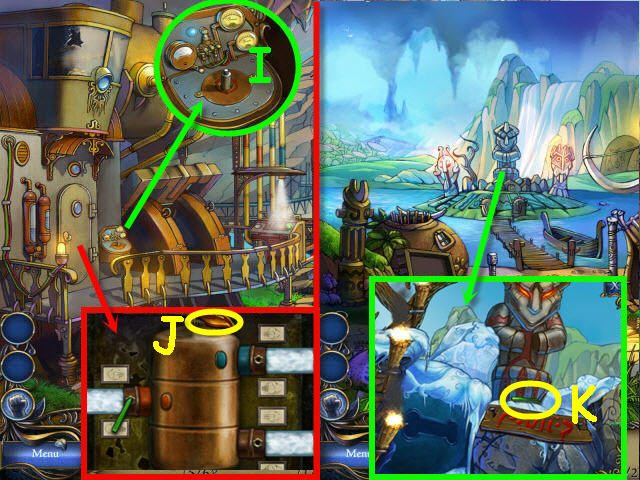
- Examine the frozen giant (J).
- Place the 3 TORCHES in the holders to trigger a puzzle.
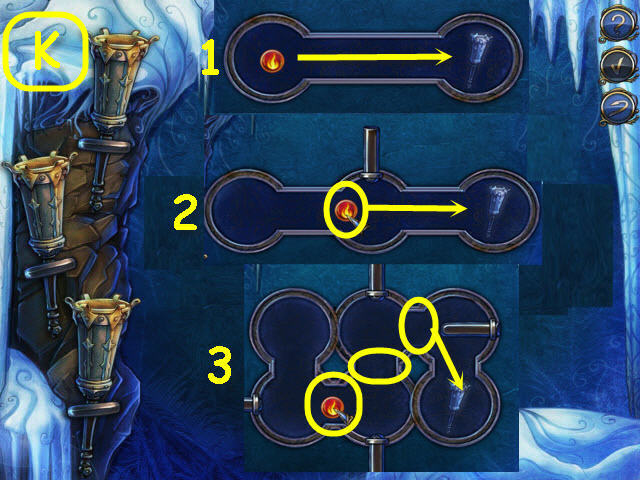
- Guide the flame to the torch without touching anything.
- See screenshot for tips on where to pause (K).
- You will now have GRUMP’S STRENGTH (L) to help you on tasks requiring strength.
- Use GRUMP’S STRENGTH on the solid vase; take the COBBLER’S KNIFE (M).
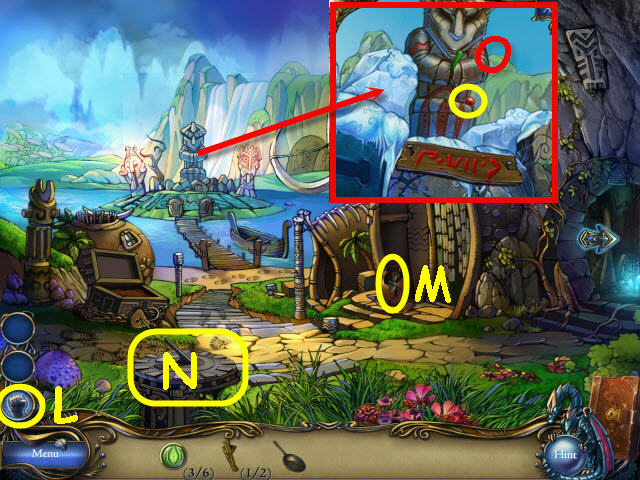
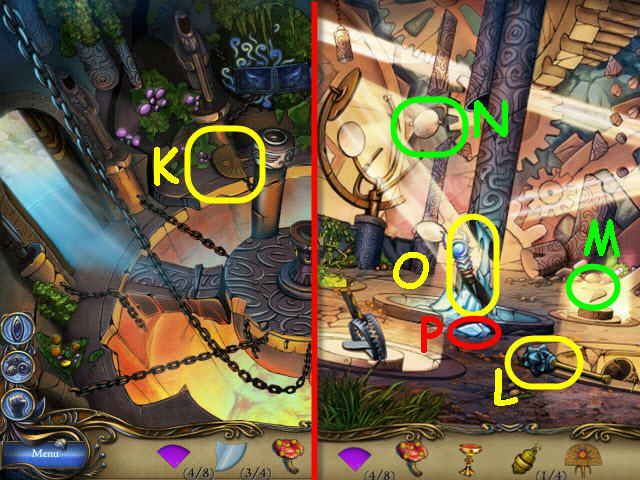
- Use GRUMP’S STRENGTH on the sun clock (N).
- Examine the totem; take the ROUND LATCH (O).
- Go to the hanging bridge.
- Examine the hook; use GRUMP’S STRENGTH on it to get a HOOK (P).
- Go to the mushroom forest.

- Examine the beehive and use the COBBLER’S KNIFE on it; take the MASK HALF 2/2 (Q).
- Use GRUMP’S STRENGTH on the jammed chest; take the CANNED GOODS (R) and the NATURE ORB 4/6 (S).
- Examine the campfire and place the FRYING PAN on it. Place the CANNED GOODS in the pan; take the TASTY FOOD (T).
- Give the TASTY FOOD to the hungry dino; take the SCREWDRIVER (U).
- Use GRUMP’S STRENGTH on the giant mushroom (V).
- Go left to the outpost.
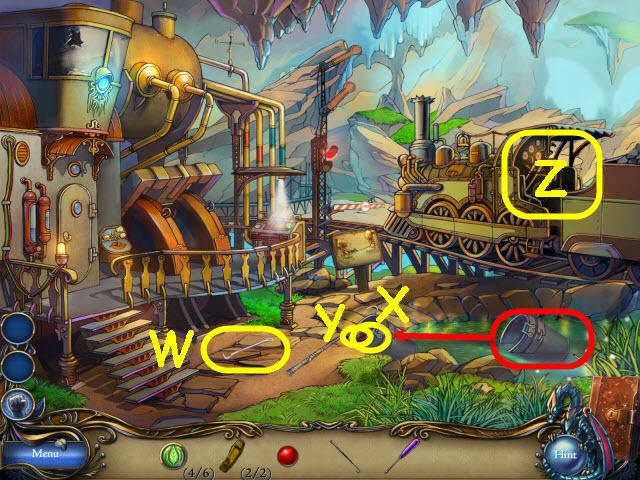
- Take the CROWBAR (W).
- Use the HOOK on the floating barrel; take the JEWEL EYE 1/2 (X) and NATURE ORB 5/6 (Y).
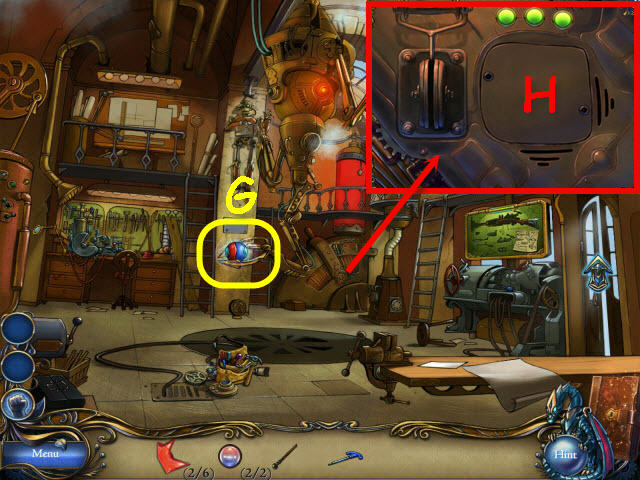
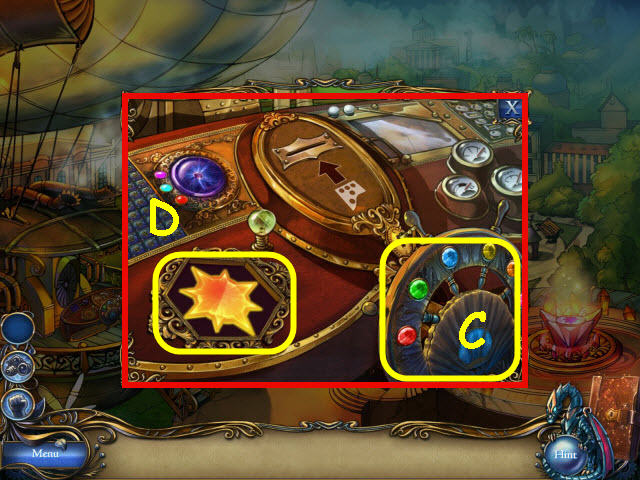
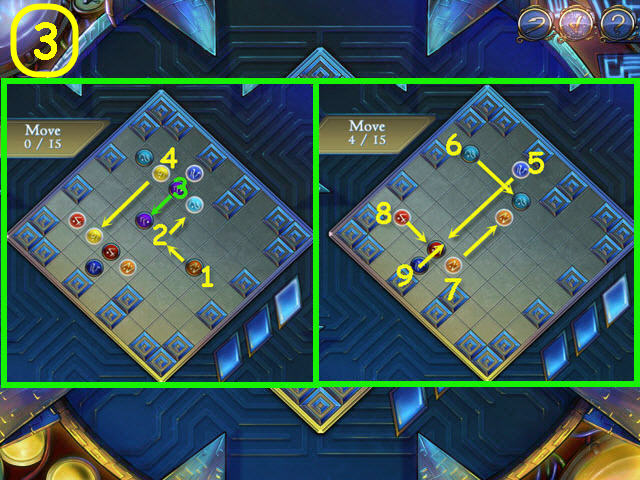
- Examine the engine driver cabin and place the ROUND LATCH on it to trigger a puzzle (Z).
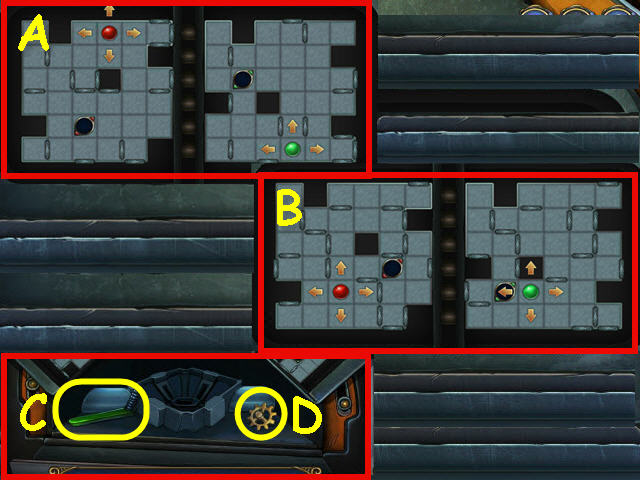
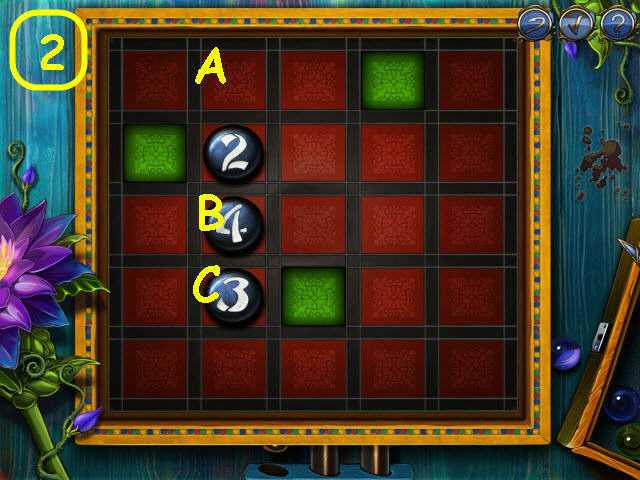
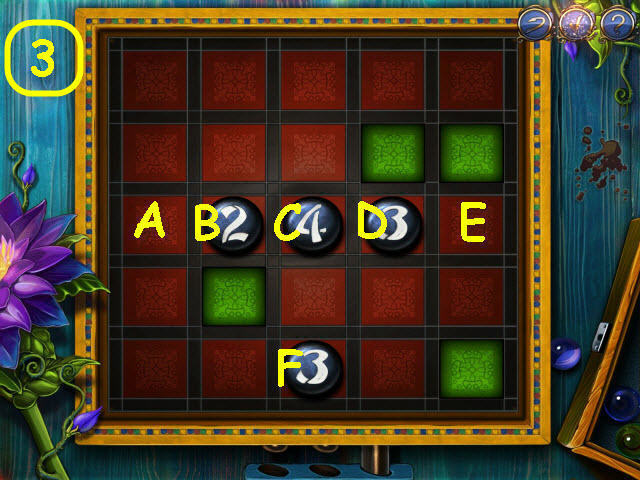
- Move the red and green balls to their matching holes.
- To solve the puzzle in casual mode, move the balls as follows; Red – left, down 2x, green – right 2 x, up, red – left, down, green – right, red – down 2 x, right 3 x, down, green – left 3 x, up, left, up 3 x, red – left and down (A).
- To solve the puzzle in advanced mode, move the balls as follows; green – right 2 x, up, right, left, red – up, right 3 x, left, down 2 x, green – left 4 x, red – up, green – right, red – up, green – right, and then left (B).
- Take the LEVER 1/2 (C) and the COGWHEEL 1/3 (D).
- Go to the mushroom forest.
- Examine the campfire; use the CROWBAR on the cracked box and take the COGWHEEL 2/3 (E).
- Go to the crystal cave.
- Examine the statue face and place the 2 MASK HALVES on it; take the COGWHEEL 3/3 (F).
- Examine the huge boulder and use the CROWBAR on it (G).
- Use GRUMP’S STRENGTH on the CROWBAR; take the VALVE (H).
- Go to the outpost.
- Examine the pressure control unit and place the VALVE on it (I).
- Examine the pumping room; take the JEWEL EYE 2/2 (J).
- Go to the abandoned settlement.
- Examine the totem; place the 2 JEWEL EYES in the eye sockets and take the LEVER 2/2 (K).
- Go back to the outpost.
- Examine the pumping room and place the 2 LEVERS on it; pull the two right LEVERS up and leave the left lever down (L).
- Examine the barrier console; take the NATURE ORB 6/6 (M) and use the SCREWDRIVER on the 2 screws.
- Place the 3 COGWHEELS in the opened panel to trigger a puzzle.
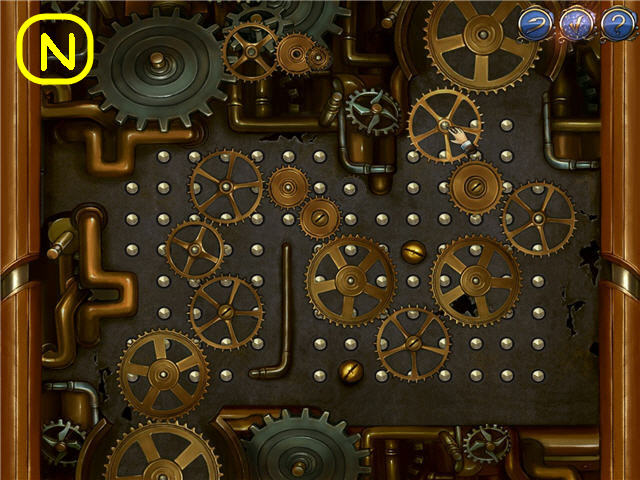
- Place the cogwheels on the pegs to get them all turning.
- See screenshot for solution (N).
- Go to the hanging bridge.
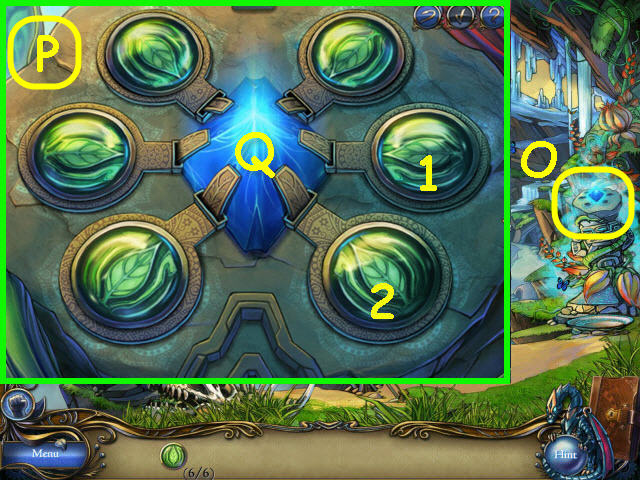
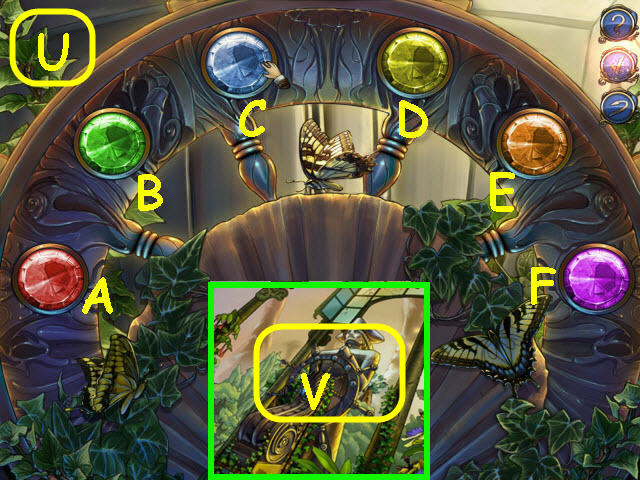
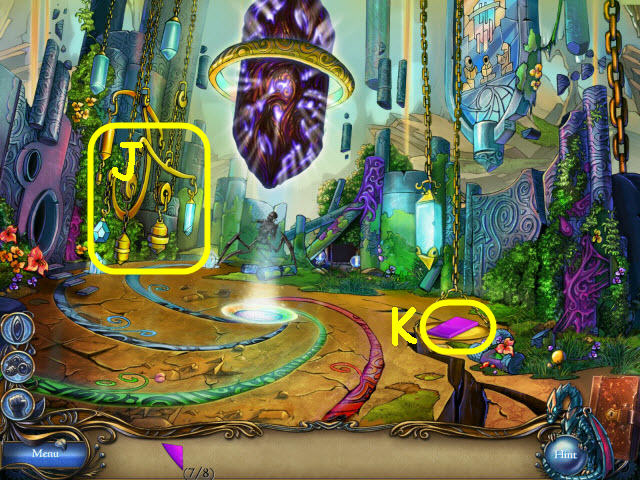
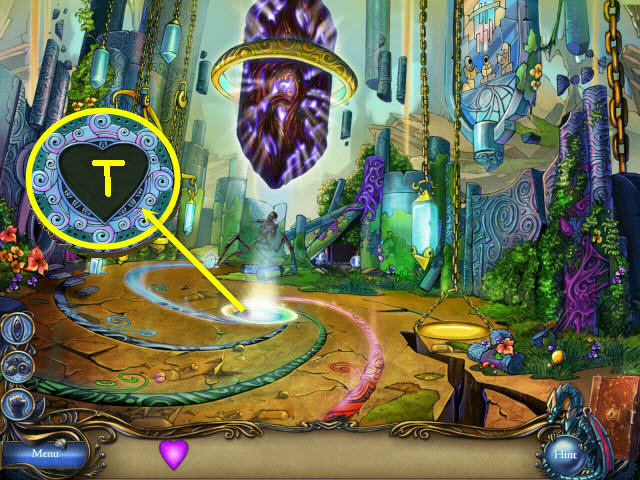
- Examine the crystal altar (O).
- Place the 6 NATURE ORBS in the slots to trigger a puzzle.
- Press the correct orbs to light them all up.
- See screenshot for correct orbs to press (P).
- Take the POWER CRYSTAL (Q).
- Go to the outpost.
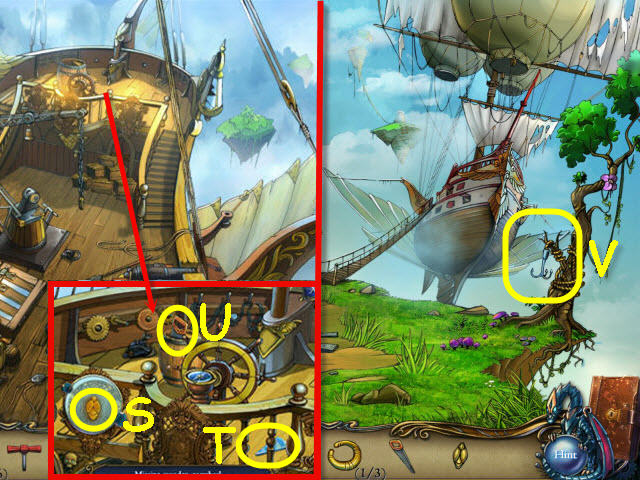
- Examine the engine driver cabin.
- Place the POWER CRYSTAL in the chamber (R).
Chapter 2 – Steam City
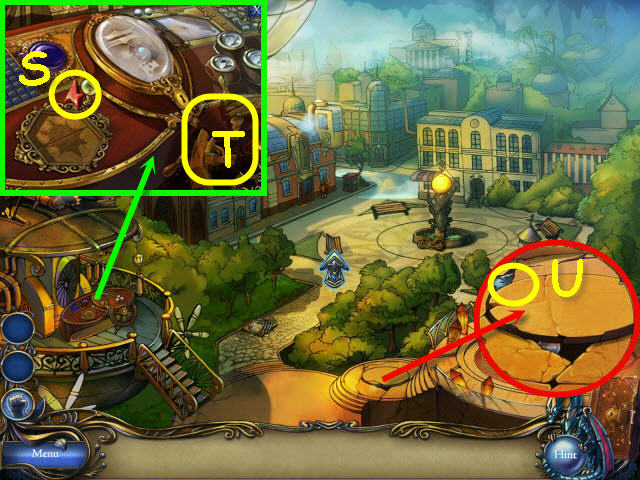
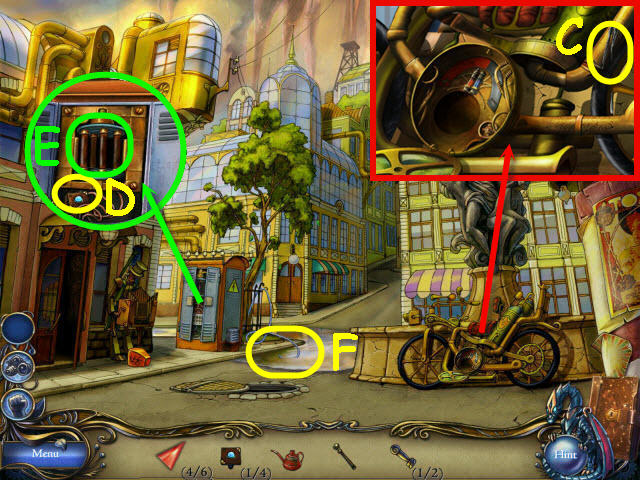
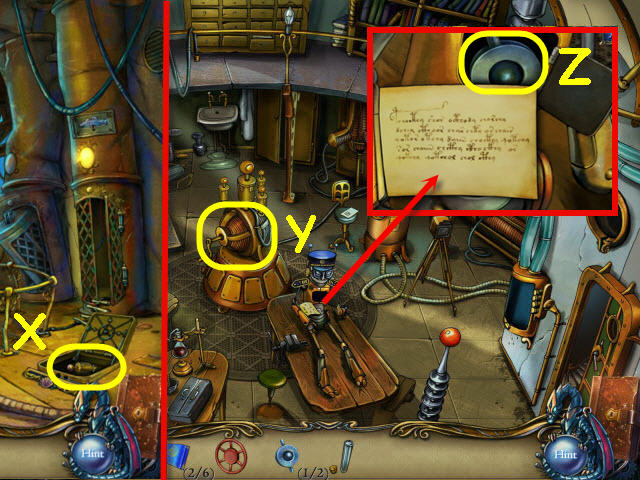
- Examine the control panel; take the POWER CRYSTAL PIECE 1/6 (S).
- Remove the broken wheel (T).
- Examine the floor slab; take the VACUUM TUBE 1/3 (U).
- Go forward to the central plaza.
- Examine the motorcycle; take the POWER CRYSTAL PIECE 2/6 (V).
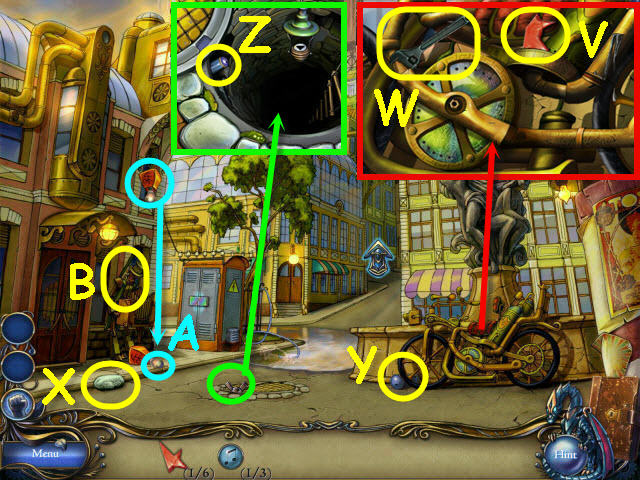
- Use GRUMP’S STRENGTH to get the WRENCH (W).
- Take the ROCK (X), and the VACUUM TUBE 2/3 (Y).
- Use the WRENCH on the sewer hatch bolt; examine the open sewer and take the VACUUM TUBE 3/3 (Z).
- Use the ROCK on the paper lantern; take the CIRCUIT BULB 1/2 (A).
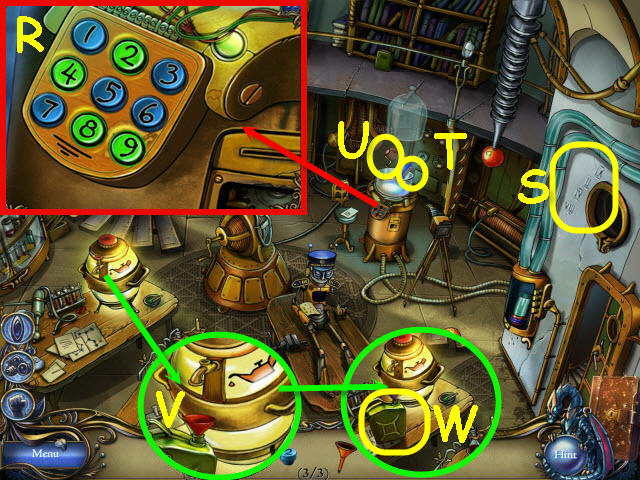
- Examine the mechanical organist; place the 3 VACUUM TUBES in the spaces to trigger a puzzle (B).
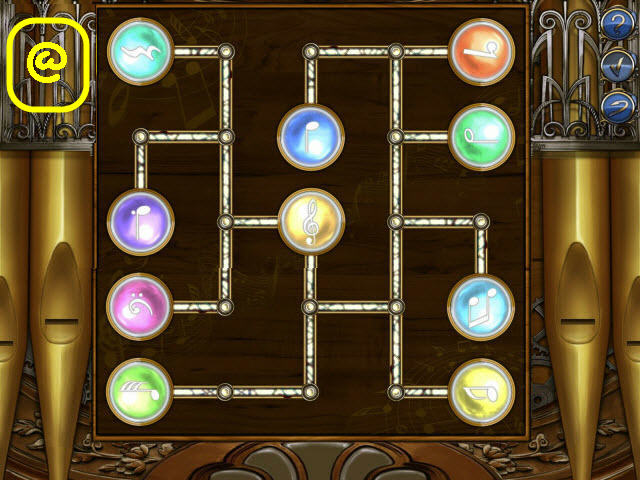
- Connect the tubes so that they all light up.
- See screenshot for solution (@).
- Enter the workshop.
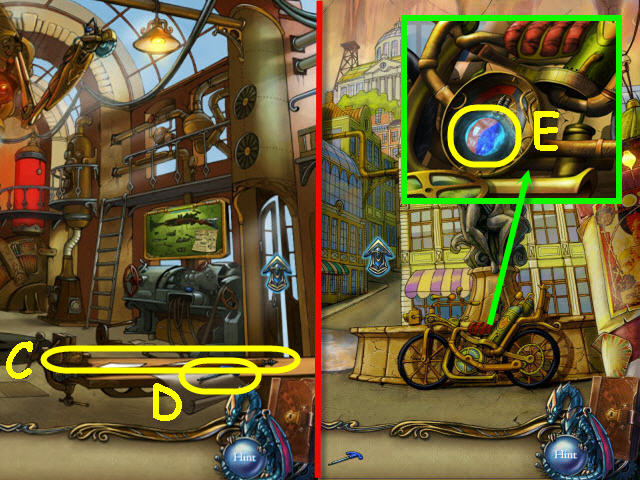
- Take the WALKING STICK (C) and HEX KEY (D).
- Go to the central plaza.
- Examine the motorcycle; use the HEX KEY on the hex screw and take the MAGNET SPHERE (E).
- Go to the zeppelin pier.

- Examine the floor slab and use the WALKING STICK on the crack to receive a BROKEN WALKING STICK; take the CIRCUIT BULB 2/2 (F).
- Go to the workshop.
- Use the MAGNET SPHERE on the dangerous iron claw (G).
- Examine the robot generator and use the HEX KEY on the panel twice (H).
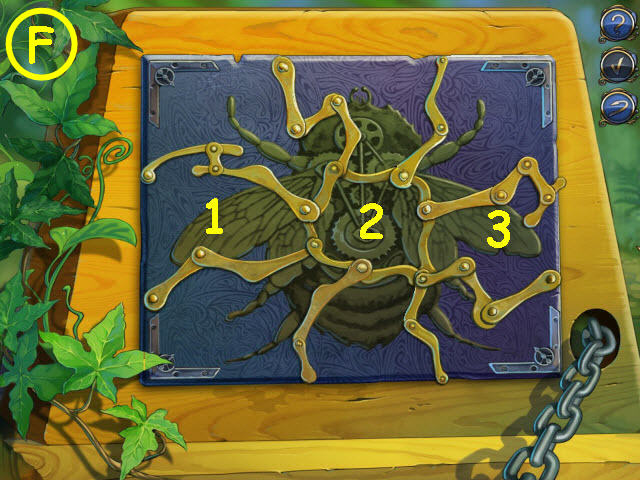
- Place the 2 CIRCUIT BULBS in the slots to trigger a puzzle.
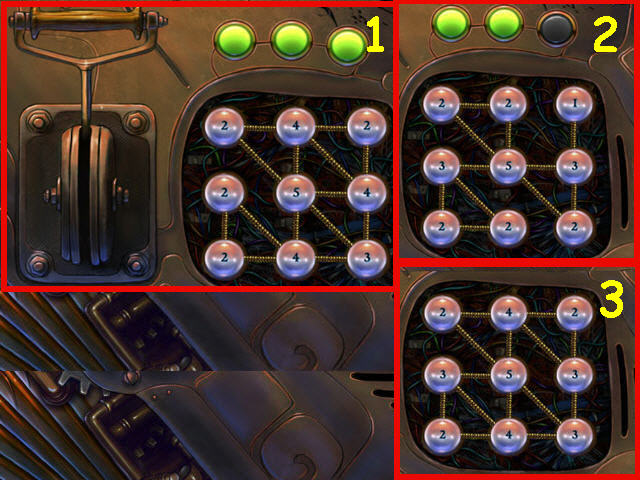
- Connect the number of wires to each circuit to match the number on the circuit.
- Pull the lever when complete.
- See screenshot for solution (1-3).
- You now have PRETTY BOY’S VISION added on the left (@).
- Take the SAW BLADE (I).
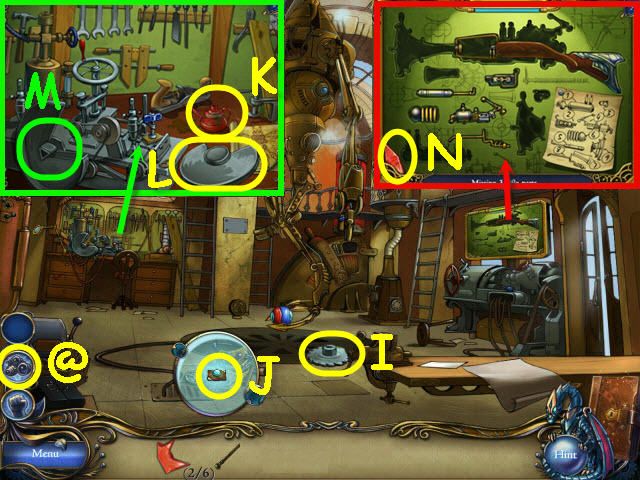
- Use PRETTY BOY’S VISION on the various instruments; take the BUTTON 1/4 (J).
- Examine the worktable; take the EMPTY OILER (K) and SAFETY COVER (L).
- Place the SAW BLADE and the SAFETY COVER on the shaft (M).
- Use the BROKEN WALKING STICK on the working saw to create a LEVER.
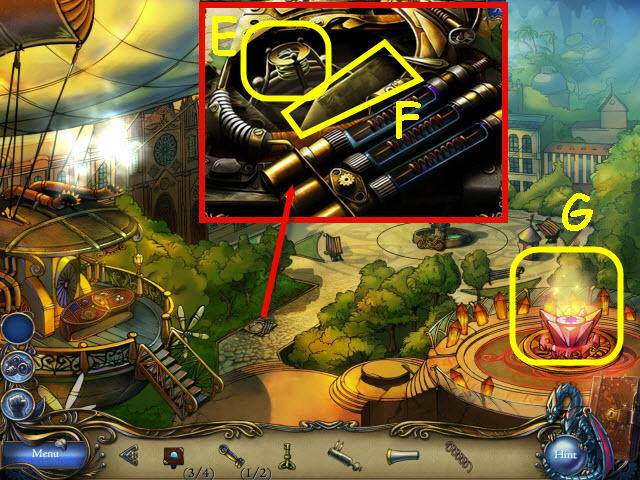
- Examine the rifle display; take the POWER CRYSTAL PIECE 3/6 (N).
- Go to the zeppelin pier.
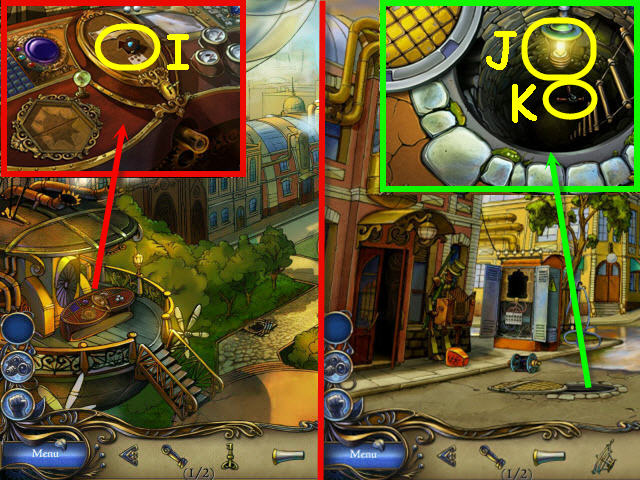
- Use PRETTY BOY’S VISION on the scattered crystals; take the VALVE 1/2 (A).
- Go to the central plaza.
- Use PRETTY BOY’S VISION on the fountain sculpture; take the POWER CRYSTAL PIECE 4/6 (B).
- Examine the motorcycle and use the EMPTY OILER on the leaking fuel to get an OILER WITH FUEL (C).
- Examine the transformer and open the hatch; take the BUTTON 2/4 (D).
- Remove the burnt fuse plug (E).
- Move the high voltage cable (F).
- Go forward to the university.
- Use the PRETTY BOY’S VISION on the suspicious bone; take the STRANGE KEY (R).
- Select the bone grasp to get the STEAM CHAMBER (S).
- Knock over the book pile; take the BUTTON 3/4 (T).
- Examine the remote corner; press the ornamental plate (U).
- Use GRUMP’S STRENGTH on the door; take the POWER CRYSTAL PIECE 5/6 (V) and the DOOR HANDLE (W).
- Place the DOOR HANDLE on the broken handle and enter through the door to the botanic garden (X).
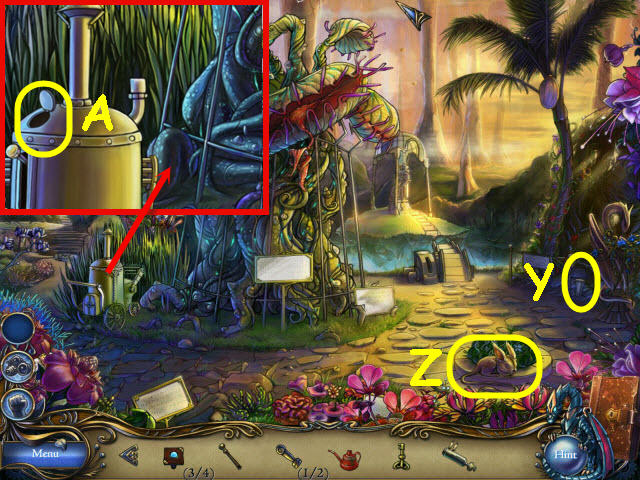
- Use GRUMP’S STRENGTH on the ornamental flowerbed; take the GUN BARREL (Y).
- Select the little creature (Z).
- Examine the lawnmower and open the fuel tank; use the OILER WITH FUEL on the tank (A) to scare away the little creature.
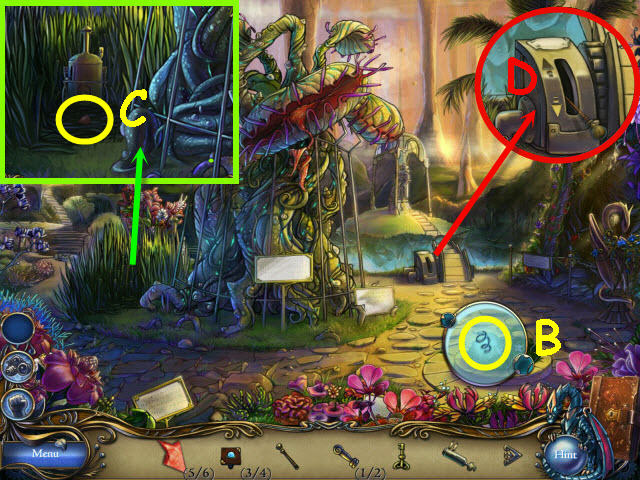
- Use the PRETTY BOY’S VISION on the tall grass; take the COPPER SPRING (B).
- Examine the lawnmower path; take the POWER CRYSTAL PIECE 6/6 (C).
- Examine the broken bridge control and place the LEVER on it (D).
- Go to the zeppelin pier.
- Examine the strange device and place the COPPER SPRING in the slot; take the MUZZLE (E) and PHOSPHORUS CORE (F).
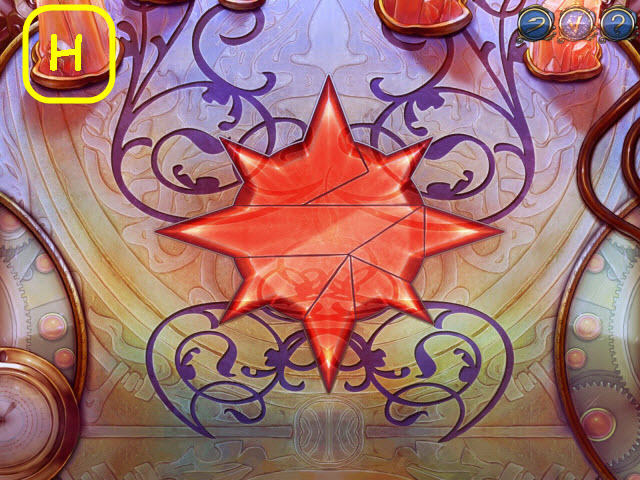
- Examine the blazing altar and place the 6 POWER CRYSTAL PIECES on the altar to trigger a puzzle (G).
- Rotate and place the pieces in their correct spots to complete the pattern.
- See screenshot for solution (H).
- Take the POWER CRYSTAL.
- Examine the control panel; use the STRANGE KEY in the keyhole and take the BUTTON 4/4 (I).
- Go to the central plaza.
- Examine the open sewer and place the PHOSPHORUS CORE in the broken lantern (J).
- Take the PORTABLE JACK (K).
- Go into the workshop.
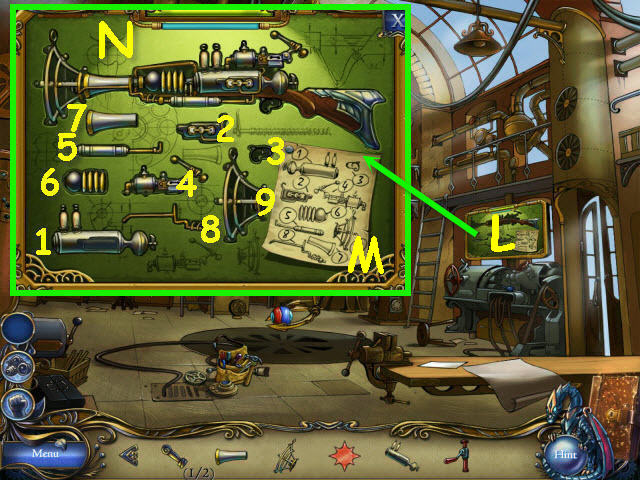
- Examine the rifle stand and place the STEAM CHAMBER, MUZZLE, and the GUN BARREL in their matching shaped niches (L).
- Follow the diagram and select the parts in the order marked to complete the rifle (M).
- Take the STEAM RIFLE (N).
- Go to the botanic garden.
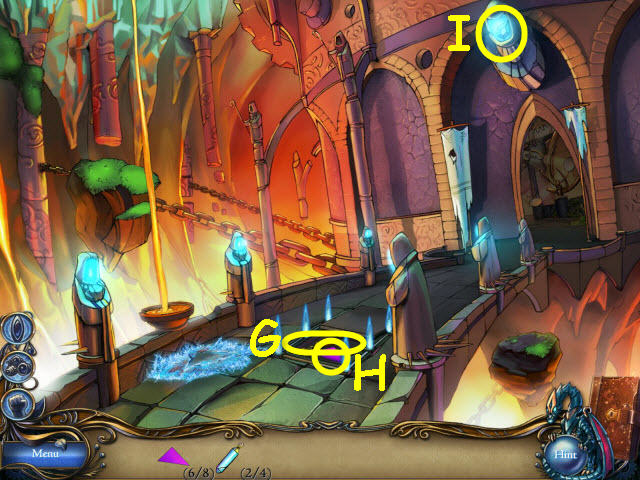
- Use the STEAM RIFLE on the exotic fruit tree (O).
- Take the TASTY FRUIT (P).
- Give the TASTY FRUIT to the tentacle tree (Q).
- Examine the lawnmower; take the PAPER KNIFE (R) and VALVE 2/2 (S).
- Examine the statue of aeronaut and place the 2 VALVES on the ship’s wheel to trigger a puzzle (T).
- Repeat the sequences.
- To solve the puzzle, select the following for casual mode; C, E, B – A, D, B, C – F, B, D, E, and C (U).
- Select the following for advanced mode; D, B, F, E – F, A, B, D, C – E, B, F, D, A and C (U).
- Take the ZEPPELIN WHEEL (V).
- Go to the university.
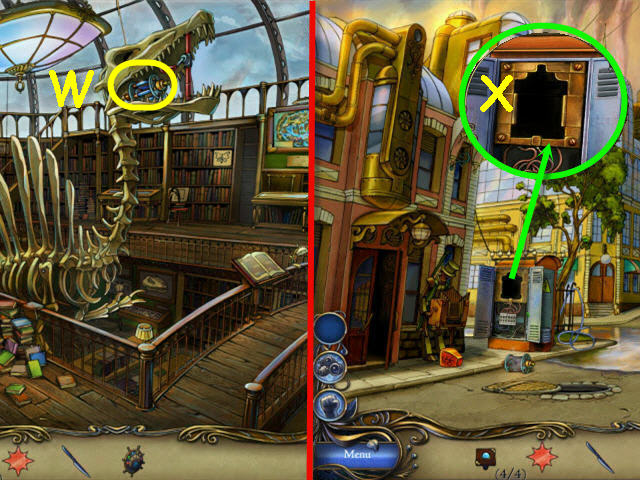
- Use the PORTABLE JACK on the dinosaur skeleton; take the FUSE PLUG (W).
- Go to the central plaza.
- Examine the transformer and place the FUSE PLUG in the fuse plug socket (X).
- Go to the university.
- Examine the remote corner; use the PAPER KNIFE to get the BLANK CARD (Y).
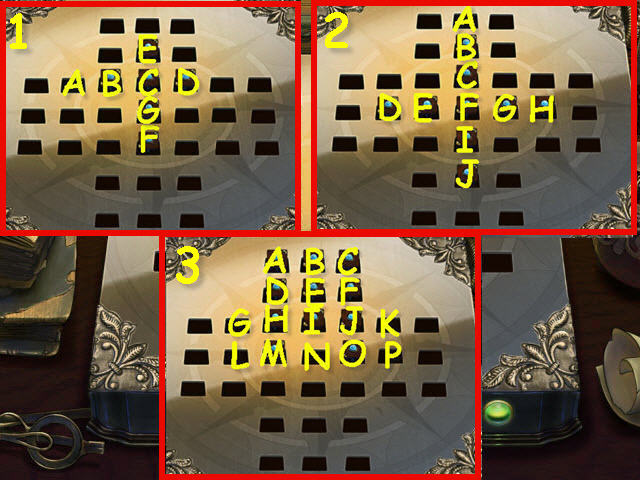
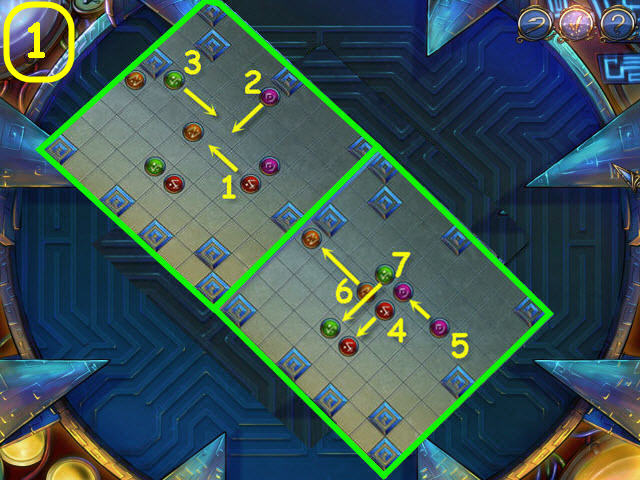
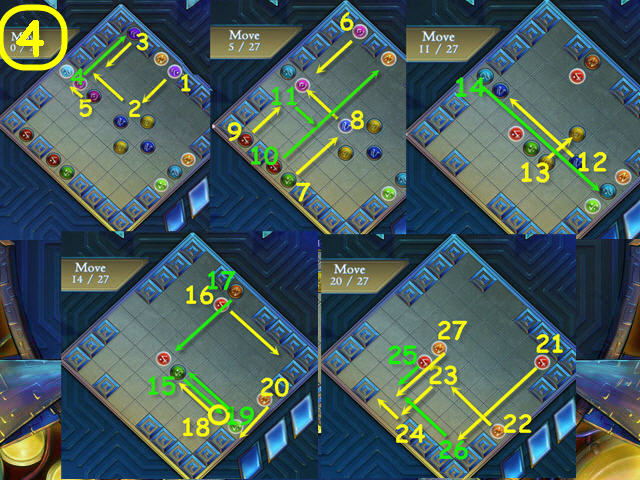
- Examine the punch card machine; place the BLANK CARD and the 4 BUTTONS on the device to trigger a puzzle (Z).
- Jump the buttons until only one is left.
- To solve the puzzle move the following buttons for casual mode: C – A, F – C, D – B, A – C, and E – G (1).
- Round 2: C – A, I – C, H – F, F – B, A – C, D – F, C – I, and J –F (2).
- Round 3: I – K, C – J, O – F, A – C, C – J, K – I, E – N, N – L, D – M and L – N (3).
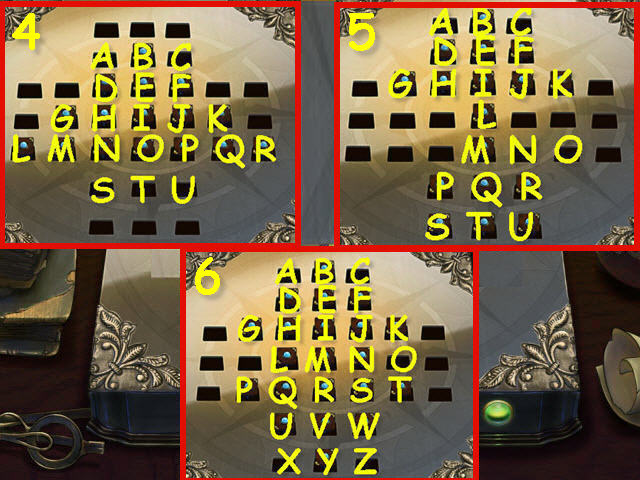
- Move the following for advanced mode: J – U, R – P, U – J, H – S, L – N, S – H, H – A, A – C, J – H, C – J, K – I, I – T, G – I, E – O, and T – I (4).
- Round 2: U – N, S – U, P – R, M – O, U – N, O – M, H – A, A – C, J – H, G – I, C – J, J – H, M – I, H – J, K – I, and E – L (5).
- Round 3: Q – X, X – Z, S – Q, Z – S, T – R, M – O, V – M, P – R, L – N, O – M, H – A, A – C, J – H, C – J, R – I, E –M, G – I, M – E, K – I, and E – M (6).
- You will earn a NAVIGATION CARD.
- Go to the zeppelin pier.
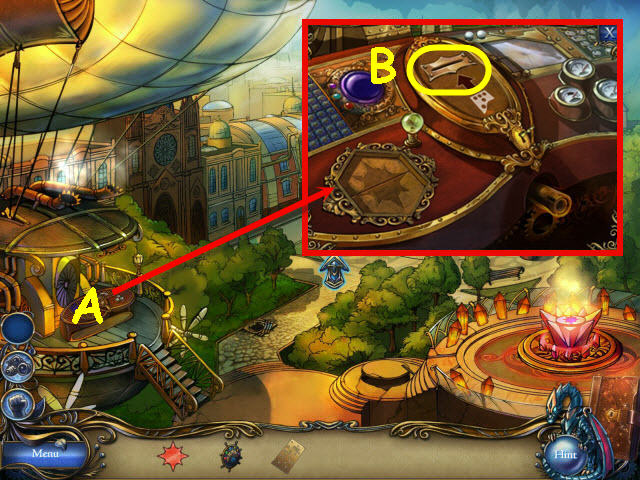
- Examine the control panel (A).
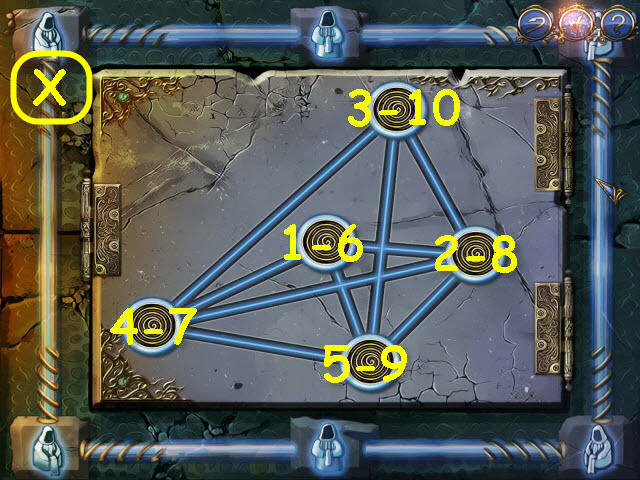
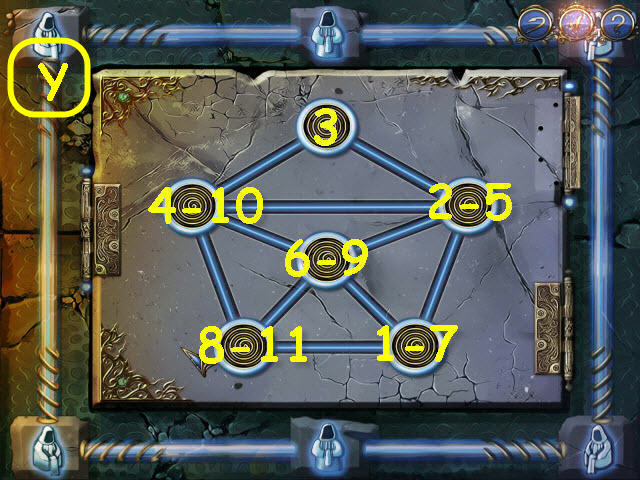
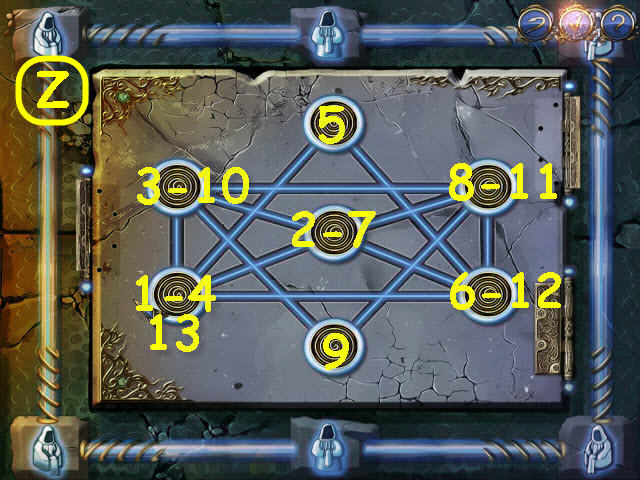
- Place the NAVIGATION CARD in the punch card slot to trigger a puzzle (B).
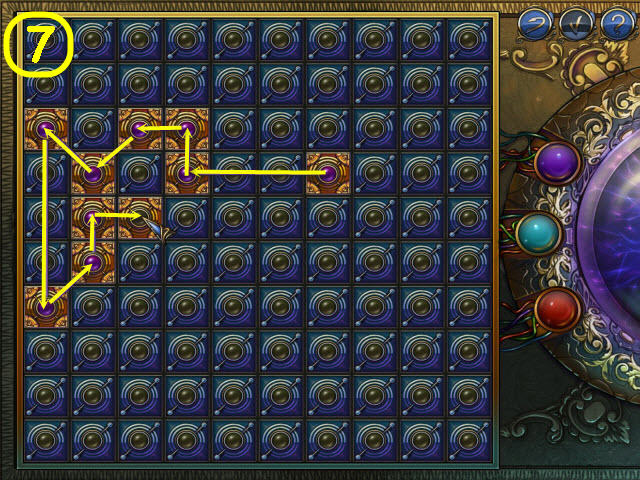
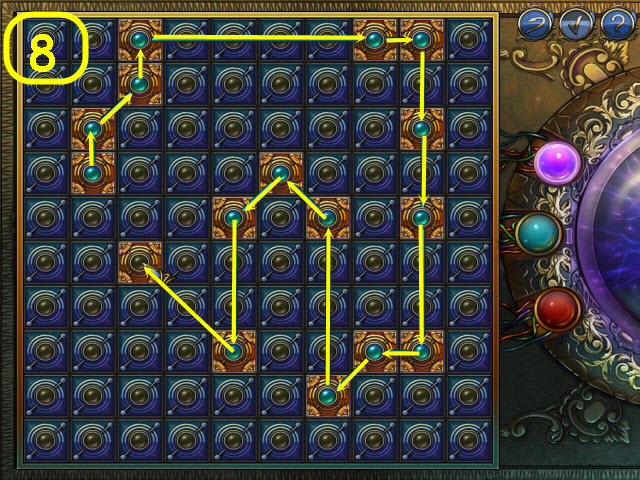
- Connect the purple dots without crossing any lines.
- See screenshots for solutions (7-9).
- Place the ZEPPELIN WHEEL on the shaft (C) and the POWER CRYSTAL in the power crystal slot (D).
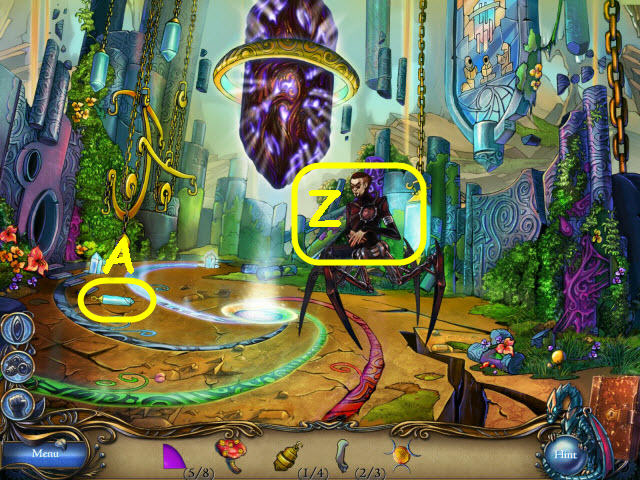
Chapter 3 – Floating Island
- Examine the wall drawing; take the SKELETON KEY (E).
- Use GRUMP’S STRENGTH to pull out the flag; take the CLOTH (F).
- Take the SMALL SPHERE 1/3 (G) and the EMPTY JUG (H).
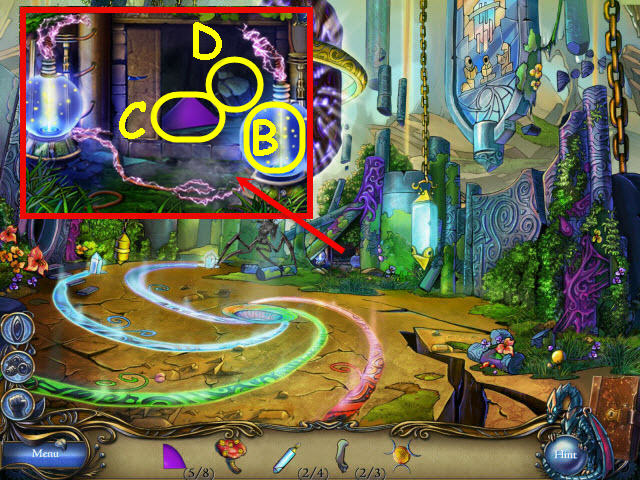
- Go forward to the temple entrance.
- Take the POWER CRYSTAL PIECE 1/6 (I).
- Examine the pond; take the COMMAND HEMISPHERE (J) and the SMALL SPHERE 2/3 (K).
- Use the EMPTY JUG on the muddy water (L) to get a WATER JUG.
- Examine the wreckage and use the PRETTY BOY’S VISION on the curious ornament; push the secret button (M).
- Take the GLOVES (N).
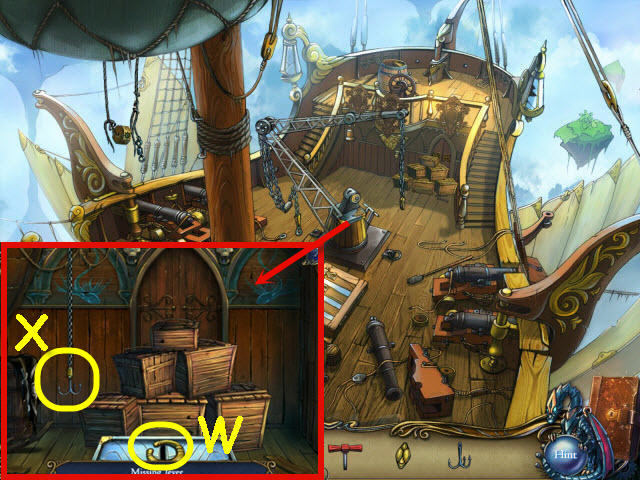
- Place the COMMAND HEMISPHERE in the circular slot to trigger a puzzle (O).

- Clear the board by colliding matching tiles.
- See screenshots for casual solutions (1, 2, and 3).
- See screenshots for hard solutions (1, 3 and 4).
- Take the CONTROL LEVER (P).
- Examine the gangway and use the GLOVES on the giant snail (Q).
- Use the WATER JUG and the CLOTH on the slippery bridge (R).
- Go on the flying ship.
- Examine the command bridge and use the PRETTY BOY’S VISION on the bas-relief; take the OVAL PLATE (S).
- Take the POWER CRYSTAL PIECE 2/6 (T).
- Move the naval hat and take the HANDSAW (U).
- Go to the temple entrance.
- Use the HANDSAW on the tied hook to get a HOOK (V).
- Go back to the flying ship.
- Examine the crane; take the CIRCULAR HANDLE 1/3 (W).
- Place the HOOK on the lifting chain (X), and the CONTROL LEVER in the groove to trigger a puzzle.
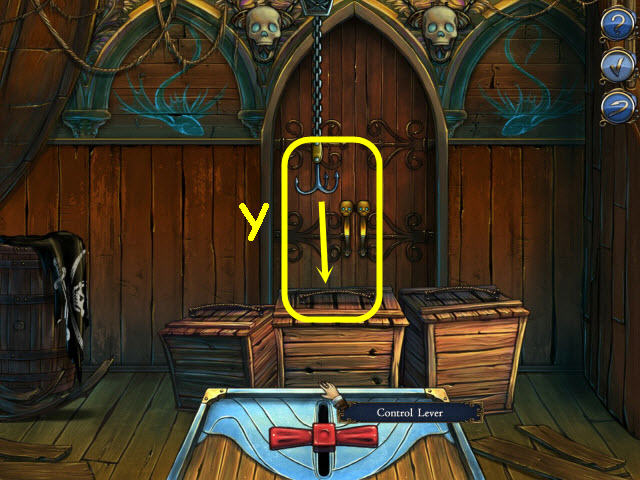
- Clear the passage by clearing the boxes.
- Move the control lever as soon as the hook is above the handles on the packages.
- See screenshot for example (Y).
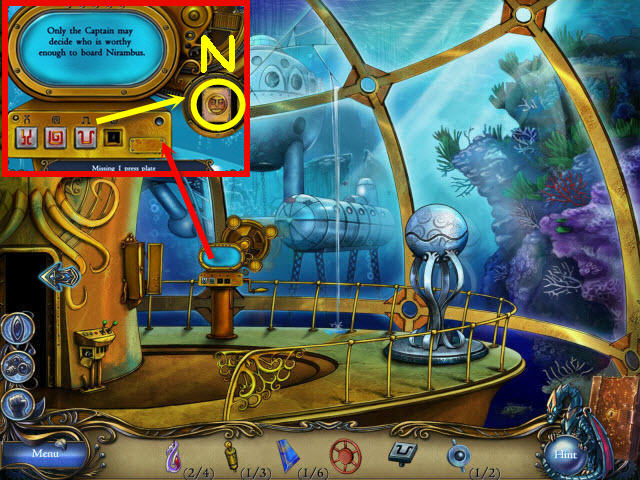
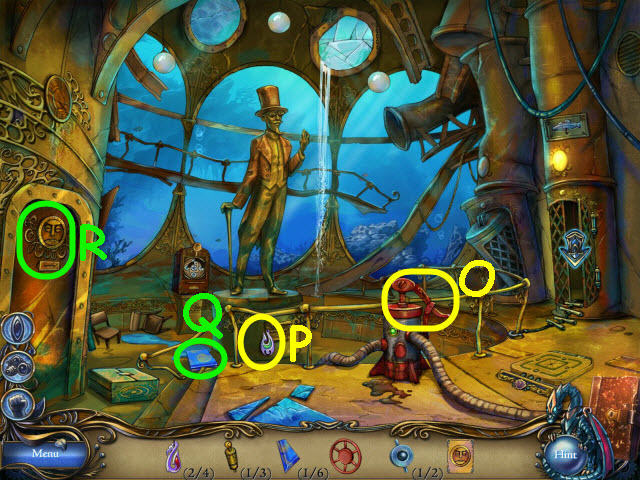
- Go into the captain’s quarters.
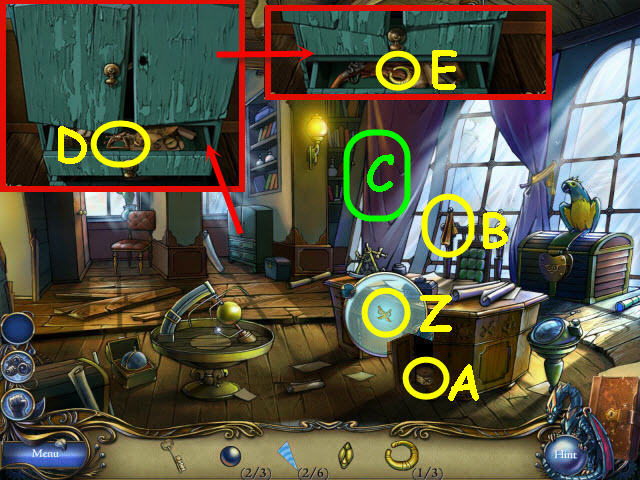
- Use the PRETTY BOY’S VISION on the wooden ornament; press on the press plate (Z).
- Take the SAFE WHEEL 1/3 (A).
- Take the CURTAIN TASSEL (B).
- Use the CURTAIN TASSEL on the window curtain (C).
- Examine the cupboard and open the top drawer; move the parchment and take the ORNAMENTAL KNOB (D).
- Close the top drawer and open the bottom drawer; take the CIRCULAR HANDLE 2/3 (E).
- Go to the flying ship.

- Examine the cannon; place the ORNAMENTAL KNOB on it and pull (F).
- Take the SMALL SPHERE 3/3 (G).
- Go to the captain’s quarters.
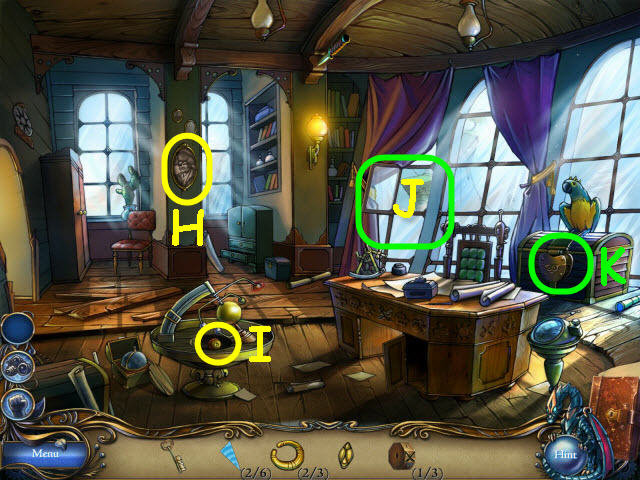
- Take down the picture to expose the safe (H).
- Place the 3 SMALL SPHERES on the damaged device; take the BIRD TOY (I).
- Throw the BIRD TOY out the open window (J).
- Use the SKELETON KEY on the curious lock to trigger a puzzle (K).
- Arrange the bottom teeth to match the top row.
- Press the red button when set.
- See screenshot for solution (L).
- You will earn ZIN’S TELEKINESIS (M).
- Use ZIN’S TELEKINESIS on the knife to get a KNIFE (N).
- Examine the cupboard and use the KNIFE on the latch; take the STONE BIRD PART 1/2 (O) and the WATER PURIFIER (P).
- Take the POWER CRYSTAL PIECE 3/6 (Q).
- Go to the flying ship.
- Use ZIN’S TELEKINESIS on the hanging wheel to get a SAFE WHEEL 2/3 (R).
- Go to the temple entrance.
- Examine the pond and place the WATER PURIFIER in the muddy water; take the STONE BIRD PART 2/2 (S).
- Place the 2 STONE BIRD PARTS on the 2 broken statues from left to right to trigger a puzzle (T).
- Press on the inner lights to find the combination that lights all the outer ring symbols.
- See screenshot for solution (U).
- Enter the ancient temple.
- Examine the skeleton; take the SAFE WHEEL 3/3 (V) and HANDLE (W).
- Go to the captain’s quarters.
- Examine the safe and place the 3 SAFE WHEELS on it to trigger a puzzle (X).
- Solve the riddle and set the correct symbols.
- See screenshot for solution (Y).
- Take the WOODEN COGWHEEL, the WEDGE 1/2, and the SEEDS.
- Go to the flying ship.

- Examine the command bridge and place the WOODEN COGWHEEL on the broken mechanism (Z).
- Go to the temple entrance.
- Examine the grappling cannon and place the HANDLE and the OVAL PLATE on it (A).
- Use GRUMP’S STRENGTH on the grappling cannon; take the HANGING LADDER (B), POWER CRYSTAL PIECE 4/6 (C), and the SWORD (D).
- Go to the ancient temple.
- Use the SWORD on the vines (E).
- Move the burdock; take the CUTTERS (F).
- Go to the distant island.
- Examine the wall drawing; use the CUTTERS to get the WEDGE 2/2 (G).
- Go to the ancient temple.
- Place the 2 WEDGES in the crack; hang the HANGING LADDER on the ladder braces (H).
- Examine the nest and place the SEEDS in it; take the CIRCULAR HANDLE 3/3 (I) and the POWER CRYSTAL PIECE 5/6 (J).
- Go to the flying ship.
- Examine the ship’s hold and place the 3 CIRCULAR HANDLES on the latches; take the UNLIT TORCH (K) and the CANNONBALL (L).
- Go to the temple entrance.
- Examine the wreckage; use the UNLIT TORCH on the flames (M) to create a LIT TORCH.
- Go back to the flying ship.
- Examine the cannon; place the CANNONBALL on the gunpowder (N) and use the LIT TORCH on the fuse (O).
- Go to the distant island.

- Take the POWER CRYSTAL PIECE 6/6 (P).
- Examine the glittering altar and place the 6 POWER CRYSTAL PIECES on it to trigger a puzzle (Q).
- Place the pieces to complete the pattern.
- See screenshot for solution (R).
- Take the POWER CRYSTAL.
- Go to the ancient temple.
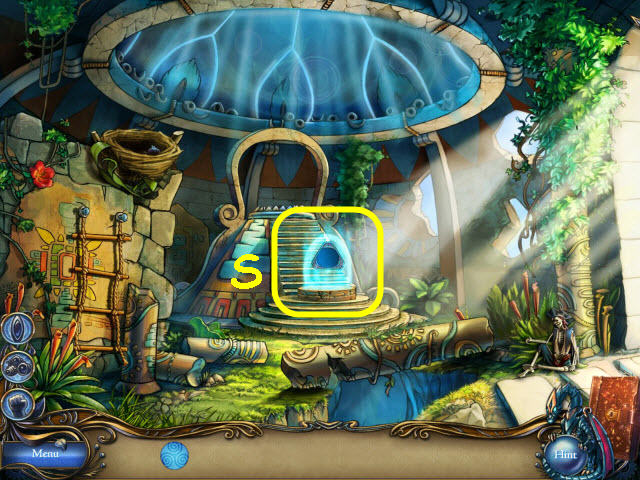
- Place the POWER CRYSTAL in the mystic slot (S).
Chapter 4 – The Aquaterrium

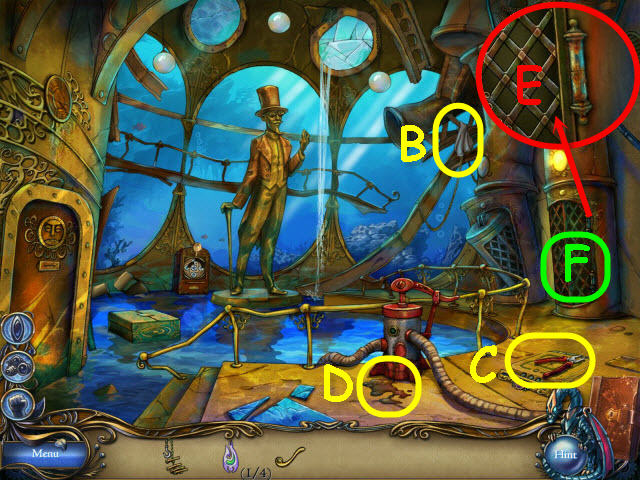
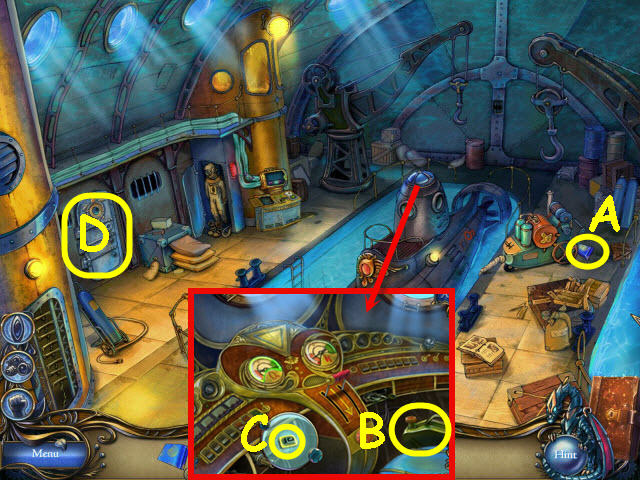
- Use the PRETTY BOY’S VISION on the tentacle; take the HANDLE (T).
- Take the ROPE LADDER (U) and the HOOK 1/4 (V).
- Examine the mechanical informatorium and press the left button; take the CONNECTOR 1/2 (W).
- Press the second from left button; take the CONNECTOR 2/2 (X).
- Examine the control panel and place the 2 CONNECTORS on it to trigger a puzzle (Y).
- Connect the wires to the correct connector.
- Select the toggle switch when set.
- See screenshot for solution (Z).
- Go to the main hall. Immediately trigger a puzzle after the cutscene and dialogue.
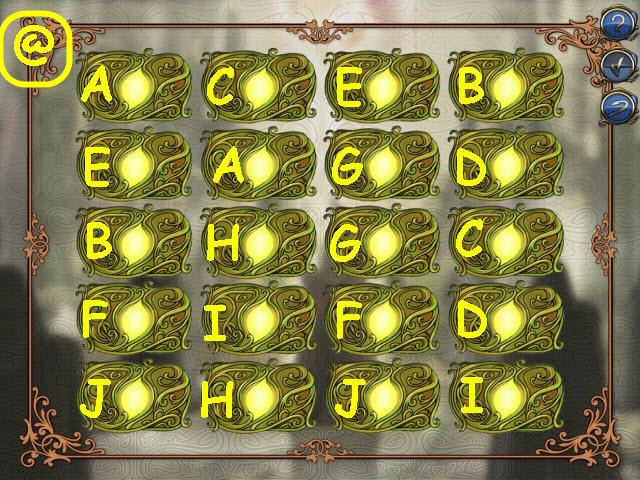
- Find the matching symbols.
- See screenshot for solution (@).
- Use ZIN’S TELEKINESIS on the hanging rag to get a RAG (B).
- Take the PLIERS (C).
- Use the RAG on the oil puddle to get an OILED RAG (D).
- Examine the elevator gate and use the OILED RAG on the hinge (E).
- Use GRUMP’S STRENGTH on the elevator door (F).
- Use the ROPE LADDER on the elevator shaft and go down to the dock.
- Use GRUMP’S STRENGTH on the wooden crate; take the COIL 1/3 (G).
- Use ZIN’S TELEKINESIS on the floating crate to get a CRYSTAL PIECE 1/6 (H).
- Examine the wall panel and use the PLIERS on the screw bolt; take the HAND WHEEL (I) and the BUTTON (J).
- Take the HATCH HANDLE 1/2 (K).
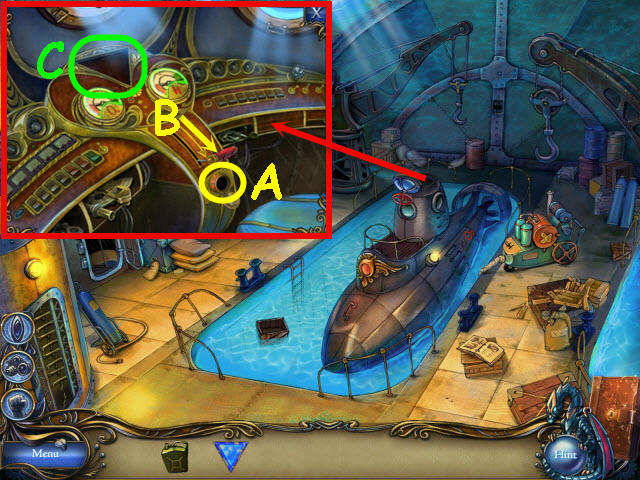
- Examine the old console and place the HANDLE on it to trigger a puzzle (L).
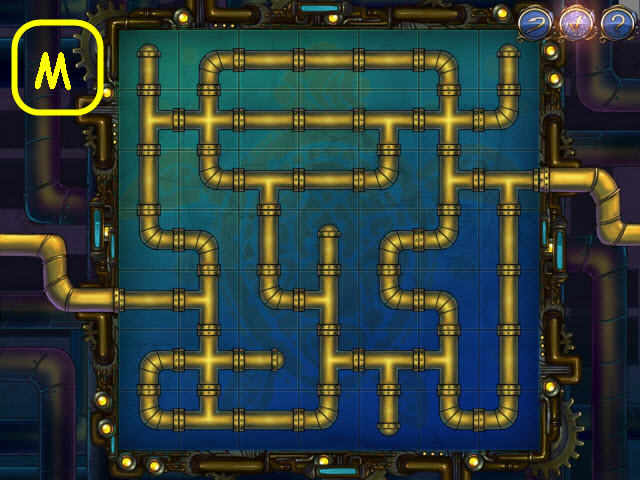
- Connect the pipes to get the pressure running.
- See screenshot for solution (M).
- Take the HOOK 2/4 from the tube.
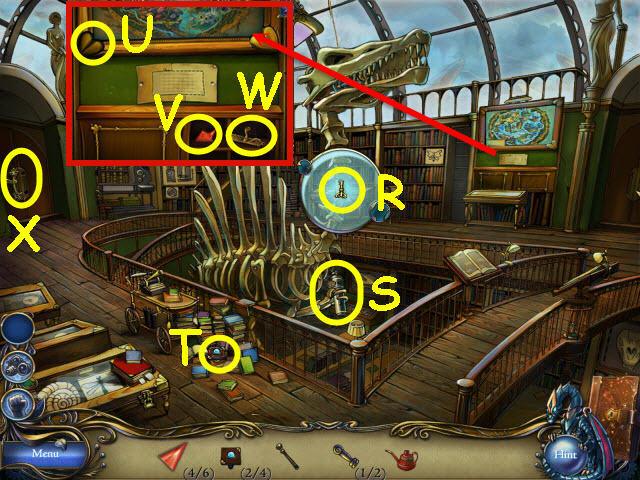
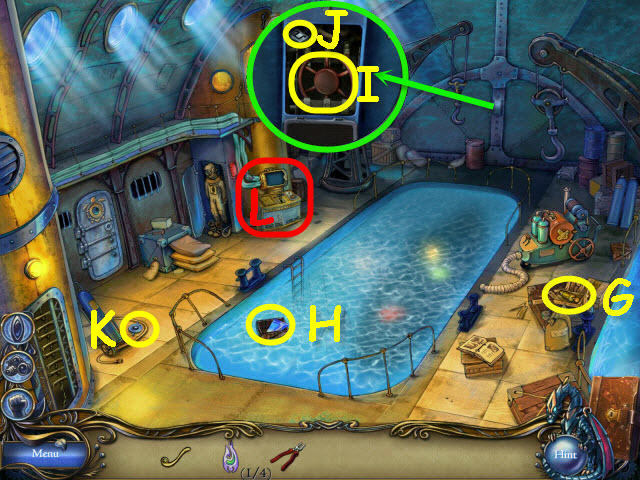
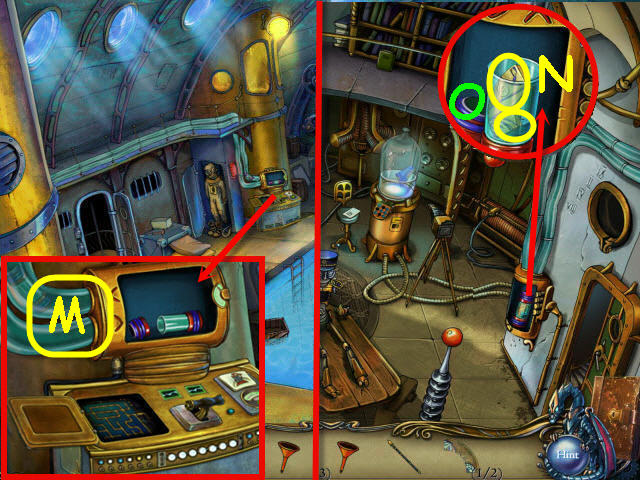
- Go to the observatory.
- Examine the mechanical informatorium and place the BUTTON on it; press the button and take the PASS CARD (N).
- Go to the main hall.
- Press the pump handle (O).
- Take the HOOK 3/4 (P) and the CRYSTAL PIECE 2/6 (Q).
- Use the PASS CARD on the doorkeeper (R).
- Go left into the laboratory.

- Use the PRETTY BOY’S VISION on the pile of garbage; take the COIL 2/3 (S).
- Examine the lab table; take the HOOK 4/4 (T), and the CHEMICAL TUBE (U).
- Go to the main hall.
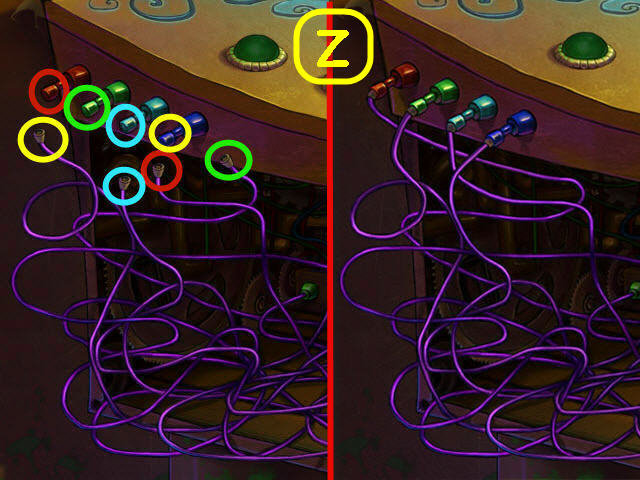
- Examine the floor niche and place the 4 HOOKS in the spaces to trigger a puzzle (V).
- Switch the green and red hooks.
- To solve the puzzle, select the hooks in the following order: E, G, H, F, D, C, E, G, I, J, H, F, D, B, A, C, E, G, I, K, J, H, F, D, B, C, E, G, I, H, F, D, E, G, and F (W).
- Take the COIL 3/3 (X).
- Go to the laboratory.
- Place the 3 COILS on the charger (Y).
- Examine the captain after the cutscene; take the HATCH HANDLE 2/2 (Z).
- Go to the dock.
- Turn on the air compressor; take the CRYSTAL PIECE 3/6 (A).
- Place the HAND WHEEL on the hatch and zoom in; take the EMPTY FUEL CAN (B).
- Use the PRETTY BOY’S VISION on the glove box; take the PRESS PLATE (C).
- Examine the gate and place the 2 HATCH HANDLES on it to open the hatch (D).
- Go to the observatory.
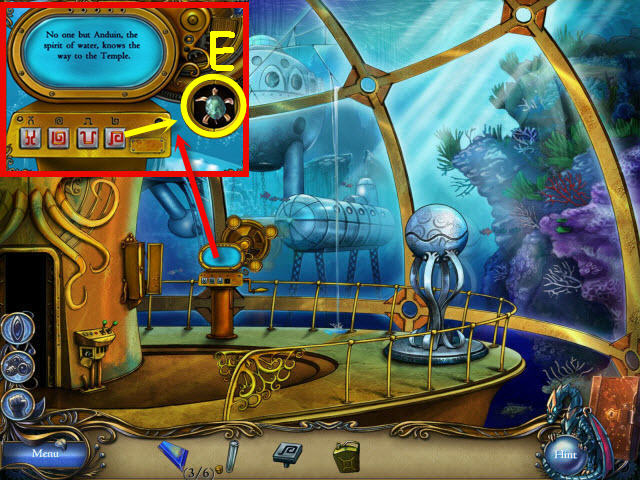
- Examine the mechanical informatorium and place the PRESS PLATE in the slot; push the button and take the TURTLE FIGURINE (E).
- Go to the undersea cave.
- Use ZIN’S TELEKINESIS on the distant button to get a BLUE BUTTON 1/3 (F).
- Take the FILLING FUNNEL (G).
- Use the CHEMICAL TUBE on the glue plant to get GLUE (H).
- Place the TURTLE FIGURINE on the incomplete monument (I).
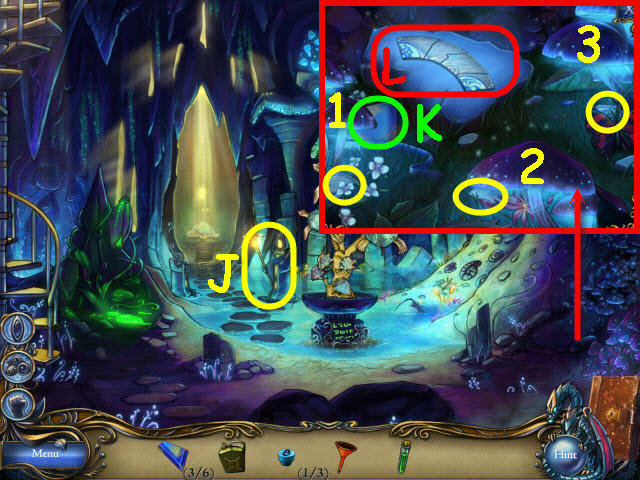
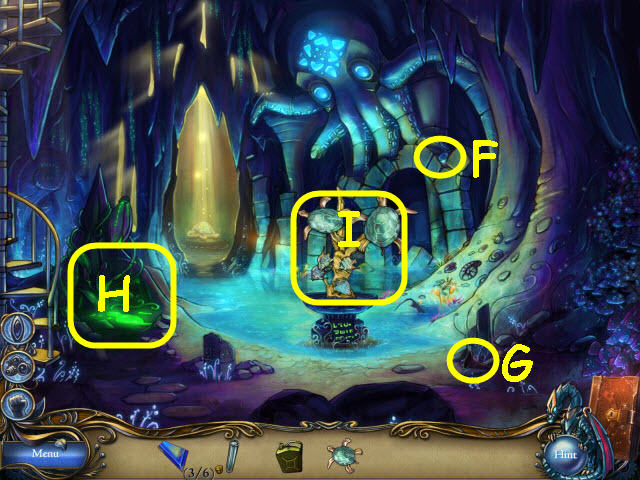
- Take the STAFF (J).
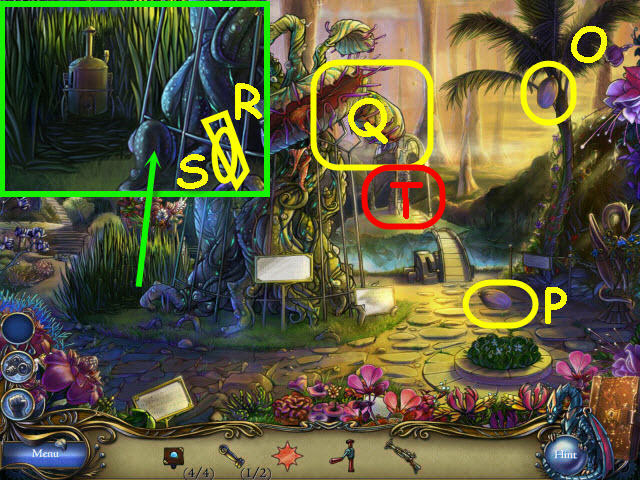
- Examine the mushroom colony and select the 3 mushrooms to light them up (1-3).
- Take the CRYSTAL PIECE 4/6 (K).
- Select the 3 fragments circled in yellow, they will automatically be placed on the big rock.
- Use the GLUE on the shattered fragment; take the SEMICIRCLE 1/2 (L).
- Go to the dock.
- Examine the old console; use the STAFF on the tube (M).
- Go to the laboratory.
- Examine the pneumatic tube box and open the tube; take the SEMICIRCLE 2/2 (N) and the BLUE BUTTON 2/3 (O).
- Go to the main hall.
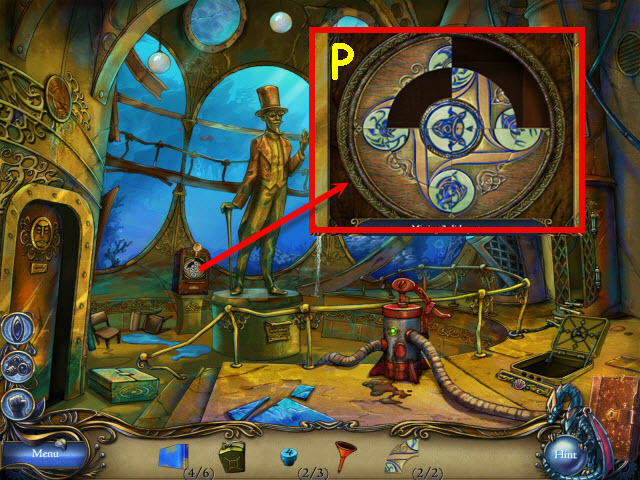
- Examine the old mechanism (P).
- Place the 2 SEMICIRCLES in the hollows to trigger a puzzle.
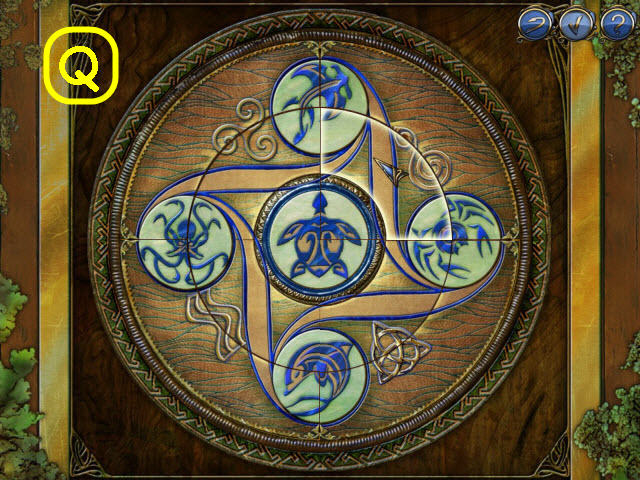
- Select and drag the pieces to complete the picture.
- See screenshot for solution (Q).
- Take the BLUE BUTTON 3/3 and CRYSTAL PIECE 5/6.
- Go to the laboratory.
- Examine the cabinet and place the 3 BLUE BUTTONS on the panel (R).
- Punch the code from the wall (S) into the panel.
- Solution: 9248.
- Take the CRYSTAL PIECE 6/6 (T) and the DRILL (U).
- Examine the lab table; use the EMPTY FUEL CAN and FILLING FUNNEL on the barrel (V).
- Turn the tap and it breaks; use the DRILL on the barrel; take the FULL FUEL CAN (W).
- Go to the undersea cave.
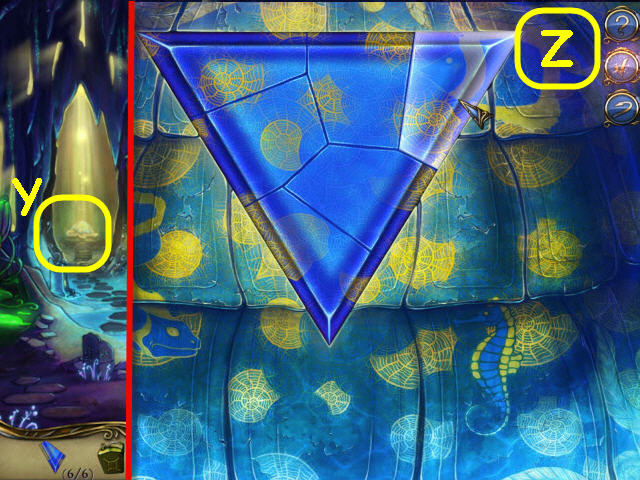
- Examine the sanctuary and place the 6 CRYSTAL PIECES on the panel to trigger a puzzle (Y).
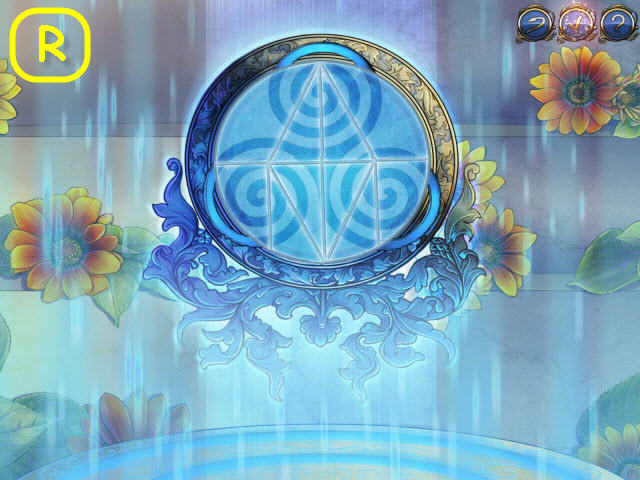
- Assemble the crystals to complete the triangle.
- See screenshot for solution (Z).
- Take the POWER CRYSTAL.
- Go to the dock.
- Examine the hatch; open the fuel tank lid and use the FULL FUEL TANK on the fuel tank (A).
- Pull the lever (B); place the POWER CRYSTAL in the triangle slot (C).
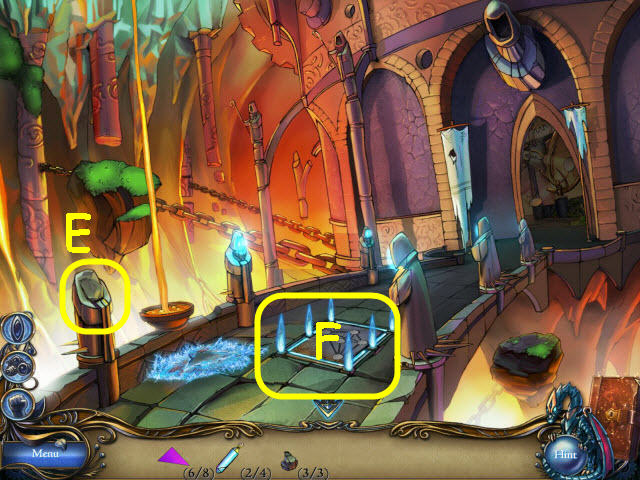
Chapter 5 – The Gaia Heart
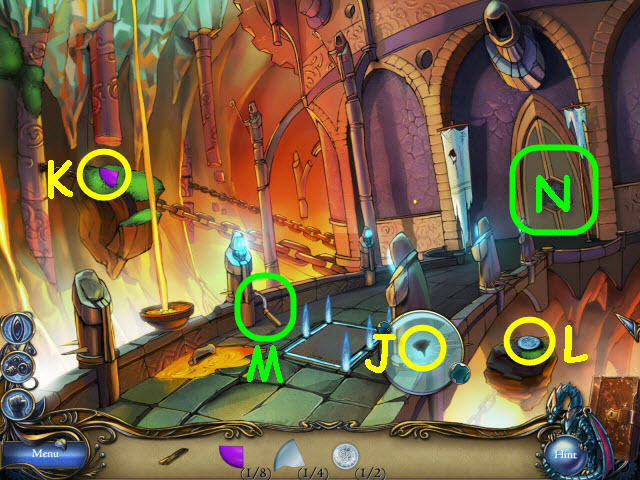
- Try and pick the seeds (D) or take the statue part (E) to cause a fire.
- Examine the tree hollow; take the MIRROR SHARD 1/4 (F).
- Move the suspicious heap and take the ELEMENT STONE 1/2 (G).
- Take the BURNT PLANK (H) and the CRYSTAL PIECE 1/8 (I).
- Go to the watchmen gates.
- Use the PRETTY BOY’S VISION on the spikes; take the MIRROR SHARD 2/4 (J).
- Use ZIN’S TELEKINESIS on the left floating island to get the CRYSTAL PIECE 2/8 (K).
- Use ZIN’S TELEKINESIS on the right floating island to get the ELEMENT STONE 2/2 (L).
- Take the SICKLE (M).
- Examine the watchmen gates and place the 2 ELEMENT STONES in the sockets to trigger a puzzle (N).
- Move the colored stones to their corresponding slots.
- To solve the puzzle, select the stones in the following order: C, D, E, F, C, D, B, A, and F (O).
- Go to the panoramic heights.
- Use the SICKLE on the green fruit to get the FRUIT 1/3 (P).
- Go to the wheel chamber.
- Use the BURNT PLANK on the wolf trap; take the EMPTY GOBLET (Q).
- Examine the scales: take the REVIVING FLUID (R).
- Take the GLOWING STONE 1/3 (S).
- Go to the watchmen gates.
- Use the EMPTY GOBLET on the streaming lava to get a GOBLET WITH LAVA (T).
- Go back into the wheel chamber.

- Examine the mini garden; take the ADHESIVE MUSHROOM (U).
- Use the PRETTY BOY’S VISION on the pressed stones; take the CRYSTAL PIECE 3/8 (V).
- Use the GOBLET WITH LAVA on the entangled tree; take the MIRROR SHARD 3/4 (W).
- Use the REVIVING FLUID on the lifeless tree; open the flower bud and take the GLOWING STONE 2/3 (X).
- Use the SICKLE on the blue fruit to get the FRUIT 2/3 (Y).
- Go to the watchmen gates.
- Use the EMPTY GOBLET on the streaming lava to get a GOBLET WITH LAVA (Z).
- Go to panoramic heights.
- Examine the tree hollow and place the ADHESIVE MUSHROOM by the electric bugs; take the ELECTRIC BUGS (A), and the GLOWING STONE 3/3 (B).
- Go to the wheel chamber.
- Examine the scales and place the 3 GLOWING STONES on it to trigger a puzzle (D).
- Place the crystals on the scales to balance it.
- See screenshot for solution (E).
- Go to the spirits chamber/ chamber of elements.
- Use GRUMP’S STRENGTH on the obsidian vase; take the CRYSTAL PIECE 4/8 (F).
- Use GRUMP’S STRENGTH on the gigantic mace to get a HEAVY MACE (G).
- Use ZIN’S TELEKINESIS on the hanging plummet to get a PIECE OF MECHANISM 1/4 (H).
- Take the FRUIT 3/3 (I).
- Examine the pillar and place the 3 FRUIT on it to trigger a puzzle (J).
- Paint each section so that no same colors touch.
- See screenshots for solution (1-3).
- Take the SYMBOL FAN (K).
- Go to the wheel chamber.
- Use the HEAVY MACE on the protuberant stone (L).
- Take the MIRROR SHARD 4/4 (M).
- Examine and place the 4 MIRROR SHARDS on the mirror (N).
- Take the WAND OF FROST (O).
- Take the ICE (P).
- Go to panoramic heights.
- Use the WAND OF FROST on the burning crate (Q).
- Take the STATUE PART 1/3 (R), and the ORGANIC SEEDS (S).
- Go to the watchmen gates.
- Use the WAND OF FROST on the statue part; take the STATUE PART 2/3 (T).
- Go to the spirits chamber/ chamber of elements.
- Place the SYMBOL FAN on the air element plate (U); receive a SYMBOL.
- Place the ICE on the water element plate (V).
- Place the GOBLET WITH LAVA on the fire element plate (W).
- Place the ORGANIC SEEDS on the nature element plate (X).
- Take the CRYSTAL PIECE 5/8 (Y).
- Go to the Gaia heart chamber.
- Use GRUMP’S STRENGTH, PRETTY BOY’S VISION, and ZIN’S TELEKINESIS, on Scartaris Umbra (Z).
- Take the PIECE OF MECHANISM 2/4 (A).
- Examine the dark corner; place the ELECTRIC BUGS on the inactive power generator (B).
- Place the SYMBOL on the symbol recess; take the CRYSTAL PIECE 6/8 (C), and the STATUE PART 3/3 (D).
- Go to the watchmen gates.
- Place the 3 STATUE PARTS on the broken statue (E).
- Examine the secret stash to trigger a puzzle (F).
- Draw over every line once.
- See screenshots for solutions (X, Y, and Z).
- Take the PIECE OF MECHANISM 3/4 (G), and the CRYSTAL PIECE 7/8 (H).
- Use ZIN’S TELEKINESIS on the hidden item to get a PIECE OF MECHANISM 4/4 (I).
- Go to the Gaia Heart Chamber.
- Hang the 4 PIECES OF MECHANISMS on the complex mechanism (J).
- Take the CRYSTAL PIECE 8/8 (K).
- Go to panoramic heights.
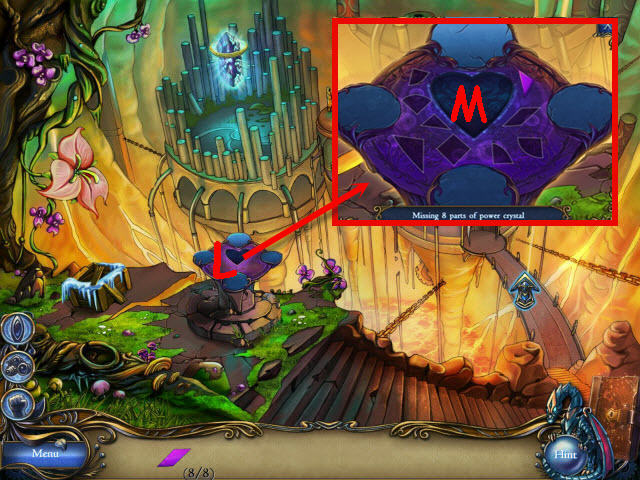
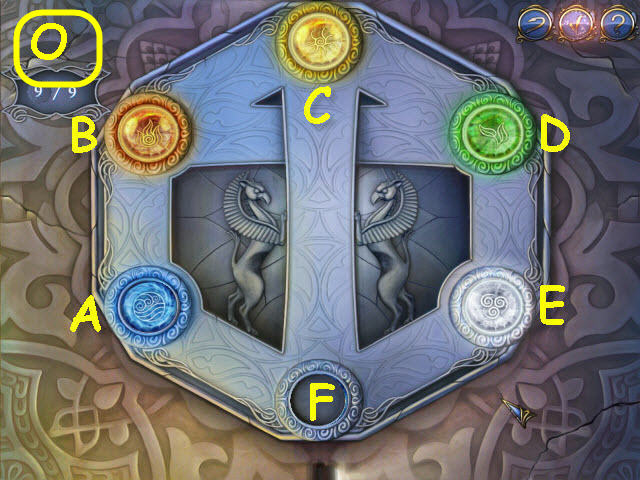
- Examine the altar of the ancients (L).
- Place the 8 CRYSTAL PIECES in the slots to trigger a puzzle (M).

- Place the pieces in the center to complete the heart.
- See screenshot for solution (N).

- Press the bottom handprint (0).
- Use the PRETTY BOY’S VISION on the left handprint (P).
- Use GRUMP’S STRENGTH on the top handprint (Q).
- Use ZIN’S TELEKINESIS on the right handprint (R).
- Take the CHARGED CRYSTAL (S).
- Go to the Gaia heart chamber.
- Examine the central niche.
- Place the CHARGED CRYSTAL in the slot (T).
Chapter 6 – The Watchmen
- Take the ALTAR STONE 1/5 (U).
- Attempt to take the fruit; take the OILY SKIN (V) after the animal peels the fruit.
- Go forward down the path to the river valley.
- Examine the hollow and remove the dense web; take the SOLID BLOCK (W), and the ALTAR STONE 2/5 (X).
- Use ZIN’S TELEKINESIS on the stuck boomerang half to get a BOOMERANG HALF (Y).
- Examine the tree roots; use GRUMP’S STRENGTH on the enclosed staff to get a LONG STAFF (Z).
- Use the PRETTY BOY’S VISION on the tree trunk; take the IMAGE PART 1/3 (A).
- Chase away the giant lizard; use the BOOMERANG HALF on the pressed image part to get an IMAGE PART 2/3 (B).
- Go to the foothill.
- Use the LONG STAFF on the hive (C).
- Take the IMAGE PART 3/3 (D).
- Go to river valley.
- Examine the pulley mechanism and place the 3 IMAGE PARTS on it to trigger a puzzle (E).
- Turn all the grayed out sections to colors.
- To solve the puzzle, select the sections in the order marked in the screenshot (F).
- Go to the ford.
- Examine the forked branch; take the MYTHRILL KEY (G).
- Examine the raft tent; take the STONE PLATE 1/3 (H), and the CARVED FIGURINE 1/3 (I).
- Go to the foothill.
- Examine the mythrill chest; use the MYTHRILL KEY on the hanging lock and take the BOWSTRING (J), and the ALTAR STONE 3/5 (K).
- Go to the ford.
- Examine the forked branch and use the BOOMERANG HALF on the sack plant (L).
- Place the BOWSTRING on the forked branch to trigger a puzzle (M).
- Aim the nuts into the dino’s mouth.
- See screenshots (1, 2, and 3) for correct positions for casual mode.
- See screenshots (1, 2 and 4) for advanced mode.
- Go forward on the right to the ruins.
- Take the BOOMERANG HALF (N) which will automatically combine with the BOOMERANG HALF in inventory to create a CUTTING BOOMERANG.
- Take the CARVED FIGURINE 2/3 (O).
- Use ZIN’S TELEKINESIS to get the CARVED FIGURINE 3/3 (P).
- Place the 3 CARVED FIGURINES on the empty pedestals (@).
- Take the STONE PLATE 2/3 (Q).
- Go to the river valley.
- Use the CUTTING BOOMERANG on the elastic vine to get a VINE (R).
- Use the CUTTING BOOMERANG on the torn net (S).
- Take the ALTAR STONE 4/5 (T).
- Examine the torn net to trigger a puzzle (U).

- Weave the net.
- See screenshot for solution (V).
- Take the FISHING NET (W).
- Go to the ruins.
- Examine the stone head and place the VINE on the broken mechanism; use the OILY SKIN on the jammed cogwheels (X).
- Take the DECORATIVE KEY (Y).
- Go to the ford.
- Use the FISHING NET on the floating chest and then use GRUMP’S STRENGTH on it (Z).
- Examine the chest and place the DECORATIVE KEY on it (A).
- Use the PRETTY BOY’S VISION on the dark corner; take the STONE PLATE 3/3 (B), and the POLISHED JEWEL 1/2 (C).
- Go to the ruins.
- Examine the gate stone and place the 3 STONE PLATES in the spaces to trigger a puzzle (D).
- To solve the puzzle, move the stones in the following order: C – K, E – L, D – E, B – D, K – A, D – B, E – K, L – C, F – L, G – D, H – M, I – F, J – I, M – H, F – G, L – F, D – E, C – D, and K – C (@).
- Go up the stairs to the rock.
- Use ZIN’S TELEKINESIS on the rock ledge to get a HAMMER (E).
- Move the water lily and use the PRETTY BOY’S VISION on the dull swamp; take the CHISEL (F).
- Examine the stone circle and place the SOLID BLOCK and the CHISEL on it. Use the HAMMER on the trapped key twice; take the DECORATIVE KEY (G).
- Go to the ford.
- Examine the chest and place the DECORATIVE KEY in the slot; take the POLISHED JEWEL 2/2 (H) and the WOODEN PLATE HALF (I).
- Go to the rock.
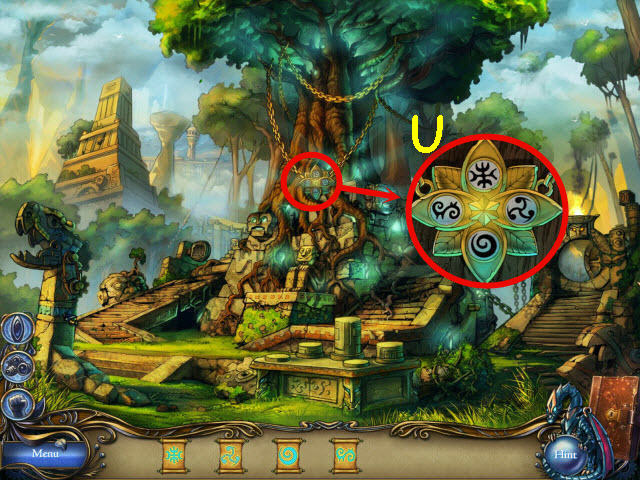
- Examine the rune columns and place the 2 POLISHED JEWELS on it to trigger a puzzle (J).
- The goal is to end up with more white than red tiles.
- Try and place as many whites along the edges that you can so you are able to surround the red. The computer placement is random.
- See screenshot a winning board (K).
- Take the SCROLL (L) and you will acquire 4 SCROLLS in inventory.
- Place the SCROLL in the matching carving (M) to get a GLOWING SCROLL.
- Go to the river valley.
- Place the WOODEN PLATE HALF and the matching SCROLL on the broken wooden plate (N); get a GLOWING SCROLL.
- Take the DECORATIVE KEY (O).
- Go to the foothill.
- Place the SCROLL on its matching carving (P); get a GLOWING SCROLL.
- Go to the ford.
- Examine the chest and place the DECORATIVE KEY in the slot; take the ALTAR STONE 5/5 (Q).
- Place the SCROLL on its matching carving (R); get a GLOWING SCROLL.
- Go to the ruins.
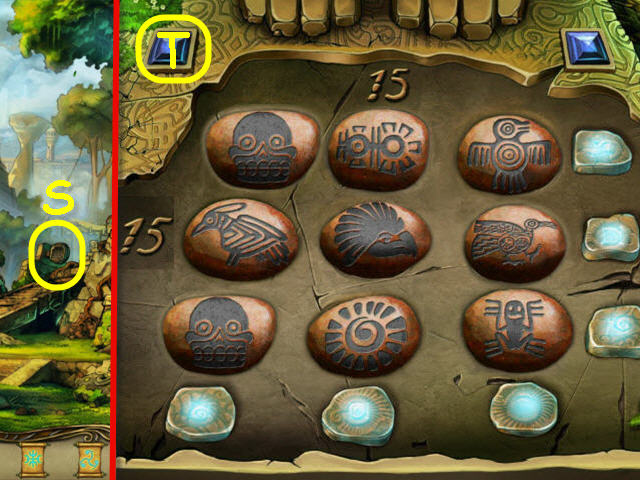
- Examine the ancient altar and place the 5 ALTAR STONES in the slots to trigger a puzzle (S).
- Arrange the runes so that all rows and columns add to 15.
- See screenshot for solution (T).
- Examine the ornamental flower.
- Place the 4 GLOWING SCROLLS on their matching symbols (U).
Chapter 7 – The Dark Sun
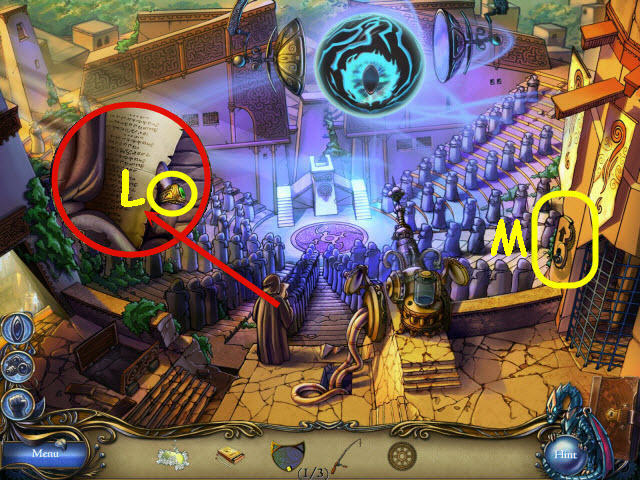
- Select the lifting mechanism; take the BROKEN CHAIN (V).
- Take the ENGRAVING PART 1/3 (W).
- Go to the waterfall square.
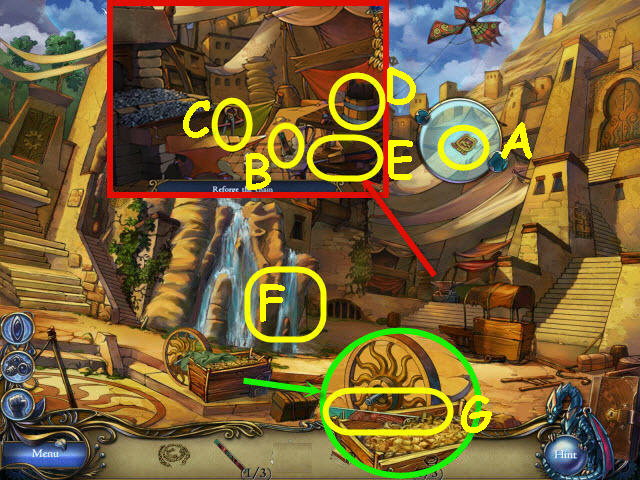
- Use the PRETTY BOY’S VISION on the kite and then use ZIN’S TELEKINESIS on it to get the MOLDING PIECE 1/4 (A).
- Examine the outdoor smithery; use GRUMP’S STRENGTH on the stone vase and take the ENGRAVING PART 2/3 (B).
- Take the TONGS (C), EMPTY BUCKET (D), and the BELLOWS (E).
- Use the EMPTY BUCKET on the waterfall to get a FULL BUCKET (F).
- Examine the crate and move the blanket; take the ENGRAVING PART 3/3 (G).
- Go to the city entrance.
- Examine the control plate and place the 3 ENGRAVING PARTS on it to trigger a puzzle (H).
- Drag the pieces to complete the picture.
- See screenshot for solution (I).
- Take the COPPER KEY (J).
- Go to the waterfall square.
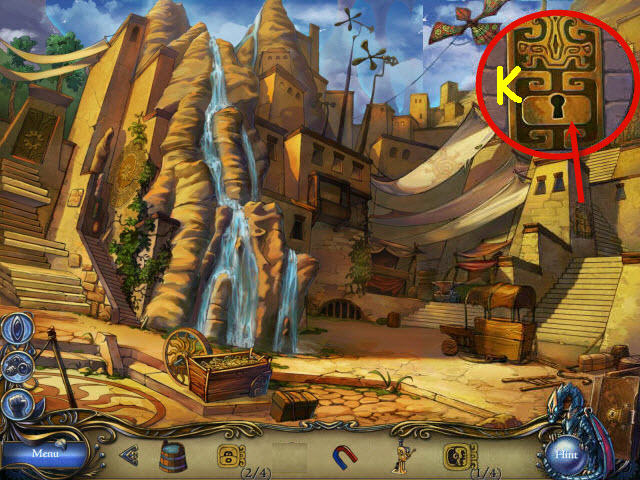
- Examine the decorative panel and use the COPPER KEY in the keyhole (K).
- Go to the assembly hall.
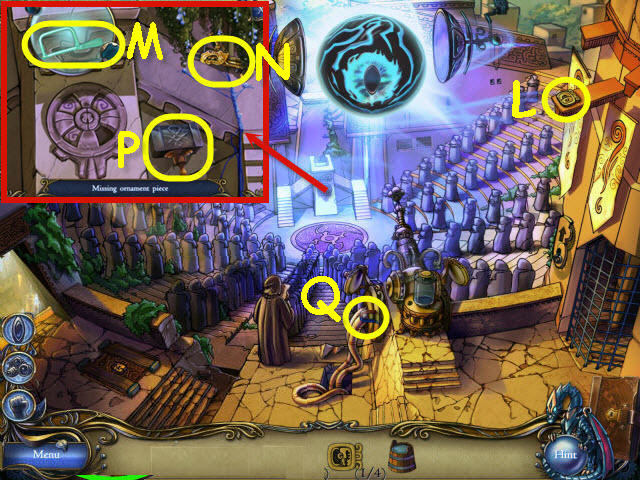
- Use ZIN’S TELEKINESIS on the distant piece to get a MOLDING PIECE 2/4 (L).
- Examine the stand and use the PRETTY BOY’S VISION on the stone ornament; take the SAW (M).
- Take the LIFTING JACK (N), and the FORGING HAMMER (P).
- Take the MAGNET (Q).
- Go to waterfall square.
- Examine the outdoor smithery and place the BROKEN CHAIN, BELLOWS, and the TONGS on the hearth (R).
- Use the FORGING HAMMER and the FULL BUCKET on the anvil to get a CHAIN (S).
- Examine the crate and use the MAGNET on the packing to get a NUT (T).
- Place the NUT on the broken wheel to get a WHEEL (U).
- Use the LIFTING JACK and the WHEEL on the broken cart (V).
- Use GRUMP’S STRENGTH on the cart.
- Examine the aqueduct; take the MOLDING PIECE 3/4 (W).
- Go to the city entrance.
- Place the CHAIN on the lifting mechanism (X).
- Examine the cabin and open the latch; take the PLASTER SEMICIRCLE (Y) and the MOLDING PIECE 4/4 (Z).
- Go to the assembly hall.
- Examine the stand and place the PLASTER SEMICIRCLE in the slot; take the PEBBLE 1/3 (A).
- Go to the waterfall square.
- Examine the wall molding and place the 4 MOLDING PIECES in the slots (B).
- Arrange the runes on top of their matching symbols.
- Rotate the wheel and move a rune to one of the outer edges to see what is underneath. Find the needed piece and place it on the opposite outer edge and then rotate to line the matching runes up and slide it in. Repeat for all the squares.
- See screenshot for solution (C).
- Take the ORNAMENT KEY (D).
- Go to assembly hall.
- Examine the trapdoor and use the SAW and the ORNAMENT KEY on the blocked door. Take the ORNAMENTAL SEAL (E) and the FISHING ROD (F).
- Go to waterfall square and up the left staircase to the garden.
- Examine the easel; take the MATCHES (G).
- Take the PEBBLE 2/3 (H).
- Examine the well and use the FISHING ROD on the stuck bottle. Use GRUMP’S STRENGTH on the solid bottle; take the PEBBLE 3/3 (I).
- Examine the gazebo; take the SOAP (J).
- Place the 3 PEBBLES in the slots to trigger a puzzle (K).

- Move the pebbles to the green squares.
- To solve the puzzle, move the first set of pebbles as follows: B – right, A – down and right (1).
- Second set: B – up, right 2 x, up, A – left, down, C – down, right, and up (2).
- Third set: C – left, A – down, right, F – up 2 x, D – right, down 2 x, B – right 2 x, up, and E – up (3).
- Take the LIFTING WHEEL.
- Go to assembly hall.
- Examine the petrified watchmen; use the SOAP on the stuck ring to get a RING (L).
- Use the LIFTING WHEEL on the gate mechanism (M).
- Go to Umbra’s tower.

- Examine the alchemy table; take all 4 INGREDIENT JARS (N).
- Take the IRON STAFF (O), ACID (P), and the ORNAMENTAL SEAL 2/3 (Q).
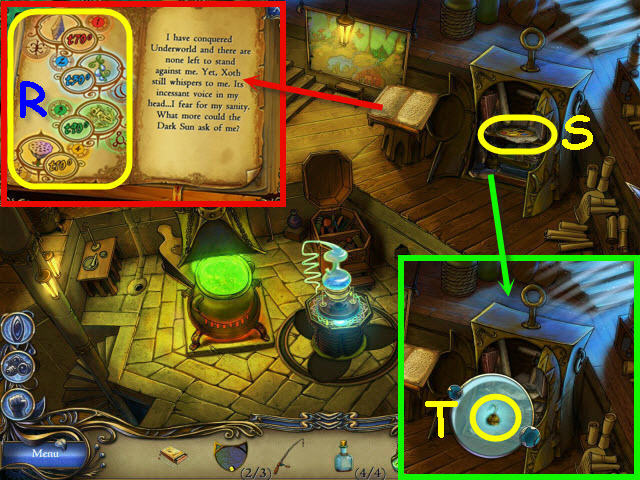
- Examine Umbra’s journal; take UMBRA’S FORMULA (R), and read the pages in the journal.
- Examine the cabinet lock and place the RING on it; move the heap of scrolls on the top shelf and take the PALETTE (S).
- Use the PRETTY BOY’S VISION on the lower shelf; take the PNEUMATIC HINGE (T).
- Go to assembly hall.
- Examine the stand and use an INGREDIENT JAR on the weird plant to get an INGREDIENT 1/4 (U).
- Go to the garden.
- Touch the chrysalid and then use an INGREDIENT JAR on it to get INGREDIENT 2/4 (V).
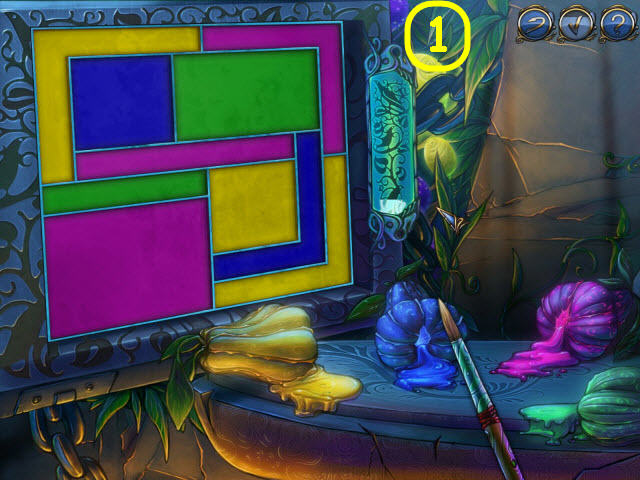
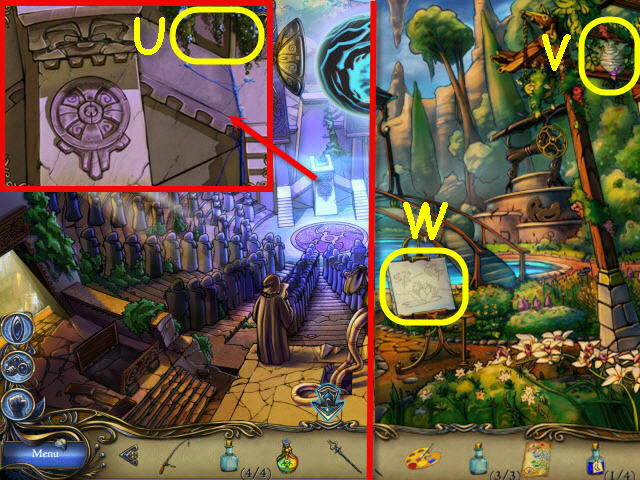
- Examine the easel and place the PALETTE on it to trigger a puzzle (W).

- Paint the picture to match the scene.
- Tips: Red + yellow = orange, blue + yellow = green, and red +blue = purple.
- See screenshot for solution (X).
- Use an INGREDIENT JAR on the open flower bud to get INGREDIENT 3/4 (Y).
- Go to the city entrance.
- Use the IRON STAFF on the tomb; use the INGREDIENT JAR on the animal carcasses to get INGREDIENT 4/4 (Z).
- Go to waterfall square.
- Examine the aqueduct; use the ACID on the hanging lock and the FISHING ROD on the hinged lid. Use ZIN’S TELEKINESIS to get the ORNAMENTAL SEAL 3/3 (A).
- Go to Umbra’s tower.
- Place the 3 ORNAMENTAL SEALS on the magnet holder (B); take the BULB (C).
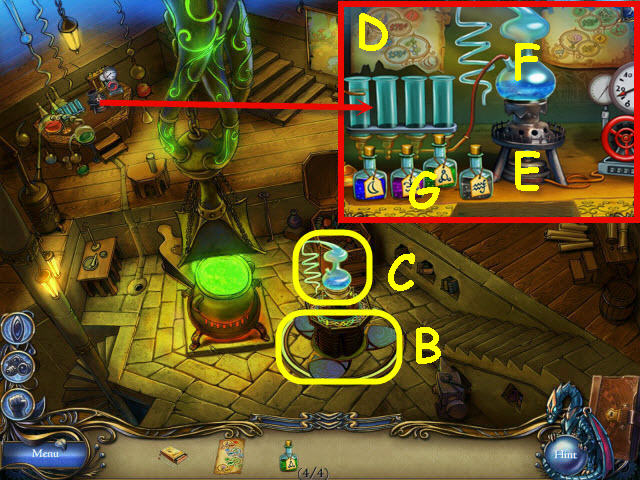
- Examine the alchemy table; place UMBRA’S FORMULA on the wall (D), use the MATCHES on the burner nozzle (E).
- Place the BULB on the burner heating plate (F), and the 4 INGREDIENTS on the alchemical component (G) to trigger a puzzle.
- Boil the ingredients at the correct temperature and order.
- Tip: To raise the temperature, hold the +/- buttons down until the correct temperature is reached (H).
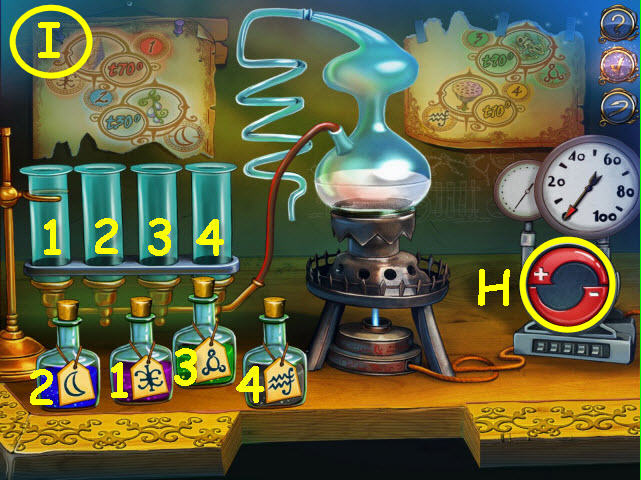
- Solution: Place bottle 1 in the first tube and turn the temperature to 70 degrees.
- Place bottle 2 in the second tube and lower the temperature to 30 degrees.
- Place bottle 3 in the third tube and increase the temperature to 90 degrees.
- Place bottle 4 in the fourth tube and lower the temperature to 10 degrees (I).
- You will earn a DISPELL POTION.
- Go to assembly hall.

- Examine the gun lid.
- Place the PNEUMATIC HINGE on it to trigger a puzzle (J).
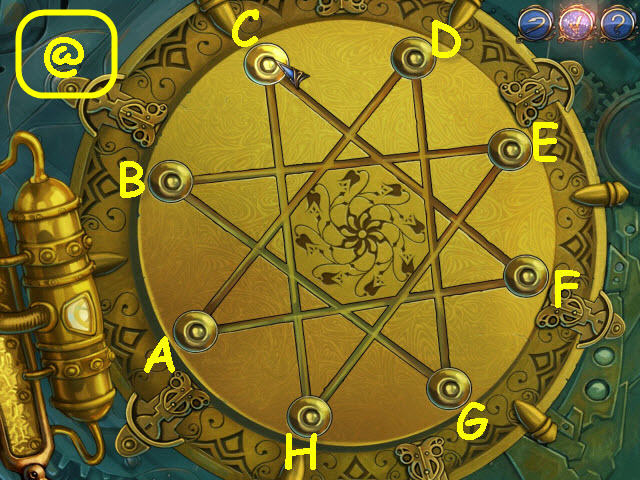
- Move the seal to every corner of the star.
- To solve the puzzle, move the seal the following steps: A – D, B – G, F – A, E – B, H – E, C – F, C – H, and C (@).
- Place the DISPELL POTION in the reservoir (K).
- Congratulations! You have successfully completed Journey: Heart of Gaia.


 Bedtime Stories: The Lost Dreams Walkthrough, Guide, & Tips
 Nemo's Secret: Vulcania Walkthrough, Guide, & Tips
 Nancy Drew: Treasure in the Royal Tower Walkthrough, Guide, & Tips
 Resurrection New Mexico Walkthrough, Guide, & Tips
 Royal Trouble Walkthrough, Guide, & Tips