Royal Trouble Walkthrough, Guide, & Tips
Royal Trouble Walkthrough

Welcome to the Royal Trouble Walkthrough!
Help Princess Loreen and Prince Nathaniel escape their castle prison!
Whether you use this document as a reference when things get difficult or as a road map to get you from beginning to end, we’re pretty sure you’ll find what you’re looking for here.
This document contains a complete Royal Trouble game walkthrough featuring annotated screenshots from actual gameplay!
We hope you find this information useful as you play your way through the game. Use the walkthrough menu below to quickly jump to whatever stage of the game you need help with.
Remember to visit the Big Fish Games Forums if you find you need more help. Have fun!
This walkthrough was created by prpldva, and is protected under US Copyright laws. Any unauthorized use, including re-publication in whole or in part, without permission, is strictly prohibited.
General Tips & Information

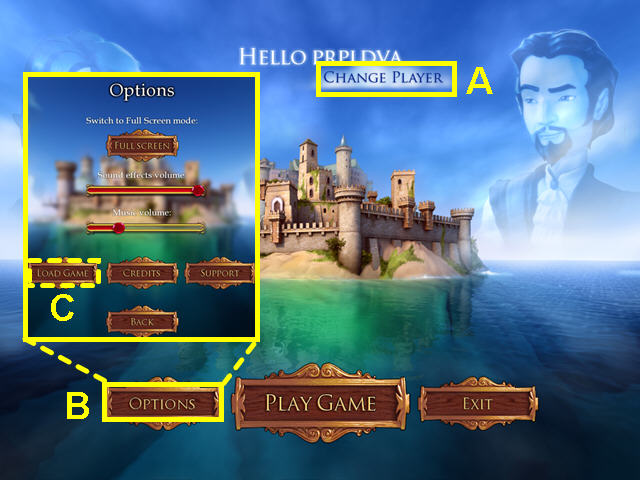
- From the main screen you may manage player profiles (A).
- You may have up to 5 profiles at a time.
- The options menu allows for the adjustment of music and sounds volume (B).
- You may play this game in windowed or full screen mode.
- While you play, the game will automatically make save points throughout the game.
- Revert to one of these points by selecting ‘Load Game’ and clicking on a picture (C).
- Warning, your game will automatically revert back to the point you choose.
- Select another save point to change again if necessary.

- You have the choice of a brief tutorial once you start the game.
- Inventory items are in the bottom panel (D).
- The bottom right picture shows which character you are playing (E).
- Click on the Hint book for Universal Hint System type nudges (F).
- Inside the hint book you can also see your percentage of progress (G).
- Your cursor will change to indicate what action is available on an item (H).
- The doorway on your cursor indicates you can move to another location.
- The magnifying glass icon indicates that you can take a closer look.
- The hand icon shows you can take an item.
- The gears icon shows that an inventory item is needed.
- The speech bubble indicates you can speak to a character.
- Mini-games are skip-able once the meter fills.
Part One: The Dungeon
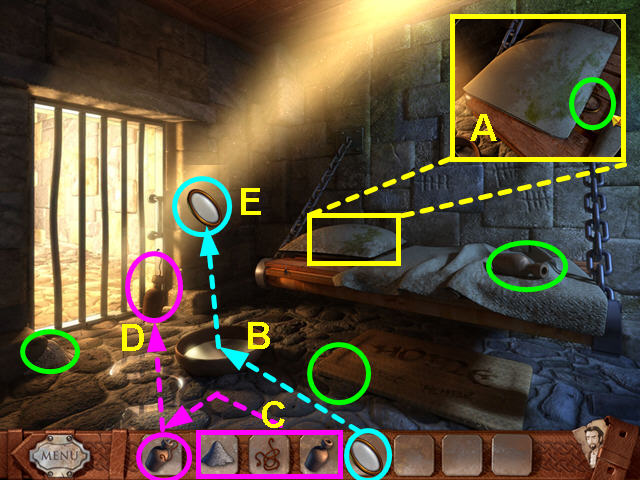
- Take the POWDER, CORD, and the EMPTY FLASK circled in green.
- Look at the close-up of the pillow and take the DIRTY LENS (A).
- Use the DIRTY LENS on the bowl of water to get the LENS (B).
- Combine the POWDER and the EMPTY FLASK, then add the CORD to make the BOMB (C).
- Place the BOMB on the closed door of the cell (D).
- Use the LENS in the sunray to light the bomb (E).
- Click on the door to exit the cell.
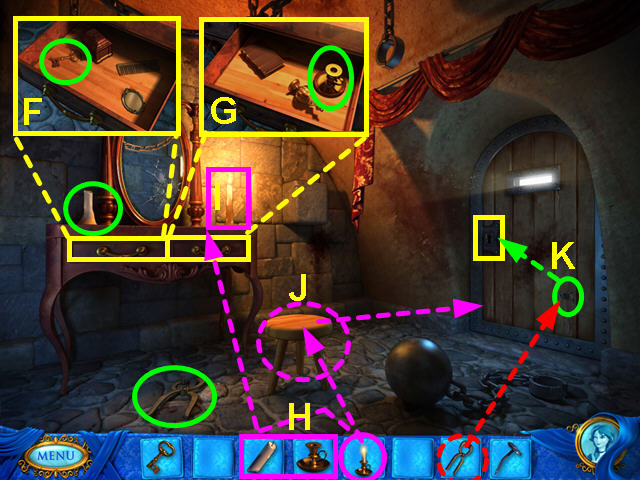
- Open the left drawer and take the SMALL KEY (F).
- Open the right drawer and take the CANDLESTICK (G).
- Take the CANDLE and the PINCERS circled in green.
- Combine the CANDLESTICK and the CANDLE (H).
- Use the CANDLE with CANDLESTICK on the lit candle on the vanity (I).
- Use the LIT CANDLE with CANDLESTICK on the stool (J).
- Click on the stool to move it next to the door.
- Use the PINCERS to take the NAIL from the door (K).
- Use the NAIL on the keyhole for a mini-game.
- Note- there is a metal pin on the left end of the curtain rod.
- You can take this as the princess or as the prince.
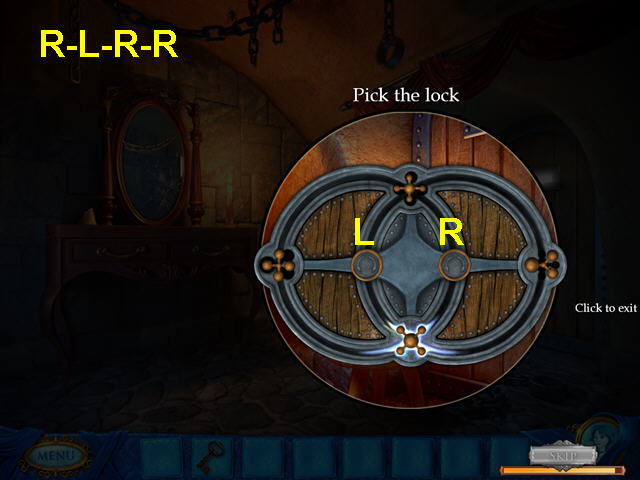
- The object of this mini-game is to rotate the wheels and move the lock pieces to their matching niche.
- Click on the right or left control to rotate the 2 circles.
- Click: R-L-R-R.
- Click on the door to exit the cell.
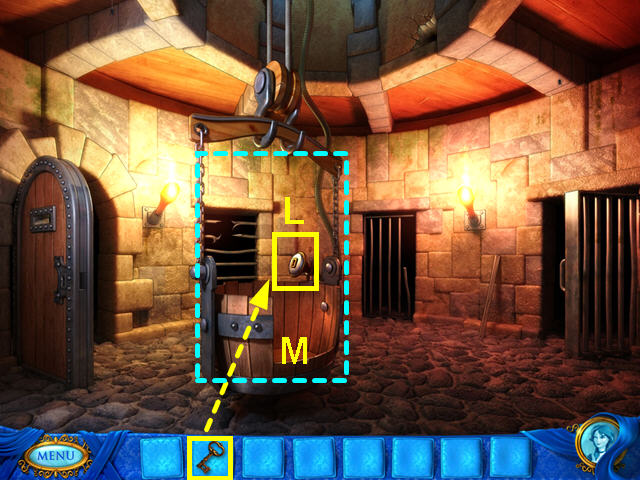
- Once the prince leaves, use the SMALL KEY on the keyhole to the lift (L).
- Click on the lift to travel up (M).
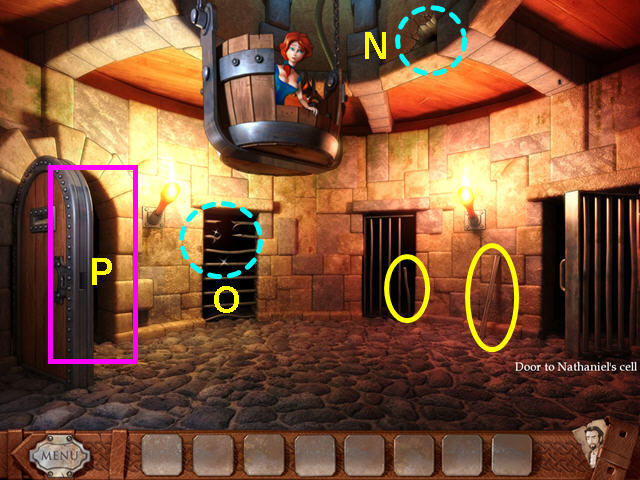
- Note the crack in the wall (N).
- Make note of the sharp iron bars (O).
- Take the POLE and the IRON BAR circled in yellow.
- Walk left and enter the princesses’ cell (P).
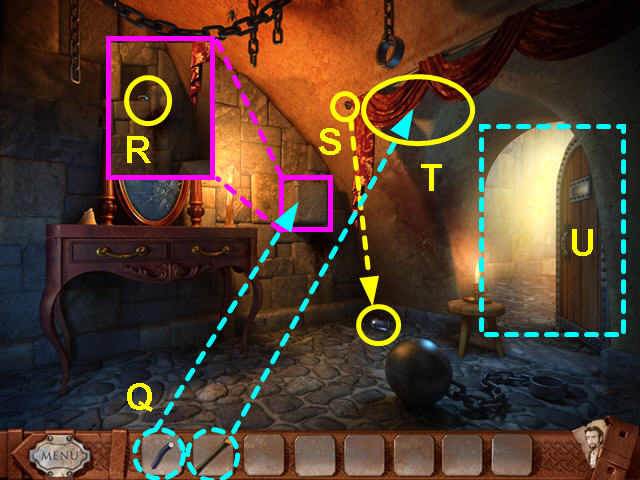
- Use the IRON BAR on the stone to get the BENT BAR (Q).
- Take the SIGNET RING from the hole the stone left (R).
- Click on the left end of the curtain rod, then take the METAL PEG that falls to the ground (S).
- Note- if you already took this item as the princess; don’t worry, the prince can get it later.
- Use the POLE to take the CURTAIN (T).
- Click on the door to exit the cell (U).
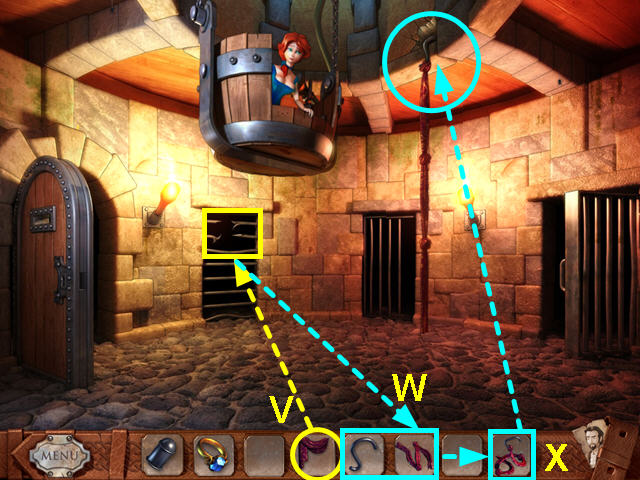
- Use the CURTAIN on the sharp iron bars to make the LINE (V).
- Combine the LINE and the BENT BAR to make the GRAPPLING HOOK (W).
- Use the CRAPPLING HOOK on the crack in the wall (X).
- Click on the rope to climb out of the dungeon.
- Give the prisoner the RING for a mini-game.
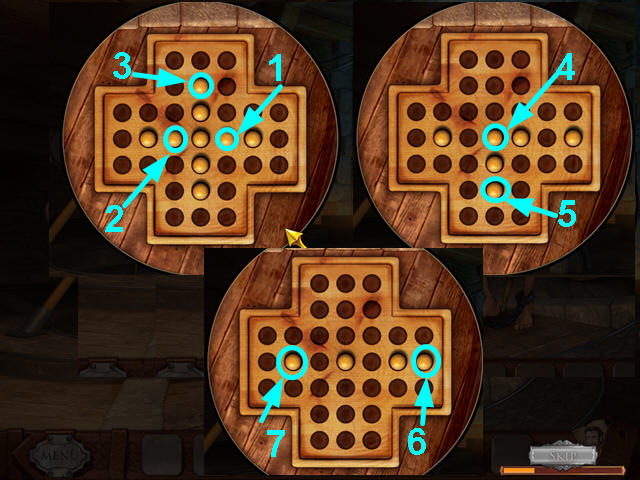
- The object of this mini-game is to jump pegs until there is only one left.
- You can only move by jumping and the jumps must be horizontal or vertical.
- Make the following jumps: 1 right, 2 right, 3 down, 4 right, 5 up, 6 left twice, and 7 right.
- After the prisoner gives you the WOOD PEGS, take the WHEEL circled in yellow.
- Combine the WOOD PEGS and the WHEEL (A).
- Add the METAL PEG to the WHEEL with WOOD PEGS.
- Note- if the princess took the METAL PEG from her cell, have the prince climb down the shaft and ask the princess for the peg.
- Place the WHEEL on the left side of the mechanism (B).
- Ring the bell to operate the lift (C).
- Exit through the drawbridge door (D).
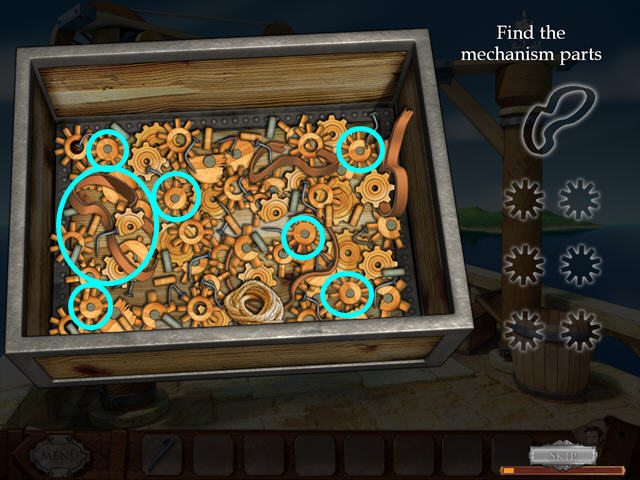
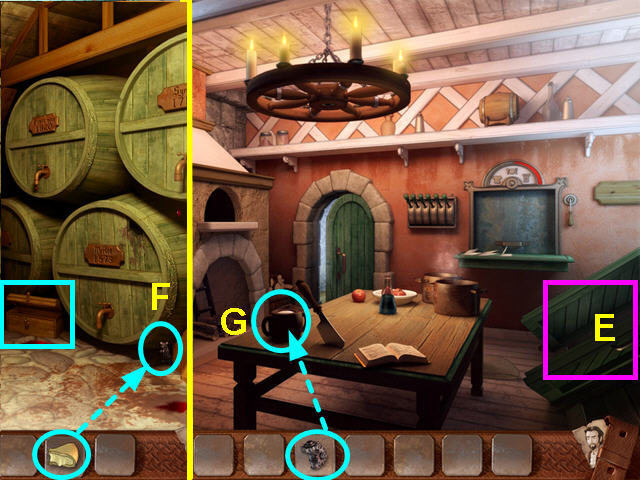
- Look in the right chest.
- Locate the 6 GEARS and the DRIVE BELT- circled in cyan.

- Open the next chest to the left.
- Find the HAMMER and the NAILS- circled in cyan.
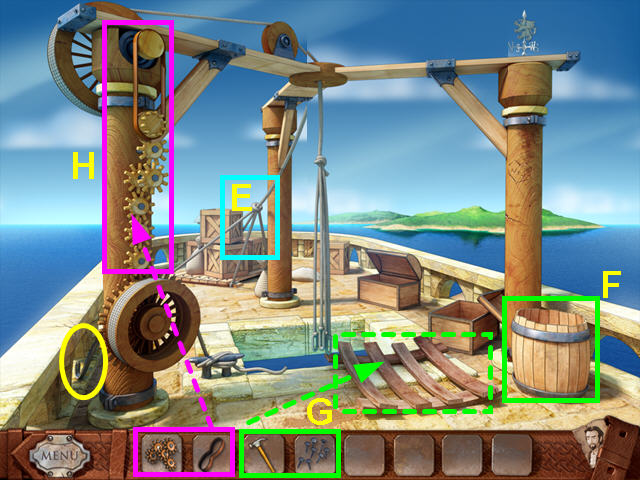
- Click on the rope of the CRANE LIFT (E).
- Find the CROWBAR- circled in yellow.
- Use the CROWBAR on the BARREL (F).
- Use the NAILS on the loose planks from the broken barrel (G).
- Use the HAMMER on the nails- click 8 times.
- Take the PLATFORM and place it into the ropes of the crane lift.
- Use the GEARS and the DRIVE BELT on the crane mechanism (H).
- Select the platform to exit.
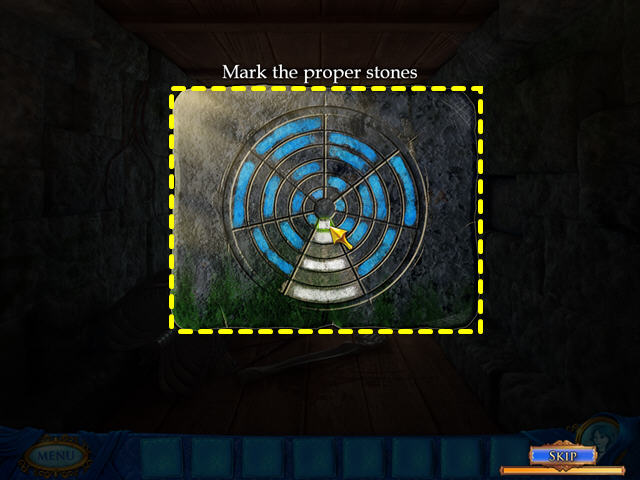
- Select the drawing on the right wall for a mini-game.
- The object is to mark the stones in the bottom wedge to complete the pattern.
- Click on a section to mark or unmark.
- From the outside to the center, fill in rings 1, 3, 5, and 6.
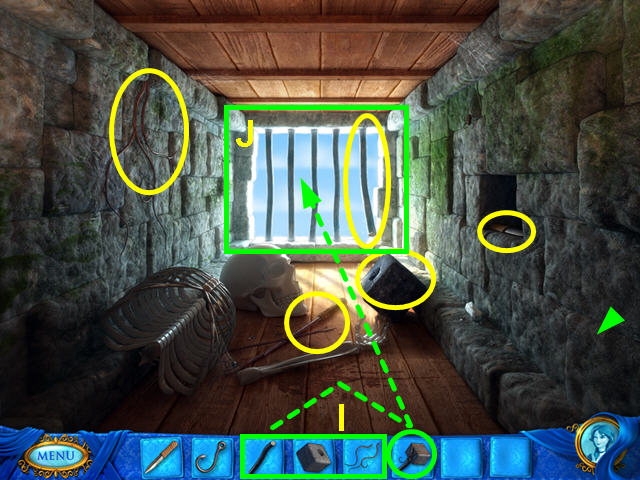
- Take the KNIFE from the niche in the right wall- circled in yellow.
- Take the STONE with a HOLE in it- circled in yellow.
- Take the IRON ROD from the window bars- circled in yellow.
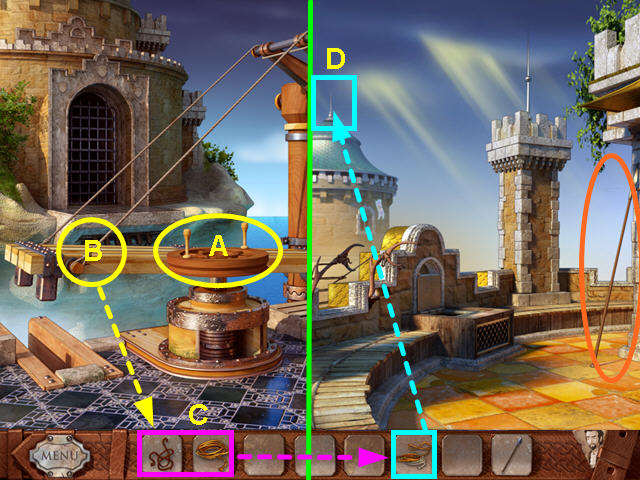
- Look at the broken fishing rod to find the HOOK.
- Take the ROOTS from the left wall- circled in yellow.
- Use the IRON ROD on the STONE with a HOLE, then add the ROOTS to make the HAMMER (I).
- Use the HAMMER on the window bars 3 times (J).
- Select the window to exit.
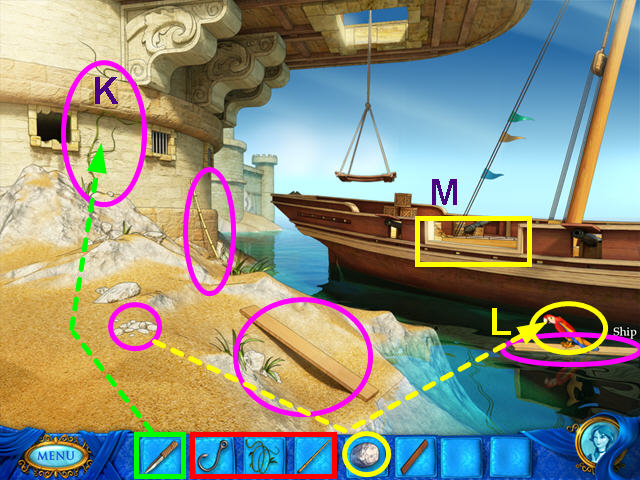
- Use the KNIFE to cut the VINES from the wall (K).
- Take the STONE from the pile of pebbles- circled in pink.
- Find the BAMBOO STICK and the PLANK, both circled in pink.
- Combine the VINES, HOOK and BAMBOO STICK to make the FISHING ROD.
- Throw the STONE at the parrot (L).
- Use the FISHING ROD on the floating PLANK circled in pink.
- Place the 2 PLANKS on the ship (M).
Part Two: Prisoners Again
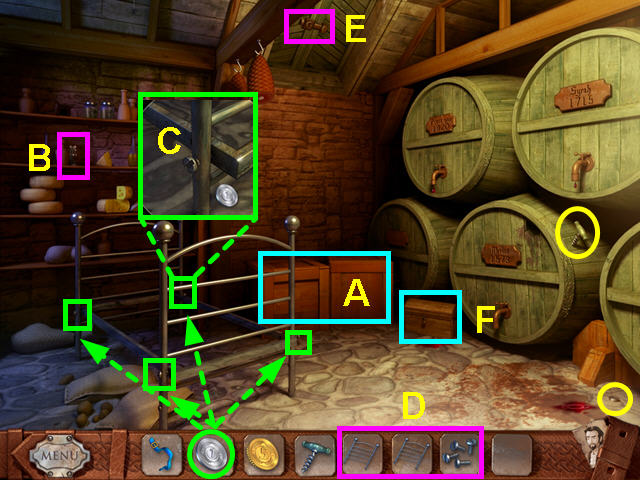
- Click on the two crates to move them under the door (A).
- Take the silver COIN and the CORKSCREW- both circled in yellow.
- Note the rat (B).
- Look at the close-up of each of the bed screws and use the coin to remove each of them (C).
- Take the 2 pieces of the BED and combine them in your inventory, then add the SCREWS (D).
- Use the LADDER just in front of the crates.
- Note the lock on the trap door (E).
- Look at the chest on the floor for a mini-game (F).
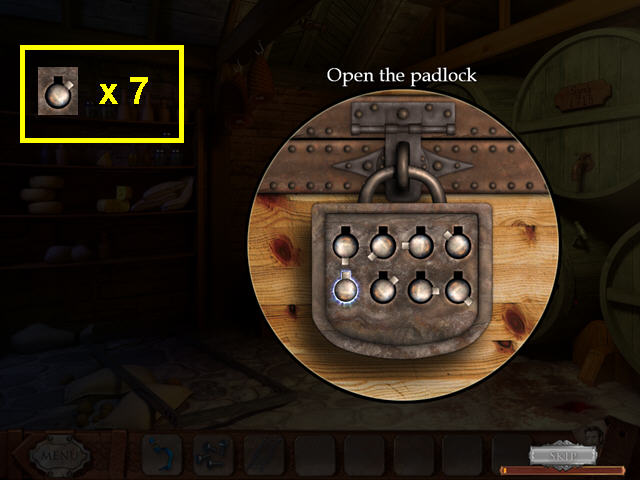
- The object of this mini-game is to turn the knobs so that all the tabs are up.
- This puzzle starts randomly, so look for the knob with the tab just to the right and click on it 7 times to open the padlock.
- Take the GOLD COIN from inside the chest.
- Use the CORK SCREW on the trap door lock for a mini-game.
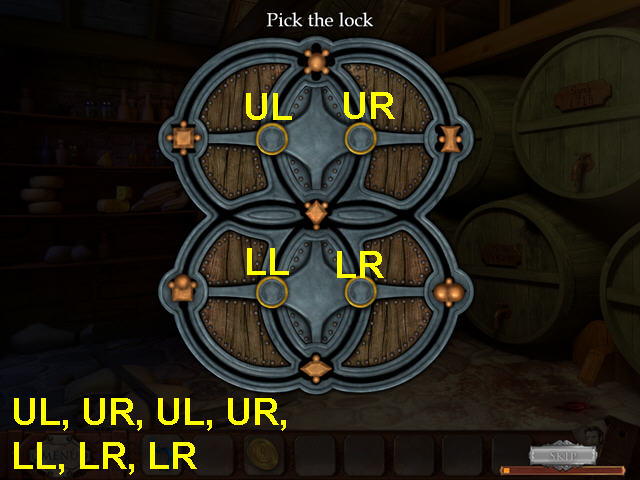
- The object of this mini-game is to rotate the wheels and move the lock pieces to their matching niche.
- Click on of the 4 controls to rotate the 4 circles.
- Click: UL, UR, UL, UR, LL, LR, LR.
- Click on the door to exit the room.
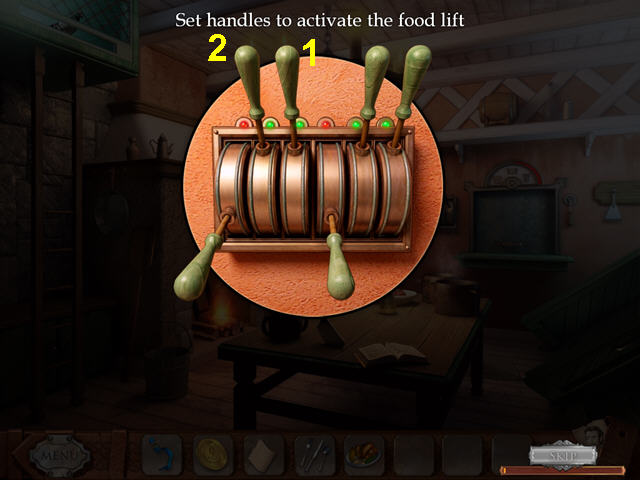
- Look at the handles on the wall, just to the left of the door for a mini-game.
- The object is to move all the handles to the upright position.
- Each handle affects the handles on its left and right.
- This puzzle is random so your solution will vary.
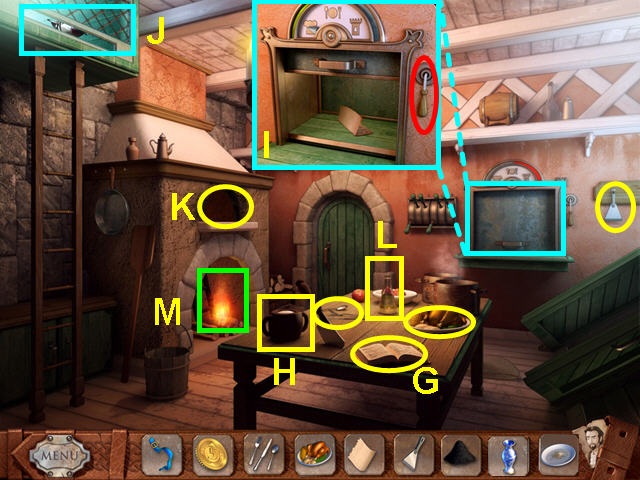
- Look at the cookbook and turn the pages until you get a PAPER (G).
- Take the CUTLERY, and the FOOD from the table- both circled in yellow.
- Get the SCRAPPER circled in yellow from the right wall .
- Note the pot of lard (H).
- Look at the close-up of the food lift (Dumbwaiter).
- Place the CUTLERY in the lift and pull the handle (I).
- Read the note that is returned.
- Place the FOOD in the lift and pull the handle.
- Take the PLATE of CRUMBS that is returned.
- Use the PLATE of CRUMBS on the dovecote (J).
- Take the FEATHER that falls.
- Use the scrapper on the SOOT above the fireplace (K).
- Use the SOOT on the flask of oil on the table (L).
- Use the FEATHER on the ink.
- Combine the FEATHER with INK and the PAPER.
- Use the LETTER to LOREEN in the food lift.
- Read the note that returns, then place the NECKLACE in the lift and pull the cord.
- Again read the note and take the VASE with WATER.
- Use the VASE with WATER on the fire (M).
- Click on the fireplace to exit.
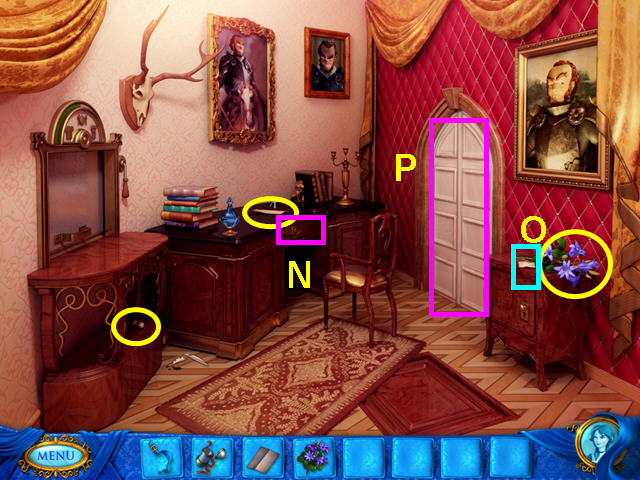
- Take the SMALL CAPSULE, FLOWERS and PAPER- all circled in yellow.
- Note the locked desk drawer (N).
- Read the note on the cabinet (O).
- Knock on the door until the guard arrives (P)..
- Talk to the guard until he will allow you out of the room in return for something that will convince his master that you struggled.
- Give the guard your NECKLACE.
- Outside, talk to the guard until he gives you the SMALL KEY.
- Walk right to return to the room.
- Use the SMALL KEY on the desk drawer for a mini-game.
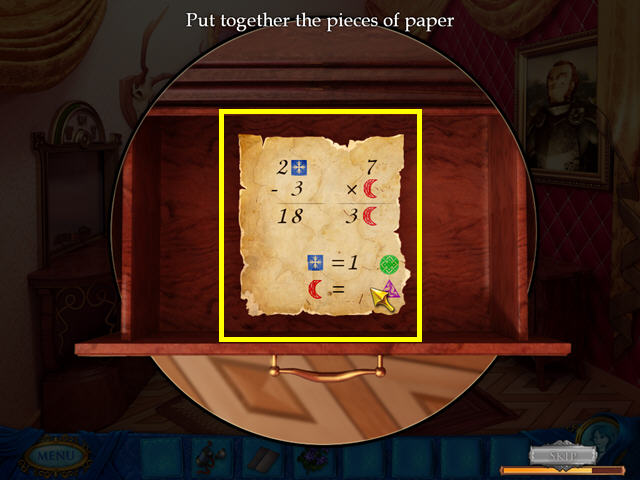
- Reassemble the code card in this jigsaw style mini-game.
- Left-click to take or place a piece in the grid.
- Walk right to exit the room.
- Give the guard the INCOMPLETE CODE CARD for a mini-game.
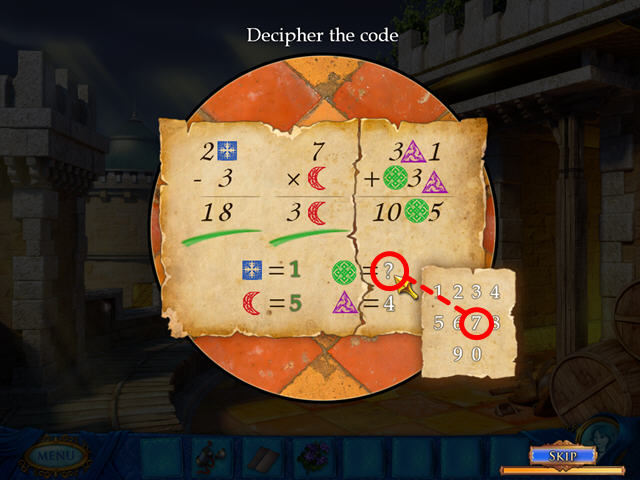
- The object is to determine what number is indicated by each symbol.
- Click on a question mark, then select a number.
- Incorrect equations will get a red X, then get wiped clean for another try.
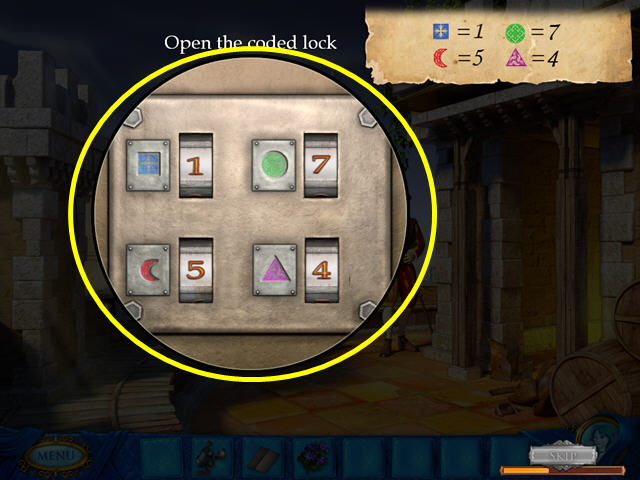
- Look at the dove cote for a mini-game.
- Use the code to enter the correct numbers.
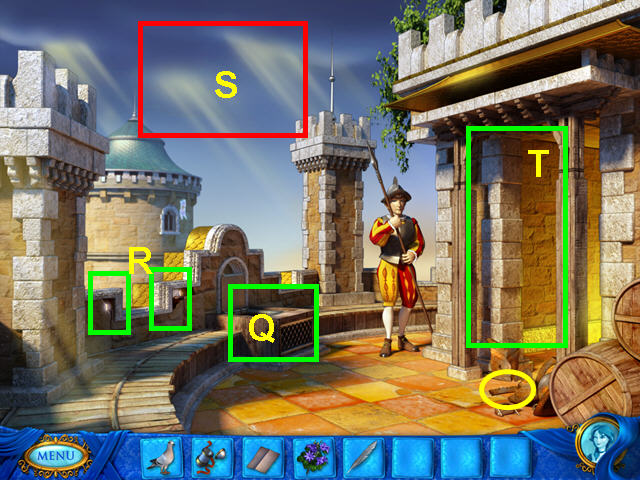
- Look inside the dove cote, then take the PIGEON and the FEATHER (Q).
- Note the cracks in the wall (R).
- Note the sky (S).
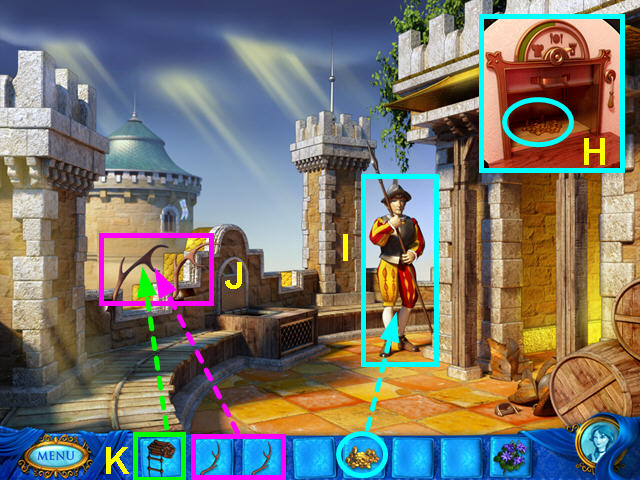
- Take the OLD JAGGED BLADE circled in yellow.
- Walk right to return to the room (T).
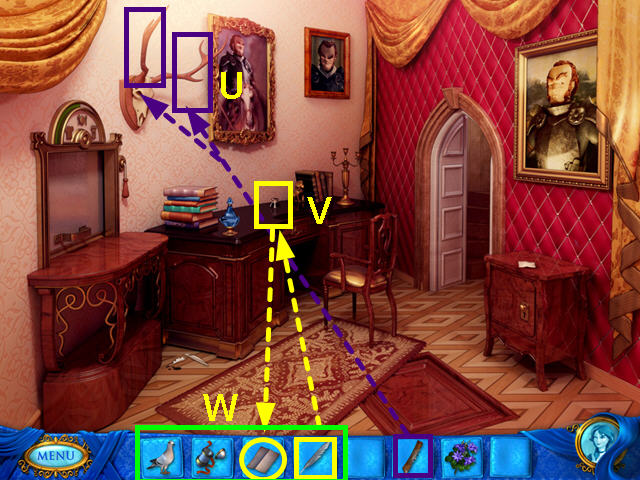
- Use the OLD JAGGED BLADE to take the 2 antlers (U).
- Use the FEATHER in the ink pot on the desk (V).
- Combine the PAPER with the INKED FEATHER.
- Combine the LETTER to NATHANIAL and the SMALL CAPSULE, then attach it to the PIGEON (W).
- Walk outside and use the PIGEON with CAPSULE on the sky.
- Take the PIGEON and read the letter from the princess (W).
- Take the POLE that the pigeon was on.
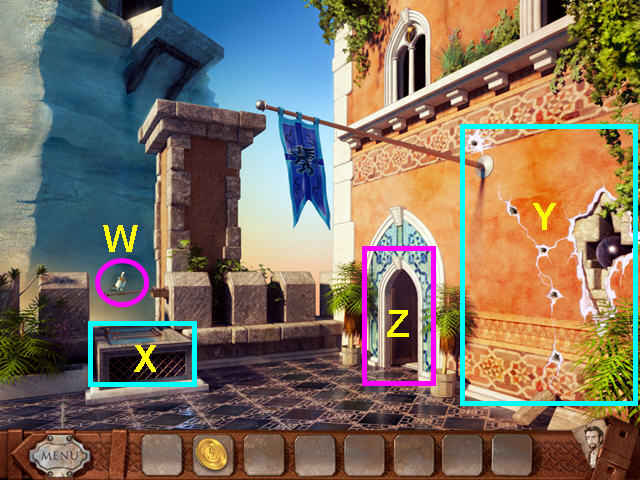
- Note the dove cote (X).
- Look at the holes in the wall (Y).
- Enter the lower door (Z).
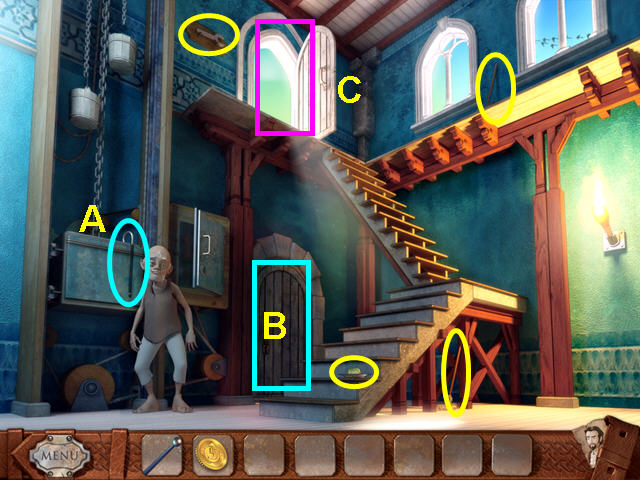
- After talking to the prisoner, take the MOP, BROOM, WRENCH, and MOLDY CHEESE- all circled in yellow.
- Note the cane (A).
- Note the locked kitchen door (B).
- Exit through the upper door.
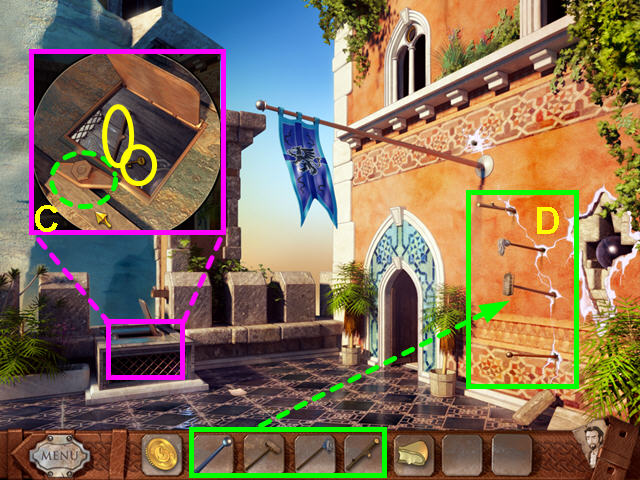
- Look at the close-up of the dove cote and use the WRENCH on the latch (C).
- Take the KEY and the STICK- both circled in yellow.
- Use the MOP, BROOM, STICK, and POLE on the 4 bottom holes in the wall (D).
- Enter the lower door, then use the KEY on the kitchen door.
- Enter the kitchen, then go right through the trapdoor to the wine cellar (E).
- Take the remaining gold from the small chest on the floor.
- Use the MOLDY CHEESE to catch the RAT (F).
- Note- the rat moves around the room. Look on the shelves, rafters, or in between the wine casks.
- Exit the wine cellar and the kitchen.
- Give the RAT to the prisoner.
- Once the prisoner give you the MECHANISM PART, return to the kitchen and use it in the pot of lard (G).
- Return and give the LUBRICATED MECHANISM PART to the prisoner.
- The object of this mini-game is to jump pegs until there are 4 or less pegs left.
- You can only move by jumping and the jumps must be horizontal or vertical.
- Should you fail 3 times in a row, the game will get a little easier.
- Check out our video solution!
- You will automatically receive the CANE.
- Return the the kitchen and put the GOLD into the food lift and pull the handle.
- Exit the kitchen, then use the upper door.
- Place the CANE in the last hole above the flagpole.
- Climb up to the window.
- Look in the food lift and take the GOLD- circled in cyan in the inset (H).
- Exit the room.
- Give the guard the GOLD and he will give you a rope ladder (I).
- Use the ANTLERS on the 2 holes in the wall (J).
- Hang the ROPE LADDER from the antlers (K).
- Climb down the ladder.
Part Three: Not Quite Free
- Walk right to exit the bridge area.
- Take the DECORATED KEY, METAL LATCHES and RAG- all circled in yellow.
- Note the knotted chains (A).
- Climb up the ladder (B).
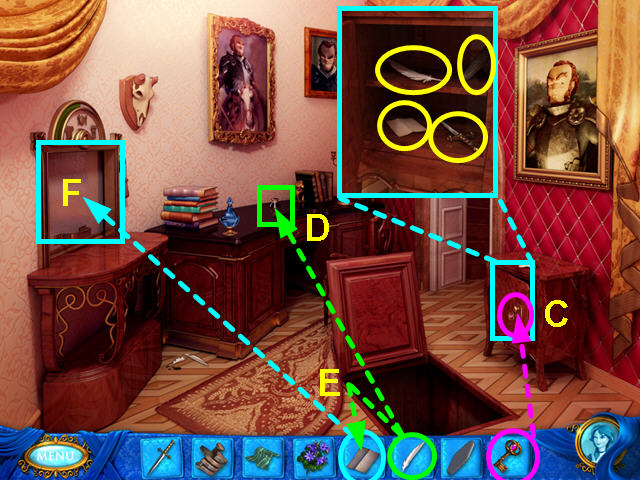
- Use the DECORATED KEY to unlock the cabinet (C).
- Take the GOOSE FEATHER, SHARPENING STONE, LUXURY PAPER and DAGGER from the cabinet- all circled in yellow in the inset.
- Use the GOOSE FEATHER on the ink (D).
- Use the GOOSE FEATHER with INK on the LUXURY PAPER (E).
- Look at the close-up of the food lift and place the LETTER to NATHANIEL inside and pull the handle (F).
- Exit the close-up of the food lift.
- Talk to the waiter (G).
- Look in the lift and read the note from the princess (H).
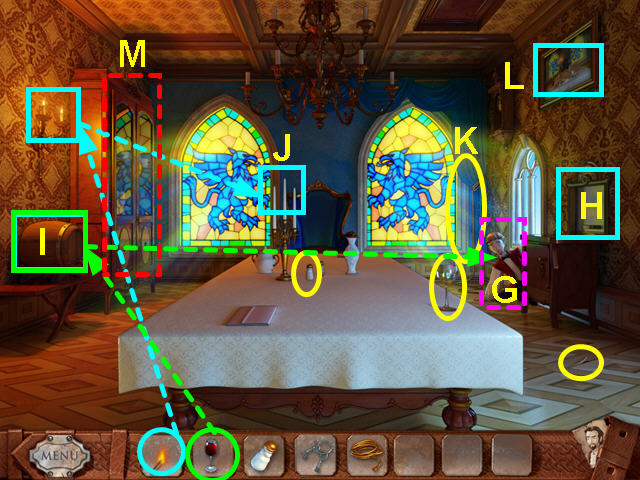
- Take the WOODEN SPLINTER, WINE GLASS, and SALT CELLAR- all circled in yellow.
- Use the WINE GLASS on the barrel of wine (I).
- Use the WOODEN SPLINTER on the lit candles on the left wall, then light the candles on the table (J).
- Click on the curtain tie back and it will fall to the ground, then take the CURTAIN TIE BACK (K).
- Give the waiter the GLASS of WINE.
- The waiter will give you his keys.
- Look at the painting on the right wall (L).
- Use the KEYS on the china cabinet for 2 mini-games (M).
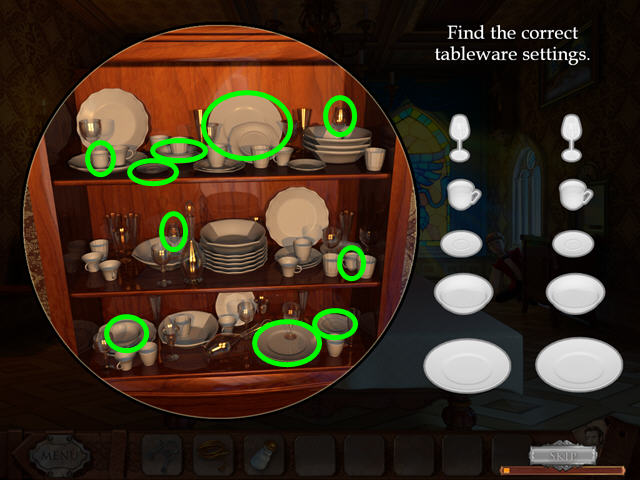
- Click on the upper portion of the china cabinet.
- Find the pieces in the cabinet that match the outlines on the right.
- TABLEWARE will go automatically into your inventory.
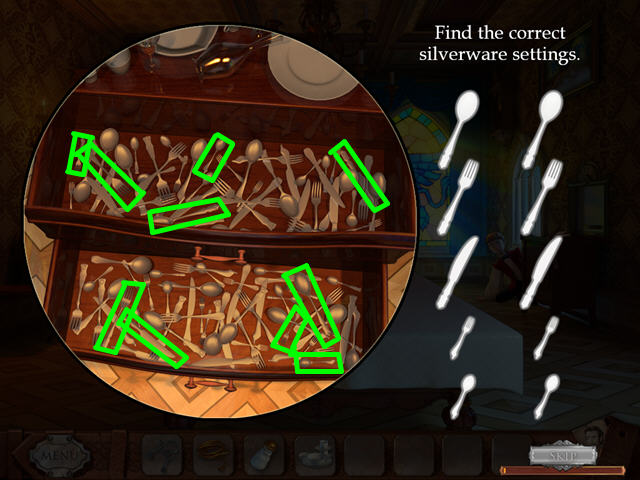
- Click on the lower portion of the china cabinet.
- Find the silverware in the cabinet that match the outlines on the right.
- SILVERWARE will go automatically into your inventory.
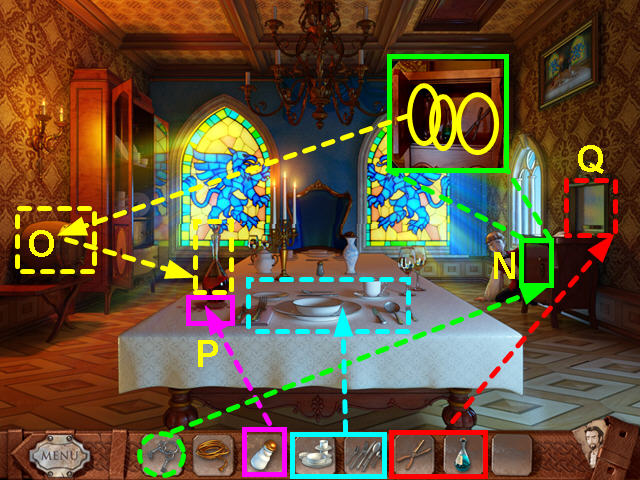
- Place the TABLEWARE and SILVERWARE on the table.
- Use the KEYS on the cabinet under the lift (N).
- Take the BLUNT SHEARS, EMPTY CARAFE, CLEANING FLUID from the cabinet- circled in yellow in the inset.
- Use the EMPTY CARAFE on the wine barrel, then place it on the table (O).
- Use the SALT CELLAR on the wine stain (P).
- Look at the close-up of the left and send the BLUNT SHEARS, then the CLEANING LIQUID to the princess (Q).
- Exit the close-up of the lift.
- Open the lift and take the CLEANING FLUID.
- Climb down through the trap door.
- Combine the BLUNT SHEARS and the SHARPENING STONE (R).
- Combine the CLEANING FLUID and the RAG (S).
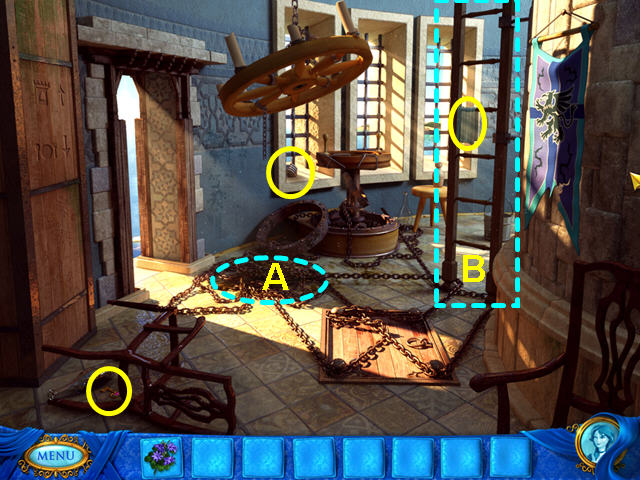
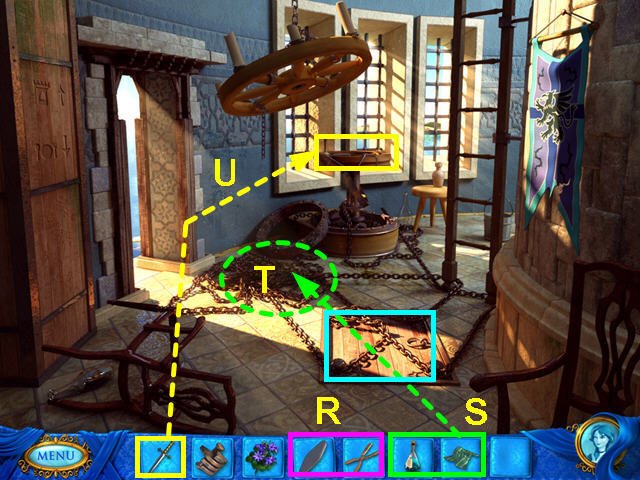
- Use the DAGGER to take the ROTATING WHEEL (T).
- Note the trap door on the floor- marked in cyan.
- Use the CLEANING RAG on the dirty chains (U).
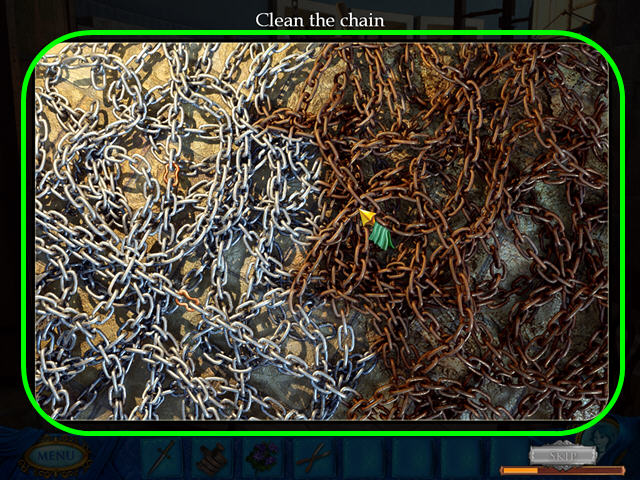
- Click the rag on the chains until all are clean and silver colored.
- Look at the clean chains and take the METAL LATCHES.
- Use the SHEARS on the chains several times to cut them away from the trap door.
- Open the trap door to learn Nathaniel needs flowers.
- Use the FLOWERS on the trapdoor.
- Click on the loose chain at the lower right corner of the trapdoor.
- After the switch to Nathaniel, take the FLOWERS and place them in the vase on the table.
- The waiter helps the prince climb up to the princess.
- Walk left to the bridge area.
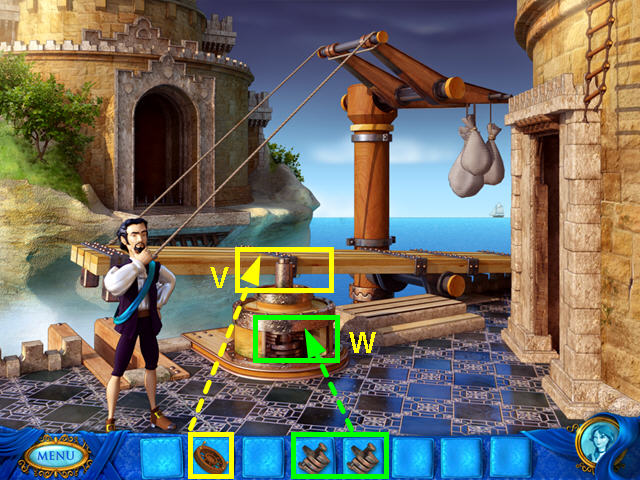
- Place the ROTATING WHEEL on the machinery (V).
- Add both METAL LATCHES to the bottom part of the machine for a mini-game (W).
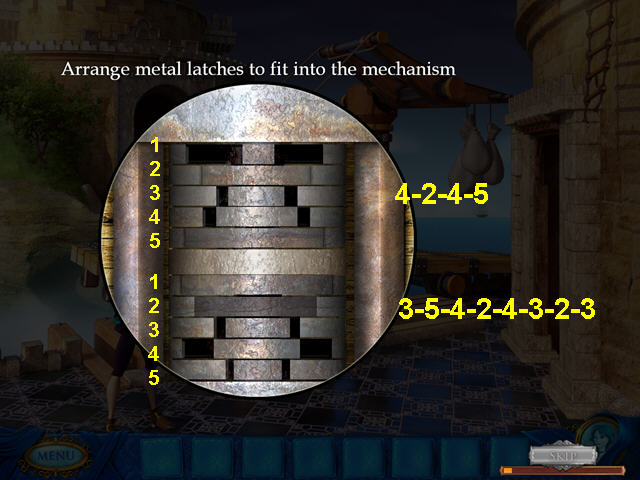
- The object of this mini-game is to move the metal pieces so they fit into the correctly sized holes.
- This mini-game is random- every time you exit and return, it will be different.
- Click on the piece in the number 2 position flips pieces 1 and 2.
- Click on the piece in the number 3 position flips pieces 1-3.
- Click on the piece in the number 4 position flips pieces 1-4.
- Click on the piece in the number 5 position flips pieces 1-5.
- One solution is shown here.
- Try to turn the rotating wheel, but you are not strong enough.
- Talk to the prince.
- Walk across the bridge to the gate.
- Click on the rotating wheel to bring the bridge back (A).
- Take the BRIDGE ROPE (B).
- Combine the BRIDGE ROPE and the CURTAIN TIE to make the LASSO (C).
- Walk right to exit the bridge area, then climb up the ladder.
- Exit the room on the right and talk to the guard until he leaves.
- Take the SPEAR the guard left behind- circled in orange.
- Use the LASSO on the top of the left tower (D).
- Click on the rope to move to the second tower.
Part Four: Escape

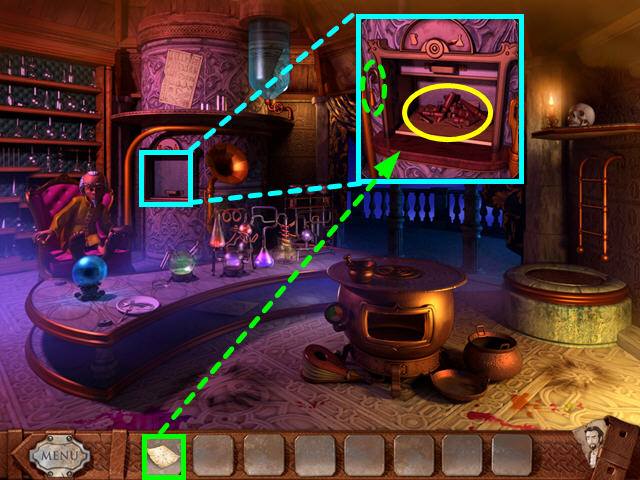
- Take the TUMMY TONIC from the shelf and give to to the alchemist (A).
- Look in the scrying orb to talk to the princess (B).
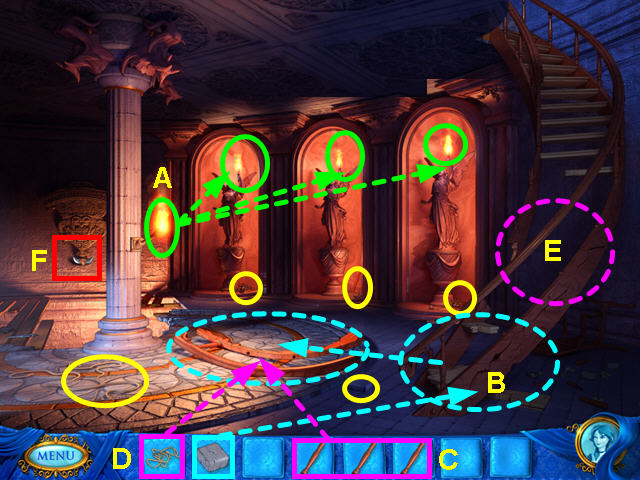
- Take the TORCH and use it to light the 3 statue’s torches (A).
- Return the TORCH to the holder on the pillar.
- Take the ROPE PIECES, STONE, and 3 BANNISTERS- all circled in yellow.
- Use the STONE on the stair handrail several times until it falls on the floor (B).
- Use the 3 BANNISTERS on the handrail piece (C).
- Use the ROPE PIECES on the handrail to make a LADDER (D).
- Take the LADDER and place in on the hole in the stairs (E).
- Note the steel hook on the back wall (F).
- Take the TORCH.
- Walk up the stairs.
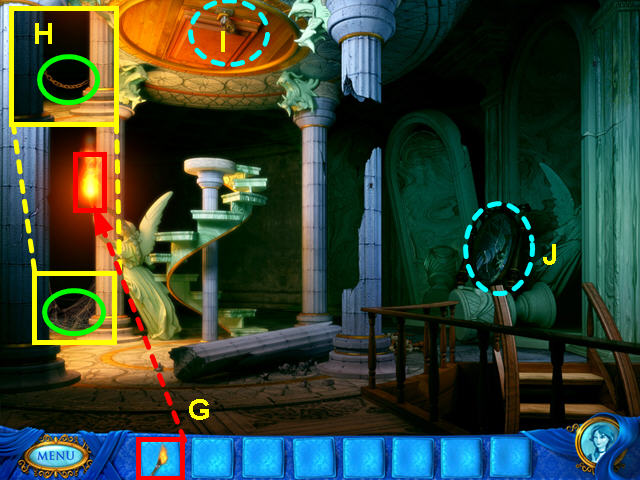
- Use the TORCH on the angel statue to light the back corner (G).
- Click on the cobweb, then take the CHAIN (H).
- Note the rusty lock on the trapdoor (I).
- Note the dirty broken mirror (J).
- Climb down the stairs and use the CHAIN on the steel hook.
- Climb down to the next lower level.
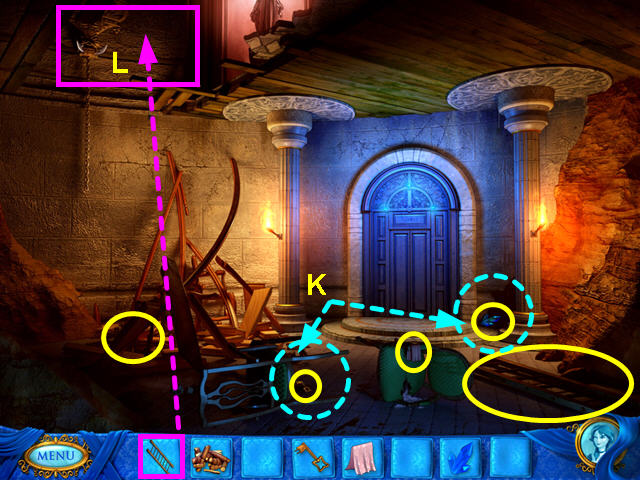
- Remove the cobwebs from the base of the right pillar and the bottom of the left chair (K).
- Click on the stairs remains to get WOOD LOGS- circled in yellow.
- Take the KEY from the bottom of the left chair and the CRYSTAL from the base of the right pillar.
- Take the HANDKERCHIEF from the right chair- circled in yellow.
- Take the LADDER and use it on the upper floor (L).
- Go up the ladder then up another level.
- Use the LOGS on the mirror, then take the DIRTY PIECE of mirror.
- Walk down twice to the bottom level.
- Combine the DIRTY MIRROR with the HANDKERCHIEF.
- Look at the door.
- Use the CRYSTAL in the hole over the door (M).
- Use the MIRROR on the upper plate of symbols (N).
- Press the symbols as they appear in the mirror.
- When correct, the symbol will illuminate.
- Walk through the door.
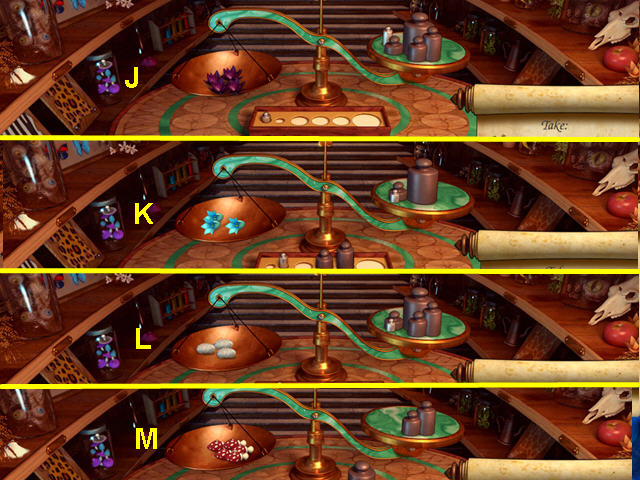
- Take the 3 laboratory WEIGHTS- all marked in yellow.
- Talk to the TUBE (O).
- Use the lift to send the LOGS up to the prince (P).
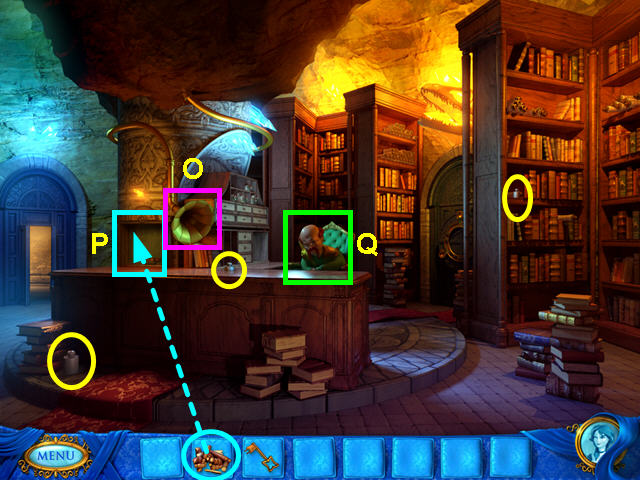
- Talk to the librarian (Q).
- The alchemist will automatically give you the LENS.
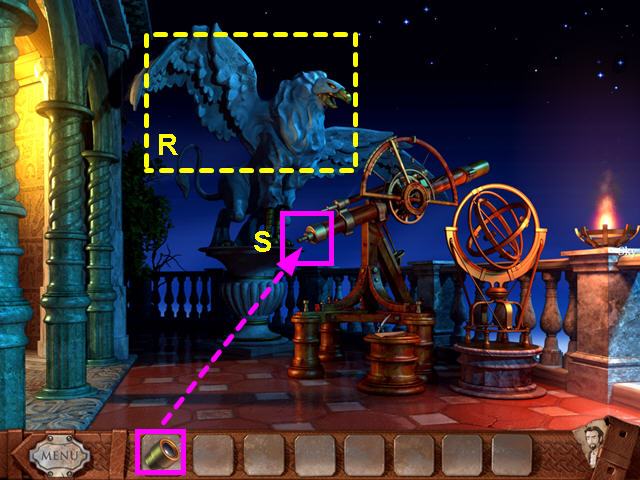
- Walk out to the terrace.
- Note the stone gryphon (R).
- Use the LENS on the telescope for a mini-game (S).
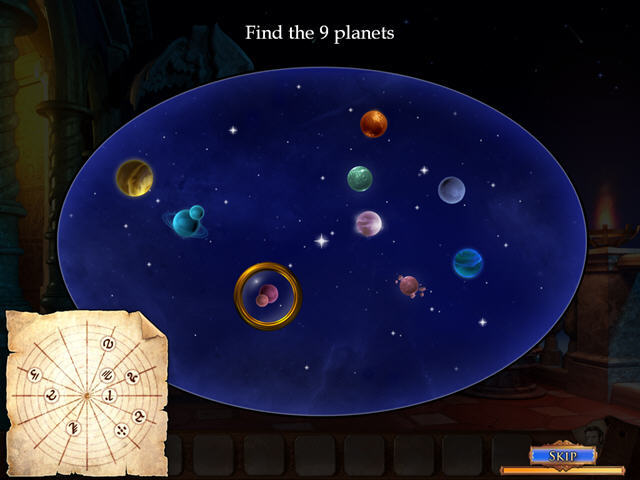
- Locate the 9 planets with the lens.
- Move the lens around the sky slowly, then click on each planet you find.
- The PLANETS’ CONFIGURATION will go automatically into your inventory.
- Walk left to enter the alchemist’s room.
- Look at the close-up of the lift and take the LOGS- marked in yellow.
- Place the PLANETS’ CONFIGURATION into the lift and pull the handle.
- The librarian will automatically give you the TUMMY TONIC RECIPE.
- Look in the lift and take the PLANETS’ CONFIGURATION.
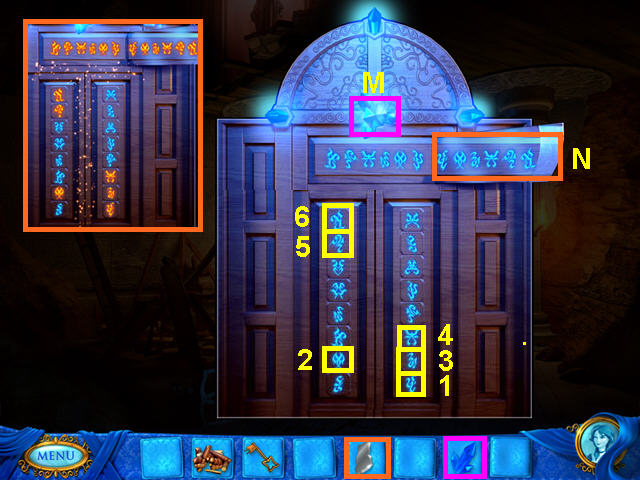
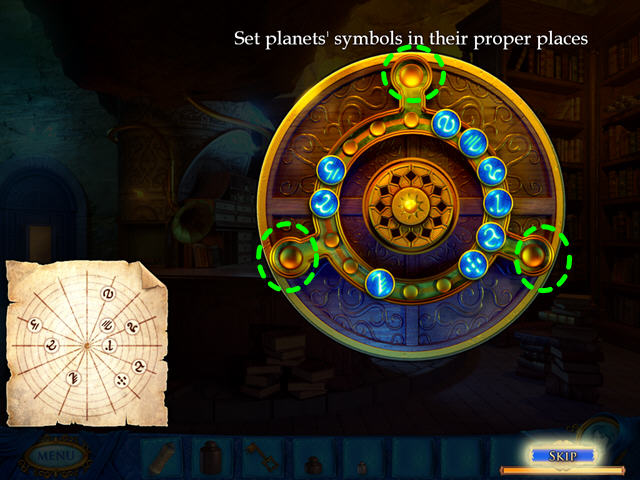
- Look at the door behind the librarian for a mini-game.
- Move the symbol discs around the circle so they replicate the positions on the planetary configuration sheet.
- Move a disc into one of the three external points to change the order.
- The discs will turn blue when correct.
- Enter the door.
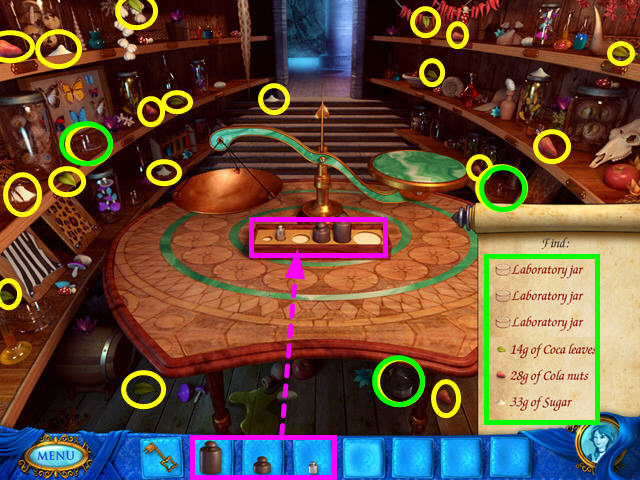
- Place the 3 LABRATORY WEIGHTS into the weight set.
- Find the 3 LABRATORY JARS- marked in green.
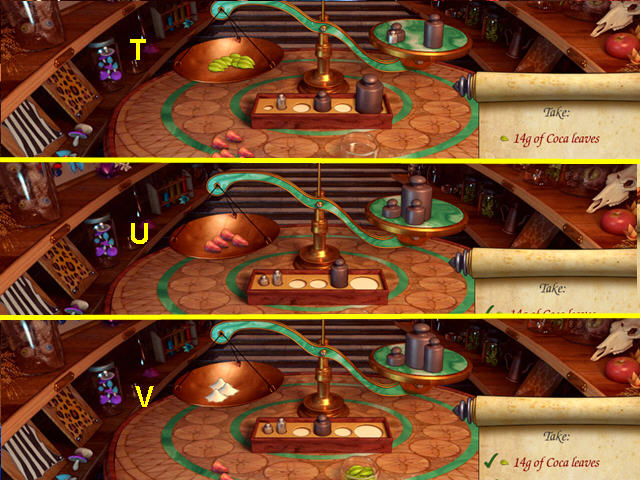
- Locate all the SUGAR, COLA NUTS, and COCA LEAVES- marked in yellow.
- Place the 1, 3, and 10g weights on the right side of the scale (T).
- Put 7 coca leaves into the left side of the scales.
- Click on the leaves to move them to a lab dish.
- Place the 3, 5, and 20g weights on the right side of the scale (U).
- Put 4 cola nuts into the left side of the scales.
- Click on the nuts to move them to a lab dish.
- Place the 3, 10, and 20g weights on the right side of the scale (V).
- Put 3 piles of sugar into the left side of the scales.
- Click on the sugar to move them to a lab dish.
- The ingredients will go automatically into your inventory.
- Exit the room and use the lift to send the INGREDIENTS to the prince.
- Look at the lift and take the INGREDIENTS (W).
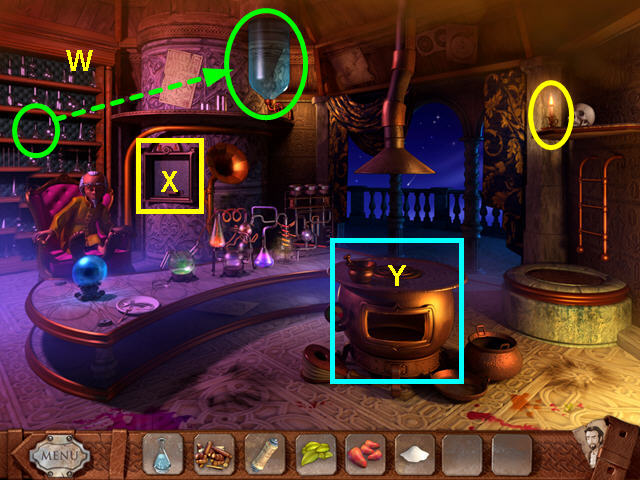
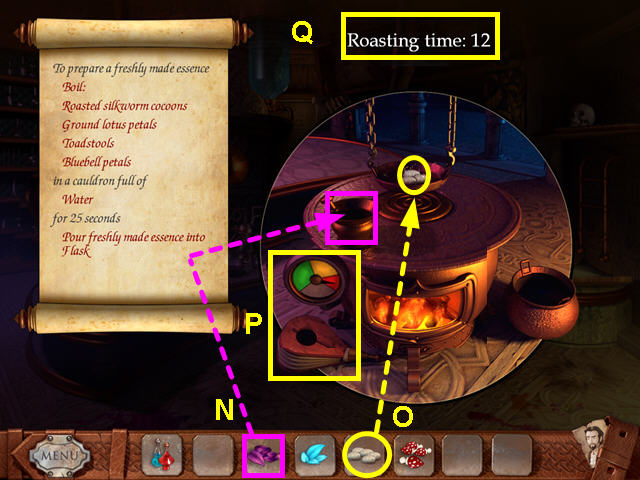
- Take a FLASK from the left wall and use it on the water tank to get a FLASK with WATER (X).
- Take the CANDLE- marked in yellow.
- Look at the close-up of the stove to make the tonic (Y).
- Place the LOGS into the stove (A).
- Use the CANDLE to light the logs.
- Use the COCA LEAVES on the mortar and pestle (B).
- Click on the pan to move it over the stove.
- Place the COLA NUTS into the roasting pan (C).
- Click rapidly on the bellows to make the needle on the gauge go to the red zone (D).
- Keep the needle in the red zone for 15 seconds- there will be a countdown over the stove (E).
- Should the needle get too high or low, click the bellows to get it back to the red zone and re-start the timer.
- Take the ROASTED COLA NUTS from the pan.
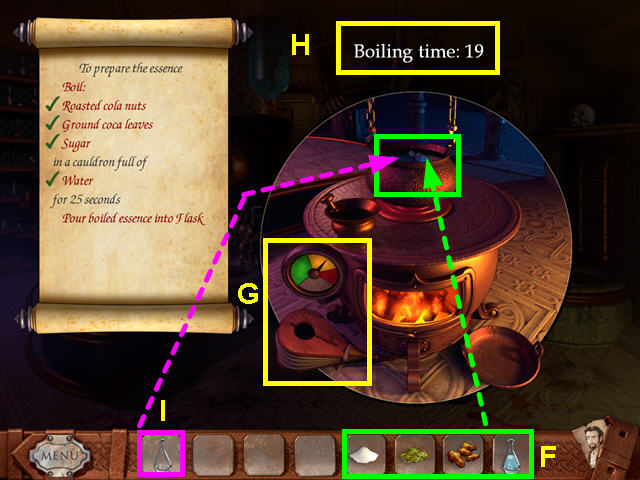
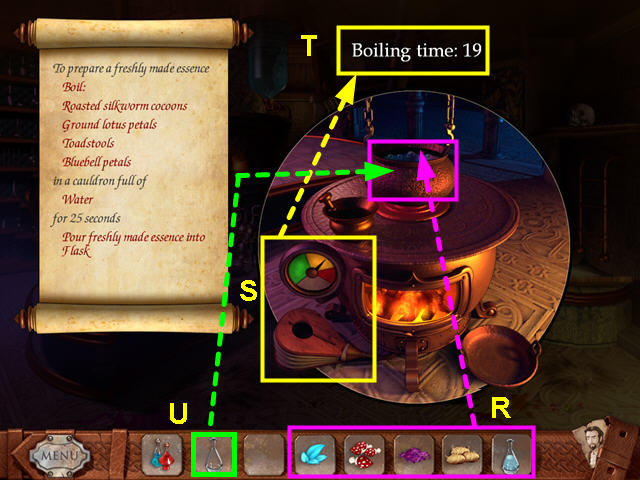
- Click on the caldron to put it on the stove.
- Use the FLASK of WATER, ROASTED COLA NUTS, GROUND COCA LEAVES, and SUGAR in the caldron (F).
- Click rapidly on the bellows to make the needle on the gauge go to the yellow zone (G).
- Keep the needle in the yellow zone for 25 seconds- there will be a countdown over the stove (H).
- Should the needle get too high or low, click the bellows to get it back to the red zone and re-start the timer.
- Use the FLASK on the caldron to get the TUMMY TONIC ESSENCE (I).
- The TUMMY TONIC RECIPE will return automatically to your inventory.
- Exit the close-up of the stove.
- Talk to the alchemist.
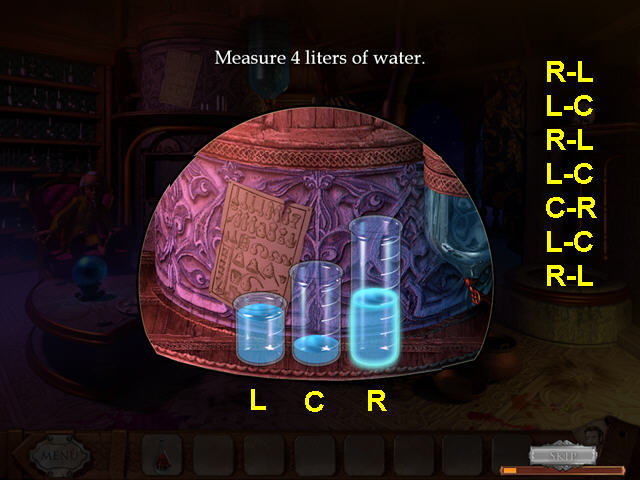
- Click on the shelves of glass to get the 8 LITER CONTAINER, then use it on the water tank for a mini-game.
- The object is to pour the water so that the container only has 4 liters of water..
- Labeling the containers left, center and right make the moves: R-L, L-C, R-L, L-C, C-R, L-C, R-L.
- Combine the TUMMY TONIC ESSENCE and the 4 LITERS of WATER.
- Give the DILUTED TUMMY TONIC to the alchemist.
- When you get the TUMMY TONIC, send it to the princess using the lift.
- Once again as the princess, look at the lift and take the TUMMY TONIC.
- Give the TUMMY TONIC to the librarian.
- Walk left to exit, the climb up twice.
- Use the HALF of TUMMY TONIC on the rusty lock.
- Use the KEY to unlock the trapdoor.
- Climb down twice and walk right to return to the librarian.
- Talk to the librarian and get the potion recipe.
- Enter the door behind the librarian.
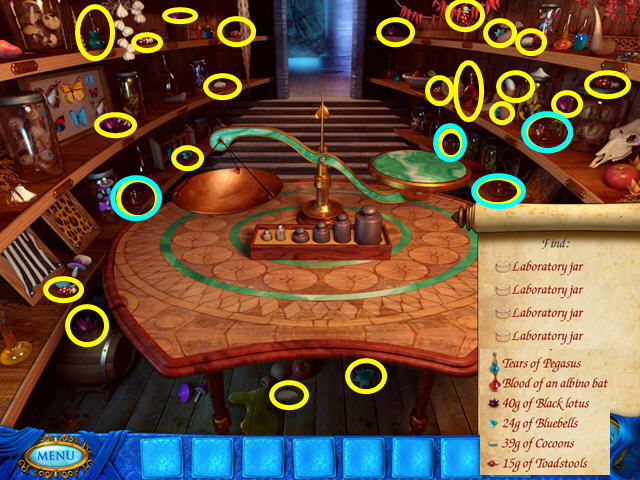
- Find the 4 LABORATORY JARS- marked in cyan.
- Locate all the ingredients- marked in yellow.
- Place the 2, 3, 5, 10 and 20g weights on the right side of the scale (J).
- Put 4 black lotus into the left side of the scales.
- Click on the flowers to move them to a lab dish.
- Place the 1, 3, and 20g weights on the right side of the scale (K).
- Put 3 bluebells into the left side of the scales.
- Click on the flowers to move them to a lab dish.
- Place the 1, 3, 5, 10, and 20g weights on the right side of the scale (L).
- Put 3 cocoons into the left side of the scales.
- Click on the cocoons to move them to a lab dish.
- Place the 5, and 10g weights on the right side of the scale (M).
- Put 5 toadstools into the left side of the scales.
- Click on the toadstools to move them to a lab dish.
- The ingredients will go automatically into your inventory.
- Exit the storeroom and library, then go up 3 times to return to the alchemist’s room.
- Take a FLASK from the back wall and use it on the water container to get water.
- Look at the close-up of the stove.
- Use the LOTUS PETALS on the mortar and pestle (N).
- Click on the roasting pan to place it on the stove.
- Place the COCOONS into the roasting pan (O).
- Click rapidly on the bellows to make the needle on the gauge go to the red zone (P).
- Keep the needle in the red zone for 15 seconds- there will be a countdown over the stove (Q).
- Should the needle get too high or low, click the bellows to get it back to the red zone and re-start the timer.
- Take the ROASTED COCOONS from the pan.
- Click on the caldron to put it on the stove.
- Use the FLASK of WATER, ROASTED COCOONS, GROUND LOTUS PETALS, TOADSTOOLS and BLUEBELL PETALS into the caldron (R).
- Click rapidly on the bellows to make the needle on the gauge go to the yellow zone (S).
- Keep the needle in the yellow zone for 25 seconds- there will be a countdown over the stove (T).
- Should the needle get too high or low, click the bellows to get it back to the red zone and re-start the timer.
- Use the FLASK on the caldron to get the FRESHLY MADE ESSENCE (U).
- Exit the close-up of the stove.
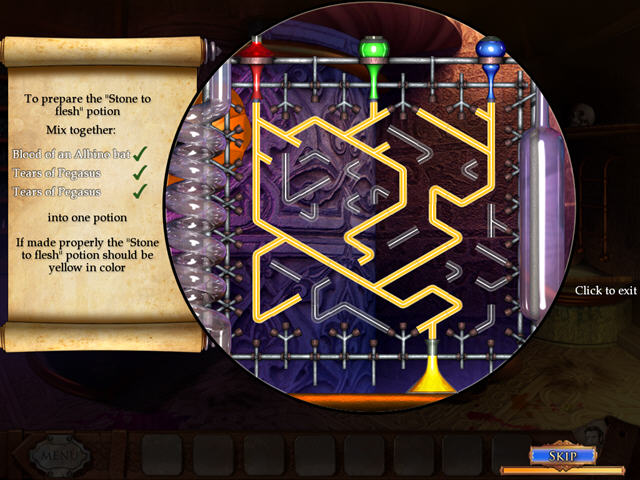
- Use the FRESHLY MADE ESSENCE on the lab equipment just to the left of the stove for a mini-game.
- The object is to mix the 3 essences’ into a yellow potion by turning the pipes.
- Click on the pipes to turn them and direct the flow to the bottom flask.
- Exit the alchemist’s room to the terrace.
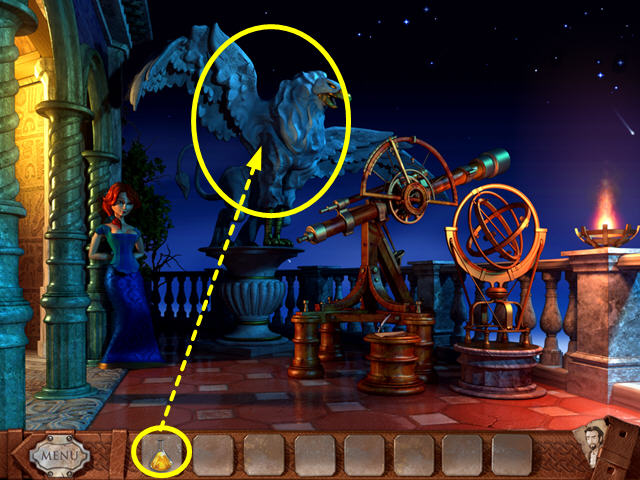
- Use the “STONE TO FLESH” potion on the gryphon.
- Congratulations! You have completed Royal Trouble!


 Reincarnations: Awakening Walkthrough, Guide, & Tips
 Best in Show Solitaire Walkthrough, Guide, & Tips
 Mystery of Unicorn Castle: The Beastmaster Walkthrough, Guide, & Tips
 Haunted Legends: The Secret of Life Walkthrough, Guide, & Tips
 Penny Dreadfuls ™ Sweeney Todd Collector's Edition Walkthrough, Guide, & Tips