Penny Dreadfuls ™ Sweeney Todd Collector's Edition Walkthrough, Guide, & Tips
Penny Dreadfuls ™ Sweeney Todd Collector’s Edition Walkthrough

Welcome to the Penny Dreadfuls ™ Sweeney Todd Collector’s Edition Walkthrough!
Sweeney Todd has returned to seek his revenge! Stop the madman from realizing his goal in this dark and engrossing Hidden Object Puzzle Adventure game!
Whether you use this document as a reference when things get difficult or as a road map to get you from beginning to end, we’re pretty sure you’ll find what you’re looking for here.
This document contains a complete Penny Dreadfuls ™ Sweeney Todd Collector’s Edition game walkthrough featuring annotated screenshots from actual gameplay!
We hope you find this information useful as you play your way through the game. Use the walkthrough menu below to quickly jump to whatever stage of the game you need help with.
Remember to visit the Big Fish Games Forums if you find you need more help. Have fun!
This walkthrough was created by Margie B.
General Tips

- There are 6 chapters in the game, all varying in length.
- You will be asked to choose either Casual or Challenge Mode at the beginning of the game.
- During Challenge Mode you get penalized for clicking randomly in the scene, the hint recharges slower. You also have less hint sparkles in the game showing you areas of interests.
- The items on the Hidden Object lists vary each time you play.
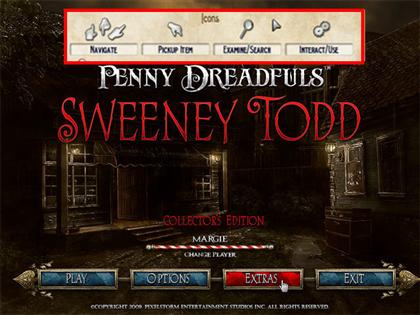
- There are several icons during play each with different functionalities.
- The grabby hand icon allows you to pick up items.
- The pointing hand icon shows you all the directions in which you can move in a scene.
- The magnifying glass icon allows you to take a closer look at something.
- When gears appear in an area that means you can use an inventory item in that spot, or you can interact with it.
- Once you complete the game you can go into the “EXTRAS’ section of the Main Menu to access your Bonus materials for the game.
- There are several mini-games in the game. These can be skipped once the skip meter has been recharged.
- Click on the Help Lantern in the lower right to access the built-in strategy guide. You will not see any screenshots in the guide but you will have step-by-step directions for completing each chapter.
- Each time you complete a task in the game, the guide will mark that section off.
Hint

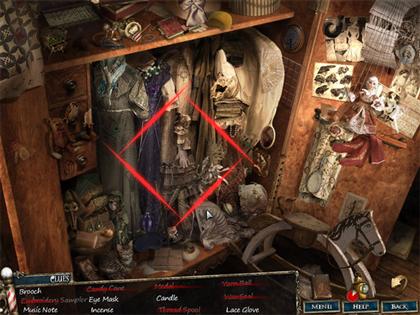
- To use a hint, click on the name of an item on the list.
- The game will show you 4 red lines around the item you’ve chosen.
- The item you need will be in the center of the red lines.
- You have to wait for the hint lantern in the lower right to be recharged before you can use a hint again.
- Click on the Help Lantern in the lower right to access the built-in strategy guide when you are not in a Hidden Object scene.
Map

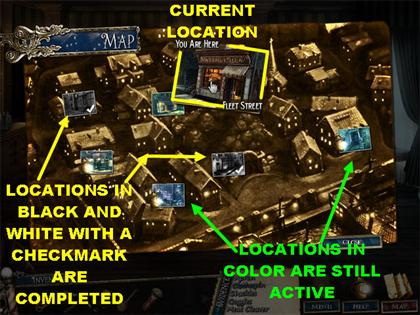
- Click on the map icon in the lower right to access all the locations for the current chapter.
- Click on any of the locations to read its name.
- Maps that are colored are accessible.
- Maps that are in black and white have been completed.
Inventory Items

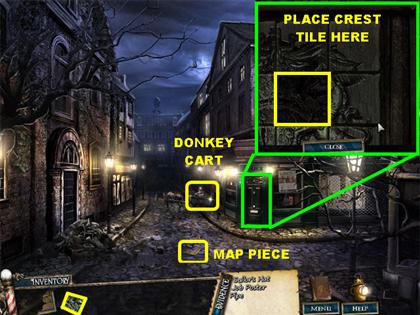
- You will find many inventory items throughout the game. These items will be stored in the tray in the lower left.
- Items in inventory could be used anywhere in the game. If you don’t use an item right away, don’t worry about it, you will use it eventually.
- Inventory Items can be used more than once. They will only disappear once you are completely finished with them.
- When you want to use an inventory item, drag it to the desired area and click it in place.
- When your inventory tray is full use the arrows on either side of it to scroll through all available items.
Chapter 1: The Arrival
Watch Lane


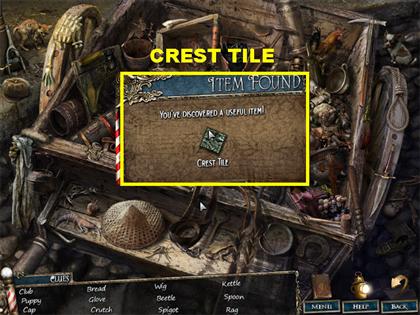
- Pick up the MAP PIECE on the ground.
- Click on the donkey cart in the back of the scene to enter a Hidden Object hunt.
- You will be given a CREST TILE at the end of your search.
- Click on the Watchhouse door on the right for a closer look.
- Place the CREST TILE on the empty slot to trigger a puzzle.
Crest Tile Puzzle

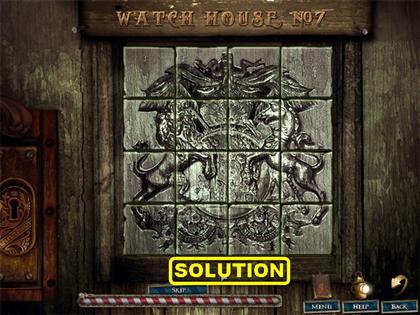
- Your goal is to form the Watchhouse crest.
- Click on a tile to rotate it.
- Click on the tiles until they look like the image in the screenshot.
- The entire puzzle will glow once all the tiles are in place.
- Go through the door after the puzzle has been solved.
Watchhouse

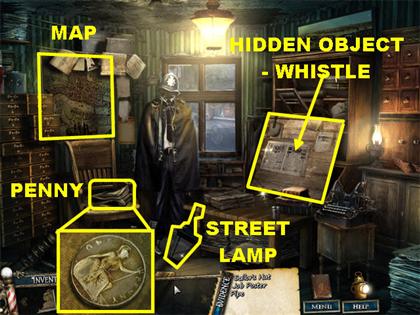
- Click on the chair on the left for a closer view.
- Pick up the PENNY on the chair.
- Pick up the STREET LAMP on the floor.

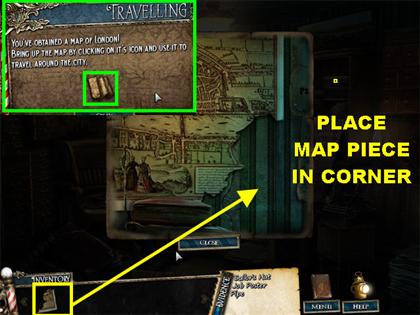
- Click on the map on the left wall.
- Place the MAP PIECE back on the wall. This action adds the map of London to your game.
- The map can be accessed in the lower right corner of the scene and will be used to travel around the city.

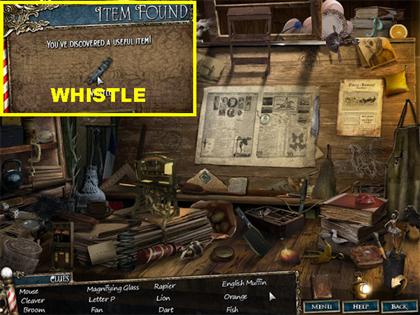
- Click on the board on the right to enter a Hidden Object hunt.
- You will receive the WHISTLE in your inventory after the search has been completed.

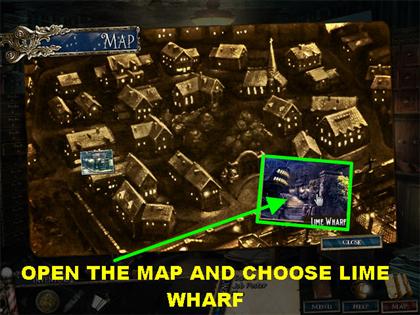
- Click on the map icon in the lower right.
- Choose Lime Wharf as your next destination.
Lime Wharf

- Pick up the PIPE on the fishing nets in the lower left corner.
- Pick up the LADDER on the right, leaning against the wall.


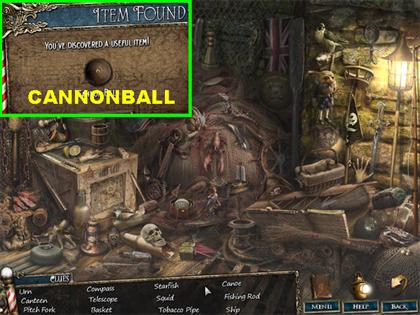
- Click on the fishing nets in the back of the scene to trigger a Hidden Object hunt.
- You will receive a CANNONBALL at the end of your search.
- Go through the steps on the right.

- There are several places to interact with in this scene.
- Place the WHISTLE on the bird on the nest in the lower right. This action scares away the bird.

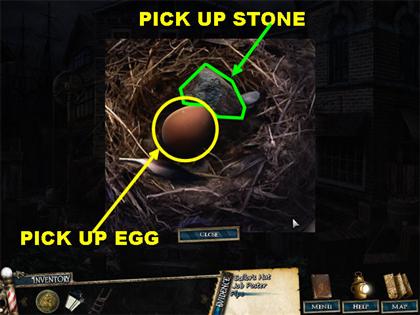
- Click on the nest for a closer view.
- Pick up the EGG in the nest.
- Pick up the STONE in the nest.

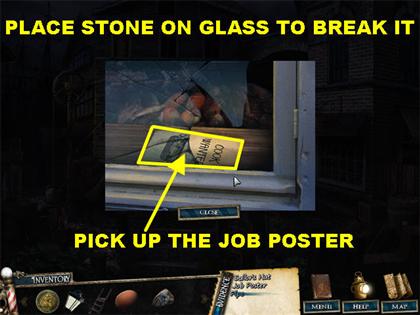
- Click on the right window for a closer view.
- Place the STONE on the window to break it.
- Pick up the JOB POSTER inside the window.

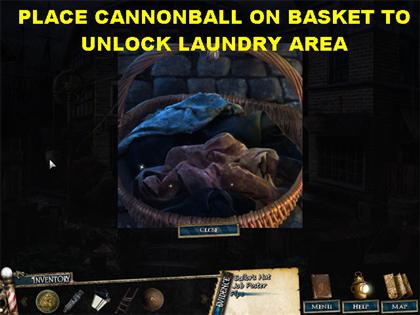
- Click on the basket hanging from the winch for a closer look.
- Place the CANNONBALL on the basket. This action opens up the laundry entrance in the back of the scene.
- Click on the center of the scene to access the laundry area.
Laundry Area

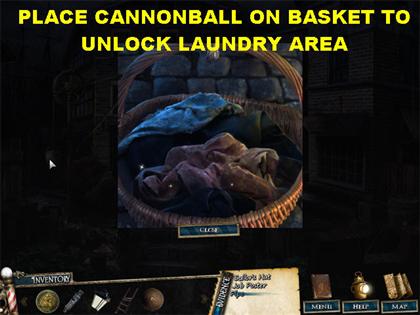
- Click on the basket in the lower left for a closer view.
- Pick up the LUMP OF COAL inside the basket.
- Pick up the RAG on the table in the lower left.
- Use the map to go back to Watch Lane.
Watch Lane

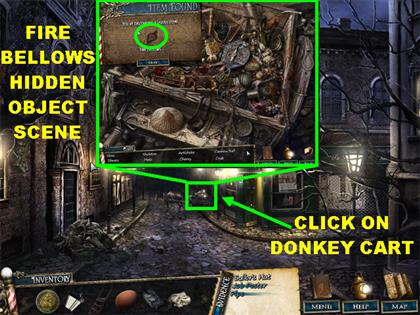
- Click on the donkey cart in the back of the scene to trigger a Hidden Object scene.
- You will receive a FIRE BELLOWS at the end of your search.
- Go back to Lime Wharf.
Lime Wharf

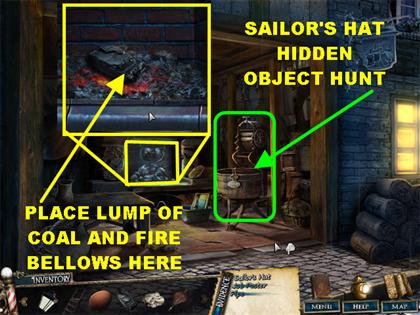
- Go up the steps and click in the center of the scene to access the laundry area.
- Click on the fireplace for a closer view.
- Place the LUMP OF COAL in the fireplace.
- Place the FIRE BELLOWS in the fireplace to ignite the fire. This action triggers a Hidden Object scene.

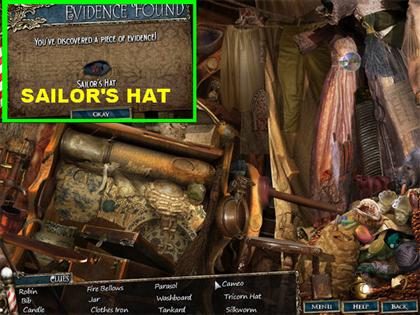
- Click on the washing machine on the right to enter a Hidden Object scene.
- You will receive the SAILOR’S HAT at the end of your search.
- This concludes the first chapter, now solve the puzzle.
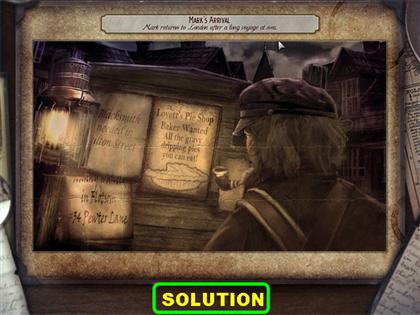
Mark’s Arrival Puzzle


- Drag the pieces onto the board.
- Correct pieces will lock into place.
- Please look at the screenshot for the solution.
Chapter 2: The Lament
Baker’s Court

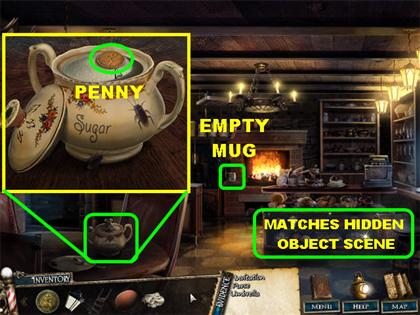
- You are automatically taken to Lime Wharf at the beginning of this chapter.
- Click on the map and choose the Baker’s Court location.
- Enter the Pie Shop.
- Pick up the EMPTY MUG close to the fireplace.
- Click on the sugar container in the lower left for a closer view.
- Click on the lid to open it.
- Pick up the PENNY on top of the sugar.

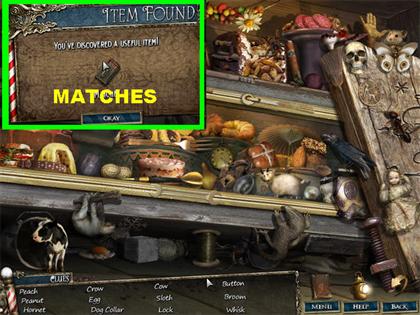
- Click on the pie display on the right to trigger a Hidden Object scene.
- You will receive the MATCHES after the search is over.
- Go outside the shop.
Baker’s Court

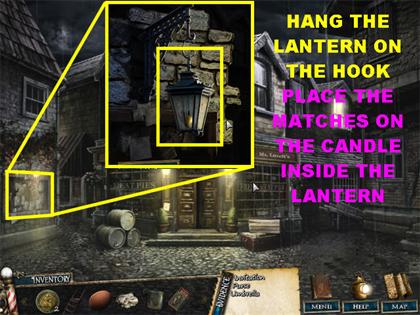
- Click on the notice board on the left for a closer view.
- Place the STREET LAMP on the hook.
- Place the MATCHES on the street lamp to light it. This action triggers a Hidden Object scene.

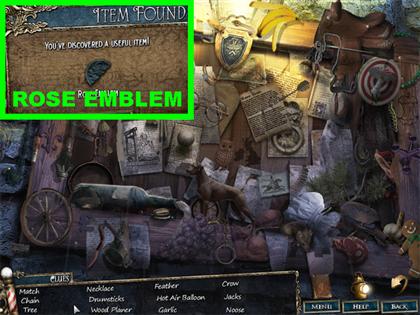
- Click on the Hidden Object scene.
- You will receive half of a ROSE EMBLEM at the end of the search.
- Go to Piccadilly Square.
Piccadilly Square

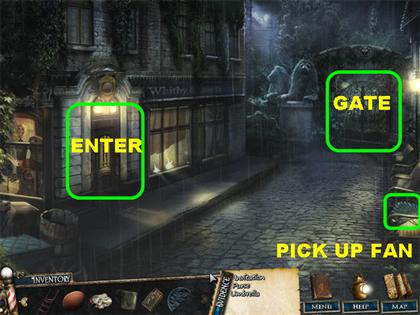
- Pick up the FAN on the bench in the lower right corner.
- Go inside the Tailor’s Shop on the left.
Tailor’s Shop

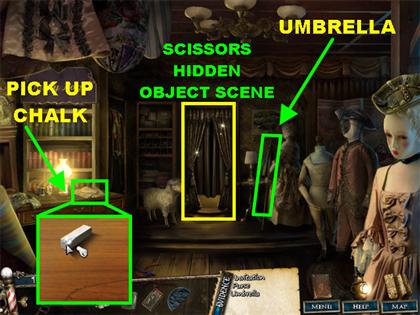
- Click on the right side of the sewing desk for a closer look.
- Pick up the CHALK in the pop-up window.
- Pick up the UMBRELLA close to the mannequin closest to the curtains.

- Click on the curtains to trigger a Hidden Object scene.
- You will receive the SCISSORS at the end of your search.

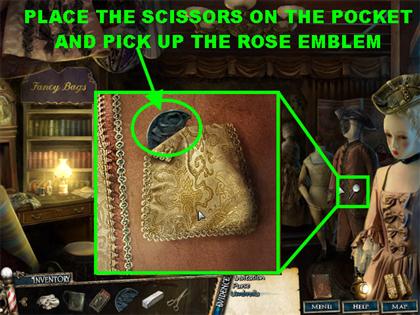
- Click on the male mannequin on the right for a closer view of his pocket.
- Place the SCISSORS on the pocket to cut a piece off.
- Pick up the second half of the ROSE EMBLEM.
- Go back outside and click on the gates in the back.
Garden


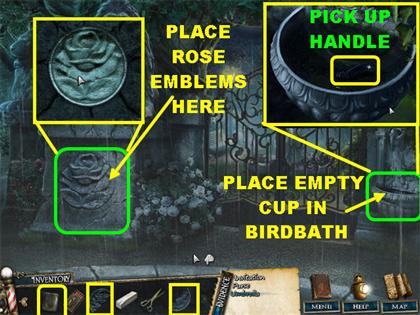
- Click on the birdbath on the right for a closer look.
- Place the EMPTY CUP in the water.
- Click on the MUG OF WATER to enter it into inventory now that it is full of water.
- Click on the GATE HANDLE that appears in the water.
- Examine the base of the lion statue on the left.
- Place both ROSE EMBLEMS into the empty slots to trigger a puzzle.
The Bleeding Rose Puzzle

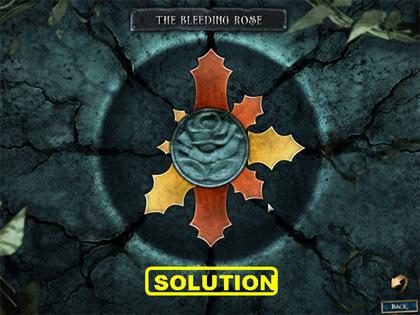
- Your goal is to arrange the blades so that no 2 blades overlap each other.
- Drag a blade around to reposition it.
- Please look at the screenshot for the solution.

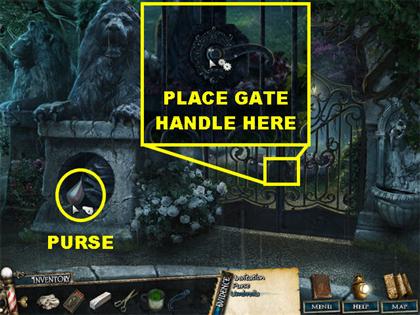
- Click on the PURSE that appears below the base of the lion statue on the left.
- Click on the gate for a closer look.
- Place the GATE HANDLE on the gate.
- Click on the GATE HANDLE to open the gate.

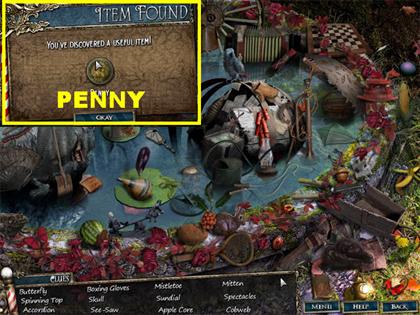
- Go inside the gate to trigger a Hidden Object scene.
- You will be given the PENNY after the search has been completed.
- Go back to the Baker’s Court location.
Baker’s Court

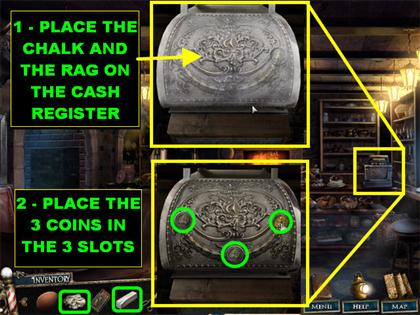
- Go inside the Pie Shop.
- Click on the cash register on the right for a closer look.
- Place the CHALK on the register.
- Place the RAG on the cash register to trigger a puzzle.
- Place the 3 PENNIES in the empty slots on top of the cash register to trigger a puzzle.
Cash Register Puzzle

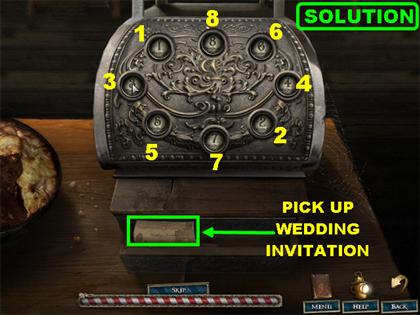
- Your goal is to move all the coins around into their appropriate slots.
- Click on a coin to attach it to your cursor.
- Below each coin there is a geometrical shape.
- Count the amount of points on each shape to know which coins go where. If a shape has 6 points, place the number 6 coin in that slot.
- Please look at the screenshot for the solution. Starting from the top and going clockwise the solution is:8-6-4-2-7-5-3-1
- The cash register view will close.
- Click on the cash register again.
- Pick up the WEDDING INVITATION inside the drawer.
- This marks the end of the second chapter, now solve the puzzle.
Johanna’s Lament Puzzle

- Drag the pieces onto the board.
- Correct pieces will lock into place.
- Please look at the screenshot for the solution.
Chapter 3: The Love of Gold
Bell Tower Street

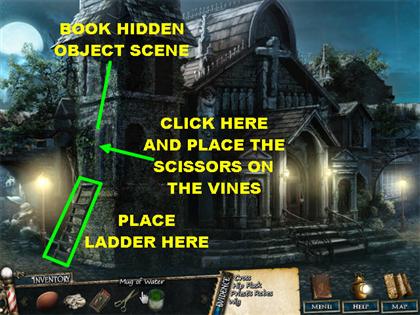
- Click on the map and go to Bell Tower Street.
- Place the LADDER on the left side of the tower.
- Click on the vines in front of the window.
- Place the SCISSORS on the vines to cut them.

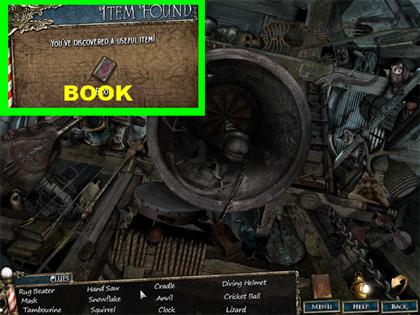
- Click on the window to trigger a Hidden Object scene.
- You will obtain a BOOK at the end of your search.
- Go to Piccadilly Square.
Piccadilly Square

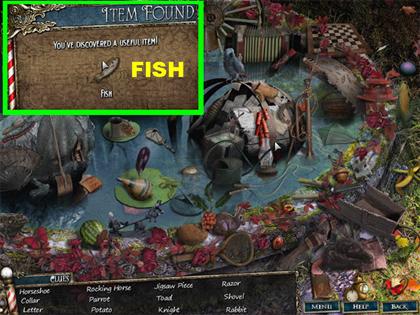
- Click on the gate in the back to access the garden.
- Click on the Hidden Object scene.
- You will receive the FISH at the end of your search.
- Go back to Lime Wharf.
Lime Wharf

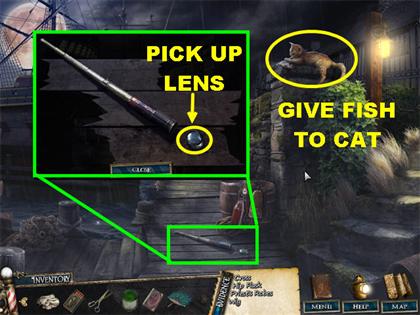
- Give the FISH to the cat in the upper right.
- The cat drops the telescope onto the ground.
- Click on the telescope for a closer view.
- Pick up the LENS on the ground.
- Go to Junk Street.
Junk Street

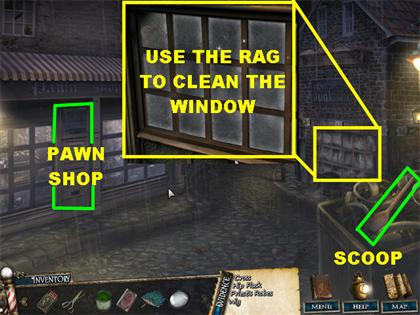
- Pick up the SCOOP in the lower right.
- Click on the window on the right for a closer view.
- Place the RAG on the window to clean it. This action triggers a Hidden Object scene.


- Click on the window to enter the Hidden Object scene.
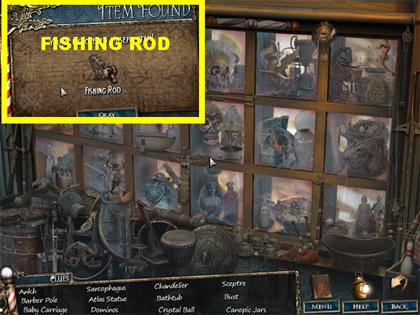
- You will receive a FISHING ROD at the end of your search.
- Go inside the Pawn Shop.
Pawn Shop

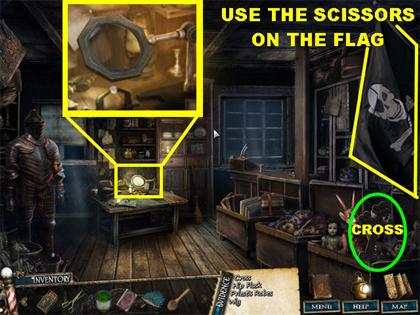
- Use the SCISSORS to cut a part of the pirate flag on the right. A PIECE OF CLOTH will go into your inventory.
- Pick up the CROSS in the lower right.
- Click on the small table in the back of the scene.
- Place the LENS into the magnifying glass. This action triggers a Hidden Object scene.

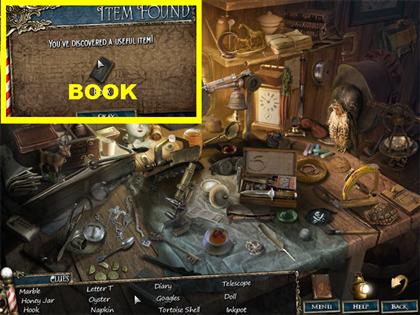
- Click on the small table in the back to access the Hidden Object scene.
- You will receive another BOOK at the end of your search.

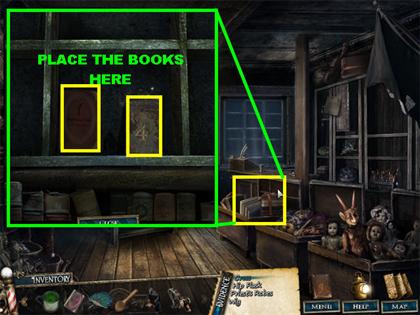
- Click on the bin full of books on the right.
- Place the 2 BOOKS from inventory on the slot to trigger a puzzle.
Book Sorting Puzzle

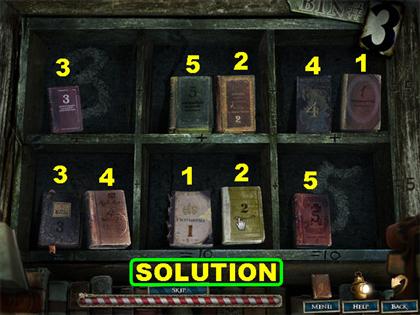
- Your goal is to place all the books in the right slots so that each row adds up to 15 and each column of books add up to 10.
- Notice the markings all around the puzzle. These markings are clues as to how to place the books.
- The solution is as follows, from top to right:FIRST ROW: 3 – 5 & 2 – 4 & 1
SECOND ROW: 3 & 4 – 1 & 2 – 5
- The books fall on the ground after they have been placed correctly.

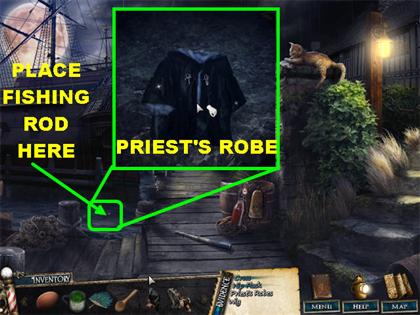
- Click on the books in the ground.
- Click on the large book to open it.
- Pick up the INCENSE inside the book.
- Click on the map and go back to the Bell Tower.
Bell Tower

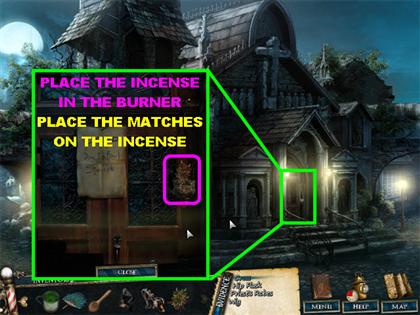
- Click on the front door.
- Place the INCENSE on the incense burner by the door.
- Place the MATCHES on the incense to light it.
- Click on the door to open it.
- Go through the door.
Inside Bell Tower

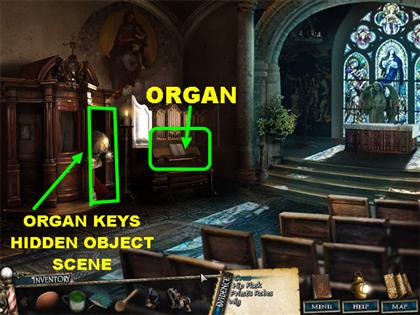

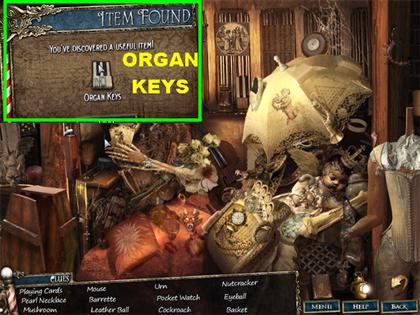
- Click on the Hidden Object scene on the left.
- You will receive the ORGAN KEYS at the end of your search.
- Click on the organ on the right.

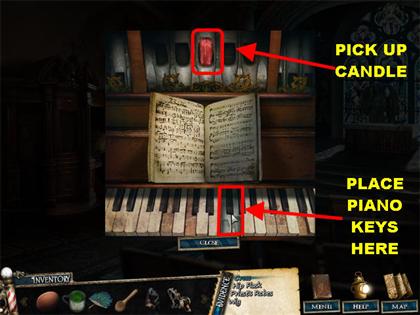
- Place the ORGAN KEYS on the organ.
- Click on the ORGAN KEYS that you just placed.
- Pick up the CANDLE from the organ pipes.

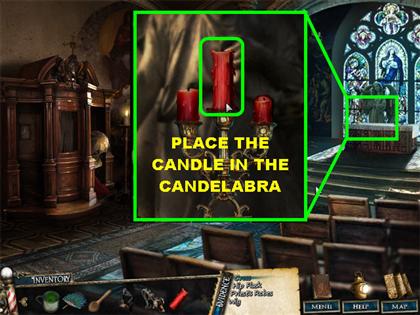
- Click on the church altar for a closer look.
- Place the CANDLE on the candelabra to trigger a puzzle.
Candles Puzzle

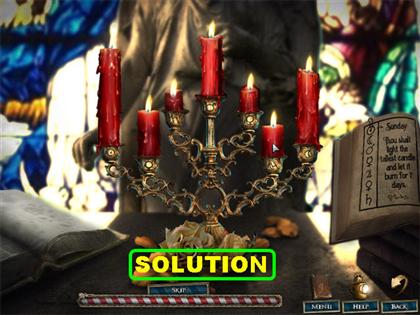
- Your goal is to organize the candles in the correct order.
- The symbols on the book and under each candle represent the days of the week.
- Click on 2 candles and they will swap places.
- Use the images on the book on the right.
- Please look at the screenshot for the solution.
- The cabinet below the altar opens up.

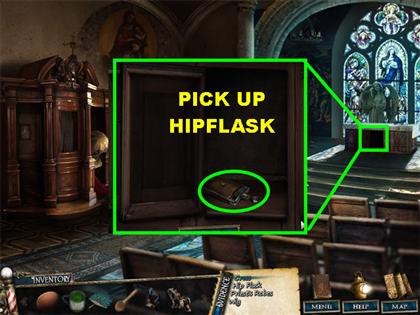
- Click on the cabinet for a closer view.
- Pick up the HIPFLASK inside the cabinet.
- Go to Lime Wharf.
Lime Wharf


- Click on the left side of the water for a closer view.
- Place the FISHING ROD in the water for the robe to appear.
- Pick up the PRIEST’S ROBE in the water.
- Go up the stairs on the right and head to the laundry area.

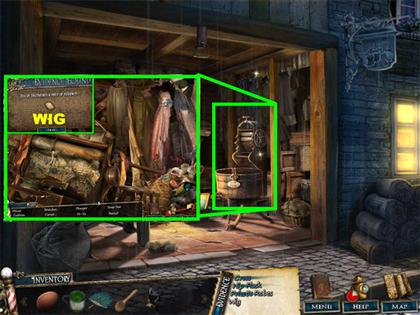
- Click on the laundry machine to trigger a Hidden Object scene.
- You will receive the WIG at the end of your search.
- This concludes this chapter, now solve the puzzle.
Lupin’s Scheme Puzzle

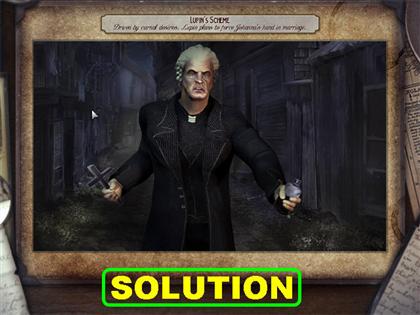
- Drag the pieces onto the board.
- Correct pieces will lock into place.
- Please look at the screenshot for the solution.
Chapter 4: The Price of Curiosity
Junk Street

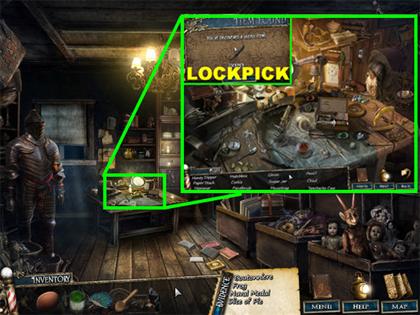
- Go to Junk Street at the beginning of the chapter.
- Enter the Pawn Shop.
- Click on the Hidden Object scene.
- You will receive a LOCKPICK at the end of your search.
- Go to Fleet Street next.
Fleet Street

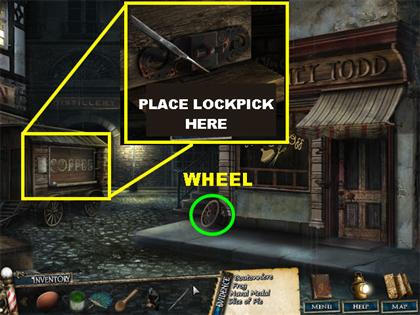

- Pick up the WHEEL by the side of the shop.
- Click on the coffee cart on the left for a closer view.
- Place the LOCKPICK on the lock
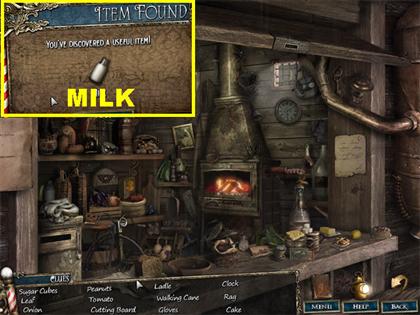
- Click on the LOCKPICK to trigger a Hidden Object scene.
- Click on the Hidden Object scene.
- You will obtain MILK at the end of your search.
- Go to the Piccadilly Square.
Piccadilly Square

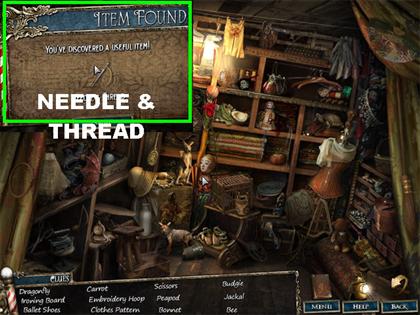

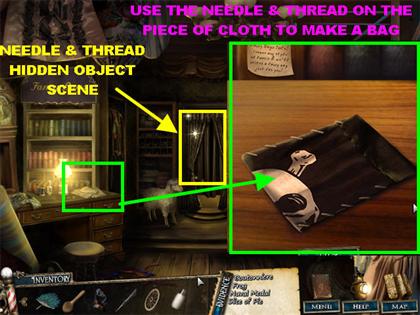
- Enter the Tailor’s Shop.
- Click on the Hidden Object scene in the back.
- You will receive a NEEDLE &THREAD at the end of your search.
- Click on the sewing desk on the left.
- Place the PIECE OF CLOTH on the tale.
- Place the NEEDLE &THREAD on the cloth to make a bag.
- Click on the BAG to pick it up.
- Go to Reagent Row.
Reagent Row

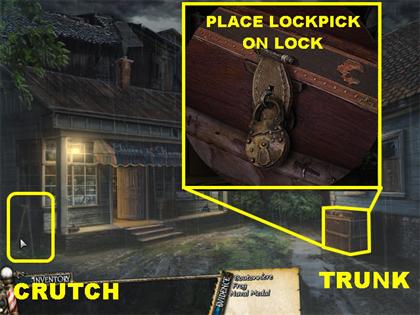
- Pick up the Crutch in the lower left.
- Click on the trunk in the lower right.
- Place the LOCKPICK on the lock.

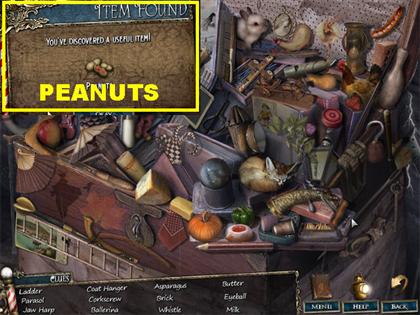
- Click on the lock to open the trunk.
- Enter the Hidden Object scene.
- You will receive PEANUTS at the end of your search.
- Go inside the Elixirs Shop.
Elixirs Shop

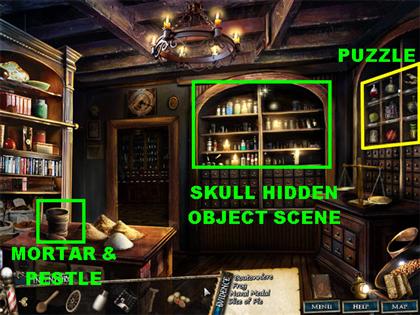

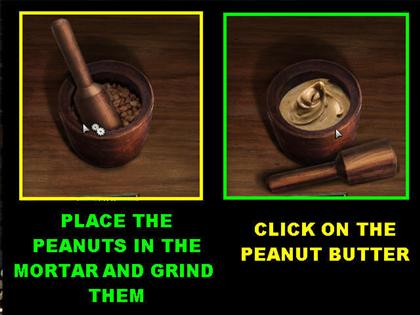
- Click on the mortar and pestle on the table on the left.
- Place the PEANUTS in the mortar.
- Use the pestle to grind the peanuts.
- Click on the PEANUT BUTTER to pick it up.

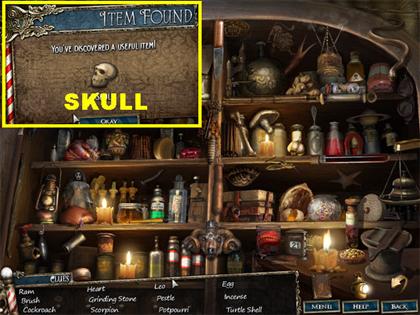
- Click on the Hidden Object scene in the back.
- You will receive the SKULL after your search.
- Click on shelf on the right to trigger a puzzle.
Apothecary Jars Puzzle

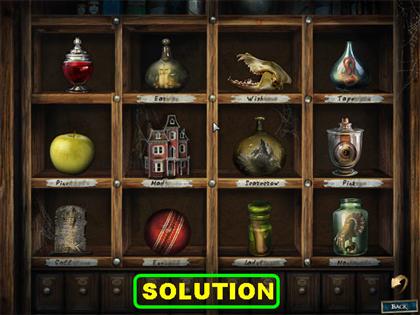
- Your goal is to sort the jar into their proper slots.
- The labels under each jar give you a partial word. You must figure out which word goes with what jar.
- Click on two items and they will swap places.
- From left to right, the solution is as follows:
- Blood – Candle (Earwax) – Skull (Wishbone)– Worm (Tapeworm)
- Apple (Pineapple) – House (Madhouse) – Crow (Scarecrow) – Eye (Pinkeye)
- Tag (Calltag )– Ball (Eyeball) – Finger (Ladyfinger) – Hand (Manhandle)
- Click on the shelf on the right for a closer view.

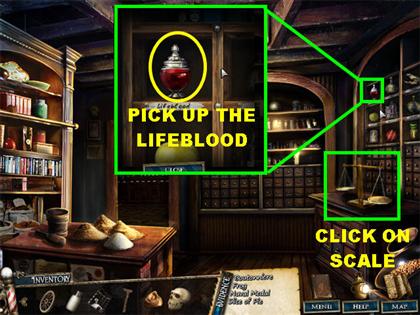
- Pick up the LIFEBLOOD on the shelf.
- Click on the scales in the lower right.

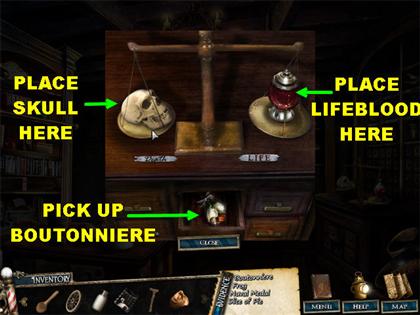
- Place the SKULL on the left scale.
- Place the LIFEBLOOD on the right scale.
- Pick up the BOUTONNIERE from the open drawer below the scales.
- Go to Baker’s Court.
Baker’s Court

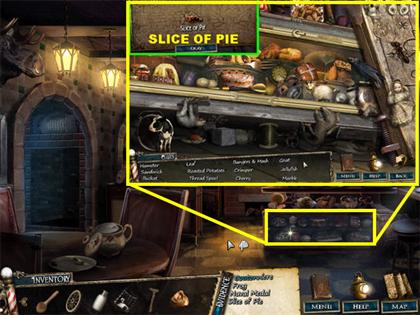
- Go inside the Pie Shop.
- Click on the pie display to trigger a Hidden Object scene.
- You will receive the SLICE OF PIE at the end of your search.
- Go to Guttersnipe Alley.
Guttersnipe Alley

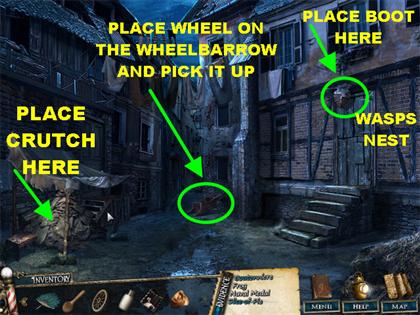

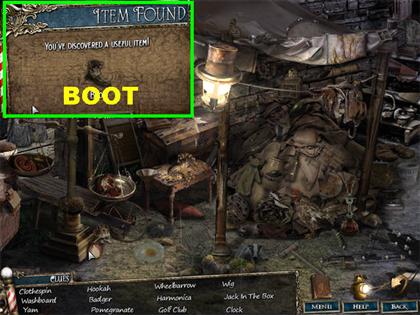
- Place the CRUTCH on the tent on the left to trigger a Hidden Object scene.
- You will receive the BOOT at the end of your search.
- Place the wheel on the wheelbarrow in the back of the scene.
- Click on the wheelbarrow to pick it up.
- Place the BOOT on the wasps nest above the door on the right to knock it down.
- Place the BAG on the wasps nest.
- Click on the door to open it and go inside.
Inside Slum House

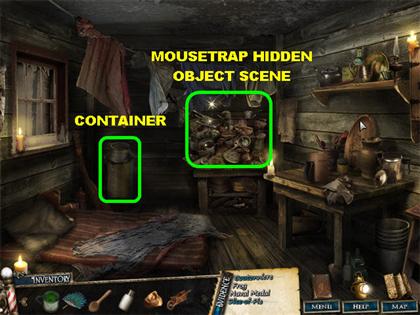

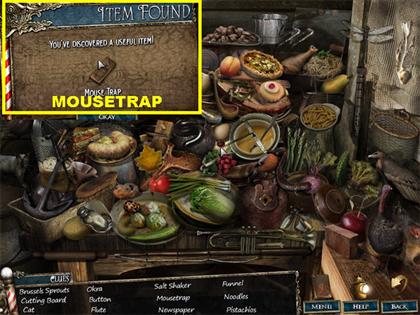
- Click on the dish pile to trigger a Hidden Object scene.
- You will receive a MOUSETRAP at the end of your search.
- Click on the canister in the back of the scene for a closer look.

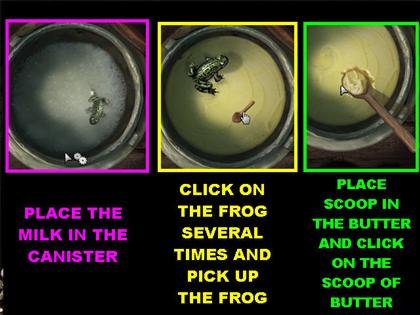
- Place the MILK in the canister.
- Click on the milk a couple of times to mix it and a frog appears on top.
- Click on the FROG and the pop-up window closes.
- Click on the canister again.
- Place the SCOOP in the butter.
- Click on the SCOOP OF BUTTER to pick it up.
- Go back to Reagent Row.
Reagent Row

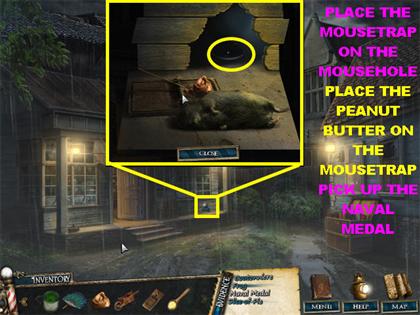
- Click on the mouse hole in the lower right side of the building.
- Place the MOUSETRAP in the hole.
- Place the PEANUT BUTTER on the MOUSETRAP and the mouse will come out of the hole.
- Pick up the NAVAL MEDAL inside the hole.
- This is the end of this chapter, please solve the puzzle.
Tobias’ Discovery Puzzle

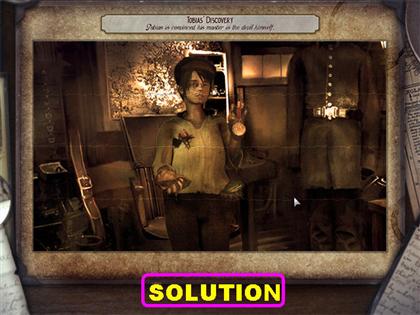
- Drag the pieces onto the board.
- Correct pieces will lock into place.
- Please look at the screenshot for the solution.
Chapter 5: The Betrayal
Bell Tower

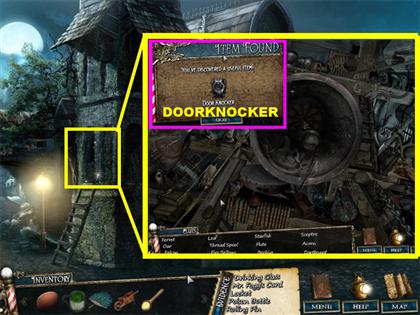
- Click on the Hidden Object scene on the left.
- You will pick up the DOORKNOCKER at the end of your search.
- Go to Mr. Fogg’s Asylum.
Mr. Fogg’s Asylum

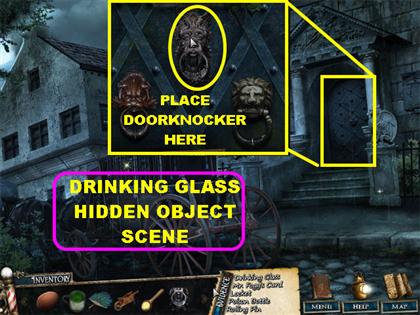

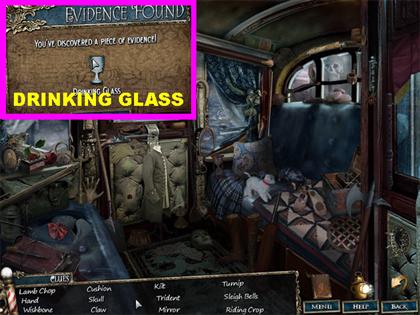
- Click on the carriage to trigger a Hidden Object scene.
- You will receive the DRINKING GLASS at the end of your search.
- Click on the door for a closer view.
- Place the DOORKNOCKER in the empty slot to trigger a puzzle.
Asylum Door Puzzle

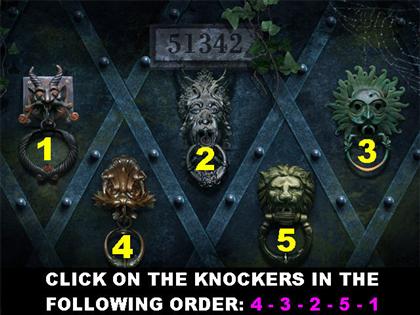
- Your goal is to click on the doorknockers in the right order.
- I will label the knockers from1 to 5, left to right. Click on the knockers in the following order: 4-3-2-5-1

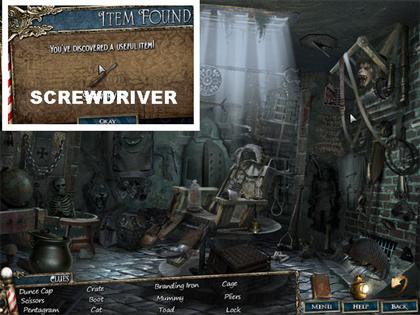
- Click on the entryway after the puzzle has been solved to trigger a Hidden Object scene.
- You will receive the SCREWDRIVER at the end of your search.

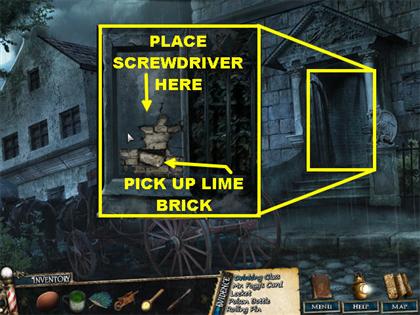
- Click on the stone column under the gargoyle.
- Use the SCREWDRIVER on the cracks.
- Pick up the exposed LIME BRICK.
- Go back to Reagent Row.
Reagent Row

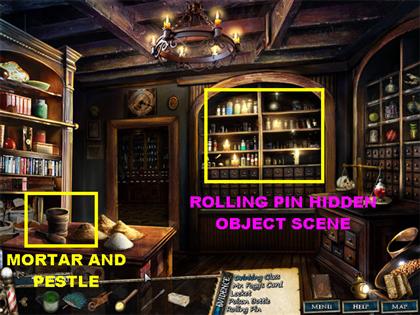

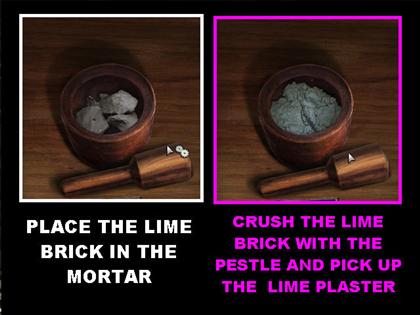
- Go into the Elixir Shop.
- Click on the mortar and pestle on the left.
- Place the LIME BRICK into the mortar.
- Use the pestle to crush the LIME BRICK.
- Pick up the LIME PLASTER inside the pestle.

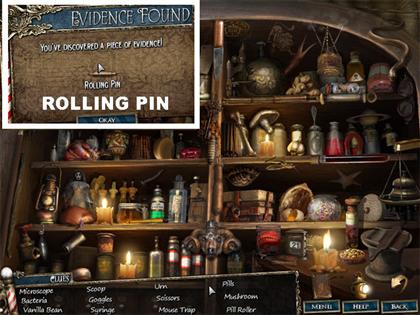
- Click on the Hidden Object scene in the back.
- You will obtain the ROLLING PIN after your search is over.
- Go to Baker’s Court.
Baker’s Court

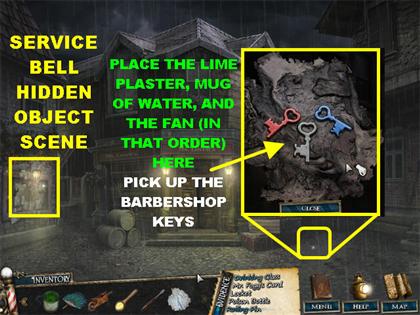
- Click on the mud puddle on the right for a closer look.
- Place the LIME PLASTER into the key indentations.
- Place the MUG OF WATER on the plaster.
- Place the FAN on the plaster to dry it.
- Pick up the BARBERSHOP KEYS in the puddle.

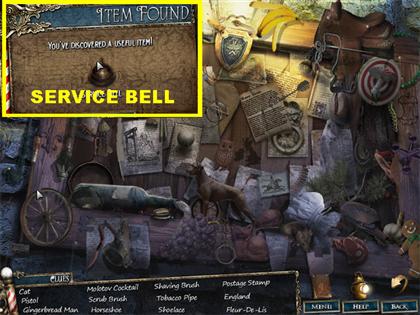
- Click on the Hidden Object scene on the left.
- You will obtain the SERVICE BELL at the end of your search.
- Go to Junk Street.
Junk Street

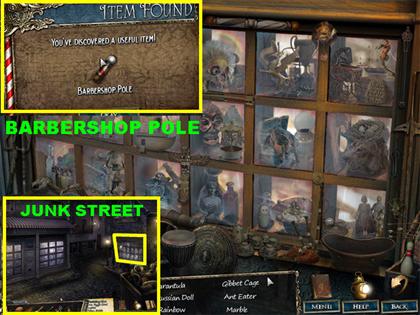
- Click on the window on the right to trigger a Hidden Object scene.
- You will obtain the BARBERSHOP POLE at the end of your search.
- Go to Fleet Street.
Fleet Street

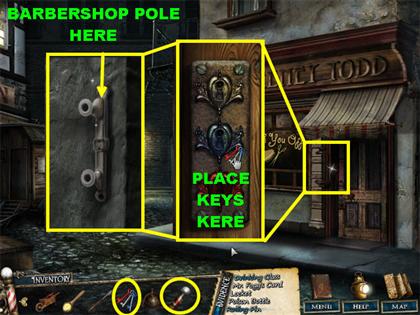
- Click on the barbershop window.
- Place the BARBERSHOP POLE on the wall.
- Click on the door for a closer look.
- Insert the BARBERSHOP KEYS in the lock to trigger a puzzle.
Barber Door Puzzle

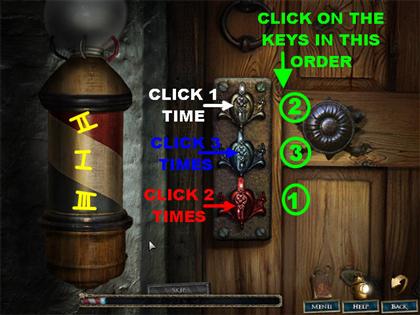
- Your goal in this game is to click on the keys in the correct order.
- When you look at the barber pole you will see numbers etched on each color. The red has the #2, the white has the # 1, and the blue has the #3,
- Click on the colored keys the amount of times shown on the pole and in the same order as the colors of the pole.
- For the solution click on the keys in the following order:Click on the RED Key 2 Times
Click on the WHITE Key 1 Time
Click on the BLUE Key 3 Times
- Click on the round handle on the right to unlock the door.
- Enter the Barbershop.
Barbershop

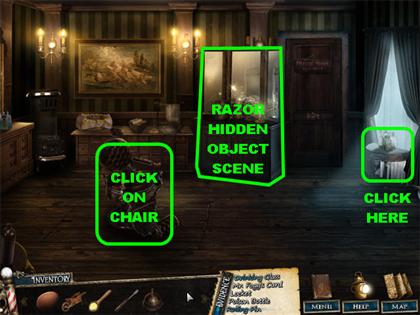

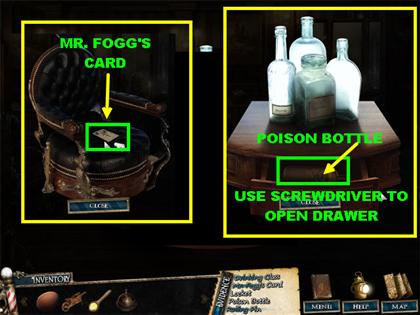
- Click on the chair for a closer look.
- Pick up MR. FOGG’S CARD on the chair.
- Click on the stand on the right.
- Place the SCREWDRIVER on the drawer to open it.
- Pick up the POISON BOTTLE inside the drawer.

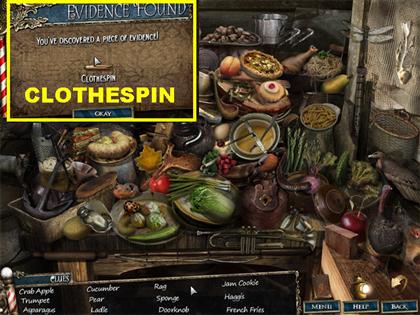
- Click on the back of the scene to trigger a Hidden Object scene.
- You will obtain the RAZOR at the end of your search.
- Go to Lime Wharf.
Lime Wharf

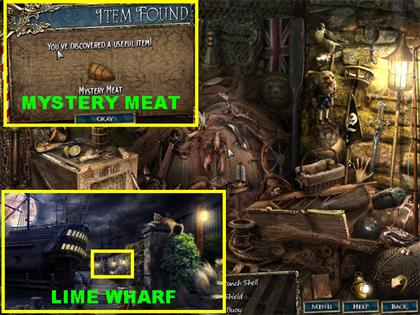
- Click on the fishing nets in the back of the scene to trigger a Hidden Object scene.
- You will receive the MYSTERY MEAT at the end of your search.
- Go to Baker’s Court
Baker’s Court

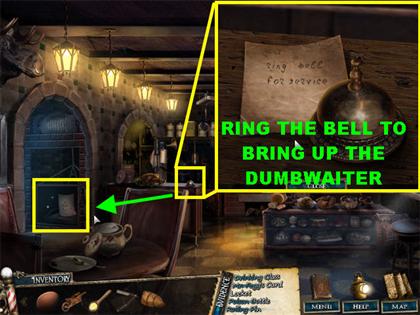
- Enter the Pie Shop.
- Click on the counter in the back of the shop.
- Place the SERVICE BELL on the counter.
- Click on the SERVICE BELL for the dumbwaiter to appear.
- Click on the dumbwaiter on the left for a closer view.

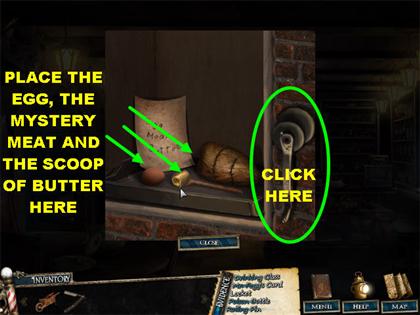
- Place the MYSTERY MEAT on the pie tray.
- Place the EGG on the pie tray.
- Place the SCOOP OF BUTTER on the pie tray.
- Click on the winch to lower the tray.

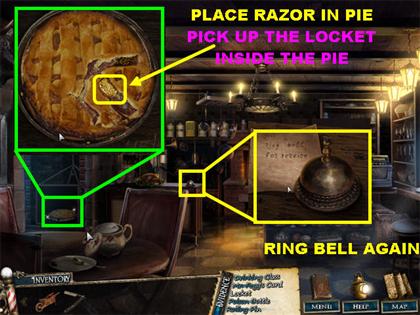
- Click on the desk in the back for a closer look.
- Click on the SERVICE BELL to raise the dumbwaiter.
- Click on the dumbwaiter on the left for a closer view.
- Place the RAZOR on the pie to cut it open.
- Pick up the LOCKET inside the pie.
- This is the end of this chapter, now solve the puzzle.
Mrs. Lovett’s Demise Puzzle

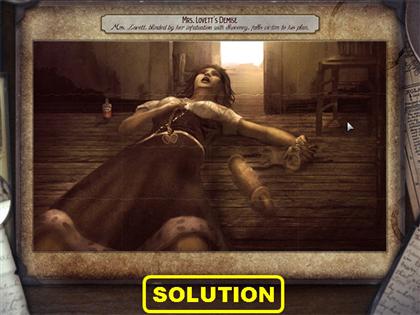
- Drag the pieces onto the board.
- Correct pieces will lock into place.
- Please look at the screenshot for the solution.
Chapter 6: The Truth
Piccadilly Square

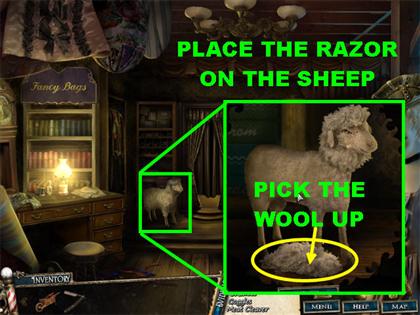
- Enter the Tailor’s Shop.
- Click on the stuffed sheep in the back of the scene.
- Place the RAZOR on the stuffed sheep to shave it.
- Click on the WOOL from the sheep.
- Go to Guttersnipe Alley.
Guttersnipe Alley

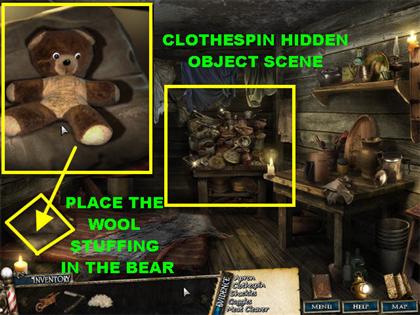
- Go into the Slum House.
- Click on the pillow located on the mattress for the stuffed bear to appear.
- Place the WOOL into the bear.
- Click on the TEDDY BEAR to enter it into inventory.


- Click on the Hidden Object scene.
- You will obtain the CLOTHESPIN at the end of your search.
- Go to Fleet Street.
Fleet Street

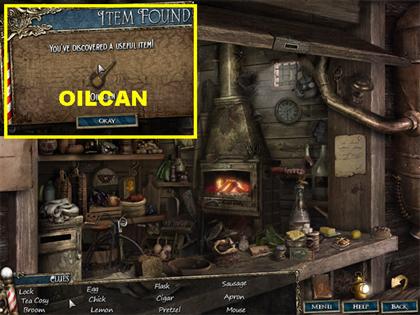
- Click on the coffee cart on the left to trigger a Hidden Object scene.
- You will obtain the OILCAN at the end of your search.
- Enter the Barbershop.
Barbershop

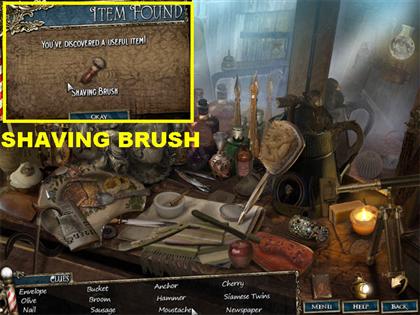
- Click on the vanity to enter a Hidden Object scene.
- You will obtain the SHAVING BRUSH at the end of your search.
- Go back to Reagent Row.
Reagent Row

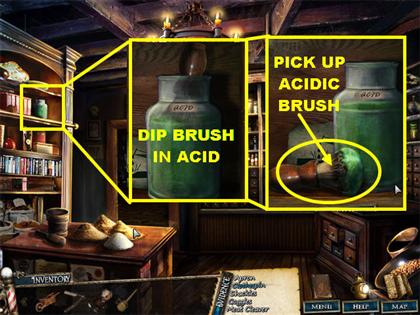
- Enter the Elixirs Shop.
- Click on the shelf in the upper left.
- Dip the SHAVING BRUSH into the jar of acid.
- Click on the SHAVING BRUSH in the jar to take it out.
- Click on the ACIDIC BRUSH to enter it into your inventory.
- Go to Junk Street.
Junk Street

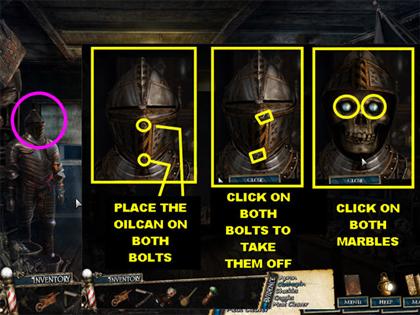
- Enter the Pawnshop.
- Click on the helmet on the suit of armor for a closer view.
- Use the OILCAN on the 2 bolts.
- Click on the 2 Bolts to remove them.
- Lift the visor.
- Pick up the 2 MARBLES from the eye sockets.
- Go to Mr. Fogg’s Asylum.
Mr. Fogg’s Asylum

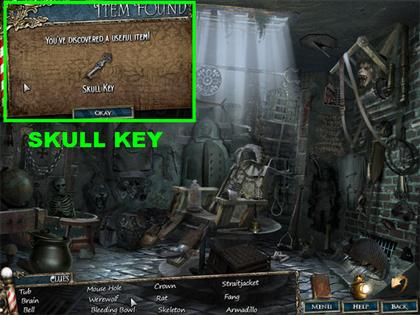
- Click on the door on the right to trigger a Hidden Object scene.
- You will obtain the SKULL KEY at the end of your search.
- Go to Fleet Street.
Fleet Street

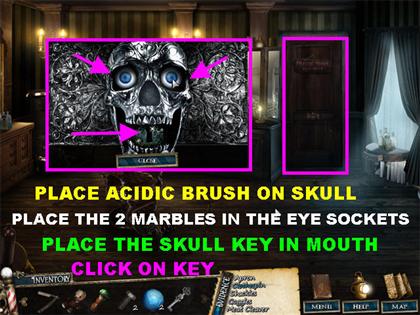
- Go into Sweeney Todd’s Barbershop.
- Click on the parlour door on the right.
- Place the ACIDIC BRUSH on the skull.
- Place the 2 MARBLES in the eye sockets of the skull.
- Place the SKULL KEY in the skull’s mouth.
- Click on the SKULL KEY to trigger a puzzle.
The Parlour Door Puzzle

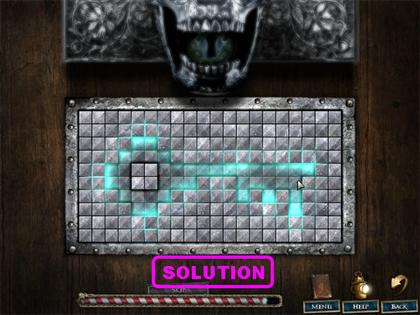
- Your goal is to press the various shapes on the plate so they form the shape of a key.
- Listen to the sounds the plates make when they are touched. You want to keep the plates down that make a locking sound (Like a key locking a door).
- Once all the pieces are in place, the whole puzzle will glow.
- Please look at the screenshot for the solution. The door will open after the puzzle has been solved.

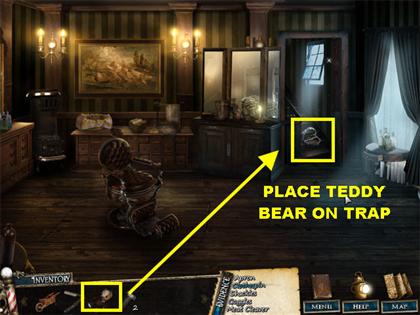
- Place the TEDDY BEAR on the trap by the steps on the right.
- Go upstairs to the Parlour Room.
Parlour Room

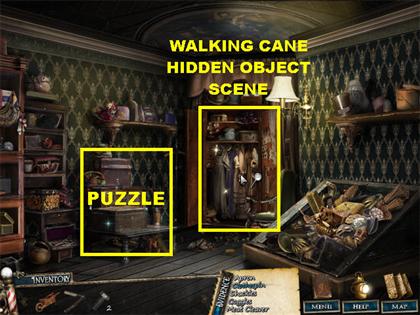
- Click on the locked treasure chest on the left.
- Solve the puzzle to unlock the chest.
The Chest Puzzle

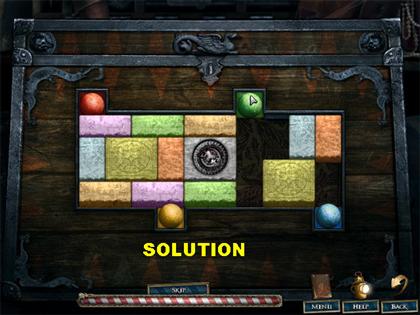
- Your goal in this puzzle is to slide the marbles to a spot that matches their color.
- Move the blocks around to make room for the marbles. Blocks cannot be moved into colored slots.
- The large grey block in the center cannot be moved.
- Start by placing the red and yellow marbles into their spots on the left first. Then try to place the marbles on the right.
- Please watch the video for a step-by-step solution for this puzzle.

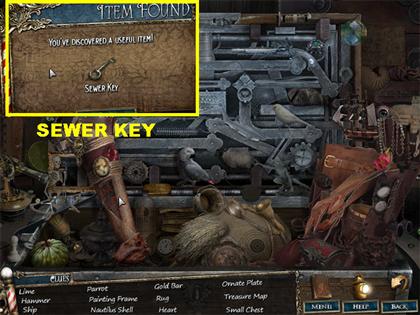
- Click on the chest after the puzzle has been solved to trigger a Hidden Object scene.
- You will receive the SEWER KEY at the end of the puzzle.

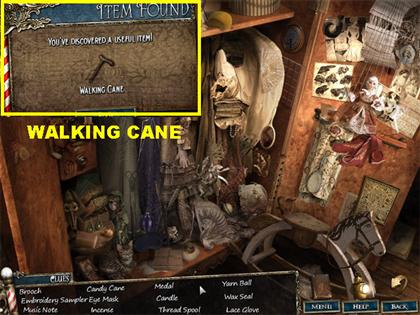
- Click on the wardrobe to trigger a Hidden Object scene.
- You will receive a WALKING CANE at the end of your search.
- Go back downstairs.
Barbershop

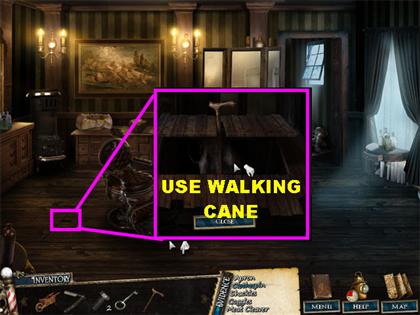
- Click on the loose board on the left side of the floor.
- Place the WALKING CANE in the hole in the floor.
- Click on the WALKING CANE to lift the board.
- Pick up the APRON under the floorboards.
- Go to Watch Lane.
Watch Lane

- Place the WHEELBARROW on the pile of garbage on the left.
- Click on the door to the sewer on the left.
- Place the SEWER KEY on the lock.
- Click on the SEWER KEY to turn it.
- Go into the Sewer.
The Sewer

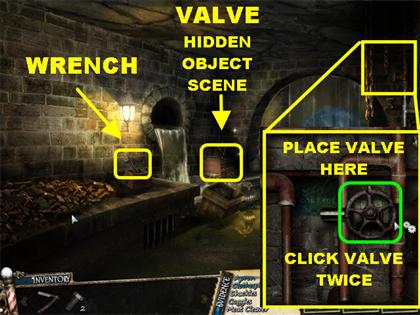

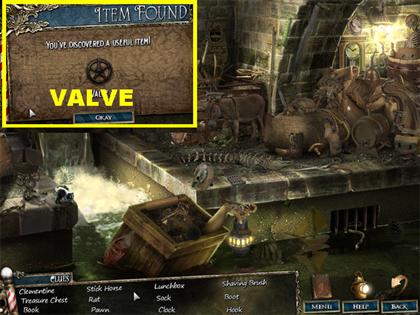
- Pick up the WRENCH lying in the box in the Sewer.
- Click on the Hidden Object scene by the water.
- You will obtain the VALVE at the end of your search.
- Click on the pipes in the upper right.
- Place the VALVE in the slot.
- Click on the VALVE 2 Times to shut off the water.
- Go through the tunnel in the back to access the pie factory.
Pie Factory

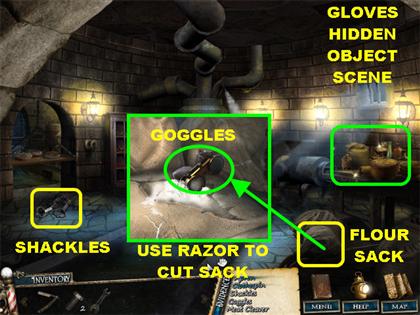
- Pick up the SHACKLES on the left side of the floor.
- Click on the sack of flour on the ground.
- Use the RAZOR to cut the sack.
- Pick up the GOGGLES inside the sack.

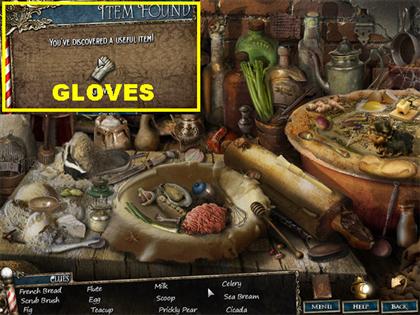
- Click on the table on the right to trigger a Hidden Object scene.
- You will receive a pair of GLOVES at the end of your search.

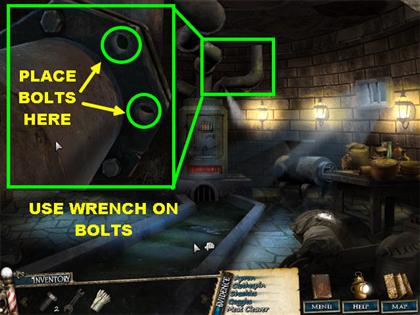
- Click on the large pipes attached to the oven
- Place the 2 BOLTS into the empty slots on the pipe.
- Use the WRENCH on both pipes to tighten them up.
The Oven Puzzle

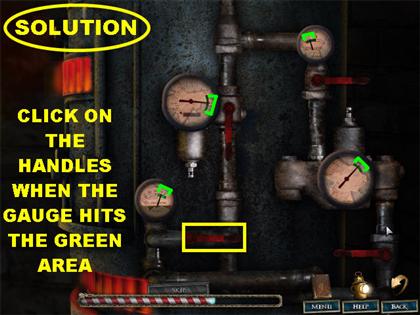
- Your goal is to close each valve so the needle tied to its meter lands in the green zone.
- Each meter you complete makes the other gauges go faster.
- Please watch the video for a step-by-step solution for this puzzle.

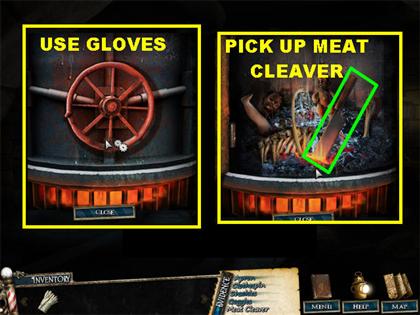
- Click on the oven door for a closer look.
- Place the GLOVES on the oven door.
- Pick up the MEAT CLEAVER inside the oven.
- This concludes this chapter, now solve the puzzle.
Mark’s Revelation Puzzle

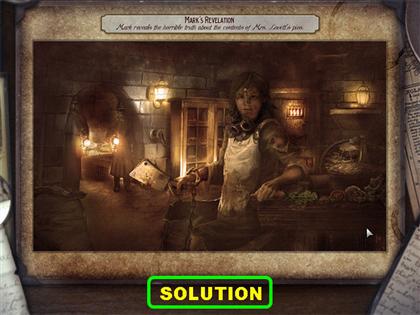
- Drag the pieces onto the board.
- Correct pieces will lock into place.
- Please look at the screenshot for the solution.
Sweeney Capture Puzzle

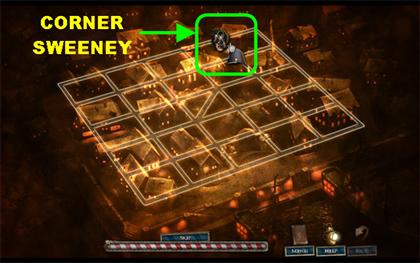
- Your goal is to capture Sweeney by making all the right moves.
- Click on a spot and the officer will move to it.
- Each time the officer makes a move Sweeney does too but away from the officer as much as possible.
- You can only capture Sweeney once your paths cross.
- Try to put Sweeney into a corner as much as possible.
- Please watch the video for a step-by-step solution for this puzzle.
- Watch the ending scenes!
Bonus Materials
- You have unlocked the Bonus Extras in the game.
- Go to the Main Menu and click on the “EXTRAS” button.

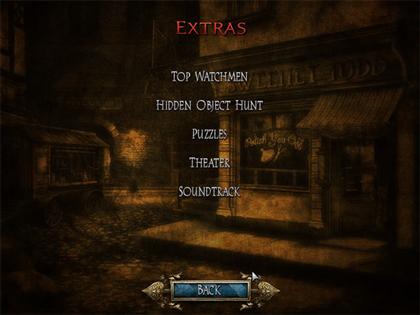
- This menu will pop up showing you all the options available.
- Click on one of the 5 available choices.
- The Top Watchmen section shows you all the high scores.
Hidden Object Hunt


- Here you can replay any of the Hidden Object scenes in the game.
- Each time you play, the game will keep track of your time.
- You can use a hint if you’re stuck and can’t find an item.
- Each time you play the same scene you will be given new items to look for.
- Replay to beat your best time.
Puzzles

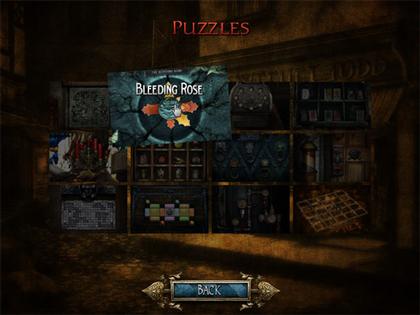
- This section allows you to replay any of the puzzles you encountered during the game.
- The solutions are always the same for these puzzles.
- You can play the games as often as you want.
Theater


- This section allows you to watch different scenes in the game.
Soundtrack

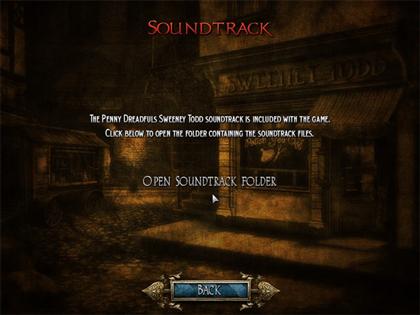
- Click on the Soundtrack and you will be taken to the folder that contains the song choices.




 Mystery Valley Walkthrough, Guide, & Tips
 Dark Tales: Edgar Allan Poe's The Premature Burial Walkthrough, Guide, & Tips
 Forgotten Kingdoms: Dream of Ruin Walkthrough, Guide, & Tips
 Grim Tales: The Wishes Walkthrough, Guide, & Tips
 Time Mysteries: The Ancient Spectres Walkthrough, Guide, & Tips