Whispered Secrets: The Story of Tideville Walkthrough, Guide, & Tips
Whispered Secrets: The Story of Tideville Walkthrough

Welcome to the Whispered Secrets – The Story of Tideville Walkthrough
Uncover the mysterious past of a sleepy seaside village and find your missing son in Whispered Secrets: The Story of Tideville!
Whether you use this document as a reference when things get difficult or as a road map to get you from beginning to end, we’re pretty sure you’ll find what you’re looking for here.
This document contains a complete Whispered Secrets – The Story of Tideville game walkthrough featuring annotated screenshots from actual gameplay!
We hope you find this information useful as you play your way through the game. Use the walkthrough menu below to quickly jump to whatever stage of the game you need help with.
Remember to visit the Big Fish Games Forums if you find you need more help. Have fun!
This walkthrough was created by Rebekah, and is protected under US Copyright laws. Any unauthorized use, including re-publication in whole or in part, without permission, is strictly prohibited.
General Tips

- This is the official guide for Whispered Secrets: The Story of Tideville.
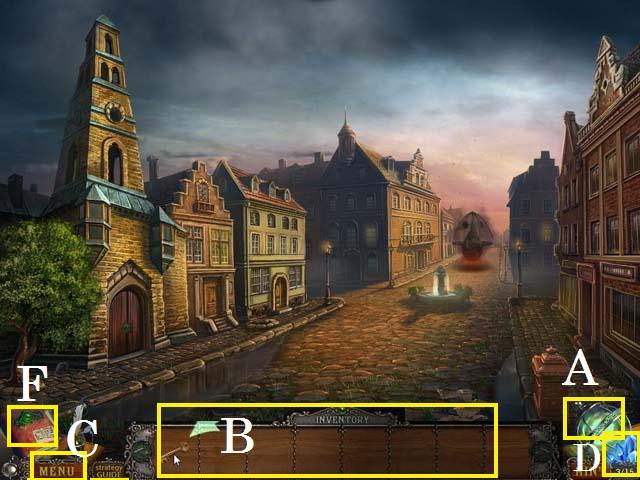
- Use the Hint Button (A) if you need additional help.
- Your inventory bar (B) will hold items until they are needed.
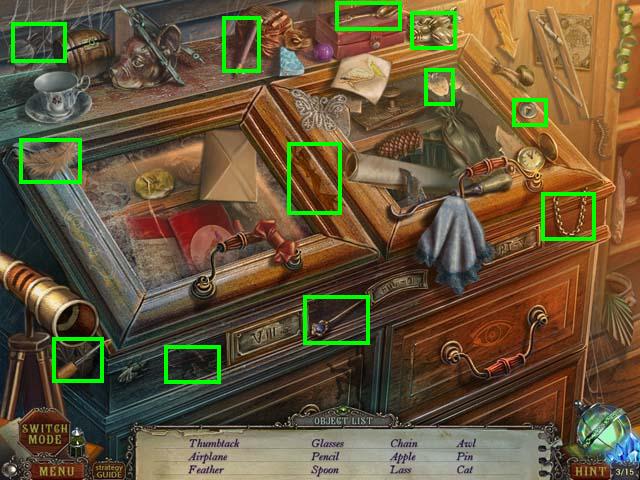
- Zoom into sparkling scenes to trigger Hidden Object Scenes. In this guide we will use the acronym ‘HOS’ for Hidden Object Scenes.
- The items in the HOS are random. All hidden objects are marked in green unless otherwise noted.
- While playing HOS, you may choose to play a match three game instead to reveal item locations.
- Click on the Menu (C) button to exit, pause, or resume the game. You can also adjust your options: sound, music, and screen size.
- You will not need to follow the exact path of this guide; however some actions are required before others can be performed.
- Throughout the game you will need to collect 15 Crystals. You can view the number of crystals you have collected (D) below the Hint button.
- Important clues will be placed in your journal (F). Use these to help solve puzzles.
Chapter 1: Tim Goes Missing
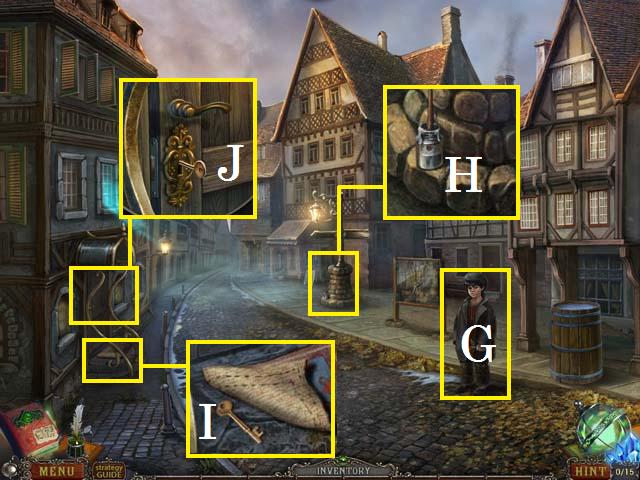
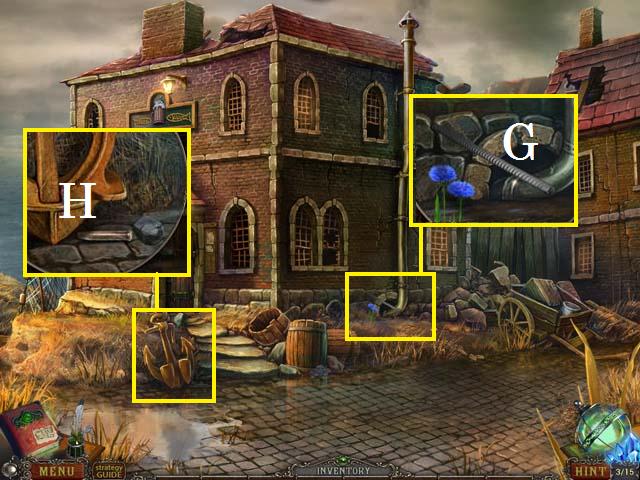
- Speak with Rudy (G).
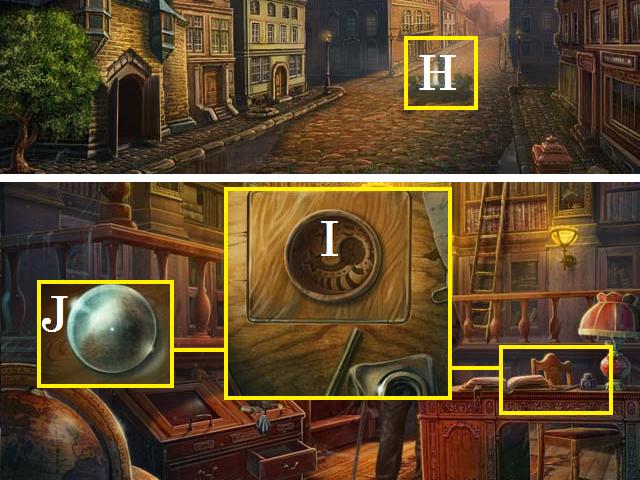
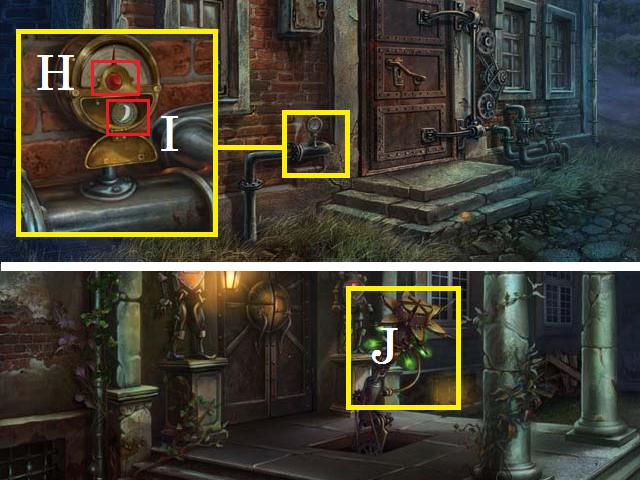
- Zoom into the lamppost; collect the GLUE (H).
- Zoom into the doorstep; move the rug, and pick up the FRONT DOOR KEY (I).
- Zoom into the front door; place the FRONT DOOR KEY into the lock (J), turn the key, and use the handle to open the door.
- Go through the door.
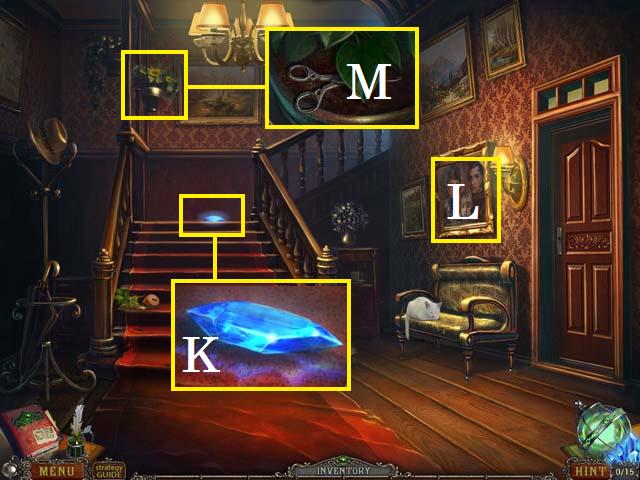
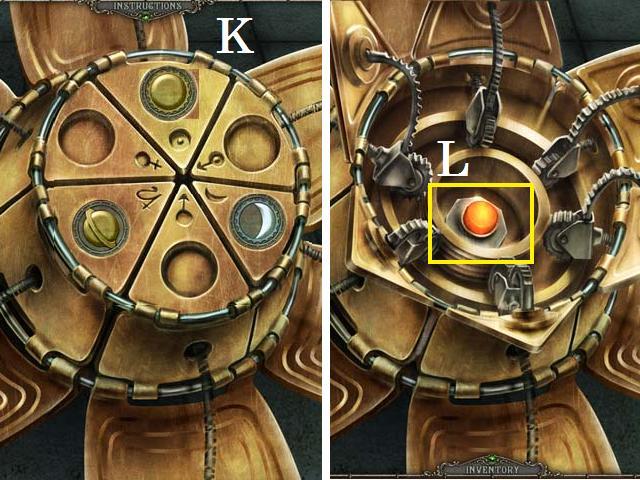
- Zoom into the crystal and then collect the first Strange Blue Crystal (K).
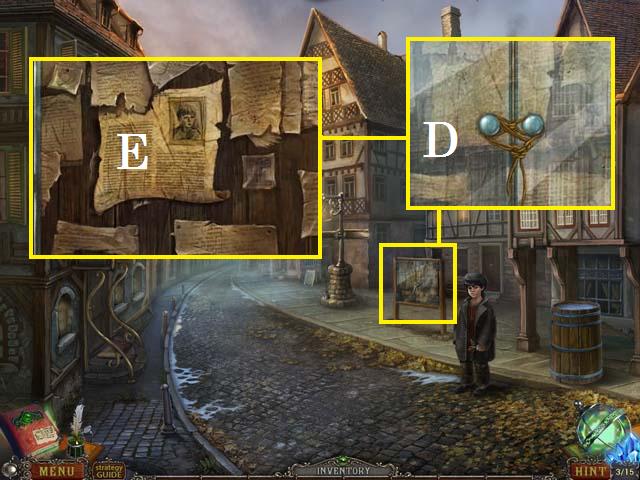
- Examine the painting (L).
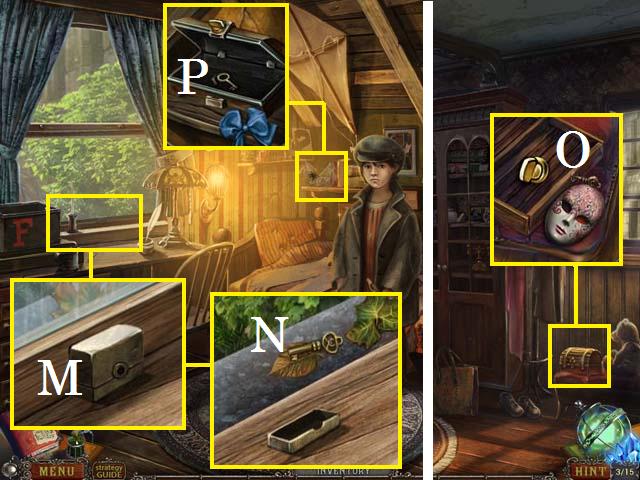
- Zoom into the plant; collect the SCISSORS (M).
- Climb the stairs to Tim’s Room.

- Speak with Tim.
- Collect the second Blue Crystal (N).
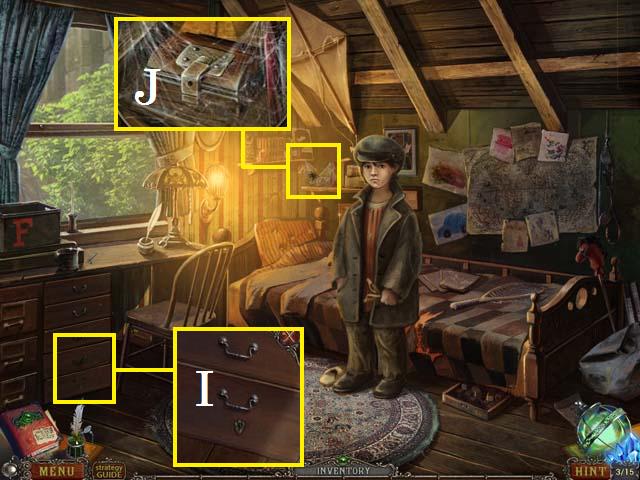
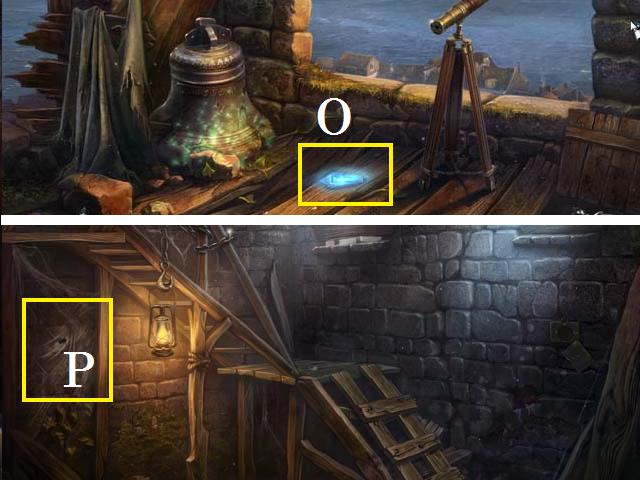
- Zoom into the blocks; collect the first DIARY PUZZLE PIECE (O).
- Zoom into the bed; move the blanket and collect the CABINET DRAWER KEY (P).
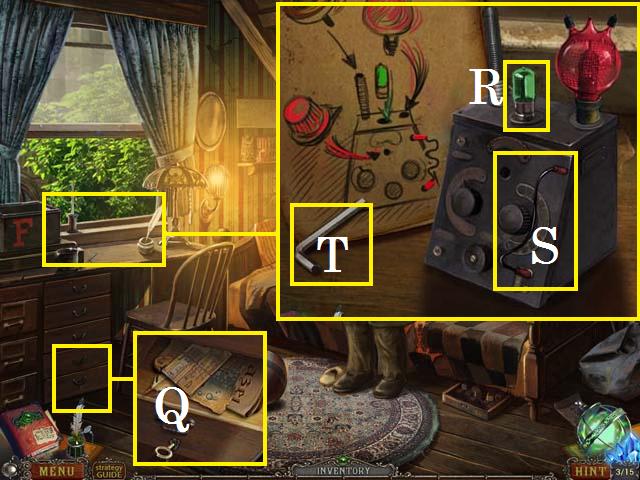
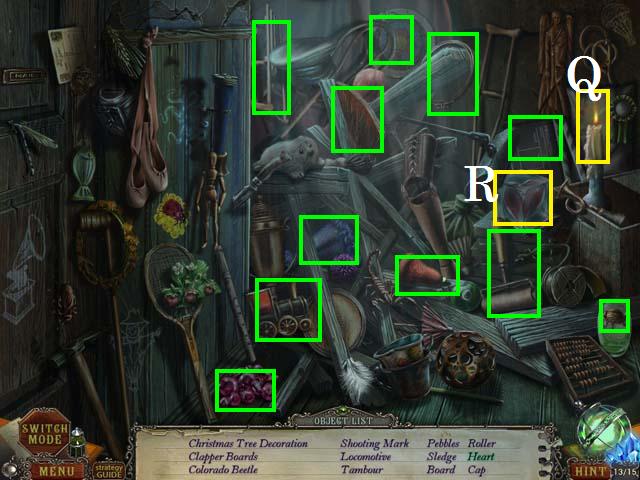
- Zoom into the shelf; move the lamb and collect the second DIARY PUZZLE PIECE (Q).
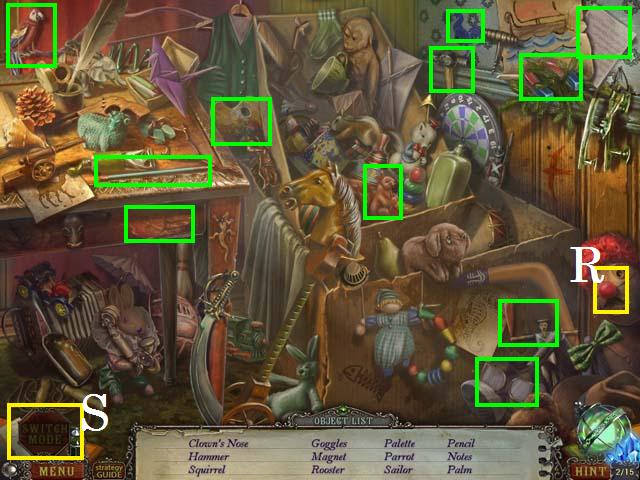
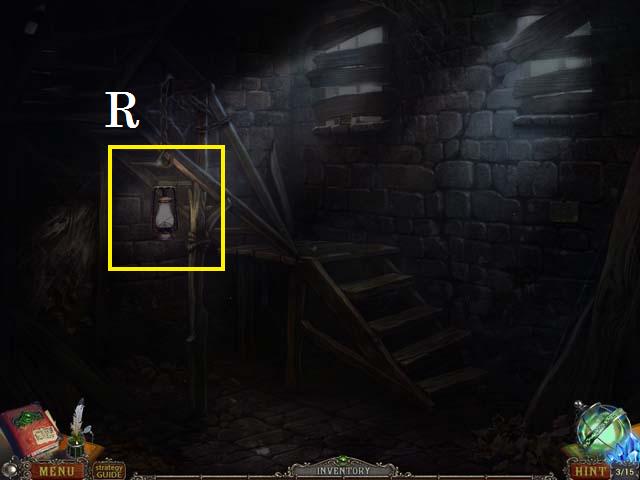
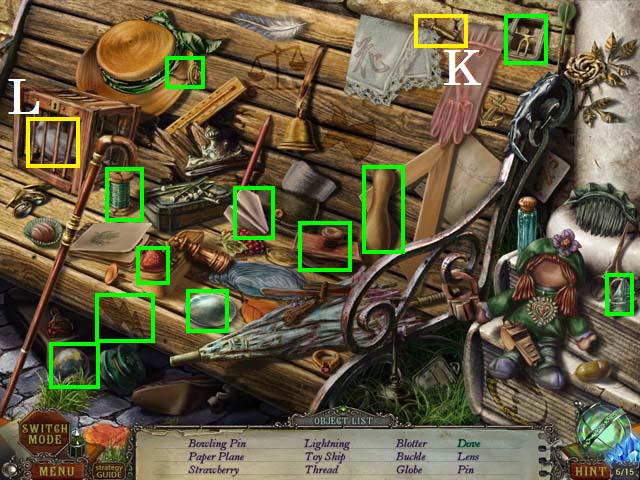
- Zoom into the sparkles to trigger a HOS.
- Move the hat to reveal the Clown’s Nose (R).
- Collect the remaining objects to receive a MAGNET.
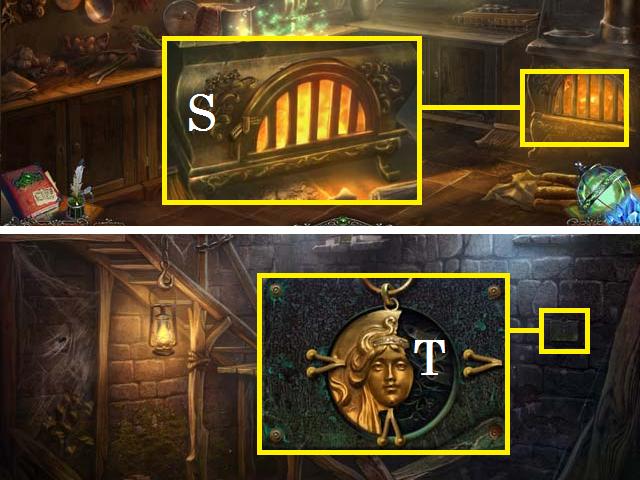
- If you are having trouble finding any or all hidden objects, you may choose to switch to a match 3 game using the switch mode button (S).
- Return downstairs.
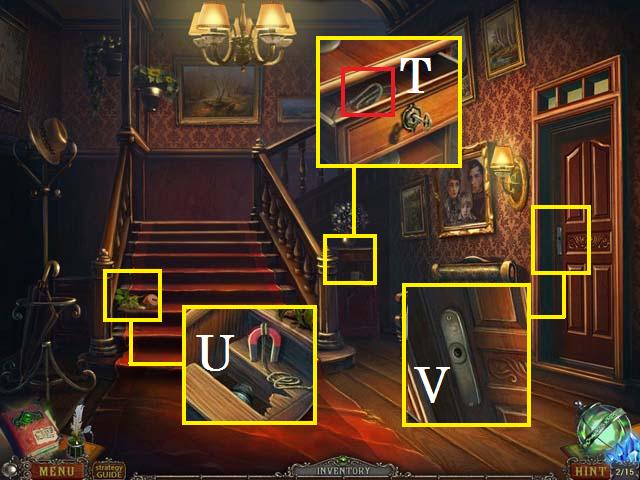
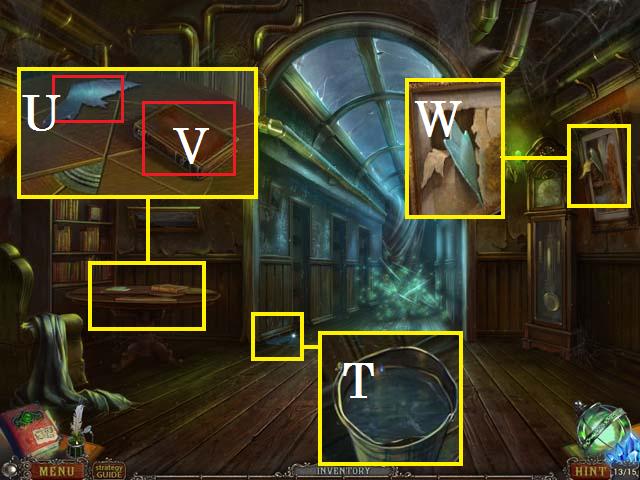
- Use the CABINET DRAWER KEY to unlock the small table; collect the ROPE (T).
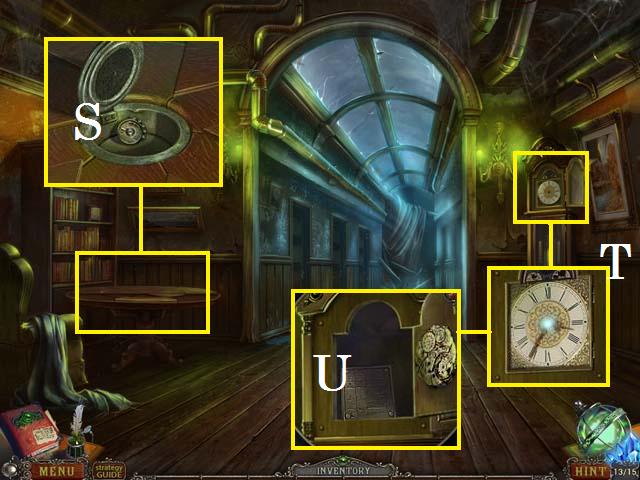
- Zoom into the stairs; place the MAGNET and the ROPE on the steps (U) and then hang them over the hole to collect the DOORKNOB.
- Zoom into the door; place the DOORKNOB (V) and go through it.
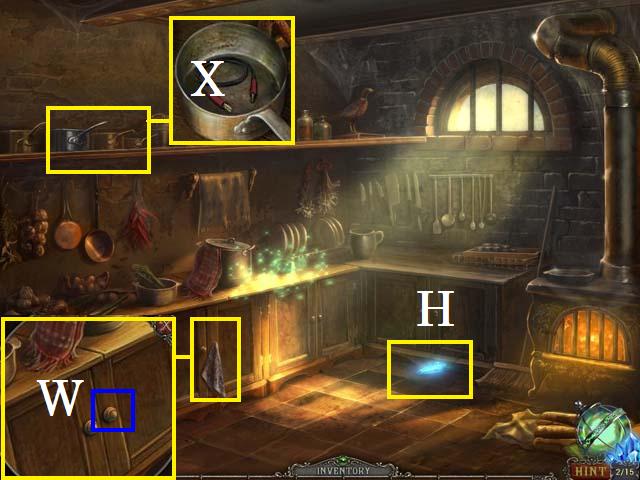
- Collect the third Blue Crystal (H).
- Zoom into the cabinet doors; move the rag and collect the KNOB (W).
- Zoom into the shelf; move the pretzel and collect the ELECTRICAL CORD (X).
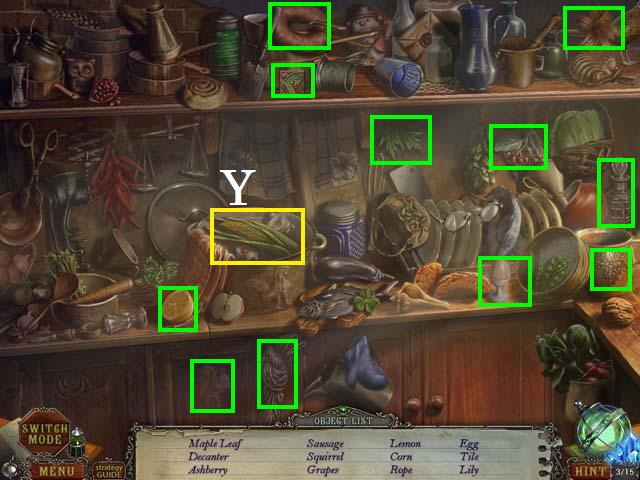
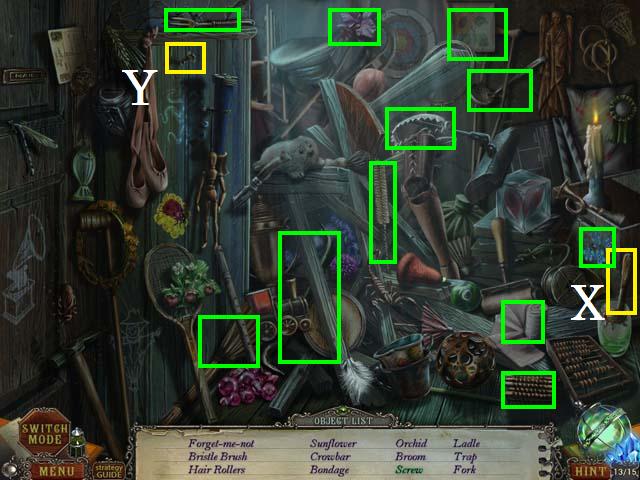
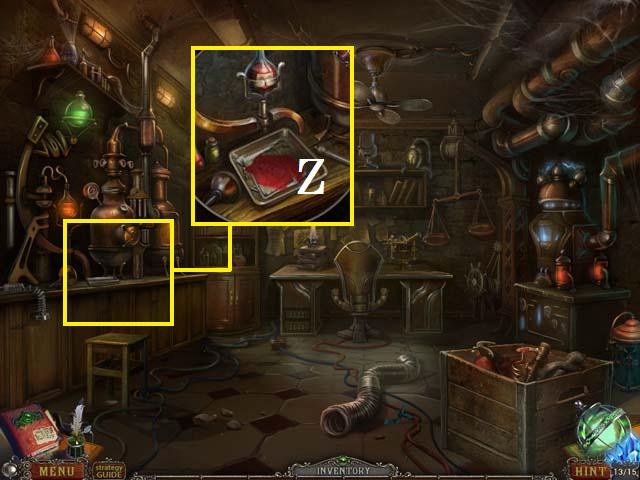
- Zoom into the sparkles to play a HOS.
- Move the pan lid to reveal the Corn (Y).
- Receive the third DIARY PUZZLE PIECE.
- Return to Our House: Tim’s Room.
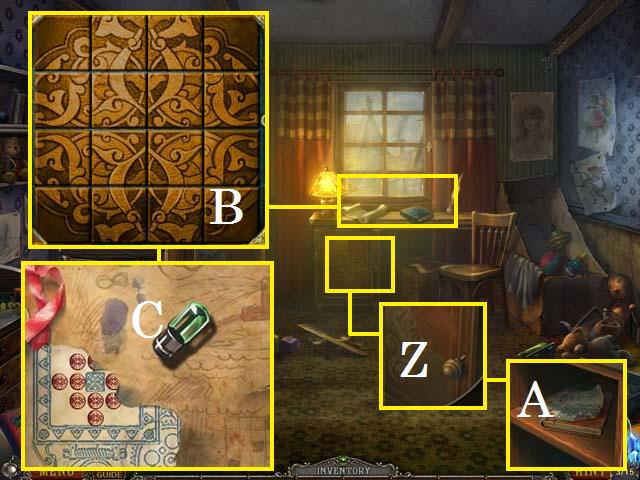
- Zoom into the desk’s cabinet door; place the KNOB (Z) and secure it with the GLUE.
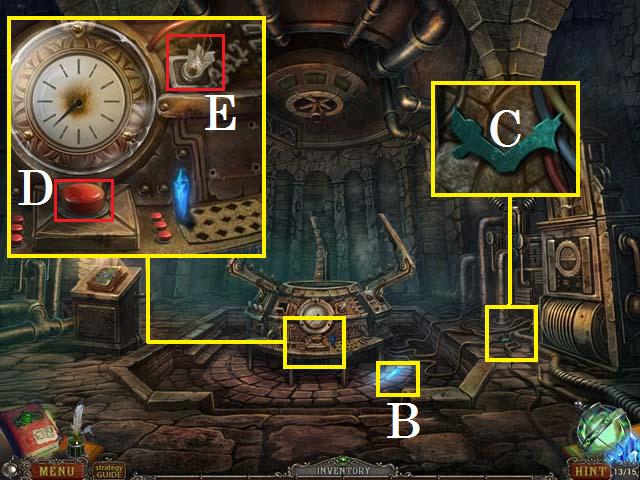
- Open the door and collect the DIARY PAGE PART (A).
- Zoom into the desk; place the three DIARY PUZZLE PIECES on the book. See the screenshot for the final arrangement of pieces (B).
- Pick up the SMALL ELECTRON TUBE (C) and place the DIARY PAGE PART in the book.
- Exit the house.
- Speak with Rudy and receive a clue.
- Zoom into the message board; cut the rope (D) with the SCISSORS and collect the NEWSPAPER (E).
- Move forward to the Street Near Rudy’s House.
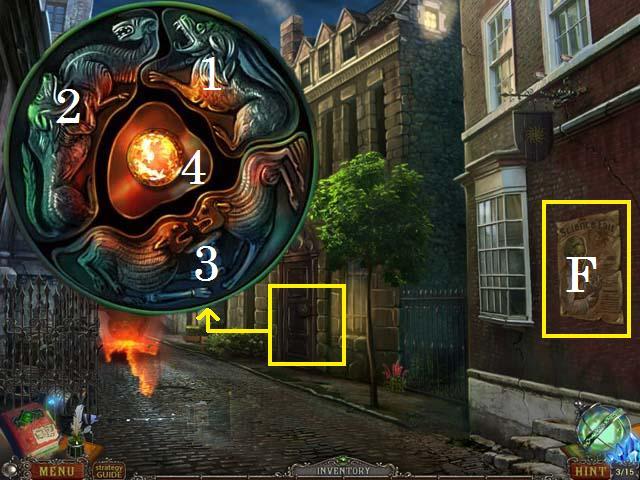
- Examine the poster (F).
- Zoom into the door; press the lock buttons from 1-4 and enter Rudy’s House: Living Room.

- Zoom into the table; collect the BRUSH (G).
- Zoom into the mantel; collect the DRAWER HANDLE (H).
- Climb the stairs to Rudy’s Room.
- Speak with Rudy.
- Zoom into the desk drawer; place the DRAWER HANDLE on it (I).
- Zoom into the shelf; remove the cobwebs (J) with the BRUSH.
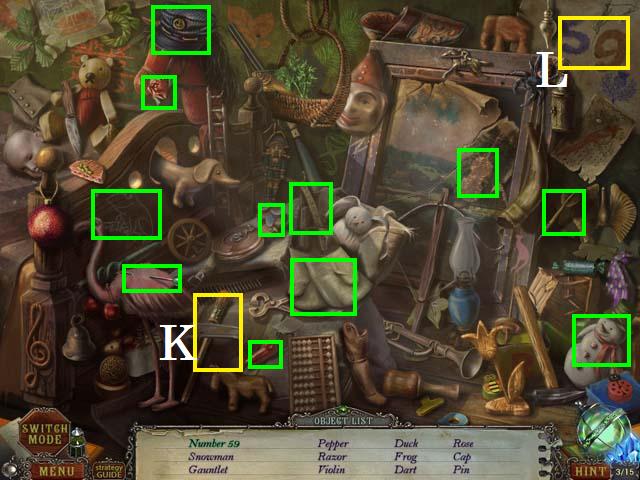
- Zoom into the sparkles to play a HOS.
- Use the paintbrush (K) to finish the Number 59 (L).
- Receive the PIN.
- Zoom into the window; insert the PIN into the lock (M) to open the window.
- Zoom back into the window; move the leaves to reveal the BOX KEY (N) and collect the key.
- Return downstairs.
- Zoom into the box; use the BOX KEY. After opening the box, move the mask and collect the LATCH (O).
- Return to Rudy’s House: Rudy’s Room.
- Zoom into the shelf; place the LATCH on the box and open it to collect the DRAWER KEY (P).
- Zoom into the desk drawer; unlock the drawer with the DRAWER KEY. Move the items around and collect the DIARY PAGE PART (Q).
- Receive the DISASSEMBLED ANTIMONSTER DEVICE from Rudy.
- Zoom into the desk; place the DISASSEMBLED ANTIMONSTER DEVICE on the desk. Place the SMALL ELECTRON TUBE (R) and the ELECTRICAL CORD (S) on the device. Pick up the HEX NUT WRENCH (T).
- Return to Tim’s Room.
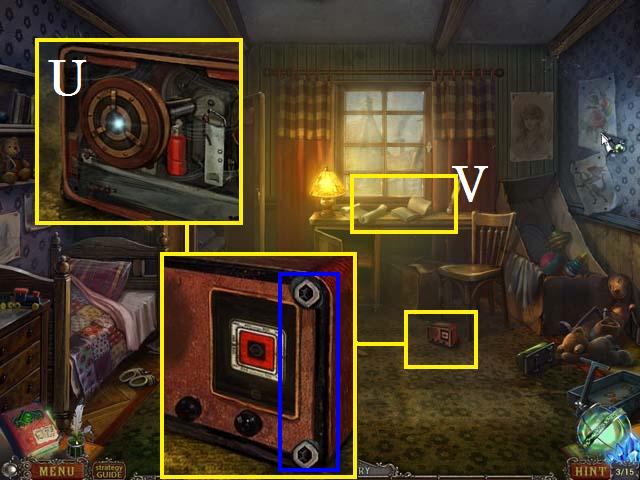
- Zoom into the radio; remove the two nuts (blue) with the HEX NUT WRENCH. Remove the faceplate and pick up the RADIO SPEAKER (U).
- Zoom into the desk (V); place the DIARY PAGE PIECE to receive the key to a lock.
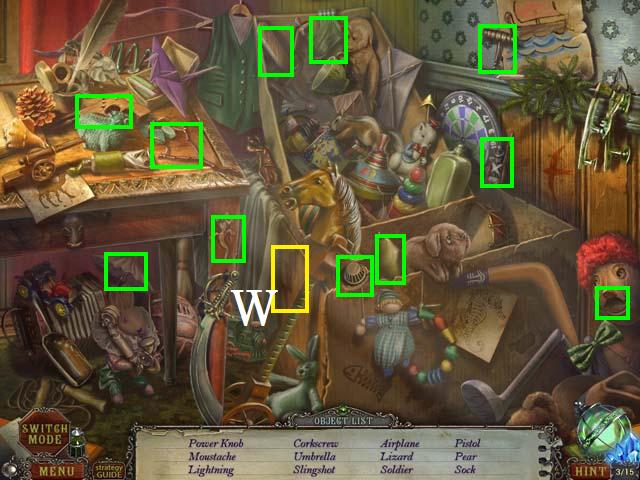
- Zoom into the sparkles to play a HOS.
- Move the sheet to reveal the Lightning (W).
- Receive the POWER KNOB.
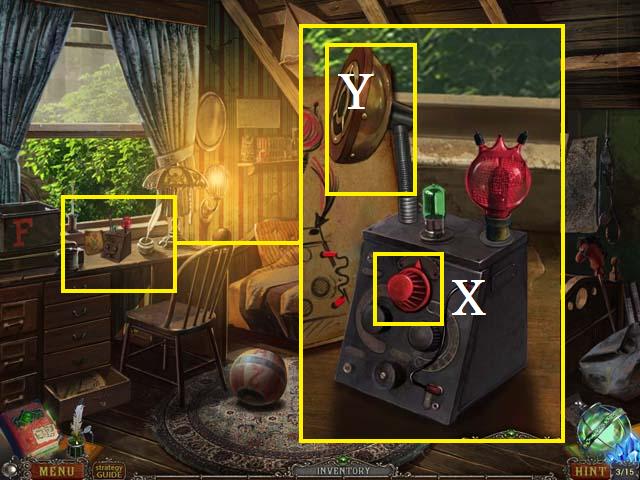
- Return to Rudy’s Bedroom.
- Zoom into the desk; place the POWER KNOB (X) and the RADIO SPEAKER (Y) on the device. Collect the ANTIMONSTER DEVICE.
- Speak with Rudy and receive a clue.
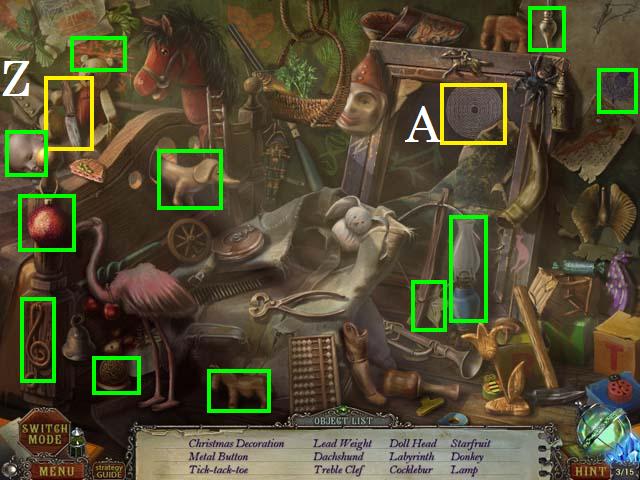
- Zoom into the sparkles to play a HOS.
- Cut the canvas with the knife (Z) to reveal the Labyrinth (A).
- Receive the first BELL TOWER LOCK PIECE.
- Return to the Street: Near Rudy’s House.
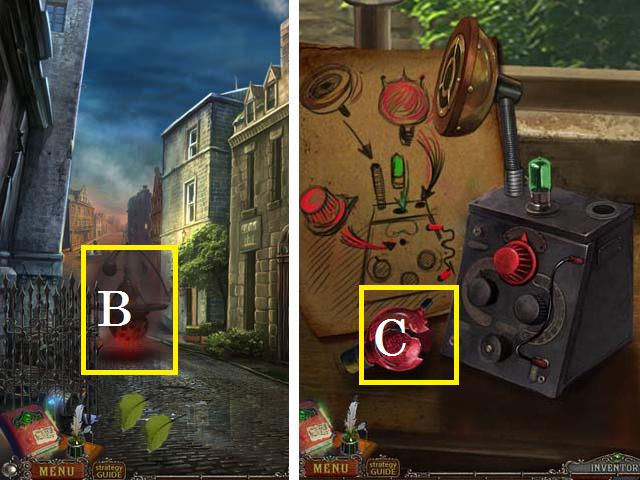
- Place the ANTIMONSTER DEVICE near the mechanical monster (B).
- Collect the BROKEN ANTIMONSTER DEVICE.
- Return to Rudy’s Bedroom.
- Place the BROKEN ANTIMONSTER DEVICE on the desk and remove the broken bulb (C).
Chapter 2: The Medallion
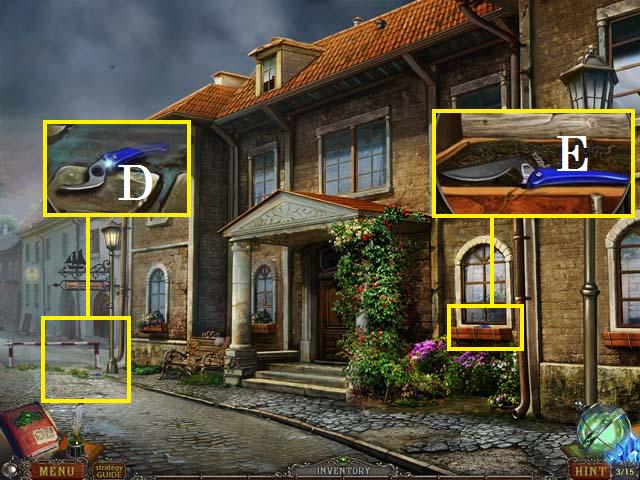
- Exit Rudy’s House and move forward to the Street: Bell Tower. Take a right at the fountain to Street: Near Library.
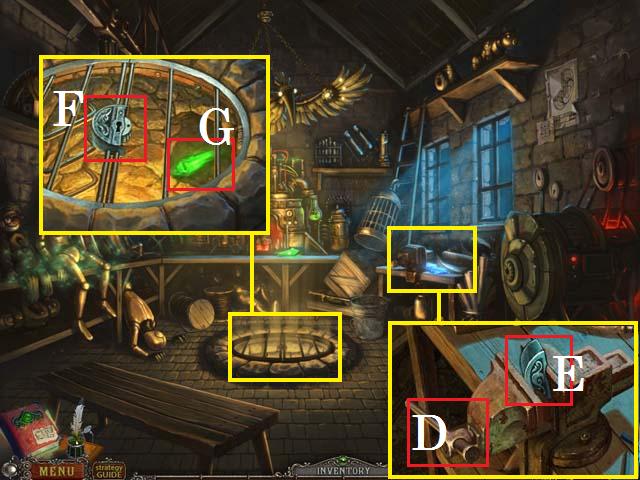
- Zoom into the road block; Pick up the PRUNING SHEARS PART (D).
- Zoom into the window box; place the PRUNING SHEARS PART on the shears (E).
- Enter the Library.
- Speak with Mr. Wilson and give him the NEWSPAPER.
- Zoom into the sparkles to play a HOS.
- Collect all of the hidden objects and receive the GLASSES.
- Give the GLASSES to Mr. Wilson.
- Return to the Street: Bell Tower. Take a left at the fountain to the Street: Near Pub.
- Zoom into the drain pipe; collect the ROD (G).
- Zoom into the anchor; use the ROD to move the anchor and collect the CHISEL (H).
- Enter the Pub.
- Speak with Mr. Miller and receive the second BELL TOWER LOCK PIECE.
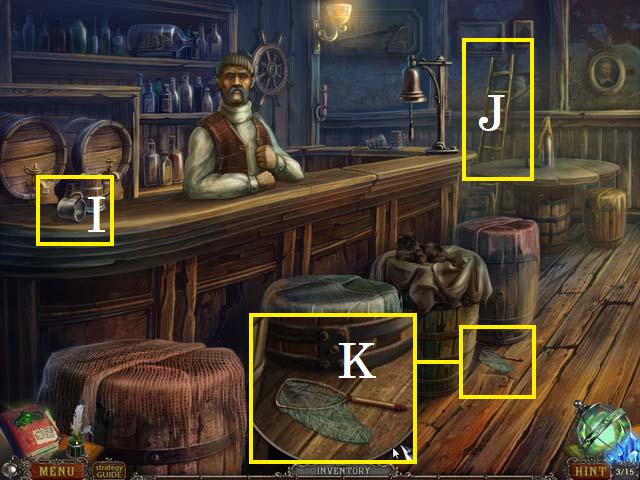
- Collect the MUG (I) and the STEPLADDER (J).
- Zoom into the floor; collect the LANDING NET (K).
- Return to the Library.

- Place the STEPLADDER (L) on the ground and zoom into the shelf; collect the third BELL TOWER LOCK PIECE (M) and the first MEDALLION PART (N).
- Return to the Street: Bell Tower.
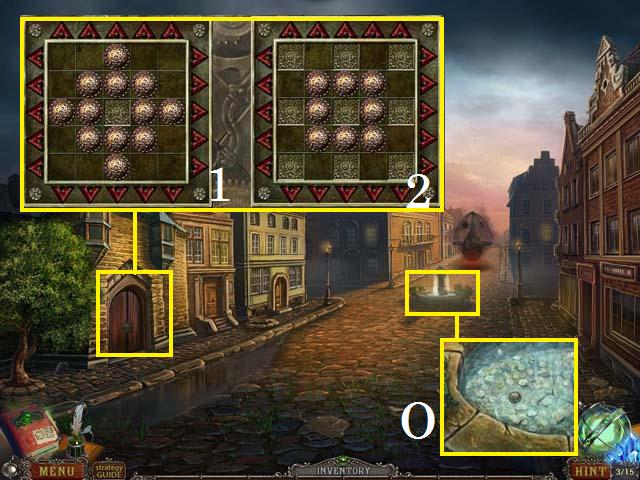
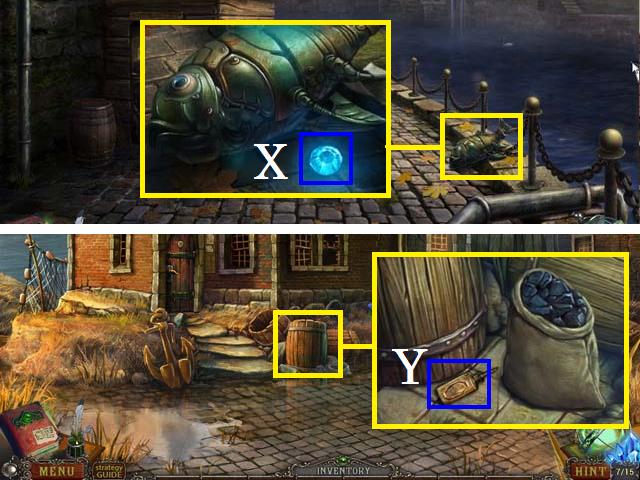
- Zoom into the fountain; use the LANDING NET to fish out the fourth BELL TOWER LOCK PIECE (O). Dip the MUG into the fountain to fill the MUG WITH WATER.
- Zoom into the bell tower door; place the four BELL TOWER LOCK PIECES in the lock. Use the arrows to arrange the pieces as shown in the screenshot (1 and 2).
- Enter the Bell Tower: Ground Floor.
- Zoom into the lamp and collect the UNLIT LAMP (R).
- Return to Our House: Kitchen.
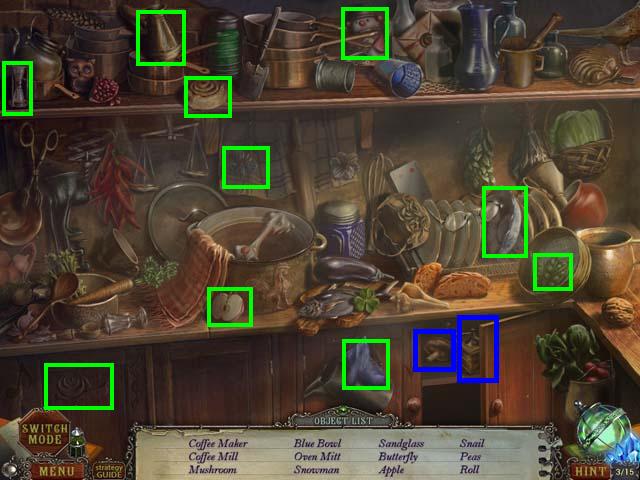
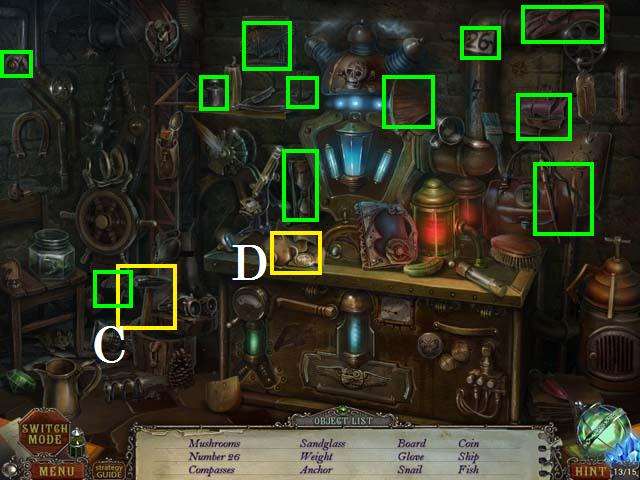
- Zoom into the sparkles to play a HOS.
- Open the cabinet to reveal the Coffee Mill (blue) and the Mushroom (blue).
- Receive the OVEN MITT.
- Zoom into the stove; pour the MUG WITH WATER on the hot handle (S). Use the OVEN MITT to open the door. Light the UNLIT LAMP with the fire to get the LIT LAMP.
- Return to the Bell Tower: Ground Floor.
- Rehang the LIT LAMP.
- After the Scientist’s dialogue, zoom into the wall panel; shimmy the panel off and place the MEDALLION PART (T) in the panel and pick up the MEDALLION.
- Return to the Pub.
- Give the MEDALLION to Mr. Miller.
- Receive the BIG ELECTRON TUBE from Mr. Miller and return to Rudy’s Room.
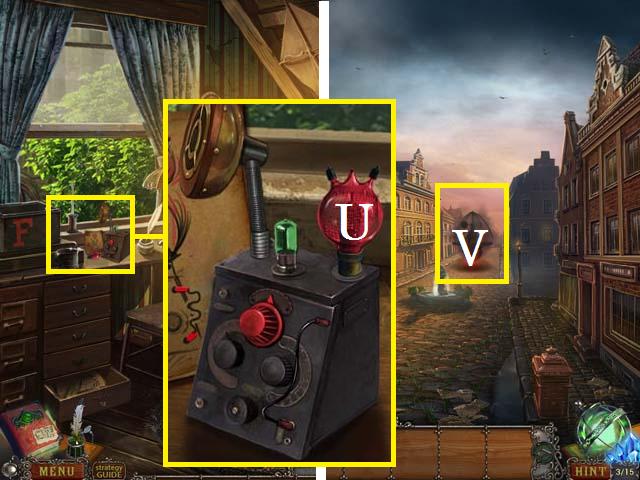
- Zoom into the desk; place the BIG ELECTRON TUBE (U) on the device and collect the REPAIRED ANTIMONSTER DEVICE.
- Return to the Street: Bell Tower.
- Place the REPAIRED ANTIMONSTER DEVICE near the Mechanical Monster (V).
- Move forward to the Bridge Over Canal.
Chapter 3: The Ferryman’s House
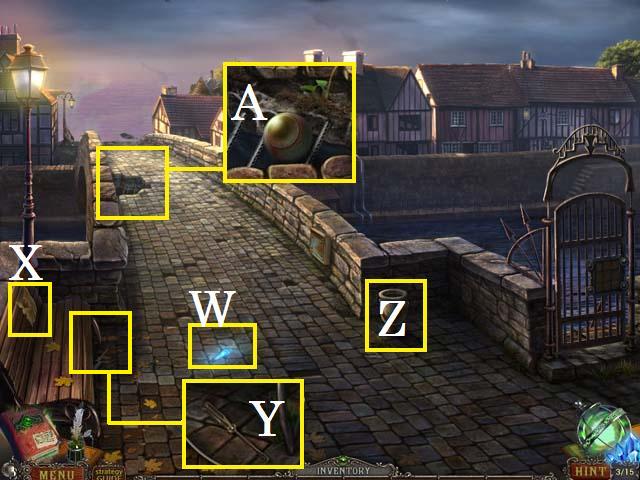
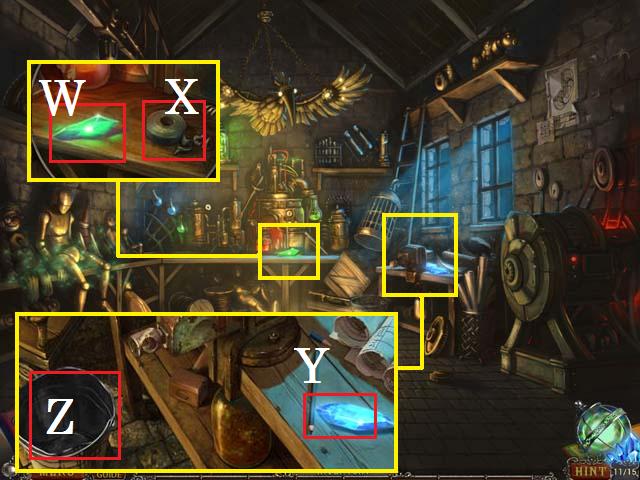
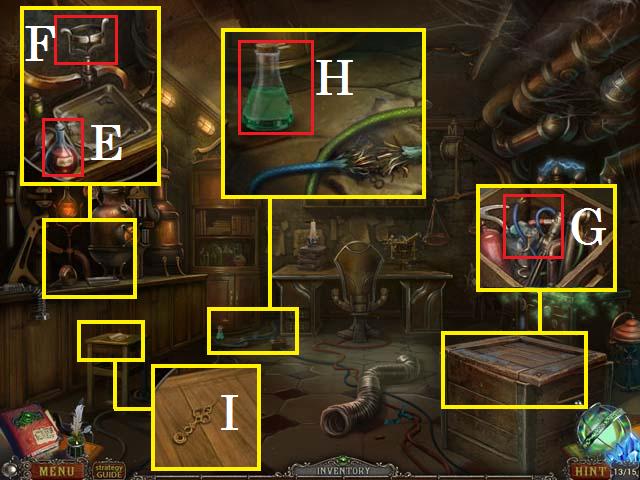
- Collect the fourth Blue Crystal (W).
- Zoom into the bench; inspect the clipping (X).
- Zoom into the bench’s base; collect the SCREWDRIVER (Y).
- Inspect the Urn (Z).
- Zoom into the hole; collect the MECHANICAL EYE (A).
- Cross the bridge to the Dock.
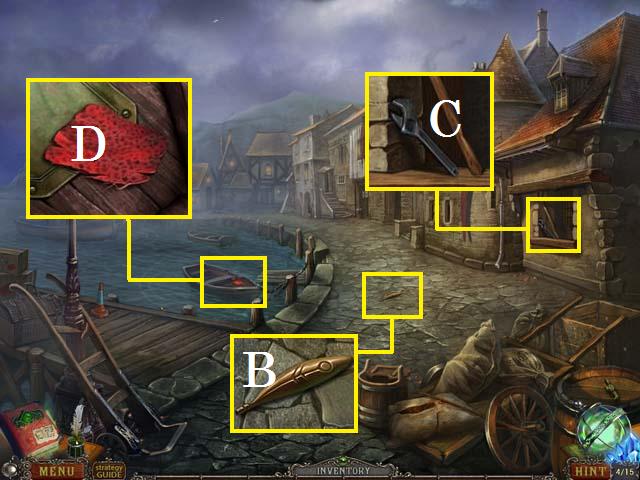
- Zoom into the ground; collect the MECHANICAL FEATHER (B).
- Zoom into the window; collect the WRENCH (C).
- Zoom into the boat; collect the RAG (D).
- Move forward to the Dock: Near Ferryman’s House.
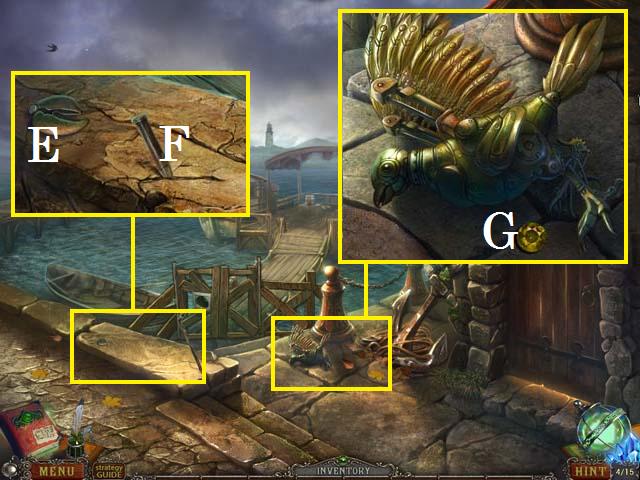
- Zoom into the ledge; collect the MECHANICAL BEAK (E) and place the CHISEL (F) on the ledge.
- Zoom into the mechanical bird; place the MECHANICAL EYE, the MECHANICAL BEAK and the MECHANICAL FEATHER on the bird. Pick up the YELLOW GEM (G).
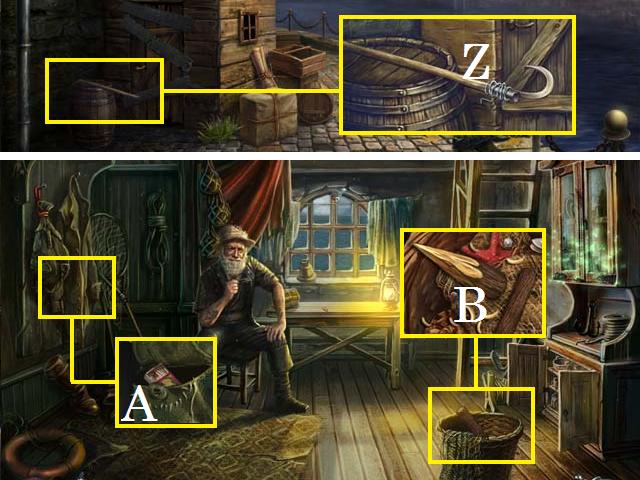
- Enter the Ferryman’s House.
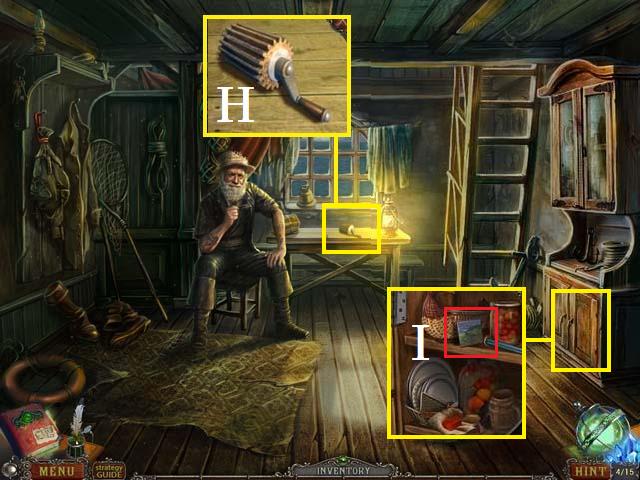
- Speak with the Mr. Barrow.
- Zoom in and collect the WINCH (H).
- Open the cabinet and zoom in; collect the first BRIDGE GATE PUZZLE PIECE (I).
- Exit the Ferryman’s House.
- Zoom into the gate; place the WINCH (J) in the slot, spin its handle, and open the gate.
- Enter the Dock: Near Ferry.
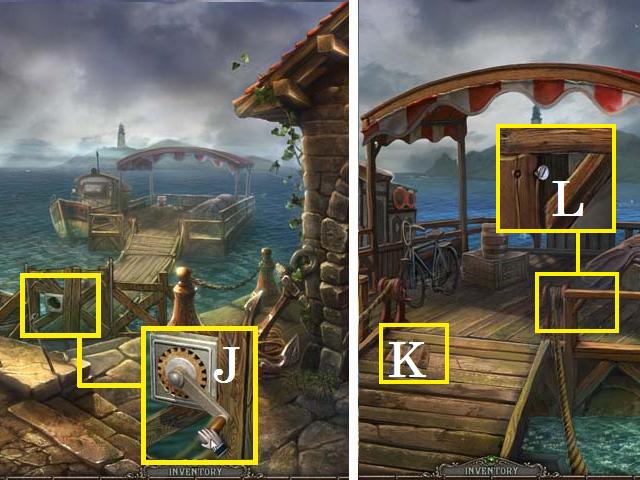
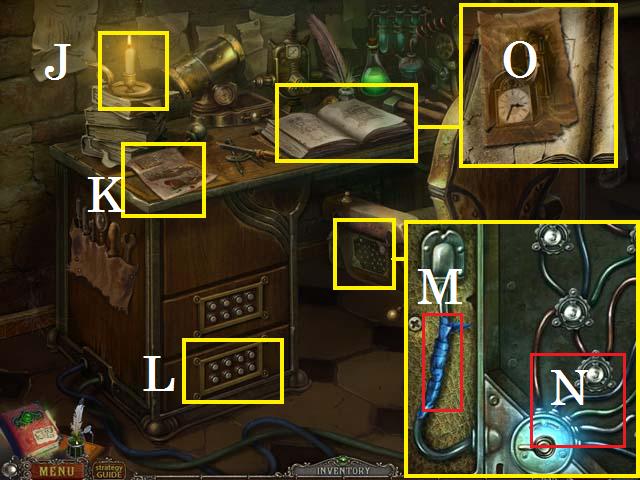
- Examine the newspaper (K).
- Zoom into the canopy; remove and collect the SCREW (L) with the SCREWDRIVER.
- Return to the Bridge over Canal.
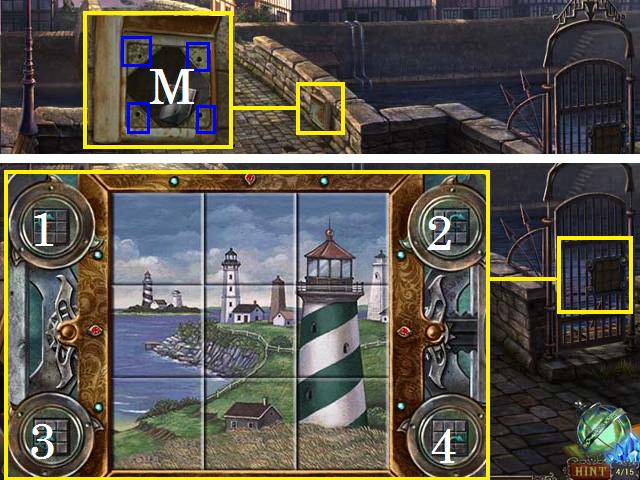
- Zoom into the panel; remove the bolts (blue) with the WRENCH, remove the faceplate, and collect the second BRIDGE GATE PUZZLE PIECE (M).
- Zoom into the gate; place both BRIDGE GATE PUZZLE PIECES.
- The beginning arrangement may be different each play through. We were able to use the following sequence to correctly arrange all of the tiles: 2, 2, 2, 4, 4, 4, 1, 1, 1, 2, 2, and 2. If you study the placements before starting you should be able to use a similar solution.
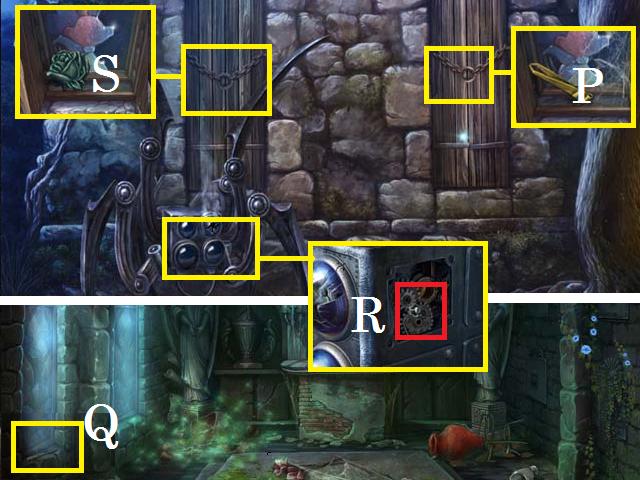
- Move through the gate to the Near Canal.
- Collect the fifth Blue Crystal (N).
- Zoom into the door; collect the PLIERS (O) and the KNIFE (P).
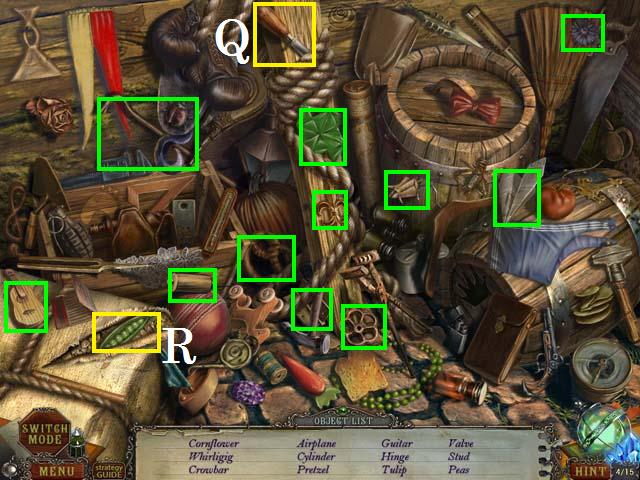
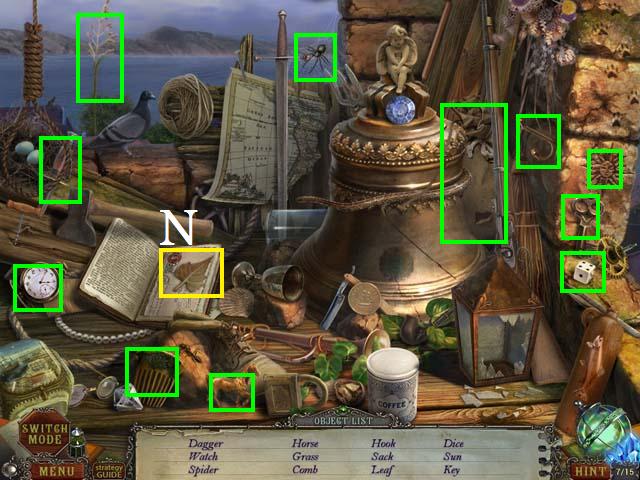
- Zoom into the sparkles to play a HOS.
- Cut the package with the knife (Q) to reveal the Peas (R).
- Receive the TELESCOPE FOCUS WHEEL.
- Return to the Library.
- Speak with Mr. Wilson.
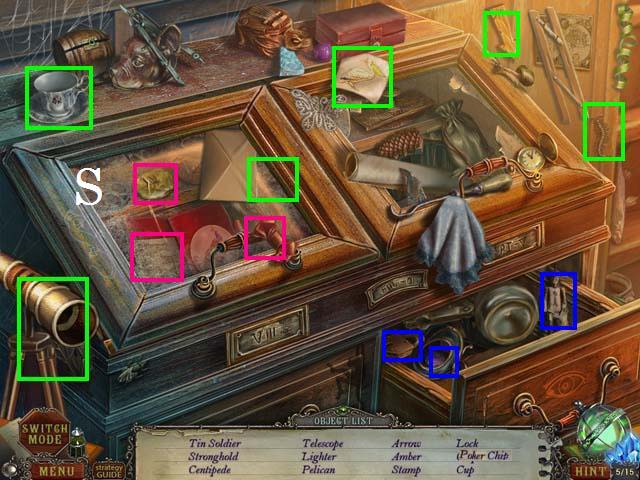
- Zoom into the sparkles to play a HOS.
- Open the drawer to reveal the Tin Soldier (blue), Lock (blue), and the Poker Chip (blue).
- Open the glass (S) in order to collect the Amber, Lighter, Stronghold, and Stamp, all marked in pink.
- Receive the TELESCOPE.
- Exit the Library.
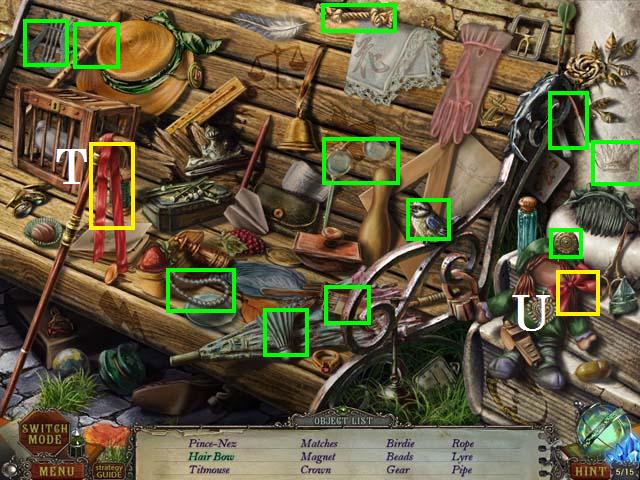
- Zoom into the sparkles to play a HOS.
- Place the ribbon (T) on the doll to get the Hair Bow (U).
- Receive the BELL TOWER DOOR GEAR.
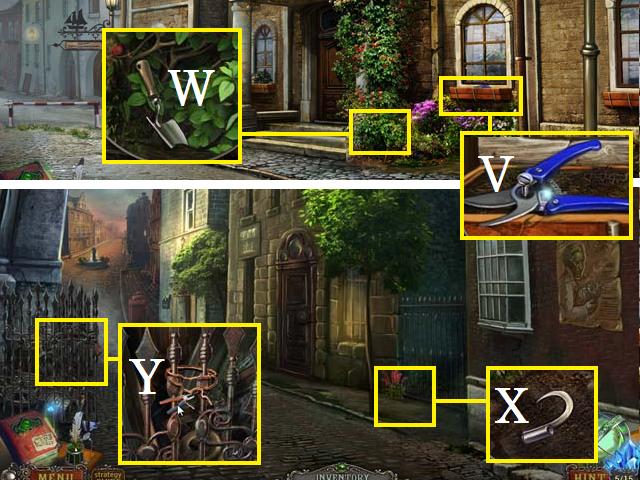
- Zoom into the window box; place the SCREW (V) in the pruning shears, and secure it with the SCREWDRIVER. Collect the PRUNING SHEARS.
- Zoom into the bushes; use the PRUNING SHEARS to clear the brush and collect the TROWEL (W).
- Return to the Street: Near Rudy’s House.
- Zoom into the dirt; use the TROWEL to dig out and collect the HOOK (X).
- Zoom into the gate; remove the WIRE (Y) with the PLIERS.
- Return to the Near Canal.
- Zoom into the door; place the HOOK on the handle (Z) and secure it with the WIRE. Collect the STICK WITH HOOK.
- Return to the Ferryman’s House.
- Zoom into the jacket; slice open the pocket with the KNIFE and collect the MATCHES (A).
- Zoom into the basket; use the KNIFE to whittle the log (B) into a Stake. Collect the STAKE.
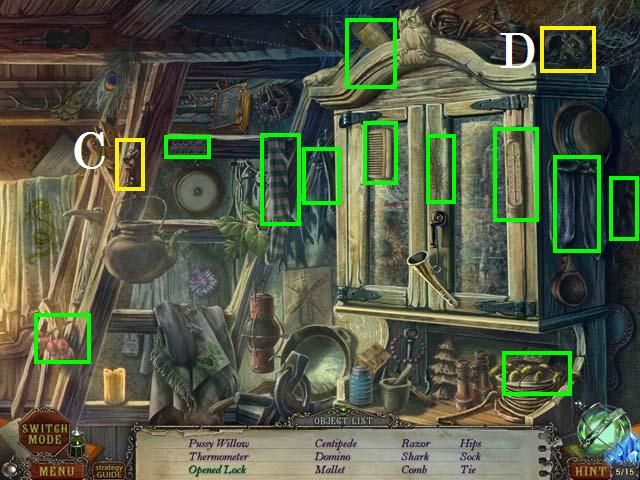
- Zoom into the sparkles to play a HOS.
- Use the key (C) to get the Opened Lock (D).
- Receive the MALLET.
- Move to the Dock: Near Ferry.
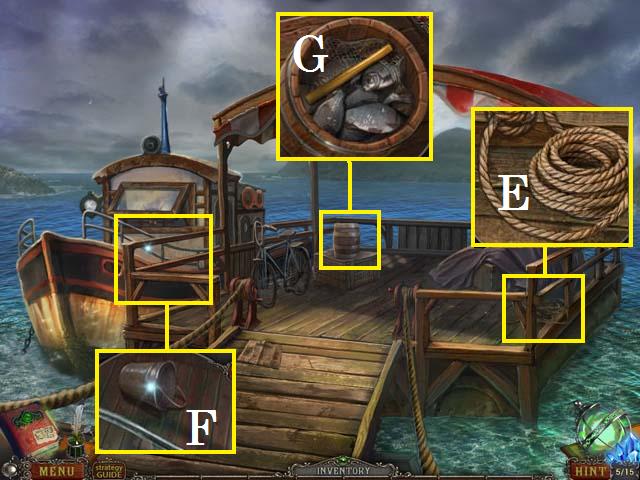
- Zoom into the rope; cut the ROPE (E) with the KNIFE. Collect the ROPE.
- Zoom into the boat; pick up the BUCKET (F) using the STICK WITH HOOK.
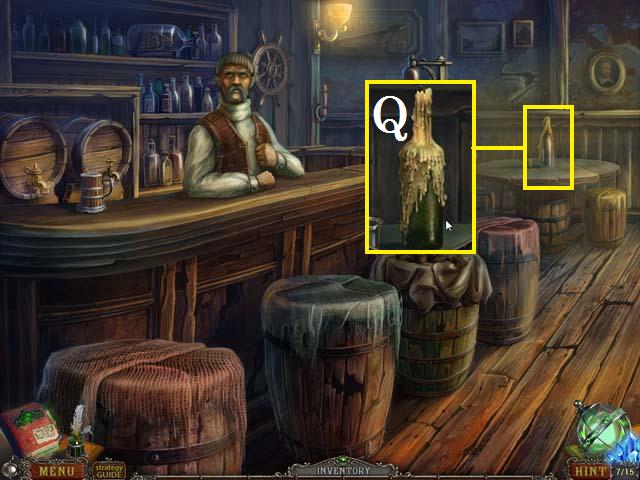
- Zoom into the barrel; use the STAKE and the MALLET to open the top. Slide the lid off and collect the HAMMER HANDLE (G).
- Return to the Dock.
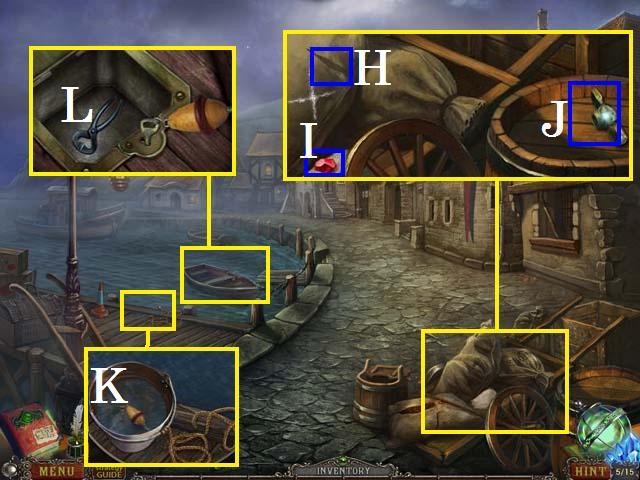
- Zoom into the cart; cut the bag (H) with the KNIFE and collect the RED GEM (I). Place the HAMMER HANDLE in the hammer head (J) and collect the HAMMER.
- Zoom into the water near the dock; place the ROPE and BUCKET on the dock. Use them to collect the BOAT KEY (K).
- Zoom into the boat; open the panel with the BOAT KEY and collect the PINCERS (L).
- Return to the Dock: Near Ferryman’s House.
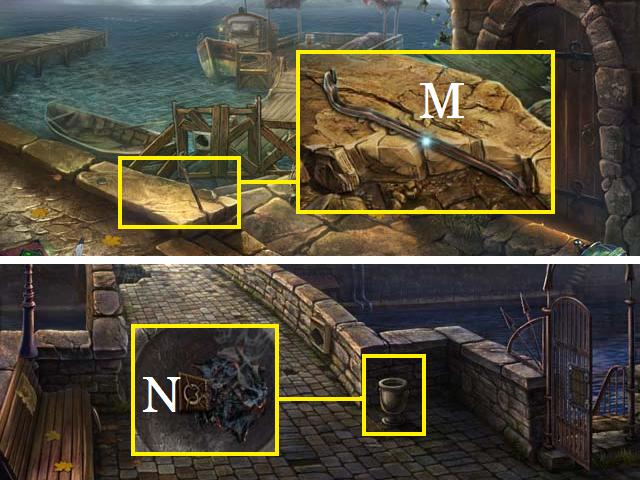
- Zoom into the ledge; use the HAMMER on the CHISEL you placed earlier and collect the CROWBAR (M).
- Return to the Bridge over Canal.
- Zoom into the urn; burn the debris with the MATCHES and collect the first BELL TOWER DOOR PUZZLE PIECE (N).
- Return to the Street: Near Rudy’s House.
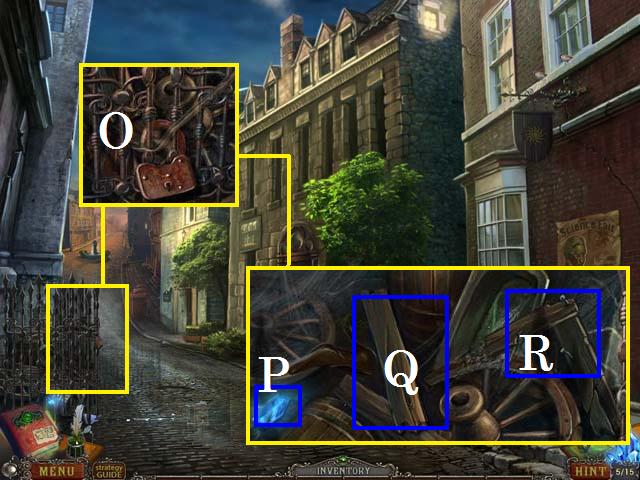
- Zoom into the gate; use the CROWBAR to remove the lock (O).
- Collect the sixth Blue Crystal (P) and the first set of BOARDS (Q).
- Use the PINCERS to collect the NAILS (R).
- Return to the Street: Near Bell Tower.
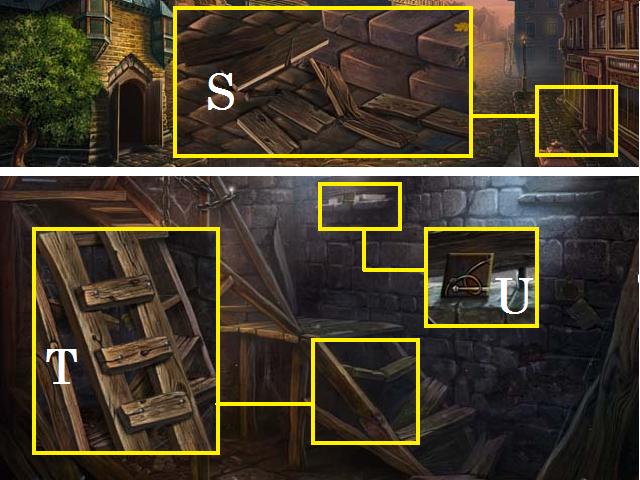
- Zoom into the steps; smash the broken box with the HAMMER and collect the second set of BOARDS (S).
- Enter the Bell Tower: Ground Floor.
- Zoom into the stairs; place the BOARDS and NAILS (T) on the broken steps. Secure the nails with the HAMMER.
- Zoom into the window; collect the second BELL TOWER DOOR PUZZLE PIECE (U).
- Climb the stairs to the Bell Tower: Top Floor.
- Zoom into the top stair; collect the BIG MECHANICAL EYE (V).
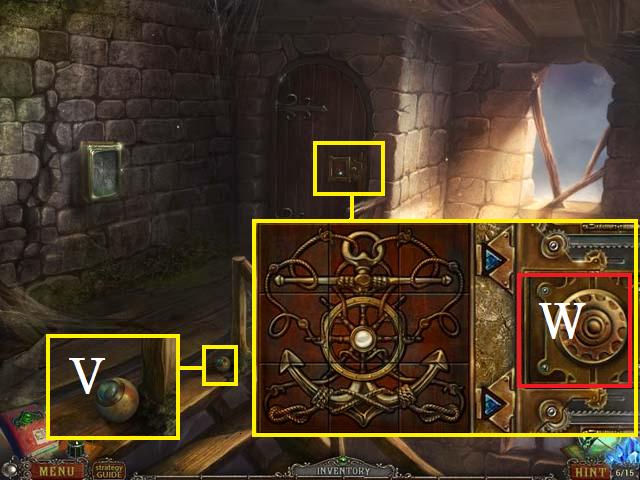
- Move the bird and zoom into the door; place both BELL TOWER DOOR PUZZLE PIECES in the lock.
- Place the BELL TOWER DOOR GEAR as well (W). The beginning configuration for this puzzle is random. Use the screenshot as a key to properly arrange the tiles.
- Enter the Bell Tower: Top Room.

- Zoom into the fallen bell; collect the STONE (X).
- Return to the Bell Tower: Top Floor.
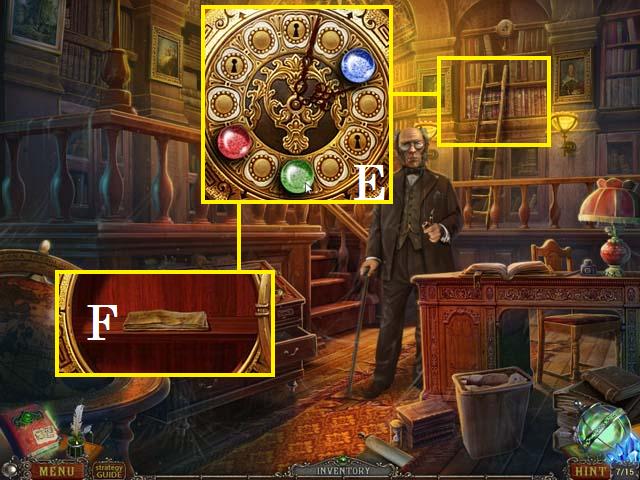
- Zoom into the panel (H); clean the glass with the RAG, then break it with the STONE. Collect the CHEST KEY (blue) and the GRATING KEY (blue).
- Return to the Bell Tower: Top Room.
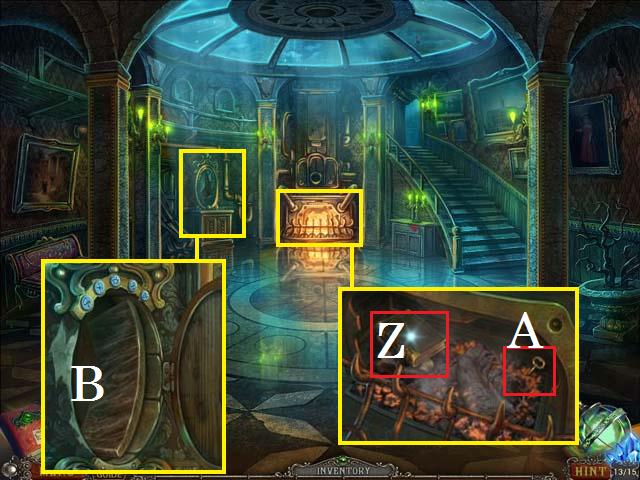
- Zoom into the chest; place the CHEST KEY in the lock (Z).
- Zoom into the gate; flip the lock cover and place the GRATING KEY in the lock (A). Turn the key and open the gate.
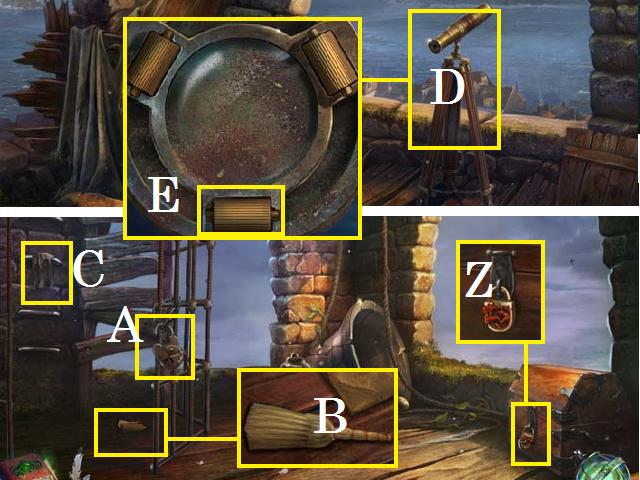
- Zoom into the ground; move the letter and collect the BROOM (B).
- Collect the DRY RAG (C).
- Open the hatch and climb up to the Bell Tower: Balcony.
- Place the TELESCOPE in the window (D).
- Zoom into the TELESCOPE; place the TELESCOPE FOCUS WHEEL (E) in the slot.
- Zoom into the sparkles to play a HOS.
- Smash the lantern’s glass with the rock (F) to get the Candle (G).
- Receive the STAMP.
- Return to the Street: Bell Tower.
- Place the DRY RAG in the fountain (H) to receive the WET RAG.
- Return to the Library.
- Zoom into the desk; place the STAMP in the container (I). Move the STAMP to reveal and collect the first TELESCOPE LENS (J).
- Exit the Library.
- Zoom into the sparkles to play a HOS.
- Open the cage with the key (K) to get at the Dove (L).
- Receive the second TELESCOPE LENS.
- Return to the Bell Tower: Balcony.
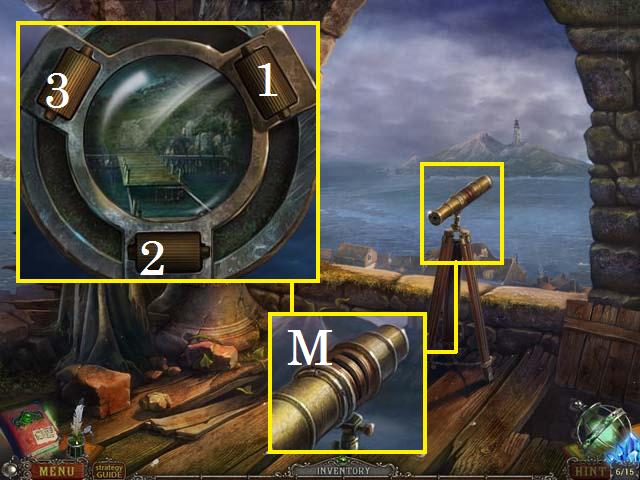
- Zoom into the telescope; place both TELESCOPE LENS (M) and zoom in again.
- Clean the lens with the WET RAG. Focus the telescope by spinning ring (1) three times, ring (2) three times, and ring (3) three times.
Chapter 4: The Road to the Island
- Zoom into the sparkles to play a HOS.
- Open the book to reveal the Leaf (N).
- Receive the SACK WITH A HOLE.
- Collect the seventh Blue Crystal (O).
- Descend to the Bell Tower: Ground Level.
- Zoom into the spider web (P); clear the web with the BROOM.
- Return to the Pub.
- Zoom into the table; light the CANDLE (Q) with the MATCHES and remove it with the KNIFE.
- Exit the Pub.
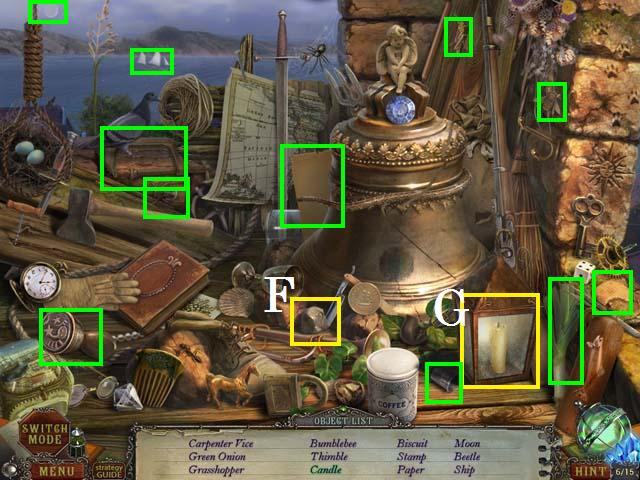
- Zoom into the Sparkles to play a HOS.
- Open the cart to reveal the Feather (R).
- Receive the NEEDLE AND THREAD.
- Zoom into the barrel; hang the SACK WITH A HOLE over the barrel. Fix the hole (S) with the NEEDLE AND THREAD and then pull the sack down.
- Move down to Near the Canal.
- Zoom into the door; remove the boards with the CROWBAR and open the door. Place the LIT CANDLE inside the door and collect the MECHANICAL FIN (T).
- Zoom into the fish (U); place the BIG MECHANICAL EYE and MECHANICAL FIN on the fish.
- Return to the Ferryman’s House.
- Speak with Mr. Barrow and receive the LIBRARY HIDING PLACE KEY and the MECHANICAL FIN.
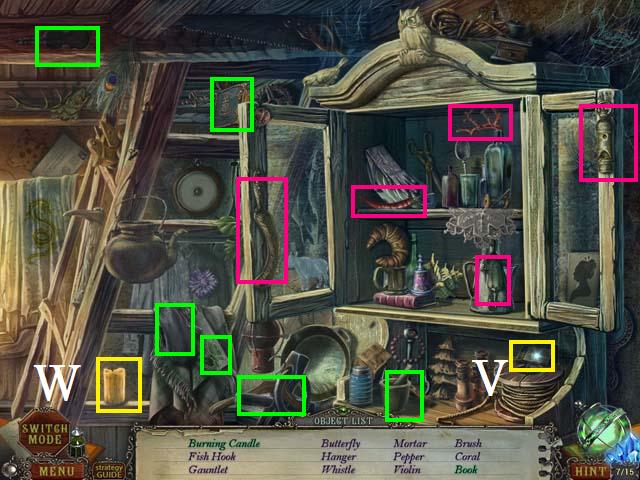
- Zoom into the sparkles to play a HOS.
- Open the cabinet to reveal the Fish hook, Whistle, Pepper, Brush, and Coral (blue).
- Use the matches (V) to get the Burning Candle (W).
- Receive the LOGBOOK.
- Give Mr. Barrow the LOGBOOK.
- Return to the Near the Canal.
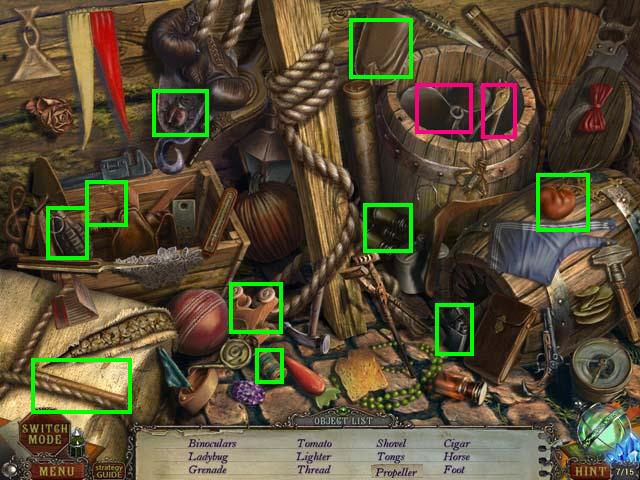
- Zoom into the sparkles to play a HOS.
- Move the barrel lid to reveal the Tongs and Propeller (pink).
- Receive the SHOVEL.
- Zoom into the fish; place the MECHANICAL FIN on the fish and collect the BLUE GEM (X).
- Return to Street: Near Pub.
- Zoom into the barrel; use the SHOVEL to move the coal into the bag. Collect the RUST REMOVER (Y) and the SACK WITH COAL.
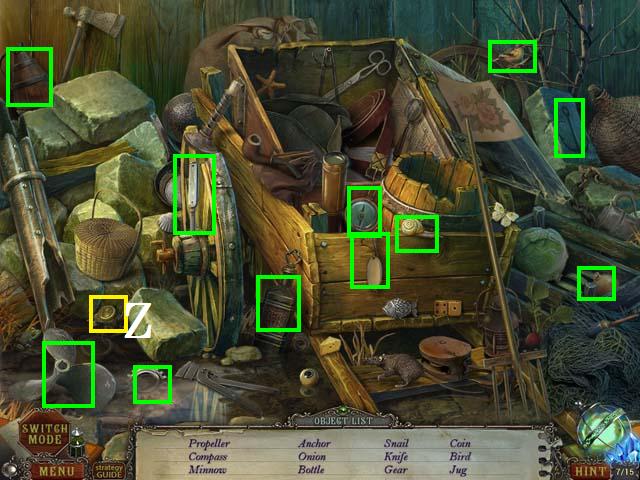
- Zoom into the sparkles to play a HOS.
- Move the stone to reveal the Coin (Z).
- Receive the COMPASS.
- Return to the Bell Tower: Top Room.
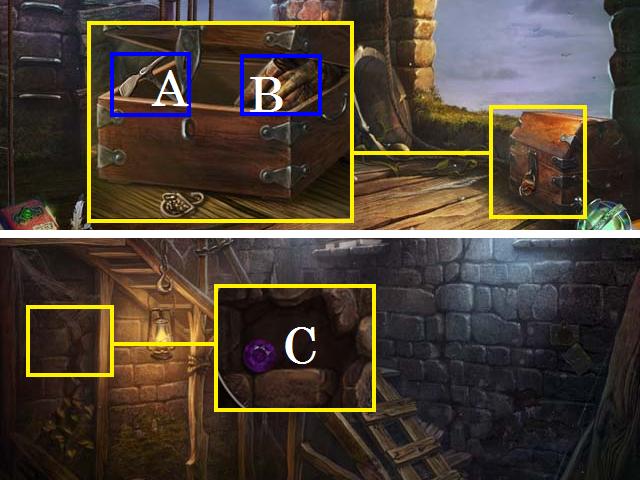
- Zoom into the chest and use the RUST REMOVER on the lock; collect the PICK (A) and the NAVIGATION MAPS (B).
- Return to the Bell Tower: Ground Floor.
- Zoom into the wall; use the PICK to remove the stone and collect the VIOLET GEM (C).
- Exit the Bell Tower.
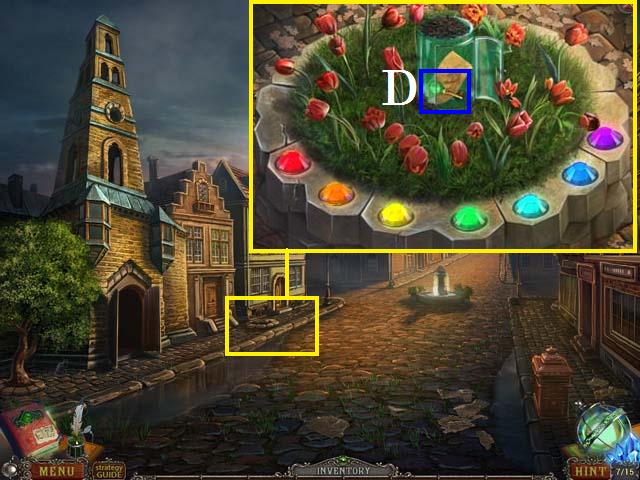
- Zoom into the planter; place the YELLOW GEM, VIOLET GEM, RED GEM, and BLUE GEM in the planter.
- Arrange them as they are shown in the screenshot. Open the glass door; collect the paper and the second LIBRARY HIDING PLACE KEY (D).
- Return to the Library.
- Speak with Mr. Wilson and receive the third LIBRARY HIDING PLACE KEY.
- Zoom into the hiding place; place the three LIBRARY HIDING PLACE KEY as shown in the screenshot (E).
- Open the latch and collect the ISLAND MAP (F).
- Return to the Ferryman’s House.
- Give the ISLAND MAP, the NAVIGATION MAPS, the COMPASS, and the SACK WITH COAL to Mr. Barrow.
Chapter 5: The Secret Island
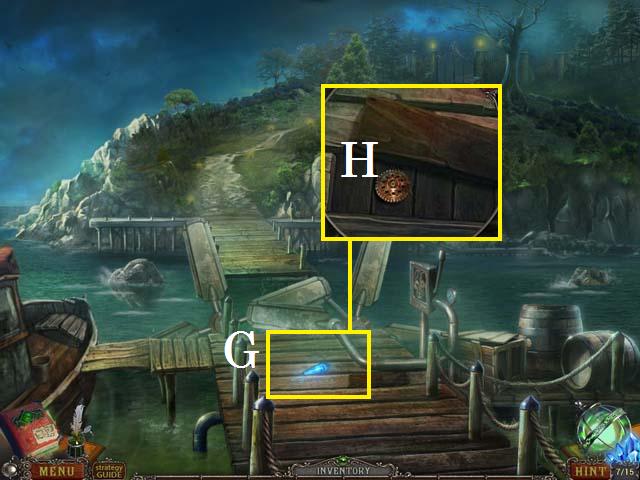
- Zoom into the dock; collect the eighth Blue Crystal (G) and shimmy the plank away. Collect the GEAR (H).
- Take a left to Island Dock on the Boat.
- Collect the Paul Card (I).
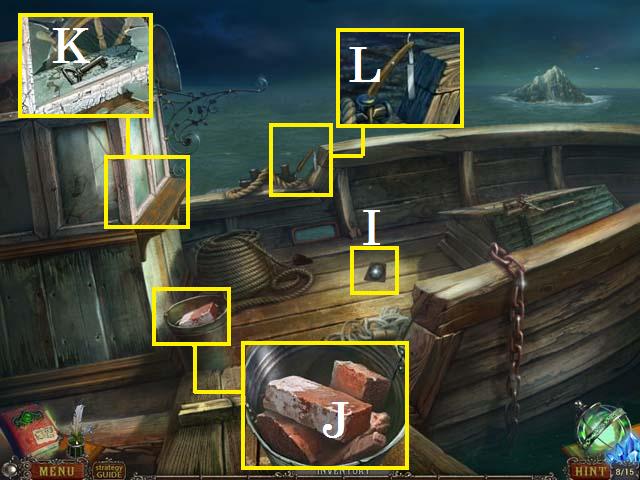
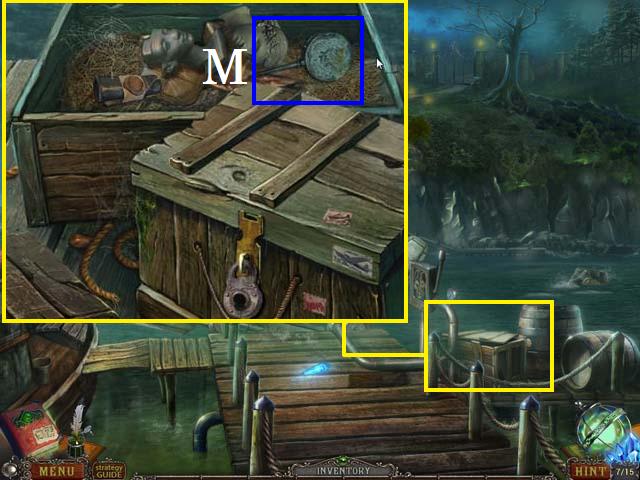
- Zoom into the bucket; collect the BRICK (J).
- Zoom into the window; break the glass with the BRICK and collect the BOAT KEY (K).
- Zoom into the rail; collect the RAZOR (L).
- Exit the Island Dock on the Boat.
- Zoom into the crate; cut the crate’s rope with the RAZOR and open the lid. Move the statue and collect the OILCAN (M).
- Return to the Island Dock on the Boat.
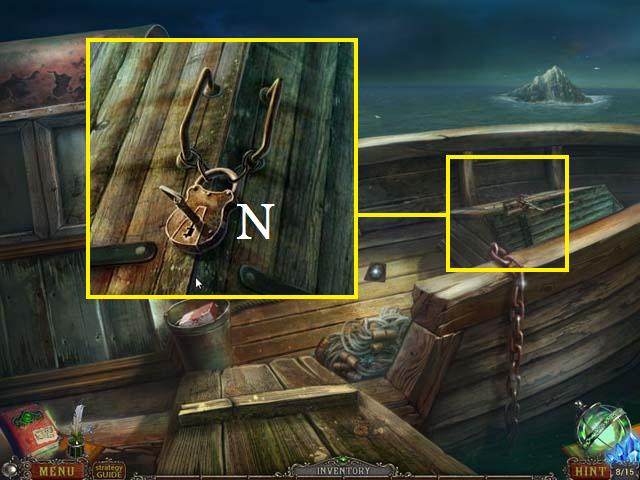
- Zoom into the cover; place the BOAT KEY in the lock (N) and use the OILCAN on the lock.
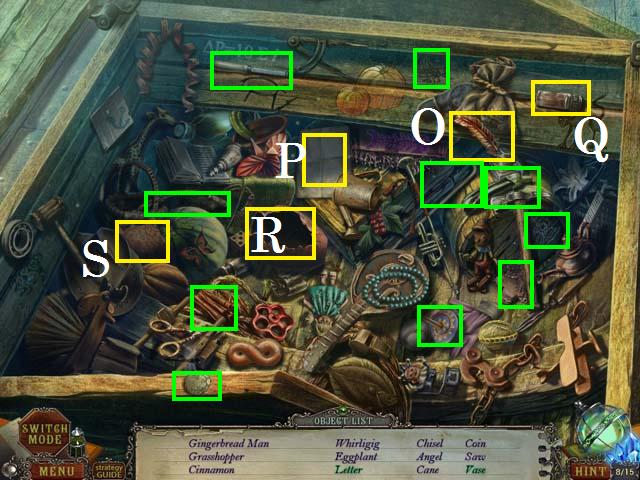
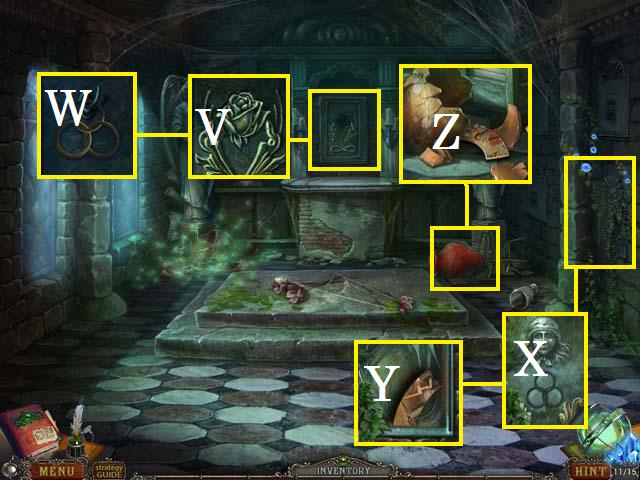
- Zoom into the sparkles to play a HOS.
- Open the cover.
- Use the pen (O) on the paper (P) to write the Letter.
- Use the glue (Q) on the broken vase (R) and place the vase piece (S) to complete the Vase.
- Receive the OLD COIN.
- Exit the Island Dock on the Boat.
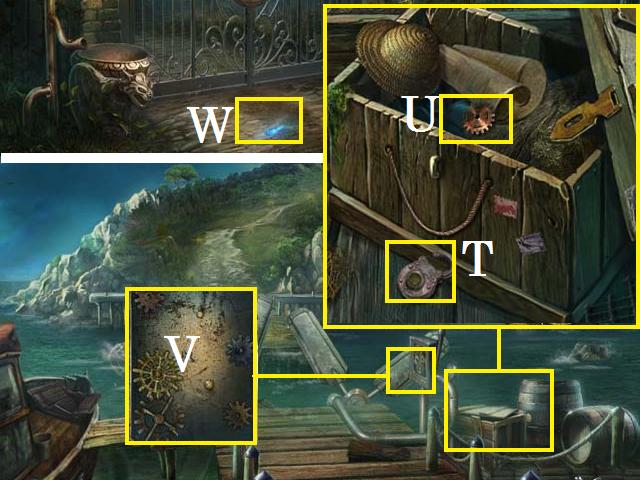
- Zoom into the crate; place the OLD COIN in the lock (T) and open the crate. Move the straw and the hat; collect the second GEAR (U).
- Zoom into the control panel; place the two GEARS in the panel (V) and cross the bridge.
- Collect the ninth Blue Crystal (W).
- Take the path to the right to the Cemetery.
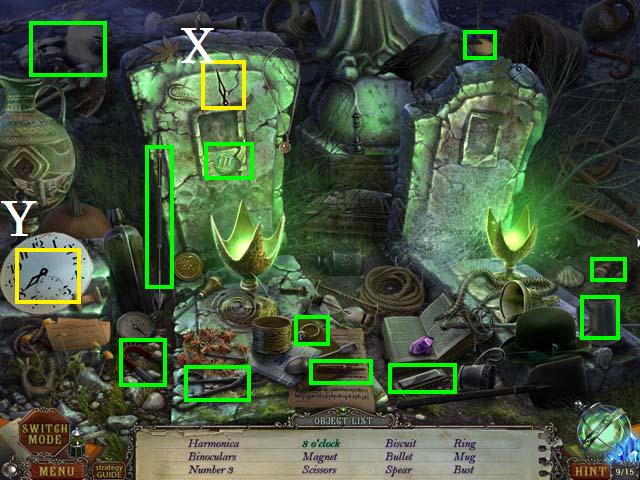
- Zoom into the sparkles to play a HOS.
- Place the minute hand (X) on the clock (Y) to get the Eight O’clock.
- Receive the first CRYPT PUZZLE PIECE.
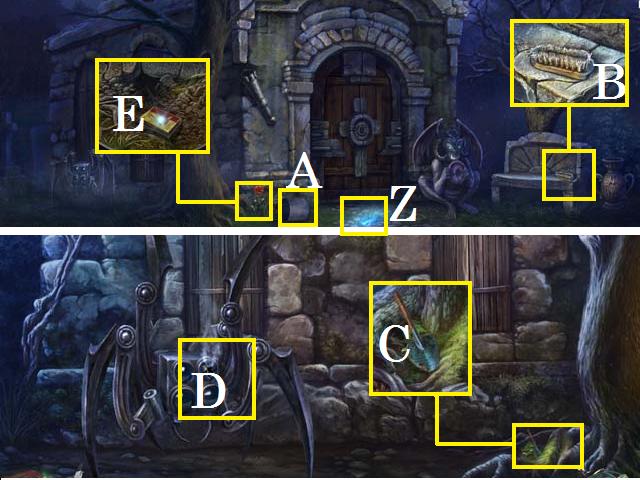
- Move forward to the Cemetery: Near Crypt.
- Collect the tenth Blue Crystal (Z) and the EMPTY BUCKET (A).
- Zoom into the bench; collect the BRUSH (B).
- Take a left to the Cemetery: Crypt Side View.
- Zoom into the tree roots; move the leaves and collect the TROWEL (C).
- Examine the machine (D).
- Back up one scene.
- Zoom into the corner of the crypt; use the TROWEL in the dirt and then collect the MATCHES (E).
- Return to the Orphanage Near Gate.
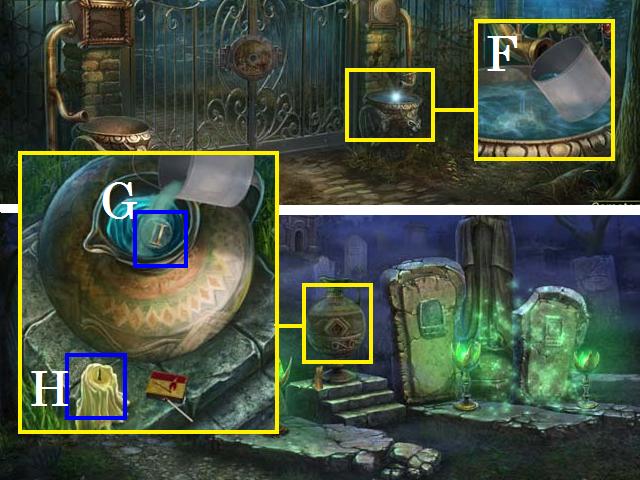
- Zoom into the water; put the EMPTY BUCKET in the water (F) to receive the BUCKET WITH WATER.
- Return to the Cemetery.
- Zoom into the pitcher; fill the pitcher with the BUCKET WITH WATER and collect the second CRYPT PUZZLE PIECE (G).
- Light the candle with the MATCHES; and collect the LIT CANDLE (H).
- Return to the Cemetery: Near Crypt.
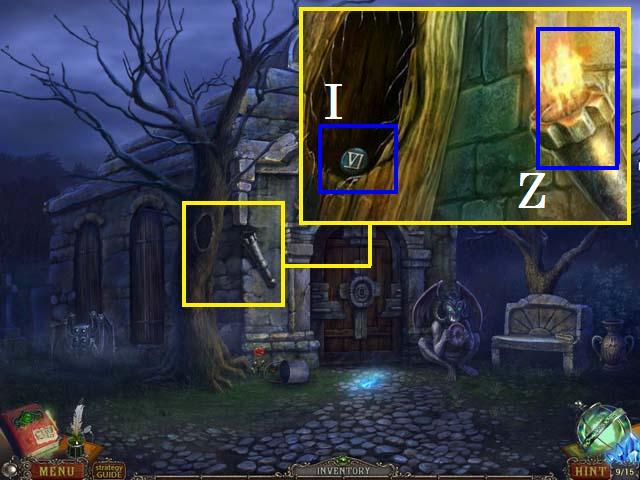
- Zoom into the torch; light the torch (Z) with the LIT CANDLE.
- Collect the third CRYPT PUZZLE PIECE (I).
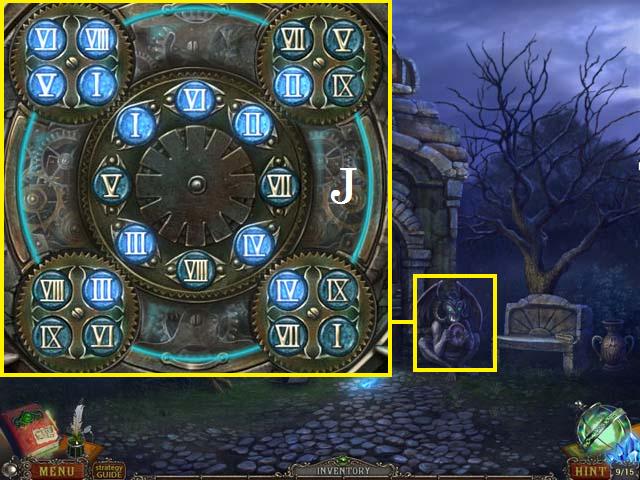
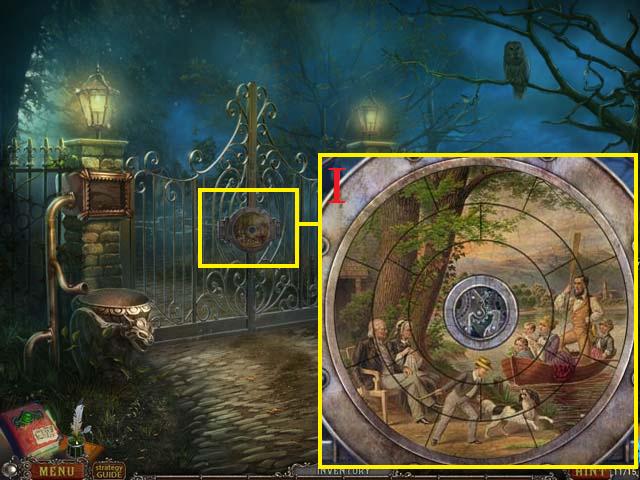
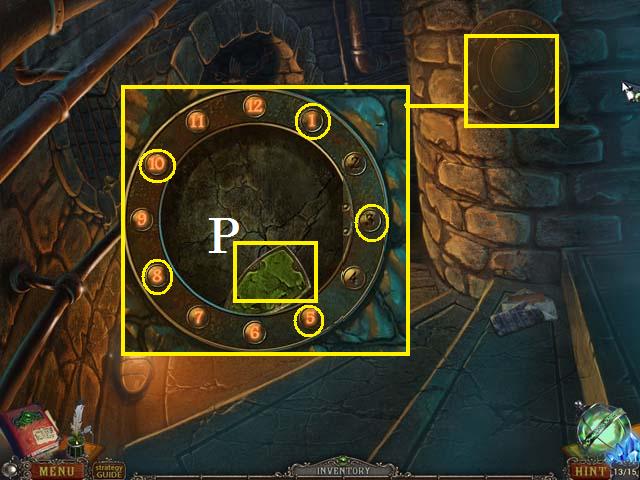
- Zoom into the statue; place all three CRYPT PUZZLE PIECES in the lock.
- Arrange the dials as they are shown in the screenshot (J). Hint: set the middle dial first, followed by the four outer dials.
- Enter the Crypt.
- Zoom into the steps; collect the eleventh Blue Crystal (K) and the ROD (L).
- Return to the Cemetery.
- Zoom into the lion head; move the head with the ROD and collect the PINCERS (M).
- Zoom into the gravestone; use the BRUSH to clean the plaque (N), and then spell out P. A. U. L. with the buttons. Collect the first GATE RING PART (O).
- Return to the Cemetery: Crypt Side View.
- Zoom into the window; cut the chain with the PINCERS, open the shutters, and collect the TWEEZERS (P).
- Return to the Crypt.
- Collect the SCREWDRIVER (Q).
- Return to the Cemetery: Crypt Side View.
- Zoom into the machine.
- Remove the screws with the SCREWDRIVER and open the panel. Remove the bullet with the TWEEZERS (R).
- Zoom into the window; cut the chain with the PINCERS and open the shutters. Collect the METAL ROSE (S).
- Return to the Crypt.
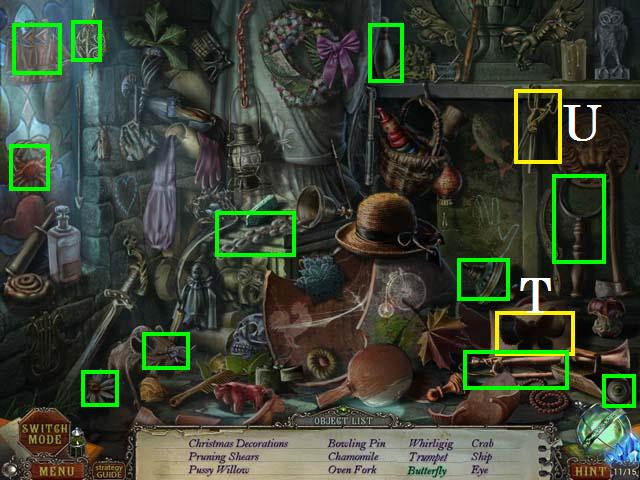
- Zoom into the sparkles to play a HOS.
- Cut out a Butterfly (T) with the scissors (U).
- Receive the PRUNING SHEARS.
- Zoom into the mantel; place the METAL ROSE in the space (V). Collect the METAL RINGS (W).
- Zoom into the side wall; remove the vines with the PRUNING SHEARS. Place the METAL RINGS in the space (X). Open the lid and collect the second GATE RING PART (Y).
- Zoom into the vase; break it with the ROD, move the broken piece and collect the third GATE RING PART (Z).

- Zoom into the sparkles to play a HOS.
- Finish the Palm (A) drawing with the chalk (B).
- Receive the fourth GATE RING PART.
- Return to the Cemetery.

- Zoom into the sparkles to play a HOS.
- Clear the cobwebs with the brush (Q) to reveal the Number 12 (C) and the Sun (D).
- Receive the MECHANICAL SCARAB BODY.
- Return to the Gate.
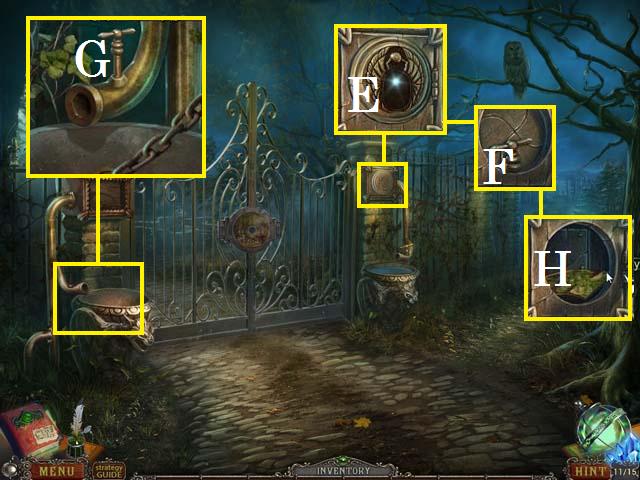
- Zoom into the panel; place the MECHANICAL SCARAB BODY (E) in the slot and collect the VALVE (F).
- Zoom into the left container; place the VALVE in it and spin the valve (G).
- Zoom back into the panel; collect the fifth GATE RING PART (H).
- Zoom into the gate lock; place all five GATE RING PARTS and arrange them as they are shown in the screenshot (I).
- Enter the Orphanage: Near Old Fountain.
Chapter 6: The Orphanage Yard
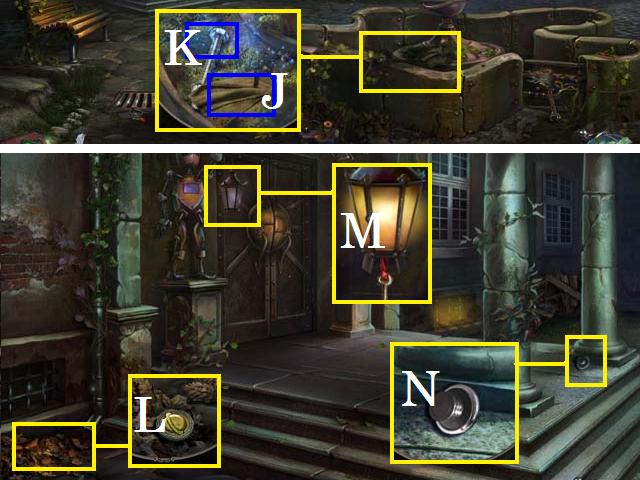
- Zoom into the fountain; collect the RAG (J) and then the BOLT WITH NUT (K).
- Move to the Orphanage: Front Porch.
- Zoom into the leaves; move them around and collect the first PLANET MEDALLION (L).
- Zoom into the lamp; place the LIT CANDLE in the lamp (M) and shut the glass.
- Zoom into the bottom of the pillar; collect the HANDLE (N).
- Back up one scene and move to the right to Orphanage: Near Old Shed.
- Zoom into the stairs; brush the dust away and collect the second PLANET MEDALLION (O).
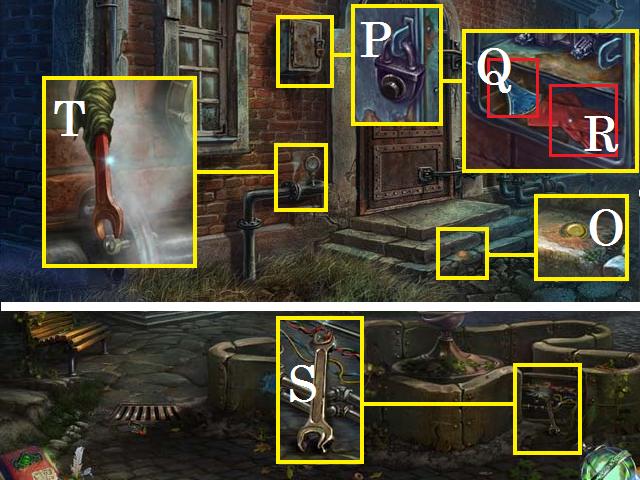
- Zoom into the panel; place the HANDLE on the lock (P). Open the panel and collect the first FOUNTAIN PUZZLE PIECE (Q) and the RUBBER GLOVES (R).
- Return to the Orphanage: Near Old Fountain.
- Zoom into the fountain; use the RUBBER GLOVES to collect the WRENCH (S).
- Return to the Orphanage: Near Old Shed.
- Zoom into the pipe; place the BOLT WITH NUT (T) in the hole. Use the WRENCH with the RAG to tighten the bolt.
- Enter the Old Warehouse.
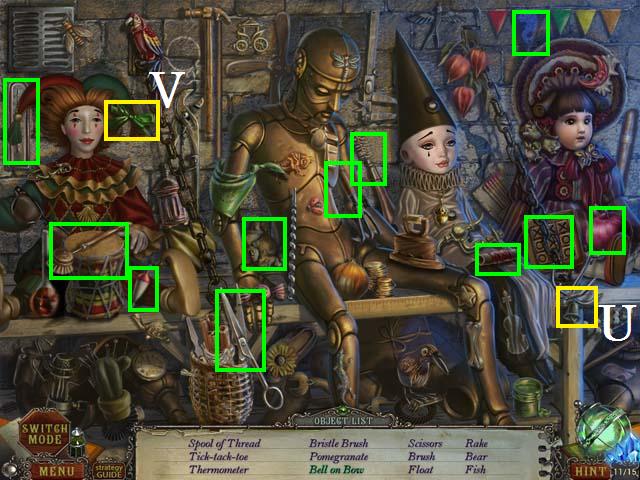
- Zoom into the sparkles to play a HOS.
- Place the Bell (U) on the Bow (V).
- Receive the SCISSORS.
- Zoom into the table; collect the first CRYSTAL (W) and the INSULATING TAPE (X).
- Zoom into the vice; collect the twelfth Blue Crystal (Y) and the EMPTY BUCKET (Z).
- Return to the Orphanage: Near Old Fountain.

- Zoom into the grate; use the SCISSORS to cut loose the GAUGE KEY (A).
- Return to the Orphanage: Front Porch.
- Zoom into the lamp; use the SCISSORS to cut loose the MANHOLE KEY (B).
- Return to the Old Warehouse.
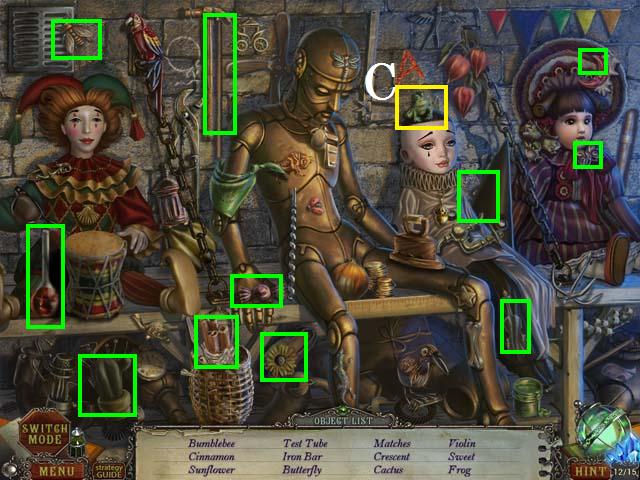
- Zoom into the sparkles to play a HOS.
- Move the hat to reveal the Frog (C).
- Receive the IRON BAR.
- Zoom into the vise; use the IRON BAR to open the vise (D). Collect the LOCK PART (E).
- Zoom into the manhole; place the LOCK PART (F) in the slot, and then use the MANHOLE KEY to open the lock. Collect the second CRYSTAL (G).
- Exit the Old Warehouse.
- Zoom into the pipe; place the GAUGE KEY (H) in the hole. Press the GAUGE KEY and collect the third PLANET MEDALLION (I).
- Return to the Orphanage: Front Porch.
- Zoom into the strange machine (J); place the two CRYSTALS in the machine.
- Zoom back in to the machine; place the three PLANET MEDALLIONS in the lock. Arrange them as shown in the screenshot (K).
- Press the red button (L).
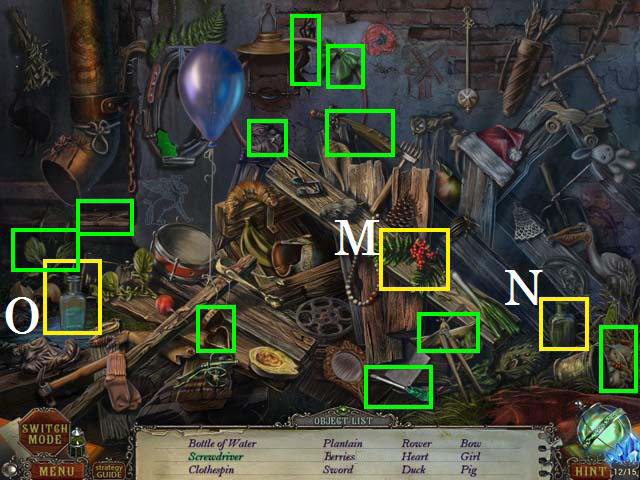
- Zoom into the sparkles to play a HOS.
- Move the blanket to reveal the Berries (M).
- Place the bottle (N) under the pipe (O) to get the Bottle of Water.
- Receive the CROSSHEAD SCREWDRIVER.
- Enter the Orphanage: Lobby.
Chapter 7: The Orphanage
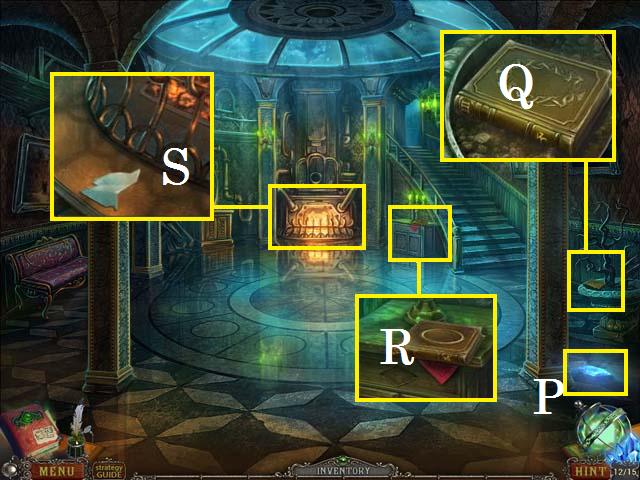
- Collect the thirteenth Blue Crystal (P).
- Zoom into the planter; collect BOOK 3 (Q).
- Zoom into the cabinet; collect BOOK 4 (R).
- Zoom into the fireplace; collect the first MIRROR SPLINTER (S).
- Climb the stairs to the Orphanage: Hall.
- Zoom into the leak; place the EMPTY BUCKET (T) under the drip to receive the BUCKET WITH WATER.
- Zoom into the table; collect the second MIRROR SPLINTER (U) and BOOK 2 (V).
- Zoom into the painting; collect the third MIRROR SPLINTER (W).
- Zoom into the sparkles to play a HOS.
- Use the screwdriver (X) to remove the Screw (Y).
- Receive the CROWBAR.
- Go back downstairs.
- Zoom into the fireplace and pour the BUCKET OF WATER on the fire; collect BOOK 1 (Z) and the CLOCK KEY (A).
- Zoom into the MIRROR; place all three MIRROR SPLINTERS in the mirror, then collect the first TABLE BOARD (B).
- Climb the stairs again.
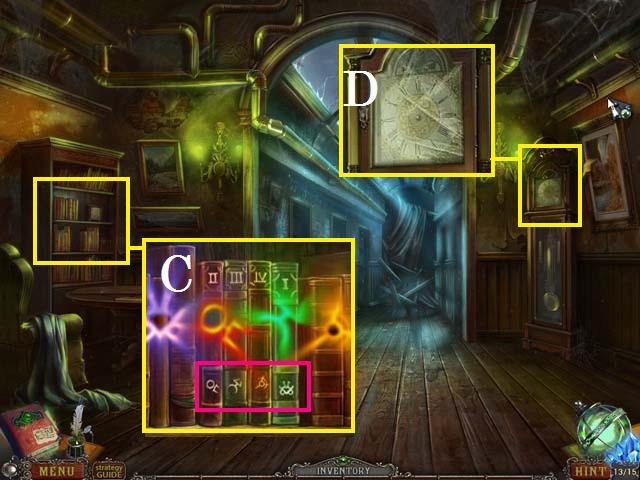
- Zoom into the bookshelf; place BOOK 1, BOOK 2, BOOK 3, and BOOK 4 on the shelf (C). Pay attention to the symbols (pink).
- Zoom into the clock; unlock the clock face (D) with the CLOCK KEY.
- Return downstairs.
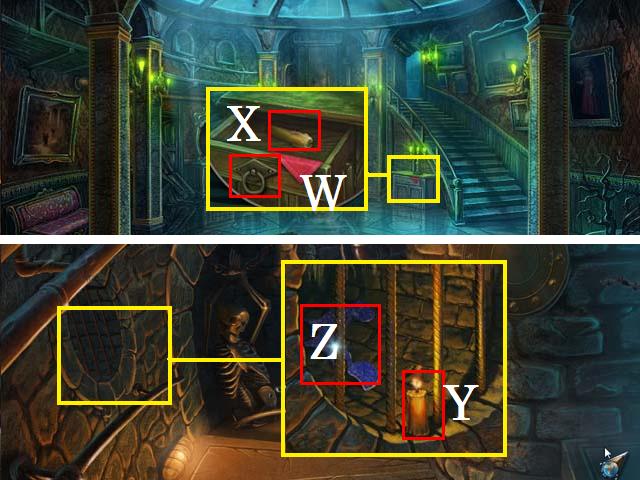
- Zoom into the mirror and then into the buttons; press the buttons in order (1-4).
- Descend the staircase to the Orphanage: Downstairs.
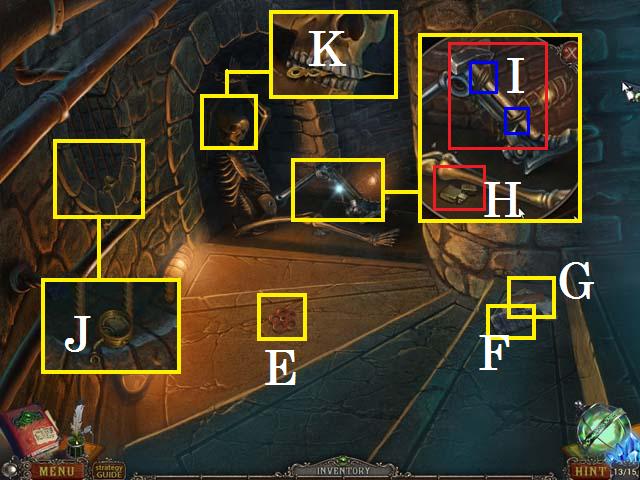
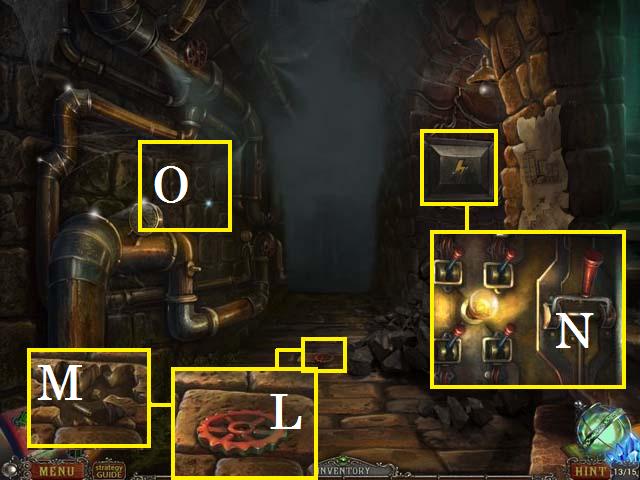
- Collect the first VALVE (E), the OVEN MITT (F), and the note (G).
- Zoom into the skeleton’s leg; cut the string (blue) with the SCISSORS. Collect the LIGHTER (H) and the HAMMER (I).
- Zoom into the tunnel; collect the first PRESSURE GAUGE (J).
- Zoom into the skeleton’s skull; collect the MINUTE HAND (K).
- Move to the Orphanage: Basement.
- Zoom into the ground; collect the second VALVE (L). Use the HAMMER to break up the brick and then collect the first SAFETY FUSE (M).
- Open the electrical panel and zoom in; pull the lever (N).
- Zoom into the wall (O); place both VALVES.
- Return to the Orphanage: Lobby.
- Zoom into the sparkles to play a HOS.
- Slice the painting with the knife (P) to reveal the Tiger (Q).
- Receive the second PRESSURE GAUGE.
- Return to the Orphanage: Basement.
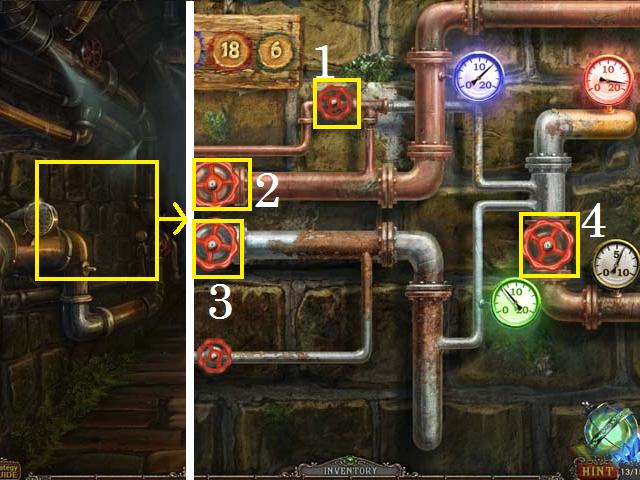
- Zoom into the wall; place the two PRESSURE GAUGES on the wall.
- Use the following sequence to set all the gauges properly: (1) five times, (2) two times, (3) three times, and (4) one time. (All to the right).
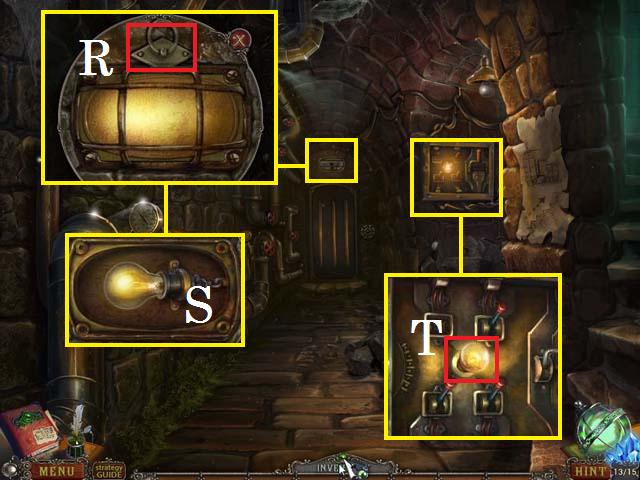
- Zoom into the light; collect the DRAWER HANDLE (R).
- Use the SCREWDRIVER to remove the light cover. Use the OVEN MITT to collect the BULB (S).
- Zoom into the electrical panel; replace the broken BULB (T).
- Return to the Orphanage: Lobby.
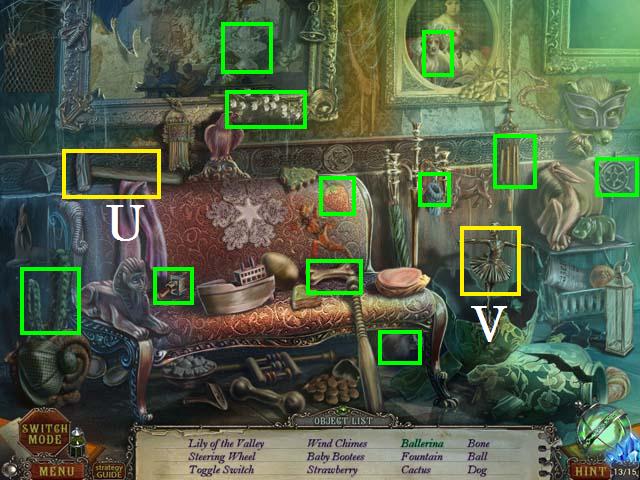
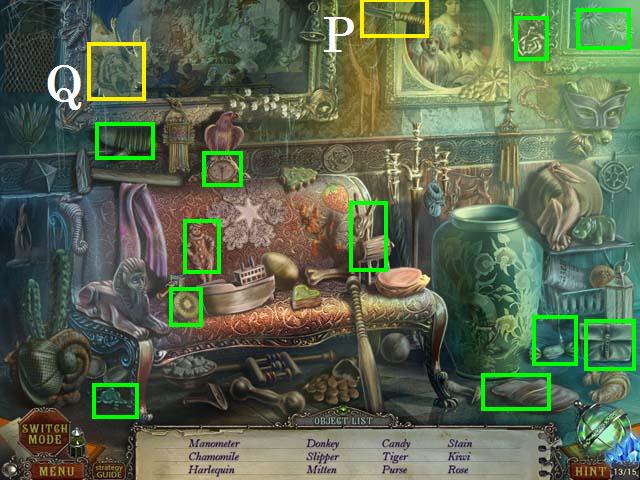
- Zoom into the sparkles to play a HOS.
- Smash the vase with the hammer (U) to reveal the Ballerina (V).
- Receive the TOGGLE SWITCH.
- Zoom into the cabinet; place the HANDLE (W), in the slot, and collect the UNLIT CANDLE (X).
- Move to the Orphanage: Downstairs.
- Zoom into the tunnel; place the UNLIT CANDLE in the tunnel (Y) and light it with the LIGHTER. Collect the first PATTERN (Z).
- Move to the Orphanage: Basement.
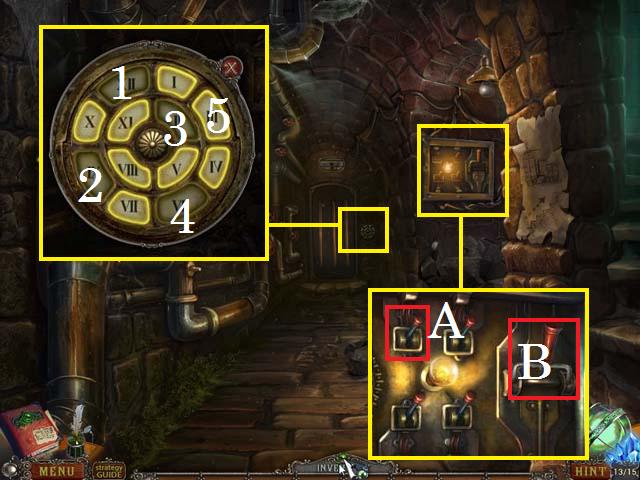
- Zoom into the electrical panel; place the TOGGLE SWITCH (A) in the panel and pull the lever (B).
- Zoom into the door lock; press the buttons the buttons in the order shown on the screenshot (1-5).
- Enter the Orphanage: Secret Room.
Chapter 8: The Secret Room
- Zoom into the sparkles to play a HOS.
- Smash the piggy bank with the hammer (C) to find the Coin (D).
- Receive the TABLE BOARD.
- Zoom into the bar; place the jar (E) in the stand (F).
- Zoom into the crate; remove the lid with the CROWBAR, then collect the WIRES (G).
- Zoom into the wires; collect the RUST REMOVER (H).
- Zoom into the stool; collect the note, then the HOUR HAND (I).
- Zoom into the Secret Room: Workplace.
- Light the candle (J) with the LIGHTER.
- Collect the note (K).
- Examine the drawer (L).
- Zoom into the chair panel; fix the wires (M) with the INSULATING TAPE and place the WIRES (N) on the puzzle.
- Zoom into the book; turn the page and collect the note (O).
- Return to the Orphanage: Downstairs.
- Zoom into the wall panel; use the RUST REMOVER on the panel, then press the buttons in the following order: 5, 10, 3, 8, and 1.
- Collect the second FOUNTAIN PUZZLE PIECE (P).
- Return to the Orphanage: Hall.
- Zoom into the sparkles to play a HOS.
- Melt the ice cube with the candle (Q) to get the Heart (R).
- Receive the third TABLE BOARD.
- Zoom into the table; place the three TABLE BOARDS on the table and open the top followed by the hatch. Collect the ARMCHAIR MECHANISM PART (S).
- Zoom into the clock.
- Place the MINUTE HAND and the HOUR HAND on the clock face. Set the time to 3:35 (T). Open the face and collect the PORTAL INSTRUCTION PLATE (U).
- Return to the Secret Room Workplace.
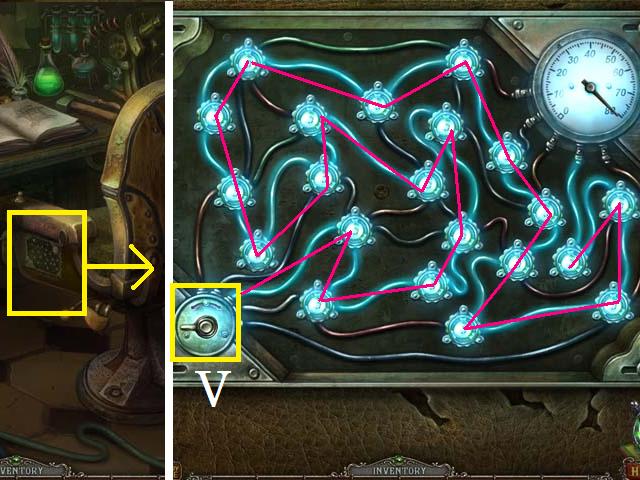
- Zoom into the chair; place the ARMCHAIR MECHANISM PART (V) in the slot. Follow the path of the (pink) line to light all of the lights.
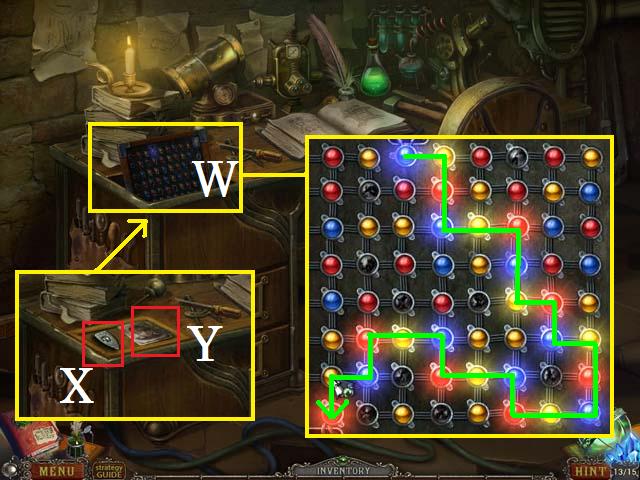
- Zoom into the panel (W); follow the (green) path to light the proper lights.
- Collect the third FOUNTAIN PUZZLE PIECE (X) and the TIM PHOTO (Y).
- Back out of the Secret Room Workplace.
- Zoom into the bench; place the TIM PHOTO in the pan (Z) and then pick it back up for a clue.
- Return to the Orphanage: Near Old Fountain.
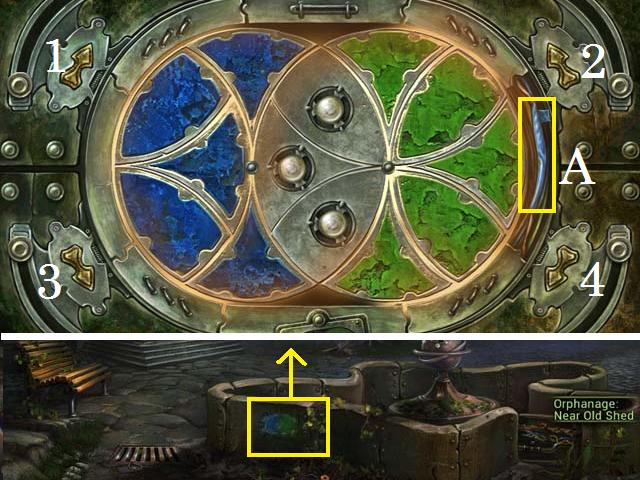
- Zoom into the fountain panel; fix the wires (A) with the INSULATING TAPE.
- Place all three FOUNTAIN PUZZLE PIECES in the lock. Use the following sequence to set the correct pattern: 3, 4, 4, 1, and 2.
- Enter the Secret Room: Under Old Fountain.
- Collect the fourteenth Blue Crystal (B).
- Zoom into the ground; move the panel and collect the second PATTERN (C).
- Zoom into the machine; press the red button (D), then remove the broken light bulb (E).
- Return to the Orphanage: Secret Room.

- Zoom into the sparkles to play a HOS.
- Spin the handle (F) to release the Steam (G).
- Receive the second SAFETY FUSE.
- Zoom into the Secret Room: Workplace.
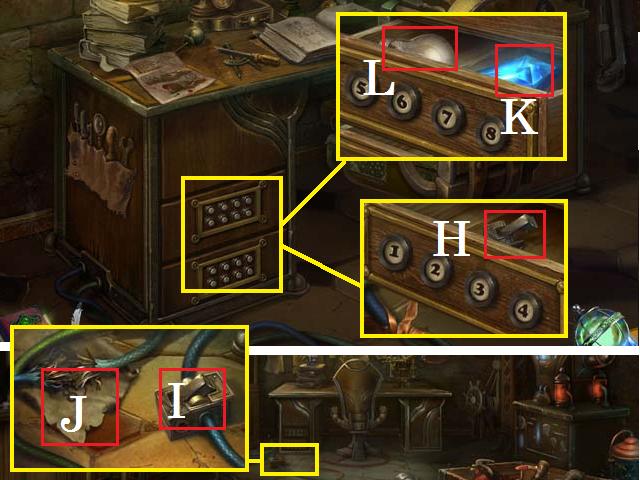
- Zoom into the drawer; enter the code 3, 4, 1, 2 and collect the SWITCH PART (H).
- Exit the Secret Room: Workplace.
- Zoom into the wires; place the SWITCH PART (I) in the slot and flip the switch. Collect the note (J).
- Zoom back into the Secret Room: Workplace.
- Zoom into the drawer; enter the code 8, 5, 7, 6 and collect the fifteenth Blue Crystal (K) and the BULB (L).
- Exit out to the Orphanage: Front Porch.

- Zoom into the sparkles to play a HOS.
- Use the dart (M) on the balloon (N) and collect the Burst Balloon (O).
- Receive the third PATTERN.
- Return to the Secret Room: Under Old Fountain.
- Zoom into the book; place all three PATTERNS on the cover and collect the third SAFETY FUSE (P).
- Zoom into the fuse panel; remove the old fuses and replace them with the 3 SAFETY FUSES (Q).
- Fix the wires (R) with the INSULATING TAPE.
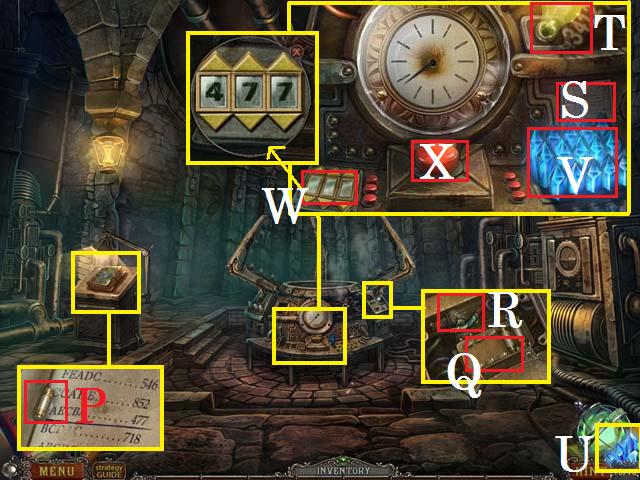
- Zoom into the machine; place the PORTAL INSTRUCTION PLATE (S) and the LAMP (T) on the panel.
- Click on the Blue Crystals (U) to move them to the panel (V).
- Zoom into the code bar (W); enter the code 477.
- Press the red button (X).
- Congratulations! You have completed Whispered Secrets: The Story of Tideville!


 Hidden in Time: Looking-glass Lane Walkthrough, Guide, & Tips
 Reality Show: Fatal Shot Walkthrough, Guide, & Tips
 Haunted Legends: Queen of Spades Walkthrough, Guide, & Tips
 The Agency of Anomalies: Mind Invasion Walkthrough, Guide, & Tips
 Grim Tales: The Wishes Walkthrough, Guide, & Tips