Ancient Adventures: Gift of Zeus Walkthrough, Guide, & Tips
Ancient Adventures: Gift of Zeus Walkthrough
Welcome to the Ancient Adventures: Gift of Zeus Walkthrough!
Go on an Ancient Adventure to Egypt and find the fantastic Gift of Zeus in this fun and exciting Hidden Object game!
Whether you use this document as a reference when things get difficult or as a road map to get you from beginning to end, we’re pretty sure you’ll find what you’re looking for here.
This document contains a complete Ancient Adventures: Gift of Zeus game walkthrough featuring annotated screenshots from actual gameplay!
We hope you find this information useful as you play your way through the game. Use the walkthrough menu below to quickly jump to whatever stage of the game you need help with.
Remember to visit the Big Fish Games Forums if you find you need more help. Have fun!
This walkthrough was created by Robin.
General Tips
- This is a Hidden Object Adventure game. Some of the items you collect will go into your inventory bag so they can be used later.

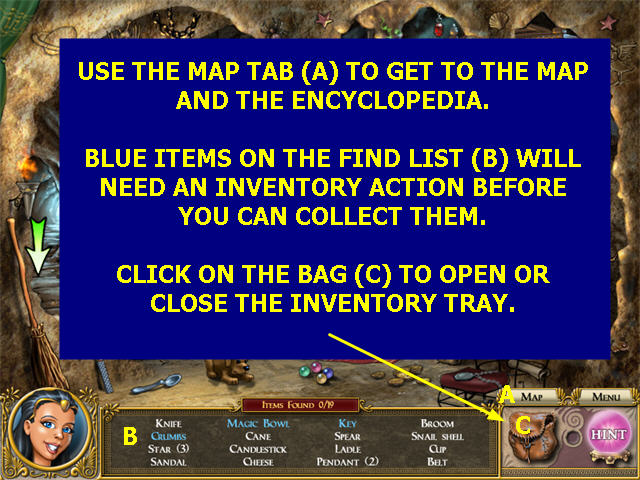


- You can open or close your inventory tray by clicking the Bag (C) in the lower right.
- Objects are generally appropriate to the scene and the right color, but may be larger or smaller than real life.
- The Find List will vary from player to play (and during replay). The Key Items which will always be the same.
- Use the MENU tab in the lower right to return to the Main Menu. The game saves automatically.
- Click on the MAP tab (A) in the lower right to go to the Map and choose a different location.
- Click on the HINT icon in the lower right if you need a hint. This will draw a glowing circle around one of the items on the Find List.
- The hint will recharge after each use.
- There is no timer.
- If you have too many incorrect clicks in a row the cursor dances around for a few seconds, but there are no other penalties.
- If the cursor turns into a magnifying glass, you will be able to use an Inventory Item there. Click to get a hint about what item to use.
- If the cursor turns into an eye, you will be able to click there to zoom in.
- If the cursor turns into a pointing finger, you can click there to use an Inventory Item you have previously clicked on.
- To use an Inventory Item, click on it in the Inventory Tray and move the cursor to where you want to use it in the scene; click again to use it.
- If you select an item from the Inventory Tray and then decide you don’t want to use it, right-click on an empty slot in the tray to put it back.
- When using an Inventory Item in the scene, pay attention to the cursor, not the exact position of the item. Click when the cursor turns into a pointing finger and the item will be placed correctly.
- The items listed in blue on the Find List (B) cannot be collected immediately. In most cases you will have to use an Inventory Item to access them, such as using a KEY from your inventory to unlock a door, and then collecting something from behind the door, or using CLIPPERS to cut a flower.
- Each Hidden Object Scene will also include two PINK CRYSTALS. These will not be listed on the Find List. Each time you get a new Find List there will be two new PINK CRYSTALS, even if it’s a previously visited location.
- The PINK CRYSTALS are marked in pink in screenshots.
- You will also earn one PINK CRYSTAL for each mini-game you complete successfully.
- There are 100 PINK CRYSTALS in the game.
- PINK CRYSTALS unlock the power-ups! These do things like reducing the reuse timer on the HINT meter.
- Power-ups will be applied as soon as you earn them, and last for the rest of the game.
- Some terms in the game typically refer to certain items, or a group of items with similar characteristics (or may be unfamiliar to the average user):
- “Lace” is usually a lace doily used as a placemat.
- “Buckler” is a type of shield that has a strap on the back.
- “Chain” will always refer to chain by itself, not chain as part of shackles or jewelry.
- “Necklace” will not have a pendant attached. Those are listed as “Pendant.”
- “Knife” will always be an eating utensil, not a Dagger.
- “Jewel Stones” are shiny gems like emeralds or rubies.
- “Crustacean” will usually be a crab.
- “Key” will be a key by itself, not part of a set on a Keyring.
- A written number like “FIVE” or “TEN” will usually be a roman numeral.

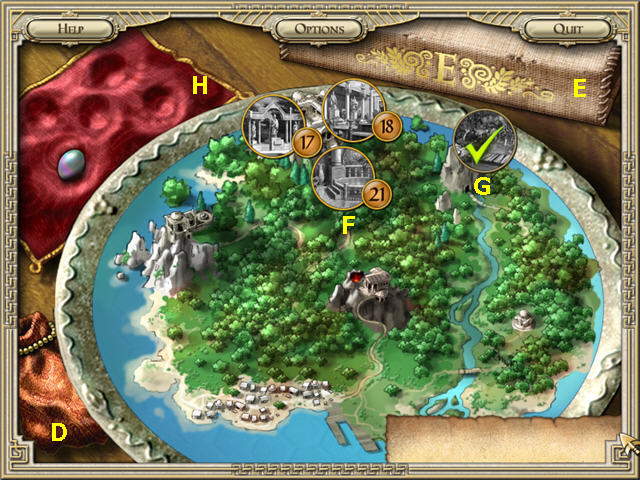
- To see the power-ups you have earned so far, click on the MAP tab in the lower right; then click on the Jewelry Bag (D) in the lower left of the scene.
- In the first few chapters, the Map is not available, so the game will automatically take you to your next location. You can still click on the MAP tab to view the bonus Encyclopedia entries.
- To read the Encyclopedia, click on the MAP tab in the lower right; then click on the book (E) at the top of the scene.
- Once you get to Chapter 4, you will use the Map to choose which Hidden Object Scene you want to work on next. You can usually work on these in any order.
- Each Hidden Object Scene on the Map has a counter (F) showing how many items are left to find there.
- Once you have completed the Find List, a checkmark (G) will appear on the Map for that location and you will no longer be able to select it for this chapter. Make sure you collect the two PINK CRYSTALS in each scene before you collect the last item on the Find List!
- The Jewel Tray in the upper left shows you how many of the MAGIC PEARLS you have collected.
- There is no HINT button for the mini-games, but some do have sparkle hints. These can be especially helpful in find-the-differences games.
- Most find-the-differences are obvious, but there is sometimes an item that is just a slight difference in shade, like the difference between gold and tan. If you are stuck, look for color differences!
- Different players may have a few different items in the find-the differences games.
- Jigsaw puzzles have a very unusual rotation sequence in this game. Not only do they rotate around a central pivot, but they can be flipped to form a mirror image. This changes the shape of the piece! If you have a piece and you can’t figure out where it goes, right-click the mouse until you see the mirror image version.
- Jigsaw and Mosaic pieces will lock into place when set correctly.
- You may match any tiles on which the single, long side is free in the Mah Jong games. You may also match any tiles on which two sides are free.
- Completing a mini-game successfully will give you more PINK CRYSTALS and unlock an Encyclopedia entry.
- You can get a longer version of some of the mini-game instructions by clicking on the HELP tab.
- If you prefer, you can skip any mini-game once the SKIP meter is recharged, but then you can’t earn all the PINK CRYSTALS, so you may not get all the power-ups.
- When you complete or skip a mini-game, the Key Item you unlock will appear in the main scene near the spot where you triggered the mini-game. You will need to click on it to collect it.
Chapter 1: the Missing Necklace
- The Map is not available in this chapter, so the game will automatically take you to each Hidden Object Scene. You start in Maia’s Home.

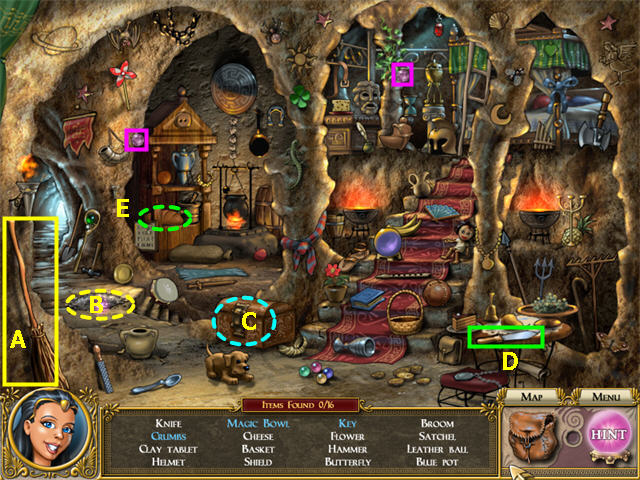
- Collect the items on the Find List.
- The Blue Pot is the large blue item with handles on the shelf, on the left side of the scene.
- The Curtain is in the upper left corner.
- The Bow is a blue ribbon in the upper right.
- Collect the BROOM (A) and use it on the Dust (B). You will reveal a KEY. Collect it.
- Use the KEY to open the Chest (C). This will trigger a mini-game.
- Opening the Chest will reveal the MAGIC BOWL. Collect it.
- Use the KNIFE (D) to cut the Bread (E). CRUMBS will go into your inventory. You will use them in another location later.
- Once you have collected all the items on the Find List, you will be automatically transferred to the next Hidden Object Scene.

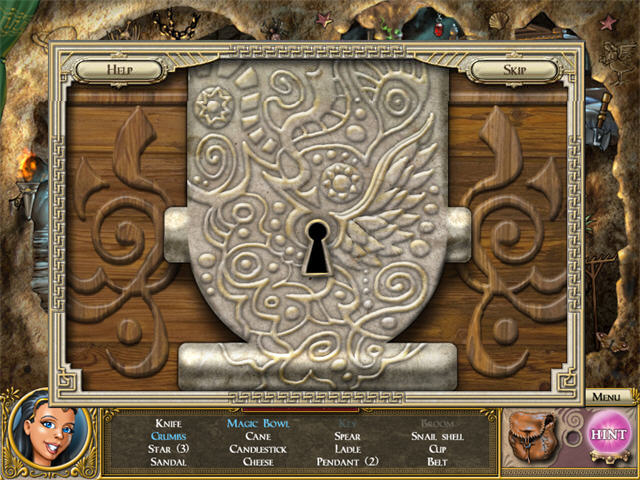
- There are many possible solutions. The screenshot shows the completed puzzle.
- Rings move in different combinations depending on which ring you put the cursor on.

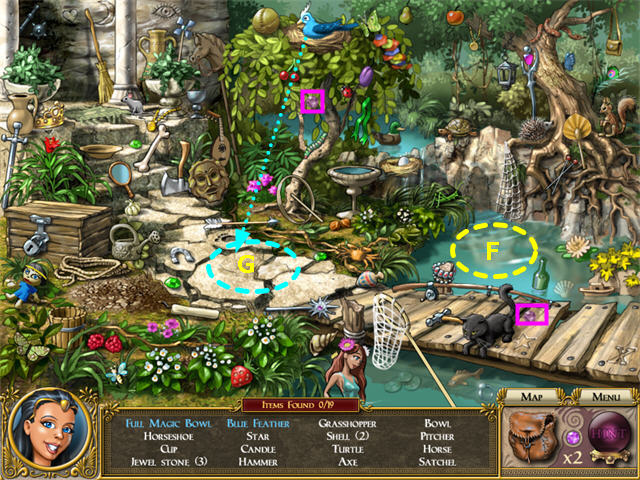
- Collect the items on the Find List.
- The Vase is the tall, tan ceramic item at the top of the stairs.
- The Bowl is on the stairs.
- The Satchel is hanging from a tree on the right.
- The Green Feather is just below the Satchel on the right. It is marked like a peacock feather.
- The Jewel Stones are the green gems.
- The Oysters in the lower right, on the near side of the pier, do not count as Shells.
- The Message is inside the bottle floating in the water.
- Put the MAGIC BOWL from your inventory in the Water (F) to fill it.
- Put the CRUMBS from your inventory on the Path (G). The Blue Bird will fly down to eat the crumbs. Collect the BLUE FEATHER from the branch where the Blue Bird was.
Chapter 2: the 1st Pearl

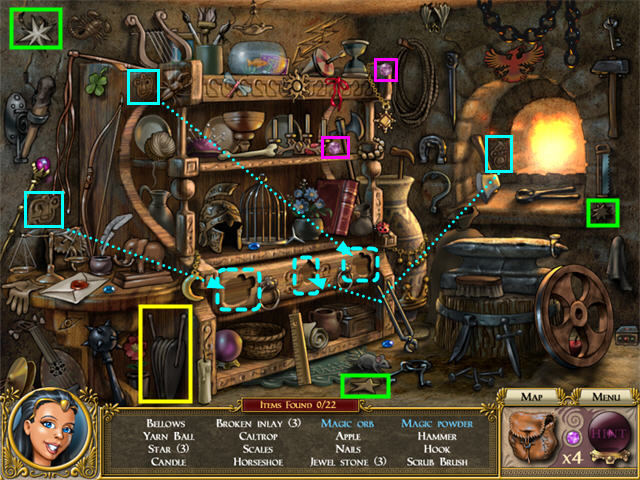
- Collect the items on the Find List.
- There are several items that might be Stars. The ones that count are marked in green in the screenshot.
- A Caltrop is on the shelf, to the right of the Birdcage.
- Collect the BELLOWS (yellow). You will use it in a different location later.
- Collect the 3 BROKEN INLAYS (cyan). Put them back into the scene as shown. Each time, position the cursor so it turns into a pointing hand before clicking. This will trigger a mini-game.
- After you complete the mini-game, the drawer will open. Collect the MAGIC ORB and the MAGIC POWDER from the drawer.

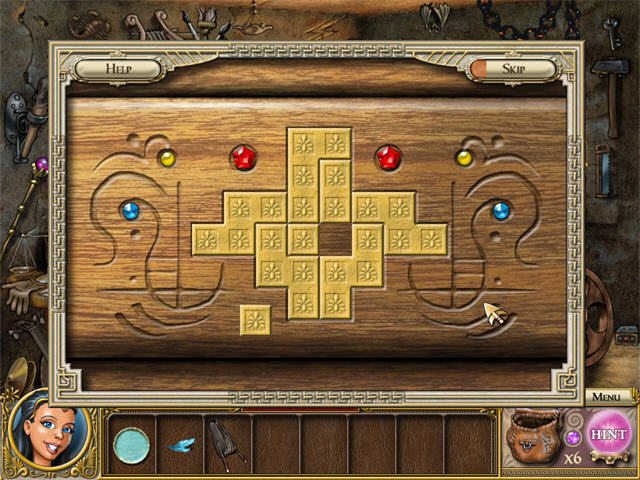
- There are several similar solutions. See the screenshot for one.
- Go to the Workshop.

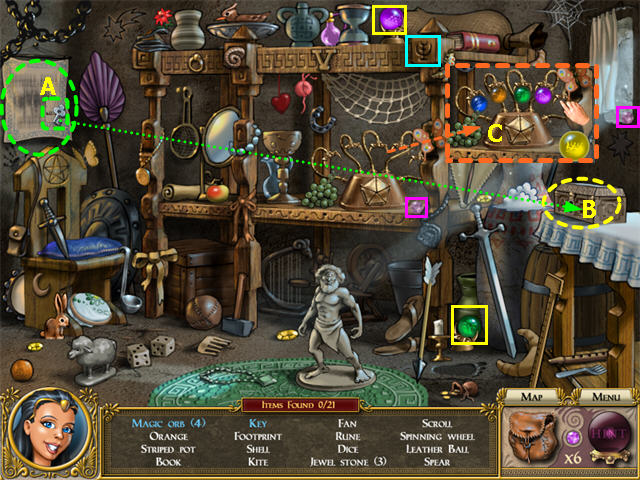
- Collect the items on the Find List.
- The Ring is on the top frame of the shelf, just below the Striped Pot.
- The 3 Jewel Stones are yellow gems that look a little like gold rings.
- The Rune (cyan) is at the top of a post.
- The Plug is a large grey Cork in the tall pot on the right.
- Two of the MAGIC ORBS (yellow) can be collected immediately.
- Use the REVEALING POWDER from your inventory on the Banner (A) hanging on the left wall.
- Use the BELLOWS from your inventory to blow away the powder. This will trigger a mini-game.
- When the mini-game is complete, collect the KEY from the Banner and use it on the Chest (B). It will open to reveal the last 2 MAGIC ORBS. Collect them.
- Put the MAGIC ORBS from your inventory into the Holder (C) matching the sequence on the Banner. Our example is Blue, Orange, Green, Purple, and Yellow. Click where the cursor changes to a pointing finger. This will trigger a repeat-the-sequence mini-game. The solution is random.

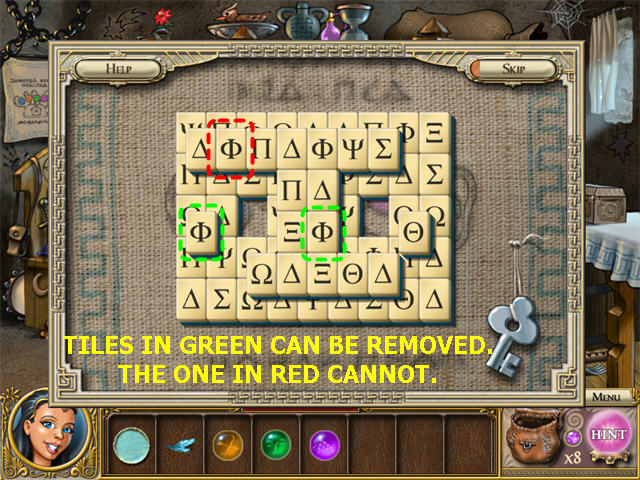
- This is a Mah Jong type game.
- Study the board carefully; note which tiles will be unlocked as you play.
- Tiles can only be removed in pairs, so both tiles must already have one long side free when you remove them.
Chapter 3: the Scrying Spell

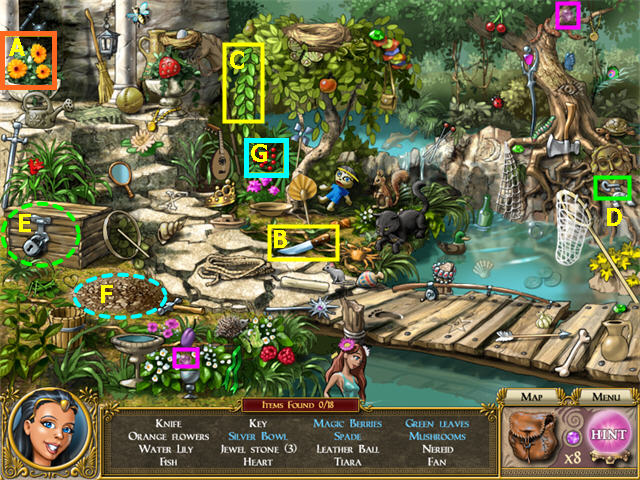
- Collect the items on the Find List.
- The Nereid is the water nymph in the lower right.
- The Water Lily is on the steps.
- The Heart is just below the Chest on the left.
- Collect the ORANGE FLOWERS (A). You will use them later.
- Use the KNIFE (B) to cut the GREEN LEAVES (C).
- Use the KEY (D) to open the Chest (E) revealing the SPADE and the SILVER BOWL.
- Use the SPADE to dig up the Dirt (F) and reveal the MUSHROOMS.
- Use the SILVER BOWL to collect the MAGIC BERRIES (G).
- Go to Maia’s Home.

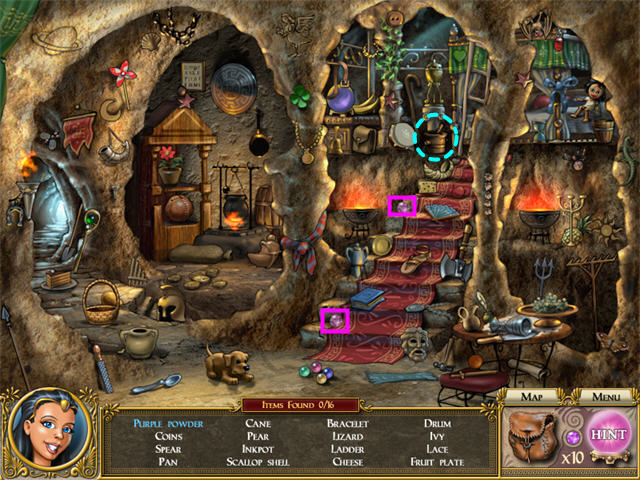
- Collect the items on the Find List.
- Put the PURPLE MUSHROOMS from your inventory into the Mortar (cyan). They will go back into your inventory as PURPLE POWDER.
- Collecting everything on the Find List will trigger a mini-game.

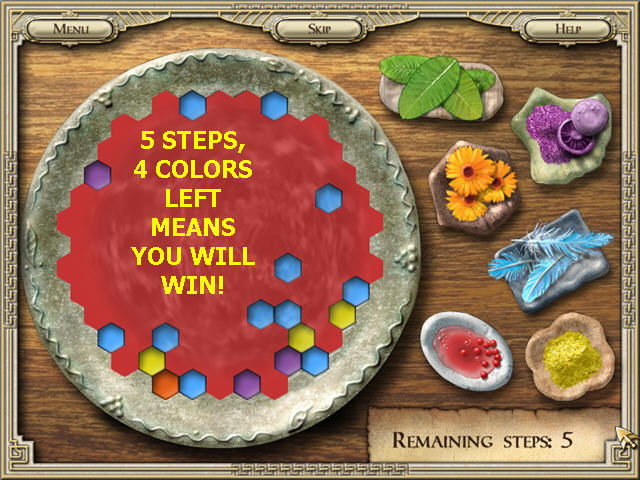
- There are many different ways to solve this. One of the easiest is to first click on each ingredient once.
- Now look for any opportunity to take out ALL of one color.
- If you have any isolated “islands,” you will have to use that color ingredient to get rid of them, but you can wait until you’ve exposed all the other blocks of that color as well.
- Once you get to where you have fewer colors in the potion than remaining steps, you will win.
Chapter 4: the Mortal Realm
- The Map is now available to you.
- There are four locations for this chapter: the Palace Courtyard, the Palace Room, the Palace Hall, and Maia’s Garden.
- This guide begins in the Palace Courtyard.

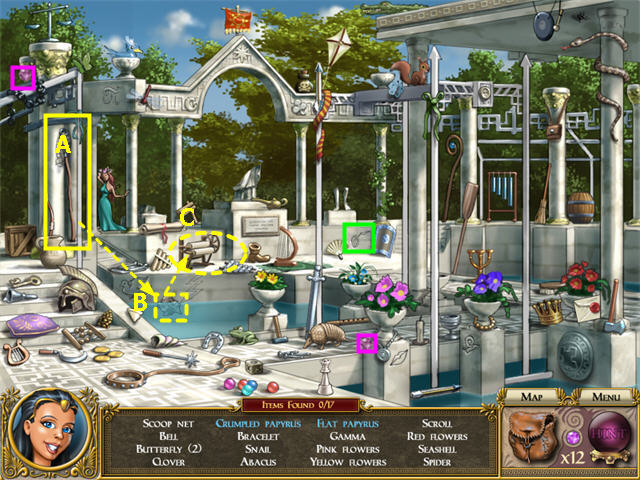
- Collect the items on the Find List.
- Gamma (green) is etched on the back wall.
- Use the SCOOP NET (A) to collect the CRUMPLED PAPYRUS (B) and put it in the Roller Press (C). This will trigger a mini-game.

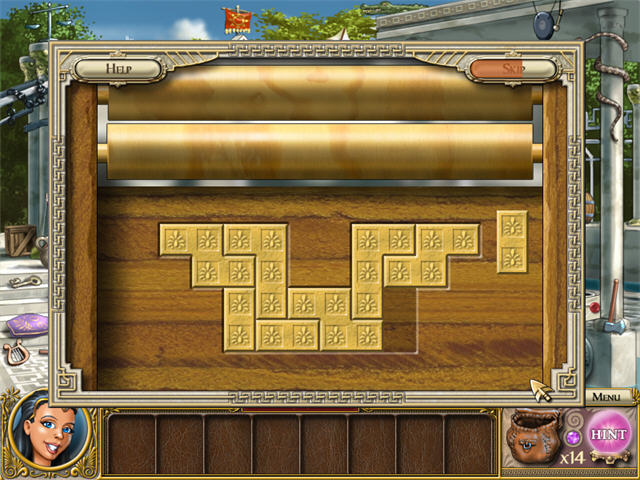
- There are several similar solutions. The screenshot shows one.
- Go to the Palace Room.

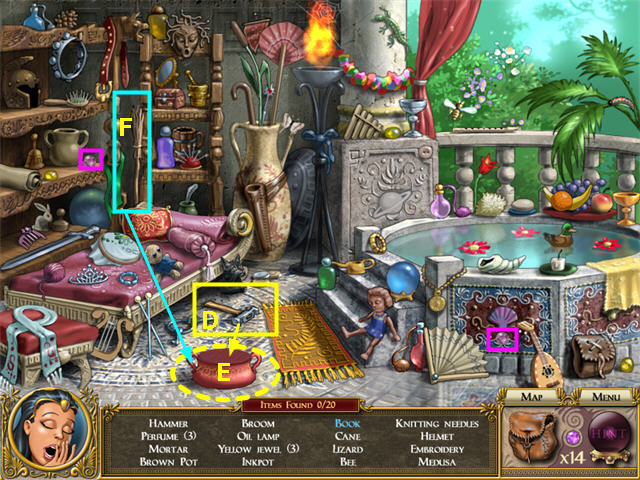
- Collect the items on the Find List.
- Use the HAMMER (D) to break the Red Pot (E).
- Use the BROOM (F) to sweep up the pieces of the broken Red Pot and reveal the BOOK.
- Clicking on the BOOK will trigger a mini-game.

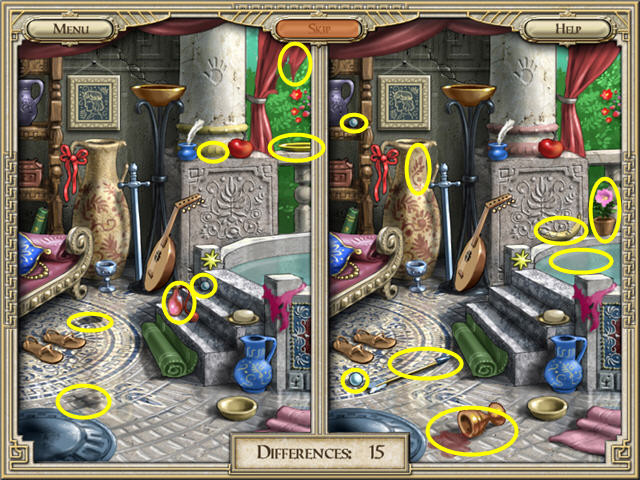
- For some players, the water level is different in the two pictures.
- Although the HINT button is not available for this game, occasionally a small sparkle will appear over one of the differences.
- Go to the Palace Hall.

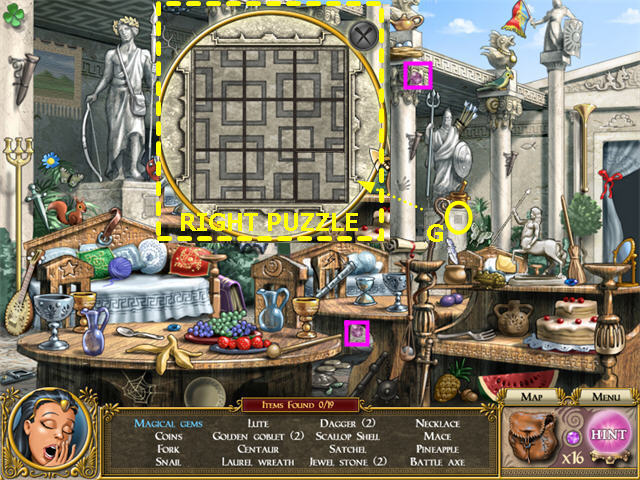
- Collect the items on the Find List.
- Click on the small design (G) on the pillar on the right Statue to trigger a mini-game.
- Click on each square to rotate it; form the design shown.

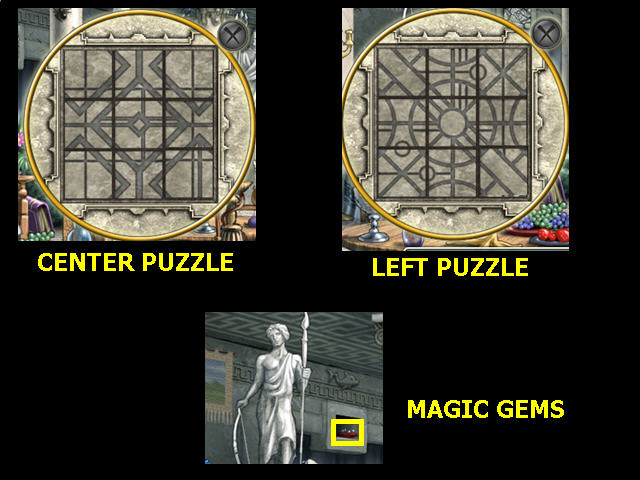
- Click on the small designs on the other two pillars and compete their designs as shown.
- When all 3 puzzles are complete, the panel to the right of the Statue with the spear will open, revealing the MAGIC GEMS!
- Go to Maia’s Garden.

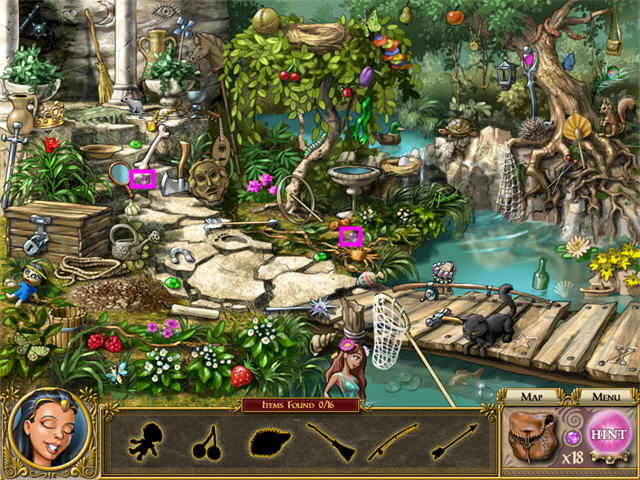
- Collect the items on the Find List.
Chapter 5: the Jewelry Box
- The Map will refresh with these four locations: the Palace Courtyard, the Palace Room, the Palace Hall, and the Workshop.
- This guide begins in the Palace Courtyard.
- Since there are new Find Lists at each location, there will also be new PINK CRYSTALS.

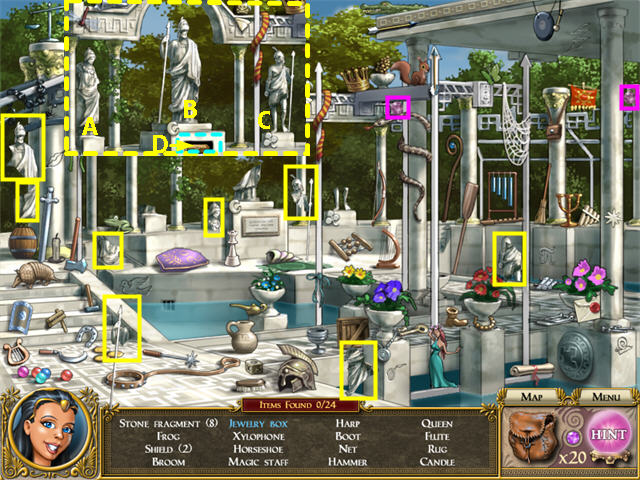
- Collect the items on the Find List.
- The Queen is a white chess piece towards the back of the scene.
- Collect the 8 STONE PIECES (yellow).
- Open the Inventory Bag. As you hover your cursor over each piece, it will tell you whether it is a “piece of a Goddess statue” (A), “piece of a God statue” (B), or “piece of a Demigod statue” (C).
- You must attach the pieces from the ground up to complete the Statues as shown.
- Once all 3 Statues are complete, the plaque on the base of the center Statue will open and you can collect the JEWELRY BOX (D).
- Go to the Palace Hall.

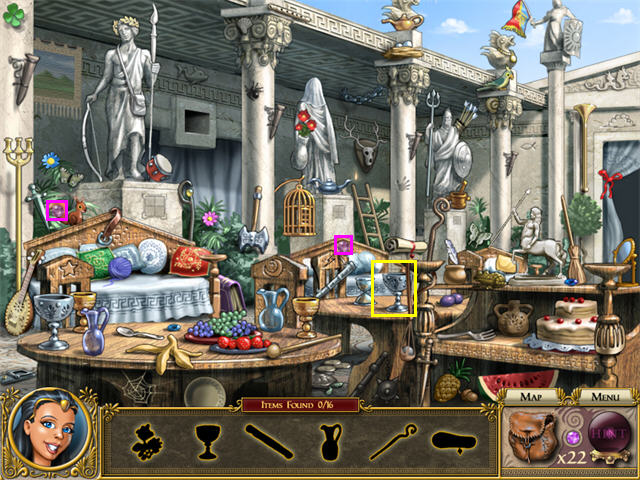
- Collect the items on the Find List.
- Only one Goblet counts; it is marked in yellow.
- Some players will need to collect the Veil on the middle Statue.
- Go to the Palace Room.

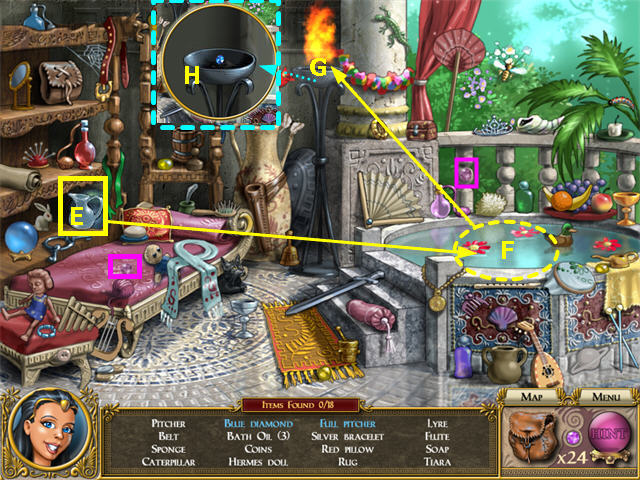
- Collect the items on the Find List.
- The Sponge is the white spiky object between the first and second posts on the pool.
- You may only be able to collect the Red Pillow from the bed by clicking on its right side.
- The Silver Bracelet looks blue. It is next to the Hermes Doll at the end of the bed.
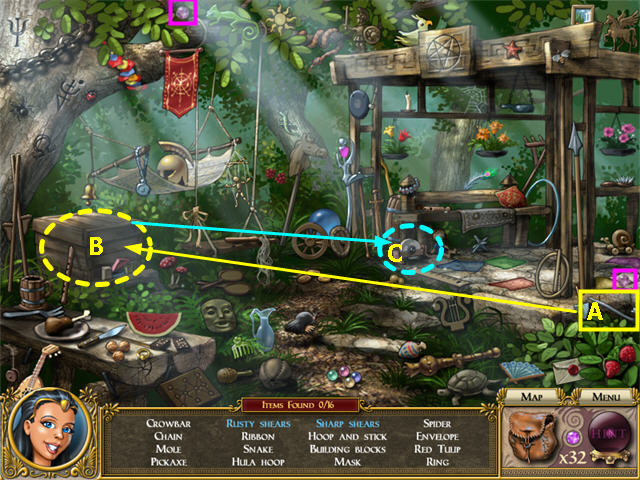
- Use the EMPTY PITCHER (E) on the Pool (F) to get a FULL PITCHER. Put out the Fire in the Brazier (G).
- Position the cursor on the Brazier so it turns into an eye, then click to zoom in and collect the BLUE DIAMOND (H).
- Go to the Workshop.

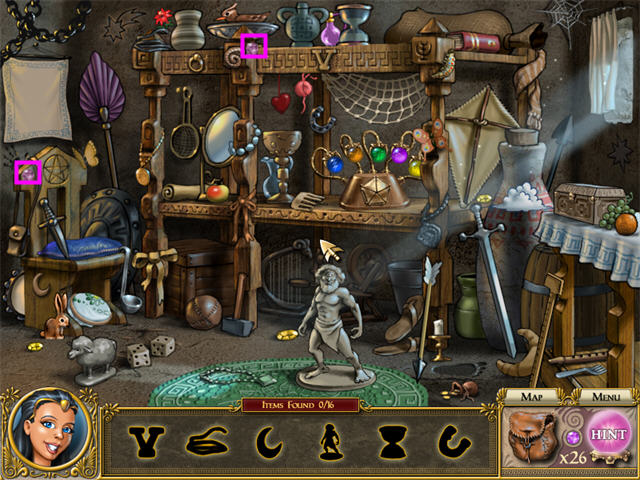
- Collect the items on the Find List.
- Collecting everything on the Find List will trigger a mini-game.

- Begin by using the BRUSH to clean the Jewelry Box. Drag it across every part of the box until all the dust is gone. When you are finished, the BRUSH will disappear.
- Use the LARGE TWEEZERS to place the LARGE GREEN LEAVES. Each leaf will only fit in one slot. When you are finished the LARGE TWEEZERS will disappear.
- Use the SMALL TWEEZERS to replace the remaining items as shown. Some items will fit in more than one slot. When you place an item over a slot in which it will fit, the slot will glow.
- The Jewelry Box will open and you can collect the 2nd PEARL.
Chapter 6: Unlocking the Gate
- There are four locations in this chapter: the Palace Room, the Forge, the Clearing, and the Temple Gate.
- This guide begins in the Palace Room.

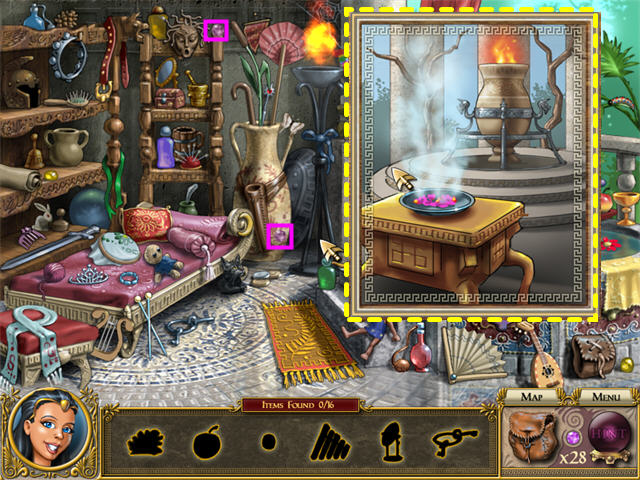
- Collect the items on the Find List.
- After you complete the Find List, put together the jigsaw puzzle as shown.
- Go to the Forge.

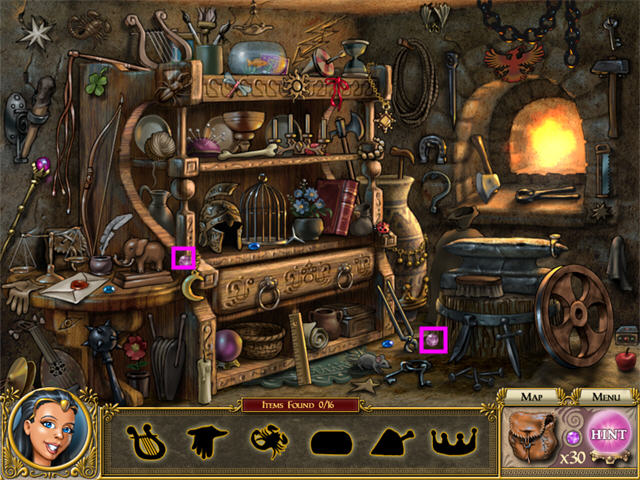
- Collect the items on the Find List.
- Go to the Clearing.


- Collect the items on the Find List.
- Use the CROWBAR (A) on the Crate (B) and collect the RUSTY SHEARS.
- Use the RUSTY SHEARS on the Grindstone (C) to get the SHARP SHEARS.
- When you have collected all the items on the Find List, you will trigger a find-the-differences mini-game.

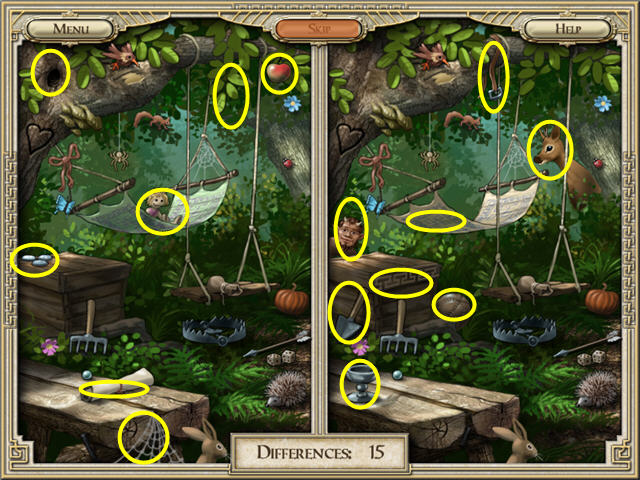
- For some players, the Hammock is a different color in the two scenes.
- For some players, the ropes on the Swing are knotted at different heights.
- Some players have a crack in the table on the left.
- Go to the Temple Gate.

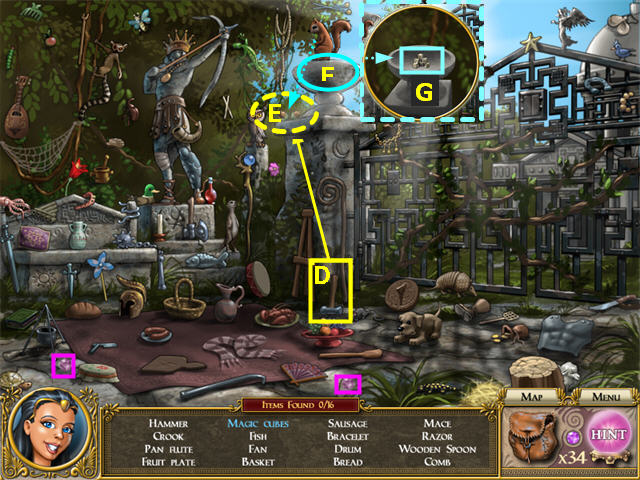
- Collect the items on the Find List.
- Use the SMALL HAMMER (D) to crack the NUTS (E).
- The Squirrel will come down to eat the NUTS. Zoom in on the Basin (F) and collect the MAGIC CUBES (G).
- Once you have collected all the items on the Find List, you will trigger a mini-game.

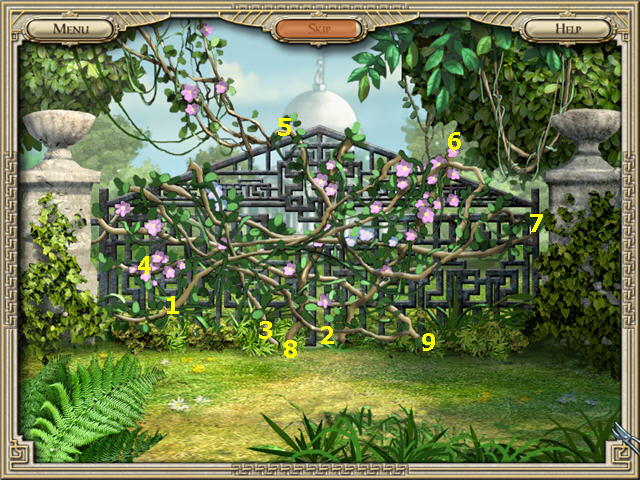
- Remove the vines, always taking the topmost as shown.
Chapter 7: the Lost Boy
- There are five locations in this chapter: the Palace Courtyard, Palace Hall, the Clearing, the Temple Gate, and the Sanctum.
- Go to the Palace Courtyard.

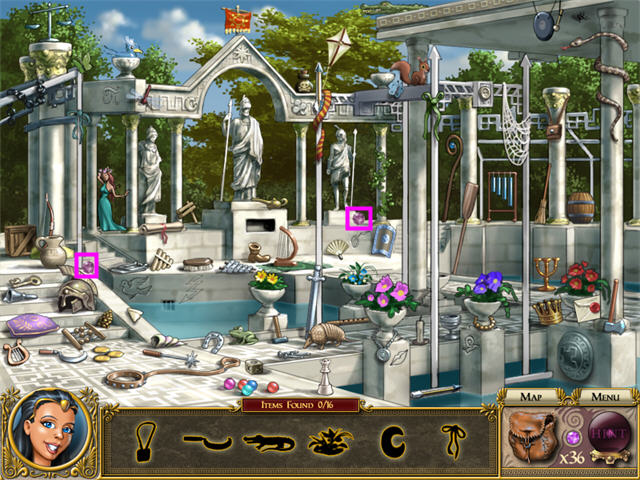
- Collect the items on the Find List.
- Go to the Palace Hall.

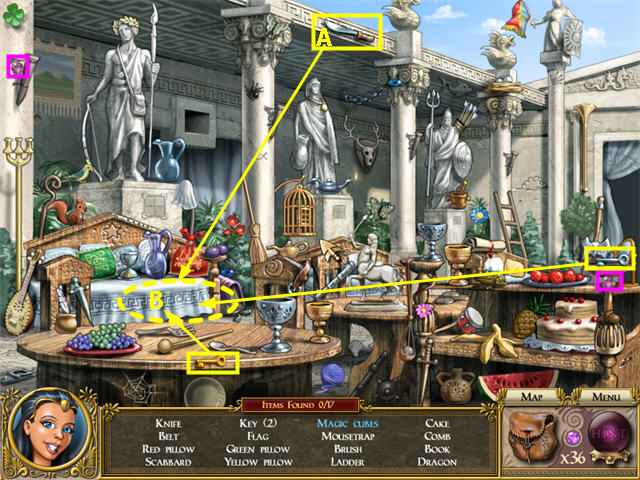
- Collect the items on the Find List.
- Use the KNIFE (A) to cut the Cloth (B) revealing a Drawer with two Locks.
- Use the GOLD KEY in the Gold Lock and the SILVER KEY in the Silver Lock. This will trigger a mini-game.

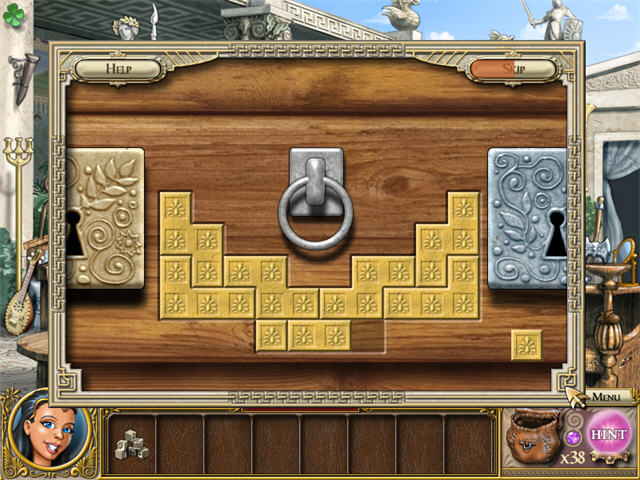
- When the mini-game is complete, the Drawer will open revealing more MAGIC CUBES.
- Go to the Clearing.

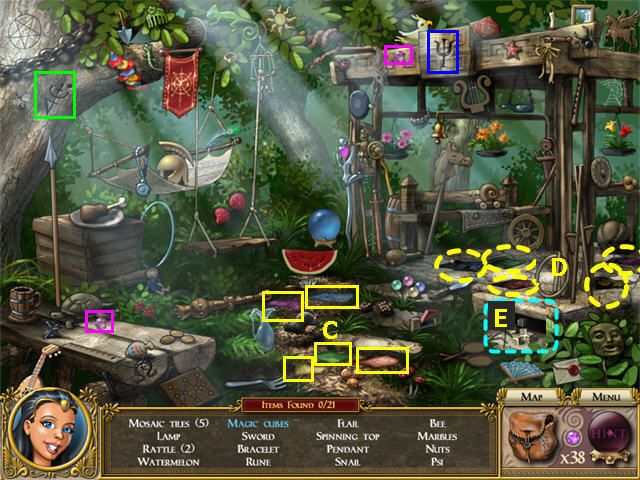
- Collect the items on the Find List.
- The Rune (green) is carved in the tree in the upper left.
- The Psi (blue) is in the upper right.
- Collect the 5 TILES (C) and put them on the matching colored Slots (D). This will trigger a Mah Jong mini-game.
- When the game is complete, a panel (E) will open, revealing more MAGIC CUBES.
- Go to the Temple Gate.

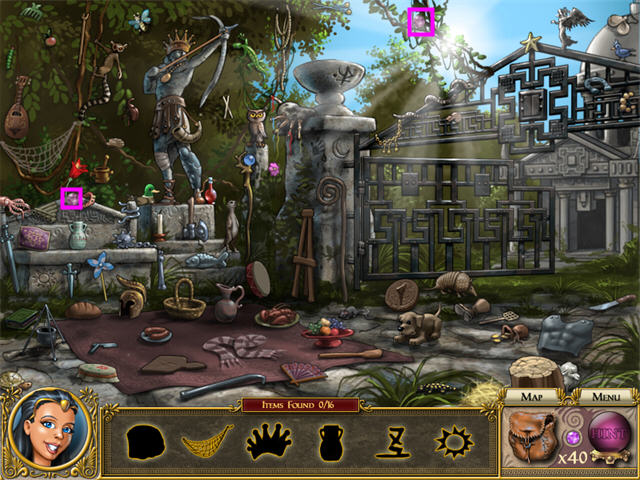
- Collect the items on the Find List.
- Go to the Sanctum.

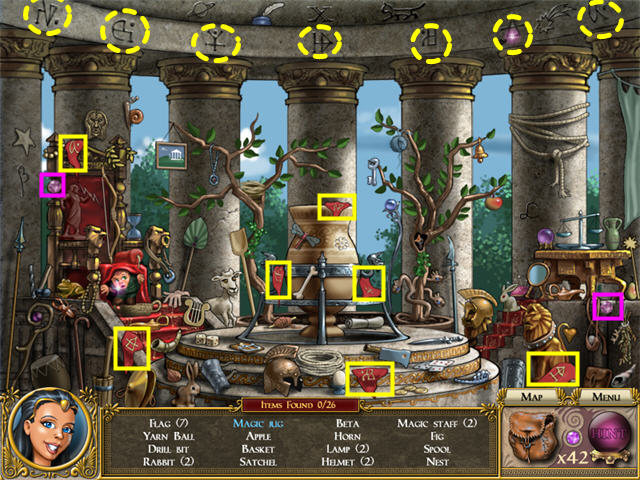
- Collect the items on the Find List.
- The Basket is on the stairs in front of the little boy.
- The Spool is of yarn, and is on the ground to the left of the big pot in the center.
- Collect the 7 FLAGS and put each one with its matching symbol at the top of the pillars. Each FLAG will only stick in one place.
Chapter 8: the Magic Tree
- This chapter has three locations: the Clearing, the Sanctum, and the Gate.
- Go to the Clearing.

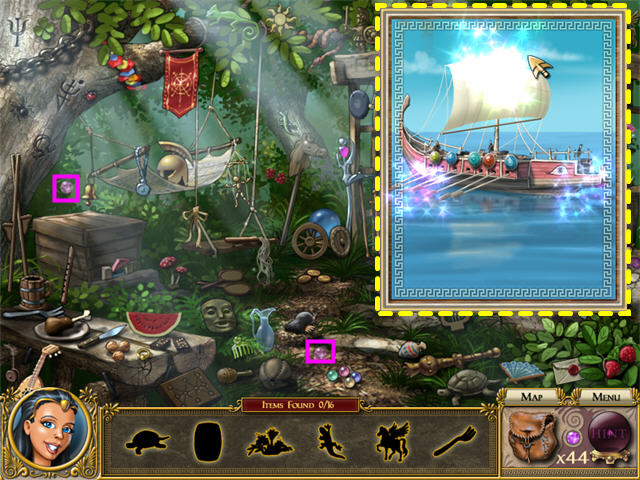
- Collect the items on the Find List.
- After you complete the Find List, put together the jigsaw puzzle as shown.
- Go to the Temple Gate.

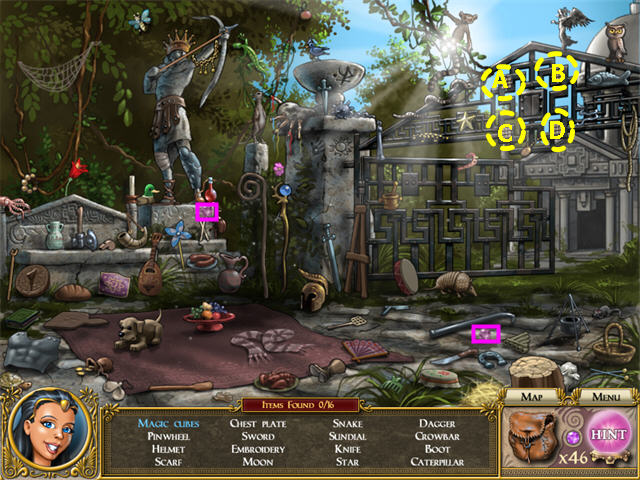
- Collect the items on the Find List.
- Click on each of the four square patterns on the Gate marked A, B, C, and D.

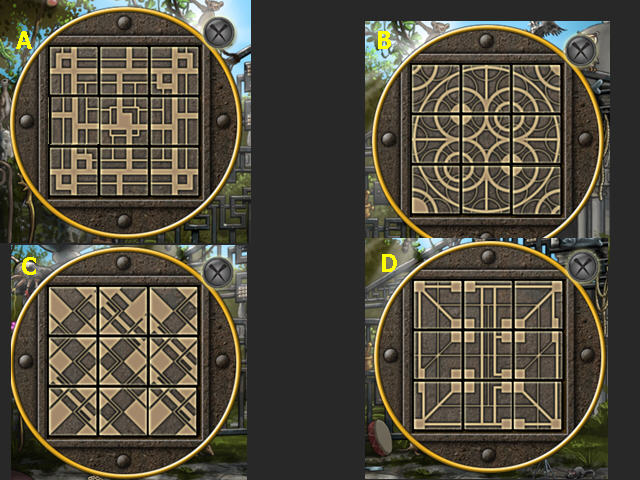
- Complete the rotation puzzles as shown. The MAGIC CUBES will be revealed behind a panel in the center of the four square patterns on the gate.
- Go to the Sanctum.

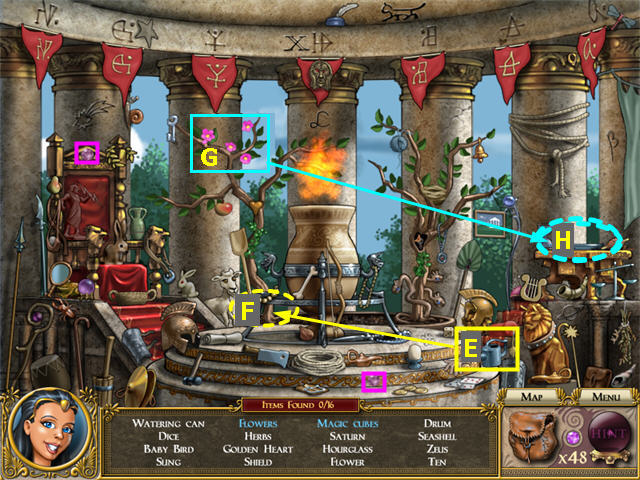
- Collect the items on the Find List.
- Polearm is a general name for a Pole Axe, a weapon with a long wooden handle.
- Greave is plate armor worn on the leg. It may look like a small rectangular shield.
- Use the WATERING CAN (E) on the TREE (F) to produce MAGIC FLOWERS (G).
- Put the MAGIC FLOWERS in the Dish (H) to trigger a mini-game.

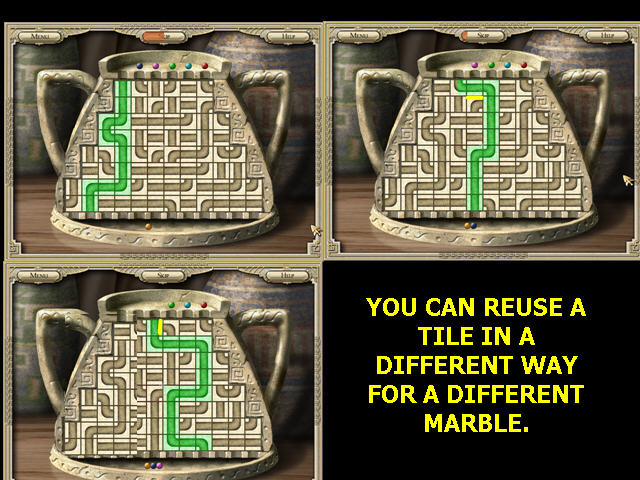
- Create the paths one at a time until all the marbles are at the bottom.

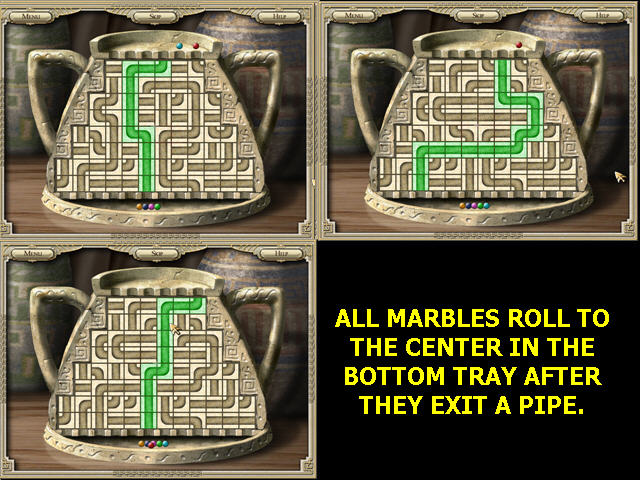
- You can reuse a tile in different paths as needed.
- At the end of the mini-game, you will receive the 3rd PEARL.
Chapter 9: the Port
- There are three locations in this chapter: the Marketplace, Port, and Galleon.
- This guide begins in the Marketplace.

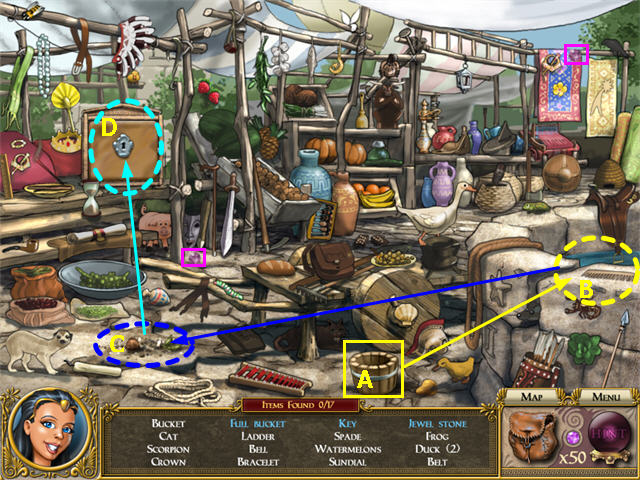
- Collect the items on the Find List.
- The Spade is on the table under the Satchel.
- To collect the Ladder, click on the rungs, not the sides.
- Fill the BUCKET (A) with Water (B). (The place where the cursor will turn to a pointing figure is along the edge of the Well, not the water itself!)
- Use the FULL BUCKET on the Dirt (C) revealing a KEY.
- Use the KEY to open the SAFE (D) revealing the JEWEL STONES. This will trigger a find-the differences mini-game.

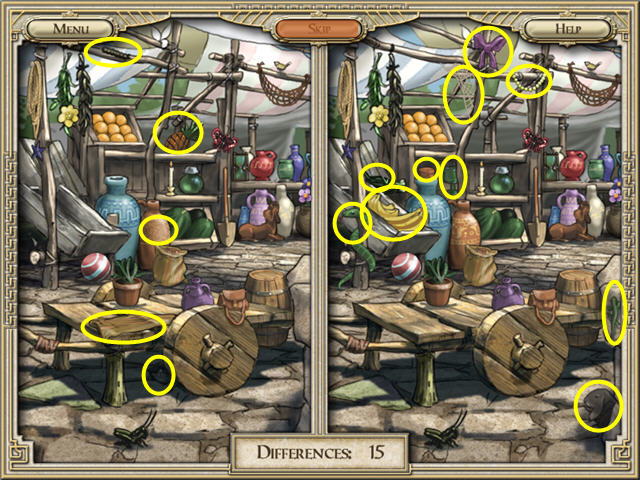
- For some players, the color of the banded decoration of the red clay pot, next to the watermelons, is different between the two scenes.
- Go to the Port.

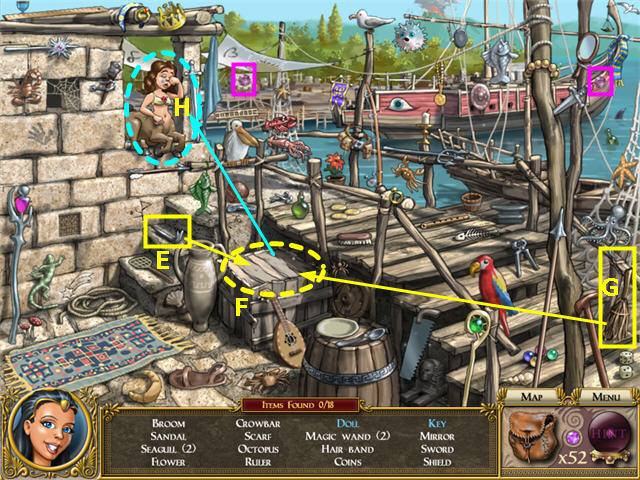
- Collect the items on the Find List.
- Use the CROWBAR (E) to open the Crate (F).
- Use the BROOM (G) to sweep the straw out of the Crate, revealing the DOLL.
- Give the DOLL to the Centaur (H); she will give you a KEY.
- Go to the Galleon.

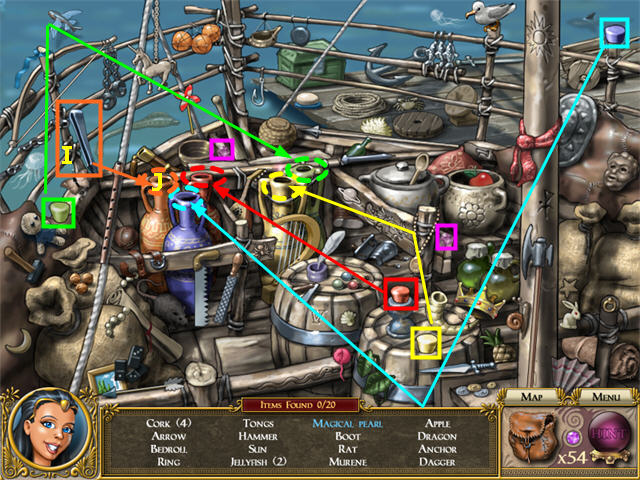
- Collect the items on the Find List.
- A Murine is an eel.
- Use the 4 CORKS to stopper the Jugs of the same color.
- When that is done, use the TONGS (I) on the last Jug (J) to reveal the MAGICAL PEARLS.
- Collect the MAGICAL PEARLS to trigger a mini-game.

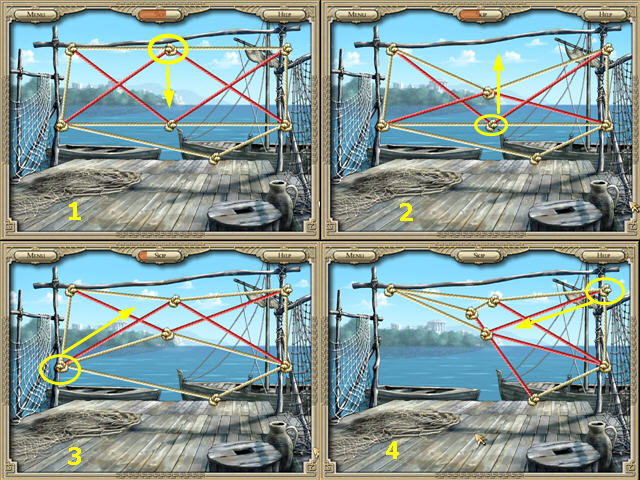
- The ropes marked in red are crossing each other. Your goal is to get all the ropes in white.

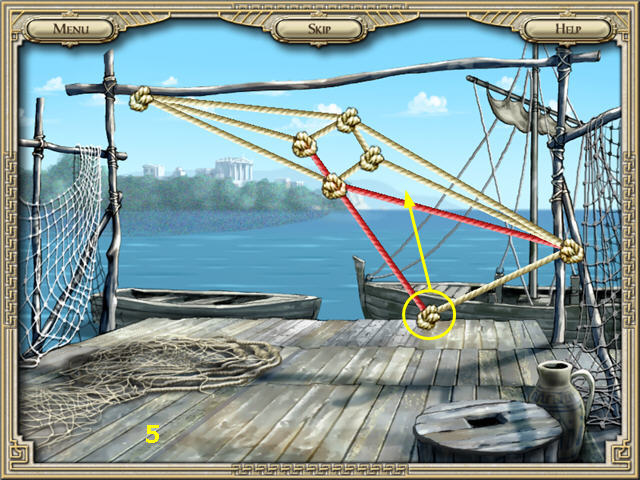
- There are several possible solutions. The screenshot shows one.
Chapter 10: Rainbow Beads
- There are three locations in this chapter: the Port, the Marketplace, and the Sanctum.
- The guide begins in the Port.

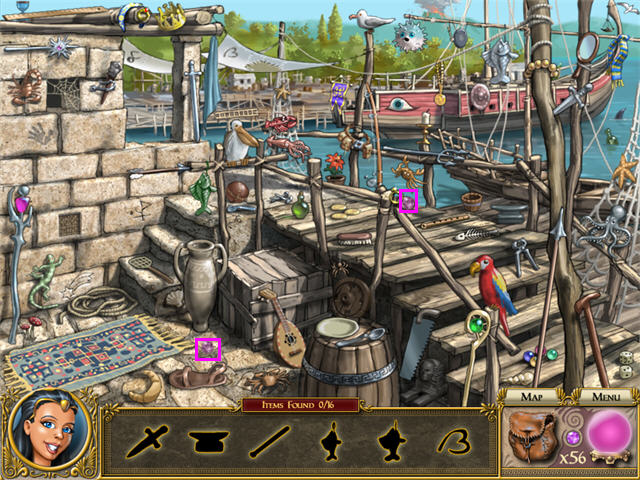
- Collect the items on the Find List.
- Go to the Marketplace.

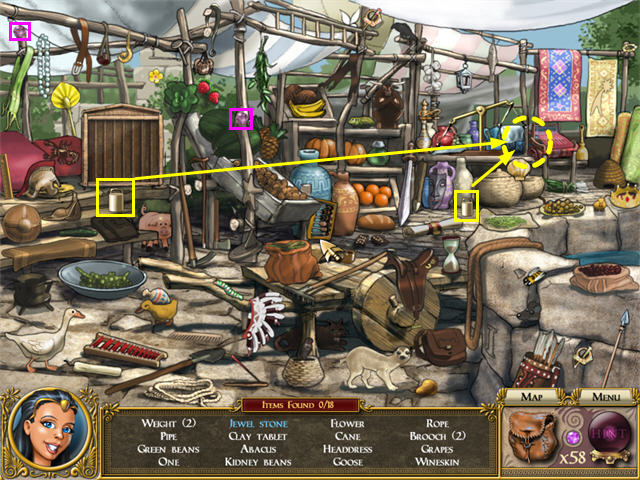
- Collect the items on the Find List.
- The only Rope that counts is the brown Rope on the well.
- Put the two WEIGHTS on the right side of the scale to reveal the JEWEL STONES.
- Go to the Sanctum.

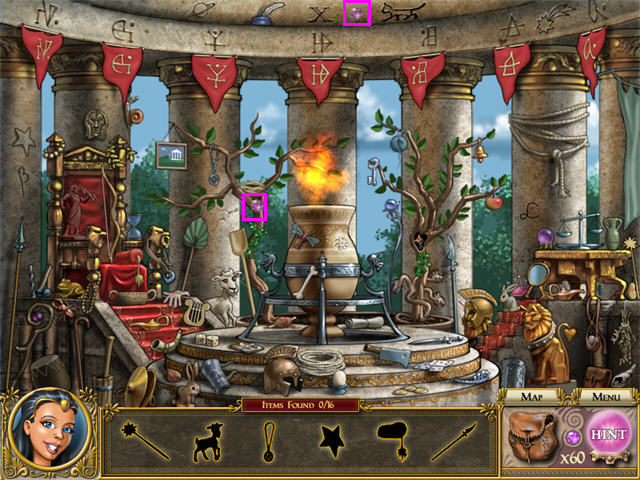
- Collect the items on the Find List.
- Once you have found all the items on the Find List, you will trigger a matching mini-game.

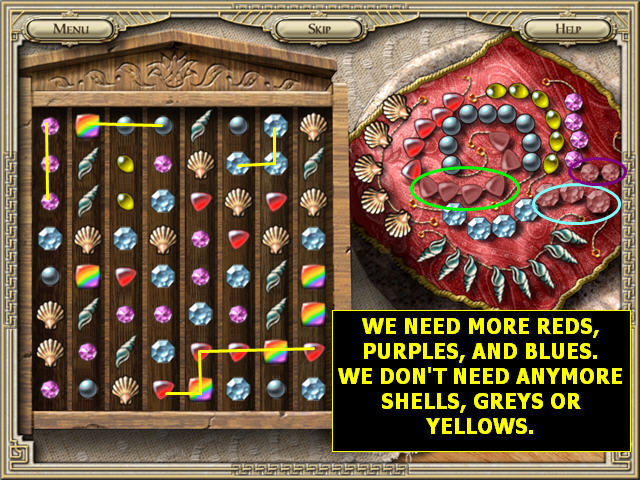
- Add beads to the strings on the right by collecting them in groups of 3 or more from the box on the left.
- You can connect the beads in the box horizontally or vertically, but not diagonally. The screenshot shows some possible matches.
- You only need enough of each type to fill its string on the right.
- Rainbow beads will help you make longer chains in the box.
- You win the mini-game when you fill all the strings on the right.
Chapter 11: the Treasure Chest
- There are three locations in this chapter: the Marketplace, the Port, and the Galleon.
- This guide begins in the Marketplace.

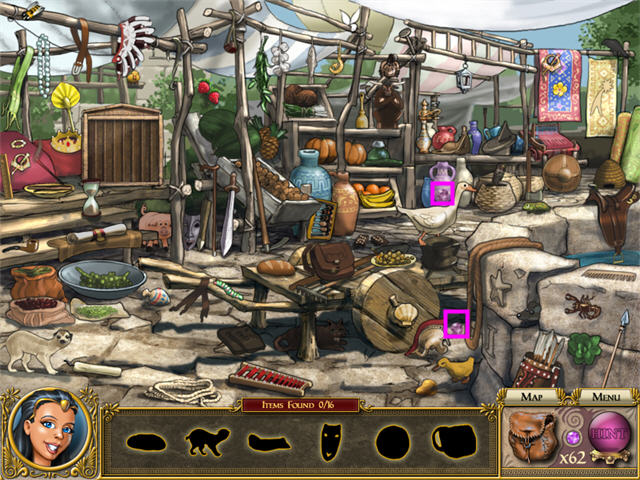
- Collect the items on the Find List.
- Go to the Port.

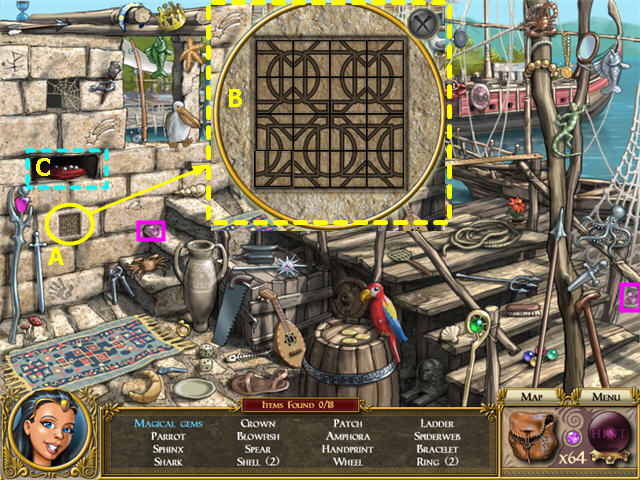
- Collect the items on the Find List.
- Click on the Panel (A) to trigger a rotation mini-game. Complete as shown (B).
- Once the mini-game is complete, the Secret Panel will open and you will be able to collect the MAGICAL JEWELS (C).
- Go to the Galleon.

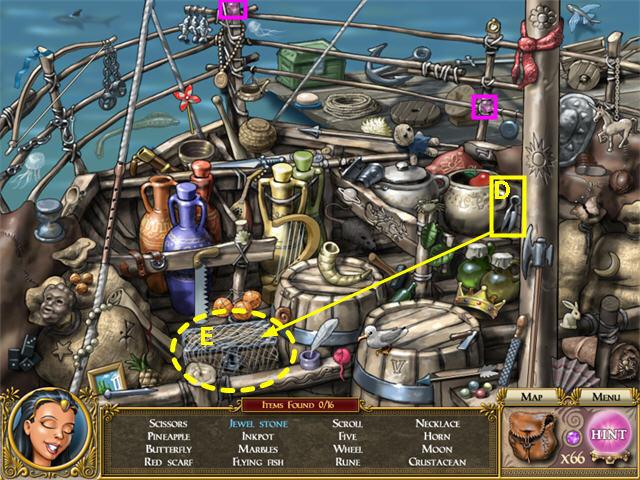
- Collect the items on the Find List.
- Use the CLIPPERS (D) to cut the Net (E) around the Chest.
- Use the KEY to unlock the Chest. This will trigger a lock puzzle mini-game.

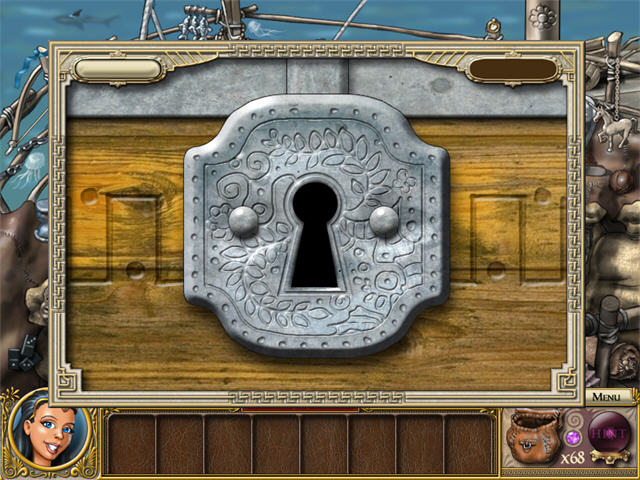
- There are many possible solutions. The screenshot shows the completed puzzle.
- Once the Chest is open, collect the 4th MAGIC PEARL.
Chapter 12: the Secret Room
- There are three locations in this chapter. For story reasons, you should complete them in this order: the Atrium, the Secret Room, and then the Garden.
- Go to the Atrium.

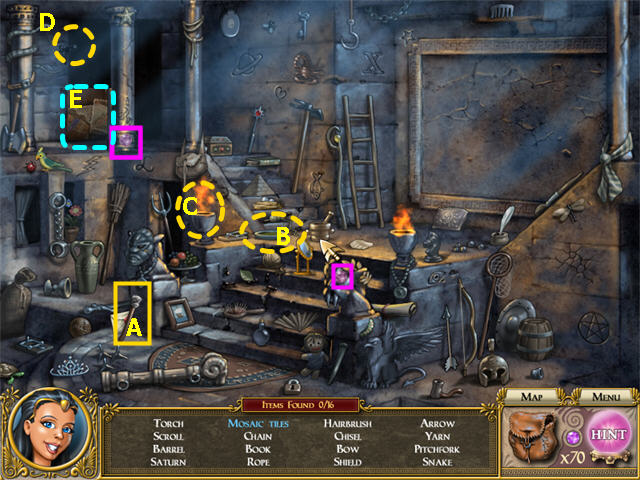
- Collect the items on the Find List.
- Dip the TORCH (A) in the Oil (B), light the torch on the Flame (C).
- Put the LIT TORCH in the Torch Holder (D) in the upper left. This will reveal the MOSAIC TILES (E).
- Once you have collected everything from the Find List, you will trigger a mosaic mini-game.

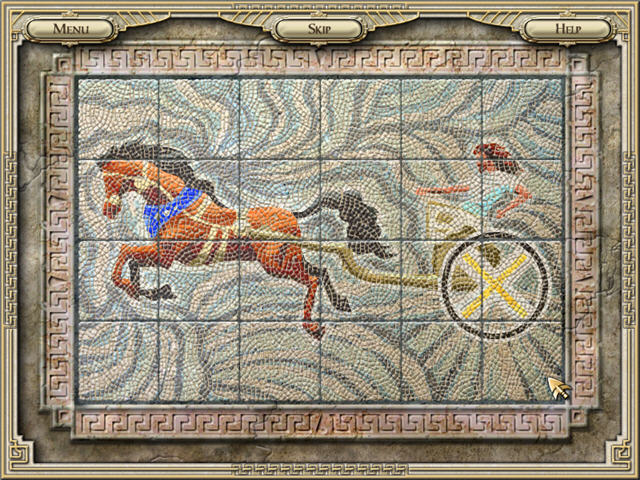
- Click on two pieces to swap them.
- Pieces will lock in place when set correctly.
- Go to the Secret Room.

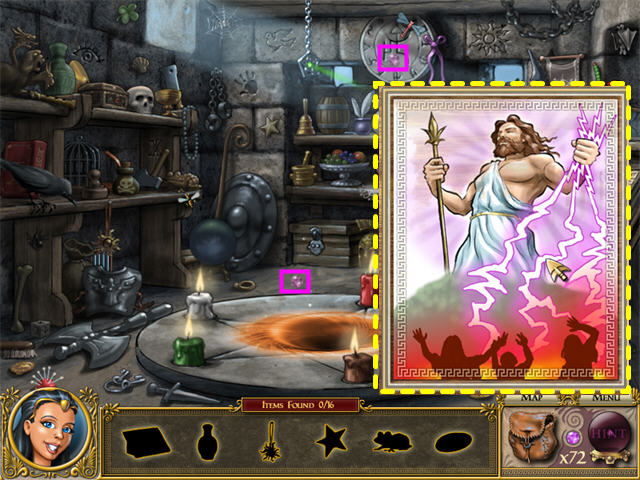
- Collect the items on the Find List.
- After you collect everything on the Find List, put together the jigsaw puzzle as shown.
- Go to the Garden.

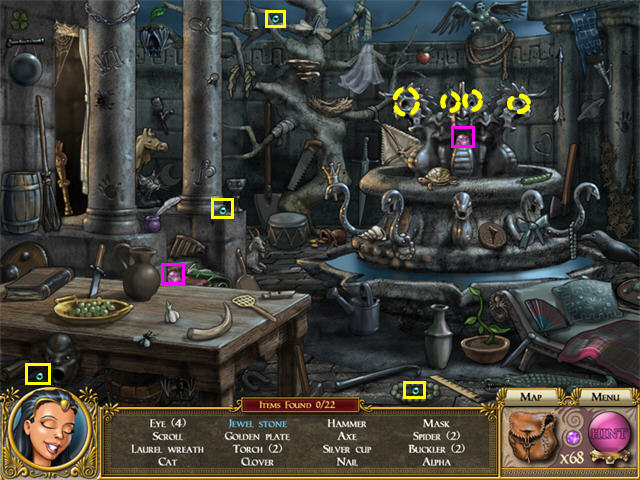
- Collect the items on the Find List.
- The 4 EYES are marked in yellow. Put them into the Statues as shown.
- The center Statue’s mouth will open revealing the 5th MAGICAL PEARL.
Chapter 13: Search for the Sorcerer
- There are four locations in this chapter: the Atrium, the Secret Room, the Garden, and the Galleon. For story reasons you should complete them in that order.
- Go to the Atrium.

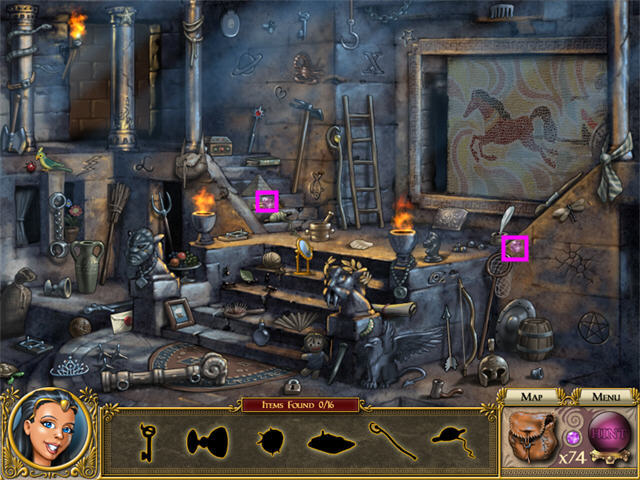
- Collect the items on the Find List.
- Go to the Secret Room.

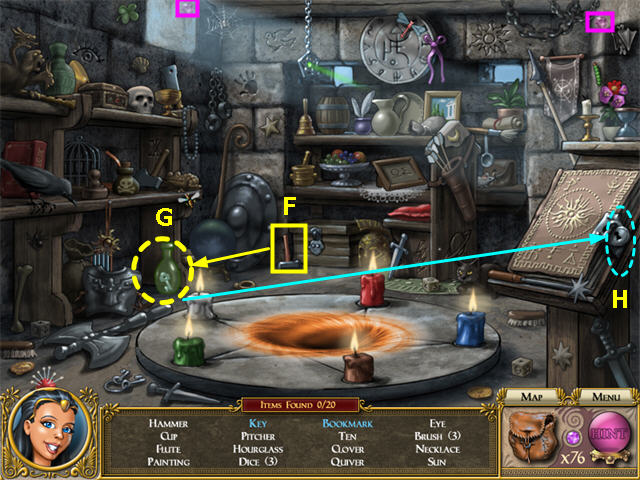
- Collect the items on the Find List.
- The only KEY that counts is the one inside the green bottle.
- Use the HAMMER (F) to break open the Bottle (G) and collect the KEY.
- Use the KEY to unlock the BOOK (H). This will trigger a rotation mini-game.

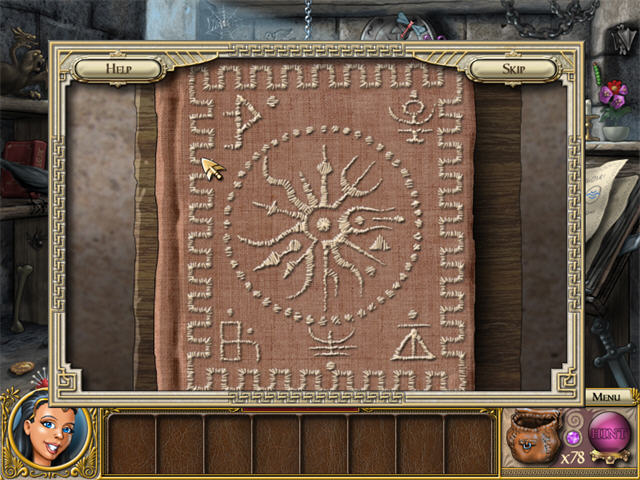
- Recreate the same pattern as the cover of the book.
- It helps to note the symbols that appear at 1, 6, and 8 o’clock. These will help you stay oriented as you do the puzzle.
- Also note that although one ring appears to be nothing but dots, it does have a few small lines, which includes the tip of the line at 11 o’clock.
- There are many possible solutions, but you will usually end by rotating the outer ring, as it is the only one that rotates by itself.
- After you complete the puzzle, collect the purple BOOKMARK from the open Book.
- Go to the Garden.

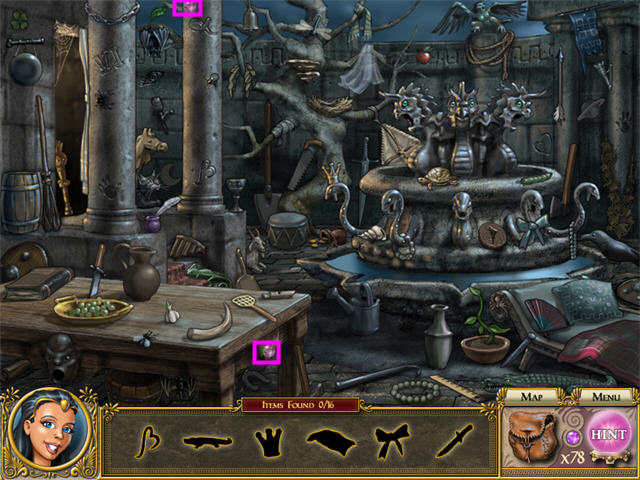
- Collect the items on the Find List.
- Go to the Galleon.

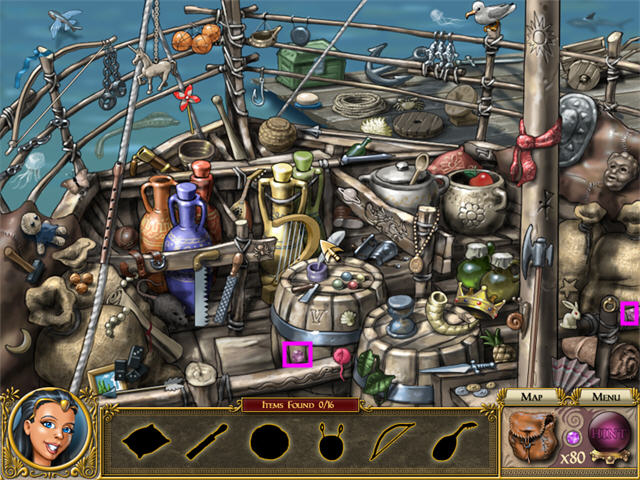
- Collect the items on the Find List.
Chapter 14: Closing the Book
- This chapter has three locations: the Atrium, the Garden, and the Secret Room. You will not be able to complete the Secret Room until you’ve been to the other locations.
- Go to the Atrium.

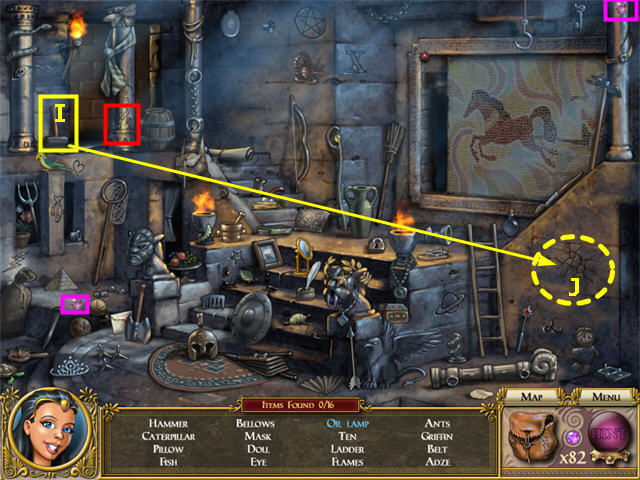
- Collect the items on the Find List.
- The “Adze” is the pickaxe in the upper right.
- The only Flames (red) that count are drawn on the base of a pillar on the upper level.
- Use the HAMMER (I) to break the weak spot on the wall (J). This will trigger a Mah Jong mini-game.
- When the mini-game is completed, the OIL LAMP will be revealed in the wall.
- Go to the Garden.

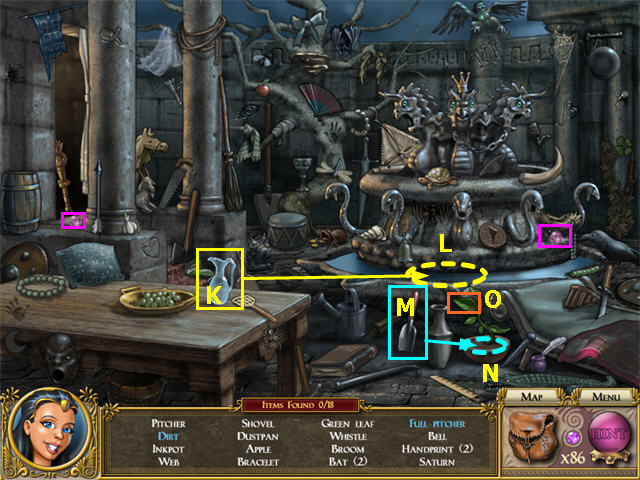
- Collect the items on the Find List.
- Fill the PITCHER (K) with WATER (L) from the Fountain.
- Use the TROWEL (M) to dig up DIRT (N) from the Potted Plant.
- Collect the LARGE GREEN LEAF (O) from the Potted Plant.
- Collecting everything on the Find List will trigger a find-the-differences mini-game.

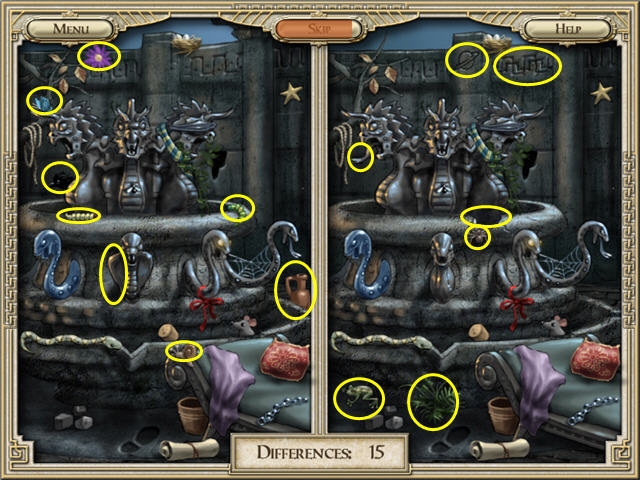
- Some players will have a raven in shadow behind the left Statue that is quite hard to see.
- Some players will have a difference in the snakes’ eyes from one scene to the other.
- Go to the Secret Room.

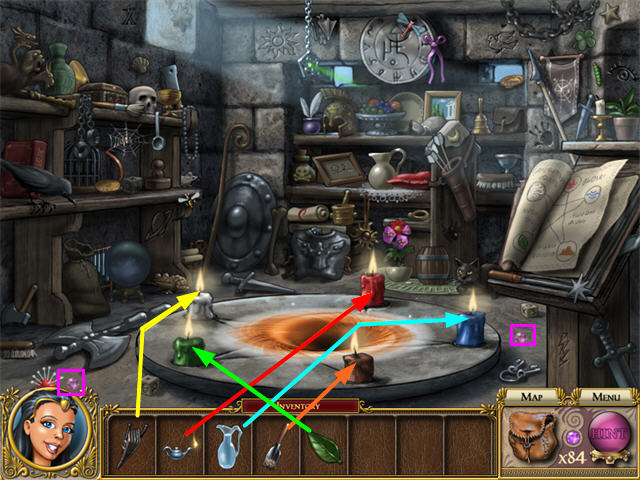
- Collect the items on the Find List.
- The only Bag that counts is the satchel.
- To put out the candles you must have already collected the BELLOWS and the OIL LAMP from the Atrium and the FULL PITCHER, DIRT, and GREEN LEAF from the GARDEN. If you don’t have them yet, you can come back later.
- The 5 Inventory Items represent the Five Elements: AIR (White Candle, BELLOWS), FIRE (Red Candle, OIL LAMP), WATER (Blue Candle, FULL PITCHER), EARTH (Brown Candle, DIRT), and PLANT LIFE (Green Candle, GREEN LEAF).
- Put each Inventory Item on its matching Candle.
- When all the Candles are out, the MAGIC POWDER will appear in the center of the Candles.
Chapter 15: the Necklace
- There are three locations on the first map for this chapter: Maia’s Home, the Workshop, and the Forge.
- Go to Maia’s Home.

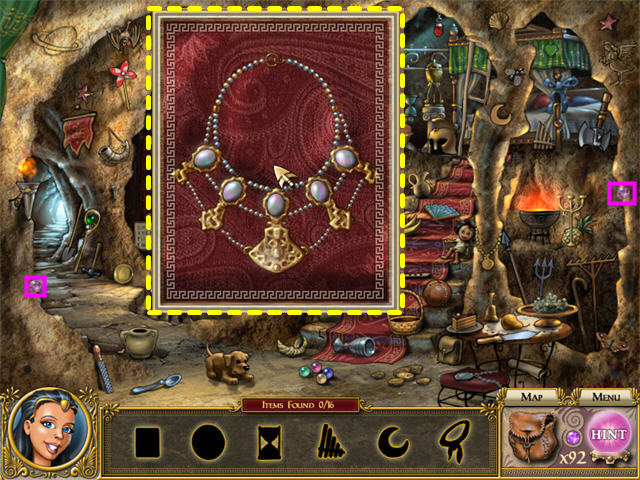
- Collect the items on the Find List.
- If your Find List includes a silhouette that just looks like a circle, try the Shield on the back wall.
- After you collect everything on the Find List, put together the jigsaw puzzle as shown.
- Go to the Workshop.

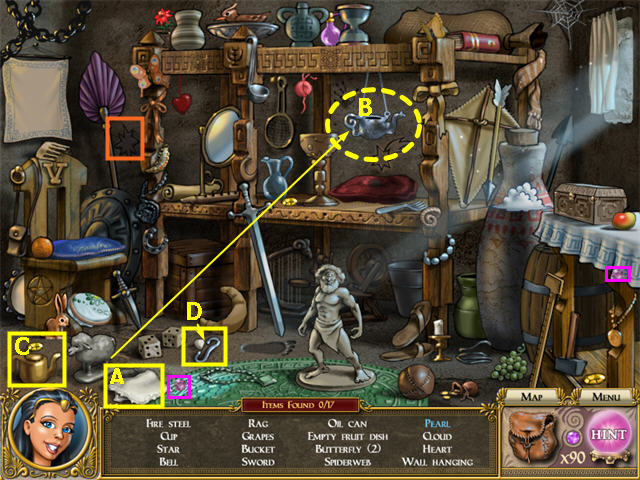
- Collect the items on the Find List.
- The Empty Fruit Bowl has a clay bird in it. It’s on the top shelf.
- The “Bell” is the Clay Bird.
- The only Star that counts is drawn on the wall, marked in orange in the screenshot.
- The “Cover” is the white tablecloth on the right side of the scene.
- Use the RAG (A) to clean the OIL LAMP (B).
- Use the OIL CAN (C) to fill the OIL LAMP; then light it with the FIRE STEEL (D).
- The PEARL will be visible on the red Pillow underneath the OIL LAMP.
- Go to the Forge.

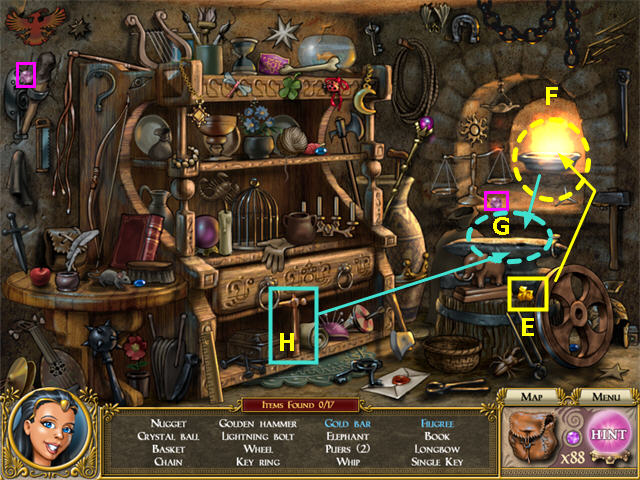
- Collect the items on the Find List.
- Put the GOLD NUGGET (E) into the FIRE (F). You will collect the GOLD BAR.
- Put the GOLD BAR on the ANVIL (G).
- Use the GOLDEN HAMMER (H) to work on the ANVIL (G). You will collect the FILIGREE.
- Collecting everything will trigger a mini-game.

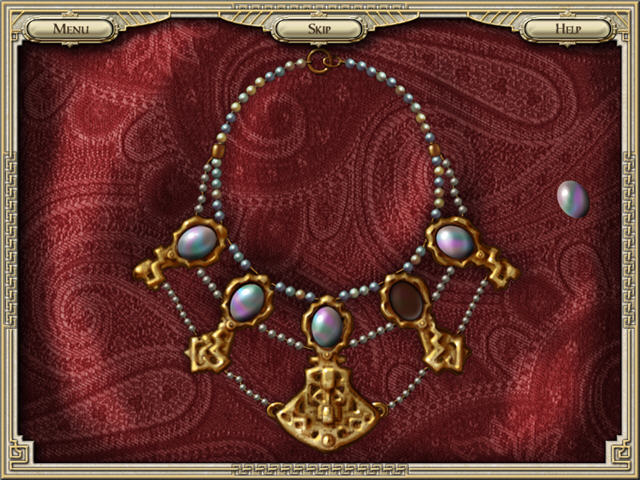
- There was a picture of the Necklace in the jigsaw puzzle at Maia’s Home so you know what it looks like.
- Pieces cannot be rotated; you can tell where most of them go just from the angle.
- Pieces will lock into place when set correctly.
- Although the instructions say you have to string the beads in the right order, you just have to place them on the correct spot on the Necklace and they will lock into place.
- The only sequence issue is that you have to place the gold frames on the Necklace before you can put the pearls into them.
- Congratulations! You’ve Completed “Ancient Adventures: Gift of Zeus!”
- You can still return to the game under this player profile and read the Encyclopedia. If you’re curious about why there was a Sphinx in a Greek game, check out the Creatures section of the Encyclopedia! Many small details from the artwork in the game have explanations there.
- If you want to replay any levels, you will need to start a new player profile. Find Lists will be different when you return!



 Death and Betrayal in Romania: A Dana Kinghtstone Novel Walkthrough, Guide, & Tips
 Mystery Case Files: Shadow Lake Walkthrough, Guide, & Tips
 Sea of Lies: Nemesis Walkthrough, Guide, & Tips
 Mystery Case Files: Key to Ravenhearst Walkthrough, Guide, & Tips
 Grim Tales: The Wishes Walkthrough, Guide, & Tips