Death and Betrayal in Romania: A Dana Kinghtstone Novel Walkthrough, Guide, & Tips
Death and Betrayal in Romania: A Dana Kinghtstone Novel Walkthrough

Welcome to the Death and Betrayal in Romania: A Dana Knightstone Novel Walkthrough
Can you escape from the grasp of a lovestruck ghost?
Whether you use this document as a reference when things get difficult or as a road map to get you from beginning to end, we’re pretty sure you’ll find what you’re looking for here.
This document contains a complete Death and Betrayal in Romania: A Dana Knightstone Novel game walkthrough featuring annotated screenshots from actual gameplay!
We hope you find this information useful as you play your way through the game. Use the walkthrough menu below to quickly jump to whatever stage of the game you need help with.
Remember to visit the Big Fish Games Forums if you find you need more help. Have fun!
This walkthrough was created by Daniel Lee Peach, and is protected under US Copyright laws. Any unauthorized use, including re-publication in whole or in part, without permission, is strictly prohibited.
General Tips

- This is the official guide for Death and Betrayal in Romania: A Dana Knightstone Novel.
- This guide will not mention each time you have to zoom into a location; the screenshots will show each zoom scene.
- Hidden-object puzzles are referred to as HOPs. This guide will not show screenshots of the HOPs, however, it will mention when an HOP is available and the inventory item you’ll collect from it.
- This guide will give step-by-step solutions for all puzzles which are not random. Please read the instructions in the game for each puzzle.
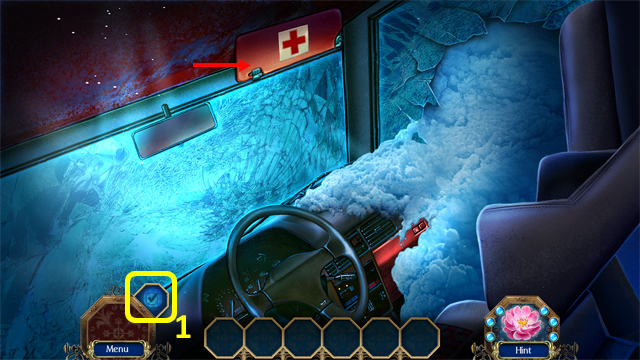
- Select the button (1) for current objectives.
Chapter 1: Reception

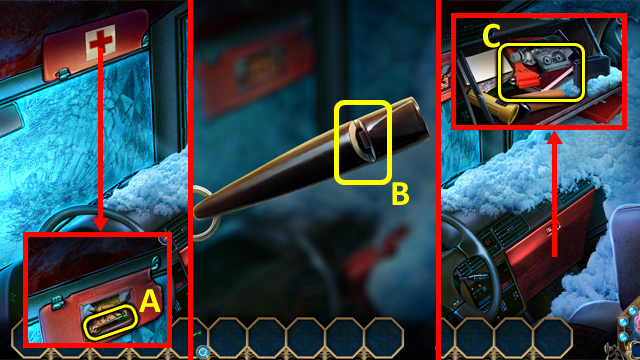
- Pull down the sun visor; grab the DOG WHISTLE (A).
- Select the DOG WHISTLE in the Inventory; remove the cap, then select the whistle (B).
- Open the glove box and select inside (C) to access a HOP; play it and receive an EMERGENCY HAMMER.

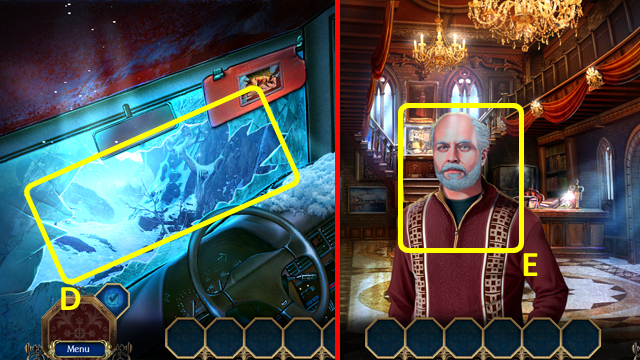
- Break the windshield with the EMERGENCY HAMMER; exit the car (D).
- Talk to the man (E).

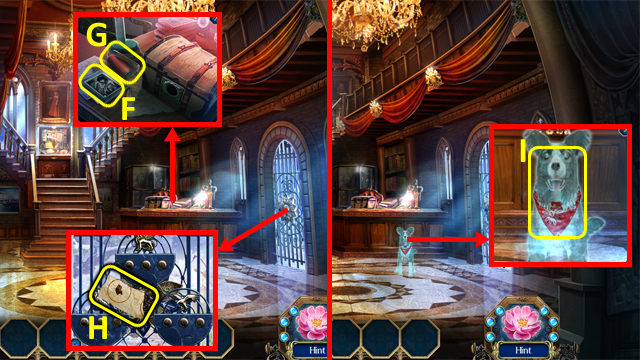
- Look at the picture (F); grab the SANDPAPER (G).
- Take the TORN NOTE 1/3 (H).
- Select Bandit (I).

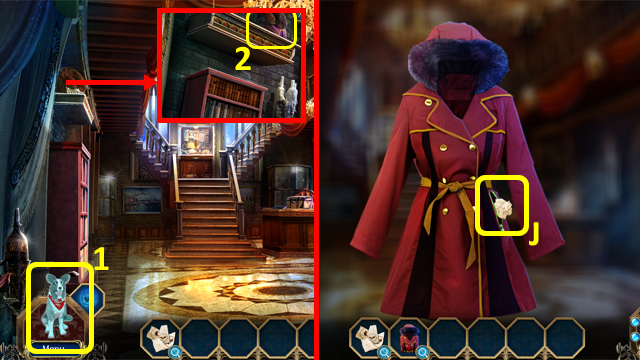
- Use Bandit to get the COAT (1-2).
- Select the COAT in the Inventory, and unfold it twice; unzip the pocket and select the balled up paper (J).

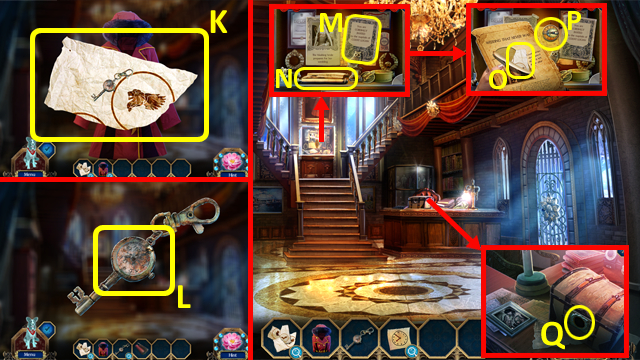
- Unwrap the paper; take the KEY and TORN NOTE 2/3 (K).
- Select the KEY in the Inventory, and use the SANDPAPER (L); receive CLOCK NOTE.
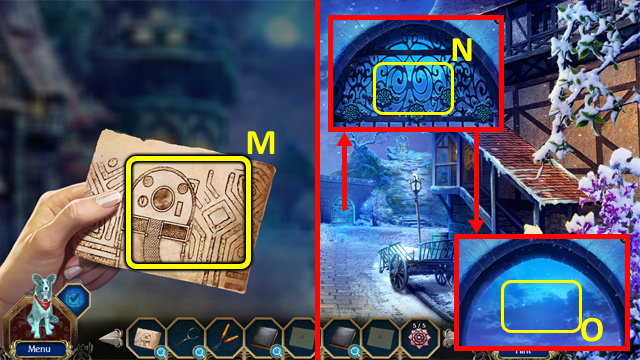
- Open the cabinet with the KEY; move the notice (M), then select the scroll (N).
- Tear the scroll; grab the TORN NOTE 3/3 (O) and DIAL (P).
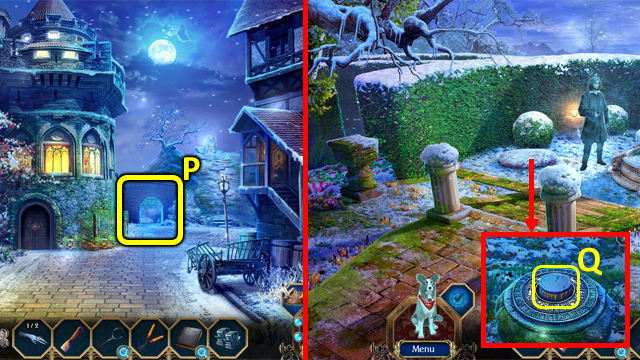
- Place the DIAL in the chest to trigger a puzzle (Q).

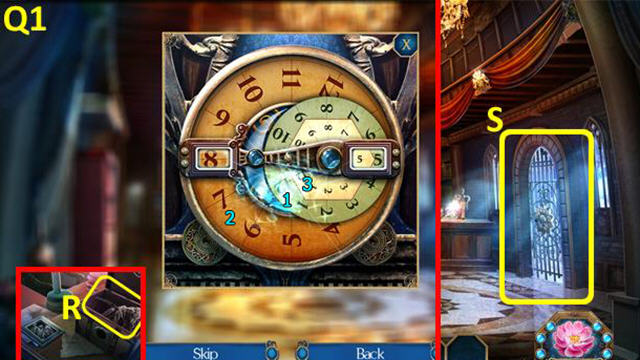
- Rotate the rings (1-3) in the order indicated to display 8:55 (Q1).
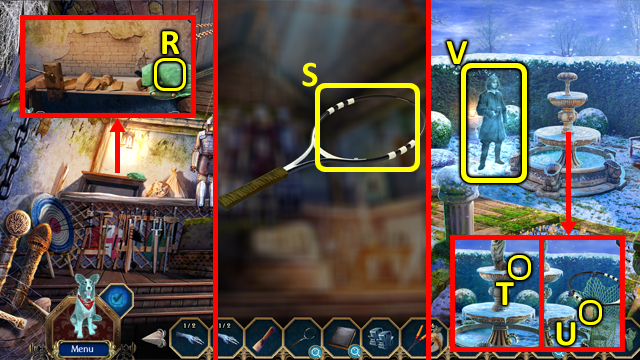
- Grab the ICE PICK and BOOTS (R).
- Select the door (S) to trigger a puzzle.

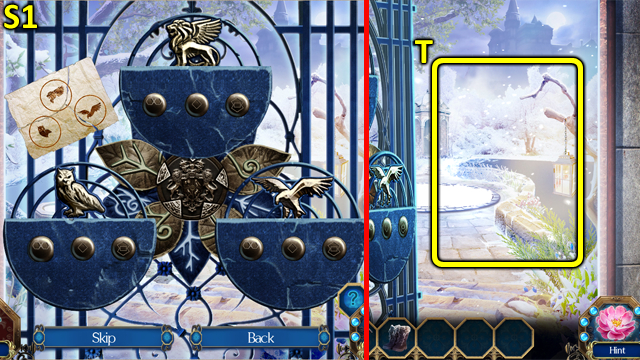
- Random solution (S1).
- Exit the hotel (T).

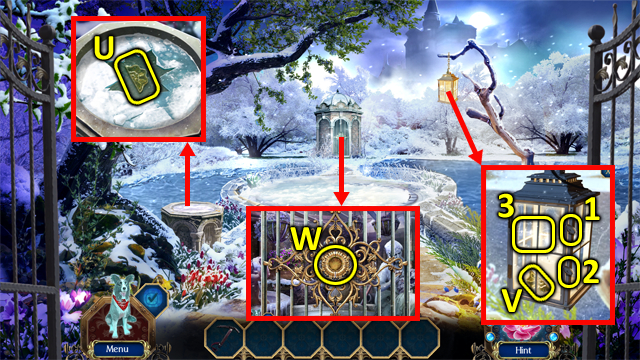
- Break the ice with the ICE PICK; grab the FLOWER HALF 1/2 (U).
- Open the lantern (1-3); take the FLOWER HALF 2/2 (V).
- Place the FLOWER HALVES to trigger a HOP (W); play it and receive a MOSIAC PIECE.

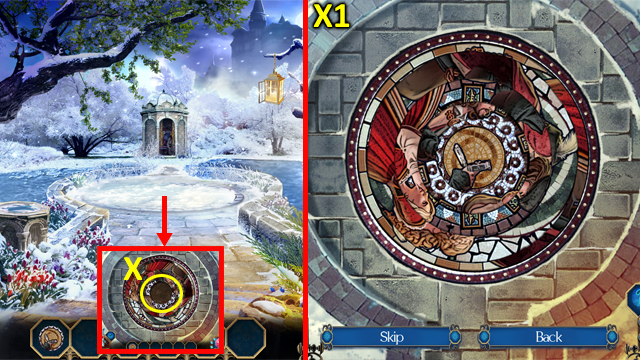
- Use Bandit to clear the snow; place the MOSIAC PIECE to trigger a puzzle (X).
- Random solution (X1).
Chapter 2: Death and Depths

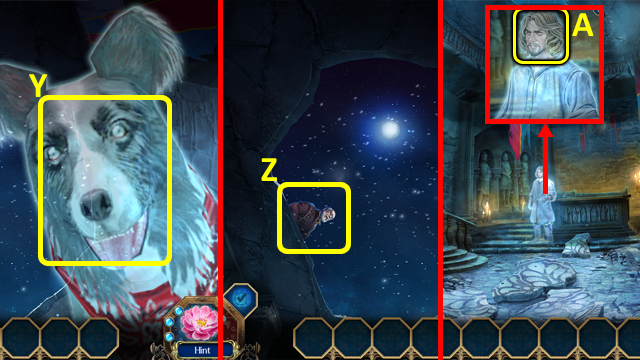
- Select Bandit (Y).
- Talk to the Caretaker (Z), then the ghost (A).

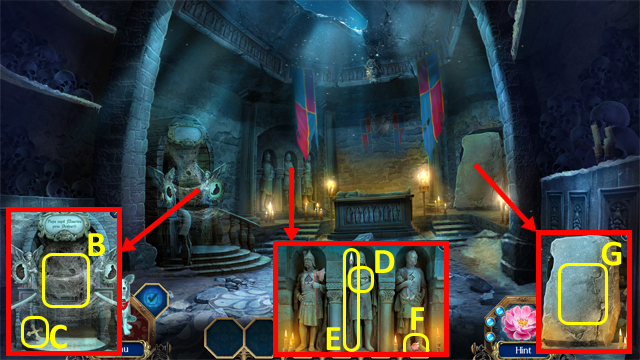
- Remove the cobwebs (B); grab the CROSS EMBLEM (C).
- Place the CROSS EMBLEM (D); take the SPEAR (E) and GOLD PETAL (F).
- Use the SPEAR with the stone to access a HOP (G); play it and receive a LION TOKEN.

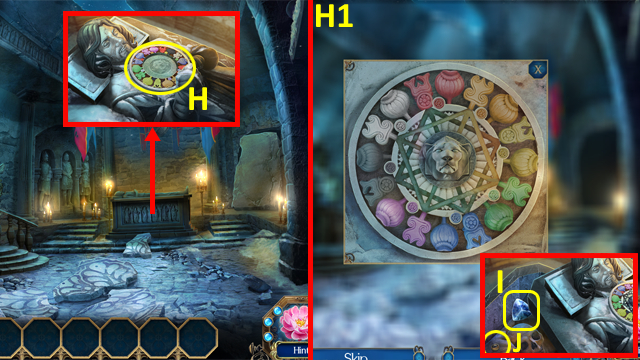
- Place the LION TOKEN to trigger a puzzle (H).
- Solution (H1).
- Grab the BLUE GEM (I) and ENGAGEMENT RING (J).

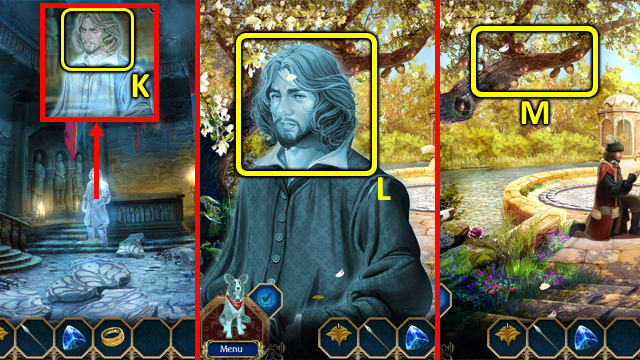
- Talk to the ghost (K), then give him the ENGAGEMENT RING.
- Talk to the Lucian (L).
- Use Bandit to knock down the acorns (M).

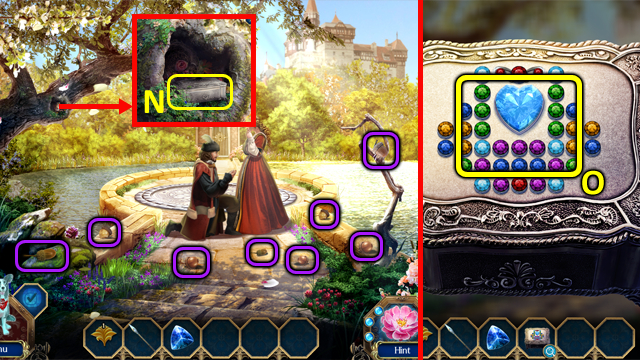
- Grab the ACORNS (purple).
- Give the ACORNS to the squirrel; take the RING BOX (N).
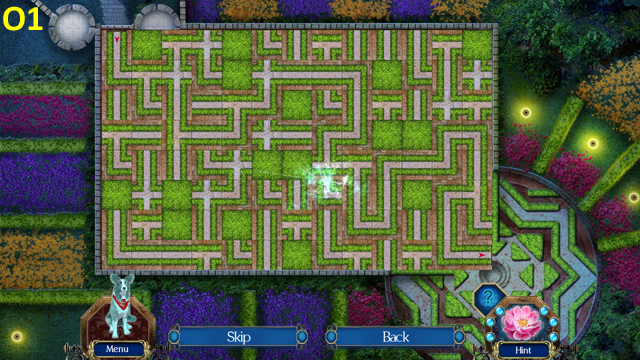
- Select the RING BOX in the Inventory; select it to trigger a puzzle (O).

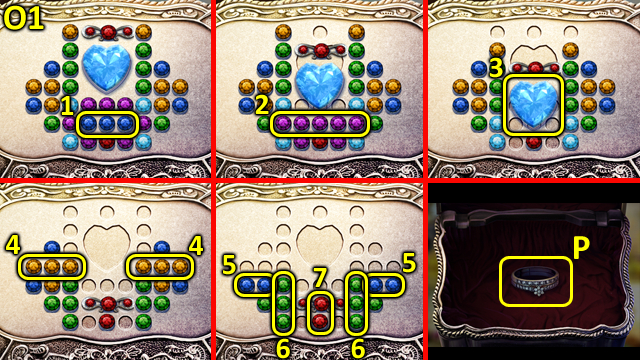
- Solution (O1).
- Take the ENGAGEMENT RING (P).

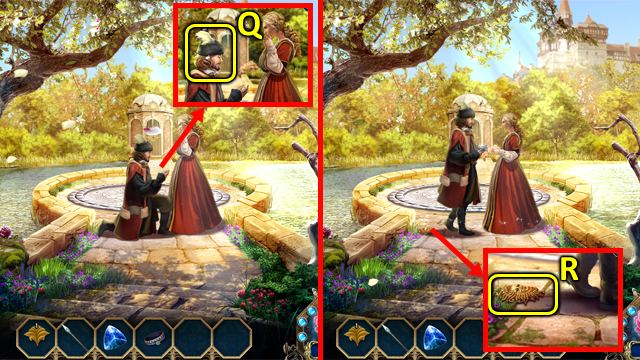
- Give the ENGAGEMENT RING to the Lucian (Q).
- Grab the STONE SUN (R).

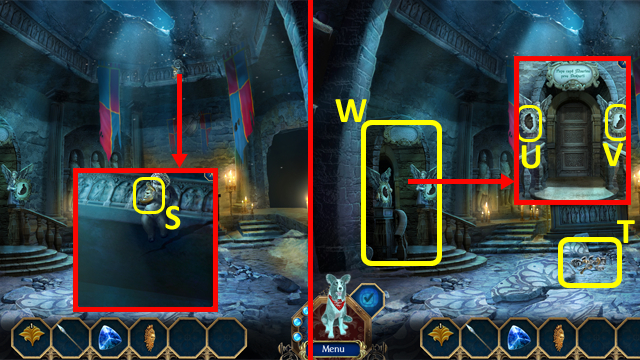
- Use Bandit (S).
- Find the pieces of the STONE MOON (T).
- Place the STONE SUN (U) and STONE MOON (V).
- Enter the Chapel (W).

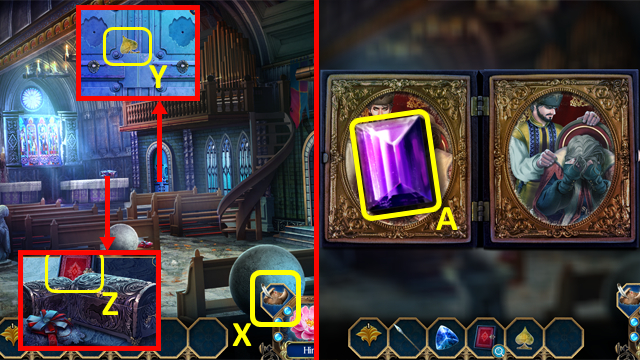
- Talk to the Caretaker, and receive a map; select (X) to access the map.
- Grab the SPADE (Y) and FRAME (Z).
- Select the FRAME in the Inventory and open it; take the VIOLET GEM (A).
- Walk down.

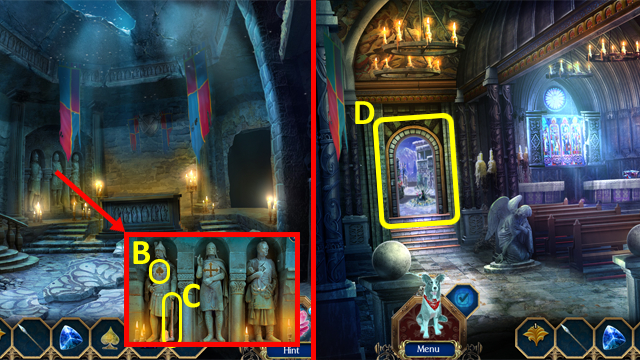
- Place the SPADE (B); take the HATCHET (C).
- Return to the Chapel.
- Enter the Garden Courtyard (D).

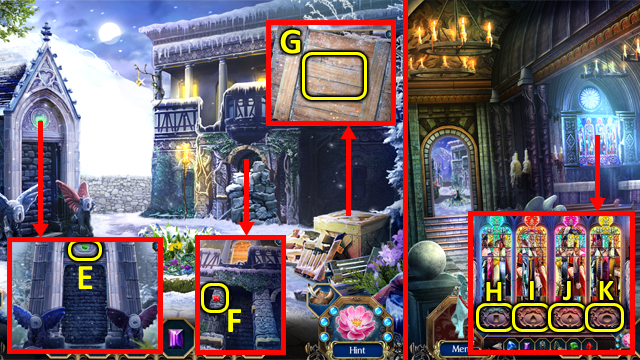
- Use Bandit to get the GREEN GEM (E).
- Use the HATCHET on the vines three times; grab the RED GEM (F).
- Open the crate with the SPEAR (G); find the pieces of the DOOR KNOCKER 1/2.
- Walk down.
- Place the VIOLET GEM (H), BLUE GEM (I), RED GEM (J), and GREEN GEM (K) to trigger a puzzle.

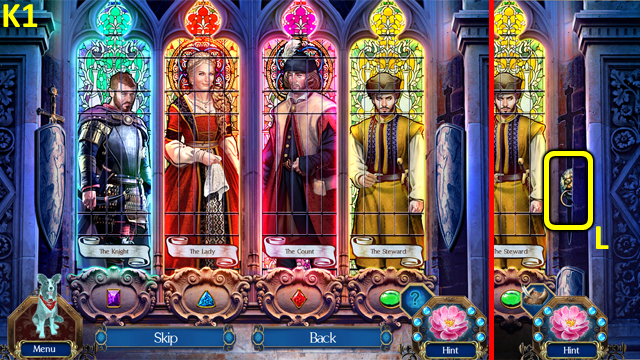
- Random solution (K1).
- Grab the DOOR KNOCKER 2/2 (L).

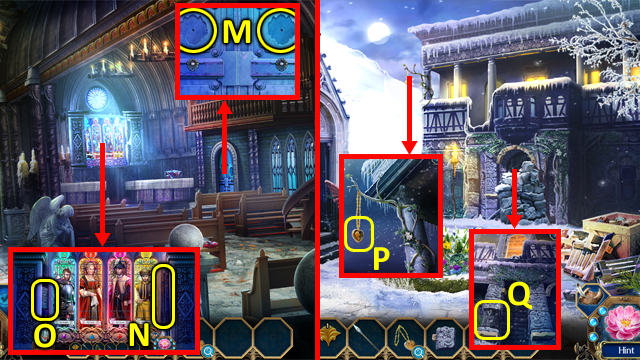
- Place the DOOR KNOCKERS to access an HOP (M); play it and receive an ORNAMENTAL SWORD.
- Place the ORNAMENTAL SWORD (N); grab the COLUMN CHUNK (O).
- Return to the Garden Courtyard.
- Use Bandit to get the LOCKET (P).
- Place the COLUMN CHUNK to trigger a puzzle (Q).

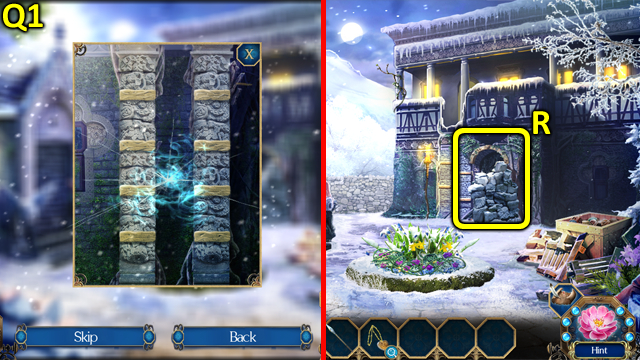
- Random solution (Q1).
- Enter Alexandra’s Room (R).

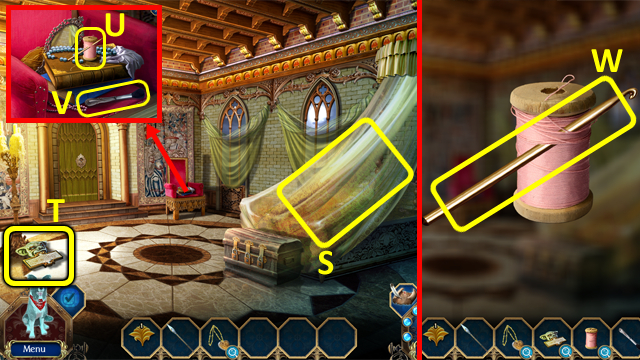
- Remove the cover (S).
- Grab the PLAQUE (T), SPOOL OF THREAD (U) and SOFT BRUSH (V).
- Select the SPOOL OF THREAD in the Inventory; take the CROCHET NEEDLE (W).
- Return to the Chapel.

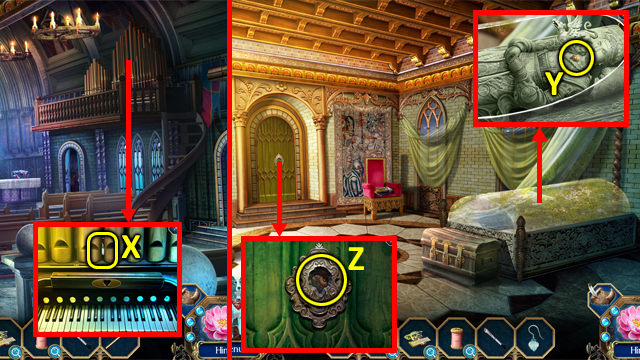
- Use the CROCHET NEEDLE to get the DIAMOND EARRING (X).
- Return to Alexandra’s Room.
- Clean the display case with the SOFT BRUSH twice, cut the glass with the DIAMOND EARRING, then select the body to access a HOP (Y); play it and receive LADY’S HEAD TOKEN.
- Place the LADY’S HEAD TOKEN (Z); open the door.

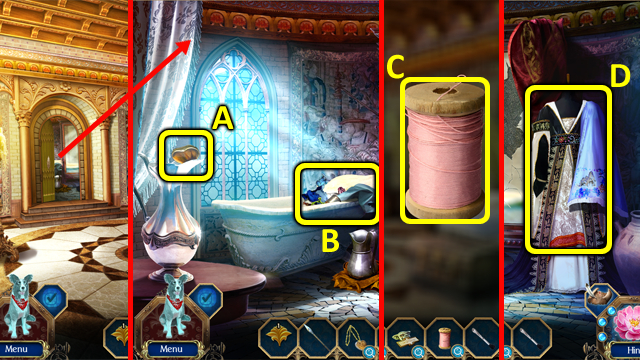
- Grab the GOLD PETAL (A).
- Play the HOP (B); receive a SEWING NEEDLE.
- Select the SPOOL OF THREAD in the Inventory and add the SEWING NEEDLE (C); receive a THREADED NEEDLE.
- Use the THREADED NEEDLE with the dress to trigger a puzzle (D).

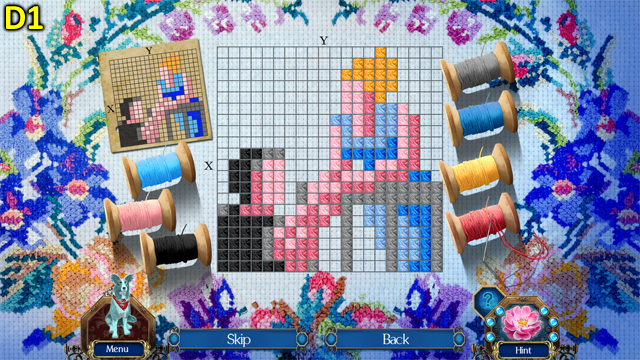
- Random solution (D1); receive a WEDDING DRESS.

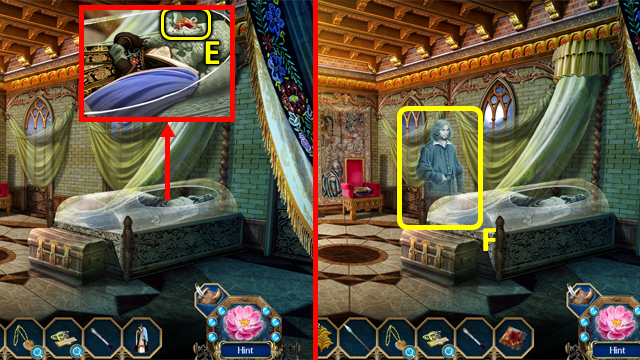
- Place the WEDDING DRESS on the statue; grab the BLOODY HANDKERCHIEF (E).
- Give the BLOODY HANDKERCHIEF to the Lucian (F).

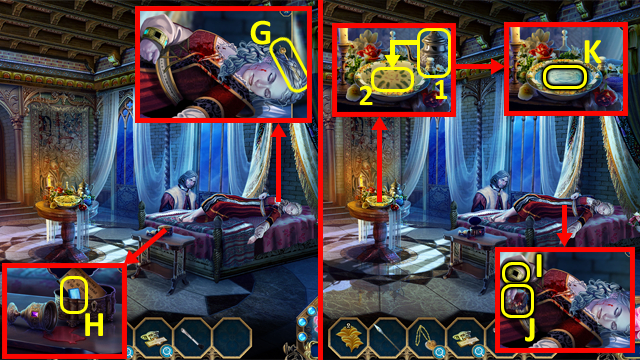
- Grab the HAIR PIN (G).
- Open the box with the HAIR PIN; take the GEM (H).
- Place the GEM (I); grab the BLOODY NAPKIN (J).
- Find the pieces of the bowl, pour the water into it (1-2), then place the BLOODY NAPKIN into the water (K); receive NICOLAE’S NAPKIN.

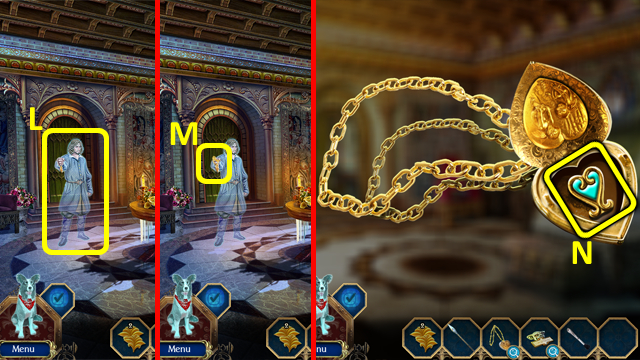
- Give NICOLAE’S NAPKIN to Lucian (L).
- Grab the LOCKET HALF (M).
- Select the LOCKET in the Inventory; add the LOCKET HALF and take the HEART KEY (N).
- Return to the Chapel.

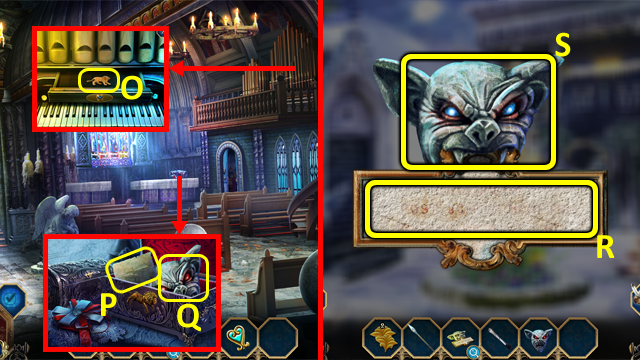
- Place the HEART KEY in the slot; take the LION ORNAMENT (O).
- Place the LION ORNAMENT in the slot; read the note (P) and grab the RED GARGOYLE HEAD (Q).
- Select the PLAQUE in the Inventory, and use the SOFT BRUSH three times (R); take the BLUE GARGOYLE HEAD (S).
- Return to the Garden Courtyard.

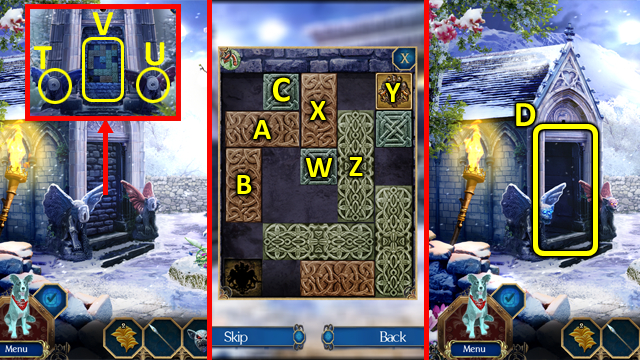
- Place the BLUE GARGOYLE HEAD (T) and RED GARGOYLE HEAD (U); select the wall to trigger a puzzle (V).
- Move the pieces up, down, left or right to create a path from the top right to the bottom left.
- Solution: Wd1- Xd1-Yl2-Zu1-Wr1-Xd1-Ar1-Bd1-Cl1-Cd2-Cr1-Cd1-Yl2-Yd2 -Yr1-Bu3-Yl1-Yd3.
- Enter the Dungeons (D).

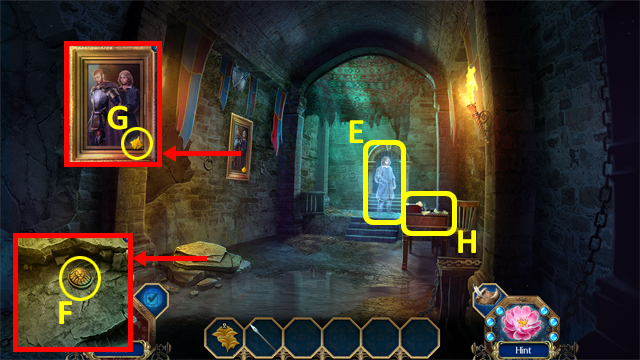
- Talk to Lucian (E).
- Lift the stone with the SPEAR; take the LION EMBLEM (F).
- Grab the GOLD PETAL (G).
- Find the pieces of the POSTER (H).
- Give the POSTER to Lucian (E).

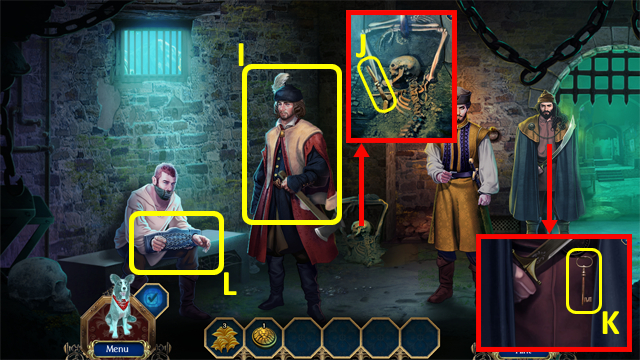
- Talk to Lucian (I).
- Grab the RAZOR (J) and PRISONER KEY (K).
- Select Nicolae’s chains to trigger a puzzle (L).

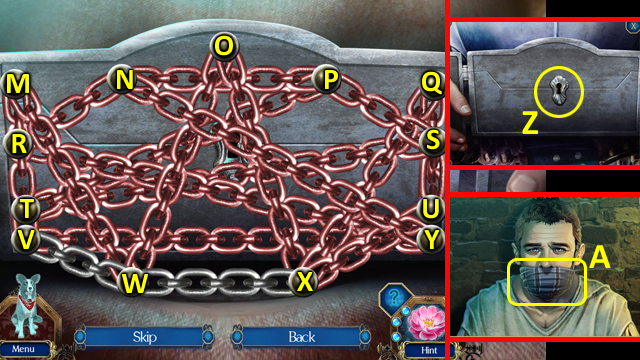
- Solution: M/Q-N/X- P/W-R/Y-S/V- R/U.
- Insert the PRISONER KEY (Z).
- Cut the gag with the RAZOR (A); receive an AXE.

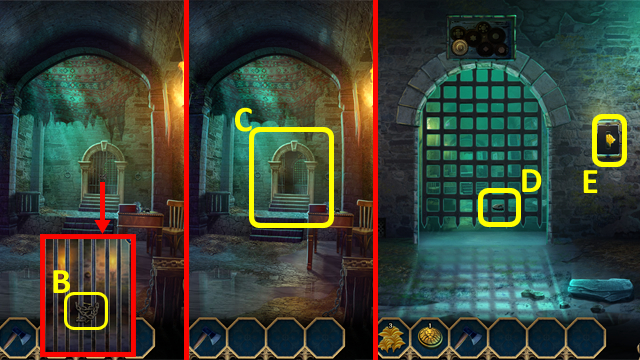
- Use the AXE on the chains (B).
- Enter the Cell (C).
- Use Bandit to get the GEAR PART (D); grab the GOLD PETAL (E).
- Look right.

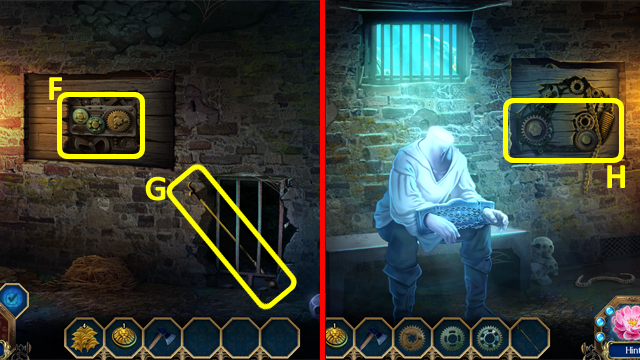
- Grab the GEAR PARTS (F) and FIREPLACE POKER (G).
- Look left twice.
- Cut the chain with the AXE; take the GEAR PARTS (H).
- Look right.

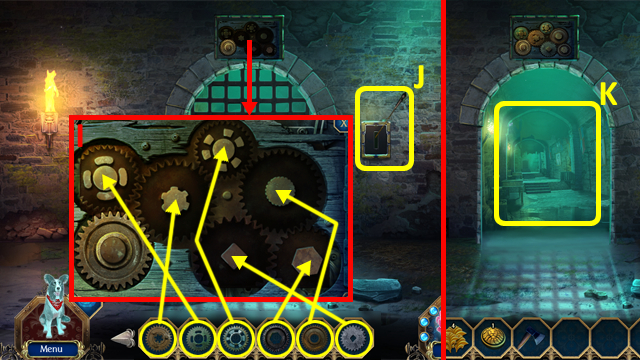
- Attach the GEAR PARTS as shown (I).
- Place the FIREPLACE POKER in the slot and pull it (J).
- Exit the Cell (K).
- Return to Alexandra’s Room.

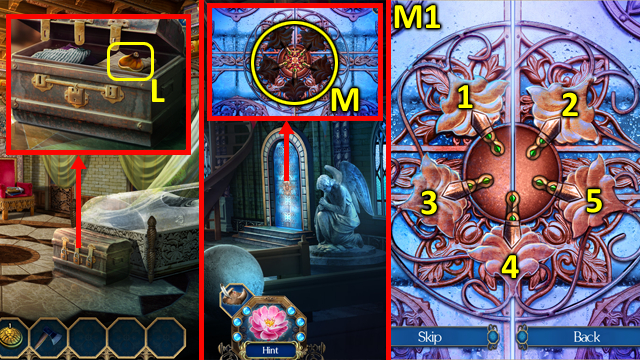
- Break the locks with the AXE; grab the GOLD PETAL (L).
- Return to the Chapel.
- Place the GOLD PETALS to trigger a puzzle (M).
- Solution (M1).
Chapter 3: Earth and Air

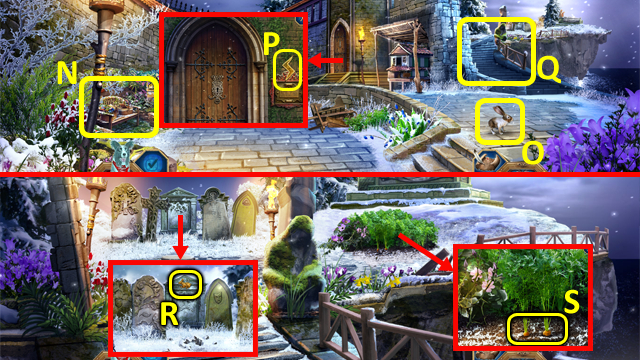
- Play the HOP (N); receive an OLD TILE 1/4.
- Send Bandit after the rabbit (O).
- Grab the LIGHTNING (P).
- Walk up to the Cemetery (Q).
- Take the RABBIT ORNAMENT (R).
- Use Bandit to dig out a CARROTS (S).
- Return to the Catacombs.

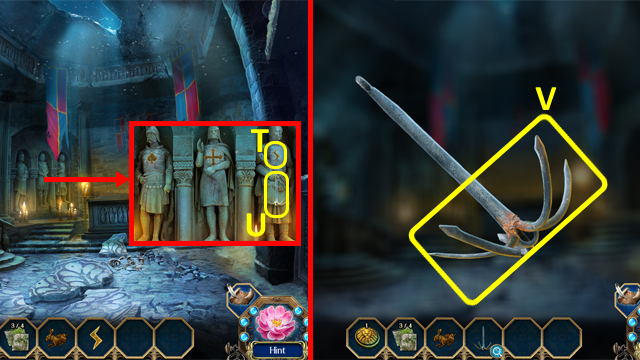
- Place the LIGHTNING (T); grab the GRAPPLING HOOK (U).
- Select the GRAPPLING HOOK in the Inventory, and break off three SMALL HOOKS (V).
- Walk left.

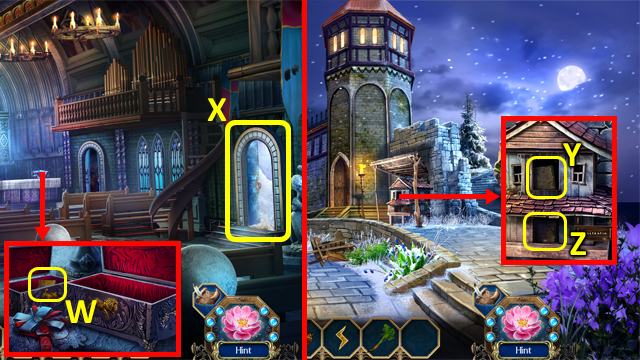
- Place the RABBIT ORNAMENT in the box; take the OLD TILE 2/4 (W).
- Enter the Cemetery Courtyard (X).
- Open the window and take the OLD TILE 3/4 (Y); give the rabbit the CARROTS and take the OLD TILE 4/4 (Z).
- Walk up.

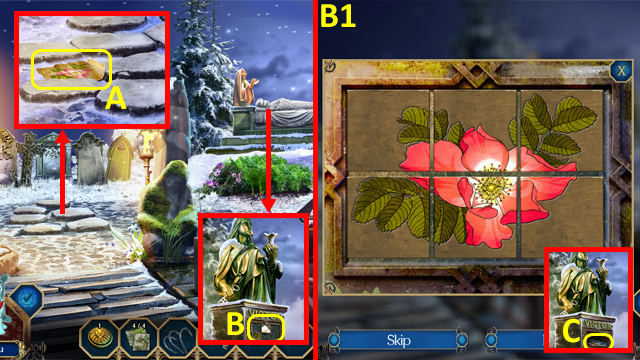
- Move the stone with the SMALL HOOKS; grab the HIDDEN NOTE (A).
- Place the OLD TILES to trigger a puzzle (B).
- Re-arrange the tiles to make a complete picture.
- Solution (B1).
- Take the GARDENING GLOVES (C).
- Walk down.

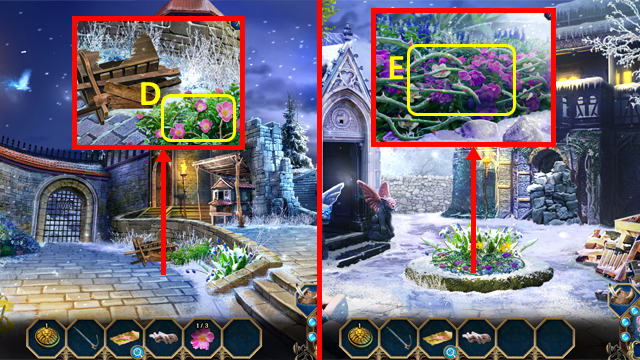
- Use the GARDENING GLOVES to get a DOG ROSE 1/3 (D).
- Return to the Cemetery Courtyard.
- Use the GARDENING GLOVES to trigger a puzzle (E).

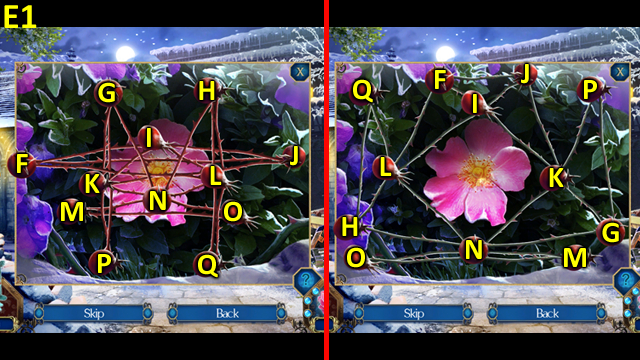
- Solution (E1).
- Receive a DOG ROSE 2/3.
- Return to the Cemetery.

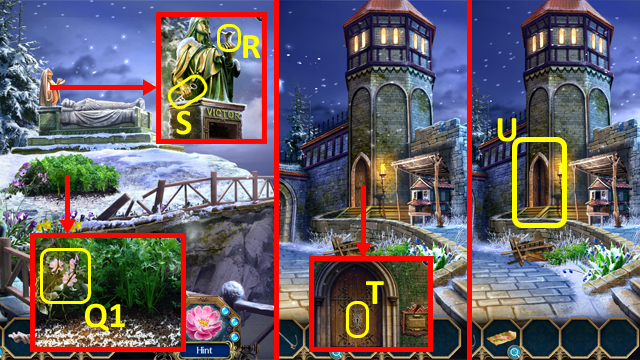
- Use the GARDENING GLOVES to get a DOG ROSE 3/3 (Q1).
- Place the DOG ROSES (R); grab the FALCONRY KEY (S).
- Walk down.
- Use the FALCONRY KEY (T).
- Enter the Tower Lobby (U).

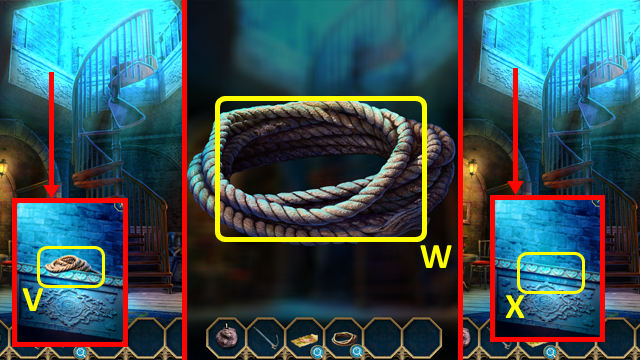
- Use Bandit to get the ROPE (V).
- Select the ROPE in the Inventory, and add the GRAPPLING HOOK (W); receive GRAPPLE AND ROPE.
- Use the GRAPPLE AND ROPE (X).

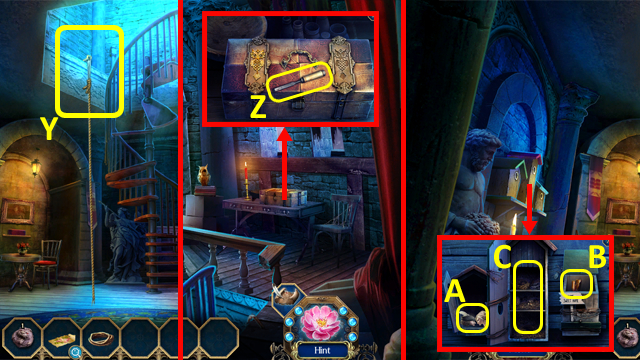
- Climb up to the Falconry (Y).
- Grab the CHISEL (Z).
- Walk down.
- Open the left birdhouse; take the TRINKET 1/6 (A).
- Open the right birdhouse; grab the CASTLE TOKEN 1/2 (B).
- Use the CHISEL to open the middle birdhouse, and find the OWL LOCK pieces (C).
- Climb up.

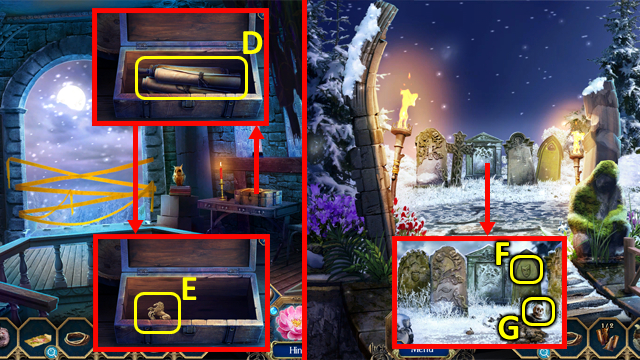
- Place the OWL LOCK in the slot, open the box, and read the three scrolls (D); receive BURIAL OF TRAITOR. Take the GATE ORNAMENT (E).
- Return to the Cemetery.
- Use BANDIT (F); take the SKULL (G).
- Return to the Dungeons.

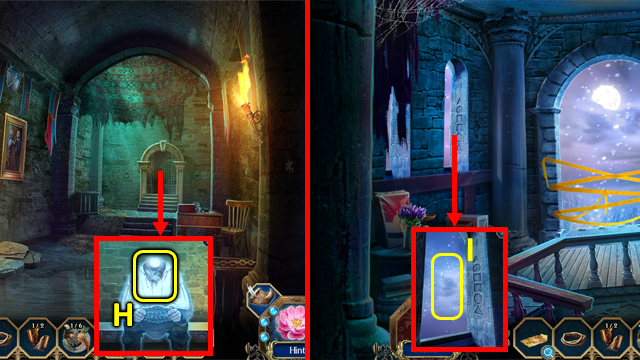
- Give the SKULL to Nicolae (H); receive FALCONRY FLUTE.
- Return to the Falconry.
- Place the FALCONRY FLUTE to trigger a puzzle (I).

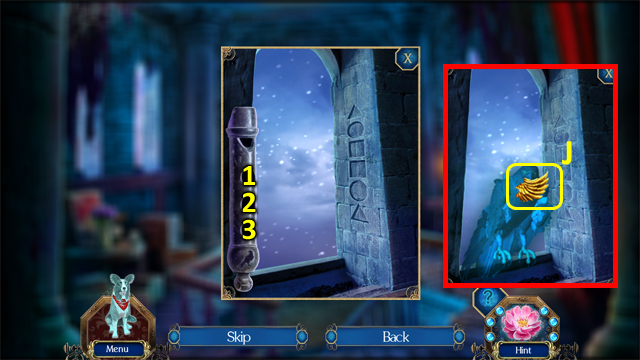
- Solution: 2-1-3-3-1-2.
- Take the METAL WING (J).

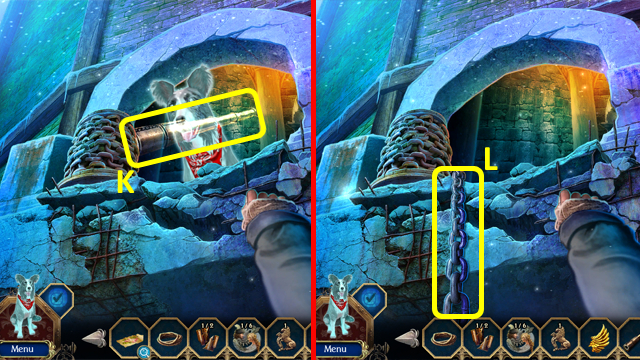
- Find the pieces of the chain.
- Take the SPYGLASS (K).
- Climb up the chain (L).
- Give the SPYGLASS to Lucian.
- Talk to Lucian.

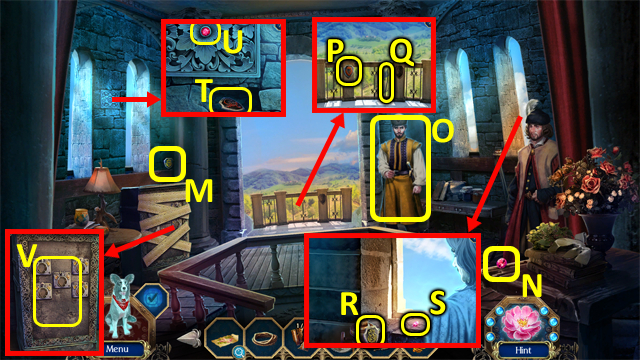
- Grab the SHIELD 1/5 (M) and GEM 1/3 (N).
- Find the pieces of the shield (O); receive a SHIELD 2/5.
- Take the SHIELD 3/5 (P) and METAL BAR (Q).
- Grab the SHIELD 4/5 (R) and GEM 2/3 (S).
- Remove the stone with the METAL BAR, and take the SHIELD 5/5 (T), grab the GEM 3/3 (U).
- Remove the boards with the METAL BAR; place the SHIELDS to trigger a puzzle (V).

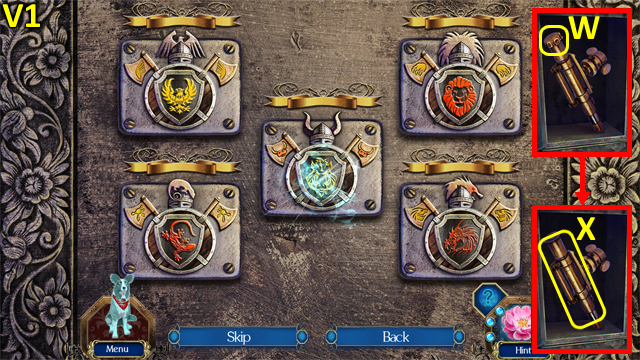
- Random solution (V1).
- Use the GEMS (W); take the TELESCOPE (X).

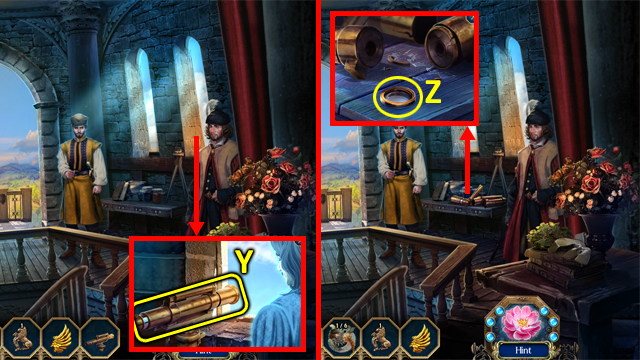
- Attach the TELESCOPE (Y) and select it.
- Grab the LENS (Z).
- Return to the Tower Lobby.

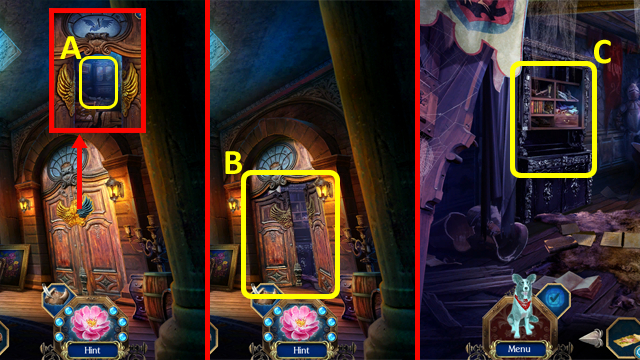
- Place the METAL WING in the door; select inside (A).
- Enter Nicolae’s Quarters (B).
- Play the HOP (C); receive NICOLAE’S SCROLL.

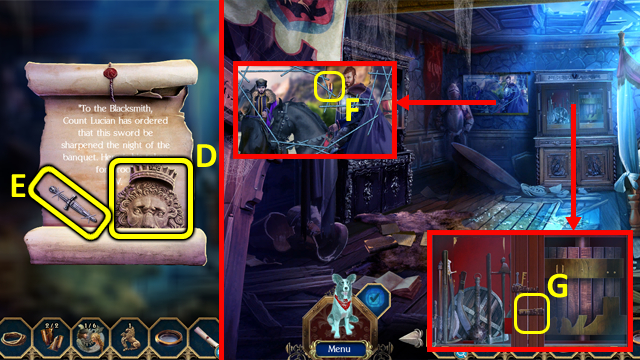
- Select NICOLAE’S SCROLL in the Inventory; take the LION EMBLEM (D) and WEAPON RACK TOKEN (E).
- Grab the CASTLE TOKEN 2/2 (F).
- Place the WEAPON RACK TOKEN to trigger a puzzle (G).

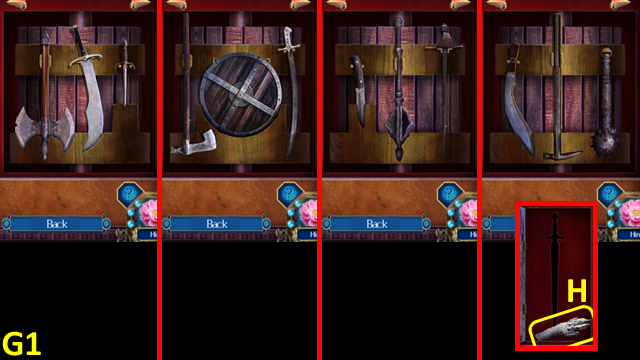
- Solution (G1).
- Grab the GAUNTLET 1/2 (H).
- Walk down.

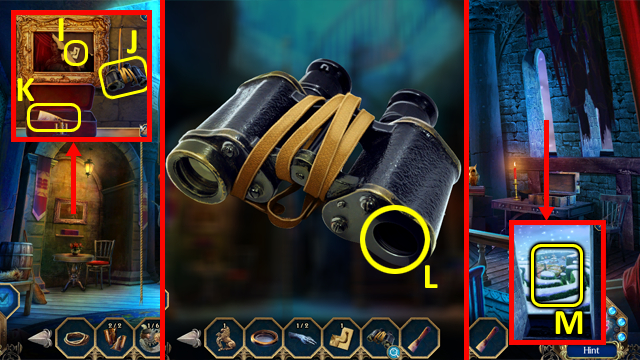
- Select the painting twice; take the DIARY PAGE 1 (I).
- Grab the BINOCULARS (J).
- Insert the CASTLE TOKENS into the box; grab the PAINT SCRAPER (K).
- Select the BINOCULARS in the Inventory; add the LENS (L).
- Climb up.
- Use the BINOCULARS to trigger a puzzle (M).

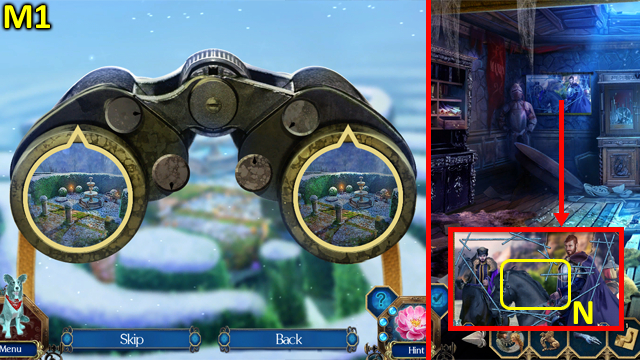
- Random solution (M1); receive a HEDGE MADE SKETCH.
- Return to Nicolae’s Quarters.
- Use the PAINT SCRAPER to trigger a puzzle (N).

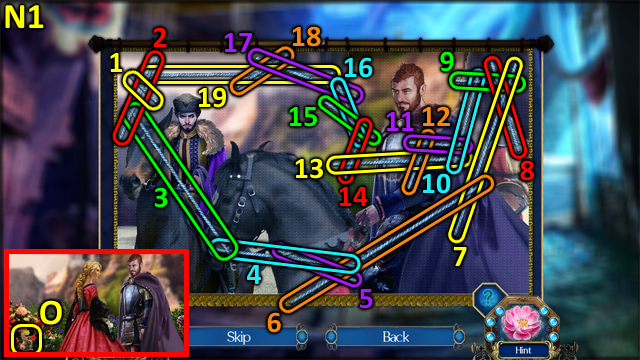
- Solution (N1).
- Read the note; grab the GATE ORNAMENT 2/2 (O).
- Return to the Cemetery Courtyard.

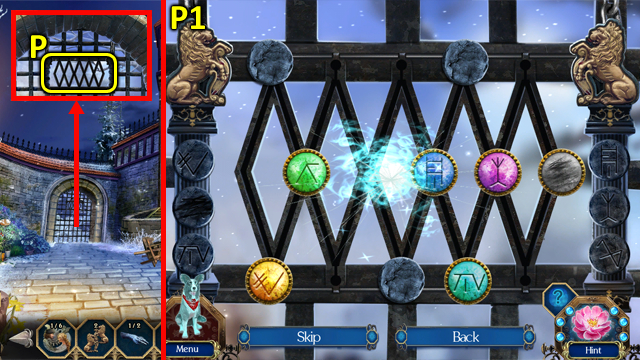
- Place the GATE ORNAMENTS to trigger a puzzle (P).
- Solution (P1).
Chapter 4: Cloak and Dagger

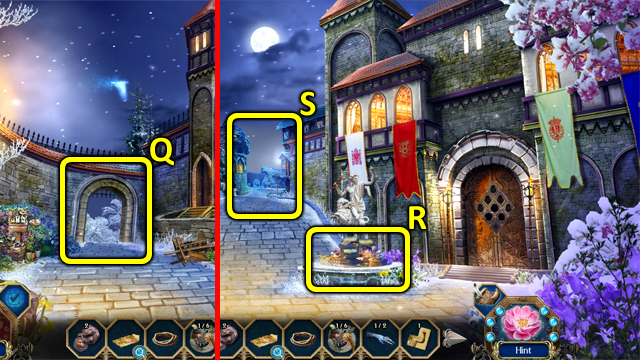
- Enter the Main Courtyard (Q).
- Play the HOP (R); receive a BLUE DIAMOND.
- Enter the Maze Entrance (S).

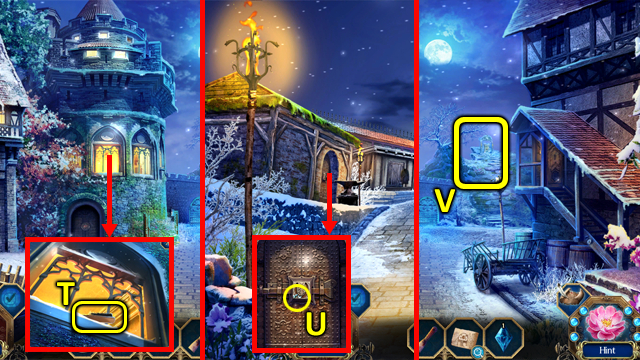
- Use Bandit to get the WIRE BRUSH (T).
- Walk down.
- Use the WIRE BRUSH on the rusty lock; grab the NUT AND BOLT (U).
- Walk forward.
- Enter the Cliff (V).

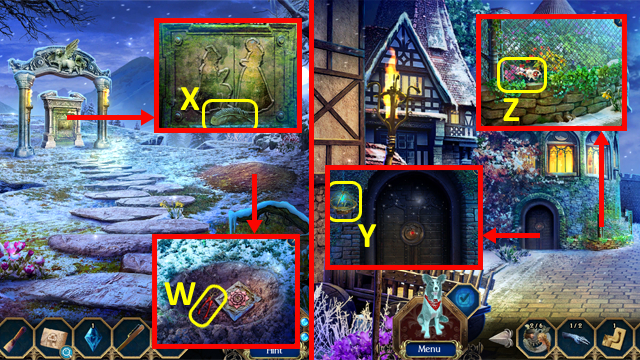
- Use Bandit to dig out the dirt, then add the NUT AND BOLT to the snippers (W); receive some WIRE SNIPPERS.
- Clean the dirt with the WIRE BRUSH; grab the TRINKET 2/6 (X).
- Walk down.
- Use the WIRE SNIPPERS to get the BLUE DIAMOND (Y).
- Cut the fence with the WIRE SNIPPERS; select inside to trigger a puzzle (Z).

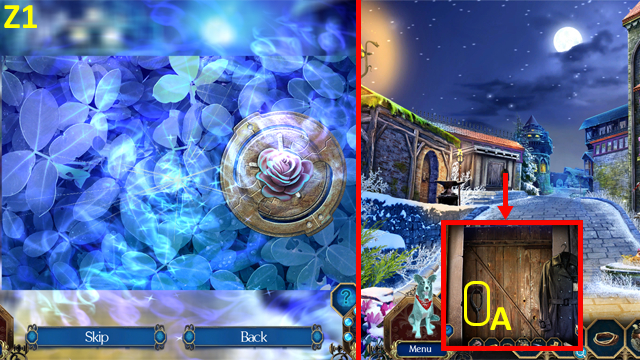
- Random solution (Z1).
- Receive a TRINKET 3/6.
- Walk down.
- Use the WIRE SNIPPERS on the wire (A).

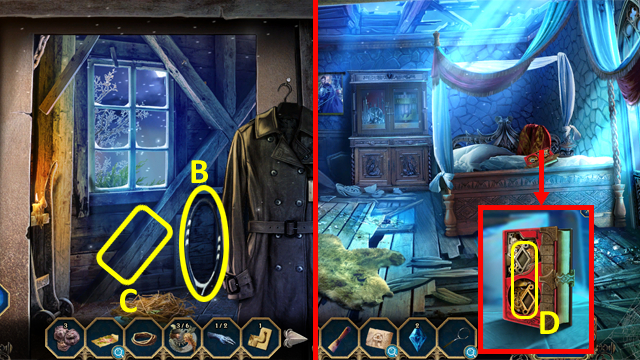
- Find the pieces of the LION EMBLEM.
- Grab the FISHING NET (B) and SHEARS BLADES (C).
- Return to Nicolae’s Quarters.
- Place the BLUE DIAMONDS to trigger a puzzle (D).

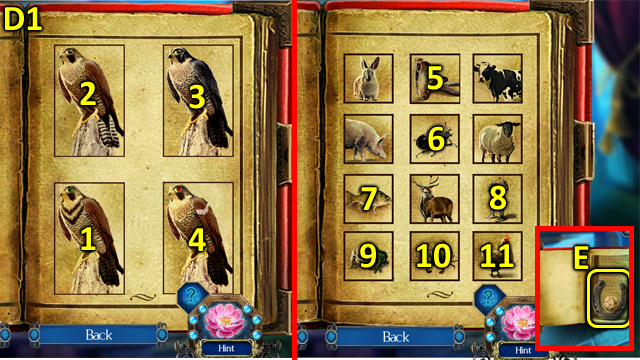
- Solution (D1).
- Grab the DIARY PAGE and HORSESHOE (E).
- Return to the Main Courtyard.

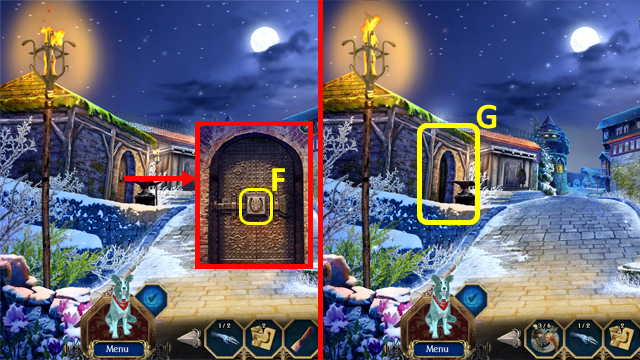
- Place the HORSESHOE (F).
- Enter the Smithy (G).

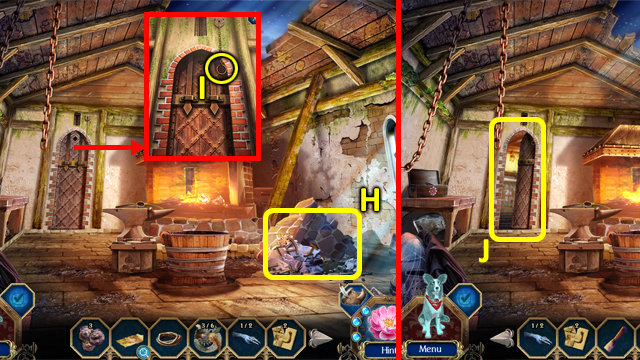
- Find all the pieces of the WAGON WHEEL (H).
- Use Bandit to open the door (I).
- Enter the Armory (J).

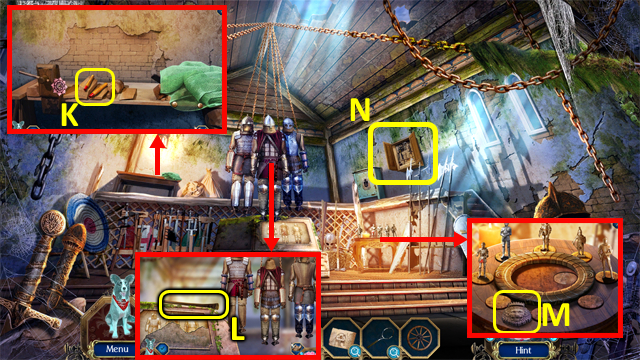
- Move the net, and add the SHEARS BLADES (K); receive some WOBBLY SHEARS.
- Grab the PICKAXE HANDLE (L) and LION EMBLEM (M).
- Select the cabinet to trigger a puzzle (N).

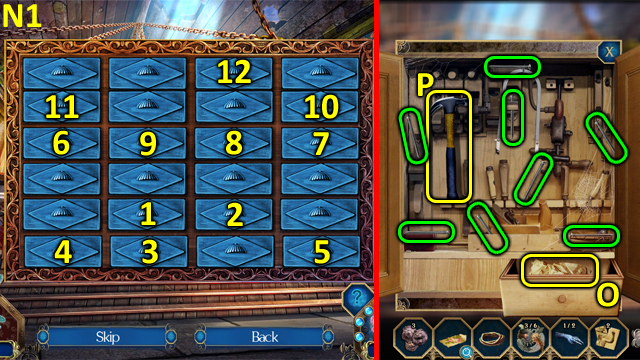
- Solution (N1).
- Open the cabinet, then open the draw; grab the DIARY PAGE (O), HAMMER (P), and NAILS (green).
- Walk down.

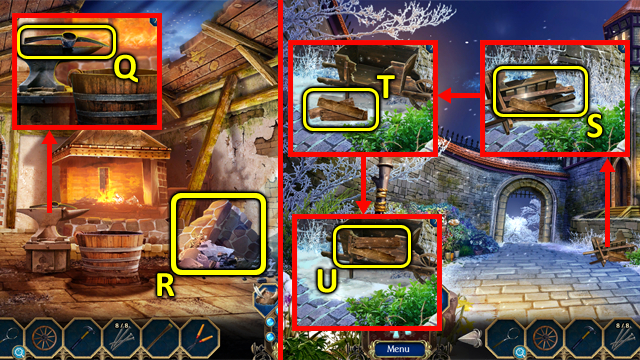
- Place the PICKAXE HANDLE (Q); receive a PICKAXE.
- Use the PICKAXE (R).
- Return to the Cemetery Courtyard.
- Add the WAGON WHEEL to the wheelbarrow (S); select it.
- Add the three boards (T).
- Use the NAILS then the HAMMER (U); take the WHEELBARROW.
- Return to the Smithy.

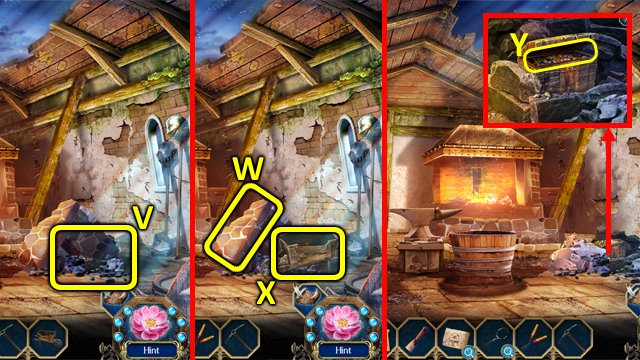
- Place the WHEELBARROW (V).
- Select the rubble twice (W), then select the WHEELBARROW (X).
- Use the PICKAXE to break the lock, use the WOBBLY SHEARS to open the chest, then select inside to access a HOP (Y); play it and receive the BLACKSMITH’S DIARY.

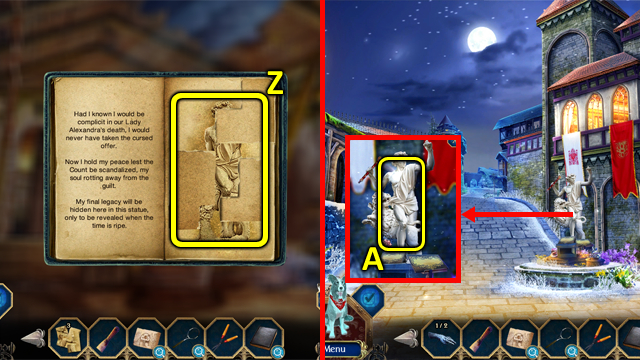
- Select the BLACKSMITH’S DIARY in the Inventory; add the DIARY PAGES (Z), then select the page.
- Walk down.
- Select the statue to trigger a puzzle (A).

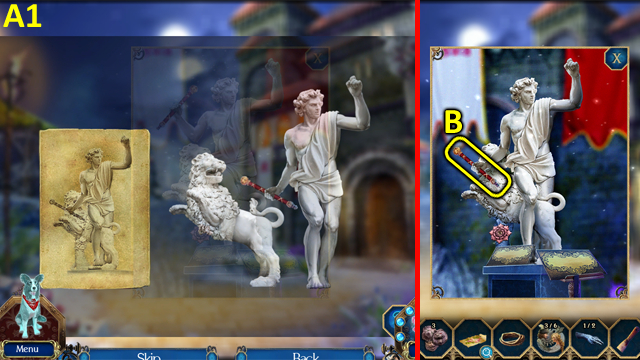
- Random solution (A1).
- Grab the SCEPTER OF TRUTH (B).
- Select the SCEPTER OF TRUTH in the Inventory to trigger a puzzle.

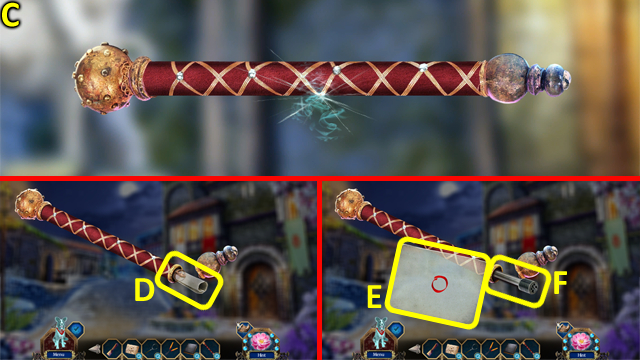
- Random solution (C).
- Pull out the scepter’s contents (D).
- Take the MAZE SCROLL (E) and ROSE BOLT DRIVER (F).

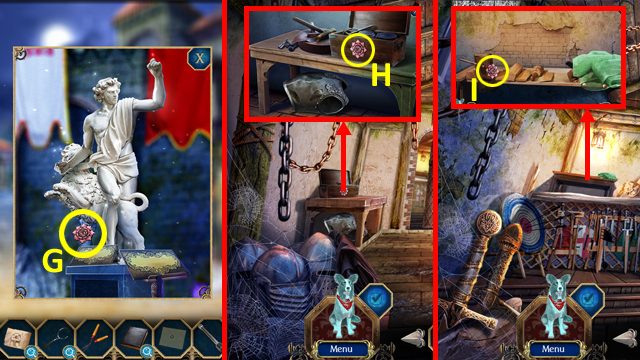
- Use the ROSE BOLT DRIVER to get the STONE ROSE 1/5 (G).
- Enter the Smithy.
- Use the ROSE BOLT DRIVER to get the STONE ROSE 2/5 (H).
- Enter the Armory.
- Use the ROSE BOLT DRIVER to get STONE ROSE 3/5 (I).
- Return to the Maze Entrance.

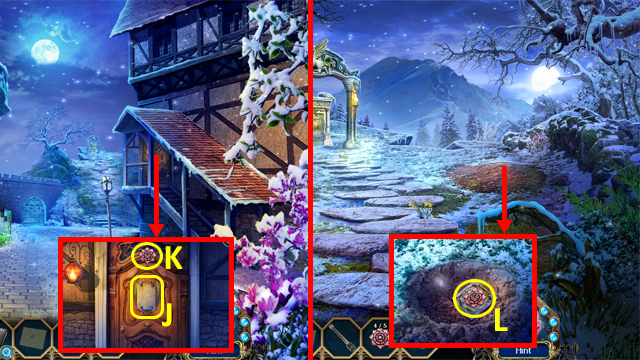
- Read the note (J); select it again to get PUSH CLIPS.
- Use the ROSE BOLT DRIVER to get the STONE ROSE 4/5 (K).
- Return to the Cliff.
- Use the ROSE BOLT DRIVER to get the STONE ROSE 5/5 (L).
- Walk down.


- Select the HEDGE MAZE SKETCH in the Inventory, and add the MAZE SCROLL (M); receive HEDGE MAZE MAP.
- Place the STONE ROSES (N); use the HEDGE MAZE MAP to trigger a puzzle (O).
- Solution (O1).

- Enter the Maze Center (P).
- Talk to Lucian.
- Find all the pieces of the pot; use the WOBBLY SHEARS (Q) and receive GARDEN SHEARS.
- Return to the Armory.

- Use the GARDEN SHEARS to cut some FISHING NET (R).
- Select the FISHING NET in the Inventory, and add the FISHING NET (S); receive a FISHING NET.
- Return to the Maze Center.
- Use the FISHING NET (T); take the WISHING COIN (U).
- Give the WISHING COIN to Lucian (V).

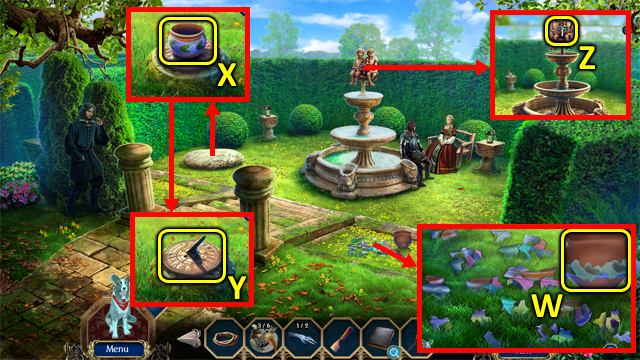

- Talk to Lucian.
- Find all the pieces of the jar; take the WISHING JAR 1/2 (W).
- Grab the WISHING JAR 2/2 (X) and SUNDIAL NOTE (Y).
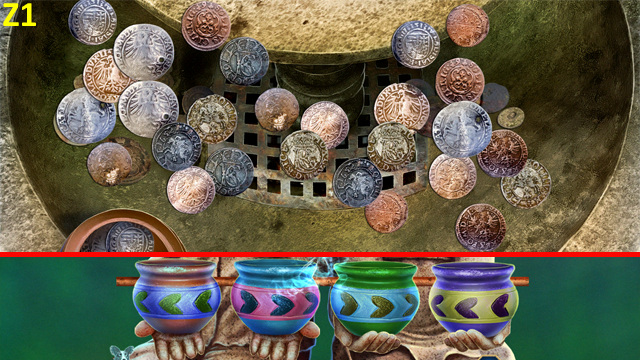
- Place the WISHING JARS to trigger a puzzle (Z).
- Random solution (Z1).

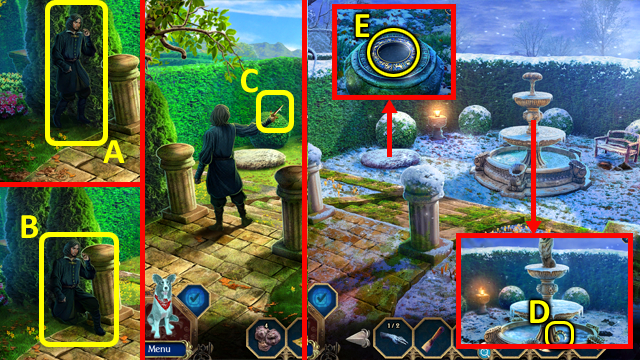
- Select Lucian (A) and (B).
- Grab LUCIAN’S DAGGER (C).
- Use LUCIAN’S DAGGER to get the SUNDIAL NEEDLE (D).
- Place the SUNDIAL NEEDLE to trigger a puzzle (E).

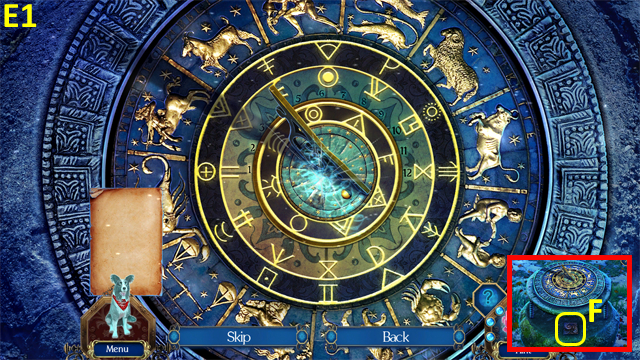
- Random solution (E1).
- Grab the ETCHED BRASS SQUARE (F).

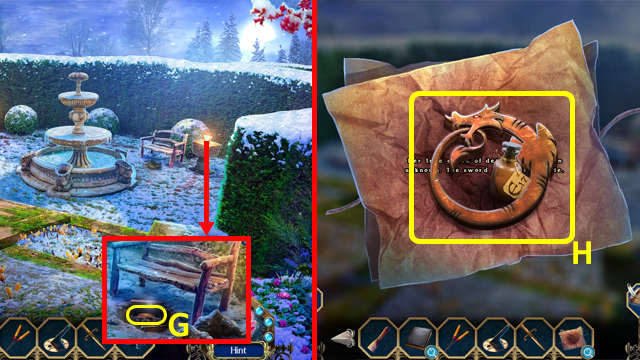
- Use Bandit to dig out the ground, then open the box with the ETCHED BRASS SQUARE; grab the CRUMPLED NOTE (G).
- Select the CRUMPLED NOTE in the Inventory, and unwrap it; take the OUROBOROS and BOTTLE E17 (H).

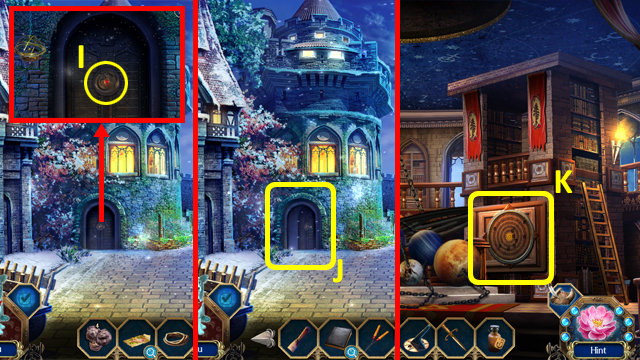
- Return to the Maze Entrance.
- Place the OUROBOROS (I).
- Enter the Apothecary (J).
- Find the board pieces to trigger a puzzle (K).

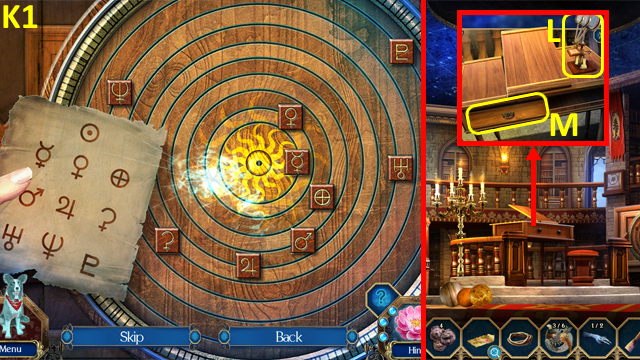
- Random solution (K1).
- Grab the CRUDE MICROSCOPE (L).
- Use LUCIAN’S DAGGER (M); receive BLADE HANDLE.
- Return to the Maze Center.

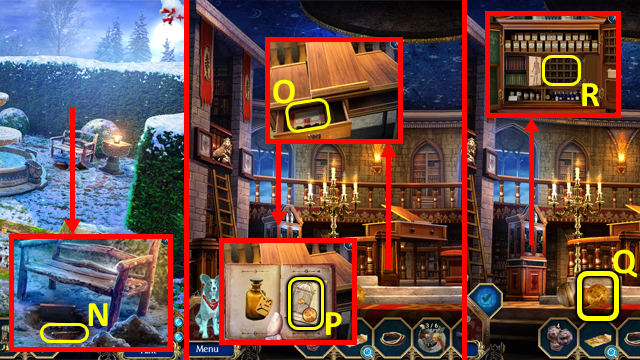
- Use the BLADE HANDLE with the chisel blade (N); receive CHISEL.
- Return to the Apothecary.
- Use the CHISEL in the drawer, then look at the APOTHECARY’S JOURNAL (O); select it twice to take it (P).
- Grab the PLANET (Q).
- Place the PLANET in the slot, then open the cabinet; select inside to trigger a puzzle (R).

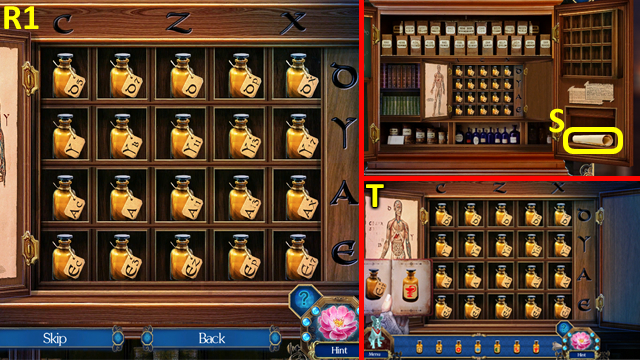
- Random solution (R1).
- Place the APOTHECARY’S JOURNAL to trigger a puzzle (S).
- Match the bottles to their symbols to trigger a puzzle (T).

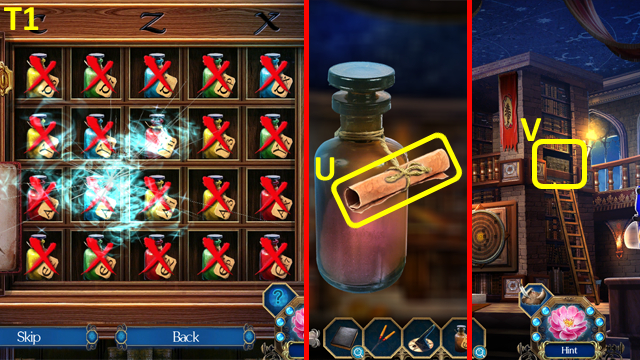
- Solution (T1).
- Receive REAPER’S TOUCH.
- Select the REAPER’S TOUCH in the Inventory; untie the note (U).
- Select the bookcase to trigger a puzzle (V).

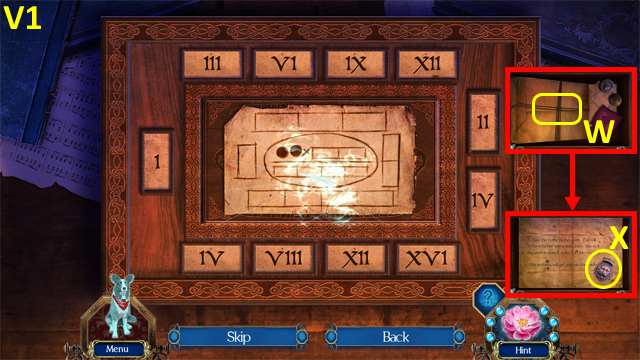
- Solution (V1).
- Open the package (W); grab the LION EMBLEM (X).

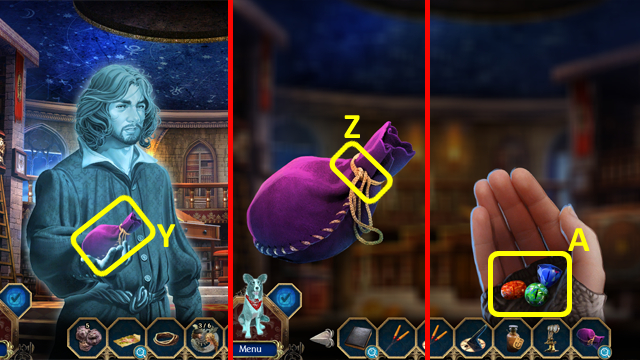
- Grab the VELVET POUCH (Y).
- Select the VELVET POUCH in the Inventory; untie it (Z).
- Take the BLUE LION GEM, GREEN LION GEM, and RED LION GEM (A).

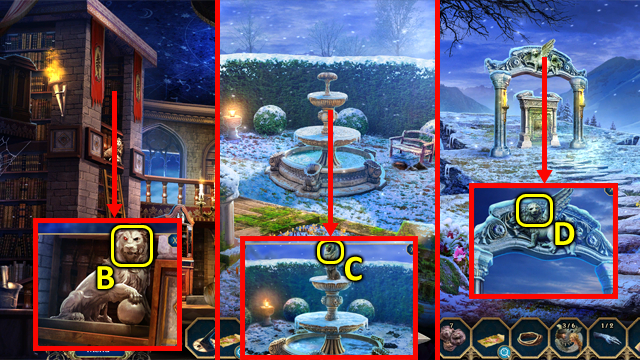
- Use Bandit to get the LION EMBLEM (B).
- Return to the Maze Center.
- Use Bandit to get the LION EMBLEM (C).
- Return to the Cliff.
- Use Bandit to get the LION EMBLEM (D).
- Return to the Main Courtyard.

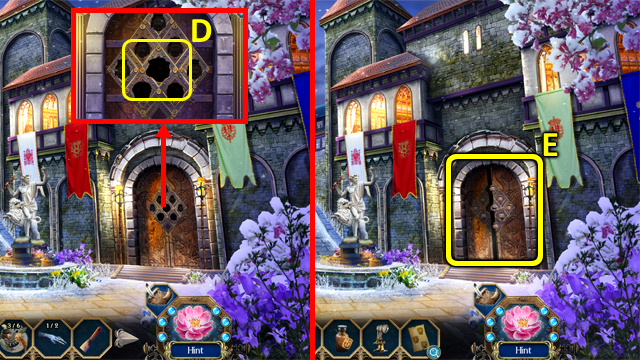
- Place the LION EMBLEMS (D); receive LION HEAD NOTE.
- Enter the Castle Hallway (E).
Chapter 5: Fatal Feast

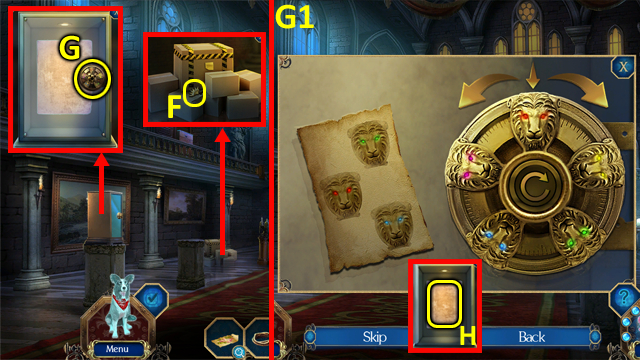
- Grab the TRINKET (F).
- Grab the TRINKET (F).
- Place the LION HEAD NOTE to trigger a puzzle (G).
- Random solution (G1).
- Take the BLANK SHEET (H).

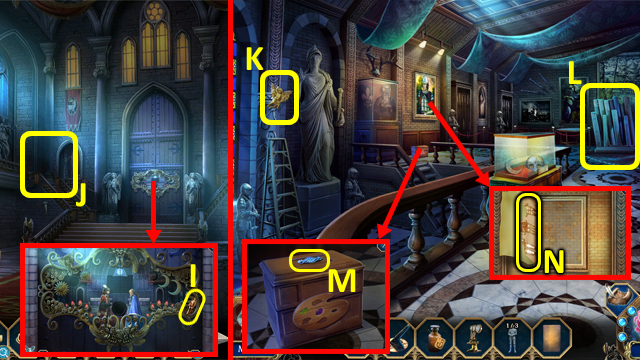
- Take the KNIGHT FIGURINE 1/3 (I).
- Walk up to the Art Gallery (J).
- Grab the TRINKET (K).
- Play the HOP (L); receive a KNIGHT FIGURINE 2/3.
- Take the HANDLE (M).
- Open the painting; grab the TORN PAINTING (N).
- Walk down.

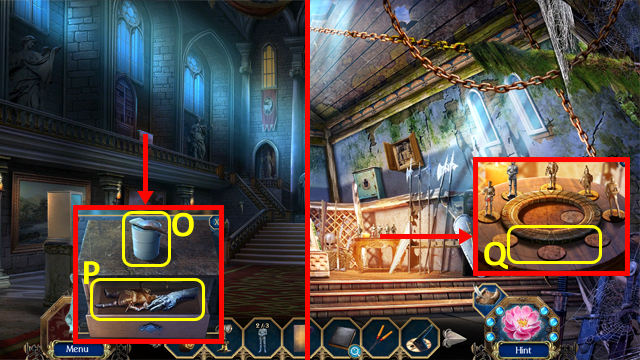
- Grab the LACQUER VARNISH (O).
- Open the drawer with the HANDLE; move the items twice and take the KNIGHT FIGURINE 3/3 and GAUNTLET 2/2 (P).
- Return to the Armory.
- Place the KNIGHT FIGURINES to trigger a puzzle (Q).

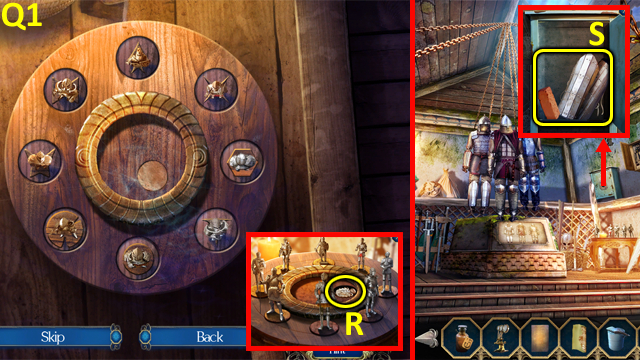
- Solution (Q1).
- Grab the SOLDIER’S TOKEN (R).
- Open the safe with the SOLDIER’S TOKEN; take the BRICK and GREAVES (S).
- Walk down.

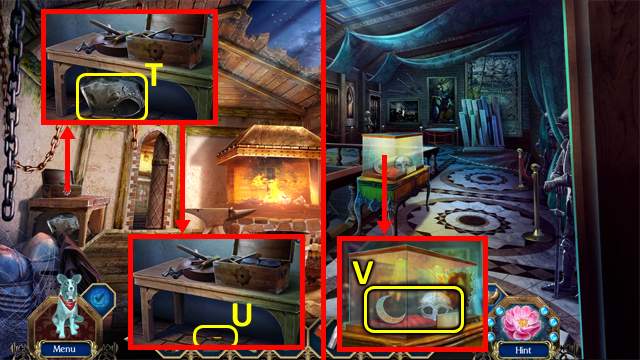
- Use the BRICK on the BREASTPLATE (T) three times, then take it; grab the SCREWDRIVER (U).
- Return to the Art Gallery.
- Break the glass with the BRICK; take the TRINKET 6/6 and HELMET (V).
- Return to the Armory.

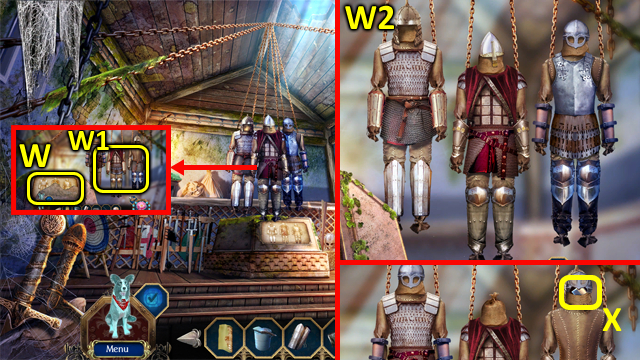
- Place the TORN PAINTING (W), then the GAUNTETS, the BREASTPLATE, THE GREAVES, and the HELMET to trigger a puzzle (W1).
- Solution (W2).
- Grab the BOOK TOKEN (X).
- Return to the Castle Hallway.

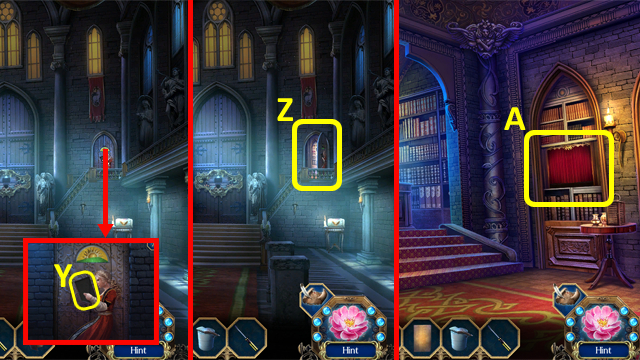
- Place the BOOK TOKEN (Y).
- Enter the Reading Room (Z).
- Select the bookcase to trigger puzzle (A); play it and receive ALEXANDRA FIGURINE.
- Return to the Cliff.

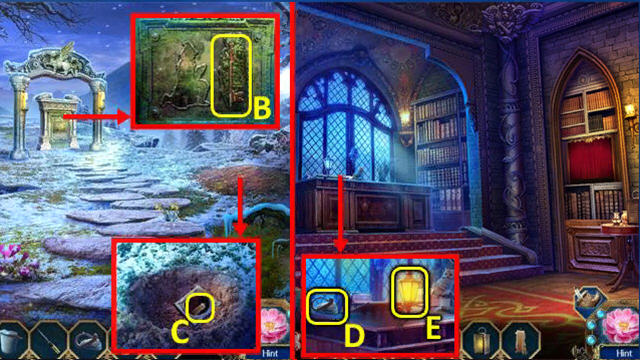
- Place the ALEXANDRA FIGURINE in the slot; take the SWORD KEY (B).
- Use the SWORD KEY in the lock; grab the CANDLE (C).
- Return to the Reading Room.
- Take the FIRE STRIKER (D). Open the lamp, insert the candle, light it with the FIRE STRIKER, then add the BLANK SHEET (E); receive a MYSTERIOUS NOTE.
- Walk down.

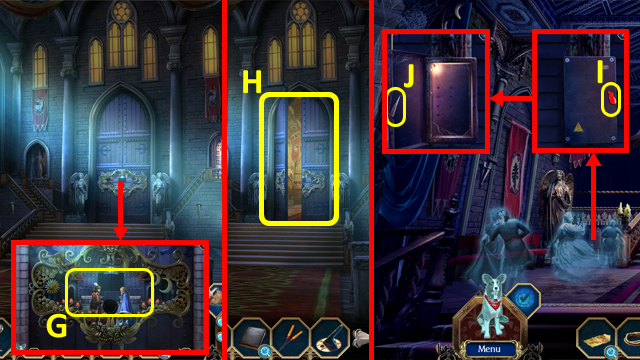
- Place the TRINKETS (G) to access a HOP; play it.
- Enter the Great Hall (H).
- Grab the COLORED KNOB 1/3 (I). Open the cover with the SCREWDRIVER; take the METAL SHRAPNEL (J).
- Walk down.

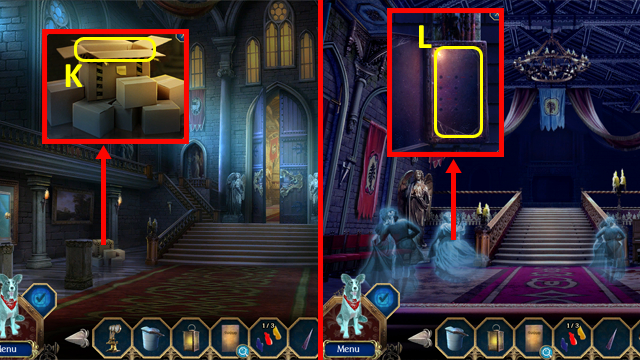
- Open the box with the METAL SHRAPNEL; find all the FUSES (K).
- Enter the Great Hall.
- Place the FUSES to trigger a puzzle (L).

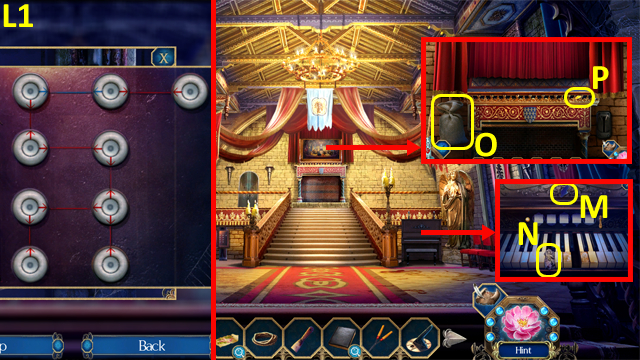
- Solution (L1).
- Grab the COLORED KNOB 2/3 (M); use the METAL SHRAPNEL with the rag (N) to receive a IMPROVISED KNIFE.
- Cut down the sandbag (O) with the IMPROVISED KNIFE; take the COLORED KNOB 3/3 (P).
- Return to the Art Gallery.

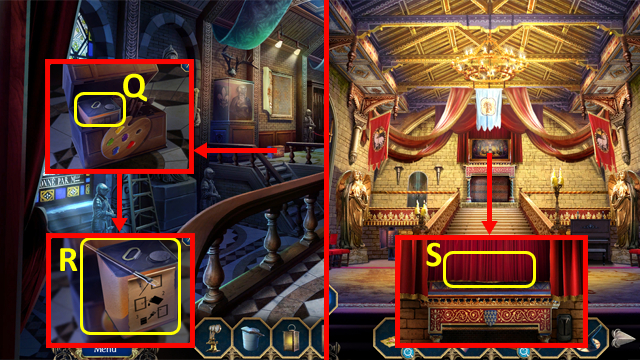

- Place the COLORED KNOBS in the box, and select inside (Q); take the BRUSH and SOLVENT (R).
- Return to the Great Hall.
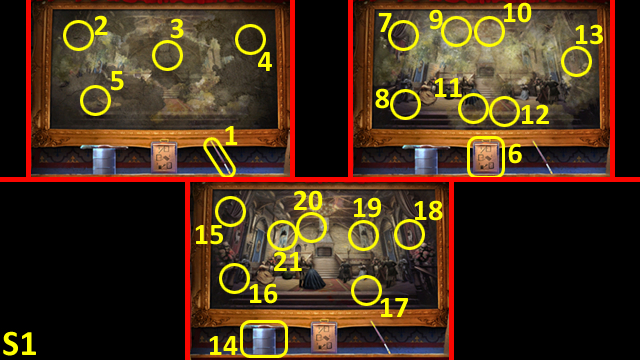
- Place the BRUSH, SOLVENT, and LACQUER VARNISH to trigger a puzzle (S).
- Solution (S1).

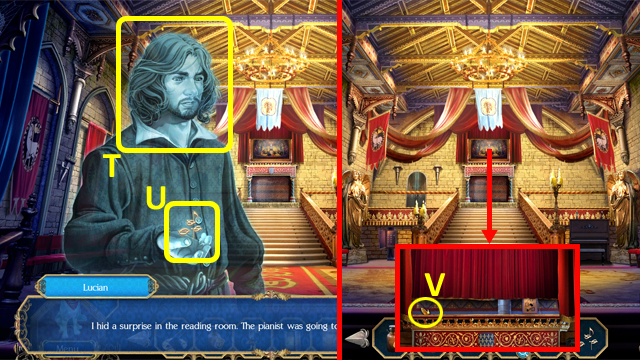
- Talk to Lucian (T); take the MUSIC NOTES (U).
- Grab the DOVE INSET 1/2 (V).
- Return to the Reading Room.

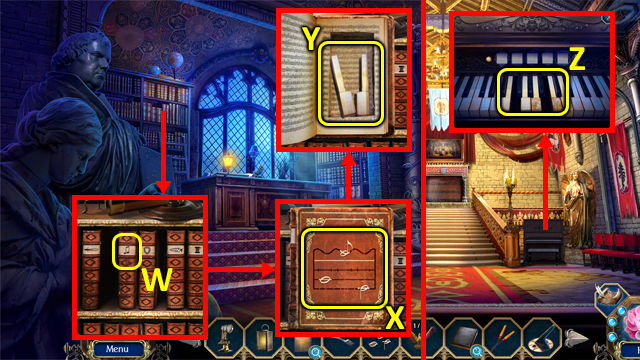
- Place the MUSIC NOTES (W).
- Arrange the notes as shown (X).
- Take the PIANO KEYS (Y).
- Return to the Great Hall.
- Place the PIANO KEYS to trigger a puzzle (Z).

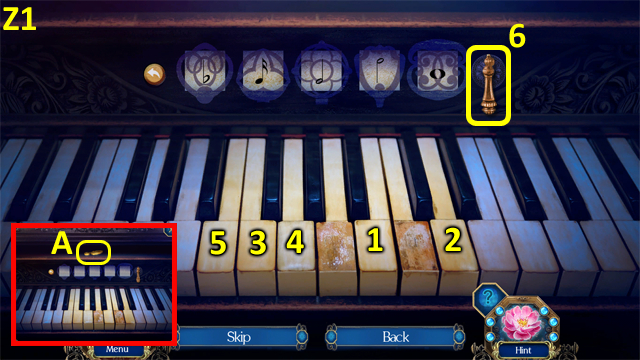
- Solution (Z1).
- Grab the DOVE INSET 2/2 (A).
- Walk down.

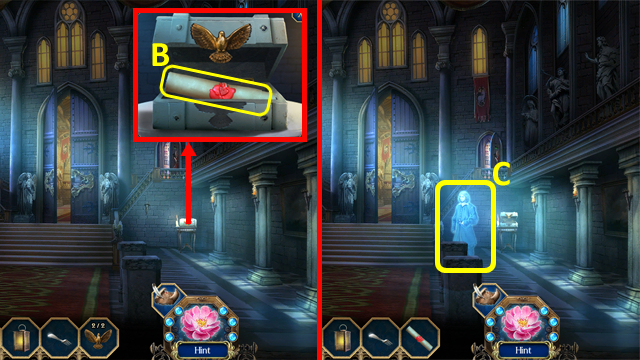
- Place the DOVE INSETS into the box; grab the INVITATION LETTER (B).
- Give the INVITATION LETTER to Lucian (C).

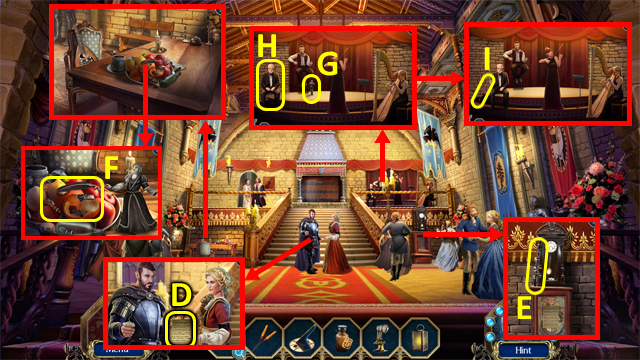
- Talk to Lucian.
- Grab the SHEET MUSIC 1/2 (D) and FLUTE (E).
- Find the pieces of the DANCE FIGURINE 1/5 (F).
- Grab the DANCE FIGURINE 2/5 (G) and give the FLUTE to the musician (H); take the BOW (I).

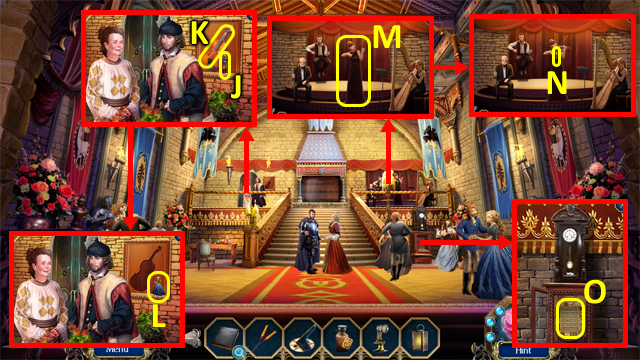
- Grab the DANCE FIGURINE 3/5 (J), then add the BOW to the violin (K); receive the VIOLIN.
- Take the DANCE FIGURINE 4/5 (L).
- Give the VIOLIN to the musician (M); grab the CLOCK KEY (N).
- Unlock the clock with the CLOCK KEY; take the SHEET MUSIC 2/2 (O).

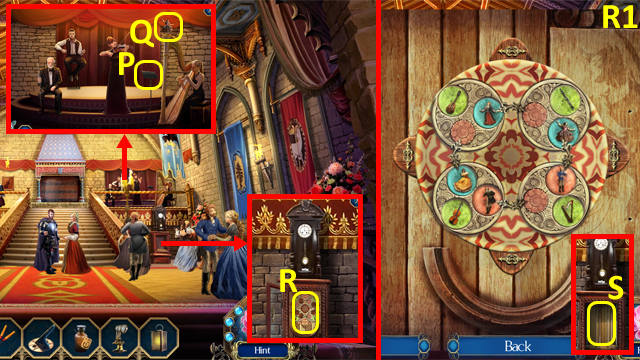
- Place the SHEET MUSIC on the stand (P); grab the DANCE FIGURINE 5/5 (Q).
- Place the DANCE FIGURINES in the clock to trigger a puzzle (R).
- Random solution (R1).
- Take the STRINGS (S).

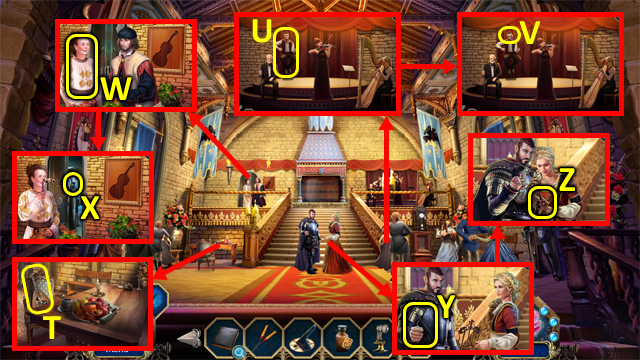
- Attach the STRINGS to the LUTE (T); take it.
- Give the LUTE to the musician (U); grab the OPERA GLASSES (V).
- Give the OPERA GLASSES to the Noblewoman (W); take NICOLAE’S GOBLET (X).
- Give NICOLAE’S GOBLET to Nicolae (Y); grab the HEXAGON CHARM (Z).
- Talk to Nicolae.
- Enter the Great Hall.
- Talk to Nicolae.

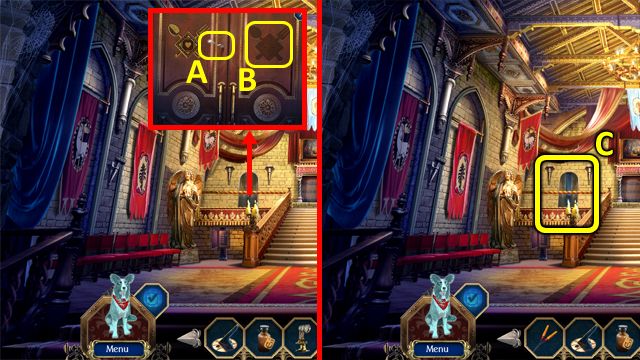
- Grab the SILVER FORK (A); place the HEXAGON CHARM (B).
- Enter the Dining Room (C).
Chapter 6: The Last Light

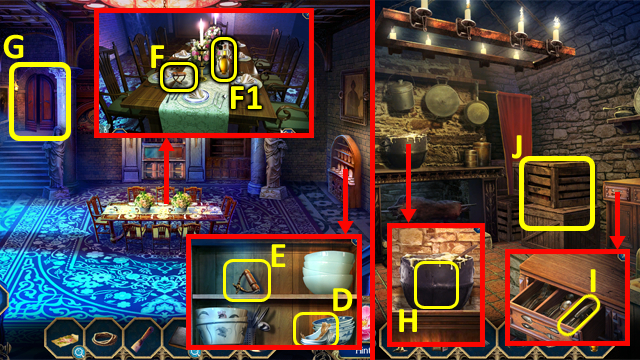

- Move the two items and grab the OIL WICK (D); move the three items and take the POT HANDLE 1/2 (E).
- Grab the POT HANDLE 2/2 (F) and OLIVE OIL (F1).
- Go to the Reading Room.
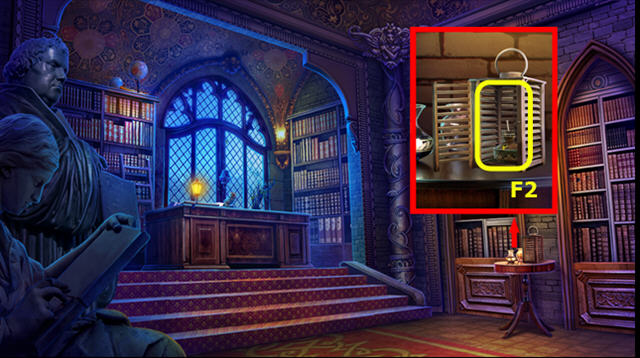
- Open the lantern (F2) and use the OLIVE OIL, OIL WICK, and FIRE STRIKER (@) to receive the SHUTTERED LAMP.
- Enter the Kitchen (G).
- Attach the POT HANDLES to the POT OF LARD (H); take it.
- Place the SILVER FORK in the slot; grab the BUTTER KNIFE (I).
- Select the crates to trigger a puzzle (J).

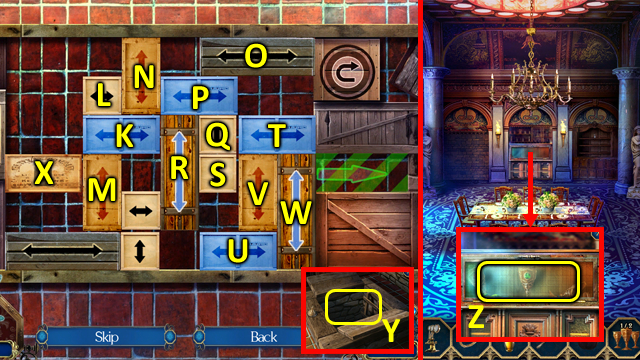
- Solution: Kl2- Ll1-Mu2-Nd1-Ol4-Pr2-Qu2-Ru2-Sd1-Pl1-Tl1-Ul1-Vd1-Wu3-Xr6.
- Open the trap door, and use the SHUTTERED LAMP (Y); find the pieces of the GOBLET 1/2.
- Walk down.
- Use the POT OF LARD, then the BUTTER KNIFE with the cabinet to open it; select inside to trigger a puzzle (Z).

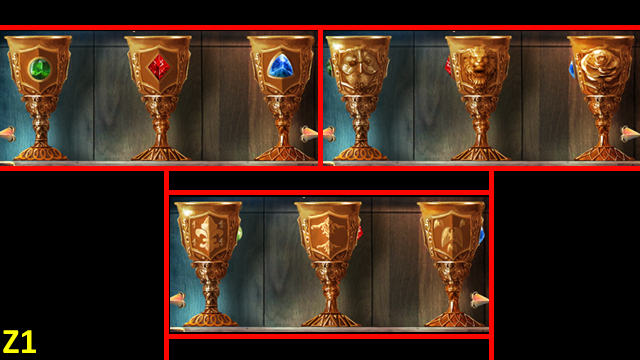
- Random solution (Z1).
- Receive a GOBLET 2/2.

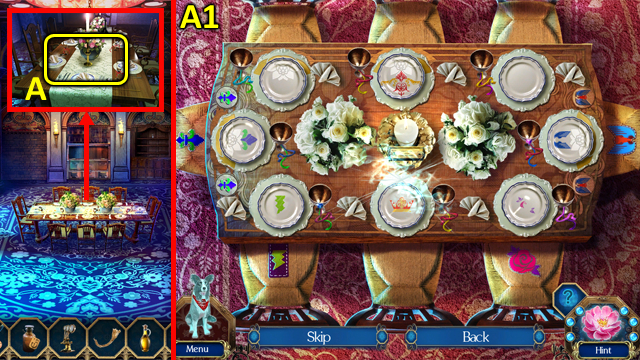
- Place the GOBLETS on the table to trigger a puzzle (A).
- Solution (A1).

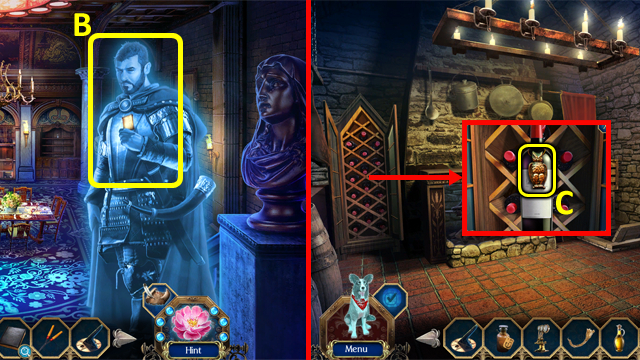
- Talk to Nicolae (B); receive SPECIAL VINTAGE NOTE.
- Enter the Kitchen.
- Use the SPECIAL VINTAGE NOTE with the wine rack; grab the OWL CHARM (C).
- Talk to Nicolae.
- Return to the Maze Entrance.

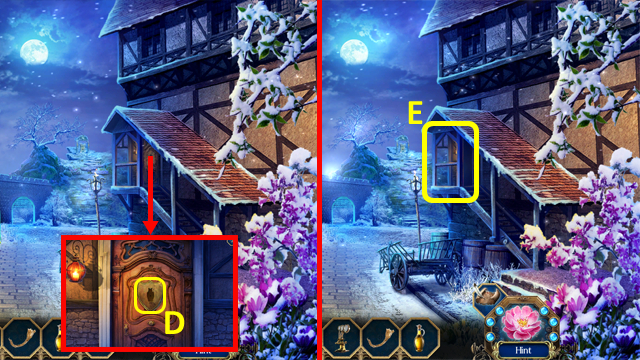
- Place the OWL CHARM (D).
- Enter Victor’s Quarters (E).

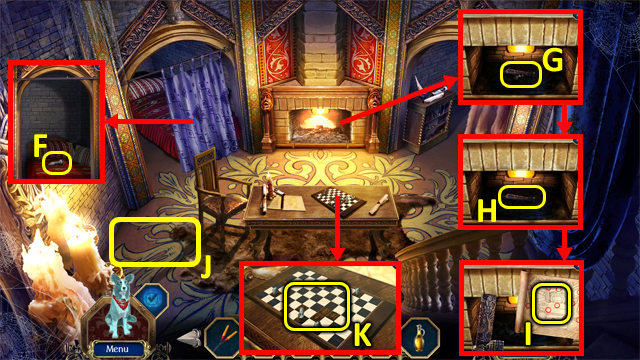
- Use Bandit to pull back the curtain; grab the GAME PIECE 1/3 (F).
- Use Bandit to clear the soot; grab the GAME PIECE 2/3 (G).
- Select the object (H) twice; take VICTOR’S ROOM MAP (I).
- Uses VICTOR’S ROOM MAP with the room (J), then find the pieces; receive GAME PIECE 3/3.
- Use the GAME PIECES with the chess board to trigger a puzzle (K).

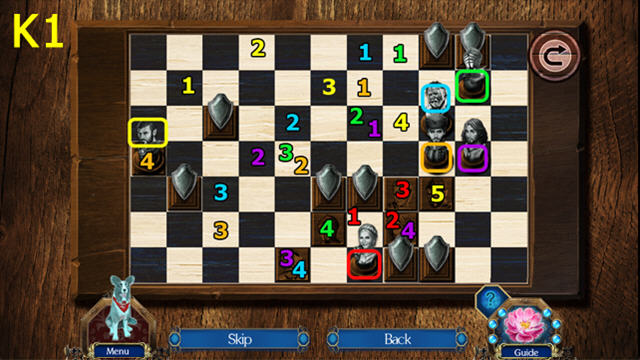
- Solution (K1).
- Receive a SIGNET RING.

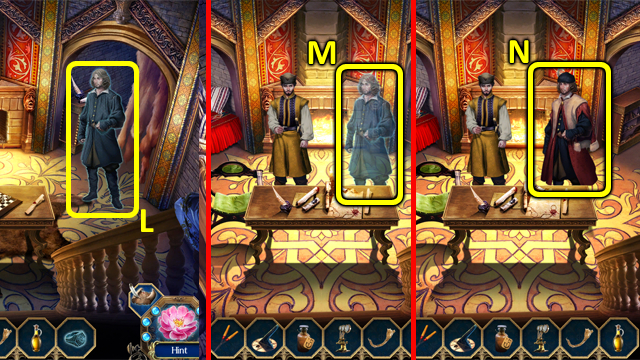
- Talk to Lucian (L); give him the SIGNET RING.
- Talk to Lucian (M) and (N).

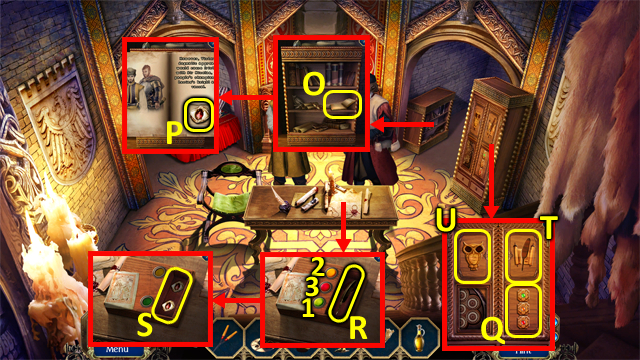
- Select the book (O); read it and take the METAL EYE (P).
- Look at the panel (Q).
- Press the buttons in the order shown (1-3); grab the QUILL (R).
- Place the METAL EYE in the slot; take the METAL EYES (S).
- Place the QUILL (T) and METAL EYES (U) to access a HOP; play it and receive a BLOODY BLUE CLOAK.

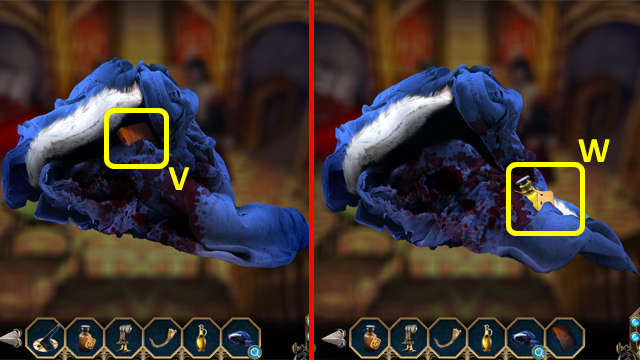
- Select the BLOODY BLUE CLOAK in the Inventory and unfold it; grab VICTOR’S BOOK (V).
- Unfold the cloak again; take the REAPER’S TOUCH (W).
- Give the REAPER’S TOUCH to Lucian.

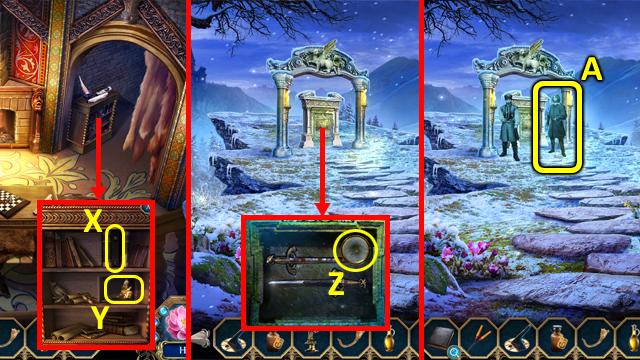
- Place VICTOR’S BOOK (X); grab LUCIAN’S FIGURINE (Y).
- Return to the Cliff.
- Place LUCIAN’S FIGURINE in the slot, then place the CRUDE MICROSCOPE to access a HOP (Z); play it to access another HOP.
- Select Lucian to trigger a puzzle (A); solve it.

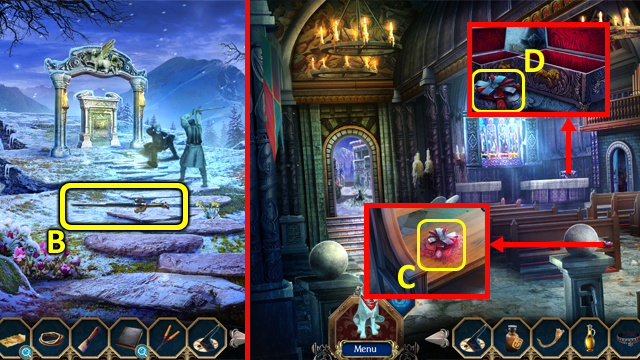
- Use Bandit to get the sword (B).
- Talk to Lucian, then Nicolae; receive ALEXANDRA’S WEDDING RING and LUCIAN’S WEDDING RING.
- Place ALEXANDRA’S WEDDING RING (C) and LUCIAN’S WEDDING RING (D).
- Congratulations, you have completed Death and Betrayal in Romania: A Dana Knightstone Novel.





 The Chronicles of Shakespeare: Romeo and Juliet Walkthrough, Guide, & Tips
 Elementals: The Magic Key Walkthrough, Guide, & Tips
 European Mystery: Scent of Desire Walkthrough, Guide, & Tips
 Exorcist Walkthrough, Guide, & Tips
 Masquerade Mystery: The Case of the Copycat Curator Walkthrough, Guide, & Tips