Masquerade Mystery: The Case of the Copycat Curator Walkthrough, Guide, & Tips
Masquerade Mystery: The Case of the Copycat Curator Walkthrough

Welcome to the Masquerade Myseries: The Case of the Copycat Curator Walkthrough!
Help P.I. Joy Black find items and turn them into disguises and gadgets to catch a corrupt curator that is stealing from her father!
Whether you use this document as a reference when things get difficult or as a road map to get you from beginning to end, we’re pretty sure you’ll find what you’re looking for here.
This document contains a complete Masquerade Myseries: The Case of the Copycat Curator game walkthrough featuring annotated screenshots from actual gameplay!
We hope you find this information useful as you play your way through the game. Use the walkthrough menu below to quickly jump to whatever stage of the game you need help with.
Remember to visit the Big Fish Games Forums if you find you need more help. Have fun!
This walkthrough was created by Robin.
General Tips
- Use the MENU button in the lower right to return to the Main Menu.
- The game autosaves automatically.
- This is a Hidden Object Adventure game. Some of the items that you collect during a Hidden Object Scene will be used in the scene or in a mini-game.
- Objects that you can use will be stored in your inventory tray. To open the tray, click on the briefcase in the lower right.

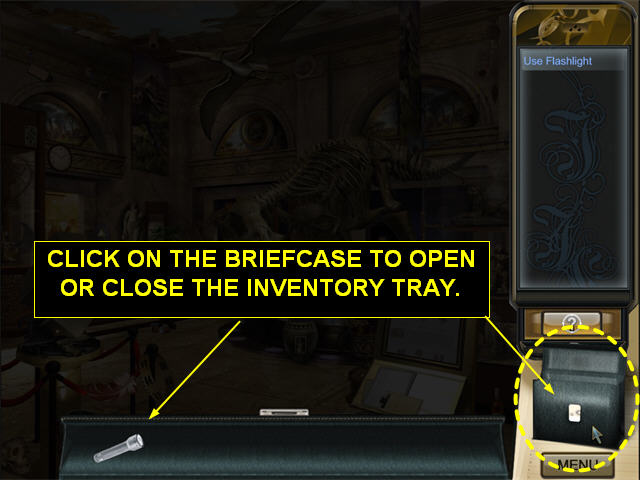
- All objects are generally appropriate to the scene and the right color and close to the right size.
- There is no timer.
- If you have too many incorrect clicks in a row the cursor freezes for a few seconds, but there is no other penalty.
- If an item appears in blue on the Find List, it is a task that you have to complete.
- If an item appears in gray on the Find List it is in another location, which may be a zoom scene or another room.
- You cannot collect an object until it appears on the Find List.
- Your inventory tray is inconsistent in what it shows you. Some items (like the FLASHLIGHT) will disappear for awhile and then reappear when you can use them. Other items will automatically combine. Some will be selected individually; others will be dragged in a group as a combo item.
- In general to use an inventory item, click on it in the inventory tray, drag it to where you want to use it in the scene, and then click again to use it.
- In many locations you will get more than one Find List to complete.
- The number of hints is unlimited, but you must wait for the hint meter to recharge each time.
- When you use a hint, an arrow will shoot at the item and a circle of light will be drawn around the general area. The item will not necessarily be in the exact center of the light circle.
- Several of the mini-games require you to look through your Inventory Tray to find objects you can use. You can drag unneeded objects to the side to get to the one you want.
Chapter 1: The Start of a New Case
- Collect the items on the Find List. When the first Find List is complete, you will get the second one. After you complete the second Find List, you will get a third one. We have marked nonKey items from the First List in yellow, nonKey items from the second list in cyan, and nonKey items from the third list in green. Key items are marked in orange.
- You cannot collect an item until it appears on the Find List.
- Objects that appear in gray on the Find List are inside the Safe.
- One of the PURPLE PUMPS is on the bookcase to the left of the window.
- In order to collect the full amount of money, you will have to get some from the main scene and some from the Safe.
- Use the SAFE KEY (1) to open the Safe.

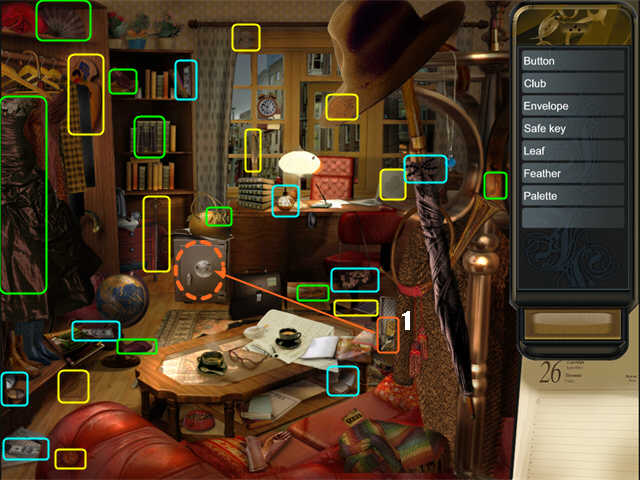
- Once you have opened it, you will be able to zoom in to see another Hidden Object Scene inside the safe.
- Some of the objects in the Safe will be from the second Find List and some will be from the third Find List.
- The MASCARA is the red cylinder to the left of the RED WALLET.

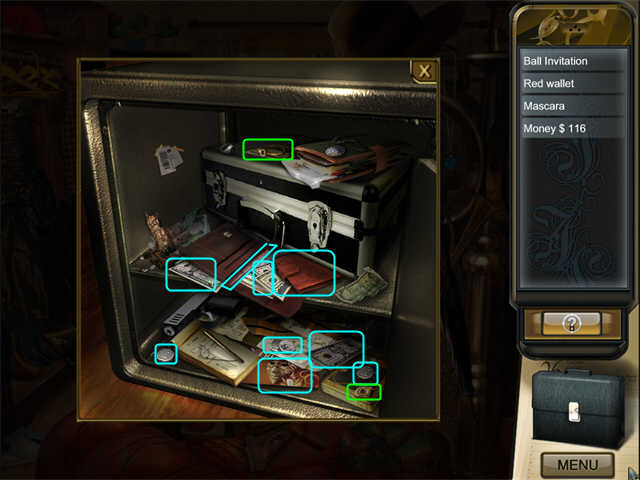
- When you have completed collecting all the items on the third Find List, you will trigger a mini-game.
Disguise Mini-Game
- Click on the briefcase in the lower right to open the Inventory Tray.
- You will have to click and drag objects in the Inventory Tray to move them so you can find other objects underneath.
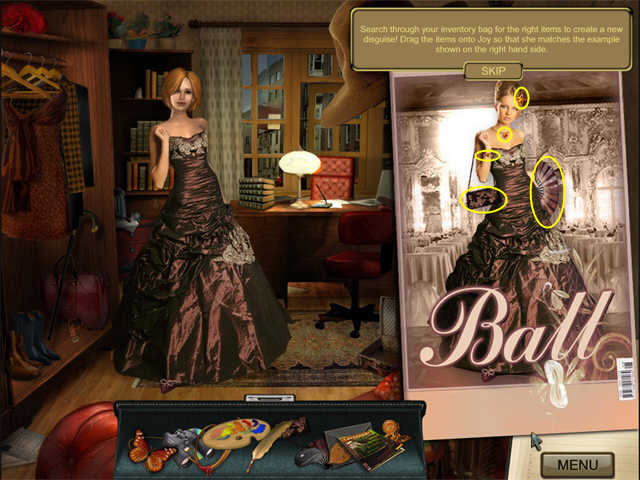
- The items you will need are:GOWN (part of the tutorial)
PURSE
FAN
GOLD BUTTERFLY HAIR CLIP
NECKLACE
BRACELET
- The SHOES will be automatically applied when you put on the GOWN.
- The screenshot shows the items you will need marked on the photo.
- To use an item, drag it from the inventory tray to its approximate position in the scene.

- You will view a cutscene to end the chapter.
Chapter 2: A Mask for all Seasons
- Collect the items on the Find List. When the first Find List is complete, you will get the second one, which uses riddles. After you complete the second Find List, you will have to do a mini-game before you get a third one. We have marked items from the First List in yellow, items from the second list in cyan, and items from the third list in green. Key items are marked in orange.
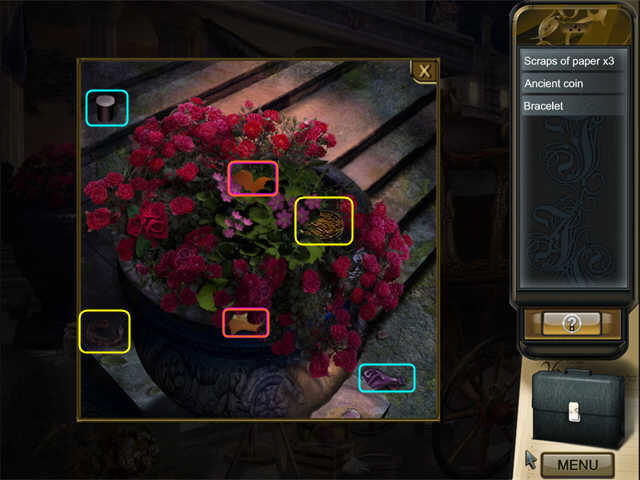
- Objects that appear in gray on the Find List are in the zoom scene by the planter on the left…

- When you click on the planter, you will be able to zoom in to see another Hidden Object Scene.

- Once you have collected everything, you will use the TORN PAPER in a mini-game.
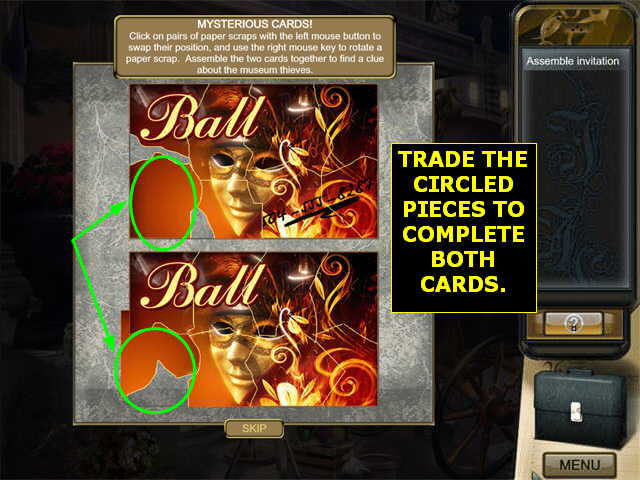
Torn Paper Mini-game
- The two pictures are identical, but they’ve have been torn differently.
- These are invitations to the Ball like the one you had in your safe.
- The pieces from the two pictures have been mixed up, so some of the pieces for the top picture are on the top and vice versa.
- Click on two pieces to trade their positions.
- Right-click on a piece to rotate it. You can go ahead and rotate pieces before you move them, which makes it easier to tell where they go.
- Pieces will fit perfectly when they are in the right spot, so if you have gaps between pieces, you’ve probably mixed some pieces from the top and bottom puzzle together.
- Pieces do NOT lock into place when set correctly.
- Once you have completed the puzzle, you can see that there is a phone number written on one of the invitations.


- After you complete the Torn Paper Mini-Game, Joy will make a phone call. Someone named Mr. Ingram is involved in the theft.
- Now you will get a new Find List based on riddles. You are going to “take a picture” at the spot identified from the riddle solution. That just means you have to click the cursor on that spot.
- Preposterous – preous = POSTER
- A Red Penguin = DOORMAN in the red tuxedo jacket.
- A Feral Guardian = CAT
- A Wavy Greeting = WELCOME BANNER
- Steps without Stairs = LADDER
- 2 Hands, 1 Face, 0 Arms, 0 Legs = CLOCK

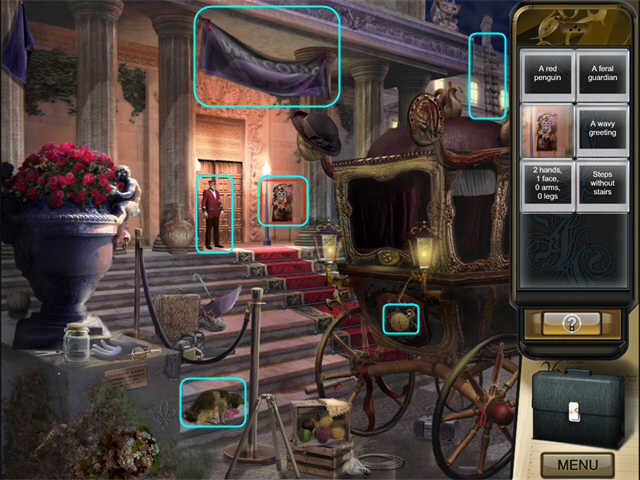
- When you have completed taking the photos, you will talk to the Doorman. He says you need a mask.
- You will get the third Find List and trigger a mini-game.
Spook the Cat Mini-Game
- You must assemble an “air horn” from the items you have in your inventory. You will need:
FILM CANISTER (in the tutorial)
SCISSORS
STRAW
BALLOON
RUBBER BAND
- Drag the SCISSORS to the FILM CANISTER and they will automatically cut all the holes you need.
- Put the STRAW on the left side of the FILM CANISTER.
- Put the BALLOON over the right side of the FILM CANISTER.
- Use the RUBBER BAND on the BALLOON.

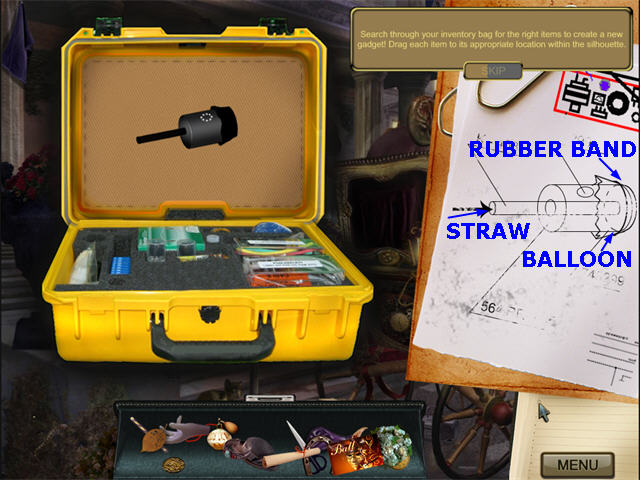
- Now you have an AIR HORN in your inventory tray. Use it on the Cat so you will be able to collect the FEATHERS.
- Collect the other items on the third Find List (marked in green).
- You will have to go back to the Planter for the ROSES.

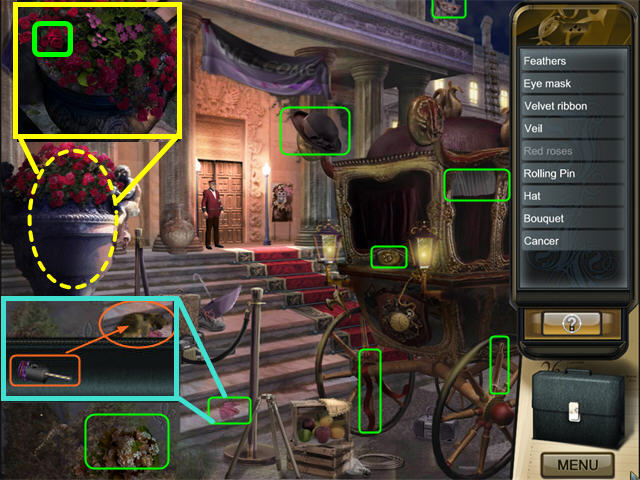
- Once the third Find List is complete, you are ready to make your mask. This will trigger a mini-game.
Make the Mask Mini-game
- You will have to click and drag objects in the Inventory Tray to move them so you can find other objects underneath.
- The items you will need are:EYE-MASK
RIBBON
VEIL
FEATHERS
RED ROSES
- The screenshot shows the items you will need marked on the photo.
- To use an item, drag it from the inventory tray to its approximate position in the scene.

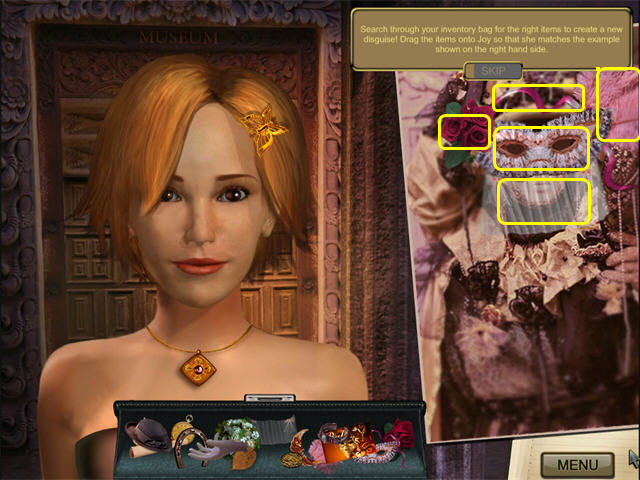
- Once you have your mask, the Doorman will let you enter the museum. Click on the door behind him to end the chapter.
Chapter 3: The Diabolical Mr. Ingram
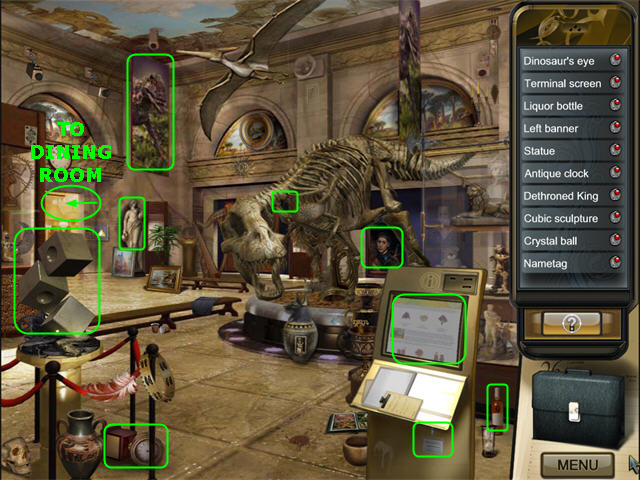
- You start out taking pictures. The Find List is riddles. These items are marked in yellow in the screenshot.
- A Pharaoh’s Tomb = PYRAMID
- As Light as Can Be = FEATHER
- A Mouth-less Speaker = WALL SPEAKER
- Stuffed but not Mounted = TEDDY BEAR
- The Oldest Timepiece Around = HOURGLASS
- The Only Living Thing = PLANT on the far side of the hall
- Once you complete this Find List, you will get a new one. The items on this Find List are marked in cyan.
- The FLASH DRIVE is a Key item. It will go into your inventory.
- Click on the Panel by the door to zoom in.

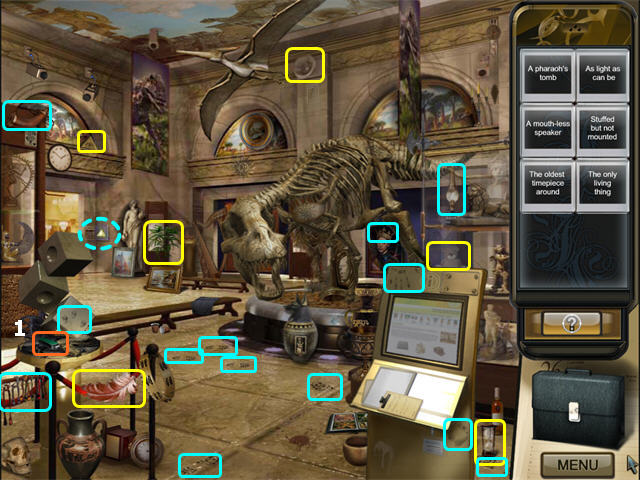
- Collect the SCREWDRIVER.
- After you have collected all of the items you can from the Find List, use the SCREWDRIVER to remove the 4 screws on the Kiosk. This will reveal the Flash Drive slot.
- Put the FLASH DRIVE in the Flash Drive Slot.

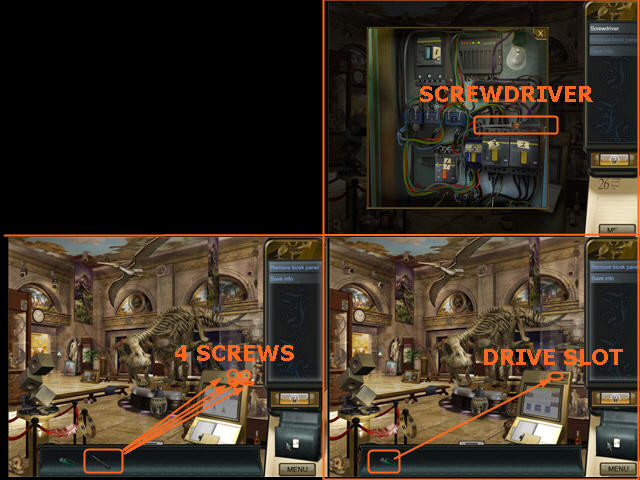
- This will trigger a mini-game.
Decrypt the Sequence Mini-game
- Swap two tiles at a time to create the pattern shown.

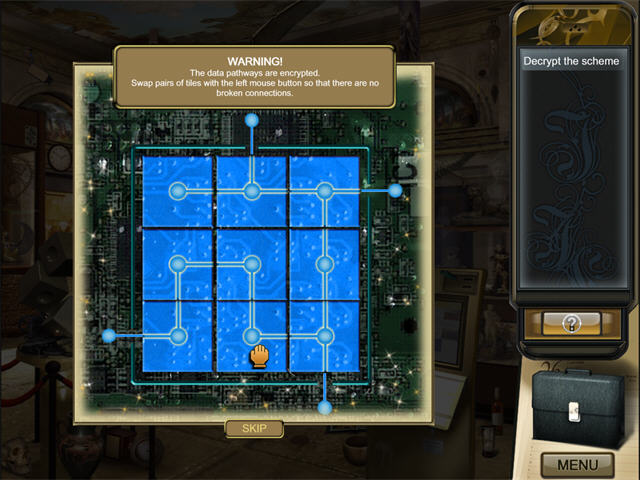
- Once you complete the mini-game you will get your third Find List. Click on the items listed. They are marked in green.
- The DETHRONED KING is the painting that used to have the crown in it.
- Once you have completed this Find List, you can exit to the Ballroom through the doorway under the big clock.

Ballroom
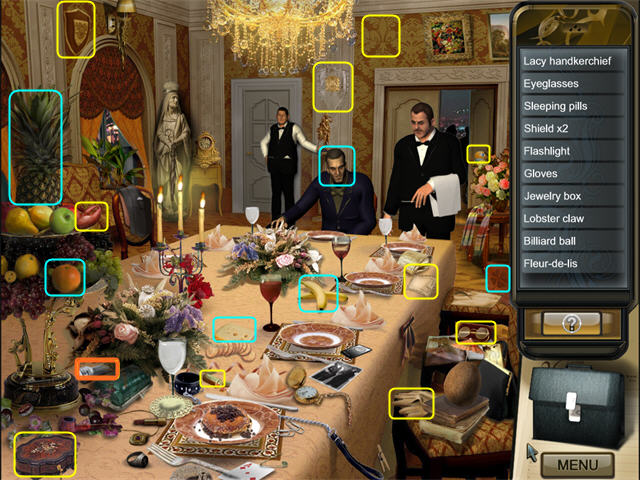
- Collect the items on the Find List. When the first Find List is complete, you will get the second one, which uses riddles.
- We have marked items from the First List in yellow, items from the second list in cyan, and items from the third list in green. Key items are marked in orange.
- Nothing rhymes with… = ORANGE
- Biggest Apple = PINEAPPLE
- Saying it will make you smile = CHEESE
- A Bundle of Nerves = the MAN at the end of the table drumming his fingers. Click on his face to take the picture.
- A Lucky Charm = CLOVER
- Slippery when Peeled = BANANAS

- After you complete the second Find List, the scene will switch back to Joy’s office, earlier in the day.
Joy’s Office
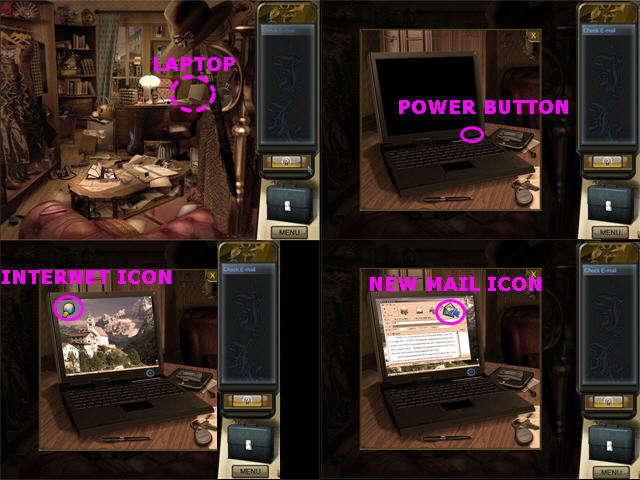
- You need to read your email. Click on the laptop on the desk to zoom in.
- Click on the power button on the right to turn it on.
- Click on the INTERNET ICON (blue globe) to go to email.
- Click on the NEW MAIL ICON (blue envelope in the upper right corner). This will trigger a mini-game.

Decode the email Mini-game
- You must make a picture out of the tiles. Tiles can be rotated with a right-click.
- Click on two tiles to swap them.
- See the screenshot for the solution.
- Note that there is an envelope underneath the @ sign—make sure it is pointing the right way.

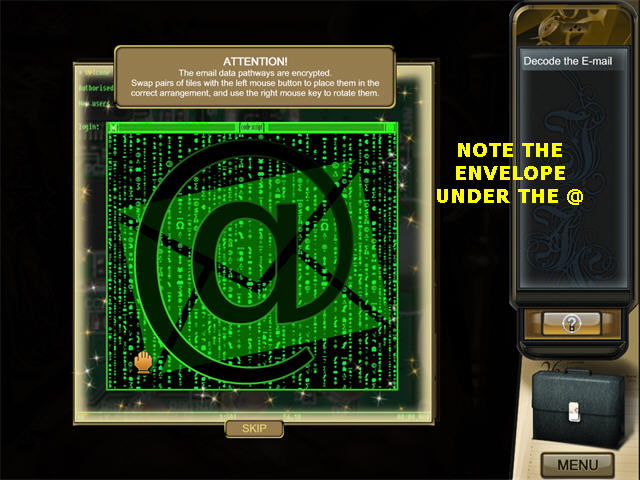
- Once you complete the mini-game, Joy will talk to her father. He is a painter. Some of his pictures are being sold on the black market—but they’re also still hanging in the museum. He wants Joy to investigate.
- You will get a Find List for this location. The SPY BUGS are marked in pink. Other objects are marked in yellow.

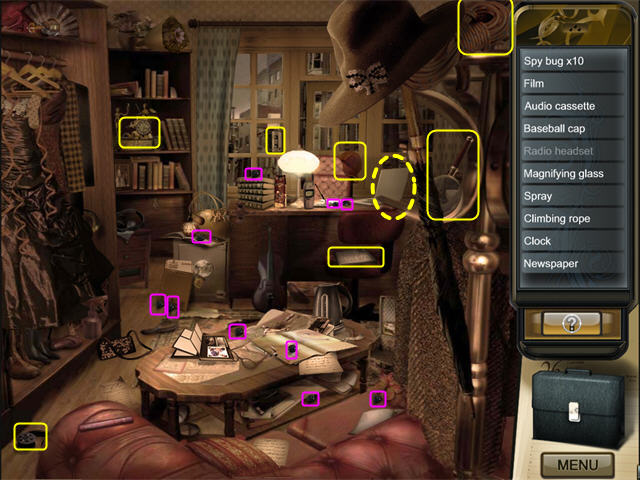
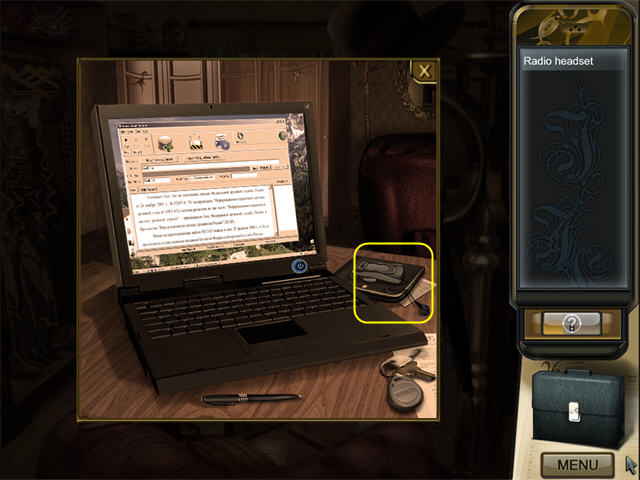
- Click on the Laptop to zoom in.
- Collect the RADIO HEADPHONES from the zoom scene.

Ballroom
- You will be back in the present time in the Museum Ballroom. Joy will talk to her dad on the phone, then decide to search the Exhibit Hall again.
- Click on the Door Icon in the lower left to return to the Exhibit Hall.
Exhibit Hall
- Your first task is to turn off the lights. It doesn’t really make any sense that no one would notice this, but just go with it.
- Zoom in on the electrical panel to the right of the arch. This will trigger a mini-game.
Turn off the Lights Mini-Game
- Make sure you click on the switch, not the number next to it.
- There are many possible solutions.
- We used 1, 2, 1, 3, 4, 5, 4, 3

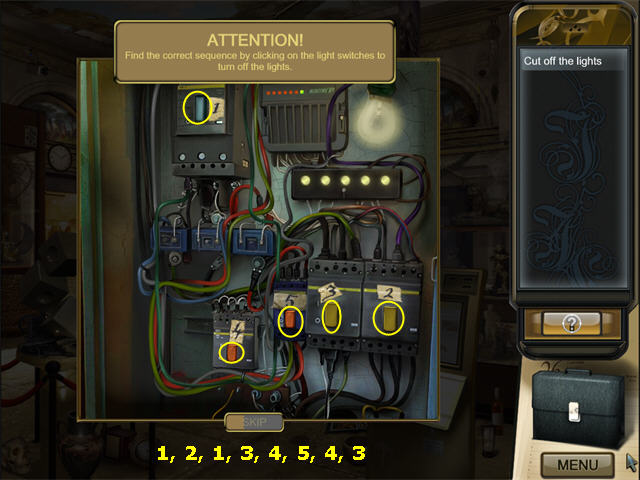
- The lights will go off and you will be back in the Exhibit Hall main scene.
Exhibit Hall
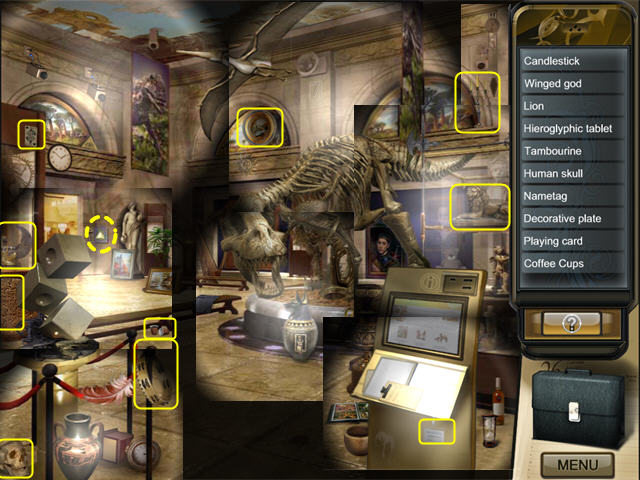
- Take the FLASHLIGHT out of your inventory tray. It will stick to your cursor.
- Now click it anywhere in the scene and you will get a new Find List. We have marked the objects in yellow.
- The screenshot is a composite. In actual gameplay you will see only a small section illuminated at a time, wherever you click.
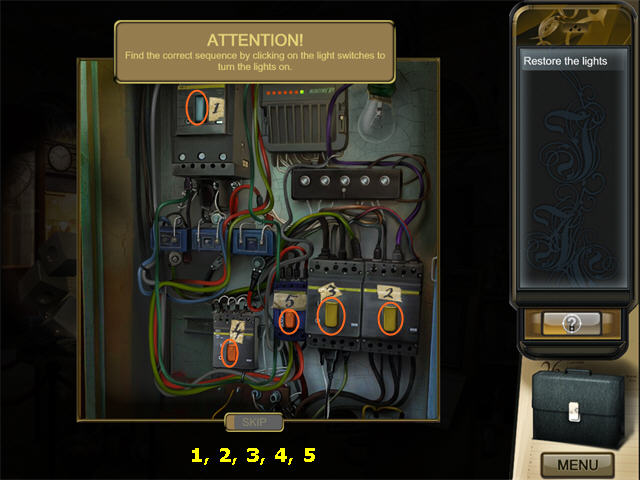
- After you have collected all the items, you need to restore the lights. Click on the light panel by the door to zoom in. This will trigger a mini-game.

Restore the Lights Mini-game
- This has the same rules as last time, but a different solution.
- Our solution was 1, 2, 3, 4, 5.

- You will get a new Find List, but none of the items are in this scene.
- Go back through the archway to the Ballroom.
Ballroom
- Collect the items on the Find List. They are marked in yellow.

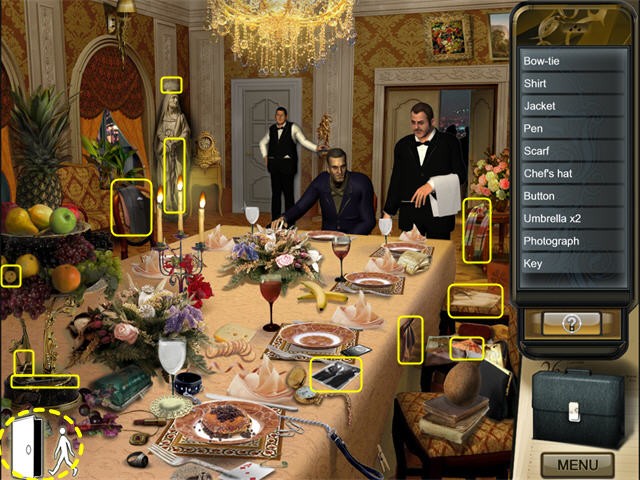
- You will get a new Find List, but none of the items are in this room. Use the Door Icon in the lower left to return to the Exhibit Hall.
Exhibit Hall
- Collect the items on the Find List. They are marked in yellow.

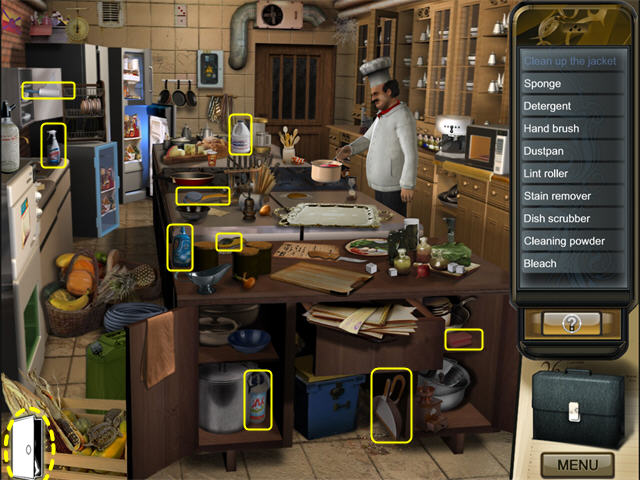
- Once you have completed all the items, you will trigger a mini-game.
Dress as a Waiter Mini-Game
- You will have to click and drag objects in the Inventory Tray to move them so you can find other objects underneath.
- The items you will need are:UNIFORM (Shirt and Skirt put together)
VEST
BOW TIE
CLIPBOARD
PEN
NAPKIN (triangular fold)
- The screenshot shows the items you will need marked on the photo.
- To use an item, drag it from the inventory tray to its approximate position in the scene.

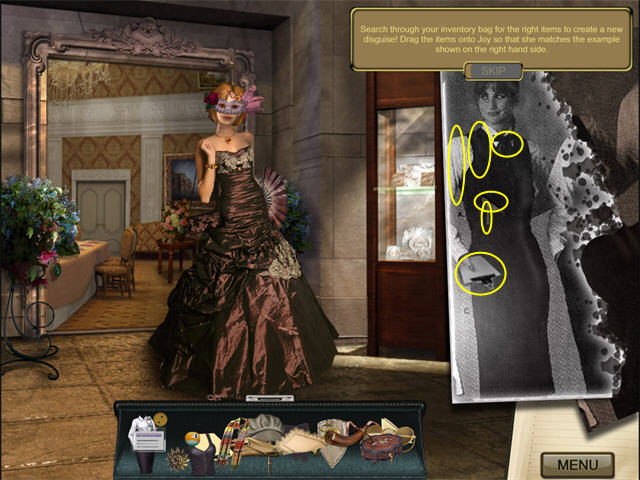
- Once Joy is ready, click on the archway to return to the Ballroom and end the chapter.
Chapter 4: A Recipe for Disaster
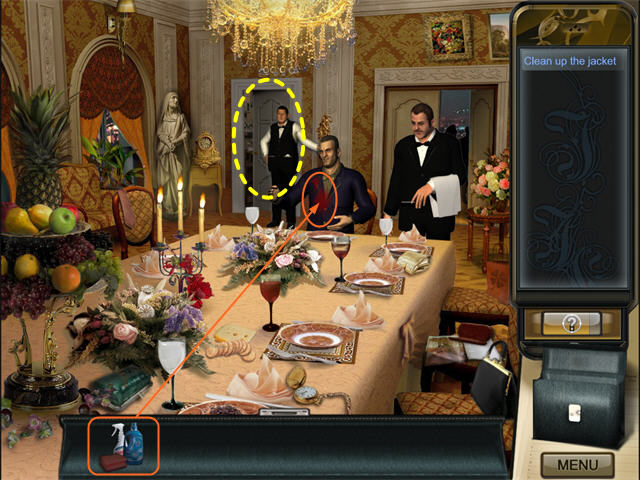
- When you enter the Ballroom, you find that Mr. Ingram has spilled wine on his shirt. The Chef sends you to the Kitchen to get cleaning supplies.
- Click on the white door in the back that leads to the Kitchen.
The Kitchen
- Collect the items on the Find List. We have marked them in yellow.


- Return to the Ballroom by clicking on the Door Icon in the lower left.
Ballroom
- Click on the Briefcase to open the inventory tray if it isn’t open already.
- Click on the cleaning supplies, then drag them to the spot on the jacket that has the stain and click again.
- Now the Chef will ask you to return to the Kitchen to help cook. Click on the white door marked in yellow.

The Kitchen
- Click on the Cook to talk to him. He will tell you you need to cook, following the Recipe that will appear in the Find List area.
- First you must collect the ingredients.
- Click on the refrigerator to zoom in.
- Collect the MUSHROOMS, STEAK, and KETCHUP. They will go into your inventory.
- Back in the main Kitchen scene, collect the KNIFE and the PEPPER.
- Open your Inventory Tray.
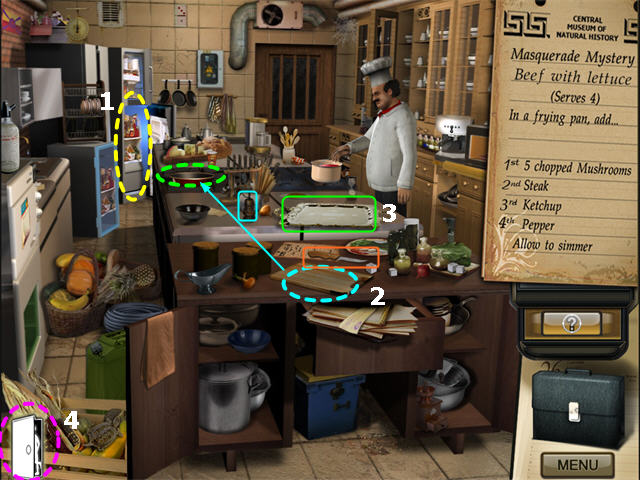
- Put the MUSHROOMS on the cutting board marked in cyan.
- Use the KNIFE to chop the MUSHROOMS.
- Put the CHOPPED MUSHROOMS In the Frying Pan.
- Put the STEAK in the Frying Pan.
- Put the KETCHUP in the Frying Pan.
- Put the PEPPER in the Frying Pan.
- Now the Chef will tell you to take the meal to the Ballroom.
- Collect the SILVER TRAY marked in green and the FRYING PAN.
- Click on the Door Icon in the lower left to go back to the Ballroom.

Ballroom
- Click on the Briefcase to open your inventory tray if it is not already open.
- Serve the STEAK onto the 4 plates.
- Put the TRAY in the center of the table.
- Click on the white door to return to the Kitchen.

The Kitchen
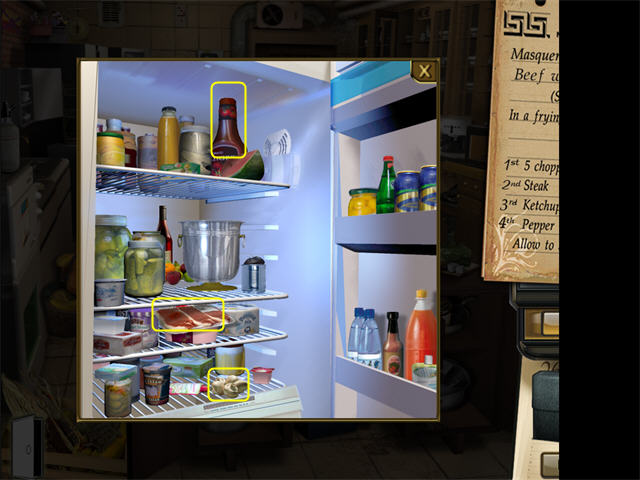
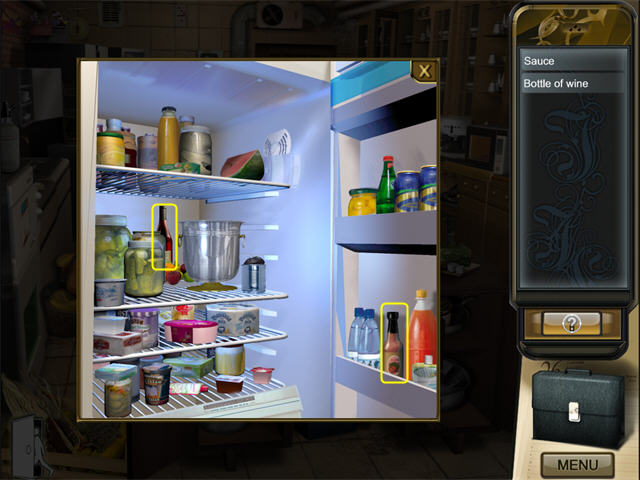
- Click on the refrigerator to open it.
The Refrigerator
- Collect the SAUCE and the WINE.

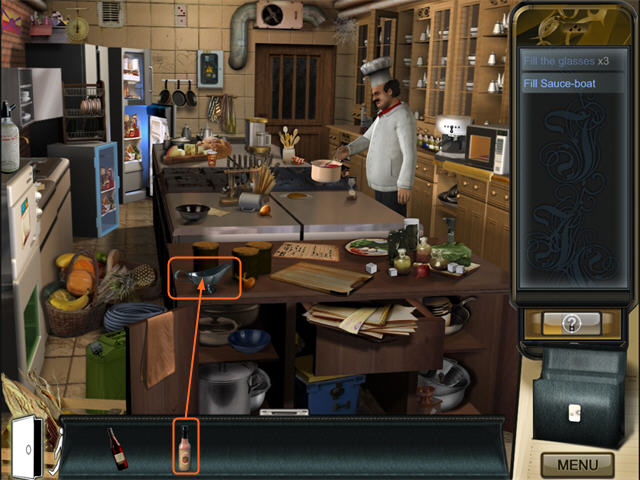
The Kitchen
- Take the SAUCE from your inventory and put it in the SAUCE-BOAT.
- Collect the SAUCE-BOAT.
- Click on the Door Icon in the lower left to return to the Ballroom.

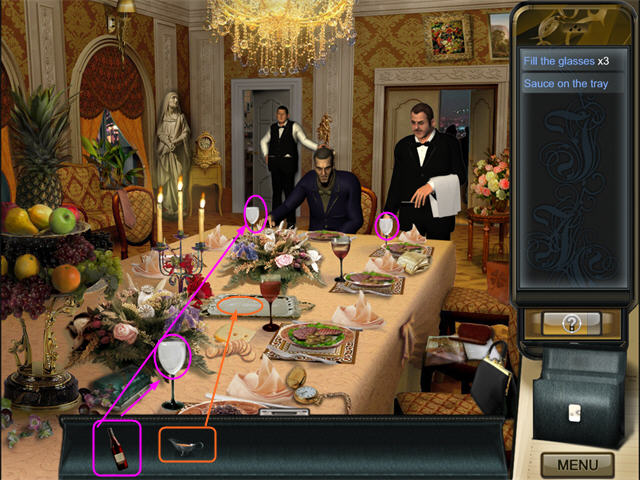
Ballroom
- Open your inventory tray.
- Serve the WINE into the empty glasses.
- Put the SAUCE-BOAT onto the SILVER TRAY.
- Click on Mr. Ingram to talk to him. He wants to give his compliments to the Chef.
- Click on the white door to return to the Kitchen.

Kitchen
- Click on the Chef to talk to him. He will go to the Ballroom to talk to Mr. Ingram.
- Click on the Door at the back of the scene. This will trigger a mini-game.
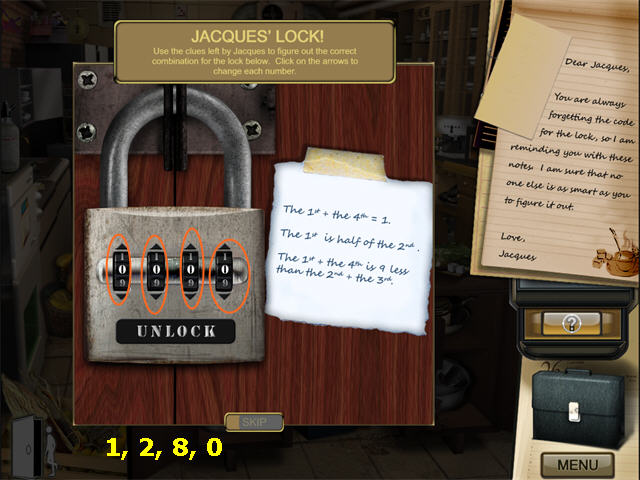
Jacques’ Lock Mini-Game
- You must use logic to determine the combination.
- Since the 1st number is half of the second number, the first number can’t be 0. Therefore the first number is 1 and the 4th number is 0.
- The 2nd number is 2 because it is twice the first number.
- (1 + 0 + 9) = 2 + X, so the third number is 8.
- The combination to the lock is 1 2 8 0.

- You will be back in the main Kitchen scene. Click on the Door to go through into the Locker Room and start the next chapter..
Chapter 5: Lock, Stock, and One Smoking Blowtorch
- Collect the NEEDLE by clicking on the Pincushion on the table.
- Go out the door to the Alley.
The Alley
- Collect the items on the Find List. They are marked in yellow.
- Click on the Dumpster to look inside.

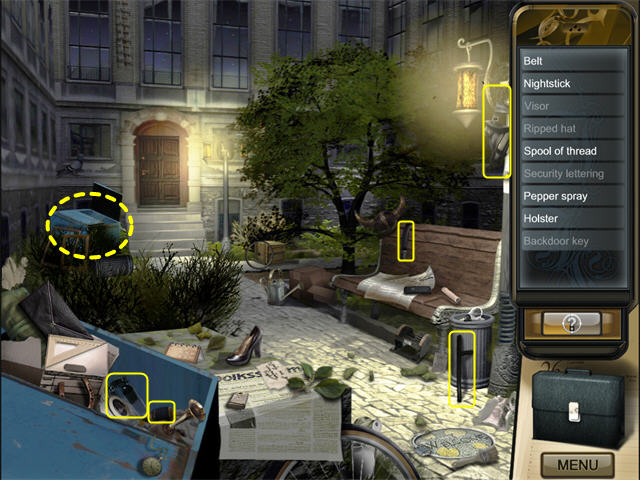
The Dumpster
- Take the BACK DOOR KEY. It will go into your inventory.
- The TORN HAT is the black object in the top left of the pile.
- The VISOR is the blue object near the KEY. You must click on the blue to collect it.

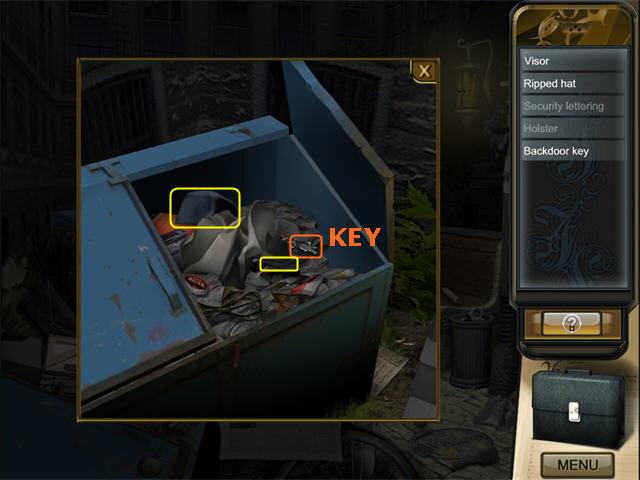
- You will automatically return to the main Alley scene after you’ve collected all the Dumpster items.
The Alley
- Click on the Briefcase to open your inventory.
- Use the BACK DOOR KEY to open the locked Back Door.
- Click on the Door to return to the Locker Room.
The Locker Room
- Nothing here. Use the Door Icon in the lower left to return to the Kitchen.
The Kitchen
- The SECURITY LETTERING is a black patch with “Security” written on it on a shelf on the upper right. Collect it.

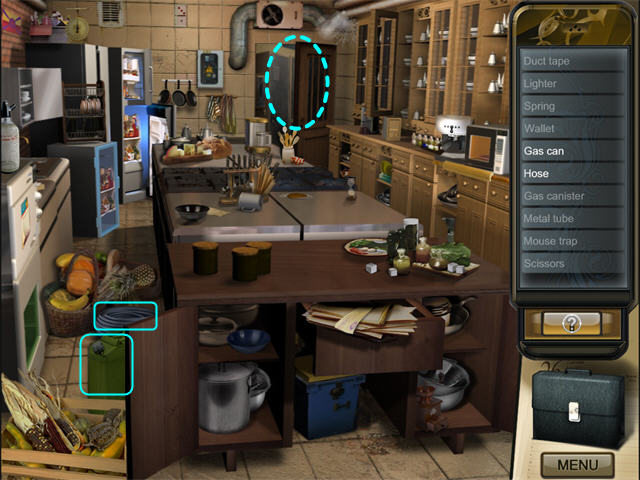
- This will trigger a mini-game.
Security Hat Mini-Game
- You will have to click and drag objects in the Inventory Tray to move them so you can find other objects underneath.
- The items you will need are:TORN HAT
VISOR
BLACK THREAD
SECURITY PATCH
- The screenshot shows the items you will need marked on the photo.
- To use an item, drag it from the inventory tray to its approximate position in the scene.

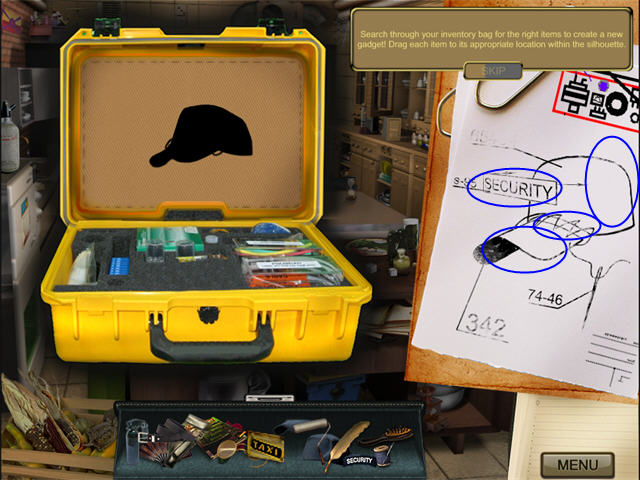
- Once the Hat is ready, you will automatically return to the main Kitchen scene.
Kitchen
- Collect the GAS CAN and the HOSE.
- Go back to the Locker Room.


Locker Room
- Collect the items on the Find List. They are marked in cyan.
- Go out the door to the Alley.

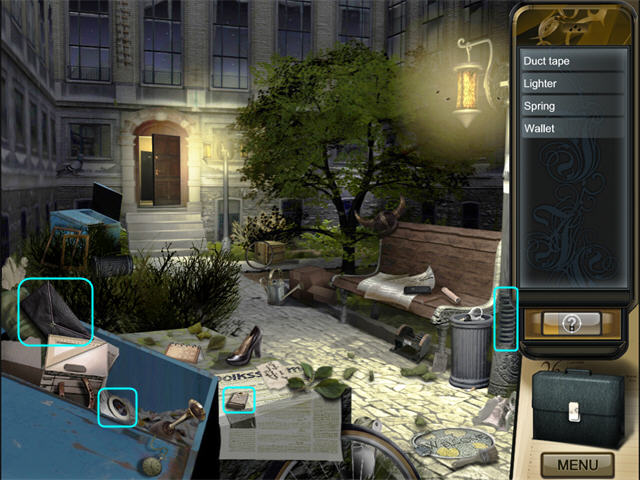
Alley
- Collect the items on the Find List. They are marked in cyan.
- Collecting the last item will trigger a mini-game.

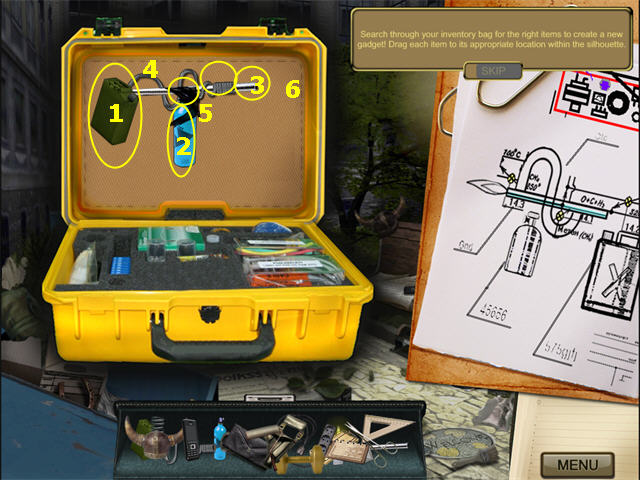
Blowtorch Mini-Game
- You will have to click and drag objects in the Inventory Tray to move them so you can find other objects underneath.
- The items you will need are:GAS CAN (1)
TANK (2)
PIPE (3)
HOSE (4)
DUCT TAPE (5)
LIGHTER (6) – apply to end of pipe
- The screenshot shows where the items go in the gadget.
- To use an item, drag it from the inventory tray to its approximate position in the scene.

- Once the BLOWTORCH is ready, you will automatically return to the main Alley scene.
- Go back through the door into the Locker Room.
Locker Room
- Collect the items on the Find List. They are marked in green.
- Some of the items are inside the leftmost locker.
- Open your inventory tray and use the BLOWTORCH on the marked locker.

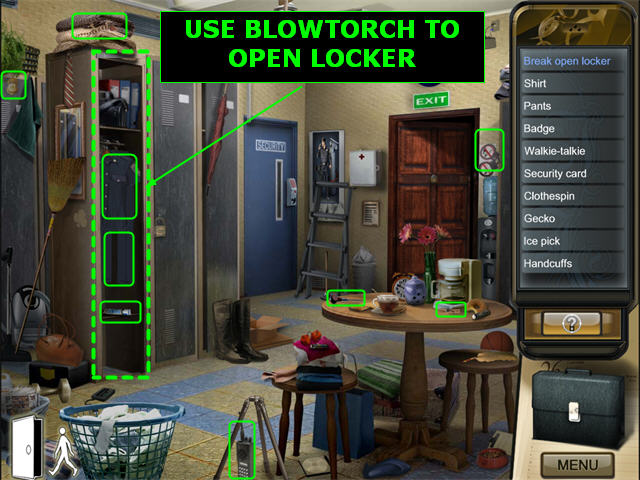
- Once you have collected all the items you will trigger a mini-game.
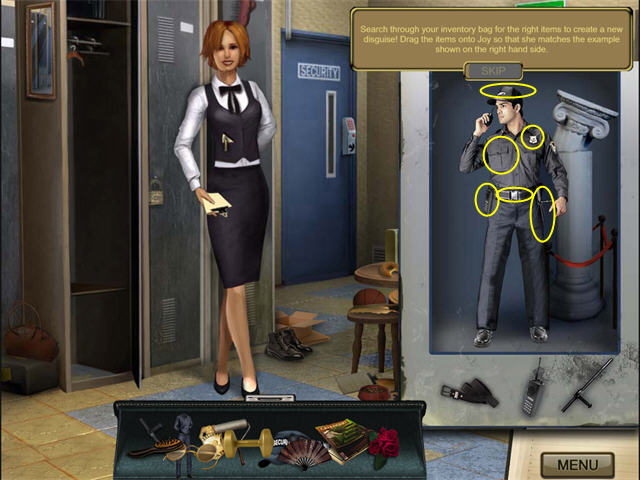
Security Uniform Mini-Game
- You will have to click and drag objects in the Inventory Tray to move them so you can find other objects underneath.
- The items you will need are:UNIFORM (pants and shirt together)
HAT
BELT
NIGHTSTICK
WALKIE TALKIE
- The screenshot shows the items you will need marked on the photo.
- To use an item, drag it from the inventory tray to its approximate position in the scene.


- Once the Uniform is ready, you will automatically return to the main Locker Room scene.
Locker Room
- You have a new Find List. To place the bugs, click on the items marked in pink.
- The WATER JUG is the tank in the water cooler by the door to the Alley.

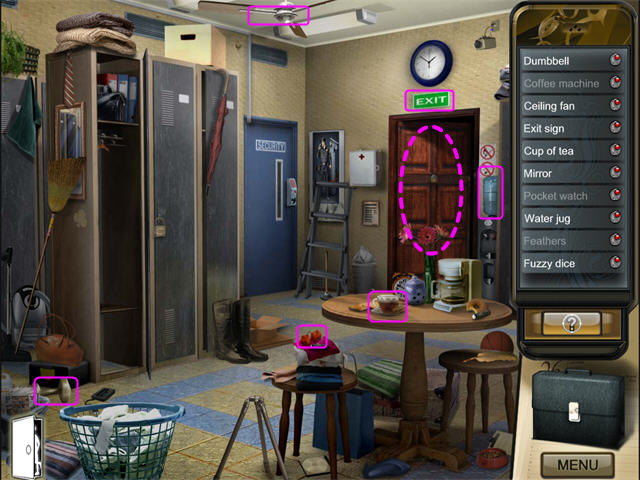
- Once you have placed everything you can in the Locker Room, go out to the Alley.
Alley
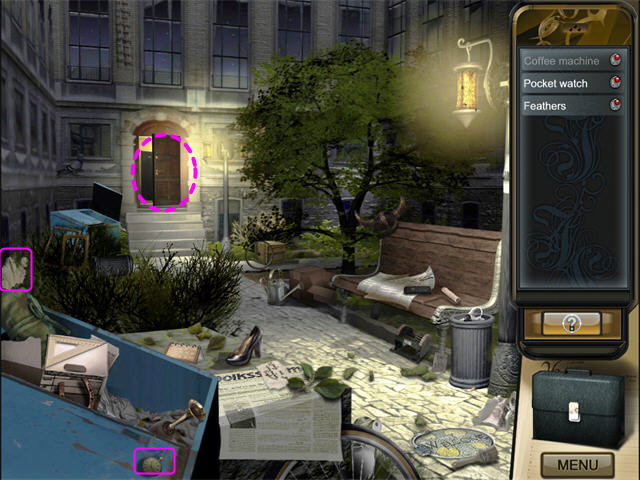
- Continue placing bugs on the items on the Find List.
- Once you have placed everything you can in the Alley, go back into the Locker Room.

Locker Room
- Use the Door Icon in the lower left to continue to the Kitchen.
Kitchen

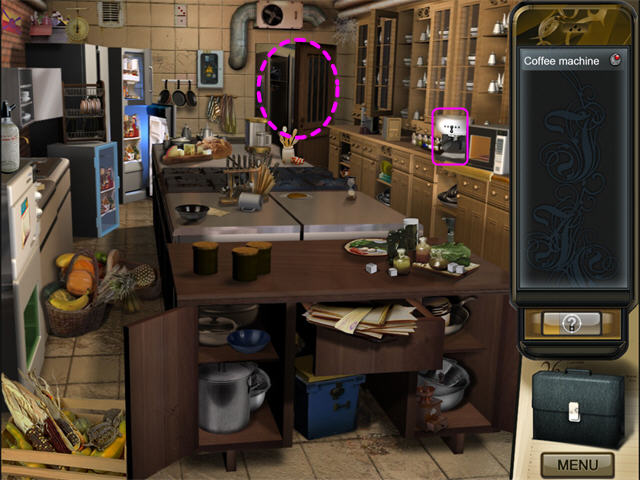
- Go back into the Locker Room.
Locker Room
- Drag the SECURITY CARD from your inventory tray to open the Security Door. You must click on the silver card reader.
- Click again to go through the door and end the chapter.
Chapter 6: Bypass Security
- Talk to the Guard. He wants some coffee.
- Click on the Door Icon to return to the Locker Room.
Locker Room
- Click on the Door Icon to return to the Kitchen.
Kitchen
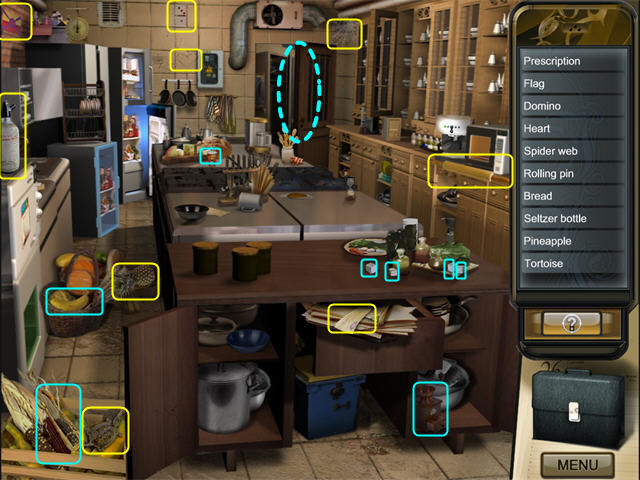
- You will get a new Find List. The items are marked in yellow.
- The PRESCRIPTION is a piece of paper under the front counter.
- Once you complete the first Find List, you will get a second one. The items are marked in cyan.
- Note: If the HINT shows you the coffee maker on the counter on the right, that’s a hint for the blue task, but you’re not ready to do it yet.
- The TONGS are in the basket on the floor in the lower left. They are a little hard to see.
- Once you have everything from this room, click on the door in the back to go through to the Locker Room.

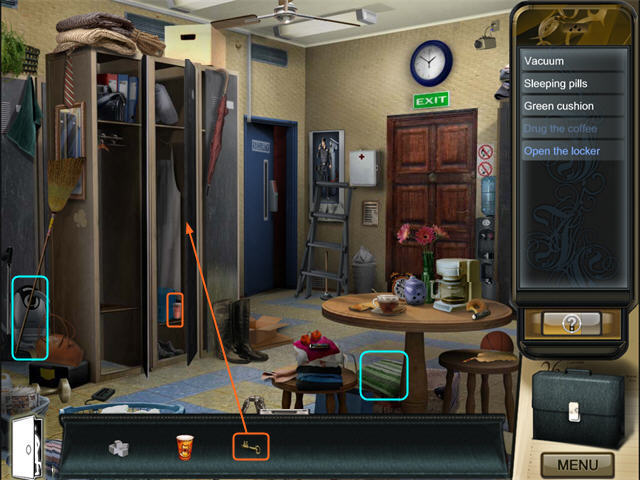
Locker Room
- Click on the Briefcase to open the inventory tray.
- Drag the KEY to the middle locker and click on the padlock to open it.
- Collect the items from the Find List. Most are marked in cyan. The SLEEPING PILLS in the locker are marked in orange.
- Click on the Door Icon in the lower left to return to the Kitchen.

Kitchen
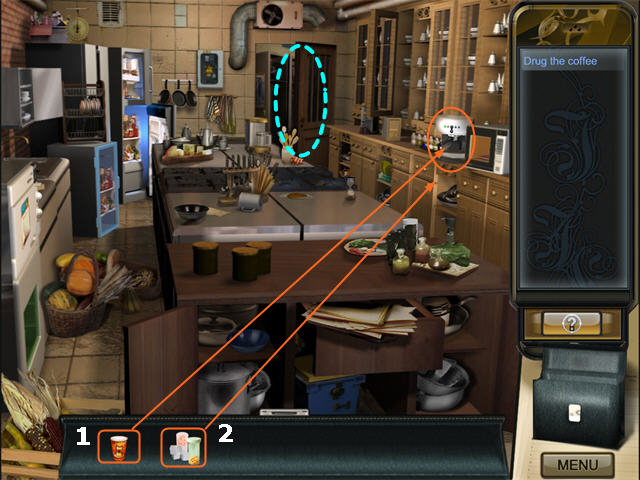
- Click on the Briefcase to open the inventory tray if it is not already open.
- Drag the PAPER CUP to the Coffee Maker, then click to put it on the platform. If it doesn’t stick, try again—you need to position it on the black platform so the coffee will go in.
- Drag the SUGAR CUBES/SLEEPING PILLS combo item from the inventory tray to the PAPER CUP and click to add them.
- The PAPER CUP WITH COFFEE will automatically go back into your inventory.
- Click on the door in the back to return to the Locker Room.

Locker Room
- Go through the Security Door.
Security Corridor
- Click on the Briefcase to open the inventory tray if it is not already open.
- Drag the PAPER CUP to the Guard, then click to give it to him.
- The Guard will drink it, falling asleep and ending the chapter.
Chapter 7: Getting a Closer Look
- This Find List uses riddles. Collect the items on the Find List.
- Once you complete the list, you will get a second Find List. The items from the first list are marked in yellow and the ones from the second list are marked in cyan.
- The Right Step = FOOTPRINT
- Not a Crook, but Crooked = CROOKED PAINTING
- “Close” to a T = CLOSET SIGN
- Hot Coffee, but Out Cold = the GUARD
- Something Shady = LAMP SHADE
- The Missing Pieces = PUZZLE PIECES

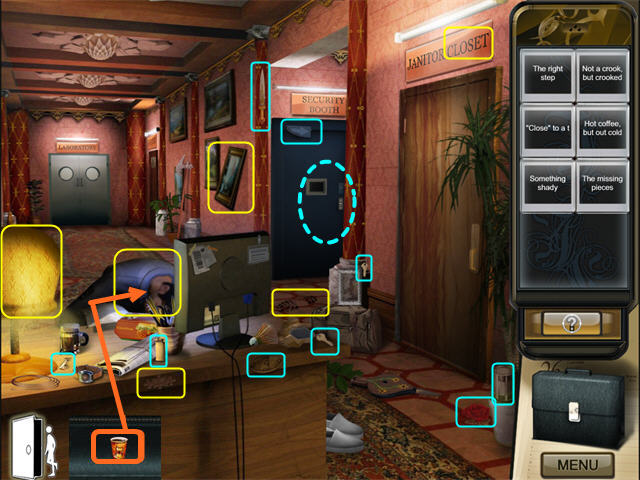
- Once you have collected everything, click on the Security Booth door to zoom in.
Security Booth
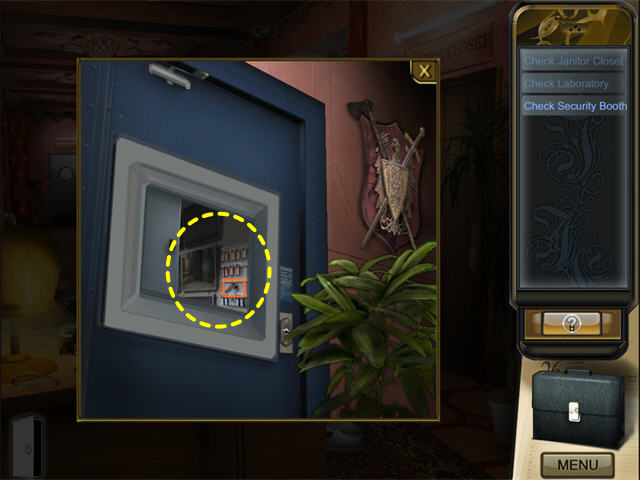
- The Keys you already have won’t work on this door. Try clicking on the open window.
- You will get a message that the door is locked and the key is just out of reach. If you don’t get this message, try clicking on the key you can see flipped up slightly on the board inside the window.
- Once you get the message, the scene will automatically close and you’ll be back in the Security Corridor.

Security Corridor
- Click on the Briefcase to open the inventory tray if it is not already open.
- Drag the KEYS to the lock on the Janitor’s Closet, then click to unlock it.
- Click on the door to enter the Janitor’s Closet.

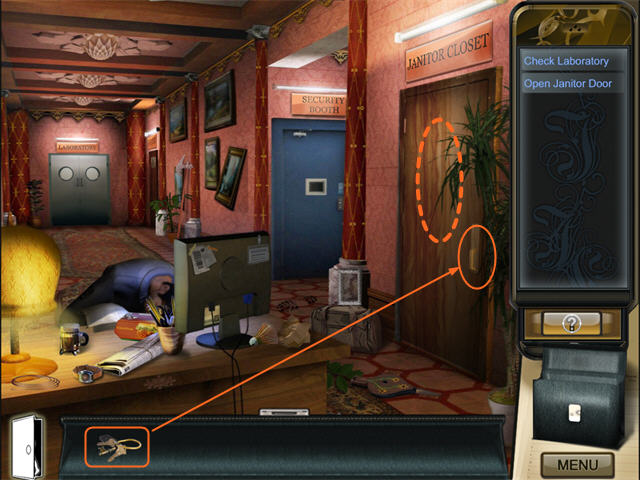
Janitor’s Closet
- It’s dark—you’ll have to use the FLASHLIGHT again.
- Click on the Briefcase to open the inventory tray if it is not already open.
- Click on the FLASHLIGHT to attach it to your cursor.
- Now anywhere you click on the scene will illuminate a small area.
- Unfortunately, this will only work once and then the FLASHLIGHT will break!
- You will get a new Find List, but none of the items are in this room.
- Click on the Door Icon in the lower left to return to the Security Corridor.
Security Corridor
- Nothing from the list here, either. Click on the Door Icon in the lower left to return to the Locker Room.
Locker Room
- Collect the items you can from the list. They are marked in yellow.
- Click on the Door to go out to the Alley

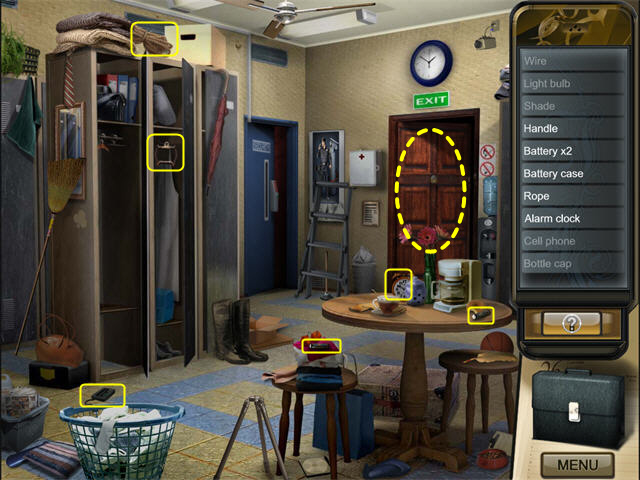
Alley
- Collect whatever you can from the Find List. The items are marked in yellow.
- The Shade looks like a white jug until you pick it up. It is at the bottom of the screen behind the wheel.
- After you have collected all the items in the main scene, click on the Dumpster to zoom in.

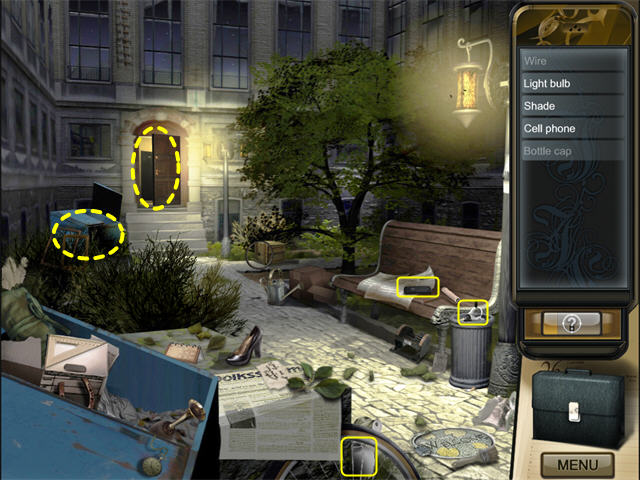
Dumpster
- Collect the items from the Find List. They are marked in yellow.

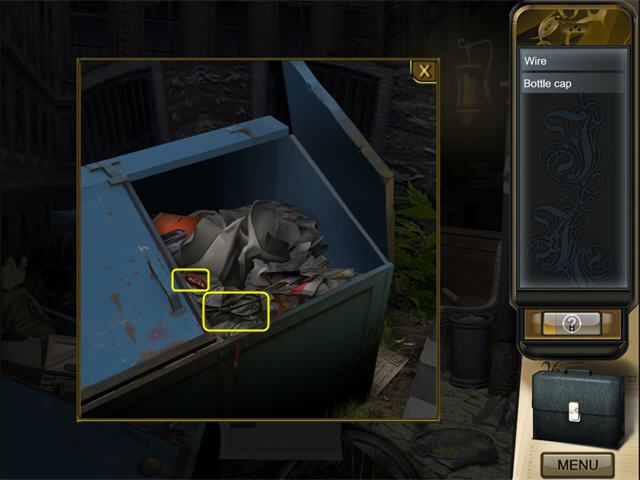
- Once you have all the items (regardless of the order you collect them), you will trigger a mini-game.
Assemble the Lamp Mini-Game
- The gadget doesn’t look very much like the drawing for this one, so we have put some of the pieces in place and marked the gadget itself.
- You will have to click and drag objects in the Inventory Tray to move them so you can find other objects underneath.
- The items you will need are:Spring (1)
Battery Holder (2)
Batteries (3)
Handle (4)
Shade (5)
Bulb (6)
- The screenshot shows where the items go in the gadget.
- To use an item, drag it from the inventory tray to its approximate position in the scene.

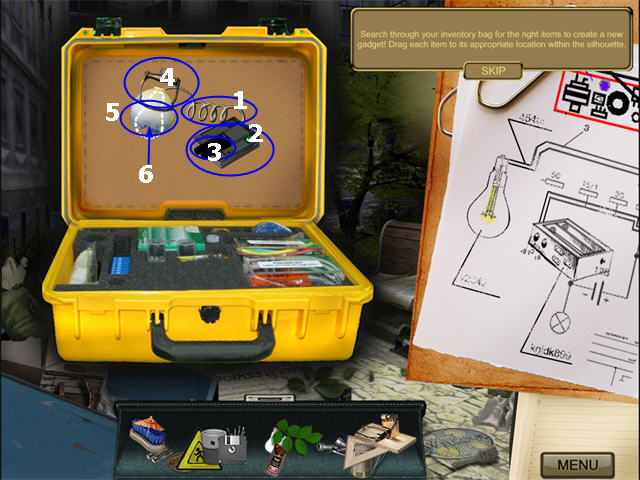
- Once the LAMP is ready, you will automatically return to the main Alley scene.
- Go back through the door into the Locker Room.
Locker Room
- Go through the SECURITY Door into the Security Corridor
Security Corridor
- Click on the door to the Janitor’s Closet to go inside.
Janitor’s Closet
- You have a new Find List. The items are marked in yellow.
- This LAMP works just the same as the FLASHLIGHT did in the Exhibition Hall.
- Click on the Briefcase to open the inventory tray if it is not already open.
- Click on the FLASHLIGHT to attach it to your cursor.
- Now anywhere you click on the scene will illuminate a small area.
- The screenshot is a composite. In actual gameplay you will see only a small section illuminated at a time, wherever you click.
- The CROWBAR (1) is a Key item. When you collect it, it will go into your inventory tray.
- Click on the Briefcase to open the inventory tray.
- Drag the CROWBAR to the 4 nails circled in orange in the screenshot to remove them. You will remove them one at a time.
- After the nails are moved, you can click on the crate to open it.

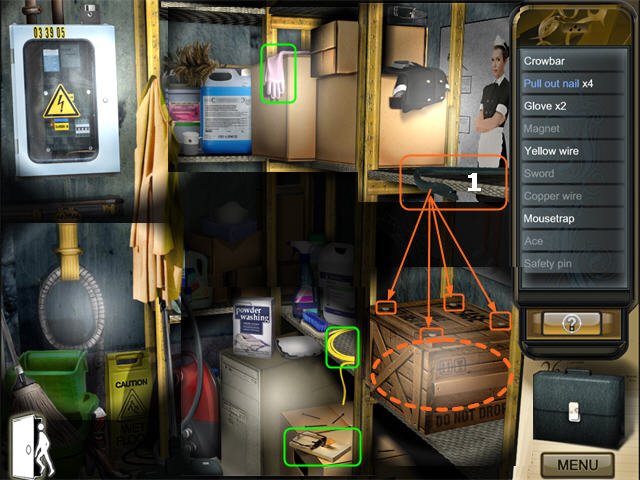
Crate
- Collect whatever you can from the Find List. The items are marked in green.
- The Crate will close automatically and you will be back in the main Janitor’s Closet scene.

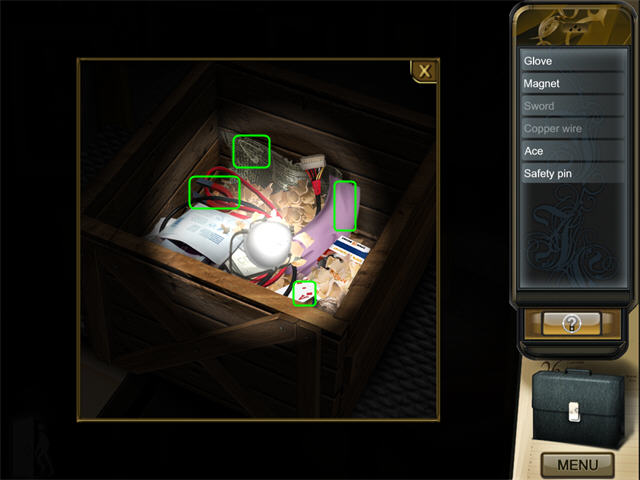
Janitor’s Closet
- Click on the Door Icon in the lower left to return to the Security Corridor.
Security Corridor
- Collect the COPPER WIRE from the left wide of the desk.

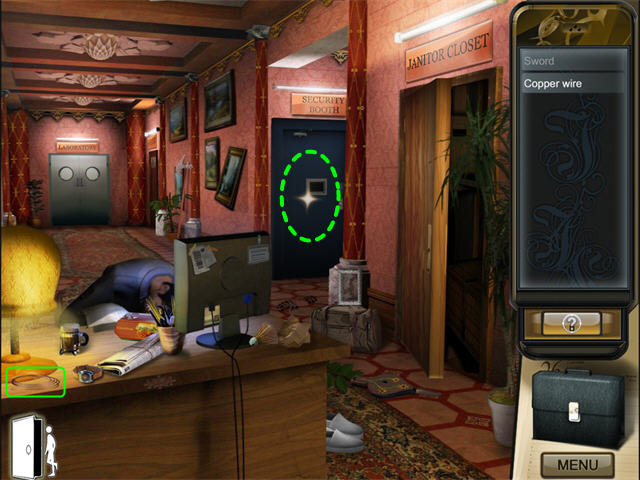
- Click on the Security Door to zoom in.
Security Door
- Collect the Sword from the wall.
- Once you have all the items from the Find List, you will automatically trigger a mini-game.

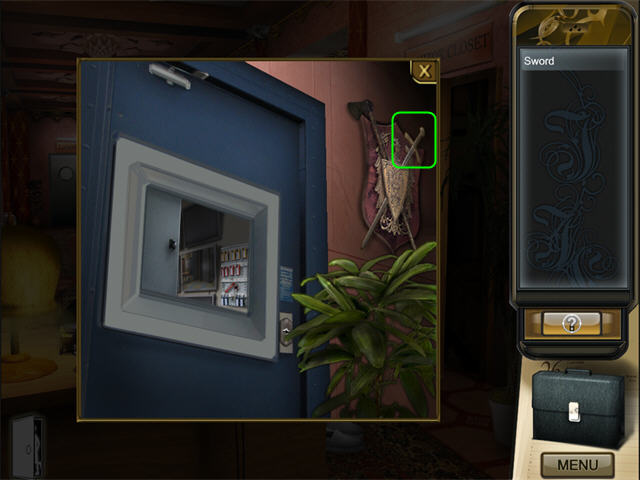
Assemble the Magnet Gadget Mini-Game
- You will have to click and drag objects in the Inventory Tray to move them so you can find other objects underneath.
- The items you will need are:SWORD
MAGNET
COPPER WIRE
YELLOW WIRE
- The screenshot shows where the items go in the gadget.
- To use an item, drag it from the inventory tray to its approximate position in the scene.

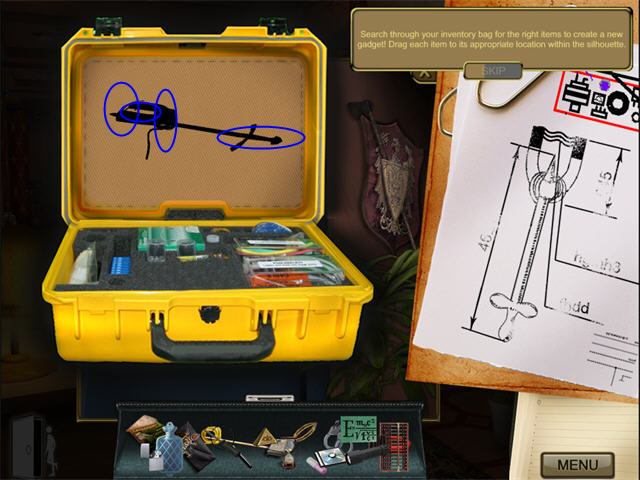
- Once the MAGNET GADGET is ready, you will automatically return to the Security Door zoom scene.
Security Door
- Drag the MAGNET GADGET from your inventory tray to the hanging KEY. Click to collect it.
- Once you have the SECURITY KEY, drag it to the lock, then click to open the door.

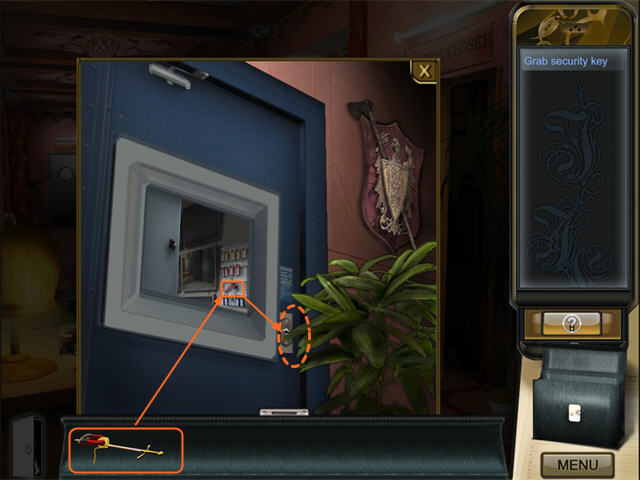
Security Booth
- Collect the items from the Find List. They are marked in yellow.
- Click on the COMPUTER MONITOR on the desk to look at the Camera views.

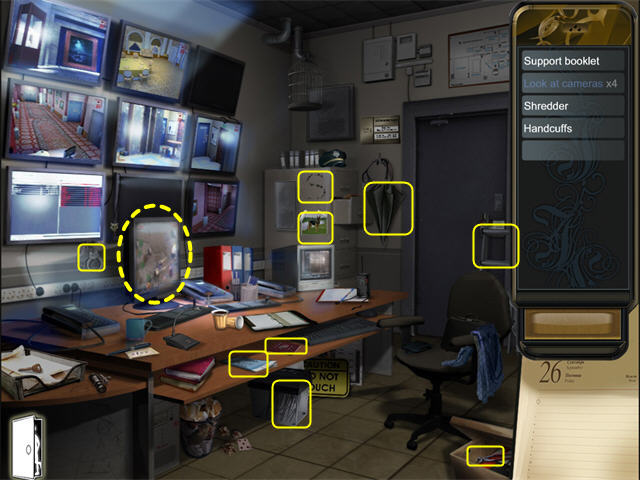
Camera Monitor
- Click on each of the four numbered buttons on the keyboard (1, 2, 3, 4).
- You will get a message that someone is doing late night painting in the lab.
- You will automatically return to the Security Booth main scene.

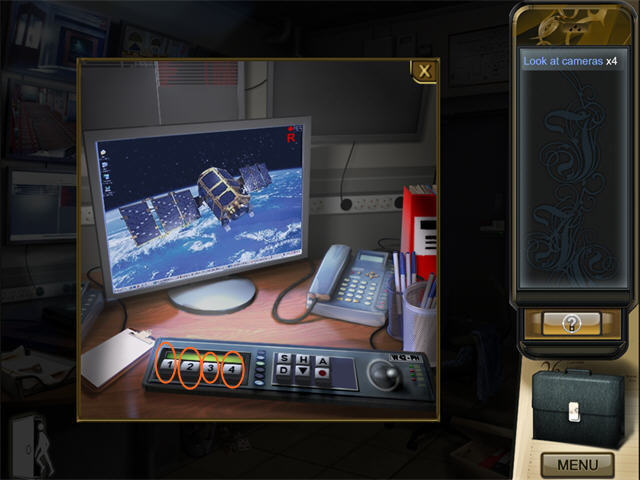
Security Booth
- You have a new Find List. Collect the items. They are marked in cyan.
- When you have everything, exit by clicking on the Door Icon in the lower left.

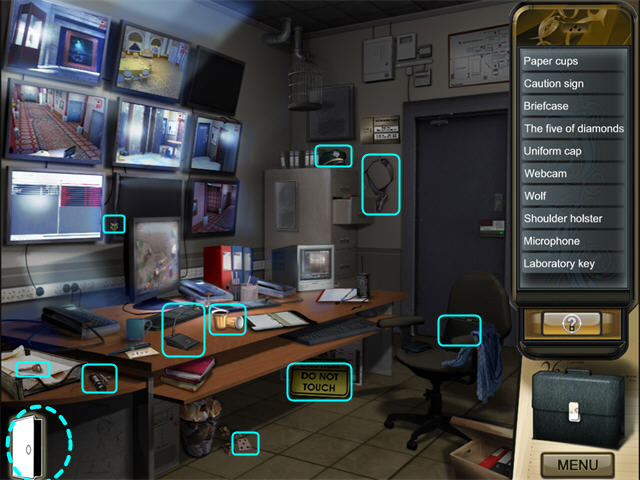
Security Corridor
- Drag the KEY from your inventory tray to the Laboratory Door and click to open.
Laboratory
- You will get a new Find List. Collect the items. Most items are marked in yellow. Key items are marked in orange.

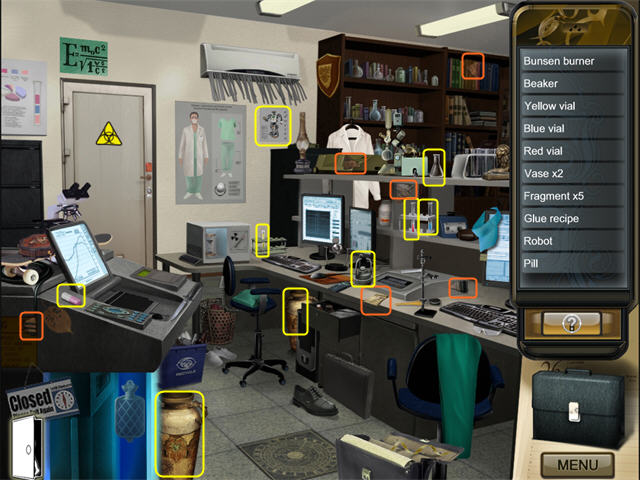
- Once you have collected everything, you will see the Glue Formula in the upper right.
- There is a Stand on the desk.
- Put the items from your Inventory Tray onto the Stand in the order shown.
- When the BUNSEN BURNER is placed correctly at the bottom, it will light.

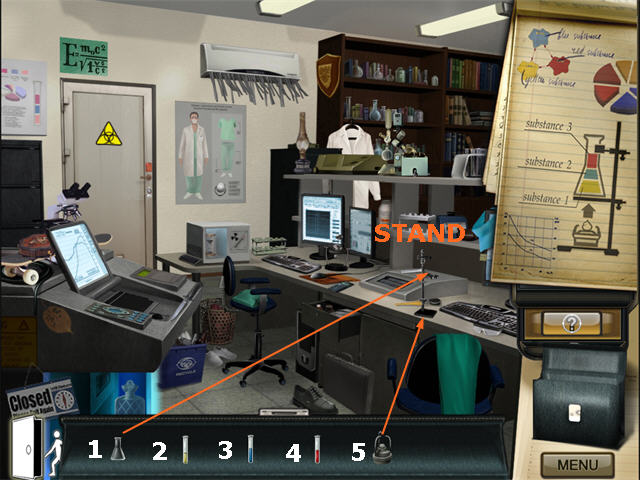
- This will trigger a mini-game.
Repair the Amphora Mini-Game
- Place the 5 FRAGMENTS as shown. Drag each FRAGMENT to its place, then click it.
- Drag the GLUE over one of the fragments and click to apply. (Try to put your cursor tip on one of the cracks around the FRAGMENT.)
- Repeat for all fragments.
- When you finish, you will see the 2 AMPHORA side by side. Click to collect them.

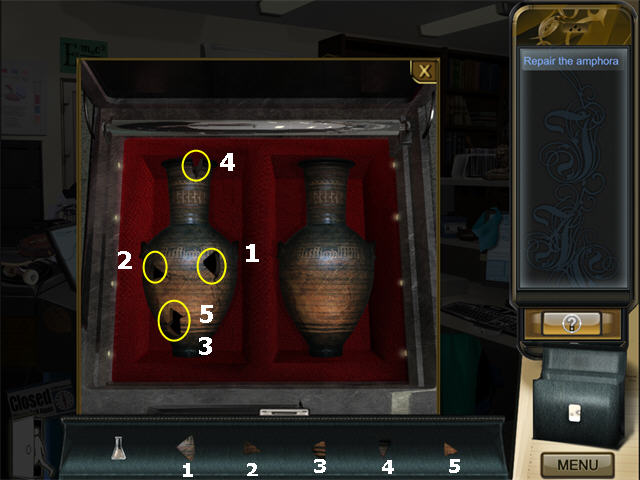
- The AMPHORA will go into your inventory tray.
- Drag the AMPHORA back to the red box and click. This will trigger a Find the Differences segment.

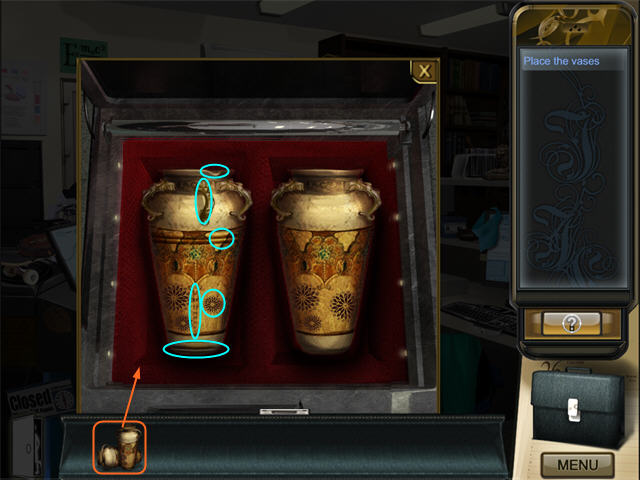
- Once you find all the differences you will get a message that one vase Is a forgery. You will be automatically returned to the main Laboratory view.
Laboratory
- You have a new Find List. Collect as many items as you can. They are marked in green.

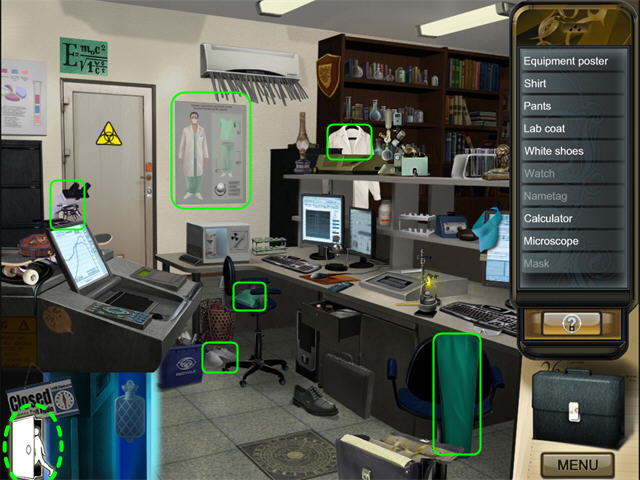
- Click on the Door Icon to return to the Security Corridor.
Security Corridor
- Collect the NAME TAG and the WATCH.
- Enter the Janitor’s Closet.

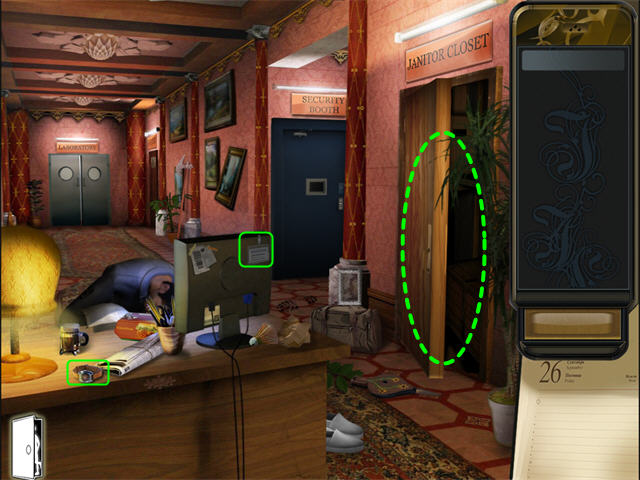
Janitor’s Closet
- Click on the Crate on the right shelf to zoom in.
Crate

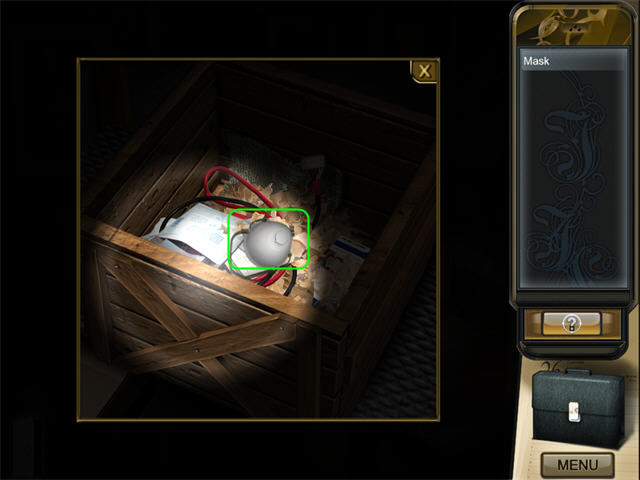
- This will trigger a mini-game
Laboratory Disguise Mini-Game
- You will have to click and drag objects in the Inventory Tray to move them so you can find other objects underneath.
- The items you will need are:UNIFORM (pants and shirt together)
WHITE LAB COAT
NAME TAG
MASK
- The screenshot shows the items you will need marked on the photo.
- To use an item, drag it from the inventory tray to its approximate position in the scene.

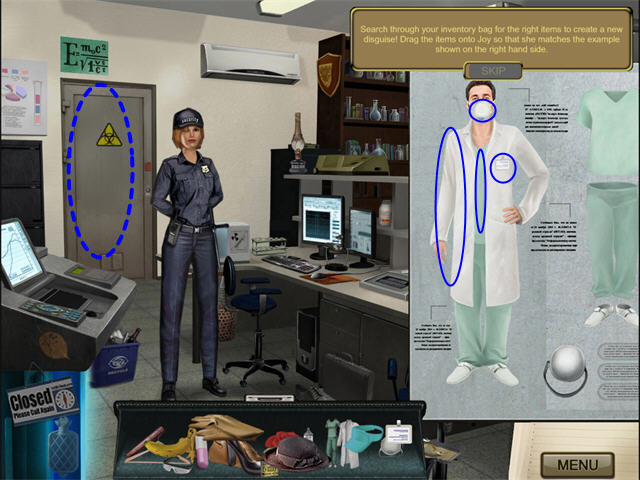
- Once the Uniform is ready, click on the door to the Restoration Room to end the chapter.
Chapter 8: Paint by Numbers
- You will receive a new Find List. The items are marked in yellow. The PAINTING FRAGMENTS are marked in pink.
- The Magnifying Glass that the man is holding does not count.

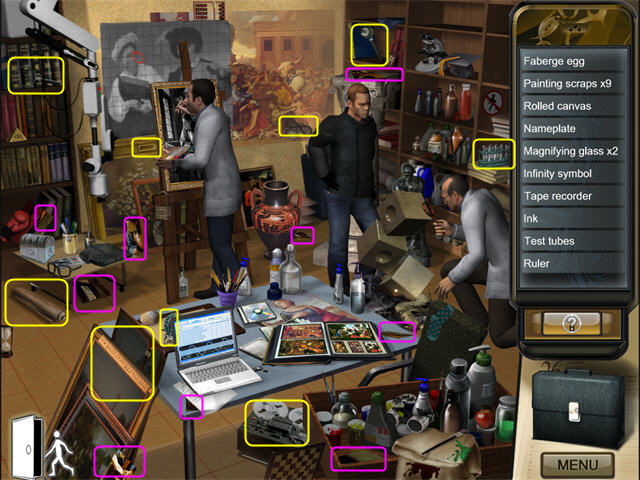
- When you have collected all of the PAINTING FRAGMENTS, you will trigger a mini-game.
Assemble the Painting Mini-Game
- Unjumble the picture by swapping two tiles at a time.
- You can rotate pieces by right-clicking.
- Pieces do NOT lock into place.

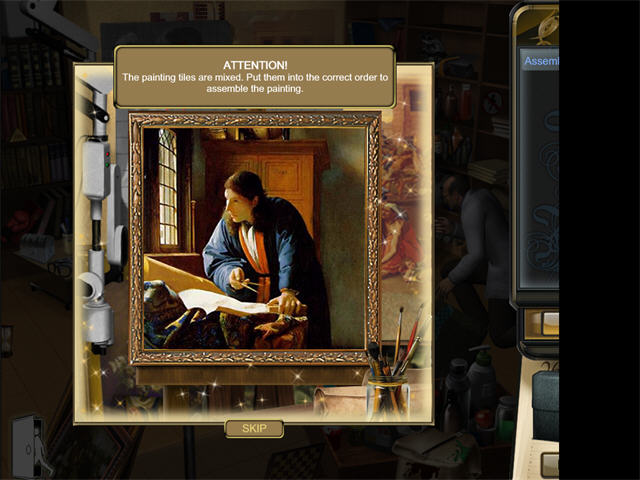
- When you have completed the mini-game, you will be returned to the main view of the Restoration Room.
Restoration Room
- You will receive a new Find List, but none of the items are in this room.
- Use the Door Icon in the lower left to return to the Laboratory.
Laboratory
- Collect what you can from the Find List. The items are marked in cyan.
- Click on the Door Icon in the lower left to return to the Security Corridor.

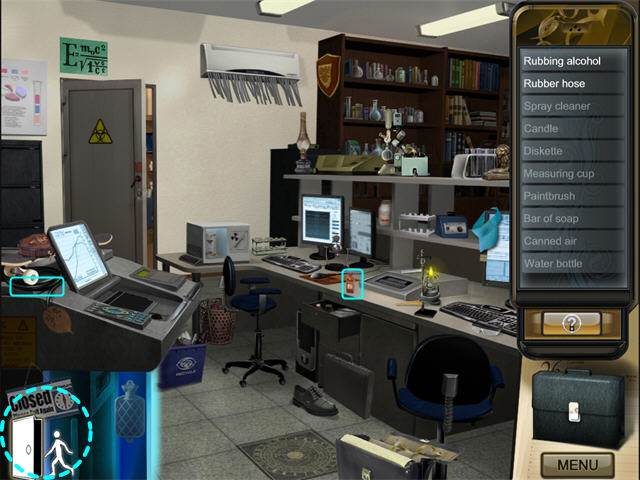
Security Corridor
- Enter the Janitor’s Closet
Janitor’s Closet
- Your cursor will still work like a lamp.
- The screenshot is a composite. In actual gameplay, you will only see a small section illuminated at a time.
- Collect the items from the Find List. They are marked in cyan.

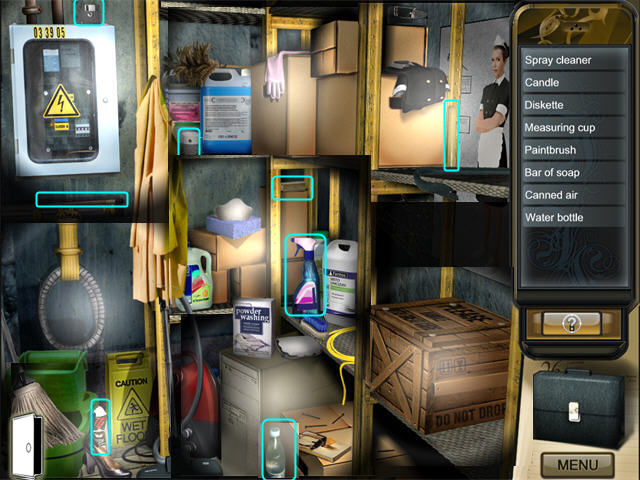
- When you have collected all the items, you will trigger a mini-game.
Assemble the Sprayer Mini-Game
- You will have to click and drag objects in the Inventory Tray to move them so you can find other objects underneath.
- The items you will need are:COMPRESSED AIR
RUBBING ALCOHOL
SPRAY TOP
TUBING
- The screenshot shows where the items go in the gadget.
- To use an item, drag it from the inventory tray to its approximate position in the scene.

- Once the SPRAYER is ready, you will automatically return to the Janitor’s Closet scene.
- Click on the Door Icon on the lower left to return to the Security Corridor.
Security Corridor
- Click on the Laboratory Door to enter.
Laboratory
- Click on the Restoration Room Door to enter.
Restoration Room
- Click on the painting that the artist is working to get a zoom scene of it.
The Painting
- Drag the Sprayer from your inventory tray to the painting. It will reveal another painting underneath. You realize the crooks are copying paintings, then painting over the originals to disguise them.

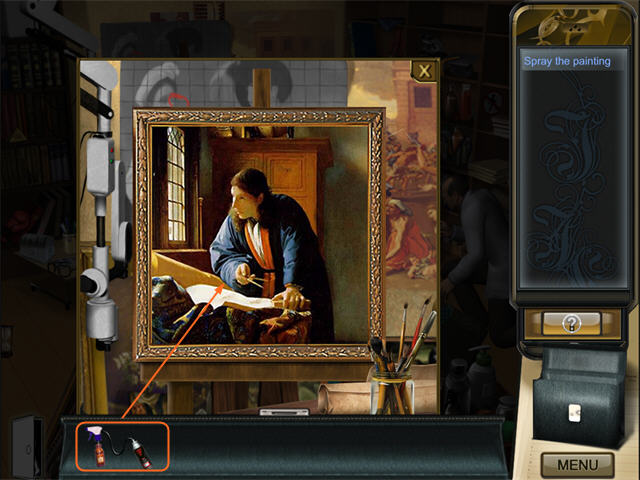
- You will be automatically returned to the main scene in the Restoration Room.
Restoration Room
- You will get a new Find List in riddles. The items are marked in green.
- An Ancient Calculator = ABACUS
- Never Found in Pairs = SOCK (this is a joke)
- It Packs a Punch = BOXING GLOVE
- “Cubism”? = CUBE STATUE
- Fit for Two Kings = CHESSBOARD
- Sold by the Seashore = SEASHELL
- You will then get a second Find List. The items on this one are marked in pink.

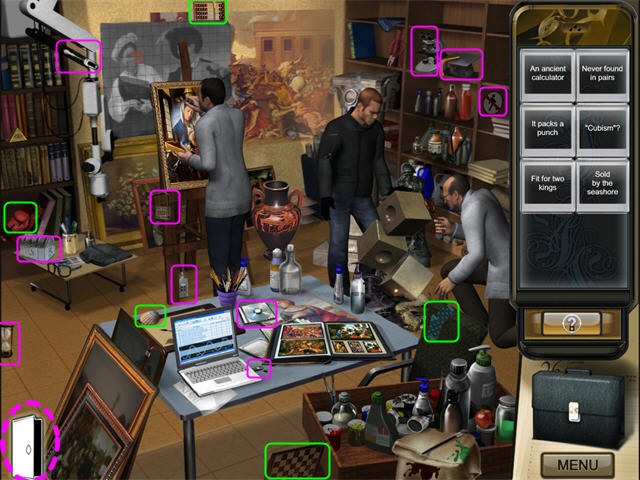
- The man will tell you to go see the Boss in the Office Lobby.
- Click on the Door Icon in the lower left to return to the Laboratory.
Laboratory
- Click on the Door Icon in the lower left to return to the Security Corridor.
Security Corridor
- Click on the door to the right of the Laboratory to go into the Office Lobby and end the chapter.
Chapter 9: It’s a Dirty Job
- You start out in the Office Lobby, but realize you need a maid’s uniform as a disguise.
- Click on the Door Icon in the lower left to return to the Security Corridor.
Security Corridor
- Enter the Janitor’s Closet.
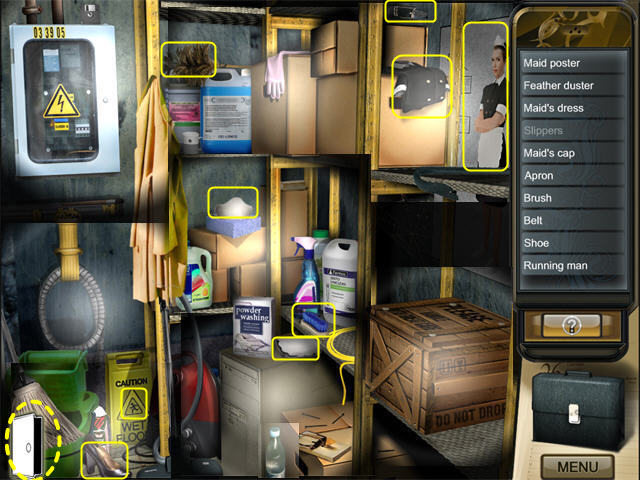
Janitor’s Closet
- Your cursor will still work like a lamp.
- The screenshot is a composite. In actual gameplay, you will only see a small section illuminated at a time.
- Collect the items from the Find List. They are marked in yellow.
- When you have collected all the items you can, click on the Door Icon in the lower left to return to the Security Corridor.


Security Corridor
- Collect the white Slippers on the floor on the right of the Desk.
- This will trigger a mini-game.
Maid Disguise Mini-Game
- You will have to click and drag objects in the Inventory Tray to move them so you can find other objects underneath.
- The items you will need are:UNIFORM
CAP
APRON
FEATHER DUSTER
- The screenshot shows the items you will need marked on the photo.
- To use an item, drag it from the inventory tray to its approximate position in the scene.

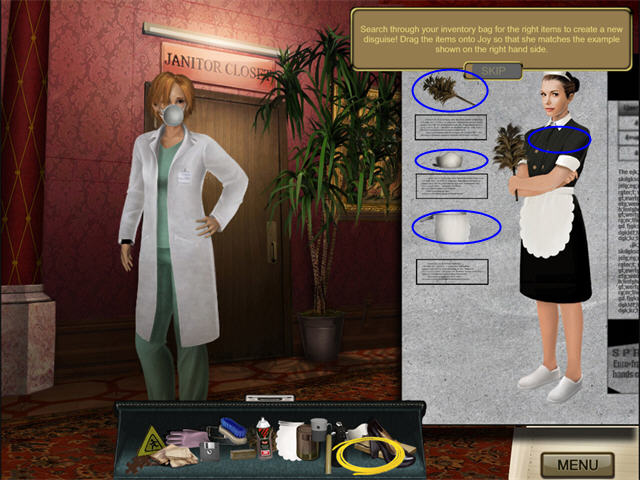
- Once the Uniform is ready, click on the door to the Office Lobby to go there.
Office Lobby
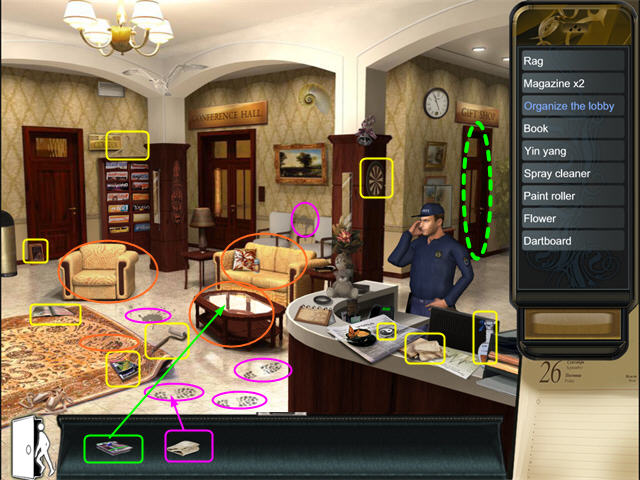
- You will get a new Find List. The items are marked in yellow.
- After you have collected everything, click on the 4 items marked in orange to straighten them. These are:COUCH
CHAIR
TABLE
RUG
- Then take the RAG from your inventory tray and use it on all the spots marked in pink. You have to do the spots one at a time, letting the rag go back into your inventory each time.
- Drag the RAG to a spot and click to clean it.
- Drag the MAGAZINE from your inventory tray to the TABLE and click to put it there.
- The Guard will tell you you can go in the Gift Shop. Click on the Gift Shop door to enter.

Gift Shop
- You will get a new Find List. The items are marked in yellow.
- Click on the small Chest to zoom in.

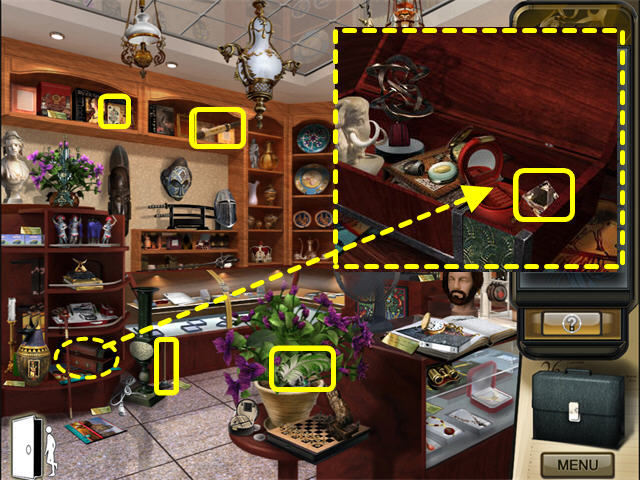
- You will automatically return to the main Gift Shop scene. Click on the Door Icon in the lower left to return to the Office Lobby.
Office Lobby
- Collect the BLACK WIRE from the desk.
- Enter the door to the Conference Hall. It’s to the right of the Magazine Rack.
Conference Hall
- Collect the items from the Find List. They are marked in yellow.

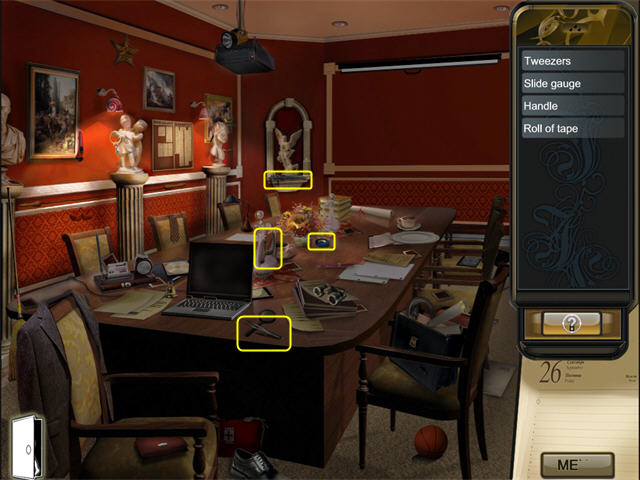
- When you have collected all the items, you will trigger a mini-game.
Assemble the Glass Cutter Gadget Mini-Game
- You will have to click and drag objects in the Inventory Tray to move them so you can find other objects underneath.
- The items you will need are:SLIDING GAUGE (1)
PLUNGER (2)
HANDLE (3)
DIAMOND (4)
BLUE TAPE (5)
BLACK WIRE (6)
- There is a rectangular item that looks something like the DIAMOND, but the true DIAMOND has a point at the base.
- The screenshot shows where the items go in the gadget.
- To use an item, drag it from the inventory tray to its approximate position in the scene.

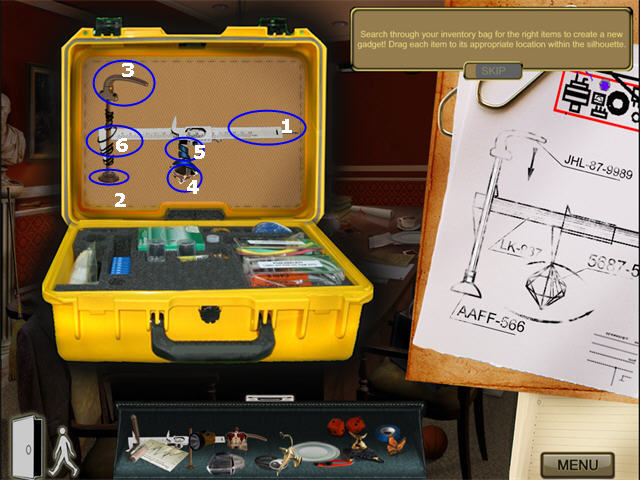
- Once the GLASS CUTTER GADGET is ready, you will automatically return to the Conference Room scene.
- Click on the Door Icon on the lower left to return to the Office Lobby.
Office Lobby
- Go through the door to the Gift Shop.
Gift Shop
- Drag the GLASS CUTTER from your inventory tray to the spot on the Display Case marked in orange and click to use it.
- Collect the EXHIBIT LIST from the case.
- You will get a new Find List. Collect the items, marked in cyan.
- The only HELMET that counts is the full size one above the glass case.
- After you collect all the items you can, click on the jewelry case to zoom in.

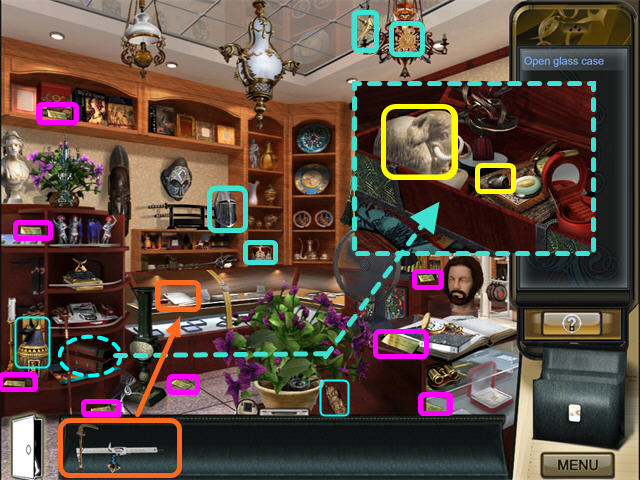
Gift Shop
- You will automatically return to the main scene in the Gift Shop with a new Find List. The items are marked in green.

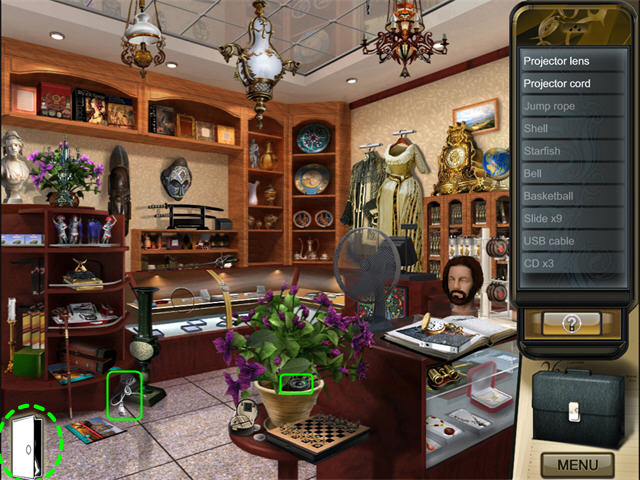
- Click on the Door Icon in the lower left to return to the Office Lobby.
Office Lobby
- Go through the door to the Conference Room.
Conference Room
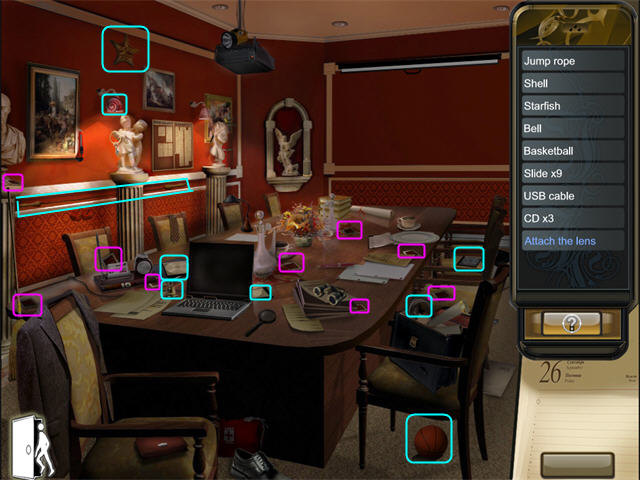
- Collect the items on the Find List. The SLIDES are marked in pink.

- Click on the Briefcase to open the inventory tray if it isn’t already open.
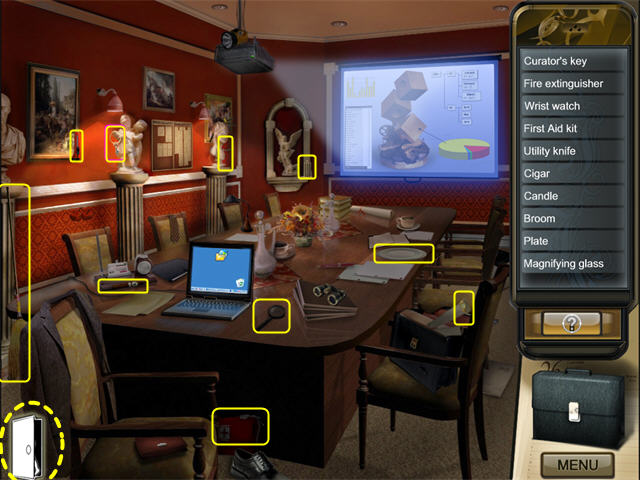
- Drag the LENS to the Projector and click near the power button (1). It will attach.
- Drag the POWER CORD to the top of the Projector (2) and click. It will attach and connect to a plug you can’t see in the ceiling.
- Click on the HANDLE (3) of the Screen to pull it down.
- Click on the Laptop (4) to turn it on.

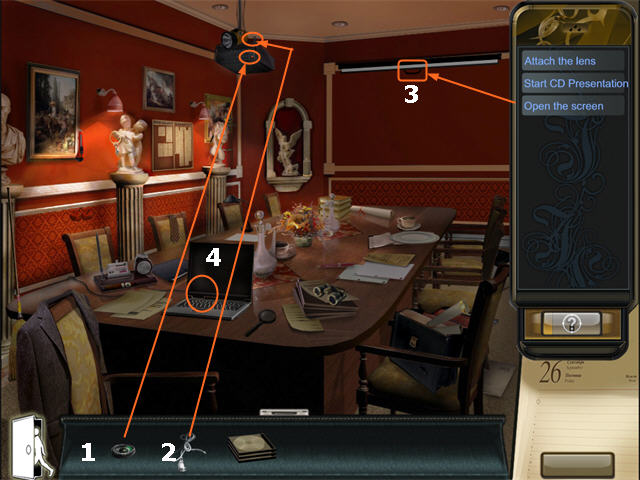
- Drag the CDs from your inventory to the Laptop and click. You will get a message explaining that the thieves must want to steal the Python since it’s worth $30 million.
- This will trigger a mini-game.
Assemble the Report Mini-Game
- Unjumble the report by swapping two tiles at a time.
- You can rotate pieces by right-clicking.
- Pieces do NOT lock into place..

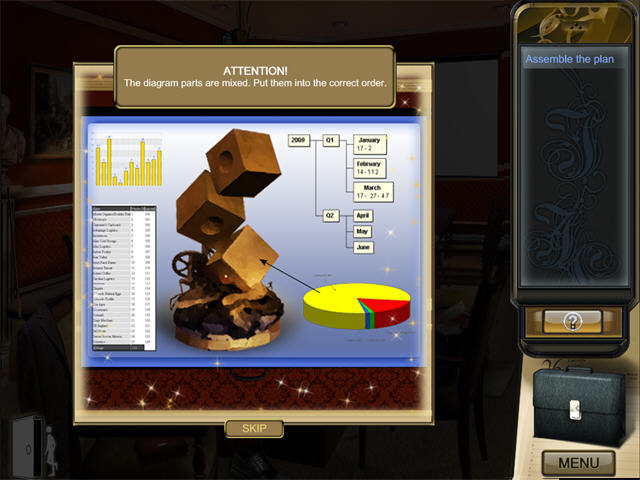
- When you have completed the mini-game, you will be returned to the main view of the Conference Room.
Conference Room
- Click on the screen to capture a picture of the Python of Stone Jungle (1).
- Now you will have a phone conversation with an art expert. He needs you to send him the photo.
- Click on the Briefcase to open your inventory tray if it is not already open.
- Drag the USB cord from your inventory trap to the Laptop and click.
- Click on the Envelope Icon on the laptop screen to send the message.

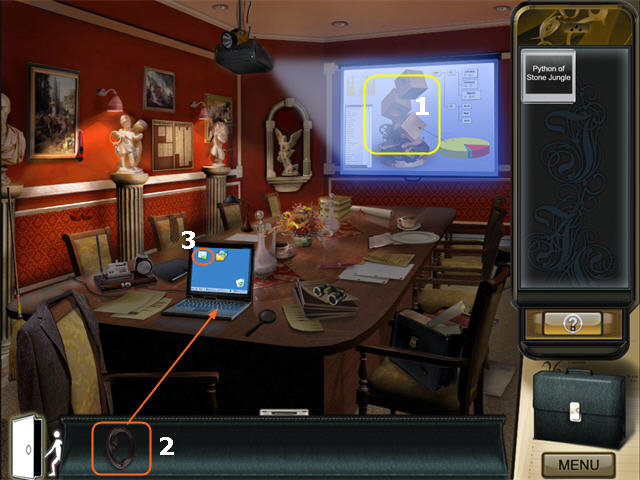
- You will get an alert about movement in the museum and decide to go back to the Restoration Room.
- Click on the Door Icon in the lower left to return to the Office Lobby.
Office Lobby
- Click on the Door Icon in the lower left to return to the Security Corridor.
Security Corridor
- Click on the Laboratory Door to enter.
Laboratory
- Click on the Restoration Room door to enter and end the chapter.
Chapter 10: the Incurable Curator
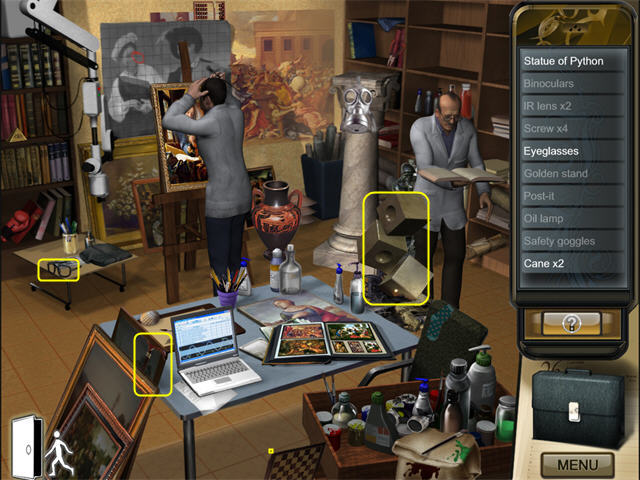
- Collect as many of the items on the Find List as you can.
- Click on the Door Icon in the lower left to return to the Laboratory.

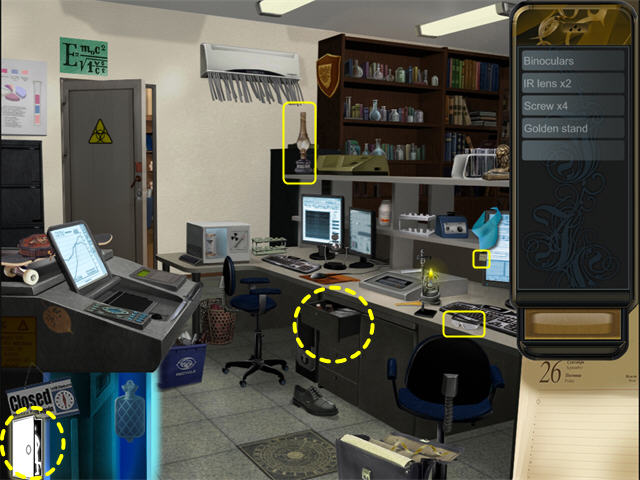
The Laboratory
- Collect the visible items.
- Click on the open Drawer to zoom in.

The Drawer
- Collect the items on the Find List.

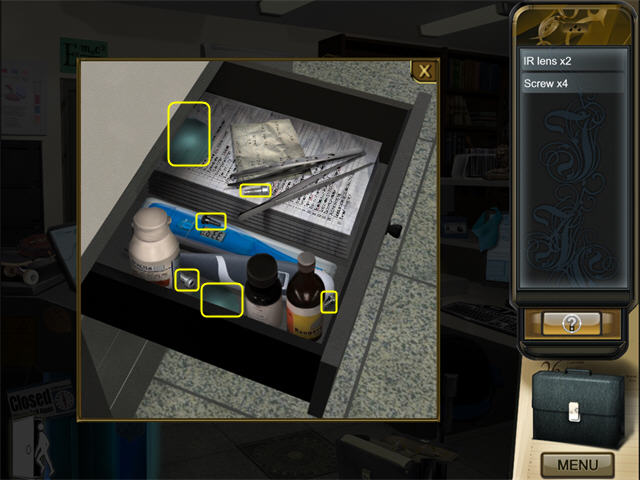
- You will automatically return to the main Laboratory scene when you are finished.
- Click on the Door Icon in the lower left to return to the Security Corridor.
Security Corridor
- Go through the door to the Office Lobby.
Office Lobby
- Go through the door into the Gift Shop.
Gift Shop
- Collect the items from the Find List.

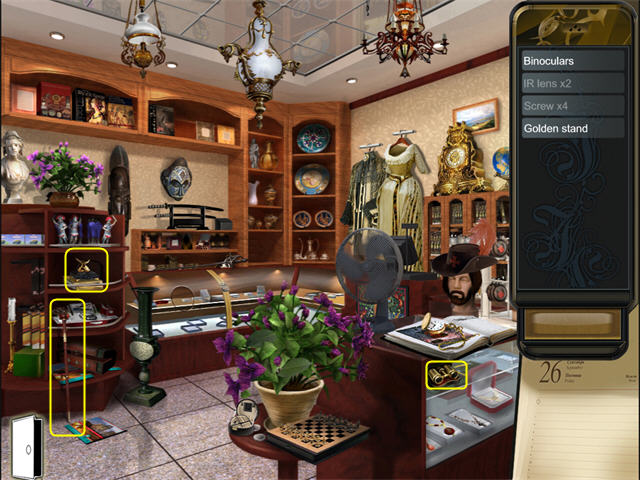
- When you have collected everything, you will trigger a mini-game.
Assemble the Scanner Mini-Game
- You will have to click and drag objects in the Inventory Tray to move them so you can find other objects underneath.
- The items you will need are:GLASSES (1)
IR LENS (2)
IR LENS (3)
BINOCULARS (4)
GOLD STAND (5)
SCREWS (6)
- The screenshot shows where the items go in the gadget.
- To use an item, drag it from the inventory tray to its approximate position in the scene.

- Once the SCANNER is ready, you will automatically return to the Gift Shop scene.
- Click on the Door Icon on the lower left to return to the Office Lobby.
Office Lobby
- Click on the Door Icon on the lower left to return to the Security Corridor.
Security Corridor
- Go through the Laboratory Door.
Laboratory
- Click on the Briefcase if the inventory tray is not already open.
- Drag the PYTHON STATUE to the Scanner and click.

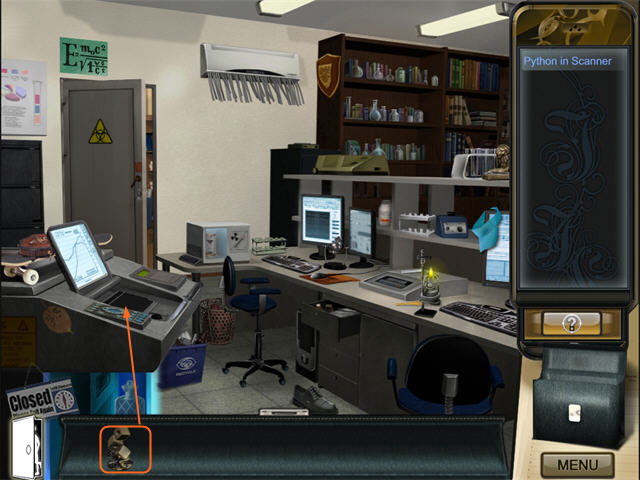
- This will trigger a mini-game.
Python Scanner Mini-Game
- Click on the errors in the left statue.

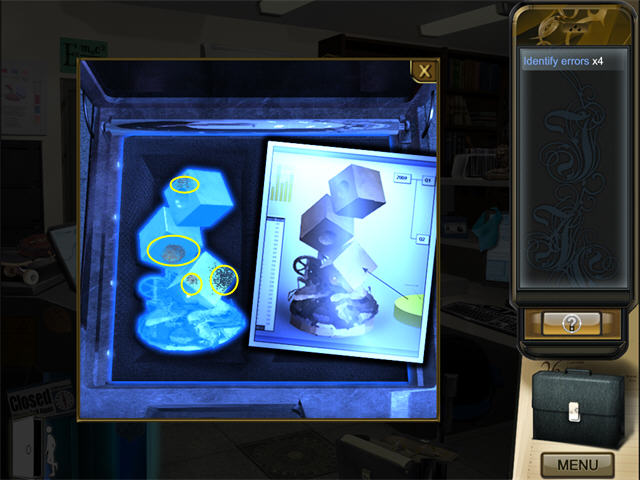
- You will automatically return to the main Laboratory scene.
- Click on the Door Icon in the lower left to return to the Security Corridor.
Security Corridor
- Go through the door to the Office Lobby.
Office Lobby
- You will get a message about needing to lure away the guard. Ignore it—that will happen automatically.
- Go through the door into the Conference Hall.
Conference Hall
- After a phone call to lure away the guard, you will get a new Find List. Collect the items, which are marked in yellow.
- Click on the Door Icon in the lower left to return to the Office Lobby.


Office Lobby
- Click on the Briefcase if the inventory tray is not already open.
- Drag the KEY to the Curator’s Office door handle and click to open.
- Click one more time to go in.
Curator’s Office
- The Find List is riddles. The items are marked in yellow.
- Sounds like “Pocket” = LOCKET
- Has the Most Keys = LAPTOP
- She’s Blind = JUSTICE FIGURE
- Duel Tools = PISTOLS
- Lives by Eating, Dies by Drinking = FIRE
- One Ear, One Mouth, No Legs = PHONE
- You will immediately get a 2nd Find List. These items are marked in cyan.
- The PRICE TAGS are marked in pink.
- Note that the PHONE and the FIRE appear on both the 1st and 2nd Find Lists.
- Click on the Statuette on the Desk to reveal the SECRET PANEL in the wall. The BUST is in the SECRET PANEL.
- Click on the Crooked Painting to reveal the SECRET SAFE.

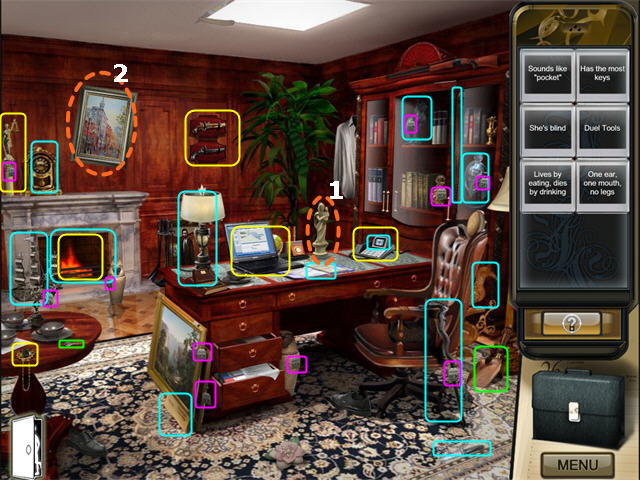
- Collect the BUST from the Secret Panel.
- Click on the Briefcase if the inventory tray is not already open.
- Drag the KEY from your inventory to the SAFE and click to unlock it. Click one more time to zoom in.

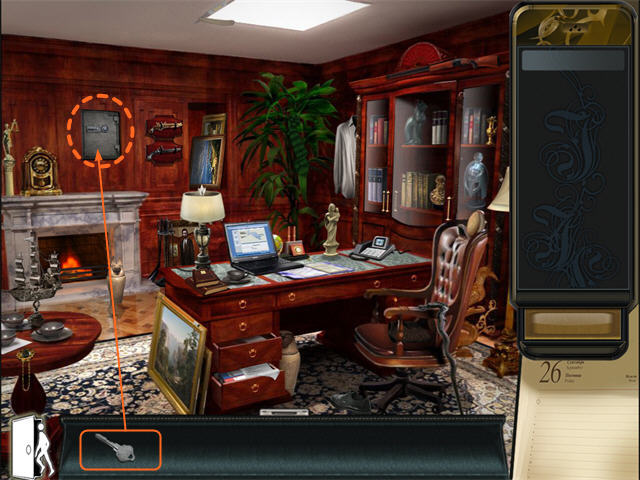
The Safe

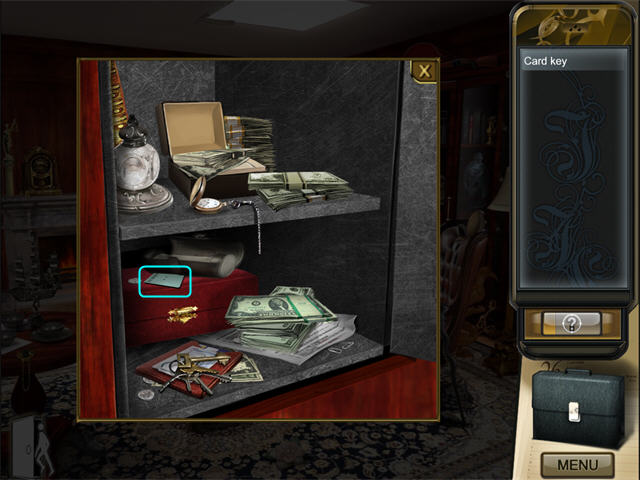
- Click on the Door Icon in the lower left to return to the Office Lobby.
Office Lobby
- Click on the Door Icon in the lower left to return to the Security Corridor.
Security Corridor
- Enter the Security Booth.
Security Booth
- Click on the Briefcase if the inventory tray is not already open.
- Drag the CARD KEY to the back door and click on the lock to use it. Click one more time to go through.

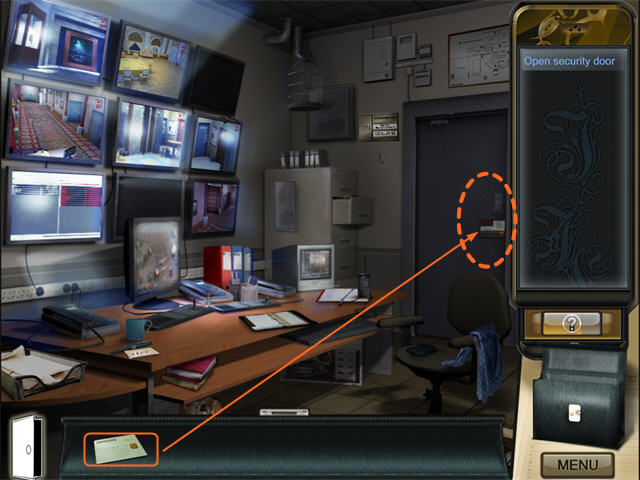
Secret Storeroom
- You will get a new Find List. The items are marked in yellow.
- You will then immediately get a 2nd Find List. Those items are marked in cyan.
- After you have collected all the items, click on the Wastebasket (marked in orange) to zoom in.

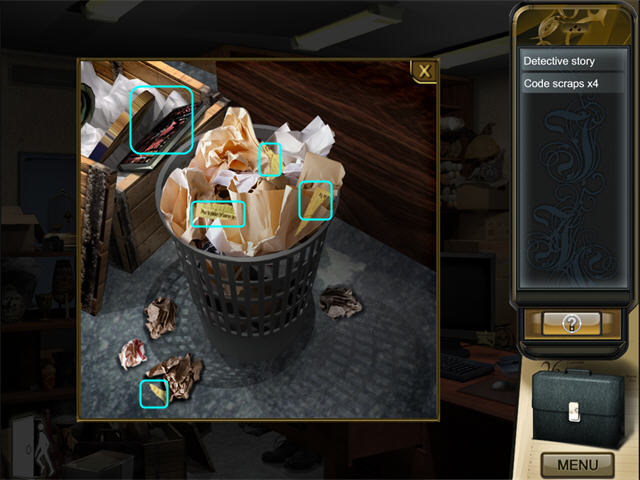
Wastebasket
- Collect the items from the Find List. They are marked in cyan.
- The CODE SLIPS are yellow.


- You will be back in the main scene of the Secret Storeroom.
- Click on the Computer to open a zoom scene.
Computer
- There is part of a yellow post-it note taped to the computer monitor. You have to use the 4 code pieces from your inventory tray to reassemble that note like a tiny jigsaw puzzle.
- The game is quite picky about the placement of the pieces, so try to get them exact.
- Drag a piece to where you want to place it, then click it.
- When you finish, you will automatically return to the main Secret Storeroom scene.

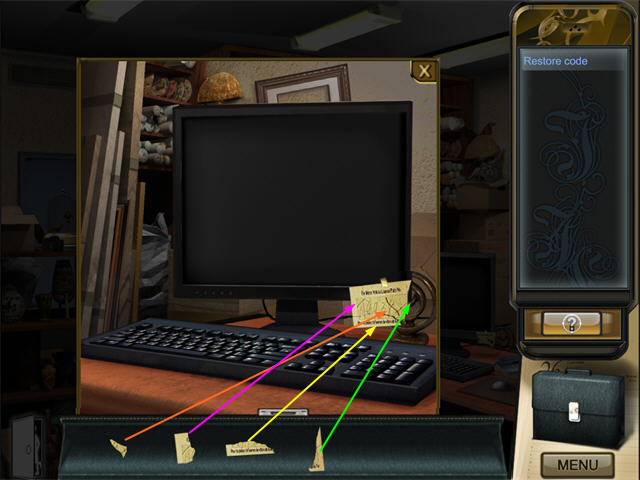
Secret Storeroom
- Joy will make another phone call and determine that she has the proof she needs to catch the crooks.
- You will get a new Find List. The items are marked in green.
- When you have collected all the items you can, click on the Door Icon in the lower left to return to the Security Booth.

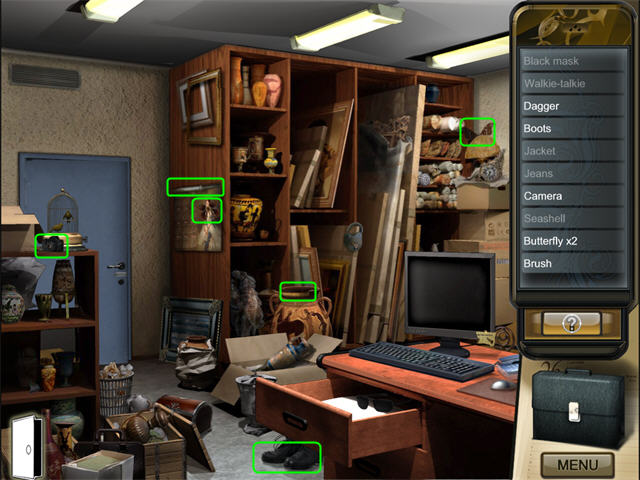
Security Booth
- Collect any items you can from the Find List.
- When you have collected all the items you can, click on the Door Icon in the lower left to return to the Security Corridor.

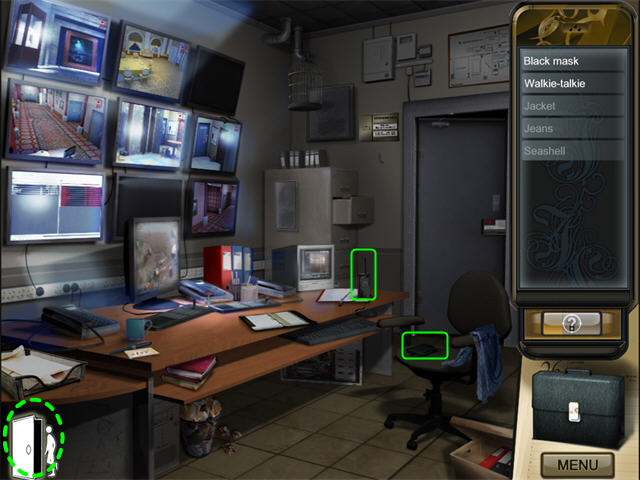
Security Corridor
- Go into the Laboratory Door and on through to the Restoration Room.
Restoration Room
- Collect the items from the Find List.
- When you have collected all the items you can, click on the Door Icon in the lower left to return to the Laboratory.

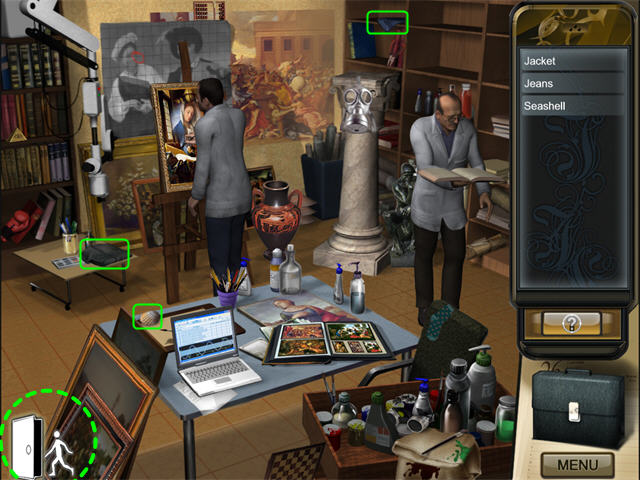
Laboratory
- From the Laboratory, go back out to the Security Corridor, and then into the Security Booth.
Security Booth
- Click on the Computer.
- Click on the 4 numbered keys, 1, 2, 3, 4.
- This will trigger a mini-game.
Bad Guy Disguise Mini-Game
- You will have to click and drag objects in the Inventory Tray to move them so you can find other objects underneath.
- The items you will need are:JACKET/PANTS COMBO
HOOD
KNIFE
WALKIE TALKIE
- The screenshot shows the items you will need marked on the photo.
- To use an item, drag it from the inventory tray to its approximate position in the scene.

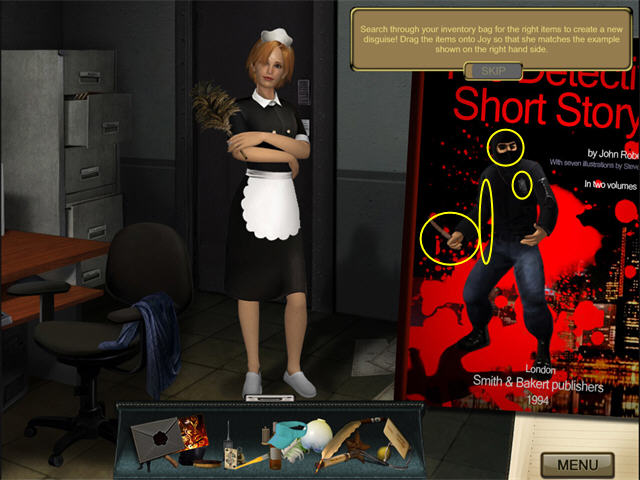
- Once the disguise is ready, go back through the door to the Secret Storeroom.
Secret Storeroom
- Go through the blue door to the Loading Bay to end the chapter.
Chapter 11: Capturing the Criminals
- Collect the items from the Find List. They are marked in yellow.
- Click on the Cellar Hatch Door (1) to close it.
- Click on the Crate (2) on the right to put it on the Cellar Hatch Door.
- Click on the Toolbox to zoom in.

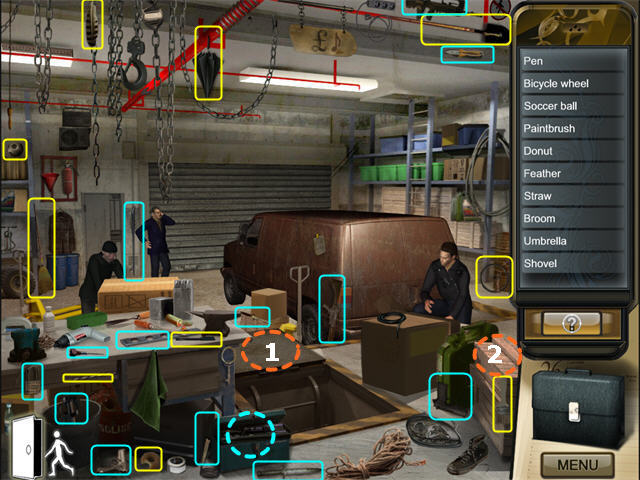
Toolbox
- Collect the items from the Find List.
- You will return to the main Garage scene.

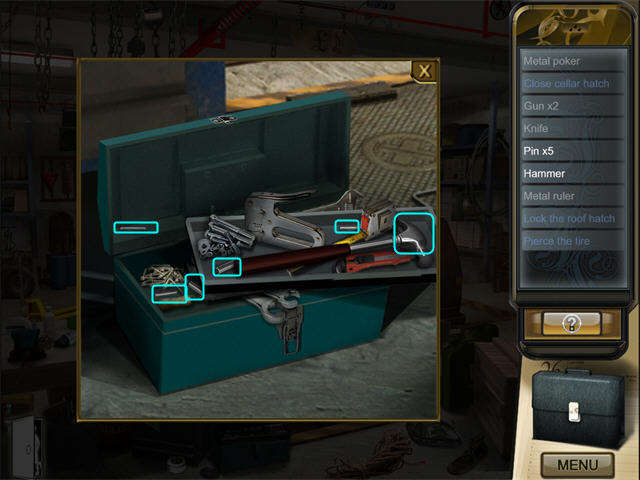
Garage
- Drag the PADLOCK to the left side of the Roof Hatch and click to lock it.
- Drag the AWL to the Tire and click to puncture it.
- Drag the POKER to the Back Door and click to block it.

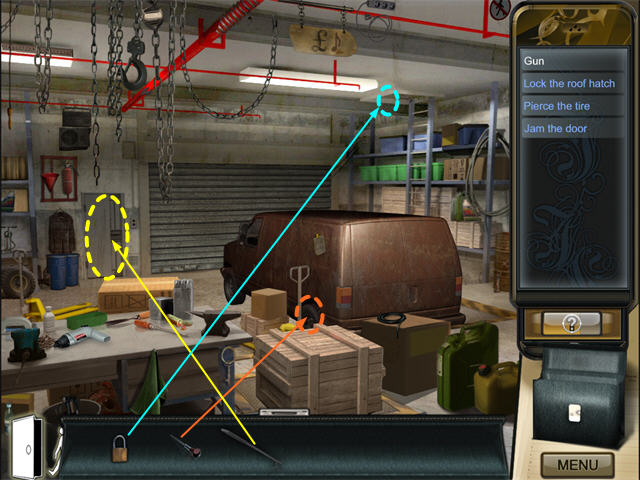
- This will trigger a mini-game.
Assemble the Lockpick Mini-Game
- You will have to click and drag objects in the Inventory Tray to move them so you can find other objects underneath.
- The items you will need are:METAL RULER (1)
METAL PEGS (2)
PLIERS (3)
- The screenshot shows where the items go in the gadget.
- To use an item, drag it from the inventory tray to its approximate position in the scene.

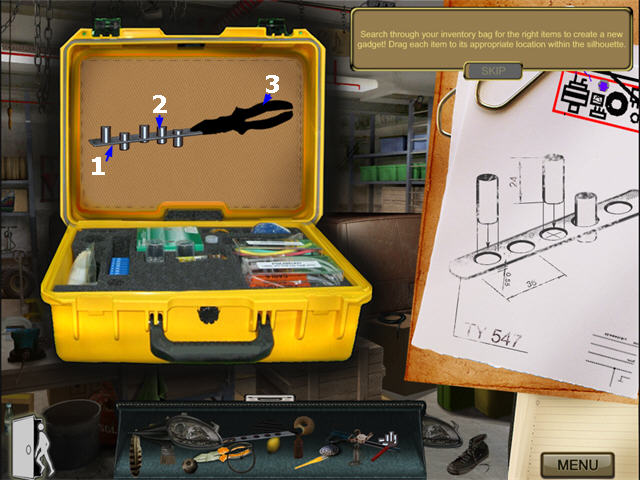
- Once the LOCKPICK is ready, you will automatically return to the Garage scene.
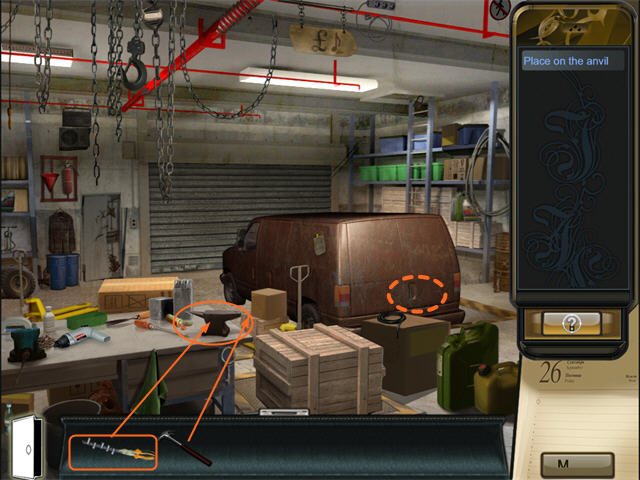
- Drag the LOCKPICK to the Anvil and click to put it there.
- Drag the Hammer to the Pliers part of the LOCKPICK and click to start hammering. You will see the Hammer working.
- When the LOCKPICK is ready, it will go back into your inventory tray.
- Drag the LOCKPICK to the back of the van and click to open the doors.

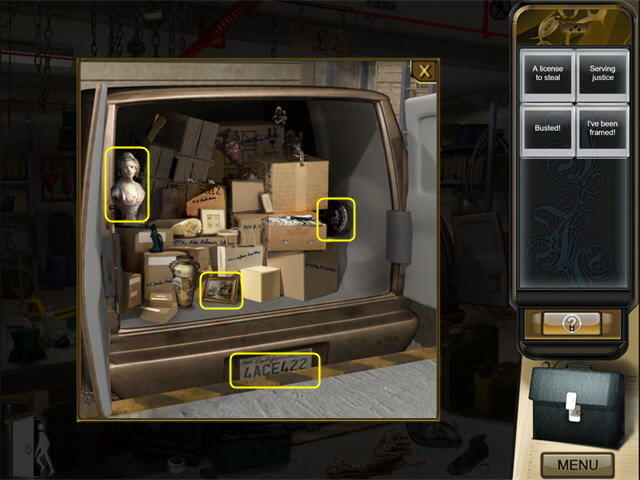
The Van
- The Find List is riddles. The items are marked in yellow.
- A License to Steal = LICENSE PLATE
- Busted! = BUST
- I’ve Been Framed = FRAMED PAINTING
- Serving Justice = TRAY

- You have a new Find List, but none of the items are in this location. Use the Door Icon to return to the Secret Storeroom.
Secret Storeroom
- Collect any items you can from the Find List. The items are marked in yellow.

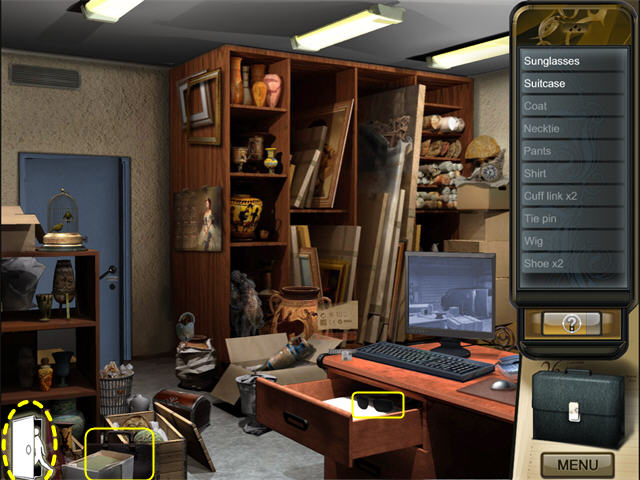
- You now need to collect things from the Curator’s Office, the Conference Room, and the Gift Shop. You can do these in any order.
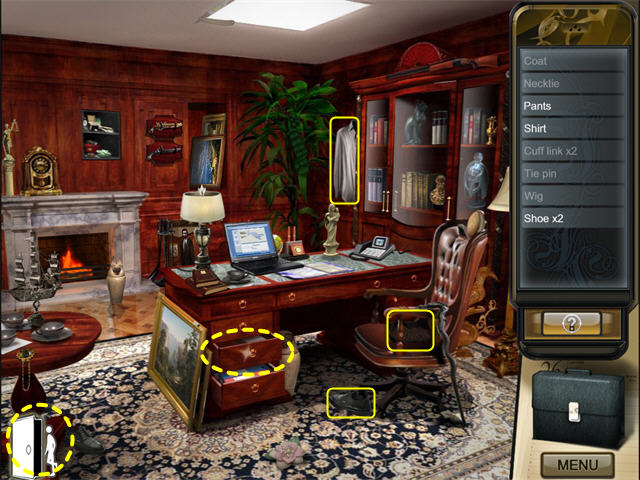
Curator’s Office
- Items available from the Find List are marked in yellow.
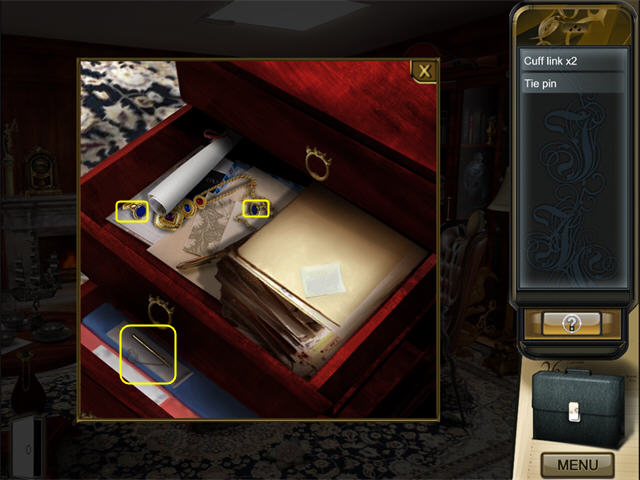
- You will also need to check in the Desk Drawer.

Desk Drawer
- Items available from the Find List are marked in yellow.

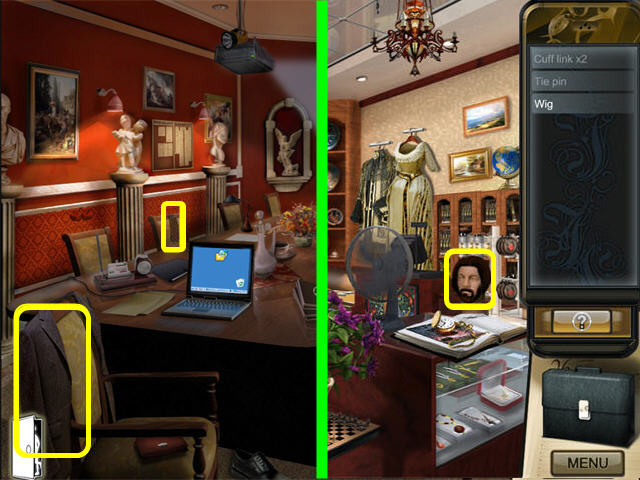
Conference Room and Gift Shop
- Items available from the Find List are marked in yellow.

- Once you complete the Find List you will trigger a mini-game.
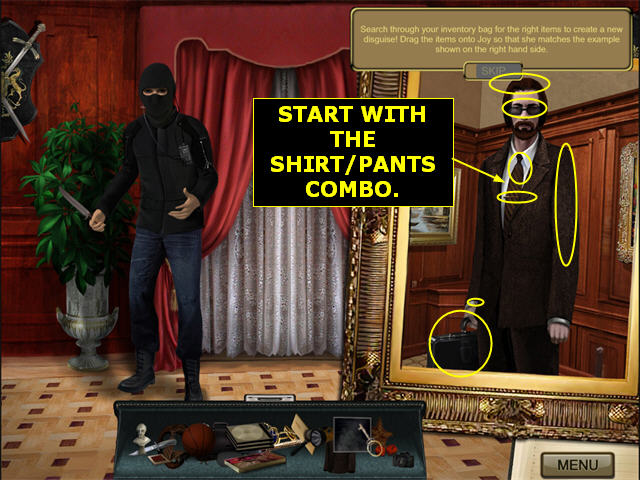
Buyer Disguise Mini-Game
- You will have to click and drag objects in the Inventory Tray to move them so you can find other objects underneath.
- The items you will need are:SHIRT/PANTS COMBO
JACKET
TIE
WIG
BRIEFCASE
SUNGLASSES
CUFFLINKS
TIE PIN
- The screenshot shows the items you will need marked on the photo.
- To use an item, drag it from the inventory tray to its approximate position in the scene.

- Once the disguise is ready, Joy will call the Police, then decide to go back to the Loading Bay.
- The Loading Bay is located through the door in the Secret Storeroom, which is in the back of the Security Booth.
Loading Bay
- Collect the ROPE.
- Drag the ROPE from the inventory tray and click it on the criminals.
- Then drag the ROPE and click it on Mr. Ingram.

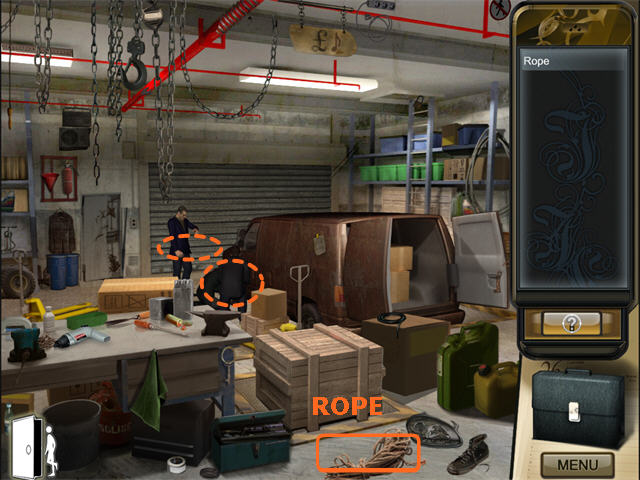
- When all the criminals are tied up, the police will arrive.
- Watch the ending.





 Haunted Train: Frozen in Time Walkthrough, Guide, & Tips
 3 Cards to Dead Time Walkthrough, Guide, & Tips
 Bridge to Another World: Burnt Dreams Walkthrough, Guide, & Tips
 Echoes of the Past: The Revenge of the Witch Walkthrough, Guide, & Tips
 Kaptain Brawe: A Brawe New World - Episode II Walkthrough, Guide, & Tips