Kaptain Brawe: A Brawe New World - Episode II Walkthrough, Guide, & Tips
Kaptain Brawe: A Brawe New World – Episode II Walkthrough

Welcome to the Kaptain Brawe: A Brawe New World – Episode II Walkthrough!
Step into Kaptain Brawe’s beautiful hand-drawn world, and master this Adventure game to save the day!
Whether you use this document as a reference when things get difficult or as a road map to get you from beginning to end, we’re pretty sure you’ll find what you’re looking for here.
This document contains a complete Kaptain Brawe: A Brawe New World – Episode II game walkthrough featuring annotated screenshots from actual gameplay!
We hope you find this information useful as you play your way through the game. Use the walkthrough menu below to quickly jump to whatever stage of the game you need help with.
Remember to visit the Big Fish Games Forums if you find you need more help. Have fun!
This walkthrough was created by BrownEyedTigre, and is protected under US Copyright laws. Any unauthorized use, including re-publication in whole or in part, without permission, is strictly prohibited.
General Tips
- This is an Adventure Game.
- Click on Settings to adjust the Master Volume, Music Volume, Effects Volume, footstep sounds, Fullscreen and Text Speed.
- Choose between hardcore or casual mode.
- In hardcore mode you will have to choose between the hand or the magnifying glass to interact with objects in the scene and there are no hints.
- In casual mode the hand or magnifying glass will be chosen for you and there will be less dialogue with abundant hints in your journal.
- If you use the hardcore mode, in this walkthrough, “click on or take” refers to using the hand icon, “look at” refers to using the magnifying glass and “speak or talk to” refers to using the thought bubble icon.
- To access the task list, click on the journal on the bottom left of the screen.
- When a new task is added the journal will bounce up and down.
- In casual mode, you can click on the tasks in your journal to get hints. The hints will start out subtle and the more you click on them, the more direct the hints become.
- You can choose the extent of tutorial you wish to have during the first dialogue choices.
- Your inventory is in the blue bag on the lower left.
- Inventory items are marked in red on the screenshots.
- To use an inventory item, click on it and it will automatically become your cursor and you can then use it on the object of your choice.
- You can combine items in inventory by clicking on one item and then clicking on the item you wish to combine it with.
- The game autosaves periodically as you play and you can click on Options to save at any time.
- There are 6 saves slots showing but new panels of additional save slots will open up as you fill them in. I used 24 save slots and did not run out.
- You can get your character to move faster by double clicking where you wish to go.
- Exits are marked with an arrow and can be located by moving your cursor around the screen or clicking on the red question mark in the lower right.
- Click on the question mark in the lower right to highlight all the hotspots and exits.
- Click anywhere on the screen to advance the dialogue.
- Dialogue trees will be in white script if you have not covered the topics and they will be gray if you have asked it already.
- You can exit the game by clicking on the green monitor in the upper left and clicking on Quit Game.
Chapter 1 – Terra Nuova
- Exhaust all conversations at the Police Station and then head back to the Mazslow.
- Speak to Kralek and Agent Zero.
- Head down to the cargo hold.

- Speak to Agent Zero and discover she is actually Luna, the lady in the posters by the bed, and exhaust all conversation.
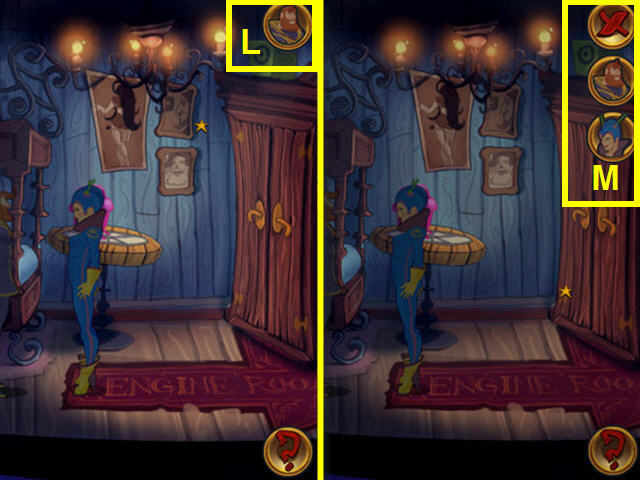
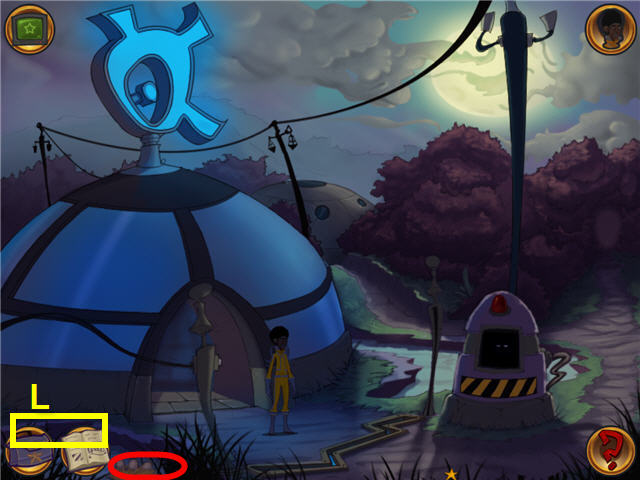
- You can now play as Luna or the Kaptain and can alternate between the two by clicking on the current character in the upper right (L) and choosing the character (M) you want to play.
- After you are introduced to the switching of characters, switch to playing as Kaptain Brawe and speak to Agent Luna again and exhaust all conversation.
- Head into the engine room to the right and leave Brawe waiting there.
- Switch to playing Agent Luna.
- Head upstairs and into the cockpit.
- Speak to Kralek and when the option comes up to ask him what you want to see, ask him to show you what the router does.
- You will automatically be switched to Kaptain Brawe after Kralek shows Luna the router.
- Use the HAMMER on Kralek.
- If you are too slow in opening your inventory and hitting Kralek with the hammer, he will go back upstairs and you will have to have Luna go up to the cockpit and get him downstairs again while Brawe waits in the engine room.
- Head upstairs to the cockpit.
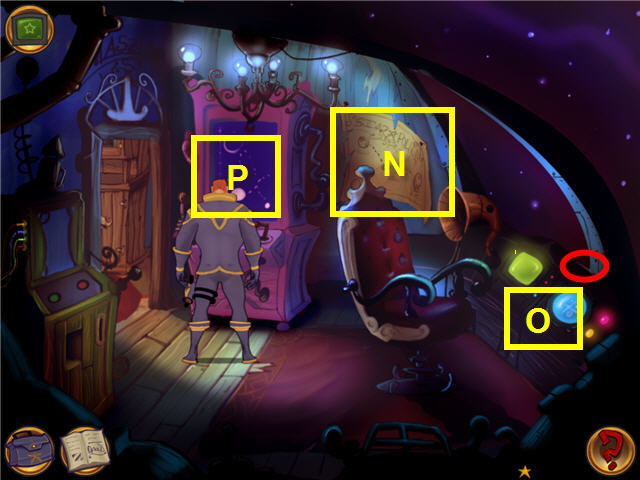
- Look at the Star Map (N) and click on Schminkell-7 a few times till you get the code.
- The code for Schminkell 7 is 7715-882.
- Click on the instruments (O) and choose the code 7715-882 that you found on the star map.
- Take the FLIGHT PATTERN CALCULATION from the top of the instrument panel.
- Use the FLIGHT PATTERN CALCULATION on the Navig-O-Tron (P).
- Click on the Navig-O-Tron a couple times to set the course and Luna will come in.
Chapter 2 – Schminkell 7
- Agent Luna and Rowboat get stuck in the cave and you are playing as Luna.
- You can no longer switch between the characters for now.
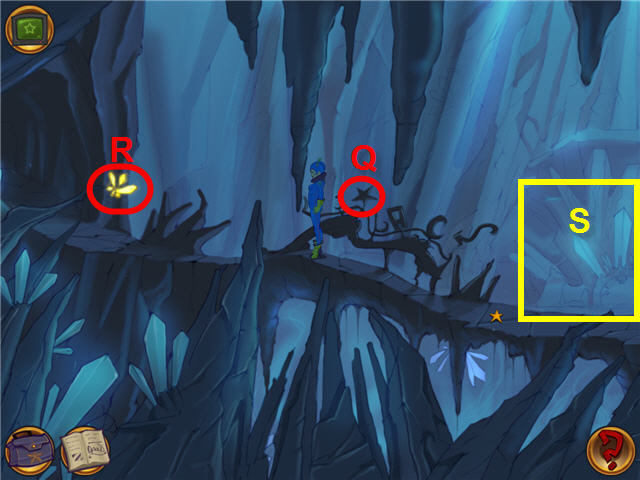
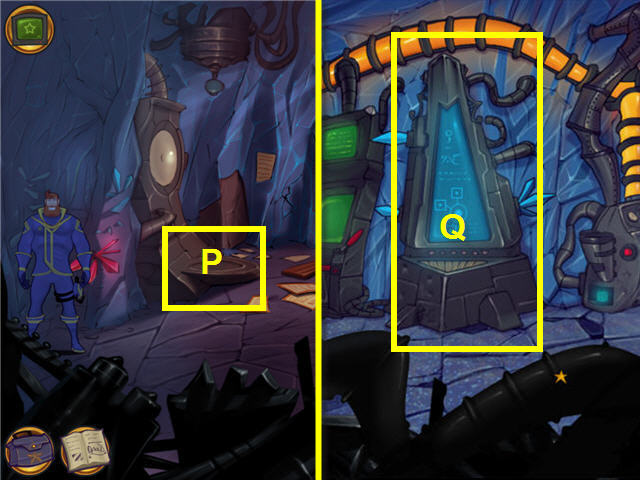
- Look at the weird fence.
- Take the fence piece (Q) to get a STAR SHAPED STONE in inventory.
- Look at the crystal cluster (R) on the cave wall.
- Rowboat may need to be moved in order to see the crystal or you can still get it while he is blocking the way.
- I needed to head to the room to the right and then walk back to the left in order to see it.
- Use the HAMMER on the crystal cluster to get a YELLOW CRYSTAL.
- Look at the DNA replicator (S) and head to the right.

- Click on the DNA Replicator.
- Click on the dirt mound next to the stairs on the left two times to get some MOIST CLAY.
- Head into the left passage located right behind the path back to the cave entrance.
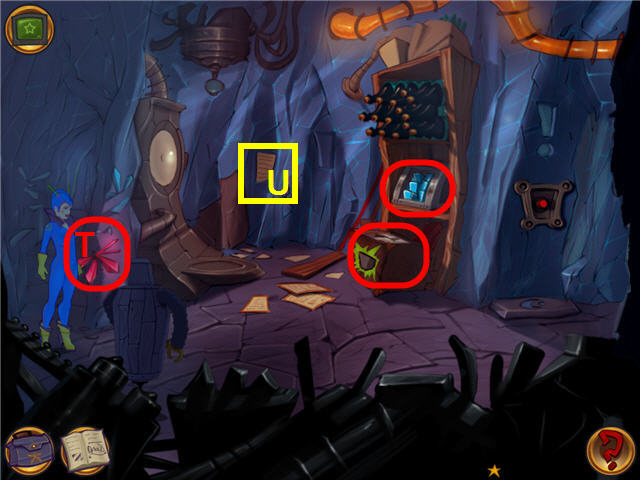
- Look at the red crystals (T) on the left of the doorway.
- Use the HAMMER on the red crystals to get a RED CRYSTAL.
- Look at the Gravity Displacer machine on the left and then read the paper on the wall (U) for the directions.
- Take a blue ION CUBE from the shelf on the right.
- Click on the titanium boxes below the ion cubes to get a TITANIUM BOX.
- Head right to the saucer room.
- Head right past the slab to the saucer room.
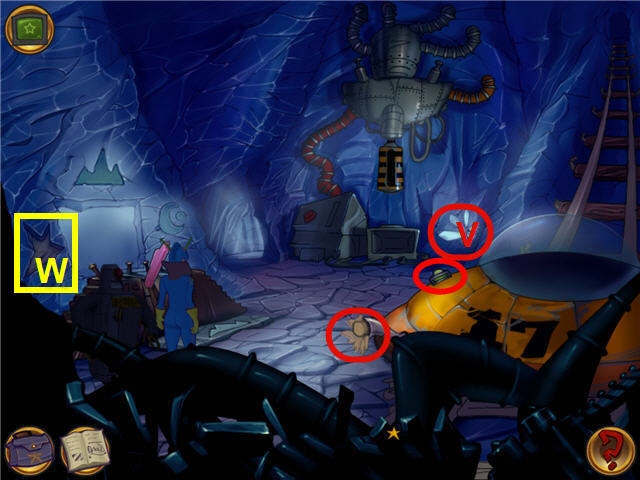
- Look at the crystal cluster (V) under the big press.
- Use the HAMMER on the crystal cluster and get a BLUE CRYSTAL.
- Look at the big press to the left of the crystals and note the working area underneath it.
- Remove the CORK from the exhaust pipe on the saucer.
- Take the EMPTY FUEL CANISTER from the top left of the saucer.
- Try and place the STAR SHAPED STONE on the star shaped slot (W) to the left of the computer screen.
- Place the STAR SHAPED STONE on the working area under the press.
- Use the HAMMER on the STAR SHAPED STONE on working area under the press and automatically get a BROKEN STONE.
- Place the BROKEN STONE in the star shaped slot and it fits but there is something wrong.
- Take the BROKEN STONE from the star shaped slot.
- In inventory, combine the MOIST CLAY with the TITANIUM BOX to get a BOX WITH CLAY.
- Combine the BROKEN STONE with the BOX OF CLAY to get a STAR SHAPED MOLD.
- Head to the computer room to the left of the press.

- Look at the computer, the instructions and the ion generator.
- Look at the button hole (A).
- Place the CORK in the button hole.
- Use the HAMMER on the CORK in the button hole.
- Place the ION CUBE in the hatch (Y) and the generator is now running.
- Place the EMPTY FUEL CANISTER on the power outlet (Z) on the generator and automatically get a REFILLED FUEL CANISTER.
- Place the STAR SHAPED MOLD on the heater (X) and push the red heater button and Luna will say it is baked.
- Take the stone mold from the heater to get a STAR SHAPED MOLD.
- Exit the room to the right and then go into the storage room via the left passage.
- Take another ION CUBE and another TITANIUM BOX from the shelves on the right.
- Head to the saucer room to the right.
- Place the REFILLED FUEL CANISTER on the saucer.
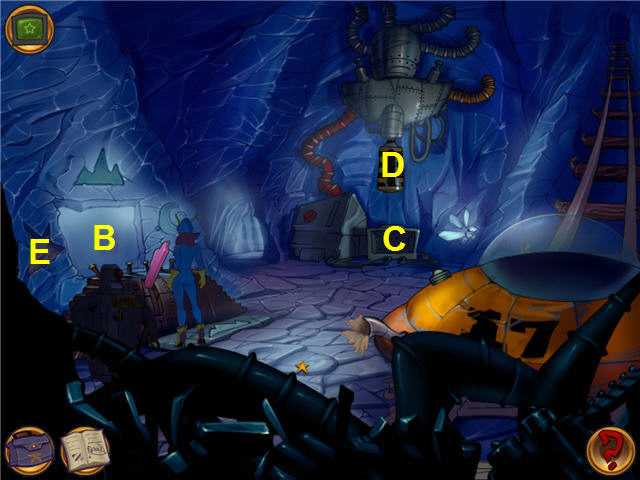
- Look at the computer screen (B) and click on it again to get a new task.
- Place the ION CUBE on the working area (C) of the press and push the big red button on the left and automatically take the ION PANCAKE.
- Place the ION PANCAKE back on the working area and place the STAR SHAPED MOLD on the big press (D) above the working area.
- Push the big red button on the right and you will automatically get an ION SHAPE.
- Place the ION SHAPE into the star shaped slot (E) to the left of the computer screen.
- Pull the crystal lever in front of the computer screen and get a new task.
- Head to the DNA Replicator.
- Look at the DNA Replicator and note that it is working now, but it has a defunct crystal.
- Note the color of the crystal is purple.
- Take the DEFUNCT CRYSTAL.
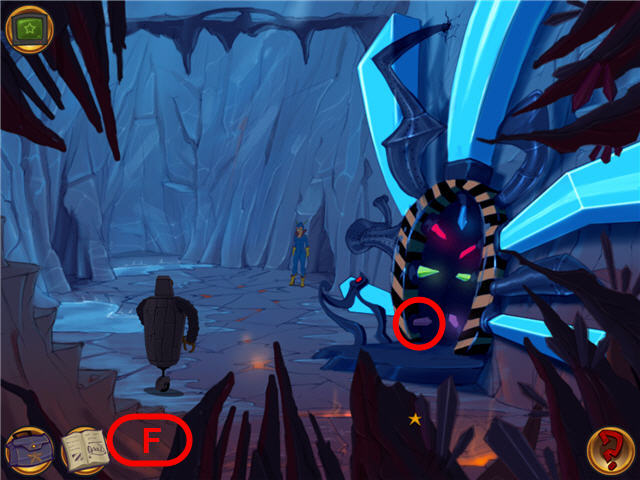
- Take some MOIST CLAY from the dirt pile (F).
- In inventory, combine the MOIST CLAY with the TITANIUM BOX to get a BOX WITH CLAY.
- Combine the DEFUNCT CRYSTAL with the BOX WITH CLAY to get a CRYSTAL MOLD.
- Head back to the computer/generator room on the right and place the CRYSTAL MOLD on the heater and press the red button.
- Head into the saucer room on the left.
- Place the BLUE CRYSTAL on the working area of the press and push the big red button on the left and automatically take the BLUE DUST off the working area.
- Place the RED CRYSTAL on the working area of the press and push the big red button on the left and automatically take the RED DUST off the working area.
- In inventory, combine the RED CRYSTAL with the CRYSTAL MOLD.
- In inventory, combine the BLUE CRYSTAL with the CRYSTAL MOLD.
- Head to the left of the press room and place the CRYSTAL MOLD on the heater.
- Press the red button on the heater and automatically get a PURPLE CRYSTAL.
- Head to the replicator room on the right.
- Place the PURPLE CRYSTAL on the DNA Replicator.
- Place the ASHES in the DNA Replicator and press the red start button.
- Speak to Danny, the resurrected man, and exhaust all conversation.
- Head to the storage room via the left passage.
- Take another TITANIUM BOX from the bottom of the shelves on the right.
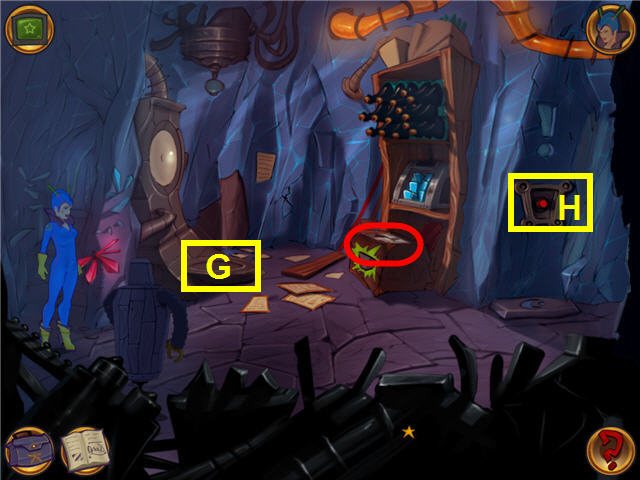
- Place the TITANIUM BOX on the gravity dispenser (G).
- Press the red button (H).
- Click on the TITANIUM BOX on the gravity dispenser and it’s too heavy for Luna. Rowboat picks it up and you will get a 500 POUND TITANIUM BOX.
- Place ROWBOAT on the gravity dispenser and press the red button.
- Head into the saucer room on the right.
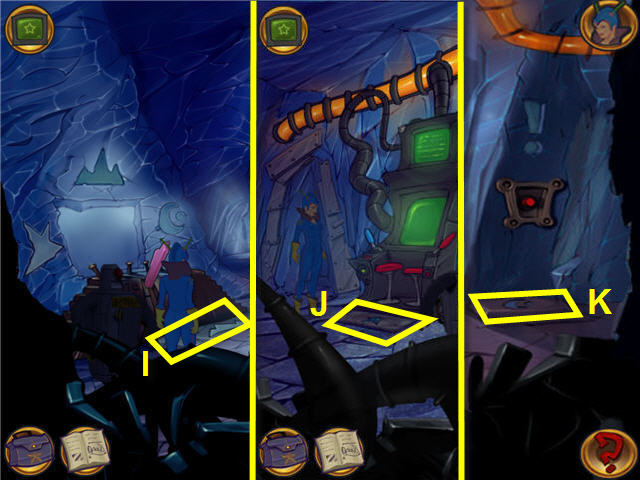
- Place the 500 POUND TITANIUM BOX on the slab (I).
- Head left to the computer room.
- Place ROWBOAT on the slab (J) in front of the computer. Be sure you are placing him on the slab and not the computer.
- Head into the supply room.
- Switch to playing as Danny by clicking on the character in the upper right and head to the supply room.
- Click on the slab (K) under the red button.
- Switch back to playing as Luna after Danny steps on the slab.
- Head into the saucer room on the right and step on the slab (I) in front of the computer screen.
- Pull the lever in front of Luna to open the tunnel door.
- Touch the Saucer and Danny and Rowboat will automatically come into the room and you will depart.
Chapter 3 – Planet Varion
- You are currently playing as Danny.
- Look at the crashed saucer on the right.
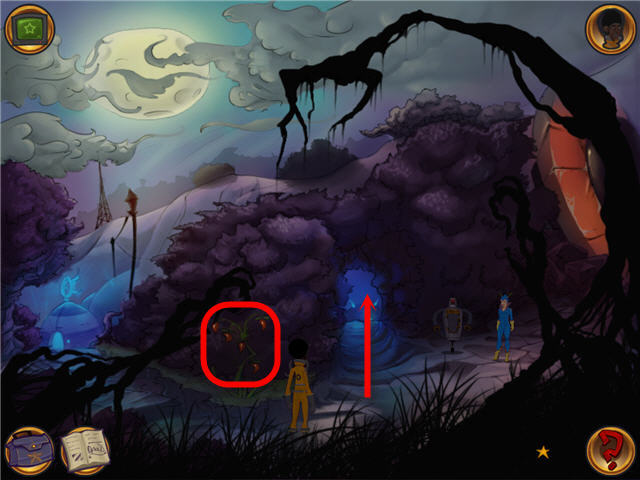
- Take a DEADLY PEPPER from the scary plant.
- Look at the scary plant again and Danny states it burns his eyes.
- Head straight through the bushes and talk to the guards at the warehouse to see what you need to get in. Exhaust all conversation.
- Head to the left and follow the path.
- Speak to the guard (11) at the guard stand and exhaust all conversation.
- After finishing all conversation show the guard your KRIBB ID CARD.
- Speak to the guard again and exhaust all conversation.
- Admit that you are cloned so that he lets you in.
- Head into the doorway to the complex.
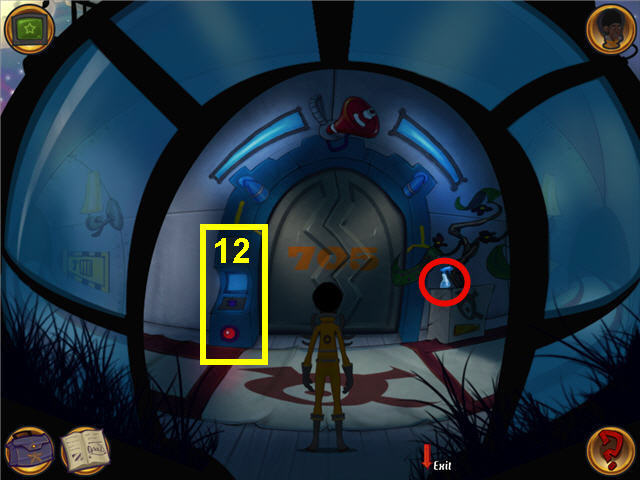
- Take the WATER SPRAYER by the plant on the right.
- Use your KRIBB ID CARD on the ID pad (12) to the left of the elevator door, but it does not work.
- Head down the right hallway and meet Danny’s clone.
- Speak to the clone and exhaust all conversation.
- Approach Danny’s clone again and exhaust all conversation again to find out why the clone has migraines.
- Be sure you have the Help Danny’s Clone task before you go further.
- Head back to the elevator and exit the complex.
- Return to the landing site on the right.
- Speak to Luna and exhaust all conversation to get a recipe.
- Head back to where the clone is inside the complex and go past him to the right to get to the landing dock.
- Take a WITHERED BRANCH from the withered bush on the right of the landing strip.
- Head into the Mazslow.
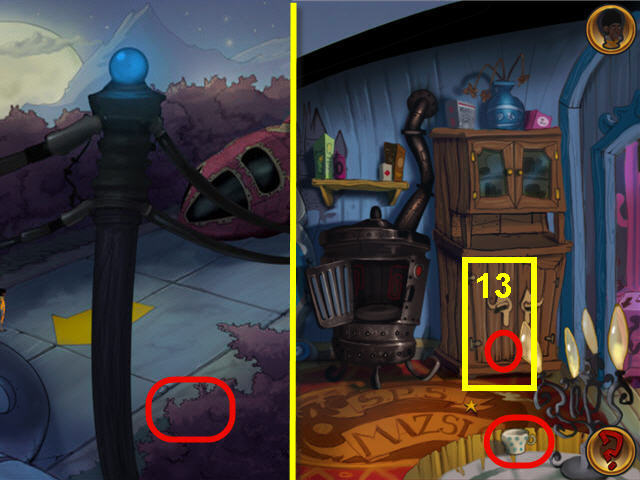
- Take the tea cup from the table to get a CERAMIC CUP.
- Open the cupboard (13) on the right of the stove (if you left it open the last time you needed it, it will already be open) and take the LIQUID SOAP from the lower shelf with the necessities.
- Exit the Mazslow through the entrance hatch and head left into the complex.
- Head to the right and exit the complex and stay out in front.
- Look at the nest with eggs and note that it is too far to reach.
- Use the WITHERED BRANCH on the nest with eggs to move the nest closer to you.
- Take an EGG from the nest.
- Use the CERAMIC CUP on the swamp water (L).
- Head back into the complex and past the clone on the right to the landing dock and enter the Mazslow.
- In inventory, combine the LIQUID SOAP with the CERAMIC CUP.
- Combine the EGG with the CERAMIC CUP.
- Place the CERAMIC CUP into the oven and push the red power button.
- Automatically get the CUP WITH MEDICINE in your inventory.
- Exit the Mazslow and head toward the right corridor on the bottom left.
- Give the CUP WITH MEDICINE to the clone and he gives you the CLONE’S ID CARD.
- Click on the computer to the left and get the AUTHORIZATION PAPERS.
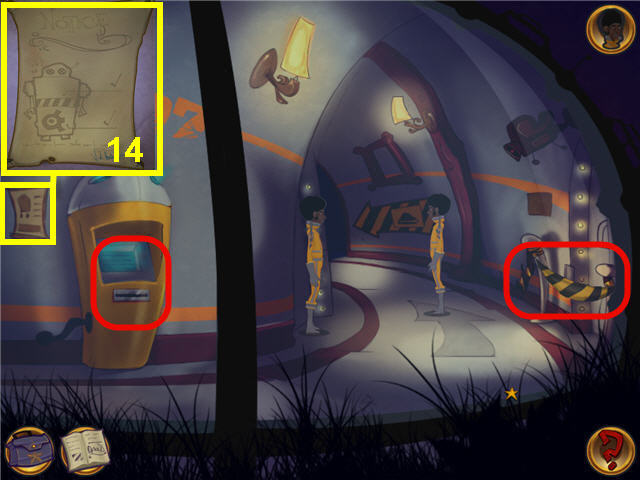
- Look at the notice (14) to the left of the computer to see what a robot needs to look like.
- Take the construction tape across the right doorway to get STICKY TAPE.
- Head to the left two times.
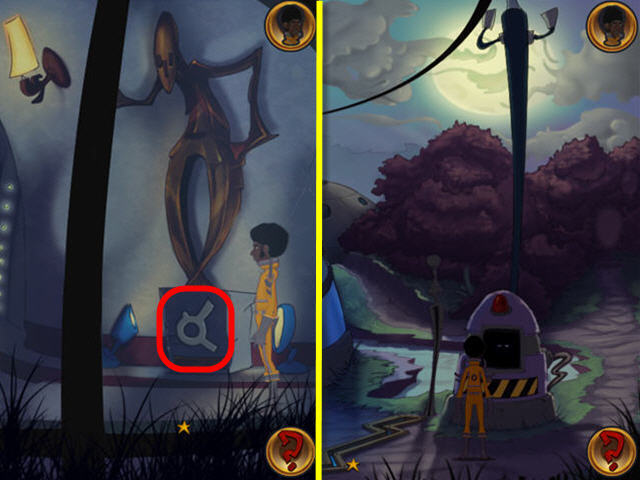
- Take the KRIBB LOGO from the bottom of the statue.
- Leave the complex and give the AUTHORIZATION PAPERS to the guard in front.
- Automatically show him the CLONE’S ID CARD and you will get SIGNED AUTHORIZATION PAPERS from the guard.
- Head to the landing site on the right.
- Place the KRIBB LOGO on Rowboat.
- Place the STICKY TAPE on Rowboat.
- Speak to Luna and she will automatically enter Rowboat.
- You automatically switch to Kaptain Brawe and hold a conversation with She.
- After Brawe talks with She, you will automatically be playing Danny again.
- Head through the bushes towards the warehouse.
- Click on the warehouse doors and the guards will let you through.
- Switch back to playing as Danny.
- In inventory, combine the DEADLY PEPPER with the WATER SPRAYER to get a PEPPER SPRAY.
- Give the PEPPER SPRAY to Luna.
- Switch to playing Luna.
- Take the ION BLOWTORCH from the containers on the bottom.
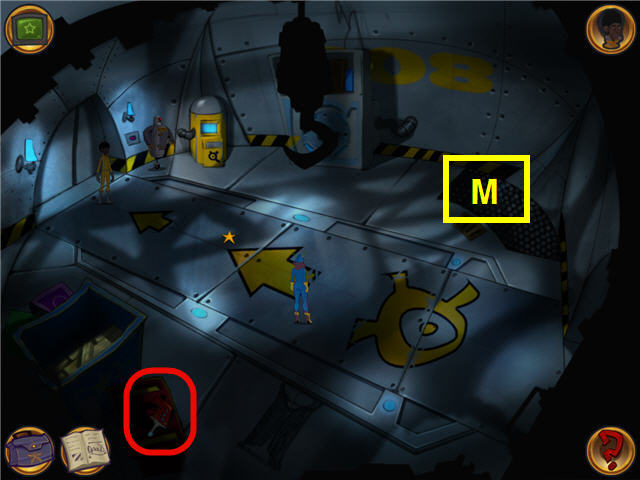
- Use the ION BLOWTORCH on the grate (M).
- Click on the grate to open it.
- Head down into the sewers.

- Look at the strange object (15).
- Try and climb up the hatch on the left but someone is standing on the grate.
- Switch to playing Danny.
- Exit out of the warehouse via the door on the left.
- Head left two more times and speak to the guard.
- You will automatically switch back to Luna.
- Head up the ladder now that She is no longer standing on the cover.
- Speak to Brawe and the aliens and give Brawe the PEPPER SPRAY.
- Switch to playing Brawe after Luna returns to the sewer.
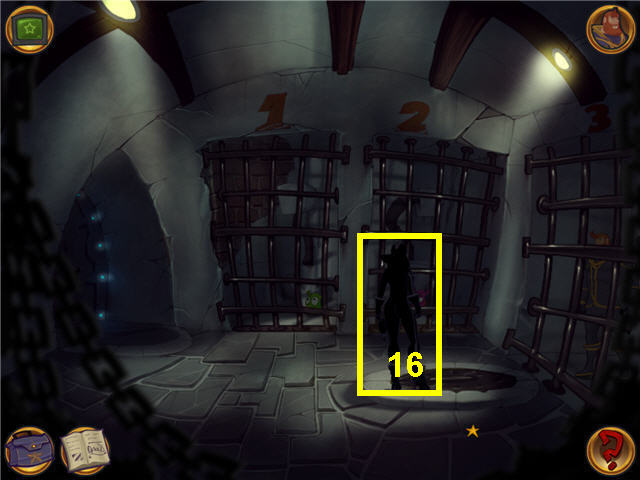
- Use the PEPPER SPRAY on She (16).
- Do not speak to She before you use the PEPPER SPRAY on her or you will not be permitted to get into your inventory to incapacitate her.
- Automatically switch to Luna after Brawe sprays She.
- Search She and get the CELL KEYS.
- Use the CELL KEY on any one of the cells and they will all be freed.
- Exit the prison and head into the door across the hall from the guard.
- Look at the willpower report slot in the lab on the left of the doorway.
- Switch to playing Brawe.
- Head down the sewer grate and pick up the strange object and get a GLOWING OBJECT.
- Head up the sewer grate on the right to enter the warehouse.
- Head out the door to the left.
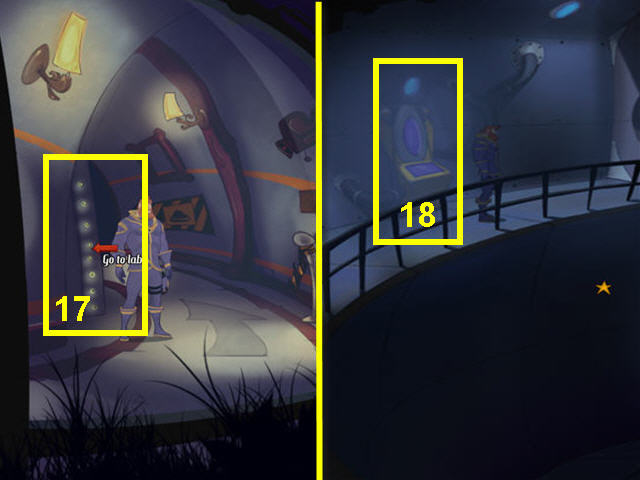
- Enter the lab door across from the warehouse door (17).
- Place the GLOWING OBJECT in the purple socket (18) on the right.
- Switch back to playing Luna.
- Exit the lab and head across the hall into the prison.
- Head down the sewer and go right and up the ladder to the warehouse.
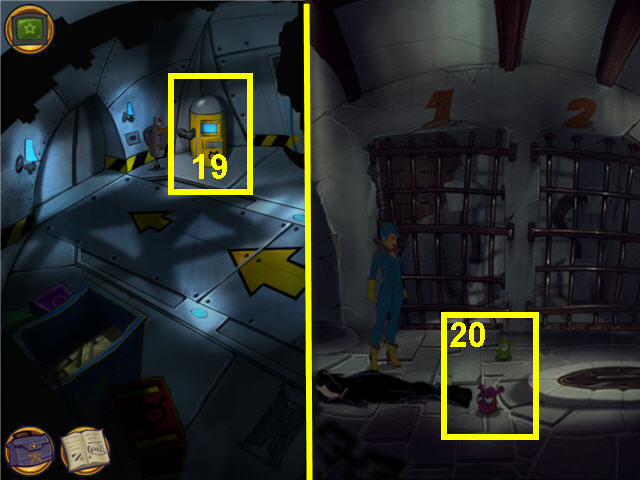
- Look at the loot terminal (19) in the corner.
- Head back to the sewers and into the prison.
- Speak to Robert and Albert, the aliens (20), in the prison, and exhaust all conversation.
- Head down the sewer again and go to the loot terminal in the warehouse.
- You need to get a strong will report so you have to choose answers that are strong willed. The solution is; 2 -1-1-3-2.
- Automatically get a STRONG WILL REPORT when you have answered correctly.
- Head down the sewer and up to the prison and go across the hall to the lab.
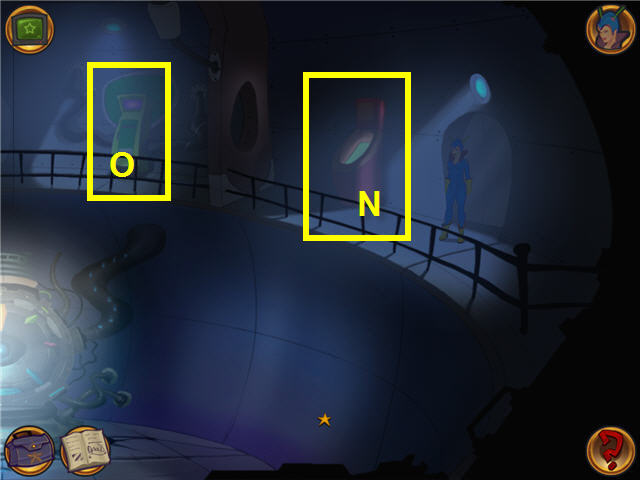
- Place the STRONG WILL REPORT in the willpower report slot (N).
- Note the third machine (O) in the middle lab door that requires a passive report.
- Switch to playing Danny.
- Head to the right past the elevator and enter the warehouse.
- Use the Loot terminal and try to get a passive report. The solution is; 3 -2 -1-3-3.
- Automatically get a PACIFIST REPORT when you have answered correctly.
- Exit the warehouse and head left to the elevator.
- Use the CLONE’S ID CARD on the ID pad to the left of the elevator.
- Use the PACIFIST REPORT on the pacifist report slot (O) on the right and watch the destruction.
- Attempt to leave via the exit on the left.
- Head back to the replicator and then left to the supply room.
- Place the DETONATOR on the gravity displacer (P).
- Head to the right to the saucer room and then to the computer room in the upper left.
- Use the teleporter controls (Q) two times to send Kralek to outer space.
- Watch the cutscene.
- Congratulations! You have successfully completed Kaptain Brawe: A Brawe New World.


 Dark Canvas: A Brush with Death Walkthrough, Guide, & Tips
 Weather Lord: Following the Princess Walkthrough, Guide, & Tips
 Fairy Tale Mysteries: The Beanstalk Walkthrough, Guide, & Tips
 AGON: The Lost Sword of Toledo Walkthrough, Guide, & Tips
 Eternal Night: Realm of Souls Walkthrough, Guide, & Tips