Fairy Tale Mysteries: The Beanstalk Walkthrough, Guide, & Tips
Fairy Tale Mysteries: The Beanstalk Walkthrough

Welcome to the Fairy Tale Mysteries: The Beanstalk Walkthrough
Defeat the giant to save the world from destruction!
Whether you use this document as a reference when things get difficult or as a road map to get you from beginning to end, we’re pretty sure you’ll find what you’re looking for here.
This document contains a complete Fairy Tale Mysteries: The Beanstalk game walkthrough featuring annotated screenshots from actual gameplay!
We hope you find this information useful as you play your way through the game. Use the walkthrough menu below to quickly jump to whatever stage of the game you need help with.
Remember to visit the Big Fish Games Forums if you find you need more help. Have fun!
This walkthrough was created by Gogii Games, and is protected under US Copyright laws. Any unauthorized use, including re-publication in whole or in part, without permission, is strictly prohibited.
General Tips
- There is a brief tutorial at the start of the game.
- The Menu button allows you to adjust in-game options and exit to the title screen.
- The Map button displays pertinent Fairmill locations as well as outstanding Tasks.
- The Inventory button displays current items at your disposal.
- The Task button displays a list of the necessary components to create a special item.
- The Hint button will highlight the next objective in a scene.
- The Blue Arc above the Hint Diamond needs to be full before another hint can be used.
- We will use the acronym HOP for Hidden-object puzzles.
Chapter 1: Town

- Speak with the Brothers Grimm to get more information (A).
- Examine the Bridge to start the Bricks Task (B).
- Find the BRIDGE BRICKS hidden around the scene to complete the Task (1, 2, 3).
- Use the BRIDGE BRICKS on the Bridge to repair it (B).
- Examine the Magic Barrier to start the Anti-Magic Spell Task (C).
- Items that cannot be collected yet are displayed with a Lock over them.
- Collect the MENDING STONE from the ground (4).
- Examine the Water to start the Magic Bowl Task (D).
- Collect the BOWL, INK, and BRUSH to create the MAGIC BOWL (5, 6, 7).
- The MAGIC BOWL is added to the Inventory (E).
- Use the MAGIC BOWL on the Water to collect HOLY WATER (D).


- Examine the Flowers behind the Brothers Grimm to start the Ritual Knife Task (F).
- Collect the HILT, BLADE, and POMMEL (8, 9, 10).
- The RITUAL KNIFE is added to the Inventory (E).
- Use the RITUAL KNIFE to collect ENCHANTED FLOWERS (F).
- The ANTI-MAGIC SPELL is added to the Inventory (E).
- Use the ANTI-MAGIC SPELL on the Magic Barrier (C).
- The Dispel Magic Task is activated once the Barrier disappears.
- Examine the Chest under the Cart to start the Combination Task (G).
- Collect 3 CODE PIECES hidden around the scene (11, 12, 13).
- Cross the Bridge and enter the Town Center (C).


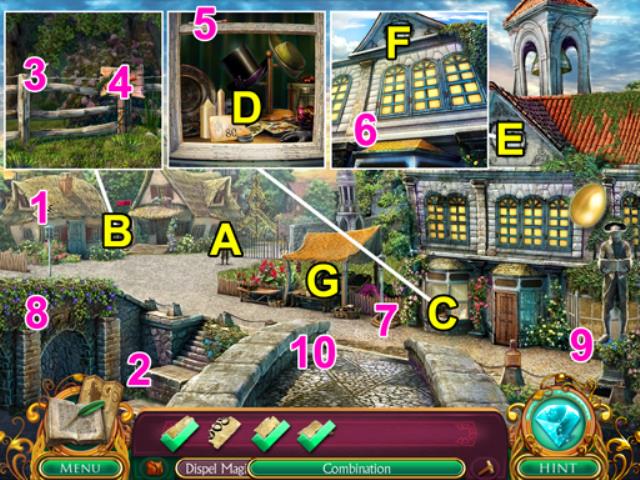
- Collect the last CODE PIECE and the LOCKBOX COMBINATION is added to your Inventory (1).
- Speak with Jack to start the Fake Key Task (A).
- Collect the WIRE near the stairs (2).
- Examine the Signpost (B) to collect a FORK and an X (3, 4).
- Examine the Window (C) to collect a MATCH (5) and start the 80 Cents Task (D).
- Examine the Clock (E) to get a 50 CENT PIECE (6)and start the Slingshot Task (F).
- Collect the ROPE, RUBBER, Y, and STONE hidden around the scene (7, 8, 9, 10).
- The SLINGSHOT is added to your Inventory.
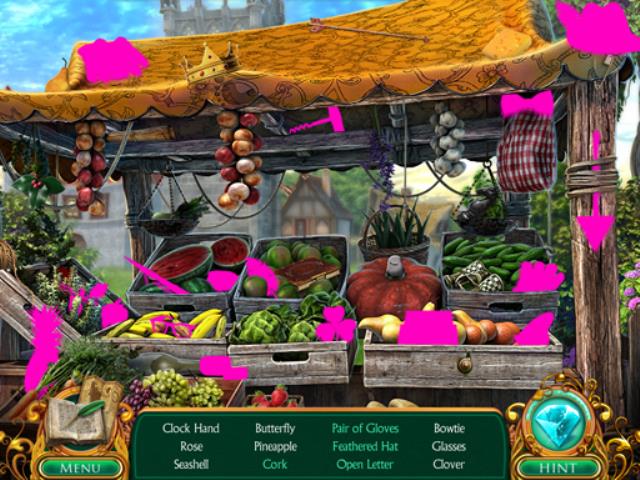
- Use the SLINGSHOT on the Clock (F) to start a HOP (G).
- Items listed in green need to be assembled by combining other items hidden in the scene.
- The CLOCK HAND is awarded and the FAKE KEY is added to your Inventory once all items are located.

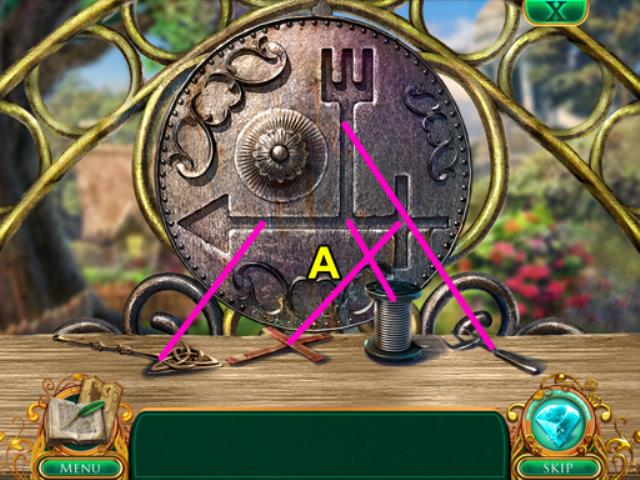


- Use the FAKE KEY on the Gate to start a mini-game (A).
- Drag the pieces of the FAKE KEY into their corresponding spaces in the Lock.
- Use the WIRE to fasten them and complete the puzzle.
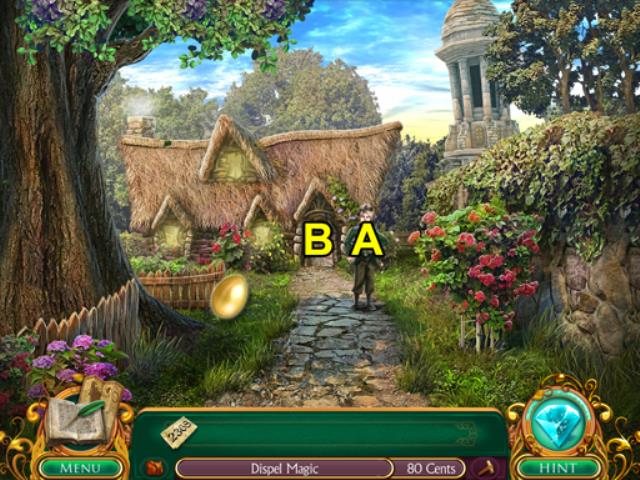
- Proceed through the open Gate into Jack’s Yard.
- Speak to Jack to gain access to his house (A).
- Follow Jack into his home (B).
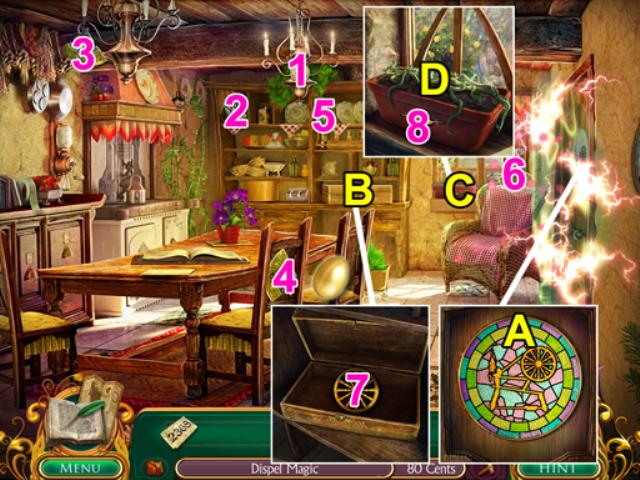
- Collect a NICKEL from the Chandelier (1).
- Examine the Magic Barrier on the Door to start the Spinning Wheel Task (A).
- Collect the STAINED GLASS from the Shelf (2).
- Examine the Box on the Shelf to start the Compass Task (B).
- Collect the 4 COMPASS PIECES from around the room (3, 4, 5, 6).
- The COMPASS is added to your Inventory.
- Use the COMPASS on the Box from the Shelf (B) to get the GLASS WHEEL (7).
- Examine the Planter on the Windowsill (C) to get the GLASS SPINDLE (8) and start the Fertilizer Task (D).
- The SPINNING WHEEL is added to your Inventory.
- Use the SPINNING WHEEL on the Magic Barrier blocking the Door (A).
- Exit through the Door into the Garden.

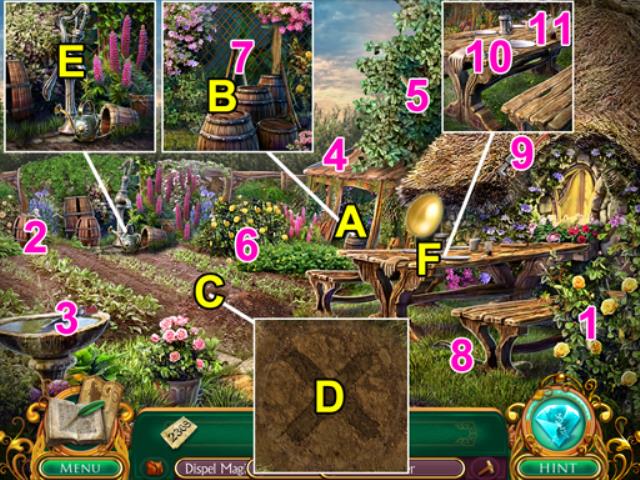
- Collect the QUARTER and 80 CENTS will be added to your Inventory (1).
- Examine the Barrels (A) to start the Garden Supplies Task (B).
- Collect the two SHEAR BLADES and two SHEAR HANDLES from the scene (2, 3, 4, 5).
- GARDEN SHEARS are added to your Inventory.
- Examine the Barrels (A) and use the GARDEN SHEARS to remove the Vines (B).
- Examine the X on the ground to start the Garden Shovel Task (C).
- Collect the SHOVEL HEAD (6).
- Find the SHOVEL HANDLE behind the Barrels (7).
- GARDEN SHOVEL is added to your Inventory.
- Use the GARDEN SHOVEL on the X on the ground to start the Barrel mini-game (D).

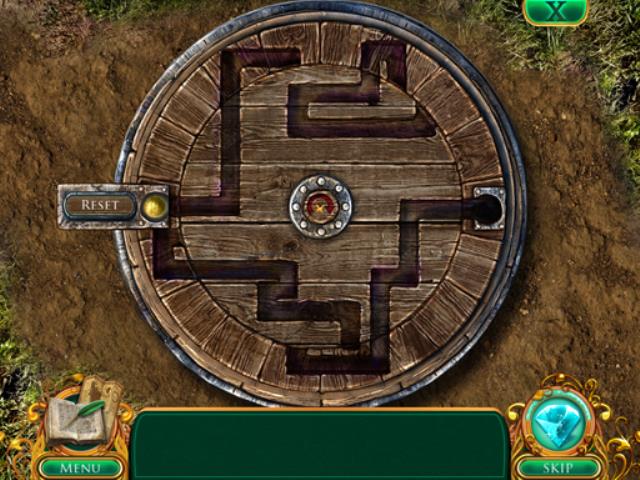


- Use the button in the center to rotate the disc while the Ball is rolling to get it to the other side.
- Solution is: rotate twice, launch ball, rotate twice, launch ball.
- Collect MIRACLE POWDER.
- Examine the Water Pump to start the Spout Repairs Task (E).
- Collect the PUMP HANDLE and ADJUSTABLE WRENCH from the scene (8, 9).
- Examine the Table (F) to collect the BOLT and TEABAG (10, 11).
- SPOUT REPAIRS are added to your Inventory.
- Use the SPOUT REPAIRS on the Water Pump to collect FRESH WATER (E).
- FERTILIZER is added to your Inventory.
- Return to Jack’s House.

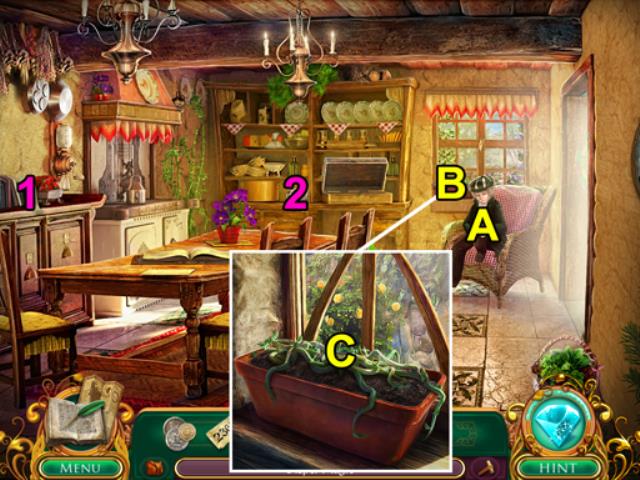

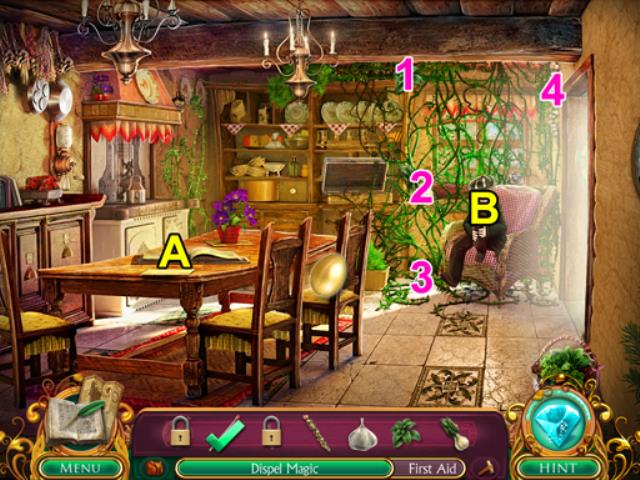

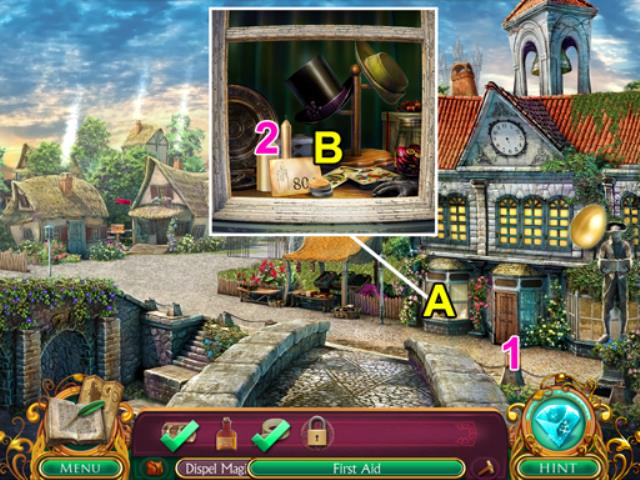
- Speak with Jack to start the First Aid Task (A).
- Collect the TAPE and BANDAGE from the room (1, 2).
- Examine the Planter (B) on the Windowsill and use the Fertilizer on the vines (C).
- Collect the BASIL, FENNEL, GARLIC, and PEPPER from the vines (1, 2, 3, 4).
- Leave the House and return to the Town Center.
- Collect the ANTISEPTIC (1).
- Examine the Shop Window (A) and use 80 CENTS (B) to purchase a CANDLE (2).
- Return to the Country Path.

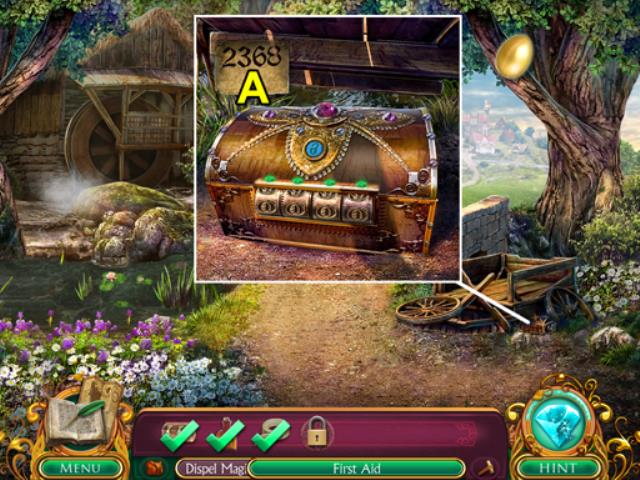


- Use the LOCKBOX COMBINATION on the Box to start a mini-game (A).
- Click on one of the digits to move the wheel until the light above the number turns green when the lock button is pressed.
- The solution is: 3259.
- Collect the BANISHING AMULET from the lockbox and DISPEL MAGIC is added to your Inventory.
- Return to Jack’s House.
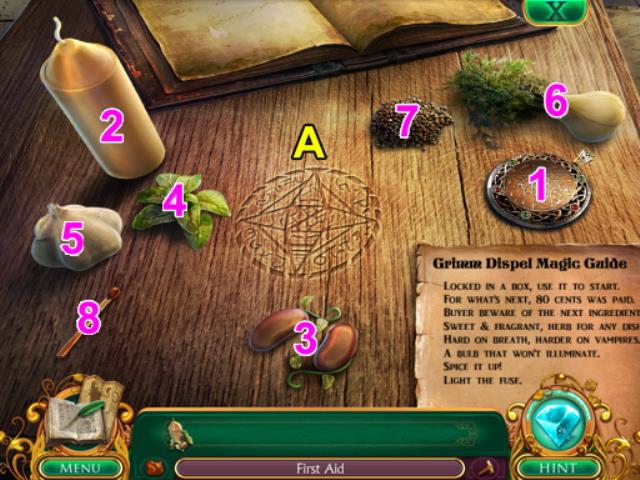
- Examine the Table to start (A).
- Use DISPEL MAGIC on the Table to start a mini-game (A).
- The components need to be placed on the central Glyph in the correct order.
- The solution is:
- Amulet (1). Candle (2). Beans (3). Basil (4). Garlic (5). Fennel (6). Pepper (7). Match (8).
- Collect the HEALING AMULET once the mini-game is completed.
- FIRST AID is added to your Inventory.
- Use the FIRST AID on Jack (B).
Chapter 2: Beanstalk

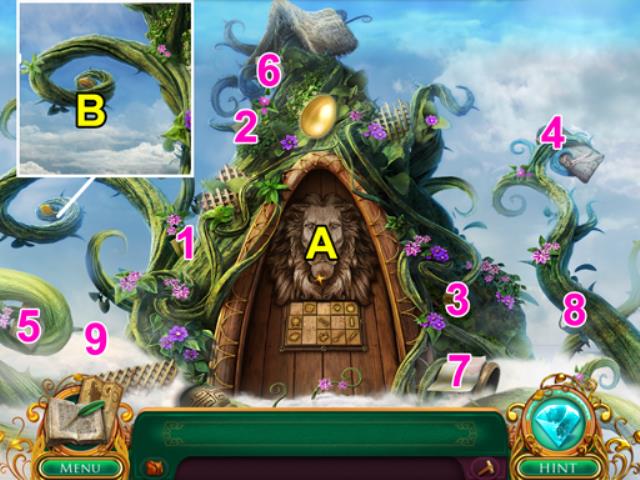

- Speak to D’ouhr to start the Puzzle Tiles Task (A).
- Collect the THIMBLE, THREAD, KEY, and SHOE TILES from the scene (1, 2, 3, 4).
- Examine the Vine to start the Fan Task (B).
- Collect the NEWS PRINT, BROWN BAG, FLYER, and PAPERCLIP from the scene (5, 6, 7, 8).
- The FAN is added to your Inventory.
- Use the FAN on the Vine (B) to get the FAN TILE (9).
- PUZZLE TILES are added to your Inventory.
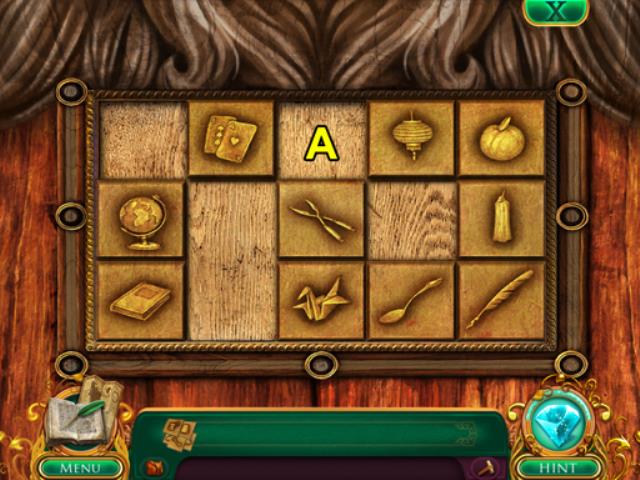
- Examine D’ouhr again to start a mini-game (A).
- Use the PUZZLE TILES to fill the empty spaces in the puzzle (A).
- Answer three riddles by selecting the correct Tile.
- The solution will change based on the riddles presented.
- D’ouhr disappears and you are free to proceed Inside The Stalk.

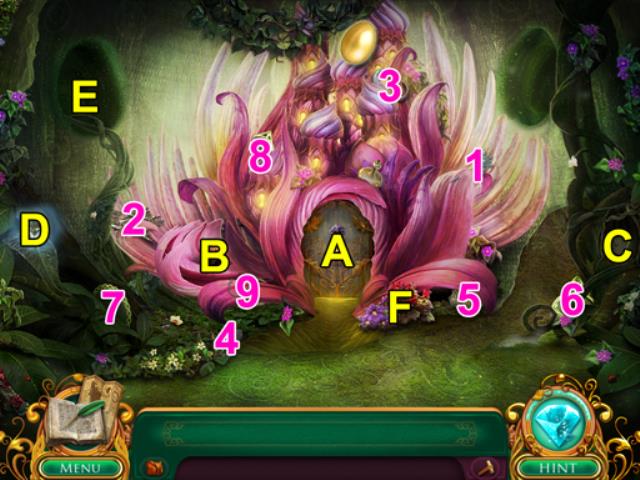

- Examine the Door to get the Create Ice Task (A).
- Collect the FREEZE WAND (1).
- Examine the Wilted Fire Flower to begin the Fire Starter Task (B).
- Collect the BRANCHES, STEEL, FLINT, and TINDER from the scene (2, 3, 4, 5).
- The FIRE STARTER is added to your Inventory.
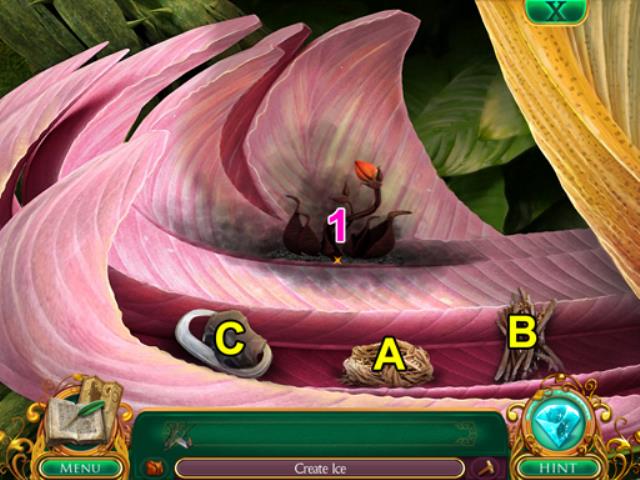
- Use the FIRE STARTER on the Wilted Fire Flower to start a mini-game (B).
- The FIRE STARTER components need to be used in the correct order to successfully complete the mini-game.
- The solution is:
- Tinder (A).
- Branches (B).
- Flint and Steel (C).
- Collect WARM COALS (1).



- Examine the Wilted Earth Flower to start the Mirrors Task (A).
- Collect the DIAMOND, CIRCULAR, and RECTANGLE MIRRORS from the scene (6, 7, 8).
- MIRRORS are added to your Inventory.
- Use the MIRRORS on the Wilted Earth Flower to start a mini-game (C).
- The MIRRORS need to be positioned to shine a beam of light onto the Flower.
- The light starts in the top left.
- Solution:
- Move the Rectangle Mirror (A) to the right twice, the Diamond Mirror (B) down twice, and the Circular Mirror (C) down once.
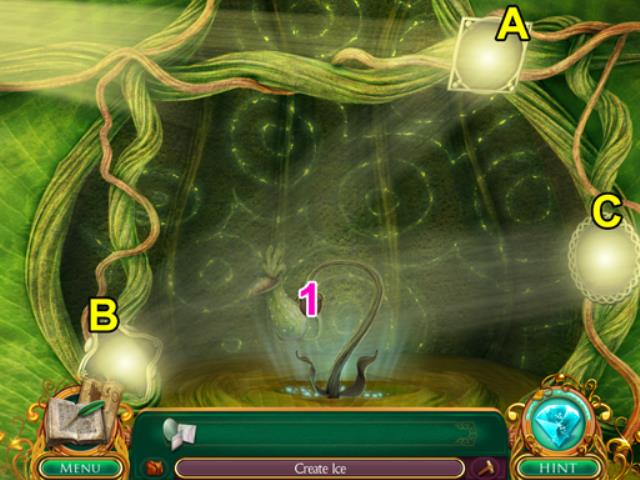
- Collect DEWY LEAVES for the Ice Flower (1).
- CREATE ICE is added to your Inventory.
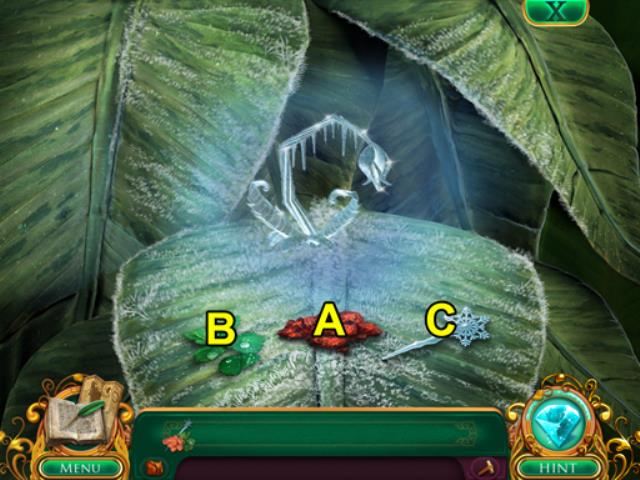
- Use CREATE ICE on the Wilted Ice Flower to start a mini-game (D).
- The CREATE ICE components need to be assembled in the correct order to cast the spell.
- The solution is:
- Warm Coals (A). Dewy Leaves (B). Freeze Wand (C).
- The Palace door is now ready to unlock.


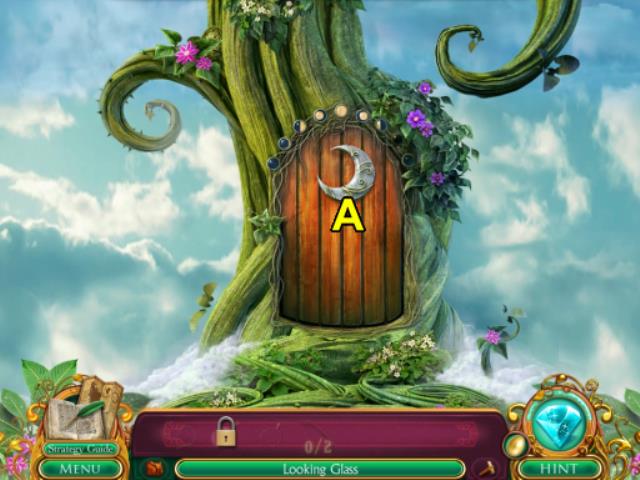

- Examine the Door and unlock it using the button with the lock icon on it. (A).
- Exit to the Moon Passage (E).
- Examine the Door to start the Looking Glass Task (A).
- Return to Inside The Stalk.
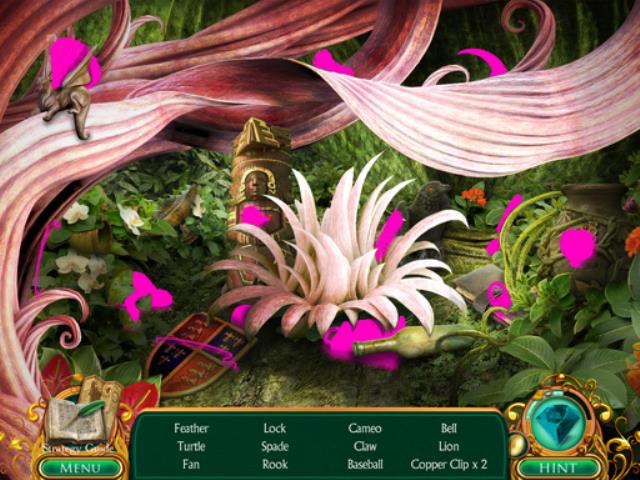
- Examine the Flower Shrub to start a HOP (F).
- Two COPPER CLIPS are collected once all objects have been located.
- Collect the CHAIN (9).
- Exit to the Flower Palace (A).

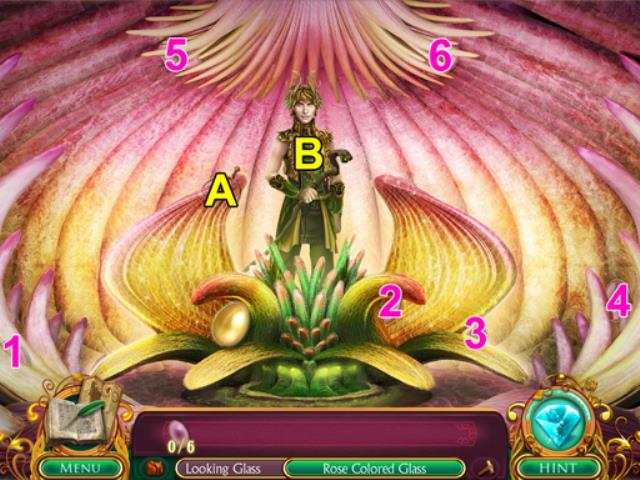


- The Guardian speaks to you and starts the Rose Colored Glass Task as you enter.
- Collect the six PINK LENSES around the scene (1, 2, 3, 4, 5, 6).
- ROSE COLORED GLASS is added to your Inventory.
- Collect the METAL RING (A).
- Give the ROSE COLORED GLASS to the Guardian (B).
- The LOOKING GLASS is added to your Inventory.
- Exit the Flower Palace and return to the Moon Passage.
- Use the LOOKING GLASS on the Door to reveal a Handle (A).
- Exit through the Door to the Moon Landscape.
Chapter 3: Moon World

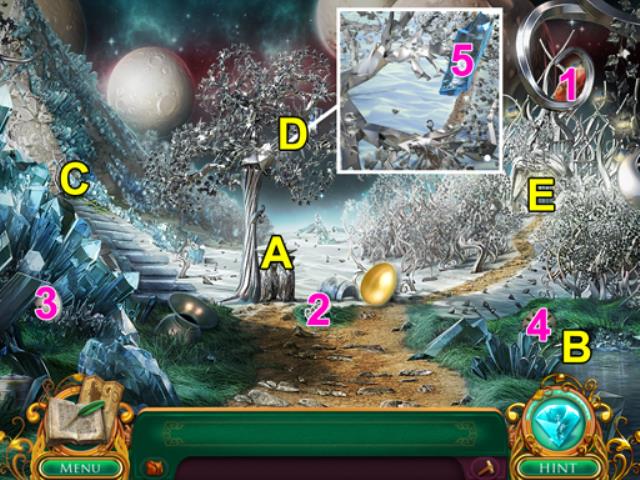



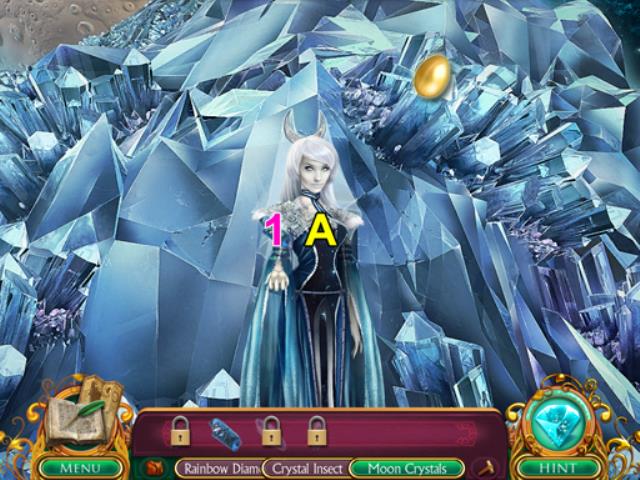
- Examine the Fountain to start the Rainbow Diamonds Task (A).
- Collect the ORANGE DIAMOND (1).
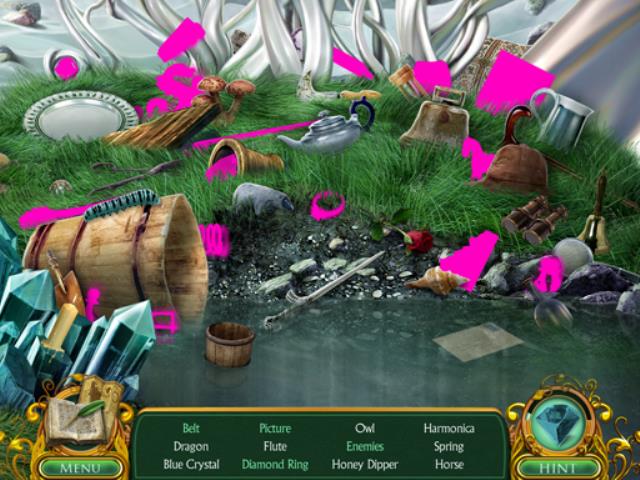
- Examine the Crystals to start a HOP (B).
- A BLUE DIAMOND is awarded once all objects have been located.
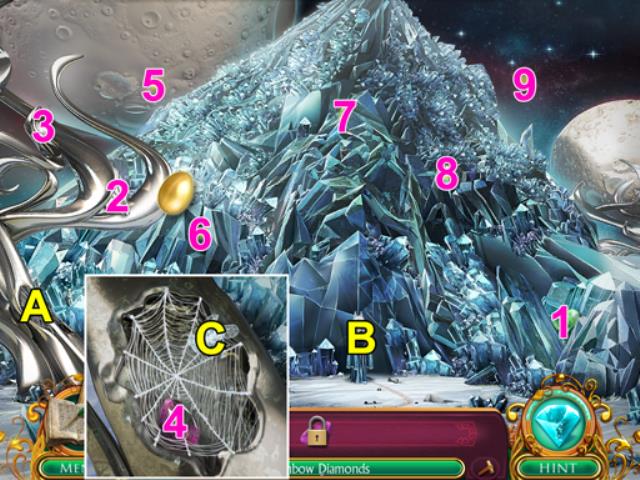
- Exit to Crystal Wall (C).
- Collect the GREEN DIAMOND (1).
- Examine the Spider Web to start the Crystal Insect Task (A).
- Collect the INSECT WINGS (2).
- Advance to the Guardian Wall (B).
- The Guardian starts the Moon Crystals Task as you enter the scene.
- Collect the first MOON CRYSTAL (1).
- Leave the Guardian and return to the Moon Landscape.


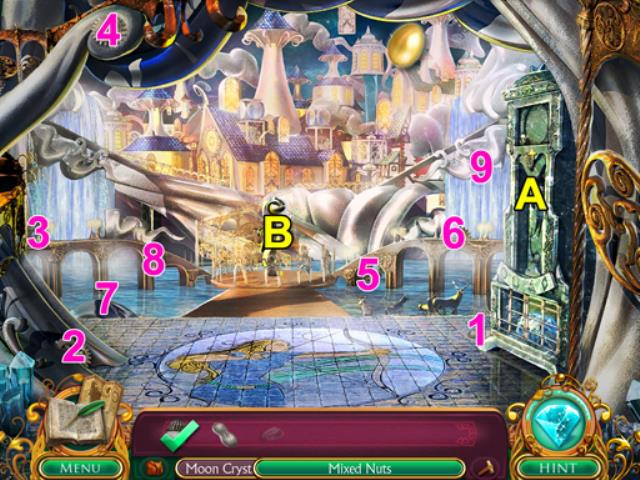

- Collect the INSECT BODY and the CRYSTAL INSECT will be added to your Inventory (2).
- Examine the Treetop to start the Mixed Nuts Task (D).
- Exit to the Crystal Wall (C).
- Collect the ACORN (3).
- Use the CRYSTAL INSCECT (C) on the Spiderweb to get the PURPLE DIAMOND (4).
- RAINBOW DIAMONDS are added to your Inventory.
- Exit to the Moon Landscape.
- Use the RAINBOW DIAMONDS on the Fountain to open the way (A).
- Exit to the Moon City (E).
- Examine the Clock (A).
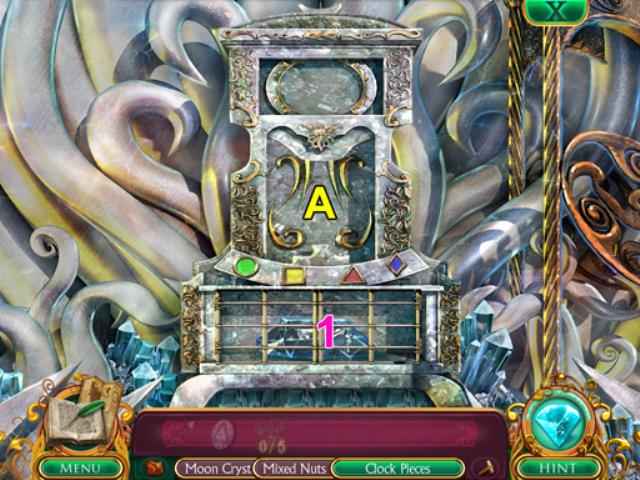
- Examine the Centerpiece to start the Clock Pieces Task (A).
- Return to the Moon City.


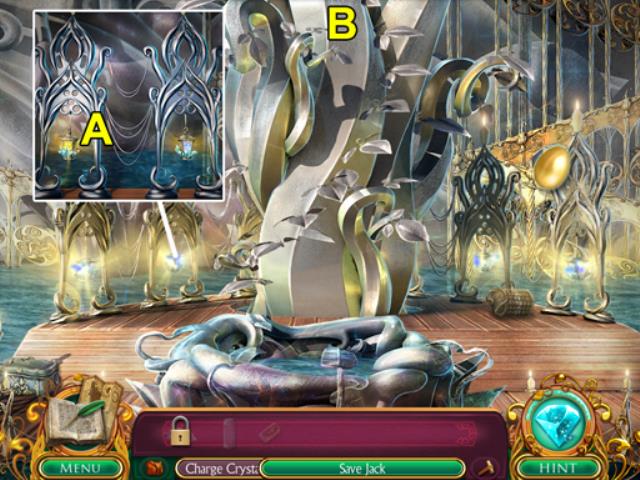


- Collect the PEANUT (1).
- Collect the five GEARS hidden around the scene (2, 3, 4, 5, 6).
- Exit to the Moon Landscape.
- Collect the CLOCK FACE (3).
- Return to Moon City (E).
- Advance to the Glade (B).
- Collect the SUNFLOWER SEED (1).
- MIXED NUTS are added to your Inventory.
- Collect the PENDULUM (2).
- CLOCK PIECES are added to your Inventory.
- Examine the Lanterns to start the Fireflies Task (A).
- Examine the Pond to start the Fishing Equipment Task (B).
- Collect the two BROAD LEAVES, LINE, and HOOK from the scene (3, 4, 5, 6).
- Return to the Moon City.
- Collect the POLE and two SILVER LEAVES from the scene (7, 8, 9).
- Examine the Clock (A).
- Use the CLOCK PIECES to start a mini-game.
- The objective is to click on the Clock when the Pendulum is pointing to a matching shape.
- Collect the second MOON CRYSTAL after completing the mini-game (1).
- Return to the Moon Landscape.


- Collect the REEL (4).
- FISHING EQUIPMENT is added to your Inventory.
- Use the MIXED NUTS on the Treetop (D) to get the third MOON CRYSTAL (5).
- Exit to the Moon City and return to the Glade (E).
- Use the FISHING EQUIPMENT on the Pond (B) to get the final MOON CRYSTAL (7).
- MOON CRYSTALS are added to your Inventory.
- Back out to the Moon Landscape and return to the Guardian Wall.
- Give the MOON CRYSTALS to the Guardian to start the Charge Crystal and Save Jack Tasks (A).
- Collect the EMPTY MOONSTONE from the Guardian (1).
- Exit to the Moon Landscape.
- Collect five FIREFLIES from around the scene (5, 6, 7, 8, 9).
- Exit to Moon Landscape.

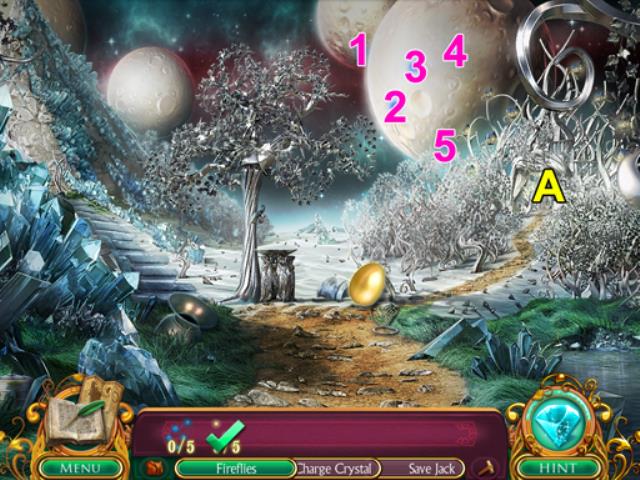


- Collect five more FIREFLIES from around the scene (1, 2, 3, 4, 5).
- FIREFLIES are added to your Inventory.
- Exit to the Moon City and return to the Glade (A).
- Use the FIREFLIES on the Lanterns to open the way forward (A).
- Climb the Beanstalk to enter the Crystal Temple (B).
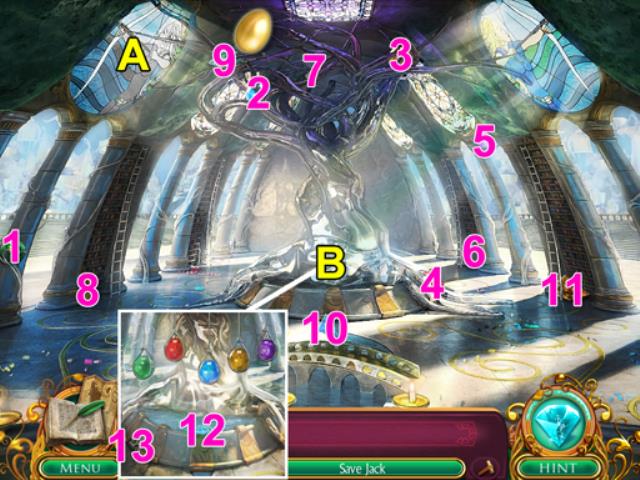
- Collect the five GLASS MOONS hidden around the scene (1, 2, 3, 4, 5).
- The CHARGE CRYSTAL is added to your Inventory.
- Collect the JAR and CORK (6, 7).
- Examine the Window to start the Stained Glass Task (A).
- Collect the four pieces of STAINED GLASS hidden around the scene (8, 9, 10, 11).
- STAINED GLASS is added to your Inventory.
- Examine the Window again (A).

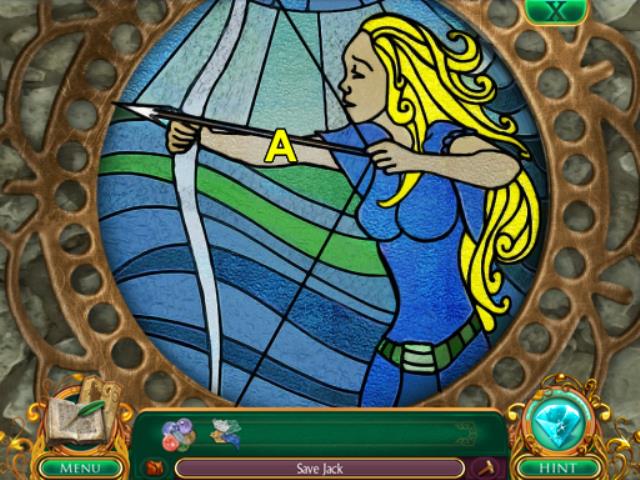


- Use the STAINED GLASS to start a mini-game (A).
- The pieces of STAINED GLASS need to be dragged over the gray areas.
- The solution is: Blue robe, Yellow hair, Orange face, and Green belt.
- Use the CHARGE CRYSTALS on Crystal Tree (B) to get the CHARGED MOONSTONE (12).
- Collect Mini Jack (13).
- SAVE JACK is added to your Inventory.
- Return to the Guardian Wall.
- Use SAVE JACK on the Guardian (A).
Chapter 4: Return to the Beanstalk

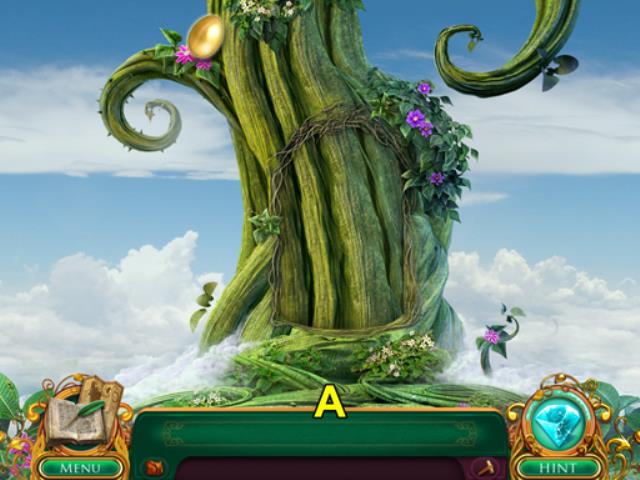

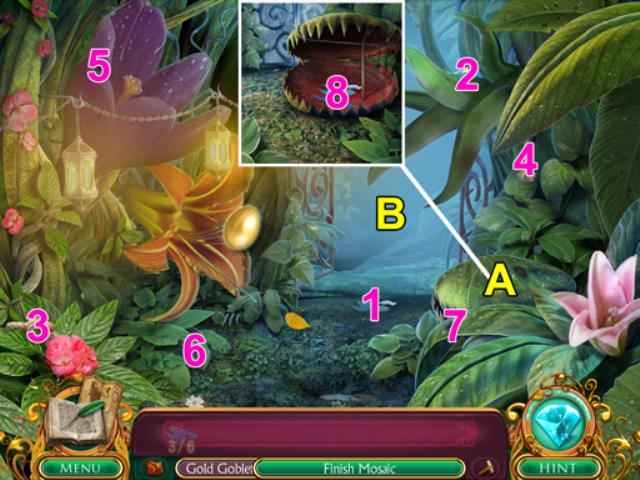

- Exit to Inside The Stalk (A).
- Examine the new Stalk to start the Gold Goblet Task (A).
- Collect the GOLD GOBLET BASE (1).
- Exit through the Crevice (B).
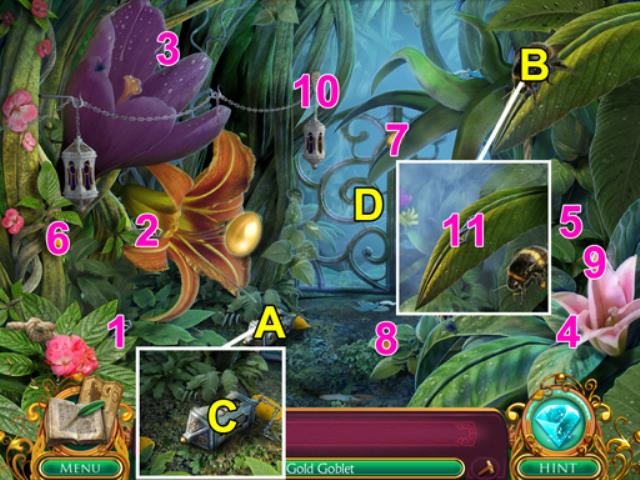
- Examine the Lantern to start the Fix Lantern Task (A).
- Locate the five of the CHAIN LINKS hidden around the scene (1, 2, 3, 4, 5).
- Examine the Bee to start the Distract Bee Task (B).
- Find four pieces of HONEY hidden around the scene (6, 7, 8, 9).
- Collect the HONEY DIPPER (10) and the BEE FOOD is added to your Inventory.
- Use the BEE FOOD on the Bee (B).
- Collect the last CHAIN LINK (11) and the CHAIN LINKS are added to your Inventory.
- Use the CHAIN LINKS on the Lantern to clear the way forward (C).
- Exit to Rose Valley (D).



- Examine the Fountain to start the Finish Mosaic Task (A).
- Collect three MOSAIC PIECES scattered around the scene (1, 2, 3).
- Exit back to the Crevice.
- Collect two more MOSAIC PIECES hidden in the scene (1, 2).
- Examine the Strange Plant to start the Open Fly Trap Task (A).
- Find two pieces of FLY TRAP ROPE in the area (3, 4).
- Catch three FLIES hiding in the leaves (5, 6, 7).
- Return to the Rose Valley (B).
- Collect two pieces of FLY TRAP ROPE (4, 5).
- Examine the Birdhouse to start the Get The Cane Task (B).
- Collect the SHINY COIN, MARBLE, CANDY, CHARM, and FEATHER (6, 7, 8, 9, 10).
- FAIRY OFFERING is added to your Inventory.
- Use the FAIRY OFFERING on the Birdhouse (B) to get the CANE (11).
- FLYTRAP OPENER is added to your Inventory.
- Exit to the Crevice.


- Use the FLYTRAP OPENER on the Strange Plant (A) to get the last MOSAIC PIECE (8).
- The BLUE ROSE is added to your Inventory.
- Return to the Rose Valley (B).
- Use the BLUE ROSE on the Mosaic (C) to get stop the fountain water.
- Collect GOLD GOBLET BOWL (12).
- The GOLD GOBLET is added to your Inventory.
- Return to Inside The Stalk.
- Use the GOLD GOBLET on the Beanstalk to make it grow (A).
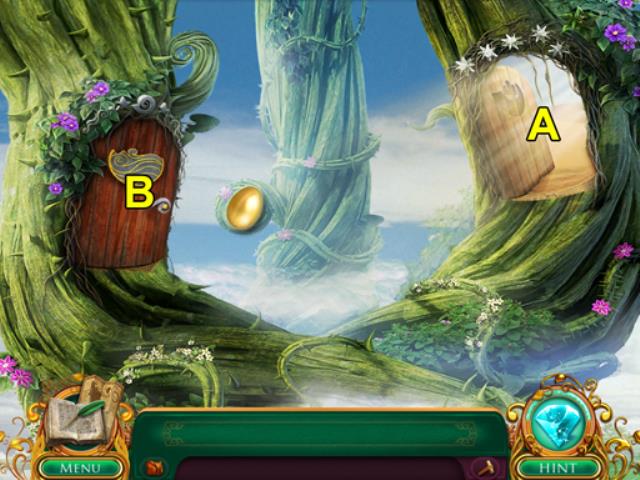
- Exit to the Crossroad (C).
- Try to move through the open door to start the Desert Emblem Task (A).
- Move through the other door to the Lagoon (B).
Chapter 5: Water World



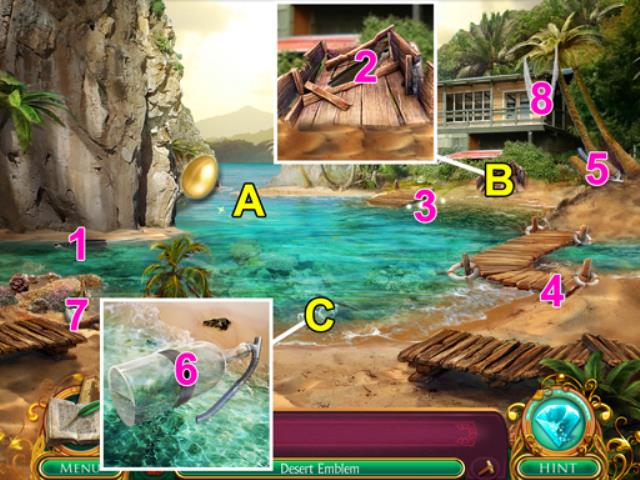
- Examine the Water to start the Breathing Equipment Task (A).
- Collect the FLIPPER (1).
- Look in the Cart (B) to find the other FLIPPER (2).
- Examine the Broken Bottle to start the Fix Bottle Task (C).
- Collect the AIR WISPS, ELECTRICAL TAPE, and SNORKEL from the area (3, 4, 5).
- FIX BOTTLE SUPPLIES are added to your Inventory.
- Use the FIX BOTTLE SUPPLIES on the Broken Bottle (C) to get a MAGIC BOTTLE (6).
- DIVING EQUIPMENT is added to your Inventory.
- Use the DIVING EQUIPMENT on the Water and exit to the Coral Reef (A).
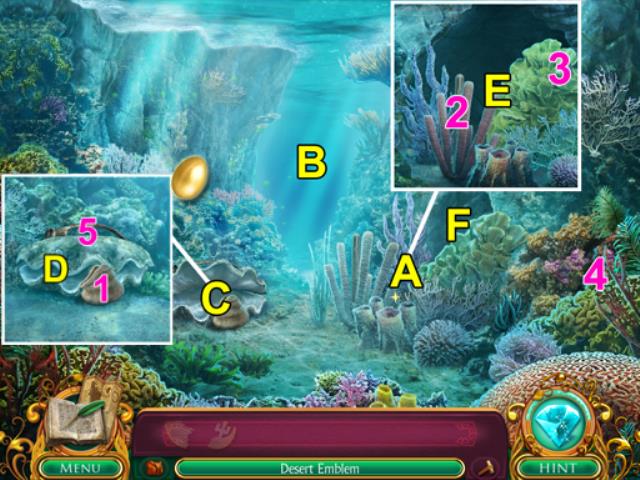
- Examine the Coral to start the Clear Coral Task (A).
- Swim ahead to the Fishing Hole (B).
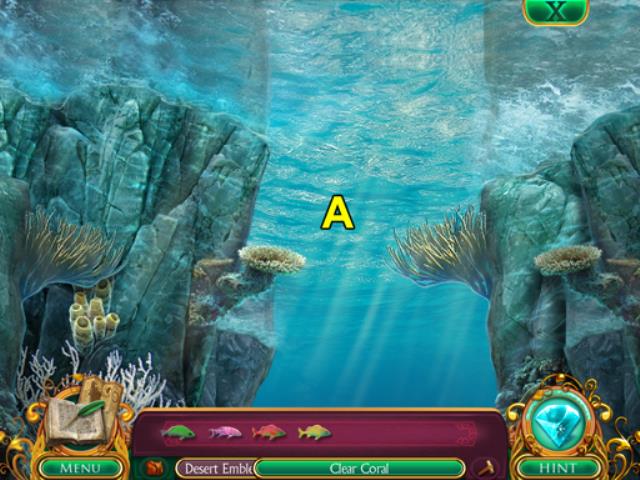
- Examine the surface of the Water to start the Catch Fish Task (A).
- Return to the Coral Reef.
- Examine the Large Clam (C) to find the FISH FOOD (1) and start the Close Clam Task (D).
- Search the Coral (A) to find the SHAFT and a PEARL PIECE (2, 3).
- Find the PEARL PIECE hidden in the coral (4).
- Return to the Lagoon.


- Collect the PEARL PIECE and the FULL PEARL is added to your Inventory (7).
- Get the FISH NET hanging from the trees (8).
- Return to the Coral Reef (A).
- Use the FULL PEARL on the Large Clam (D) and get the HOOP (5).
- The FISHING GEAR is added to your Inventory.
- Swim ahead to the Fishing Hole (B).
- Use the FISHING GEAR on the surface of the Water to start a mini-game (A).
- A sequence of five colored fish will appear at the top of the screen.
- Catch fish of the matching color in the order presented.
- Once you catch three sequences COLORED FISH will be added to your Inventory.
- You automatically return to the Coral Reef.
- Use the COLORED FISH on the Coral (E).
- Proceed into the Cenote (F).

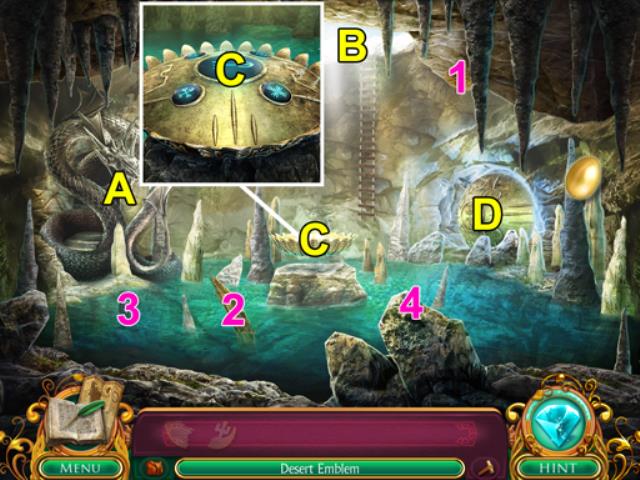


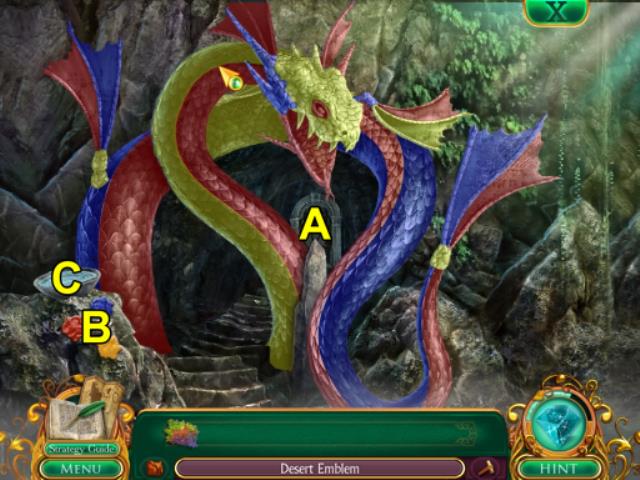
- Examine the Dragon to start the Paint Supplies Task (A).
- Collect the SPONGE (1).
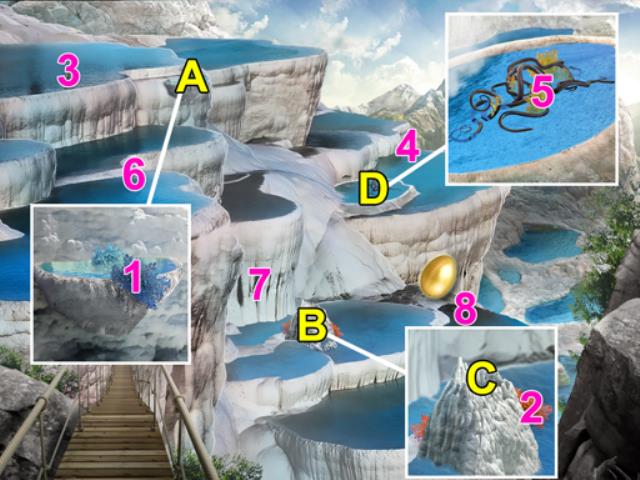
- Exit to the Mineral Spring (B).
- Examine the pool (A) to find BLUE ALGAE (1).
- Examine the Vent (B) to find RED ALGAE (2) and start the Block Vent Task (C).
- Collect two HEAVY STONES from around the area (3, 4).
- Return to the Cenote.
- Collect the final HEAVY STONE (2) and HEAVY ROCKS are added to your Inventory.
- Return to the Mineral Spring (B).
- Use the HEAVY ROCKS on the Vent to expose another Pool (C).
- Examine the new Pool (D) to find YELLOW ALGAE (5).
- PAINT SUPPLIES are added to your Inventory.
- Return to the Dragon in the Cenote.
- Use the PAINT SUPPLIES on the Dragon to start a mini-game (A).
- Use the Paint Splotches on the left to select a color (B).
- Use the Water to clear away existing paint (C).
- The objective is to paint the entire Dragon without using the same color on connecting pieces.


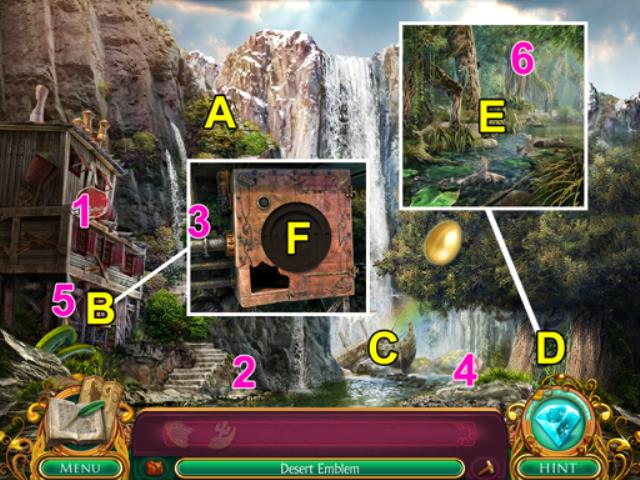

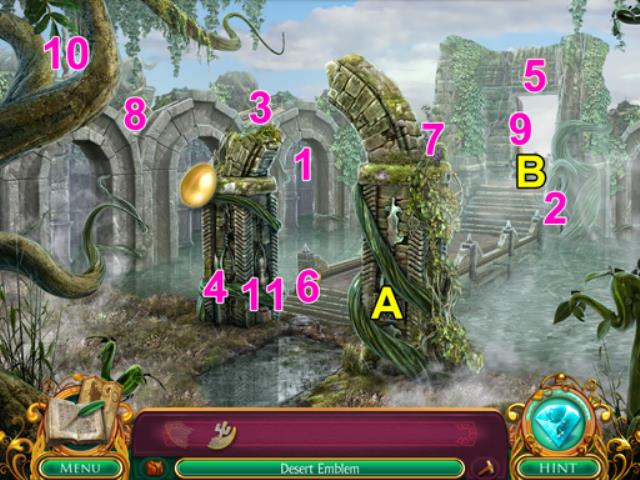
- Examine the Floating Platform to start the Break Barrier Task (C).
- Collect two ANCIENT RUNES from the area (3, 4).
- Return to the Mineral Spring (B).
- Collect three ANCIENT RUNES from the area (6, 7, 8).
- BARRIER RUNES are added to your Inventory.
- Return to the Cenote.
- Use the BARRIER RUNES on the Floating Platform to open the way forward (C).
- Proceed to the Waterfall (D).
- Proceed up the Stairs to the Bayou (A).
- Examine the Pillar to start Raise Bridge Task (A).
- Collect a BULB, FUSE and the BRIDGE SWITCH from the area (1, 2, 3).
- Return to the Waterfall.


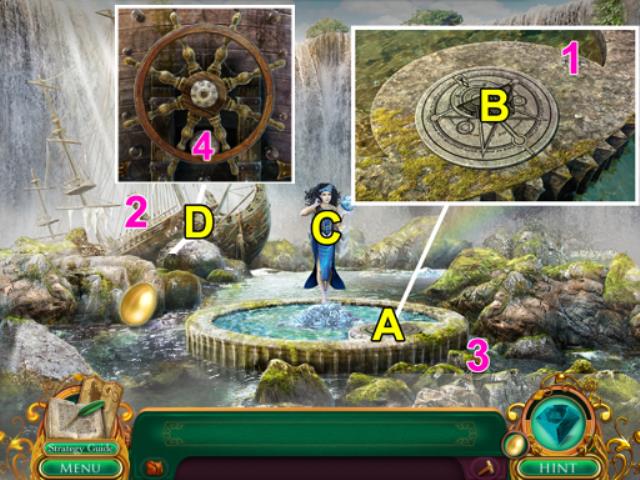


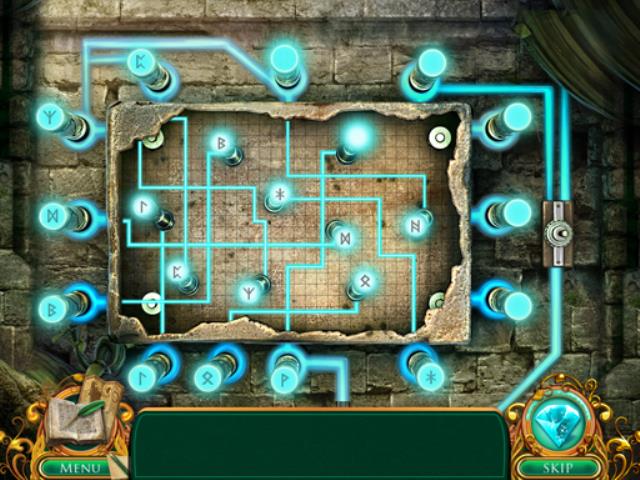
- Collect two BULBS from the area (1, 2).
- Examine the Panel (B) to find a FUSE (3).
- Proceed into the Basin (C).
- Examine the Emblem (A) to find a FUSE (1) and start the Break Water Cage Task (B).
- BAYOU BRIDGE PARTS are added to your Inventory.
- Return to the Bayou.
- Collect the WATER CAGE PENCIL and PAPER (4, 5).
- The WATER CAGE SPELL is added to your Inventory.
- Use the BAYOU BRIDGE PARTS on the Pillar to start a mini-game (A).
- The objective is to light up all the fuses in the center panel.
- Mouse over the inactive fuses to reveal their special rune.
- Activate matching pairs until all fuses are lit.
- Collect the DESERT EMBLEM RIGHT from the Bridge (6).
- Return to the Basin.
- Use the WATER CAGE SPELL on the Emblem to start a mini-game (A).
- Fold the Paper until it matches the mold in the Emblem to release the Guardian (B).


- Speak to the Guardian to start the Gather The Plants Task (C).
- Return to the Waterfall.
- Collect the FLOWER (4).
- Examine the Panel to start the Crack Safe Task (B).
- Continue up to the Bayou (A).
- Collect the LAVENDER (7).
- Collect the INNER RING (8).
- Return to the Waterfall.
- Explore the Overgrowth to start the Trim The Vines Task (D).
- Collect a TRIMMER BLADE (5).
- Take the Stairs to the Bayou (A).
- Collect the TRIMMER BLADE (9).
- TRIMMERS will be added to your Inventory.
- Return to the Waterfall.
- Use the TRIMMERS on the Overgrowth (E) to get OUTER RING (6).
- Proceed to the Basin (C).
- Examine the Shipwreck to start the Fix Ship Wheel Task (D).
- Collect two SHIP WHEEL PIECES from the area (2, 3).
- Return to the Bayou.


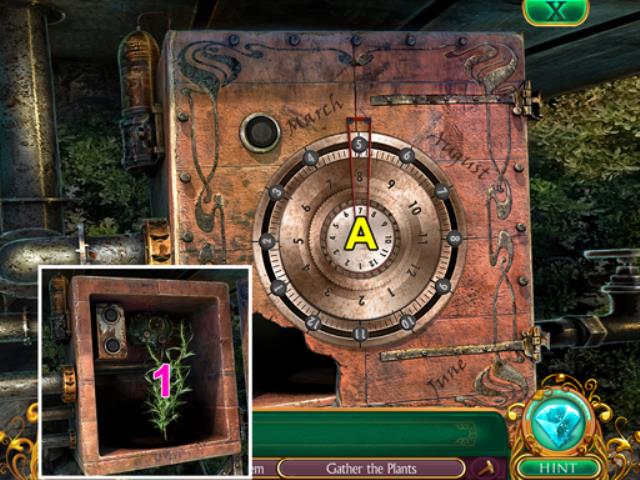
- Collect two SHIP WHEEL PIECES from the area (10, 11).
- The SHIP WHEEL is added to your Inventory.
- Return to the Basin.
- Use the SHIP WHEEL on the Shipwreck (D) to get the PANEL DIAL (4).
- PANEL PIECES will be added to your Inventory.
- Return to the Waterfall.
- Examine the Panel (B) and use the PANEL PIECES on the center disc to start a mini-game (F).
- The objective of the mini-game is to rotate each disc to the correct digit.
- The solution is: 5, 8, 7 as hinted by the dates written on panel.
- Collect the ROSEMARY after completing the mini-game (1).
- GATHERED PLANTS will be added to your Inventory.
- Return to the Bayou.
- Examine the Cauldron (B).

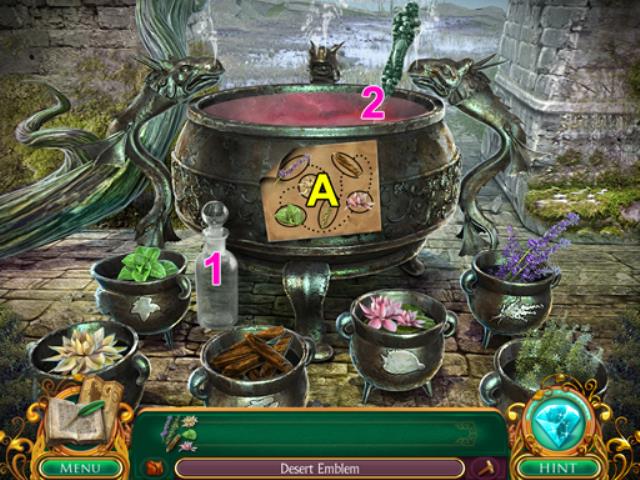


- Use the GATHERED PLANTS on the Cauldron to start a mini-game (A).
- The objective of the mini-game is to select the ingredients in the correct order.
- Follow the recipe outlined in the image on the front of the Cauldron to start the Repower The Orb Task.
- Take the POTION BOTTLE and MAGICAL ESSENCE (1, 2).
- The ORB POTION is added to your Inventory.
- Return to the Basin.
- Use the ORB POTION on the Guardian (C).
- Examine the Chamber that appears to find the DESERT EMBLEM LEFT (A).
- DESERT EMBLEM is added to your Inventory.
- Return to the Crossroad.
Chapter 6: Desert World


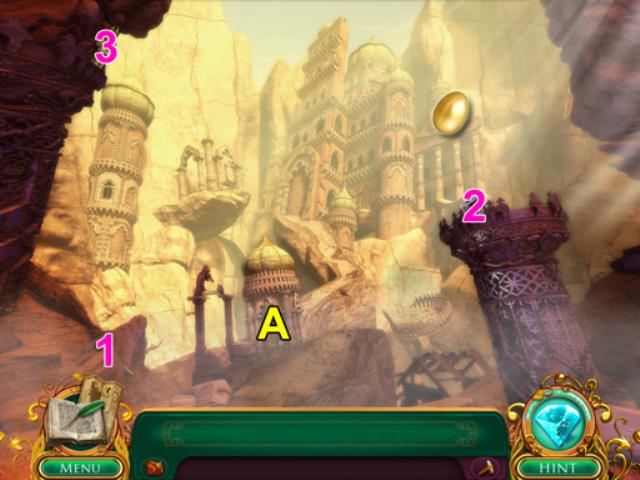

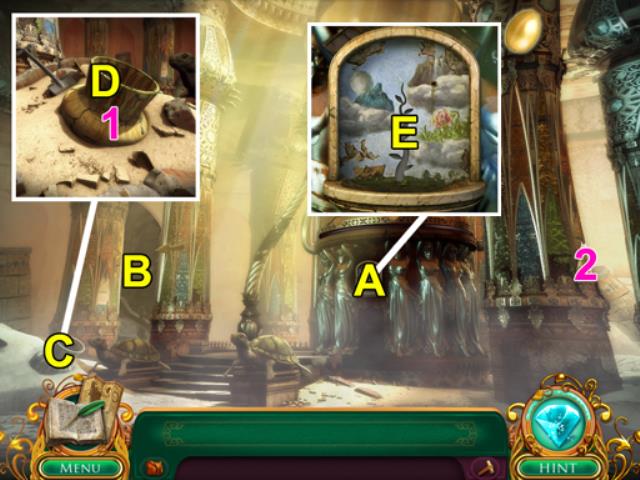

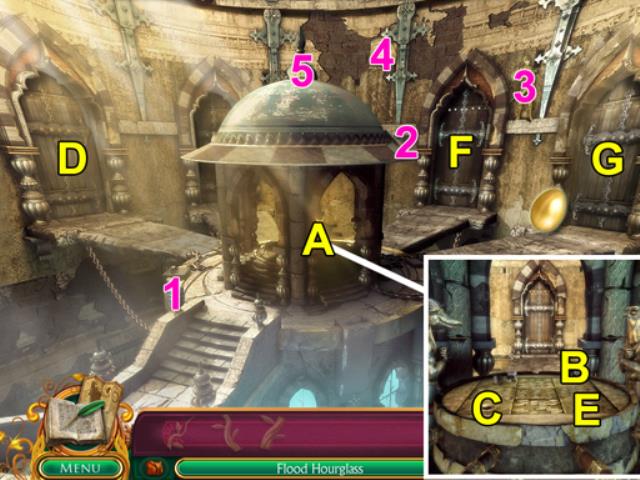
- Use the DESERT EMBLEM on the Closed Door (A).
- Proceed through to the Ruin Entrance (A).
- Continue through the Ruins to the Hourglass Room (A).
- Examine the Mural to start the Flood Hourglass Task (A).
- Proceed to the Chain Room (B).
- Examine the Dome (A) to open the Tomb door (B) and start the Open Chain Room Doors Task (C).
- Collect the MOON EMBLEM RIGHT HALF (1).
- Proceed to the Tomb (D).

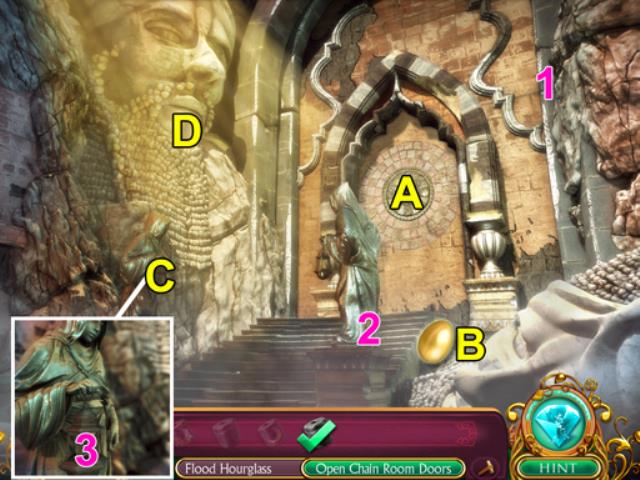

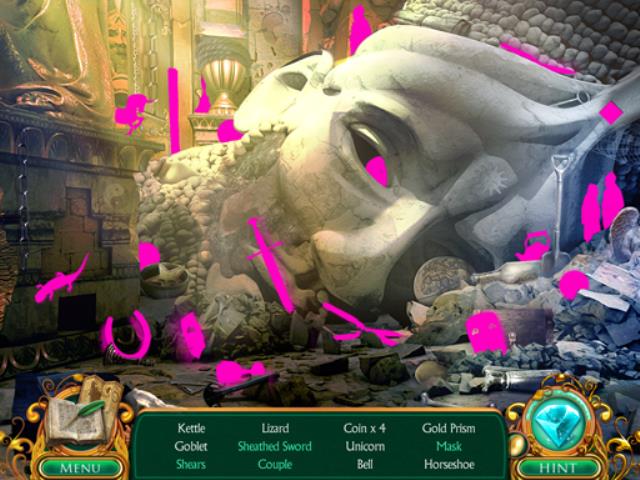


- Examine the Wall Mural to start the Assemble Prism Task (A).
- Collect TURTLE EMBLEM RIGHT HALF (1).
- A HOP becomes available (B).
- Locate all the listed items to collect the PRISM HALF.
- Return to the Hourglass Room after completing the HOP.
- Examine the Clay Pot to start the Dig Out The Pot Task (C).
- Return to the Chain Room (B).
- Collect the SHOVEL SPADE (2).
- Return to Ruin Entrance.


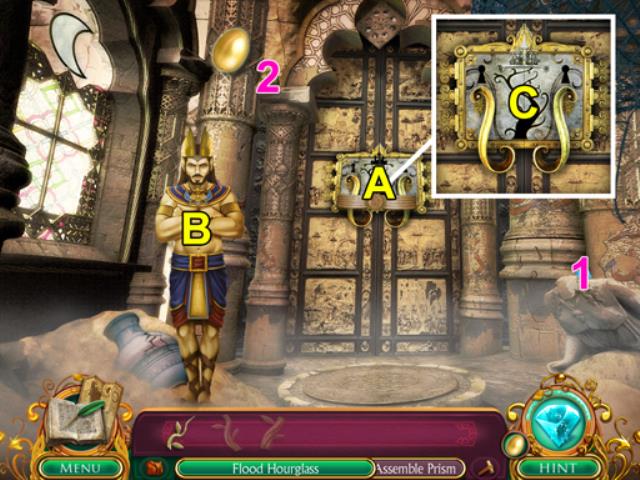
- Collect the SHOVEL HANDLE and the SHOVEL is added to your Inventory (1).
- Collect the MOON EMBLEM LEFT HALF (2).
- Return to Hourglass Room (A).
- Use the SHOVEL on the Clay Pot (D) to get the TURTLE EMBLEM LEFT HALF (1).
- CHAIN DOOR KEYS are added to your Inventory.
- Exit to Chain Room.
- Use the CHAIN DOOR KEYS inside the Domes empty slots (C).
- Select each Key to unlock the Chain Room Doors (C, E).
- Exit to Arch Gate (G).
- Collect the PRISM HALF and the SUN MOON PRISM is added to your Inventory (1).
- Examine the Emblem on the Door to start the Ornate Keys Task (A).
- Speak to the Desert Guardian that appears to start the Gather The Statues Task (B).
- Return to the Chain Room.
- Collect the first STATUE (3).
- Exit to the Hourglass Room.


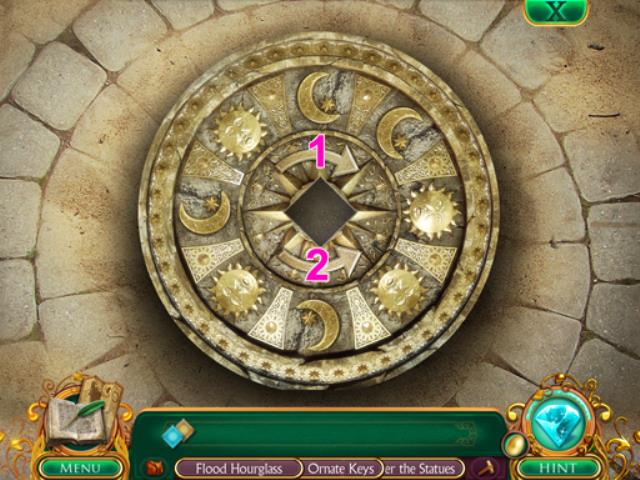
- Collect the next STATUE (2).
- Exit to the Ruin Entrance.
- Collect the next STATUE (3).
- Return to the Tomb (A).
- Collect another STATUE (2).
- Examine the Large Statue (C) to get a SILVER KEY (3).
- Use the SUN MOON PRISM on the Wall Mural to start a mini-game (A).
- After completing the mini-game, collect the BEANSTALK EMBLEM BASE (D).
- The objective of the mini-game is to light each symbol by spinning the Prism.
- Sun symbols need to be highlighted in Yellow while Moon symbols need Blue light.
- Press 1×3, 2×1, 1×6, 2×1, 1×2 to complete the mini-game.
- Completing the mini-game reveals the BEANSTALK EMBLEM BASE in the main scene.
- Return to the Chain Room and enter the Turtle Room to the right of the dome.

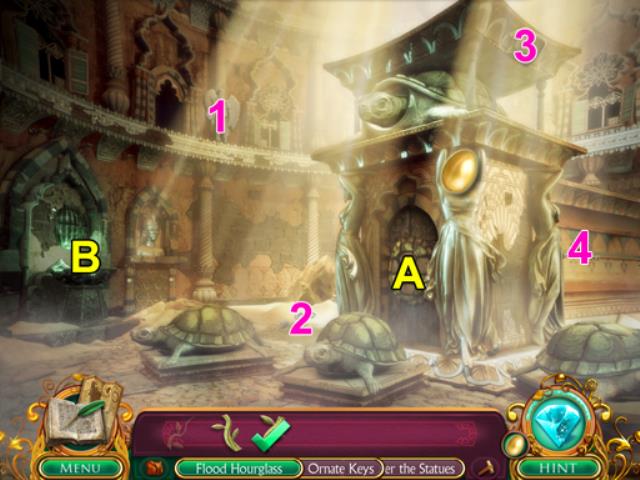

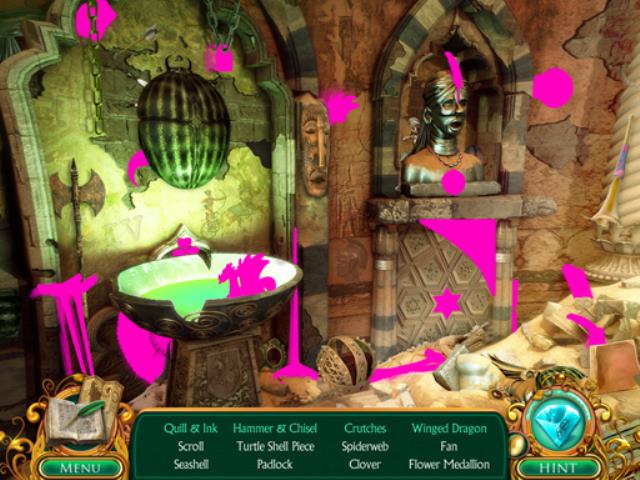


- Collect the final STATUE and the GUARDIAN STATUES are added to your Inventory (1).
- Collect the SILVER KEY (2).
- Examine the Turtle Shell in the center to start the Pillar Turtle Task (A).
- Collect the PILLAR SHELL PIECE on top of the Altar (3).
- Collect CLOUD AMULET (4).
- Examine the Bowl to start a HOP (B).
- Locate all the listed items.
- Another PILLAR SHELL PIECE is collected after all items have been located.
- Return to the Chain Room after completing the HOP.
- Collect two PILLAR SHELL PIECES hidden in the room (4, 5).
- Exit to the Arch Gate (G).
- Collect the final PILLAR SHELL PIECE and the PILLAR TURTLE SHELL is added to your Inventory (2).
- Use the GUARDIAN STATUES on the Desert Guardian (B).
- The Desert Guardian gives you the VINE AMULET and the ORNATE SILVER KEYS are added to your Inventory.
- Use the ORNATE SILVER KEYS to unlock the panel on the Door (C).
- Examine the hieroglyphs that appear to start a mini-game (A).

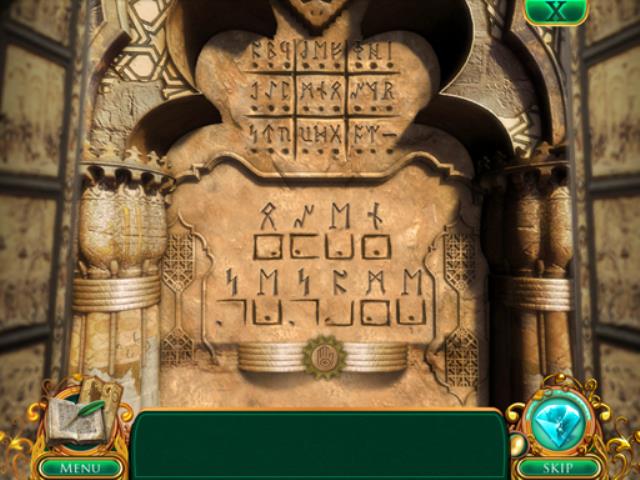


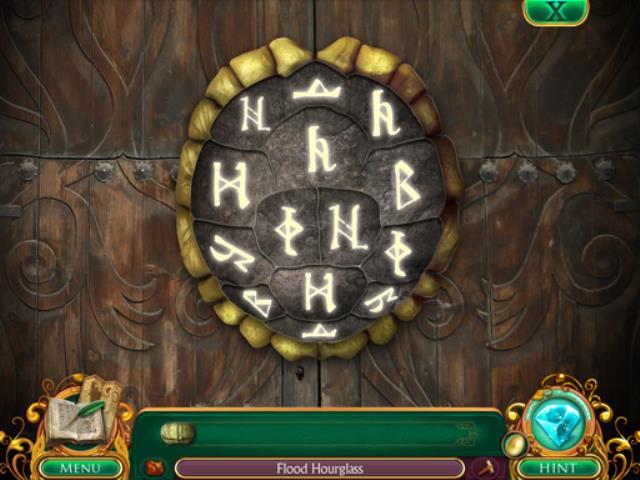

- The objective of the mini-game is to select the Runes at the top based on the Glyphs that appear in the center.
- Note the shape of the boxes and the location of dot in the Glyphs to find the matching Rune within the grid.
- Select a Rune within the top grid then click any matching Glyph to highlight it.
- Check your progress by clicking on the Hand Icon at the bottom of the puzzle.
- Collect the BEANSTALK EMBLEM TIP after completing the mini-game.
- Return to the Turtle Room.
- Use the PILLAR TURTLE SHELL on the Pillar to start a mini-game (A).
- The objective of this mini-game is to match the Symbols hidden under the segments of the Turtle Shell.
- Match pairs until all the pieces of the Shell have been used.
- Collect the BEANSTALK EMBLEM CENTER after completing the mini-game.
- The BEANSTALK EMBLEM is added to your Inventory.
- Return to the Hourglass Room.


- Use the BEANSTALK EMBLEM on the Mural (E).
- Exit to Ruin Entrance.
- Speak to the Desert Guardian to get the GUARDIAN RELIC (A).
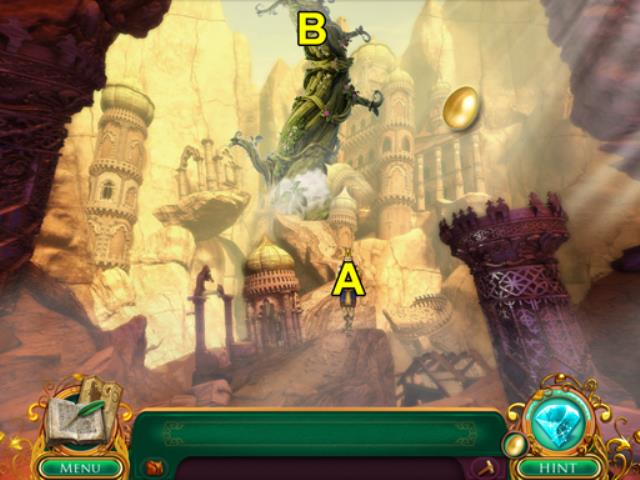
- Climb the Beanstalk to move to In The Clouds (B).
Chapter 7: Cloud World


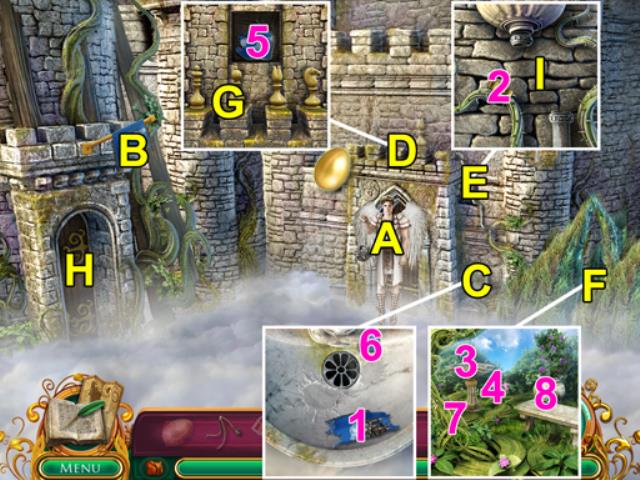
- The Slay The Giant Task activates as soon as you enter this area.
- Advance into the Courtyard (A).
- Speak to the Cloud Guardian to start the Sew Sling Task (A).
- Examine the Torn Flag to start the Mend Blue Flag Task (B).
- Look in the Fountain (C) to find a BLUE FLAG STRIP (1).
- Examine the Wall above the Cloud Guardian to start the Unlock Chess Panel Task (D).
- Examine the Pipes (E) to find the BISHOP (2) and start the Water Pipe Task.
- Look into the Shrubs (F) to find the PAWN, and a PIPE PIECE (3, 4).
- Return to In The Clouds.
- Collect the BLUE FLAG STRIP and KNIGHT from the Beanstalk (1, 2).
- CHESS PIECES are added to your Inventory.
- Return to the Courtyard (A).
- Use the CHESS PIECES on the Wall (G) to get the last BLUE FLAG STRIP (5).
- BLUE FLAG is added to your Inventory.
- Use the BLUE FLAG to repair the Torn Flag (B).
- Proceed into the Inner Tower (H).

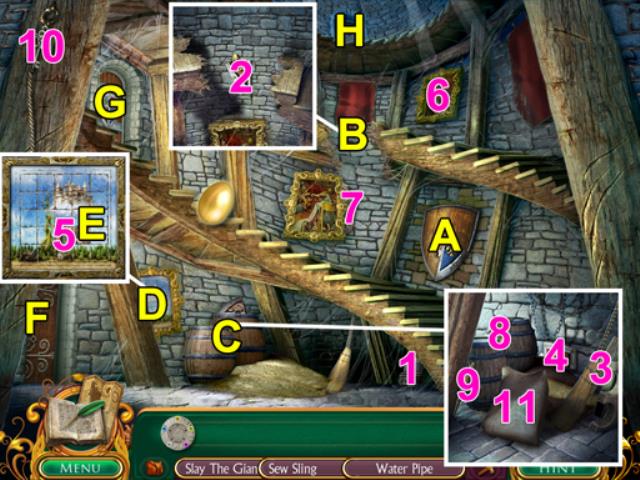


- Collect the PIPE PIECE (1).
- Examine the Shield Frame to start the Complete Shield Task (A).
- Examine the Gap (B) to start the Repair Stairs Task and collect a SHIELD PIECE (2).
- Search the Barrels (C) to find a STRONG BOARD and a SHIELD PIECE (3, 4).
- Examine the Picture Frame (D) to start the Stone Puzzle Task and collect a PIPE PIECE (5).
- FOUNTAIN PIPES are added to your Inventory.
- Return to the Courtyard.
- Use the FOUNTAIN PIPES on the Pipes (I).
- Search the Fountain to find a STONE TILE (6).
- Examine the Shrubs to find a STRONG BOARD and a SHIELD PIECE (7, 8).
- Return to In The Clouds.
- Collect a STRONG BOARD and a STONE TILE from the Vines (3, 4).
- PUZZLE TILES are added to your Inventory.
- Return to the Inner Tower.
- Use the PUZZLE TILES on the Painting to unlock the Door (E).
- Proceed into the Alchemy Lab (F).


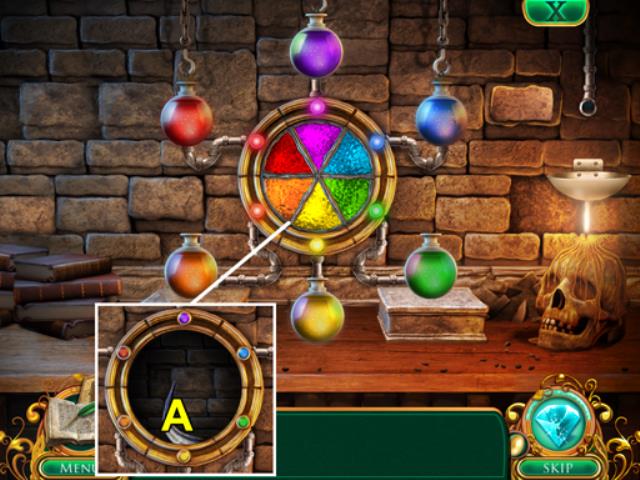


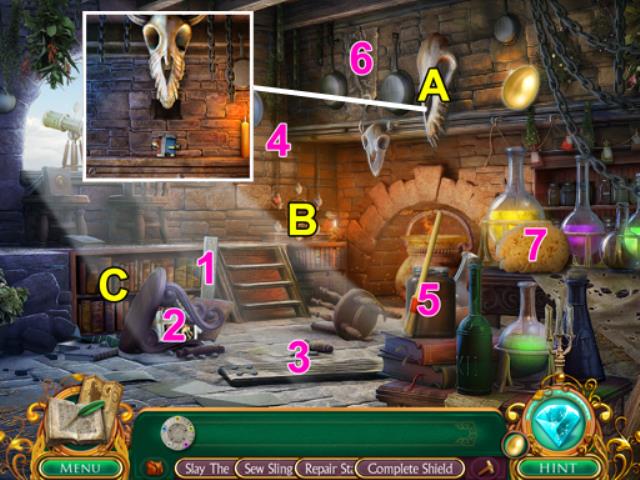
- Collect the STRONG BOARD, SHIELD PIECE, and NAILS from the room (1, 2, 3).
- Examine the Skull to start the Bull Horns Task (A).
- Examine the Potion Machine to start a mini-game (B).
- The Empty Bottles need to be filled with the color that matches their light in the Machine.
- Select an Empty Bottle then combine the colors from the Machine to create a match.
- Solution:
- Green = Blue and Yellow.
- Orange = Yellow and Red.
- Purple = Red and Blue.
- Collect the RIGHT HORN that appears after completing the puzzle (A).
- Return to the Inner Tower.
- Collect the LEFT HORN from the Painting (6).
- The BULL HORNS are added to your Inventory.
- Return to the Alchemy Lab (F).
- Examine the Large Skull (A) and use the BULL HORNS on the skull to get the final SHIELD PIECE.
- The SHIELD PIECES are added to your Inventory.
- Examine the Bookshelf to start a mini-game (C).

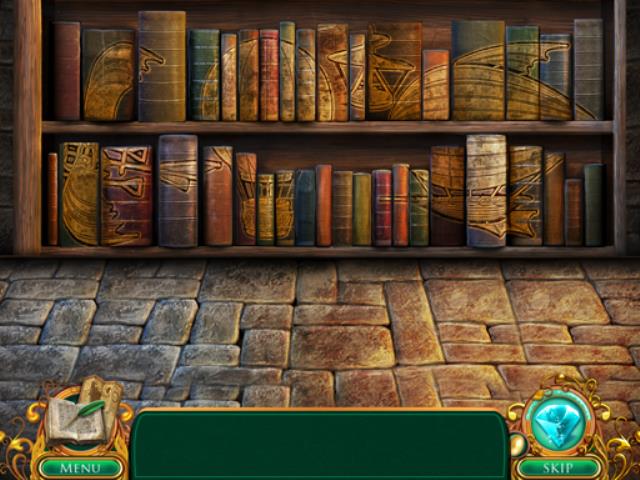


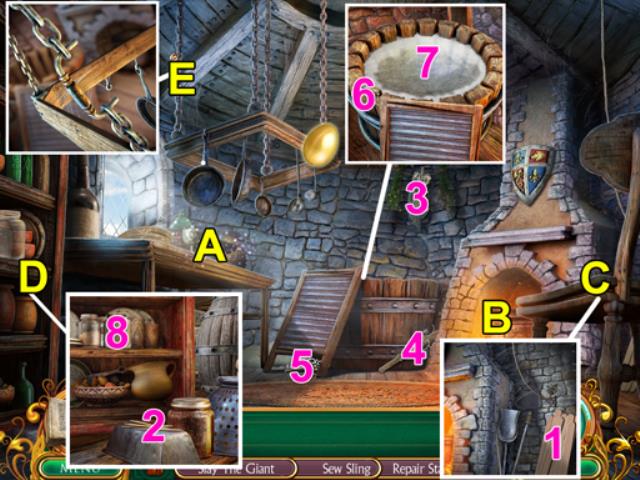

- Place all the Books in their correct location.
- Use the image on the Book Edges as a guide.
- A BOOK is awarded after completing the puzzle.
- Exit to the Inner Tower.
- Use the SHIELD PIECES on the Shield Frame (A).
- Advance into the Kitchen (G).
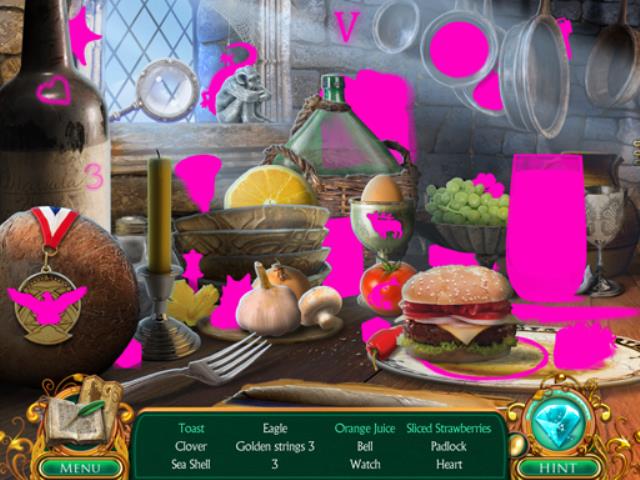
- Examine the Table to start a HOP (A).
- Locate all the listed items.
- MATCHES are collected after all items have been located.
- Examine the Cauldron to start a mini-game (B).

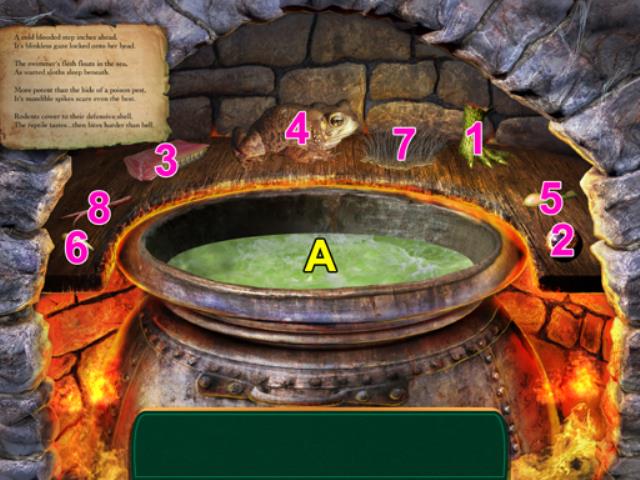



- The Ingredients need to be added in the correct order.
- The Riddle offers hints to the order.
- The solution is: 1. Foot. 2. Eyeball. 3. Fish. 4. Toad. 5. Stinger. 6. Tooth. 7 Quills. 8. Tongue.
- Collect the REPAIR ESSENCE from the Cauldron (A).
- The STAIR REPAIRS are added to your Inventory.
- Return to the Inner Tower.
- Use the STAIR REPAIRS on the Gap (B).
- Proceed up to the Falling Bridge (H).
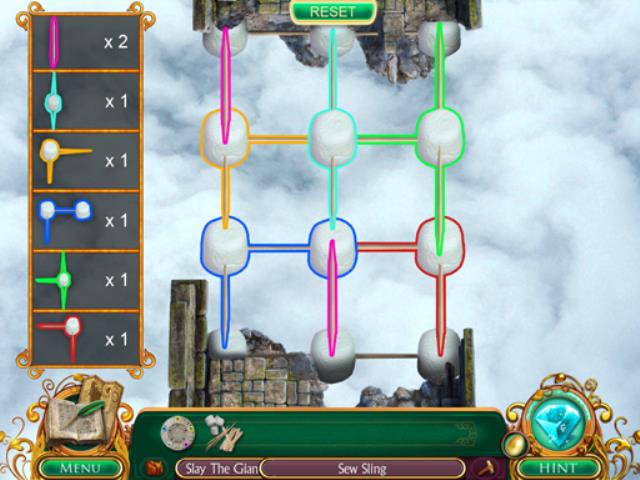
- Examine the Broken Bridge to start the Marshmallow Bridge Task (A).
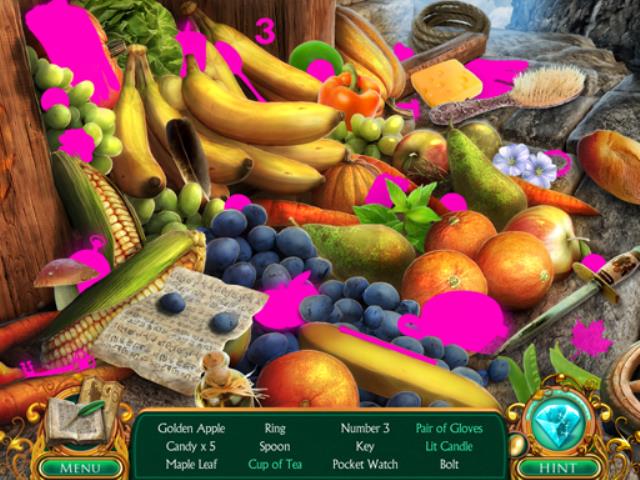
- Examine the Crate to start the Golden Apple Task (B).
- Search the Fruits for a HOP (C).
- Locate all the listed items.
- The GOLDEN APPLE is collected after all items have been located.
- Return to the Alchemy Lab.


- Collect the GLUE (5) and the GOLDEN APPLE will be added to your Inventory.
- Return to the Kitchen.
- Examine the Fireplace (C) to get POPSICLE STICKS (1).
- Search the Shelf to find TOOTHPICKS (2).
- Return to the Falling Bridge.
- Use the GOLDEN APPLE on the Crate (B) to get MARSHMALLOWS (1).
- MARSHMALLOW BRIDGE ITEMS are added to your Inventory.
- Examine the Broken Bridge (A).
- Use the MARSHMALLOW BRIDGE ITEMS in the empty space to start a mini-game.
- A list of the available Repair Items appear on the left.
- Use all the available Repair Items to create a grid to the other side of the Bridge.
- Examine the Tower to start the Mend Tower Flag Task (D).
- Return to the Inner Tower.


- Collect the OGRE FLAG PIECE near the Painting (7).
- Examine the Barrels (C) to find another OGRE FLAG PIECE (8).
- Return to the Alchemy Lab (F).
- Collect the OGRE FLAG PIECE from the Wall (6).
- Return to the Kitchen.
- Collect the final OGRE FLAG PIECE (3).
- The ATTIC FLAG is added to your Inventory.
- Return to the Falling Bridge.
- Use the ATTIC FLAG on the Tower to open the Door (D).
- Proceed into the Attic (E).

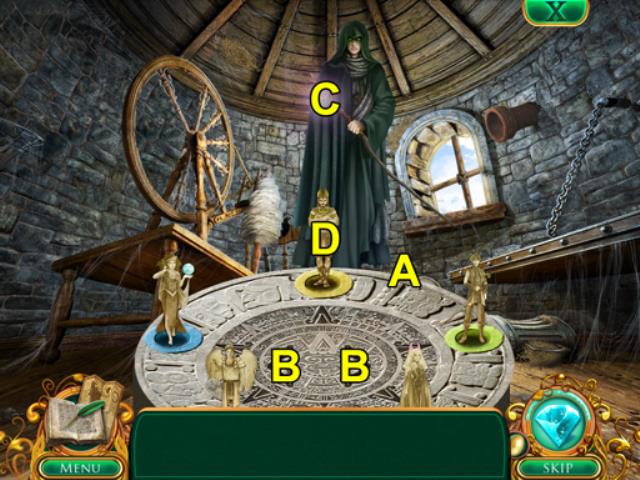

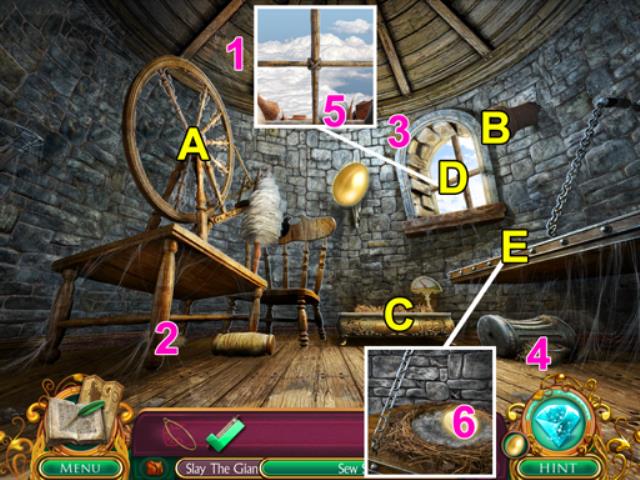


- Use the GUARDIAN RELIC anywhere in the scene to begin a mini-game (A).
- Use the Arrows (B) to cycle the Statues to find the color that matches the Flower Guardians Staff (C).
- The Guardian Statue at the top of the Wheel can be used against the Flower Guardian (D).
- The MAGIC PATTERN is awarded after defeating the Flower Guardian.
- Examine the Spinning Wheel to start the Spinning Wheel Task (A).
- Examine the Pipe to start the Unclog The Drain Task (B).
- Examine the Scale to start the Gather Straw Task (C).
- Collect four pieces of STRAW from the room (1, 2, 3, 4).
- LOOSE STRAW is added to your Inventory.
- Use the LOOSE STRAW on the Scale (C) to get a NEEDLE.
- Examine the Window (D) to get WOOL (5).
- Exit to Falling Bridge.
- Collect the WHEEL SPOKE (2).
- Exit to the Inner Tower.
- Examine the Barrels (C) to get a WHEEL SPOKE (9).
- Continue to the Alchemy Lab (F).


- Collect the SPONGE (7).
- Exit to the Kitchen.
- Collect the WHEEL SPOKE (4).
- Examine the Broken Chain to start the Replace The Chain Task (E).
- Collect a KEY (5).
- Examine the Washtub (F) to find a HANDLE and SOAP BUBBLES (6, 7).
- Search the Shelf (D) for a JAR (8).
- The DRAIN CLEANER is added to your Inventory.
- Exit to the Inner Tower.
- Collect the KEY (10) and the REPLACEMENT CHAIN is added to your Inventory.
- Return to the Kitchen (G).
- Use the REPLACEMENT CHAIN on the Broken Chain (E).
- SPINNING WHEEL SPOKES are added to your Inventory.
- Return to the Attic.
- Use the SPINNING WHEEL SPOKES on the Spinning Wheel (A).
- MAGIC SLING PARTS are added to your Inventory.
- Use the DRAIN CLEANER on the Pipe (B) to cause an golden egg to fall out.
- Examine the Bench (E) and collect the GOLDEN EGG (6).
- Exit to the Courtyard.


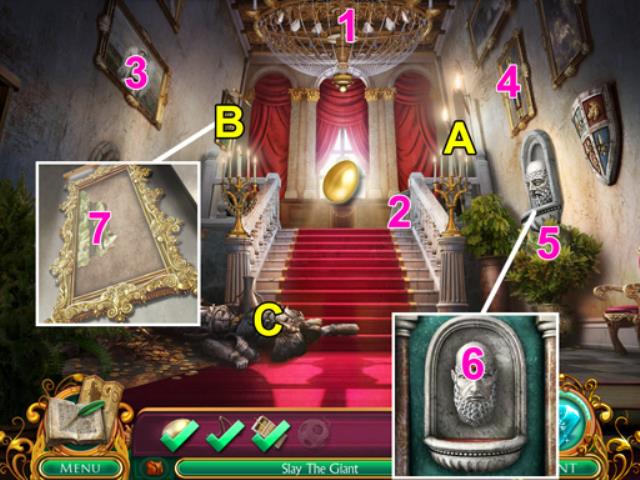

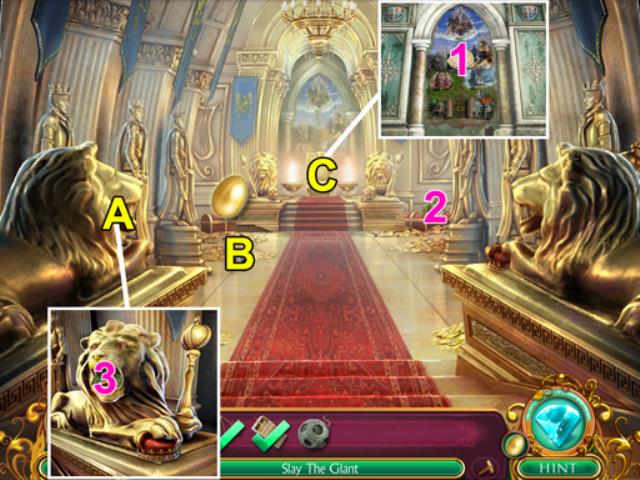

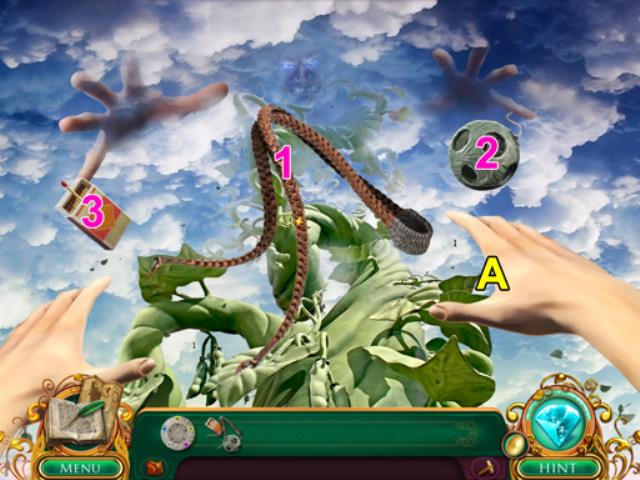
- Use the MAGIC SLING PARTS on the Cloud Guardian to get the MAGIC SLING (A).
- Proceed into the Hallway (A).
- Advance into the Throne Room (A).
- Examine the Lion Statue to start the Adorn Lion Task (A).
- Examine the Bombshells to start the Pack The Bombs Task (B).
- Examine the Mural (C) to collect the PACKING LEATHER (1) and start the Tapestry Cutouts Task.
- Return to the Hallway.
- Collect a LION EYE GEM and METAL PAN from the room (1, 2).
- Collect the CLOUD and DESERT GUARDIAN CUTOUTS from the Paintings (3, 4).
- Examine the Green Painting to start the Repair Painting Task (B).
- Collect a PAINTING PIECE in the Shrub (5).
- Examine the Fountain to get a LION EYE GEM (6).
- Examine the Toppled Statue to start a HOP (C).
- Locate all the listed items.
- The CROWN AND SCEPTER are collected after all items have been located.
- LION ADORNMENTS are added to your Inventory.
- Return to the Throne Room.


- Collect a PAINTING PIECE (2).
- Examine the Lion Statue (A) and use the LION ADORNMENTS to get another PAINTING PIECE (3).
- The FULL PAINTING is added to your Inventory.
- Return to the Hallway.
- Use the FULL PAINTING on the Green Painting (B) to get the PLANT GUARDIAN CUTOUT (7).
- Return to the Inner Tower.
- Examine the Barrels (C) to find the PACKING SAND (11).
- BOMB PACKING is added to your Inventory.
- Exit to the Throne Room.
- Place the BOMB PACKING in the Box to start a mini-game (B).

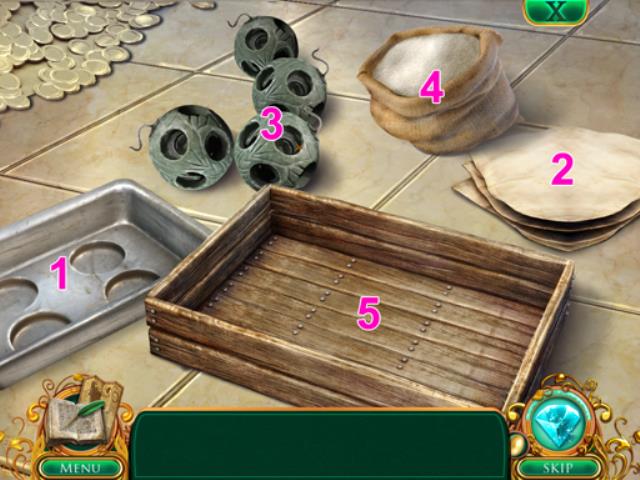


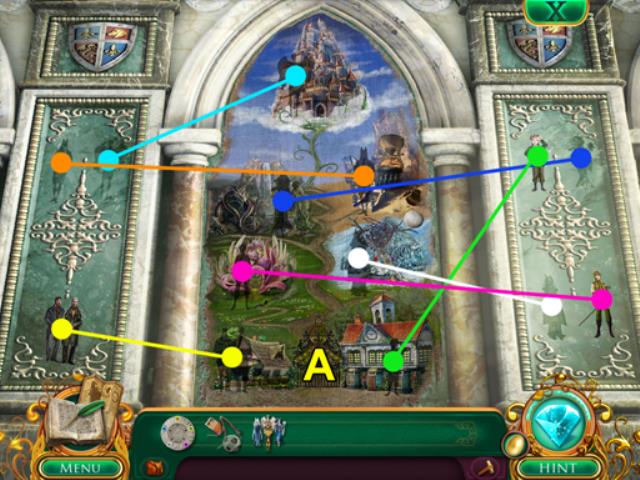


- The ingredients need to be placed in the Box in the correct order.
- The solution is: 1. Pan. 2. Leather. 3. Shells. 4. Sand.
- Collect the EXPLOSIVES and the WATER GUARDIAN CUTOUT (5).
- GIANT SLAYING SUPPLIES and GUARDIAN CUTOUTS are added to your Inventory.
- Use the GUARDIAN CUTOUTS on the Mural to start a mini-game (C).
- Place all the Characters from the side sections into the main Tapestry.
- Look for matching outlines.
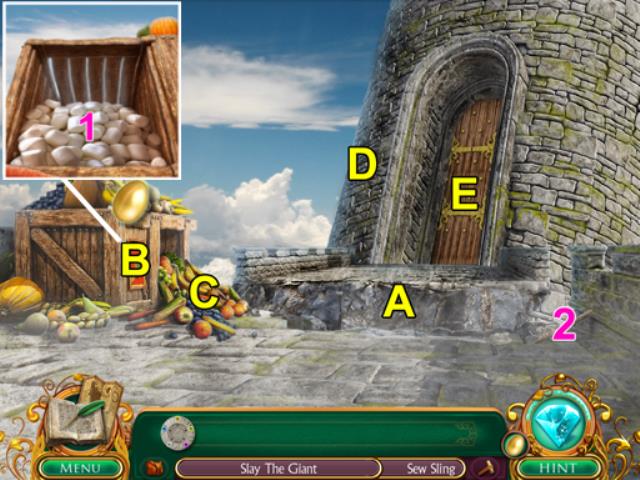
- Collect JACK and prepare to confront the Giant (A).
- Use the Sling (1) and then the Bomb (2) on the hand (A).
- Use the MATCH (3) on the armed sling (A) to ignite the bomb and watch the ending cinematic.
- Congratulations! You’ve completed Fairy Tale Mysteries: The Beanstalk!




 Hidden Mysteries: Return to Titanic Walkthrough, Guide, & Tips
 Intrigue Inc: Raven's Flight Walkthrough, Guide, & Tips
 Relic Hunt Walkthrough, Guide, & Tips
 Alice in Wonderland Walkthrough, Guide, & Tips
 Ghosts of the Past: Bones of Meadows Town Walkthrough, Guide, & Tips