Elementals: The Magic Key Walkthrough, Guide, & Tips
Elementals: The Magic Key Walkthrough

Welcome to the Elementals: The Magic Key Walkthrough!
Plunge into the captivating world of magic inhabited by elementals. Help Albert, a young magician, restore the Key of Eiron.
Whether you use this document as a reference when things get difficult or as a road map to get you from beginning to end, we’re pretty sure you’ll find what you’re looking for here.
Enjoy this complete Elementals: The Magic Key game walkthrough, featuring annotated screenshots from actual gameplay!
We hope you find this information useful as you play your way through the game. Use the walkthrough menu below to quickly jump to whatever stage of the game you need help with.
Remember to visit the Big Fish Games Forums if you find you need more help. Have fun!
This walkthrough was created by Phillip J.
WALKTHROUGH MENU
- GENERAL TIPS
- CHAPTER ONE: THE MAGIC TOWER
- CHAPTER TWO: THE GREAT FOREST
- CHAPTER THREE: THE CAVERN
- CHAPTER FOUR: THE GREAT RIVER
- CHAPTER FIVE: THE SKY CASTLE
- CHAPTER SIX: THUNDER HILLS
- CHAPTER SEVEN: TEMPLE OF FLAMES
GENERAL TIPS
- Pay attention to the scroll in the upper left corner of a normal scene; it is a helpful agenda.
- After each use the hint button automatically recharges within a few moments.
- When you take too long to find an item, it will begin to glisten with orange sparks for a short while.
- Use an attack spell at the beginning of each magic battle; the spells usually recharge after summoning a few elementals.
- There are no penalties for using the exit button at the bottom right corner of a puzzle.
PUZZLES

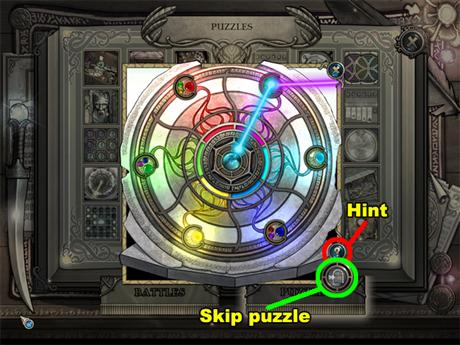
- Each puzzle has a button in the bottom right corner of the scene with a small door on it. You can click that button to skip the puzzle, but only after it is finished recharging.
- The button with the question mark is used to view a hint concerning the current puzzle.
MAGIC BATTLES

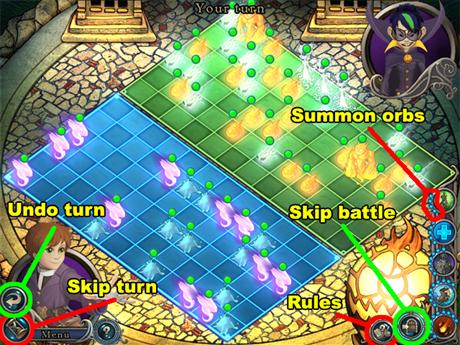
- In the bottom left corner of the screen is the button used to skip your turn.
- Above that button is a button used to undo a move you previously made.
- The button with the small door left of the bottom right corner of the screen will allow you to skip a magic battle.
- The 3rd button to the left of the bottom right corner of the screen will display the rules of the game.
- Each spell has an amount of orbs on the left side of them. These orbs indicate how many elementals need to be summoned before the spell is available.
- Align any 3 matching elementals vertically, horizontally, or diagonally to summon a stronger elemental.
- Try aligning 5 elementals to summon 3 stronger elementals instead of 1.
CHAPTER ONE: THE MAGIC TOWER
ALBERT’S BIRTHDAY

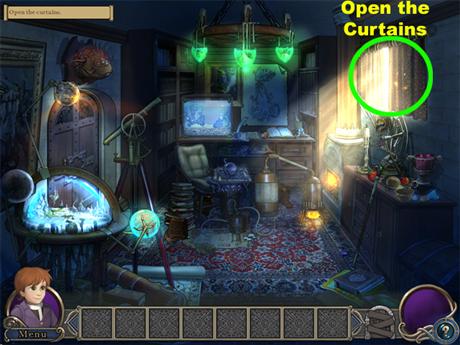
- Click on the curtains on the right side of the room.

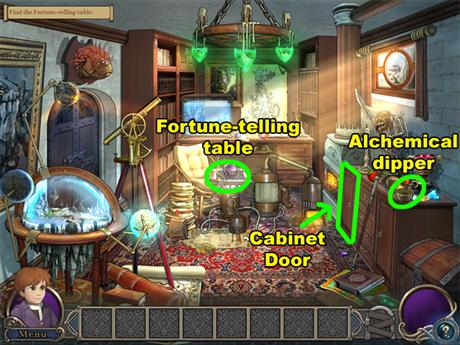
- Click on the Fortune-telling table in the center of the room.
- Click on the alchemical dipper below the window.
- Click on the left cabinet door of the dresser below the window.

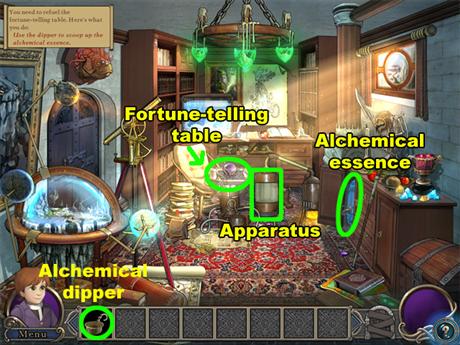
- Use the alchemical dipper from your inventory on the alchemical essence, which is in the left cabinet door.
- With the dipper still attached to your cursor, click on the apparatus in the center of the room.
- Click on the Fortune-telling table.

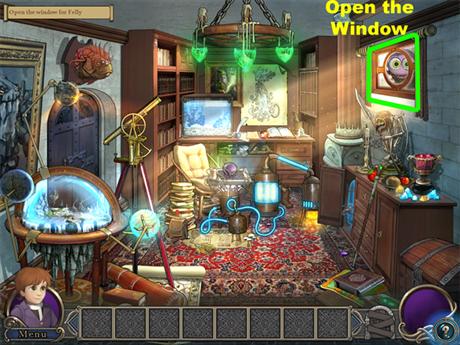
- Click on the window to let Felly in.

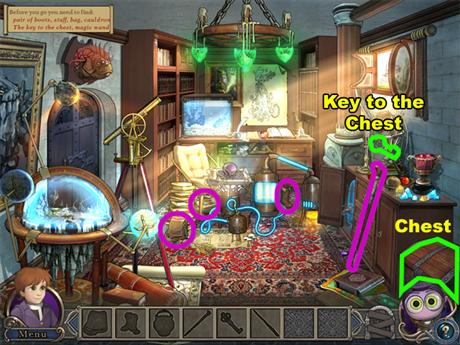
- Collect the pair of boots, cauldron, and bag located near the center of the room.
- Collect the key and staff below the window.
- Use the key on the chest in the bottom right corner of the room to unlock it.
- Click on the unlocked chest to open it.

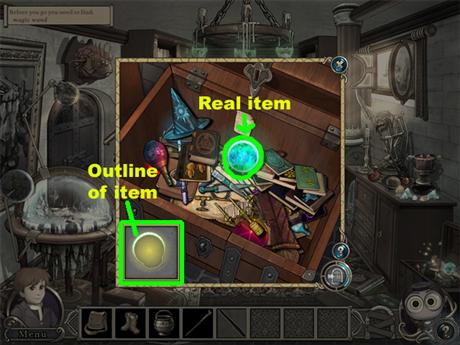
- Use the image of the outlined item in the bottom left corner of this puzzle to find an item of the same shape in the chest.
- The first item in the chest is the crystal ball in the center of the chest.
- Click on the crystal ball to remove it from the chest.
- After finding an item, the image of the outlined item will change to match another item for you to find.

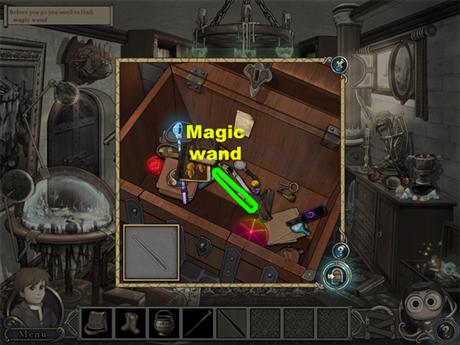
- After finding several items you will find the wand at the bottom of the chest.

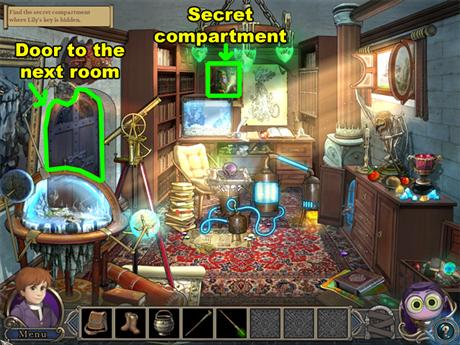
- Click on the painting above the fish tank.
- Click the door on left side of the room to leave.

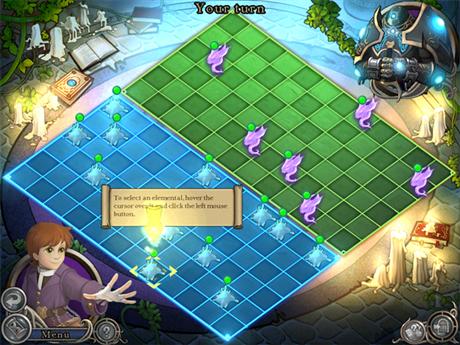
- You will be attacked for the first time as you enter the room.
- Pay attention to the tutorial that is provided.

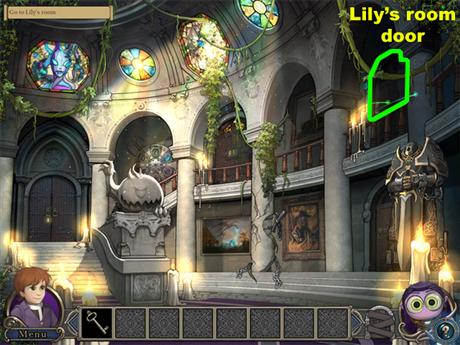
- Click on Lily’s room door above the golem you fought.

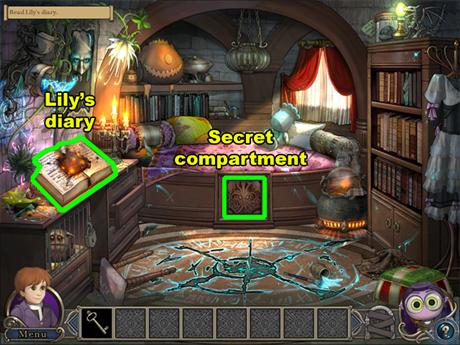
- Click on Lily’s diary to read it.
- Click on the wooden carving at the foot of bed.

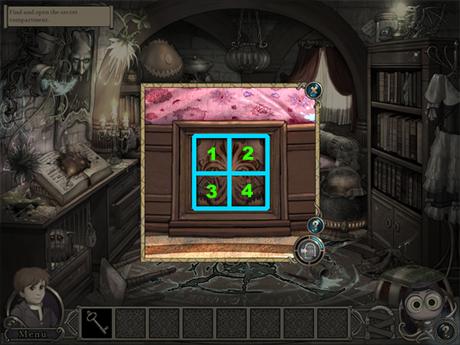
- The puzzle has 4 sections: an upper left, bottom left, upper right, and a bottom right section.
- In the screenshot a number is assigned to each of the sections.
- Click once on each section in the order below:Section 1 (upper left)
Section 4 (lower right)
Section 2 (upper right)
Section 3 (lower left)

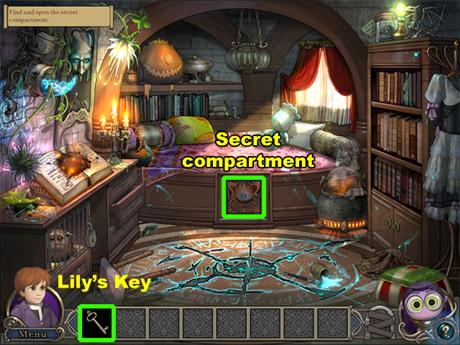
- Use Lily’s key to open the secret compartment.

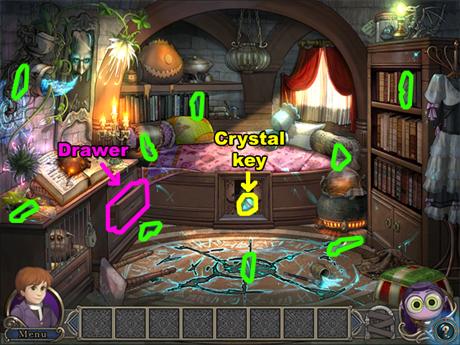
- Collect the crystal key stored in the secret compartment.
- Collect the 6 mirror shards scattered around the center of the screen.
- Collect the 2 mirror shards between the top and bottom corners of the left side of the screen.
- Collect the mirror shard on the top shelf of the book case.
- Click on the open drawer below Lily’s diary.

- Similar to the puzzle before, remove the unwanted items until you find a key in the center of the drawer.

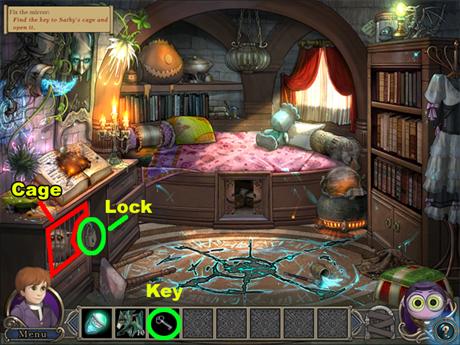
- Use the key to unlock the lock on the cage to the left of the room.
- Click on the cage to open it.
- The creature will attack you after you open the cage.

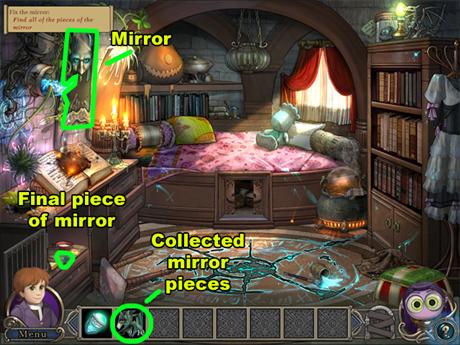
- Collect the final mirror shard inside the cage.
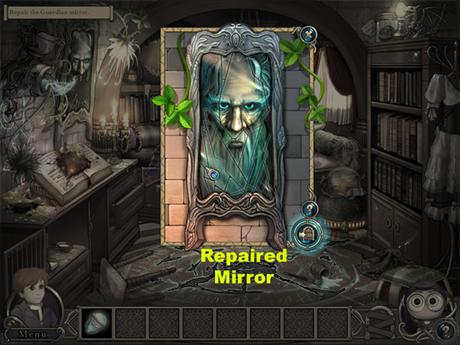
- Use the mirror shards on the broken mirror above Lily’s diary.

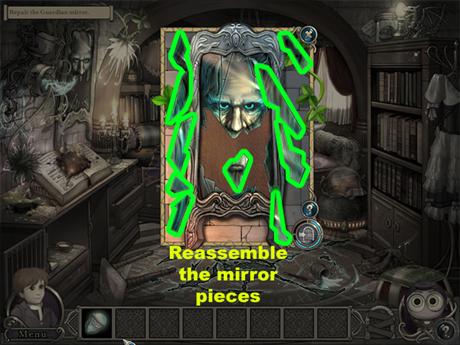
- Drag the 10 mirror shards to their proper positions to complete this jigsaw puzzle.
- The shards will snap into place when you set them where they belong.


- This is how the puzzle will turn out once the shards are in their correct places.

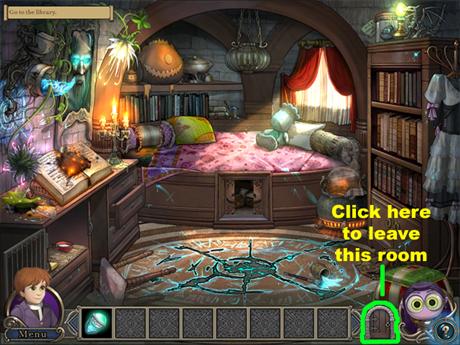
- Click on the small door beside Felly on the lower right corner of the screen to exit.

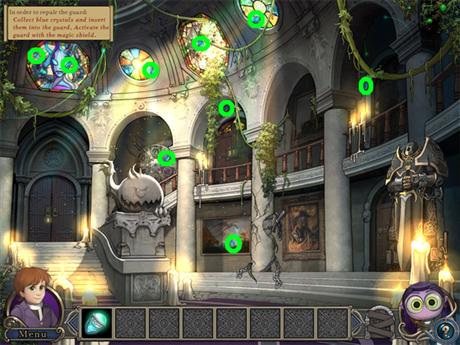
- Collect all 9 magic crystals.
- 5 of the crystals are in the 4 stained-glasses at the top of this room.
- 1 crystal is below the 2nd archway above the fire element statue.
- 1 is below the 3rd archway above the center of the room.
- 1 is under the 5th archway left of Lily’s room door.
- 1 of the crystals is in the painting below the center of this scene.

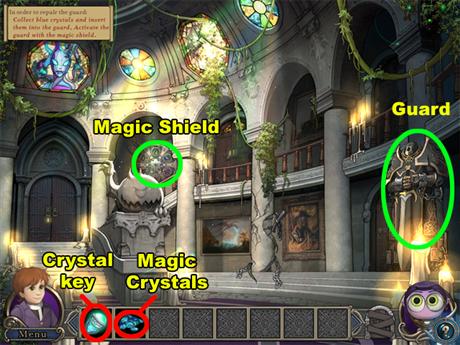
- Use the magic crystals on the golem guard you fought earlier.
- Use the crystal key on the magic shield under the 2nd archway.

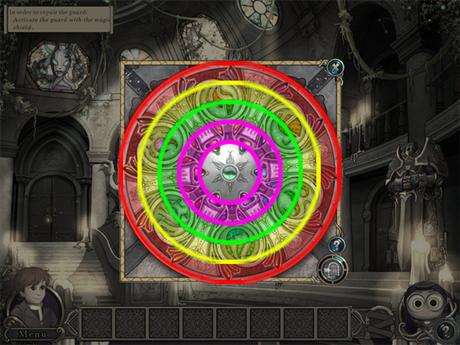
- In this puzzle you must rotate the 4 outer rings of the shield until they all align properly with the center of the shield.
- It is best to align the rings from the innermost to the outermost part of the shield.

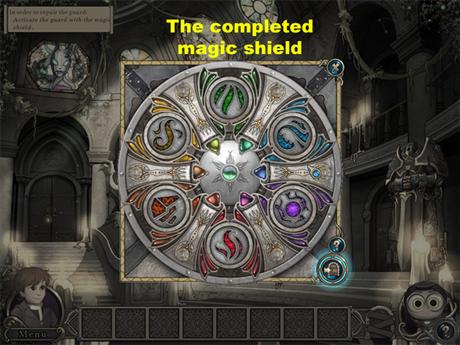
- This is how the aligned shield will appear once you have completed this puzzle.

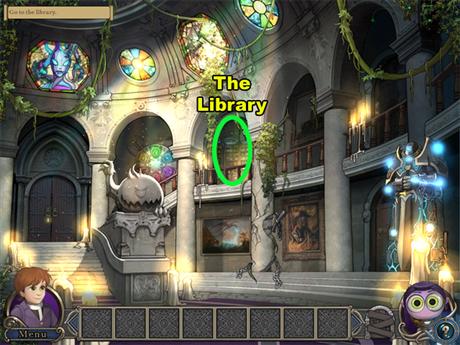
- Click on the entrance to the library under the third archway.

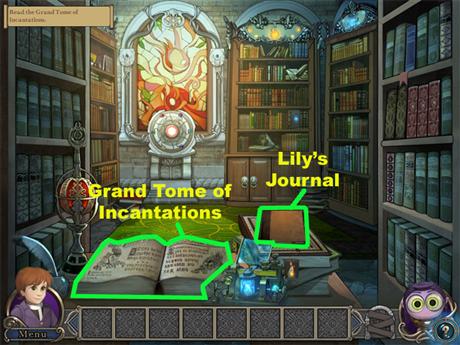
- Click on the large opened book at the bottom of the scene.
- Click on Lily’s journal to the right of the large book.

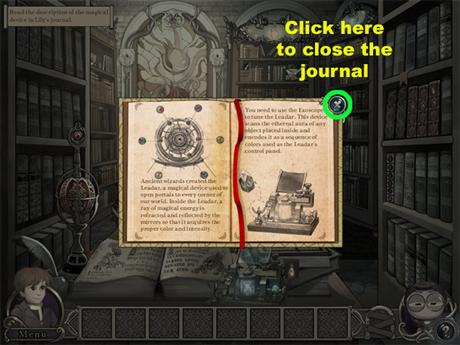
- After reading what is in the journal, click on the “X” button in the upper right corner of the journal to close it.

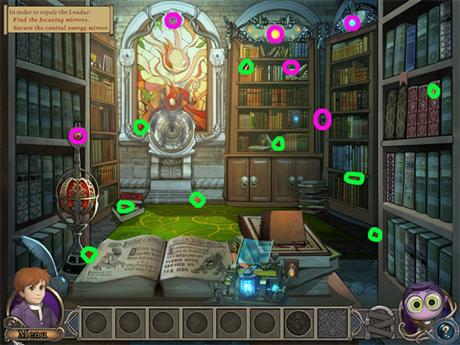
- Find all 6 focusing mirrors.
- 1 is at the top of the stain-glass window.
- 2 are at the top of the 2 book cases right of the window.
- 1 is on the 4th shelf of the book case to the right of the window.
- 1 of these mirrors is at the top of the red contraption to the left of the room.
- 1 of the mirrors is in the center of the right half of the screen.
- Find all 9 pieces of the central mirror.
- 1 is on the 4th shelf of the book case to the right of the window.
- 1 is on the 1st shelf of the book case to the right of the window.
- 1 is below the center of the right half of the room.
- 1 is to the right of Lily’s journal.
- 1 is below the top right corner of the room.
- 1 of the pieces is in the bottom left corner of the stained-glass window.
- 1 of the pieces is to the left of the large opened book.
- 2 of the pieces are between the large book and the stained-glass window.

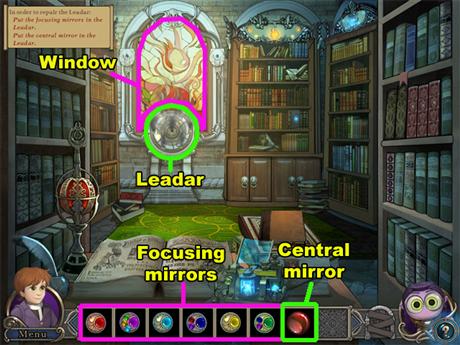
- The Leadar is the smoking contraption below the stained-glass window.
- Use all 6 of your focusing mirrors on the Leadar.
- Place the central mirror into the Leadar.
- Click on the stained-glass window.

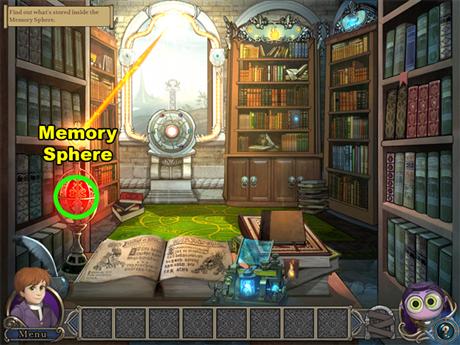
- Click the center of the glowing red memory sphere to the left of the room.

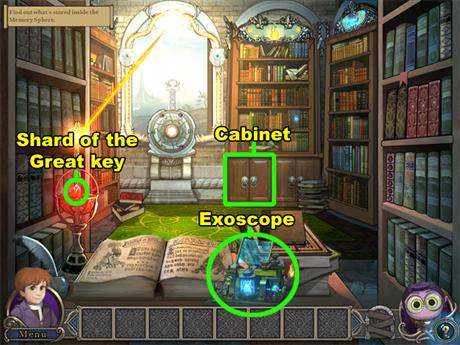
- Collect the glowing red shard in the center of the memory sphere.
- Then use the shard on the Exoscope; which is the glowing blue contraption at the bottom of the room.
- Click on the left pair of cabinet doors above Lily’s journal.

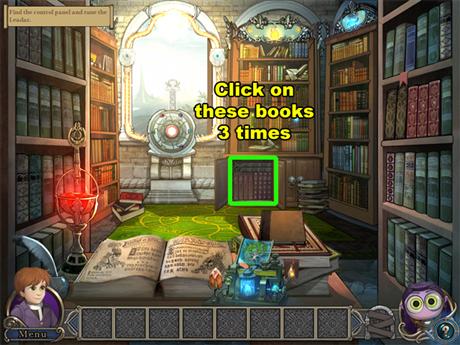
- You will find a stack of books in the cabinet door.
- Starting with the 2 horizontal books, begin clicking on the books until all the books have been removed from the cabinet.

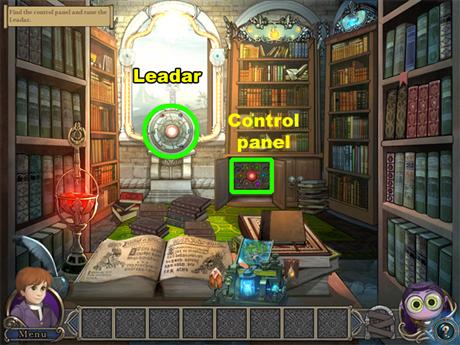
- In the cabinet is a control panel.
- The control panel will make a color coded sequence that you will have to mimic by clicking on the colored buttons you saw flash.
- Here is the sequence of colored buttons to press:Purple, yellow, red, and then green.
Click on the Leader next.

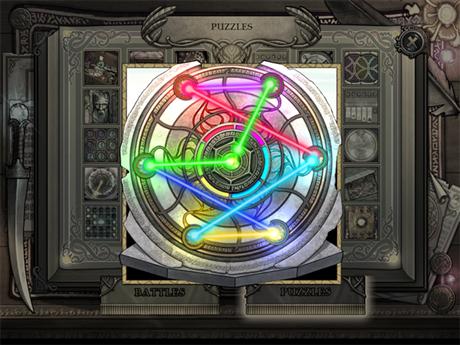
- There are 6 focusing mirrors around the Leader.
- You must rotate to mirrors to redistribute the colored beam through all of the mirrors and back through the center.
- However the color of the beam that was created by the center has to be the color of the final beam passing through the center.
- Click on the mirrors in this order to succeed:Rotate the purple mirror 1 time.
Rotate the red mirror 4 times.
Rotate the light blue mirror 4 times.
Rotate the dark blue mirror 4 times.
Rotate the green mirror 2 times.

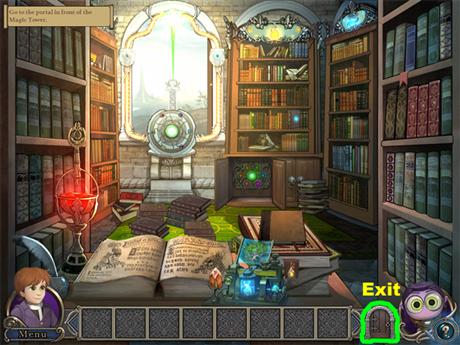
- Exit the room by clicking on the small door beside Felly.

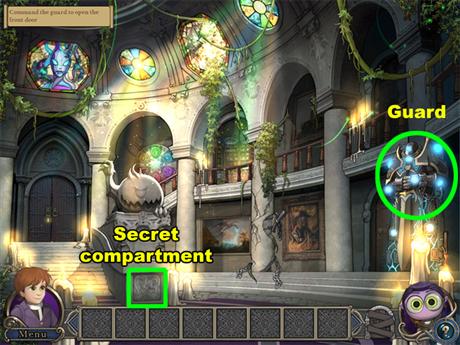
- Click on the guard.
- Click on the small stone carving at the bottom of the stairs.

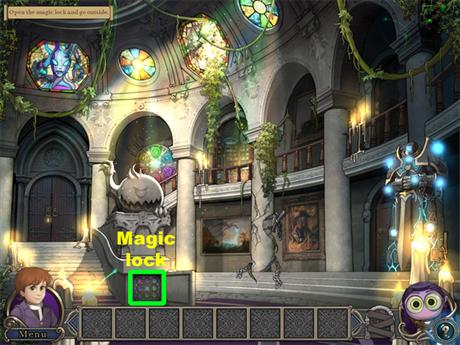
- Click on the magic lock at the bottom of the stairs.

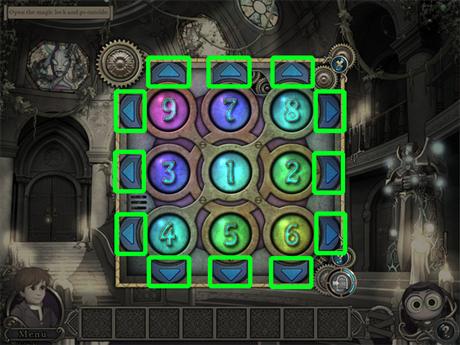
- There are 9 arrows surrounding this puzzle.
- Those arrows shift the numbers either horizontally or vertically depending on which them you click.
- Rearrange the numbers numerically starting with the number “1” set in the top left corner to complete this puzzle.

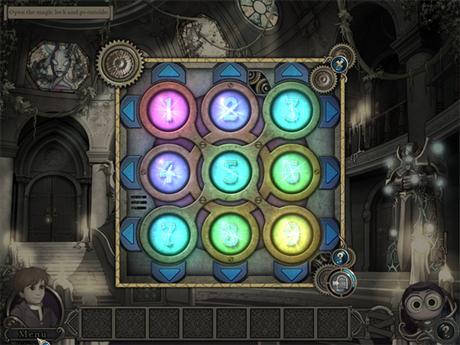
- This is how it will look after completion.

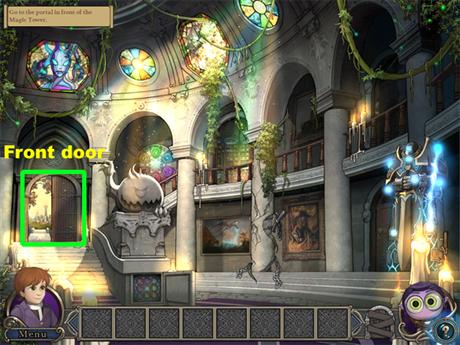
- Click on the opened door to the left of the room.

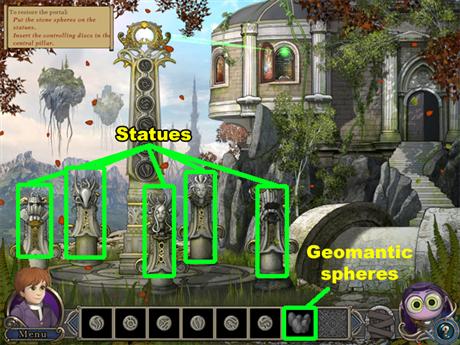
- Click the central pillar surrounded by statues.
- Find the 5 geomantic spheres.
- 1 is on the stairs leading back to the door of the Magic Tower.
- 1 is on the left side of the door.
- 1 is one the right side of the 2nd statue and another is on the right side of the 5th statue.
- 1 is on the roof of the library near the top center of the scene.
- Find the 6 stone discs.
- 1 above the left library window.
- 1 is above the center of the scene.
- 1 is on the top of the 2nd column of the Tower.
- 1 is above the Tower’s door.
- 2 of the discs are on the bridge leading to the Tower.


- Use the geomantic spheres on the 5 statues surrounding the central pillar.

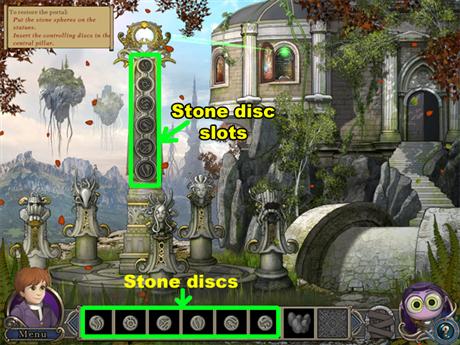
- Place the stone discs into their symbol-matching slots on the pillar.
- Each slot has a symbol to match the symbol of a disc.

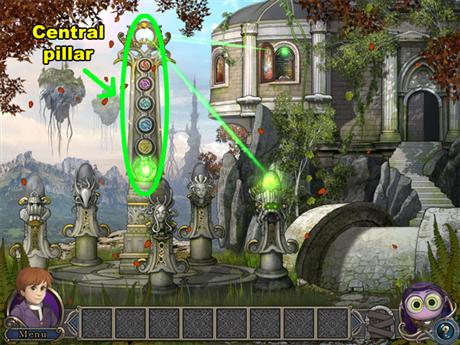
- Click on the central pillar.
CHAPTER TWO: THE GREAT FOREST
THE FOREST MASTER

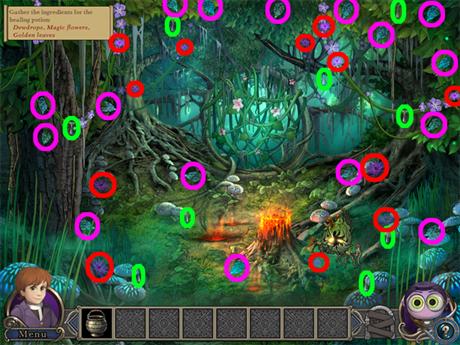
- Collect all 9 Dewdrops.
- 2 of the Dewdrops are on the left side of the fire.
- 2 are on the right side of the Forest Baby.
- 1 is on the vine covering the 1st tree trunk on the left side of the room.
- 1 is left of the top center of the room.
- 1 is to the left side of the top right corner of the room.
- 2 are near the center of the top right section of the room.
- Collect all 16 Golden leaves.
- 2 are below the top left corner of the room.
- 1 is above the center of the left half of the room.
- 1 is below the center of the left half of the room near the tree.
- 1 is left of the center of the room.
- 1 is below the fire.
- 6 are in a straight horizontal line at the top of the room.
- 2 below the top right corner of the room.
- 1 is to the right of the center of the screen.
- 1 is above the bottom right corner of the room.
- Collect all 12 Magic flowers.
- Magic flowers look similar to normal flowers, though unlike normal flowers they have over 10 pedals.
- 1 of the flowers is above the cauldron in your inventory.
- 1 is in the center of the left half of the room.
- 3 of them are near the top of the left half of the room.
- 3 are near the top of the right half of the room.
- 1 is on the thick vine on the right side of the room.
- 1 is below the Forest Baby.
- 1 is to the right of the Forest Baby.
- 1 is in the center of the right half of the room.

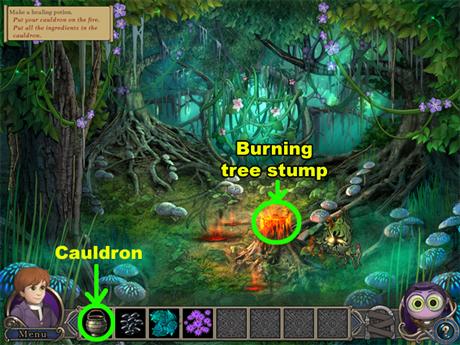
- Place the cauldron onto the burning tree stump.

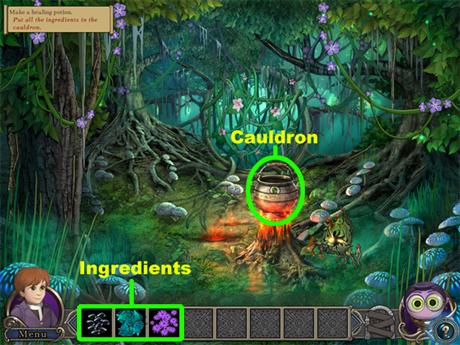
- Place all of the ingredients you collected into the cauldron.
- Click on the cauldron.

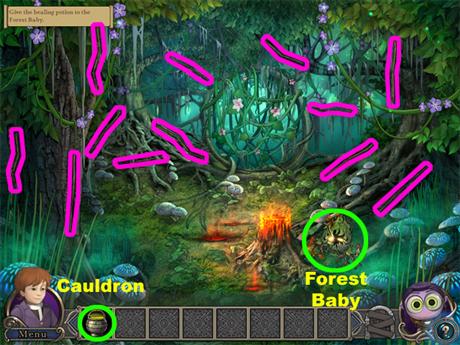
- Use the Cauldron on the Forest Baby.
- Collect all 12 twigs.
- 7 twigs are bunched up around the center of the left half of the screen.
- 5 twigs are bunched up around the center of the right half of the screen.
- Albert will cast a magic spell when you are finished collecting the twigs.

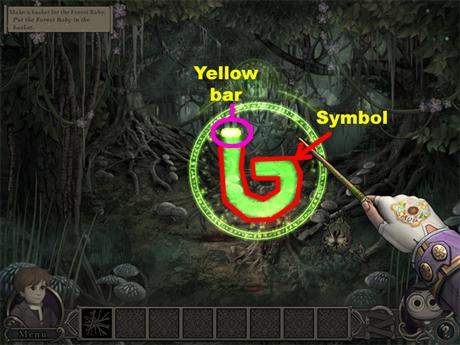
- Drag the glowing bar as if you were using a crayon to trace the symbol from beginning to end.
- If you trace outside of the symbol you will have to start over again.

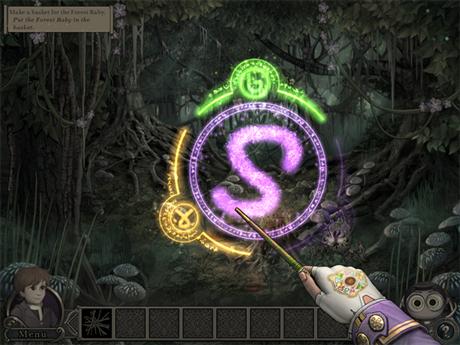
- There should be a noticeable sparkling trail of energy as you trace a symbol.
- After tracing the 3 symbols you will receive a basket.

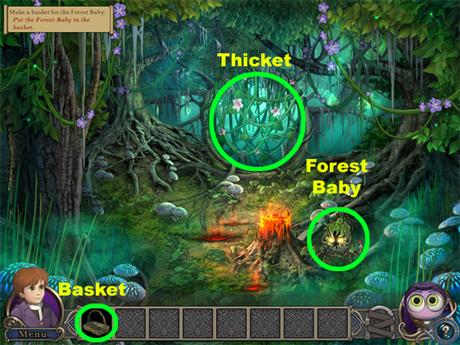
- Use the basket on the Forest Baby.
- Click on the thicket in the center of the screen.

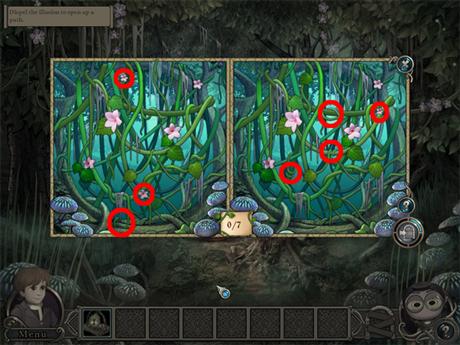
- Find 7 differences between the 2 pictures to complete this puzzle.
- Here are the differences:
- At the top of the picture there is a small flower missing.
- Below the center of the picture is a small flower missing.
- Left of the bottom center of the picture is a thin curled-up vine missing.
- Just right of the center is a thin vine wrapped around a thick vine twice instead of once.
- Below the flower near the upper right corner there is a flower missing.
- Right of the lowest real flower is a thin vine wrapped around a thick vine.
- Above the center are 2 vines wrapped around a thick vine instead of 1.

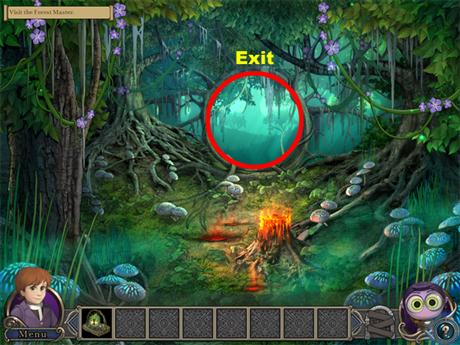
- Click the area where the thicket used to be.
- You will be attacked by a fire elemental.

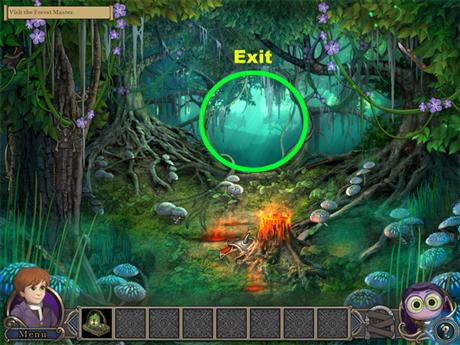
- Continue through the entrance to the Forest Master.

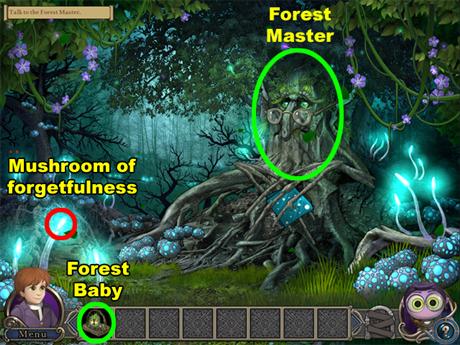
- Click the Forest Master.
- Give the Forest Master the Forest Baby.

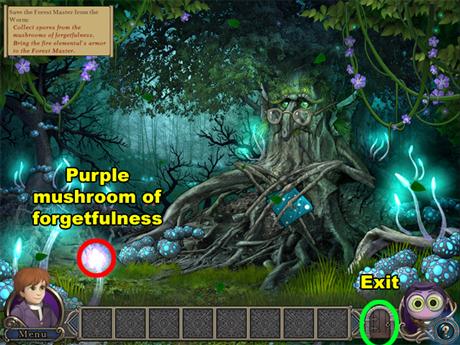
- Click a mushroom whenever it turns purple to collect its spore. The mushrooms look like glowing tentacles.
- Collect the spores.
- Use the door beside Felly to exit.

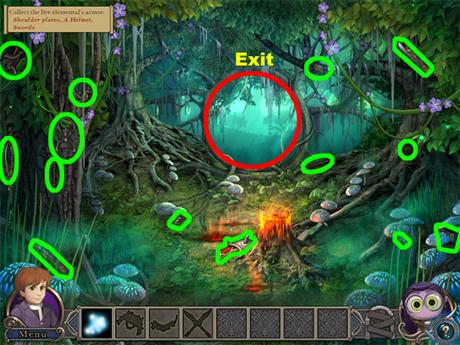
- Collect all 14 pieces of armor.
- 5 pieces are on the 1st tree to the left.
- 1 is above Albert’s head.
- 2 are left of the fire.
- 2 are to the right of the entrance to the Forest Master.
- 2 are on the last tree to the right.
- 2 are above Felly in the mushrooms.
- Go back to the Forest Master.

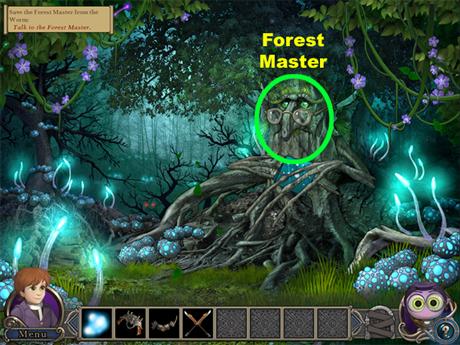
- Click the Forest Master.
- You will receive your first artifact and be attacked by a worm.

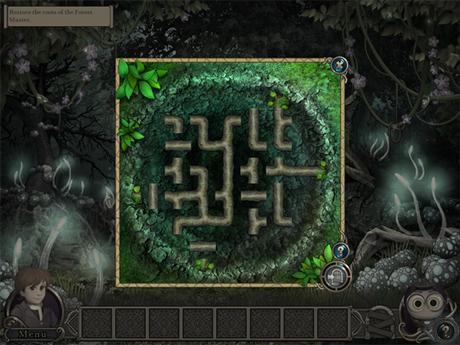
- Reconnect all of the Forest Master’s roots to complete this puzzle.
- Rotate the roots until they are all connected without any gaps.
- Rotate a root by 45 degrees by clicking on it.

- This is how the roots will look once the puzzle is complete.


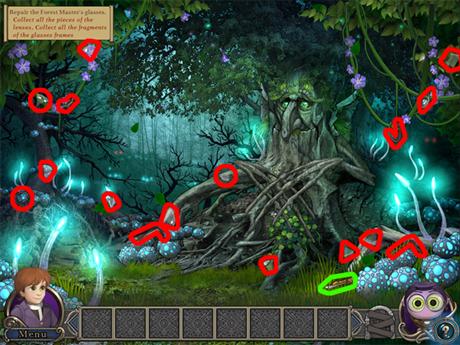
- Collect all 16 fragments of Forest Master’s glasses.
- 3 are on the thick vine near the upper left corner of the room.
- 2 are in the center of the left wall of the scene.
- 3 are below the center of the left half of the room.
- 1 is on the Forest Master’s root in the center of the room.
- 1 is below the Forest Master’s fingers.
- 3 are above the door beside Felly.
- 3 are on the vines below the top right corner of the room.
- Collect the sharp sword left of the bottom right corner of the room.

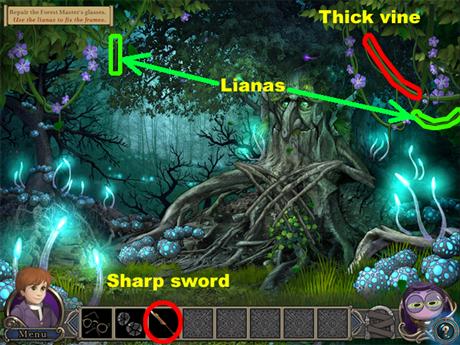
- Collect the 2 lianas. Lianas are thin vines.
- 1 of them is the lowest vine connected to the right wall of the screen.
- The 2nd is the vine hanging downwards off of the highest thick vine in the left half of the room.
- Use the sharp sword to cut the 2nd highest thick vine in the right half of the room.

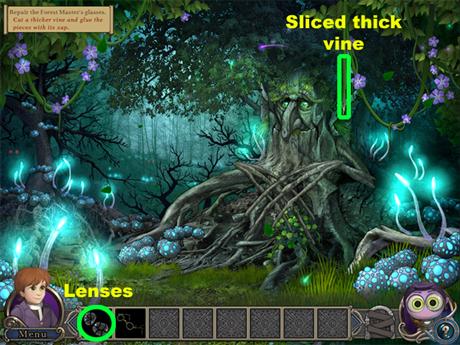
- Use the lenses on the thick vine you cut earlier.
- Albert will then cast a spell to fix the glasses.

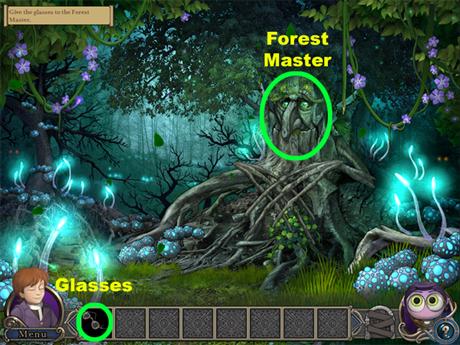
- Give the fixed glasses to the Forest Master.
- You will receive a crystal shard, and a portal will open.

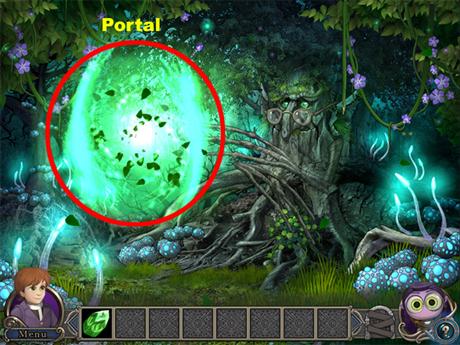

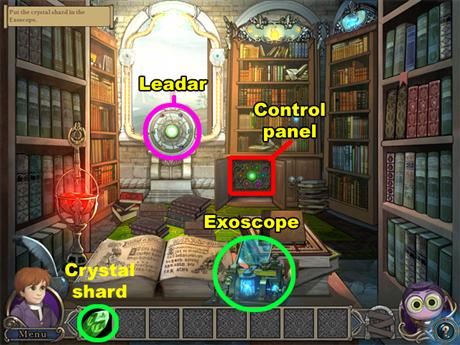
- Use the shard on the Exoscope.
- Use this sequence for the control panel:
- Red, blue, yellow, green, orange.
- Click the Leadar.
- Rotate the mirrors in this order:
- Rotate the purple mirror 1 time.
- Rotate the red mirror 1 time.
- Rotate the green mirror 1 time.
- Rotate the dark blue mirror 1 time.
- Rotate the light blue mirror 4 times.
- Rotate the yellow mirror 2 times.

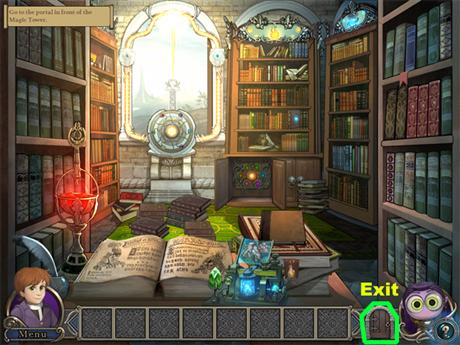
- Click on the door beside Felly.

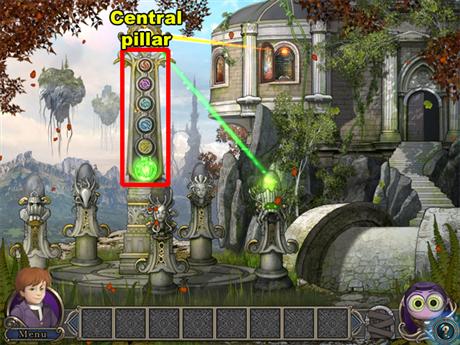
- Click on the central pillar.
- You will be interrupted by a card game.

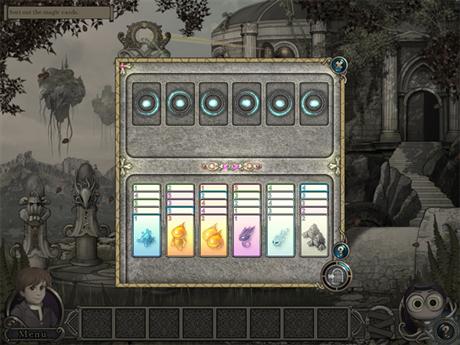
- Arrange each element of card at the top of the puzzle from the lowest to the highest number.
- There are 6 spaces at the top of the puzzle for the 6 elements of cards available.
- To stack the cards in the upper spaces you will have to begin with the lowest card then stack to the highest.
- At the bottom you can only stack a card onto another from the highest to the lowest number.
- You can stack any combination of colors at the bottom of the puzzle, and apply a card with any number value to a blank space.
- Right-clicking a card will send it to its rightful space at the top; if it is available.

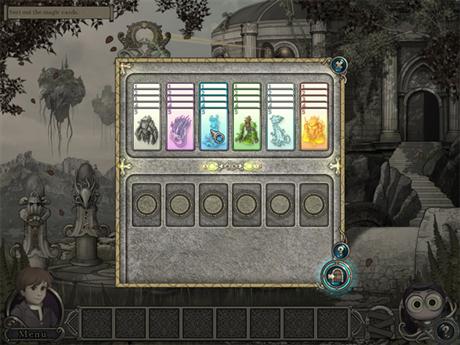
- This is how the completed decks should look.

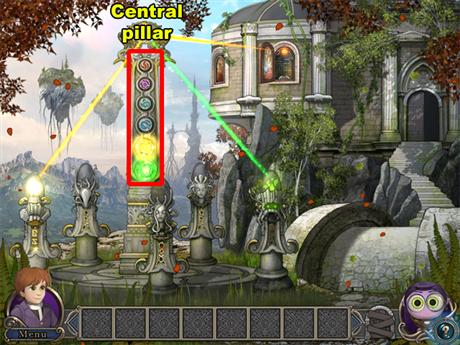
- Click on the central pillar again.
CHAPTER THREE: THE CAVERN
LADY OF THE LAKE

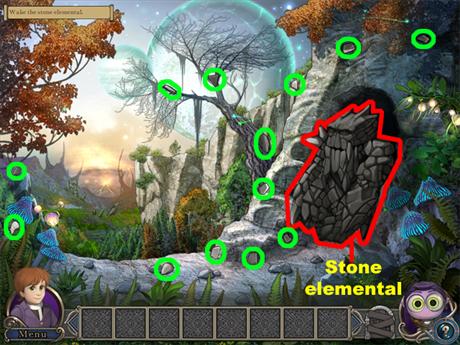
- Click the stone elemental blocking the cave.
- Collect all 13 stones.
- 2 stones are above Albert’s head.
- 3 stones are by the center of the bottom of this scene.
- 2 stones are on the tree branches near the top center of this scene.
- 3 stones are left of the stone elemental.
- 3 stones are above the stone elemental.

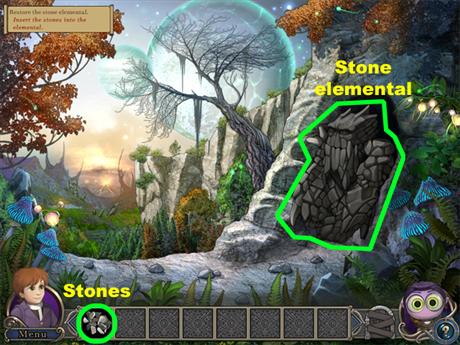
- Use the stones on the stone elemental.

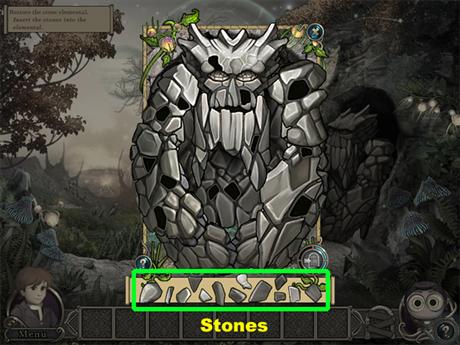
- Place the stones at the bottom of the puzzle into the shape-matching empty spaces of the elemental.
- Fill in all of the empty spaces to complete this puzzle.

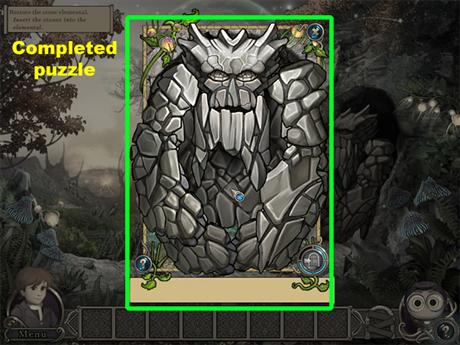
- This is how the stone elemental will look.
- Albert will cast a spell on the elemental.
- You will be attacked by the elemental.

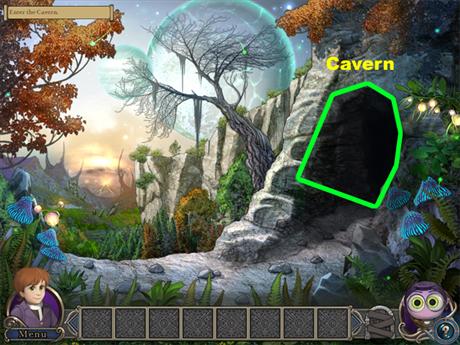
- Enter the cavern through the entrance the stone elemental was blocking.

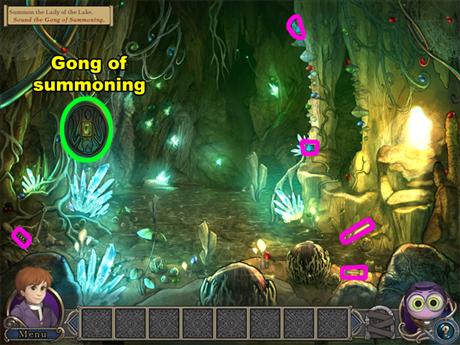
- Click the Gong of Summoning on the left side of the room.
- Collect all 5 pieces of the Wand of Summoning.
- 1 is above Albert’s head.
- 2 are above the small door beside Felly.
- 1 is right of the center of the room on a column.
- 1 is right of the top center of the room on the same column.

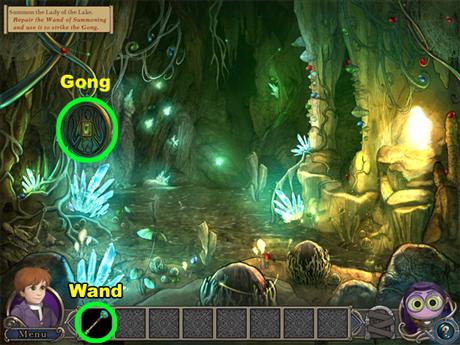
- Use the Wand on the Gong.

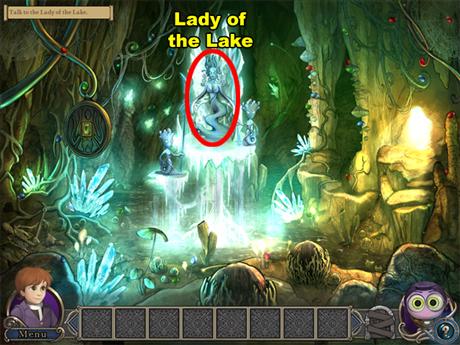
- Click on the Lady of the Lake.
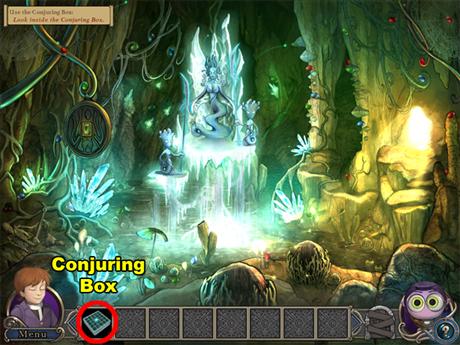
- She will give you an artifact, and a Conjuring Box.


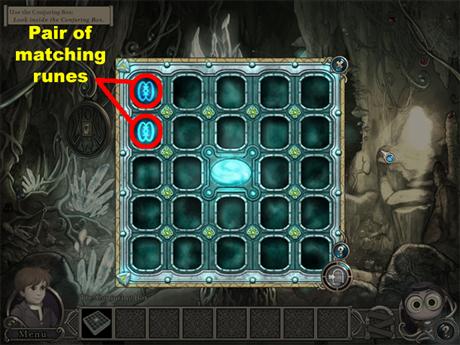
- There are runes hidden in each of the dark spaces.
- When you find 2 matching runes they will pair up and stay visible.
- Pair up all 12 matching runes to complete the puzzle.

- The positions of the runes are randomized, but this is how the completed puzzle should look.

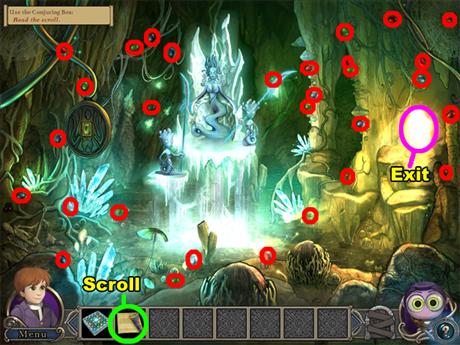
- Click the scroll in your inventory.
- Collect all 30 of the red, green, and blue crystals.
- 4 are to the left of the Lady of the Lake.
- 2 are above the Gong.
- 1 is left of the Gong.
- 4 are between the Gong and Albert’s head.
- 3 are around the bottom center of the room.
- 4 are to the right of the Lady of the Lake.
- 7 are above the cavern entrance.
- 2 are to the left of the cavern entrance.
- 2 are to the right of the entrance.
- 1 is on the lower glowing crystal in the right half of the room.
- Exit through the cavern’s entrance.

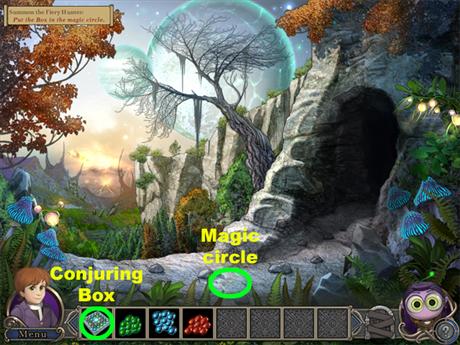
- At the center of the bottom of the room is a faded light blue magic circle.
- Use the Conjuring Box on the magic circle.


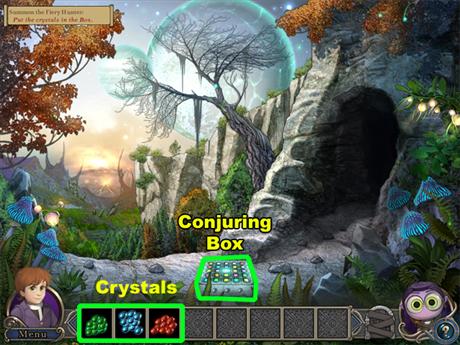
- Place all of the crystals into the Conjuring Box.

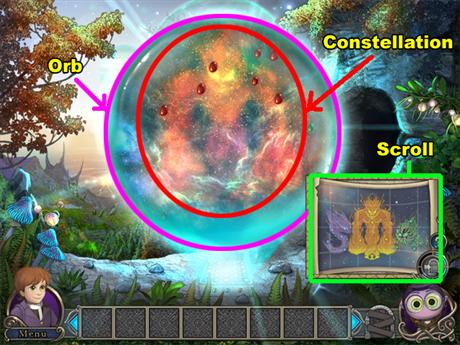
- Use the scroll above Felly as a guide to see where the crystals belong on each constellation.
- Keep in mind the sizes of the crystals when following the scroll’s guide.
- To scroll the view of the constellations drag anything except the crystals while keeping your cursor inside of the orb.

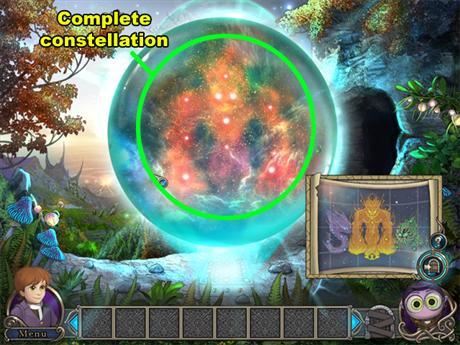
- This is how a complete constellation will look.
- Remember to complete all 3 constellations.
- Afterwards you will enter a magic battle.

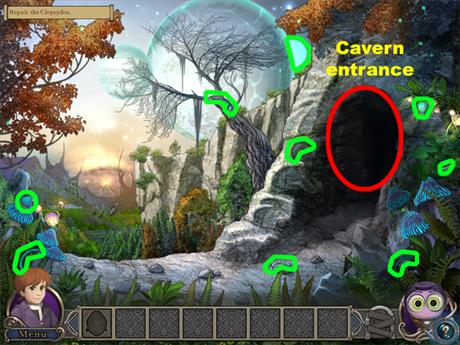
- Collect all 9 pieces of the Clepsydra.
- 2 are above the bottom left corner of the scene.
- 1 is on the tree near the center of the scene.
- 1 is to the right of the larger moon in the sky.
- 1 is left of the cavern entrance.
- 2 are right of the cavern entrance.
- 1 is above Felly.
- 1 is at the bottom of the screen near the cavern entrance.
- Enter the Cavern.

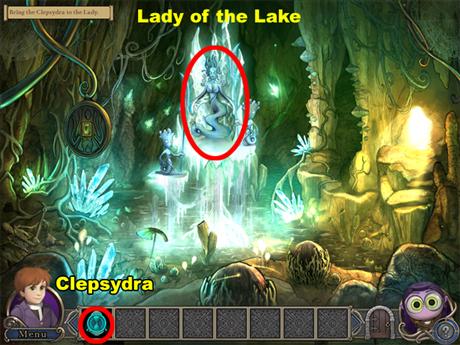
- Give the Clepsydra to the Lady of the Lake.
- You will receive another shard.

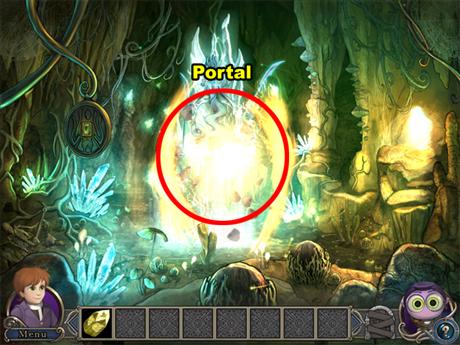

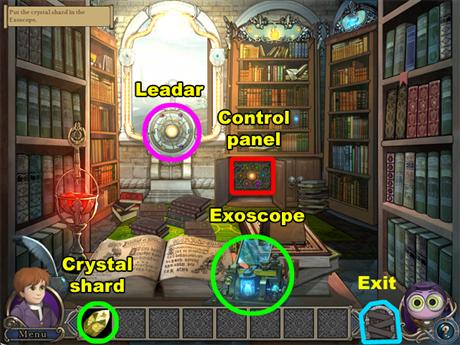
- Use the shard on the Exoscope.
- Use this sequence for the control panel:
- Purple, green, orange, red, and blue.
- Click the Leadar.
- Rotate the mirrors in this order:
- Rotate the yellow mirror 3 times.
- Rotate the red mirror 4 times.
- Rotate the light blue mirror 1 time.
- Rotate the purple mirror 4 times.
- Rotate the dark blue mirror 3 times.
- Exit the room.

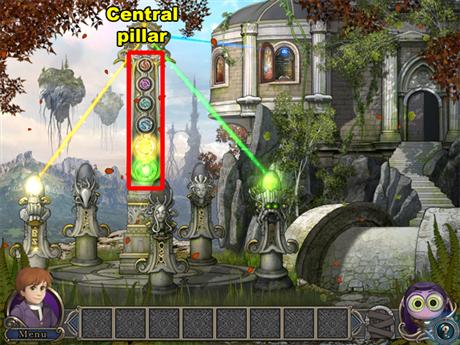
- Click the central pillar.
- You will be interrupted by the same card game as last time.
- After completing the puzzle, click on the central pillar again.
CHAPTER FOUR: THE GREAT RIVER
THE WATER LORD

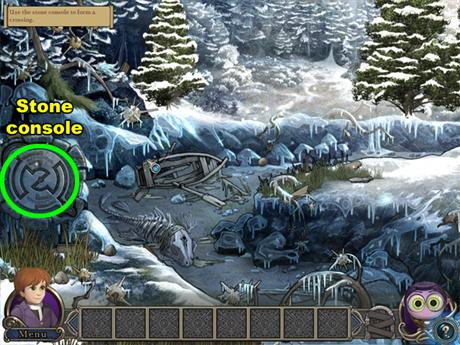
- Click on the stone console on the left side of the scene.

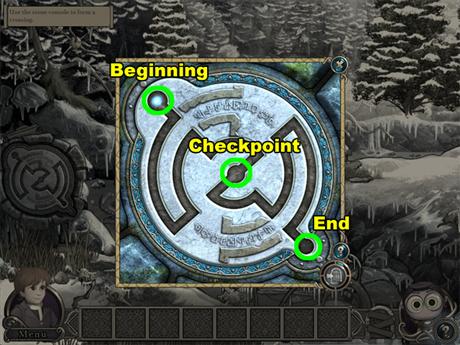
- This is almost the same as casting a spell.
- You must drag the orb, tracing the entire path from beginning to end.
- There is a checkpoint in the middle of the console. After dragging the energy through that point, it becomes your new start off point.

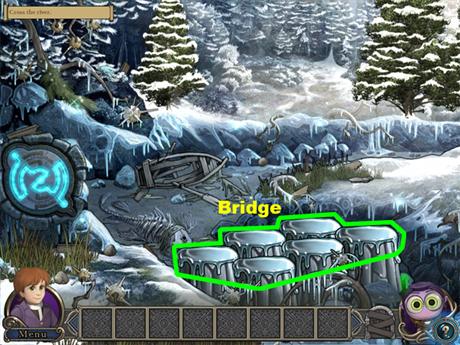
- Click the stone bridge at the bottom of the scene.
- You will be attacked when you cross the bridge.

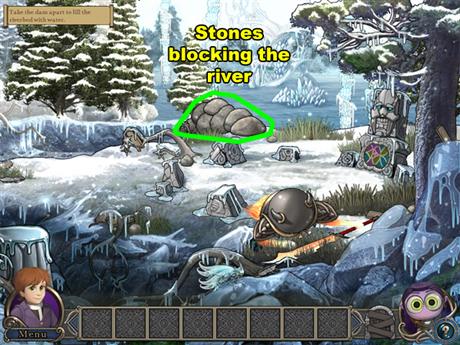
- Click on the stones blocking the river near the center of this scene.
- After the River Keeper talks to you a puzzle will appear on your screen.

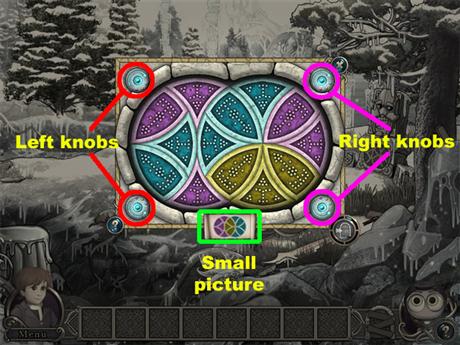
- Use the 4 knobs on each corner of this puzzle to rotate the interlaced circles in the center.
- The 2 knobs on the left side will rotate the left circle by 180 degrees.
- The 2 knobs on the right side will rotate the right circle by 90 degrees.
- The small picture at the bottom of the puzzle indicates what the puzzle needs to look like to complete it.

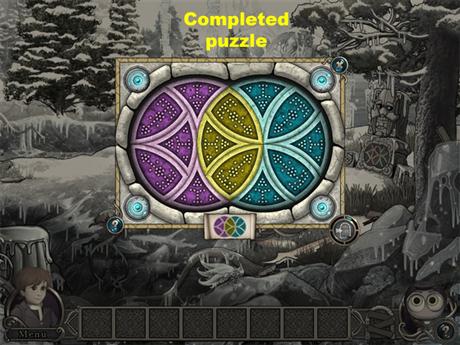
- This is what your puzzle will look like once it is complete.
- Afterwards you will receive a can.

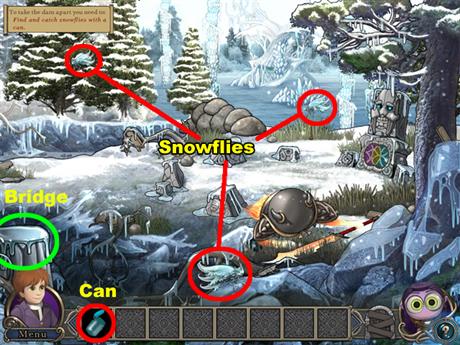
- Use the can to catch the Snowflies flying around the screen.
- You will need to catch 7 of them.
- After you are finished catching the Snowflies on this side of the bridge, cross the bridge to find more of them.
- Afterwards cross back over to the right side of the bridge.

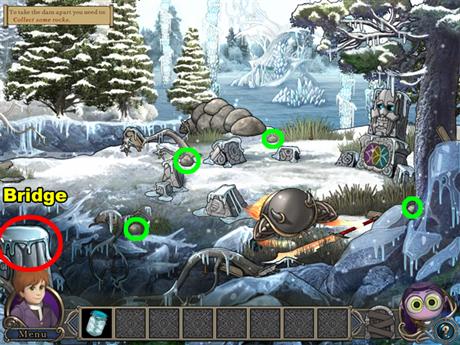
- Collect 4 rocks on this side of the bridge.
- 2 are below the boulders blocking the river.
- 1 is above the bottom right corner of the scene.
- 1 is below the center of the left half of the scene.
- Cross the Bridge.

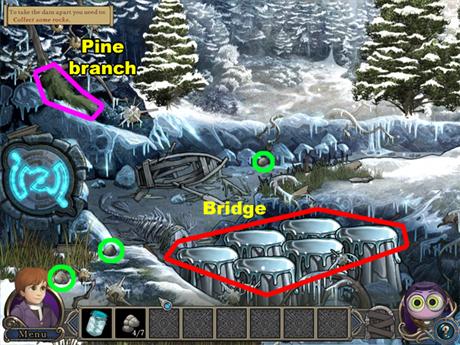
- Collect the 3 remaining rocks.
- 2 are to the right of the bottom left corner of the scene.
- 1 is in the center of the scene.
- Collect the pine branch above the stone console.
- Cross over the bridge again.

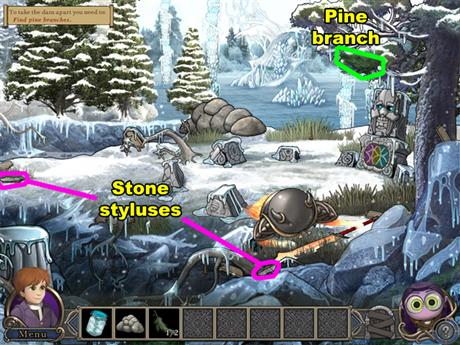
- Collect the pine branch above the River Keeper.
- Collect 2 stone styluses.
- 1 is below the fire elemental.
- 1 is above the bridge.

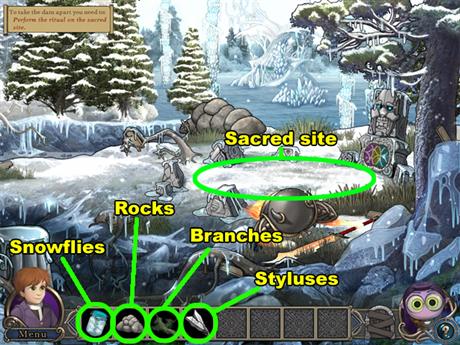
- Use the branches on the sacred site above the fire elemental.
- Use the styluses on the site.
- Use the rocks on the site.
- Use the can of Snowflies on the site.
- You will be given another artifact.
- Cross over the bridge.

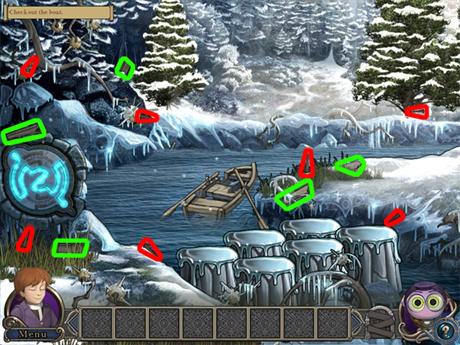
- Click the boat above the bridge.
- Collect 5 wooden planks.
- 1 is below the stone console.
- 1 is above the stone console.
- 2 are on the right side of the boat.
- 1 is near the center of the upper left section of the scene.
- Collect 7 nails.
- 1 is below the upper left corner of the scene.
- 1 is above the upper left corner of the scene.
- 1 is on the left side of the bridge.
- 1 is above the center of the left half of the scene.
- 1 is on the right side of the boat.
- 1 is on the right side of the bridge.
- 1 is in the tree trunk of the tree on the right side of the screen.
- Cross the bridge.
- You will be attacked by a stone element.

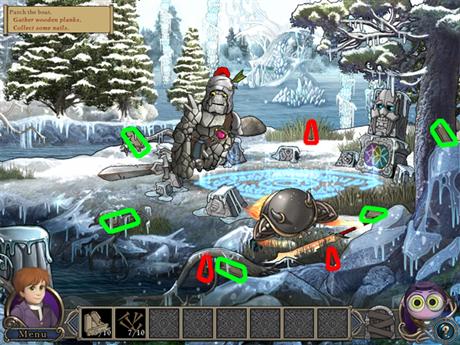
- Collect the 5 remaining planks.
- 1 is to the left of the stone elemental’s sword.
- 1 is on the right side of the bridge.
- 1 is at the center of the bottom of the scene.
- 1 is on the right side of the fire elemental.
- 1 is on the tree trunk on the right side of the scene.
- Collect the 3 remaining nails.
- 1 nail is below the fire elemental.
- 1 nail is at the center of the bottom of the scene.
- 1 nail is on the right side of the stone elemental.
- Cross the bridge 1 last time.

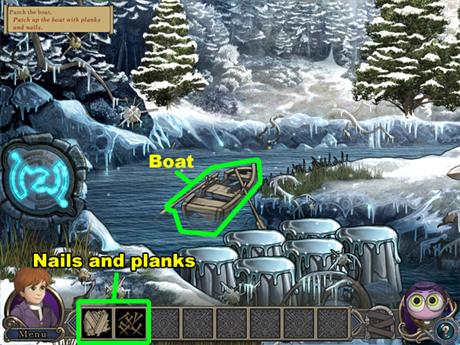
- Use the nails and planks on the boat.
- Albert will cast a magic spell.
- After casting the spell click on the boat again.

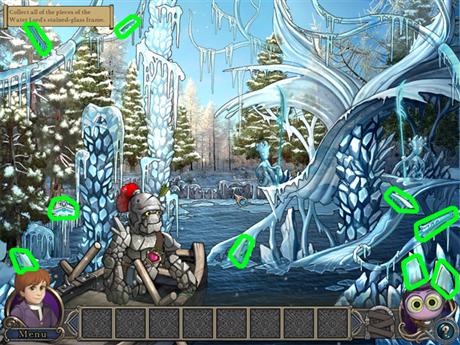
- Collect all 9 pieces of the Water Lord’s stained-glass frame.
- 2 pieces are above the bottom left corner of the scene.
- 1 is in the upper left corner of the scene.
- 1 is right of the upper left corner of the scene.
- 1 is to the right of the boat.
- 4 are above Felly.

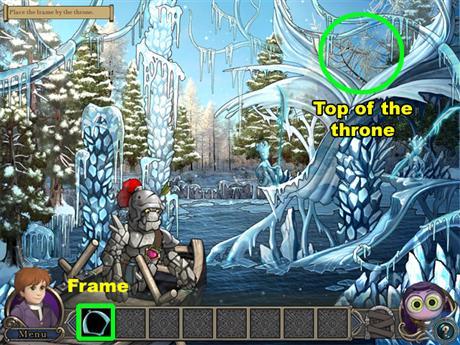
- Place the frame at the top of the 3rd pillar on the right side of the scene.
- Albert will then cast a magic spell.

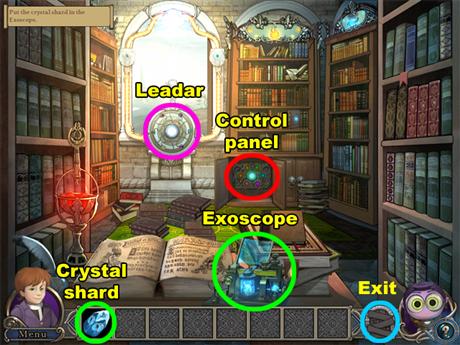
- Click on the repaired stained-glass portrait.

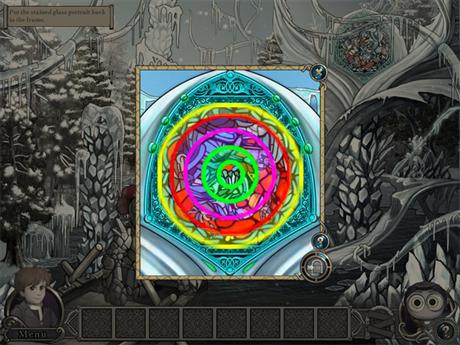
- Realign the outer rings of the portrait to complete the puzzle.
- Start with the innermost ring and work your way outwards.

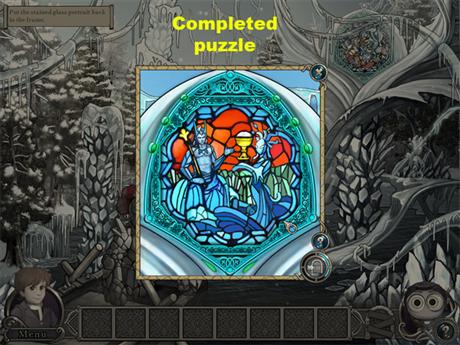
- This is how the portrait will look.

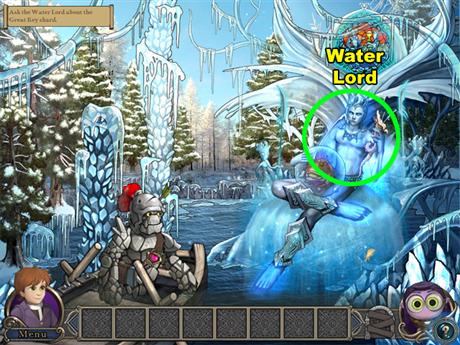
- Click on the portrait to summon the Water Lord.
- Click the Water Lord.
- You will receive a crystal shard.

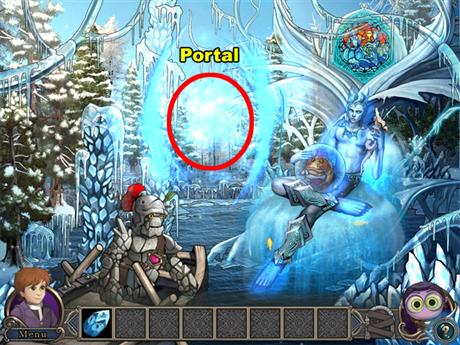


- Use the shard on the Exoscope.
- Use this sequence for the control panel:
- Orange, blue, red, green, purple, and yellow.
- Click the Leadar.
- Rotate the mirrors in this order:
- Rotate the purple mirror 4 times.
- Rotate the dark blue mirror 4 times.
- Rotate the green mirror 4 times.
- Rotate the red mirror 2 times.
- Rotate the yellow mirror 1 time.
- Rotate the light blue mirror 3 times.
- Exit the room.

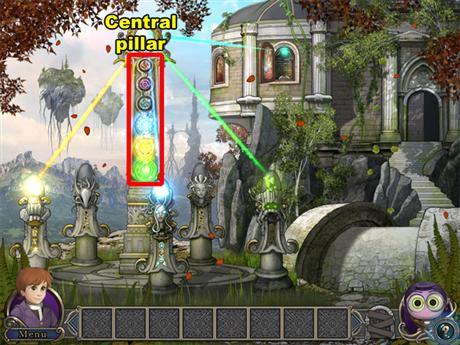
- Click the central pillar.
- You will be interrupted by another card game.
- When the card game is over, click on the pillar again.
CHAPTER FIVE: THE SKY CASTLE
RESCUING THE MISTRESS

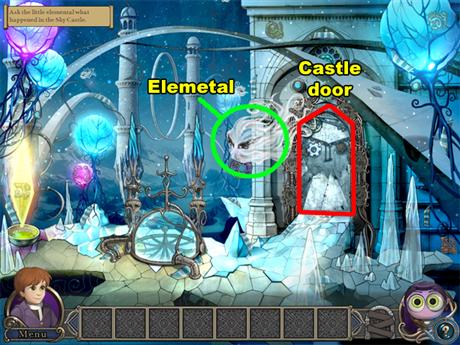
- Click the wind elemental in the center of the scene.
- Click on the Castle Door.
- The Door will attack you.

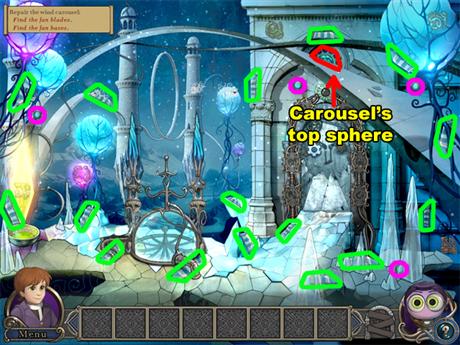
- Collect all 16 fan blades.
- 1 is below the top left corner of the scene.
- 1 is above the bottom left corner of the scene.
- 2 are to the right of the bottom left corner of the scene.
- 1 is above the center of the left half of the scene.
- 4 are around the center of the bottom half of the scene.
- 2 are to the left of the bottom right corner of this scene.
- 1 is above the bottom right corner of this scene.
- 1 is below the upper right corner of this scene.
- 1 is above the center of the scene.
- 1 is above the door.
- 1 is on the blue balloon in the upper right corner of the scene.
- Collect all 4 fan bases.
- 1 is below upper left corner of the scene.
- 1 is above Felly.
- 1 is above the Door.
- 1 is below the blue balloon in the upper right corner of the scene.
- Albert will then cast a spell.
- Collect the carousel’s top sphere above the Door.

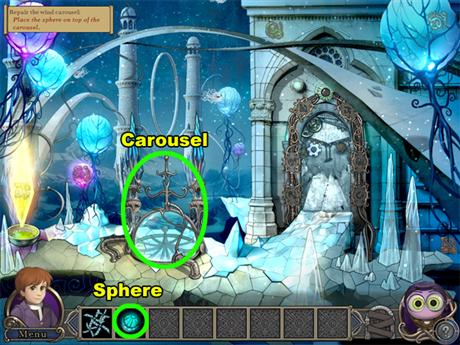
- Use the sphere on the carousel below the center of the left half of the scene.

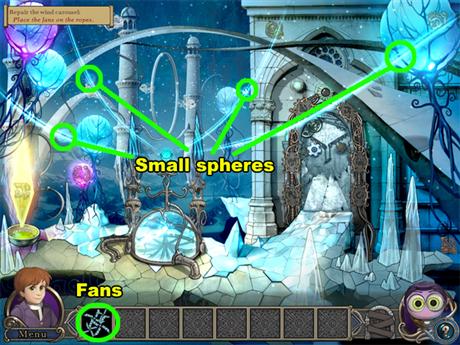
- Place the 4 fans on each of the 4 ropes connected to the carousel.
- Each of the ropes has a glowing sphere on it; those are where the fans belong.

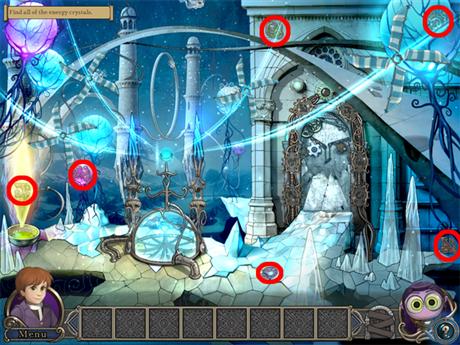
- Collect all 6 energy crystals.
- 1 is above the bottom left corner in the yellow glowing diamond.
- 1 is below the 1st of the 4 fans on the left side of the scene.
- 1 is near the bottom center of the scene.
- 1 is above the 3rd of the 4 fans.
- 1 is in the upper right corner of this scene.
- 1 is above the bottom right corner of this scene.

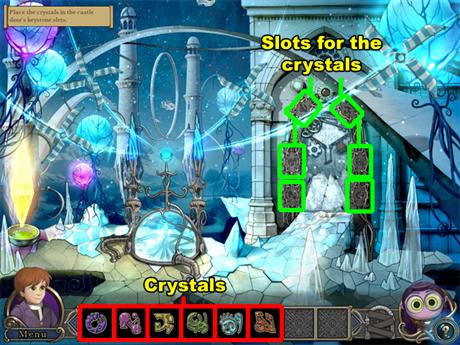
- Place each crystal you collected into the slots surrounding the Castle Door.
- Each crystal has a symbol matching 1 of the symbols of the Door’s slots.

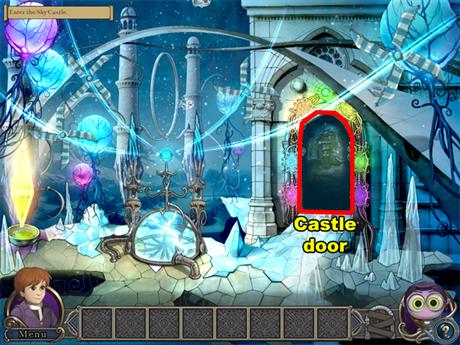
- Click on the entrance to the Castle.

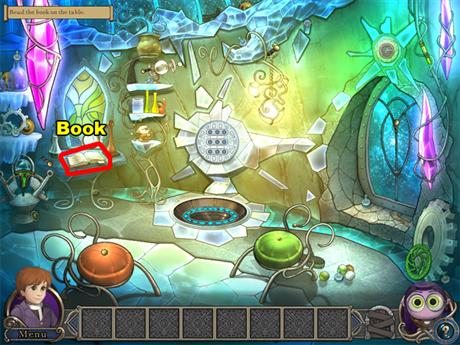
- Click the book on the table in the left side of the room.
- You will obtain a note.

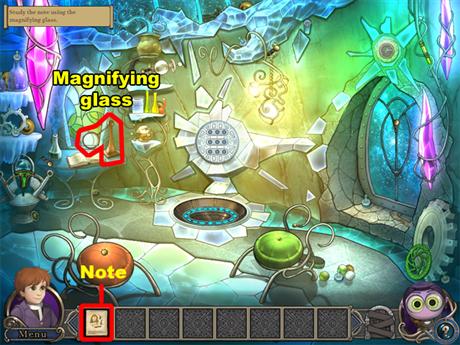
- Use the note on the magnifying glass beside the book.

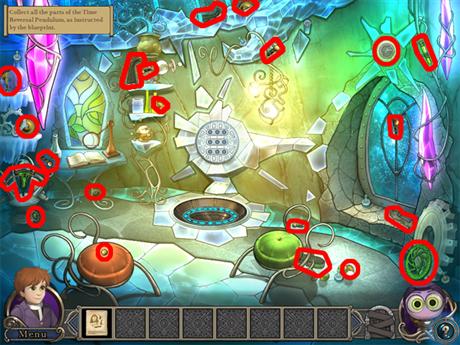
- Collect all 21 parts of the Time Reversal Pendulum.
- 2 parts are left of the large purple crystal in the left side of the room.
- 3 parts are below the purple crystal on the left side of the room.
- 1 is below the book on the left side of the room.
- 1 is in the center of the orange chair near the bottom left corner of the scene.
- 3 are on the right side of the stained-glass window.
- 3 are in the center of the top of the room.
- 3 are to the right of the green chair.
- 2 are above Letty.
- 2 are on the left side of the upper right corner.
- 1 is left of the lower purple crystal on the right side of the scene.

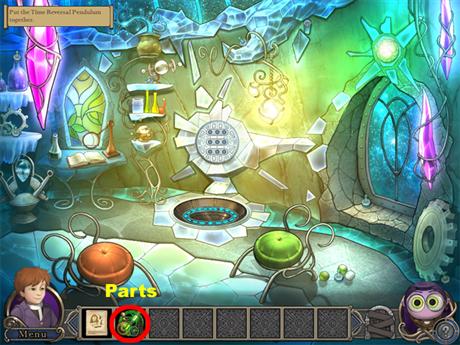
- Click on the parts in your inventory.

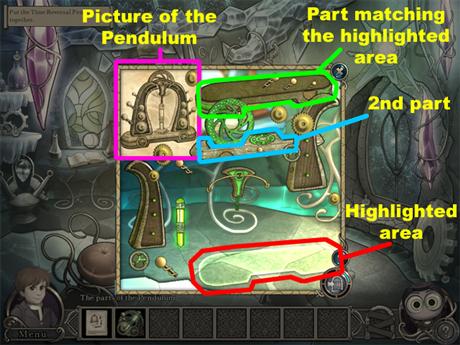
- Reassemble the Pendulum to move on.
- There is a small picture in the upper left corner of the puzzle displaying how the Pendulum should look once you are finished.
- Place the bottom piece of the pendulum in the highlighted area at the bottom of the puzzle.
- The bottom piece is right of the picture at the top of the puzzle.
- Then you must place the piece with the green circular symbol on it onto the bottom piece at the bottom of the puzzle.
- The piece with the green symbol is right of the bottom right corner of the picture.
- From then on you will be able to snap the rest of the pieces into place easily.

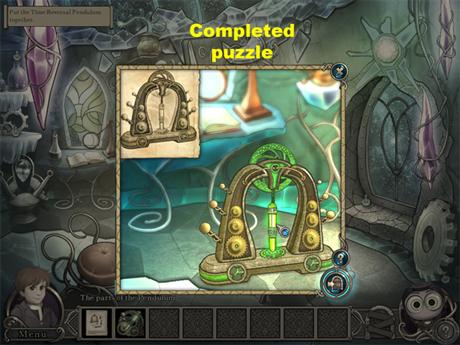
- This is how it will look.

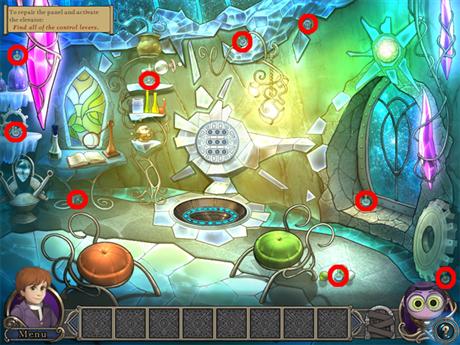
- Find all 9 of the control levers.
- 2 are on the left side of the purple crystal on the left side of the room.
- 1 is below the book on the table.
- 1 is above the center of the left half of the room.
- 2 are right of the top center of the scene.
- 1 is right of the green chair.
- 1 is below the glass window on the right side of the scene.
- 1 is in the bottom right corner of the room.

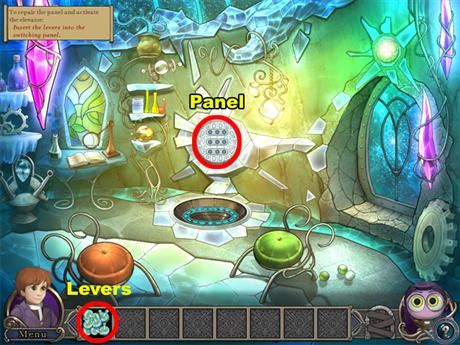
- Use the levers on the control panel in the center of the room.
- Click on the control panel.

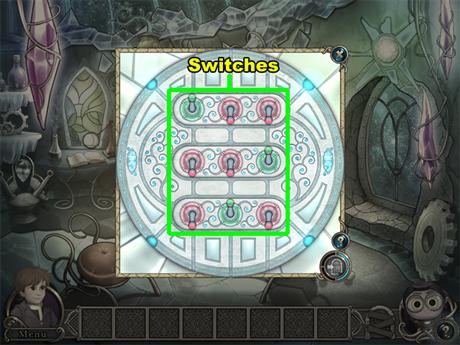
- Get all of the switches to be in an upward position to complete this puzzle.
- Clicking a switch will reverse its position along with any of the switches in a horizontal and vertical line from its location.

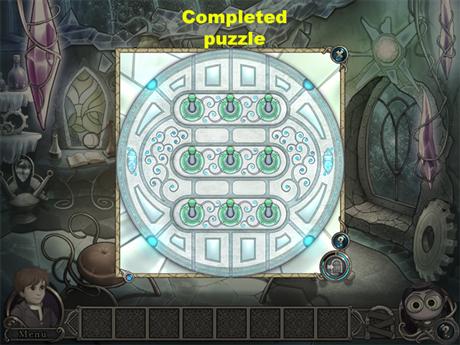
- This is how the completed puzzle will look.

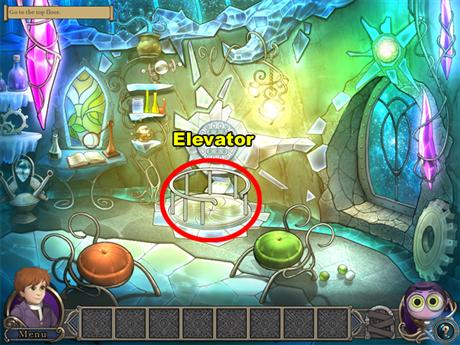
- Click on the elevator below the control panel.

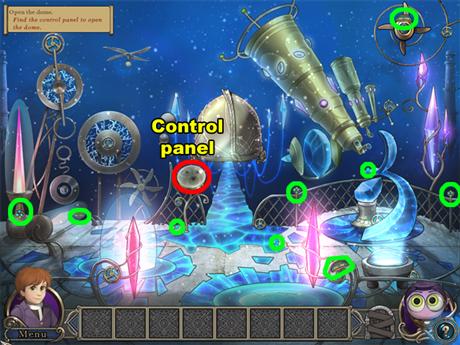
- Click on control panel left of the center of the room.
- Collect the 9 parts of the 3 keys.
- 1 is below the triangular-shaped crystal on the left side of the room.
- 1 is to the left of the 2nd crystal on the left side of the room.
- 1 is below the control panel.
- 2 are left of the 3rd crystal on the right side of the room.
- 1 is to the right of the 3rd crystal on the right side of the room.
- 1 is below the telescope on the right side of the room.
- 1 is left of the upper right corner of the room.
- 1 is above the bottom right corner of the room on a railing.

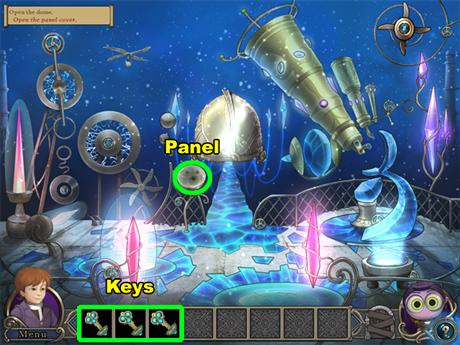
- Place the 3 keys into the control panel.

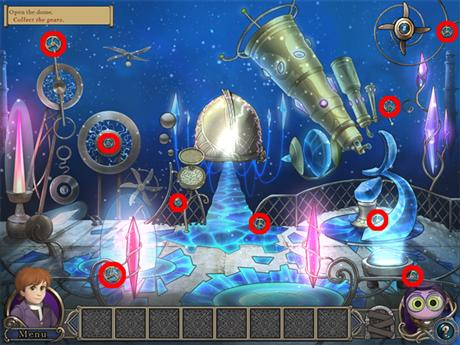
- Collect all 9 gears.
- 1 is right of the top left corner of the room.
- 1 is in the center of the left half of the room.
- 1 is left of the 2nd crystal on the left side of the room.
- 1 is below the control panel.
- 1 is left of the 3rd crystal on the right side of the room.
- 1 is to the right of the 3rd crystal on the right side of the room.
- 1 is above Felly.
- 1 is right of the telescope.
- 1 is in the upper right corner of the room.

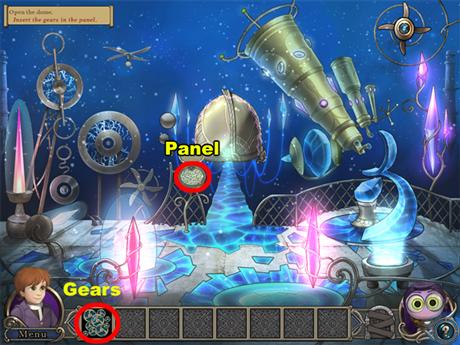
- Use the gears on the control panel.

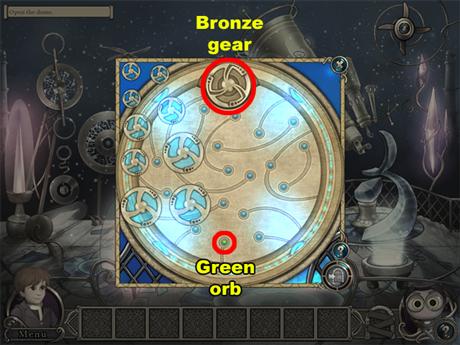
- Use the gears to rotate the bronze gear at the top of the puzzle.
- The green orb at the bottom of the screen will rotate a gear when one is placed onto it.
- The blue orbs hold the gears in place.
- A rotating gear will rotate the gear it is touching if the gear is connected to a blue orb.

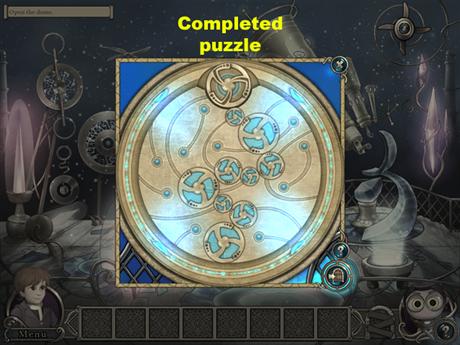
- This is how the end result should look.
- After this puzzle you will be attacked by a fire elemental.
- After the battle you will gain a crystal shard.

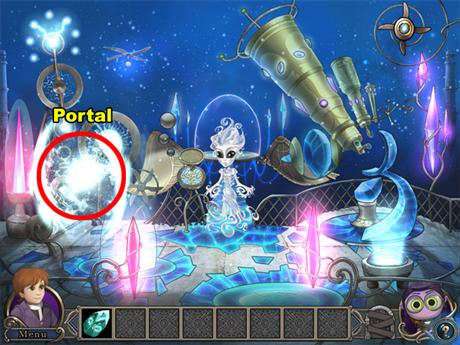
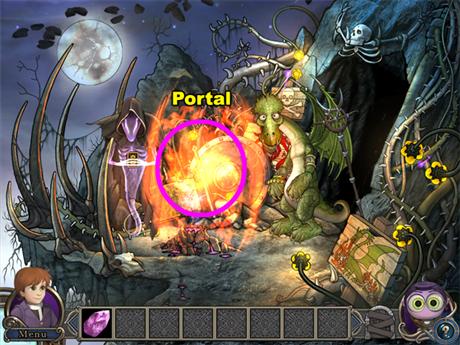
- Enter the portal on the left side of the room.

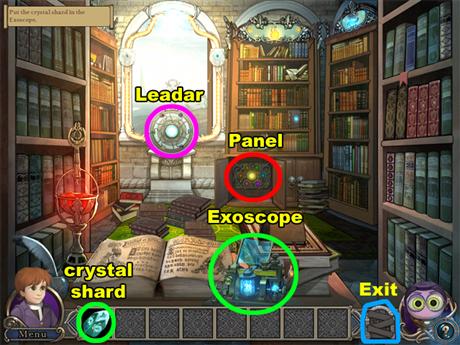
- Use the shard on the Exoscope.
- Use this sequence for the control panel:
- Green, orange, yellow, red, blue, and purple.
- Click the Leadar.
- Rotate the mirrors in this order:
- Rotate the dark blue mirror 4 times.
- Rotate the green mirror 4 times.
- Rotate the red mirror 2 times.
- Rotate the yellow mirror 1 time.
- Rotate the light blue mirror 1 time.
- Rotate the purple mirror 3 times.
- Exit the room.

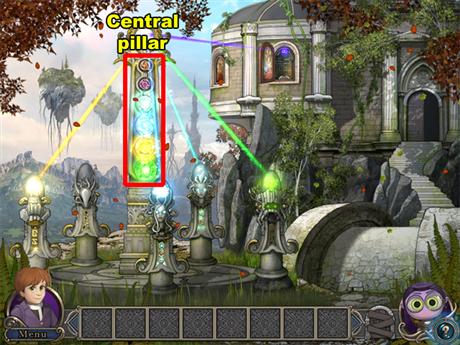
- Click on the central pillar.
- You will be attacked.
- After the magic battle click on the pillar again.
CHAPTER SIX: THUNDER HILLS
THE DRAGON

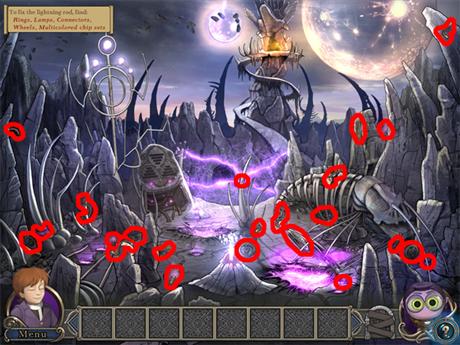
- Collect all 23 parts of the control panel.
- 1 is below the upper left corner of the scene.
- 3 are to the right of the bottom left corner of the scene.
- 5 are above the bottom center of the left half of the scene.
- 1 is in the center of the scene.
- 5 are right of the center in the bottom half of the scene.
- 1 is to the left of Felly.
- 3 are above Felly.
- 3 are around the center of the right half of the scene.
- 1 is in the upper right corner of the scene.

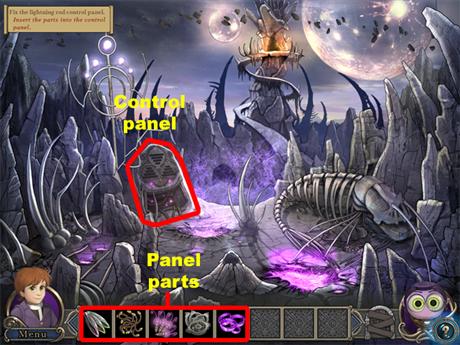
- Insert all of the parts into the control panel left of the center of the scene.
- Click on the control panel.

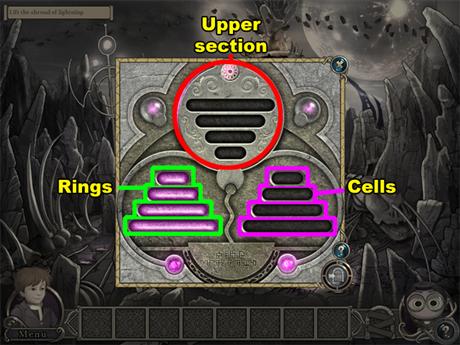
- Transfer all of the purple rings to the upper section of this puzzle to move on.
- Click on a ring then click on an available cell to transfer it.
- A ring transferred to a cell will block all of the larger sized cells and rings in its section from any kind of transfer.

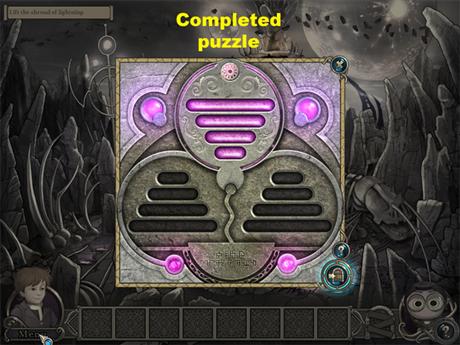
- This is how the complete puzzle will turn out.

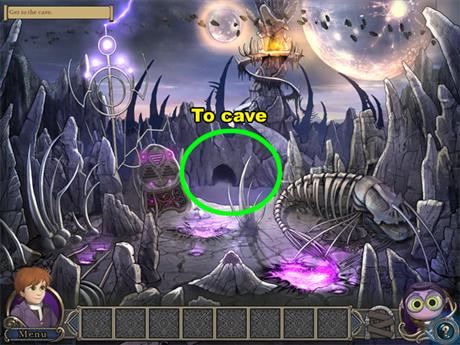
- Click the cave entrance in the center of the scene.
- You will then be attack by 3 elementals.
- When you are finished click the cave entrance again.

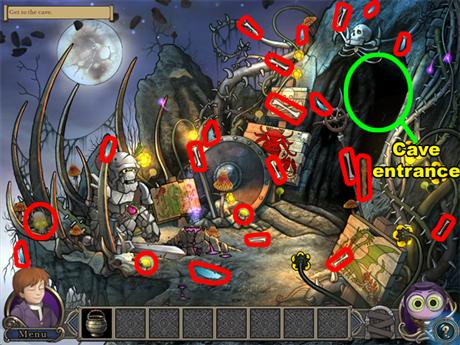
- Click on the entrance to the cave on the right side of the scene.
- Collect all 22 ingredients to make the Wand of Light.
- 2 are above the bottom left corner.
- 1 is above the stone elemental’s head.
- 1 is below the stone elemental’s sword.
- 1 is at the bottom center of the scene.
- 4 are around the outer ring of the shield in the center of the scene.
- 1 is below the shield in the center of the scene.
- 3 are in the entrance of the cave.
- 3 are above the cave entrance.
- 1 is above Felly.
- 1 is to the left of Felly.
- 4 are above the wooden sign with the red dragon left of the cave entrance.
- Albert will cast a spell when you are finished collecting.
- Click on the cave entrance.

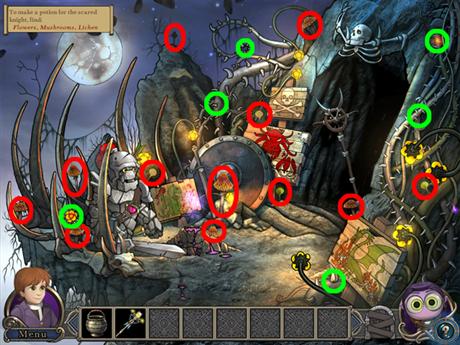
- Collect all of the 22 ingredients for the potion.
- 3 are left of the stone elemental.
- 1 is on the shield in the center of the room.
- 1 is to the right of the stone elemental’s head.
- 1 is below the shield in the center of the room.
- 1 is to the right of the shield.
- 1 is above the right side of the shield.
- 1 is left of the top center of the scene.
- 1 is right of the top center of the scene.
- 1 is below the center of the right half of the scene.
- 1 is above the bottom right corner of the scene.
- The 10 flowers you must collect explode soon after appearing.
- These flowers have 6 different spawning points that are all connected to the thorny vines around the scene.
- 1 is left of the stone elemental.
- 1 is above the shield.
- 1 is below the top center of the scene.
- 1 is below the top right corner of the scene.
- 1 is on the right side of the cave entrance.
- 1 is left of the dragon sign near the bottom right corner of the room.
- The flowers will continue to reappear until you collect 10 of them.

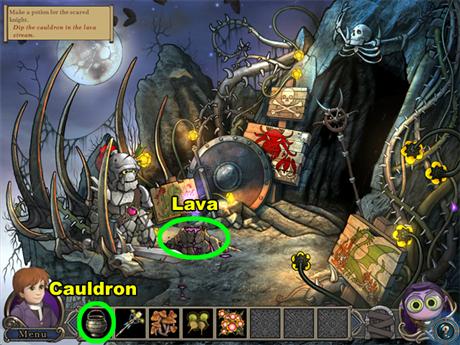
- Place the cauldron on the purple lava above the sword of the stone elemental.

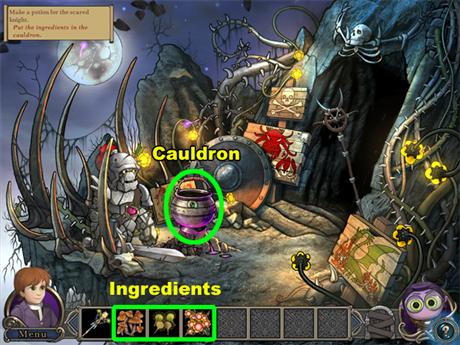
- Place the ingredients into the cauldron.
- Click on the cauldron to add it to your inventory.

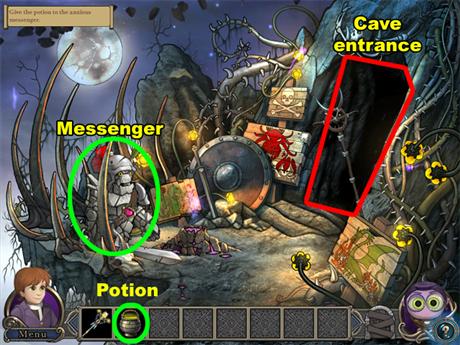
- Use the potion on the stone elemental.
- He will then give you a map and a letter.
- Click on the entrance of the cave.

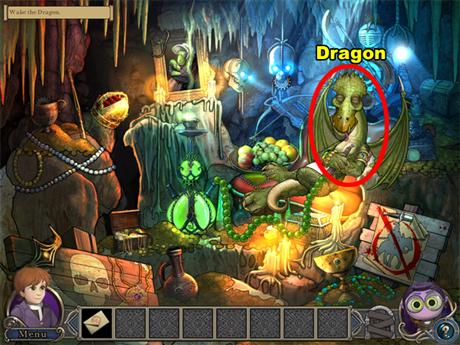
- Click on the sleeping Dragon on the right side of the screen.
- The Dragon will then attack you.

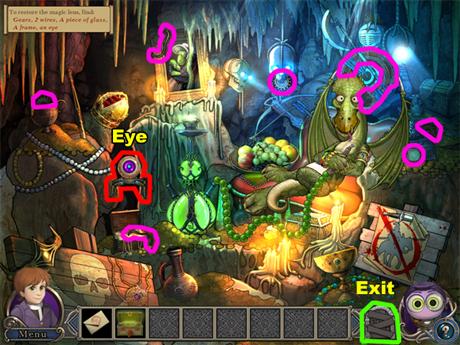
- Collect 3 gears.
- 1 is in a cup below the top left corner of the room.
- 1 is in the mouth of the 2nd skull near the top center of the room.
- 1 is on the right side of the Dragon.
- Collect 1 eye.
- The eye is the creature jumping around the screen.
- Collect 2 wires.
- 1 wire is on the portrait near the top center of the room.
- 1 is below the center of the left side of the room.
- Collect 1 piece of glass.
- The glass in on the right side of the Dragon’s right wing.
- Collect 1 frame.
- The frame to the right of the Dragon’s head.
- Albert will cast a magic spell.
- Exit the cave afterwards.

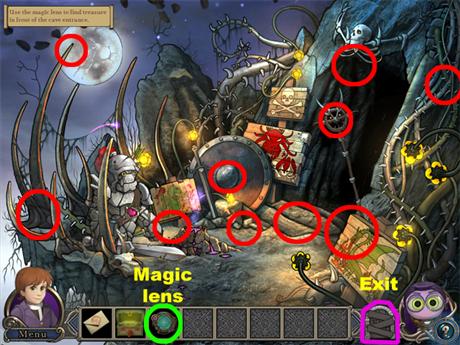
- Use the magic lens to collect the 10 hidden treasure items.
- 1 is above the bottom left corner.
- 1 is on the moon near the upper left corner of the scene.
- 1 is above the stone elemental’s sword.
- 1 is in the center of the shield.
- 1 is below the shield.
- 2 are on the steps to the cave.
- 2 are in the cave’s entrance.
- 1 is below the top right corner of the room.
- Exit through the small door beside Felly.

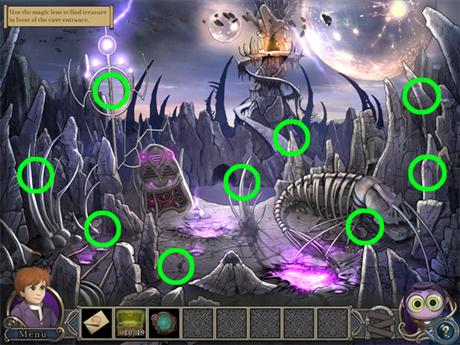
- Collect the 9 remaining treasure items.
- 1 is in the center of the lightning rod on the left side of the scene.
- 1 is above the bottom left corner of the scene.
- 1 is below the center of the left side of the screen.
- 1 is below the control panel.
- 1 is in the center of the scene.
- 1 is to the right of the center of the scene.
- 1 is on the near the head of the skeleton on the right side of the scene.
- 1 is below the moon on the right side of the scene.
- 1 is in the center of the right side of the scene.
- Return to the Dragon.

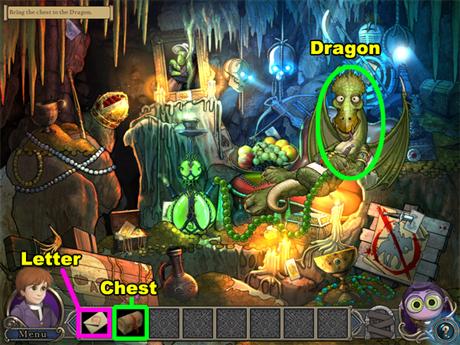
- Give the Dragon the treasure chest.
- You will be given another crystal shard.
- Give the Dragon the letter.

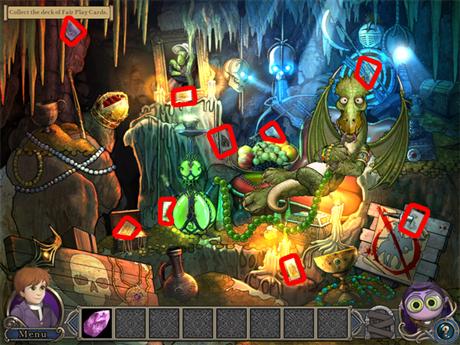
- Collect all 9 cards.
- 1 is the right side of the top left corner of the room.
- 2 are by the left of the green glowing object on the left side of the room.
- 1 is in the frame of the portrait on the left side of the room.
- 2 are above the fruit bowl by the Dragon’s foot.
- 1 is above the Dragon’s head.
- 1 is above the bottom right corner of the room.

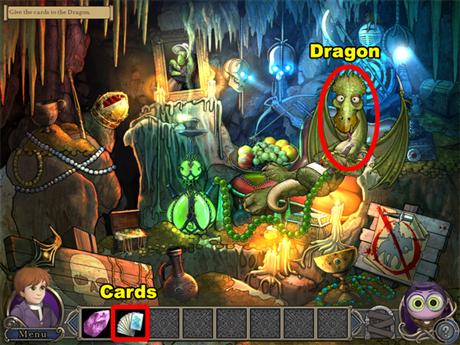
- Give the Dragon the cards.

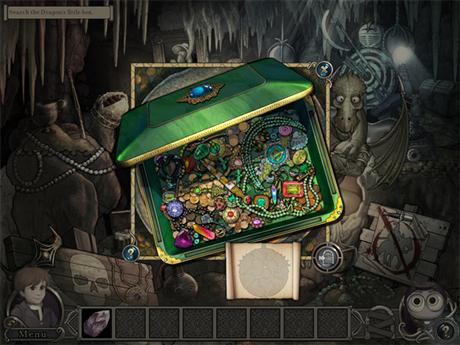
- Collect all 12 pieces of the Amulet.
- Once you click on a piece of the Amulet it will attach itself to the bottom of the puzzle.
- To find the Amulet pieces drag the other items around until you can find them.

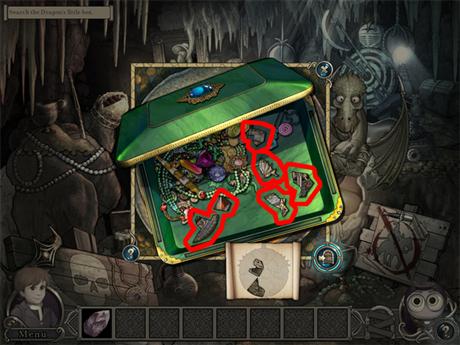
- The Amulet pieces all look similar to each other.
- After collecting all of the pieces another puzzle will pop up.

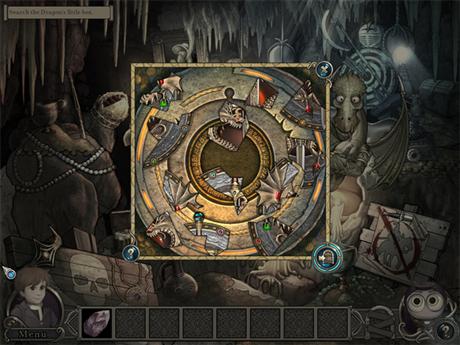
- Place the pieces together to form the Amulet.
- The pieces will snap to the puzzle when you set them into their proper places.

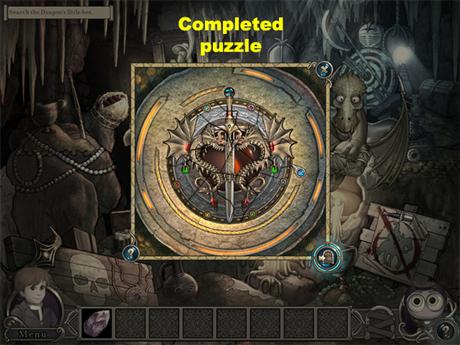
- This is how the Amulet will look.
- You now have another artifact for battle.
- Exit the cave.

CHAPTER SEVEN: TEMPLE OF FLAMES
THE GREAT KEY

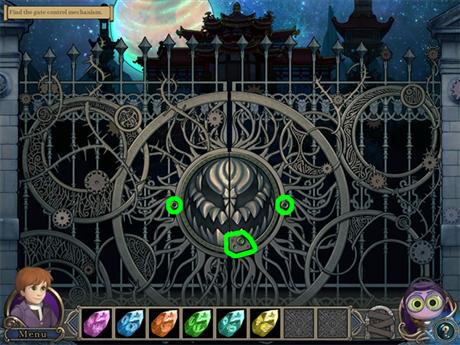
- Click on the light blinking below the center of the gate.
- Click both circles to the left and right of the gate’s center.

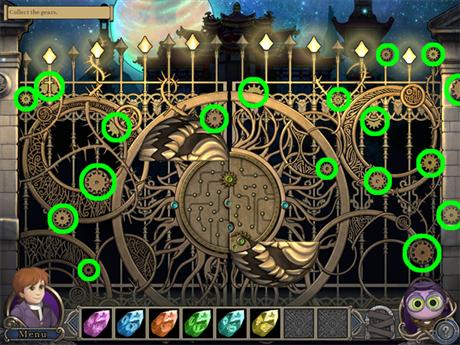
- Collect all 18 gears from around the gate.
- 2 are below the top left corner of the gate.
- 3 are connected to the top left circle on the left side of the gate.
- 1 is to the right of the bottom left corner of the scene.
- 2 are above the center of the gate.
- 1 is right of the center of the gate.
- 3 are connected to the top right circle on the right side of the gate.
- 3 are below the area of the top right corner of the screen.
- 2 are above the bottom right corner of the scene.
- 1 is in the above the center of the right half of the gate.

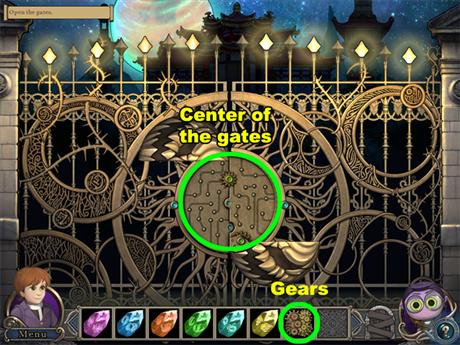
- Use the gears on the center of the gate.

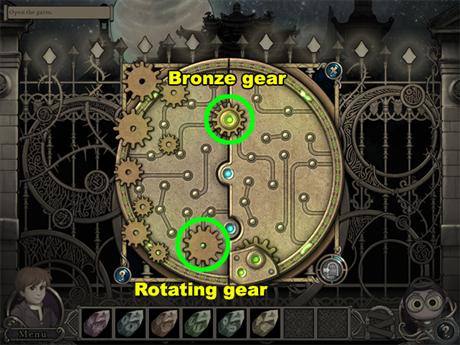
- Use the rotating gear at the bottom of the puzzle to rotate the bronze gear at the top of the puzzle.
- You do not need to use all of the gears to make a path from the bottom gear to the top gear.

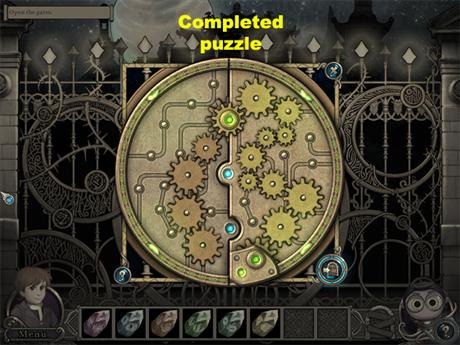
- After to top gear rotates, the puzzle will change.
- This time you will have to use the top gear to rotate the bottom gear on the right half of the puzzle.
- You will have to use all of the gears this time.


- This is how your puzzle should look.
- Afterwards you will be attacked by 2 fire elementals.

- Collect all 24 pieces of the plate.
- 3 of the pieces are above the center of the scene.
- 1 is at the center of the top of the Castle.
- 6 are around the center of the right half of the scene.
- 1 is above the bottom right corner of the scene.
- 1 is on the right side of the center of the scene.
- 2 are on the right side of the center of the bottom of the scene.
- 1 is above the center of the left half of the scene.
- 1 is in the center of the bottom of the scene.
- 6 are around the center of the left side of the scene.
- 1 is left of the center of the scene.
- 1 is in the center of the bottom left section of the scene.

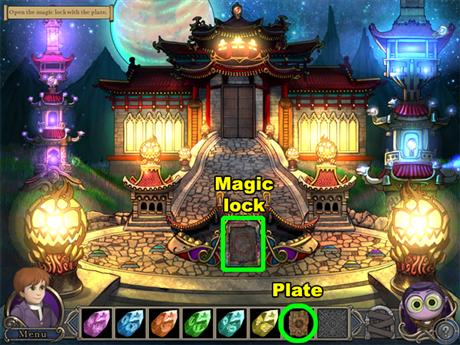
- Use the plate on the magic lock below the center of the scene.

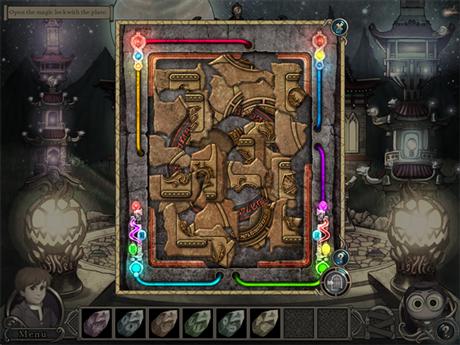
- Rearrange the plate’s pieces correctly to complete this puzzle.
- Starting with the corners of the puzzle can be helpful.

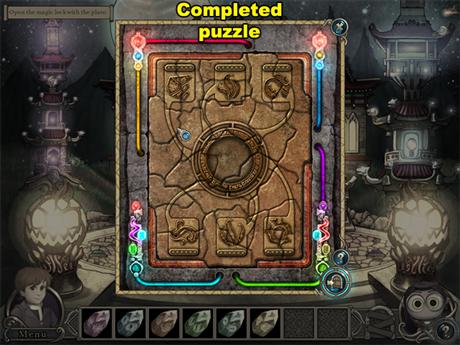
- This is how the puzzle will turn out.
- Afterwards the puzzle will transform into another kind of puzzle.

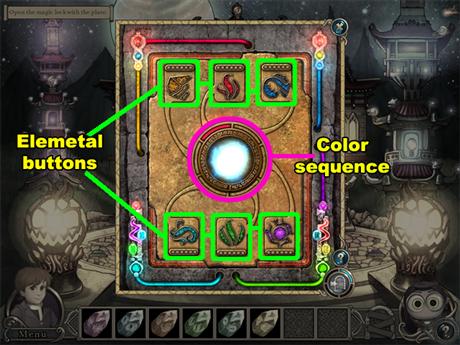
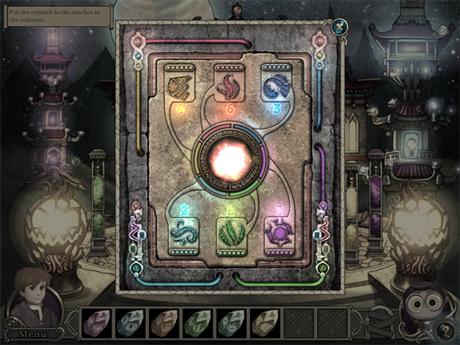
- Use the color sequence in the center of this puzzle as a guide showing which elemental button needs to be clicked.
- You must press the correct elemental button before the color sequence changes its color.
- The puzzle will be complete after you press each button correctly 6 times.


- At the end of the puzzle a number will be assigned to each elemental button.
- The numbers on each elemental button are needed for the next puzzle.

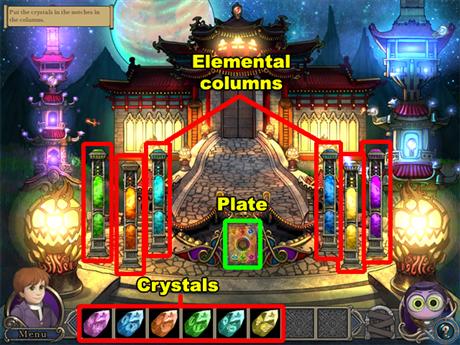
- 6 elemental columns will rise from the ground.
- Place each of the 6 crystals into their matching columns in the correct order.
- The order in which to place the crystals into elemental columns is on the plate of the puzzle you previously complete.
- This is the correct order to place crystals into the columns:1 purple
2 light blue
3 dark blue
4 yellow
5 green
6 orange
A cage will then rise from the center of the scene.

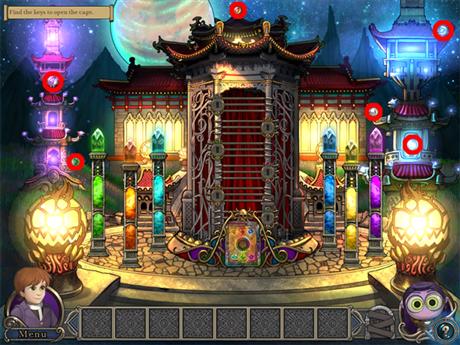
- Find the 6 colored keys to the cage.
- 1 is covering the 3rd purple light of the shrine on the left side of the scene.
- 1 is to the left of the top of the green column.
- 1 is above the top center of the Castle.
- 1 is below the top right corner.
- 1 is on the right side of the top of the purple column.
- 1 is above the purple column.

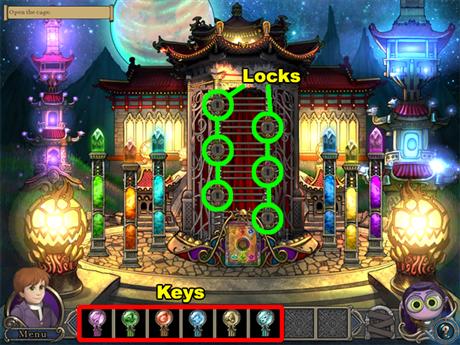
- Each key has a color as well as the 6 locks on the cage do.
- Use each key on their color-matching locks.

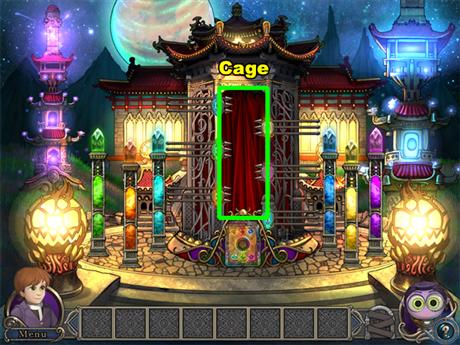

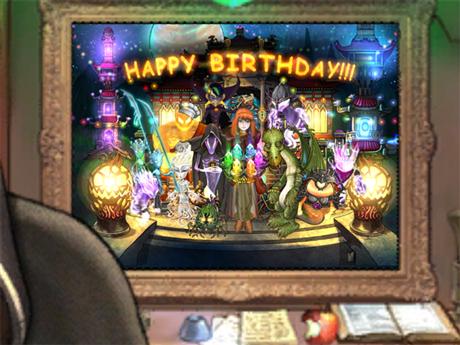
- Enjoy the final scenes of the game.





 Mystery Case Files: Key to Ravenhearst Walkthrough, Guide, & Tips
 Iron Roses Walkthrough, Guide, & Tips
 Fear for Sale: Phantom Tide Walkthrough, Guide, & Tips
 Tales of Terror: House on the Hill Walkthrough, Guide, & Tips
 Grim Tales: The Final Suspect Walkthrough, Guide, & Tips