Mystery Case Files: Shadow Lake Walkthrough, Guide, & Tips
Mystery Case Files: Shadow Lake Walkthrough

Welcome to the Mystery Case Files: Shadow Lake Walkthrough
The residents of Bitterford, Maine have fallen prey to a terrible curse. It’s up to you to unravel the series of mysterious events that led to the town’s downfall and uncover the evil that was responsible.
Whether you use this document as a reference when things get difficult or as a road map to get you from beginning to end, we’re pretty sure you’ll find what you’re looking for here.
This document contains a complete Mystery Case Files: Shadow Lake game walkthrough featuring annotated screenshots from actual gameplay!
We hope you find this information useful as you play your way through the game. Use the walkthrough menu below to quickly jump to whatever stage of the game you need help with.
Remember to visit the Big Fish Games Forums if you find you need more help. Have fun!
This walkthrough was created by Margie B, and is protected under US Copyright laws. Any unauthorized use, including re-publication in whole or in part, without permission, is strictly prohibited.
General Tips

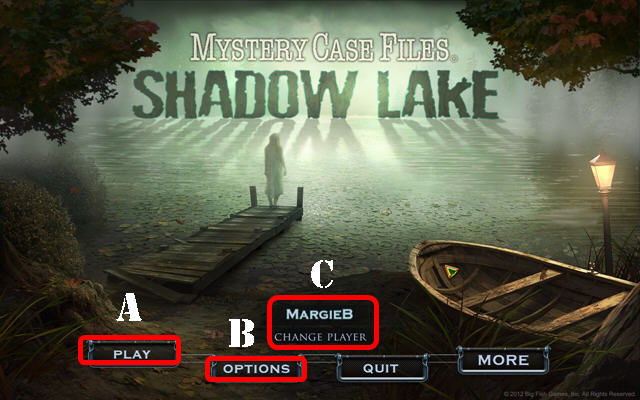
- Select Play (A) to begin your adventure.
- The Options (B) button allows you to adjust the environmental volume, effects volume, music volume, hardware cursor, high definition, windowed mode, and subtitles.
- The ‘Change Player’ button (C) can be used to manage your profiles in the game.
- The best way to use this walkthrough is by clicking on the ‘CTRL’ and ‘F’ keys on your keyboard to simultaneously to bring up a search box.
- Type the keyword into the search box at the bottom of your screen and click on ‘NEXT’ to find the section you need help with. Clicking ‘NEXT’ again will bring up all instances in which that keyword was mentioned in the guide.
- The Case Book records the specific numbers unique to your game. Since numbers are random, it is best to check the numbers for your game.
- Pay attention to your surroundings because you will have to find the locations in which the drawings belong. Once you find them, line up the drawings with the scene and click on it. If you did it successfully, the drawing will charge.
- Once an inventory item has been picked up it will be added to your inventory wheel. Hover your mouse at the bottom of the screen to make the inventory wheel appear.
- Use the arrows on the sides of the inventory wheel to scroll through all possible options.
- Hidden-object scenes will be referred to as ‘HOS’ in this guide.
- Use the Map to travel directly to a location.
- Puzzles can be skipped by clicking on the skip button once it has been filled.
Chapter 1: Drive Motel
- If you chose to use the tutorial, your gameplay may vary a little bit at the beginning from what is written here.
- Go towards the van. Zoom into the back of the van. Listen to what Jack Talon has to say (A).
- Walk down.
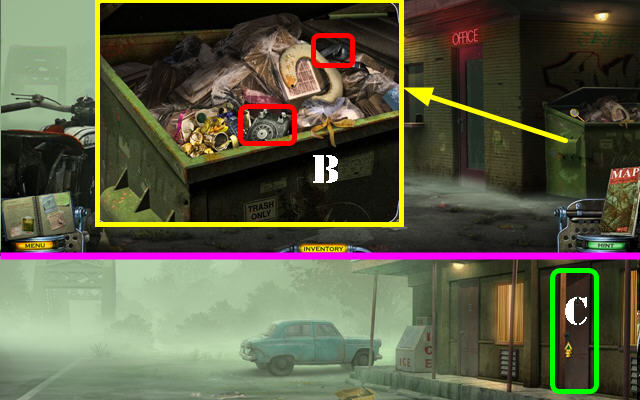
- Zoom into the dumpster; take the PHONE BASE and the PHONE RECEIVER (B).
- Go forward.
- Go into the room no. 2 (C).
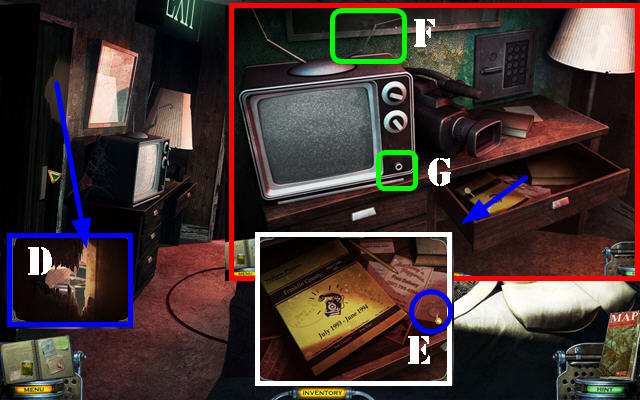
- Open the left door and the look through the hole in the door (D).
- Zoom into the TV area; open the drawer and zoom into it; take the QUARTER (E). Note Kelli’s number (the number may be random).
- Touch the right antenna (F) once, and then again after the message stops; you will receive the BENT ANTENNA.
- Push the TV button (G).
- Exit the TV and walk down twice.
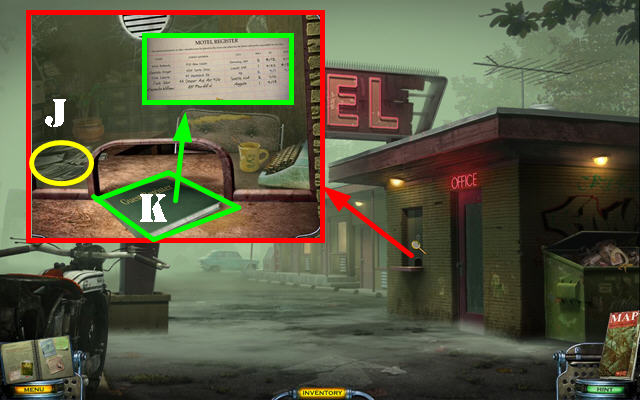
- Zoom into the window; use the BENT ANTENNA on the spot marked in the screenshot (J)..
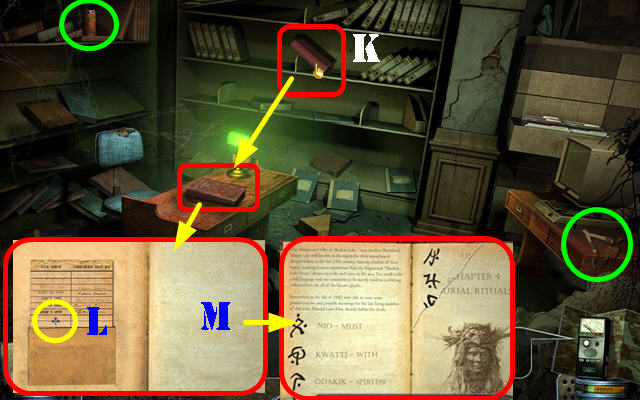
- Open the guest registry book (K). This action writes Cassandra’s apt. number in the casebook.
- Return to the room.
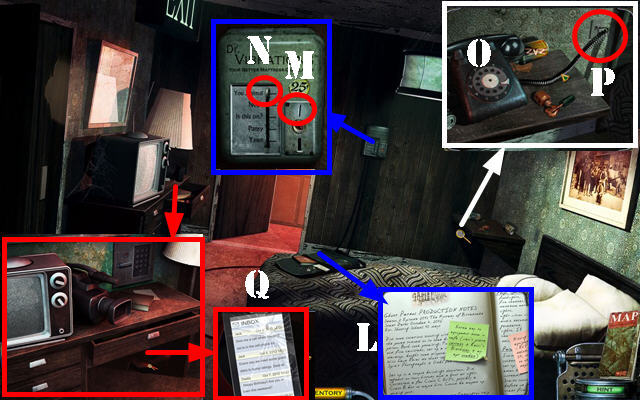
- Take a closer look at the satchel on the bed; open the notebook and read the note (L). The note states that the combination for the safe consists of the van’s plate letters + Kelli’s birthday + Cassandra’s apt. number.
- Zoom into the device; insert the QUARTER into the slot (M) and slide the knob all the way up to ‘You Animal’ (N).
- Zoom into the nightstand; put the PHONE BASE down and add the PHONE RECEIVER to it (O). Plug in the phone (P).
- Zoom into the dial and dial Kelli’s number (from the drawer).
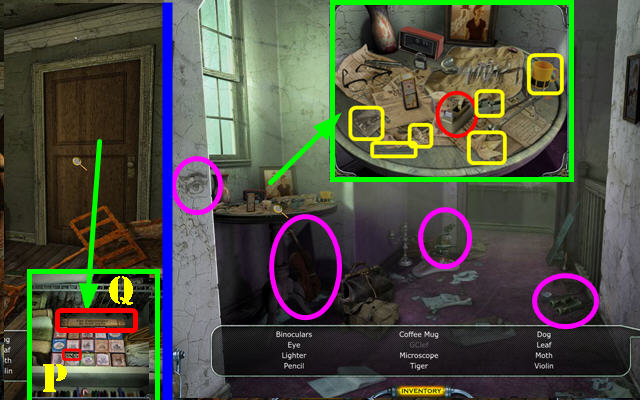
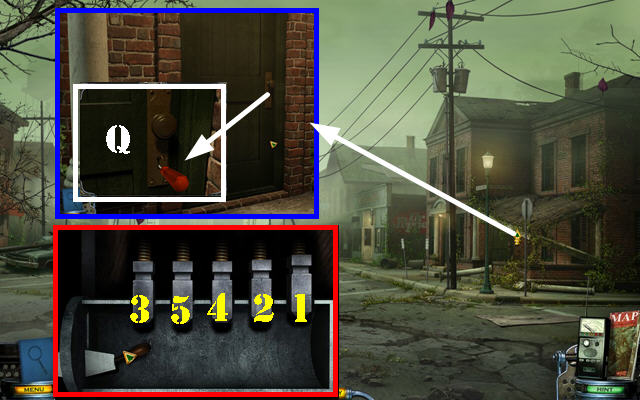
- Zoom back into the TV and look below the dresser; answer the phone and note the birthday on the cell phone (Q). The number is always 7.
- Exit this scene and go into the dark room ahead.
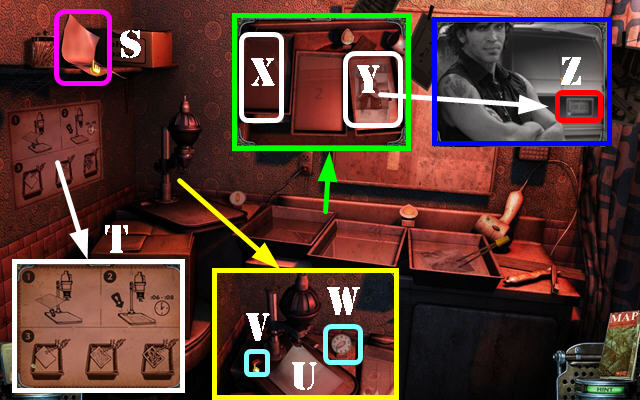
- Take the PHOTO PAPER (S).
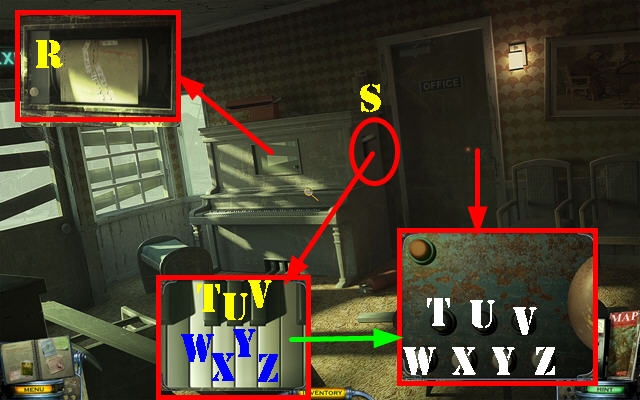
- Look at the instructions (T).
- Zoom into the enlarger; place the PHOTO PAPER on the tray (U). Push the button (V), look at the timer and push the button again after the timer passes the 6 but before it gets to 8 (W).
- Take the EXPOSED PHOTO PAPER.
- Take a closer look at the trays; place the EXPOSED PHOTO PAPER in the left tray (X) and then take another look at it once it reaches the last tray (Y).
- Write down the 3 letters on the license plate (the letters are random) (Z).
- Walk down.
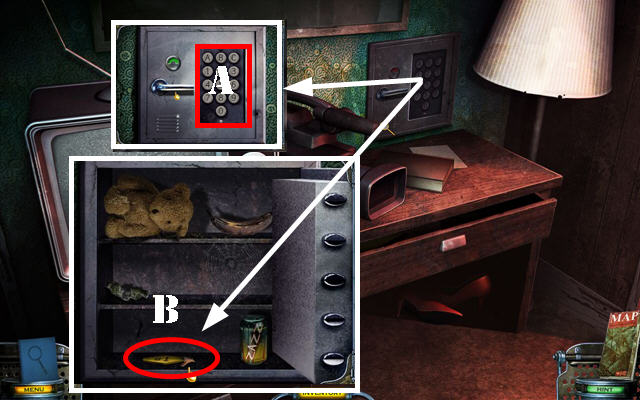
- Zoom back into the TV area and then take a closer look at the safe (A).
- Input the 3 letters from the license plate found in the dark room photo, the birthdate (which is always 7), and the apt. number (found in the journal if you looked at the registry book in the reception window).
- Open the safe and take the MOTEL KEY (B).
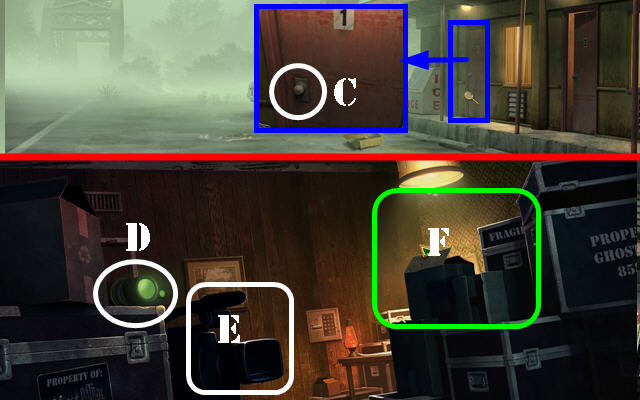
- Walk down twice and zoom into room no. 1; insert the MOTEL KEY into the keyhole and go through the door (C).
- Take the NIGHT-VISION GOGGLES (D) and the INFRARED CAMERA (E).
- Go forward through the top of the trunks (F).
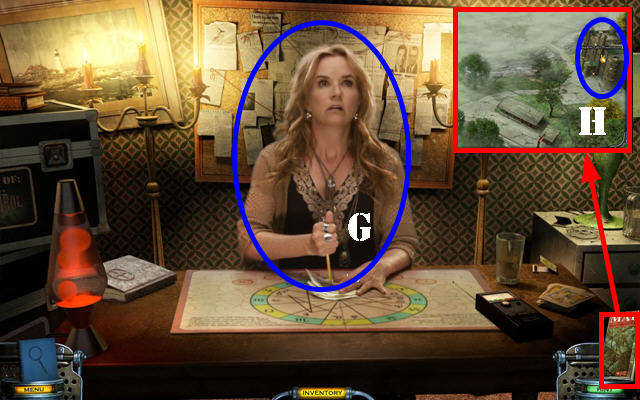
- Cassandra will give you a set of DRAWINGS (G).
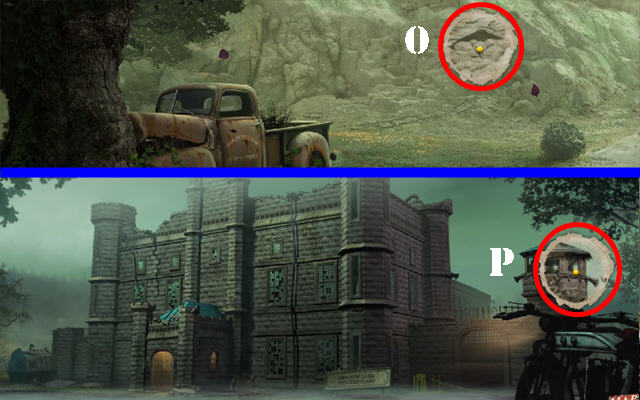
- Open the map (H) and go to the Shadow Lake Penitentiary.
Chapter 2: Shadow Lake Penitentiary.
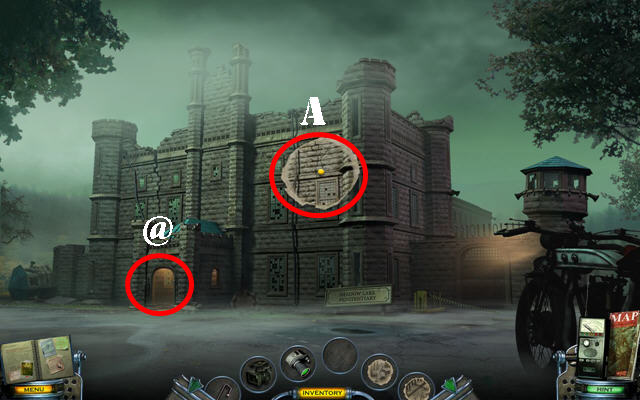
- Place the DRAWING over the window (A) and select it to receive the CHARGED DRAWING.
- Go into the penitentiary (@).

- Zoom into the recorder and press the button (B).
- Knock over the stone ball (C) and then pick up the STONE BALL (D).
- Zoom into the railing and take the PRISON KEY (E).
- Take a closer look at the door and use the PRISON KEY on the lock (F).
- Go through the door to access a HOS.
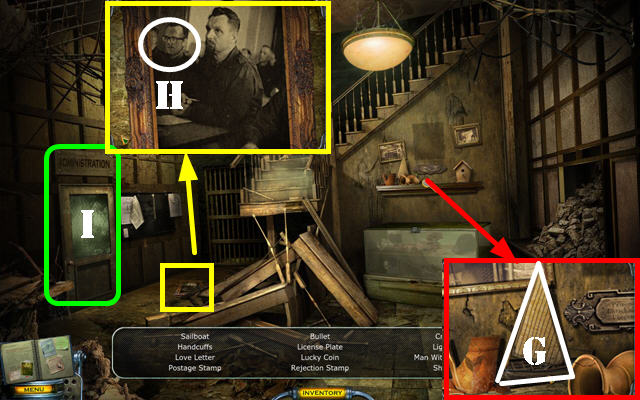
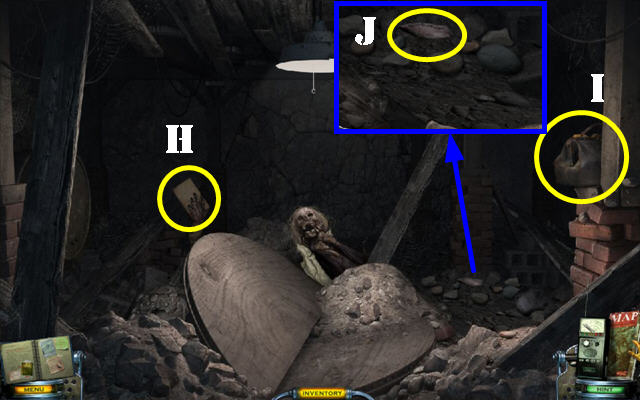
- Take a closer look at the shelf; move the jug and take the sailboat (G).
- Zoom into the picture on the floor; take the man with glasses (H).
- Open the door and go into the administration room (I).
- Zoom into the first desk; take the SMALL SILVER KEY (J).
- Open the case and take the bullet (K).
- Zoom into the file cabinets; open the bottom drawer and take the love letter (L). Look for the rest of the listed items.
- Walk down.
- Zoom into the glass cabinet; use the SMALL SILVER KEY in the lock (M).
- Take the shovel (N). You will receive a message from Cassandra regarding Jaime Monihan.
- Return to the administration room.
- Zoom into the back gate to activate a puzzle.
- Place all the bottom pieces into the correct spots on the left side of the puzzle.
- Please look at the screenshot for the solution (A-E) and pull on the ring (#).
- Go through the gate.
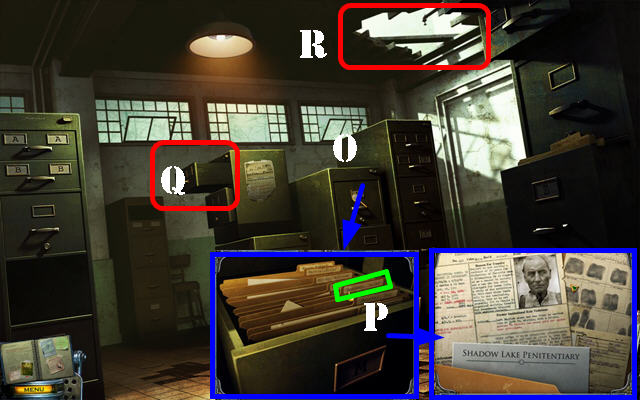
- Zoom into the ‘M’ file cabinet (O); pull up Jaime Monihan’s file (P).
- Place the STONE BALL in the cabinet (Q.
- Go through the ceiling (R).
- Touch the left wall to activate a HOS.
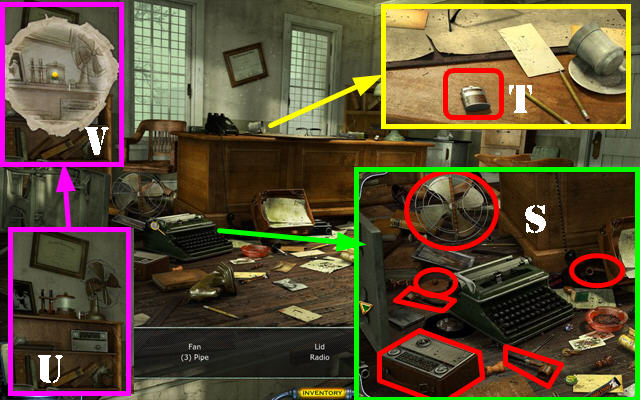
- Zoom into the floor; take the FAN, the 3 PIPES, the 70′S LID and a RADIO (S)..
- Zoom into the desk; take the LIGHTER (T).
- Place the FAN, RADIO, 70′S LID, 3 PIPES, and LIGHTER as shown in the screenshot (U).
- Use the DRAWING in the area you just recreated (V).
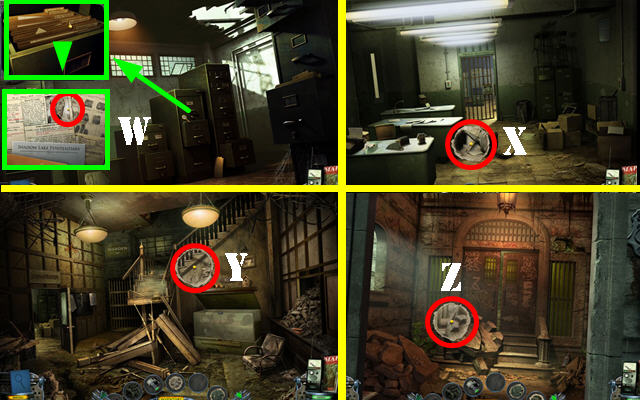
- Place the rest of the DRAWINGS in place (W-Z).
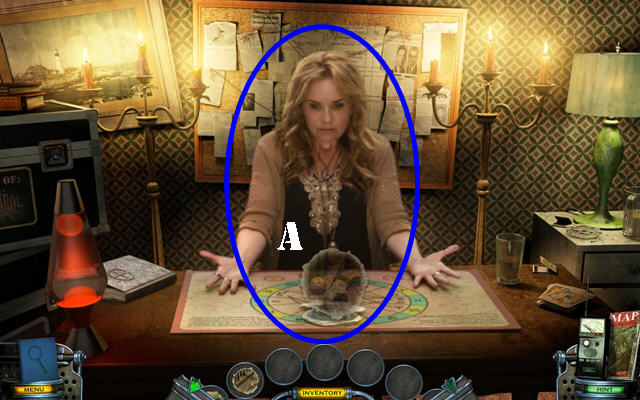
- Return to Cassandra in the motel to automatically give her the CHARGED DRAWINGS (A).
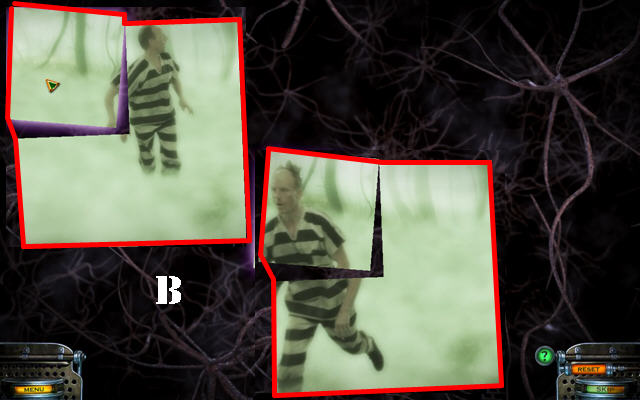
- Solve the medium’s puzzle..
- Click and drag the picture parts together; two correct pieces will automatically lock together (B).
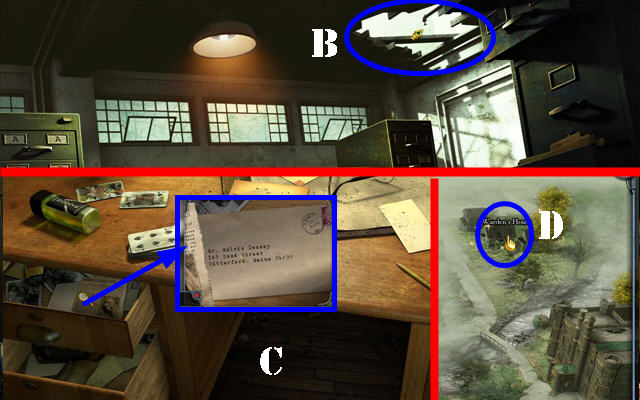
- Open the map and go to Shadow Lake Penitentiary. Go into the records room and then go through the ceiling (B) to reach the Warden’s Office.
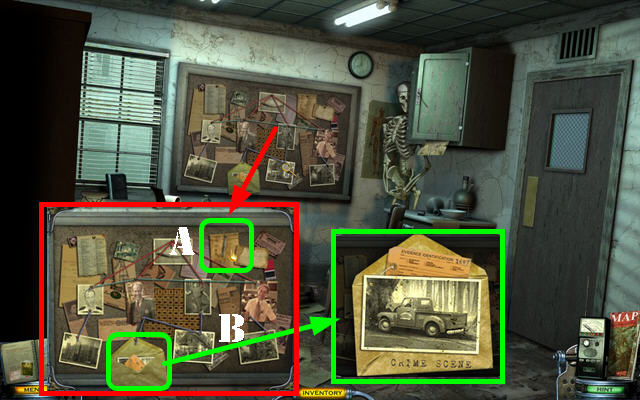
- Take a closer look at the desk.
- Open the left drawer; zoom into it and move the article aside. You’ve just unlocked a new location on the map – the Warden’s House (C).
- Open the map and choose the Warden’s House location (D).
Chapter 3: The Warden’s House
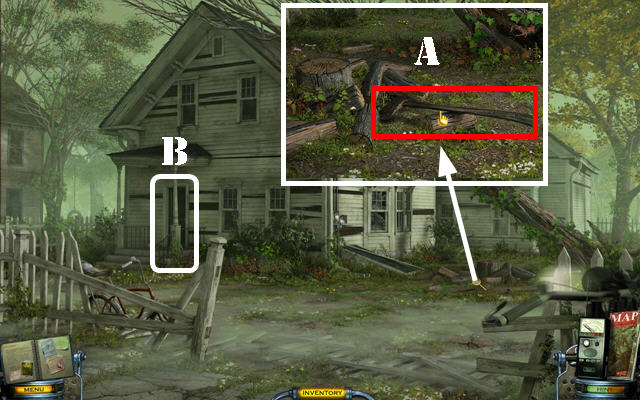
- Zoom into the pile of wood; take the RUSTY AXE (A).
- Go into the house (B) to activate a HOS.
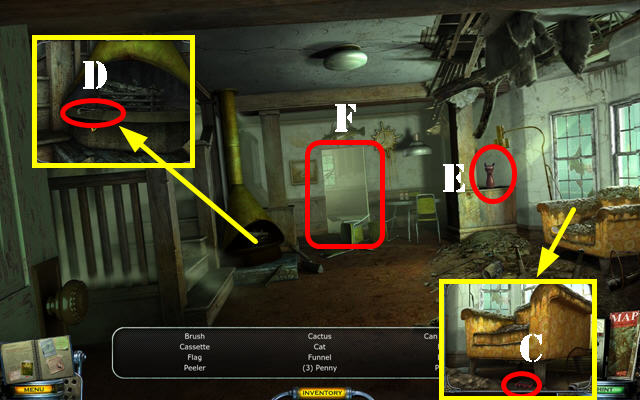
- Zoom into the chair and take the cassette (C).
- Zoom into the furnace and take the poker (D).
- Grab the cat (E).
- Go into the kitchen (F).
- Zoom into the junk drawer in between the stove and the sink.
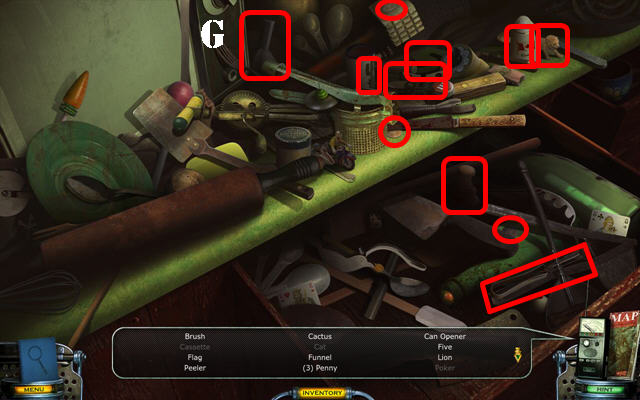
- Find all the items on the list (G).
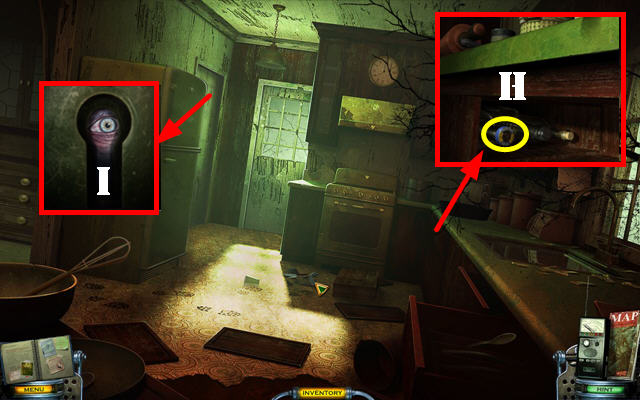
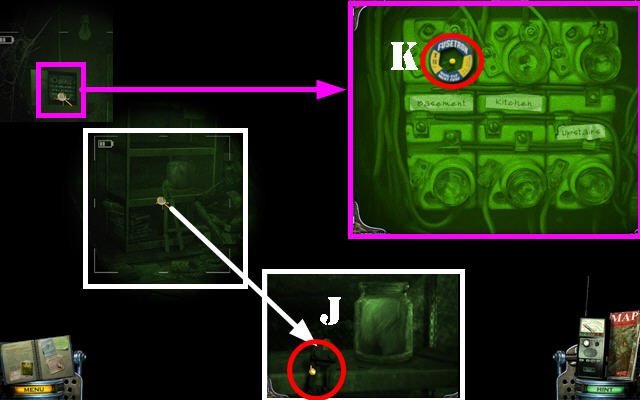
- Pull out the junk drawer; zoom into the niche and take the FUSE (H).
- Take a closer look at the door; touch the door and look through the peephole (I). Use the NIGHT-VISION GOGGLES in the doorway.
- Zoom into the shelf; take the SMALL BOLT CUTTERS (J).
- Open the fuse box on the upper left; insert the FUSE into it (K). Exit this scene.
- Exit the kitchen and go up the steps.
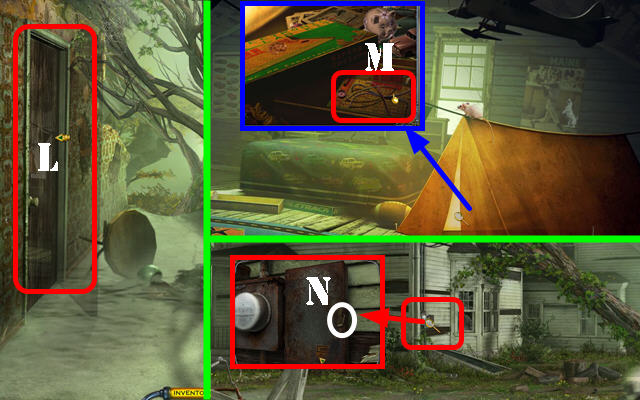
- Open the left door and go through it (L).
- Zoom into the tent and take the WIRES (M).
- Walk down 3 times.
- Zoom into the power box; cut the lock with the SMALL BOLT CUTTERS (N).

- Zoom into the panel and place the WIRES on it to activate a mini-game.
- Drag the wires to the boxes of the same color and click them in place; they must be connected to the amount of spaces (boxes) shown on the box.
- Please look at the screenshot for the solution (O).
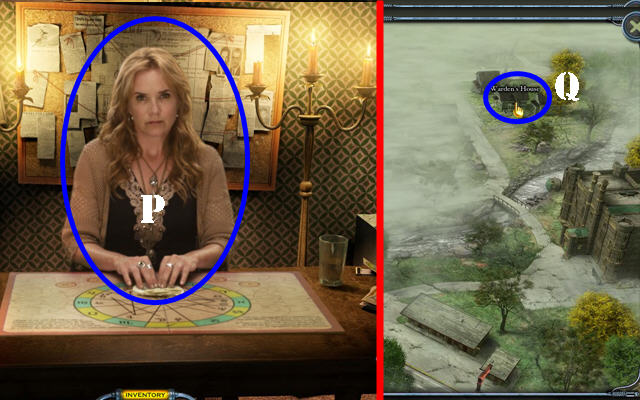
- Return to Cassandra’s motel room. She will hand you another set of DRAWINGS for you to find (P).
- Return to the Warden’s House (Q).
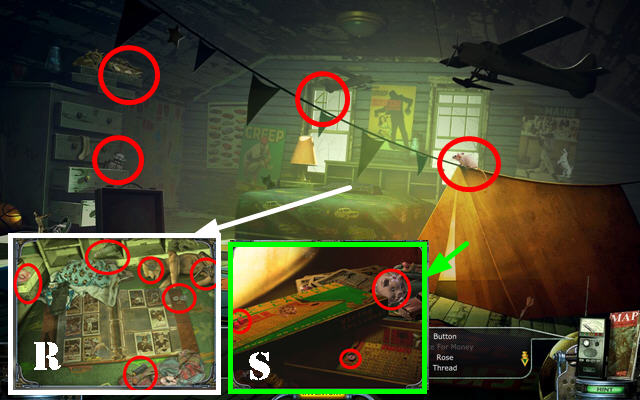
- Go to the upstairs bedroom for a HOS.
- Zoom into the bed (R) and the tent (S); look for items on your list.
- Pick up the rest of the items on the list.
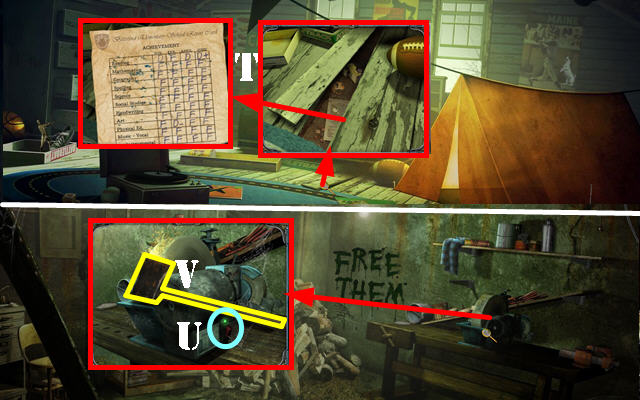
- Zoom into the loose floorboard and remove it; zoom into the report card (T).
- Return to the basement.
- Zoom into the machine and flip the switch (U). Place the RUSTY AXE on the grindstone to receive the SHARPENED AXE (V).
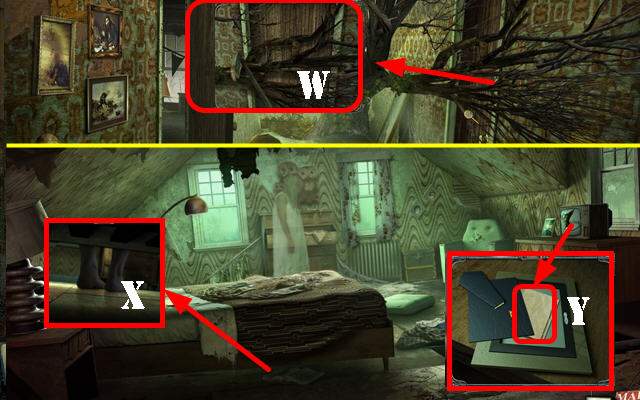
- Go to the upstairs hallway.
- Zoom into the tree and chop it with the SHARPENED AXE 3 times (W).
- Go through the right door.
- Look below the bed (X).
- Zoom into the picture frame by the TV; touch it, open the clips and remove the back. Zoom into the letter (Y).
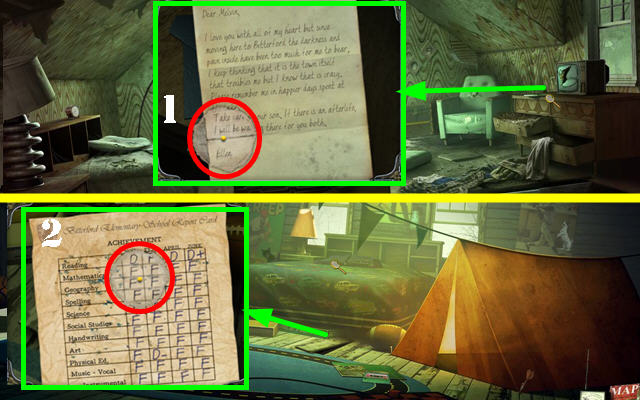
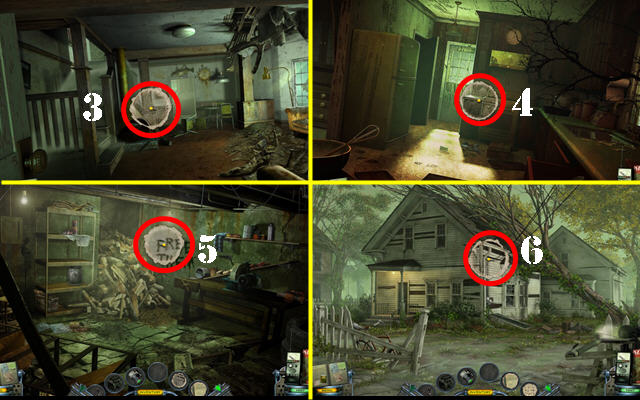
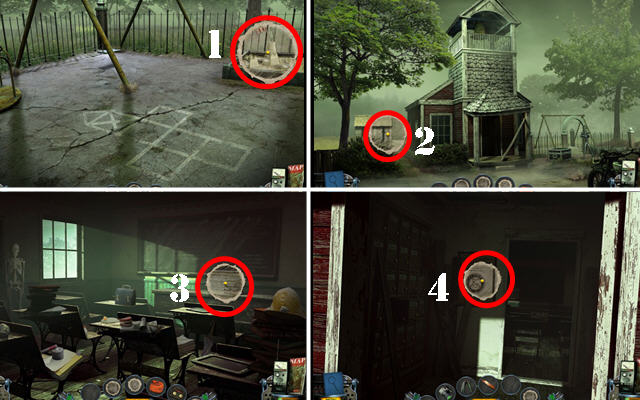
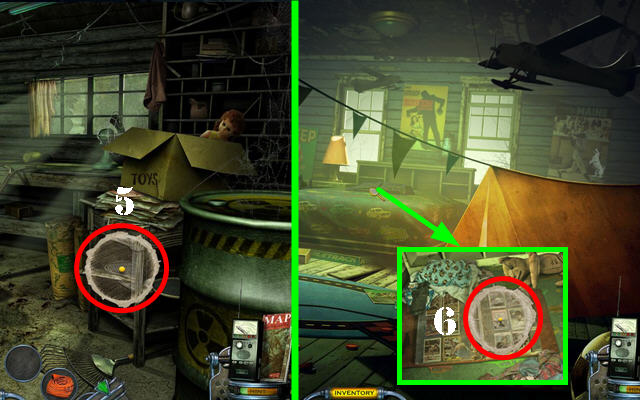
- Locate the rest of the DRAWINGS shown on the screenshots (1-6).
- Return to Cassandras motel room to automatically give her the CHARGED DRAWINGS.
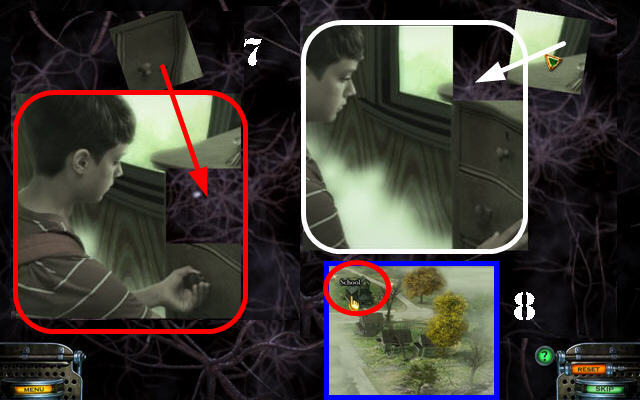
- Put together the puzzle.
- Solve the medium’s puzzle. Click and drag the picture parts together; two correct pieces will automatically lock together.
- Attach the pieces to the center one that’s locked to make the puzzle easier to solve.
- Please look at the screenshot for the solution (7).
- Open the map and go to the School (8).
Chapter 4: The School
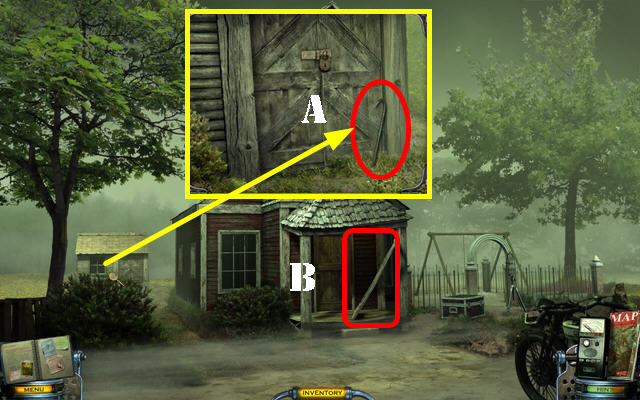
- Zoom into the shed; take the CROWBAR (A).
- Open the door and go through it to activate a HOS (B).
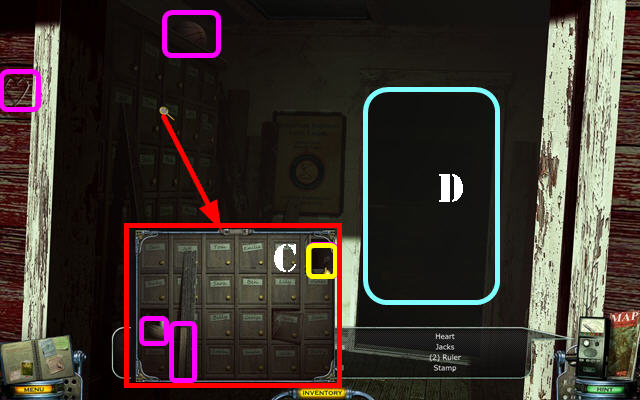
- Zoom into the lockers and open Mr. Hanson’s locker; take the TEACHER’S DESK KEY (C).
- Find the rest of the items on the list.
- Use the NIGHT-VISION GOGGLES in the darkened room (D).
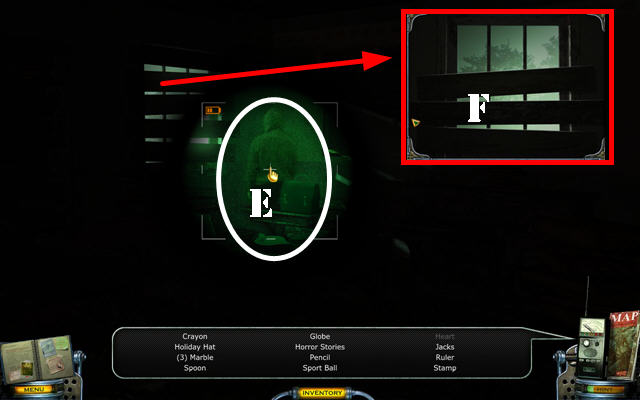
- Touch the ghost (E) and your goggles will no longer work.
- Zoom into the window; remove the boards with the CROWBAR to light up the room (F).
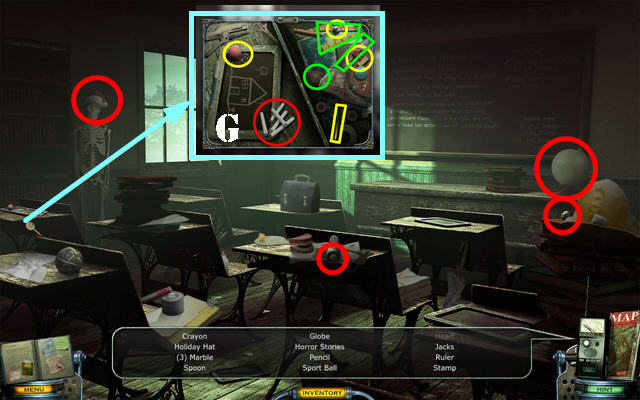
- Zoom into the left desk; take the CHALK (G).
- Find the rest of the items on the list.
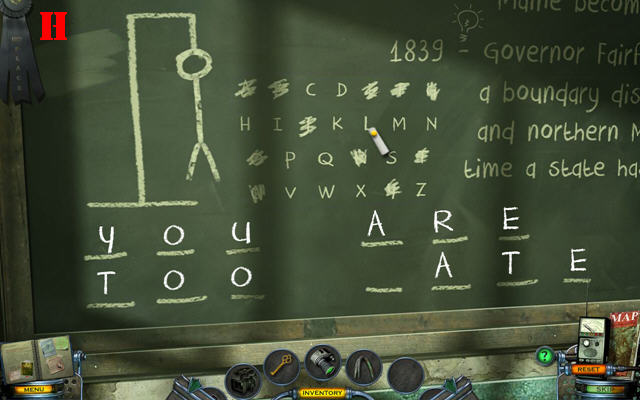
- Zoom into the chalkboard; use the CHALK on it to activate a puzzle.
- Touch the letters ‘YOU ARE TOO LATE’ with the CHALK to solve the puzzle (H).
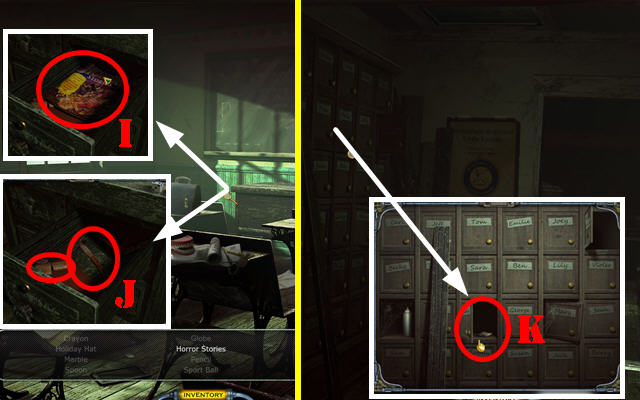
- Zoom into the desk; use the TEACHER’S DESK KEY in the lock and take the horror stories (I).
- You receive a message regarding Billy.
- Take the KNIFE and the LIGHTER (J) from the drawer.
- Walk down.
- Zoom into the lockers and open Billy’s locker. Take the BASEBALL CARD (K).
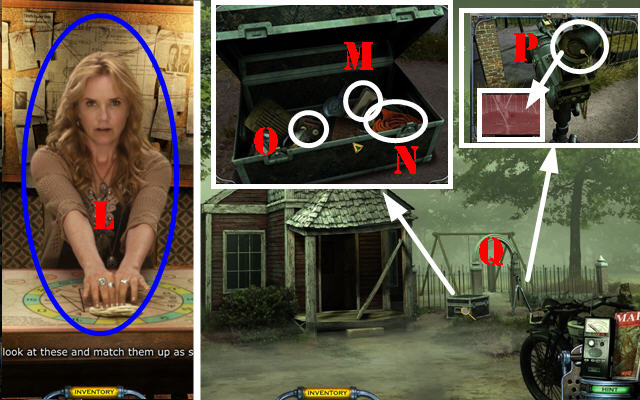
- Return to the see Cassandra’s motel room to receive the DRAWINGS (L).
- Return to the outside of the School.
- Zoom into the trunk and open it. Look at the letter; it states that the infrared camera can be used for viewing ghosts (M).
- Take the EXTENSION CORD (N) and the VIDEO TAPE (O).
- Zoom into the tripod; place the INFRARED CAMERA on it and then touch the lens (P).
- Go to the playground (Q).
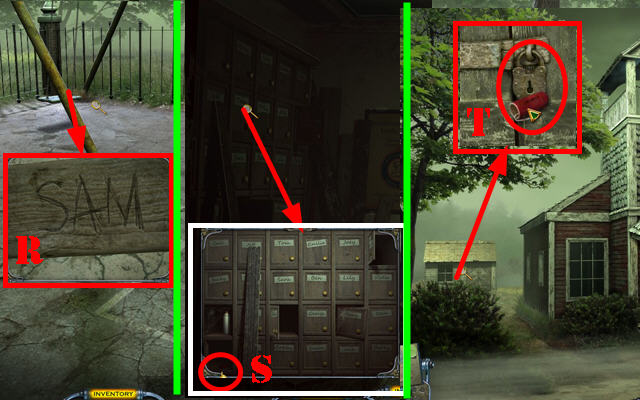
- Take a closer look at the seat and flip it over to reveal the name ‘Sam’ (R).
- Walk down and go into the school and then zoom into the locker; open Sam’s locker and take the M80 (S).
- Walk down.
- Zoom into the shed door and then on the lock; place the M80 on the lock and light it with the LIGHTER (T).
- Open the door and enter the shed.
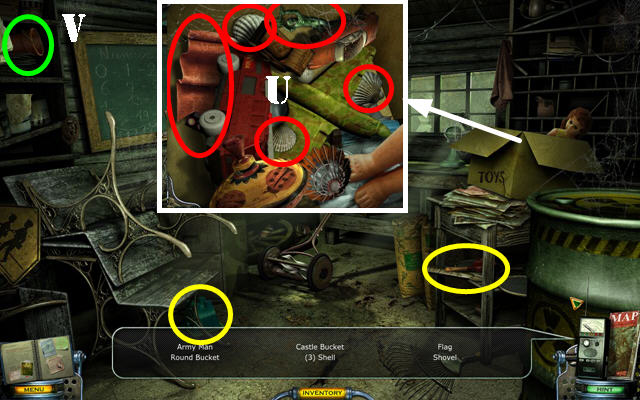
- Look in the box and take the 3 SHELLS, an ARMY MAN, and a FLAG (U).
- Move the clothes and take the ROUND BUCKET (V).
- Take the CASTLE BUCKET and the SHOVEL (yellow).
- Return to the playground.
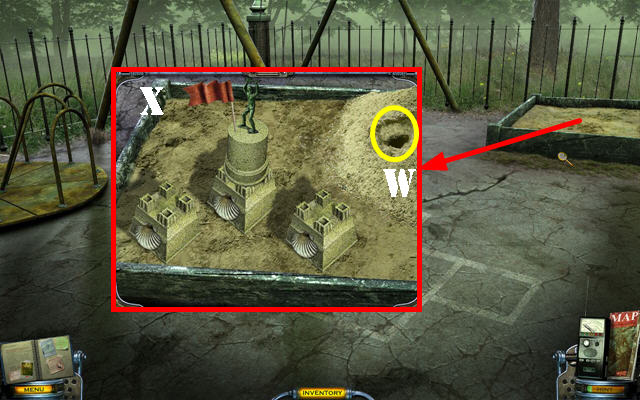
- Zoom into the sandbox; use the ROUND BUCKET and the CASTLE BUCKET in the sand (W) to receive the FILLED ROUND BUCKET and the FILLED CASTLE BUCKET respectively.
- Recreate the sand castle as shown in the screenshot (X). If you make a mistake, remove the items with the SHOVEL.
- Once the sandcastle is complete, apply the DRAWING (1) to it.
- Place the rest of the DRAWINGS around the School (2-5).
- Return to the Warden’s House. Go to the second floor and go into the left bedroom. Zoom into the bed; place the BASEBALL CARD in the sleeve and then apply the DRAWING (6).
- Return to the motel and talk to Cassandra.
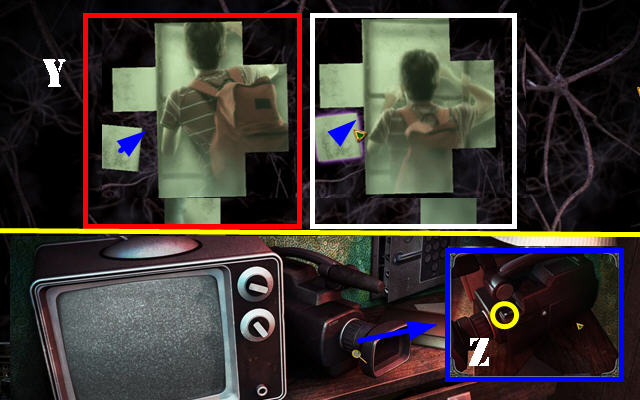
- Recreate the live jigsaw-style puzzle as shown on the screenshot (Y).
- Return to room no.2 in the motel.
- Zoom into the video camera; insert the VIDEO TAPE and press play (Z). Watch the video.
- Return to the lockers in the School.
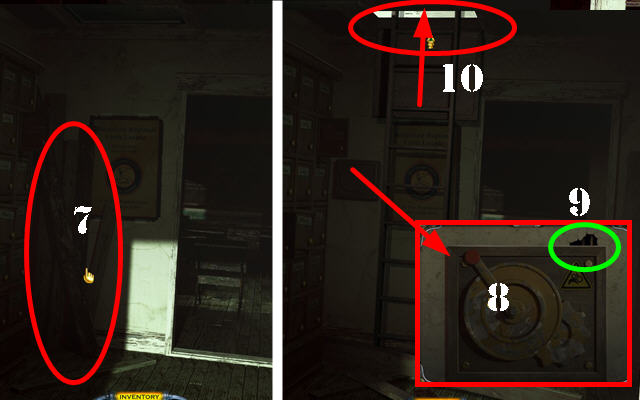
- Knock down the boards (7).
- Zoom into the pulley mechanism; pull the handle and it will break (8). Cut the rope with the KNIFE (9) to lower a ladder.
- Take the ladder up to the roof (10).
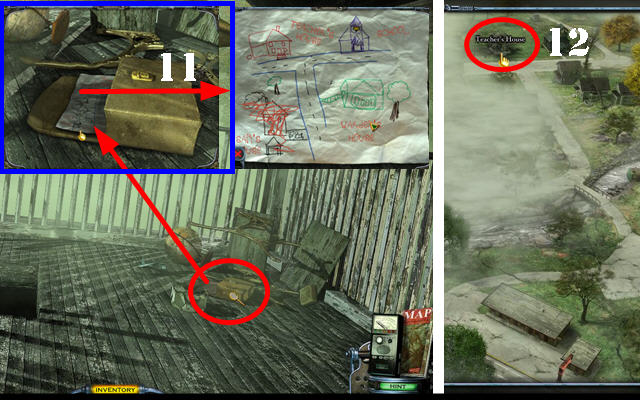
- Look at the bag and then look at the drawing (11).
- Open the map and go to the Teacher’s House (12).
Chapter 5: The Teacher’s House
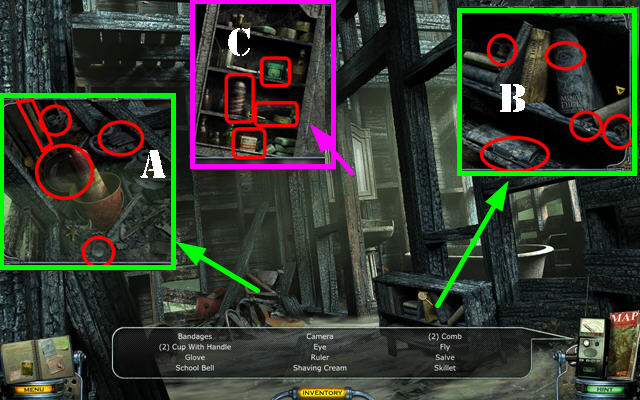
- Go inside the house to activate a HOS.
- Examine the debris (A) and the bookcase (B) to locate items on the list..
- Open the medicine cabinet to look for items (C).
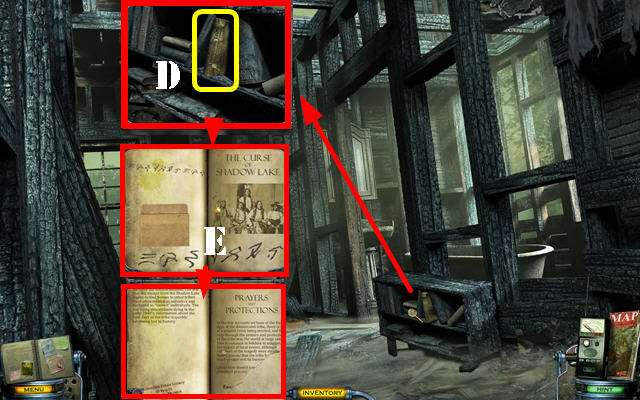
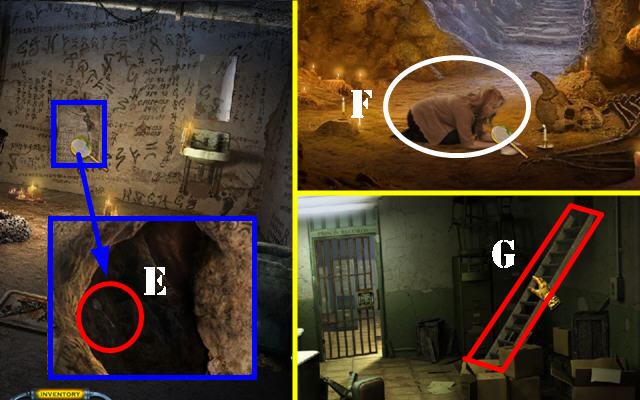
- Zoom into the bookcase; look at the Amaseconti Tribe book (D) and touch the page (E). This action unlocks a new map section.
- Walk down and go into the garage.
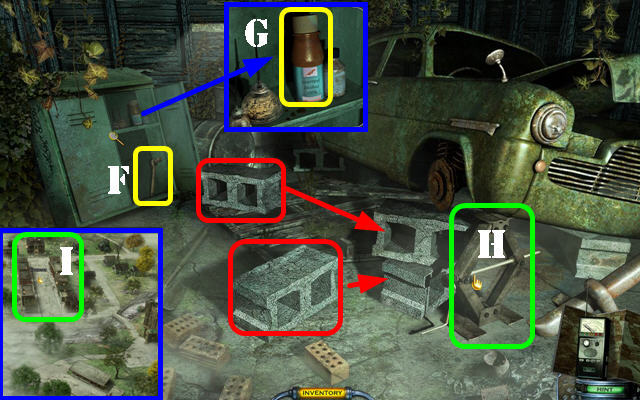
- Open the cabinet and take the LUG WRENCH (F).
- Zoom into the top shelf and take the ISOPROPYL ALCOHOL (G).
- Grab the 2 CINDER BLOCKS (red). Place the 2 CINDER BLOCKS under the wheel; take the CAR JACK (H).
- Open the map and choose the Downtown area (I).
Chapter 6: The Downtown Library
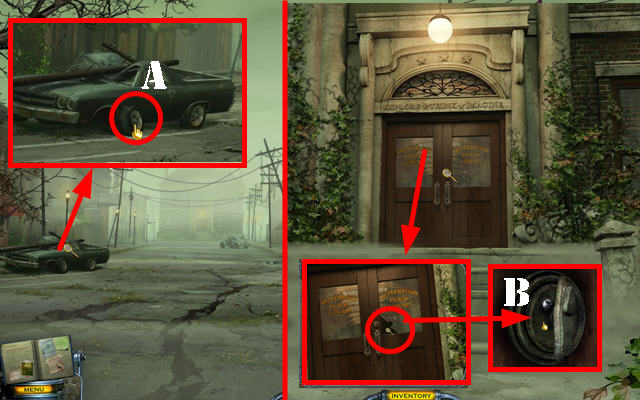
- Zoom into the car and take the SPARE TIRE (A).
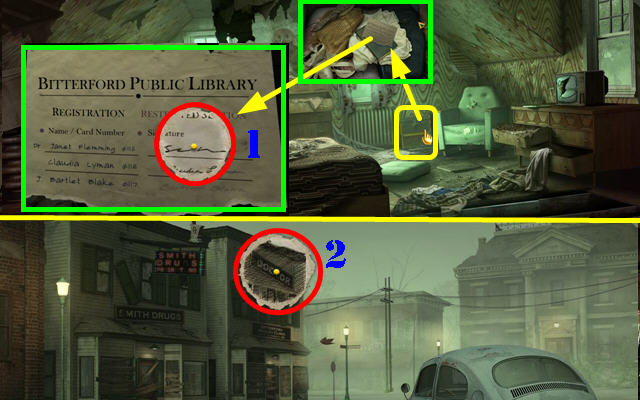
- Go forward and then go towards the library on the right.
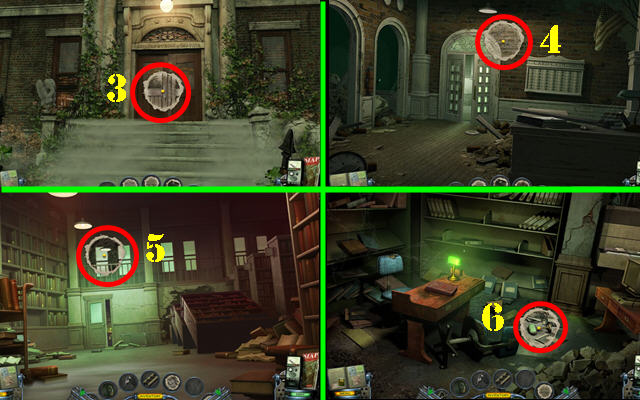
- Zoom into the front door and use the CROWBAR to break the right glass. Zoom into the broken glass and turn the lock (B). Go through the door.
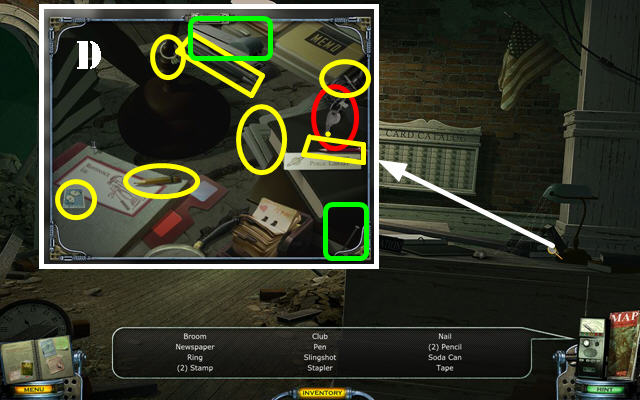
- Play the HOS.
- Zoom into right side of the desk; take the CAR KEY (red).
- Find the rest of the items on the list (D).
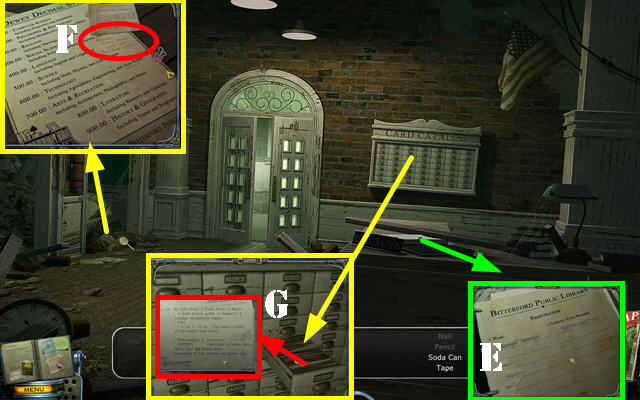
- Examine the documents on the left side of the desk (E).
- Zoom into the paper on the ground; move the note and look at the 600.00 line (F).
- Zoom into the card catalog; open the 600 cabinet and read the note (G).
- Go through the door.
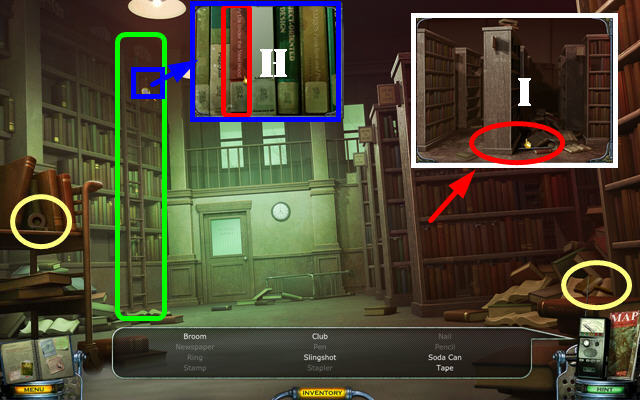
- Move the ladder and zoom into the ‘My Life Under the Steel Hood’ book (H); click on line 7 and read the instructions regarding the gas tank (H).
- Take the LADDER (green).
- Grab the broom and the tape (yellow).
- Zoom into the bookcase; place the CROWBAR under it (J). Click on the crowbar twice.
- Go through the door.
- Take the soda can and the slingshot (green).
- Touch the book on the shelf (K) and it will land on the table. Open the book; pull out the card and take the club from the list (L).
- Flip the page (M).
- Return to Cassandra’s motel room to receive some DRAWINGS.
- Return to the Warden’s House. Go to the master bedroom upstairs.
- Open the trunk and zoom into it; look at the note and place the DRAWING on it (1).
- Return Downtown and place the rest of the DRAWINGS as shown in the screenshots (2-6).
- Return to the motel and talk to Cassandra.
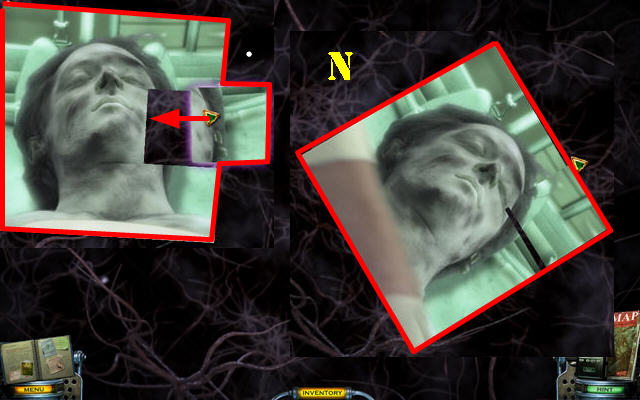
- Solve the medium’s puzzle (N). Click and drag the picture parts together; two correct pieces will automatically lock together.
- The middle piece can be rotated but it cannot move from that spot; use that piece to assemble the rest of the jigsaw.
Chapter 7: The Coroner’s Office
- Return to the Downtown area and go forward.
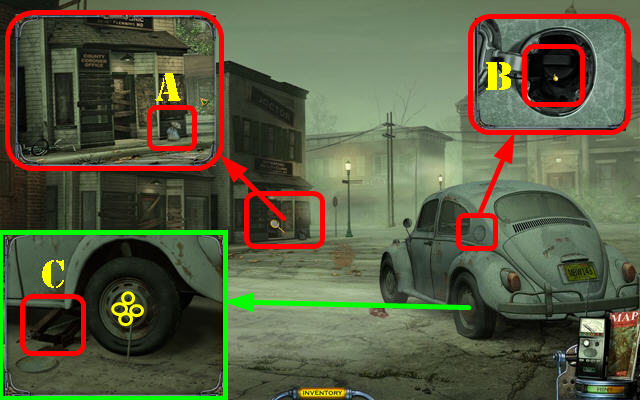
- Zoom into the coroner’s office; take the SANDBAG (A).
- Examine the gas tank; open it and remove the cap (B).Insert the ISOPROPYL ALCOHOL into the tank.
- Zoom into the tire; use the CAR JACK under the car (C). Remove the wheel cover.
- Use the LUG WRENCH to loosen the lug nuts (yellow). Remove the 4 lug nuts.
- Take off the tire and replace it with the SPARE TIRE.
- Replace the lug nuts and touch the lug wrench to tighten the nuts.
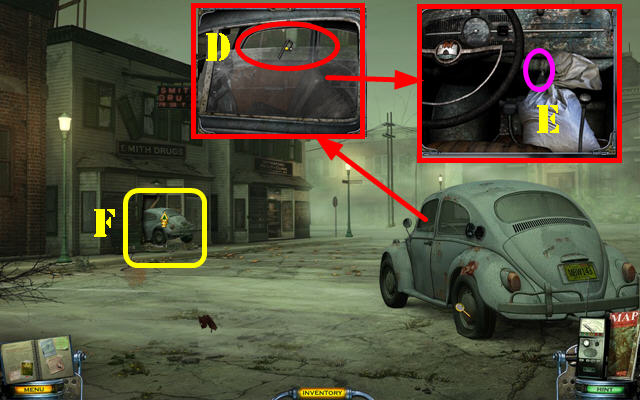
- Take a closer look at the car window and insert the BENT ANTENNA into the window (D).
- Zoom into the front seat; insert the CAR KEY into the ignition and turn the key (purple).
- Place the SANDBAG on the pedal (E). The car will crash into the drugstore.
- Take a closer look at the car (F) and then go forward.
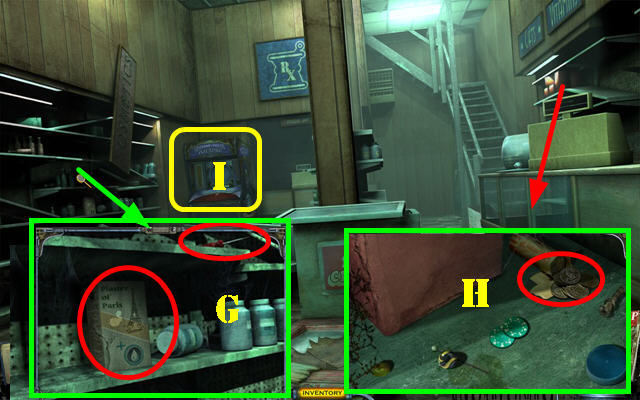
- Zoom into the left shelf; take the PLASTER OF PARIS and the SCREWDRIVER (G).
- Examine the right shelf; take the QUARTER (H).
- Zoom into the Pachinko machine (I).
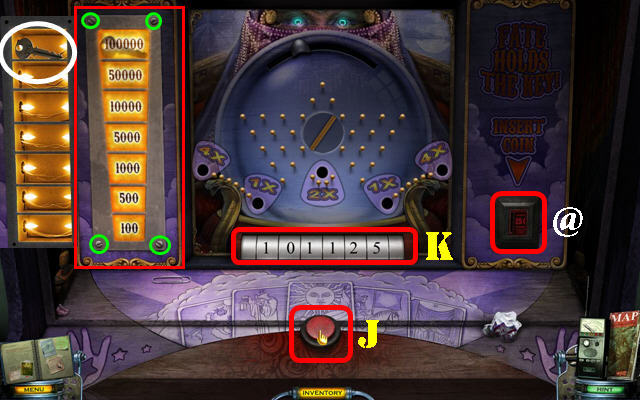
- Insert a QUARTER into the slot to activate a puzzle (@).
- Press the red button (J) to drop the ball. Drop the ball into the numbered holes to increase your multiplier. If your ball falls in the bottom area, it resets your multiplier.
- The solution to this puzzle is random; you’ll win the game once you reach 100,000 points (K). If you score below 100,000 points, you will need to get another quarter from the shelf and start over.
- Remove the screws on the machine with the SCREWDRIVER (green). Remove the panel and take the PHARMACY KEY (white).
- Zoom into the hatch. Use the PHARMACY KEY on the lock and go up to the roof (L).
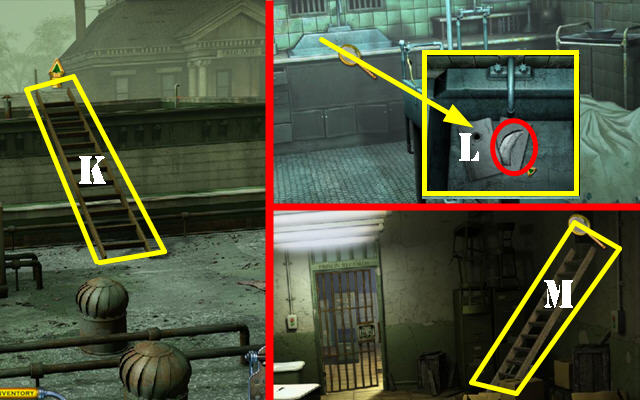
- Place the LADDER on the building and go across (M).
- Zoom into the pipe; attach the EXTENSION CORD to it and go down the cord (N).
- Zoom into the window; use the KNIFE on the locking mechanism and go through the window (O).
- Zoom into the closet (P); take the items listed in your game.
- Go through the left door.
- Zoom into the table; take the TAPE (red). Find the rest of the items.
- Walk down.
- Zoom into the bedroom closet and take the PIANO ROLL (Q).
- Go through the left door and then go right.
- Zoom into the piano and open the sliding glass door; insert the PIANO ROLL (R). Place some TAPE on the roll.
- Pull the lever (S) on the side of the piano and watch the keys.
- Zoom into the door lock and recreate the piano keys.
- To solve the puzzle, select the buttons in this order: Y, Z, Y, U, X, and X.
- Go through the door.
- Zoom into the bulletin board; take the BOBBY PIN (A).
- Look at the envelope and pull out the photo (B).
- Return to Cassandra’s motel room to receive some DRAWINGS.
- Return to the coroner’s office in the Downtown area (you can reach the area by going through the roof in the pharmacy) and then go through the back door to activate a HOS.
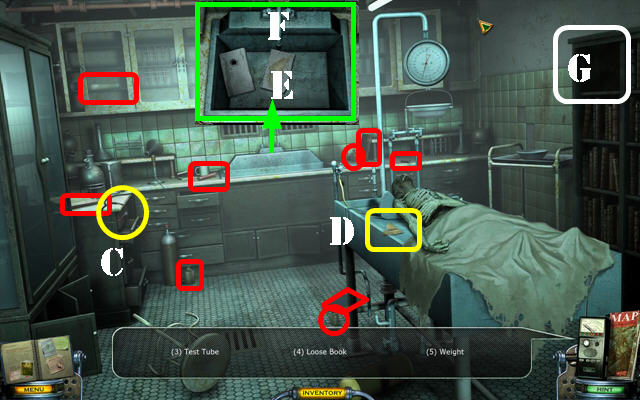
- Take the STETHOSCOPE (C) and the TORN PAGE (D).
- Find the rest of the items on the list (red).
- Zoom into the sink and put the PLASTER OF PARIS in the mold (E). Put the top on and turn on the water (F). You will need to let it sit for a while. You will not come back to it until later on in the game.
- Place the 4 BOOKS on the shelf (G).
- Walk down.
- Take the rest of the items on the list (H).
- Return to the autopsy room.
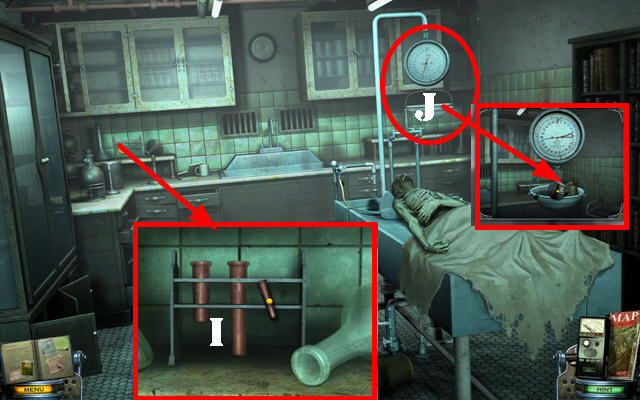
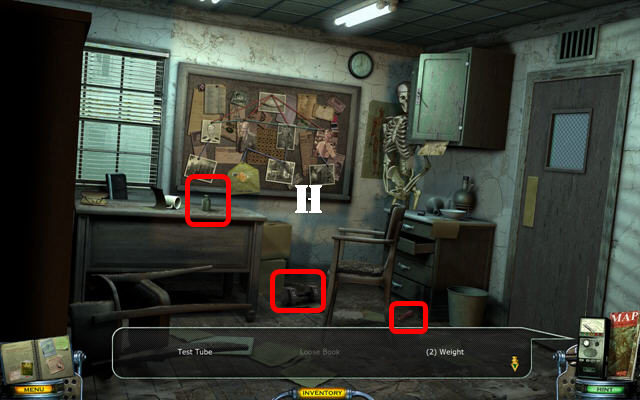
- Zoom into the test tube rack; place the SHORT TEST TUBE, LONG TEST TUBE, and the MEDIUM TEST TUBE on the rack (from left to right). Note: the test tube placements may be random (I).
- Take a closer look at the scale (J); place the two 1/2 LB WEIGHTS, 1 LB WEIGHT, 2 LB WEIGHT, and the DUMBBELL on the scale.
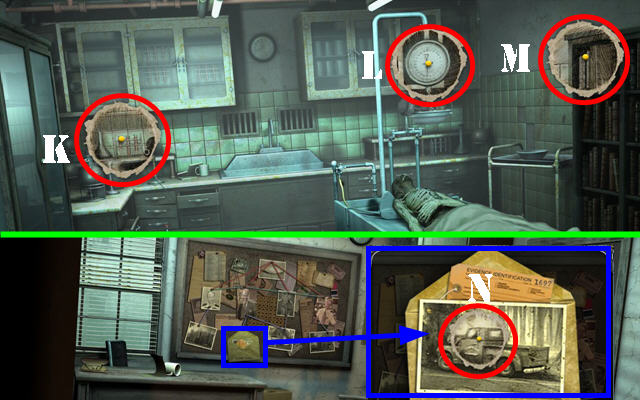
- Place the 3 DRAWINGS on the areas marked on the screenshot (K-M).
- Walk down.
- Zoom into the bulletin board. Take a closer look at the envelope and pull out the photo; place the DRAWING on the photo (N).
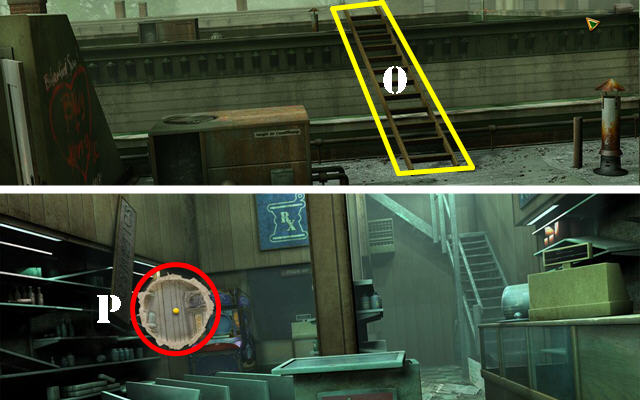
- Walk down 4 times; take the LADDER back from the roof (O).
- Walk down to reach the pharmacy.
- Place the DRAWING (P).
- Walk down twice.
- Zoom into the Sheriff’s Office and then again on the door; use the BOBBY PIN and then the SCREWDRIVER in the lock (Q).
- Touch the lock to activate a puzzle.
- Push all the pins until they all remain above the middle box. Touch a tumbler to send it to the top. The tumblers must be pushed in the order of slowest to fastest.
- To solve the puzzle select the tumblers quickly in the order shown in the screenshot (1-5).
- Go through the door.
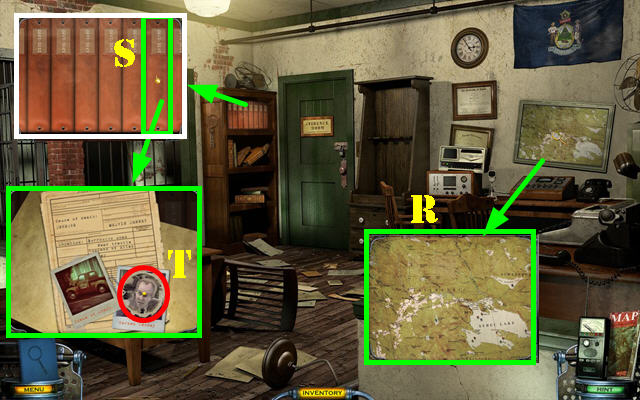
- Zoom into the map; look at the Sebec lake area (R).
- Take a closer look at the books; open the one marked 1601-1700 (S).
- Apply the DRAWING to the picture (T).
- Go through the door to reach the evidence room and activate a HOS.
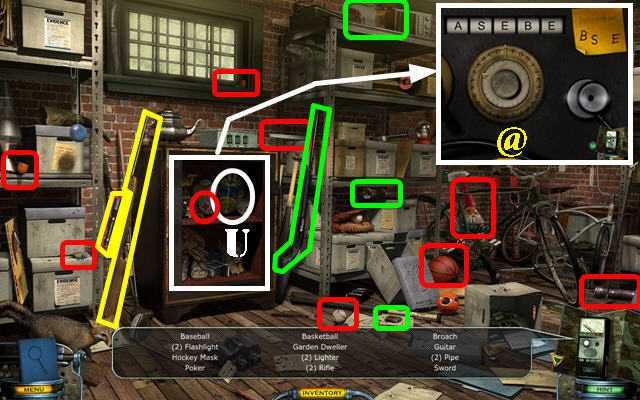
- Find all the items on the list.
- Zoom into the safe and place the STETHOSCOPE on the dial to activate a puzzle.
- Rotate the dial to discover the letters in the combination and then input them in the correct order to unlock the safe. The letters can be repeated more than once.
- Solution: Turn the dial clockwise to the letter ‘S’ and stop, turn the dial counterclockwise to ‘E’ and stop, turn the dial clockwise to ‘B’ and stop, turn the dial counterclockwise to ‘E’ and stop, turn the dial clockwise to ‘C’ and stop to input the code ‘SEBEC’ (@).
- Take the Hockey Mask (U) from inside the safe (and any other item from your list). You will hear a message regarding the number 1142.
- Return to Cassandra’s motel room to automatically give her the CHARGED DRAWINGS.
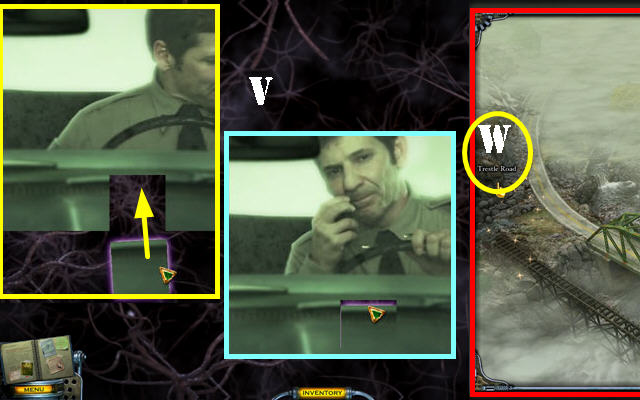
- Solve the medium’s puzzle. Click and drag the picture parts together; two correct pieces will automatically lock together (V).
- Open the map and go to the Trestle road (W).
Chapter 8: Trestle Road
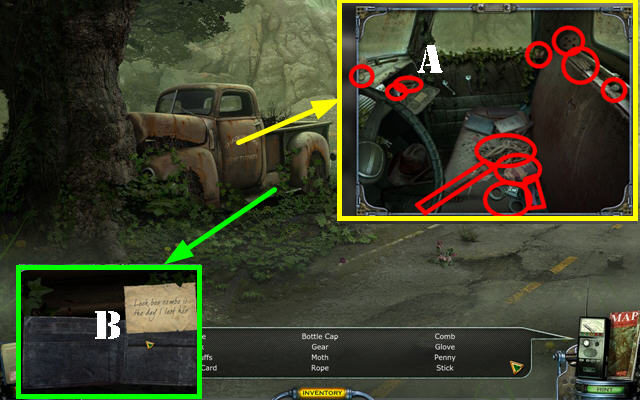
- Play the HOS.
- Take a closer look at the truck; open the glove compartment (A) and locate all the items on the list.
- Zoom into the area below the truck; open the wallet and pull out the note (B). It states: ‘Lock box combo is the day I lost her’.
- Return to the Sherriff’s office and you will receive a message from Cassandra to see her. Return to Cassandra’s motel room to receive some DRAWINGS.
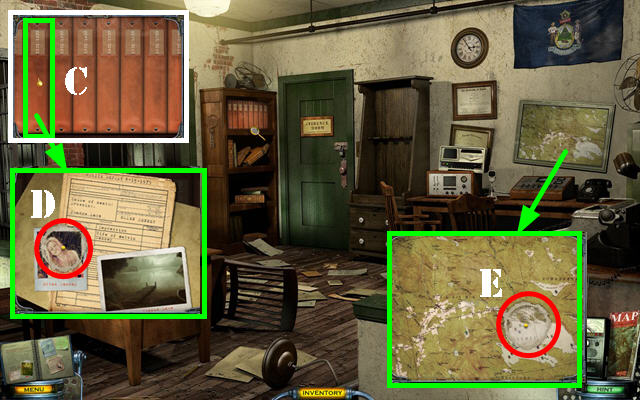
- Return to the Sheriff’s Office; zoom into the books and open the one marked 1101-1200 (C).
- Note the date of her death on the book – 815. Place the DRAWING over the picture (D).
- Zoom into the map; place the DRAWING (E).
- Go into the evidence room.
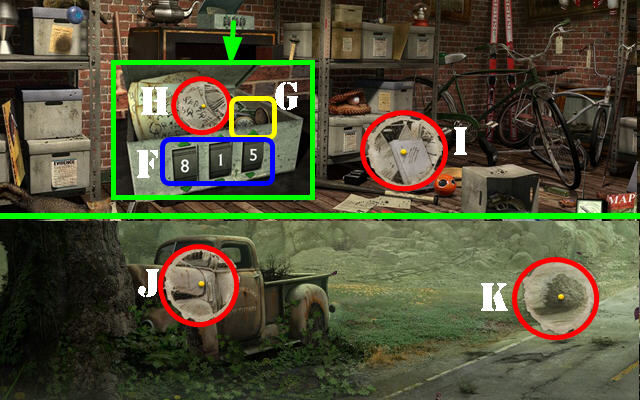
- Zoom into the box; input the numbers 815 (F).
- Take the WARDEN’S KEYS (G). Zoom back into the box and place the DRAWING (H).
- Place the other DRAWING (I).
- Return back to Trestle Road. Place the 2 DRAWINGS (J-K).
- Return to Cassandra’s motel room to automatically give her the CHARGED DRAWINGS.
- Solve the medium’s puzzle. Click and drag the picture parts together; two correct pieces will automatically lock together.
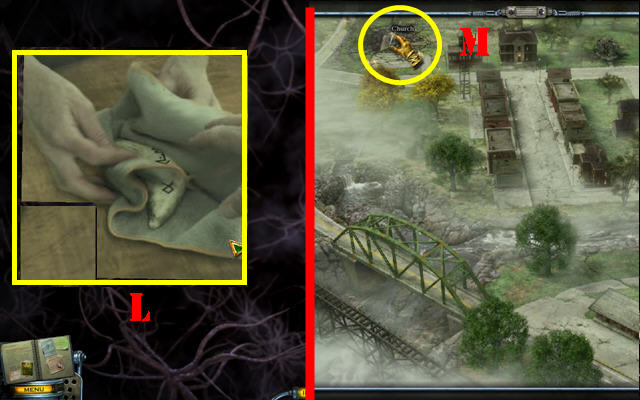
- The center piece in this puzzle rotates but will not move from its spot; start your puzzle from there.
- Please look at the screenshot for the solution (L).
- Open the map and choose the Church location (M).
Chapter 9: The Church
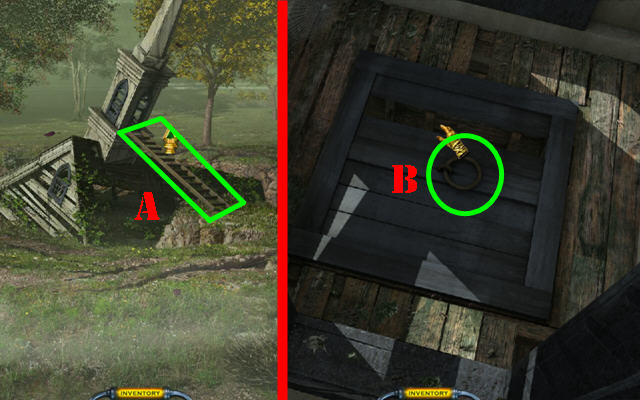
- Place the LADDER on the side of the building (A).
- Go into the church.
- Pull the hatch ring (B) and it will break off.
- Use the KNIFE on the hatch, pull on it and go through.
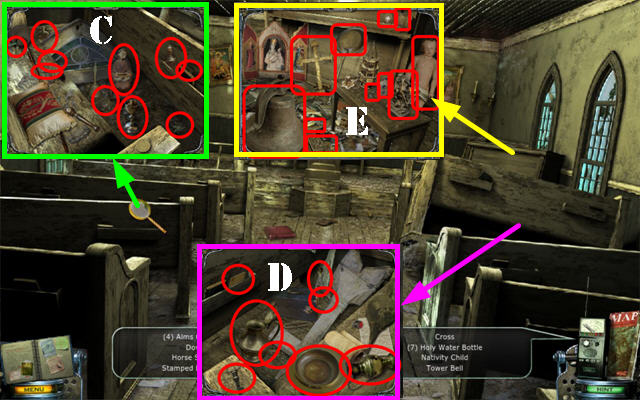
- Zoom into the left pew and take the all the items on your list (C).
- Zoom into the right pew and take the all the items on your list (D).
- Zoom into the pew by the window and take the all the items on your list (E).
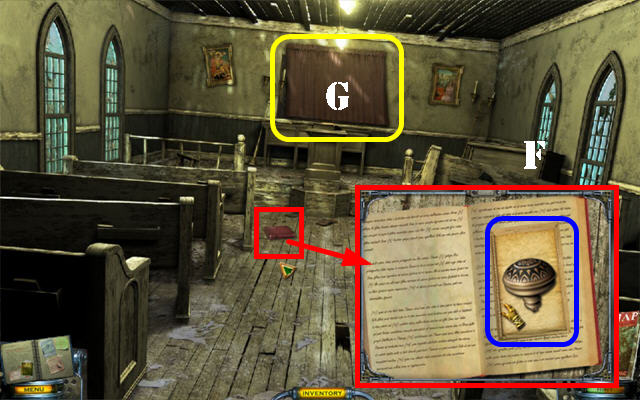
- Zoom into the book; open it and take the CHURCH KEY (F).
- Open the curtain and zoom into the stained glass window (G).
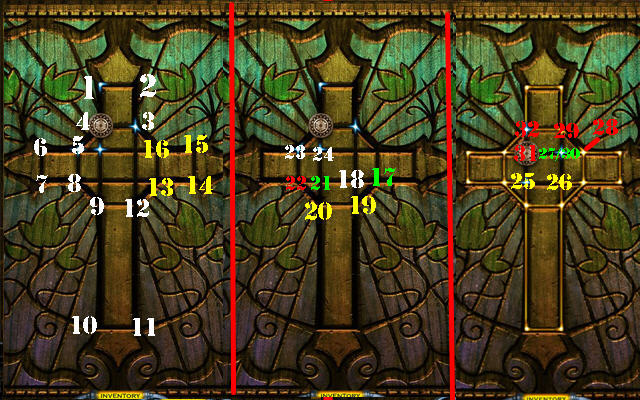
- Place the CHURCH KEY on the window to activate a puzzle.
- Select any adjacent light to move the handle there and complete that path. Connect every path on the board without crossing over the same path twice.
- Please look at the screenshot for the solution (1-32). The puzzle will reset itself if you run out of moves.
- Return to Cassandra’s motel room to receive some DRAWINGS.
- Return to the inside of the Church and go forward.
- Take the TORN PAGE (H).
- Grab the DOCTOR’S BAG (I).
- Zoom into the pile of rocks and move the rocks aside. Use the DOCTOR’S BAG on the relic (J) to receive the RELIC-IN BAG.

- Place the DRAWINGS as shown in the screenshot (K-P).
- Return to Cassandra’s motel room to automatically give her the CHARGED DRAWINGS.
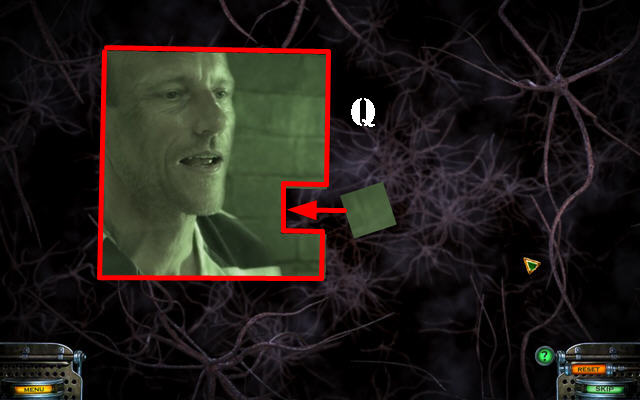
- Solve the medium’s puzzle. Click and drag the picture parts together; two correct pieces will automatically lock together.
- In this section, you may want to start with the eyes first, followed by the mouth, and then the rest of the face (Q).
Chapter 10: The Relic
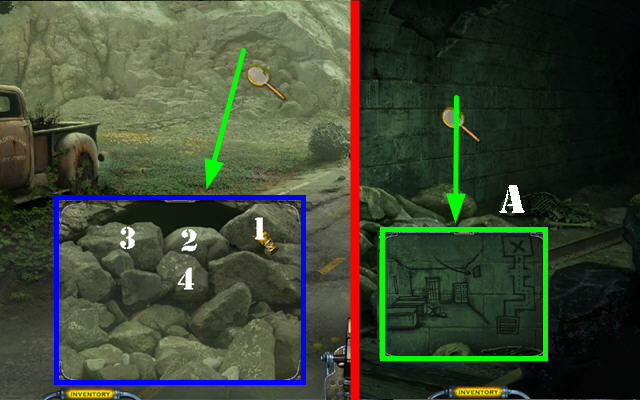
- Return to Trestle Road.
- Zoom into the rocks; remove 4 of them and go forward (1-4).
- Zoom into the wall twice to see the sketch (A).
- Return to the prison’s administration office.
- Place the LADDER on the grate (if you don’t have the ladder, go back and get it from the Church).
- Zoom into the grate; remove the 4 screws with The SCREWDRIVER (B).
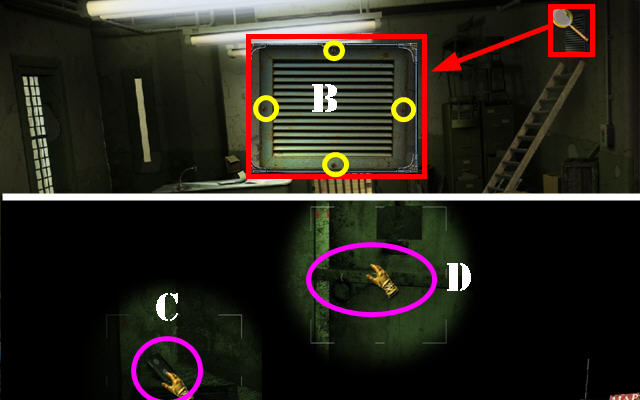
- Remove the grate and use the NIGHT-VISION GOGGLES in the ventilation shaft.
- Take the VIDEO TAPE in the lower left corner (C).
- Use the WARDEN’S KEYS on the lock (D). Go through the door.
- Zoom into the calendar on the wall; remove it and take the SPOON (E).
- Go forward twice and you’ll see Cassandra (F).
- Walk down 4 times.
- Take back the LADDER (G).
- Return to the inside of the Teacher’s House.
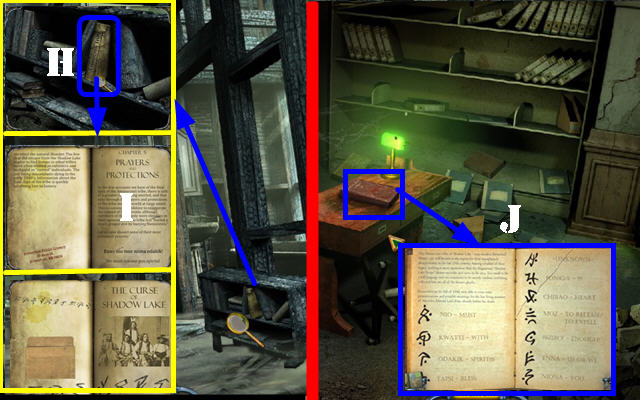
- Take a closer look at the bookcase and open the Amaseconti Tribe book (H). Place the TORN PAGE on the right page (I). Flip the page.
- Return to the reading room in the Downtown Library.
- Open the red book; place the TORN PAGE on the right page (J).
- Return to the roof on the pharmacy. Place the LADDER and go across it (K). Return to the autopsy room.
- Zoom into the sink; remove the mold cover and take the FAKE RELIC (L). if you haven’t already done so, place the plaster of Paris in the mold, close it and turn on the water.
- Walk down 5 times.
- Take back the LADDER (K).
- Return to the administration office in the prison. Place the LADDER on the ventilation shaft (M) and use the NIGHT-VISION GOGGLES in the shaft.
- Go through the door, the hole in the wall, and then forward.

- Zoom into the candle behind Cassandra; place the SPOON over it (N).
- Zoom into the RELIC and swap it out with the FAKE RELIC (O).
- Go forward.
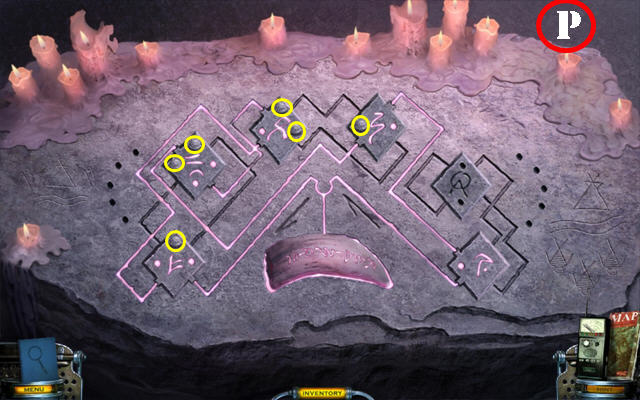
- Place the RELIC in the niche to activate a puzzle.
- You must spell out: ‘We must release you spirits’. Drag one tile over the other to swap their positions.
- Please look at the screenshot for the solution (P). This solution may be random. Look in the Case Book and place the pegs (yellow) in the right spots according to the image.
- Take the RELIC.
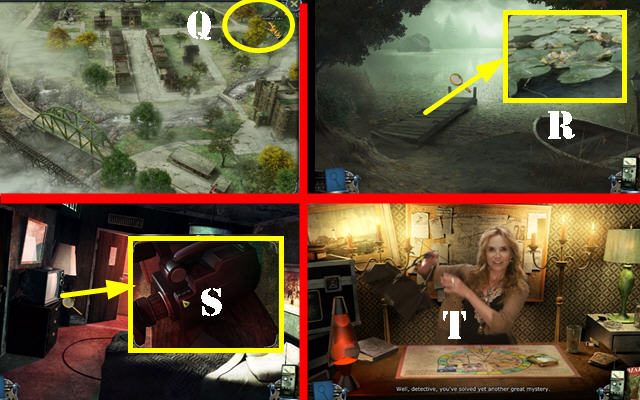
- Open the map and go to Shadow Lake (Q).
- Zoom into the pier and toss the RELIC in (R).
- Return to motel room no. 2; zoom into the TV and open the video camera; place the VIDEO TAPE in and play it (S).
- Return to Cassandra’s motel room (T).
- Congratulations, you have completed Mystery Case Files: Shadow Lake Standard Edition!


 Lost Souls: Enchanted Paintings Walkthrough, Guide, & Tips
 Secrets of the Dark: Temple of Night Walkthrough, Guide, & Tips
 Nightmare Realm Walkthrough, Guide, & Tips
 Dark Dimensions: City of Ash Walkthrough, Guide, & Tips
 Whispers: Revelation Walkthrough, Guide, & Tips