Haunted Legends: The Undertaker Walkthrough, Guide, & Tips
Haunted Legends: The Undertaker Walkthrough

Welcome to the Haunted Legends: The Undertaker Walkthrough
Find out who is behind the shocking zombie invasion.
Whether you use this document as a reference when things get difficult or as a road map to get you from beginning to end, we’re pretty sure you’ll find what you’re looking for here.
This document contains a complete Haunted Legends: The Undertaker game walkthrough featuring annotated screenshots from actual gameplay!
We hope you find this information useful as you play your way through the game. Use the walkthrough menu below to quickly jump to whatever stage of the game you need help with.
Remember to visit the Big Fish Games Forums if you find you need more help. Have fun!
This walkthrough was created by MargieB, and is protected under US Copyright laws. Any unauthorized use, including re-publication in whole or in part, without permission, is strictly
General Tips


- This is the Official Guide for Haunted Legends: The Undertaker.
- Choose ‘Play’ (A) to begin your adventure.
- The ‘Options’ (B) Button allows you to adjust the screen, music, cursor, and sound.
- The ‘Click here to change player’ (C) can be used to manage your profiles in the game.
- Choose ‘More Games’ (D) to view other titles from this developer.
- We will use the acronym HOS for the Hidden Object Scenes. The items in the HOS are random.
- Some puzzle solutions may be random.
- There are 30 FISH SCALES to find in the game. This guide marks all the scales with the ‘@’ symbol in the screenshots and in the guide.
- Inventory items will stay in inventory until they are no longer needed.
Chapter 1: Meet Mrs. Fisher
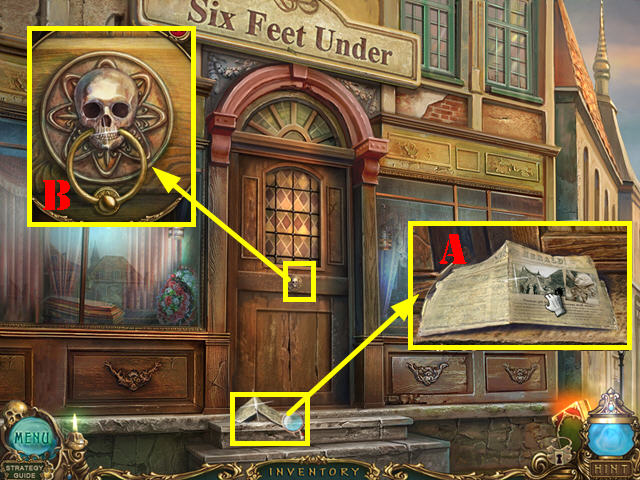
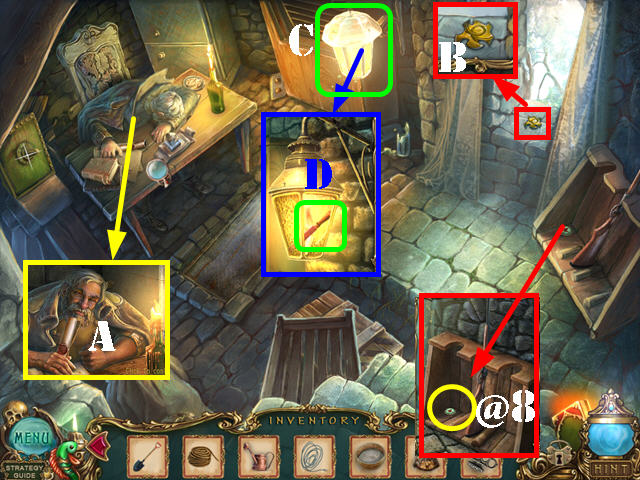
- Go towards the door.
- Zoom into the newspaper; take it and then take the HANDLE below it (A).
- Zoom into the door; put the HANDLE on it (B).
- Knock on the door and then go through the door once you finish talking to Mrs. Fisher.
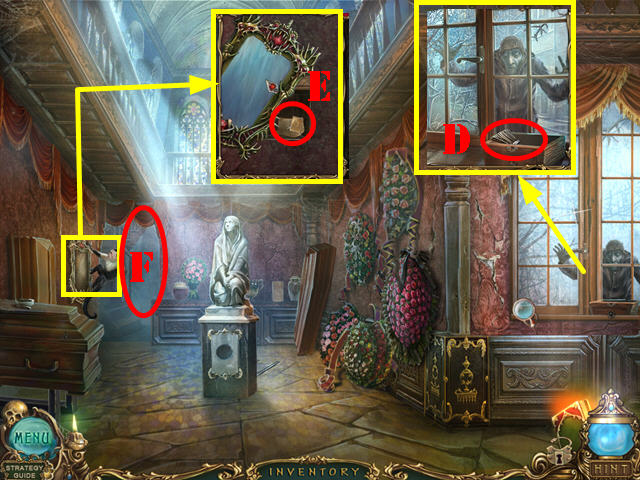
- Talk to Mrs. Fisher.
- Take a closer look at the window and take the BRUSH (D).
- Zoom into the monkey on the mirror; take the notes on the screen. Touch the mirror again and take the note (E).
- Go through the doorway (F).
- Talk to Mrs. Fisher.
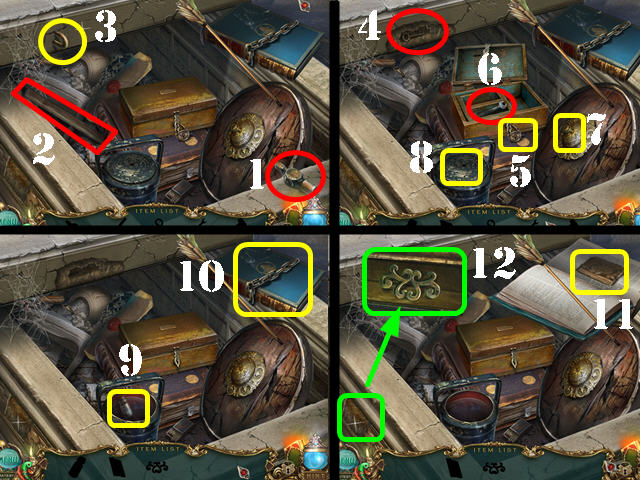
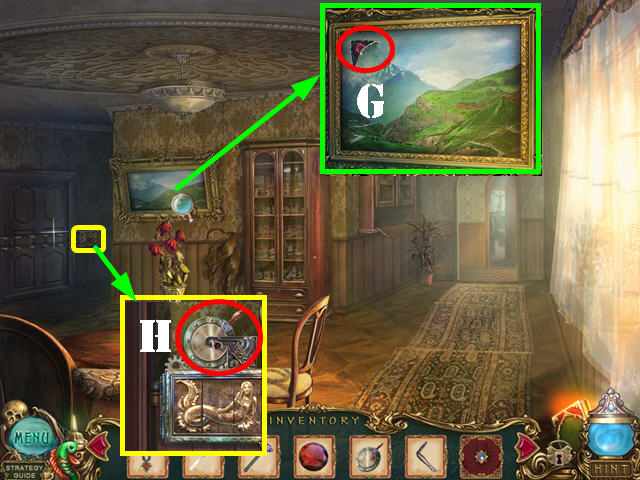
- Zoom into the plant; take the note (G). Move the leaves aside and take the LENS (H).
- Look at the portrait and take the KEY (I).
- Take a closer look at the window; take the note and the COFFIN HANDLE (J).
- Walk down.
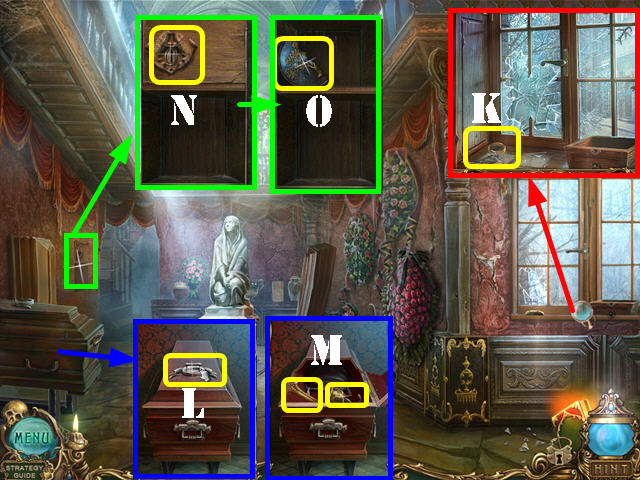
- Zoom into the window; take the LENS SOCKET (K).
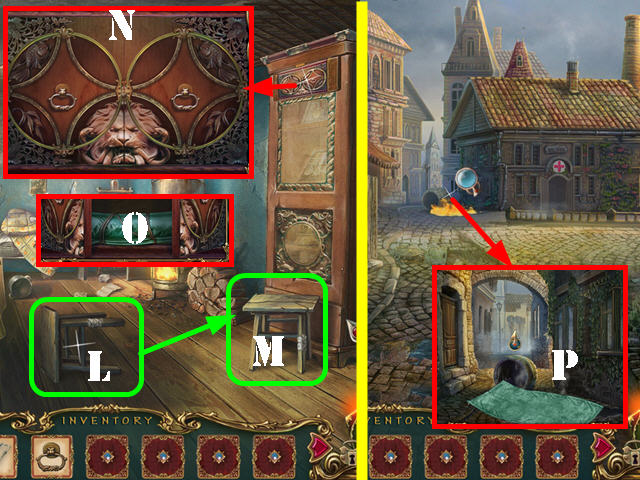
- Zoom into the coffin; put the COFFIN HANDLE on it and turn the handle (L).
- Take the BONE and the PIRATE HOOK (M).
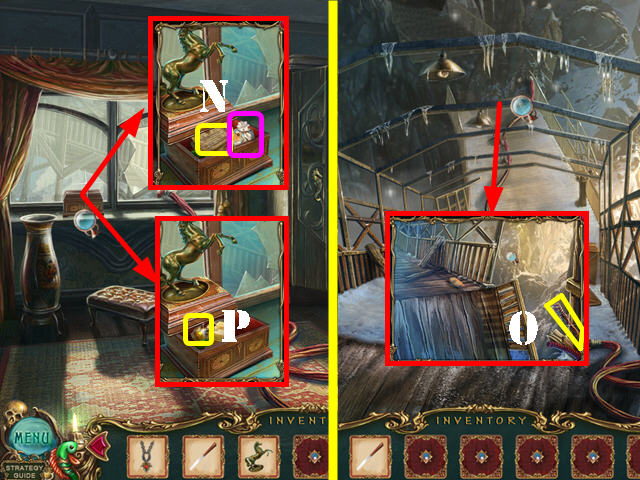
- Zoom into the lock; put the KEY in it and turn the key (N). Take the LEFT MEDALLION HALF (O).
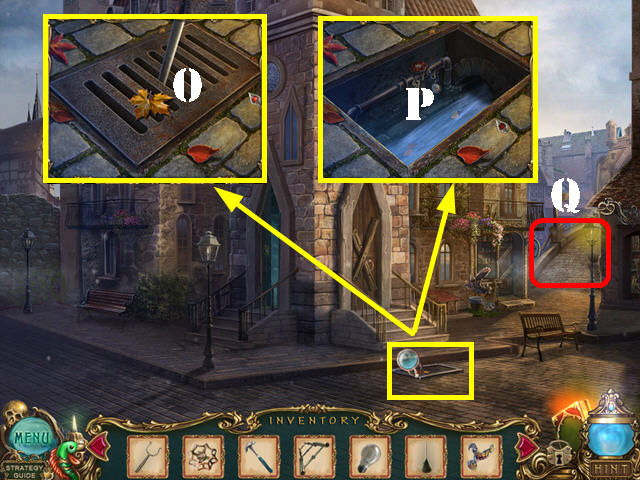
- Go through the doorway and then take a closer look at the window.
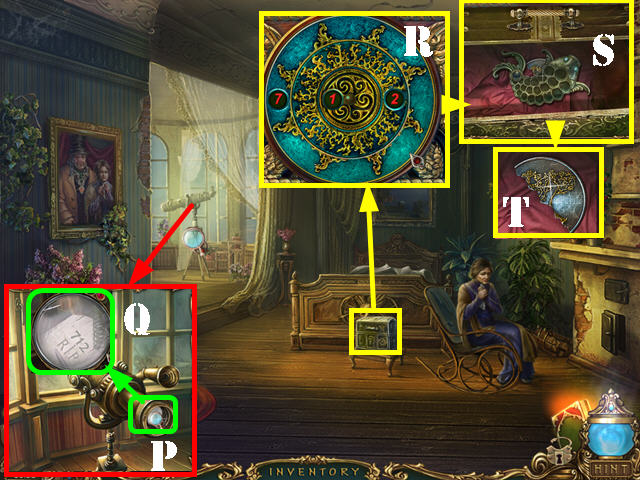
- Put the LENS SOCKET and then the LENS on the telescope (P).
- Touch the lens to view a clue (Q).
- Zoom into the chest and enter the code 712 (R) by rotating the disks into the right spots. Take the IRON FISH (S).
- Open the iron fish, close it, and take the RIGHT MEDALLION HALF from the chest (T).
- Walk down.
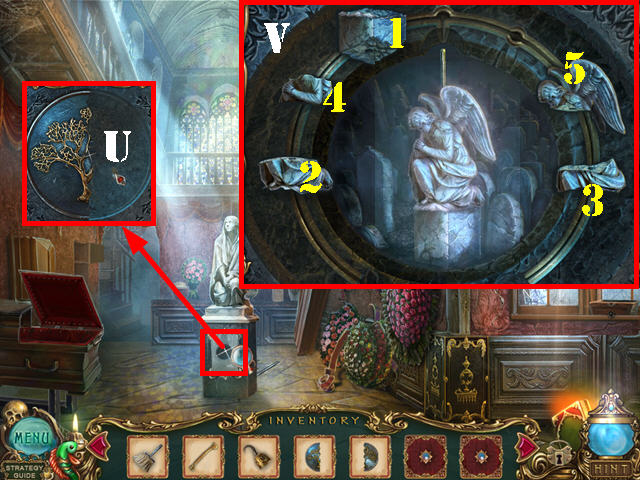
- Zoom into the pedestal; put the LEFT MEDALLION HALF and the RIGHT MEDALLION HALF into the slot to activate a puzzle (U).
- Complete the angel figure by putting the pieces into the right spots.
- Touch a piece and then an arrow to move it to that spot.
- Please look at the screenshot for the solution (V) and place the pieces in the order shown in the screenshot (1-5).
- Go down the hatch.
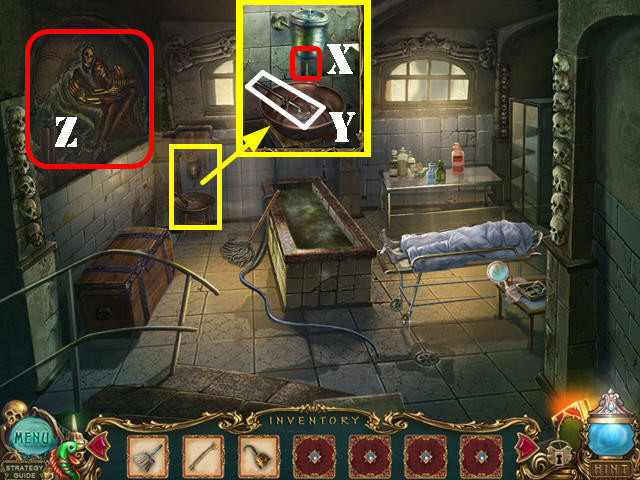
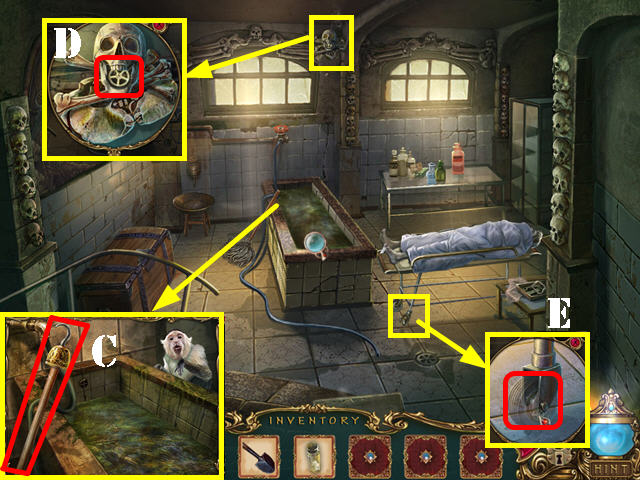
- Look at the sink; touch the spigot (X) twice and take the SHOVEL (Y).
- Take a closer look at the skeletons; put the BONE on the scene to activate a puzzle (Z).
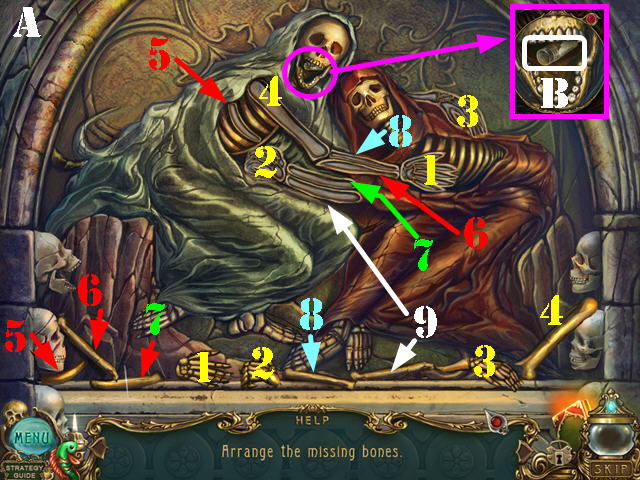
- Put the bones back in their place.
- Please look at the screenshot for the solution (A).
- Zoom into the skeleton’s mouth and take the BOTTLE WITH POWDER (B).
- Zoom into the tub.
- Put the PIRATE HOOK on the mop handle to get the LONG HOOK (C).
- Zoom into the skull; use the LONG HOOK in its mouth to get the WHEEL (D).
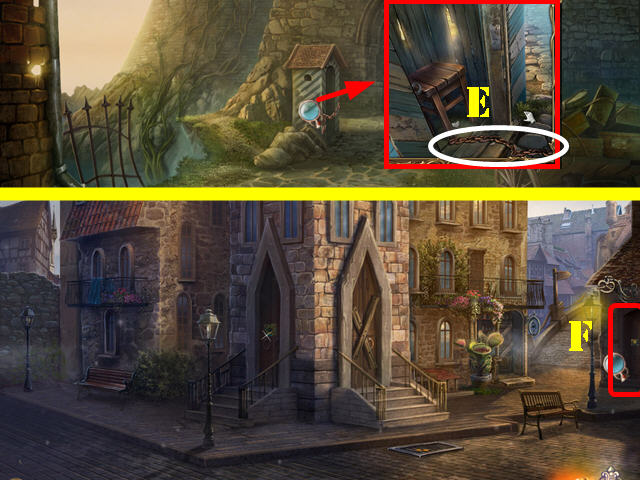
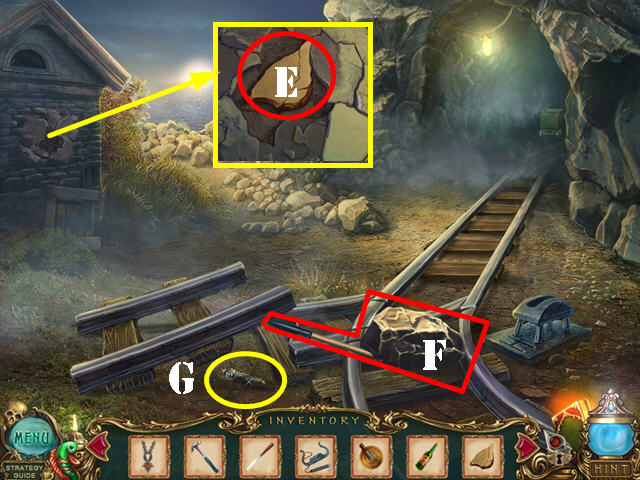
- Look at the bottom of the gurney; put the WHEEL on it to activate a HOS (E).
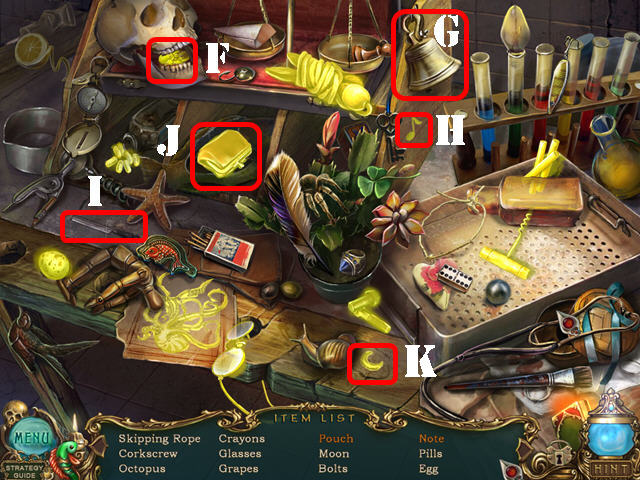
- Play the HOS.
- Open the skull’s mouth and take the grapes (F).
- Ring the bell (G) and take the note (H).
- Cut the fish with the file (I) and take the pouch (J).
- Touch the snail and take the moon (K).
- You will receive the CORKSCREW.
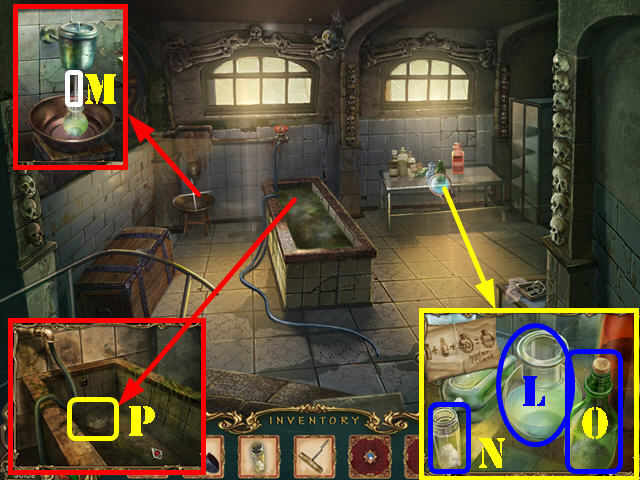
- Take a closer look at the table and take the EMPTY BOTTLE (L).
- Look at the sink; put the EMPTY BOTTLE in it and touch the spigot to get the BOTTLE WITH WATER (M).
- Look at the table again; put down the BOTTLE WITH WATER (L) and the BOTTLE WITH POWDER (N).
- Remove the cork on the green bottle with the CORKSCREW (O).
- Put the BOTTLE WITH POWDER into the bottle with water.
- Pour the contents from the green bottle into the bottle (L).
- Take the CLEANING SOLUTION.
- Zoom into the tub; put the CLEANING SOLUTION in it and pull the drain plug (P).
- Go down the steps to reach the underground crypt.
Chapter 2: Underground Crypt
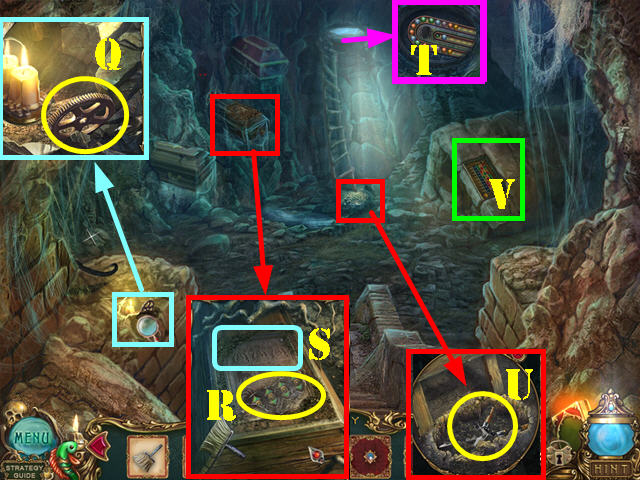
- Zoom into the GEAR and then take it (Q).
- Take a closer look at the coffin; clean it with the BRUSH and take the BUTTONS (R).
- Touch the images on the coffin (S).
- Look at the hole in the ceiling (T) and then zoom into the bottom of the ladder. Use the SHOVEL on the dirt and take the SHEARS (U).
- Zoom into the puzzle; put the BUTTON on it to activate a puzzle (V).
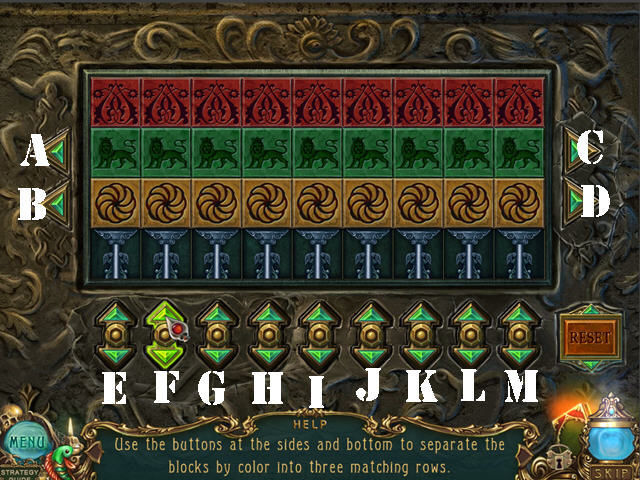
- Using the clue discovered on the coffin as a clue, use the arrows on the buttons to put the tiles in place.
- To solve the puzzle, please follow these steps: G, C, G, J, A, J, F, B, F, C, F, A, F, I, B, I, C, I, A, I, K, D, K, C, K, A, K, E, B, E, F, B, F, B, G, D, G, K, B, K, L, D, and L.
- Take the CHEST KEY ().
- Walk down.
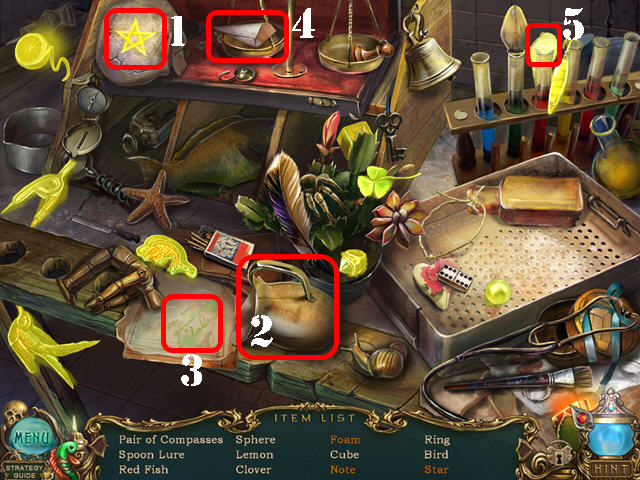
- Play the HOS.
- Touch the skull and take the star (1).
- Touch the pitcher (2) and take the note (3).
- Drag the cone (4) to the test tube and take the foam (5).
- You will receive the RED FISH.
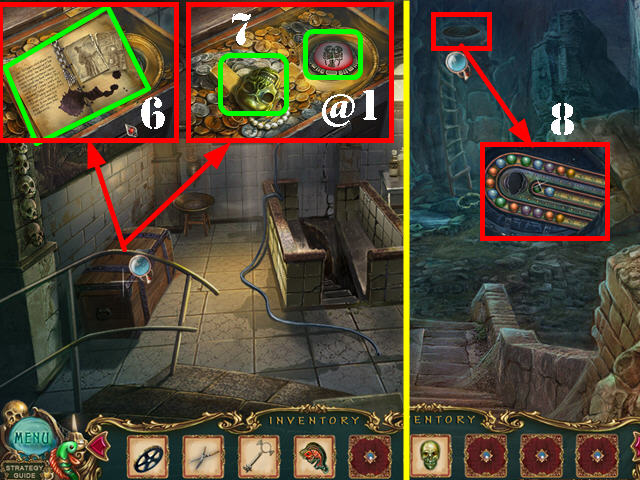
- Zoom into the chest; use the CHEST KEY in the lock and take the note (6).
- Grab the SKULL (7) and the LOBSTER SCALE (@1).
- Return to the underground crypt.
- Zoom into the hatch and put the SKULL in the slot to activate a puzzle (8).
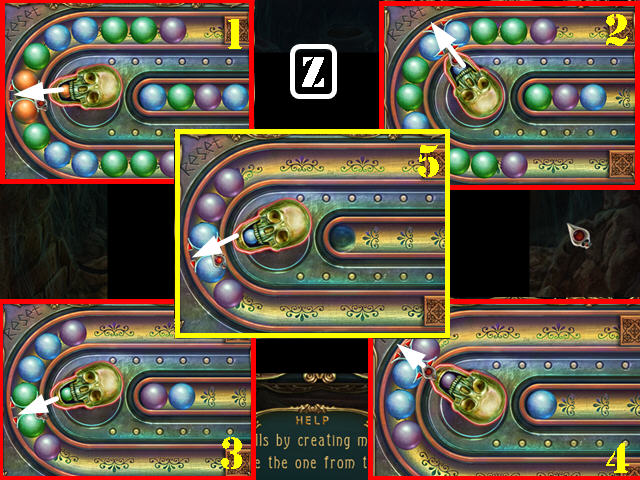
- Move the skull’s head to the right position and then shoot the ball into the right spot to eliminate a set of balls.
- Please look at the screenshot for the solution (Z) and follow the steps indicated (1-5).
- Go through the hatch.
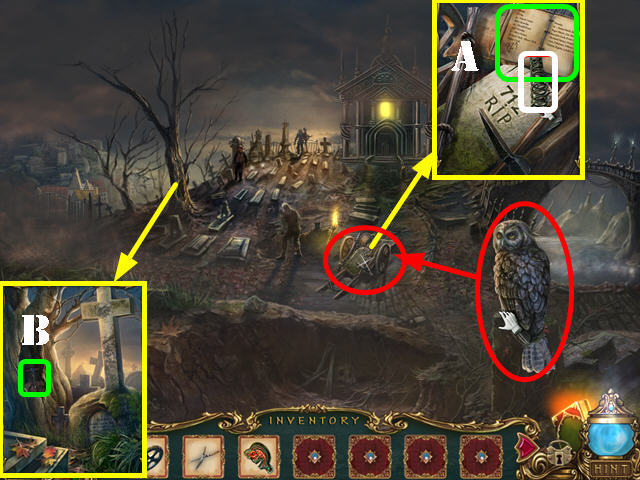
- Touch the owl on the stump (red) and then again on the cart (red).
- Zoom into the cart; take the SPRING and the note (A).
- Zoom into the tree; remove the boards and take the SCREWDRIVER (B).
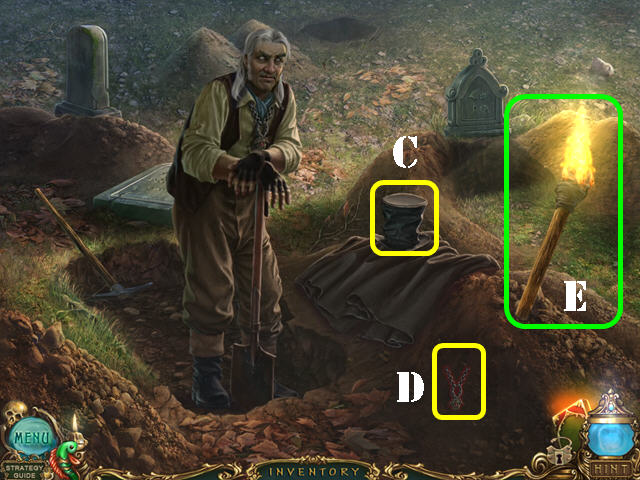
- Zoom into the undertaker; remove the hat to view the monkey (C).
- Touch the amulet (D) and then the note pages. The AMULET will be added to inventory.
- Take the TORCH (E).
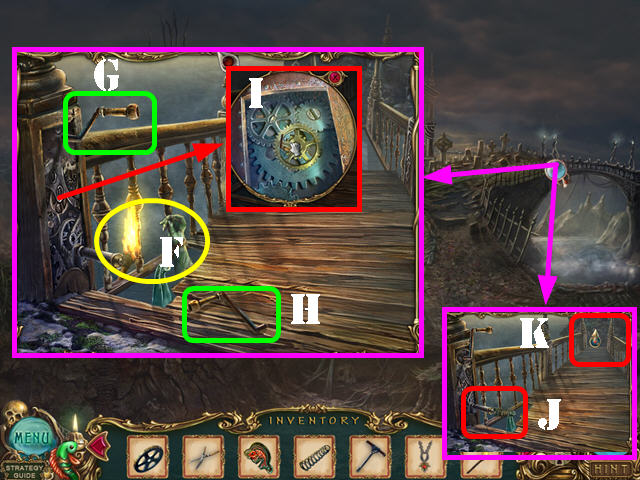
- Zoom into the bridge; use the TORCH in the hole to get rid of the zombie hand (F).
- Pull the handle (G) and then take the BRIDGE HANDLE (H).
- Zoom into the mechanism; place the GEAR and then the BRIDGE HANDLE on it (I).
- Put the SPRING on the mechanism and pull on the handle (J).
- Go forward on the bridge (K).
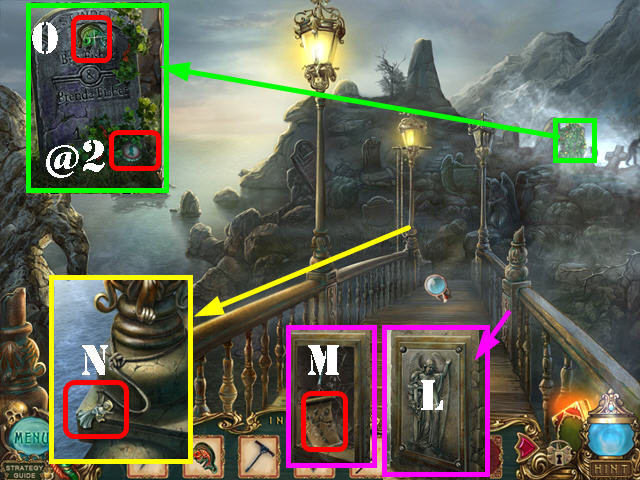
- Zoom into the plaque; remove the screws with the SCREWDRIVER (L).
- Remove the plaque; take the note and the SKULL (M).
- Zoom into the lamppost; pull the rope and take the ANGEL (N).
- Zoom into the grave; take the OWL SCALE (@2).
- Use the SHEARS on the vines and take the GREEN FISH (O).
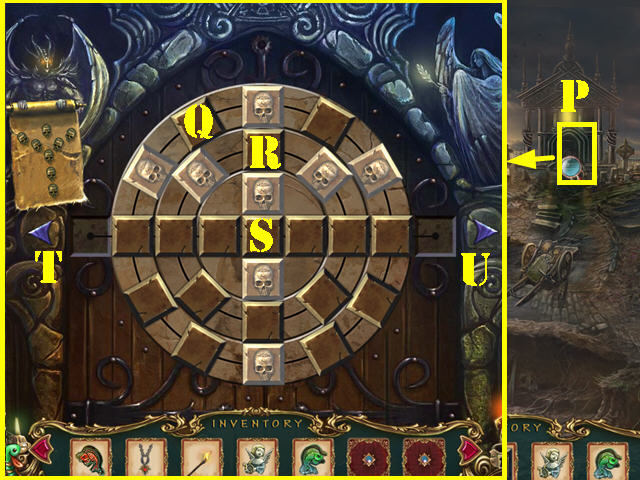
- Walk down and zoom into the door; put the SKULL on the lock to activate a puzzle (P).
- Recreate the image on the paper by rotating the disk and using the arrows on each side.
- To solve the puzzle, make the following moves: outer ring 5 spaces clockwise (Q), 2nd ring 1 space clockwise (R), right arrow x 1 (U), center circle 2 spaces clockwise (S), left arrow x 1 (T), 2nd ring 1 space counterclockwise(R), left arrow x 1 (T), center circle 1 space clockwise (S), right arrow x 1 (U) and 2nd ring 1 space clockwise(R).
- Go through the door.
- Put the TORCH in the holder on the left column to activate a HOS.
- Take the hammerhead (1) and put it on the handle (2); take the hammer.
- Use the hammer on the hook (3) and take the key (4).
- Use the key in the lock (5) and take the wrench (6).
- Use the wrench on the bolt (7) and then take the bolt.
- Use the bolt on the lid (8) and take the acid (9).
- Use the acid on the chain (10) and take the bas-relief (11).
- Zoom into the side of the casket; put the bas-relief in the niche. Take the DECORATIVE INSERT (12).
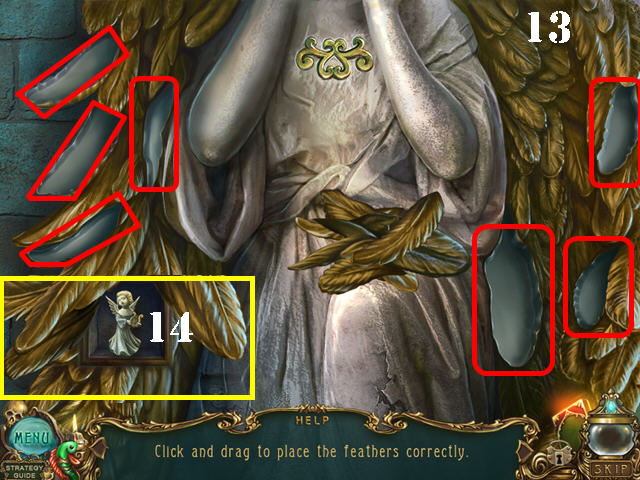
- Zoom into the statue; put the DECORATIVE INSERT into the niche to activate a puzzle.
- Put the feathers found on the angel’s lap back on her wings. Please look at the screenshot for the solution (13).
- Take the ANGEL (14).

- Zoom into the casket; put the 2 ANGELS on it (15).
- Go down the steps (16).

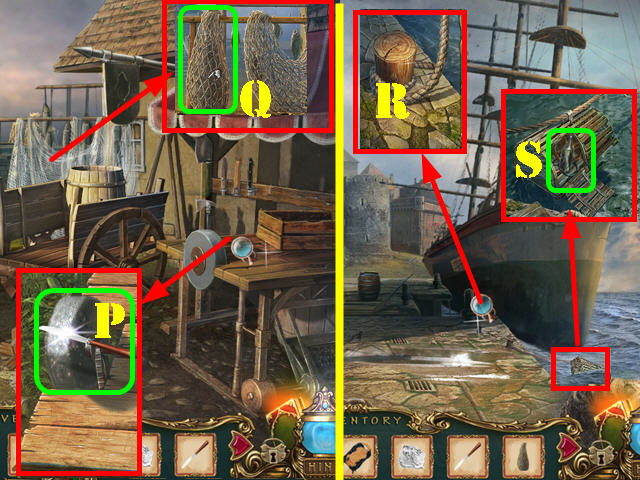
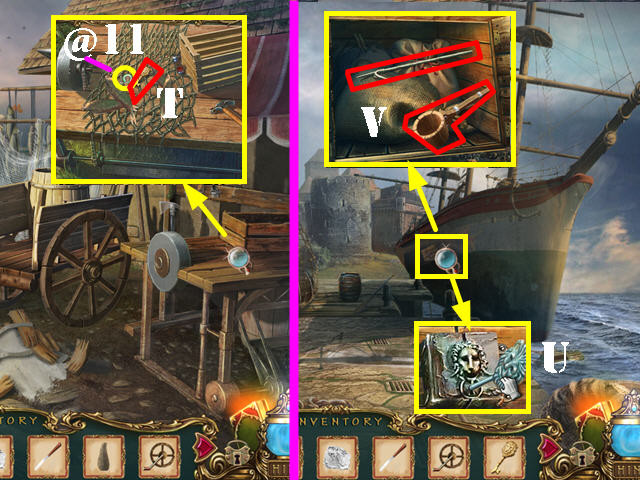
- Look at the light beacon; take the FISHING LINE WITH HOOK (A).
- Look at the boat; take the PEG LEG (B).
- Put the FISHING LINE WITH HOOK on the rod and take the ROD (C).
- Zoom into the tent; use the PEG LEG on the shell and take the PLIERS (D).
- Walk down.
- Play the HOS.
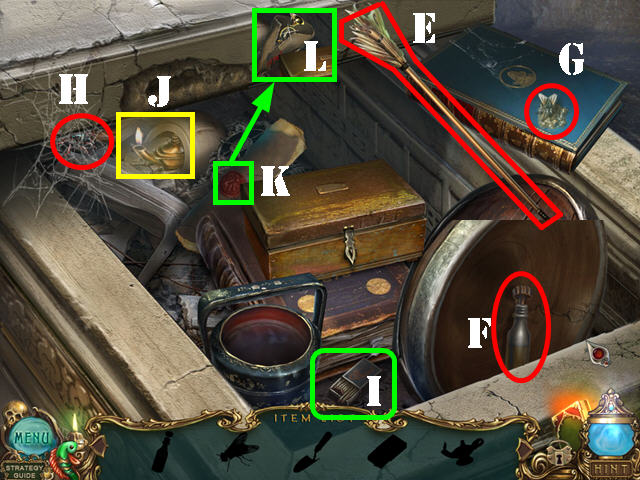
- Remove the arrow (E) and take the glue (F).
- Use the GLUE on the book and then take the fly (G) once it lands on the glue.
- Put the fly next to the spider (H) and then take the spade.
- Take the matches (I).
- Use the spade on the dirt; use the matches on the oil lamp and take the lamp (J).
- Use the lamp on the wax seal (K).
- Take the BICYCLE HORN (L).

- Look over the edge and use the ROD to get the LAMP HANDLE (M).
- Go down the steps in the coffin (N).
- Zoom into the light beacon; put the LAMP HANDLE in the slot and pull the handle (O).
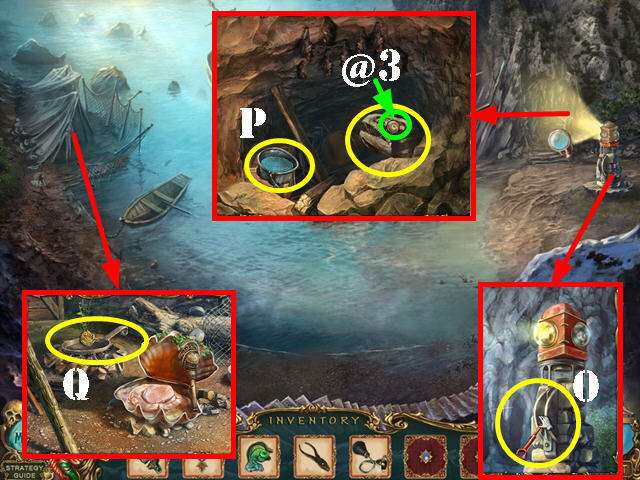
- Look inside the cave; use the BICYCLE HORN to drive away the bats. Take the SUN SCALE (@3) and the BUCKET OF WATER (P).
- Zoom into the tent; use the BUCKET OF WATER on the pan; take the YELLOW FISH and the PAN (Q).
- Walk down twice and go left.
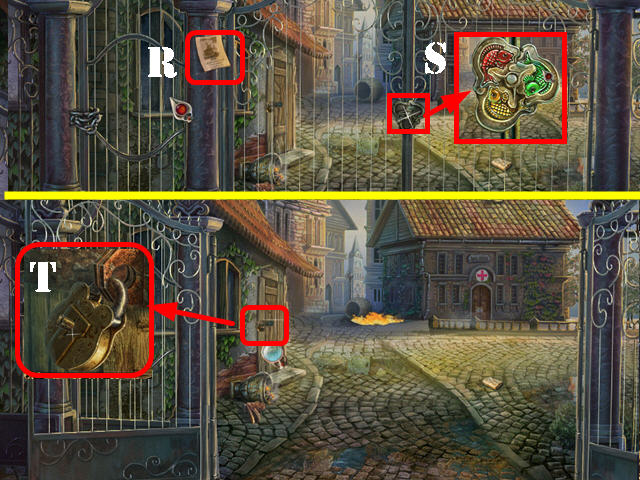
- Take the note (R).
- Zoom into the gate; put the YELLOW FISH, RED FISH, and GREEN FISH into the slots (S).
- Look at the lock on the door; pull the pin out with the PLIERS and go through the door to access the watchhouse (T).
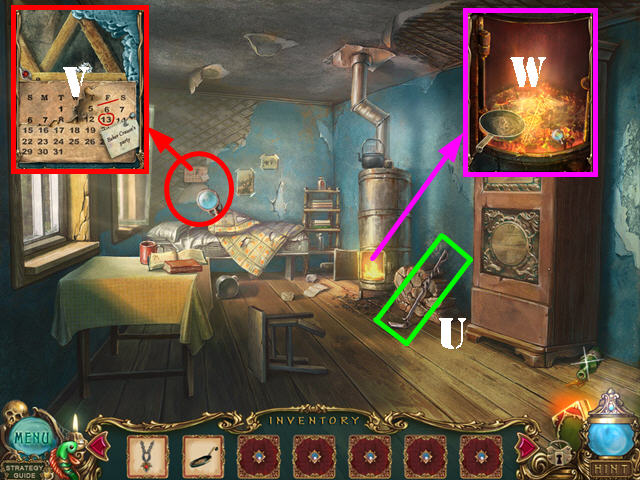
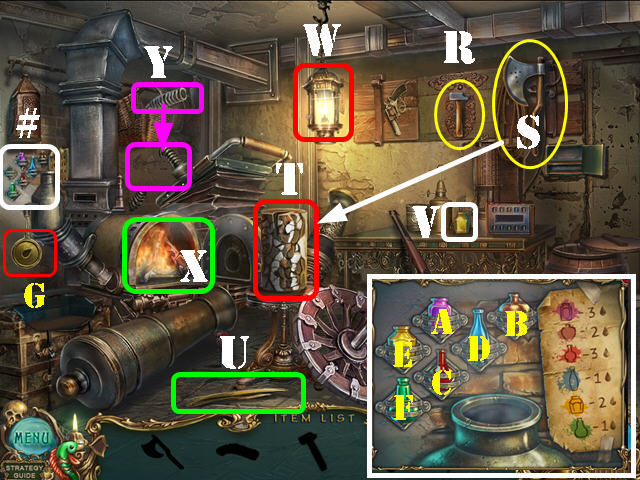
- Take the POKER (U).
- Look at the back wall; take the note (V).
- Zoom into the furnace; put the PAN in the furnace and then take the KEY with the POKER (W).
- Walk down.
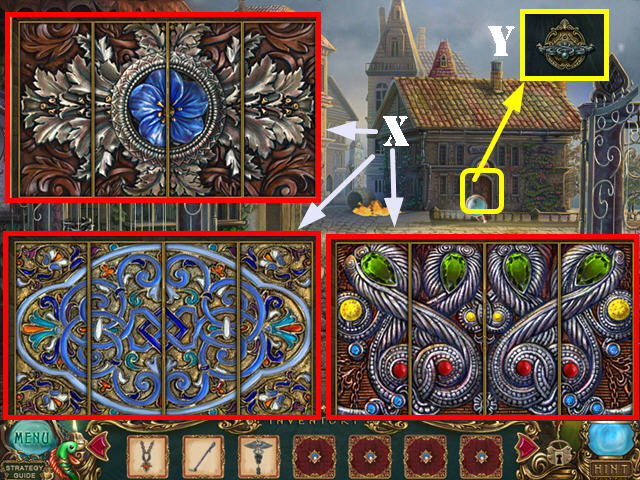
- Zoom into the door to activate a puzzle.
- Select the panels to change their image; reproduce 3 stained glass images as shown in the screenshot (X).
- Use the KEY in the lock and enter the hospital (Y).
Chapter 3: Hospital
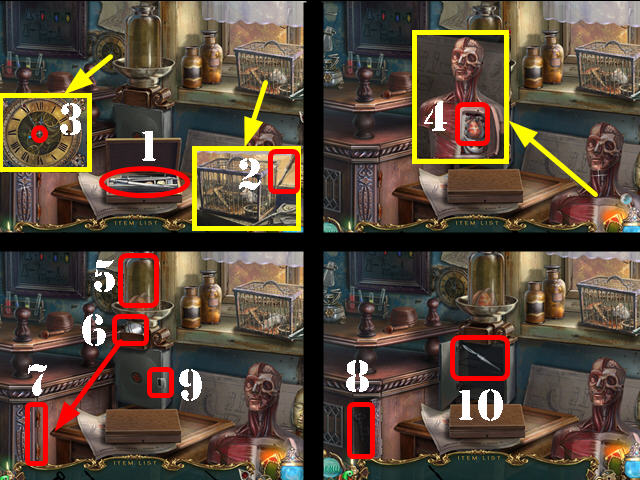
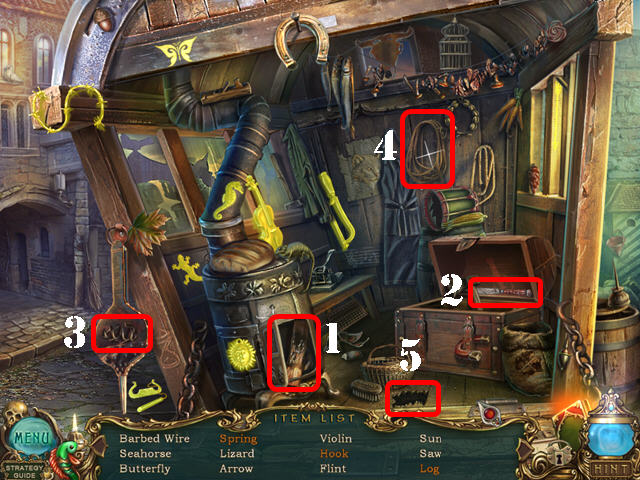
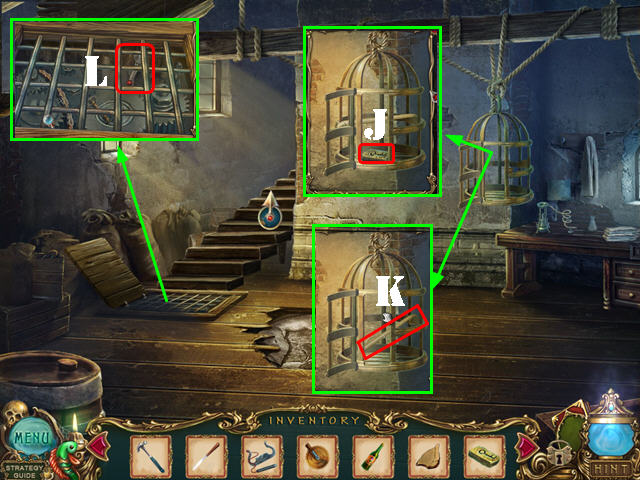
- Play the HOS.
- Open the box and take the tweezers (1).
- Take a closer look at the cage and take the screwdriver (2).
- Zoom into the clock and remove the glass cover. Remove the screw (3) with the screwdriver and take the clock hand.
- Zoom into the mannequin and open the chest cavity with the clock hand. Take the heart with the tweezers (4).
- Put the heart in the jar (5) and take the oiler (6).
- Use the oiler on the hinges (7) and take the key (8).
- Use the key on the lock (9) and take the SCALPEL (10).
- Walk down.
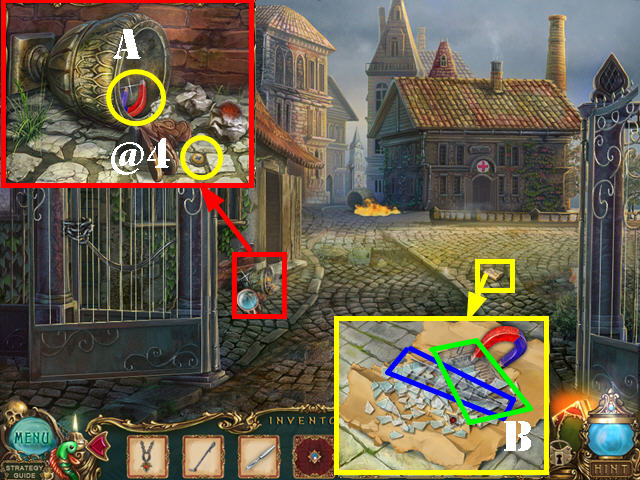
- Zoom into the pot; touch the boot and take the DEER SCALE (@4). Use the POKER to remove the papers and then take the MAGNET (A).
- Zoom into the package and open it; take the TWEEZERS with the MAGNET and then take the note (B).
- Go through the left door to access the watchhouse.
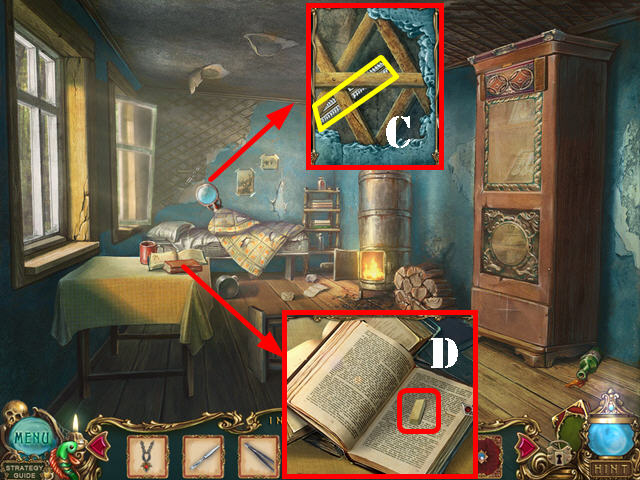
- Look at the back wall; remove the SAW BLADE with the TWEEZERS (C).
- Zoom into the book; cut the strap with the SCALPEL; open the book and take the ERASER (D).
- Return to the hospital.
- Look at the desk; move the tools aside and put the SAW BLADE on the handle; take the HACKSAW (E). Take the note (F).
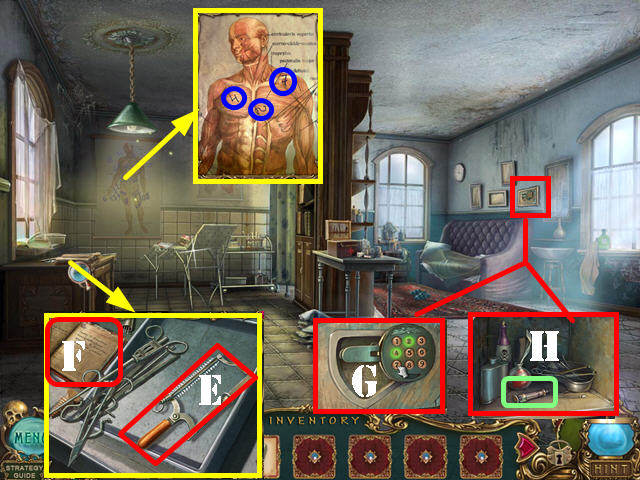
- Zoom into the poster; use the ERASER on it and look at the clue (blue).
- Zoom into the safe; enter the code 427 (G) on the keypad and take the SYRINGE (H).
- Return to the watchhouse.
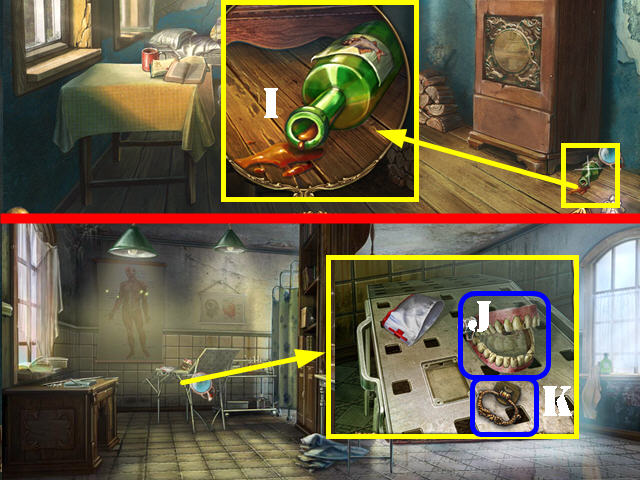
- Zoom into the bottle; use the SYRINGE in it to get the FISH OIL (I).
- Return to the hospital.
- Zoom into the table; use the FISH OIL on the teeth (J) and take the HANDLE (K).
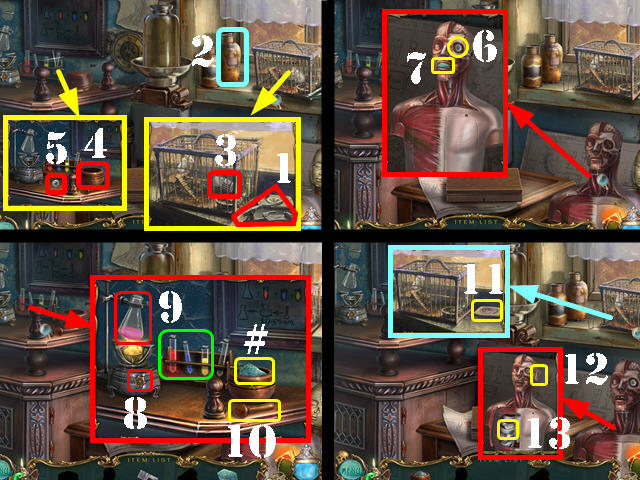
- Play the HOS.
- Zoom into the shelf and take the bottle opener (1).
- Use the bottle opener on the bottle to get the cheese (2).
- Zoom into the cage and open it; put the cheese in the cage and take the matches (3).
- Look at the shelf; touch the mortar (4) and take the eye (5); touch the mortar again to flip it over.
- Take a closer look at the mannequin; put the eye in the socket (6) and take the gypsum (7).
- Zoom into the shelf again; touch the 3 test tubes marked in green. Light the burner with the matches and then turn the knob (8).
- Put the gypsum in the mortar (#) and then touch the acid bottle (9). Touch the pestle (10) and take the gypsum.
- Zoom into the cage; use the gypsum in the mold and take the ear (11).
- Zoom into the mannequin and put the ear on it (12); take the BANDAGE (13).
- Return to the watchhouse.
- Use the BANDAGE on the stool; take the STOOL (L).
- Put the STOOL down (M) and then zoom into the top of the cabinet. Put the HANDLE on the door and spin the Left side 2 times and the right side 3 times (N).
- Remove the rope and take the TARP (O).
- Walk down.
- Zoom into the fire; use the TARP on it and go forward to the town square (P).
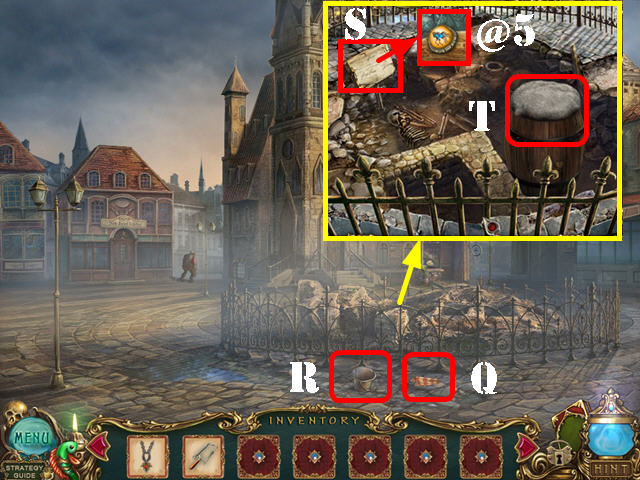
- Take the HANDKERCHIEF (Q) and the BUCKET (R).
- Look inside the fence; take the note (S) and then take the HORSE SCALE (@5) below it.
- Use the BUCKET in the barrel to get the CEMENT (T).
- Go left.
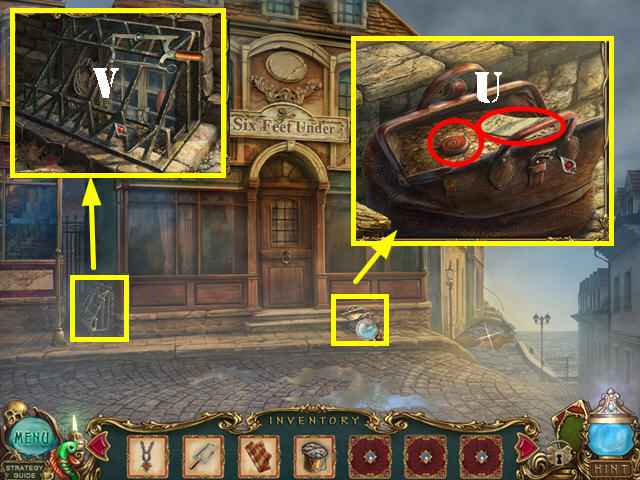
- Zoom into the bag; take the note and the SPIRAL BUTTON (U).
- Zoom into the grid and cut it with the HACKSAW to activate a HOS (V).
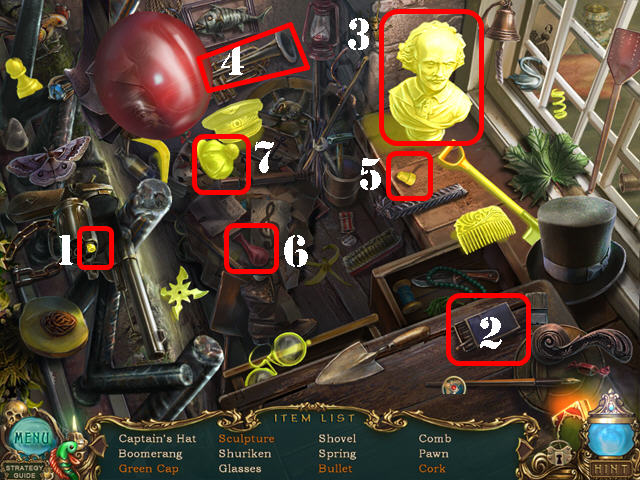
- Open the gun and take the bullet (1).
- Strike the match (2) and take the sculpture (3).
- Play the trumpet (4) and take the cork (5).
- Touch the balloon (6) twice and take the green cap (7).
- You will receive the SHOVEL.
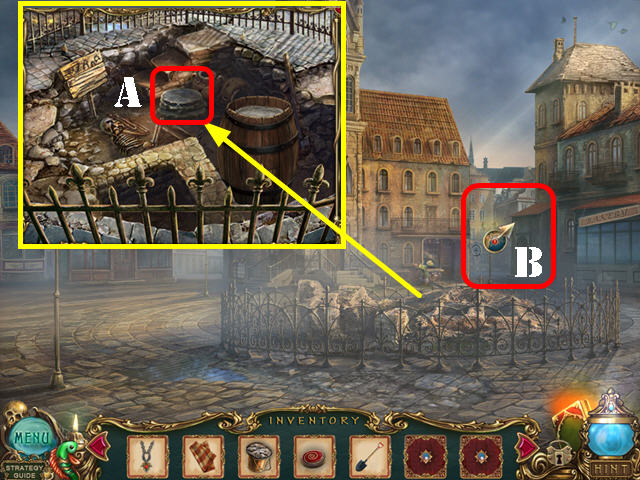
- Walk down for a cutscene and then take the note on the screen.
- Zoom into the ground inside the fence; use the SHOVEL in the dirt and take the PAVING STONES (A).
- Go right (B).
- Zoom into the grid and take the ROPE (C).
- Take a closer look at the Venus flytrap; take the WATERING CAN (D).
- Return to the outside of the funeral home.
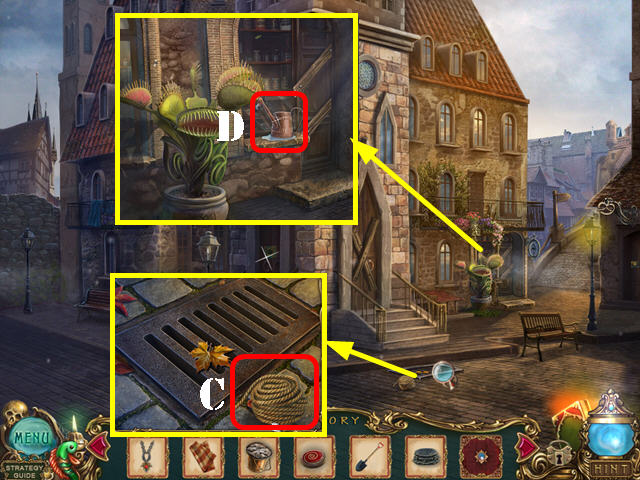
- Play the HOS.
- Touch the top hat and take the card (E).
- Touch the ant next to the top hat and then take the acorn (F).
- Touch the bat in the upper left and take the clover (G) that falls below.
- Use the file (H) on the rod and take the wire (I).
- You will receive the TROWEL.
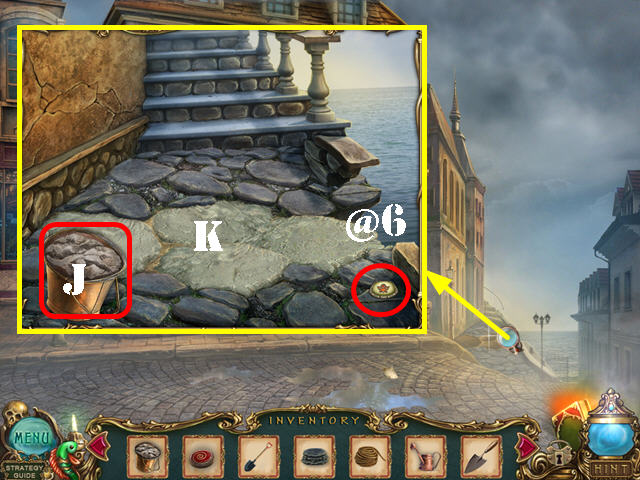
- Zoom into the pavement and take the ROSE SCALE (@6).
- Put down the CEMENT and the use the TROWEL in the bucket (J).
- Put down the 4 PAVING STONES over the cement (K).
- Go forward.
- Zoom into SG (L).
- Take the note (M).
- Use the WATERING CAN on the seeds (N). You will receive the EMPTY WATERING CAN.
- Climb the wall and then go up the steps.
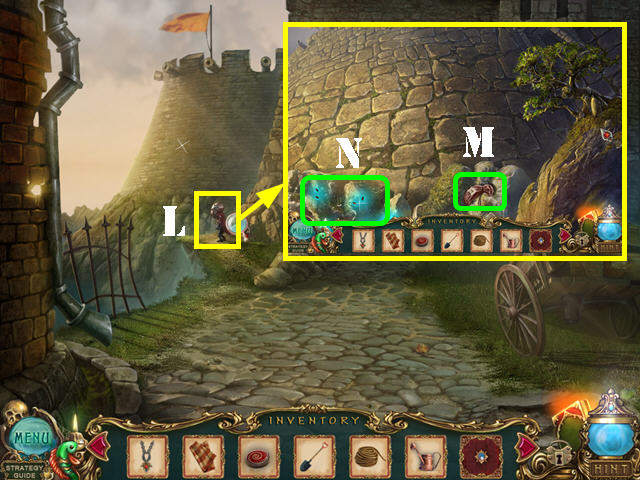
Chapter 4: The Fort
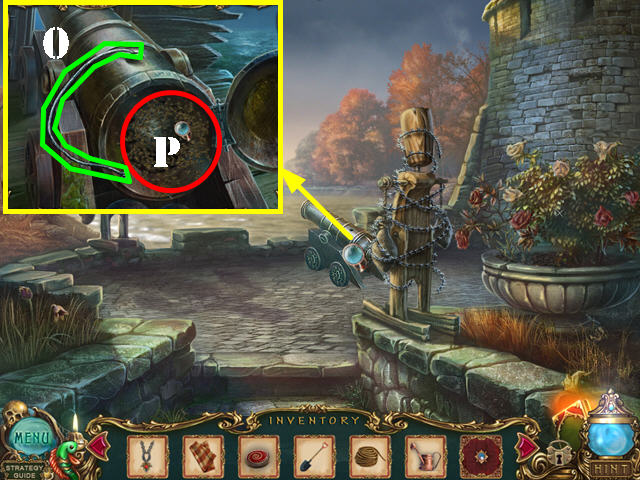
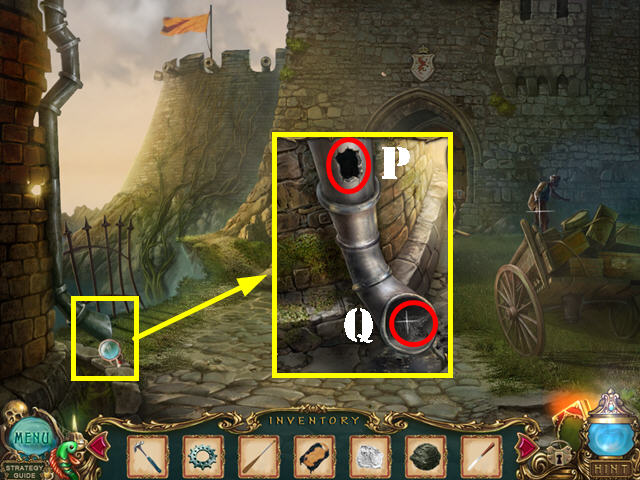
- Examine the cannon; take the FUSE (O).
- Open the cannon’s lid (P) to reveal the bees.
- Walk down twice.
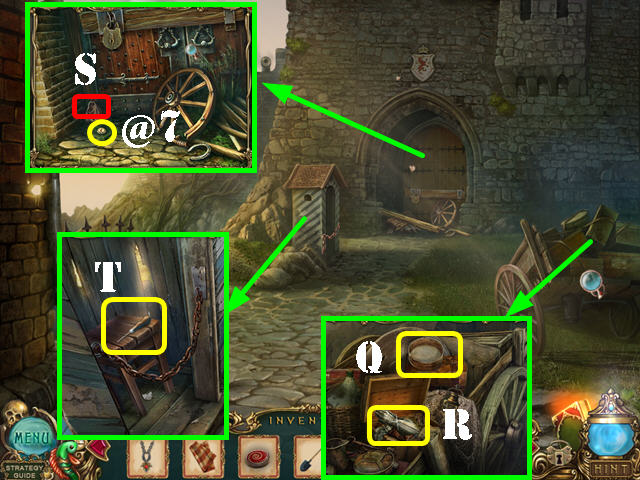
- Zoom into the cart and take the SIEVE (Q).
- Open the chest and take the IRON GLOVE (R).
- Look at the door; remove all the debris and take the SEA DRAGON SCALE (@7) and the TOBACCO (S).
- Zoom into the guard’s hut; take the AWL (T).
- Go up the tower and then up the steps.

- Use the IRON GLOVE on the barbed wire to get the WIRE (U).
- Zoom into the sack and use the AWL on it; take the BRASS KNUCKLES (V).
- Walk down.
- Zoom into the right door; open the lock and insert the WIRE in it (W). Go through the door.
- Zoom into the man and use the TOBACCO on him (A).
- Examine the gun rack and take the CROW SCALE (@8).
- Look at the window and take the LEAF (B).
- Zoom into the lantern; use the BRASS KNUCKLES on the glass to get the GLASS SHARD (C).
- Take the FILE with the HANDKERCHIEF (D).
- Walk down 2 times.
- Zoom into the guard’s hut; use the FILE on the chain and then take the CHAIN (E).
- Walk down twice and go right.
- Zoom into the door on the far right (F).
- Put the LEAF on the lock to activate a puzzle.
- Rotate the rings into the right positions.
- Please look at the screenshot for the solution (G).
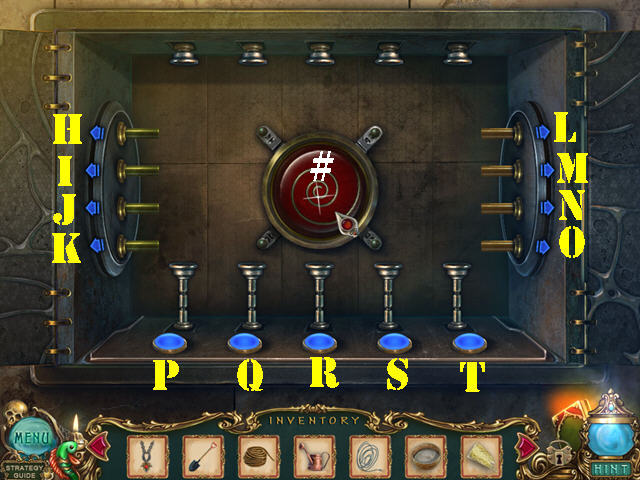
- For the second part of the puzzle, push the lower pins into the upper pins. Select the arrow buttons to move the crossbars.
- To solve the puzzle, press on the buttons in this order: R, K, J, I x 2, H, P, L x 3, M, N, O x 3, S, L, M, N, O, T, H x 2, L, I x 3, J x 2, N, J, K, and Q.
- Put the SPIRAL BUTTON into the slot (#) and go through the door to access the bakery.
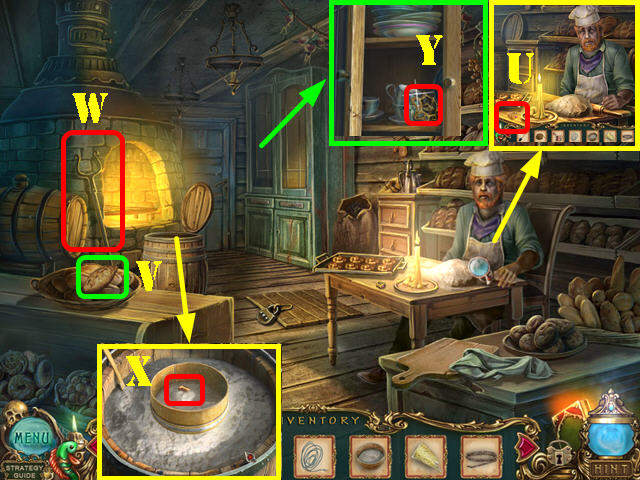
- Talk to the baker. Take the RING on the table (U).
- Touch the bread and then take the POISONED BREAD (V).
- Grab the OVEN FORK (W).
- Zoom into the barrel put the SIEVE in it and take the BULLET (X).
- Zoom into the cabinet and open the door; take the HANDLE (Y).
- Walk down.
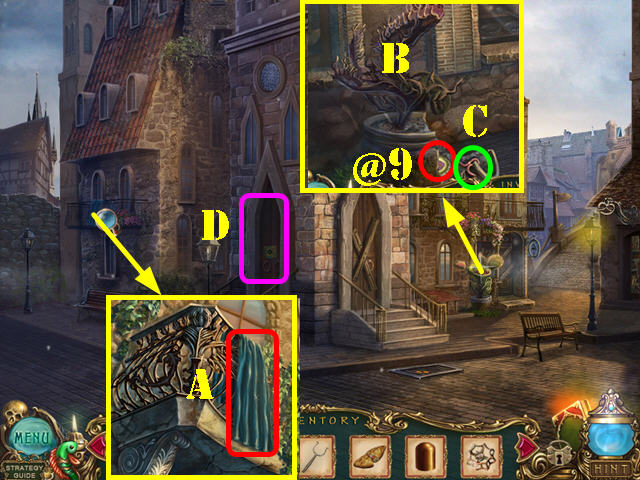
- Zoom into the balcony; take the CURTAIN with the OVEN FORK (A).
- Zoom into the Venus flytrap and give it the POISONED BREAD (B).
- Use the SHOVEL in the potted plant; take the CONCH SCALE (@9) and the WORM (C). Exit this scene.
- Zoom into the left door to activate a puzzle (D).
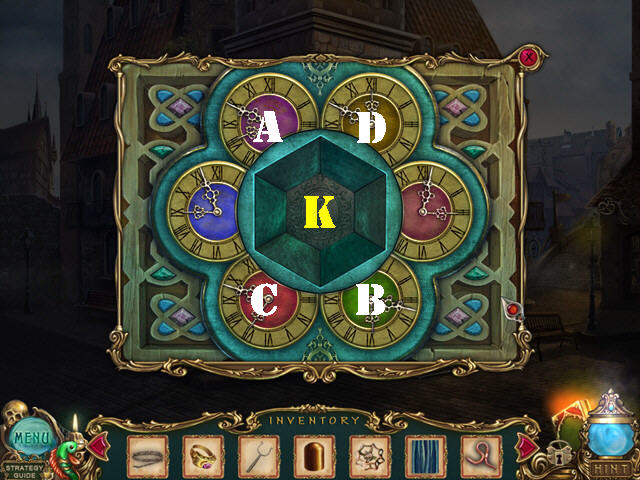
- Swap the clocks diagonally until you form a hexagon in the center.
- To solve the puzzle, please swap the pieces in this exact order: B-A x 2, A-B, B-A x 2, C-D, A-B, and D-C x 2.
- Put the RING in the niche (K).
- Go through the door to access the bell tower.
Chapter 5: Bell Tower
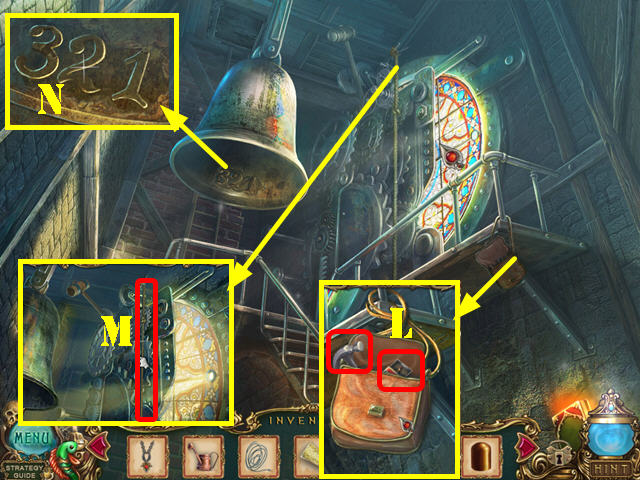
- Zoom into the bag and open it; take the MATCHES and the HAMMER (L).
- Zoom into the gears; attach the ROPE to the hook and pull the rope (M).
- Zoom into the bell; look at the clue (N).
- Return to the bakery.
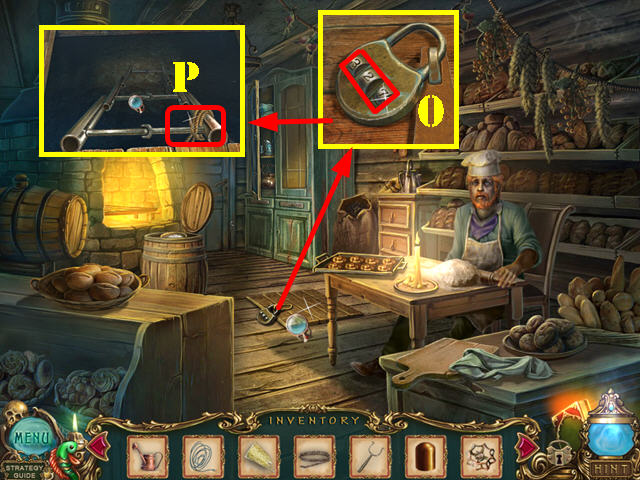
- Zoom into the hatch; change the combination on the lock to 321 (O).
- Cut the rope with the GLASS SHARD; take the LADDER (P).
- Walk down twice; go left, take the path on the right, up the tower, and through the right door.
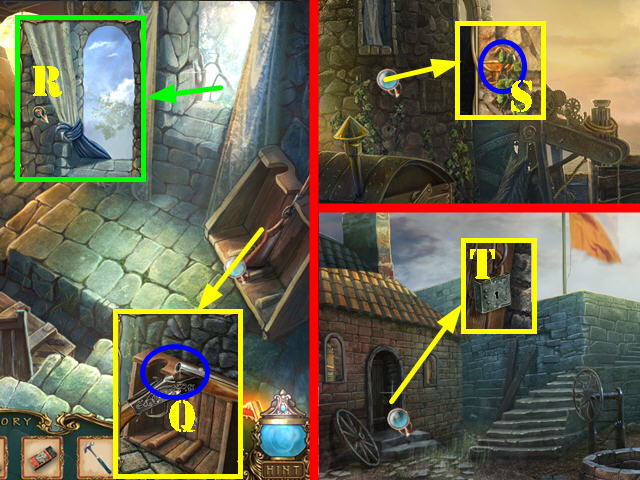
- Take a closer look at the gun rack; open the rifle, put the BULLET in it and take the RIFLE (Q).
- Zoom into the window; put the CURTAIN on the window, touch it, and go out the window (R).
- Look at the wall; take the LOCK COMPONENT (S).
- Walk down twice.
- Zoom into the left door; use the RIFLE on the lock to activate a HOS (T).
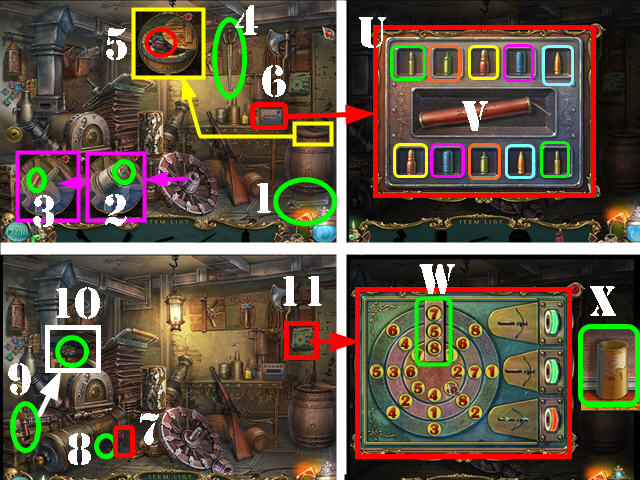
- Play the HOS.
- Take the wrench (1). Zoom into the wheel and use the wrench on the nut (2). Remove the cover and take the bullet (3).
- Take the rapier (4) and use it to open the barrel lid. Zoom into the barrel and take the jack (5).
- Examine the mechanism (6); put the bullet in the slot to activate a mini-puzzle.
- Find matching pairs of bullets. Once a correct match has been selected, the doors will remain open. The puzzle will reset once an incorrect match has been selected.
- Please look at the screenshot for the color coordinated solution (U). Take the dynamite (V).
- Use the jack on the cannon (7) and then take the lighter (8). Put the dynamite on the chest and then light the dynamite with the lighter (9); take the lock (10).
- Zoom into the device (11) and put the lock on it to activate a puzzle.
- Enter the code 758 (from top to bottom) (W) and then take the ROCKET CASING (X).
- Walk down 3 times and go right.

- Zoom into the store front and then into the window. Use the LOCK COMPONENT in the lock to activate a puzzle (Y).
- Mix the ingredients according to the recipes, the bottles are labeled as follows: yellow (1), blue (2), and pink (3).
- Touch the pink bottle; then put the spoon in the first container. Touch the blue bottle and then put the spoon in the first container to create the purple powder.
- Touch the pink bottle; then put the spoon in the second container. Touch the yellow bottle and then put the spoon in the second container to create the red powder.
- Touch the blue bottle; then put the spoon in the third container. Touch the yellow bottle and then put the spoon in the third container to create the green powder.
- Put the spoon in the first container and then put its contents into the center container. Put the spoon in the third container and then put its contents into the center container; take the GUNPOWDER (Z).
- Walk down and go into the bell tower.
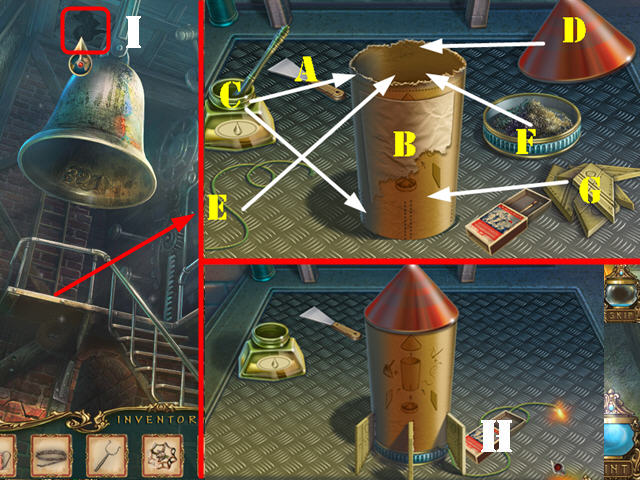
- Examine the platform; put down the FUSE, MATCHES, GUNPOWDER, and the ROCKET CASING to activate a puzzle.
- Use the scraper (A) on the front of the casing (B).
- Put the following items on the casing in this order: glue on the rim (C), put the top on (D), add the fuse to the top and it will land at the bottom (E), add the gunpowder to the top (F), put glue on the side of the canister (C) and place side pieces on (G).
- Touch the match (H) to light the fuse.
- Go up to the roof (I).
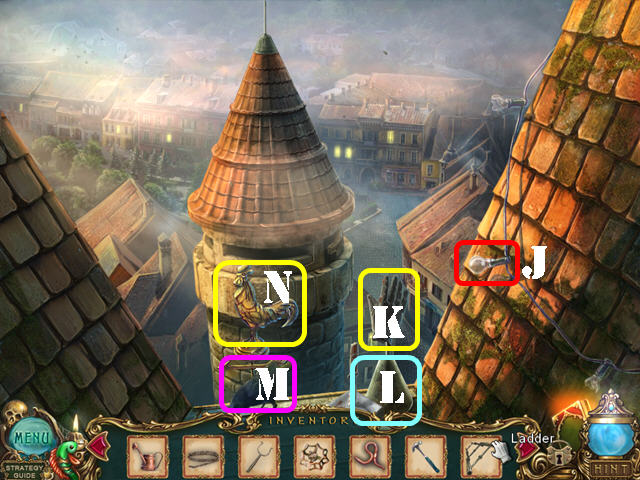
- Take the LIGHT BULB (J).
- Grab the glove (K) and then take the FLAGPOLE (L).
- Give the WORM to the crow (M) and take the WEATHERVANE (N).
- Walk down twice.
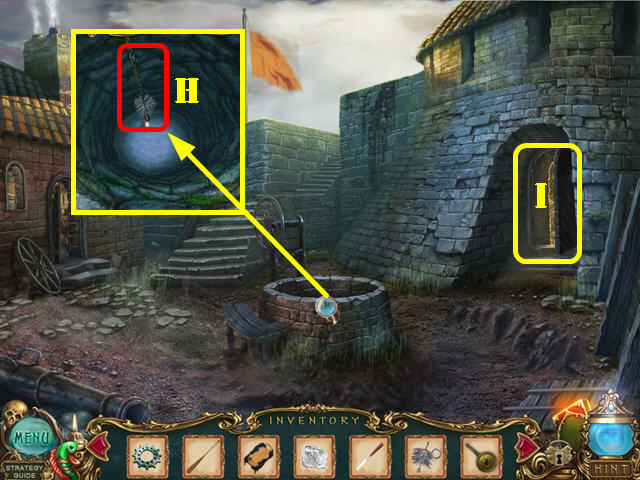
- Zoom into the grate; lift it with the FLAGPOLE (O).
- Put the EMPTY WATERING CAN in the water to get the CAN WITH WATER (P).
- Go right (Q).
- Zoom into the lantern; put the LIGHT BULB in it and take the LANTERN (R).
- Return to the bell tower.
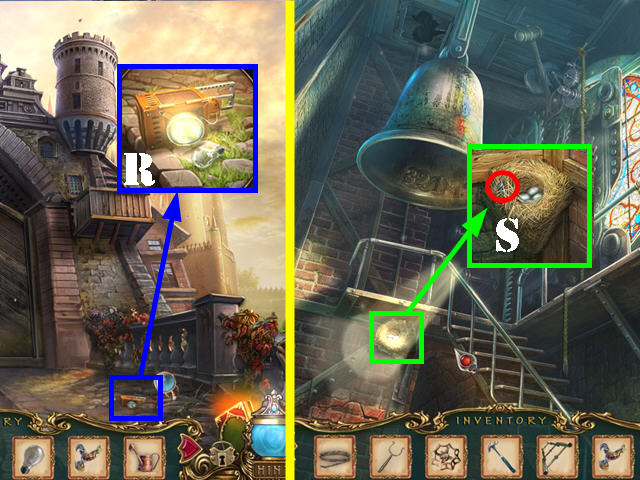
- Use the LANTERN in the area below the platform. Zoom into the nest and use the OVEN FORK to get the NAIL (S).
- Walk down and go right.
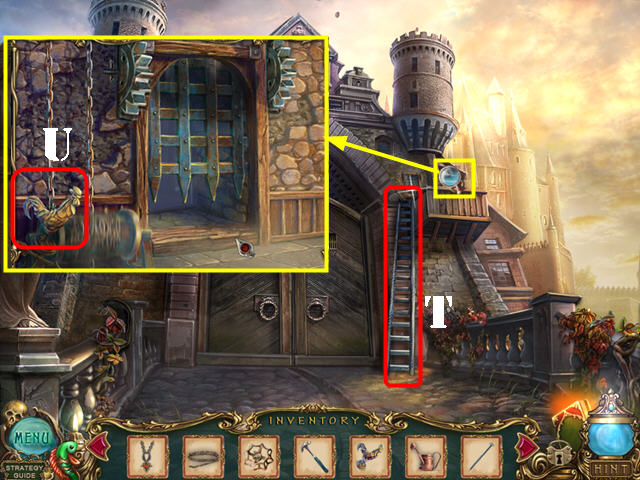
- Put the LADDER on the side of the building (T).
- Zoom into the window; put the WEATHER VANE on the hook and go through the window (U).
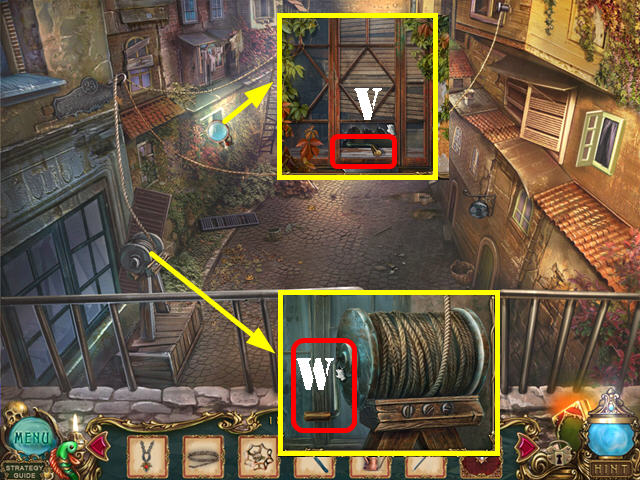
- Look at the window; remove the paint with the NAIL. Break the window and take the HANDLE (V).
- Zoom into the winch; put the HANDLE on it and turn the handle. Take back the HANDLE (W).

- Zoom into the bridge straight ahead; take the WOODEN LID (X).
- Put the WOODEN LID on the bridge (Y) and go left to reach the market (Z).
Chapter 6: The Market
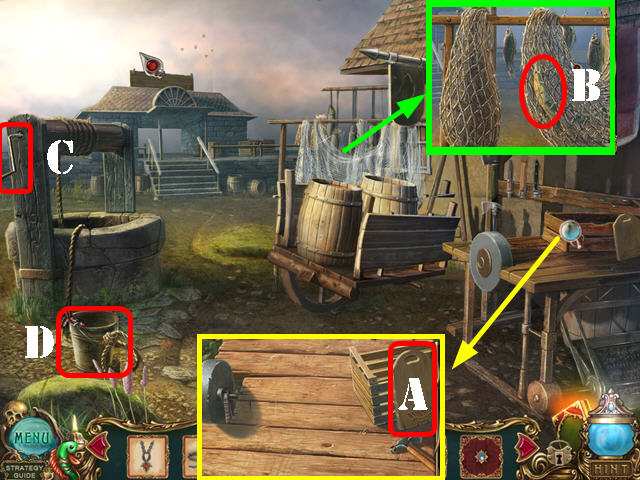
- Zoom into the table; take the CUTTING BOARD (A).
- Take a closer look at the nets; touch the right one and take the SAWFISH (B).
- Put the HANDLE on the well and then turn the handle (C).
- Look in the bucket to activate a puzzle (D).
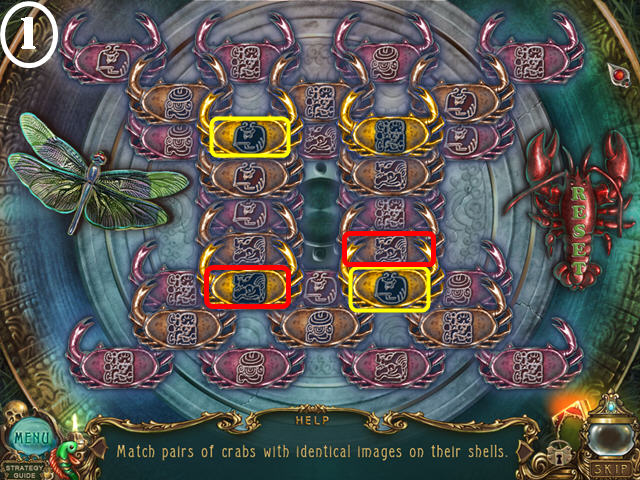
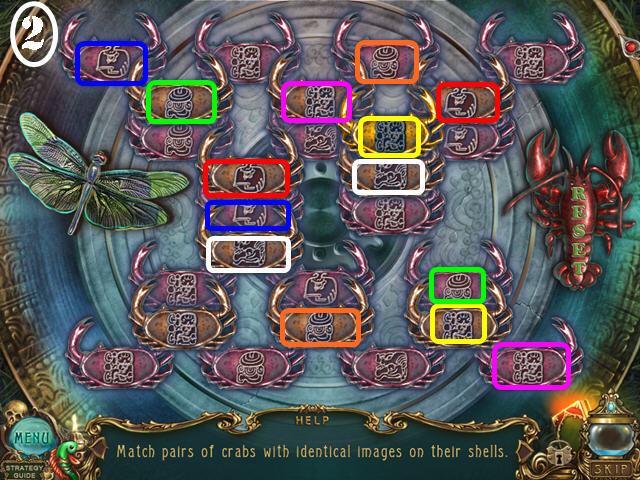
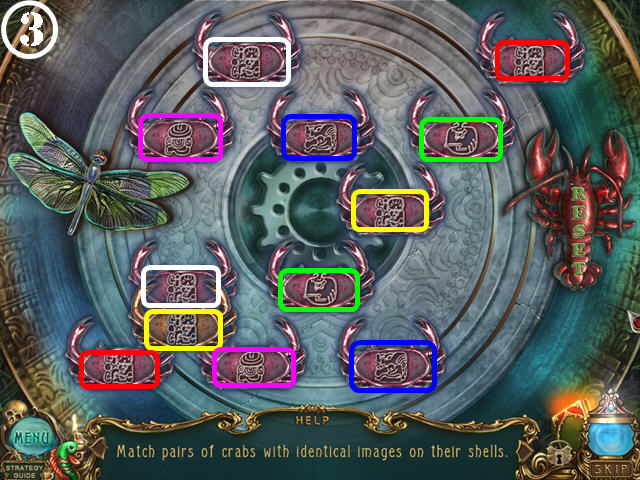
- Match pairs of crabs. You can only eliminate a match that is not blocked by another piece.
- Please look at the screenshots for the solution (1-3) and eliminate the pairs in this order: Yellow, Red, Green, Purple, White, Blue, and Orange.
- Take the GEAR WHEEL.
- Go forward.
- Take the notes on the screen.
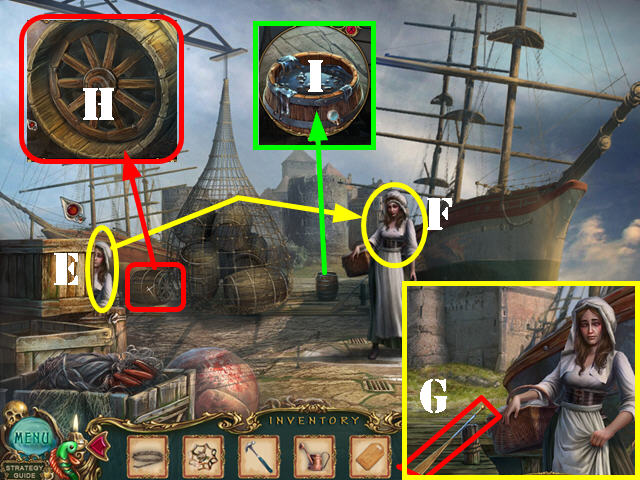
- Look at the girl hiding behind the crates (E) and then talk to her once she comes out (F). Take the OAR at the end of the conversation (G).
- Zoom into the barrel; take the WHEEL (H).
- Zoom into the barrel; put the CUTTING BOARD in it and take the BOARD WITH TAR (I).
- Walk down 3 times.
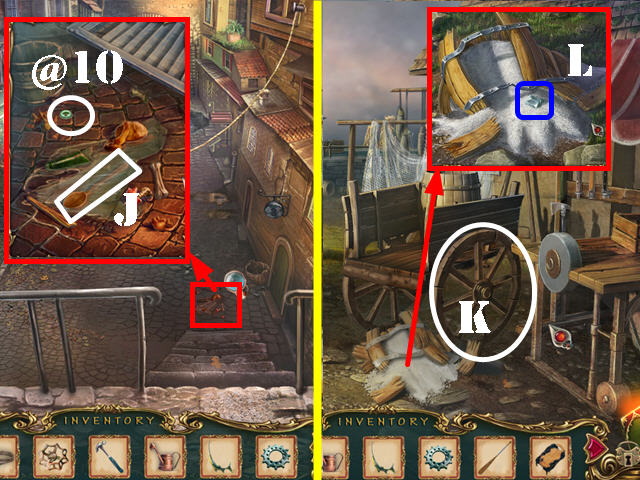
- Zoom into the ground; take the TREE SCALE (@10) and the SPOON (J).
- Return to the market.
- Put the WHEEL on the cart and touch the cart (K).
- Zoom into the broken barrel; use the SPOON in the salt and take the POTASSIUM CHLORATE CRYSTAL (L).
- Walk down 5 times; go left, through the right path, up the tower, and then up the steps.
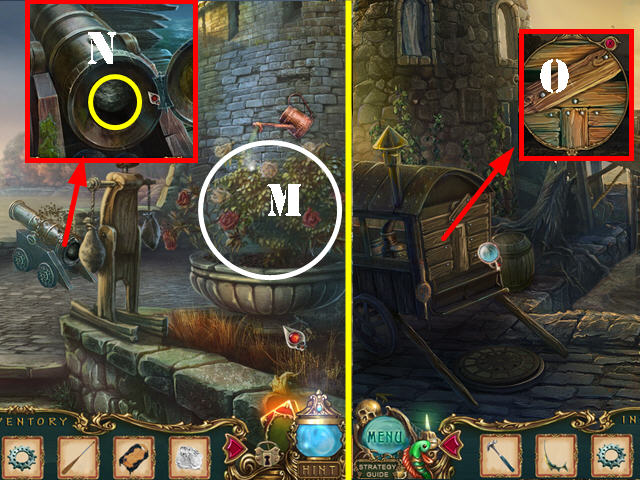
- Use the CAN WITH WATER on the plants (M) to lure away the bees. Note: make sure you opened the cannon’s lid first.
- Zoom into the cannon and take the STONE (N).
- Walk down; go through the right door and then the window.
- Look at the boards; use the SAWFISH on them to activate a HOS (O).
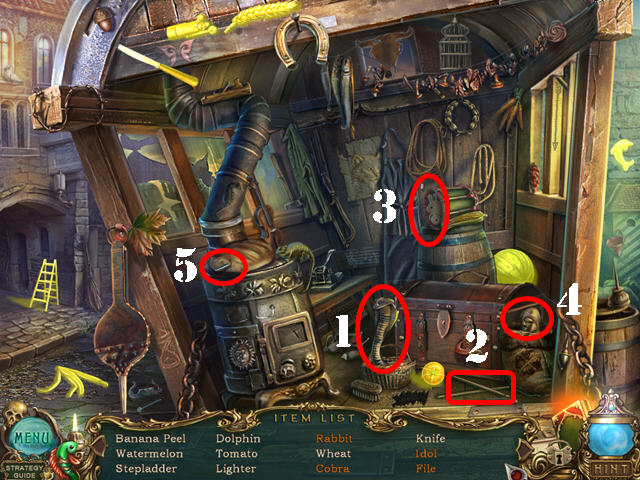
- Touch the basket and take the cobra (1).
- Use the drumsticks (2) on the drum and take the rabbit (3).
- Open the sack and take the idol (4).
- Touch the bread and take the file (5).
- You will receive the KNIFE.
- Walk down 3 times.
- Zoom into the drainpipe; put the STONE in the hole (P) and take the CHIMNEY BRUSH (Q).
- Go up the tower.
- Play the HOS.
- Take the hammer (R) and the ax (S). Chop the log (T) with the ax and take the firewood.
- Take the sliver (U) and the bottle (V).
- Break the lantern with the hammer; use the sliver in the lantern to get the firesliver (W).
- Open the furnace and put the firewood in it. Use the firesliver on the firewood (X).
- Take the hose (Y) and put it on the broken hose (Z).
- Zoom into the bottles (#) and put the bottle in the holder.
- Take the bottles in the order shown in the screenshot and add the drops noted on the clue.
- To solve the puzzle, add the drops in this order: Ax3, Bx2, Cx3, Dx1, Ex2, and Fx1.
- Take the OIL (G).
- Look in the well; put the CHAIN in it and then attach the CHIMNEY BRUSH to the chain. Take the JETTON COMMANDANT (H).
- Go into through the door (I).
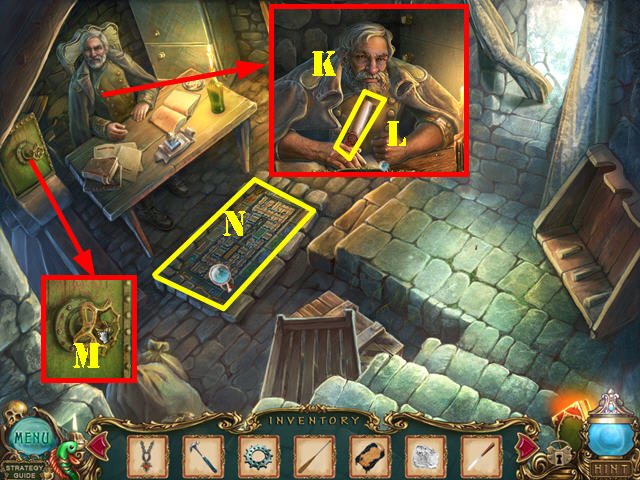
- Take a closer look at the commandant; give him the JETTON COMMANDANT (K). Take the scroll from his hand (L).
- Zoom into the safe; put the HANDLE on it and turn the handle (M).
- Zoom into the hatch (N); use the OIL on it to activate a puzzle.
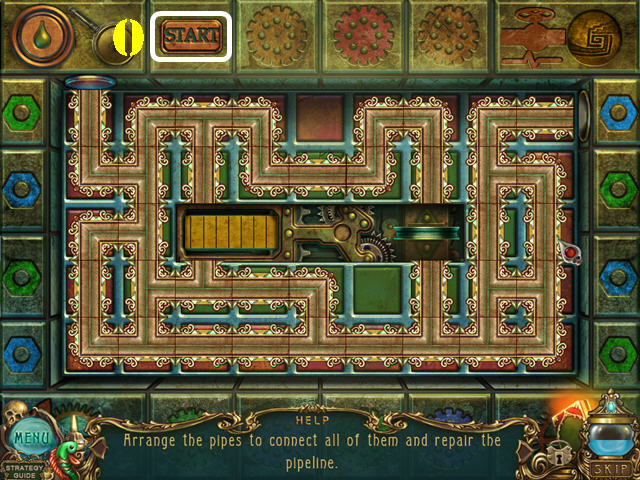
- Select a pipe to rotate it and keep rotating pipes until the pipeline has been fixed.
- Please look at the screenshot for the solution and then press ‘start’ (O). Solving this puzzle unlocks the gate.
- Return to the market.
- Zoom into the table; use the KNIFE on the grinding stone to get the SHARPENED KNIFE (P).
- Zoom into the net; cut the left net with the SHARPENED KNIFE to get the NET (Q).
- Go forward.
- Zoom into the stump; cut the rope with the SHARPENED KNIFE (R).
- Zoom into the trap in the water and open it; take the note in the bottle and the HANDLE below it (S).
- Walk down.
- Take a closer look at the table; put the NET on it.
- Cut the net with the SHARPENED KNIFE and move the fish aside; take the SHELL SCALE (@11) and the KEY (T).
- Return to the dock.
- Examine the lock on the side of the boat; use the KEY in the lock and turn the key (U). Take the HARPOON and the SCOOP (V).
- Return to the commandant’s quarters and go out the window.
- Play the HOS.
- Open the furnace and take the log (1).
- Open the chest and take the knife (2); cut the bellows with the knife and take the spring (3).
- Use the rope (4) in the hole (5) to get the hook.
- You will receive the FLINT.
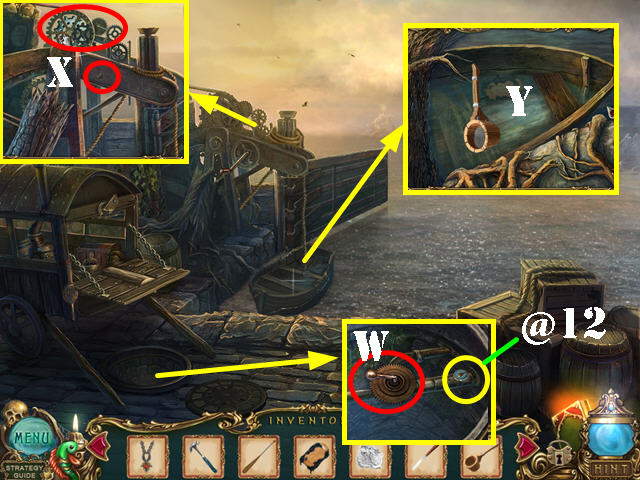
- Use the HARPOON on the manhole cover. Zoom into it; take the FISH SCALE (@12) and the HANDLE (W).
- Zoom into the mechanism; put the GEAR WHEEL and then the HANDLE on it to lift the boat (X).
- Zoom into the boat; use the BOARD WITH TAR on the boat. Use the SCOOP on the water in the boat (Y).
- Put the OAR in the boat to go across.
Chapter 7: The Lighthouse

- Look in the ship; take the RUM, note, and FIREWOOD (A).
- Take a closer look at the fire pit; take the BOULDER (B).
- Put the FIREWOOD in the pit and then use the FLINT on it. Put the POTASSIUM CHLORATE CRYSTAL in the fire to scare away the wolves (C).
- Take a closer look at the lighthouse; take the BROKEN SHOVEL (D).
- Go right.
- Look at the wall; chip away a piece and take the first FRESCO PART (E).
- Place the BROKEN SHOVEL under the rails; use the BOULDER on the shovel (F).
- Take the LIGHTHOUSE KEY (G).
- Walk down.
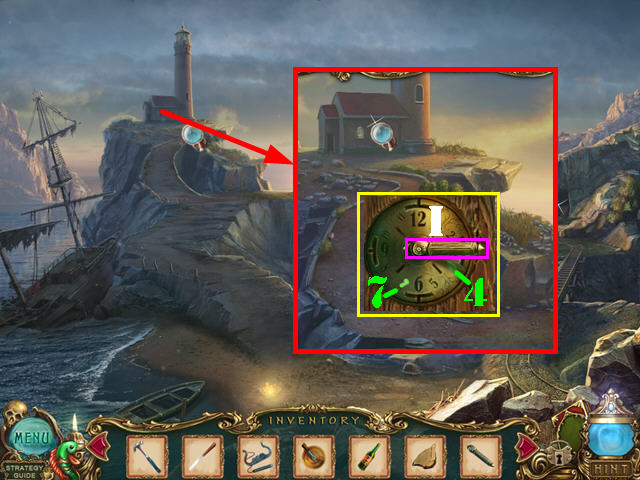
- Zoom into the lighthouse and then the door; use the LIGHTHOUSE KEY in the lock (H).
- Touch the numbers 4 and 7 and then turn the handle (I).
- Go into the lighthouse.
- Zoom into the cage and open it; take the FORM (J), touch the bar and take the HOOK (K).
- Open the hatch and zoom into it; use the HOOK on the lever to unlock the stairs (L).
- Go up the stairs.
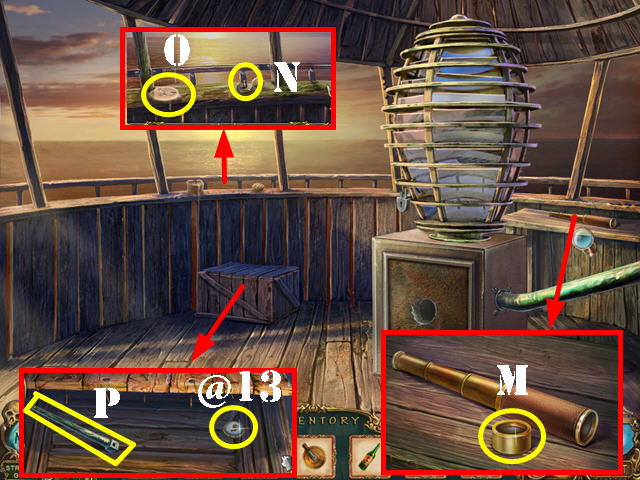
- Zoom into the telescope; remove the LENS and take it (M).
- Look at the railings; take the PIN (N).
- Use the FLINT on the candle and take the WICK (O).
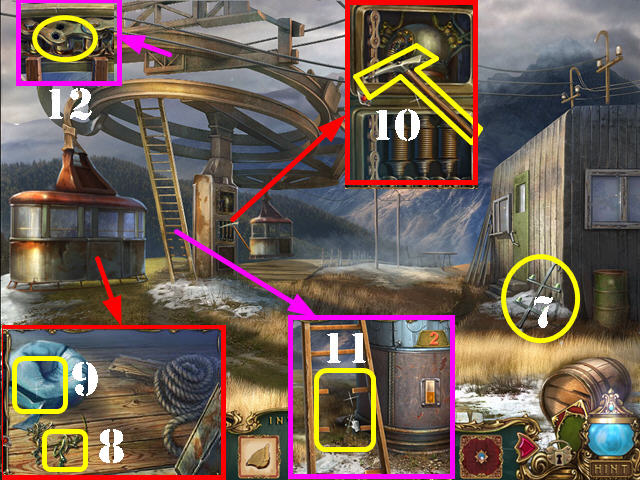
- Look at the crate; remove the nails with the HAMMER. Take the TULIP SCALE (@13) and the LEVER (P).
- Walk down twice and go right.
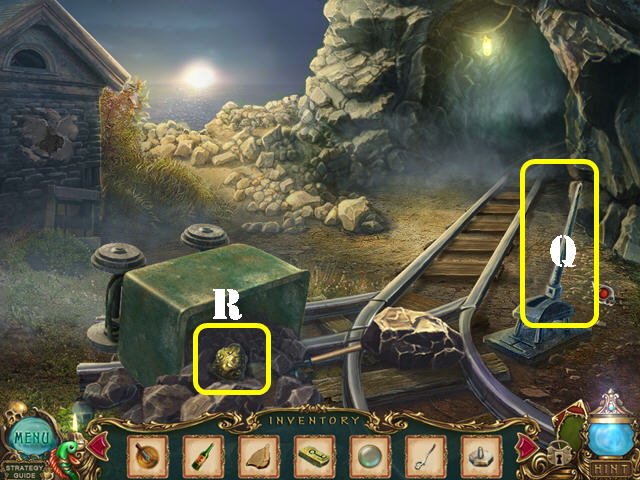
- Put the LEVER on the switch and then pull on the lever (Q).
- Take the NUGGET (R).
- Return to the lighthouse.
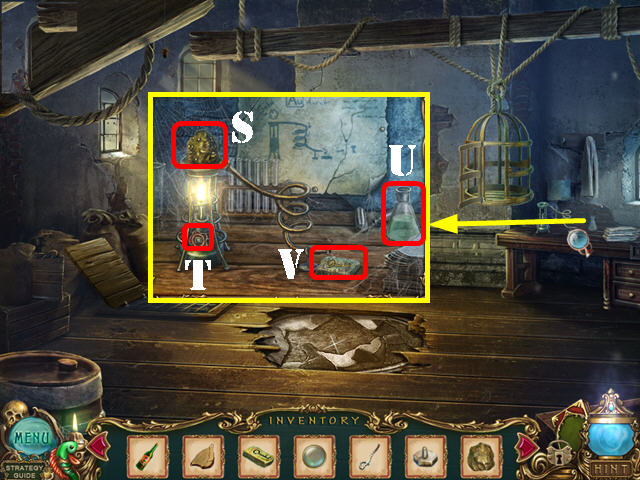
- Take a closer look at the table; put the FORM on the table.
- Put the NUGGET on the device (S).
- Turn the knob (T). Use the FLINT on the burner.
- Touch the beaker (U) and take the KEY (V).
- Go up the steps.
- Zoom into the lock; use the KEY in the lock and open the cage (1).
- Take the second FRESCO PART (2).
- Pour the RUM into the funnel (3) and then add the WICK to the top (4). Light the wick with the FLINT.
- Zoom into the safe; put the HANDLE in the niche and turn the handle (5). Turn the lever inside the mechanism (6).
- Walk down twice.
- Take a closer look at the spot the light is shining to (7). Go forward after the fog clears up.
- Take the ANTENNA (7).
- Open the cable car door, zoom into it and take the KEYS (8).
- Use the SHARPENED KNIFE on the deflated ball to get the RUBBER STRIP (9).
- Zoom into the hoist and take the ICE AXE (10).
- Zoom into the ladder and put the ANTENNA on it (11).
- Zoom into the chain above the ladder and put the PIN on it (12).
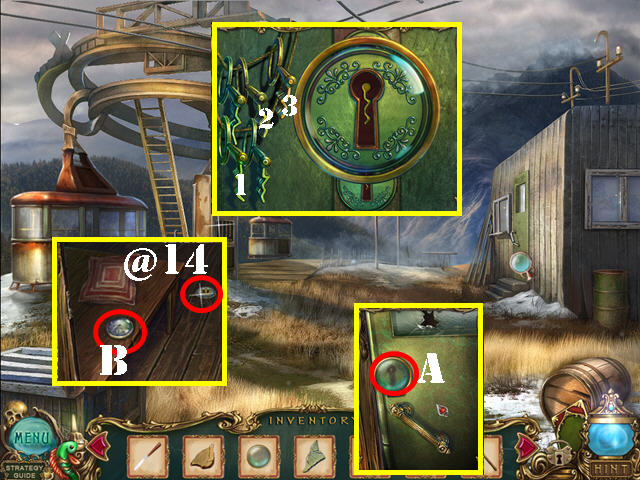
- Zoom into the door and put the LENS over the locks (A).
- Zoom into the lock and insert the KEYS into the lock to activate a puzzle.
- Put the keys in the right locks (1-3).
- Take the CROWN SCALE (@14) and the STARTER (B).
- Return to the lighthouse.
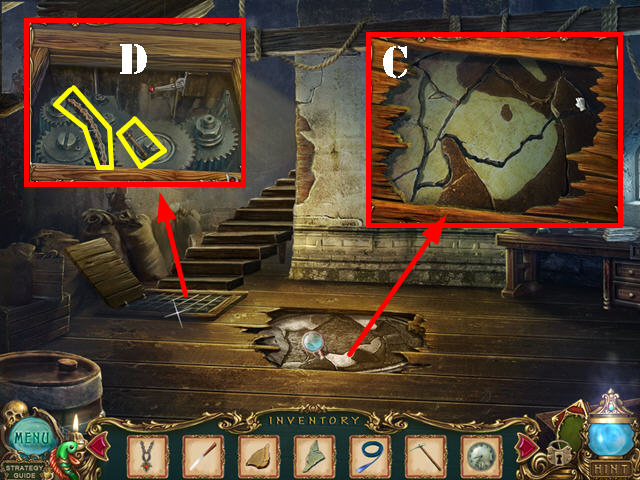
- Zoom into the ground; put the 2 FRESCO PARTS on the ground.
- Put the 4 pieces into the right spots to open the grid (C).
- Zoom into the hatch; take the TRIANGULAR KEY and the CHAIN (D).
- Return to the cable car.
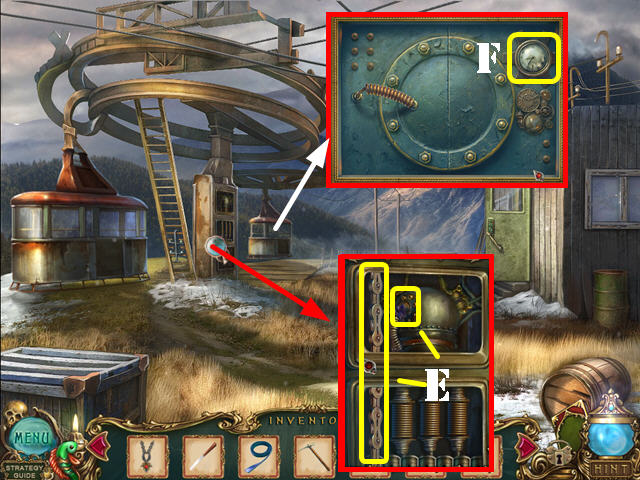
- Zoom into the hoist; put the RUBBER STRIP and the CHAIN on it (E).
- Zoom into the cable car; put the STARTER in the slot to activate a puzzle (F).
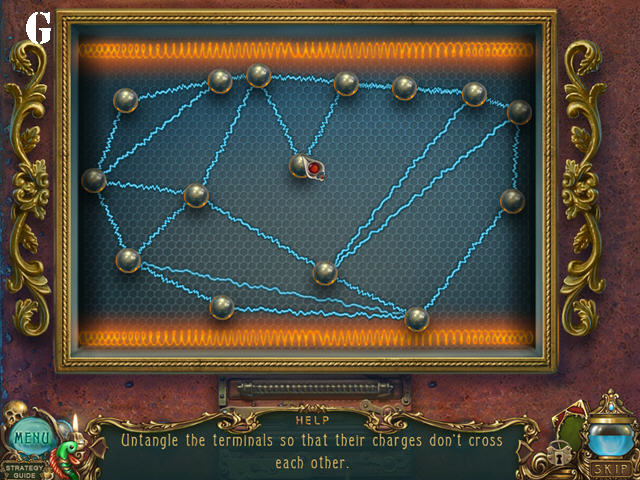
- Pull on the nodes to pull the strings apart; blue lines are untangled and yellow ones are still untangled.
- Please look at the screenshot for the solution (G).
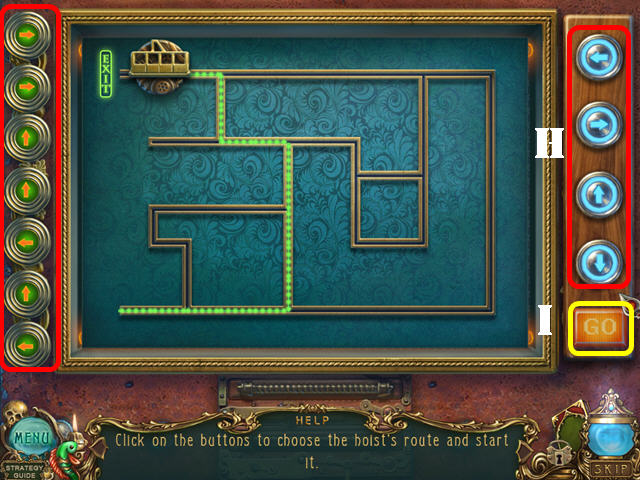
- For the second part of the puzzle, choose the hoist’s route.
- Select the arrows (H) that will lead the hoist’s route: right x 2, up x 2, left, up, and left and then press go (I).
Chapter 8: Hotel
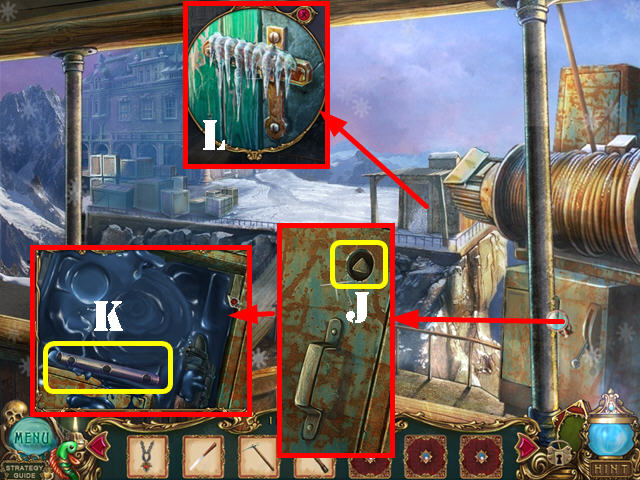
- Zoom into the panel; put the TRIANGULAR KEY into the keyhole (J).
- Take the TUBE (K).
- Zoom into the door; remove the ice with the ICE AXE to activate a HOS (L).

- Play the HOS.
- Pull the sheet and take the trumpet (M).
- Touch the bag and take the keys (N).
- Use the bellows (O) on the pile of dust and take the shoe (P).
- Break the owl with the hammer (Q) and take the scroll (R).
- You will receive the DOLPHIN.
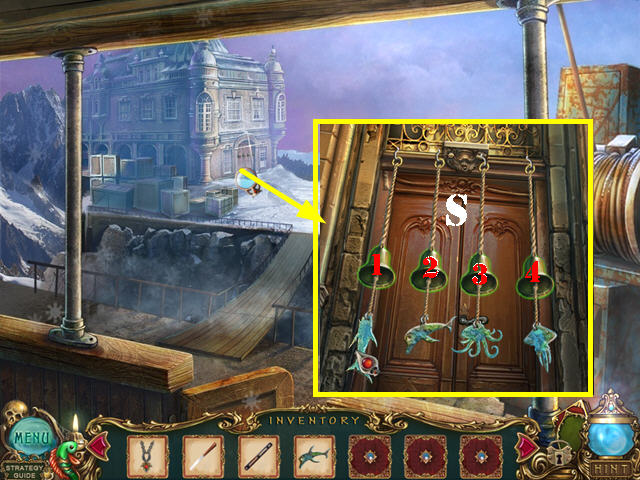
- Examine the hotel door; put the DOLPHIN on the rope.
- Ring the bells in this order: 2, 4, 3, 1 (S).
- Go through the door.
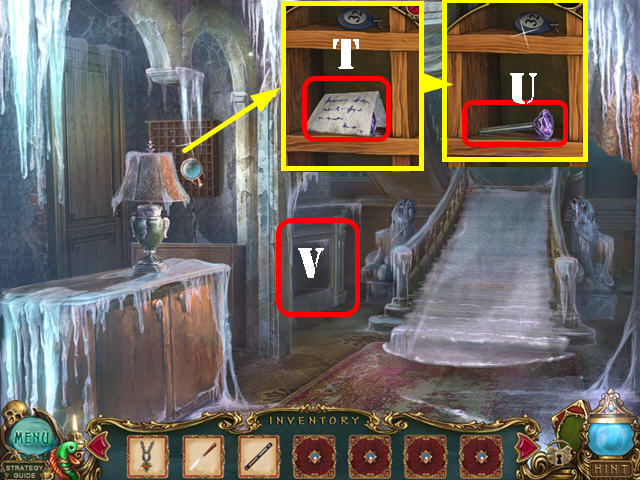
- Look in the cubbyhole and take the note (T) and all the notes that appear after it.
- Take the LEVER (U).
- Zoom into the chimney and put the TUBE in it to activate a puzzle (V).
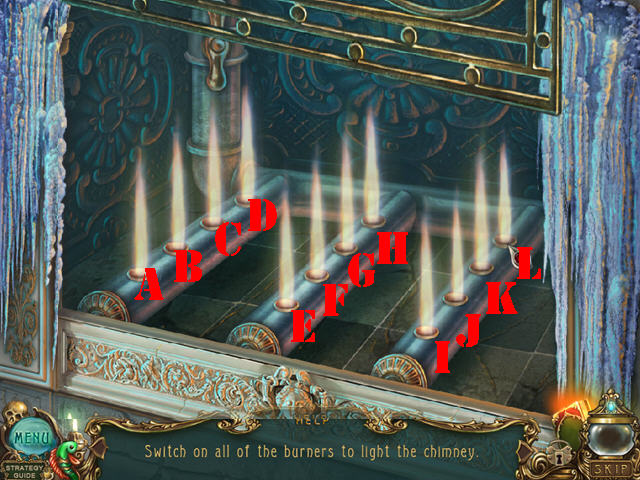
- To solve the puzzle, select the buttons in this order: A, C, D, E, G, H, I, K, and L.
- Go through the left door.
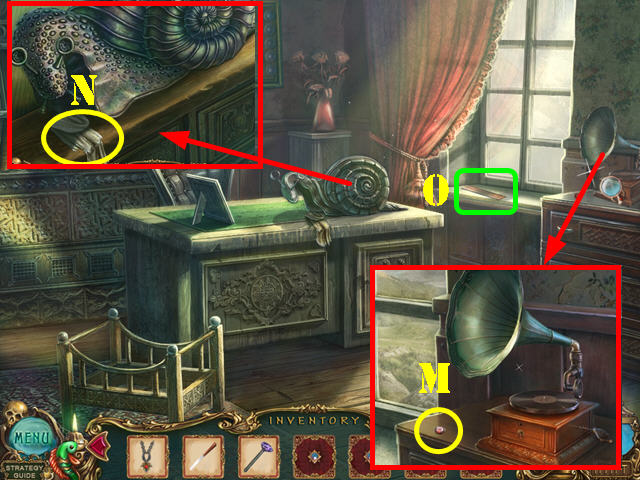
- Zoom into the gramophone; take the SNAIL EYE (M).
- Take a closer look at the snail; take the RAG (N).
- Take the RULER by the window sill (O).
- Exit the snail and walk down twice.
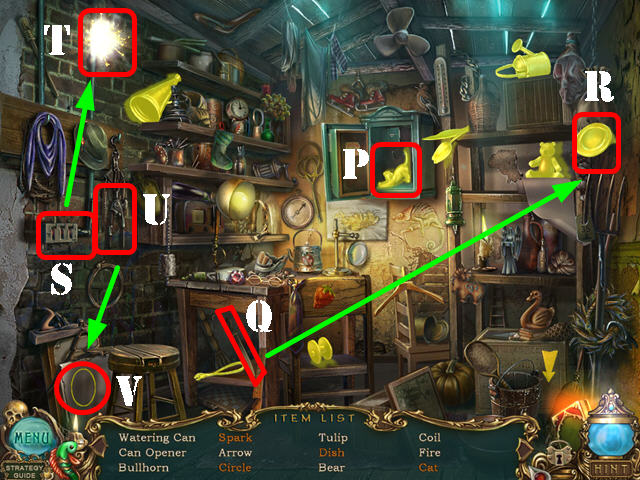
- Play the HOS.
- Open the door and take the cat (P).
- Cut the sack with the knife (Q) and take the dish (R).
- Flip the switch (S) and take the spark (T).
- Use the compass (U) on the paper; take the circle (V).
- You will receive the CAN OPENER.

- Zoom into the panel; wipe the oil with the RAG and take the SHELL (W).
- Return to the hotel office.
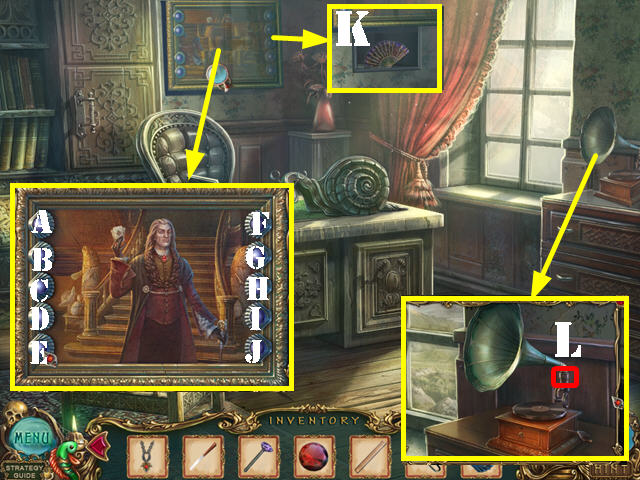
- Zoom into the painting and put the SHELL in the slot to activate a puzzle.
- Press the buttons in this order to solve the puzzle: A x 7, H x 4, D x 4, and J x 6.
- Take the FAN in the niche (K).
- Zoom into the gramophone; use the CAN OPENER on the nut to receive the GRAMOPHONE HORN (L).
- Walk down.
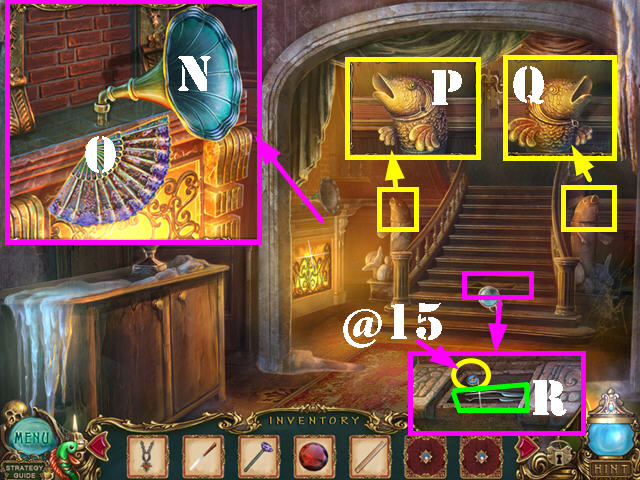
- Zoom into the chimney; put the GRAMOPHONE HORN in the slot (N).
- Use the FAN on the horn to melt the ice on the stairs (O).
- Examine the left fish and turn its head twice (P).
- Examine the right fish and turn its head twice (Q).
- Zoom into the steps; take the EAGLE SCALE (@15) and the PICKLOCK (R).
- Go up the steps.
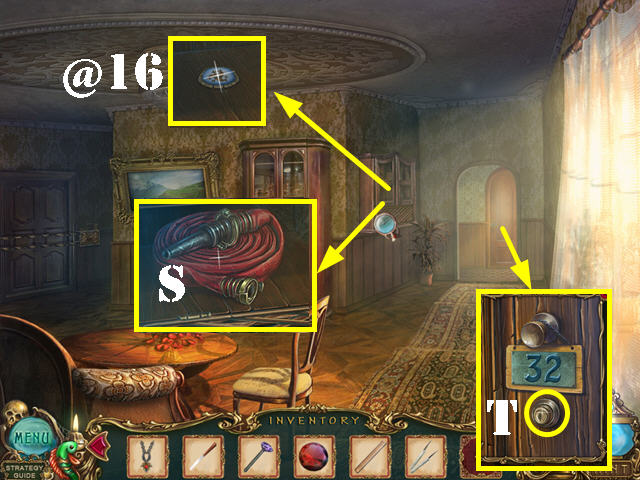
- Examine the cabinet; use the RULER to open the door. Take the HOSE (S) and the FISH SCALE (@16).
- Examine the back door; use the PICKLOCK in the lock and go through the door (T).
Chapter 9: The Finale
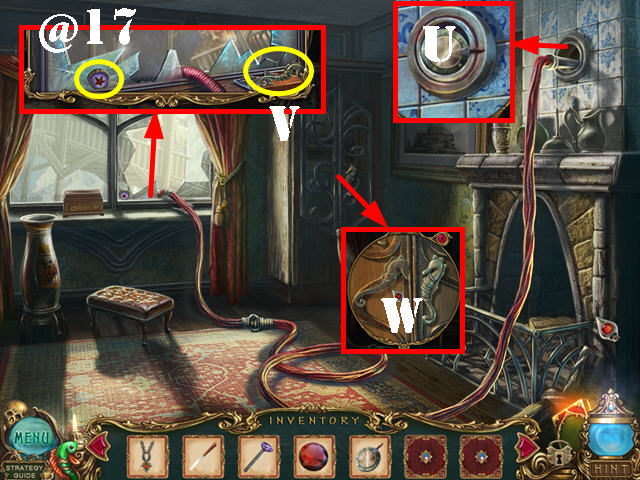
- Examine the wall; take the VALVE (U) and then put the HOSE in the hole.
- Look through the window; take the STARFISH SCALE (@17) and the SEA HORSE (V).
- Zoom into the armoire; put the SEA HORSE in the slot to activate a HOS (W).
- These instructions assume that you pulled the clothes out of the way before you perform the actions mentioned below.
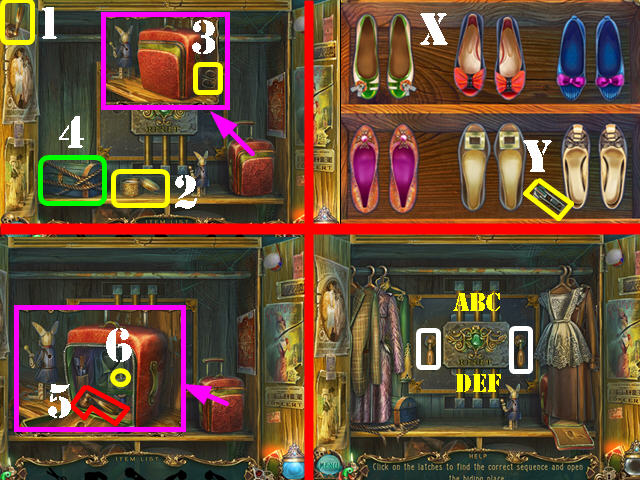
- Take the handle (1) and the petroleum jelly (2). Zoom into the suitcase and take the scissors (3).
- Cut the ropes on the chest with the scissors. Zoom into the chest to activate a mini-puzzle (4).
- Arrange the matching shoes next to each other. Select two shoes to swap their positions. Once all the shoes are next to each other, arrange them facing the right way.
- Please look at the screenshot for the solution (X). Take the zipper pull (Y).
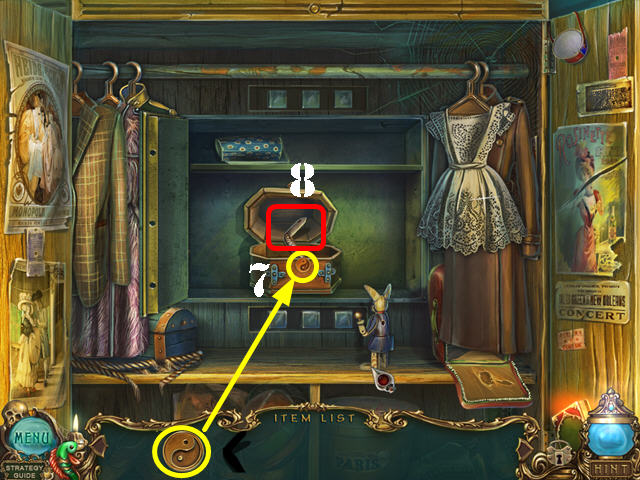
- Zoom into the suitcase; use the petroleum jelly on the zipper and then add the zipper pull to it. Unzip the suitcase by dragging the zipper to the opposite side; take the second handle (5). Pull out and then take the yin-yang symbol (6).
- Put the 2 handles in the slots (white) to activate a puzzle.
- Select the latches in the right order. To solve the puzzle, select the latches in this order: A, C, E, D, A, B, F, and D.
- Put the Yin-yang symbol in the slot (7).
- Take the POCKETKNIFE (8).
- Walk down.
- Zoom into the painting; cut the painting with the POCKETKNIFE and take the second SNAIL EYE (G).
- Zoom into the left door; put the VALVE on the lock and turn it twice (H).
- Go through the left door.
- Take the second LEVER (I).
- Pull on the hose (J).
- Return to the office.
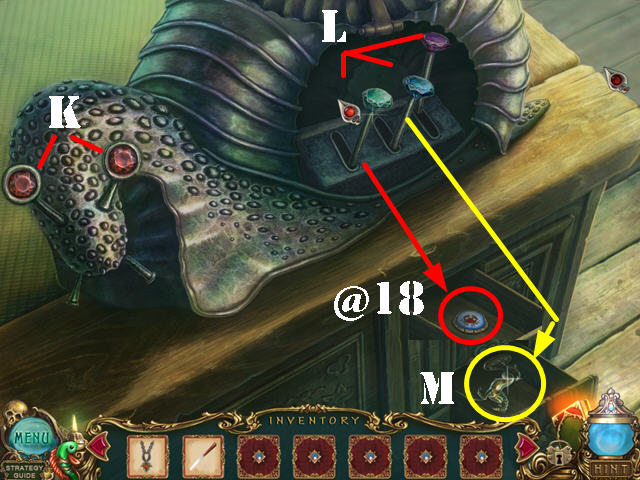
- Zoom into the snail on the desk; put the 2 SNAIL EYES (K) in the sockets and the 2 LEVERS in the slots (L).
- Pull on the center lever and then take the HORSE (M).
- Pull the left lever and take the CRAB SCALE (@18).
- Return to the upstairs bedroom.
- Zoom into the window sill; put the HORSE on the box; take the SALT and the notes (N).
- Walk down and go through the left door.
- Use the SALT on the icy pathway. Examine the bottom of the bridge and take the TORCH (O).
- Return to the bedroom.
- Zoom into the horse; put the TORCH on the oil to get the OILED TORCH (P).
- Walk down twice.
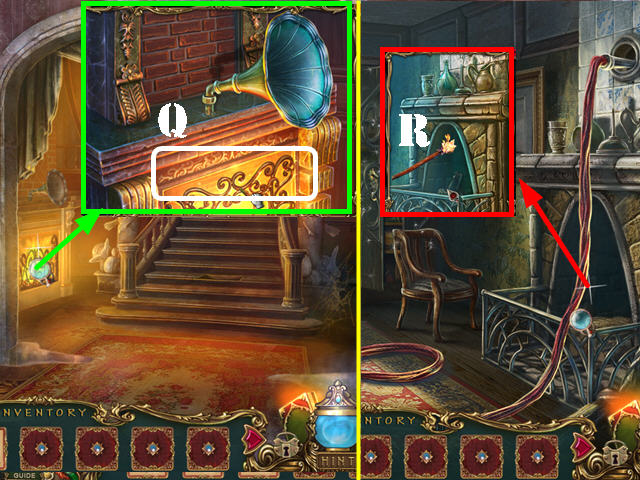
- Zoom into the chimney; put the OILED TORCH in it to get the TORCH (Q).
- Return to the bedroom.
- Zoom into the fireplace; use the TORCH in it to get the hot air outside (R).


- Play the HOS.
- These instructions assume that you pulled the clothes out of the way before you perform the actions mentioned below.
- Take the toy drum (S).
- Take the piece of fabric (T).
- Zoom into the suitcase; take the thread and needle and the screwdriver (U).
- Zoom into the plaque; remove the screws with the screwdriver (V).
- Take the wind-up key (W).
- Examine the suitcase; give the toy drum to the bunny and put the wind-up key on its back (X). Take the lock piece (Y).
- Zoom into the panel; put the lock piece on it to activate a mini-puzzle.
- Touch a latch and pieces that can be swapped will light up. Put all the pieces in the right spots (Z).
- Put the piece of fabric on the balloon and patch it up with the needle and thread (A) to receive the BALLOON.
- Walk down and go through the left door.
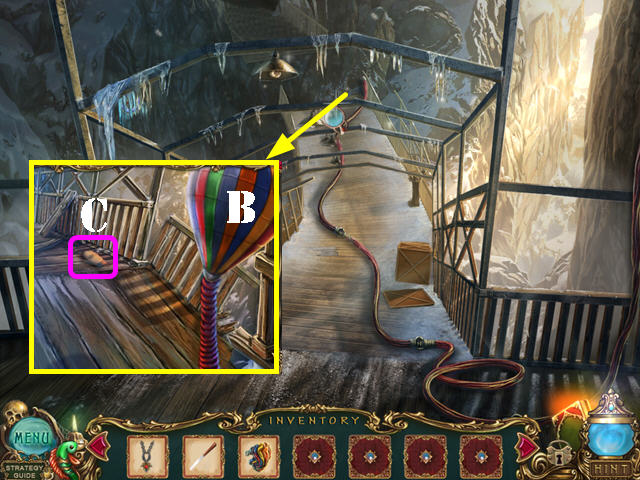
- Zoom into the broken bridge; attach the BALLOON to the hose (B).
- Take the GLOVE (C).
- Take the bridge.
- Grab the LADDER (D).
- Take the notes (E).
- Examine the ground; take the DRAGON SCALE (@19) and the HAMMER (F).
- Walk down.
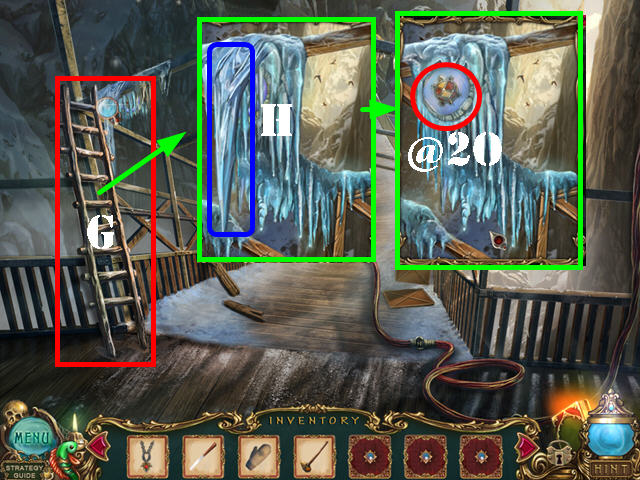
- Place the LADDER on the left (G).
- Examine the icicle; break it with the HAMMER to get the ICICLE (H).
- Grab the TURTLE SCALE (@20).
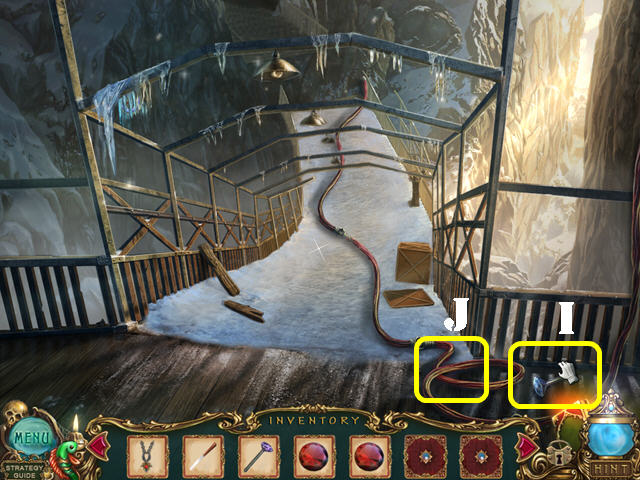
- Go forward and then zoom into the mechanical fish.
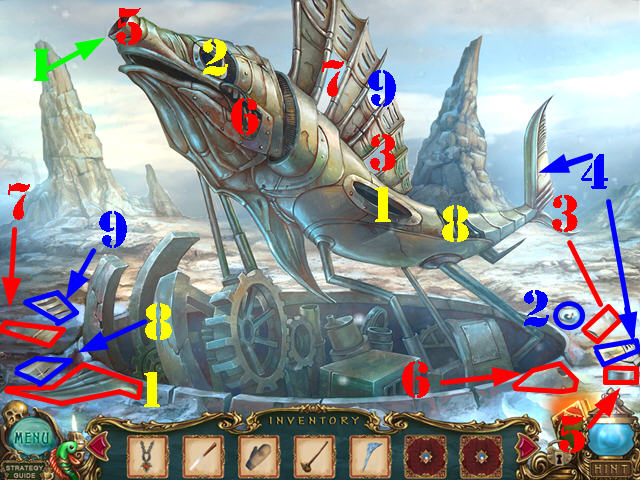
- Drag all the pieces scattered in the snow on the right parts of the fish. Note: some items have to be moved aside in order for the pieces to become visible (1-9).
- Place the ICICLE on the nose (I) after all other pieces have been placed.
- Zoom into the window; wipe it with the GLOVE. Break the window with the HAMMER.
- Zoom into the cage; take the notes (J) and then put the AMULET in the niche (K).
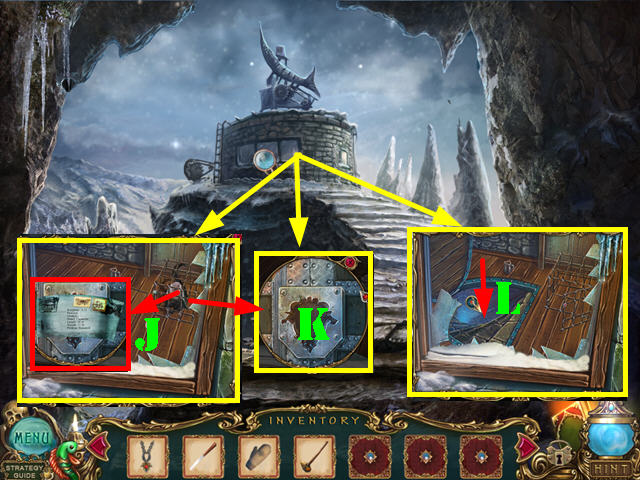
- Go down the hatch (L).
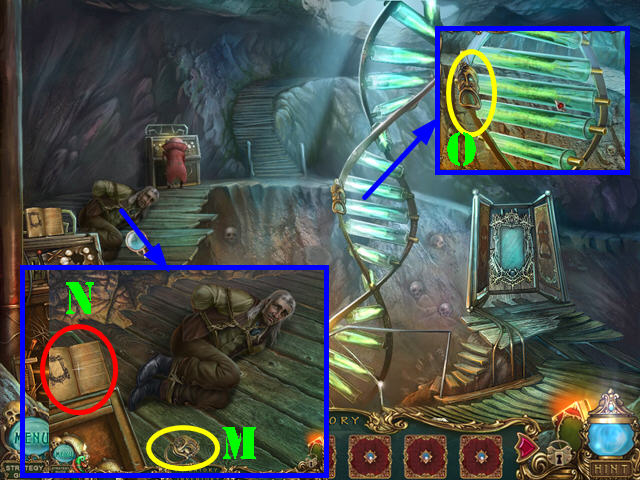
- Zoom into the man; take the FIRST PART OF LOCK after the conversation ends (M).
- Take the notes (N). Exit the close-up scene.
- Look at the structure in the center; take the SECOND PART OF LOCK (O).
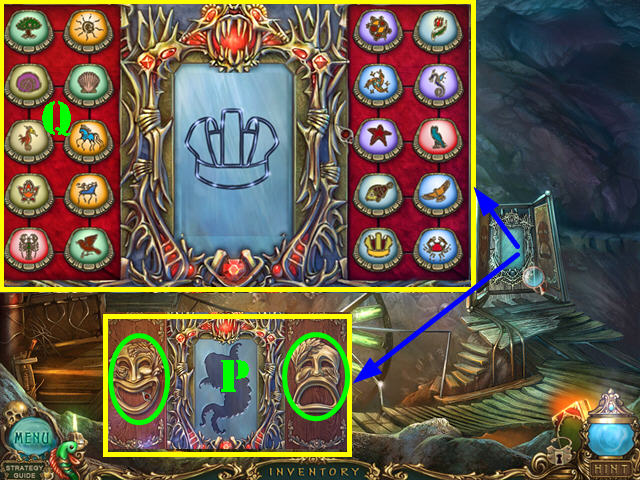
- Zoom into the door; put the FIRST PART OF LOCK and the SECOND PART OF LOCK into the slots to activate a puzzle (P). Note: this puzzle will not unlock unless you’ve recovered all the fish scales.
- Flip the tiles to match the image in the mirror. For each incorrect match, the tiles will shuffle (Q).
- The solution to this puzzle is random, since it depends on the pieces you touch first, however, if you haven’t touched any pieces you will be able to flip the tiles shown in the screenshot as they appear on the screen.
- Congratulations, you have completed Haunted Legends: The Undertaker


 3 Cards to Dead Time Walkthrough, Guide, & Tips
 Flux Family Secrets: The Book of Oracles Walkthrough, Guide, & Tips
 Midnight Mysteries: The Salem Witch Trials Walkthrough, Guide, & Tips
 Dark Dimensions: Shadow Pirouette Walkthrough, Guide, & Tips
 Mystery of Mortlake Mansion Walkthrough, Guide, & Tips