The Missing: Island of Lost Ships Walkthrough, Guide, & Tips
The Missing: Island of Lost Ships Walkthrough

Welcome to the The Missing: Island of Lost Ships Walkthrough
After setting out to search for your missing friend, you find yourself trapped on the mysterious Island of Lost Ships.
Whether you use this document as a reference when things get difficult or as a road map to get you from beginning to end, we’re pretty sure you’ll find what you’re looking for here.
This document contains a complete The Missing: Island of Lost Ships game walkthrough featuring annotated screenshots from actual gameplay!
We hope you find this information useful as you play your way through the game. Use the walkthrough menu below to quickly jump to whatever stage of the game you need help with.
Remember to visit the Big Fish Games Forums if you find you need more help. Have fun!
This walkthrough was created by Lucky Smile, and is protected under US Copyright laws. Any unauthorized use, including re-publication in whole or in part, without permission, is strictly prohibited.
General Tips

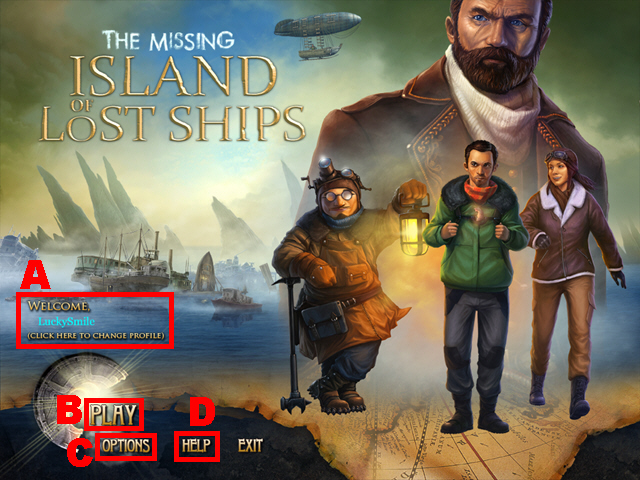
- This is the official guide for The Missing: Island of Lost Ships.
- Access your current profile (A) to create, delete, or edit any profile.
- Press Play (B) to start the game.
- Select Options (C) to adjust the sound and the display mode.
- Access the Help section (D) to review some basic guidelines for the game.
- Hidden Object scenes will be referred to as HOS throughout this guide.
- Items in HOS are randomized.
- You can choose between three different grades of difficulty: casual, normal, and expert mode.
Chapter 1: The Island

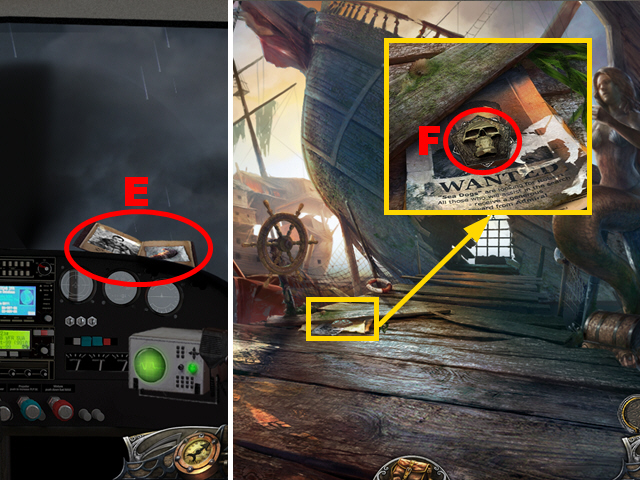
- Take the journal (E).
- Zoom into the floor; take the SKULL (F).
- Move forward.

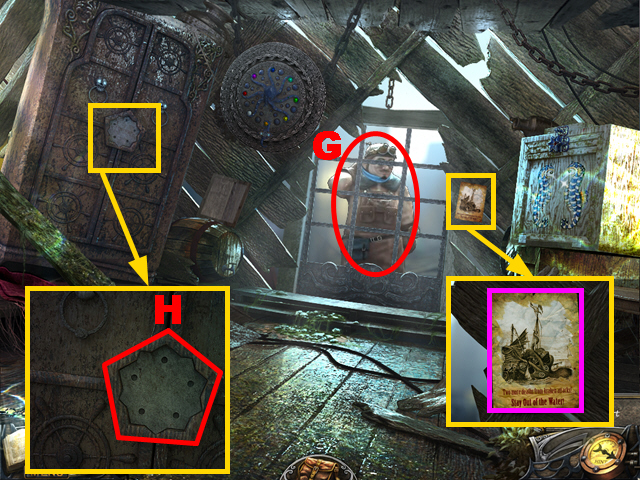
- Talk to Herbert (G).
- Zoom into the cabinet; put the SKULL into the niche (H).
- Zoom into the poster; read the poster marked in purple.
- Play the HOS.

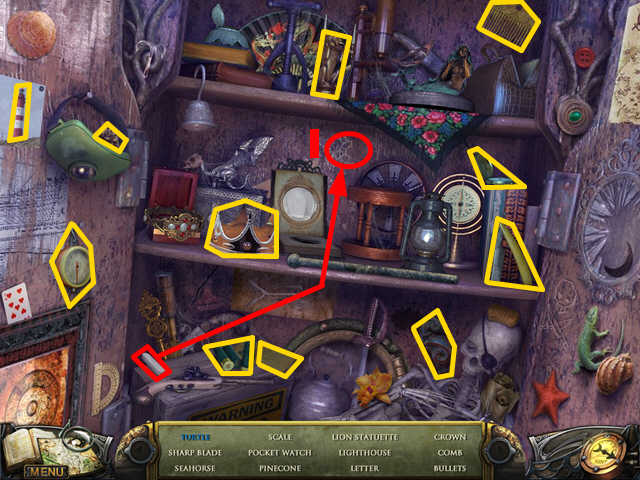
- Take the chalk, use it to draw the turtle, and take the turtle (I).
- The SEAHORSE will be acquired.

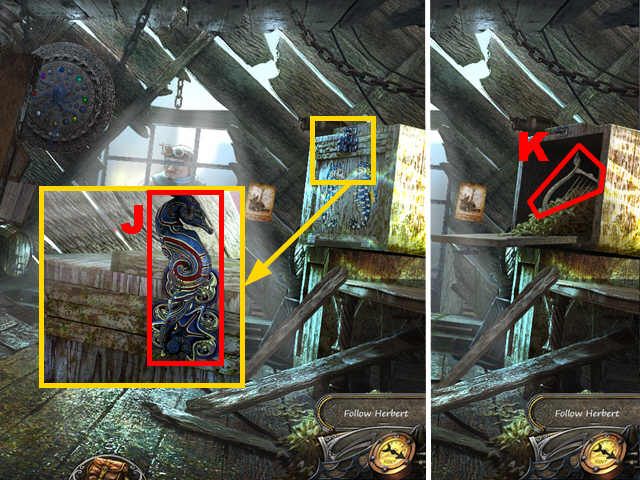
- Zoom into the crate; put the SEAHORSE into the slot (J).
- Turn the seahorse.
- Take the HARP (K).
- Walk down.

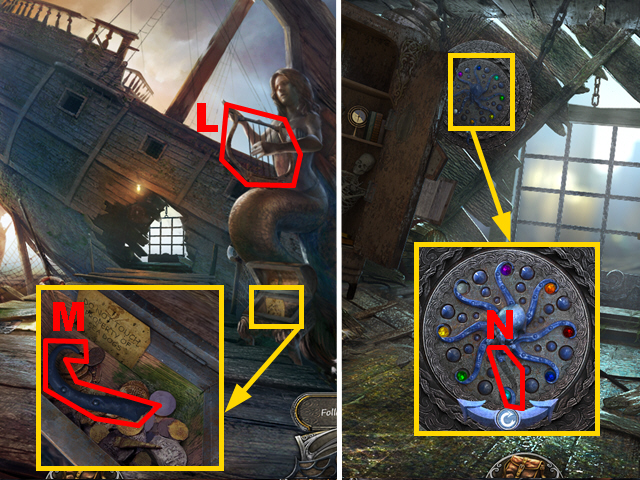
- Put the HARP into the hands of the statue (L).
- Zoom into the chest; take the TENTACLE (M).
- Move forward.
- Zoom into the circular panel; add the TENTACLE to it (N) to play a mini-game.

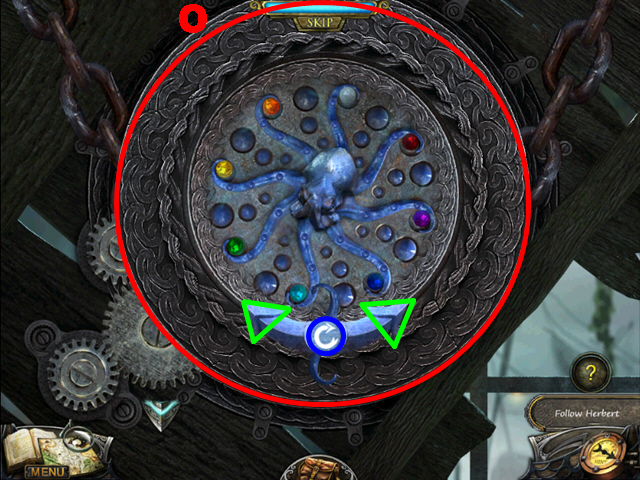
- Press the arrows marked in green to rotate the tentacles and press the button marked in blue to switch the pearls.
- Each colored pearl has to be placed into the correct tentacle.
- If a tentacle is activated, the eyes of the octopus will glow in the pearl’s color which belongs to that tentacle.
- The screenshot displays the correct solution (O).
- Move forward and turn left.

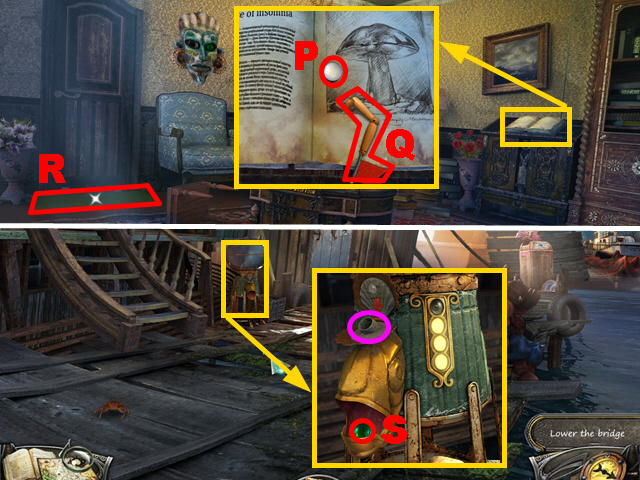
- Zoom into the book; turn its pages once; take the PEARL (P) and the first FLAG (Q).
- Remove the green blanket (R).
- Walk down.
- Zoom into the vending machine; put the PEARL into the slot marked in purple and take the CRYSTAL (S).
- Turn left.

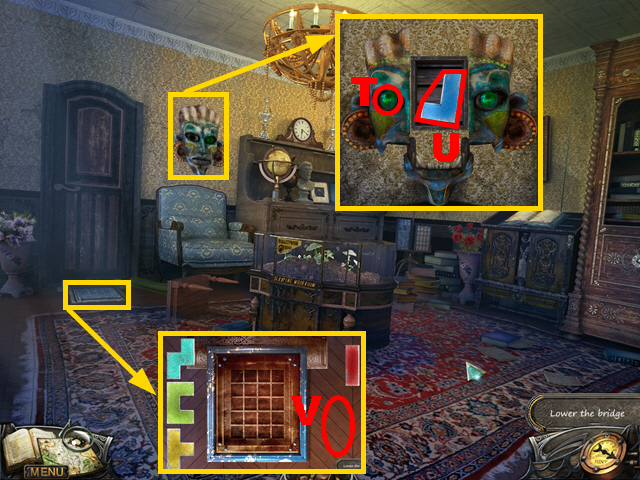
- Zoom into the mask; put the CRYSTAL into the niche (T) and take the PUZZLE (U).
- Zoom into the floor panel; put down the PUZZLE (V) to play a mini-game.

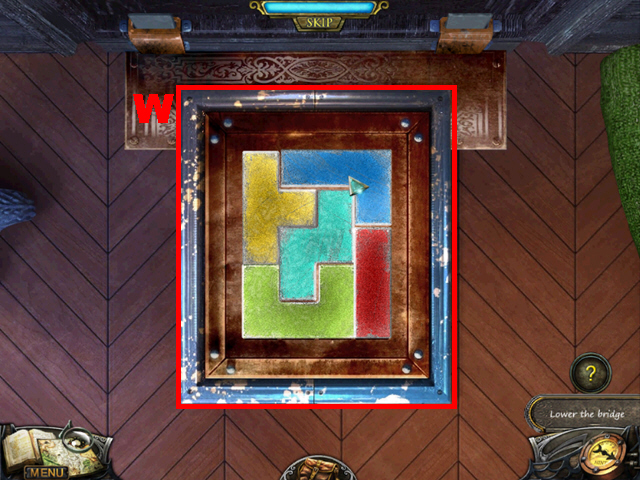
- Rotate the puzzle pieces and drag them into the box.
- To solve this puzzle (W), each puzzle piece has to be stored in the box without any empty spaces or overlapping pieces.
- Play the HOS.

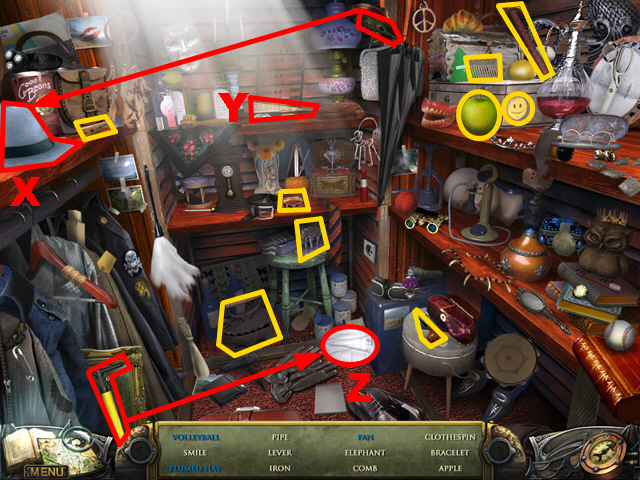
- Take the feather, put it onto the hat, and take the plumed hat (X).
- Open the fan and take the fan (Y).
- Take the air pump, put it next to the volleyball, and take the volleyball (Z).
- You will receive the LEVER.
- Walk down.

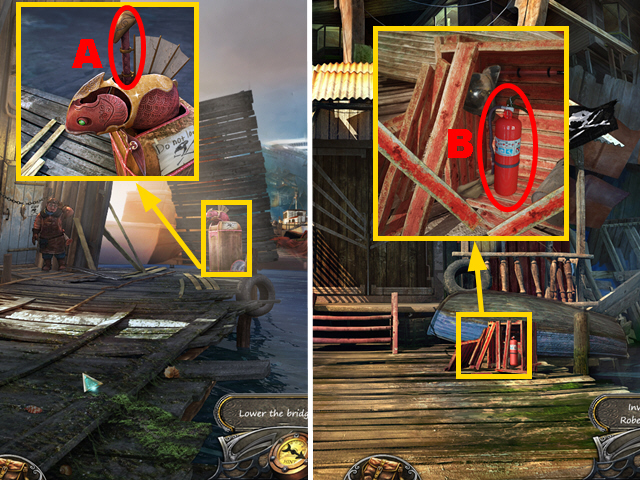
- Zoom into the device; put the LEVER into the slot (A) and press the lever.
- Move forward twice.
- Zoom into the broken crate; move aside the boards and take the FIRE EXTINGUISHER (B).
- Walk down.

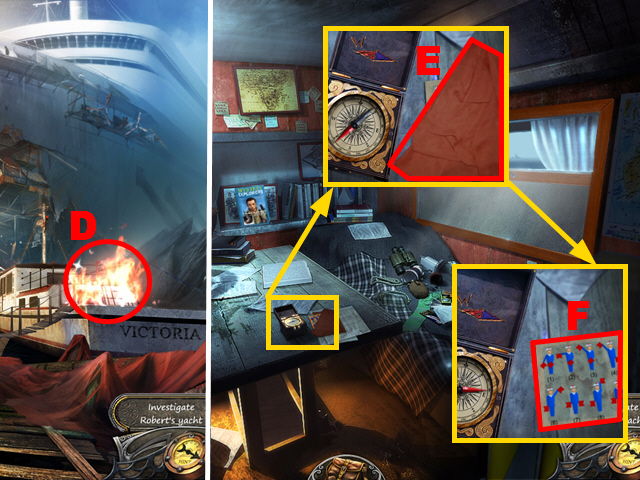
- Use the FIRE EXTINGUISHER on the flames to extinguish the fire (D).
- Turn right.
- Zoom into the compass; take the PATCH (E) and the signal code guide (F).
- Play the HOS.

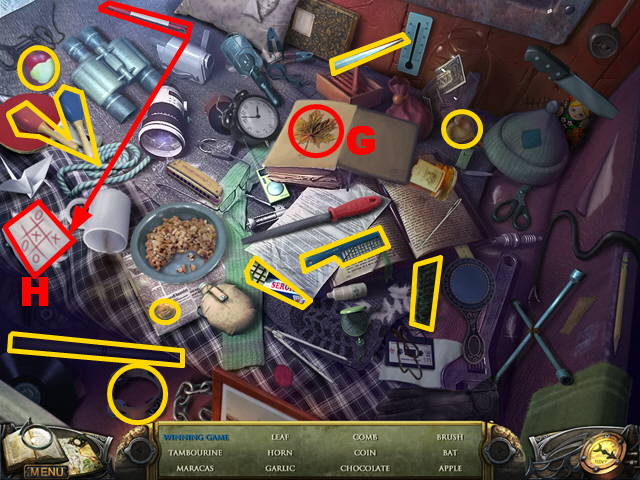
- Open the book and take the leaf (G).
- Take the pencil, use it to draw on the paper, and take the winning game (H).
- The HORN will be acquired.

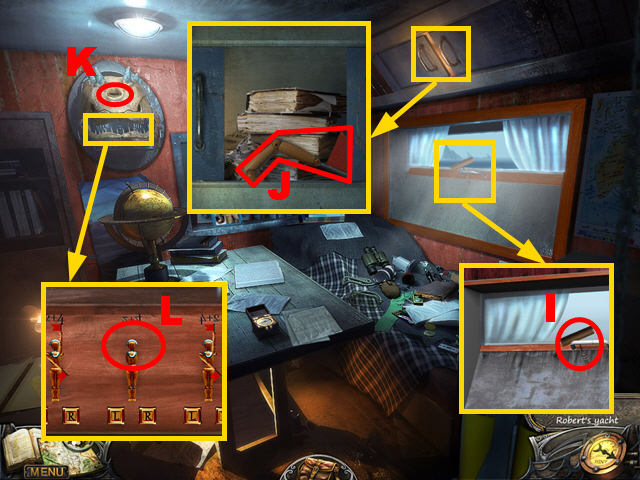
- Zoom into the window; take the CORKSCREW (I).
- Zoom into the cabinet; move aside the door and take the second FLAG (J).
- Put the HORN into the niche (K).
- Zoom into the fish; add the first FLAG and the second FLAG to the board (L) and play the mini-game.

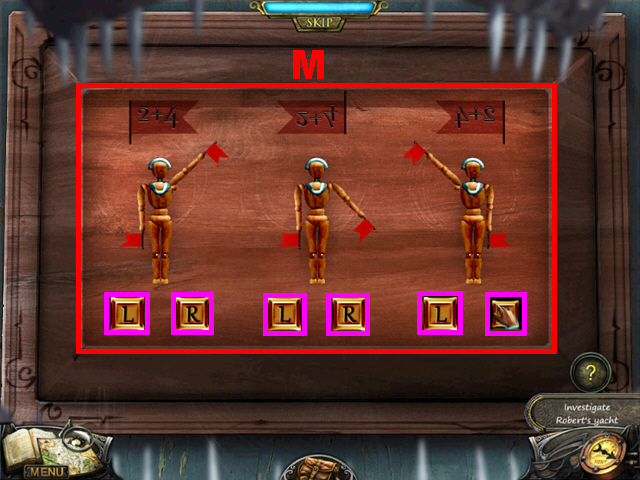
- To solve this puzzle (M), rearrange the flags according to the signal code guide by pressing the buttons marked in purple.
- For the first figure, press the L-button six times and the R-button once. You have to recreate the sixth pattern from the signal code guide.
- For the second figure, press the L-button six times and the R-button three times. You have to recreate the ninth figure from the signal code guide.
- For the third figure, press the L-button three times and the R-button four times. You have to recreate the mirror version of the sixth figure from the signal code guide.

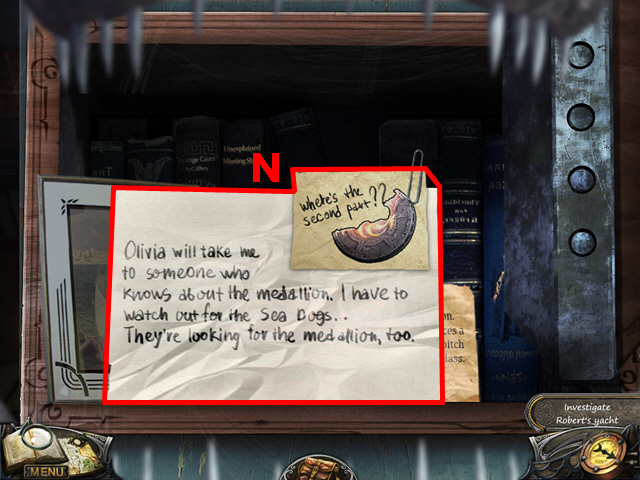
- Read and take the note (N).
- Walk down and turn left.

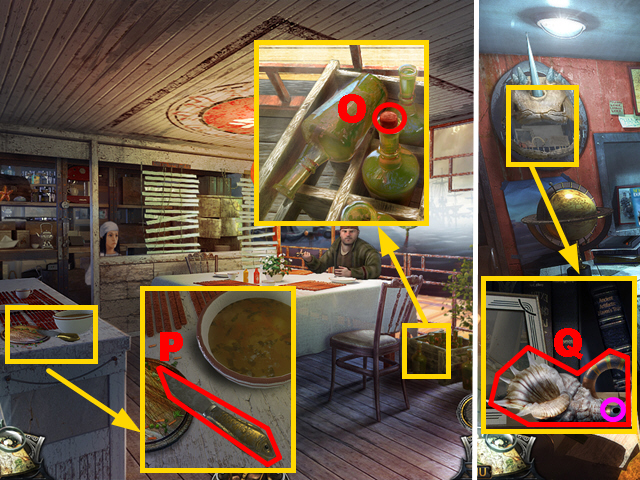
- Zoom into the crate; use the CORKSCREW to remove the cork (O); the CORK will be acquired.
- Zoom into the table; take the KNIFE (P).
- Walk down and turn right.
- Zoom into the fish; put the CORK into the niche marked in purple and take the SEASHELL (Q).
- Walk down twice and turn left.

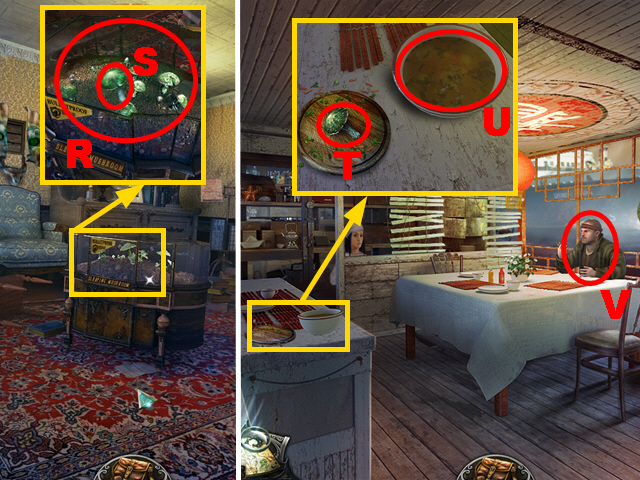
- Zoom into the showcase; use the SEASHELL on the showcase to break the glass (R).
- Use the KNIFE to remove the mushroom (S); the MUSHROOM will be acquired.
- Walk down, move forward, and turn left.
- Zoom into the table; put down the MUSHROOM (T) and cut the mushroom with the KNIFE.
- Take the cut mushroom, put it into the dish (U), and take the SOUP.
- Give the SOUP to the guy (V).
- Play the HOS.

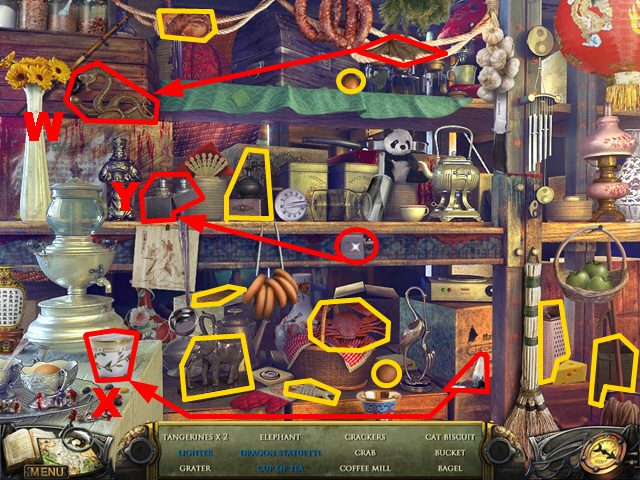
- Take the wing, put it onto the dragon, and take the dragon statuette (W).
- Take the teabag, put it into the cup, and take the cup of tea (X).
- Take the part of the lighter, put it into the lighter, and take the lighter (Y).
- The CAT BISCUIT will be acquired.

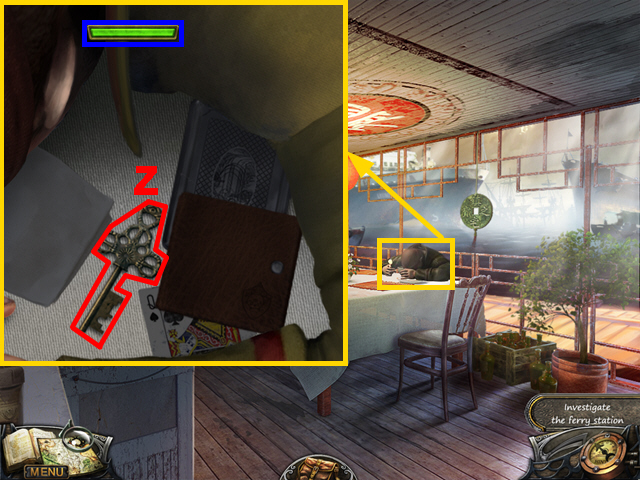
- Zoom into the guy.
- Move the items away without waking up the bandit.
- Keep the bar marked in blue from getting red; move the items very slowly to do so.
- When you have removed all the items take the KEY (Z).
- Walk down and go forward.

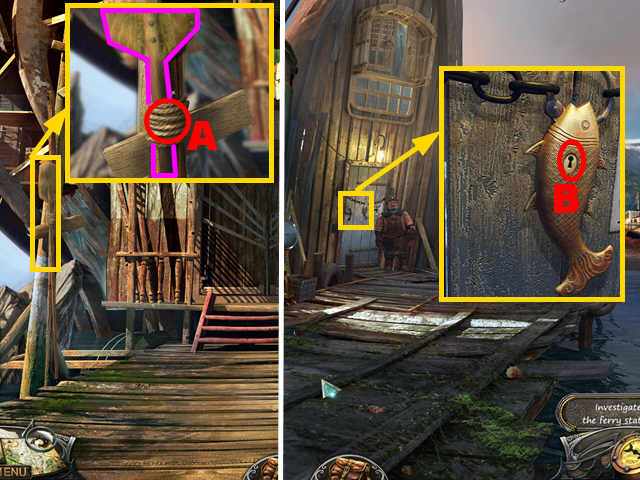
- Zoom into the oar; cut the rope (A) with the KNIFE and take the OAR marked in purple.
- Walk down twice.
- Zoom into the door; put the KEY into the lock (B) and turn the key once to open the door; the CHAIN will be acquired.
- Follow Herbert through the door.
- Play the HOS.

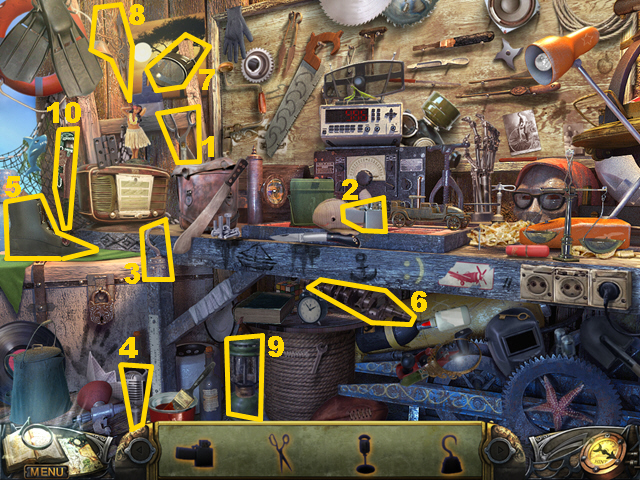
- Find the items (1-10).
- The WRENCH will be acquired.
- Walk down three times.

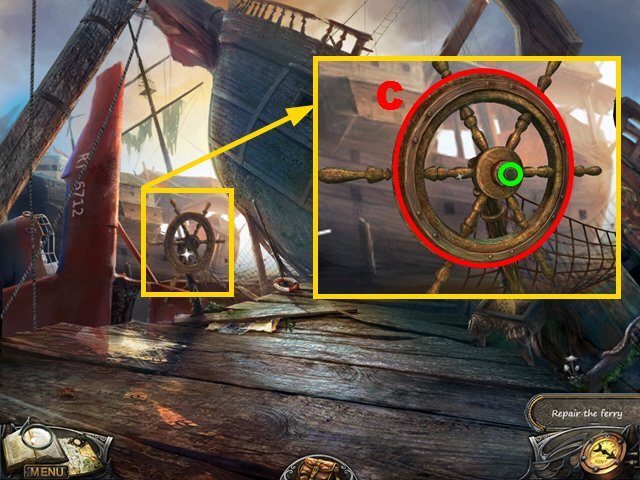
- Zoom into the wheel; use the WRENCH to remove the bolt marked in green and take the WHEEL (C).
- Move forward.
- Play the HOS.

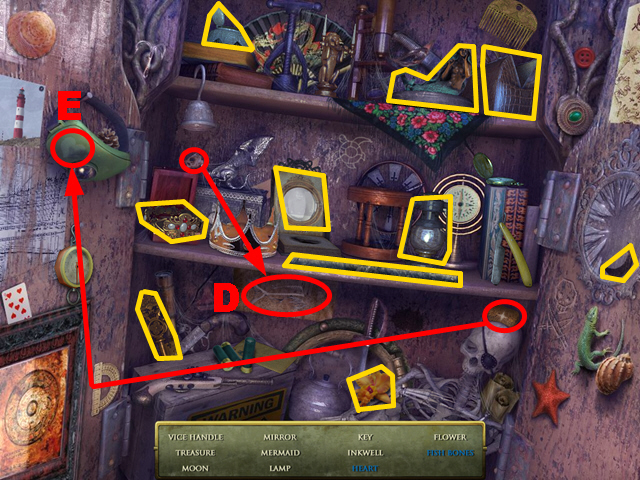
- Take the fish bone, connect it to the incomplete fish bones, and take the fish bones (D).
- Take the sponge, use it to clean the heart, and take the heart (E).
- The VICE HANDLE will be acquired.
- Move forward and go through the gate.

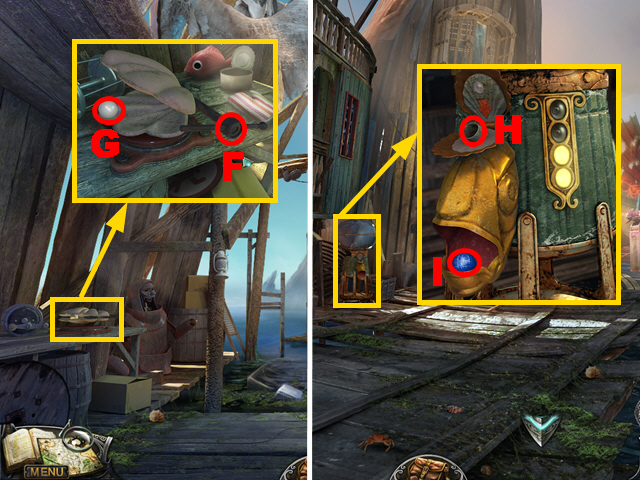
- Zoom into the shell; put the VICE HANDLE into the niche (F), press the handle, and take the PEARL (G).
- Walk down.
- Zoom into the vending machine; put the PEARL into the slot (H) and take the BEARING (I).
- Go through the gate and move forward.

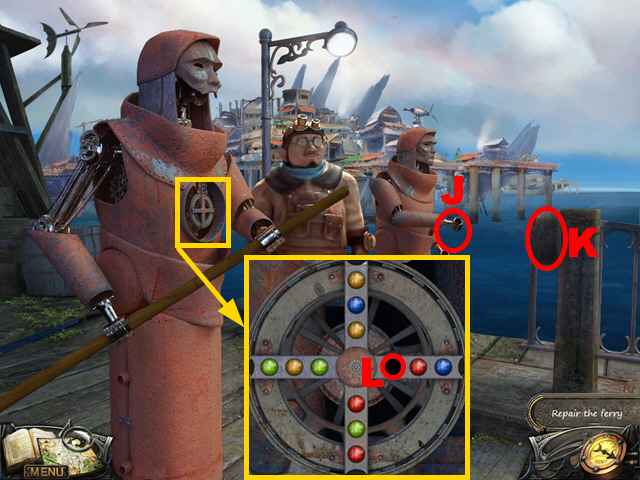
- Put the OAR into the hands of the second robot (J).
- Add the WHEEL to the device (K).
- Zoom into the panel; add the BEARING to it (L) and play a mini-game.

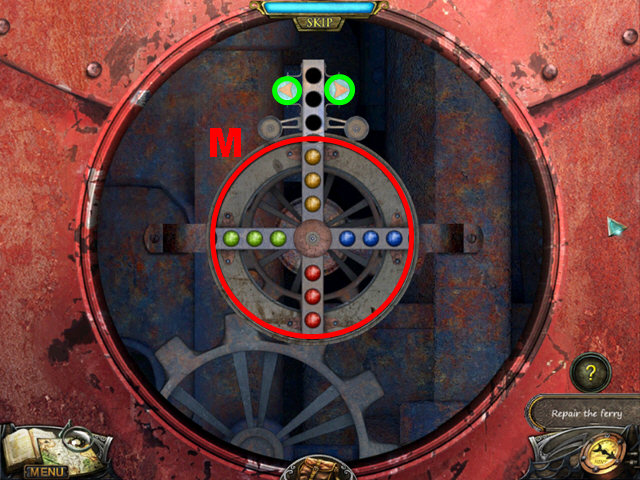
- Press the balls to move them and press the arrow buttons marked in green to rotate the lines.
- Balls can only be moved into adjacent empty spots.
- To solve this puzzle (M), line up balls according to their color.
- It is helpful to start lining up the blue balls, the red balls, the green balls, and to finish with lining up the yellow balls.
Chapter 2: The Hangar

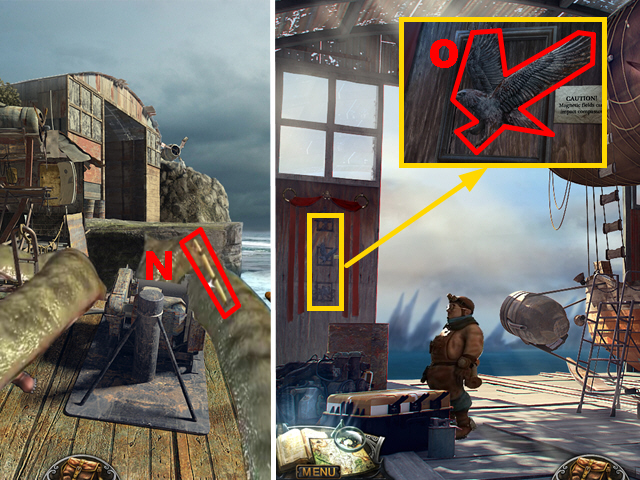
- Try to go anywhere.
- Take the HARPOON (N).
- Move forward.
- Zoom into the wall; use the KNIFE on the eagle (O) to acquire the EAGLE.
- Walk down.

- Zoom into the gate; put the EAGLE into the niche (P).
- Turn left.
- Zoom into the cat; give the CAT BISCUIT to the cat (Q).
- Zoom into the opening; use the CHAIN on the magnet (R) to acquire the MAGNET.
- Walk down three times, move forward, and turn right.

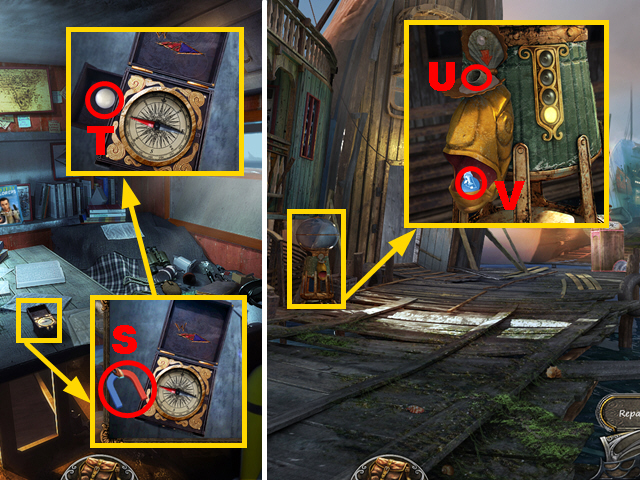
- Zoom into the compass; hold the MAGNET next to the compass (S) and take the PEARL (T).
- Walk down twice.
- Zoom into the vending machine; put the PEARL into the slot (U) and take the BLUE BULB (V).
- Move forward and turn right.
- Play the HOS.

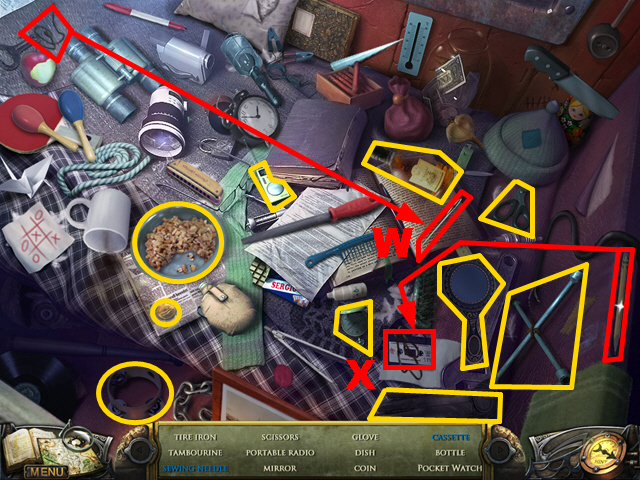
- Take the thread, combine it with the needle, and take the sewing needle (W).
- Take the pencil, use it on the cassette, and take the cassette (X).
- The NEEDLE AND THREAD will be acquired.
- Walk down twice and go through the gate.
- Play the HOS.


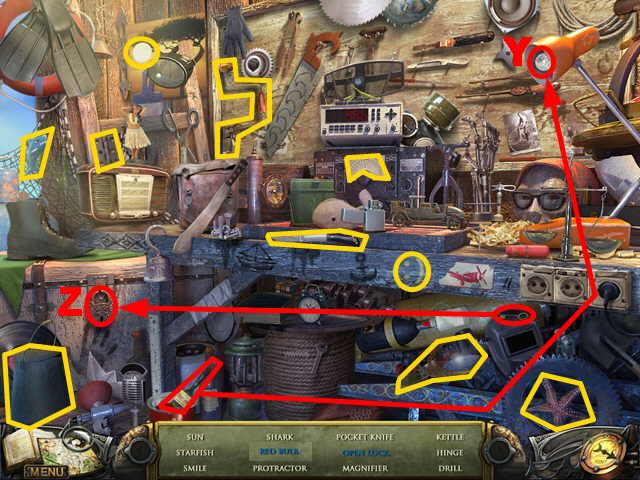
- Take the brush, use it to paint the lamp red, and take the red bulb (Y).
- Take the key, put it into the lock, and take the open lock (Z).
- The RED BULB will be acquired.
- Move forward and turn left.

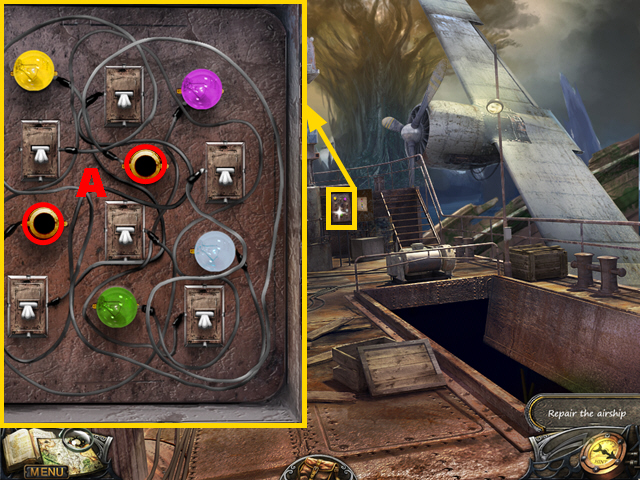
- Zoom into the control panel; put the RED BULB and the BLUE BULB into the slots (A) to play a mini-game.

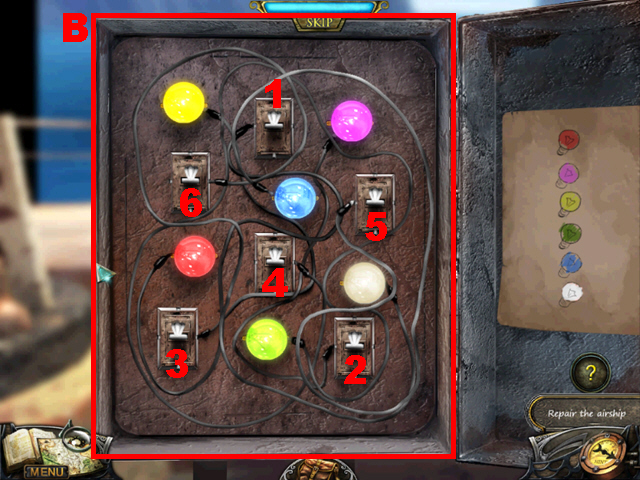
- To solve this puzzle (B), press the switches in the sequence 1- 6.

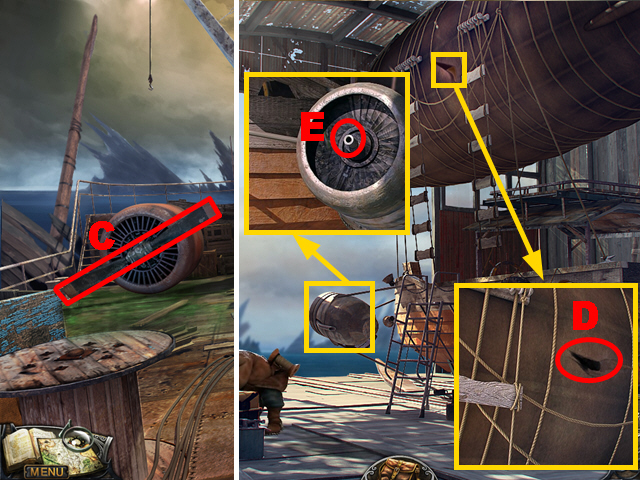
- Use the WRENCH on the propeller (C) and take the PROPELLER.
- Walk down and move forward.
- Zoom into the balloon; put the PATCH on the hole (D) and sew the patch with the NEEDLE AND THREAD.
- Zoom into the device; put the PROPELLER on it (E).
Chapter 3: The Big Tree

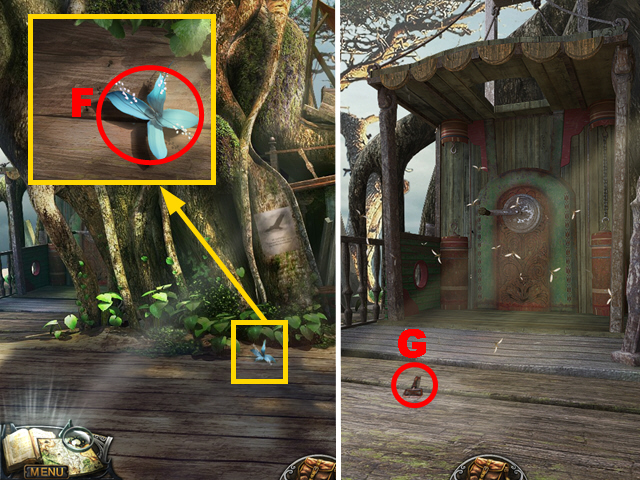
- Zoom into the floor; take the MEDICINE PLANT (F).
- Turn left.
- Take the KEY (G).
- Walk down.

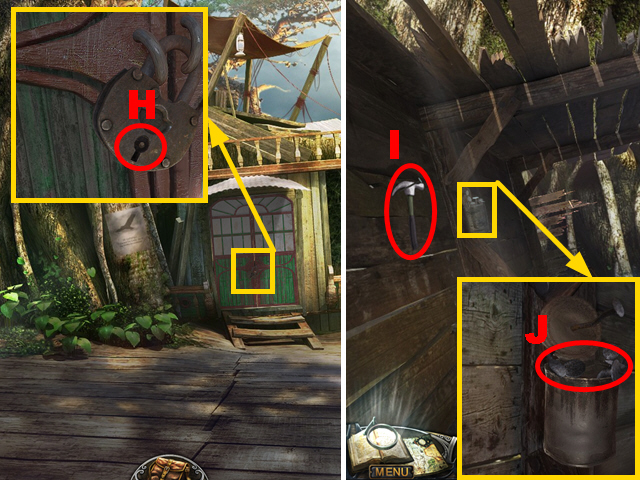
- Zoom into the door; put the KEY into the lock (H) and turn the key once.
- Move forward.
- Take the HAMMER (I).
- Zoom into the wall; take the NAILS (J).
- Play the HOS.

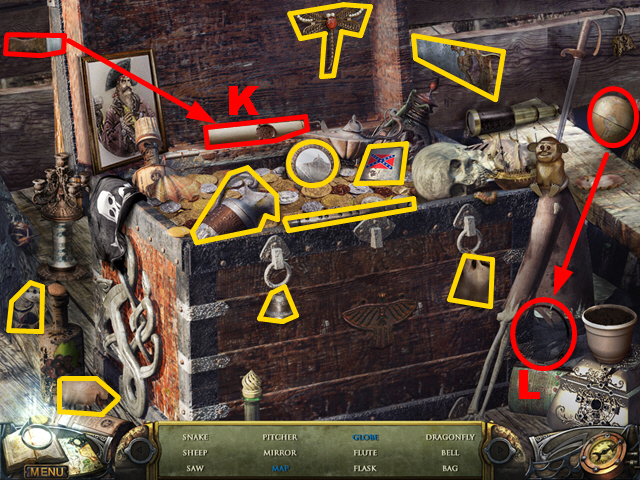
- Take the knife, use it to open the scroll, and take the map (K).
- Take the part of the globe, combine it with its other part, and take the globe (L).
- The SAW will be acquired.

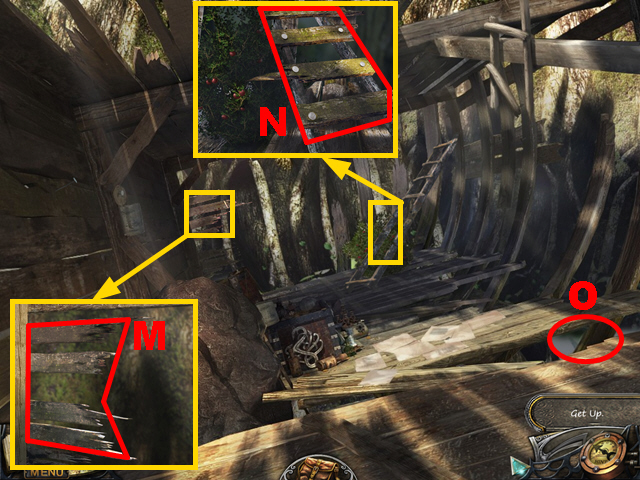
- Zoom into the planks; use the SAW to remove the planks (M); the PLANKS will be acquired.
- Zoom into the ladder; put the PLANKS on the ladder (N), put the NAILS into the boards, and fix the nails with the HAMMER.
- Drag the ladder to the front (O).
- Climb up the ladder.

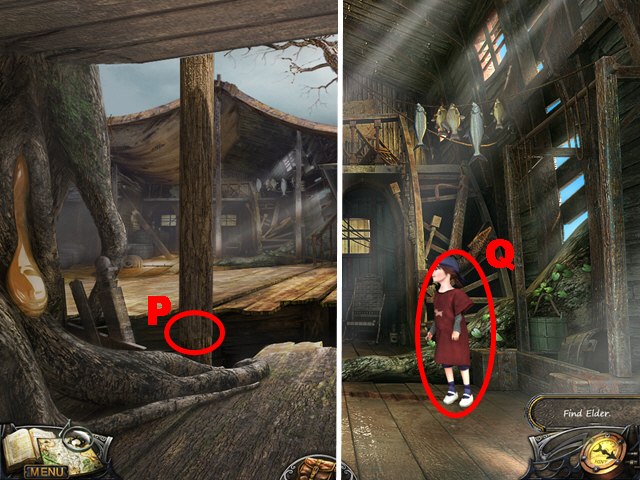
- Use the SAW to cut the large plank (P).
- Move forward.
- Talk to the boy (Q).
- Move forward.

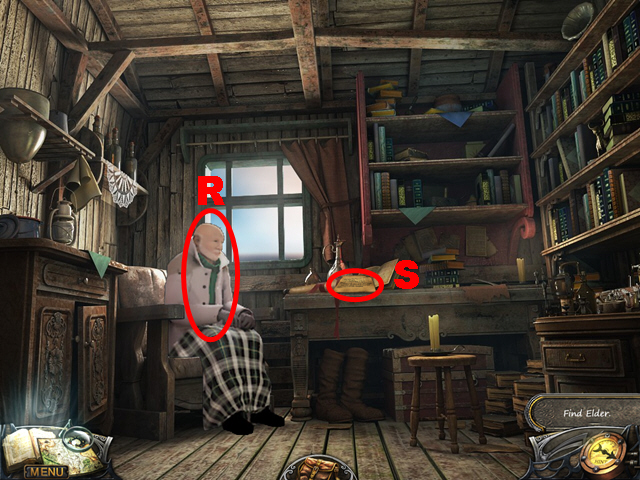
- Talk to the elder (R).
- Read the note (S).
- Play the HOS.

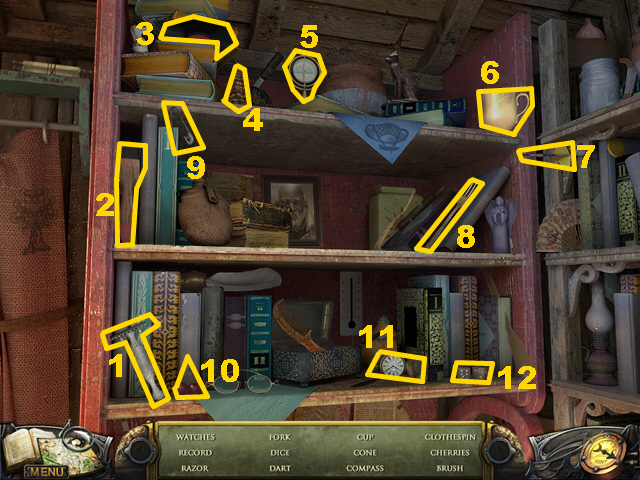
- Find the items 1-12.
- The BRUSH will be acquired.
- Walk down twice.

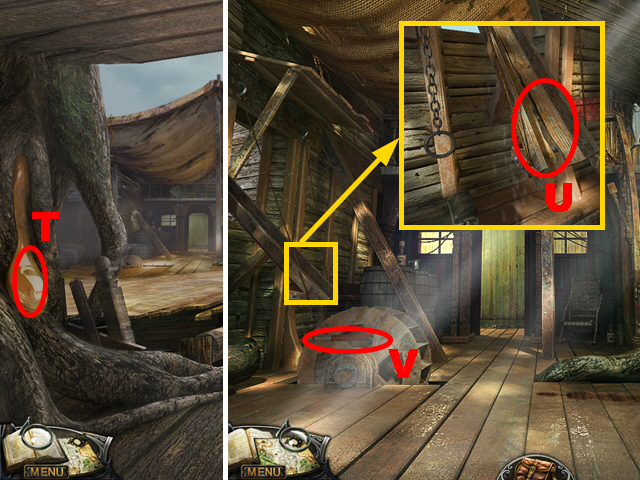
- Dip the BRUSH into the flammable liquid (T) to acquire the RESIN BRUSH.
- Move forward.
- Zoom into the inflow of the water wheel; use the RESIN BRUSH on the broken part (U).
- Take the SMOKE GUN (V).
- Walk down twice and turn left.

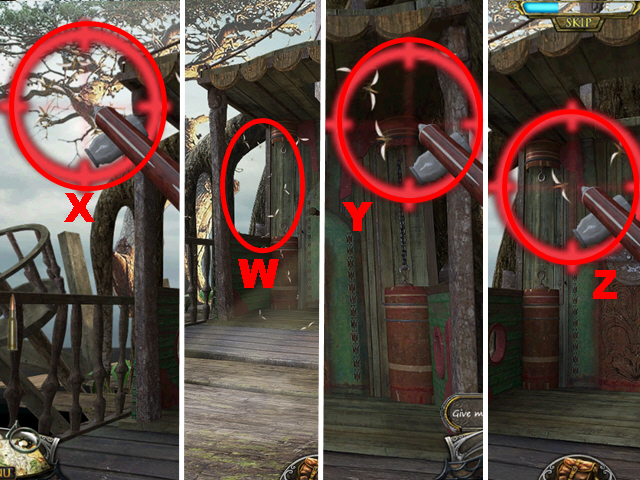
- Aim the SMOKE GUN at the bees (W) to play a mini-game.
- Remove the bees with three shots (X), (Y), and (Z) to complete the mini-game.

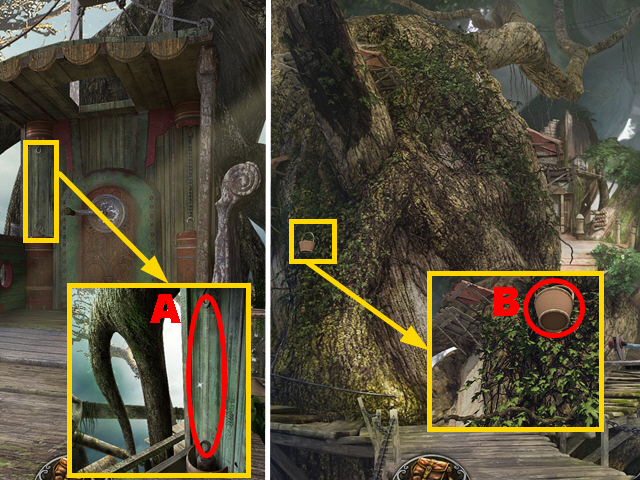
- Zoom into the elevator; connect the CHAIN to the hooks (A).
- Go up.
- Zoom into the tree; use the HARPOON on the basket (B) to acquire the BASKET.
- Walk down twice, move forward, and go down the ladder.
- Play the HOS.

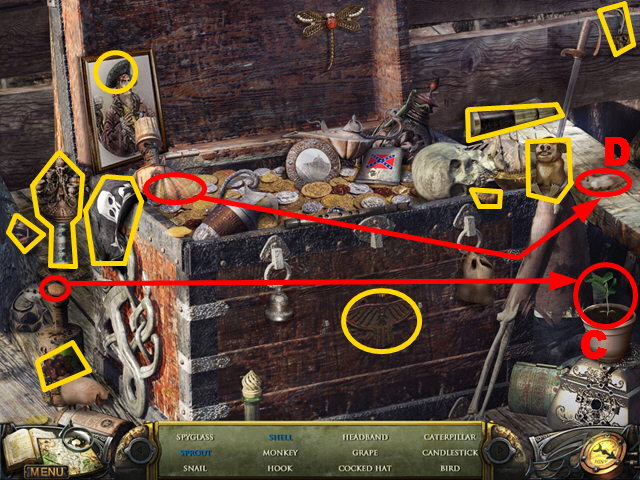
- Take the seed, put it into the soil, and take the sprout (C).
- Take the upper part of the shell, put it into the lower half of the shell, and take the shell (D).
- MONKEY 1 will be acquired.

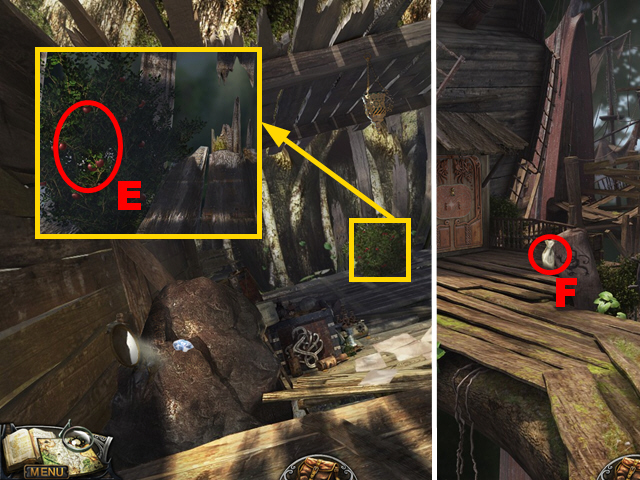
- Zoom into the berry bush; use the BASKET on the berries (E) to acquire the BUSH BASKET.
- Go up the ladder, walk down, turn left, go up, and turn left.
- Take the POUCH (F).
- Play the HOS.

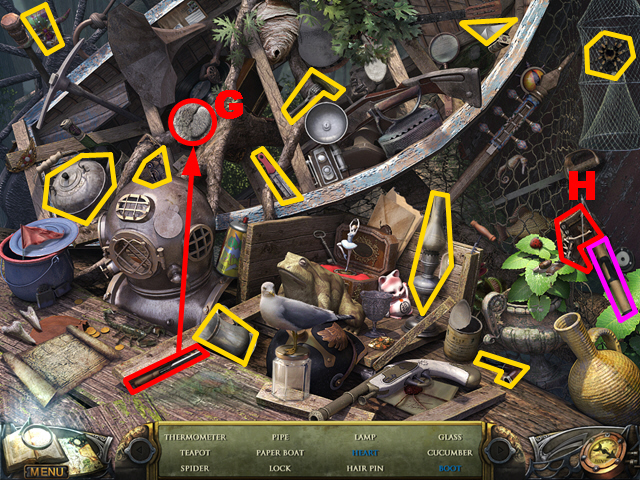
- Take the scraper, use it on the incomplete heart, and take the heart (G).
- Press the rod marked in purple and then take the boot (H).
- The THERMOMETER will be acquired.
- Walk down and turn right.
- Play the HOS.

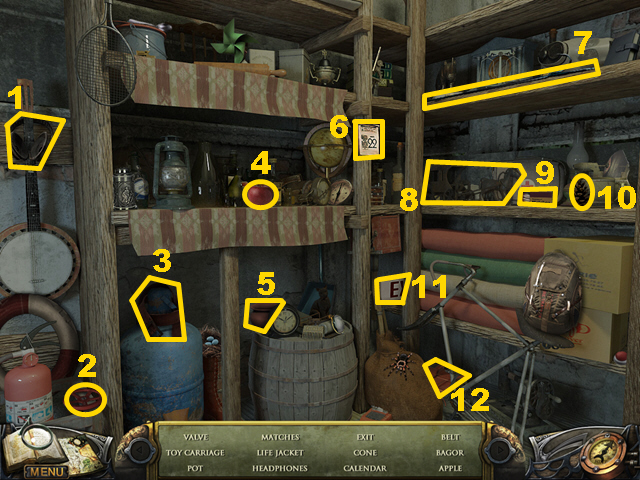
- Find the items 1-12.
- The MATCHES will be acquired.
- Walk down twice.

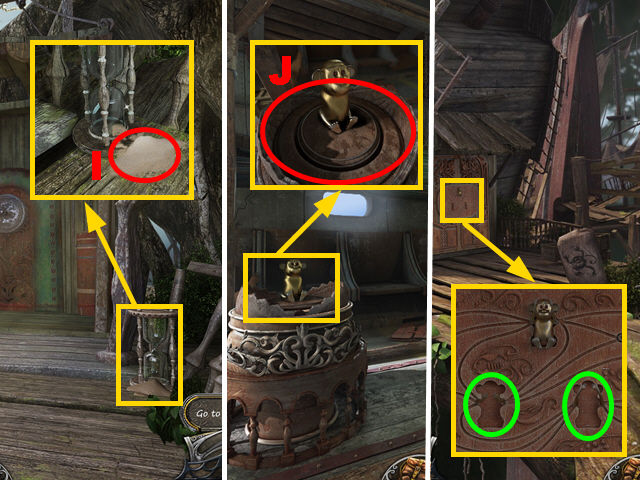
- Zoom into the hourglass; put the POUCH into the sand (I) to acquire the BAG OF SAND.
- Go up and turn right.
- Zoom into the monkey; put the BAG OF SAND onto the pedestal (J) to acquire the MONKEY 2.
- Walk down and turn left.
- Zoom into the door; put MONKEY 1 and MONKEY 2 into the niches marked in green to activate a mini-game.

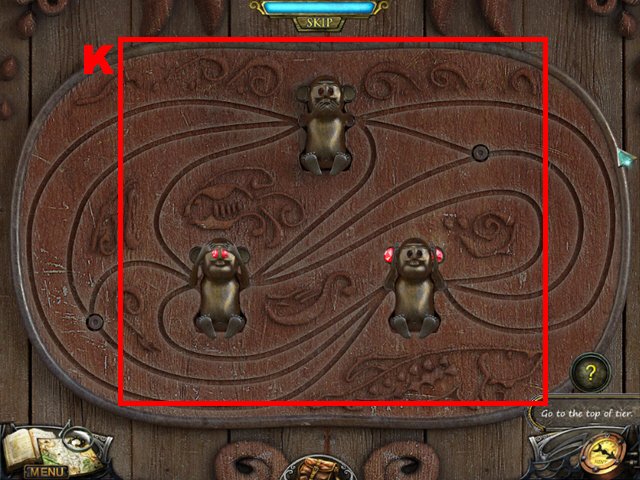
- Press the arms of the three monkeys to change their position.
- To solve this puzzle (K), connect each monkey to its related arms.
- Turn left.
- Play the HOS.

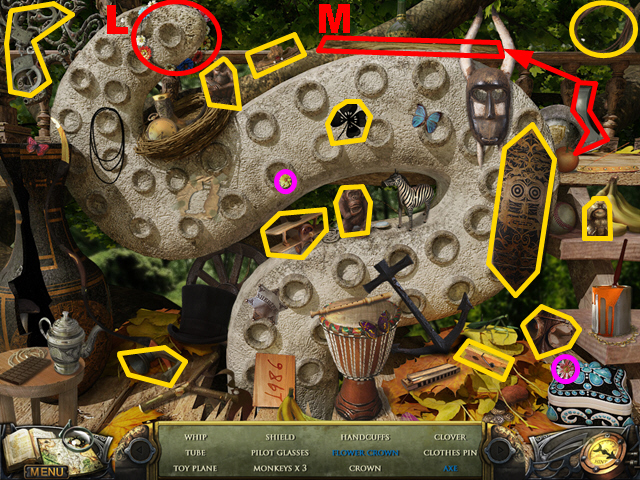
- Collect the two flowers marked in purple, put them onto the flower crown, and take the flower crown (L).
- Take the upper part of the axe, combine it with its lower part, and take the axe (M).
- The TUBE will be acquired.
- Walk down four times and move forward three times.

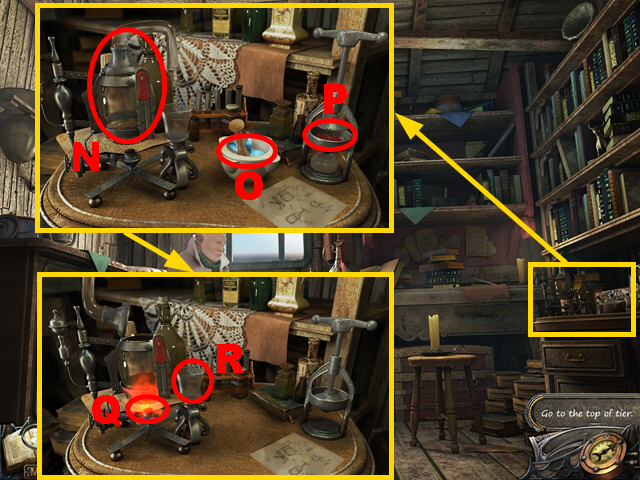
- Zoom into the table; put the TUBE and the THERMOMETER onto the burner (N).
- Put the MEDICINE PLANT into the mortar (O) and fill the BUSH BASKET into the press (P).
- Use the pestle one the medicine plant and use the press.
- Fill both ingredients into the burner; use the MATCHES to light the burner (Q).
- Close the tube and take the POTION (R).

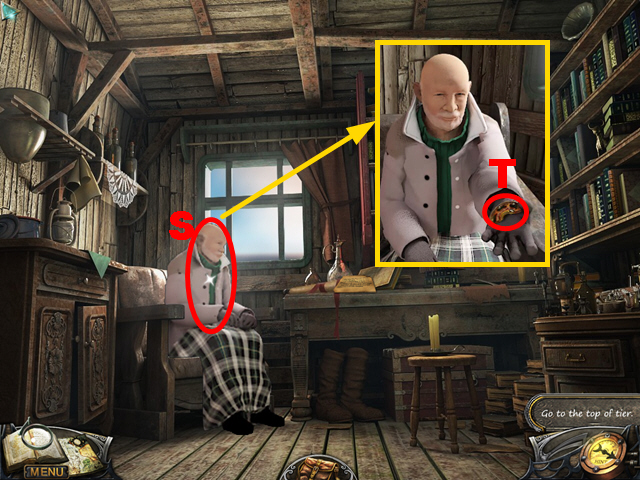
- Give the POTION to the elder (S).
- Take the MEDALLION HALF (T).
- Play the HOS.

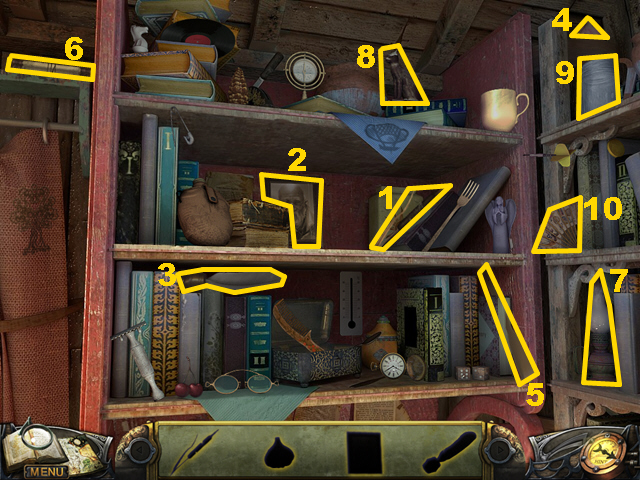
- Find the items 1-10.
- The JAR will be acquired.
- Walk down three times, turn left, go up, and turn right.

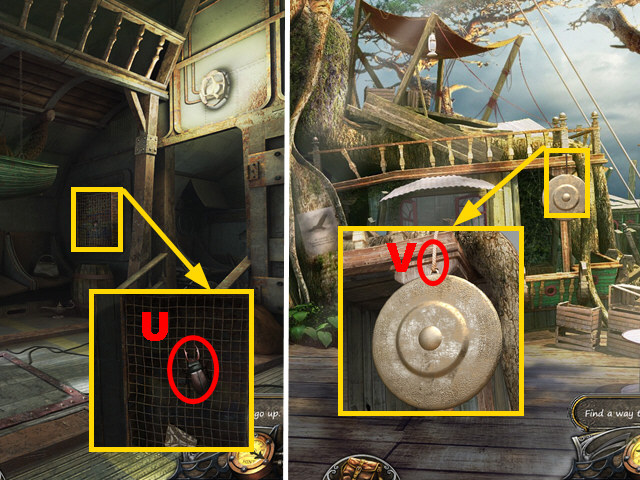
- Zoom into the box; use the JAR on the beetle (U) to acquire the CLIPPER BEETLE.
- Walk down three times.
- Zoom into the gong; use the CLIPPER BEETLE on the rope (V) to acquire the GONG.
- Turn left, go up, and turn left twice.

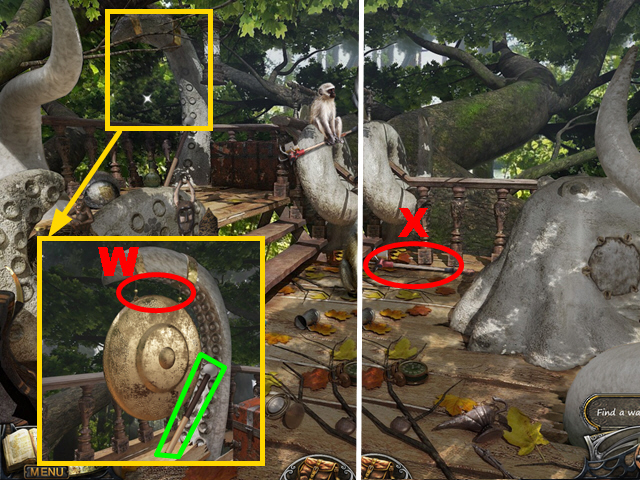
- Zoom into the holder; connect the GONG to the hooks (W) and hit the gong with the bat marked in green.
- Take the LEVER (X).
- Walk down twice.

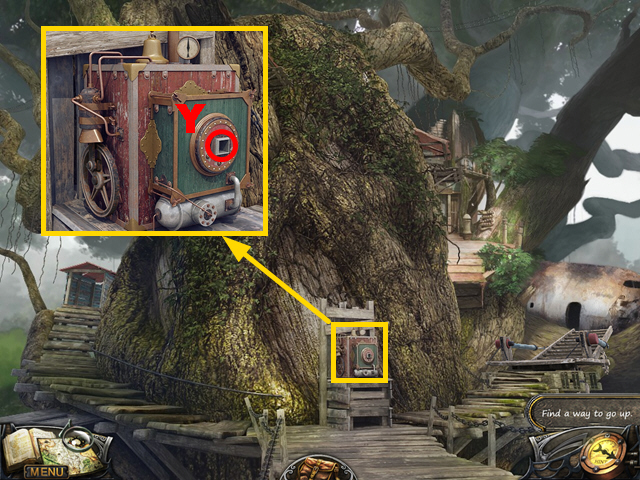
- Zoom into the device; put the LEVER into the niche (Y) and pull the lever.
- Move forward.
Chapter 4: The Bird’s Nest

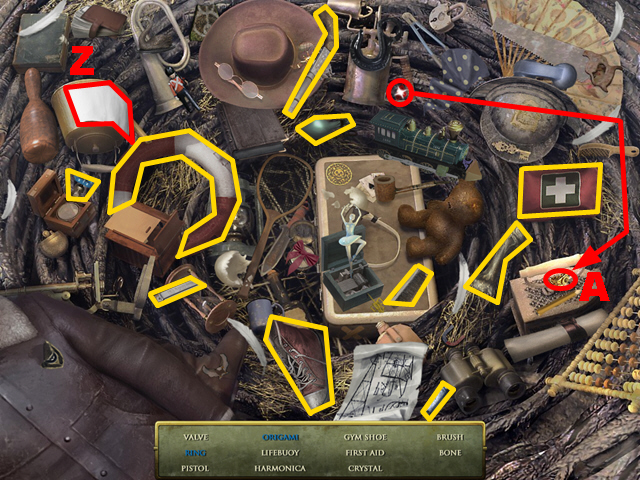
- Play the HOS.
- Fold the paper five times and take the origami (Z).
- Take the ruby, put it onto the ring, and take the ring (A).
- You will receive the BALL.

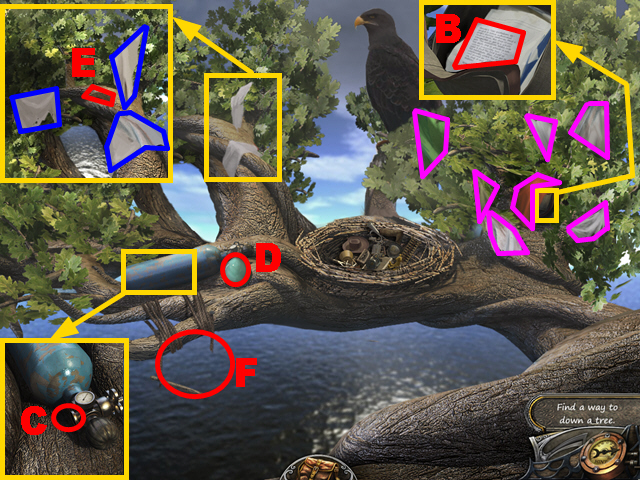
- Zoom into the backpack; open it and read the note (B).
- Zoom into the bottle; put the BALL on it (C).
- Use the HARPOON to burst the ball (D).
- Zoom into the branches; take the CLAW (E) and collect 3 RAGS marked in blue.
- Collect 7 RAGS marked in purple.
- Use the 10 RAGS on the branch (F).
- Climb down and turn left twice.

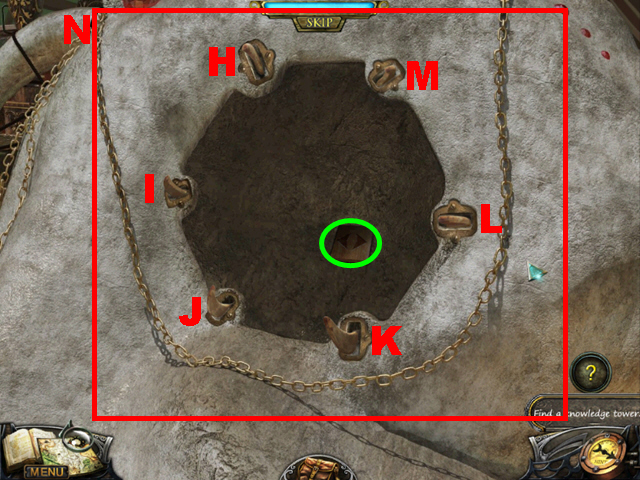
- Zoom into the stone structure; put the CLAW into the empty niche (G).
- Play a mini-game.


- To solve this puzzle (N), press the claws in the following sequence: L, M, I, L, J, H, I, J, I, K, M, L, H, K, M, J, H, L, I, H, K, M, H, and L.
- Take the TOWER DETAIL 1 marked in green.
- Play the HOS.

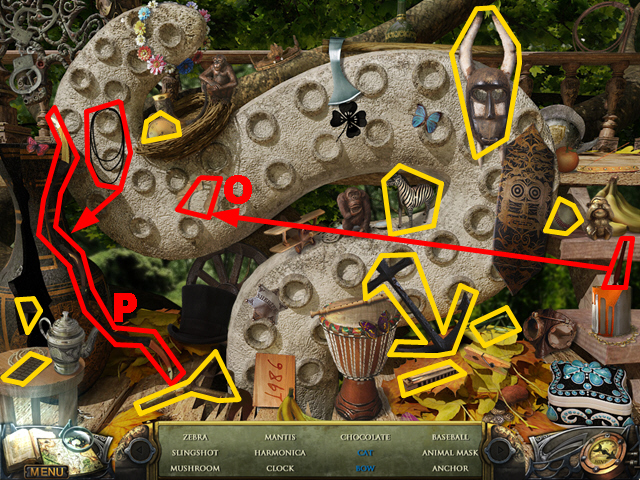
- Take the brush, use it to paint the shape, and take the cat (O).
- Take the string, connect it to the bow, and take the bow (P).
- The ANCHOR will be acquired.
- Walk down.
- Play the HOS.

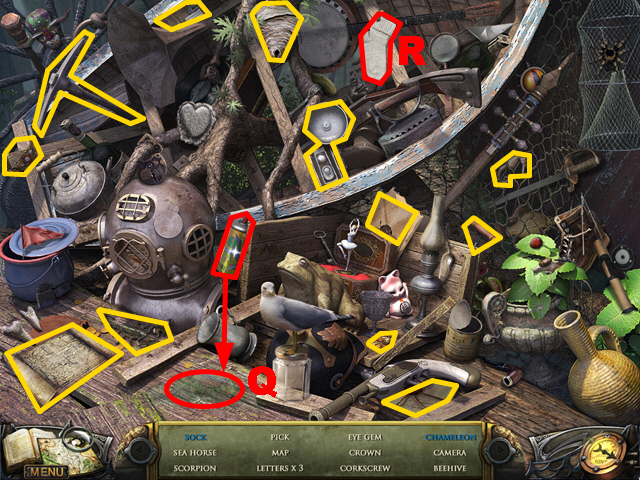
- Take the spray can, use it on the chameleon, and take the chameleon (Q).
- Remove the leaves and take the sock (R).
- The JEWEL EYE will be acquired.
- Walk down three times, move forward, and climb down the ladder.

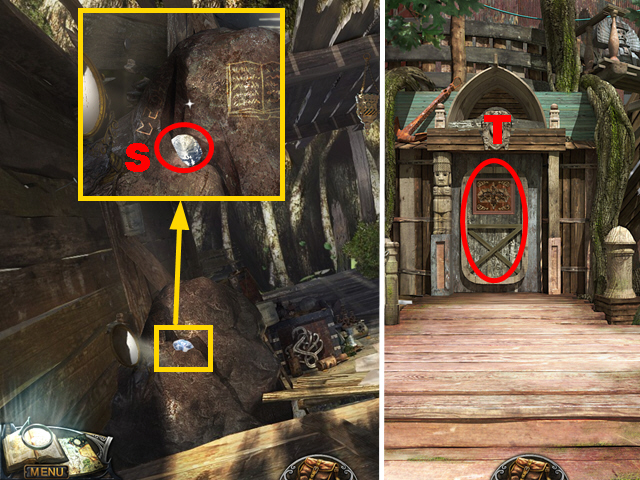
- Zoom into the diamond; use the ANCHOR to loosen the diamond (S) and take the DIAMOND.
- Go up the ladder, walk down, turn left, go up, and turn right.
- Zoom into the door (T) to play a mini-game.

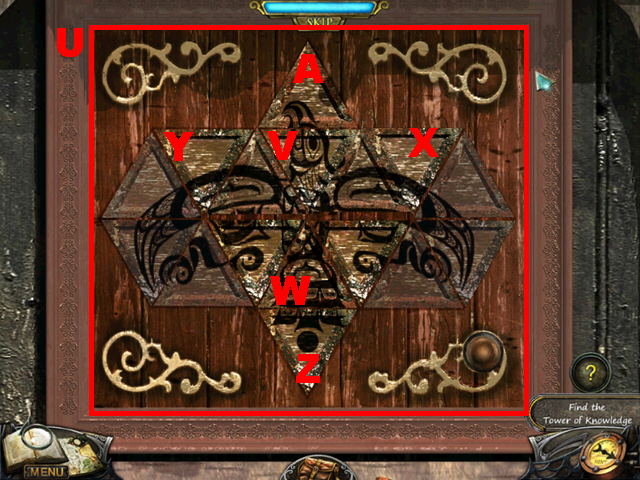
- To solve this puzzle (U), press the tiles in the following sequence: Vx2, Wx2, Vx3, Xx2, Yx1, Zx1, and Ax2.
- Move forward.

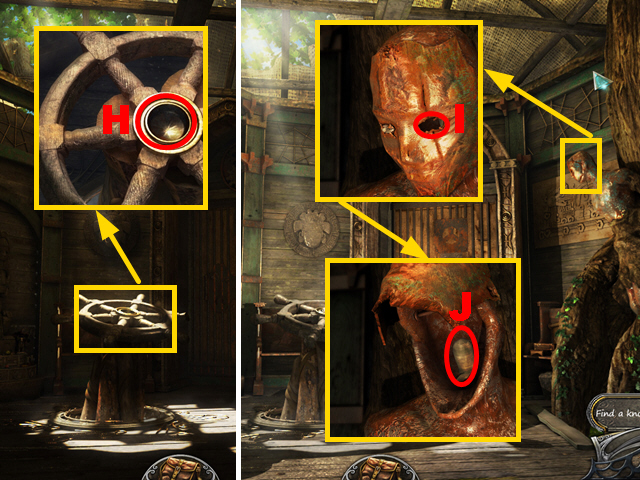
- Zoom into the wheel; put the DIAMOND into the niche (H).
- Zoom into the statue; put the CRYSTAL EYE into the niche (I).
- Remove the mask and take the TORCH (J).
- Play the HOS.

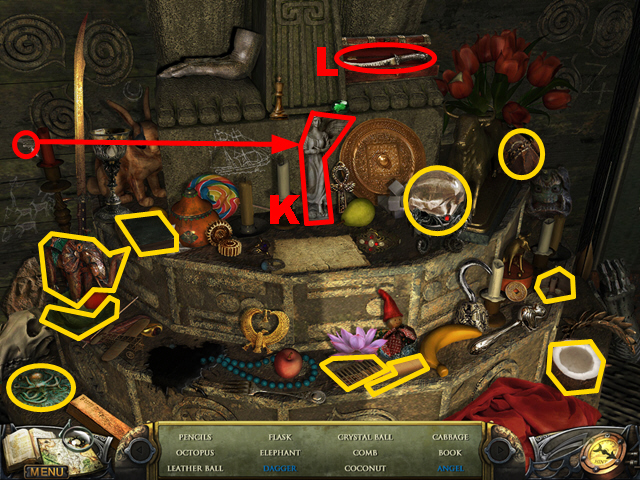
- Take the wing, put it onto the angel, and take the angel (K).
- Open the case and take the dagger (L).
- The PENCILS will be acquired.
- Walk down four times and move forward twice.

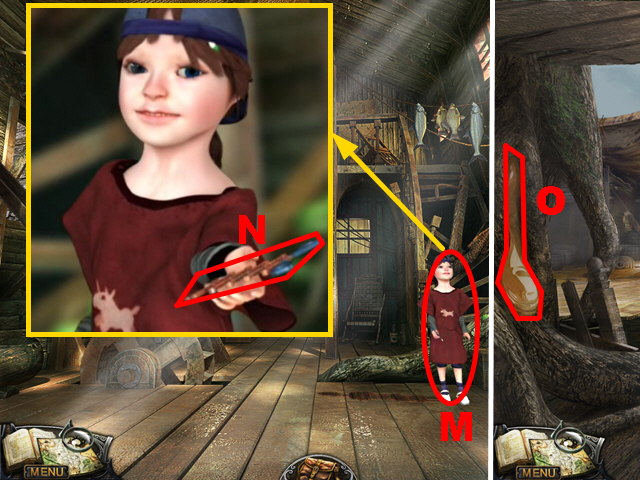
- Give the PENCILS to the boy (M) and take the GRABBER (N).
- Walk down.
- Dip the TORCH into the flammable liquid (O) to acquire the RESIN TORCH.
- Walk down, turn left, go up, turn right, and move forward.

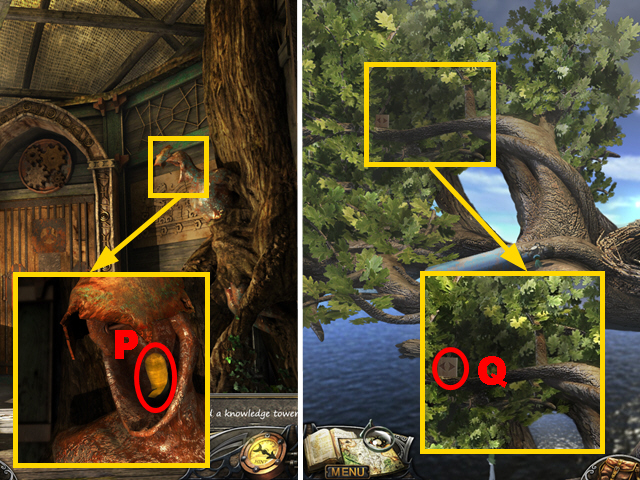
- Zoom into the statue; put the RESIN TORCH into the opening (P) and use the MATCHES to light the torch.
- Walk down twice and climb up the rags.
- Zoom into the branch; use the GRABBER on the wooden piece (Q) to acquire the TOWER DETAIL 2.
- Play the HOS.

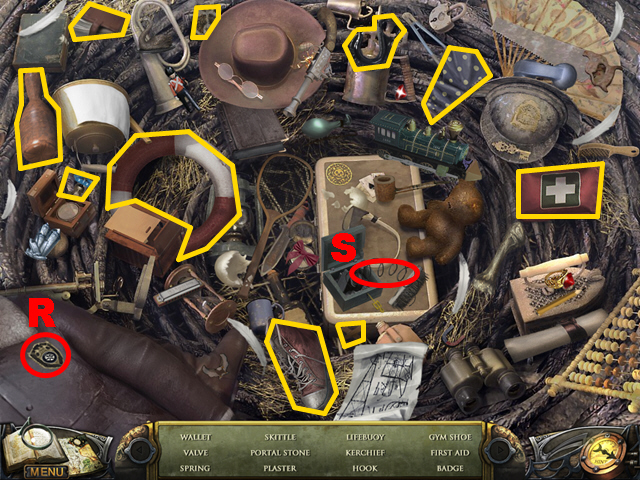
- Rip open the jacket and take the badge (R).
- Turn the ballerina and take the spring (S).
- The PORTAL DETAIL 2 will be acquired.
- Walk down, turn right, and move forward.

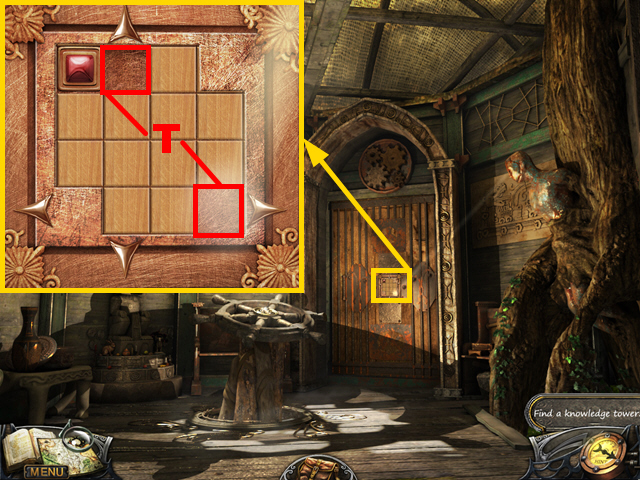
- Zoom into the door; put the TOWER DETAIL 1 and the TOWER DETAIL 2 into the panel (T) to play a mini-game.

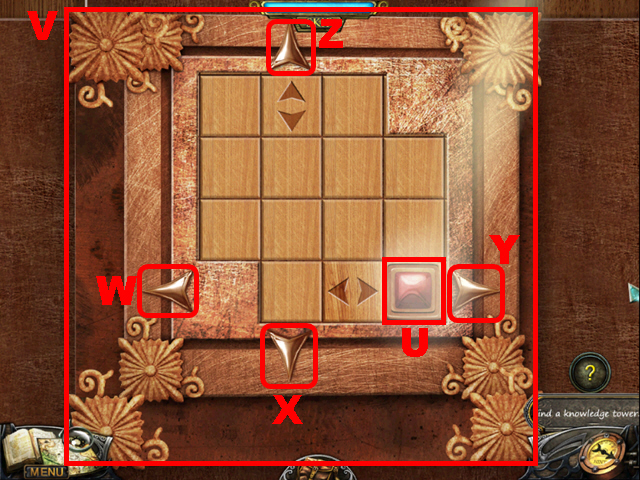
- Move the gem into the appropriate spot (U).
- To solve this puzzle (V), press the arrow buttons in the following sequence: Wx2, Xx1, Yx2, Xx3, Wx2, Xx1, Yx2, Xx3, Wx2, Xx1, Wx1, Xx3, Yx1, Zx1, Yx1, Xx1, Wx1, Xx3, and Yx1.
- Move forward.

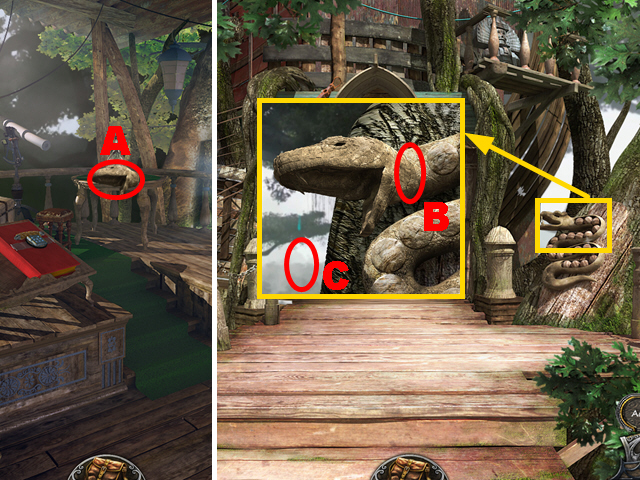
- Take the SNAKE DETAIL (A).
- Walk down twice.
- Zoom into the tree; put the SNAKE DETAIL onto snake statue (B).
- Hold the JAR below the snake head (C) to acquire the ACID.
- Move forward.
- Play the HOS.

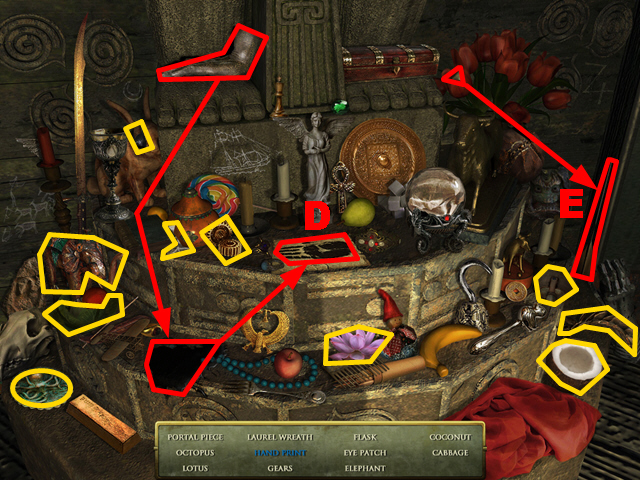
- Take the hand, put it onto the ink spot, put the hand onto the paper, and take the hand print (D).
- Take the arrowhead, put it onto the arrow, and take the arrow (E).
- The PORTAL DETAIL 3 will be acquired.
- Walk down twice, press the lever, and turn right.
- Play the HOS.

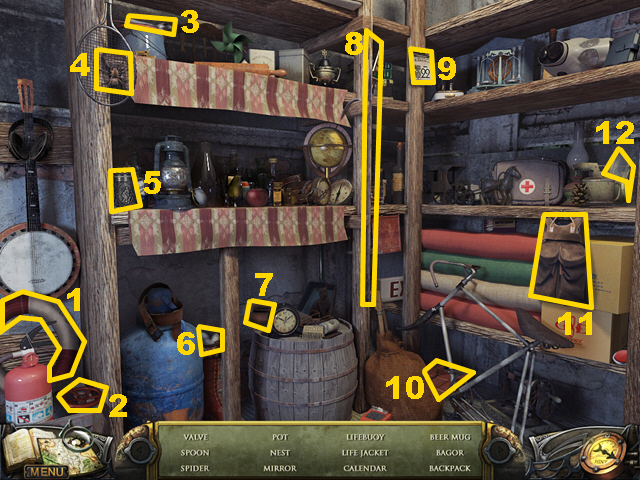
- Find the items 1-12.
- The MIRROR will be acquired.

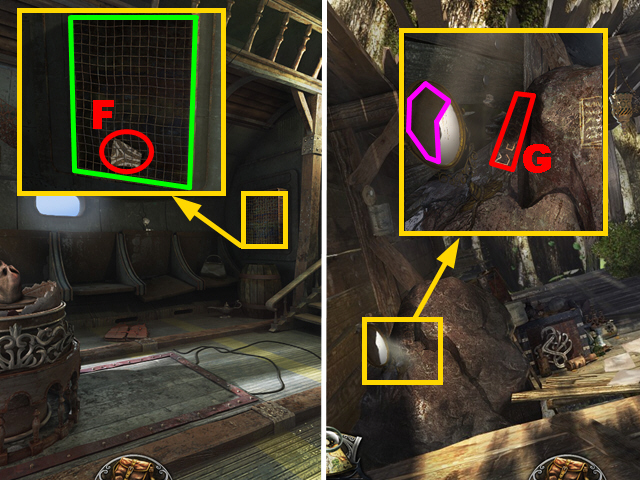
- Zoom into the box; use the ACID on the grid marked in green and take the PORTAL DETAIL 1 (F).
- Walk down three times, move forward, and go down the ladder.
- Zoom into the rock; put the MIRROR into the niche marked in purple and make note of the code (G).
- Climb up the ladder, walk down, turn left, go up, turn the lever, turn right, and move forward twice.

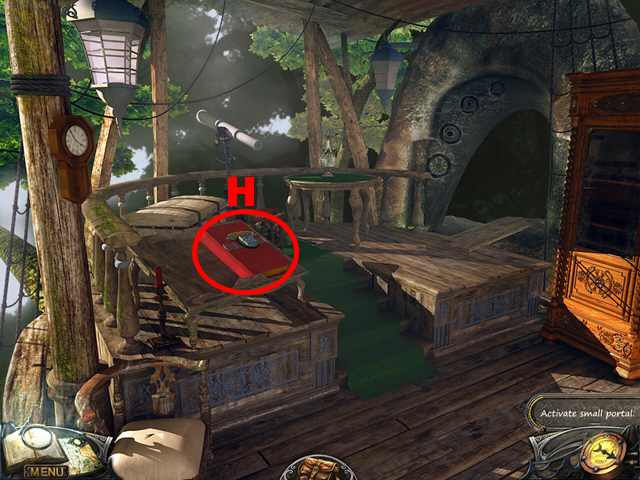
- Zoom into the book (H) to play a mini-game.

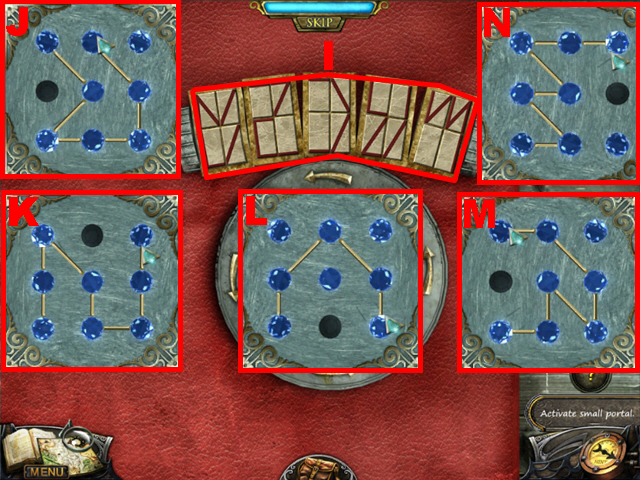
- Recreate the symbols by drawing lines between the blue gems.
- To solve this puzzle (I), enter the symbols in the sequence J – N.

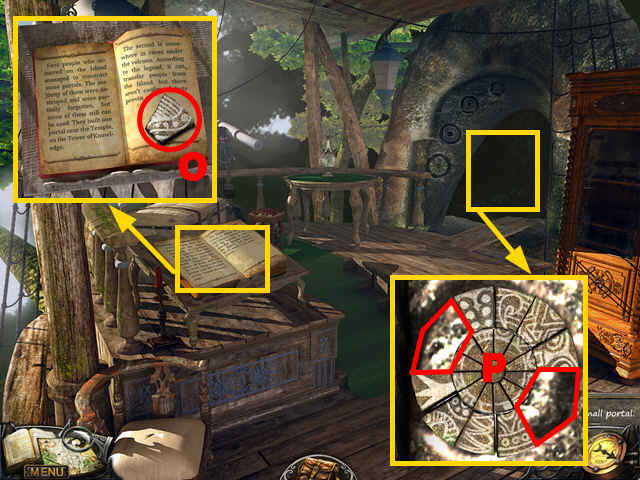
- Zoom into the book; take the PORTAL DETAIL 4 (O).
- Zoom into the portal; add the 4 PORTAL DETAILS to the other pieces (P) to play the mini-game.

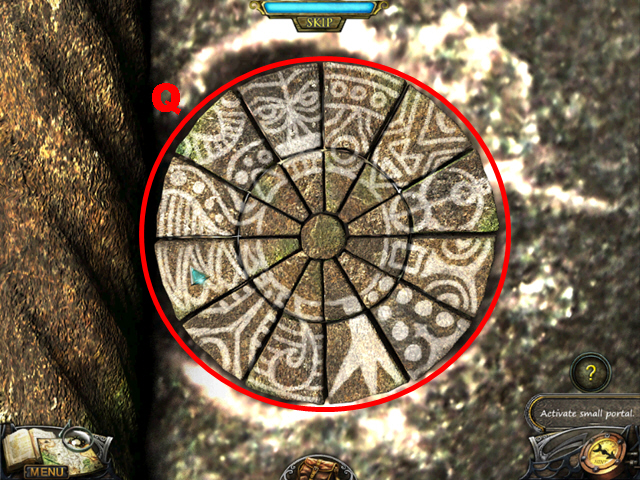
- To solve this puzzle (Q), swap adjacent pieces to recreate a coherent pattern.
- Move forward.
Chapter 5: The Cargo Department

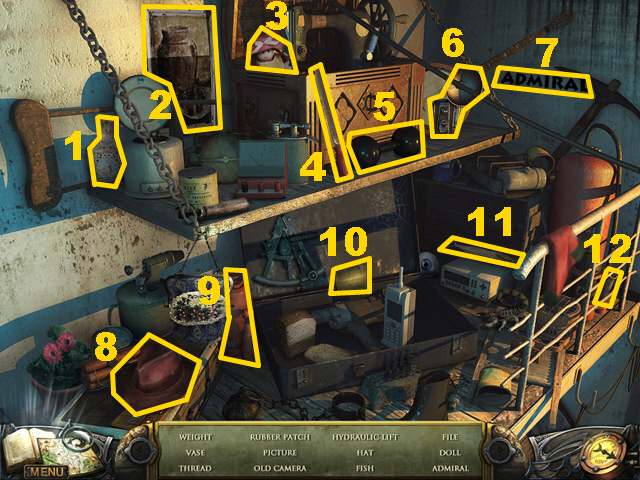
- Play the HOS.
- Find the items 1-12.
- You will receive the RUBBER.

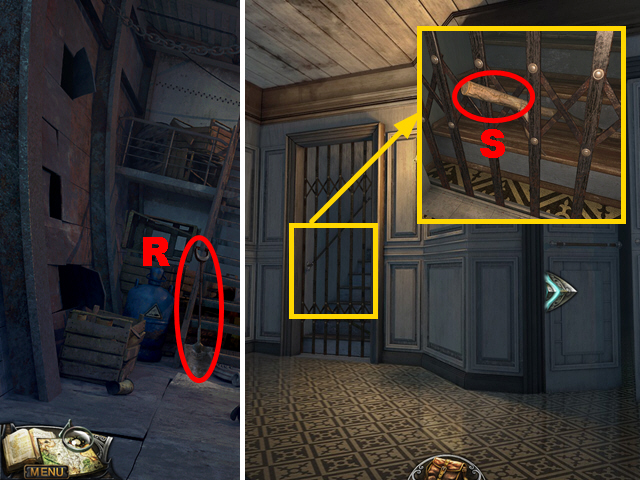
- Take the SHOVEL (R).
- Move forward.
- Zoom into the door; use the SAW to cut the piece of wood (S).
- Turn right.

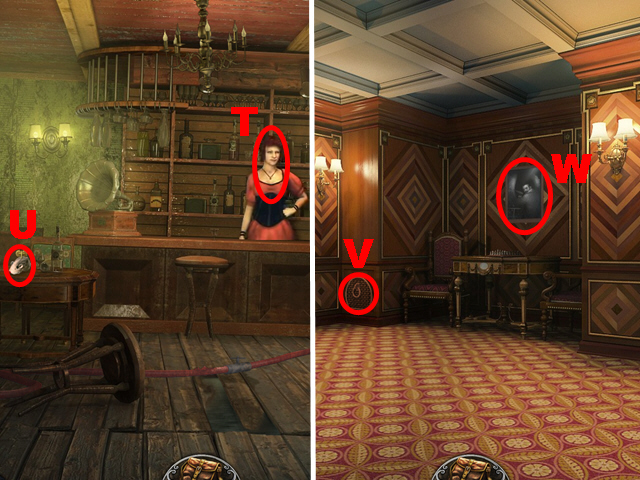
- Talk to the bartender (T).
- Take the CLOCKWORK MOUSE (U).
- Walk down and move forward.
- Take the DOOR OF THE CELL (V).
- Make note of the poster (W).
- Walk down twice.

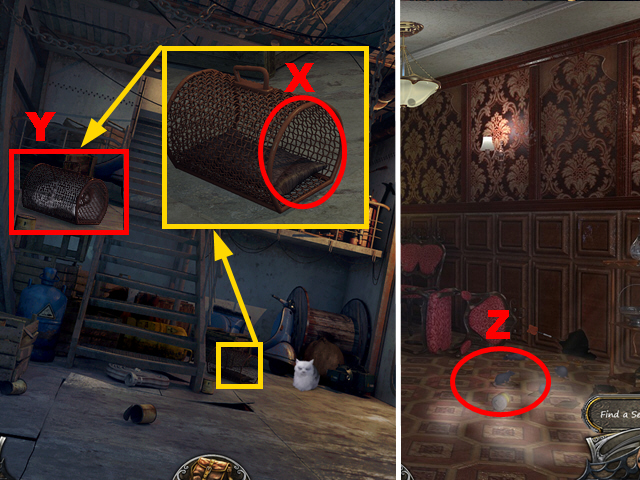
- Zoom into the trap; add the DOOR OF THE CELL and the CLOCKWORK MOUSE to the trap (X).
- Take the CAT (Y).
- Move forward three times.
- Put down the CAT (Z).
- Play the HOS.

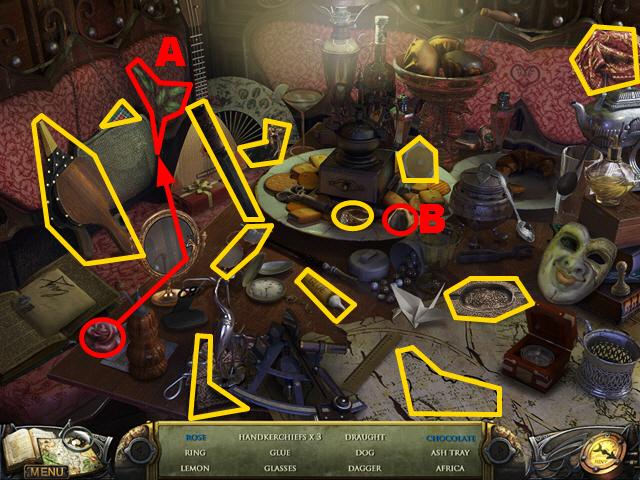
- Take one part of the rose, put it onto the other part, and take the rose (A).
- Open the wrapping and take the chocolate (B).
- The GLUE will be acquired.

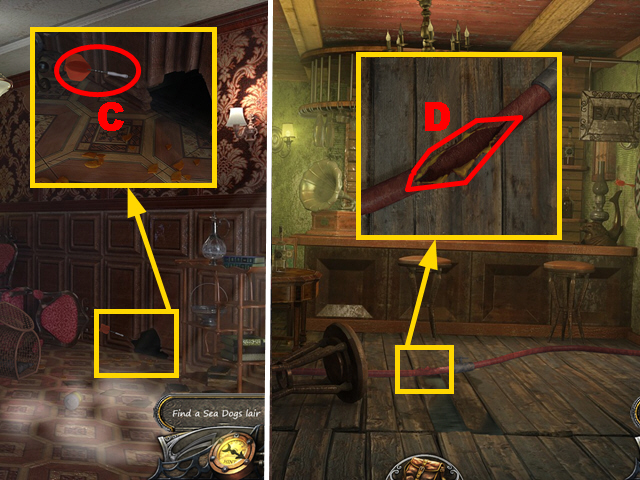
- Zoom into the hole; take the DART 1 (C).
- Walk down twice and turn right.
- Zoom into the wiring; grease the hole with the GLUE (D) and put the RUBBER onto the hole.
- Play the HOS.

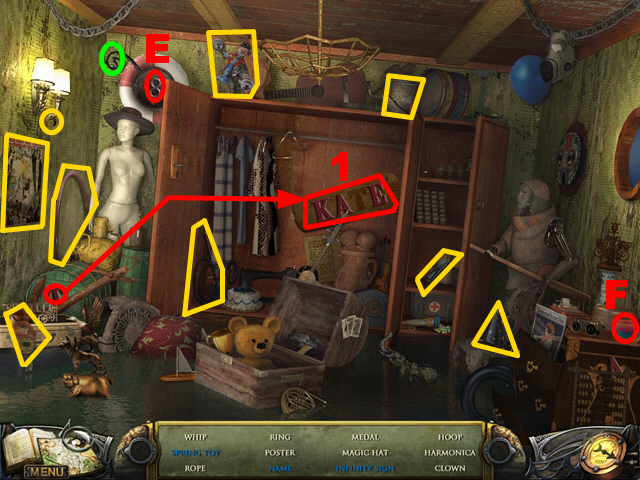
- Press the handle marked in green and take the infinity sign (E).
- Press the spring and take the spring toy (F).
- Take the letter ‘T’, put it onto the nameplate, and take the name (1).
- The RING will be acquired.
- Walk down and move forward.

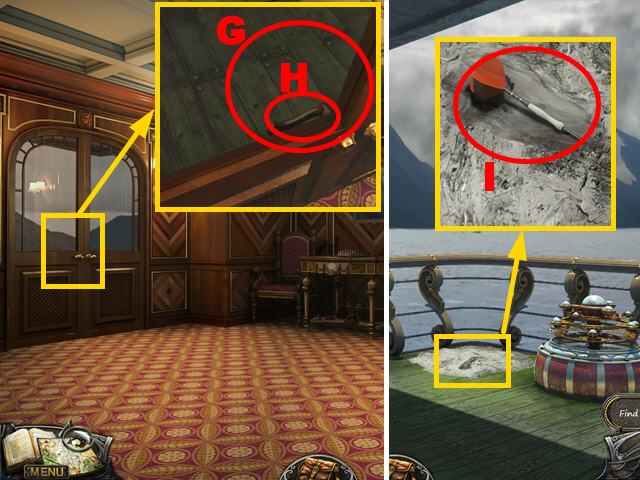
- Zoom into the door; use the RING to cut the glass (G) and press the handle (H).
- Turn left.
- Zoom into the dirt; use the SHOVEL to remove the dirt and take the DART 2 (I).
- Walk down twice and turn right.

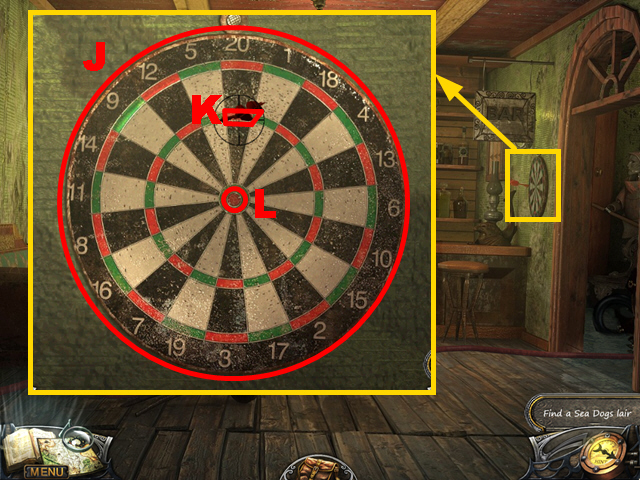
- Zoom into the dartboard and add the 2 DARTS to it (J) to play a mini-game.
- You have to earn at least 120 points with three darts to win this game.
- Try to aim at 60 points (K) and at 50 points (L) to reach the required amount of points quickly.
- The DOOR SYMBOL will be acquired.
- Play the HOS.

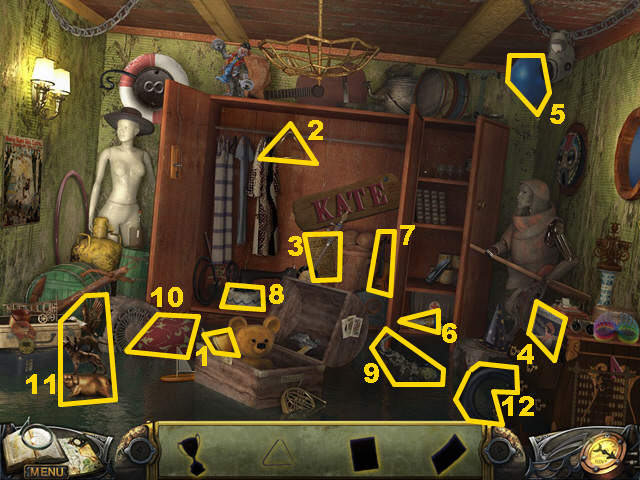
- Collect the items 1-12.
- The WHEEL will be acquired.
- Walk down twice.

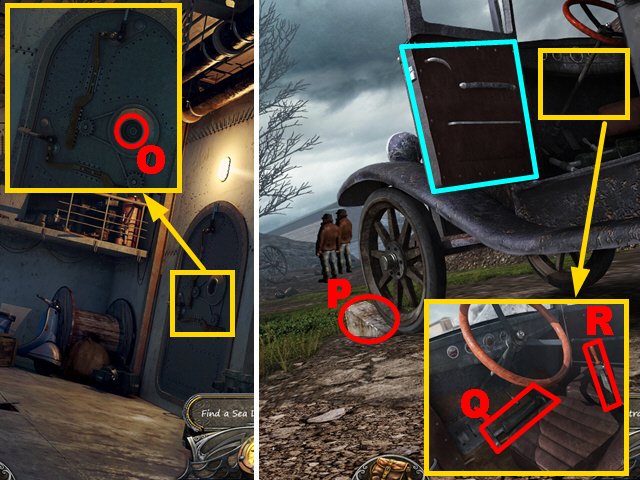
- Zoom into the door; put the DOOR SYMBOL into the niche (O).
- Turn right.
- Remove the stone (P) and open the car door marked in blue.
- Zoom into the car; take the PUMP (Q) and press the handle (R).
- Move forward.
Chapter 6: The Sea Dog’s Lair

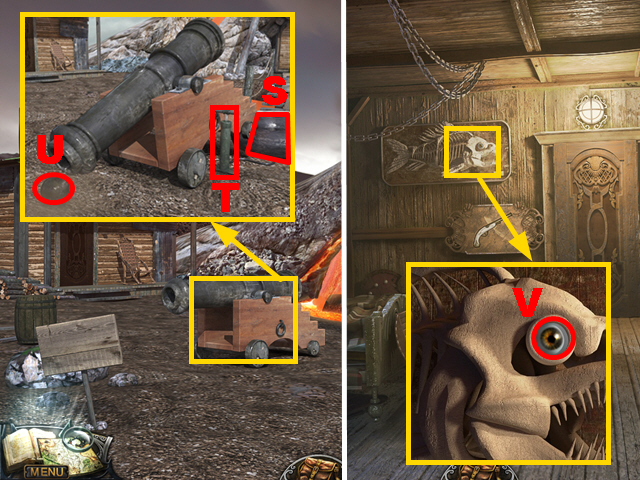
- Zoom into the cannon; put down the WHEEL next to the cannon (S).
- Connect the PUMP to the wheel (T) and press the pump.
- Take the KERNEL (U).
- Open the door and turn left.
- Zoom into the large fish; take the BROWN EYE (V).
- Walk down three times, move forward twice, and turn left.

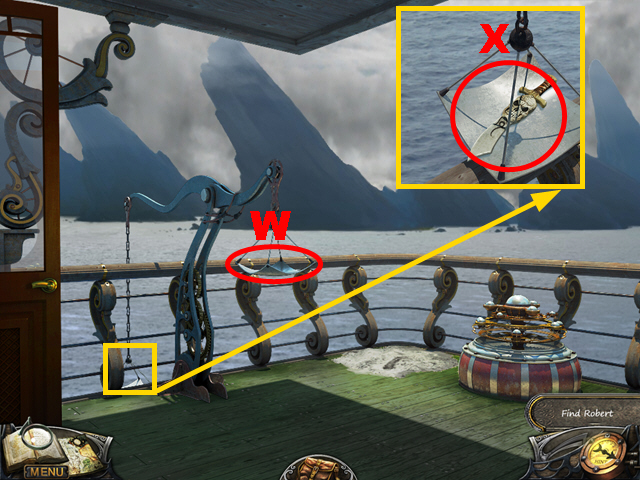
- Zoom into the scale; put down the KERNEL (W) and zoom into the scale once more; take the SWORD (X).
- Walk down three times and play the HOS.

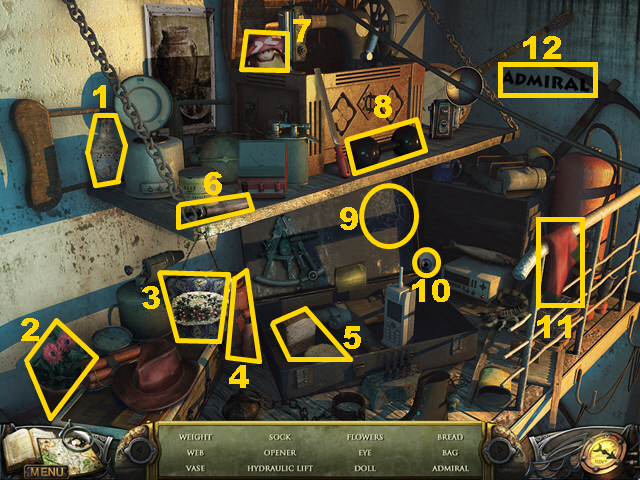
- Find the items 1-12.
- The BLUE EYE will be acquired.
- Turn right, move forward, and turn left.

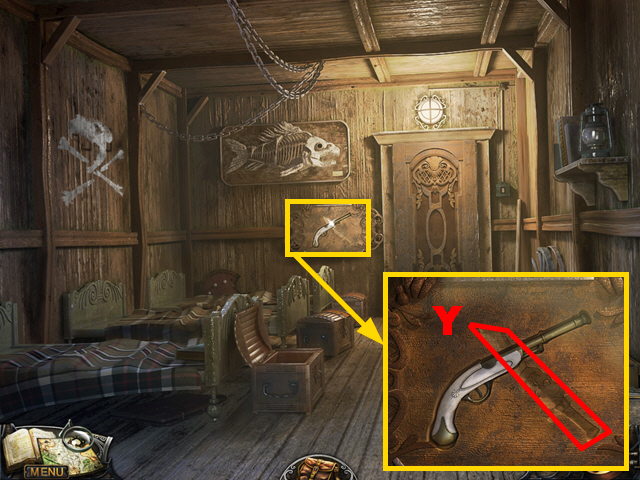
- Zoom into the weapon plate; put the SWORD into the niche (Y).
- Play the HOS.

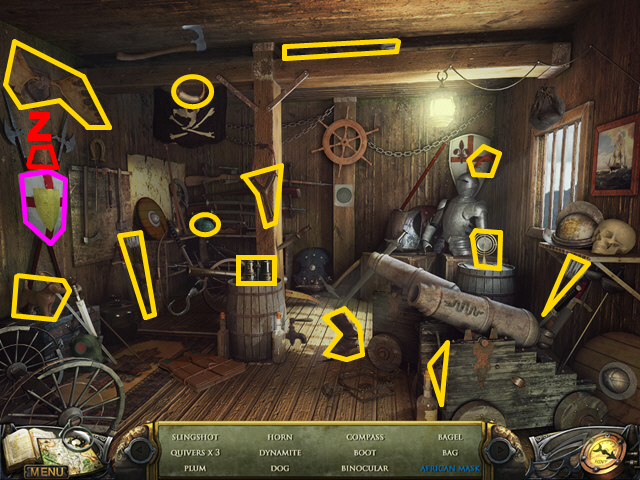
- Move down the shield marked in purple and take the African mask (Z).
- The SLINGSHOT will be acquired.
- Walk down three times and move forward three times.
- Play the HOS.

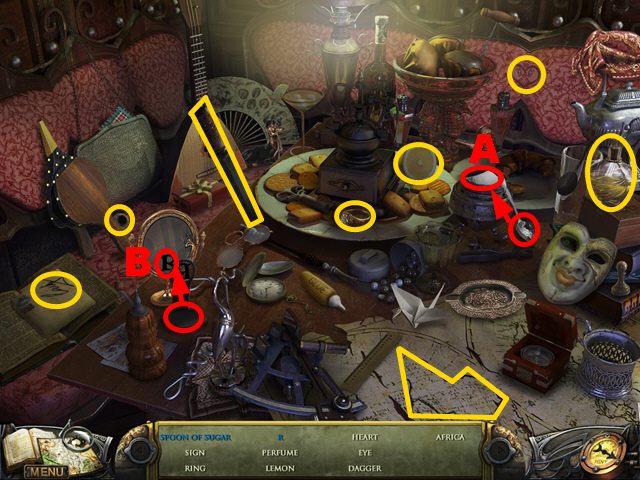
- Open the box, take the spoon, and put it into the container (A) to acquire the spoon of sugar.
- Press the letter sign and take the letter R (B).
- The PINK EYE will be acquired.

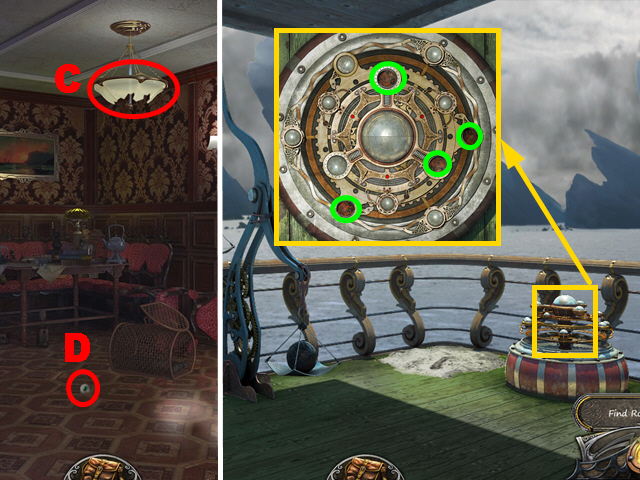
- Shoot at the luster (C) with the SLINGSHOT and take the GREEN EYE (D).
- Walk down and turn left.
- Zoom into the device; put the GREEN EYE, the BROWN EYE, the BLUE EYE, and the PINK EYE into the slots marked in green to play a mini-game.

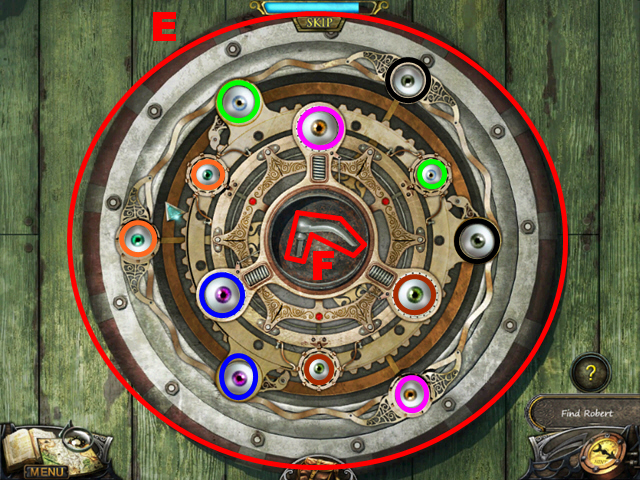
- Find pairs of identical eyes to solve this puzzle (E).
- Positions of the eyes will change when you open two different eyes.
- Pairs of eyes are framed by similarly colored circles.
- Take the HANDLE (F).
- Walk down twice.

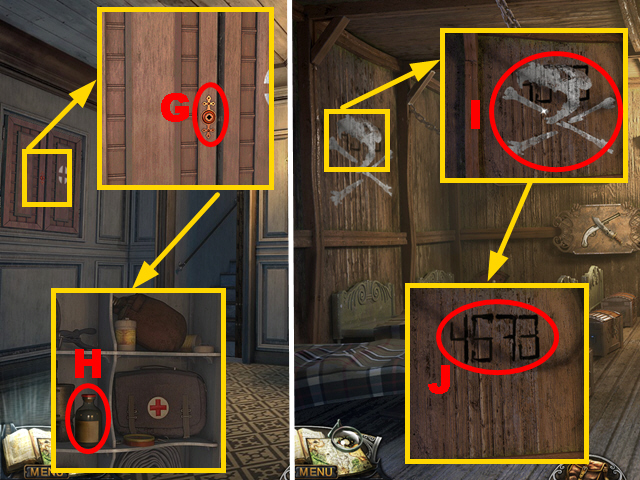
- Zoom into the cabinet; put the HANDLE into the niche (G), press the handle, and take the SOLVENT (H).
- Walk down, turn right, move forward, and turn left.
- Zoom into the wall; use the SOLVENT on the white paint (I) and make note of the numerical code (J).
- Play the HOS.

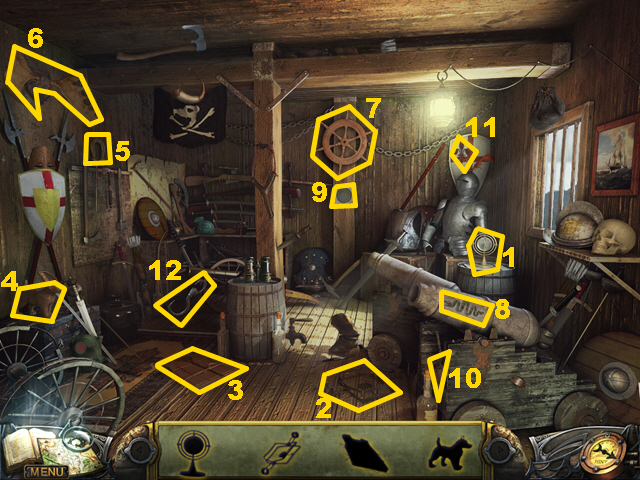
- Find the silhouetted items 1-12.
- The HOOK will be acquired.
- Walk down.

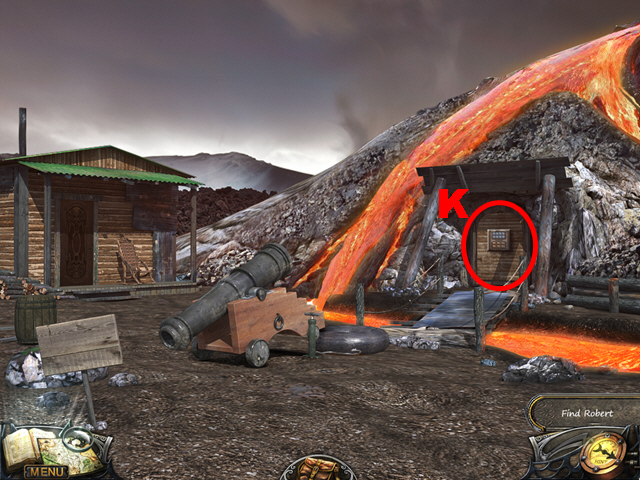
- Zoom into the door (K) to play a mini-game.

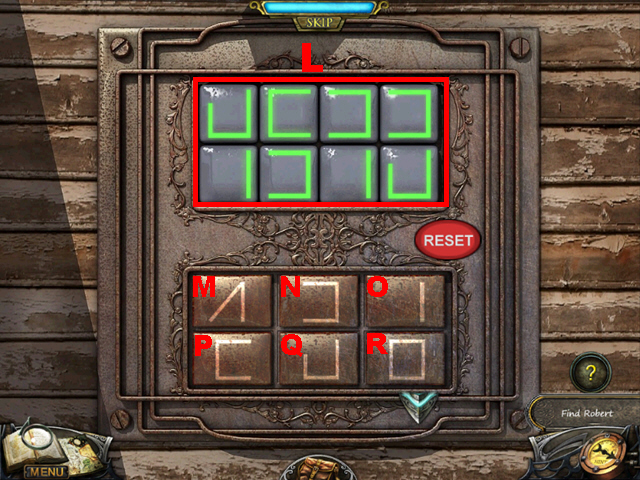
- To solve this puzzle (L), press the buttons in the following sequence: Q, O, P, Nx2, O, N, and Q.
- Move forward.

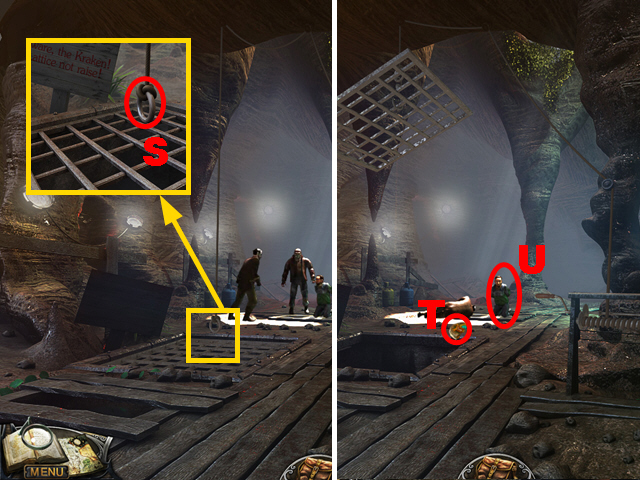
- Zoom into the rope; connect the HOOK to the eyelet (S).
- Take the TALISMAN (T) and talk to Robert (U).
- Turn right.
- Play the HOS.

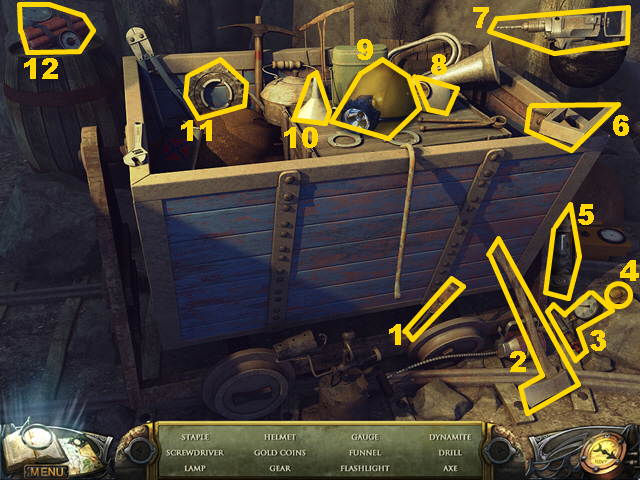
- Find the items 1-12.
- The STAPLE will be acquired.

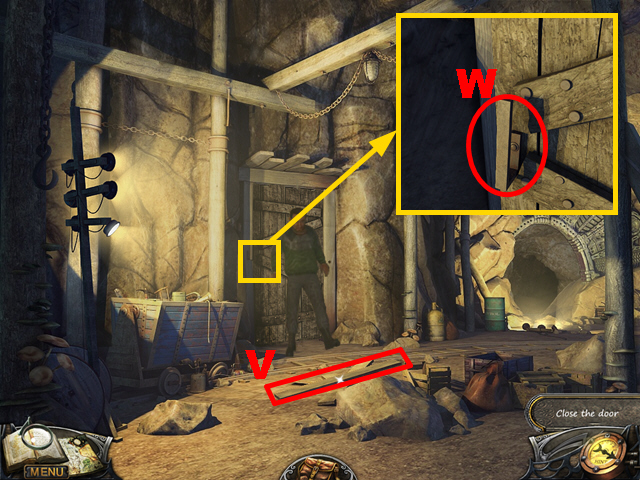
- Take the PLANK (V).
- Zoom into the door; put the STAPLER and the PLANK into the holding (W).
- Move forward.

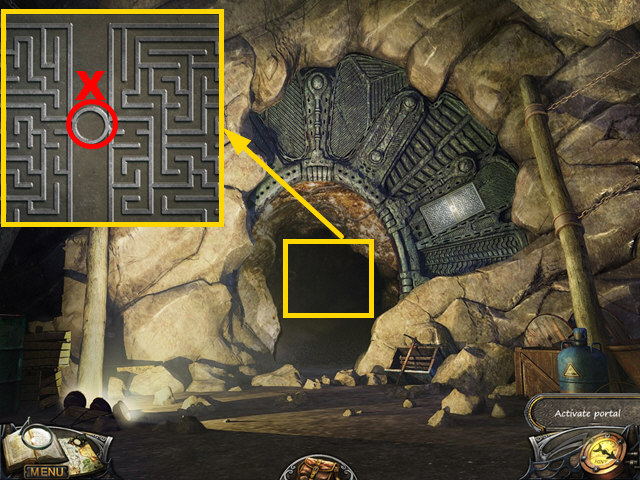
- Zoom into the portal; add the TALISMAN into the slot (X) to play a mini-game.

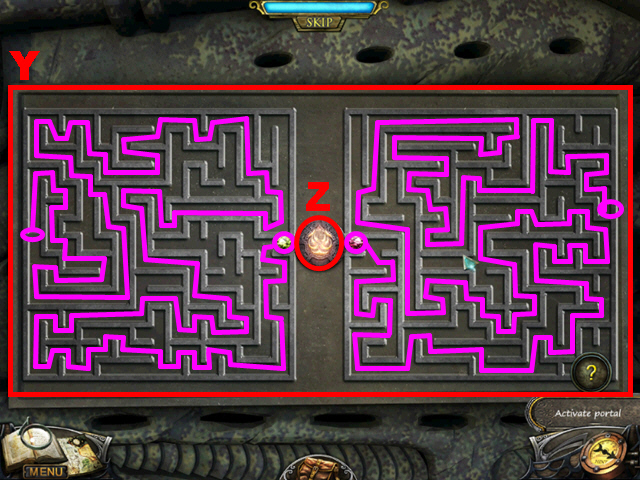
- To solve this puzzle (Y), move both the puzzle pieces marked in purple towards the talisman (Z).
- Move forward.
- Congratulations, you have finished The Missing: Island of Lost Ships.





 House of 1000 Doors: Serpent Flame Walkthrough, Guide, & Tips
 League of Light: Wicked Harvest Walkthrough, Guide, & Tips
 The Inquisitor Walkthrough, Guide, & Tips
 Whispered Secrets: Into the Wind Walkthrough, Guide, & Tips
 Mysterium: Lake Bliss Walkthrough, Guide, & Tips