Whispered Secrets: Into the Wind Walkthrough, Guide, & Tips
Whispered Secrets: Into the Wind Walkthrough

Welcome to the Whispered Secrets: Into the Wind Walkthrough
People have been disappearing in the town of Ridleton for the past 15 years… Can you weather the storm and solve the case?
Whether you use this document as a reference when things get difficult or as a road map to get you from beginning to end, we’re pretty sure you’ll find what you’re looking for here.
This document contains a complete Whispered Secrets: Into the Wind game walkthrough featuring annotated screenshots from actual gameplay!
We hope you find this information useful as you play your way through the game. Use the walkthrough menu below to quickly jump to whatever stage of the game you need help with.
Remember to visit the Big Fish Games Forums if you find you need more help. Have fun!
This walkthrough was created by Nathaniel Apgar, and is protected under US Copyright laws. Any unauthorized use, including re-publication in whole or in part, without permission, is strictly prohibited.
General Tips
- This is the official guide for Whispered Secrets: Into the Wind.
- This guide will not mention each time you have to zoom into a location; the screenshots will identify each location.
- Hidden-object puzzles are referred to as HOPs. This guide will not show screenshots of the HOPs; however, it will mention when a HOP is available and the inventory item you’ll collect from it.
- This guide will give step-by-step solutions for all puzzles which are not random. Please read the instructions in the game for each puzzle.
Chapter 1: Rescue

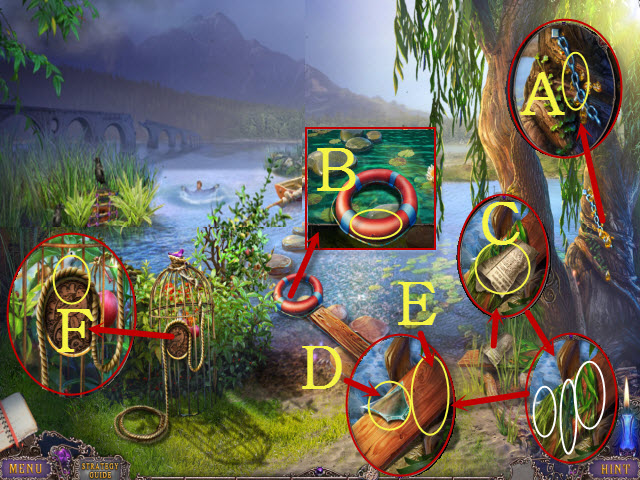
- Take the CHAIN (A) and LIFE BUOY (B).
- Read the newspaper (C) and move the seaweed (white); take the GLASS SHARD (D) and 1/2 PLANK (E).
- Use the GLASS SHARD; receive the ROPE (F).
- Place the ROPE with the LIFE BUOY; select rope 3x; receive the LIFE BUOY WITH ROPE (inventory).

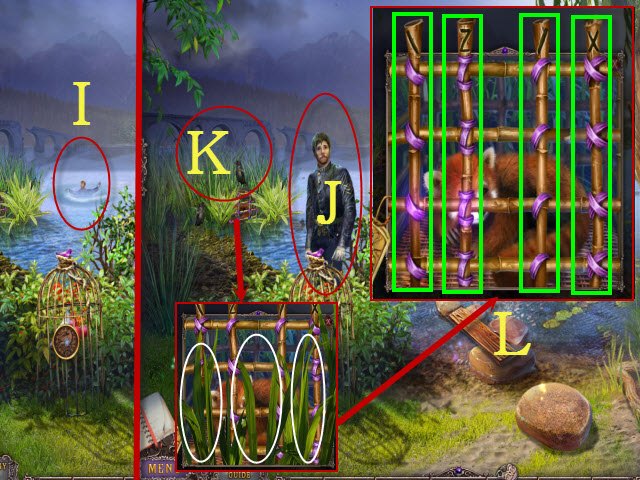
- Use the LIFE BUOY WITH ROPE (I).
- Talk to the Policeman; receive the WHISTLE (J).
- Use the WHISTLE (K).
- Move the grass (white) for a mini-game.
- Solution: (L).

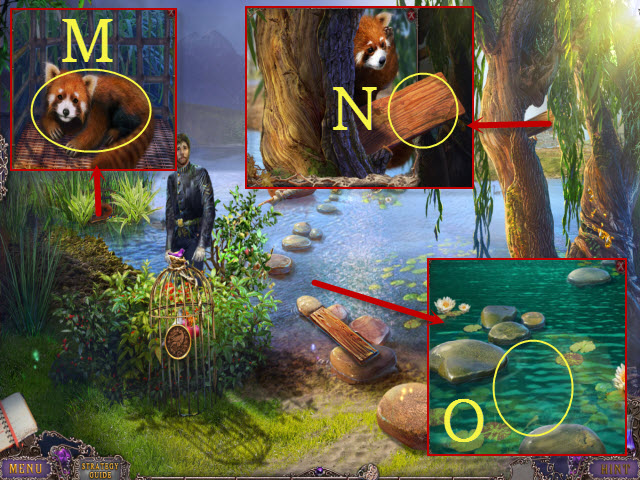
- Take the panda (M).
- Select the boards (N); receive the 2/2 PLANK.
- Place the 2/2 PLANK (O).
- Walk forward.

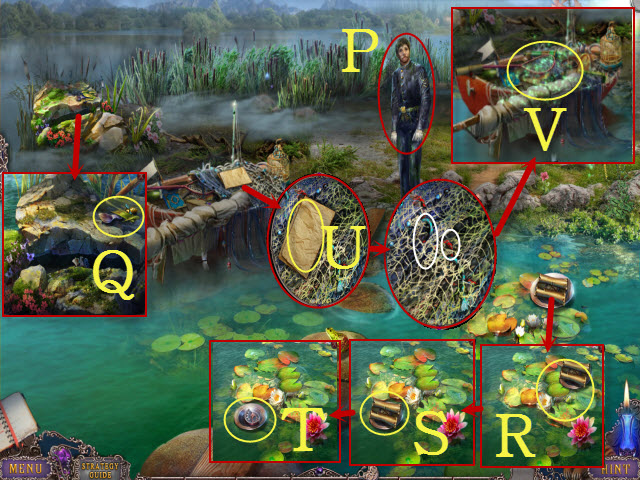
- Talk to the Policeman (P).
- Move the leaf; take the SPOON (Q).
- Use the LIFE BUOY WITH ROPE (R).
- Take the map (S) and BIRD EMBLEM HALF (T).
- Read the newspaper (U); move the strings (white).
- Play the HOP (V); receive the BIRD EMBLEM HALF.
- Walk down.

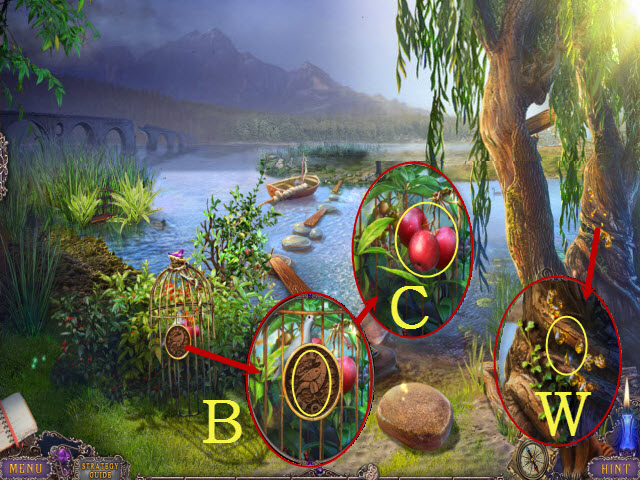
- Use the SPOON; receive the SPOON WITH RESIN (W).
- Place the BIRD EMBLEM HALFS together; select them and place the SPOON WITH RESIN. Select the emblems; receive the BIRD EMBLEM (inventory).
- Place the BIRD EMBLEM (B).
- Open the cage; take the APPLES (C).
- Walk forward.

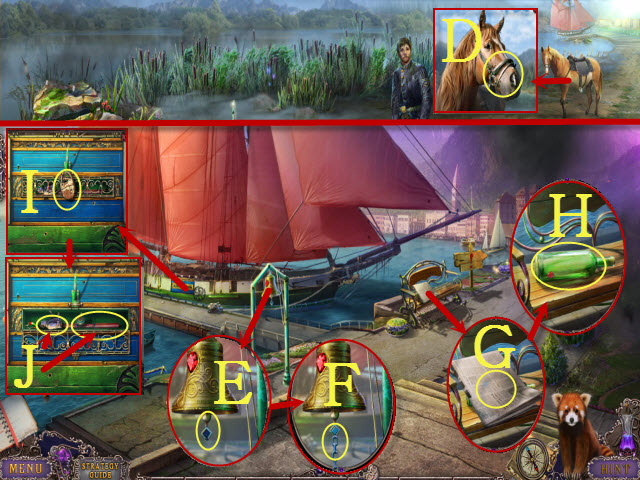
- Use the APPLES (D); speak with the Policeman to receive the GUN.
- Walk forward.
- Place the CHAIN (E); pull it twice (F) to receive the RED GEM.
- Read through the newspaper (G); take the CLOSED BOTTLE (H).
- Use the GUN (I).
- Take the STATUE PART and FOLDED FISHING ROD (J).
- Walk down.

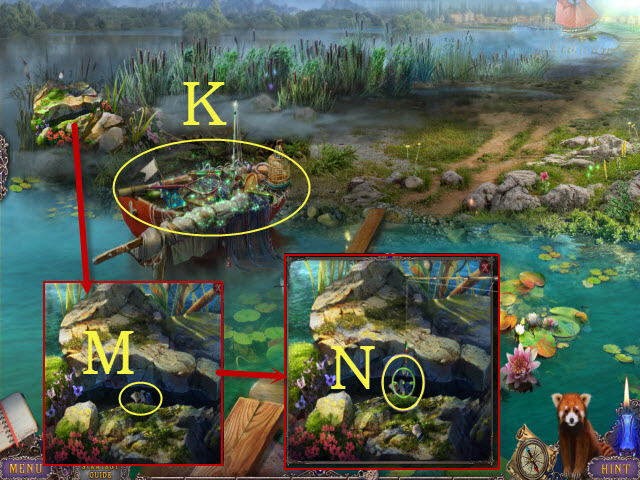
- Play the HOP (K); receive the BLUE SEASHELL.
- Select FOLDED FISHING ROD reel 4x; receive the FISHING ROD (inventory).
- Use the FISHING ROD (M); select the target when the reticle turns green (N).
- You receive the METAL SHIP.
- Walk forward.

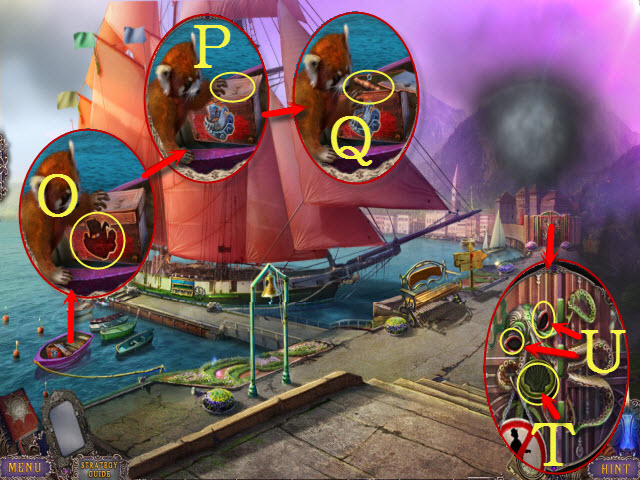
- Place the METAL SHIP (O).
- Move the lid (P); take the CORKSCREW (Q).
- Use the CORKSCREW on the CLOSED BOTTLE; select the bottle and take the RED GEM (inventory).
- Place the BLUE SEASHELL (T) and two RED GEMS (U).
- Walk forward.

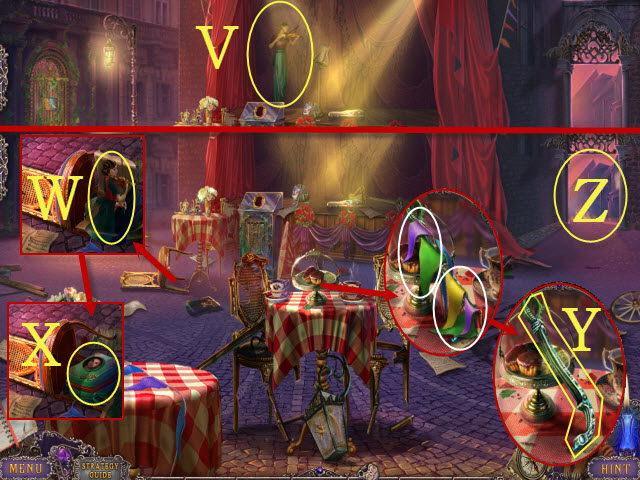
- Talk to the Musician (V).
- Move the picture (W); take the BAG (X).
- Move the flags (white); take the PUMP HANDLE (Y).
- Select the archway (Z).

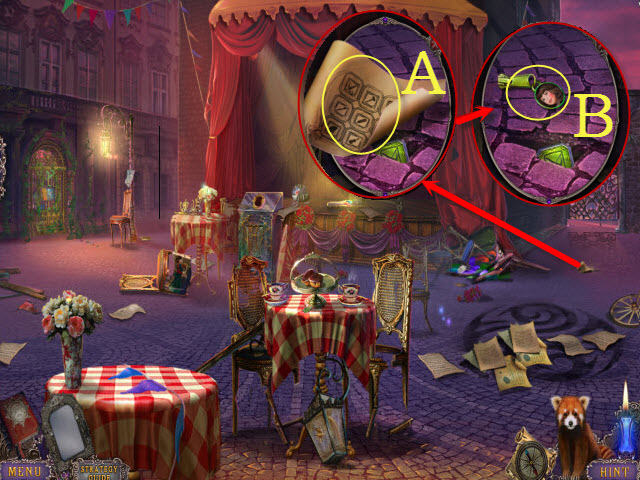
- Take the GATE CODE (A) and ZIPPER PULL (B).
- Place the ZIPPER PULL on the BAG. Select the zipper twice; take the MIRROR, MAGNET, and FILE (inventory).
- Return the pieces of the MIRROR; select it (inventory).

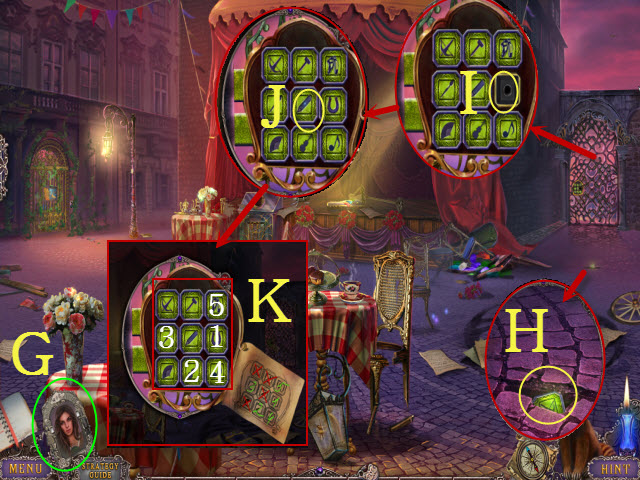
- Talk to the Huntress (G).
- Use the MAGNET (H); receive the GATE BUTTON.
- Place the GATE BUTTON (I).
- Select the nine squares on the GATE CODE; take the GATE CODE (inventory).
- Place the GATE CODE (J); solution: 1-5 (K).
- Walk right to the City Square: Shops.

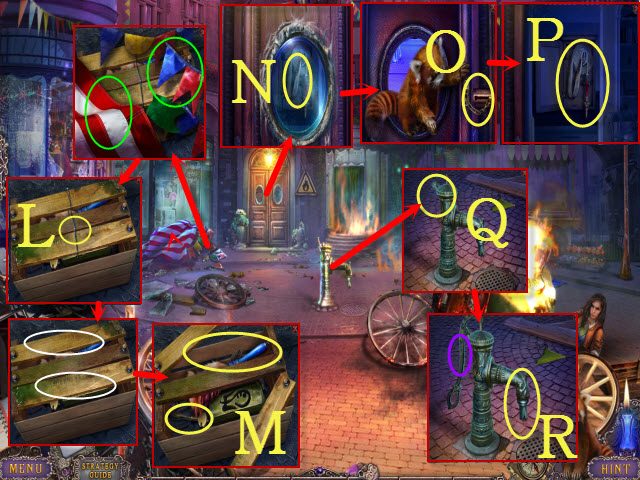
- Move the flags (green); use the FILE (L).
- Move the two boards (white); take the DUSTER and GLASS CUTTER (M).
- Use the GLASS CUTTER (N).
- Select the chain twice (O).
- Take the HOSE (P).
- Place the PUMP HANDLE (Q); select it (purple) and place the HOSE (R).

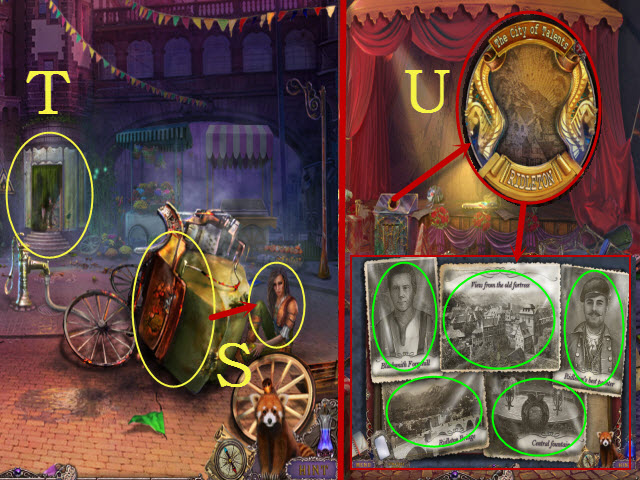
- Move the carriage; talk to the Huntress (S).
- Move the curtain to play the HOP (T); receive the PICTURE PIECES.
- Examine the PICTURE PIECES; select them twice and take the RIDLETON EMBLEM (inventory).
- Walk down.
- Place the RIDLETON EMBLEM (U).
- Clear the photos (green).
- Play the HOP; receive the ANVIL PART and WOLF EMBLEM.

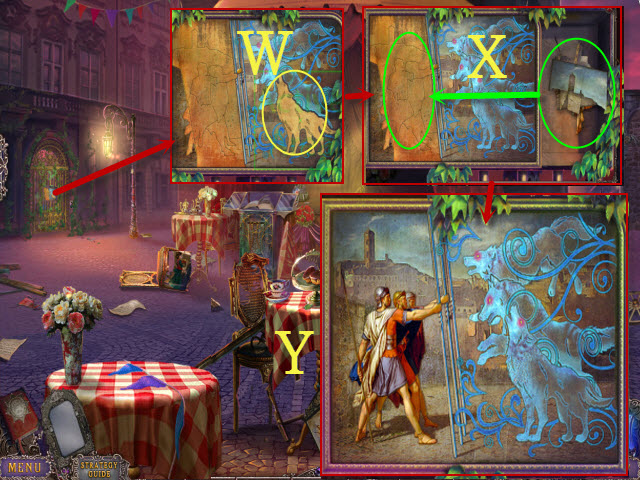
- Place the WOLF EMBLEM (W) for a mini-game (X).
- Solution: (Y).
- Walk left to the Fountain Courtyard.
Chapter 2: The Fountain

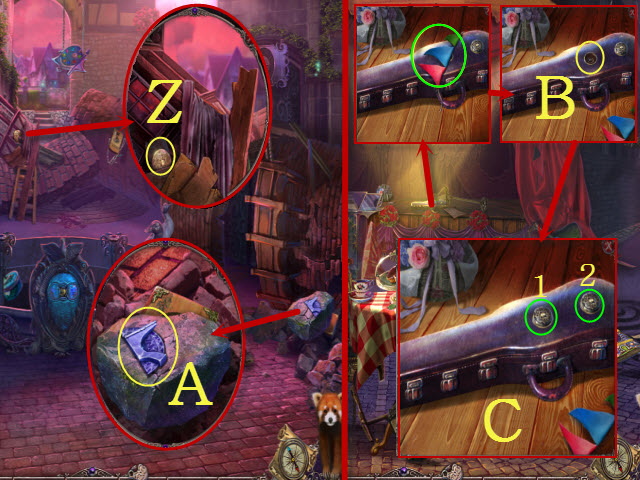
- Take the CASE BUTTON (Z).
- Take the ANVIL PART (A).
- Walk down.
- Move the flag (green); place the CASE BUTTON (B) for a mini-game.
- Solution: 2-2-1-2-1 (C).

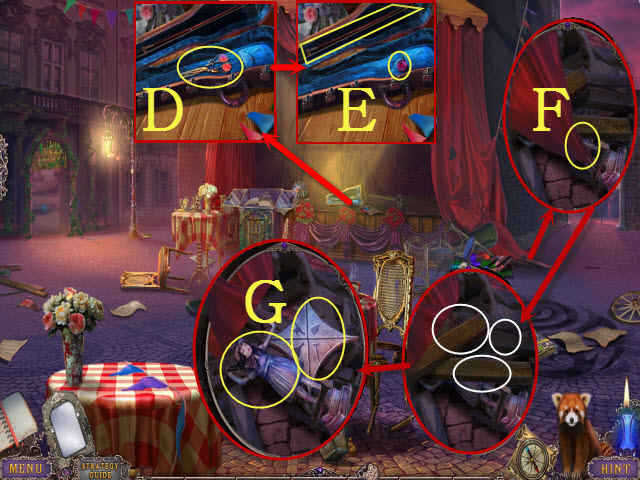
- Take the SCISSORS (D).
- Open the bag; take the 1/3 GEMS and FIDDLESTICK (E).
- Use the SCISSORS (F).
- Move the boards 3x (white); take the STATUE and TILE (G).
- Walk left.

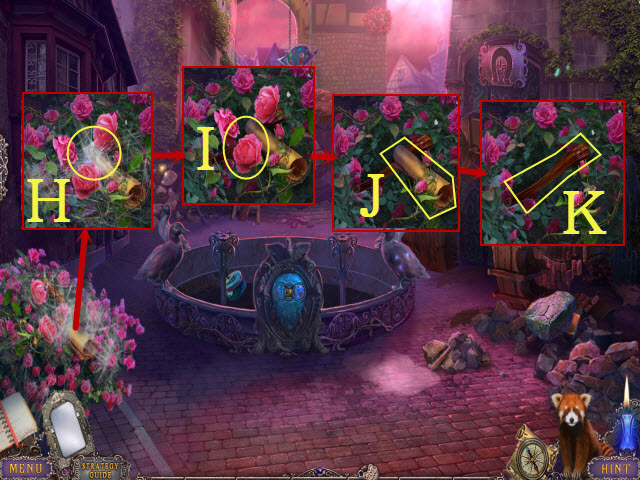
- Use the DUSTER (H).
- Use the SCISSORS (I); receive the ROSES.
- Select the recipe twice (J).
- Take the CHAIR LEG (K).
- Select the ROSES 4x to receive the ROSE PETALS (inventory).
- Walk down.

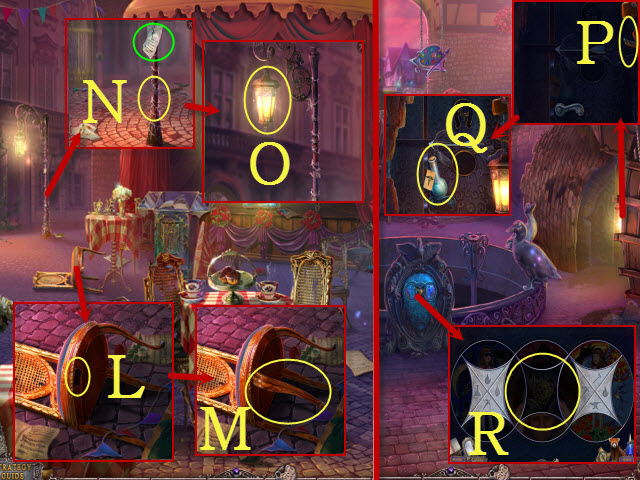
- Place the CHAIR LEG (L); take the CHAIR (M).
- Read the paper (green); place the CHAIR (N).
- Use the FIDDLESTICK (O); receive the LANTERN.
- Walk left.
- Place the LANTERN (P); take the MEDICINE BOTTLE (Q).
- Place the TILE for a puzzle (R).

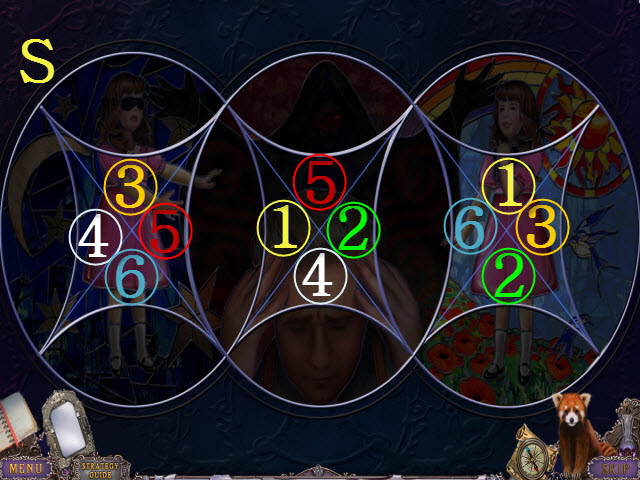

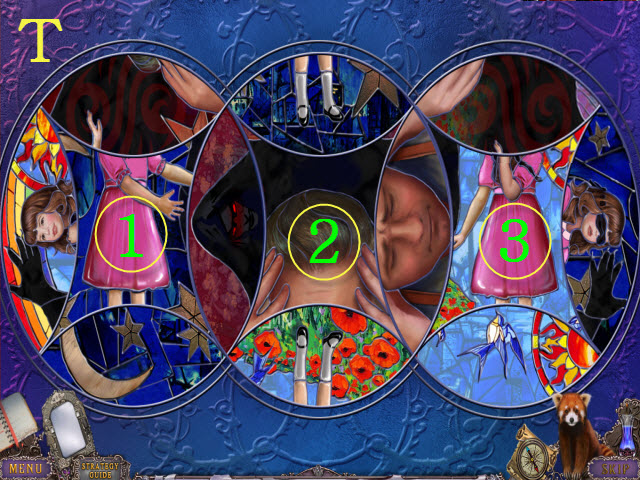
- Solution: (S); 2-2-2-1-1-2-2-3 (T).
- Take the BAG BUTTON.

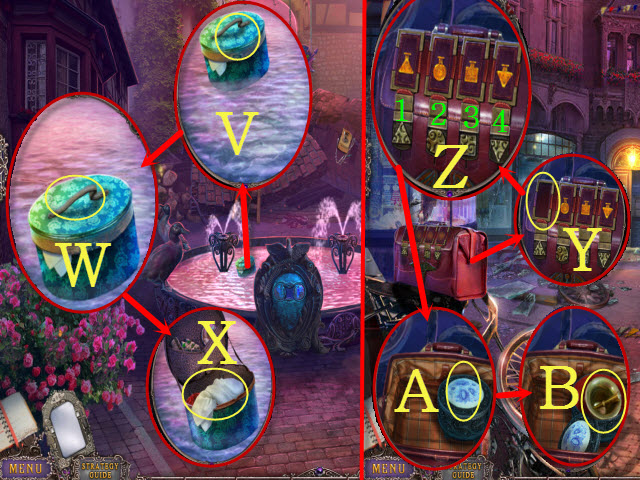
- Use the FIDDLESTICK (V).
- Open the lid (W); take the SCARF (X).
- Go to the City Square: Shops.
- Place the BAG BUTTON (Y); enter: 4-2-1 (Z).
- Open the lid (A); take the MORTAR AND PESTLE (B).
- Place the ROSE PETALS in the MORTAR AND PESTLE; select it twice and take the GROUND ROSE PETALS (inventory).

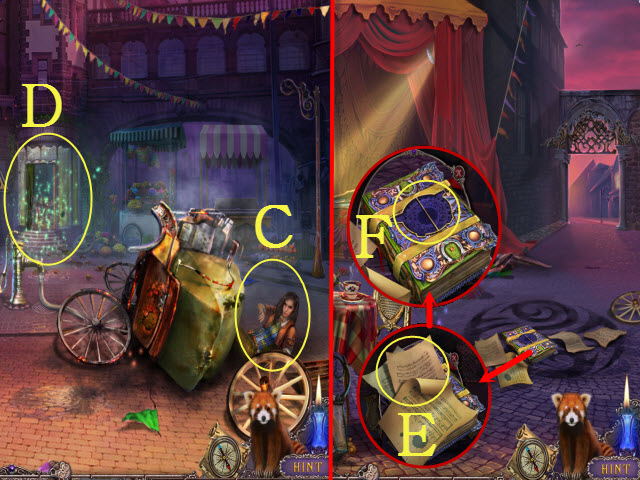
- Open the MEDICINE BOTTLE; place the GROUND ROSE PETALS. Select the bottle 4x to receive the MEDICINE (inventory).
- Select the SCARF 3x and use the MEDICINE on it; take the BANDAGE WITH MEDICINE (inventory).
- Give the BANDAGE WITH MEDICINE to the huntress (C); receive the BROKEN CROSSBOW.
- Play the HOP (D); receive the SHOE.
- Walk down.
- Move the music sheets (E); place the two ANVIL PARTS (F).

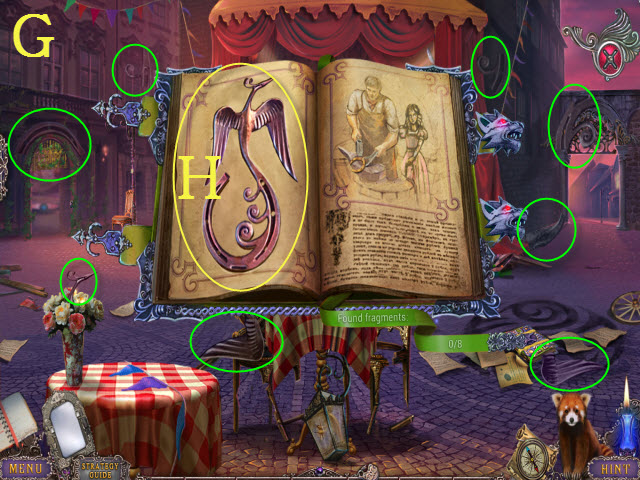
- Find the fragments (G); take the BIRD SYMBOL (H).
- Walk right.

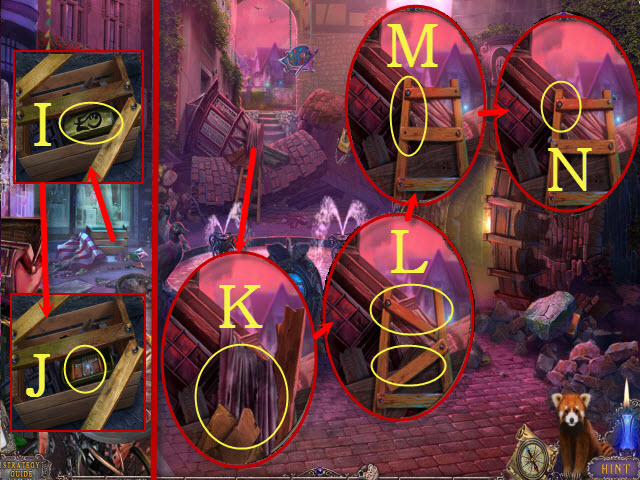
- Place the BIRD SYMBOL (I); take the PLATE WITH NAILS (J).
- Select the PLATE WITH NAILS 5x; receive the NAILS (inventory).
- Go to the Fountain Courtyard.
- Clear the debris (K); select the rungs twice (L).
- Place the NAILS (M); use the SHOE (N).
- Climb up to the Painter’s House Entrance.

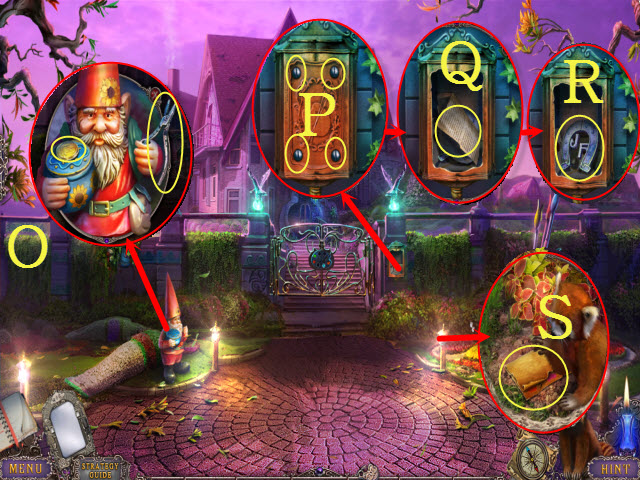
- Take the COIN and PLIERS (O).
- Use the COIN 4x (P).
- Read the paper; take it (Q) and the BLACKSMITH FIGURE (R).
- Select the note (S); receive the GEM PALLET CODE.
- Walk down.

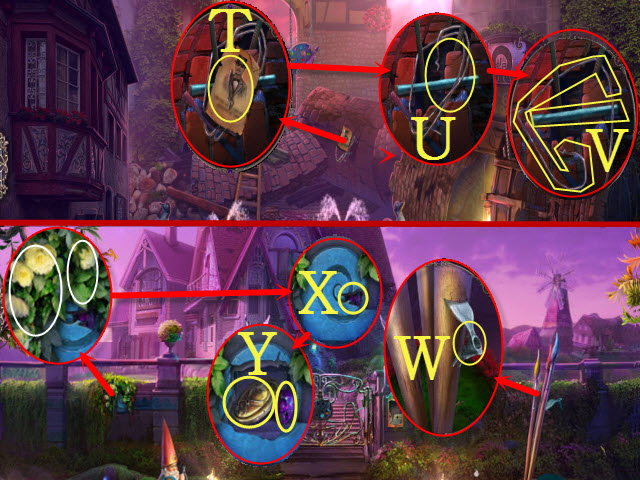
- View the poster (T); use the PLIERS twice (U).
- Take the WIRE and AX HANDLE (V).
- Climb up.
- Place the AX HANDLE (W); receive the BROKEN AX.
- Place the WIRE with the BROKEN AX; select the ax 3x to receive the AX (inventory).
- Move the two leaves (white); use the AX (X); take the VESSEL KEY and 2/3 GEMS (Y).
- Walk down.

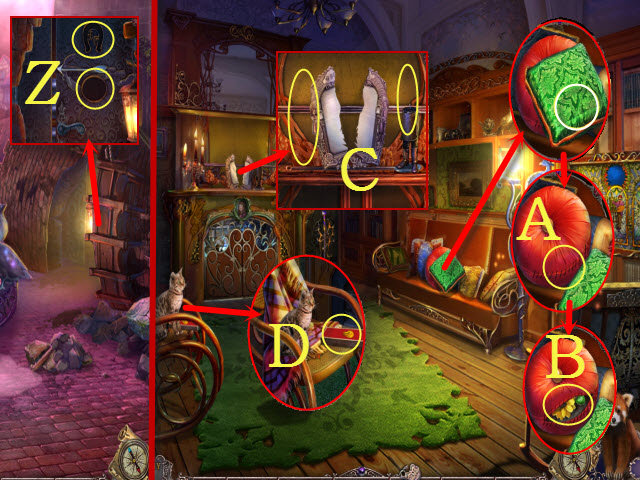
- Place the BLACKSMITH FIGURE and VESSEL KEY (Z).
- Enter John’s Place.
- Move the pillow (white); use the SCISSORS (A).
- Take the FLOWER (B).
- Place the STATUE PART and STATUE (C).
- Take the MATCHBOX (D).
- Go to the Painter’s House Entrance.

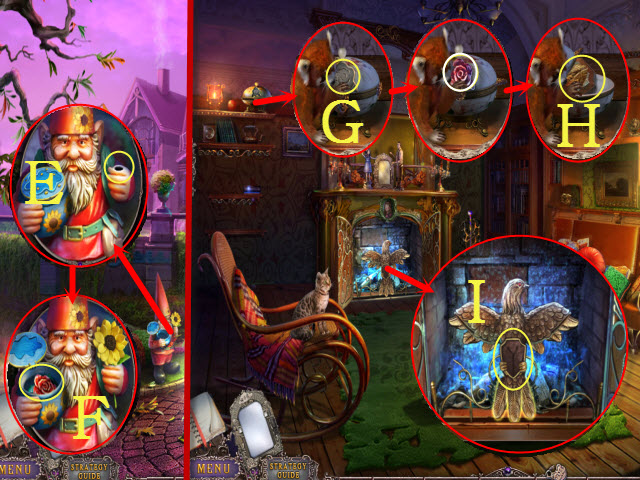
- Place the FLOWER (E).
- Take the ROSE FIGURE and BOW (F).
- Return to John’s Place.
- Place the ROSE FIGURE (G).
- Select the lid (white); take the SHIELD (H).
- Place the SHIELD for a mini-game (I).

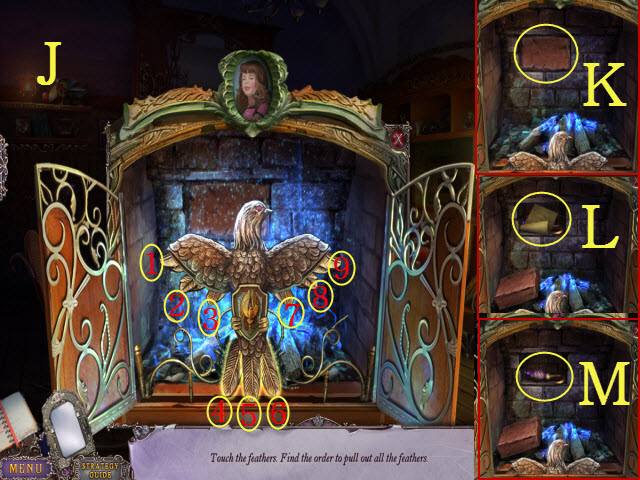
- Solution: 4-6-9-5-2-6 (J).
- Move the brick (K); select the note (L).
- Take the LEVER HANDLE (M).

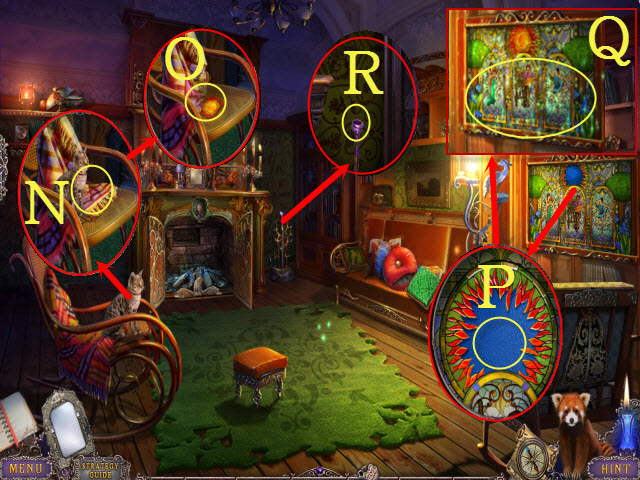
- Place the BOW (N).
- Move the blanket; take the SUN (O).
- Place the SUN (P); play the HOP (Q) to receive the MOLECULE TOKEN.
- Place the LEVER HANDLE; pull it (R).
- Enter John’s Workroom.
Chapter 3: The Workroom

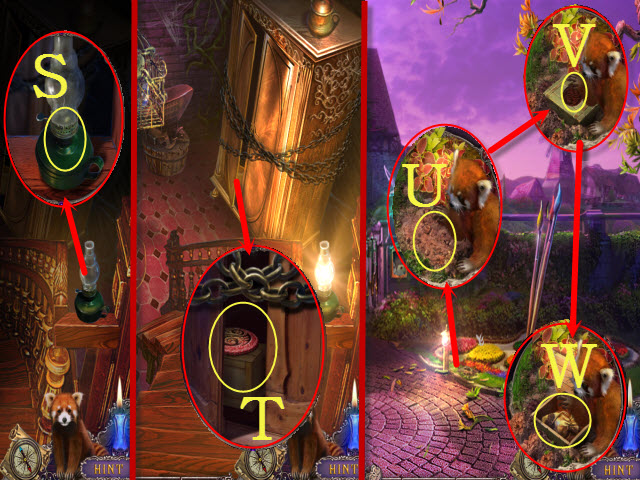
- Use the MATCHBOX (S); select the lantern.
- Select the door; use the FIDDLESTICK to take VAAL SYMBOL (T).
- Return to the Painter’s House Entrance.
- Move the soil (U); place the VAAL SYMBOL (V); take the POCKET WITH STONES (W).
- Select the POCKET WITH STONES twice; take the COLORED BUTTONS and ORIGAMI (inventory).
- Fold the ORIGAMI 7x; take the ORIGAMI BIRD (inventory).
- Walk down.

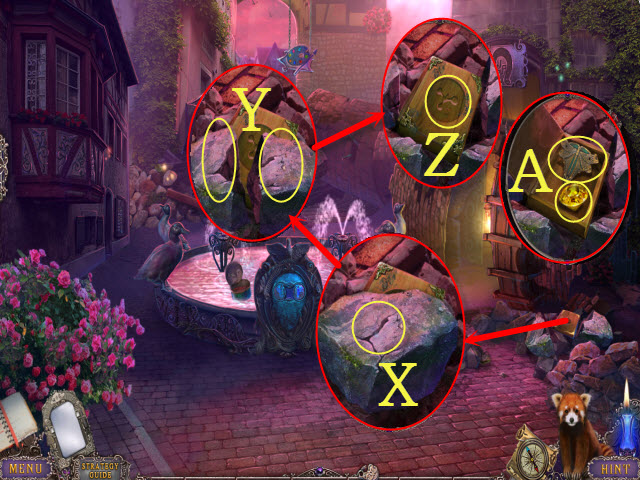
- Use the AX (X); move the rocks (Y).
- Place the MOLECULE TOKEN (Z); take the 3/3 GEMS and DRAGONFLY (A).
- Go to John’s Workroom.

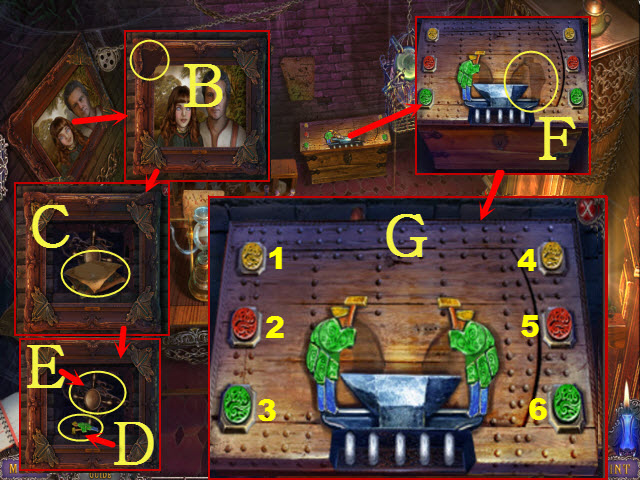
- Place the DRAGONFLY (B).
- Select the note and take it (C); take the GREEN MAN (D) and select the handle (E).
- Place the GREEN MAN for a mini-game (F).
- Solution: 1-3-2-5-4-6-3-1-6-3-2-4 (G).

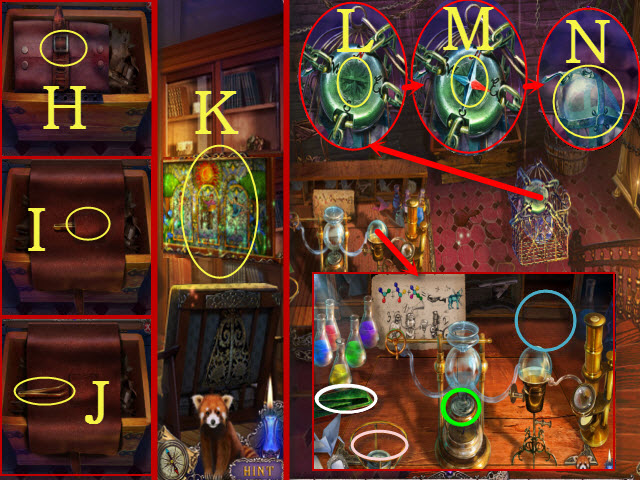
- Take the 1/3 TUBE OF PAINT (H).
- Open the bag; select the pocket (I); take the TONGS (J).
- Walk down.
- Play the HOP (K); receive the COMPASS NEEDLE.
- Walk forward.
- Place the COMPASS NEEDLE (L); select it 3x (M) and take the CROSSBOW VESSEL (N).
- Use the MATCHBOX (green); place the ORIGAMI BIRD (blue), TONGS (white), and CROSSBOW VESSEL (pink) for a puzzle.

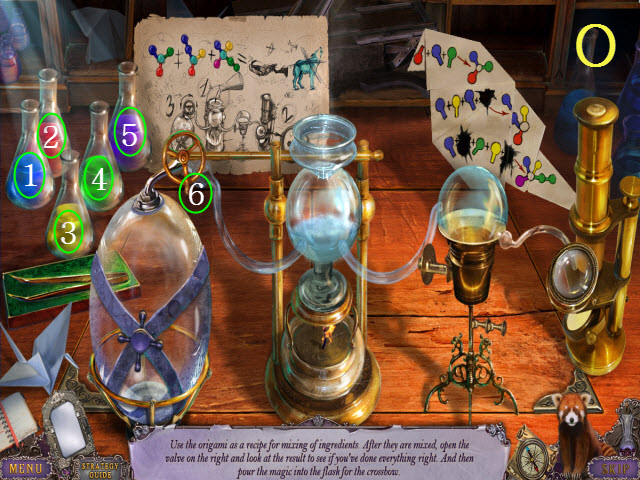
- Complete the recipe.
- Solution: 2-1-4-6-1-3-1-2-6-1-5-4-3-4-6 (O).
- You receive the FULL CROSSBOW VESSEL.

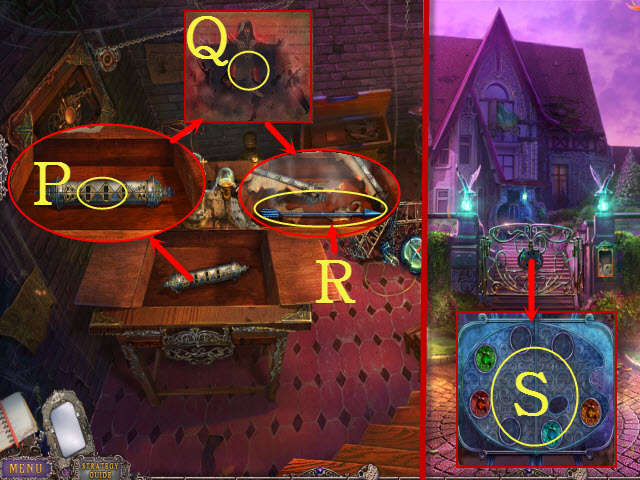
- Place the COLORED BUTTONS (P).
- Select the image (Q); take the ARROW (R).
- Place the ARROW and FULL CROSSBOW VESSEL with the BROKEN CROSSBOW; take the CROSSBOW (inventory).
- Return to the Painter’s House Entrance.
- Place the 3/3 GEMS and GEM PALLET CODE for a mini-game (S).

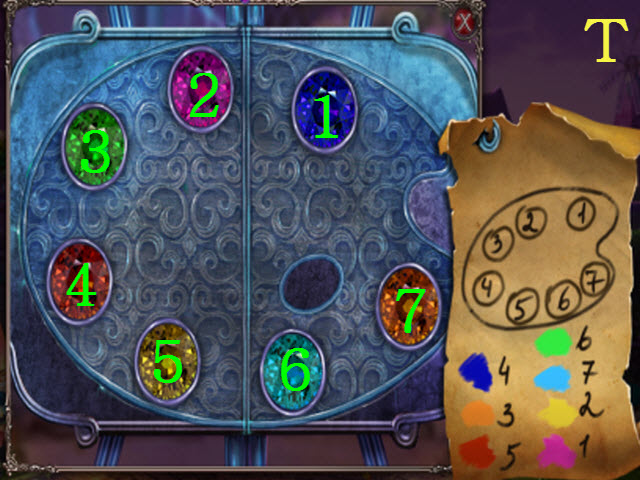
- Solution: 1-4-7-3-2-1-2-5-6-7 (T).
- Walk forward.

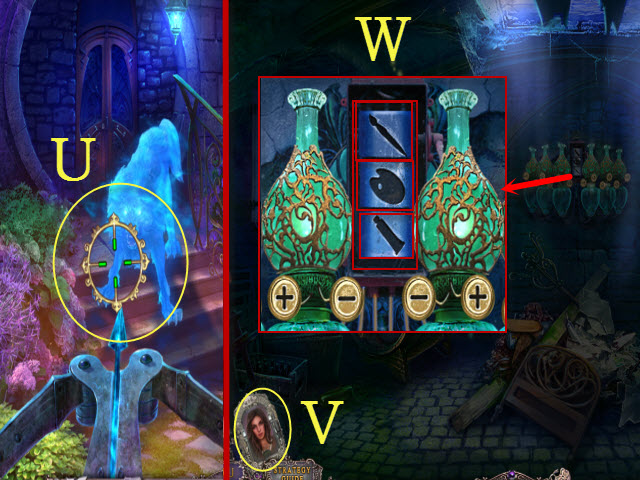
- Use the CROSSBOW; when the reticle turns green, select the target (U).
- Talk to the Huntress (V).
- Align the icons (W) for a mini-game.

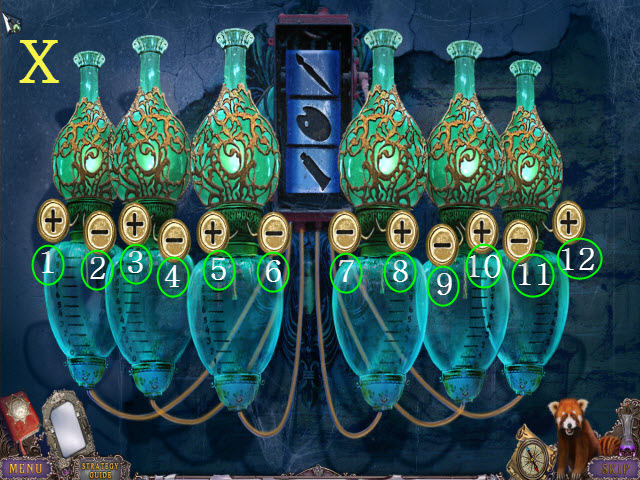
- Please see the screenshot (X).
- Solution: 1-1-2-2-1-1-2-3-3-3-3-4-3-3-5-5-5-6-5-6-5-8-8-8-7-8-10-10-10-9-12-12-11-12.

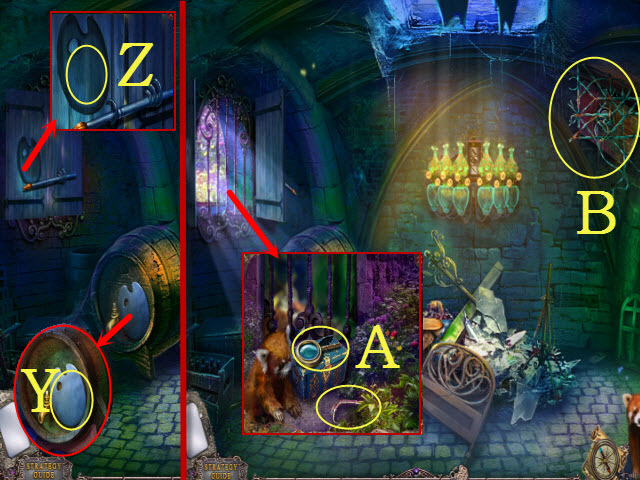
- Take the PALETTE (Y).
- Place the PALETTE; select it (Z).
- Take the MAGNIFYING GLASS and CANE (A).
- Play the mini-game (B).

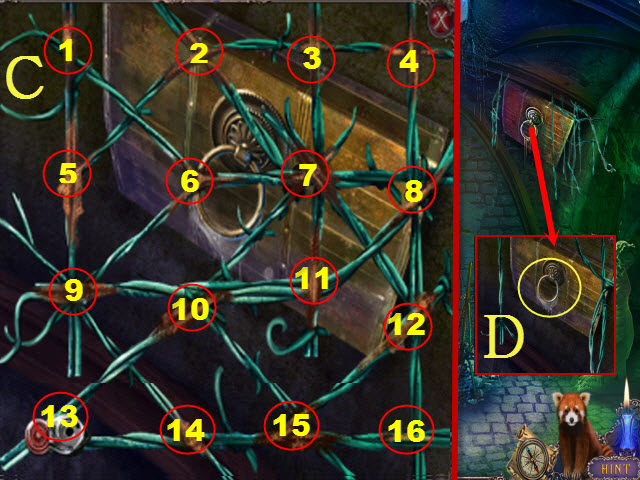
- This puzzle is random.
- Here is one possible solution: 10-9-5-1-6-7-11-8-4-3-2-5-1-6-9-10-7-12-15-16-15-4-9-10-11-10-13 (C).
- Use the CANE (D).
- Climb the ladder to the Painter’s House: Corridor.

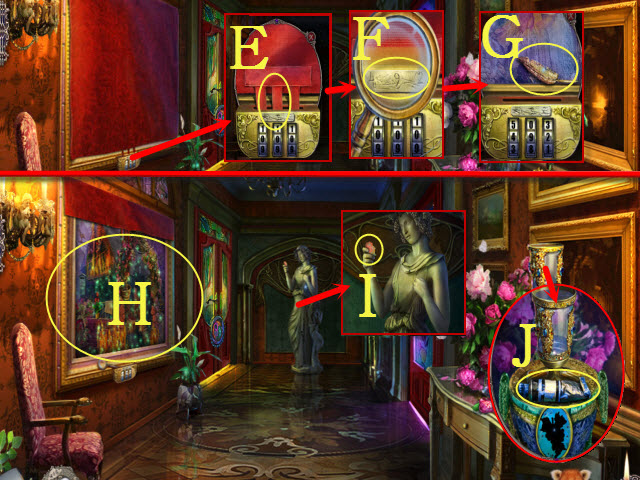
- Use the MAGNIFYING GLASS (E); set to: 4-9-2 (F) and take the FEATHER (G).
- Play the HOP (H); receive the METAL CIRCLE.
- Take the AFRICA (I).
- Take the 2/3 TUBE OF PAINT (J).
- Walk down.

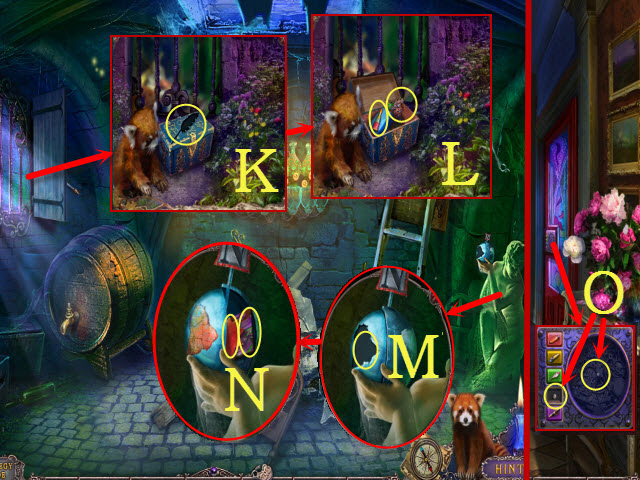
- Place the FEATHER (K).
- Take the BLUE BUTTON and GRAPES (L).
- Place the AFRICA (M); take the METAL STAR and PUZZLE PART (N).
- Climb up.
- Place the BLUE BUTTON and METAL CIRCLE for a mini-game (O).

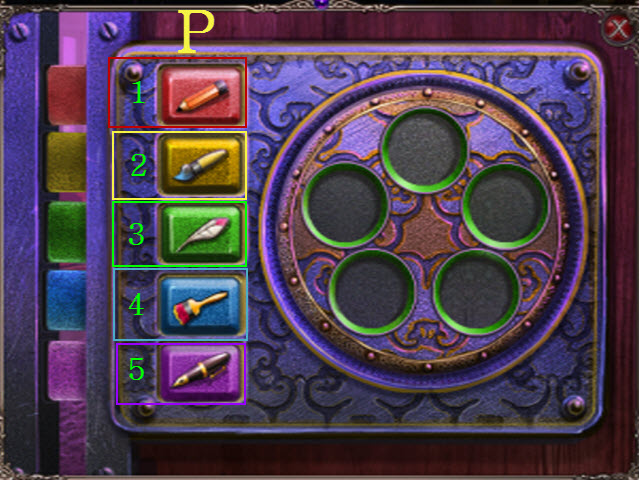
- Solution: 1-5-3-3-2-4-4-1-3-5-4-2-1-1-5-2-4-3 (P).
- Walk right to the Painter’s House: Studio.
Chapter 4: The Studio

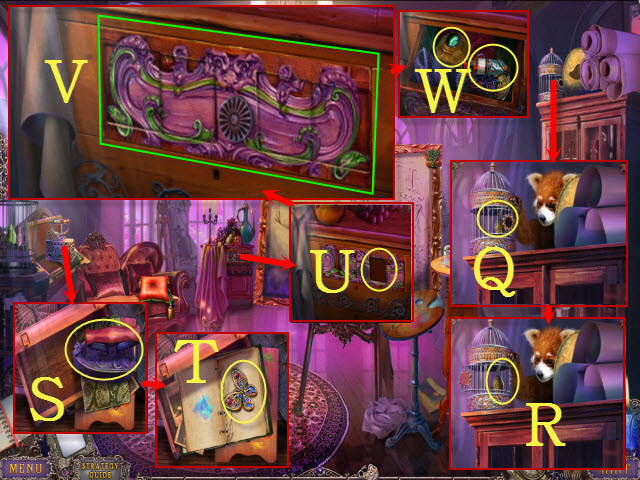
- Place the METAL STAR (Q); open the cage.
- Take the DOOR HANDLE (R).
- Take the FLATIRON (S); open the book and take BUTTERFLY (T).
- Place the PUZZLE PART for a mini-game (U).
- Solution: (V).
- Take the 3/3 TUBE OF PAINT and CHEST (W).
- Walk down.

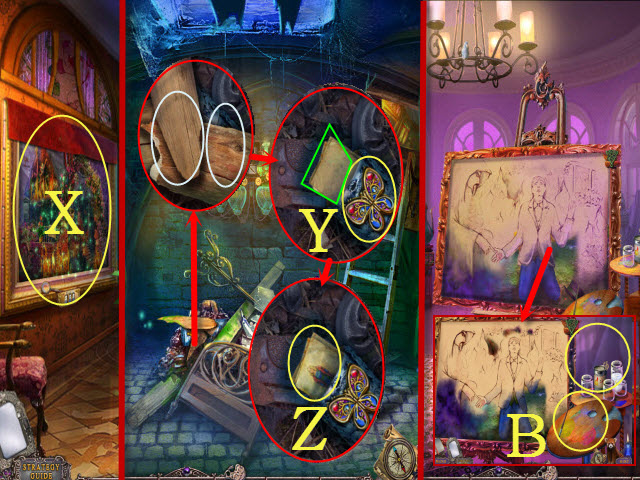
- Play the HOP (X); receive the 1/4 ARTIST’S PAGE.
- Walk down.
- Move the boards (white); place the BUTTERFLY (Y) and open the lid.
- Read the note (green); take the SKETCH (Z).
- Return to the Painter’s House: Studio.
- Place the 3/3 TUBE OF PAINT and SKETCH for a puzzle (B).

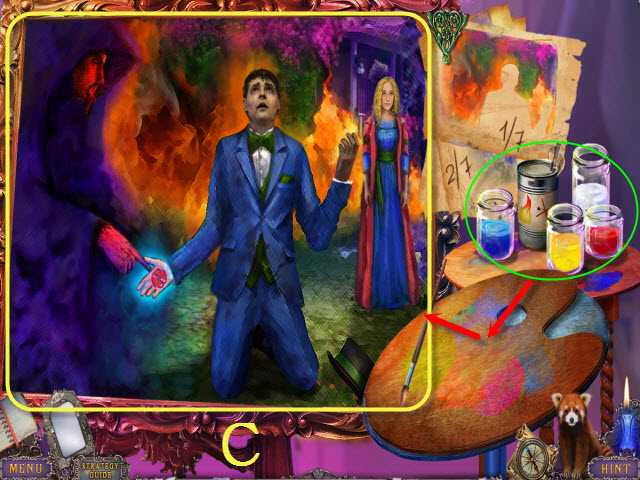
- Solution: (C).
- Take the 2/4 ARTIST’S PAGE.
- Walk down.

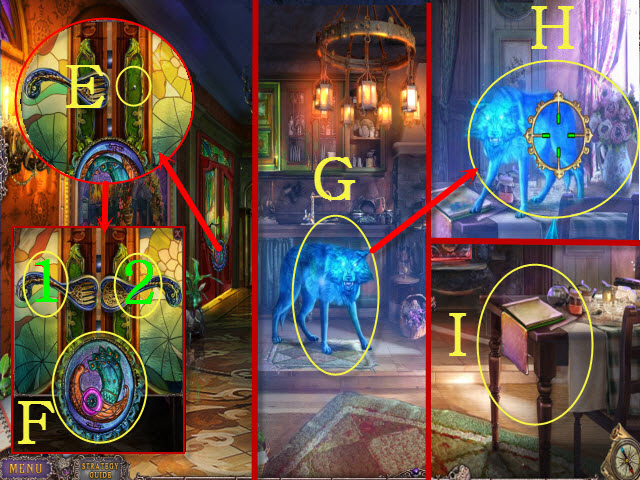
- Place the DOOR HANDLE for a mini-game (E).
- Solution: 1-2-2-1-2-2-2-2 (F).
- Enter the Painter’s House: Kitchen.
- Select anywhere and use the CROSSBOW; when the reticle turns green (G, H), select it.
- Play the mini-game (I).

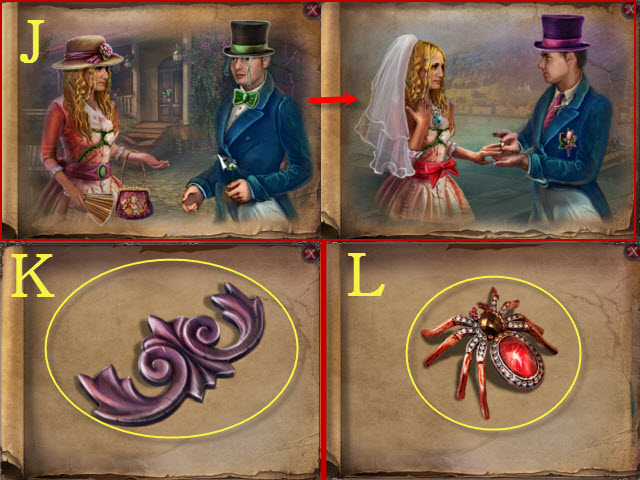
- Solution: (J).
- Take the CREST (K) and SPIDER (L).

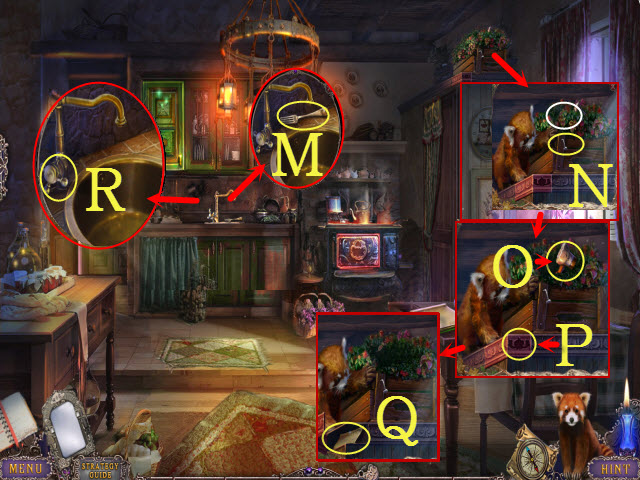
- Take the FORK (M).
- Select the shrub (white); use the FORK (N) to receive the NAIL.
- Take the MEAT HAMMER (O) and place the CREST (P); take the 3/4 ARTIST’S PAGE (Q).
- Use the MEAT HAMMER (R); receive the FAUCET HANDLE.
- Return to the Painter’s House: Studio.

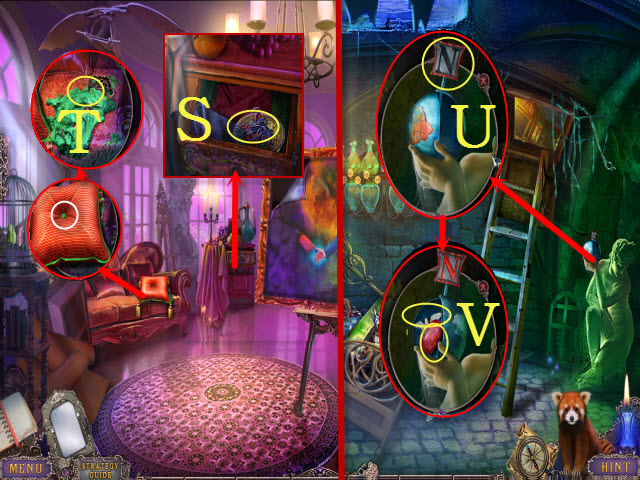
- Use the NAIL (S); take the NORTH.
- Move the pillow (white); use the FORK (T) to receive the KEY IN PAINT.
- Walk down twice.
- Place the NORTH (U); take the RED JEWEL and ANGEL (V).
- Open the CHEST; take the GREEN JEWEL. Place the ANGEL in the slot. Select the locket 3x to receive the JENNIFER’S MEDALLION. Select the page 3x to receive the 4/4 ARTIST’S PAGE (inventory).
- Climb up.

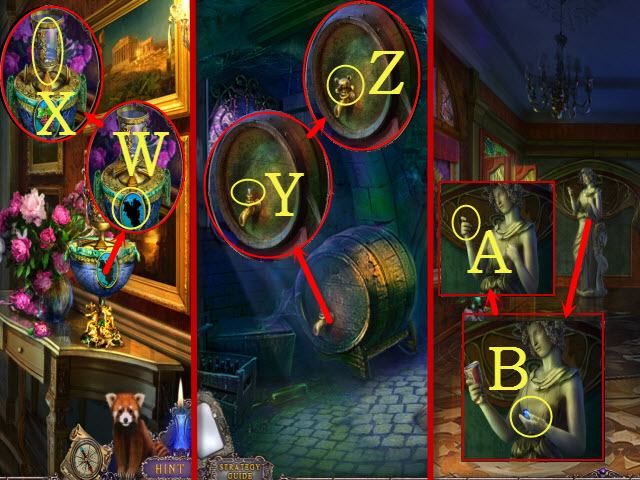
- Place the GRAPES (W); take the GOBLET (X).
- Walk down.
- Place the FAUCET HANDLE (Y).
- Use the GOBLET (Z); receive the GOBLET WITH WINE.
- Climb up.
- Place the GOBLET WITH WINE (A); take the BLUE JEWEL (B).
- Walk left.

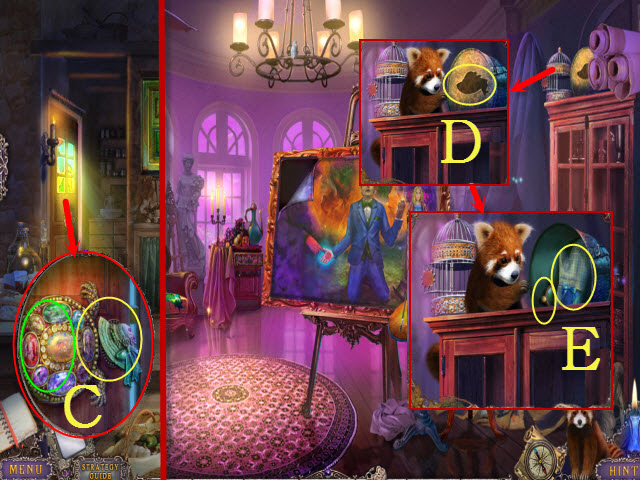
- Place the RED JEWEL, GREEN JEWEL, and BLUE JEWEL (green); take the HAT (C).
- Go to the Painter’s House: Studio.
- Move the paper; place the HAT (D).
- Take the SIDEBOARD HANDLE and OVEN MITT (E).
- Return to the Painter’s House: Kitchen.

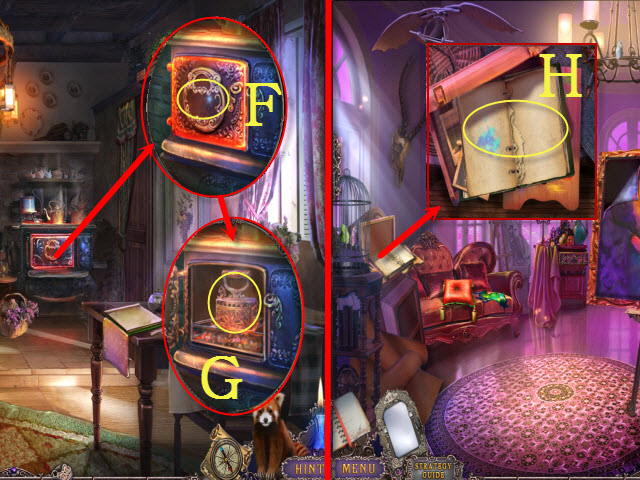
- Use the OVEN MITT; place the FLATIRON (F).
- Use the OVEN MITT (G); receive the HOT FLATIRON.
- Return to the Painter’s House: Studio.
- Place the 4/4 ARTIST’S PAGE; use the HOT FLATIRON. Take the LATCH (H).
- Return to the Painter’s House: Kitchen.

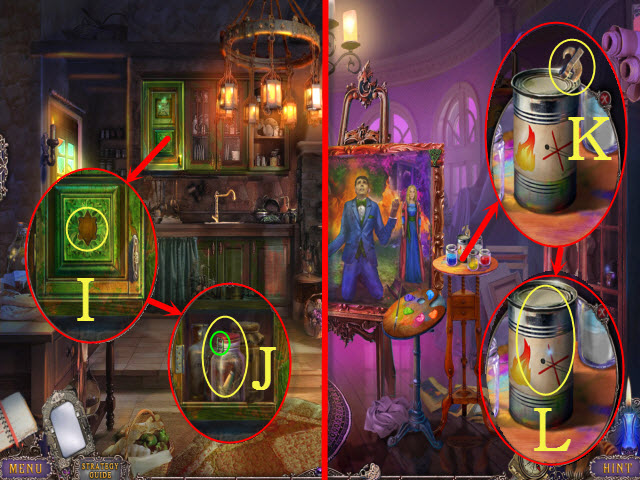
- Place the SIDEBOARD HANDLE; open the cabinet (I).
- Place the LATCH (green); open the jar. Take the CAN OPENER HANDLE (J).
- Return to the Painter’s House: Studio.
- Use the CAN OPENER HANDLE (K); open the lid. Take the SOLVENT (L).
- Use the SOLVENT on the KEY IN PAINT; select it and receive the KEY (inventory).
- Return to the Painter’s House: Kitchen.

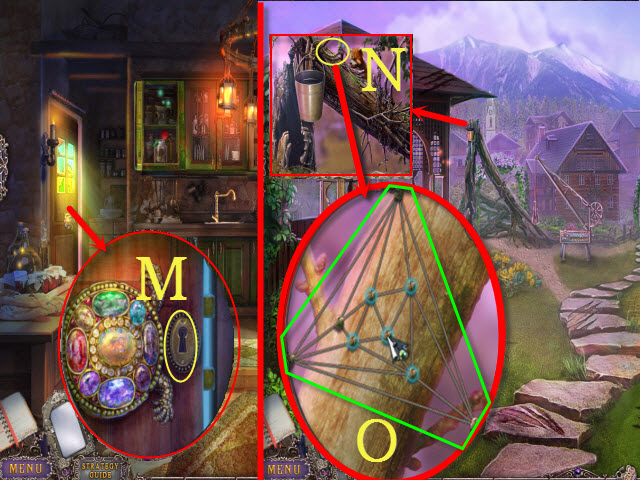
- Use the KEY; turn it (M).
- Walk left to the Street.
- Zoom in for a mini-game (N).
- Solution: (O); take the BUCKET WITH ROPE.
- Examine the BUCKET WITH ROPE; select the bucket 4x to receive the ROPES. Take the 1/2 LATCH and BUCKET (inventory).
- Walk right.

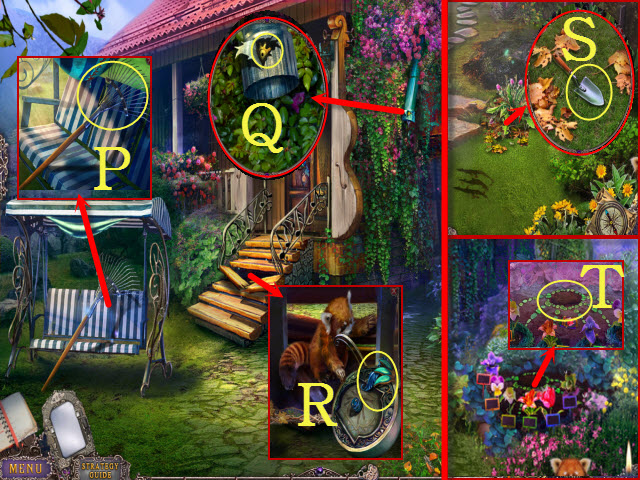
- Take the RAKE (P).
- Use the MEAT HAMMER; take the COGWHEEL (Q).
- Move the boards twice; select the wing twice to receive the BLUE WING (R).
- Walk down.
- Use the RAKE; take the SHOVEL (S).
- Walk right.
- Use the SHOVEL for a mini-game (T).

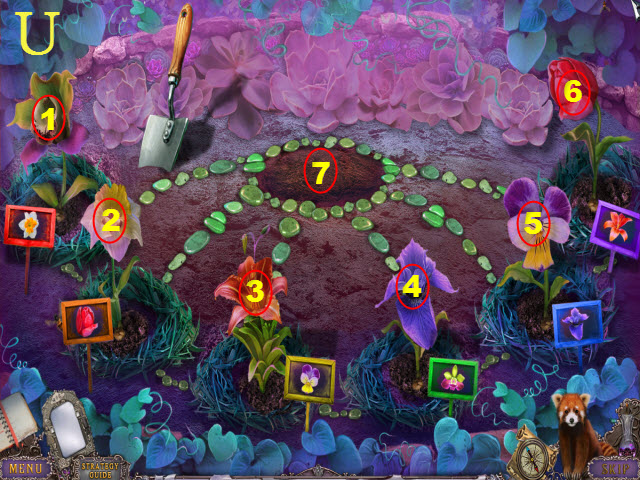
- Solution: 1-2-3-7-6-5-4-3-2-7-6-5-4-3-7-5-4-7-6-5-7 (U).
- Move the lid; take the PIECE OF ARMOR and RIBBON.
- Walk down.

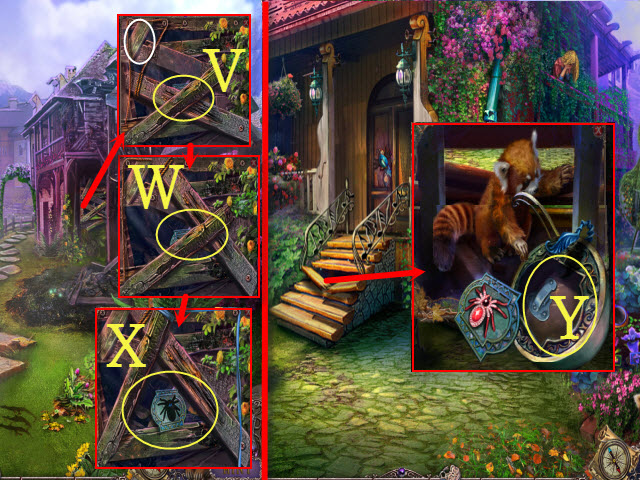
- View the poster and attach the ROPES (V); select the rope (white).
- Place the RIBBON; pull it (W).
- Take the PANEL and YELLOW WING (X).
- Walk right.
- Place the PANEL and SPIDER; take the PHOTO and 2/2 LATCH (Y).
- Walk down.

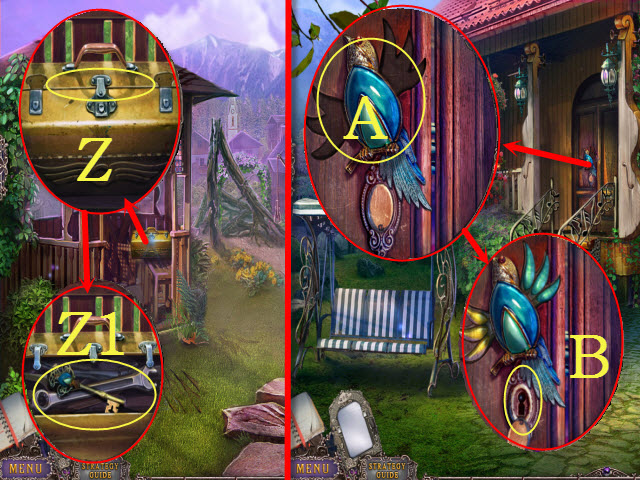
- Place the 2/2 LATCH (Z); take the BIRD KEY and WRENCH (Z1).
- Walk right.
- Place the BLUE WING and YELLOW WING (A).
- Use the BIRD KEY; turn it (B).
- Enter the Henry House: Living Room.
Chapter 5: The House

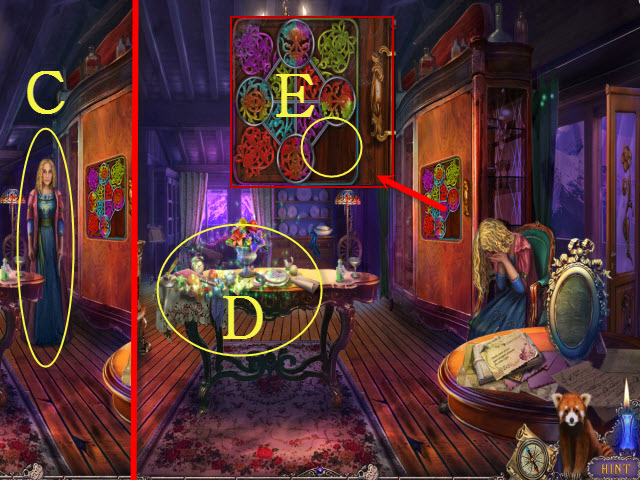
- Give the woman JENNIFER’S MEDALLION (C).
- Play the HOP (D); receive the CERAMIC HANDLE.
- Place the PIECE OF ARMOR (E) for a mini-game.

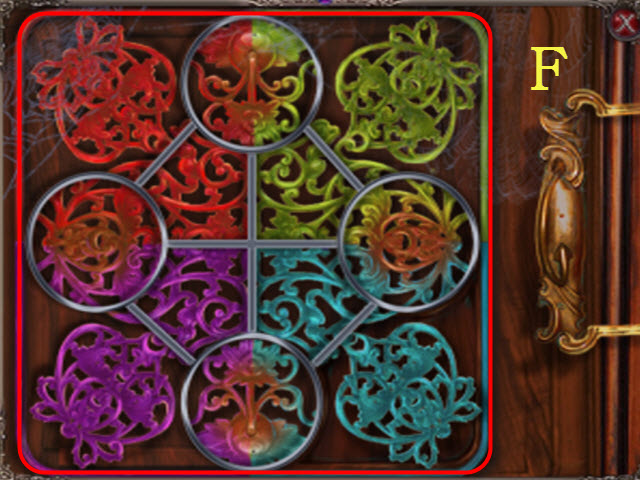
- Solution: (F).
- Take the POKER.

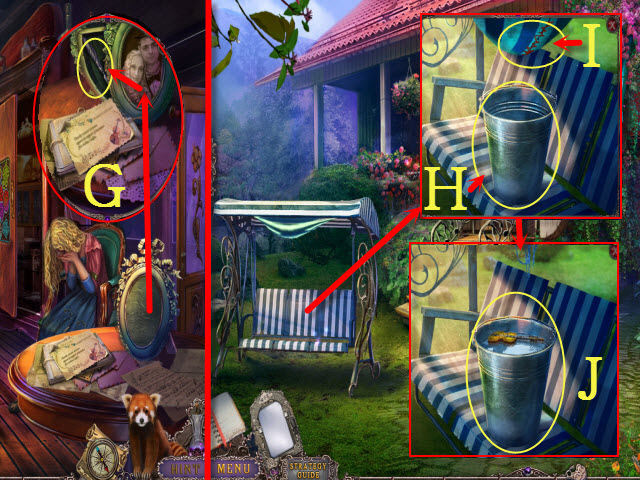
- Place the PHOTO; take the LETTER OPENER (G).
- Walk down.
- Place the BUCKET (H); use the LETTER OPENER (I).
- Take the VIOLIN and BUCKET WITH WATER (J).
- Walk forward.
- Play the HOP; receive the SKIMMER.

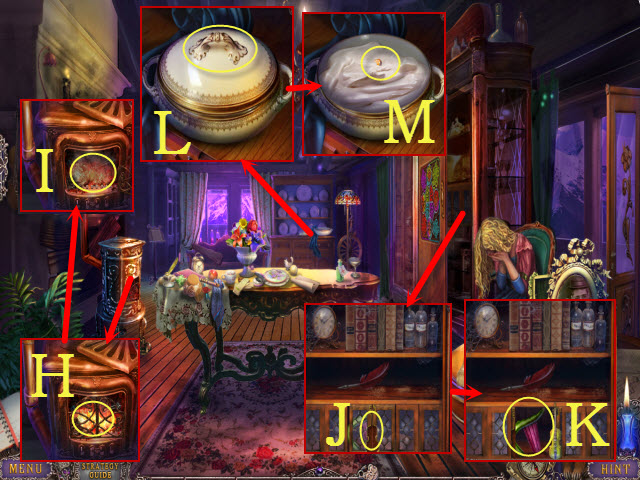
- Use the BUCKET WITH WATER; open the stove (H).
- Use the POKER; take the WINCH HANDLE (I).
- Place the VIOLIN (J); take the GREEN HANDLE (K).
- Place the CERAMIC HANDLE (L); open the lid and use the SKIMMER to receive the BUTTON (M).
- Walk down twice.

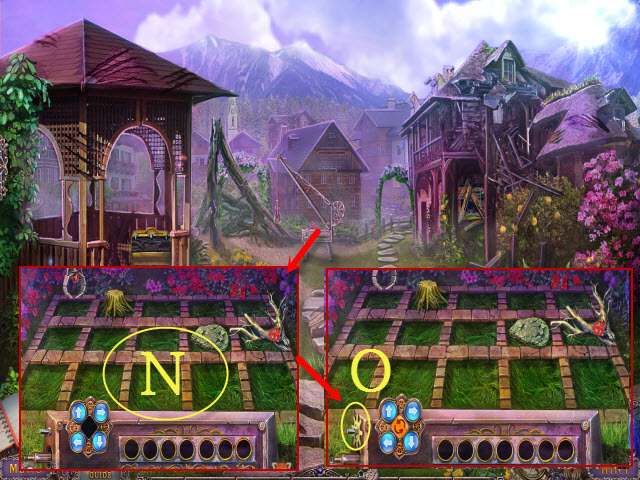
- Place the BUTTON, WINCH HANDLE, and COGWHEEL (N).
- Use the WRENCH for a puzzle (O).

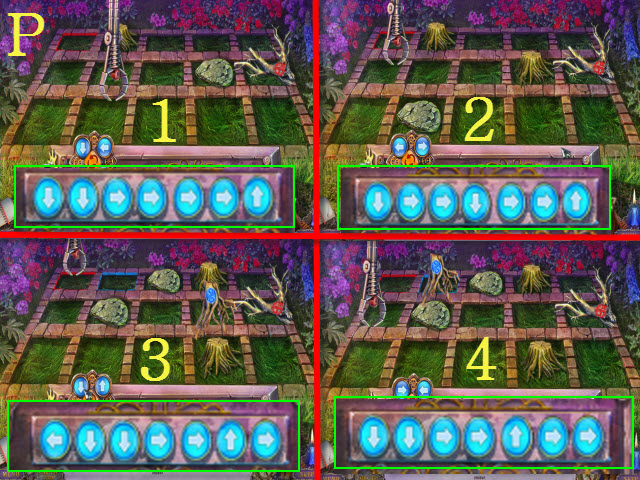
- Solution: 1-4 (P).
- Walk left to the Old City Street.

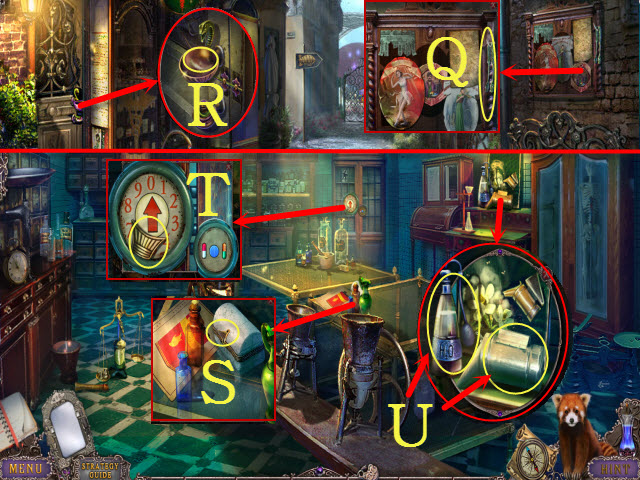
- Take the TONGS (Q).
- Place the GREEN HANDLE (R).
- Walk left to the Abandoned Pharmacy.
- Move the bottles twice; use the TONGS to receive the WINGS (S).
- Take the GONDOLA (T).
- Take the SMOKER TUBE and SPRAY (U).
- Walk down.

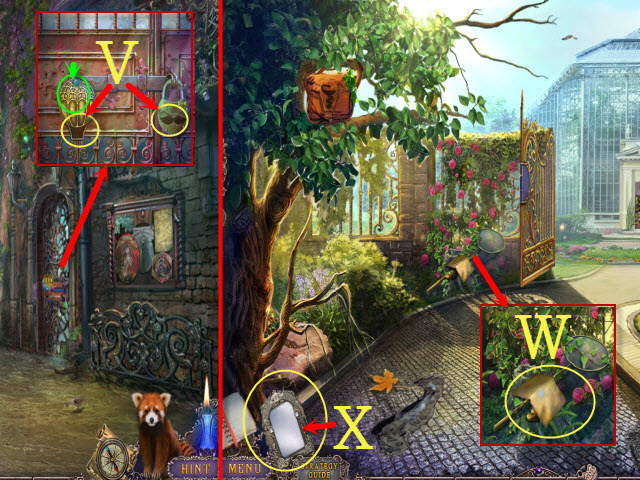
- Move the balloon (green); place the GONDOLA and WINGS (V).
- Walk right to the Air Balloon Gates Airport.
- Take the NOTE FOR PHARMACIST and CRANE HANDLE (W).
- Talk to the Huntress (X).
- Select the four spaces on the NOTE FOR PHARMACIST (inventory).
- Go to the Abandoned Pharmacy.

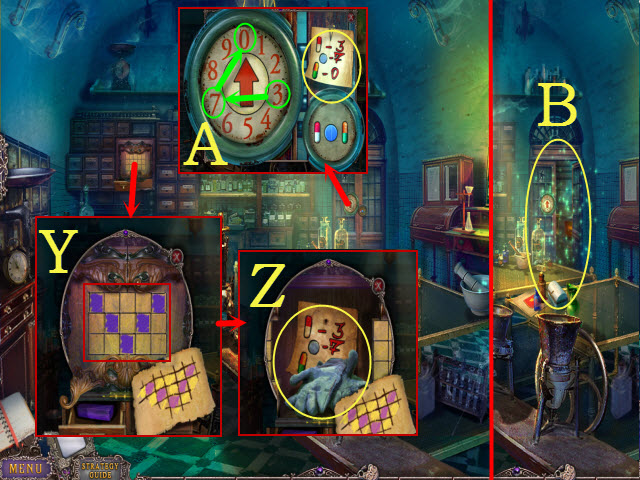
- Place the NOTE FOR PHARMACIST for a mini-game.
- Solution: (Y).
- Take the GARDEN GLOVE and RECIPE CODE (Z).
- Place the RECIPE CODE; select 3-7-0 (A).
- Play the HOP; receive the ALCOHOL (B).
- Walk down.

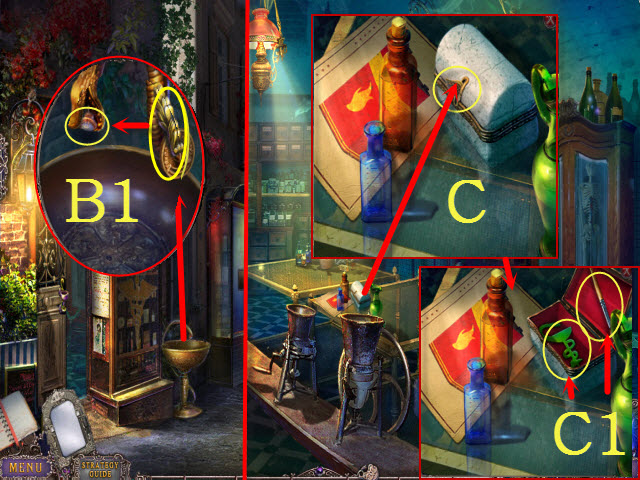
- Place the CRANE HANDLE; turn it and take the HANDLE (B1).
- Walk left.
- Place the HANDLE. Select it and open the lid (C).
- Take the BRUSH and MEDICAL SIGN (C1).
- Return to the Air Balloon Gates Airport.

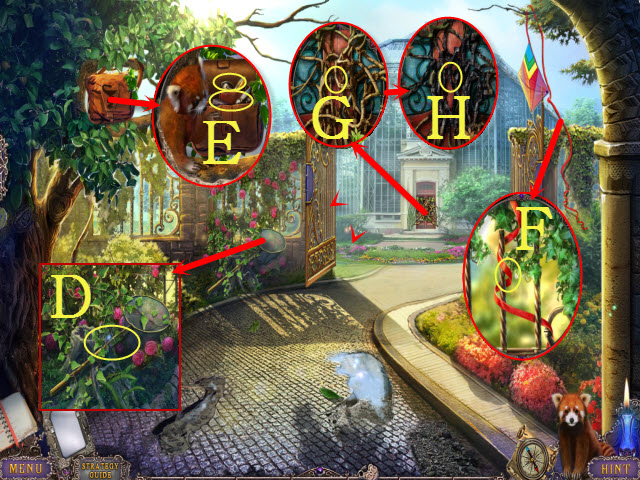
- Use the GARDEN GLOVE (D); take the NET.
- Place the MEDICAL SIGN; take the SCALPEL and FLINT (E).
- Use the SCALPEL; receive the RIBBON (F).
- Use the ALCOHOL and FLINT (G).
- Clear the branches (H); receive the SMOLDERING COALS.
- Open the door; enter the Greenhouse.

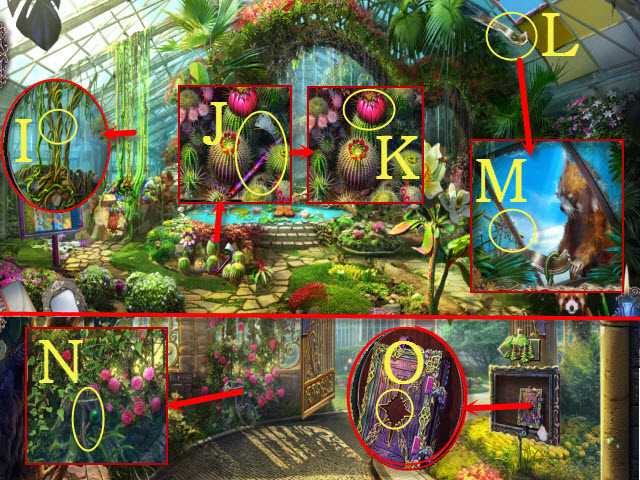
- Use the SCALPEL (I); receive the VINES.
- Use the GARDEN GLOVE (J); receive the HATCHET.
- Use the SPRAY; take the WATER SYMBOL (K).
- Place the VINES (L); take the WIND ROSE (M).
- Walk down.
- Use the HATCHET; take the LEVER (N).
- Place the WIND ROSE (O).

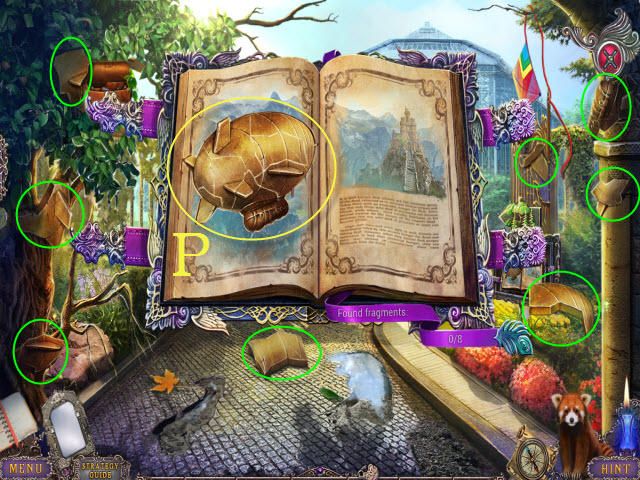
- Find the fragments; take the AIRSHIP (P).
- Walk down.

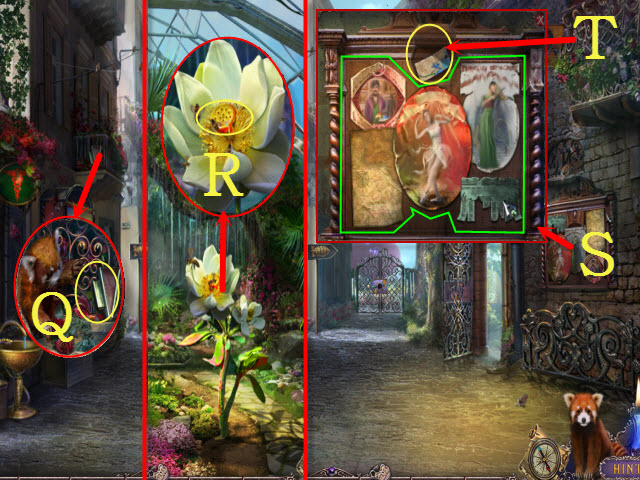
- Use the NET (Q); receive the BELLOWS.
- Place the SMOLDERING COALS and BELLOWS with the SMOKER TUBE. Select the coal and bellows. Take the SMOKER (inventory).
- Return to the Greenhouse.
- Use the SMOKER and BRUSH; receive the BRUSH WITH GLUE (R).
- Walk down twice.
- Use the SPRAY and BRUSH WITH GLUE for a mini-game (S).
- Solution: (green); take the POSTER FRAGMENT (T).
- Return to the Greenhouse.

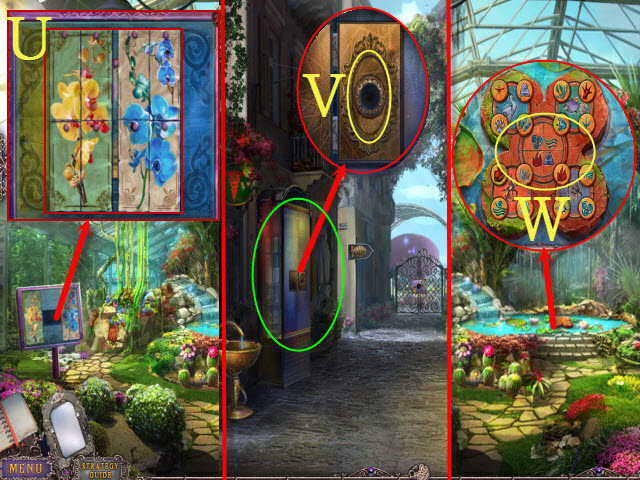
- Place the POSTER FRAGMENT for a mini-game; solution: (U).
- Select the note twice; take the HANDLE and LIGHTNING PLATE.
- Walk down twice.
- Place the HANDLE (V).
- Select the door (green); play the HOP and take the SCALES, STAR PLATE, and FROG SYMBOL.
- Return to the Greenhouse.
- Place the WATER SYMBOL and FROG SYMBOL for a mini-game (W).

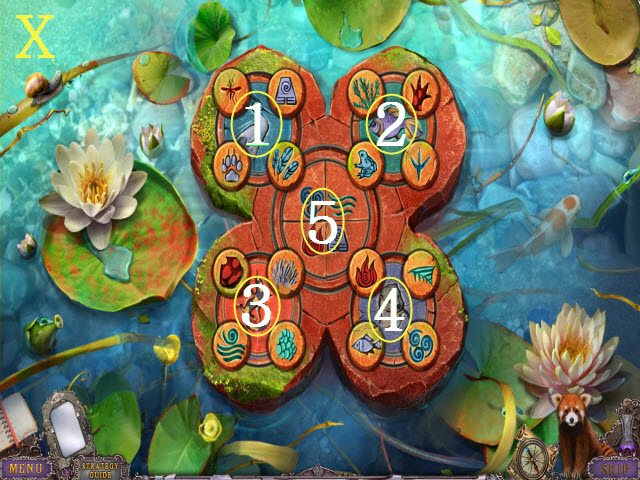
- Solution: 1-5-3-3-5-4-4-5-1-2-4-5-1-5-5-4-3-2-5-5-3-2-2-5-5-1-1-1-2-5-5-2-2-2-5-5 (X).
- Take the VIOLET CIRCLE.
- Walk down twice.

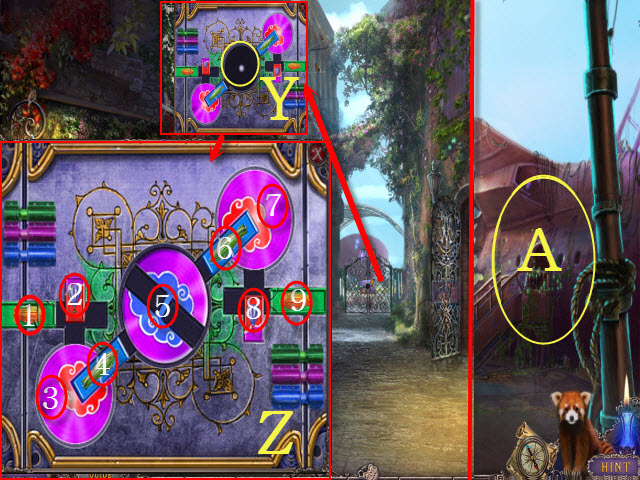
- Place the VIOLET CIRCLE for a mini-game (Y).
- Solution: 5-4-6-3-3-3-3-3-7-7-7-7-7-8-2-1-9 (Z).
- Walk forward to the Air Balloon Landing Field.
- Play the HOP (A); receive the PIN.
Chapter 6: The Balloon

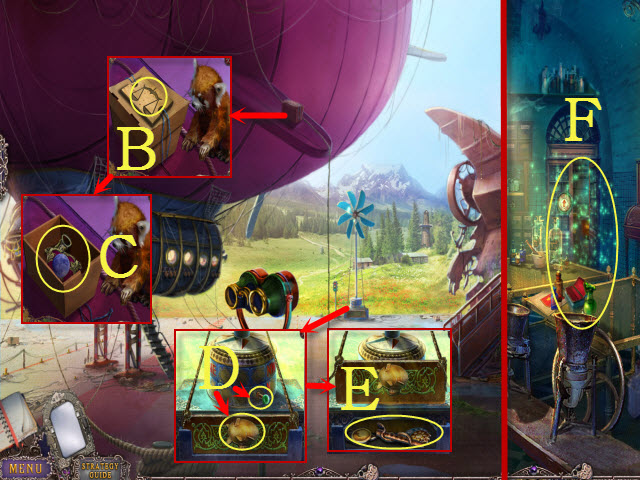
- Use the RIBBON on the PIN; select the pin twice to take the PIN WITH RIBBON (inventory).
- Place the SCALES and open the lid (B).
- Take the MOON PLATE and WEIGHT (C).
- Place the AIRSHIP and LEVER; select the lever twice (D).
- Take the SNAKE FLUTE, OILCAN, and SUN AND MOON (E).
- Return to the Abandoned Pharmacy.
- Play the HOP (F); receive the STETHOSCOPE.

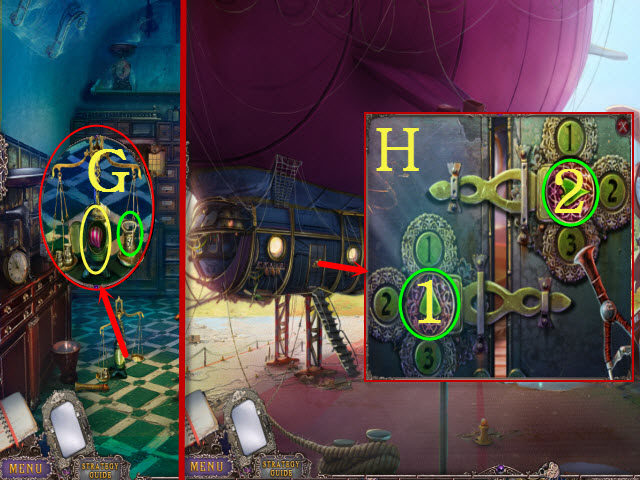
- Place the WEIGHT (green); take the HOT AIR BALLOON (G).
- Go to the Air Balloon Landing Field.
- Use the STETHOSCOPE for a mini-game.
- Solution: 1-1 (H).
- Enter the Air Balloon.

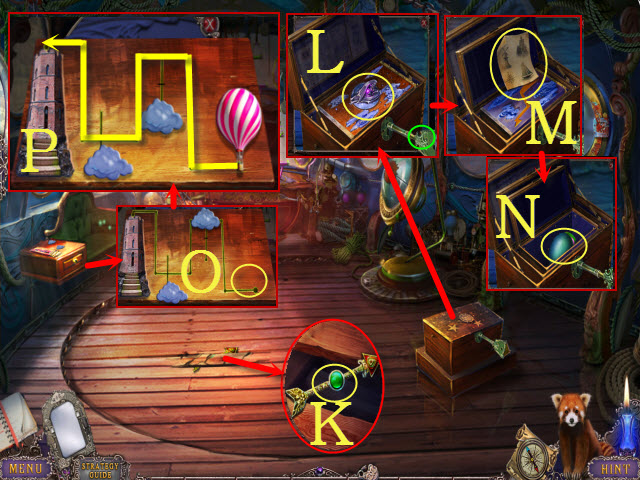
- Use the HATCHET (K); take the ARROW.
- Place the STAR PLATE; turn the key (green). Take the VIOLET BAT WEIGHT (L).
- Place the MOON PLATE; turn the key. Take the MAP (M).
- Place the LIGHTNING PLATE; turn the key. Take the EGG and GREEN BUTTON (N).
- Place the HOT AIR BALLOON for a mini-game (O).
- Solution: (P).
- Take the BINOCULARS.

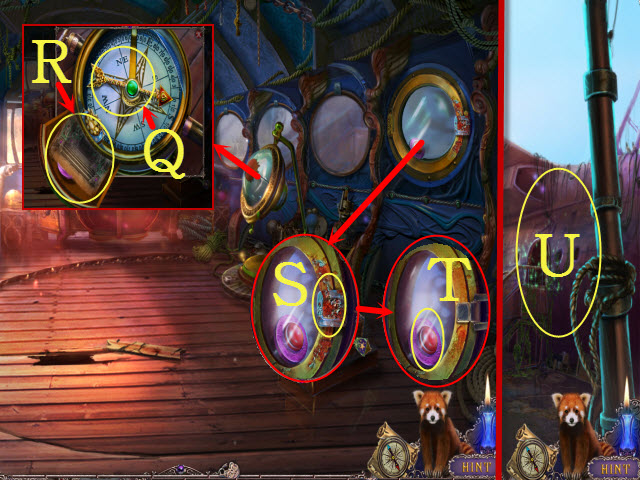
- Place the SUN AND MOON and ARROW (Q).
- Select the sketch twice; receive the SKETCH and take the BUTTON (R).
- Use the OILCAN (S); select the porthole twice to take the PURPLE BUTTON (T).
- Walk down.
- Play the HOP (U); receive the AIRSHIP WHEEL.

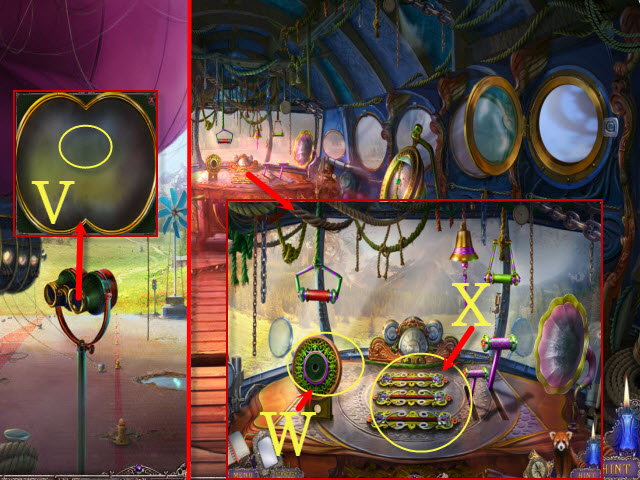
- Place the BINOCULARS and MAP (V); receive the MAP.
- Enter the Air Balloon.
- Place the AIRSHIP WHEEL and MAP (W).
- Place the GREEN BUTTON, PURPLE BUTTON, and BUTTON for a puzzle (X).

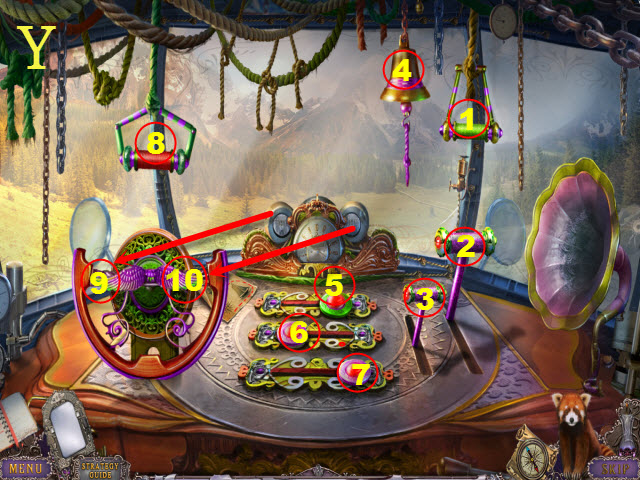
- This puzzle is random. One possible solution: 1-2-2-3-3-3-4-5-6-6-7-7-8-10-10-9-10-10-9-10-9-9 (Y).
- Select anywhere; use the CROSSBOW twice for a mini-game.

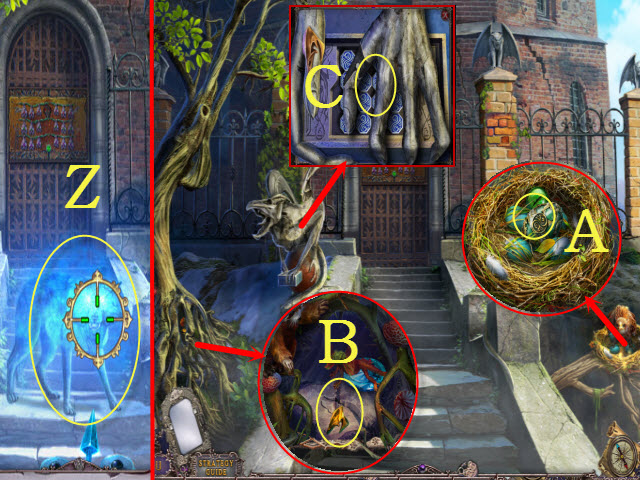
- When the reticle turns green, select the target (Z).
- Place the EGG; move the leaves to take the SNAKE EYE (A).
- Use the PIN WITH RIBBON (B); receive the RING.
- Place the RING for a mini-game (C).

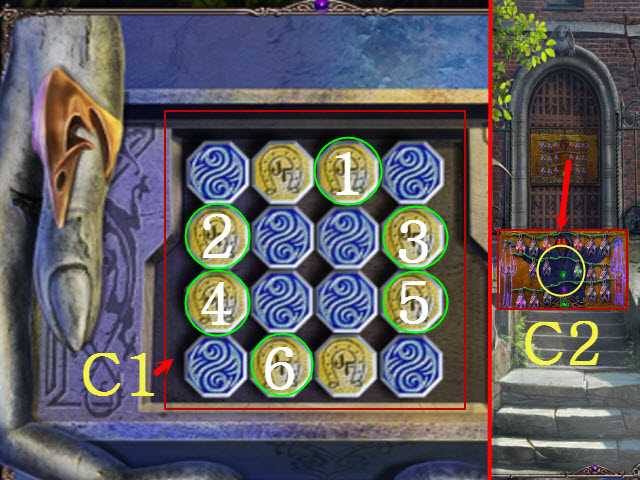
- Solution: 6-4-3-1-5-6-2-1 (C1).
- Take the GREEN BAT WEIGHT and 1/3 DRAGON TILE.
- Place the GREEN BAT WEIGHT and VIOLET BAT WEIGHT for a puzzle (C2).

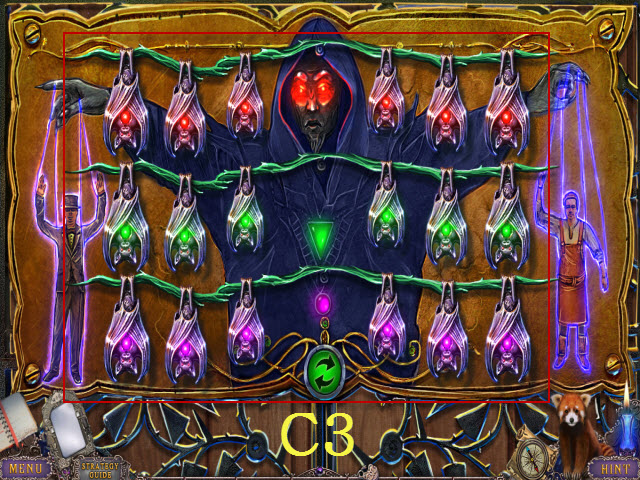
- Solution: (C3).
- Walk forward to the Fortress: Stairs.

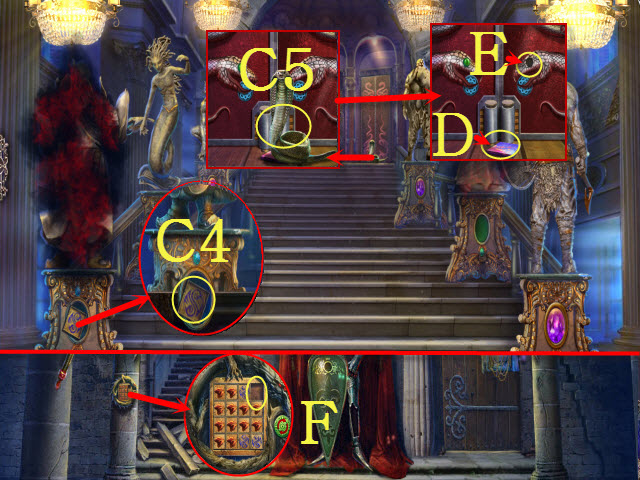
- Take the VAAL TILE (C4).
- Use the SNAKE FLUTE (C5).
- Take the 2/3 DRAGON TILE (D); place the SNAKE EYE (E).
- Walk right to the Fortress: Hall.
- Place the VAAL TILE for a mini-game (F).

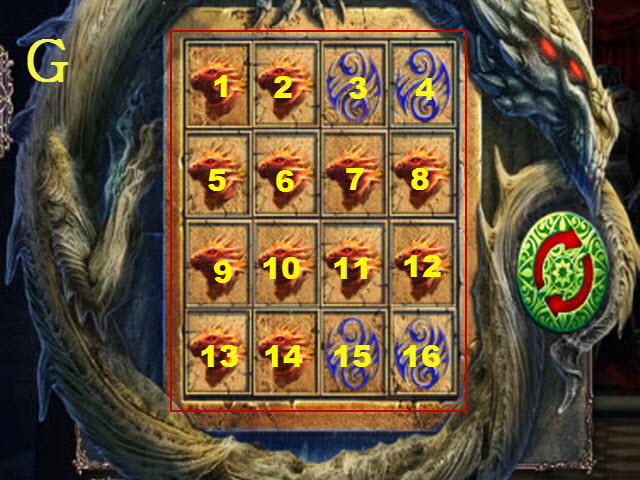
- Solution: 2-3-4-8-15-14-14-13-13-9-16-15 (G).
- Take the BRICK.

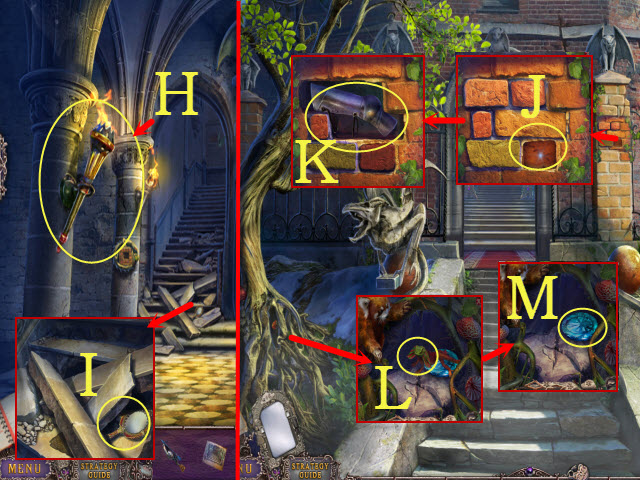
- Take the TORCH (H).
- Take the HAND MIRROR (I).
- Walk down twice.
- Place the BRICK; clear the bricks (J).
- Take the PIECE OF ARMOR (K).
- Use the HAND MIRROR (L); take the CRYSTAL (M).
- Walk forward.

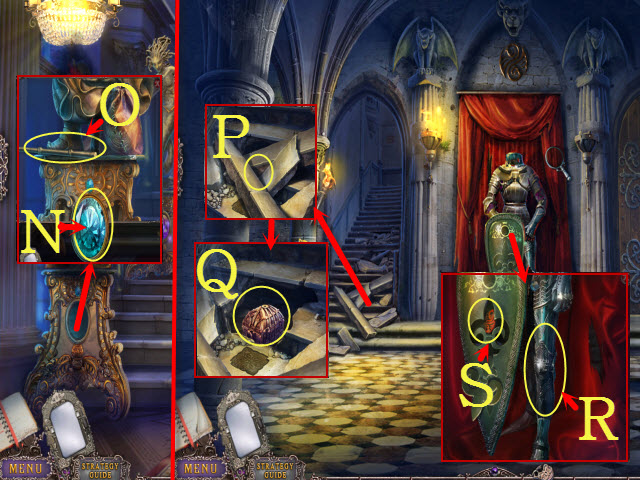
- Place the CRYSTAL (N); take the BAMBOO STICK (O).
- Walk right.
- Use the BAMBOO STICK (P); take the CHEST (Q).
- Place the PIECE OF ARMOR (R); take the SYMBOL (S).
- Walk down twice.

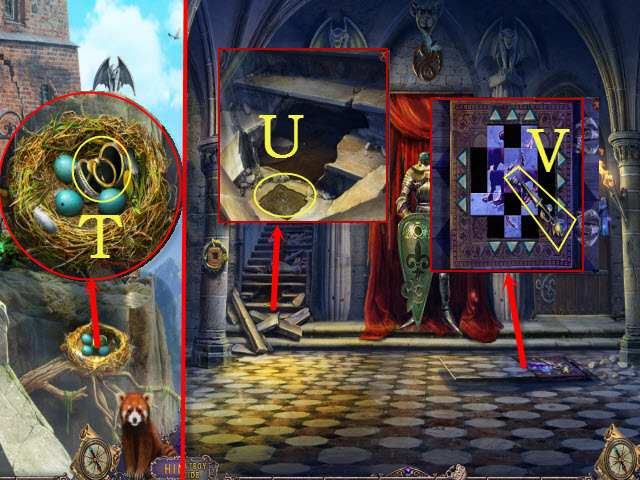
- Place the SYMBOL; take the RING (T).
- Place the RING with the CHEST. Select the ring and open the chest; take the GOLD SYMBOL and FIERY ARROW CONVERTER (inventory).
- Return to the Fortress: Hall.
- Place the GOLD SYMBOL (U); take the DAGGER (V).
- Walk down.

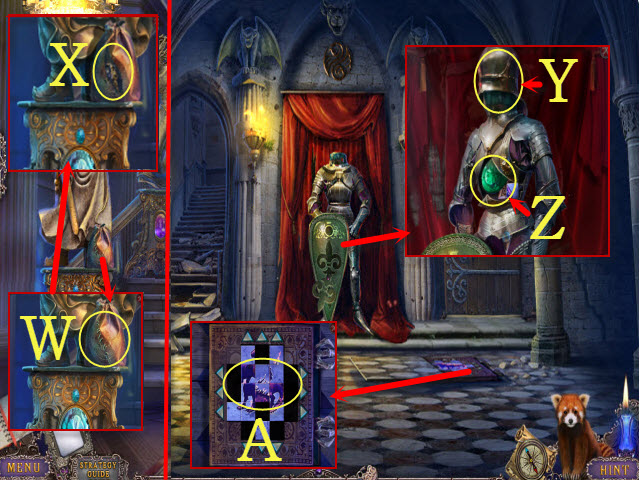
- Use the DAGGER (W); take the SWORDSMAN and KNIGHT’S HELMET (X).
- Walk right.
- Look up; place the KNIGHT’S HELMET (Y).
- Take the 3/3 DRAGON TILE, CRYSTAL ANGEL, and TRIANGULAR BUTTON (Z).
- Place the 3/3 DRAGON TILE for a mini-game (A).

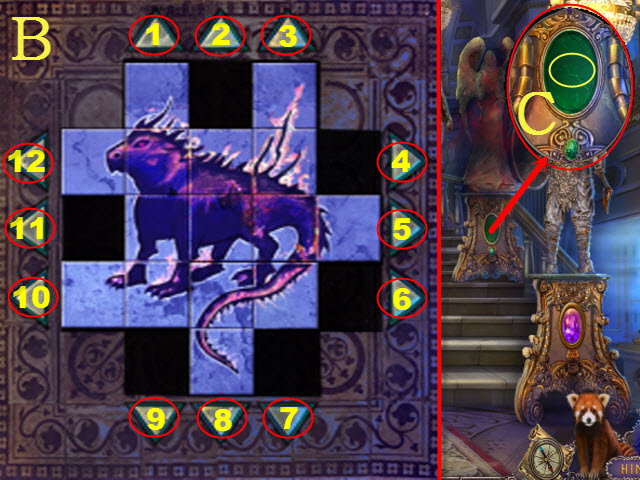
- Solution: 9-5-12-1-11-4-7-5-3-12 (B).
- Take the FUNNEL and WINGED DRAGON.
- Walk down.
- Place the CRYSTAL ANGEL (C).

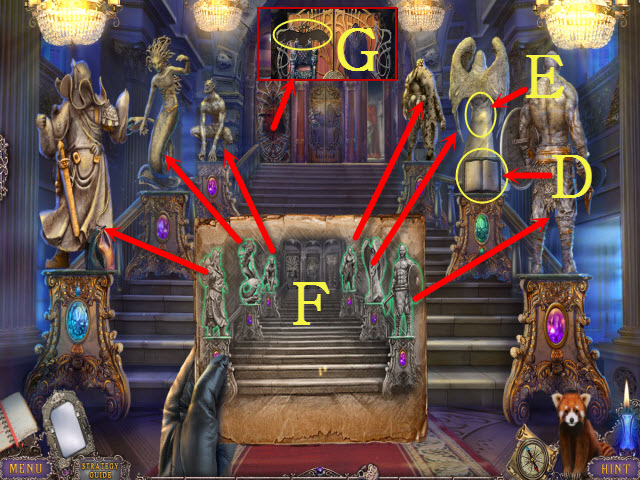
- Play the HOP; take the GLASS TUBE (D).
- Use the SKETCH (E) to arrange the statues (F).
- Place the WINGED DRAGON (G).
- Walk left to the Fortress: Throne Room.
Chapter 7: The Throne Room

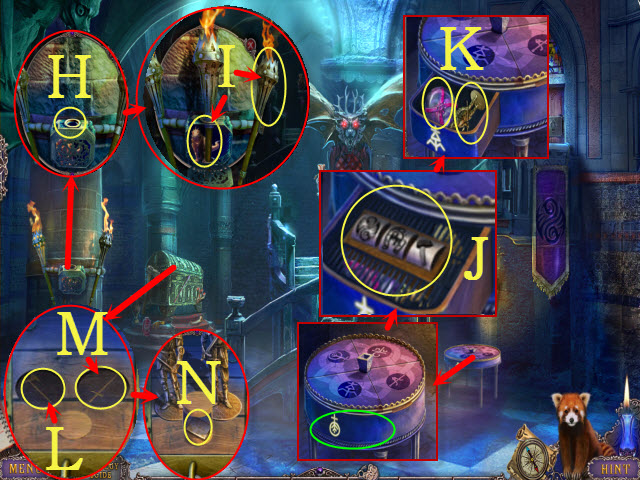
- Talk to the Huntress.
- Place the TORCH (H); take the DRAGON and TORCH (I).
- Move the disc 3x (green).
- Enter the code (J).
- Take the WARRIOR WITH AX and ROUND FLASK (K).
- Place the WARRIOR WITH AX (L) and SWORDSMAN (M).
- Select the note twice and take the BUTTON (N).
- Walk down.

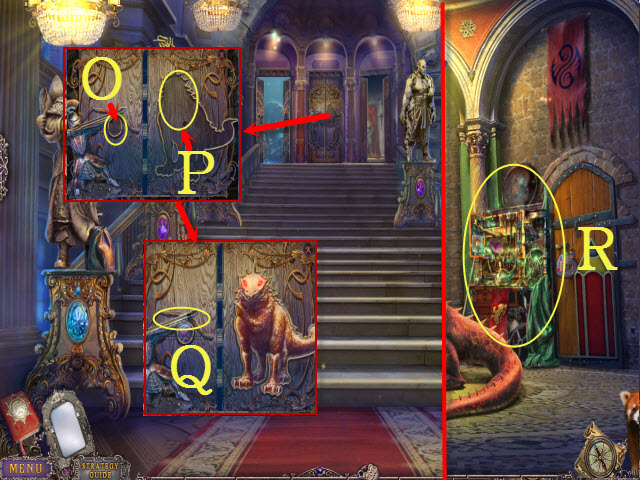
- Place the ROUND FLASK (O) and DRAGON (P).
- Select the arrow (Q).
- Walk forward to the Fortress: Guard’s Room.
- Play the HOP (R); receive the MACE.
- Return to the Fortress: Throne Room.

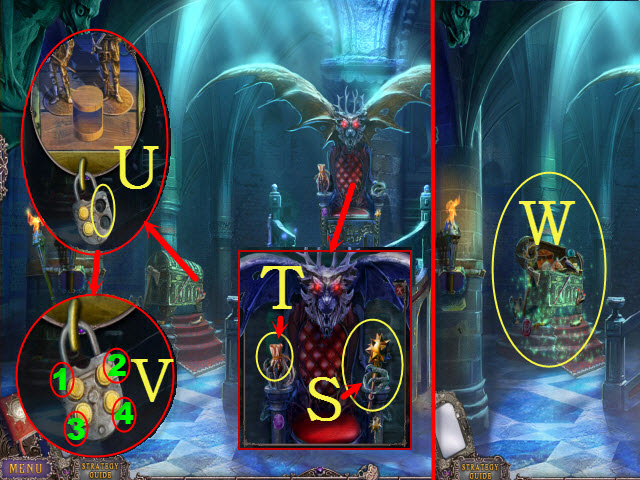
- Place the MACE (S); take the POUCH (T).
- Select the POUCH twice. Select the paper 3x; take the BUTTON. Select the note twice; take the POWDER (inventory).
- Place the two BUTTONS for a mini-game (U).
- Solution: 1-4-2-3 (V).
- Play the HOP (W); receive the EMPTY FLASK.
- Open the FIERY ARROW CONVERTER; place the FUNNEL, GLASS TUBE, and EMPTY FLASK on it. Use the POWDER. Turn the handle; take the FIERY VESSEL (inventory).
- Place the CROSSBOW with the FIERY VESSEL. Replace the crossbow vessel with the FIERY VESSEL; take the DRAGON CROSSBOW (inventory).
- Return to the Fortress: Guard’s Room.

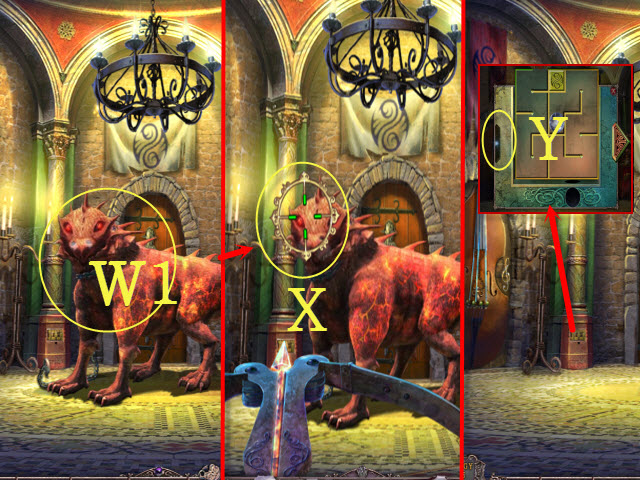
- Select the dragon and use the DRAGON CROSSBOW (W1); select the reticle when it turns green 3x (X).
- Place the TRIANGULAR BUTTON for a mini-game (Y).

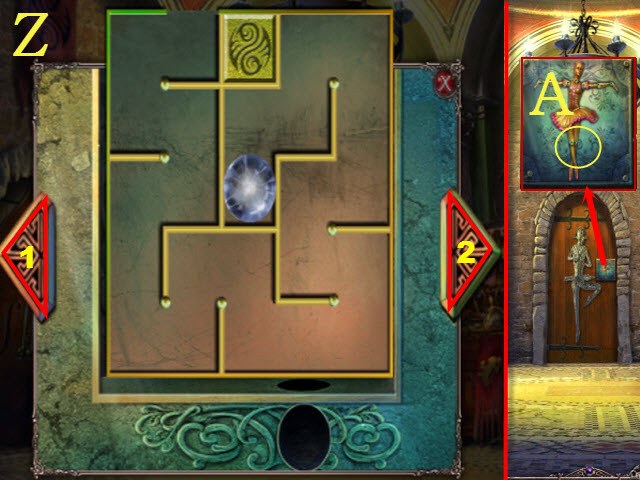
- Solution: 2-2-1-2-1-1-1-2-2-1-1-1-2-2-1-1-1-2-2-1-1-2 (Z).
- You receive the MAGIC SPHERE. Take the BALLERINA DANCE DIAGRAM.
- Place the BALLERINA DANCE DIAGRAM for a mini-game (A).

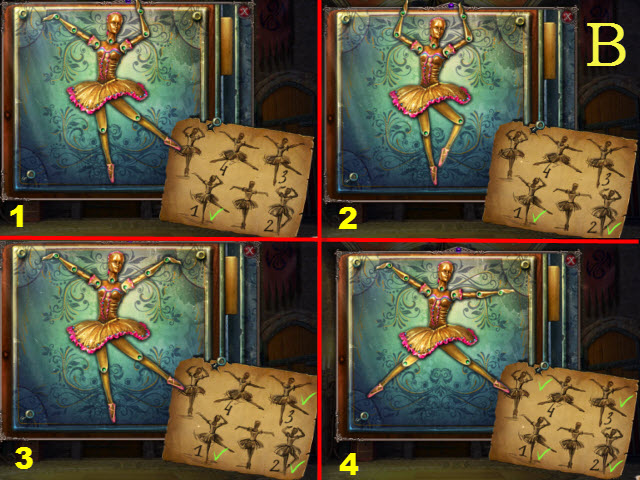
- Solution: 1-4 (B).
- Walk forward to the Fortress: Dancer’s Hall.

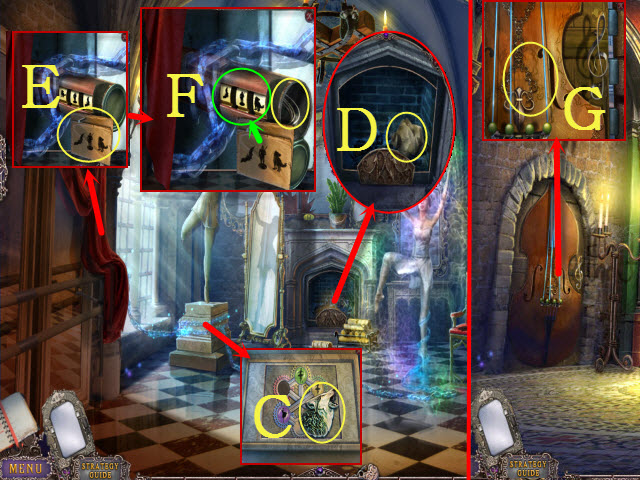
- Take WOLF TILE (C).
- Select and take the NOTE (D).
- Move the curtain; place the NOTE (E).
- Align the symbols (green); take the STRING (F).
- Walk down.
- Place the STRING for a mini-game (G).

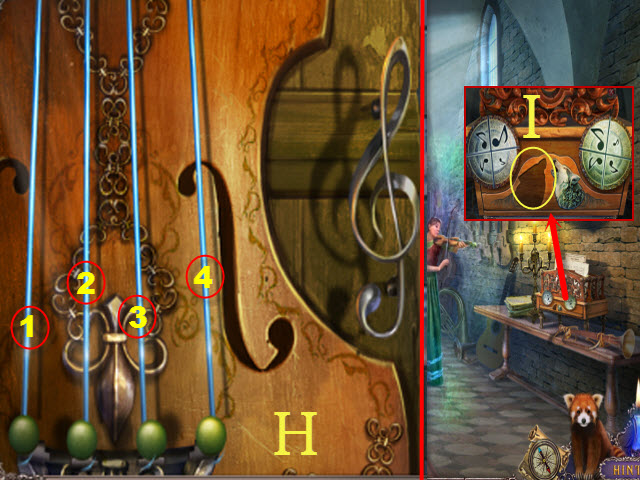
- Solution: 1-2-3-4-2-3-1-4-2-2-1-2-1-4-1 (H).
- Walk left to the Fortress: Violinist’s Hall.
- Place the WOLF TILE for a mini-game (I).

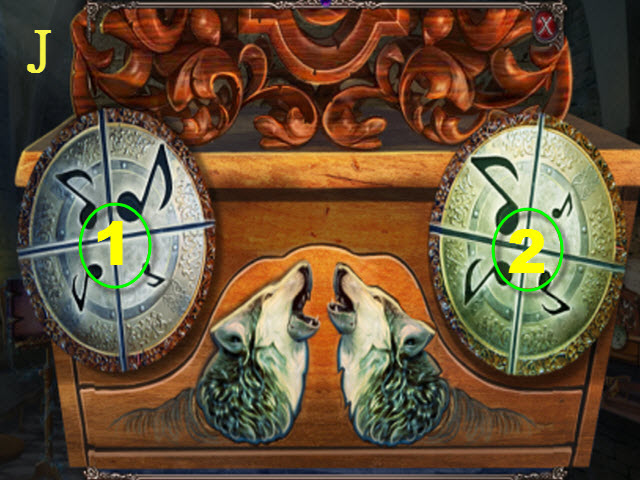
- Solution: 1-2-2-1 (J).
- Select the note twice; take the MIRROR.
- Return to the Fortress: Dancer’s Hall.

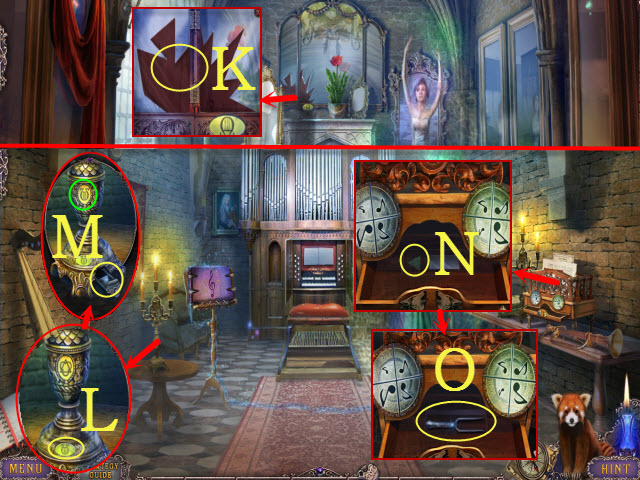
- Place the MIRROR (K); receive the SYMBOL.
- Go to the Fortress: Violinist’s Hall.
- Place the SYMBOL (L).
- Select the symbol x2 (green); take the TRIANGLE (M).
- Place the TRIANGLE (N); take the TUNING FORK (O).
- Return to the Fortress: Dancer’s Hall.

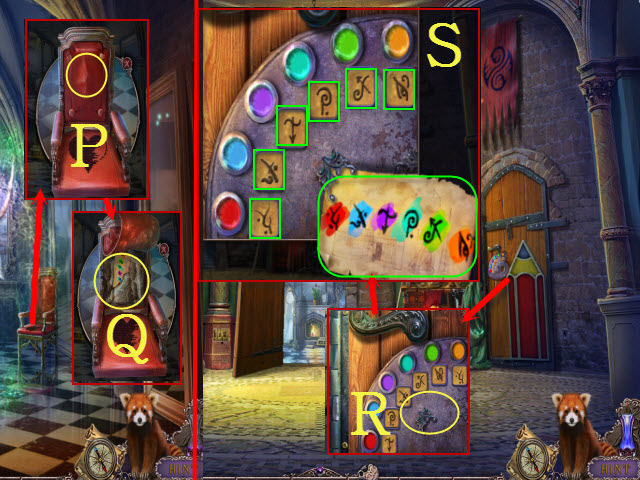
- Use the TUNING FORK (P).
- Take the ARTIST’S PAINTING DIAGRAM (Q).
- Walk down.
- Place the ARTIST’S PAINTING DIAGRAM for a mini-game (R).
- Solution: (S).
- Walk right to the Fortress: Painter’s Hall.

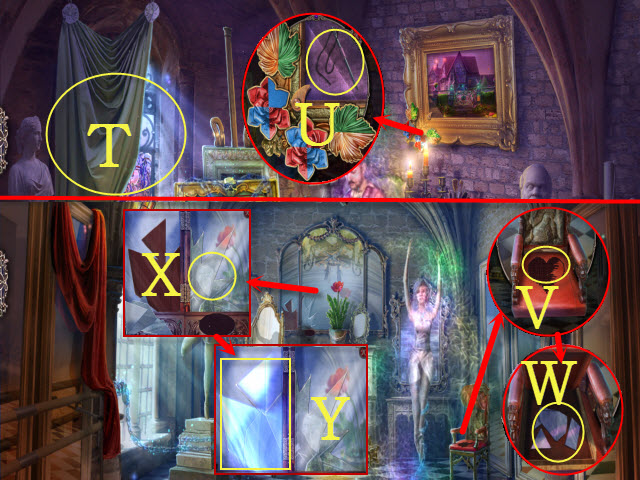
- Move the curtain; play the HOP and receive the 1/2 KEY ORGAN (T).
- Take the NEEDLE WITH THREAD (U).
- Go to the Fortress: Dancer’s Hall.
- Use the NEEDLE WITH THREAD (V); take the MIRROR SHARDS (W).
- Place the MIRROR SHARDS for a mini-game (X).
- Solution: (Y).
- Take the HARP STRING and ROSE PART.
- Go to the Fortress: Painter’s Hall.

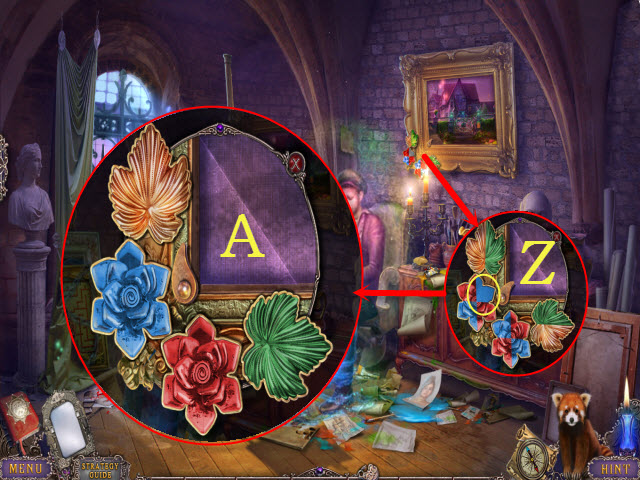
- Place the ROSE PART for a mini-game (Z).
- Solution: (A).
- Take the SHEET MUSIC.
- Return to the Fortress: Violinist’s Hall.

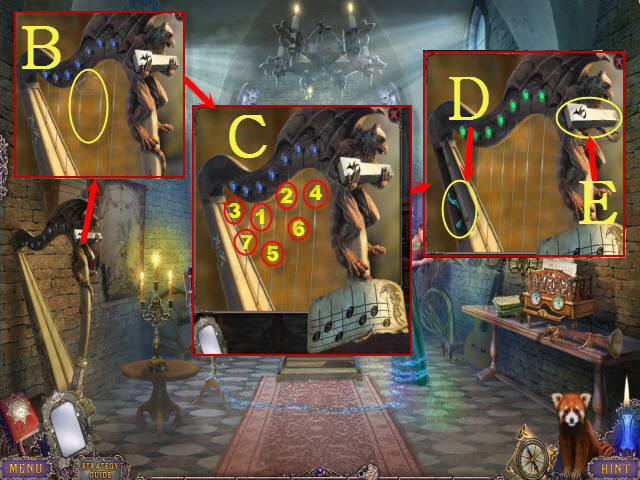
- Select the string; place the HARP STRING and SHEET MUSIC for a mini-game (B).
- Solution: 1-2-3-4-5-6-7 (C).
- Take the HAMMER AND TONGS (D) and 2/2 KEY ORGAN (E).

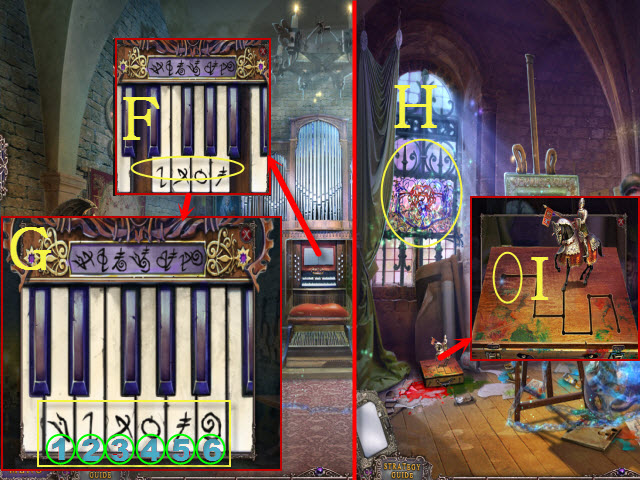
- Place the 2/2 KEY ORGAN for a mini-game (F).
- Solution: 1-3-2-4-5-6-1-5-6-2-4-5-2-3-6 (G).
- Take the KNIGHT and HOOK.
- Return to the Fortress: Painter’s Hall.
- Play the HOP (H); receive the PALETTE.
- Place the KNIGHT for a mini-game (I).

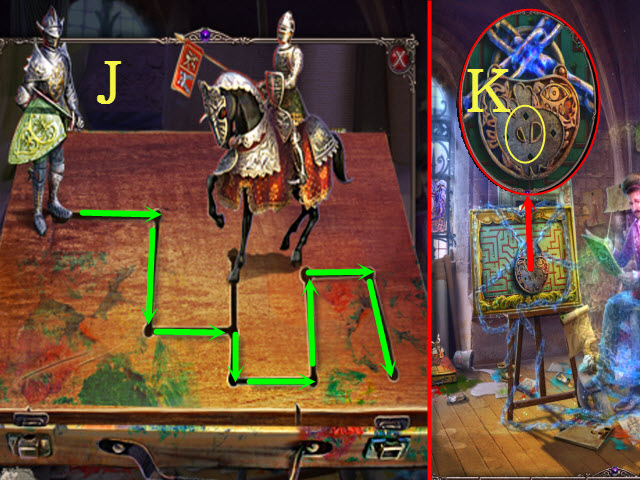
- Solution: (J).
- Take the BALLERINA BUTTON and TONGS.
- Place the PALETTE and view the easel for a puzzle (K).

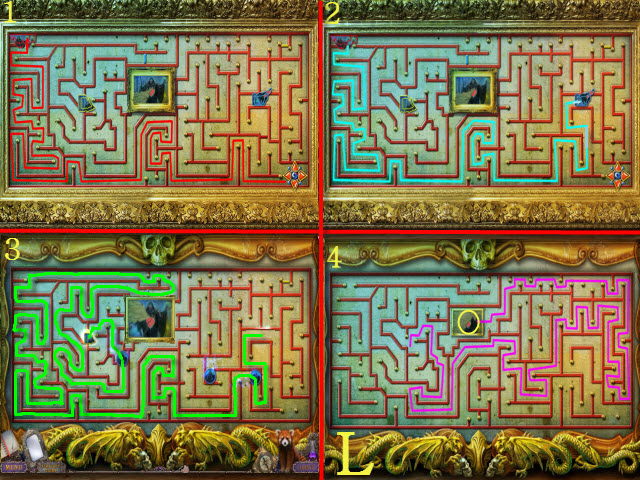
- Solution: 1-4 (L).
- Talk to the Artist.

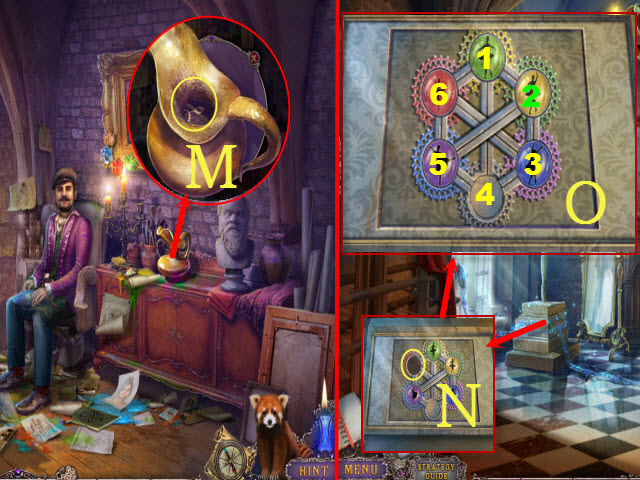
- Use the HOOK; take the TREBLE CLEF (M).
- Return to the Fortress: Dancer’s Hall.
- Place the BALLERINA BUTTON for a mini-game (N).
- Solution: 1-2-3-4-5-2-3-4 (O).
- Select the drum for a mini-game.

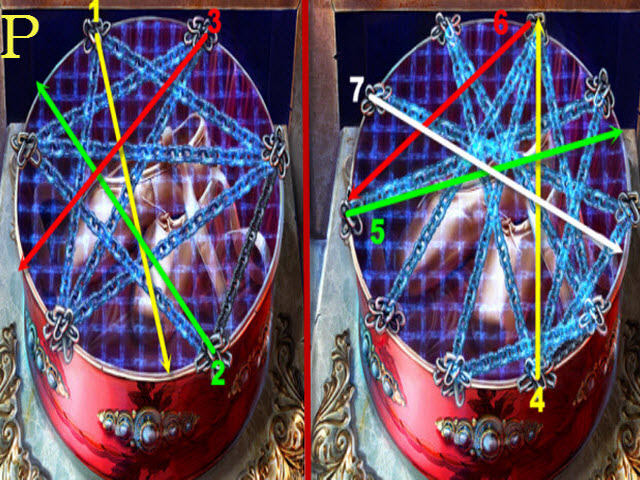
- Please see the screenshot for the solution.
- Solution: 1-7 (P).
Chapter 8: The Sword

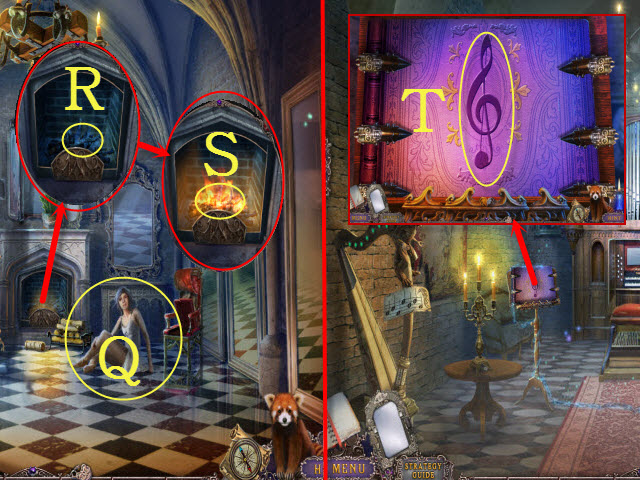
- Talk to the Ballerina (Q).
- Use the TORCH (R).
- Place the TONGS and MAGIC SPHERE (S); receive the MAGIC SPHERE.
- Go to the Fortress: Violinist’s Hall.
- Place the TREBLE CLEF for a mini-game (T).

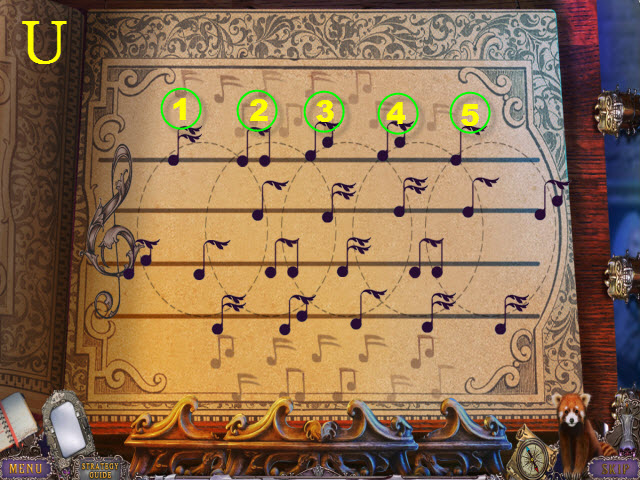
- Please see the screenshot for the solution.
- Solution: 1-2-3-4-5-1-2-3-4-5 (U).

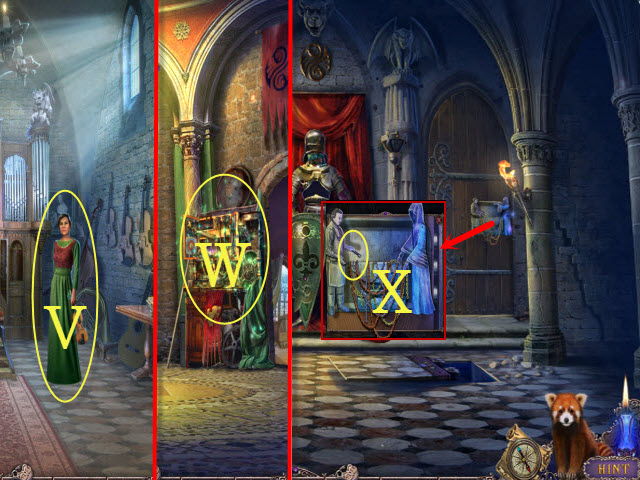
- Talk to the Musician (V).
- Walk down.
- Play the HOP (W); receive the HAMMER.
- Return to the Fortress: Hall.
- Place the HAMMER for a mini-game (X).

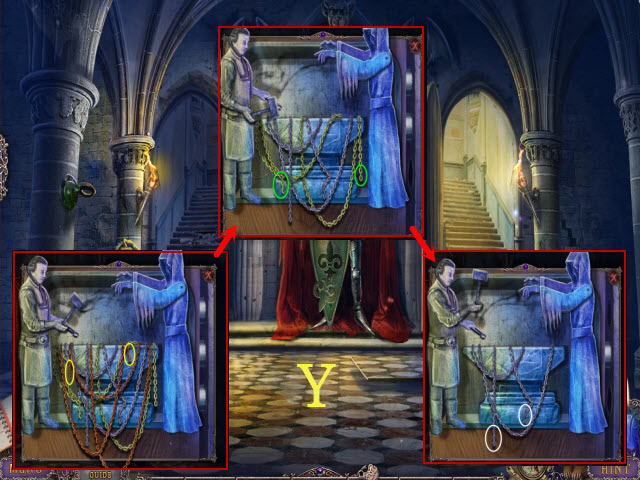
- Solution: (Y).
- Walk upstairs.

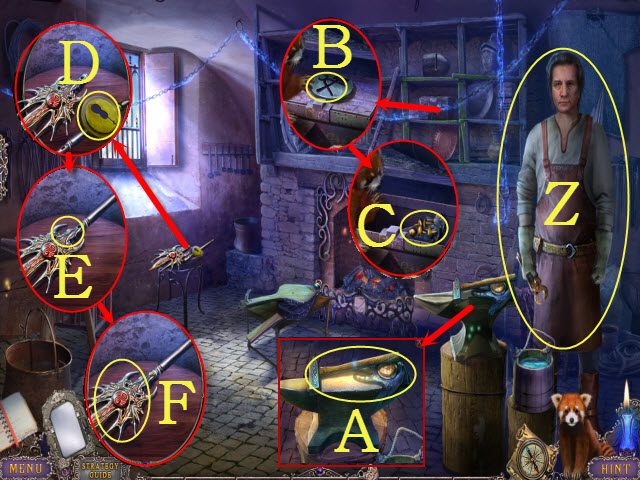
- Talk to the Blacksmith twice; receive the NET (Z).
- Take the HAMMER and FIRE-RETARDANT GLOVE (A).
- Place the HAMMER AND TONGS; open the lid (B).
- Take the RIVETS and MAGICIAN SILHOUETTE (C).
- Take the VIOLIN DISK; select the handle (D).
- Place the RIVETS; use the HAMMER (E). Take the STAFF (F).
- Return to the Fortress: Throne Room.

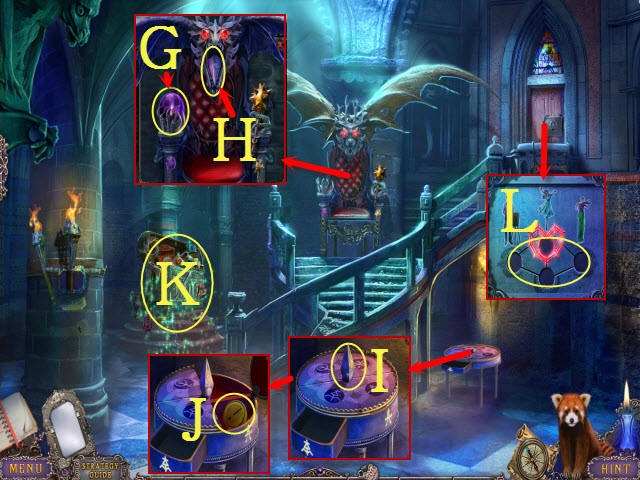
- Place the MAGIC SPHERE (G); take the PYRAMID (H).
- Place the PYRAMID (I); turn it and take the PAINTBRUSH DISK (J).
- Play the HOP (K); receive the BALLERINA DISK.
- Place the VIOLIN DISK, PAINTBRUSH DISK, and BALLERINA DISK for a mini-game (L).

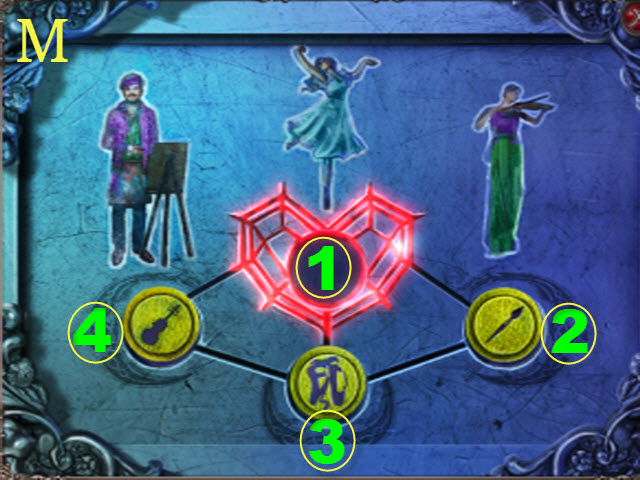
- Solution: 4-3-2-1-4-3-4-3-2-1-4-3-2-1-3-4-3-2-1-3 (M).
- Select the knocker; walk upstairs to the Fortress Heart.

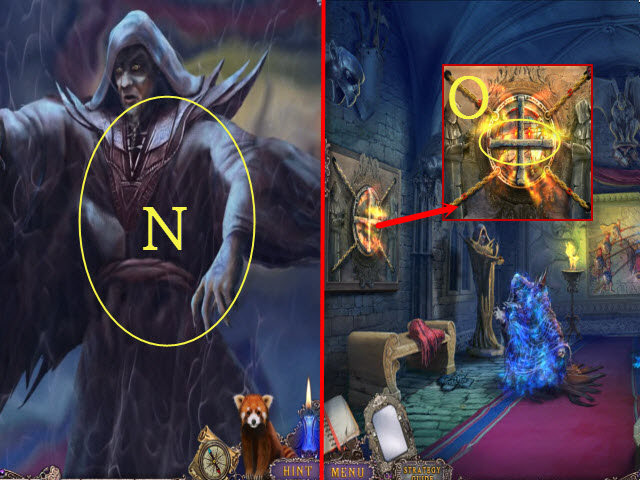
- Use the NET (N).
- Use the FIRE-RETARDANT GLOVE for a mini-game (O).

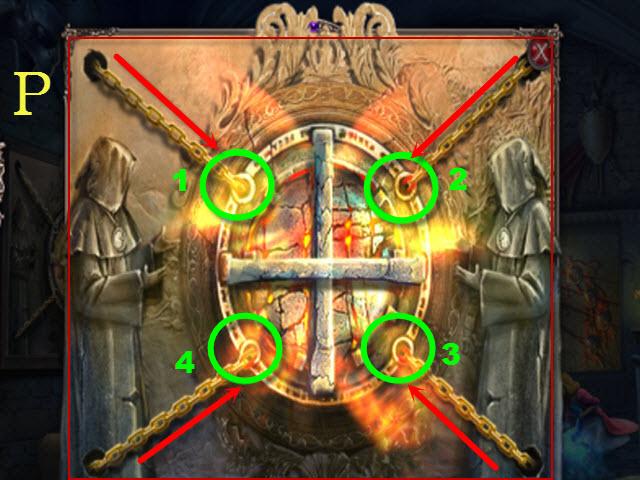
- Solution: 4-1-3-2 (P).
- You receive the METAL.

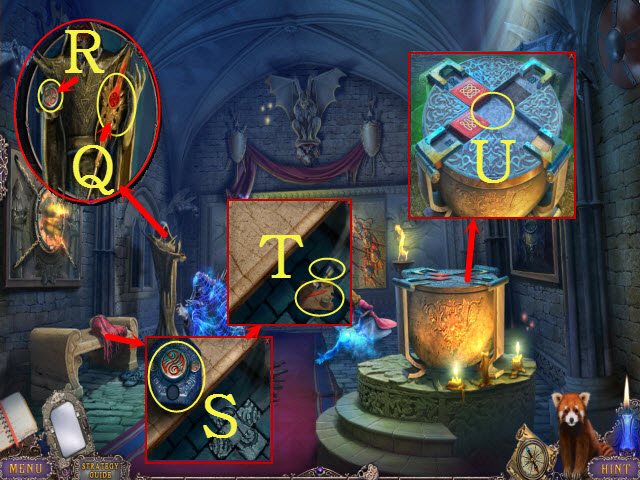
- Place the STAFF (Q); take the VAAL KEY (R).
- Move the blanket; take the CHEST (S).
- Place the VAAL KEY in the CHEST; take the SWORD HILT and BAR (inventory).
- Rotate the two stones; take the BLADE FORGING DIAGRAM and BELLOWS NOZZLE (T).
- Place the BAR for a mini-game (U).

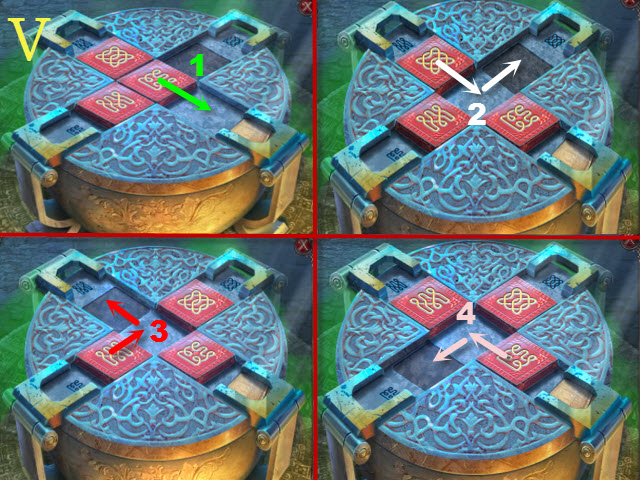
- Solution: 1-4 (V).
- Select paper twice; receive the MAGIC SOLUTION.

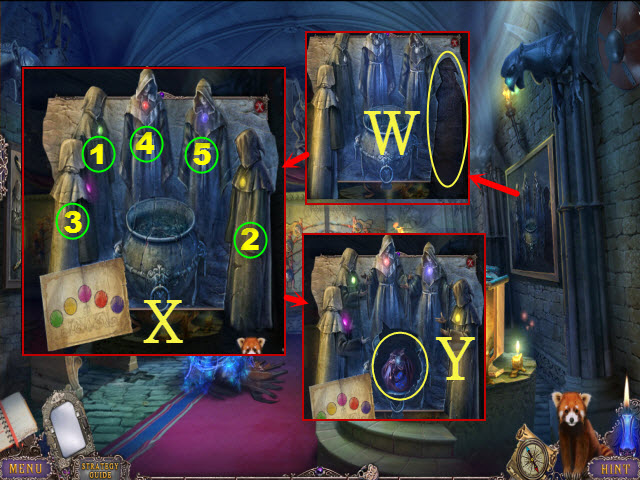
- Place the MAGICIAN SILHOUETTE and MAGIC SOLUTION (W).
- Select the statues: 1-5 (X).
- Take the MAGIC SACK (Y).
- Return to the Fortress: John’s Dungeon.

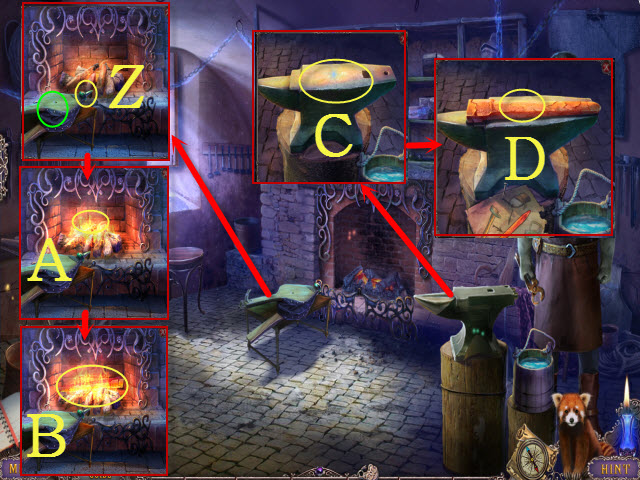
- Place the BELLOWS NOZZLE (Z); select the bellows (green).
- Place the METAL (A). Use the TONGS (B); receive METAL VAAL SYMBOL.
- Place the BLADE FORGING DIAGRAM, METAL VAAL SYMBOL, and MAGIC SACK (C).
- Use the HAMMER (D); receive the BLADE.
- Place the SWORD HILT with the BLADE; select it twice to receive the SWORD (inventory).
- Return to the Fortress Heart.

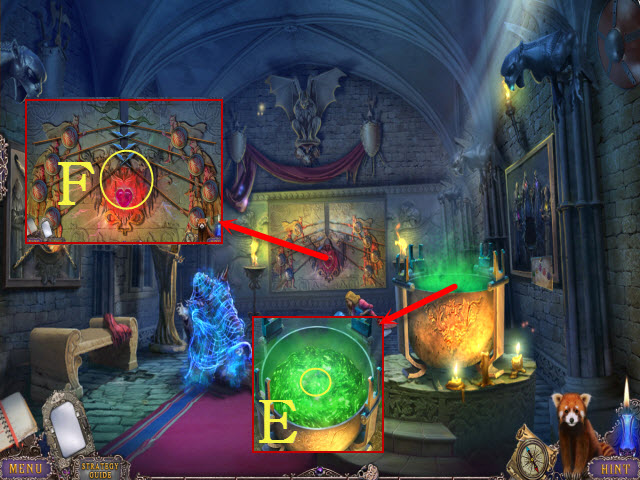
- Open the cauldron; use the SWORD to receive the PUNISHMENT SWORD (E).
- Use the PUNISHMENT SWORD for a mini-game (F).

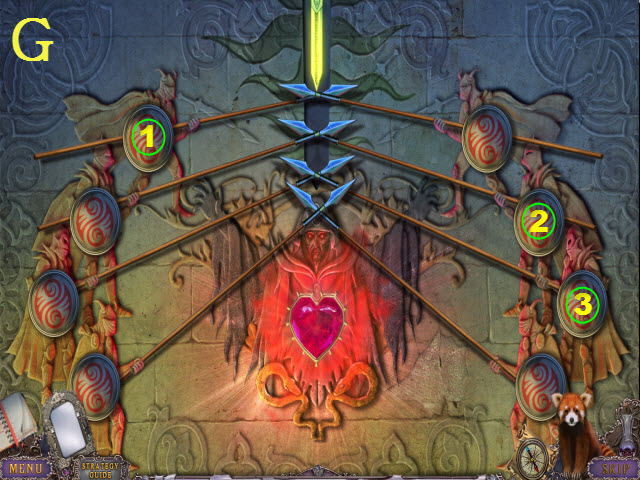
- Please see the screenshot for the solution.
- Solution: 1-2-3 (G).
- Congratulations, you’ve completed Whispered Secrets: Into the Wind.





 Mishap: An Accidental Haunting ™ Walkthrough, Guide, & Tips
 Clockwork Tales: Of Glass and Ink Walkthrough, Guide, & Tips
 Snark Busters 2: All Revved Up Walkthrough, Guide, & Tips
 Bridge to Another World: Burnt Dreams Walkthrough, Guide, & Tips
 Detective Quest: The Crystal Slipper Walkthrough, Guide, & Tips