Detective Quest: The Crystal Slipper Walkthrough, Guide, & Tips
Detective Quest: The Crystal Slipper Walkthrough
Welcome to the Detective Quest: The Crystal Slipper Walkthrough
Push your detective skills to the limit in a fantastical faraway land and find a prince’s lost love.
Whether you use this document as a reference when things get difficult or as a road map to get you from beginning to end, we’re pretty sure you’ll find what you’re looking for here.
This document contains a complete Detective Quest: The Crystal Slipper game walkthrough featuring annotated screenshots from actual gameplay!
We hope you find this information useful as you play your way through the game. Use the walkthrough menu below to quickly jump to whatever stage of the game you need help with.
Remember to visit the Big Fish Games Forums if you find you need more help. Have fun!
This walkthrough was created by LuckySmile, and is protected under US Copyright laws. Any unauthorized use, including re-publication in whole or in part, without permission, is strictly prohibited.
General Tips

- This is the official guide for Detective Quest: The Crystal Slipper.
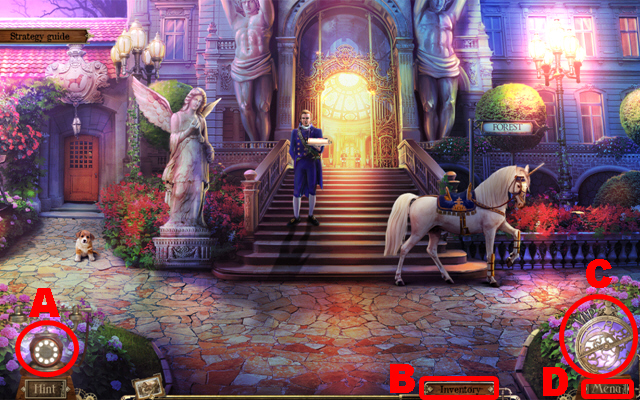
- Press the hint button (A) to get a direct clue how to proceed.
- Hover over the inventory (B) to review your current inventory items or to take and use them in specific scenes.
- Access the map (C) to find out locations with active objectives and to quickly travel to any location.
- From the menu (D) you can leave the game, adjust the volume plus the display mode, and change the difficulty of the game.
- Hidden Object scenes will be referred to as HOS throughout this guide.
- There are three grades of difficulty to choose from: casual, advanced, and hardcore mode.
Chapter 1: The Palace
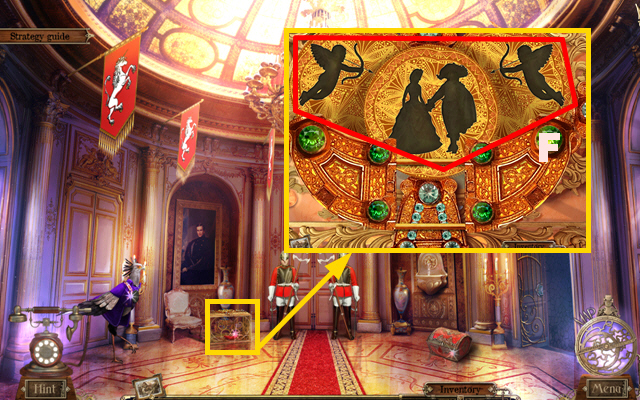
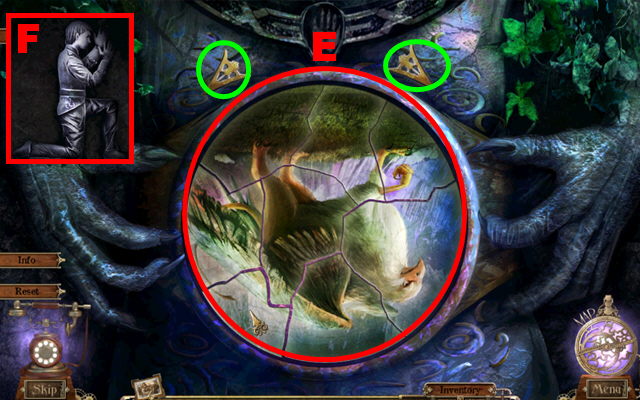
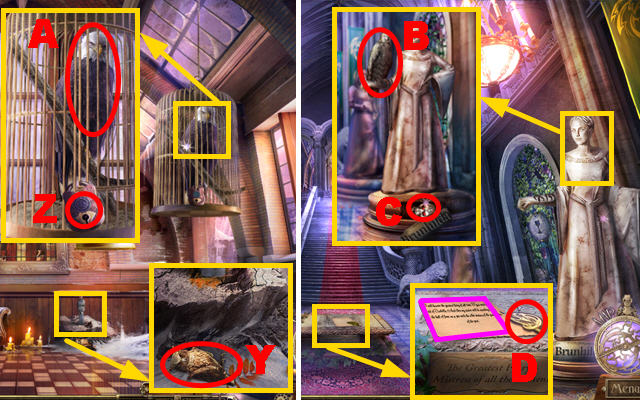
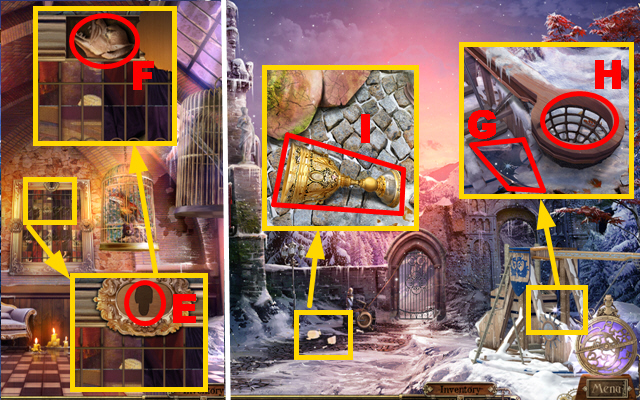
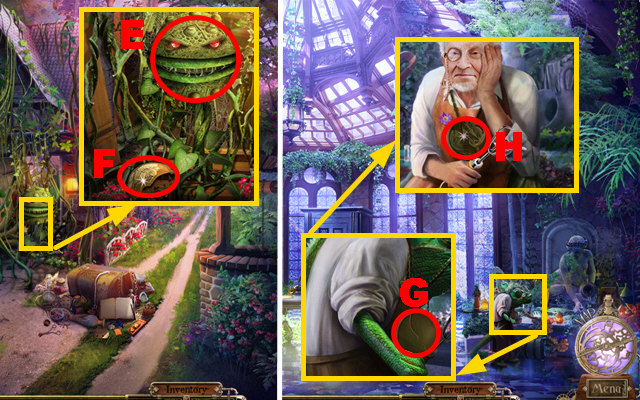
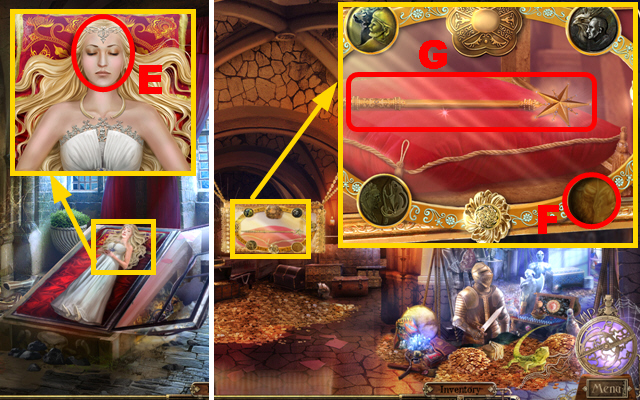
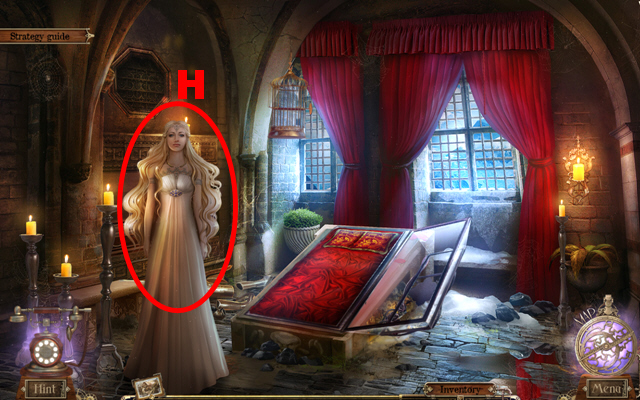
- Talk to the courtier (E).
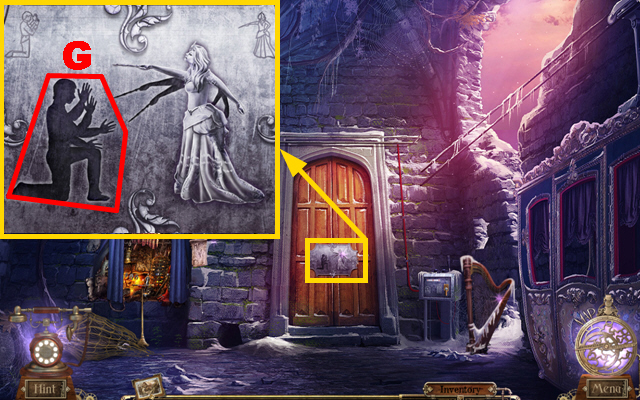
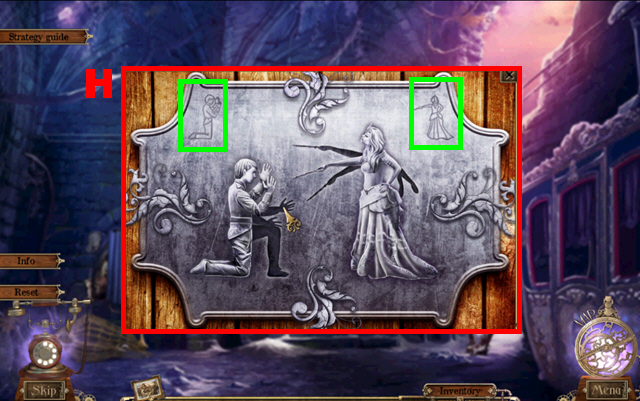
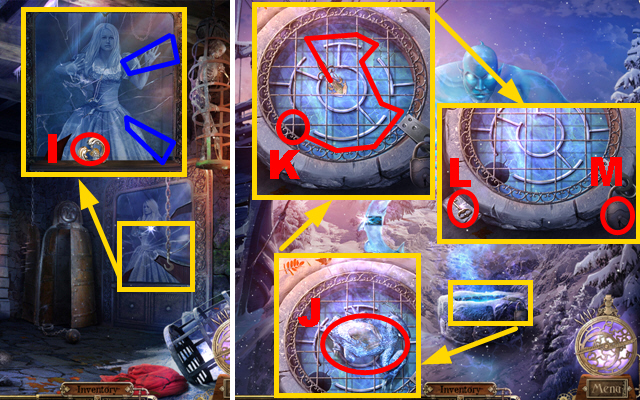
- Zoom into the courtier’s tray; take the ROYAL LETTER (F), the PHOTO CLUE below the letter (G), and the RING below the photo (H).
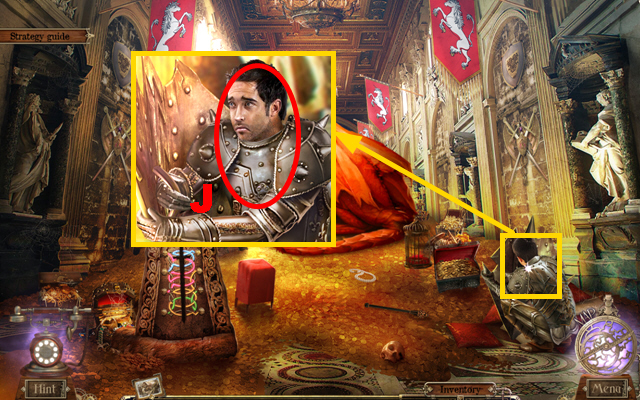
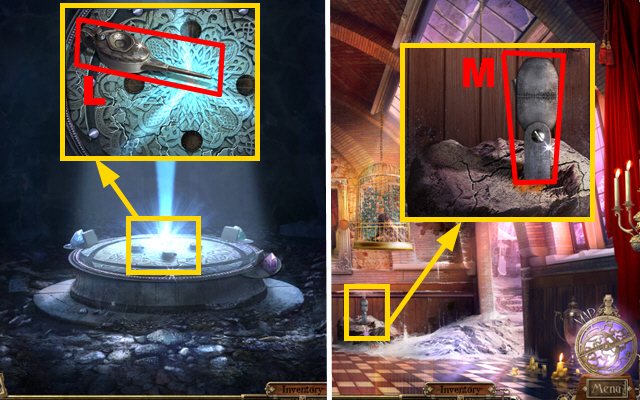
- Zoom into the unicorn; remove the old horseshoe (I).
- Move forward.
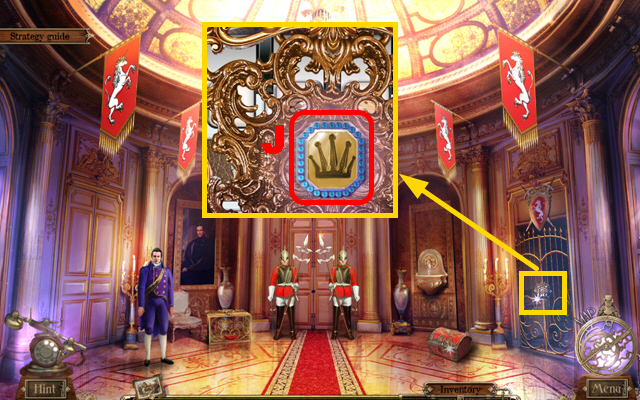
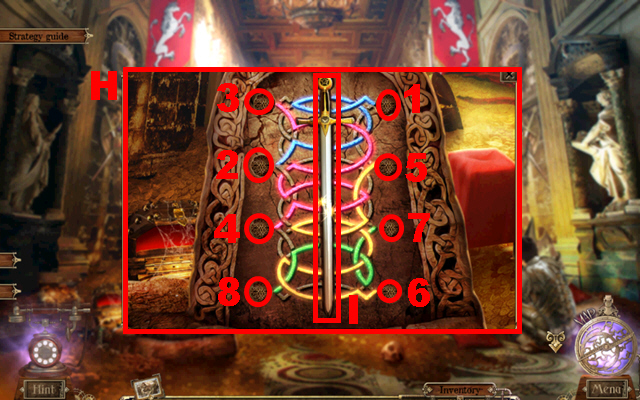
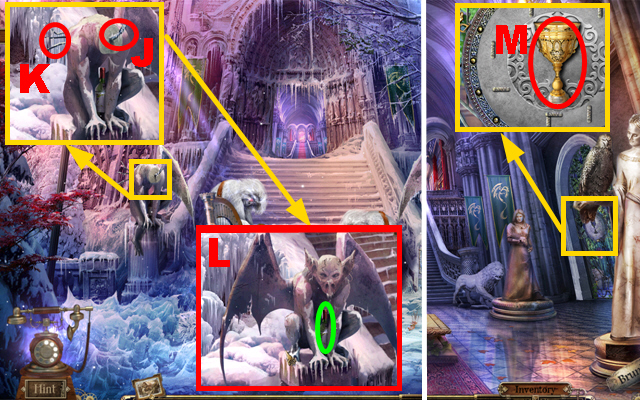
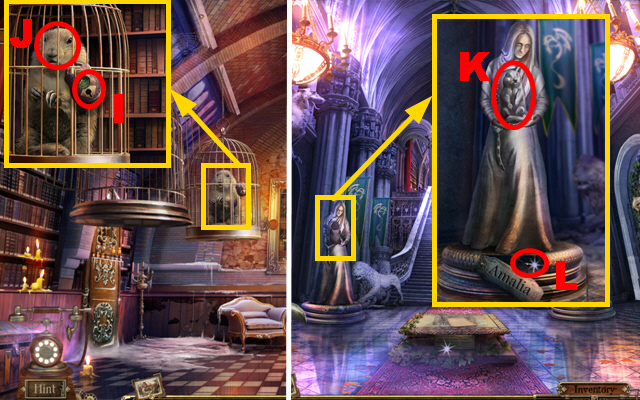
- Zoom into the gate; put the RING into the slot (J).
- Play the mini-game.
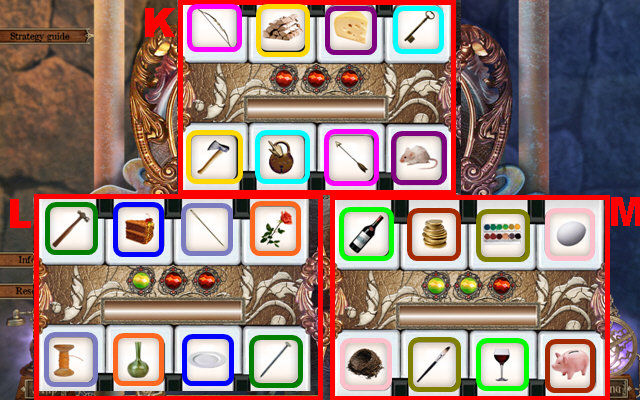
- To solve this puzzle, you have to activate four matching pairs three times (K), (L), and (M).
- The pairs are framed in the same color.
- Enter the Minor treasury.
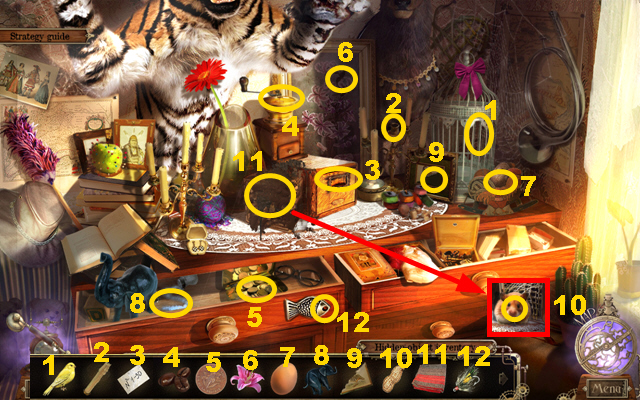
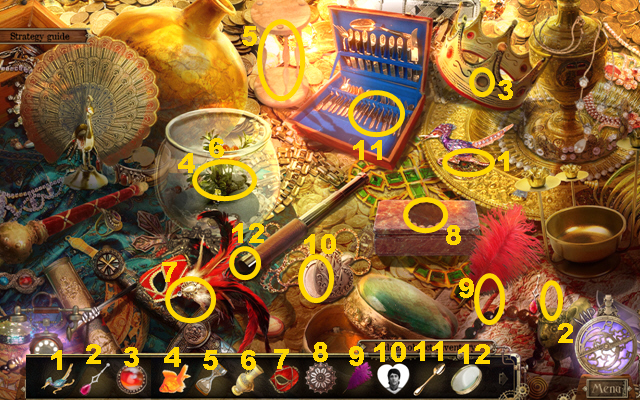
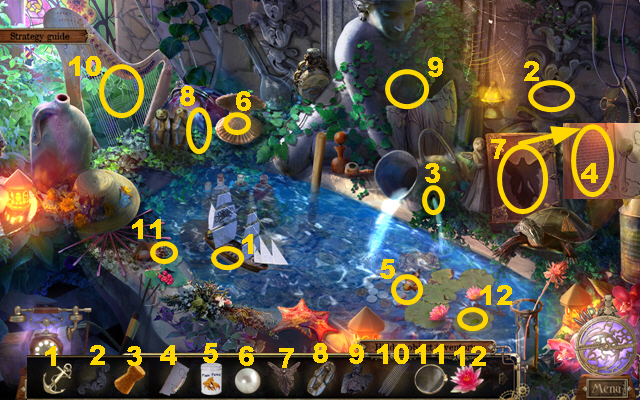
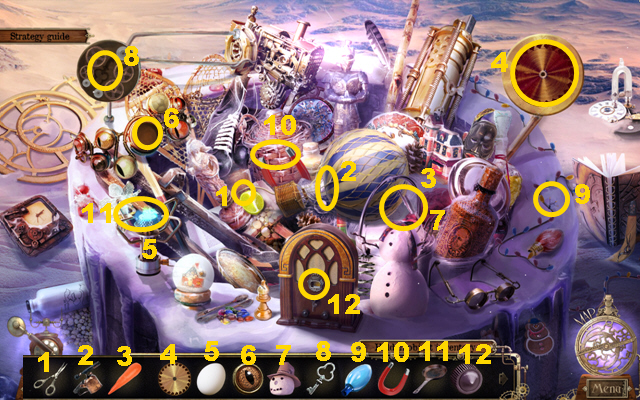
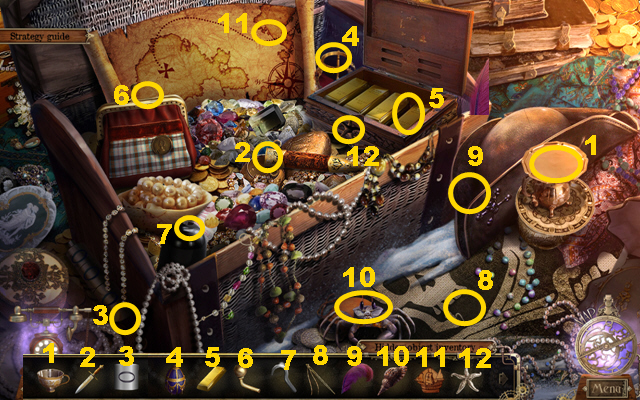
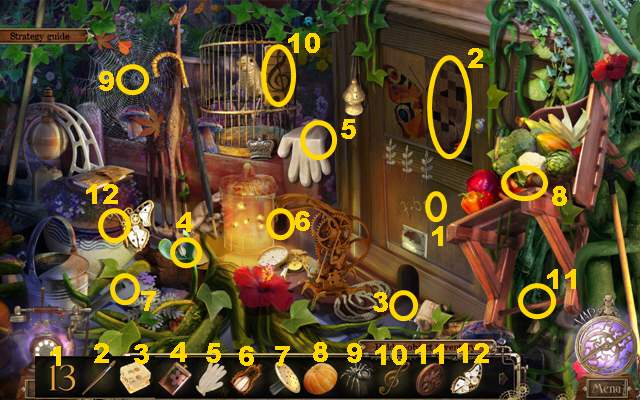
- Play the HOS.
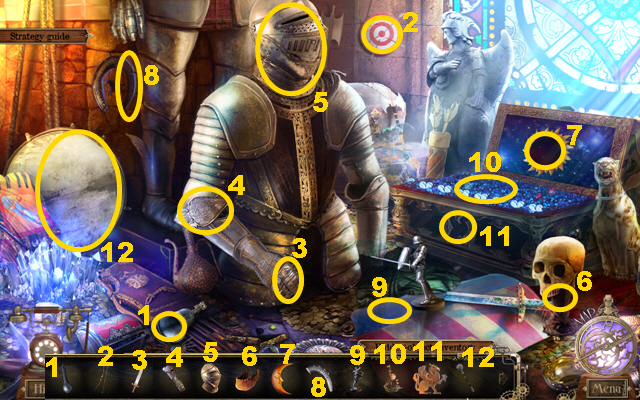
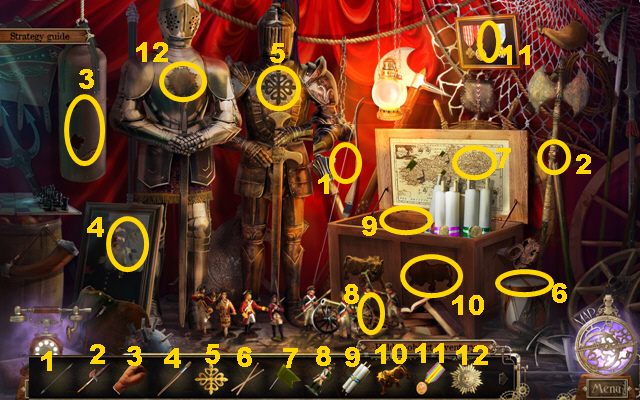
- Put the items 1-12 back into their correct places.
- You will receive the HORSESHOE.
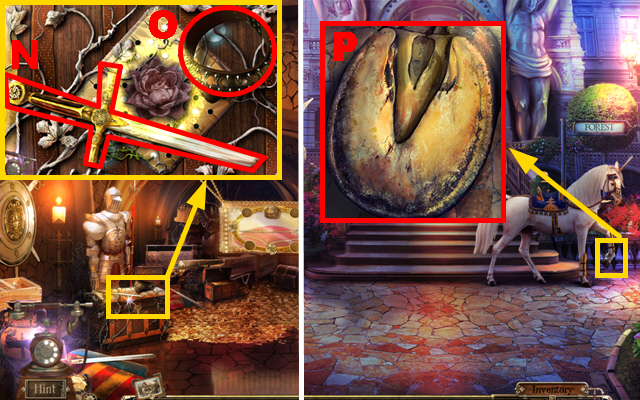
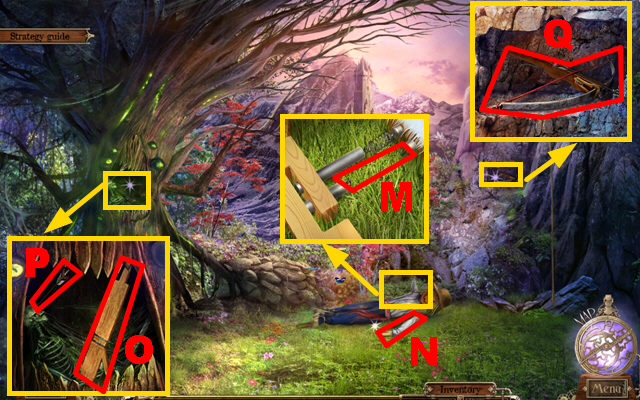
- Zoom into the vine chest; take the SWORD FRAGMENT (N) and the COLLAR (O).
- Walk down twice.
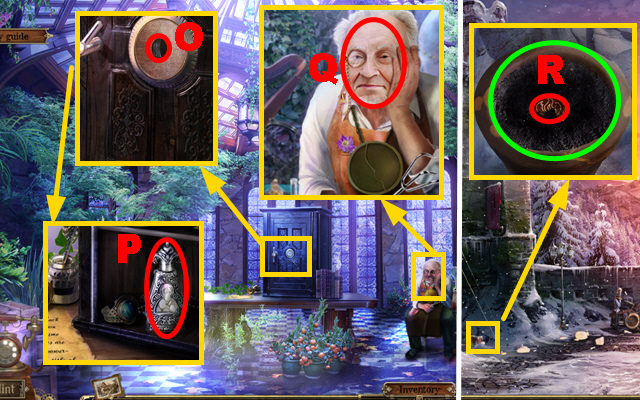
- Zoom into the unicorn; put the HORSESHOE on its hoof (P).
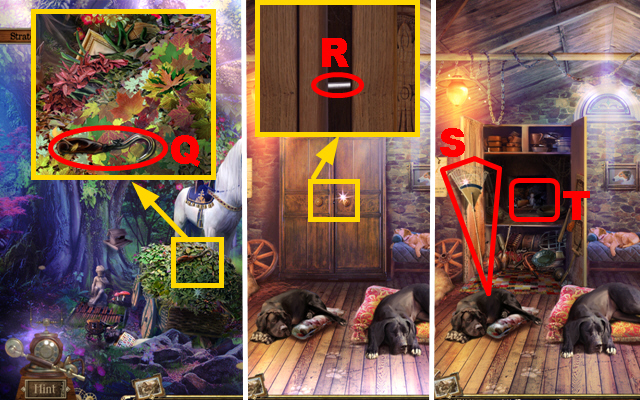
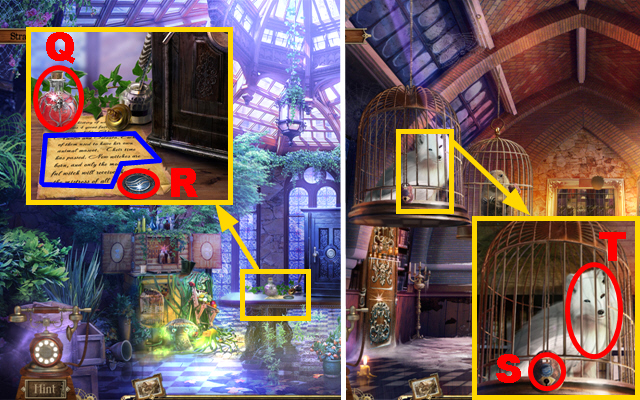
- Zoom into the cart; take the HOOK (Q).
- Walk down and enter the Royal kennels.
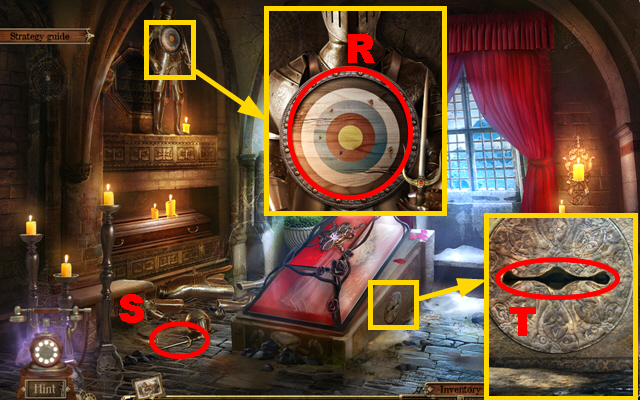
- Zoom into the cupboard; use the HOOK to remove the latch (R).
- Take the RAKE (S).
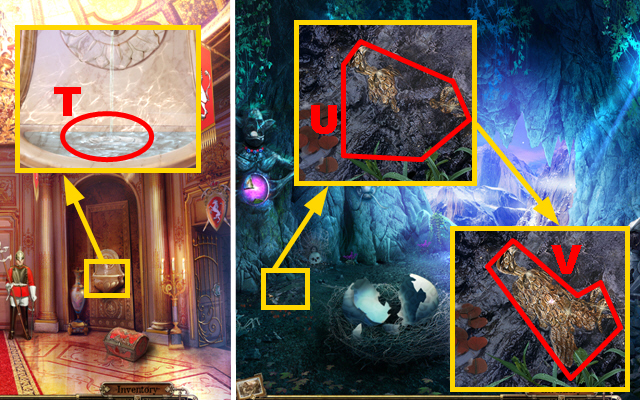
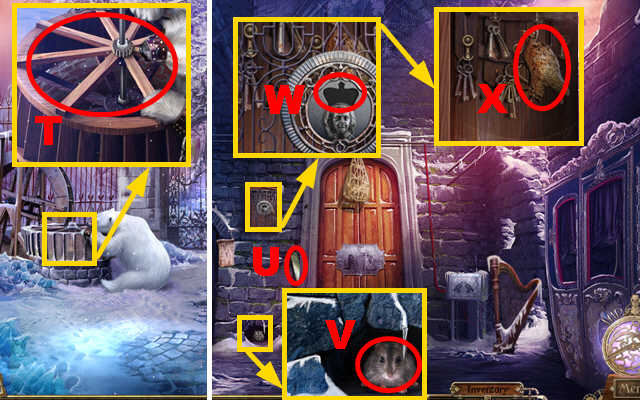
- Zoom into the cupboard (T) and use the FLASHLIGHT to brighten it.
- Play the HOS.
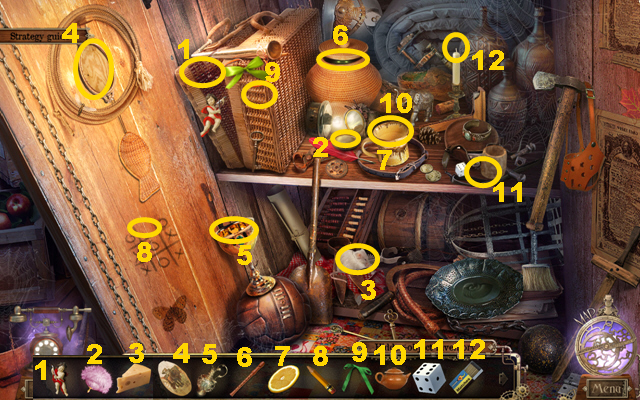
- Put the items 1-12 back into their correct places.
- You will receive the GOBLET.
- Walk down and turn right.
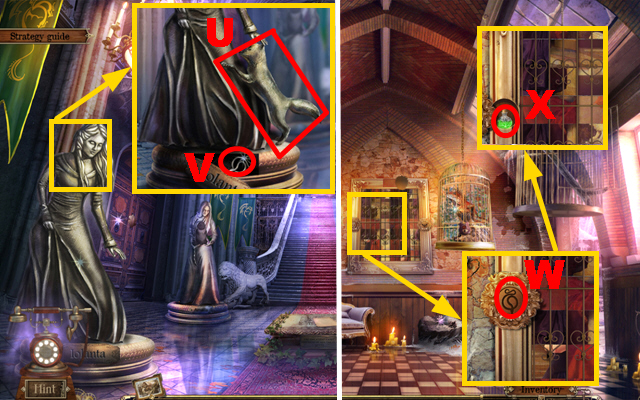
- Zoom into the cart; use the RAKE twice to remove the leaves (U).
- Use the SWORD FRAGMENT to cut the vine (V).
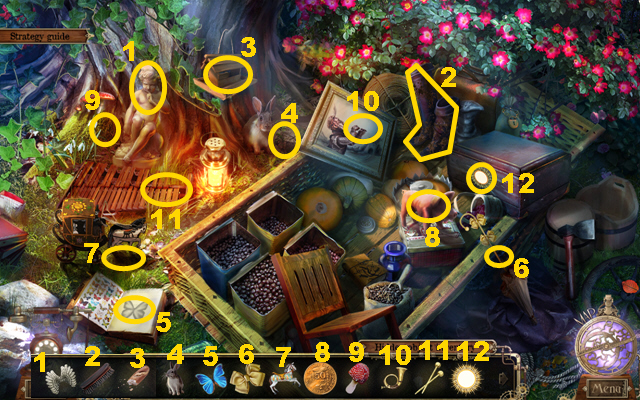
- Play the HOS.
- Put the items 1-12 back into their correct places.
- You will receive the HUNTING HORN.
- Go to the Royal kennels.
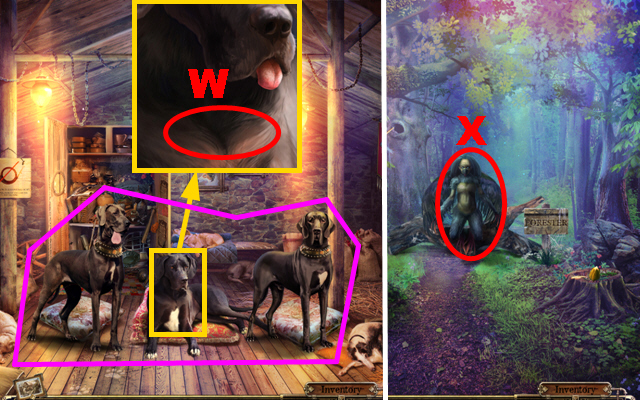
- Use the HUNTING HORN to wake the dogs marked in purple.
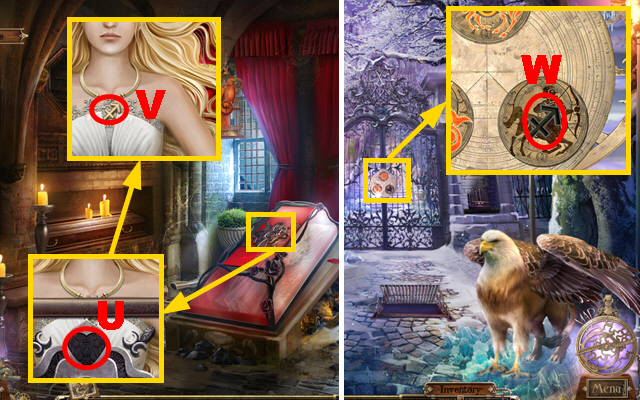
- Zoom into the leader; put the COLLAR around his neck (W).
- Take the DOGS.
- Walk down and turn right.
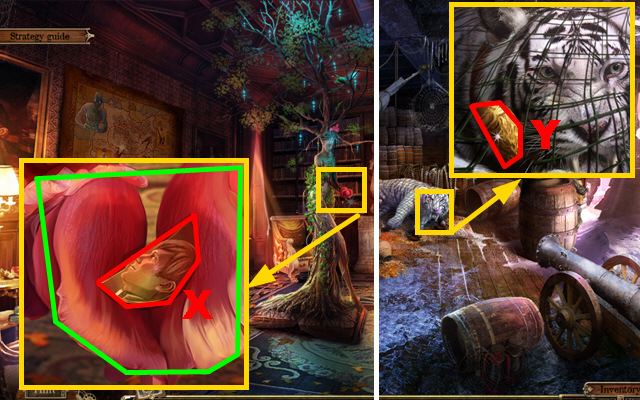
- Use the DOGS to chase away the harpy (X).
- Move forward.
- The PHOTO CLUE will be removed from the inventory.
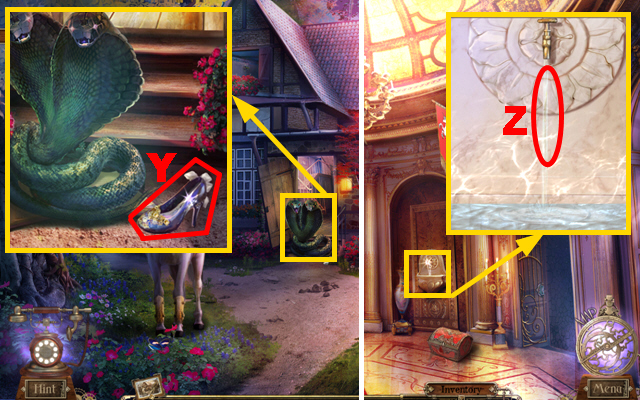
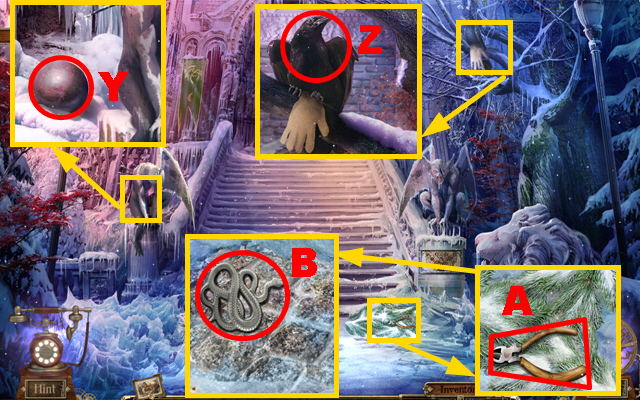
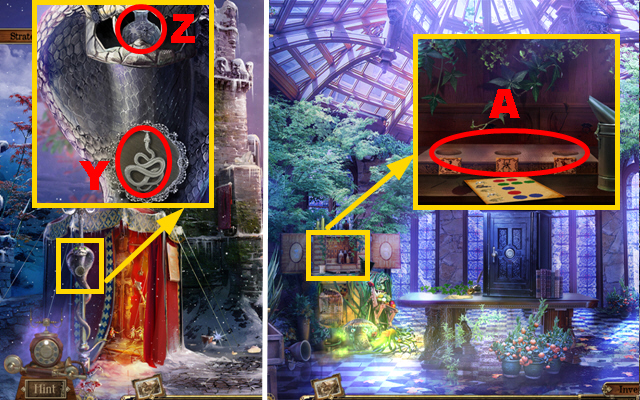
- Zoom into the cobra; take the 2/2 GLASS SLIPPER (Y).
- Go to the Hall.
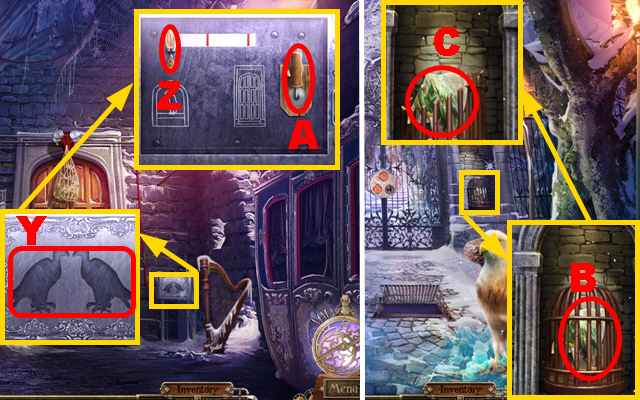
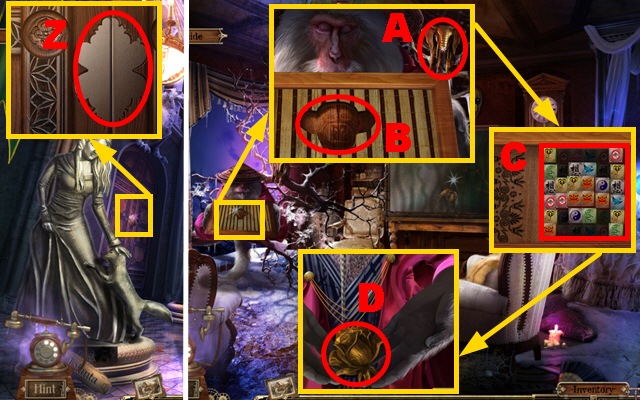
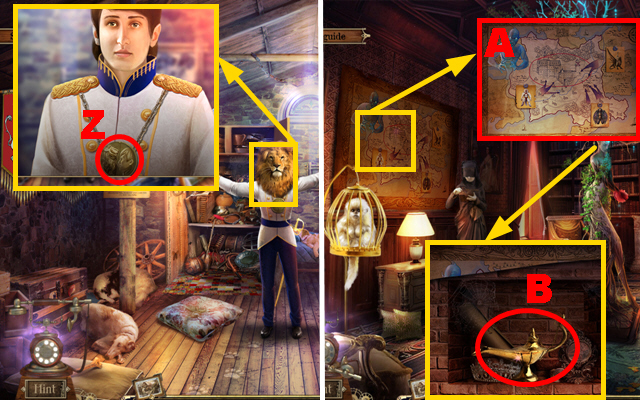
- Zoom into the fountain; hold the GOBLET below the faucet (Z) to acquire the WATER.
- Walk down and turn right.
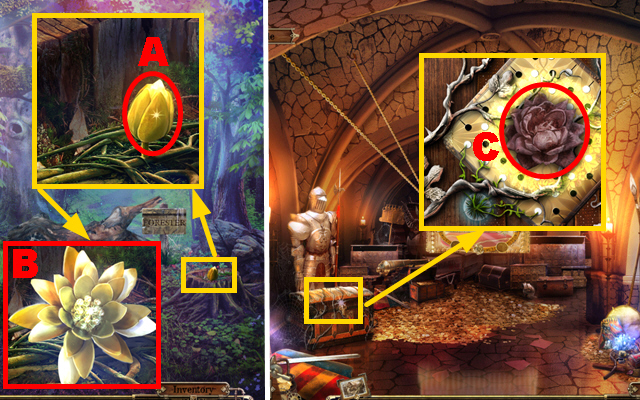
- Zoom into the stump; pour the WATER over the bud (A) and take the GOLDEN FLOWER (B).
- Go to the Minor treasury.
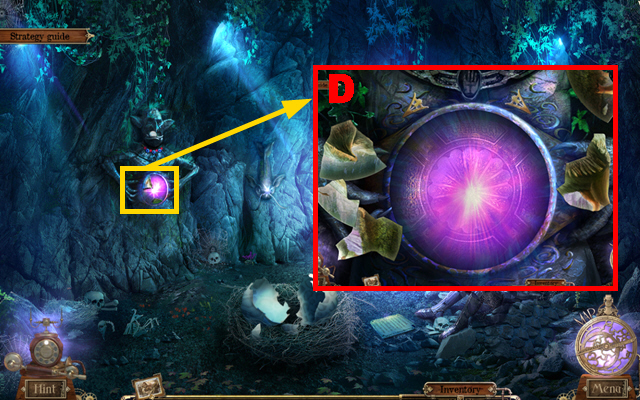
- Zoom into the vine chest; remove the old flower (C), put the GOLDEN FLOWER in its place, and play the mini-game.
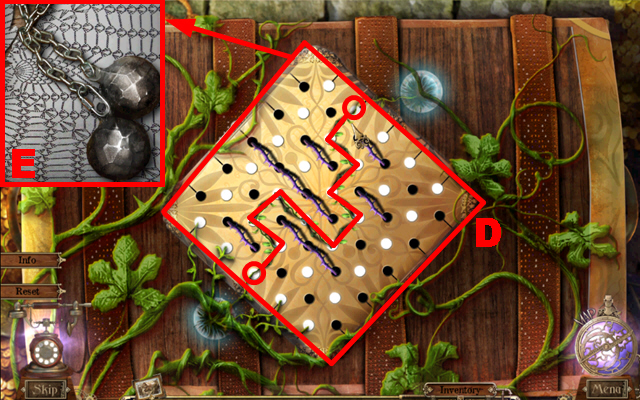
- To solve this puzzle (D), connect the lower left side and the upper right side with white vines.
- Press two adjacent white dots to connect them and avoid the purple vines.
- Take the SHACKLES (E).
- Go to the Forester’s house.
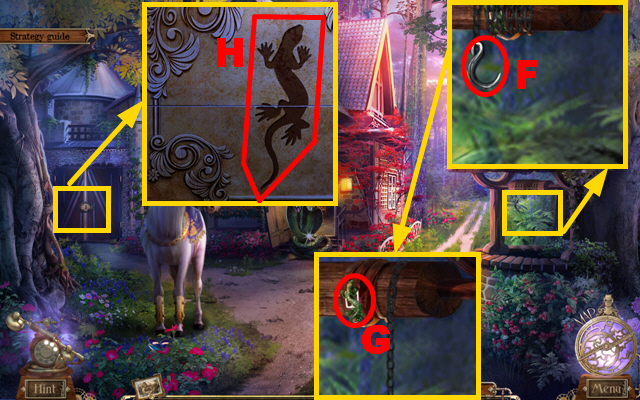
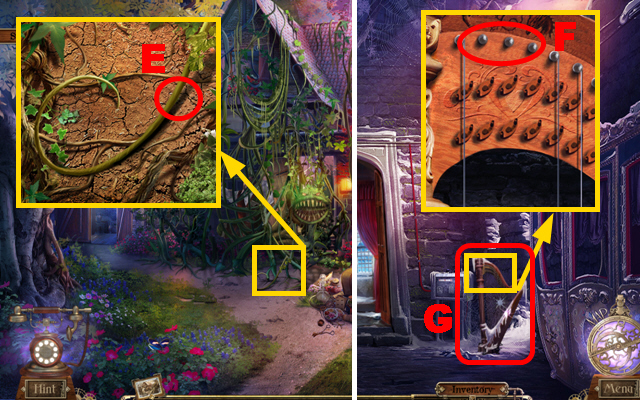
- Zoom into the well; connect the SHACKLES to the hook (F) and take the LIZARD (G).
- Zoom into the shed door; put the LIZARD into the niche (H) and play the mini-game.
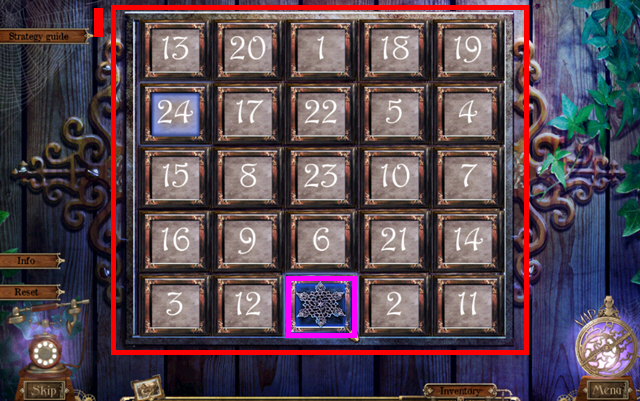
- To solve this puzzle (I), press the number plates until all numbers 1-25 are discovered; in this example only the plate marked in purple still needs to be turned.
- Keep in mind that even and uneven numbers always alternate.
- Enter the Shed.
Chapter 2: The Shed
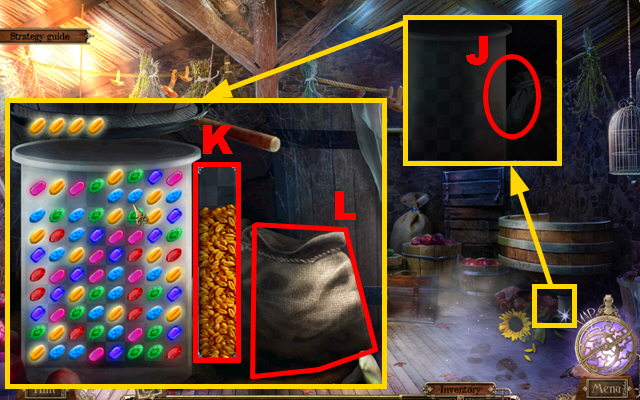
- Zoom into the barrel; use the FLASHLIGHT in it (J) and play the mini-game.
- Match three yellow beans until you have filled the bar (K) to complete this mini-game.
- Take the GRAIN (L).
- Go to the Forest.
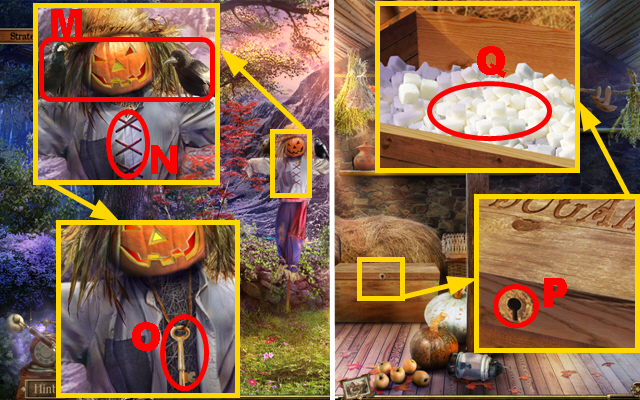
- Zoom into the scarecrow; use the GRAIN to lure away the crows (M). Cut the shirt open (N) with the SWORD FRAGMENT.
- Take the KEY (O).
- Go to the Shed.
- Zoom into the sugar box; put the KEY into the lock (P) and take the SUGAR (Q).
- Go to the Forest.
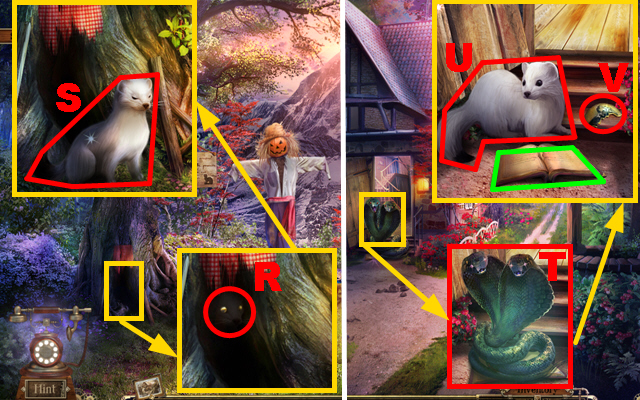
- Zoom into the burrow; use the SUGAR to lure out the ERMINE (R).
- Take the ERMINE (S).
- Walk down.
- Zoom into the cobra; use the ERMINE to chase away the cobra (T).
- Take the ERMINE (U) and the CAMEO ‘BEAR’ (V); read the book marked in green.
- Enter the Forester’s house and go up the stairs to the Bedroom.
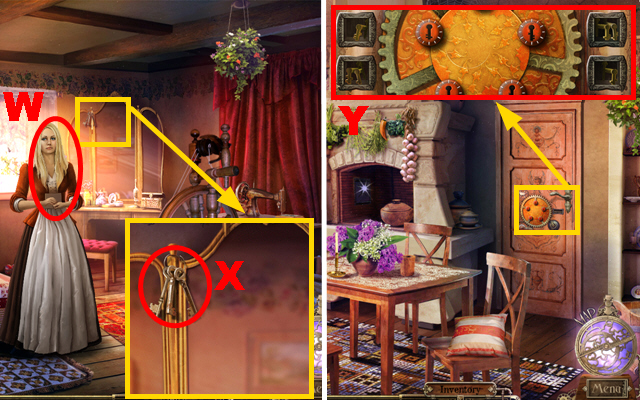
- Give the ROYAL LETTER to the girl (W).
- Zoom into the mirror; take the KEYS (X).
- Walk down.
- Zoom into the keyhole; put down the KEYS (Y) to play a mini-game.
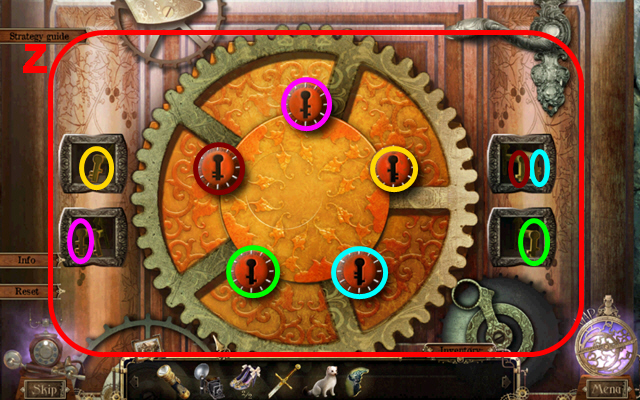
- To solve this puzzle (Z), put five keys into the corresponding locks.
- Go to the Trophy room.
- Play the HOS.
- Put the items 1-12 back into their correct positions.
- You will receive the SNARE.
- Go to the Bedroom.
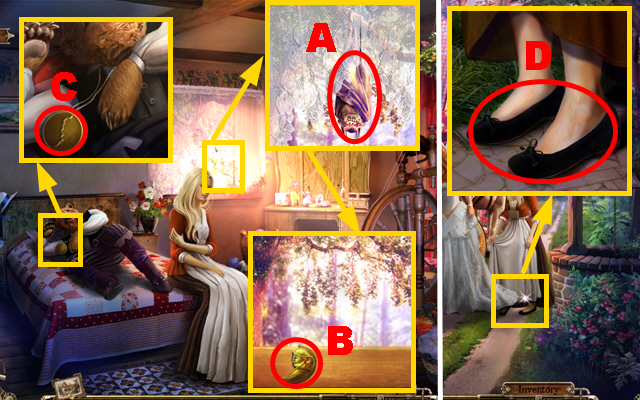
- Zoom into the window; move aside the curtains and use the SNARE to catch the gargoyle (A).
- Take the CAMEO ‘FORESTER’ (B).
- Zoom into the bear; put the 2 CAMEOS ‘BEAR’ and ‘FORESTER’ into the amulet (C) and take the CAMEO OF BEAR (C).
- Zoom into Isabella’s feet; put the 2 GLASS SLIPPERS on her feet (D).
- Walk down.
- Play the HOS.

- Put the items 1-12 back into their correct positions.
- You will receive the GRAPPLE.
- Move forward.
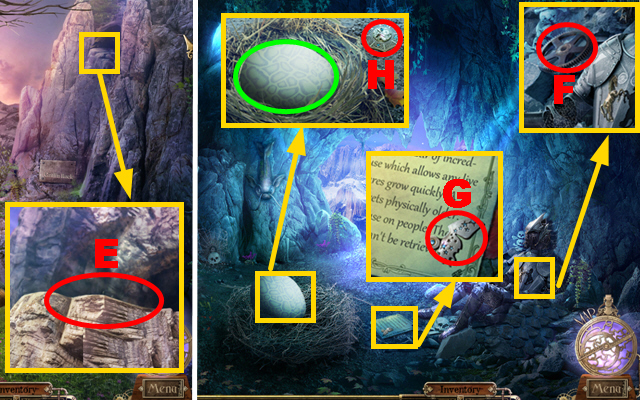
- Zoom into the grotto; throw the GRAPPLE at the ‘Griffin Rock’ (E).
- Climb up the rope.
- Zoom into the skeleton robber; take the COGWHEEL (F).
- Zoom into the note; take the CLOSET AMULET (G).
- Zoom into the nest; take the ALCHEMIST AMULET (H) and hit the egg marked in green twice to crack it.
- Go to the Minor treasury.
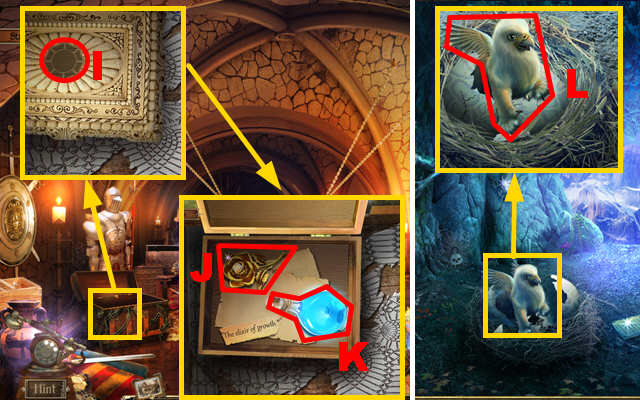
- Zoom into the vine chest; put the ALCHEMIST AMULET into the niche (I).
- Take the ROSE BROOCH (J) and the ELIXIR OF GROWTH (K).
- Go to the Grotto.
- Zoom into the nest; pour the ELIXIR OF GROWTH over the griffin (L).
- Go to the Bedroom.
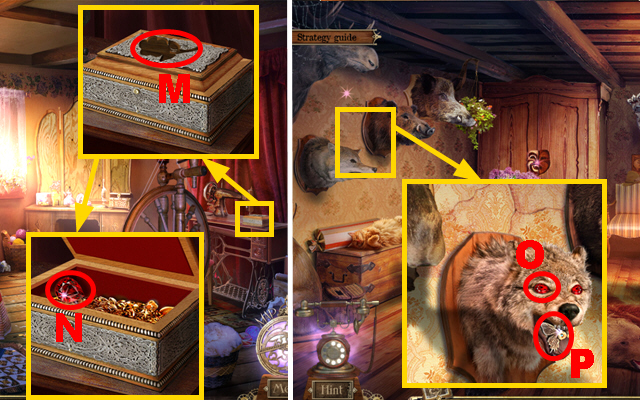
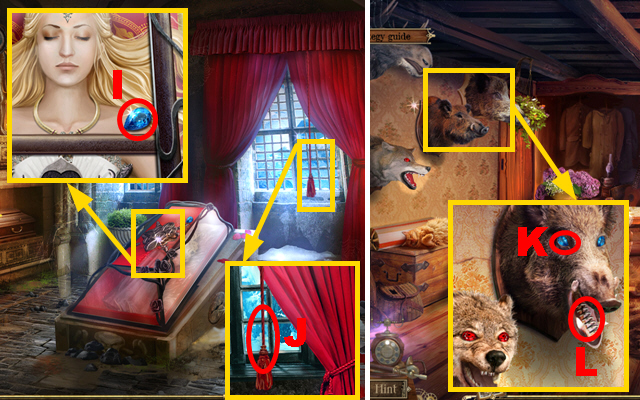
- Zoom into the chest; put the ROSE BROOCH into the niche (M) and take the RUBY (N).
- Go to the Trophy room.
- Zoom into the heads; put the RUBY into the empty eye of the wolf (O) and take the CLOSET AMULET (P).
- Walk down.
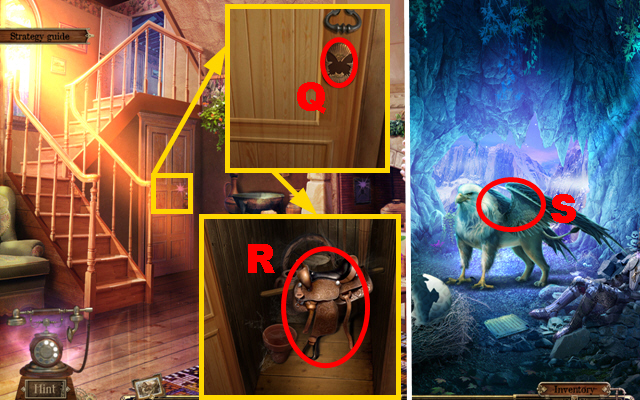
- Zoom into the storeroom; put the 2 CLOSET AMULETS into the niche (Q) and take the SADDLE (R).
- Go to the Grotto.
- Put the SADDLE on the griffin (S).
- Go to the Gate to the Dark Tower.
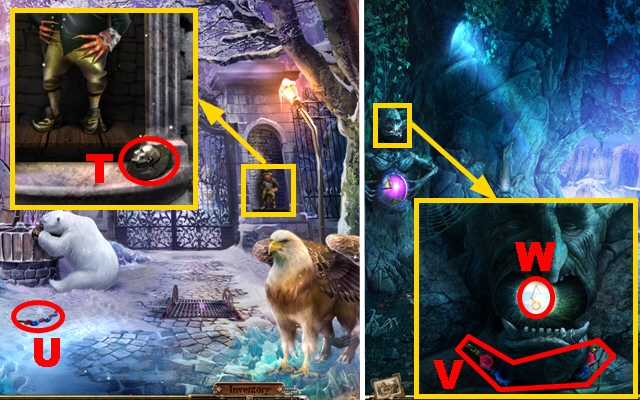
- Zoom into the leprechaun; take the CAMEO (T).
- Take the NECKLACE (U).
- Walk down.
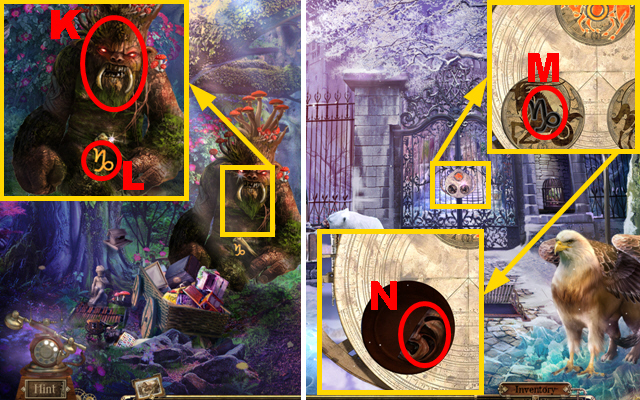
- Zoom into the goblin bas-relief; put the NECKLACE on the neck (V) and use the ERMINE to acquire the TAURUS SYMBOL (W).
- Move forward.
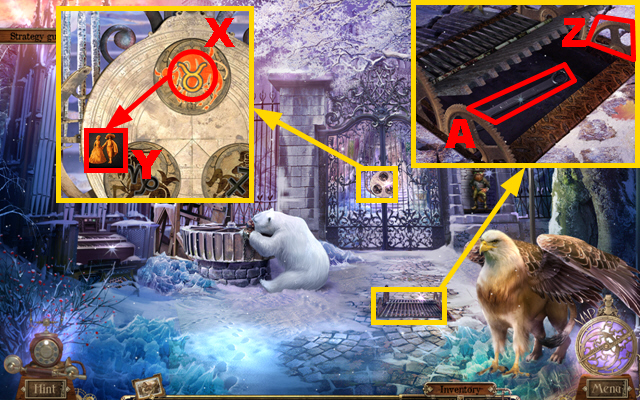
- Zoom into the gate; put the TAURUS SYMBOL into the slot (X) and take the VOODOO AMULET (Y).
- Zoom into the drain; connect the COGWHEEL to the mechanism (Z) and take the WRENCH (A).
- Walk down twice.

- Zoom into the plate; use the WRENCH to remove the screws marked in purple.
- Take the VOODOO AMULET (B) and the POT OF GOLD (C).
- Move forward twice.
- Zoom into the leprechaun; give the POT OF GOLD to the leprechaun (D), take the VOODOO AMULET (E), and pull the rope marked in blue.
- Go to the Hall.
- Zoom into the left side chest; put the 3 VOODOO AMULETS into the niches (F).
- Play the mini-game.
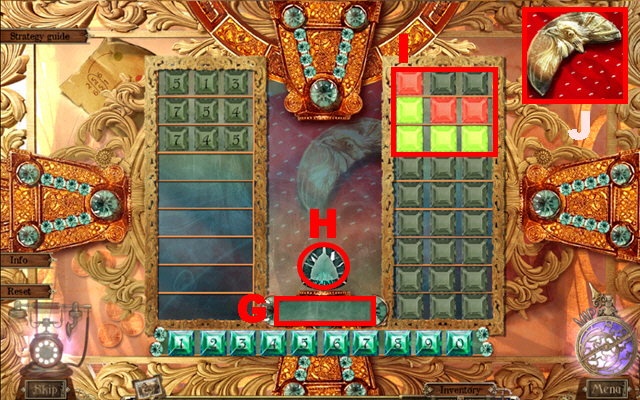
- Guess the correct three-digit code to complete this mini-game. The code does not start with a zero.
- Put numbers into the bar (G) and press the gem (H) to enter your guess.
- The lights (I) indicate whether currently entered numbers are correct; a red light means a number is part of the code, a green light means a number is correctly placed.
- The code is randomized.
- Take the CAMEO (J).
Chapter 3: The Treasury of the Dragon
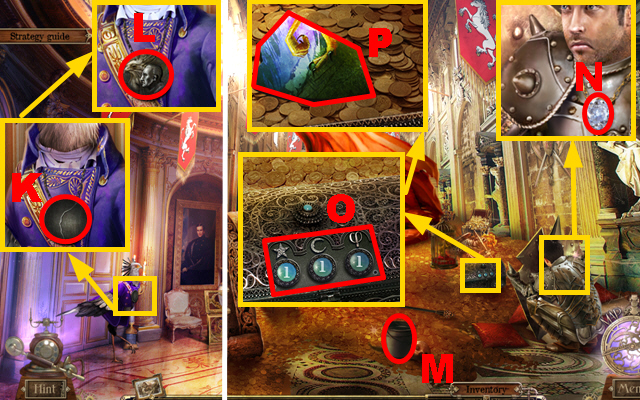
- Zoom into the secretary; put the 2 CAMEOS on the amulet (K) and take the CAMEO OF SECRETARY (L).
- Enter the Treasury of the dragon.
- Take the PAIL (M).
- Zoom into the swordfighter; take the DIAMOND (N).
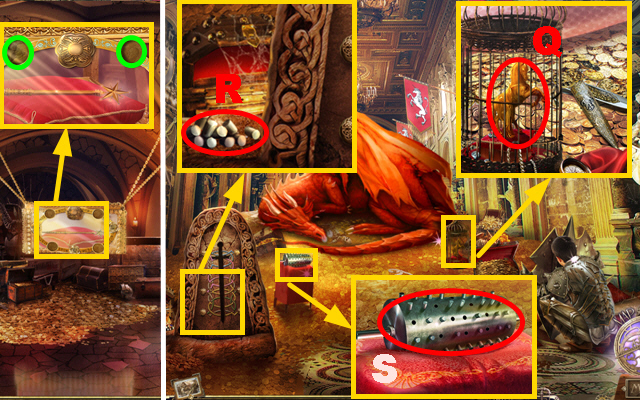
- Zoom into the chest; enter the code 223 (O) to open the chest and take the MOSAIC (P).
- Go to the Minor treasury.
- Zoom into the chest; put the CAMEO OF BEAR and the CAMEO OF SECRETARY into the niches marked in green.
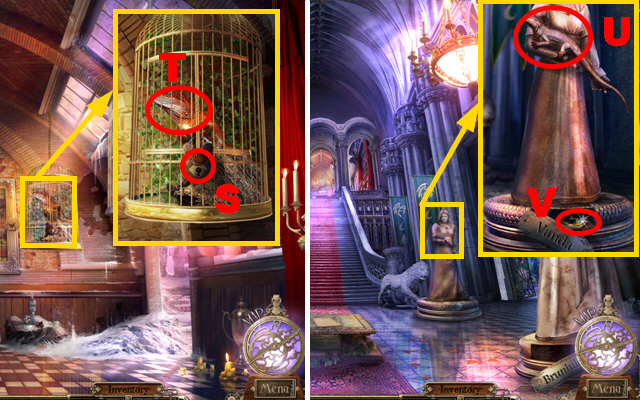
- Go to the Treasury of the dragon.
- Zoom into the cage; use the ERMINE to acquire the GOLDEN HORSE (Q).
- Zoom into the swordholder; take the DRUMSTICKS (R).
- Zoom into the ottoman; put the DRUMSTICKS into the DRUM (S) and take the DRUM.
- Walk down.
- Zoom into the fountain; put the PAIL into the fountain (T) to acquire the BUCKET OF WATER.
- Go to the Grotto.
- Zoom into the dirt; pour the BUCKET OF WATER over the dirt (U) and take the VULTURE FIGURE (V); you will receive the PAIL.
- Go to the Trophy room.
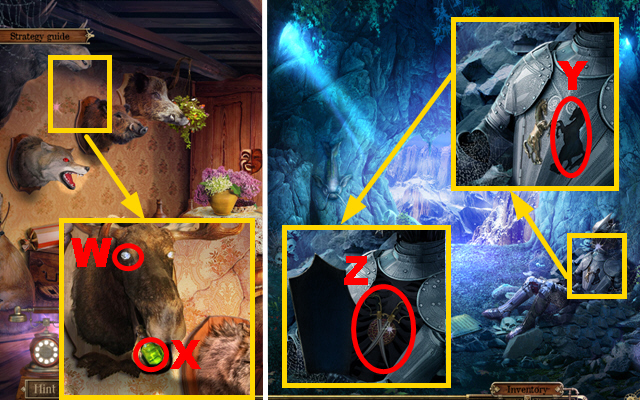
- Zoom into the heads; put the DIAMOND into the empty eye of the moose(W) and take the ELIXIR OF COURAGE (X).
- Go to the Grotto.
- Zoom into the skeleton robber; put the GOLDEN HORSE into the slot (Y) and take the CROSSED SWORDS (Z).
- Go to the Kitchen.
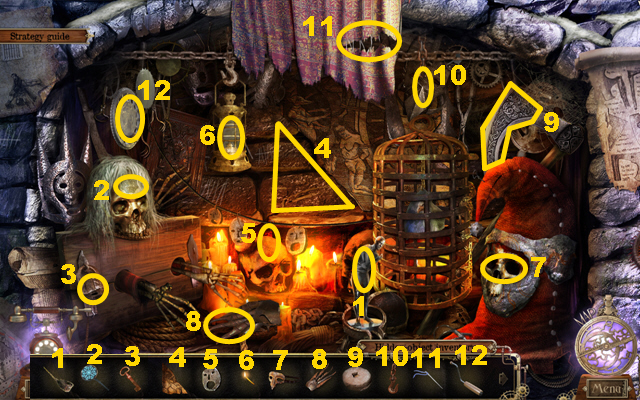
- Zoom into the fireplace; use the FLASHLIGHT to illuminate the fireplace (A), put the CROSSED SWORDS into the niche (B); take the ORGAN KEYS (C) and read the note marked in purple.
- Go to the Hall.
- Zoom into the fountain; put the PAIL into the water (D) to acquire the BUCKET OF WATER.
- Turn right.
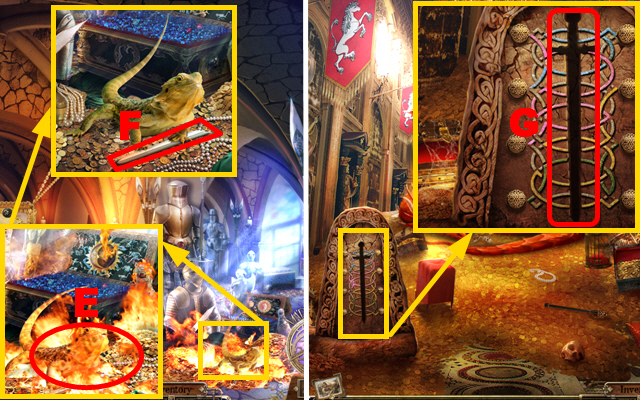
- Zoom into the salamander; pour the BUCKET OF WATER over the flames (E) and take the SWORD FRAGMENT (F).
- Go to the Treasury of the dragon.
- Zoom into the swordholder; put the 2 SWORD FRAGMENTS into the niche (G).
- Play the mini-game.
- To solve this puzzle (H), press the stones 1-8 to connect equally colored lines.
- The pattern of the lines is randomized.
- Take the SWORD (I).
- Zoom into the swordfighter; give the SWORD and the ELIXIR OF COURAGE to the swordfighter (J).
- Play the HOS.
- Put the items 1-12 back into their correct positions.
- You will receive the TRAP.
- Go to the Forest thicket.
- Zoom into the goblin; throw the TRAP at the goblin (K) and take the CAPRICORN SYMBOL (L).
- Go to the Gate to the Dark Tower.
- Zoom into the gate; put the CAPRICORN SYMBOL into the slot (M) and take the MASK (N).
- Go to the Trophy room.

- Zoom into the cupboard; put the MASK into the slot (O) and take the ORGAN PIPE (P).
- Go to the Gate to the Dark Tower.
- Zoom into the organ; put down the DRUM, the ORGAN KEYS, and the ORGAN PIPE (Q) to play a mini-game.
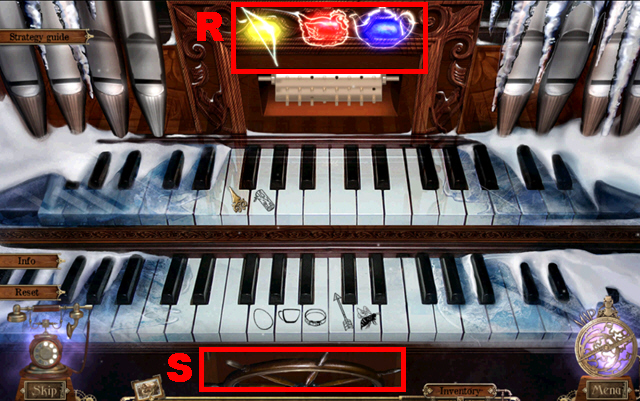
- Press the correct organ key symbols corresponding to the symbols above (R).
- For the first sequence press: arrow, egg, and cup.
- For the second sequence press: flower, bee, and thread.
- For the third sequence press: color palette, hammer, and wheel.
- For the fourth sequence press: flower, key, and shield.
- Take the HAND WHEEL (S).
- Zoom into the winch; put down the HAND WHEEL (T).
- Go to the Dungeon.
- Take the SAW (U).
- Zoom into the mouse hole; use the ERMINE to chase away the mouse (V) and to acquire the CROWN.
- Zoom into the protection guard; put the CROWN into the niche (W) and take the VULTURE FIGURE (X).
- Zoom into the security control; put the 2 VULTURE FIGURES into the niches (Y).
- Set the switch into the correct position (Z) and pull the lever (A).
- Walk down.
- Zoom into the cage; cut the metal bars with the SAW (B) and take the MOSAIC (C).
- Go to the Dungeon.
- Play the HOS.
- Put the items 1-12 back into their correct positions.
- You will receive the MOSAIC.
- Go to the Grotto.
- Zoom into the goblin’s belly; put down the 3 MOSAICS (D).
- Play the mini-game.
- Press the arrow buttons marked in green to rotate the disc.
- To solve this puzzle, put the mosaic pieces into the disc to create the picture (E).
- Take the PRINCE FIGURE (F).
- Go to the Dungeon.
- Zoom into the door; put the PRINCE FIGURE into the niche (G).
- Play the mini-game.
- To solve this puzzle (H), press the limbs of the prince and the witch according to the pattern marked in green.
- Enter the Fairy Dungeon.
Chapter 4: The Fairy Dungeon
- Zoom into the glass coffin; take the TOPAZ (I).
- Zoom into the blinds; cut the rope with the SAW (J) to acquire the BOWSTRING.
- Go to the Trophy room.
- Zoom into the heads; put the TOPAZ into the empty eye of the boar (K) and take the SPRING (L).
- Go to the Forest.
- Zoom into the scarecrow; connect the SPRING to the hand (M) and take the WOODEN HAND (N).
- Zoom into the tree; put the WOODEN HAND between the jaws (O) and take the ARROW (P).
- Zoom into the niche with the crossbow; connect the ARROW and the BOWSTRING to the crossbow and take the CROSSBOW (Q).
- Go to the Fairy Dungeon.
- Zoom into the knight; fire the CROSSBOW at the target (R) and take the SAI (S).
- Zoom into the coffin base; insert the SAI into the slot (T).
- Play the HOS.

- Put the items 1-12 back into their correct positions.
- You will receive the HEART.
- Zoom into the glass coffin; put the HEART into the slot (U) and take the SAGITTARIUS SYMBOL (V).
- Walk down twice.
- Zoom into the gate; put the SAGITTARIUS SYMBOL into the niche (W).
- Play the mini-game.
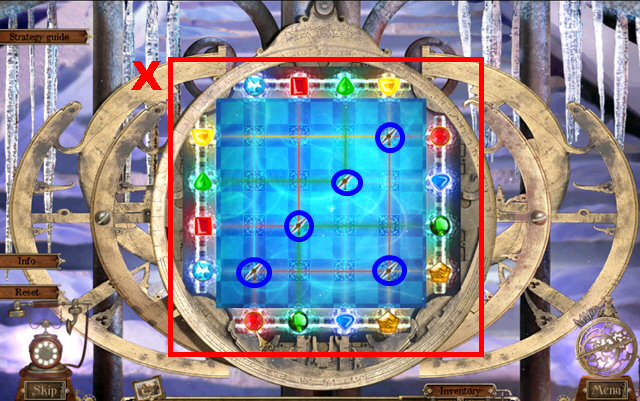
- To solve this puzzle (X), put down the mirrors marked in spots marked in blue and activate the gems.
- Go to the Stairs of the tower.
- Zoom into the gargoyle parapet; take the CANNON BALL (Y).
- Zoom into the branch; use the ERMINE to chase away the crow (Z) and to acquire the GARDENER’S GLOVE.
- Zoom into the brushwood; take the CUTTERS (A), remove three branches, and take the SNAKE AMULET (B).
- Go to the Grotto.

- Zoom into the catfish; cut the whisker with the CUTTERS (C) to acquire the CATFISH WHISKER.
- Go to the Treasury of the dragon.
- Zoom into the dragon skin; use the GARDENER’S GLOVE on the whisker (D) to acquire the DRAGON WHISKER.
- Go to the Forester’s house.
- Zoom into the stem; cut the stem with the CUTTERS (E) to acquire the CHOMPER STEM.
- Go to the Dungeon.
- Zoom into the harp; connect the CATFISH WHISKER, the DRAGON WHISKER, and the CHOMPER STEM to the harp (F).
- Take the HARP (G).
- Go to the Stairs of the tower.

- Try to move forward.
- Put down the HARP (H).
- Zoom into the harp and press the notes in the following sequence to put the snowmen to sleep: I, J, K, I x2, J, and K.
- Move forward twice and turn right.
- Zoom into the pot; take the GRADIENT (L).
- Zoom into the tent; put down the GRADIENT (M) and play the mini-game.
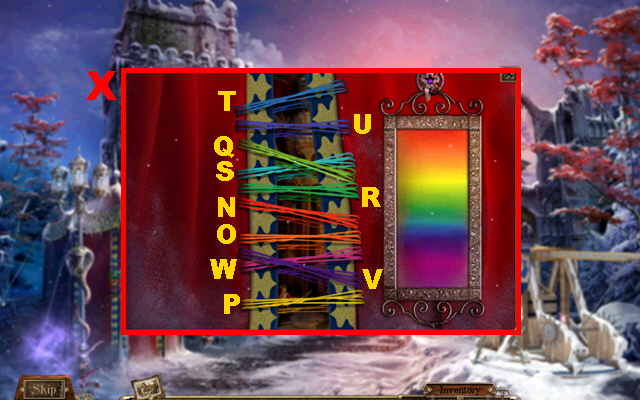
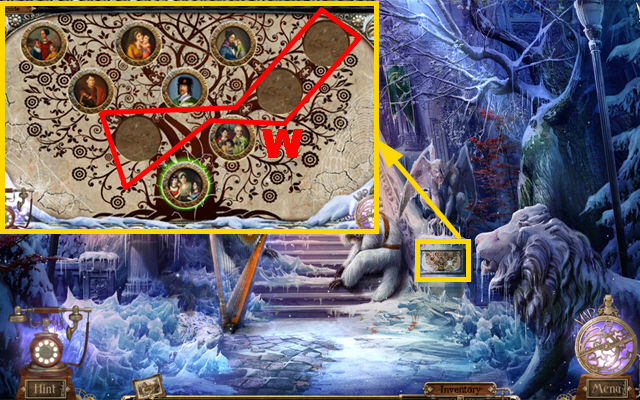
- Cut the threads in the sequence N-W to complete this mini-game (X).
- Play the HOS.
- Put the items 1-12 back into their correct places.
- You will receive the AIR SYMBOL.
- Walk down.
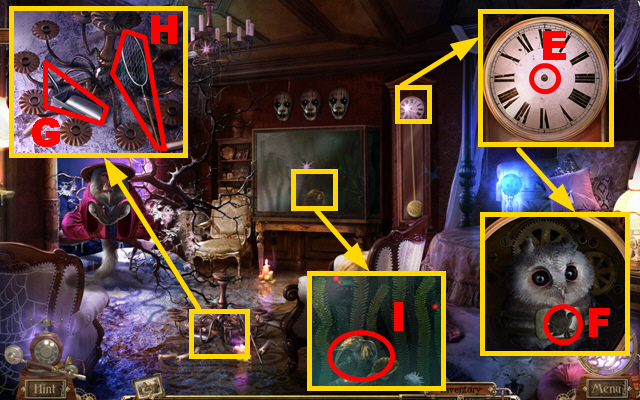
- Zoom into the stone; take the OWL (Y).
- Zoom into the eagle’s cage; put the AIR SYMBOL on the lock (Z) and take the EAGLE (A).
- Walk down.
- Zoom into the right statue in the front; put the EAGLE on the statue (B) and take the PIECE OF PICTURE (C).
- Zoom into the plinth; take the CAMEO OF CHAMELEON (D) and read the note marked in purple.
- Move forward.
- Zoom into the picture; put the PIECE OF PICTURE into the niche (E) and take the GARGOYLE HEAD (F).
- Turn right.
- Zoom into the catapult; take the GARGOYLE WING (G) and put the CANNON BALL into the net (H).
- Zoom into the statue pieces; take the GOBLET (I).
- Go to the Stairs of the tower.
- Zoom into the gargoyle parapet; connect the GARGOYLE HEAD (J) and the GARGOYLE WING (K) to the gargoyle.
- Press the head, the leg, and the wing of the gargoyle to create the correct pose (L); take the WINE marked in green.
- Move forward.
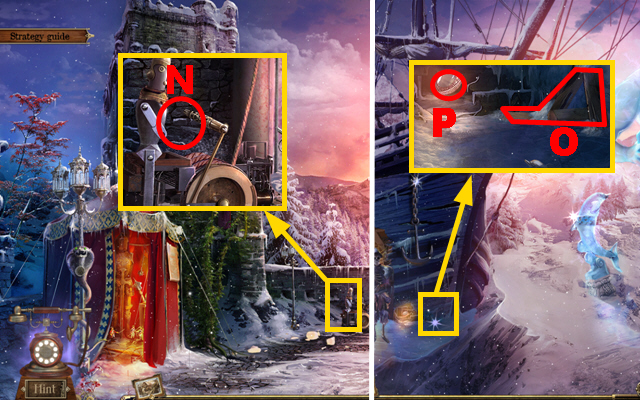
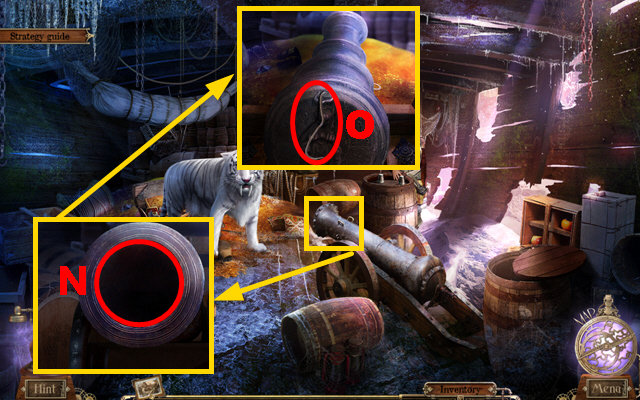
- Zoom into the right door; put down the GOBLET (M) and pour the WINE into the goblet to play a mini-game.
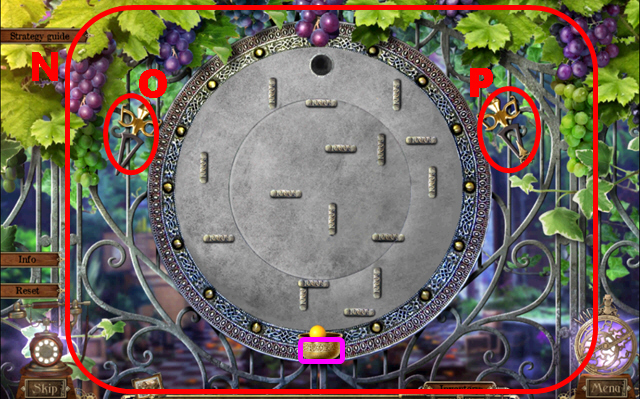
- To solve this puzzle (N), rotate the disk to lead the ball into the vessel marked in purple by pressing the arrow buttons O and P.
- Press the buttons in the following sequence to complete this mini-game: O, P x5, O, P, O, and P.
- Turn right.
Chapter 5: The Arboretum
- Zoom into the table; take the POISON 1/3 (Q), the WATER SYMBOL (R), and read the note marked in blue.
- Go to the Hall of trophies.
- Zoom into the fox’s cage; put the WATER SYMBOL into the lock (S) and take the WHITE FOX (T).
- Walk down.
- Zoom into the left statue in the front; put down the WHITE FOX (U) and take the PIECE OF PICTURE (V).
- Move forward.
- Zoom into the picture; put the PIECE OF PICTURE into the slot (W) and take the POISON (X).
- Turn right.
- Zoom into the snake head; put the SNAKE AMULET into the slot (Y) and take the POISON (Z).
- Go to the Arboretum.
- Zoom into the small cabinet; put down the 3 POISONS (A) and play the mini-game.

- Use the pipette (B) to fill drops from the poison flasks into the empty container (C).
- Fill the following drops into the container to mix the correct concoction: 2 red drops, 3 green drops, 1 blue drop, 1 red drop, and 2 blue drops.
- Pour the concoction into the smoker (D) and take the SMOKER.
- Go to the Forester’s house.
- Zoom into the chomper; use the SMOKER on the chomper (E) to remove it and take the CAMEO OF CHAMELEON (F).
- Go to the Arboretum.
- Zoom into the chameleon; put the 2 CAMEOS OF CHAMELEON on the amulet (G).
- Take the CAMEO OF CHAMELEON (H); the CHIP will be acquired.
- Play the HOS.
- Put the items 1-12 back into their correct positions.
- You will receive the EARTH SYMBOL.
- Go to the Hall of trophies.
- Zoom into the gopher’s cage; put the EARTH SYMBOL into the lock (I) and take the GOPHER (J).
- Walk down.
- Zoom into the rear left statue; put down the GOPHER (K) and take the SPIRAL KEY (L).
- Go to the Forester’s house.
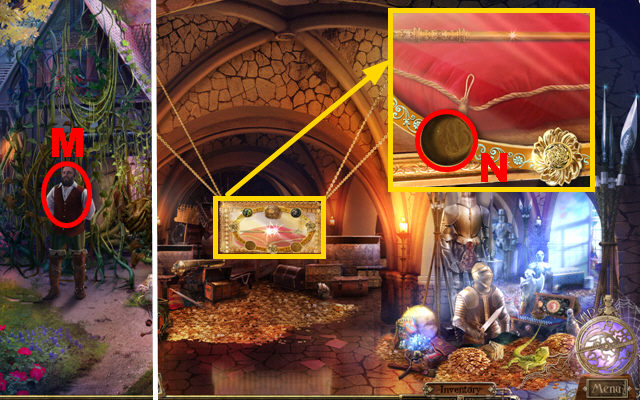
- Talk to the forester (M); you will receive the CHIP.
- Go to the Minor treasury.
- Zoom into the chest; put down the CAMEO OF CHAMELEON (N).
- Go to the Arboretum.
- Zoom into the safe; put the SPIRAL KEY into the niche (O) and take the MEDICINE (P).
- Zoom into the gardener; give the MEDICINE to the gardener (Q) to acquire the HOE.
- Go to the Balcony.
- Zoom into the pot; use the HOE to plow the soil marked in green and take the FIRE SYMBOL (R).
- Walk down.
- Zoom into the salamander’s cage; put the FIRE SYMBOL into the lock (S) and take the SALAMANDER (T).
- Walk down.
- Zoom into the rear right statue; put down the SALAMANDER (U) and take the CHIP (V).
- Walk down.
- Zoom into the ritual shield; put down the 3 CHIPS (W) to play the mini-game.
- Swap adjacent pieces until each chip is in its correct position to solve this puzzle (X).
- Take the BEANS (Y).
- Go to the Balcony.
Chapter 6: Isabella’s Tower

- Zoom into the pot; put the BEANS into the pot (Z) and pour the ELIXIR OF GROWTH over the soil (Z).
- Enter Isabella’s tower (A).
- Play the HOS.
- Put the items 1-12 back into their correct places.
- Item 6 has to be put in its place before item 2 can be put in its place.
- You will receive the PICK.
- Walk down.
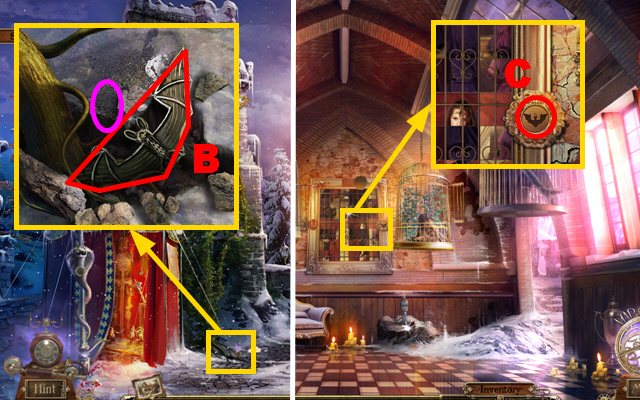
- Zoom into the crack; use the PICK to widen the crack marked in purple and take the PIECE OF PICTURE (B).
- Walk down.
- Zoom into the picture; put the PIECE OF PICTURE into the niche (C).
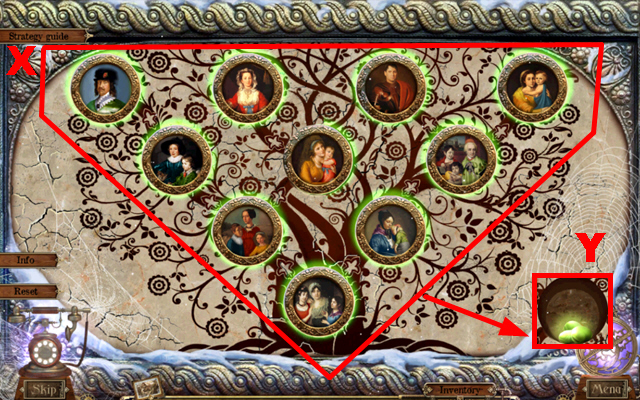
- Play the mini-game.
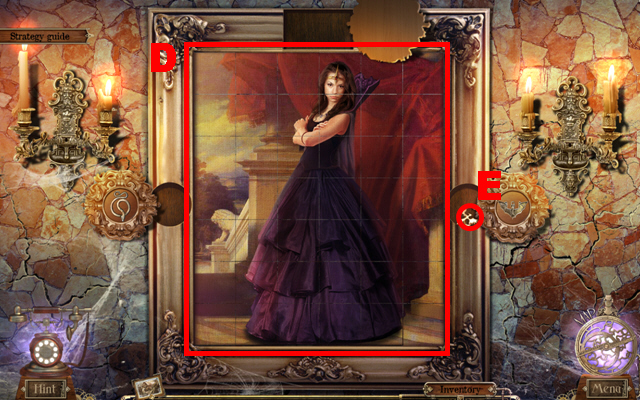
- To solve this puzzle (D), move around the rows and columns of the picture until it is coherent.
- Take the SIGNET (E).
- Go to the Fairy Dungeon.
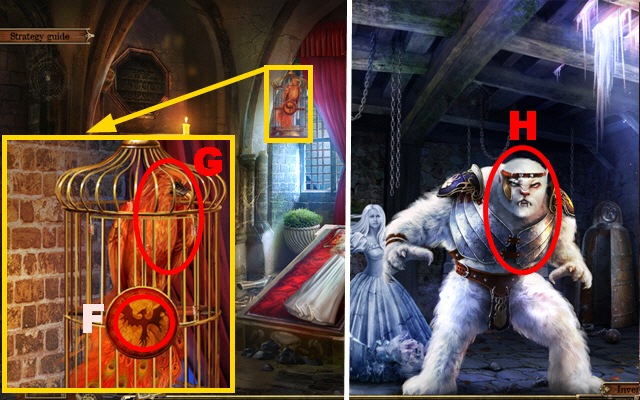
- Zoom into the cell of the phoenix; put the SIGNET into the slot (F) and take the PHOENIX (G).
- Go to Isabella’s tower.
- Use the PHOENIX to chase away the snow general (H).
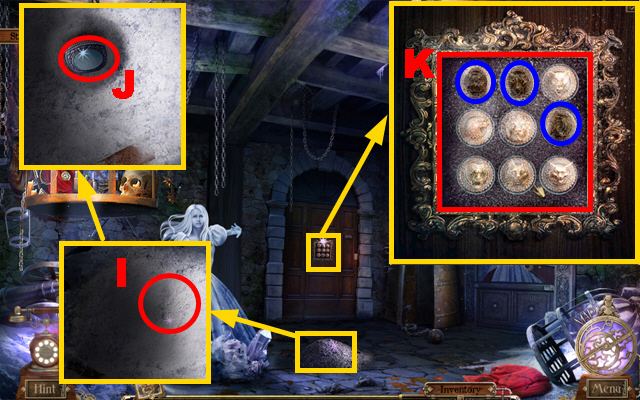
- Zoom into the general’s ashes; take the REMAINS (I) and the MIRROR (J).
- Zoom into the lock; use the REMAINS to powder the lock (K).
- Press the buttons marked in blue to open the lock.
- Enter the Room of shadows.
- Zoom into the mirrors; take the OIL CAN (L).
- Go to the Hall of trophies.
- Zoom into the stone; pour the OIL CAN over the metal arm and take the METAL ARM (M).
- Turn right.
- Zoom into the porter; add the METAL ARM to the porter (N).
- Go to the Snow dunes.
- Zoom into the fallen anchor; take the WOOD (O) and use the ERMINE to acquire the MIRROR (P).
- Go to the Hall of trophies.
- Zoom into the library door; take the MIRROR (Q).
- Go to the Room of shadows.
- Zoom into the mirrors; put down the 3 MIRRORS (R) and play the mini-game.
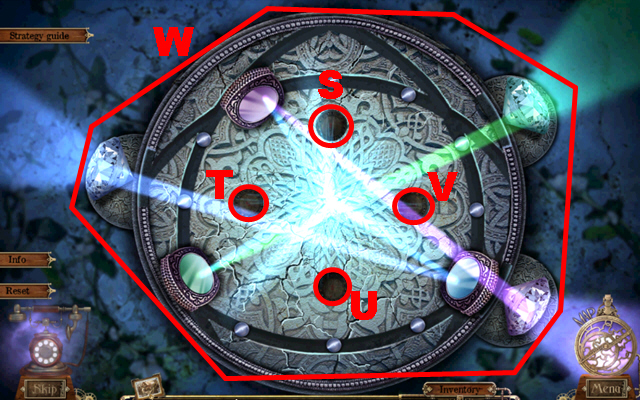
- Press the buttons S-V in the following sequence: S, T, S, V, U, V, U, V, T, S, and U.
- To solve this puzzle (W), arrange the mirrors so that each ray of light reflects towards the equally colored crystal.
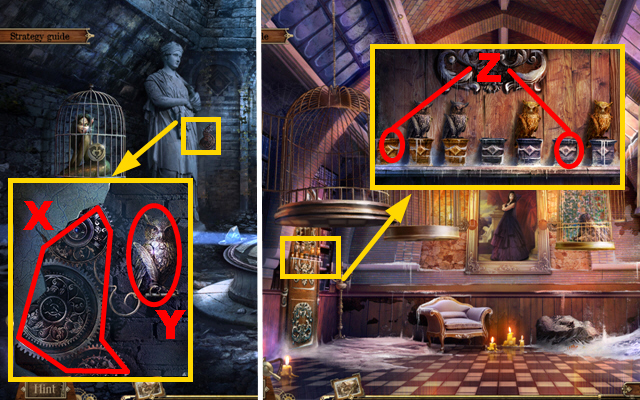
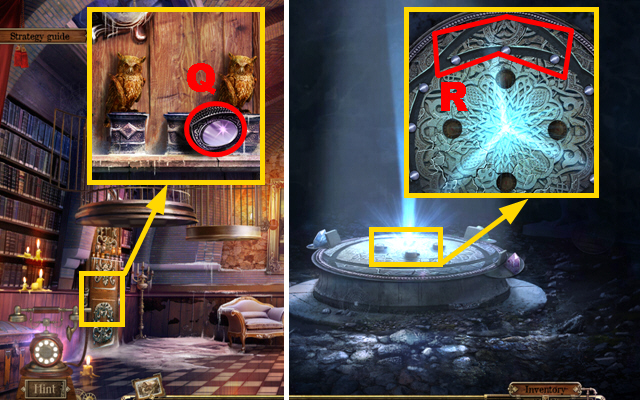
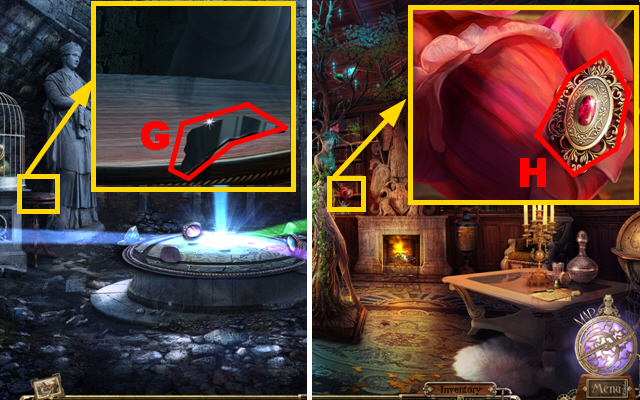
- Zoom into the wall; pour the OIL CAN over the mechanism (X) and take the OWL (Y).
- Go to the Hall of trophies.
- Zoom into the library door; put down the 2 OWLS (Z) to play a mini-game.
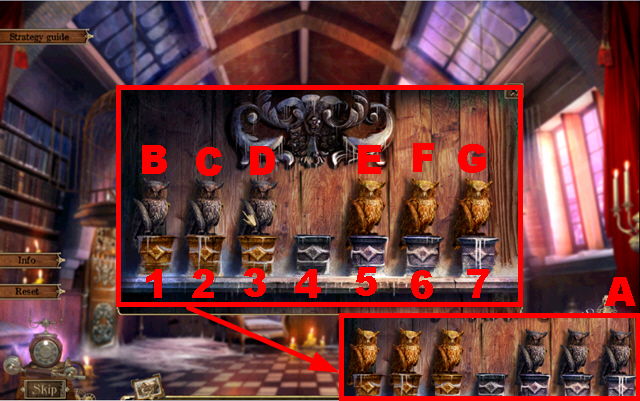
- To solve this puzzle (A), rearrange the owls so that each owl matches the color of its pedestal.
- Owls can move at most two spots at once.
- Move the owls in the following sequence to complete this puzzle: E4, D5, E3, C4, E2, D3, F5, C6, F4, D5, B3, E1, F2, D4, G5, C7, D6, B4, G3, and B5.
- Enter the Library.
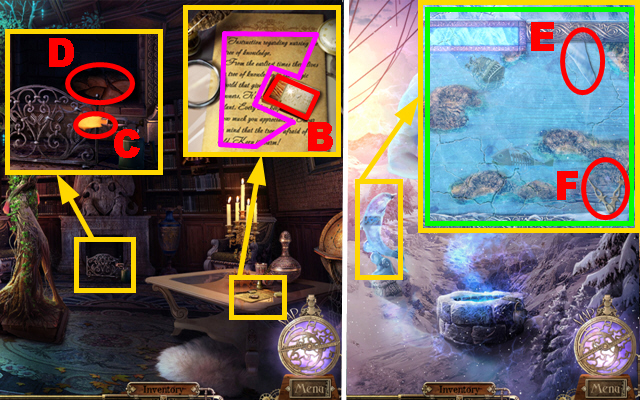
- Zoom into the note; take the MATCHES (B) and read the note marked in purple.
- Zoom into the fireplace; use the MATCHES to light the blowtorch (C) and put down the WOOD (D).
- Take the BLOWTORCH and light the woods.
- Go to the Snow dunes.
- Zoom into the ice dolphin; use the BLOWTORCH to melt the ice marked in green.
- Take the FRAGMENT (E) and the CLOCK HANDS (F).
- Go to the Room of shadows.
- Zoom into the table; take the FRAGMENT (G).
- Go to the Library.
- Zoom into the tree; take GISELLE’S AMULET (H).
- Go to Isabella’s tower.
- Zoom into the mirror; insert two FRAGMENTS into the gaps marked in blue and take the SIREN’S AMULET (I).
- Go to the Snow dunes.
- Zoom into the ice frog; use the BLOWTORCH to melt the ice frog (J).
- Guide the frog towards the hole (K) by pressing the arrow buttons.
- Take the KEY (L) and put the KEY into the lock (M).
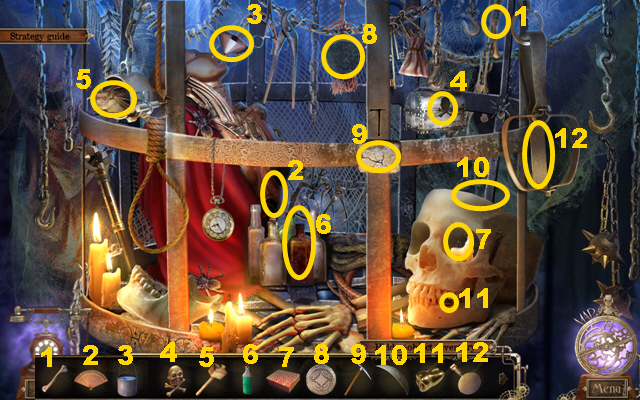
- Play the HOS.
- Put the items 1-12 back into their correct places.
- Item 2 has to be put in its place before item 1 can be put in its place.
- Item 7 has to be put in its place before item 3 can be put in its place.
- Item 11 has to be put in its place before item 5 can be put in its place.
- You will receive the RADIO.
- Go to the Room of shadows.
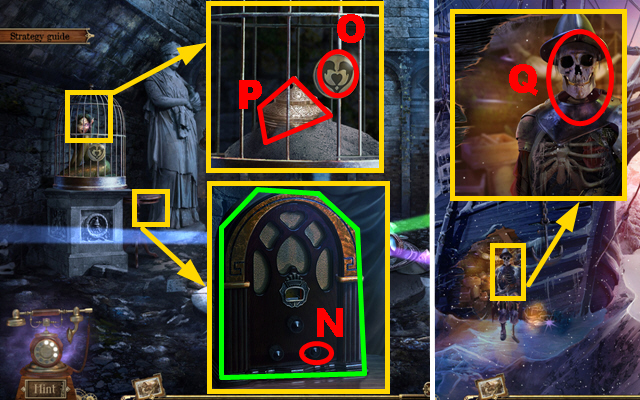
- Zoom into the table; put down the RADIO marked in green and turn the switch (N).
- Zoom into the siren’s cell and click on the siren; put the SIREN’S AMULET into the slot (O) and take the SOUL (P).
- Go to the Snow dunes.
- Zoom into the captain; give the SOUL to the captain (Q).
- Go Inboard.
Chapter 7: Inboard

- Zoom into the captain’s chest; take the FUSE (R).
- Walk down.
- Zoom into the anchor chain; attach the FUSE to the dynamite (S) and use the BLOWTORCH to light the fuse (T).
- Zoom into the fallen anchor; take the DOLPHIN (U).
- Zoom into the ice dolphin; put down the DOLPHIN (V) and play the mini-game.
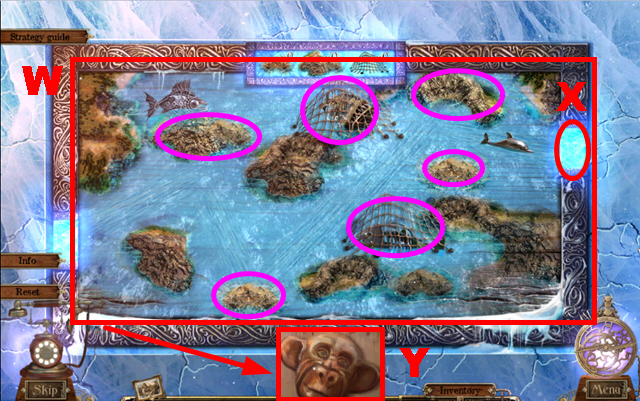
- To solve this puzzle (W), put down the rocks and the nets marked in purple so that the dolphin can reach its goal safely (X).
- Take the MONKEY FACE (Y).
- Go to the Lobby of the tower.
- Zoom into Giselle’s door; put GISELLE’S AMULET into the lock (Z).
- Turn left.
- Zoom into the monkey sage; take the ELEPHANT (A) and put the MONKEY FACE into the slot (B).
- Press matching pairs to finish the game of mahjong (C); take the AMULET OF ROSES (D).
- Zoom into the clock; put the CLOCK HANDS on the clock (E) and put the AMULET OF ROSES into the niche (F).
- Zoom into the floor; take the LADLE (G) and the SCOOP NET (H).
- Zoom into the aquarium; put the SCOOP NET into the water to acquire the ELEPHANT (I).
- Go Inboard.
- Zoom into the barrel; put the LADLE into the barrel to acquire the GUNPOWDER (J) and take the ELEPHANT (K).
- Go to the Library.
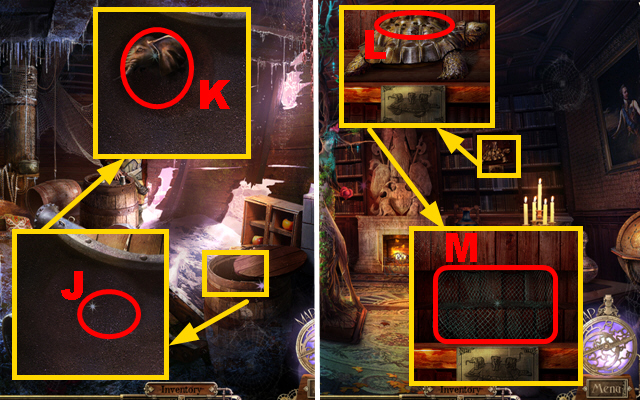
- Zoom into the turtle; put down the 3 ELEPHANTS (L) and take the NET (M).
- Go Inboard.
- Zoom into the naval gun; put the GUNPOWDER and the NET into the cannon (N).
- Use the BLOWTORCH to light the fuse (O).
- Play the HOS.
- Put the items 1-12 back into their correct places.
- You will receive the CODED DRUM.
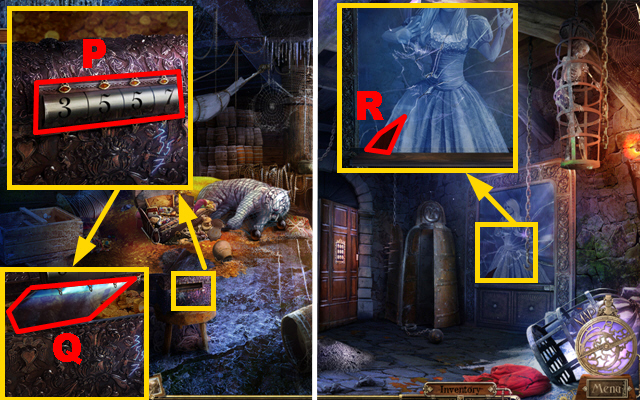
- Zoom into the captain’s chest; put the CODED DRUM into the niche (P) and enter the code ’3557′ to open the chest.
- Take the FRAGMENT (Q).
- Go to Isabella’s tower.
- Zoom into the mirror; put the FRAGMENT into the gap (R); you will receive ISABELLA’S AMULET.
- Go to the Hall.
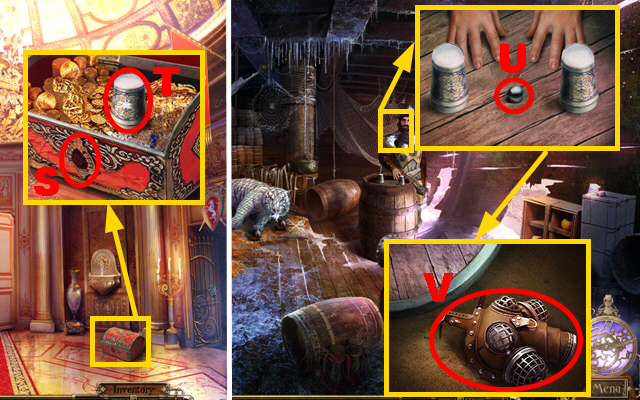
- Zoom into the chest; put ISABELLA’S AMULET into the niche (S) and take the THIMBLE (T).
- Go Inboard.
- Zoom into the captain; put down the THIMBLE (U).
- Find the die under the correct thimble three times.
- Take the GAS MASK (V).
- Go to the Arboretum.
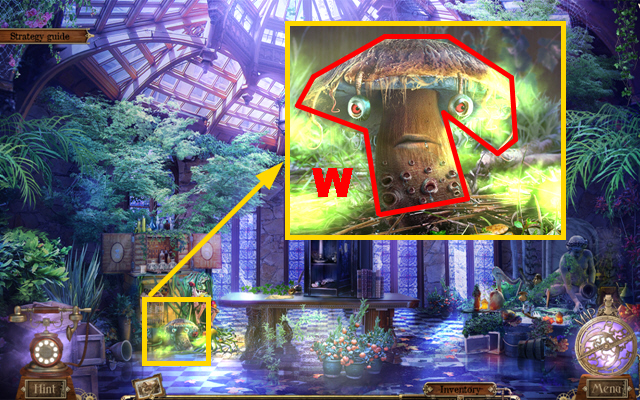
- Zoom into the mushroom; use the GAS MASK on the mushroom (W) to get past it.
- Play the HOS.
- Put the items 1-12 back into their correct places.
- You will receive the BUTTERFLY.
- Go to the Library.
- Zoom into the tree; put the BUTTERFLY on the flower marked in green and take the CAMEO (X).
- Go Inboard.
- Zoom into the tiger; take the CAMEO (Y).
- Go to the Royal kennels.
- Zoom into the prince; put the 2 CAMEOS on the amulet (Z) and take the CAMEO.
- You will receive the POTION OF LIFE and the BLADE.
- Go to the Library.
- Zoom into the map; cut open the map with the BLADE (A) and take the LAMP (B).
- Go to the Snow dunes.
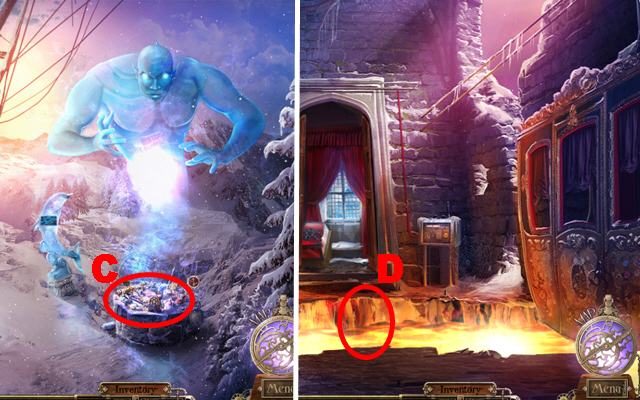
- Put down the LAMP (C) to acquire the GENIE.
- Go to the Dungeon.
- Use the GENIE to overcome the obstacle (D).
- Move forward.
- Zoom into the glass coffin; use the POTION OF LIFE on the fairy to revive her (E).
- Go to the Minor treasury.
- Zoom into the chest; insert the CAMEO into the remaining niche (F) and take the WAND (G).
- Go to the Fairy Dungeon.
- Give the WAND to the fairy (H).
- Congratulations, you have completed Detective Quest: The Crystal Slipper.


 Small Town Terrors: Livingston Walkthrough, Guide, & Tips
 Shiver Vanishing Hitchhiker Walkthrough, Guide, & Tips
 Silent Nights: Children's Orchestra Walkthrough, Guide, & Tips
 Sweet Lily Dreams: Chapter 1 Walkthrough, Guide, & Tips
 Twilight Phenomena: Strange Menagerie Walkthrough, Guide, & Tips