Sweet Lily Dreams: Chapter 1 Walkthrough, Guide, & Tips
Sweet Lily Dreams: Chapter 1 Walkthrough

Welcome to the Sweet Lily Dreams: Chapter I Walkthrough
Travel to a world of dreams and erase the nightmares that haunt us while we sleep in Sweet Lily Dreams: Chapter I!
Whether you use this document as a reference when things get difficult or as a road map to get you from beginning to end, we’re pretty sure you’ll find what you’re looking for here.
This document contains a complete Sweet Lily Dreams: Chapter I game walkthrough featuring annotated screenshots from actual gameplay!
We hope you find this information useful as you play your way through the game. Use the walkthrough menu below to quickly jump to whatever stage of the game you need help with.
Remember to visit the Big Fish Games Forums if you find you need more help. Have fun!
This walkthrough was created by Rose Portal Games, and is protected under US Copyright laws. Any unauthorized use, including re-publication in whole or in part, without permission, is strictly prohibited.
General Tips
- This is the Official Guide for Sweet Lily Dreams: Chapter 1.
- Select New Dream to start the game.
- Before starting the game, you can change the Options. Below is a description of what each option does: Difficulty – Changes the difficulty of the enemies.
- Music Volume – Adjusts the music volume.
- Sound Volume – Adjusts the sound effect volume.
- Family Mode – Turning this on removes any questionable content that may not be suitable for very young children.
- Tutorials – Turning this on displays tutorials within the game. It is recommended to keep this on the first time playing, as Sweet Lily Dreams uses quite a different system from the usual RPGs.
- Graphic Quality – A lower setting removes heavy effects and will help improve performance.
- Change Window – Switch between full screen and windowed size. Alternatively you can press F11 at any time.
- Customize Controls – Change any keyboard and gamepad controls.
- Review Tutorials (only available from within the game) – Read the game’s tutorials.
- F12 pauses the game at any time. While paused, hold the ‘left movement key’ (standard this is the left arrow key) and press F12 again to shut the game down.
- To walk around, left-click with your mouse on the desired location, or use the movement keys (standard: the arrow keys). Optionally, hold the left mouse button to follow the mouse.
- To access the menu, click on the icons at the bottom or right of the screen. Then use the mouse or the movement keys to scroll through the menus.
- To talk to a person, click on them with the mouse or approach them using the movement keys and then pressing the confirm key (standard: Enter). Use the same technique to open doors and chests, and to pick up items or read signs and notes.
- The mouse icon changes as it moves over people or objects that allow interaction. A speech bubble indicates you can talk to a person; a hand icon indicates you can pick up or manipulate an object; a magnifying glass indicates something that can be read; a sword indicates that you can battle with a monster.
- When a message appears on the screen, left-click or press the confirm key, after you have finished reading, to close the message box.
- Below is an image that shows how the menus work.

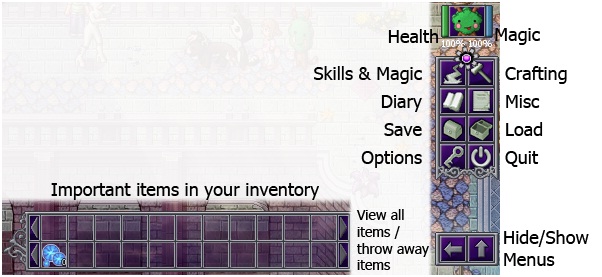
- Misc leads to the following menus: Accessories – Equip accessories.
- Discard Items – View all your items and be able to throw some away. Alternatively there is a short-cut at the bottom-right of the inventory belt (the horizontal inventory bar at the bottom of the screen).
- Points and Stats – View how many points you have collected and other statistics your gameplay.
- You can also click on the character portraits at the top-right to view more about them.
Chapter 1: The Beginning
- After the cutscene and brief tutorial, left-click or use the arrow keys and confirm key to open the two chests.
- Go through the portal.
- Left-click or use the arrow keys and confirm key to choose your elemental power. The star is thunder, the flower is water, the heart is fire and the snowflake is cold.

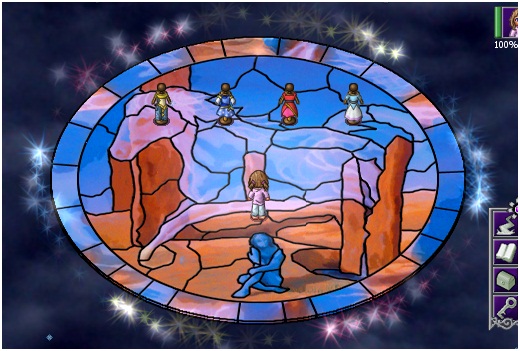
- Go through the portal.
- Now choose a garment, which determines your elemental defense. Again you can choose between thunder, water, fire and cold.
- After the tutorial you must fight the Bogeyphobius. This is a very simple and straight-forward introductory battle. Just keep using Attack until this incarnation of bed-monster fear is erased.
- After defeating the Phobius you will be in a ship’s cabin. Pick up the pole on the right, then use it to grab the key on the left. Open the door.
- After a cutscene, you will find yourself controlling a different character: Faith. See the map below to find your way to the Asurean Ruins.

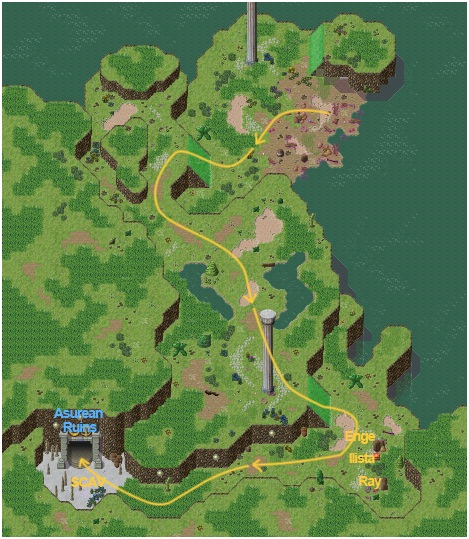
- At the entrance to the Asurean Ruins you can accept a side-quest from SCAV. See the side-quests section of this walkthrough for more information.
- The Asurean Ruins splits up into four areas from the entrance hall. To access the north-western part, you must collect four Golden Rings. To access the north-eastern part, you must find a Blue-Golden Vase. These items can be found in the (south-)west and (south-)east.
- See the maps below for the exact locations of these items and a hidden room in the south-western area. To enter that room, simply examine the crack in the wall at the top.

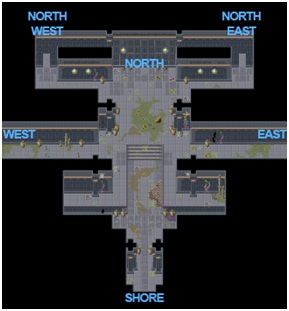

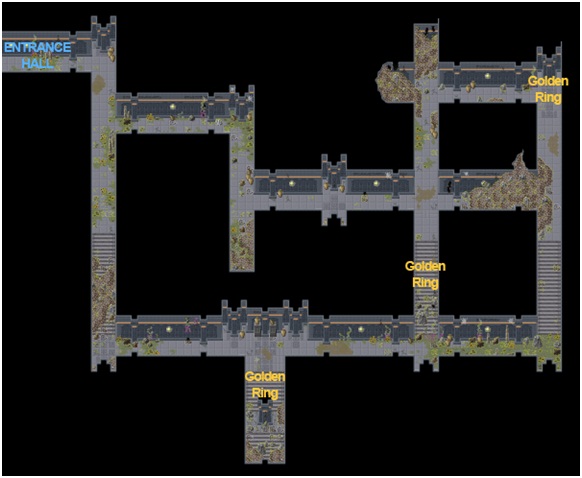

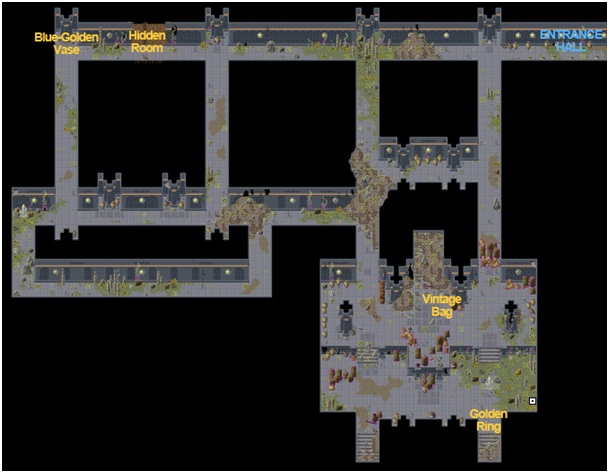
- After collecting all items, go to the north-western door at the entrance hall and insert the four Golden Rings.
- A mini-game will be triggered in which you must rotate the rings to form an image. Use the assigned movement keys or the mouse by clicking on the arrows at the bottom-right corner. The image below shows how the rings must look to complete the mini-game.

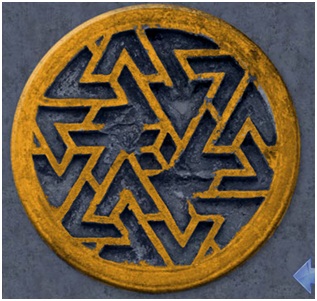
- To enter the north-eastern area, you simply have to place the Blue-Golden Vase.
- In both northern areas you must pull a switch at the top. See the maps below for the route to the switches. On your way back you can use another switch to open up a short-cut back.

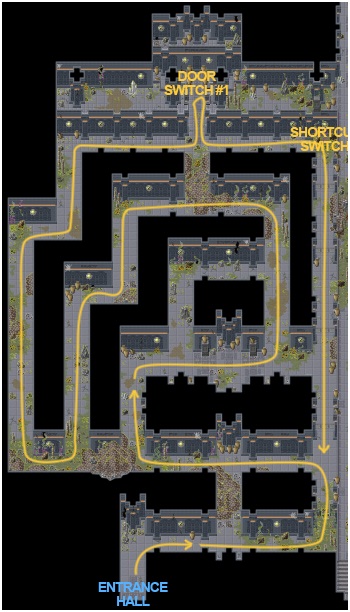

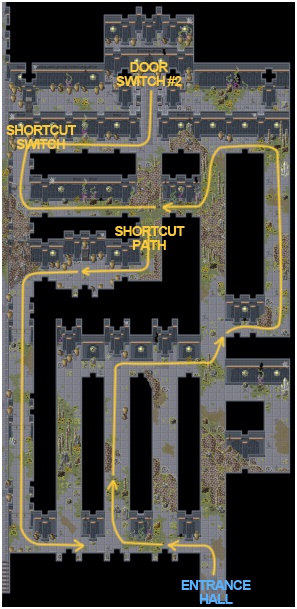
- Afterwards, go through the northern door in the entrance hall.
- Keep going north.
- At The Dreamline, you must grab the zipper on the left until the water flows onto the machine and the door up ahead opens.
- Save and prepare for the upcoming boss fight, then continue.
- After a cutscene, Curly will have joined your party and you are up against a creature called the Pyrophobius: the embodiment of the fear for fire. T he Pyrophobius is of the fire element. It is thus weak to water, resistant to ice and absorbs fire. If you have magic, make sure not to use the fire or ice elements. Every 2 turns it will use Fireball. If you are low on Health Points or feeling particularly strategic, it is better to use Defend with Faith and Curly the turn it will use Fireball. Other than that, this is a pretty straight-forward battle. Inferno is rather strong, so try to keep your Health up with potions. Fortunately, though, a message that says the Pyrophobius ‘glows brightly’ is displayed before it uses this skill.
- After the battle, you are back in control of Lily. Follow the path you took as Faith into the Asurean Ruins. As you previously opened up the northern door, you can immediately go to The Shrine.
- Enter the portal there.
- After another cutscene, you are at the main city in the game: Rosaria. If you have played the ‘prequel’ Whisper of a Rose this is a special moment, as you spend that entire game traveling to this flying city. You are now in control of Faith, Curly and Lily.
- Follow the path all the way to the east, to the Fairy Godmother’s Tower. If you want you can explore the city, talk to characters and activate quests, but until after meeting the Fairy Godmother a couple of characters are missing.
- After the cutscene at the Fairy Godmother’s Tower, go back west to the Central District. You will enter Lily’s house. This is where you can place furniture for bonuses and change Lily’s gear if you have bought any new ones at the Points Extravaganza.
- Before proceeding, you should go to the Item Shop to buy potions and Craleef for the next boss battle.
- Now go back to the Dream Chamber and check out the portal at the top-left to enter the first dream world level: the Hypercubex.
Chapter 2: Hypercubex
- See the map below to guide you through the first area. You can also access the Chamber of Computers here at the north-east for the side-quest The Answer to Everything.

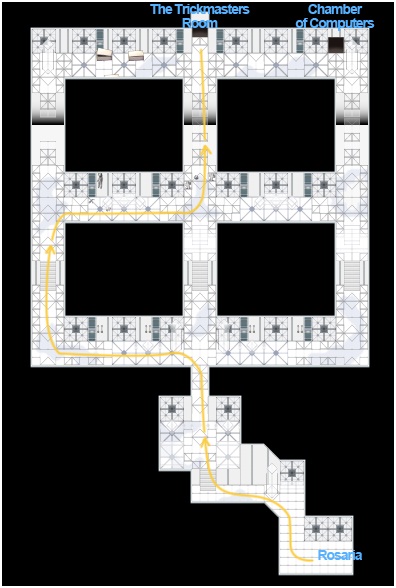
- At The Trickmaster’s Room you must talk to the Trickmaster to play a game of thimblerig. This simply involves following the cap with the dice and selecting it after the Trickmaster has moved them around. You only need to win three rounds to continue, but if you win all seven rounds you win a bunch of shards and potions.
- Continue, and after a cutscene enter the portal there.
- You will now play a maze mini-game, in which you must collect four keys and bring them to a panel to proceed. Optionally, speak to the flying brain to skip the puzzle. The rooms must be moved using control panels to reach the keys. Upon first entering the maze, proceed west and then north to find the first control panel. Below is an image displaying all sixteen rooms in their original position (with the player being at the first control panel). The room marked as ‘here’ and the bottom-right most room have control panels. Note that you can only view the rooms nearby — the others are shrouded with a question mark.

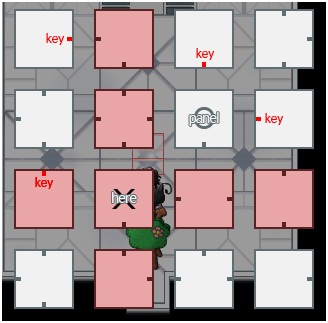
- First you must reach the panel room to activate the key rooms’ doors. Follow these steps starting from the first control panel:
Move the room WEST. Walk SOUTH. Walk WEST. (You reach the other control panel).
- Move the room EAST. Move the room EAST again. Walk EAST. Walk NORTH. Walk NORTH.
- Now check the panel to activate the key rooms’ doors.
- From here on simply keep moving the rooms until you reach the keys.
- Then return to the panel, place the four keys and go into the portal.
- Now heal, save and prepare for an upcoming boss battle. When ready, go north into the next room.
- After a cutscene you will fight the Octophobius, the incarnation of the fear for octopi. Use thunder magic if you have it, and avoid water magic. If you have Lily’s water dress or thunder power, equip those at her house in Rosaria. The Octophobius uses Flood twice: when it is below 50% and 20% Health Points. Keep an eye out on its Health bar and Defend when you estimate it will use Flood. Poison can be rather annoying, but it only uses it every two turns.
- After defeating the boss you will have cleared the first level of this dark dream world! Step into the portal and feel free to do side-quests or to buy new items and furniture and such. When you’re done, come back to the Dream Chamber and proceed to the London Mansion.
Chapter 3: London Mansion
- Skip the garden area for now and go north into the London Mansion.
- Follow the butler up the stairs.
- You will now have to find a key. First go through the north-western door at the Bridge and speak with the character. She will give you a key to the basement.
- Go back to the Foyer and all the way around the house (either going west or east) until you reach the Laundry Room at the north. In the Kitchen is a hidden room that can be accessed by checking the crack in the wall (see the image below).

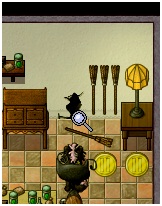
- At the Laundry Room, go down into the basement, use the key to unlock the door and check the storage room at the south-west for the Housekeeper’s Notes.
- Now go back up and west to the Conservatory.
- Check the plant at the top-left for the key.
- Return to the butler at the Bridge and give the key to him.
- After a cutscene you will be given the task to collect six Pink Flowers from the garden. See the image below for a map of where the flowers are. To reach the north-western area of the garden you must leave through the Living Room.

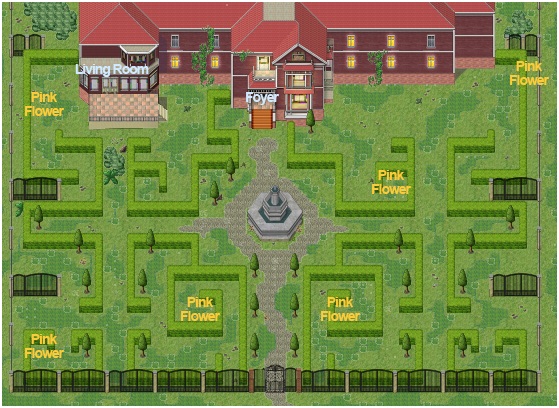
- After handing over the Pink Flowers to the requesting character, a certain event will take place and you must now find a way into the hidden basement.
- Go to the Library which is the bottom-left door at the Bridge.
- Check the bottom of the most top-left bookshelf to find a note.
- Go to the shelves of wine at the north-east of the basement.
- Check the most right part of the north-eastern shelves. The clock will move aside to reveal the hidden basement’s entrance. See the image below.

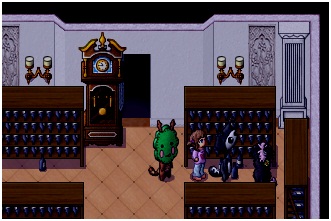
- Go into the Basement Library.
- In the first area, travel all the way east and go up the stairs.
- In the second area go to the north and the third area to the west.
- Save, heal and prepare for the upcoming boss battle.
- When ready, go north to face It. This is a fairly straight-forward battle, as It has no particular weaknesses or strengths. He uses Balloon Blast every now and then for strong damage on one target, and Circus Trick every three turns starting from the second to protect itself. It is fully resistant to every status effect except Blind and Burn. If you are having a tough time defeating him, you may want to teach a character Blind and have him or her keep trying to apply the status to It.
- After the battle, go south and you will be back at the Basement Library’s entrance.
- Head back up into the mansion and return to the Laboratory to give the butler the Violet Roots. He will give you two more items: the Red Roots and Blue Roots, though the monsters at the Basement Library actually drop those as well.
- Go to the chemistry desk to initiate a mini-game in which you must combine the Red Roots and Blue Roots into a Purple Vial.

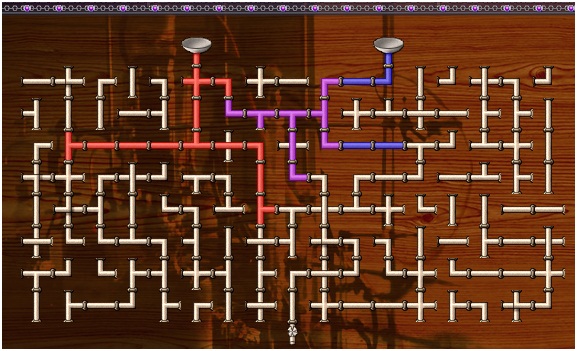
- In this mini-game the goal is to turn the pipes around so that they form a connection between the cylinders at the top and the tube at the bottom. When the connection is formed, scroll to the tube at the bottom and confirm to start the pumping process. The fluids will combine and you will receive a Purple Vial. Give it to the butler and he will give you a Violet Potion.
- Now go down to the Foyer and prepare for another boss battle.
- When ready, head west into the Living Room to encounter Mister Hyde. On the first turn and every four turns thereafter, he uses Mass Blind. If you have any blind-resistant accessories, equip them. You can also use Defend when you know he will use Mass Blind, as defending heavily decreases the chance of receiving a negative state. He is quite susceptible to Burn, so have someone use it on him if you have the spell. It will stop him from using Mass Blind and Thunder.
- After the battle, the level will be cleared. You can now go to the Laboratory and speak with a certain character to continue the potion mixing mini-game for great rewards, including the Anklet of Hi-Evasion and the Corsage of Cold.
- When ready, move on to the next level: the Russian Forest.
Chapter 4: Russian Forest
- When you enter the area and follow the path for a bit, it will immediately become clear what your goal this level is. The forest has multiple talking trees that give you access to an underground tunnel-network if you complete their quests. The Tree of the Sunflower, Rose and Iris require you to find their respective Rider, which you cannot do yet. The Tree of the Aster requires you to find a hare.


- Go to Russian Forest: West. At Russian Forest: South-West is the fox for a certain side-quest in Rosaria.

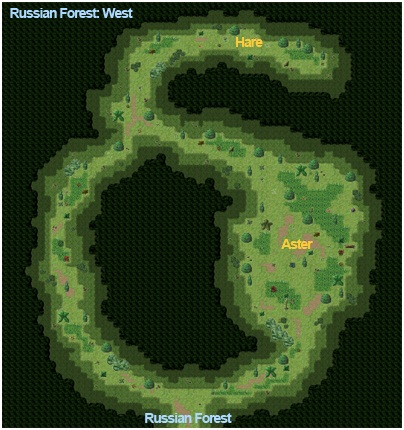


- Get the Hare and return it to the Tree of the Aster.
- Go to Russian Forest: South via the underground tunnel.

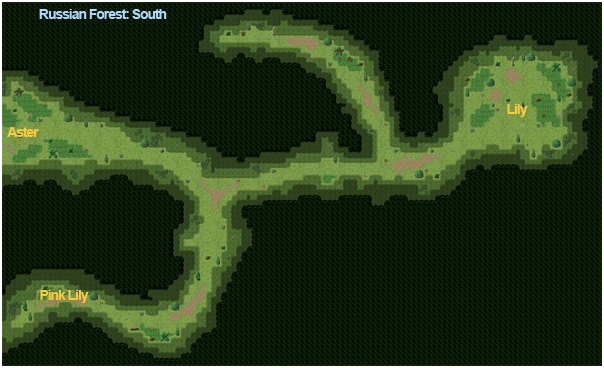
- Talk to the Tree of the Lily, get the Pink Lily and return it.
- Now take the tunnel to Russian Forest: North-East.

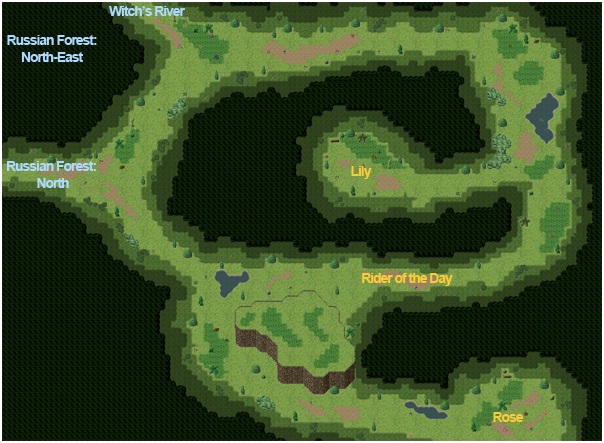
- Head north-west to the Witch’s River for a cutscene. You can now encounter the riders in the forest. You must speak with all three to be able to reach Baba Yaga on the other side of the Witch’s River.
- First talk to the Rider of the Day at Russian Forest: North-East. You can now go through the Trees of the Rose.
- Go west to the Russian Forest: North.

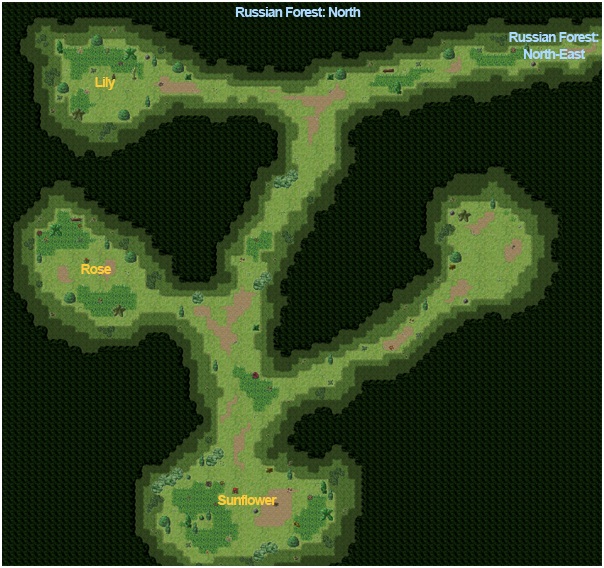
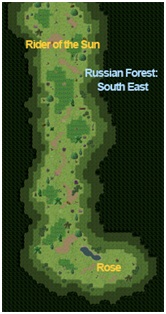
- Take the tunnel of the Tree of the Rose to Russian Forest: South-East (see the image on the right).
- Speak with the Rider of the Sun and you can now go through Trees of the Sunflower.
- Go back to Russian Forest: North and into the Sunflower’s tunnel.
- Go to Russian Forest: North-West and speak with the Rider of the Night, which opens the Trees of the Iris.


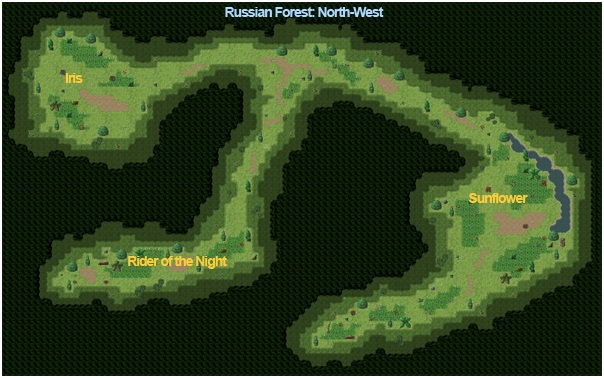
- Now take the Iris’ tunnel to Baba Yaga’s Path (the northern most exit). If Curly has a good accessory equipped, unequip it.
- Head north for a cutscene.
- Now save, heal and prepare for an upcoming mini-boss fight.
- Head west and into the cave when ready. At any point you can still return to Rosaria, but the next thing to do is to go north at Baba Yaga’s Path.
- Save and prepare for a real boss fight.
- When ready, go north to see the final cutscene. Congratulations! You’ve finished this part of Sweet Lily Dreams!
Side-Quests of Part I
- This section gives instructions on completing the side-quests available in Part I of Sweet Lily Dreams. Move on to Chapter 1 for the main storyline.
- Bags and Boggards – Available from the start (until leaving the Shore / Asurean Ruins area) by talking to SCAV at the Shore.
SCAV’s research team has left behind an important bag in the Asurean Ruins when they were chased off by Phobius.
- Go into the Asurean Ruins and take a left to the south-western area. Retrieve the Vintage Bag and return it to SCAV.
- The Answer to Everything – Available from the start by talking to Tome at Rosaria: Southern District.Tome must solve a very complicated formula, and hasn’t been able to succeed so far. Travel to the Hypercubex, and go into the room to the north-east of the first area. Trade the formula to the machine with the smiling face and it will give you the answer. Return to Tome.
- Mixing Mania – After completing the London Mansion talk to Doctor Jekyll at London Mansion: Laboratory. Doctor Jekyll was so impressed by your potion mixing skills that he has asked you for further assistance.
- This quest simply involves going down to the mansion’s basement library, fighting Phobius for ingredients and then mixing potions at the laboratory’s desk. The potions required to mix are (in chronological order):
- Mix a Purple Vial and give it to Doctor Jekyll.
- Mix a Purple Vial, Green Vial and Orange Vial.
- Mix 2 Purple Vials, 2 Green Vials and 2 Orange Vials.
- Mix a Red-Purple Vial and a Red-Orange Vial.
- Mix 2 Blue-Purple Vials and 2 Blue-Green Vials.
- Mix 2 Blue-Green Vials, 2 Yellow-Green Vials and 2 Yellow-Orange Vials.
- Finding a Fox – Available from the start by talking to Star at Rosaria: Southern District.
- Star wants to surprise Hellena, Melrose’s friend, with a pet as her birthday gift! Hellena loves foxes, but there are none around in Rosaria.
- Go to the Russian Forest: South-West. The fox can be found in the center of the area.
- Icing on Top – Available from the start by talking to Ginger at Rosaria: Southern District. Ginger, the gingerbread man, wants to give Gingie icing for her birthday, but there is none.
- Speak with the maid in the kitchen of the London Mansion to receive the icing.
- Looove Skills (Are Lacking) – Available from the start by talking to Ocous at Rosaria: Southern District (south-west).Ocous has a big crush on Vivien, of the Relulael. He wants to make a good impression by studying the Relulael before approaching her.
- Go to the basement library and speak with the mysterious librarian at the entrance, down the stairs. Go all the way east and then north to the next area. Go up the stairs and all the way north to the second ‘circular’ room. The book is on the center-right bookshelf in the north.
Now go back south in this same area, down the stairs and check the bookshelf at the south-west. Return the books to Ocous.
Secrets
- Below is a list of the secrets in the game. These count for all three parts of the Sweet Lily Dreams series.
- There are five hidden rooms in the game. They are described in the walkthrough, but here’s a quick list: Asurean Ruins South-West – London Mansion: Kitchen – North Swamp: the pipe – Pyramid Greater Hall F3
Dracula’s Castle Room
- The following pieces of furniture give a special effect when all placed: Valentine Effect – Large Valentine Table – Valentine Table – Valentine Chair x2 – Valentine Bed – Valentine Plant – Pink Curtain Long OR Pink Curtain Short (can only be crafted!) – Valentine Clock.
- Halloween Effect: Coffin – Bones – Pumpkin – Straw Bed (can only be crafted!).
- Armoury Effect: Armour – Mace – Swords – Axe.
- Scholar Effect: Cabinet – Wooden Cabinet – Bookcase x2 – Globe Table.
- If you pick up less than 20 Healing Orbs in the total of the game, you will find a special treasure chest at the Phobius Core, where you can take a paper airplane to the ending. It contains:
- 2000 Points
- 20x Thunder Shards
- 20x Water Shards
- 20x Fire Shards
- 20x Cold Shards
- 20x Thunder Crystals
- 20x Water Crystals
- 20x Fire Crystals
- 20x Cold Crystals




 Dark Parables: The Final Cinderella Walkthrough, Guide, & Tips
 Lost Lands: The Four Horsemen Walkthrough, Guide, & Tips
 Exorcist Walkthrough, Guide, & Tips
 Valerie Porter and the Scarlet Scandal Walkthrough, Guide, & Tips
 Creepy Tales: Lost in Vasel Land Walkthrough, Guide, & Tips