Twilight Phenomena: Strange Menagerie Walkthrough, Guide, & Tips
Twilight Phenomena: Strange Menagerie Walkthrough

Welcome to the Twilight Phenomena: Strange Menagerie Walkthrough
You’ve come to Mexico to explore a mysterious mansion. But this is no vacation. Your cousin is missing, and the house is crawling with bizarre and deadly creatures!
Whether you use this document as a reference when things get difficult or as a road map to get you from beginning to end, we’re pretty sure you’ll find what you’re looking for here.
This document contains a complete Twilight Phenomena: Strange Menagerie game walkthrough featuring annotated screenshots from actual gameplay!
We hope you find this information useful as you play your way through the game. Use the walkthrough menu below to quickly jump to whatever stage of the game you need help with.
Remember to visit the Big Fish Games Forums if you find you need more help. Have fun!
This walkthrough was created by SeverineSnape, and is protected under US Copyright laws. Any unauthorized use, including re-publication in whole or in part, without permission, is strictly prohibited.
General Tips
- This is the official guide for Twilight Phenomena: Strange Menagerie.
- This guide will not mention each time you have to zoom into a location; the screenshots will show each zoom scene.
- You can create a custom play mode using your preferred settings. The mode can be changed during the game.
- We will use the acronym HOP for Hidden-object puzzles. Interactive items will be color-coded and some will be numbered; please follow the numbers in sequence.
- The HOP lists are random; our lists may vary from yours.
Chapter 1: The Doctor

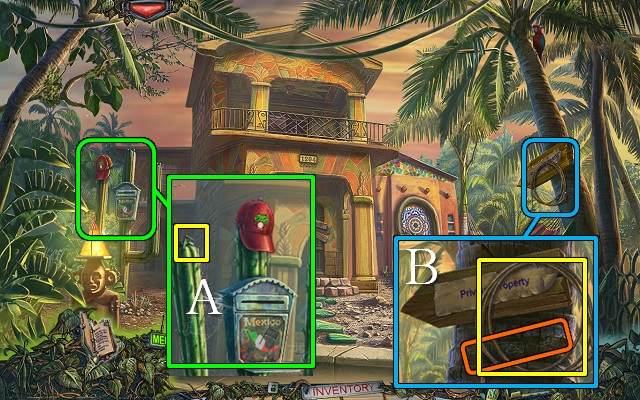
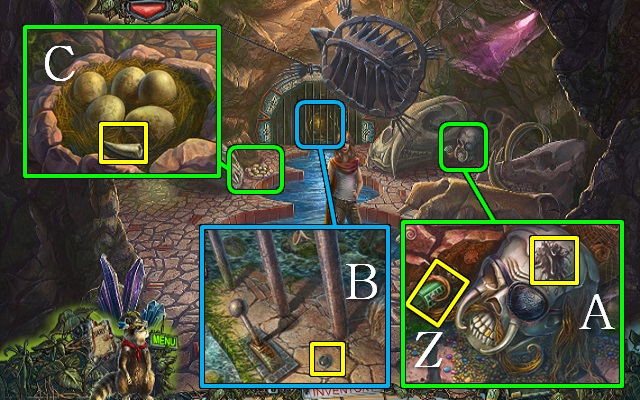
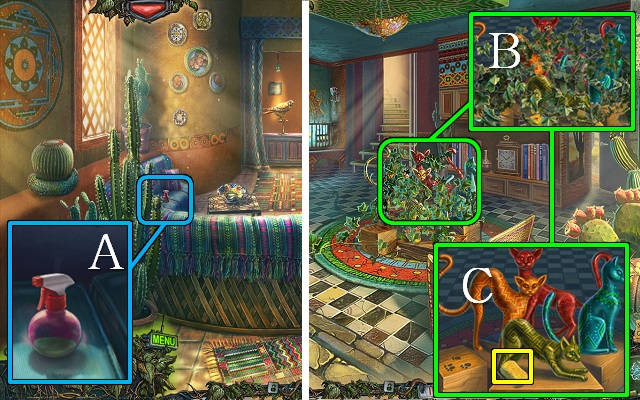
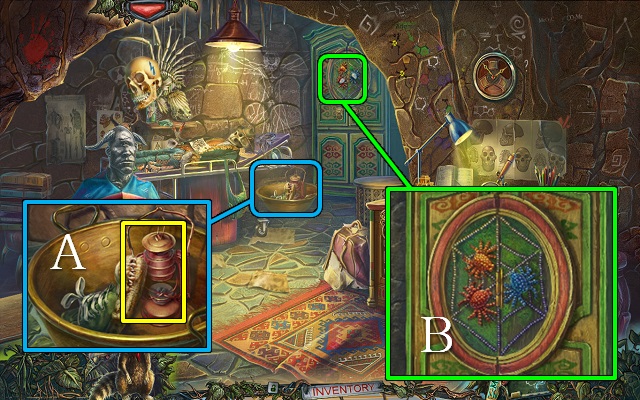
- Move Mary’s cap; take the CACTUS NEEDLE (A).
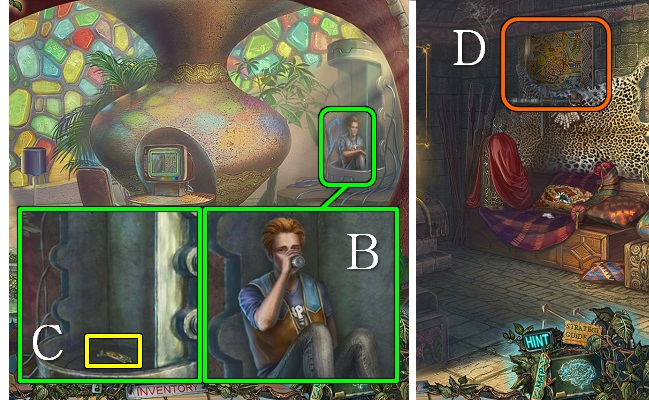
- Take the LASSO; note the symbols (B).
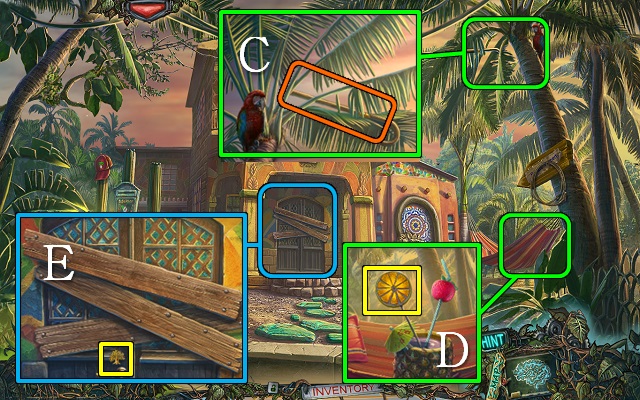
- Use the LASSO to get the CANE (C).
- Take the ORANGE FIGURE (D).
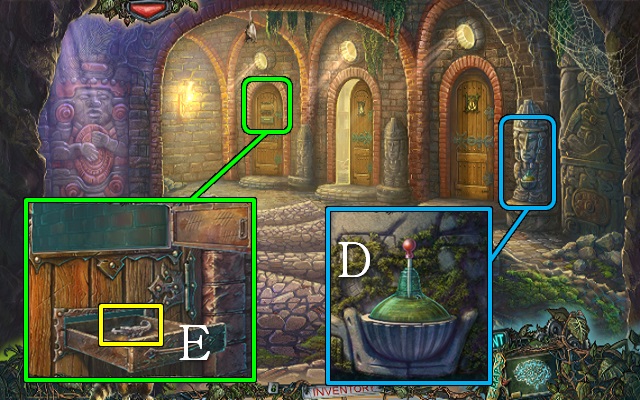
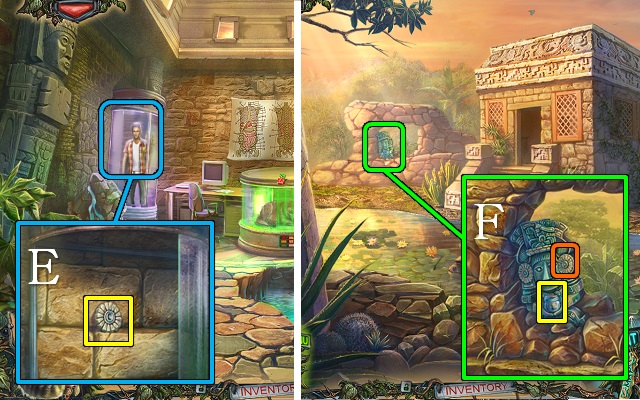
- Remove the boards with the CANE and take the TREE PENDANT (E); walk forward to the Lobby.
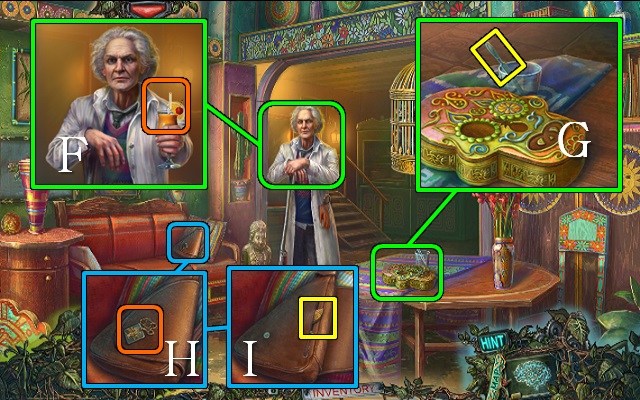
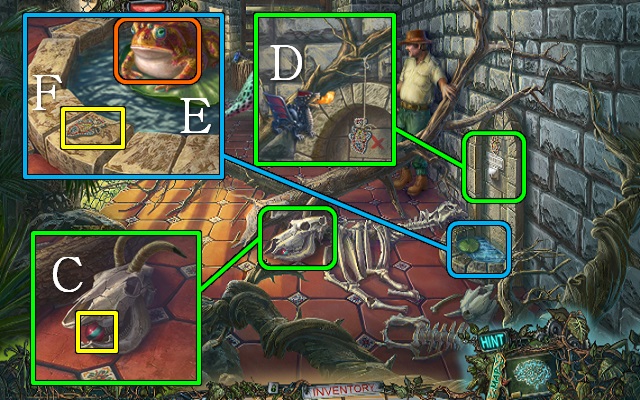
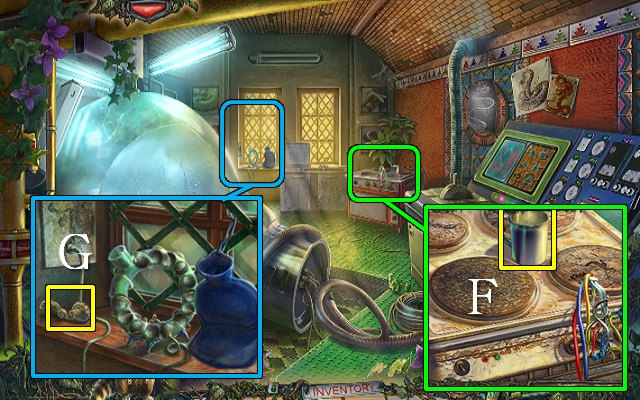
- Talk to the doctor; drink some lemonade (F).
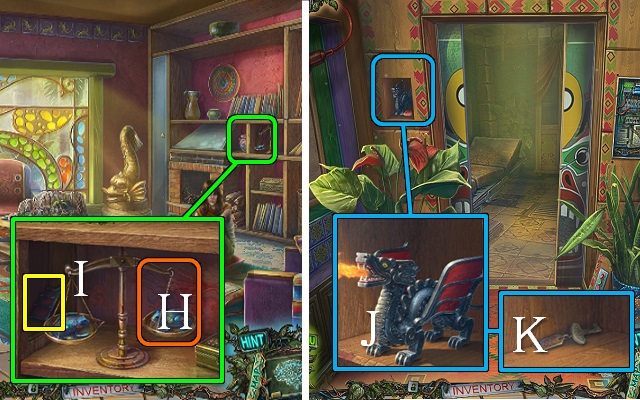
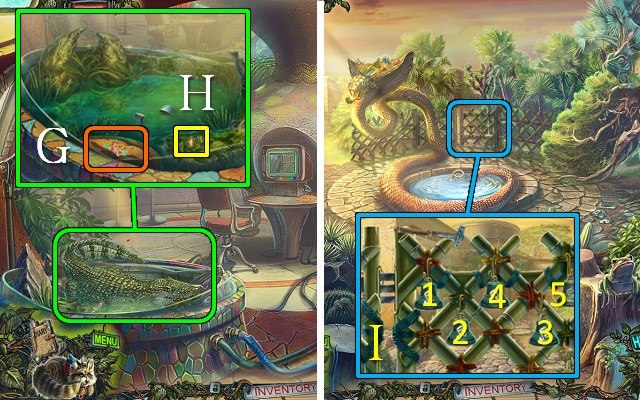
- Take the SCALPEL (G).
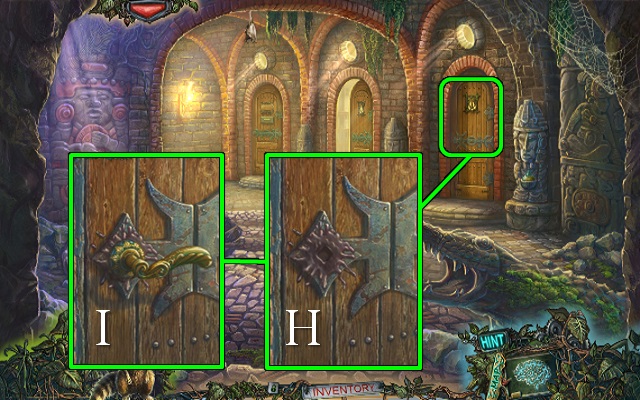
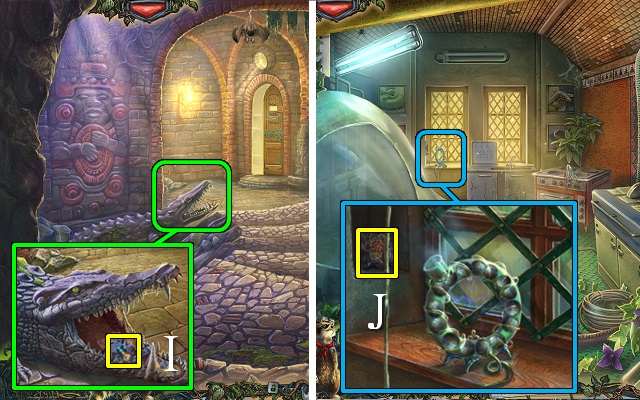
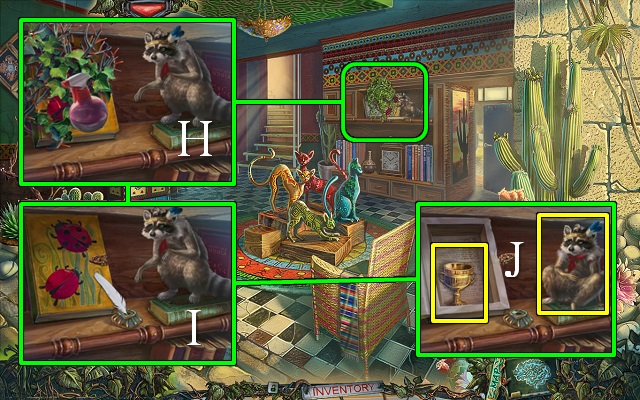
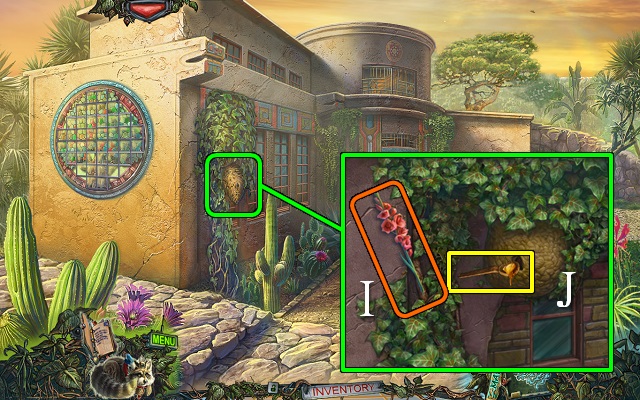
- Put the TREE PENDANT on the locked bag (H) and open the bag; take the STONE SHELL (I).
- Walk down to the Yard.
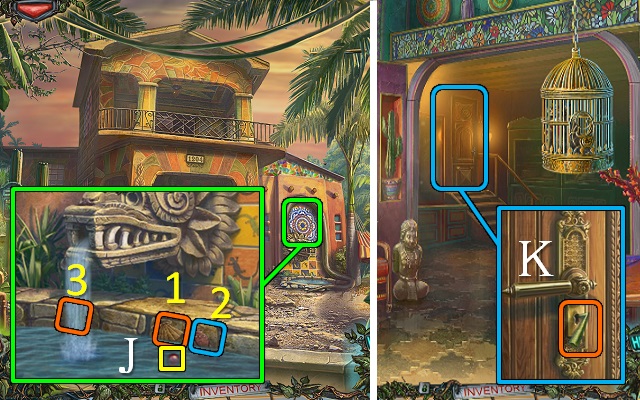
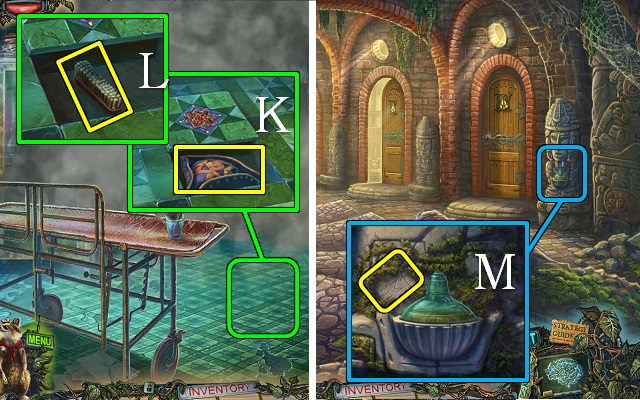
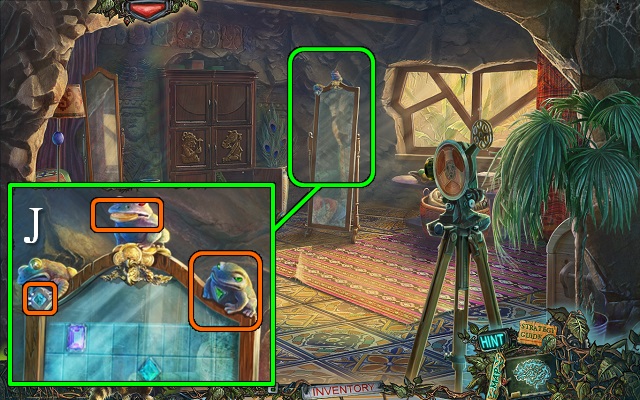
- Put the STONE SHELL on the fountain tile; push the tiles in numerical order and take the EYE (J).
- Go inside.
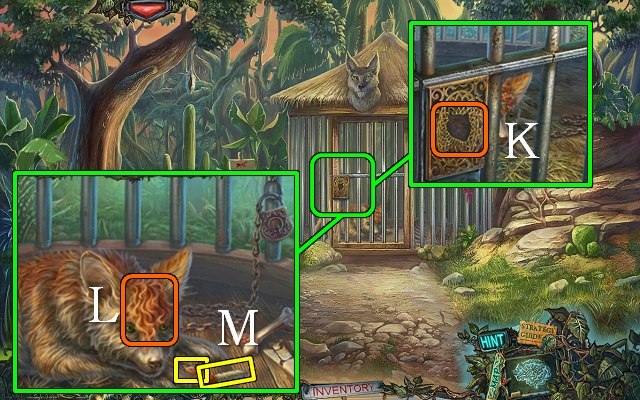
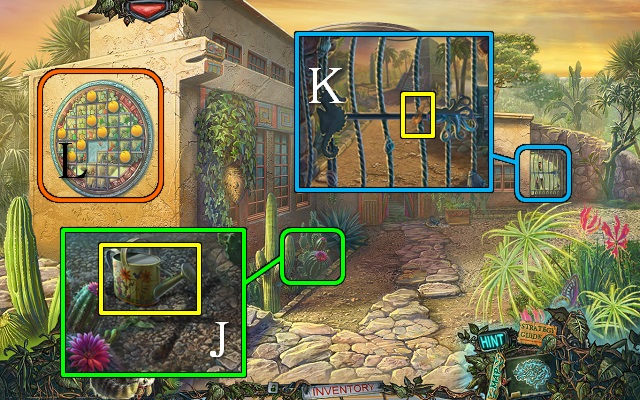
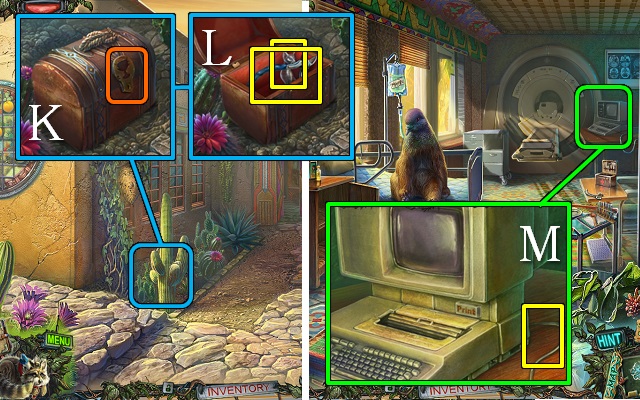
- Pick the back door lock with the CACTUS NEEDLE (K); walk forward to the Corridor.
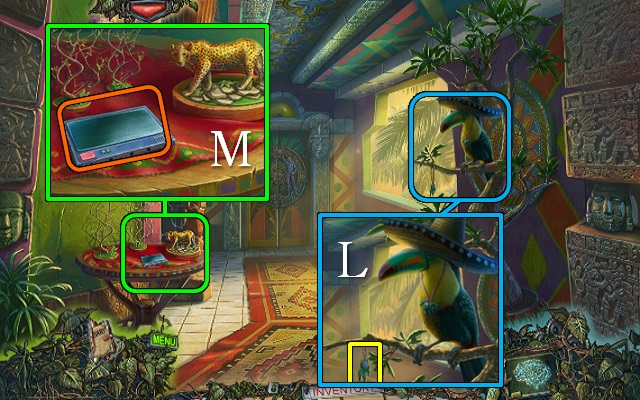
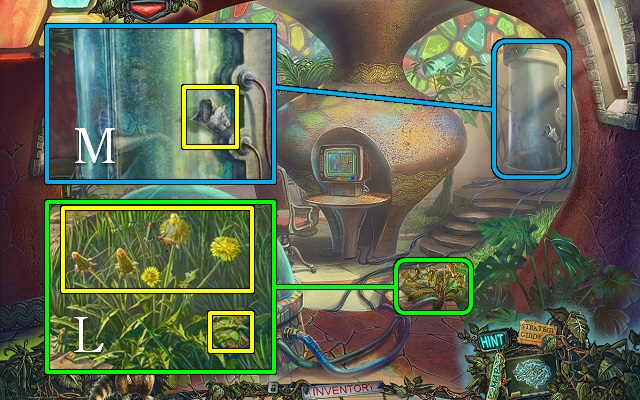
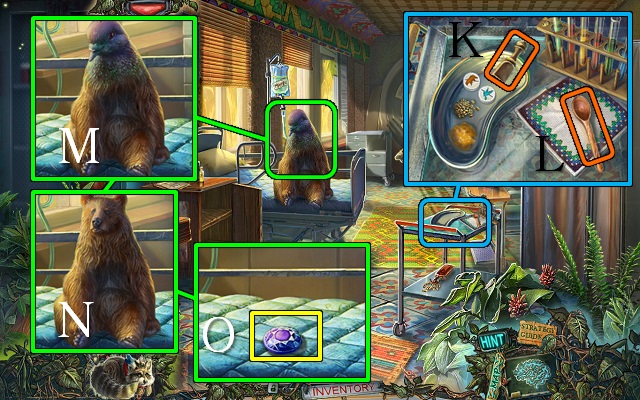
- Take the PAW MEDALLION (L).
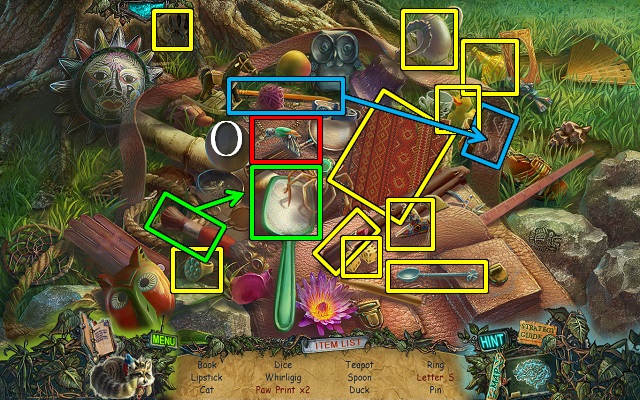
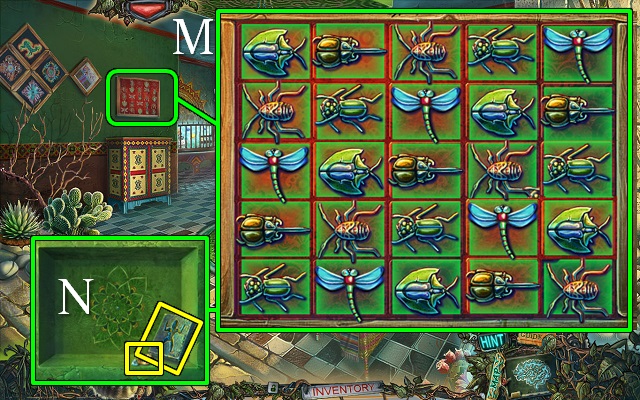
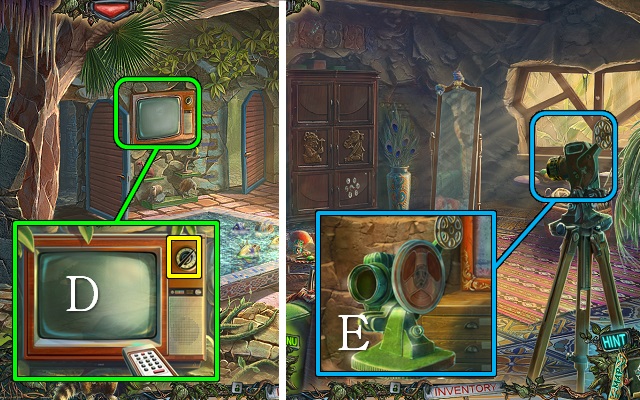
- Watch the video (M).
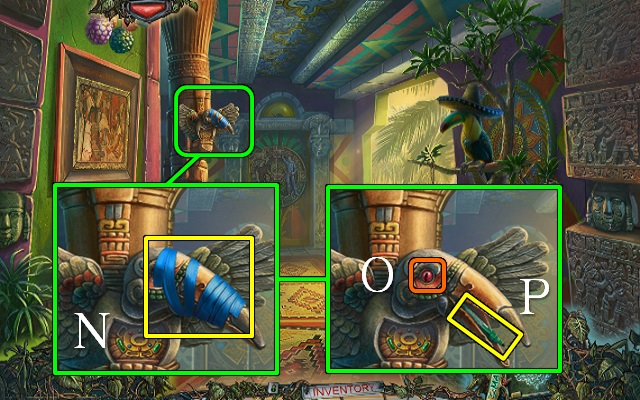
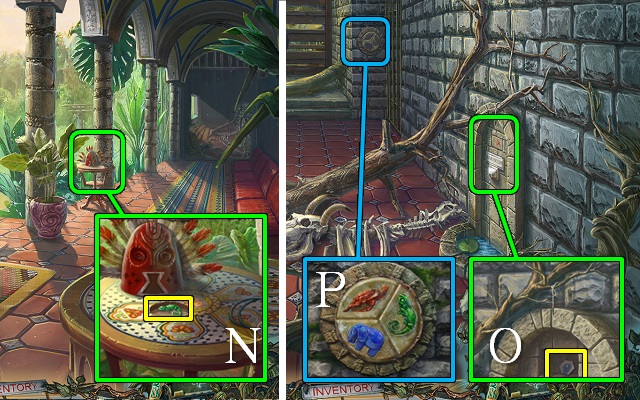
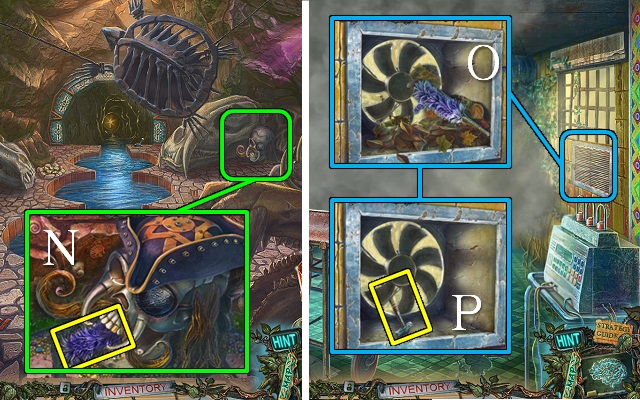
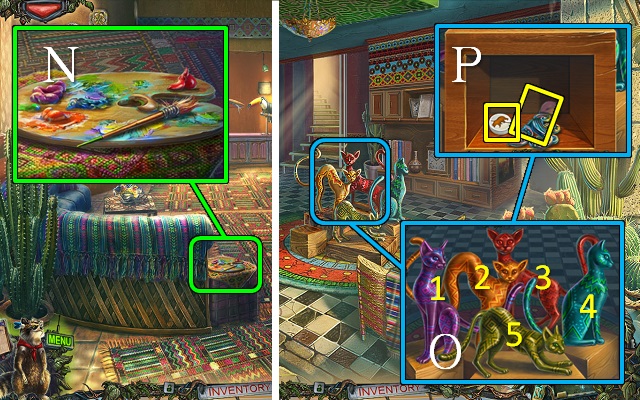
- Take the TAPE (N), put the EYE in the socket (O) and take the GREEN MARKER (P).
- Walk down.
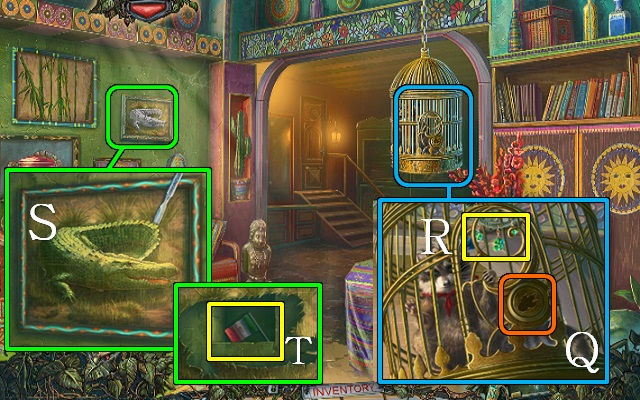
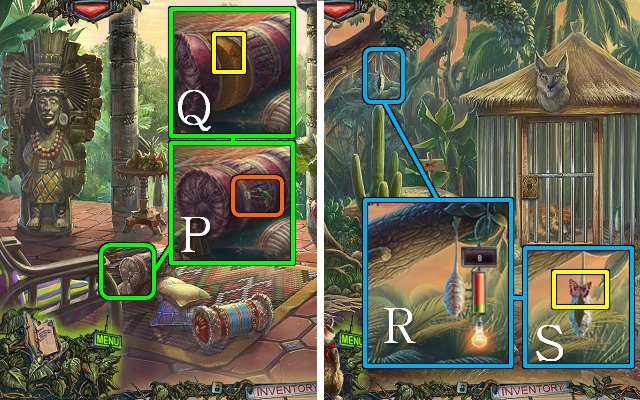
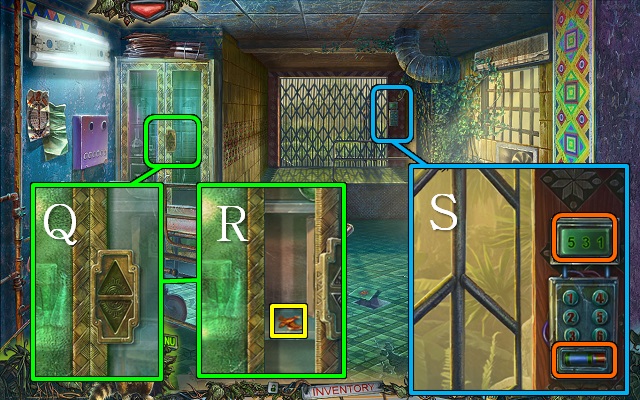
- Open the cage with the PAW MEDALLION (Q).
- Take the GREEN STONES (R).
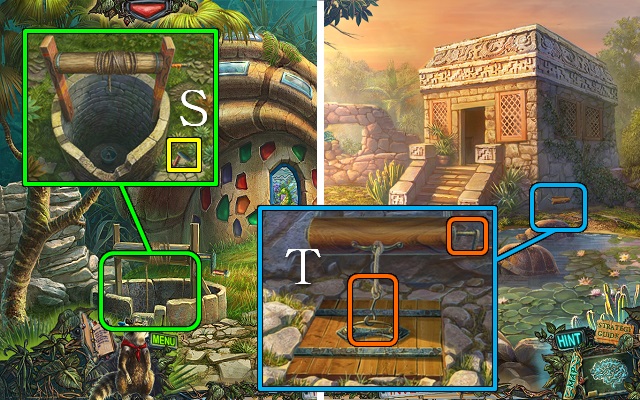
- Use the GREEN MARKER on the painting and cut it with the SCALPEL; take the CROCODILE PICTURE (S) and FLAG (T).
- Walk down.
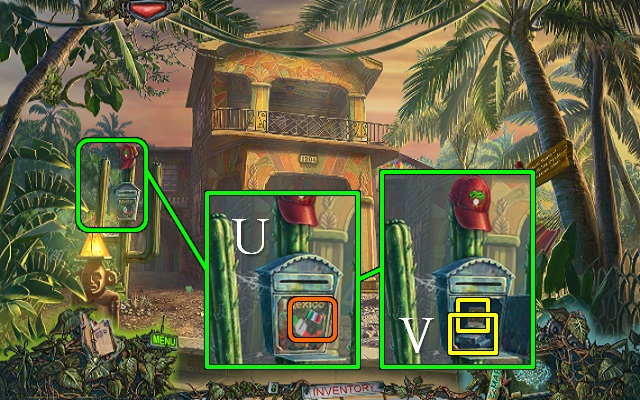
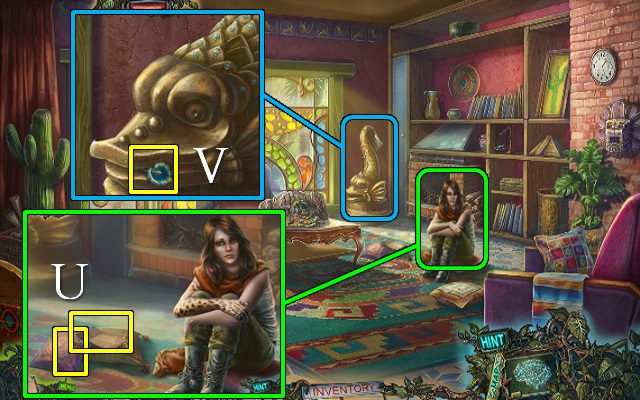
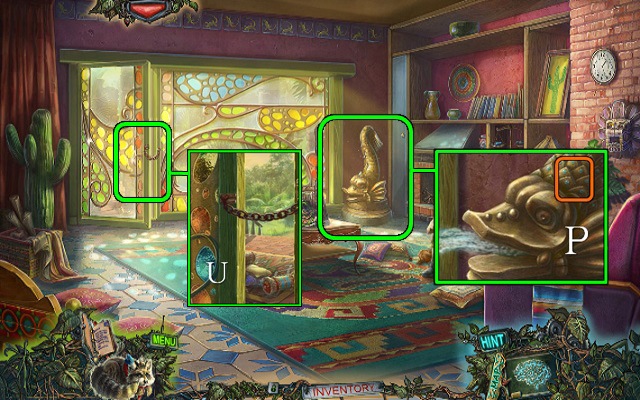
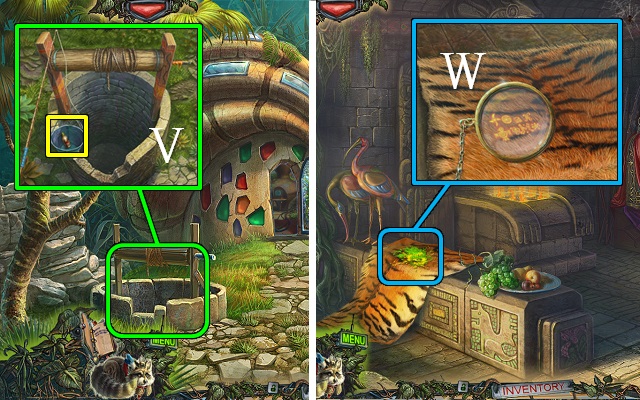
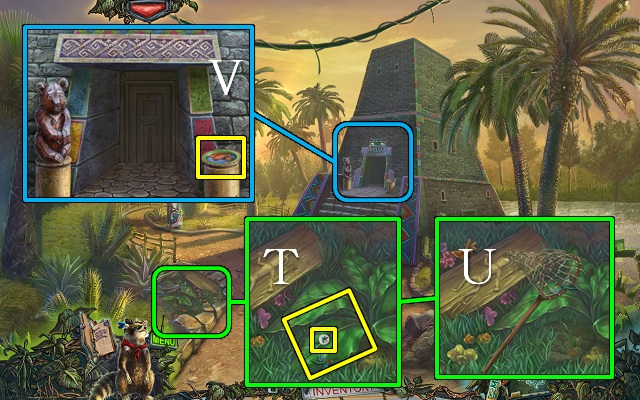
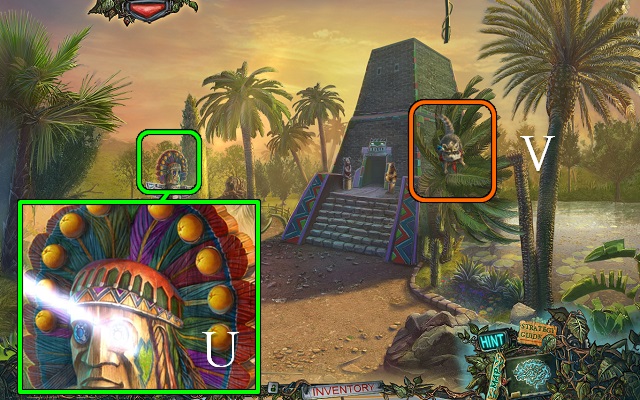
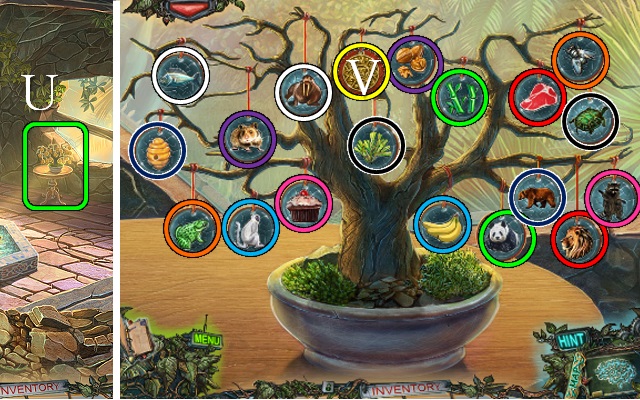
- Chase off the cat; put the FLAG on the mailbox and open it (U), look at the picture and take the CAMERA (V).
- Go inside.
- Talk to the doctor.
- Go to the Corridor.
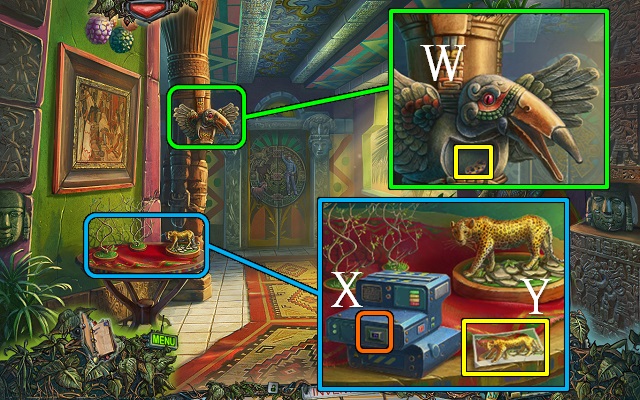
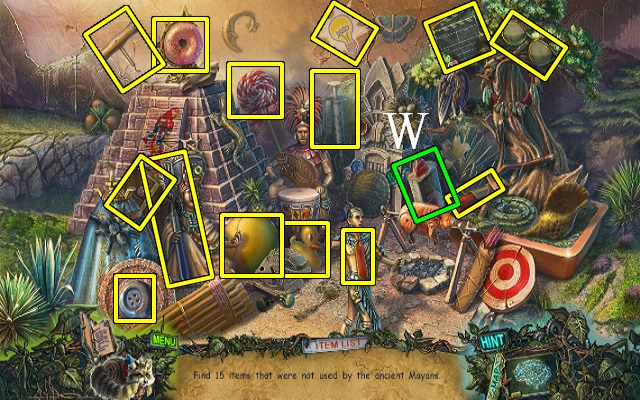
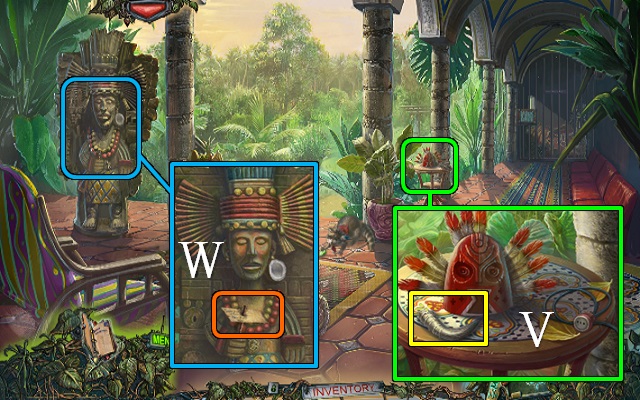
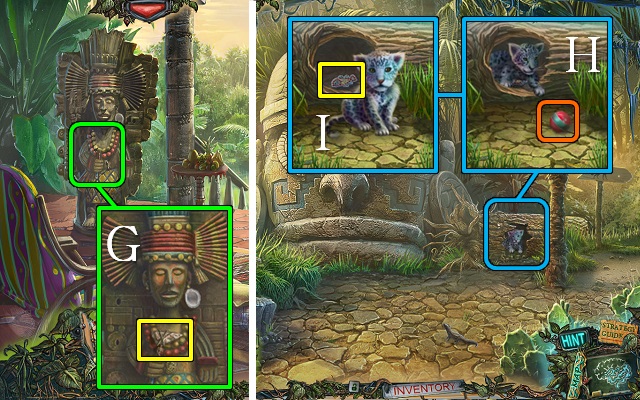
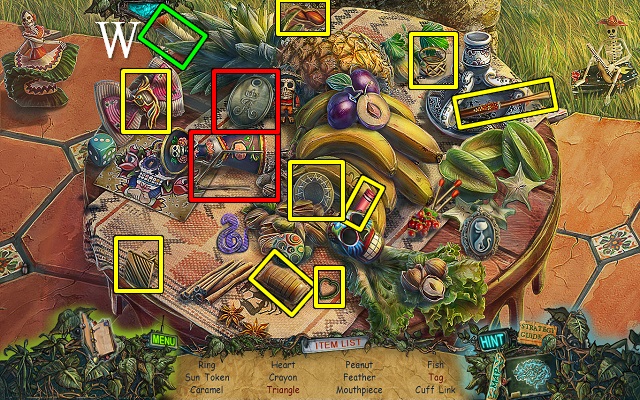
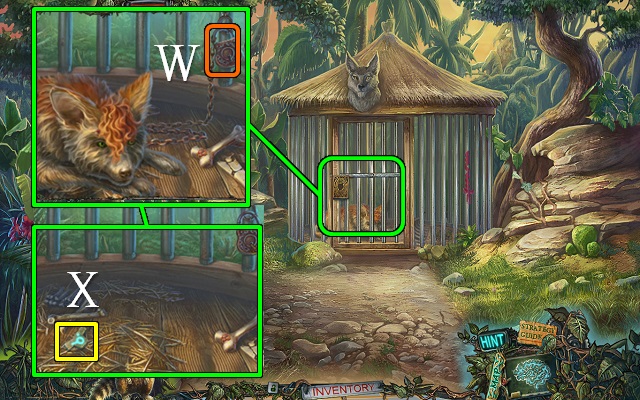
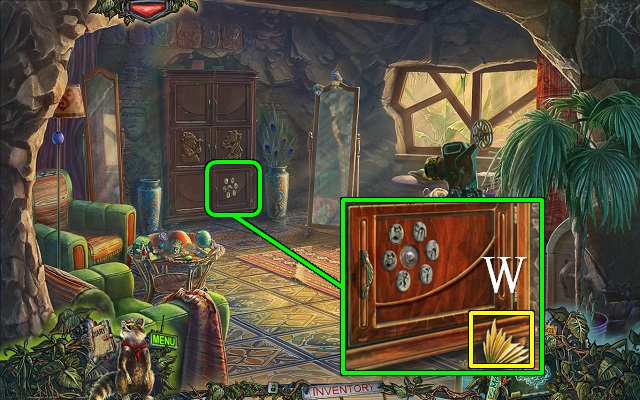
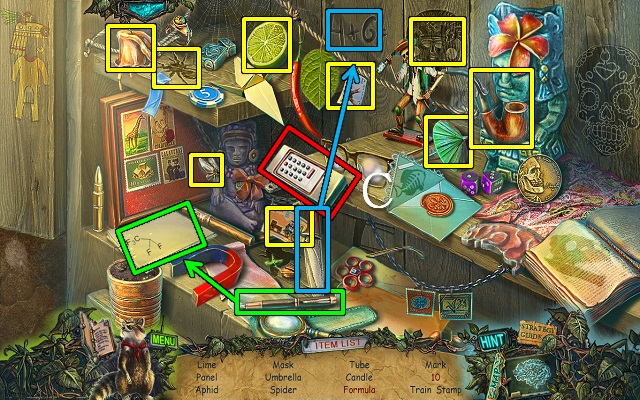
- Put the GREEN STONES on the pillar; take the COOKIE FIGURE (W).
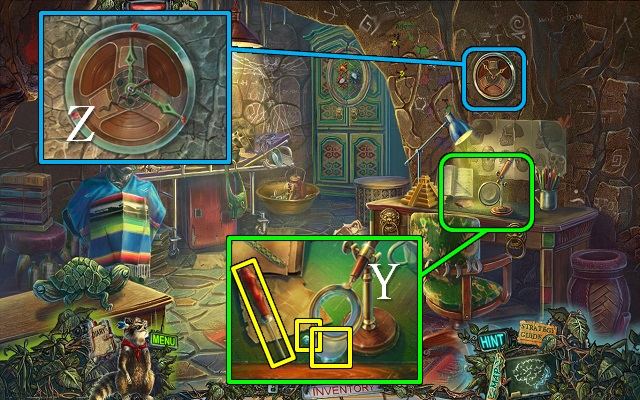
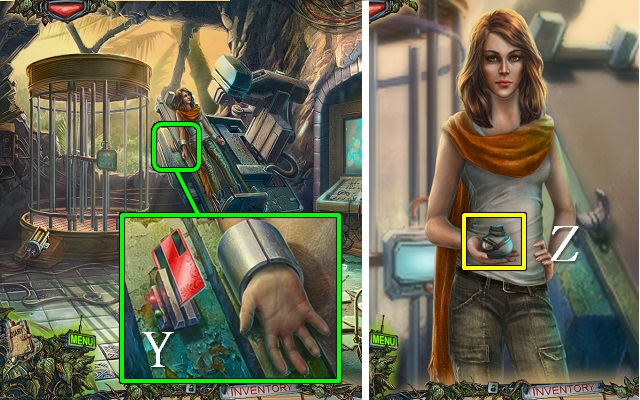
- Put the CAMERA on the table and take a picture (X); move the picture, cut it with the SCALPEL and take the JAGUAR PICTURE (Y).
- Walk down.
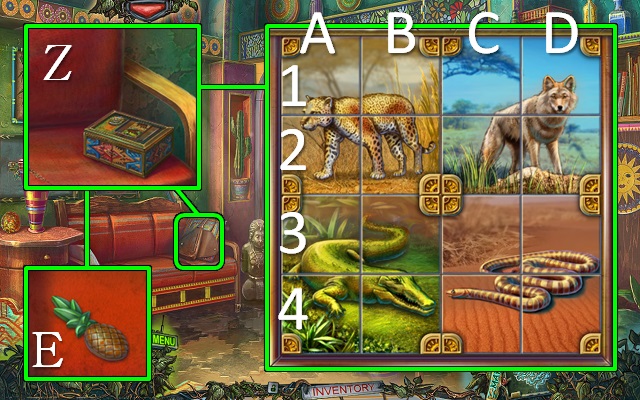
- Move the bag and the cushion; put the CROCODILE PICTURE and JAGUAR PICTURE on the box (Z) for a mini-game.
- Use the medallion to swap two pictures.
- Right-click to turn the medallion.
- Swap the following tiles: D1-C2, D3-C4, turn, C1-D2, C3-D4, B1-C2, B3-C4, turn, C1-B2, C3-B4, D2-C3, turn, C3-D4, C2-D3, turn, C2-D1.
- Take the PINEAPPLE FIGURE (E).
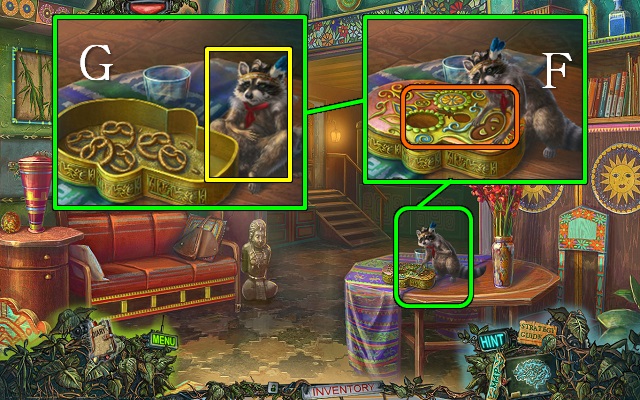
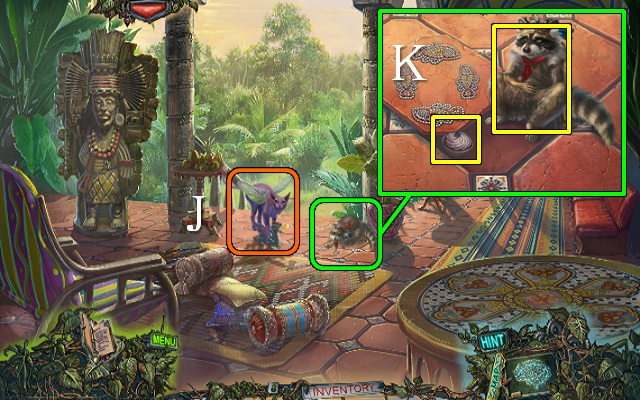
- Put the ORANGE FIGURE, COOKIE FIGURE and PINEAPPLE FIGURE on the box (F); take the raccoon (G).
- Go to the Corridor.
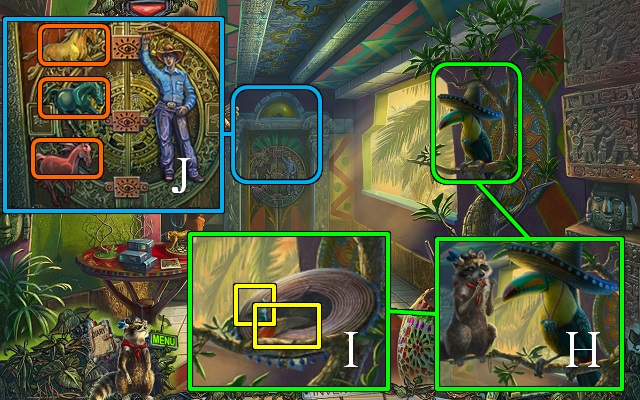
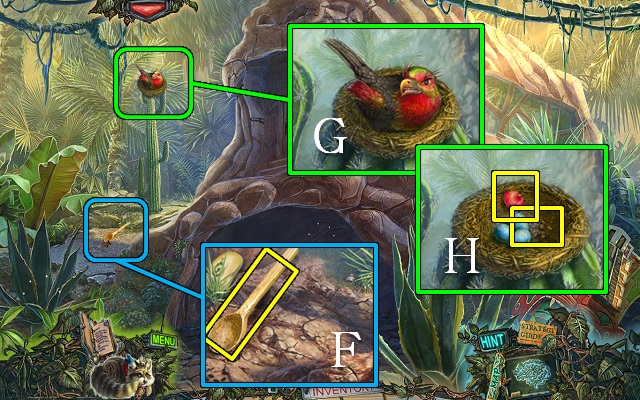
- Use the raccoon to scare off the bird (H); take FEATHER 1/3 and the METAL MUSTANG (I).
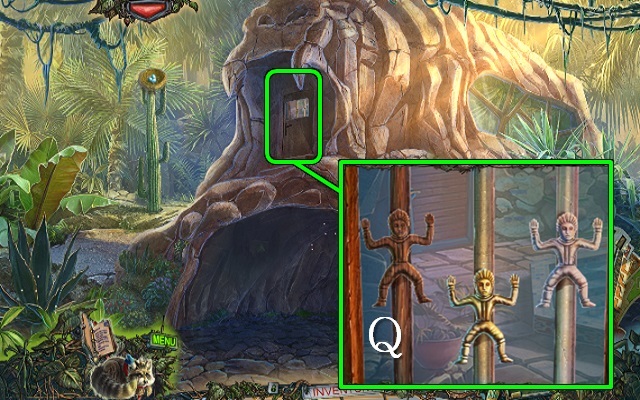
- Put the LASSO and METAL MUSTANG on the door; move all three mustangs to the other side (J).
- Go into the Elevator.
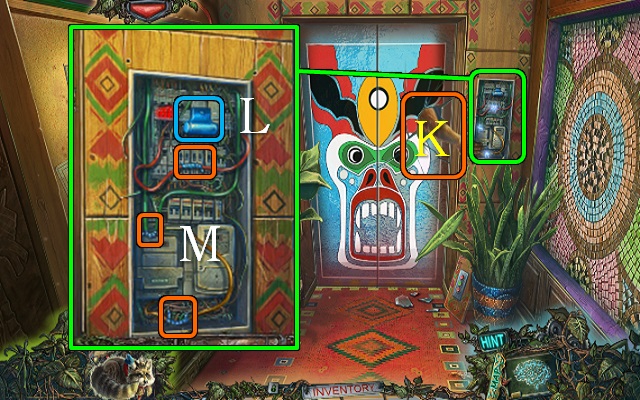
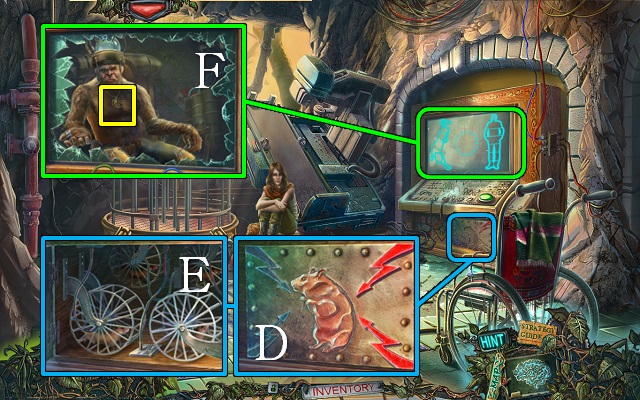
- Slap the arm away (K).
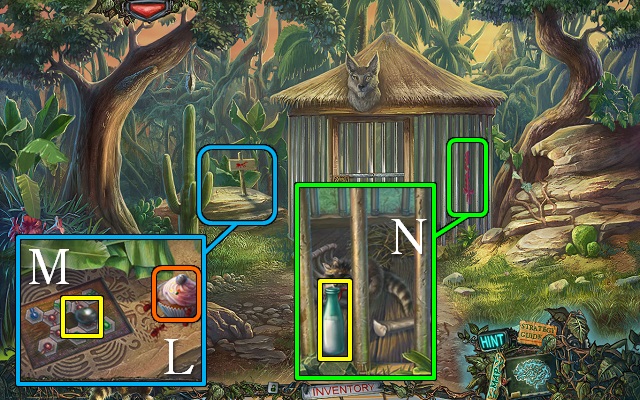
- Turn off the power panel (L), fix the three wires with the TAPE (M) and turn the power back on.
- Walk forward to the Basement.
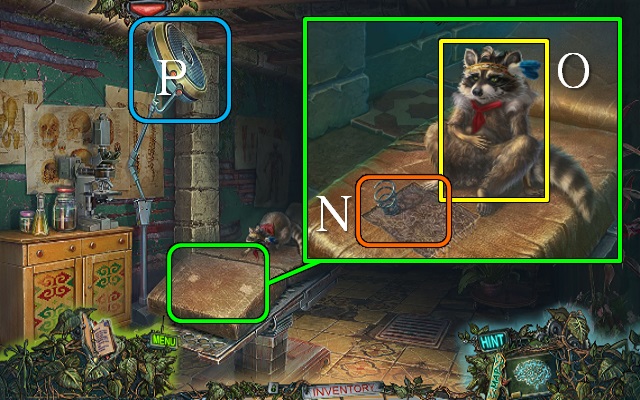
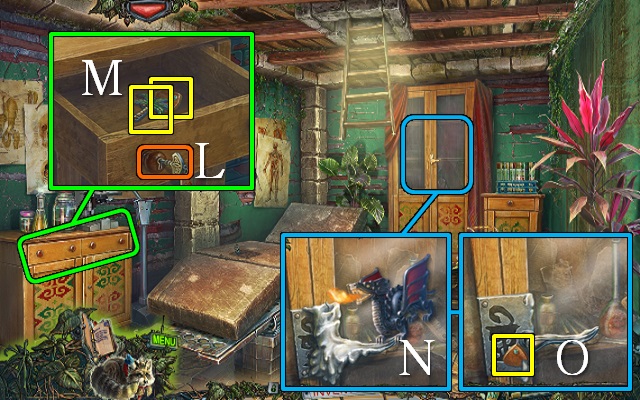
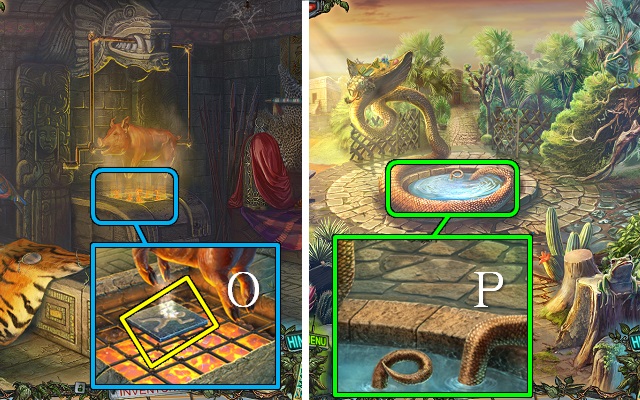
- Cut the examination table with the SCALPEL (N); take the RAG and the raccoon (O).
- Use the raccoon to move the lamp (P).
- Walk down.
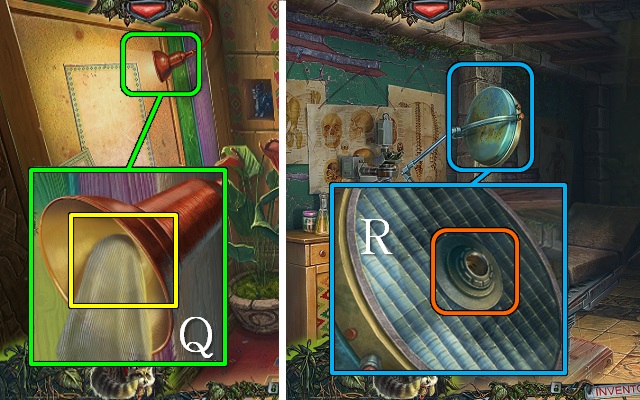
- Take the LIGHT BULB with the RAG (Q).
- Walk forward.
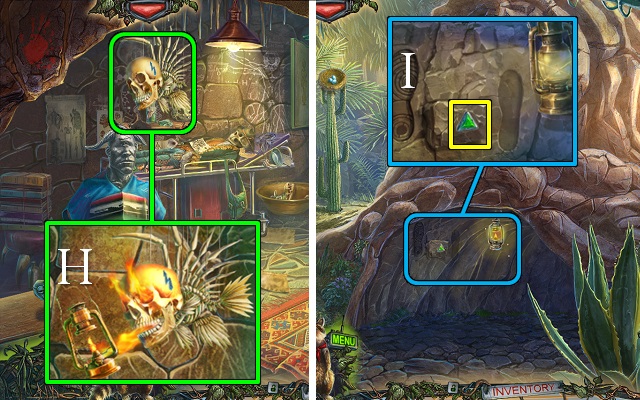
- Remove the note from the lamp and put the LIGHT BULB in it (R).
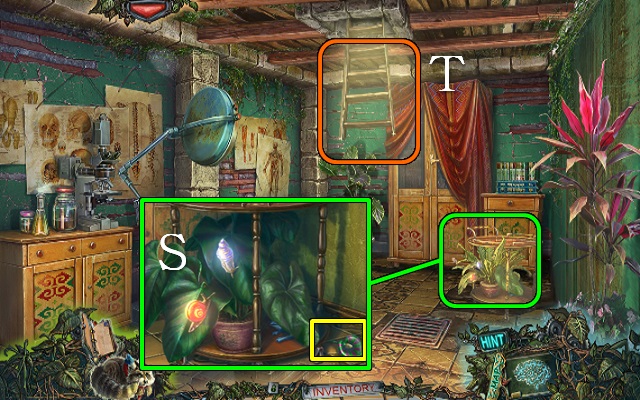
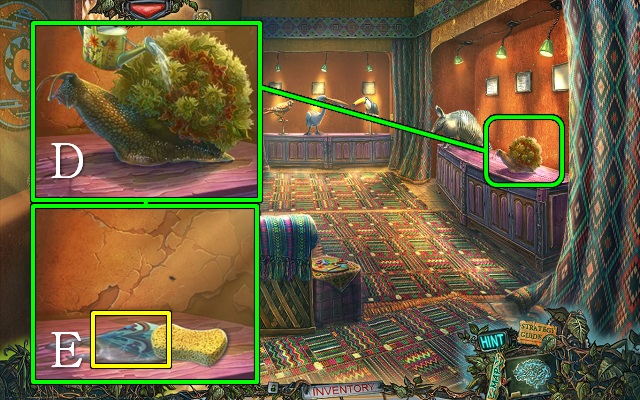
- Take the FLOWER (S).
- Pull down the ladder and go up to the Sitting Room (T).
- Talk to Mary; take MARY’S MEDICAL CHART and KEY 1/2 (U).
- Take the FLOWER (V).
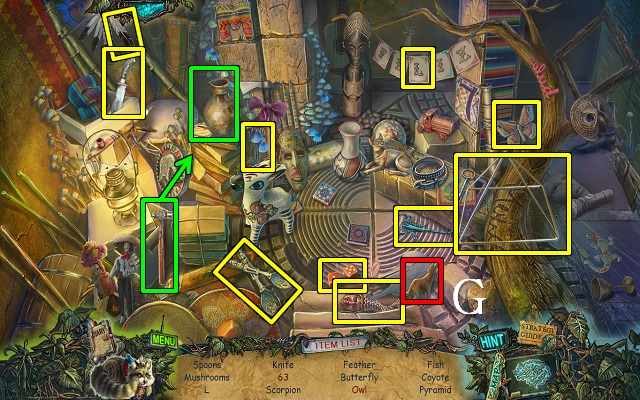
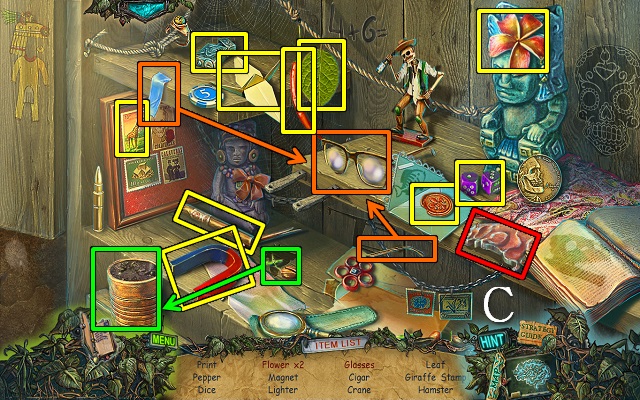
- Play the HOP.
- You receive the LIGHTER FLUID (W).
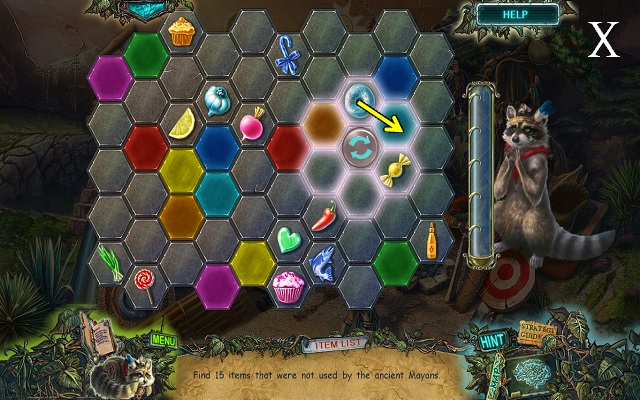
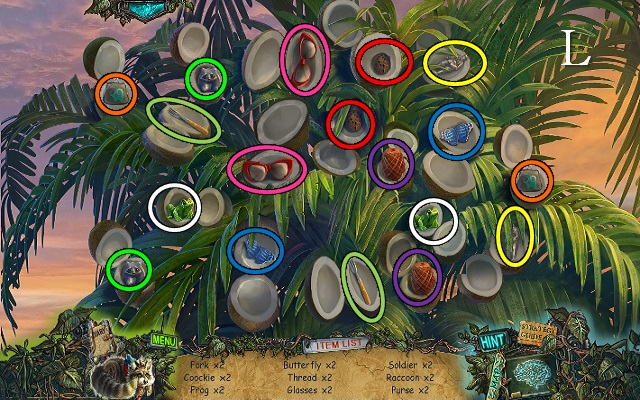
- Instead of a HOP you can choose to play a mini-game (X).
- Rotate groups of tiles to move the sweet snacks to tiles with matching color; for every 5 snacks the raccoon will find one HOP item for you.
- Go to the Elevator.
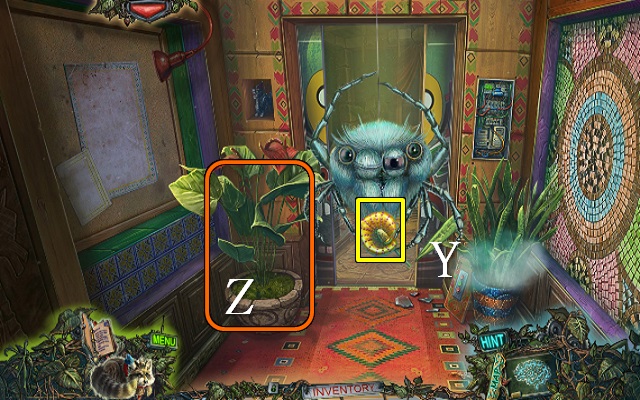
- Take the FLOWER (Y).
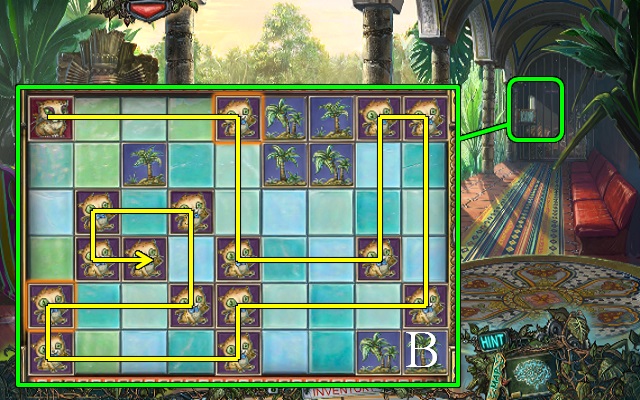
- Put the three FLOWERS on the left plant (Z) for a mini-game.
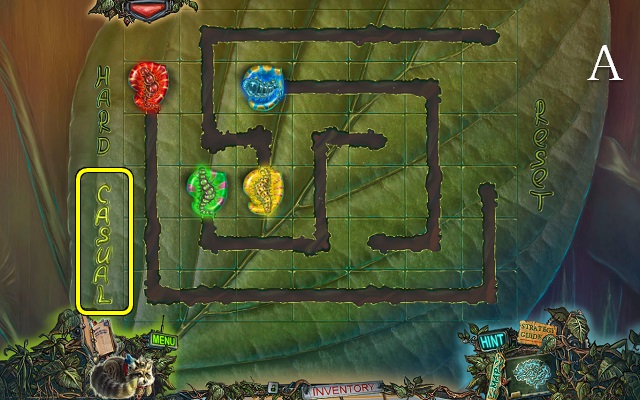
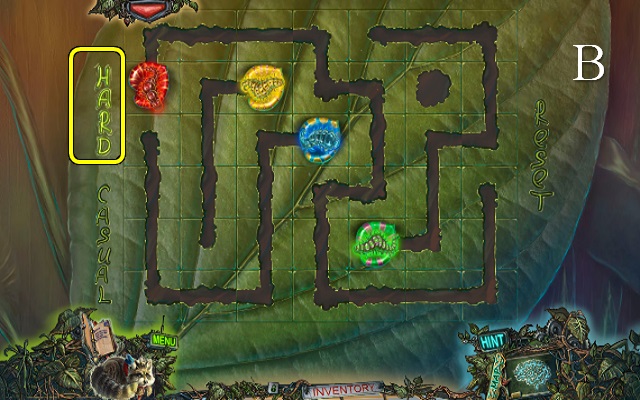
- Select a caterpillar and use the arrow keys to guide it to the flower of the same color.
- The caterpillars’ paths may not cross.
- Casual (A) and hard (B) solutions are shown.
- Take a CATERPILLAR.
- Go to the Basement.
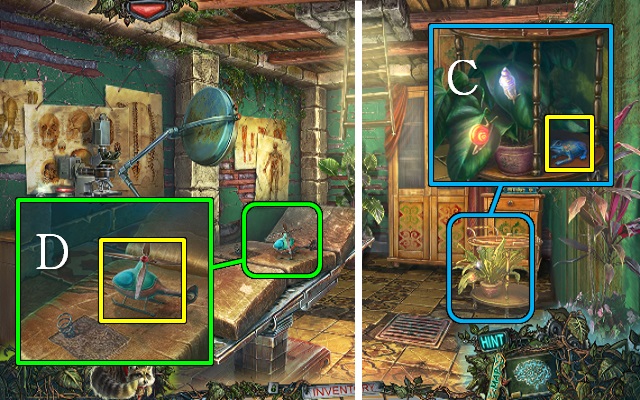
- Use the CATERPILLAR on the plant; take the PORCELAIN FROG (C).
- Take the TOY HELICOPTER (D).
- Go to the Elevator.
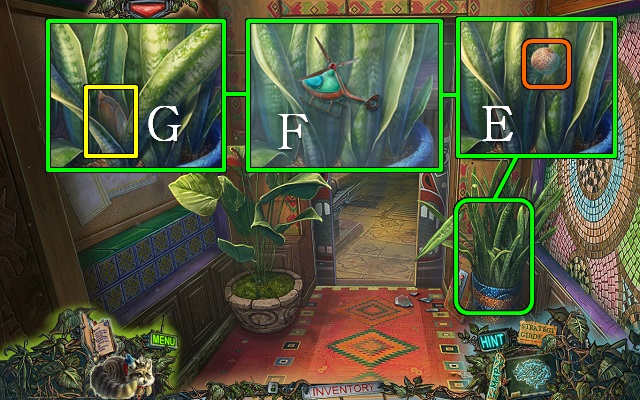
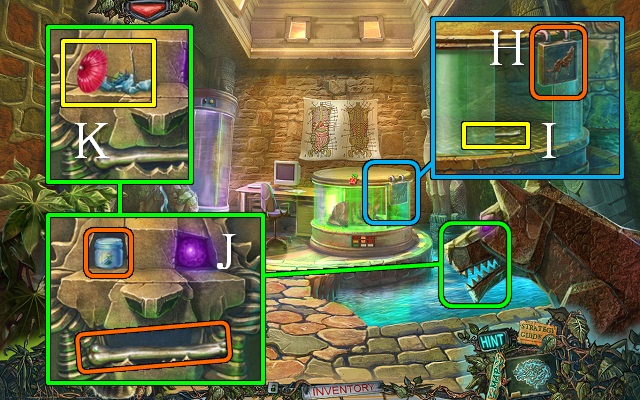
- Pick the seed bulb from the right plant (E) and clear the fog with the TOY HELICOPTER (F); move the leaves and take the SCALE PAN (G).
- Go to the Sitting Room.
- Put the SCALE PAN and PORCELAIN FROG on the scales (H); take the DRAGON WING (I).
- Go to the Elevator.
- Put the LIGHTER FLUID and DRAGON WING on the dragon; take the DRAGON LIGHTER (J) and KEY 2/2 (K).
- Walk forward.
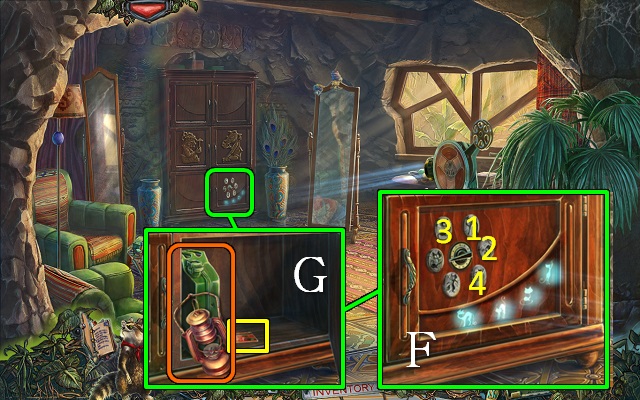
- Put the KEYS in the drawer locks and open the drawer (L); take the PALM FIGURE and FISH SCALE 1/2 (M).
- Move the curtains from the cupboard; melt the candle with the DRAGON LIGHTER (N) and take FISH SCALE 2/2 (O).
- Go to the Sitting Room.
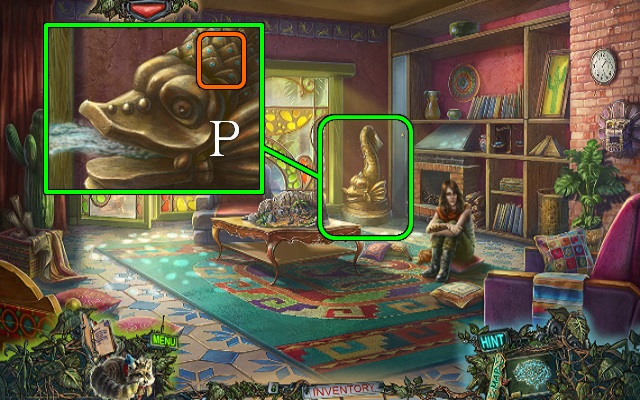
- Put the FISH SCALES on the statue (P).
- Play the HOP.
- You receive the MEDICAL EMBLEM (Q).
- Walk down.
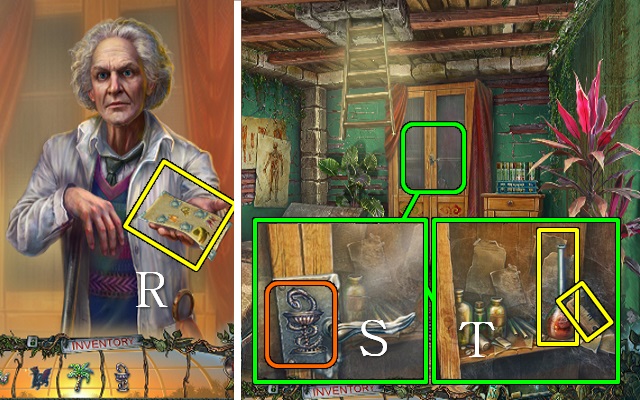
- Talk to the doctor and give him MARY’S MEDICAL CHART.
- Take the paper for the DNA samples (R).
- Put the MEDICAL EMBLEM on the cupboard lock (S); open the cupboard and take the COMB and ACID (T).
- Walk forward.
- Melt the back door chain with the ACID and walk forward to the Terrace (U).
Chapter 2: The Stone Head
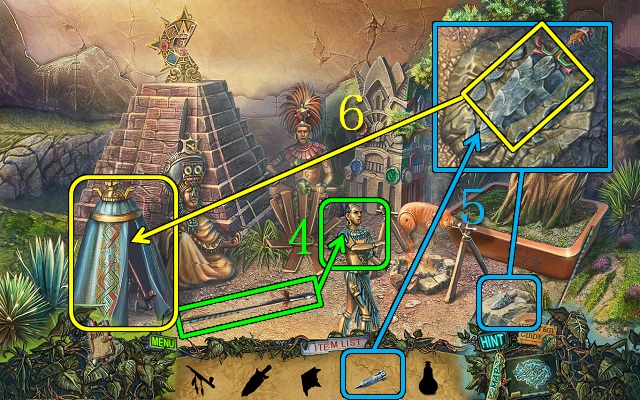
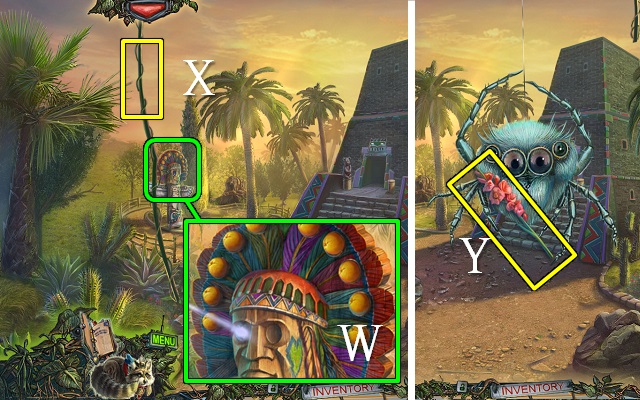
- Take the HORN (V).
- Read the note (W).

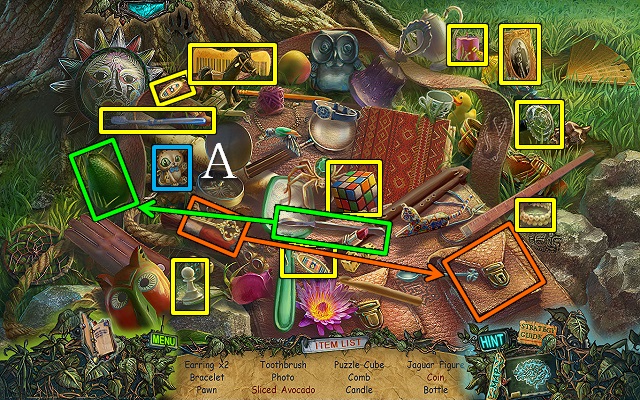
- Play the HOP (X).
- You receive the BERRIES.
- Walk forward to the Stone Head and go on to the Coyote Cage.
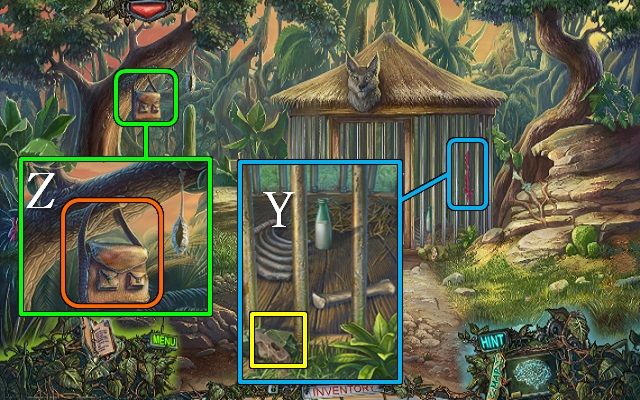
- Take the TOMAHAWK HEAD (Y).
- Move the bag (Z).
- Play the HOP or mini-game.
- You receive the JAGUAR FIGURE (A).
- Walk down.
- Talk to Mary.
- Walk down.
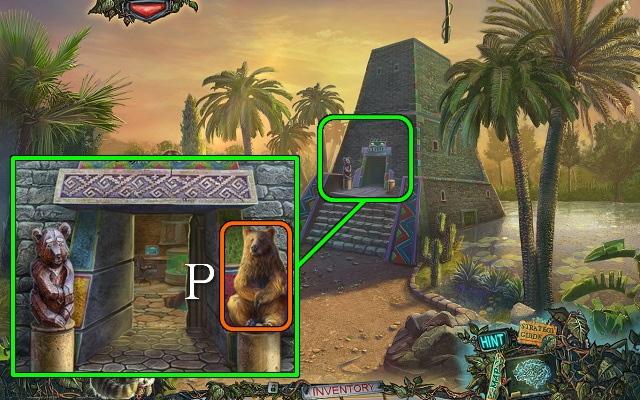
- Put the PALM FIGURE and JAGUAR FIGURE on the back door for a mini-game.
- Help the jaguar collect her cubs; she can only move in straight lines and must collect a cub each move (B).
- Go through to the Jaguar Cage.
- Talk to the man.
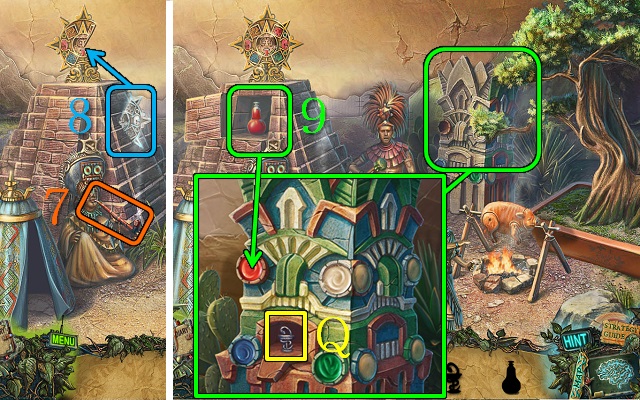
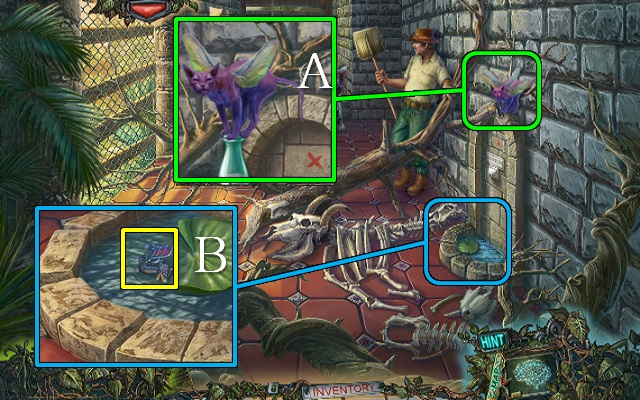
- Put the HORN on the skull; take the BALL (C).
- Burn through the rope with the DRAGON LIGHTER (D).
- Try to take the fish; give the BERRIES to the frog (E) and take the ROPE and FISH 1/2 (F).
- Walk down.
- Put the TOMAHAWK HEAD and ROPE on the stick; take the TOMAHAWK (G).
- Go to the Stone Head.
- Give the BALL to the cub (H); take FISH 2/2 (I).
- Walk down.
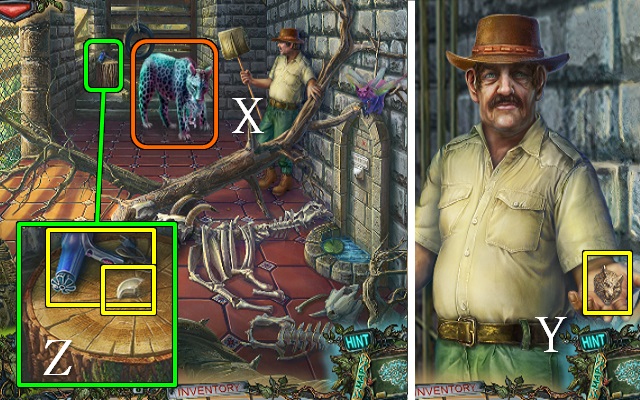
- Chase the cat away (J).
- Put the FISH on the floor tiles; take the CUPCAKE and the raccoon (K).
- Go to the Coyote Cage.
- Put the CUPCAKE (L) on the ant hill; take METAL BALL 1/2 (M).
- Release the raccoon into the cage; take the MILK (N).
- Play the HOP or mini-game.
- You receive the PIN (O).
- Go to the Terrace.
- Put the PIN on the zipper (P); open the zipper and take the NEEDLE AND THREAD (Q).
- Go to the Coyote Cage.
- Put the CATERPILLAR in the cocoon and sew it shut with the NEEDLE AND THREAD (R); wait and take the BUTTERFLY (S).
- Walk down.
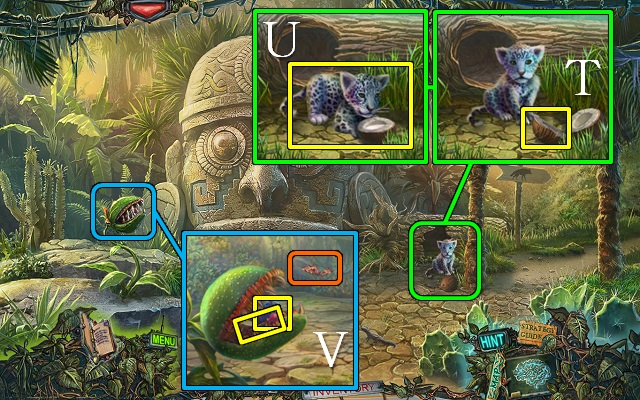
- Use the TOMAHAWK on the coconut and take the COCONUT EARRING (T); put milk in the other half and take the JAGUAR CUB (U).
- Release the BUTTERFLY on the plant; take the PIPETTE and BLUE ELEPHANT (V).
- Walk down.
- Play the HOP or mini-game.
- You receive FEATHER 2/3 (W).
- Go into the Jaguar Cage.
- Give the JAGUAR CUB to the jaguar (X).
- Talk to the man and take the COYOTE KEY (Y).
- Take the HAIR DRYER and JAGUAR CLAW (Z).
- Feed the MILK to the cat; take the CAT (A).
- Take the WET DRAGON LIGHTER (B).
- Walk down.
- Put the HAIR DRYER (C) and WET DRAGON LIGHTER on the table; plug in the dryer and take the DRAGON LIGHTER (D).
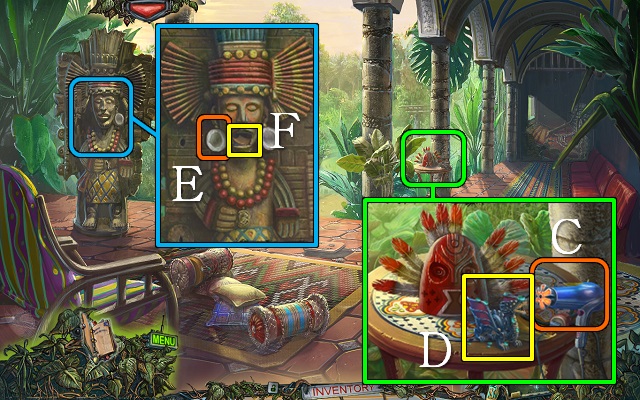
- Put the COCONUT EARRING (E) on the statue; take the code (F).
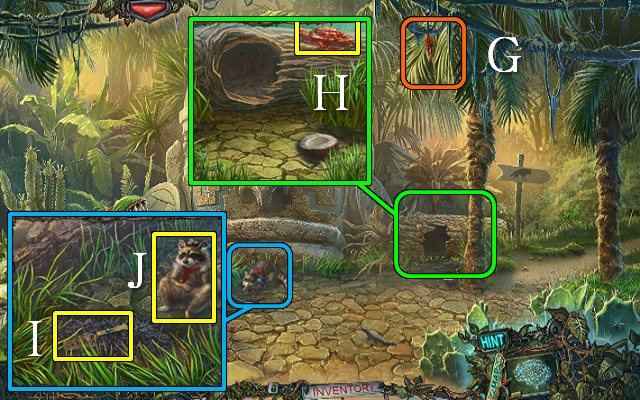
- Go to the Stone Head.
- Use the CAT on the tree (G).
- Take the RED TURTLE (H).
- Use the DRAGON LIGHTER on the thorns; take the SPATULA (I) and the raccoon (J).
- Go to the Coyote Cage.
- Put the COYOTE KEY in the lock (K).
- Use the COMB on the coyote (L); take FEATHER 3/3 and the COYOTE HAIR (M).
- Go to the Terrace.
- Put the FEATHERS on the statuette; take the GREEN CHAMELEON (N).
- Go into the Jaguar Cage.
- Remove the marked stone with the SPATULA; take the PUZZLE PART (O).
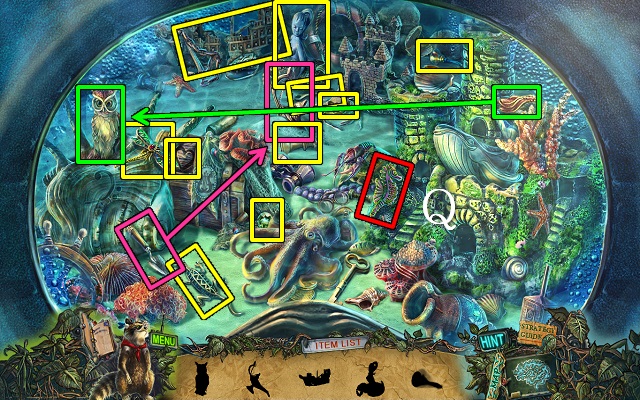
- Put the BLUE ELEPHANT, RED TURTLE and GREEN CHAMELEON on the safe (P); zoom in for a mini-game.

- Find pairs of animals that were used to create the creatures shown (Q).
- Take the KEY (R).
- Go to the Coyote Cage.
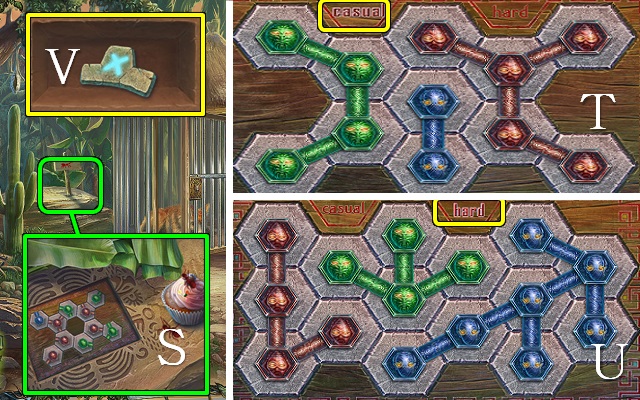
- Put the PUZZLE PART on the ant hill puzzle (S) for a mini-game.
- Move the tiles until all the spokes of the same color connect.
- Casual (T) and hard (U) solutions are shown.
- Take the SYMBOL (V).
- Put the KEY in the lock and turn it (W); take the SYMBOL (X).
- Walk down.
- Put the two SYMBOLS on the statue’s eye; push the symbols in numerical order (Y).
- Walk forward to the Sewer.
Chapter 3: The Snake Mutant
- Talk to Mary.
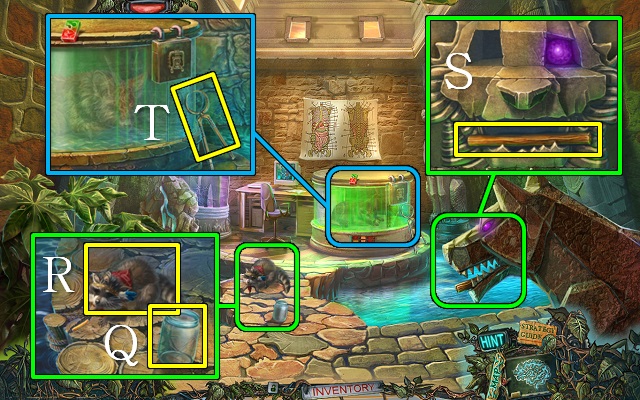
- Take the CURLER (Z) and take the RESIN with the SPATULA (A).
- Take the SWITCH (B).
- Take the STONE TOOTH (C).
- Go left to the Catacombs.
- Use the PIPETTE on the oil burner (D); you receive a PIPETTE WITH OIL.
- Open the latch with the SPATULA; talk to Mary and take the COLLAR KEY (E).
- Go through the middle door to the Incubator.
- Take the METAL CUP (F).
- Take the DOOR HANDLE (G).
- Walk down.
- Put the RESIN (H) and DOOR HANDLE (I) on the right door.
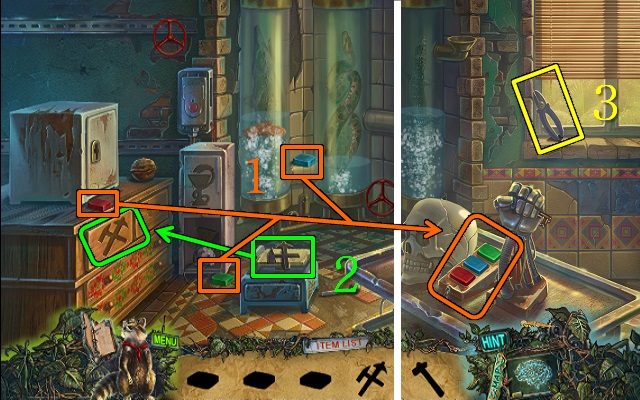
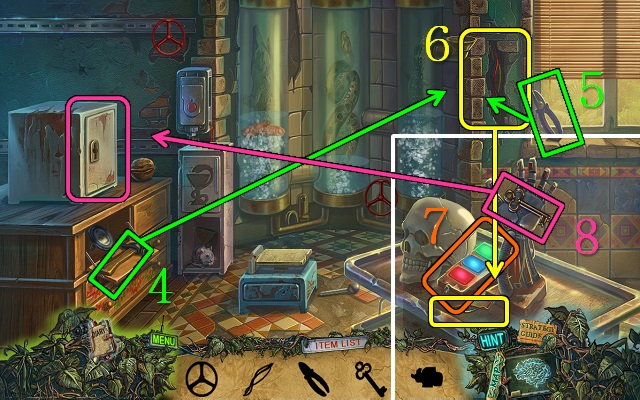
- Play the HOP.
- Push green, red, blue (7).
- Water puzzle: J right x2, K right, K left, J left, K right x2.
- You receive the OVEN MITT (L).
- Go to the Incubator.
- Clean the incubator with the OVEN MITT; take the WATCH CHAIN (M).
- Walk down.
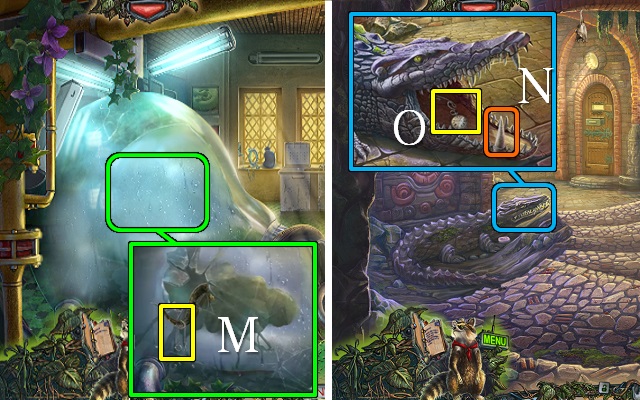
- Put the STONE TOOTH on the crocodile (N) and open the mouth; put the WATCH CHAIN on the watch and take the WATCH ON A CHAIN (O).
- Walk down.
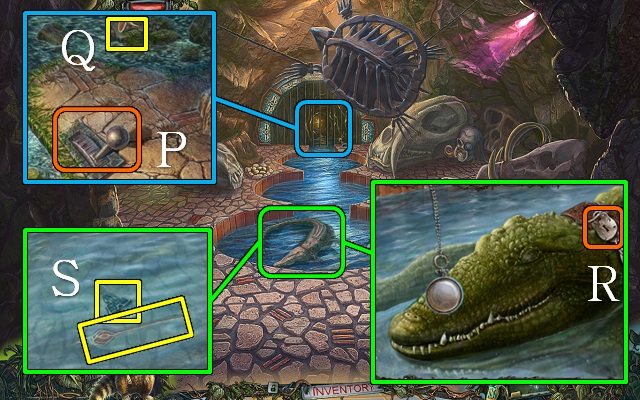
- Use the PIPETTE WITH OIL on the lever (P), pull the lever and take the FUNNEL (Q).
- Hypnotize the crocodile with the WATCH ON A CHAIN; open the collar with the COLLAR KEY (R) and wake up the crocodile with the WATCH ON A CHAIN.
- Take the BUTTON and the PIN (S); use the METAL CUP on the water to get a CUP OF WATER.
- Go to the Incubator.
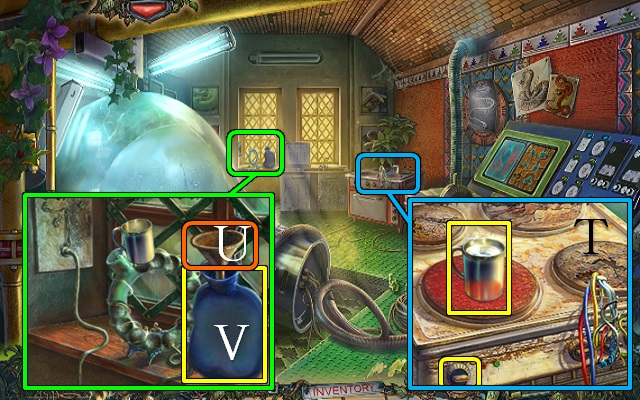
- Put the CUP OF WATER and SWITCH on the stove; switch on the stove and take the CUP OF HOT WATER with the OVEN MITT (T).
- Put the FUNNEL in the hot water bottle (U) and pour in the CUP OF HOT WATER; take the HOT WATER BOTTLE (V).
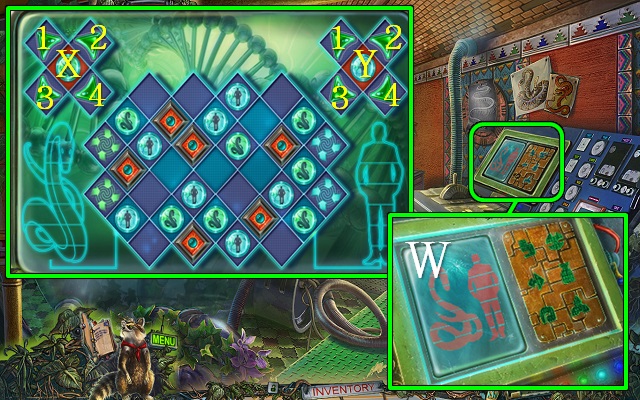
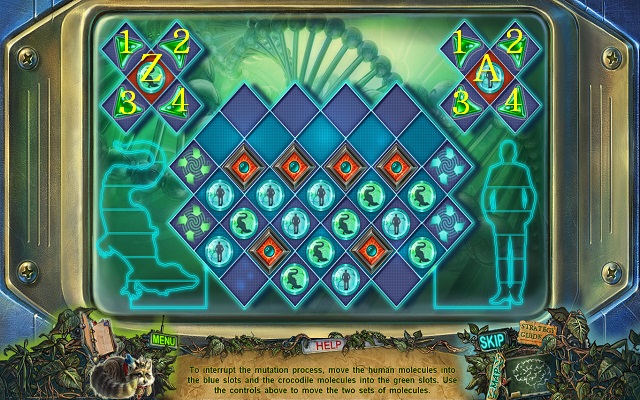
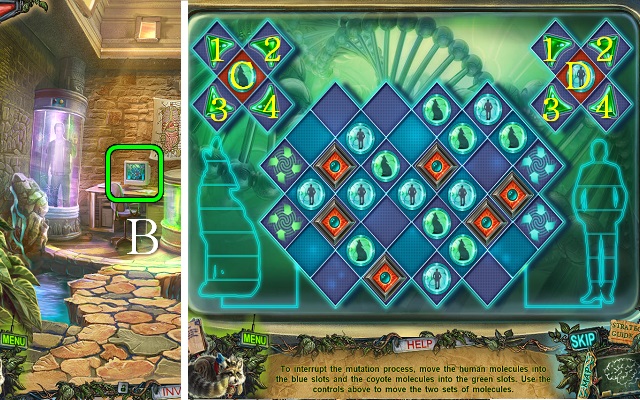
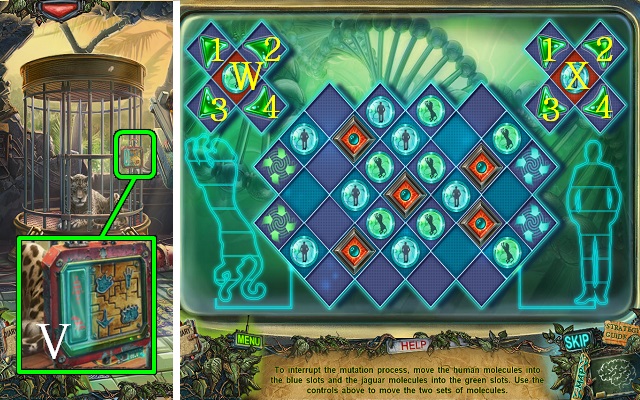
- Put the BUTTON on the control panel; move all buttons to their correct places to access a mini-game (W).
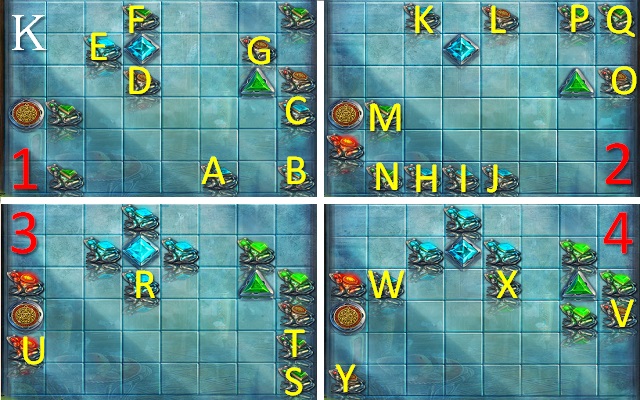
- Use the arrows to move the human tokens to the blue portals and the snakes to the green portals.
- Solution: X3, Y4x3, Y2, Y4, Y2, X1x2, X4, X3x2, Y4x2, Y2x4, Y4x2, Y2, Y4x2, Y2x3, Y4x2, X1, X3x2, X1x2, X3, X1, X3, X1, X3x2, X1, Y1, Y2x2, Y4x2, Y2, X2, X1x3, X3x4, X1x2.
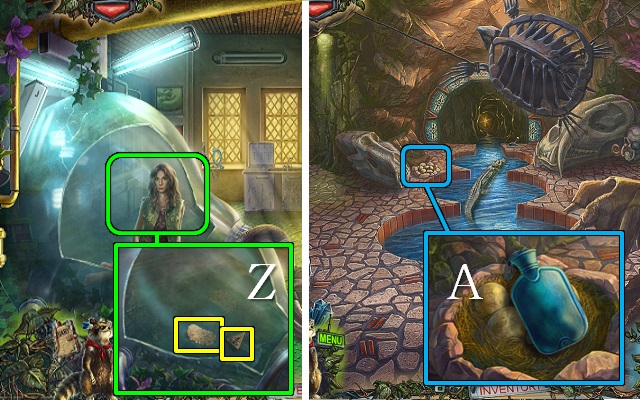
- Talk to the woman; take TRIANGLE 1/2 and the SNAKESKIN (Z).
- Go to the Sewer.
- Put the HOT WATER BOTTLE on the eggs (A); zoom in to play a mini-game.
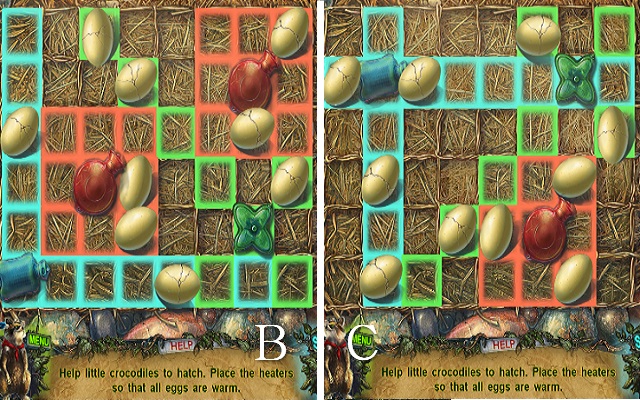
- Place the heaters among the eggs so all eggs are warmed.
- Casual (B) and hard (C) solutions are shown.
- Release the baby crocodiles.
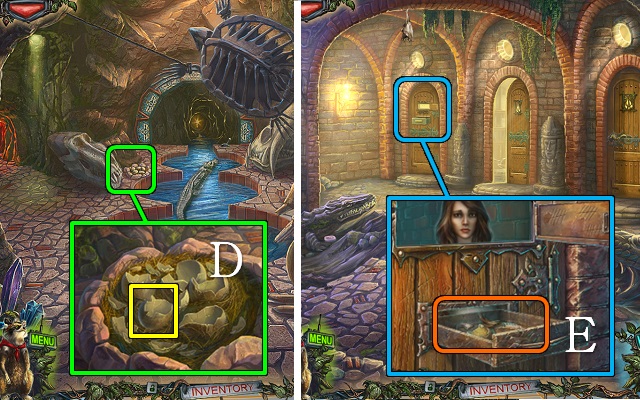
- Take a CROCODILE EGG (D).
- Go to the Catacombs.
- Put the CROCODILE EGG, SNAKESKIN, COYOTE HAIR and JAGUAR CLAW in the drawer (E).
- Go through to the Loading Bay.
- Talk to Mary.
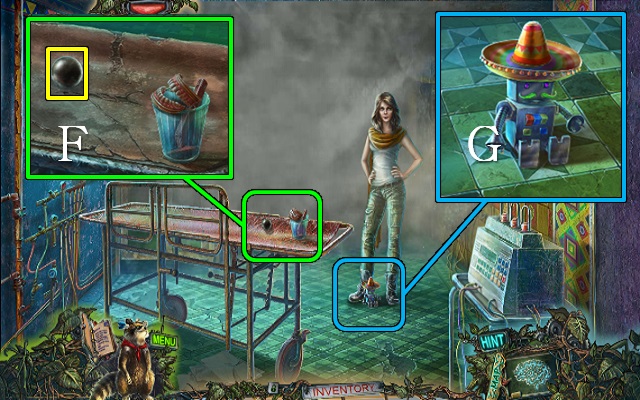
- Take METAL BALL 2/2 (F).
- Take the ROBOT (G).
- Walk down.
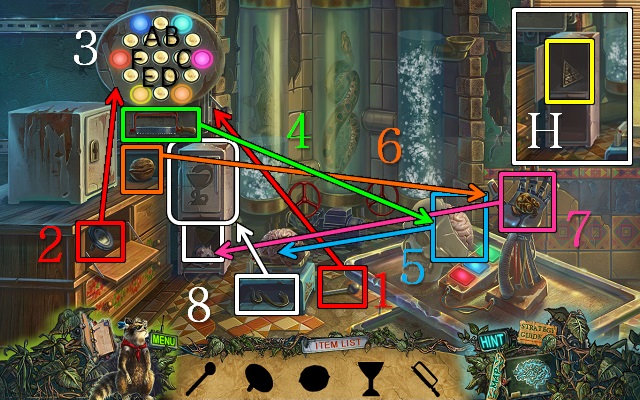
- Play the HOP.
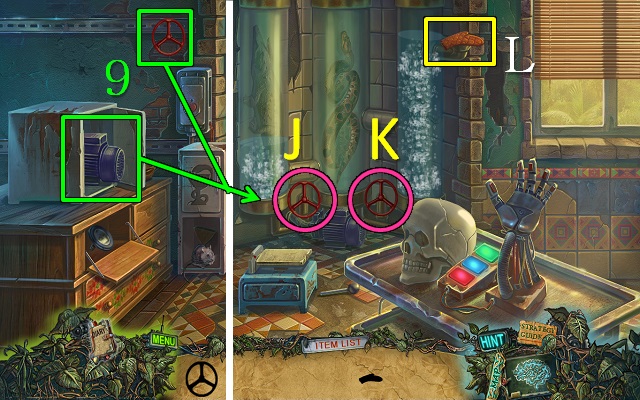
- Light puzzle (3): Ax3, Dx3, Ax3, B, C, E, F, Ax2, B, Ax4, Dx2, E, Dx4.
- Push blue, red, green (7).
- You receive TRIANGLE 2/2 (H).
- Put the ROBOT in the crocodile’s mouth; close and open the mouth and take the BATTERY (I).
- Go to the Incubator.
- Put the METAL BALLS in the bottle; take the TILE INLAY (J).
- Go to the Loading Bay.
- Put the TILE INLAY on the tile; take the PIRATE HAT (K) and BRUSH (L).
- Walk down.
- Clean the wall with the BRUSH and note the code (M).
- Walk down.
- Put the PIRATE HAT on the skull; take the FEATHER DUSTER (N).
- Go to the Loading Bay.
- Remove the vent with the PIN; read the note, use the FEATHER DUSTER (O) twice and take the BELL HAMMER (P).
- Open the cupboard with the TRIANGLES (Q); take BIRD FIGURINE 1/3 (R).
- Talk to Mary, remove the panel, put the battery in the lock and enter 531 (S).
- Walk forward to the Pond.
Chapter 4: The Crocodile Mutant
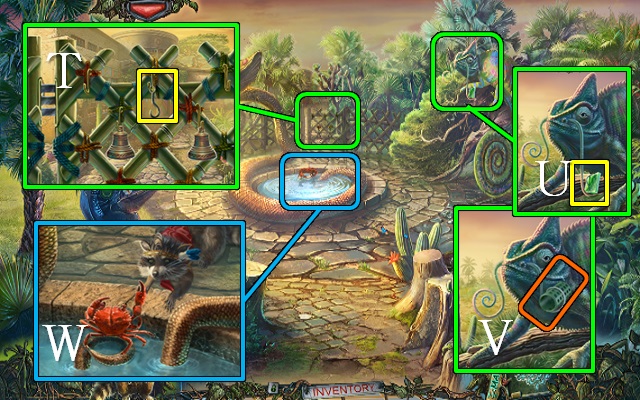
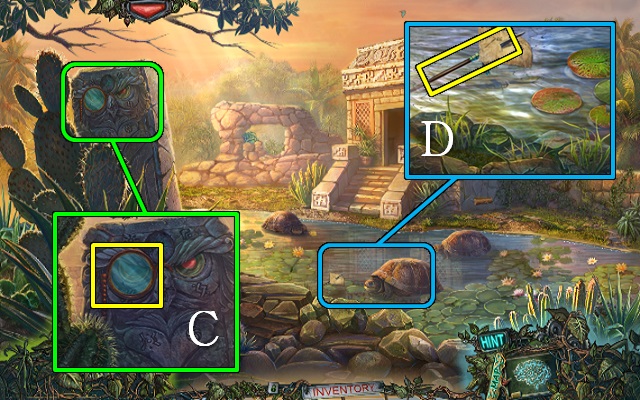
- Take the HOOK (T).
- Take STAINED GLASS 1/2 (U); put the CURLER on the chameleon (V).
- Use the raccoon on the crab (W); zoom in for a mini-game.
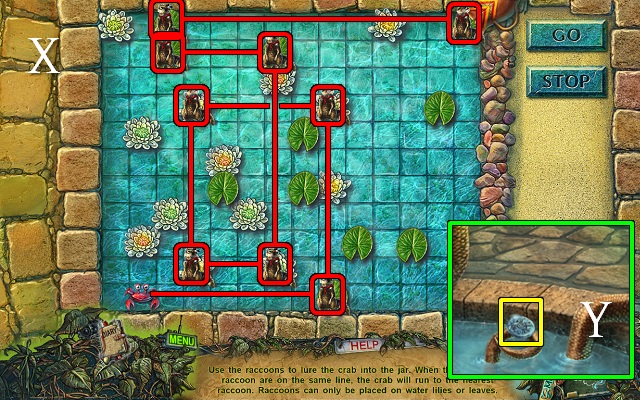
- Use the raccoons to guide the crab over the lilies to the jar; the crab will walk to the nearest raccoon in a straight line (X).
- Take the SYMBOL (Y).
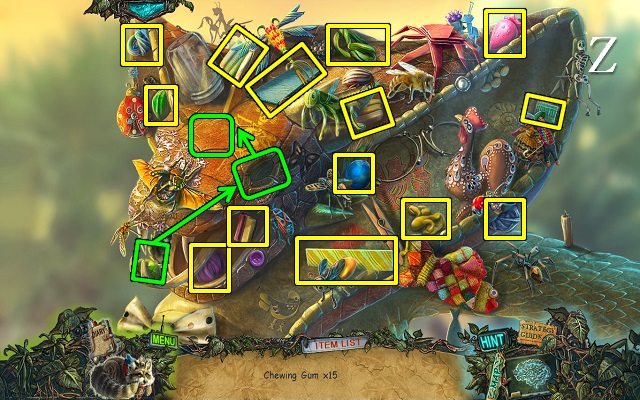
- Play the HOP or mini-game (Z).
- You receive the CHEWING GUM.
- Walk down.
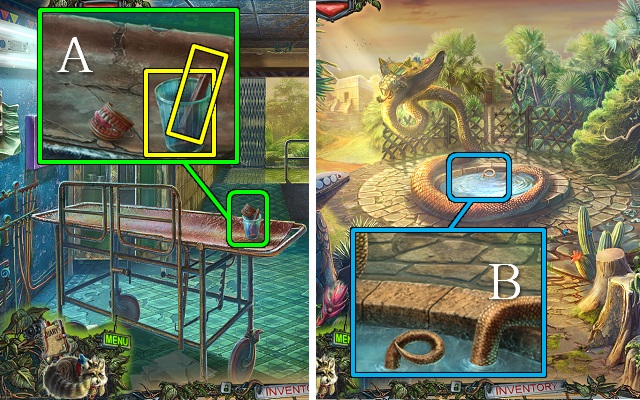
- Use the CHEWING GUM on the dentures; take the RAZOR and GLASS (A).
- Walk forward.
- Fill the GLASS to get a GLASS OF WATER (B).
- Walk forward to the Stream.
- Take the MONOCLE (C).
- Take the code and the SPEAR (D).
- Walk down and go right to the Reptile House.

- Take the MATCHES (E).
- Use the SPEAR on the pit; take BIRD FIGURINE 2/3 and the SHAWL (F).
- Read the note by the cactus; use the RAZOR and the SHAWL on the cactus and pull it over, and take BIRD FIGURINE 3/3 and the raccoon (G).
- Walk down.
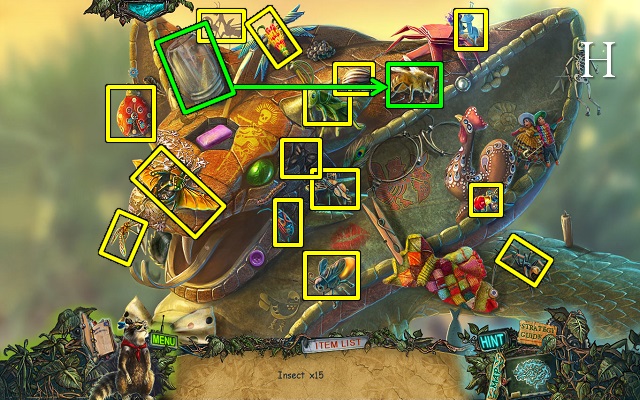
- Play the HOP or mini-game.
- You receive a BEE IN A JAR (H).
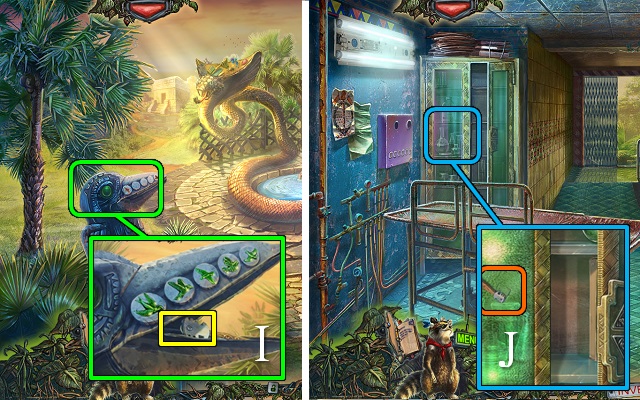
- Put the BIRD FIGURINES on the statue; swap the birds until they’re all green and take the GLASS CUTTER (I).
- Walk down.
- Use the GLASS CUTTER to get STAINED GLASS 2/2 (J).
- Go to the Reptile House.
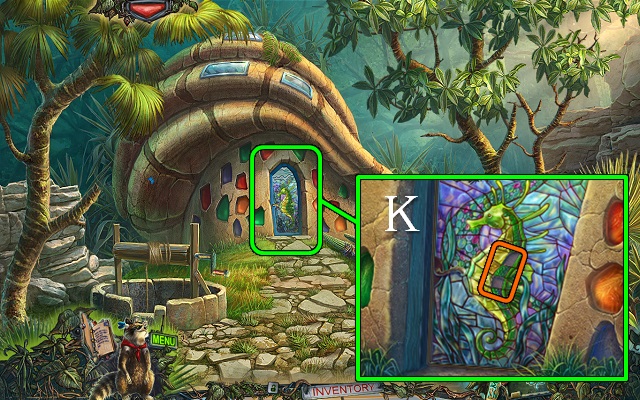
- Put the STAINED GLASS on the door (K).
- Go in.
- Put the GLASS OF WATER on the flowers, release the BEE IN A JAR and take the DANDELIONS and the MOSAIC TILE (L).
- Take the NEWSPAPER (M).
- Go to the Stream.
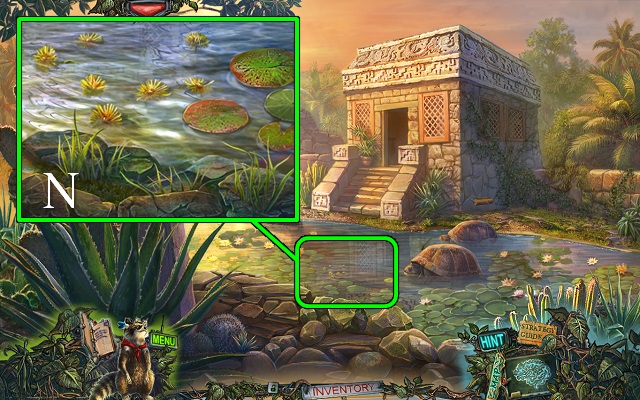
- Put the DANDELIONS in the water (N).
- Walk forward to the Mayan Hut.
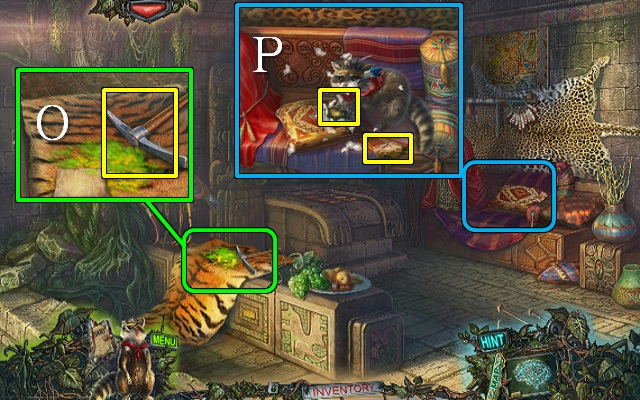
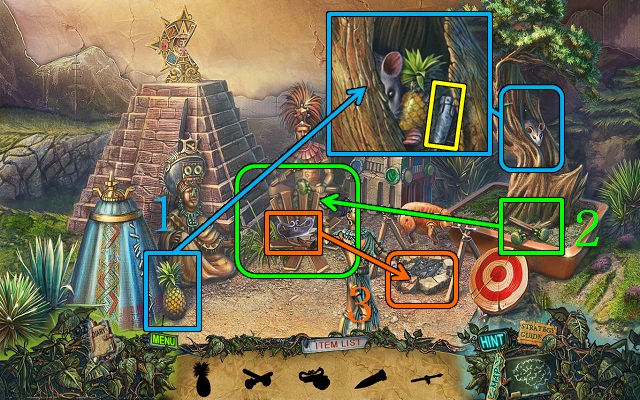
- Take note and the PICKAXE (O).
- Use the raccoon on the bench; take the RAG and BELL 1/3 (P).
- Put the NEWSPAPER on the coals and light it with the MATCHES; use the RAG on the pig to get an OILY RAG (Q).
- Walk down.
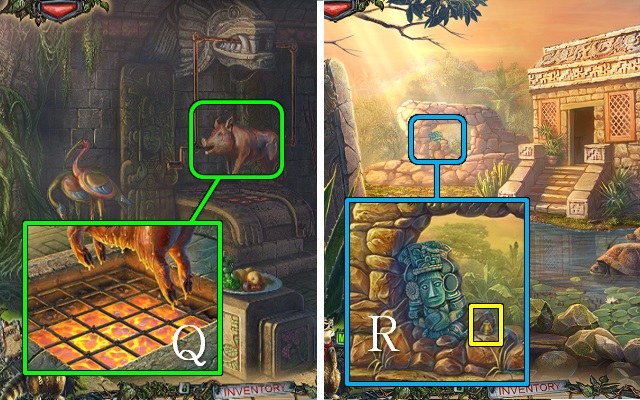
- Use the PICK on the ruins three times; take BELL 2/3 (R).
- Go to the Reptile House.
- Grease the winch with the OILY RAG and turn it; take the HANDLE (S).
- Go to the Stream.
- Put the HOOK and HANDLE on the hatch (T); turn the handle and zoom into the hatch.

- Play the HOP or mini-game.
- You receive the FISHING ROD (U).
- Go to the Reptile House.
- Use the FISHING ROD on the well; take the SOLVENT (V).
- Go to the Mayan Hut.
- Use the SOLVENT on the stain; look at the symbols with the MONOCLE (W).
- Walk down.
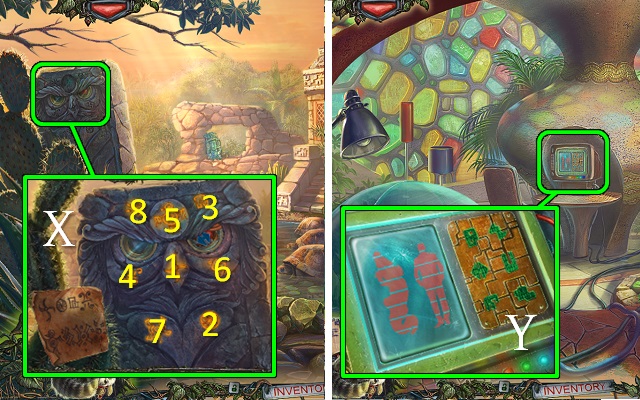
- Put the SYMBOL on the owl; push the buttons in numerical order and take the BUTTON (X).
- Go into the Reptile House.
- Put the BUTTON on the computer; move the buttons into their correct places for a mini-game (Y).
- Play as before.
- Solution: Z2, Z1, Z2, Z1, A2x2, Z3, Z1, Z3, Z1, Z3, Z1, Z3, Z1, Z3x3, A1, A2, A1, A2, A4, A2, A4, A2, A4, A2, A4, A2, A4x2, Z1x2, Z2x2, Z4, Z2, Z1, Z2, Z1, Z3, Z1, Z3, Z1, Z3, Z1, Z3, Z1, Z3x2, A4, A2, A4, A2, A4, A2, A4, A2x2, Z2, Z1x2, Z3, Z1, Z3, Z1x2, A1, A2x2, A4x2, A2.
- Talk to the man and give him the GLASS OF WATER (B); take the PUZZLE PIECE (C).
- Go to the Mayan Hut.
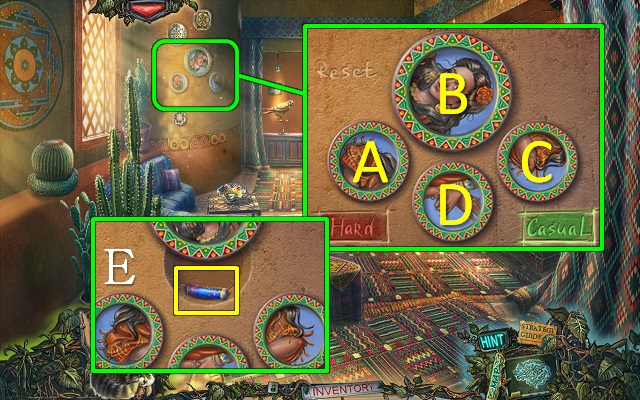
- Put the PUZZLE PIECE on the mural for a mini-game (D).
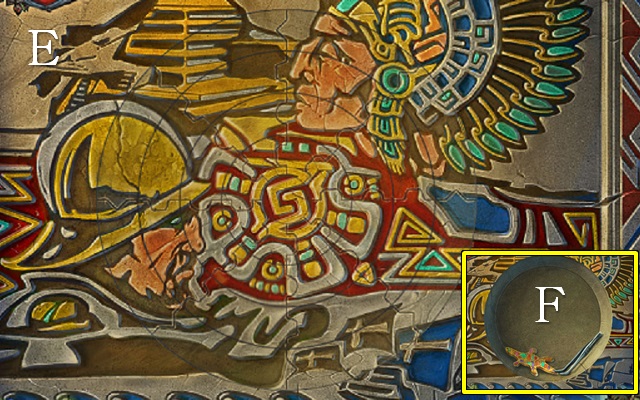
- Swap the fragments in each ring to recreate the mural (E).
- Take the TWEEZERS and CROCODILE FIGURE (F).
- Go into the Reptile House.
- Put the CROCODILE FIGURE in the reservoir (G); take BELL 3/3 (H).
- Go to the Pond.
- Hang the BELLS on the fence; use the BELL HAMMER to hit the bells in numerical order (I).
- Walk forward to the Garden.
Chapter 5: The Bear-Pigeon Mutant
- Take the WATERING CAN (J).
- Talk to Mary and take the FUR (K).
- Put the MOSAIC TILE on the mural for a mini-game (L).
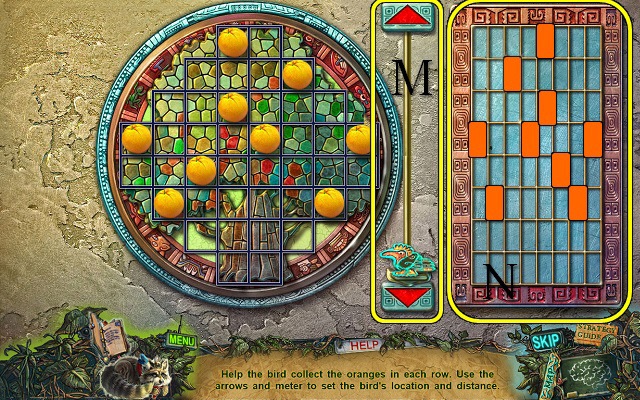
- Move the bird up and down with the arrows (M) and use the grid (N) to select a speed for the bird to collect the oranges.
- You receive the GLASS BALLS.
- Go into the Museum and go up the stairs.
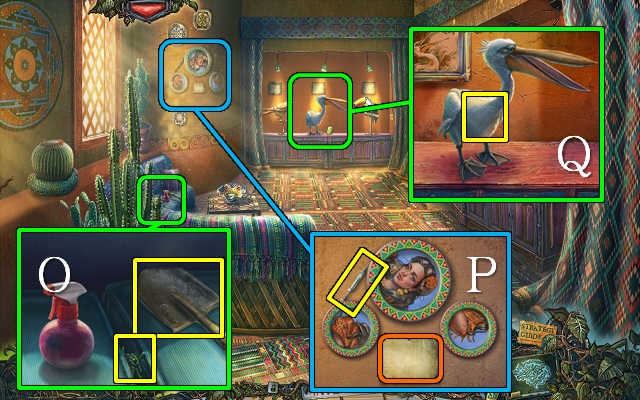
- Take the SHOVEL; take the BEETLE with the TWEEZERS (O).
- Read the note and take the SYRINGE (P).
- Take a pelican FEATHER (Q).
- Go to the Garden.
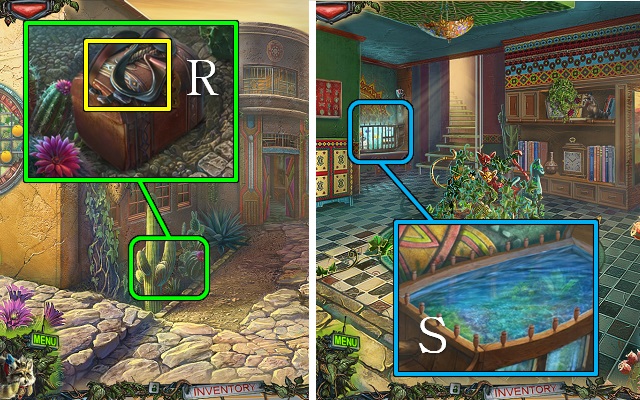
- Dig with the SHOVEL; take the DIVING MASK (R).
- Go inside.
- Use the DIVING MASK on the fish tank (S).

- Play the HOP.
- You receive a FISH (T).
- Go upstairs.
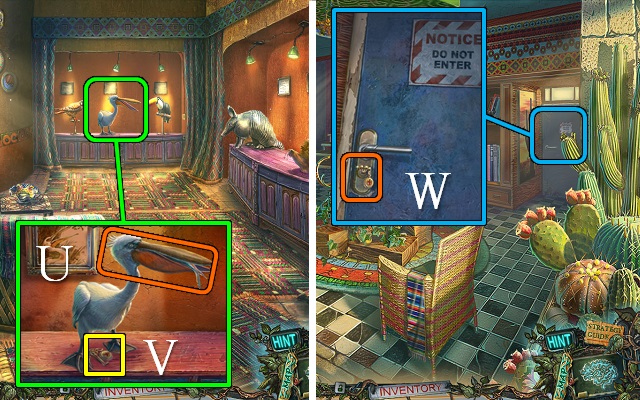
- Give the FISH to the pelican (U); take the KEY (V).
- Walk down.
- Try to go through the door, then open it with the KEY (W) and go through to the Hospital Ward.
- Talk to the doctor.
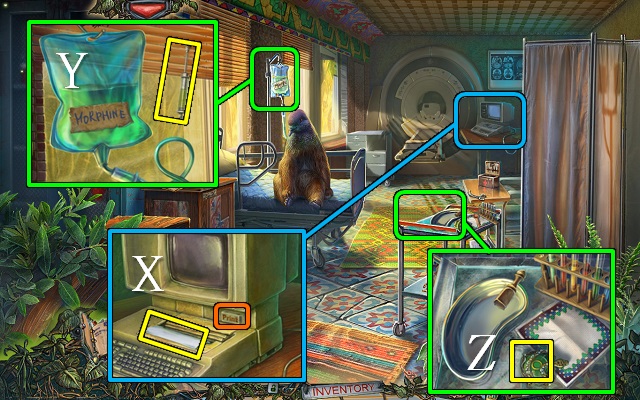
- Print and take the recipe (X).
- Take some MORPHINE from the drip with your SYRINGE (Y).
- Take the SNAKE VENOM (Z).
- Go back upstairs.
- Open the spray bottle; put the MORPHINE and the SNAKE VENOM in it, close it and pick up the POISON-IVY POISON (A).
- Go downstairs.
- Use the POISON-IVY POISON on the ivy (B); take the SPONGE (C).
- Go upstairs.
- Use the WATERING CAN on the snail (D); wipe up the slime with the SPONGE and take the TILE (E).
- Go to the Hospital Ward.
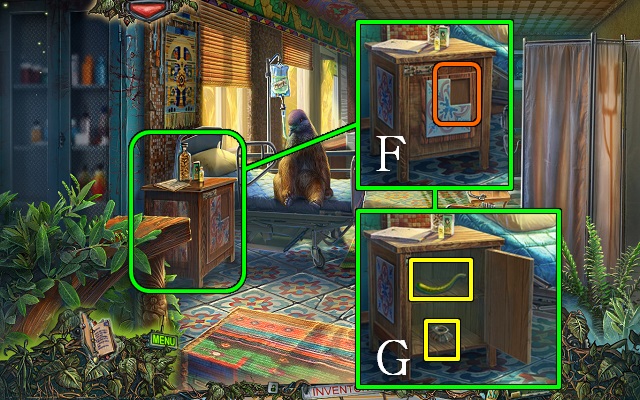
- Open the bedside table with the TILE (F); take the INK and the TAIL (G).
- Walk down.
- Use the POISON-IVY POISON on the shelf (H); put down the INK and the FEATHER, draw dots on the ladybird (I), open the book, and take the recipe, CHALICE KEY and the raccoon (J).
- Walk down.
- Open the bag with the CHALICE KEY (K); take the NIPPERS and the CAT FIGURINE (L).
- Go to the Hospital Ward.
- Cut the computer WIRE with the NIPPERS (M).
- Go upstairs.
- Put the FUR and WIRE on the brush; take the BRUSH WITH PALETTE (N).
- Go downstairs.
- Put the TAIL on the green cat and put down the CAT FIGURINE and BRUSH WITH PALETTE for a mini-game.
- Make all cats raise their tails by touching them once in numerical order (O).
- Take the BEAR PILL and OCTOPUS PART (P).
- Play the HOP.
- You receive the SEA HORSE (Q).
- Walk down.

- Distract the scorpion with the raccoon; take the NET (R).
- Put the OCTOPUS PART and SEA HORSE on the gate (S); move the octopus.
- Walk forward to the Pyramid.
- Take the BIRD PILL and LEAF (T); catch the DRAGONFLY with the NET (U).
- Take the PLATE (V).
- Put the GLASS BALLS on the totem pole (W).
- Take the VINE (X) and FLOWER (Y).
- Go to the Museum and go upstairs.
- Put the PLATE on the wall for a mini-game.
- Turn the plates until they’re all the right way up.
- Casual: turn plates C, B, A, D.
- Hard: turn plates Dx2, C, Ax3.
- Take the FIRECRACKER (E).
- Go to the Pyramid and walk on to the Cave.
- Take the WOODEN SPOON (F).
- Scare the bird with the FIRECRACKER (G); take the GRAIN and COCKTAIL UMBRELLA (H).
- Go to the Garden.
- Put the FLOWER on the vines (I) and use the WOODEN SPOON to get a SPOON WITH HONEY (J).
- Go to the Hospital Ward.
- Put the BEAR PILL, BIRD PILL, SPOON WITH HONEY and GRAIN in the dish; mash it together with the pestle (K) and take the BEAR-PIGEON MEDICINE with the spoon (L).
- Give the BEAR-PIGEON MEDICINE to the creature (M); take the BEAR (N) and SAPPHIRE (O).
- Go to the Pyramid.
- Put the BEAR on the pedestal (P) and go in.
Chapter 6: Rescue Mary
- Take the JAR (Q) and use the COCKTAIL UMBRELLA on the orange wedge; take the raccoon (R).
- Take the STICK (S).
- Take the TONGS (T).
- Walk down.
- Put the SAPPHIRE in the totem’s eye (U).
- Use the raccoon (V).

- Play the HOP (W).
- You receive a TUBE OF CHILLI.
- Go to the Cave.
- Put the JAR in the dirt and put the STICK in it; put the LEAF and VINE on the jar and take the JAR OF TERMITES (X).
- Walk down.
- Put the TUBE OF CHILLI on the wood; release the JAR OF TERMITES and zoom in for a mini-game (Y).
- Use the termites to remove all wood from around the figurine (Z).
- Take the WOODEN IDOL and COYOTE CONTROLS (A).
- Go into the pyramid.
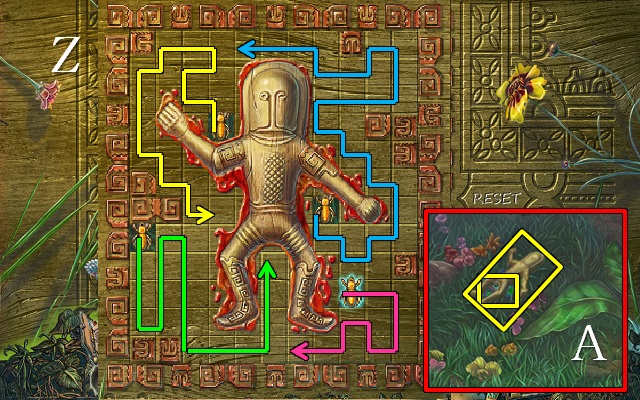
- Put the COYOTE CONTROLS on the computer for a mini-game.
- Solution: C3, C1x2, D2x2, D4x2, D2x2, C3x2, C1x2, C3x2, C1x2, D4x3, D2x2, D4, D2x2, C3, C4, C3x2, C1x2, C3, C1x2, C4, C3x2, C1x2, C4, C3x2, C1x2, D1, D2, D4, D2, D4, D2, D4, D2, D4x2, D2, D4.
- Talk to Clive and take the STONE FLOWER (E).
- Go to the Stream.
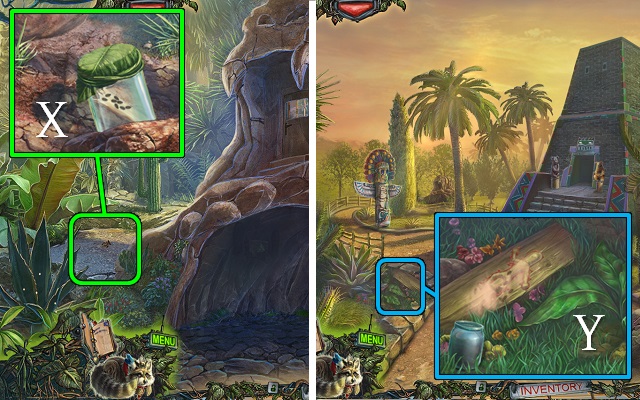
- Put the STONE FLOWER on the idol; take the BEETLE IN A JAR (F).
- Play the HOP or mini-game.
- You receive a COYOTE FIGURINE (G).
- Go into the Pyramid.
- Open the cage with the COYOTE FIGURINE (H); take the BONE (I).
- Put the BONE in the wolf’s mouth and the BEETLE IN A JAR in its eye socket (J); push the bone and use the COCKTAIL UMBRELLA to take the BEETLE (K).
- Walk down.
- Play the HOP (L).
- You receive a TIN SOLDIER.
- Go to the Museum.
- Put the two BEETLES and the DRAGONFLY in the box for a mini-game.
- Arrange the bugs so that there are no identical bugs in rows, columns or diagonals (M).
- Take the RING WITH DIAMOND and STONE FORM (N).
- Go to the Mayan Hut.
- Put the STONE FORM by the fire and use the TONGS to put it on the fire; put the TIN SOLDIER in the form and take out the HOT IDOL with the TONGS (O).
- Go to the Pond.
- Put the HOT IDOL in the pond to receive a TIN IDOL (P).
- Go to the Cave.
- Put the WOODEN IDOL and TIN IDOL on the bars in the door (Q).
- Go into the Cave House.
- Open the tin and take the raccoon and the CLOCK HAND (R).
- Take the FROG FIGURINE (S).
- Take the RED BEADS (T).
- Zoom into the plant for a mini-game (U).
- Match the animals to their foods.
- Take the GOLD COIN (V).
- Go through the right door to the Projector Room.
- Talk to Mary.
- Take the FISHTAIL (W).
- Play the HOP or mini-game.
- You receive the BLUE BEADS (X).
- Walk down and go through the left door to the Office.
- Use the RING WITH DIAMOND on the lens; take the DIAMOND, LENS and AWL (Y).
- Put the CLOCK HAND on the clock and move the hands until they turn green (Z); remove the hands and take the FILM REEL and note.
- Take the LAMP (A).
- Put the RED BEADS and BLUE BEADS on the spiders (B).
- Play the HOP or mini-game.
- You receive the REMOTE CONTROL (C).
- Walk down.
- Use the REMOTE CONTROL on the TV; take the KNOB (D).
- Go into the Projector Room.
- Remove the lens from the projector and put the LENS and the FILM REEL on it (E).
- Put the KNOB on the cupboard and push the buttons in the order shown by the lights (F); take the ELECTRONIC CARD, make a hole in the canister with the AWL and fill the LAMP to get a LAMP WITH GASOLINE (G).
- Go to the Office.
- Put the FISHTAIL on the skeleton; light the LAMP WITH GASOLINE to get a BURNING LAMP (H).
- Go to the Cave.
- Use the BURNING LAMP on the cave.
- Take the GEM with the AWL (I).
- Go to the Projector Room.
- Put the FROG FIGURINE on the right corner of the mirror; give the GOLD COIN to the middle frog, the DIAMOND to the left frog and the GEM to the right frog (J).
- Look into the mirror for a mini-game.
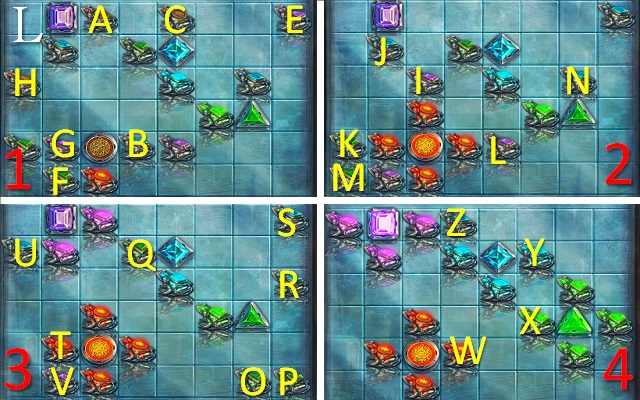
- Slide the frogs to the jewels with the same color.
- Casual solution (K) (l = left, r = right, u = up, d = down):
- Section 1: A l; B l; C d l; D d l; E u; F r; G l u.
- Section 2: H u; I u; J u; K r; L r d l u l; M d r; N r; O d; P d; Q d.
- Section 3: R d; S l; R u l; T l u r; S u; U d.
- Section 4: V d l u r; W r; X r; Y u.
- Hard solution (L): Section 1: A d; B d; C l d r d; E l d; F l; G d; H d r d; B r u.
- Section 2: I u; J l; K u; L u l u l u; K r d r d r; M u r d r d r; N r.
- Section 3: O u; P u; Q u r d; R u l; S l; T l; U d r u r u; T r; V l u.
- Section 4: W r; X u; Y u; Z r; Y d; X d; W l.
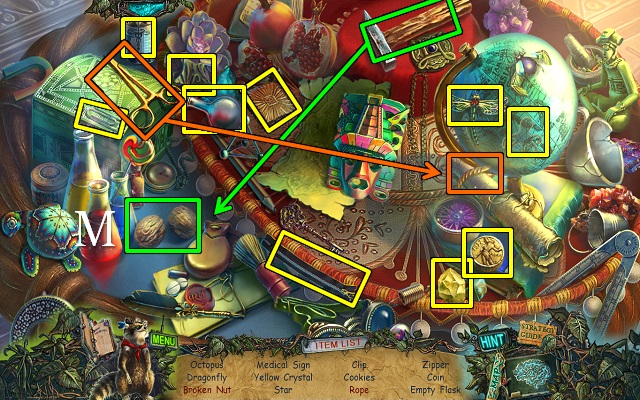
- Play the HOP or mini-game.
- You receive the NUTS (M).
- Walk forward to the Leopard Cage.
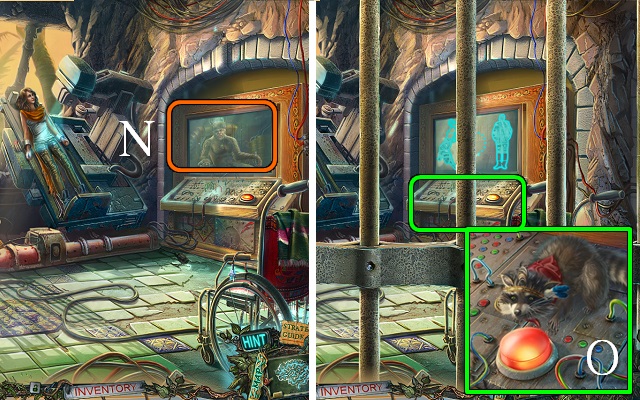
- Look at the monitor (N).
- Use the raccoon on the controls (O).
- Walk down.
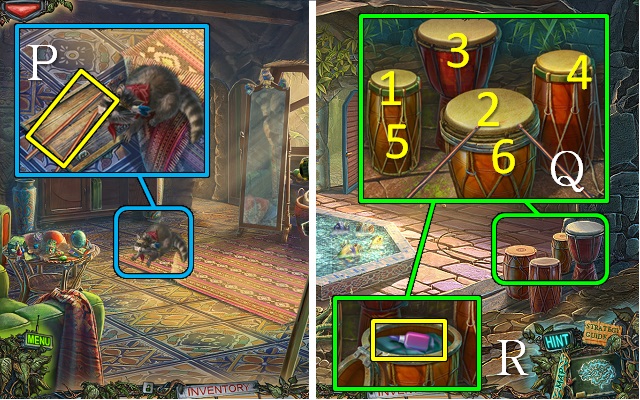
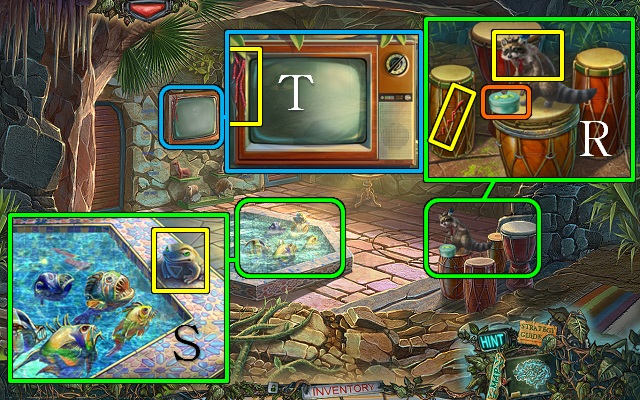
- Move the rug; take the DRUMSTICKS (P).
- Walk down.
- Put the DRUMSTICKS on the bongos and hit the drums in numerical order (Q); take the GLUE (R).
- Go into the Office.
- Use the GLUE on the shoe; take the SHOE and the BUCKET (S).
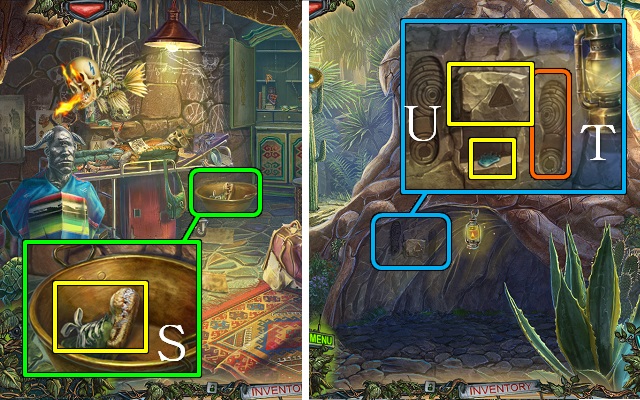
- Go to the Cave.
- Put the SHOE on the plain footprint (T); take the BUTTON and STONE (U).
- Go to the Leopard Cage.
- Put the BUTTON on the cage and move the buttons to their matching slots (V); play the mini-game.
- Play as before.
- Solution: X1, X2, W1, W3x2, W1, W3, W1, X4, X2, X1x3, W1x3, W3, W1x2, W3x2, W1, X3, X4x4, X2x2, X4, X2x2, X4x2, X2, X4, X2x2, X4, X2x2, X3, X4x3, X2x2, X4, X2x2, X3x2, X4x3, X2, X4, X2x2, W3x5, W1, W3x4, W1x2.
- Use the ELECTRONIC CARD on Mary’s cuff (Y).
- Talk to Mary and take the SLEEPING POWDER (Z).
- Walk down twice.

- Put the SLEEPING POWDER in the water; take the LIGHTNING FIGURE and put the BUCKET in the water to get a BUCKET OF WATER (A).
- Go into the Office.
- Pour the BUCKET OF WATER over the skeleton; take the LIGHTNING FIGURE (B).
- Play the HOP or mini-game.
- You receive the HAMSTER FIGURE (C).
- Go to the Leopard Cage.
- Put the HAMSTER FIGURE and LIGHTNING FIGURES on the metal panel (D); give the NUTS to the hamsters (E).
- Smash the monitor with the STONE; take the CHAIN (F).
- Walk down.

- Put the CHAIN on the hatch and open it (G); take the raccoon (H).
- Go to the Leopard Cage.
- Release the raccoon on the hamsters (I).
- Congratulations, you have completed Twilight Phenomena: Strange Menagerie.


 Paranormal Pursuit: The Gifted One Walkthrough, Guide, & Tips
 Labyrinths of the World: Shattered Soul Walkthrough, Guide, & Tips
 Hallowed Legends: Ship of Bones Walkthrough, Guide, & Tips
 Spirits of Mystery: The Silver Arrow Walkthrough, Guide, & Tips
 Sea of Lies: Nemesis Walkthrough, Guide, & Tips