Dark Mysteries: The Soul Keeper Walkthrough, Guide, & Tips
Dark Mysteries: The Soul Keeper Walkthrough

9Welcome to the Dark Mysteries: The Soul Keeper Walkthrough
Charles Dexter Ward summons you to the island of Pawtuxet to stop a revenant from murdering the townspeople.
Whether you use this document as a reference when things get difficult or as a road map to get you from beginning to end, we’re pretty sure you’ll find what you’re looking for here.
This document contains a complete Dark Mysteries: The Soul Keeper game walkthrough featuring annotated screenshots from actual gameplay!
We hope you find this information useful as you play your way through the game. Use the walkthrough menu below to quickly jump to whatever stage of the game you need help with.
Remember to visit the Big Fish Games Forums if you find you need more help. Have fun!
This walkthrough was created by Cerasus Media, and is protected under US Copyright laws. Any unauthorized use, including re-publication in whole or in part, without permission, is strictly prohibited.
General Tips
- On each page you will find the necessary steps to complete the game.
- The steps will be shown in chronological order.
- In addition to this guide, you can try using the hint button or the hints in the journal.
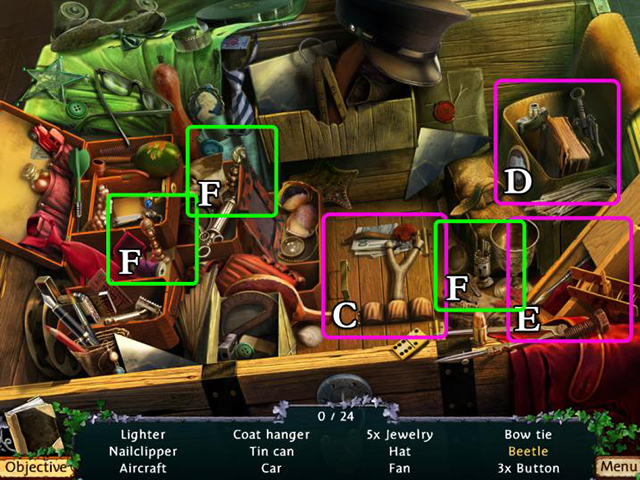
- During HO scenes, objects listed in yellow lettering are hidden behind other objects.
Chapter 1: The Revenant

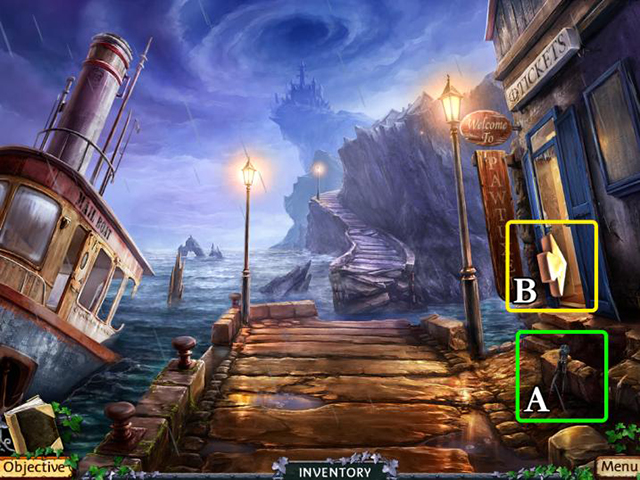
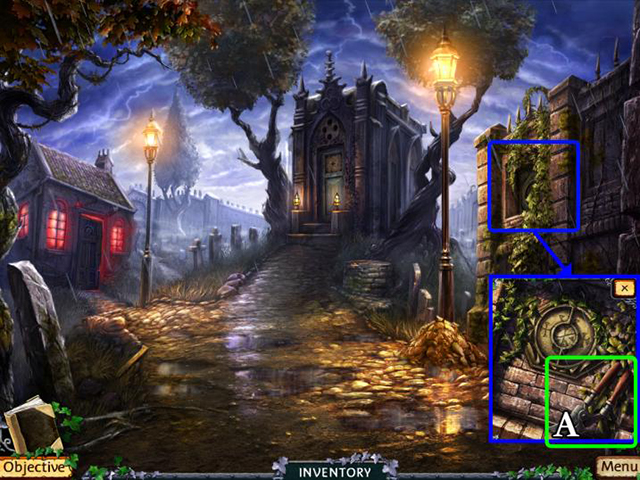
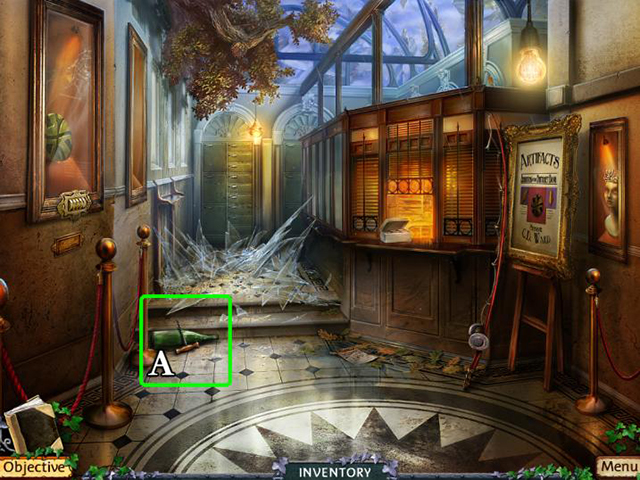
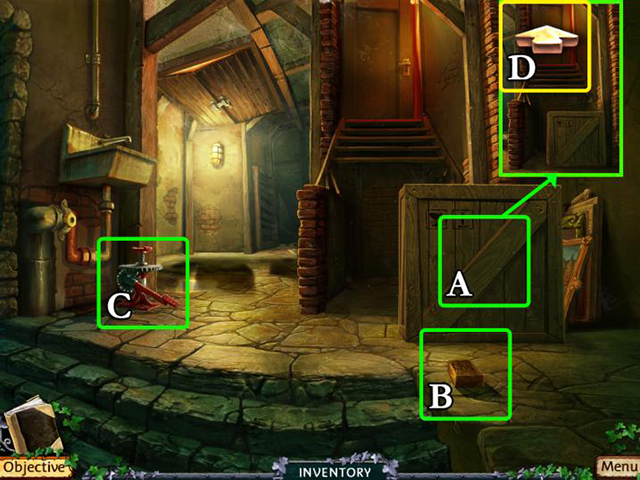
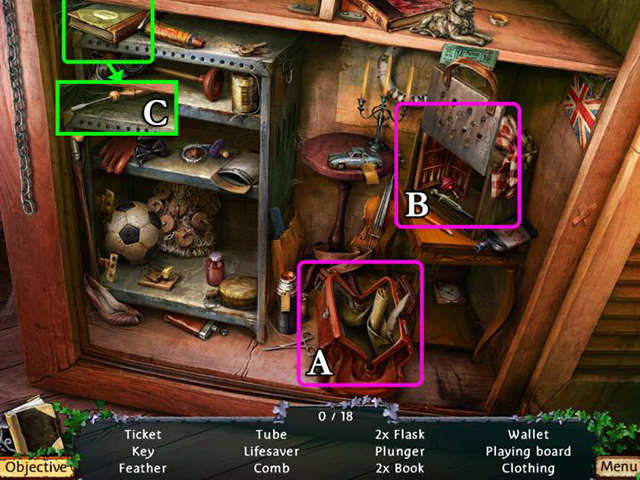
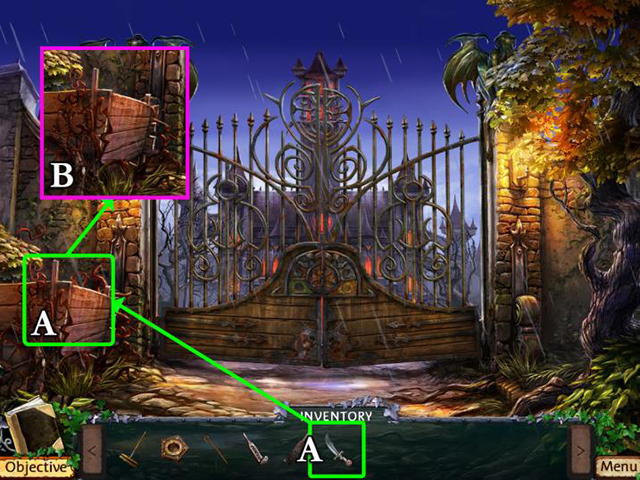
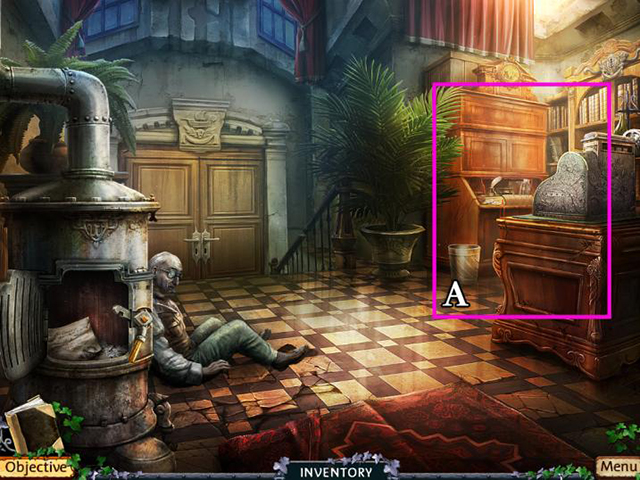
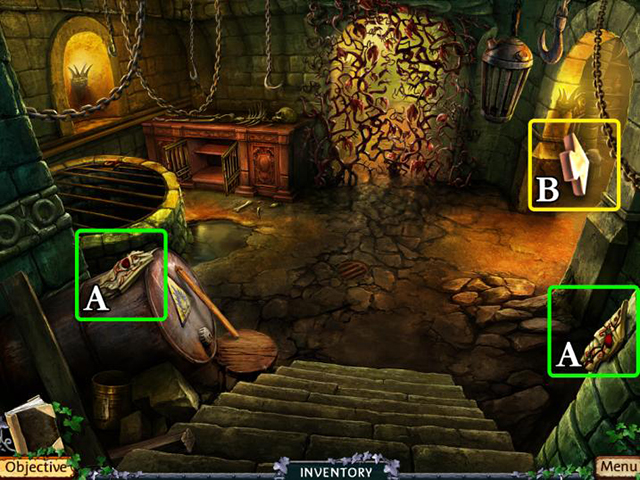
- Pick up the bolt cutters (A).
- Go right to the ticket office (B).
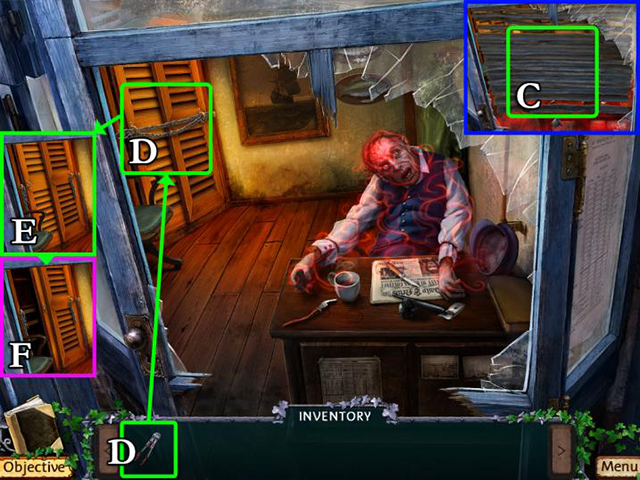
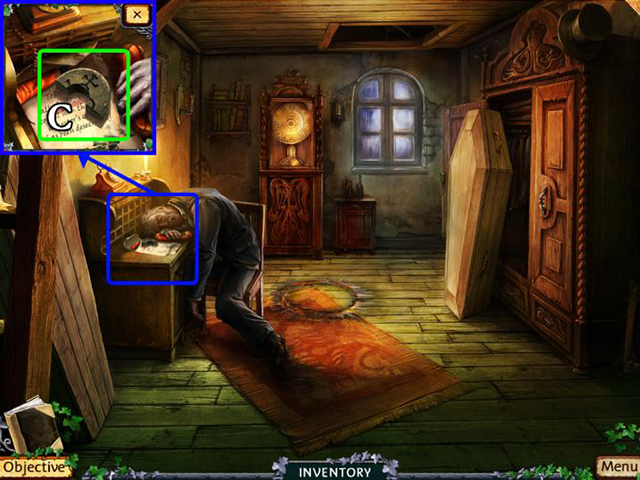
- Open the blinds (C).
- Use the bolt cutters to cut the chain (D).
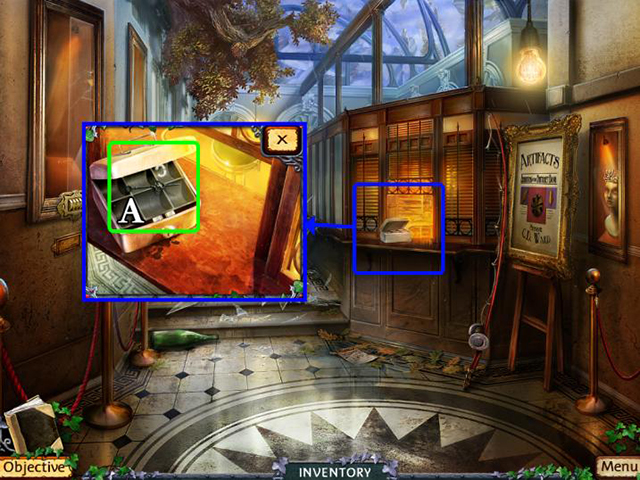
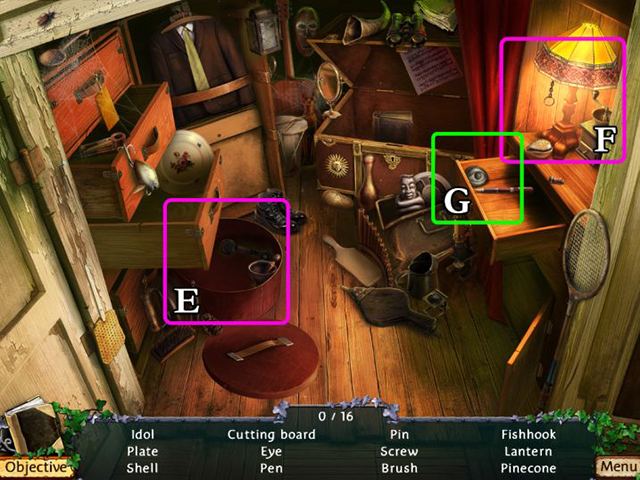
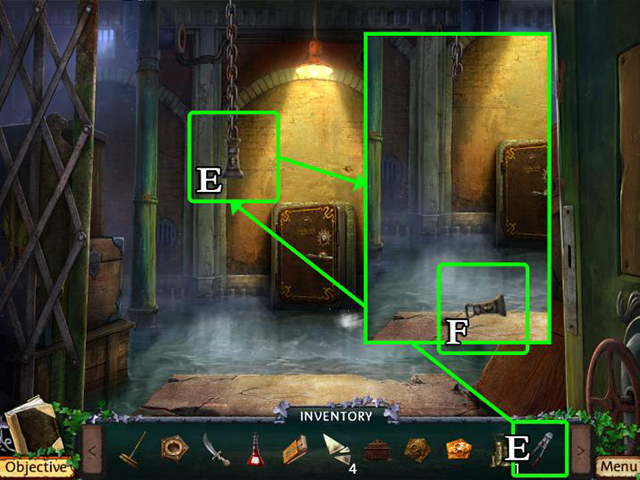
- Open the closet (E).
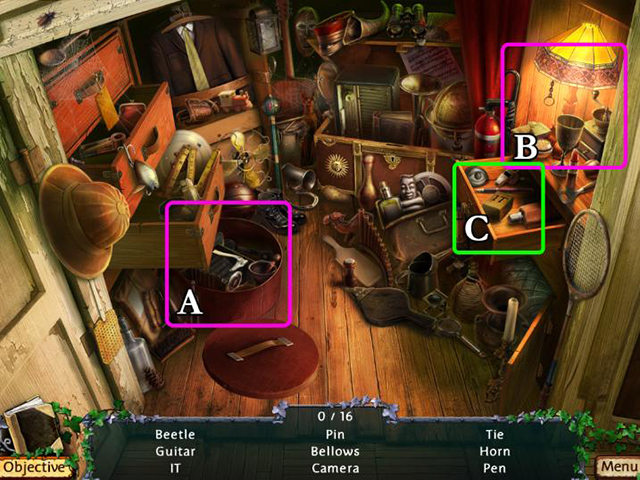
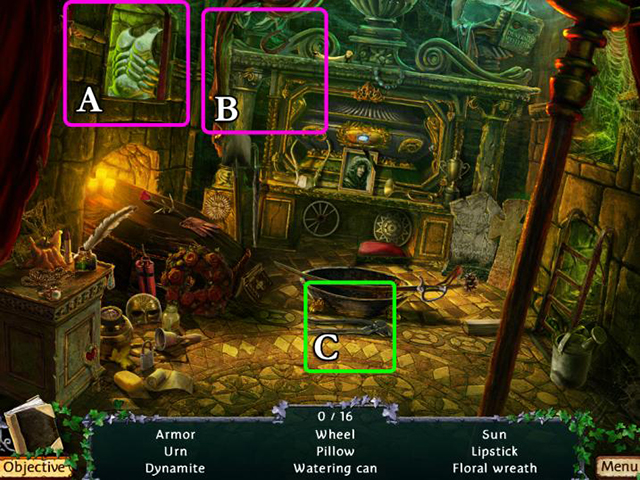
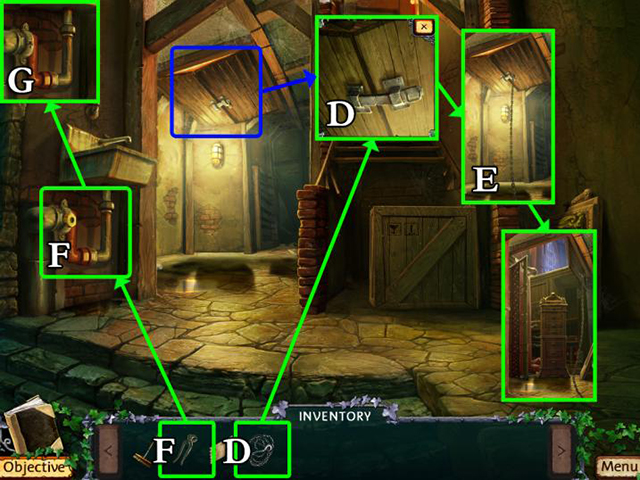
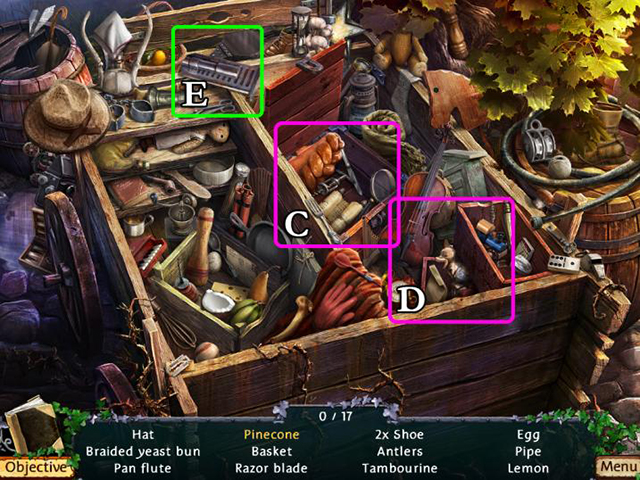
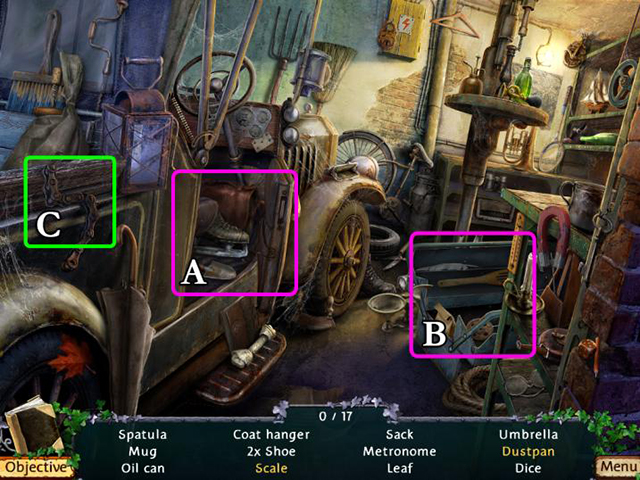
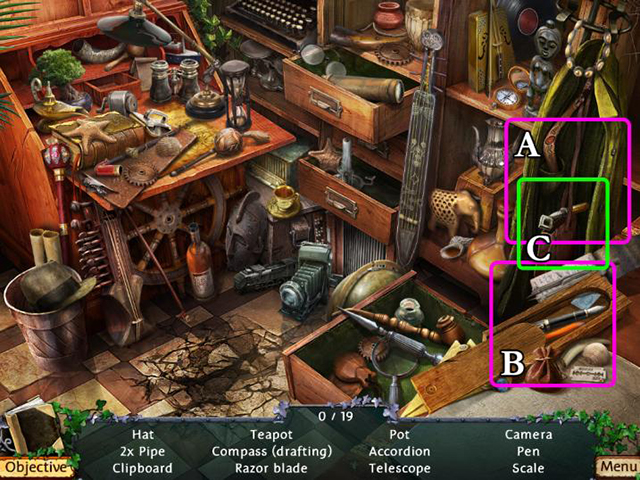
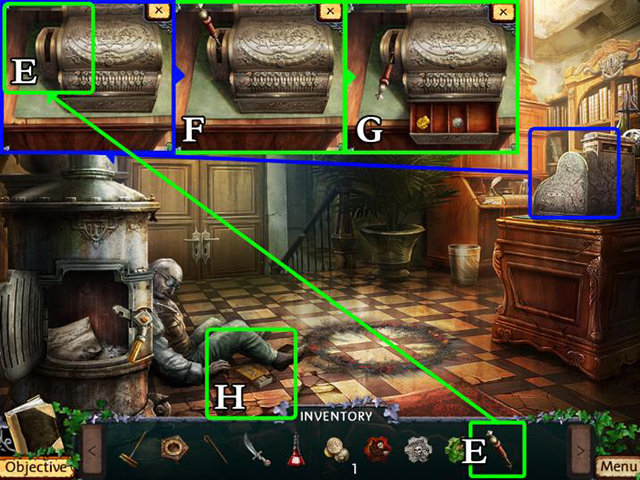
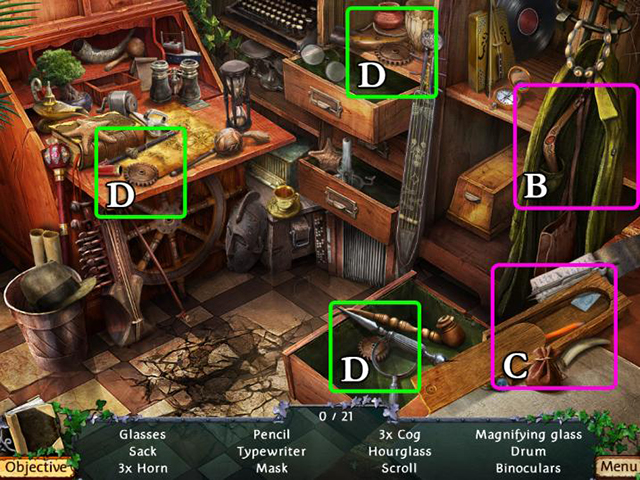
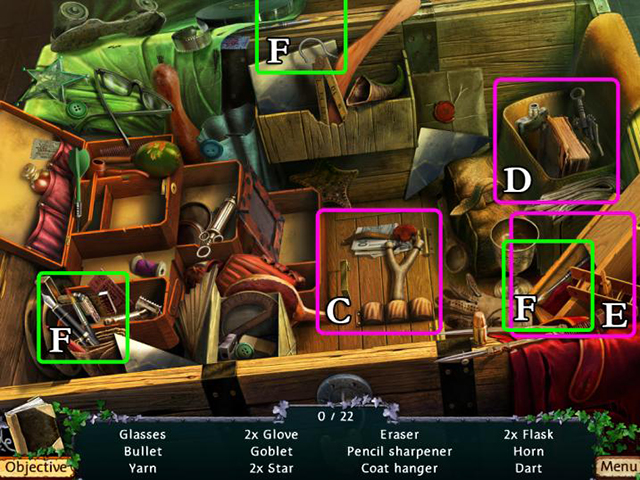
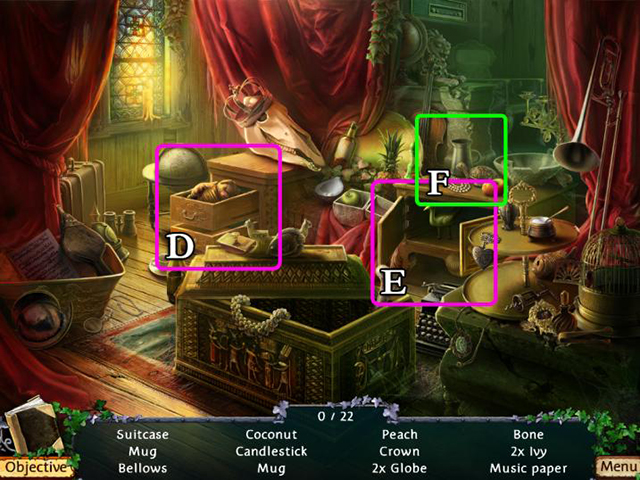
- Start the HO-scene (F).
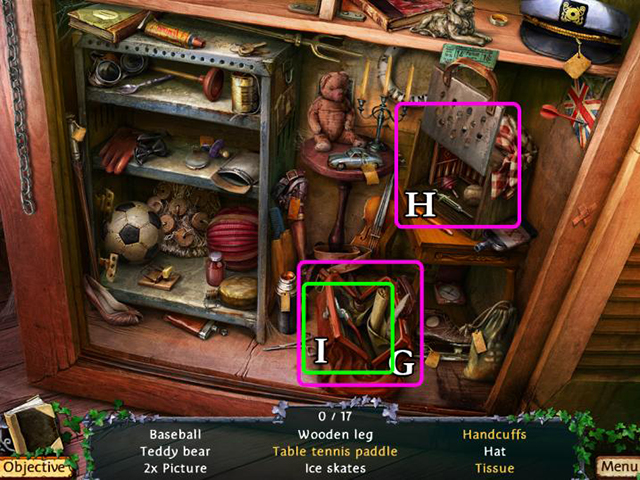
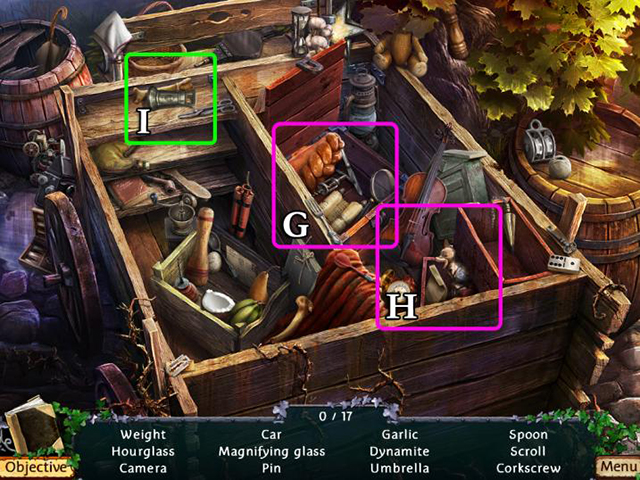
- Find all of the hidden objects.
- These objects can be manipulated: (G) and (H).
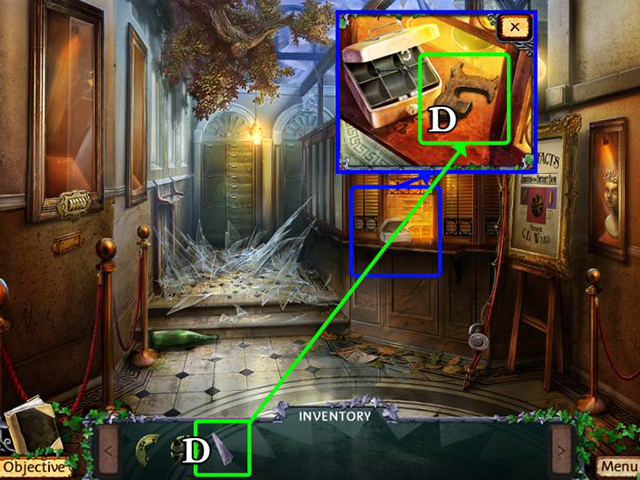
- Inventory object: half a pliers (I).
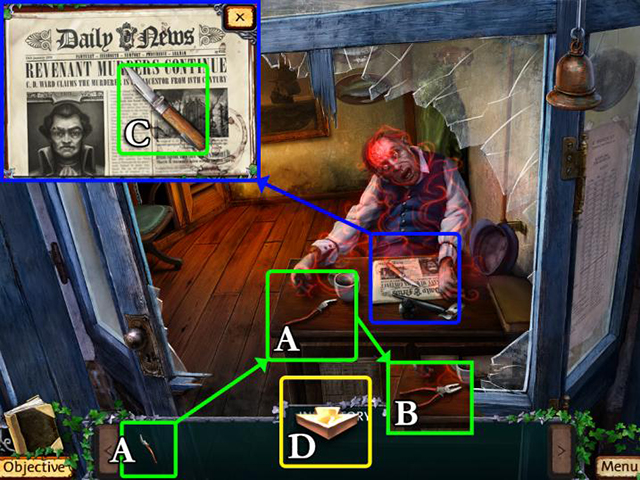
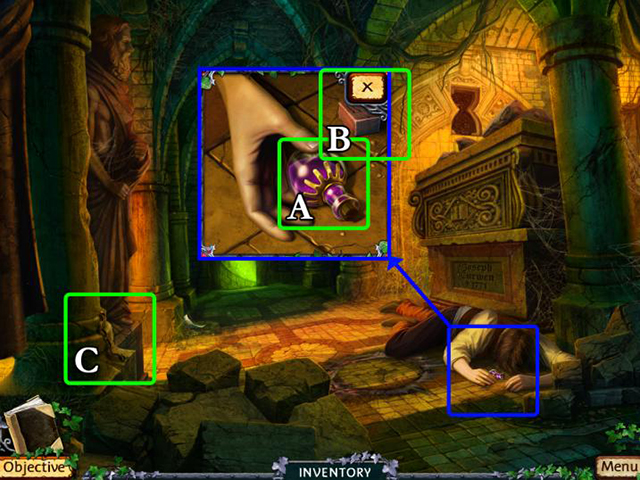
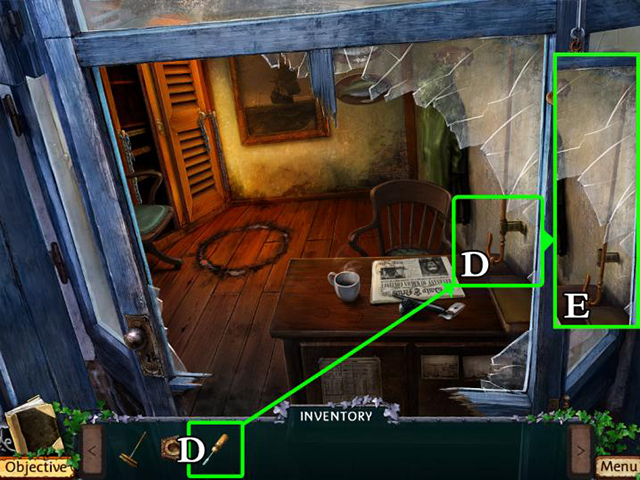
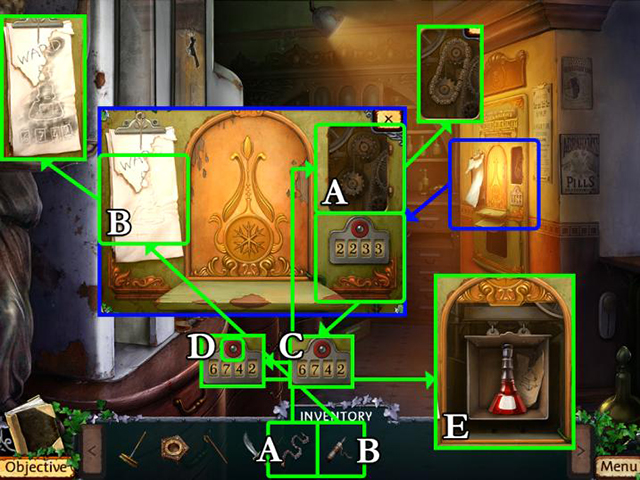
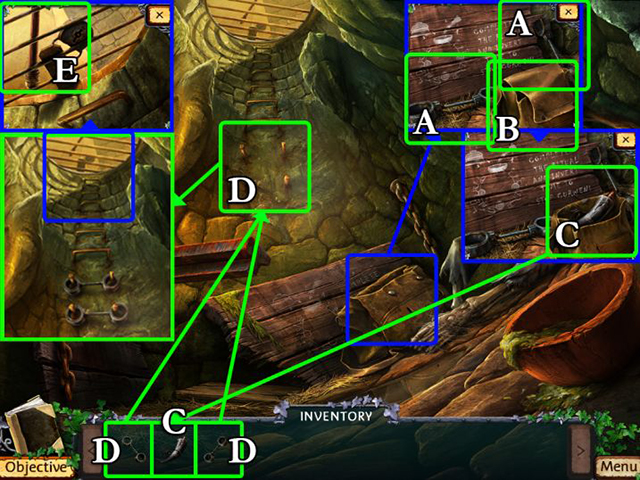
- Combine the half of pliers with the other half lying on the desk (A).
- Pick up the pliers (B).
- Pick up the knife (C).
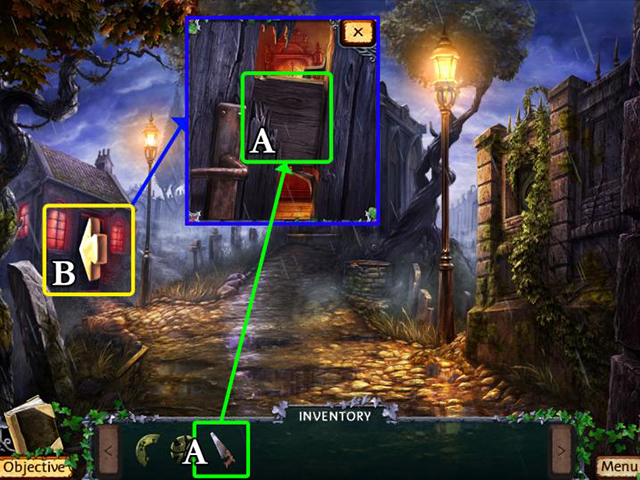
- Leave the Ticket Office (D).
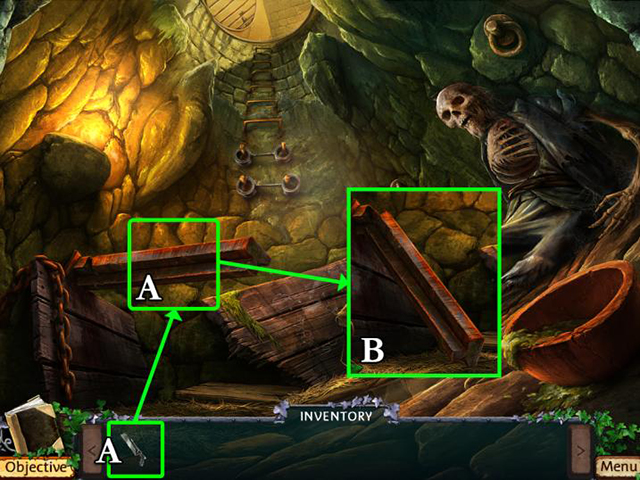
- Use the pliers to pull the nails out of the plank (E).
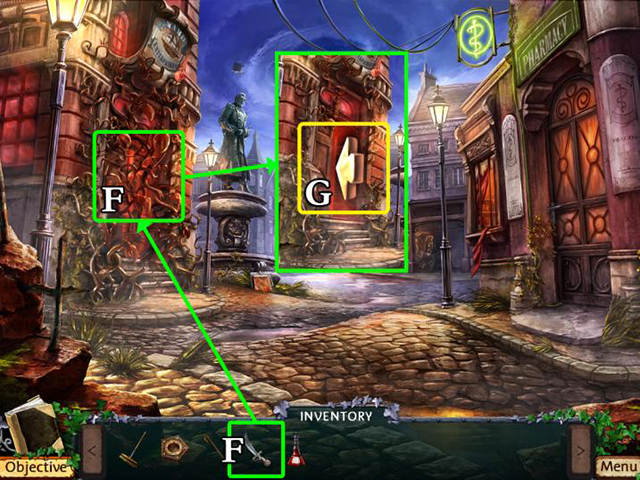
- Use the plank as a bridge (F).
- Go north (G).

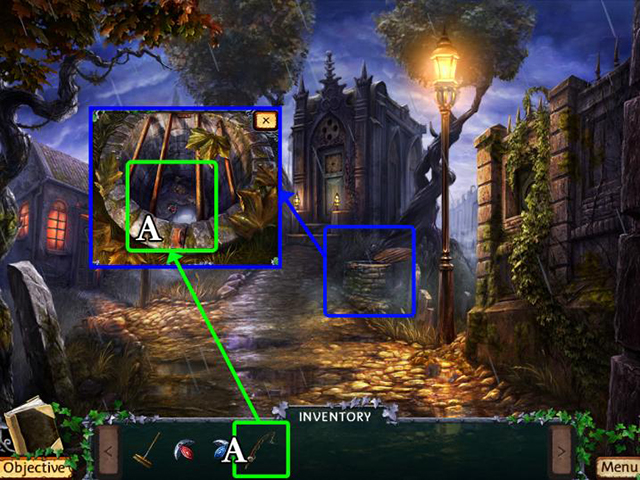
- Use the knife to open the bag (H).
- Pick up the stone symbol (I).
- Go right, into the Graveyard (J).
- Pick up the garden shears (A).
- Go back to the Coast.

- Use the garden shears to get at the truck handle (B).
- Pick up the truck handle (C).
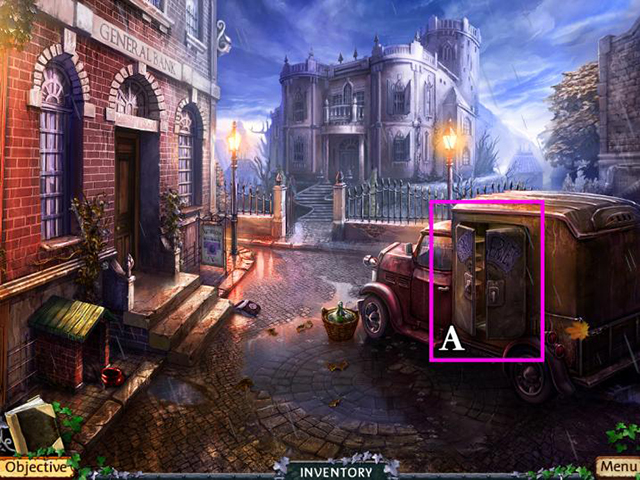
- Go north (D).
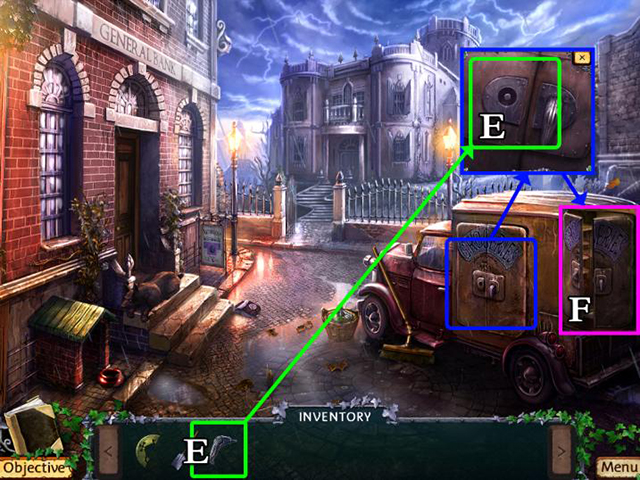
- Use the truck handle to open the truck (E).
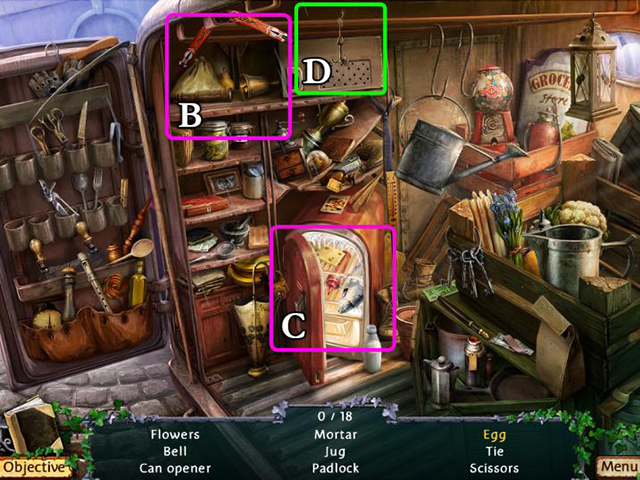
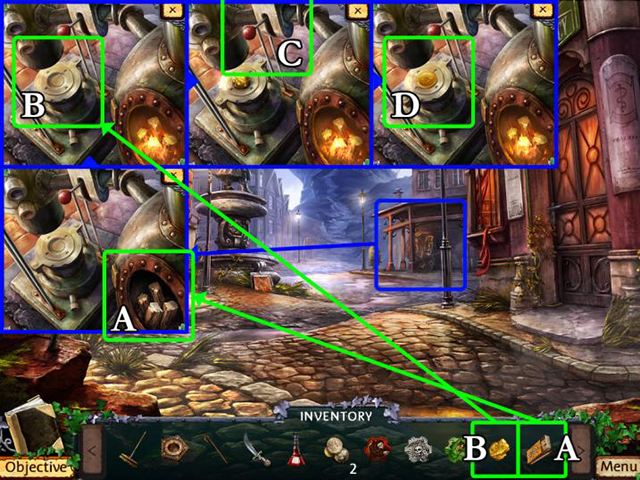
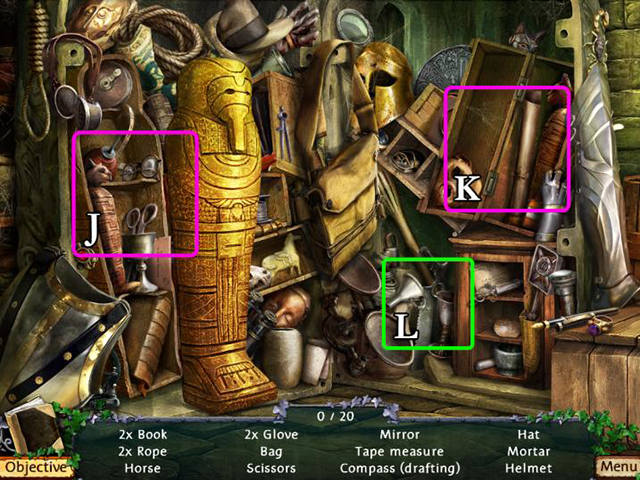
- Start the HO-scene (F).

- Find all of the hidden objects.
- These objects can be manipulated: (A) and (B).
- Inventory object: can opener (C).
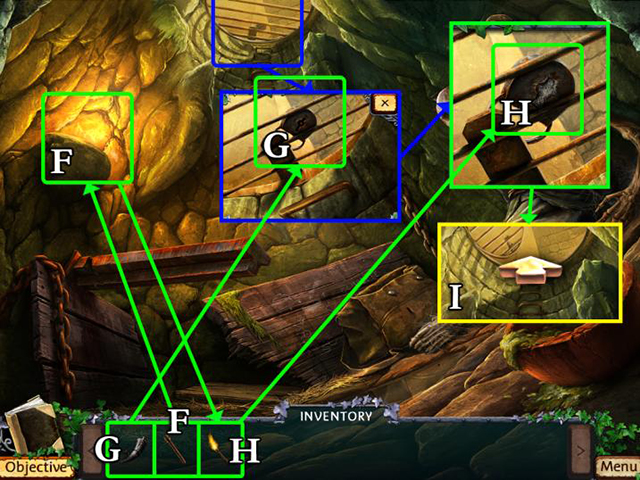
- Go back to the Coast.
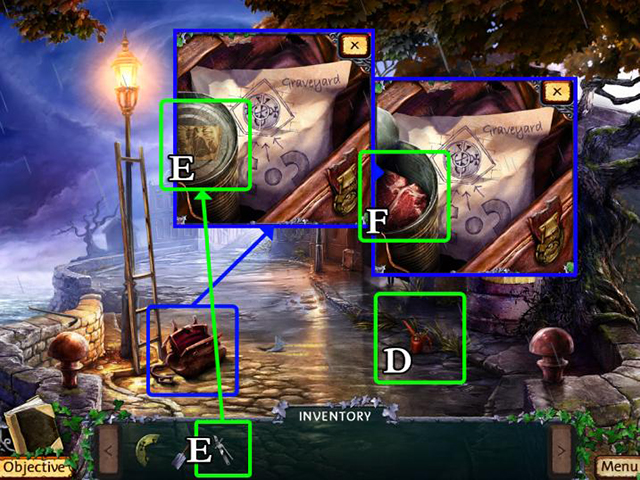
- Pick up the empty oil can (D).
- Open the dog food with the can opener (E).
- Pick up the meat (F).
- Go north.
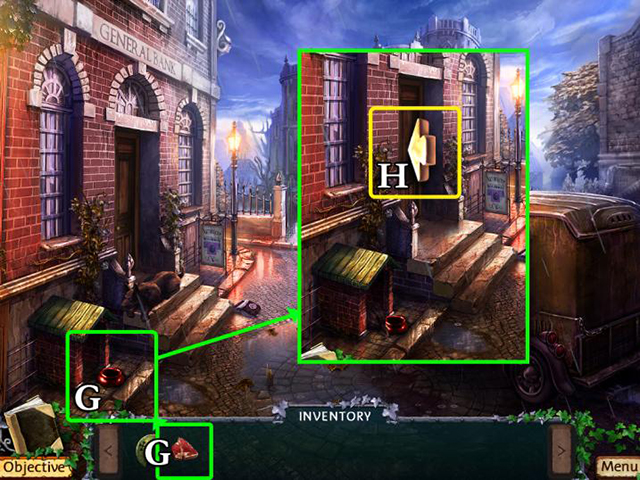
- Put the meat in the dog’s bowl (G).
- Go into the Pawtuxet Bank (H).
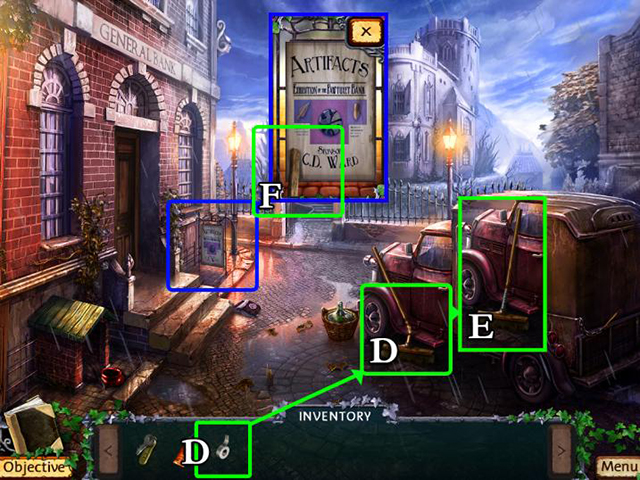
- Pick up the corkscrew (A).
- Leave the Pawtuxet Bank.
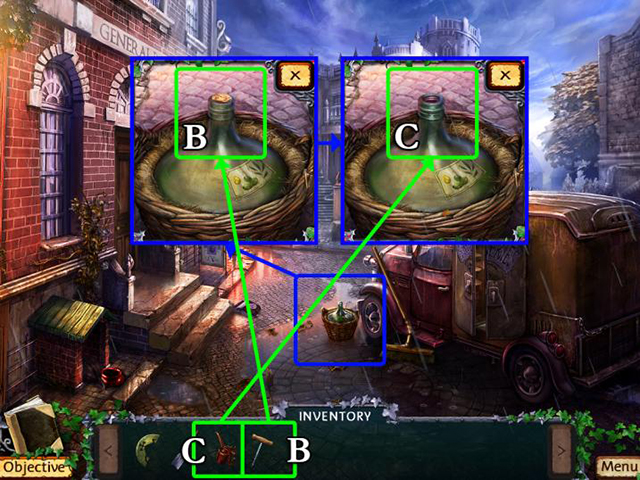
- Use the corkscrew to open the bottle of oil (B).
- Fill the empty oil can (C).
- Go back in the Pawtuxet Bank.
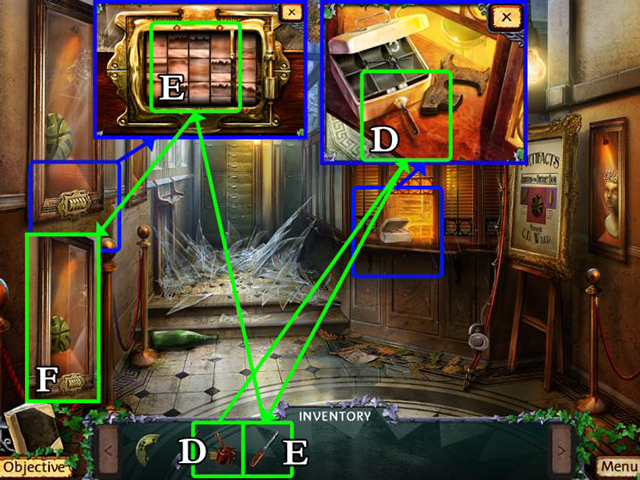
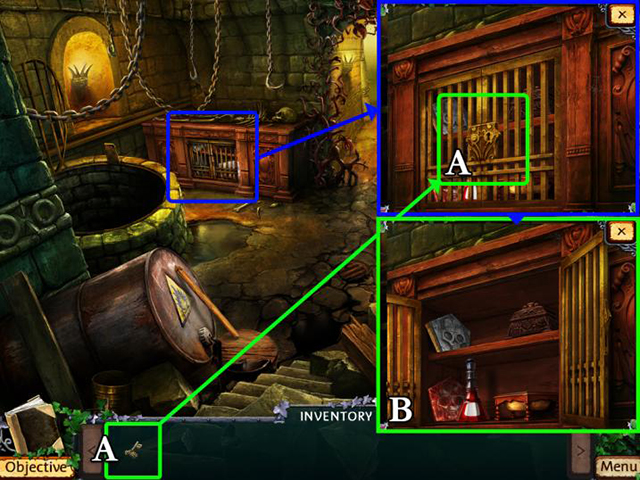
- Use the oil to loosen the lock pick (D).
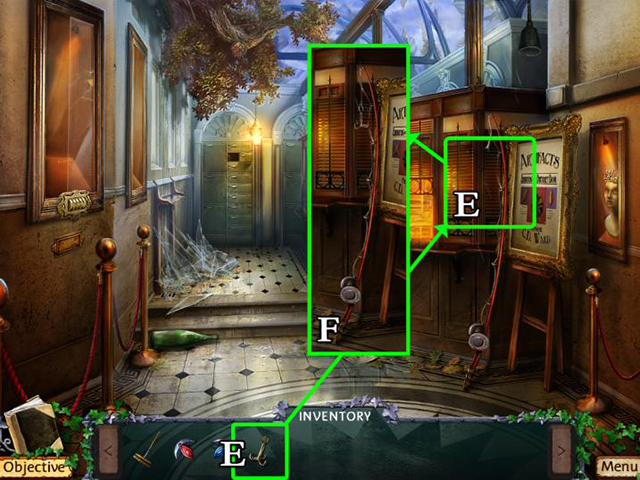
- Use the lock pick to break into the display case (E).
- Possible solution: right, down, right, up, up, right, down, right, up, down, up, down, right.
- Pick up the stone symbol (F).
- Go back to the Coast.
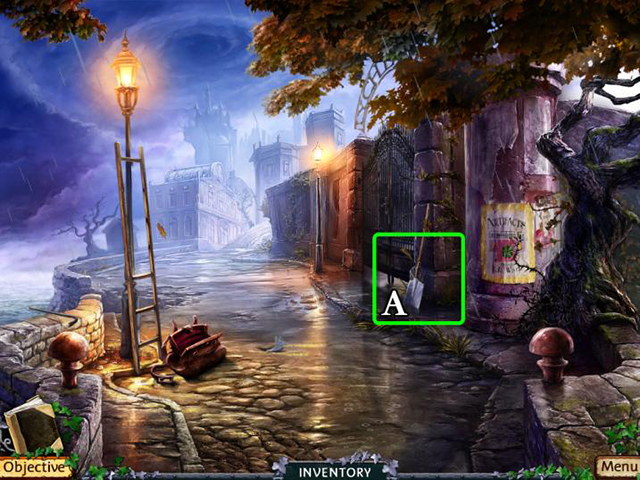
- Pick up the shovel (A).
- Go to the Graveyard.
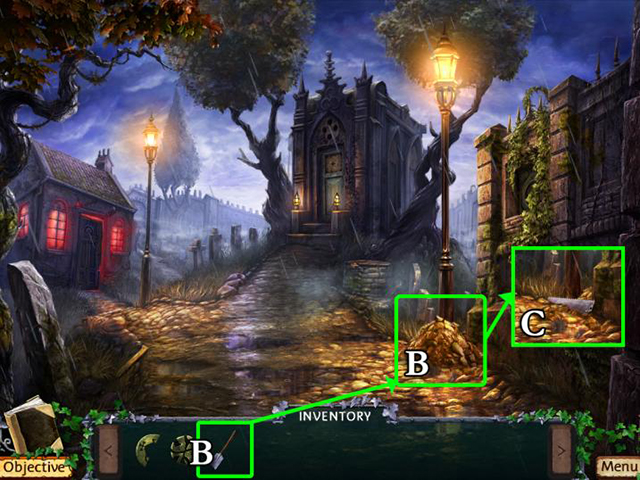
- Use the shovel to dig up the saw blade (B).
- Pick up the saw blade (C).
- Go back to the Pawtuxet Bank.
- Put the saw blade in the handle (D).
- Go back to the Graveyard.
- Use the saw to get through the door (A).
- Enter the Gravedigger’s House (B).
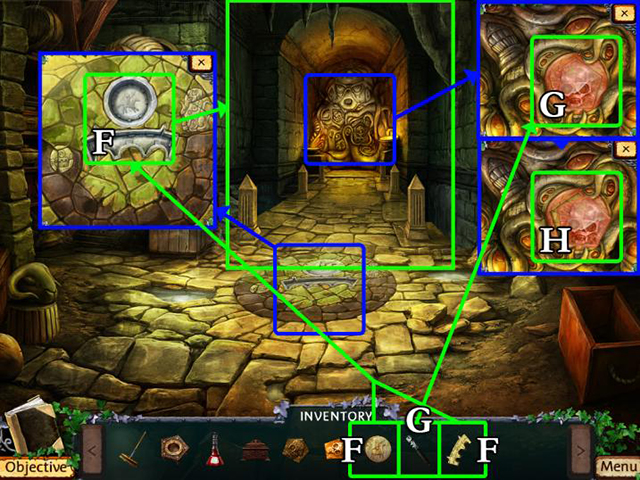
- Pick up the stone symbol (C).
- Leave the house.

- Place all three stone symbols in the socket (D).
- Pick up the magic salt (E).
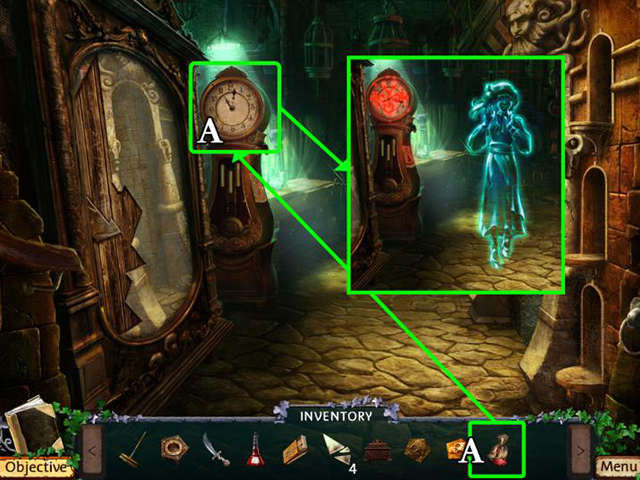
- Pick up the clock hand (F).
- Go back to the Pawtuxet Bank.
- Pick up the other clock hand (A).
- Go back to the Gravedigger’s House.
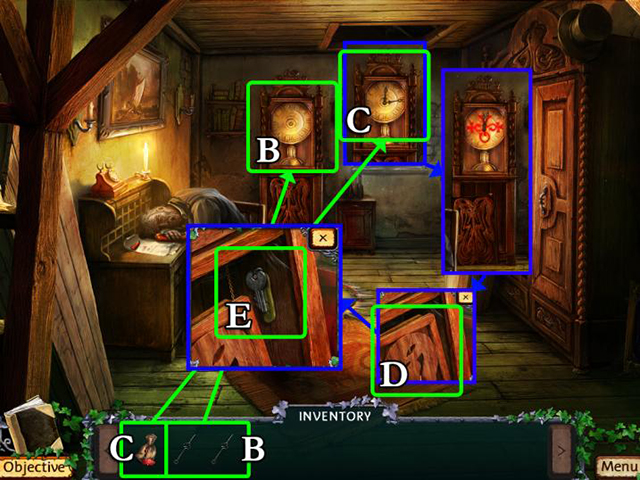
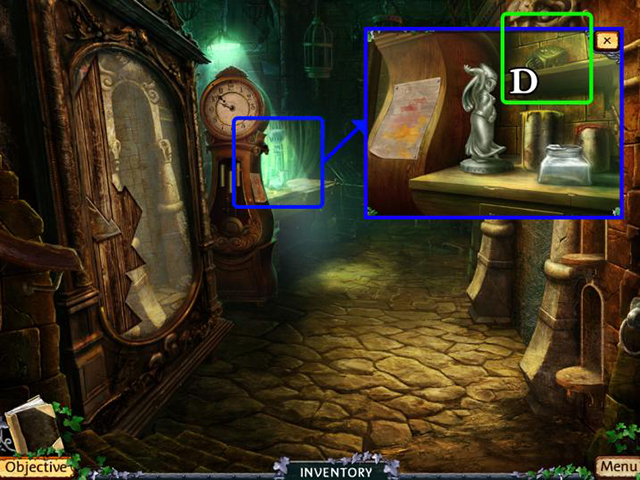
- Place both clock hands into the clock (B).
- Sprinkle the magic salt on the clock (C).
- Remove the lid (D).
- Pick up the safe key (E).
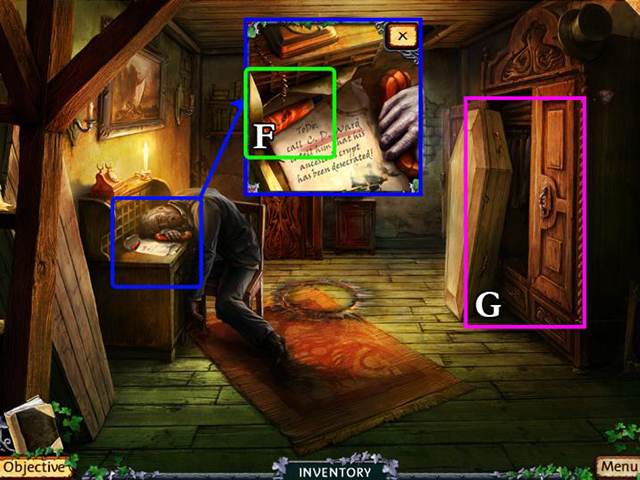
- Pick up the glue (F).
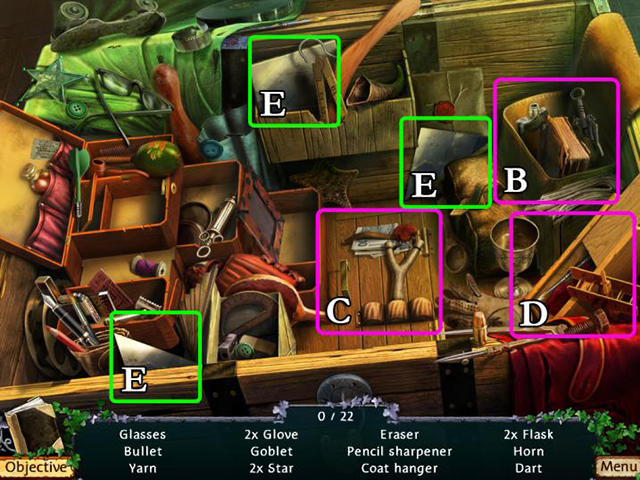
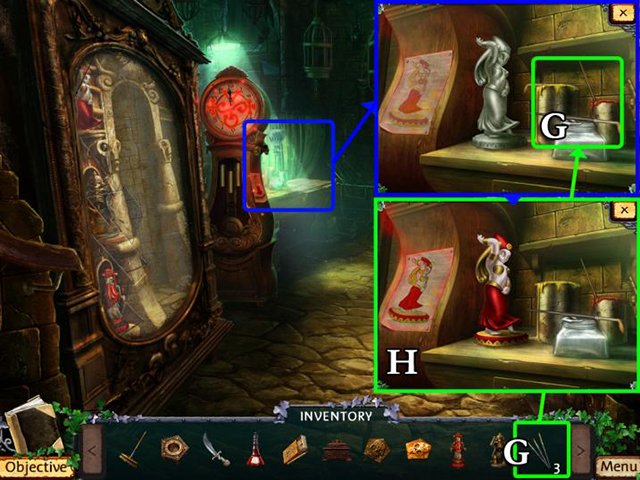
- Start the HO-scene (G).

- Find all of the hidden objects.
- These objects can be manipulated: (A) and (B).
- Inventory object: tape (C).
- Go back to the Dead End.
- Repair the broom with the tape (D).
- Pick up the broom (E).
- Pick up the ladder rung (F).
- Enter the Pawtuxet Bank.
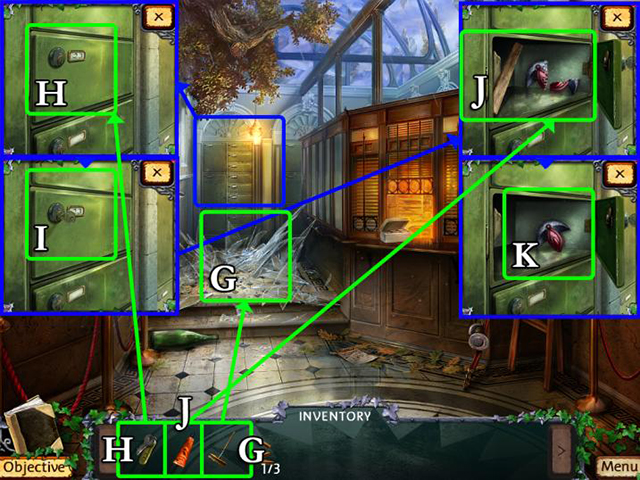
- Sweep away the glass shards (G).
- Use the safe key to unlock the deposit box (H).
- Open the deposit box (I).
- Pick up the ladder rung and glue the lock piece back together (J).
- Pick up the lock piece (K).
- Go back to the Graveyard.
- Pick up the ladder rung (A).
- Pick up the chest lock by the well (B).
- Go back to the Coast.

- Set the rungs in the ladder (C).
- Pick up the ladder (D).
- Enter the Gravedigger’s House.
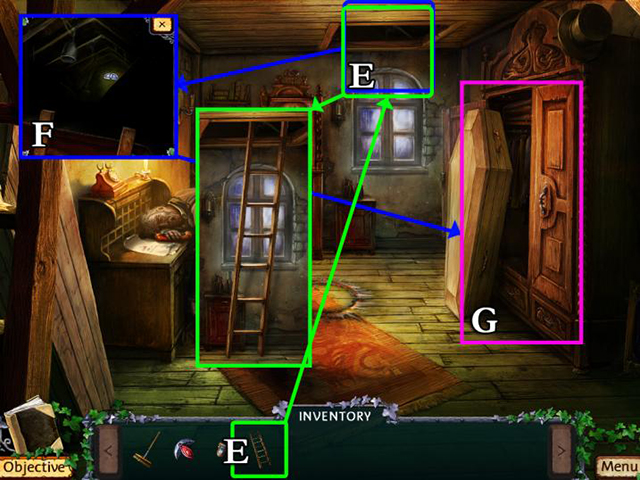
- Use the ladder to reach the attic (E).
- Examine the attic (F).
- Start the HO-scene (G).
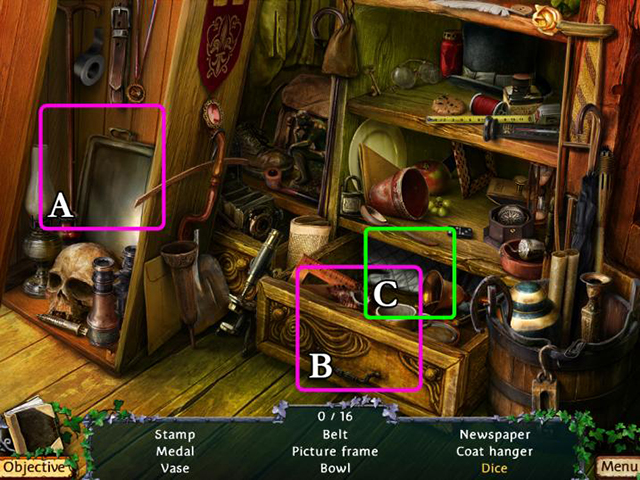
- Find all of the hidden objects.
- These objects can be manipulated: (A) and (B).
- Inventory object: oven mitt (C).
- Go back to the Pawtuxet Bank.

- Use the oven mitt to unscrew the light bulb (D).
- Pick up the light bulb (E).
- Go back to the Gravedigger’s House.
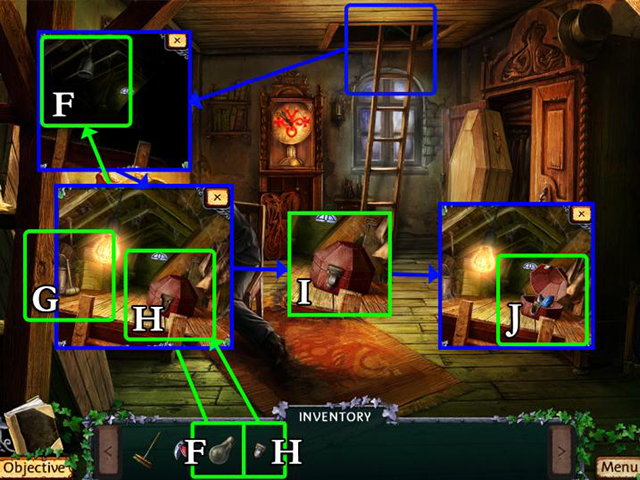
- Screw in the lightbulb to light up the attic (F).
- Pick up the mallet (G).
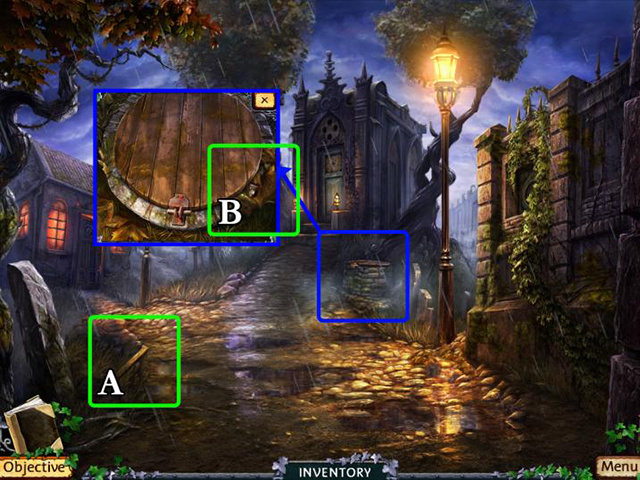
- Set the chest lock in the casket (H).
- Open the casket (I).
- Pick up the lock piece (J).
- Leave the Gravedigger’s House.
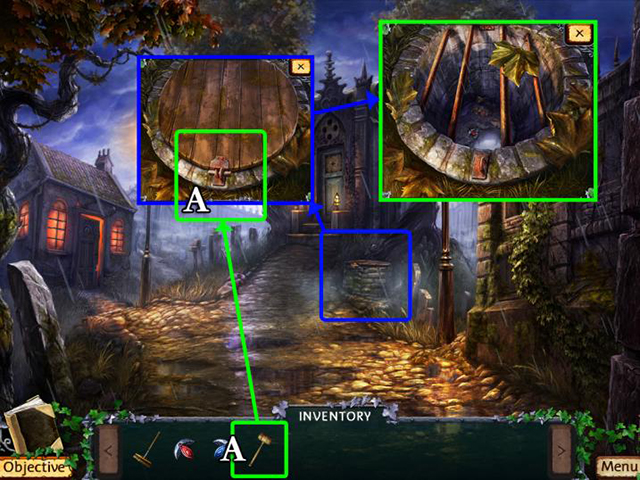
- Use the mallet to remove the lid of the well (A).
- Start the HO-scene in the truck in front of the Pawtuxet Bank.
- Find all of the hidden objects.
- These objects can be manipulated: (B) and (C).
- Inventory object: fishhook (D).
- Go back in the Pawtuxet Bank.
- Tie the fishhook to the fishing rod (E).
- Pick up the fishing rod (F).
- Go back to the Graveyard.
- Use the fishing rod to hook the lock piece in the well (A).
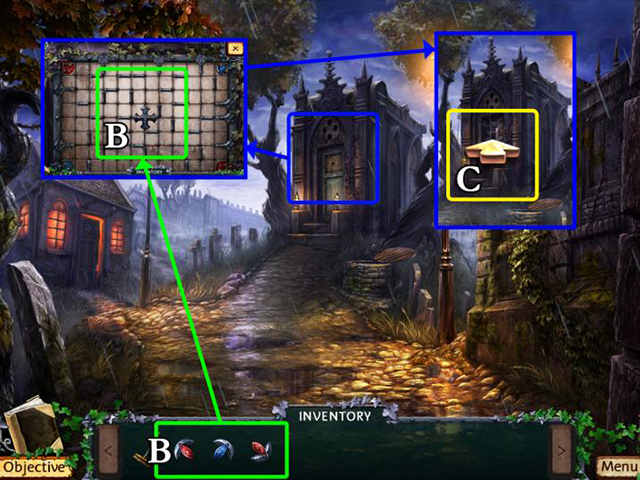
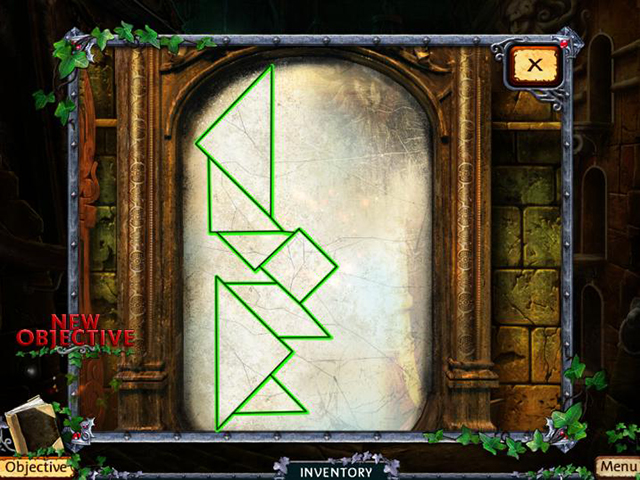
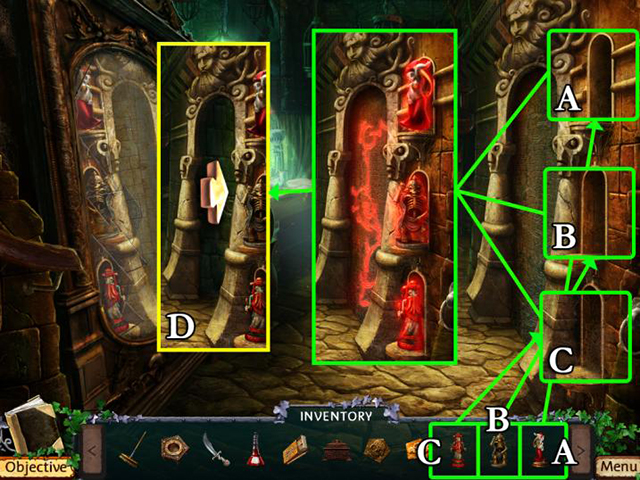
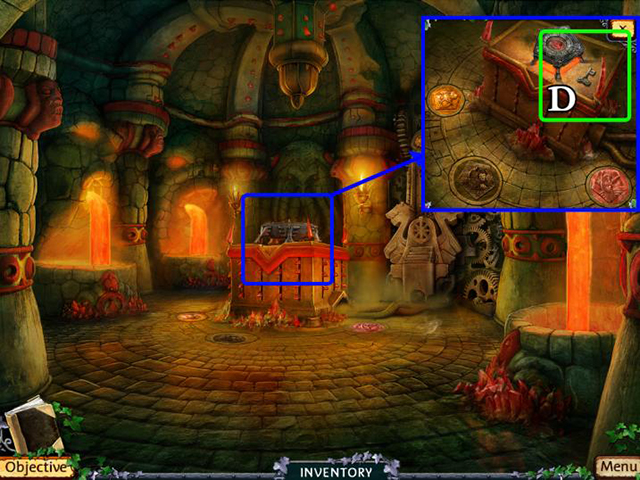
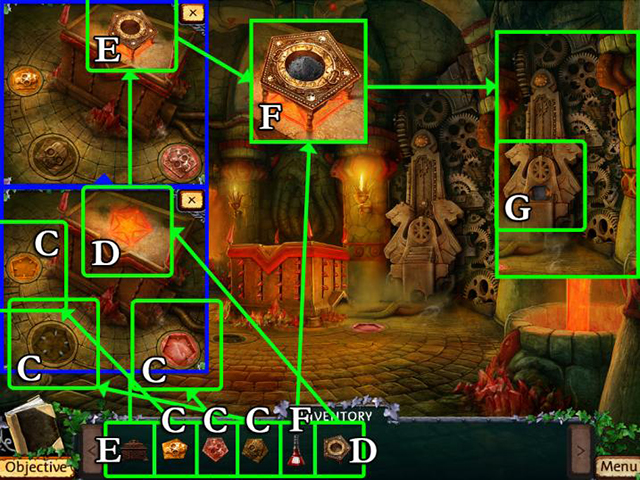
- Put all lock pieces in the puzzle and solve it (see screenshot).
- Enter the Crypt (C).

- Puzzle solution: see screenshot, red (D) and blue (E).
Chapter 2: An Unfinished Ritual
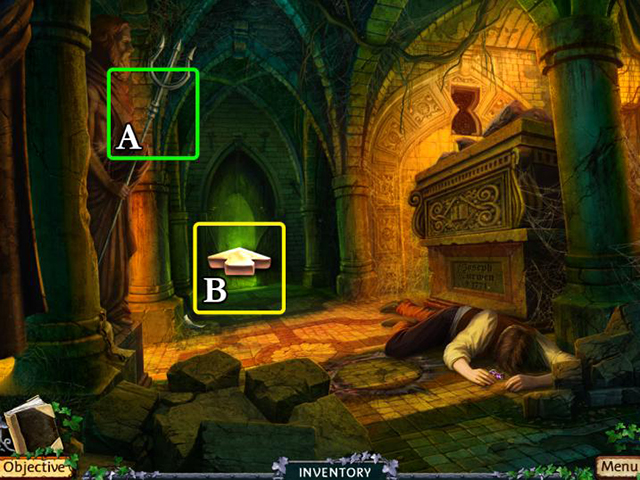
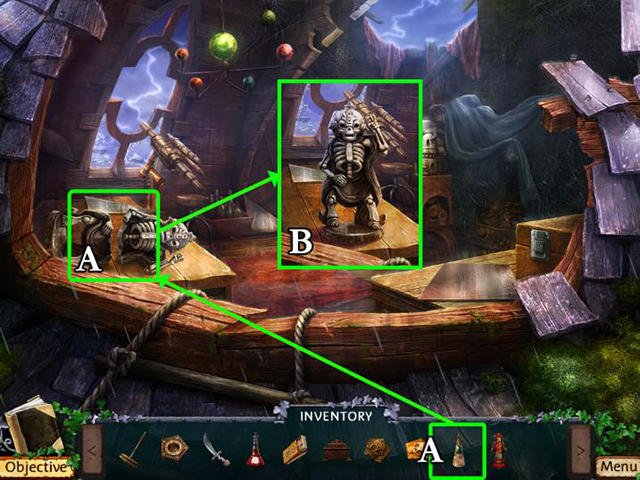
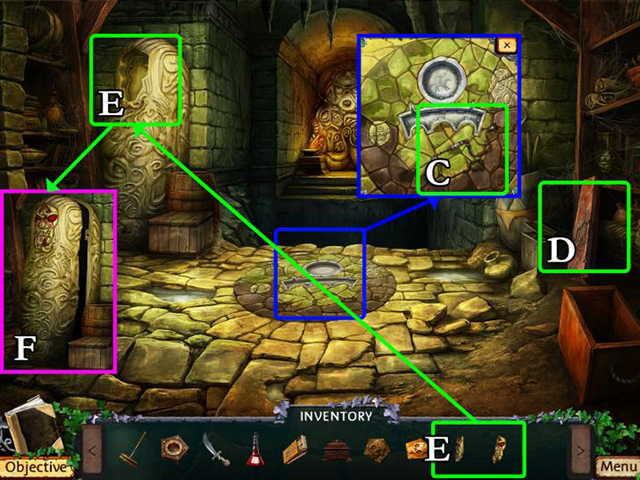
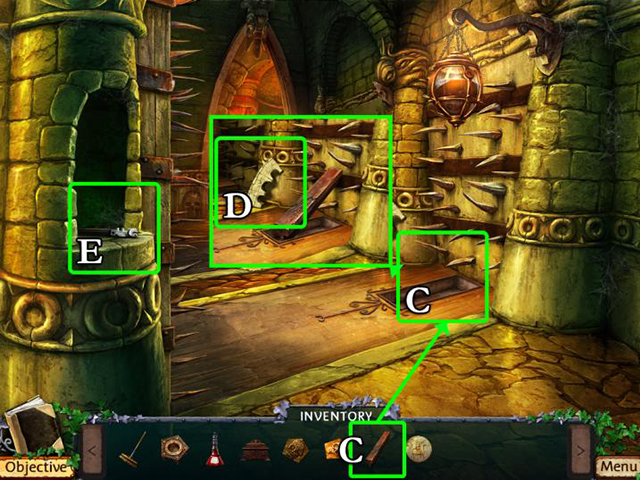
- Pick up the trident (A).
- Go north (B).
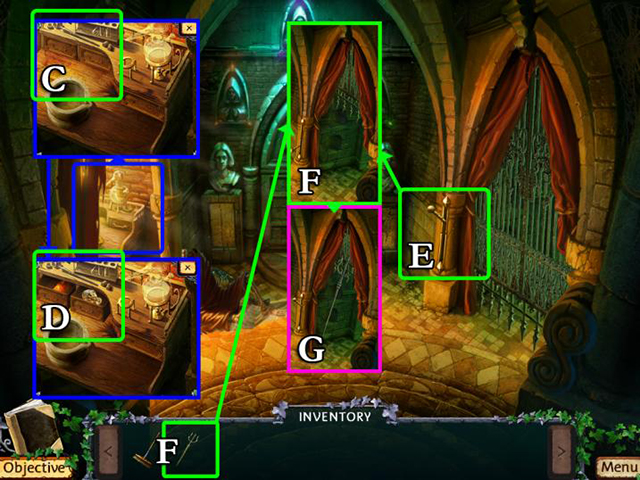
- Open both desk drawers (C).
- Pick up the empty vial and the orange crystal (D).
- Use the lever to open the gate (E).
- Use the trident to hold the gate open (F).
- Start the HO-scene (G).
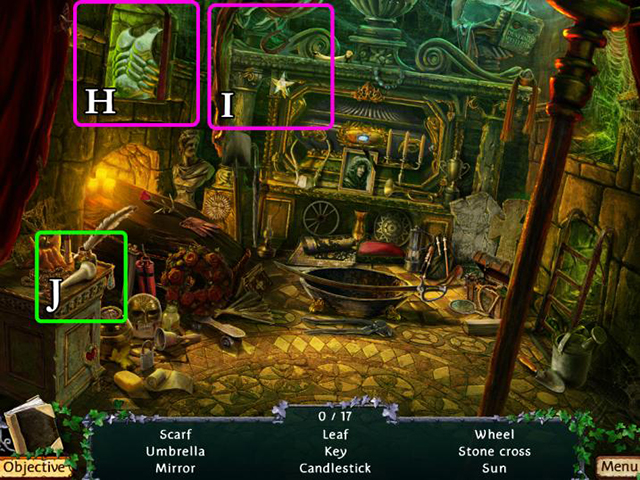
- Find all of the hidden objects.
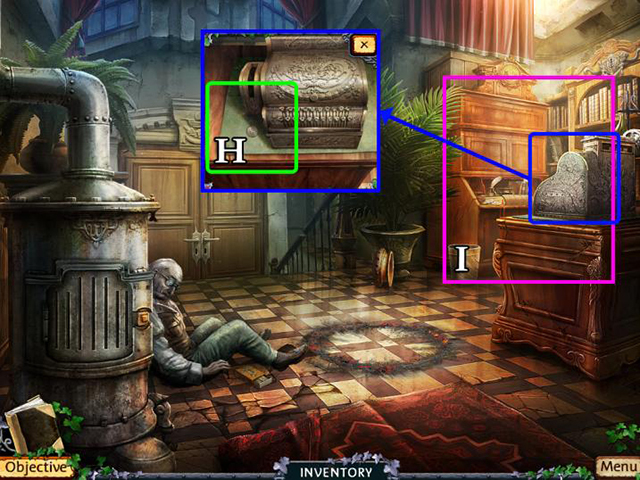
- These objects can be manipulated: (H) and (I).
- Inventory object: pestle (J).
- Go south.
- Pick up the purple vial (A).
- Pick up the block marked ‘IM’ (B).
- Pick up the drawer handle (C) and go north.
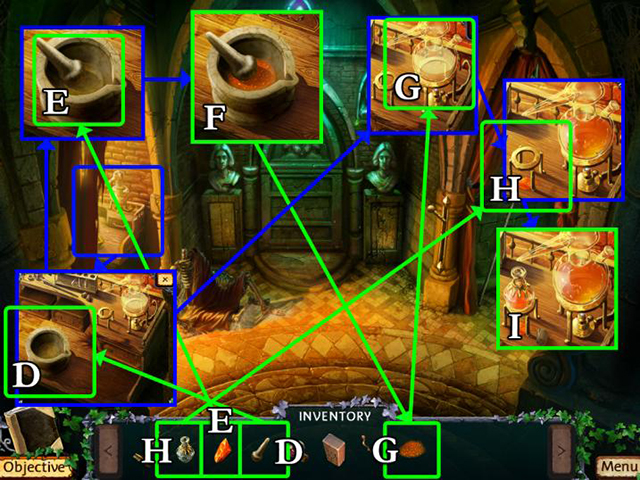
- Place the pestle in the mortar (D).
- Place the orange crystal in the mortar (E).
- Pick up the orange pigment (F).
- Put the orange pigment in the bulb (G).
- Put the empty vial in the fixture (H).
- Pick up the orange vial (I).
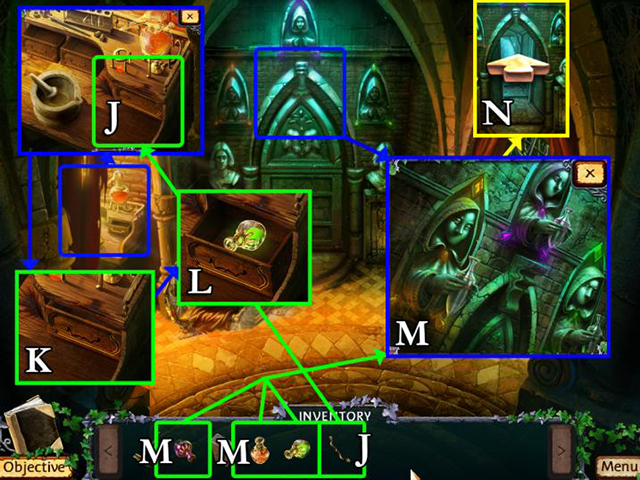
- Fasten the drawer handle on the desk drawer (J).
- Open the drawer (K).
- Pick up the green vial (L).
- Place the three liquids in their fixtures (M).
- Go north (N).
- Push the crate under the broken stairs (A).
- Pick up the block marked ‘MO’ (B).
- Pick up the car jack (C).
- Enter the Lounge (D).
- Go into the Entry Hall (E).
- Find all of the hidden objects.
- These objects can be manipulated: (A) and (B).
- Inventory object: block marked ‘IT’ (C).
- Go back into the Lounge.
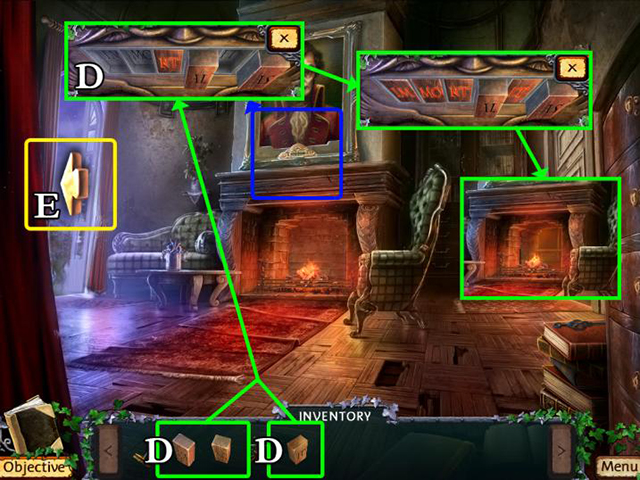
- Set all pieces into the puzzle (D) and solve it.
- Possible solution: IT, MO, AL, RT, IM, AL, IT, MO.
- Go west (E).
- Use the car jack to open the garage (F).
- Start the HO-scene (G).
- Find all of the hidden objects.
- These objects can be manipulated: (A) and (B).
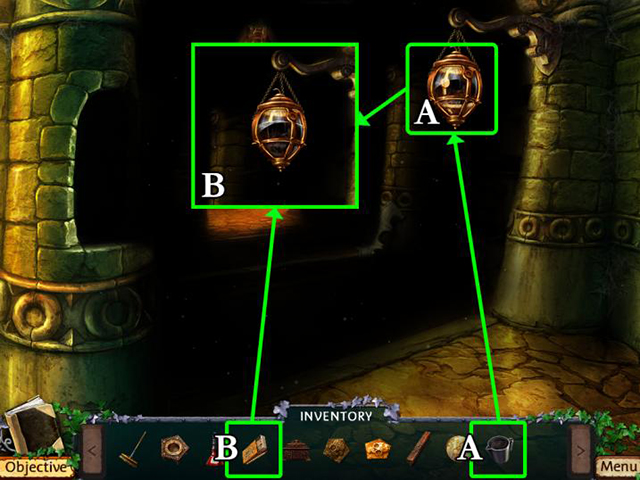
- Inventory object: bucket (C).
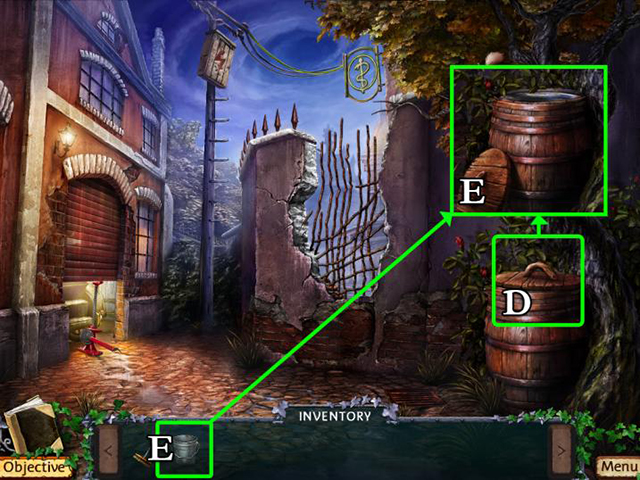
- Open the barrel (D).
- Fill the bucket with water (E).
- Go back to the Lounge.
- Extinguish the fire (F).
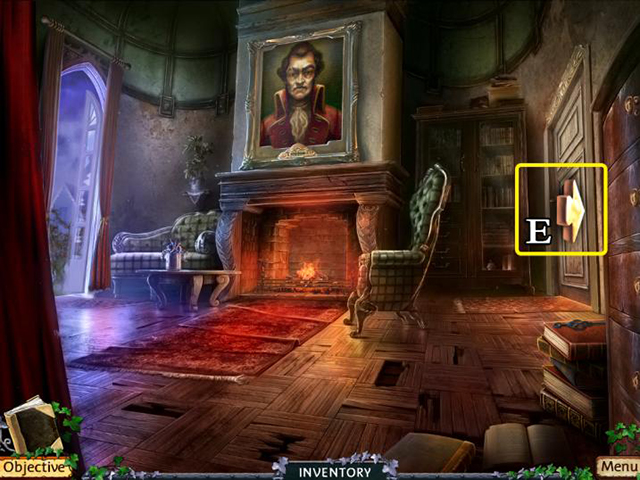
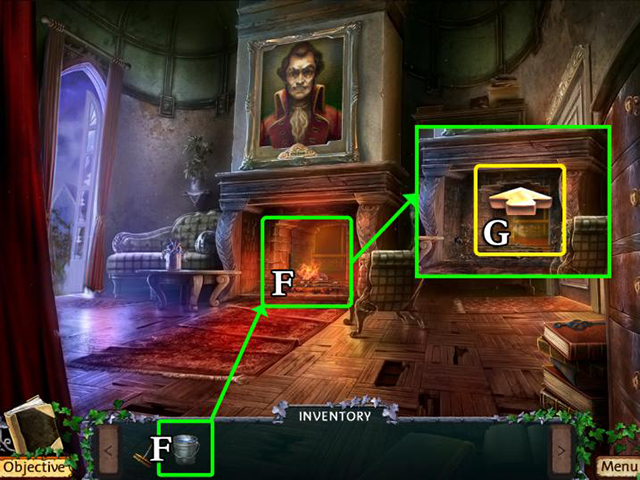
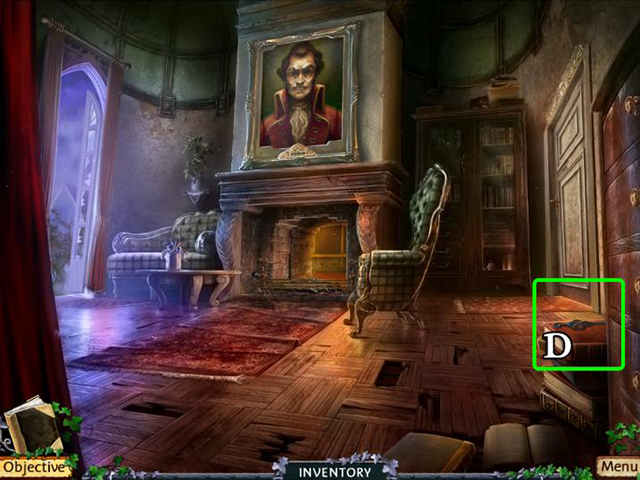
- Enter the Study (G).
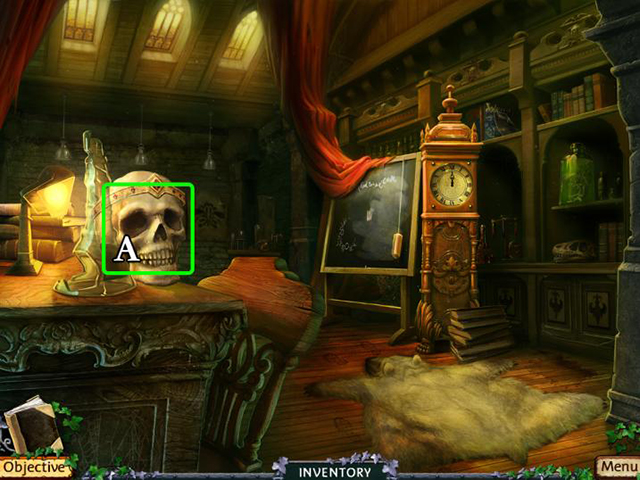
- Pick up the skull (A).
- Go back to the Catacombs.
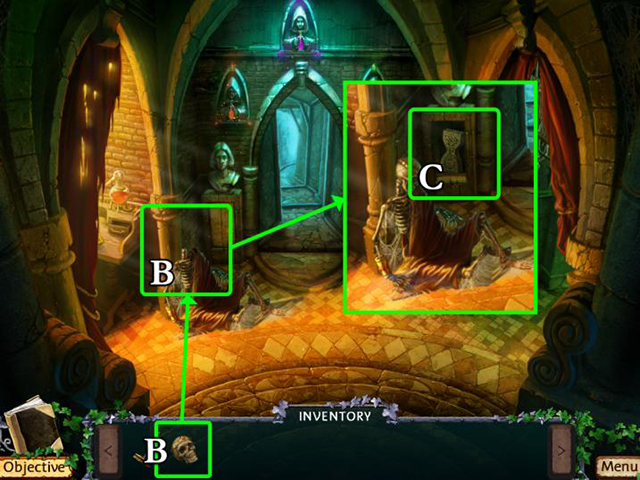
- Put the skull on the skeleton (B).
- Pick up the hourglass emblem (C).
- Go south.
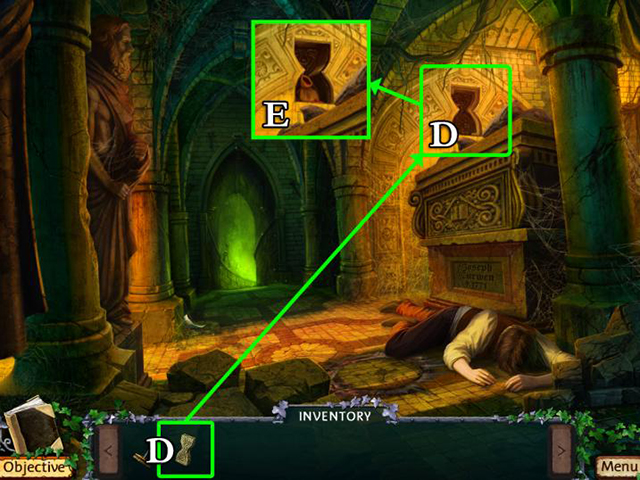
- Insert the hourglass emblem (D).
- Pick up the magic salt (E).
- Start the HO-scene in the Catacombs.
- Find all of the hidden objects.
- These objects can be manipulated: (A) and (B).
- Inventory object: wrench (C).
- Go into the Lounge.
- Pick up the clock hand (D).
- Go into the Study.
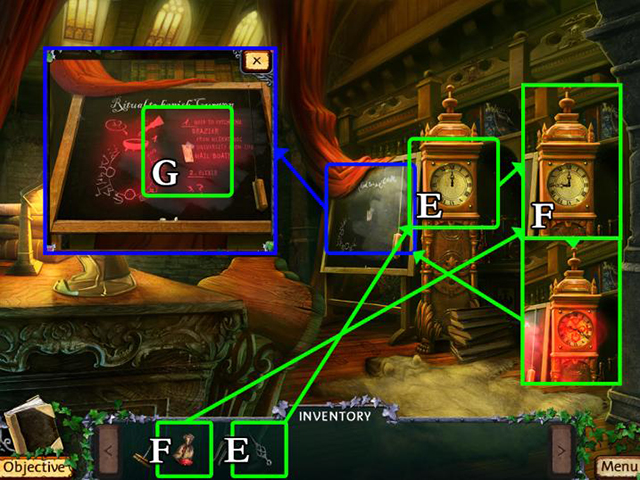
- Place the clock hand in the clock (E).
- Sprinkle the magic salt on the clock (F).
- Pick up the mail ticket (G).
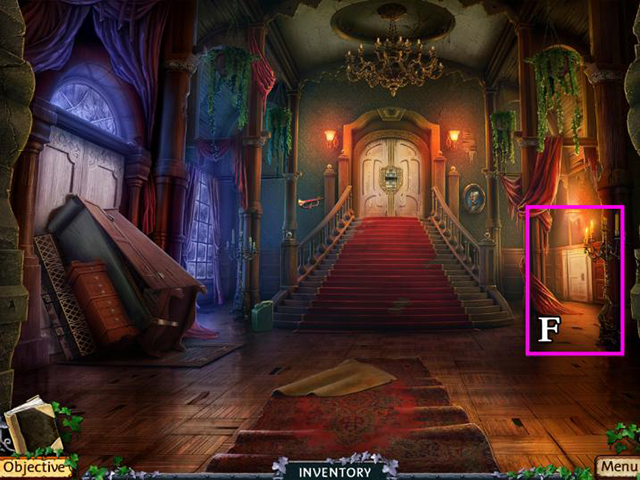
- Start the HO-scene to the right of the stairs in the Entry Hall.
- Find all of the hidden objects.
- These objects can be manipulated: (A) and (B).
- Inventory object: trapdoor chain (C).
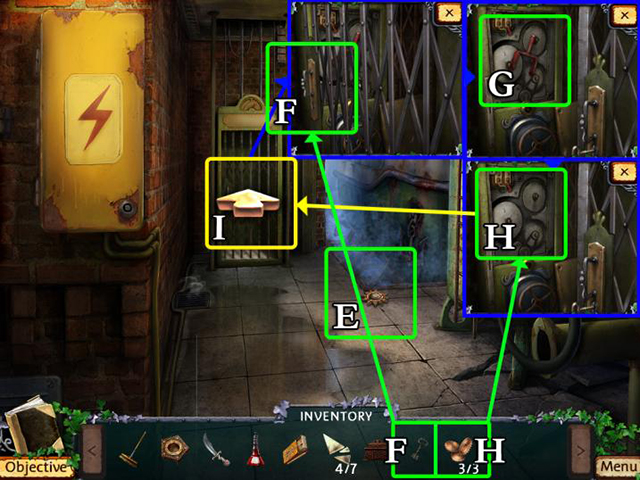
- Go back into the Cellar.
- Fasten the trapdoor chain to the trapdoor (D).
- Use the chain to pull the door open (E).
- Use the wrench to loosen the pipe (F).
- Pick up the pipe (G) and go to the Entry Hall.
- Pick up the fuel (H).
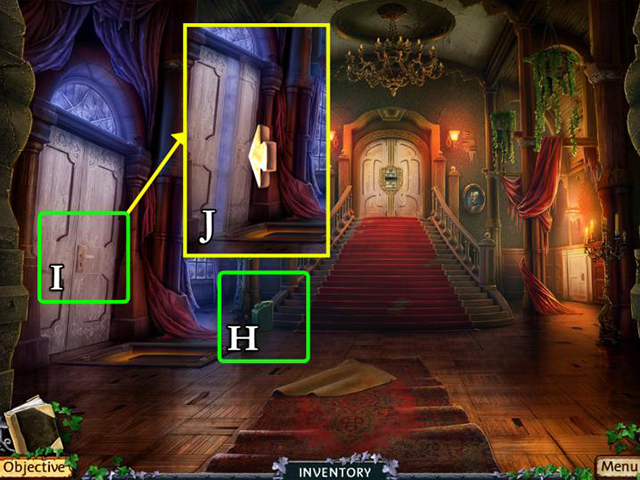
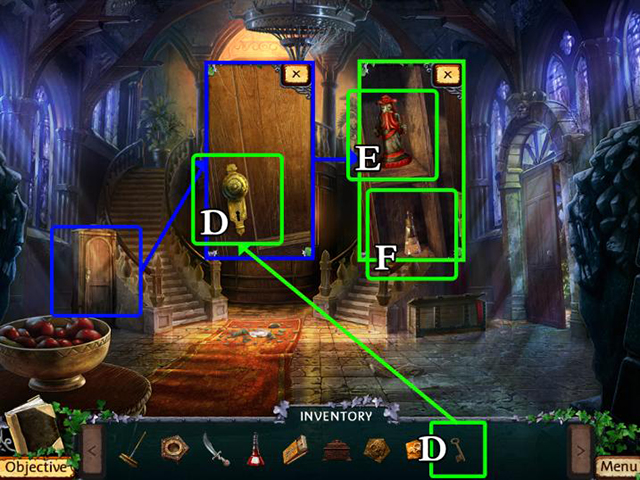
- Open the front door of the villa (I).
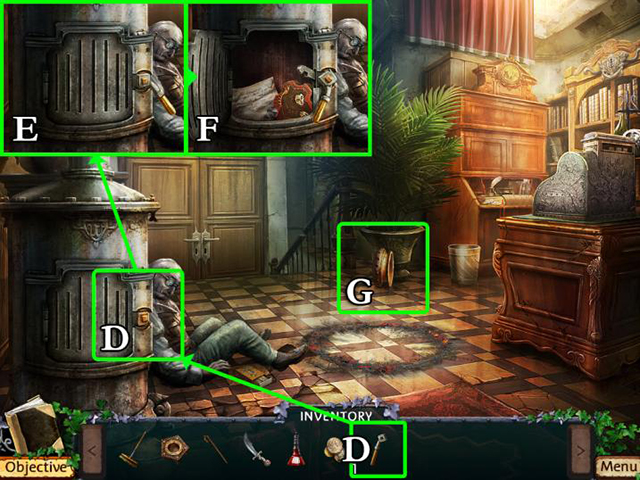
- Go through the front door back to the opening scene (J).
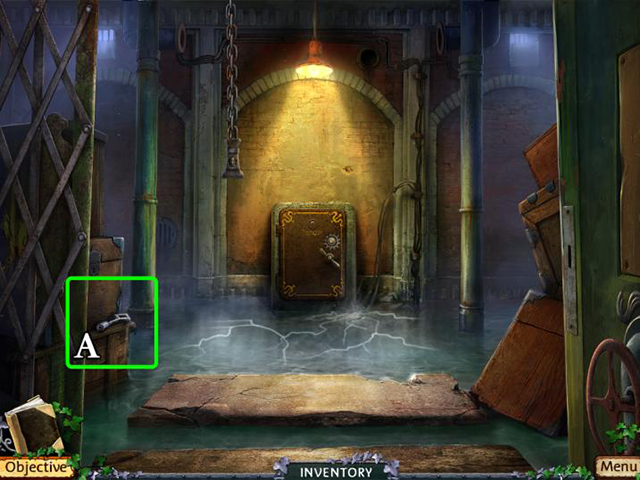
Chapter 3: An Ancient Brazier
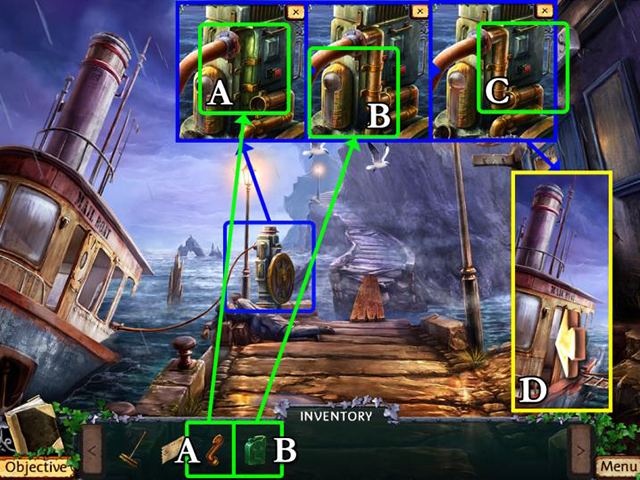
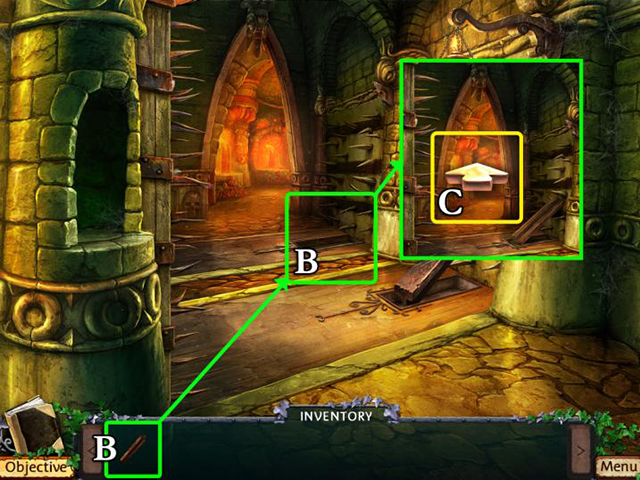
- Install the pipe (A).
- Fill the tank with fuel (B).
- Press the switch (C).
- Board the Mail Boat (D).

- Put the mail ticket in the slot (E).
- Open the package (F).
- Pick up the slip of paper (G).
- Pick up the brazier (H).
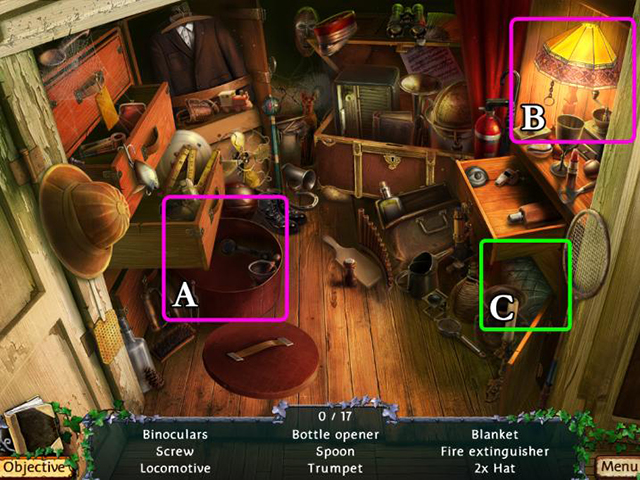
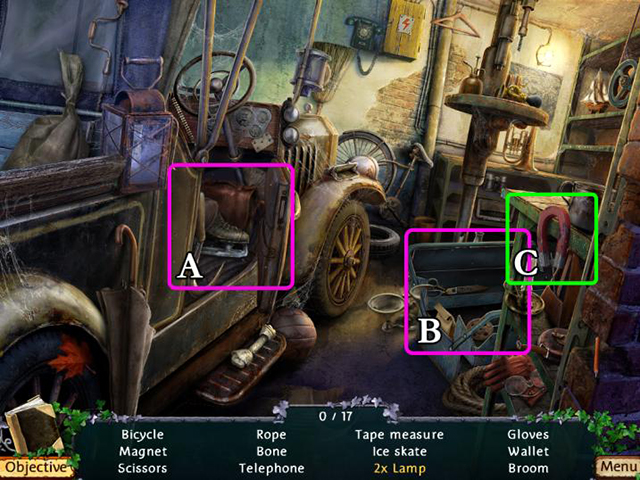
- Go back in the Ticket Office.
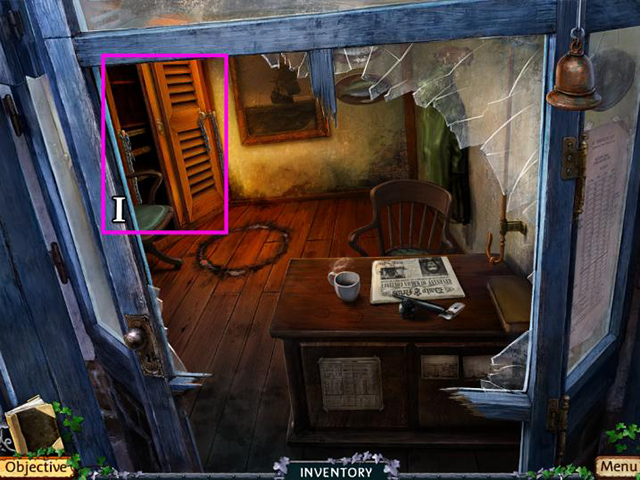
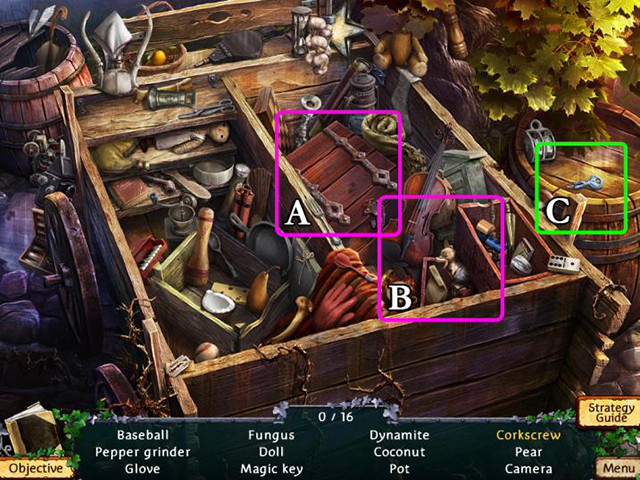
- Find all of the hidden objects.
- These objects can be manipulated: (A) and (B).
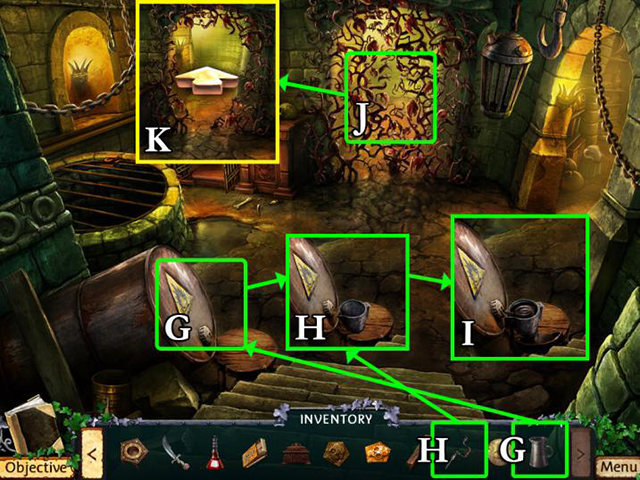
- Inventory object: screwdriver (C).
- Use the screwdriver to retrieve the hook (D).
- Pick up the hook (E).
- Go back onto the Mail Boat.
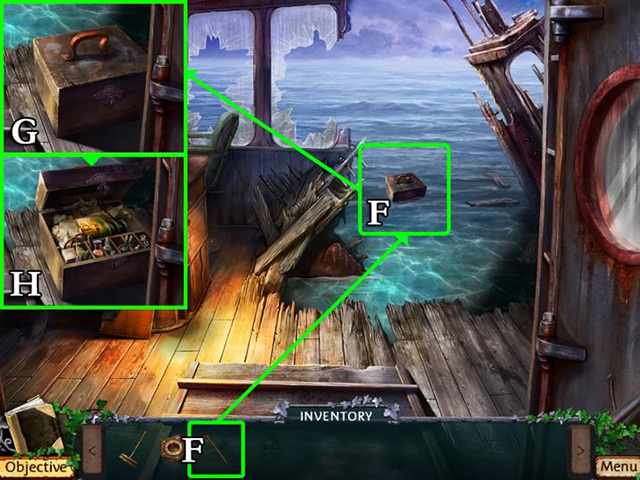
- Use the hook to retrieve the chest (F).
- Open the chest (G).
- Pick up the acid (H).
- Go back to the Dead End.
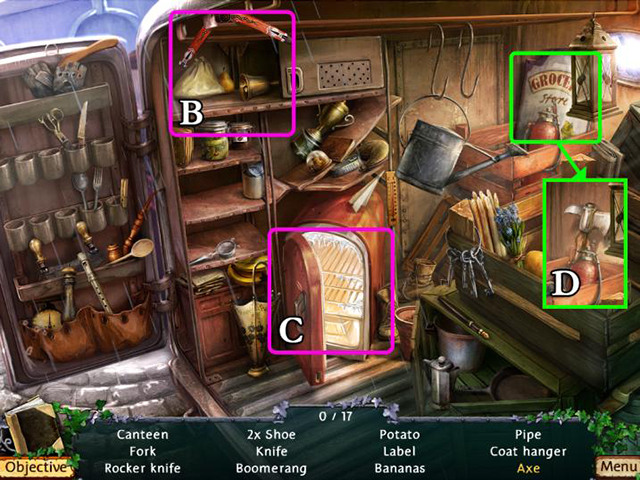
- Find all of the hidden objects.
- These objects can be manipulated: (B) und (C).
- Inventory object: axe (D).
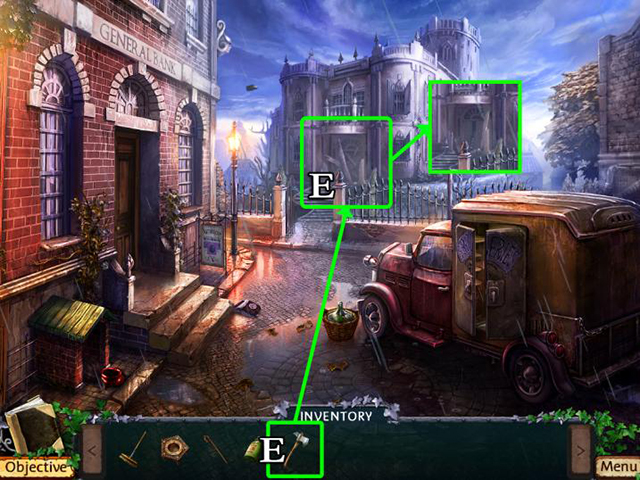
- Clear the way with the axe (E).
- Go to the Backyard.
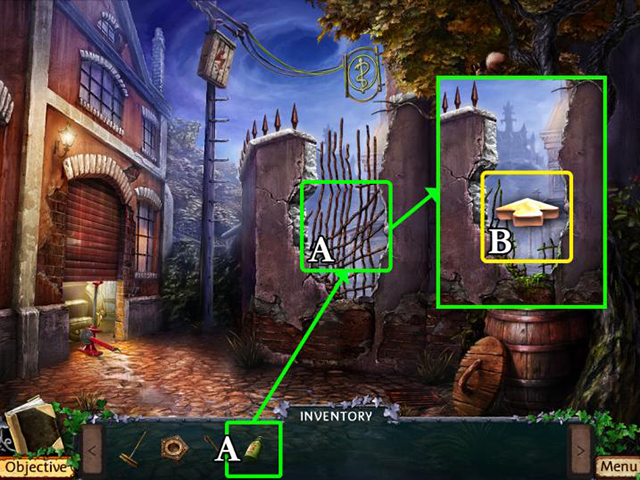
- Use the acid to melt the gate (A).
- Go north (B).
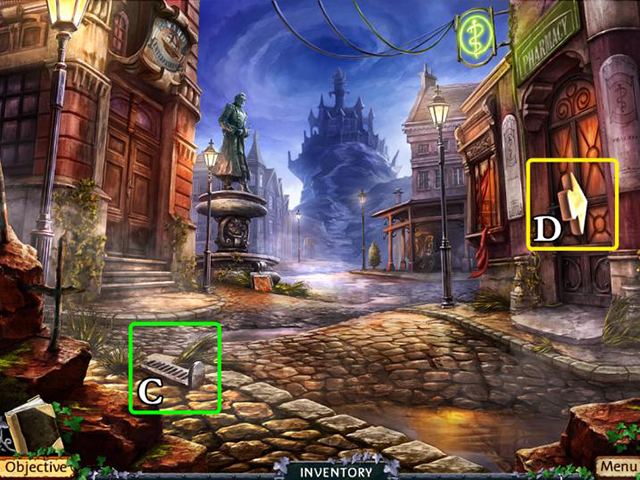
- Pick up the step (C).
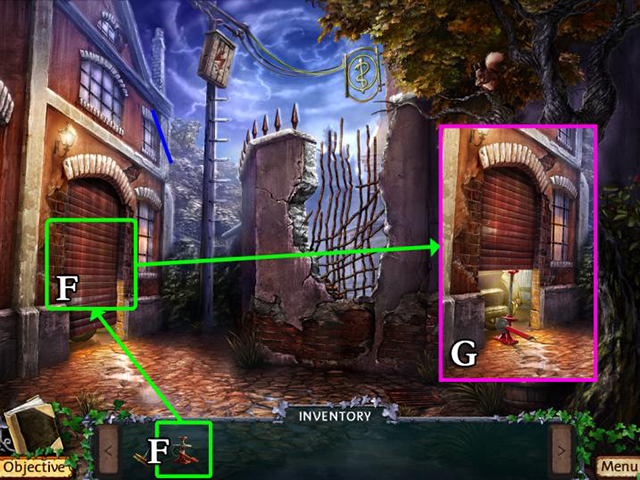
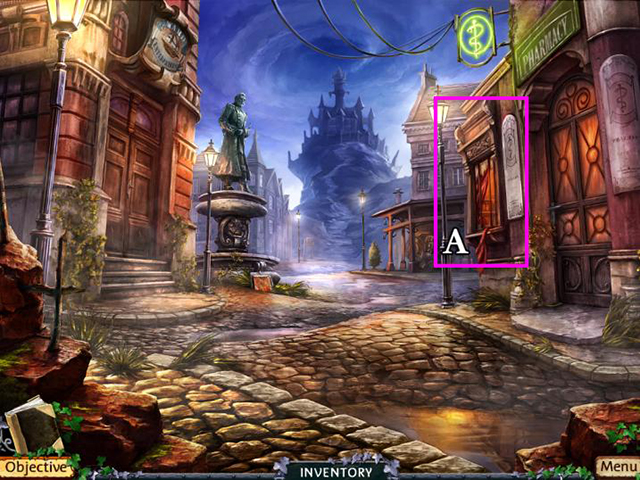
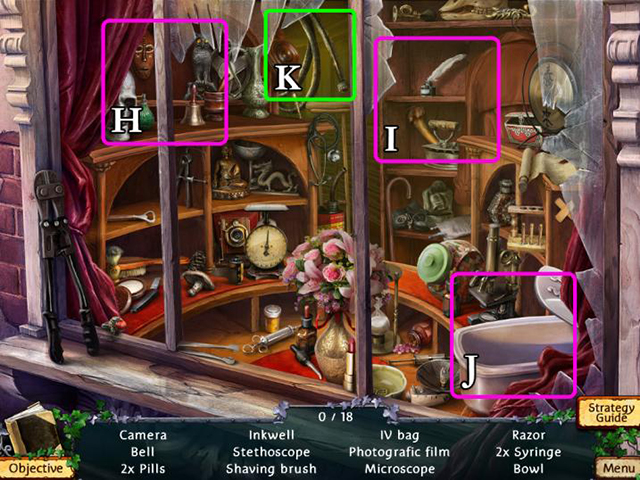
- Enter the Pharmacy (D).
- Pick up the step (E).
- Leave the Pharmacy.
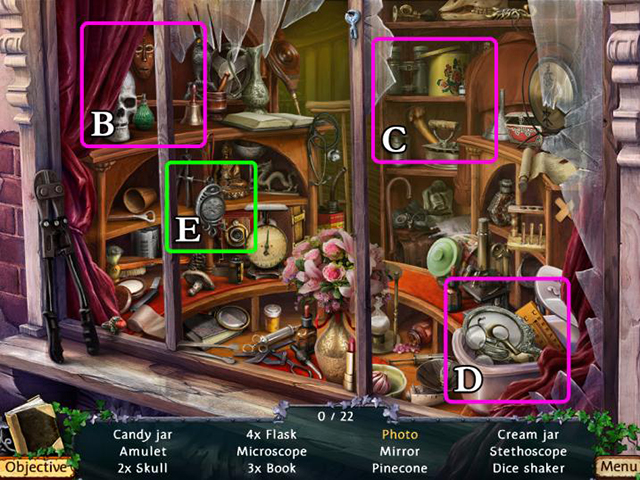
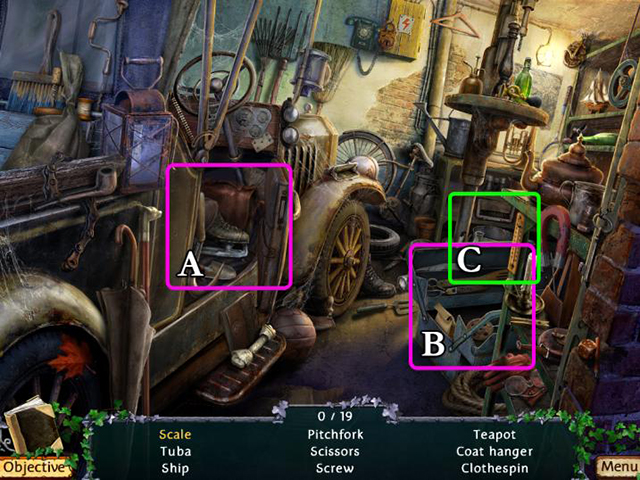
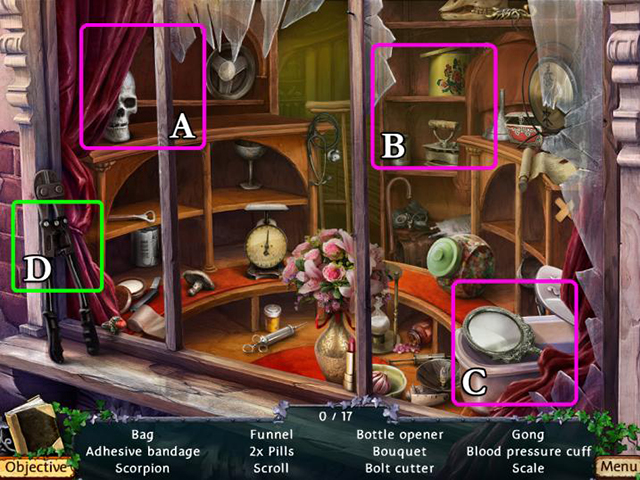
- Find all of the hidden objects.
- These objects can be manipulated: (B), (C) and (D).
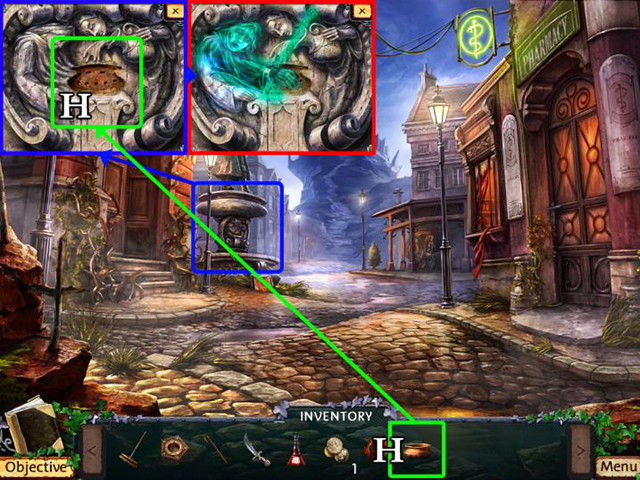
- Inventory object: amulet (E).
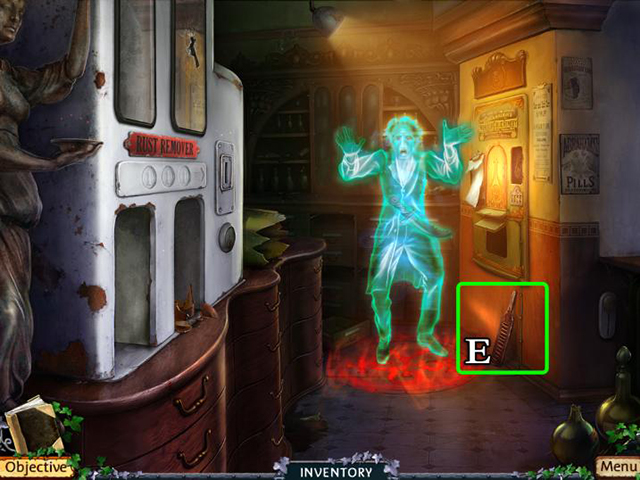
- Enter the Pharmacy.
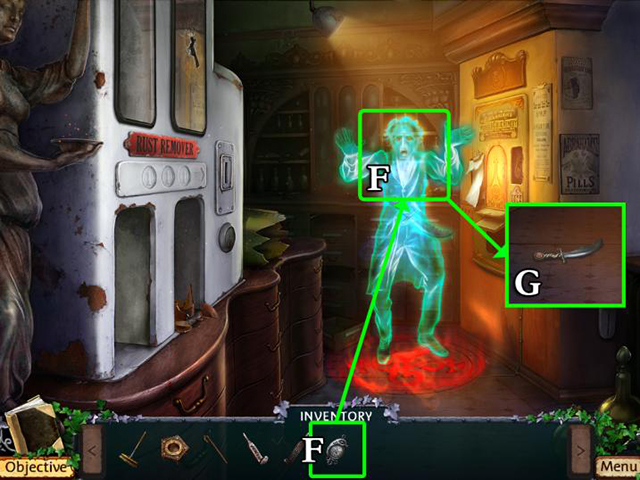
- Give the ghost the amulet (F).
- Pick up the dagger (G).
- Leave the Pharmacy and go north.
- Use the dagger to clear the way (A).
- Start the HO-scene (B).
- Find all of the hidden objects.
- These objects can be manipulated: (C) and (D).
- Inventory object: step (E).
- Go back to the Backyard.
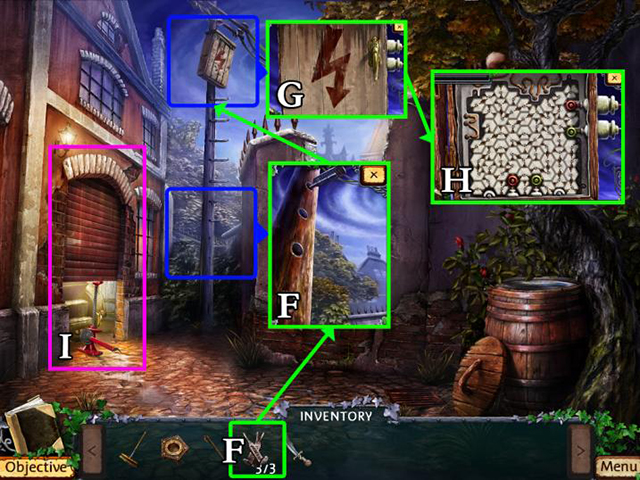
- Put all three steps into the pole (F).
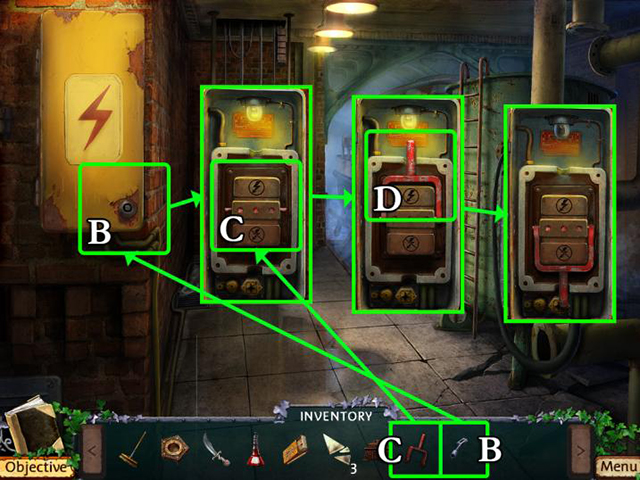
- Open the transformer (G).
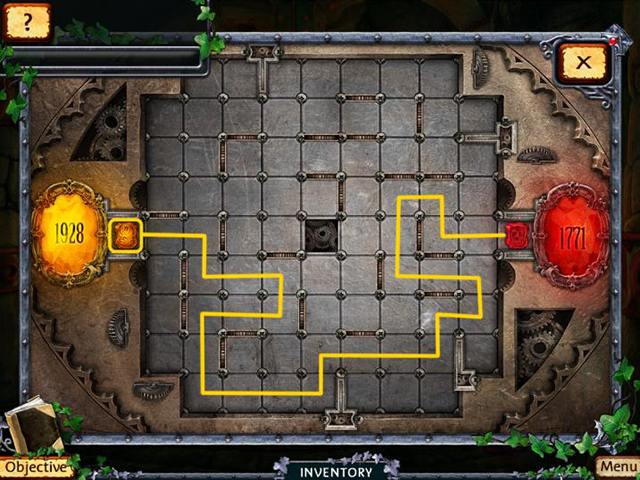
- Solve the puzzle (H) (see screenshot).
- Start the HO-scene (I).
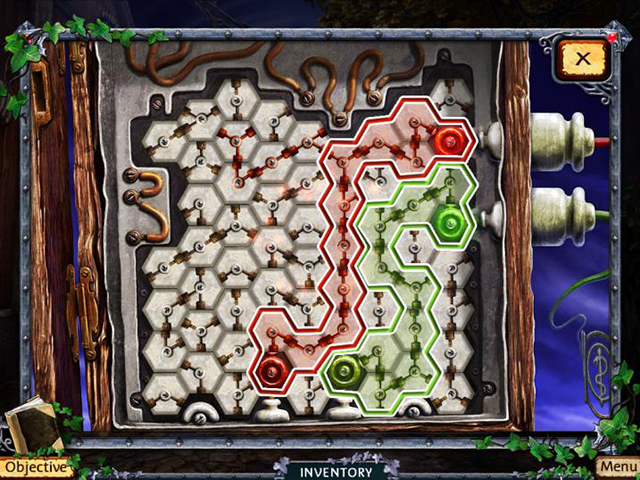
- Possible solution: see screenshot.
- Hint: Look for short circuits! In this example you should connect the green circuit first. Flip segments that are causing interference so that the other connection can’t flow.
- Find all of the hidden objects.
- These objects can be manipulated: (A) and (B).
- Inventory object: chain (C).
- Go to the Main Street.
- Pick up the charcoal (D).
- Go to the Pharmacy.
- Insert the chain (A).
- Use the charcoal to reveal the code (B).
- Enter the correct code (C).
- Turn on the machine (D).
- Pick up the elixir (E).
- Leave the Pharmacy.
- Use the dagger to clear a way to Ward’s Trading Office (F).
- Enter Ward’s Trading Office (G).
- Pick up the coin (H).
- Start the HO-scene (I).
- Find all of the hidden objects.
- These objects can be manipulated: (A) and (B).
- Inventory object: oven handle (C).
- Insert the oven handle (D).
- Open the oven (E).
- Pick up the gear (F).
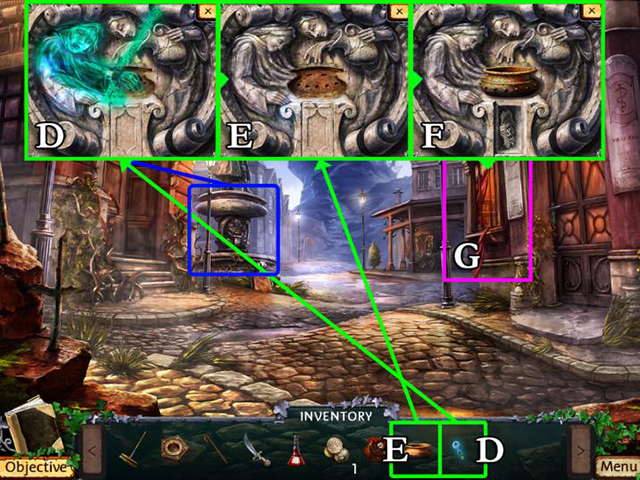
- Pick up the amphora (G).
- Leave Ward’s Trading Office.
- Try to insert the amphora (H).
- Go to the Mansion Gate and start the HO-scene.
- Find all of the hidden objects.
- These objects can be manipulated: (A) and (B).
- Inventory object: magic key (C).
- Use the magic key to free the ghost (D).
- Insert the amphora (E).
- Pick up the gear (F).
- Start the HO-scene (G).
- Find all of the hidden objects.
- These objects can be manipulated: (H), (I) and (J).
- Inventory object: hose (K).
- Go back to Ward’s Trading Office.
- Enter the door to the shipyard (A).
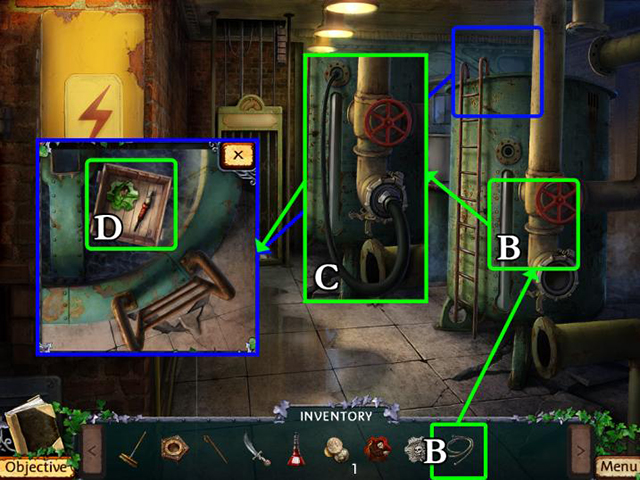
- Fasten the hose to the tank (B).
- Turn on the water (C).
- Pick up the gear and the register lever (D).
- Go back to Ward’s Trading Office.
- Fasten the lever to the register (E).
- Open the register (F).
- Pick up the coin and the golden nugget (G).
- Pick up the matches (H).
- Leave the office.
- Light the fire (A).
- Place the gold nugget into the mold (B).
- Use the press (C).
- Pick up the coin (D).
- Enter the Pharmacy.
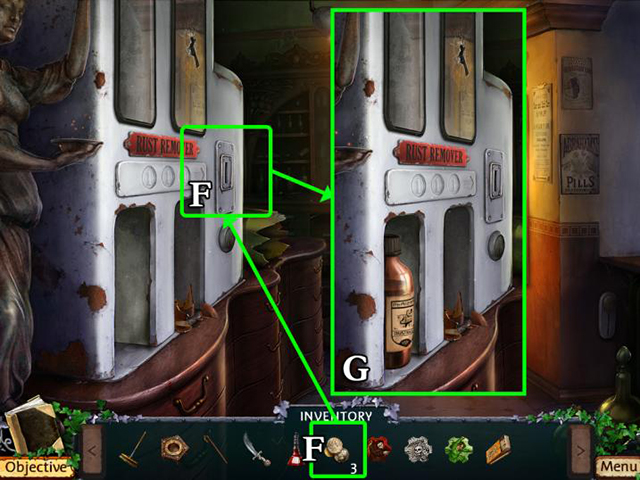
- Place the coins in the vending machine (F).
- Pick up the rust remover (G).
- Go to the Mansion Gate.
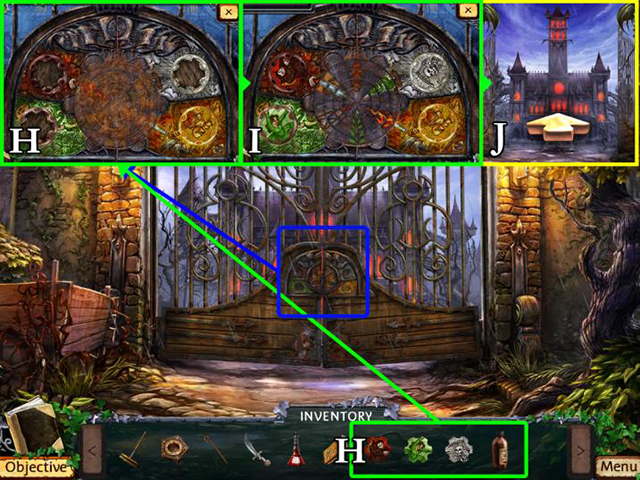
- Place all gears in the gate and apply the rust remover (H).
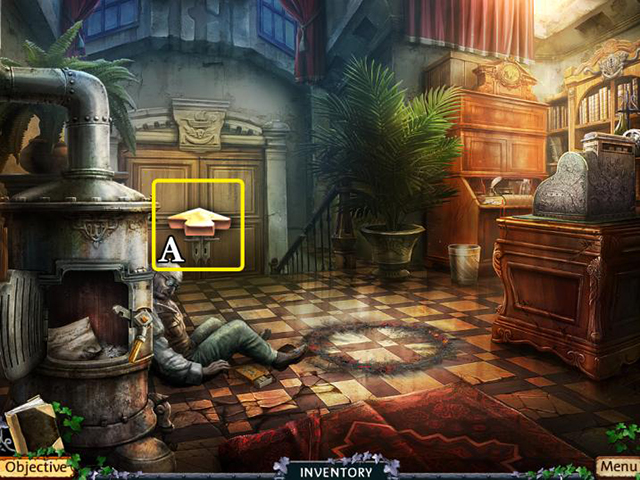
- Solve the puzzle (I) (see next page).
- Enter the mansion (J).
- Solution: see screenshot.
Chapter 4: A Mysterious Brew
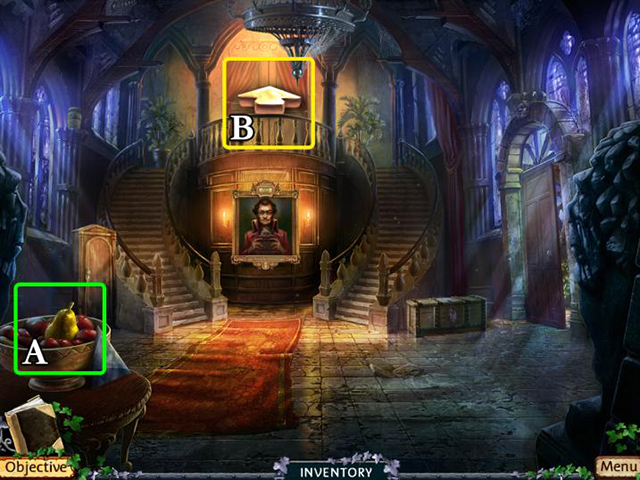
- Pick up the pear (A).
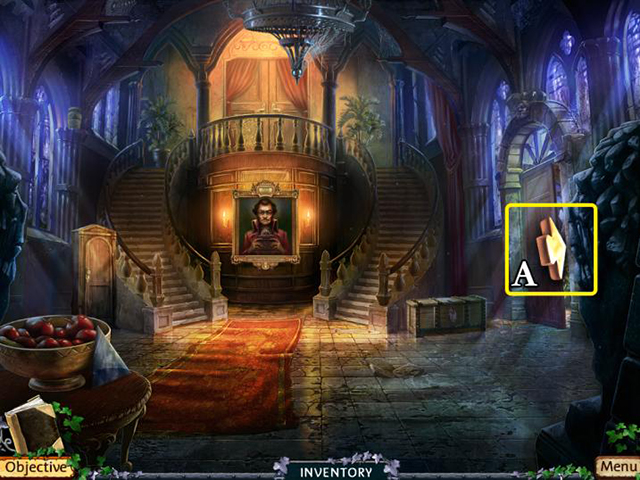
- Go north (B).

- Pick up the painted casket part (C).
- Start the HO-scene (D).
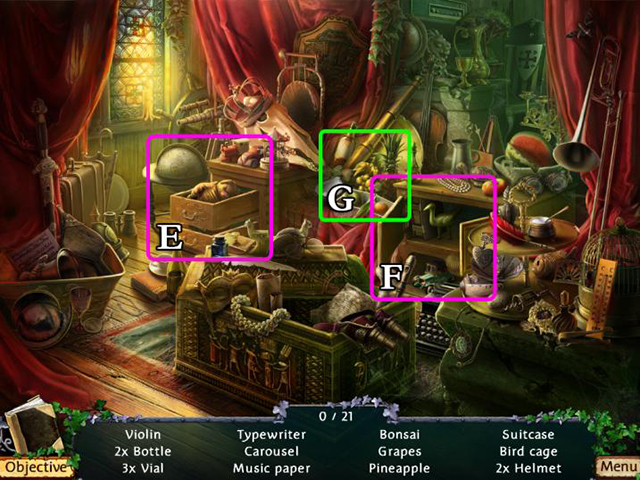
- Find all of the hidden objects.
- These objects can be manipulated: (E) and (F).
- Inventory object: grapes (G).
- Go back to the Hall.
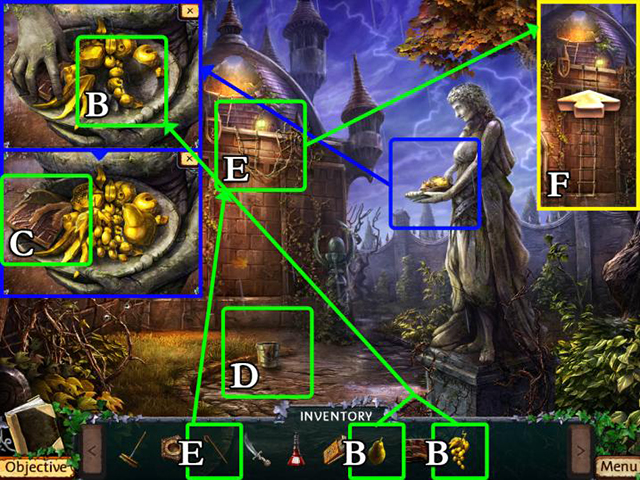
- Put the pear and the grapes in the statue’s bowl (B).
- Pick up the second part of the casket (C).
- Pick up the cleaning bucket (D).
- Use the hook to retrieve the rope-ladder (E).
- Go to the Attic (F).
- Pick up the file (G).
- Pick up the three mirror shards (H).
- Go back to the Hall.
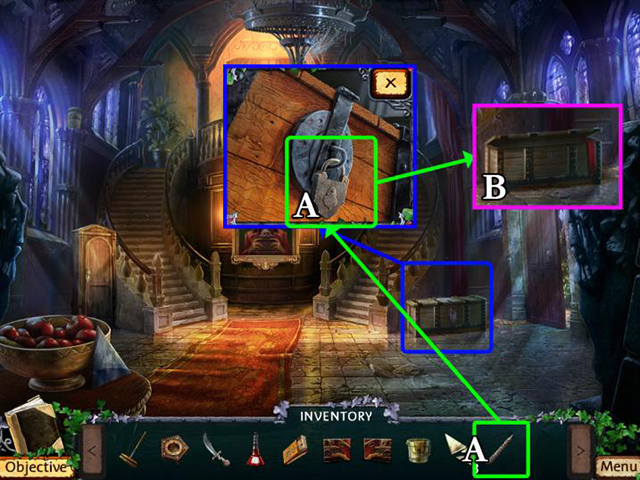
- Use the file to open the chest (A).
- Start the HO-scene (B).
- Find all of the hidden objects.
- These objects can be manipulated: (C), (D) and (E).
- Inventory object: chess pieces (F).
- Go back to the Attic.
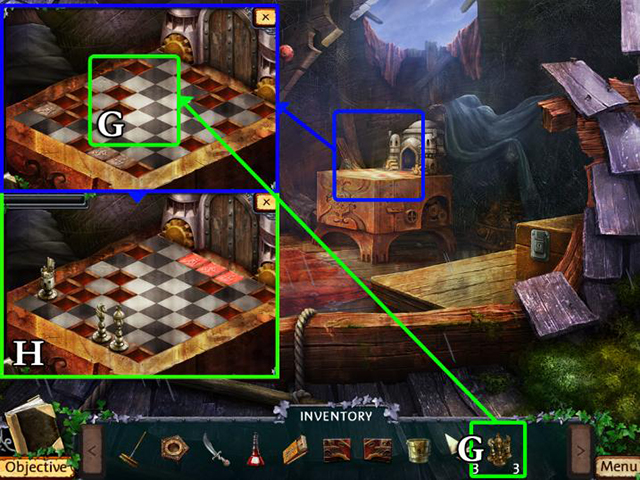
- Place the chess pieces on the chess board (G).
- Solve the puzzle (H) (see next page).
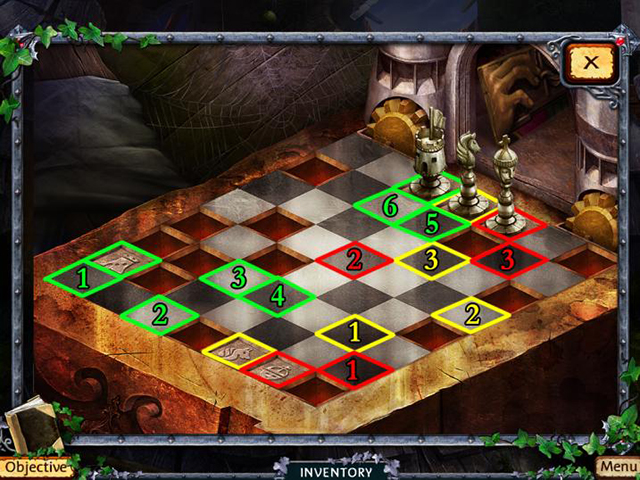
- Possible solution: see screenshot.
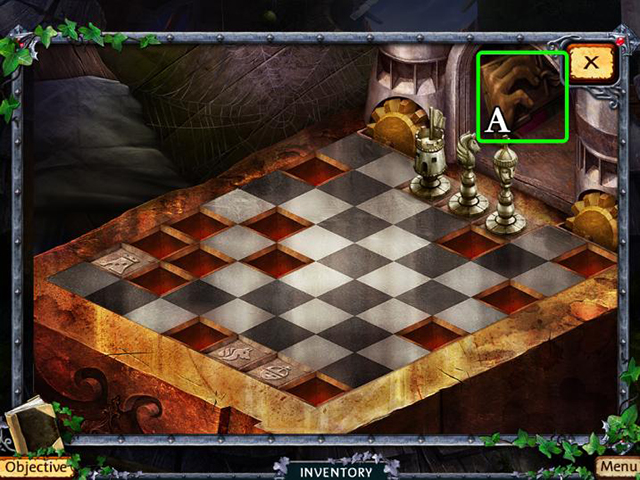
- Pick up the third casket part (A).
- Go back to the Hall.
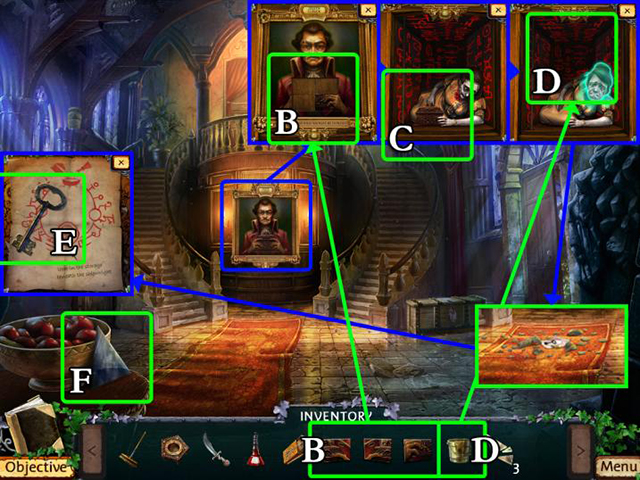
- Place all of the missing pieces in the portrait (B).
- Pick up the casket (C).
- Use the cleaning bucket to clean away the symbols (D).
- Pick up the elevator key (E).
- Pick up the mirror shard (F).
- Go back to Ward’s Trading Office.
- Find all of the hidden objects.
- These objects can be manipulated: (B) and (C).
- Inventory object: cogs (D).
- Go to the Shipyard.
- Pick up the turning disk (E).
- Open the elevator with the elevator key (F).
- Pick up the electric lever (G).
- Insert the cogs (H).
- Use the elevator (I).
- Pick up the square socket key (A).
- Go back.
- Insert the square socket key (B).
- Insert the electric lever (C).
- Flip the switch (D).
- Use the elevator.
- Insert the missing turning disk (E).
- Turn the disk in the right direction (F) (for solution: see next page).
- Pick up the wooden symbol (G).
- Pick up the wheel (H).
- Go to the Backyard and start the HO-scene.
- Solution: see screenshot.
- Find all of the hidden objects.
- These objects can be manipulated: (A) and (B).
- Inventory object: magnet (C).
- Go into the Entry Hall.
- Insert the wheel (D).
- Solve the puzzle (E) (possible solution: left, right, left, right, left, right, right, right, left, right, left).
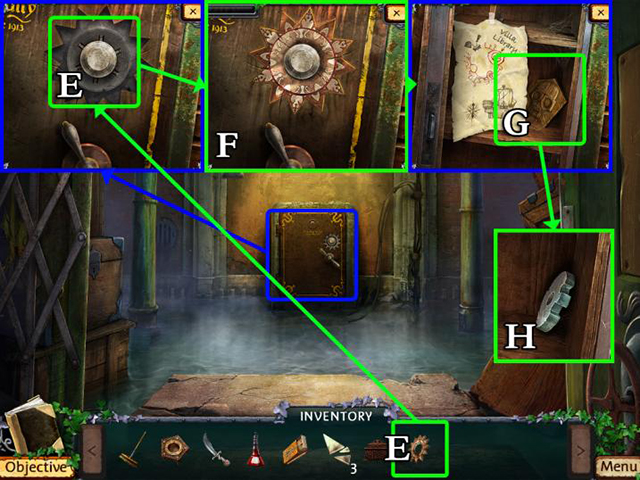
- Enter the Library (F).
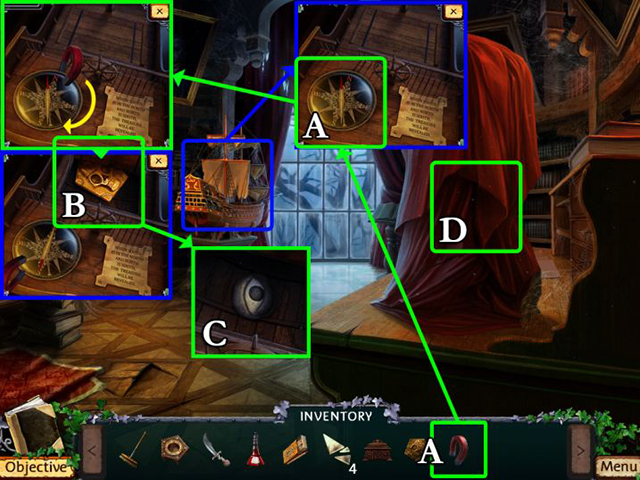
- Use the magnet to adjust the compass (A).
- Move the compass south.
- Pick up the metal symbol (B).
- Pick up the eye (C).
- Remove the cloth from the bust (D).
- Go back to the Entry Hall and start the HO-scene.
- Find all of the hidden objects.
- These objects can be manipulated: (E) and (F).
- Inventory object: eye (G).
- Go to the Library.
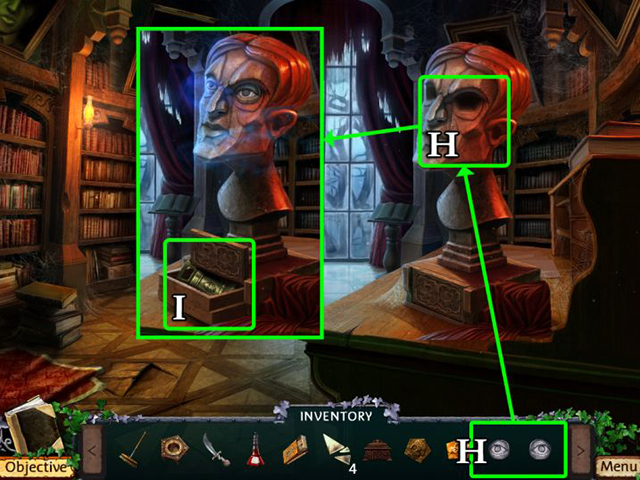
- Insert both eyes (H).
- Pick up the weight (I).
- Go to the Main Street and start the HO-scene.
Chapter 5: Curwen’s Ashes
- Find all of the hidden objects.
- These objects can be manipulated: (A), (B) and (C).
- Inventory object: bolt cutter (D).
- Enter the Storage Room.
- Use the bolt cutter to cut the weight from the chain.
- Pick up the weight (F).
- Go to the Mansion Gate and start the HO-scene.
- Find all of the hidden objects.
- These objects can be manipulated: (G) and (H).
- Inventory object: weight (I).
- Enter the Parlor.

- Place the weights in front of the scale (A).
- Place three weights on the left scale (B).
- Enter the new passage to the Laboratory (C).
- Pick up the fish (D).
- Go back to the Park.
- Insert the fish (E).
- Pick up the magic salt (F).
- Go back to the Laboratory.
- Sprinkle the magic salt on the clock (A).
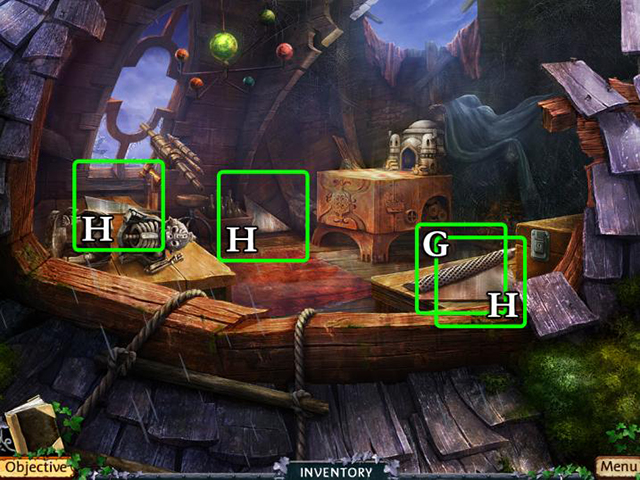
- Go to the Hall and start the HO-scene.
- Find all of the hidden objects.
- These objects can be manipulated: (B), (C) and (D).
- Inventory object: mirror shards (E).
- Go to the Laboratory.

- Place all of the broken shards into the mirror (F).
- Solve the puzzle (G) (solution: see next page).
- Go back to the Parlor and start the HO-scene.
- Solution: see screenshot.

- Find all of the hidden objects.
- These objects can be manipulated: (A) and (B).
- Inventory object: closet key (C).
- Enter the Hall.
- Unlock the closet with the closet key (D).
- Pick up the glue (E).
- Pick up the mage statue (F).
- Go to the Attic.
- Glue the broken statue back together (A).
- Pick up the death statue (B).
- Go back in the Hall and start the HO-scene.
- Find all of the hidden objects.
- These objects can be manipulated: (C), (D) and (E).
- Inventory object: brushes (F).
- Go to the Laboratory.
- Put the brushes on the workbench (G).
- Use the brushes to paint the statue.
- Pick up the dancer statue (H).
- Place the statues in the correct positions: (A), (B) and (C).
- Go east (D).
Chapter 6: Symbols Of Death
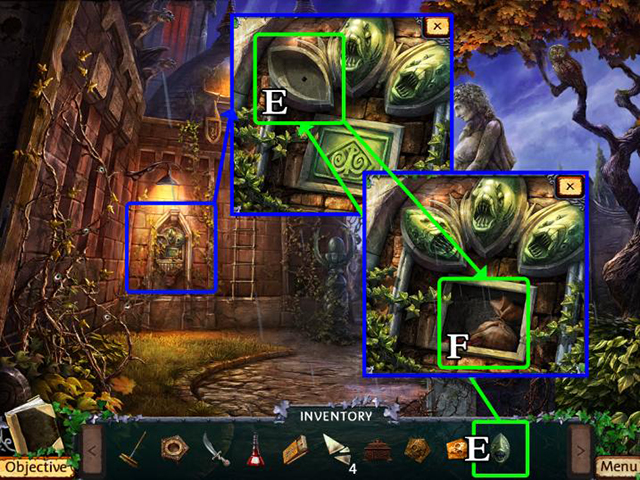
- Pick up both mask halves (A).
- Go east (B).
- Pick up the drill (C).
- Pick up the truss (D).
- Place the mask halves in the sarcophagus (E).
- Start the HO-scene (F).
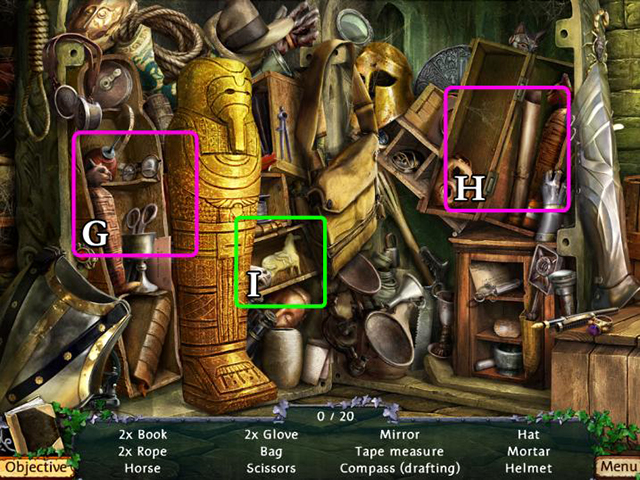
- Find all of the hidden objects.
- These objects can be manipulated: (G) und (H).
- Inventory object: horse (I).
- Go back to the Parlor.
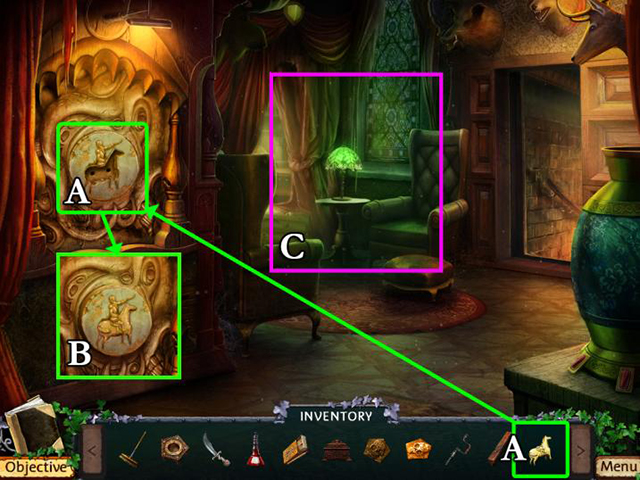
- Insert the horse (A).
- Pick up the rider (B).
- Start the HO-scene (C).
- Find all of the hidden objects.
- These objects can be manipulated: (D) und (E).
- Inventory object: can (F).
- Enter the Vaults.
- Place the can in front of the oil barrel (G).
- Use the drill to open the barrel (H).
- Pick up the full oil can (I).
- Use the dagger to cut away the magic roots (J).
- Go north (K).
- Pour the oil into the lamp (A).
- Light the oil with the matches (B).
- Use the truss to block the trap (C).
- Pick up the mosaic bridge (D).
- Pick up the glasscutter (E).
- Go back to the Shrine.
- Place the rider and the mosaic bridge into the mosaic (F).
- Use the glasscutter to cut the symbol free (G).
- Pick up the glass symbol (H).
- Pick up the shackles (A) and open the bag (B).
- Pick up the gunpowder (C).
- Use the shackles as steps (D).
- Pick up the torch (E).
- Light the torch (F).
- Fill the lock with gunpowder (G).
- Use the torch to ignite and destroy the lock (H).
- Climb out of the well (I).
- Go to the Shrine and start the HO-scene.
- Find all of the hidden objects.
- These objects can be manipulated: (J) and (K).
- Inventory object: hacksaw (L).
- Go back into the Well.
- Use the hacksaw to cut off the steel truss (A).
- Go into the Passageway.
- Set down the truss to block the second trap (B).
- Go north (C).
- Pick up the key (D).
- Go back into the Vaults.
- Open the cabinet (A).
- Pick up all six ritual objects (B).
- Enter the Ritual Chamber.
- Place the symbols (C).
- Place the brazier (D).
- Pour the ashes into the brazier (E).
- Pour the elixir into the brazier (F).
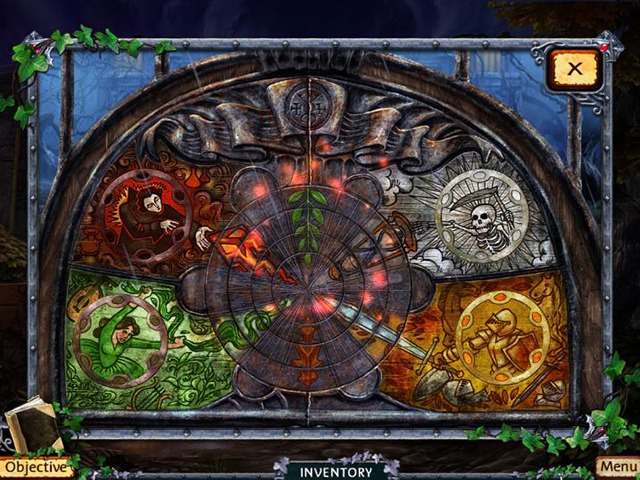
- Solve the puzzle (G) (see possible solution).
- Possible solution: see screenshot.


 3 Days: Amulet Secret Walkthrough, Guide, & Tips
 Syberia, Part 2 Walkthrough, Guide, & Tips
 Surface: Game of Gods Walkthrough, Guide, & Tips
 Emberwing: Lost Legacy Walkthrough, Guide, & Tips
 My Singing Monsters Tips and Tricks, Guide, & Tips