The Torment of Whitewall Walkthrough, Guide, & Tips
The Torment of Whitewall Walkthrough

Welcome to the The Torment of Whitewall Walkthrough
You made a long journey to find out who is tormenting the town of Whitewall. Wives, sisters and daughters disappear with no traces. People talk about some stalker who seems everywhere… and nowhere.
Whether you use this document as a reference when things get difficult or as a road map to get you from beginning to end, we’re pretty sure you’ll find what you’re looking for here.
This document contains a complete The Torment of Whitewall game walkthrough featuring annotated screenshots from actual gameplay!
We hope you find this information useful as you play your way through the game. Use the walkthrough menu below to quickly jump to whatever stage of the game you need help with.
Remember to visit the Big Fish Games Forums if you find you need more help. Have fun!
This walkthrough was created by BrownEyedTigre, and is protected under US Copyright laws. Any unauthorized use, including re-publication in whole or in part, without permission, is strictly prohibited.
General Tips

- This is the official guide to The Torment of Whitewall.
- Select Options to adjust the Sound FX, Music and Voice Volume. You can also adjust Full-screen, Custom Cursor, and Mute all Sounds.
- You may select between Easy, Normal, and Hard Mode.
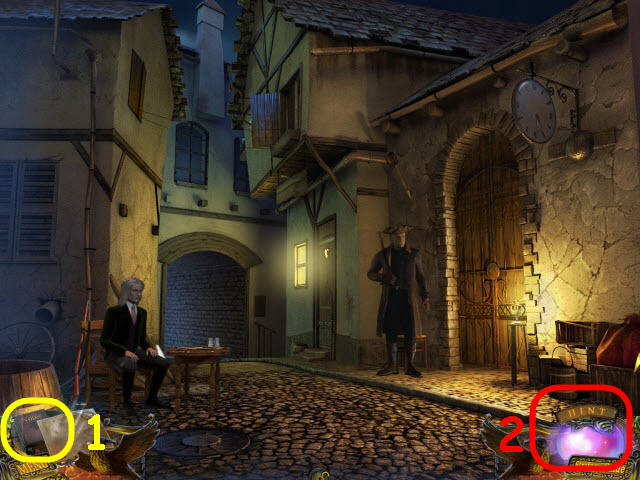
- You can review the notes and story updates in the Notebook (1) on the lower left. The book will sparkle when there are story updates.
- Hidden-object scenes are referred to as HOS throughout the guide. Items written in red in a HOS require an extra step before they can be obtained.
- In order to trigger the HOS, some actions are required first. If you do not have a HOS where they are located in the guide, please check the guide to see what you may have missed.
- Move your cursor down to the bottom of the screen to raise the Inventory bar. The bar may be locked in place by locking the padlock in the center.
- Select the Hint button (2) on the bottom right to get a hint in HOS and in the main quest.
- Inventory items will be marked in all CAPS in the strategy guide.
Chapter 1
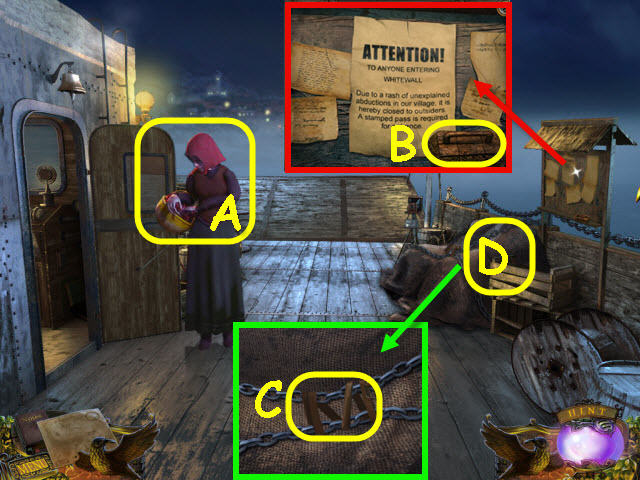
- Speak to Victoria (A).
- Examine the bulletin board; take the SPONGE (B).
- Examine the chains; take the BELT (C).
- Remove the tarp and examine the pile to access a HOS (D).
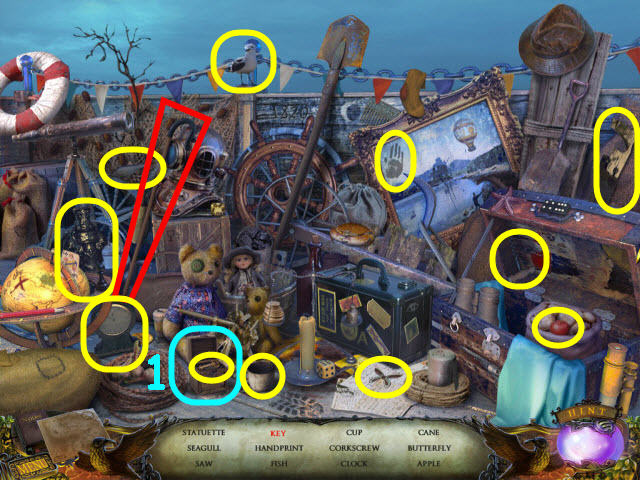
- Find the items listed.
- Open the box to get the key (1).
- You will earn a CANE.
- Examine the shawl; use the CANE on it to get a SHAWL (E).
- Give the SHAWL to Victoria; take the RARE FLOWER (F).
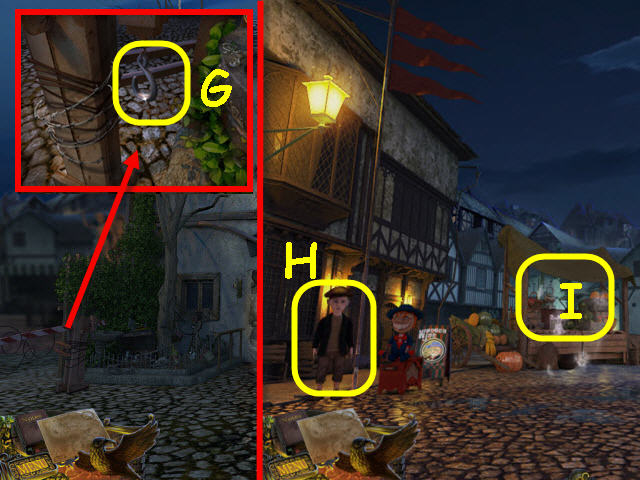
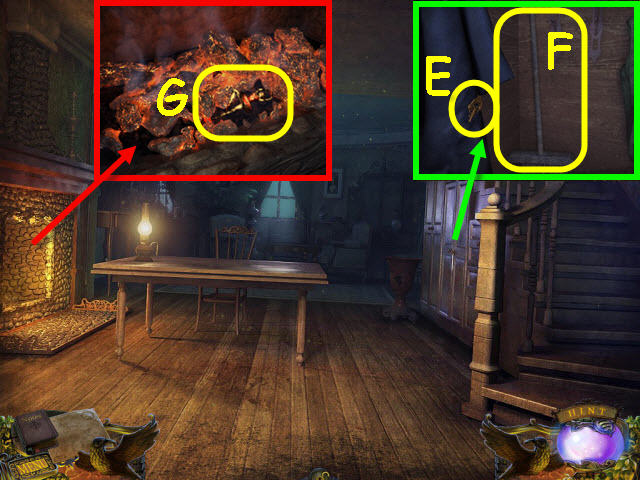
- Examine the barrel and open the purse; take the VALVE (G).
- Go left into the helm.
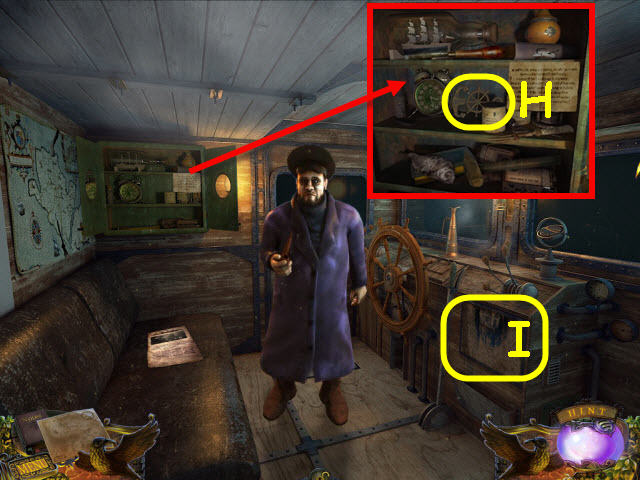
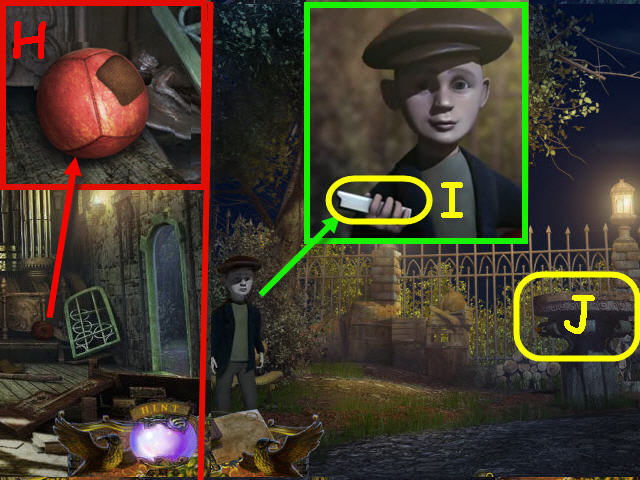
- Open the cabinet and examine it; read the note and take the ANCHOR (H).
- Examine the mechanism; use the SPONGE on the oil and place the ANCHOR on the lock. Place the VALVE on the pipes to trigger a puzzle (I).

- Turn off the valves in the order of the dials.
- See screenshot for correct order (J).
- Take the LIGHTER from the captain.
- Back out.
- Go forward after the cut scene.
- Talk to Victoria.
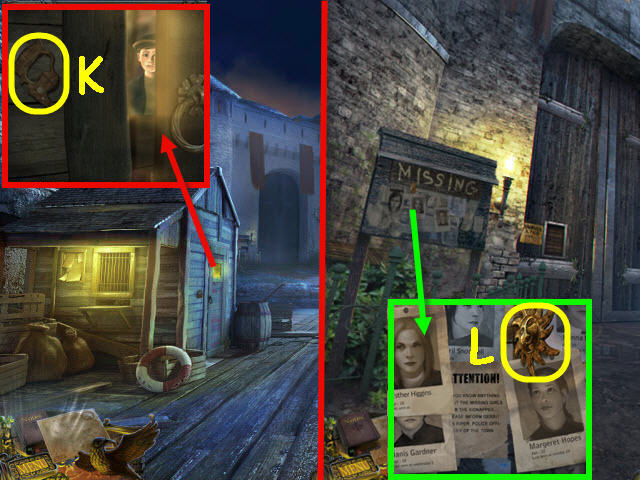
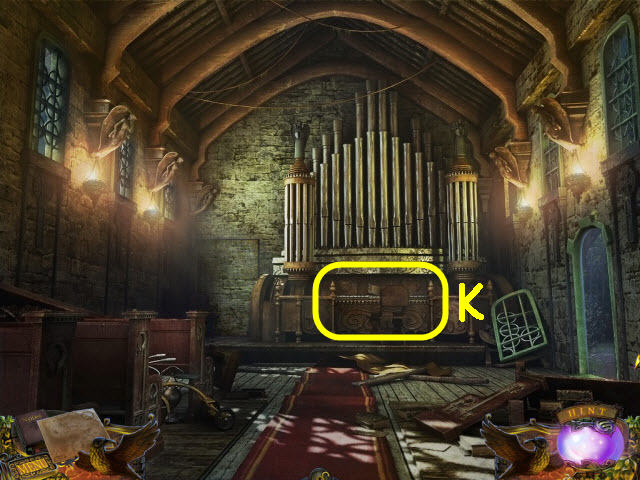
- Examine the door; take the SAW HANDLE (K) and select the boy.
- Go forward.
- Examine the bulletin board; take the SUN SYMBOL (L).
- Back out and go right.
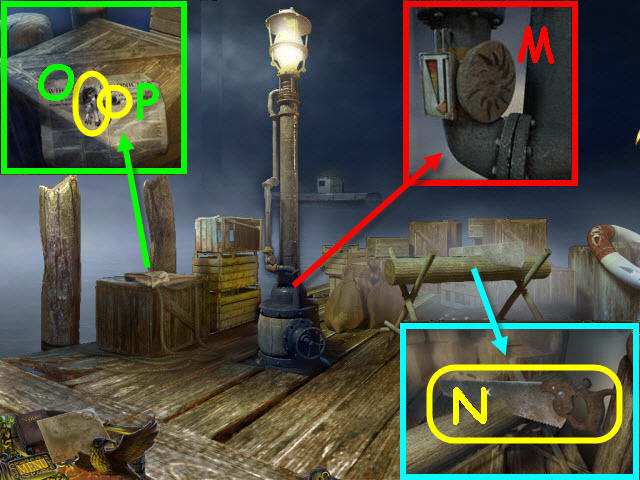
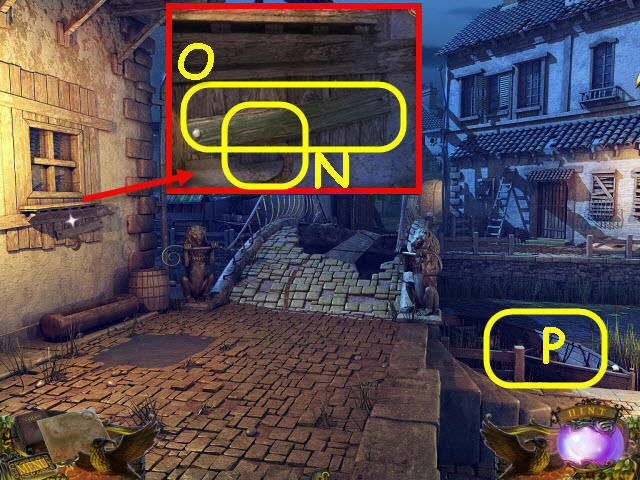
- Examine the lamppost and place the SUN SYMBOL in the matching recess (M).
- Examine the beam and place the SAW HANDLE on the blade; take the SAW (N).
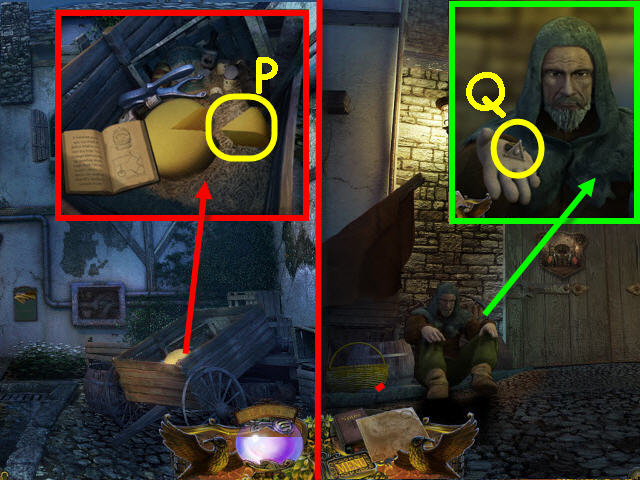
- Examine the crate and open the paper; take the GARGOYLE (O) and STAMP EMBLEM (P).
- Back out.
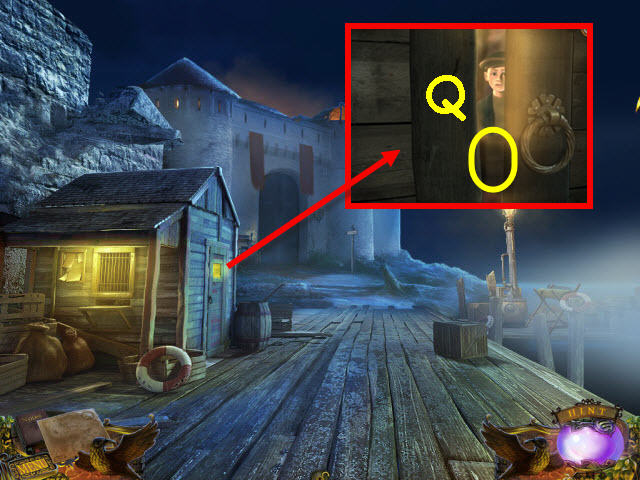
- Examine the door and use the SAW on the board (Q).
- Examine the open shack after the cut scene to access a HOS.
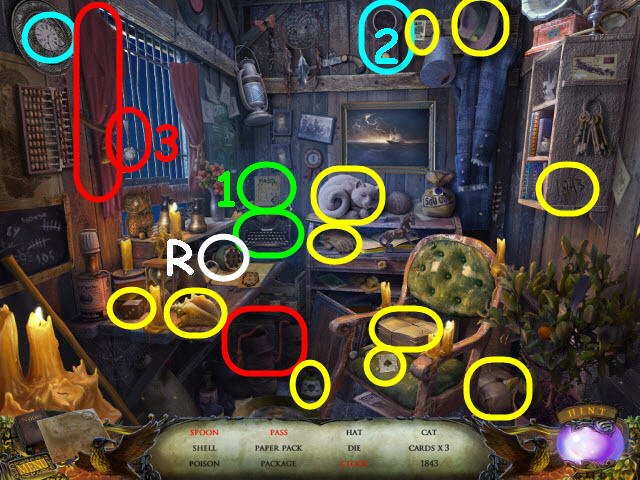
- Find the items listed.
- Type on the typewriter to get the pass (1).
- Place the clock face on the clock to get a clock (2).
- Use the curtain tie on the curtain to get a spoon (3).
- You will earn a PASS.
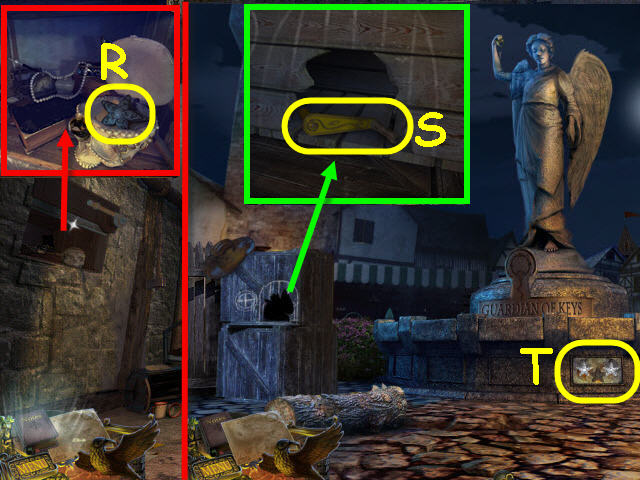
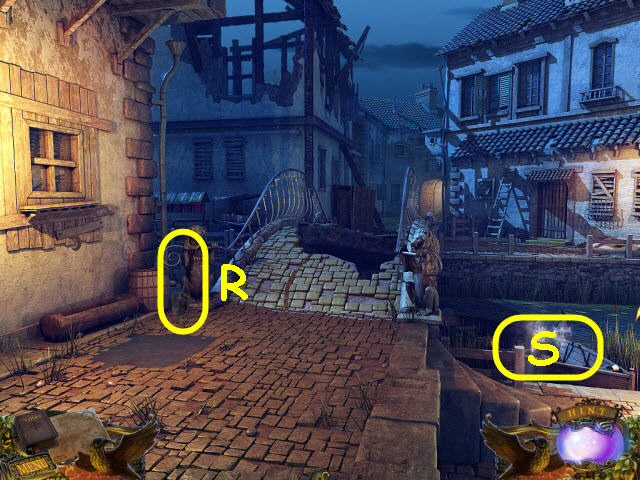
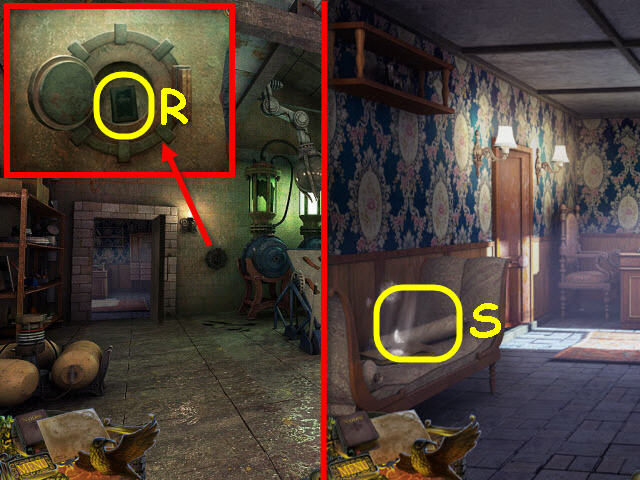
- Examine the stamp and place the PASS and STAMP EMBLEM on it to trigger a puzzle (R).
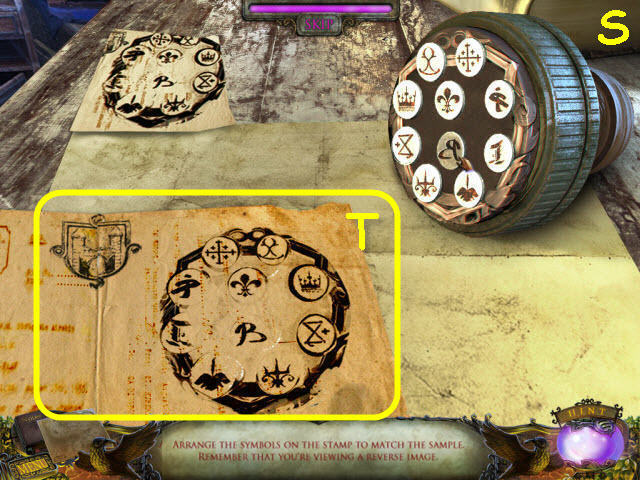
- Place the stamp emblems on the stamp in the mirror image.
- See screenshot for solution (S).
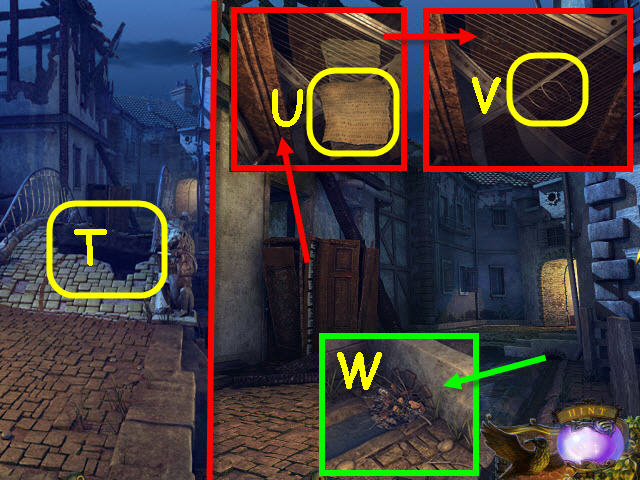
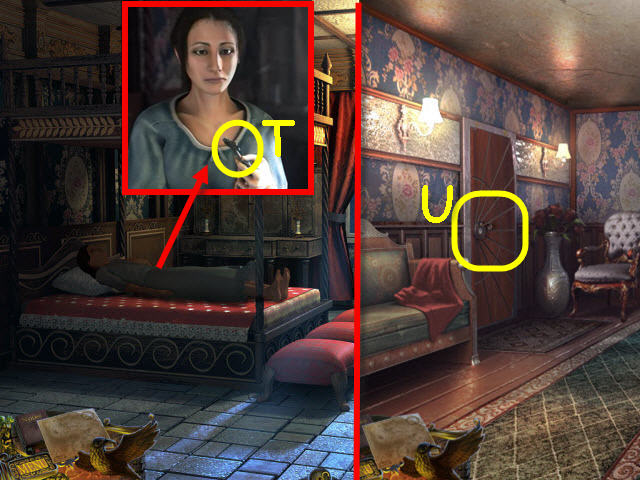
- Take the STAMPED PASS (T).
- Back out and go forward.
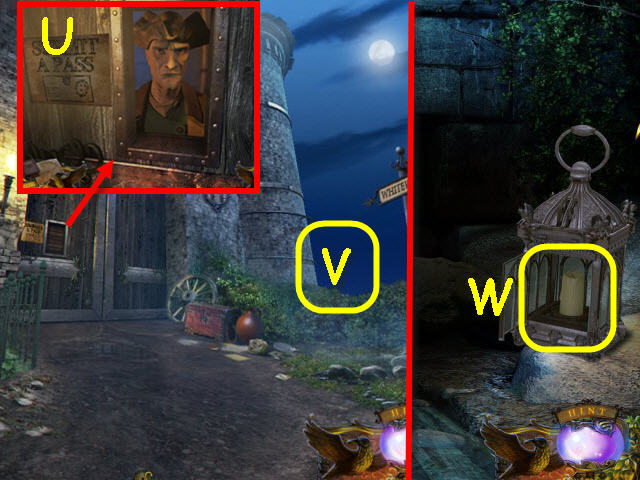
- Examine the window and slide it open; give the STAMPED PASS to the man (U).
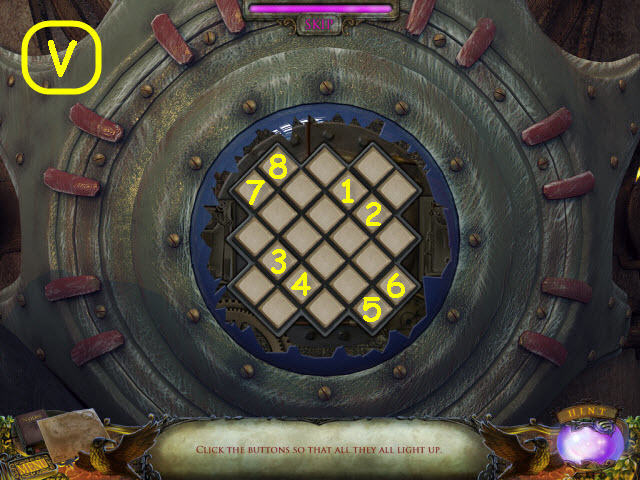
- Follow the boy to the right of the wall (V).
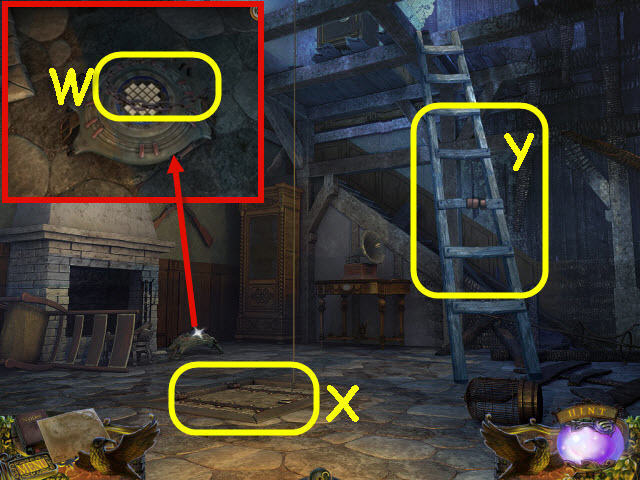
- Examine the lantern and place the GARGOYLE on it; use the LIGHTER on the candle (W).
- Back out.
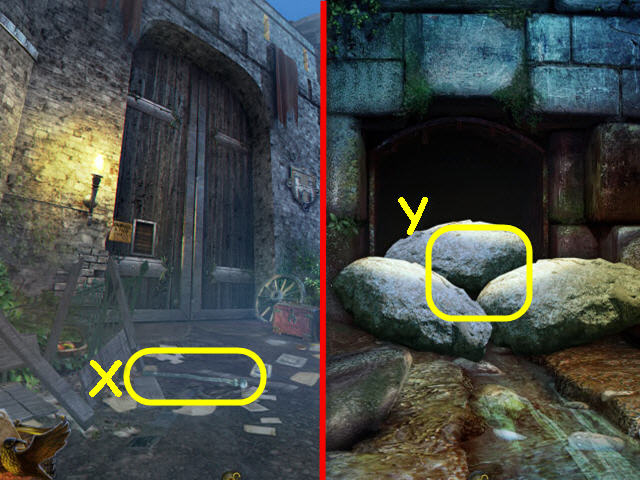
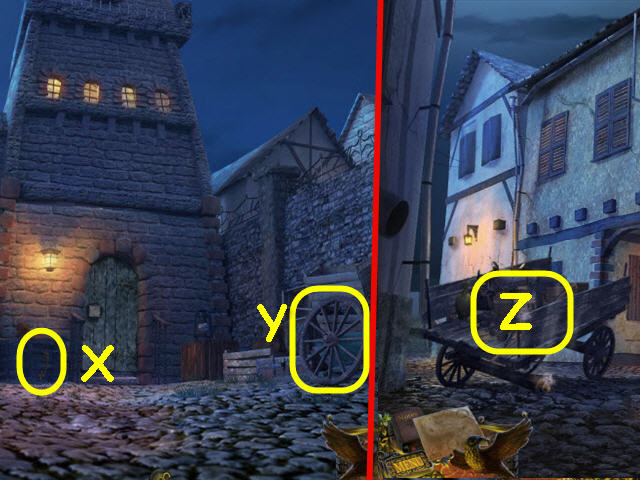
- Take the GATE POST (X).
- Go straight to the right of the wall.
- Use the GATE POST on the rocks (Y).
- Enter the tunnel and speak to the boy.
- Go forward, left, and forward twice.
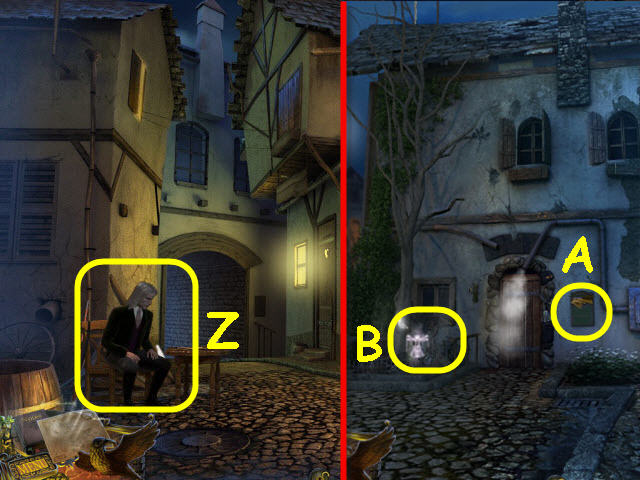
- Speak to the Count (Z).
- Go forward through the arch.
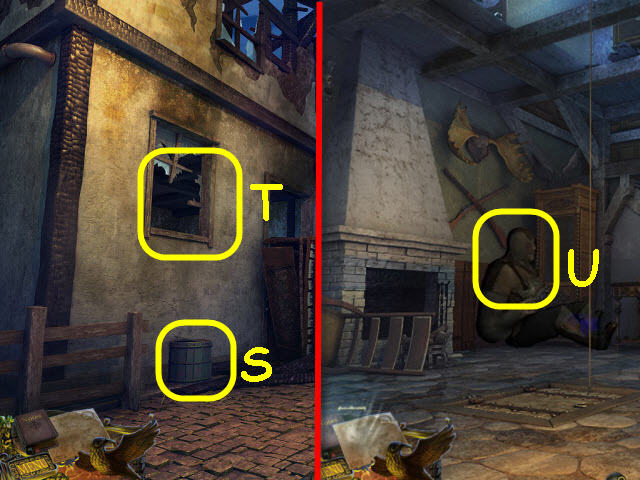
- Examine the mailbox and read the note (A).
- Examine the area left of the door to access a HOS (B).
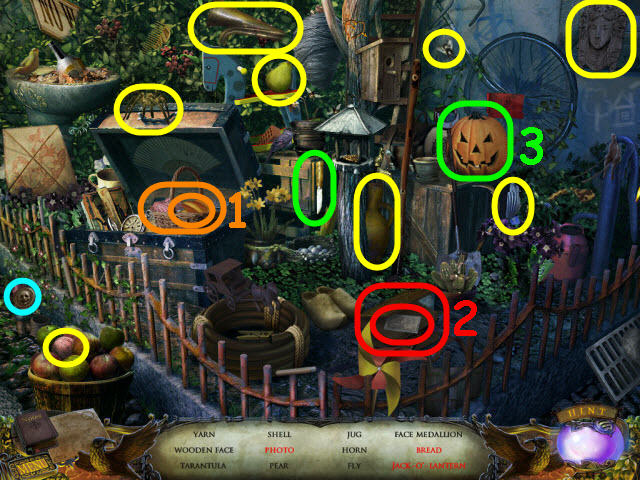
- Find the items listed.
- Move the cloth to get the bread (1).
- Open the book to get the photo (2).
- Use the knife on the pumpkin to get a jack-o-lantern (3).
- You will earn a FACE MEDALLION.
- Back out.
- Examine the door and place the FACE MEDALLION on the lock to trigger a puzzle (C).
- Match the outer symbols with the inner symbols.
- See screenshot for solution (D).
- Enter through the newly-opened door.
- Examine the notices (E).
- Examine the shelves to access a HOS (F).
- Find the items listed.
- Move the hat to get the weight (4).
- Place the 0 on the 100 to get 1,000 (5).
- You will earn a WEIGHT.
- Back out and go forward to Esther’s house.
- Examine the gate; place the WEIGHT on the hook (G).
- Go left through the newly-opened gate.
- Talk to the boy (H).
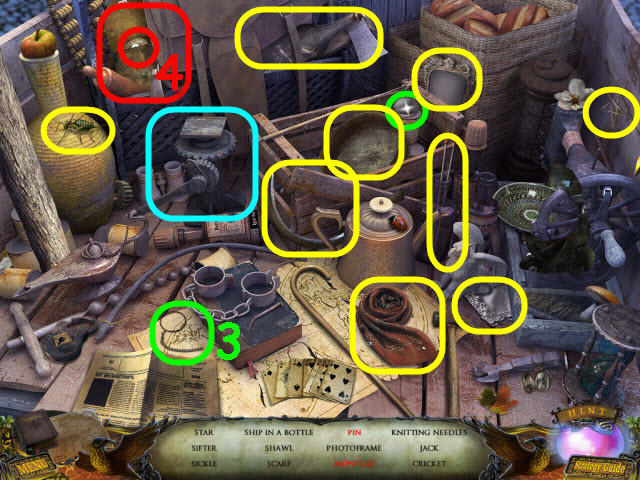
- Examine the stand to access a HOS (I).
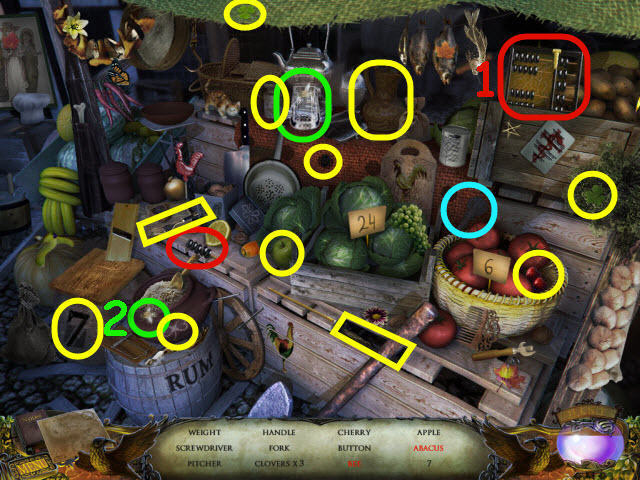
- Find the items listed.
- Place the beads on the abacus to get an abacus (1).
- Move the glass to release the bee; the bee will fly around and you will need to catch him once it stops (2).
- You will earn a HANDLE.
- Go forward.
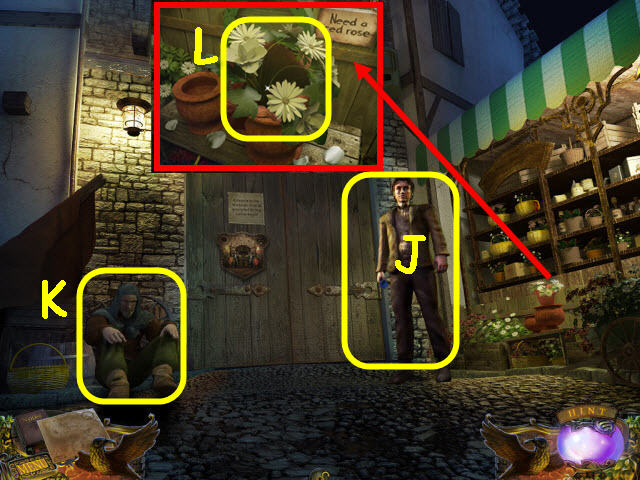
- Speak to the florist (J) and the poor man (K).
- Examine the flowers and place the RARE FLOWER in the vase; get a BOUQUET (L).
- Back out three times and go right into the building.
- Examine the grate and use the HANDLE on the lock; turn the HANDLE. Take the SHERIFF’S BADGE (M) and the KNIFE (N).
- Go to Esther’s house.
- Examine the area left of the door to access a HOS (O).
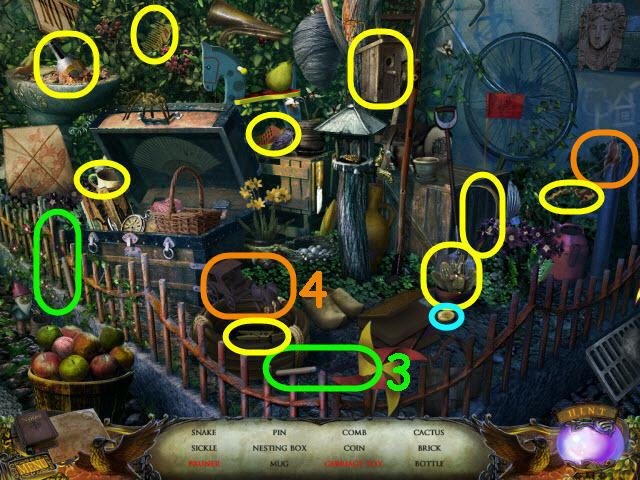
- Find the items listed.
- Combine the pruner half with the pruner half to get a pruner (3).
- Place the carriage driver with the carriage to get a carriage toy (4).
- You will earn a COIN.
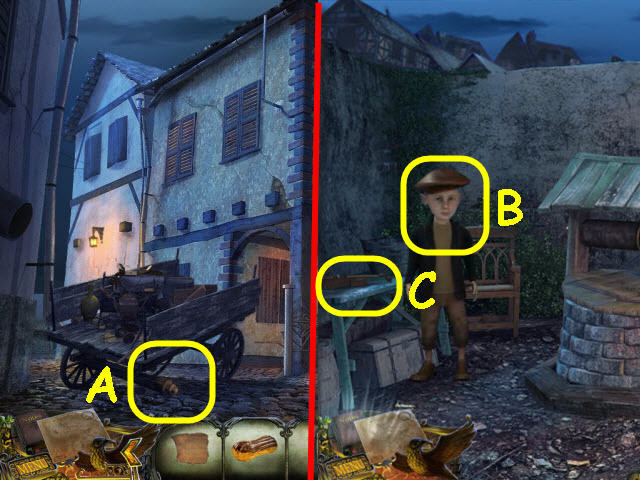
- Examine the cart; use the KNIFE on the cheese block and take the CHEESE (P).
- Go left and forward.
- Give the COIN to the poor man; take the RING (Q).
- Back out three times and go right into the building.
- Examine the hole in the wall and place the RING on the skull; take the STARFISH (R) and read the note.
- Back out, go forward; go left and then right to the fountain.
- Examine the booth; give the CHEESE to the mouse and take the HANDLE (S).
- Examine the fountain base and place the STARFISH in the slot to trigger a puzzle (T).
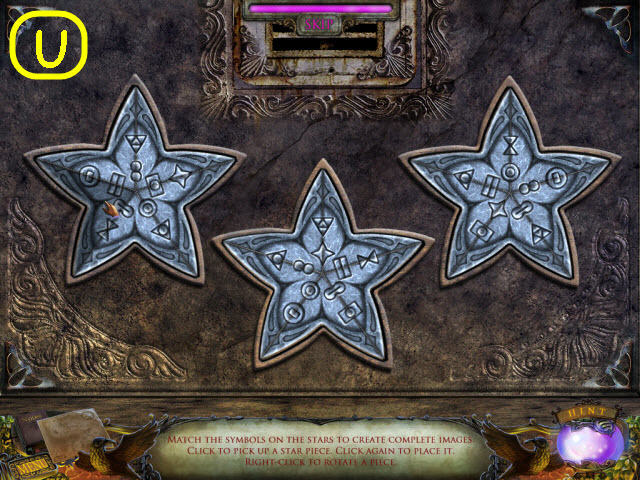
- Arrange the star pieces to complete the pattern.
- See screenshot for solution (U).
- Back out.
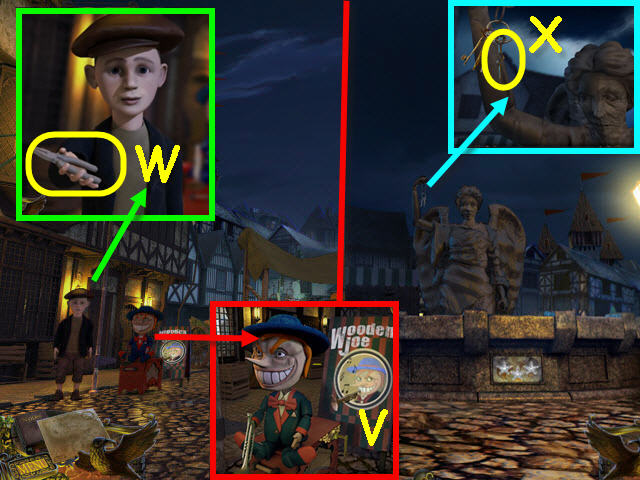
- Examine the hurdy-gurdy; place the HANDLE on it and crank it (V).
- Take the PLIERS (W) from the boy.
- Go right to the fountain.
- Examine the statue arm and use the PLIERS on the key ring; take the KEY (X).
- Go to Esther’s house.
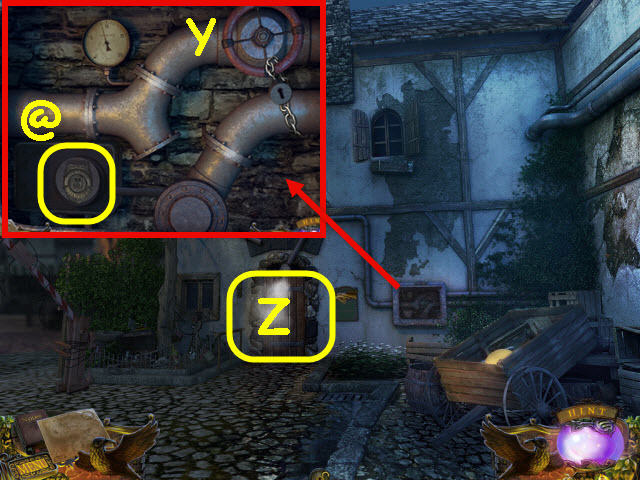
- Examine the pipes and remove the cover. Place the SHERIFF’S BADGE in the slot (@); use the KEY on the lock and turn the valve (Y).
- Knock on the door (Z) and then give the BOUQUET to the lady.
- Enter Esther’s house.
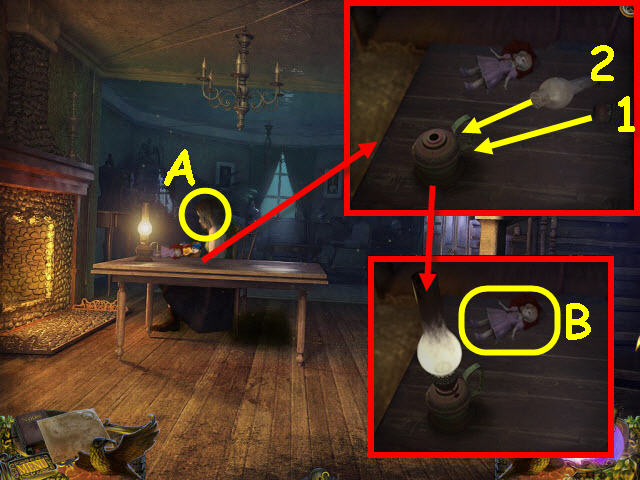
- Attempt to speak with Esther (A).
- Examine the table; assemble the lamp (1-2) and use the LIGHTER on it.
- Take the DOLL (B).
- Go up the stairs.
- Examine the dresser top; take the CABINET HANDLE (C).
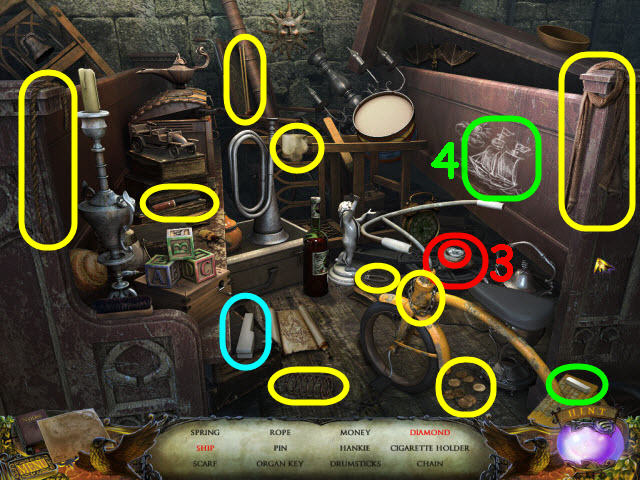
- Examine the corner hutch to access a HOS (D).
- Find the items listed.
- Use the rag on the picture to get a portrait (1).
- Use the matches on the candle to get wax (2).
- You will earn TONGS.
- Back out.
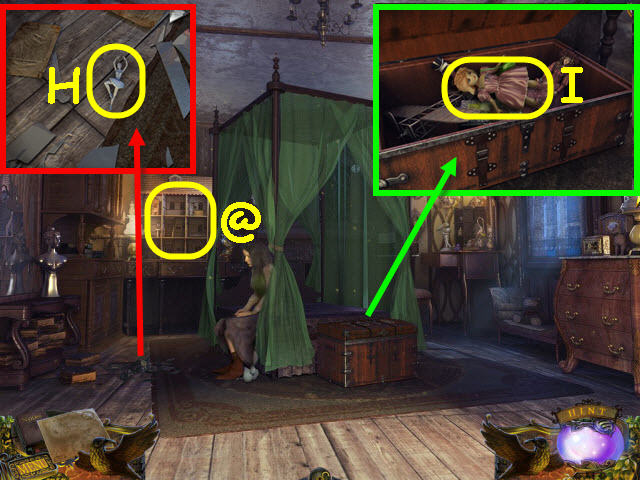
- Examine the cabinets and place the CABINET HANDLE on it; take the CHEST KEY (E), and the BROOM (F).
- Examine the fireplace; use the TONGS to get the DIRTY STATUETTE (G).
- Go up the stairs.
- Examine the broken glass and use the BROOM on it; take the CLEAN STATUETTE (H).
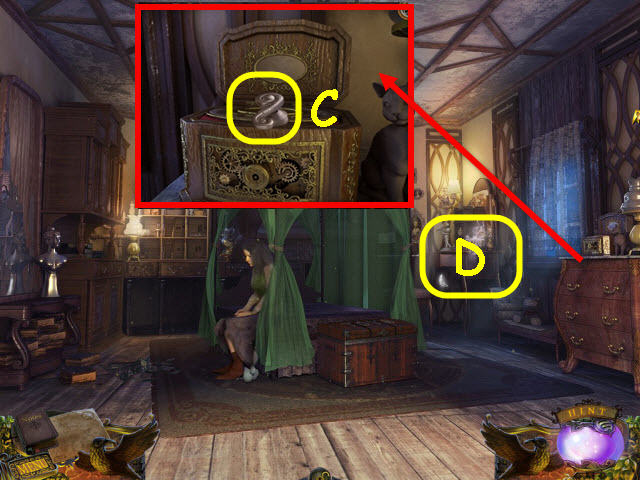
- Examine the toy chest and use the CHEST KEY on it; take the 2nd DOLL (I).
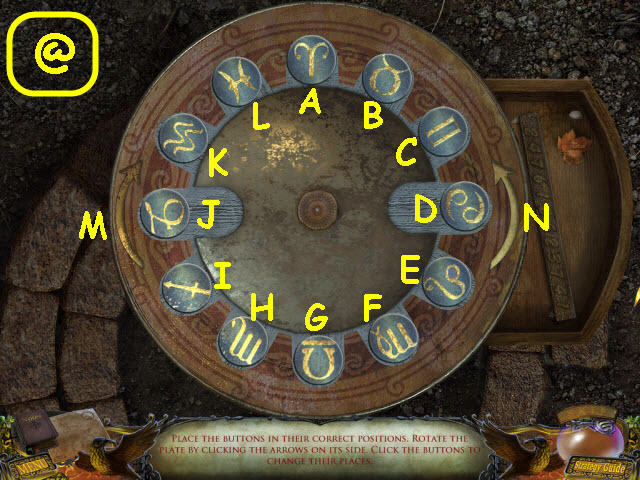
- Examine the doll house and place the 2 DOLLS on it to trigger a puzzle (@).
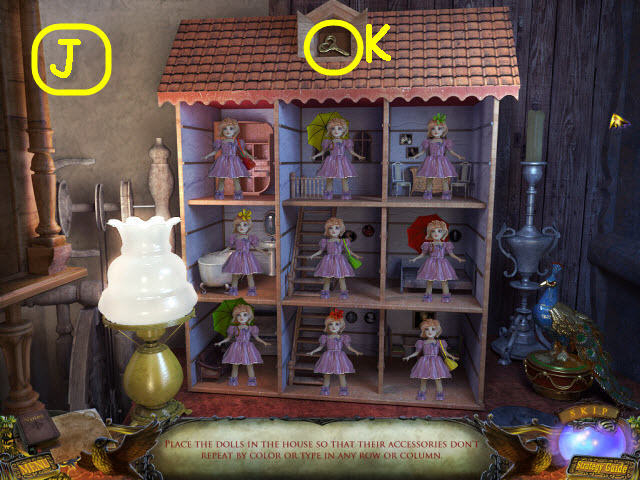
- Arrange the dolls so that no two of the same are in any row or column.
- See screenshot for solution (J).
- Take the MUSIC BOX KEY (K).
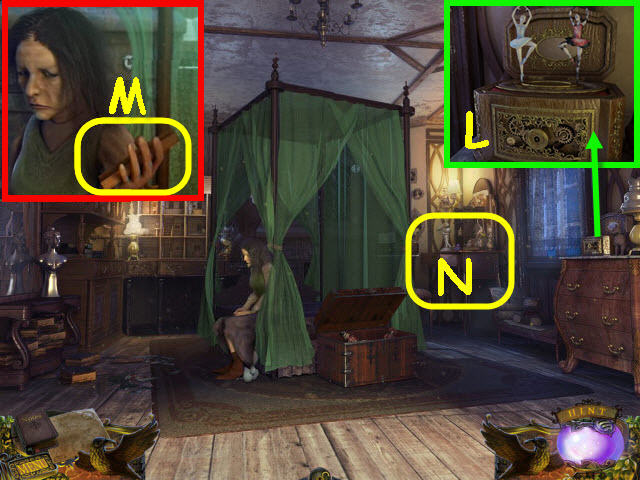
- Examine the dresser top; place the DIRTY STATUETTE and CLEAN STATUETTE on the music box. Use the MUSIC BOX KEY in the lock and turn the key (L).
- Take the STRANGE KEY from Esther (M).
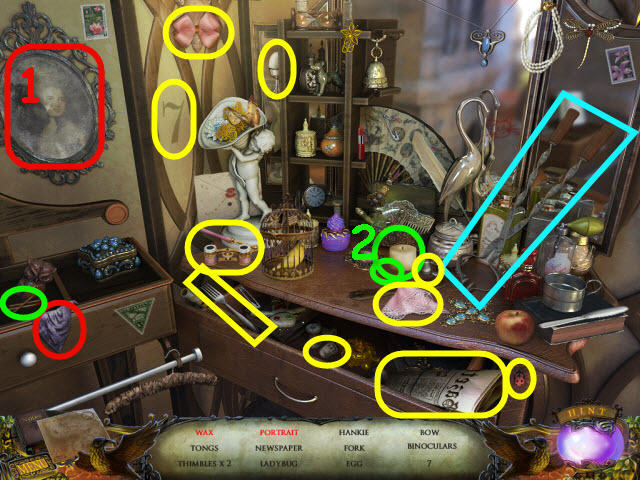
- Examine the corner table to access a HOS (N).
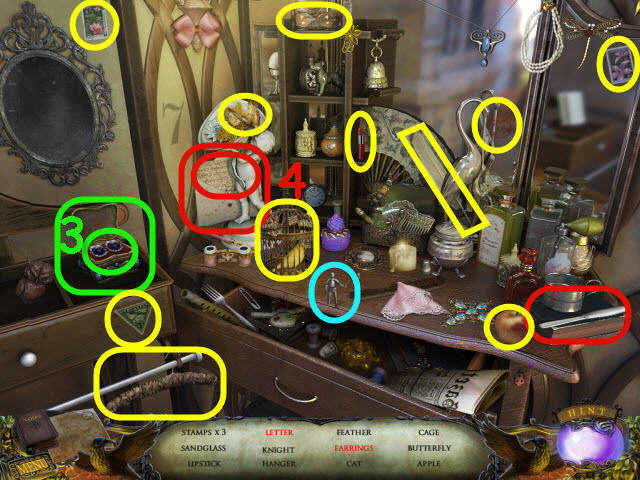
- Find the items listed.
- Open the box to get the earrings (3).
- Use the letter opener on the letter to get a letter (4).
- You will earn a KNIGHT.
- Back out twice and go left to the courtyard.
- Examine the stand (O).
- You will access a HOS.
- Find the items listed.
- Use the carrot on the slicer to get sliced carrot (5).
- Use the can opener on the can to get peas (6).
- You will earn a CUPCAKE.
- Go forward to the gate.
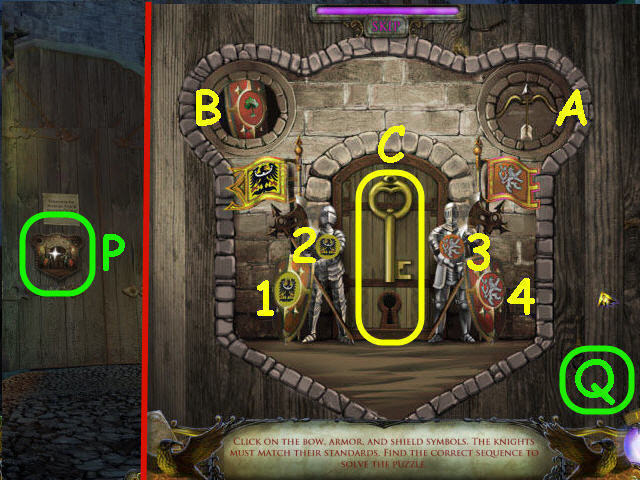
- Examine the gate and place the KNIGHT on the lock to trigger a puzzle (P).
- To solve the puzzle, perform the following actions: Turn the bow (A) three times and shoot the arrow. Give the shield (B) to the bottom right knight, select each crest in the order marked (1-4) until they match the symbol on the flag on the same side (Q).
- Use the key (C) on the keyhole below it and enter through the newly-opened gate.
Chapter 2
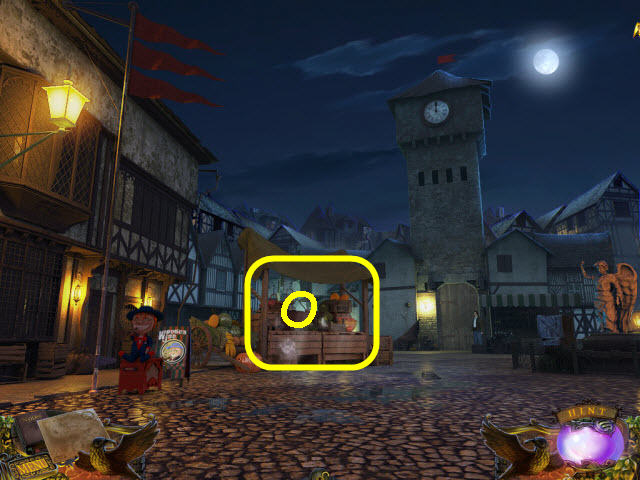
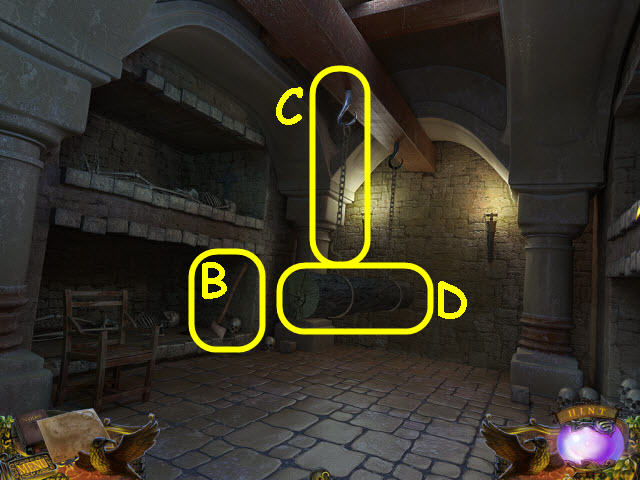
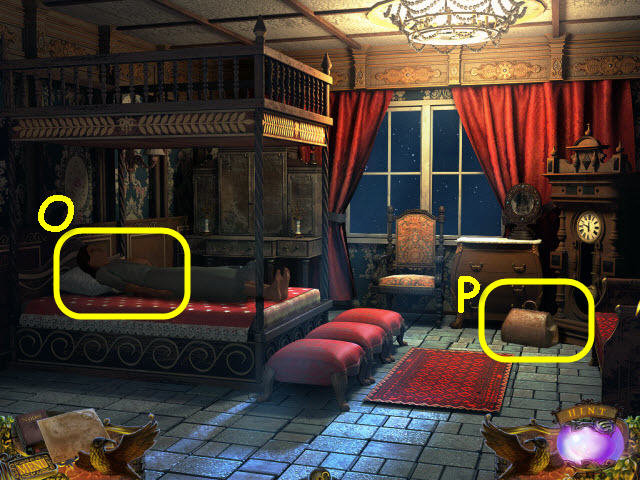
- Take the SHOVEL (R).
- Examine the boat to access a HOS (S).

- Find the items listed.
- Move the reeds to get the duck (1).
- You will earn a PLANK.
- Place the PLANK across the broken bridge (T).
- Go forward across the bridge.
- Examine the piano; take the MUSIC (U).
- Use the PLIERS to get the STRING (V).
- Examine the drain; use the SHOVEL on the debris (W).
- Go forward and then up the right stairs.
- Take the HANDHOLD (X) and WHEEL (Y).
- Back out.
- Examine the cart to access a HOS (Z).
- Find the items listed.
- Place the lens in the frame to get a monocle (3).
- Open the pouch to get a pin (4).
- You will earn a JACK.
- Examine the cart; place the JACK and WHEEL on it (A).
- Move the cart and go up the left.
- Speak to the boy and then give him the CUPCAKE (B).
- Examine the violin and place the STRING on it to trigger a puzzle (C).
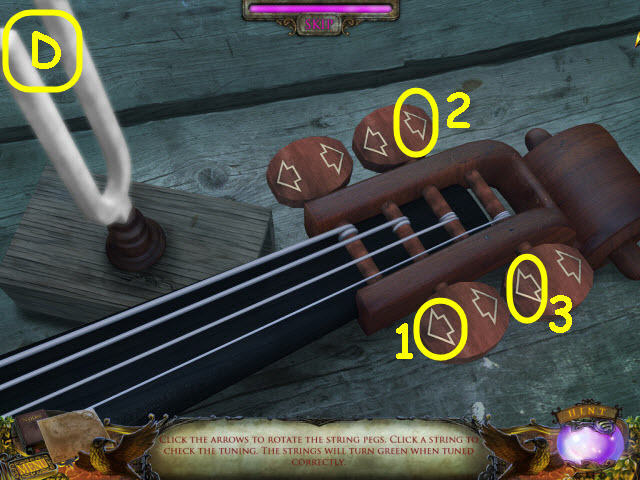
- Adjust the strings so that they are all green when played.
- See screenshot for arrows to select; then pluck a string (D).
- You will earn a VIOLIN.
- Back out and go right up the stairs.
- Give the VIOLIN to the poor man; take the PUZZLE TILE (E).
- Examine the door and place the PUZZLE TILE on the lock to trigger a puzzle (F).
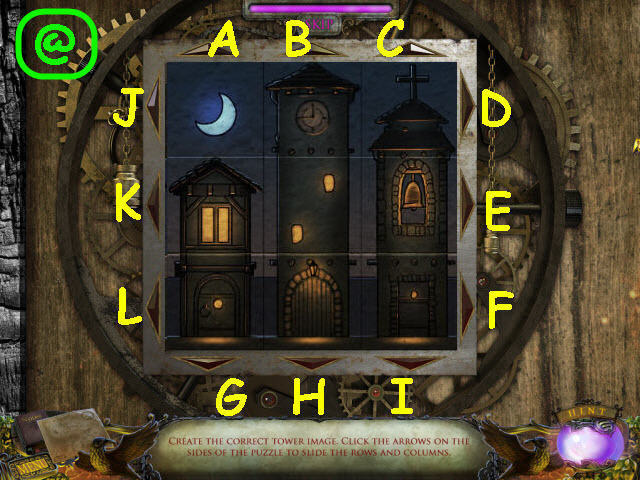
- Complete the scene by sliding the rows and column.
- To solve the puzzle; select the following arrows: D, B, D, K, C, J, A, C, L, I, F, A, E, A, F, and A (@).
- Enter the watchmaker’s shop.
- Speak to the watchmaker (G).
- Go up the winding staircase on the right by selecting the top landing (@).
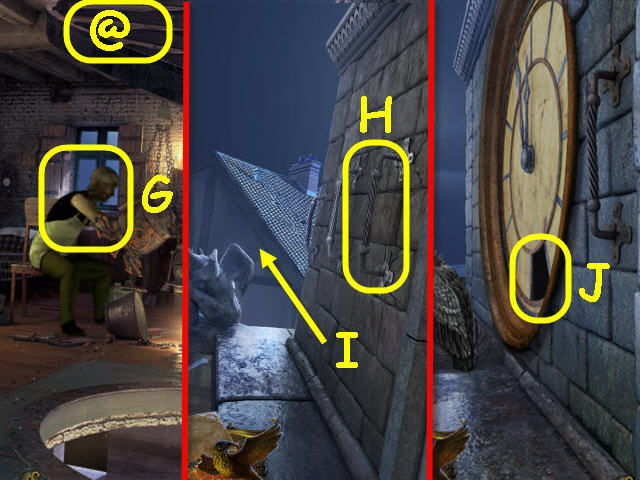
- Examine the wall and place the HANDHOLD on it (H).
- Go forward on the ledge (I).
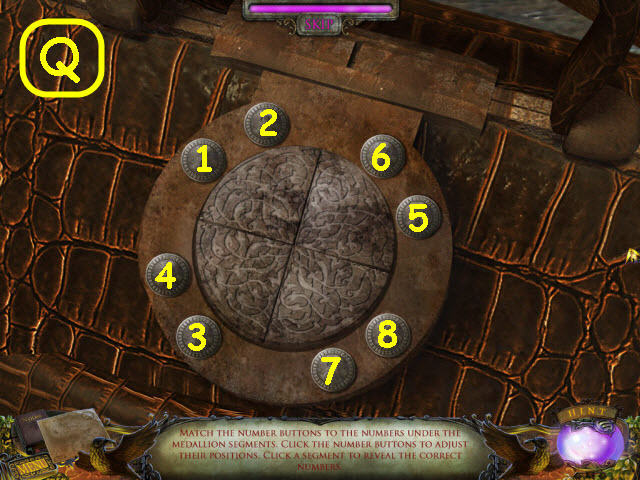
- Examine the hole in the clock to trigger a puzzle (J).
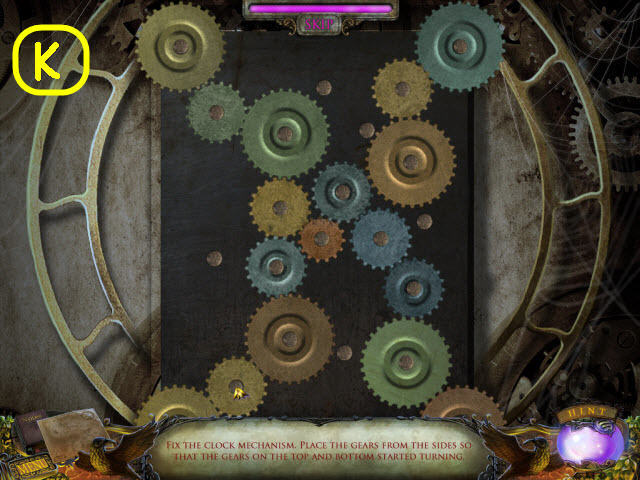
- Place the gears so that all four corner gears are turning.
- See screenshot for solution (K).
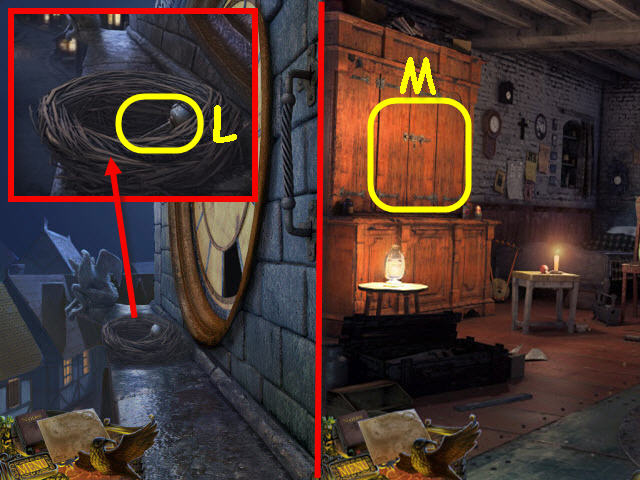
- Examine the nest; take the OILER (L) to get some STRAW automatically.
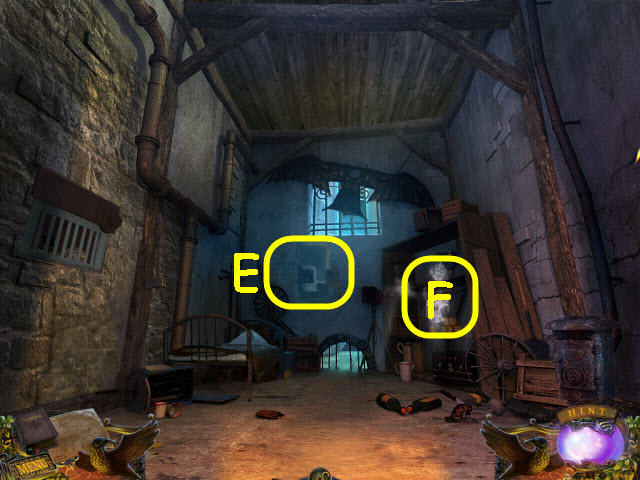
- Back out and go down through the doorway.
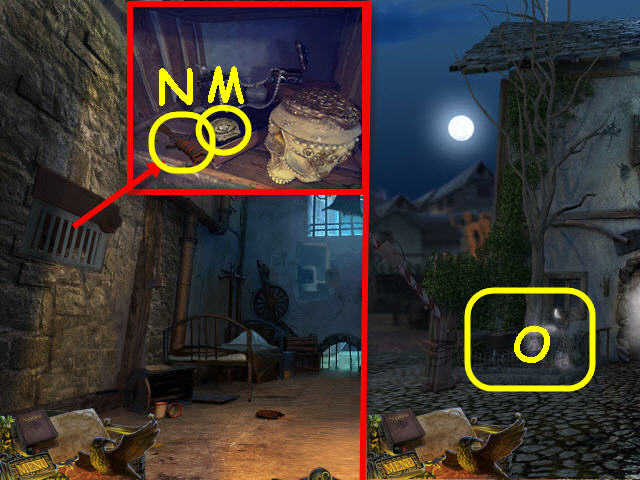
- Examine the cabinet; use the OILER on the lock (M).
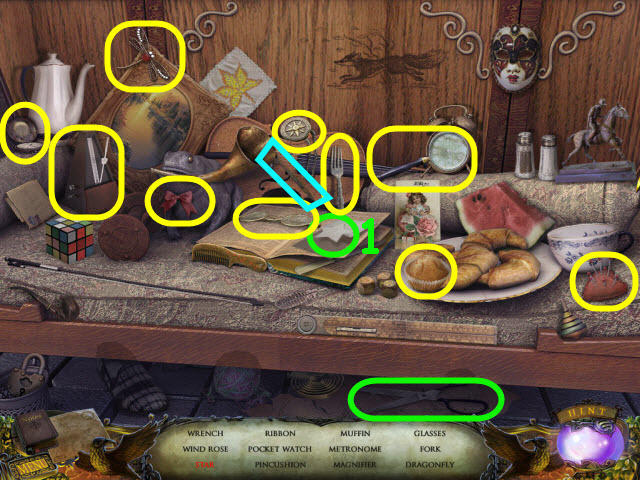
- Examine the opened cabinet to access a HOS.
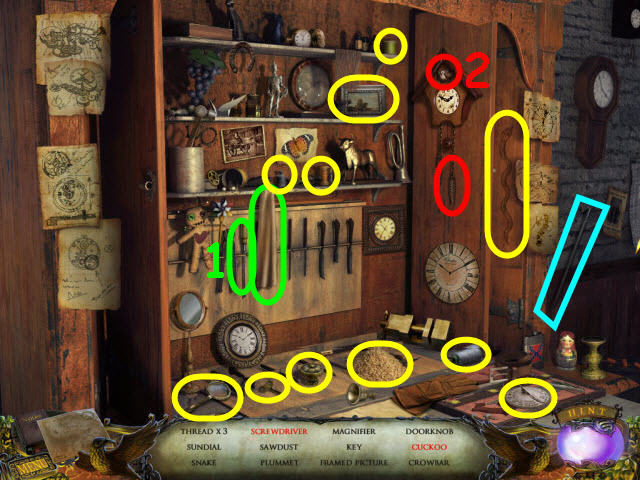
- Find the items listed.
- Move the cloth to get the screwdriver (1).
- Pull the clock weight to get a cuckoo (2).
- You will earn a CROWBAR.
- Back out four times to the bridge.
- Examine the ledge and use the CROWBAR on the board; get a HOOK (N) and a BOARD (O).
- Examine the boat to access a HOS (P).
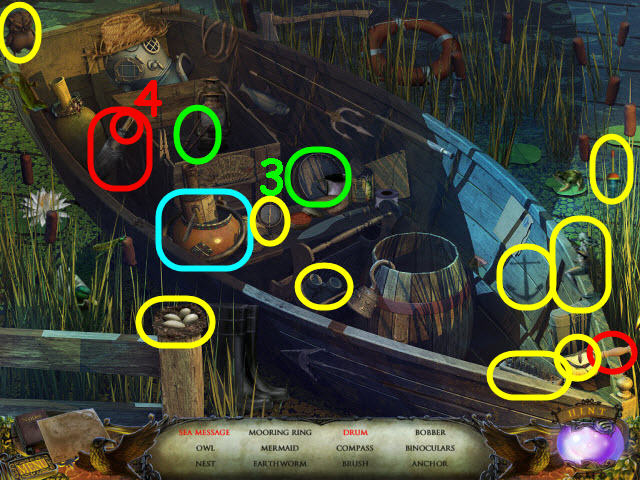
- Find the items listed.
- Use the drumsticks on the drum to get a drum (3).
- Use the corkscrew on the corked bottle to get a sea message (4).
- You will earn a MOORING RING.
- Go forward twice and up the left to the well.

- Examine the well; use the CROWBAR on the lid. Crank the winch and use the KNIFE on the rope to get a BUCKET (Q).
- Back out.
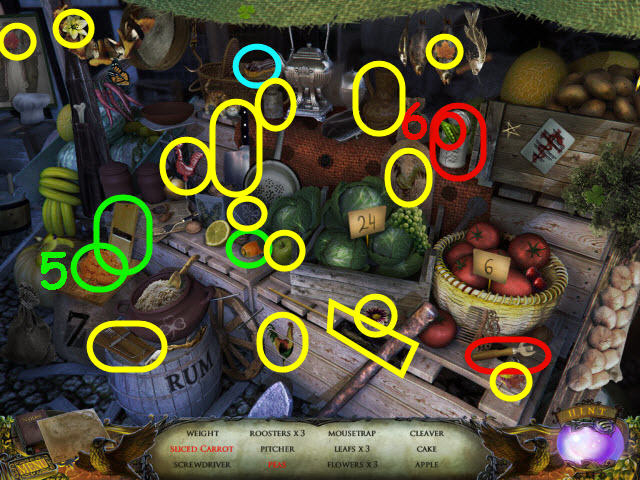
- Examine the cart to access a HOS (R).
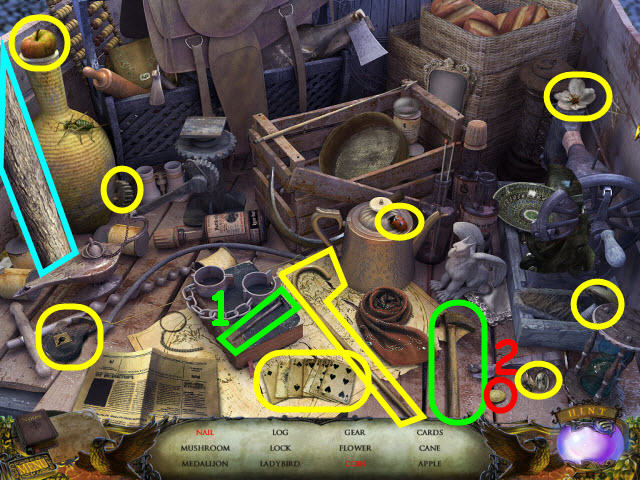
- Find the items listed.
- Use the hammer on the bent nail to get a nail (1).
- Move the leaf to get the coin (2).
- You will earn a LOG.
- Back out.
- Place the BUCKET under the window (S).
- Examine the window and remove the bottom glass shards (T).
- Go through the window.
- Examine the monster after the cut scene to trigger a puzzle (U).
- Light all the buttons.
- To solve the puzzle, press the buttons in the order marked in the screenshot (V).
- Examine the chest plate; take the CHAIN (W).
- Examine the hatch (X) and pull on the ring.
- Examine the broken ladder and place the BOARD on the top and the BELT on the broken rung (Y).
- Go up the ladder.
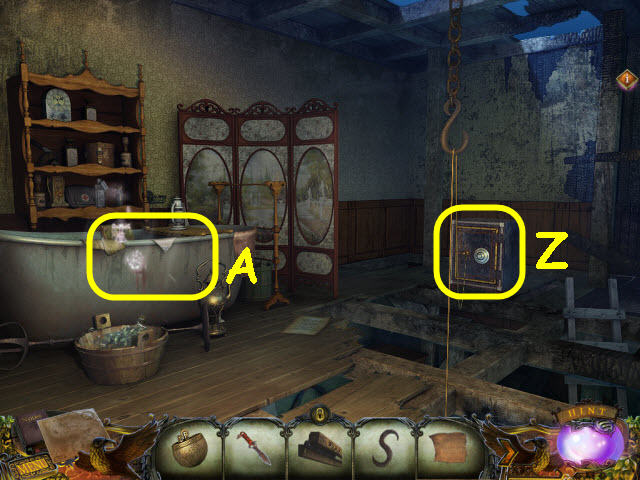
- Knock the safe over (Z).
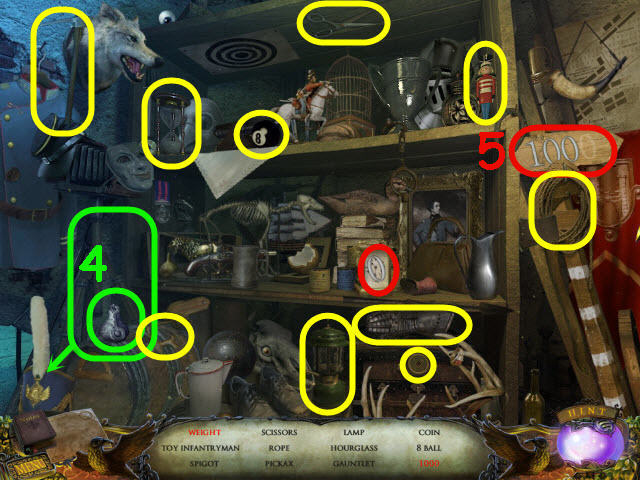
- Examine the bath tub to access a HOS (A).
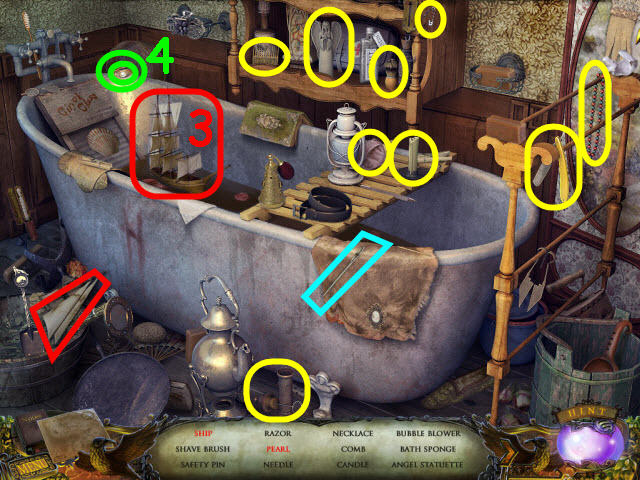
- Find the items listed.
- Place the sails on the boat to get a ship (3).
- Open the clam to get the pearl (4).
- You will earn a NEEDLE.
- Go down the ladder and then down the newly opened hatch on the floor.
- Take the AXE (B).
- Hang the CHAIN on the hook; place the HOOK on the chain and the MOORING RING on the HOOK (C).
- Place the LOG in the rings (D).
- Swing the LOG to make a hole in the wall.
- Go forward through the wall.
Chapter 3
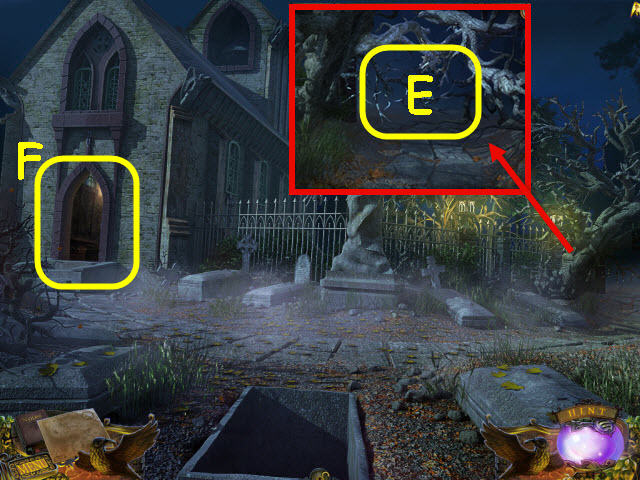
- Examine the fallen tree; use the AXE on the branches (E).
- Enter the church (F).
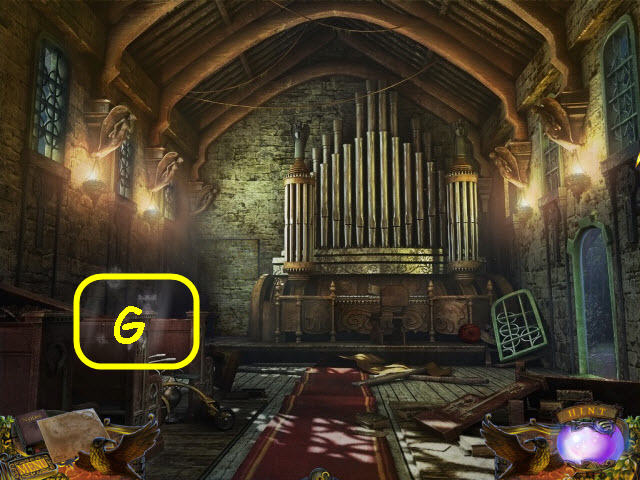
- Examine the pews (G).
- You will access a HOS.
- Find the items listed.
- Combine the two sun halves to get a metal sun (1).
- Unroll the scroll to get the map (2).
- You will earn a PATCH.
- Examine the deflated ball and use the STRAW, PATCH and NEEDLE on it; get a BALL (H).
- Go right through the door.
- Speak to the boy; give the boy the BALL; take the ORGAN KEY (I).
- Examine the fountain to access a puzzle (J).
- Place the zodiac signs on their matching signs underneath.
- To solve the puzzle select the following; A, M x 2, E, N, slide into A, N, I, N, slide into E, M x 3, H, N, M x 2, slide into H, N x 2, L, M, N x 2, slide into I, M x 6, C, M x 2, N, slide into C, N, K, M, N, slide into L.
- N x 2, D, M x 3, N x 2, slide into K, N x 2, M x 3, F, M x 2, slide into D, N, slide into F, N x 2, J, M x 3, G, N, M x 2, slide into G, M, and N x 2 and slide into J (@).
- Take the MUSIC CIPHER.
- Back out.
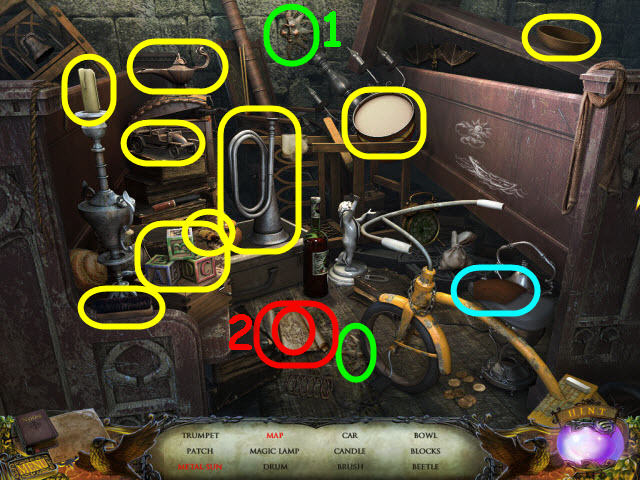
- Examine the pews on the left to access a HOS.
- Find the items listed.
- Open the bag to get a diamond (3).
- Use the chalk on the drawing to get a ship (4).
- You will earn a 2nd ORGAN KEY.
- Examine the organ (K).
- Place the 2 ORGAN KEYS, MUSIC and MUSIC CIPHER on it to trigger a puzzle.
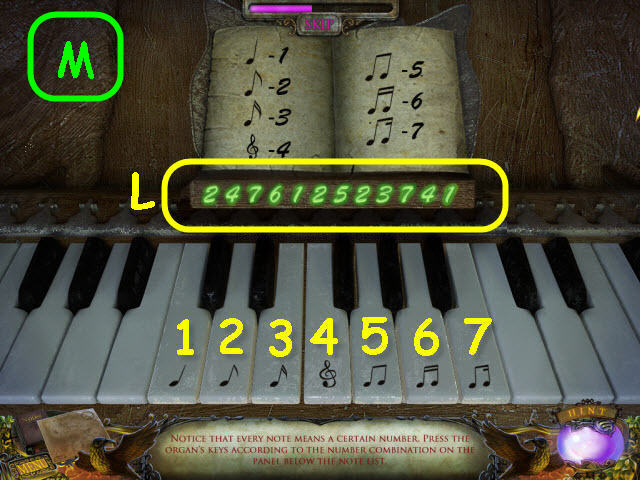
- Press the keys in the order displayed (L).
- See screenshot for solution (M).
- Go through the newly-opened door on the left of the organ.
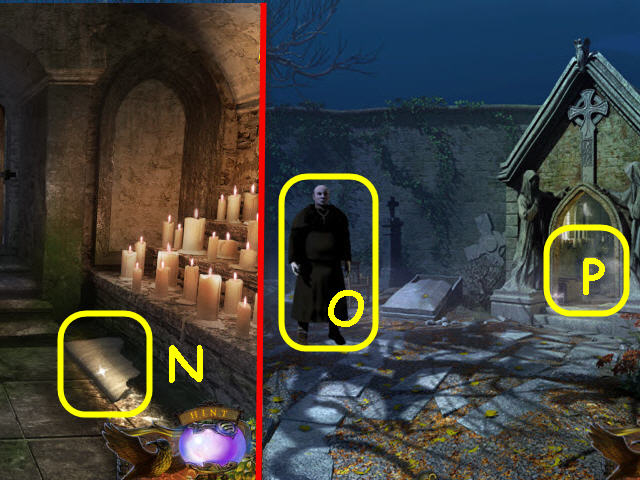
- Take the COFFIN LID PART (N).
- Back out twice and go right.
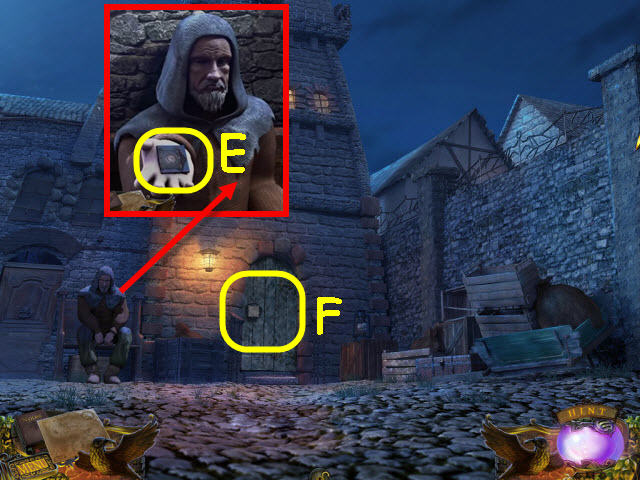
- Speak to the priest (O).
- Examine the mausoleum to access a HOS (P).
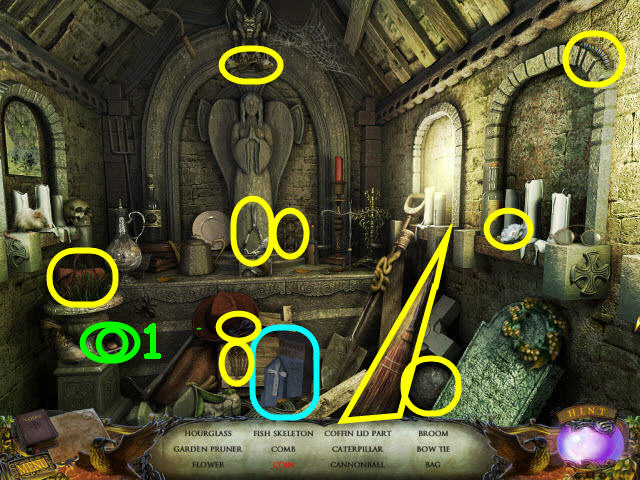
- Find the items listed.
- Open the coin purse to get a coin (1).
- You will earn a 2nd COFFIN LID PART.
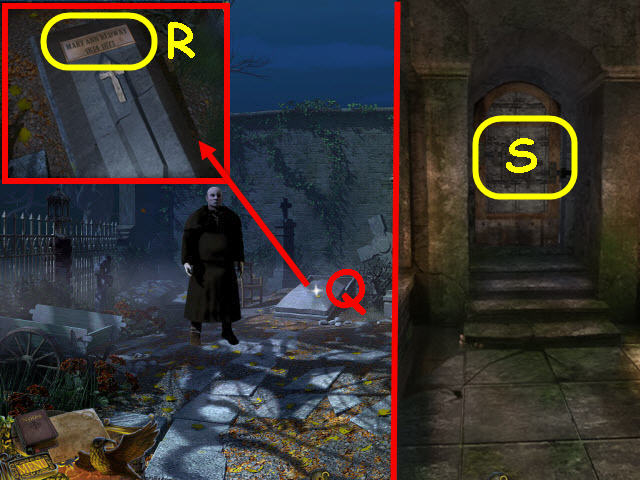
- Examine the grave; place the 2 COFFIN LID PARTS on it (Q).
- Note the dates 1834-1873 (R).
- Back out; enter the church and go through the left rear door.
- Examine the door to trigger a puzzle (S).
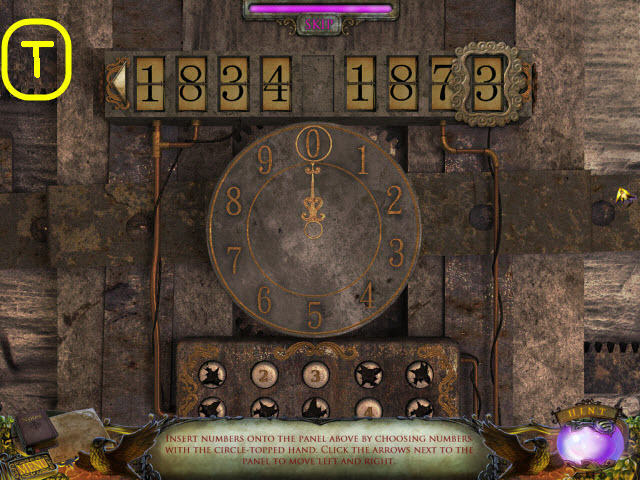
- Set the correct numbers using the clue from the gravestone.
- To solve the puzzle; select the following buttons on the bottom: 3 x 3, 2, right arrow, 4, 2, right arrow, 3, right arrow, 2 x 2, right arrow, 3 x 3, 2, right arrow, 4, 2, right arrow, 3, 2 x 2, right arrow, and 3 (T).
- Go forward through the newly-opened door and then left.

- Examine the shelves (U).
- You will access a HOS.
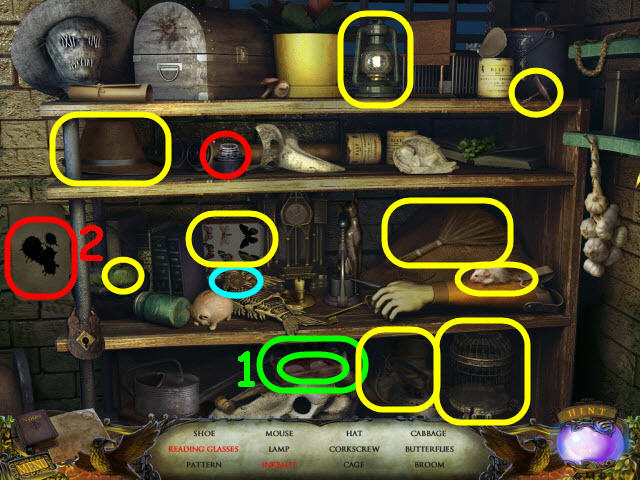
- Find the items listed.
- Open the glass case to get reading glasses (1).
- Use the inkpot on the paper to get ink (2).
- You will earn a PATTERN.
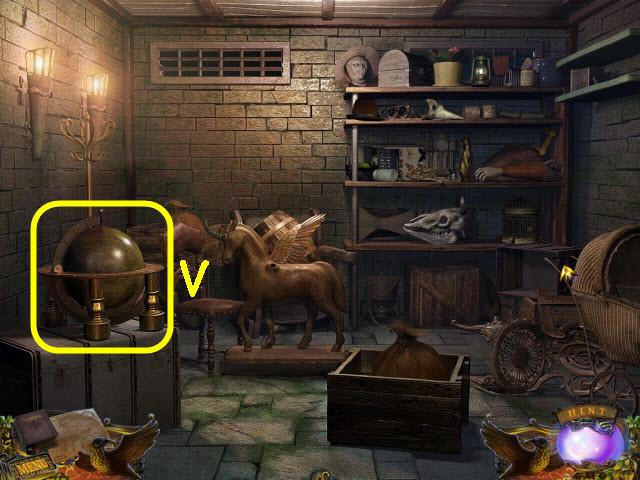
- Examine the globe (V).
- You will trigger a puzzle.
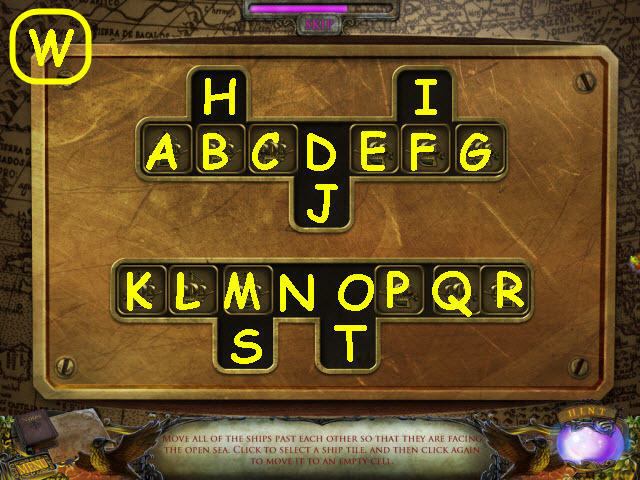
- Switch the positions of the boats so they are all facing outwards.
- To solve the puzzle move the boats to the following squares: C –J, B – H, E – B, F – C, G – I, J – G, C – F, B – E, A – J, E – A, F – B, I – C, J – I, C – F, B – J, H – E, J – B, E – J, F – C, I – F, and J – E.
- Bottom row: M – T, P – S, L – P, K – O, S – K, O – S, P – L, Q – M, R – N, T – R, N – T, M – Q, L – P, T – L, P – T, Q – N, T – Q, N – T, S – P, and T –M (W).
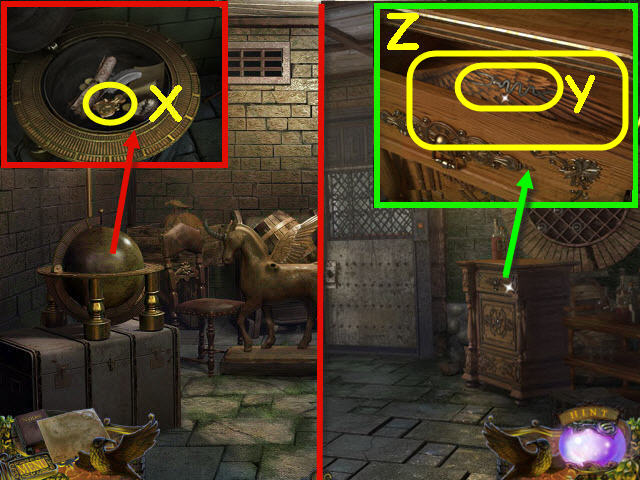
- Open the globe; zoom in and take the 2nd PATTERN (X).
- Back out.
- Examine the cabinet and place the 2 PATTERNS on the top drawer handle; take the SILVER FORK (Y) and WING (Z).
- Go left.
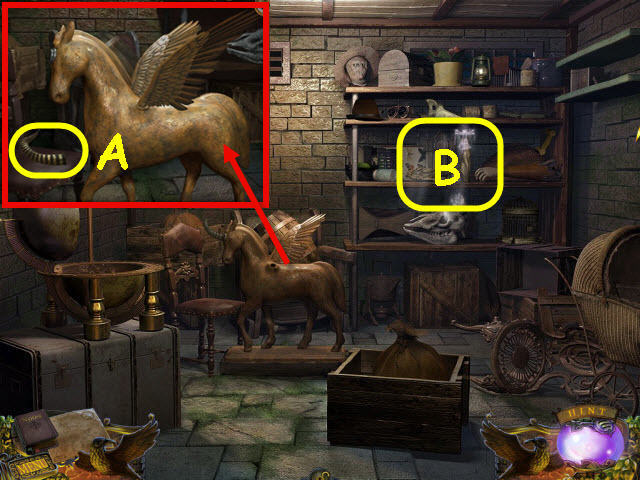
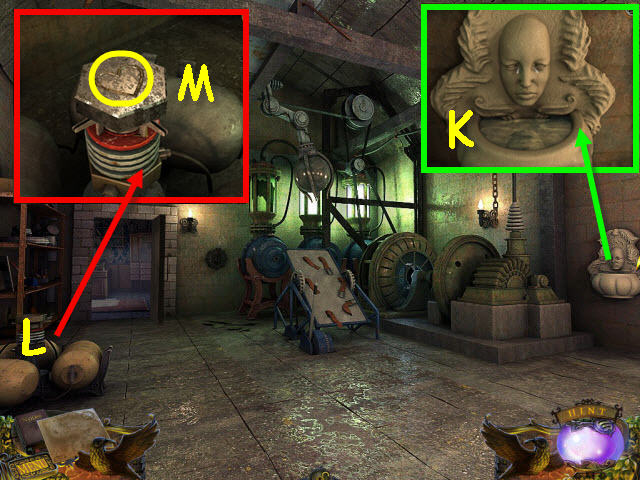
- Examine the unicorn and place the WING on it; take the HORN (A).
- Examine the shelves to access a HOS (B).
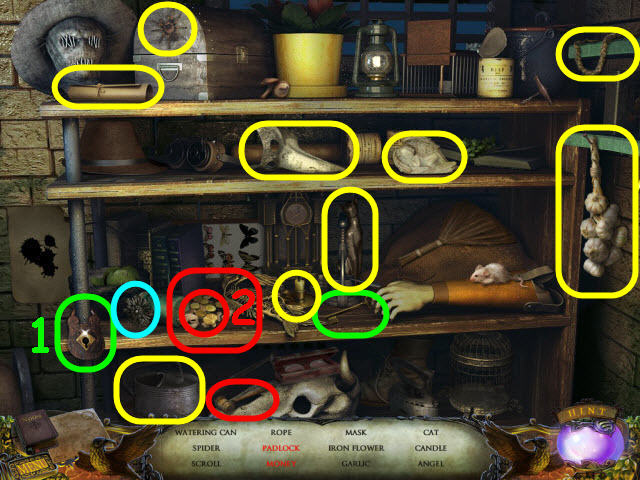
- Find the items listed.
- Use the key on the lock to get a padlock (1).
- Use the hammer on the piggybank to get money (2).
- You will earn an IRON FLOWER.
- Back out.
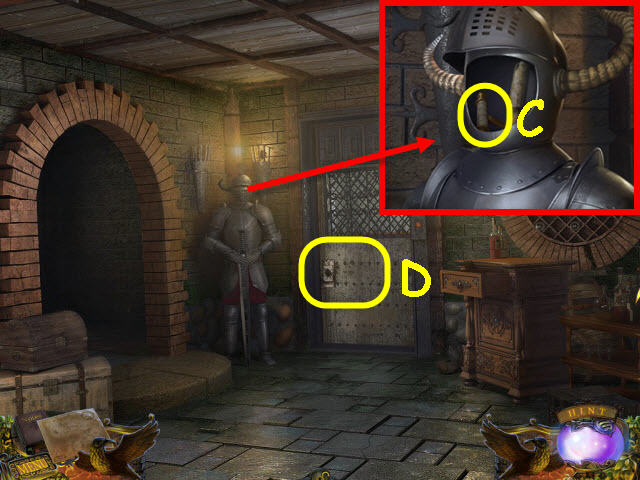
- Examine the armor and place the HORN on the helmet; take the ELEVATOR HANDLE (C) and read the note.
- Examine the door and place the IRON FLOWER on the lock (D).
- Enter forward into the newly-opened elevator.
- Examine the panel and place the ELEVATOR HANDLE in the slot; pull the ELEVATOR HANDLE (E).
- Exit the elevator.
- Go forward through the door in the left rear of the room after the cut scene.
- Examine the desk; read the note and take the MOLD HALF (F).
- Examine the sofa to access a HOS (G).
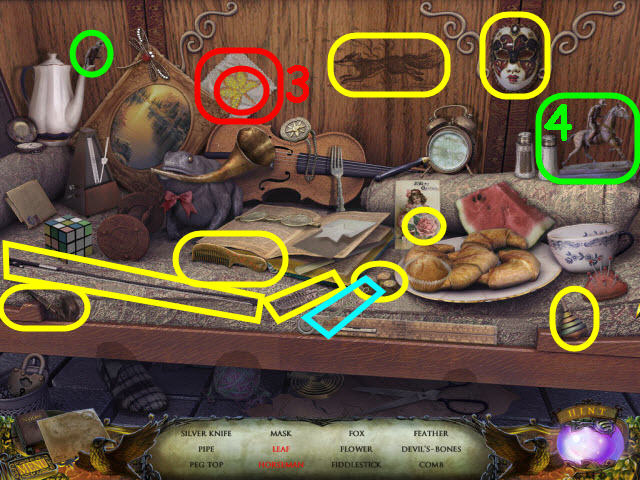
- Find the items listed.
- Move the cloth to get the leaf (3).
- Place the man on the horse to get a horseman (4).
- You will earn a SILVER KNIFE.
- Go left through the door to the right of the sofa.
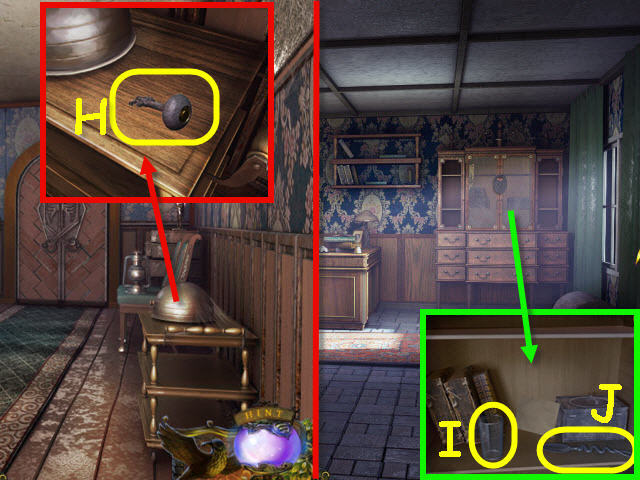
- Examine the butler table; take the EYE KEY (H).
- Back out.
- Examine the cabinet and use the EYE KEY on the lock. Take the GLASS (I), SILVER SPOON (J), and read the note.
- Back out.
- Examine the font and use the GLASS on the water; get a FULL GLASS (K).
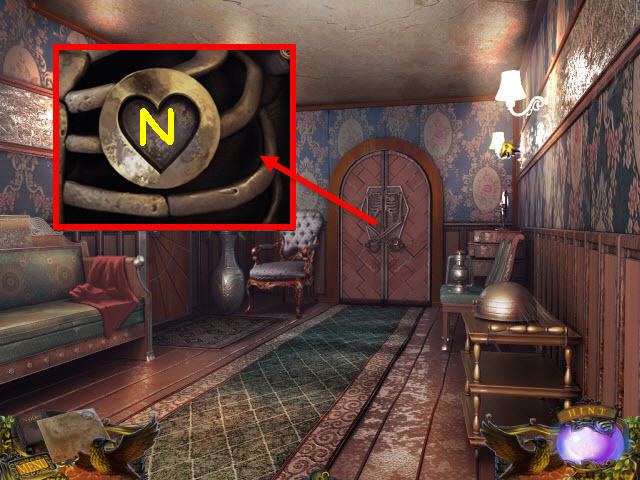
- Examine the burner and place the MOLD HALF on it (L).
- Use the LIGHTER on the burner and place the SILVER FORK, SILVER KNIFE, and the SILVER SPOON in it.
- Use the FULL GLASS on the mold; take the HEART (M).
- Go forward through the door and then through the door left of the desk.
- Examine the door and place the HEART in the recess (N).
- Go forward through the newly-opened door.
- Speak to Marie (O).
- Examine the doctor’s bag to trigger a puzzle (P).
- Switch the numbers to match the numbers under the center pieces.
- Slide a center piece to see the numbers underneath and then select any two numbers to switch them.
- See screenshot for solution (Q).
- Place the STRANGE KEY on the half of strange key to create a SAFE KEY.
- Back out three times.
- Examine the safe and use the SAFE KEY and KNIFE on it; take the DIARY (R).
- Go forward through the door.
- Examine the sofa to access a HOS (S).
- Find the items listed.
- Use the scissors on the paper to get a star (1).
- You will earn a WRENCH.
- Go through the door on the left and then go forward.
- Give the DIARY to Marie; take the LIBRARY KEY (T).
- Back out.
- Examine the door and use the LIBRARY KEY on the lock (U).
- Go left through the newly-opened door.
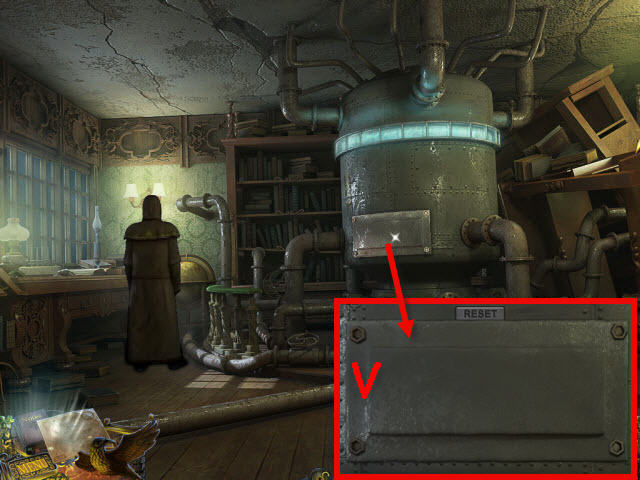
- Examine the panel (V).
- Use the WRENCH on the nuts to trigger a puzzle.
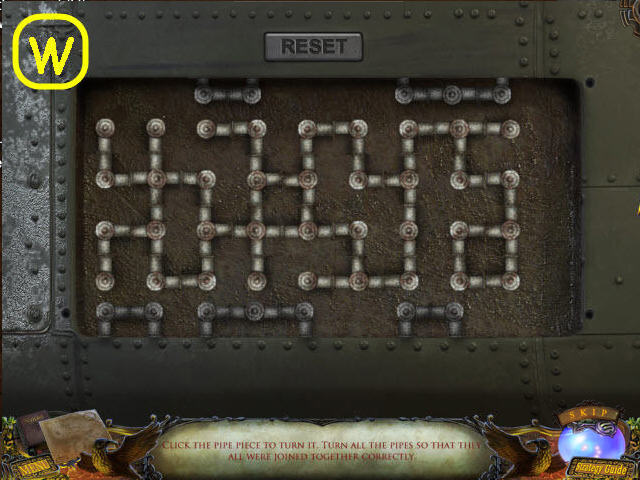
- Arrange the pipes so they are all connected.
- See screenshots for solution (W).
- Congratulations! You have successfully completed The Torment of Whitewall.


 Haunted Train: Frozen in Time Walkthrough, Guide, & Tips
 Witches' Legacy: Lair of the Witch Queen Walkthrough, Guide, & Tips
 Hidden Mysteries: The Forbidden City Walkthrough, Guide, & Tips
 Ominous Objects: Phantom Reflection Walkthrough, Guide, & Tips
 Grim Facade: Mystery of Venice Walkthrough, Guide, & Tips