Surface: Game of Gods Walkthrough, Guide, & Tips
Surface: Game of Gods Walkthrough

Welcome to the Surface: Game of the Gods Walkthrough
Save your friends and escape from a deadly game!
Whether you use this document as a reference when things get difficult or as a road map to get you from beginning to end, we’re pretty sure you’ll find what you’re looking for here.
This document contains a complete Surface: Game of the Gods game walkthrough featuring annotated screenshots from actual gameplay!
We hope you find this information useful as you play your way through the game. Use the walkthrough menu below to quickly jump to whatever stage of the game you need help with.
Remember to visit the Big Fish Games Forums if you find you need more help. Have fun!
General Tips
- This is the official guide for Surface: Game of the Gods.
- This guide will not mention each time you have to zoom into a location; the screenshots will show each zoom scene.
- Hidden-object puzzles are referred to as HOPs. This guide will not show HOP solutions. It will identify the location of the HOP and the inventory item acquired.
- This guide will show solutions for non-random puzzles. Please read the in-game instructions for each puzzle.
Chapter 1: The Game

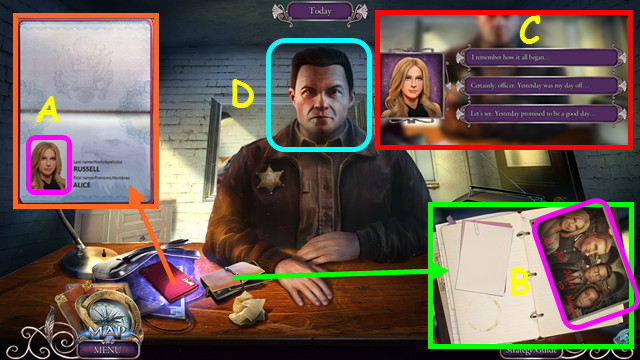
- Open the passport; select the photo (A).
- Open the journal, turn the pages, and select the photo (B).
- Select a dialog line for a HOP (C).
- Select the Policeman (D).

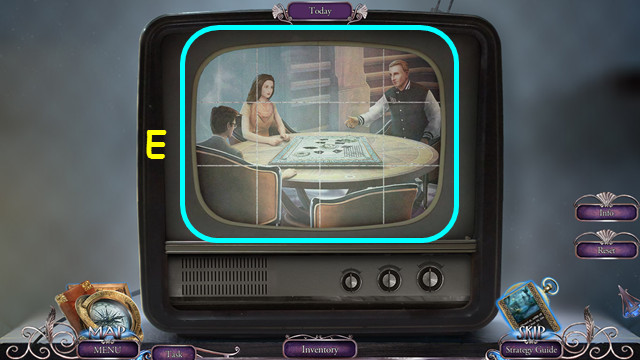
- Restore the image (E).
- Select 2 pieces to swap positions.

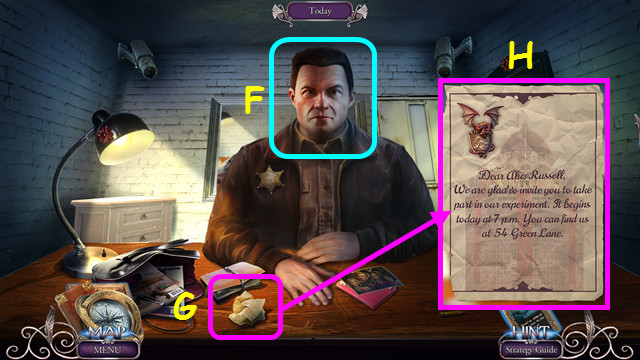
- Select the Policeman (F).
- Open the crumpled wad of paper (G).
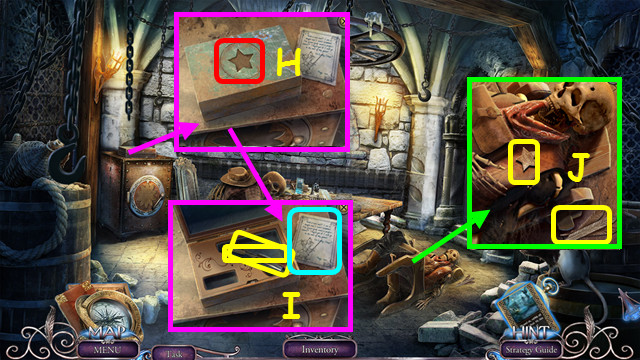
- Restore the invitation (H).

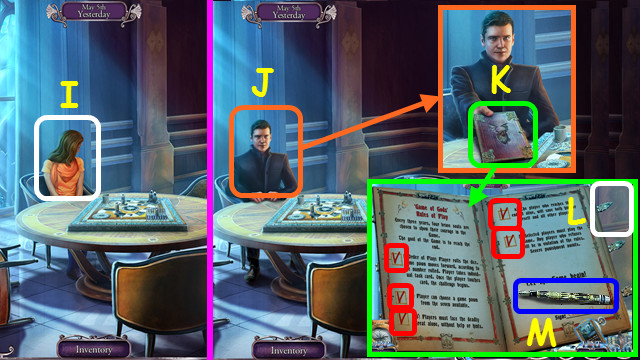
- Select Maggie (I).
- Select the Stranger (J).
- Select the book and open it (K).
- Select outside the book (L).
- Select the pen (M) and check each box (red).
- Select the pen again to sign; close the book.

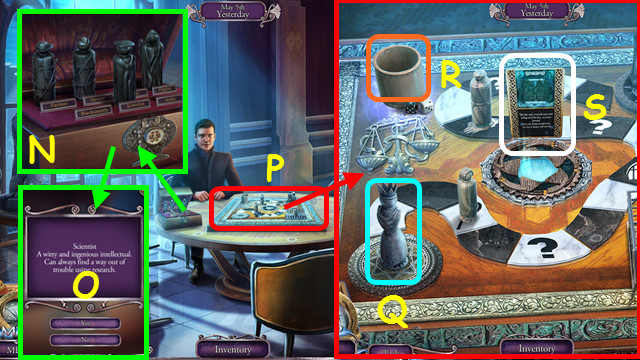
- Select a GAME PAWN (N); press yes to make your decision or no to select another (O).
- Select the board (P).
- Place the GAME PAWN on the board (Q).
- Select the cup (R).
- Read the card (S).

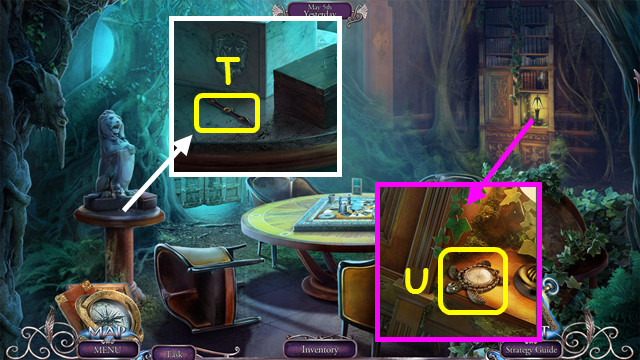
- Take the COMPASS NEEDLE (T).
- Take the BROKEN COMPASS (U).
- Combine the BROKEN COMPASS and the COMPASS NEEDLE to make the COMPASS (inventory).

- Place the COMPASS (V).
- Play the HOP to earn the SABER (W).
- Use the SABER (X).
- Walk forward.
Chapter 2: Maggie


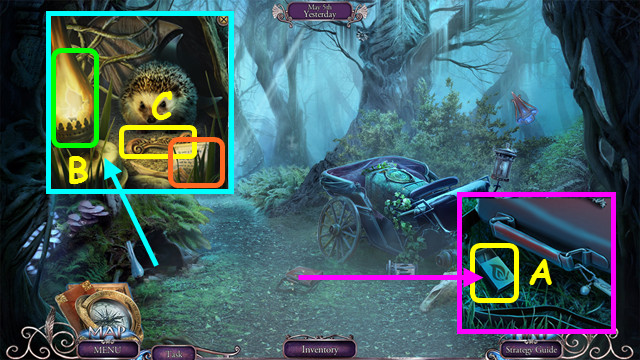
- Take the MATCH (A).
- Use the MATCH (B).
- Take the HANDLE and read the note (C).
- Walk down.

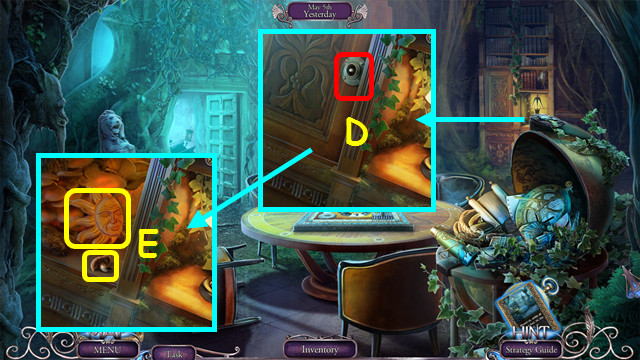
- Place and turn the handle (D).
- Take the MUSHROOM and SUN (E).
- Walk forward.

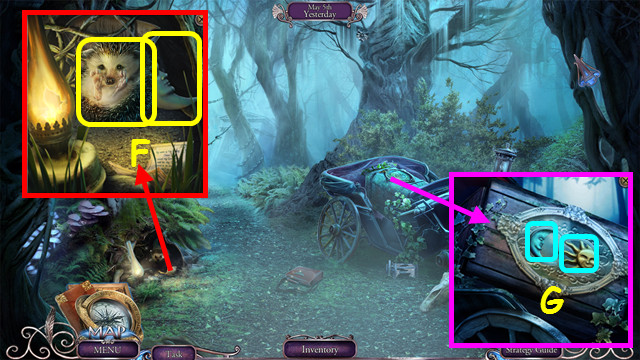
- Give the MUSHROOM; take the HEDGEHOG and MOON (F).
- Place the MOON and SUN, and then press them (G).

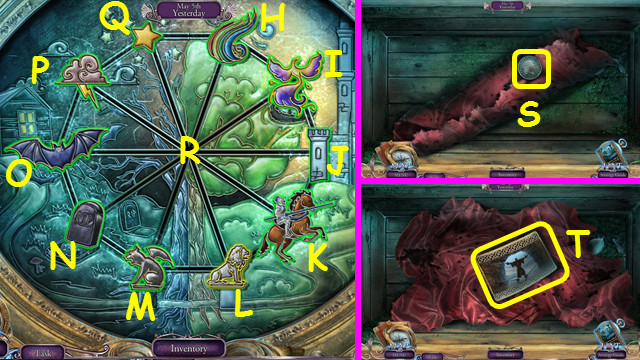
- Select the locations P-Q-H-R-M-L-K-J-I-H-R-N-O-P-R-M-L-K-R-L-M-N-R-M-L-R.
- Take the COIN (S); open the cloth and take the GAME CARD (T).
- Select the GAME CARD (inventory).

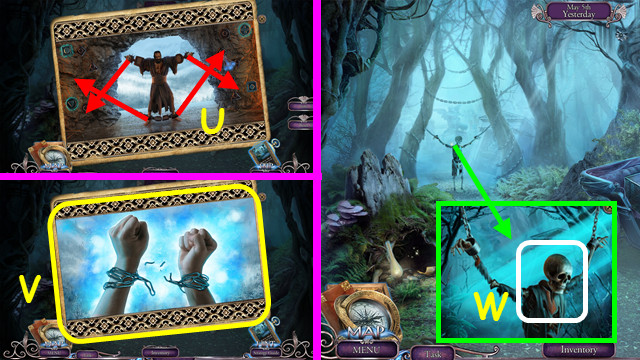
- Move the chains as shown (U).
- Take the RELEASE CARD (V).
- Use the RELEASE CARD (W).
- Walk forward.

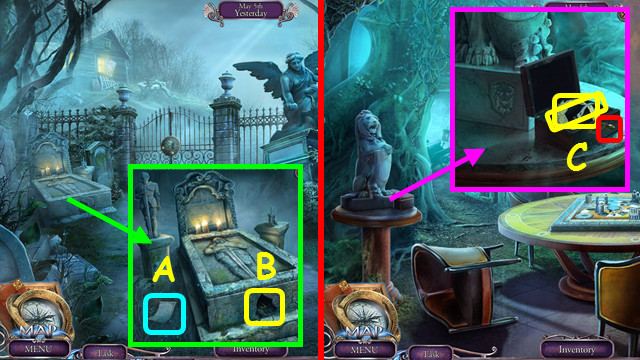
- Read the note (A).
- Use the HEDGEHOG; take the BOX KEY (B).
- Walk down 2x.
- Use the BOX KEY; take the ANGEL WREATH and 1st SHEARS HALF (C).
- Walk forward 2x.

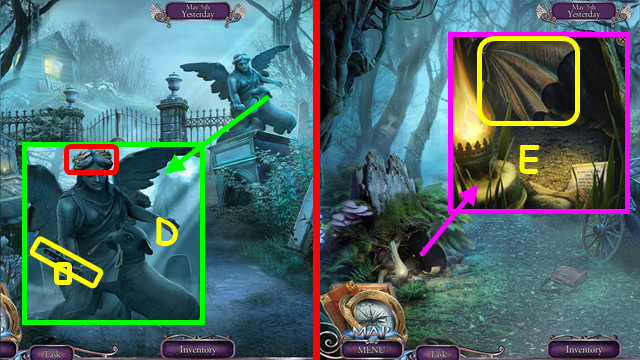
- Place the ANGEL WREATH: take the 2nd SHEARS HALF and 1st MOSAIC PART (D).
- Combine the 2 SHEARS HALVES to make the SHEARS (inventory).
- Walk down.
- Use the SHEARS; take the GARGOYLE WING (E).
- Walk forward.

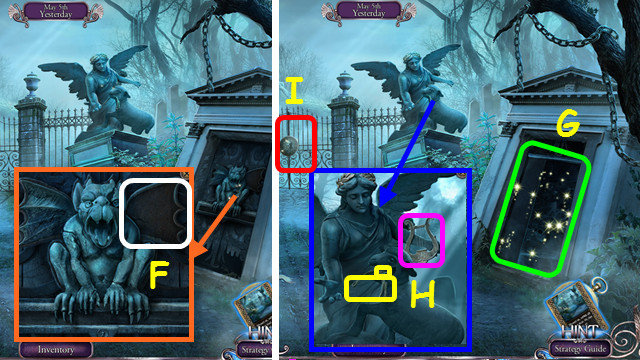
- Place the GARGOYLE WING (F).
- Play the HOP to earn the ANGEL LYRE (G).
- Place the ANGEL LYRE; take the BUCKET HANDLE and 2nd MOSAIC PART (H).
- Select the gate (I).

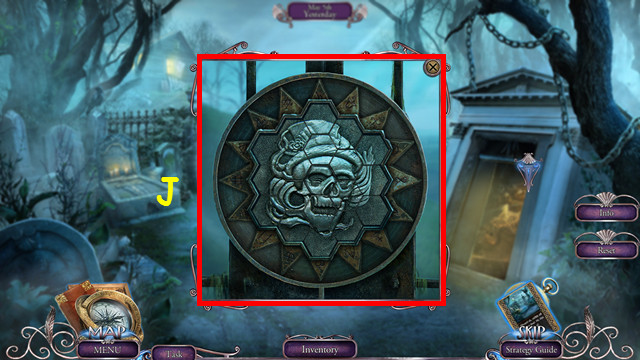
- Place the 2 MOSAIC PARTS.
- Restore the image (J).
- Walk forward.

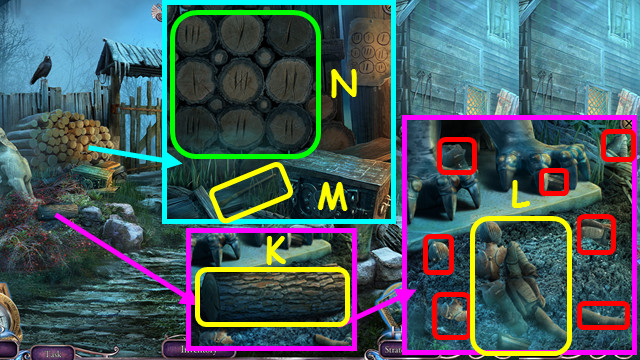
- Take the LOG (K).
- Select all the pieces (red); take the BROKEN STATUE (L).
- Take the GLUE BRUSH (M).
- Place the LOG in the opening; arrange the logs as shown (N).

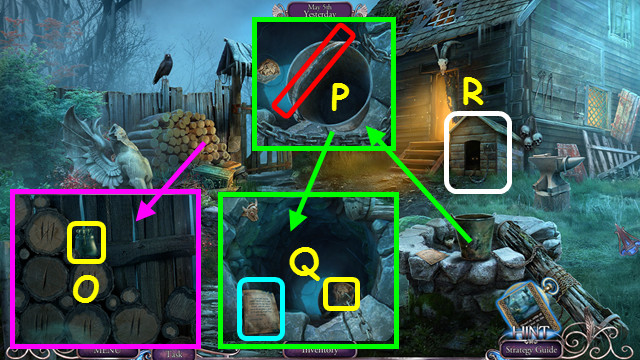
- Take the GLUE (O).
- Combine the BROKEN STATUE, GLUE, and BRUSH to make the KNIGHT STATUE (inventory).
- Place the BUCKET HANDLE; select the bucket 2x (P).
- Take the LION AMULET and read the note (Q).
- Look in the doghouse (R).
- Walk down.

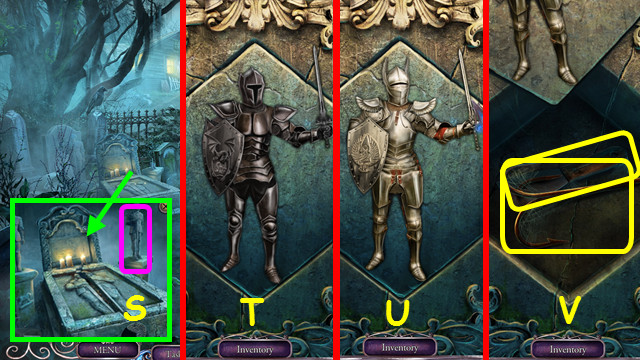
- Place the KNIGHT STATUE (S).
- Restore the dark knight (T).
- Restore the light knight (U).
- Take the TRIPLE HOOK and the SCRAPER (V).
- Walk down 2x.

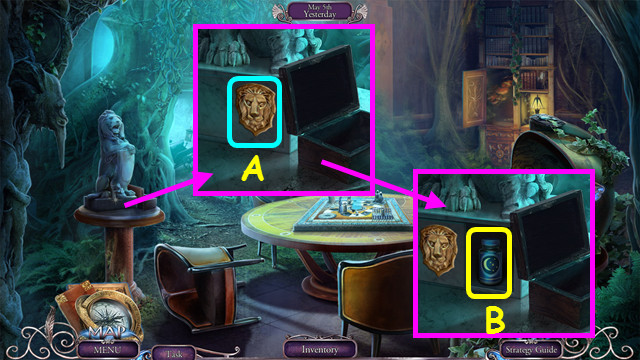
- Place the LION AMULET and press it (A).
- Take the SLEEPING PILLS (B).
- Walk forward 3x.

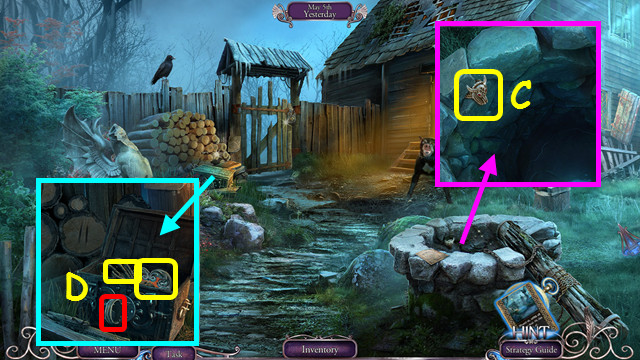
- Use the SCRAPER; take the IRON RING (C).
- Place the IRON RING; take the ROPE and HEART MEDALLION (D).
- Combine the TRIPLE HOOK and ROPE to make the CLIMBING HOOK (inventory).
- Walk down 2x.

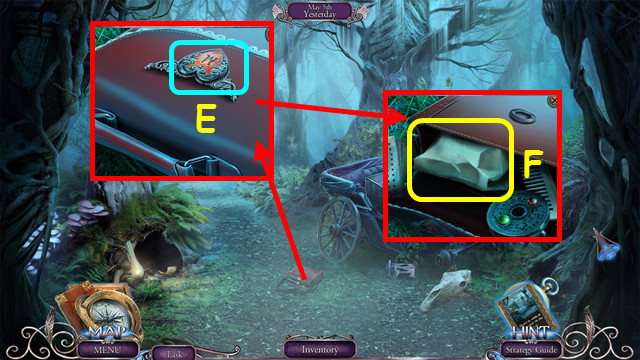
- Place the HEART MEDALLION and push it (E).
- Move the items; take the WRAPPER (F).
- Open the WRAPPER and add the SLEEPING PILLS to make the DRUGGED HAMBURGER (inventory).
- Walk forward 2x.

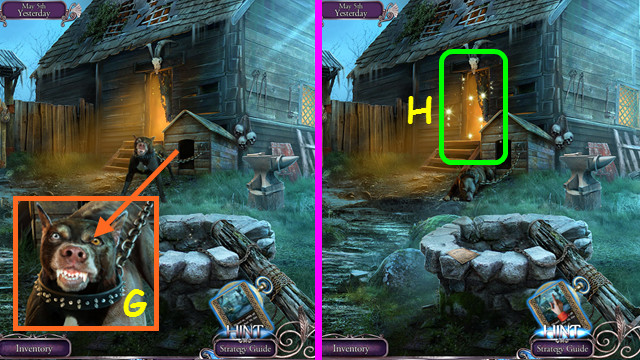
- Use the DRUGGED HAMBURGER (G).
- Play the HOP (H).

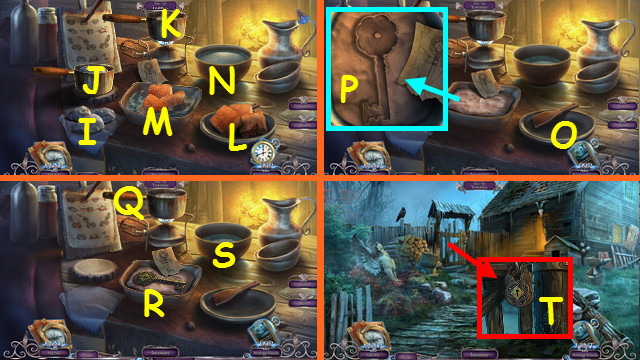
- Place the 3 metal chunks (I) in the pan (J); move the pan to the burner (K).
- Place the 3 wax chunks (L) in the square bowl (M).
- Pour water (N) into the square bowl.
- Use the spatula (O) in the square bowl.
- Select the wax several times to make the key impression (P).
- Select the pan (Q) and pour it into the key impression (R).
- Pour water (S) on the key; turn over the mold and take the GATE KEY.
- Use the GATE KEY (T); open the gate and walk forward.

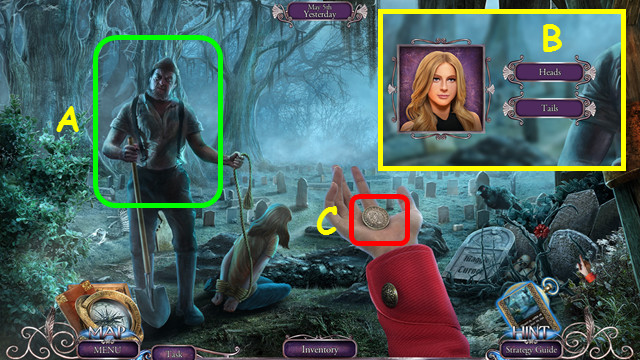
- Talk to the Lumberjack (A).
- Select heads or tails (B).
- Take the COIN (C).

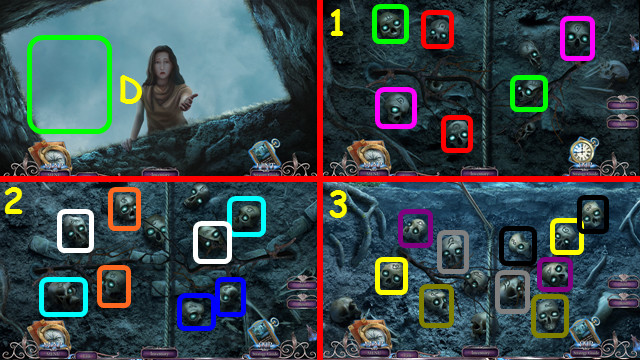
- Use the CLIMBING HOOK (D).
- Select matching runes (color-coded).
- There are 3 set of runes (1-3).

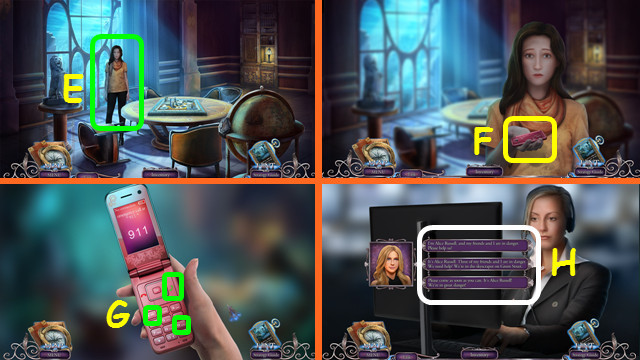
- Talk to Maggie (E).
- Take the cell phone (F).
- Press 9-1-1 and the green phone button (G).
- Select a response (H).
Chapter 3: Kevin

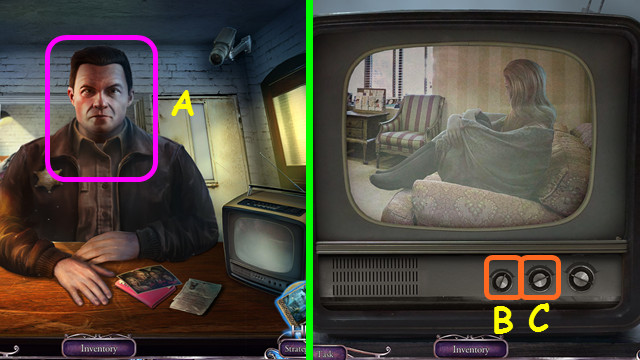
- Select the Policeman (A).
- Select Bx2-Cx3.

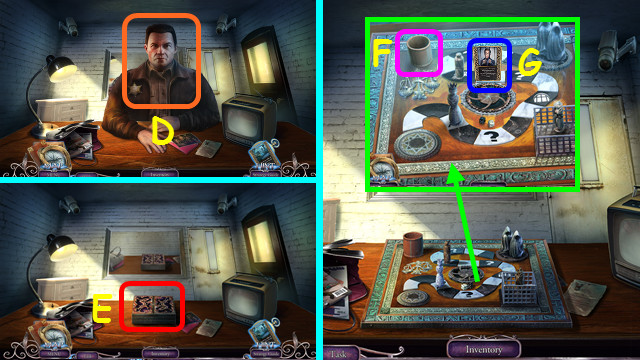
- Select the Policeman (D).
- Select the box (E).
- Select the cup (F).
- Read the card (G).

- Take the SHERRIFF’S BADGE and FEATHERS (J).
- Place the SHERRIFF’S BADGE; push it (H).
- Take the RAMROD and RAZOR BLADE; read the note (I).

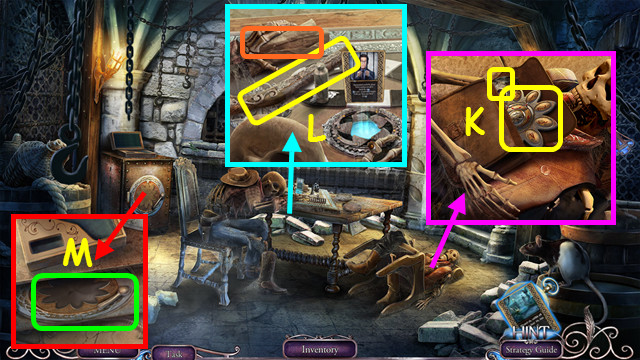
- Use the RAZOR BLADE; take the SAFE EMBLEM and 1st RING PART (K).
- Read the note; take the UNLOADED REVOLVER (L).
- Place the SAFE EMBLEM (M).

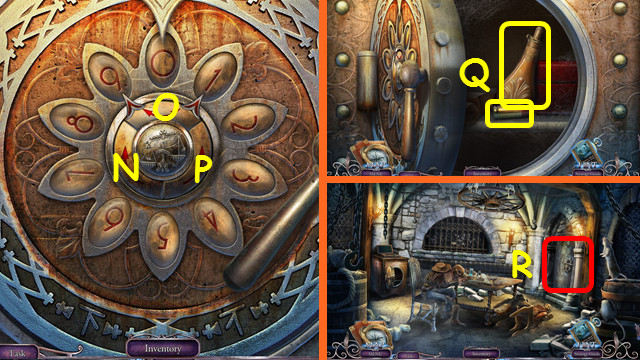
- Select N-O-Nx2-O-Nx2-O-P-O-Px3-O-Px2-O-N-O-Nx2-O-Px5.
- Take the BULLET and GUNPOWDER (Q).
- Combine the UNLOADED REVOLVER, GUNPOWDER, BULLET, and RAMROD to make the REVOLVER (inventory).
- Use the REVOLVER (R).
- Walk forward.

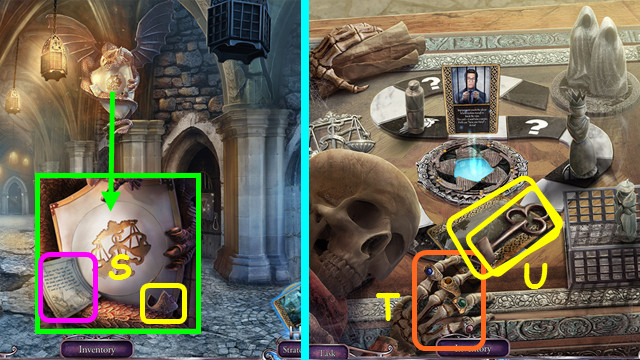
- Read the note; take the 2nd RING PART (S).
- Combine the 2 RING PARTS to make the SKELETON’S RING (inventory).
- Walk down and select the table.
- Place the SKELETON’S RING; arrange the rings as shown (T).
- Take the TRIANGULAR KEY and MYSTERIOUS CARD (U).
- Walk forward.

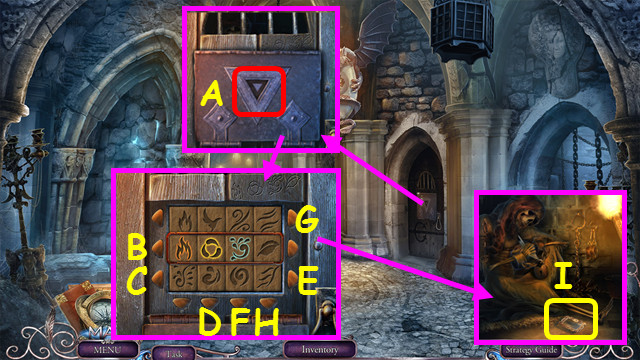
- Use the TRIANGULAR KEY (A).
- Press B-Cx2-Dx2-E-Fx2-Gx2-H.
- Take the VIEWFINDER (I).
- Combine the MYSTERIOUS CARD and the VIEWFINDER (inventory).

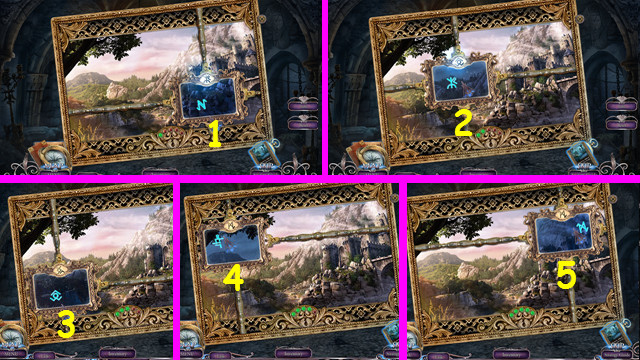
- Find the symbols in order (1-5).
- Take the HIDDEN MYSTERY CARD.

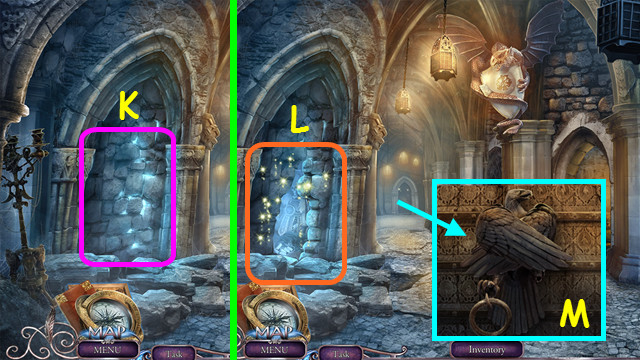
- Use the HIDDEN MYSTERY CARD (K).
- Play the HOP to earn the EAGLE RING (L).
- Place the EAGLE RING (M).
- Walk forward.

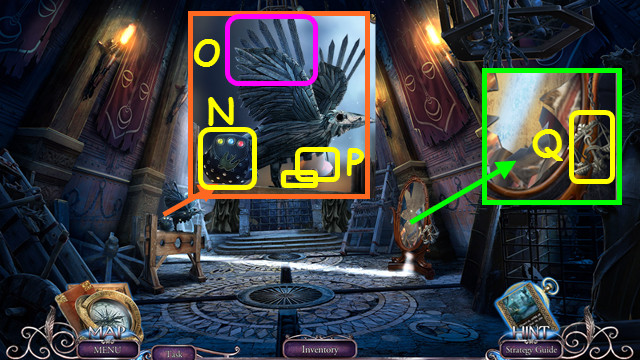
- Take the LADY’S HANDBAG (N).
- Place the FEATHERS; arrange them as shown (O).
- Take the SHACKLE KEY and 1/4 MIRROR SHARDS (P).
- Take the SCALE EMBLEM (Q).
- Walk down.

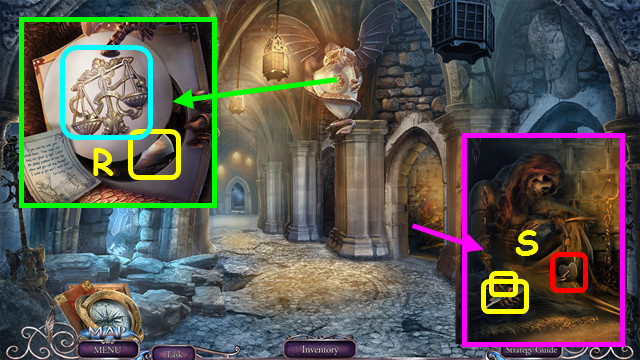
- Place the SCALE EMBLEM; take the 2/4 MIRROR SHARDS (R).
- Use the SHACKLE KEY; take the 3/4 MIRROR SHARDS and BIRD MEDALLION (S).
- Combine the LADY’S HANDBAG and BIRD MEDALLION; press blue-yellow-red, take the 4/4 MIRROR SHARDS and 1st PRECIOUS FLOWER (inventory).
- Walk forward.

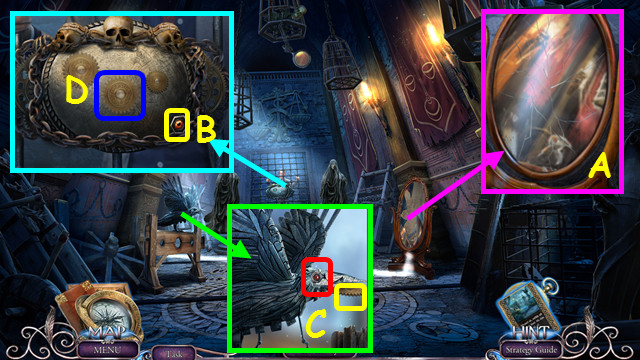
- Place the 4 MIRROR SHARDS and restore the mirror (A).
- Select the MIRROR 3x.
- Take the RAVEN EYE (B).
- Place the RAVEN EYE; take the GEAR (C).
- Place the GEAR (D).

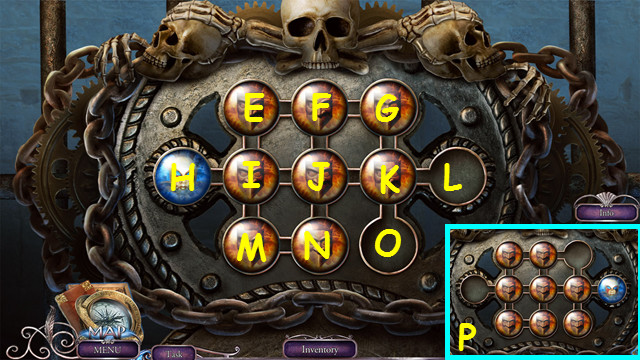
- Drag the discs K-L, K-O, F-G, I-E, I-H, N-M, J-N, E-F, I-E, N-M, J-N, G-F, K-L, K-G, I-H, K-O, K-L.
- Final solution (P).

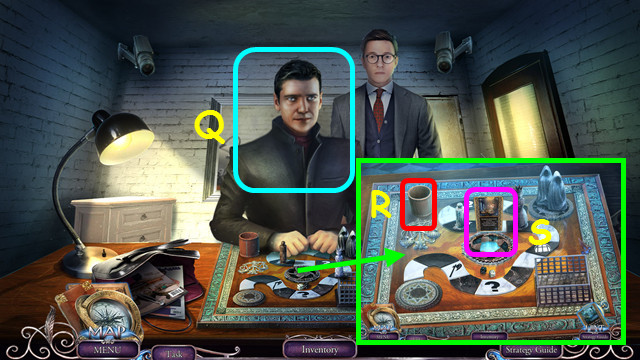
- Talk to the Stranger (Q).
- Select the cup (R).
- Read the card for a HOP; you earn the FROZEN CARD (S).
- Select the cup and read the card once more.
Chapter 4: Jim

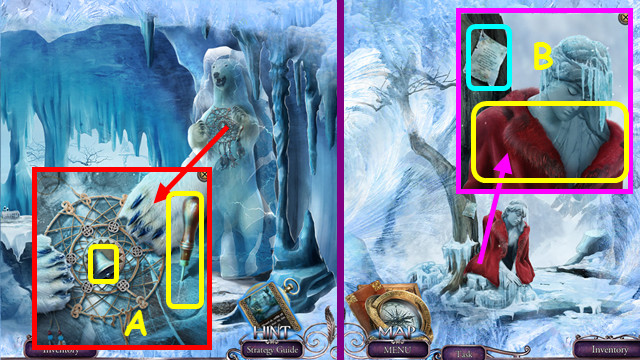
- Take the 1st BELL and AWL (A).
- Walk forward.
- Read the note; take the COAT (B).

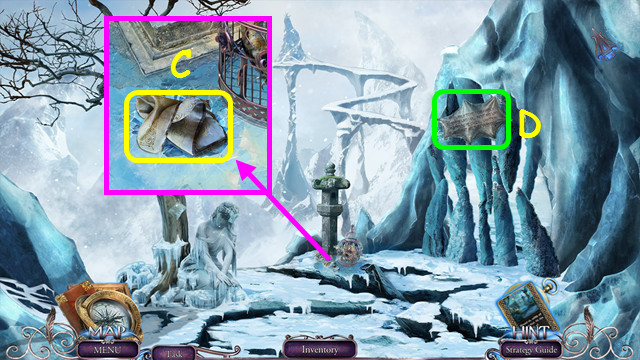
- Use the AWL; take the CLOTH (C).
- Open the CLOTH; take the 1/2 SWITCHES and SNOWFLAKE AMULET (inventory).
- Read the note (D).
- Walk down.

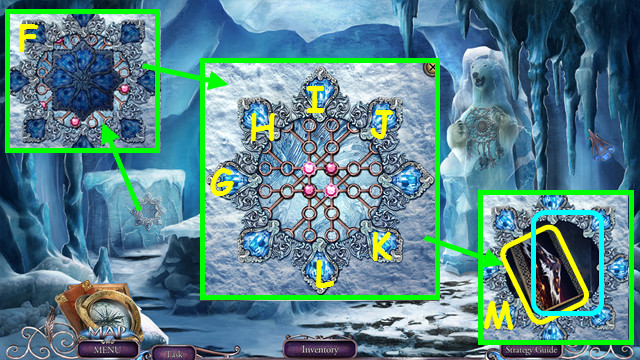
- Place the SNOWFLAKE AMULET (F).
- Select Gx3-I-K-G-H-I-J-L-J-Kx2.
- Take the MAGIC CARD and read the note (M).
- Select the MAGIC CARD (inventory).

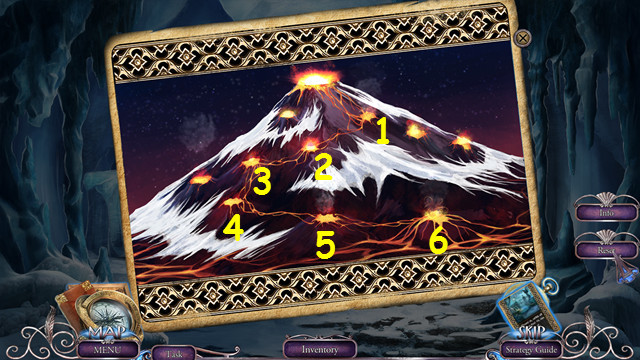
- Select 1-6.
- Take the LAVA CARD.
- Walk forward.

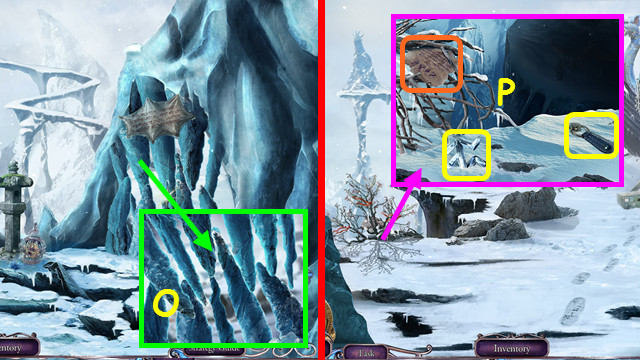
- Place the LAVA CARD (O).
- Walk forward.
- Read the note; take the FROST RUNE and ZIPPER (P).
- Combine the FROZEN CARD and the FROST RUNE (inventory).

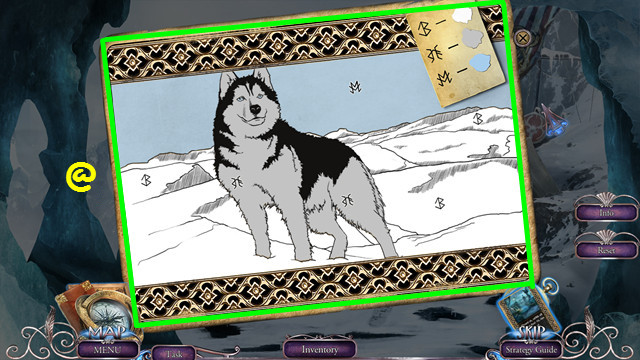
- Color the card as shown (@).
- Take the SNOWDOG CARD.

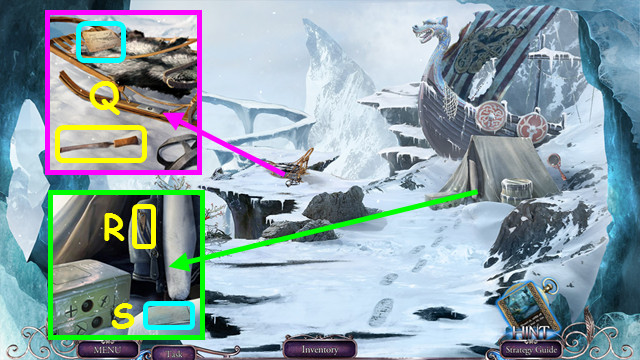
- Read the instructions and take the FILE (Q).
- Use the ZIPPER; take the PENKNIFE (R).
- Read the note (S).
- Walk down.

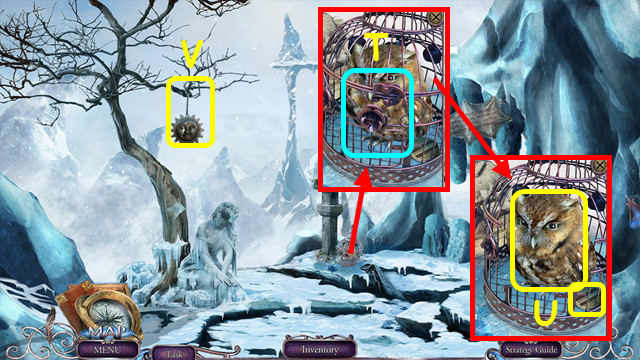
- Use the FILE (T).
- Take the OWLET and 2/2 SWITCHES (U).
- Use the OWLET to take the SUN TOTEM and HOOK (V).
- Walk forward.

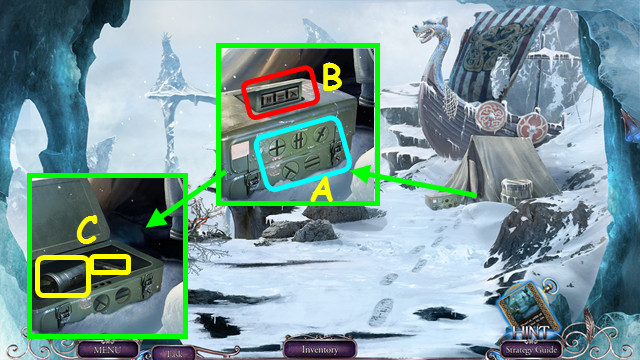
- Place the 2 SWITCHES (A).
- Press the 3 switches that match these symbols (B).
- These change with every attempt.
- Take the FLASHLIGHT and BOLT (C).
- Walk down 2x.

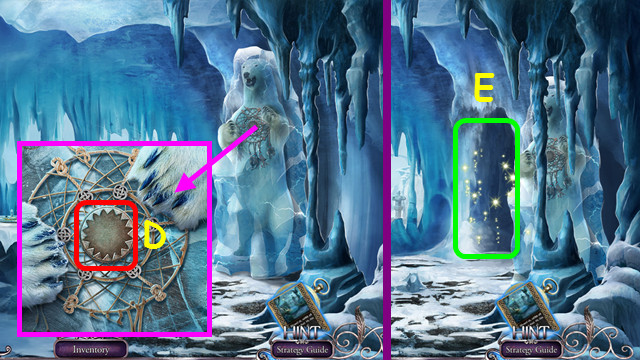
- Place the SUN TOTEM (D).
- Play the HOP to earn the FISHING ROD (E).
- Combine the FISHING ROD and HOOK to make the FISHING ROD (inventory).
- Go forward twice.

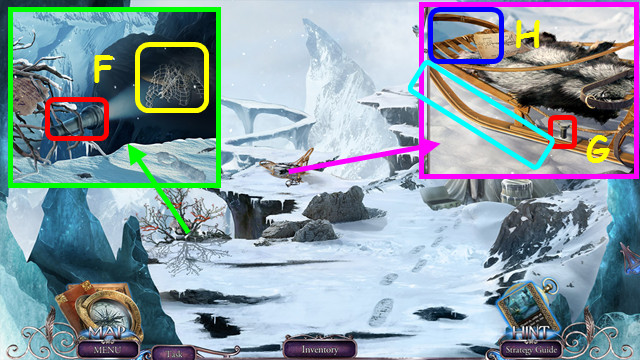
- Place the FLASHLIGHT; use the FISHING ROD to take the ENTANGLED NET (F).
- Combine the ENTANGLED NET and PENKNIFE; take the WRENCH and SKI (inventory).
- Place the SKI, BOLT, and use the WRENCH (G).
- Place the SNOWDOG CARD (H).

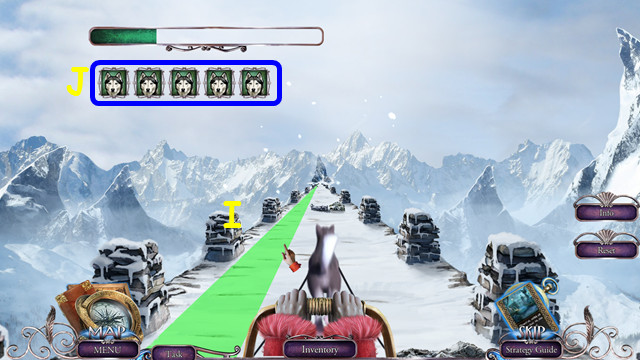
- Move the dog left, center, or right to avoid the obstacles (I).
- Solution center-right-right-left-center-right-center-left-center-right-center-right-center-right-right-right-right-left-center-right-center-right-center-left-right.
- If you hit 5 obstacles, the mini-game will restart (J).

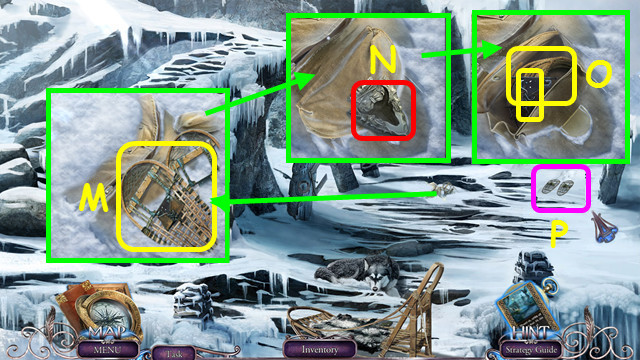
- Take the PILE OF STICKS (K).
- Take the KNAPSACK BUTTON (L).


- Take the DAMAGED SNOWSHOES and remove the snow (M).
- Place the KNAPSACK BUTTON and push it (N).
- Take the BELT and ROPE (O).
- Combine the DAMAGED SNOWSHOES, PILE OF STICKS, ROPE, and BELT to make the SNOW SHOES (inventory).
- Place the SNOW SHOES; walk forward (P).

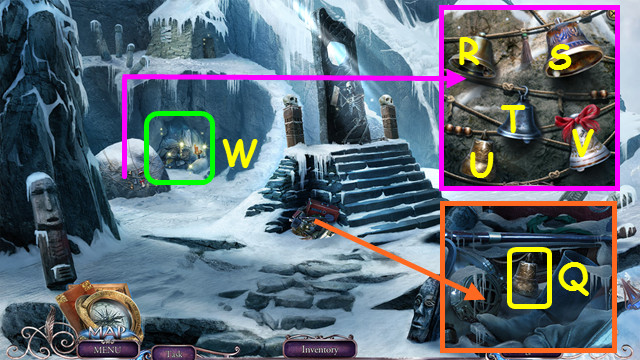
- Take the 2nd BELL (Q).
- Place the 2 BELLS; repeat the sequences R-S-T, U-V-V-R, R-R-R-V-T.
- Play the HOP to earn the MYSTERIOUS CARD (W).
- Select the MYSTERIOUS CARD (inventory).

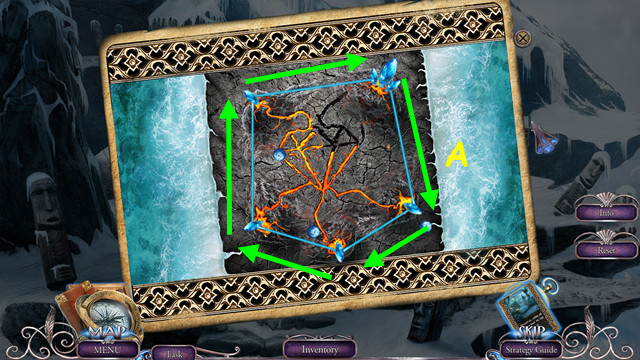
- Connect the 5 crystals (A).
- Do not let a ball hit the line you are making.
- Take the RELEASE PRISONER CARD.

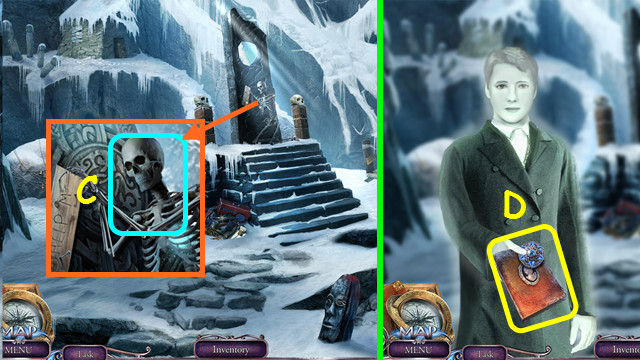
- Use the RELEASE PRISONER CARD (C).
- Take the DEFENSE AMULET and GHOST’S BOOK (D).
- Open the GHOST’S BOOK, turn the pages, restore the 3 photos, and take the SILVER KEY (inventory).

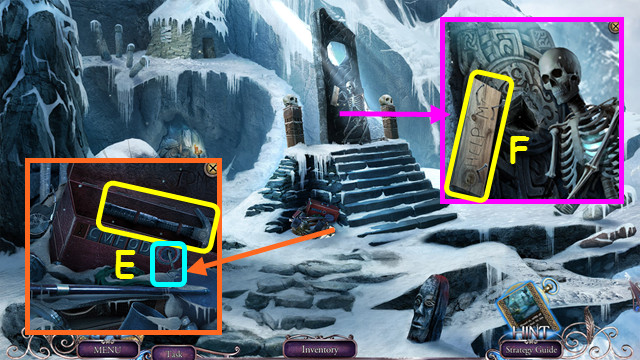
- Use the SILVER KEY; take the HAMMER (E).
- Use the HAMMER to take the 1-3/6 NAILS and the 1st WOODEN PLANK (F).
- Walk down.

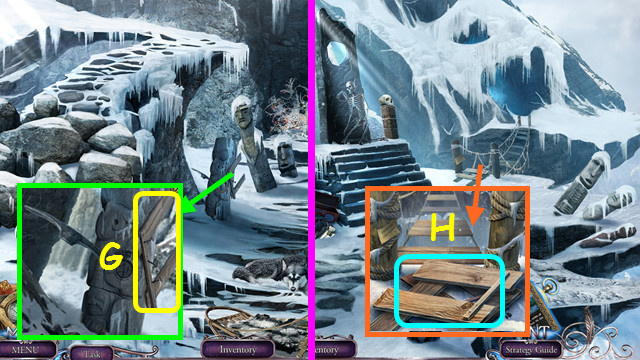
- Use the HAMMER to take the 4-6/6 NAILS and the 2nd WOODEN PLANK (G).
- Combine the 2 WOODEN PLANKS, 6 NAILS, and HAMMER to make the BRIDGE FRAGMENT (inventory).
- Walk forward.
- Place the BRIDGE FRAGMENT (H).

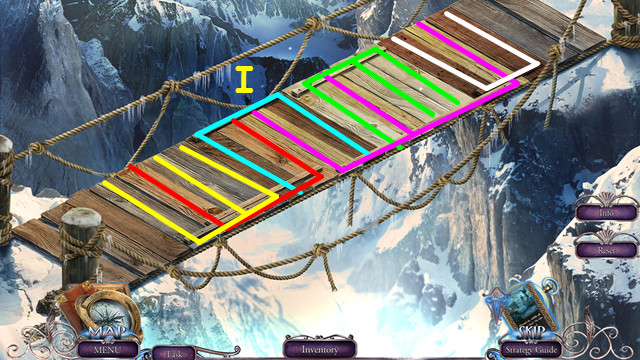
- Restore the bridge (I).
- Walk forward.

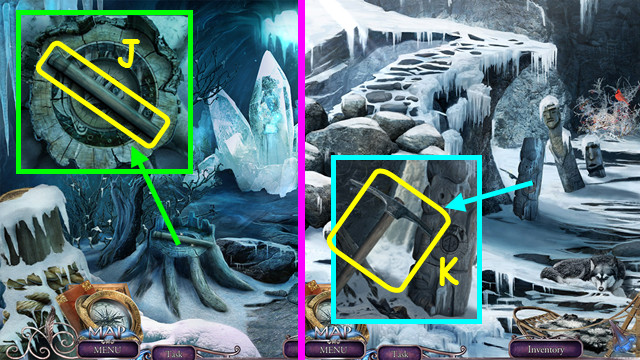
- Take the PICKAXE HANDLE (J).
- Walk down 2x.
- Use the PICKAXE HANDLE to take the PICKAXE (K).
- Walk forward 2x.

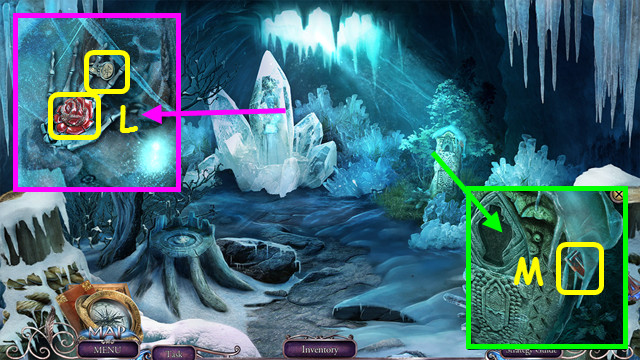
- Use the PICKAXE; take the 2nd PRECIOUS FLOWER and SIGNET RING (L).
- Use the PICKAXE; take the LETTER T (M).
- Walk down.

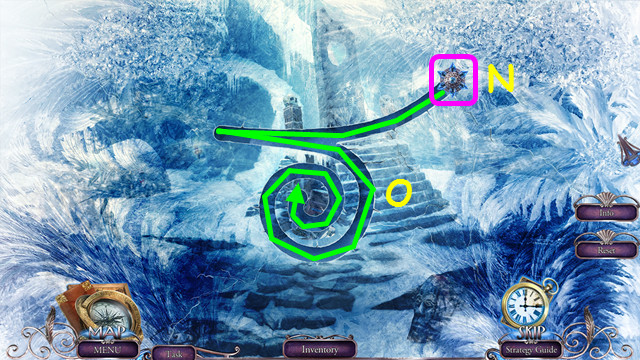
- Place the DEFENSE AMULET (N).
- Drag the amulet through the rune (O).

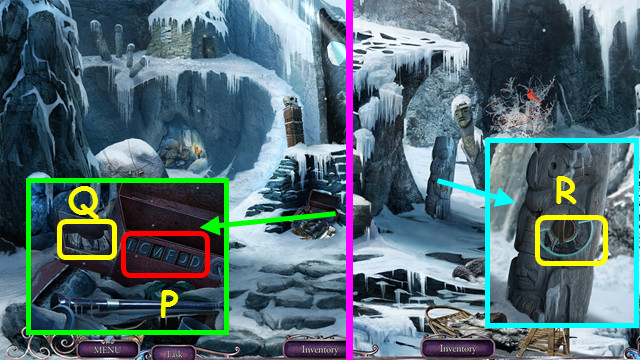
- Place the LETTER T; press T-O-M (P).
- Take the 1st WOODEN DISK HALF (Q).
- Walk down.
- Place the SIGNET RING; take the 2nd WOODEN DISK (R).
- Go forward 2x.

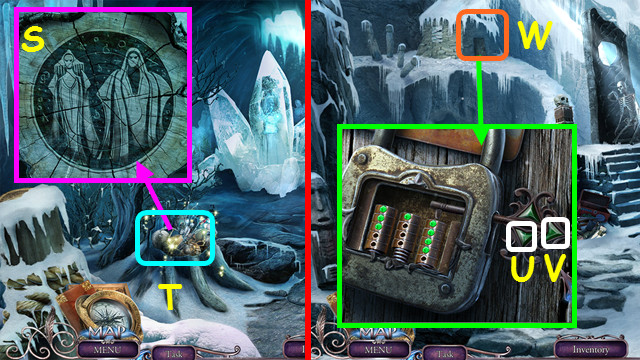
- Place the 2 WOODEN DISKS; restore the image (S).
- Play the HOP to earn the LOCKPICK (T).
- Walk down.
- Use the LOCKPICK; press Ux3-V-U-V-Ux4-V.
- Enter the Madman’s Hut (W).

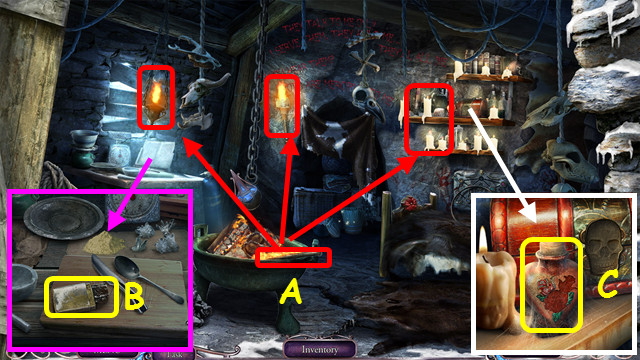
- Take the STICK (A) and use it 3x (red).
- Take the LIGHTER (B).
- Take the HEART BOTTLE (C).
- Combine the HEART BOTTLE and the 2 PRECIOUS FLOWERS to make the 0/2 VIAL OF SOULS (inventory).

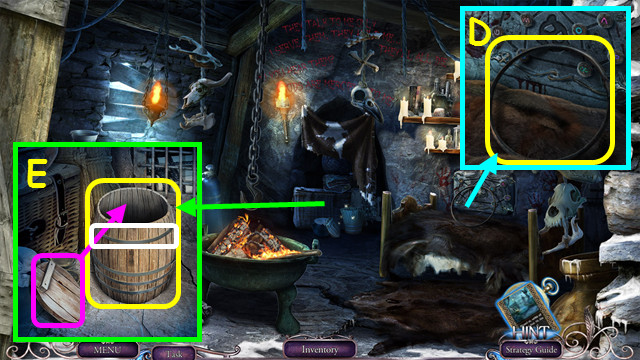
- Take the BARREL RIM (D).
- Place the BARREL RIM, add the lid, and take the BARREL (E).
- Walk down.

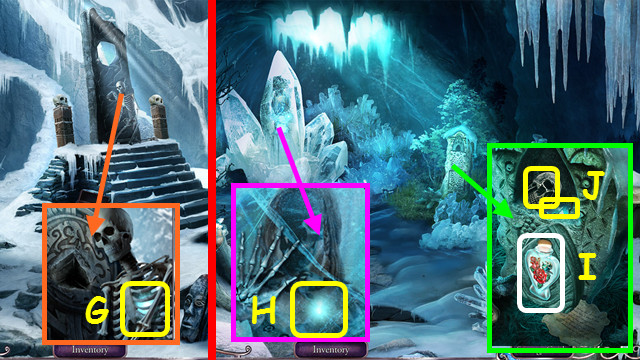
- Use the 0/2 VIAL OF SOULS to make the 1/2 VIAL OF SOULS (G).
- Go to the Ice Meadow.
- Use the 1/2 VIAL OF SOULS to make the VIAL OF SOULS (H).
- Place the VIAL OF SOULS (I).
- Take the SILVER SKULL and 1/4 CARD PIECES (J).
- Go to the Madman’s Hut.

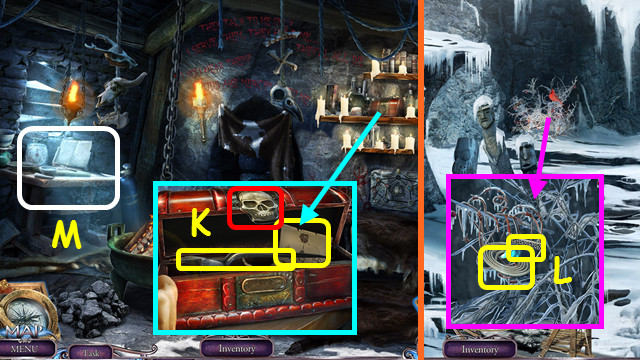
- Place the SILVER SKULL; take the WIRE CUTTERS and EXPLOSIVE RECIPE (K).
- Walk down twice.
- Use the WIRE CUTTERS; take the 2/4 CARD PIECES and FUSE (L).
- Return to the Madman’s Hut.
- Select the table (M).

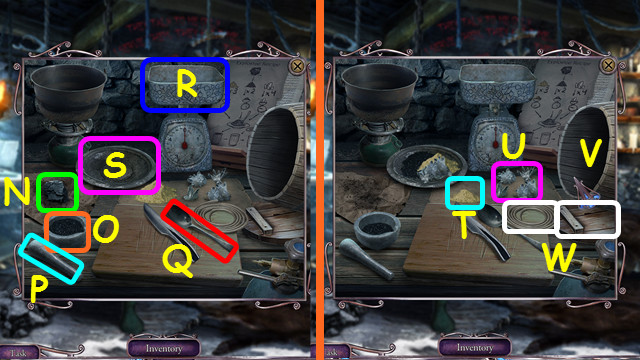
- Place the BARREL, FUSE, and EXPLOSIVES RECIPE on the table.
- Move the charcoal (N) to the mortar (O); use the PESTLE (P).
- Use the spoon 2x (Q) to put the charcoal into the scale bowl (R).
- Pour the scale bowl onto the plate (S).
- Do the same with 3 spoonfuls of sulfur (T).
- Place the 4 saltpeter crystals (U) in the scale and move them to the plate.
- Use the spoon to stir the mixture on the plate; pour the plate into the barrel (V).
- Place the lid and fuse (W) on the barrel to earn the BARREL OF EXPLOSIVE.
- Walk down twice.

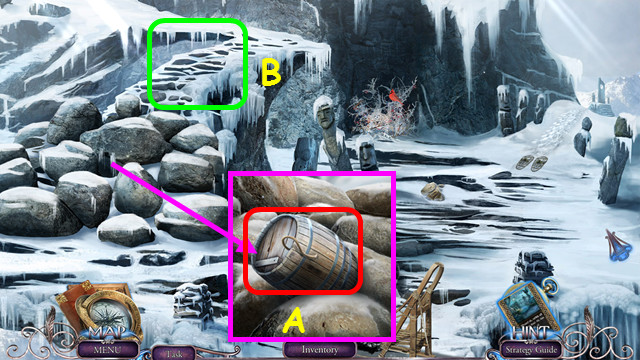
- Place the BARREL OF EXPLOSIVE and use the LIGHTER (A).
- Walk to the Mountain Slope (B).

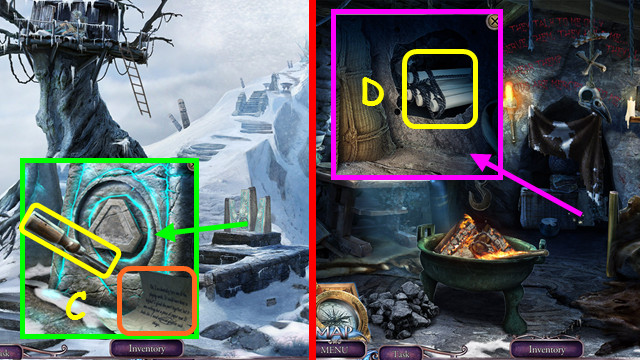
- Take the SCREWDRIVER and read the note (C).
- Return to the Madman’s Hut.
- Use the SCREWDRIVER; take the ROPE LADDER PIECE (D).
- Return to the Mountain Slope.

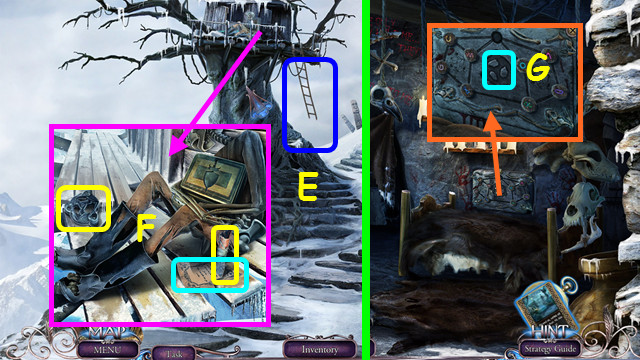
- Place the ROPE LADDER PIECE (E).
- Take the AMULET OF RAVENS, SHARP STONE, and read the note (F).
- Return to the Madman’s Hut.
- Place the AMULET OF RAVENS (G).

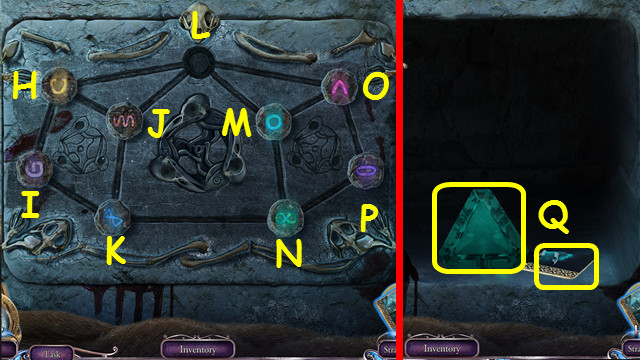
- Select O-P-N-K-I-H-J-L-O-P-N-K-I-H-L-M-N-K-I-H-J-L-H-I-K-J-L.
- Take the GEM and 3/4 CARD PIECES (Q).
- Return to the Mountain Slope.

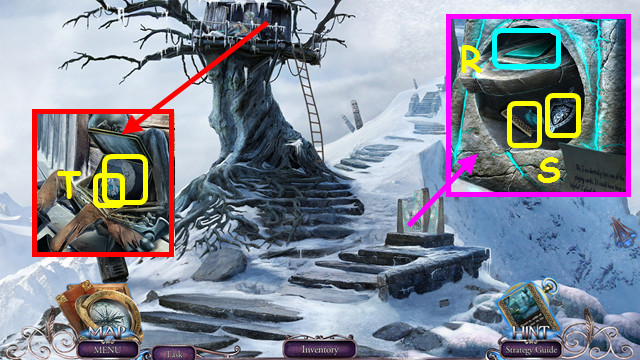
- Place the GEM (R).
- Take the 4/4 CARD PIECE and KNIGHT’S AMULET (S).
- Place the KNIGHT’S AMULET; take the BOTTLE OF VISCOUS LIQUID and MAGIC GLUE RECIPE (T).
- Walk down.

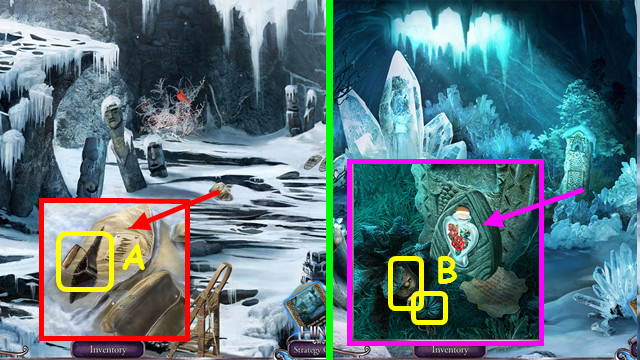
- Use the SHARP STONE; take the SHOVEL (A).
- Go to the Ice Meadow.
- Use the SHOVEL; take the 0/2 ICE FLOWER POLLEN and MANDRAKE ROOT (B).

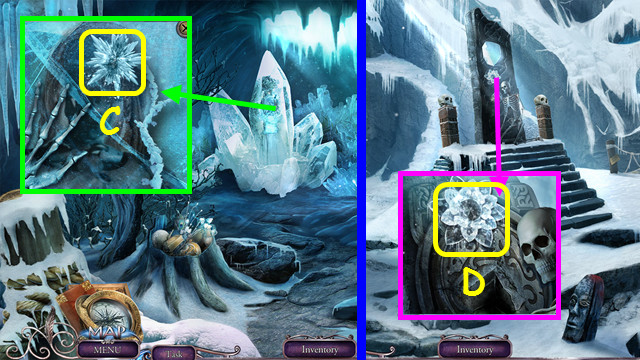
- Use the 0/2 ICE FLOWER POLLEN to get the 1/2 ICE FLOWER POLLEN (C).
- Walk down.
- Use the 1/2 ICE FLOWER POLLEN to get the 2/2 ICE FLOWER POLLEN (D).
- Enter the Madman’s Hut and select the potion table on the left.

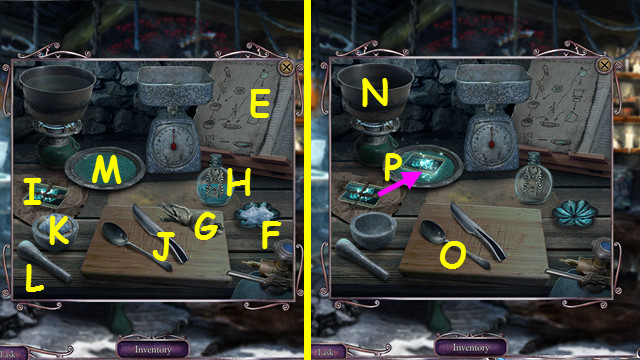
- Place the MAGIC GLUE RECIPE (E), ICE FLOWER POLLEN (F), MANDRAKE ROOT (G), BOTTLE OF VISCOUS LIQUID (H), and 4 CARD PIECES (I).
- Use the knife (J) on the mandrake; move the pieces to the mortar (K) and add the ice flower pollen.
- Use the pestle (L).
- Pour the mixture onto the plate (M).
- Pour the viscous liquid into the bowl (N), and then onto the plate.
- Use the spoon (O) on the plate.
- Use the card pieces on the plate to make the ANTI-MAGIC CARD (P).
- Go to the Mountain Slope and walk forward.

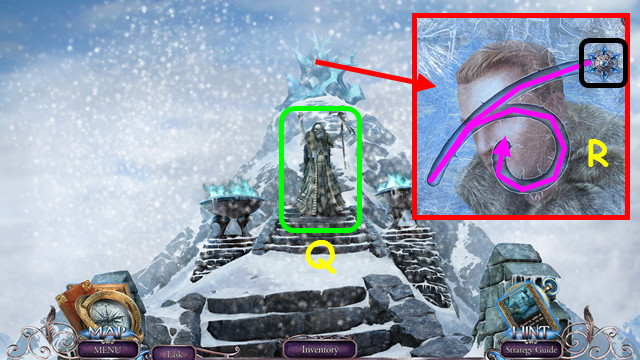
- Use the ANTI-MAGIC CARD (Q).
- Place and drag the DEFENSE AMULET through the rune (R).
Chapter 5: The Gods

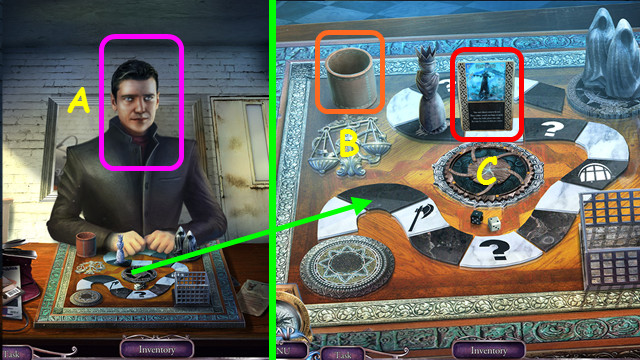
- Talk to the Stranger (A).
- Select the cup (B).
- Select the card for a HOP (C); you earn the STAFF BASE.
- Select the cup and card again.

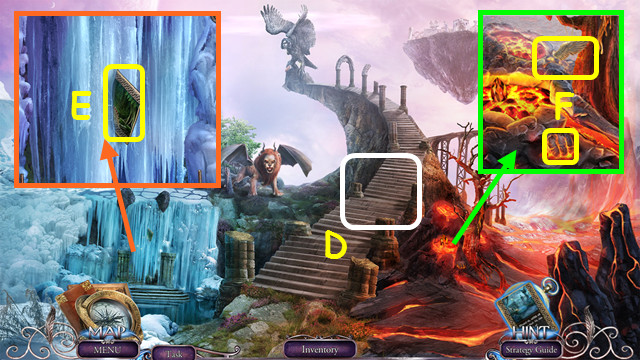
- Select the path (D).
- Take the PEGASUS WING and HOT COAL (F).
- Use the HOT COAL; take the MYSTERIOUS CARD (E).
- Select the MYSTERIOUS CARD (inventory).

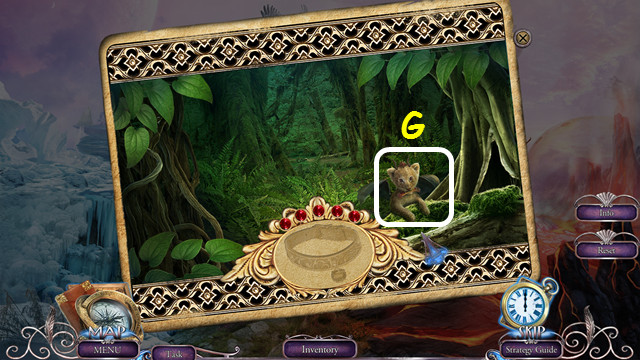
- Select the creature as it pops up 5x (G).
- Take the ANIMAL COLLAR CARD.

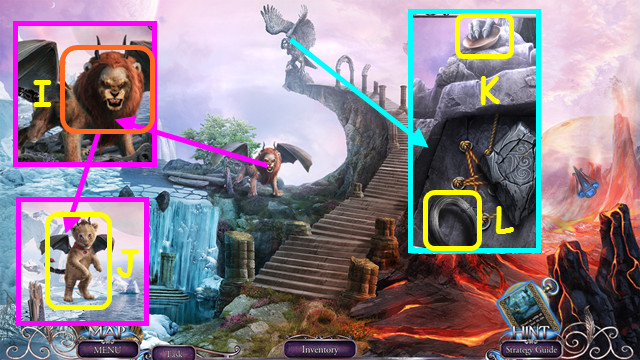
- Use the ANIMAL COLLAR CARD (I).
- Take the TAMED ANIMAL (J).
- Use the TAMED ANIMAL to take the PLATE (K).
- Take the SPOOL OF WIRE (L).

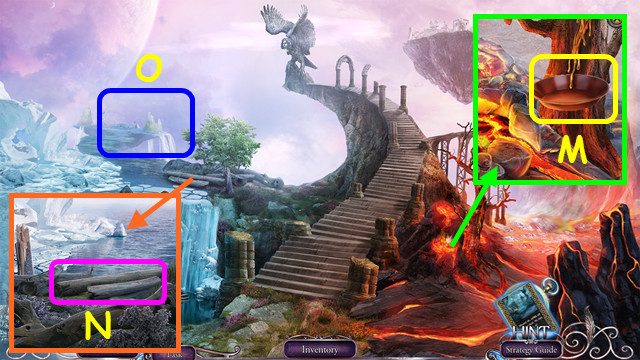
- Use the PLATE to take the PLATE OF RESIN (M).
- Use the SPOOL OF WIRE (N).
- Go to the Sea Island (O).

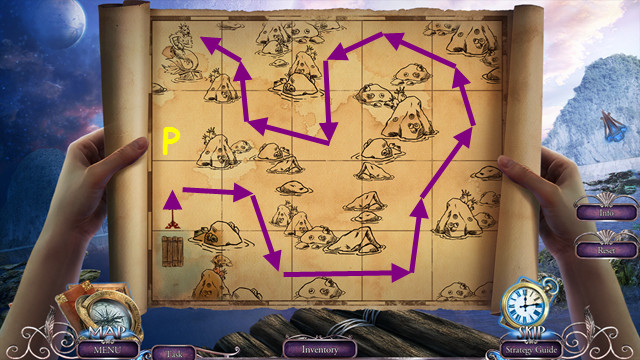
- Use the arrows to guide the raft.
- Follow the marked path (P).

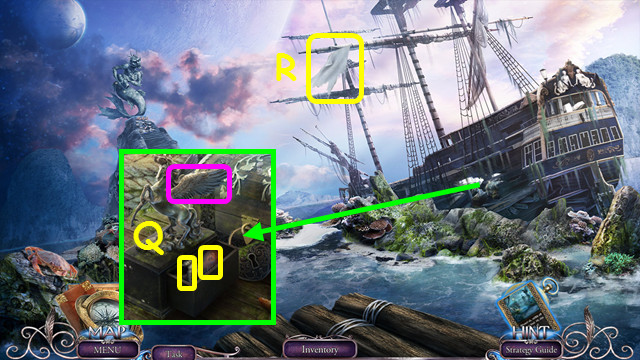
- Place the PEGASUS WING; take the 1/2 LEAF CLASP and FUEL (Q).
- Use the TAMED ANIMAL to take the SAIL PART (R).
- Walk down.

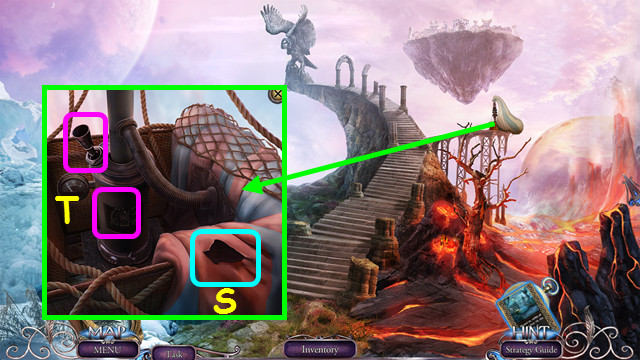
- Use the PLATE OF RESIN and SAIL PART (S).
- Use the FUEL and the LIGHTER (T).

- Try to walk forward.
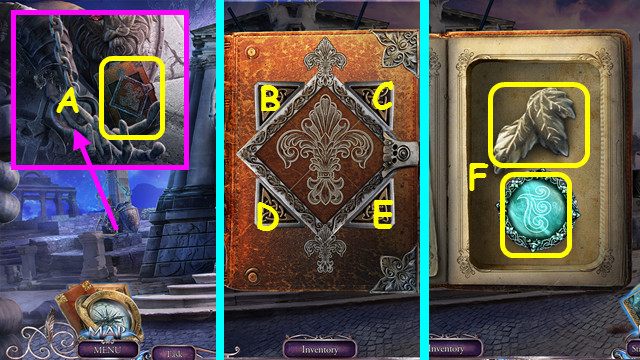
- Take SIR LEROY’S DIARY (A).
- Select SIR LEROY’S DIARY (inventory).
- Press E-C-Bx2.
- Open the diary and move the page; take the 2/2 LEAF CLASP and WIND STONE (F).
- Walk down.

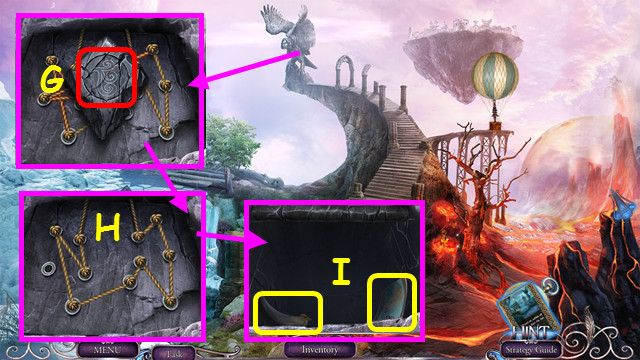
- Place the WIND STONE (G).
- Move the ropes as shown (H).
- Take the 1/3 STAFF HEAD and MYSTERIOUS CARD (I).
- Go to the Sea Island.

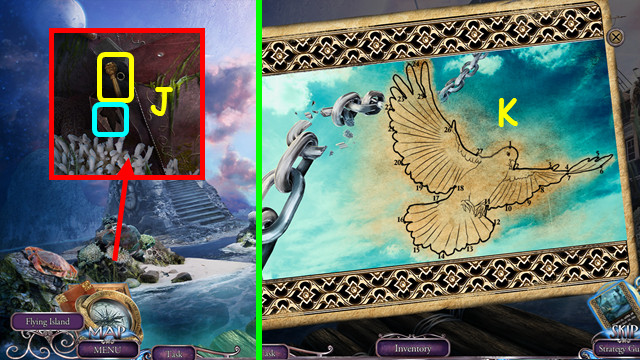
- Place the LEAF CLASP; take the ENCHANTED PEN (J).
- Combine the MYSTERIOUS CARD and ENCHANTED PEN (inventory).
- Select the dots in numerical order; also connect 27-1 (K).
- Take the FREEDOM RUNE CARD.
- Go to Outside The Temple.

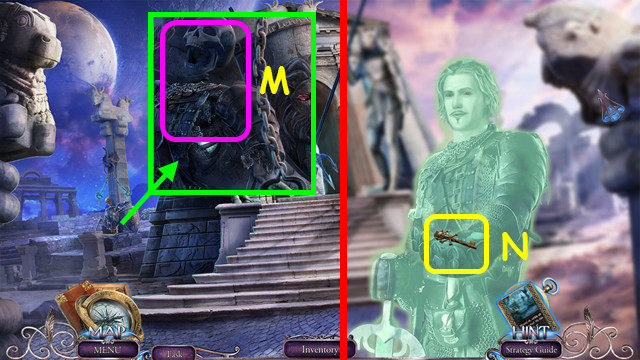
- Use the FREEDOM RUNE CARD (M).
- Talk to Sir Leroy and take the PIRATE KEY (N).
- Return to Sea Island.

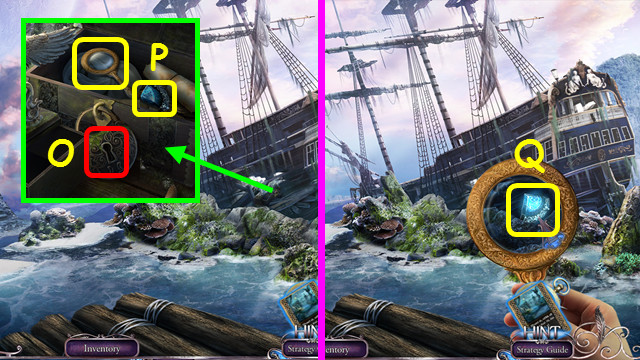
- Use the PIRATE KEY (O).
- Take the TREASURE HUNT LENS and 1/4 WATER STONE PART (P).
- Use the TREASURE HUNT LENS to take the 2/4 WATER STONE PART (Q).
- Walk down.

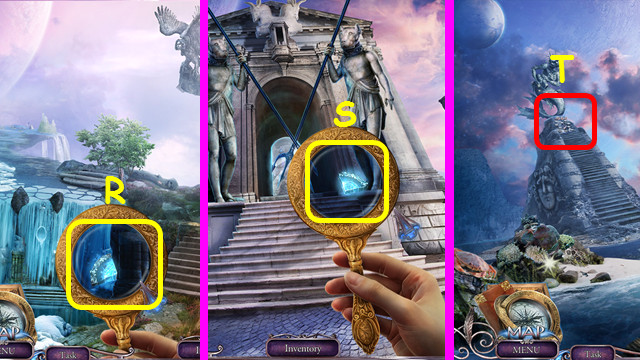
- Use the TREASURE HUNT LENS to take the 3/4 WATER STONE PART (R).
- Go to Outside The Temple.
- Use the TREASURE HUNT LENS to take the 4/4 WATER STONE PART (S).
- Return to Sea Island.
- Select the mini-game (T).

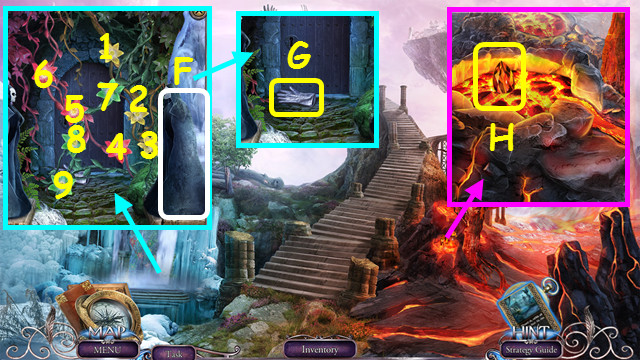
- Place the WATER STONE (A).
- Move 4 drops each of green and blue to the correct bottles; dump the yellow drops (B).
- Take the STATUETTE OF THE GODDESS and 2/3 STAFF HEAD (C).
- Walk down.

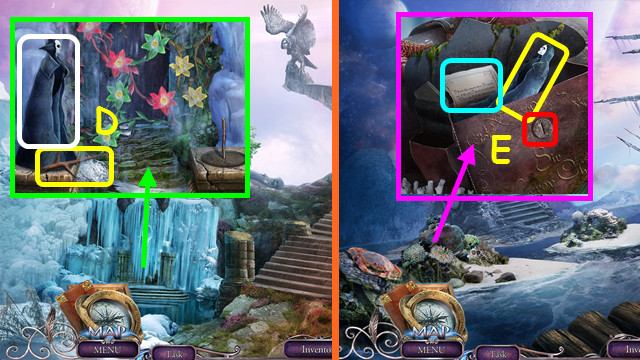
- Place the STATUETTE OF THE GODDESS; take the SHARP THORN (D).
- Go to Sea Island.
- Use the SHARP THORN; read the note and take the STATUETTE OF THE GODS (E).
- Walk down.


- Place the STATUETTE OF THE GODS (F).
- Select the buds in numerical order (1-9).
- Take the FIREPROOF GLOVE (G).
- Use the FIREPROOF GLOVE to take the FIRE RUBY (H).
- Go to Outside The Temple.

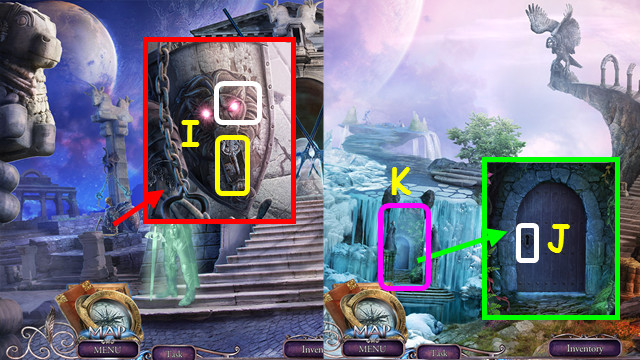
- Place the FIRE RUBY; take the STONE KEY (I).
- Walk down.
- Use the STONE KEY (J).
- Play the HOP to earn the EARTH STONE (K).
- Go to Outside The Temple.

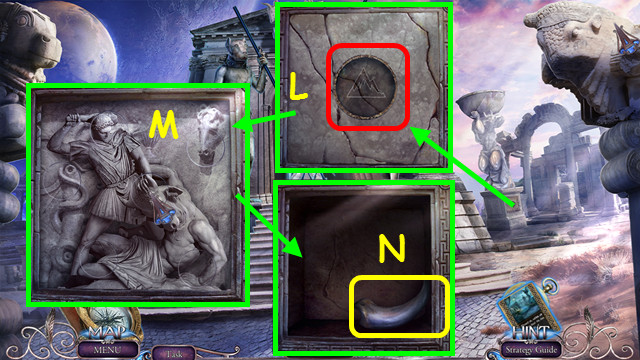
- Place the EARTH STONE (L).
- Restore the carving (M).
- Take the 3/3 STAFF HEAD (N).
- Combine the STAFF BASE and STAFF HEAD to make the STAFF (inventory).

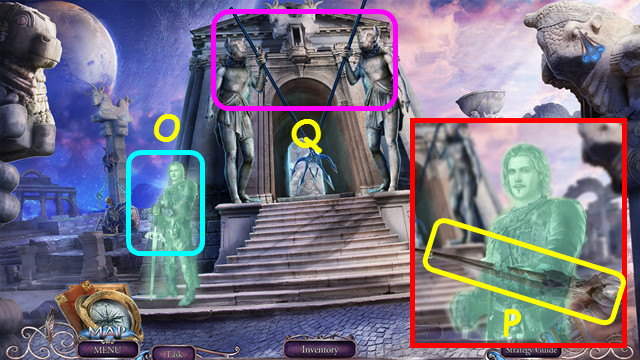
- Use the STAFF (O).
- Take the STAFF OF THE DEAD (P).
- Use the STAFF OF THE DEAD (Q).
- Walk forward.

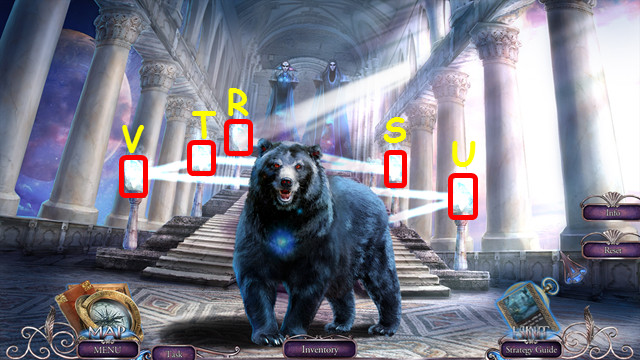
- Select the crystals R-S-T-U-V.
- Aim the light at the bear.

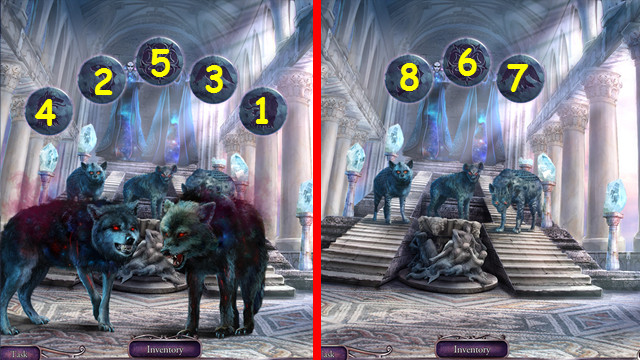
- Repeat the sequence 1-5.
- Repeat the sequence 6-8.

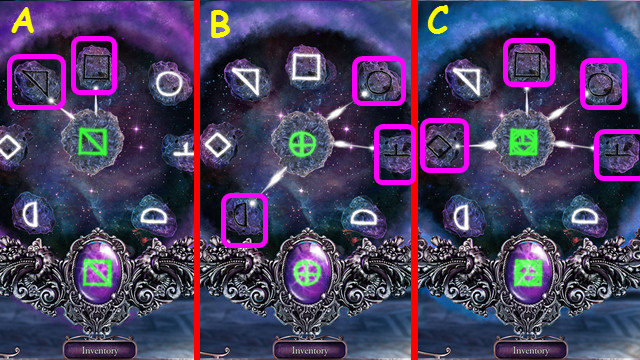
- Select the 3 sets of runes (A-C).
- Congratulations! You have completed Surface: Game of the Gods.


 Amaranthine Voyage: The Tree of Life Walkthrough, Guide, & Tips
 Elementals: The Magic Key Walkthrough, Guide, & Tips
 9: The Dark Side of Notre Dame Walkthrough, Guide, & Tips
 Dark Parables: Curse of Briar Rose Walkthrough, Guide, & Tips
 Brink of Consciousness: Dorian Gray Syndrome Walkthrough, Guide, & Tips