Emberwing: Lost Legacy Walkthrough, Guide, & Tips
Emberwing: Lost Legacy Walkthrough

Welcome to the Emberwing: Lost Legacy Walkthrough
A dragon has awoken after a hundred years – and it’s after your son.
Whether you use this document as a reference when things get difficult or as a road map to get you from beginning to end, we’re pretty sure you’ll find what you’re looking for here.
This document contains a complete Emberwing: Lost Legacy game walkthrough featuring annotated screenshots from actual gameplay!
We hope you find this information useful as you play your way through the game. Use the walkthrough menu below to quickly jump to whatever stage of the game you need help with.
Remember to visit the Big Fish Games Forums if you find you need more help. Have fun!
This walkthrough was created by David Becker, and is protected under US Copyright laws. Any unauthorized use, including re-publication in whole or in part, without permission, is strictly prohibited.
General Tips
- This is the official guide for Emberwing: Lost Legacy.
- This guide will not mention each time you have to zoom into a location; the screenshots will show each zoom scene.
- We will use the acronym HOP for Hidden-object puzzles. Interactive items will be color-coded and some will be numbered; please follow the numbers in sequence.
- Use the map to travel to a location.
Chapter 1: At Home

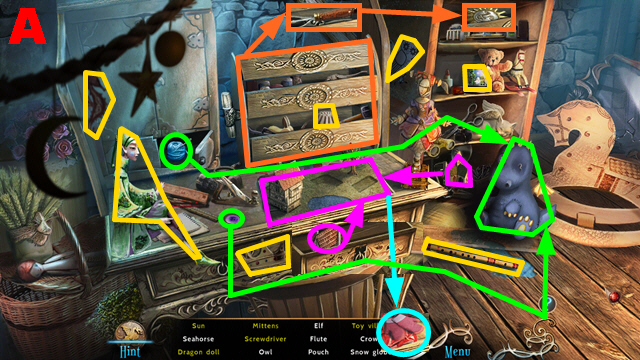
- Play the HOP.
- You receive the SCREWDRIVER (A).

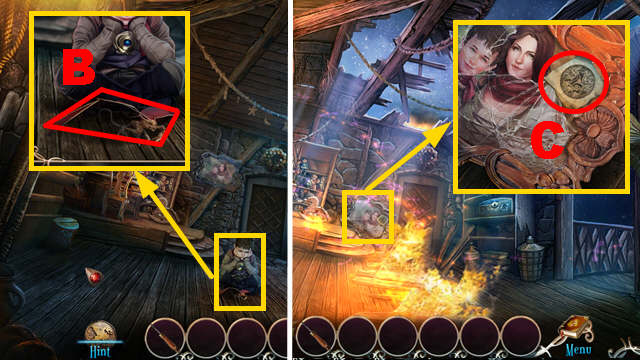
- Use the SCREWDRIVER (B).
- Take the SKETCH (C).
- Turn right.

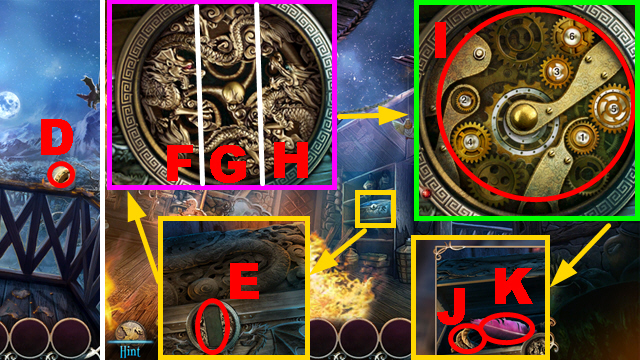
- Take the DIAL (D).
- Walk down.
- Place the DIAL (E).
- Play the mini-game.
- Solution (purple): Fx2, Gx4, Hx3.
- Solution (green): (I).
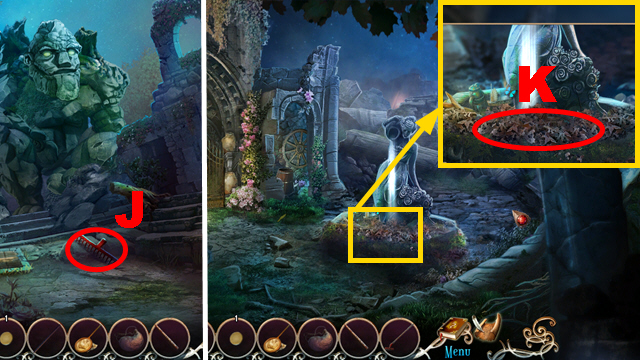
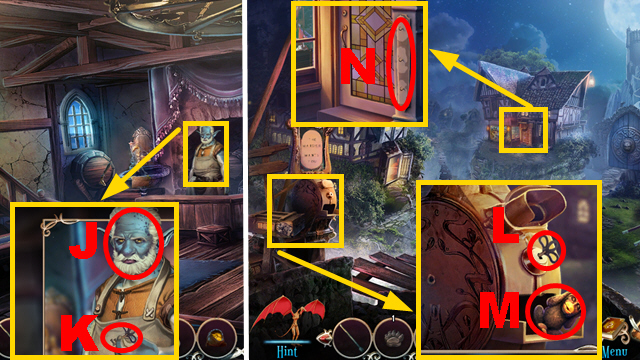
- Take the ROPE (J) and FEATHER 1/3 (K).
- Turn right.

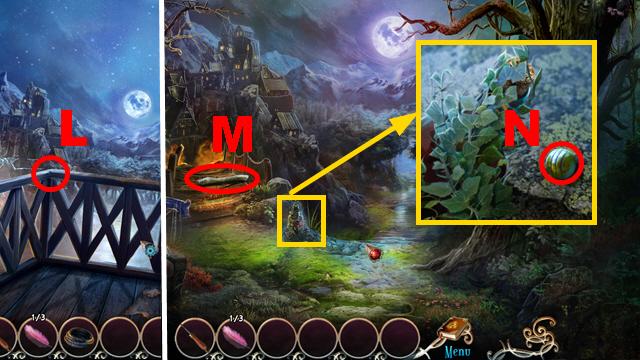
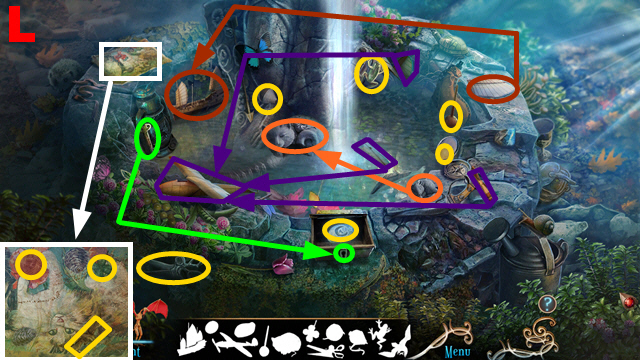
- Place the ROPE (L).
- Climb down.
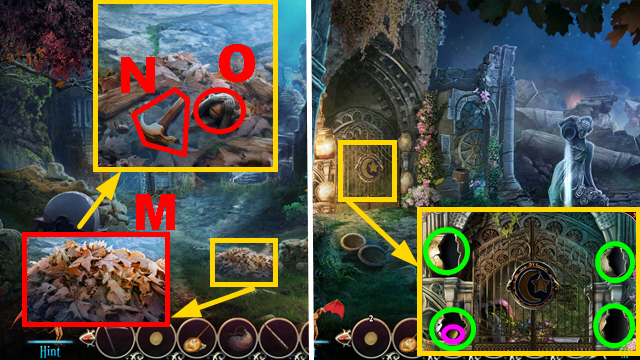
- Take the WOODEN STICK (M) and BEAD 1/5 (N).
- Move forward.

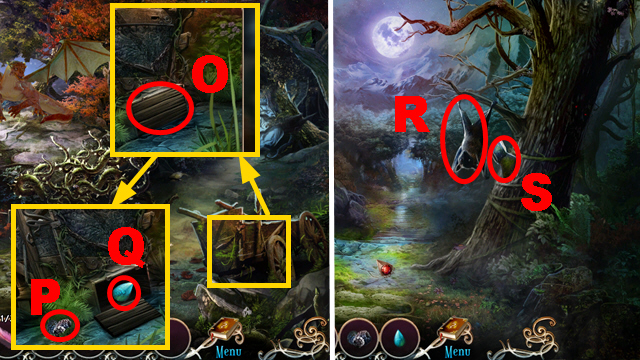
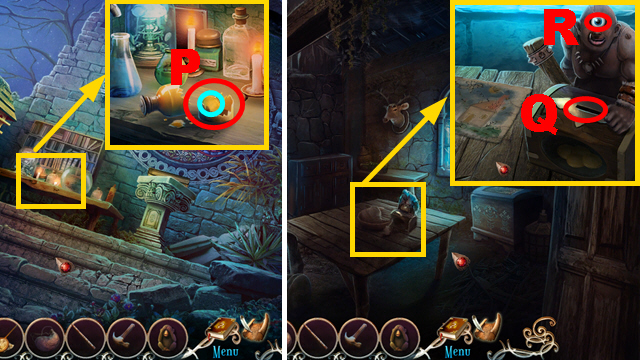
- Use the SCREWDRIVER (O); take the BERRIES (P) and CRYSTAL (Q).
- Walk down.
- Give the BERRIES to the bat (R).
- Connect the WOODEN STICK to the blade (S); take the AXE.
- Move forward.

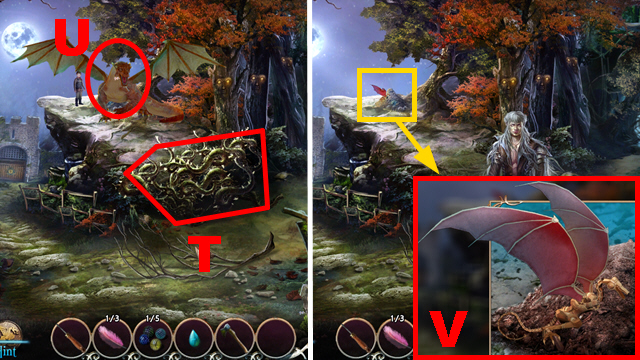
- Use the AXE four times (T).
- Talk to the dragon (U).
- Take the clockwork dragon (V).
- Turn right.

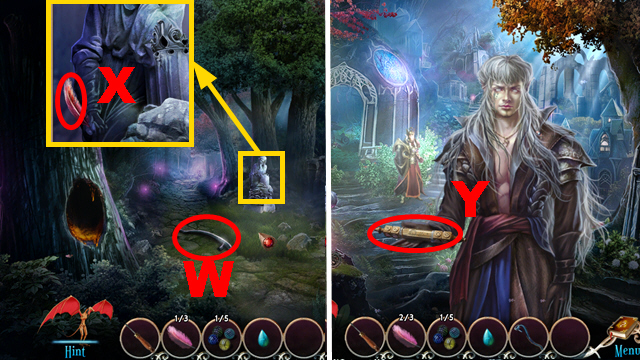
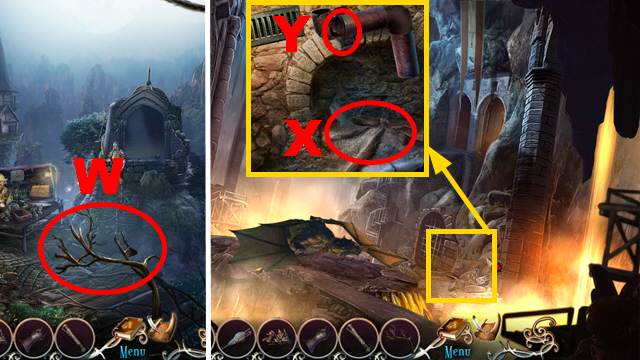
- Take the PUMP HANDLE (W) and FEATHER 2/3 (X).
- Move forward.
- Play the mini-game (Y).

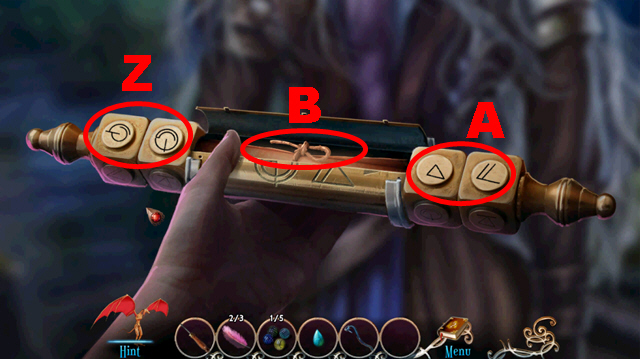
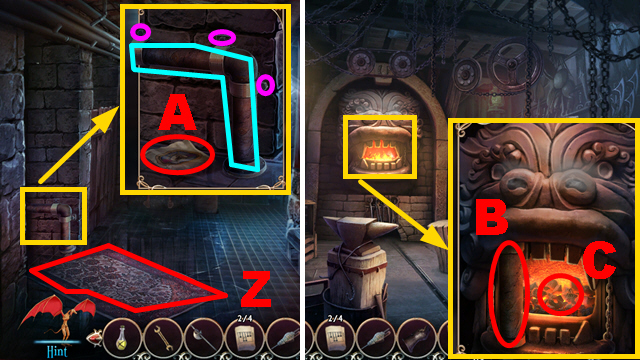
- Solution: (Z) and (A).
- Take the map (B).

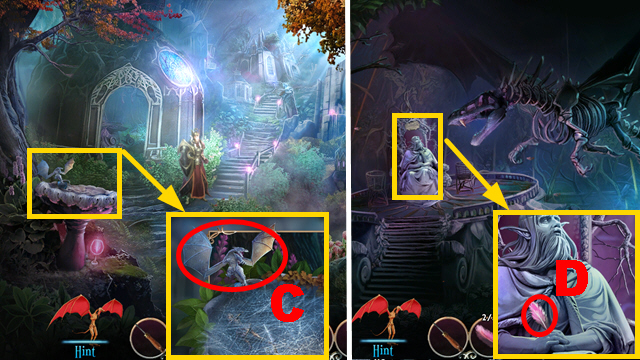
- Take the DRAGON FIGURINE (C).
- Turn left.
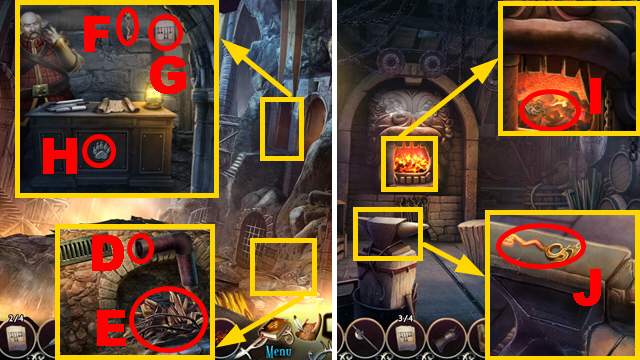
- Take FEATHER 3/3 (D).
- Walk down.

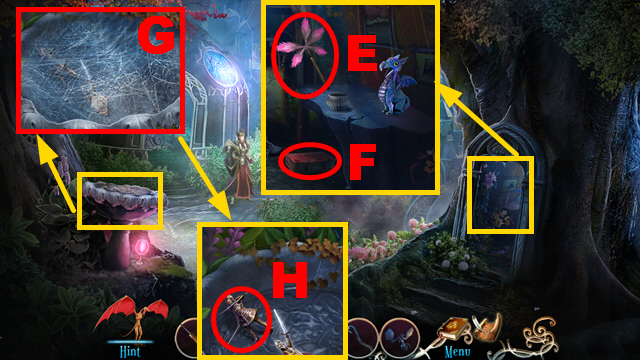
- Place 3 FEATHERS (E).
- Take the FEATHER DUSTER and VOL.3: THE GOLDEN AGE OF ELVES (F).
- Use the FEATHER DUSTER (G); take the SOLDIER FIGURINE (H).
- Move forward.

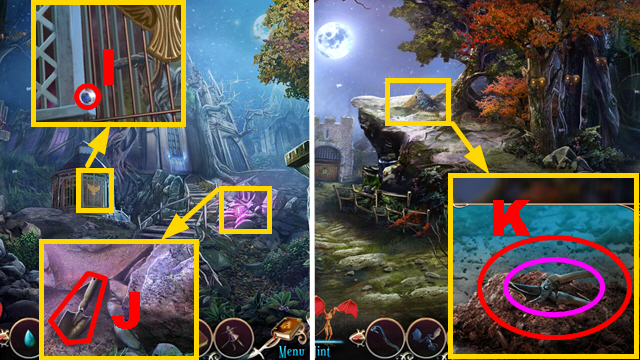
- Take BEAD 2/5 (I) and TROWEL (J).
- Walk down three times.
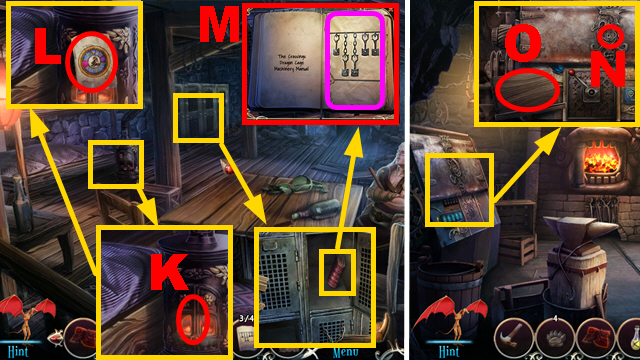
- Use the TROWEL (K); take the PRUNING SHEARS (purple).
- Walk down.

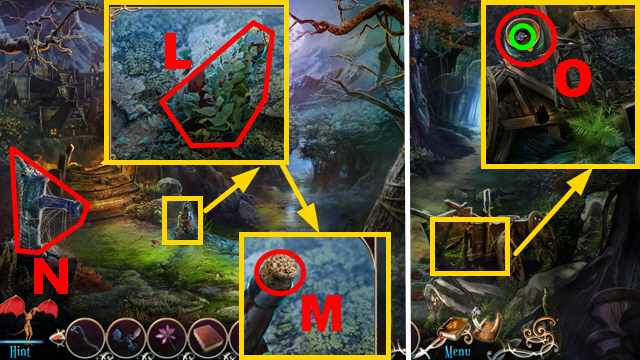
- Use the PRUNING SHEARS (L); take the CORK (M).
- Use the FEATHER DUSTER (N).
- Move forward.
- Place the CORK (green); take the EMPTY JAR (O).
- Walk down.

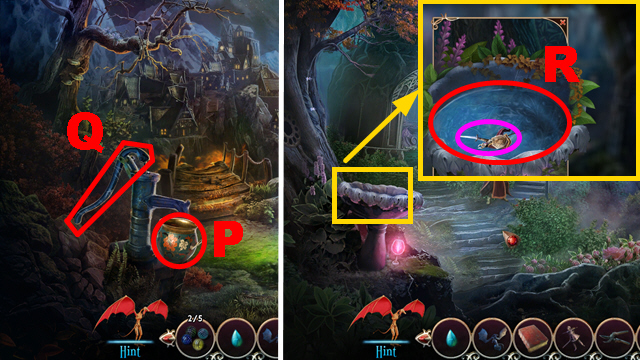
- Place the EMPTY JAR (P) and PUMP HANDLE (Q).
- Push the handle; take the JAR OF WATER.
- Go to the Village Entrance.
- Use the JAR OF WATER (R); take the KING FIGURINE (purple).
- Turn left.

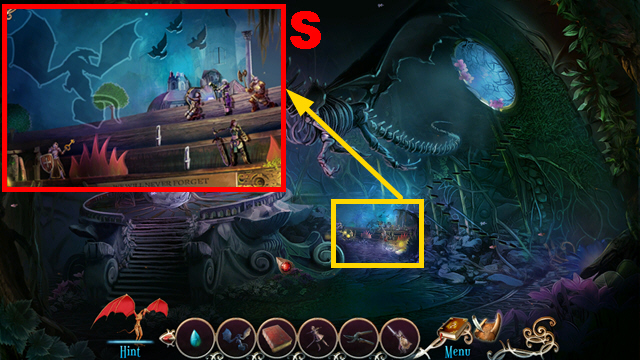
- Place the SOLDIER FIGURINE, KING FIGURINE, and DRAGON FIGURINE (S).
- Play the HOP.

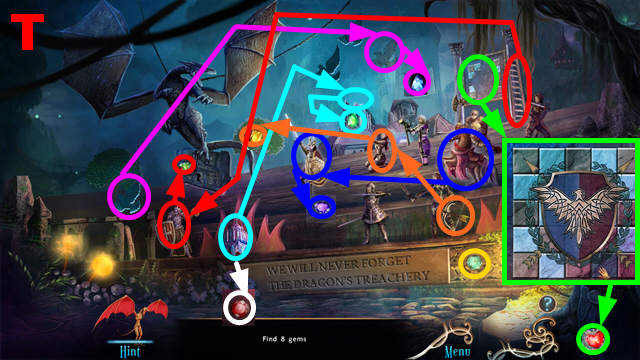
- You receive the GEMS (T).
- Walk down twice.

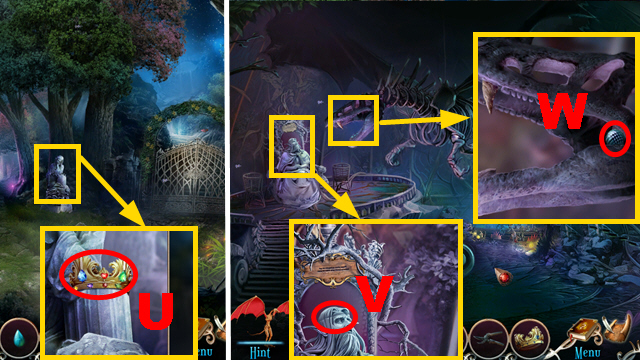
- Place the GEMS (U); take the CROWN.
- Turn left twice.
- Place the CROWN (V).
- Take BEAD 3/5 (W).

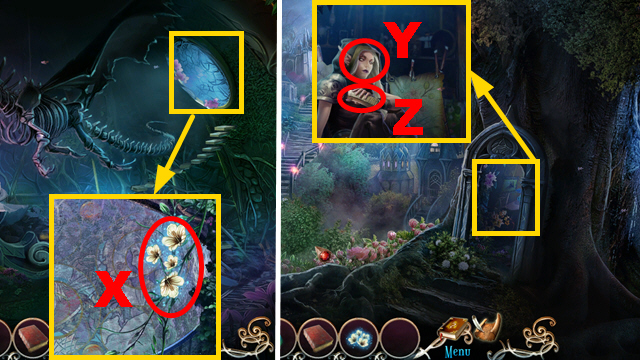
- Collect the MOONBELLS (X) with the PRUNING SHEARS.
- Walk down.
- Give the MOONBELLS to the elf (Y); take the BRUSH (Z).
- Turn left.

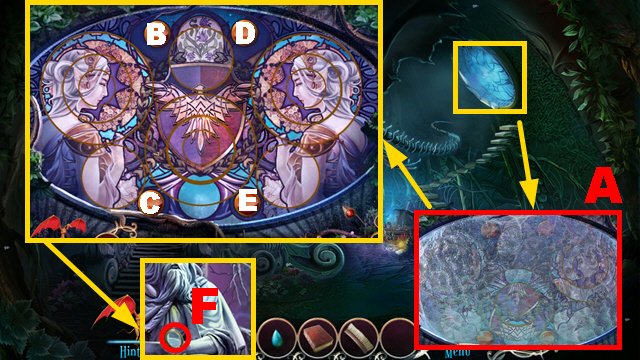
- Use the BRUSH three times (A).
- Play the mini-game.
- Turn the knobs (B-E) to solve the puzzle.
- This puzzle is randomized.
- Take the LENS (F).
- Walk down, move forward.

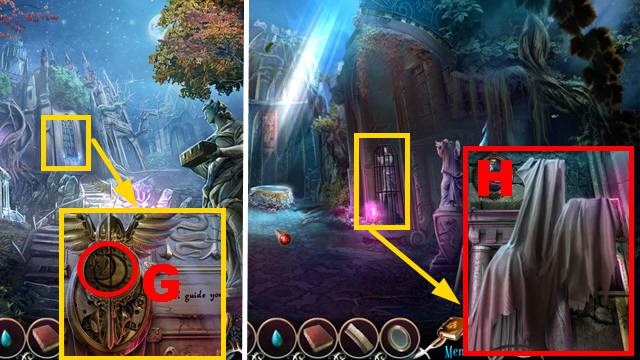
- Use the LENS (G).
- Move forward.
- Remove the blanket (H).
Chapter 2: The Elven Library

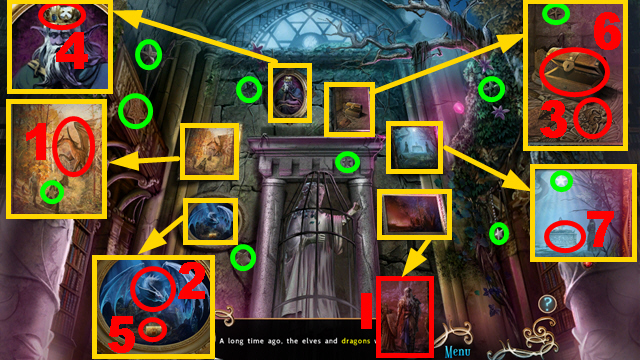
- Play the HOP.
- Collect items 1-7.
- Collect 10 stars (green).
- Collect Eridan (I).

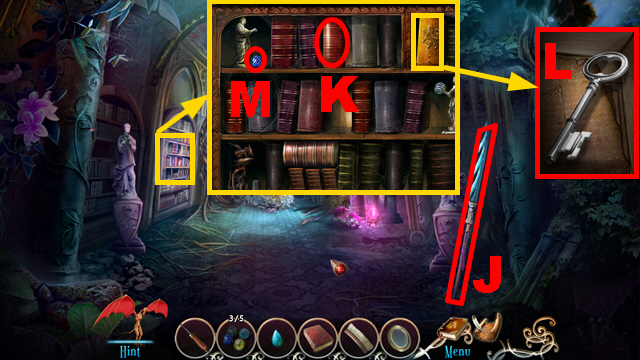
- Take the SPEAR (J).
- Place VOL. 3: THE GOLDEN AGE OF ELVES (K).
- Take the SILVER KEY (L) and BEAD 4/5 (M).
- Walk down twice.

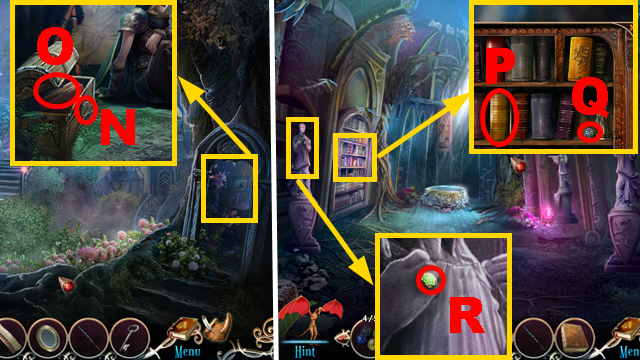
- Use the SILVER KEY (N); take VOL. 5: HUMAN GASTRONOMY (O).
- Move forward twice.
- Place VOL. 5: HUMAN GASTRONOMY (P); take BEAD 5/5 (Q).
- Take the FLOWER RING (R).
- Walk down.

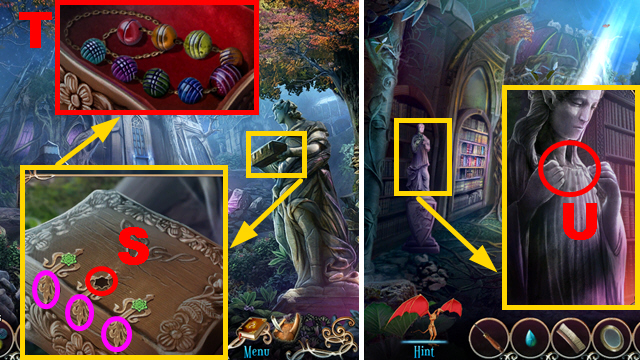
- Place the FLOWER RING (S); open the box (purple).
- Place 5 BEADS correctly (T); take the NECKLACE.
- Move forward.
- Place the NECKLACE (U).
- Walk down.

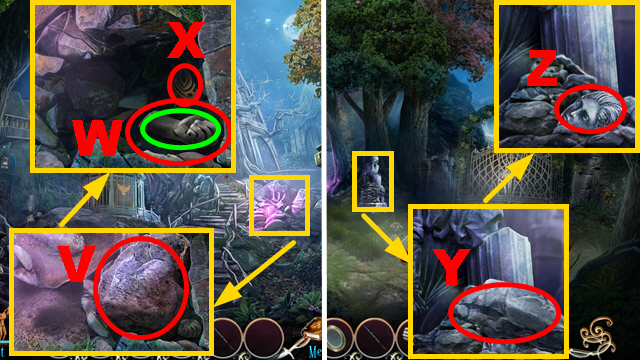
- Use the SPEAR (V) and BRUSH (W).
- Take the STONE ARM (green) and METAL WING (X).
- Walk down twice.
- Use the SPEAR (Y); take the STONE HEAD (Z).
- Go to the Elven Library.

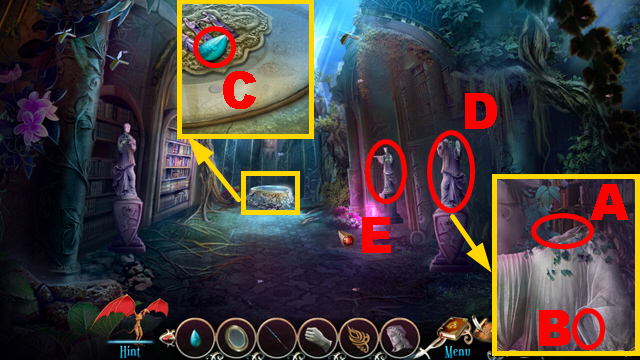
- Place the STONE HEAD (A) and STONE ARM (B).
- Take the CRYSTAL (C); you receive the SKETCH.
- Examine the SKETCH.
- Rotate statue (D) once and statue (E) twice.

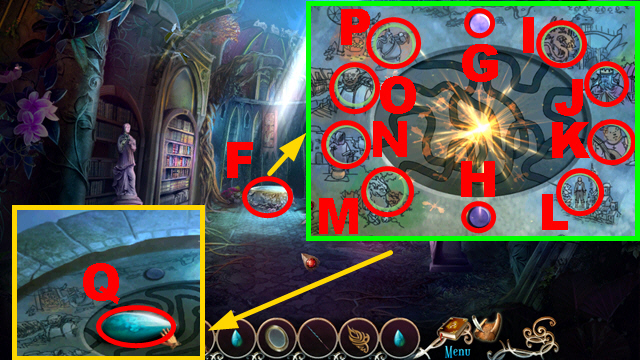
- Play the mini-game (F).
- Solution: (green).
- Activate buttons G-R to swap pathways and tokens.
- This puzzle is randomized.
- Take the CRYSTAL (Q).
- Walk down three times.

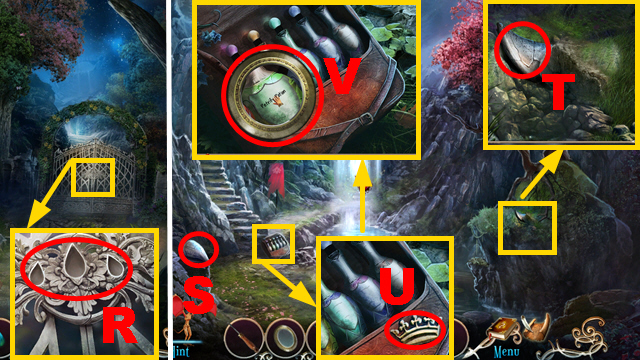
- Place 3 CRYSTALS (R).
- Turn right.
- Take STONE TOOTH 1/6 (S).
- Collect STONE TOOTH 2/6 with the SCREWDRIVER (T).
- Take the CROWN CREST (U).
- Use the LENS to collect the PETRIFY POTION (V).
- Go to the King’s Pavilion.

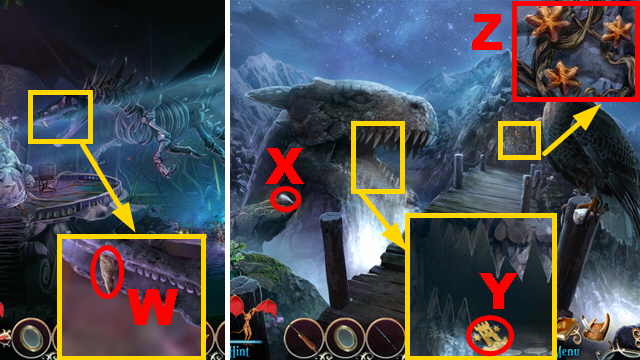
- Use the PETRIFY POTION (W); take STONE TOOTH 3/6.
- Walk down twice, turn right, turn left.
- Use the SPEAR (X).
- Take the CASTLE CREST (Y) and STARNUTS (Z).
- Walk down.

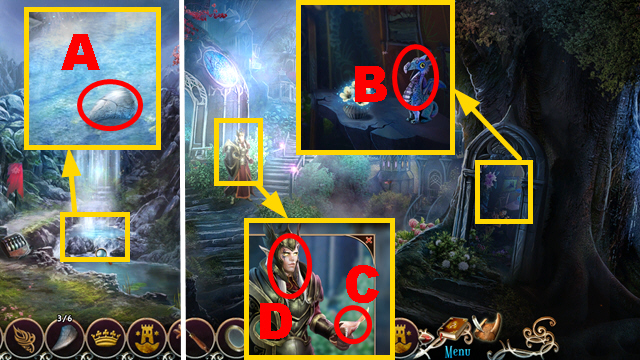
- Take STONE TOOTH 4/6 (A).
- Walk down, turn left.
- Place the STARNUTS (B) to acquire the STARNUT SEEDS.
- Give the STARNUT SEEDS to the guard (C); take the EAGLE HOOD (D).
- Walk down, turn right, turn left.

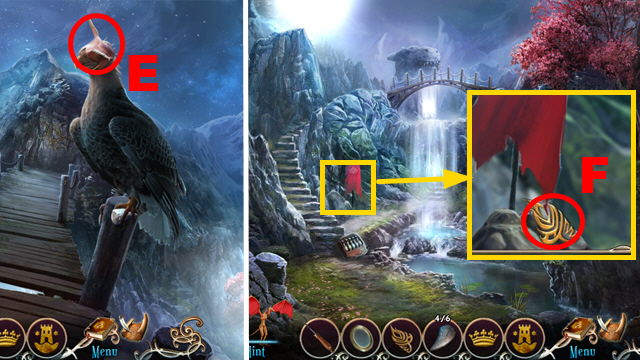
- Place the EAGLE HOOD (E).
- Walk down.
- Take the METAL WING (F).
- Go to the Village Center.

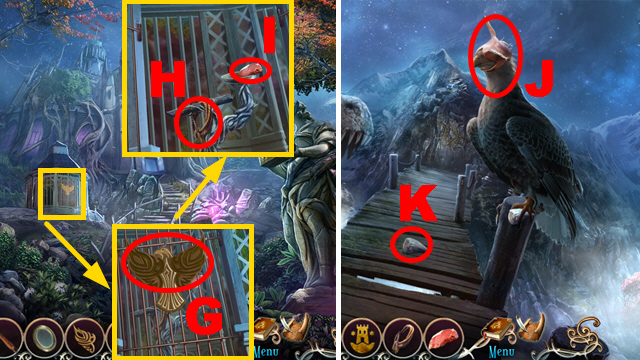
- Place 2 METAL WINGS (G); take the ROPE (H) and MEAT (I).
- Go to the Top of Waterfall.
- Give the MEAT to the eagle (J).
- Take STONE TOOTH 5/6 (K).
- Walk down three times.

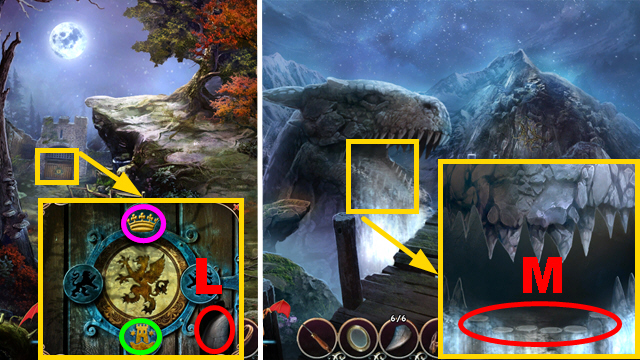
- Take STONE TOOTH 6/6 (L).
- Place the CROWN CREST (purple) and CASTLE CREST (green).
- Turn right twice, turn left.
- Place 6 STONE TEETH (M).

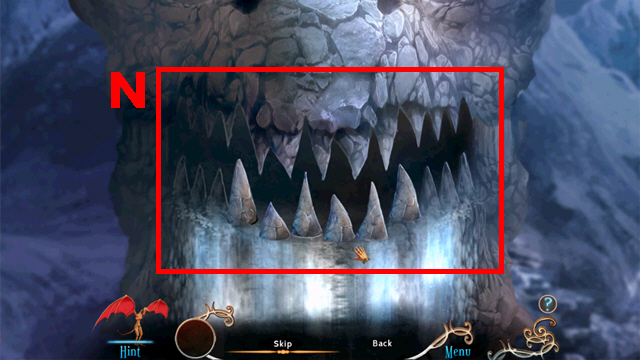
- Play the mini-game.
- Solution: (N).
- Walk down, move forward.

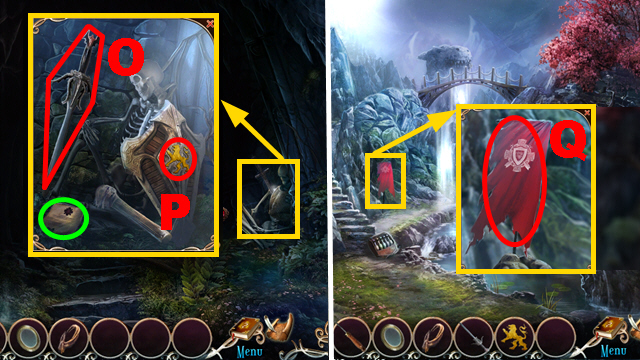
- Take the SWORD (O) and LION CREST (P); examine the note (green).
- Walk down.
- Collect the CLOTH with the SWORD (Q).
- Move forward.

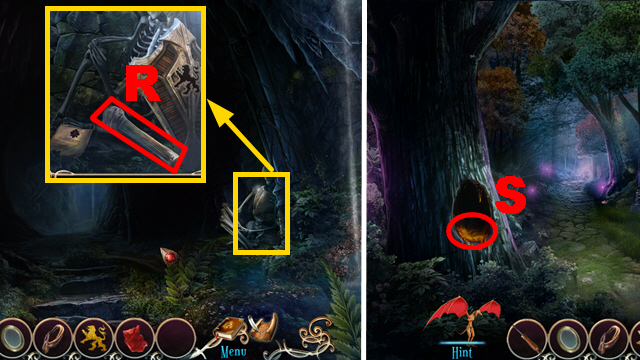
- Place the CLOTH (R) to acquire the STICK WITH CLOTH.
- Walk down twice.
- Place the STICK WITH CLOTH (S) to acquire the UNLIT TORCH.
- Turn right, move forward.

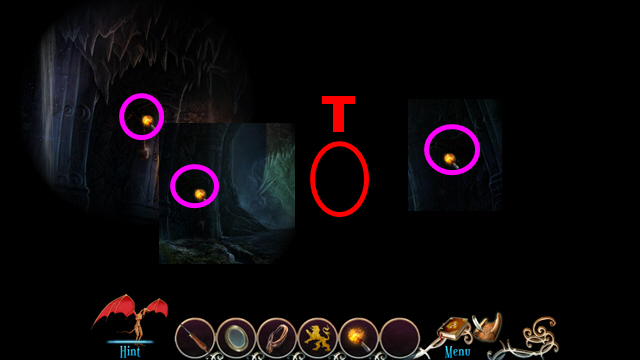
- Place the UNLIT TORCH (T).
- Use the BURNING TORCH three times (purple).
- Move forward.

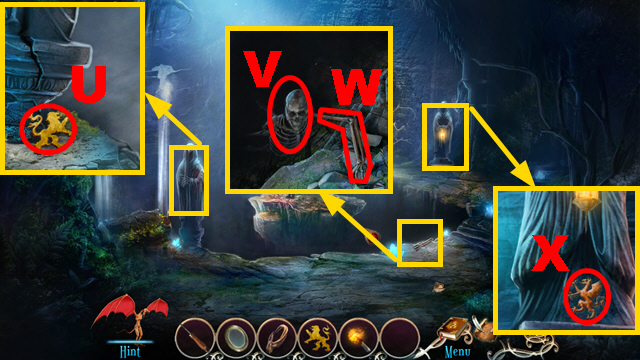
- Take the LION CREST (U).
- Grab the skeleton (V); take the SKELETON ARM (W).
- Take the DRAGON CREST (X).
- Walk down four times.

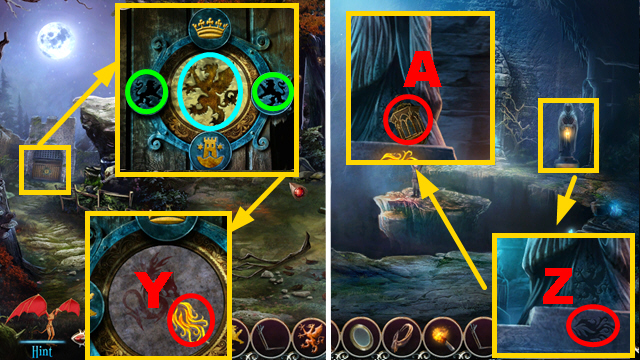
- Place 2 LION CRESTS (green) and DRAGON CREST (blue).
- Take the FLAME SYMBOL (Y).
- Go to the Dragon’s Lair.
- Place the FLAME SYMBOL (Z).
- Use the BURNING TORCH and ROPE (A) to acquire the LANTERN WITH ROPE.

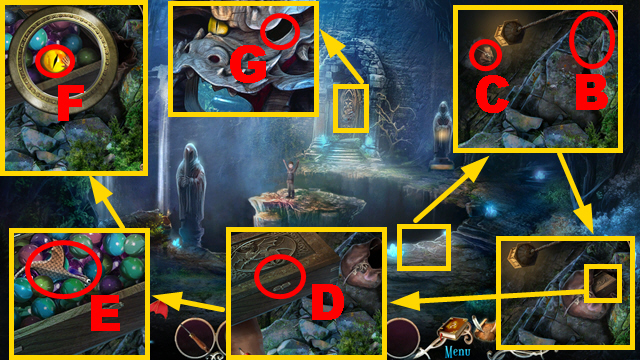
- Place the LANTERN WITH ROPE (B); push it.
- Collect the bag with the SKELETON ARM (C).
- Use the SCREWDRIVER (D); take JIGSAW PIECE 1/5 (E).
- Use the LENS to collect the DRAGON’S EYE (F).
- Place the DRAGON’S EYE (G).

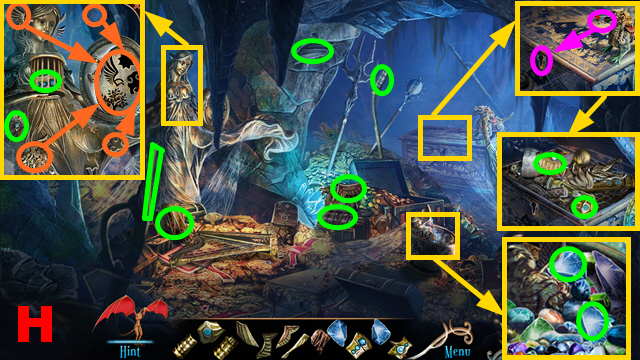
- Play the HOP.
- You receive the SLEDGEHAMMER (H).

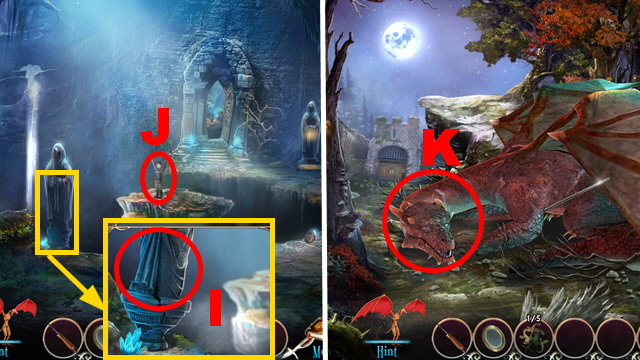
- Use the SLEDGEHAMMER four times (I).
- Talk to the boy (J).
- Talk to the dragon (K).
- Turn left.
Chapter 3: The Crash Site

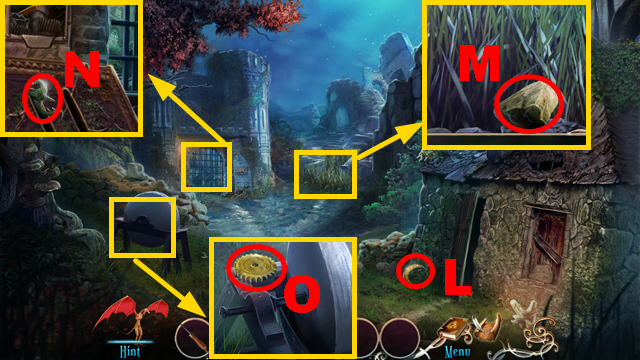
- Take the MOON-SHAPED CREST (L), BIG ROCK (M), and SMALL GEAR (N).
- Collect JIGSAW PIECE 2/5 with the SCREWDRIVER (O).
- Turn right.

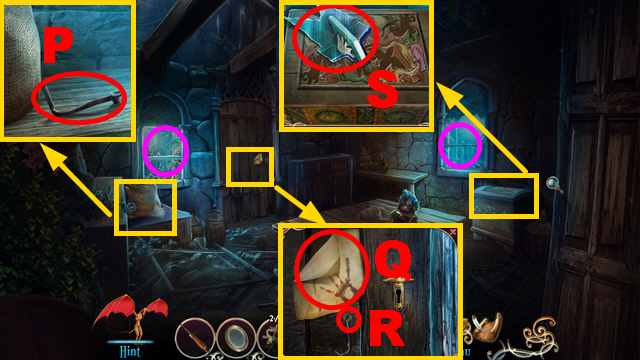
- Use the BIG ROCK twice (purple).
- Take the CRANK (P).
- Read the note (Q); use the SCREWDRIVER (R) to acquire the SMALL HOOK.
- Take the ALCHEMIST STAINED GLASS (S).

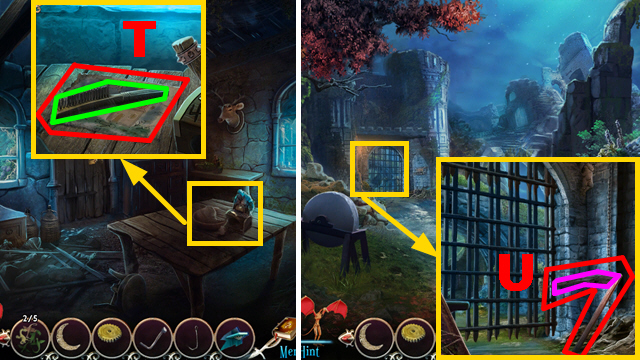
- Take the WIRE BRUSH (green); examine the sketch (T).
- Walk down.
- Use the WIRE BRUSH (purple); take the BLUNT BLADE (U).

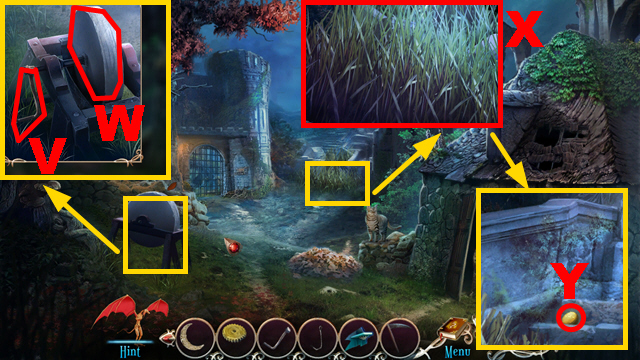
- Place the CRANK (V); use the BLUNT BLADE (W) to acquire the SCYTHE.
- Use the SCYTHE three times (X); take the COIN (Y).
- Move forward.

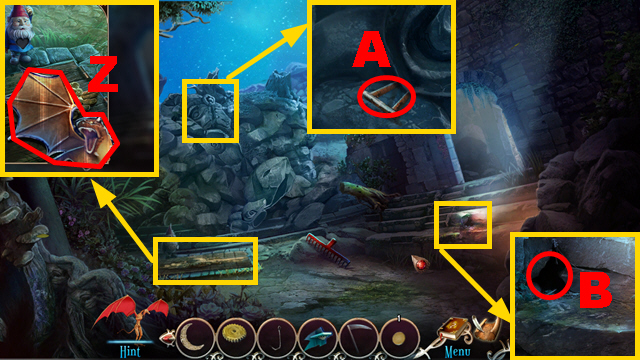
- Take the DRAGON STAINED GLASS (Z).
- Collect the LEVER with the SCREWDRIVER (A).
- Place the LENS (B); lure out the mouse.
- Turn right.

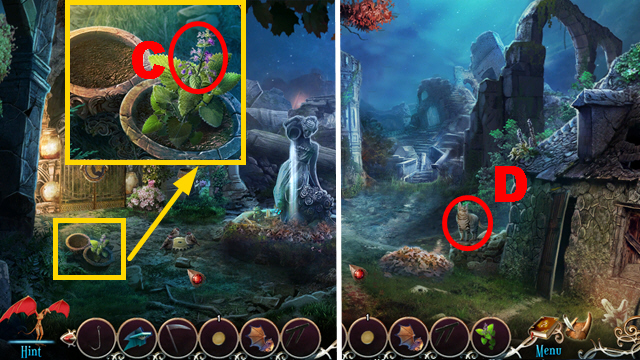
- Collect the CATNIP with the SCYTHE (C).
- Walk down twice.
- Collect the CAT with the CATNIP (D).
- Move forward.

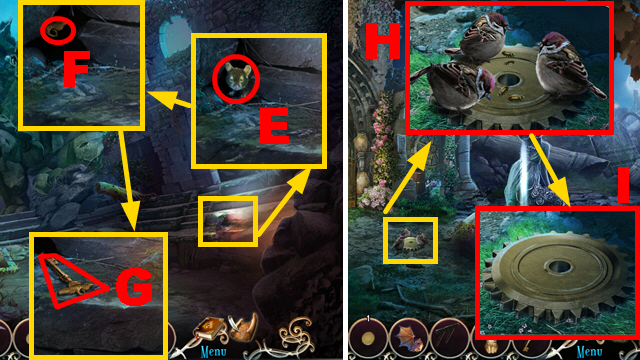
- Use the CAT (E) and SMALL HOOK (F).
- Take the OLD KEY (G).
- Turn right.
- Use the CAT (H); take the GEAR (I).
- Go to the Cottage.

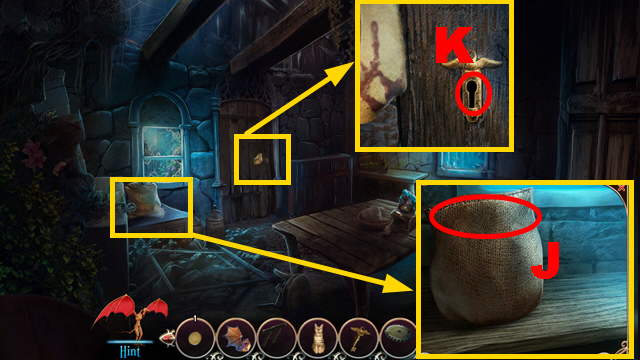
- Use the SCYTHE (J).
- Insert the OLD KEY into the lock (K).

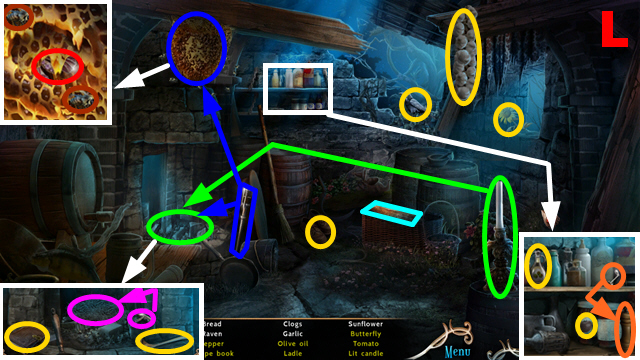
- Play the HOP.
- You receive the OLIVE OIL (L).
- Walk down.

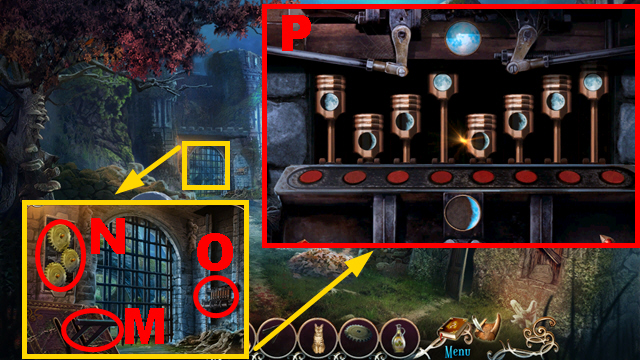
- Put down the LEVER (M); place the GEAR and SMALL GEAR (N).
- Pour the OLIVE OIL over the gears; pull the lever.
- Play the mini-game (O).
- Solution: (P).
- Examine the gate.
- Turn left.

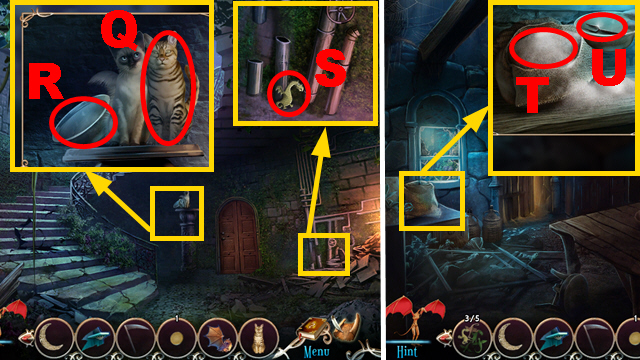
- Try to go upstairs.
- Place the CAT (Q); take the SIFTER (R).
- Take JIGSAW PIECE 3/5 (S).
- Go to the Cottage.
- Use the SIFTER (T); take the FORK (U).
- Walk down, turn left.

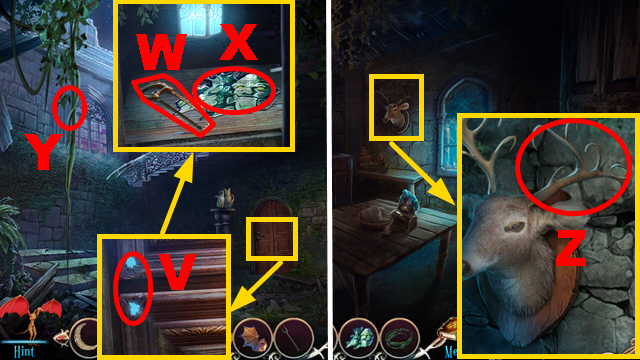
- Place the FORK (V); take the SAW (W) and GOLEM STAINED GLASS (X).
- Use the SCYTHE (Y) to acquire the VINE ROPE.
- Go to the Cottage.
- Use the SAW (Z).
- Connect the VINE ROPE to the antler to acquire the GRAPPLING HOOK.
- Walk down, turn left.

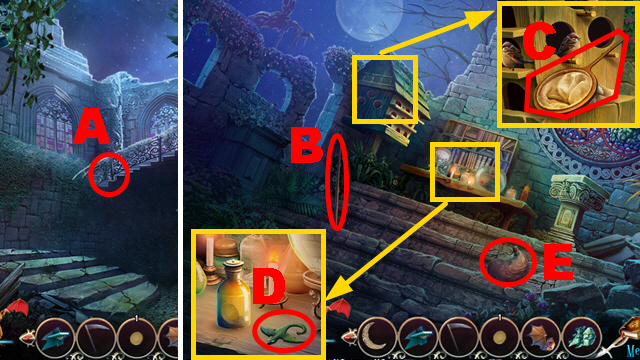
- Throw the GRAPPLING HOOK (A).
- Climb up.
- Take the RAKE HANDLE (B), NET (C), JIGSAW PIECE 4/5 (D), and EMPTY WATERSKIN (E).

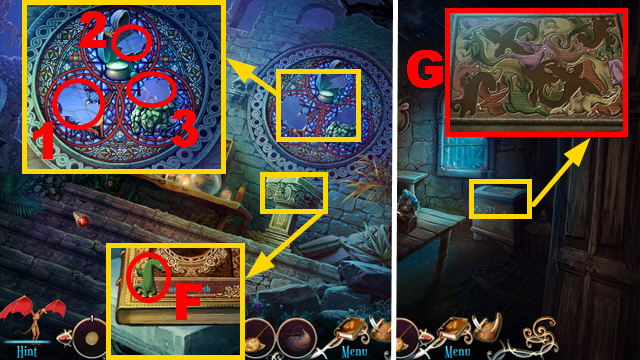
- Place the DRAGON STAINED GLASS (1), ALCHEMIST STAINED GLASS (2), and GOLEM STAINED GLASS (3).
- Take JIGSAW PIECE 5/5 (F).
- Go to the Cottage.
- Place 5 JIGSAW PIECES (G).

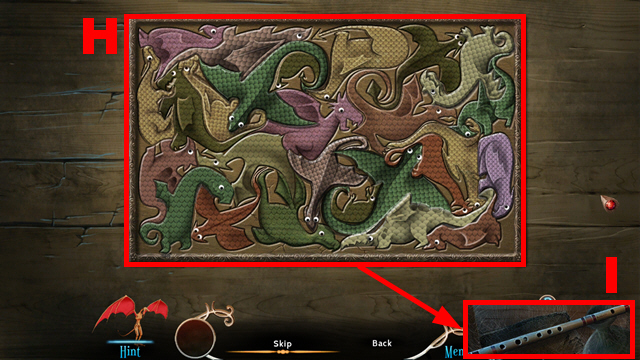
- Play the mini-game.
- Solution: (H).
- Take the FLUTE (I).
- Walk down, move forward.

- Place the RAKE HANDLE (J) to acquire the RAKE.
- Turn right.
- Use the RAKE three times (K).

- Play the HOP.
- You receive the COIN (L).
- Walk down twice.

- Use the RAKE (M); take the HAMMER (N) and SEE NO EVIL (O).
- Move forward, turn right.
- Use the HAMMER (green); take the COIN (purple).
- Go to the 2/F Tower.

- Use the HAMMER (P); take the COIN (blue).
- Go to the Cottage.
- Use 4 COINS (Q); take the EYE (R).
- Go to 2/F Tower.

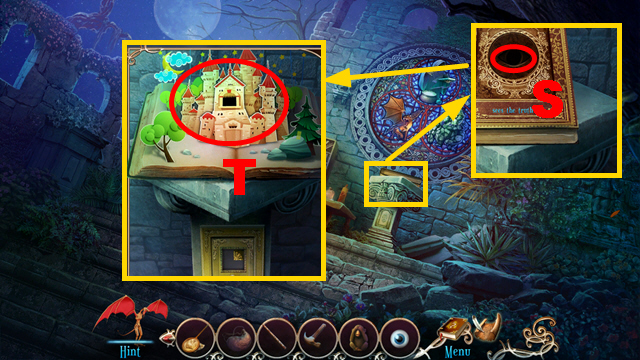
- Place the EYE (S).
- Play the HOP (T).

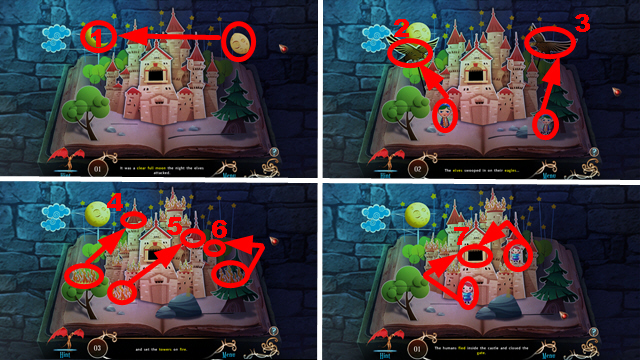
- Solution: 1-7.
- Continue with the HOP.

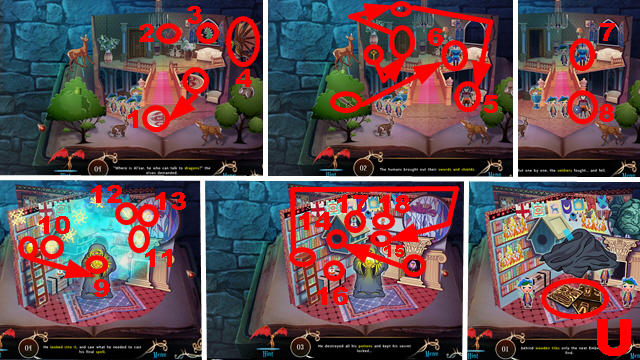
- Solution: 1-18.
- Take the TILE PIECES (U).

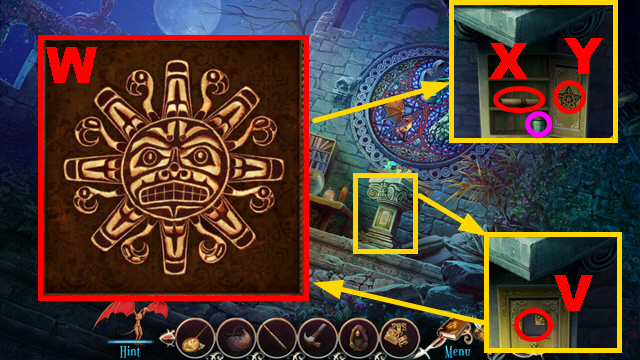
- Place the TILE PIECES (V).
- Play the mini-game.
- Solution: (W).
- Take the ELIXIR RECIPE (X), EMPTY JAR (purple), and STAR-SHAPED CREST (Y).
- Go to the Forest Fork.

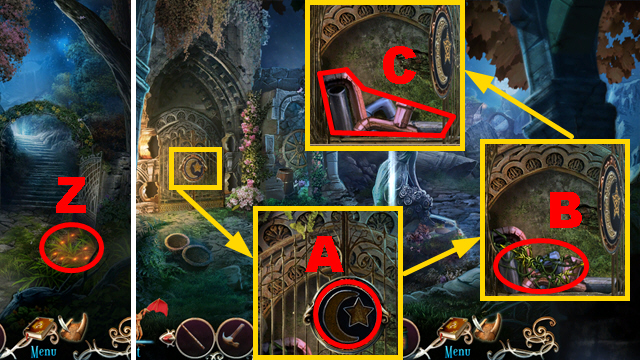
- Use the NET (Z) to acquire the FIREFLIES IN A JAR.
- Go to the Courtyard.
- Place the STAR-SHAPED CREST and MOON-SHAPED CREST (A).
- Use the SCYTHE four times (B); take the PIPES (C).
- Go to the G/F Tower.

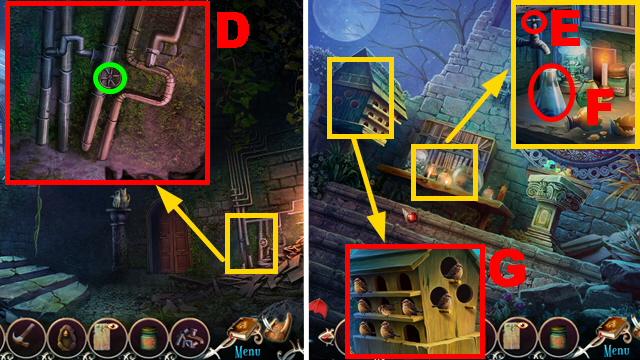
- Arrange the PIPES correctly (D); rotate the valve (green).
- Move forward.
- Turn the faucet (E); take the POTION BASE (F).
- Use the FLUTE (G).

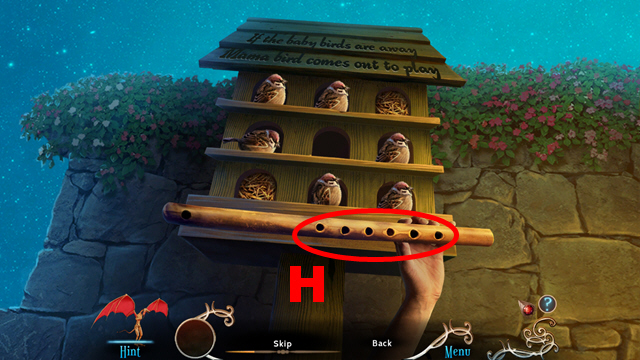
- Play the mini-game.
- Select the flute holes (H) in the correct sequence.
- The sequence is randomized.
- You acquire the BIRD.
- Go to the Golem Room.

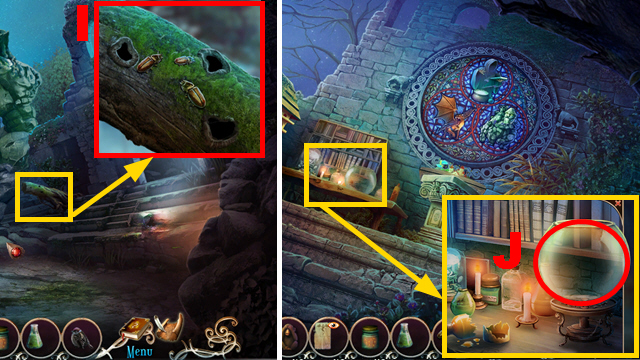
- Place the BIRD (I) to acquire the BEETLE.
- Go to the 2/F Tower.
- Use the POTION BASE, FIREFLIES IN A JAR, and BEETLE (J).
- You acquire the DRAGON ELIXIR.
- Go to the Forest Clearing.
Chapter 4: Healing the Dragon

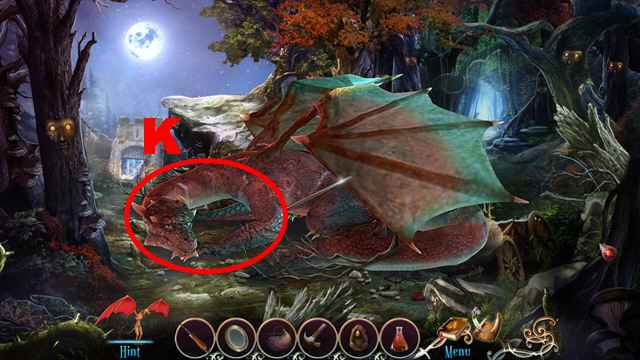
- Use the DRAGON ELIXIR (K).
- Turn right.

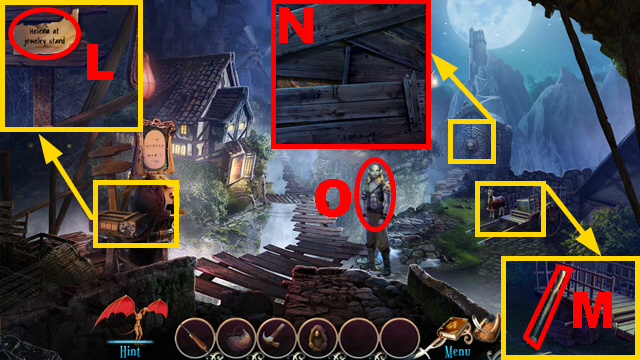
- Take the TORN NOTICE (L) and BUTTER CHURN PLUNGER (M).
- Use the HAMMER four times (N).
- Talk to the resident (O).
- Turn left.

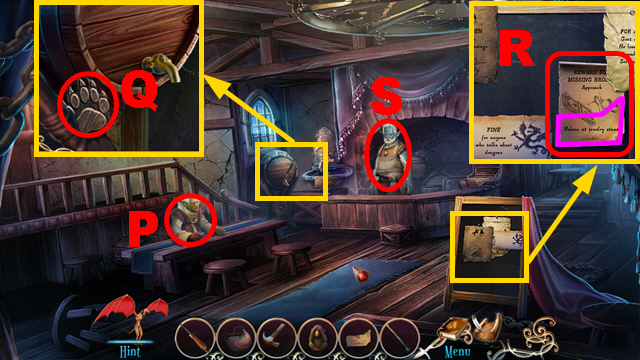
- Talk to the old man (P).
- Take the PAW PRINT (Q).
- Place the TORN NOTICE (purple); take HELENA’S NOTICE (R).
- Talk to Tyrell (S).
- Walk down, move forward.

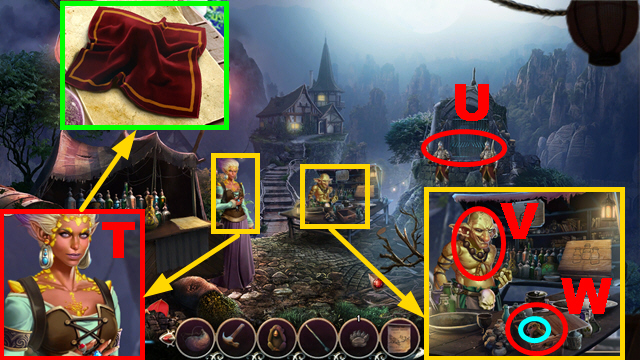
- Give HELENA’S NOTICE to the woman (T); take the HANDKERCHIEF (green).
- Talk to the guards (U) and potionsmaster (V).
- Use the SCREWDRIVER (W); take the SPEAK NO EVIL (blue).

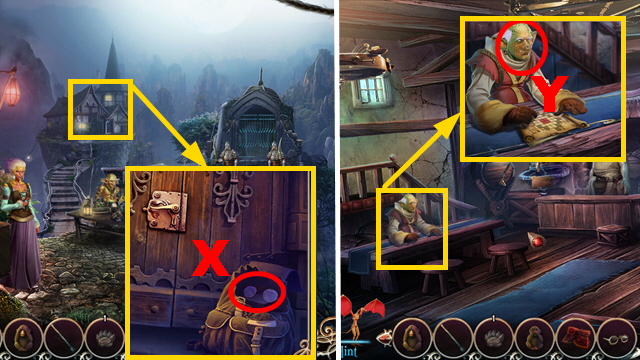
- Open the bag; take the READING GLASSES (X).
- Go to the Tavern.
- Give the READING GLASSES to the man (Y).

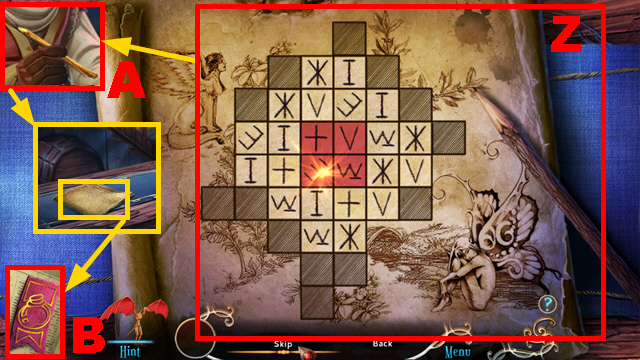
- Play the mini-game.
- Solution: (Z).
- Take the PENCIL (A) and POTION COUPON (B).
- Walk down, move forward.

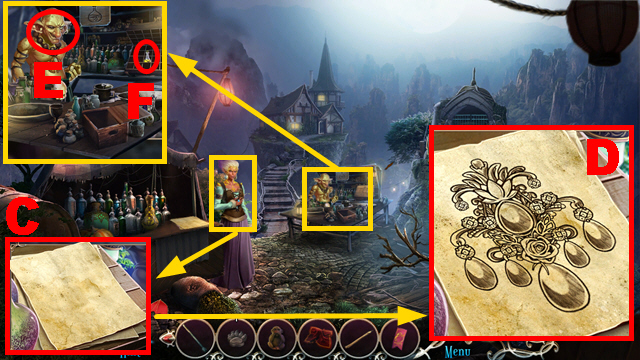
- Use the PENCIL (C).
- Adjust the brooch sketch correctly (D).
- Take the BROOCH SKETCH.
- Use the POTION COUPON (E); take the RUST-BE-GONE POTION (F).
- Go to the Tavern.

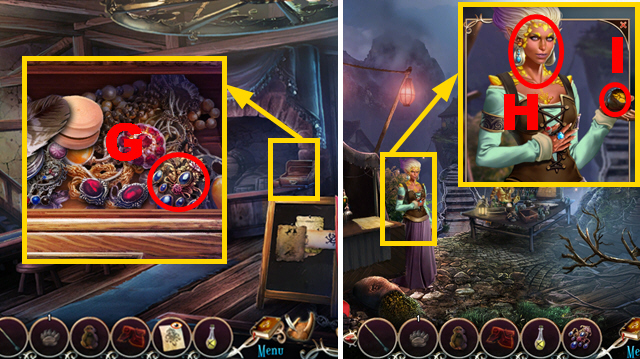
- Take the BROOCH (G).
- Walk down, move forward.
- Give the BROOCH to the woman (H); take the CROSSINGS CURRENCY (I).
- Go to the Tavern.

- Give the CROSSINGS CURRENCY to Tyrell (J); take the VIEWSCOPE KEY (K).
- Walk down.
- Place the VIEWSCOPE KEY (L); take the HEAR NO EVIL (M).
- Place SEE NO EVIL, HEAR NO EVIL, and SPEAK NO EVIL (N).

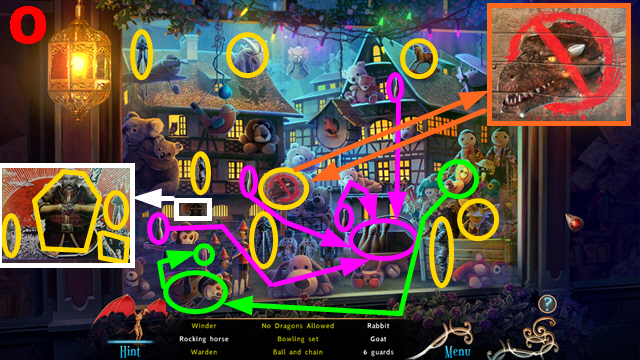
- Play the HOP.
- You receive the WINDER (O).

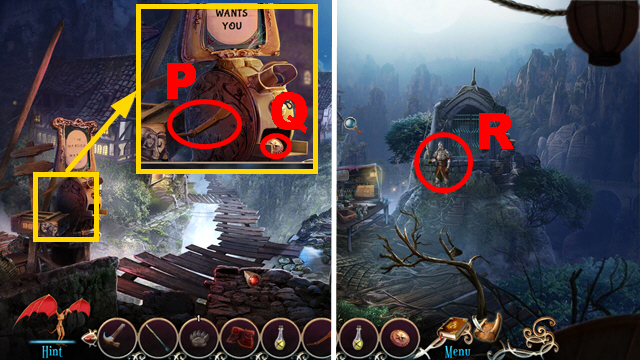
- Place the WINDER (P); take the GUARD’S BADGE (Q).
- Move forward.
- Give the GUARD’S BADGE to the guard (R).
- Go to the Tavern.

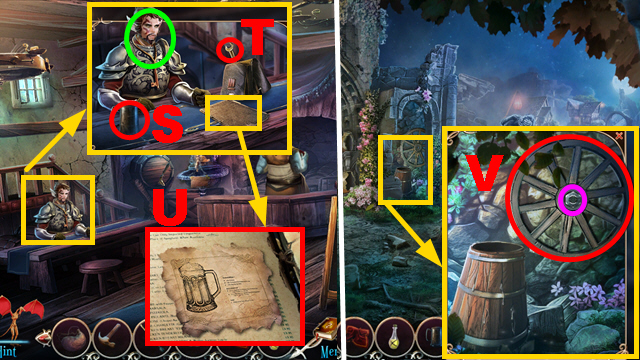
- Take the EMPTY ALE MUG (S) and WRENCH (T).
- Talk to the guard (green).
- Take the BUTTERED ALE RECIPE (U).
- Walk down twice.
- Use the WRENCH (purple); take the WHEEL (V).
- Turn right.

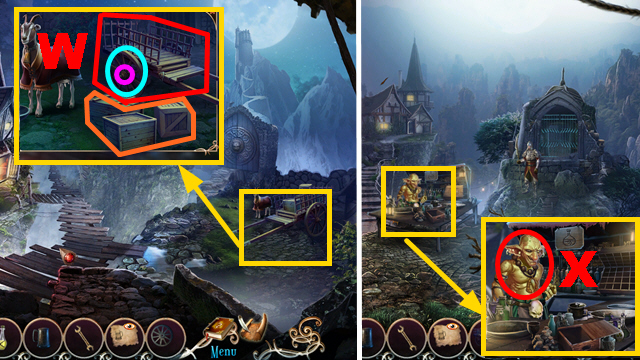
- Place the WHEEL (blue); use the WRENCH (purple).
- Put 3 crates (orange) on the cart; take the POTIONS DELIVERY (W).
- Move forward.
- Give the POTIONS DELIVERY to the potionsmaster (X).

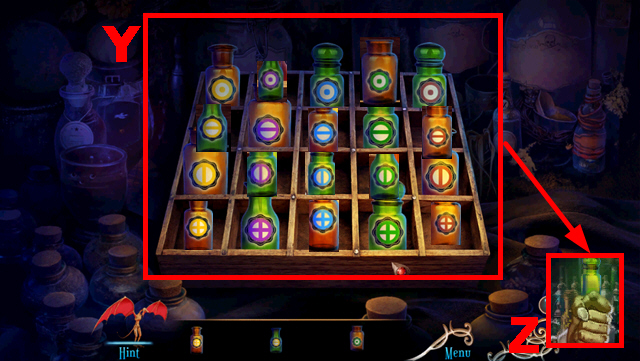
- Play the mini-game.
- Solution: (Y).
- Take the NIGHTY-NIGHT POTION (Z).
Chapter 5: The Barracks

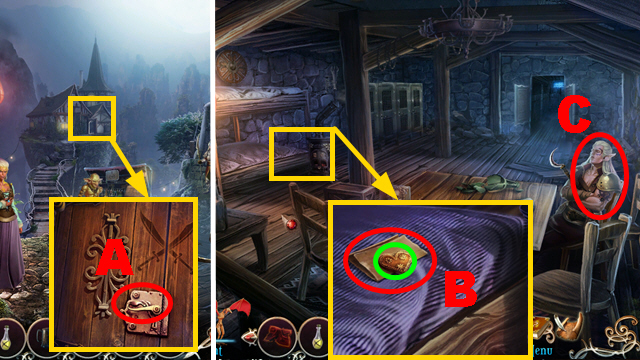
- Use the WRENCH (A).
- Take the HEART (green); examine the note (B).
- Examine the guard (C); you receive the TATTOO DESIGN.
- Go to the Golem Room.

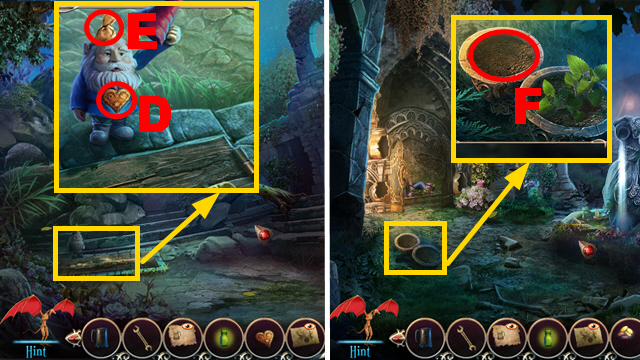
- Place the HEART (D); take the BITTERWEED SEEDS (E).
- Turn right.
- Place the BITTERWEED SEEDS (F).
- Go to the Tavern.

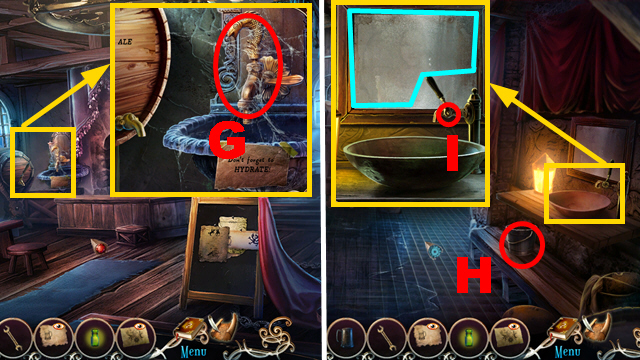
- Use the HANDKERCHIEF (G).
- Walk down, move forward three times.
- Take the EMPTY BUCKET (H).
- Collect the TAP with the WRENCH (I); use the HANDKERCHIEF (blue).
- Go to the Tavern.

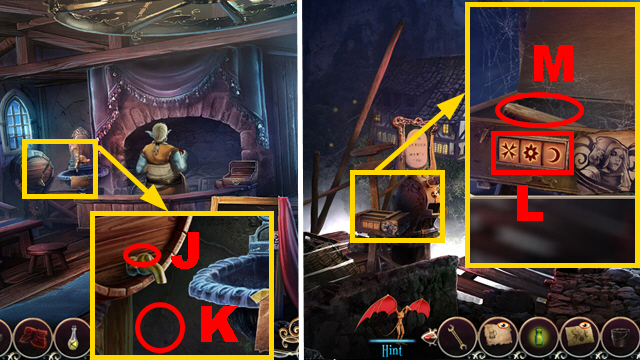
- Place the TAP (J) and EMPTY ALE MUG (K) to acquire the AGED ALE.
- Walk down.
- Examine the TATTOO DESIGN; assemble the correct symbols (L).
- Take the BATON (M).
- Go to the Barracks.

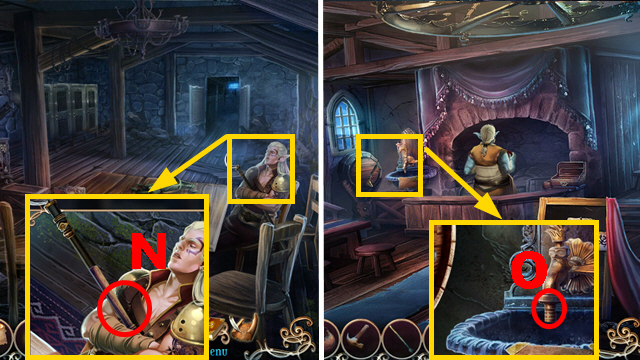
- Place the BATON (N) to acquire the HOOKED SPEAR.
- Go to the Tavern.
- Use the EMPTY WATERSKIN (O) to acquire the WATER.
- Walk down twice.

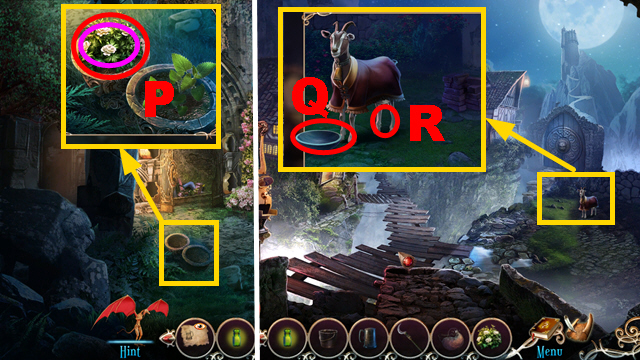
- Use the WATER (P); take the BITTERWEED (purple).
- Turn right.
- Use the WATER and BITTERWEED (Q).
- Place the EMPTY BUCKET (R) to acquire the MILK.
- Walk down.

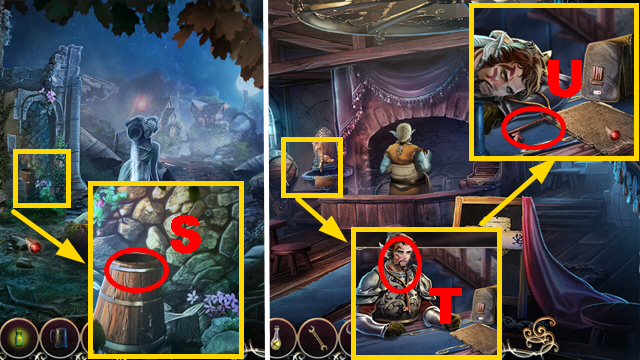
- Use the MILK and BUTTER CHURN PLUNGER (S) to acquire the SPIKED BUTTERED ALE.
- Go to the Tavern.
- Give the SPIKED BUTTERED ALE to the guard (T).
- Take the LOCKER KEY (U).
- Go to the Barracks.

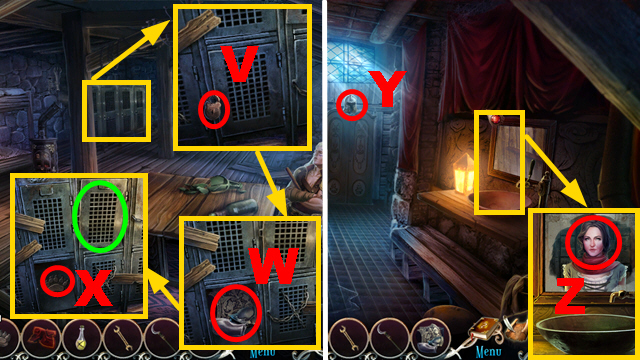
- Use the LOCKER KEY (V).
- Take the GUARD UNIFORM (W) and PAW PRINT (X).
- Open the locker (green).
- Move forward.
- Use the HOOKED SPEAR to collect the HELMET (Y).
- Put on the HELMET and GUARD UNIFORM (Z).
- Walk down twice.

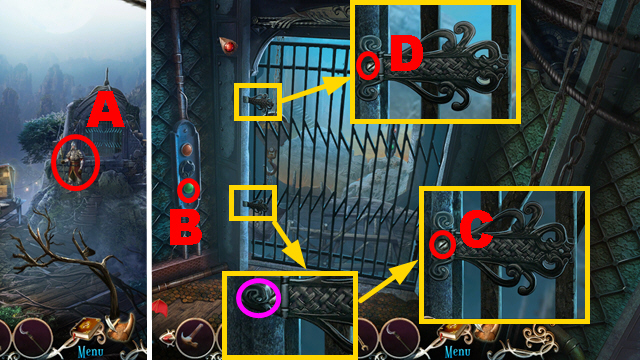
- Talk to the guard (A).
- Turn right.
- Collect the DOWN BUTTON with the SCREWDRIVER (B).
- Use the HAMMER (purple).
- Use the SCREWDRIVER (C) and (D); remove 2 metal plates.

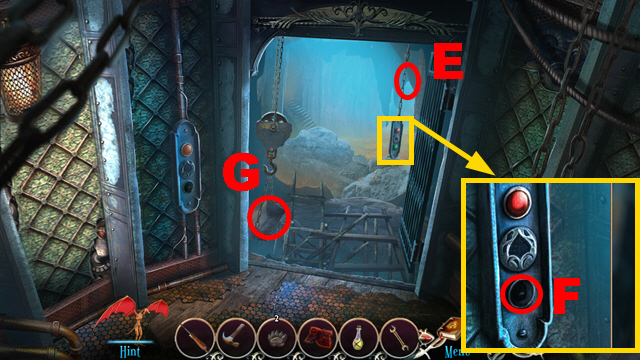
- Open the door.
- Use the HOOKED SPEAR (E).
- Place the DOWN BUTTON (F); push it.
- Examine the cart (G).

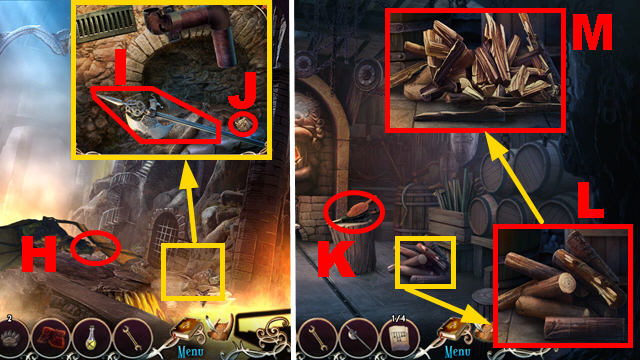
- Play the mini-game.
- Solution: 1-19.


- Talk to the dragon (H).
- Take the HALBERD (I) and MANUAL PAGE 1/4 (J).
- Turn left.
- Take the BELLOWS (K).
- Use the HALBERD twice (L); take the FIREWOOD (M).

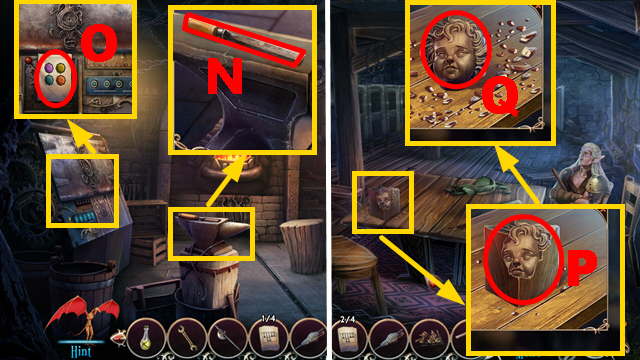
- Take the CHISEL (N) and MANUAL PAGE 2/4 (O).
- Go to the Barracks.
- Use the CHISEL seven times (P); take the ANGEL HEAD (Q).
- Walk down four times.

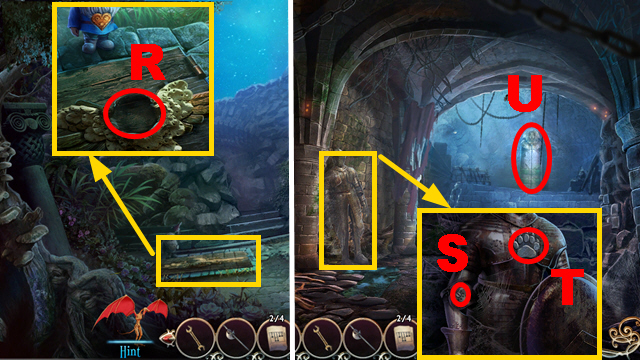
- Place the ANGEL HEAD (R); open the trapdoor.
- Go downstairs.
- Use the SCREWDRIVER (S) to acquire the GAUNTLET.
- Take the PAW PRINT (T).
- Examine the coffin (U).

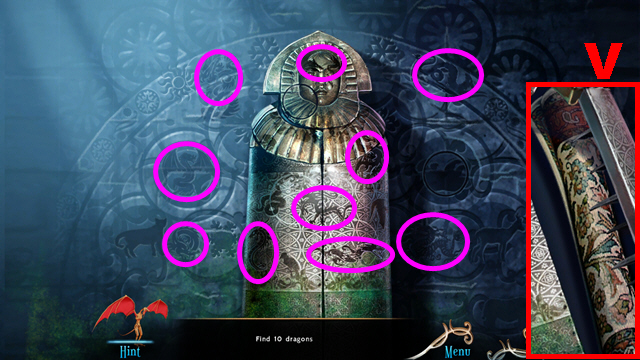
- Play the HOP.
- Take the TAPESTRY (V).
- Go to the Main Street.

- Collect the DRY KINDLING with the HALBERD (W).
- Turn right.
- Place the FIREWOOD and DRY KINDLING (X).
- Use the WRENCH (Y).
- Go to the Shower.

- Place the TAPESTRY (Z).
- Use the WRENCH (purple).
- Take the WET SHEET (A) and 2 PIPES (blue).
- Go to the Forge.
- Place the PIPE (B); collect the HOT COAL with the GAUNTLET (C).
- Walk down.

- Place the PIPE (D); use the HOT COAL and BELLOWS (E).
- Take the DEFORMED KEY (F), MANUAL PAGE 3/4 (G), and PAW PRINT (H).
- Turn left.
- Place the DEFORMED KEY (I); take the HOT KEY with the GAUNTLET.
- Place the HOT KEY (J); hit it with the HAMMER three times.
- Take the MACHINE KEY.
- Go to the Barracks.

- Place the WET SHEET (K); take MANUAL PAGE 4/4 (L).
- Place 4 MANUAL PAGES (purple); take the MACHINE MANUAL (M).
- Go to the Forge.
- Insert the MACHINE KEY into the lock (N); place the MACHINE MANUAL (O).

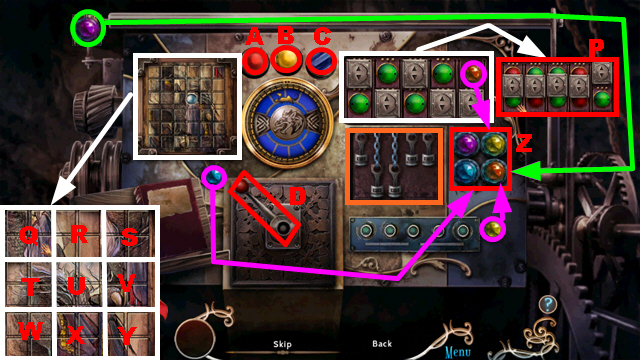
- Play the mini-game.
- Solution: purple, P.
- U, S, Y, X, R, S, X, Y, R, U, V, Y, Q, Y, U, Q, R, U, X, V, Q, R, U, Q, S.
- Green, Z, orange.
- Ax2, Bx4, D.
- Walk down.

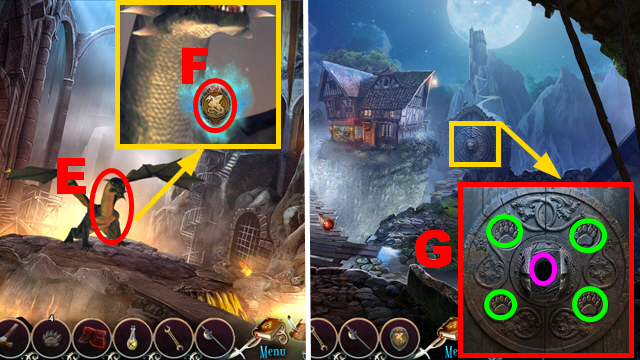
- Talk to the dragon (E); take the DRAGON TOKEN (F).
- Go to the Crossings Landing.
- Use the RUST-BE-GONE POTION (G).
- Place 4 PAW PRINTS (green) and the DRAGON TOKEN (purple).
- Turn right.
Chapter 6: Across the Moat

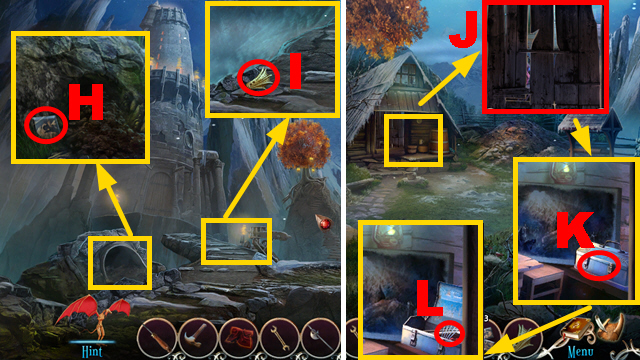
- Take TILE 1/3 (H) and WOODEN CARVING (I).
- Turn right.
- Use the HALBERD (J) to acquire the WOODEN PLANK.
- Use the HAMMER (K); take the NAILS (L).

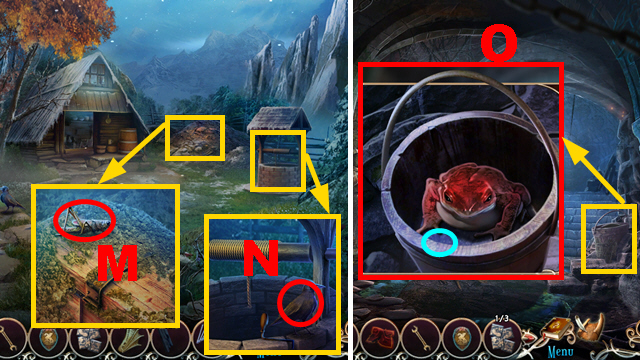
- Take the INSECT (M).
- Chase the bird (N).
- Go to the Dungeon.
- Place the INSECT (blue); take the PAIL (O).

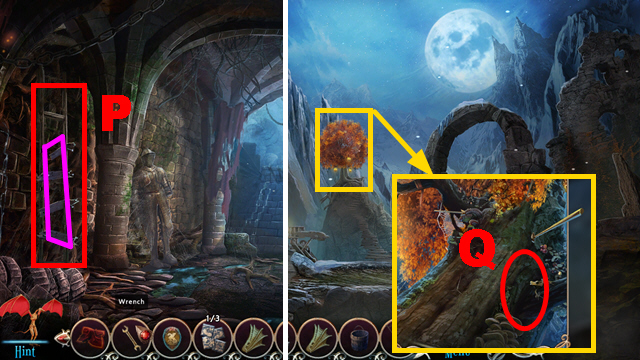
- Place the WOODEN PLANK and NAILS (purple); fix them with the HAMMER.
- Take the LADDER (P).
- Walk down, turn right three times.
- Place the LADDER (Q).

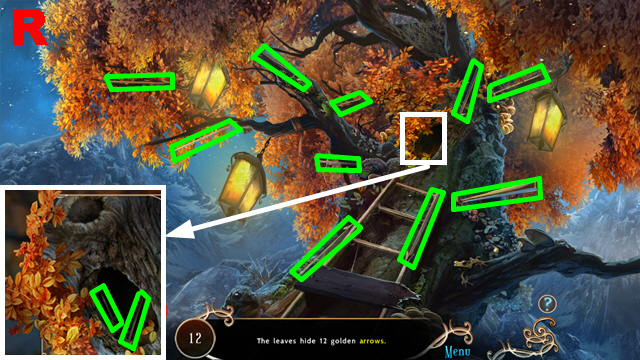
- Play the HOP.
- You receive the ARROW (R).
- Turn right.

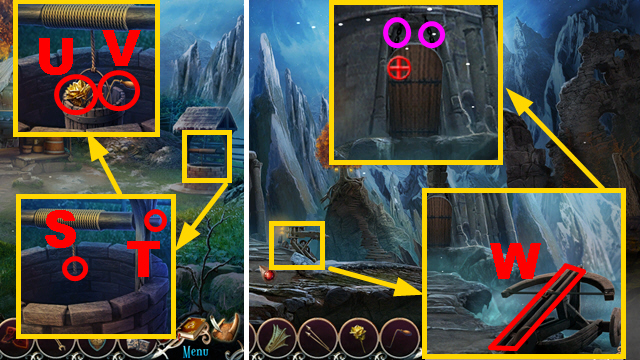
- Place the PAIL (S) and WRENCH (T); take the METAL FLOWER (U) and WINCH LEVER (V).
- Walk down.
- Place the ARROW and WINCH LEVER (W).
- Turn the handle; shoot 2 arrows (purple).
- Turn left.

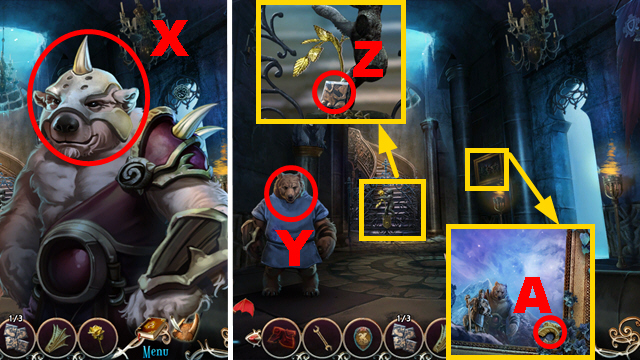
- Give the DRAGON TOKEN to the bear (X).
- Talk to the bear (Y).
- Take TILE 2/3 (Z) and WOODEN CARVING (A).
- Turn right.

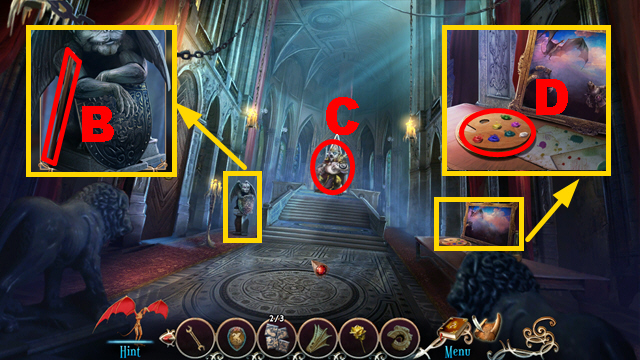
- Take the WOODEN STICK (B).
- Talk to the king (C).
- Take the COLOR PALETTE (D).
- Walk down twice, turn right.

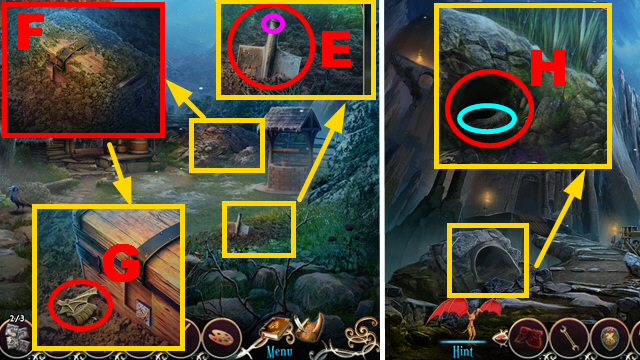
- Place the WOODEN STICK (purple); take the SHOVEL (E).
- Use the SHOVEL four times (F); take the WOODEN CARVING (G).
- Walk down.
- Use the SHOVEL (H); take the METAL PAW (blue).
- Turn left, turn right.

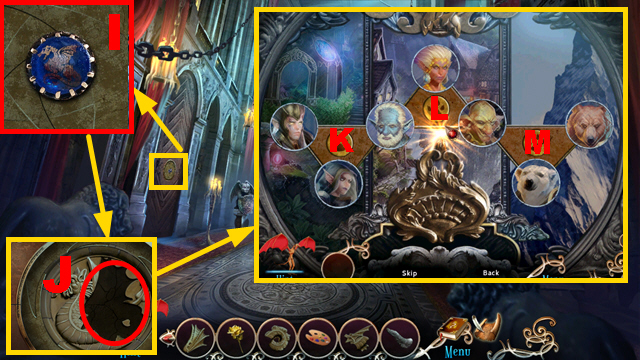
- Place the DRAGON TOKEN (I).
- Put down 3 WOODEN CARVINGS (J).
- Play the mini-game.
- Use the buttons K-M to solve this puzzle.
- The puzzle is randomized.
- Turn left.

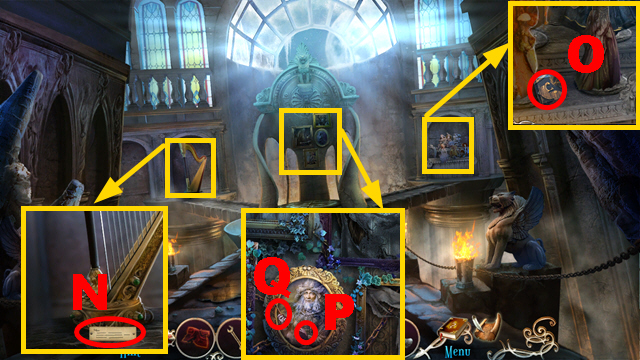
- Take the note (N) and TILE 3/3 (O).
- Place the COLOR PALETTE (P); take the MAGICAL PAINTBRUSH (Q).
- Go to the Cabin Clearing.

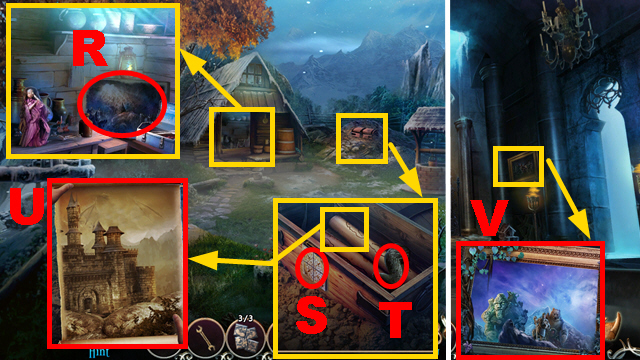
- Use the MAGICAL PAINTBRUSH; take PAINTING 1 (R).
- Place 3 TILES (S); take the METAL LEG (T).
- Use the MAGICAL PAINTBRUSH; take PAINTING 4 (U).
- Walk down, turn left.
- Use the MAGICAL PAINTBRUSH; take PAINTING 2 (V).

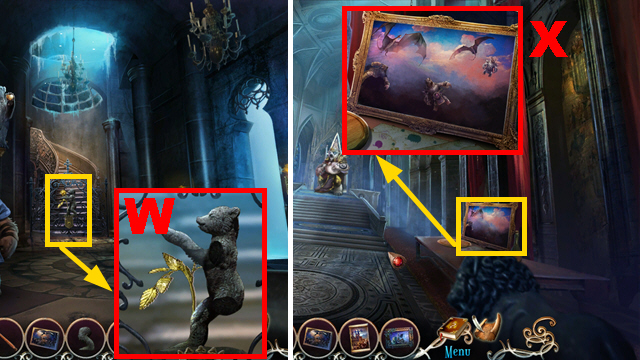
- Place the METAL LEG, METAL PAW, and METAL FLOWER (W).
- Turn right.
- Use the MAGICAL PAINTBRUSH; take PAINTING 3 (X).
- Turn left.

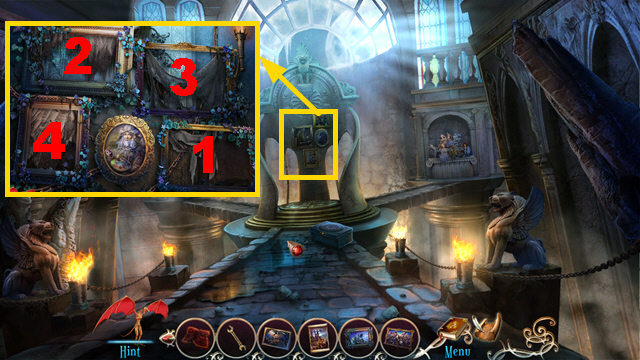
- Place PAINTINGS 1 (1), PAINTING 2 (2), PAINTING 3 (3), and PAINTING 4 (4).
- Play the mini-game.

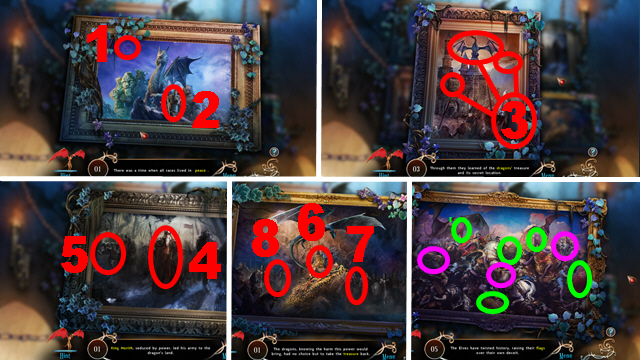
- Solution: 1-8.
- Collect the items (green) and (purple).

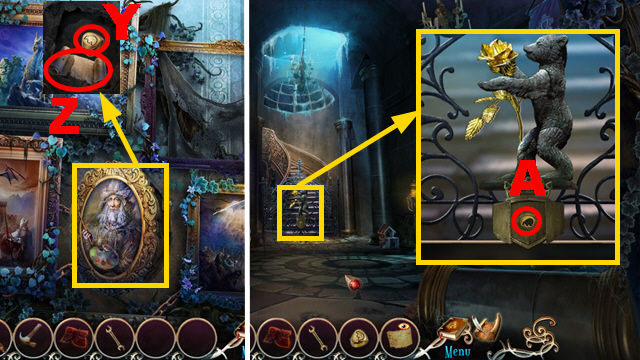
- Take the SIGNET RING (Y) and ANCIENT SCROLL (Z).
- Walk down twice.
- Place the SIGNET RING (A).
- Go upstairs.

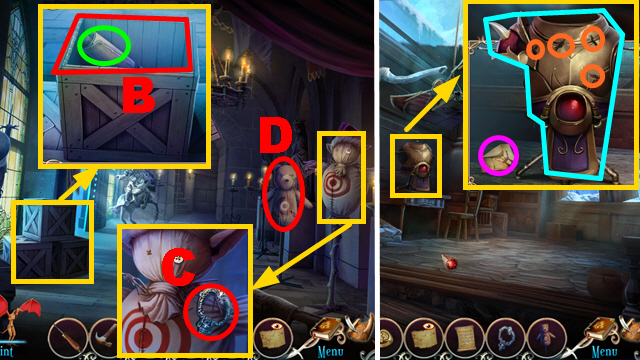
- Use the HAMMER (B); take the MUSIC SHEET (green).
- Take the DOOR HANDLE (C) and SCAREBEAR (D).
- Move forward.
- Examine the note (purple); use the HAMMER (orange).
- Take the BREAST PLATE (blue).
- Walk down, turn left.

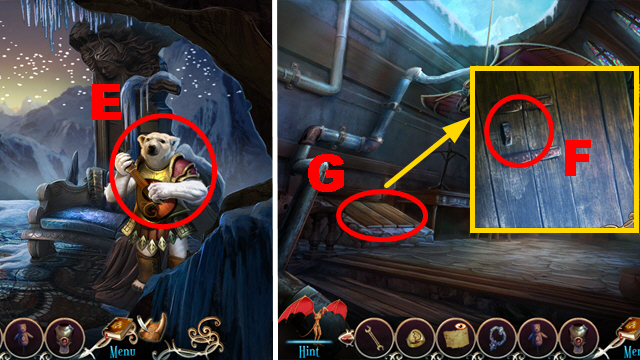
- Give the MUSIC SHEET to the bear (E).
- Walk down, move forward.
- Place the DOOR HANDLE (F); open the trapdoor.
- Examine the trapdoor (G).

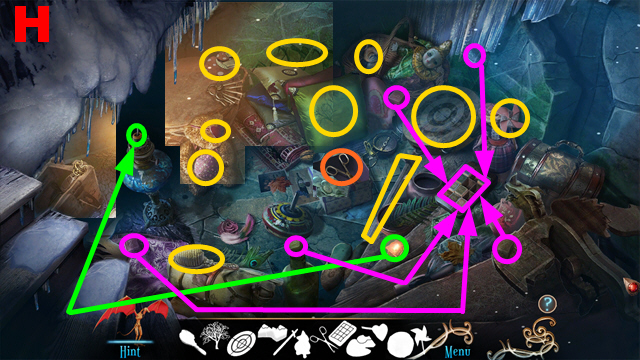
- Play the HOP.
- You receive the SCISSORS (H).
- Walk down.

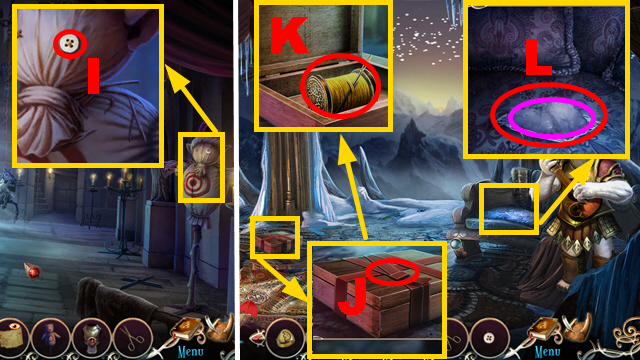
- Collect the CLOTHES BUTTON with the SCISSORS (I).
- Turn left.
- Use the SCISSORS (J); take the NEEDLE AND THREAD (K).
- Collect the TORN CLOTH with the SCISSORS (L); take the COTTON STUFFINGS (purple).
- Go to the Cabin Clearing.

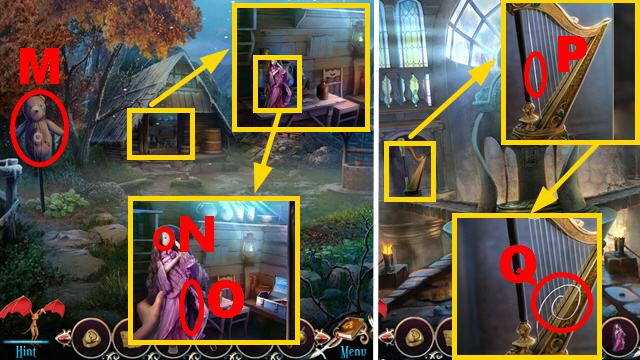
- Place the SCAREBEAR (M).
- Use the CLOTHES BUTTON and NEEDLE AND THREAD (N).
- Use the COTTON STUFFINGS and NEEDLE AND THREAD (O).
- Take the CROSSINGS DOLL.
- Go to the Vault of History.
- Use the SCISSORS (P); take the INSTRUMENT STRING (Q).

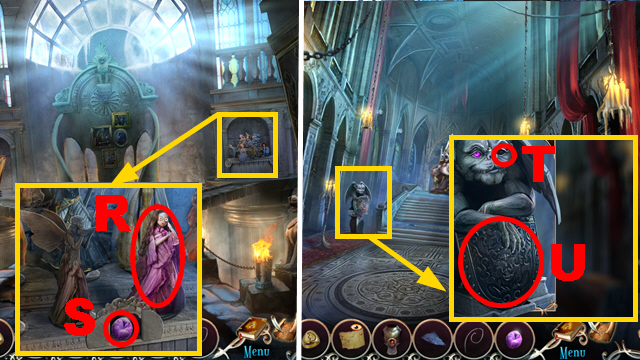
- Place the CROSSINGS DOLL (R).
- Take the GEM (S).
- Walk down.
- Place the GEM (T).
- Take the SHIELD (U).
- Go to the Battleroom.

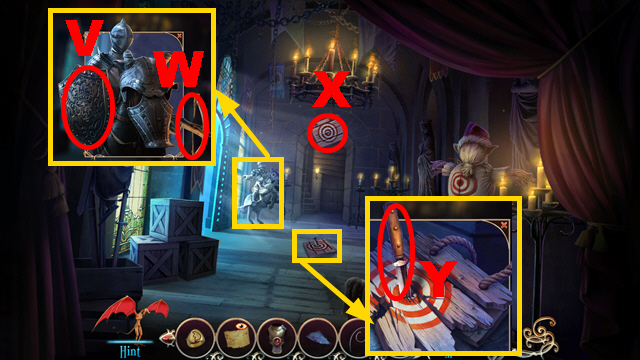
- Place the SHIELD (V); take the CROSSBOW (W).
- Shoot the CROSSBOW (X).
- Take the THROWING KNIFE (Y).
- Turn left.

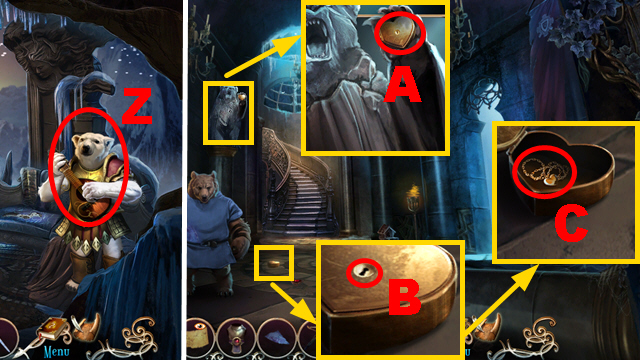
- Give the INSTRUMENT STRING to the bear (Z); you receive the LUCKY PIN.
- Walk down twice.
- Use the CROSSBOW (A).
- Use the LUCKY PIN (B); take the BEAR HEART (C).
- Turn right, turn left.

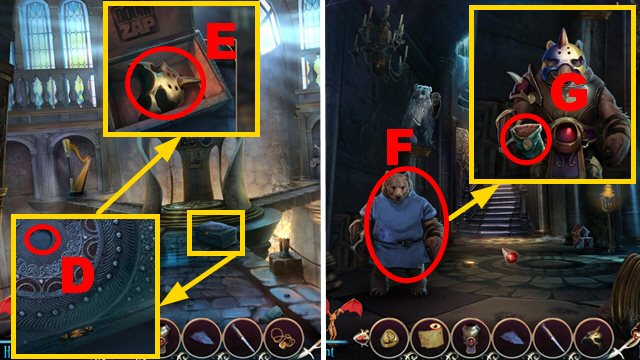
- Place the BEAR HEART (D); take the BEAR HELMET (E).
- Walk down twice.
- Give the BEAR HELMET and BREAST PLATE to the bear (F).
- Take the FUR POUCH (G).
- Walk down, turn right.

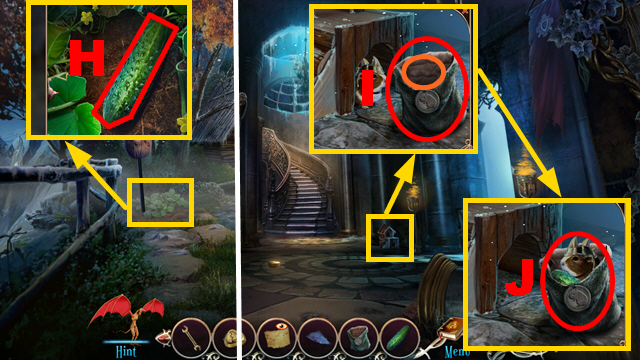
- Collect the CUCUMBER PIECE with the THROWING KNIFE (H).
- Walk down, turn left.
- Place the FUR POUCH (I) and CUCUMBER PIECE (orange).
- Take the ARMORED GUINEA PIG (J).
- Walk down.

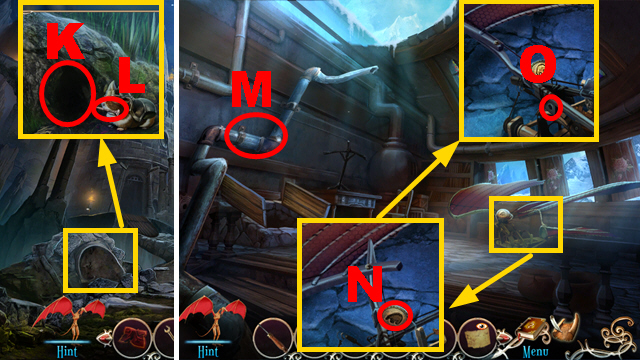
- Use the ARMORED GUINEA PIG (K); take the SCREW (L).
- Go to the Toy Workshop.
- Use the ARMORED GUINEA PIG (M).
- Place the SIGNET RING (N); use the SCREW and SCREWDRIVER (O).
- You receive the BIG KITE.
- Walk down, turn left.

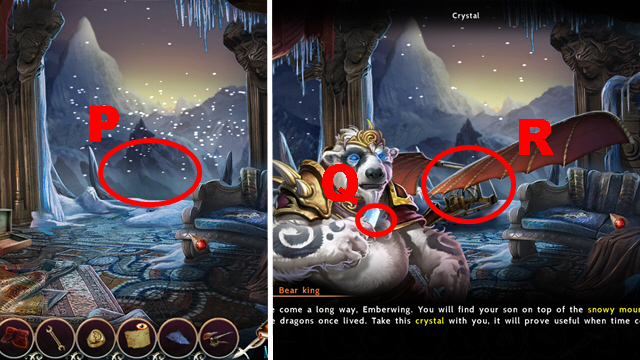
- Place the BIG KITE (P).
- Take CRYSTAL 1/4 (Q).
- Use the kite (R).
Chapter 7: The Lookout Point

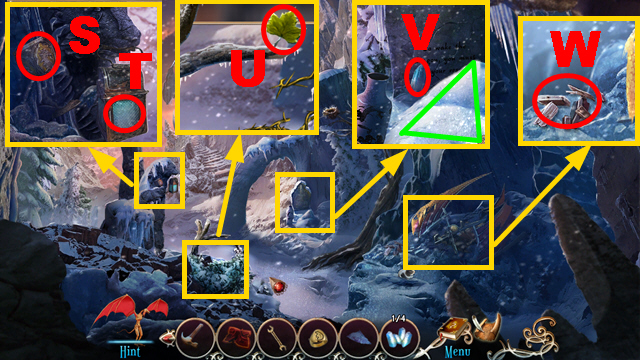
- Take the CHALICE (S); use the SCREWDRIVER (T).
- Take the GREEN LEAF (U) and CRYSTAL 2/4 (V).
- Use the CHALICE (green) to acquire the SNOW.
- Take the WOOD SCRAPS (W).
- Move forward.

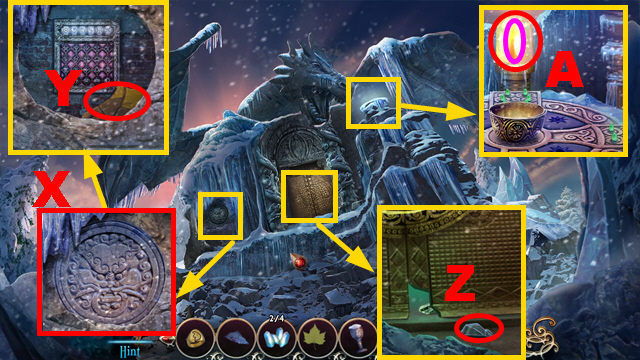
- Use the SCREWDRIVER (X); take the THICK GLOVES (Y).
- Take MIRROR SHARD 1/3 (Z).
- Use the HAMMER (A); collect the SUN PRISM with the THICK GLOVES (purple).
- Walk down.

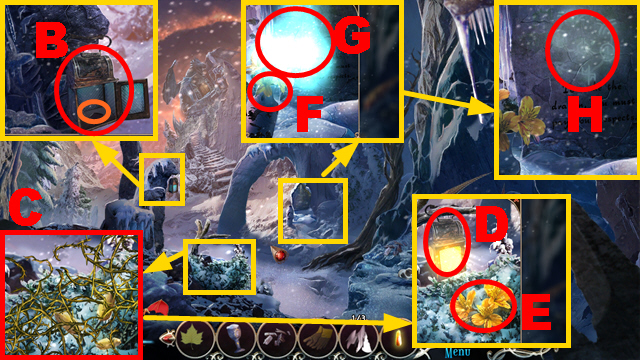
- Place the SUN PRISM (orange); take the SUN LANTERN (B).
- Use the THICK GLOVES twice (C); place the SUN LANTERN (D).
- Take the SUN LILIES (E).
- Place the SUN LILIES (F); talk to the wisp (G).
- Take the GLYPH NOTE (H).
- Move forward.

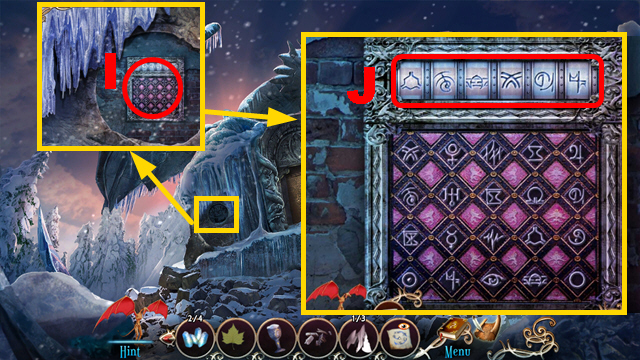
- Examine the GLYPH NOTE.
- Play the mini-game (I).
- Solution: (J).

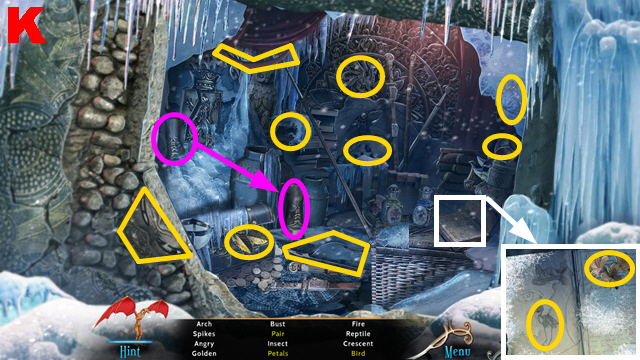
- Play the HOP.
- You receive the TOY ARMOR (K).
- Walk down.

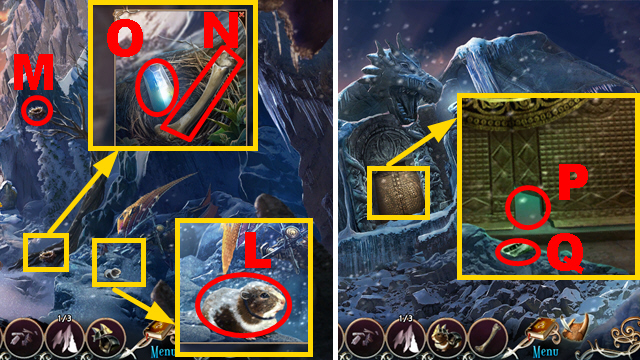
- Place the TOY ARMOR (L); take the ARMORED GUINEA PIG.
- Use the ARMORED GUINEA PIG (M).
- Take the BONE (N) and CRYSTAL 3/4 (O).
- Move forward.
- Use the ARMORED GUINEA PIG (P); take CRYSTAL 4/4 (Q).

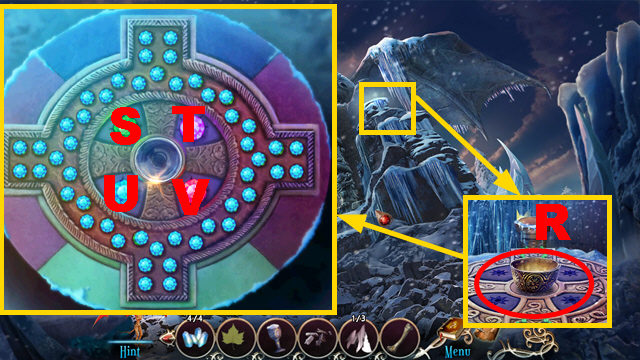
- Place 4 CRYSTALS (R).
- Play the mini-game.
- To solve this puzzle, activate buttons S-V until all gems are of the same color.
- This puzzle is randomized.

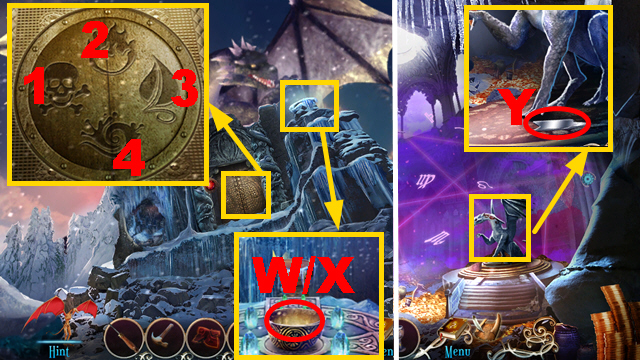
- Place the WOOD SCRAPS (W); take the ASH.
- Place the SNOW (X); take the WATER.
- Place the BONE (1), ASH (2), GREEN LEAF (3), and WATER (4).
- Move forward.
- Take MIRROR SHARD 2/3 (Y).

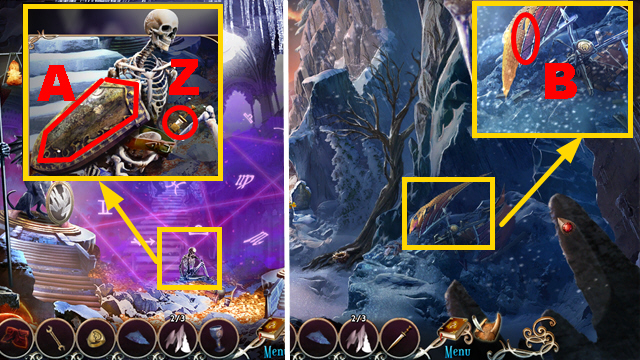
- Take the DAGGER (Z); use the WATER (A).
- Walk down twice.
- Use the DAGGER to acquire the CLOTH (B).
- Move forward twice.

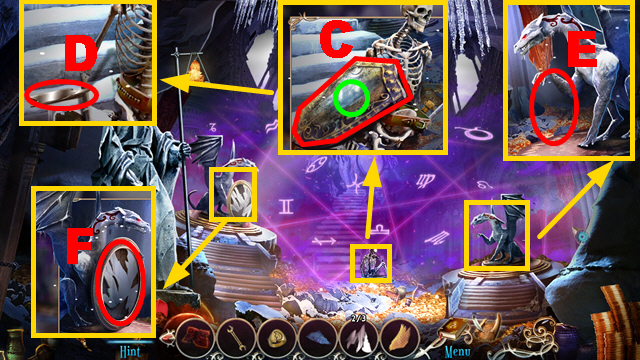
- Use the CLOTH (green).
- Take the SHINY SHIELD (C) and MIRROR SHARD 3/3 (D).
- Place the SHINY SHIELD (E) and 3 MIRROR SHARDS (F).

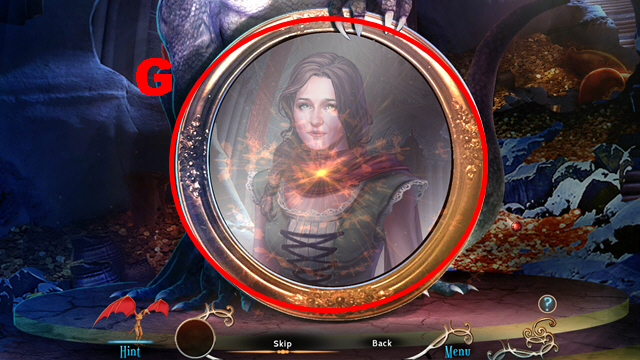
- Play the mini-game.
- Solution: (G).

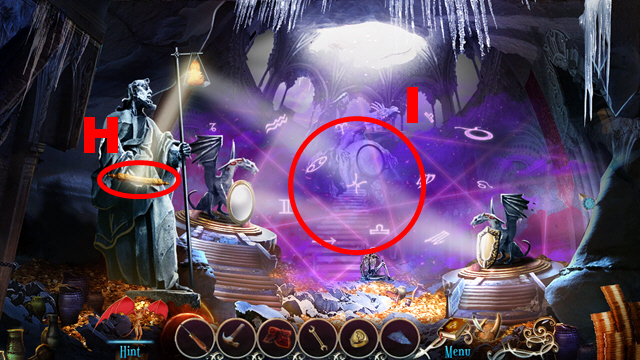
- Take the MAGIC SCROLL (H).
- Use the MAGIC SCROLL (I).

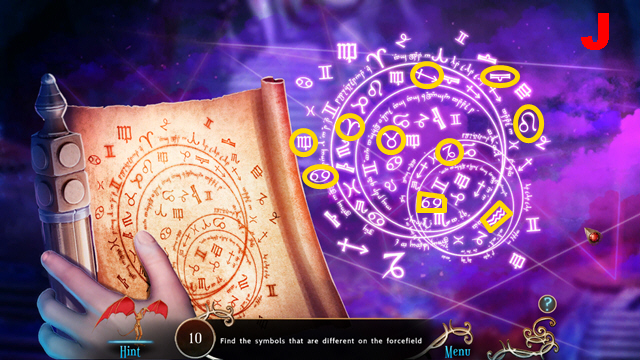
- Play the HOP.
- Solution: (J).

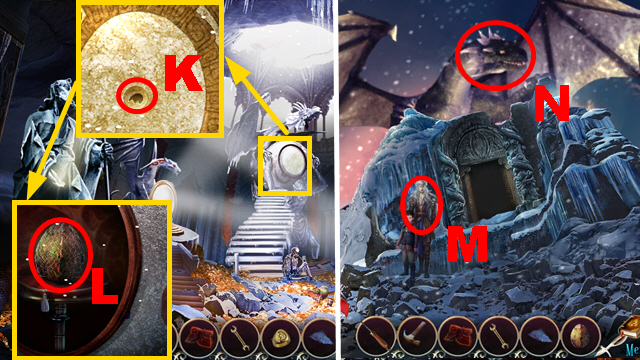
- Place the SIGNET RING (K); take the DRAGON EGG (L).
- Give the DRAGON EGG to Eridan (M).
- Talk to the dragon (N).

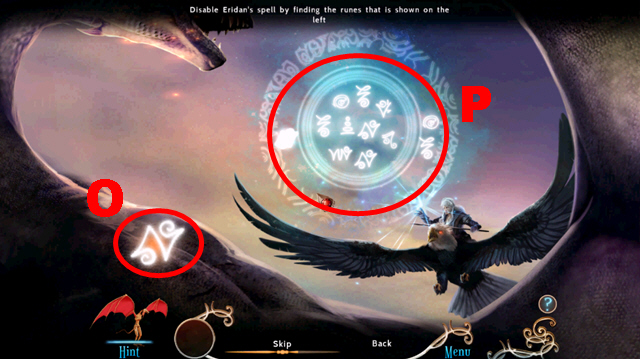
- Play the mini-game.
- Find the runes shown on the left (O) in the center (P) three times to defeat Eridan.
- The appearance of runes is randomized.
- Congratulations, you have completed Emberwing: Lost Legacy.






 Emma and the Inventor Walkthrough, Guide, & Tips
 Lost in Time: The Clockwork Tower Walkthrough, Guide, & Tips
 Princess Isabella: Return of the Curse Walkthrough, Guide, & Tips
 The Dreamatorium of Dr Magnus Walkthrough, Guide, & Tips
 Living Legends: Wrath of the Beast Walkthrough, Guide, & Tips