Phantasmat: Crucible Peak Walkthrough, Guide, & Tips
Phantasmat: Crucible Peak Walkthrough

Welcome to the Phantasmat: Crucible Peak Walkthrough
A disastrous avalanche… an evacuation… did anyone survive? The ski trip you’ve dreamed of for so long turns into a nightmare.
Whether you use this document as a reference when things get difficult or as a road map to get you from beginning to end, we’re pretty sure you’ll find what you’re looking for here.
This document contains a complete Phantasmat: Crucible Peak game walkthrough featuring annotated screenshots from actual gameplay!
We hope you find this information useful as you play your way through the game. Use the walkthrough menu below to quickly jump to whatever stage of the game you need help with.
Remember to visit the Big Fish Games Forums if you find you need more help. Have fun!
This walkthrough was created by prpldva, and is protected under US Copyright laws. Any unauthorized use, including re-publication in whole or in part, without permission, is strictly prohibited.
General Tips

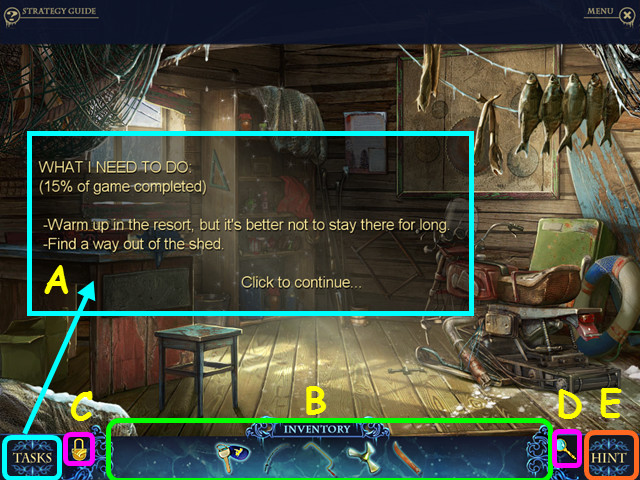
- Check the Task List to view your current objective (A).
- Your inventory (B) is located in the lower panel; select an item to use it.
- The inventory auto-hides; move your mouse down to reveal the panel.
- Select the lock to freeze the inventory panel in the up position (C).
- Select the magnifying glass to enlarge the inventory items (D).
- Hints are unlimited, but you must wait for the meter to refill (E).

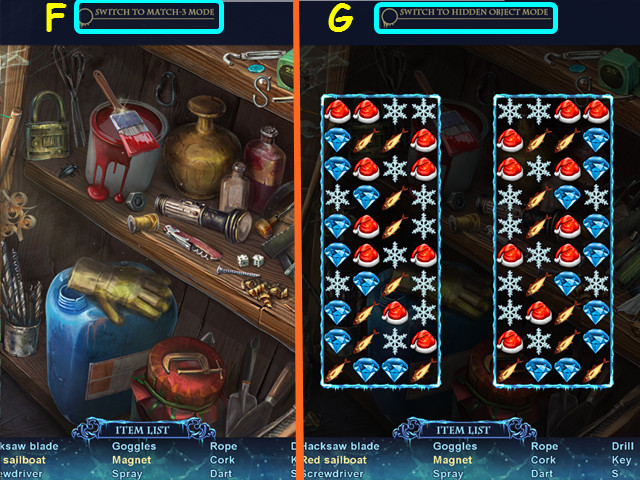
- Hidden Object Scenes will be referred to as HOS in this walkthrough.
- HOS and mini-games are often randomized – your solution may vary.
- Hidden Object items listed in bold are hidden or require additional steps.
- Select the ‘Switch to Match 3 Mode’ button to play a Match 3 game instead of the HOS (F).
- Select the ‘Switch to Hidden Object Mode’ button to search for hidden objects instead of playing match 3 (G).
Chapter 1: The Resort

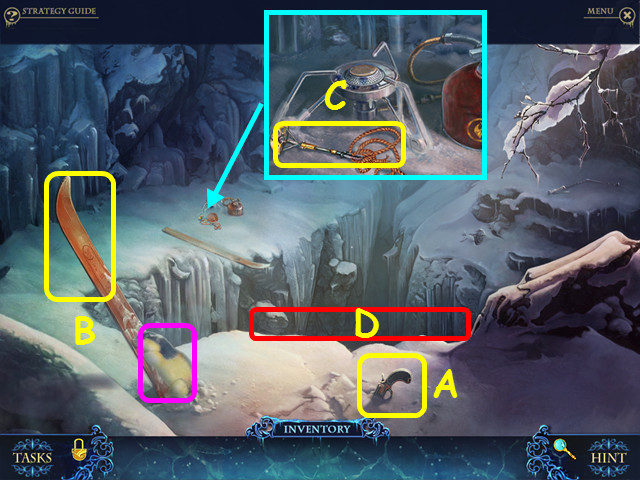
- You will have the option of some interactive help.
- Take the FLARE PISTOL (A).
- Scare the rodent away, then take the SKI PART (B).
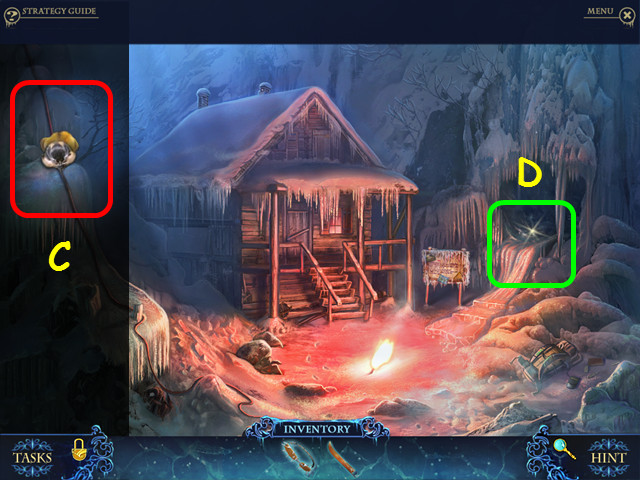
- Look at the equipment and take the ROPE WITH SAFETY FASTENER (C).
- Look down the cliff (D).

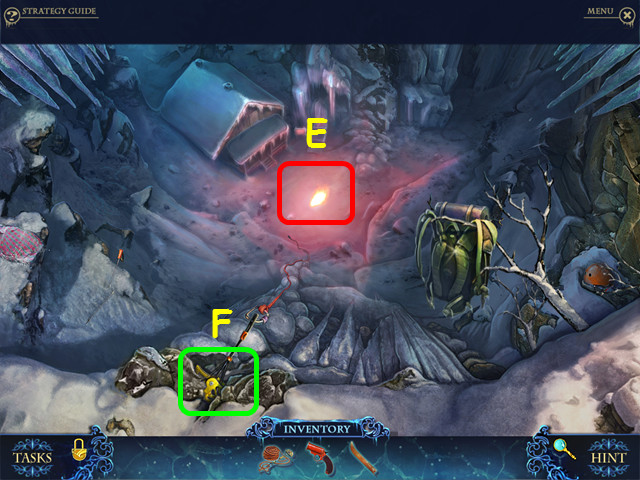
- Use the FLARE PISTOL on the darkness (E).
- Use the ROPE WITH SAFETY FASTENER on the rock (F).
- Climb down the rope.

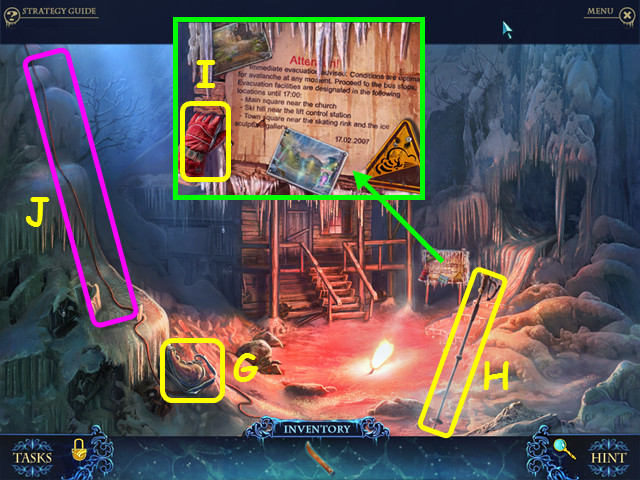
- Take the BOTTLE WITH WATER (G).
- Take the SKI POLE (H).
- Look at the sign and take the SKI GLOVE (I).
- Climb up the rope (J).

- Use the SKI POLE on the backpack (K).
- Climb down the rope.
- Select the backpack for a HOS (L).

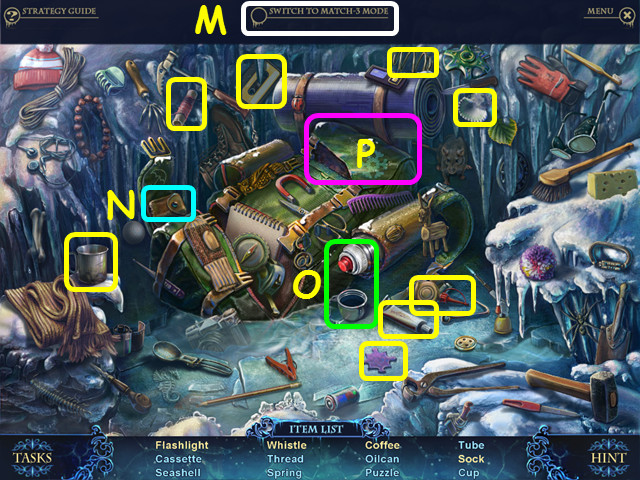
- Locate all the items on the list.
- Select the ‘Switch to Match 3 Mode’ button to play match 3 instead of the HOS if you desire (M).
- Open the pouch to find the whistle (N).
- Open the thermos to pour the coffee (O).
- Open the flap to find the flashlight and the sock (P).
- You will earn the CUP.
- Climb up the rope, then walk down.

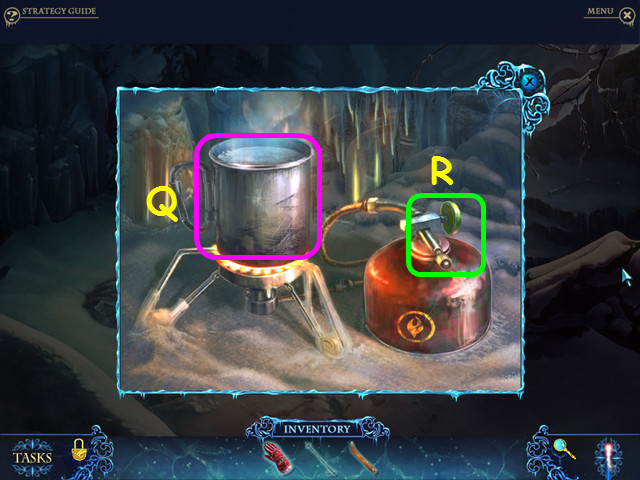
- Look at the equipment and place the CUP on the burner (Q).
- Pour the BOTTLE WITH WATER into the cup.
- Press the ignite button to light the stove (R).
- Use the SKI GLOVE on the cup to get the BOILING WATER.
- Look down the cliff, then climb down the rope.


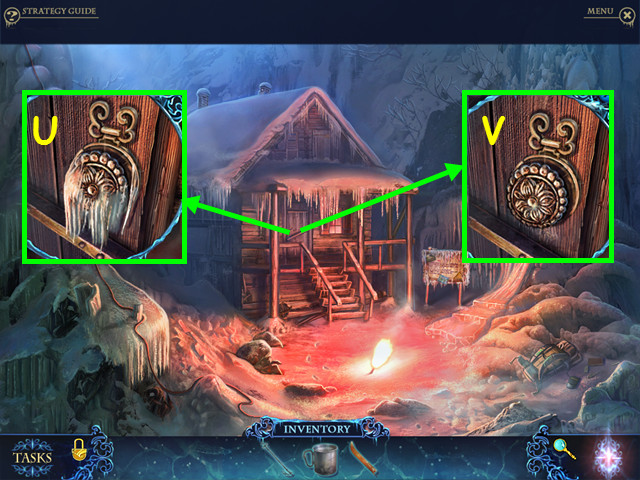
- Look at the cabin door and use the BOILING WATER on the doorknob (U).
- Turn the doorknob (V), then enter the cabin.

- Use the SKI POLE on the trapdoor (W).
- Look up the ladder and take the BUTANE TORCH (X).
- Note the mini-game on the table (Y).


- Look at the ice flow, then use the BUTANE TORCH on the ice (A).
- Trace around the outer edge of the boot.
- Hold the left mouse button down and drag it around the outline of the boot.
- Take the CRAMPONS (B).
- Walk down.


- Try to capture the rodent (C).
- Use the CRAMPONS on the path (D).

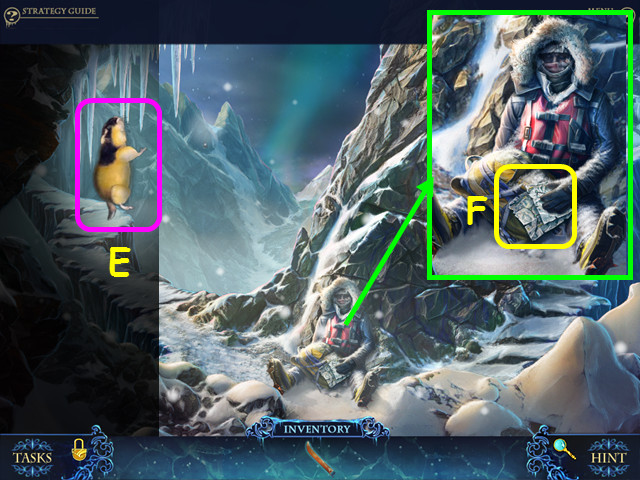
- Try again to capture the rodent (E).
- Look at the corpse and take the MAZE MAP (F).
- Walk down, enter the cabin and look at the table for a mini-game.

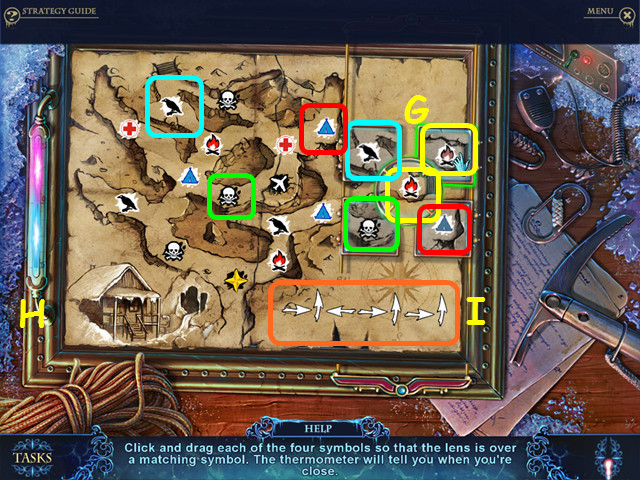
- Place the MAZE MAP into the frame to trigger the mini-game.
- Drag each of the 4 symbols so the lens is over a matching symbol (G).
- Do this for all 4 symbols (color coded).
- Note the background in each symbol to determine the correct location.
- The thermometer will fill if correct (H).
- Note the directions that appear on the map (I).
- Exit the map, walk down, then walk to the right.

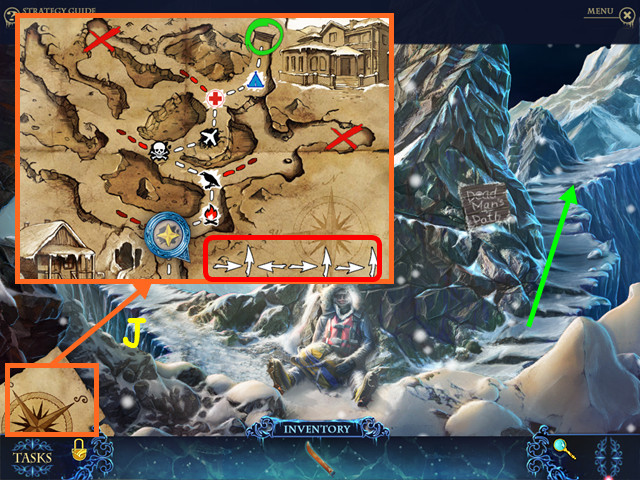
- Select the map from the lower left (J).
- Walk right, up, left, right, up, right, and up.

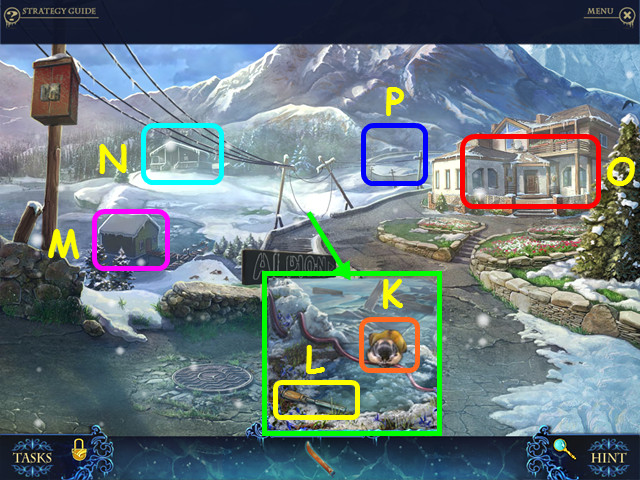
- Look at the downed power lines and try to capture the rodent (K).
- Take the LOCK PICK (L).
- Note the fishing shack (M).
- Note the house (N).
- Note the resort (O).
- Walk forward (P).

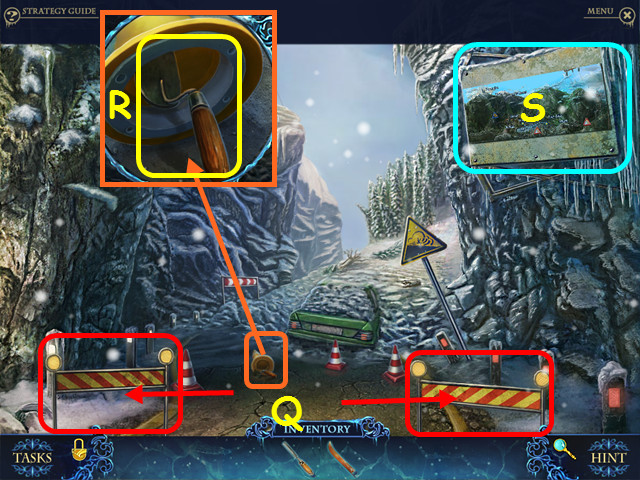
- Move the two barriers aside (Q).
- Tip over the yellow cone, zoom in and take the TROWEL (R).
- Read the map (S).
- Walk down, then go right to the resort.

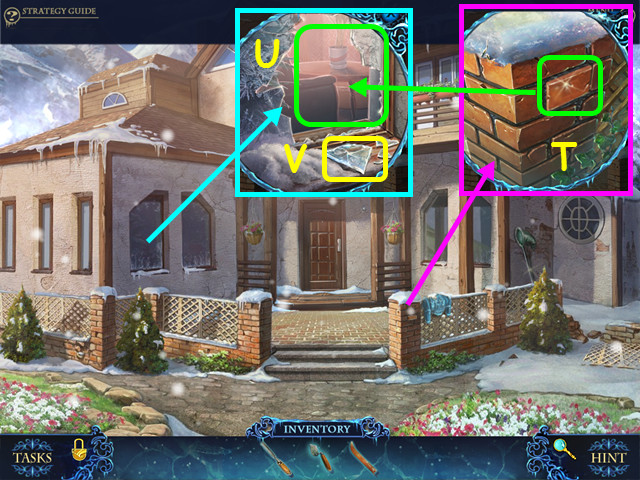
- Look at the fence and use the TROWEL to remove the BRICK (T).
- Look at the window and use the BRICK to break the window (U).
- Take the GLASS SHARD (V).

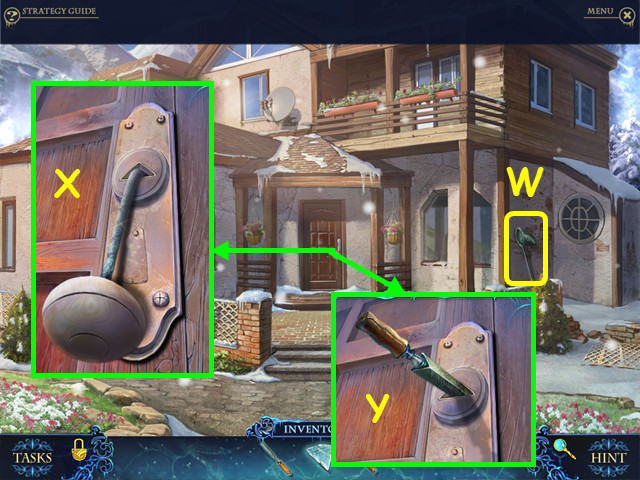
- Take the BUTTERFLY NET (W).
- Look at the door, pull the knob, then use the GLASS SHARD to remove the knob (X).
- Use the LOCK PICK in the triangular hole and turn it (Y).
- Walk forward to enter the resort.

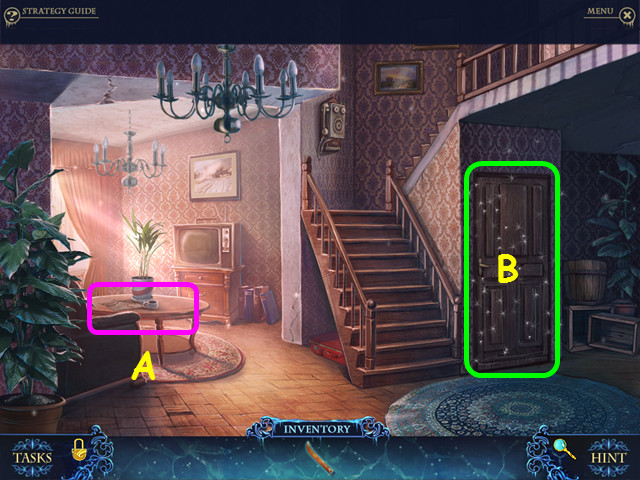
- Note the map on the table (A).
- Select the door for a HOS (B).

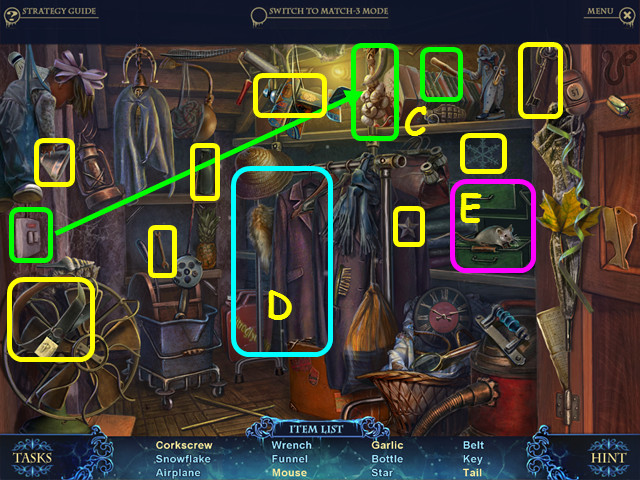
- Locate all the items on the list.
- Turn on the light switch to find the garlic and the corkscrew (C).
- Move the coat aside to find the tail (D).
- Open the case to find the mouse (E).
- You will earn the WRENCH.
- Walk up the stairs.

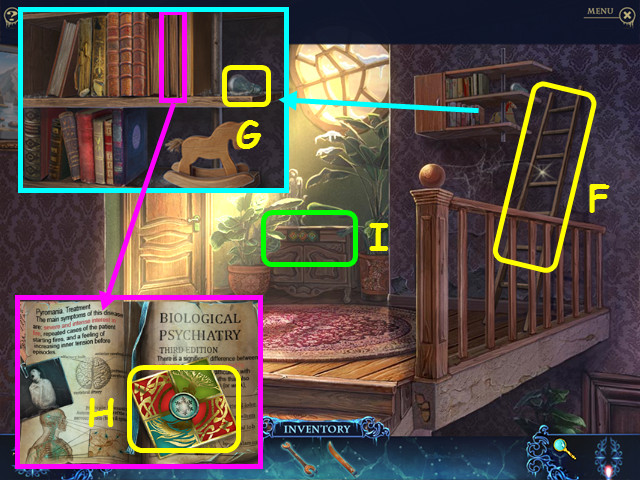
- Take the LADDER (F).
- Look at the shelf and take the FUSE BULB (G).
- Open the book and take the PUZZLE PART (H).
- Look at the cabinet for a mini-game (I).

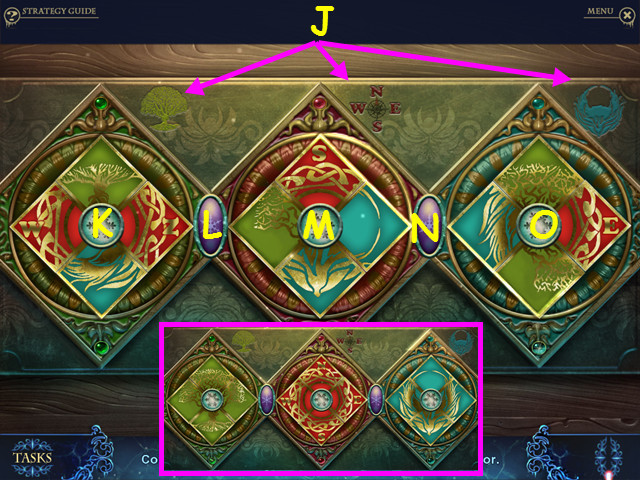
- Place the PUZZLE PART in the left position to trigger the mini-game.
- Move the squares to the correct position based on the symbols (J).
- Press the center snowflake buttons to spin the blocks (K, M, O); press the purple buttons to swap squares (L, N).
- Press the buttons in this order: L, Kx2, Mx3, Ox3, N, Mx2, K, L, Kx3, Ox2, Mx3, N, O, M, N, M, L, Mx2, N, Mx3, and N.
- Take the LETTER OPENER from the opening.
- Walk down and look at the map on the table.

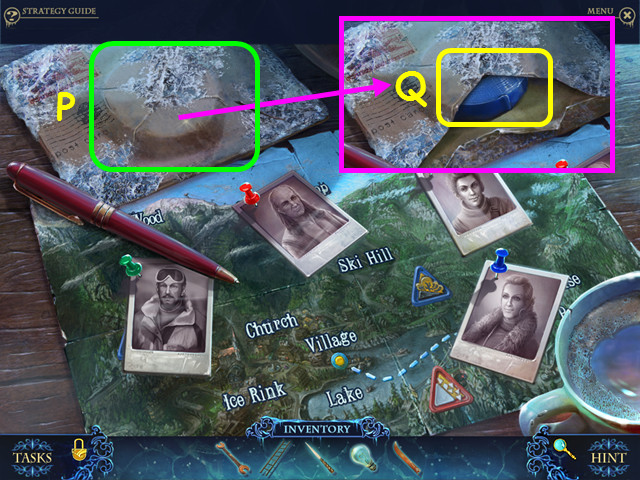
- Use the LETTER OPENER on the letter (P).
- Take the ELECTRICAL TAPE (Q).
- Note the photos.
- Exit the close-up, then walk down twice.

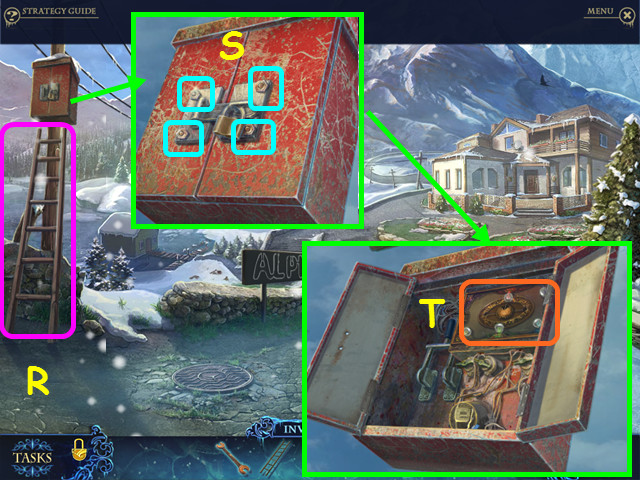
- Place the LADDER on the pole (R).
- Look at the power box and use the WRENCH on the 4 bolts (S).
- Open the power box, then select the area with bulbs for a mini-game (T).

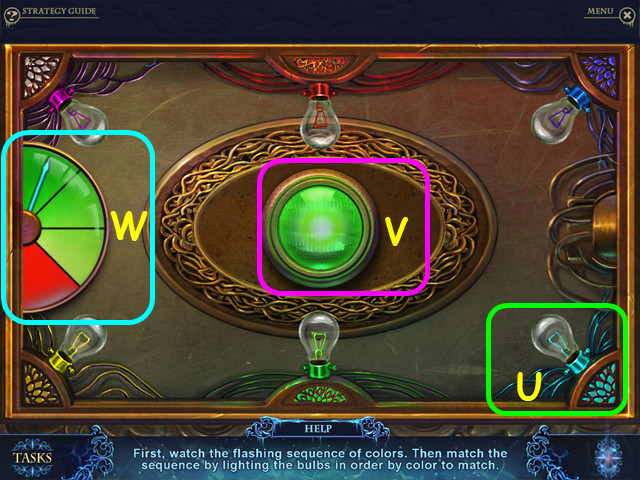
- Place the FUSE BULB in the lower right socket (U).
- Watch the sequence of lights in the center (V), then select the colored bulbs in the same order.
- You must do a series of 3 sequences that are randomly generated.
- Our random sequences were: (aqua, purple, yellow, red), (red, blue, green, yellow, purple), (blue, yellow, red, purple, aqua, green).
- Your progress will be noted on the left meter (W).

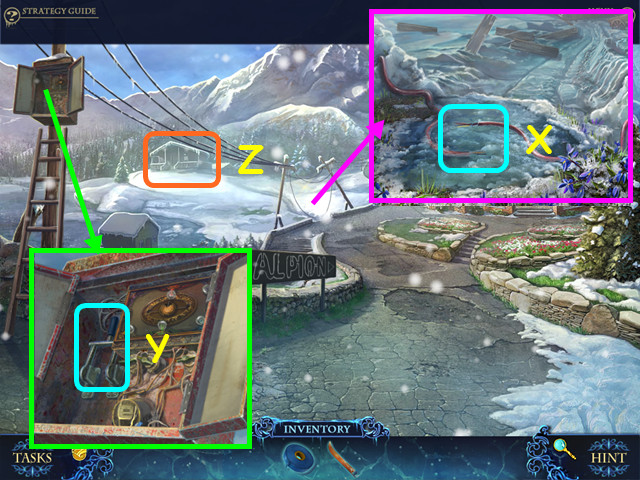
- Exit the close-up.
- Look at the downed power lines and use the ELECTRICAL TAPE on the wires (X).
- Look at the power box and flip the switch (Y).
- Walk to the far house (Z).
Chapter 2: Peter’s House

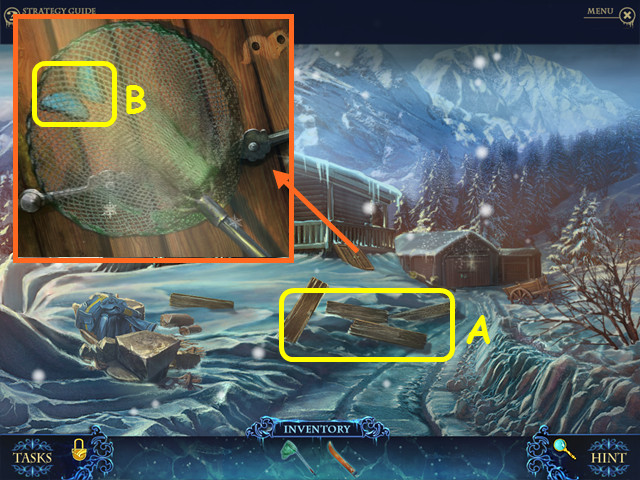
- Take the BOARDS (A).
- Look at the cellar door and use the BUTTERFLY NET to trap the butterfly, then take the BUTTERFLY (B).
- Walk down, then go left towards the boathouse.

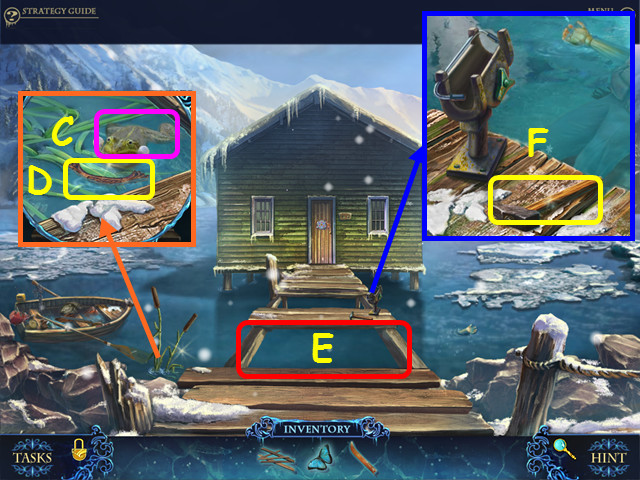
- Look at the cattails and give the BUTTERFLY to the frog (C).
- Take the WOODEN HANDLE (D).
- Place the BOARDS on the dock (E).
- Look at the pole holder and take the HAMMER (F).
- Walk down, go right, then enter the resort.

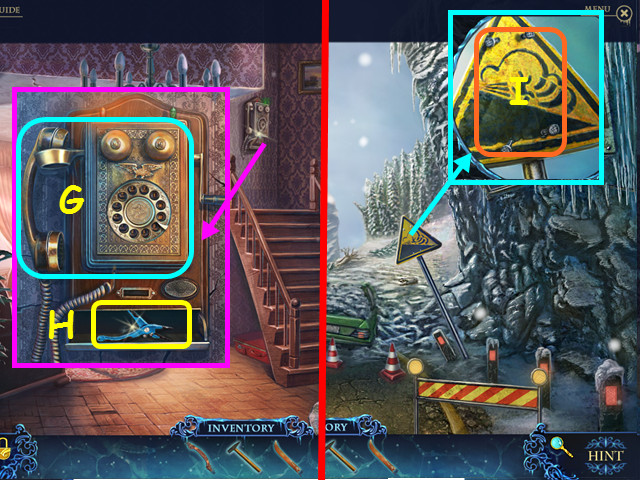
- Look at the phone and select the dial (G).
- Take the PLIERS (H).
- Exit the close-up of the phone.
- Walk down twice, then go forward to the mountain pass.
- Look at the sign and use the PLIERS to take the BENT NAILS (I).
- Walk down, then go towards Peter’s house.

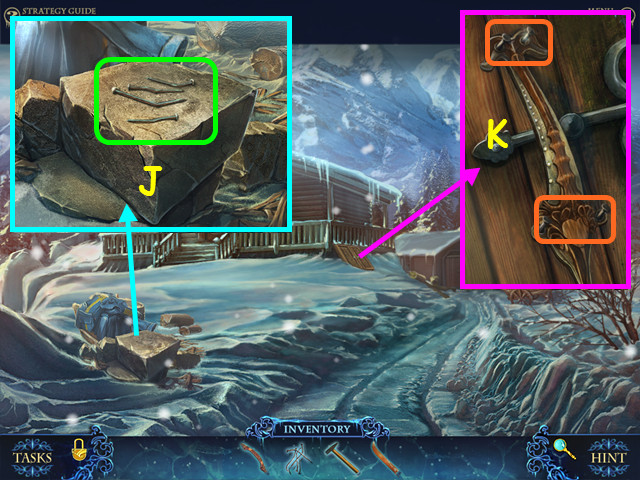
- Look at the rock, place the BENT NAILS on the surface, use the HAMMER to straighten them, then take the NAILS (J).
- Look at the cellar door: place the WOODEN HANDLE on the door, place the NAILS, then use the HAMMER on the 4 nails (K).
- Pull the handle, then select the cellar for a HOS.

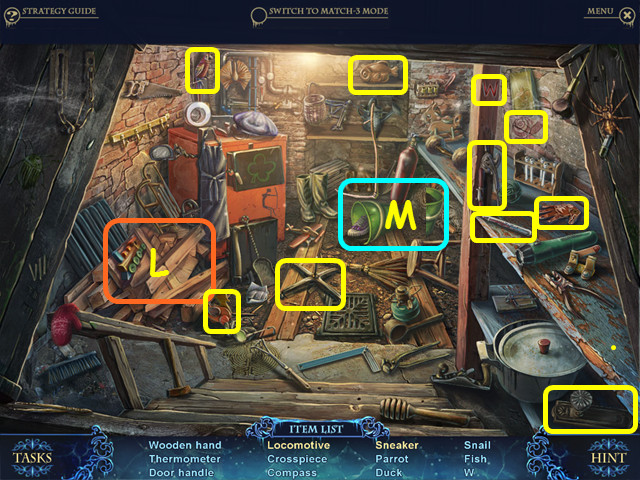
- Locate all the items on the list.
- Move the boards to find the locomotive (L).
- Tip the bucket to find the sneaker (M).
- You will earn the WOODEN HAND.
- Look at the front door to Peter’s house for a mini-game.

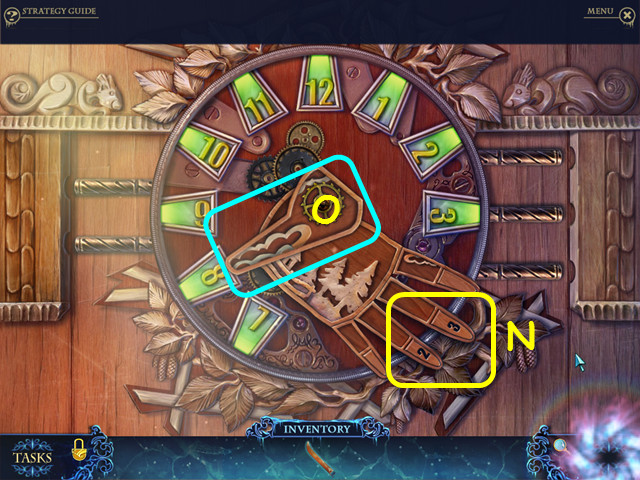
- Place the WOODEN HAND in the device to trigger the mini-game.
- Use the 2 and 3 fingers (N) to move the thumb (O) and light all the numbers.
- Press the fingers in this order: 3, 2, 3, 2, 3, 3, 2, and 3.
- Enter the house.

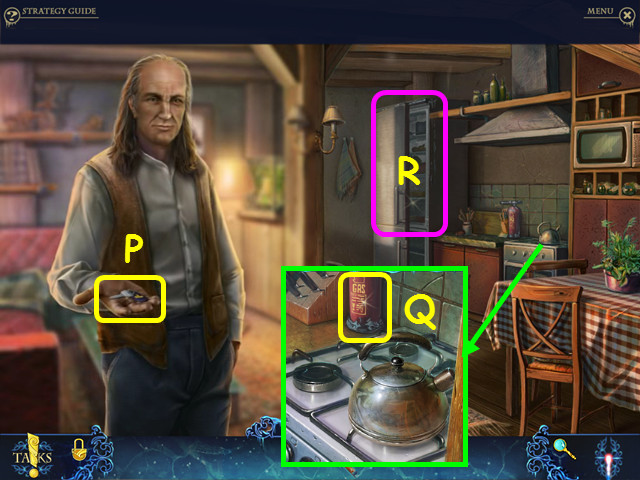
- Take the SNOWMOBILE KEY from Peter (P).
- Look at the counter and take the BUTANE TORCH (Q).
- Open the fridge and look inside (R).

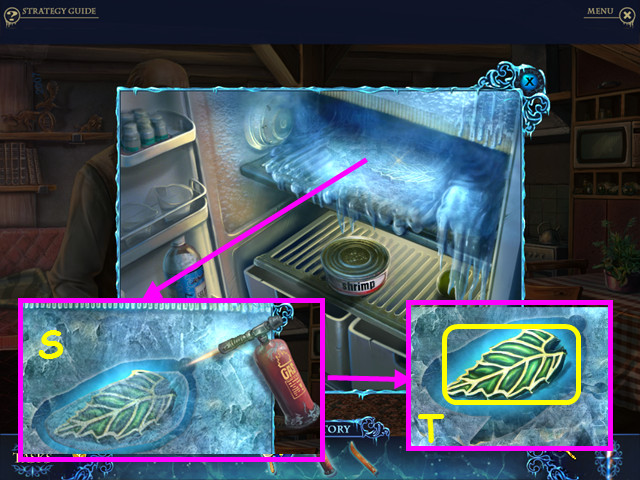
- Use the BUTANE TORCH on the ice, then trace around the object (S).
- Take the METAL LEAF (T).
- Walk down.
- Look at the shed door for a mini-game.

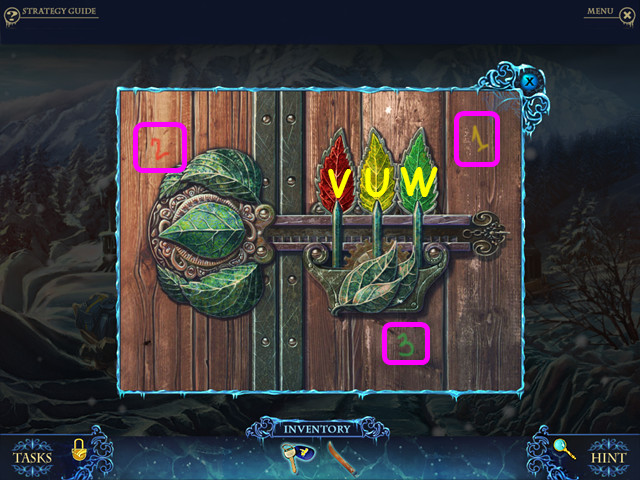
- Place the METAL LEAF in the mechanism to activate the mini-game.
- Note the colored numbers written on the wood (pink).
- Select the leaves in this order: U, V, W.
- Enter the shed.

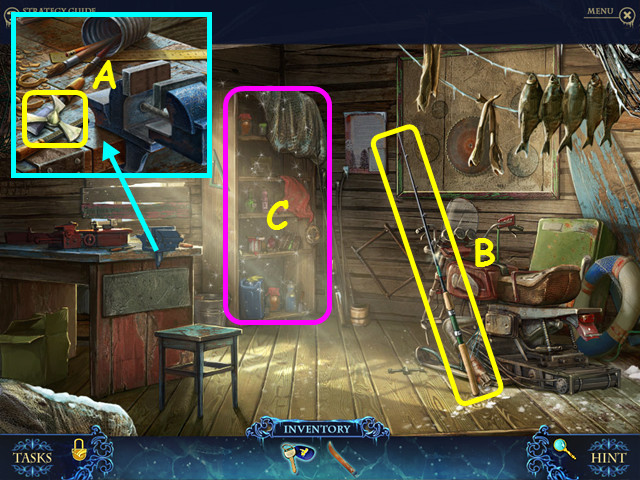
- Look at the workbench and take the PROPELLER (A).
- Take the ROD WITHOUT FISHING LINE (B).
- Select the shelves for a HOS (C).

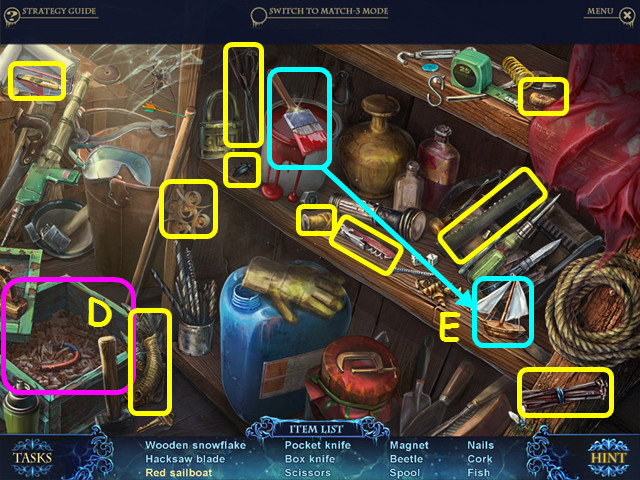
- Locate all the items on the list.
- Move the crate lid to find the magnet (D).
- Use the red paintbrush on the boat to make the red sailboat (E).
- You will earn the SAW BLADE.

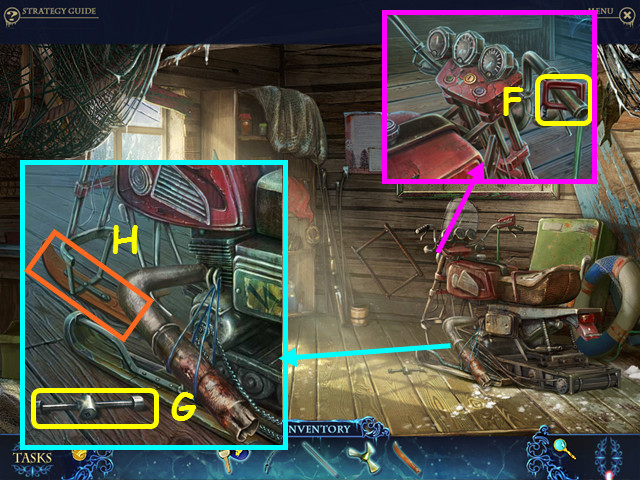
- Look at the handlebars of the snowmobile and take the SAW FRAME (F).
- Look at the base of the snowmobile and take the VISE LEVER (G).
- Place the SKI PART on the front bracket (H).

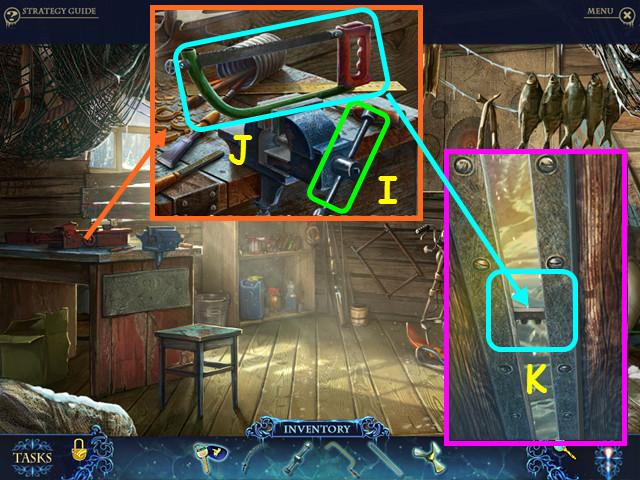
- Look at the workbench and place the VISE LEVER on the vise (I).
- Place the SAW FRAME in the vise, then place the SAW BLADE in the frame and take the HACKSAW (J).
- Walk down and use the HACKSAW on the latch (K).
- Walk down, then enter the house.

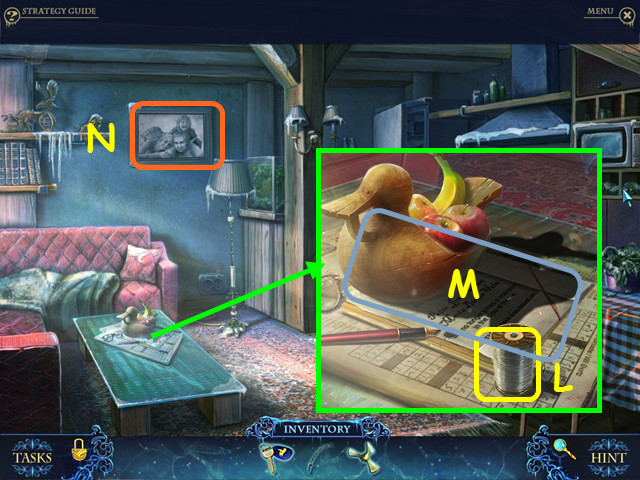
- Talk to Peter.
- Look at the table and take the FISHING LINE (L).
- Look at the divorce decree (M).
- Look at the photograph on the wall (N).
- Walk down twice and go left towards the fishing shack.

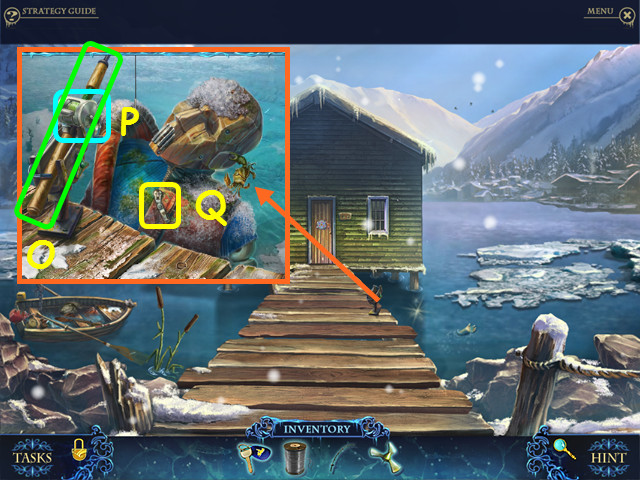
- Look at the rod holder and place the ROD WITHOUT FISHING LINE in it (O).
- Place the FISHING LINE on the rod, then spin the handle (P).
- Take the ZIPPER PULL from the dummy (Q).
- Walk down, go right, then enter the resort.

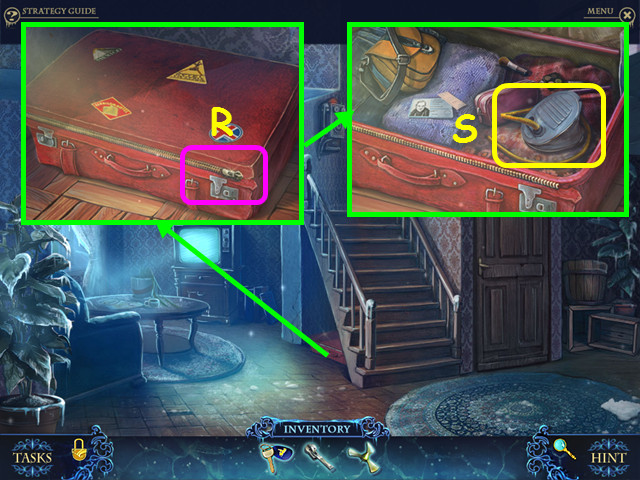
- Look at the suitcase under the stairs and attach the ZIPPER PULL (R).
- Open the suitcase and take the PUMP (S).
- Walk down twice, then go left to the boathouse.

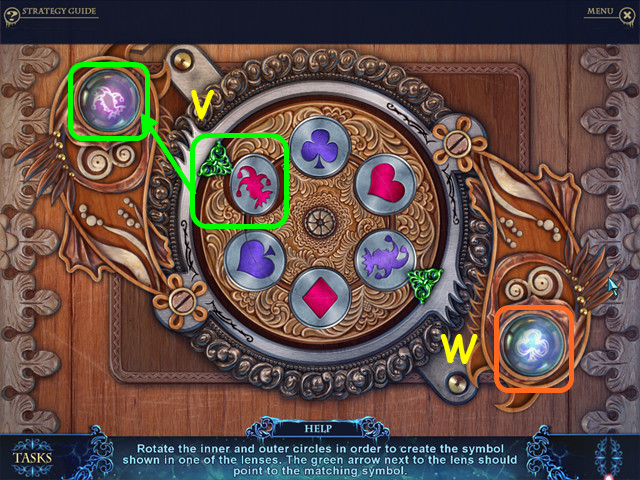
- Take the WOODEN FISH from Otto (T).
- Look at the door for a mini-game (U).


- Place the WOODEN FISH on the mechanism to activate the mini-game.
- Rotate the two discs to form a symbol that matches the one shown in the eye (V).
- The next symbol will form in the other eye (W).
- There are six total symbols.
- Move the center disc first, as it moves the outer disc in the opposite direction.
- Enter the boathouse.

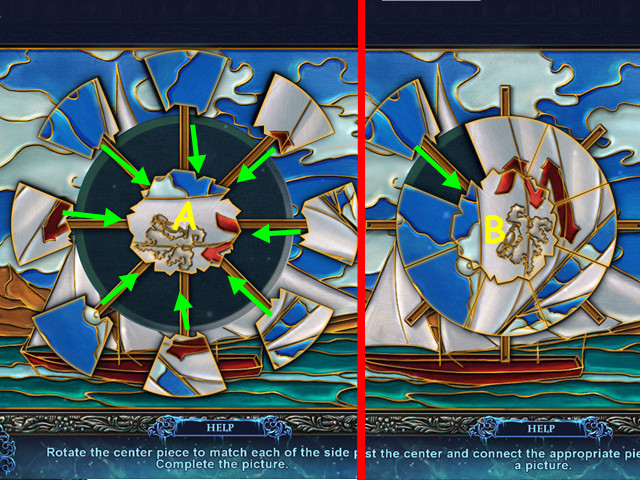
- Look at the mini-game on the left wall.
- Rotate the center piece (A), then select the outer pieces to attach to the center once aligned.
- Continue rotating the center piece and attaching the outer pieces until all are attached (B).

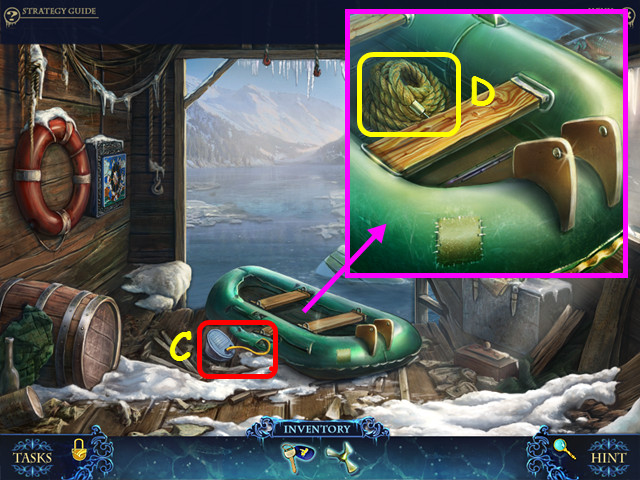
- Use the PUMP on the boat, then press the pump to inflate the boat (C).
- Look at the boat and take the ROPE WITH HOOK (D).
- Walk down.

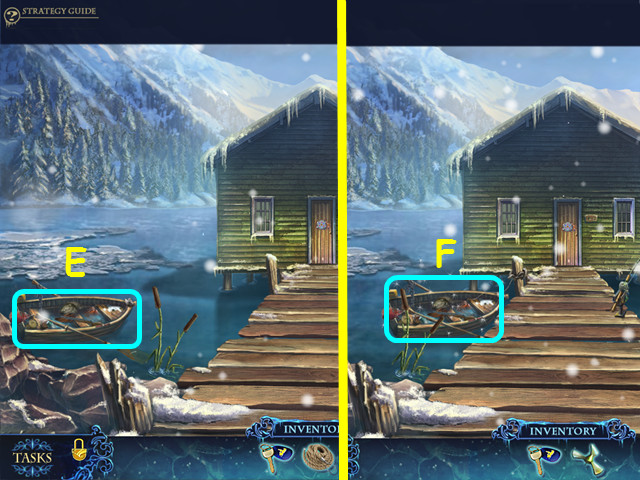
- Use the ROPE WITH HOOK on the boat (E).
- Look at the boat for a HOS (F).

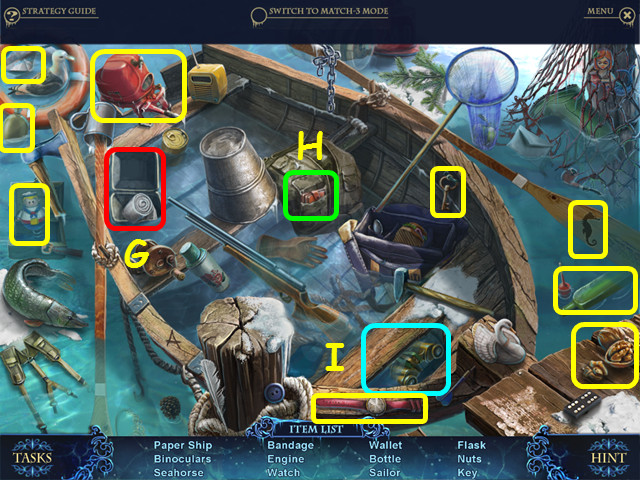
- Locate all the items on the list.
- Open the first aid case to find the bandage (G).
- Open the vest pocket to find the wallet (H).
- Move the board to find the binoculars (I).
- You will earn the ENGINE.
- Enter the boathouse.

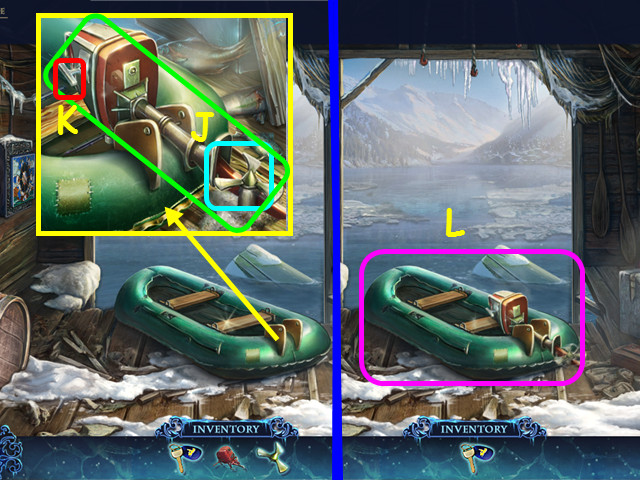
- Look at the boat; place the ENGINE on the mount, then place the PROPELLER on the engine (J).
- Pull the starter cord (K).
- Push the boat into the water (L).
Chapter 3: The Ski Lift

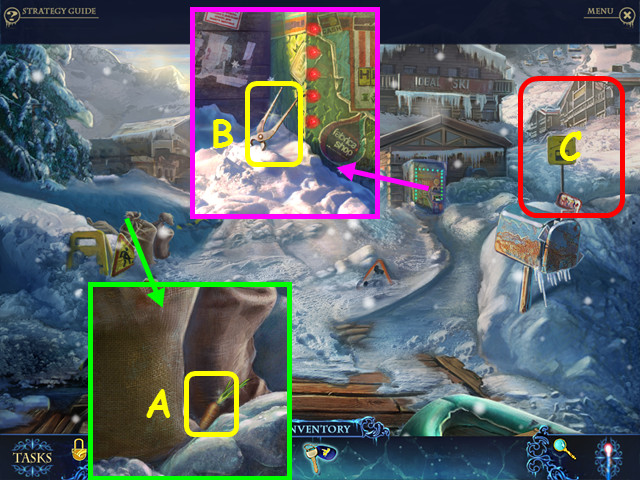
- Look at the sandbags and take the CARROT (A).
- Look at the vending machine and take the CUTTING PLIERS (B).
- Walk right to the ski lift (C).

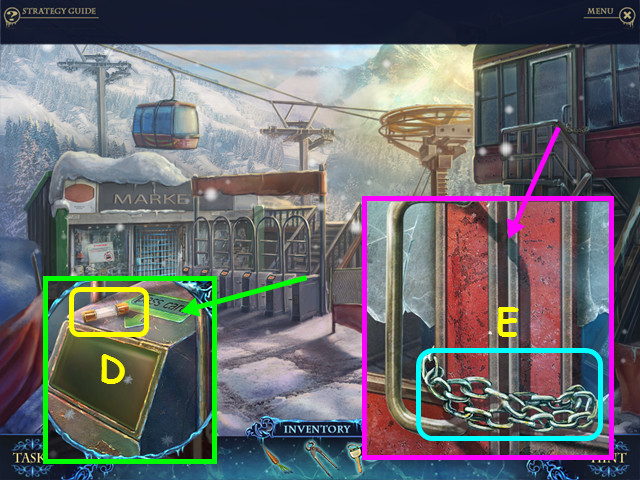
- Look at the pass gates and take the FUSE (D).
- Look at the tower door and use the CUTTING PLIERS on the chains (E).
- Enter the tower.

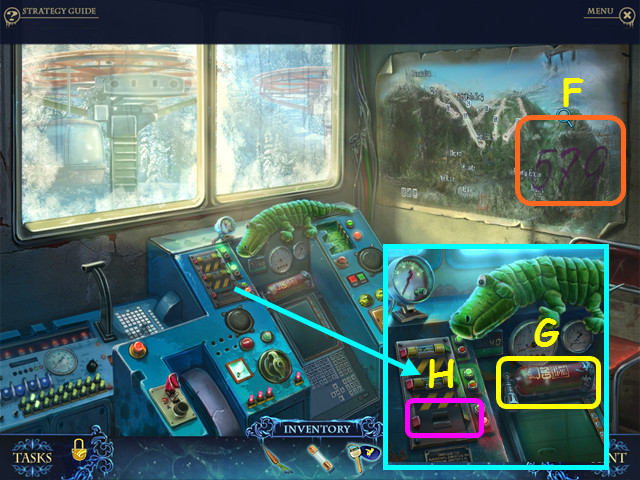
- Look at the map and note the number 579 (F).
- Look at the controls and take the BUTANE TORCH (G).
- Place the FUSE in the slot (H).
- Exit the tower.

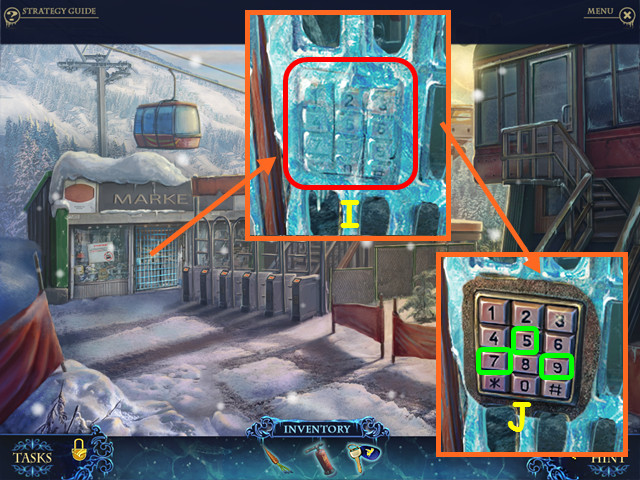
- Look at the door grate and use the BUTANE TORCH to remove the ice on the keypad (I).
- Select 5, 7, 9 (J).
- Enter the market.

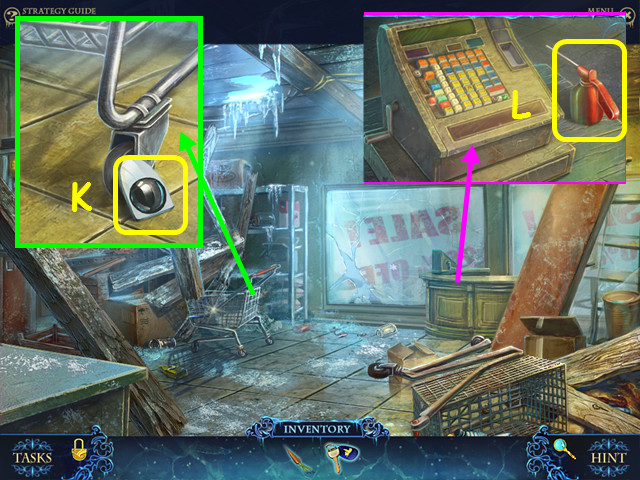
- Look at the shopping cart and take the TOY’S EYE (K).
- Look at the counter and take the OIL (L).
- Walk down, then enter the tower.

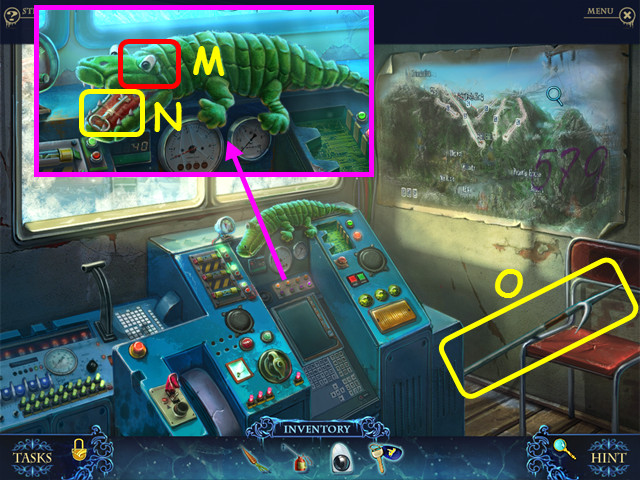
- Look at the controls and place the TOY’S EYE on the alligator (M).
- Take the POSTAL KEY (N).
- Take the BOAT HOOK (O).
- Walk down twice.

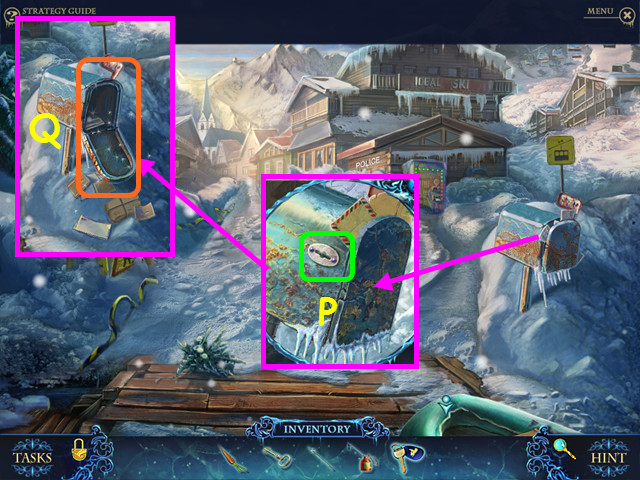
- Look at the mailbox and use the POSTAL KEY in the lock (P).
- Select the open mailbox for a HOS (Q).

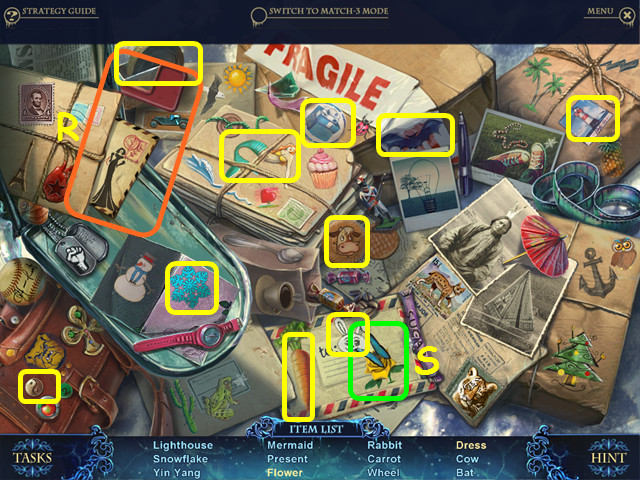
- Locate all the items on the list.
- Move the flag to find the dress (R).
- Scare away the butterfly to find the flower (S).
- You will earn the CART WHEEL.
- Walk to the right, then enter the market.

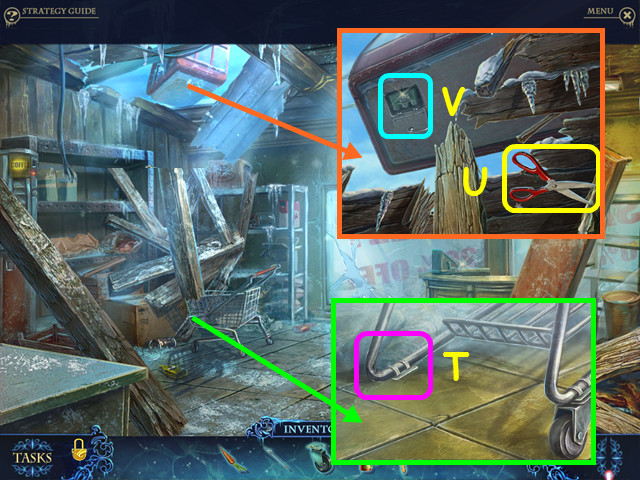
- Look at the cart and attach the CART WHEEL (T).
- Pull the cart back.
- Look at the cable car and take the SCISSORS (U).
- Use the BOAT HOOK to take the CIRCUIT CHIP (V).
- Walk down, then enter the tower.

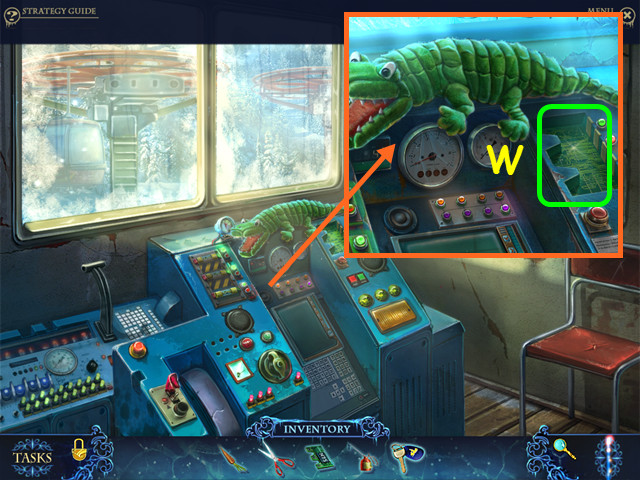
- Look at the controls and place the CIRCUIT CHIP in the panel (W).
- This will trigger a mini-game.

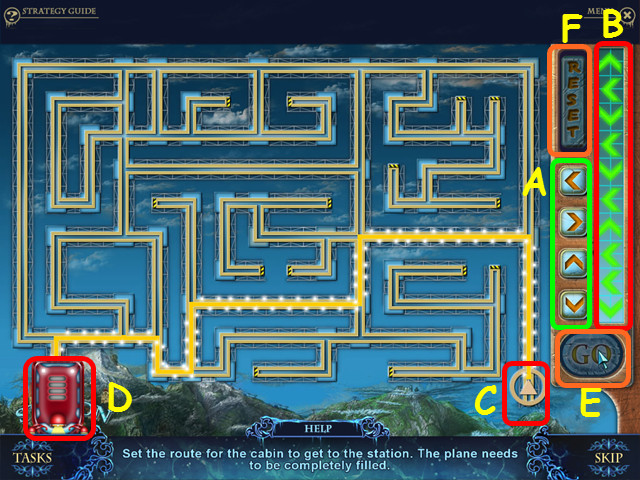
- Select arrows (A) to form a sequence (B) that will move the car (C) to the end (D).
- Select the ‘GO’ button to start the car (E); select the reset button to start over (F).
- Walk down twice.

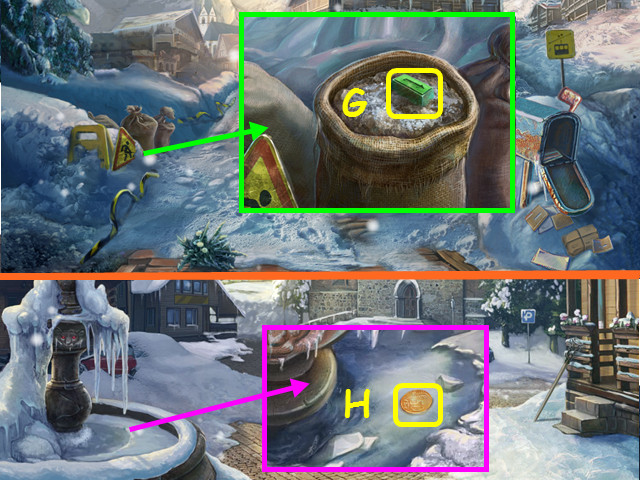
- Look at the sandbags and use the SCISSORS on the knot, then take the BUTTON (G).
- Walk forward.
- Look at the fountain and take the 1/2 COIN (I).
- Walk down, go right, then enter the market.
- Look at the register on the counter.

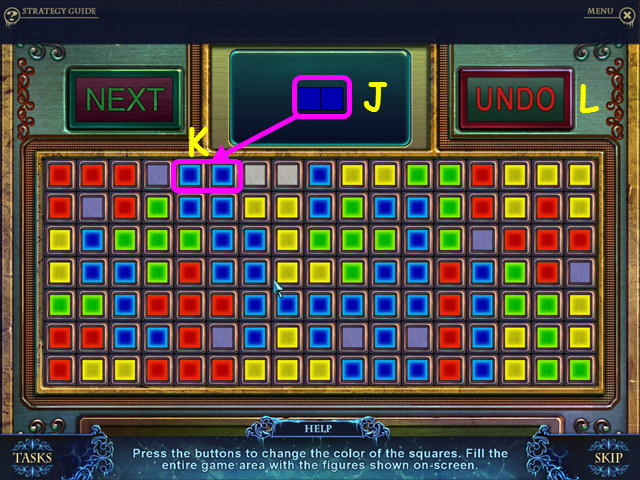
- Place the BUTTON on the register for a mini-game.
- Look at the shape in the top window (J), then select any of the buttons below to recreate the shape and color (K).
- Press a button until you find the color you want.
- Continue fitting shapes on the board until it is filled.
- Note- you do not have to have a perfect board; you can have some empty squares.
- Use the undo button to erase a shape you are making; you cannot use it after a shape is complete (L).
- Select the next button to see another shape.
- Take the 2/2 COIN from the register drawer.
- Walk down twice.

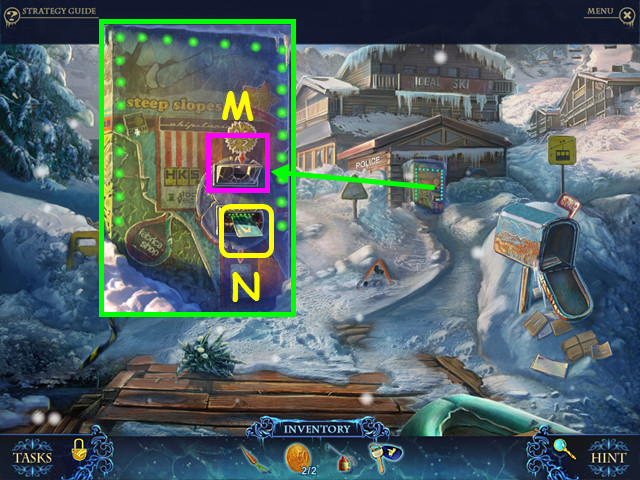
- Look at the vending machine and place the 2 COINS in the slot (M).
- Take the PASS CARD (N).
- Walk to the right.

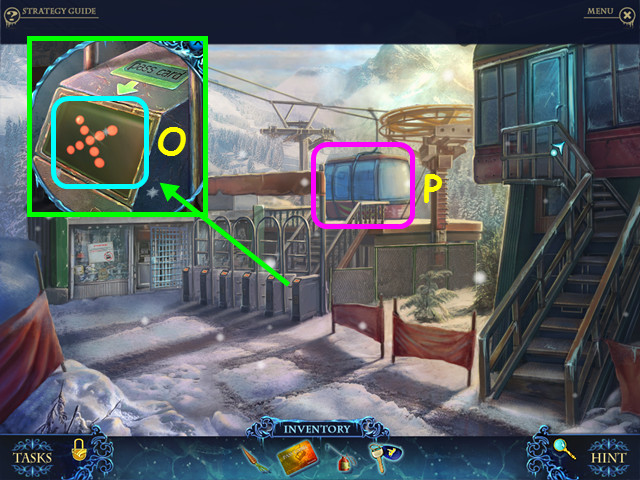
- Look at the gate and use the PASS CARD on the scanner (O).
- Enter the cable car (P).

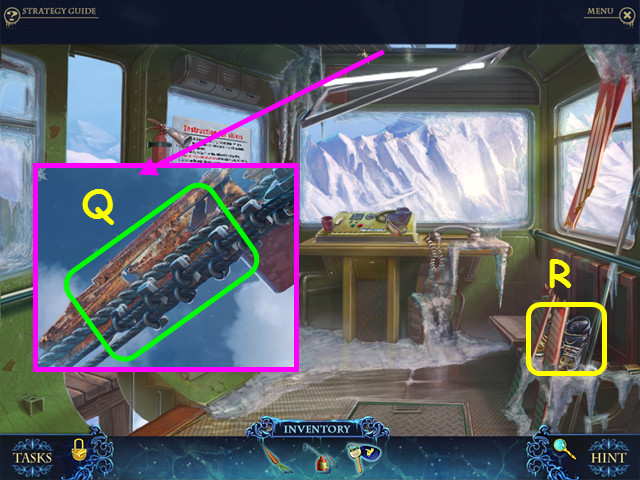
- Look out the roof and use the OIL on the wheel (Q).
- Take the SNOWBOARD BOOTS (R).

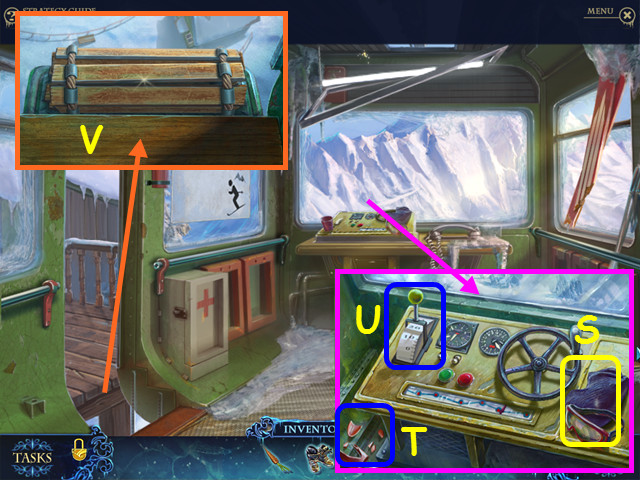
- Look at the controls; take the MASK AND GOGGLES (S).
- Knock the cup over (T), then move the lever (U).
- Open the door and push the ladder down (V).
- Exit the car.

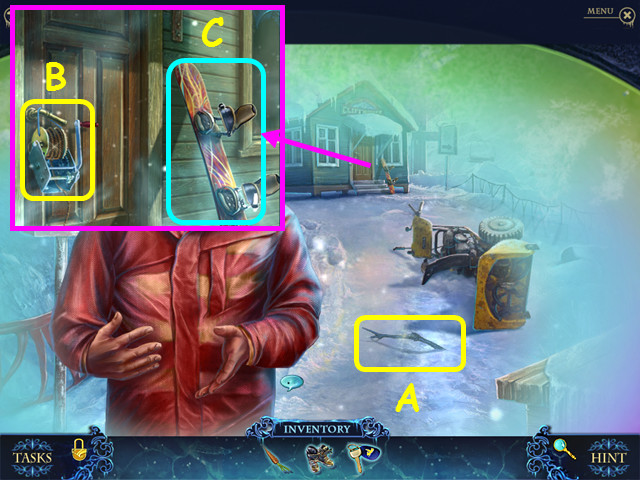
- Use the MASK AND GOGGLES on the flurries so you can see.
- Take the BRANCH (A).
- Look at the door and take the WINCH (B).
- Place the SNOWBOARD BOOTS on the board to get the BOARD (C).
- Walk to the right.

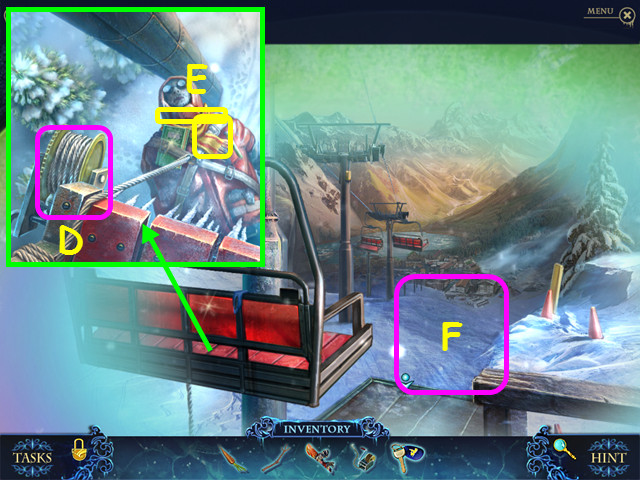
- Look at the chair and attach the WINCH (D).
- Take the SCARF and the AVALANCHE BEEPER (E).
- Place the BOARD on the snow (F).

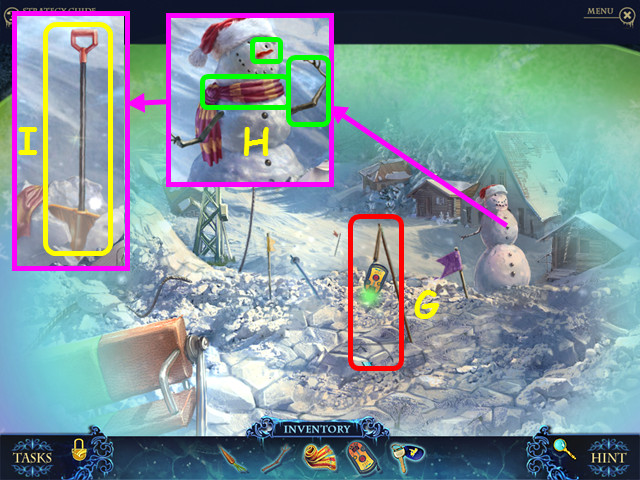
- Use the AVALANCHE BEEPER on the packed snow (G).
- Look at the snowman and add the BRANCH, SCARF, and CARROT (H).
- Take the SNOW SHOVEL (I).

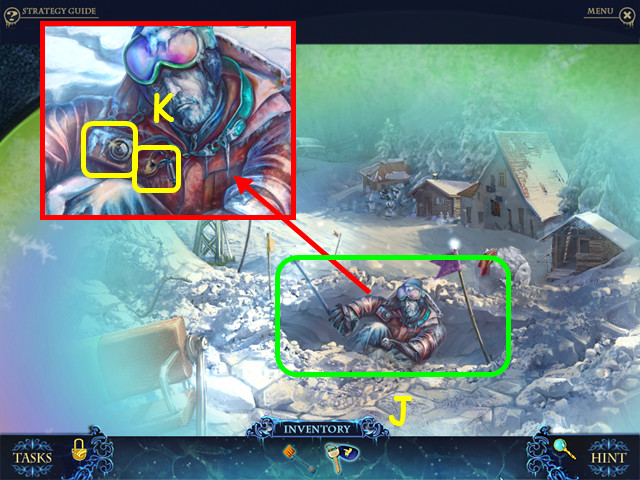
- Use the SNOW SHOVEL on the packed snow (J).
- Look at the man; take the FLAT CAMERA and SHULTZ’S KEYS (K).
- Walk down twice.
- Look at the door and use SHULTZ’S KEYS in the lock, then enter the store.

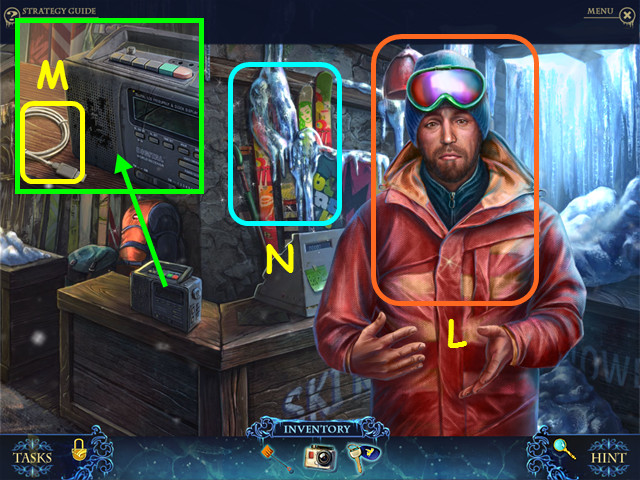
- Talk to Shultz and note the directions (L).
- Look at the radio and take the USB CABLE (M).
- Look at the back wall for a HOS (N).

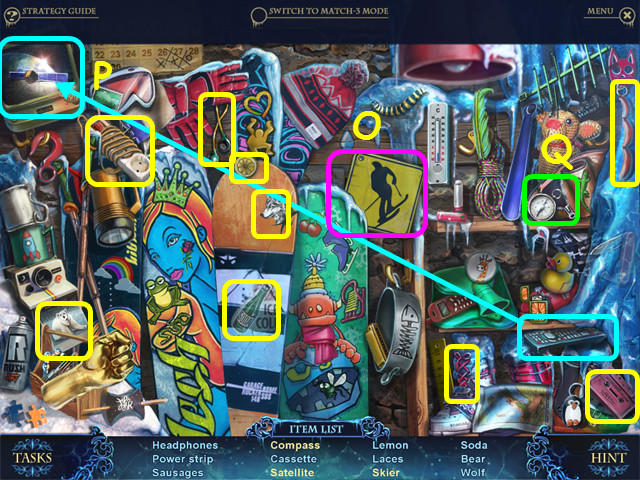
- Locate all the items on the list.
- Move the sign to find the skier (O).
- Use the remote on the TV to find the satellite (P).
- Open the pouch to find the compass (Q).
- You will earn the POWER STRIP.
- Walk down, then go to the left.

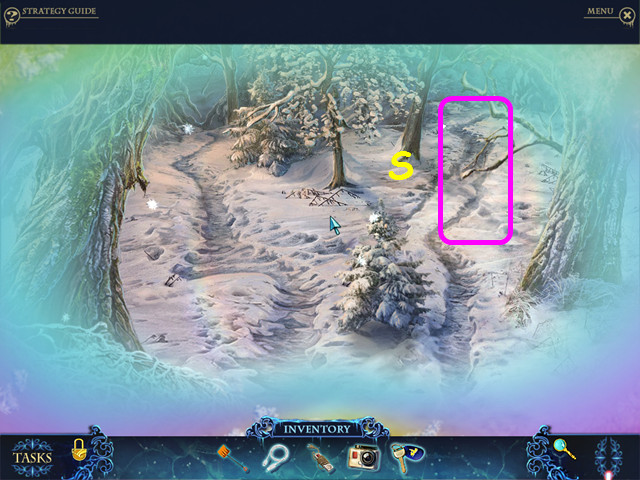
- Per Shultz’s instructions, walk right (S), left, straight, right, and left.

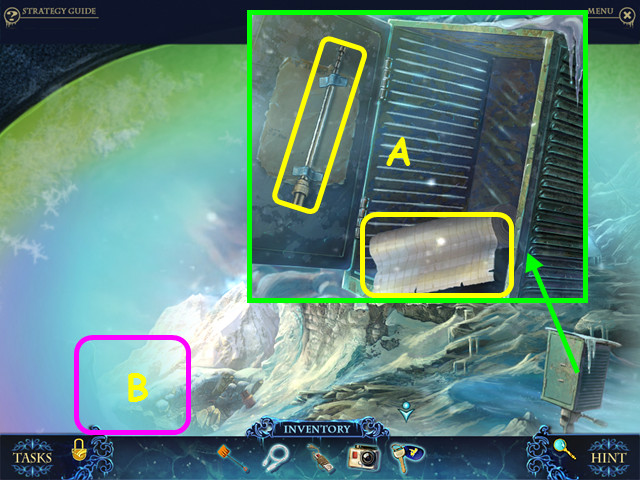
- Open the box; take the ANTENNA and the ROLL OF PAPER (A).
- Walk to the left (B).

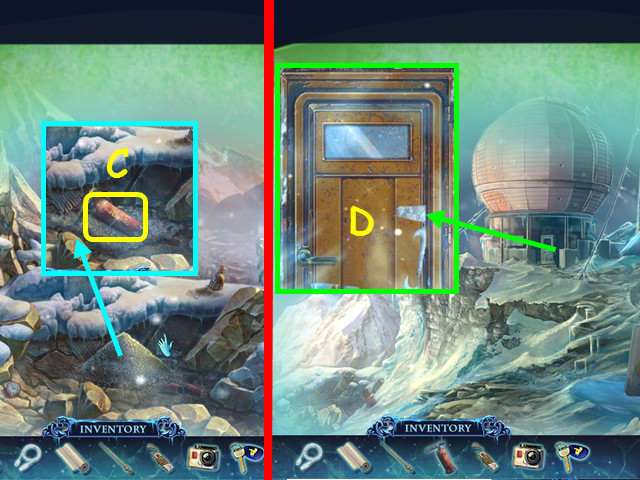
- Use the SNOW SHOVEL on the pile of ashes to find the BUTANE TORCH (C).
- Walk down.
- Look at the door and use the BUTANE TORCH around the outline of the door (D).
- Open the door and go inside.

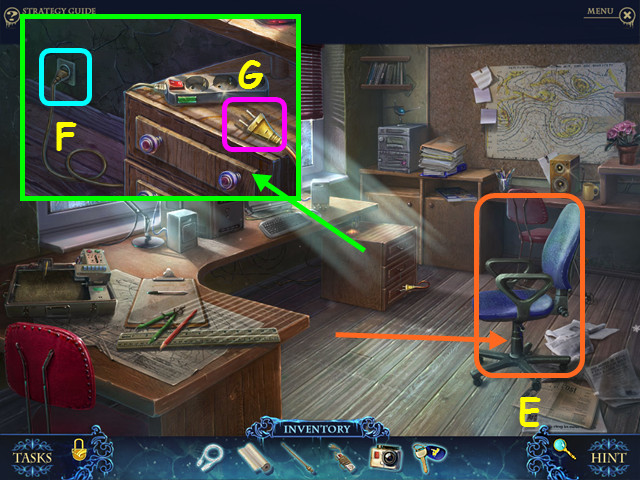
- Move the chair (E).
- Look at the cabinet and place the POWER STRIP in the outlet (F).
- Move the plug (G) to the power strip.

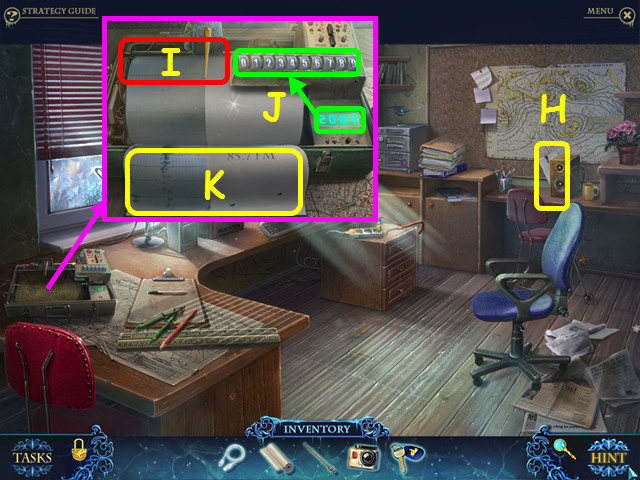
- Take the SPEAKER (H).
- Look at the seismograph and add the roll of paper (I).
- Press 2007 (J).
- Take the RADIO FREQUENCY (K).
- Walk down 3 times and enter the ski shop.

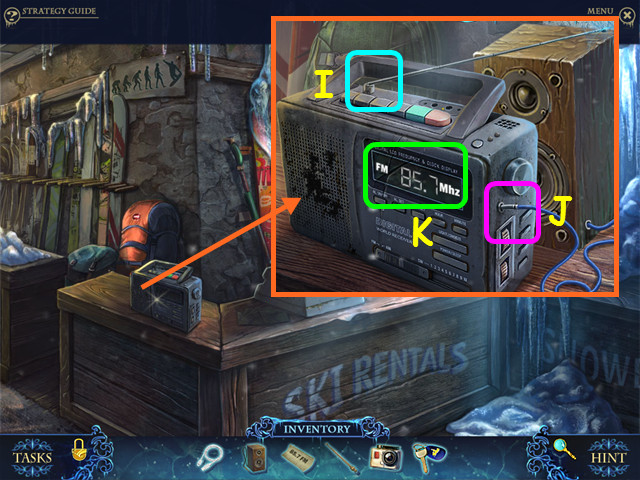
- Look at the radio and attach the ANTENNA (I).
- Plug in the SPEAKER (J).
- Use the RADIO FREQUENCY on the radio (K).
- Walk down, go left, right, then enter the station.

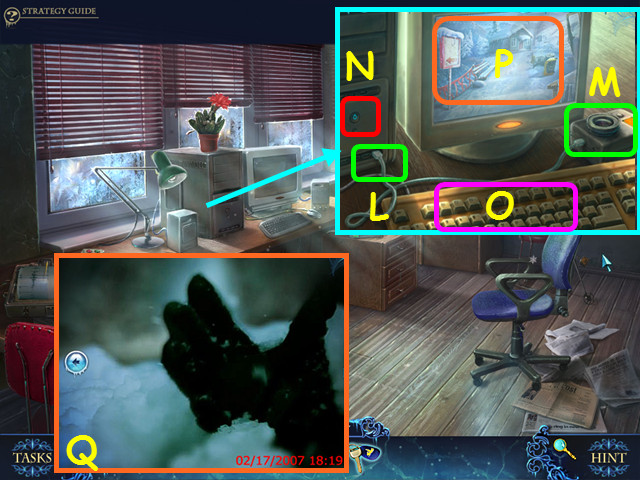
- Look at the computer and attach the USB CABLE (L).
- Attach the FLAT CAMERA to the cable (M).
- Press the power button on the CPU (N).
- Touch the keyboard (O), then look at the monitor (P).
- Scroll through the photos (Q), then take the CAMERA.
- Walk down, then go to the left.

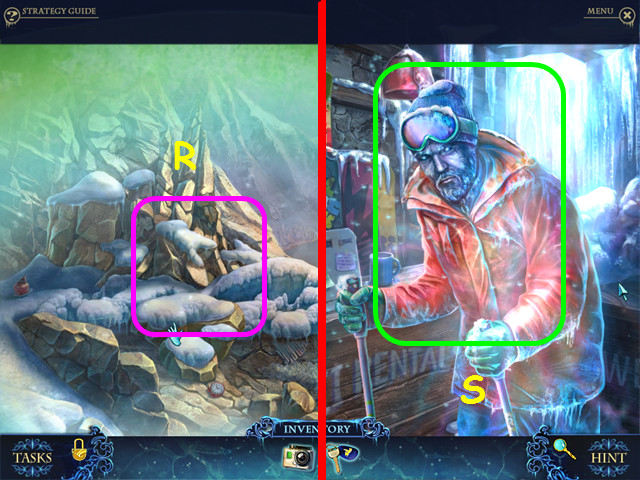
- Use the CAMERA on the crater to get the CRATER SNAPSHOT (R).
- Walk down three times, then enter the ski shop.
- Talk to Shultz, then give him the CRATER SNAPSHOT (S).
- Select the back wall for a HOS.

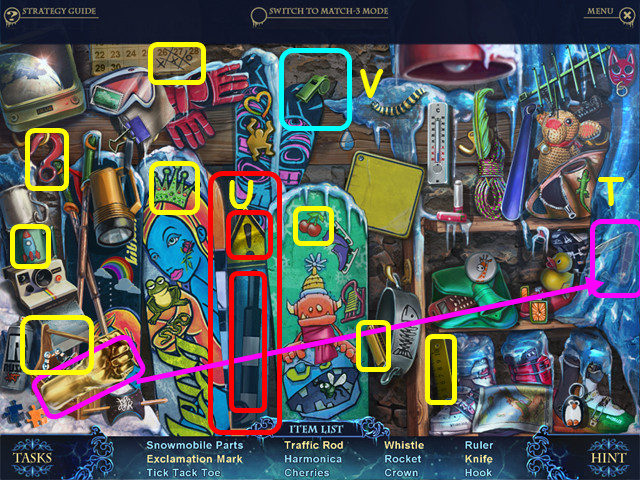
- Locate all the items on the list.
- Use the fist on the ice to find the knife (T).
- Move the snowboard to find the traffic rod and the exclamation mark (U).
- Remove the hat to find the whistle (V).
- You will earn the SNOWMOBILE PARTS.
- Walk down, right, forward twice, then down 4 times.
- After talking to Greta, walk towards Peter’s house, then enter the shed.
Chapter 4: The Church

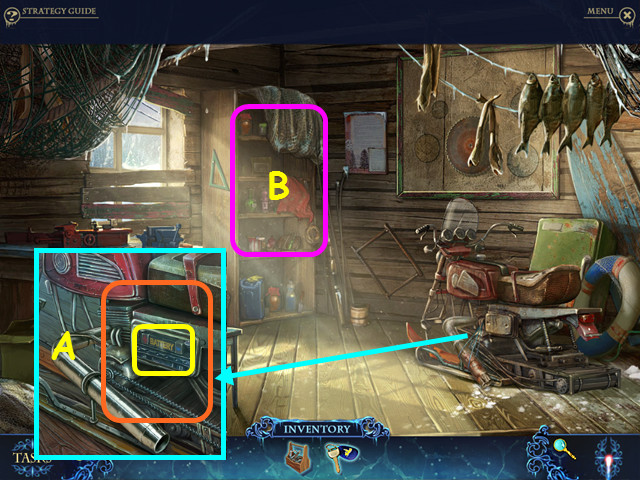
- Look at the base of the snowmobile and use the SNOWMOBILE PARTS on the battery cover, then take the DEAD BATTERY (A).
- Select the shelves for a HOS (B).

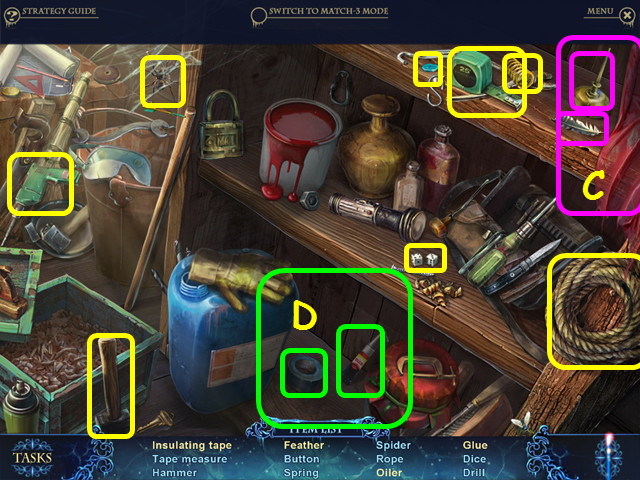
- Locate all the items on the list.
- Move the red cloth to find the feather and the greaser (C).
- Move the jug to find the glue and the insulating tape (D).
- You will earn the GLUE.
- Walk down twice, go left, enter the boathouse, go forward, right, then enter the cable car.

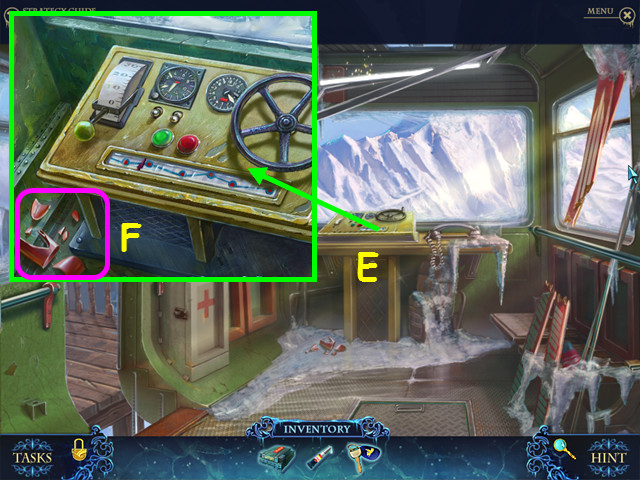
- Look at the controls (E), then use the GLUE on the broken cup (F).
- This will trigger a mini-game.

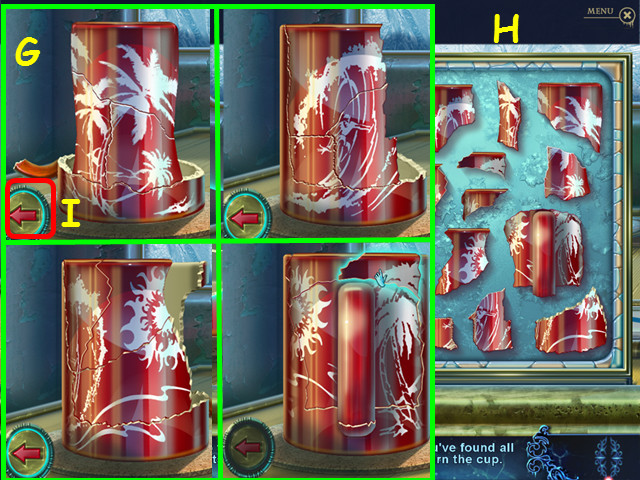
- Restore the cup (G) by placing the pieces (H) on the base.
- Select the arrow (I) to spin the base.
- Use the shadow outlines as a guide.
- Once finished, take the CUP.
- Exit the cable car and walk down.

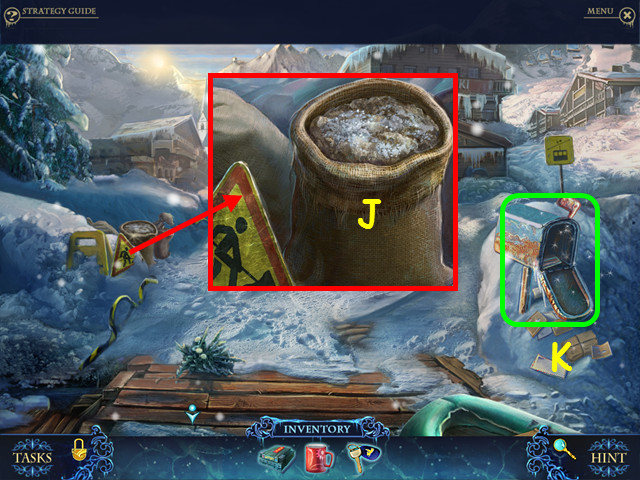
- Look at the bags; use the CUP on the opening to get the CUP OF SALT (J).
- Select the mailbox for a HOS (K).

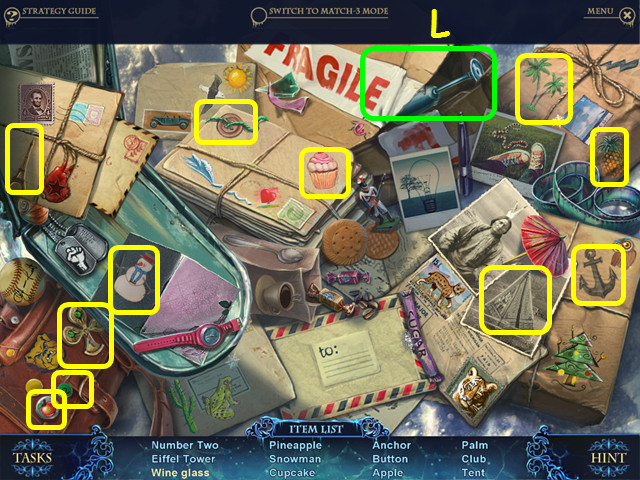
- Locate all the items on the list.
- Open the box to find the wine glass (L).
- You will earn the CLUB SYMBOL.
- Walk forward.

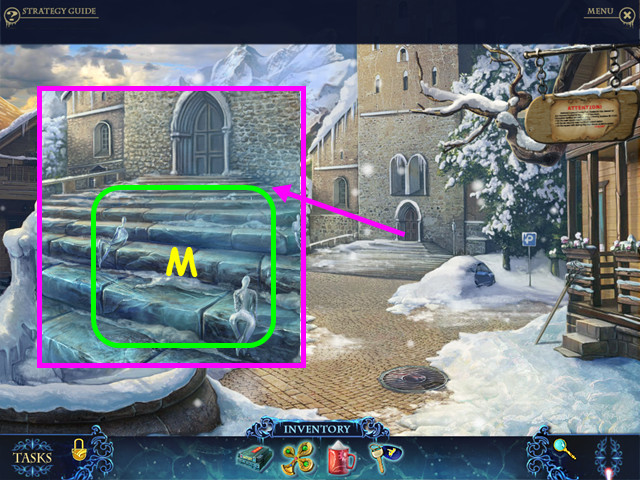
- Look at the church steps and use the CUP OF SALT on the ice (M).
- Enter the church.

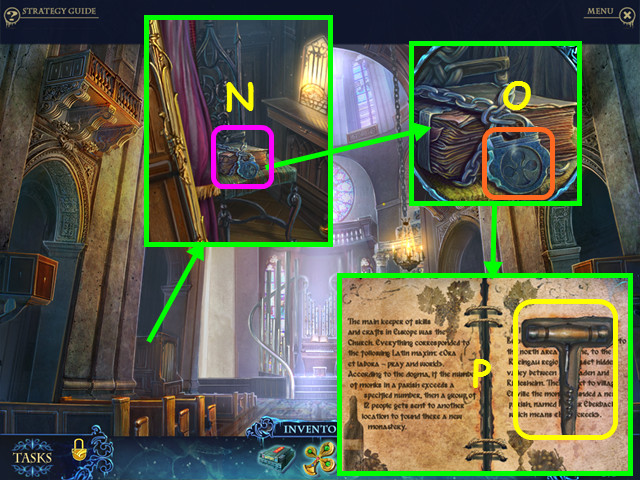
- Look at the confessional, then look at the chair (N).
- Use the CLUB SYMBOL on the lock (O).
- Look at the book, turn the page and take the CORKSCREW (P).
- Walk to the right.

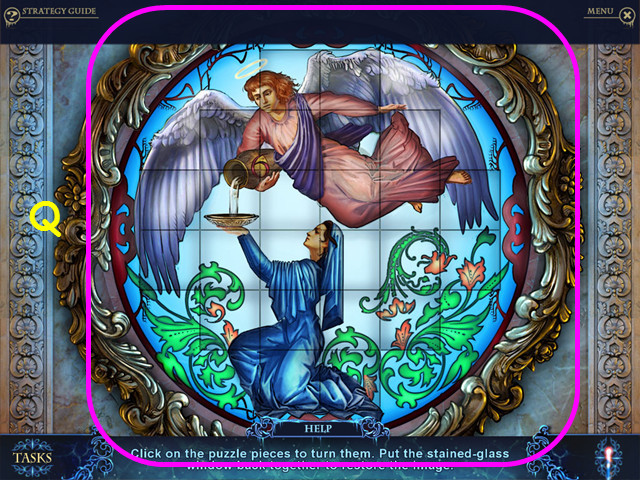
- Select the stained glass window for a mini-game.
- Rotate the pieces to restore the image (Q).
- Take the STONE HAND once the window breaks.

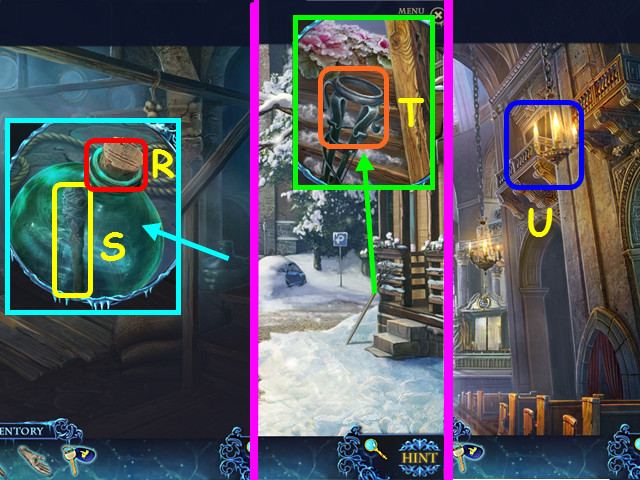
- Look at the bottle and use the CORKSCREW on the cork (R).
- Take the TORCH (S).
- Walk up the stairs, then down.
- Look at the pole, place the TORCH in the pole, then take the LAMPLIGHTER POLE (T).
- Enter the church and use the LAMPLIGHTER POLE on the chandelier to get the LIGHTED TORCH (U).
- Walk to the right.

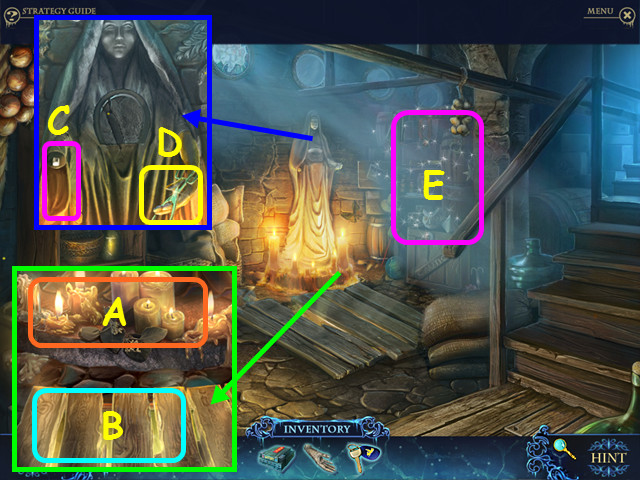
- Look at the base of the statue and use the LIGHTED TORCH on the candles (A).
- Note the boards (B).
- Look at the head of the statue and place the STONE HAND on the left (C).
- Take the TONGS FOR COAL (D).
- Look at the shelves for a HOS (E).

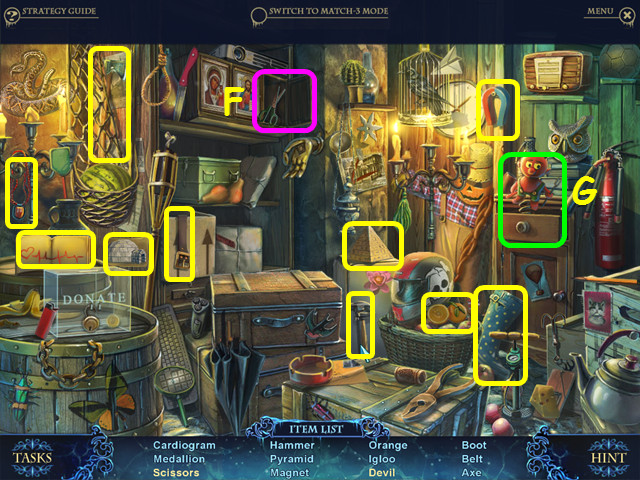
- Locate all the items on the list.
- Open the cabinet to find the scissors (F).
- Open the drawer to find the devil (G).
- You will earn the AXE.
- Look at the base of the statue and use the AXE on the boards.

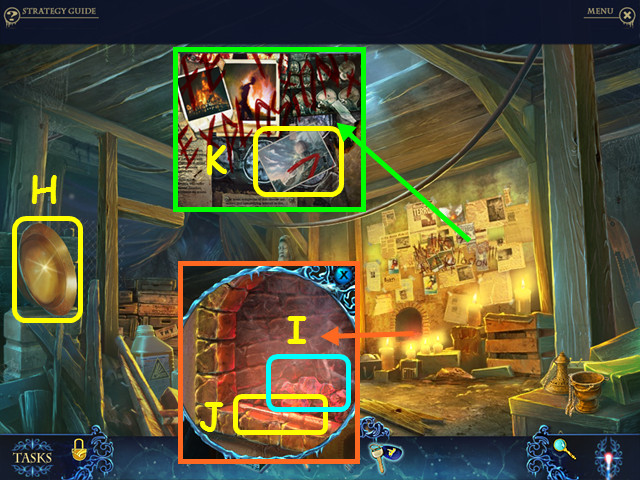
- Take the PLATE (H).
- Look at the fireplace and use the TONGS FOR COAL to take the HOT COAL (I).
- Take the SCREWDRIVER (J).
- Look at the bulletin board and take the 1st VILLAGE PICTURE (K).
- Go up through the hole, up the stairs, then walk down.

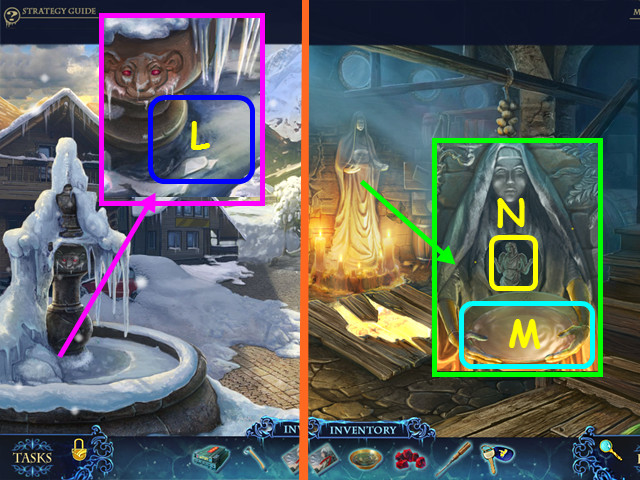
- Look at the fountain and use the plate to get the PLATE WITH WATER (L).
- Enter the church, then walk right.
- Look at the statue and place the PLATE WITH WATER in her hands (M).
- Take the STATUETTE (N).
- Walk up the stairs.

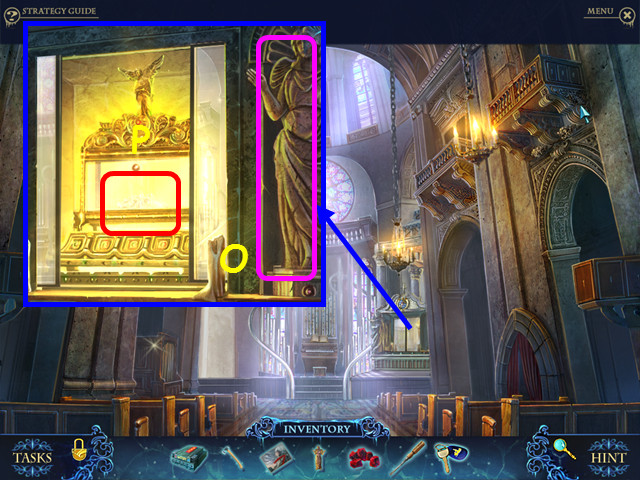
- Look at the cabinet and place the STATUETTE on the right (O).
- Take the INCENSE (P).
- Walk to the right, then enter the hole.

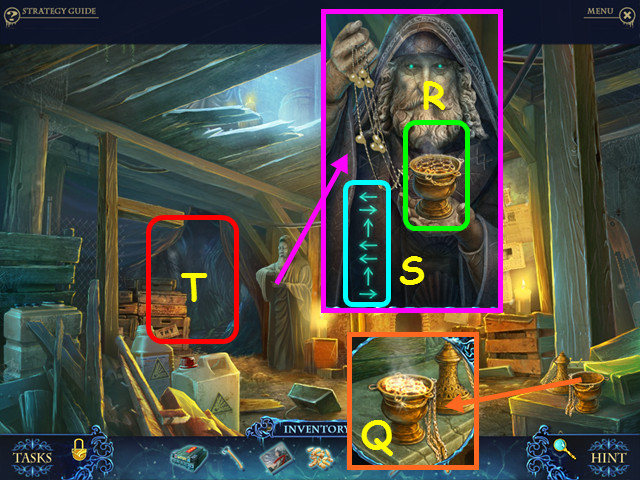
- Look at the censer and place the HOT COAL, followed by the INCENSE in the cup, then take the CENSER (Q).
- Look at the statue and place the CENSER in his hands (R).
- Note the directions (S).
- Enter the cave (T).
- Following the directions from the statue, walk left, right, forward, left, left, forward, and right.

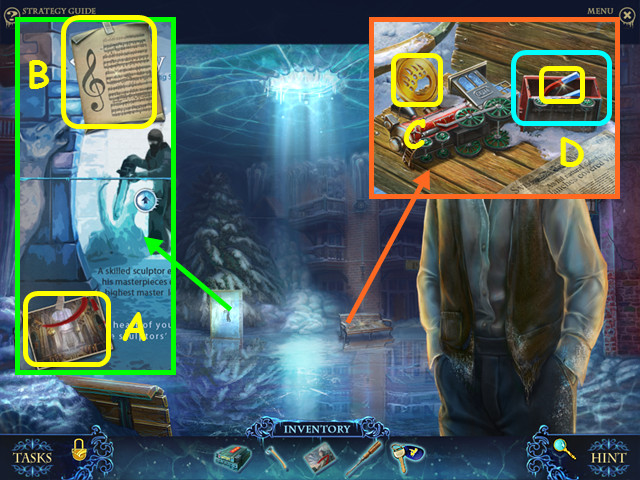
- Look at the sign; scroll down to take the 2nd VILLAGE PICTURE (A), scroll up to take the NOTES (B).
- Look at the bench and take the PAW SYMBOL (C).
- Use the SCREWDRIVER on the car, then take the MAGNET (D).
- Walk down twice, then go up the hole.

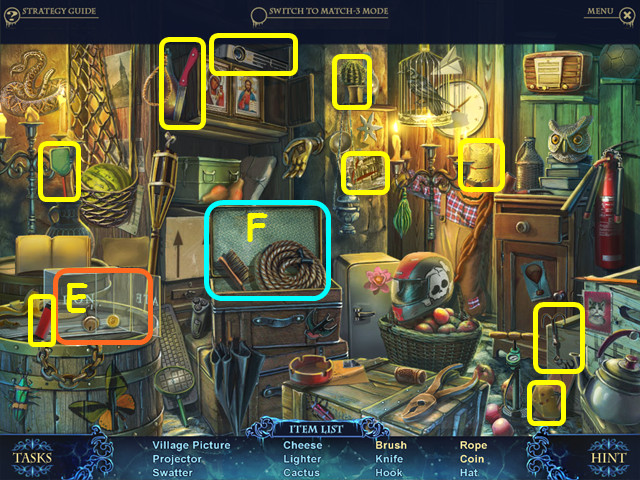
- Select the shelves for a HOS.
- Locate all the items on the list.
- Open the donations box for the coin (E).
- Open the suitcase to find the brush and the rope (F).
- You will earn the 3rd VILLAGE PICTURE.
- Walk up the stairs and look at the organ for a mini-game.

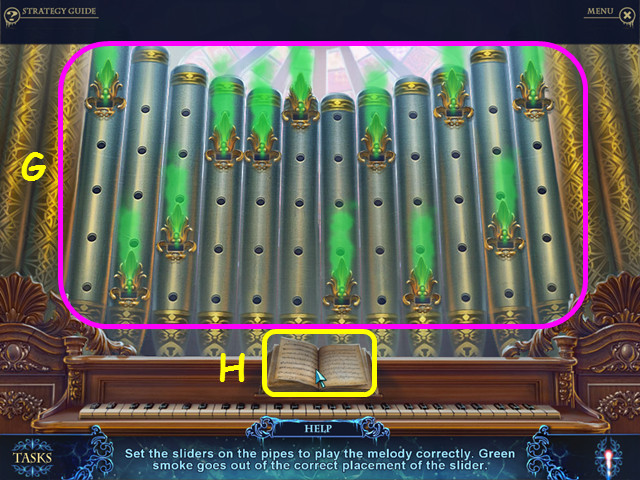
- Place the NOTES on the organ to activate the mini-game.
- Move the metal slider so that green smoke comes from all the pipes (G).
- Yellow smoke indicates you are 1 place off, red smoke means you are more than 1 place away.
- Select the music book to see where you stand (H).

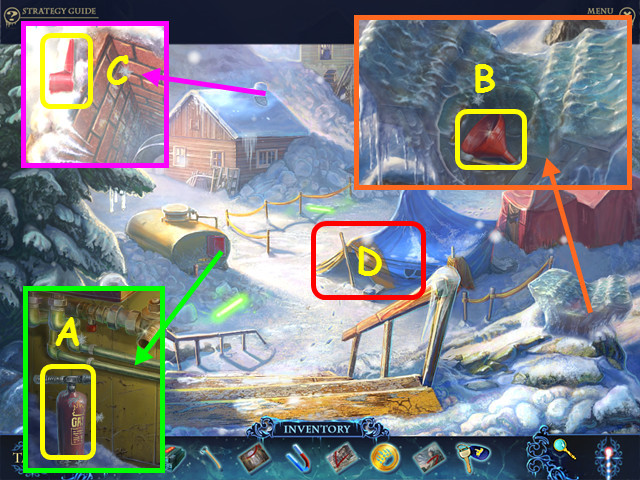
- Walk forward.
- Look at the tank and take the BUTANE TORCH (A).
- Look at the toolbox and use the BUTANE TORCH to free the FUNNEL (B).
- Look at the chimney and take the VALVE (C).
- Enter the tent (D).

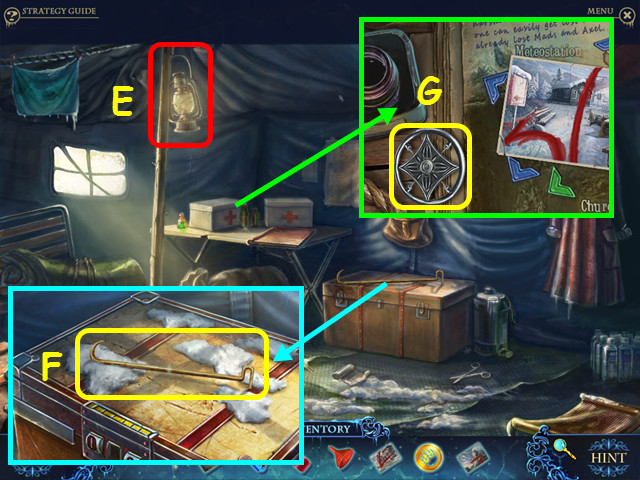
- Turn on the lantern (E).
- Look at the chest and take the HOOK WITH HANDLE (F).
- Look at the table and take the LATTICE PART (G).
- Exit the tent and walk down.

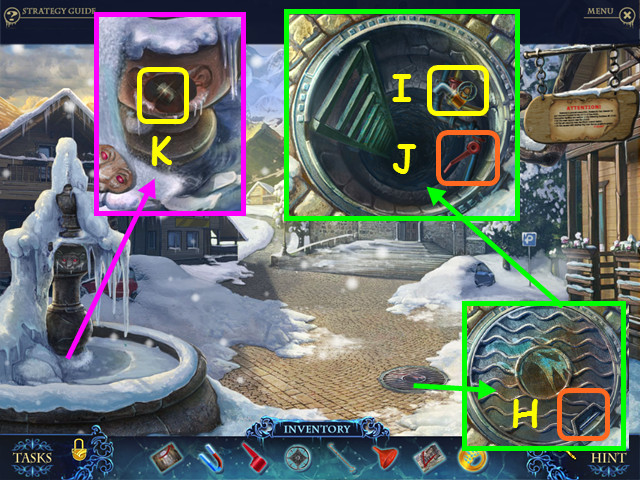
- Look at the manhole and use the HOOK WITH A HANDLE to remove the lid (H).
- Take the TAP (I); place the VALVE on the pipe and turn it on (J).
- Look at the fountain and take the TUMBLER (K).
- Enter the church.

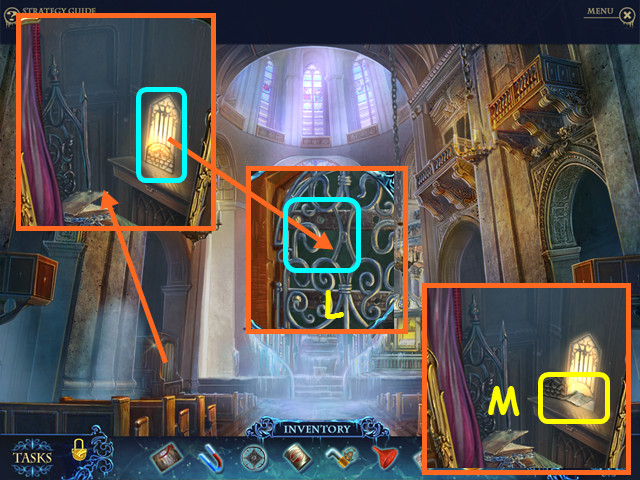
- Look at the confessional; look at the grate then place the LATTICE PART (L).
- Take the 4th VILLAGE PICTURE (M).
- Walk down, go forward, then enter the tent.
- Look at the table for a mini-game.

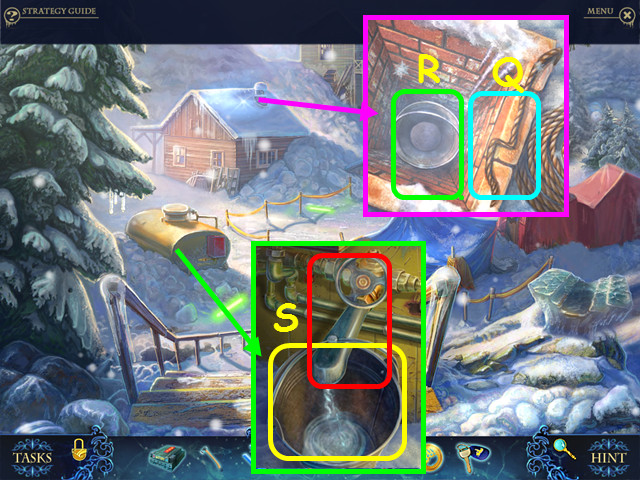
- Place the 4 VILLAGE PICTURES on the scrapbook.
- Place the pictures into the correct holders (N).
- Note the code 302.
- Exit the close-up.

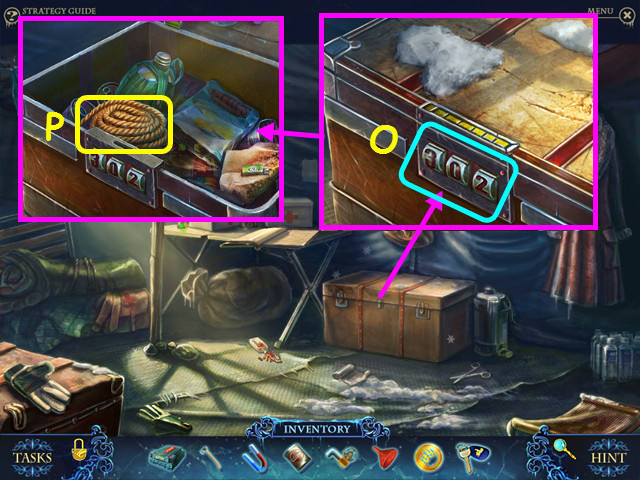
- Look at the chest and place the TUMBLER in the lock, then turn the wheels to 3-0-2 (O).
- Take the ROPE (P).
- Walk down.


- Look at the chimney and place the ROPE on the right, then attach the MAGNET (Q).
- Pull the rope and take the BUCKET (R).
- Look at the tank and place the TAP on the pipe, then place the BUCKET underneath (S).
- Take the BUCKET OF FUEL.
- Walk down, enter the church, go right, enter the hole in the floor, walk left twice.

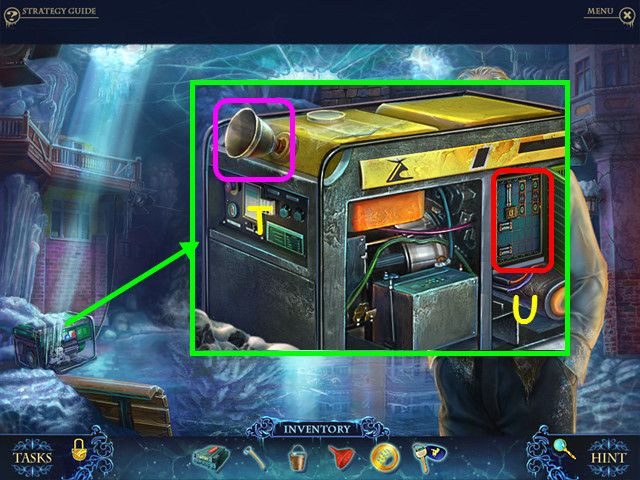
- Look at the generator; place the FUNNEL in the tank, then pour in the BUCKET OF FUEL (T).
- Select the panel for a mini-game (U).

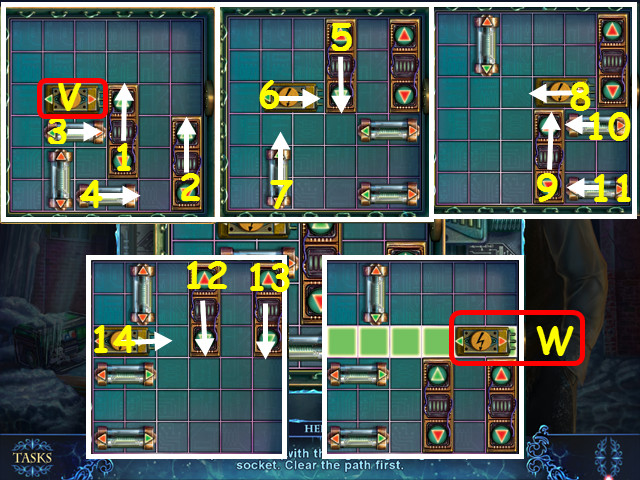
- Move the lightning piece (V) to the power connection (W).
- Slide the pieces in the direction indicated in numerical order (1-14).
Chapter 5: The Museum

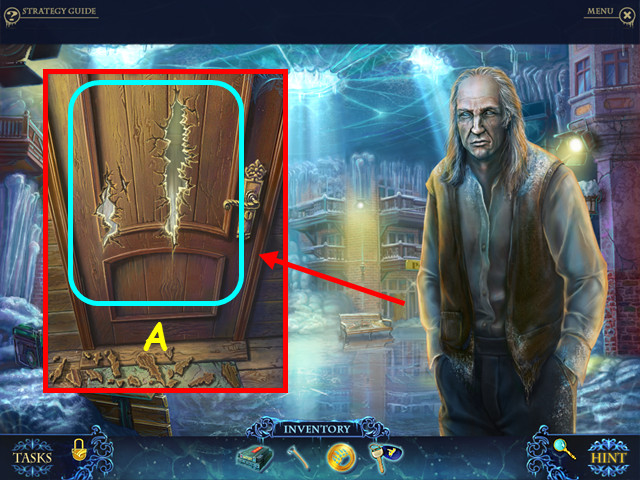
- Look at the post office door and use the AXE on the door (A).
- Enter the post office.

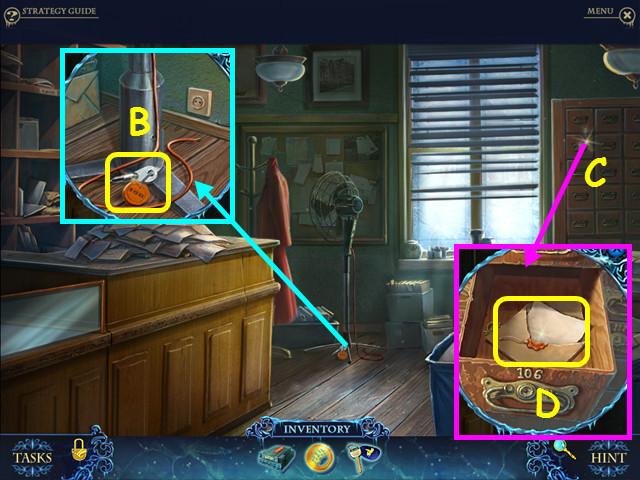
- Look at the base of the fan and take the KEY (B).
- Look at the cabinet and use the KEY on the drawer (C).
- Take the WIFE’S LETTER (D).
- Walk down.

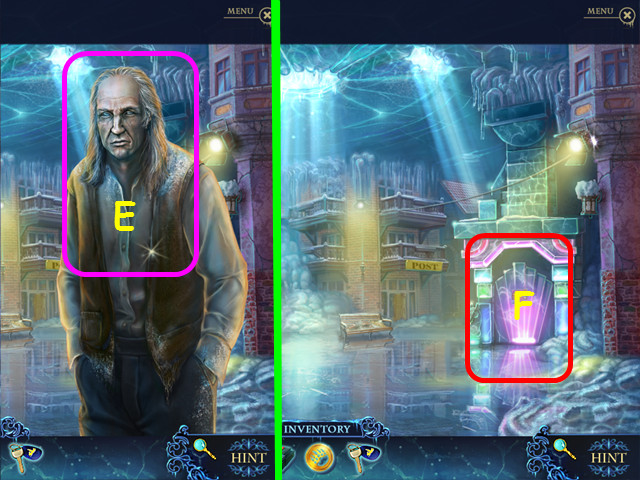
- Give the WIFE’S LETTER to Peter (E).
- Look at the museum door for a mini-game (F).

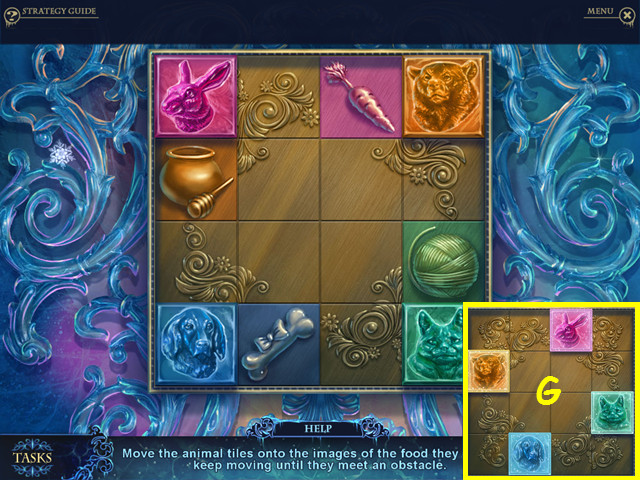
- Slide the 4 animal chips over the appropriate treat (G).
- Move the pink bunny right, then move the blue dog up.
- Slide the orange bear down, left, then up.
- Move the blue dog right, then down.
- Slide the green cat left, up, left, down, then right.
- Enter the museum.

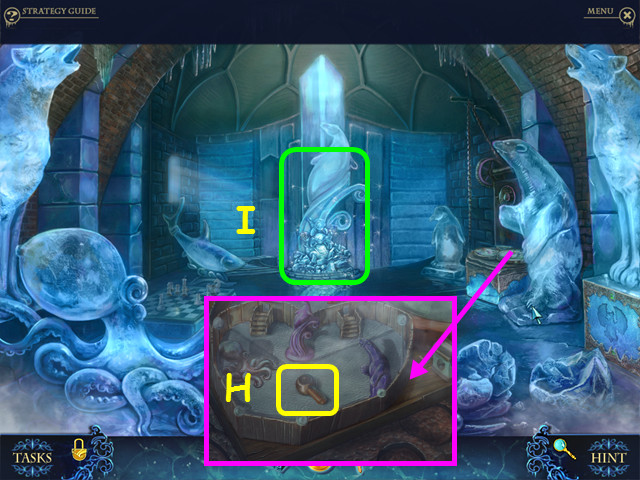
- Look at the table and take the FAN BUTTON (H).
- Select the center sculpture for a HOS (I).

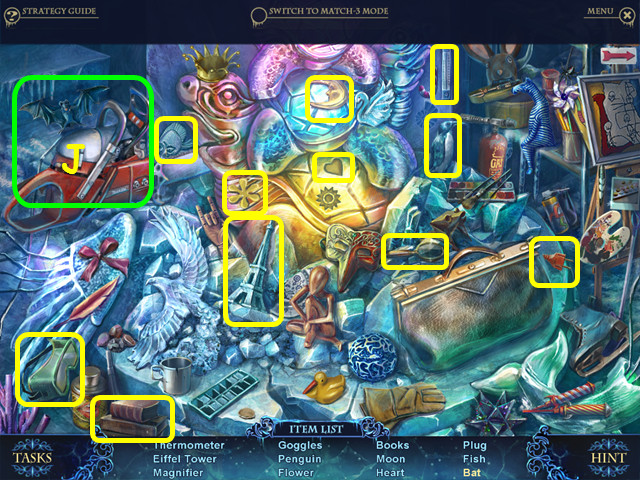
- Locate all the items on the list.
- Move the chainsaw to find the bat (J).
- You will earn the ELECTRICAL PLUG.
- Walk down, then enter the post office.

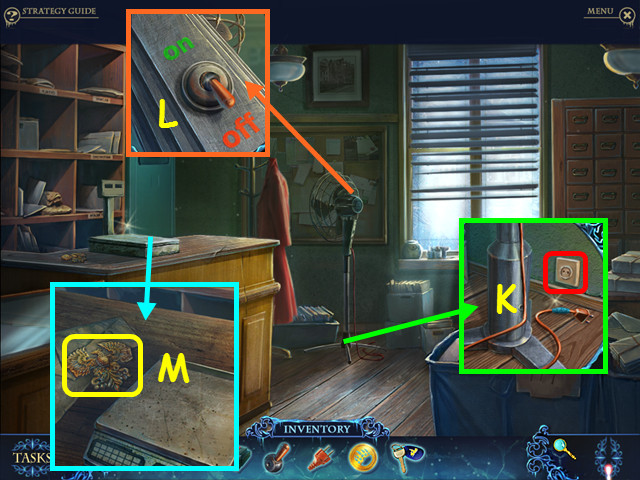
- Look at the base of the fan, attach the ELECTRICAL PLUG on the wire, then plug it in (K).
- Look at the top of the fan, attach the FAN BUTTON, then turn it on (L).
- Select the fan so it turns.
- Look at the scale and take the PHOENIX (M).
- Exit the post office, then enter the museum.

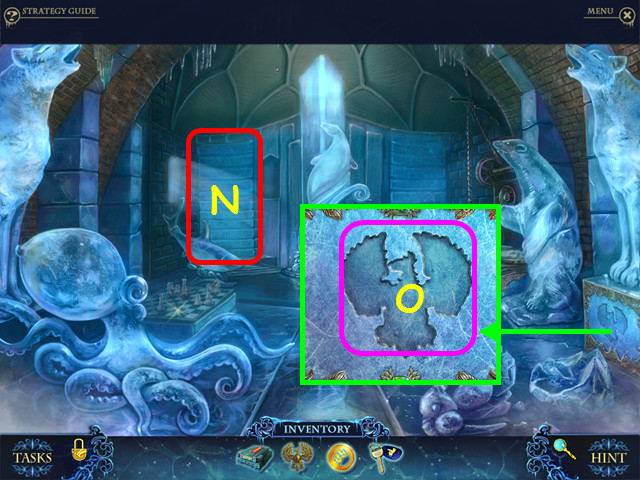
- Note the place where the stairs should be (N).
- Look at the base of the right wolf and place the PHOENIX in the indentation for a mini-game (O).

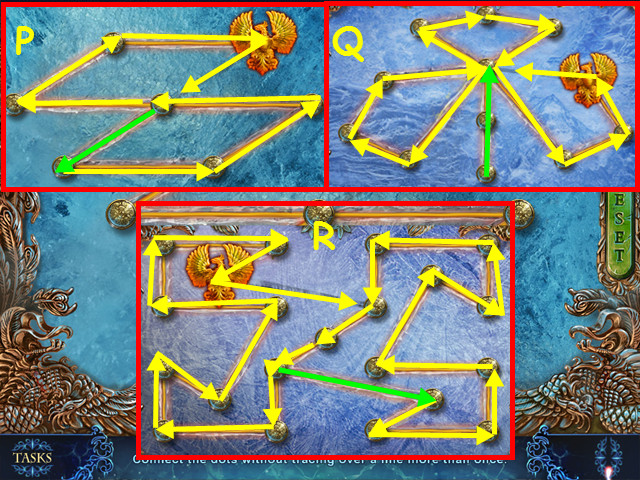
- Trace the diagram completely without duplicating any lines.
- Select any point to begin, then click on a connecting point (green arrow).
- There are 3 patterns to complete (P, Q, R).
- Walk forward up the stairs.

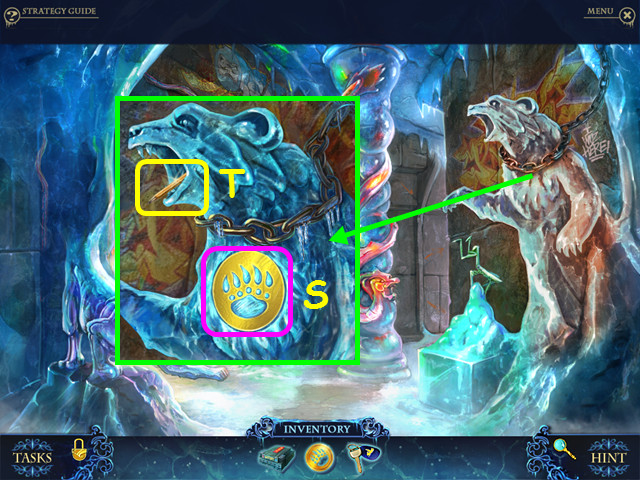
- Look at the bear and place the PAW SYMBOL on his chest (S).
- Take the PENCIL (T).
- Walk forward.

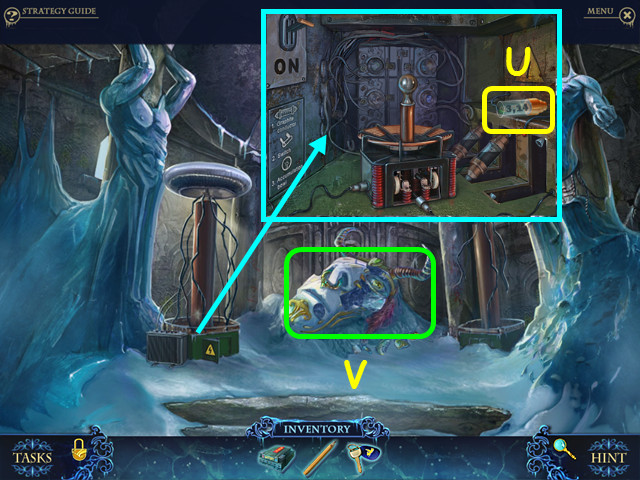
- Look in the generator; note the number 3.14, then take the BULB (U).
- Note the fallen head (V).
- Walk down twice.

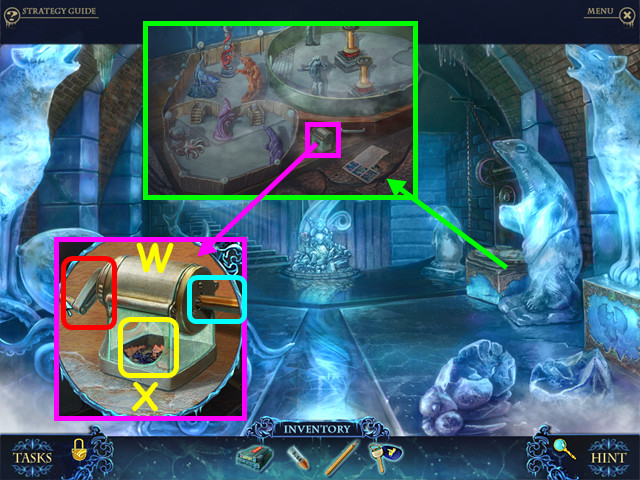
- Look at the table on the right.
- Look at the sharpener, place the PENCIL in it, then turn the handle (W).
- Take the GRAPHITE POWDER (X).
- Walk down twice, enter the post office, then look at the scale on the left.

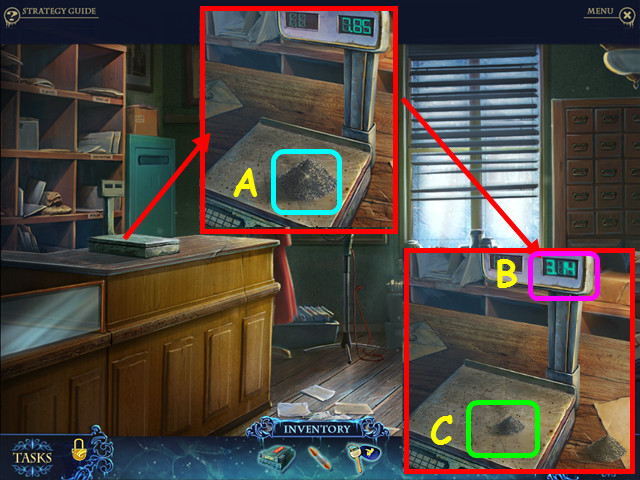
- Place the GRAPHITE POWDER on the scale (A).
- Remove powder 3 times until the scale reads 3.14 (B).
- Use the BULB on the powder to get the GRAPHITE CONDUCTOR (C).
- Walk down, enter the museum, then go forward twice.

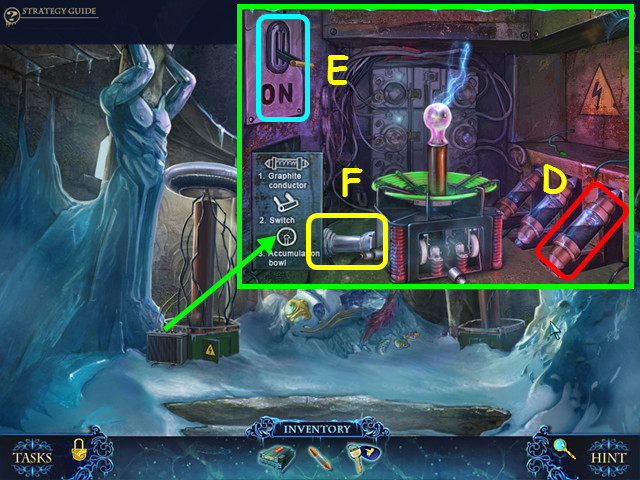
- Look in the generator and place the GRAPHITE CONDUCTOR in the slot (D).
- Pull the switch (E).
- Take the CHESSMAN (F).
- Exit the generator and walk down twice.

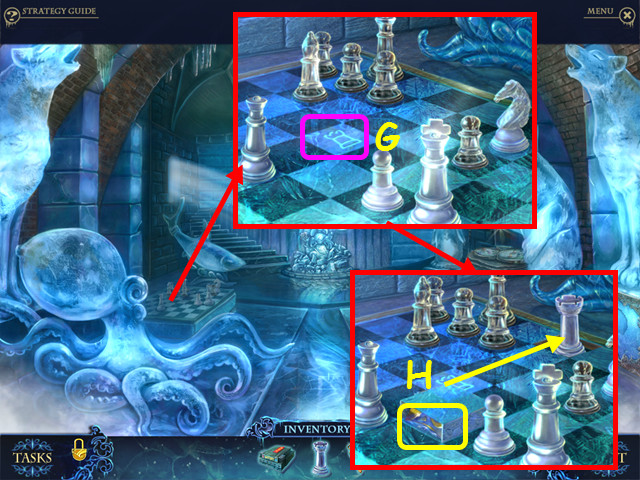
- Look at the chessboard and place the CHESSMAN on the symbol (G).
- Move the chess piece, then take the FACE PART (H).
- Walk forward twice.

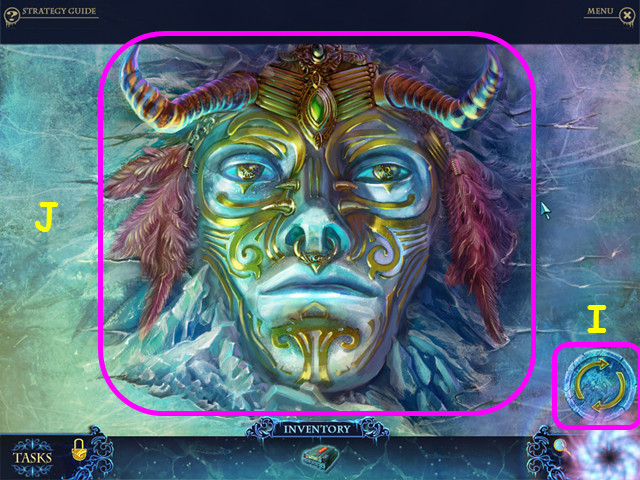
- Look at the fallen face in the back for a mini-game.
- Place the FACE PART on the face to trigger the mini-game.
- Place the pieces on the button (I) to rotate them, then place the piece into the face (J).
- Walk forward.

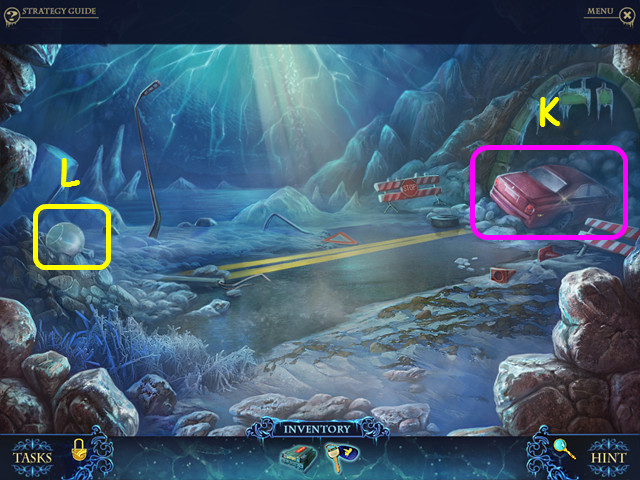
- Note the locked car (K).
- Take the GLASS SPHERE(L).
- Walk down.

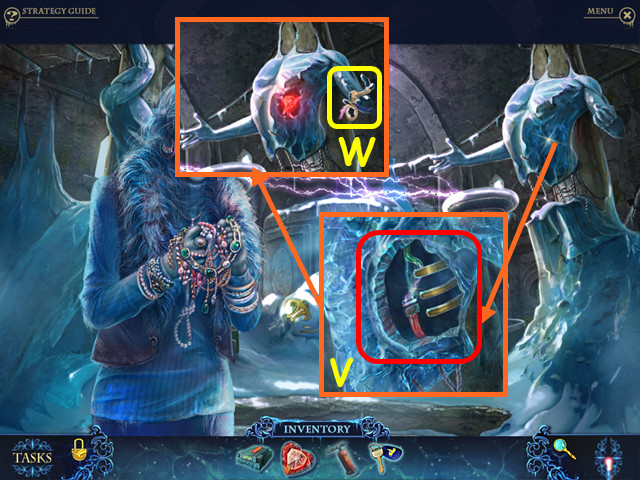
- Look at the generator and place the GLASS SPHERE over the bulb (M).
- After talking to Greta, look at the torso and take the MINIATURE FACE (N).
- Walk down twice.

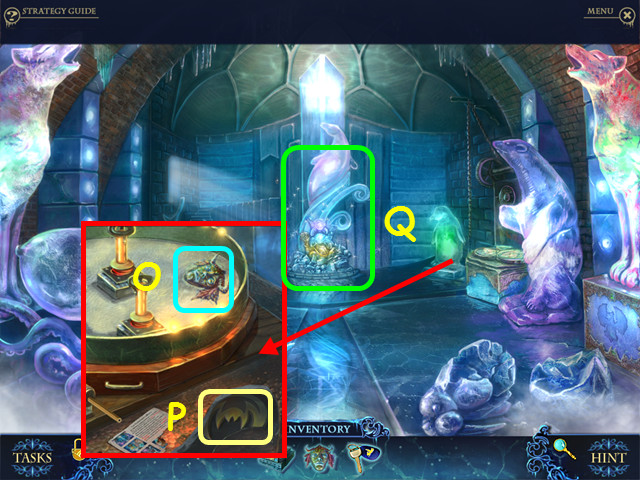
- Look at the table on the right and place the MINIATURE FACE in the indentation (O).
- Take the FANGS SYMBOL (P).
- Select the center statue for a HOS (Q).

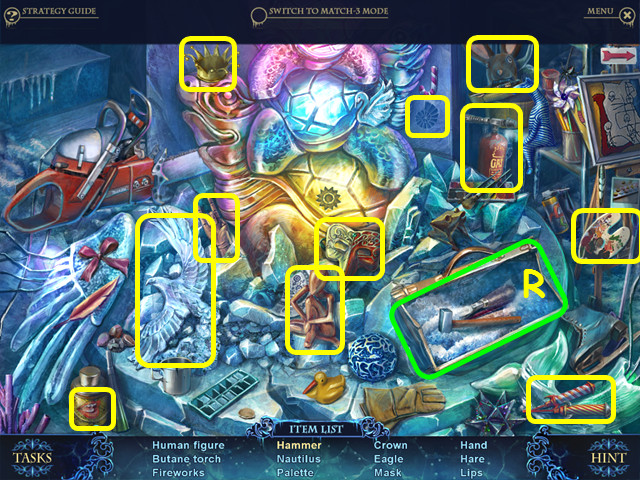
- Locate all the items on the list.
- Open the bag to find the hammer (R).
- You will earn the BUTANE TORCH.
- Walk forward.

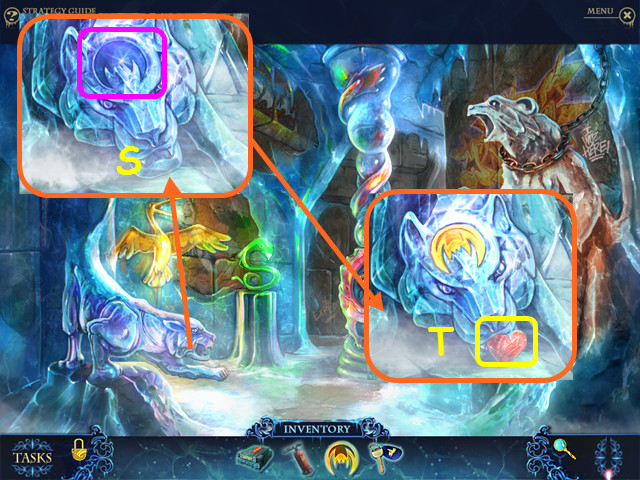
- Look at the wolf and place the FANGS SYMBOL on his head (S).
- Take the HEART (T).
- Walk forward.


- Look at the torso and use the BUTANE TORCH to open a hole, then place the HEART inside (V).
- Take the CAR KEY (W).
- Walk forward.

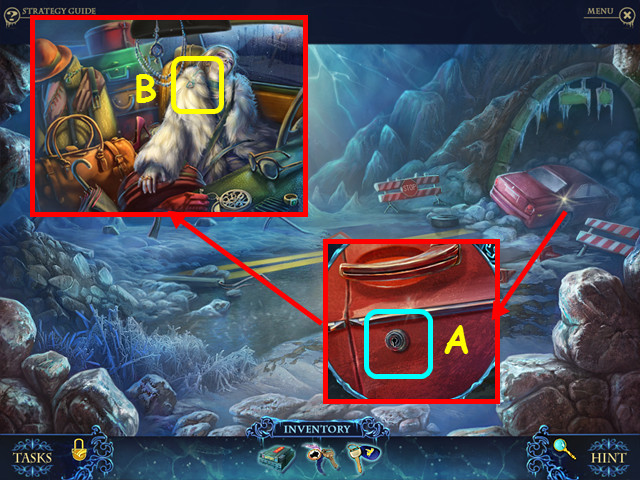
- Look at the car and use the CAR KEY in the lock (A).
- Look inside and take the LOCKET (B).
- Walk down.

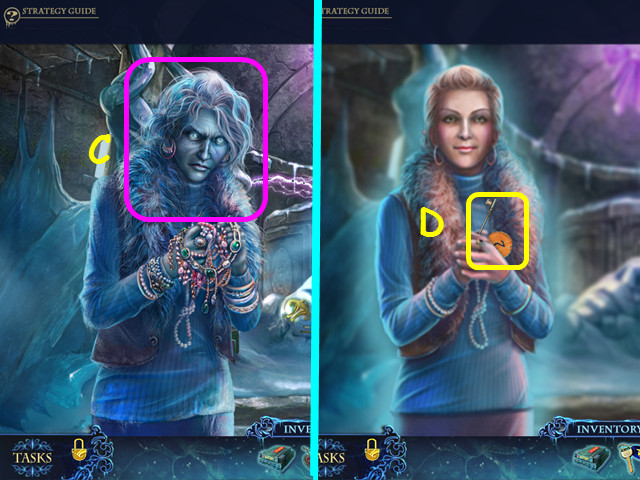
- Give the LOCKET to Greta (C).
- Take OTTO’S ROOM KEY (D).

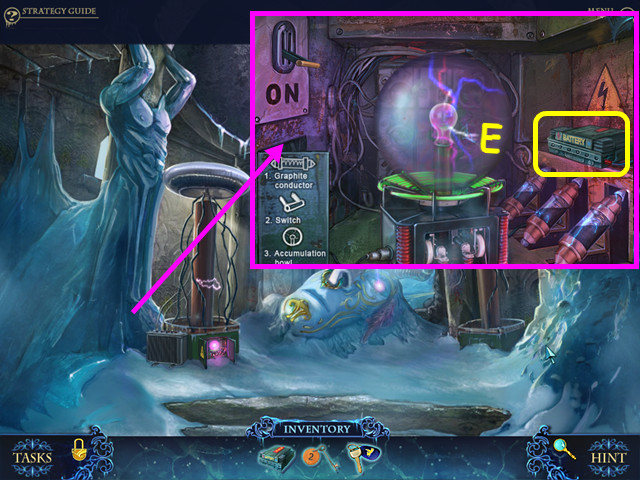
- Look in the generator and place the DEAD BATTERY on the shelf (E).
- Take the CHARGED BATTERY.
- Walk down 5 times, go up the hole, up the stairs, walk down 5 times, go right, enter the resort, and walk up the stairs.

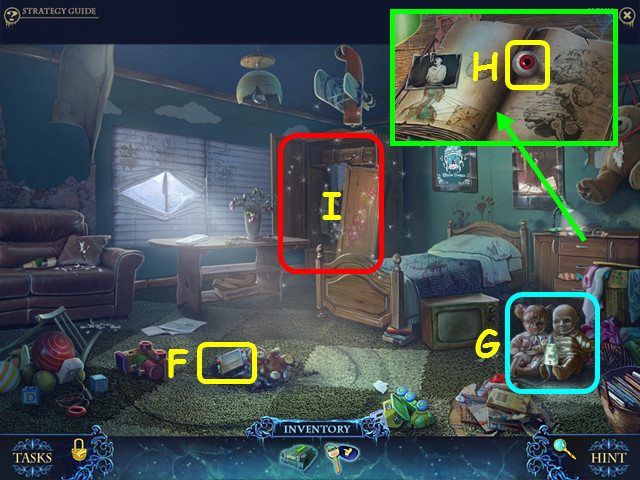
- Look at the door and use OTTO’S ROOM KEY on the lock, then enter the room.
- Take the RGB AMPLIFIER (F).
- Note the dolls (G).
- Look at the dresser and take the RED EYE (H).
- Select the wardrobe for a HOS (I).

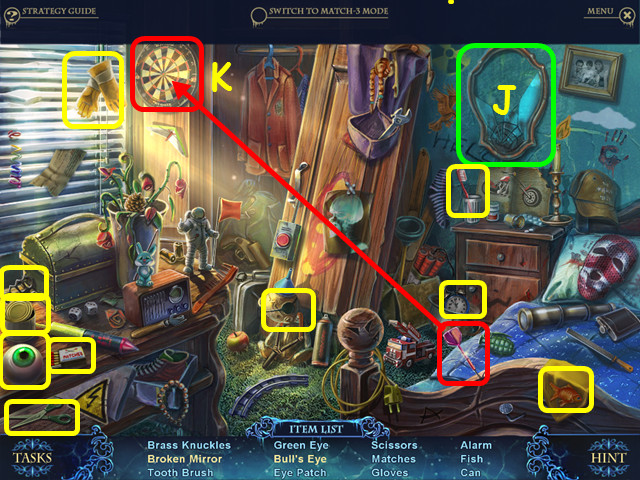
- Locate all the items on the list.
- Remove the poster to find the broken mirror (J).
- Use the dart on the dart board to make the bull’s eye (K).
- You will earn the GREEN EYE.
- Look at the dolls.

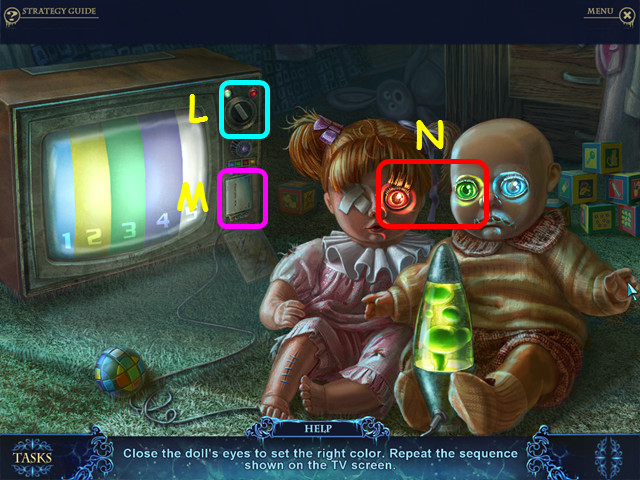
- Turn on the TV (L).
- Place the RGB AMPLIFIER under the dial (M).
- Place the RED EYE in the left doll, and the GREEN EYE in the right doll (N).

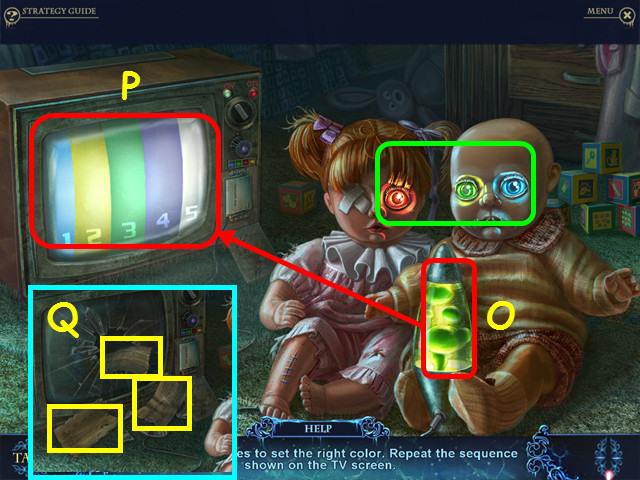
- Open and close the eyes to change the color of the lava lamp (O) to match the pattern on the TV (P).
- Close, then open the blue eye.
- Close the red and green eyes, open the red, then the green.
- Close the red, blue, then the green eye.
- Take the 1/4, 2/4, and 3/4 MEDICAL ASSIGNMENT PAGES (Q).
- Select the wardrobe for a HOS.

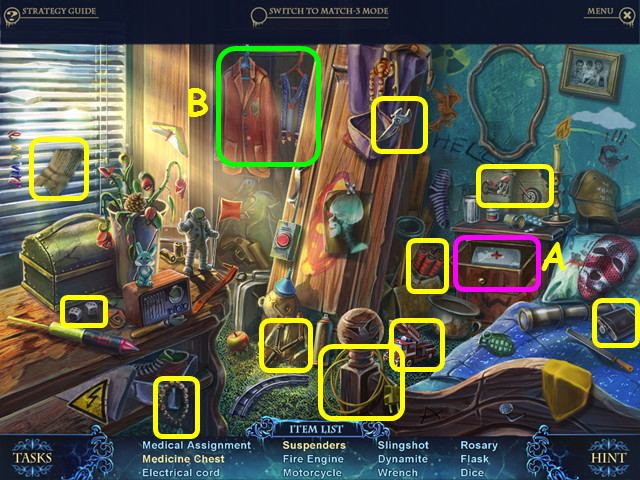
- Locate all the items on the list.
- Open the drawer to find the medicine chest (A).
- Move the jacket to find the suspenders (B).
- You will earn the 4/4 MEDICAL ASSIGNMENT PAGES.

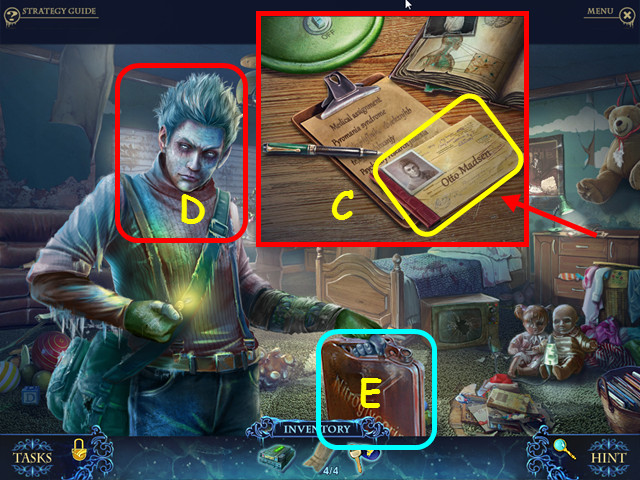
- Look at the dresser and place the 4 MEDICAL ASSIGNMENT PAGES in the book (C).
- Look at the book to get the MEDICAL CARD.
- Give the MEDICAL CARD to Otto (D).
- Take the CAN OF GASOLINE from Otto (E).
- Walk down 4 times, head towards Peter’s house, then enter the shed.

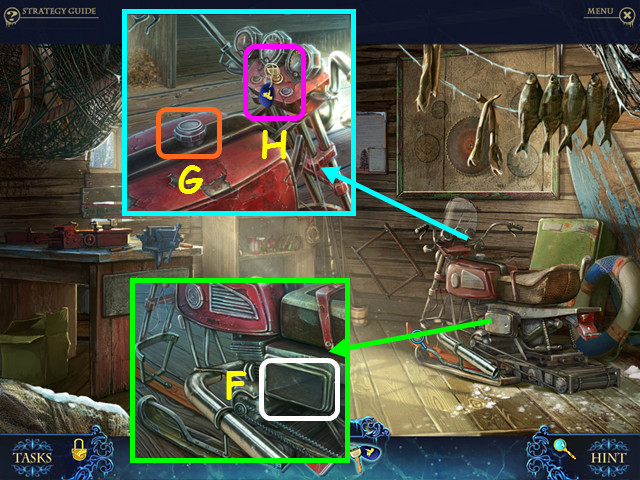
- Look at the base of the snowmobile and insert the BATTERY (F).
- Look at the handlebars, open the gas tank and pour the CAN OF GASOLINE inside (G).
- Use the SNOWMOBILE KEYS in the ignition (H).
- Turn the key.
- Congratulations! You have completed Phantasmat: Crucible Peak!
Bonus Mini-games

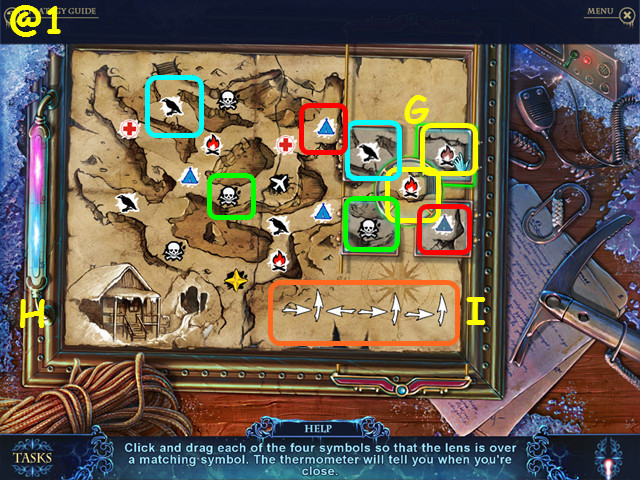
- Mini-game 1 (@1).
- Drag each of the 4 symbols so the lens is over a matching symbol (G).
- Do this for all 4 symbols (color coded).
- Note the background in each symbol to determine the correct location.
- The thermometer will fill if correct (H).

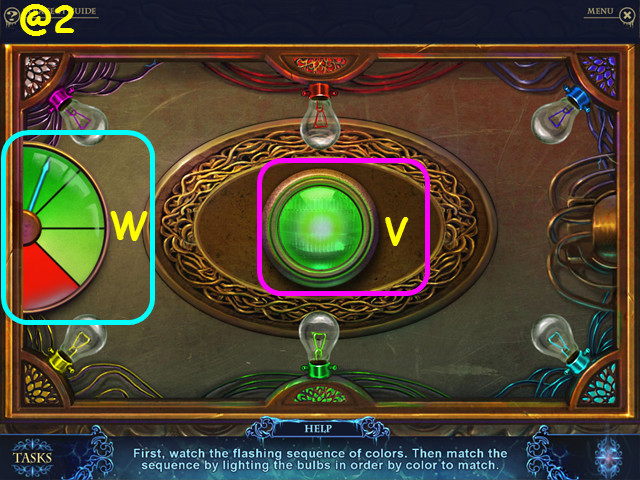
- Mini-game 2 (@2).
- Watch the sequence of lights in the center (V), then select the colored bulbs in the same order.
- You must do a series of 3 sequences that are randomly generated.
- Our sequences were: (aqua, purple, yellow, red), (red, blue, green, yellow, purple), (blue, yellow, red, purple, aqua, green).
- Your progress will be noted on the left meter (W).

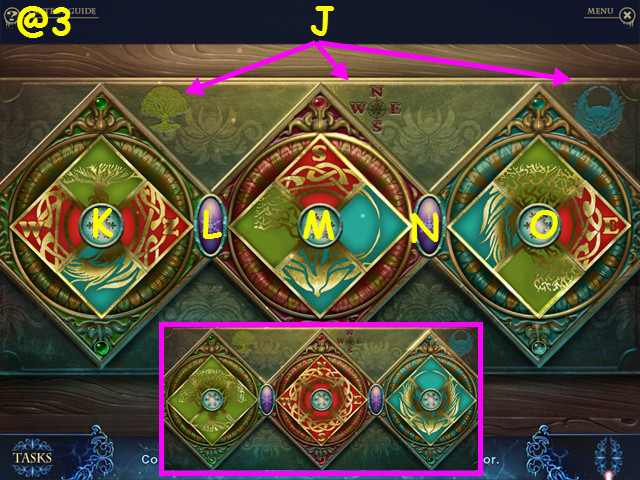
- Mini-game 3 (@3).
- Move the squares to the correct position based on the symbols (J).
- Select the center snowflake buttons to spin the blocks (K, M, O); select the purple buttons to swap squares (L, N).
- Select the buttons in this order: L, Kx2, Mx3, Ox3, N, Mx2, K, L, Kx3, Ox2, Mx3, N, O, M, N, M, L, Mx2, N, Mx3, and N.

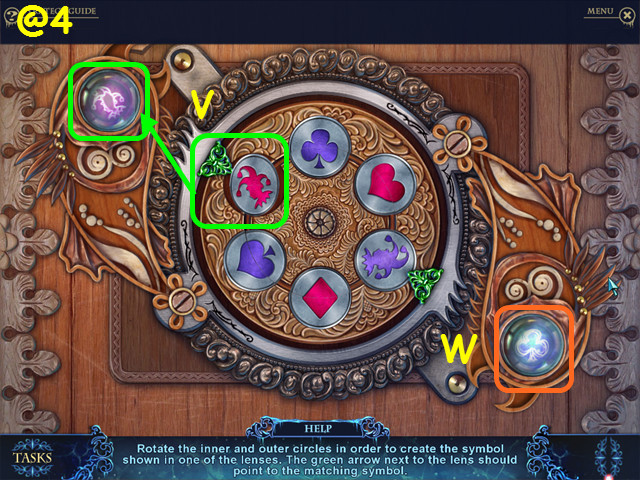
- Mini-game 4 (@4).
- Rotate the two discs to form a symbol that matches the one shown in the eye (V).
- The next symbol will form in the other eye (W).
- There are six total symbols.
- Move the center disc first, as it moves the outer disc in the opposite direction.

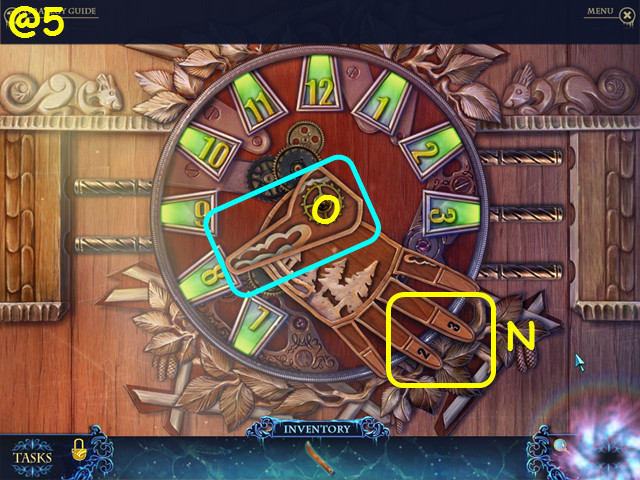
- Mini-game 5 (@5).
- Use the 2 and 3 fingers (N) to move the thumb (O) and light all the numbers.
- Press the fingers in this order: 3, 2, 3, 2, 3, 3, 2, and 3.

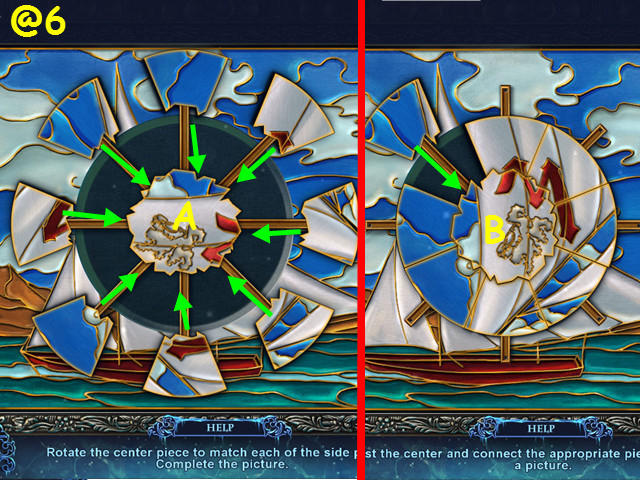
- Mini-game 6 (@6).
- Rotate the center piece (A), then select the outer pieces to attach to the center once aligned.
- Continue rotating the center piece and attaching the outer pieces until all are attached (B).

- Mini-game 7 (@7).
- Select arrows (A) to for a sequence (B) that will move the car (C) to the end (D).
- Select the ‘GO’ button to start the car (E); select the reset button to start over (F).

- Mini-game 8 (@8).
- Look at the shape in the top window (J), then select any of the buttons below to recreate the shape and color (K).
- Press a button until you find the color you want.
- Continue fitting shapes on the board until it is filled.
- Note- you do not have to have a perfect board; you can have some empty squares.
- Use the undo button to erase a shape you are making; you cannot use it after a shape is complete (L).
- Select the next button to see another shape.

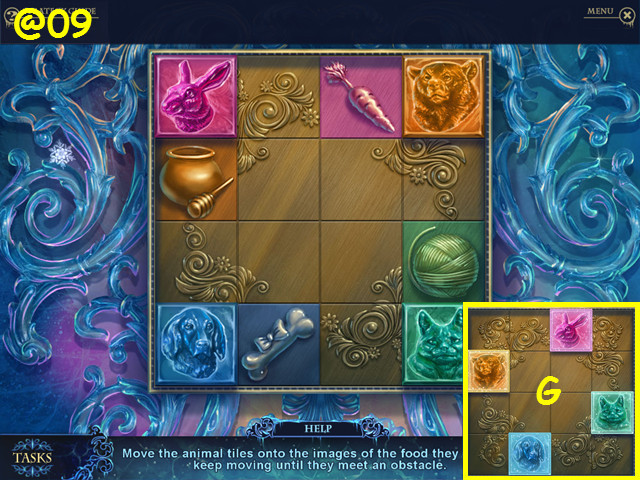
- Mini-game 9 (@9).
- Slide the 4 animal chips over the appropriate treat (G).
- Move the pink bunny right, then move the blue dog up.
- Slide the orange bear down, left, then up.
- Move the blue dog right, then down.
- Slide the green cat left, up, left, down, then right.

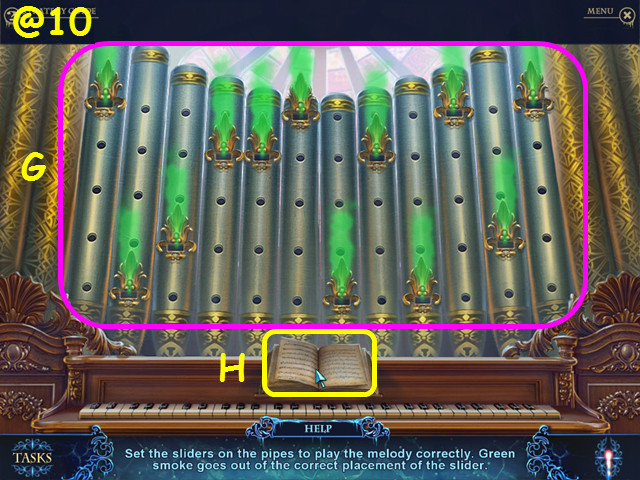
- Mini-game 10 (10).
- Move the metal slider so that green smoke comes from all the pipes (G).
- Yellow smoke indicates you are 1 place off, red smoke means you are more than 1 place away.
- Select the music book to see where you stand (H).


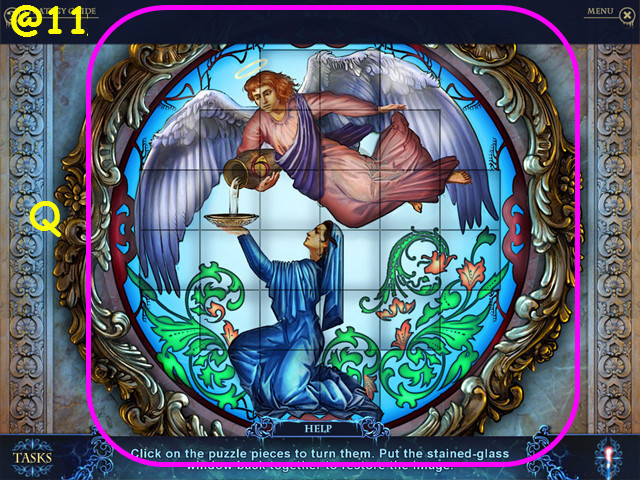
- Mini-game 11 (@11).
- Rotate the pieces to restore the image (Q).


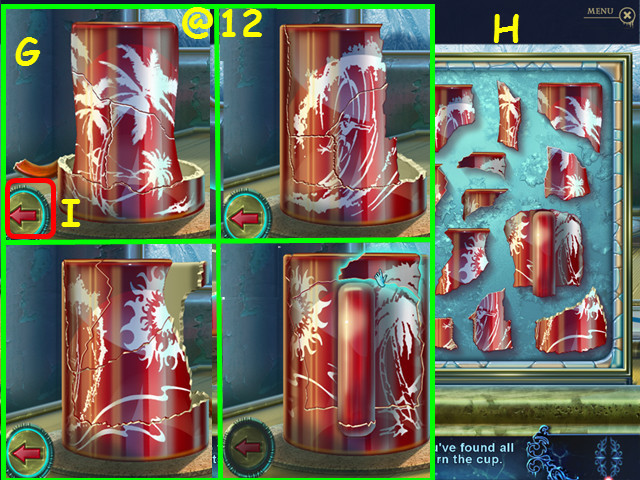
- Mini-game 12 (@12).
- Restore the cup (G) by placing the pieces (H) on the base.
- Select the arrow (I) to spin the base.
- Use the shadow outlines as a guide.

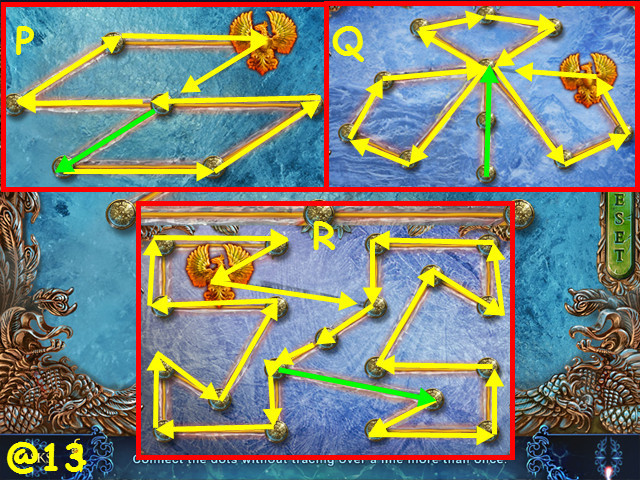
- Mini-game 13 (@13).
- Trace the diagram completely without duplicating any lines.
- Select any point to begin, then click on a connecting point (green arrow).
- There are 3 patterns to complete (P, Q, R).

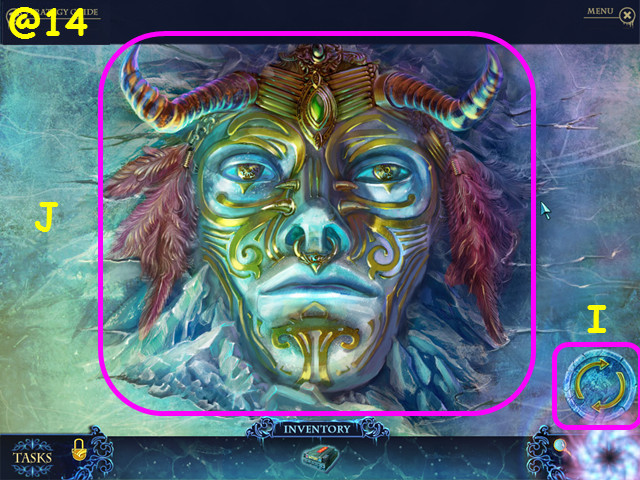
- Mini-game 14 (@14).
- Place the pieces on the button (I) to rotate them, then place the piece into the face (J).

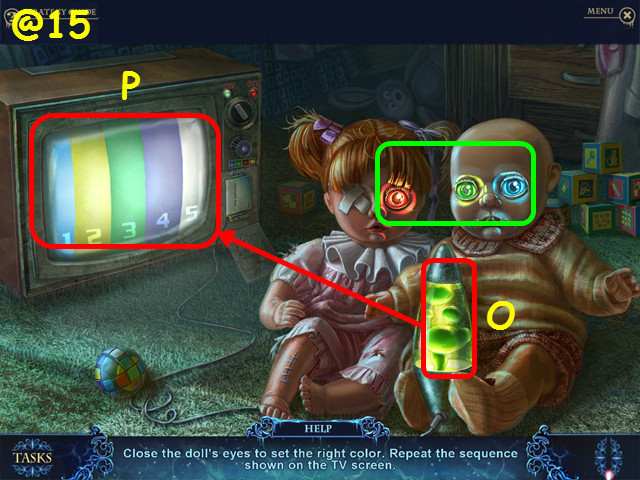
- Mini-game 15 (@15).
- Open and close the eyes to change the color of the lava lamp (O) to match the pattern on the TV (P).
- Close, then open the blue eye.
- Close the red and green eyes, open the red, then the green.
- Close the red, blue, then green eye.






 Best in Show Solitaire Walkthrough, Guide, & Tips
 Angela Young 2: Escape the Dreamscape Walkthrough, Guide, & Tips
 Whispered Secrets: The Story of Tideville Walkthrough, Guide, & Tips
 Awakening: The Dreamless Castle Walkthrough, Guide, & Tips
 Blood Oath Walkthrough, Guide, & Tips