Whispers: Revelation Walkthrough, Guide, & Tips
Whispers: Revelation Walkthrough

Welcome to the Whispers: Revelation Walkthrough
Orphaned Lunna can see and speak with spirits, but when a mysterious spirit asks for her help, she must face a challenge she never expected.
Whether you use this document as a reference when things get difficult or as a road map to get you from beginning to end, we’re pretty sure you’ll find what you’re looking for here.
This document contains a complete Whispers: Revelation game walkthrough featuring annotated screenshots from actual gameplay!
We hope you find this information useful as you play your way through the game. Use the walkthrough menu below to quickly jump to whatever stage of the game you need help with.
Remember to visit the Big Fish Games Forums if you find you need more help. Have fun!
This walkthrough was created by Origaming Media, and is protected under US Copyright laws. Any unauthorized use, including re-publication in whole or in part, without permission, is strictly prohibited.
General Tips

- This is the official guide for Whispers: Revelation.
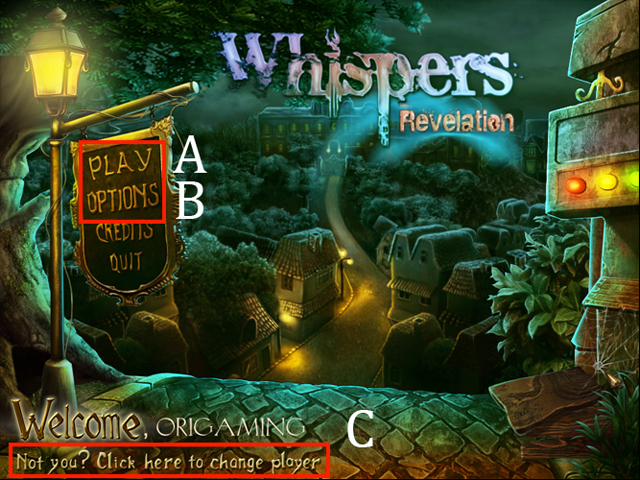
- Select PLAY (A) to begin or continue your game.
- The OPTIONS (B) allows you to adjust screen, music, sound, cursor, film grain, and aspect correction.
- ‘Not you? Click here to change player’ (C) button is used to add or delete player profiles.
- Your inventory/hidden object list is at the bottom center.
- Throughout the guide, we will use the acronym ‘HOS’ for Hidden Object Scenes and ‘HOPS’ for Hidden Object Puzzle Scenes.
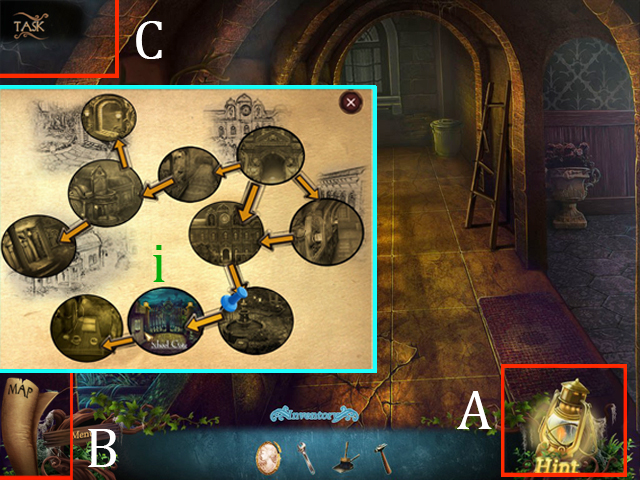
- HINT (A) button is on the lower right corner of the screen. Hints are unlimited in both HOS and quest scenes but you must wait for it to recharge between uses.
- Select the map (B) to check where you are and you can hover your cursor over the area to see the location name (i).
- Select the Task tab (C) to see your current objective.
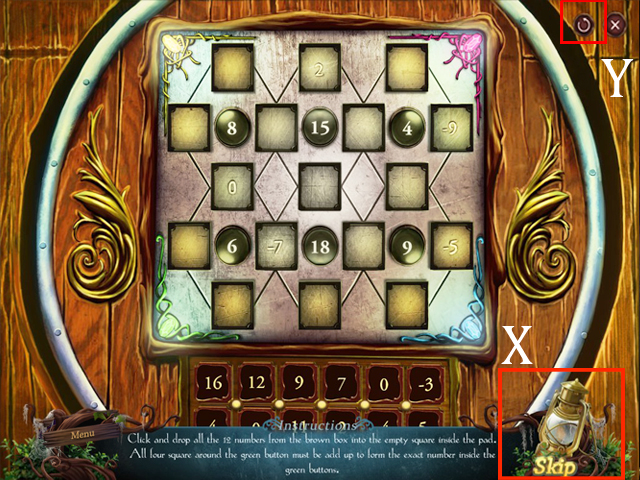
- You can also skip HOPS by clicking the SKIP (X) button on lower right of the screen. The button is clickable after it is fully charged.
- All HOPS have a RESET (Y) button on the top right; use it if you want to follow the solutions shown in this guide.
Chapter One: Mysterious Humming
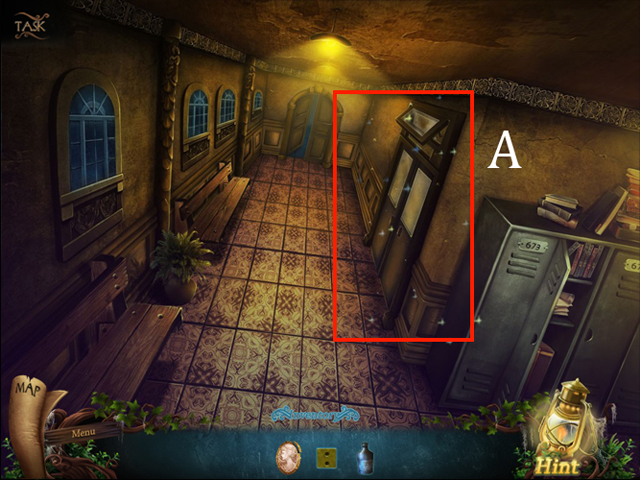
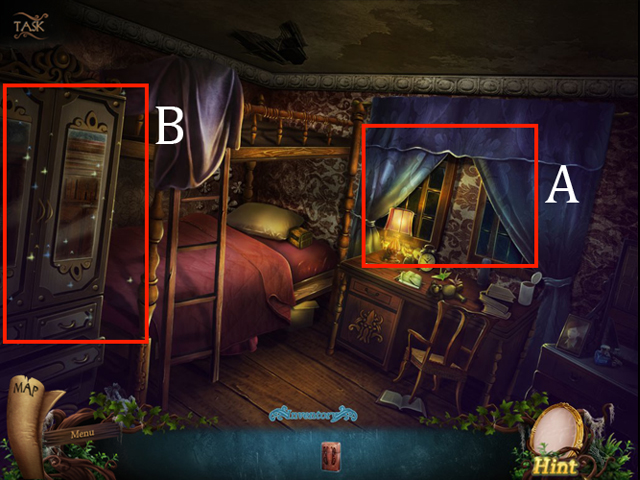
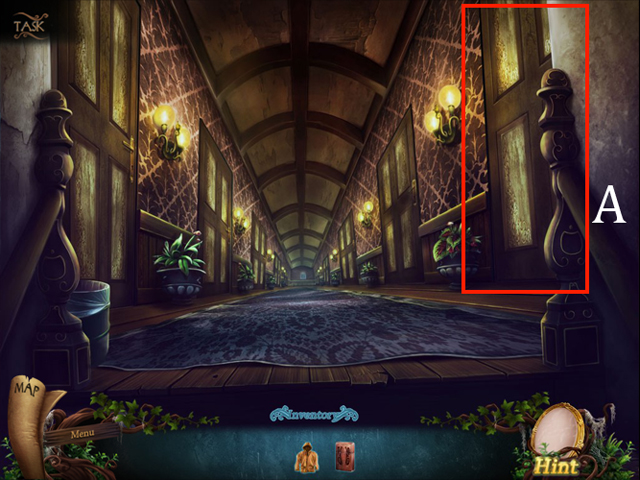
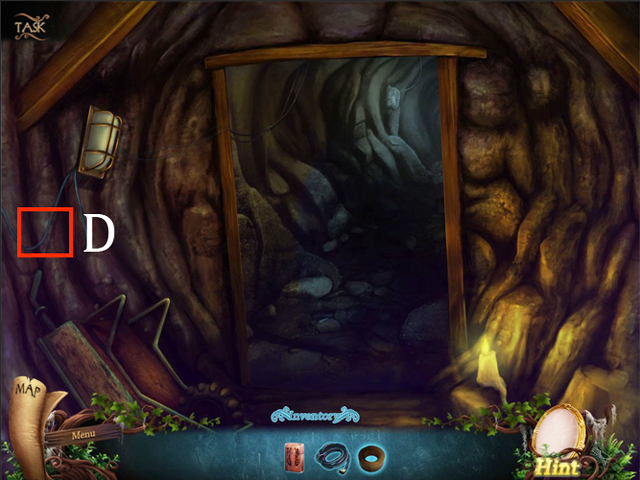
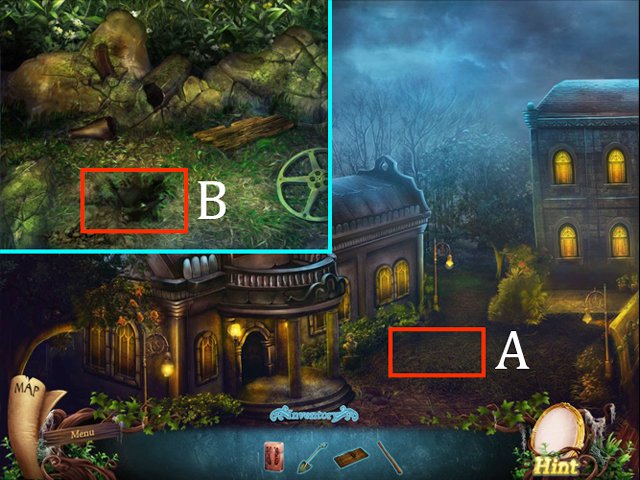
- Move your mouse to right of the screen. Your cursor will change into navigation mode (smokey arrow).
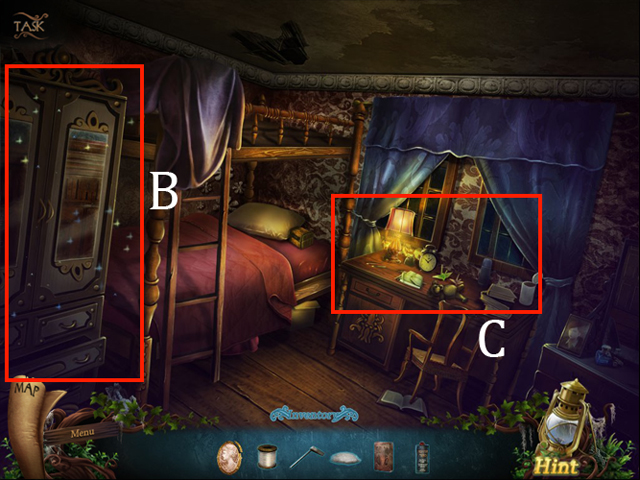
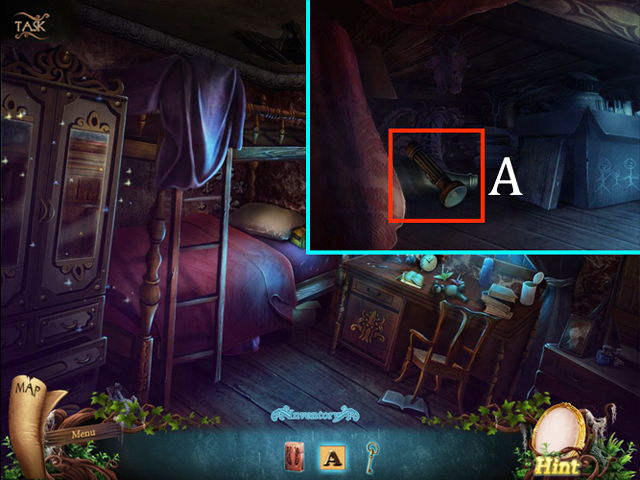
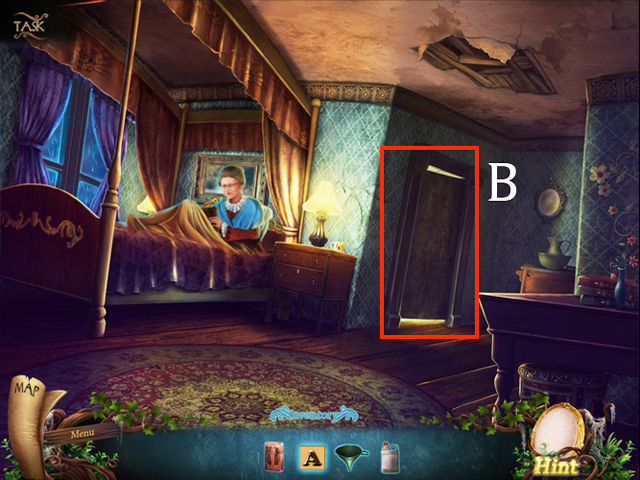
- You (Lunna) must return to Lunna’s Room.
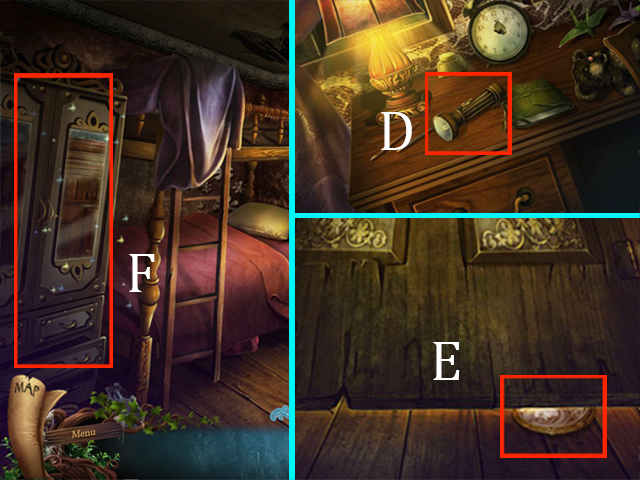
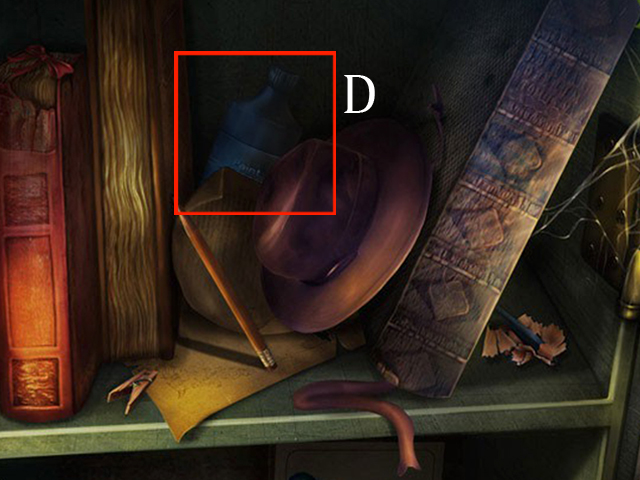
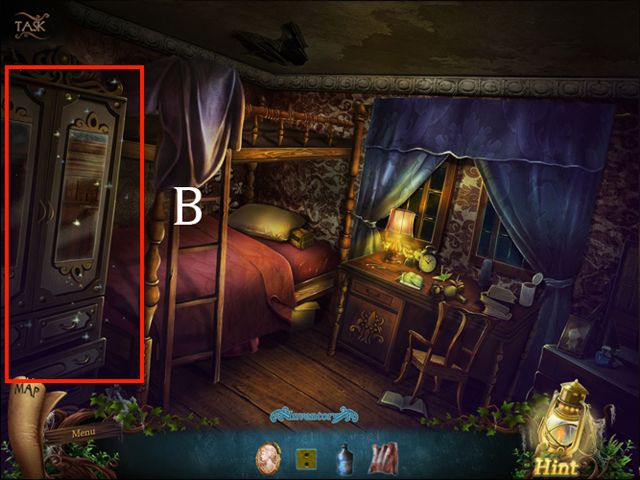
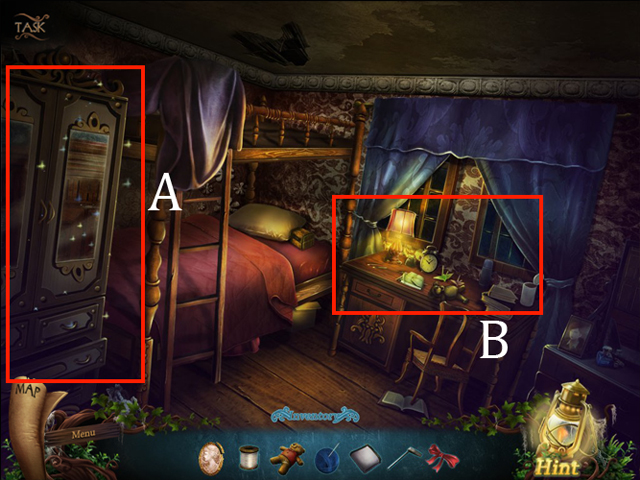
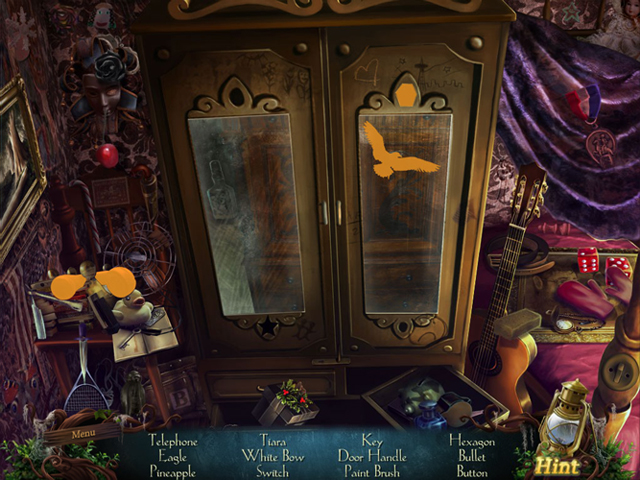
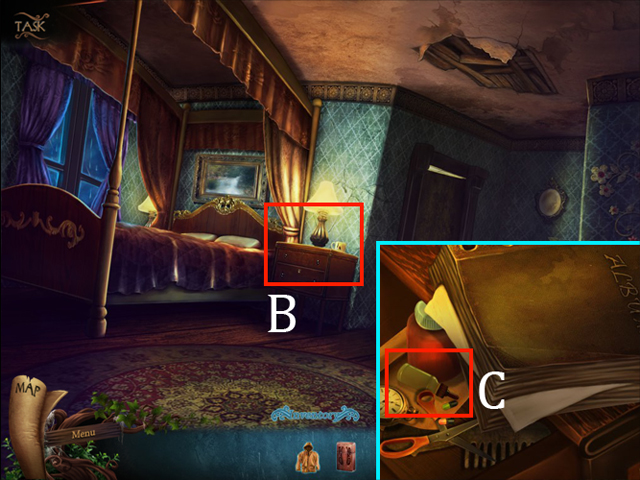
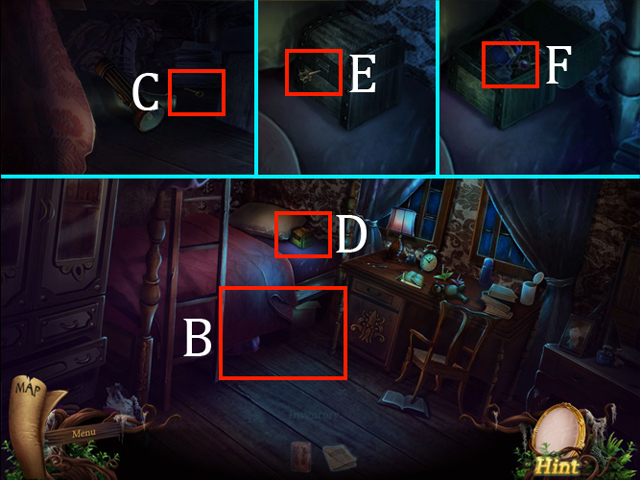
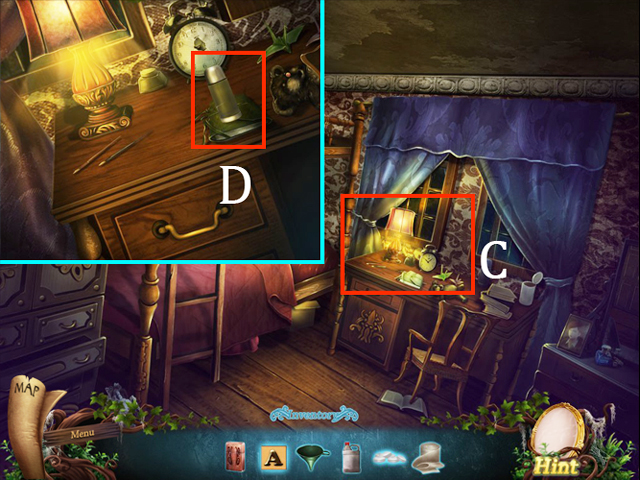
- Examine the desk; take the FLASHLIGHT (D).
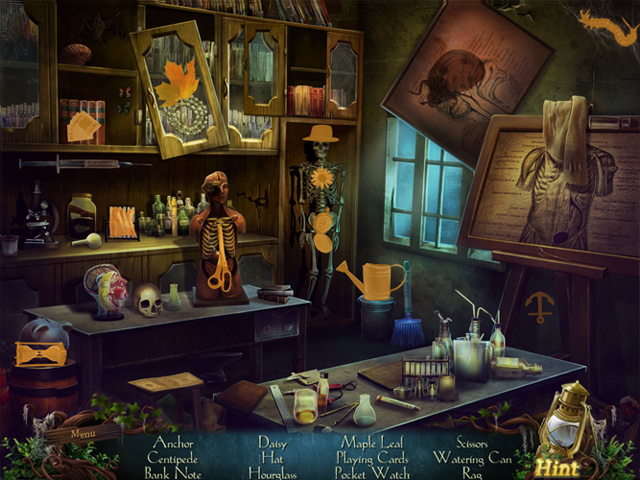
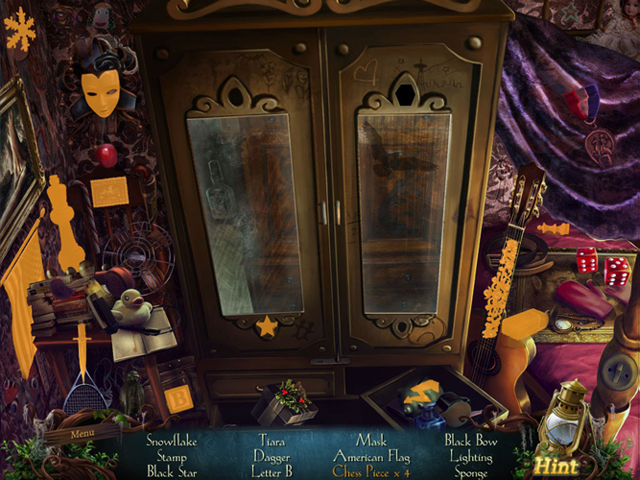
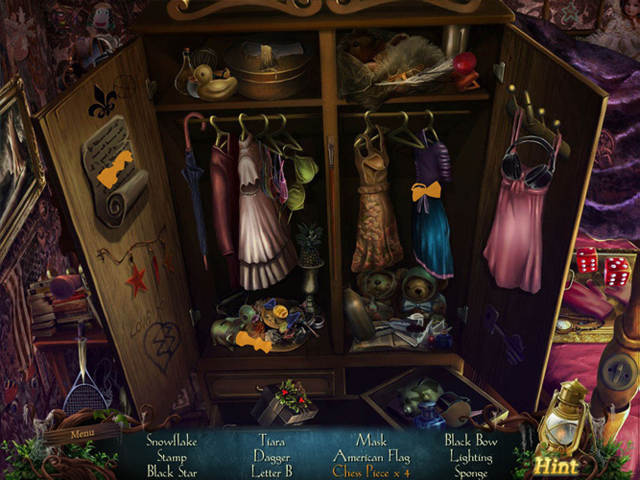
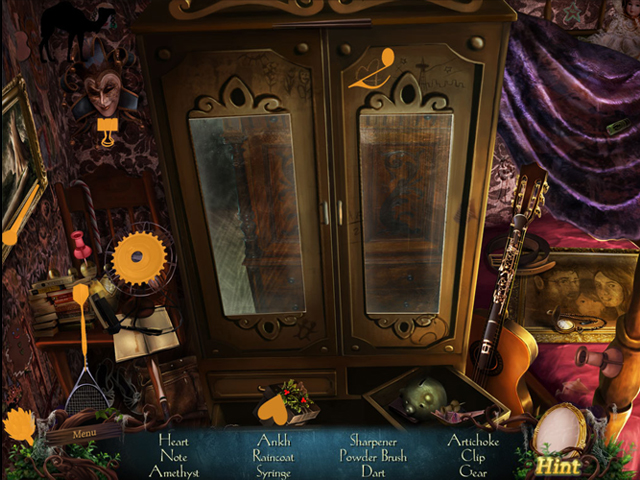
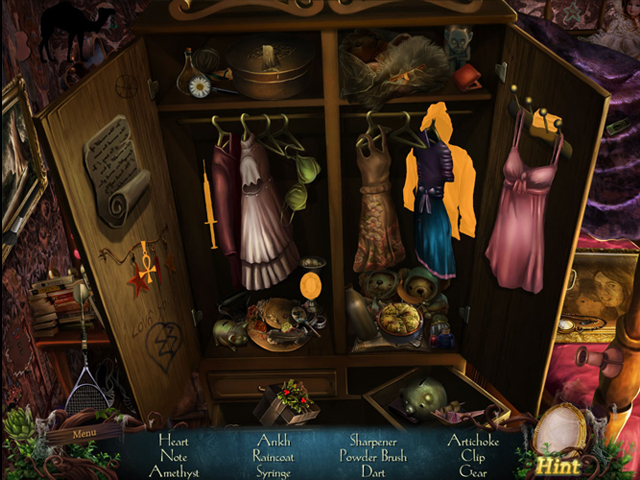
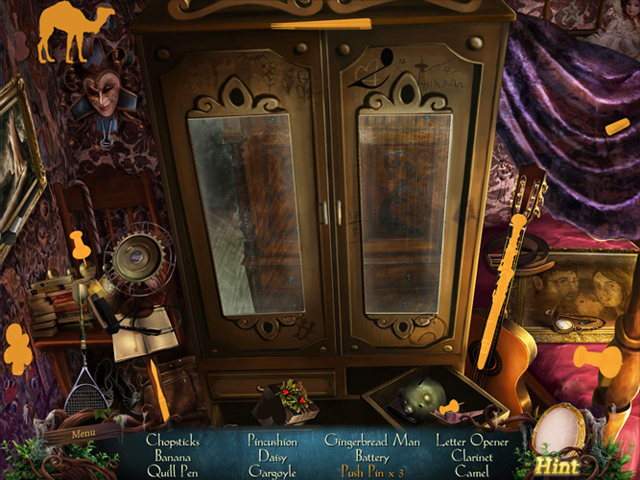
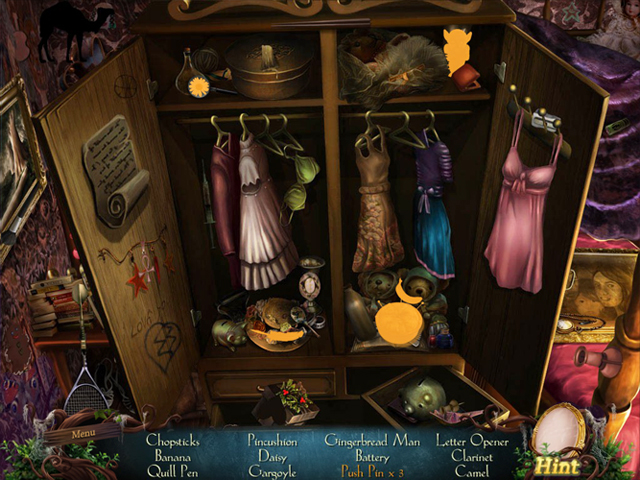
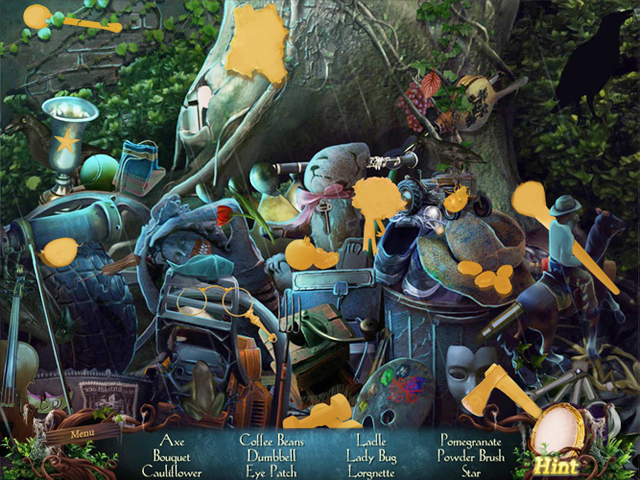
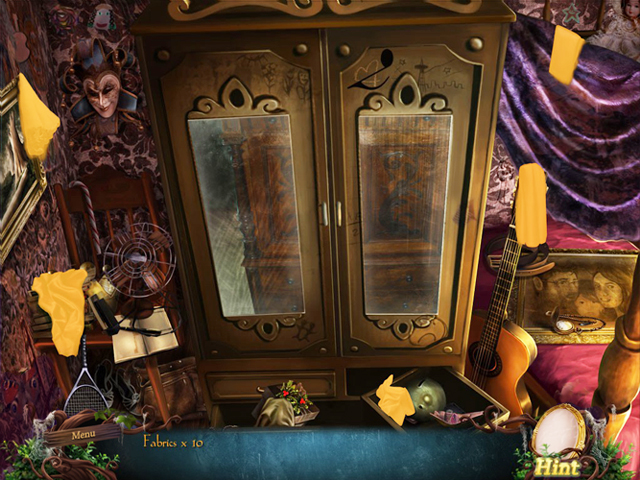
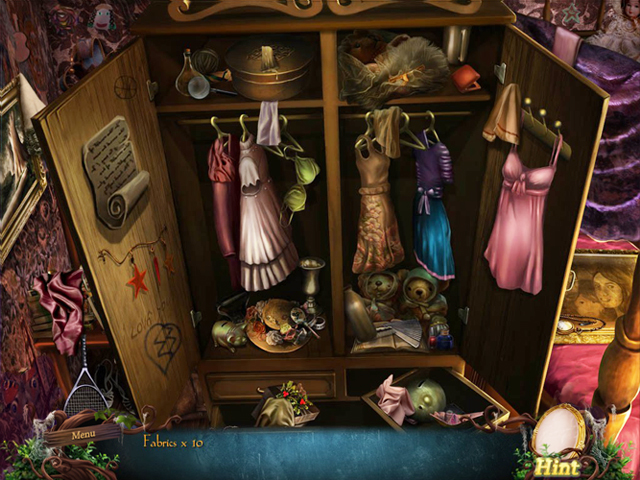
- Open the Wardrobe (F) to play the HOS.
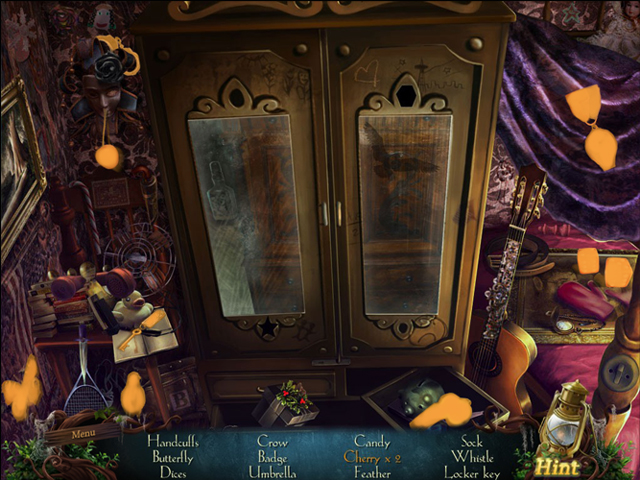
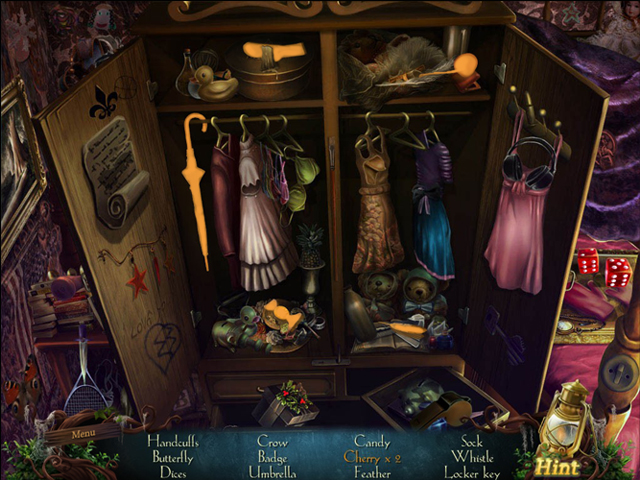
- The LOCKER KEY will be added to the inventory.
- Take the BROOCH (E).
- Get out of the room once again.
- Make your way to the School Entrance.
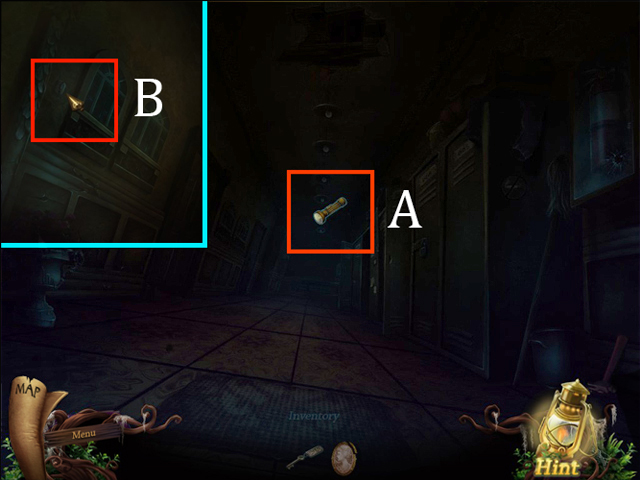
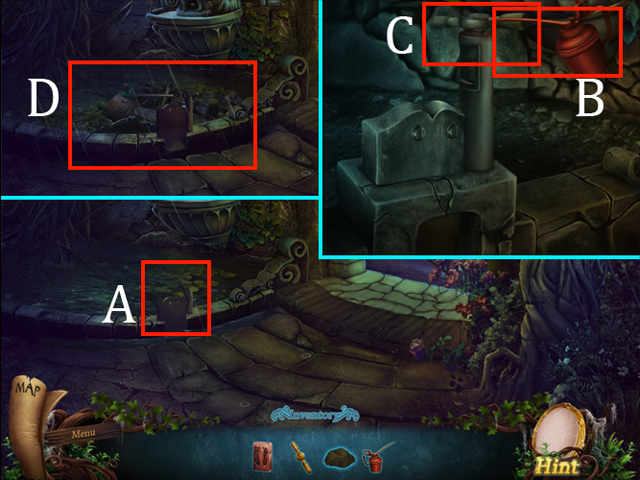
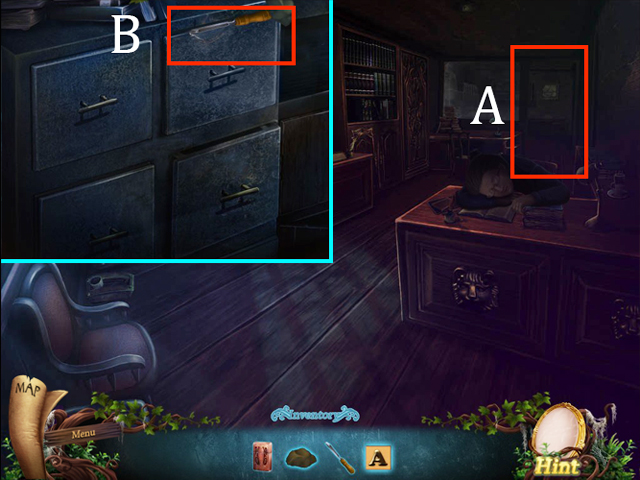
- Use the FLASHLIGHT (A) from your inventory and drop it in the room to illuminate your surroundings.
- Then click the SWITCH (B) to turn on the lights.
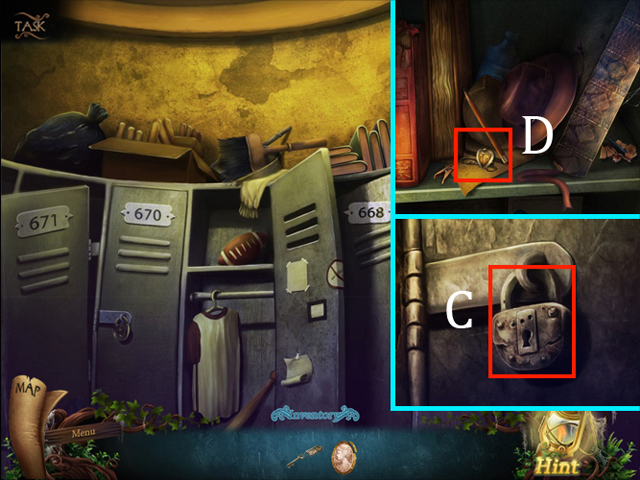
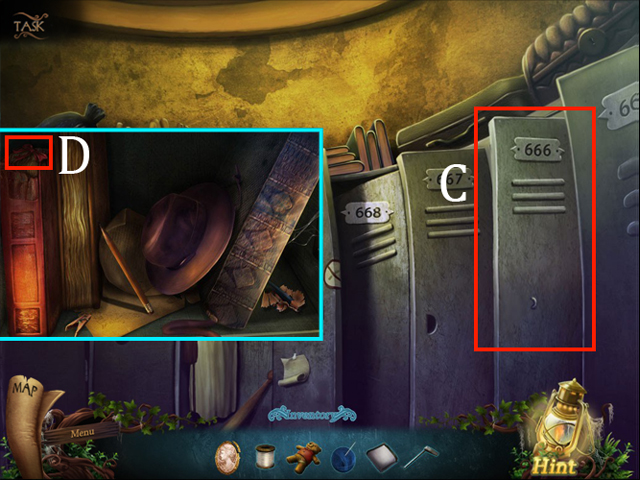
- Examine the Lockers; zoom into the Padlock (C).
- Use the LOCKER KEY to open the Locker; take the PENDANT (D).
- Walk down twice.
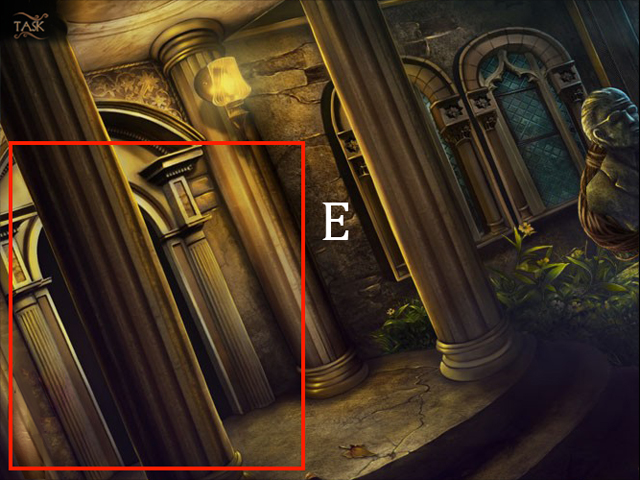
- You have to avoid being seen by the School Guard; take a Left from School Entrance.
- Inspect the Hall Entrance, then to enter to the HALL (E).
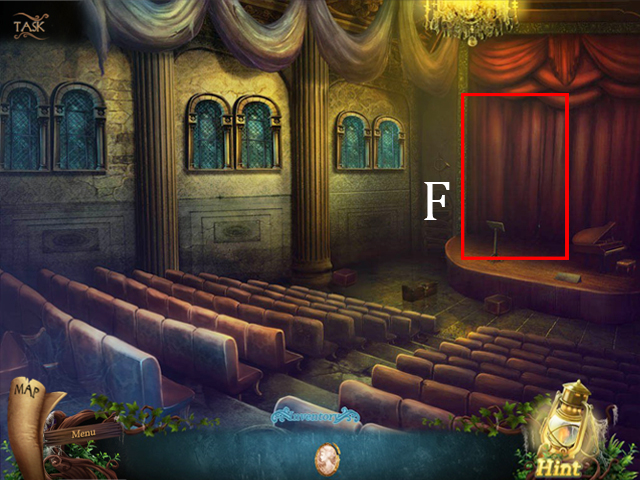
- Click the curtain to get into the Backstage (F).
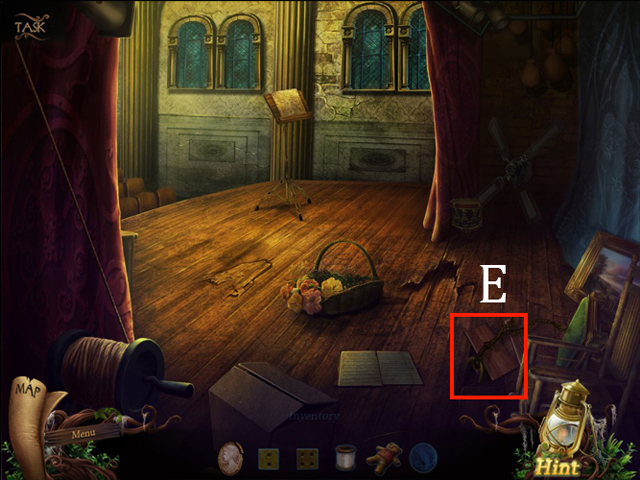
- After the cutscene; take left to leave the Backstage.
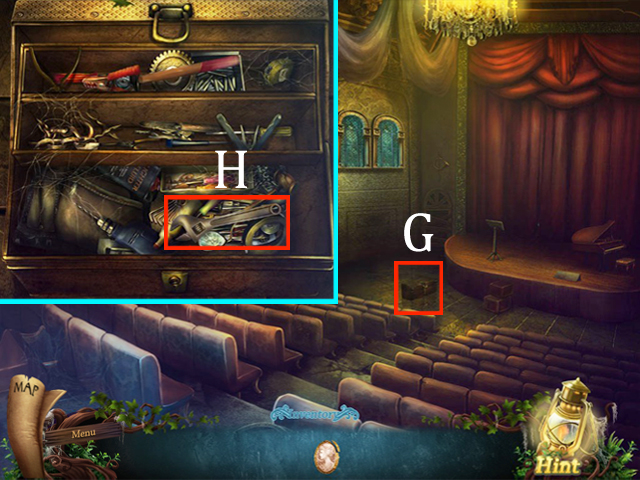
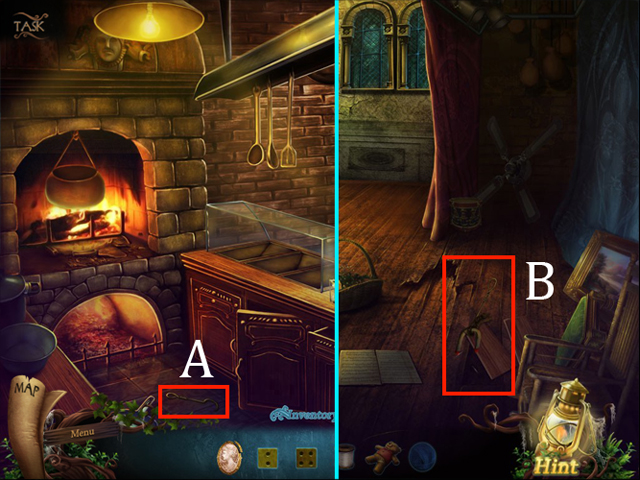
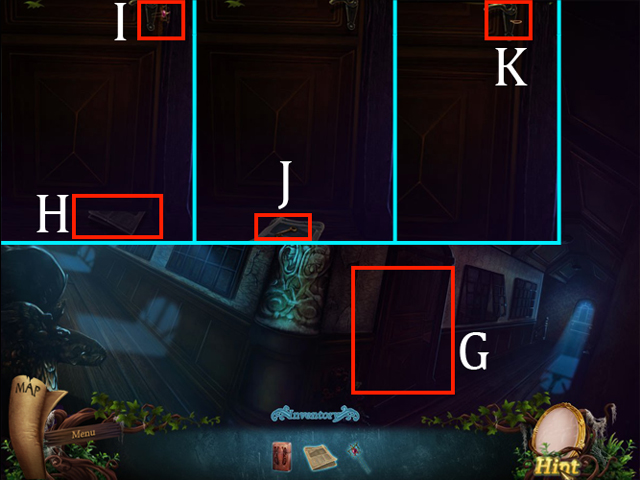
- Look at the TOOLBOX (G); pick up the WRENCH (H).
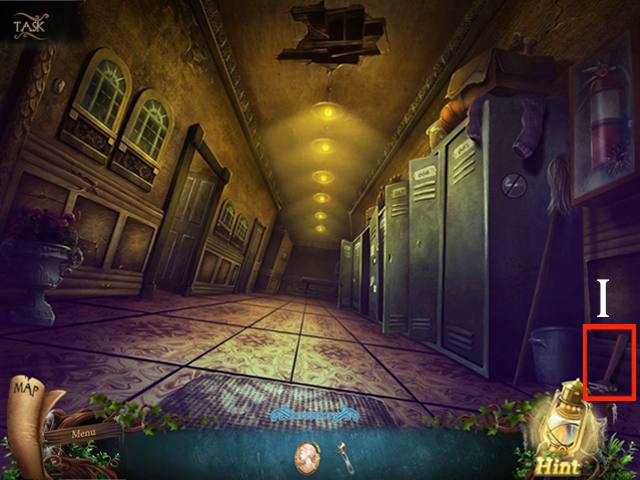
- Go back to the School Corridor; grab the HAMMER (I).
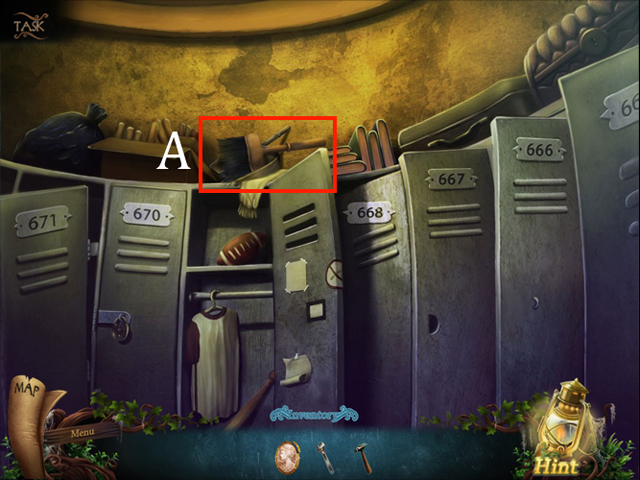
- Go back to the Locker and take the DUSTPAN AND BRUSH (A).
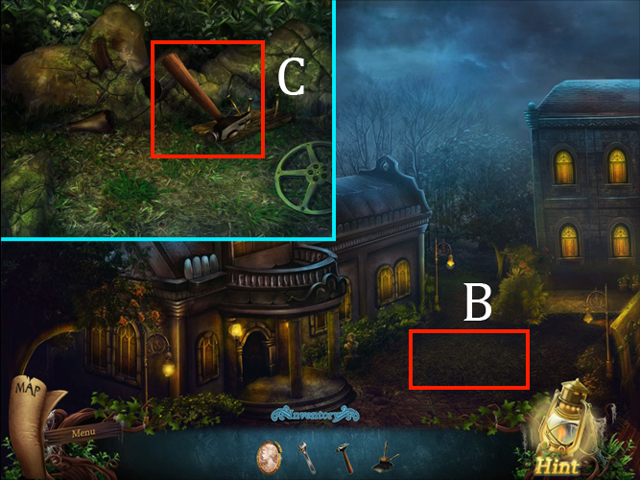
- Go back to the Hall Yard.
- Zoom into the Ground (B); use the HAMMER (C) to pull some NAILS out.
- Go back to the Dormitory Corridor.
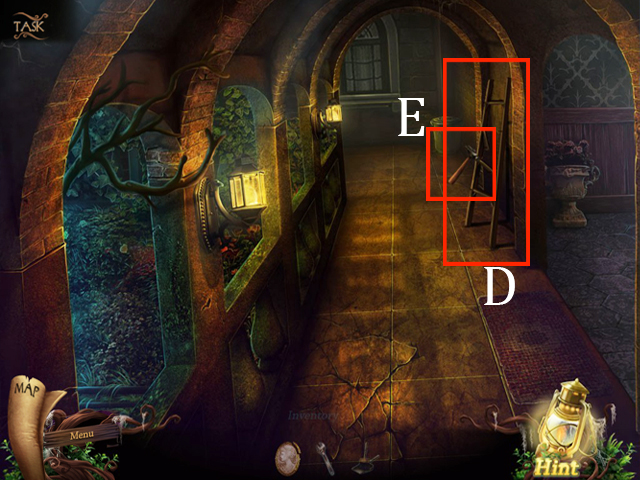
- Place the NAILS on the Broken Ladder (D); then use HAMMER (E).
- LADDER will be added to your inventory.
- Go back to the Hall; proceed ahead to the Backstage.
- Use DUSTPAN AND BRUSH (A) to put the sand back to the bag.
- SANDBAG will be added to your inventory.
- Place the LADDER (C) on the wall and then hang the SANDBAG (B) at its place.
- Use the WRENCH (D) on the LEVER (E) and click on the LEVER (E) to open the curtain.
Chapter Two: The Shadow
- After the cutscene; play the mini-game to open door behind it.
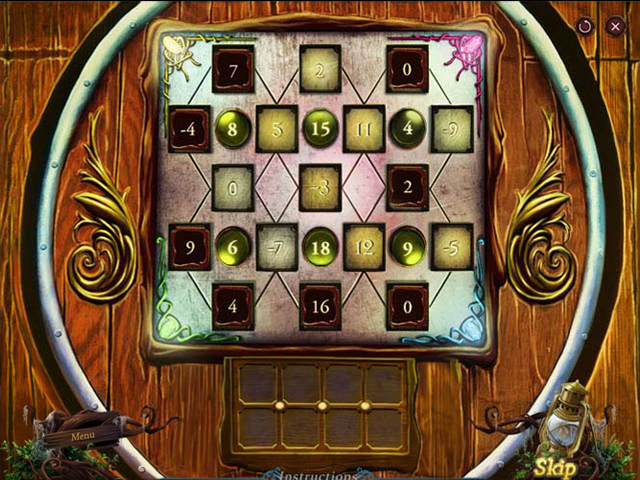
- Your goal is to drop all numbers from brown box into empty squares inside the pad. Numbers around each green button must add up to the exact number displayed on it. Green button will light.
- Please look at the screenshot for the HOPS solution.
- Enter the Library.
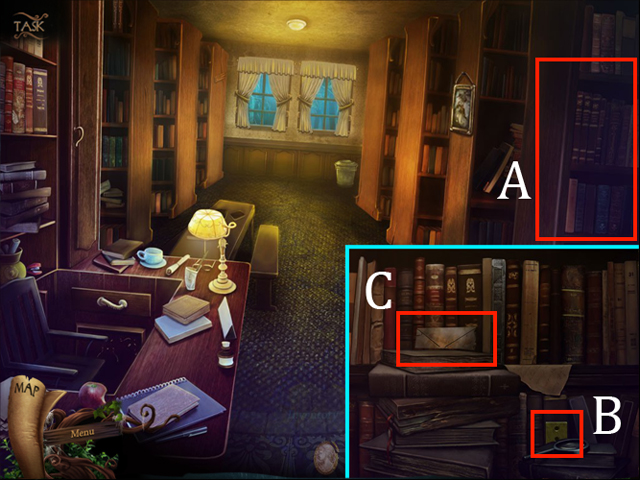
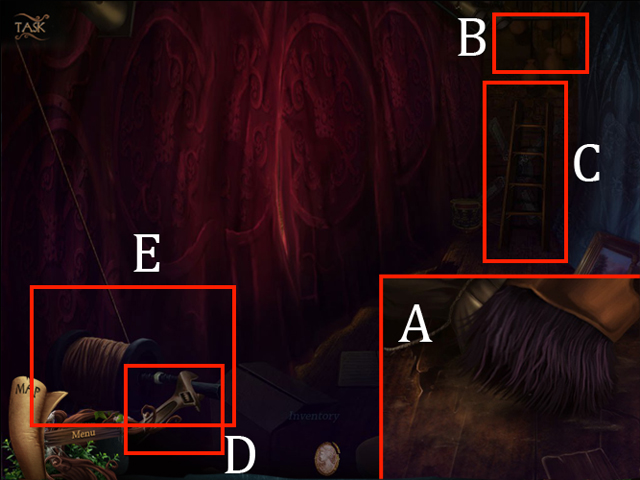
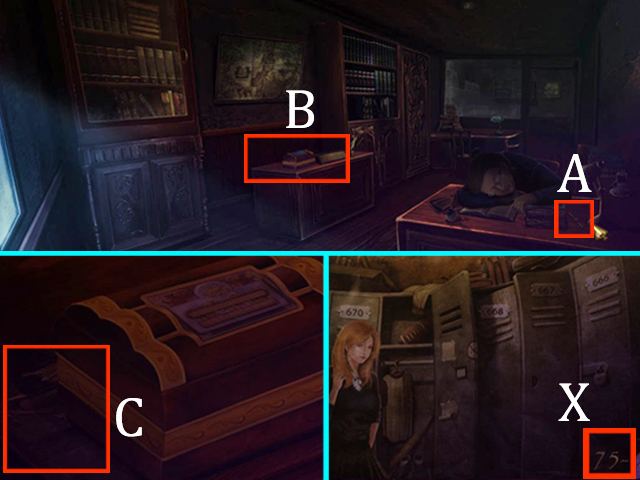
- Zoom into BOOK SHELVES (A) at the right-side; collect the Swamp Gate PUZZLE PIECE 1/3 (B).
- Examine the ENVELOPE (C) at the left to activate a HOPS.
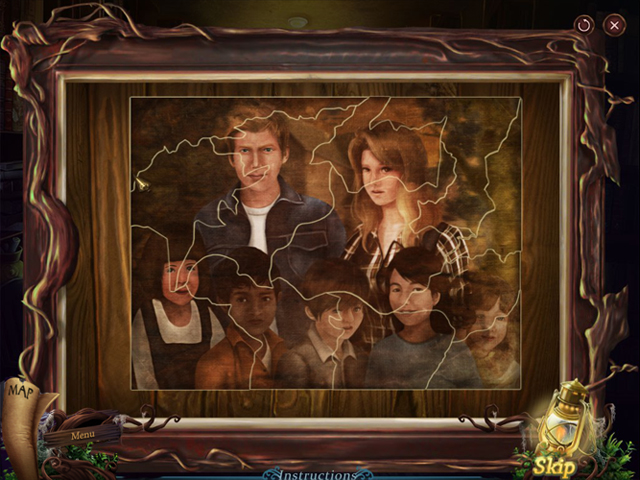
- Left-click on a piece to place it on the board and right-click it to rotate it. Correct pieces will lock in place when placed into the right spots on the board.
- Please look at the screenshot for the solution.
- Go down once.
- Move to the Dormitory Second Floor; head back to Lunna’s room.
- You will meet a girl from before; enter to Lunna’s room.
- Go back to the Hall and examine the Piano at the right-side on the Backstage.
- Go to the Locker.
- Take the PAINT THINNER (D).
- Walk down; then turn right.
- RAG will be added to your inventory.
- Return to Lunna’s Room.
Chapter Three: The Piano
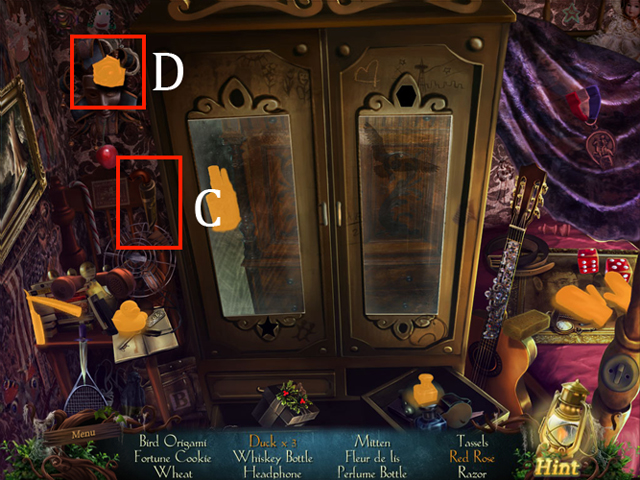
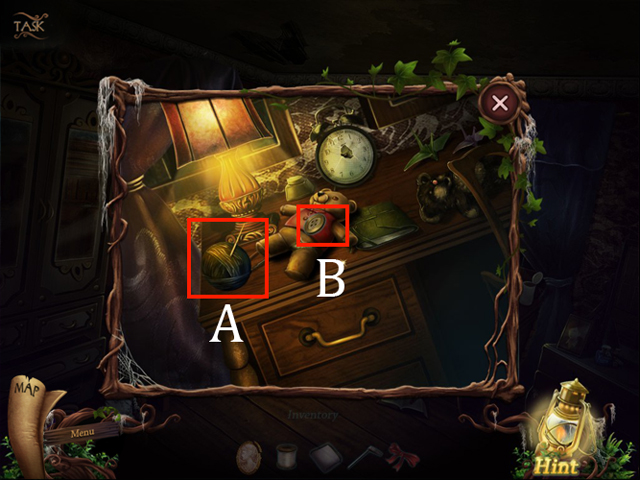
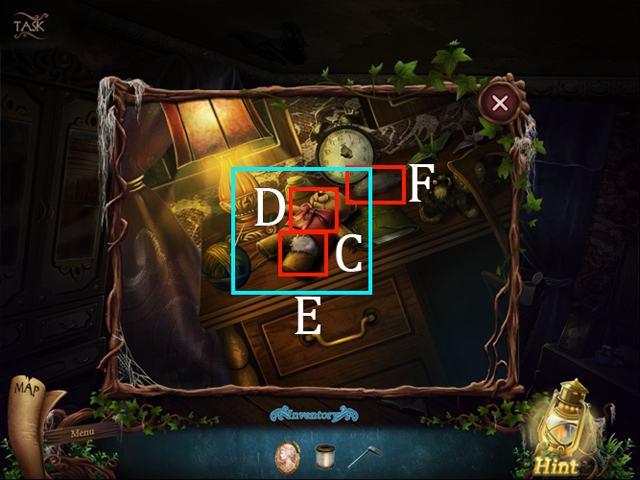
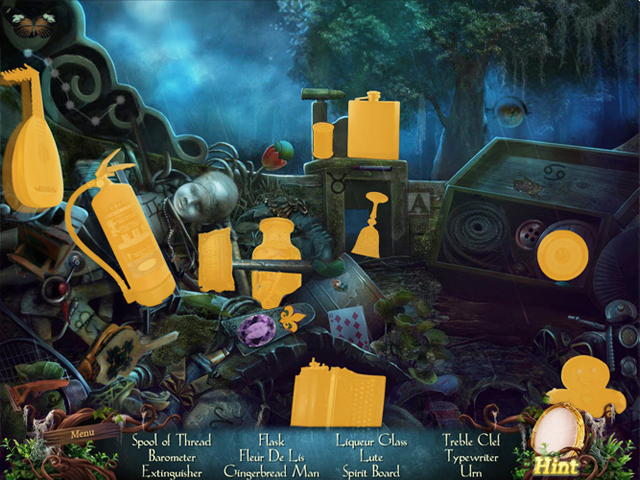
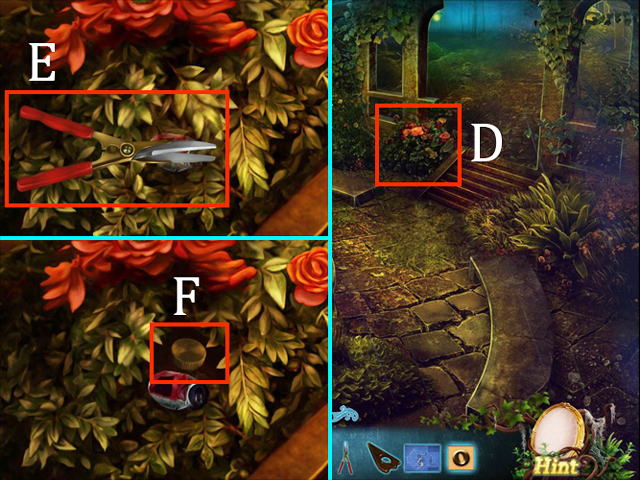
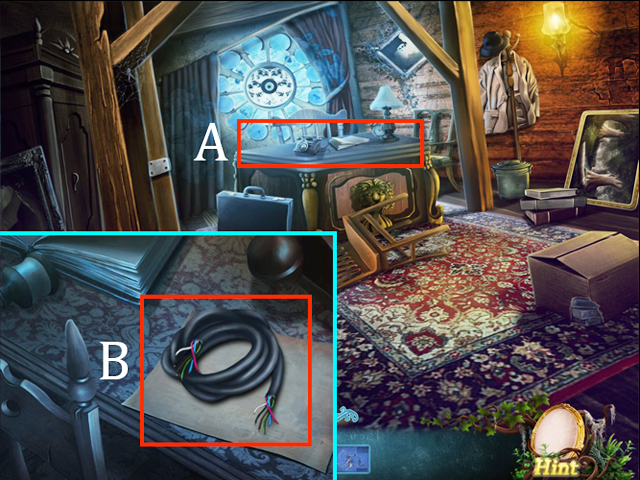
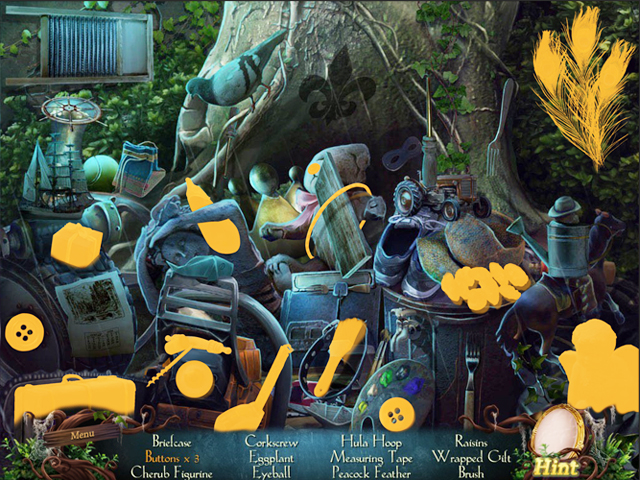
- In this HOS, there’s a special item that requires an extra step: Red Rose.
- Place the Red Paint Tube (C) to Black Rose (D); it will create the RED ROSE.
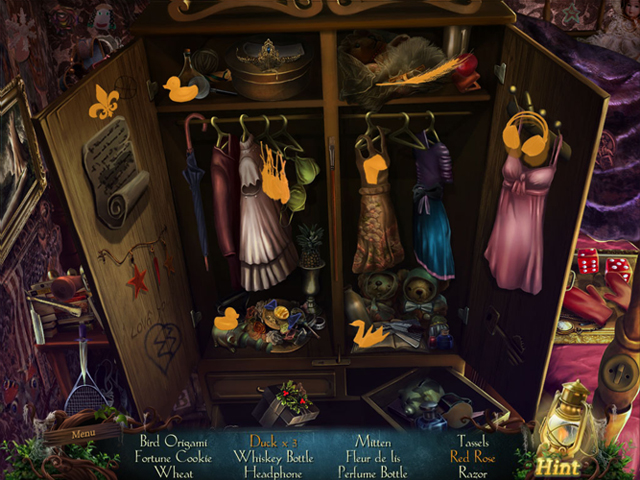
- RAZOR will be added to your inventory.
- Go to the Library.
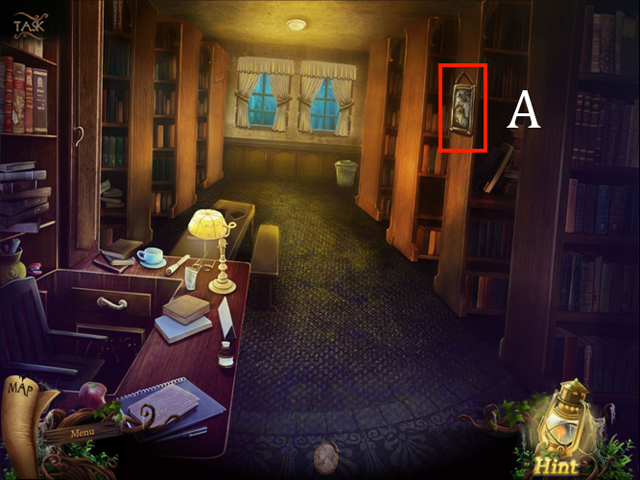
- Examine the Poseidon Painting (A).
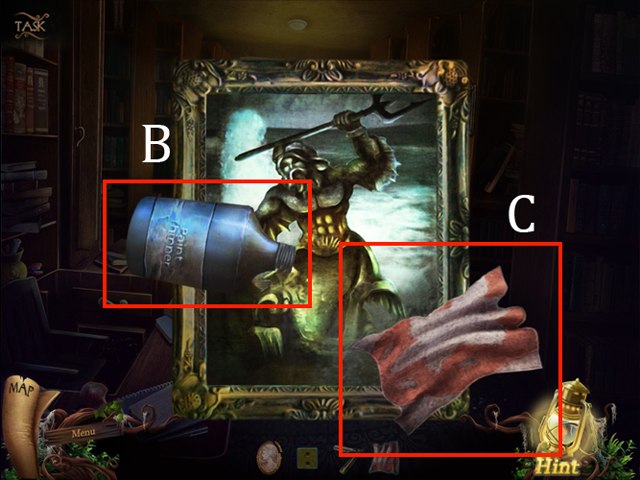
- Place the PAINT THINNER (B) on the Painting; followed by the RAG (C) twice.

- Finally use the RAZOR (D) twice to tear out the Painting.
- Take the NOTE SHEET (E).
- Return to the Hall, examine the Piano again.
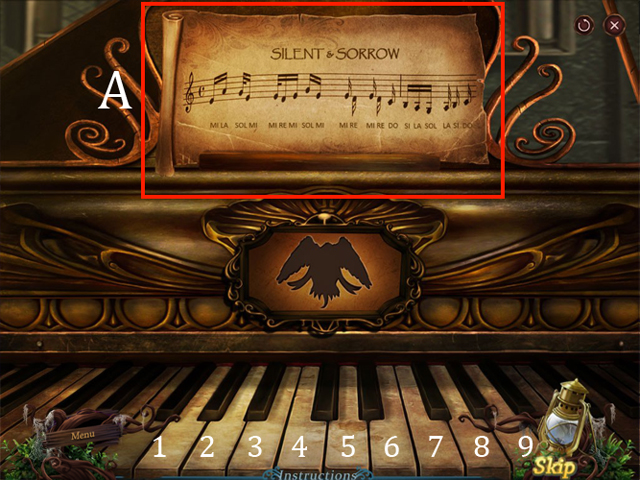
- Place the NOTE SHEET (A) on the piano’s sheet buffer.
- Press the piano tuts by following sequence below:
6, 9, 8, 6, 6, 5, 6, 8, 6, 6, 5, 6, 5, 4, 3, 2, 1, 2, 3, 4.
- The Swamp Gate PUZZLE PIECE 2/3 will be added to your inventory.
Chapter Four: Little Girl
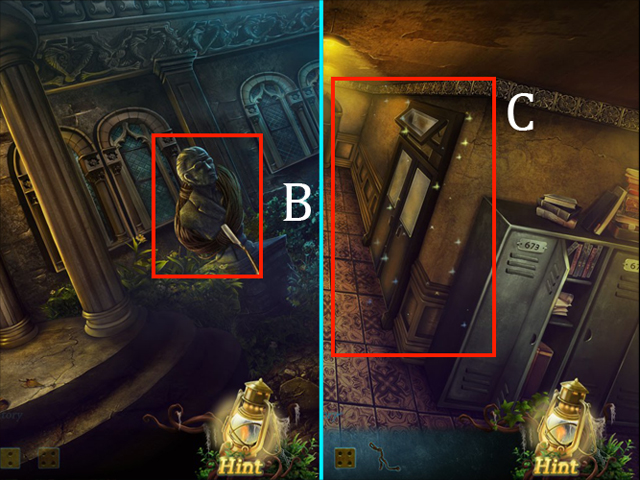
- Walk down; use your RAZOR on the Rope (B).
- ROPE will be added to your inventory.
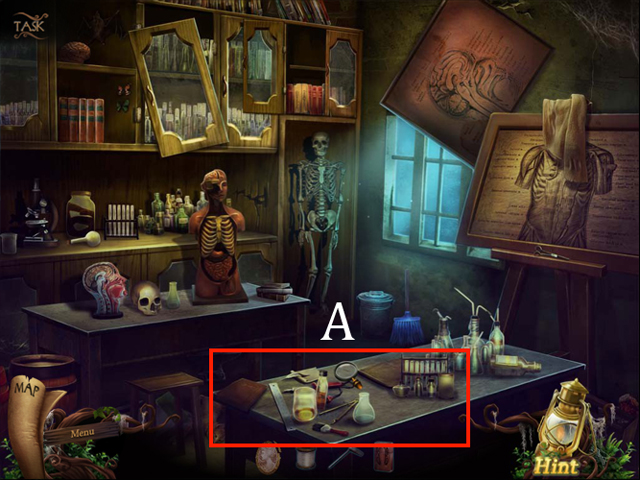
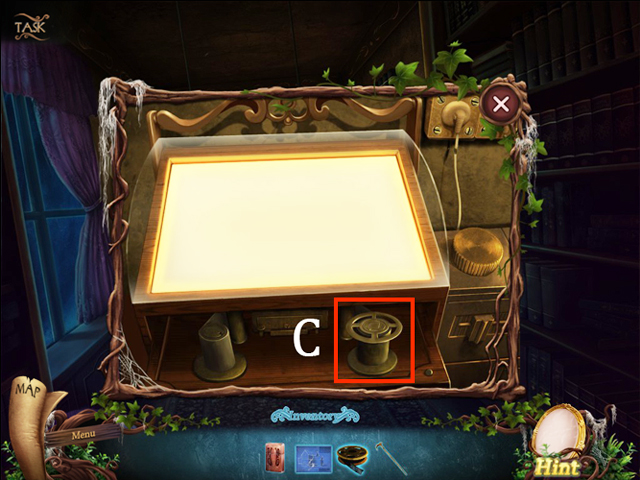
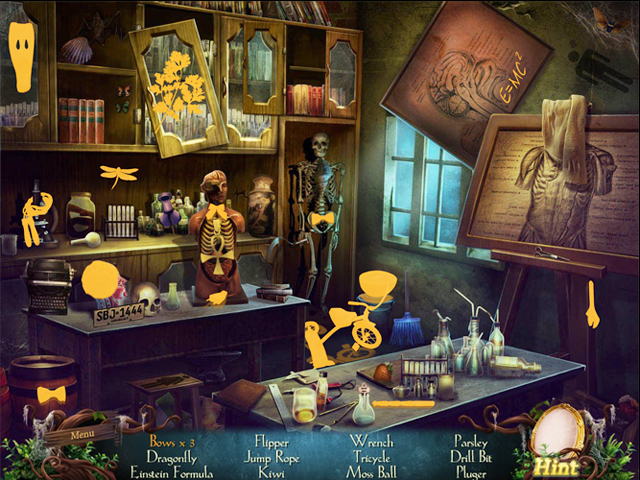
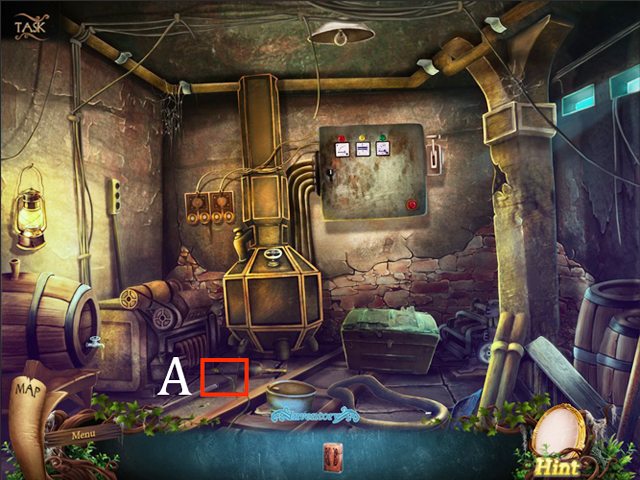
- Make your way to the Laboratory and play another HOS (C).
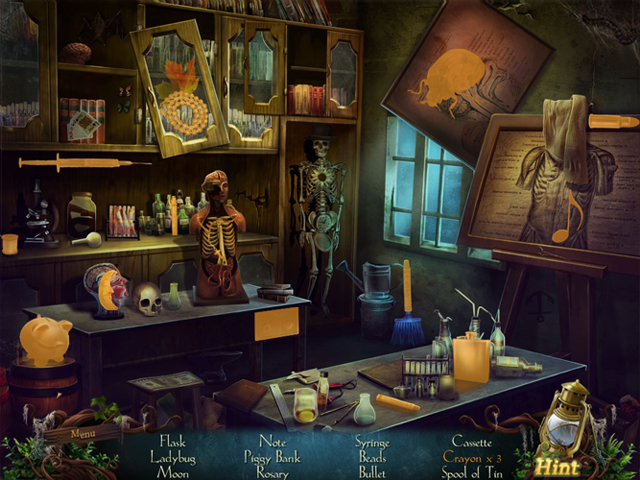
- A SPOOL OF TIN will be added to your inventory.
- Go forward to the door that leads to Canteen.
- Talk to the little girl.
- A BROKEN DOLL will be added to your inventory.
- Return to the Hall.
Chapter Five: The Swamp Gate
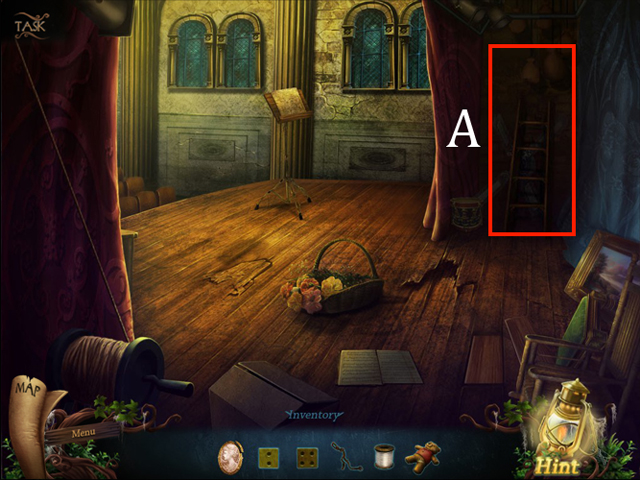
- Go forward t to the Backstage and take the LADDER (A).
- Go back to School Corridor. Then go through the left door to enter the Classroom.
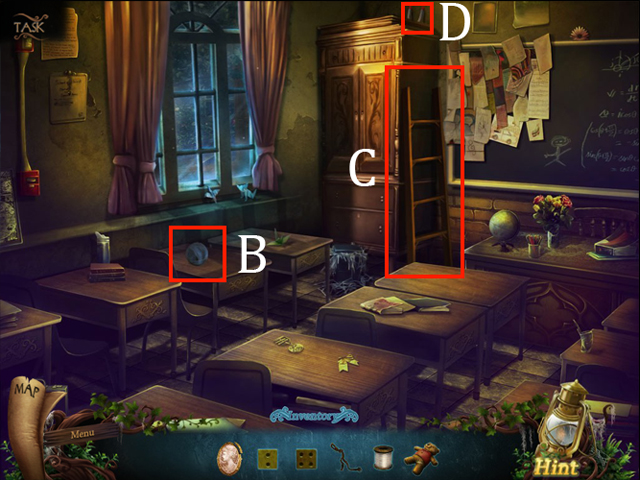
- Pick up the SPOOL OF YARN (B).
- Place the LADDER (C) near the Cupboard to take the MAGNET (D).
- Combine items MAGNET and ROP to create MAGNET WITH ROPE.
- Go back to the Backstage.
- Click at the Wooden Floor (E) to open it.
- Place the MAGNET WITH ROPE in it.
- Go back to the Canteen.
- Take the HOOK (A).
- Go back to Backstage again; place the HOOK on the Opened Wooden Floor (B).
- A NEEDLE and a Swamp Gate PUZZLE PIECE 3/3 will be added to your inventory.
- Combine items YARN and NEEDLE to create YARN WITH NEEDLE.
- Back to the Hall Entrance then walk down once.
Chapter Six: The Grumpy Man
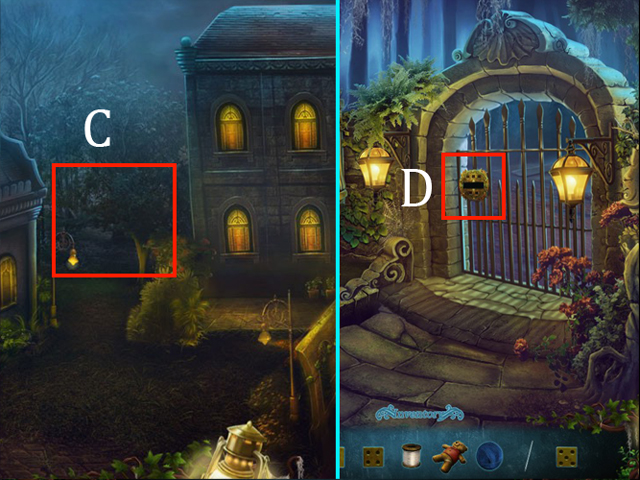
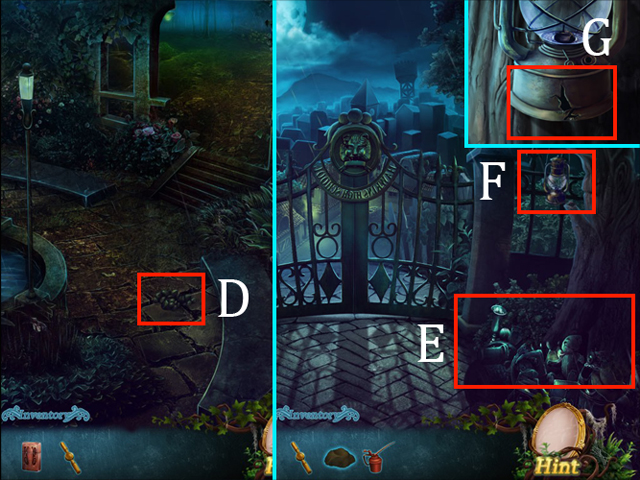
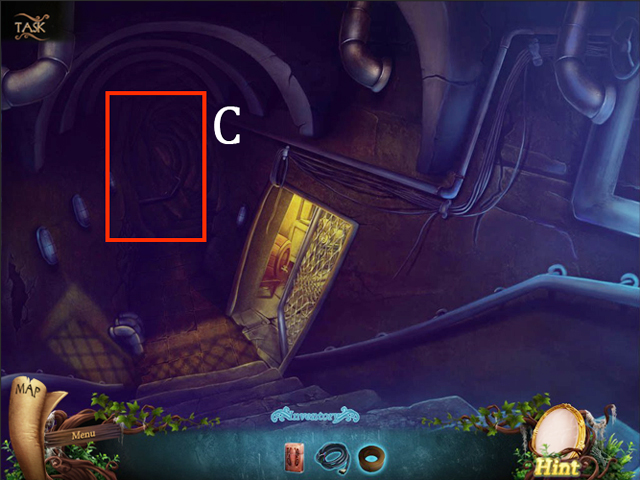
- Go through the Passage (C), towards the Swamp Gate.
- Place the Swamp Gate PUZZLE PIECES on the gate (D).
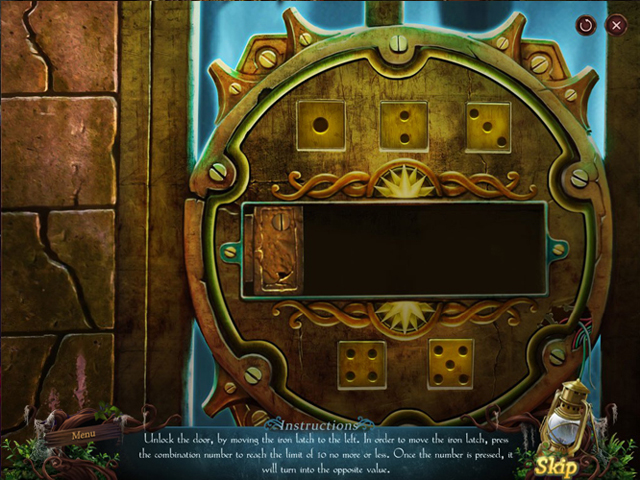
- Unlock the door by pressing the combination number to reach the limit of 10. Each time the number is pressed, it will turn into minus value.
- Please follow this combination for the solution: 5, 1, 5, 1, 2.
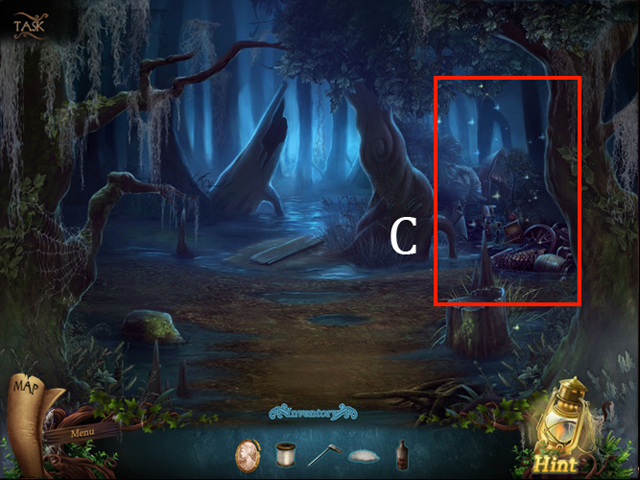
- Proceed ahead to swamp.
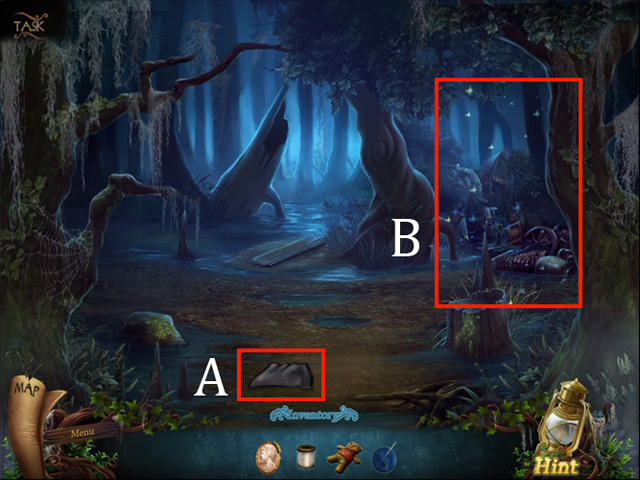
- Grab the HANDKERCHIEF (A).
- Play the HOS on right-side (B).
- A WELDING TOOL will be added to your inventory.
- Go back to School Corridor.
Chapter Seven: The Doll
- Zoom into the Locker (C); Take the RIBBON (D).
- Return to Lunna’s Room.
- BUTTON will be added to your inventory.
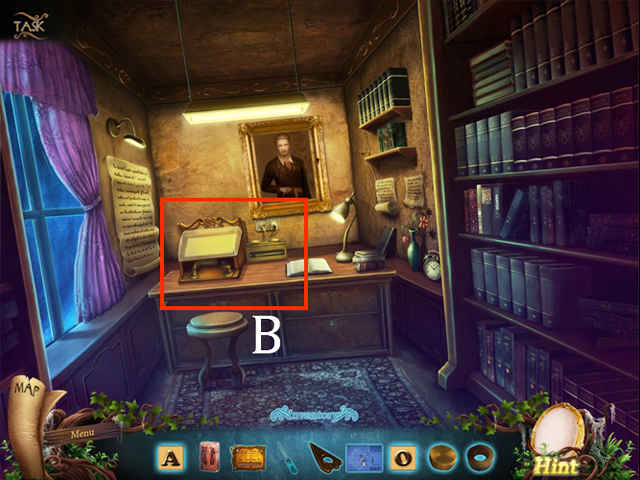
- Examine Table (B); place the Broken Doll on it.
- Put the YARN WITH NEEDLE on the Table (A).
- BUTTON on the Doll (B) to activate a HOPS.
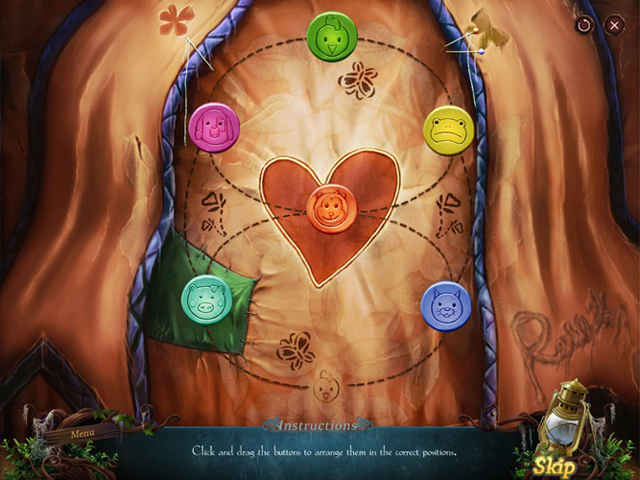
- Click and drag the buttons to arrange them in the correct positions shown.
- Please look at the screenshot for the solution.
- Place the HANDKERCHIEF on the Doll (C) to patch it.
- Finally, RIBBON (D) on it.
- Pick up the DOLL (E), and COTTON (F) on the Table.
- Get back to the Canteen; meet the girl and give her the DOLL.
- Zoom into a Drawer (A); take the RUST REMOVER (B).
- Return to the Swamp.
Chapter Eight: The Initials P.H Lighter
- A BROKEN LIGHTER will be added to your inventory.
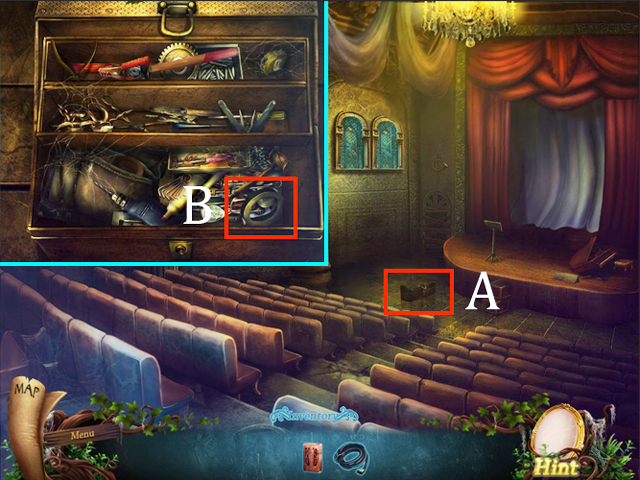
- Go back to the Hall.
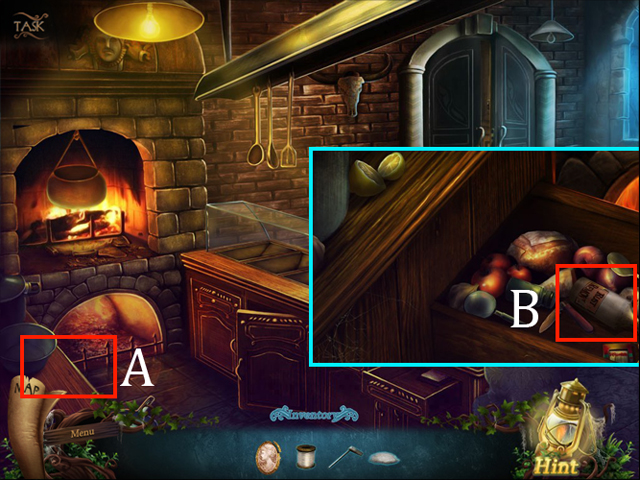
- Examine the Toolbox again and take the LIGHTER FLUID (A).
- Back out of the area; return to Lunna’s room.
- A SPONGE will be added to your inventory.
- Combine items SPONGE and RUST REMOVER to create WET SPONGE.
- Zoom into the Table (C).

- Click on the LIGHTER (D) thrice.
- Insert the COTTON (E); followed by the LIGHTER FLUID (F).
- Last, click one more time on the LIGHTER and use the WET SPONGE (G) on it.
- LIGHTER will be added to your inventory.
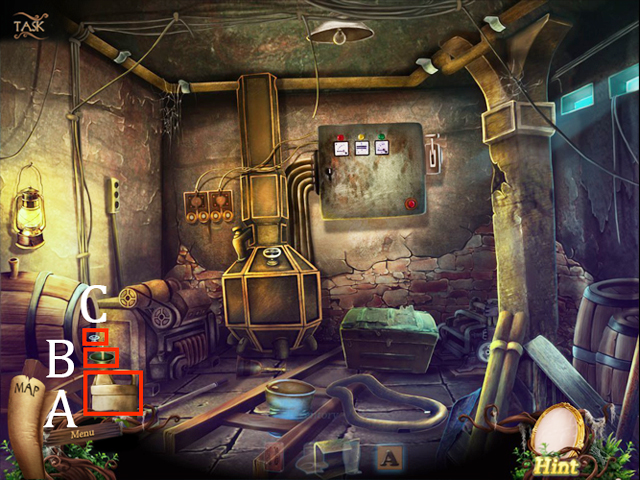
- Return to the Laboratory.
Chapter Nine: The Vintage Brooch
- Examine the Table (A) to start fixing the brooch.
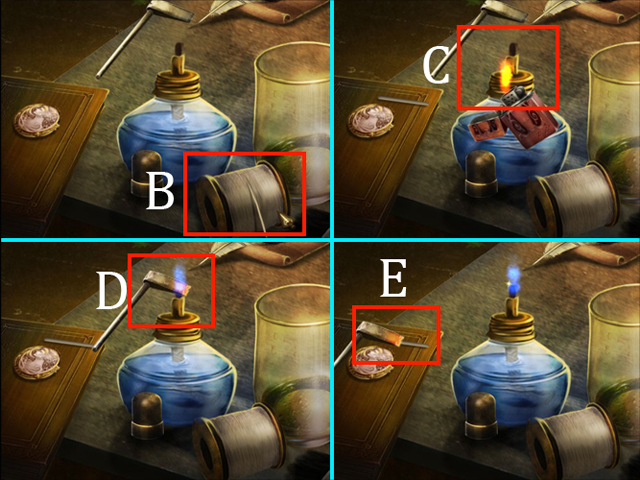
- Click the Spool of Tin (B) on the Table to grab some of it.
- Then use the LIGHTER (C) to light up the Alcohol Burner.
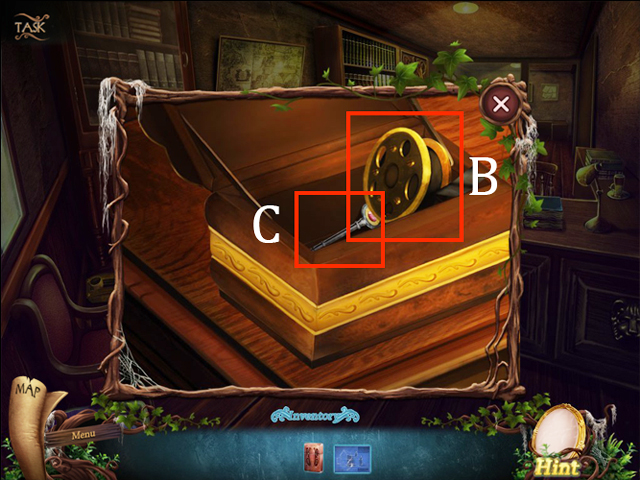
- Pick up the WELDING TOOL and place it right to the Fire (D) until it heats.
- Place the burning WELDING TOOL on the TIN right next to the Broken Brooch (E) to melt it.
- Use the Welding Tool (F) with TIN to attach the Brooch together.
- A BROOCH will be added to your inventory.
- Get back to the Hall and go to the Backstage.
Chapter Ten: ‘Lull’ the Guard
- Select on the Window (A) and you’ll see the guard is patrolling around.
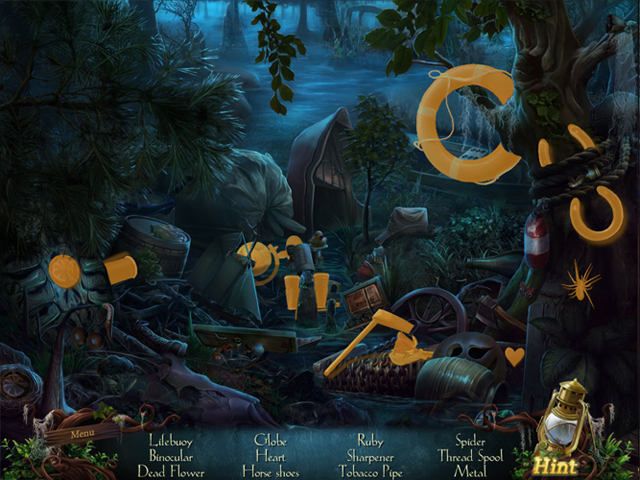
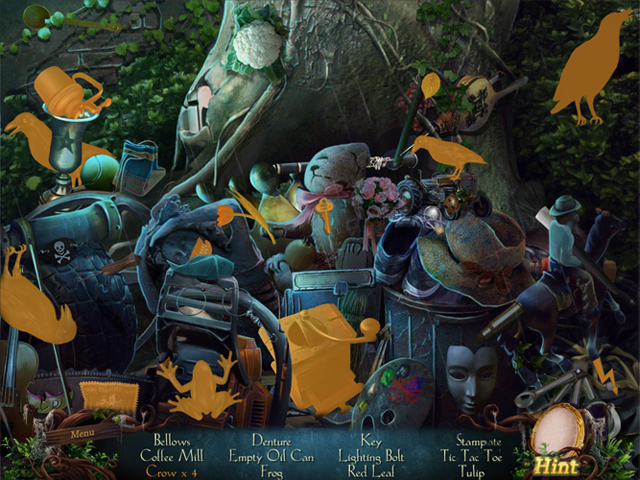
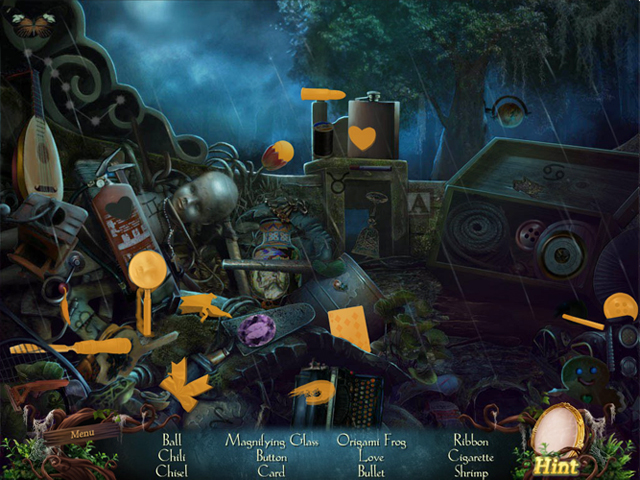
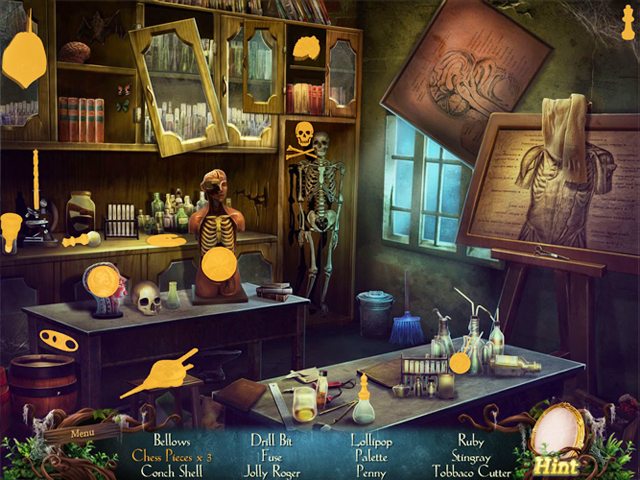
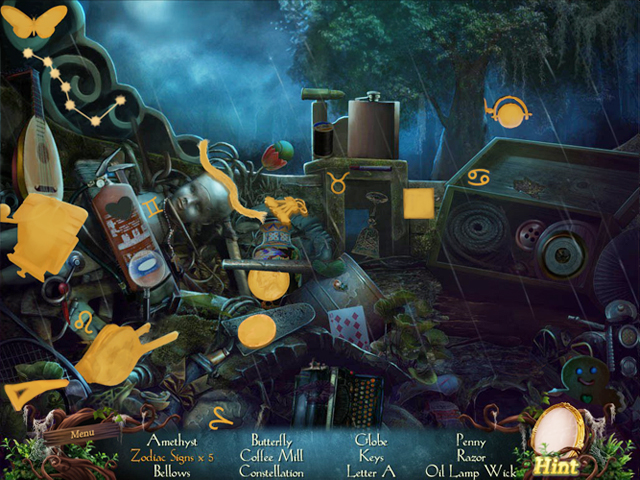
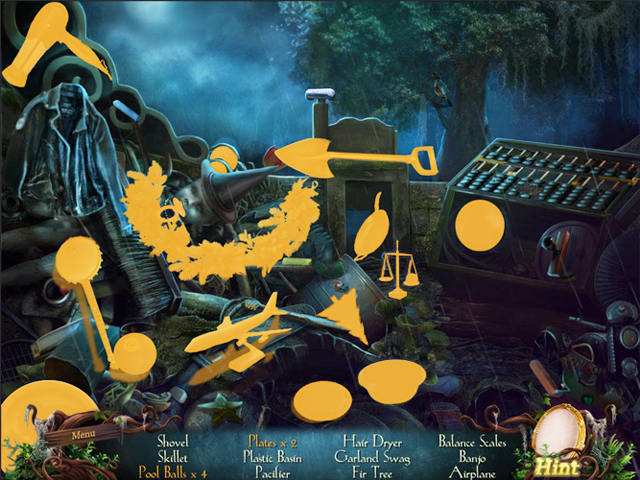
- Find the listed items in HOS (B).
- RAINCOAT will be added to your inventory.
- Back out from the area.
- Enter to Dorothy’s Room (A).
- Examine the Drawer (B); take the SLEEPING LIQUID MEDICINE (C).
- Walk down twice to Dormitory First Floor.
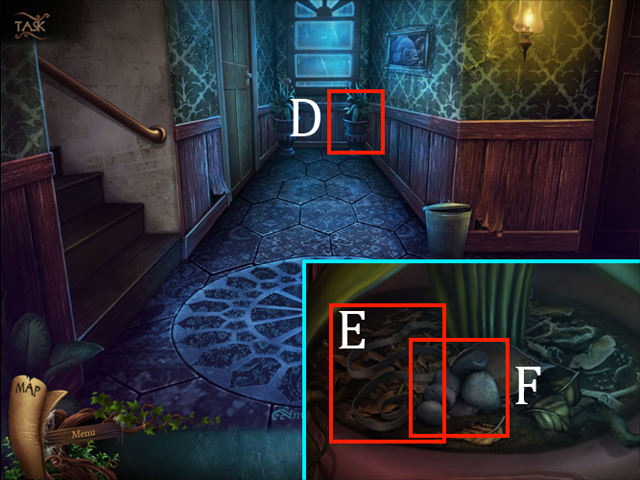
- Look at the Pot (D); take the RUBBER (E) and the STONES (F).
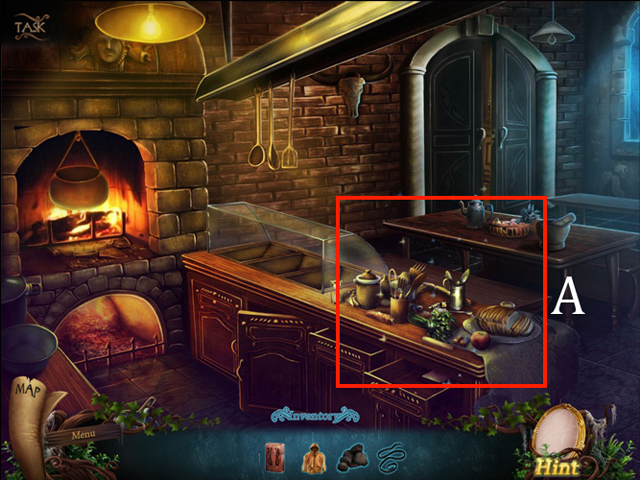
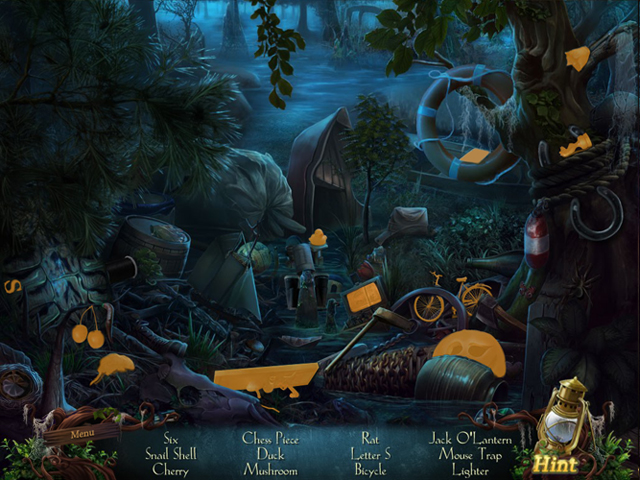
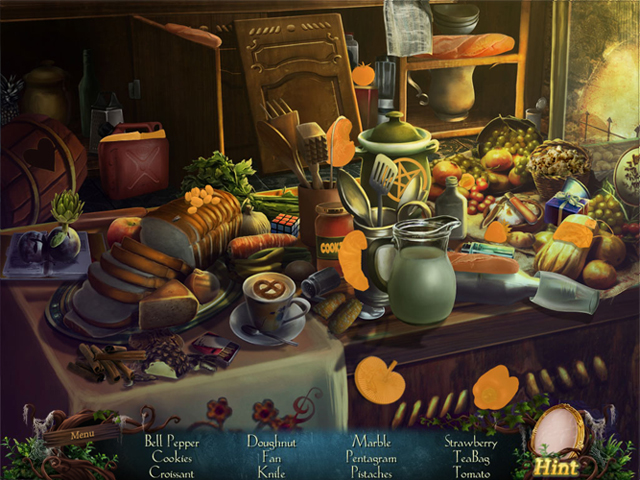
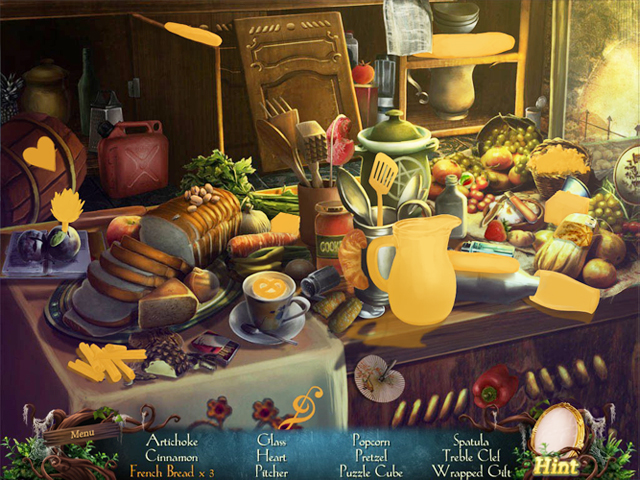
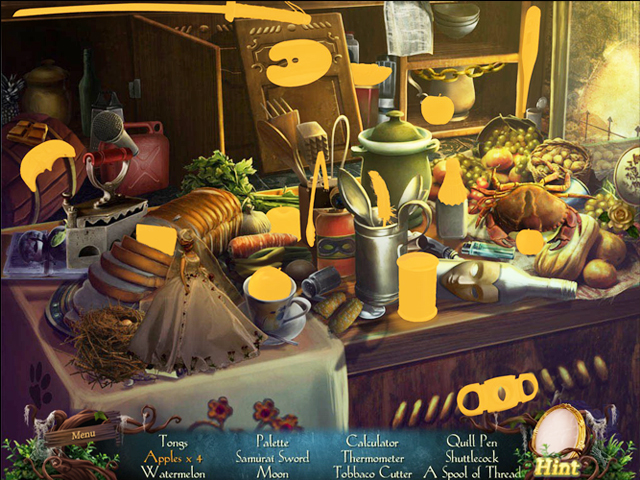
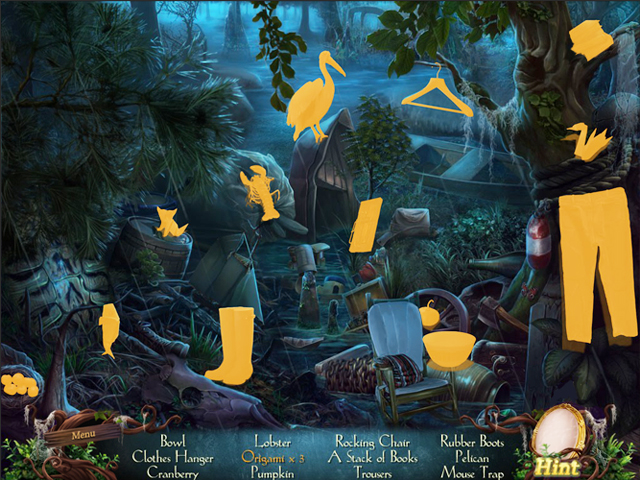
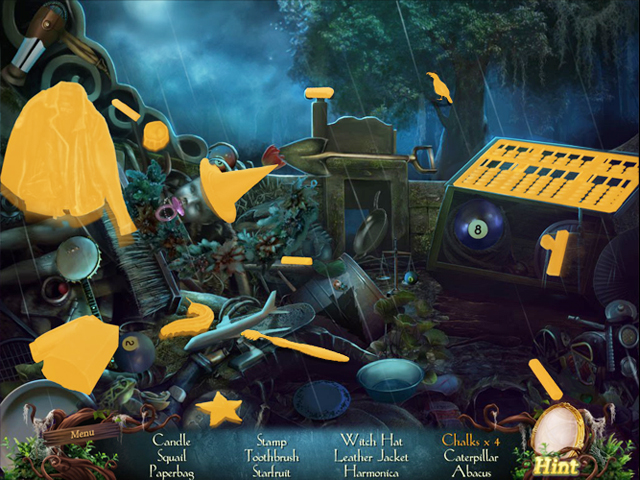
- Head to the Canteen and play the HOS (A).
- Locate the items on the list.
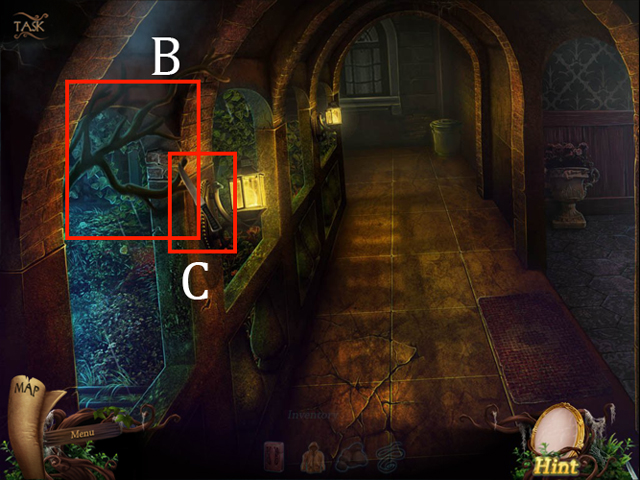
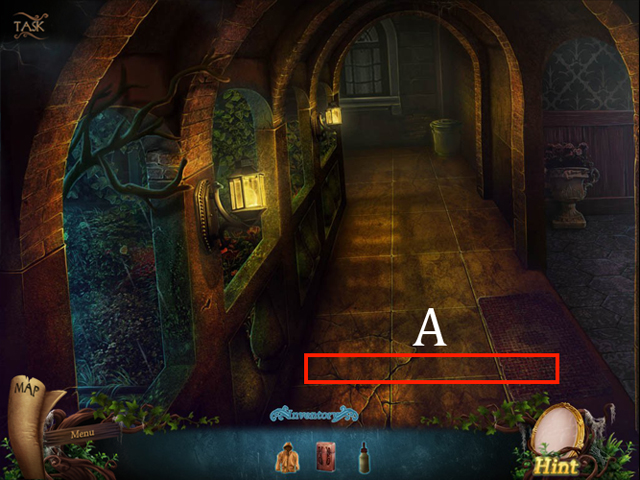
- Back to the Dormitory Corridor ; look at the BRANCH (B).
- Use the KNIFE (C) on it.
- THE BRANCH will be added to your inventory.
- Combine items TREE BRANCH and RUBBER to create SLINGSHOT WITHOUT STONES.
- Then, combine SLINGSHOT WITHOUT STONES with STONES to create THE SLINGSHOT.
- Go back to Lunna’s room; use the SLINGSHOT on the window.
- Go through the Main Entrance, to the Guard’s Post.
- You can use two ways to go to the Main Entrance.
- First way is from Dormitory Corridor (A); the second is from the School Entrance (B).
- Walk down twice.
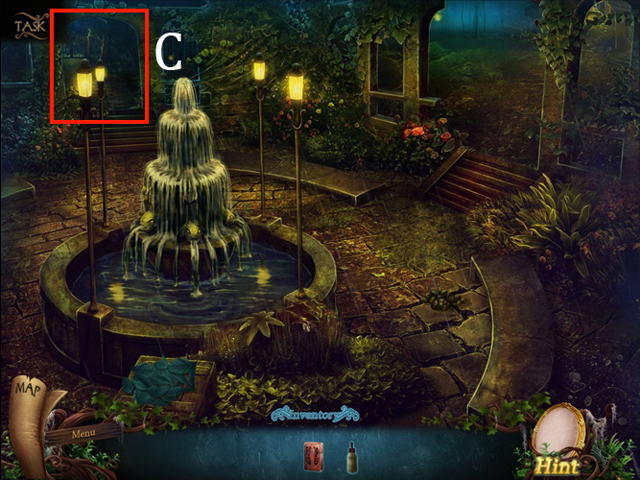
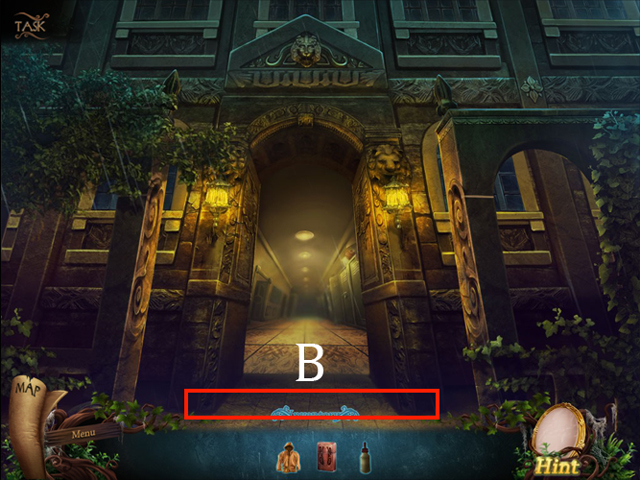
- You will arrive at the Main Entrance; click the Fountain.
- Then head straight to the School Gate (C).
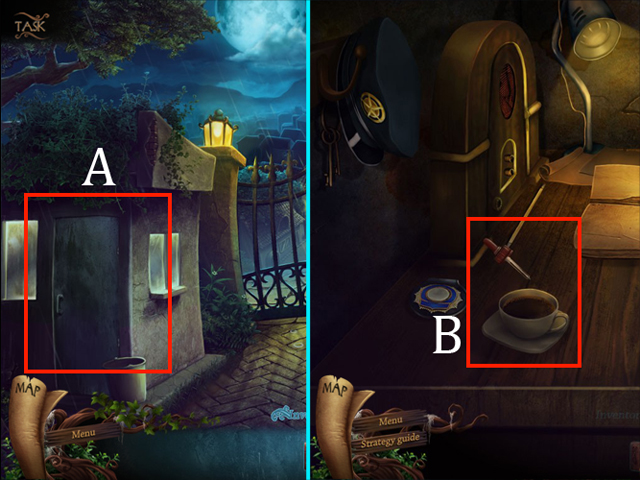
- Enter the Guard Post (A) on the left.
- Put the LIQUID SLEEPING MEDICINE in the Coffee (B).
- Get out from the Guard Post.
- Then head to the School Second Floor.
Chapter Eleven: The File Cabinet/ Naomi Morgan’s File
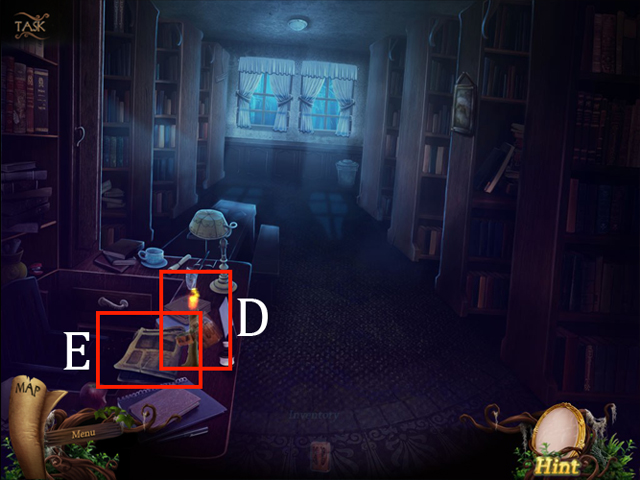
- Use the LIGHTER from your inventory to light the Candle (D).
- Take the NEWSPAPER (E).

- Go downstairs and get into the Classroom; pick up the RULER (A).
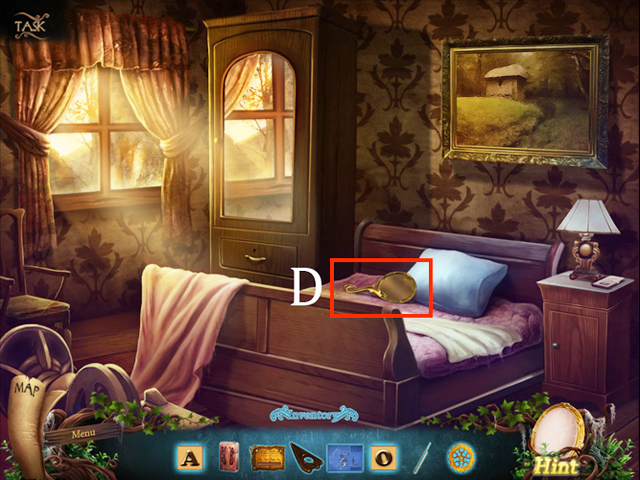
- Return to Lunna’s Room; Zoom under the Bed (B).
- Use the RULER to grab the Key (C).
- BOX KEY will be added to your inventory.
- Examine the Box (D); use the BOX KEY (E) to get the Box open; take the HAIRPIN (F).
- Return to School Second Floor and zoom into Administration Room Door (G).
- Put the NEWSPAPER on the sideline of the Door (H) and use the HAIRPIN (I) through the key hole to drop down the key.
- Pull out the NEWSPAPER; take the ADMINISTRATION ROOM’S KEY (J). Use it to open the Door (K).
- Go through the door; take the TAP (A).
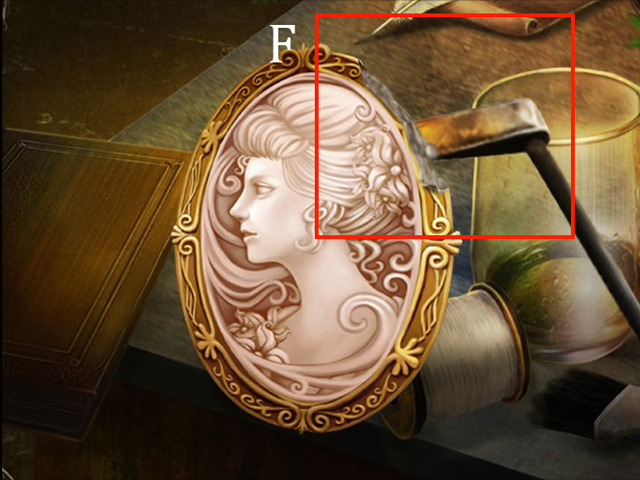
- Zoom into the Desk (B); examine the Photograph (C).
- There is a code on the lower right (X).
- Go back to School Fountain; take the STONE (D) on the ground.
- Go toward to the School Gate; play the HOS (E).
- An EMPTY OILCAN will be added to your inventory.
- Zoom into the Oil Lamp (F); place the EMPTY OIL CAN (G) on it.
- The OILCAN will be added to your inventory.
- Go to the Swamp Gate.
- Drag the TAP to the Pool Dam (A).
- Then zoom into it; use the OILCAN on the Pool Dam (B).
- Click on the Tap (C); play the HOS (D).
- The CHISEL will be added to your inventory.
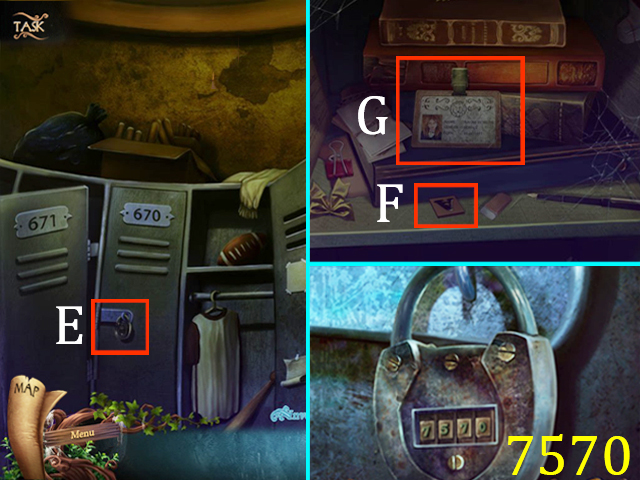
- Head back to the School Corridor; examine the Padlock (E) on Locker #670 to activate the HOPS.
- To unlock the padlock, you need to input the right combination. The first 2 codes are at lower right corner of the Photo you got earlier. The last two codes are locker’s number which you tried to open.
- Please look at the screenshot for the solution.
- Take the LETTER A piece (F).
- Look at the ID Card (G) to see the girl’s name.
- Go back to Administration Room; zoom into Cabinets (A).
- Combine the CHISEL and STONE to create CHISEL WITH STONE.
- Use CHISEL WITH STONE on the Cabinet (B); select the file once.
- Walk down.
- MACHINE ROOM KEY will be added to your inventory.
- Go into the Lunna’s Room and play the HOS.
Chapter Twelve: The Machine Room
- The BATTERY will be added to your inventory.
- Zoom under the Bed again; take the EMPTY FLASHLIGHT (A).
- Combine items BATTERY and EMPTY FLASHLIGHT to create FLASHLIGHT.
- Go to the Laboratory and play the HOS.
- The FUSE will be added to your inventory.
- Return to the Fountain.
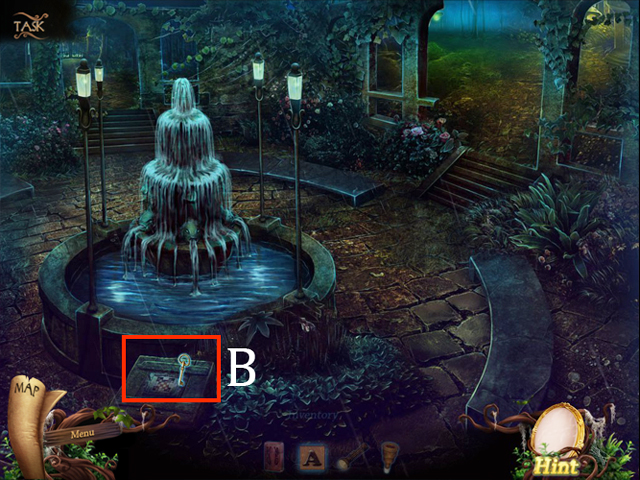
- Use the MACHINE ROOM KEY on the Cellar Door (B) to activate a HOPS.

- Drag the chessboard pieces onto the board so that all the pieces fit without overlapping.
- Please look at the screenshot for the solution.
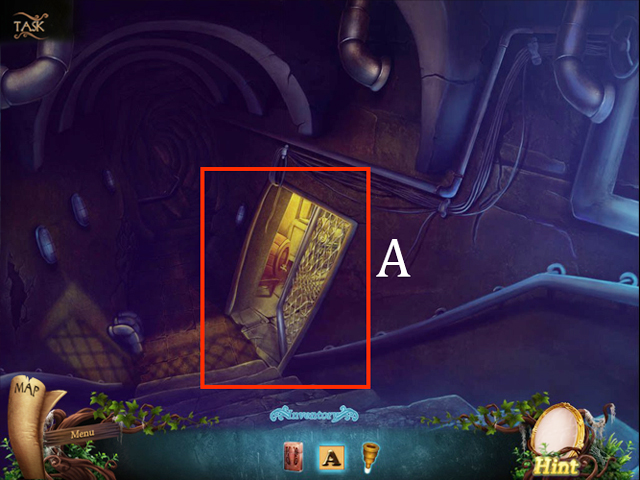
- Go through the Right Door (A) into Machine Room.
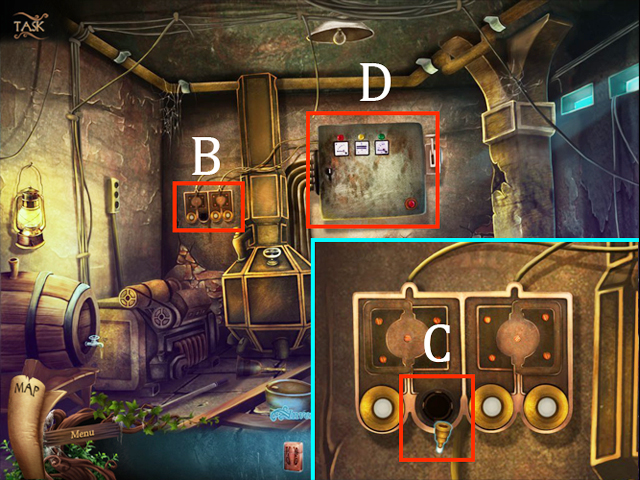
- Zoom into the Fuse Box (B); place the FUSE (C) to activate the Panel Box HOPS (D).
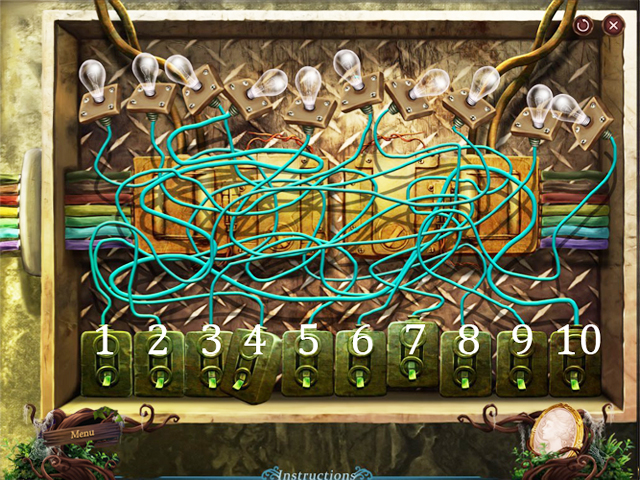
- Click on the lights in the correct order by tracing the bulb on top with the matching switch at the bottom. Bulbs must be lit from left to right.
- Please look at the screenshot and use the following pattern for the solution:8, 5, 4, 10, 7, 2, 6, 1, 3, 9.
Chapter Thirteen: The Shed
- Go to the Swamp and play the HOS.
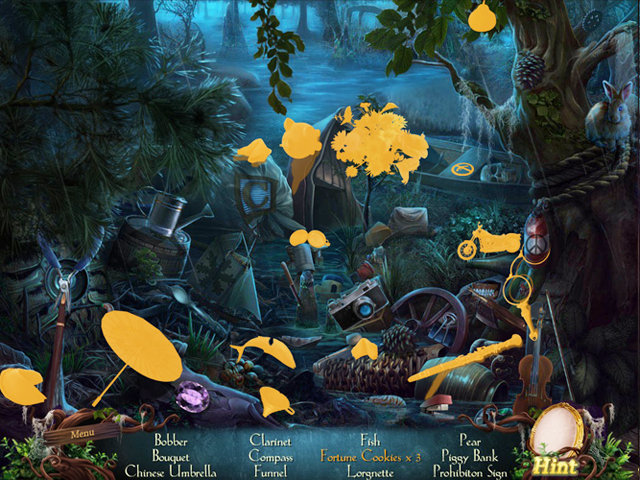
- The FUNNEL will be added to your inventory.
- Play the HOS once again.
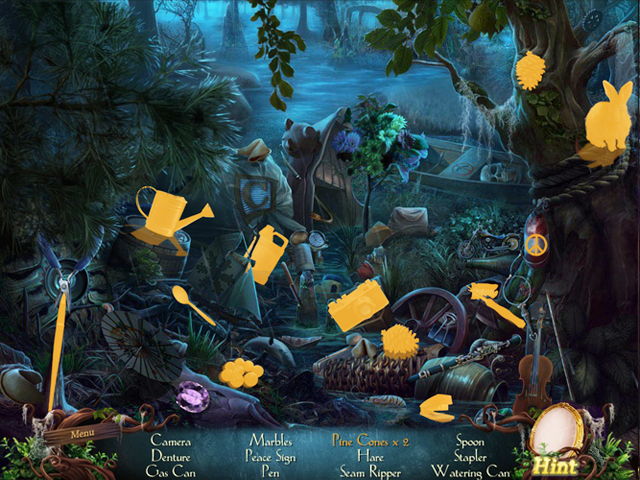
- The EMPTY GAS CAN will be added to your inventory.
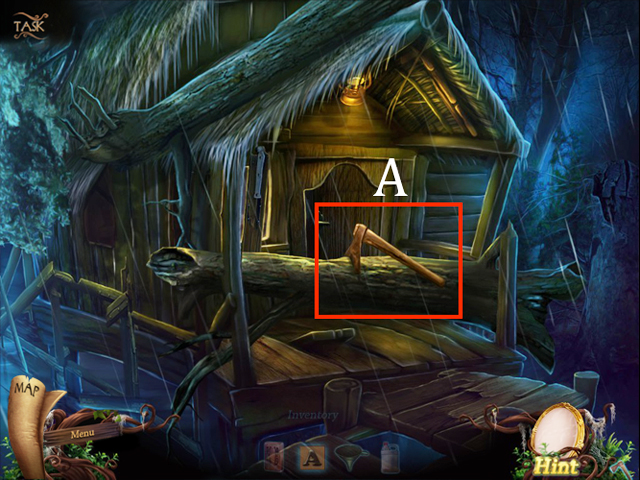
- Take the left turn and go forward until you reach the Shed.
- A Log (A) is blocking the entrance.
- Go back to School Gate and play the HOS.
- AXE will be added to your inventory.
- Return to the Shed.
- Cut the fallen log with the axe.
- Go back to Dorothy’s Room.
- Go forward to door (B) on the right side.

- Examine the Closet; take the PAINKILLER (A) and the ROLLER BANDAGE (B).
- Get out from Dorothy’s Room and go into Lunna’s Room.
- Zoom into the Desk (C); pick up the Flask (D).
- Head back to the Canteen and play the HOS.
- EMPTY GLASS will be added to your inventory.
- Combine the EMPTY GLASS and FLASK to create a GLASS of WATER.
- Combine the GLASS OF WATER with PAINKILLER to create A GLASS OF WATER WITH PAINKILLERS.
- Go back to the Machine Room.
- Put the EMPTY GAS CAN below the Oil Drum (A) and FUNNEL on top of them (B).
- Turn the Tap (C) to fill the EMPTY GAS CAN with oil.
- GAS CAN will be added to your inventory.
- Go to the Swamp Gate and play the HOS.
- The OIL LAMP WICK will be added to your inventory.
- Return to the Shed.
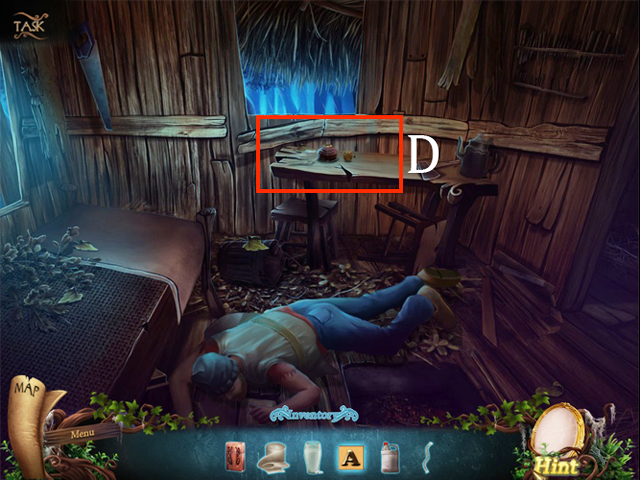
- Zoom into the Table to light his Kerosene Lamp (D).
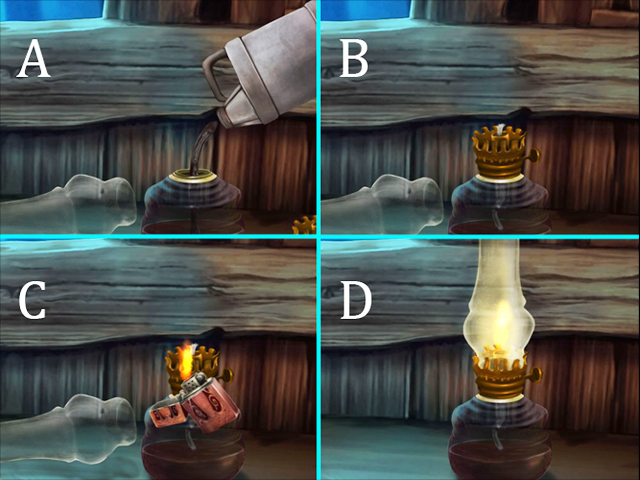
- Pour OIL into the glass shade until it fills (A).
- Then put the OIL LAMP WICK to the burners; place them onto glass shade (B).
- Use the LIGHTER to light a fire (C).
- Finally, close it with the chimney glass (D).
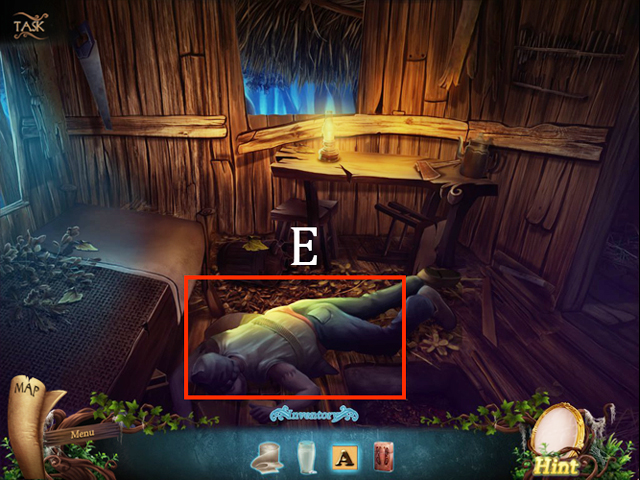
- Use ROLLER BANDAGE on the man on the floor (E), and followed by A GLASS OF WATER WITH PAINKILLERS.
- Go to School Gate and play the HOS.

- The BROOM will be added to your inventory.
- Return to the Shed.
Chapter Fourteen: The Eagle Crest
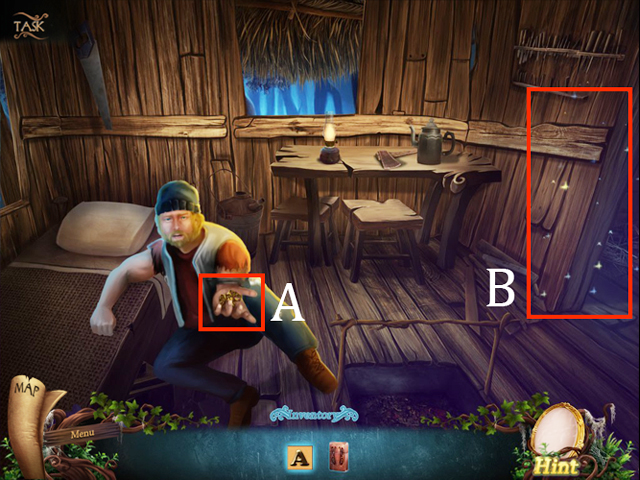
- Take the EAGLE CREST (A) from him.
- Play the HOS (B).
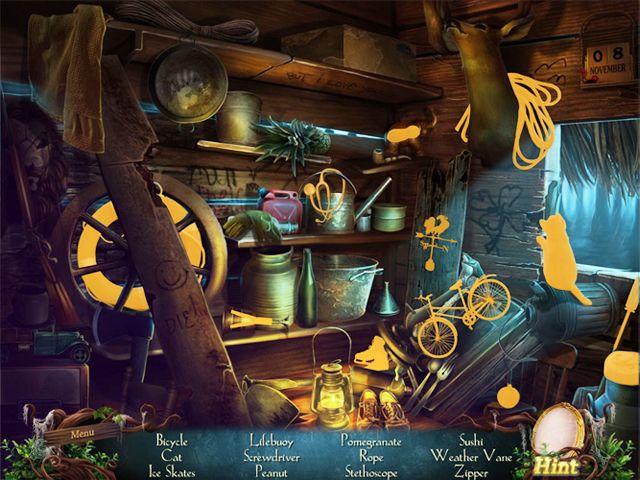
- The SCREWDRIVER will be added to your inventory.
- Walk down to the swamp, and play the HOS.
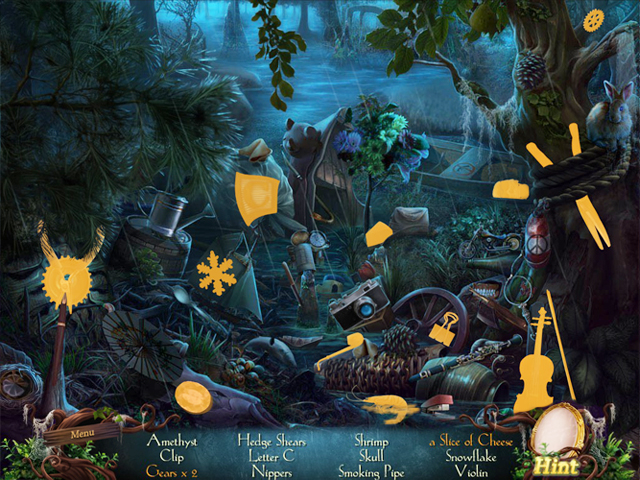
- The HEDGE SHEARS will be added to your inventory.
- Go to the Swamp Gate and play the HOS.
- The SPIRITBOARD will be added to your inventory.
- Walk down once and turn left to the Hall.
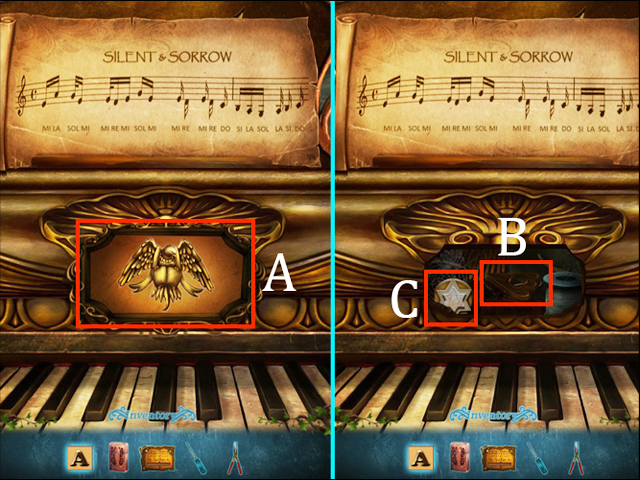
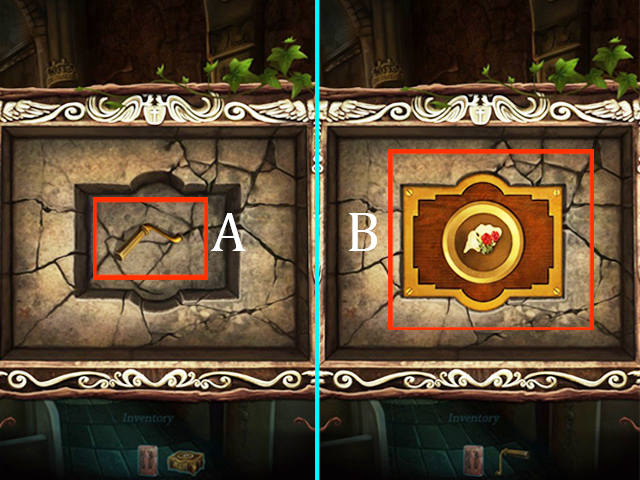
- Examine the Piano on the Backstage; place the EAGLE CREST on the Carved Board (A).
- Take the PLANCHETTE (B) and the STATUE PIECE (C).
- Go back to the Hall Entrance.
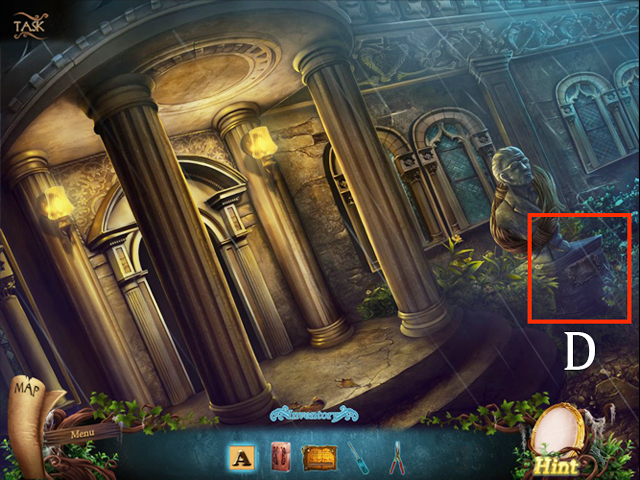
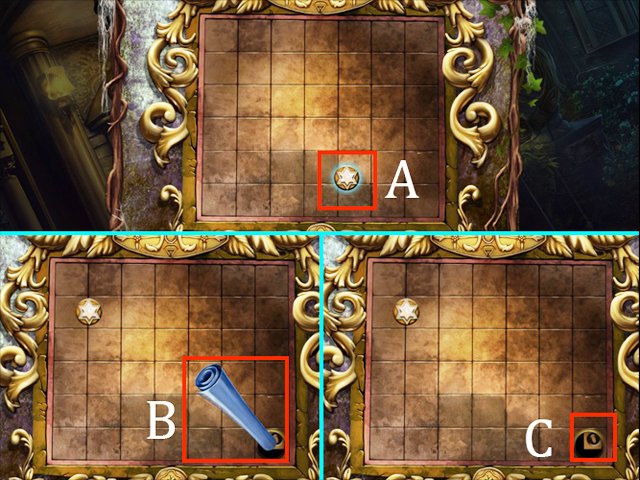
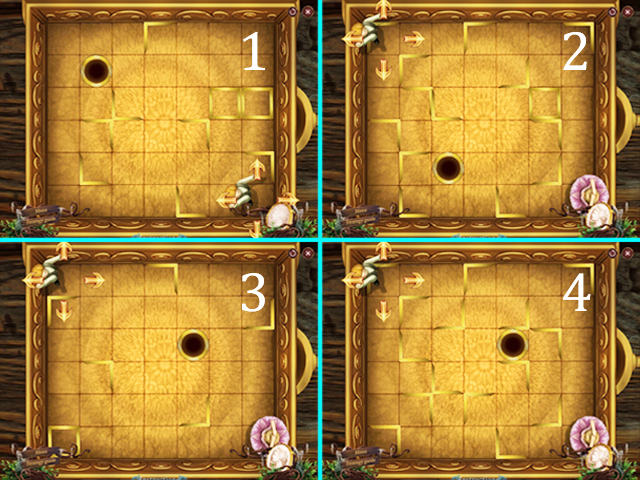
- Place the PUZZLE STATUE PIECE (A) on the board to activate the HOPS.
- Your goal is to move the Blue piece into the hole. Avoid the moving obstacle or the Blue piece will return to the first place.
- Please follow these instructions for the solution:
1. up left, up left, up right, up left, up right, down left, up left, down left, left, up left.
2. down right, down right, right.
3. down right, down right, down right, right, down, down right, right.
- Take the BLUEPRINT (B) and the LETTER O Piece (C).
Chapter Fifteen: The Burnt Orphanage
- Go to the Fountain, and zoom into the Bushes (D).
- Use the HEDGE SHEARS 4 times to cut the Bushes (E) completely.
- Take the KNOB (F).
- Return to the Canteen.
- Zoom into the Drawer (G); take the DUCT TAPE (H).
- Go back to the Library.

- Go forward to the last path of the Library (A).
- Examine the Microfilm Machine (B).
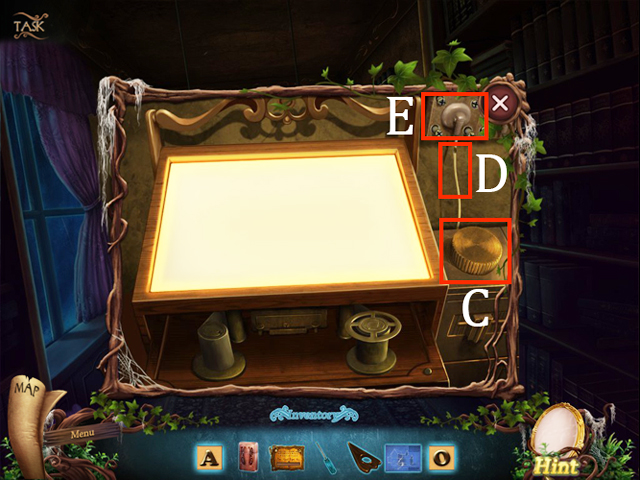
- Place the KNOB (C).
- Use DUCT TAPE (D) to seal it, and then use the SCREWDRIVER (E).
- Return to the Fountain.
- Zoom into the Drawer (A) in the Children’s Room; click four times to move stuff away.
- Take the LOCKPICK (B).
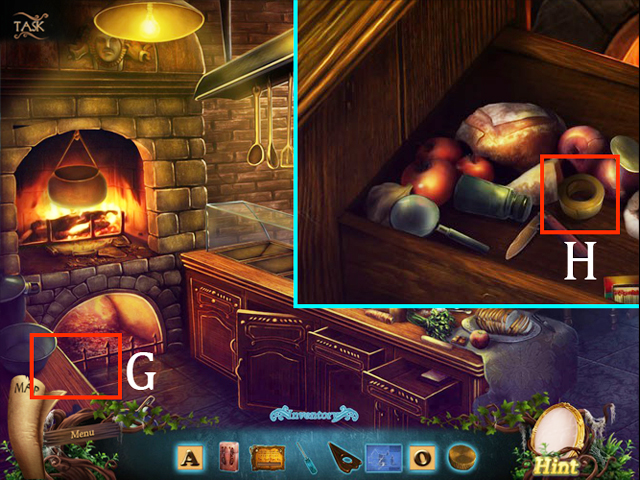
- Get out from the room, take the right turn to go downstairs. Then turn right near the stairs to enter the Kitchen.
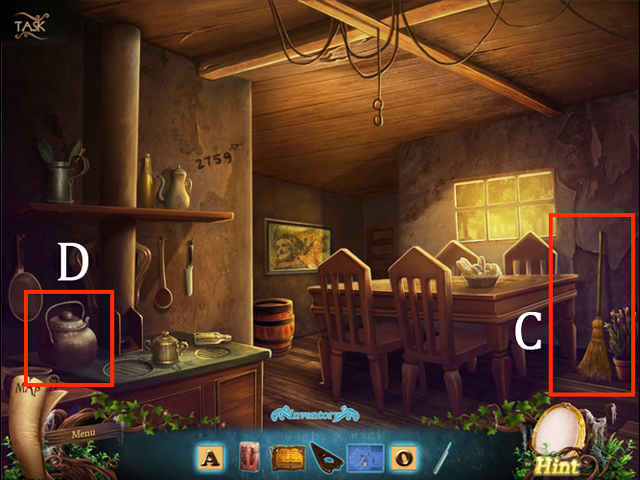
- Take the BROOM (C) and the KETTLE (D).
- Walk down.
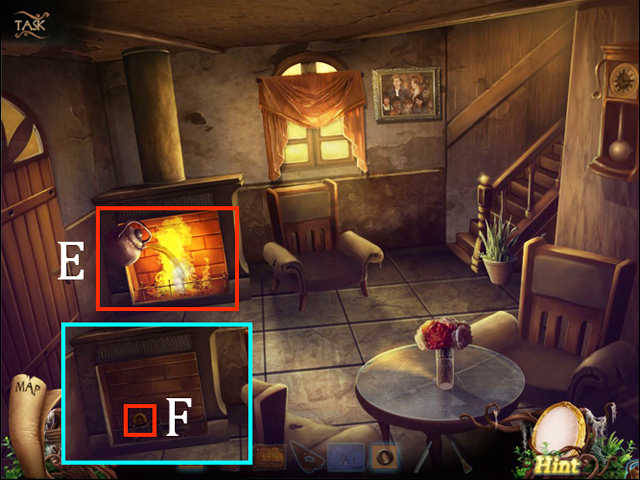
- Use the KETTLE on the Burning Fireplace (E) to put out the flame.
- Take the GEAR (F).
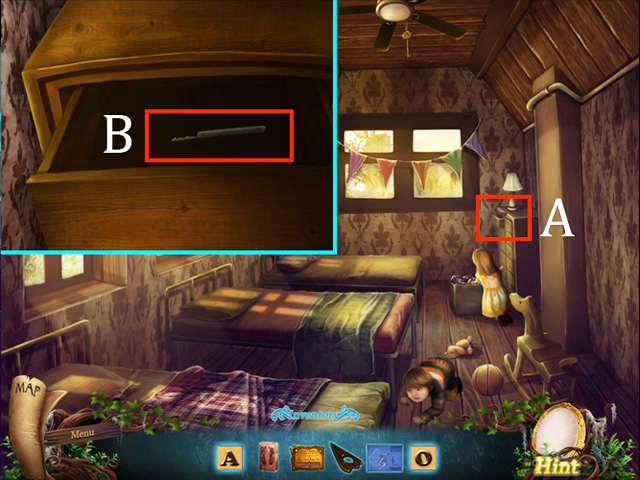
- Go back upstairs; enter the Children’s Room from the right door.
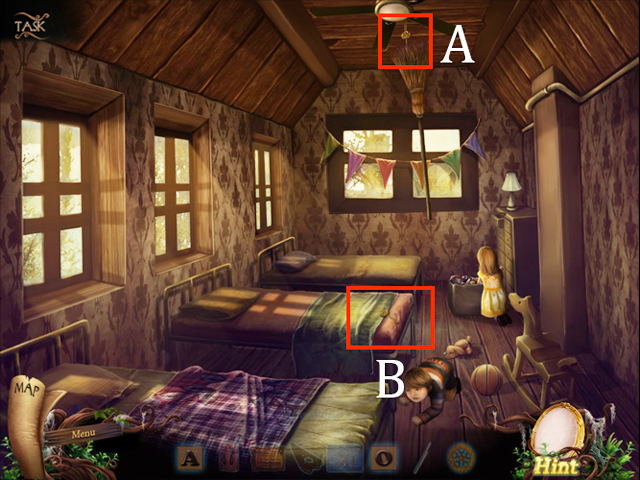
- Use BROOM on the Ceiling Fan (A) to take the hanging key.
- Pick up the KEY that fell on the Bed (B).
- Walk down.
- Use the KEY to open the Door (C) next to Children’s room.
- Take the HAND MIRROR (D).
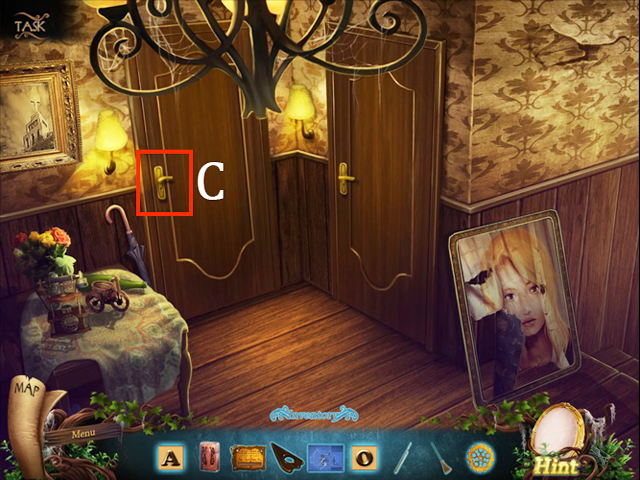
- Go forward twice.
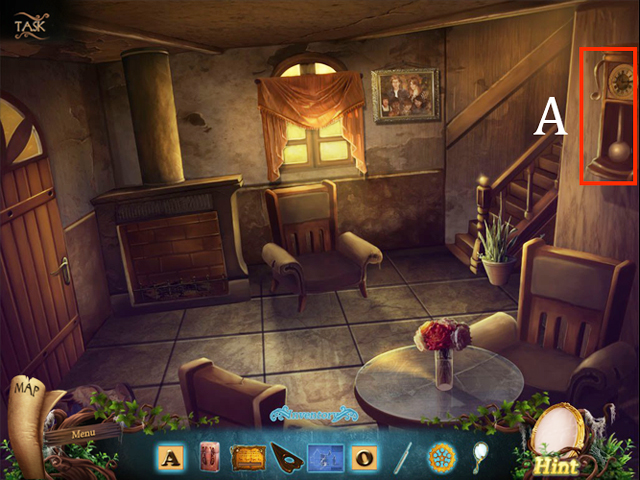
- Use the HAND MIRROR on the Wall Clock (A) to see what was reflected on the mirror.
- Click on the Wall Clock to activate the HOPS.
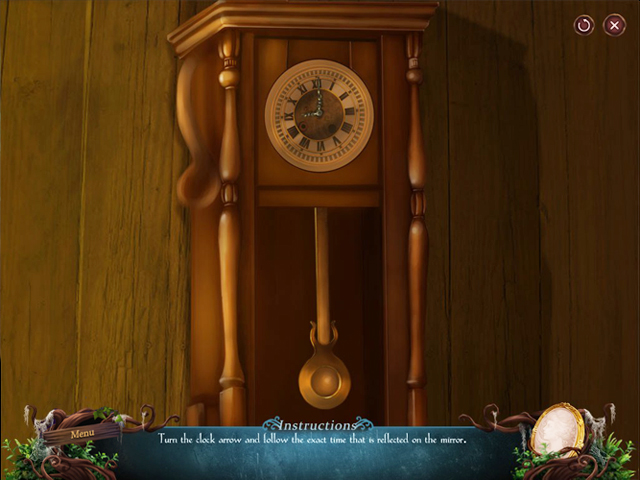
- Your goal is turn the clock arrow as reflected on the hand mirror.
- Please look at the screenshot for the solution.
- PROJECTOR PUZZLE PIECE will be added to your inventory.
- Return to the Children’s Bedroom.
- Zoom into Projector (B) and use LOCKPICK to open the Padlock (C).
- Place the GEAR (D) to start the HOPS.
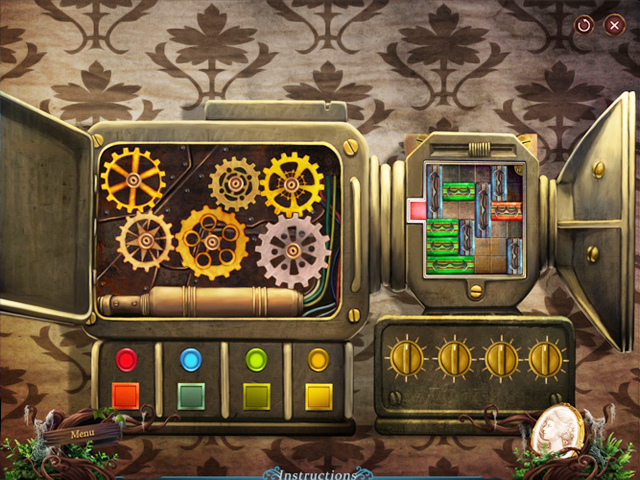
- Your goal is to place the gears on the pegs to attach all of the gears.
- The solution is shown in the screenshot.
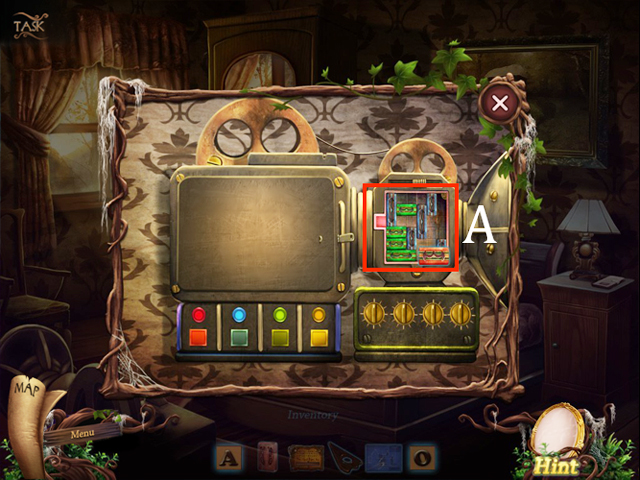
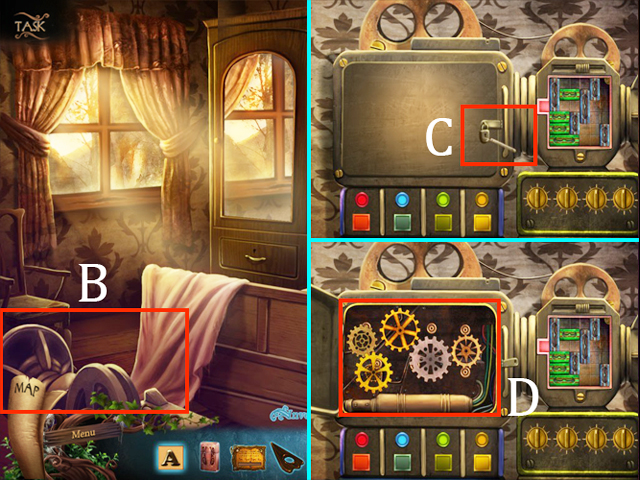
- After that, place the PROJECTOR PUZZLE PIECE (A).
- Your goal is slide the pieces out of the way so you can remove the red pieces from others. You can only move the pieces with the direction of arrows above them.
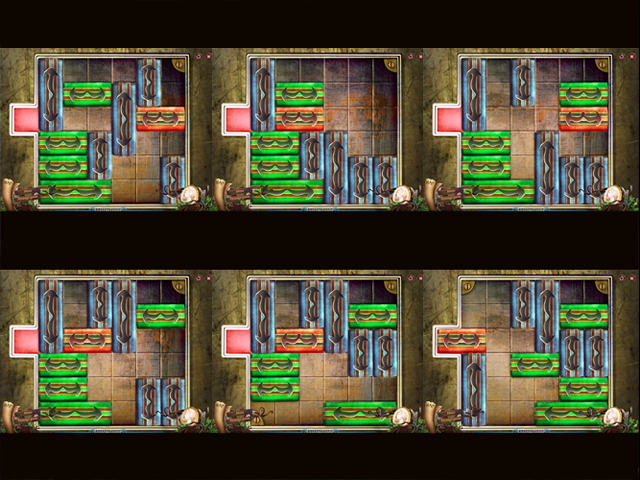
- Please look at the screenshot for the solution.
- Turn to the next HOPS (B).
- It’s a memory puzzle; your goal is to memorize the lights and repeat them.
- Follow these combinations for the solution: 2, 1, 4, 3.
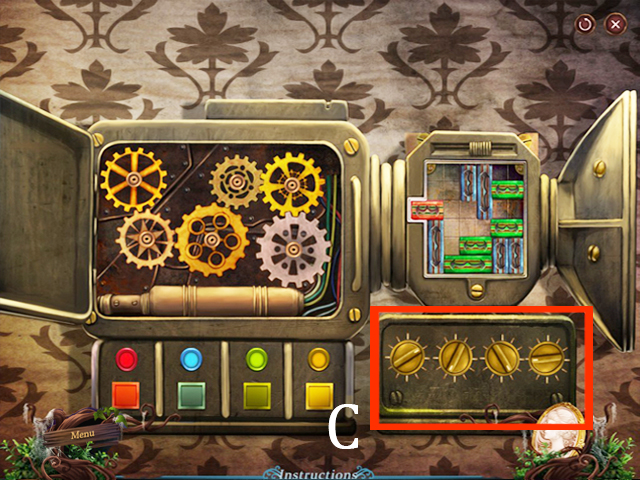
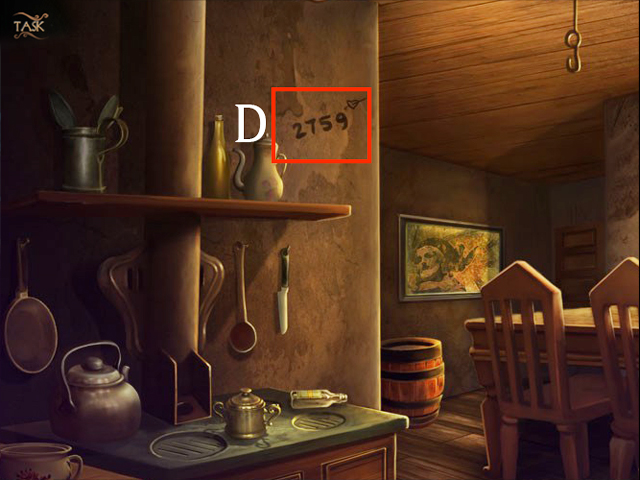
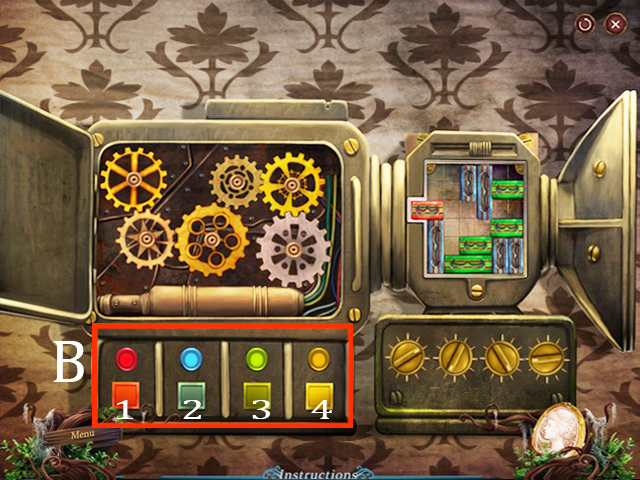
- The last HOPS in the projector (C) is to enter the right combination of the knobs, which were shown on the Wall (D) in the Kitchen.
- Enter the right combination of Knobs (B): 2, 7, 5, 9.
- Click the projector to continue.
Chapter Sixteen: The Blueprints
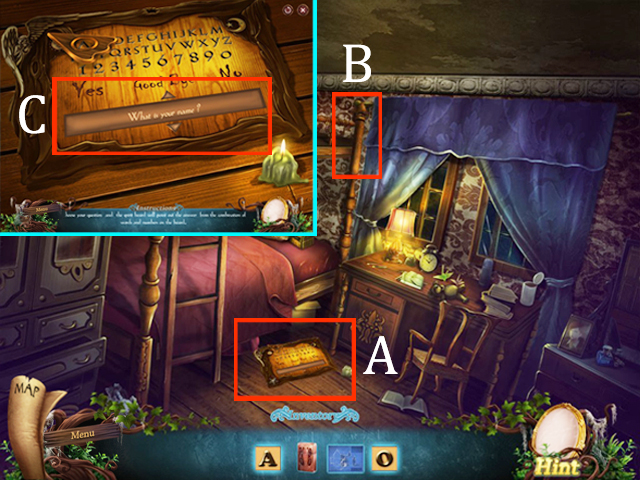
- Examine the Board (A) to play spirit board mini game.
- Choose the Questions (C) and the spirit board will point out the answer by using the planchette.
- LETTER N PIECE will be added to your inventory.
- Play the HOS in the room.
- KNOT OF FABRICS will be added to your inventory.
- Place the KNOT OF FABRICS (B) near the window to tie it up.
- Get out through the window, and go to the Administration Room.
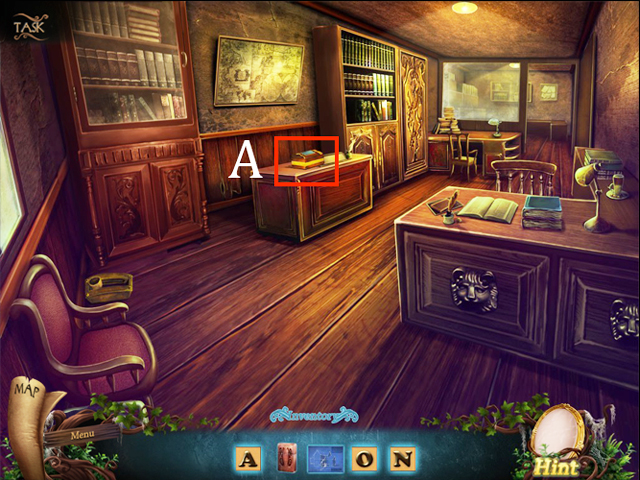
- Examine the box on the Table (A) to activate a HOPS.
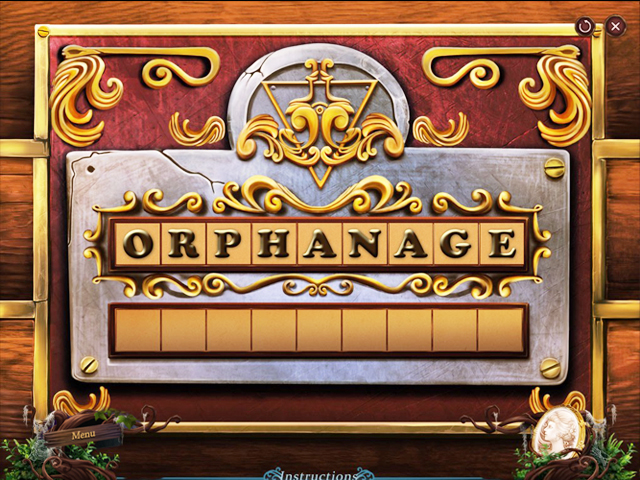
- Arrange the letters so that they spell ‘ORPHANAGE’ to solve the puzzle and open the box.
- Take the MICROFILM REEL (B) and the PAINTING’S KEY (C).
- Go to the Library.
- Return to the last path of the Library.
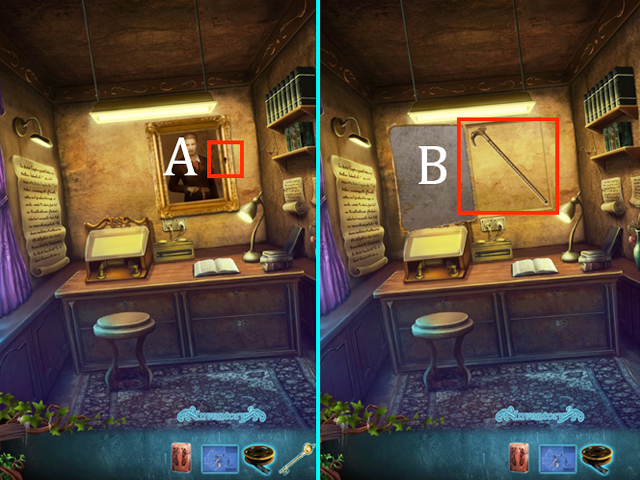
- Use the PAINTING’S KEY on the key hole of the Painting (A).
- Take the CANE (B).
- Next, zoom into the Microfilm Machine.
- Place the MICROFILM REEL on the Empty Reel (C).
- Click on the glass plate to view the next document.
- Go back to the Administration Room.
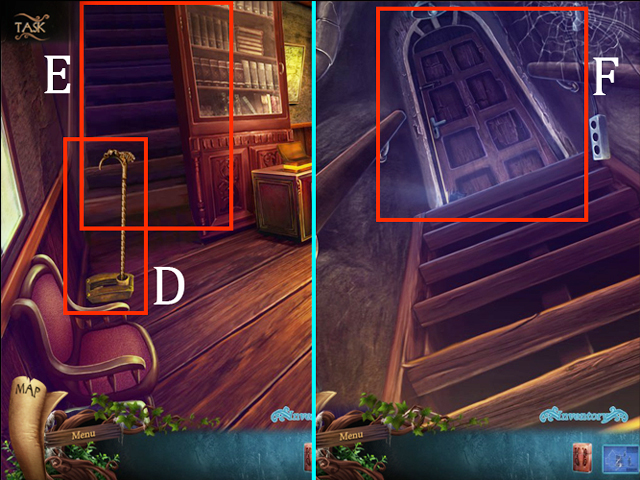
- Place the CANE (D) to open a secret door.
- Go through the Secret Entrance (E), and proceed to the Stairs (F) that leads to the Headmaster’s Room.
- Zoom into the Desk (A) then click 4 times to move the stuff away.
- Take the PLUGLESS CABLE (B).
- Go to the Laboratory to play the HOS.
- The PLUGGER will be added to your inventory.
- Combine items PLUGLESS CABLE with PLUGGER to create The CABLE.
- Go to the Canteen and play the HOS.
- The TONGS will be added to your inventory.
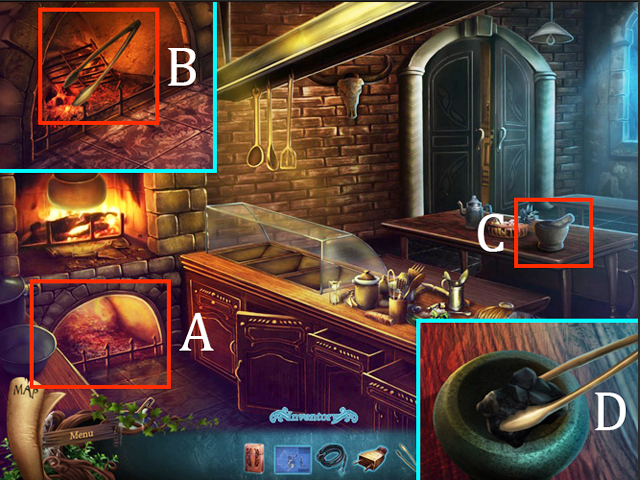
- Zoom into the Fireplace (A).
- Use the TONGS to pick up the Charcoal (B).
- Zoom into the Mortal and Pestle (C). Place the CHARCOAL on it to grind it into Powder (D).
- CHARCOAL POWDER will be added to your inventory.
- Go to the School Gate and play the HOS.
- BRUSH will be added to your inventory.
- Return to the Headmaster’s Room.
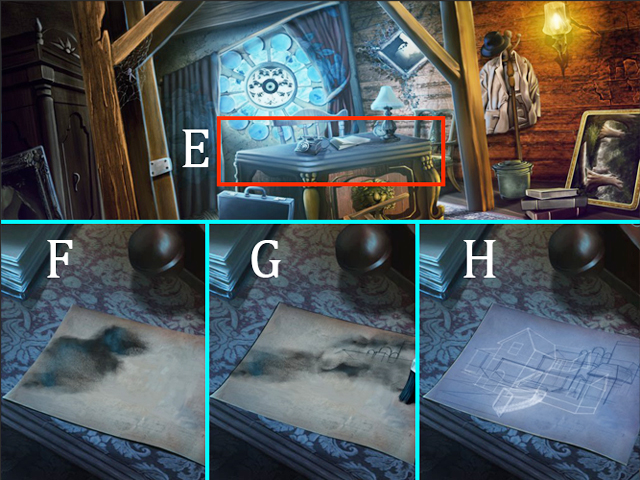
- Zoom into the Desk (E); place the CHARCOAL POWDER (F) on the paper.
- Then use the BRUSH (G) to see imprints on the paper.
- Put the BLUEPRINT (H) on the paper.
- Go to the Hall.
Chapter Seventeen: The Tunnel
- Zoom into the Toolbox (A) and take the DUCT TAPE (B).
- Go to the Machine Room.
- Examine the Broken Wire (D).
- Place the CABLE and then the DUCT TAPE (D) on the wire to fix it.
- Walk down once, turn right to the Machine Room.
- Take the Cable (A) on the floor.
- Walk down twice, take the right-side after you reach School Fountain, and then go forward to the Swamp Gate.
- SHOVEL will be added to your inventory.
- Go to the Swamp and play a HOS.
- MOUSE TRAP will be added to your inventory.
- Go into the Shed; play the HOS.

- PICKAXE HANDLE will be added to your inventory.
- Walk backward seven times.
- Zoom into the Ground (A); use SHOVEL to dig and you’ll find Pickaxe Head (B) in it.
- Place the PICKAXE HANDLE on the Pickaxe Head (B).
- PICKAXE will be added to your inventory.
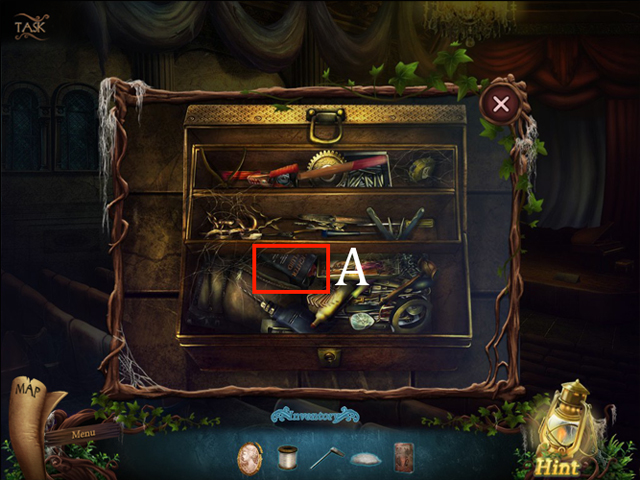
- Return to the Laboratory and play the HOS.
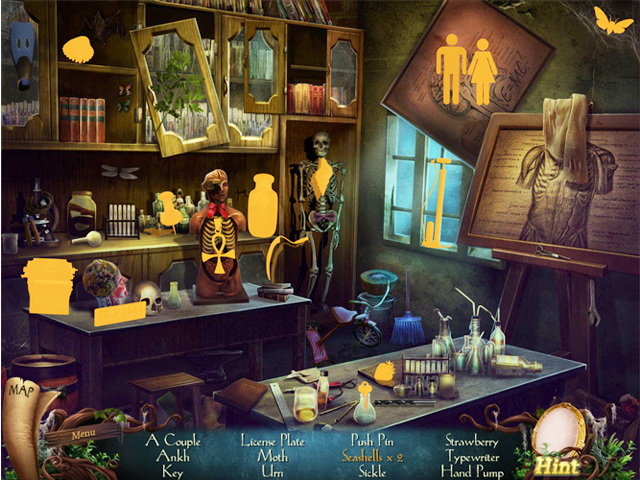
- HANDPUMP will be added to your inventory.
- Proceed ahead to the Canteen and play the HOS.
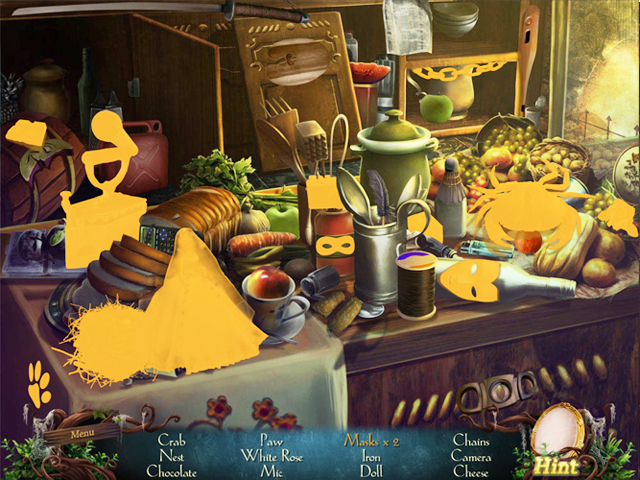
- CHEESE will be added to your inventory.
- Combine MOUSE TRAP with the CHEESE to create MOUSETRAP WITH CHEESE.
- Next, go to the School Gate to play the HOS.
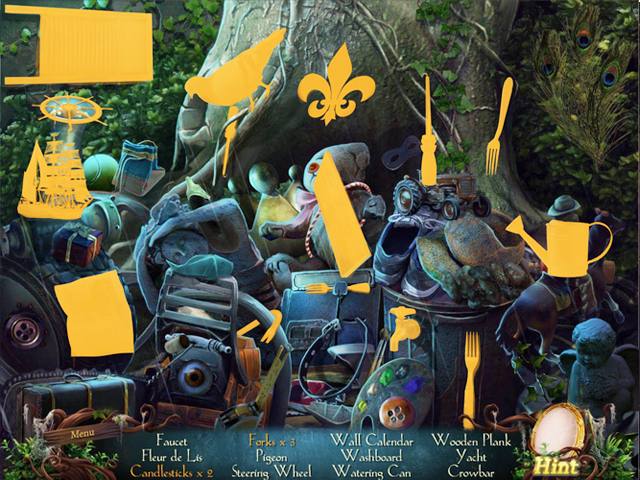
- CROWBAR will be added to your inventory.
- Return to the tunnel from the Fountain.
- Go deep forward; stones are blocking your way.
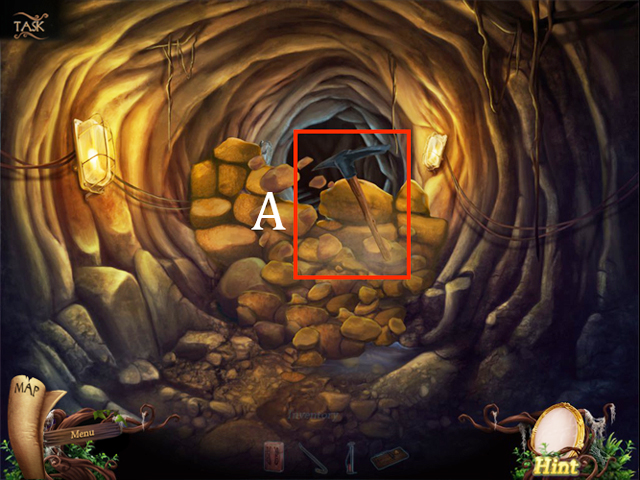
- Use the PICKAXE on the Stones (A) to knock them down.

- At the Left Tunnel (A), use the CROWBAR to open the Locked Door (B).
- Place the MOUSETRAP WITH CHEESE (C).
- The MOUSE will be added to your inventory.
- Place the MOUSE (E) to distract the Snake (D).
- Use the HANDPUMP (G) to repair the Ball (F).
- The BALL will be added to your inventory.
- Go to the right path; The MUSIC BOX will be added to your inventory.
- Return to the Swamp Gate and play the HOS.
Chapter Eighteen: The Finale
- A CANDLE will be added to your inventory.
- Return to the Fountain. Follow the girl’s directions to get through the Swamps:
right, right, right, left, right, left.
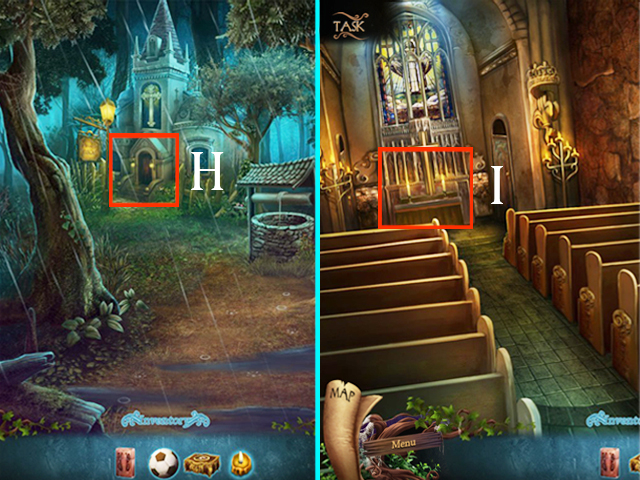
- Proceed ahead to the Church (H) and place the CANDLE on the Altar (I) to activate the HOPS.
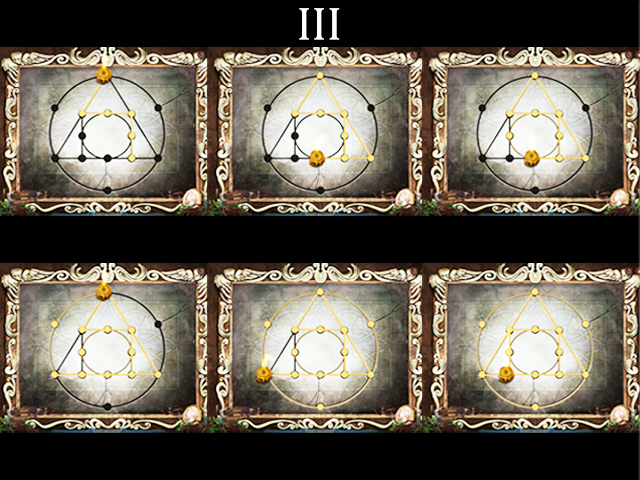
- The goal of this puzzle is to connect the dots without retracing a path. Lit everything in one row without crossing the same line.
- Please look at the screenshot for the solution.
- Pick up the CRANK (A).
- Zoom into the Altar again to place the MUSIC BOX (B) on it. Play the HOPS.
- Lead the dancers to the meeting point by clicking the arrow keys.
- Follow these instructions for the solution:1. left, up, left, down, left, up, right, down, right, up, right, down, left.2. down, right, up, right, down, right, down, left.3. right, down, left, up, left, up, right, down, right, up, left, down.4. down, right, down, right, up, right, down, right, up, left.
- CONGRATULATIONS! You have completed Whispers: Revelation!


 The Tarot's Misfortune Walkthrough, Guide, & Tips
 Haunted Legends: The Bronze Horseman Walkthrough, Guide, & Tips
 Season of Mystery: The Cherry Blossom Murders Walkthrough, Guide, & Tips
 Strange Cases: The Faces of Vengeance Walkthrough, Guide, & Tips
 Grim Tales: The Wishes Walkthrough, Guide, & Tips