Chimeras: Tune of Revenge Walkthrough, Guide, & Tips
Chimeras: Tune of Revenge Walkthrough
Welcome to the Chimeras: Tune of Revenge Walkthrough
An organ grinder seeks revenge, marking his victims with cards. Can you stop him before he destroys the entire city?
Whether you use this document as a reference when things get difficult or as a road map to get you from beginning to end, we’re pretty sure you’ll find what you’re looking for here.
This document contains a complete Chimeras: Tune of Revenge game walkthrough featuring annotated screenshots from actual gameplay!
We hope you find this information useful as you play your way through the game. Use the walkthrough menu below to quickly jump to whatever stage of the game you need help with.
Remember to visit the Big Fish Games Forums if you find you need more help. Have fun!
This walkthrough was created by BrownEyedTigre, and is protected under US Copyright laws. Any unauthorized use, including re-publication in whole or in part, without permission, is strictly prohibited.
General Tips

- This is the official guide to Chimeras: Tune of Revenge.
- Select Options to adjust the Music, Effects, Environment, and Voice Volume. You can also adjust Gamma, Full Screen, Wide Screen, Custom Cursor and Special Effects.
- You may select between Casual, Advanced and Hardcore Mode.
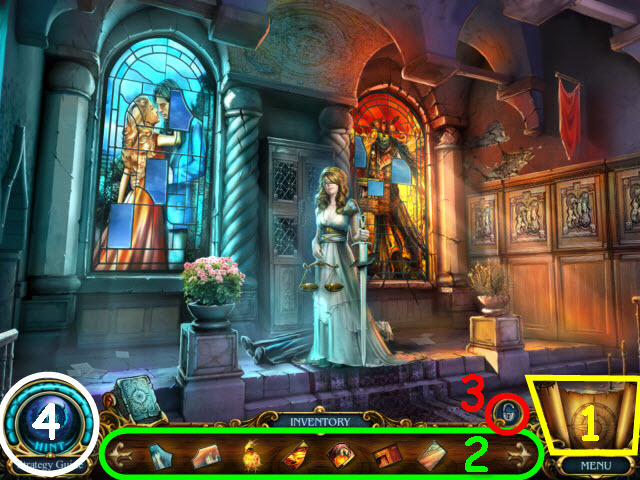
- There is a Map (1) on the bottom right of your toolbar that enables you to travel quickly to other areas and lets you know what tasks to complete in each location.
- Hidden object scenes are referred to as HOS throughout the guide.
- Items in blue in the Find List require an extra step to acquire.
- Puzzles may be skipped and reset.
- Move your cursor down to the bottom of the screen to raise the Inventory bar (2). You may lock it in the up position by closing the padlock (3).
- Select the Hint button (4) on the bottom left to get a hint in HOS and in the main quest.
- Inventory items will be marked in all CAPS in the strategy guide.
Chapter 1 – Gendarme
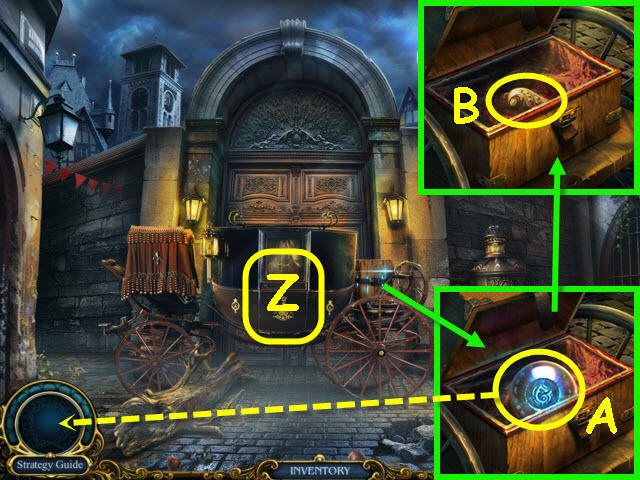
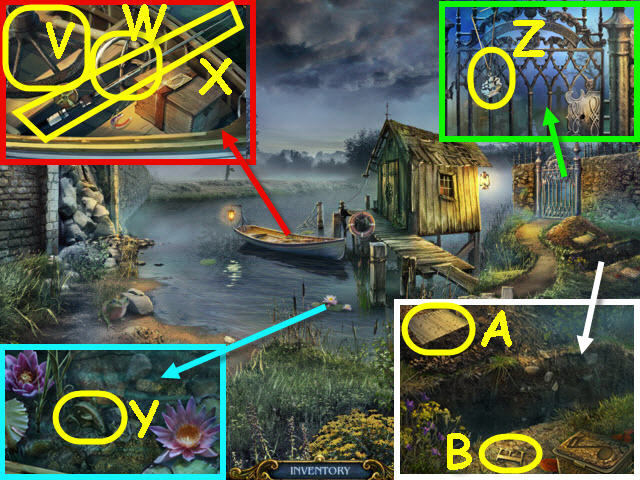
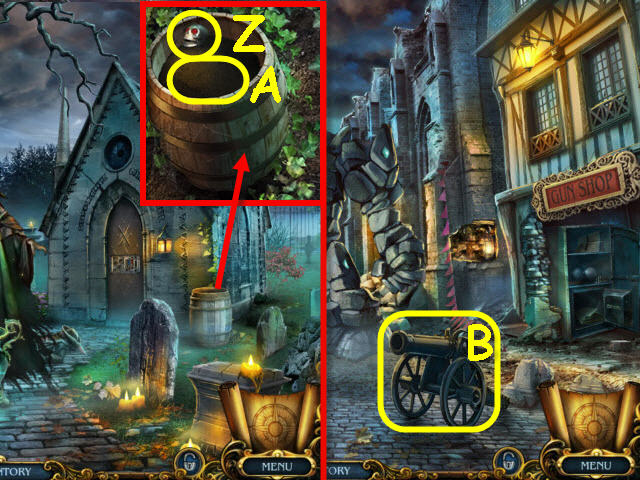
- Examine the trunk and open it; take the amulet (A) which will be added to your bottom left toolbar as your hint button.
- Take the HANDLE (B).
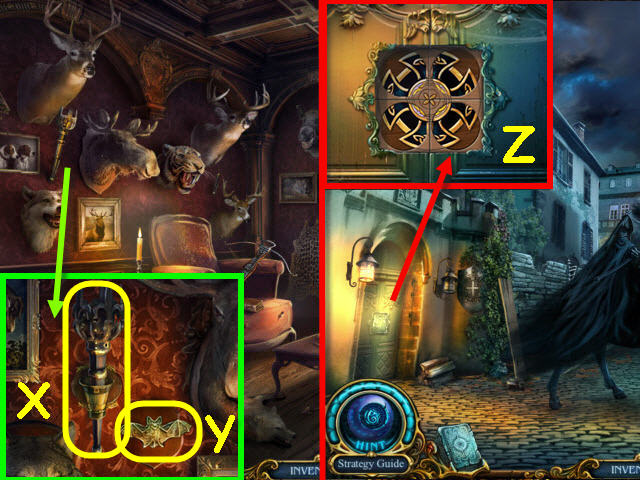
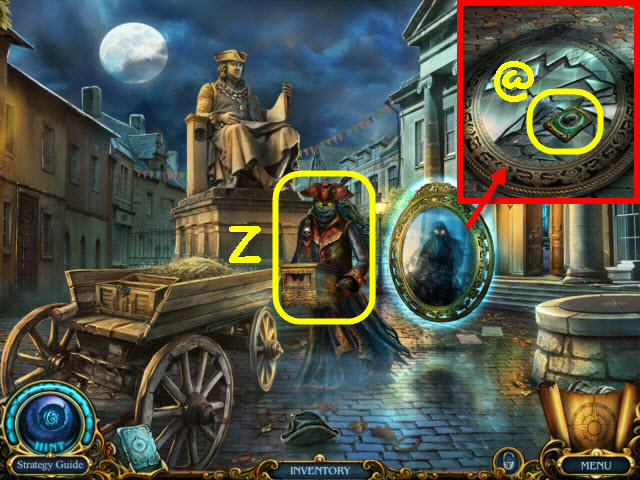
- Examine the carriage door and place the HANDLE on it (Z).
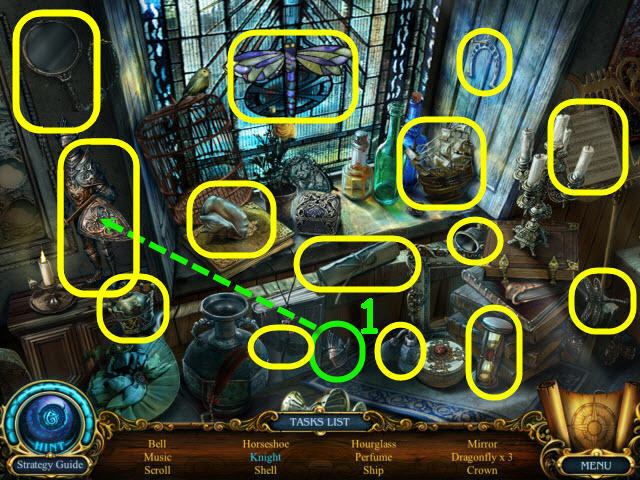
- Examine the opened carriage to access a HOS.

- Find the items listed.
- Place the axe handle on the handle to get the axe (1).
- You will earn an AXE.
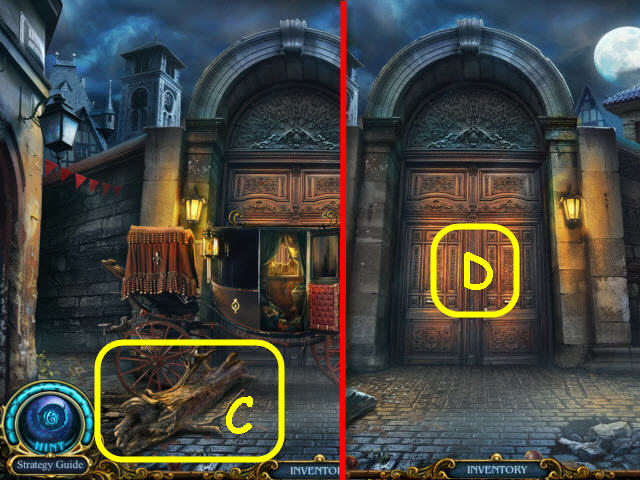
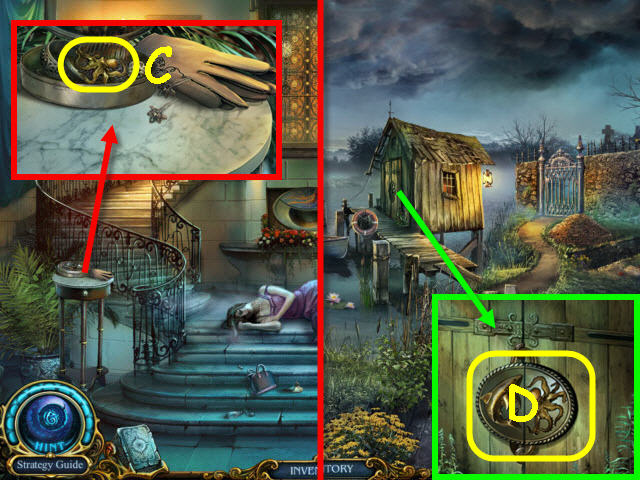
- Examine the log and use the AXE on it (C).
- Push the carriage out of the way.
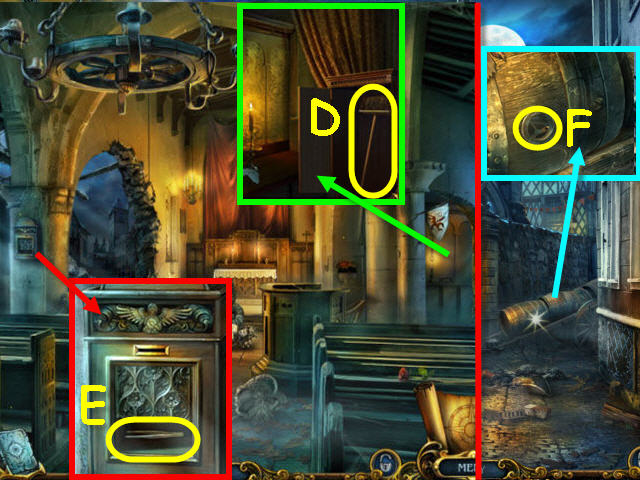
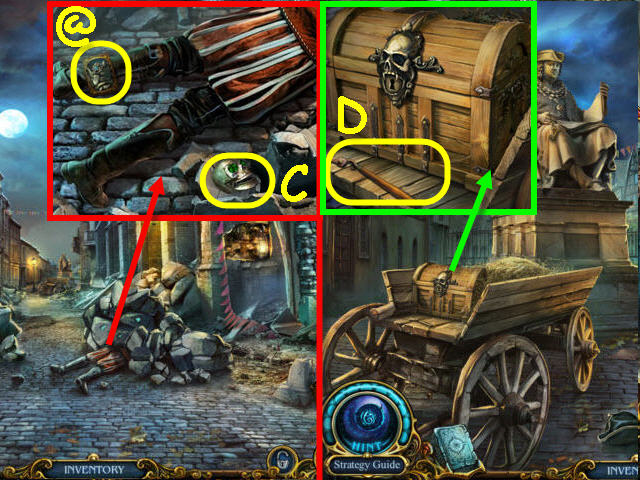
- Open the gates (D).
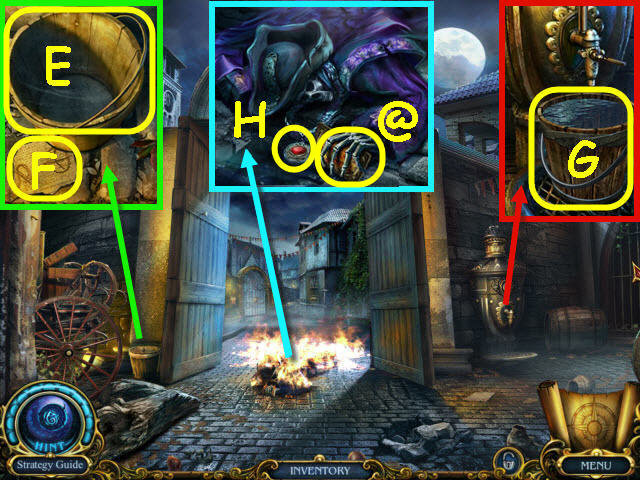
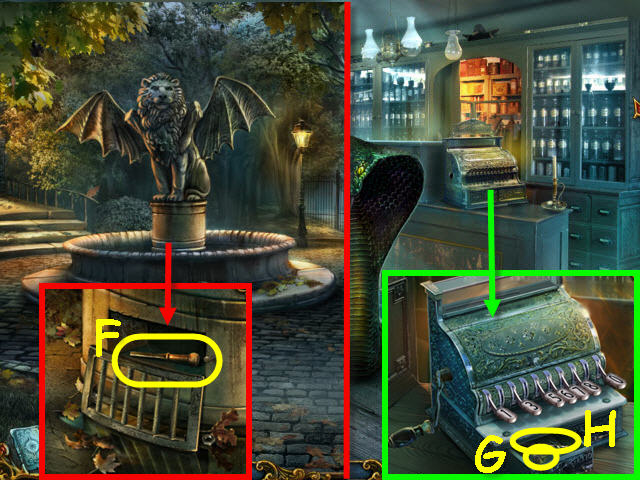
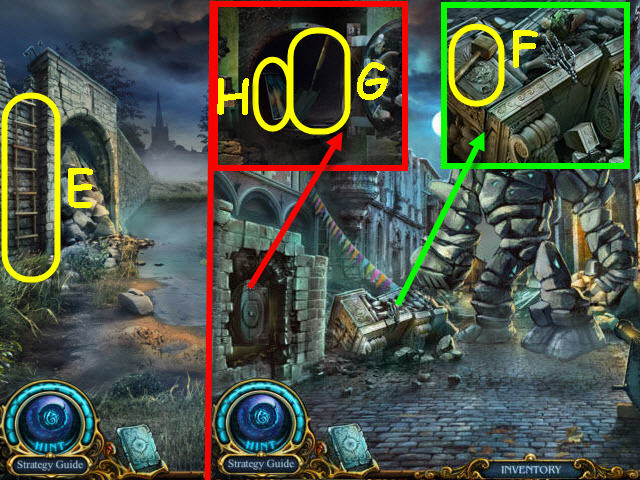
- Examine the bucket; take the BUCKET (E), and the PIECE OF PAPER (F).
- Examine the vat and place the BUCKET under the tap; turn on the tap and take the BUCKET OF WATER (G).
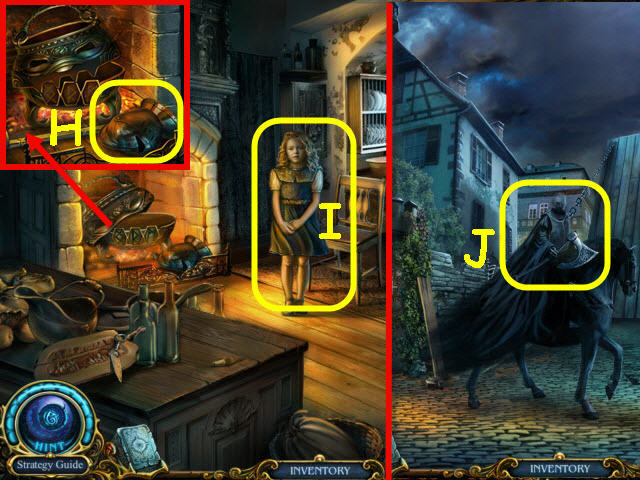
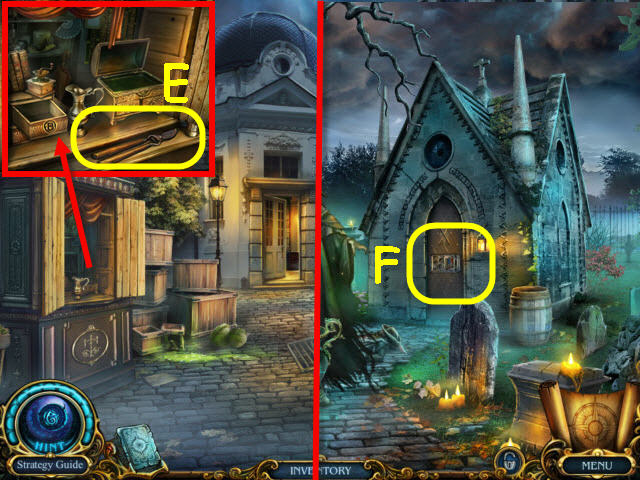
- Examine the burning man and place the BUCKET OF WATER on him; take the RUBY 1/2 (H) and the cursed card (@).
- Go forward to the narrow street.
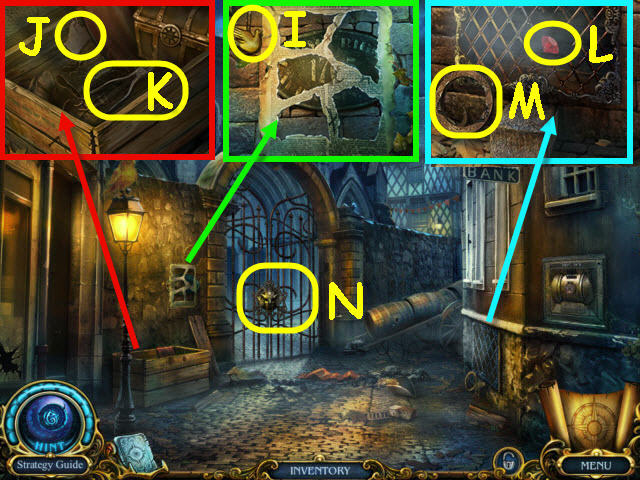
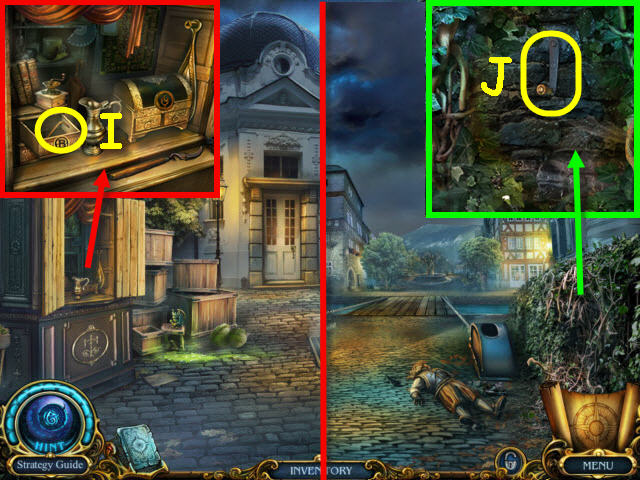
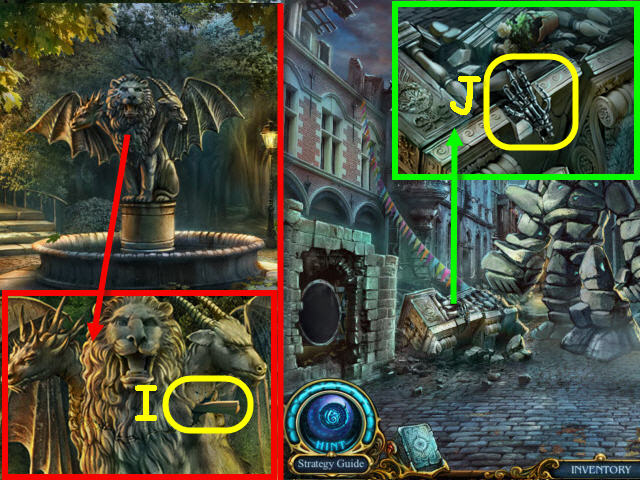
- Examine the wall; take the DOVE MEDALLION (I).
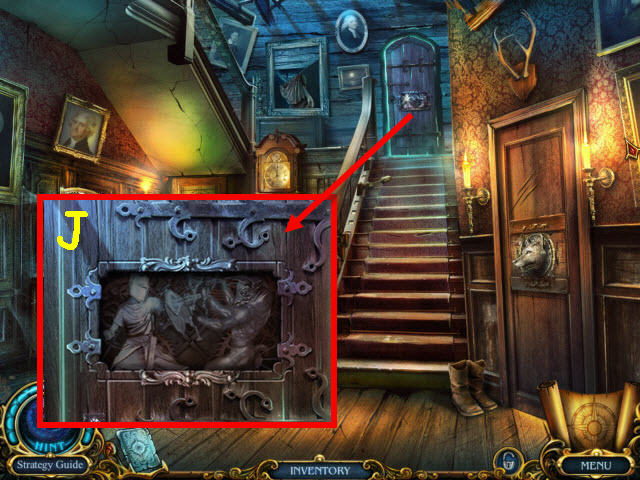
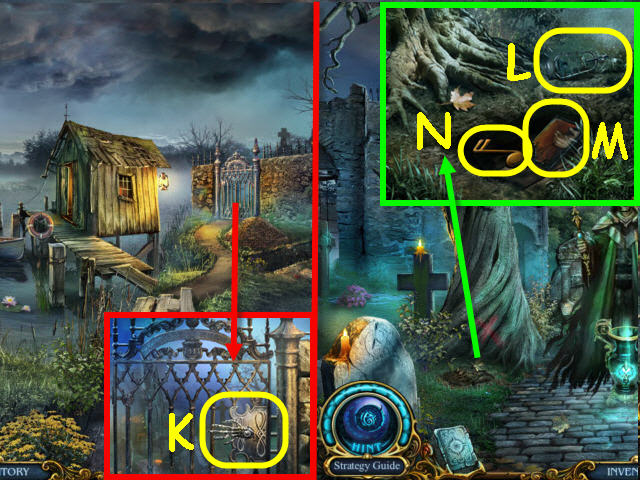
- Examine the crate; take the 2nd PIECE OF PAPER (J), and NIPPERS (K).
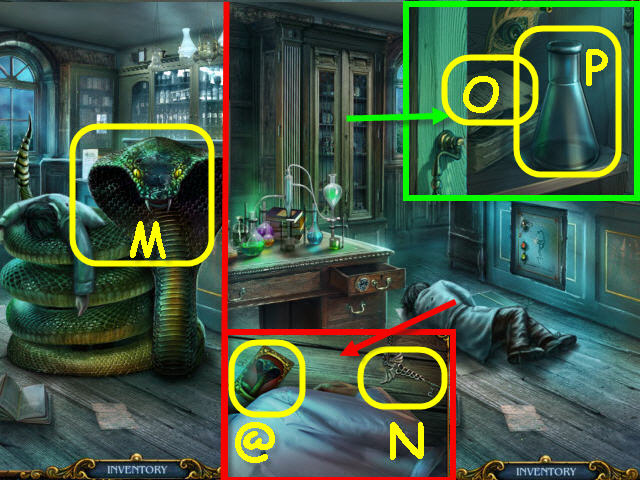
- Examine the grate and use the NIPPERS on it; take the RUBY to get RUBIES 2/2 (L), and the BIG BRONZE RING (M).
- Examine the gate and place the 2 RUBIES on the eye sockets (N).
- Go forward through the newly-opened gates.
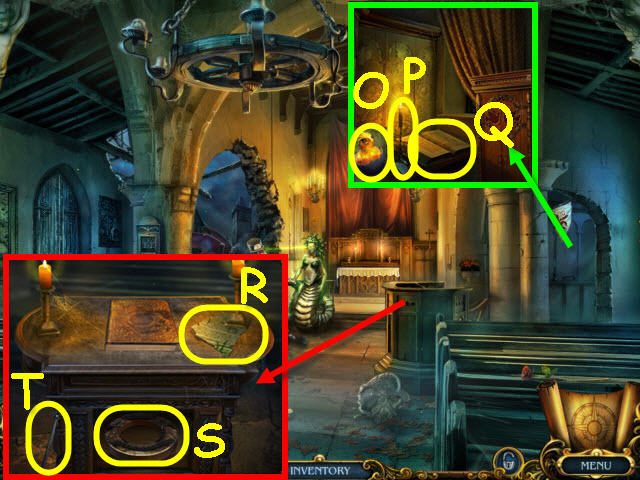
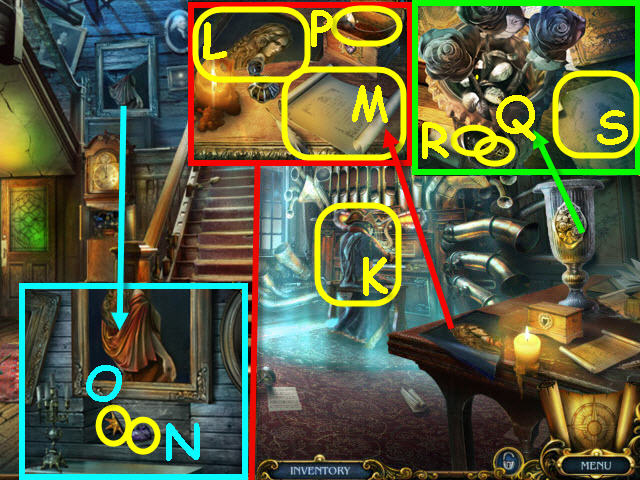
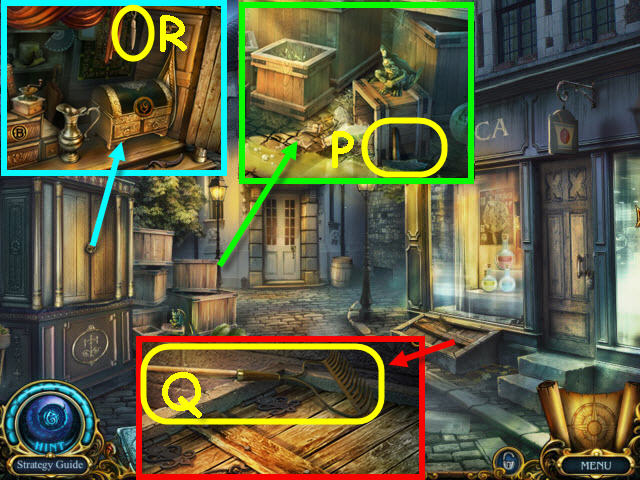
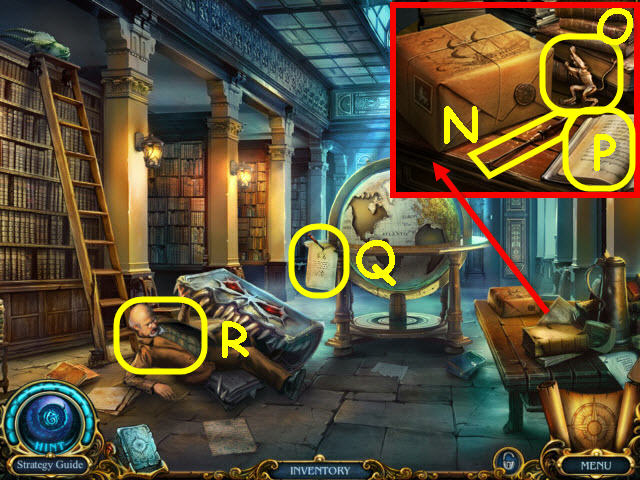
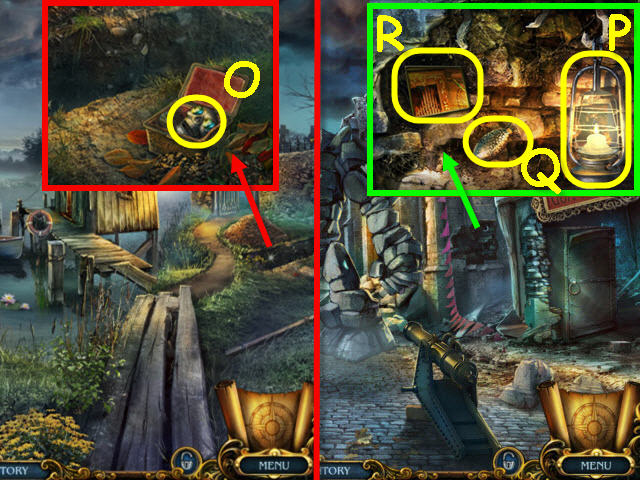
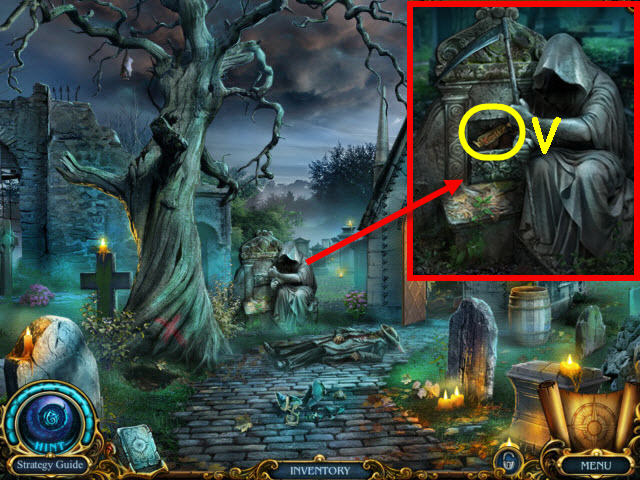
- Examine the alcove and crack the egg twice; take TERRANCE (O). You can now use TERRANCE when you need to light something or do not want to get burned.
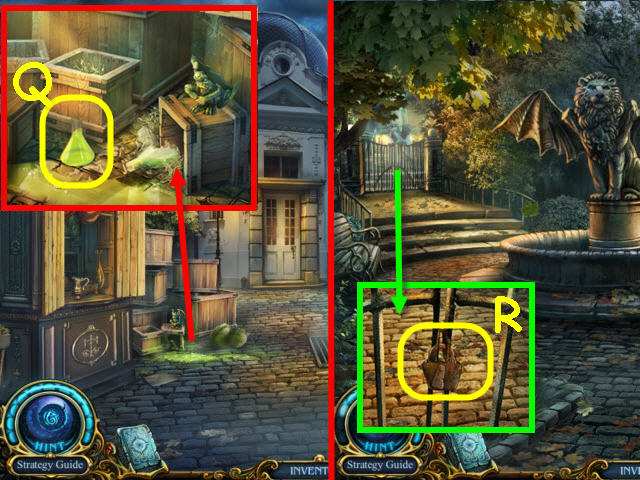
- Use TERRANCE to light the candle (P); take the PRAYER BOOK (Q).
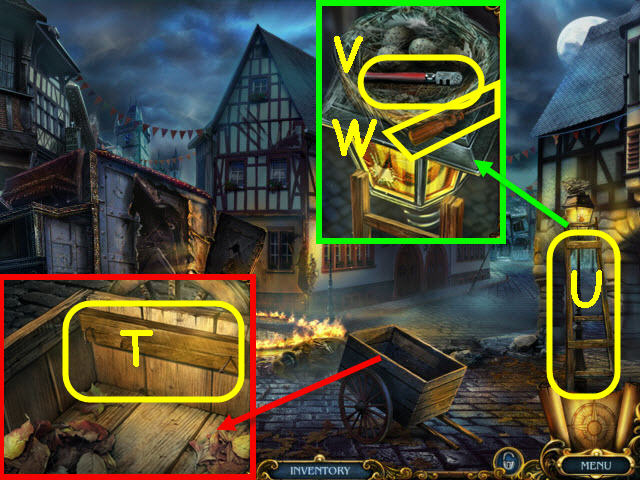
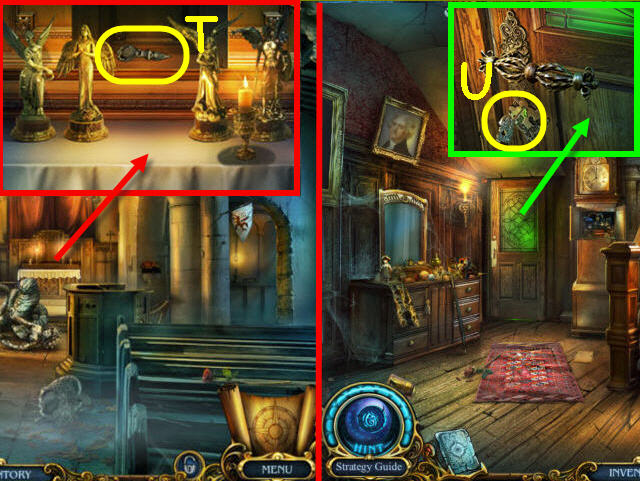
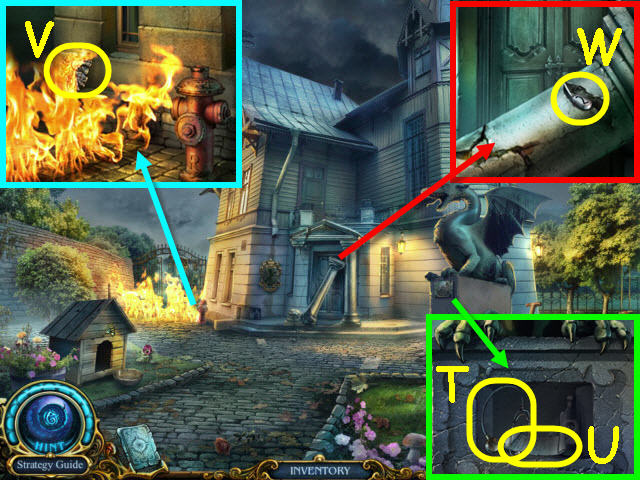
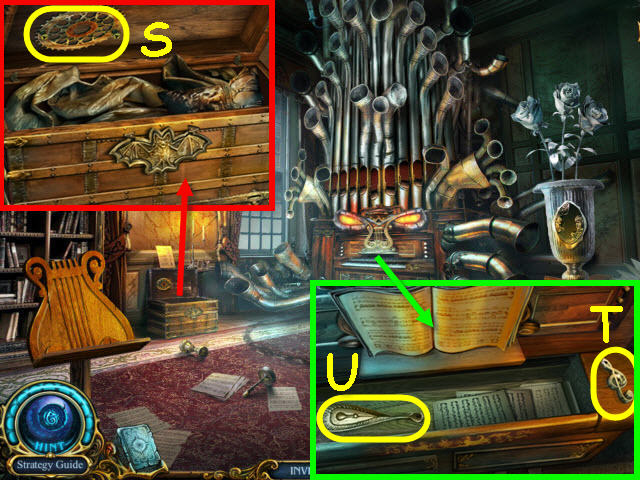
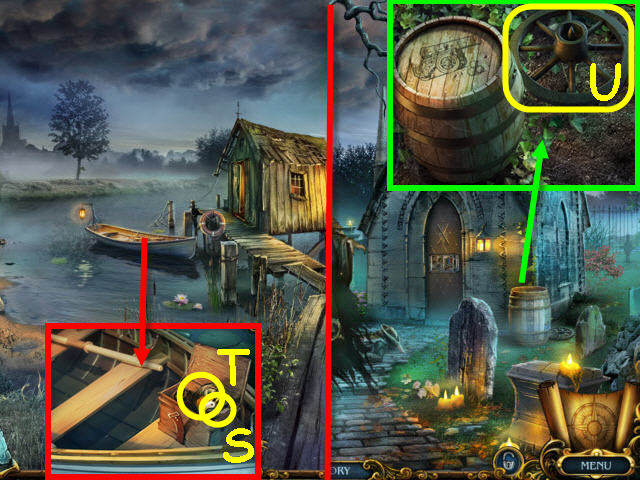
- Examine the pulpit and place the PRAYER BOOK on it; take the 3rd PIECE OF PAPER (R), SMALL BRONZE RING (S), and the HOIST HANDLE (T).
- Back out.
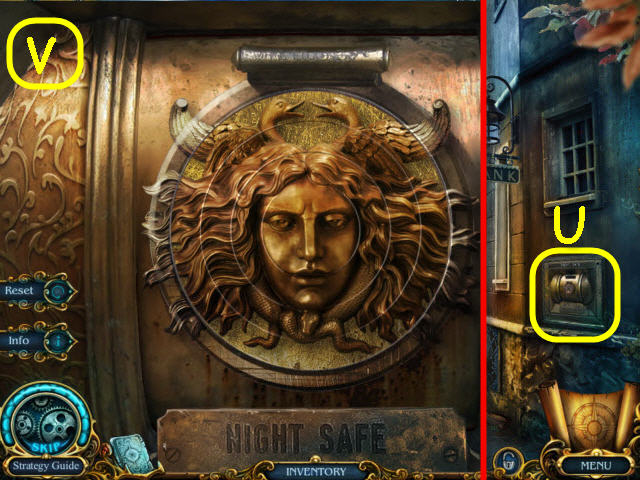
- Examine the safe and place the BIG BRONZE RING and the SMALL BRONZE RING on it to trigger a puzzle (U).
- Rotate the rings to complete the picture.
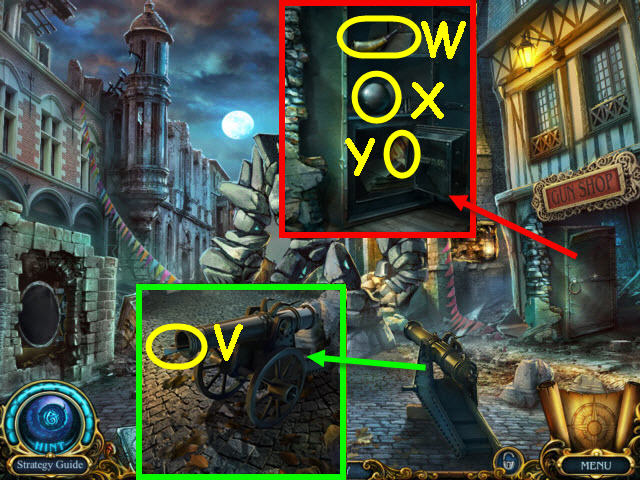
- See screenshot for solution (V).
- Take the DAGGER.
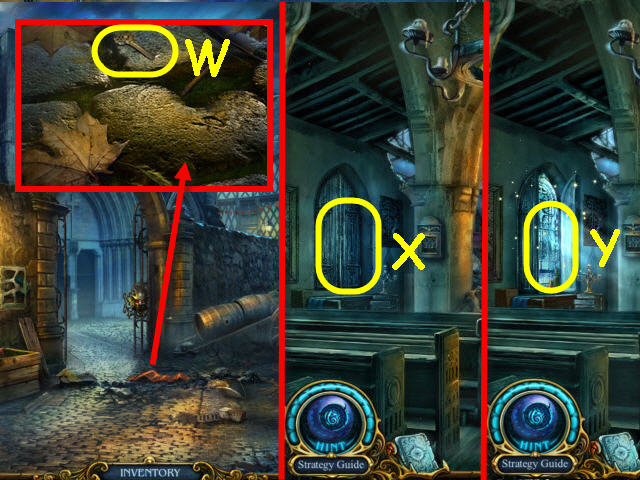
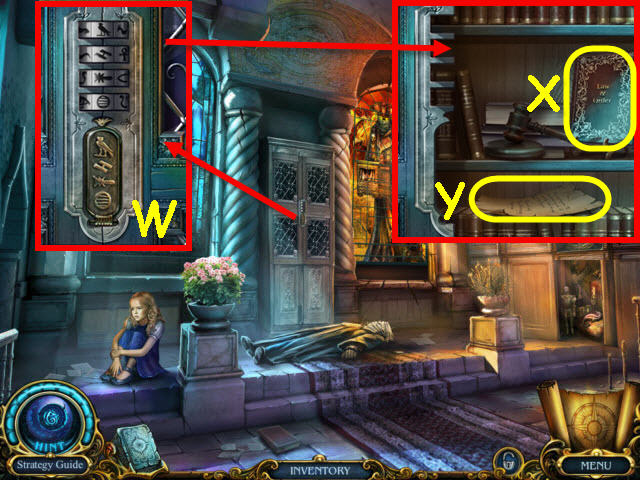
- Examine the crack and use the DAGGER on it; take the SILVER KEY (W).
- Go forward.
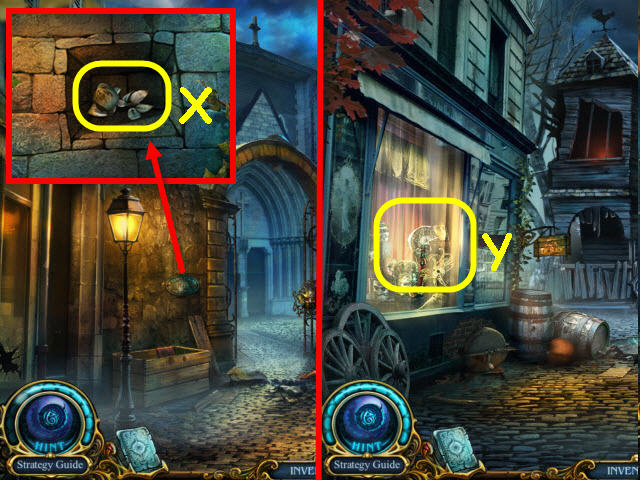
- Examine the shutters and use the SILVER KEY on the lock (X).
- Examine the stained glass window to access a HOS (Y).
- Find the items listed.
- Place the helmet on the armor to get a knight (1).
- You will earn a MIRROR.
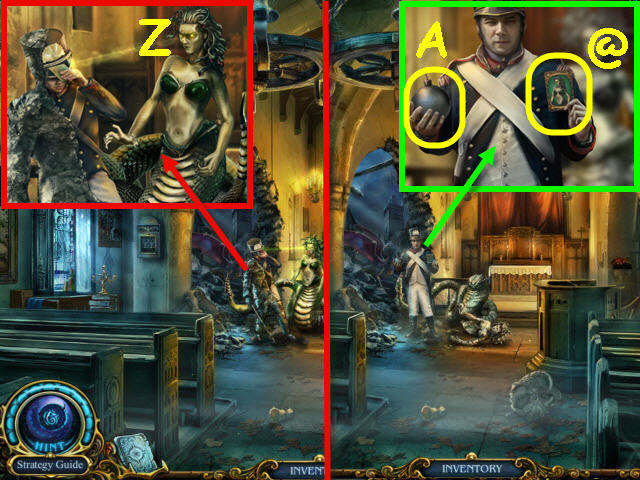
- Examine Medusa and use the MIRROR on her (Z).
- Examine the gendarme; take the BOMB (A) and the cursed card (@).
- Go forward through the hole in wall of the church.
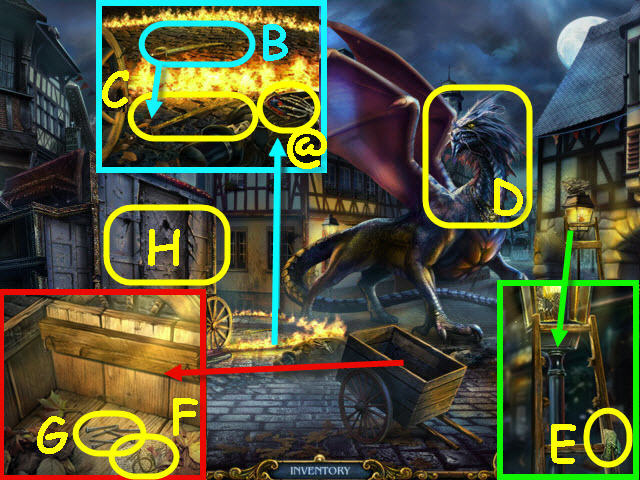
- Examine the banker and use TERRANCE on the sword (B); take the BLUNT SWORD (C) and the cursed card (@).
- Examine the dragon (D).
- Examine the lantern; take the 4th PIECE OF PAPER (E).
- Examine the cart; take the 5th PIECE OF PAPER (F), and the NAILS (G).
- Examine the carriage door and use the BOMB on it (H).
- Back out twice.
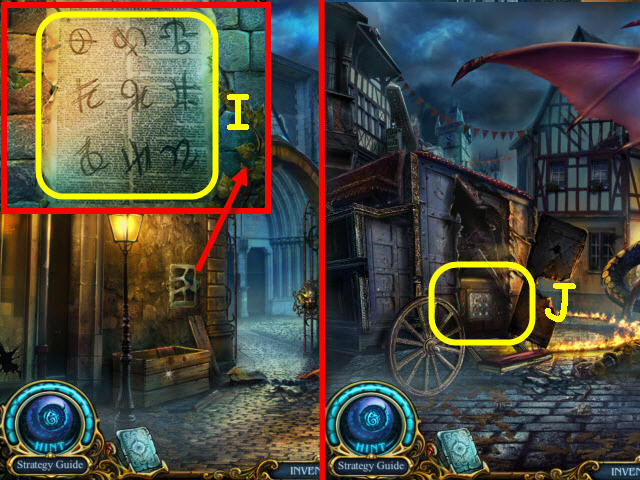
- Examine the poster and place the 5 PIECES OF PAPER on it; take the POSTER WITH A CODE (I).
- Go forward twice to the city square.
- Examine the carriage and place the POSTER WITH A CODE on it to trigger a puzzle (J).
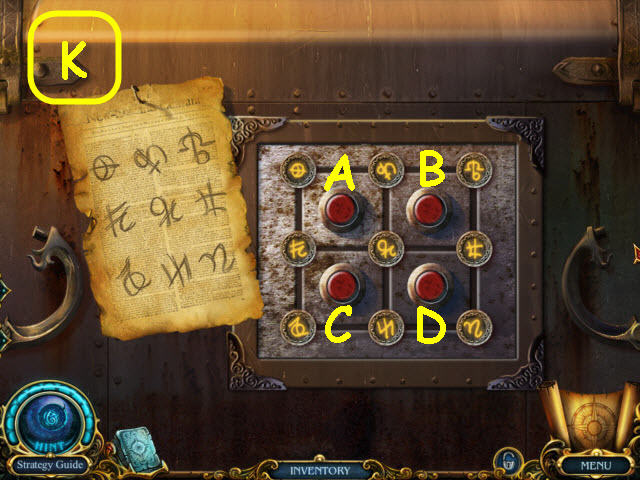
- Arrange the symbols to match the code.
- To solve the puzzle, select the following buttons; D-C-C-B-A-C-C-B-B-B-C-C-B and B (K).
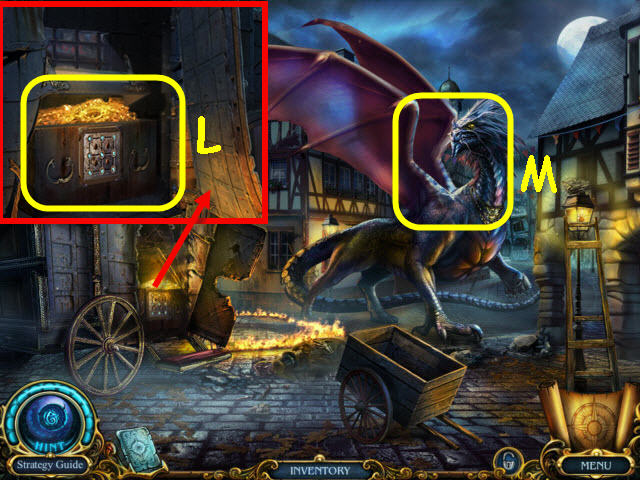
- Examine the carriage; take the TREASURE (L).
- Give the TREASURE to the dragon (M).
- Go up the path to the monster house.
Chapter 2 – Monster House
- Examine the grindstone and use the BLUNT SWORD on it to get a SHARP SWORD (N).
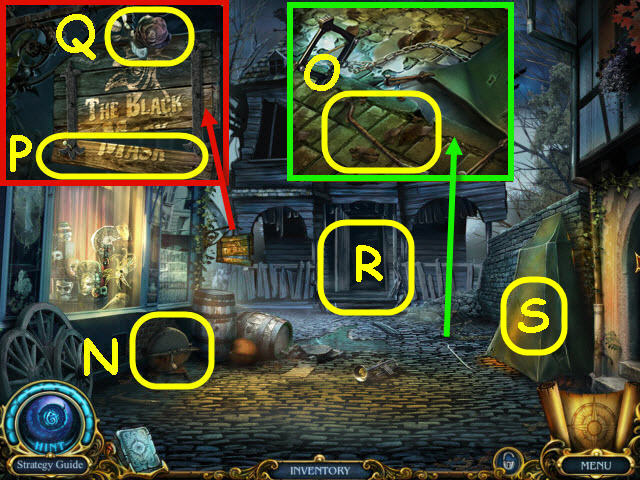
- Examine the jack; take the NAIL PULLER (O).
- Examine the sign; use the NAIL PULLER on the nail to get a BOARD 1/2 (P) and take the SILVER ROSE 1/3 (Q).
- Attempt to go forward into the house (R).
- Examine the tent and use the SHARP SWORD on it; reexamine the tent to access a HOS (S).
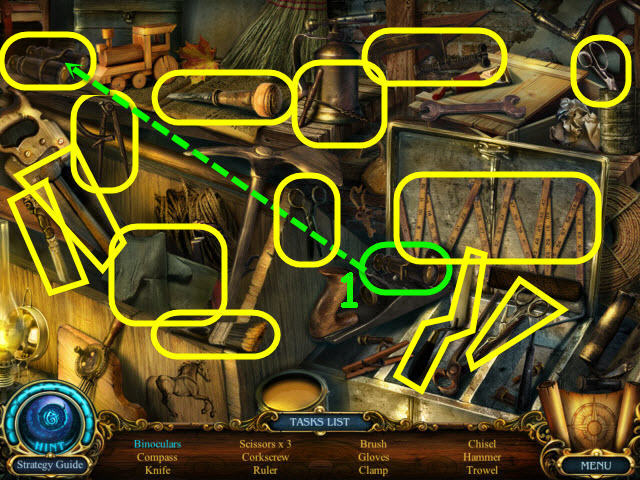
- Find the items listed.
- Place the half of a binocular with the other half to get a binocular (1).
- You will earn a HAMMER.
- Back out.
- Examine the cart and use the NAIL PULLER on the nails; take the BOARD 2/2 (T).
- Examine the broken ladder and use the 2 BOARDS, NAILS and HAMMER on it (U).
- Examine the lantern; take the GLASS CUTTER (V), and SCREWDRIVER (W).
- Back out twice.
- Examine the plaque and use the SCREWDRIVER on it; take the SILVER ROSE 2/3 (X).
- Go to the monster house.
- Examine the window and use the GLASS CUTTER on it (Y).
- Examine the cut window to trigger a puzzle.
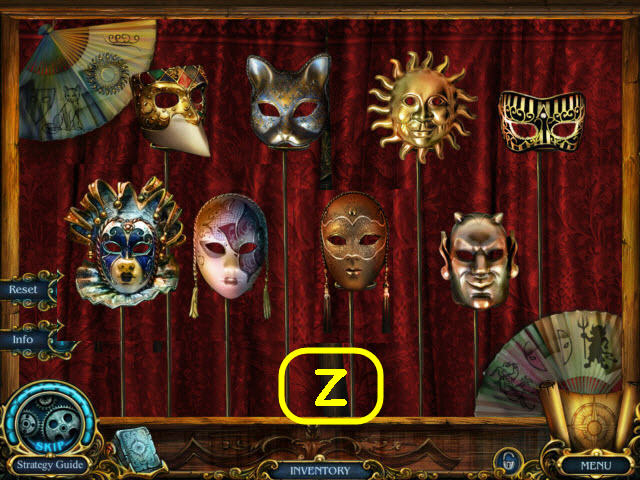
- Arrange the masks in the correct order.
- See screenshot for solution (Z).
- Take the MASK.
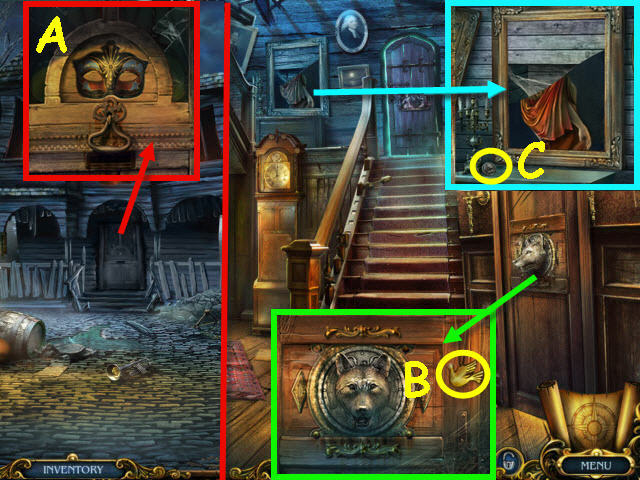
- Examine the door; place the MASK on the lock (A).
- Enter the house to the hall.
- Examine the right door; take the 2nd DOVE MEDALLION (B).
- Examine the painting; take the COIN (C).
- Go to the church.
- Examine the alcove; place the 2 DOVE MEDALLIONS on the cabinet door and open it. Take the BROOM (D).
- Examine the donation box and drop in the COIN; take the TWEEZERS (E).
- Back out.
- Examine the barrel; use the TWEEZERS to get the WIND-UP KEY (F).
- Go to the hall in the monster house.
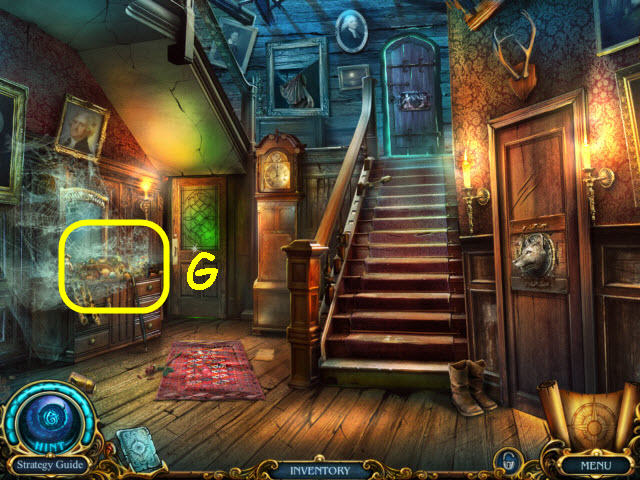
- Examine the vanity and use the BROOM on the cobwebs (G).
- Examine the cleaned vanity to access a HOS.
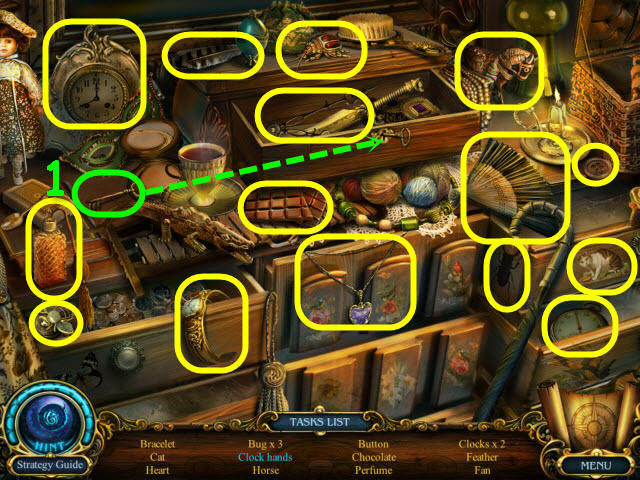
- Find the items listed.
- Use the key on the drawer to get the clock hands (1).
- You will earn CLOCK HANDS.

- Examine the clock (H).
- Place the CLOCK HANDS and WIND-UP KEY on it to trigger a puzzle.
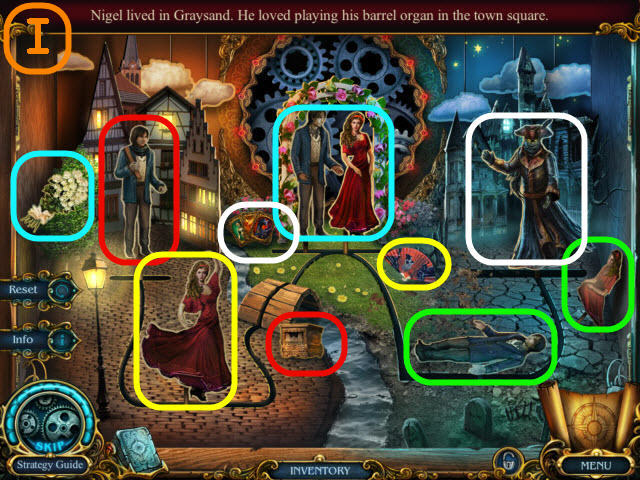
- Place the correct items with the figures.
- To solve the puzzle, place the items with their owners in the following order: Red, yellow, blue, green, and white (I).
- Take the SMALL SPEAR.
- Examine the attic door and use the SMALL SPEAR on the lock (J).
- Go up to the attic.
- Select the organ grinder (K).
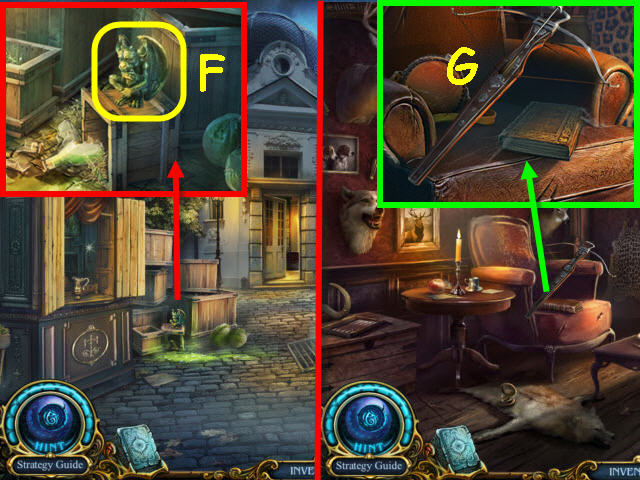
- Examine the table; take the PART OF A PICTURE (L) and read the note (M).
- Back out.
- Examine the painting and place the PART OF A PICTURE on it; take the HEART MEDALLION (N) and the STAR FRAGMENT 1/2 (O).
- Return to the attic.
- Examine the table and place the HEART MEDALLION on the box; take the SILVER ROSE 3/3 (P).
- Examine the vase and place the 3 SILVER ROSES in the vase; open the rosebuds. Take the ANGEL STATUE (Q), the KITCHEN KEY (R), and read the note (S).
- Go to the church.
- Examine the altar and place the ANGEL STATUE on it; take the CABINET HANDLE 1/2 (T).
- Go to the hall in the monster house.
- Examine the kitchen door and use the KITCHEN KEY on the lock; turn the key (U).
- Go into the kitchen.
Chapter 3 – Alicia
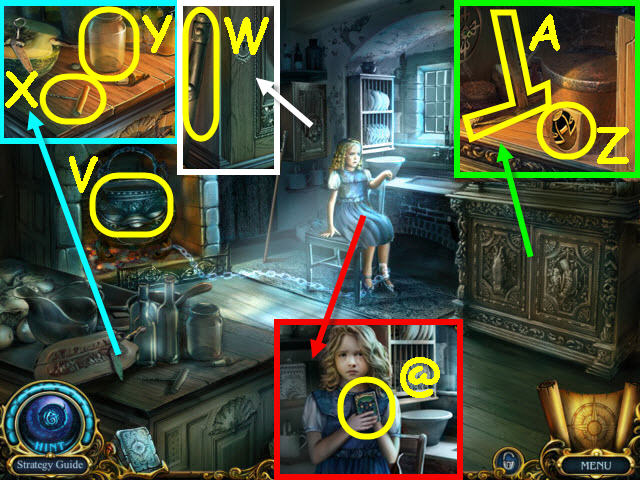
- Speak to Alicia; take the cursed card (@).
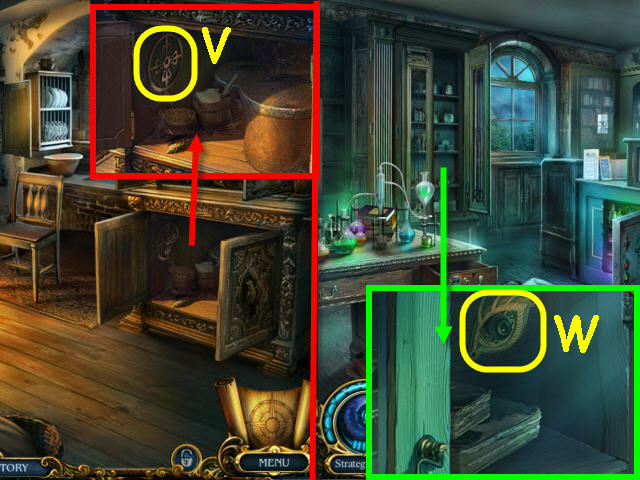
- Select the cauldron (V).
- Examine the small cabinet; take the HANDLE (W).
- Examine the counter; take the CORKSCREW (X) and GLASS JAR (Y).
- Examine the bottom cabinets and open the doors; take the COAT OF ARMS PART (Z) and PICKAXE (A).
- Go to the narrow street.
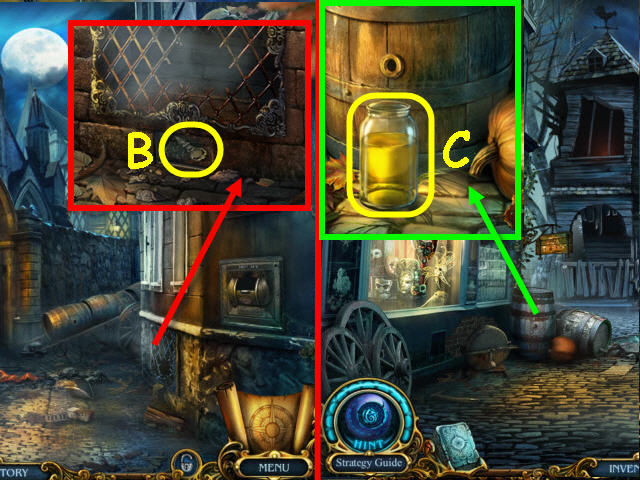
- Examine the grate and use the PICKAXE on the brick; take the CABINET HANDLE 2/2 (B).
- Go to the monster house.
- Examine the barrel and use the GLASS JAR and CORKSCREW on it; take the JAR FILLED WITH OIL (C).
- Go to the kitchen.
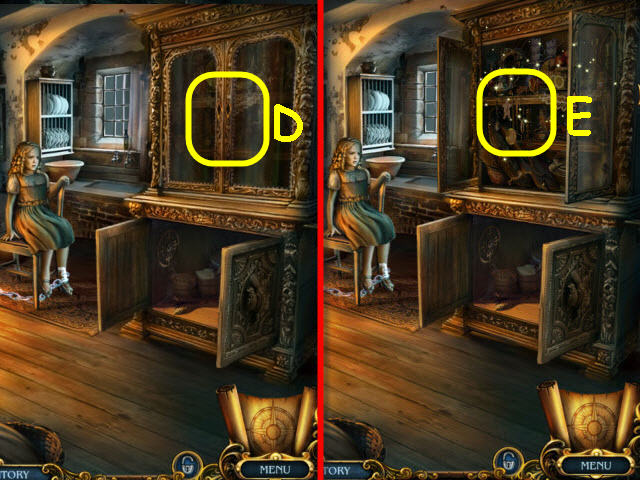
- Examine the upper cabinet and place the 2 CABINET HANDLES on it (D).
- Examine the opened cabinet to access a HOS (E).
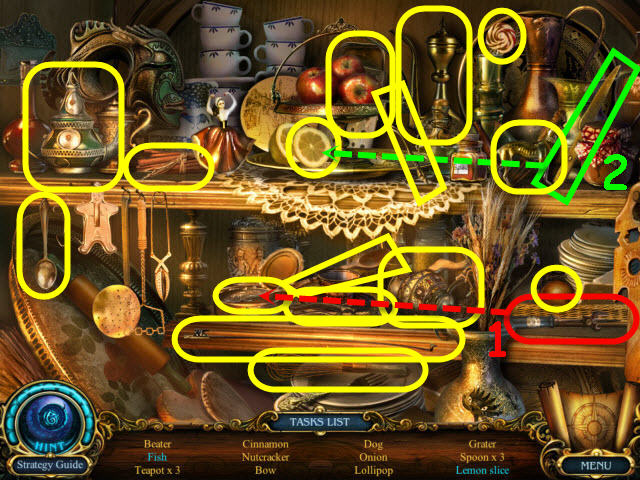
- Find the items listed.
- Use the can opener on the can to get fish (1).
- Use the knife on the lemon to get a lemon slice (2).
- You will earn a VIOLIN BOW.
- Back out and go upstairs.
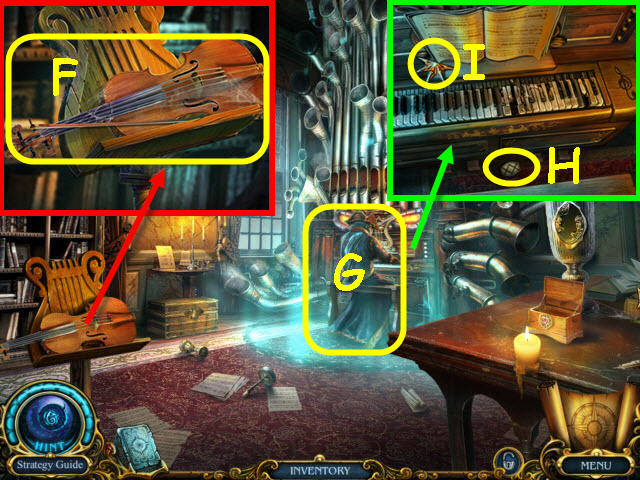
- Examine the violin and place the VIOLIN BOW on it; take the VIOLIN (F).
- Use the violin on the organ grinder (G).
- Examine the organ; take the RUNE (H) and the STAR MEDALLION 2/2 (I).
- Go to the narrow street.
- Examine the crate and place the 2 STAR MEDALLIONS on the chest; take the BOOK (J).
- Go back to the attic.
- Examine the bookshelf; place the BOOK on it to trigger a puzzle (K).
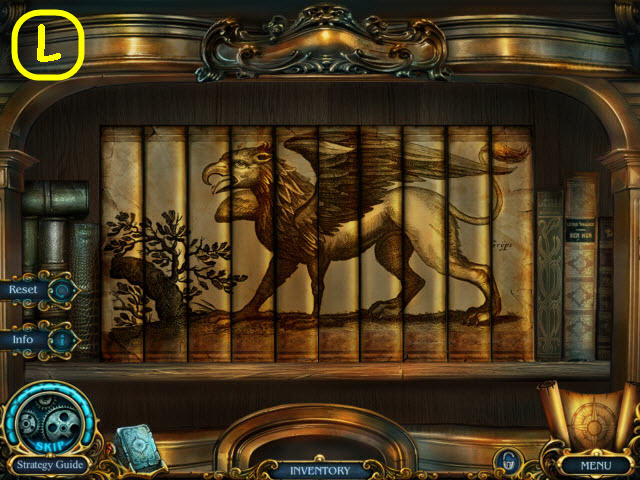
- Place the books in the correct order to complete the picture.
- See screenshot for solution (L).
- Take the PLIERS.
- Back out twice.
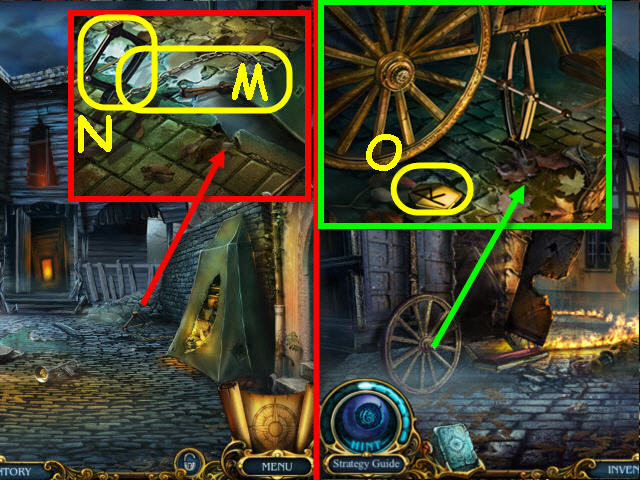
- Examine the jack and use the PLIERS on the chain; take the CHAIN (M) and HOIST (N).
- Back out.
- Examine the carriage wheel and place the HOIST underneath; place the HOIST HANDLE on it and turn the handle. Take the 2nd RUNE (O).
- Go up the newly-opened path to the clock tower.
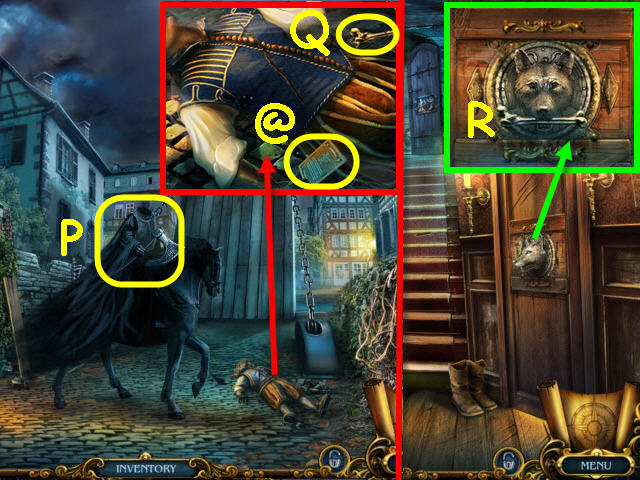
- Speak to the horseman (P).
- Examine the victim; take the cursed card (@) and the IRON BONE (Q).
- Go to the hall in the monster house.
- Examine the wolf head and place the IRON BONE in its mouth; turn the head to open the door (R).
- Go through the newly-opened door to the hunter’s room.
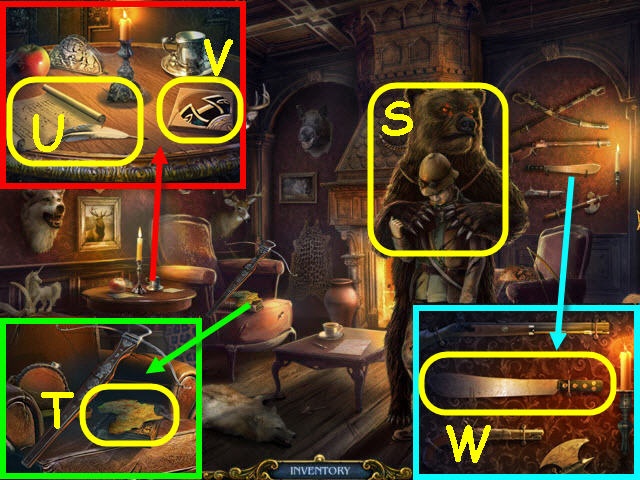
- Examine the bear and note the medallion (S).
- Examine the chair; take AFRICA (T).
- Examine the table; read the note (U) and take the 2nd COAT OF ARMS PART (V).
- Examine the weapons; take the MACHETE (W).
- Examine the torch; take the TORCH (X) and the BAT FIGURINE (Y).
- Go to the clock tower.
- Examine the door and place the 2 COAT OF ARMS PARTS on the lock; rotate the parts to complete the pattern (Z).
- Examine the opened doorway to access a HOS.
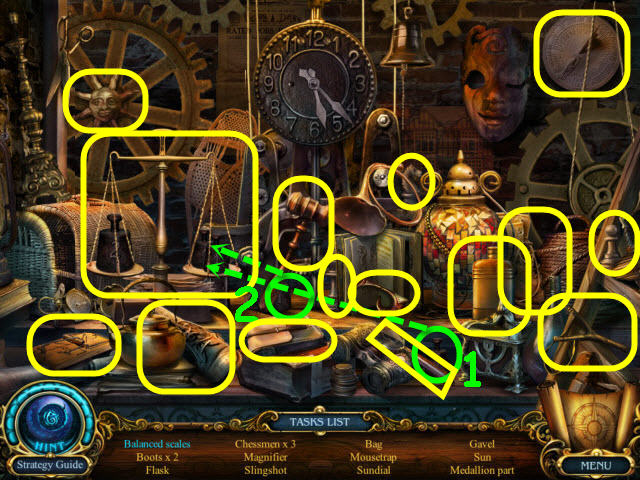
- Find the items listed.
- Place the 2 weights on the scale to get a balanced scale (1-2).
- You will earn a MEDALLION PART 1/2.
- Go to the attic.
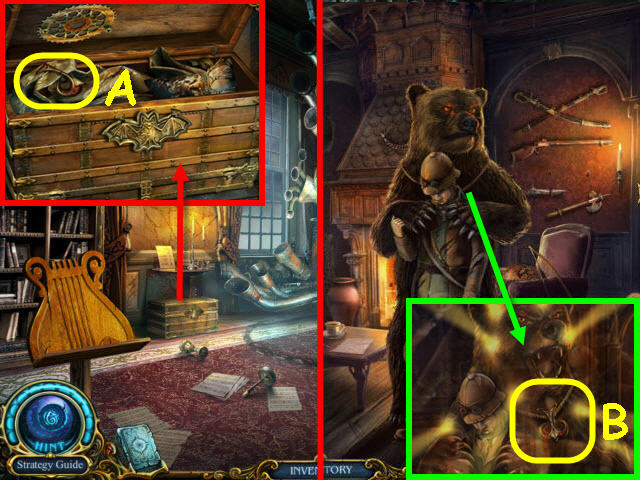
- Examine the chest and place the BAT FIGURINE on the lock; open the lid and take the MEDALLION PART 2/2 to get a BEAR MEDALLION 2/2 (A).
- Go to the hunter’s room.
- Examine the bear and place the BEAR MEDALLION on the necklace (B).
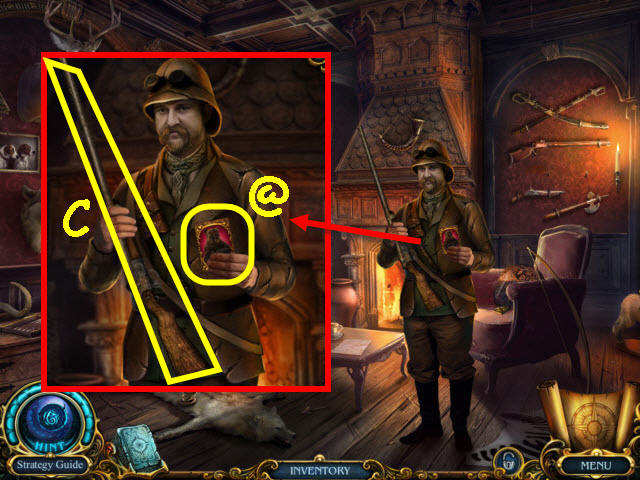
- Examine the hunter; take the cursed card (@).
- Take the HUNTING GUN (C).
- Examine the chair; take the 3rd RUNE (D).
- Examine the fireplace and use TERRANCE to get the SHAMROCK MEDALLION (E).
- Go to the kitchen.
Chapter 4 – Knight
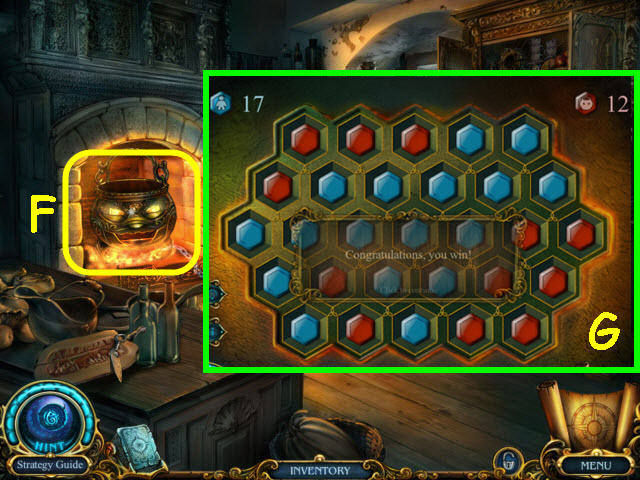
- Examine the cauldron and place the 3 RUNES on it (F).
- Reexamine the cauldron to trigger a puzzle.
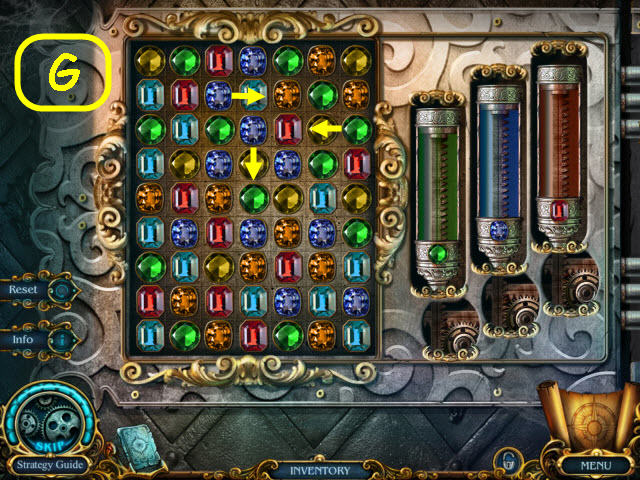
- Place the blue gems so that you can turn more spaces blue than your red opponent.
- See screenshot for a winning board (G).
- Examine the cauldron; take the HELMET (H).
- Speak to Alicia (I).
- Go to the clock tower.
- Give the HELMET to the horseman (J).
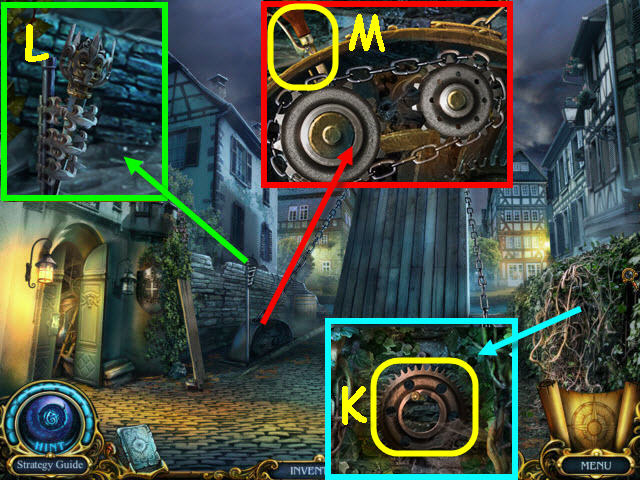
- Examine the vines and use the MACHETE on them; take the LARGE GEAR (K).
- Examine the torch holder and place the TORCH in it; light the TORCH with TERRANCE (L).
- Examine the drawbridge mechanism and place the LARGE GEAR, CHAIN and JAR FILLED WITH OIL on it; pull the handle (M).
- Go forward to the park.
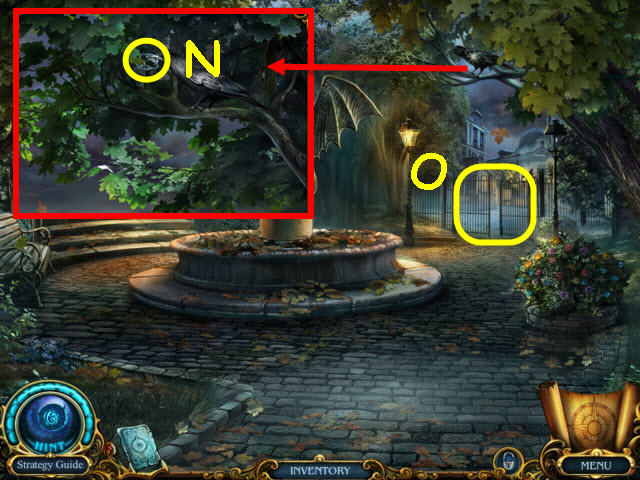
- Examine the raven and use the HUNTING GUN to scare it away; automatically get a RAVEN AMULET (N).
- Go through the fence on the right to get to the dead end (O).
- Examine the crates; take the CANNON WHEEL PART (P).
- Examine the cellar door and place the HANDLE on the rake head; take the RAKE (Q).
- Examine the showcase and place the RAVEN AMULET on the lock; take the SCISSORS PART (R).
- Back out.
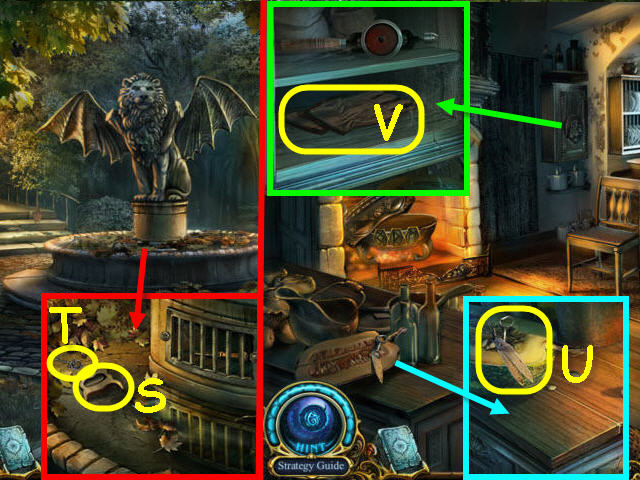
- Examine the fountain and use the RAKE on the leaves; take the HANDSAW HANDLE (S) and the CUPBOARD KEY (T).
- Go to the kitchen of the monster house.
- Examine the counter and place the SCISSORS PART on the scissors part; take the SCISSORS (U).
- Examine the cupboard and use the CUPBOARD KEY on the lock; turn the key. Take the LEATHER GLOVES (V).
- Return to the park.
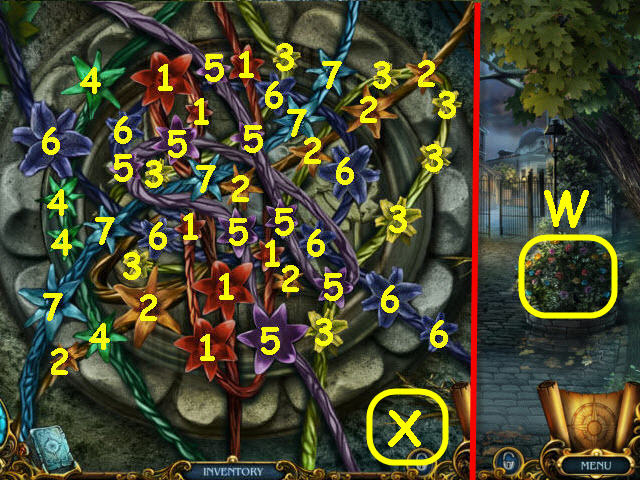
- Examine the flowers and use the LEATHER GLOVES on the thorns to trigger a puzzle (W).
- Close all the buds to remove them.
- Solution: Select all the same colored buds to close them (1-7). When all of one color is closed that branch will be removed. You can choose any color of buds to start (X).
- Take the BIG BUTTON.
- Go to the hall in the monster house.
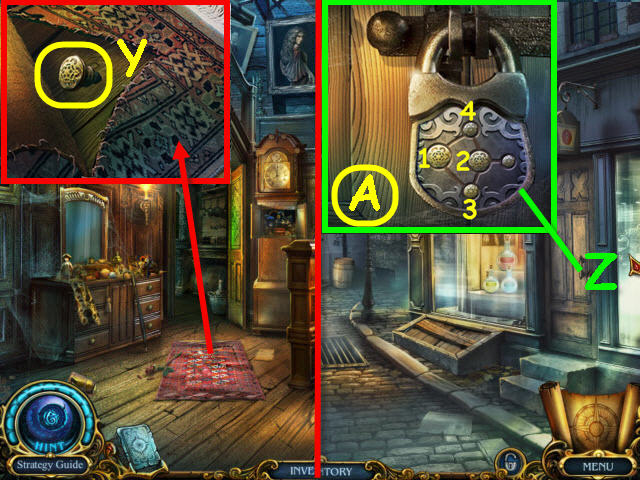
- Examine the rug and use the SCISSORS on the stitching; take the SMALL BUTTON (Y).
- Go to the dead end.
- Examine the drug store door and place the BIG BUTTON and SMALL BUTTON on the lock (Z).
- Select the correct buttons to push them all in. See screenshot for solution (A).
- Enter the newly-opened drug store.

- Examine the desk and place the HANDSAW HANDLE on the blade; take the HANDSAW (B).
- Place the SHAMROCK MEDALLION on the drawer; take the S LETTER (C), and the WRENCH (D).
- Back out.
- Examine the cellar door and use the HANDSAW on it; open the cellar door (E).
- Examine the opened cellar door to access a HOS.
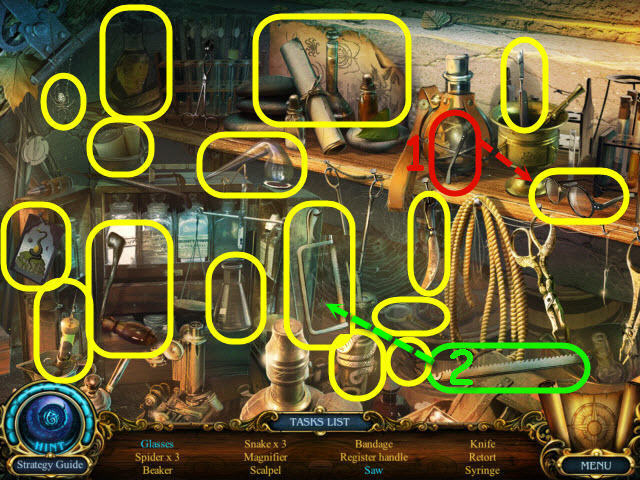
- Find the items listed.
- Place the eyeglass arm on the frame to get glasses (1).
- Place the blade on the saw handle to get a saw (2).
- You will earn a CASH REGISTER LEVER.
- Back out.
- Examine the fountain; use the WRENCH on the bolts and take the CHISEL (F).
- Go to the drug store.
- Examine the cash register; place the CASH REGISTER LEVER on it and turn the lever. Take the SIGNET RING (G) and DRILL BIT (H).
- Back out.
- Examine the showcase; use the SIGNET RING on the drawer and take the HEX WRENCH (I).
- Back out twice.
- Examine the ivy and use the HEX WRENCH on the screw; take the DRILL HANDLE (J).
- Go to the kitchen of the monster house.
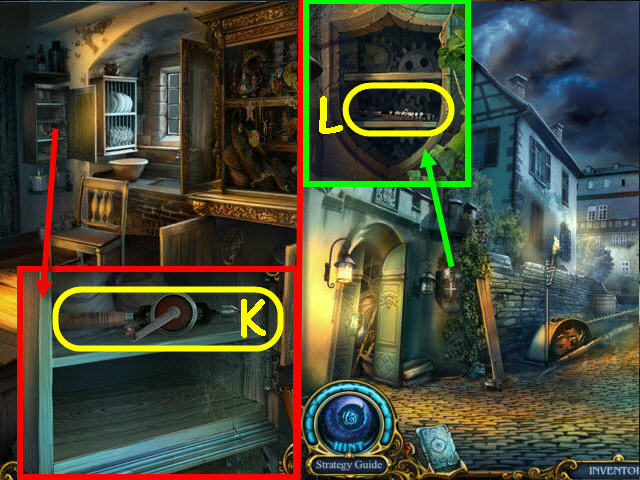
- Examine the small cabinet; place the DRILL BIT and DRILL HANDLE on the drill and take the DRILL (K).
- Go back to the clock tower.
- Examine the crest and use the DRILL on it; take the FLUTE (L).
- Go to the drug store.
- Use the FLUTE on the snake (M).
- Examine the pharmacist; take the cursed card (@) and the PHARMACIST’S KEY (N).
- Examine the medicine cabinet and use the PHARMACIST’S KEY on the lock; turn the key. Read the letter (O) and take the FLASK (P).
- Back out.
- Examine the crates and use the FLASK on the acid; take the ACID (Q).
- Back out.
- Examine the mansion gates and use the ACID on the lock; push the gates open (R).
- Go up the newly-opened left path to the mansion.
Chapter 5 – The Mansion
- Examine the statue pedestal and use the CHISEL on the plaque; take the STETHOSCOPE (T) and read the note (U).
- Examine the fire; use TERRANCE to get the LION BAS-RELIEF 1/2 (V).
- Examine the doorway; take the BUTTON ’2′ (W).
- Go to the drug store.
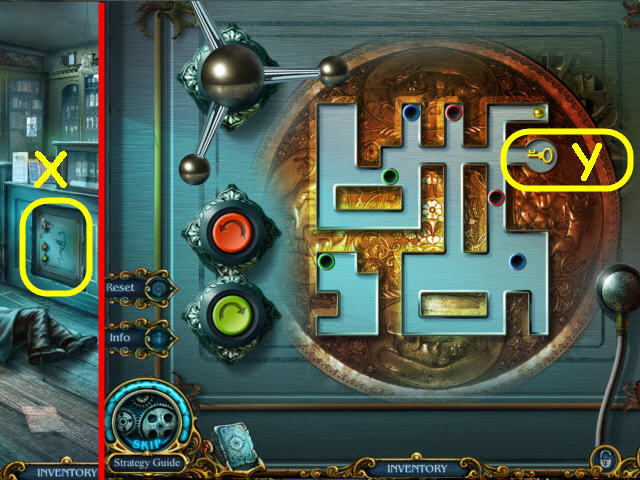
- Examine the safe; use the STETHOSCOPE on it to trigger a puzzle (X).
- Guide the yellow ball to the key.
- To solve the puzzle, select the red or green buttons as follows: Red-green-red x8- green-red-green x3, and red x2 (Y).
- Examine the opened safe to access a HOS.
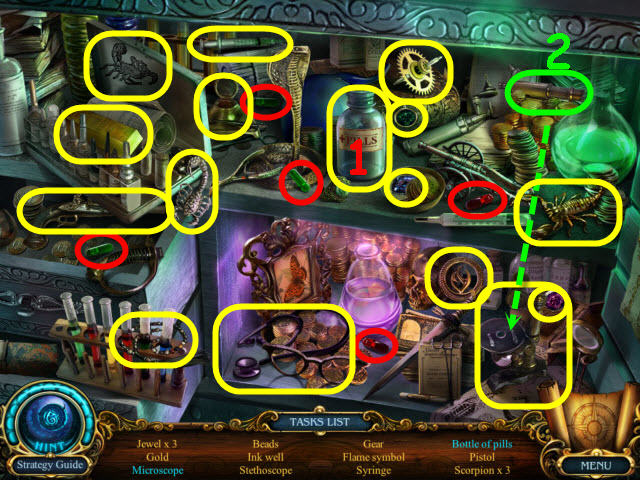
- Find the items listed.
- Place the pills circled in red in the bottle to get a bottle of pills (1).
- Place the scope on the microscope to get a microscope (2).
- You will earn a FIRE AMULET.
- Back out.
- Examine the showcase and place the FIRE AMULET on the chest; take the DYNAMITE (Z).
- Go to the mansion.
- Examine the doorway; place the DYNAMITE on the pillar and use TERRANCE to light it (A).
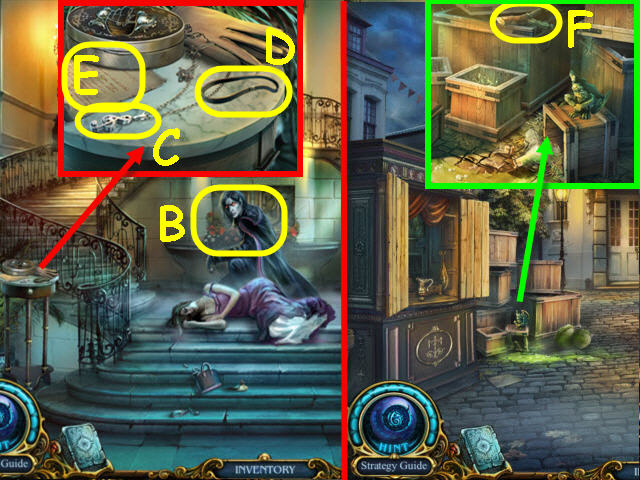
- Go into the mansion to the mansion hall.
- Speak to the vampire (B).
- Examine the table; take the TREBLE CLEF (C), RUBBER BAND (D) and read the note (E).
- Go to the dead end.
- Examine the crates and place the RUBBER BAND on the branch; take the SLINGSHOT (F).
- Go to the mansion.
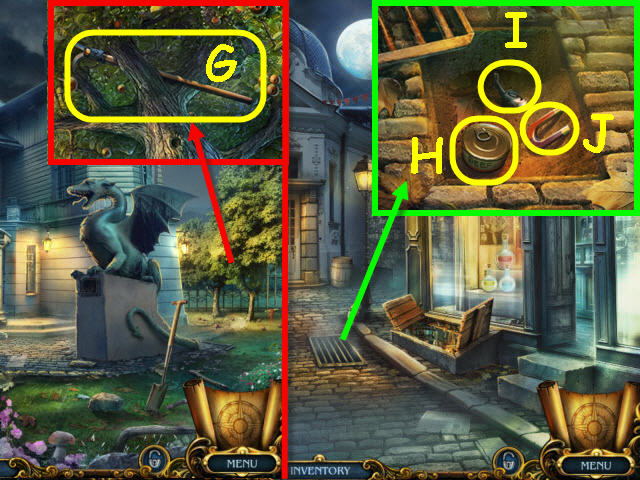
- Examine the tree; use the SLINGSHOT to get the BOAT HOOK (G).
- Go to the dead end.
- Examine the grate and use the BOAT HOOK on it. Take the TIN CAN (H), BUTTON ’9′ (I), and the MAGNET (J).
- Go to the mansion.
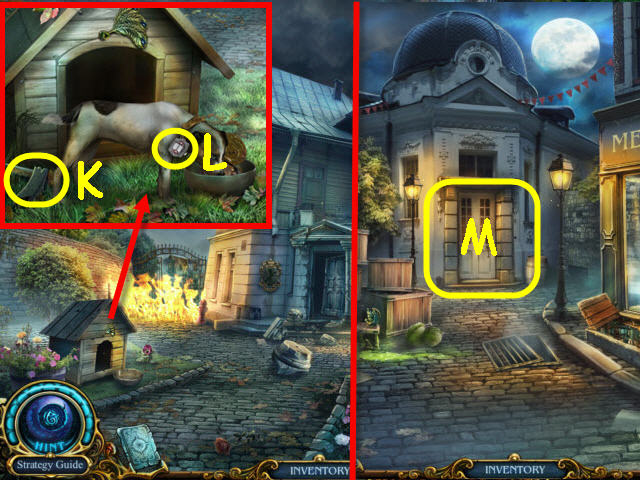
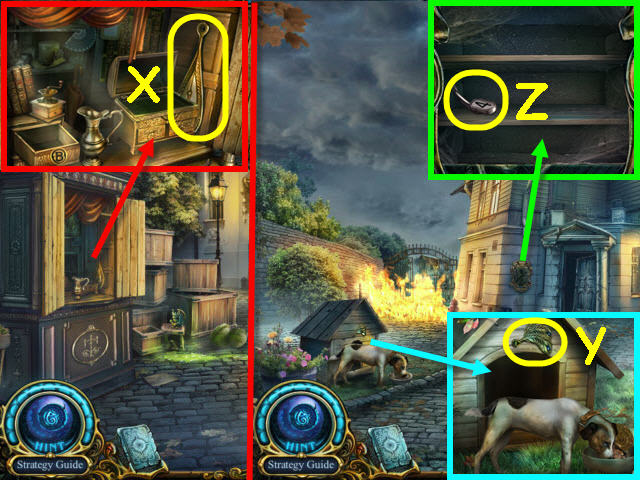
- Examine the doghouse; take the 2nd CANNON WHEEL PART (K).
- Place the TIN CAN in the bowl; take the ARCHIVE KEY (L).
- Go to the dead end.
- Examine the door and use the ARCHIVE KEY on the lock (M).
- Go forward into the archive.
- Examine the table; take the UNIQUE SCREWDRIVER (N), LION BAS-RELIEF (O), and read the note (P).
- Read the note (Q).
- Select the archivist (R).
- Go to the attic of the monster house.
- Examine the chest and use the UNIQUE SCREWDRIVER on the screws; take the SMALL GOLDEN GEAR (S).
- Examine the organ and place the TREBLE CLEF in the slot (T).
- Use the UNIQUE SCREWDRIVER on the screw; take the GOLDEN FEATHER (U).
- Go to the kitchen.
- Examine the cabinet and use the UNIQUE SCREWDRIVER on the screw; take the BIG GOLDEN GEAR (V).
- Go to the drug store.
- Examine the medicine cabinet and use the UNIQUE SCREWDRIVER on the screws; take the BIRD’S EYE (W).
- Back out.
- Examine the showcase and use the UNIQUE SCREWDRIVER on the screw; take the 2nd GOLDEN FEATHER (X).
- Go to the mansion.
- Examine the doghouse and use the UNIQUE SCREWDRIVER on the screw; take the GOLDEN CREST (Y).
- Examine the crest and place the LION BAS-RELIEF on it; take the BUTTON ’4′ (Z).
- Go forward into the mansion hall.

- Examine the peacock and place the 2 GOLDEN FEATHERS, GOLDEN CREST, SMALL GOLDEN GEAR, BIG GOLDEN GEAR, and BIRD’S EYE on it; take the SILVER ARROW (A).
- Go to the drug store.
- Examine the cash register and place the BUTTON ’2′, BUTTON ’4′, and BUTTON ’9′ on it (B).
- Press the buttons 2-4-6-9 as shown in the drawer (C); take the SOUTH AMERICA (D), and the GARGOYLE STATUE PART (E).
- Back out.
- Examine the crates and place the GARGOYLE STATUE PART on the statue; take the GARGOYLE (F).
- Go to the hunter’s room in the monster house.
- Examine the crossbow and place the SILVER ARROW on it; take the CROSSBOW (G).
- Go to mansion hall.
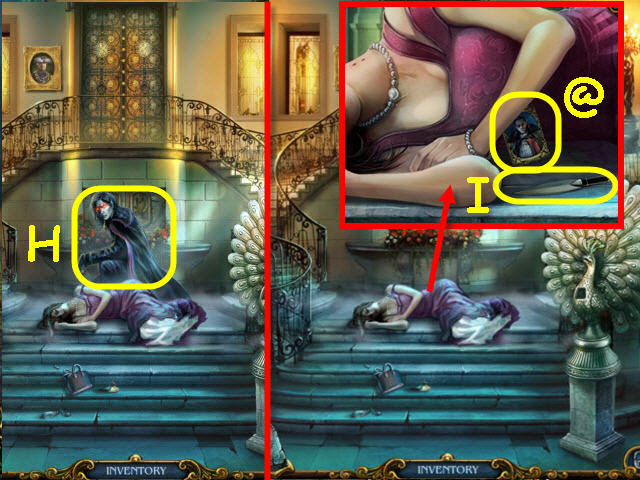
- Use the CROSSBOW on the vampire (H).
- Examine the woman; take the cursed card (@), and the UTILITY KNIFE (I).
- Go to the archive.
Chapter 6 – Chimera
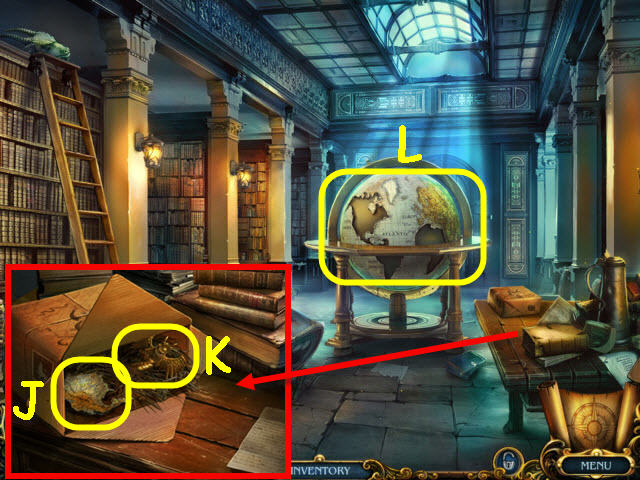
- Examine the table and use the UTILITY KNIFE on the package; take the NORTH AMERICA (J), and DRAGON STATUETTE (K).
- Examine the globe and place the NORTH AMERICA, SOUTH AMERICA, and AFRICA on it (L).
- Examine the opened globe to access a HOS.
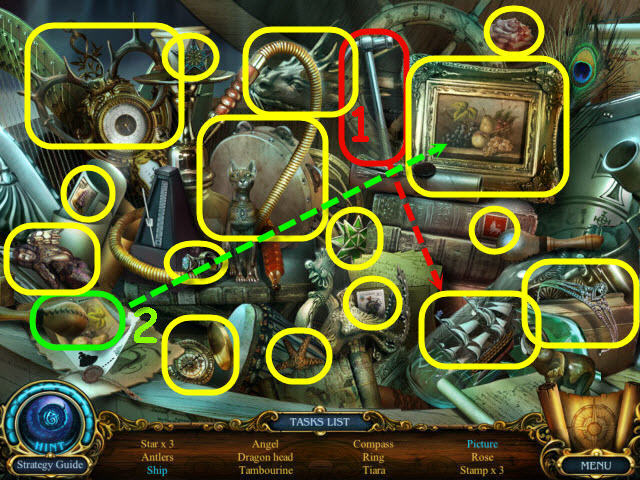
- Find the items listed.
- Use the hammer on the bottle to get a ship (1).
- Place the picture in a frame to get a picture (2).
- You will earn CHIMERA’S LEFT HEAD.
- Go to the mansion hall.
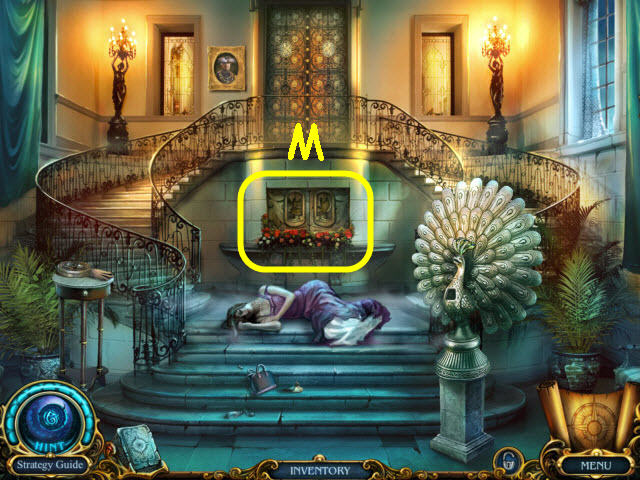
- Examine the bas-relief (M).
- Place the GARGOYLE and DRAGON STATUETTE on it to trigger a puzzle.
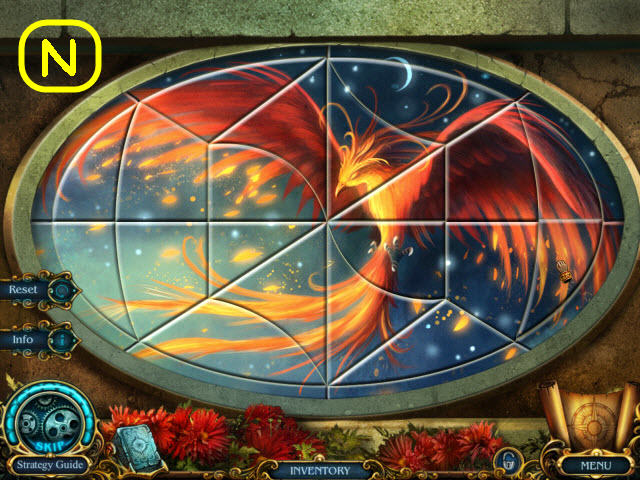
- Place the pieces in the frame to complete the picture.
- See screenshot for solution (N).
- Take the ROPE.
- Go to the archive.
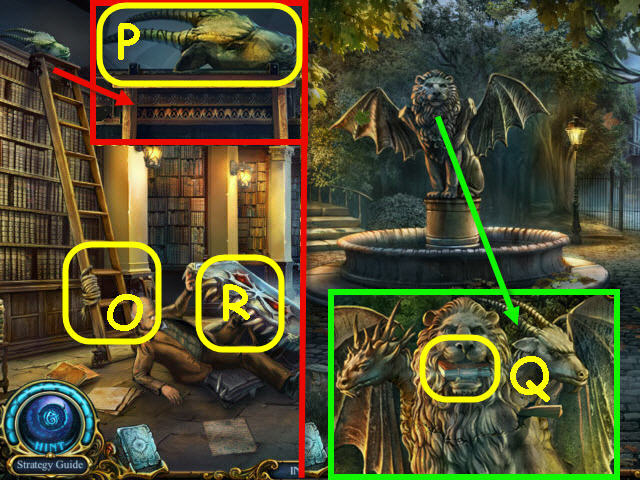
- Examine the broken ladder and wrap the ROPE on it (O).
- Examine the top of the ladder; take the CHIMERA’S RIGHT HEAD (P).
- Back out twice to the fountain.
- Examine the Chimera statue and place CHIMERA’S LEFT HEAD and CHIMERA’S RIGHT HEAD on it; take the GLOWING BOOK (Q).
- Go back to the archives.
- Use the GLOWING BOOK on the evil book (R).
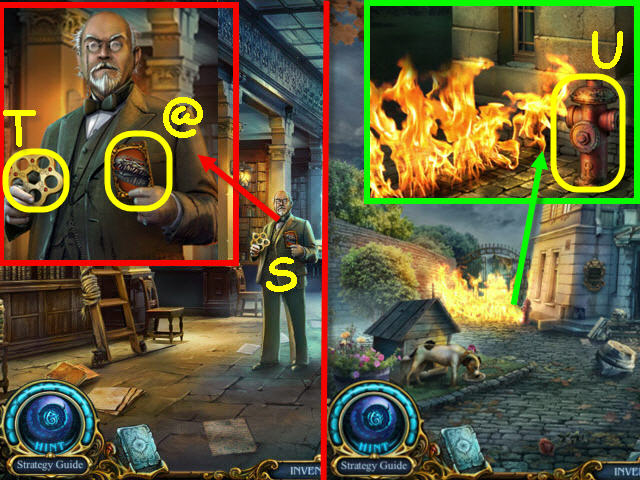
- Speak to the archivist (S).
- Examine the archivist; take the cursed card (@) and the VALVE (T).
- Go to the mansion.
- Examine the fire and use the VALVE on the fire hydrant (U).
- Go forward through the newly-opened gate to the lake.
- Examine the boat; take the 3rd CANNON WHEEL PART (V) and VALVE WHEEL (W).
- Place the MAGNET on the fishing pole; take the FISHING ROD (X).
- Examine the lily pad; use the FISHING ROD in the water to get the SHARK (Y).
- Examine the gate; take the SHIP (Z).
- Examine the grave; read the note (A), take the E LETTER (B).
- Go to the mansion hall.
- Examine the table; place the SHIP on the trinket box and take the OCTOPUS (C).
- Go back to the lake.
- Examine the shed and place the OCTOPUS and SHARK on the lock; select the lock (D).
- Examine the opened shed to access a HOS.

- Find the items listed.
- Use the knife on the shell to get the pearl (1).
- Place the fin on the shark to get the shark (2).
- You will earn a ROPE LADDER.
- Examine the wall and place the ROPE LADDER on it (E).
- Go over the wall via the rope ladder to the ruined street.
- Examine the collapsed facade; take the WOODEN MALLET (F).
- Examine the safe; place the VALVE WHEEL on it and turn. Take the SPADE (G) and the STAINED-GLASS PART (H).
- Go to the park.
- Examine the statue; use the WOODEN MALLET to get the WEDGE (I).
- Go back to the ruined street.
- Examine the collapsed facade and use the WEDGE and WOODEN MALLET on it; take the GATE HANDLE (J).
- Back out.
- Examine the gate and place the GATE HANDLE on it; turn the handle (K).
- Go through the newly-opened gates to the cemetery.
- Examine the tree trunk and use the SPADE on the freshly dug dirt three times. Take the LANTERN (L), 2nd STAINED-GLASS PART (M), and MUSIC NOTE (N).
- Back out.
- Examine the grave and place the MUSIC NOTE on the box; open the box and take the BLUE SKULL (O).
- Go left to the ruined street.
- Examine the hole in the wall and hang the LANTERN in it; use TERRANCE to light it (P).
- Take the GOLDEN FISH (Q) and 3rd STAINED-GLASS PART (R).
- Back out.
- Examine the boat and place the GOLDEN FISH on the box; take the YIN-YANG (S) and 4th STAINED-GLASS PART (T).
- Go to the cemetery.
- Examine the barrel; place the 3 CANNON WHEEL PARTS on the wheel and take the CANNON WHEEL (U).
- Go to the ruined street.
- Examine the cannon and place the CANNON WHEEL on it; turn the cannon twice and take the CROWBAR (V).
- Examine the gun shop door and use the CROWBAR on it; take the EMPTY HORN (W), and CANNONBALL (X).
- Place the YIN-YANG on the safe; take the 5th STAINED-GLASS PART (Y).
- Go to the cemetery.
- Examine the barrel and use the CROWBAR on the lid; take the RED SKULL (Z).
- Use the EMPTY HORN on the opened barrel to get a HORN WITH GUNPOWDER (A).
- Go to the ruined street.
- Examine the cannon and place the HORN WITH GUNPOWDER and CANNONBALL in it (B).
- Turn the cannon twice and use TERRANCE to light it.
Chapter 7 – Justice
- Examine the body; take the cursed card (@) and the GREEN SKULL (C).
- Go forward to the courthouse.
- Examine the chest; take the HALF OF SHEARS (D).
- Go to the dead end.
- Examine the showcase and place the HALF OF SHEARS on the shears part; take the LOPPING SHEARS (E).
- Go to the cemetery.
- Examine the crypt door and place the RED SKULL, GREEN SKULL and BLUE SKULL on it to trigger a puzzle (F).
- Make matches of three or more green, red or dark blue gems to fill the meters.
- The layouts are random, see screenshot for examples (G).
- Examine the opened crypt to access a HOS.
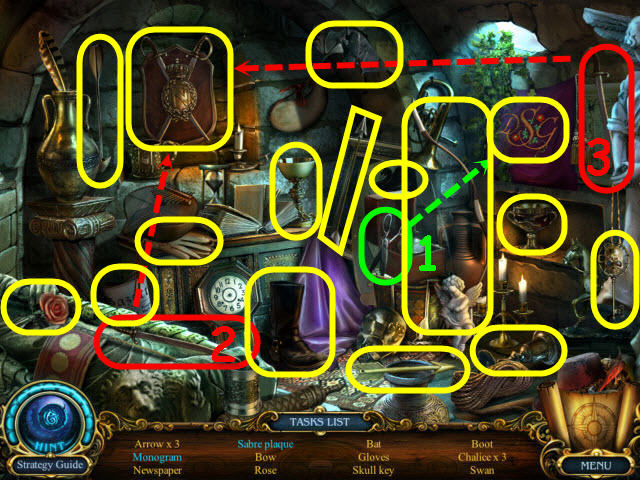
- Find the items listed.
- Use the scissors on the cloth to get a monogram (1).
- Place the two sabres on the plaque to get a sabre plaque (2-3).
- You will earn a SKULL KEY.
- Go to the courthouse.
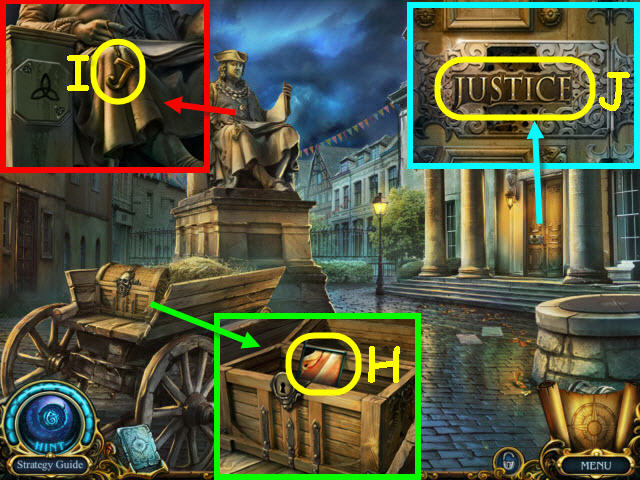
- Examine the chest and use the SKULL KEY on it; turn the key and take the 6th STAINED-GLASS PART (H).
- Examine the statue; use the LOPPING SHEARS to get the J LETTER (I).
- Examine the courthouse door and place the J LETTER, S LETTER, and E LETTER on the plaque; select the plaque to open the door (J).
- Enter the court.
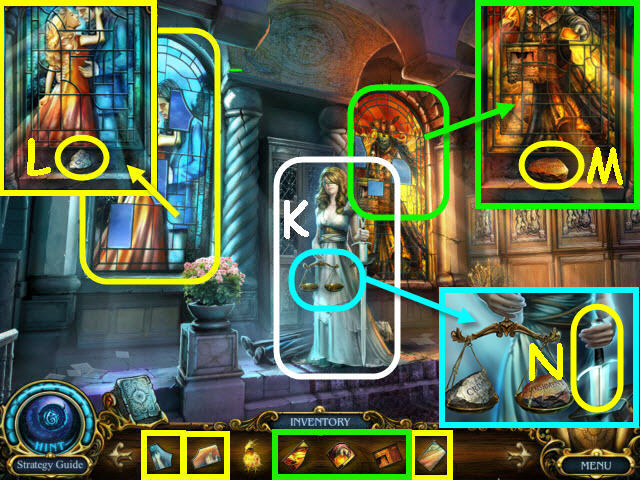
- Speak to Lady Justice (K).
- Examine the left stained glass window and place the 3 STAINED-GLASS PARTS marked in yellow in the spaces; take the ‘CRIME’ STONE (L).
- Examine the right stained glass window and place the 3 STAINED-GLASS PARTS marked in green in the spaces; take the ‘PUNISHMENT’ STONE (M).
- Examine the scales and place the ‘PUNISHMENT STONE and ‘CRIME’ STONE on them; get the SWORD OF JUSTICE (N).
- Examine the judge; take the cursed card (@) and JUDGE’S SIGNET RING (O).
- Go to the cemetery.
- Use the SWORD OF JUSTICE on the vessel (P).
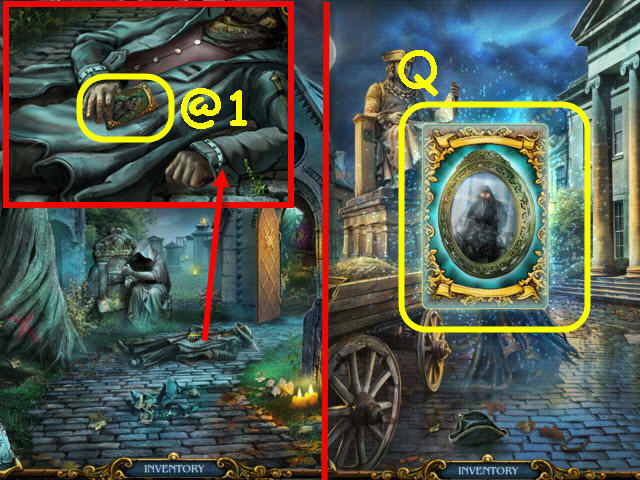
- Examine the gravedigger; take the cursed card (@1).
- Go to the courthouse.
- Attempt to take the last cursed card (Q).
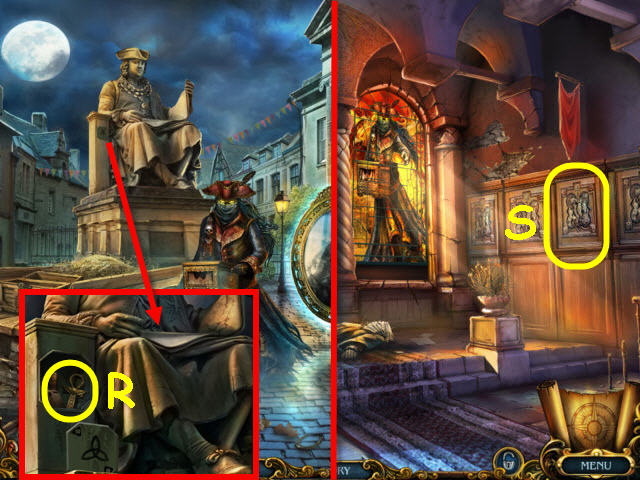
- Examine the statue and place the JUDGE’S SIGNET RING on the plate; take the ANKH (R).
- Go into the court.
- Examine the wall panel and place the ANKH in the recess to trigger a puzzle (S).
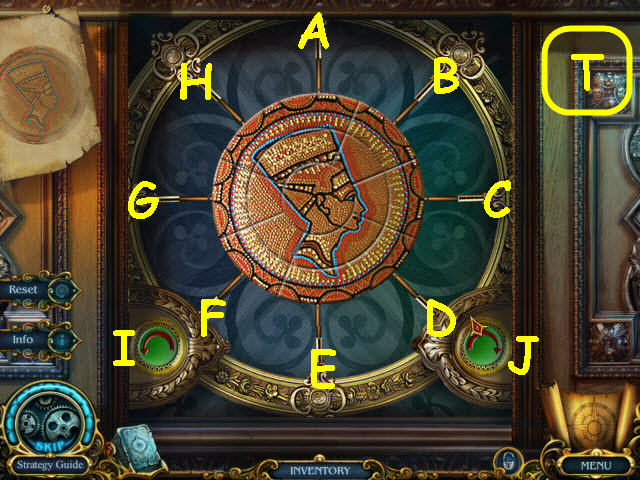
- Complete the picture.
- To solve the puzzle select the following: H-Jx2-C-D-J-B-F-Jx2-A-Jx2-E-Jx3-G-I-D-I-B-J-H-J-F-Jx2-A-J-E-C-J-G, and Jx2 (T).
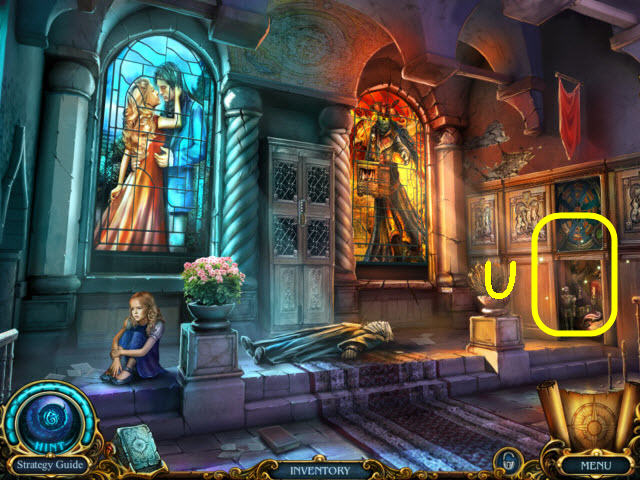
- Examine the opened cabinet (U).
- You will access a HOS.
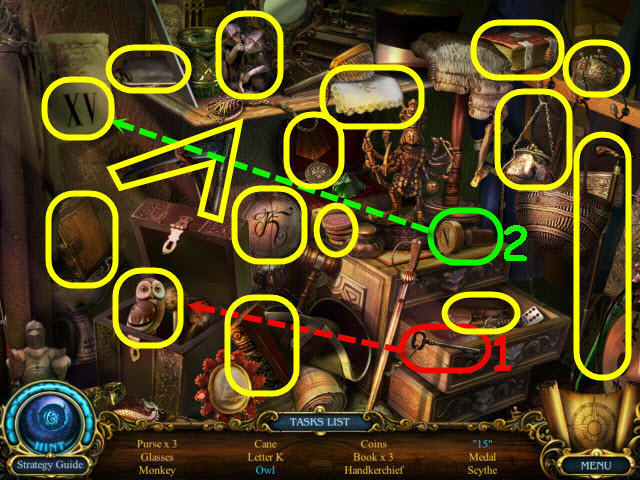
- Find the items listed.
- Use the key on the chest to get an owl (1).
- Use the V stamp on the paper to get the ’15′ (2).
- You will earn a SCYTHE.
- Go to the cemetery.
- Examine the reaper and place the SCYTHE in his hands; take the CARTOUCHE (V).
- Go to court.
- Examine the cabinet and place the CARTOUCHE in the slot; turn the tumblers to duplicate the symbols on the CARTOUCHE (W).
- Take the LAW BOOK (X), and read the note (Y).
- Back out.
- Examine and place the LAW BOOK on the mirror; take the cursed card (@) to get a CURSED DECK.
- Give the CURSED DECK to the organ grinder to trigger a puzzle (Z).
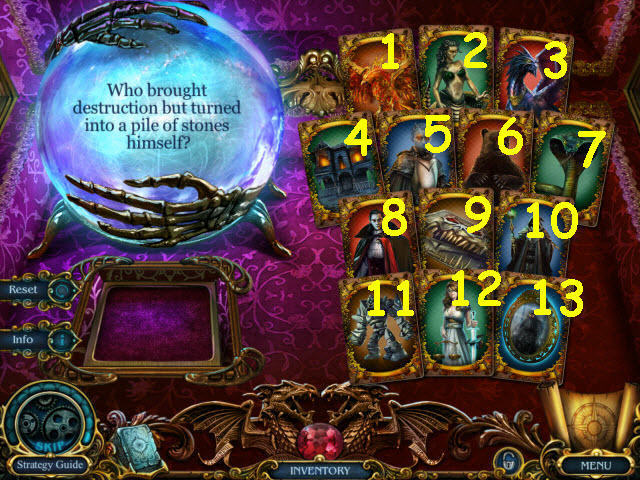
- Select the cards to match the questions.
- To solve the puzzle, select the cards and place them into the tray under the sphere to match the questions as follows:
- Who looks like a sun burst and is the Mayor’s punishment? 1.
- Whose child became your good companion while his parent was a curse? 1.
- Who is afraid of mirror reflections and became the Gendarme’s torment? 2.
- Who punishes for nonfeasance and turns into stone? 2.
- Who inflicts a penalty for bribes and loves the shine of jewelry? 3.
- Who meted out punishment for a greedy banker? 3.
- Who came to life and became the fatal mistake for an innocent child? 4.
- Who was the prison for the one punished by mistake? 4.
- Who executed the mean one not having a head himself? 5.
- Who became the atonement of meanness, lies and blackmail? 5.
- Who is huge and strong and gave a bashing to a coward? 6.
- Who became the curse of the boaster and traitor? 6.
- Who brought vengeance on the one who created poison instead of remedy? 7.
- Who dealt with an avid breaker of the Hippocratic Oath? 7.
- Who deprived the cold-blooded murderer of blood? 8.
- Who punished for jealousy the unprincipled poisoner? 8.
- Who became the torture for the one who wrote a mendacious story? 9.
- Who punished the archivist for lying and deceiving? 9.
- Who inflicted the curse on the one who disrespected the dead? 10.
- Who brought retribution to the mean grave digger? 10.
- Who punished the murderer who threw the fatal stone? 11.
- Who brought destruction but turned into a pile of stones himself? 11.
- Who taught a lesson to the one who betrayed justice? 12.
- Who was the curse for the unjust judge taking bribes? 12.
- Who inflicted the curse for the unjust judge taking bribes? 13.
- Who showed you your doubts and became your curse? 13.
- Congratulations, you have completed Chimeras: Tune of Revenge.


 Grim Tales: The Final Suspect Walkthrough, Guide, & Tips
 Age of Oracles: Tara's Journey Walkthrough, Guide, & Tips
 Queen's Tales: The Beast and the Nightingale Walkthrough, Guide, & Tips
 Royal Detective: The Lord of Statues Walkthrough, Guide, & Tips
 Punished Talents: Seven Muses Walkthrough, Guide, & Tips