Otherworld: Omens of Summer Walkthrough, Guide, & Tips
Otherworld: Omens of Summer Walkthrough

Welcome to the Otherworld: Omens of Summer Walkthrough
Dark magic threatens our world! Can you stop the Shade and his minions before it’s too late?
Whether you use this document as a reference when things get difficult or as a road map to get you from beginning to end, we’re pretty sure you’ll find what you’re looking for here.
This document contains a complete Otherworld: Omens of Summer game walkthrough featuring annotated screenshots from actual gameplay!
We hope you find this information useful as you play your way through the game. Use the walkthrough menu below to quickly jump to whatever stage of the game you need help with.
Remember to visit the Big Fish Games Forums if you find you need more help. Have fun!
This walkthrough was created by Lucky Smile, and is protected under US Copyright laws. Any unauthorized use, including re-publication in whole or in part, without permission, is strictly prohibited.
General Tips

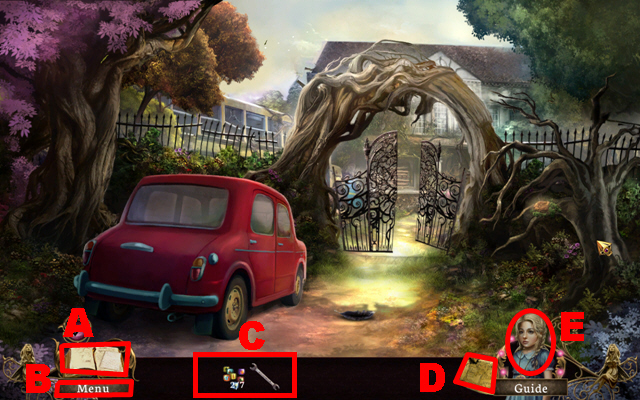
- This is the official guide for Otherworld: Omens of Summer.
- Access the journal (A) to review the information you have gathered so far.
- Select the menu (B) to adjust the settings and to exit the game.
- Collected items will be stored in the inventory (C).
- You can quickly travel to previously discovered locations through the map (D).
- Ask Fiona (E) for help if you get stuck at any time.
- There are three grades of difficulty you can choose from: casual, expert, and hardcore mode.
- Hidden Object scenes will be referred to as HOS throughout this guide.
- SPOILER ALERT! If you enter the central portal first at the end of the second chapter, steps will vary slightly from the ones in this guide. You will find the BLADE embedded in the wall inside the lighthouse, the BANDAGES beside the trunk with chimes, the FUNNEL on the fresnel lens, and the MATCHES inside the gramophone. The LANTERN is assembled and refilled on the quay.
- SPOILER ALERT! If you enter the right portal first at the end of the second chapter, steps will slightly vary from the ones in this guide. You will find the BLADE stuck in the car’s flat tire, and the MATCHES beside the tire. After completing the HOS in the trunk of the car, you will find an oil can and a funnel in the trunk; you should refill the lantern there.
Chapter 1: A Murder of Crows

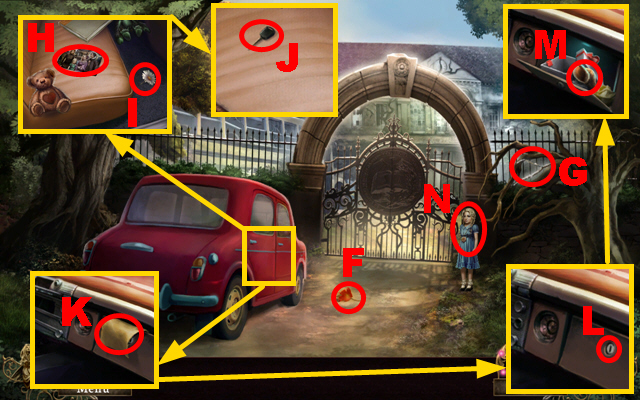
- Take the LEAF (F) and the BRANCH (G).
- Zoom into the car doors and open the left door; remove the two toys and the book; take the photo (H), the BLOOMING FLOWER (I), and the GLOVE BOX KEY (J).
- Open the right door and take the letter (K); put the GLOVE BOX KEY into the lock (L) and take the SEA SHELL (M).
- Talk to Fiona (N).

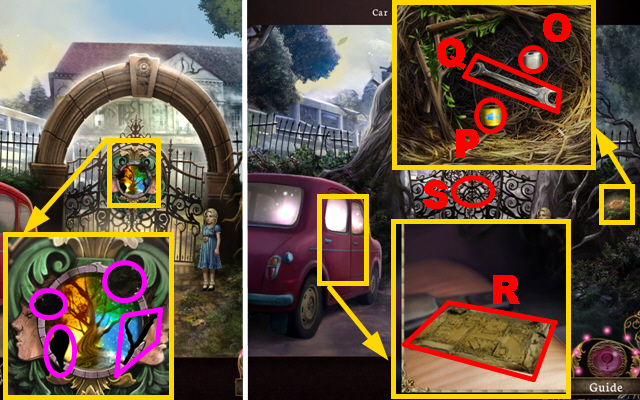
- Zoom into the magical crest; put the LEAF, the BRANCH, the BLOOMING FLOWER, and the SEA SHELL into the slots marked in purple.
- Zoom into the nest and move aside the branches; take the 1/7 LARGE BEAD (O), the 2/7 LARGE BEAD (P), and the WRENCH (Q).
- Zoom into the car and open the right door; take the map (R).
- Zoom into the gate (S).
- Play the HOS.

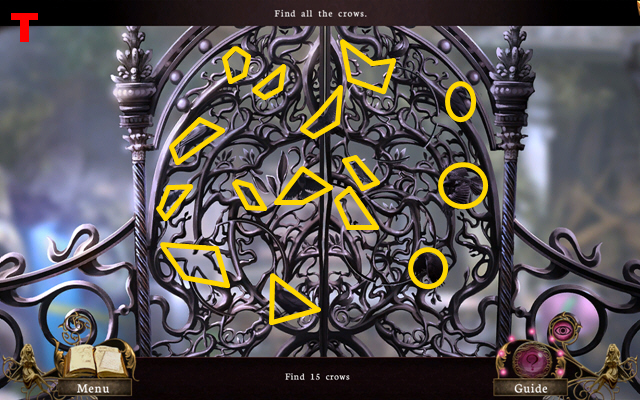
- Rotate the 3 circles into the correct position and find the 15 crows marked in yellow (T).

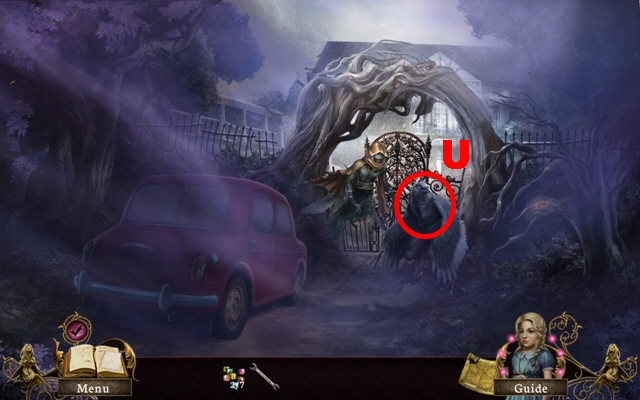
- Talk to the crow (U).
- Play the mini-game.

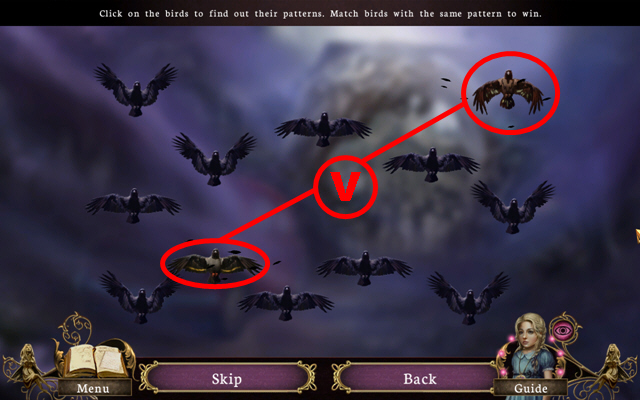
- To complete this mini-game, match pairs of similar crows.
- Selecting two crows will reveal their pattern (V).
- If two similar crows are selected they will be removed, if two differing crows are selected, they will switch places.

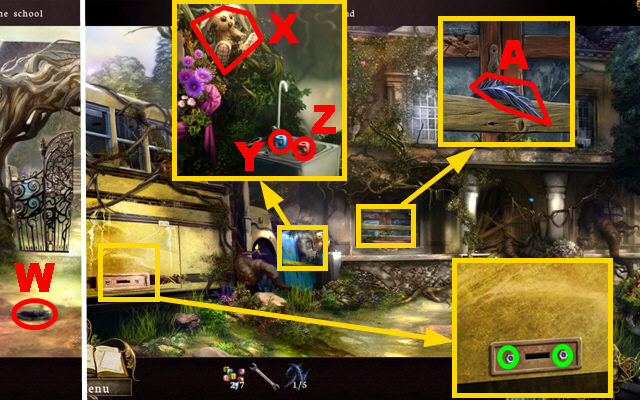
- Take the 1/5 FEATHER (W).
- Move forward.
- Zoom into the locker; take the STUFFED BUNNY (X), the 3/7 LARGE BEAD (Y), and the 4/7 LARGE BEAD (Z).
- Zoom into the window; take the 2/5 FEATHER (A).
- Zoom into the compartment; use the WRENCH to remove the 2 bolts marked in green.
- Play the HOS.

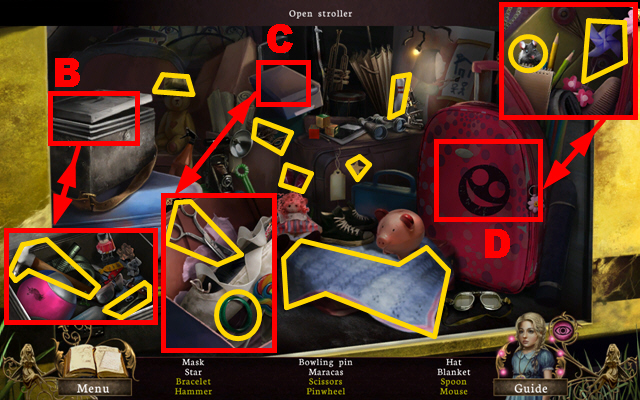
- Zoom into the bag (B) to discover two items.
- Zoom into the box (C) to discover two items.
- Zoom into the stroller (D) to discover two items.
- You will receive the HAMMER.
- Turn right.

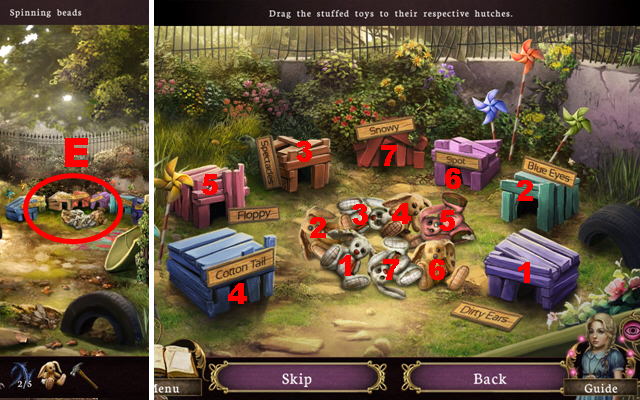
- Zoom into the bunnies (E) and put down the STUFFED BUNNY to play a mini-game.
- To solve this puzzle, put the bunnies 1-7 into their related huts.

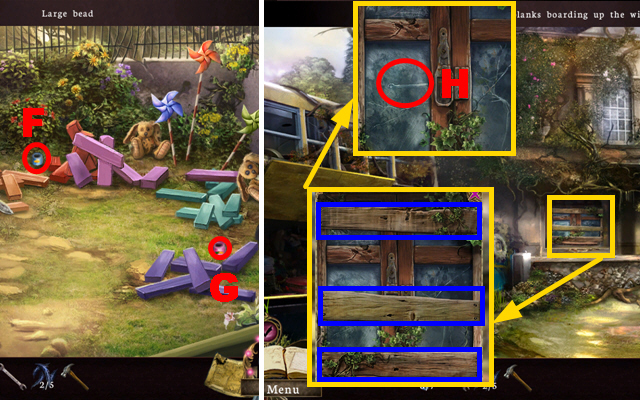
- Take the 5/7 LARGE BEAD (F) and the 6/7 LARGE BEAD (G).
- Walk down.
- Zoom into the window; use the HAMMER to remove the three boards marked in blue.
- Use the HAMMER to break the window (H).
- Enter the School.

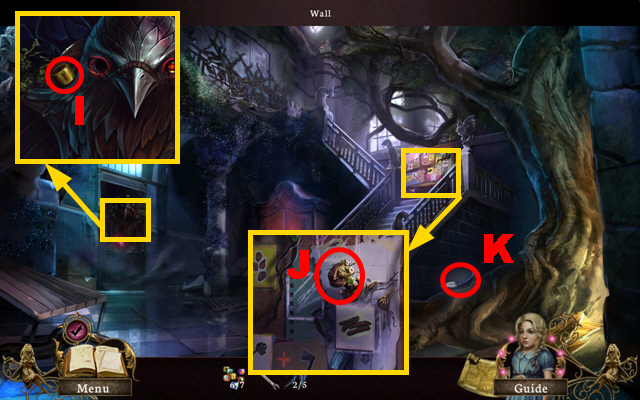
- Zoom into the classroom door; take the 7/7 LARGE BEAD (I).
- Zoom into the wall; talk to the scarecrow (J); you will receive the GEM.
- Take the 3/5 FEATHER (K).
- Walk down and turn right.

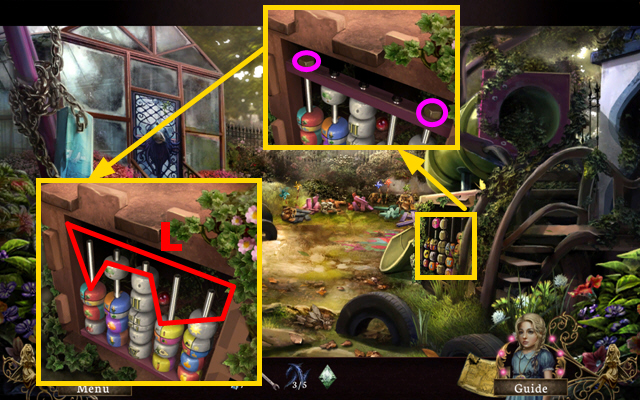
- Zoom into the spinning beads; remove the 2 bolts marked in purple with the WRENCH.
- Remove the top and put down the 7 LARGE BEADS (L).
- Play the mini-game.

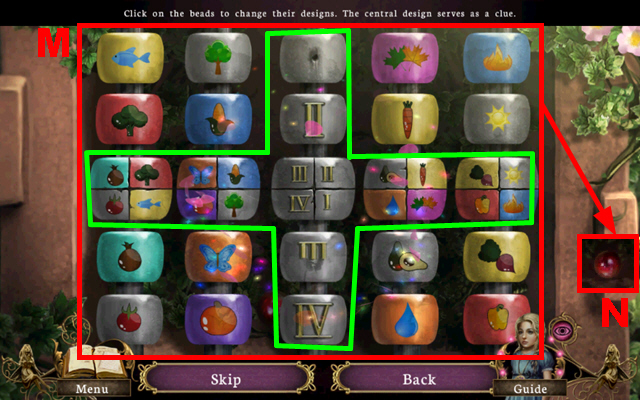
- To solve this puzzle (M), press the beads to create the correct design.
- The fixed beads marked in green serve as a clue.
- Take the GLASS BEAD (N).

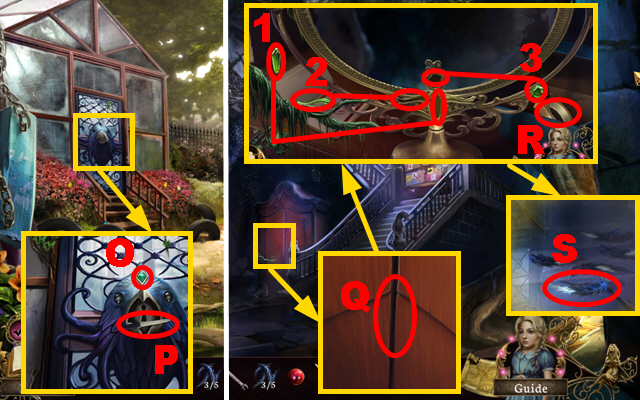
- Zoom into the greenhouse door and put the GEM into the slot (O); take the NAIL FILE (P).
- Walk down and move forward.
- Zoom into the storage and use the NAIL FILE to open the cover (Q); take the TAPE (R).
- Put the mirror fragments into their corresponding slots (1-3).
- Touch the mirror, turn its pages twice, and take the 4/5 FEATHER (S).

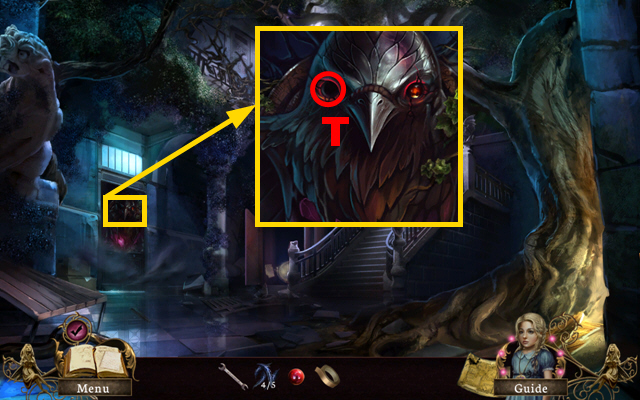
- Zoom into the door; put the GLASS BEAD into the slot (T).
- Enter Fiona’s Classroom.
- Play the mini-game.

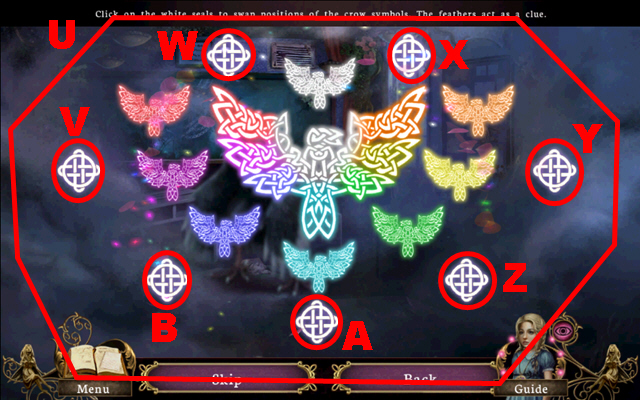
- To solve this puzzle (U), press the white seals to swap the crow emblem’s positions. The colors of the crow’s feathers indicate the correct placements. The crow emblems’ positions are randomized on start so your solution may vary.
- A sample solution has been attached, where the white seals are pressed in the following sequence: W, Y, X, V, W, Z, Y, X, W, V, B, Y, and Z.

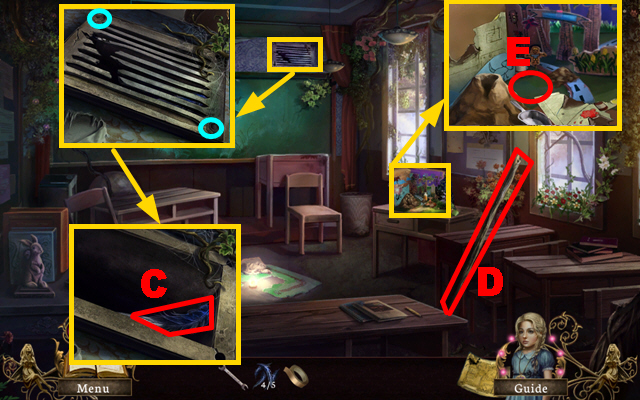
- Zoom into the air vent and remove the 2 bolts marked in blue with the WRENCH; remove the grate and take the 5/5 FEATHER (C).
- Take the STICK (D).
- Zoom into the diorama; put down the TAPE (E).
- Play the HOS.

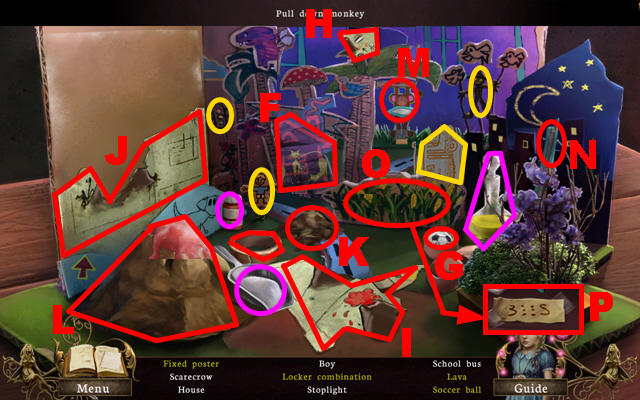
- Pull down the paper and take the house (F).
- Crack the egg and take the soccer ball (G).
- Open the window, take the poster piece (H), put it next to the other poster piece (I), use the tape to fix the pieces, take the new piece, connect it to the poster half (J), and take the fixed poster.
- Put the clay (K) on the volcano (L).
- Pour the baking soda, the red dye, and the vinegar (all marked in purple) into the volcano.
- Take the lava from the volcano.
- Pull down the monkey (M).
- Take the paper handle (N), connect it to the blade (held by the monkey), use the scythe to harvest the corn (O), and take the locker combination (P).
- You will receive the LOCKER COMBINATION.
- Walk down.

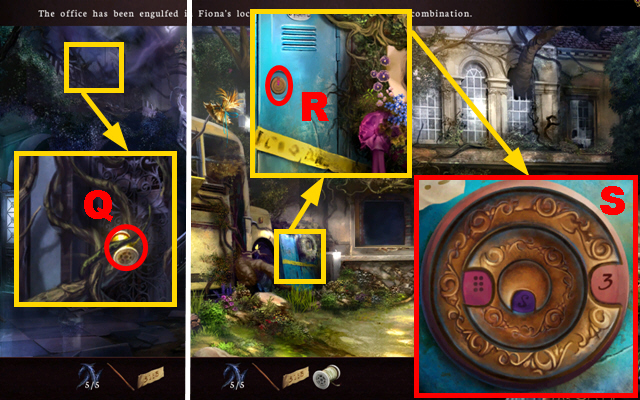
- Zoom into the Principal’s Office; take the THREAD (Q).
- Walk down.
- Zoom into the locker; put down the LOCKER COMBINATION (R).
- To solve this puzzle (S), rotate the circle pieces to enter the correct combination.
- Play the HOS.

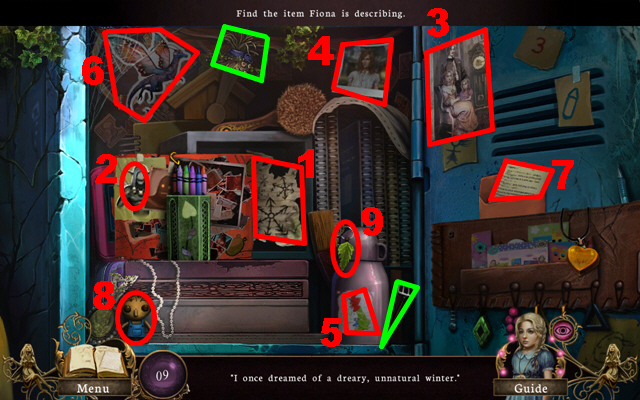
- Collect the items in sequence 1-9.
- Move the cover and take the winter (1).
- Open the envelope and take the letter (7).
- Collect the rake and the hat marked in green, put them on the scarecrow, and take the scarecrow (8).
- Pull out the key (9) and take it.
- You will receive the GREENHOUSE KEY.
- Turn right.

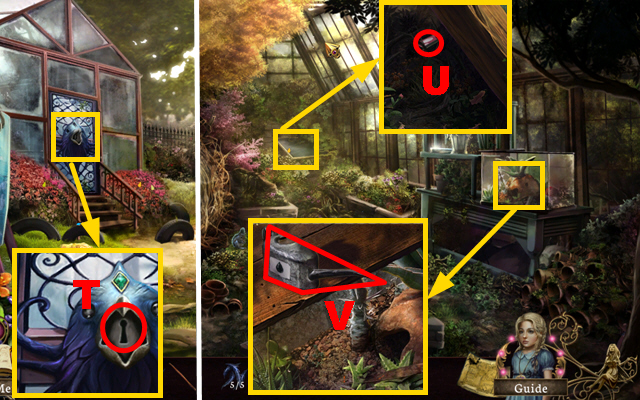
- Zoom into the door; put the GREENHOUSE KEY into the lock (T).
- Enter the Greenhouse.
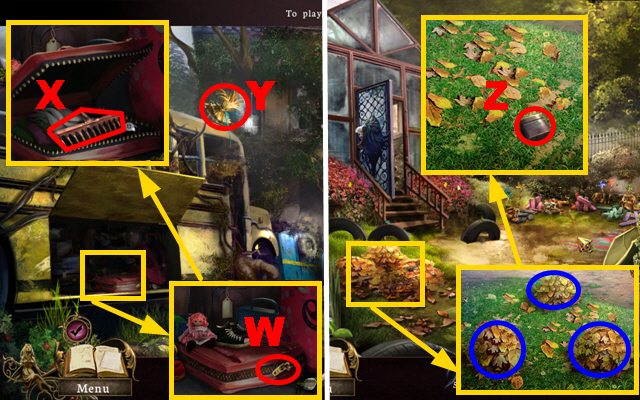
- Zoom into the blackboard; use the STICK twice to pull the eraser closer (U) and take the ERASER.
- Zoom into the terrarium; take the CAN OF OIL (V).
- Walk down twice.

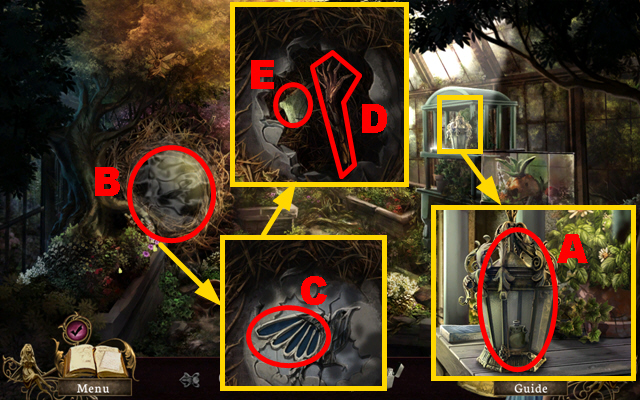
- Zoom into the bus, pour the CAN OF OIL over the zipper (W), and open the stroller; connect the STICK to the rake head (X) to acquire the RAKE.
- Use the RAKE to acquire the STRAW HAT (Y).
- Turn right.
- Zoom into the leaves and remove the three piles marked in blue with the RAKE; take the LIGHTER (Z).
- Move forward.

- Zoom into the lantern and open it; pour the CAN OF OIL into the lantern (A), put the THREAD into it, and light it with the LIGHTER.
- Take the LANTERN.
- Use the LANTERN to remove the magic from the dark forcefield (B).
- Put the 5 FEATHERS into the slots (C).
- Take the SCARECROW’S ARM (D) and the letter (E).
- Go to Fiona’s Classroom.

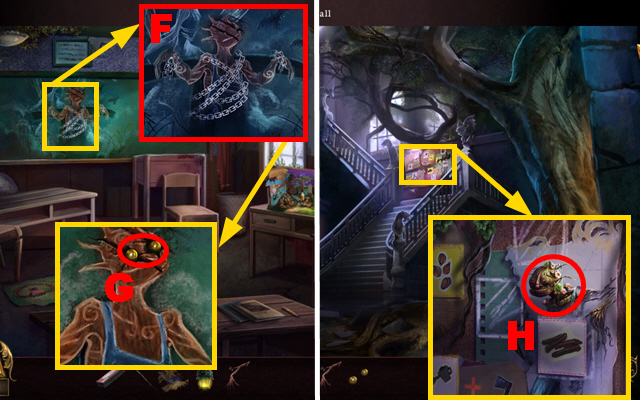
- Zoom into the blackboard and use the ERASER to remove the chains (F); move the ERASER around to clear the whole picture.
- Take the SCARECROW’S EYES (G).
- Walk down.
- Zoom into the board; give the STRAW HAT, the RAKE, the SCARECROW’S ARM, and the SCARECROW’S EYES to the scarecrow (H).
- Play the mini-game.

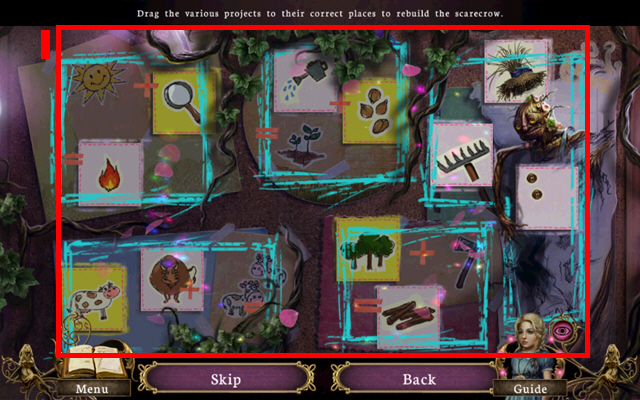
- To solve this puzzle (I), swap the papers to put each paper into its correct position.
Chapter 2: The Antiquarian

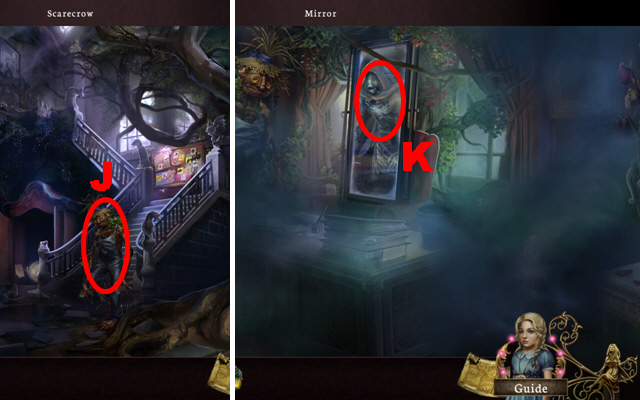
- Talk to the scarecrow (J).
- Talk to the shade (K).

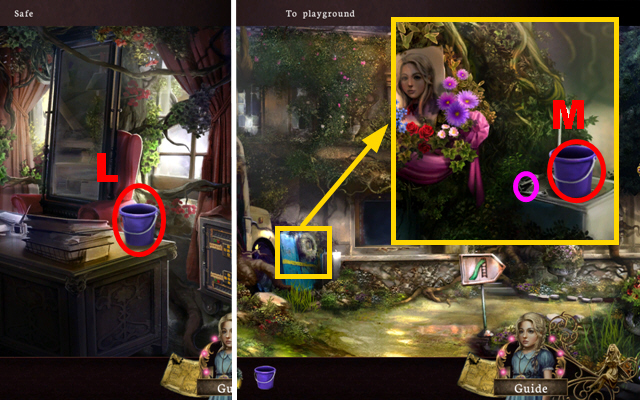
- Take the EMPTY BUCKET (L).
- Walk down twice.
- Zoom into the locker and put down the EMPTY BUCKET (M).
- Select the handle marked in purple and take the BUCKET OF WATER.
- Turn right and move forward.

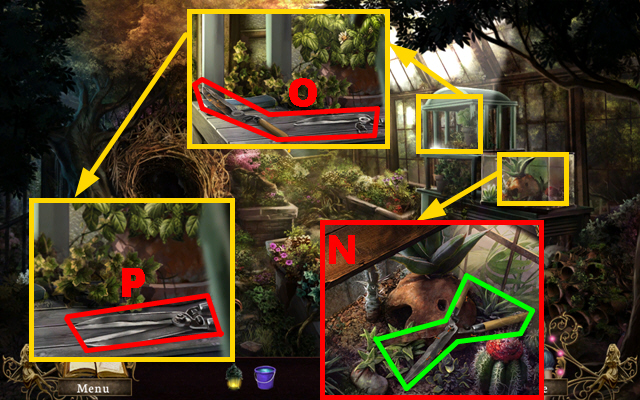
- Zoom into the terrarium and pour the BUCKET OF WATER into it (N); take the BLUNT SHEARS marked in green.
- Zoom into the whetstone and put down the BLUNT SHEARS (O); drag the shear along the whetstone.
- Connect the sharpened shear to its other half and take the GARDENING SHEARS (P).
- Go to the Principal’s Office.

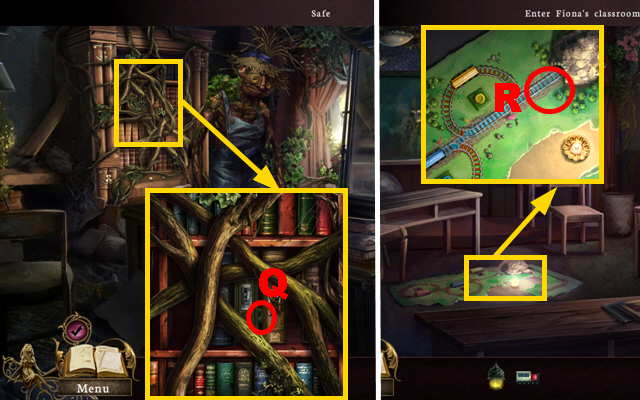
- Zoom into the bookcase and use the GARDENING SHEARS 4 times on the branches; take the ENGINE (Q).
- Go to Fiona’s Classroom.
- Zoom into the tracks; put down the ENGINE (R).
- Play the mini-game.

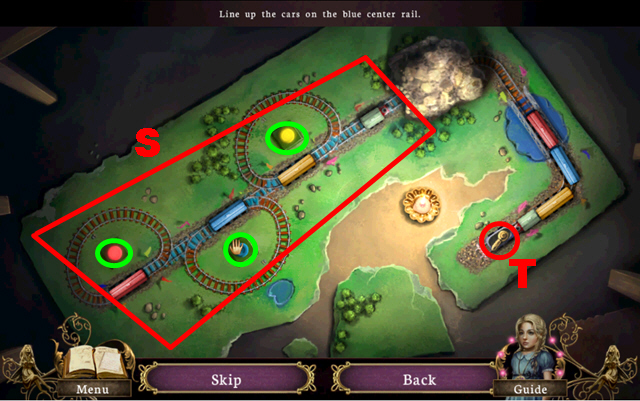
- To solve this puzzle (S), align the three carts on the blue track.
- Press the buttons marked in green to stop the related cart.
- Take the WINDER (T).
- Go to the Principal’s Office.

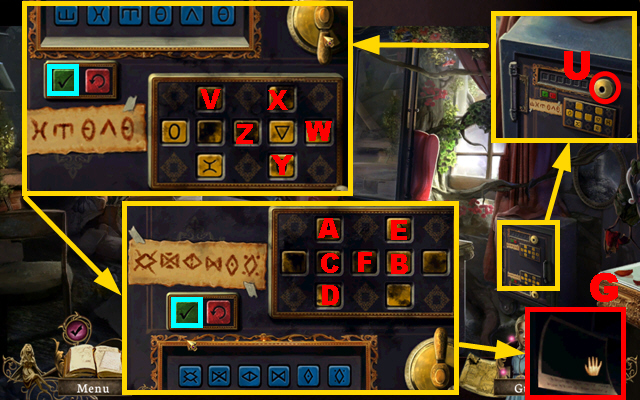
- Zoom into the safe and put down the WINDER (U); play the mini-game.
- To solve the first part of the puzzle, press the buttons in the following sequence: V, W, X, Y, Z, and Y; press the button marked in blue.
- To solve the second part of the puzzle, press the buttons in the following sequence: A, B, C, D, E, and F; press the button marked in blue.
- Take the ENCHANTED PHOTO (G).

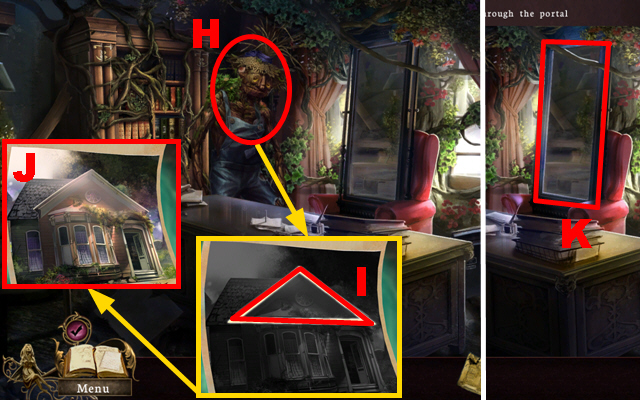
- Give the ENCHANTED PHOTO to the scarecrow (H).
- Retrace the triangle shape (I) and take the photo (J).
- You will receive the 1/4 BELL.
- Go through the portal (K).

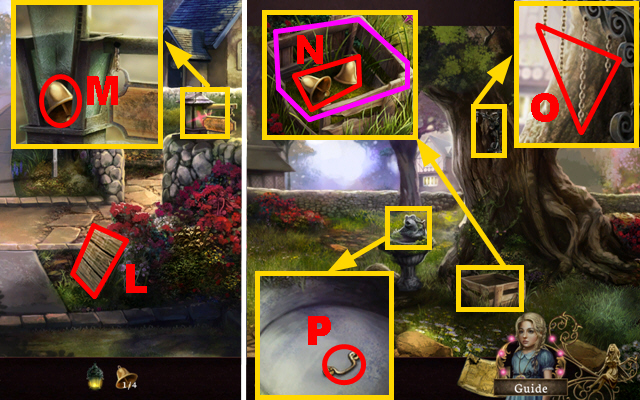
- Take the WOODEN PLANK (L).
- Zoom into the sign post and lift the cover; take the 2/4 BELL (M).
- Move forward.
- Zoom into the crate; take the 2 BELLS (N).
- Put the WOODEN PLANK on the crate marked in purple.
- Zoom into the ringer and connect the 4 BELLS to it (O).
- Zoom into the fountain; take the 1/2 HANDLE (P).
- Open the door, enter the house, and go upstairs.

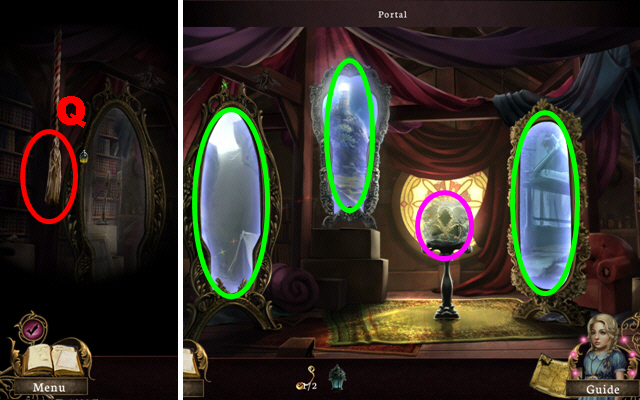
- Use the LANTERN to light the room; pull the cord (Q).
- Zoom into the 3 portals marked in green and the navigation device marked in purple.
- Ms. Thomas will talk to you.
- You will receive the 1/3 STATUETTE.
- Go upstairs.

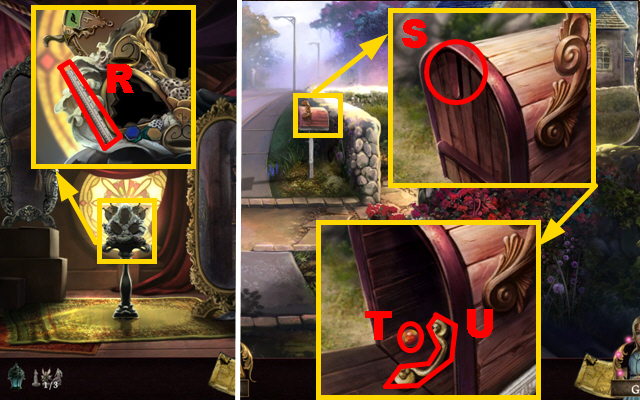
- Zoom into the navigation device; take the RULER (R).
- Walk down three times.
- Zoom into the mailbox and use the RULER to open it (S); take the ORB (T) and the 2/2 HANDLE (U).
- Move forward twice.

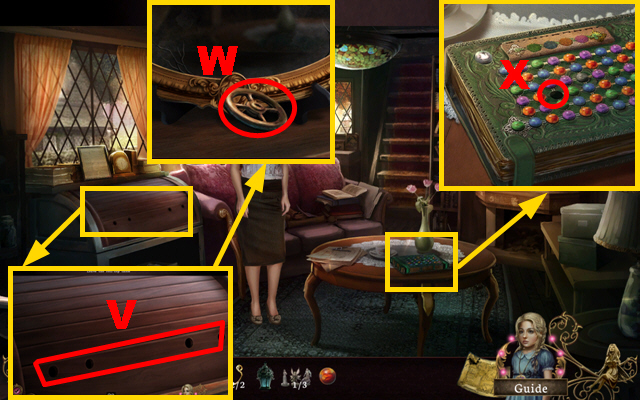
- Zoom into the roll-top table and put down the 2 HANDLES (V); take the VALVE (W).
- Zoom into the table and put down the ORB (X).
- Play the mini-game.

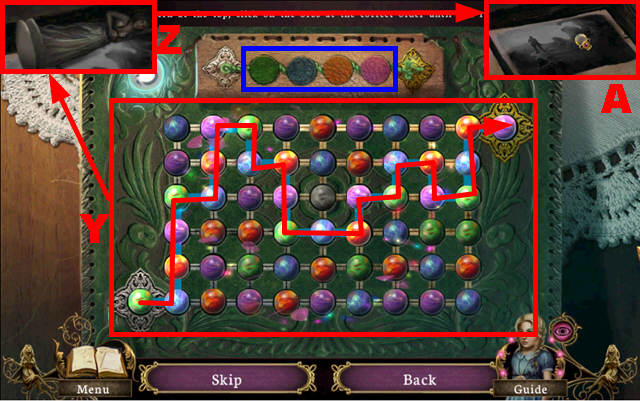
- To solve this puzzle (Y), trace a line from the green orb to the purple orb using the pattern marked in blue.
- Take the 2/3 STATUETTE (Z) and the photo (A).
- Walk down.

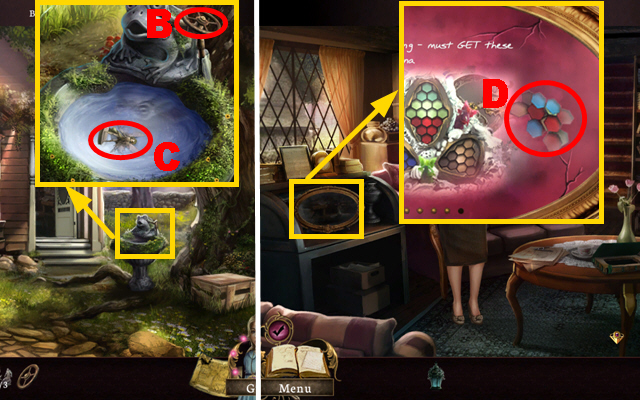
- Zoom into the fountain and put down the VALVE (B); take the 3/3 STATUETTE (C).
- Move forward.
- Zoom into the roll-top table and then zoom into the mirror; turn the pages four times and take the NAVIGATION CONTROL PIECE (D).
- Move forward.

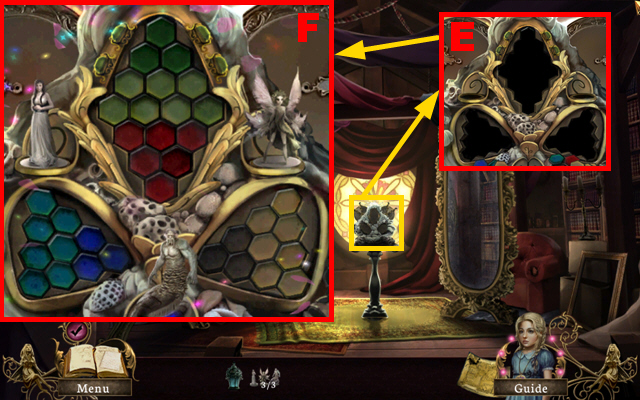
- Zoom into the navigation device; put down the 3 STATUETTES and the NAVIGATION CONTROL PIECE (E).
- Play the mini-game.
- To solve this puzzle (F), put the navigation control pieces into their correct positions.
- Play the second mini-game.

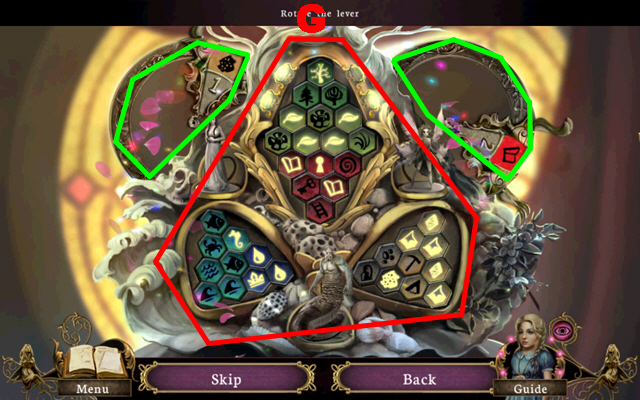
- To solve this puzzle (G), press the white symbols.
- Rotate the disks marked in green to see which symbols have to be pressed.
- You will receive the artifacts case.

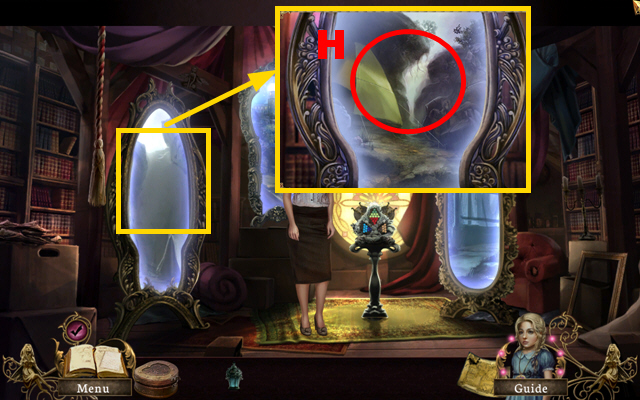
- Zoom into the left portal; touch the portal (H) to go through it.
- If you decide to enter the central or the right portal first, see the General Tips section for additional steps required.
Chapter 3: A Tale of Undying Love

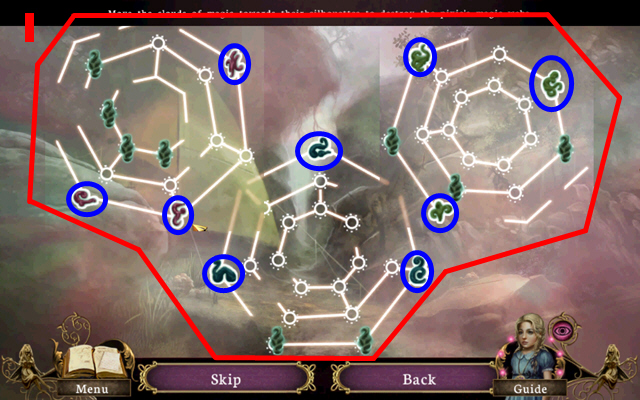
- Zoom anywhere to play a mini-game.
- To solve this puzzle (I), move the 9 clouds of magic marked in blue into their corresponding shapes.

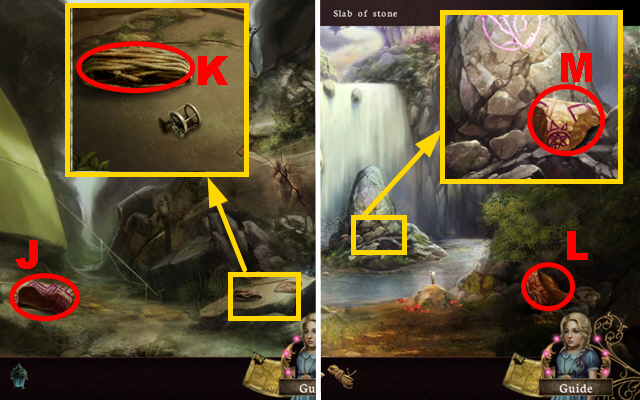
- Take the 1/6 STONE SLAB (J).
- Zoom into the slab; take the ROPE (K).
- Move forward.
- Take the 2/6 STONE SLAB (L).
- Zoom into the large rock; take the 3/6 STONE SLAB (M).
- Move forward.

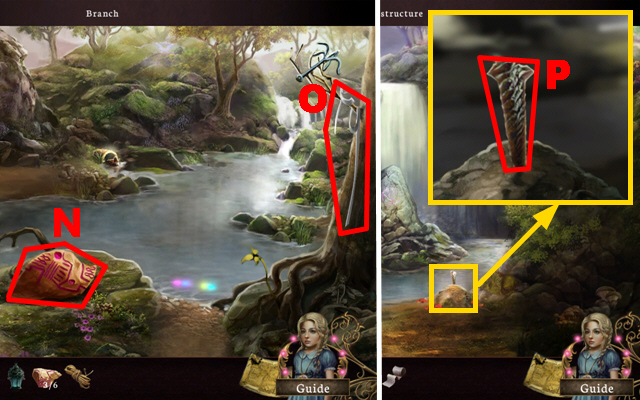
- Take the 4/6 STONE SLAB (N) and the BANDAGES (O).
- Walk down.
- Zoom into the blade; put the BANDAGES around the blade (P) to acquire the BLADE.
- Walk down.

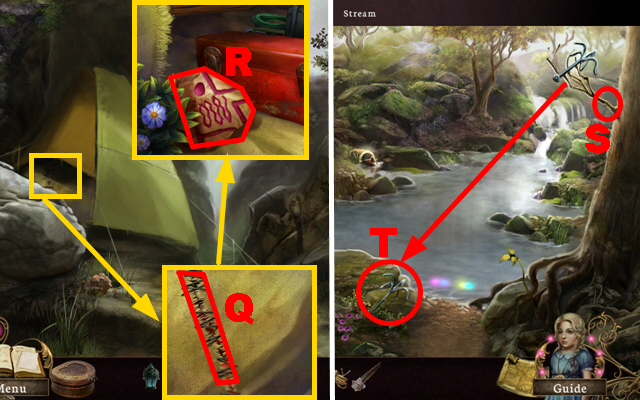
- Zoom into the tent and cut it open with the BLADE (Q); take the 5/6 STONE SLAB (R).
- Move forward twice.
- Cut the branch with the BLADE (S) three times.
- Connect the ROPE to the hook (T) to acquire the GRAPPLING HOOK.

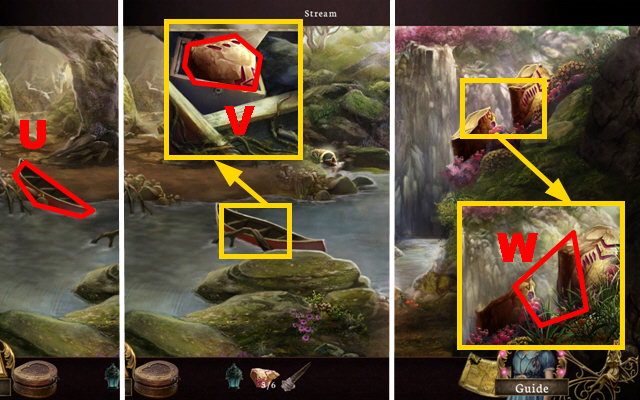
- Throw the GRAPPLING HOOK at the boat (U) to pull it closer.
- Zoom into the boat; take the 6/6 STONE SLAB (V).
- Walk down.
- Zoom into the stone structure; put down the 6 STONE SLABS (W).
- Play the mini-game.

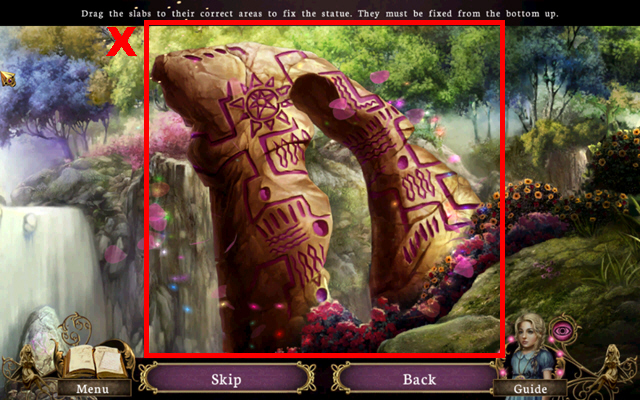
- To solve this puzzle (X), drag the slabs into their correct positions from bottom to top.

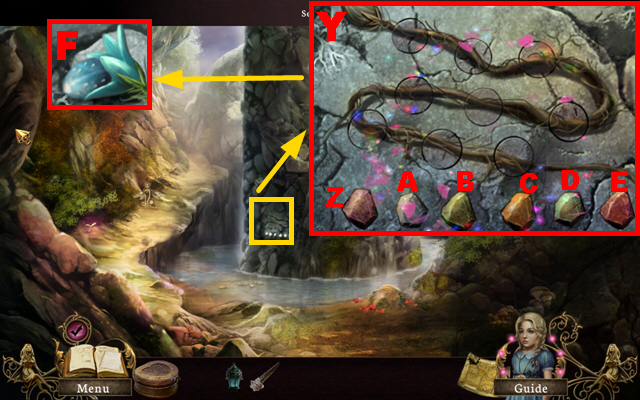
- Zoom into the wall to play a mini-game.
- To solve this puzzle, press the gems to elevate or depress the vines. Focus on the top or bottom row first before correcting the middle. The elevation of the gems are randomized at every start of the game, so your solution may vary.
- A sample solution has been attached, where the gems are pressed in the following sequence: Z, E x2, D, B, A, and C.
- Take the MAGIC SEED (D).
- Move forward twice.
- Play the mini-game.

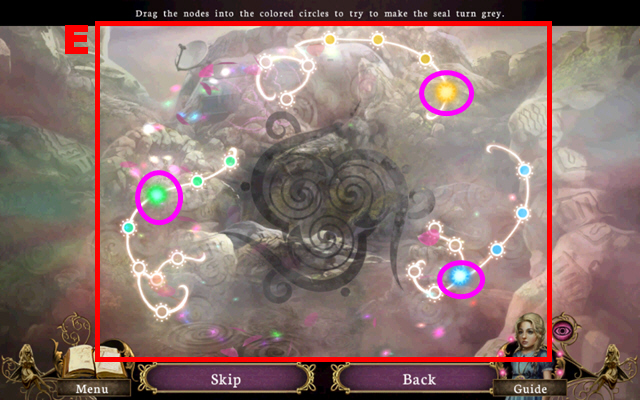
- To solve this puzzle (E), drag the three nodes into the circles marked in purple to turn the seal completely gray.

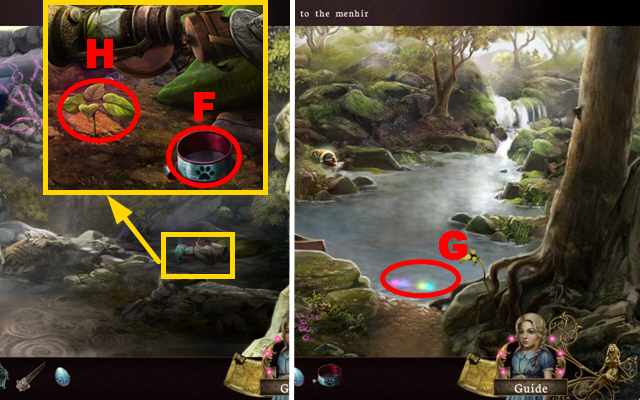
- Zoom into the junk and remove the trash; take the BOWL (F).
- Walk down.
- Put the BOWL into the water (G) to acquire the BOWL OF WATER.
- Move forward.
- Zoom into the junk; pour the BOWL OF WATER over the seed (H).
- Play the mini-game.

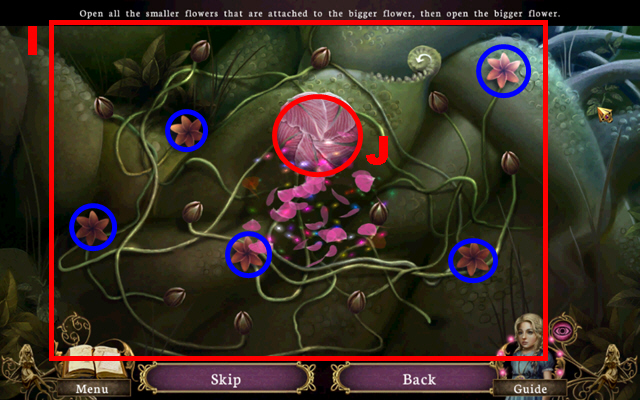
- To solve this puzzle (I), open the five small flowers marked in blue (and attached to the big flower), then open the big flower (J).

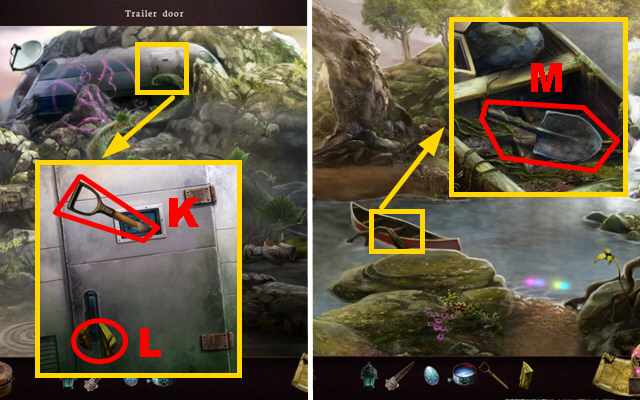
- Zoom into the trailer; take the HANDLE (K) and the RAG (L).
- Walk down.
- Zoom into the boat; connect the HANDLE to the spade (M) to acquire the SPADE.
- Walk down twice.

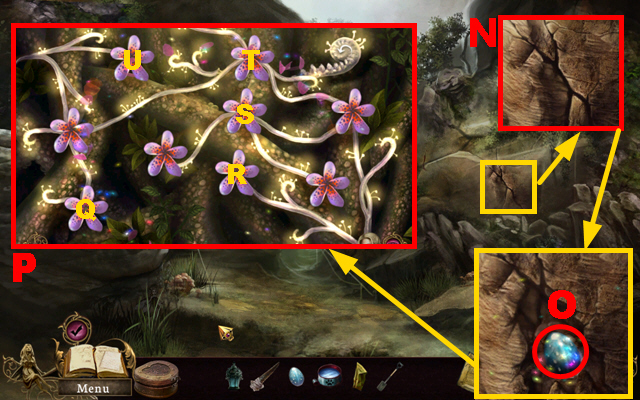
- Zoom into the crack; use the SPADE on the crack three times (N); put down the MAGIC SEED (O).
- Play the mini-game.
- To solve this puzzle (P), press the buds in the following sequence: Q, R, S, T, and U.
- Climb up the beanstalk.

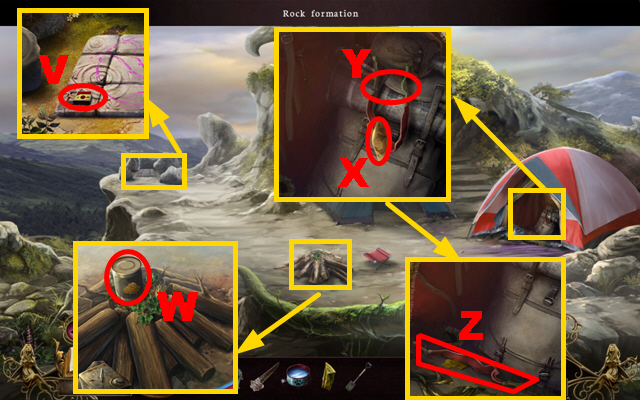
- Zoom into the rock formation; take the MATCHES (V).
- Zoom into the campfire; open the can with the BLADE (W) to acquire the CANNED CORN.
- Zoom into the tent and take the paper (X); cut the elastic band with the BLADE twice (Y) and take the ELASTIC BAND (Z).
- Go to the Stream.

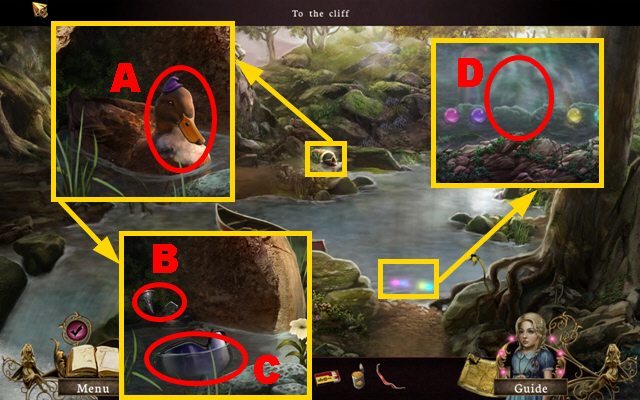
- Zoom into the tree hole and give the CANNED CORN to the duck (A); take the FUNNEL (B) and connect the ELASTIC BAND to the goggles (C) to acquire the GOGGLES.
- Zoom into the water; use the GOGGLES to look into the water (D).
- Play the mini-game.

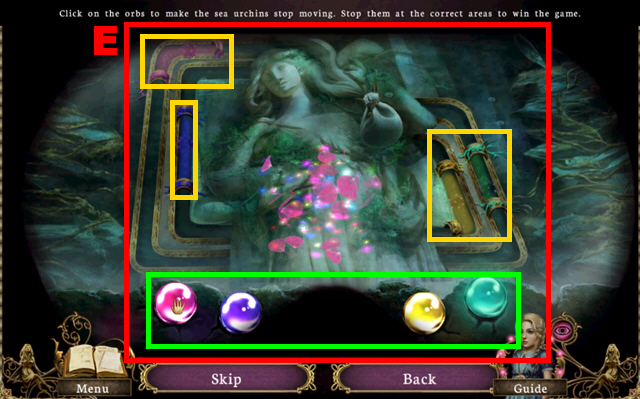
- To solve this puzzle (E), press the orbs marked in green when a sea urchin is in its colored area.
- The areas are marked in yellow.
- For example, press the purple orb as soon as the purple sea urchin goes through the purple area.
- Go to the Campsite.

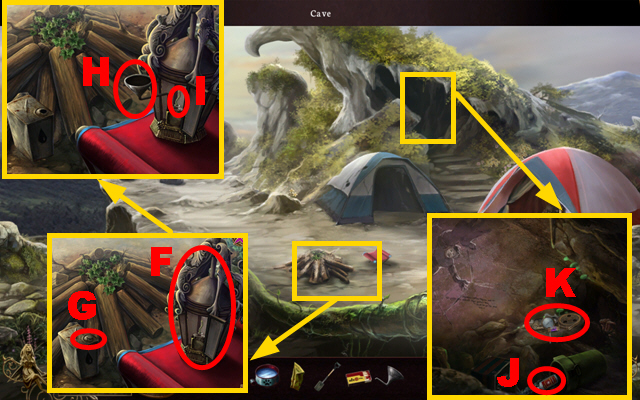
- Zoom into the campfire and put down the UNLIT LANTERN (F); open the oil can with the BLADE (G).
- Put down the FUNNEL (H), take the oil can, and pour it into the funnel.
- Use the MATCHES to light the lantern (I), close the lantern, and take the LANTERN.
- Use the LANTERN to zoom into the cave and throw the bucket over; take the RUST REMOVER (J) and the PANEL PARTS (K).
- Go to the Trailer.

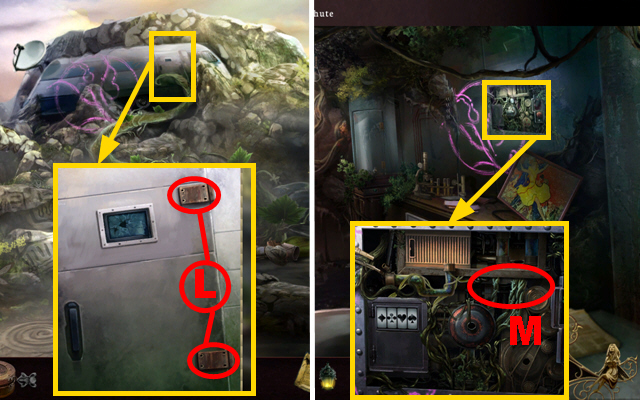
- Zoom into the trailer and apply the RUST REMOVER to the hinges (L); use the RAG to clean the hinges; open the door.
- Enter the trailer.
- Remove the painting and zoom into the panel; put down the PANEL PARTS (M).
- Play the mini-game.

- To solve this puzzle (N), return each of the panel parts to their correct places.
- Put all the parts marked in yellow into their correct spots.
- Enter the correct code into the panel marked in purple according to the symbols connected to each slot.
- Put the purple cylinder into its correct place (1).
- Take the key marked in blue and put it into the lock marked in blue.
- Put the pedestal into the shape (O).
- Put the crystal into its correct slot (P).

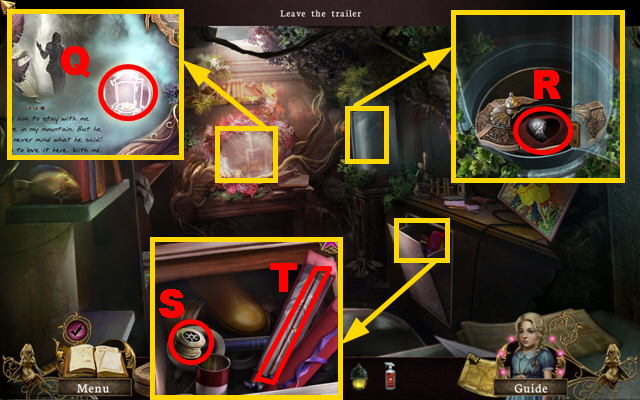
- Zoom into the mirror and turn the pages twice; press the button (Q).
- Zoom into the glass tube and remove the cover; take the 1/2 HEART PIECE (R).
- Zoom into the chute and open the box; take the FISHING LINE (S) and the ROD (T).
- Go to the Mountain passage.


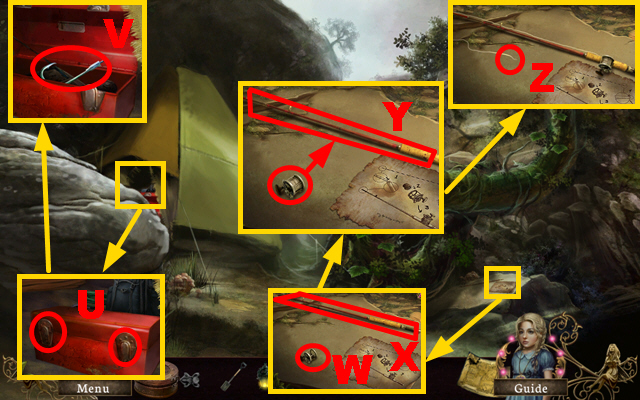
- Zoom into the tent and apply the RUST REMOVER to the toolbox (U); use the RAG to clean the toolbox; take the FISHING HOOK (V).
- Zoom into the stone slab; connect the FISHING LINE to the reel (W) and the ROD to the fishing rod part (X).
- Connect the reel to the rod (Y) and the FISHING HOOK to the line (Z).
- Take the FISHING ROD.
- Go to the Stream.

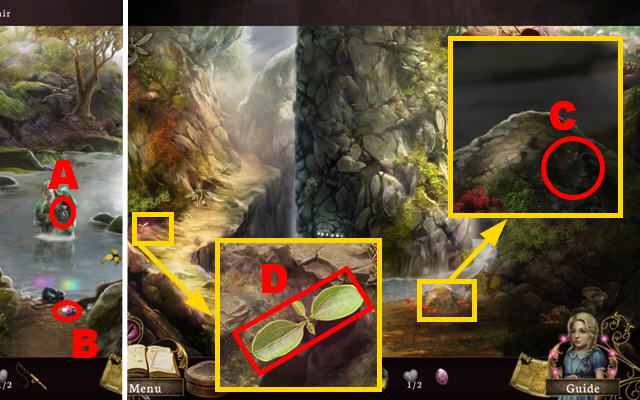
- Use the FISHING ROD to reel in the pouch (A).
- Take the MAGIC SEED (B).
- Walk down.
- Zoom into the soil and use the SPADE to dig out the soil; put down the MAGIC SEED (C).
- Zoom into the seedling; pour the BOWL OF WATER over it (D).
- Climb up the beanstalk.
- Play the mini-game.

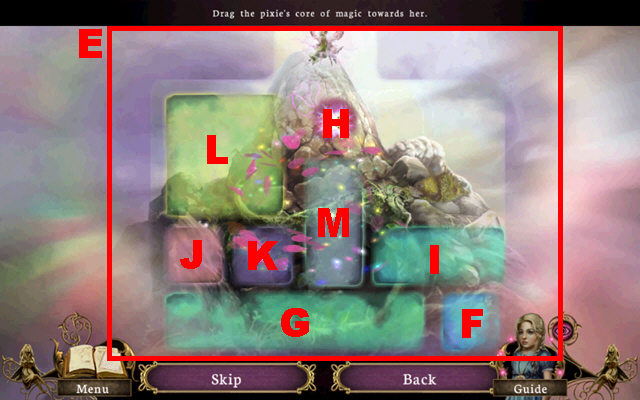
- To solve this puzzle (E), move the sliders in the following sequence: F down, G left, H up, F right, G down, I down, I right, J down, K down, L left, M left, H up, I right, M down, and H left.

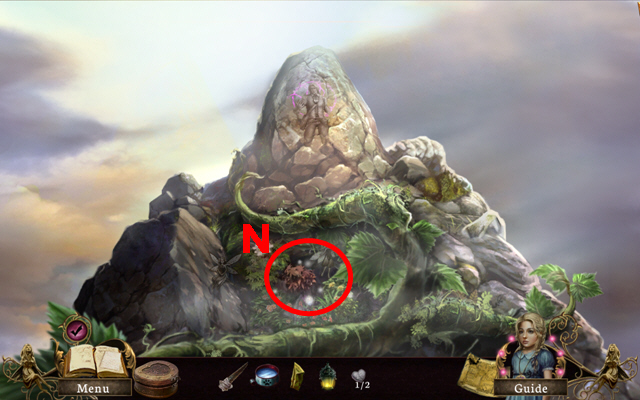
- Zoom into the ledge (N).
- Play the HOS.

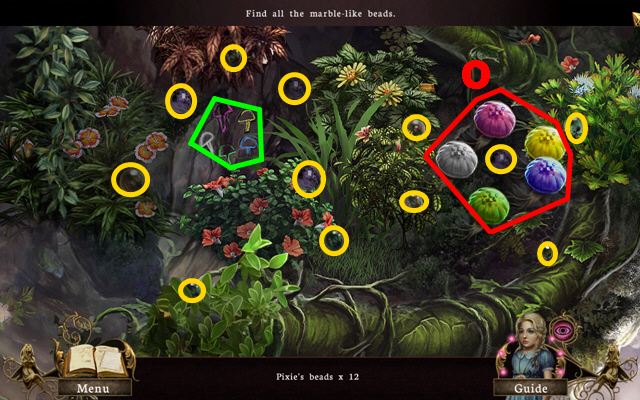
- Remove the shrub, the vines, the snail, and the butterfly.
- Press the mushrooms to change their colors (O) according to the pattern marked in green.
- Collect the 12 marble-like beads marked in yellow.
- You will receive the 12 PIXIE’S BEADS.
- Go to the Campsite.

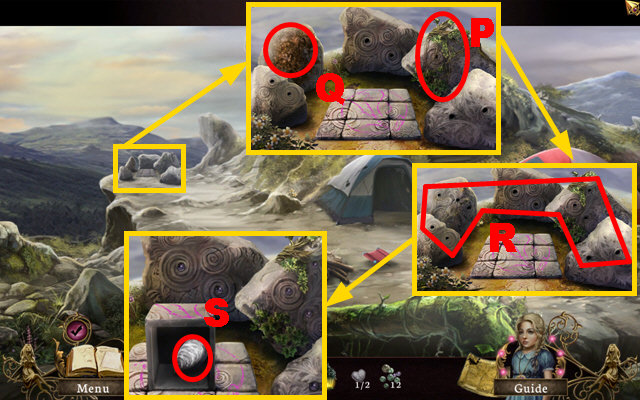
- Zoom into the rock formation; use the BLADE to remove the vines (P), pour the BOWL OF WATER over the dirty rock (Q), and use the RAG to clean the dirty rock.
- Put the 12 PIXIE’S BEADS into the empty slots (R).
- Take the 2/2 HEART PIECE (S).
- Go to the Island’s top.

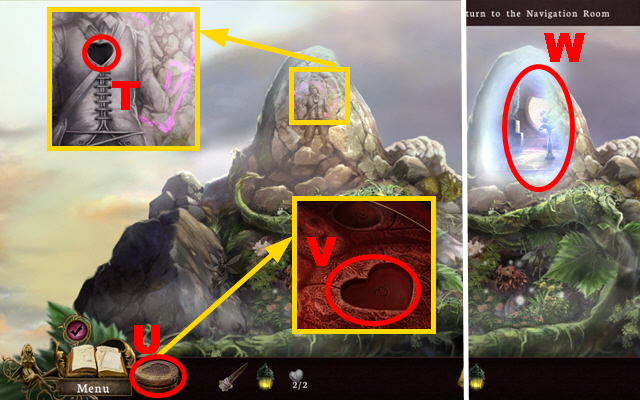
- Zoom into the rock; put the 2 HEART PIECES into the slot (T).
- You will receive the UNDYING LOVE artifact.
- Open the artifacts case (U) and put the UNDYING LOVE artifact into the slot (V).
- Go through the portal (W).

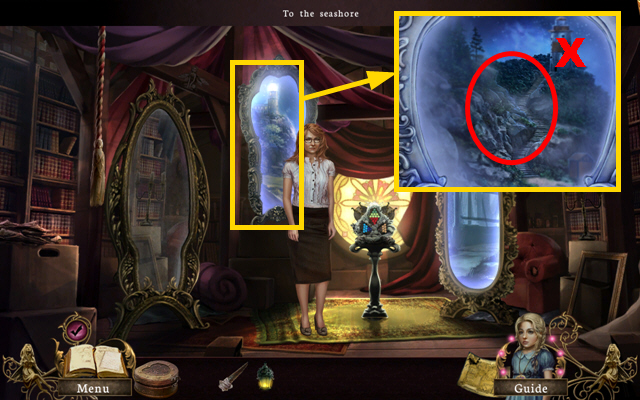
- Zoom into the portal; touch the portal (X) to go through it.
Chapter 4: The Lighthouse

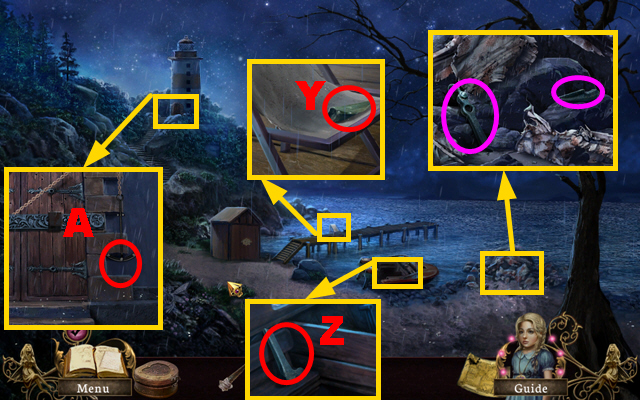
- Zoom into the quay; take the 1/4 ANCHOR PIECE (Y).
- Zoom into the boat; take the 2/4 ANCHOR PIECE (Z).
- Zoom into the rocks and move aside the wreckage pieces; take the 2 ANCHOR PIECES marked in purple.
- Zoom into the lighthouse door; put down the 4 ANCHOR PIECES (A).
- Enter the lighthouse.

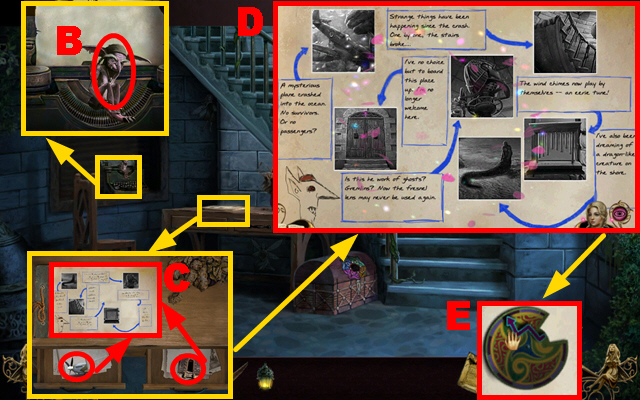
- Zoom into the typewriter; talk to the sleeping gremlin (B).
- Zoom into the desk and open both drawers; put both photos onto the document (C).
- Play the mini-game.
- To solve this puzzle (D), swap the picture pieces until each picture is correctly assembled and in its correct place.
- Remove the photo and take the GUIDE TO CHIME (E).
- Go upstairs.

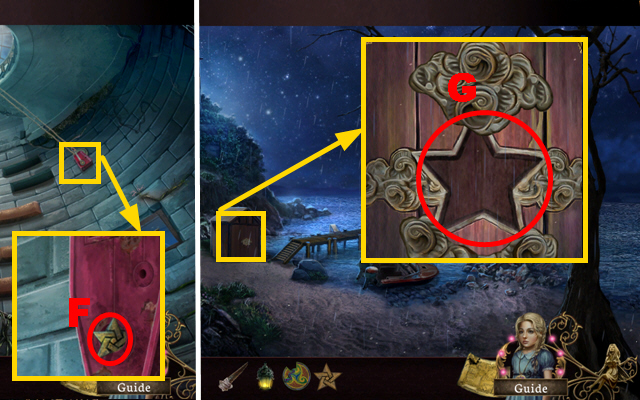
- Zoom into the pulley; take the STAR (F).
- Walk down twice.
- Zoom into the shed and move aside the cloud covers; put the STAR into the slot (G).
- Play the HOS.

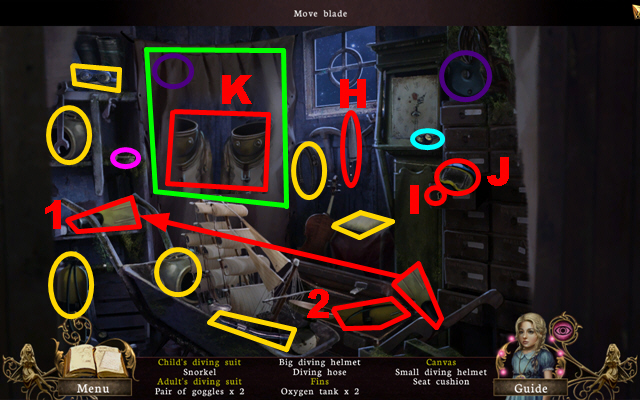
- Take the knife (H) and use it three times on the canvas marked in green to acquire the canvas.
- Take the key marked in purple, put it into the lock (I), and take the goggles (J).
- Put the control marked in light blue on the oxygen tank and take the oxygen tank (2).
- Collect the two weights marked in violet, put them on the 2 diving suits, and take the adult’s and the child’s diving suit (K).
- Take one fin, put it next to the other fin (1); take the fins.
- You will receive the SEAT CUSHION.
- Enter the lighthouse.

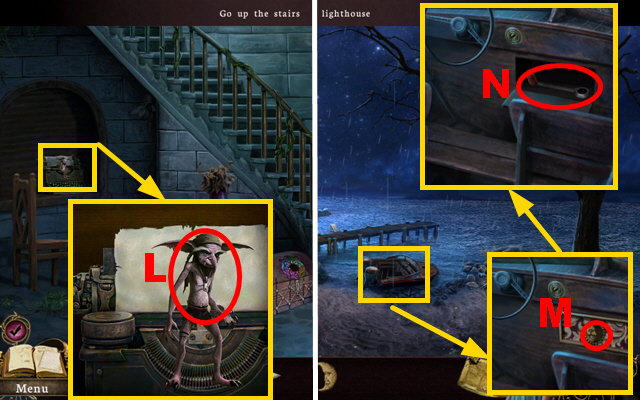
- Zoom into the typewriter; give the SEAT CUSHION to the gremlin (L).
- You will receive the MOON EMBLEM.
- Walk down.
- Zoom into the boat and put the MOON EMBLEM into the slot (M); take the CRANK HANDLE (N).
- Enter the lighthouse and go upstairs.

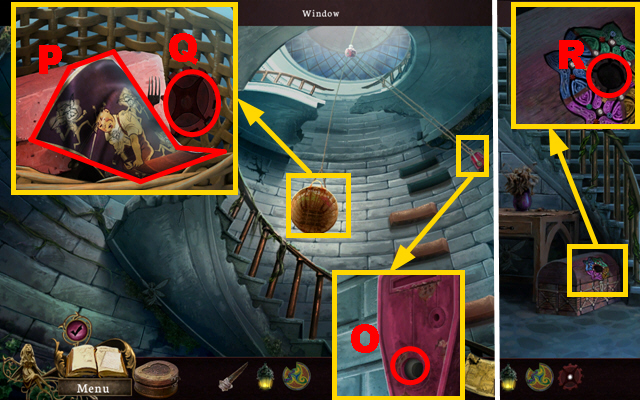
- Zoom into the pulley; put down the CRANK HANDLE (O).
- Zoom into the basket; take the poster (P) and the GEAR (Q).
- Walk down.
- Zoom into the chest; put the GEAR into the slot (R).
- Play the mini-game.

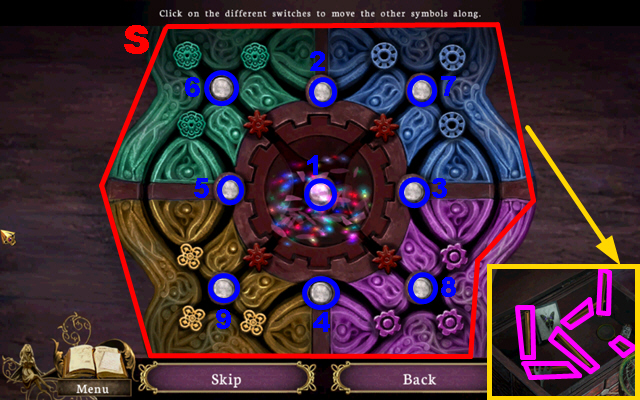
- To solve this puzzle (S), press the switches marked in blue until each colored symbol is in its colored area.
- Switch 1 rotates the central part, switches 2-5 swap symbols of adjacent areas, and switches 6-9 rotate the remaining four areas.
- Move aside some objects and take the 6 CHIMES marked in purple.
- Go upstairs.

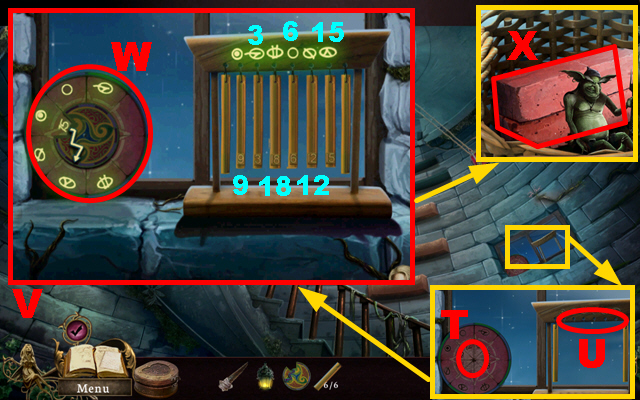
- Zoom into the right window; put down the GUIDE TO CHIME (T) and the 6 CHIMES (U).
- Play the mini-game.
- To solve this puzzle (V), put the 6 numbered chimes into their correct positions.
- Rotate the chime guide (W) to see which number belongs to which symbol.
- Touch the wind chime once each chime has been placed correctly.
- Take the BRICKS (X).

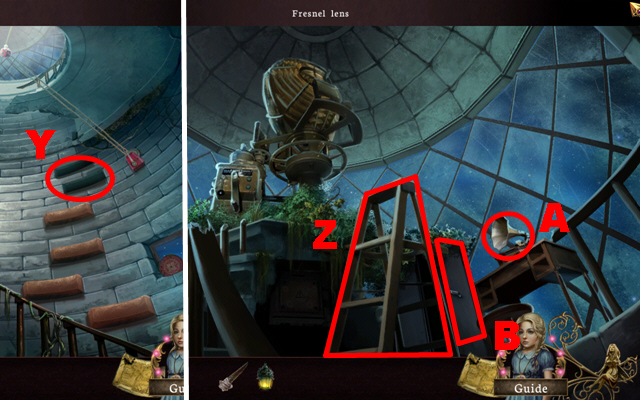
- Put the BRICKS into the slots (Y).
- Go upstairs.
- Take the LADDER (Z).
- Zoom into the gramophone (A) to talk to the gremlin.
- Zoom into the cabinet (B).
- Play the HOS.

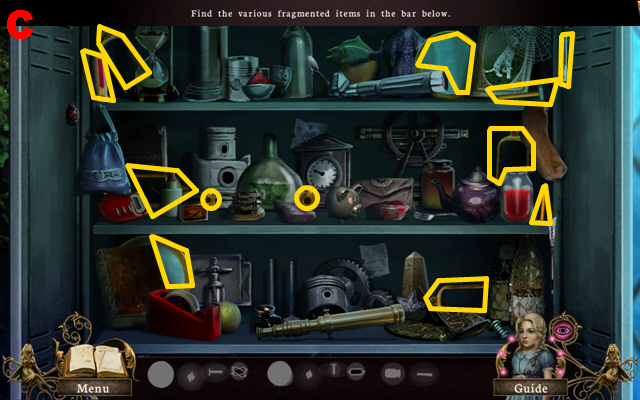
- Find the 12 items marked in yellow (C).
- You will receive the SCREWDRIVER and the FACE PLATES.
- Walk down twice.

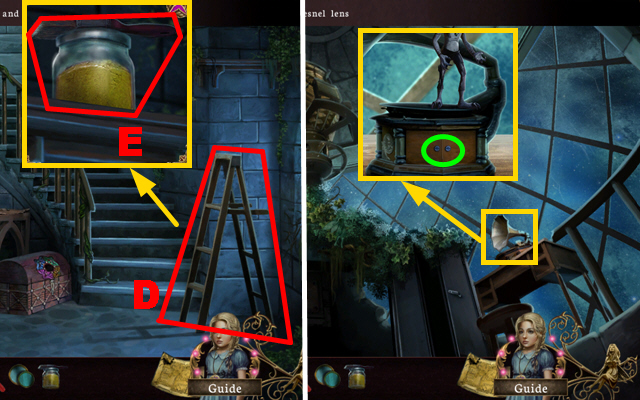
- Put down the LADDER (D).
- Take the PAINTBRUSH AND POWDER (E).
- Go upstairs twice.
- Zoom into the music box; remove the 2 screws marked in green with the SCREWDRIVER to acquire the SCREWS.
- Walk down.

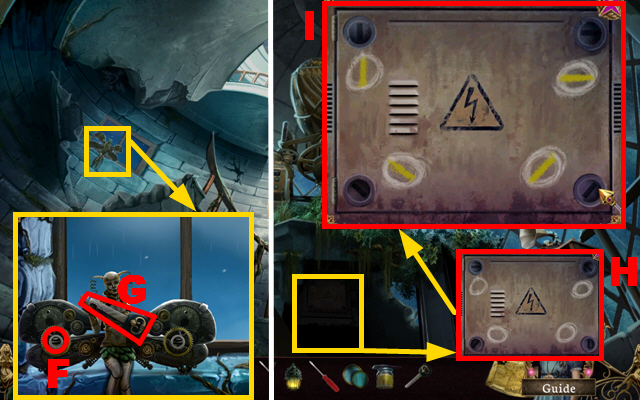
- Zoom into the left window; put down the SCREWS (F) and fix them with the SCREWDRIVER.
- Take the MOTORBOAT KEY (G).
- Move forward.
- Use the LANTERN to zoom into the area below the stairs; spread the PAINTBRUSH AND POWDER over the panel (H).
- Use the SCREWDRIVER to turn the screws into the correct positions (I).
- Play the mini-game.

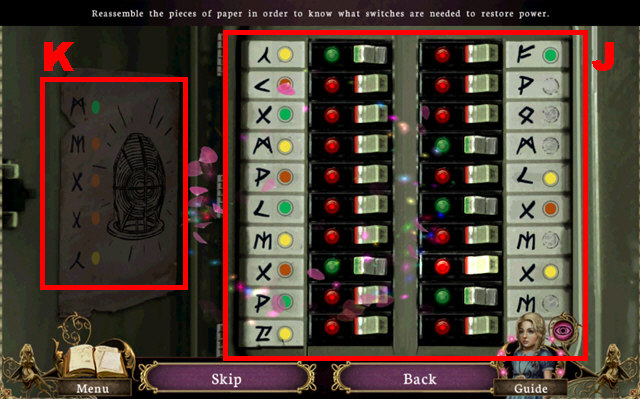
- To solve this puzzle (J), turn the switches on the right side according to the distribution guide (K).

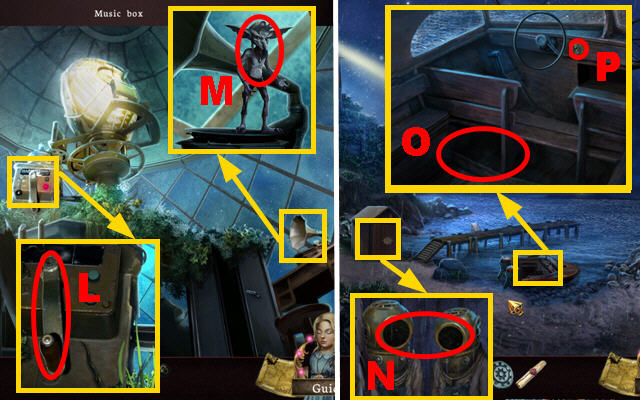
- Zoom into the lens; turn the lever (L).
- Zoom into the gramophone; talk to the gremlin (M).
- You will receive the SEAL OF THE GREMLINS and the SCROLL OF PASSAGE.
- Walk down three times.
- Zoom into the shed; put the FACE PLATES on the diving suits (N) to acquire the DIVING SUITS.
- Zoom into the boat; put down the DIVING SUITS (O), put the MOTORBOAT KEY into the lock (P).
Chapter 5: A Mermaid’s Despair

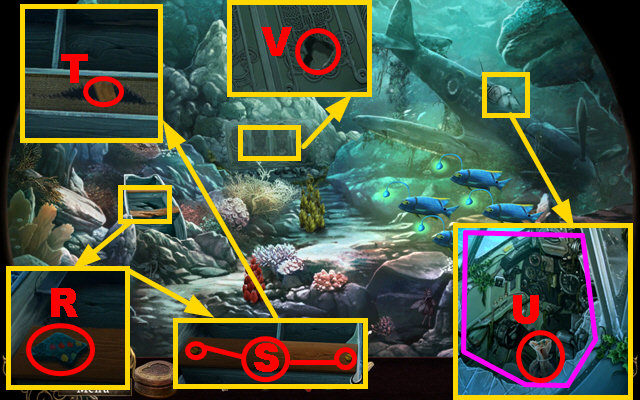
- Zoom into the boat; take the 1/2 RELIEF FRAGMENT (R) and remove the 2 screws (S) with the SCREWDRIVER.
- Cut the cover with the BLADE and take the PICKAXE (T).
- Zoom into the airplane and break the glass marked in purple with the PICKAXE three times; use the PICKAXE to acquire the RELIEF FRAGMENT (U).
- Zoom into the boulder; put the RELIEF FRAGMENT into the niche (V).
- Play the HOS.

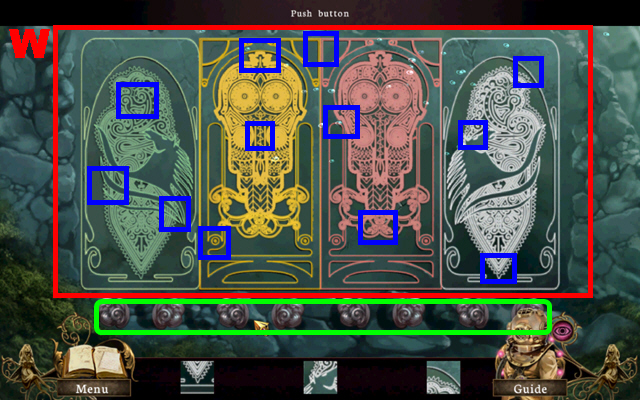
- Press the buttons marked in green to color the patterns correctly (W).
- Find the 12 fragments marked in dark blue.
- Move forward.

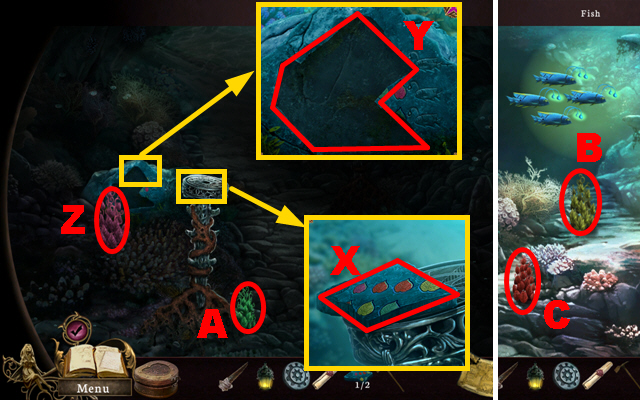
- Zoom into the torch; take the 2/2 RELIEF FRAGMENT (X).
- Zoom into the relief; put down the 2 RELIEF FRAGMENTS (Y).
- Cut the two seaweeds (Z) and (A) with the BLADE to acquire the 2 SEAWEEDS.
- Walk down.
- Cut the 2 seaweeds (B) and (C) with the BLADE to acquire the 2 SEAWEEDS.
- Move forward.

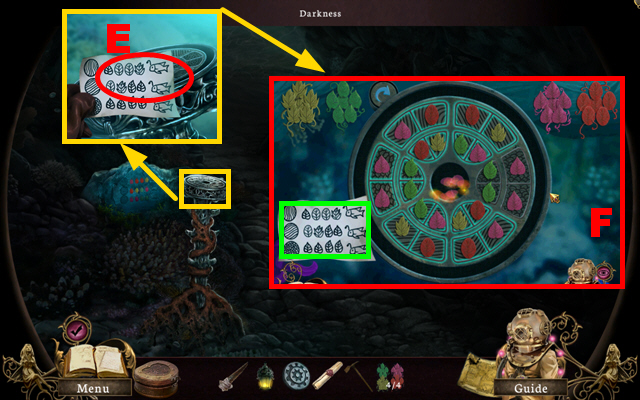
- Zoom into the torch; put down the 4 SEAWEEDS (E).
- Play the mini-game.
- To solve this puzzle (F), put the different sorts of seaweeds into the areas according to the feeding guide marked in green.

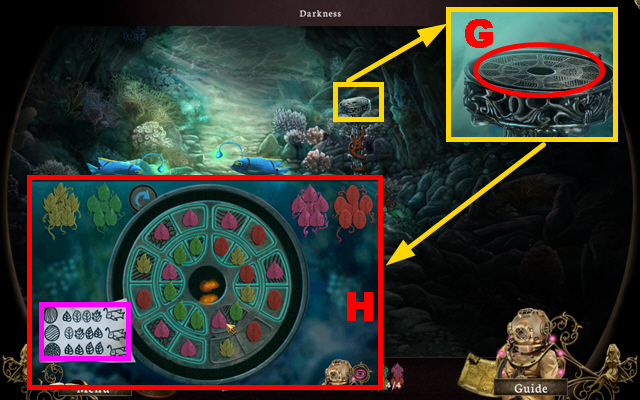
- Zoom into the second torch; put down the 4 SEAWEEDS (G).
- To solve this puzzle (H), put the different sorts of seaweeds into the right areas according to the feeding guide marked in purple.
- Move forward.

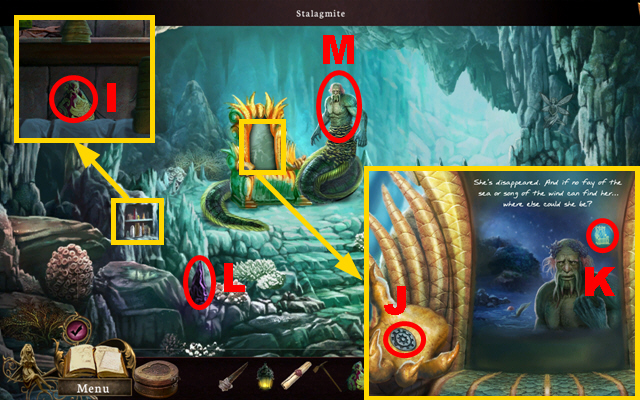
- Zoom into the shelf and move aside the potions; take the EMPTY POUCH (I).
- Zoom into the throne and put down the SEAL OF THE GREMLINS (J); turn the pages twice and press the button (K).
- Break the stalagmite with the PICKAXE (L) to acquire the STALAGMITE.
- Give the SCROLL OF PASSAGE to the Nyx (M).
- Move forward.

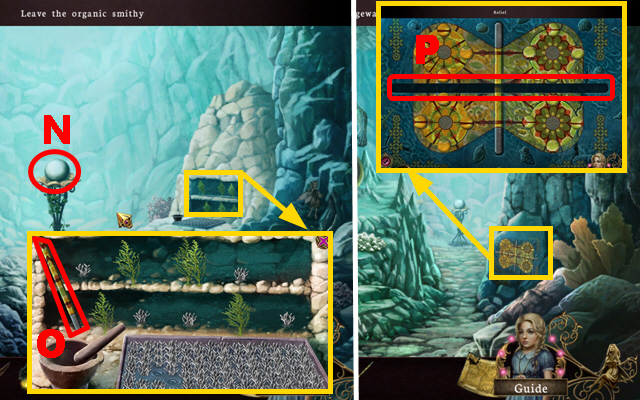
- Zoom into the reference (N); turn the pages four times.
- Zoom into the shelf; take the BAR (O) and move aside the seaweeds to make all the 5 corals visible.
- Walk down.
- Zoom into the relief; put down the BAR (P).
- Play the mini-game.

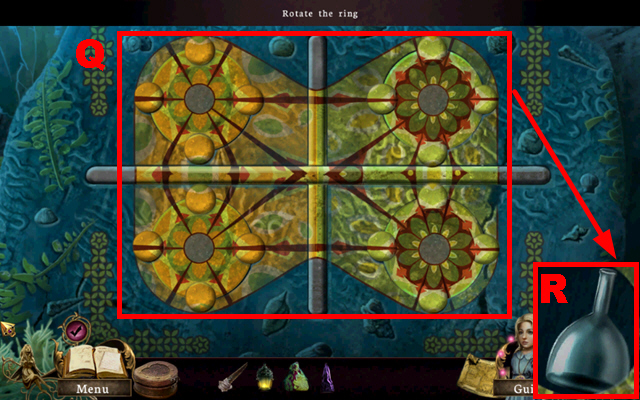
- To solve this puzzle (Q), rotate the four disks to create a coherent pattern.
- Take the EMPTY FLASK (R).
- Walk down.

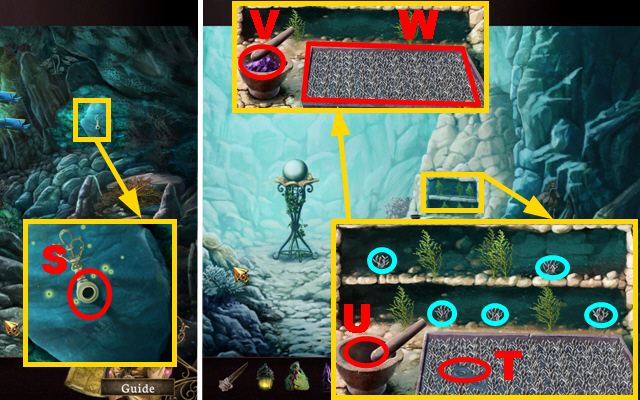
- Zoom into the niche; hold the EMPTY FLASK below the spout (S) to acquire the FLASK WITH PLANKTON.
- Move forward twice.
- Zoom into the shelf; put the five corals marked in blue into the cultivation tray (T) and put the STALAGMITE into the mortar (U).
- Pound the stalagmite with the pestle five times; put the stalagmite powder (V) into the EMPTY POUCH to acquire the POWDER and take the CULTIVATION TRAY (W).

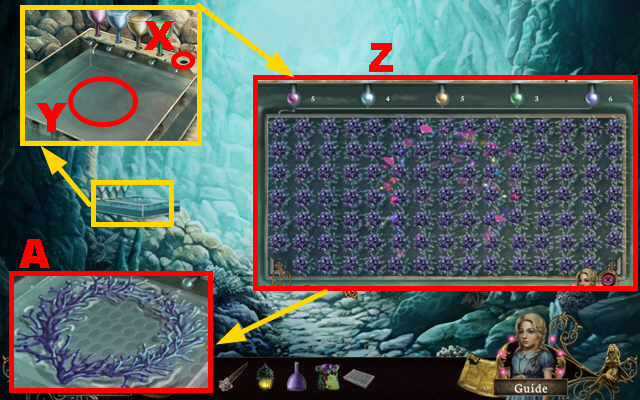
- Zoom into tank; put down the FLASK WITH PLANKTON (X), pour the POWDER into the water (Y), and put the CULTIVATION TRAY into the water.
- Play the mini-game.
- Press the colored flasks to change the color of the corals. The corals are randomized every time the game is started, so each solution is different. Turn the corals violet (Z) to win the game.
- A sample solution has been attached, where the colored flasks are pressed in the following sequence: green, violet, blue, yellow, green, purple, blue, green, purple, yellow, green, blue, purple, yellow, green, blue, and violet.
- Take the NYX’S CROWN (A).
- Walk down.

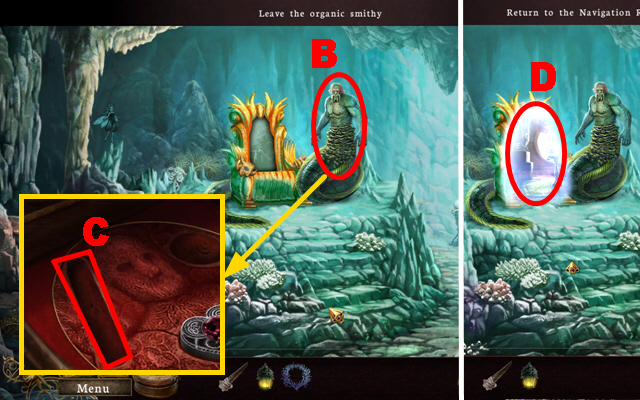
- Give the NYX’S CROWN to the Nyx (B).
- You will receive the MERMAID’S DESPAIR.
- Put the MERMAID’S DESPAIR into the niche (C).
- Go through the portal (D).

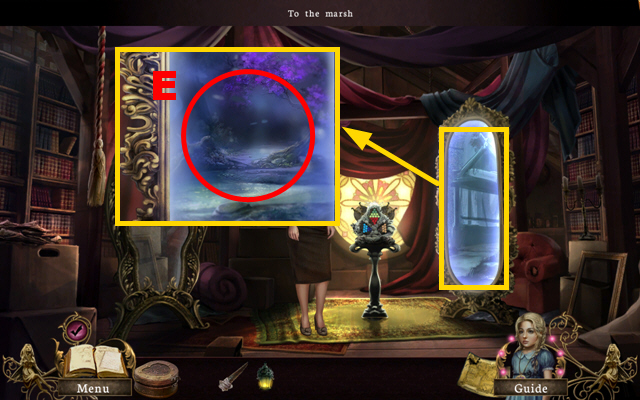
- Zoom into the right portal; touch it (E) to go through it.
Chapter 6: Swamp of Secrets

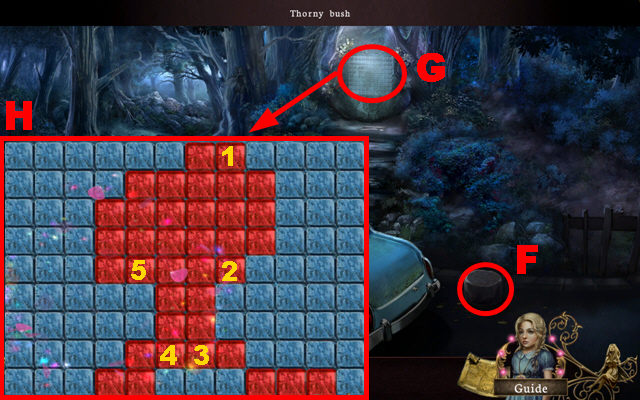
- Take the 1/4 STEPPING STONE (F).
- Zoom into the rock (G).
- Play the mini-game.
- To solve this puzzle (H), press the glyphs in order of 1-5.
- Take the right path.

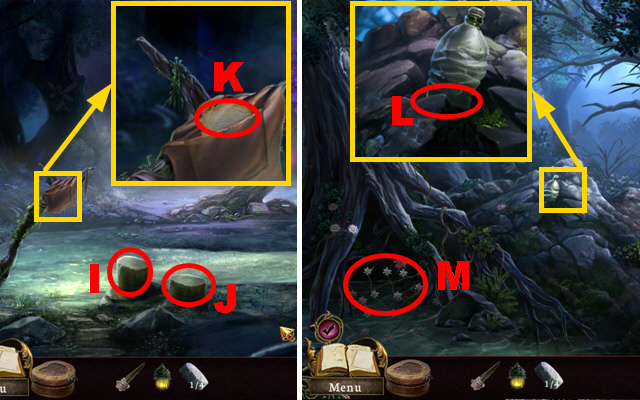
- Take the 2/4 STEPPING STONE (I) and the 3/4 STEPPING STONE (J).
- Zoom into the shirt; take the scrap of paper (K).
- Walk down and take the left path.
- Zoom into the bottle; put the BLADE into the crack (L) to acquire the EMPTY BOTTLE.
- Zoom into the roots (M).
- Play the mini-game.

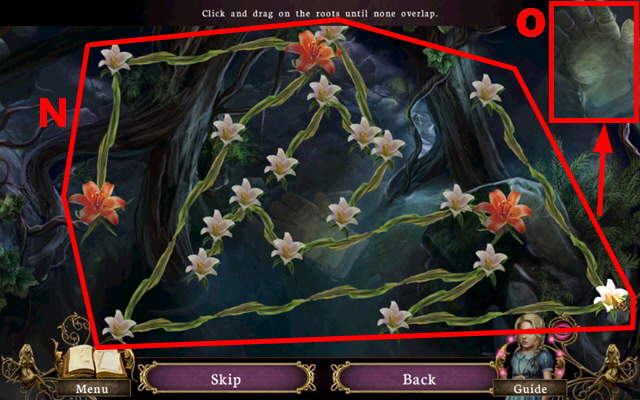
- To solve this puzzle (N), select and drag around the roots so that no root overlaps with another one.
- Take the GLOVE (O).

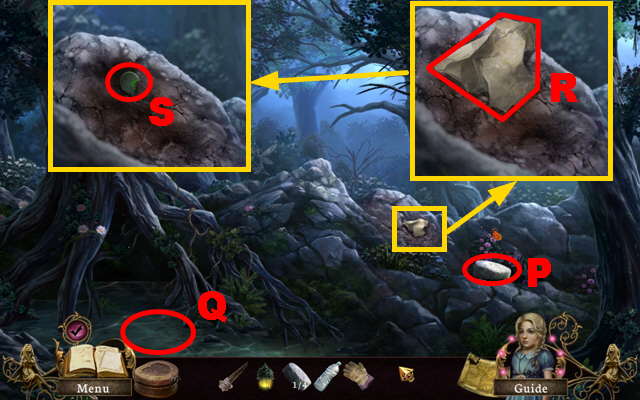
- Take the 4/4 STEPPING STONE (P).
- Put the EMPTY BOTTLE into the water (Q) to acquire the BOTTLED WATER.
- Zoom into the mound and take the page (R); pour the BOTTLED WATER over the soil and take the ROUND BUTTON (S).
- Walk down.

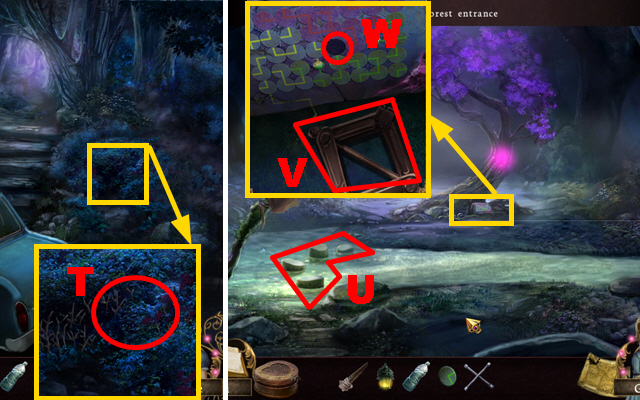
- Zoom into the bush; use the GLOVE on the thorny bush (T) to acquire the LUG WRENCH.
- Take the right path.
- Put down the 4 STEPPING STONES (U).
- Zoom into the tree base; take the JACK (V) and put down the ROUND BUTTON (W).
- Play the mini-game.

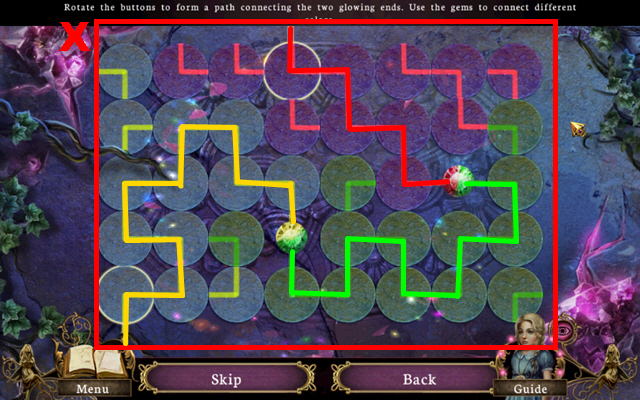
- To solve this puzzle (X), rotate the path buttons so that the green, the red, and the yellow gems are all connected to their glowing ends.

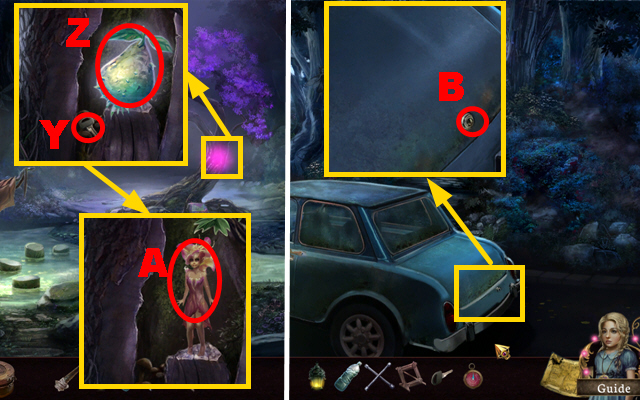
- Zoom into the tree; take the KEY (Y) and hold the LANTERN next to the crystal fruit (Z) to melt it.
- Talk to Fay (A); you will receive the COMPASS.
- Walk down.
- Zoom into the trunk; put the KEY into the lock (B).
- Play the HOS.

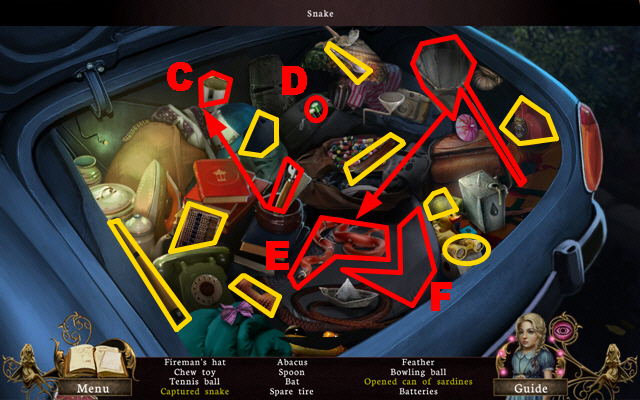
- Take the can opener, open the can with it, and take the opened can of sardines (C).
- Open the zipper and take the batteries (D).
- Take the net, use it to catch the snake, and take the captured snake (E).
- Open the zipper below the snake and take the spare tire (F).
- You will receive the TIRE.

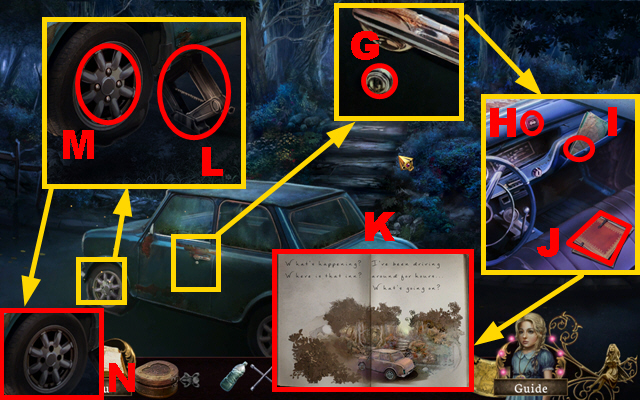
- Zoom into the door and put the KEY into the lock (G); press the button (H), put down the COMPASS (I), and zoom into the journal (J).
- Turn the pages twice and take the JOURNAL (K).
- Zoom into the tire; put down the JACK (L) and use the LUG WRENCH to remove the flat tire (M).
- Put down the TIRE and fix it with the LUG WRENCH (N).
- Take the right path.

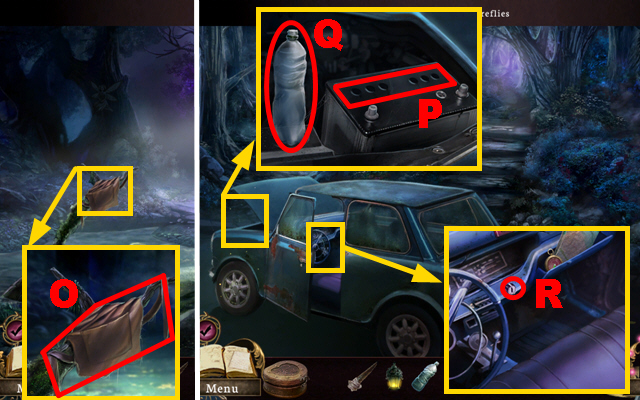
- Zoom into the shirt; take the CLOTH (O).
- Walk down.
- Use the LANTERN to zoom into the car hood; use the BLADE to remove the lids (P) and put down the BOTTLED WATER (Q).
- Put the CLOTH on the bottle to filter the water.
- Zoom into the door; put the KEY into the ignition (R) to get the car going.

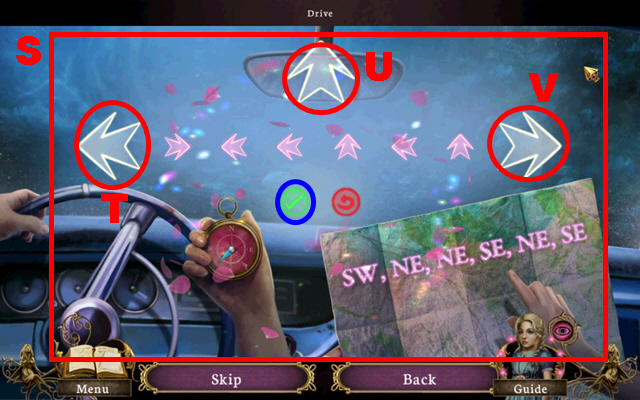
- Zoom anywhere to activate the mini-game.
- To solve this puzzle (S), press the arrow buttons in the following sequence for the first part: U, V, U, T, U, and T.
- Press the arrow buttons in the following sequence for the second part: T, U, V, T, T, and V.
- Press the arrow buttons in the following sequence for the third part: V, T, T, U, T, and U.
- You always have to press the confirmation button marked in blue once you have entered the complete sequence.
Chapter 7: Banshee’s Grief

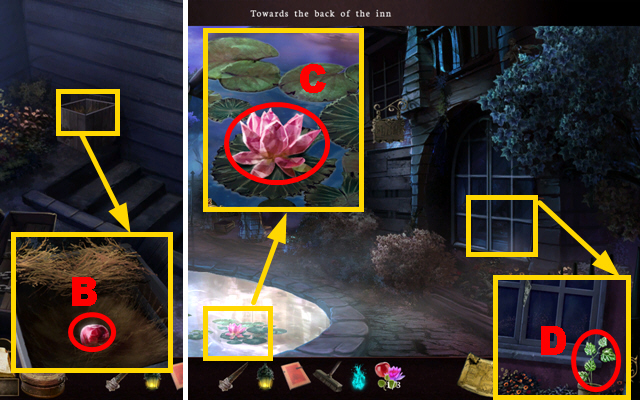
- Zoom into the pond; take the METAL PIECE (W).
- Move forward.
- Take the BROOM (X).
- Zoom into the door; put the METAL PIECE into the slot (Y).
- Play the mini-game.

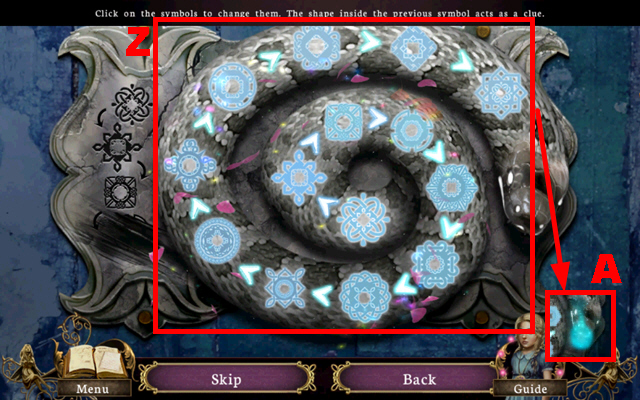
- To solve this puzzle (Z), change the symbols so that each symbol’s outer shape resembles the previous symbol’s inner shape.
- Take the MAGIC FLAME (A).


- Zoom into the crate, remove the cover, and move aside the hay; use the MAGIC FLAME on the apple (B) to acquire the 1/3 SIGIL.
- Walk down.
- Zoom into the pond; use the MAGIC FLAME on the lily (C) to acquire the 2/3 SIGIL.
- Zoom into the window; use the MAGIC FLAME on the magic plant (D) to acquire the 3/3 SIGIL.
- Move forward.

- Zoom into the door; put the 3 SIGILS into the slots (E).
- Enter the basement.
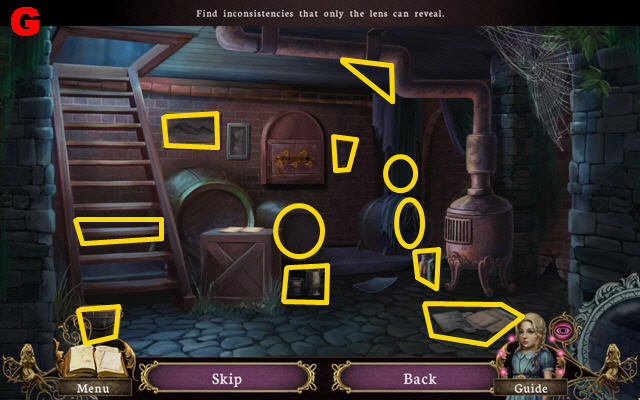
- Press the lens (F) to play a mini-game.


- To solve this puzzle (G), find the 11 inconsistencies marked in yellow by hovering the lens around the scenery.

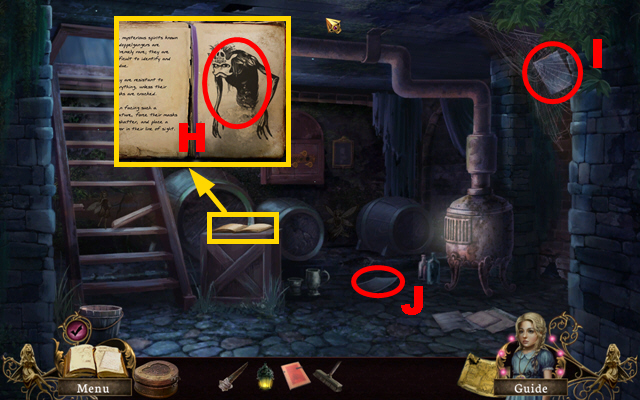
- Zoom into the book and turn the pages once; take note of the doppelganger (H).
- Use the BROOM to remove the picture from the cobweb (I).
- Take the 1/3 PICTURE (J).
- Go to the Reception.
- Play the mini-game.

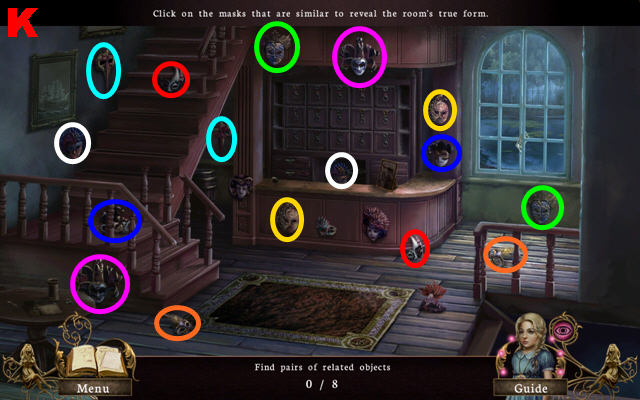
- To solve this puzzle (K), find eight pairs of masks.
- Each mask pair has been color coded.

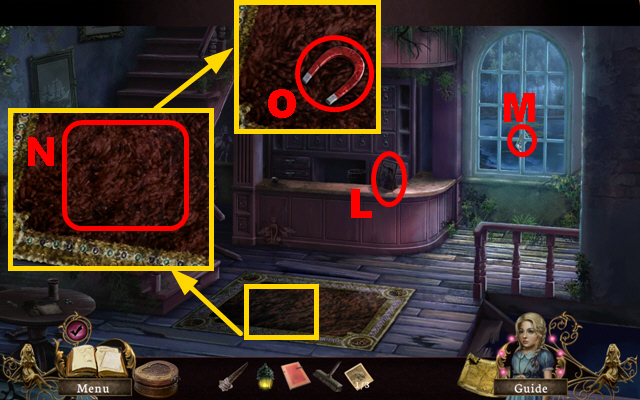
- Take a look at the picture (L).
- Open the window (M).
- Zoom into the carpet and put down the BROOM (N); move the broom around to clean it.
- Take the MAGNET (O).
- Walk down.

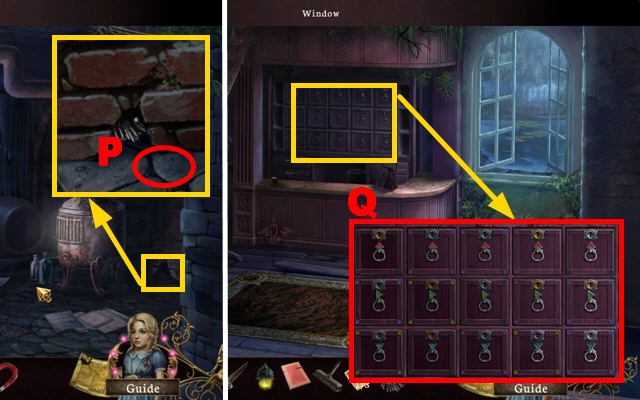
- Zoom into the hole; put down the MAGNET (P) to acquire the KEYS.
- Move forward.
- Zoom into the reception desk; put down the KEYS (Q).
- Play the mini-game.

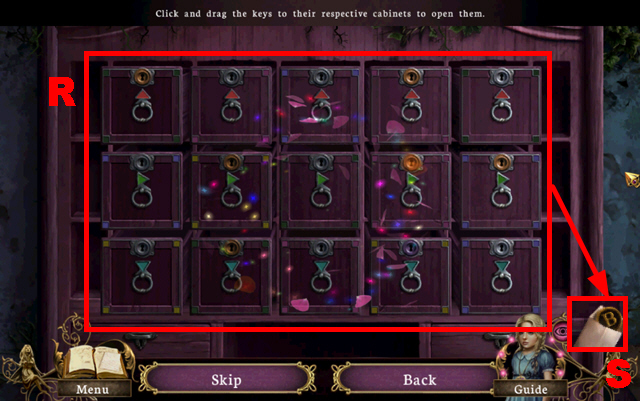
- To solve this puzzle (R), put each key into its corresponding locker.
- To solve this puzzle, look for the two colored shapes on each locker and each key, and the color of the key head and the lock.
- Take the CABINET PIECE (S).
- Walk down.

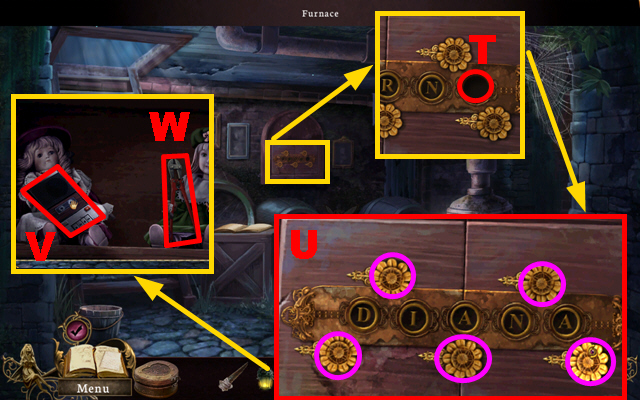
- Zoom into the cabinet; put down the CABINET PIECE (T).
- Play the mini-game.
- To solve this puzzle (U), rotate the flowers marked in purple to enter the name ‘Diana’.
- Take the TAPE RECORDER (V) and the BOLT CUTTER (W).
- Walk down.

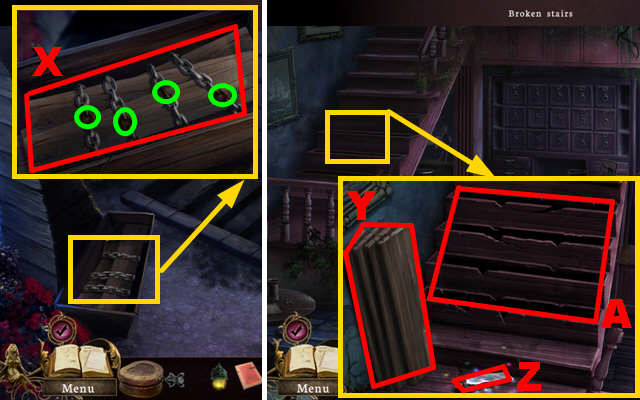
- Zoom into the crate; cut the four worn chain parts marked in green with the BOLT CUTTER.
- Take the BOARDS (X).
- Move forward twice.
- Zoom into the stairs and put down the BOARDS (Y); apply the glue (Z) to the broken stairs from bottom to top and fix the boards on each step (A).
- Go upstairs.

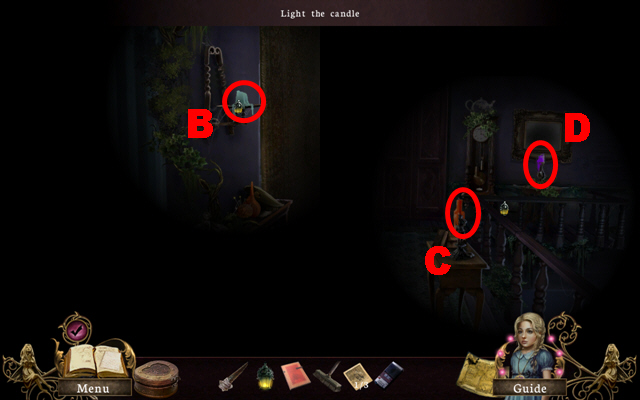
- Use the LANTERN to light the 3 candles (B), (C), and (D).

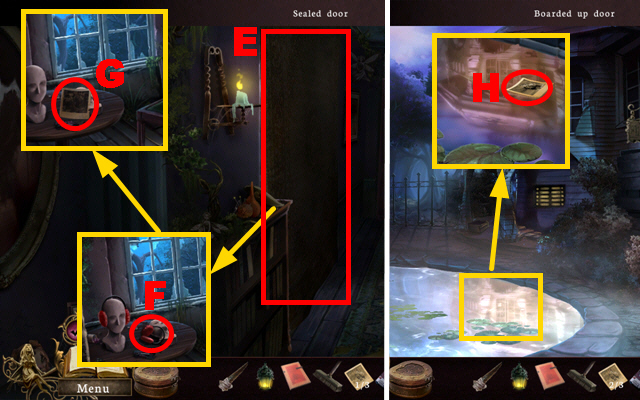
- Remove the tapestry (E) and zoom into the room behind it; take the earmuffs (F) and the 2/3 PICTURE (G).
- Walk down four times.
- Zoom into the pond; take the 3/3 PICTURE (H).
- Move forward four times.

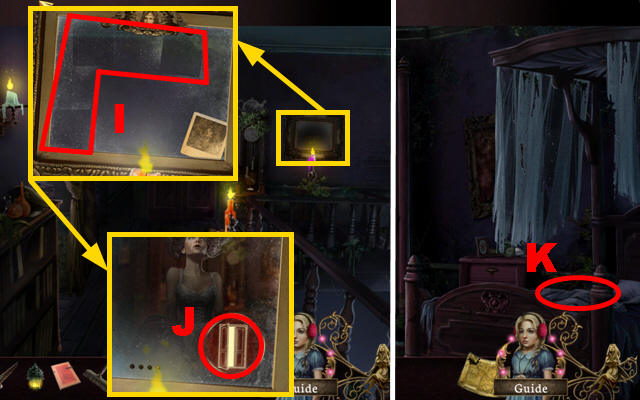
- Zoom into the mirror; put down the 3 PICTURES (I).
- Turn the pages three times and press the button (J).
- Enter the Master’s bedroom.
- Zoom into the bed (K).
- Play the HOS.

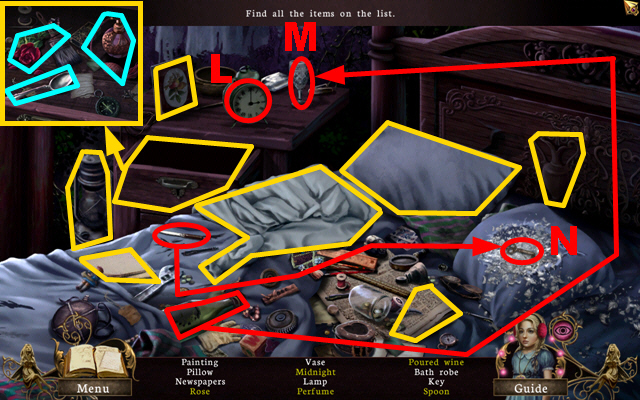
- Turn the clock to 12 am and take midnight (L).
- Take the bottle, pour the wine into the cup, and take the poured wine (M).
- Take the knife, cut the pillow with it, and take the key (N).
- Zoom into the drawer and collect the 3 items marked in light blue.
- You will receive the KINDLING.
- Walk down three times.

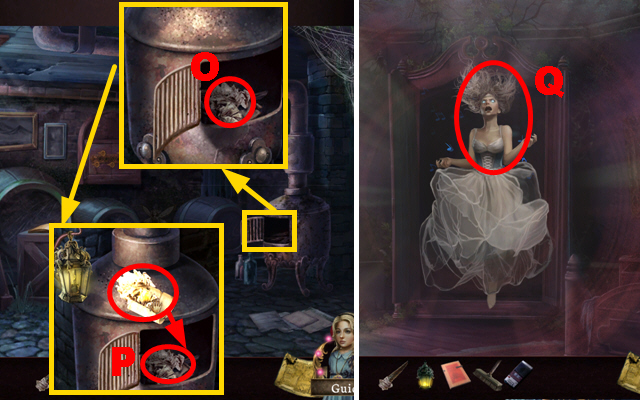
- Zoom into the furnace and open it; put down the KINDLING (O) and light it with the LANTERN.
- Move the LIT KINDLING into the furnace (P).
- Move forward three times.
- Hold the TAPE RECORDER next to the banshee (Q).
- Play the mini-game.

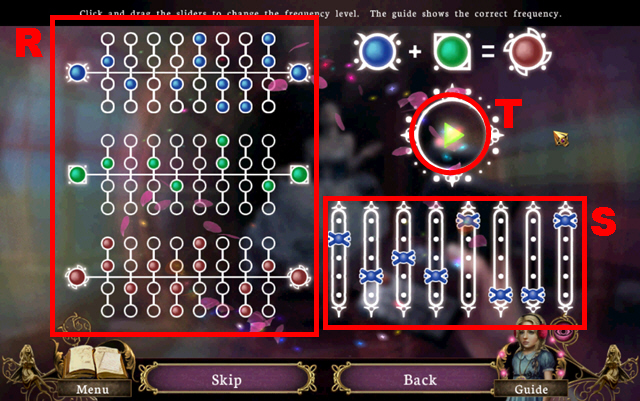
- To solve this puzzle (R), adjust the sliders (S) to create the correct frequency.
- When you have adjusted the correct frequency press the button (T).

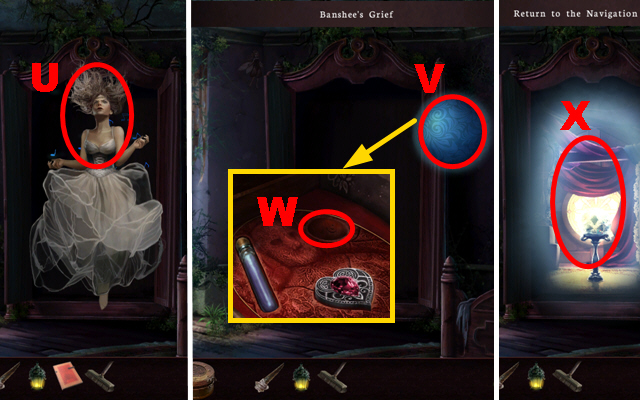
- Give the JOURNAL to the banshee (U).
- Take the BANSHEE’S GRIEF (V) and put it into the slot (W).
- Go through the portal (X).
- Play the mini-game.
Chapter 8: The Final Masquerade

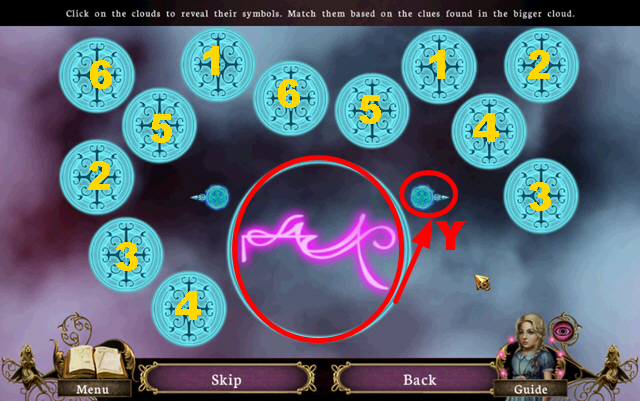
- To solve this puzzle, find the pairs that belong together (1-6).
- If you back out of the mini-game, the position of the symbol will be randomized.
- Sort through the different symbols with the arrow button (Y).

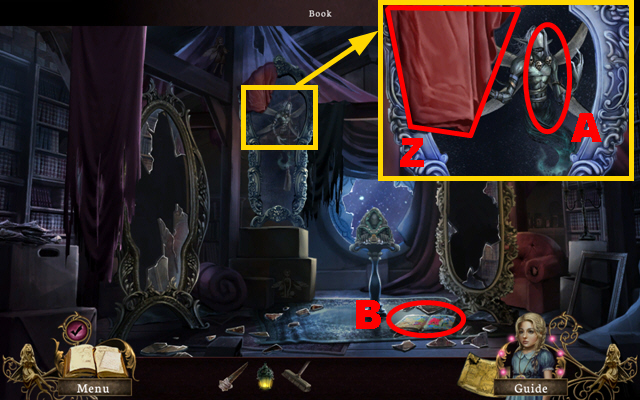
- Zoom into the mirror; take the SCRAP OF CLOTH (Z) and touch the mirror (A).
- Zoom into the book (B).
- Play the HOS.

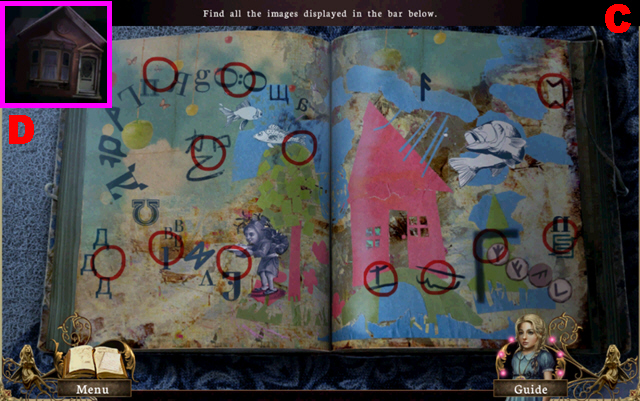
- Find the 12 fragmented items marked in red (C).
- Flip the pages three times and take the HOUSE STATUETTE (D).

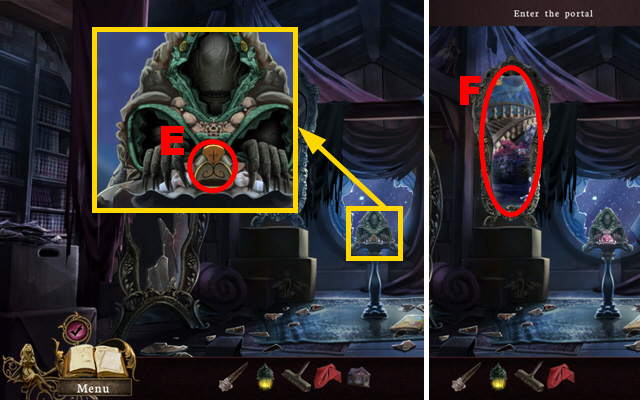
- Zoom into the navigation device; put down the HOUSE STATUETTE (E).
- Go through the portal (F).

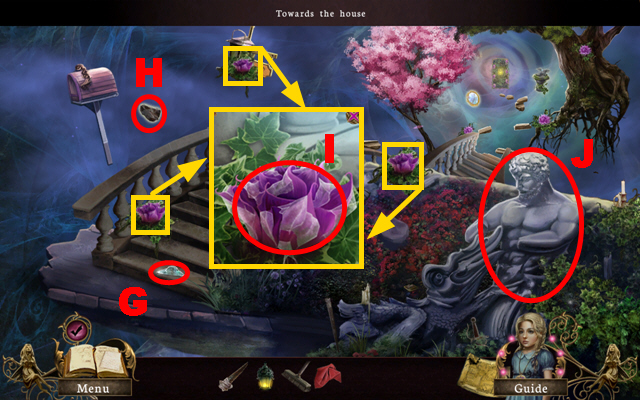
- Use the SCRAP OF CLOTH to pick up the first MIRROR FRAGMENT (G).
- Take the UNCHARGED STONE (H).
- Zoom into the 3 buds; light all of them with the LANTERN (I).
- Zoom into the statue (J).
- Play the HOS.

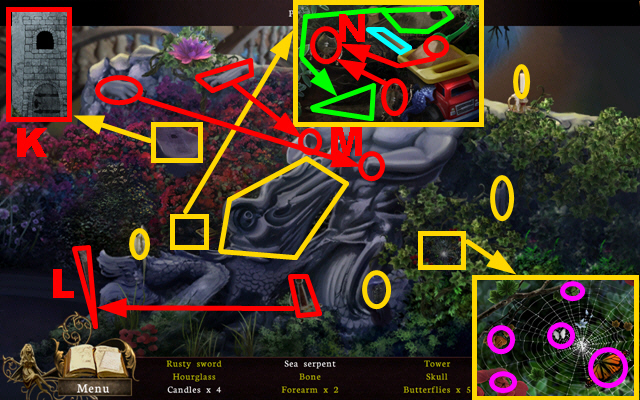
- Zoom into the rock, remove the leaves, adjust the sticks to a tower shape, and take the tower (K).
- Zoom into the cobweb and collect the 5 butterflies marked in purple.
- Take the sword hilt, put it on the sword, and take the rusty sword (L).
- Take the two hands, put them on the statue’s arms, and take the 2 forearms (M).
- Zoom into the toys; take the bone marked in light blue.
- Connect the skull’s half to its other half and take the skull marked in green.
- Take the sand, fill it into the broken hourglass, take the half of the hourglass, put it onto the other half, and take the hourglass (N).

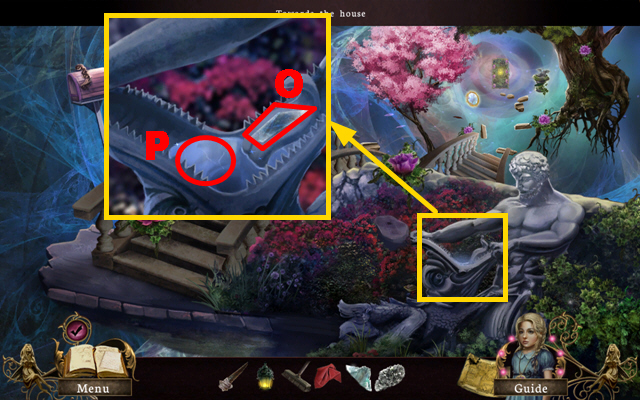
- Zoom into the statue; use the SCRAP OF CLOTH to take the second MIRROR FRAGMENT (O).
- Put the BLADE into the mouth (P) to acquire the CHARGED BLADE.
- Move forward.

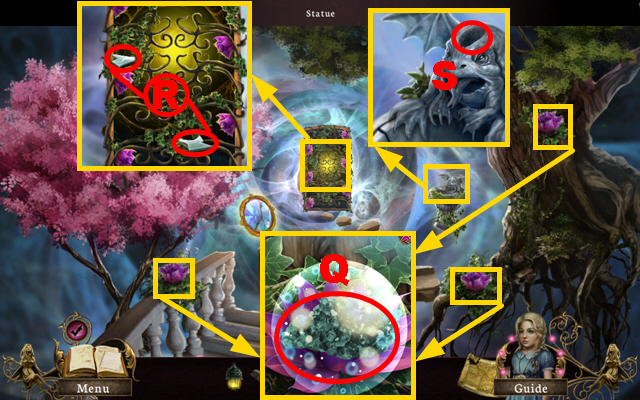
- Zoom into the 3 magical buds; use the LANTERN to light all three of them (Q).
- Zoom into the door; use the SCRAP OF CLOTH to collect the third and fourth MIRROR FRAGMENTS (R).
- Zoom into the birdbath; put the UNCHARGED STONE into the niche (S).
- Play the mini-game.

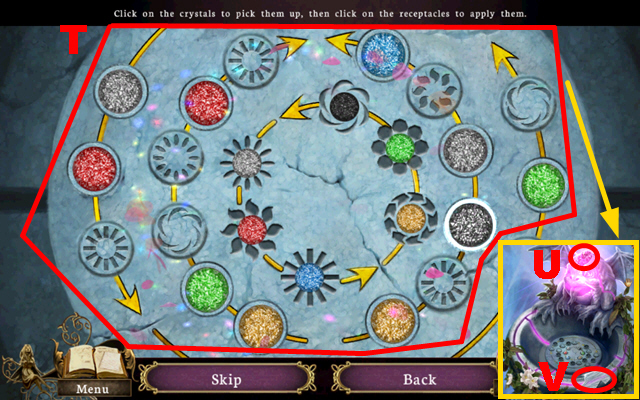
- To solve this puzzle (T), pick up the colored crystals and put them into the correct slots.
- The arrows and the symbols serve as clues.
- Take the CHARGED CRYSTAL (U).
- Use the SCRAP OF CLOTH to pick up the fifth MIRROR FRAGMENT (V).

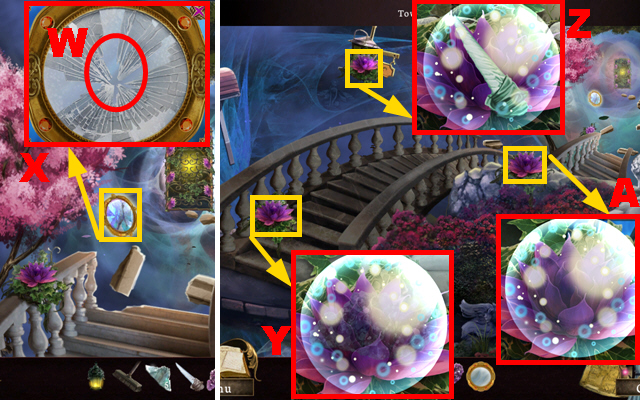
- Zoom into the mirror; put the 5 MIRROR FRAGMENTS into it (W) and take the MIRROR (X).
- Walk down.
- Zoom into the three flowers; put the CHARGED CRYSTAL into the first magical bud (Y).
- Put the CHARGED BLADE into the second flower (Z).
- Put the MIRROR into the third flower (A).
- Move forward.

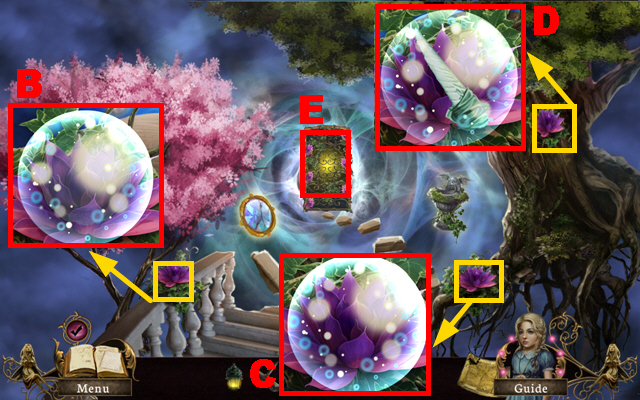
- Zoom into the three flowers; put the MIRROR into the first flower (B).
- Put the CHARGED CRYSTAL into the second flower (C).
- Put the CHARGED BLADE into the third flower (D).
- Zoom into the door, back out, and go through it (E).
- Play the mini-game.

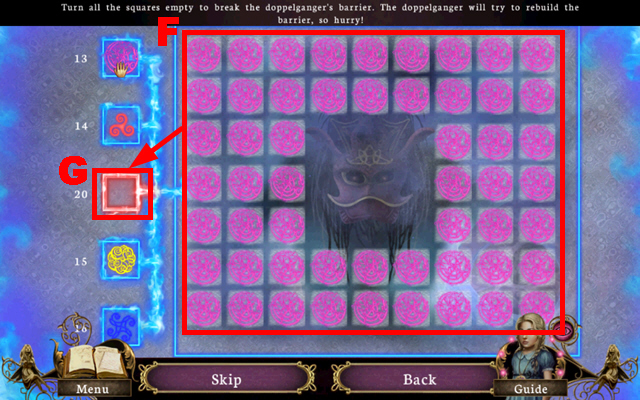
- To solve this puzzle (F), turn all the squares into the same color, and then press the button (G) to remove all squares from the field.
- The doppelganger will try to block your advance, so keep an eye on the squares you already turned.

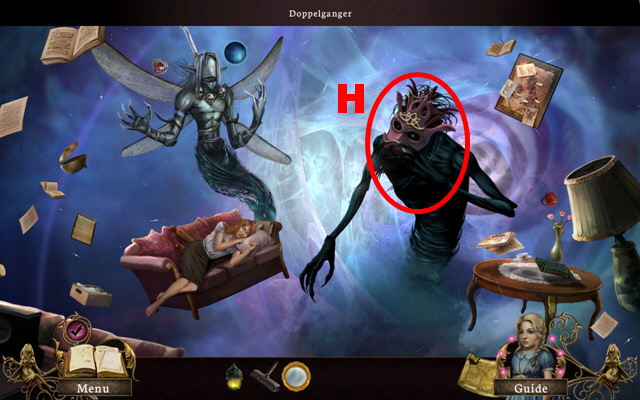
- Hold the MIRROR next to the doppelganger (H).
- Play the mini-game.

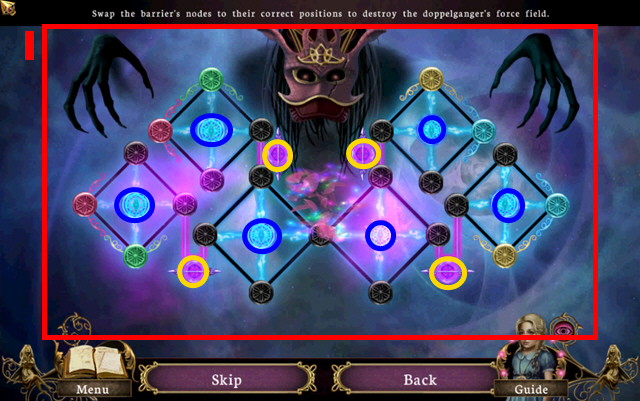
- To solve this puzzle (I), swap each of the colored nodes into their correct positions.
- The buttons marked in yellow swap nodes into adjacent areas.
- The buttons marked in dark blue rotate the surrounding area.
- The doppelganger can activate the buttons, too, so keep an eye on any changes.

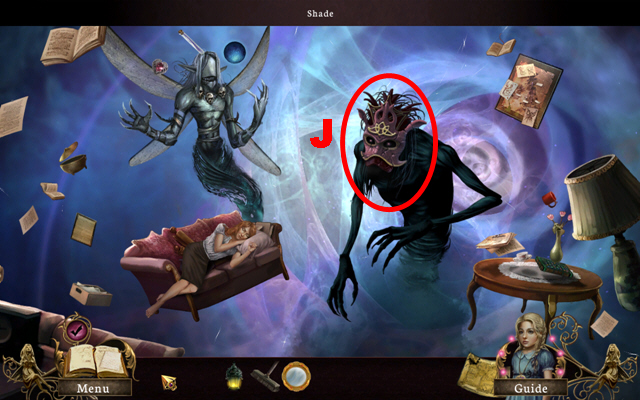
- Show the MIRROR to the doppelganger (J).
- Play the mini-game.

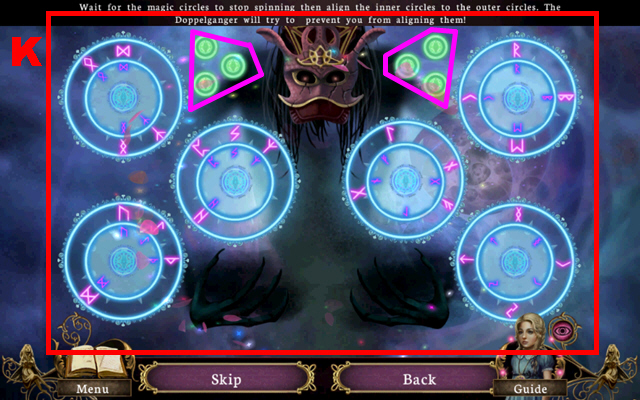
- To solve this puzzle (K), wait for the outer circles to stop spinning, and then rotate the inner circles to align them with the outer circles.
- The green circles marked in purple display how many circles have been correctly aligned.
- Congratulations, you have completed Otherworld: Omens of Summer.



 Twisted Lands: Insomniac Walkthrough, Guide, & Tips
 Time Riddles: The Mansion Walkthrough, Guide, & Tips
 Samantha Swift and the Fountains of Fate Walkthrough, Guide, & Tips
 Surface: Return to Another World Walkthrough, Guide, & Tips
 Echoes of the Past: The Castle of Shadows Walkthrough, Guide, & Tips