Echoes of the Past: The Castle of Shadows Walkthrough, Guide, & Tips
Echoes of the Past: The Castle of Shadows Walkthrough
Welcome to the Echoes of the Past: The Castle of Shadows Walkthrough!
Restore the royal amulet to break an ancient curse and stop an evil witch from regaining her terrible powers!
Whether you use this document as a reference when things get difficult or as a road map to get you from beginning to end, we’re pretty sure you’ll find what you’re looking for here.
This document contains a complete Echoes of the Past: The Castle of Shadows game walkthrough featuring annotated screenshots from actual gameplay!
We hope you find this information useful as you play your way through the game. Use the walkthrough menu below to quickly jump to whatever stage of the game you need help with.
Remember to visit the Big Fish Games Forums if you find you need more help. Have fun!
This walkthrough was created by Margie B, and is protected under US Copyright laws. Any unauthorized use, including re-publication in whole or in part, without permission, is strictly prohibited.
General Tips

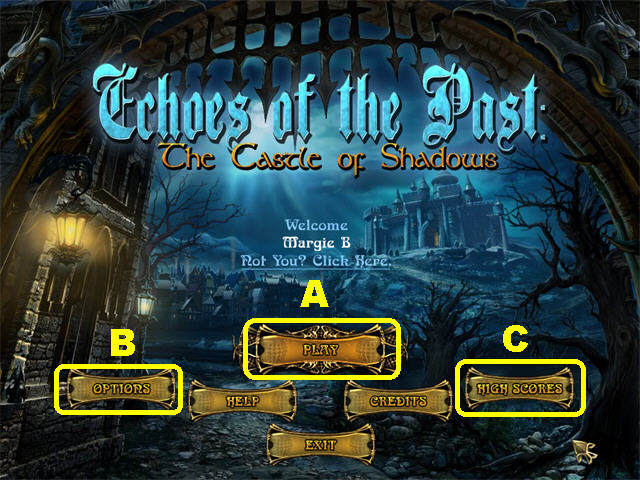
- Click on the PLAY (A) Button to access the game.
- Click on the OPTIONS (B) Button in the Main Menu to adjust screen size, volume, and cursor.
- The HIGH SCORES (C) Button shows your score in the game and the scores of fictitious players.
- Glowing areas indicate a Hidden Object Scene. The items in red in Hidden Object Scenes are items that you will need to solve a mini-puzzle to find.
- The navigation arrows allow you to travel to different parts of the game. Placing your cursor at the bottom of each scene will always take you out of it.
- You can skip any of the puzzles. When you skip a puzzle, 30 minutes will be added to your time. Most puzzles can be reset by exiting the puzzle.
- Certain areas are blocked; you will not be able to enter them until certain tasks or puzzles have been completed.
- Use your Journal, in the upper left, to gain valuable information about the game and to read the story as it unfolds.

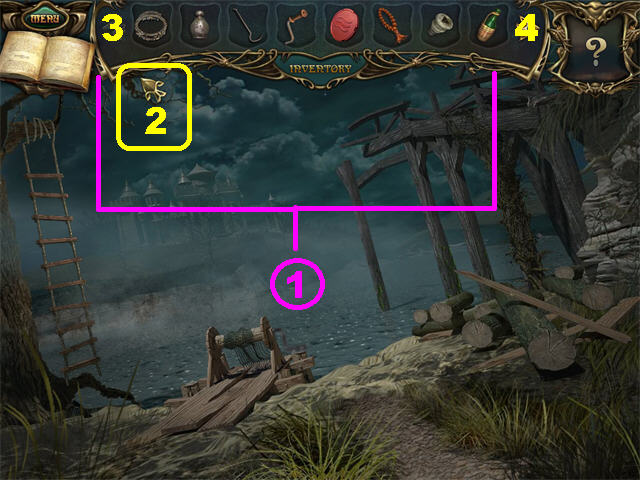
- The items you find throughout the game will be stored in your Inventory Tray (1), located above each scene.
- Place your cursor (2) at the top of the screen to make the inventory tray appear.
- Drag inventory items to areas in which you wish to use them and click them in place.
- If your inventory tray gets full, use the arrows (3 and 4) on the sides to sort through all the items.
- In Hidden Object Scenes, the mirror will act as a hint; click on it to find a random item on your list.
- The game starts you off with 10 free hints. In order to obtain more hints, you have to find the 2 Mirrors hidden in each new Hidden Object Scene.
- Each Mirror that you find adds one extra hint to your game.
Chapter 1: The Chapel

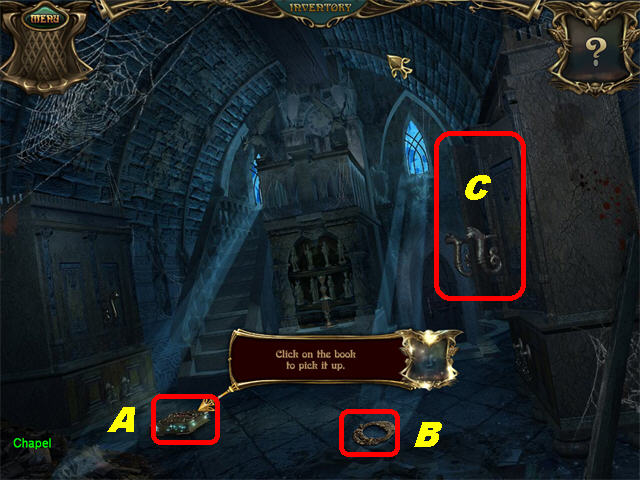
- Pick up the MAGIC BOOK (A) in the lower left.
- Pick up the AMULET STAND (B) on the ground.
- Click on the sparkling area on the right (C) to play a Hidden Object Scene.

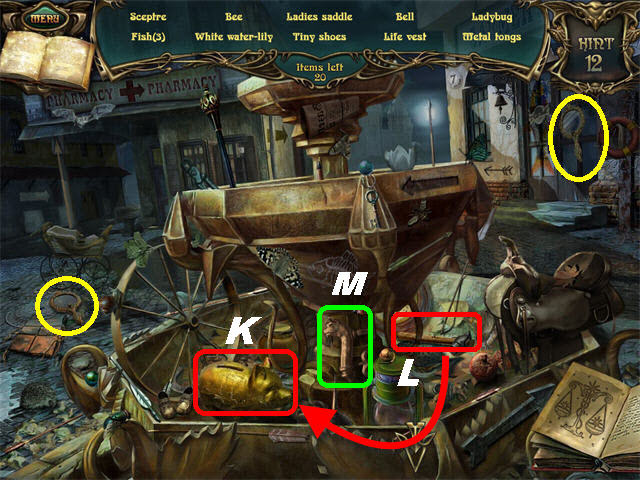
- Pick up the 2 MIRRORS marked in yellow.
- Strike the matchstick (D) on the matchbox (E) to light it. Use the lit matchstick on the candle at the bottom of the scene; pick up the BURNING CANDLE (F).

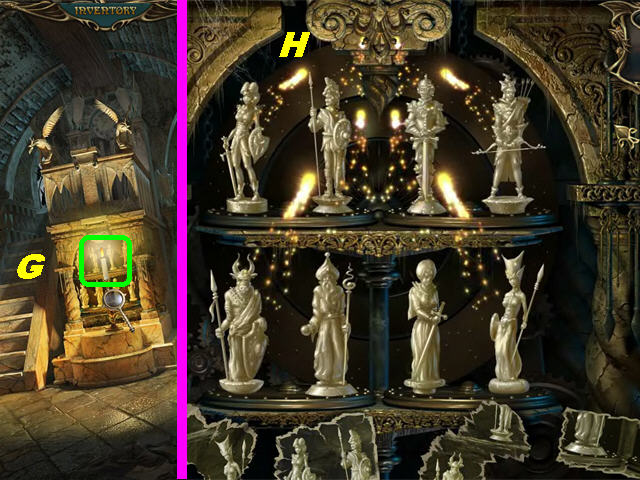
- Place the BURNING CANDLE on the candlestick (G) to light up the room.
- Click on the back statues to trigger a puzzle.
- Place the statues in the correct order using the torn images at the bottom of the screen.
- Click on any 2 pieces to swap their locations.
- Please look at the screenshot for the solution (H).
- The STATUETTE will be added to inventory.
- Go up to the Clock.

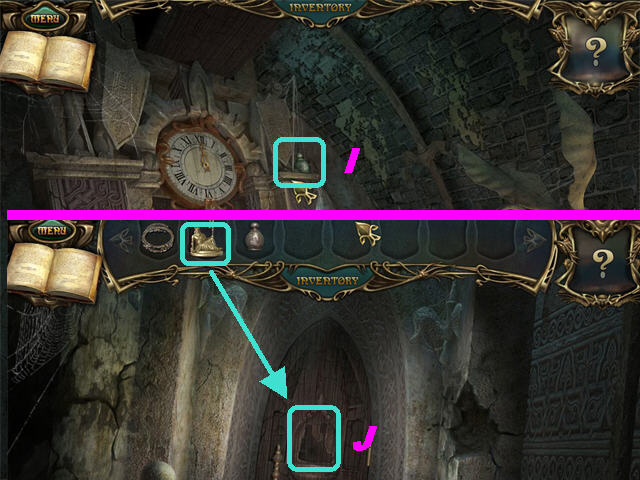
- Pick up the WEIGHT (I) in the upper right.
- Go back down and towards the Street Door in the lower right.
- Place the STATUETTE on the back door (J) to unlock it; go through the door and forward.
Chapter 2: The Bridge


- Click on the fountain to trigger a Hidden Object Scene.
- Pick up the 2 MIRRORS marked in yellow.
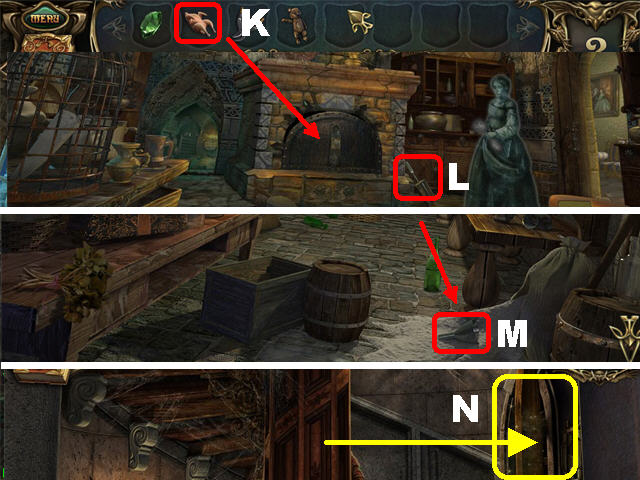
- Pick up the HAMMER (L) on the right and break open the piggy bank (K); pick up the COIN inside the bank.
- Pick up the HANDLE (M) in the lower center.

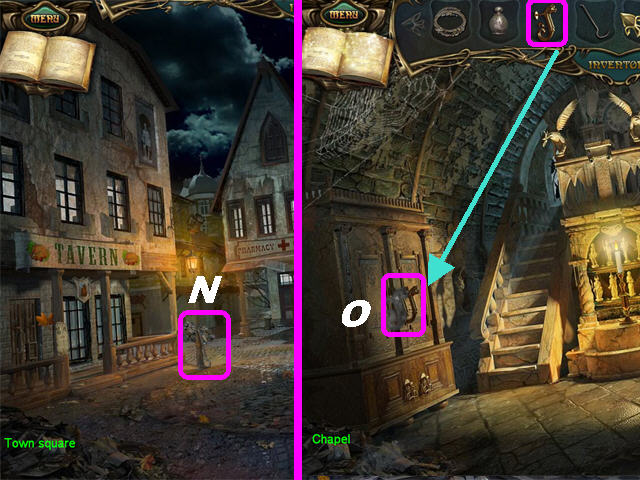
- Pick up the CROWBAR (N) on the left lamppost.
- Return to the Chapel.
- Place the HANDLE on the left cupboard (O) to trigger a puzzle.

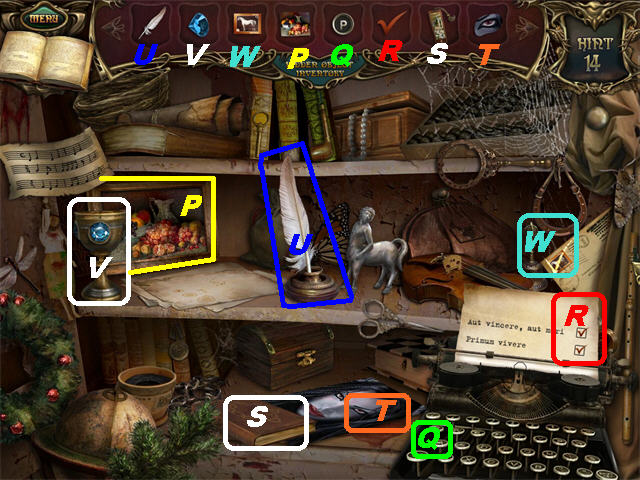
- Place the items back in their spots.
- The STILL LIFE (P) belongs in the frame.
- The TYPEWRITER KEY (Q) belongs on the typewriter.
- Place the CHECK MARK (R) on the paper that comes out of typewriter.
- Place the BOOKMARK (S) in the book on the lower shelf.
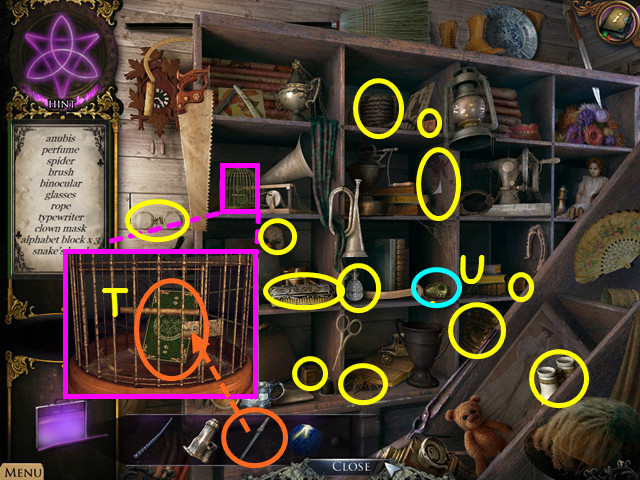
- Place the EYE (T) on the photo below the book on the last shelf.
- Place the QUILL (U) on the inkwell on the middle shelf.
- Place the GEM (V) on the chalice on the left.
- The STAMP (W) belongs on the postcard in the lower right.
- The HANDLE will be added to your inventory.

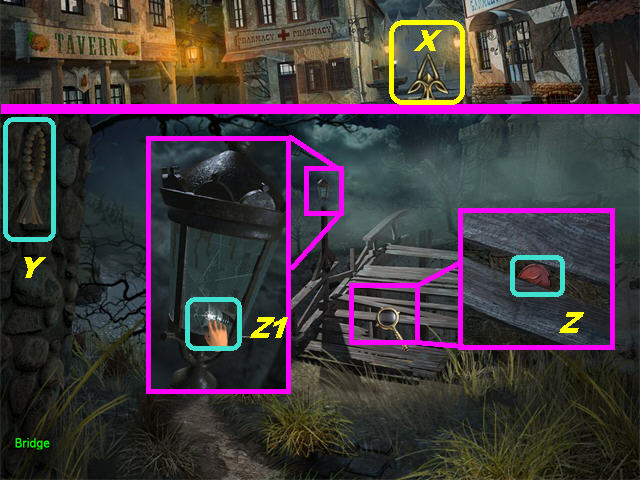
- Return to the Town Square and proceed to the Bridge (going between the 2 buildings on the right) (X).
- Pick up the BEADS (Y) in the upper left.
- Zoom into the broken Bridge; pick up the RED TOKEN (Z).
- Zoom into the lamppost; pick up the FUSE (Z1)
- Go to the River Bank by going left of the Bridge.

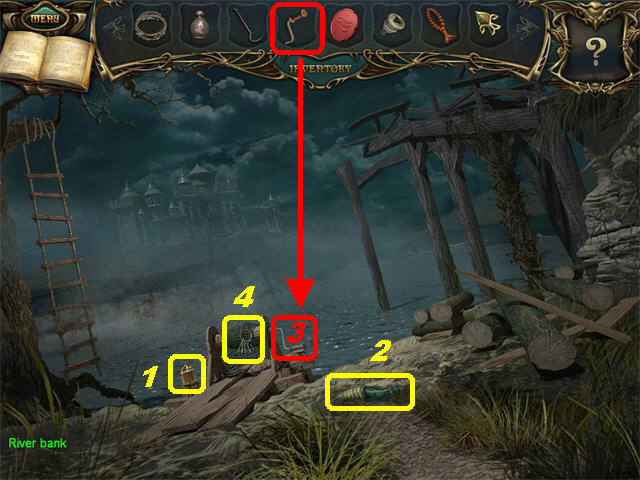
- Pick up the LIGHTER (1) in the lower left.
- Pick up the WINE BOTTLE (2) in the lower center.
- Place the HANDLE on the broken mechanism (3); pick up the KEYS (4) that appear on the mechanism.
- Return to Town Square.
Chapter 3: The Tavern

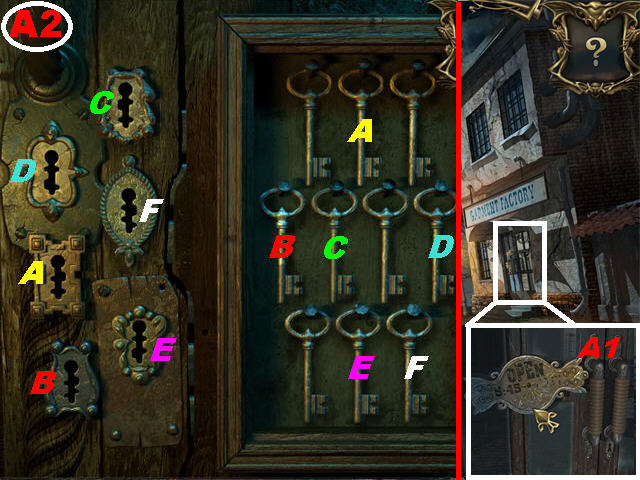
- Zoom into the Garment Factory on the right; notice the 5:45 (A1) opening time on the door.
- Zoom into the Tavern door on the left.
- Place the KEYS on the board to trigger a puzzle.
- Put the keys in the correct keyholes.
- Please look at the screenshot for the solution (A2).
- Enter the Tavern.

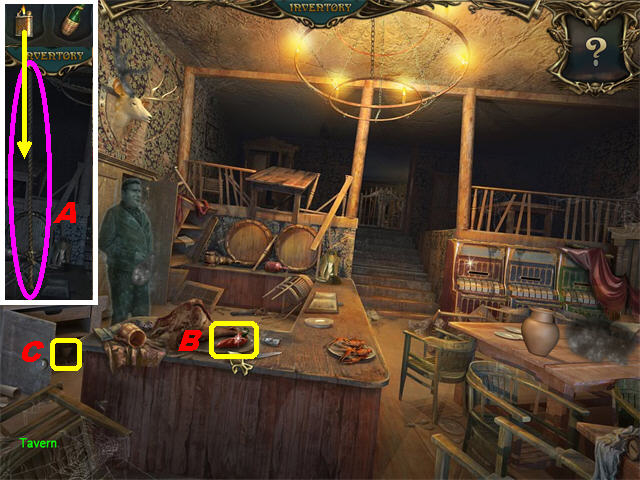
- Light the fuse in the center of the scene with the LIGHTER (A).
- Pick up the PEPPER (B) on the table.
- Open the cabinet in the lower (C) left; pick up the GLASS.
- Give the WINE BOTTLE to the ghost on the left. The Tavern Owner gives you the first piece of the AMULET.

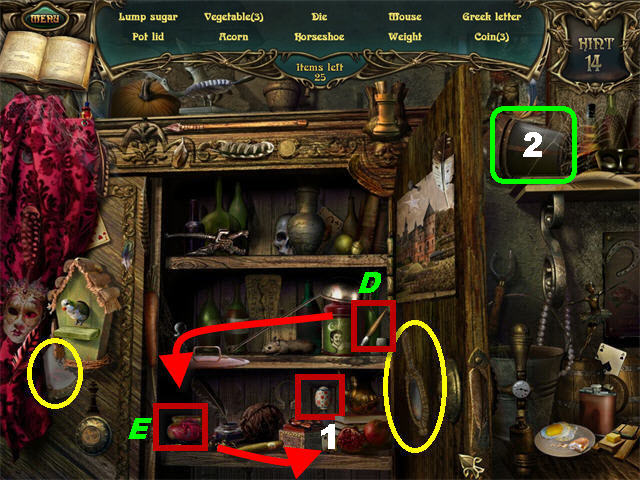
- Play the Hidden Object Scene after the ghost disappears.
- The 2 MIRRORS are marked in yellow.
- Pick up the paintbrush (D) on the second shelf and dip it into the paint (E) in the lower shelf. Paint the egg on the bottom shelf; click on the EASTER EGG (1).
- Pick up the STREET LAMP (2) in the upper right.

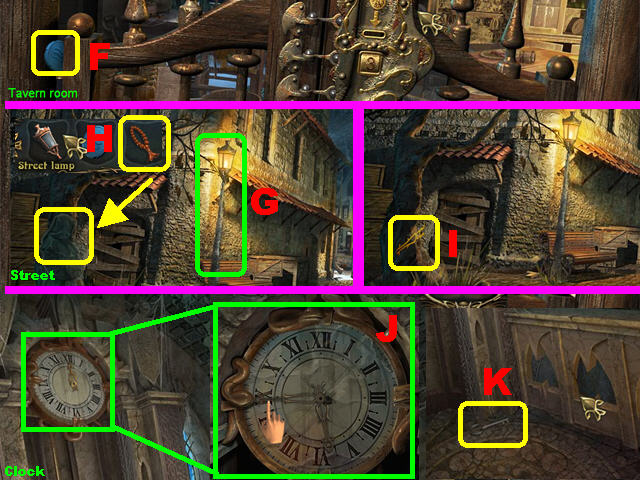
- Go up the steps to the Tavern Room.
- Pick up the BLUE TOKEN (F) on the left side of the door.
- Return to the Street by clicking down 3 times from this spot.
- Place the STREET LAMP (G) on the left lamppost.
- Give the BEADS (H) to the Monk’s ghost on the left; he will give you the second AMULET.
- Pick up the clock HAND (I) in the lower left.
- Return to the Clock area above the Chapel.
- Zoom into the clock; place the clock HAND on the face.
- Change the time to 5:45 (J) by dragging the hands around the face; pick up the FACTORY KEY (K) on the ground.
- Return to Town Square.
Chapter 4: Garment Factory

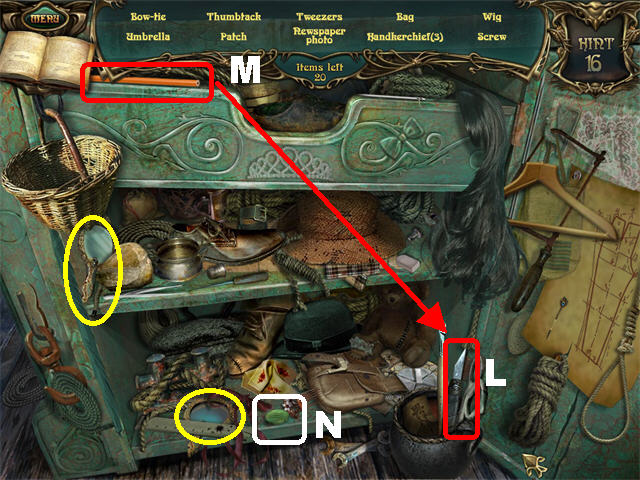
- Zoom into the Garment Factory on the right; use the FACTORY KEY on the lock and go inside.
- Zoom into the sparkling area in the lower right to play a Hidden Object Scene.
- Pick up the 2 MIRRORS marked in yellow.
- Pick up the KNIFE (L) in the lower right and place it on the Pencil (M) in the upper left.
- Pick up the GREEN TOKEN (N) in the lower shelf.
- Click in the upper right to trigger a puzzle.

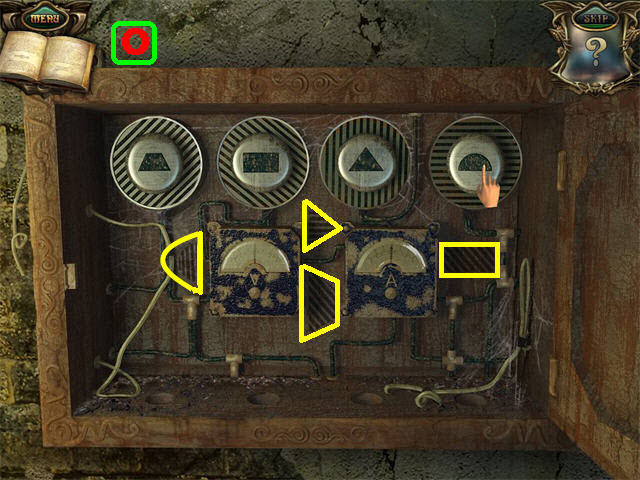
- Place the FUSE in the empty slot.
- Put the fuses into their right spots.
- The solution to this puzzle is contained within the markings you see along the center of the board. There are 4 images that match the shape of the buttons.
- Drag and click in place the fuse onto the disc that matches its shape.
- Please look at the screenshot for the solution (O).
- The factory is now lit.

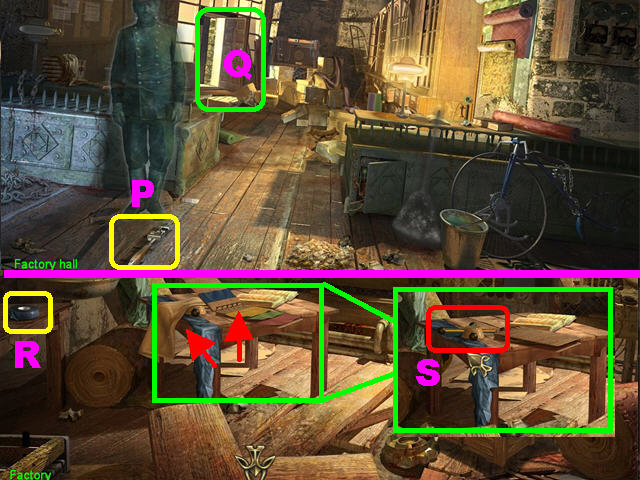
- Use the crowbar on the ground (near the guard) to lift up the board: pick up the WRENCH (P) in the floor boards.
- Go through the back door (Q).
- Pick up the INSULATION TAPE (R) on the left.
- Close the book on the table, click on the fabric and pick up the HANDLE (S) on the table.
- Return to the Tavern.

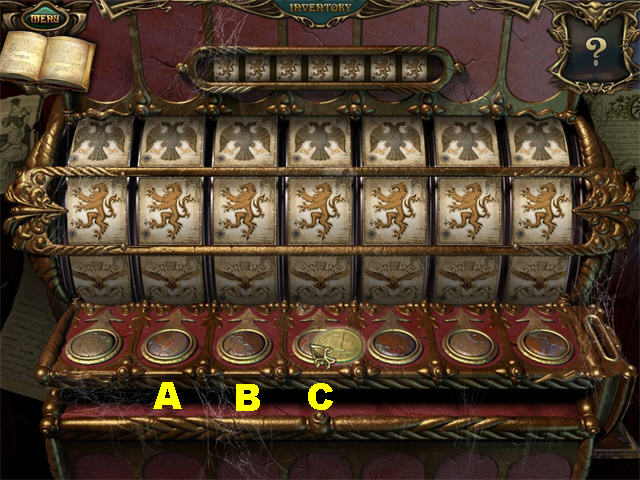
- Zoom into the Red Slot Machine in the back; use the RED TOKEN in the coin slot.
- Push the buttons in a specific order so that you have all the lions in a row, just like the image above the machine.
- The solution is A – B (4x) – C (3x).
- COIN 1 will be added to your inventory.

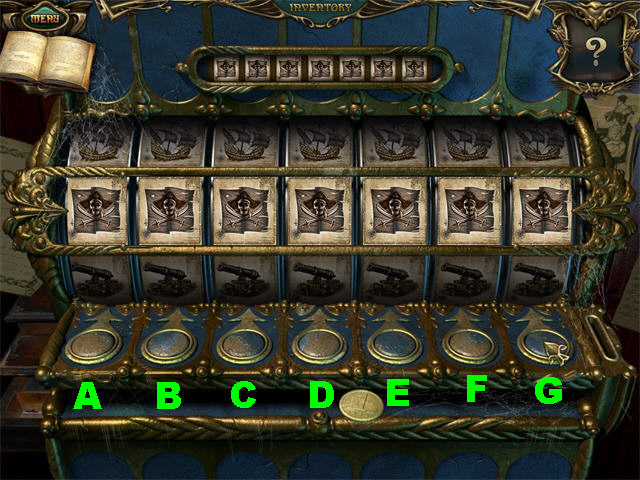
- Zoom into the Blue Slot Machine.
- Place the BLUE TOKEN in the coin slot. You need to have Jolly Rogers across the board to complete the puzzle.
- The solution is A (1X) – B (4X) – C (6X) – D (5X) – E (1X) – F (3X) – G (4X).
- COIN 2 will be added to your inventory.

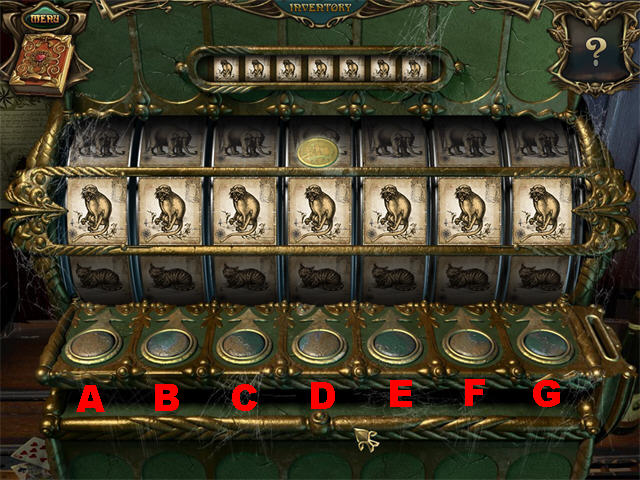
- Zoom into the Green Slot Machine.
- Place the GREEN TOKEN in the coin slot. You must have monkey images across the board to complete the puzzle.
- The solution is C (3X) – F (4X) – E (4X) – D (3X) – B (2X) – A (5X) – G (5X).
- COIN 3 will be added to inventory.
- Go up the steps to the Tavern Room.

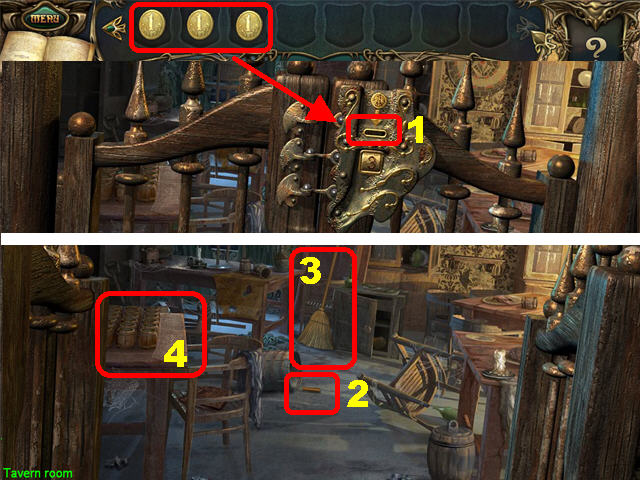
- Place the 3 COINS in the slot (1) to unlock the door.
- Pick up the HACKSAW (2) and the BROOM (3) on the ground.
- Click on the left table (4) to trigger a puzzle.

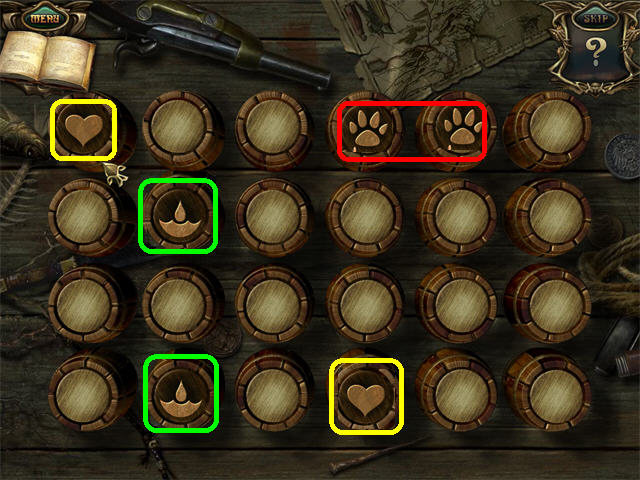
- Click on the matching pairs of items.
- Each matching pair will disappear from the screen. If you make an incorrect match, the symbols will disappear.

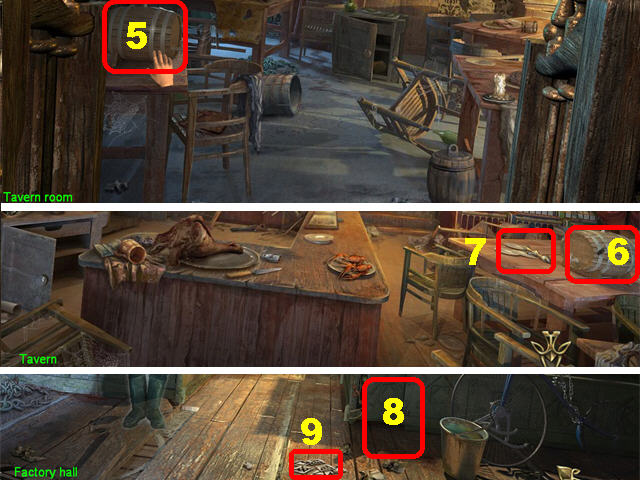
- Pick up the SMALL BARREL (5) on the table after the puzzle has been solved.
- Exit to return to the Tavern.
- Place the SMALL BARREL (6) on the right table; pick up the HANDLE (7).
- Return to the Factory Hall.
- Place the BROOM (8) in the lower right; pick up the CLOTHES TAGS (9) on the floor.
- Go into the Factory in the back.

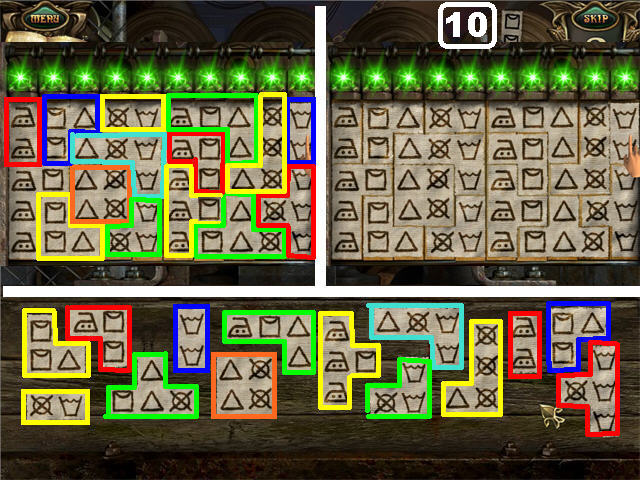
- Zoom into the Tag machine in the back of the scene.
- Place the CLOTHES TAGS on the machine to activate the puzzle.
- You must place the clothes tags so that each column has identical symbols. Use the permanent piece as a placement guide.
- A green light will appear above correctly placed columns.
- Please look at screenshot for the solution (10).

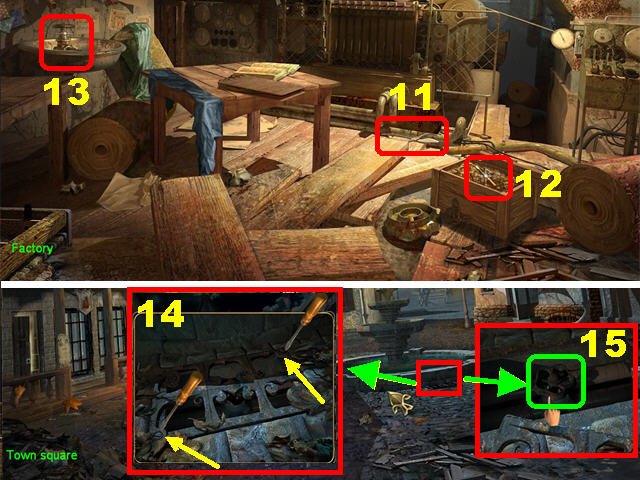
- Pick up the GARDEN PRUNER (11) that fell on the ground.
- Open the crate in the lower right with the HACKSAW and pick up the SCREWDRIVER (12).
- Loosen the faucet with the WRENCH; pick up the FAUCET (13) in the sink.
- Go to the Town Square.
- Zoom into the drain by the fountain; remove the 2 screws with the SCREWDRIVER to lift off the cover (14).
- Click on the valve (15) to drain the water out of the fountain; click on the fountain to trigger a puzzle.

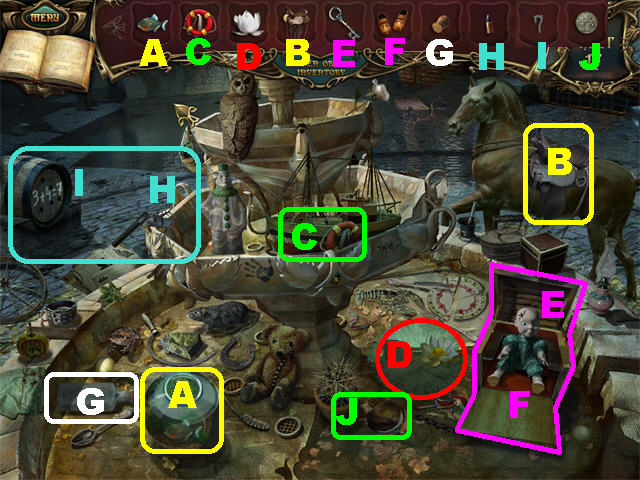
- Place the items back where they belong.
- The FISH (A) belongs in the fish bowl.
- Place the SADDLE (B) on the horse.
- The LIFE BOUY (C) belongs on the ship.
- Put the WATER LILY (D) on the lily pad in the lower right.
- Open the chest (E) with the BIG KEY.
- Put the TINY SHOES (F) on the doll inside the chest.
- The CORK (G) belongs on the bottle in lower left.
- Place the BULLET (H) in the gun on the left; it will shoot the barrel across it.
- Place the NUMBER 7 (I) on the lid of the barrel on the left that reads “3 + 4 + =.”
- The COIN (J) belongs in the coin purse in the lower right.
- The UNIFORM CAP will be added to your inventory.
- Go to the Street.

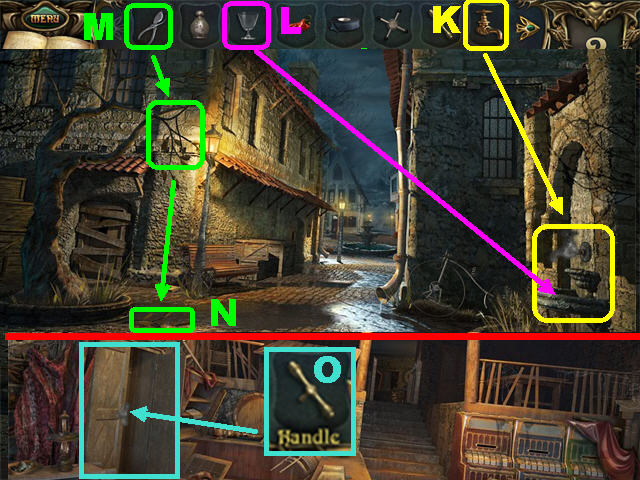
- Place the FAUCET (K) in the lower right.
- Place the GLASS (L) under the faucet; pick up the GLASS WITH WATER.
- Cut the branch on the left with the GARDEN PRUNER (M).
- Pick up the DRY TREE BRANCH (N) that falls on the ground.
- Go into the Tavern.
- Place the golden HANDLE (O) on the closet door, on the left, to trigger a Hidden Object Scene.

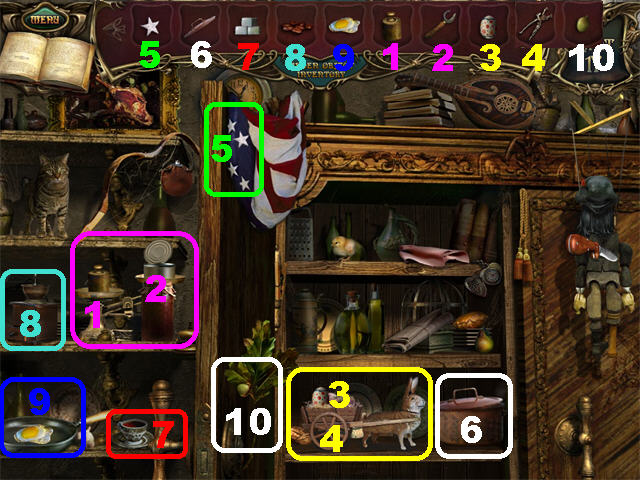
- Put the WEIGHT (1) on the scale on the left and a tin can will appear.
- Open the tin can on the scale with the TIN OPENER (2).
- Put the EASTER EGG (3) in the rabbit’s cart in the lower shelf and it will move up a bit.
- Crack the nut (4) behind the rabbit’s cart with the NUTCRACKER.
- The WHITE STAR (5) belongs on the flag.
- Place the POT LID (6) on the pot in the lower right.
- Place the LUMP OF SUGAR (7) in the teacup in the lower left.
- Place the COFFEE BEANS (8) in the coffee grinder on the left.
- Place the FRIED EGG (9) in the frying pan in the lower left.
- The ACORN (10) belongs on the small tree in the lower center.
- The KNIFE will be added to inventory.
- Go into the Factory Hall.

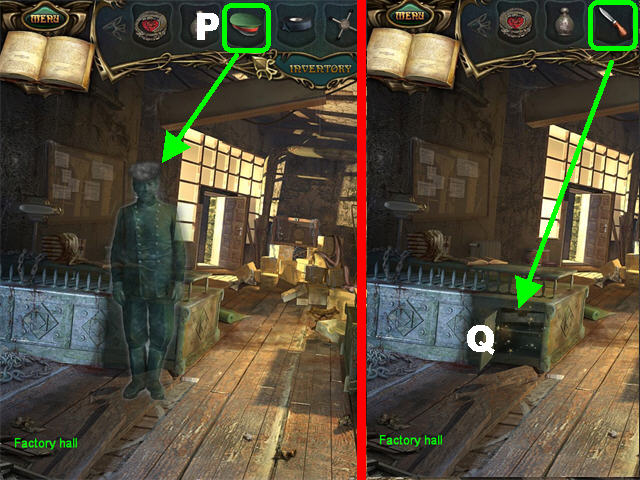
- Give the UNIFORM CAP (P) to the Factory Guard. He gives you the third AMULET.
- Open the Locker (Q) in the lower left with the KNIFE to trigger a Hidden Object Scene.

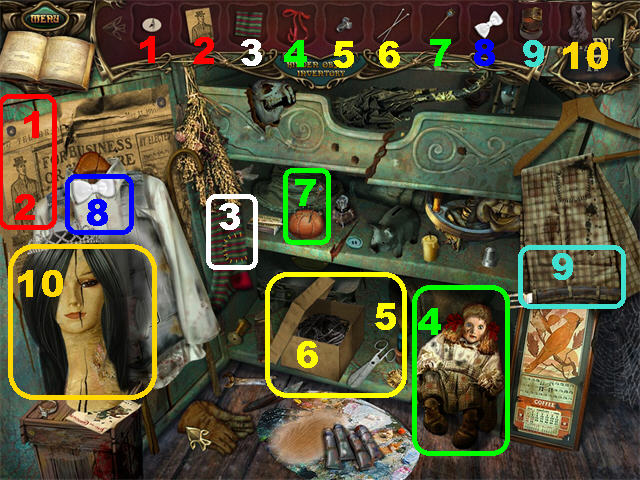
- The THUMBTACK (1) belongs on the newspaper on the left.
- The NEWSPAPER PHOTO (2) belongs in the upper left side of the newspaper.
- Place the PATCH (3) on the stocking on the left.
- The RIBBON (4) belongs on the doll’s hair in the lower right.
- Place the SCREW (5) on the broken scissors in the lower right to cut open the adjacent box next.
- Place the KNITTING NEEDLE (6) inside the box.
- The PIN (7) belongs in the pincushion on the shelf.
- Put the BOW TIE (8) on the white shirt on the left.
- The BELT (9) belongs to the pants on the right.
- Put the WIG (10) on the head in the lower left.
- The ANTLER will be added to your inventory.

- Go into the Tavern.
- Place the ANTLER (R) on the deer head in the upper left; pick up the DART (S) behind the deer.
- Go into the Tavern Room.
- Zoom into the dartboard (T) in the back; pick up the BUTTON (U) that falls below it.
- Return to Town Square.
Chapter 5: Pharmacy


- Zoom into the Pharmacy in the back.
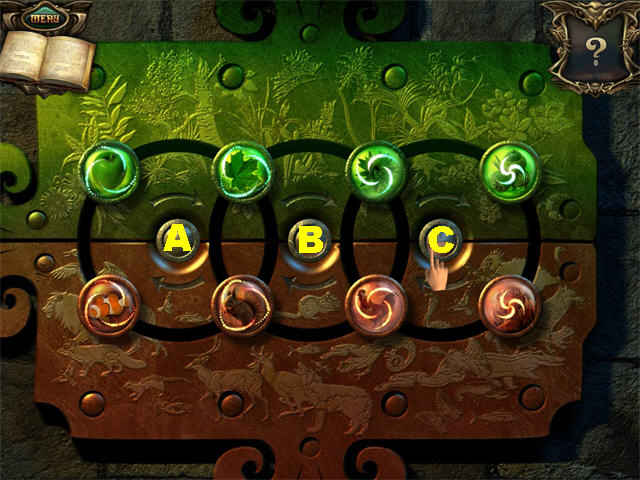
- Place the BUTTON on the board to trigger a puzzle.
- Place the buttons on the board according to the color of the background; green on top and brown on bottom.
- Please look at the screenshot for the solution and click on the buttons in the following order: A – B – A – C – C.
- Enter the Pharmacy.

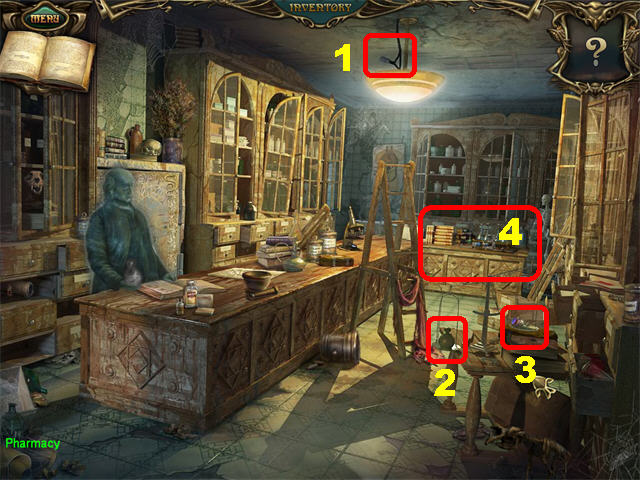
- Place the INSULATION TAPE on the lamp’s broken wire (1).
- Put the WEIGHT on the left side of the scale (2); pick up the DRY HERBS (3) on the right scale.
- Zoom into the table in the back (4).

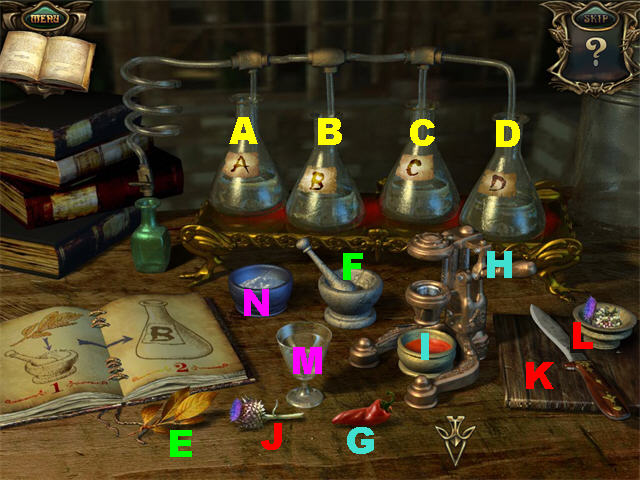
- Place the DRY HERBS, GLASS WITH WATER, PEPPER, and DRY TREE BRANCH on the matching silhouettes, on the table.
- Prepare the medication using the instructions in the book. Flip the book’s pages by clicking on them in order to view the full set of instructions.
- Place the DRY TREE BRANCH (E) into the mortar and pestle (F).
- Put the CHOPPED DRY TREE BRANCH into the “B” BEAKER.
- Put the PEPPER (G) into the press (H) on the right to liquefy it.
- Place the LIQUID PEPPER (I) into the “C” BEAKER.
- Place the DRY HERBS (J) on the cutting board (K).
- Put the CHOPPED DRY HERBS (L) into the “D” BEAKER.
- Put the GLASS OF WATER (M) into the POWDER in the blue bowl (N).
- Put the BLUE LIQUID (N) into the “A” BEAKER.
- The MEDICATION will be added to inventory.

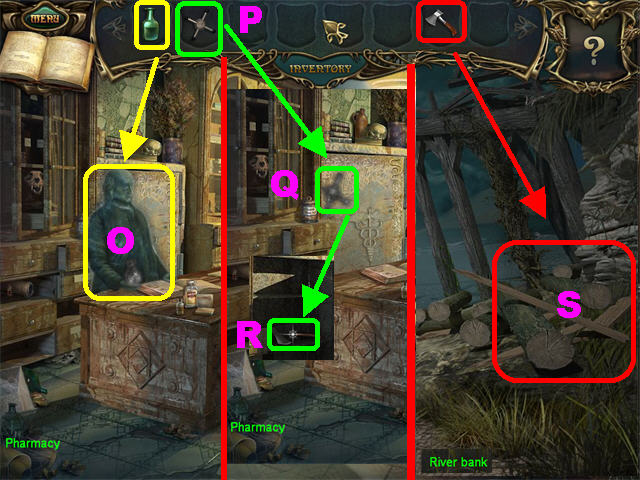
- Give the MEDICATION to the Pharmacist (O) and he will give you the fourth AMULET.
- Place the four-sided HANDLE (P) on the safe (Q) that becomes visible after the Pharmacist leaves.
- Pick up the HATCHET (R) inside the safe.
- Go to the River Bank located beyond the Bridge.
- Chop the Logs with the HATCHET. Zoom into the pile to trigger a Hidden Object Scene on the fountain in Town Square.
- Return to Town Square.

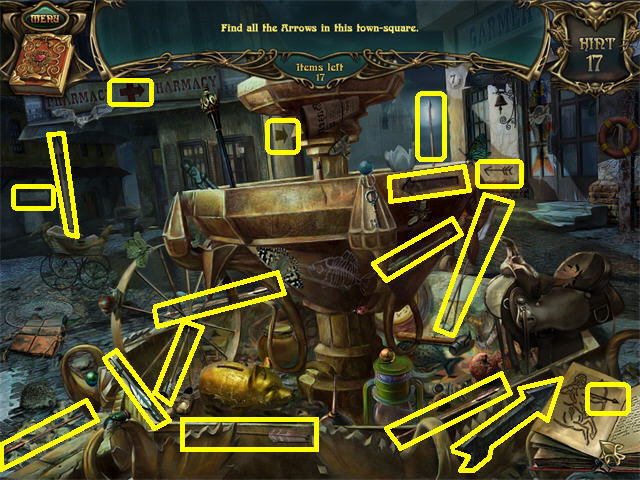
- Play the Hidden Object Scene by the fountain.
- Find the 17 arrows marked in yellow.
- Flip the pages of the book in the lower right until you find the image of the arrow.
- The ARROW will be added to inventory.

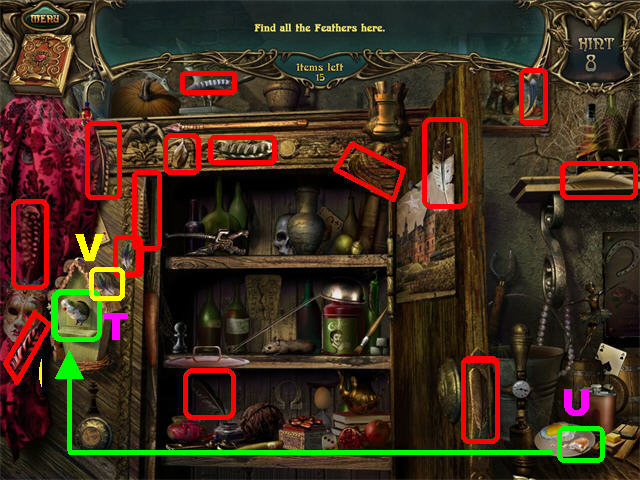
- Go into the Tavern; click on the cupboard on the left.
- Find the 15 FEATHERS marked in red.
- Give the BIRD (T) the BREAD (U) in the lower right; pick up the FEATHER (V) marked in yellow that falls on the birdhouse.
- The QUILL has been added to your inventory.

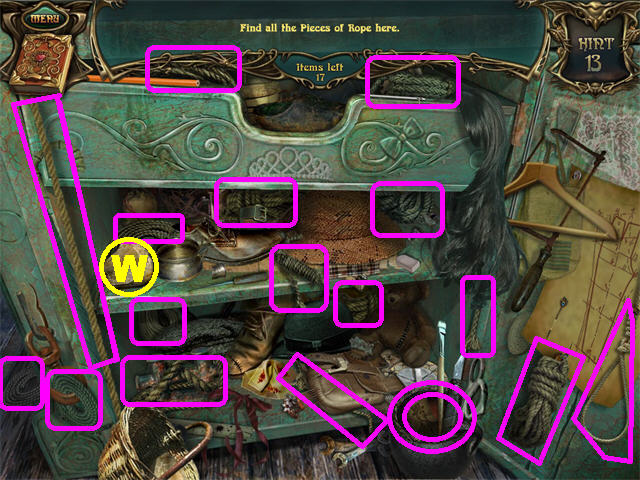
- Go into the Factory Hall. Click on the cabinet in the lower right.
- Pick up the 17 ROPE pieces marked in magenta.
- Pick up the rock (W) on the first shelf and place it into the basket on the left; click on the ROPE attached to it.
- The ROPE will be added to inventory.
- Go to the River Bank.

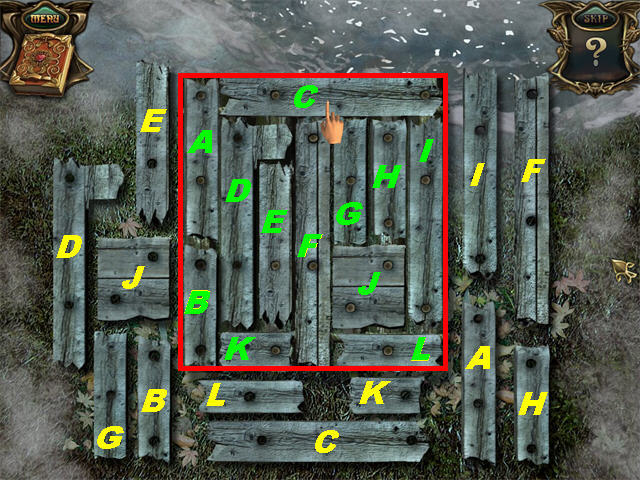
- Zoom into the logs in the lower right.
- Place the ROPE on the log to trigger a mini-game.
- Place the wood pieces into the right spots. Correct pieces will lock into place.
- Please look at the screenshot for the solution.
- Click on the assembled raft in the water to cross the river.
Chapter 6: Castle Gate

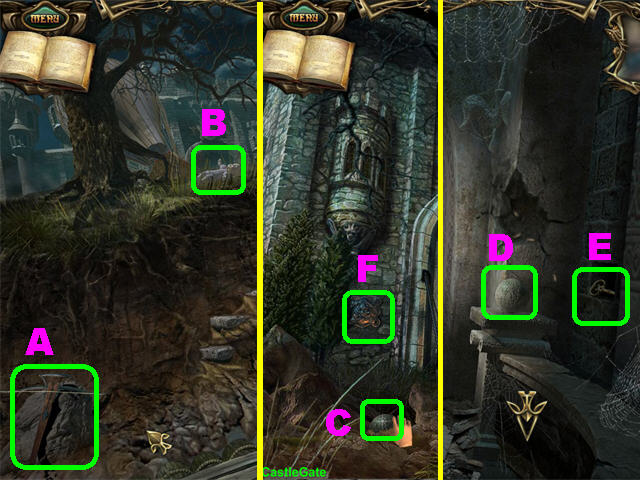
- Place the ARROW on the crossbow (A) in the lower left corner and a hot air balloon will fall on the ground.
- Pick up the DOLL (B) that falls on the ground.
- Click on the stairs to reach the Castle Gate.
- Pick up the STONE BALL (C) in the lower left.
- Return to the Street Door via the raft.
- Place the STONE BALL (D) on the right; pick up the TRIANGULAR KEY (E) on the right side of the wall.
- Return to the Castle Gate.
- Zoom into the plate (F) on the left side of the wall.

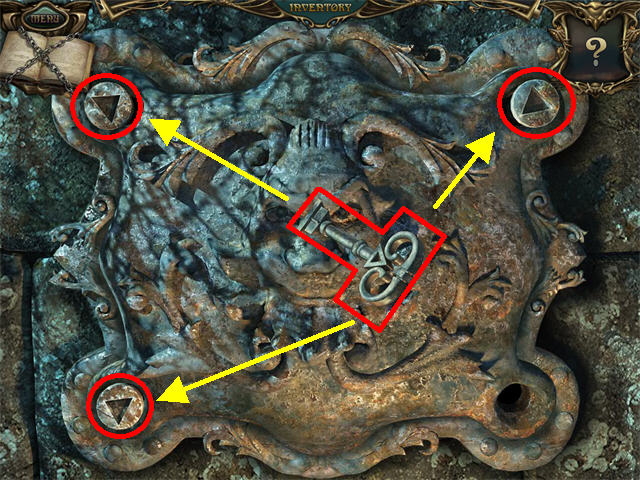
- Use the TRIANGULAR KEY to remove the 3 triangular screws on the cover.

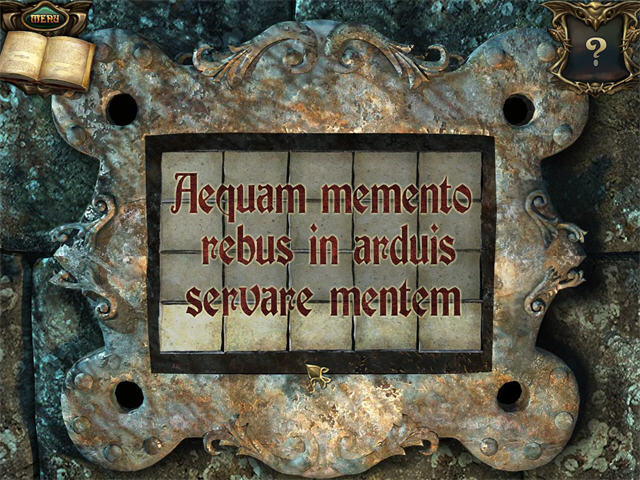
- Click on any 2 stones to swap their positions.
- Please look at the screenshot for the solution.
- The words “LICITUM SIT” appear on the board.
- Go through the door.

- Click on the Hidden Object Scene in the lower right.
- Pick up the 2 MIRRORS marked in yellow.
- Pick up the KNIFE (F) in the lower right and place it on the stump on the left. Click on the WOODEN DOLL (G).
- Pick up the KEROSENE CAN (H) on the left.

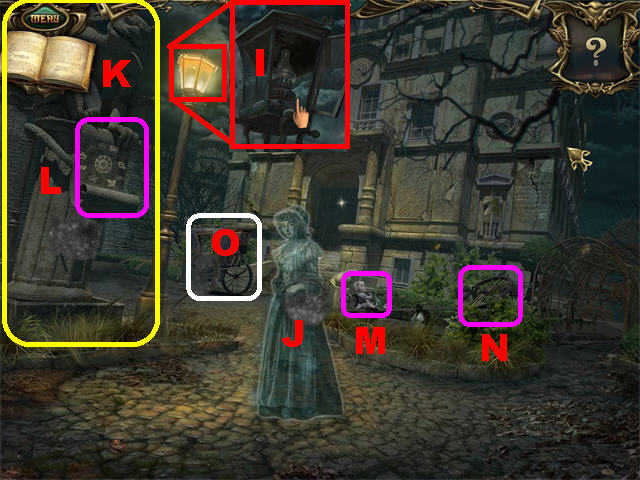
- Zoom into the street lamp on the left; place the KEROSENE CAN on the lamp and click on the bottom of the lamp to light it (I).
- The Castle’s Maidservant (J) appears in the scene.
- Give the QUILL to the gargoyle (K). Note the symbols on the scroll (L) that appears above the column; you’ll need those to solve a puzzle.
- Place the DOLL (M) on the see-saw; pick up the WHEEL (N) on the opposite side of the see-saw.
- Put the WHEEL (O) on the cab on the left to move it aside.
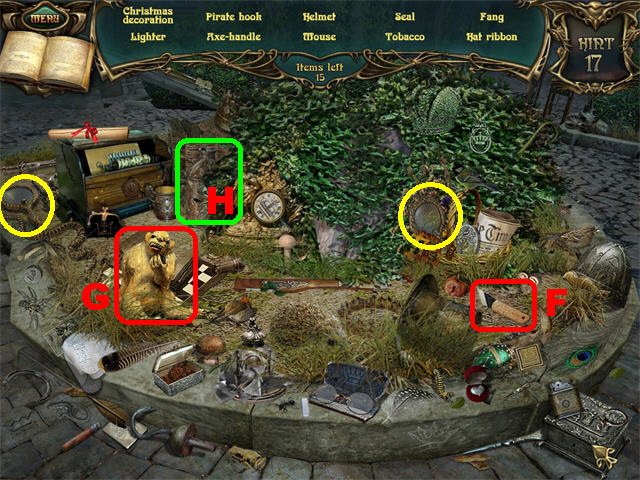
- Click on the spot in which the cab was located to trigger a Hidden Object Scene.

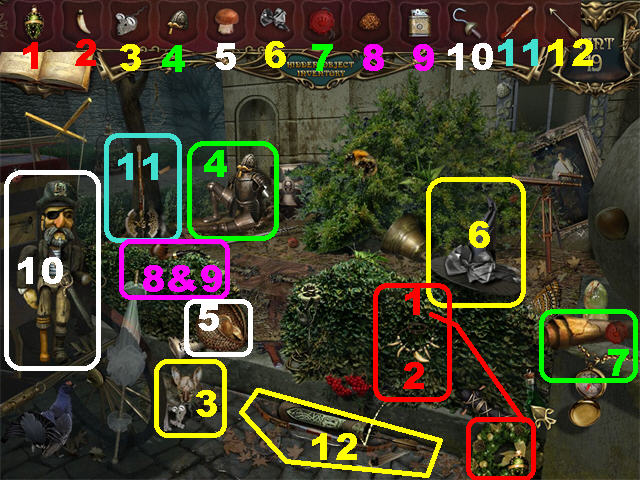
- Place the CHRISTMAS DECORATION (1) on the wreath in the lower right and it will fall to the ground.
- Place the FANG (2) on the necklace that appeared behind the wreath.
- The MOUSE (3) belongs to the cat in the lower left.
- Place the HELMET (4) on the armor by the back wall.
- The MUSHROOM (5) goes into the basket.
- Put the HAT RIBBON (6) on the witch’s hat.
- Place the SEAL (7) on the scroll in the lower right.
- Place the TOBACCO (8) and the LIGHTER into the pipe (9) on the left.
- Give the PIRATE HOOK (10) to the pirate on the left.
- The AXE HANDLE (11) belongs on the axe by the tree.
- The ARROW (12) belongs on the quiver on the ground.
- The BULBS will be added to your inventory.
- Click down.

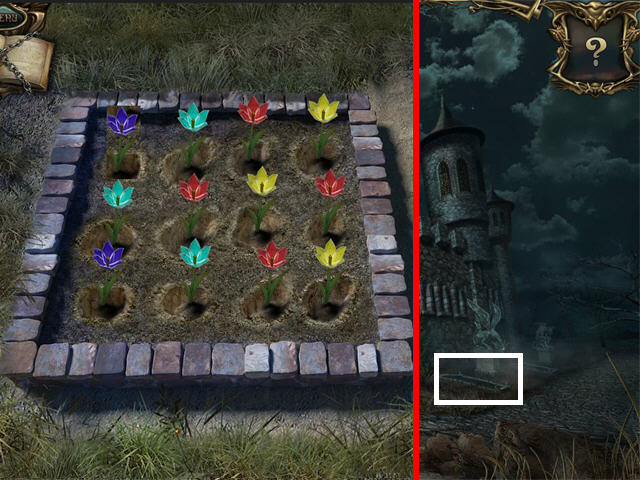
- Zoom into the right part of the ground and place the BULBS on the ground to trigger a puzzle.
- Plant the bulbs so that none of them fade following the rules below:
- Red bulbs can be placed near yellow and blue bulbs.
- Yellow bulbs can only be placed near red bulbs.
- Blue bulbs can be placed near red and violet bulbs.
- Violet bulbs can be placed only near blue bulbs.
- Please look at the screenshot for the solution.
- The BOUQUET will be added to inventory.

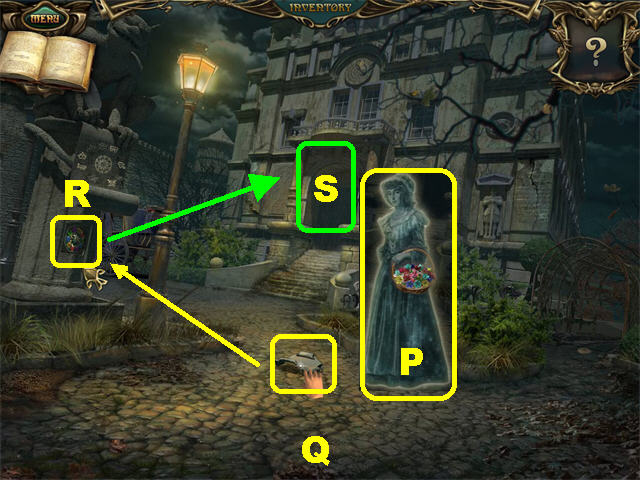
- Go through the gate.
- Give the BOUQUET to the Maidservant (P) to obtain the fifth piece of the AMULET.
- Pick up the CHIMERA TABLET (Q) on the ground.
- Place the CHIMERA TABLET below the gargoyle on the left; pick up the DOOR DECORATION (R).
- Zoom into the door (S); place the DOOR DECORATION on the board to trigger a puzzle.

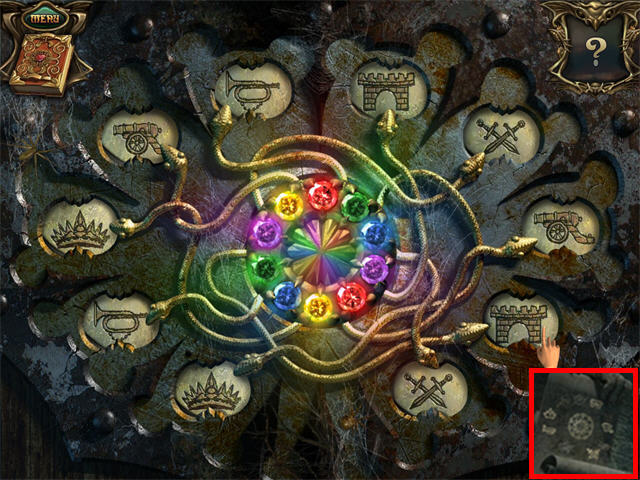
- For the solution you can look at the image on the scroll by the gargoyle, outside the castle door.
- Click on the white areas to scroll through all the images.
- Start by placing the images shown on the scroll by the gargoyle. Trace each image to the matching colored stone and place the appropriate image in that slot.
- Follow the same steps for the rest of the stones and symbols to complete the puzzle.
- Please look at the screenshot for the solution.
- Enter the castle.
Chapter 7: Castle

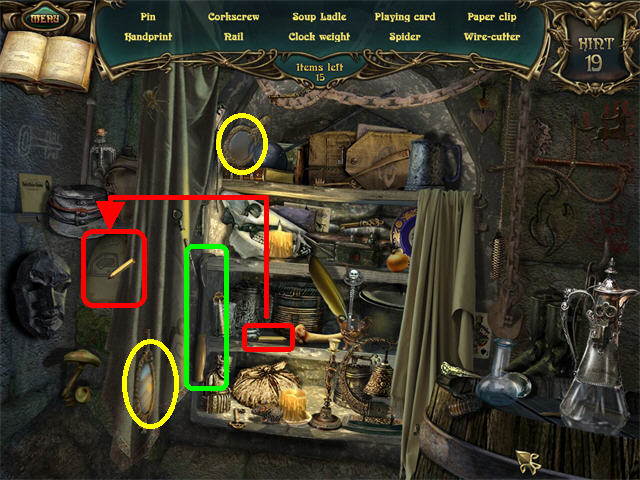
- Place the AMULET STAND on the stand in the Throne Room; you will be taken to the Dungeon Cell.
- Play the Hidden Object Scene on the right.
- Pick up the 2 MIRRORS marked in yellow.
- Pick up the chalk marked in red and place it on the paper on the left. Pick up the SKETCH once it has been completed.
- Pick up the NAIL PULLER marked in green on the left side of the screen.

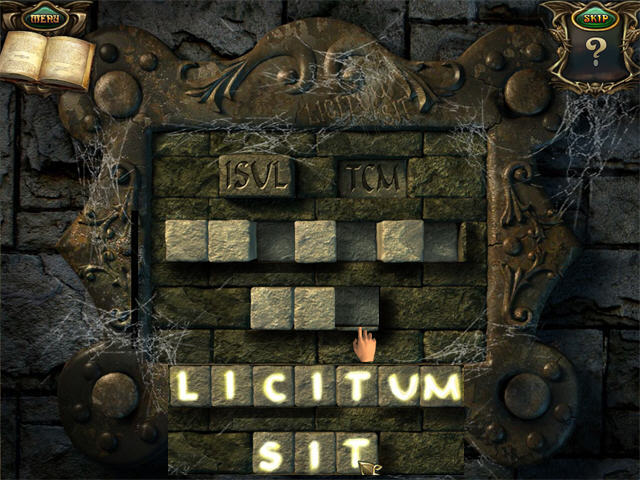
- Place the NAIL PULLER on the boards on the back wall.
- Zoom into the puzzle on the back wall.
- Set the correct position for the stones.
- Notice the stones with I, S, U, and L are pushed out.
- The letters T, C, and M are pushed in.
- The word “Licitum Sit” is etched in the upper center.
- You must press the stones using the clues given above to spell out “Licitum Sit”. If you reset the puzzle, you have to click on the stones twice so they are completely pushed in.
- Please look at the screenshot for the solution and set the stones as follows:
- First Row: Out-Out-In-Out-In-Out-In.
- Second Row: Out-Out-In.
- Go through the entryway after the puzzle has been solved.

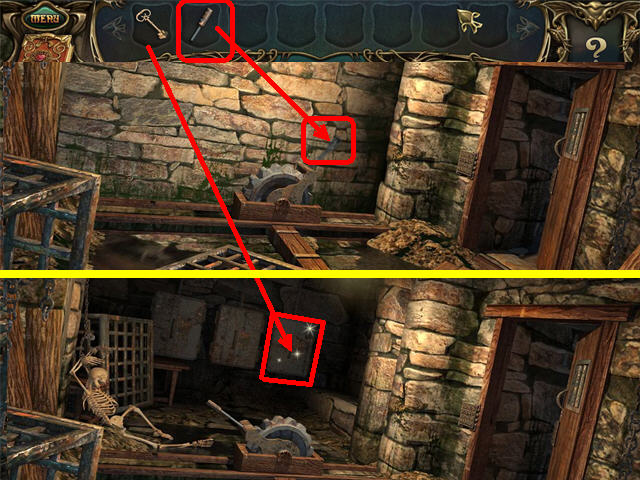
- Zoom into the panel next to the door.
- Press the buttons until they all remain lit.
- Please look at the screenshot for the solution.

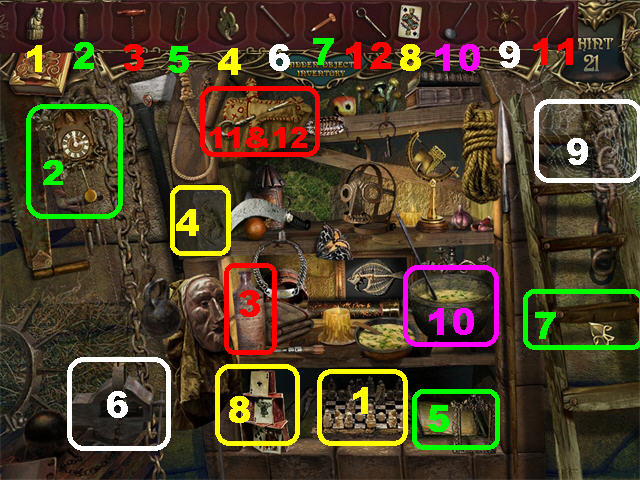
- Go through the door. Click on the sparkling area on the left.
- Put the CHESS PIECE (1) on the chessboard.
- The CLOCK WEIGHT (2) belongs on the clock in the upper left.
- Place the CORKSCREW (3) on the bottle on the second shelf.
- Place the FIRE (4) in the recess on the left side of the shelf and a stack of papers will appear in the lower right.
- Put the PAPER CLIP (5) on the stack of papers in the lower right.
- Put the METAL STICK (6) on the vice grip in the lower left.
- The NAIL (7) belongs on the broken ladder on the right.
- Put the PLAYING CARD (8) on the house of cards in the lower left.
- The SPIDER (9) belongs on the cobweb.
- Place the SOUP LADLE (10) in the cauldron.
- Put the WIRE CUTTER (11) on the wired voodoo doll.
- Put the VOODOO PIN (12) in the voodoo doll.
- The LEVER will be added to your inventory.
- Click down.


- Place the LEVER in the slot of the contraption near the back wall to open it up.
- Zoom into the last cabinet on the back wall.
- Place the TRIANGULAR KEY in the lock to trigger a puzzle.

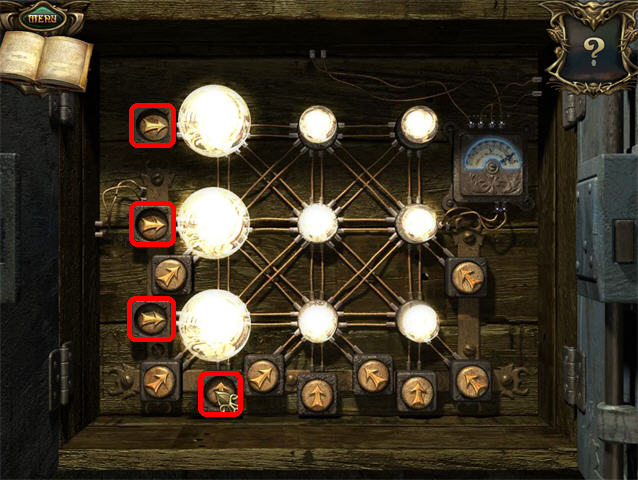
- Press on the correct arrows to make all the lights shine.
- Please look at the screenshot and click on the arrows marked in red in any order to solve the puzzle.
- Solving this puzzle turns on the lights in Dungeon Cell 2.
- Click down.

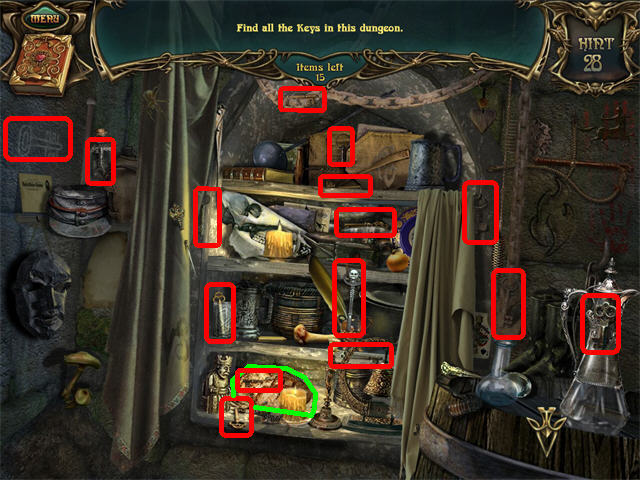
- Click on the sparkling area on the right.
- Find the 15 KEYS marked in red.
- Click twice on the bread marked in green and pick up the KEY inside.
- The KEY will be added to your inventory.
- Go through the door.

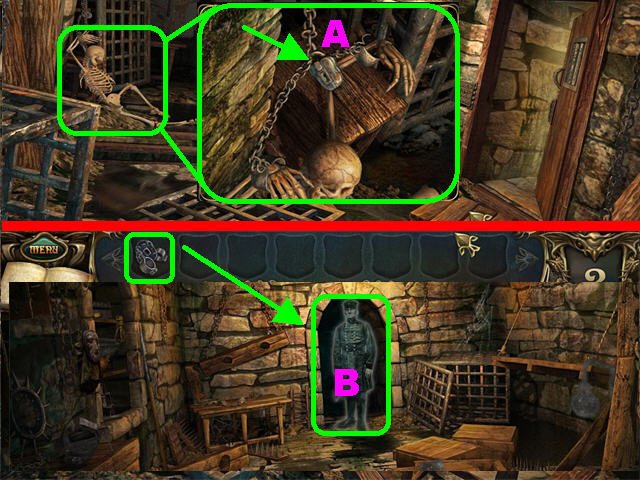
- Zoom into the skeleton; use the KEY on the lock (A) and pick up the HANDCUFFS.
- Go through the right door; give the HANDCUFFS to the ghostly Jailer (B).
- The Green MAGIC GEM will be added to inventory.
- Go through the back door, the ceiling, and the right door to reach the Hall.

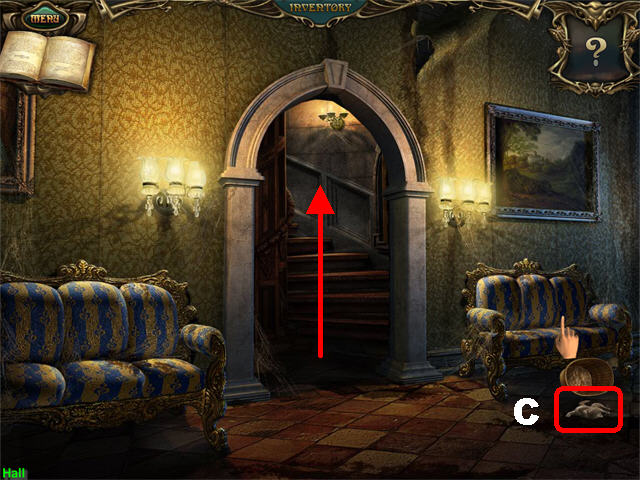
- Click on the basket on the couch to make it fall; pick up the CHICKEN (C) on the ground.
- Click on the steps to reach the Tower Center.
- Click on the Hidden Object Scene on the right.

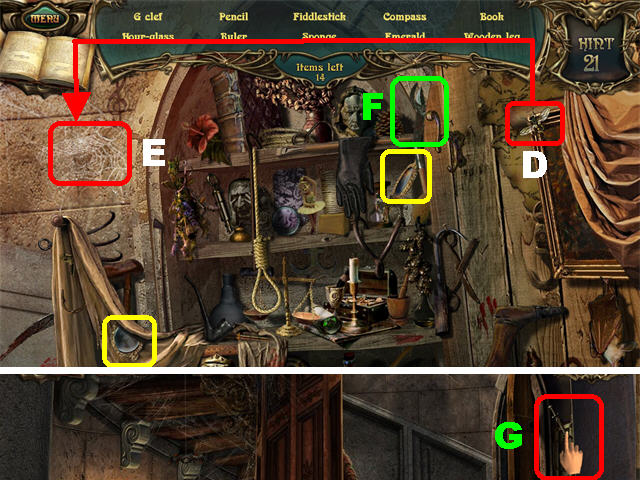
- Pick up the 2 MIRRORS marked in yellow.
- Pick up the FLY (D) on the frame in the upper right and place it on the spider web (E) in the upper left; click on the SPIDER to eliminate it from the list.
- Pick up the GARDEN PRUNER (F) in the upper right to add it to inventory.
- Click on the LEVER (G) on the right to make the missing steps appear; go up the steps.

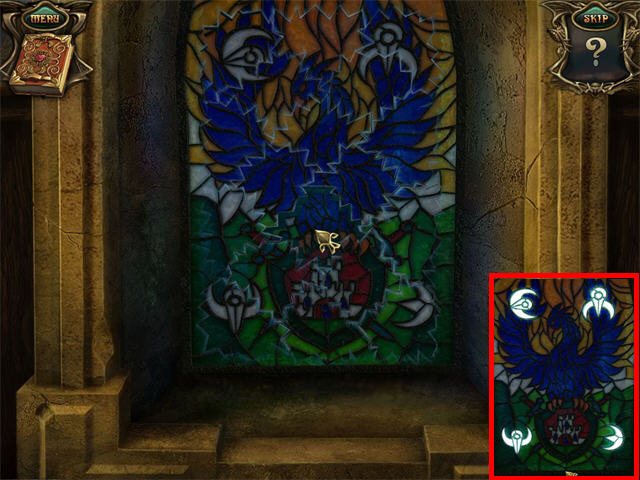
- Zoom into the window on the right to play a puzzle.
- Reassemble the image to reflect the one in the screenshot.
- Pay attention to the four large white symbols in the puzzle (H).
- Exit out of that view and click on the Hidden Object Scene on the left.

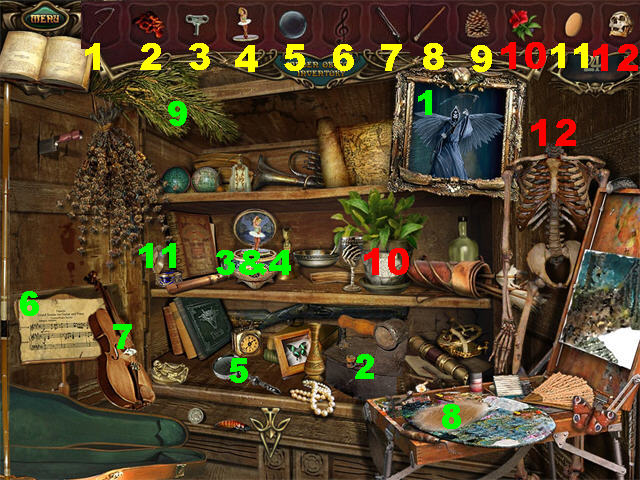
- Give the SCYTHE (1) to the Grim Reaper in the frame.
- Place the HOT COALS (2) in the old-fashioned iron in the lower right.
- The SMALL KEY (3) belongs on the music box on the middle shelf.
- Place the BALLERINA (4) in the music box.
- Put the LENS (5) in the magnifying glass in the bottom shelf.
- Place the CLEF (6) on the music sheet in the lower left and the violin will appear.
- Place the FIDDLESTICK (7) on the violin.
- The PAINTBRUSH (8) belongs on the palette in the lower right.
- Put the PINE (9) on the wreath in the upper left.
- The FLOWER (10) belongs in the potted plant.
- Place the SPONGE (11) in the compact on the middle shelf.
- The SKULL (12) belongs on the skeleton, on the right.
- The QUADRANGULAR KEY will be added to inventory.
- Zoom into the books in the bookcase.

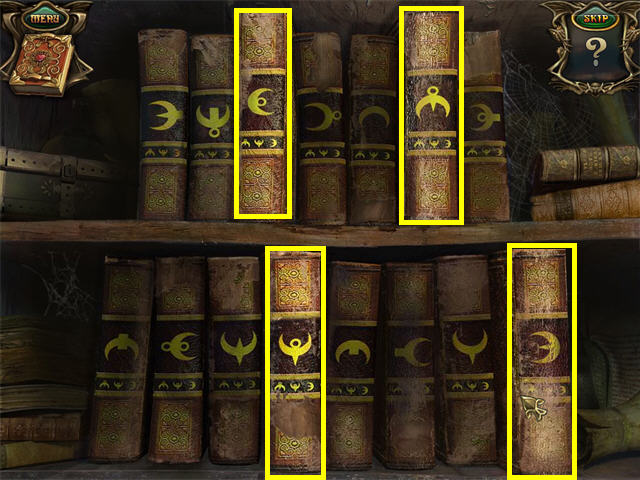
- You must click on 4 correct books to unlock the door.
- Look at the symbols on the puzzle you recently solved to view the correct books.
- Please look at the screenshot for the solution.
- Go into the hidden compartment.

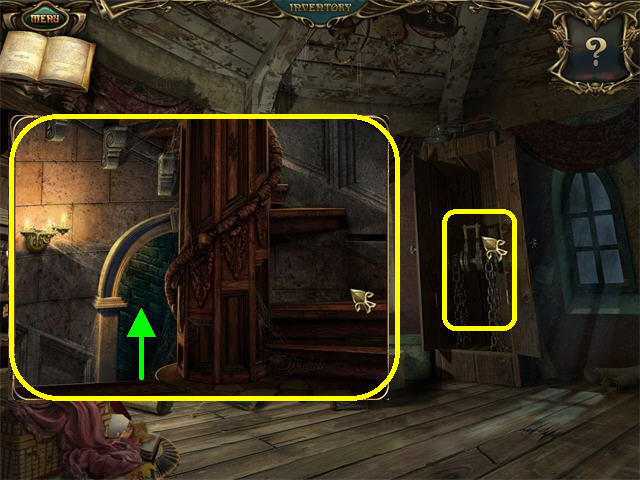
- Click on the closet on the right to open it; click on the lever inside the closet and you will see a brief cut scene of the grate in the Tower Center opening.
- Go to the Tower Center by clicking down 2 times. Click on the entryway by the steps to reach the Entrance. Go forward and then go through the right door to reach the Storage Room.

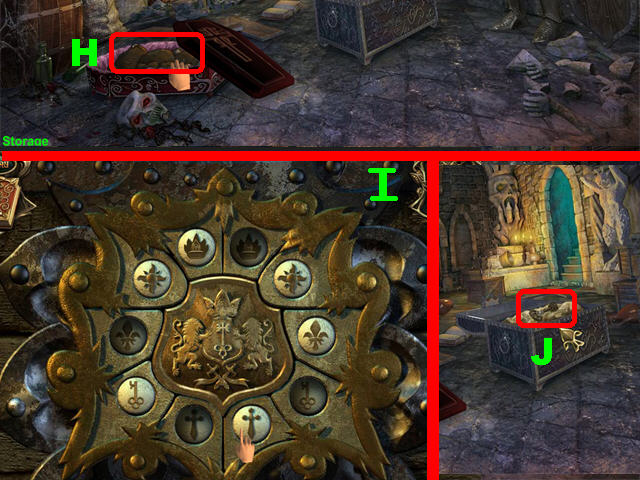
- Click on the casket’s lid 2 times; pick up the TEDDY BEAR (H) inside the casket.
- Zoom into the chest to trigger a puzzle.
- Set the correct pairs of identical signs to unlock the chest.
- Please look at the screenshot for the solution (I).
- Pick up the HEXAGONAL KEY (J) inside the chest.
- Click down 5 times, go through the hole in the ground and click down 2 more times.

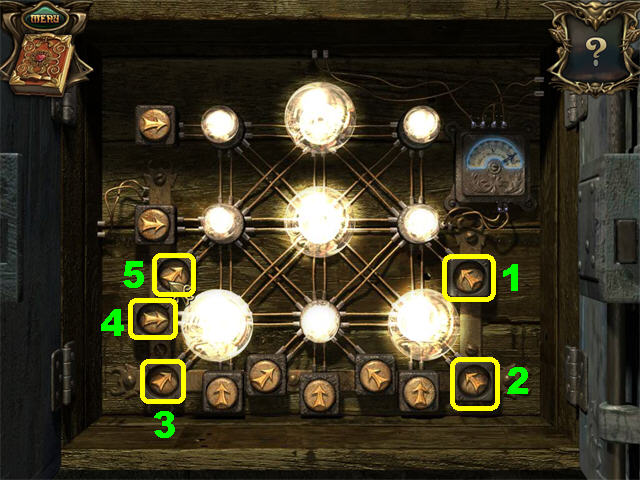
- Zoom into the first electrical equipment on the left.
- Place the HEXAGONAL KEY in the lock to trigger a puzzle.
- Click on the buttons marked in yellow, in the order shown in the screenshot, to solve the puzzle.
- You will see a brief view of the Laboratory lighting up.

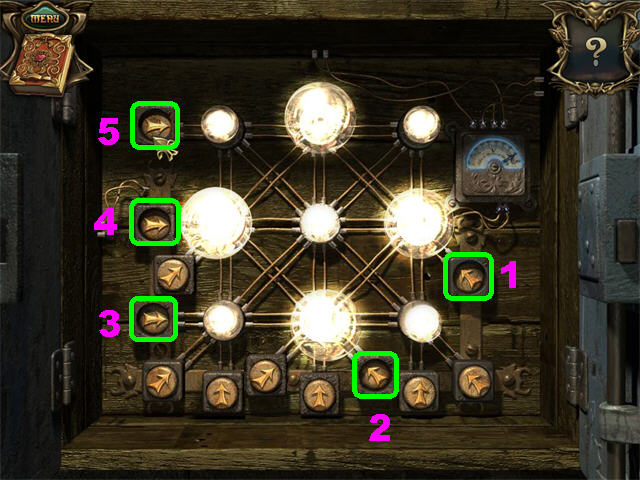
- Zoom into the middle electrical equipment.
- Place the QUADRANGULAR KEY in the lock to trigger a puzzle.
- Click on the buttons marked in green, in the order shown in the screenshot, to solve the puzzle.
- The Kitchen is now lit.
- Go through the right door, forward, and through the ceiling to reach the Kitchen.

- Place the CHICKEN (K) in the oven.
- Pick up the SCOOP (L) next to the oven.
- Go into the Wine Cellar in the back of the Kitchen.
- Place the SCOOP on the spilled flour in the lower right and pick up the FUNNEL.
- Exit the Kitchen and go into the Tower Center (N).

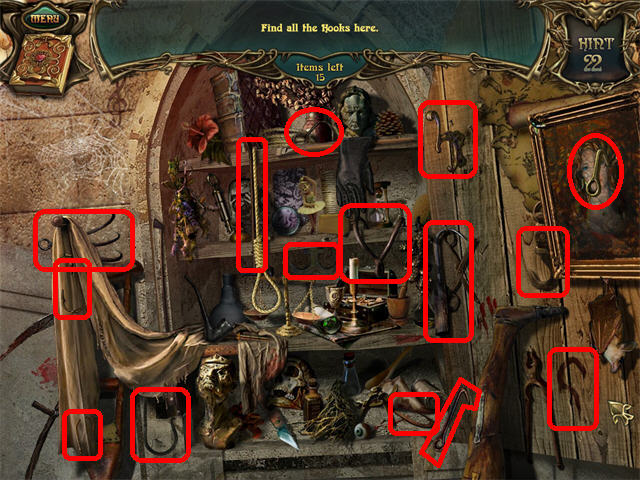
- Click on the right window.
- Find the 15 HOOKS marked in red.
- Click on the cloth in the upper right; pick up the HOOK.
- The HOOK will be added to inventory.
- Go through the entryway next to the steps; then forward.

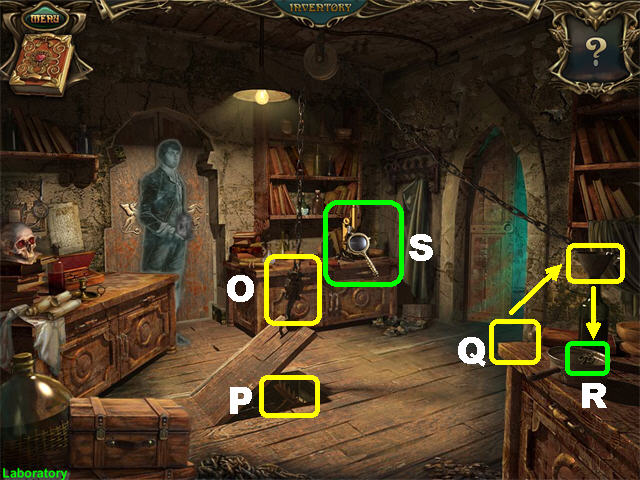
- Place the HOOK (O) on the chain hanging from the ceiling to lift the trapdoor.
- Pick up the RAKE (P) in the ground.
- Place the FUNNEL (Q) on the right table and the liquid from the pan will pour into the bottle.
- Pick up the CHEST KEY (R) in the pan.
- Zoom in to the microscope (S) in the back of the scene to trigger a puzzle.

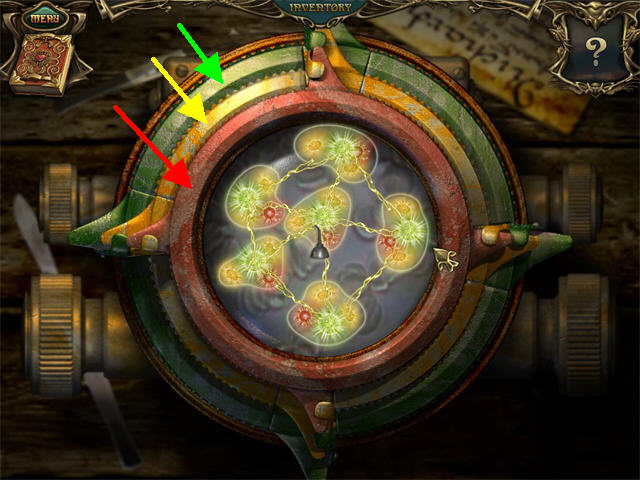
- Turn the circles so you can see the maximum amount of atoms.
- Click on the green, yellow, and red rims to rotate them.
- Click on the GREEN RIM 3 times (or until you see 6 green molecules).
- Click on the YELLOW RIM 3 times (or until you see 12 yellow molecules).
- Click on the RED RIM 3 times (or until you see 6 red molecules).
- The OIL CAN will be added to inventory.
- Click down until you reach the Kitchen and go into the Wine Cellar in the back.

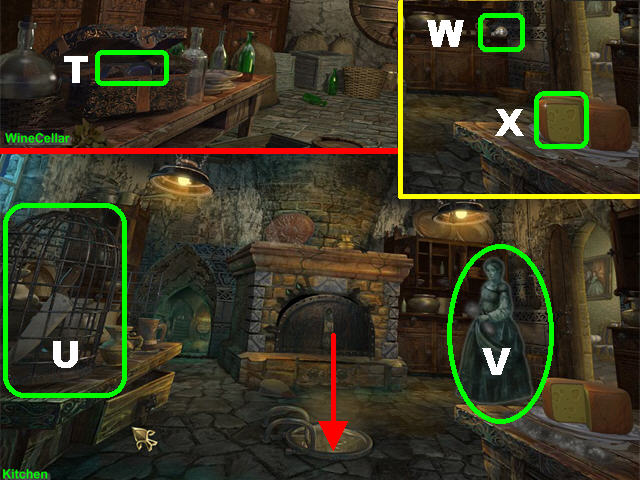
- Open the chest with the CHEST KEY.
- Pick up the SOUP LADLE (T) inside the chest.
- Go to the Kitchen.
- Place the OIL CAN on the rusty cage (U) on the left; pick up the KITCHEN KNIFE inside the cage.
- Give the SOUP LADLE to the cook (V).
- The cook gives you the YELLOW MAGIC GEM.
- Pick up the ELECTRIC BULB (W) on the counter that appears after the cook disappears.
- Cut a slice of CHEESE with the KITCHEN KNIFE in the lower right; pick up the PIECE OF CHEESE (X).
- Go through the hole in the ground and click down once to reach Dungeon Cell 2.
Chapter 8: Garden

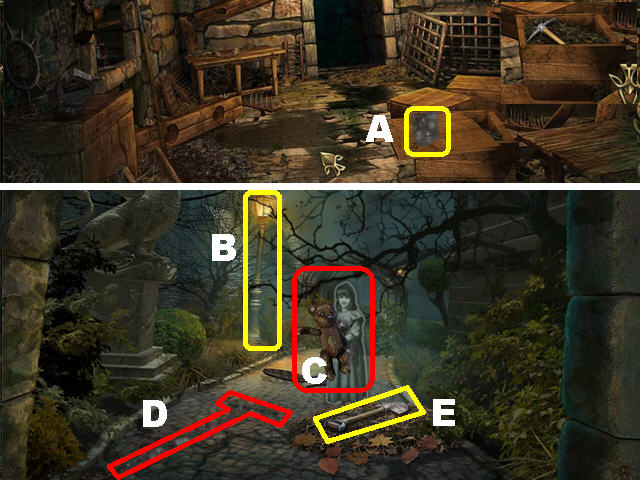
- Place the PIECE OF CHEESE on top of the crate in the lower right (A).
- Grab the PICK inside the crate.
- To get to the Garden go through the door, then the ceiling. Turn right out of the kitchen. Go forward through the passageway next to the steps, forward again, and right 2 times.
- Zoom into the lamppost (B) on the left; place the ELECTRIC BULB in the lamp to light up the Garden.
- Give the TEDDY BEAR (C) to the little girl; she gives you the Red MAGIC GEM.
- Place the RAKE (D) on the matching silhouette on the ground; pick up the SPADE (E) in the pile of leaves on the ground.
- Note that you can click on the manhole in the ground to gain access to the Dungeon Cell, but for now go forward.
- Use the GARDEN PRUNER on the bushes and go forward to return to the Castle Gate.

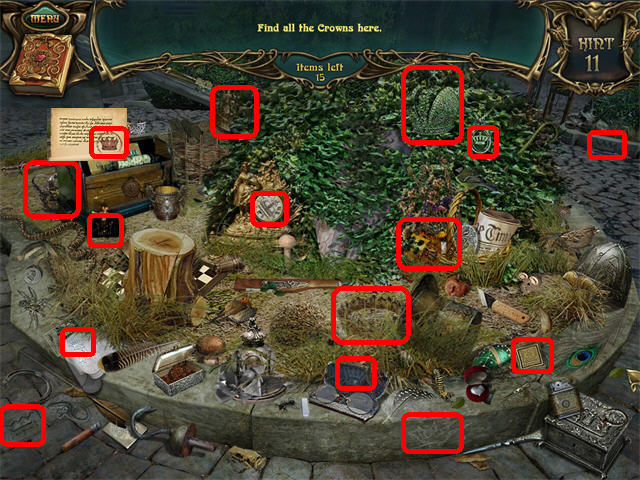
- Click on the sparkling area in the lower right.
- Find the 15 CROWNS marked in red.
- Open the scroll in the upper left; click on the CROWN on the scroll.
- The CROWN will be added to your inventory.
- Click down twice.

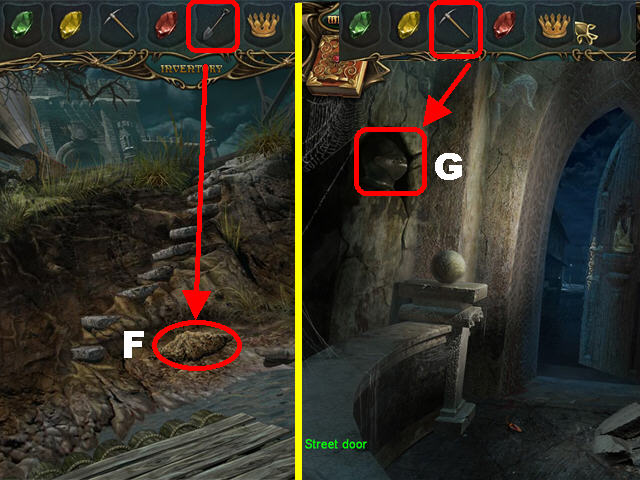
- Place the SPADE on the ground; pick up the buried FETTERS (F).
- Take the raft and return to the Street Door.
- Use the PICK on the left side of the wall; pick up the KNIGHT HEAD (G).
- Click down.

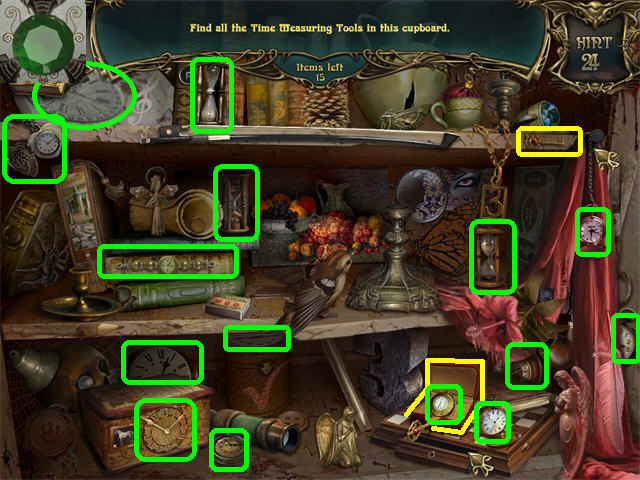
- Play the Hidden Object Scene on the right.
- Pick up the 15 TIME MEASURING TOOLS marked in green.
- Pick up the KEY in the upper right; open the red clock case in the lower right. Pick up the clock inside the case.
- The HOURGLASS will be added to inventory.
- Take the raft back to the castle and go to the Laboratory. Go through the right side of the castle, click down when you reach the Garden, (not the manhole), and click down one last time.

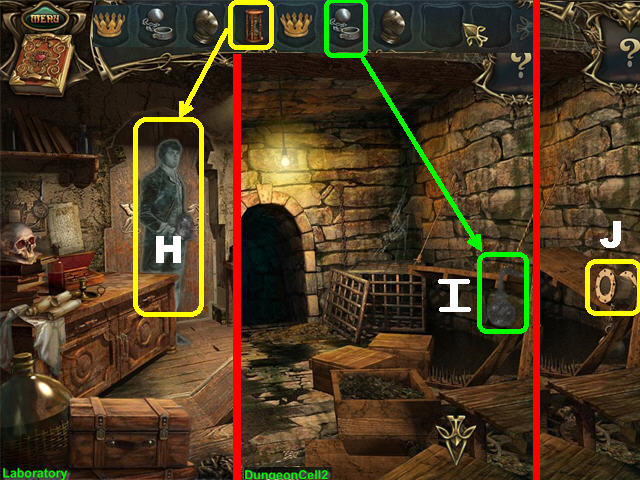
- Give the HOURGLASS to the Scientist (H).
- The Blue MAGIC GEM will be added to inventory.
- Return to Dungeon Cell 2 by clicking down until you get there.
- Place the FETTERS on the table (I) on the right; pick up the PART OF THE PIPE (J).
- Return to the Kitchen, make a right, go through the door and turn below the steps to reach the Entrance.

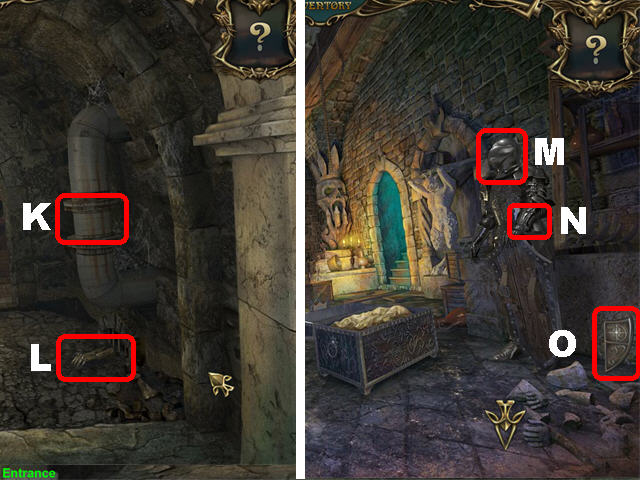
- Place the PART OF THE PIPE (K) on the pipe on the right to stop the leak.
- Pick up the KNIGHT GLOVE (L) on the ground.
- Go forward and make a right.
- Place the KNIGHT HELMET (M) and the KNIGHT GLOVE (N) into the matching silhouettes on the armor on the right.
- Pick up the PART OF THE SHIELD 1 (O) next to the armor.
- Go through the right door.

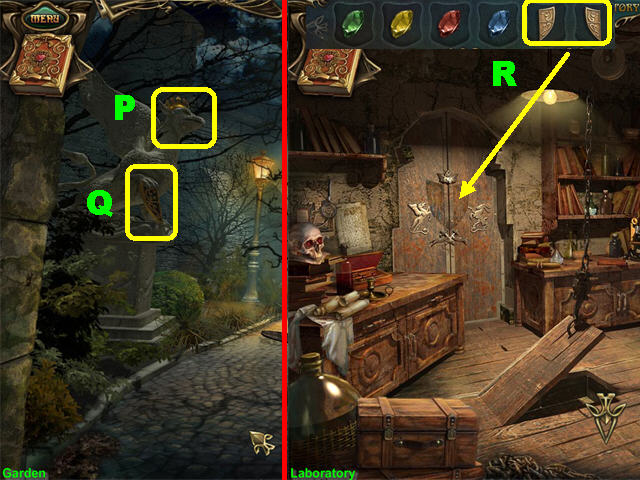
- Place the CROWN on the gargoyle statue (P); pick up the PART OF THE SHIELD 2 (Q) from the gargoyle.
- Click down 2 times.
- Place the PARTS OF THE SHIELD 1 and 2 on the left door (R).

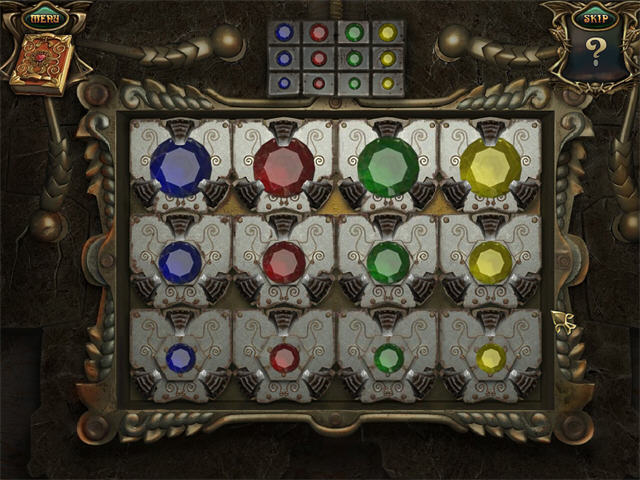
- Zoom into the door; place the Green, Yellow, Blue, and Red MAGIC GEMS on the board to activate the puzzle.
- Swap the gems to arrange them as shown in the pattern above the puzzle.
- Click on a color and all available moves will light up.
- Please look at the screenshot for the solution.

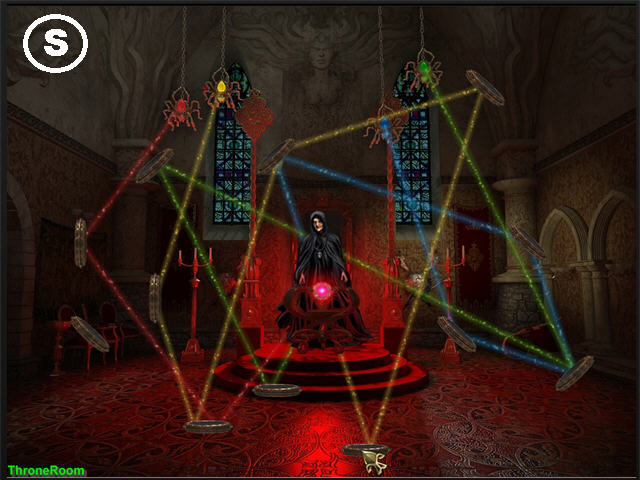
- Go through the door after the puzzle has been solved.
- Zoom into each of the 4 glowing spiders and place the matching colored LARGE GEM in its place to activate the puzzle.
- Click on the mirrors to rotate them so that all the beams of light point to the center of the amulet.
- Please look at the screenshot for the solution (S).
- Congratulations! You’ve Completed Echoes of the Past: The Castle of Shadows!





 Myths of the World: Black Rose Walkthrough, Guide, & Tips
 Witch Switch Tips and Tricks, Guide, & Tips
 Treasure Seekers: The Time Has Come Walkthrough, Guide, & Tips
 Mystery Age: The Imperial Staff Walkthrough, Guide, & Tips
 Cascade Tips and Tricks, Guide, & Tips