Surface: Return to Another World Walkthrough, Guide, & Tips
Surface: Return to Another World Walkthrough

Welcome to the Surface: Return to Another World Walkthrough.
The people of Lightfalls are disappearing, and it’s up to you to save them!
Whether you use this document as a reference when things get difficult or as a road map to get you from beginning to end, we’re pretty sure you’ll find what you’re looking for here.
This document contains a complete Surface: Return to Another World game walkthrough featuring annotated screenshots from actual gameplay!
We hope you find this information useful as you play your way through the game. Use the walkthrough menu below to quickly jump to whatever stage of the game you need help with.
Remember to visit the Big Fish Games Forums if you find you need more help. Have fun!
This walkthrough was created by prpldva, and is protected under US Copyright laws. Any unauthorized use, including re-publication in whole or in part, without permission, is strictly prohibited.
General Tips
- This is the official guide for Surface: Return to Another World.
- This guide will not mention each time you have to zoom into a location; the screenshots will show each zoom scene.
- Hidden-object puzzles are referred to as HOPs. This guide will not show HOP solutions. It will identify the location of the HOP and the inventory item acquired.
- This guide will show solutions for non-random puzzles. Please read the in-game instructions for each puzzle.
- In this game, you will sometimes have to select the new scene to trigger dialog, cut-scenes, or tasks prior to interacting with the scene.
Chapter 1: Home

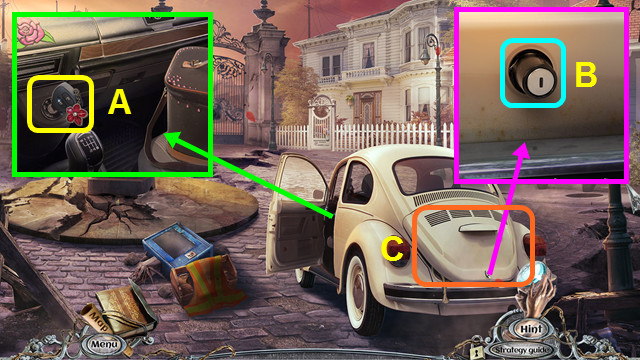
- Take the CAR KEYS (A).
- Use the CAR KEYS (B).
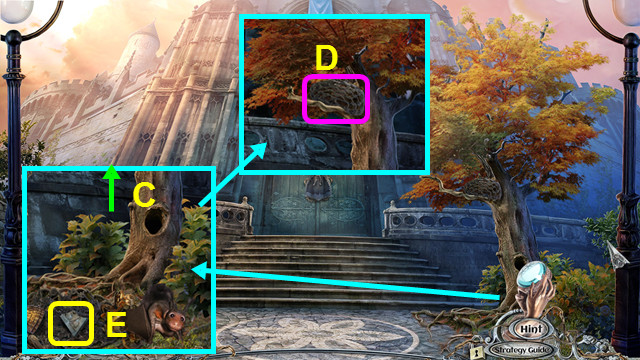
- Play the HOP; earn the HACKSAW (C).

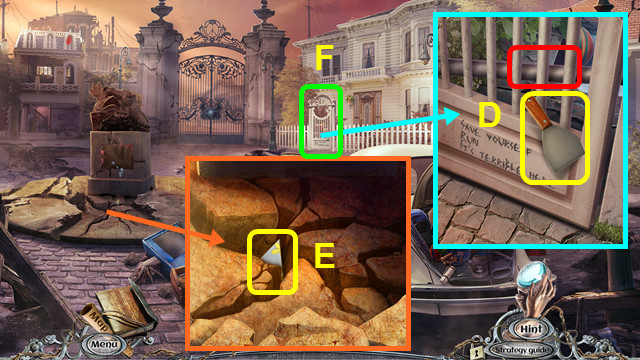
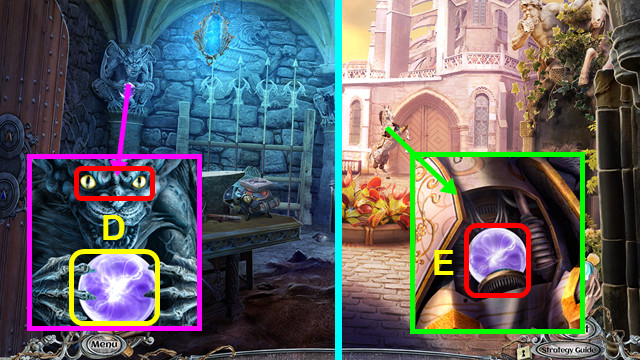
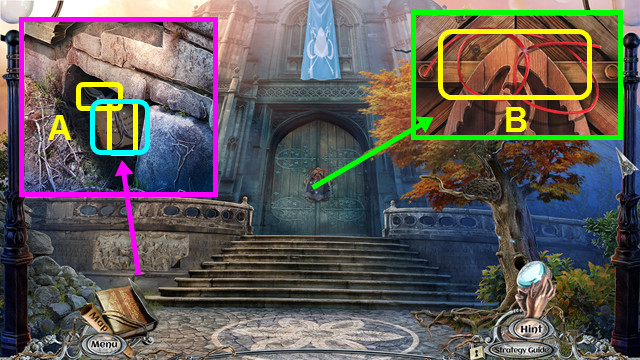
- Take the PAINT SCRAPER; use the HACKSAW (D).
- Use the PAINT SCRAPER; take the MOSAIC PIECE (E).
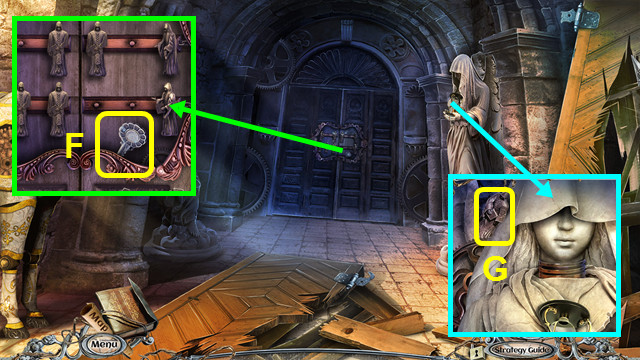
- Enter the Courtyard (F).

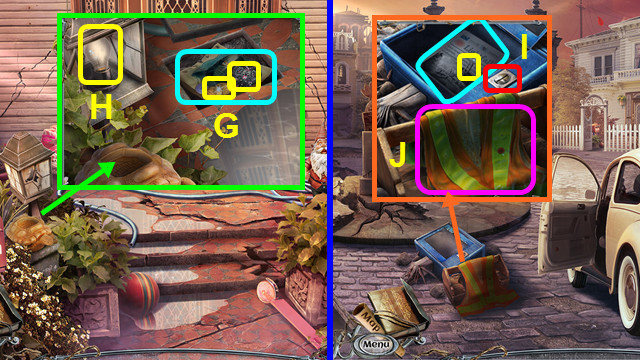
- Use the PAINT SCRAPER; take the HEART MEDALLION, COINS, and read the note (G).
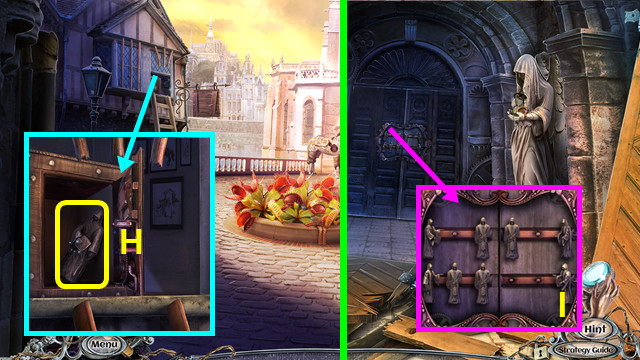
- Open the lamp; take the LIGHT BULB (H).
- Walk down.
- Use the COINS; take the PAPER CLIP and read the paper (I).
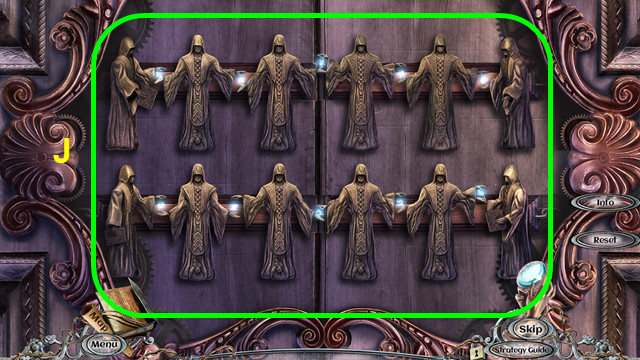
- Remove the safety vest (J).

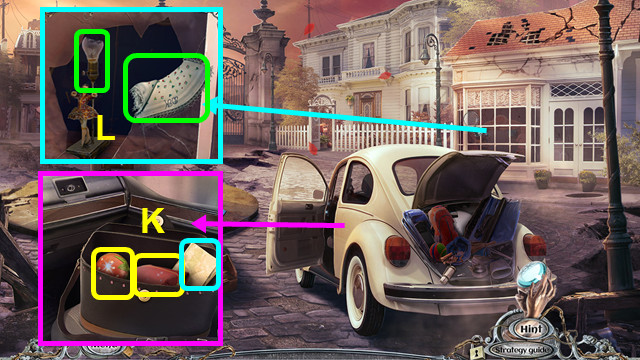
- Place and press the HEART MEDALLION; take the MAKEUP BAG, STRAWBERRY, and read the note (K).
- Combine the MAKEUP BAG and PAPER CLIP; take the HANDKERCHIEF (inventory).
- Use the HANDKERCHIEF; replace the LIGHT BULB (L).

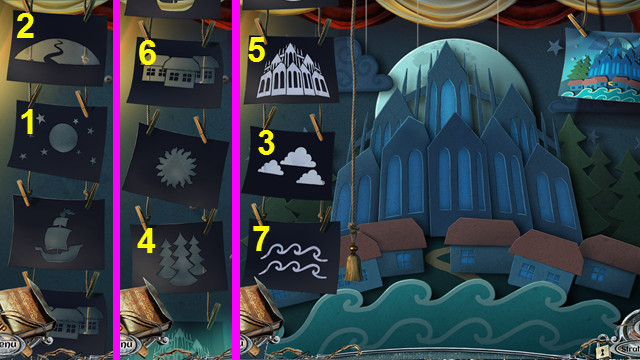

- Select the pieces 1-7.
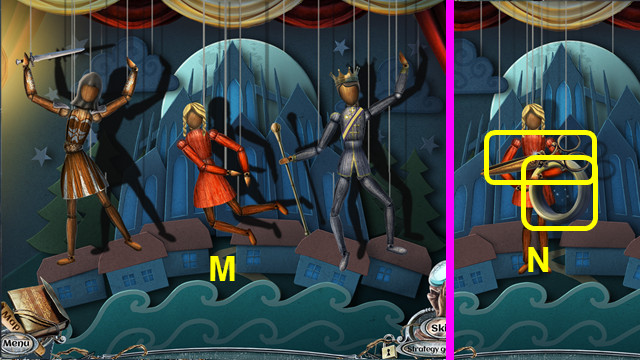
- Arrange the puppets (M).
- Take the SCISSORS and FISHING LINE (N).
- Enter the Courtyard.

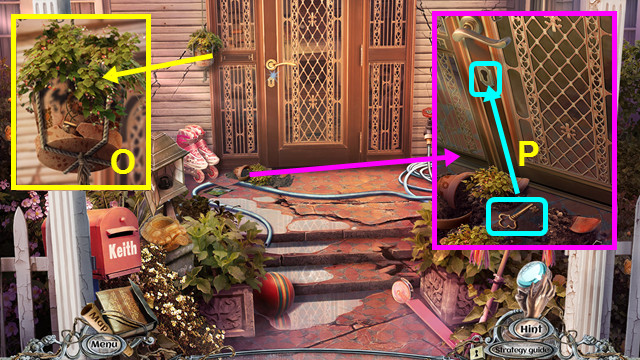
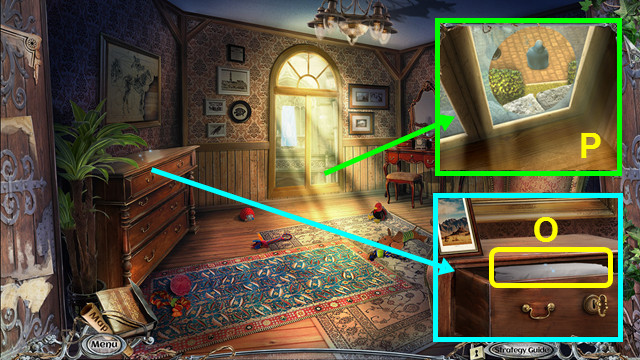
- Use the SCISSORS (O).
- Move the pieces, take the key, and use it in the lock (P).
- Walk forward.

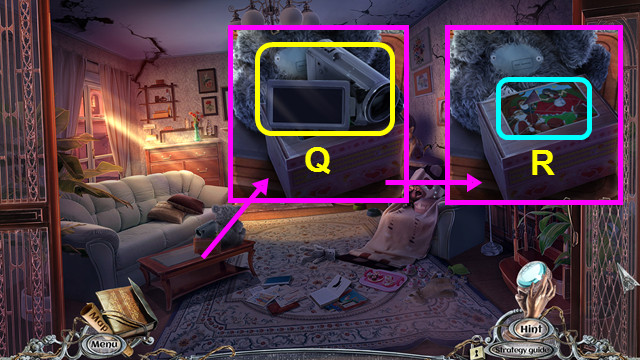
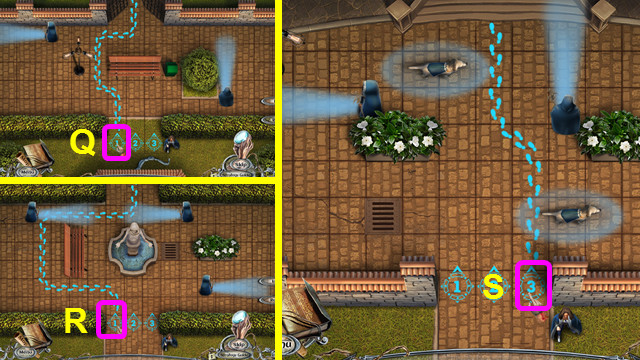
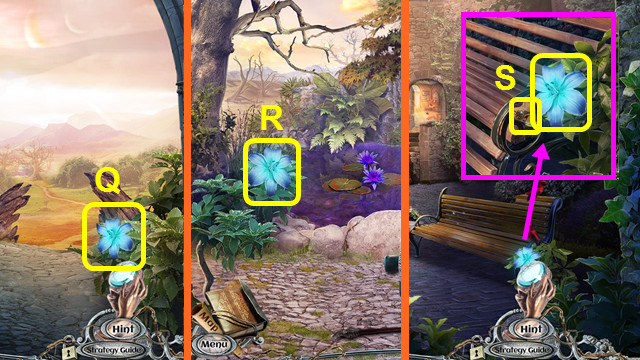
- Select (Q); take the VIDEO CAMERA.
- Place the MOSAIC PIECE (R).

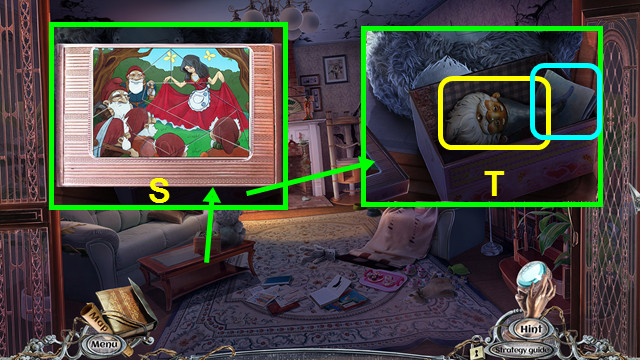
- Restore the mosaic (S).
- Take the GNOME’S HEAD and read the note (T).

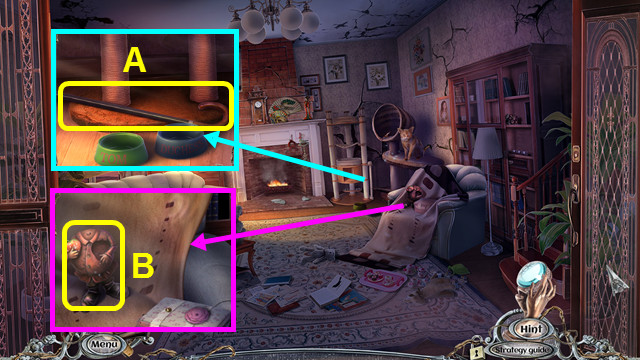
- Take the CANE (A).
- Take the BROKEN GNOME (B).
- Combine the BROKEN GNOME, GNOME’S HEAD, and STRAWBERRY to make the GARDEN GNOME (inventory).
- Walk down.

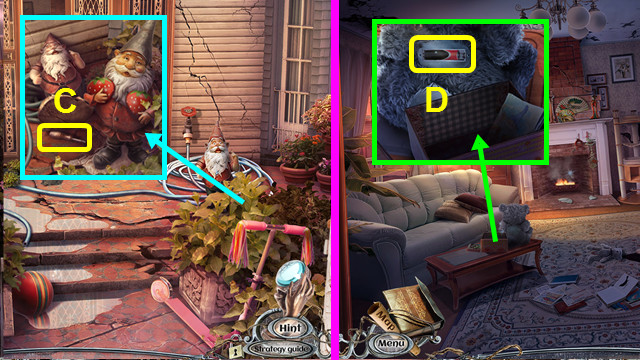
- Place the GARDEN GNOME; take the SCREWDRIVER (C).
- Go forward.
- Use the SCREWDRIVER; take the BATTERY (D).
- Combine the VIDEO CAMERA and BATTERY; take the WIRE (inventory).
- Walk down 2x.

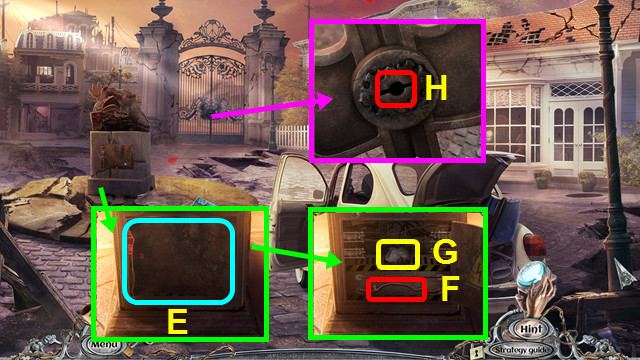
- Pan up; remove the cover (E).
- Place the WIRE (F).
- Open the note; take the GATE KEY and the 1st REGISTER BUTTON (G).
- Use the GATE KEY (H).
- Walk forward.

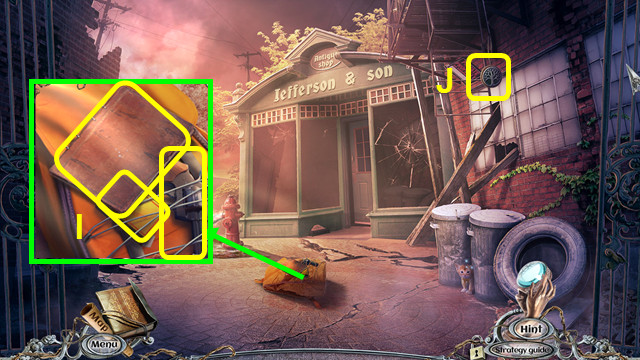
- Take the JOURNAL, MATCHES, and GUN (I).
- Select the JOURNAL; play the HOP and take the HOUSE PENDANT (inventory).
- Use the CANE to take the TREE PENDANT (J).
- Walk down.

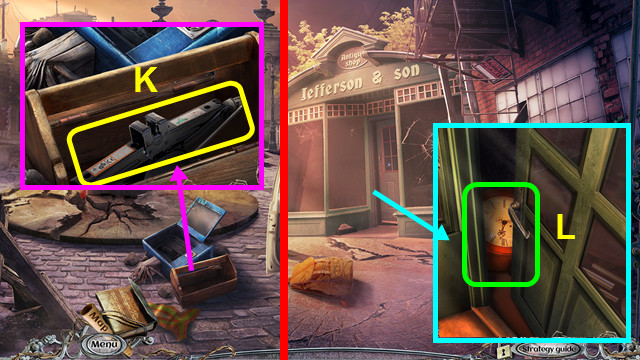
- Place the TREE PENDANT and HOUSE PENDANT; take the JACK (K).
- Walk forward.
- Use the JACK (L).
- Walk forward.

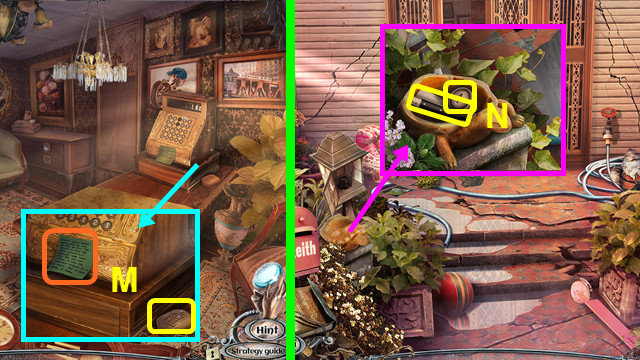
- Read the note; take the TURTLE CARAPACE (M).
- Go to the Courtyard.
- Place the TURTLE CARAPACE; take the 2nd REGISTER BUTTON and RAZOR (N).
- Walk forward.

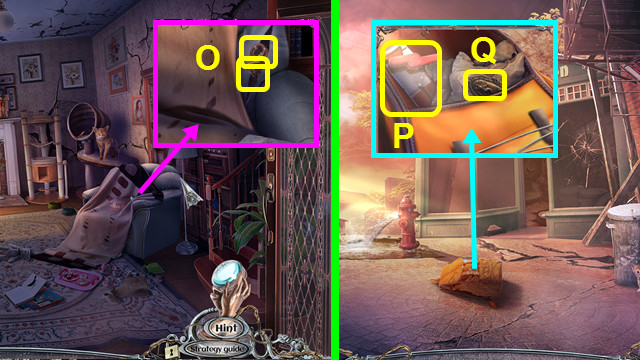
- Move the blanket and use the RAZOR; take the SPRING and 1st LOCK PART (O).
- Walk down 2x; go forward.
- Use the RAZOR; take the CAN OPENER (P).
- Unfold the note 2x; select and read the note then take the BRASS EMBLEM (Q).
- Go forward.

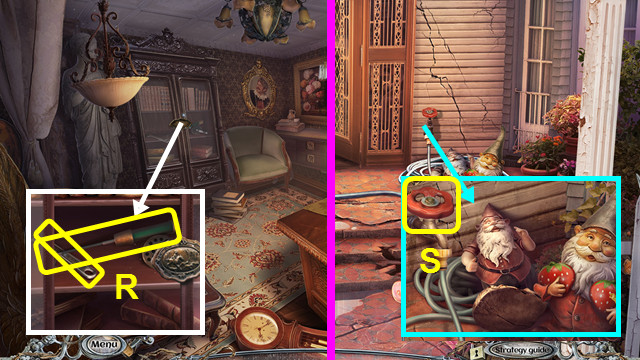
- Place and press the BRASS EMBLEM; take the BROKEN FISHING ROD and WRENCH (R).
- Return to the Courtyard.
- Use the WRENCH to take the VALVE (S).
- Walk down and forward.
Chapter 2: The Pier

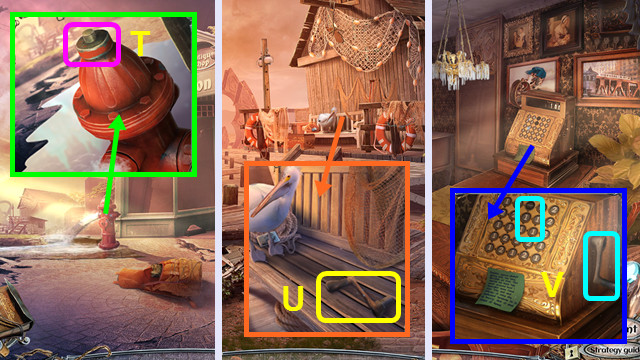
- Use the VALVE (T).
- Walk left.
- Pan right; take the CASH REGISTER HANDLE (U).
- Walk down and forward.
- Place the 2 REGISTER BUTTONS and CASH REGISTER HANDLE (V).

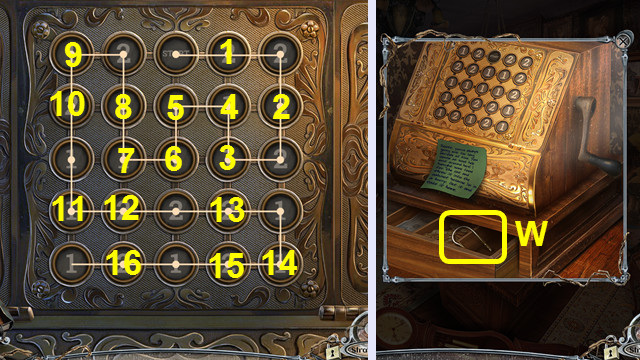
- Select the buttons 1-16.
- Take the FISHING HOOK (W).
- Combine the BROKEN FISHING ROD, FISHING LINE, and FISHING HOOK to make the FISHING ROD (inventory).
- Walk down and left.

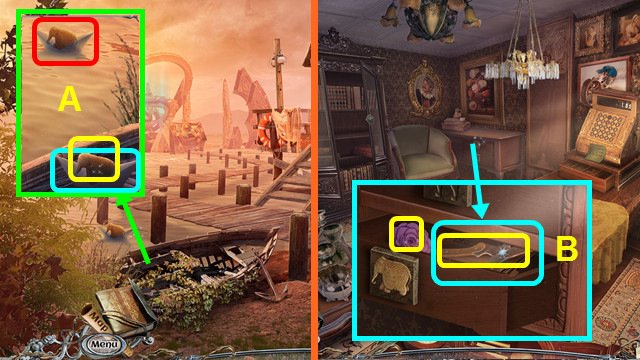
- Use the FISHING ROD; take the WOODEN ELEPHANT and read the note (A).
- Walk down and forward.
- Place the WOODEN ELEPHANT; take the FLOWER HANDLE, PRUNERS, and read the case file (B).
- Go to the Parent’s House.

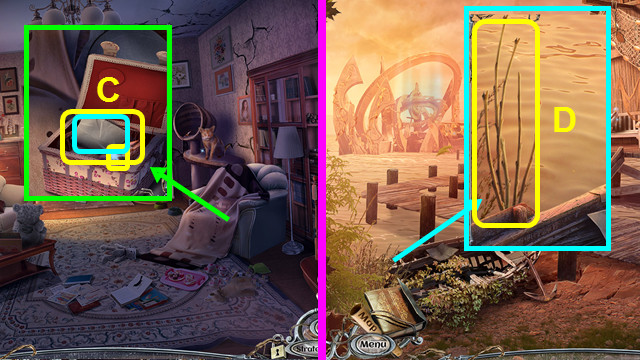
- Place the FLOWER HANDLE and read the note; take the UNFINISHED BASKET and 1/2 COPPER SEAGULLS (C).
- Go to the Pier.
- Use the PRUNERS; take the REEDS (D).
- Combine the UNFINISHED BASKET and REEDS to make TOM’S BASKET (inventory).
- Walk down.

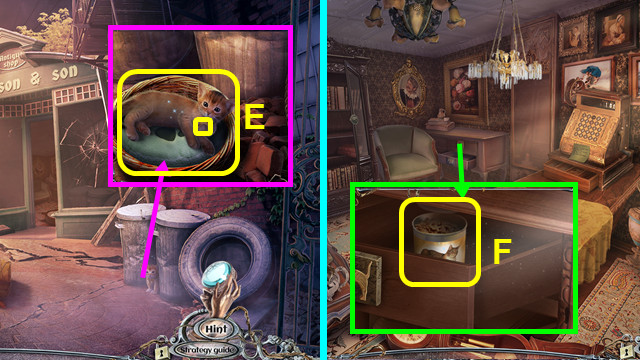
- Place TOM’S BASKET; take the WOODEN CAT and KITTEN (E).
- Walk forward.
- Place the WOODEN CAT and use the CAN OPENER; take the CAT FOOD (F).
- Go to the Parent’s House.

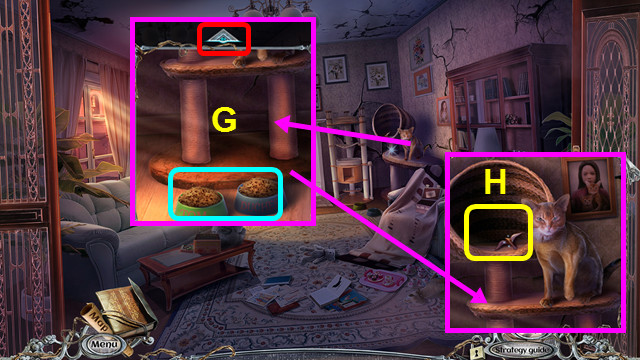
- Place the CAT FOOD; pan up (G).
- Place the KITTEN; receive the 2/2 COPPER SEAGULL (H).
- Go to the Pier.

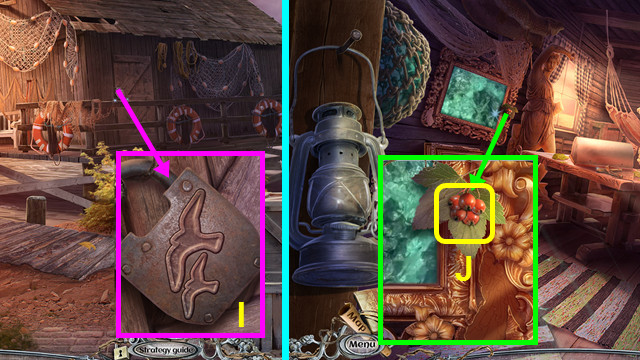
- Place and press the 2 COPPER SEAGULLS (I).
- Walk forward.
- Take the BERRIES (J).

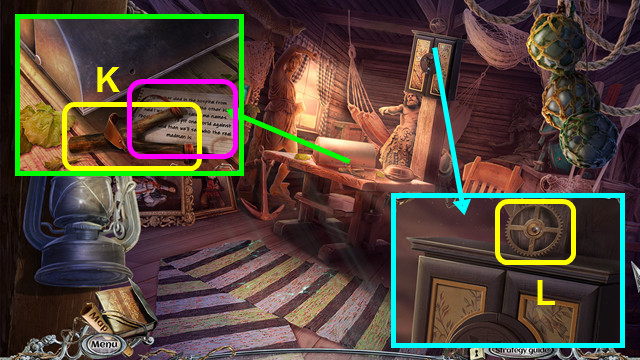
- Take the SLINGSHOT; read the note (K).
- Combine the SLINGSHOT and BERRIES; make the LOADED SLINGSHOT (inventory).
- Take the 1/4 GEARS (L).
- Walk down.

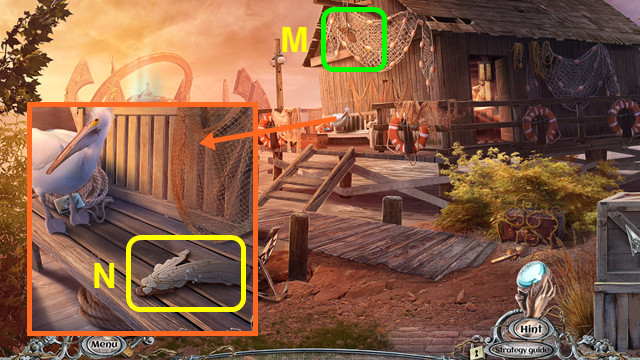
- Use the LOADED SLINGSHOT (M).
- Take the WOODEN FIGURINE (N).
- Go forward.

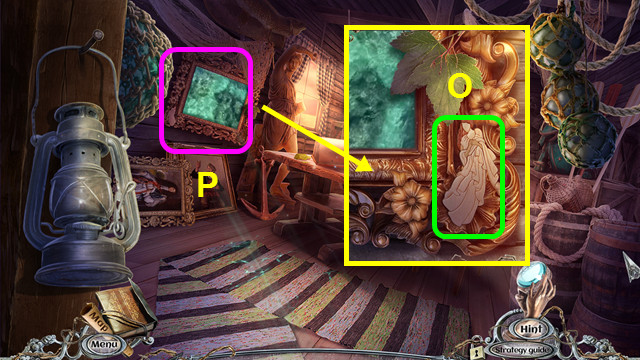
- Place the WOODEN FIGURINE (O).
- Play the HOP; earn the ANCHOR (P).
- Walk down.

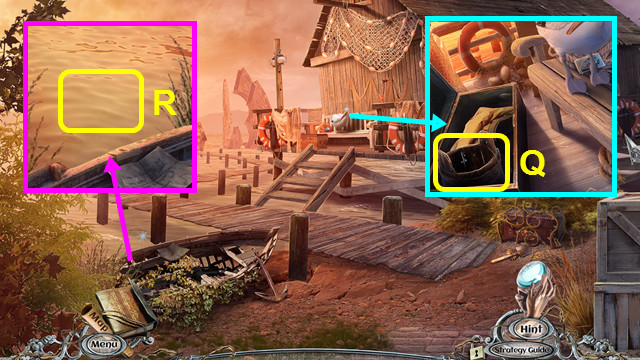
- Pan left. Place and press the ANCHOR; take the BUCKET (Q).
- Use the BUCKET to take the BUCKET OF WATER (R).
- Go to the Parent’s House.

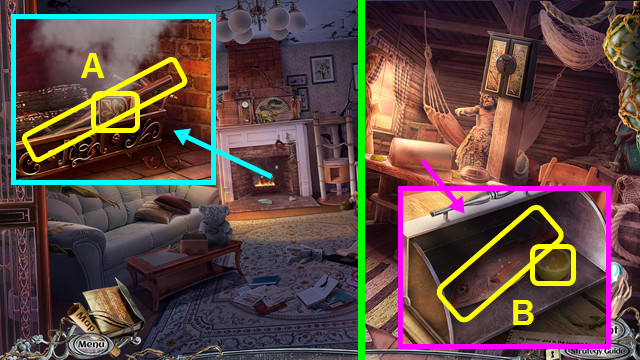
- Use the BUCKET OF WATER; take the 2nd LOCK PART and HANDLE (A).
- Return to the Fisherman’s Cabin.
- Use the HANDLE; take the FISH and LEMON (B).
- Walk down.

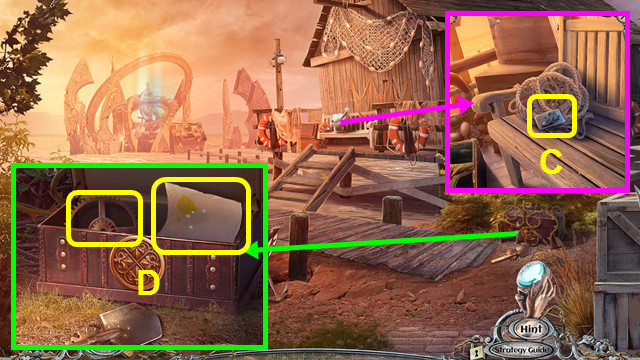
- Use the FISH; take the GLOVE COMPARTMENT BUTTON (C).
- Use the PRUNERS and place the 2 LOCK PARTS; take the 2/4 GEARS and MYSTERIOUS PAPER (D).
- Combine the MYSTERIOUS PAPER and LEMON to make the PAPER WITH CODE (inventory).
- Walk down 2x.

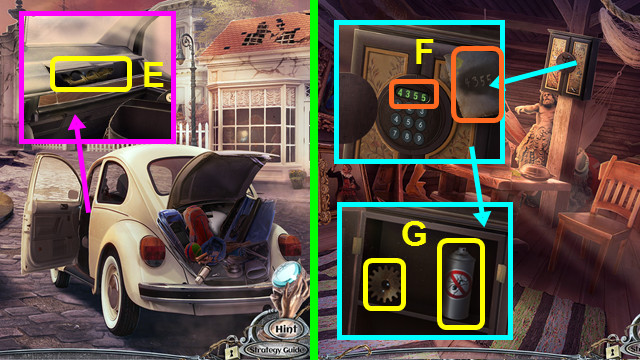
- Place and press the GLOVE COMPARTMENT BUTTON; take the CADUCEUS (E).
- Go to the Fisherman’s Cabin.
- Place the CADUCEUS; place the PAPER WITH CODE and enter 4-3-5-5 (F).
- Take the 3/4 GEARS and BUG SPRAY (G).
- Walk down.

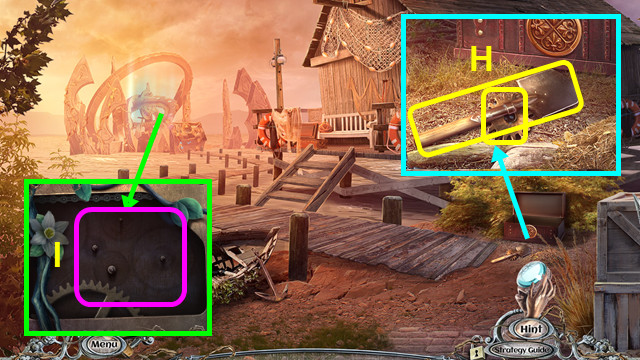
- Use the BUG SPRAY; take the SHOVEL and 4/4 GEARS (H).
- Place the 4 GEARS (I).

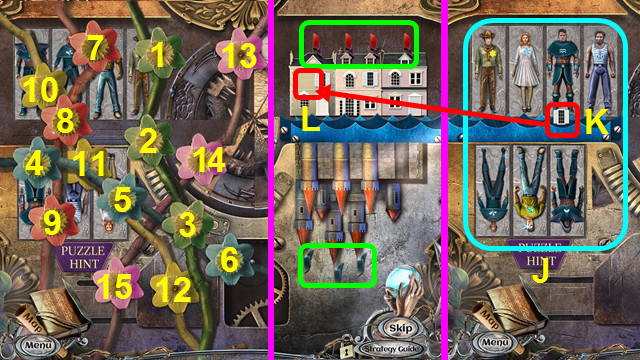


- Select the flowers 1-14.
- Select the 7 flags (green).
- Arrange the people (J).
- Move the window (K) to the house (L).
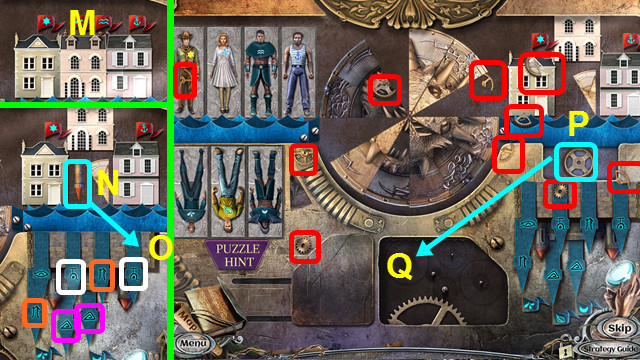
- Swap the windows (M).
- Place the spire (N) on the castle (O).
- Select pairs of symbols (color-coded).
- Take the gear (P) and place it (Q).
- Select the 10 gear parts (red).
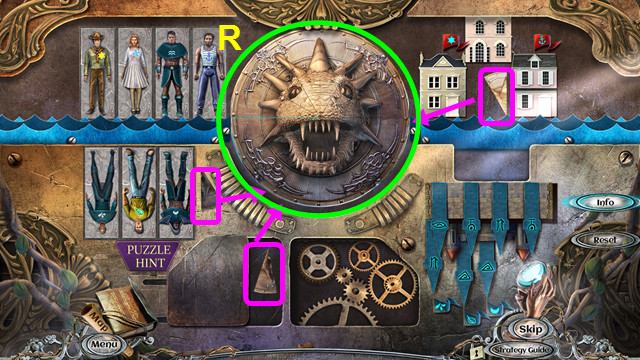
- Take the 3 wedges (pink) and place them; restore the image (R).
Chapter 3: The Prison Cell

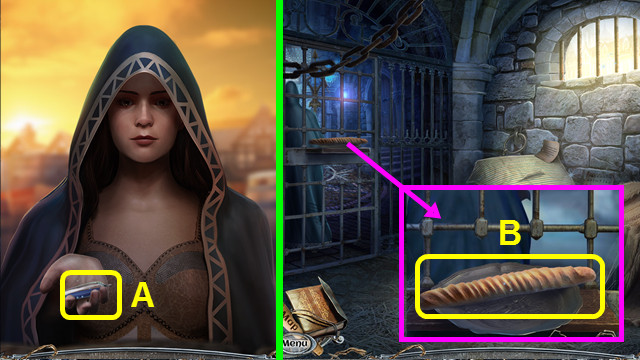
- Talk to the Stranger; take the SLEEPING-POTION CAPSULE (A).
- Take the LOAF OF BREAD (B).
- Open the LOAF OF BREAD; take the BREAD and FILE (inventory).

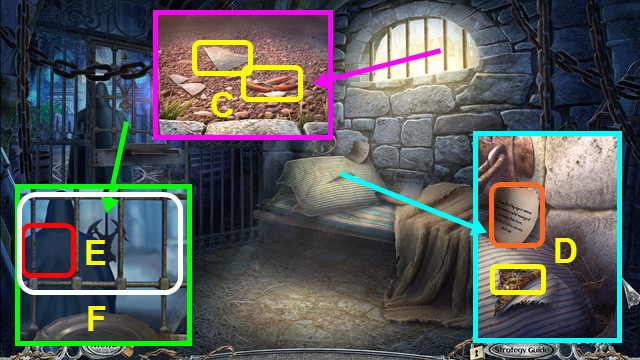
- Use the BREAD; take the GLASS SHARD and FEATHERS (C).
- Use the GLASS SHARD; take the DART BODY and read the note (D).
- Combine the DART BODY, SLEEPING-POTION CAPSULE, and feathers to make the SOPORIFIC DART (inventory).
- Use the SOPORIFIC DART (E); use the FILE (F).
- Walk left.

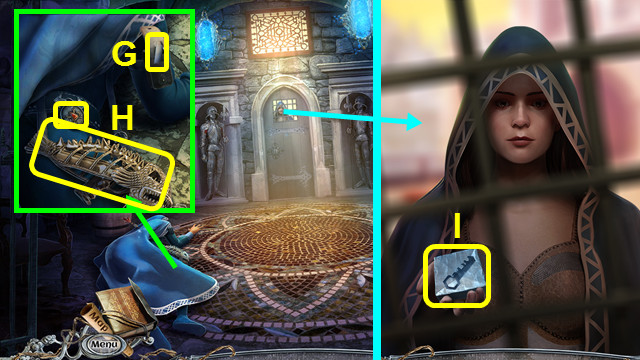
- Open the case; take the CHALK (G).
- Take the 1st GUARD INSIGNIA and FISH GUN (H).
- Talk to the Stranger; take the KEY MOLD (I).
- Walk down.

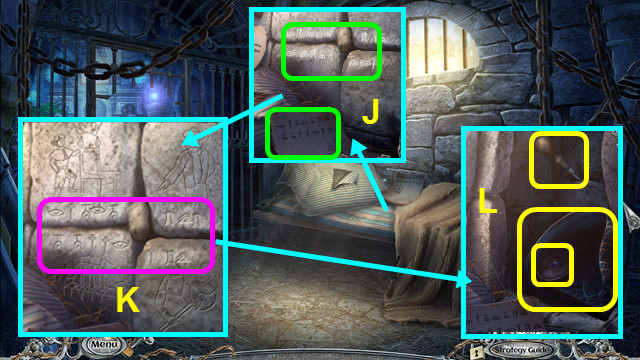
- Look at the hint; use the CHALK (J).
- Restore the runes (K).
- Take the 2nd GUARD INSIGNIA, cloak, and SCREWDRIVER (L).
- Walk left.

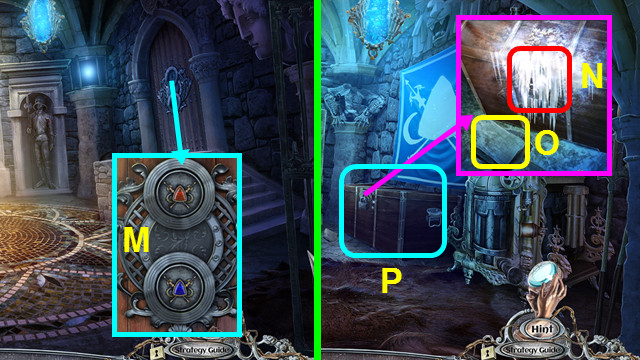
- Place and press the 2 GUARD INSIGNIAS (M).
- Walk right.
- Use the FISH GUN (N).
- You now have an UNLOADED FISH GUN.
- Use the stone on the lock (O).
- Play the HOP; earn the BELONGINGS (P).
- Open the BELONGINGS; take the MATCHES, SHOVEL, and SPRING (inventory).

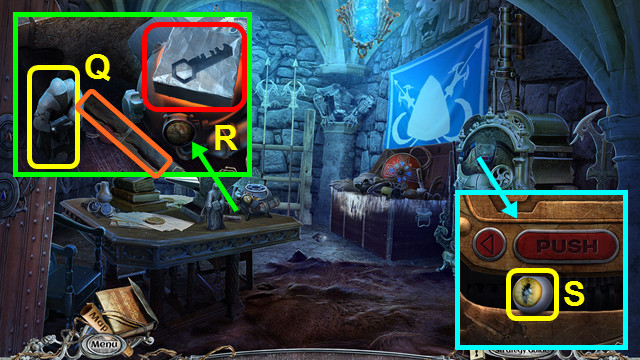
- Take the 1/4 LIBRARIAN FIGURINES and read the scroll (Q).
- Use the MATCHES and place the KEY MOLD (R).
- Take the 1st GARGOYLE EYE (S).
- Walk down.

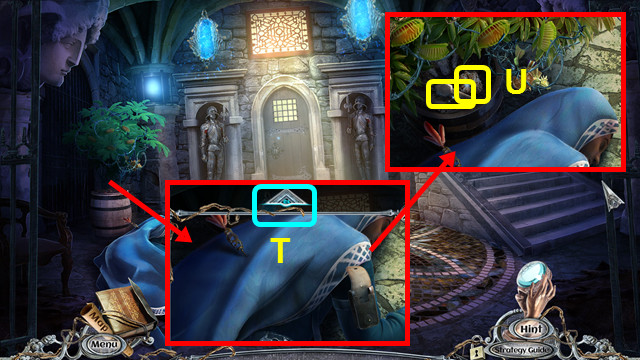
- Pan up (T).
- Use the SHOVEL; take the IRON PIECE and CLAY (U).
- Walk right.

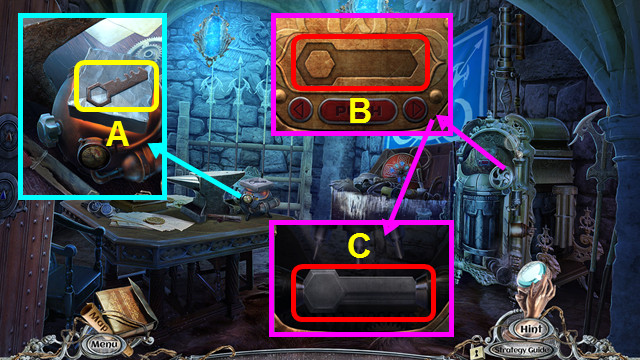
- Place the CLAY; take the CLAY KEY (A).
- Place the CLAY KEY (B).
- Place the IRON PIECE (C).

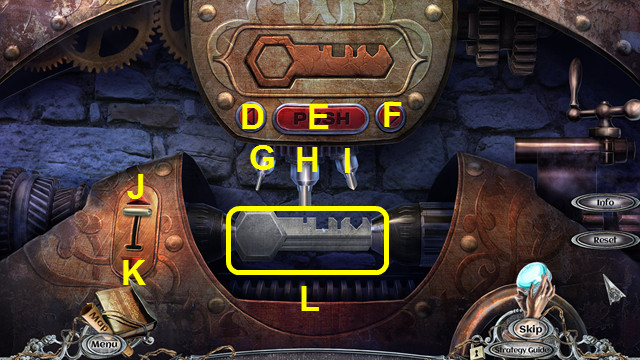
- Select G-K-E-F-I-J-E-F-G-E-K-G-E-F-J-E.
- Take the DUNGEON KEY (L).
- Walk down.

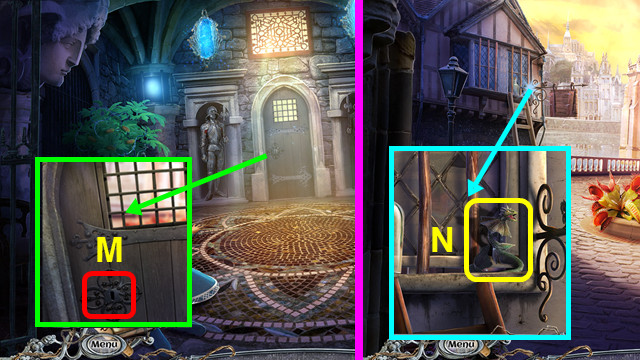
- Use the DUNGEON KEY (M).
- Go forward.
- Take the 1/2 DRAGONS (N).

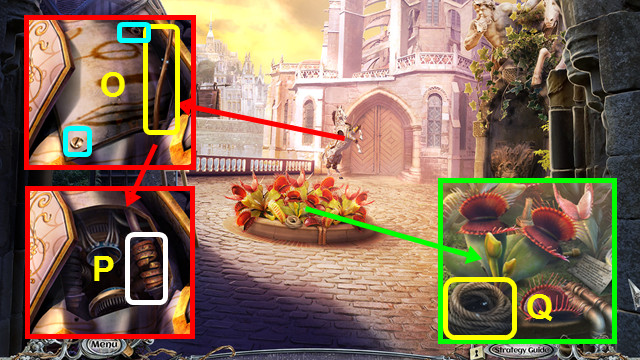
- Take the STICK; use the SCREWDRIVER (O).
- Replace the SPRING (P).
- Take the ROPE (Q).

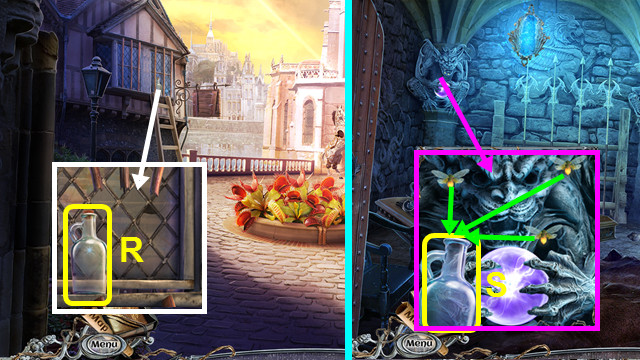
- Use the ROPE and STICK; take the BOTTLE (R).
- Walk down and right.
- Place the BOTTLE and push the bugs into the bottle; take the BOTTLE WITH BUGS (S).
- Walk down and forward.

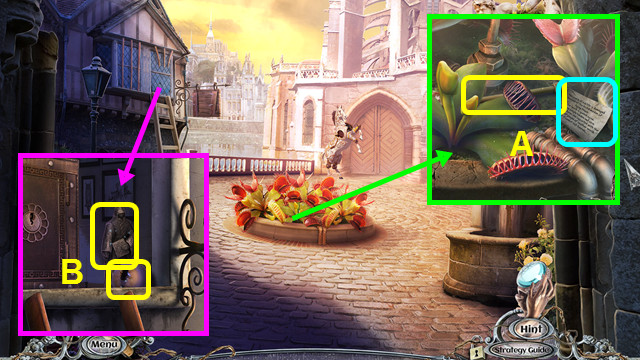
- Use the BOTTLE WITH BUGS; take the KNITTING NEEDLE and read the note (A).
- Use the KNITTING NEEDLE; take the 2/4 LIBRARIAN FIGURINES and 2nd GARGOYLE EYE (B).
- Walk down and right.

- Place the 2 GARGOYLE EYES; take the ENERGY BALL (D).
- Walk down and forward.
- Place the ENERGY BALL (E).
- Walk forward.

- Take the SUN KEY (F).
- Take the 3/4 LIBRARIAN FIGURINE (G).
- Walk down.

- Use the SUN KEY; take the 4/4 LIBRARIAN FIGURINE (H).
- Walk forward.
- Place the 4 LIBRARIAN FIGURINES (I).

- Solution (J).
- Walk forward.
Chapter 4: The Library

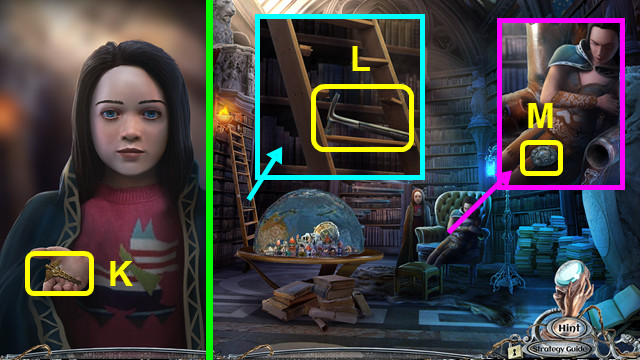
- Talk to Lila; take the CADUCEUS (K).
- Take the HAMMER (L).
- Take the AGONY EMBLEM (M).
- Walk down 2x.

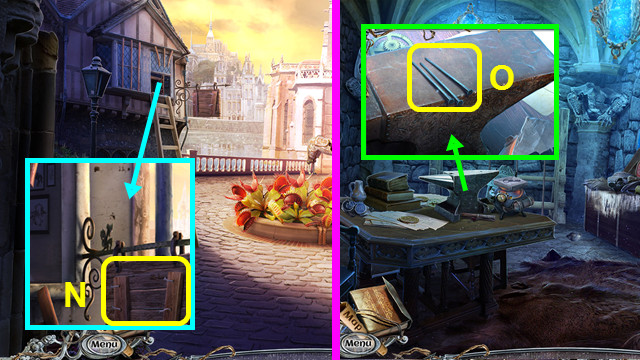
- Pan right; use the HAMMER to take the CROOKED NAILS and PLANKS (N).
- Walk down and right.
- Use the CROOKED NAILS and HAMMER; take the STRAIGHT NAILS (O).
- Walk down and go forward 3x.

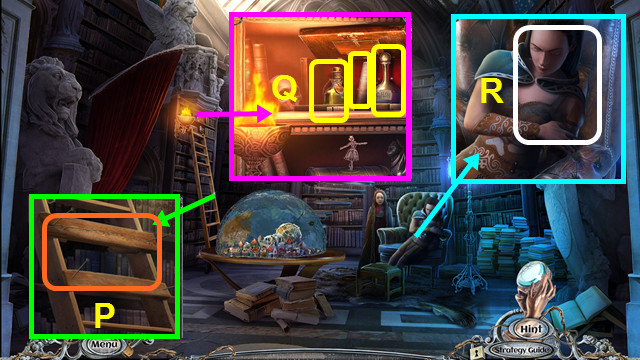
- Use the PLANKS, STRAIGHT NAILS, and HAMMER (P).
- Place and press the CADUCEUS; take the ANTIBIOTIC, BANDAGES, and REGENERATION ELIXIR (Q).
- Use the ANTIBIOTIC, BANDAGES, and REGENERATION ELIXIR (R).

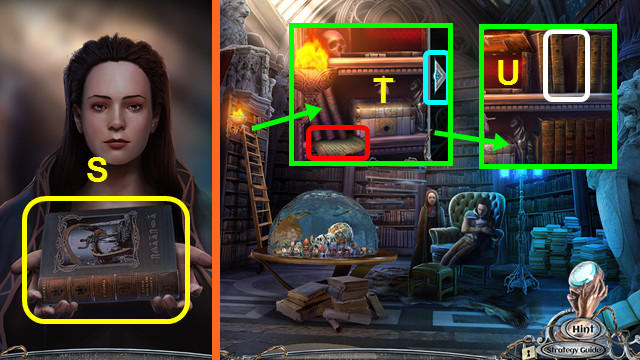
- Talk to Ruby; take the ANCIENT BOOK (S).
- Read the note and pan right (T).
- Place the ANCIENT BOOK (U).

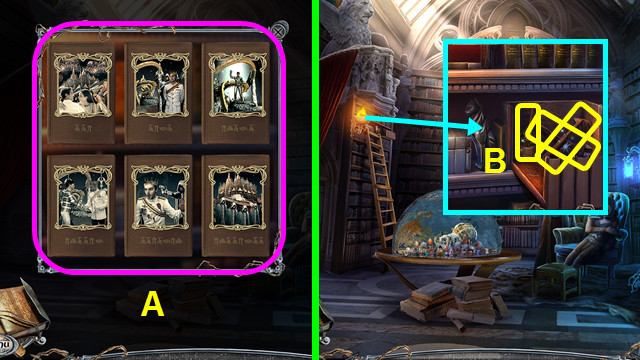
- Solution (A).
- Take the RAKE, NIPPERS, and MAGIC GLUE (B).
- Walk down 3x.

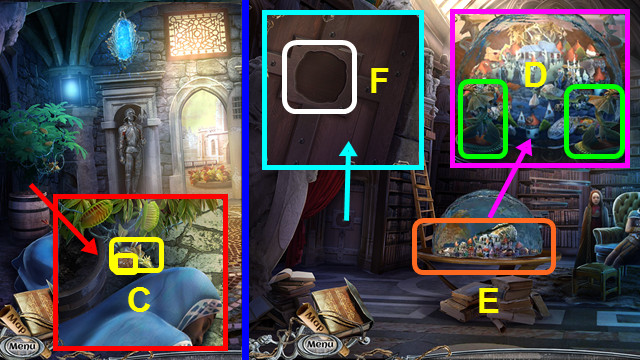
- Use the NIPPERS; take the MEDAL OF VALOR and 2/2 DRAGONS (C).
- Walk forward 3x.
- Place the 2 DRAGONS (D).
- Play the HOP; earn the CRESCENT (E).
- Add the CRESCENT to the AGONY EMBLEM (inventory).
- Place the AGONY EMBLEM (F).
- Walk left.

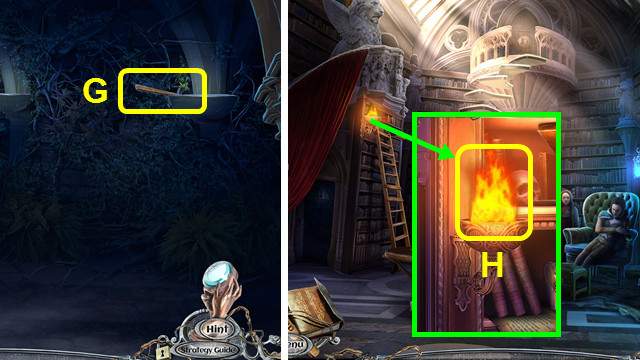
- Take the STICK (G).
- Walk down.
- Pan left; use the STICK to make the IMPROVISED TORCH (H).
- Walk left.

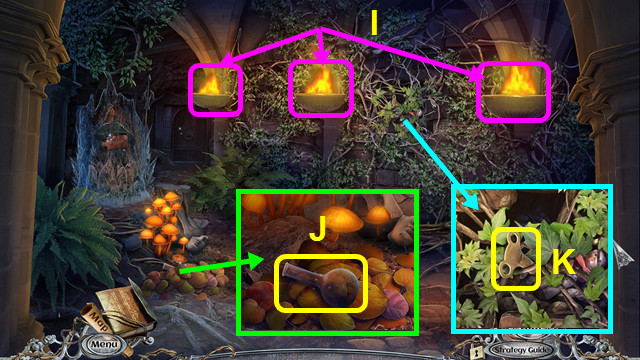
- Use the IMPROVISED TORCH 3x (I).
- Use the RAKE; take the FLASK (J).
- Take the WINDING KEY (K).
- Walk down.

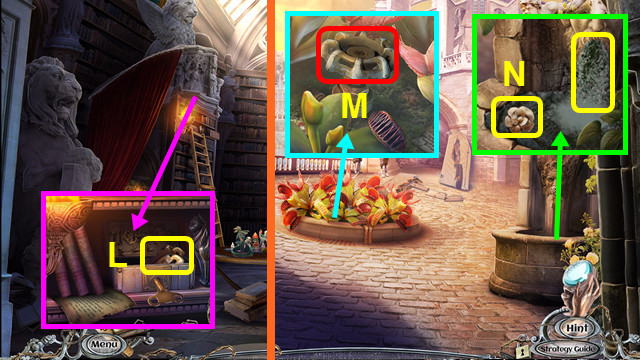
- Use the WINDING KEY; take the FOUNTAIN VALVE (L).
- Walk down 2x.
- Place and turn the FOUNTAIN VALVE (M).
- Take the 1st FLOWER BUTTON; use the FLASK to make the FLASK WITH DARK WATER (N).
- Walk forward 2x; go left.

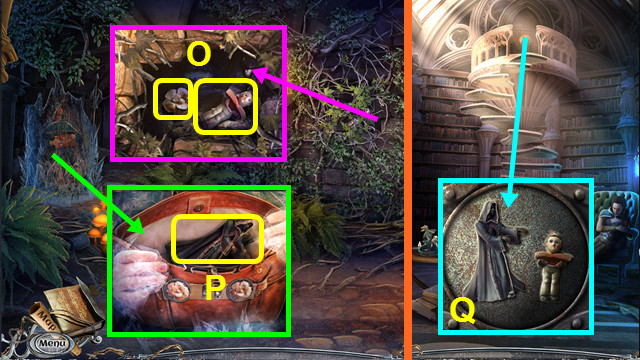
- Use the FLASK WITH DARK WATER; take the 2nd FLOWER BUTTON and BOY FIGURINE (O).
- Place and press the 2 FLOWER BUTTONS; take the AGONY-RESIDENT FIGURINE (P).
- Walk down.
- Place the AGONY-RESIDENT FIGURINE and the BOY FIGURINE (Q).

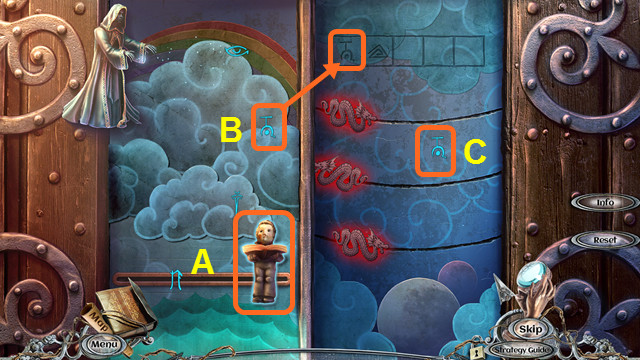
- Slide the boy (A) to catch first symbol (B).
- Slide dragons to allow matching symbol to float up (C).
- There is a set of 2, 3, 4, and 5 symbols.
- Walk forward.

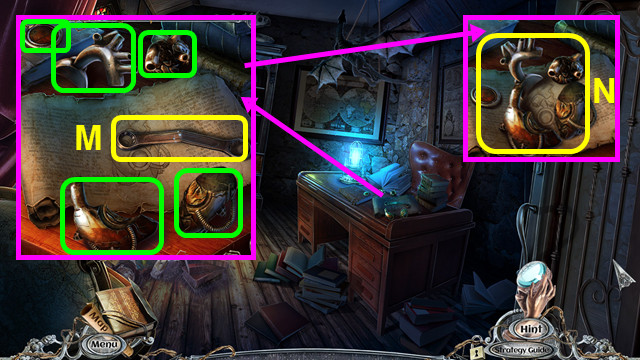
- Take the WRENCH (M).
- Select the 5 heart pieces (green).
- Use the MAGIC GLUE; select and take the MECHANICAL HEART (N).
- Walk down 2x.

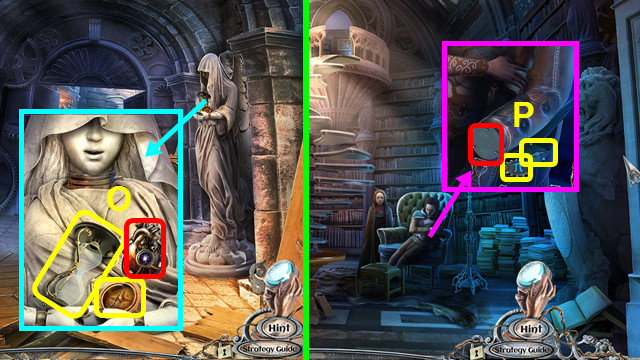
- Place the MECHANICAL HEART; take the HOURGLASS and BROKEN COMPASS (O).
- Walk forward.
- Place the HOURGLASS; take the 1/2 RUNES and COMPASS NEEDLE (P).
- Combine the BROKEN COMPASS, MAGIC GLUE, and COMPASS NEEDLE to make the COMPASS (inventory).
- Walk forward.

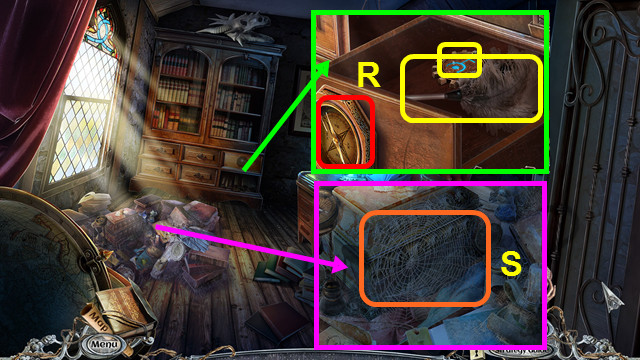
- Place the COMPASS; take the DUST BRUSH and 2/2 RUNES (R).
- Use the DUST BRUSH (S).

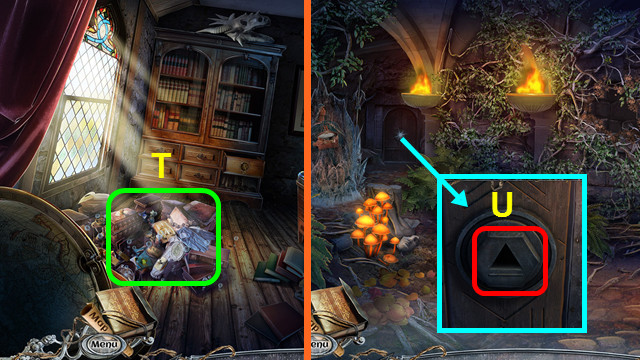
- Play the HOP; earn the BOOK WITH SECRET (T).
- Combine the BOOK WITH SECRET and 2 RUNES; take the TRIANGULAR KEY and FANCY NECKLACE (inventory).
- Walk down and left.
- Use the TRIANGULAR KEY (U).
Chapter 5: The Street of Rustling Wings

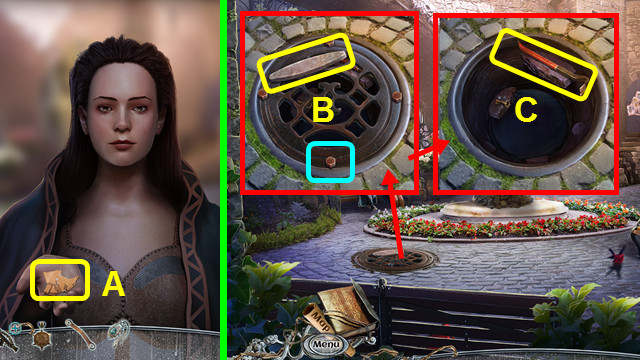
- Talk to Ruby; take the 1/4 PICTURE FRAGMENTS (A).
- Take the GRINDING STONE and use the WRENCH (B).
- Take the CROWBAR (C).

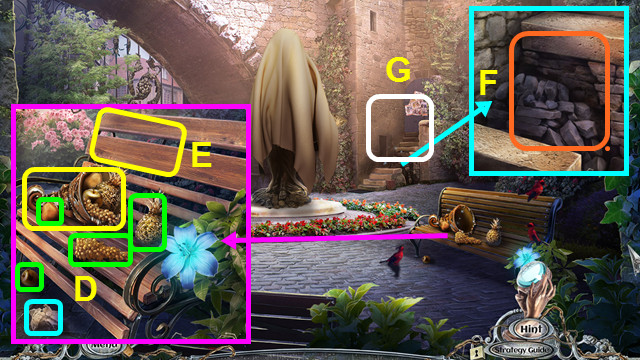
- Read the note, select the 4 fruit (green), and take the CORNUCOPIA (D).
- Use the CROWBAR to take the BOARDS (E).
- Place the BOARDS (F).
- Play the HOP (G).
- Walk forward.

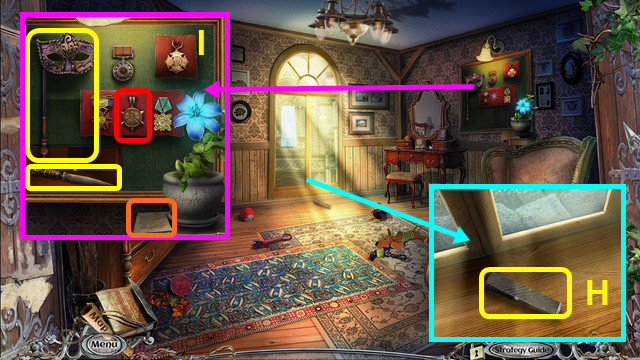
- Take the WEDGE (H).
- Take the MASK and read the note; place the MEDAL OF VALOR and take the BLUNT KNIFE (I).
- Combine the BLUNT KNIFE and GRINDING STONE to make the SHARP KNIFE (inventory).
- Combine the MASK and SHARP KNIFE to take the DIAMOND; take the STICK (inventory).
- Walk down.

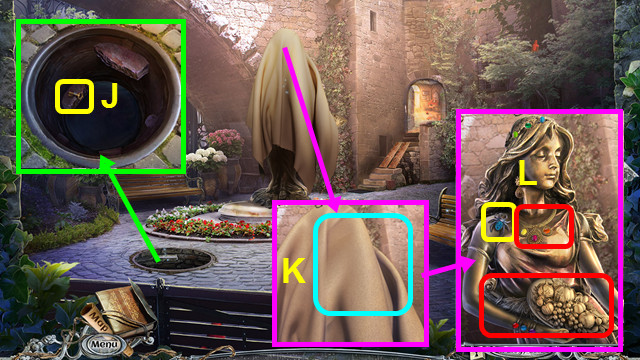
- Use the STICK to take the DRAWER KEY (J).
- Use the SHARP KNIFE (K).
- Take the 1st ORNATE AMULET; place the CORNUCOPIA and FANCY NECKLACE (L).

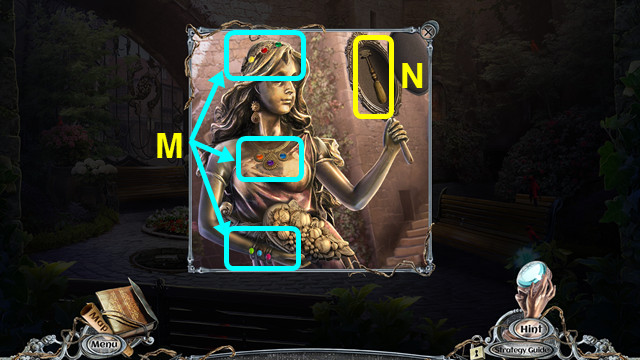
- Solution (M).
- Take the OLD GLASS CUTTER (N).
- Combine the OLD GLASS CUTTER and DIAMOND to make the GLASS CUTTER (inventory).
- Go forward.

- Use the DRAWER KEY; take the BEDSHEET (O).
- Tie the BEDSHEET together to make the TIED BEDSHEET (inventory).
- Use the GLASS CUTTER and TIED BEDSHEET; receive the HEAVY STONE (P).

- Select (Q) when the guards are in the position shown.
- Select (R) when the guards are in the position shown.
- Select (S) when the guards are in the position shown.

- Use the WEDGE and HEAVY STONE; take the HOOK, NIPPERS, and read the note (A).
- Take the WIRE (B).
- Combine the STICK, WIRE, and HOOK to make the STICK WITH HOOK (inventory).

- Pan up (C).
- Use the STICK WITH HOOK (D).
- Use the NIPPERS and move the items; take the BAS-RELIEF FRAGMENT (E).

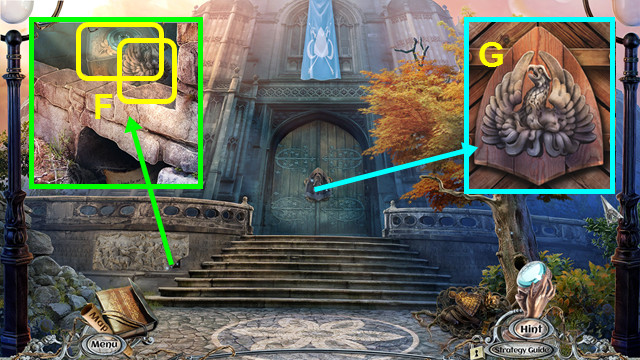
- Place the BAS-RELIEF FRAGMENT; take the PHOENIX FIGURINE and ORNATE CHEST (F).
- Place the PHOENIX FIGURINE (G).
- Walk forward.

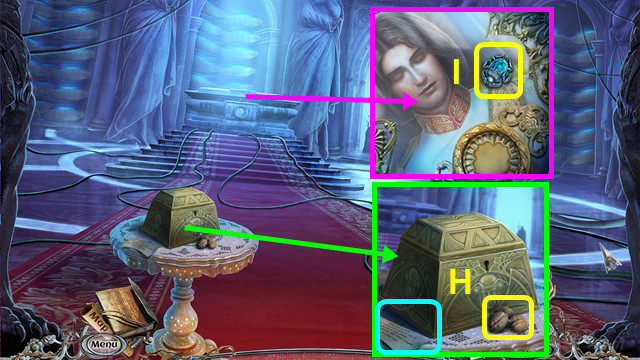
- Read the note and take the NUTS (H).
- Use the NIPPERS; take the 2nd ORNATE AMULET (I).
- Walk down.

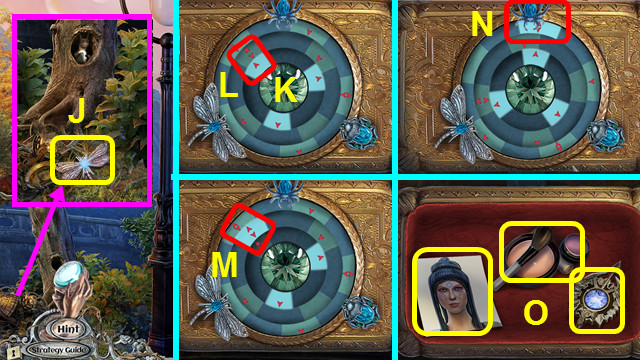
- Give the NUTS; take the 3rd ORNATE AMULET (J).
- Combine the ORNATE CHEST and 3 ORNATE AMULETS (inventory).
- Press the center gem (K). Press the lighted arrow when it is adjacent to 2-way arrow (L).
- Press the 2-way arrow on the 2nd ring when it is adjacent to a 2-way arrow on the outer ring (M).
- Press the 2-way arrow on the outer ring when it is adjacent to an amulet (N).
- Repeat this process for the other 2 amulets.
- Take the PHOTO OF CARETAKER, MAKEUP, and CARETAKER’S BADGE (O).
- Walk down.

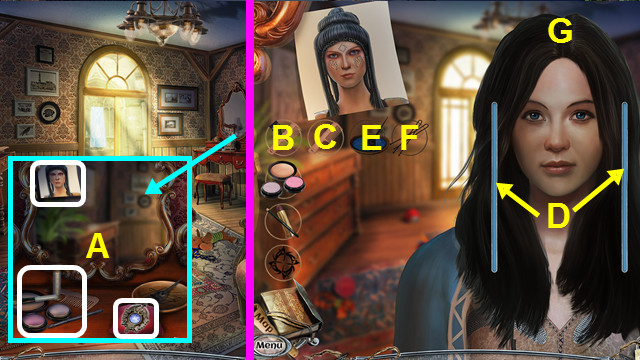

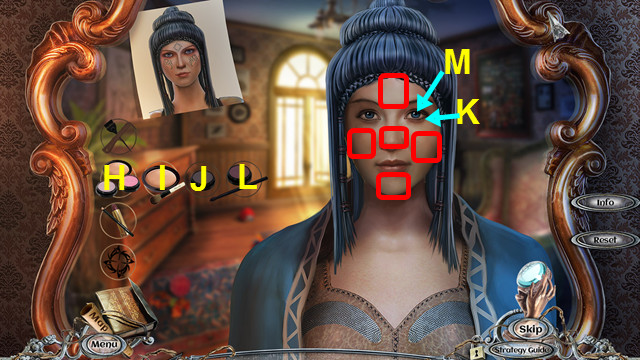

- Place the PHOTO OF CARETAKER, MAKEUP, and CARETAKER’S BADGE (A).
- Select B-C; drag the comb down the 2 blue lines (D).
- Select E; drag the dye brush down the 2 blue lines.
- Use (F) on (G).
- Select H-I; use the brush on the 5 spots (red).
- Use (J) on (K).
- Use (L) on (M).
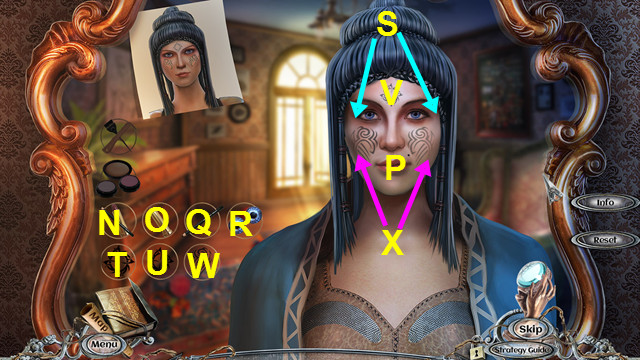
- Select N-O; use the lipstick on (P).
- Use (Q) on (P).
- Use (R) on (S).
- Select T-U; select (V).
- Use (W) on (X).
- Go forward 3x.

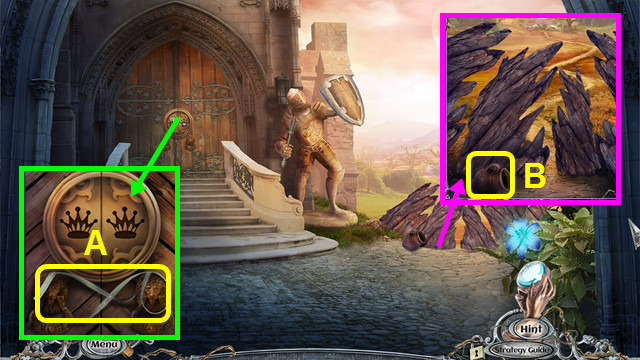
- Take the TAPE (A).
- Take the JUG (B).
- Combine the JUG and TAPE to make the JUG WITH TAPE (inventory).
- Walk down 4x.

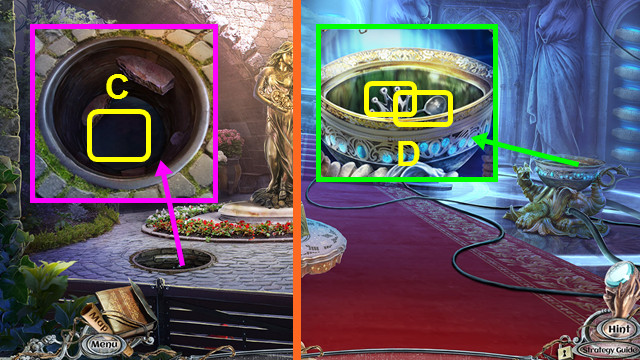
- Use the JUG WITH TAPE to take the JUG WITH WATER and ITEM IN MUD (C).
- Go forward 3x.
- Use the JUG WITH WATER; take the SILVER SPOON and 1st CROWN AMULET (D).
- Combine the ITEM IN MUD and SILVER SPOON to find the SUN DISC and HAIRPIN (inventory).

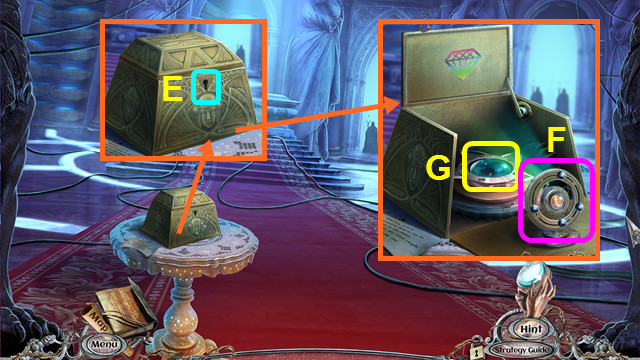
- Use the HAIRPIN (E).
- Move the sliders to the position shown (F).
- Take the LENS (G).
- Walk forward.

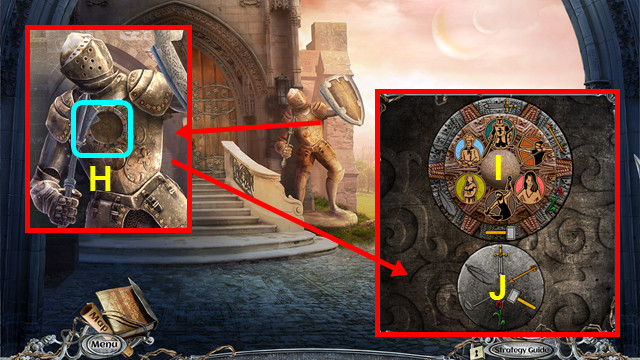
- Place the SUN DISC (H).
- Select Jx4-I-Jx2-Ix2-Jx3-I-Jx4-I-Jx3-I.

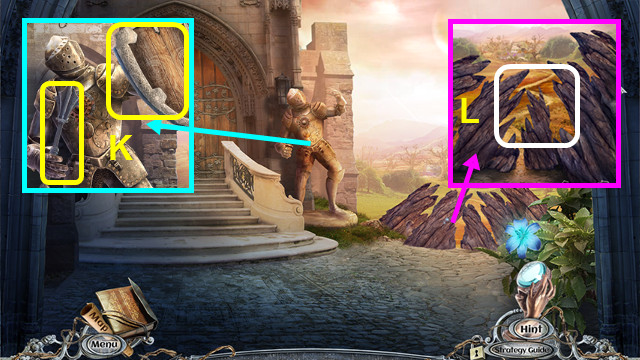
- Take the MACE and SHIELD (K).
- Use the MACE (L).
- Walk right.
Chapter 6: The Life Source

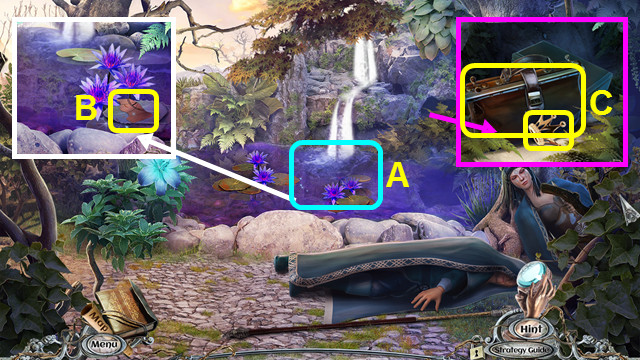
- Play the HOP to earn the BROKEN GLASSES.
- Combine the BROKEN GLASSES and LENS to make the MYSTERY GLASSES (inventory).
- Use the MYSTERY GLASSES (A).
- Take the 2/4 PICTURE FRAGMENTS (B).
- Move the plants; take the BAG WITH CHEMICALS and 2nd CROWN AMULET (C).
- Walk down.

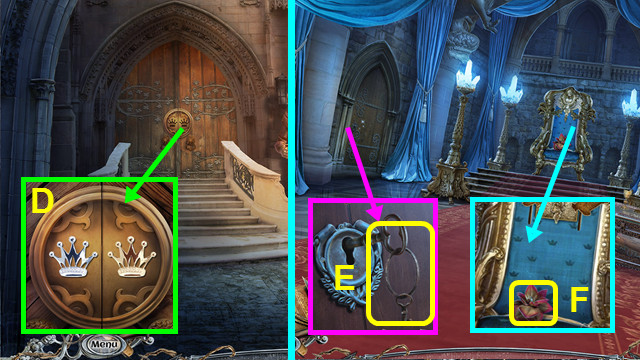
- Place and press the 2 CROWN AMULETS (D).
- Walk forward.
- Take the BUNCH OF KEYS (E).
- Combine the BAG WITH CHEMICALS and BUNCH OF KEYS; take the POTION INGREDIENT and CLUBS AMULET (inventory).
- Take the MOURNING FLOWER (F).
- Walk down and right.

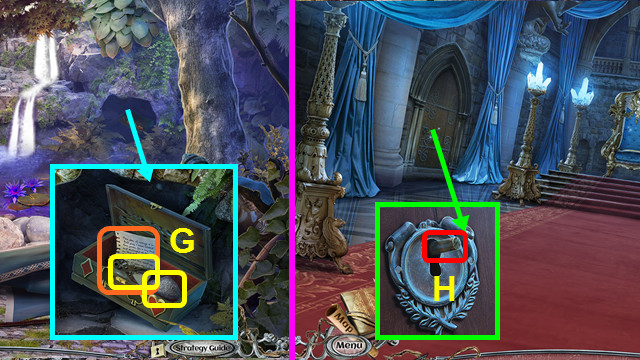
- Place the CLUBS AMULET; take the PLIERS, SILVER POLLEN, and read the note (G).
- Walk down and forward.
- Use the PLIERS (H).
- Walk left.

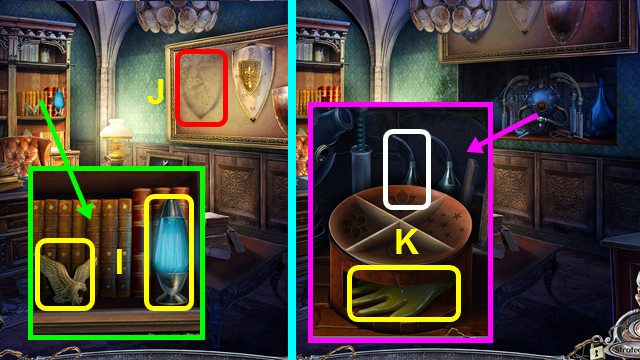
- Take the 1st GOLDEN EAGLE and NEON LAMP (I).
- Place the SHIELD (J).
- Place the POTION INGREDIENT; take the RUBBER GLOVES (K).
- Walk down 2x; go right.

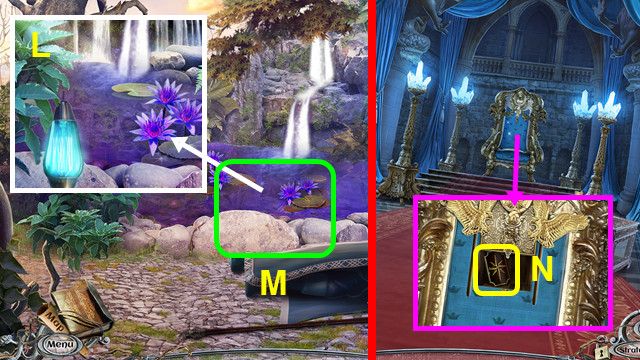
- Use the NEON LAMP and RUBBER GLOVES (L).
- Play the HOP; earn the SHARDS (M).
- Sort the SHARDS: take the 2nd GOLDEN EAGLE and MAGIC VIAL (inventory).
- Walk down and forward.
- Place the 2 GOLDEN EAGLES; take the STAR BADGE (N).
- Walk left.

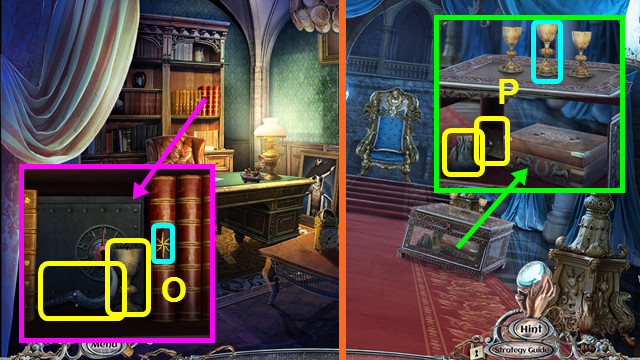
- Place the STAR BADGE; take the KING’S CUP and MOON SICKLE (O).
- Walk down.
- Place the KING’S CUP; take the 3/4 PICTURE FRAGMENT and STARDUST (P).
- Walk down.

- Use the MOON SICKLE to take the 1/4 MOONFLOWERS (Q).
- Walk right.
- Use the MOON SICKLE to take the 2/4 MOONFLOWERS (R).
- Walk down 5x.
- Use the MOON SICKLE to take the 3/4 MOONFLOWERS; take the 4/4 PICTURE FRAGMENTS (S).
- Walk forward.

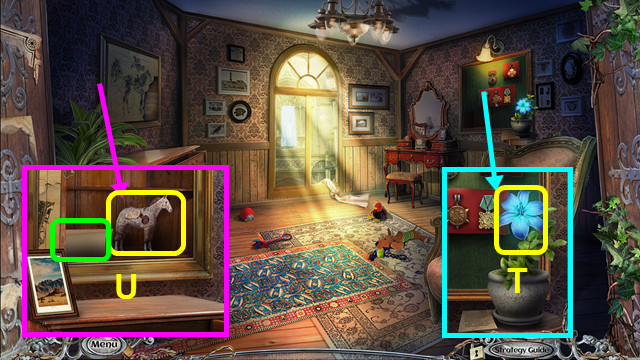
- Use the MOON SICKLE to take the 4/4 MOONFLOWERS (T).
- Place the 4 PICTURE FRAGMENTS; read the note and take the MECHANICAL HORSE (U).
- Go forward 4x.

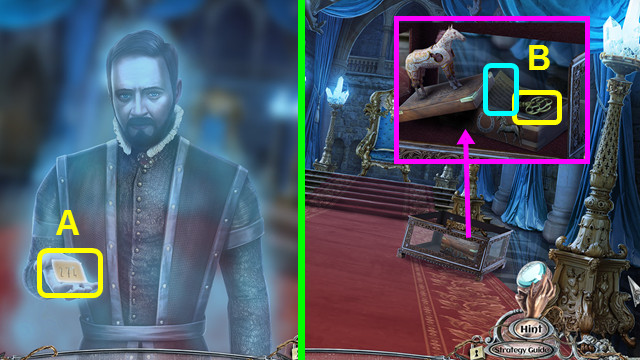
- Talk to Thorvald; take the CODE (A).
- Place the MECHANICAL HORSE; read the note and take THORVALD’S SAFE KEY (B).
- Walk left.

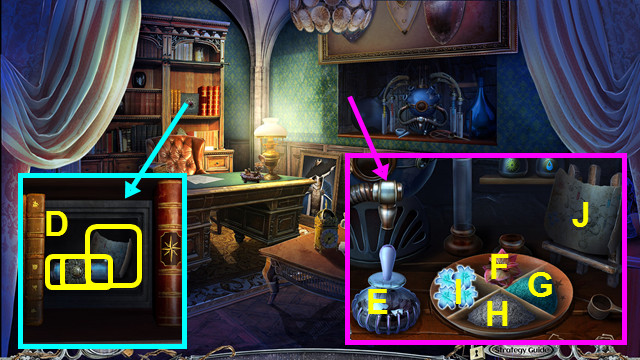
- Place the CODE and THORVALD’S SAFE KEY; take the POTION RECIPE, PRINCE’S AMULET, and FISH GUN CHARGE (D).
- Combine the UNLOADED FISH GUN and FISH GUN CHARGE to make the CHARGED FISH GUN (inventory).
- Place the MAGIC VIAL (E), MOURNING FLOWER (F), STARDUST (G), SILVER POLLEN (H), 4 MOON FLOWERS (I), and POTION RECIPE (J).

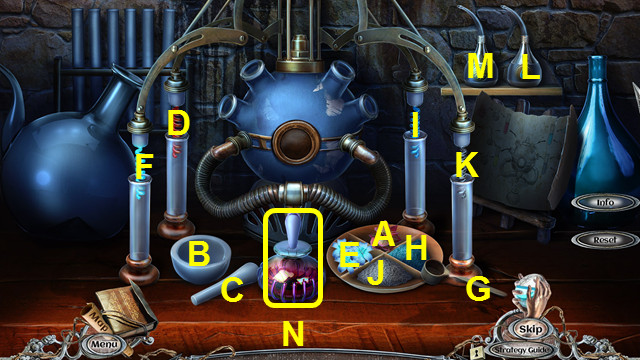
- Move A to B; use C on B, and move B to D.
- Move E to B 4x; use C on B, and move B to F.
- Use G on H and I.
- Use G on J and K.
- Use L on D and F.
- Use M on I and K.
- Take the PURIFYING POTION (N).
- Walk down 2x; go right.

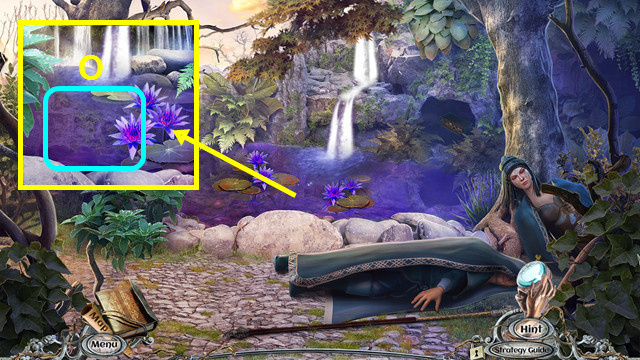
- Use the PURIFYING POTION (O).
- You earn the LIVING WATER.
- Walk down 2x.

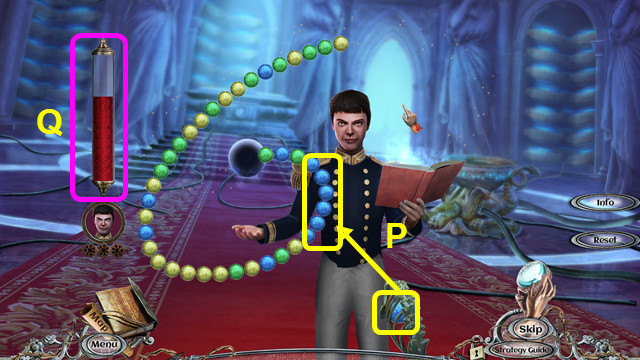
- Shoot spheres to make sets of three or more (P).
- Continue until the meter is empty (Q).
- This mini-game is randomly generated.

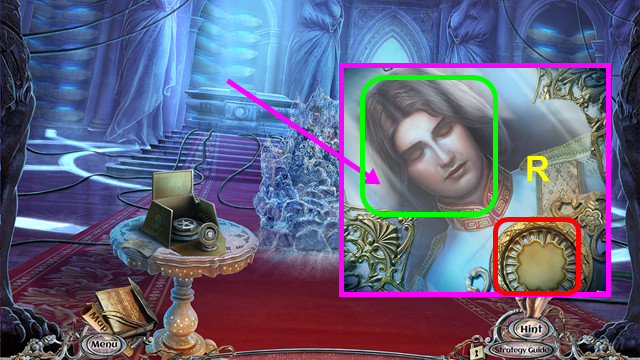
- Place the PRINCE’S AMULET; use the LIVING WATER (R).
- Congratulations! You have completed Surface: Return to Another World!




 Mystery Case Files: Escape from Ravenhearst Walkthrough, Guide, & Tips
 Mystery Age: The Imperial Staff Walkthrough, Guide, & Tips
 Tales from the Dragon Mountain: The Strix Walkthrough, Guide, & Tips
 Sprouts Adventure Walkthrough, Guide, & Tips
 Nikopol: Secrets of the Immortals Walkthrough, Guide, & Tips