Punished Talents: Seven Muses Walkthrough, Guide, & Tips
Punished Talents: Seven Muses Walkthrough
Welcome to the Punished Talents: Seven Muses Walkthrough
Life imitates art with deadly results in this thrilling whodunit!
Whether you use this document as a reference when things get difficult or as a road map to get you from beginning to end, we’re pretty sure you’ll find what you’re looking for here.
This document contains a complete Punished Talents: Seven Muses game walkthrough featuring annotated screenshots from actual gameplay!
We hope you find this information useful as you play your way through the game. Use the walkthrough menu below to quickly jump to whatever stage of the game you need help with.
Remember to visit the Big Fish Games Forums if you find you need more help. Have fun!
This walkthrough was created by MargieB, and is protected under US Copyright laws. Any unauthorized use, including re-publication in whole or in part, without permission, is strictly prohibited.
General Tips
- This is the official guide for Punished Talents: Seven Muses!
- This guide will not mention each time you have to zoom into a location; the screenshots will show each zoom scene.
- Hidden-object puzzles are referred to as HOPs in this guide. Items listed in green are hidden or require additional actions to locate. Interactive items in HOPs are color-coded.
- Mini-games and HOPs are sometimes randomized; your solution may vary.
- This guide will give step-by-step solutions for all puzzles which are not random. Please read the instructions in the game for each puzzle.
Chapter 1: The Boulevard

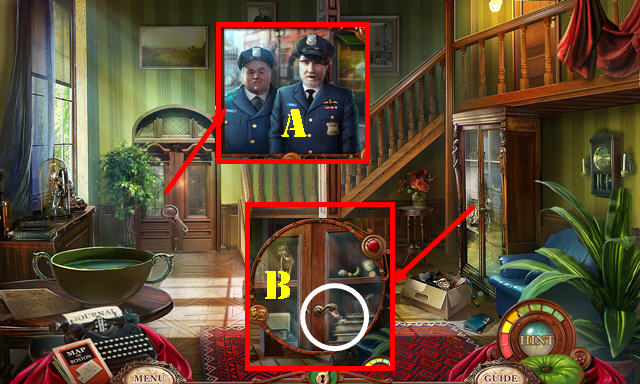
- Open the door to talk to the officers (A).
- Pull the handle (B) to activate a HOP.

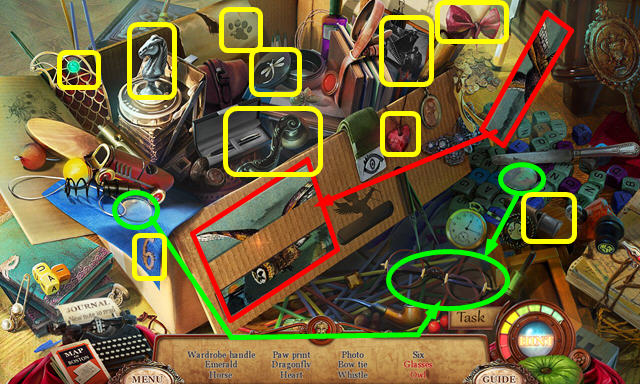
- Play the HOP.
- You receive the WARDROBE HANDLE (C).

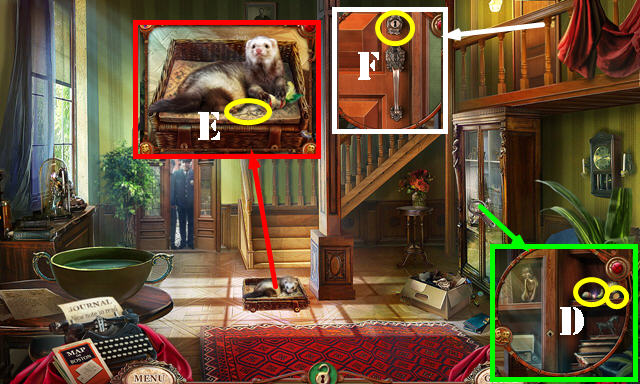
- Place the WARDROBE HANDLE on the wardrobe and pull it; take the FERRET TOY and COIN 1/4 (D).
- Give the FERRET TOY to the ferret; take the OFFICE KEY (E).
- Use the OFFICE KEY in the lock (F); turn the key and go through the door.

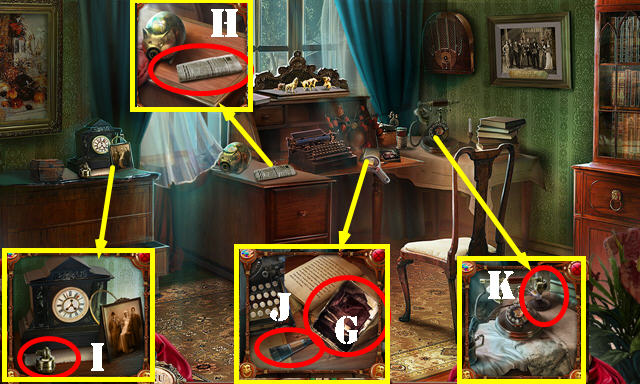
- Touch anywhere on the scene.
- Take the 2 Notes (G and H).
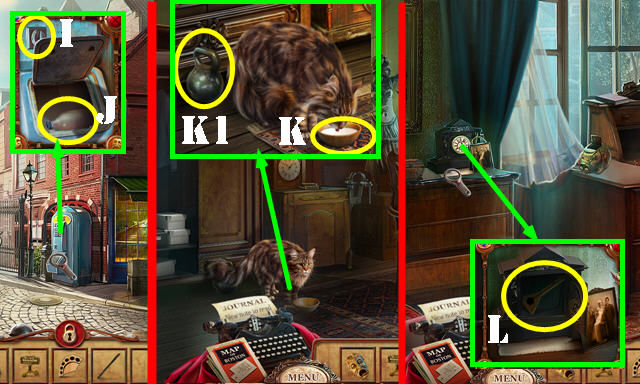
- Take the EARPIECE (I) and GLUE (J).
- Place the EARPIECE on the phone and then answer it (K).
- Walk down and go out the door.

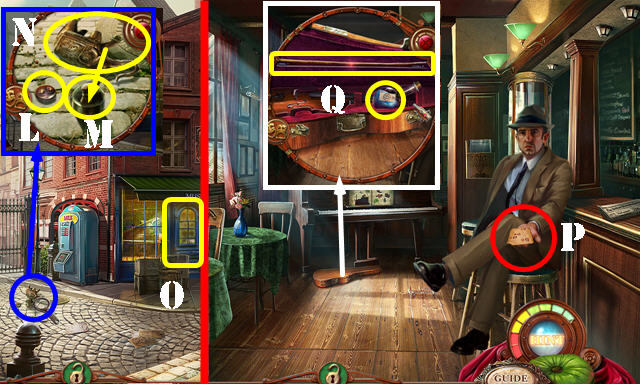
- Take the PIG SNOUT (L).
- Use some GLUE on the base (M), then place the statue on it (N) and take the ELEPHANT FIGURINE.
- Enter the Cafe (O).
- Talk to Robert; take the DECODER (P).
- Open the latches; take the CLEANING SOLUTION and BOW (Q).
- Return to Russell’s Office.

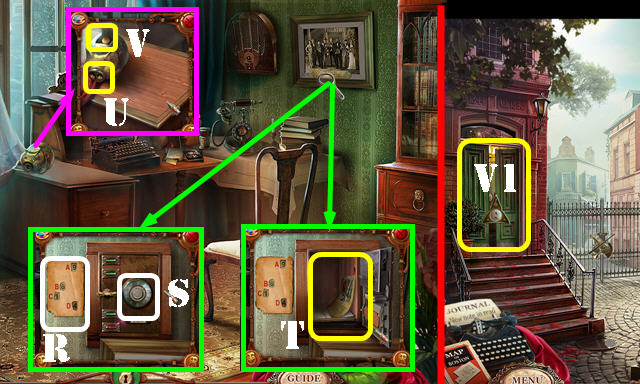
- Remove the picture and place the DECODER on the paper (R).
- Turn the dial (S) to 9614 (in either direction) and stop after each one.
- Take the Note and the MANUSCRIPT (T).
- Place the PIG SNOUT on the pig (U); take the COIN 2/4 (V).
- Return to the Boulevard and go through the left door (V1).

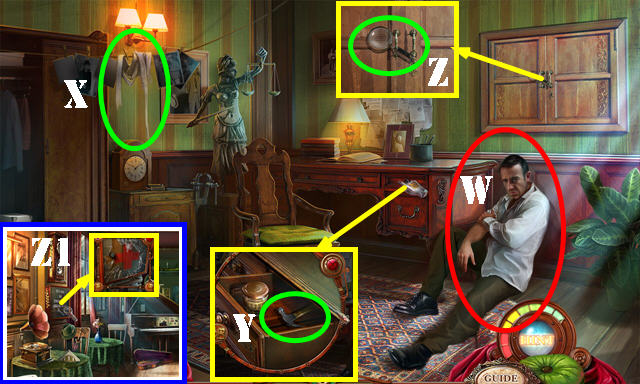
- Talk to Robert (W).
- Take the DIRTY BANDAGE (X).
- Open the drawer; take the HAMMER (Y).
- Grab the MAGNIFYING GLASS (Z).
- Return to the Cafe.
- Break the glass with the HAMMER and open the door to activate a HOP (Z1).

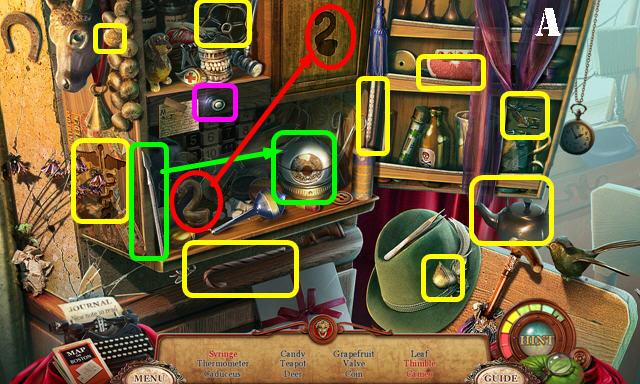
- Play the HOP.
- You receive the SYRINGE (A).
- Walk down twice.

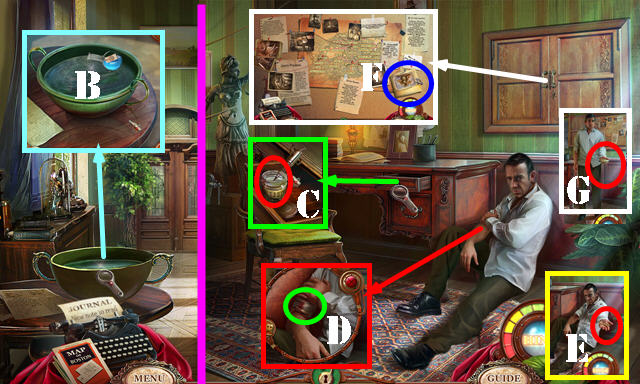
- Use the CLEANING SOLUTION in the bowl, then place the DIRTY BANDAGE in it to get the BANDAGE (B).
- Return to Robert’s House.
- Remove the lid and dip the SYRINGE in the bottle to get the SYRINGE WITH MORPHINE (C).
- Use the SYRINGE WITH MORPHINE on Robert’s arm and then place the BANDAGE on it (D).
- Give Robert the MANUSCRIPT and take the EVIDENCE-BOARD KEY (E).
- Use the EVIDENCE-BOARD KEY on the lock; take the Note (F).
- Take the SHEET MUSIC PART from Robert (G).
- Return to the Cafe.

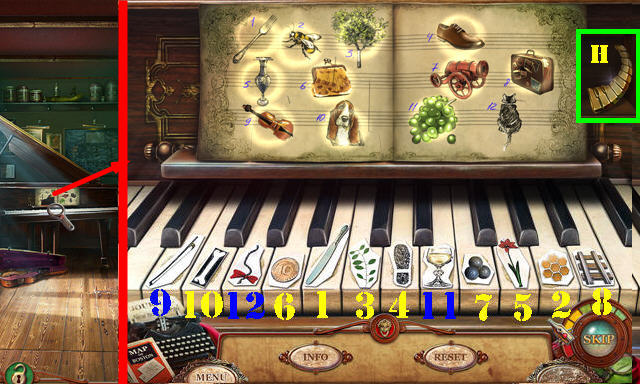
- Place the SHEET MUSIC PART over the other one to activate a puzzle.
- Select the keys from 1-12. Take the KEYBOARD (H).
- Walk down.

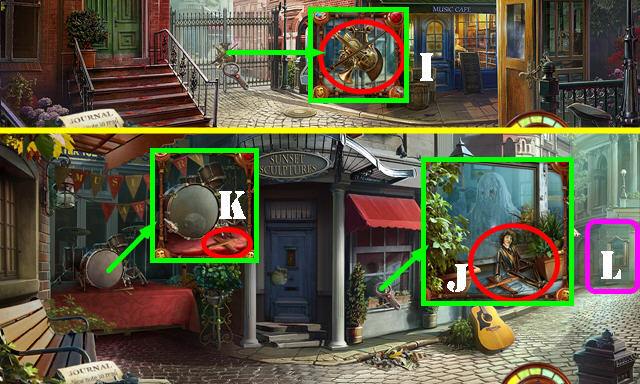
- Place the BOW and the KEYBOARD on the gate; go through the gate (I).
- Look at the window; take the PUPPET (J).
- Take the OPERATING CROSS (K).
- Head to the Acting Block (L).

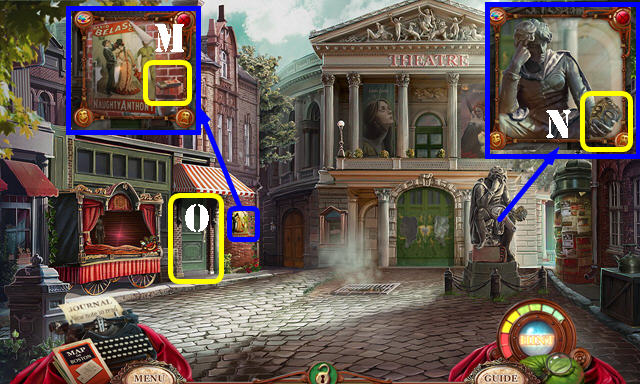
- Take the MATCHES (M) and TRAGEDY MASK (N).
- Enter the Shop (O).

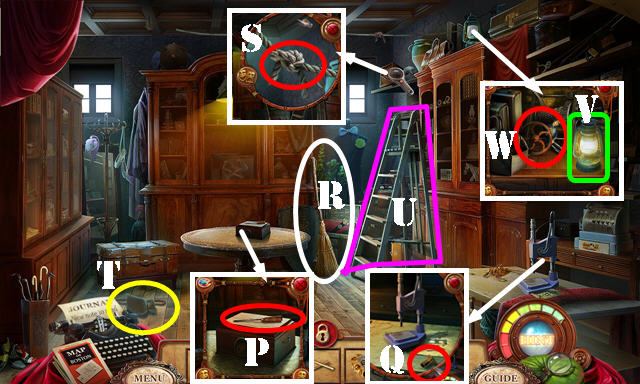
- Take the SCREWDRIVER (P), GUITAR PEG (Q), and BROOM (R).
- Untie the rope (S); take the BAG OF PLASTER (T).
- Move the ladder twice (U); use the MATCHES on the lantern (V); take the PUPPET and the VALVE (W).
- Walk down twice.

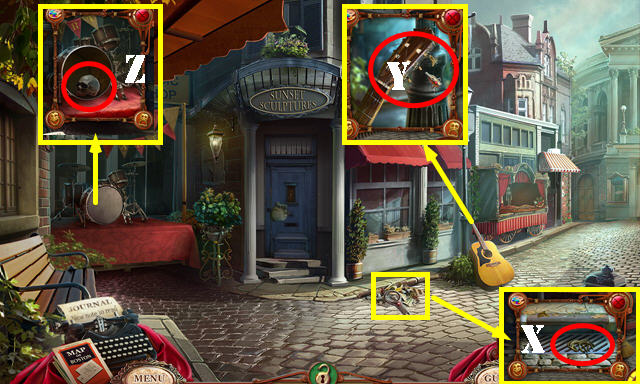
- Use the BROOM on the debris; take the ZEBRA FIGURINE (X).
- Place the GUITAR PEG on the guitar; turn the peg twice and take the STRINGS (Y).
- Use the SCREWDRIVER on the screws and take the SKULL (Z).
- Return to the Acting Block.

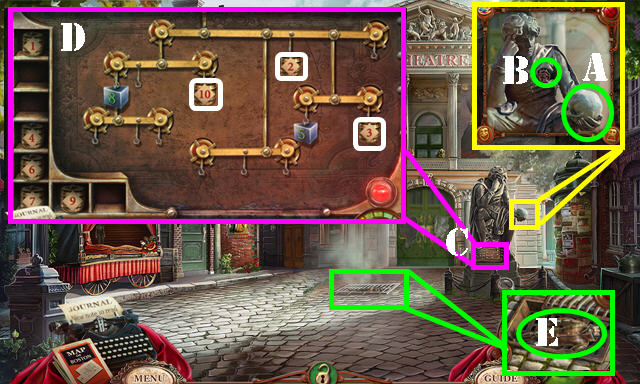
- Place the SKULL in the hand (A) and the VALVE in the slot (B). Turn the valve.
- Open the puzzle (C).
- Place the wrights on the right hooks (D).
- Open the grate; take the PUPPET BODY (E).
- Enter the Shop.
Chapter 2: The Shop

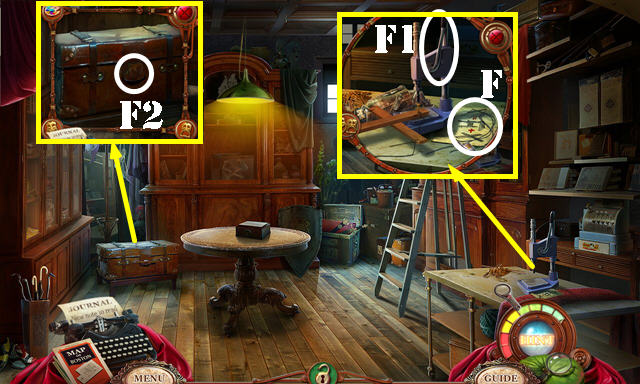
- Put down the OPERATING CROSS, STRINGS and the PUPPET BODY.
- Add the strings (F) to the cross and touch the machine (F1). Repeat these steps 3 more times. Take the PUPPET.
- Place the ZEBRA FIGURINE in the slot to activate a HOP (F2).

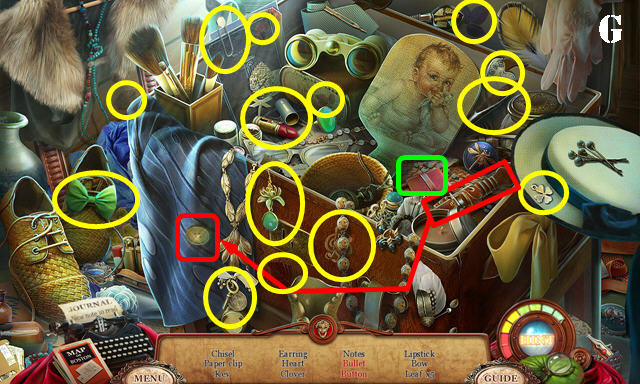
- Play the HOP.
- You receive the CHISEL (G).
- Walk down.

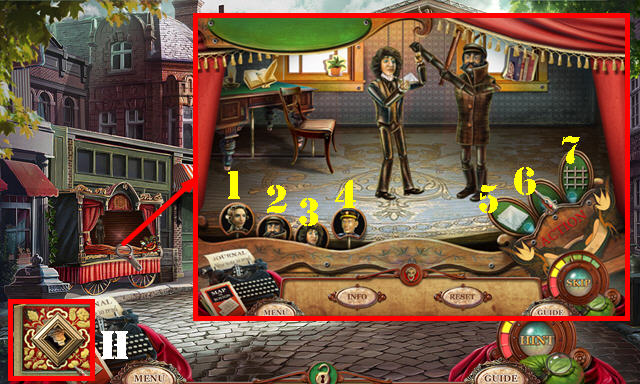
- Place the 3 PUPPETS on the stage to activate a puzzle.
- Round One: 3, 2, 6.
- Round Two: 1, 2, 6, 5, 4, 5.
- Round Three: 3, 4, 5, 7.
- Take the THEATER SYMBOL (H).
- Return to the Shop.

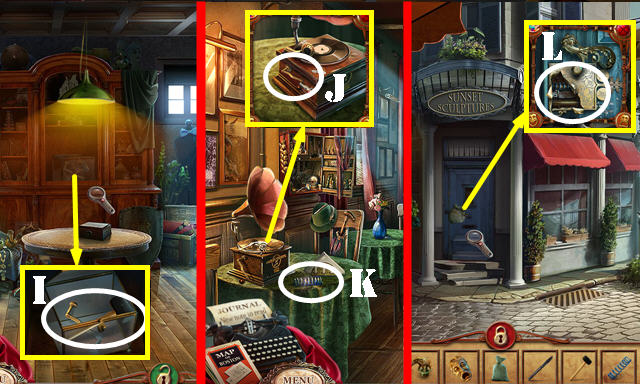
- Use the THEATER SYMBOL in the slot; take the SLEDGEHAMMER and GRAMOPHONE HANDLE (I).
- Return to the Cafe.
- Place the GRAMOPHONE HANDLE on the gramophone (J); take the SPRING (K).
- Return to the Music Block.
- Use the CHISEL on the plaster and the SLEDGEHAMMER on the chisel. Place the SPRING in the mechanism (L) and go through the door.

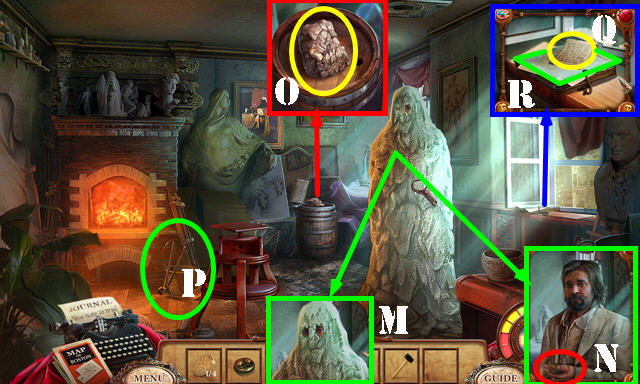
- Use the SLEDGEHAMMER on the sculptor (M). Talk to him and take the BOX LOCK (N).
- Take the CLAY (O), PINCERS (P) and the Note (Q).
- Touch the book to activate a puzzle (R).

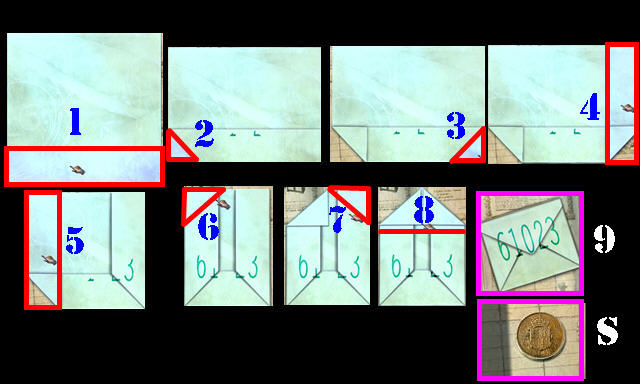
- Fold the paper in the right order (1-8). Nine shows the final image.
- Take the COIN 3/4 (S).
- Return to the Boulevard.

- Use the PINCERS on the chain (T); open the door and take the BEAR FIGURINE (T1).
- DIAL 61023 (U). Take the Note and then the CUPID BLUEPRINT (V).
- Return to Russell’s Office.

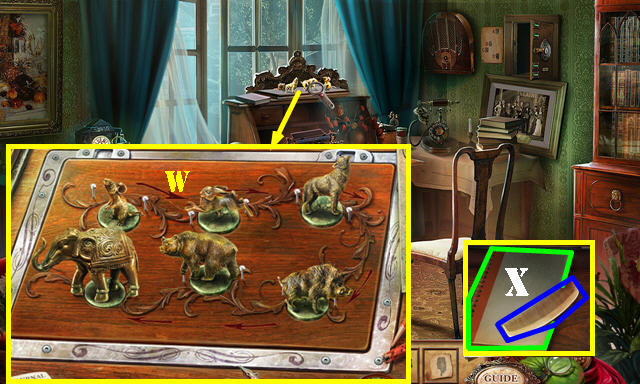
- Put down the BEAR FIGURINE and the ELEPHANT FIGURINE to activate a puzzle.
- Swap the figurines as shown (W).
- Take the COMB and open the book (X).
- Return to the Acting Block.

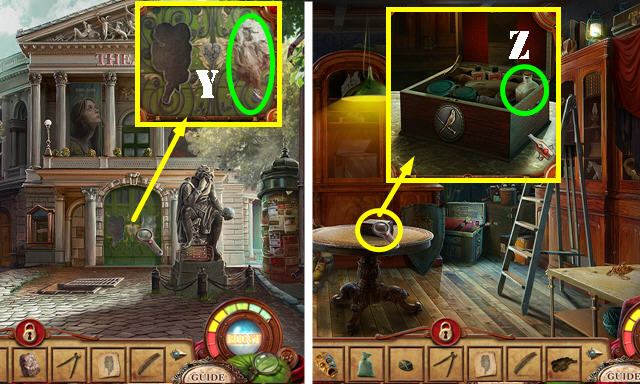
- Place the CLAY over the cupid (Y); take the CUPID CAST.
- Return to the Shop.
- Place the BOX LOCK in the slot; take the PLASTER SOLVENT (Z).
- Return to the Sculptor’s Studio.

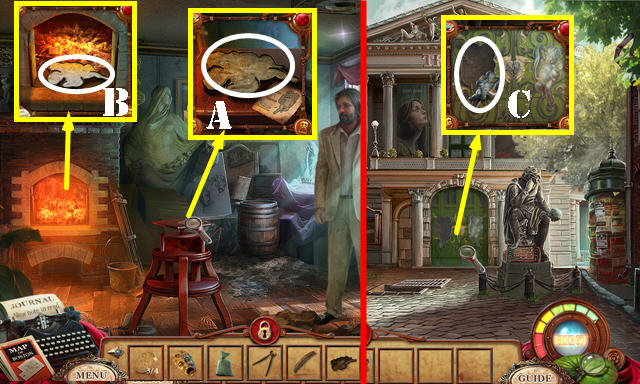
- Put down the CUPID BLUEPRINT and CUPID CAST. Place the BAG OF PLASTER and then the PLASTER SOLVENT in the mold. Take the FORM WITH PLASTER (A).
- Place the FORM WITH PLASTER in the fireplace; use the PINCERS to place it in the fire and then take the PLASTER CUPID (B).
- Return to the Acting Block.
- Place the PLASTER CUPID on the door (C). Go through the door.

- Talk to Corey.
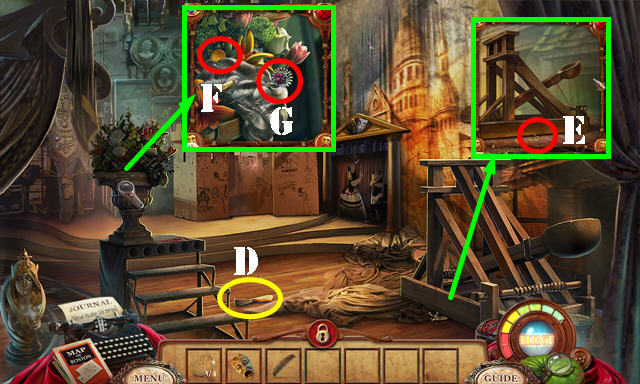
- Take the SCRAPER (D) and the CLOCK KEY (E).
- Take the COIN 4/4 (F). Use the COMB on the wig and take the HAIRPIN (G).
- Walk down.

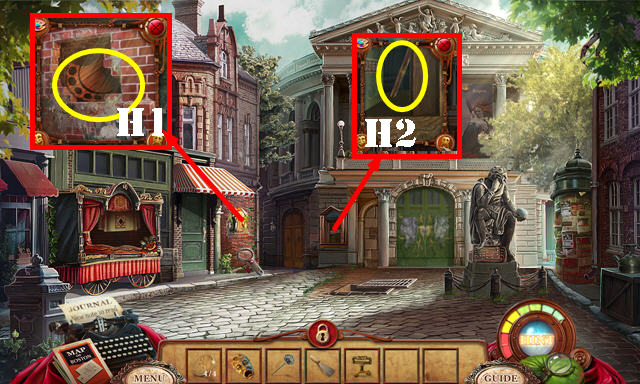
- Remove the poster with the SCRAPER; take the FAN (H1).
- Use the HAIRPIN on the window; take the LEVER (H2).
- Walk down twice.


- Insert the 4 COINS in the slot (I); take the MILK (J).
- Return to Robert’s House.
- Place the MILK in the saucer (K); take the WEIGHT (K1).
- Return to Russell’s Office.
- Use the CLOCK KEY in the clock; turn the key twice and take the BALALAIKA (L).
- Return to Backstage.

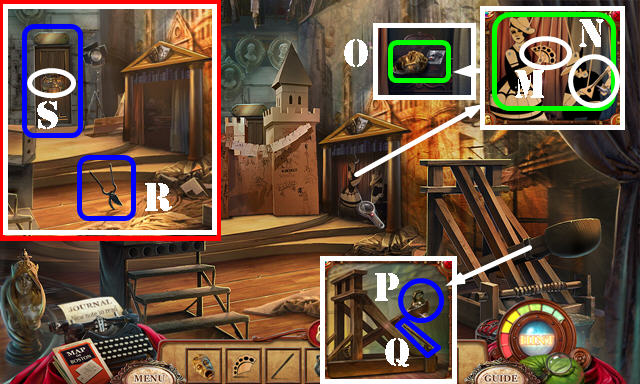
- Place the FAN (M) and the BALALAIKA (N) on the puppets.
- Take the COMEDY MASK and the Book (O).
- Place the WEIGHT (P) and the LEVER (Q) on the catapult; pull the lever. Take the PRUNERS (R).
- Place the COMEDY and TRAGEDY MASKS on the back door (S) to activate a puzzle.

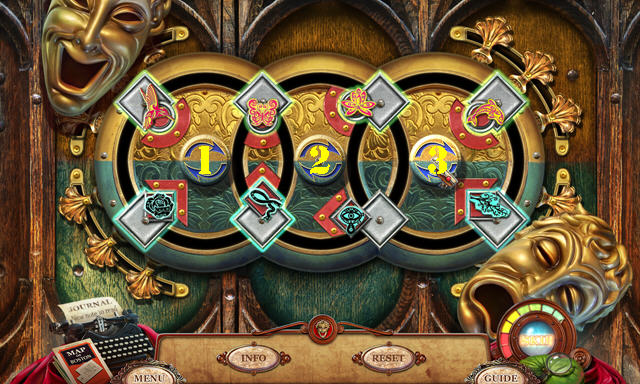
- Place the symbols in the right spots.
- Solution: 2, 2, 1, and 3.
- Go through the door to enter the Dressing Room.

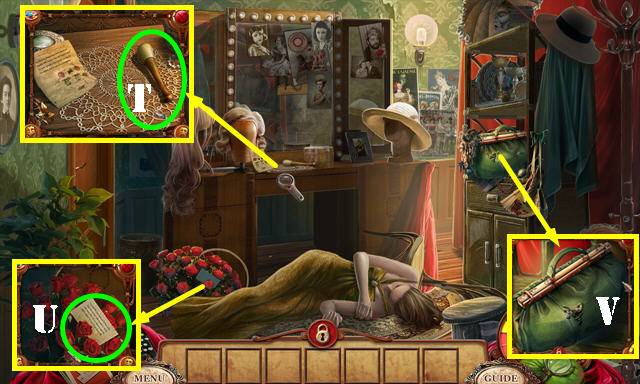
- Talk to Kaya.
- Take the PESTLE (T).
- Take the Note (U).
- Open the bag (V) to activate a HOP.

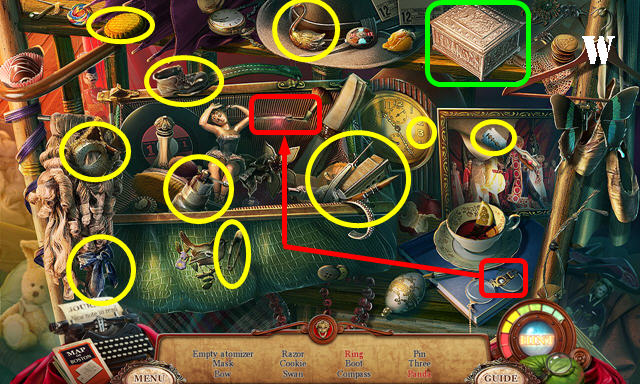
- Play the HOP.
- You receive the EMPTY ATOMIZER (W).
- Return to the Music Block.

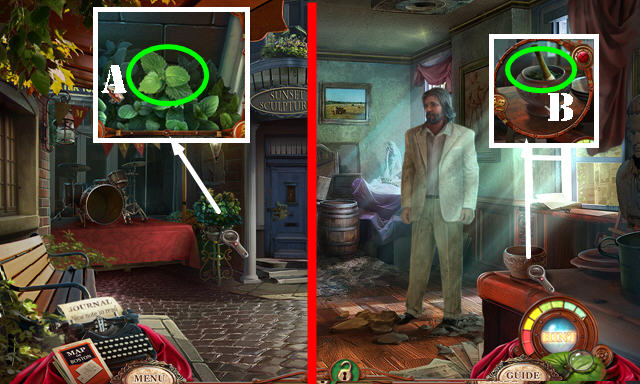
- Use the PRUNERS on the plant to get the MINT (A).
- Return to the Sculptor’s Studio.
- Place the MINT in the mortar and use the PESTLE to crush it; take the CRUSHED MINT (B).
- Return to the Dressing Room.

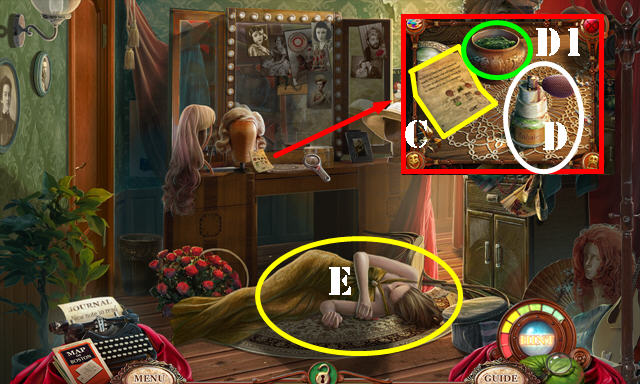
- Look at the Note (C).
- Put down the EMPTY ATOMIZER (D) and the CRUSHED MINT (D1). Place the crushed mint inside the atomizer and take the ASTHMA MEDICINE.
- Use the ASTHMA MEDICINE on Kaya (E). You will be transported to the Police Station.
Chapter 3: Police Station

- Talk to Jack and the officer.
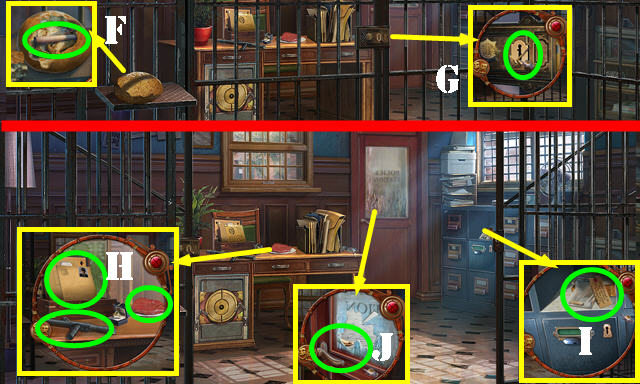
- Touch the bread; take the Note and the LOCKPICK (F). Take the BREAD.
- Use the LOCKPICK on the lock (G).
- Take the POLICE BATON, STEAK and Note (H).
- Take the bullet 1/6 (I).
- Break the glass with the POLICE BATON; pull the inside handle and go through the door (J).

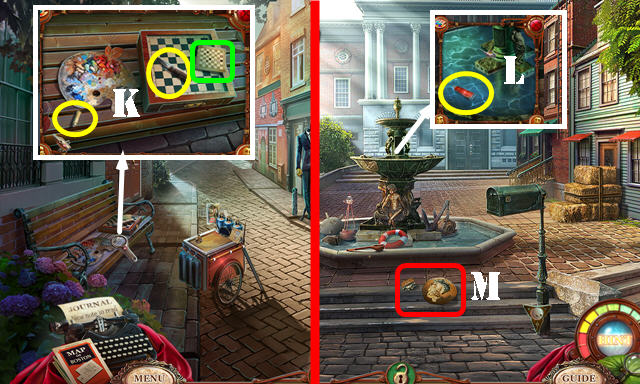
- Take the PENKNIFE and the BULLET 2/6 (K). Look at the Note (green).
- Go forward.
- Take the PAINT TUBE 1/3 (L).
- Place the BREAD on the ground to activate a HOP (M).

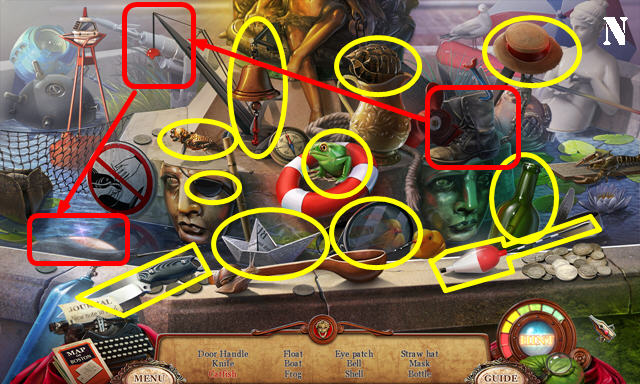
- Play the HOP.
- You receive the GALLERY DOOR HANDLE (N).

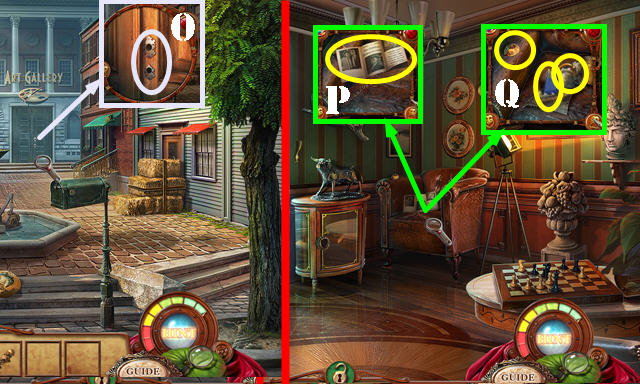
- Place the GALLERY DOOR HANDLE on the door (O); enter the Art Gallery.
- Take the Note (P).
- Cut the chair with the PENKNIFE; take the AMBER, PUZZLE PART 1/3 and DOOR KNOCKER (Q).
- Walk down twice.

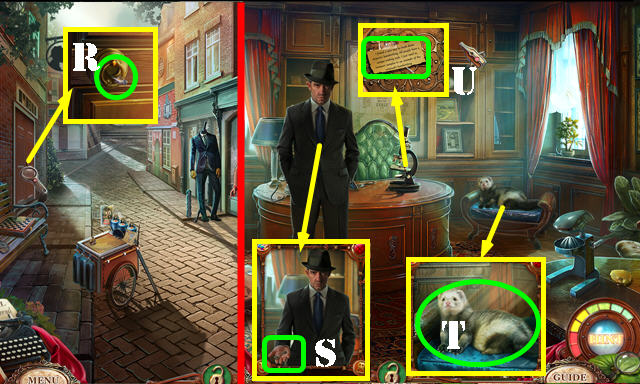
- Place the DOOR KNOCKER on the door; knock on it and go through the door (R).
- Talk to the detective; take the CARD-FILE KEY (S).
- Give the STEAK to the ferret to receive LUCY (T).
- Take the Note (U).
- Walk down twice.

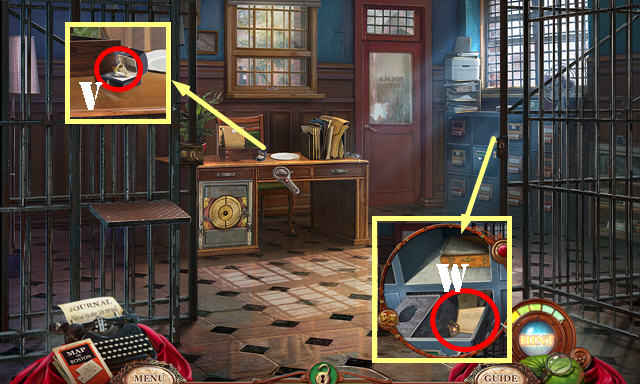
- Place the AMBER on the ring; take the AMBER RING (V).
- Use the CARD-FILE KEY in the lock; turn the key and look at the Note, then take the CHESSBOARD OPENER (W).
- Return to the Art Block.

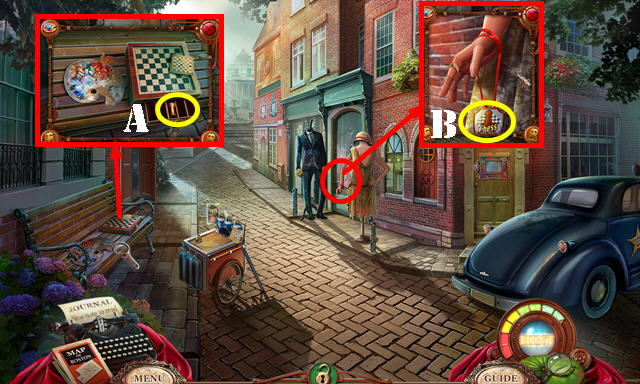
- Use the CHESSBOARD OPENER on the lock; take the CHESS FIGURINE 1/2 (A).
- Place the AMBER RING on the finger; take the CHESSMAN SYMBOL (B).
- Return to the Art Gallery.

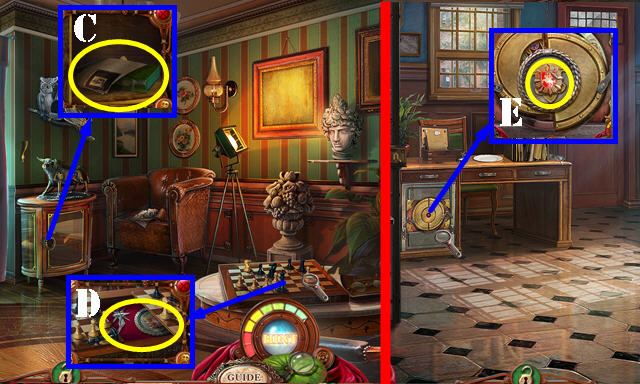
- Place the CHESSMAN SYMBOL in the slot and twist the knob; take the Note, CHESS FIGURINE 2/2 and BOOK 1/3 (C).
- Place the 2 CHESS FIGURINES on the board; take the EXPLORER’S MUSE and the SAFE DIAL (D).
- Return to the Police Station.
- Place the SAFE DIAL on the lock to activate a puzzle (E).

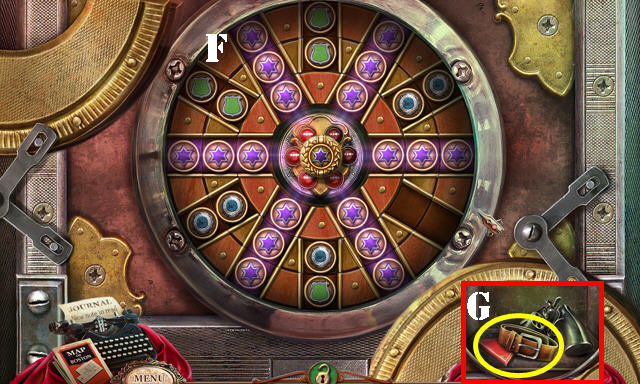
- Place the purple stars in the right spots by rotating the rings into place.
- Please look at the screenshot for the final image (F).
- Take the BELT and the PUZZLE PART 2/3 (G).
- Return to the Art Gallery.

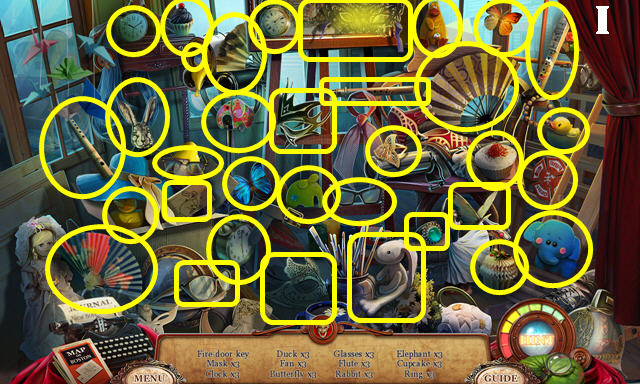


- Place the BELT on the curtains (H) to activate a HOP.
- Play the HOP.
- You receive the FIREFIGHTER SYMBOL (I).
- Walk down twice.

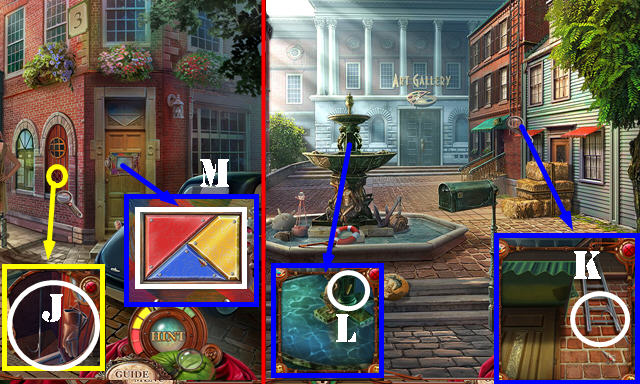
- Place the FIREFIGHTER SYMBOL in the slot; take the POKER and the GLOVES (J).
- Go forward.
- Pull down the ladder with the POKER. Place LUCY on the ladder to get the FOUNTAIN PLATE (K).
- Place the FOUNTAIN PLATE on the fountain; take the PUZZLE PART 3/3 (L).
- Walk down.
- Place the 3 PUZZLE PARTS on the door to activate a puzzle (M).

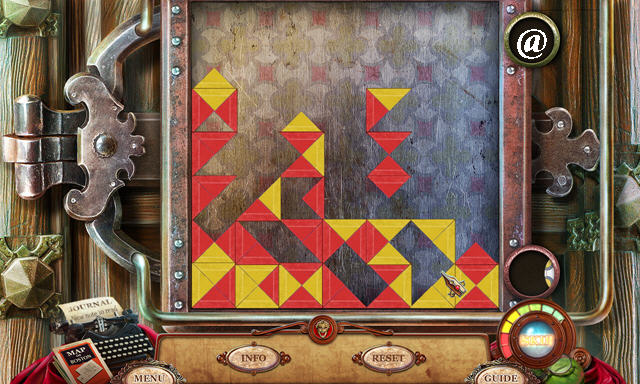
- Remove the fields of the same color in groups of four or more by rotating the pieces until you’ve eliminated enough red and yellow squares.
- Random solution (@).
- Enter Corey’s House.
Chapter 4: Corey’s House

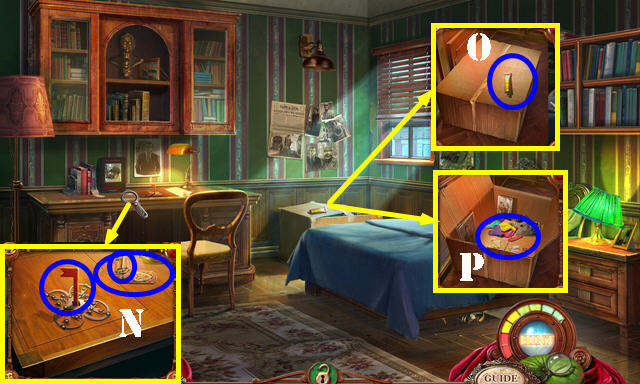
- Take the MAILBOX FLAG, TRUNK KEYS and Note (N).
- Take the PAINT TUBE 2/3 (O). Cut the box with the PENKNIFE and take the BALLOONS (P).
- Walk down.

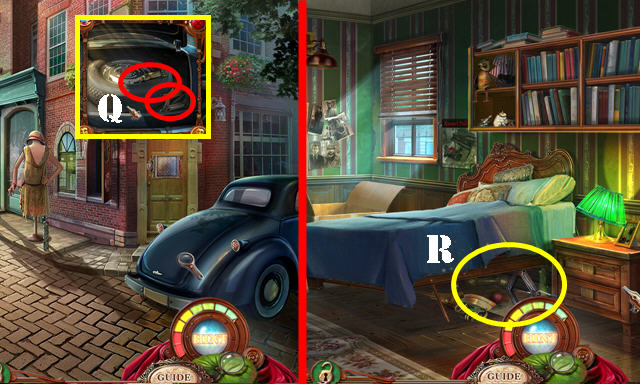
- Use the TRUNK KEYS in the lock and turn the key; take the FOUNDER FIGURE 1/2 and the JACK (Q).
- Return to the Corey’s House.
- Use the JACK under the bed to activate a HOP (R).

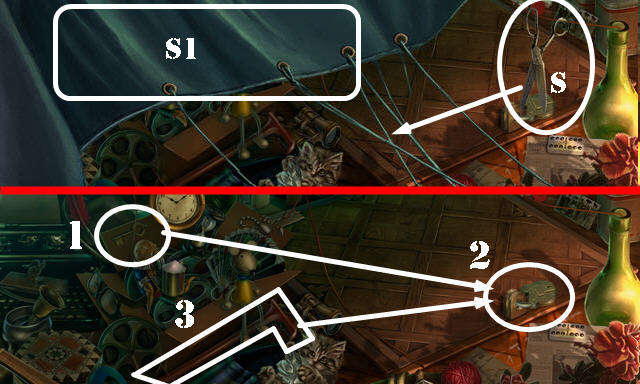

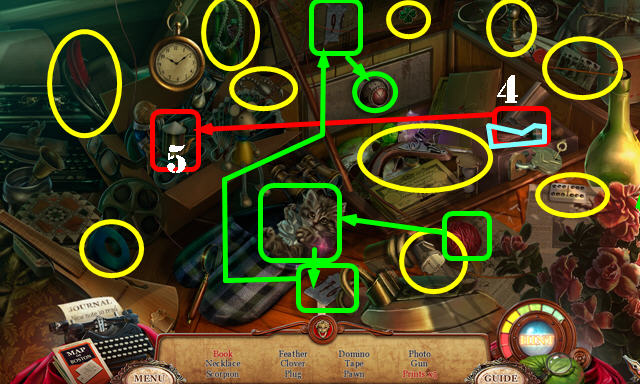

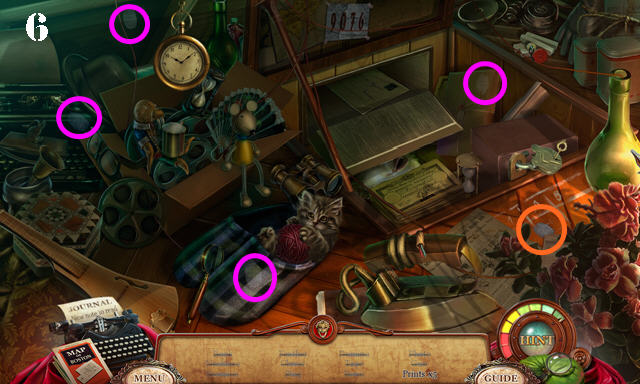
- Play the HOP.
- Cut the string with the scissors (S) and move the cover (S1).
- Use the key (1) in the lock (2) and use the cane on the door (3).
- Dip the spoon (4) in the powder (5). Place the powder in the brush (light blue).
- Take the 5 Prints (6).
- You receive the BOOK 2/3.
- Return to the Fountain.

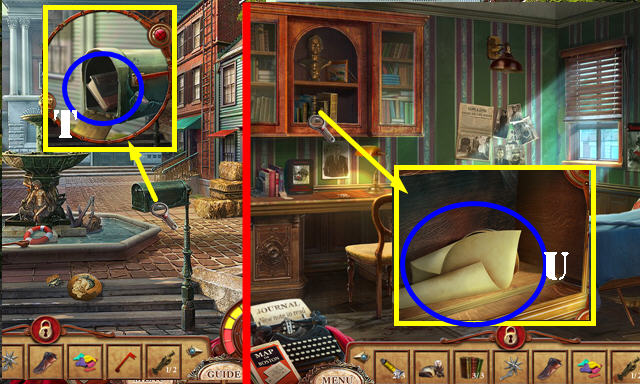
- Place the MAILBOX FLAG on the mailbox; take the BOOK 3/3 (T).
- Return to Corey’s House.
- Place the 3 BOOKS on the shelf; take the Note, PRESSURE GAUGE, and BULLET 3/6 (U).
- Walk down.

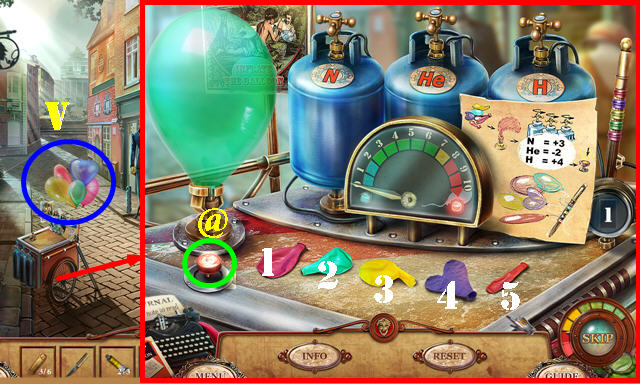
- Put down the BALLOONS and PRESSURE GAUGE to activate a puzzle. Inflate the balloons using the clue as a guide.
- Use the combinations below in the order shown and then press the button (@) after each combination has been entered.
- Red Balloon (5): N x3 and He x2.
- Purple Balloon (4): N x2.
- Yellow Balloon (3): N x1, and H.
- Green Balloon (2): Hx2.
- Pink Balloon (1): N x2, and H.
- Take the BALLOONS (V).
- Go Forward.

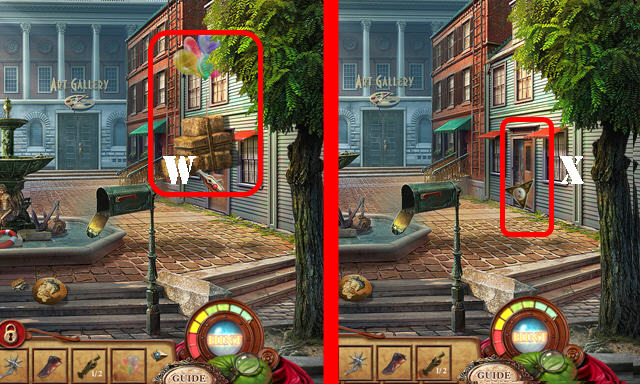
- Place the BALLOONS on the haystack (W).
- Go through the door to access the Artist’s House (X).

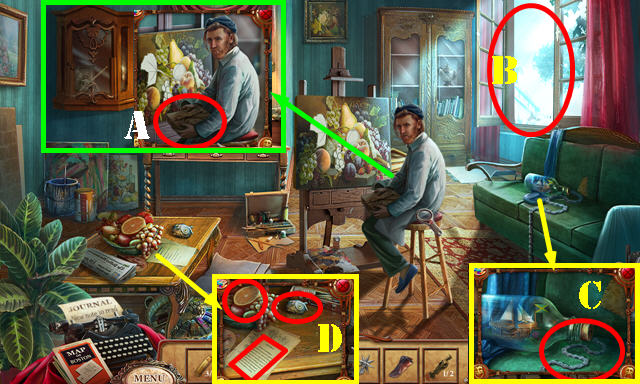
- Talk to the artist; take the PACKAGE (A).
- Open the window and throw the PACKAGE out the window (B).
- Talk to the artist again.
- Take the CHAIN (C).
- Take the Note, CRYSTAL OWL, and ORANGE (D).
- Return to the Art Gallery.

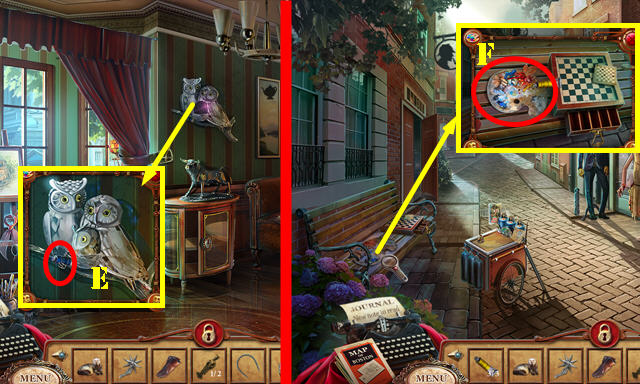
- Place the CRYSTAL OWL next to the others; take the PAINT TUBE 3/3 (E).
- Walk down twice.
- Place the 3 PAINT TUBES on the PALETTE, then take it (F).
- Return to the Artist’s House.

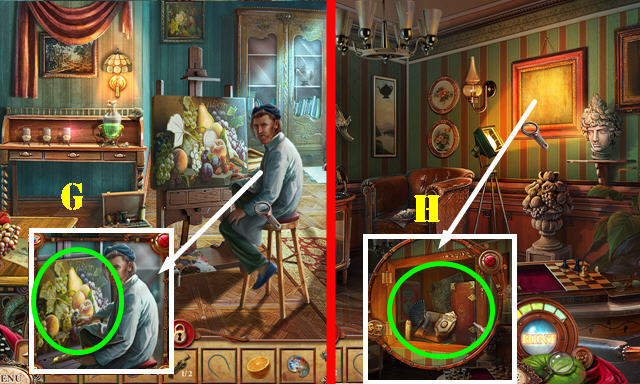
- Give the PALETTE to the artist and take the PAINTING (G).
- Return to the Art Gallery.
- Place the PAINTING in the frame and open the safe; take the BULLET 4/6, POLICE BADGE, and ACTOR’S MUSE (H).
- Return to the Police Station.

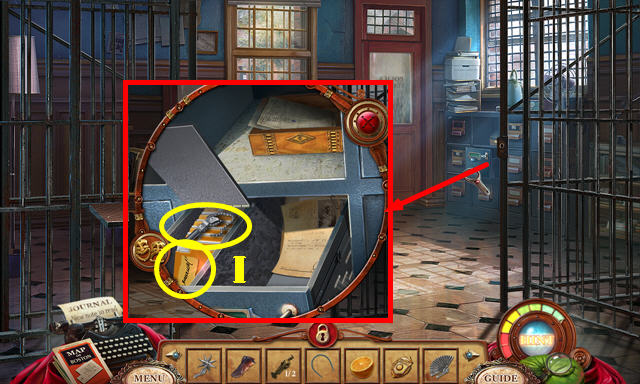
- Place the POLICE BADGE in the slot; take the CHAIN KEY and the HANDWRITING SAMPLE 1/4 (I).
- Return to the Fountain.

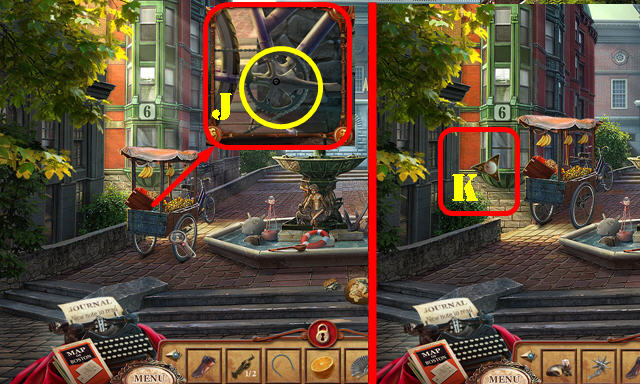
- Place the CHAIN on the bicycle and then use the CHAIN KEY on it (J).
- Go to the Science Block (K).

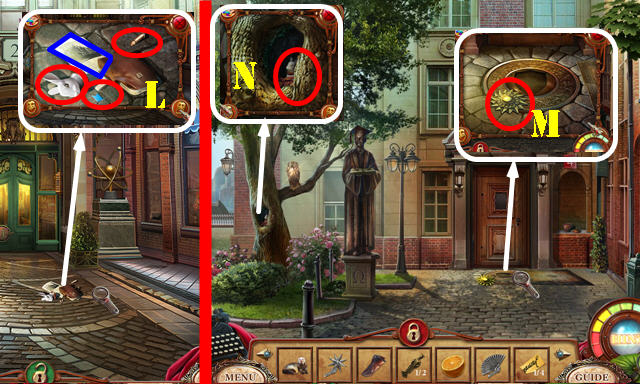
- Take the BULLET 5/6, PIN 1/2 and RABBIT HEAD (L). Look at the note (blue).
- Head left.
- Move the rug and take the STAR (M).
- Use LUCY in the tree hole to get the RABBIT 1/2 (N).
- Return to Corey’s House.

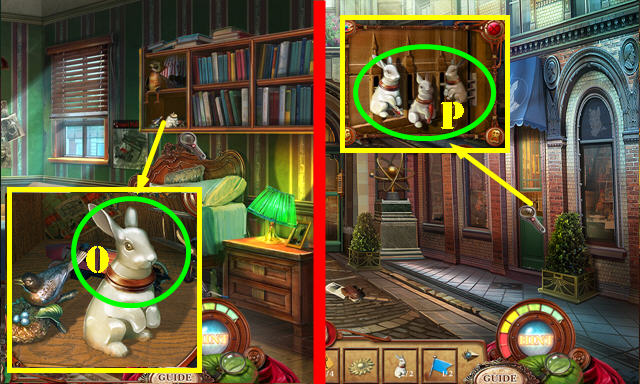
- Place the RABBIT HEAD on the statue; take the RABBIT 2/2 (O).
- Return to the Science Block.
- Place the 2 RABBITS on the door and enter the Gift Shop (P).
Chapter 5: Gift Shop

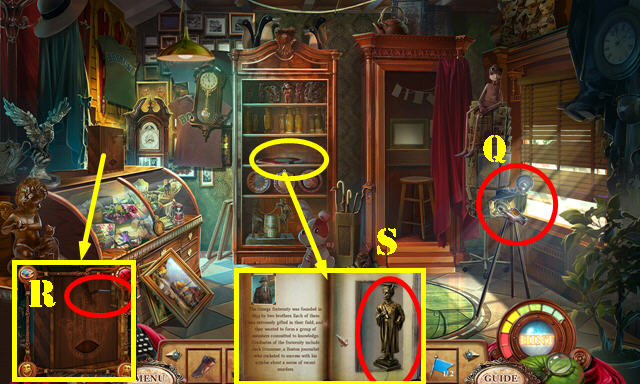
- Touch the camera (Q).
- Take the CORKSCREW (R).
- Place the STAR on the book; open it and take the FOUNDER FIGURE 2/2 (S).
- Return to the College.

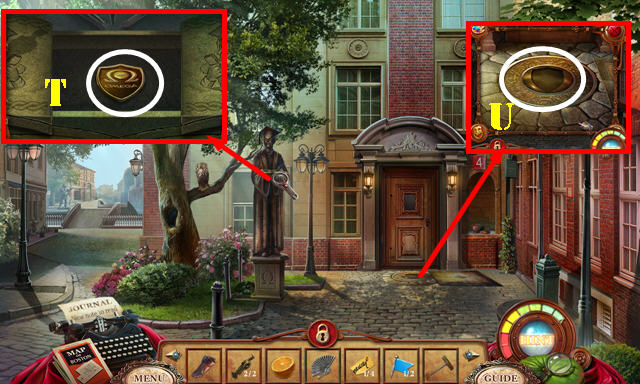
- Place the 2 FOUNDER FIGURES on the book; take the FRATERNITY SYMBOL (T).
- Place the FRATERNITY SYMBOL in the slot (U); go through the door.

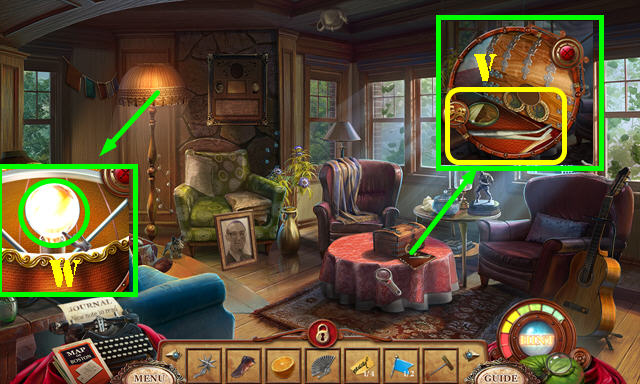
- Take the PHOTO LENS and TWEEZERS. Open the book (V).
- Touch the bulb; take the LIGHT BULB with the GLOVES (W).
- Return to the Artist’s House.

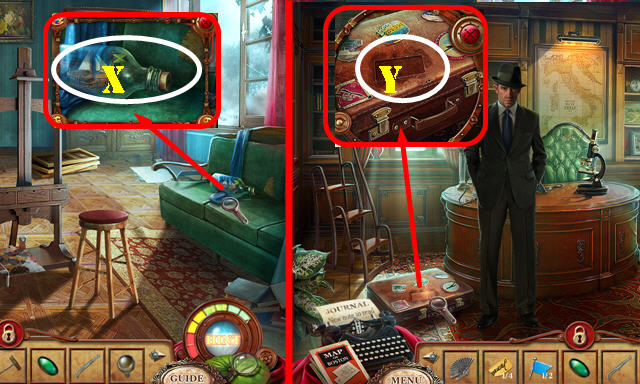
- Remove the cork with the CORKSCREW; use the TWEEZERS to get the JAMAICAN FLAG (X).
- Return to the Detective’s Office.
- Place the JAMAICAN FLAG on the suitcase to activate a HOP (Y).

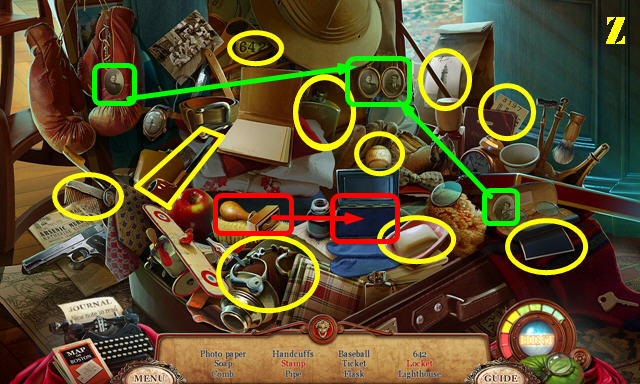
- Play the HOP.
- You receive the PHOTO PAPER (Z).
- Return to the Gift Shop.

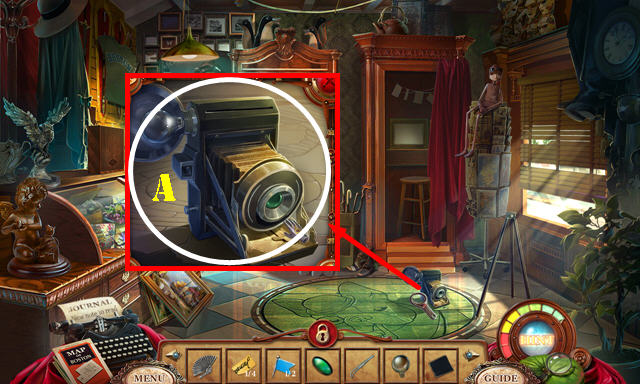

- Place the LIGHT BULB, PHOTO LENS, and PHOTO PAPER in the camera; take the CAMERA (A).
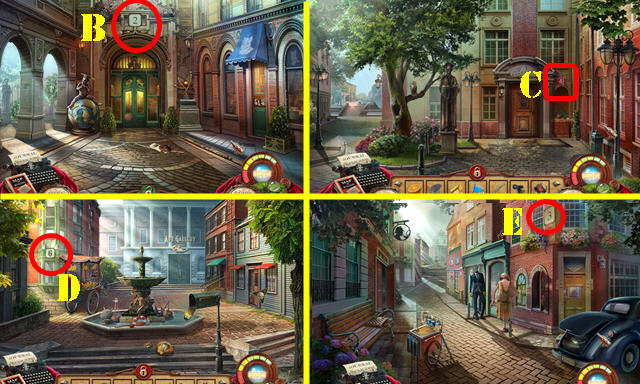
- Go to the Science Block. Use the CAMERA on the number 2 to get the UNDEVELOPED FILM 1/4 (B).
- Go to the College. Use the CAMERA on the number 4 to get the UNDEVELOPED FILM 2/4 (C).
- Return to the Fountain. Use the CAMERA on the number 6 to get the UNDEVELOPED FILM 3/4 (D).
- Return to the Art Block. Use the CAMERA on the number 3 to get the UNDEVELOPED FILM 4/4 (E).
- Return to the Gift Shop.

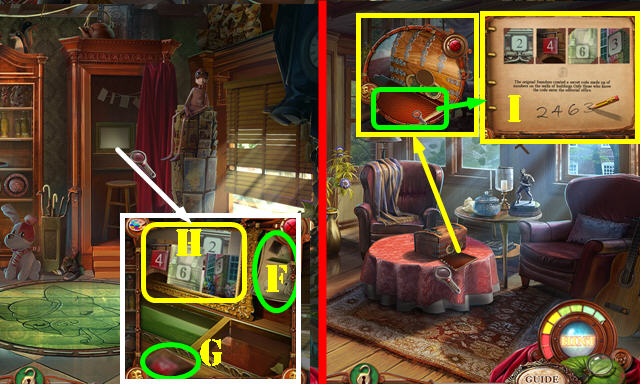
- Look at the clue (F).
- Put down the 4 UNDEVELOPED FILMS (G) and use the TWEEZERS on them; take the PHOTOS (H).
- Return to the Fraternity.
- Open the journal and flip the page. Place the PHOTOS on the page; touch the page and take the CODE (I).
- Walk down twice.

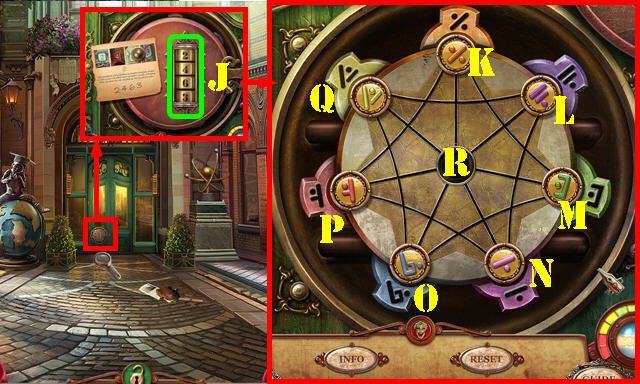
- Place the CODE on the door; enter 2463 on the tumblers to activate a puzzle (J).
- Place the chips in their matching slots.
- Solution: R-P, L-R, Q-L, O-Q, M-O, K-M, R-K, L-R, N-L, P-N, R-P, L-R, Q-L, O-Q, M-O, and R-M.
- Go through the door to access the Editorial Office.

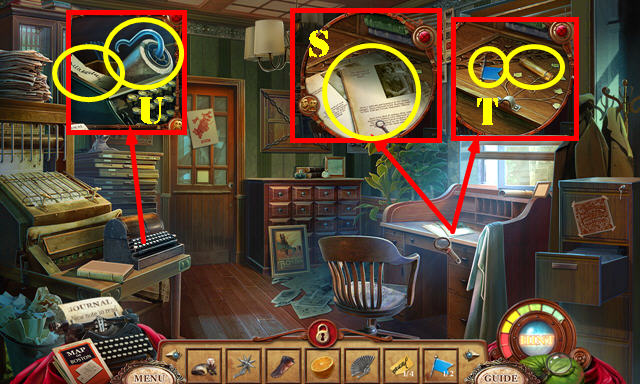
- Read the note (S), then take the PIN 2/2 and the BULLET 6/6 (T).
- Use the PENKNIFE on the typewriter; take the HANDWRITING SAMPLE 2/4 and the REEL (U).
- Return to the Police Station.

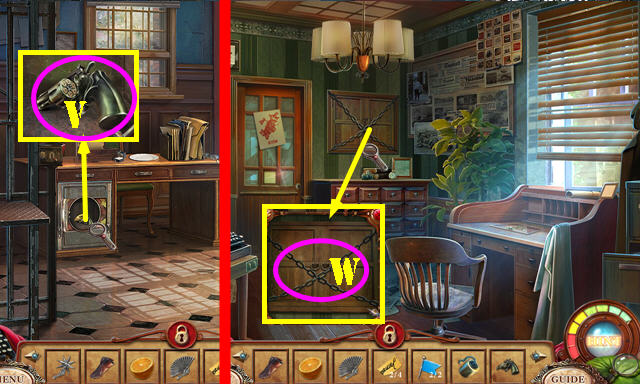
- Place the 6 BULLETS in the revolver; take the REVOLVER WITH BULLETS (V).
- Return to the Editorial Office.
- Use the REVOLVER WITH BULLETS on the chains (W). Open the door and place the 2 PINS on it to activate a puzzle.

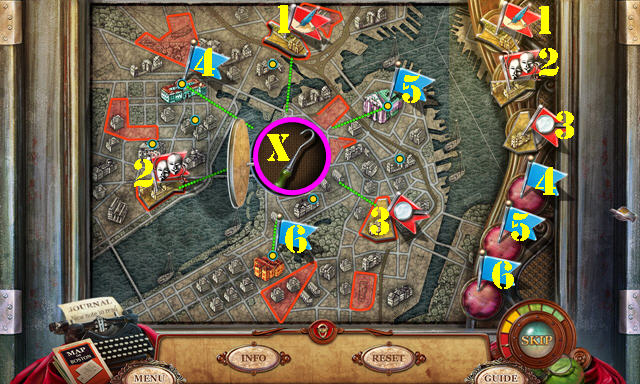
- Place the pins in the right spots.
- Solution (1-6). Take the HOOK (X).

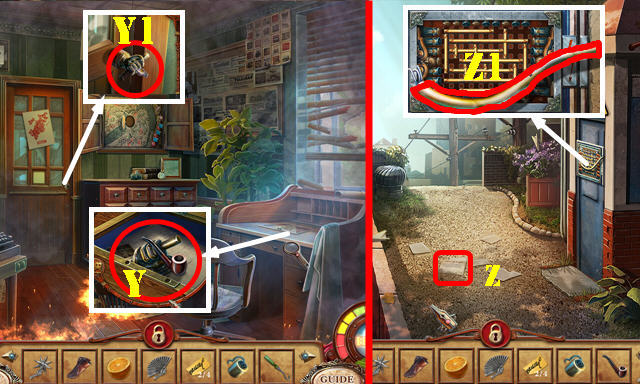
- Use the HOOK on the desk; take the SMOKING PIPE, DOOR HANDLE and Note (Y).
- Use the DOOR HANDLE on the door; go through the door to access the Roof (Y1).
- Take the Note (Z).
- Place the GLOVES on the wires to activate a puzzle (Z1).

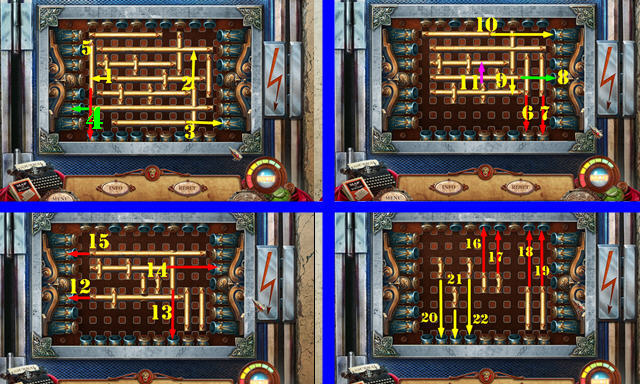
- Remove the metal bars in order (1-22).
- Solving the puzzle activates a HOP.

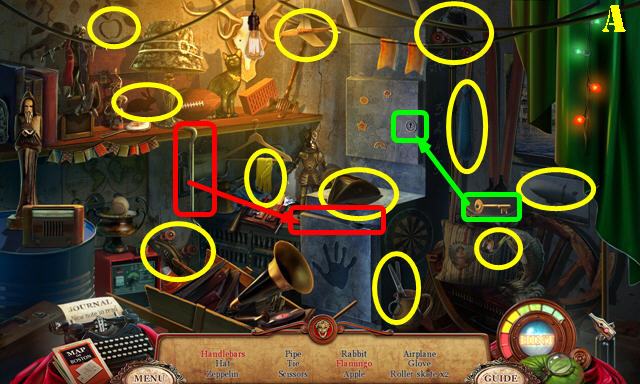

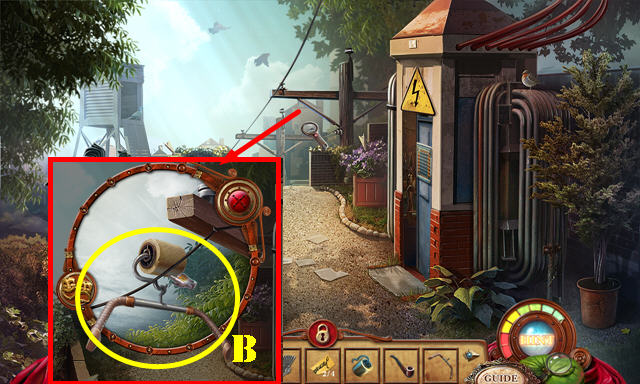
- Play the HOP.
- You receive the HANDLEBARS (A).
- Place the REEL on the wire and then place the HANDLEBAR on the on the reel (B). Push it and then go down to reach the Port Block.
Chapter 6 : Auction House

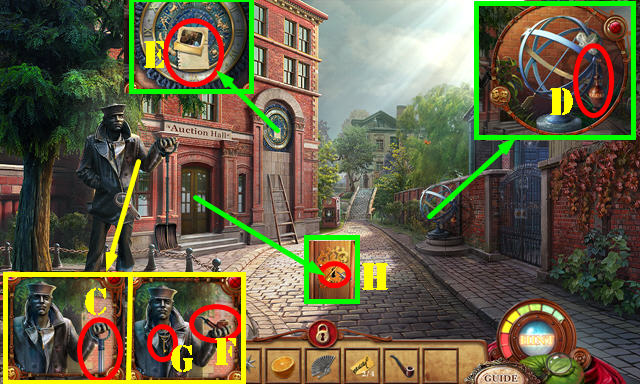
- Take the SHOVEL (C), VASE (D) and the 2 Notes (E).
- Give the SMOKING PIPE to the statue (F); take the AUCTION-HOUSE KEY (G).
- Use the AUCTION-HOUSE KEY in the lock (H); turn the key and enter the Auction House.

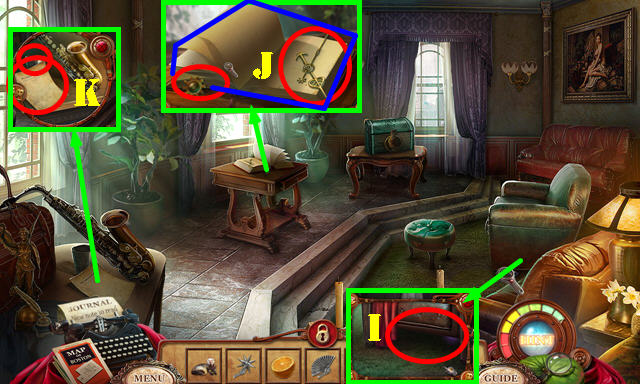
- Use LUCY under the chair to get the SEXTANT KNOB (I).
- Take the CLOCK HANDS and COGWHEEL; look at the book (J).
- Take the Note and GLASS (K).
- Walk down.

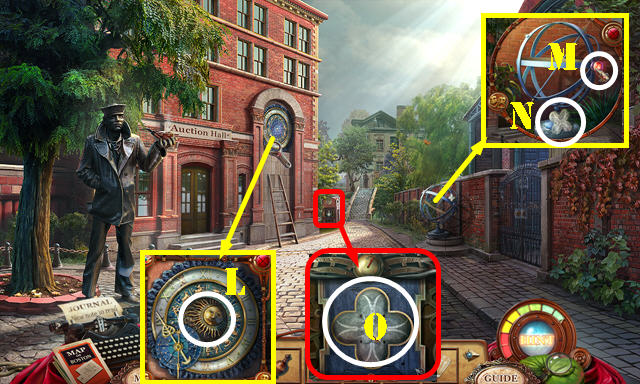
- Place the CLOCK HANDS on the clock; take the SUN (L).
- Place the SEXTANT KNOB in the slot (M); take the BRIDGE KEY (N).
- Place the BRIDGE KEY and then the COGWHEEL on the mechanism to activate a puzzle (O).

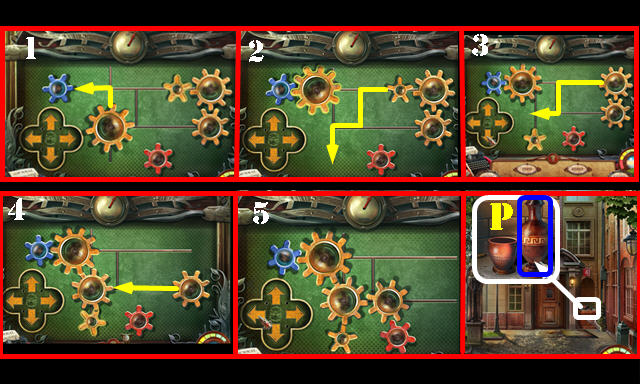
- Position the gears as shown (1-5) Select the gear first and then select the arrows. Position 5 shows the final image.
- Cross the bridge to arrive at the College.
- Put down the VASE to activate a HOP (P).

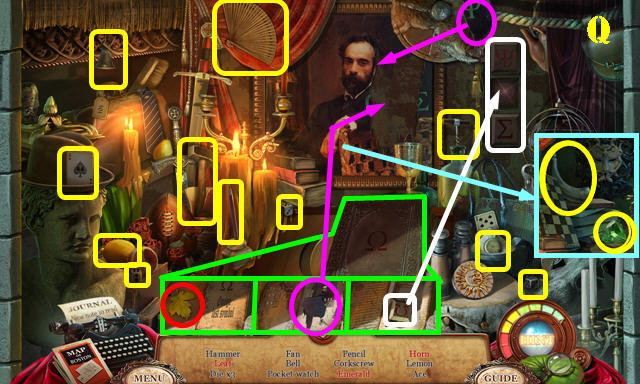
- Play the HOP.
- Move the curtain in the upper right.
- Open the book (green) and flip the pages. Place the items in the areas shown.
- Place the Omega sign in the slot (white) and then press the blocks in the order that appears on the completed picture (purple).
- You receive the HAMMER (Q).
- Return to Port Block.

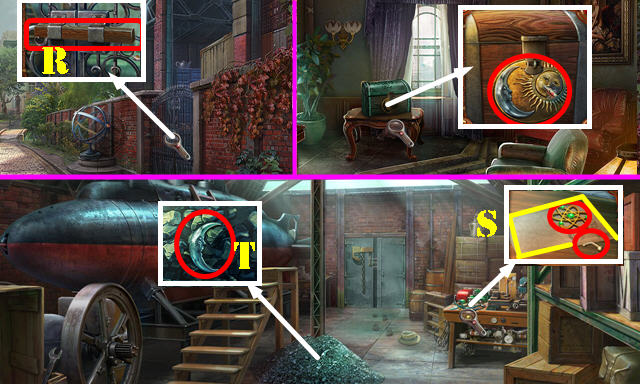
- Use the HAMMER on the block (R) and then go through the gate.
- Remove the debris; take the ATOMIC SYMBOL and PURSE CLASP (S).
- Use the SHOVEL on the coal; take the MOON (T).
- Return to the Auction House.
- Place the SUN and MOON in the slots and open the latch to activate a HOP (U).

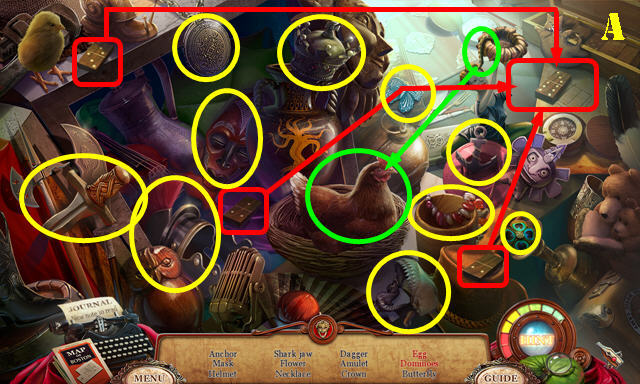
- Play the HOP.
- You receive the ANCHOR SIGN (A).
- Return to the Warehouse.

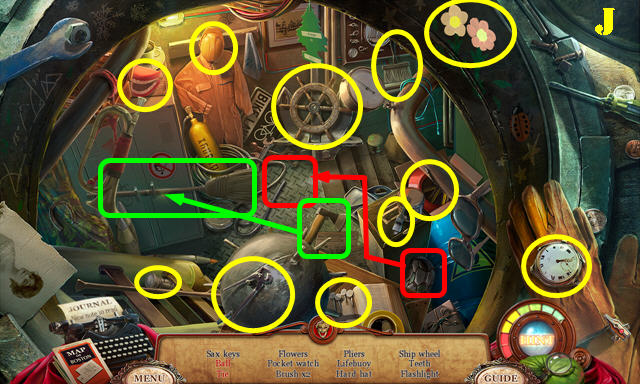
- Remove the broken anchor and place the ANCHOR SIGN on the chain (B).
- Go down to the Cellar.

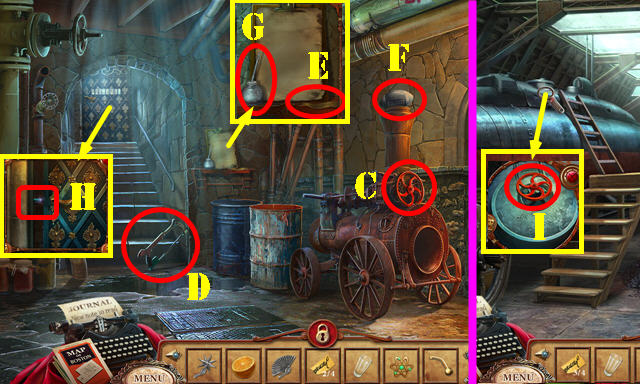
- Take the VALVE (C), HANDSAW (D), HANDWRITING SAMPLE 3/4 (E), RUGBY BALL (F) and OILER (G).
- Cut the bar with the HANDSAW; open the door and go through it (H).
- Place the VALVE on the door (I). Turn it to activate a HOP.


- Play the HOP.
- You receive the SAX KEYS (J).
- Return to the Auction House.

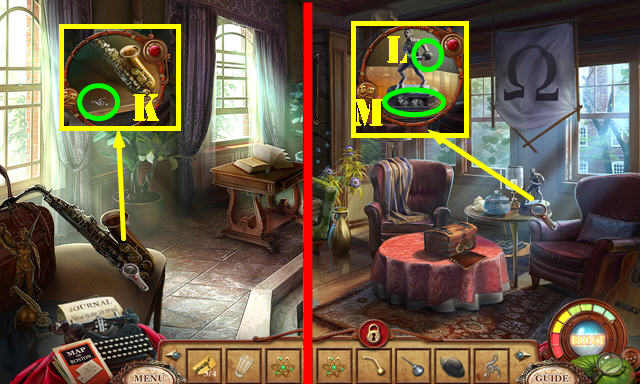
- Place the SAX KEYS on the sax; take the MUSICIAN’S MUSE (K).
- Return to the Fraternity.
- Place the RUGBY BALL on the statue (L); take the SCULPTOR’S MUSE (M).
- Walk down twice.

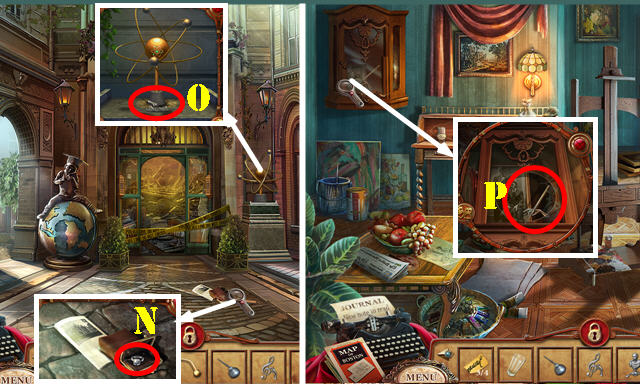
- Place the PURSE CLASP on the purse; take the DIAMOND RING (N).
- Place the ATOMIC SYMBOL on the model; take the SCIENTIST’S MUSE (O).
- Return to the Artist’s Studio.
- Use the DIAMOND RING on the glass; take the ARTIST’S MUSE (P).
- Return to the Detective’s Office.
Chapter 7: The Finale

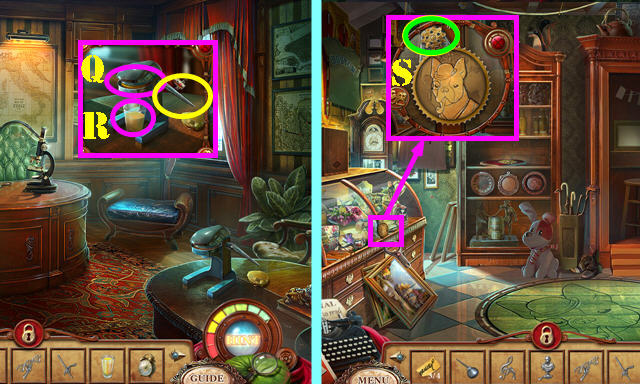
- Place the ORANGE in the juicer (Q) and put down the GLASS. Press the handle (yellow) and take the ORANGE JUICE (R).
- Return to the Gift Shop.
- Use the OILER on the gear to activate a HOP (S).

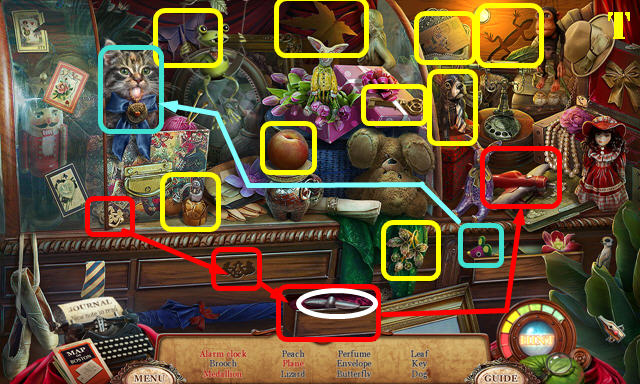
- Play the HOP.
- You receive the ALARM CLOCK (T).
- Return to the College.

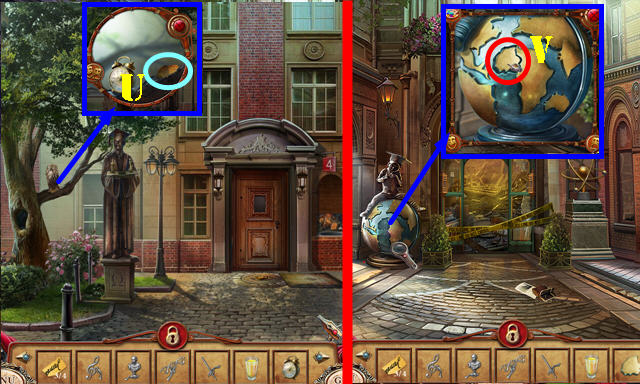
- Use the ALARM CLOCK on the owl; take the CONTINENT PIECE (U).
- Walk down.
- Place the CONTINENT PIECE on the globe to activate a HOP (V).

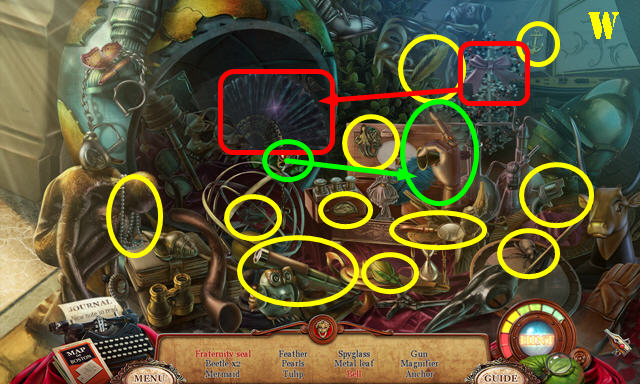
- Play the HOP.
- You receive the GREEK SYMBOL (W).
- Return to the Fraternity.

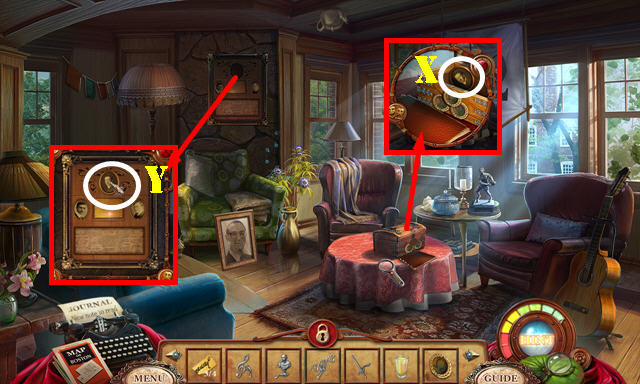
- Put the GREEK SYMBOL in the slot; take the PHOTO OF FRATERNITY FOUNDER (X).
- Place the PHOTO OF FRATERNITY FOUNDER in the slot to activate a HOP (Y).

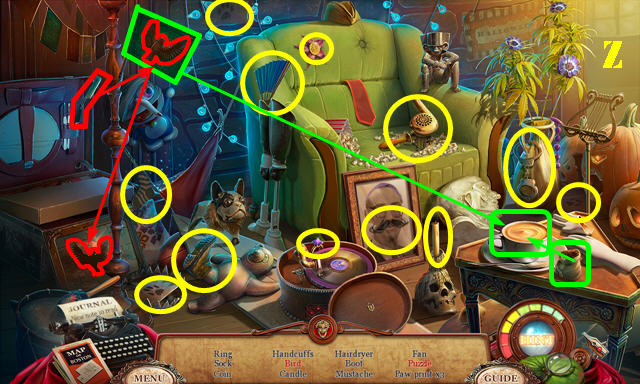
- Play the HOP.
- You receive the RHOMBUS RING (Z).
- Return to Corey’s House.

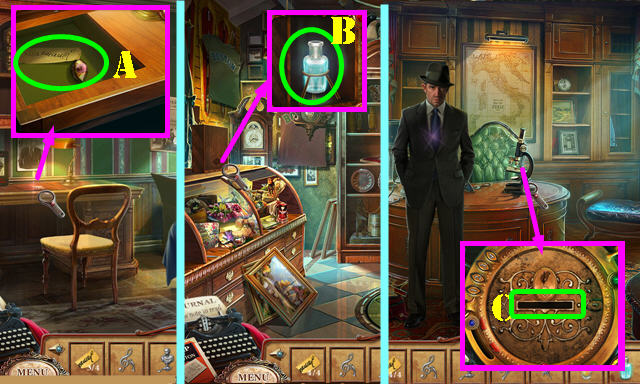
- Place the RHOMBUS RING in the slot; take the GIFT-BOX KEY and the HANDWRITING SAMPLE 4/4 (A).
- Return to the Gift Shop.
- Place the GIFT-BOX KEY in the slot; take the GLOWING LIQUID (B).
- Return to the Detective’s Office.
- Place the 4 HANDWRITING SAMPLES in the slot to activate a puzzle (C).

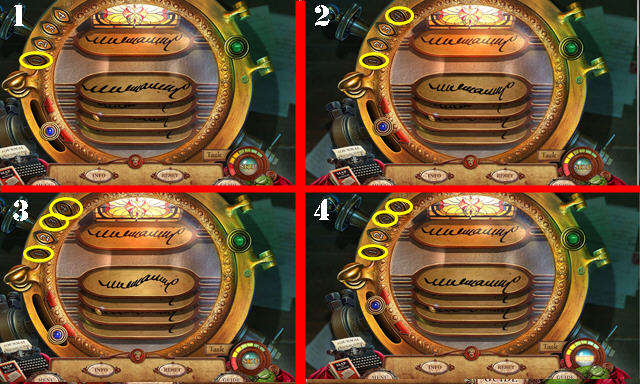
- Adjust the knob until each sample matches the top example (1-4).
- Take the WRITER’S MUSE.
- Return to the Cellar.

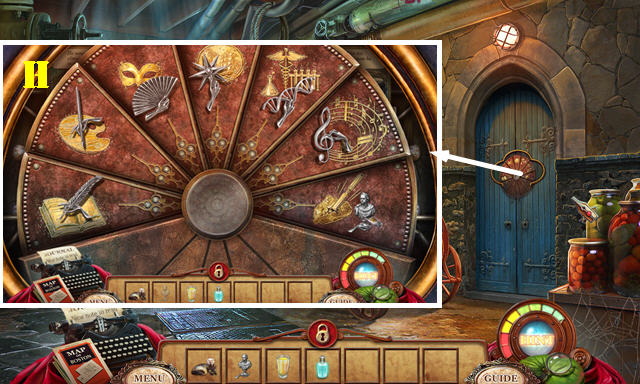

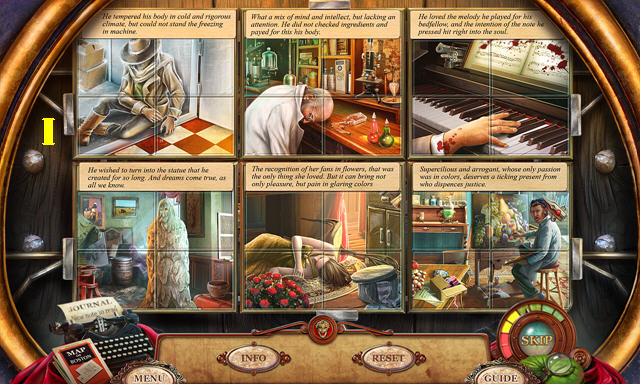

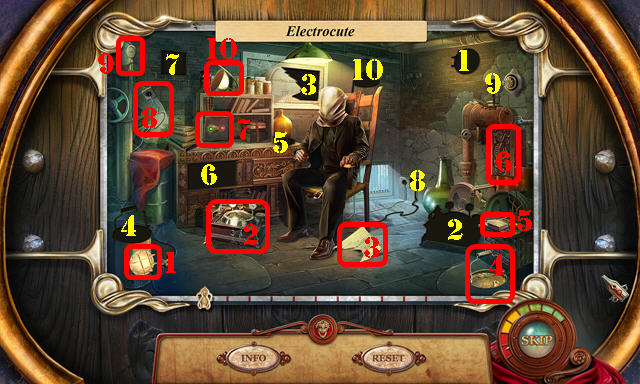
- From left to right, place the items in this order: WRITER’S MUSE, ARTIST’S MUSE, ACTOR’S MUSE, EXPLORER’S MUSE, SCIENTIST’S MUSE, MUSICIAN’S MUSE, and SCULPTOR’S MUSE (H) to activate a puzzle.
- Swap the images as shown (I).
- Drag all the items marked in red into the areas numbered in yellow (1-10).
- Enter the Execution Site.

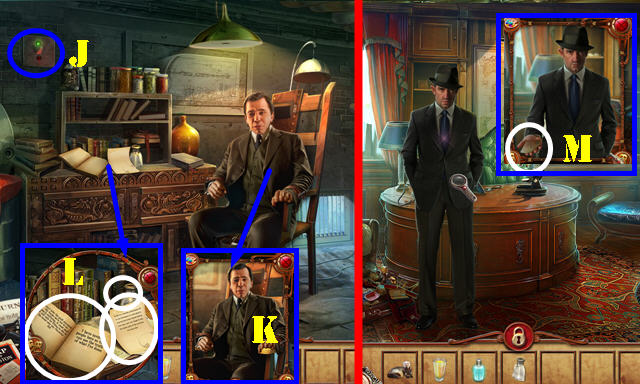
- Turn on the switch (J).
- Talk to Russell (K).
- Take the Note and the CLEAR LIQUID, then look at the Book (L).
- Return to the Detective’s Office.
- Talk to the Detective; take the RECIPE (M).
- Return to the Artist’s House.

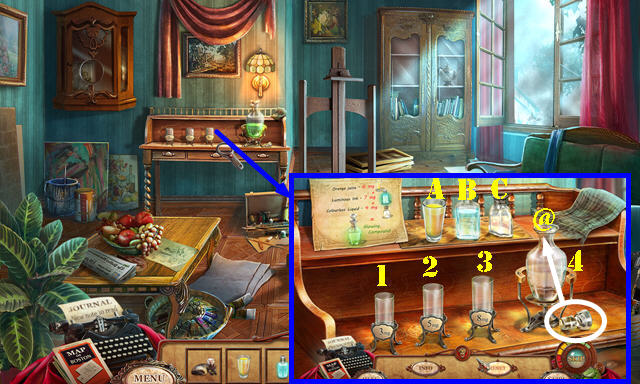
- Put down the ORANGE JUICE, GLOWING LIQUID, RECIPE and CLEAR LIQUID.
- Solution One: A-3, 3-2, A-1, 1-3, 3-4.
- Solution Two: B-2, 2-3, B-2, 2-1, 2-3, 3-4.
- Solution Three: C-2, 2-1, 2-3, 1-C, C-2, 2-1, 2-3, 3-4.
- Place the stopper on the flask, and take the GLOWING COMPOUND (@).
- Return to the Cellar.

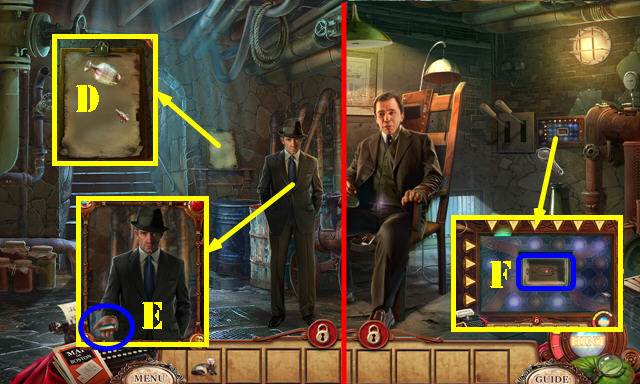

- Place the GLOWING COMPOUND on the paper (D).
- Talk to the Detective and take the TRANSISTOR (E).
- Return to the Execution Site.
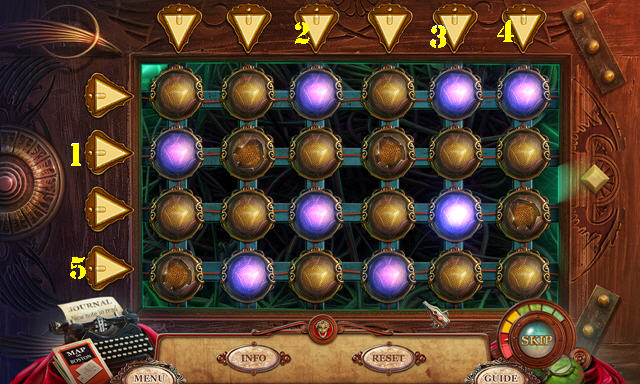
- Place the TRANSISTOR in the slot to activate a puzzle (F).
- Turn off all the lamps by selecting them in this order: (1-5).
- Congratulations, you have completed Punished Talents: Seven Muses!




 Vampire Legends: The Untold Story of Elizabeth Bathory Walkthrough, Guide, & Tips
 Order of the Light: The Deathly Artisan Walkthrough, Guide, & Tips
 Ghost Encounters: Deadwood Walkthrough, Guide, & Tips
 Sea of Lies: Tide of Treachery Walkthrough, Guide, & Tips
 Settlement: Colossus Walkthrough, Guide, & Tips