Break the Curse: The Crimson Gems Walkthrough, Guide, & Tips
Break the Curse: The Crimson Gems Walkthrough

Welcome to the Break the Curse: The Crimson Gems Walkthrough
Save a loving couple from the clutches of a powerful alchemist in Break the Curse: The Crimson Gems!
Whether you use this document as a reference when things get difficult or as a road map to get you from beginning to end, we’re pretty sure you’ll find what you’re looking for here.
This document contains a complete Break the Curse: The Crimson Gems game walkthrough featuring annotated screenshots from actual gameplay!
We hope you find this information useful as you play your way through the game. Use the walkthrough menu below to quickly jump to whatever stage of the game you need help with.
Remember to visit the Big Fish Games Forums if you find you need more help. Have fun!
This walkthrough was created by Rebekah, and is protected under US Copyright laws. Any unauthorized use, including re-publication in whole or in part, without permission, is strictly prohibited.
General Tips


- This is the official guide for Break the Curse: The Crimson Gems.
- Use the Hint Button (A) if you need additional help.
- Your Inventory Bar (B) will hold items until they are needed.
- Click on the Menu (C) button to exit, pause, or resume the game. You can also use this button adjust your options (sound, music, and screen size).
- Use your Journal (D) for additional help with puzzles and tasks.
- See your Task bar (E) for additional help.
- You will not need to follow the exact path of this guide; however, some actions are required before others can be performed.
Chapter 1: The Gate
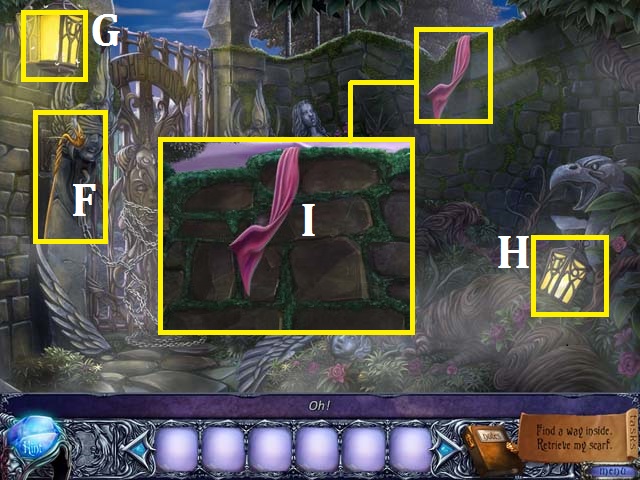
- Collect the LAMPLIGHTER (F).
- Light the LAMPLIGHTER with the burning lamp (G) to receive the LAMPLIGHTER (LIT).
- Use the LAMPLIGHTER (LIT) to light the lamp (H).
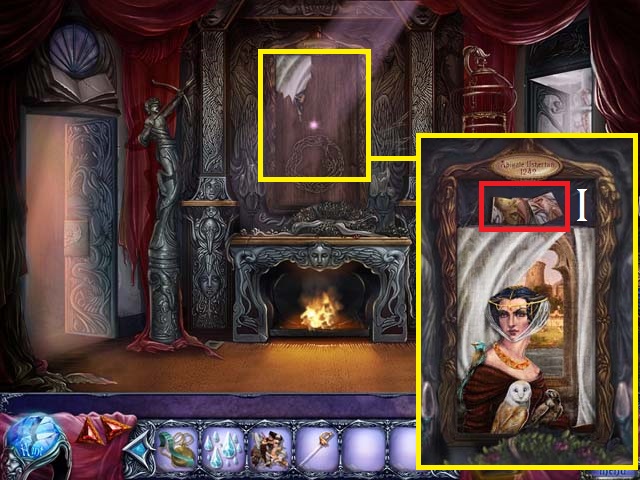
- Zoom into the wall; try to grab the scarf (I).
- Enter the Graveyard.
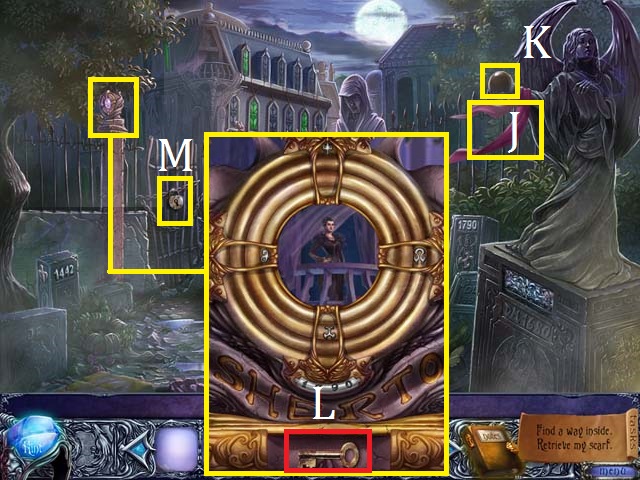
- Try to grab the scarf (J) again.
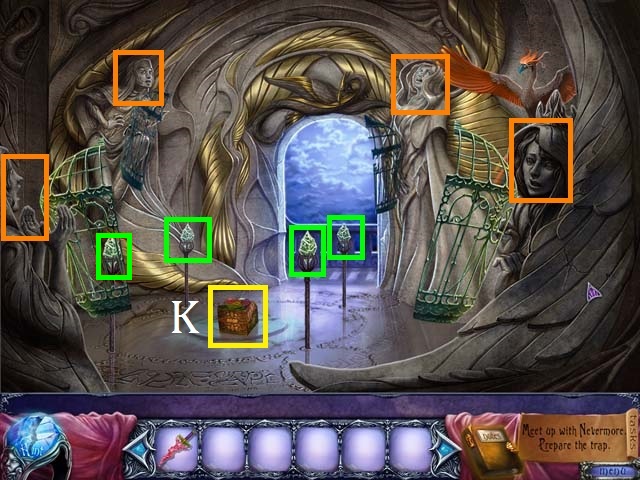
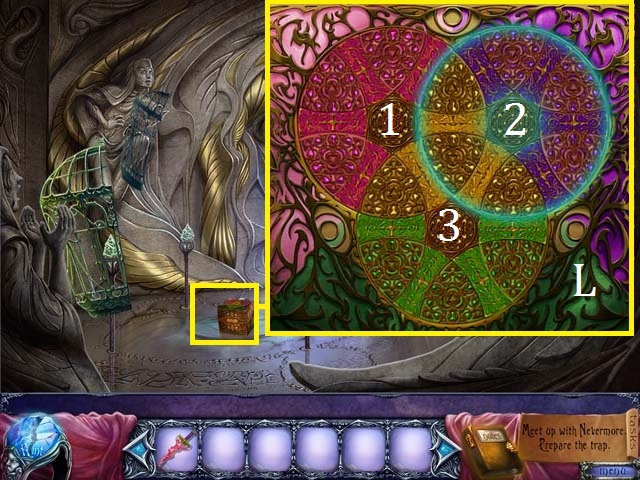
- Collect the first GLOBE (K).
- Zoom into the puzzle; set the rings as shown in the screenshot. The clues can be found on the gravestones. Begin with the outer ring first and move towards the middle. Collect the PADLOCK KEY (L).
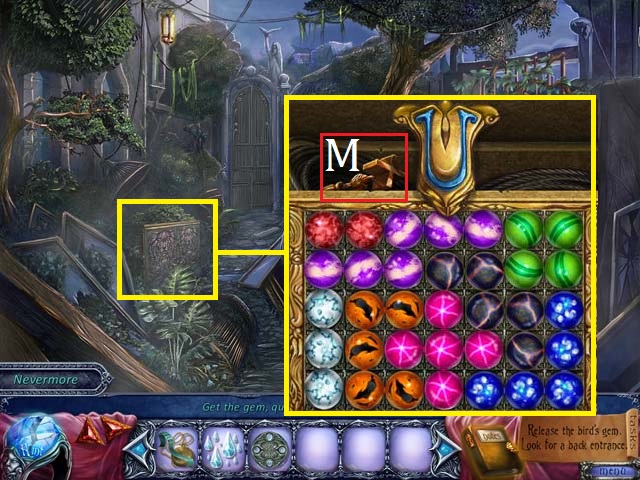
- Unlock the gate (M) with the PADLOCK KEY and enter the Yard.
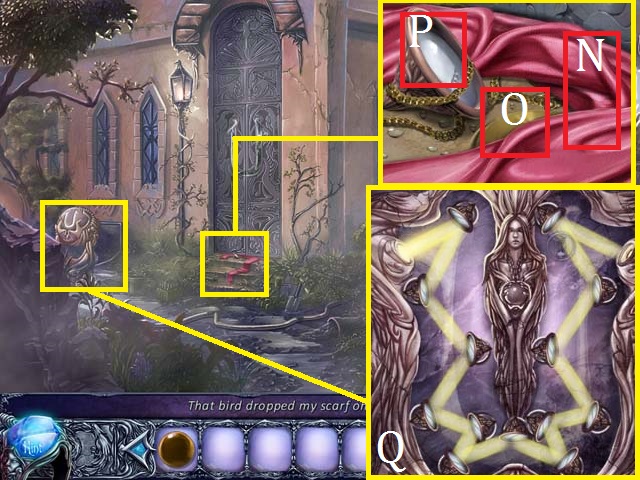
- Zoom into the steps; collect the scarf (N), HARRY’S POCKETWATCH (O), and the MIRROR (P).
- Zoom into the lamp; place the MIRROR in the puzzle. Arrange the mirrors as shown in the screenshot (Q).
- Enter the House.
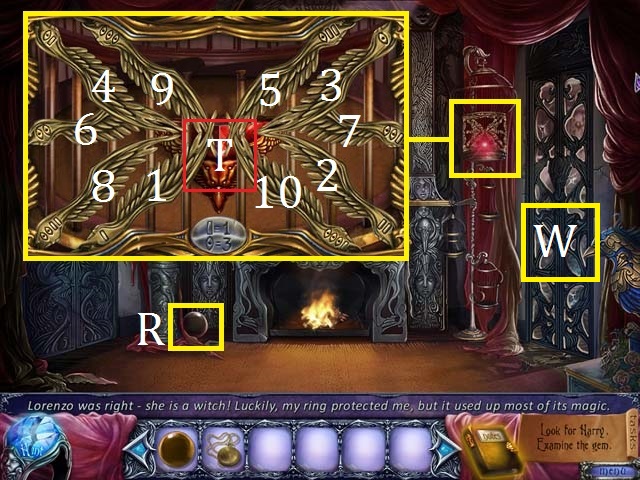
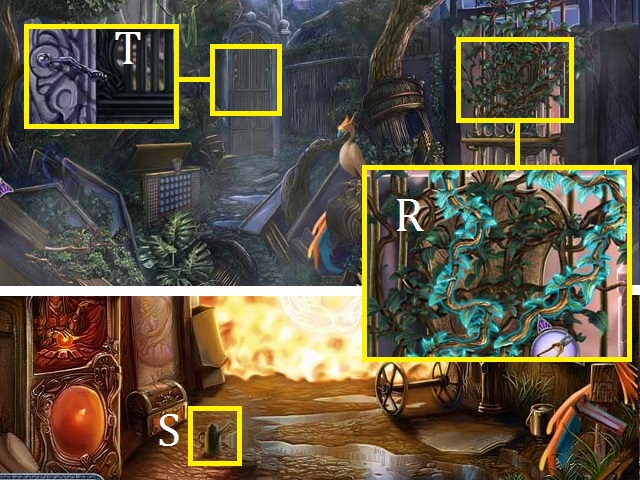
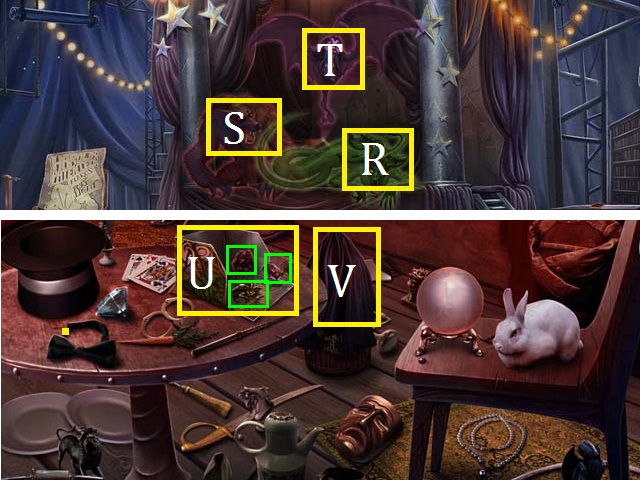
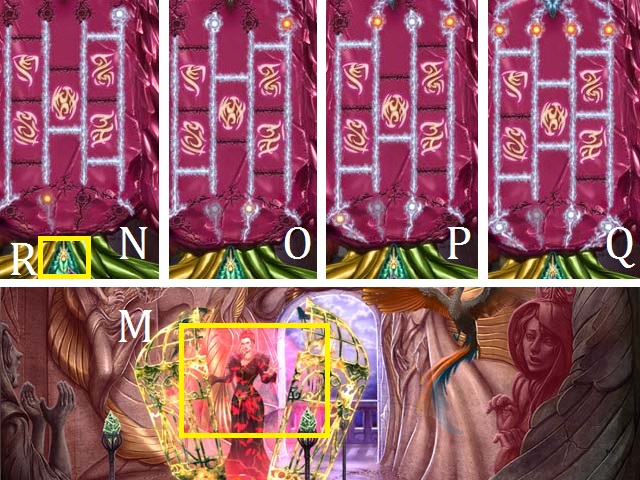
- Collect the second GLOBE (R).
- Zoom into the cage; remove the wings in order of 1-10 and collect the first Crimson Gem (T).
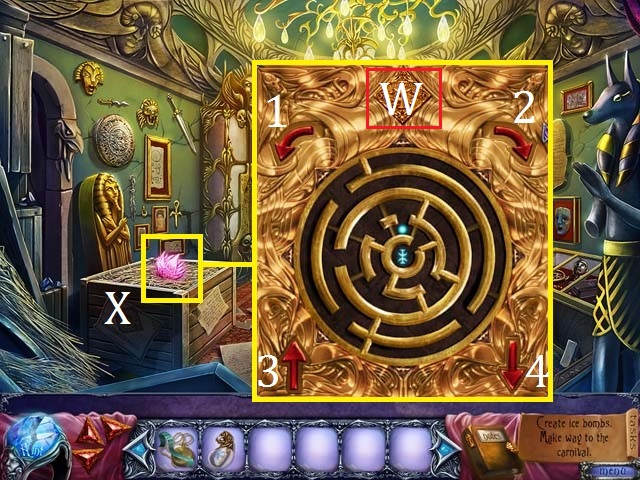
- Zoom into the door (W) to open it.
- Return to the Graveyard.
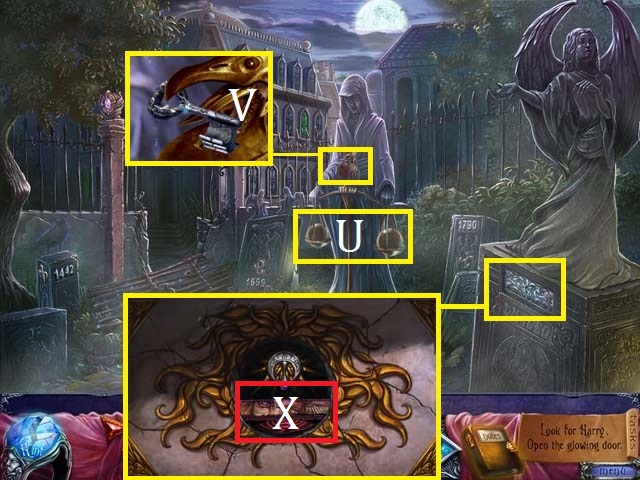
- Place both GLOBES on the scale (U).
- Zoom into the bird; collect the FLEUR-DE-LIS KEY (V).
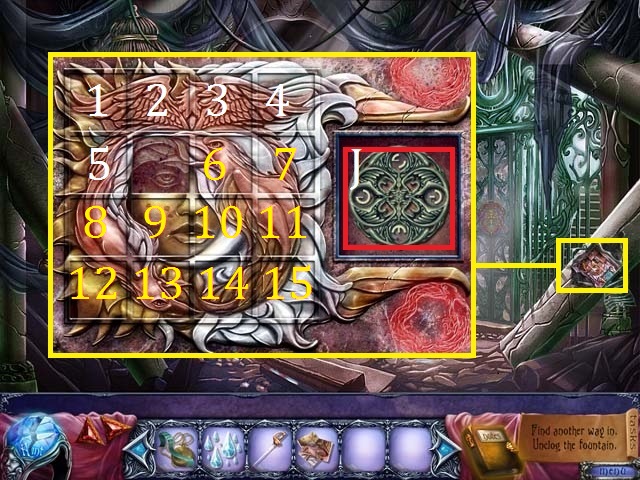
- Zoom into the statue; use the FLEUR-DE-LIS KEY to open the puzzle. Arrange the pieces as shown in the screenshot. Collect the METAL STRIP (X).
- Return to the House. Exit out to the Fountain.
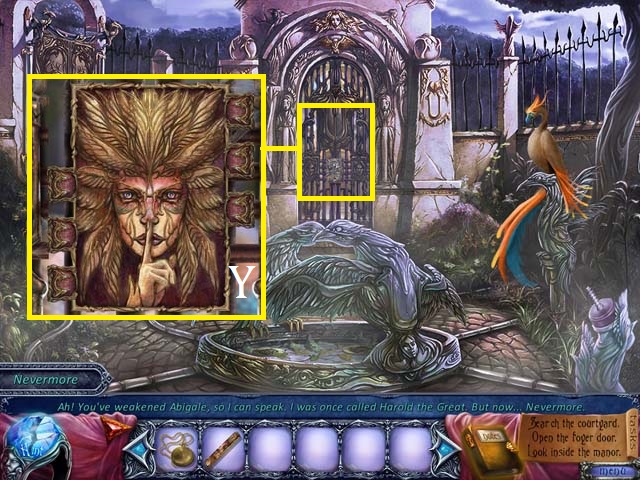
- Zoom into the grate; place the METAL STRIP in the puzzle and arrange the picture as it is shown in the screenshot (Y).
- Enter the Crypt.
- Collect the TONGS (Z) and the WRENCH (A).
- Zoom into the ground; collect the ribbon. It will combine with the WATCH in your inventory and become the PERFORMER’S BELONGINGS..
- Collect all ten SAPPHIRE TEARS (pink).
- Return to the Fountain.

- Zoom into the grass; use the WRENCH to collect the six valves (orange) and receive the VALVE.
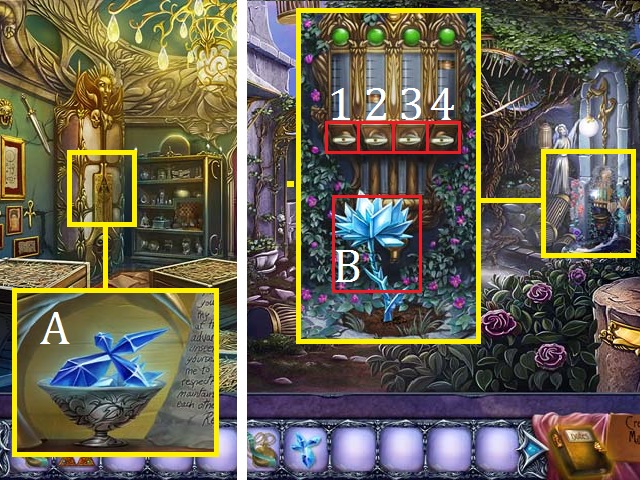
- Zoom into the stand; place the VALVE on the screw (B).
- Return to the House.
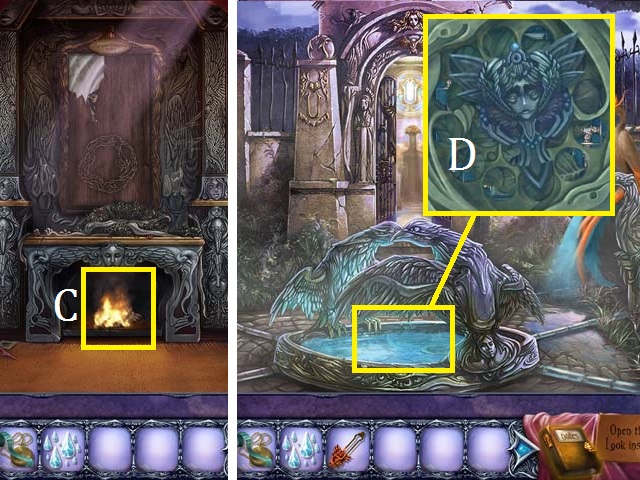
- Use the TONGS to remove the RED-HOT MEDALLION from the fireplace (C).
- Exit back out to the Fountain.
- Zoom into the fountain; remove the debris and place the RED-HOT MEDALLION in the water. Collect the MEDALLION (D).
- Return to the House.
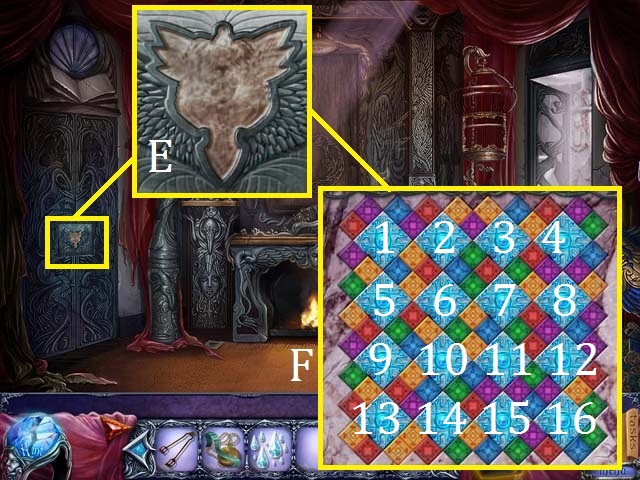
- Zoom into the door; place the MEDALLION in the slot (E).
- Swap 2 and 15, 3 and 14, 4 and 13, 5 and 12, 7 and 10, 8 and 9, 11 and 16. Rotate each square until they are lit as shown in the screenshot (F).
- Enter the Collapsed Hallway.
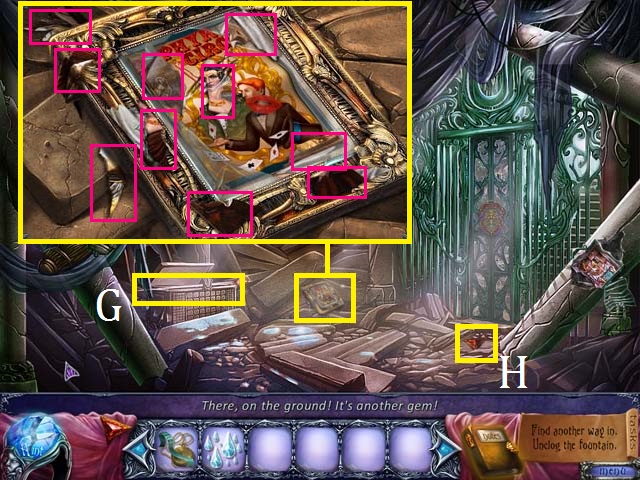
- Zoom into the poster; collect all ten PAINTING SCRAPS (pink).
- Collect the RAPIER (G) and the second Crimson Gem (H).
- Exit back one scene to the House.
- Zoom into the painting; place the PAINTING SCRAPS in the frame and arrange them as shown in the screenshot.
- Collect the STONE TILES (I).
- Return to the Collapsed Hallway.
- Zoom into the pillar; place the STONE TILES in the puzzle.
- Select the tiles in the following order: 8, 15, 9, 1, 6, 9, 1, 6, 9, 8. 15, 1, 6, 9, 8, 15, 5, 2, 1, 5. 13, 11, 14, 3, 10, 12, 11, 14, 3, 10. 12, 11, 14, 7, 4, 3, 10, 15, 6, 5. 13, 6, 15, 10, 6, 13, 5, 15, 8, 9. 15, 9, 15, 8, 9, 10, 12, 15, 10, 12. 14, 11, 15, 10, 8, 9, 12, 14, 10, 8. 9, 12, 14, 9, 8, 10, 9, 8, 12, 14. 8, 13, 5, 8, 13, 12, 14, 13, 12, 9. 10, 14, 12, 8, 5.
- Collect the ORNAMENTED DISK (J).
- Return to the Fountain.
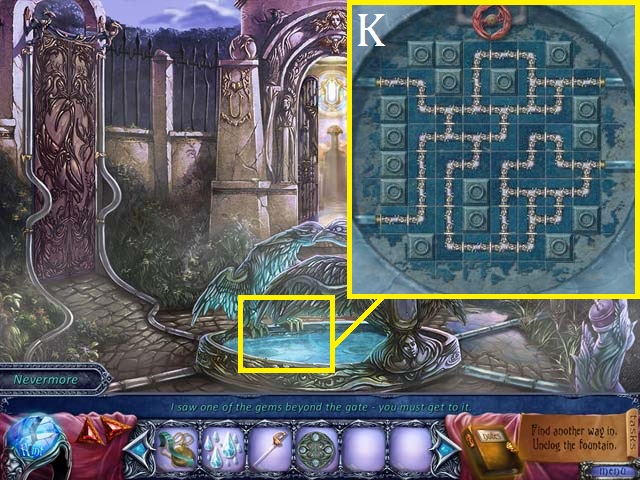
- Zoom into the fountain; remove the grate with the RAPIER. Remove the leaves and then arrange the pipes as shown in the screenshot (K).
- Enter the Backyard.
Chapter 2: The Backyard
- Zoom into the box; place the SAPPHIRE TEARS in the lid to open the box.
- Use the screenshot for a winning solution. Collect the CROSS-SHAPED KEY (M).
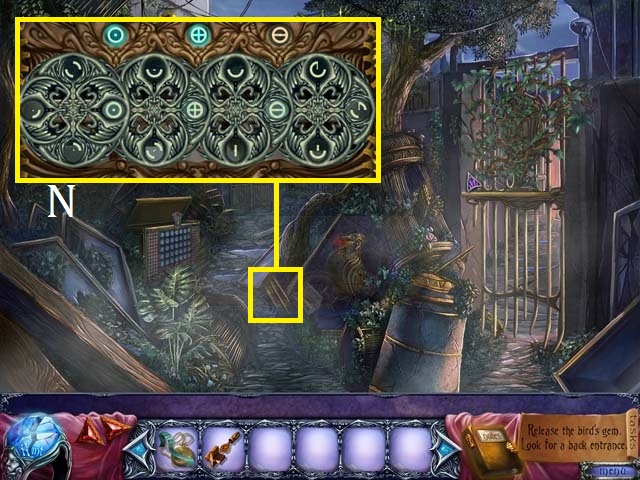
- Zoom into the little box; place the ORNAMENTED DISK in the puzzle.
- Set the disks as shown in the screenshot (N) by starting with the far left disk and working your way to the far right disk.
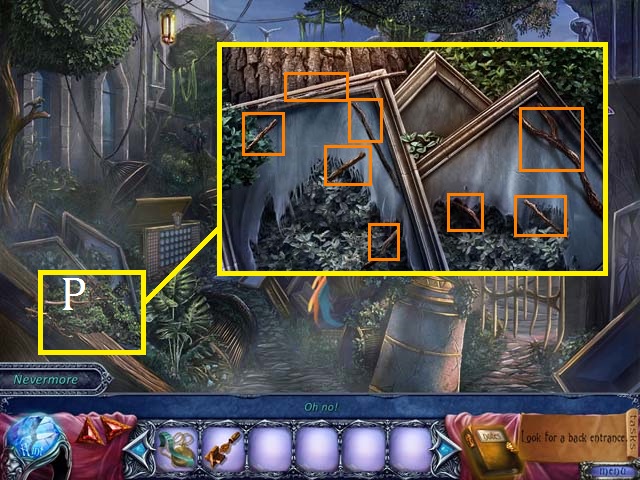
- Zoom into the fallen branch (P); remove the two canvas pieces to reveal two branches. Collect all eight branches (orange) to receive the STICK.
- Return to the Crypt.
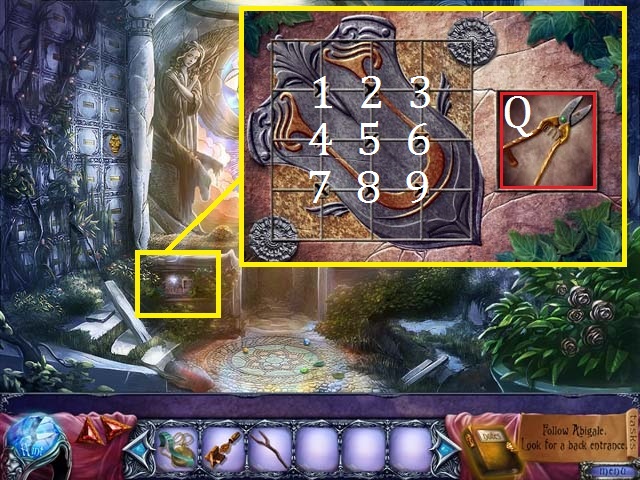
- Zoom into the panel; use the CROSS-SHAPED KEY to turn the tiles in the following sequence: 9, 7, 7, 5, 5, 8, 9, 9, 9, 5. 8, 7, 4, 4, 4, 7, 1, 1, 1, 4. 4, 4, 3, 5, 5, 1, 1, 1, 5, 5. 5, 2, 2, 1, 2, 2, 3, 3, 2, 1. 1, 1, 2, 2, 2, 3, 3, 2, 3, 3. 3, 2, 2, 2, 3, 3, and 3..
- Collect the SHEARS (Q).
- Return to the Backyard.
- Zoom into the gate; use the SHEARS to remove the vines. Start with the top vine (R) and work your way down.
- Use the STICK to hold up the gate.
- Move to the Alley.
- Collect the OIL CAN (S).
- Return to the Backyard.
- Zoom into the back gate; use the OIL CAN on the handle (T) and then turn it to open the gate.
- Enter the Garden.
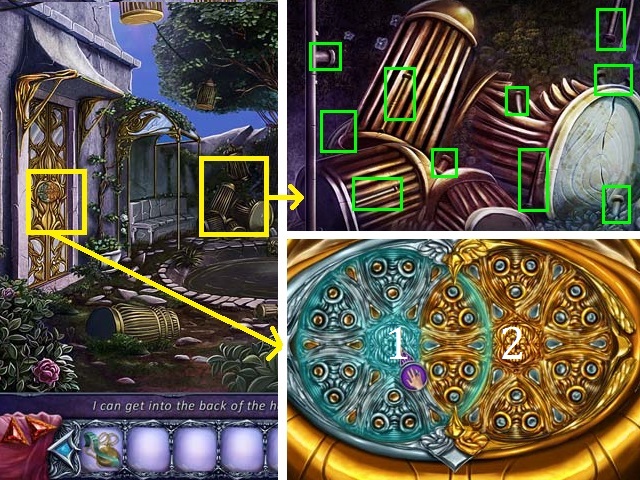
- Zoom into the cages; collect all ten of the METAL PIPES (green).
- Zoom into the door to activate a puzzle.
- Rotate the disks until the correct image is formed. CC = counterclockwise and C = clockwise.
- Follow this sequence to solve the puzzle: 2CC, 1C, 1C, 2C, 1C, 2CC, 1C, 1C, 2C, 1CC, 1CC, 2C, 2C, and 1CC.
- Enter the Trophy Room.
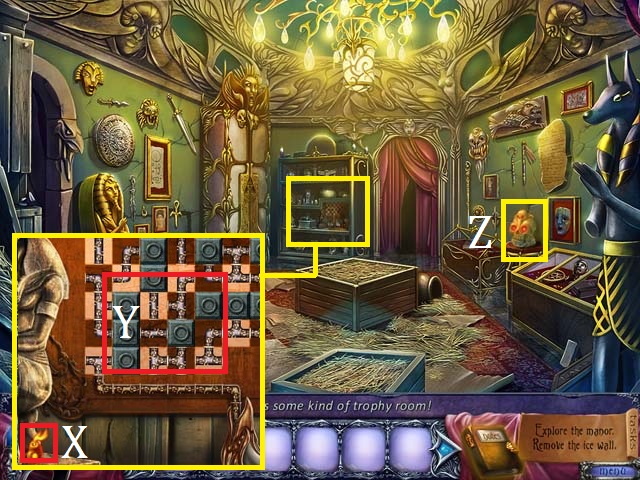
- Zoom into the shelf; collect the FIRE FLOWER SEED (X) and place the METAL PIPES in the puzzle (Y) and then zoom back out.
- Collect the ORNAMENTED SKULL (Z).
- Return to the Garden.
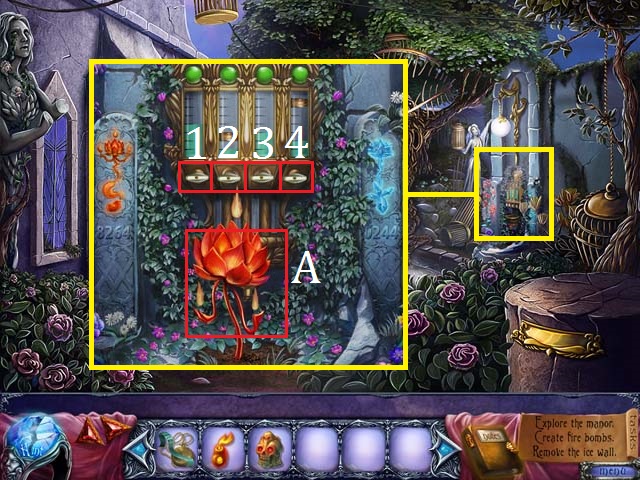
- Zoom into the seed grower; place the FIRE FLOWER SEED in the dirt. Open the valves in the following order: 3, 4, 4, 1.
- Collect the FIRE FLOWER (A).
- Return to the Trophy Room.
- Zoom back into the shelf; place the FIRE FLOWER in the vial (B) and then arrange the pipes as shown in the screenshot. Collect the FIRE POTION (C).
- Use the FIRE POTION on the icy door (D).
- Enter the Grand Foyer.

- Zoom into the base of the statue; place the ORNAMENTED SKULL on the plate (E).
- Collect the first DEFORMED WOODEN MEDALLION (F).
- Zoom into the curtain; use the screenshot for a winning arrangement (G).
- Enter the Phoenix Room..
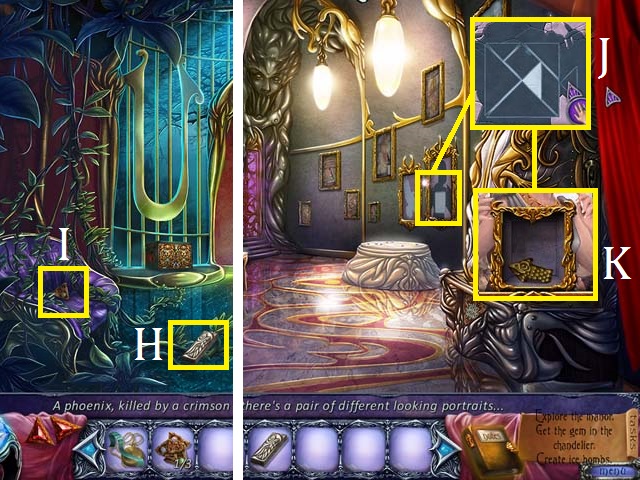
- Collect the RECTANGULAR BLOCK (H) and the second DEFORMED WOODEN MEDALLION (I).
- Exit the room and climb the stairs to the Upstairs Hallway.
- Zoom into the frames; use the screenshot (J) for a winning arrangement. Collect the ARROW-SHAPED BUTTON (K).
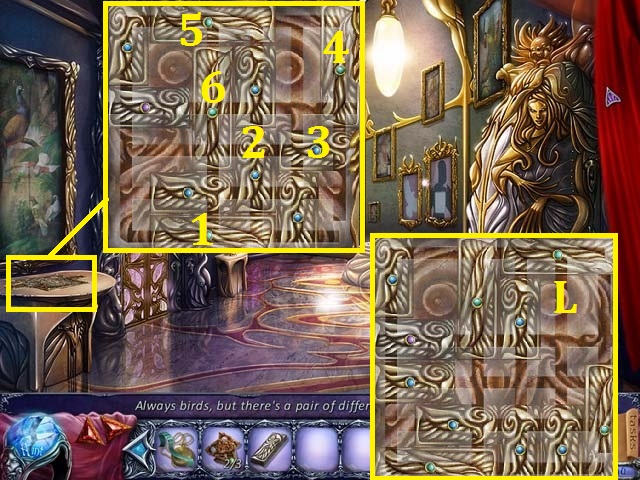
- Zoom into the table; place the RECTANGULAR BLOCK on the puzzle. Move the blocks in the following order: 1 left, 2 down, 3 left, 4 down, 5 right, 6 up and then 3 left again (L).
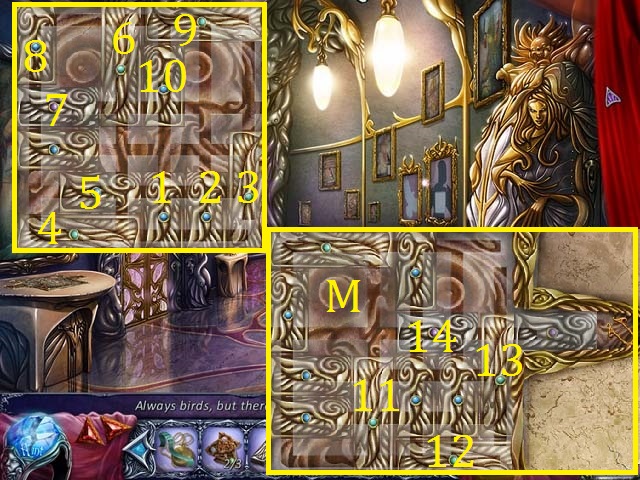
- Continue with 1, 2, and 3 up on the next screenshot. Move 4 all the way to the right, 5 left, 6 down. 7 right, 8 down, 9 left, 10 up, and 7 right as shown in the screenshot (M). Move 11 up, 12 left, 13 down, and then finish with 14 all the way to the right.
- Collect the GLYPH KEY.
- Return downstairs.
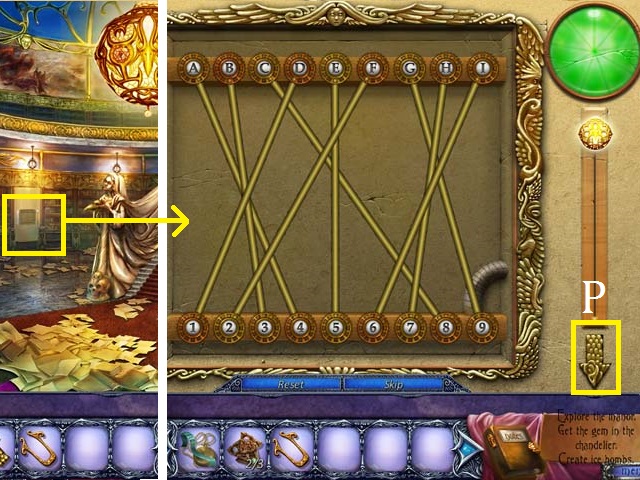
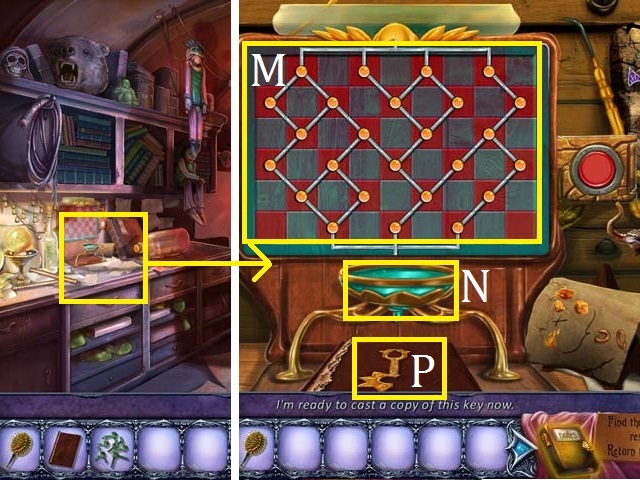
- Zoom into the panel; place the ARROW-SHAPED KEY in the slot (P).
- Connect the letters and numbers as shown in the screenshot. Press the ARROW-SHAPED KEY.
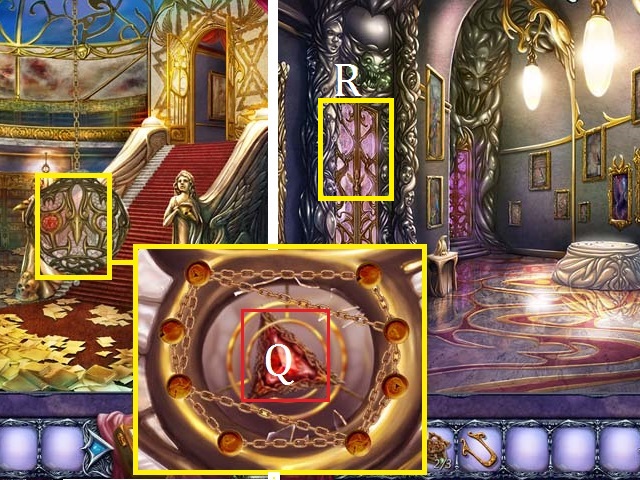
- Zoom into the chandelier; arrange the chains as shown in the screenshot and collect the third Crimson Gem (Q).
- Return to the Upstairs Hallway.
- Zoom into the door (R) to open it.
- Enter the Alchemy Room.
Chapter 3: The Alchemy Room
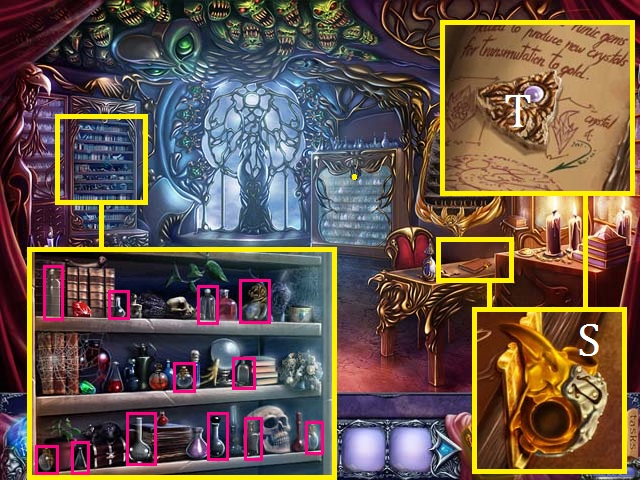
- Zoom into the desk; place the GLYPH KEY in the lock (S). Turn the pages and collect the third DEFORMED WOODEN MEDALLION (T).
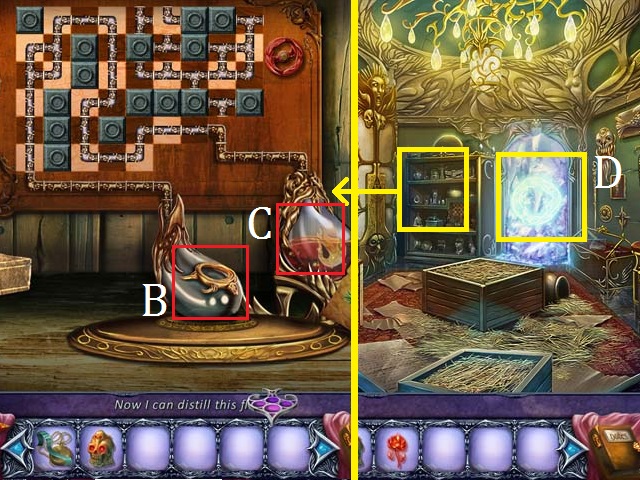
- Zoom into the shelf; collect all twelve empty beakers (pink) to receive the ALCHEMICAL BEAKER.
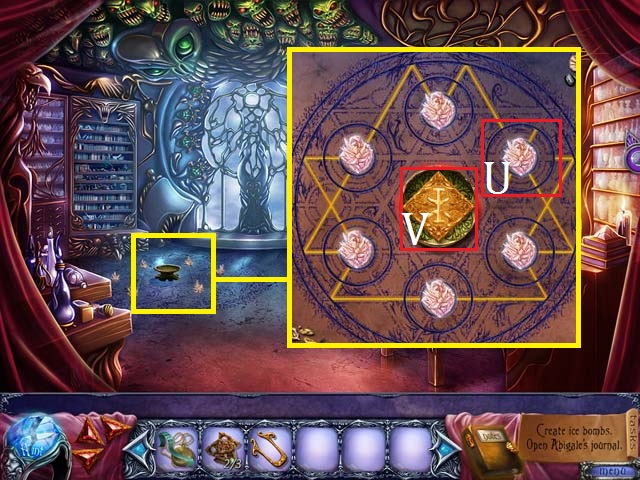
- Zoom into the floor; turn the dial (U) once to solve this puzzle.
- Collect the GOLDEN SIGIL (V) and replace it with the three DEFORMED WOODEN MEDALLIONS.
- Return to the Trophy Room.
- Zoom into the crate; place the GOLDEN SIGIL in the slot (W).
- Use the following sequence to solve this puzzle: 2, 2, 4, 1, 1, 1, 1, 3, 1, 1, 4, 2, 4, 2, 4, 1, 1, 1, 1, 3, 1, 1, 1, 3, 2.
- Collect the RUNIC GEM (X).
- Return to the Alchemy Room.
- Zoom into the case; place the RUNIC GEM at the top of the puzzle (Y).
- Use the sequence 1-8 to solve this puzzle. You will receive the TRANSMUTATION CRYSTALS.
- Zoom into the ground; place the TRANSMUTATION CRYSTALS in the circle.
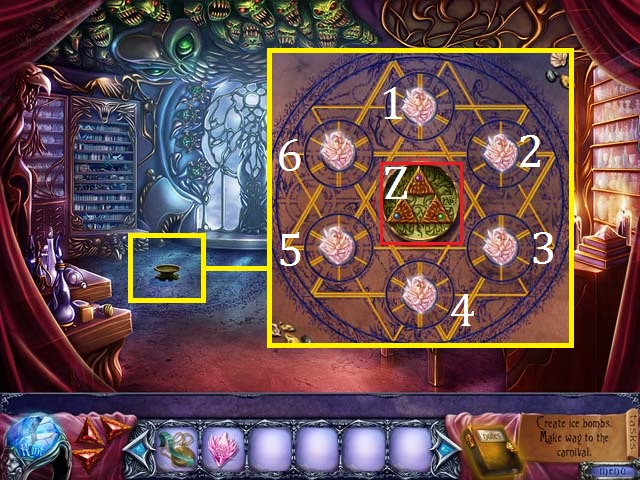
- Set the dials in this order: 1, 2, 6, 5, 4, and 3. Collect the GOLDEN MEDALLION (Z).
- Return to the Trophy Room.
- Zoom into the case; place the GOLDEN MEDALLION in the cutout and then collect the ICE FLOWER SEED (A).
- Return to the Garden.
- Zoom into the seed grower; place the ICE FLOWER SEED in the dirt. Open the valves in the following order: 2, 3, 1, 2, 2, 4, 1, 2. Collect the ICE FLOWER (B).
- Return to the Trophy Room.

- Zoom into the shelf; place the ICE FLOWER and the ALCHEMICAL BEAKER (C).
- Arrange the pipes as shown in the screenshot. Collect the alchemical beaker as the ICE POTION.
- Return to the Alley.
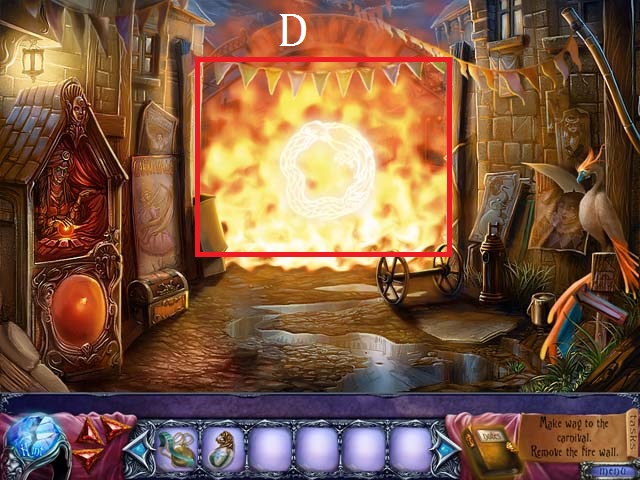
- Use the ICE POTION on the fire (D).
- Enter the Circus.
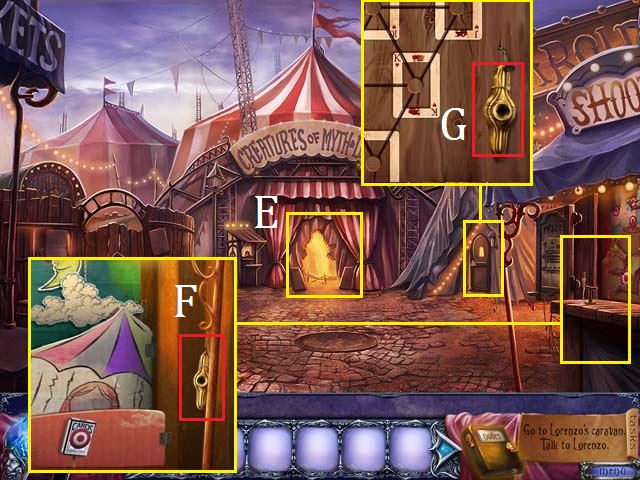
- Try to enter the Curious Animal Tent (E).
- Zoom into the shooting gallery; collect the first GOLDEN DIAL (F) and zoom back out.
- Zoom into the door; collect the second GOLDEN DIAL (G).
- Zoom into the gate; place both GOLDEN DIALS in the puzzle. CC = counterclockwise and C = clockwise.
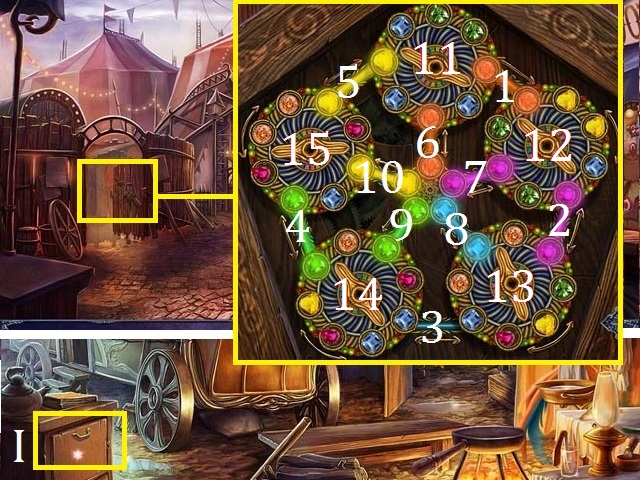
- Use the following sequence to solve this puzzle: 10, 11C, 11C, 11C, 11C, 6, 1, 11CC, 5, 15CC, 11CC, 11CC, 11CC, 11CC, 5, 11CC, 15C, 5, 15CC, 12C, 12C, 1, 2, 12CC, 12CC, 12CC, 7, 12C, 7, 12C, 2, 13C, 8, 14C, 9, 3, 13C, 13C, 3, 13C, 13C, 14CC, 3, 15C, 14C, 14C, 4, 14CC, 14CC, 14CC, 14CC, 4, 15CC, 14CC, 4, and 14C.
- Enter Lorenzo’s Camp.
- Open the drawer (I) to receive the BAG OF PELLETS.
- Enter the Coach.
Chapter 4: Lorenzo’s Camp
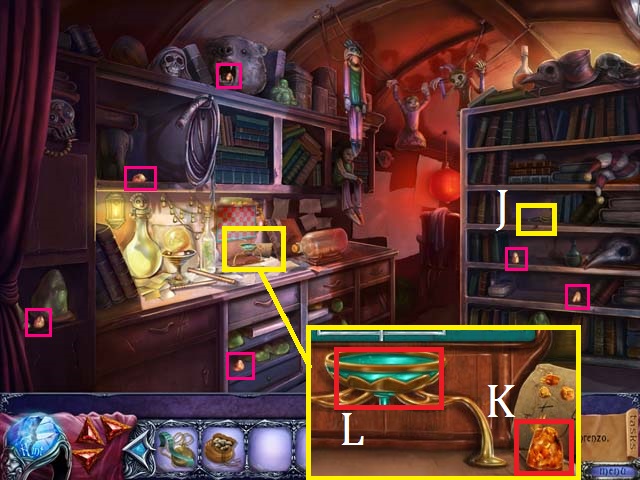
- Collect the HAIRBRUSH (J) and six pieces of AMBER RESIN (pink).
- Zoom into the desk; collect the last piece of AMBER RESIN (K) and place all of the AMBER RESINS in the bowl (L). Zoom back out.
- Enter the back room to speak with Lorenzo.
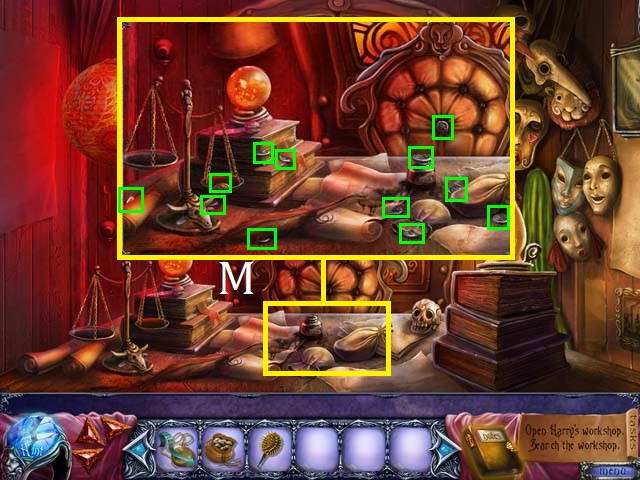
- Zoom into the desk (M); collect all twelve coins (green) to receive the COIN.
- Return to the Alley.
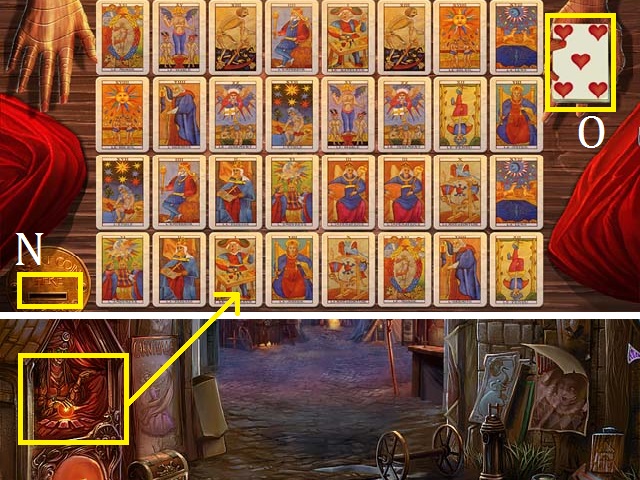
- Zoom into the fortune teller; place the COIN in the slot (N).
- You can use the screenshot as a key to finish this puzzle. Collect the DECK OF CARDS (O).
- Return to the Circus.
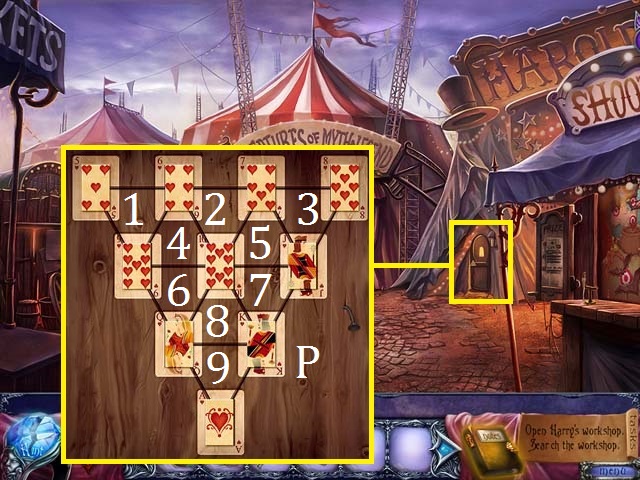
- Zoom into the door; place the DECK OF CARDS on the puzzle.
- Arrange the cards as shown in the screenshot (P), using the following sequence: 3, 5, 8, 9, 5, 7, 4, 6, 4, 5, 3, 1, 4, 5, 4, and 2.
- Enter Harry’s Tent.
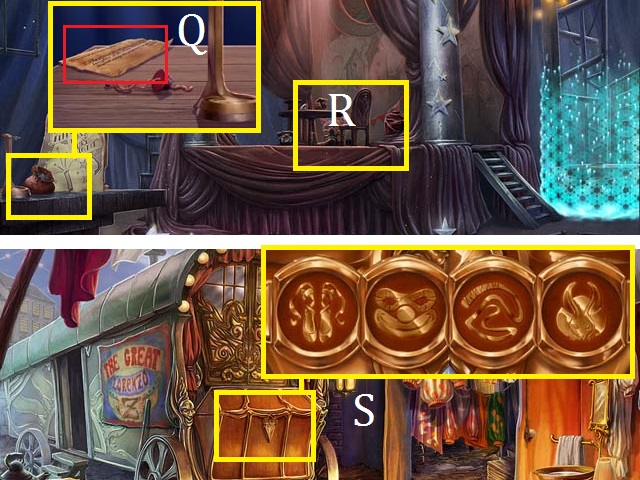
- Zoom into the table; collect the CARNIVAL CODE (Q).
- Try to zoom into the stage (R).
- Return to Lorenzo’s Camp.
- Zoom into the chest; place the CARNIVAL CODE on the chest and then set the dials as shown in the screenshot (S) to receive the ZEPHYR CARNIVAL Z.
- Return to the Alley.
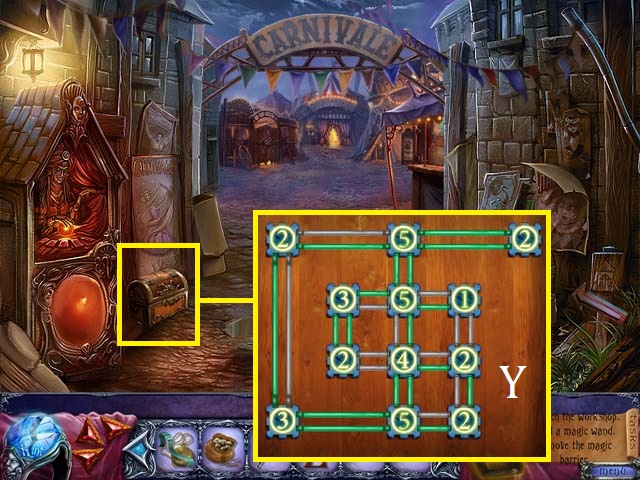
- Zoom into the chest; place the ZEPHYER CARNIVAL Z in the cutout to open the chest.
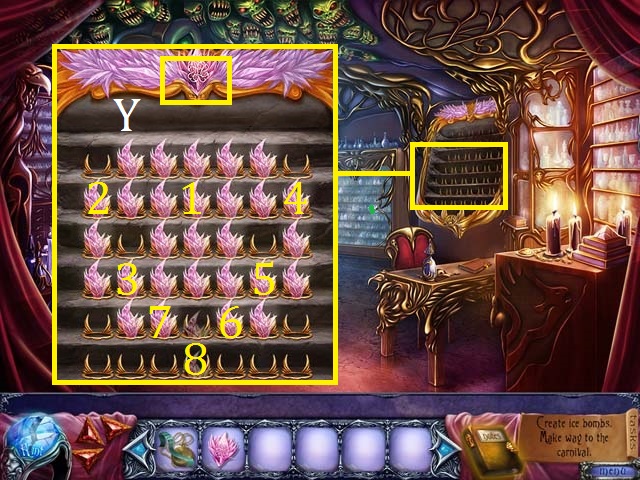
- Light the bars as shown in the screenshot (Y) to receive the SLINGSHOT.
- Return to the Circus.
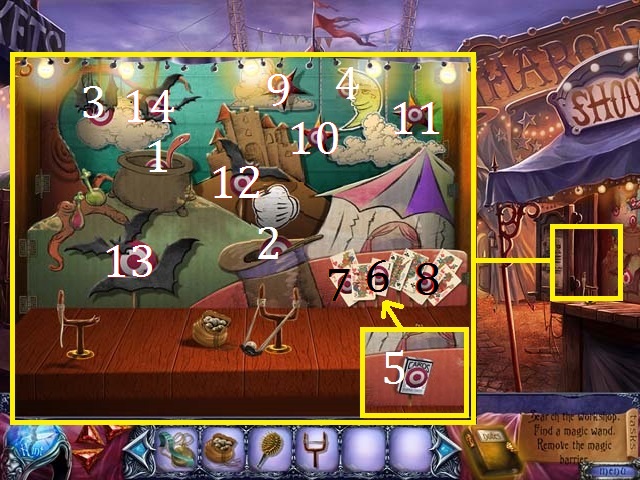
- Zoom into the shooting gallery; place the BAG OF PELLETS and SLINGSHOT on the table.
- Select the targets in the order of 1-14 to receive the MAGIC WAND.
- Return to Harry’s Tent.
- Zoom into the force field; use the MAGIC WAND on the force field and then match three of the same colored hexagons. Continue to play the puzzle until you have gotten rid of the four hexagons with the card suits on them.
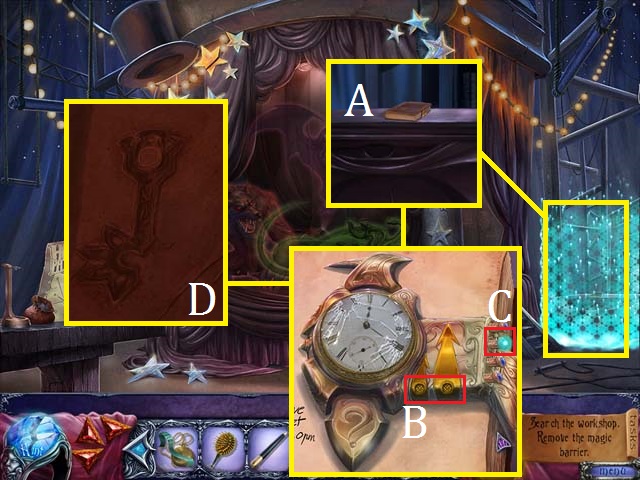
- Zoom into the book (A) and then open it. Place the PERFORMER’S BELONGINGS in the book. Set the time to 12:20 using the two dials (B), and then press the button that lights up (C). Set the clock to 4:40 and press the button that lights up again. Continue with 7:30 and then 9:10.
- Flip the pages of the book and then collect the KEY IMPRINT (D).
- Return to Lorenzo’s Coach.
- Go into the back and speak with Lorenzo to receive the CLOTHES BASKET.
- Exit the Coach.
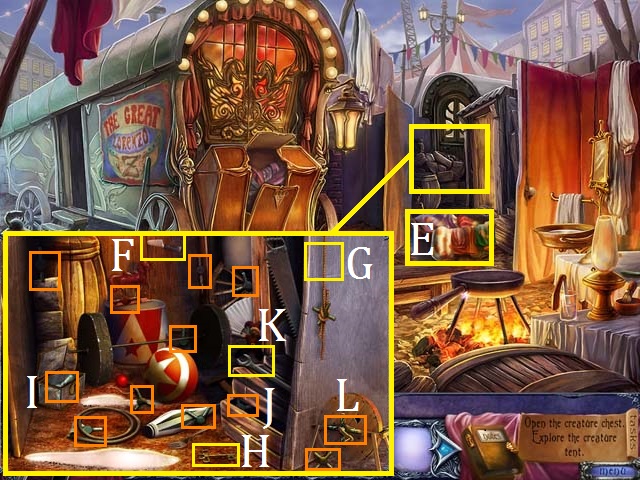
- Place the CLOTHES BASKET on the ground (E) and put all of the clown’s clothes in the basket.
- Zoom into the shed; use the knife (F) to cut the rope (G).
- Use the key (H) to open the box (I). Open the drawer (J). Use the wrench (K) to remove the crank (L).
- Collect all twelve of the molding device parts (orange) to receive THE PARTS FOR LORENZO’S MOLDING DEVICE.
- Enter the Coach.
- Zoom into the desk; place THE PARTS FOR LORENZO’S MOLDING DEVICE on the board (M) and then place the KEY IMPRINT under the bowl (N).
- Arrange the board as shown in the screenshot. Press the button and then collect the RESIN KEY (P).
- Return to the Crypt.
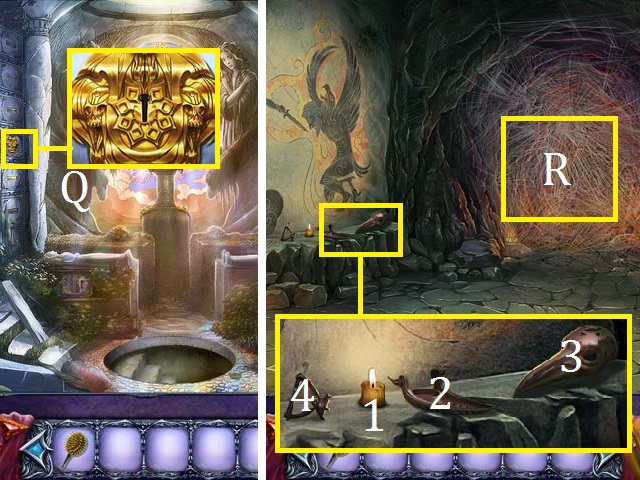
- Zoom into the panel; use the RESIN KEY in the lock (Q).
- Take the open tunnel.
- Zoom into the ledge; place the candle (1), (2) the top (3), and then the handle (4) on the base to assemble and receive the BIRDHEAD LANTERN.
- Use the BIRDHEAD LANTERN to burn away the spider webs (R).
- Enter the back room.
- Put down the BIRDHEAD LANTERN to light up the room.
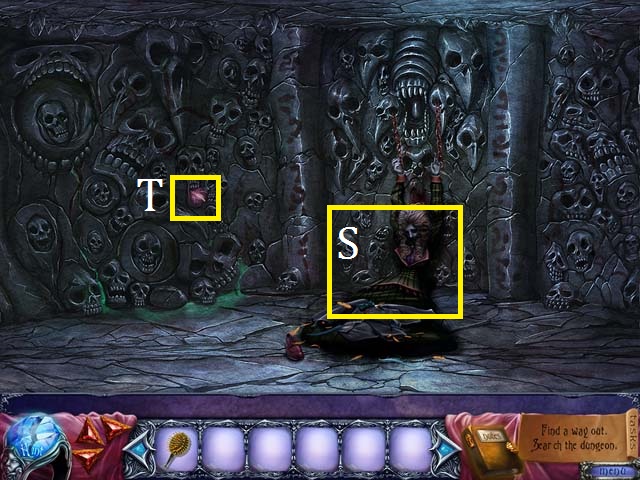
- You may examine the body (S).
- Collect the RUNIC GEM (T) and then watch the wall crumble.
- Move into the sewer.
- Zoom into the ground; collect the EMPTY FLARES (U).
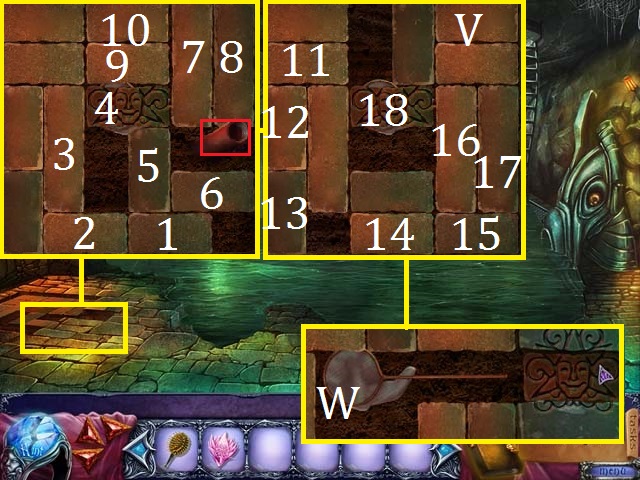
- Move 1 right, 2 right, 3 down, 4 left, 5 up, 6 left, 7 and 8 down, 9 and 10 right, 5 up again, 4 right, then 3 up. You should have the arrangement shown in the screenshot (V). From this arrangement, move 11 right, 12 and 13 up, 14 and 15 left, 16 and 17 down, and then move 18 out of the puzzle.
- Collect the NET (W).
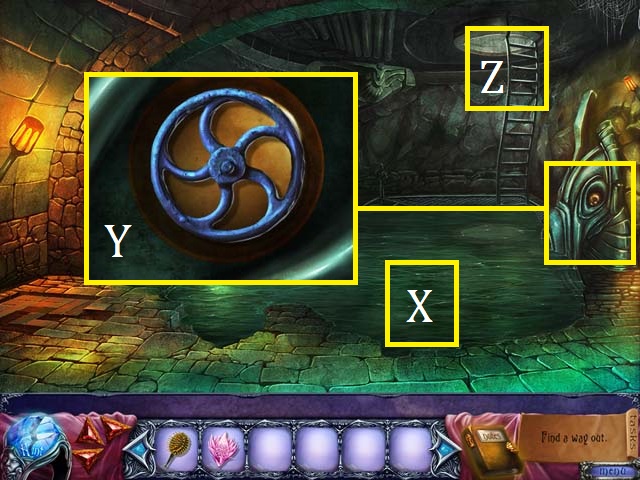
- Use the NET to fish items out of the water (X) until you receive the VALVE.
- Zoom into the drain; place the VALVE on the spindle (Y) and then turn it.
- Take the stairs (Z) out of the sewer.
- Enter Harry’s Tent.

- Zoom into the table; place the EMPTY FLARES on the stand (A). Use the spoon (B) to scoop the gunpowder (C) into the empty flares. Place the cap (D) on top and collect HARRY’S FLARES.
- Exit the tent.
- Use HARRY’S FLARES to remove the dark cloud (E); enter the Creatures of Myth and Legend Tent.
Chapter 5: The Creatures of Myth
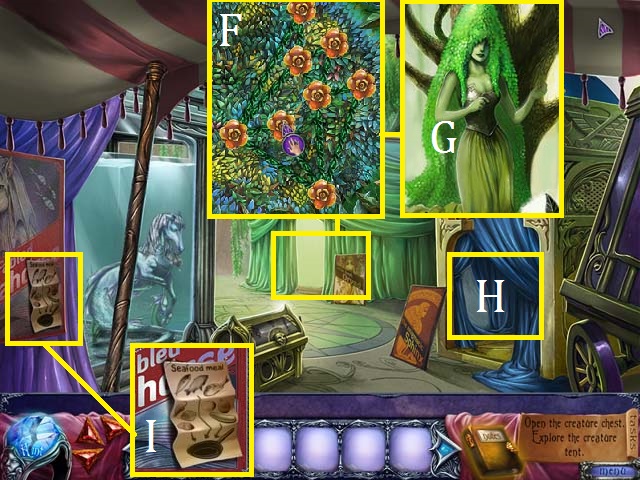
- Zoom into the Dryad Tent; you may use the screenshot to see a winning arrangement (F). Give the HAIRBRUSH to the Dryad (G) to receive her MIRROR.
- Examine the Sphinx Tent (H).
- Zoom into the Seahorse poster; collect the SEAHORSE MEAL RECIPE (I).
- Return to Lorenzo’s Camp.
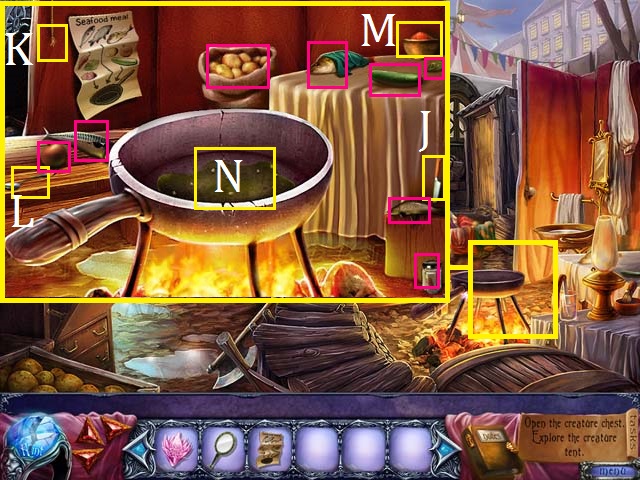
- Zoom into the pot; place the SEAHORSE MEAL RECIPE in the pop-up window. .
- Use the knife (J) to cut the rope (K). Use the spoon (L) to place the seasoning (M) in the pot (N). Place the rest of the ingredients (pink) in the pot to receive the SEAHORSE’S SEAFOOD.
- Enter Lorenzo’s Coach and move to the back room.
- Speak with Lorenzo to receive the SPHINX RIDDLE TICKET.
- Return to the Creatures of Myth and Legend Tent.
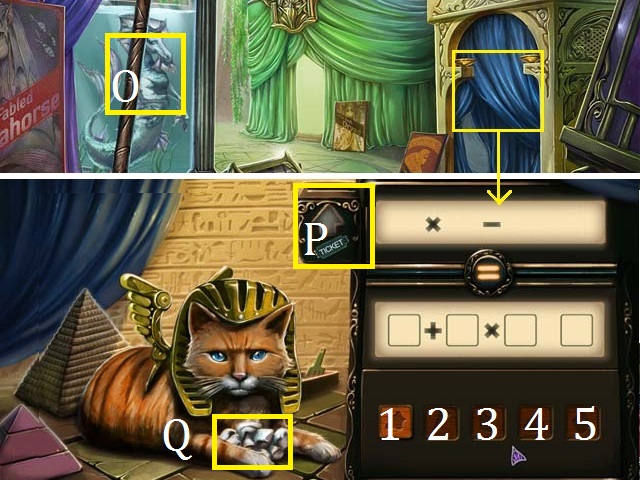
- Feed the SEARHORSE’S SEAFOOD to the seahorse (O) and receive the GARLIC.
- Zoom into the Sphinx Tent; place the SPINX RIDDLE TICKET in the slot (P).
- The solution to the first puzzle is: (4) – (2) + (1). The second solution is (3) x (2) + (1). The third solution is (3) + (5) x (4) / (3).
- Collect the SILVER (Q).
- Return to Harry’s Tent.
- Use the MIRROR on Medusa (R), the SILVER on the werewolf (S), and the GARLIC on the vampire (T).
- Zoom into the stage; Collect the three representations of creature (green) and then HARRY’S ILLUSION BOX (U).Remove the cover from the cage (V).
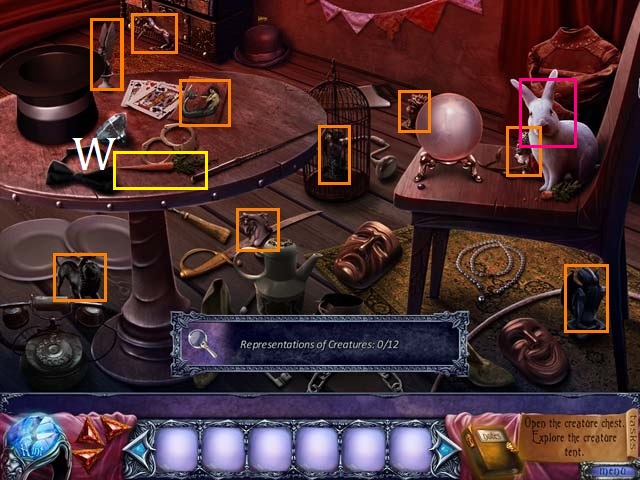
- Feed the rabbit (pink) the carrot (W).
- Collect rest of the items (orange) to receive the CREATURE STATUETTES.
- Return to the Creatures of Myth and Legend Tent.
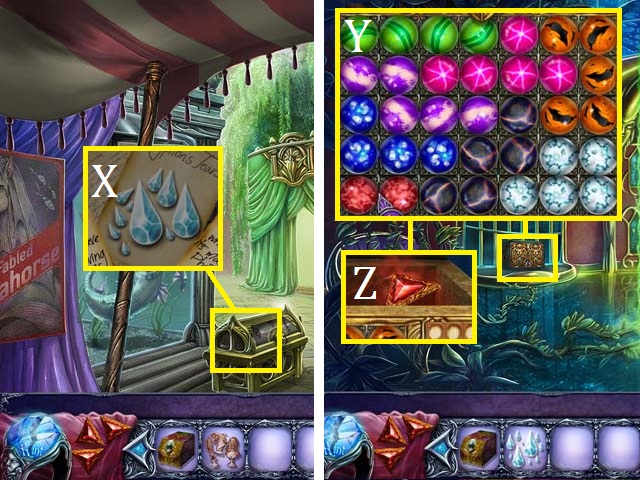
- Zoom into the chest; place the CREATURE STATUETTES in the cutouts to open the chest. Move the letters and then collect the SAPPHIRE TEARS (X).
- Return to the Phoenix Room.
- Zoom into the box; place the SAPPIRE TEARS in the lid to open the box. You may use the screenshot (Y) for a winning arrangement. Collect the fourth Crimson Gem (Z).
- Return to the Upstairs Hall.
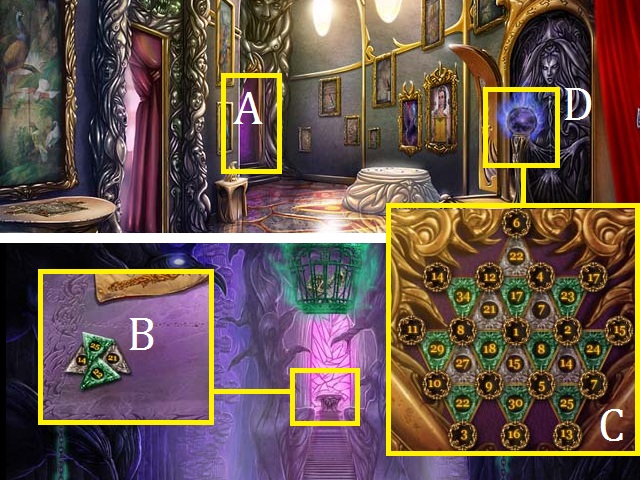
- Zoom into the door (A) to open it.
- Enter the Altar Room.
- Zoom into the table; collect the NUMBERED TRIANGLE (B).
- Exit the room.
- Zoom into the sarcophagus; place the NUMBERED TRIANGLE in the puzzle.
- Arrange the tiles as shown in the screenshot (C) by using the following sequence: 20, 21, 22, 14, 8. 21, 34, 18, 21, 15, 7. 25, 7, 7, 14, 23.
- 23, 7. 22, 22, 14, 14, 30.
- 14. 24, 14, 22, 30, and 25. 30, 22, 30, 25, 30, 30, 22.
- Collect the GLOWING ORB (D).
- Enter the Altar Room.
- Use the GLOWING ORB on the posts in the following order: 2, 1, 4, 3. Note: tap the posts with the GLOWING ORB four times until the cage drops before moving on to the next post.
- Zoom into the fallen cage; collect the CAGE PARTS (E).
- Collect all eleven of the intact bones (green) to receive the BIRD BONES.
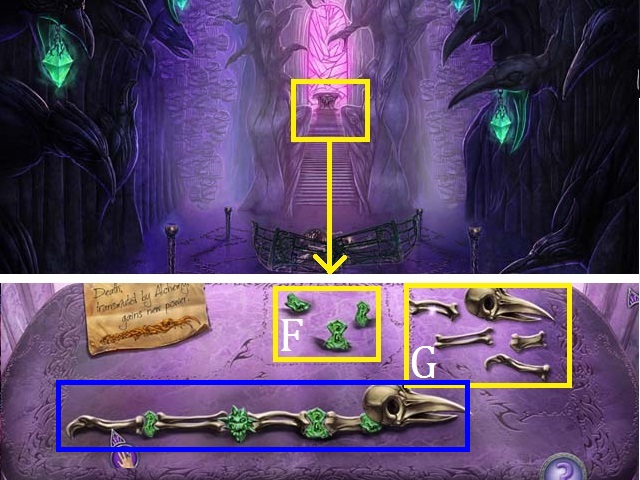
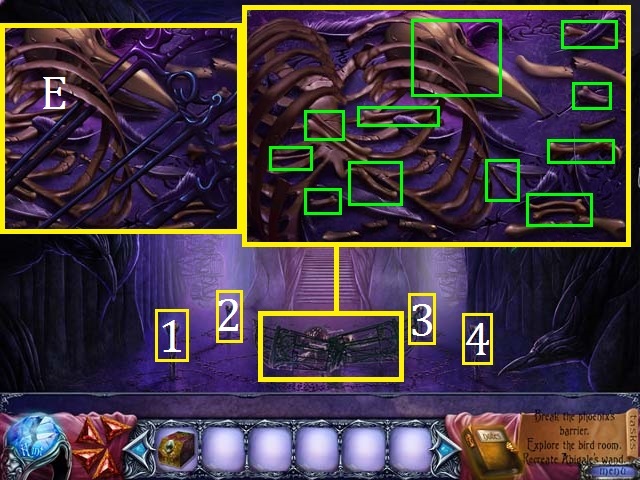
- Zoom into the table; place the BIRD BONES on the table.
- Attach the pieces (F) and bones (G) as shown in the screenshot and then collect the MAGIC WAND (blue).
- Return to the Alchemy Room.
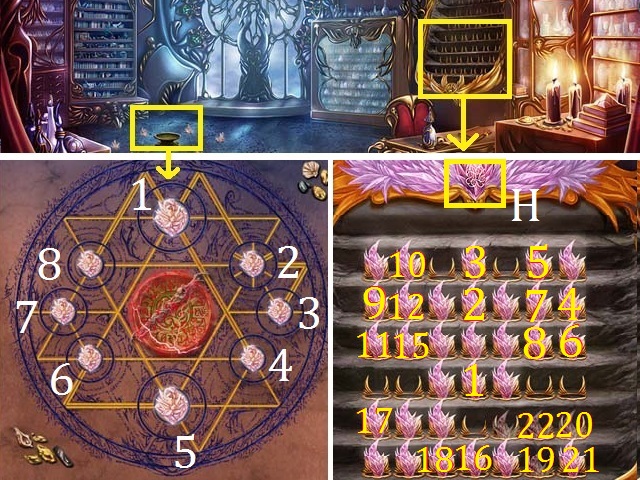
- Zoom into the case; place the RUNIC GEM at the top of the window (H).
- Use the following sequence: (yellow numbers) 1, 2, 3, 4, 56, 4, 6, 7, 5, 4, 8. 9, 10, 9, 11, 12, 10, 9, 15, 3. 16, 17, 18, 16, 19, 20, 21, 22.
- Receive the TRANSMUTATION CRYSTALS.
- Zoom into the ground; place the TRANSMUTATION CRYSTALS in the circle. Place the MAGIC WAND in the middle of the circle.
- Set the crystals as shown in the screenshot using the following sequence: (white numbers) 3, 4, 6, 5, 7, and 8.
- Receive ABIGALE’S GOLDEN WAND.
- Return to the Phoenix Room.
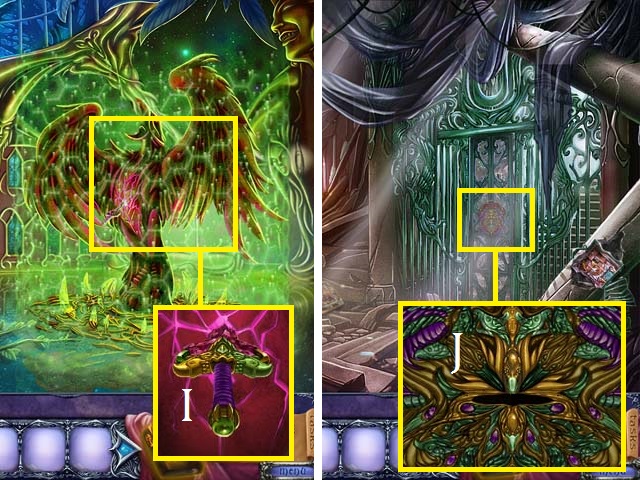
- Zoom into the Phoenix; Use ABIGALE’S GOLDEN WAND on the force field. Complete the mini-game and then collect ABIGALE’S SWORD (I).
- Return to the Collapsed Hallway.
- Zoom into the door; use ABIGALE’S SWORD in the slot (J) to open the door.
- Enter the Shrine Room.
- Place the CAGE PARTS in the middle of the room. Repeat the sequences by pressing the glowing crystals (green) in front of the angels (orange) until all of the CAGE PARTS are separated.
- Place HARRY’S ILLUSION BOX in the middle of the room (K).
- Zoom into HARRY’S ILLUSION BOX.
- Use the following sequence by moving counterclockwise only: 2, 3, 3, 2, 1, 3, 2, 1, 3, 2, 1.
- Use ABIGALE’S SWORD against her (M).
- Arrange the first grid (N) and press the button (R). Set up the grid as it is shown in figure (O) and press the button. Continue with figure (P) and then finish with figure (Q).
- Congratulations! You have completed Break the Curse: Crimson Gems!


 The Book of Desires Walkthrough, Guide, & Tips
 Whispered Secrets: Into the Wind Walkthrough, Guide, & Tips
 Reality Show: Fatal Shot Walkthrough, Guide, & Tips
 Dark Dimensions: Homecoming Walkthrough, Guide, & Tips
 Empress of the Deep: Legacy of the Phoenix Walkthrough, Guide, & Tips