Christmas Stories: Nutcracker Walkthrough, Guide, & Tips
Christmas Stories: Nutcracker Walkthrough

Welcome to the Christmas Stories: Nutcracker Walkthrough
A classic Christmas tale with a whole new twist! Help the Nutcracker rescue the princess from the evil Rat King in this memorable hidden-object puzzle adventure game.
Whether you use this document as a reference when things get difficult or as a road map to get you from beginning to end, we’re pretty sure you’ll find what you’re looking for here.
This document contains a complete Christmas Stories: Nutcracker game walkthrough featuring annotated screenshots from actual gameplay!
We hope you find this information useful as you play your way through the game. Use the walkthrough menu below to quickly jump to whatever stage of the game you need help with.
Remember to visit the Big Fish Games Forums if you find you need more help. Have fun!
This walkthrough was created by MargieB, and is protected under US Copyright laws. Any unauthorized use, including re-publication in whole or in part, without permission, is strictly
General Tips


- This is the official guide for Christmas Stories: Nutcracker.
- Press (A) to start playing the game.
- Select ‘Change player’ (B) to edit, delete, or create a profile.
- Select options (C) to adjust the sound, the display mode, and the difficulty of the game.
- Hidden Object Scenes will be referred to as HOS throughout the guide.
- All inventory items will be marked in all CAPS throughout the guide.
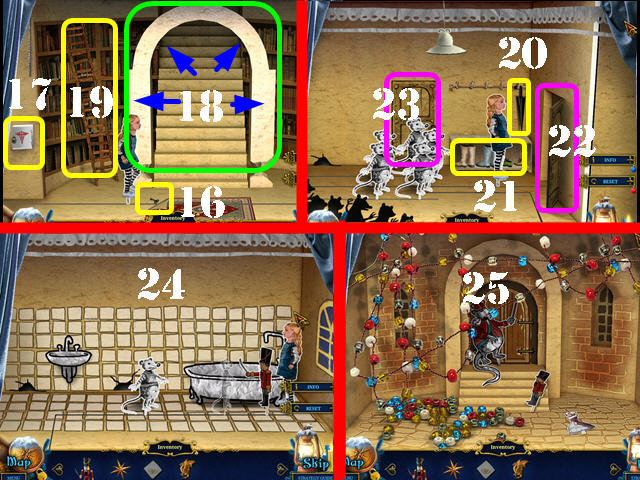
- Use the Map to travel directly to a location.
- To follow the puzzle solutions outlined in this game, please select the reset button first. If a puzzle is random, it will be noted as such in the instructions.
Chapter 1: The Palace
- You will automatically receive the INVITATION.
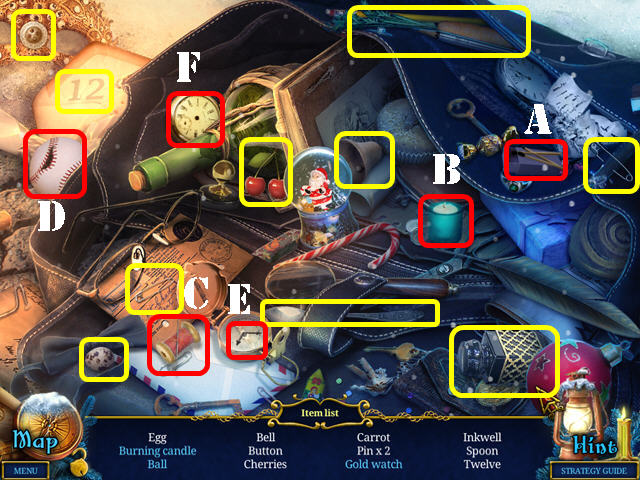
- Zoom into the satchel and touch it twice to activate a HOS.
- Drag the match (A) to the candle (B) and take the burning candle.
- Use the needle and thread (C) on the ball (D); take the baseball.
- Drag the clock hands (E) to the watch (F); take the gold watch.
- You will receive the BELL.
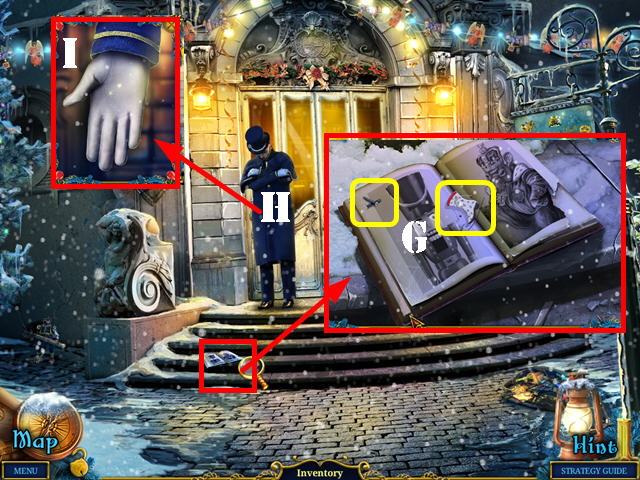
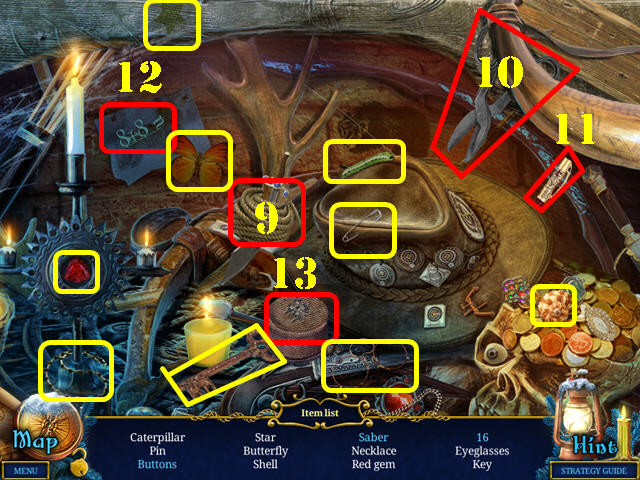
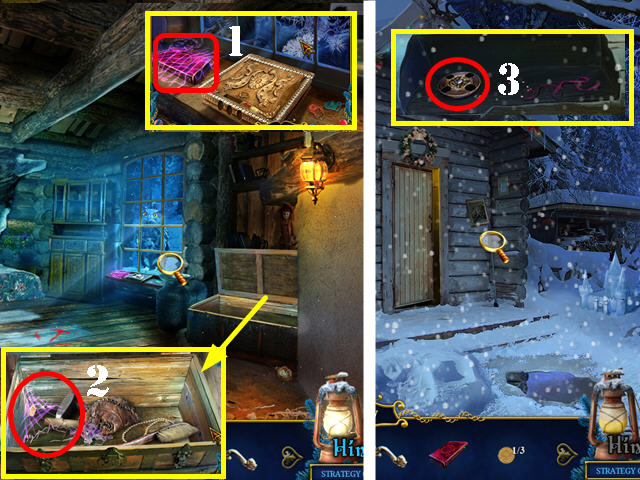
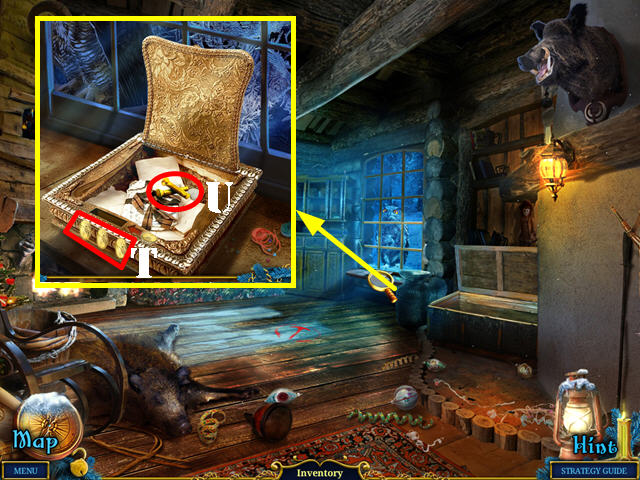
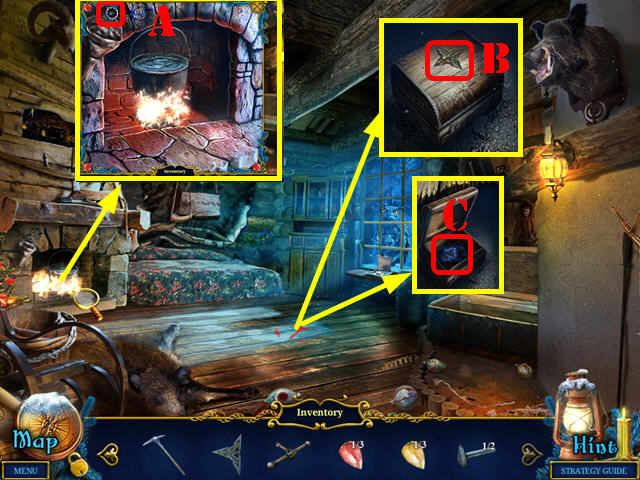
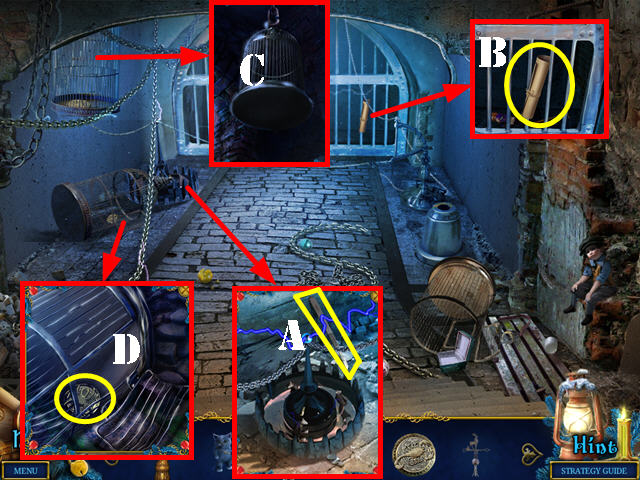
- Zoom into the book; take the first TOY and the SCREWS (G).
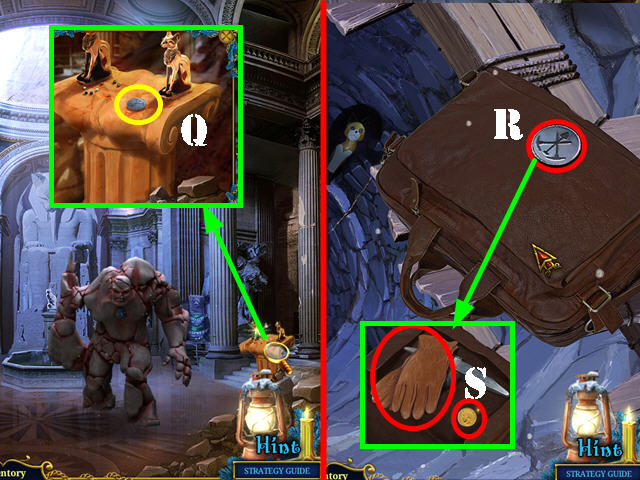
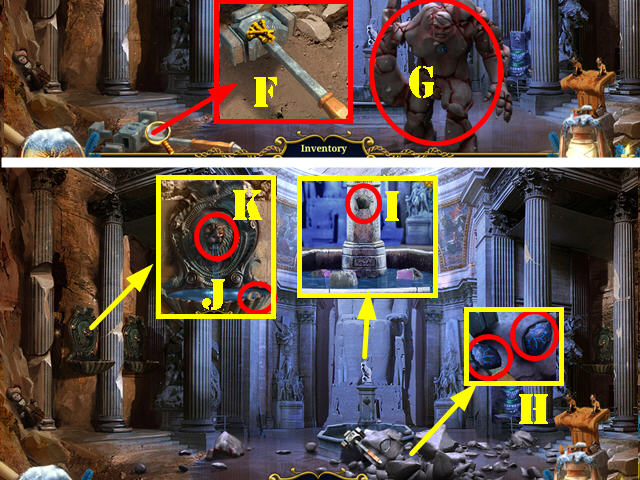
- Use the BELL on the butler (H). Put the INVITATION in his hand (I) and enter the Christmas Hall.
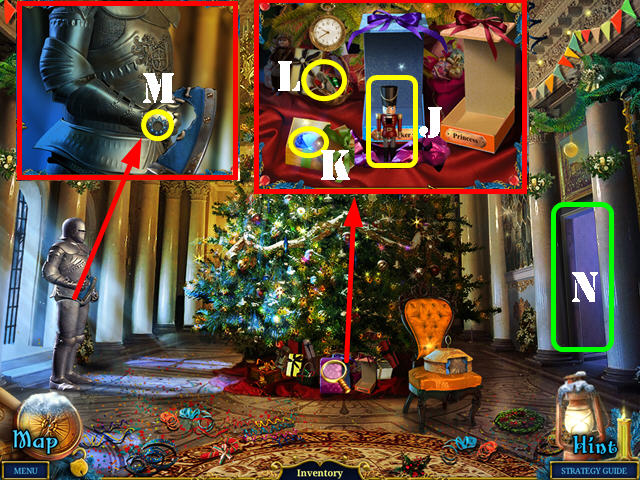
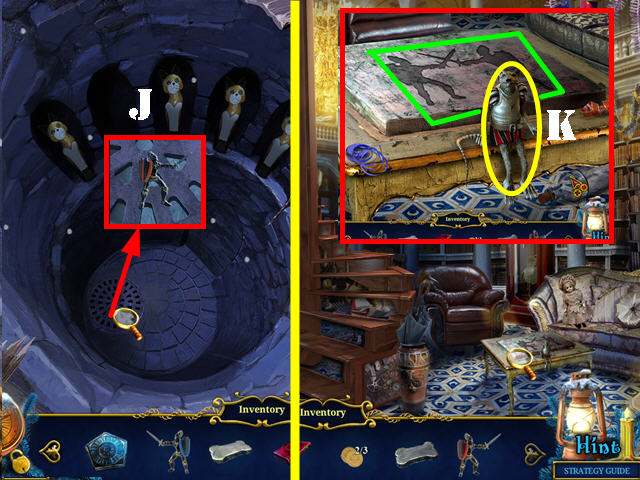
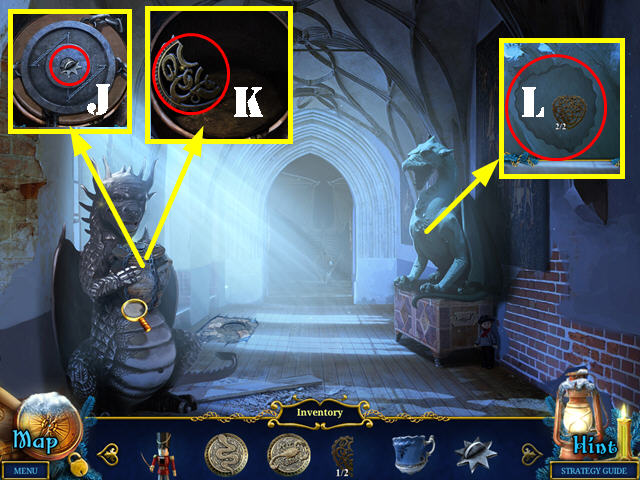
- Zoom into the presents under the tree; open the gift box and take the NUTCRACKER (J).
- Open the small box and take the GEM (K).
- Take the HANDLE (L).
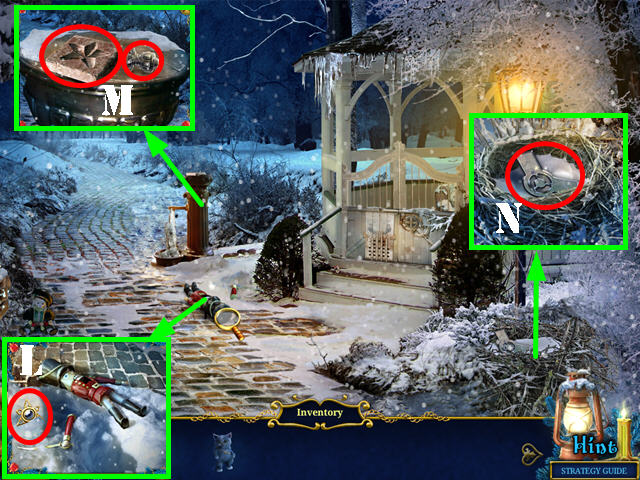
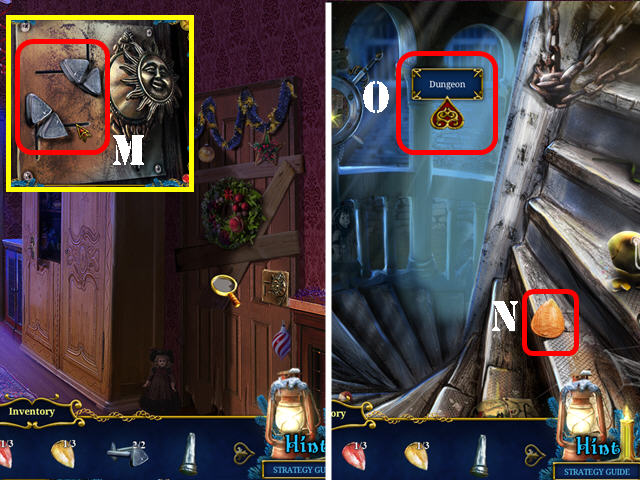
- Zoom into the armor; put the GEM in the slot (M) to receive the SHIELD SECTION.
- Go right to reach the Kitchen Door (N).
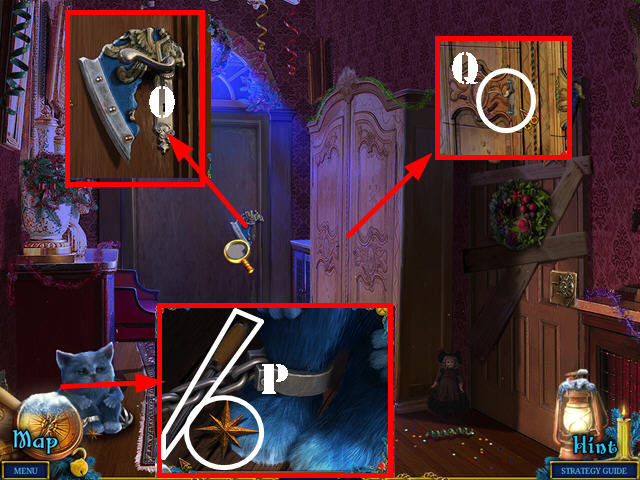
- Look at the back door and take the SHIELD SECTION (O).
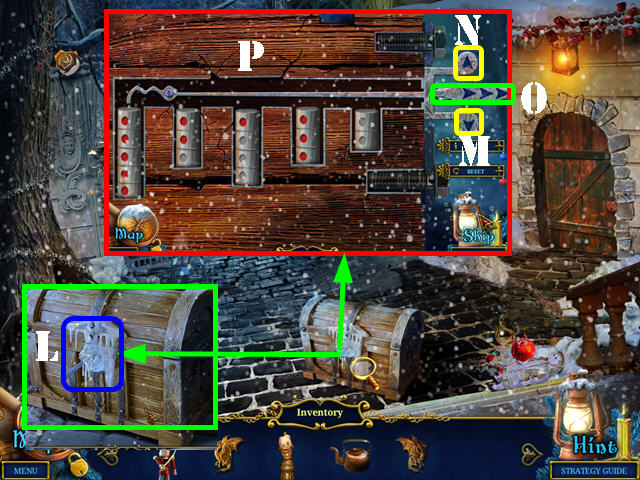
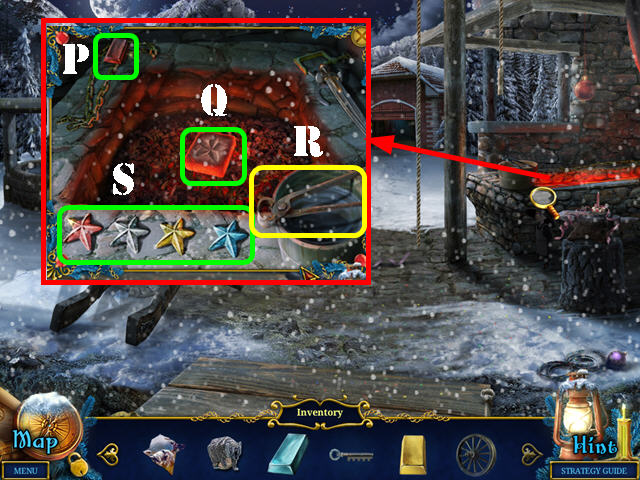
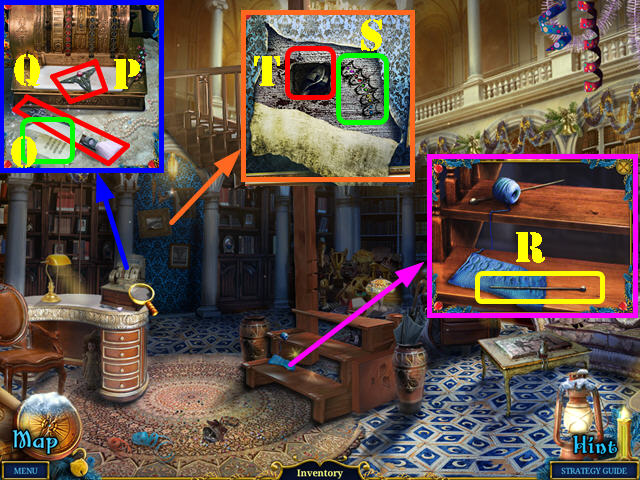
- Zoom into the cat; take the SCREWDRIVER and the STAR (P).
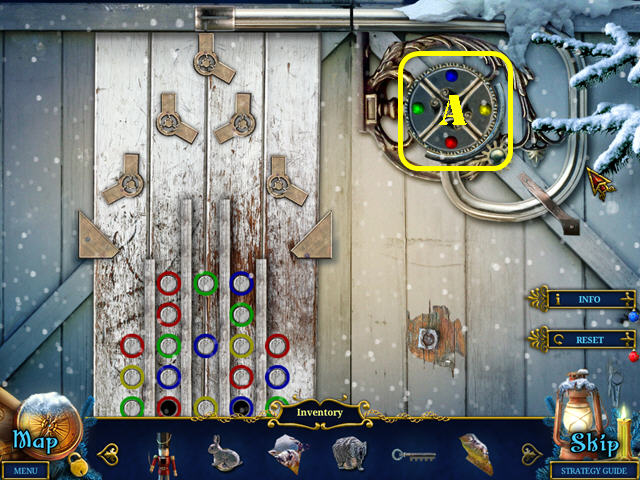
- Take a closer look at the cabinet and attach the HANDLE to it (Q). Use the SCREWS on the handle and fasten them with the SCREWDRIVER.
- Pull the handle and zoom into the cabinet to activate a puzzle.
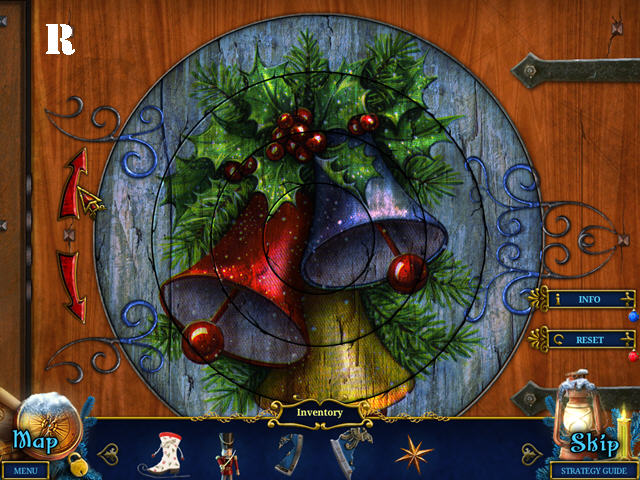
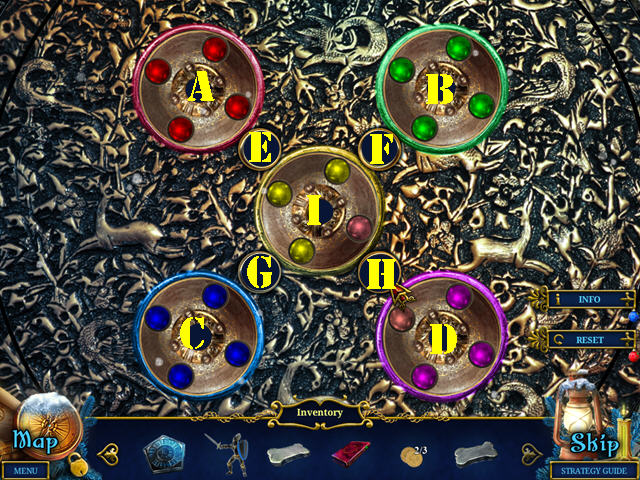
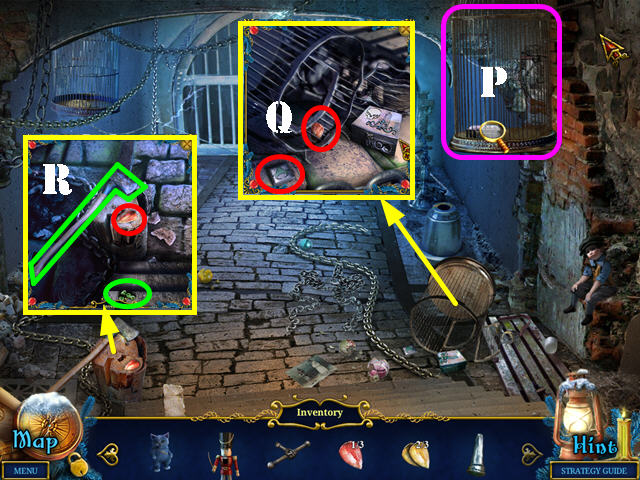
- Touch a ring, and then an arrow, to rotate the rings until they have been formed correctly. Rotating a ring will affect others.
- The puzzle solution is random; the screenshot shows you the final solution (R).
- Solve the puzzle to activate a HOS.

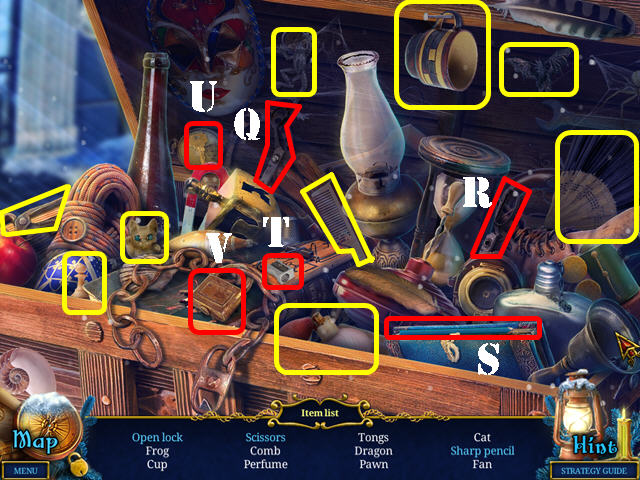
- Play the HOS.
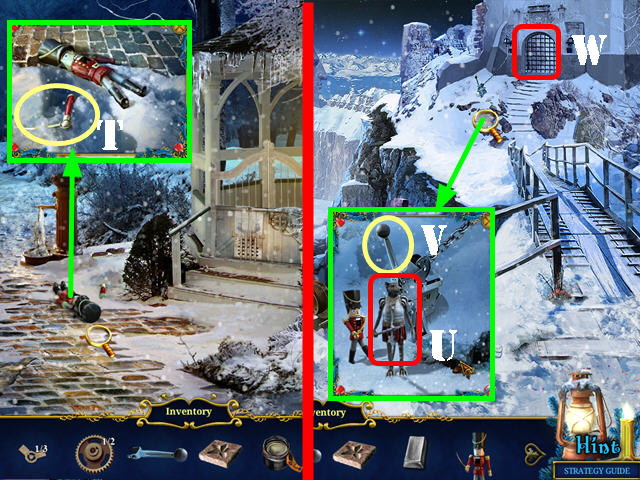
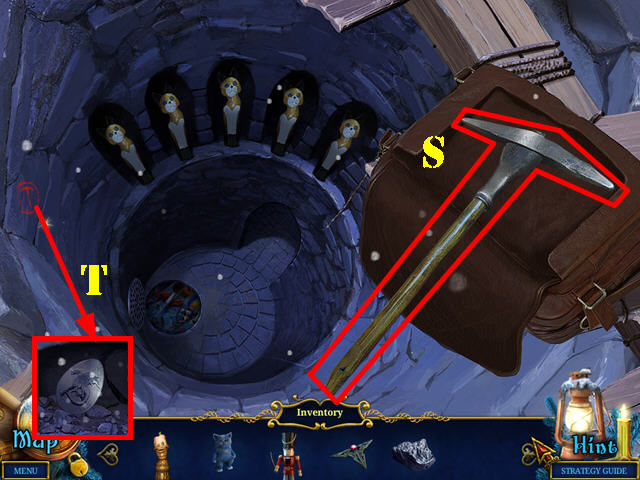
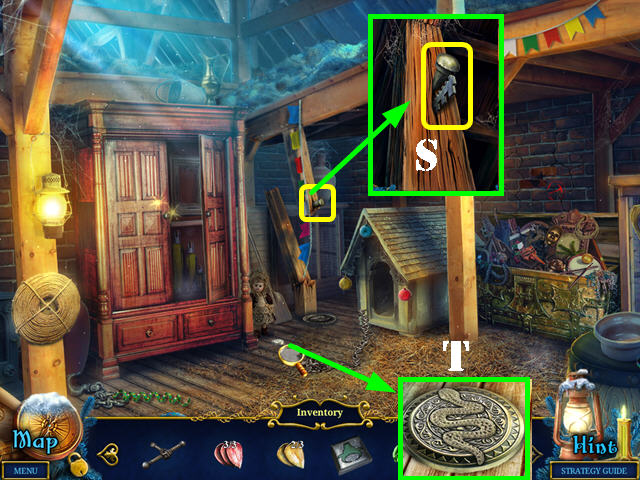
- Use the scissors (S) on the necklace (T) and take the cut necklace.
- Drag the doll piece (U) to the base (V) and take the nesting doll.
- Touch the apple (W) and take the apple core.
- You will receive the second TOY.
- Walk down twice to the Palace Gates.
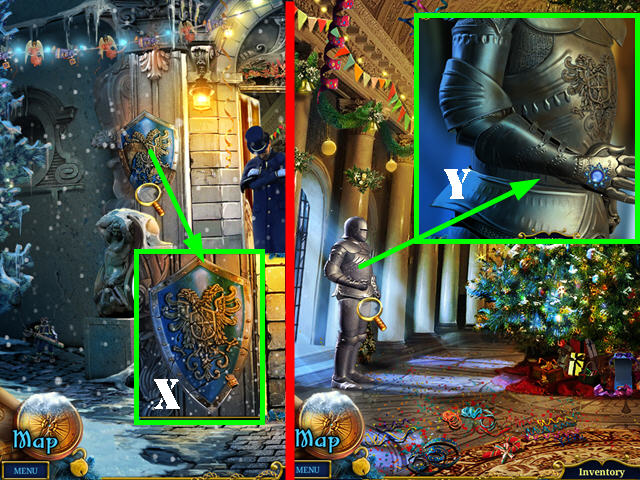
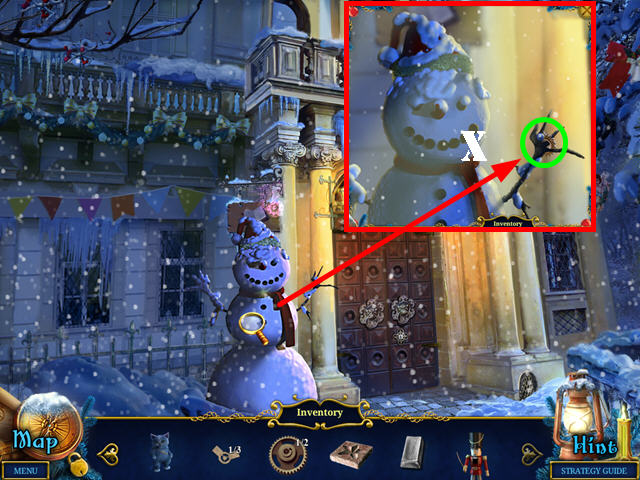
- Zoom into the shield; put the 2 SHIELD SECTIONS on it and take the SHIELD (X).
- Return to the Christmas Hall.
- Zoom into the armor and place the SHIELD on it (Y).
- Go through the left door to the Garden Entrance.
- Touch anywhere on the scene.
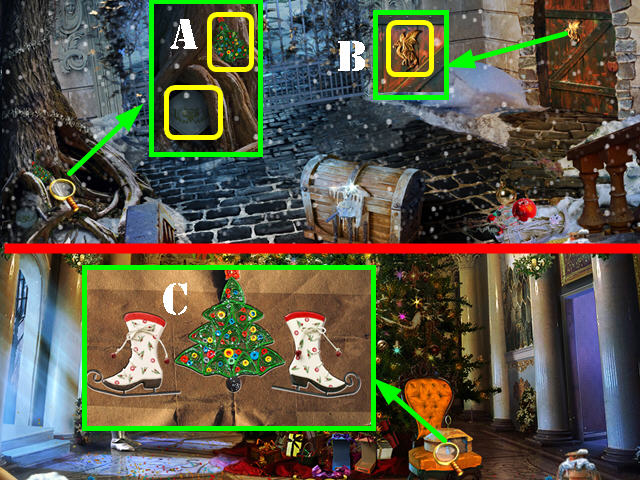
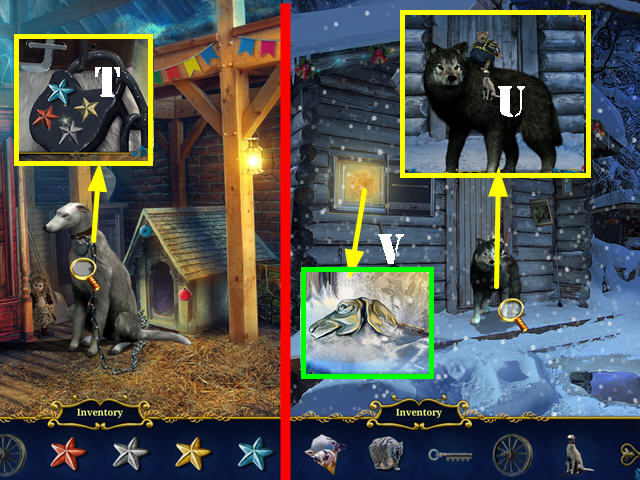
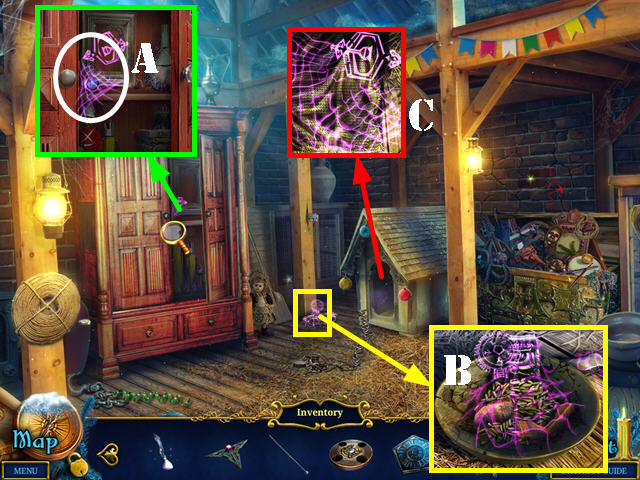
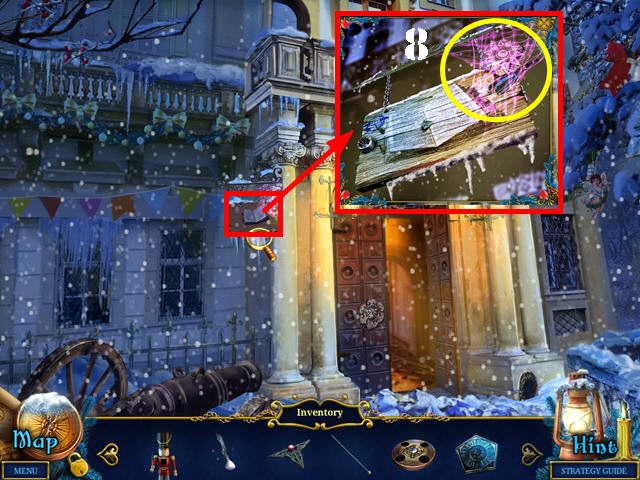
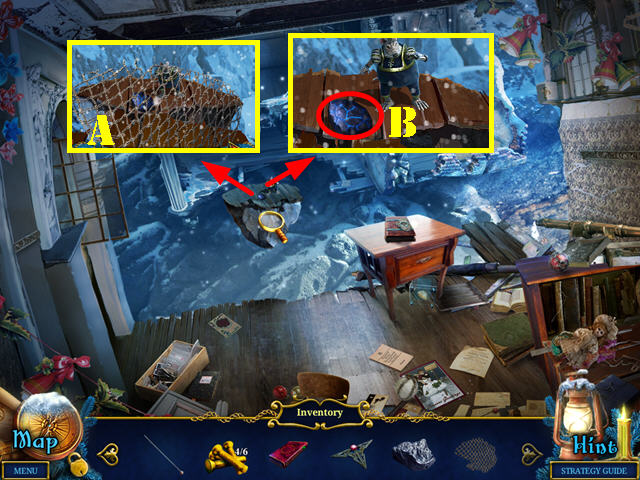
- Zoom into the tree roots; take the HANDKERCHIEF and the third TOY (A).
- Zoom into the door; take the first DRAGON (B).
- Walk down for a cutscene.
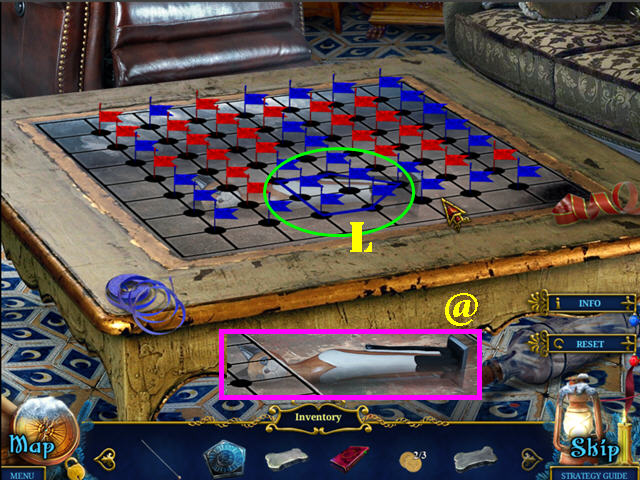
- Zoom into the puppet theater; put the 3 TOYS on the curtain (C) to activate a puzzle.
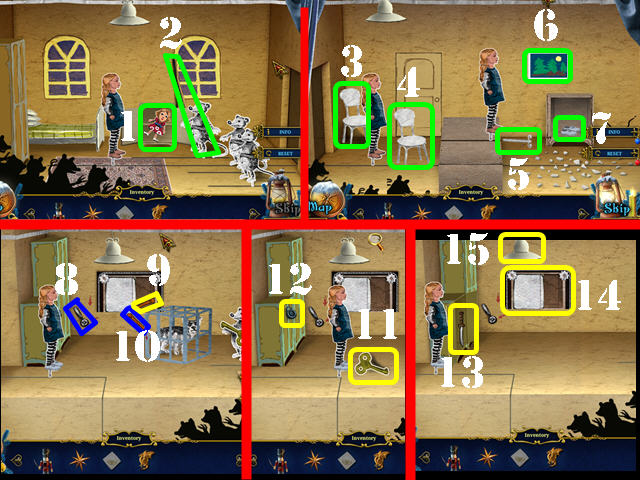
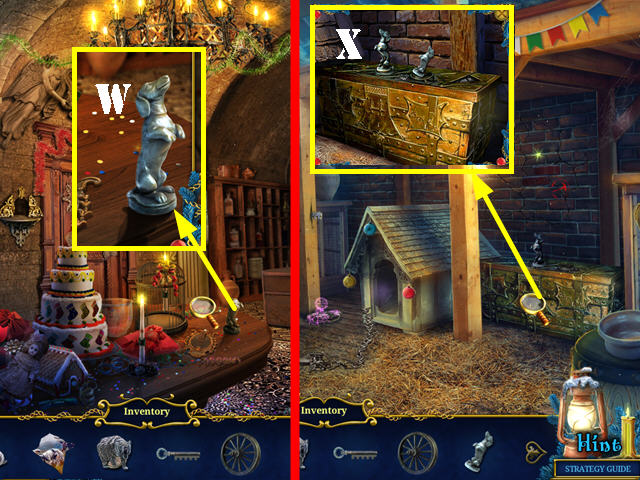
- Pick up an item so the character can interact with it. Open the stand and take the doll (1). Take the broom (2).
- Take the chair (3) and put it down (4). Grab the stick (5) and touch the painting (6). Open the shoe locker and put on the shoes (7).
- Push the lever (8) and grab the lever (9) inside the elevator. Pull the lever on the cage (10).
- Take the key (11) and use it in the lock (12).
- Take the knife (13) and use it on the rope (14). Tie the rope to the lamp (15) to jump down.
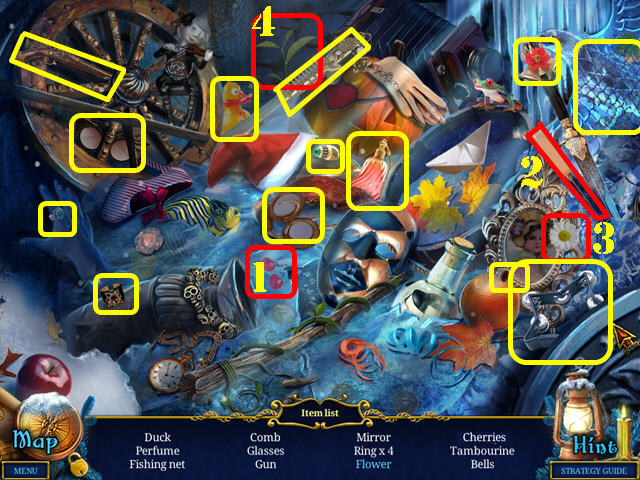
- Lift the carpet and take the key (16). Use the key on the medicine chest (17). Drop the arch (18) to trap the rats. Touch the ladder to go across (19).
- Take the umbrella (20). Throw the 4 sets of boots at the rats (21). Close the door (22) and open the next door (23).
- The Nutcracker will defeat all the rats except for the largest one (24).
- Take the GARLAND (25).
- Return to the Kitchen Door.
Chapter 2: The Kitchen
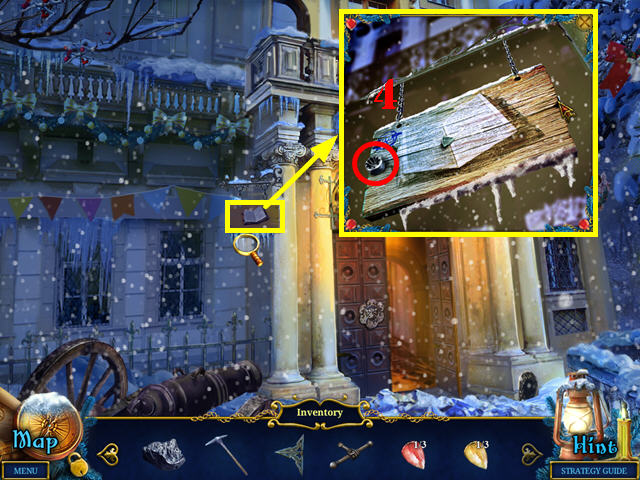
- Place the GARLAND on the back door. Go through the door to access the Kitchen.
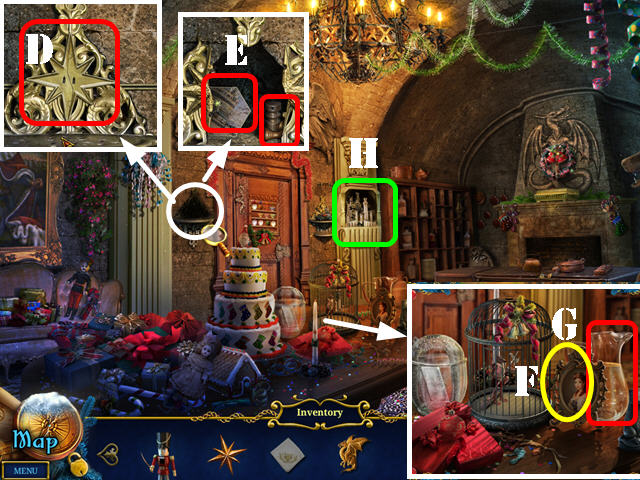
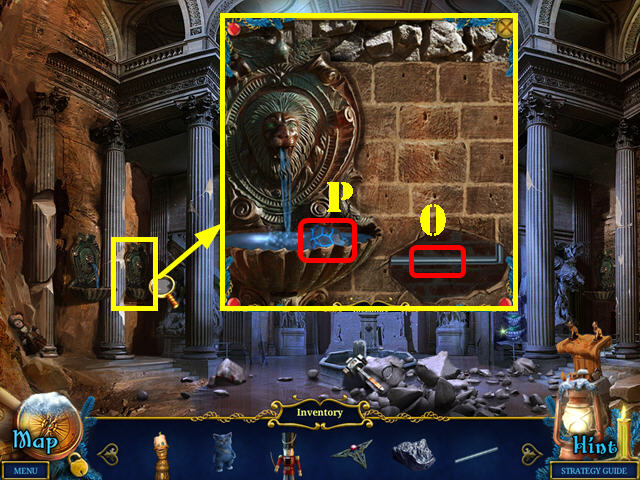
- Examine the stand; wipe it with the HANDKERCHIEF and insert the STAR into the niche (D).
- Take the WEIGHTS and the FRESCO PIECE (E).
- Take a closer look at the table; touch the photo (F) and then take the WATER PITCHER (G).
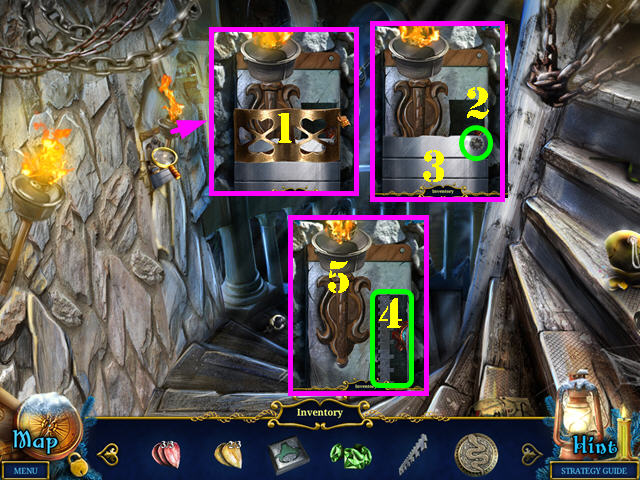
- Examine the castle (H) and add the WEIGHTS to the catapult to activate a puzzle.
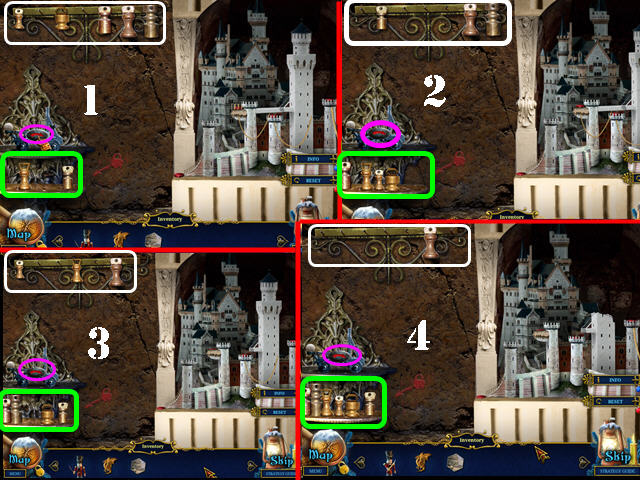
- You must destroy the castle by using the weights in the right combinations to hit the red buttons.
- Grab a weight (white) and place it on the catapult (green) and then press the button (purple).
- To solve the puzzle, please use the weights in the combinations shown (1-4).
- Take the CANDLE.
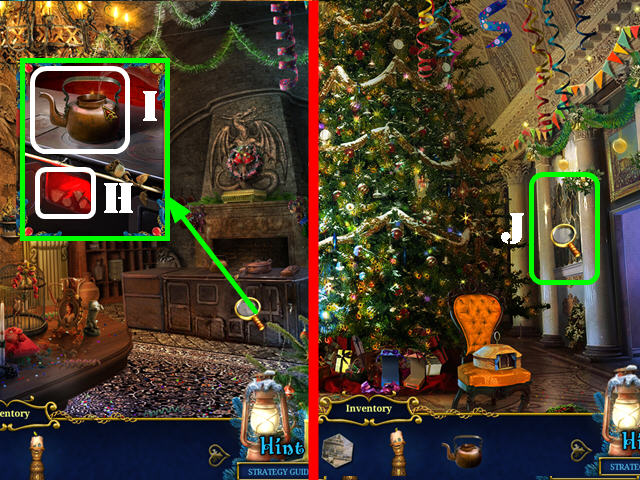
- Zoom into the stove; open the door and use the CANDLE on the logs (H). Pour the WATER PITCHER into the kettle; take the KETTLE (I).
- Return to the Christmas Hall.
- Zoom into the fresco (J) and add the FRESCO PIECE to it to activate a puzzle.

- Select any two pieces to swap their positions. Left-click on a piece to rotate it. Once a piece has been placed correctly, it will lock in place.
- Please look at the screenshot for the solution and take the second DRAGON (K).
- Return to the Garden Entrance.
- Zoom into the chest; use the KETTLE on the icy lock (L).
- Zoom back into the chest to activate a puzzle.
- Use the bottom arrow (M) to tap the lockpick onto a barrel and add the red dots. Use the top arrow (N) to remove the red dots. Use the handle (O) to move the lockpick to the right.
- Please look at the screenshot for the solution (P). Solve the puzzle to activate a HOS.
- Play the HOS.
- Drag the scissor half (Q) to the other one (R); take the scissors.
- Use the pencil (S) in the sharpener (T) and take the sharp pencil.
- Use the key (U) on the lock (V) and take the open lock.
- You will receive the third DRAGON.
- Return to the Kitchen.
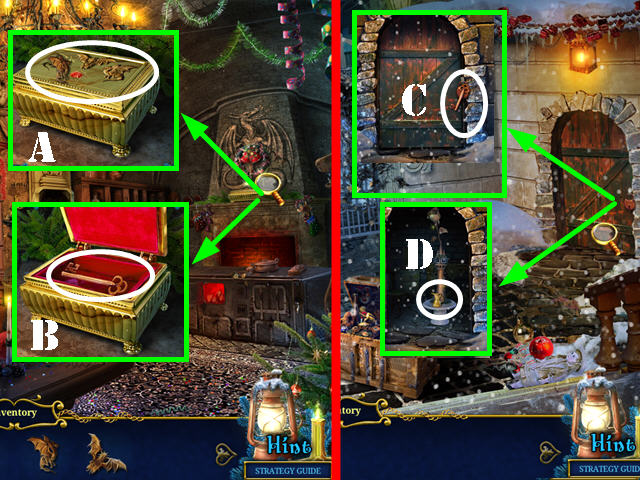
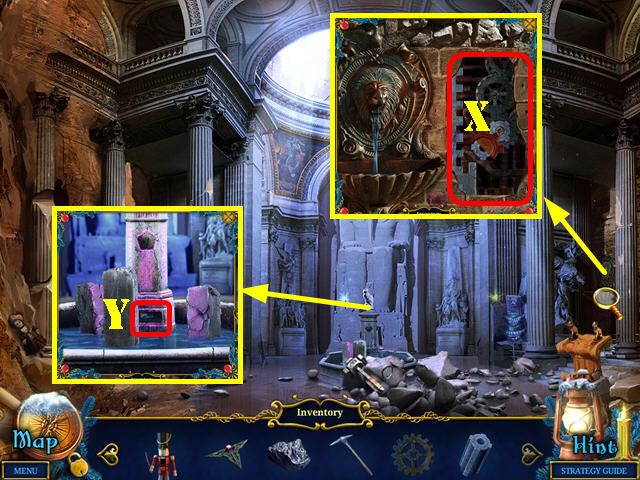
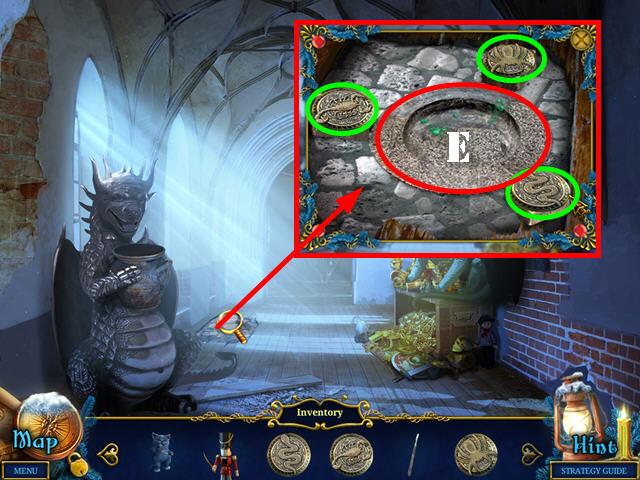
- Zoom into the chest on the mantle; put the 3 DRAGONS in the slots (A) and take the BRONZE KEY (B).
- Return to the Garden Entrance.
- Zoom into the door; use the BRONZE KEY in the lock (C).
- Take the OIL CAN (D).
- Return to the Kitchen.
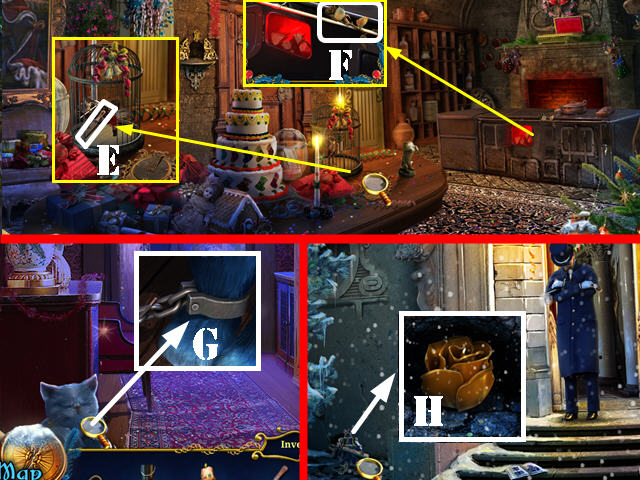
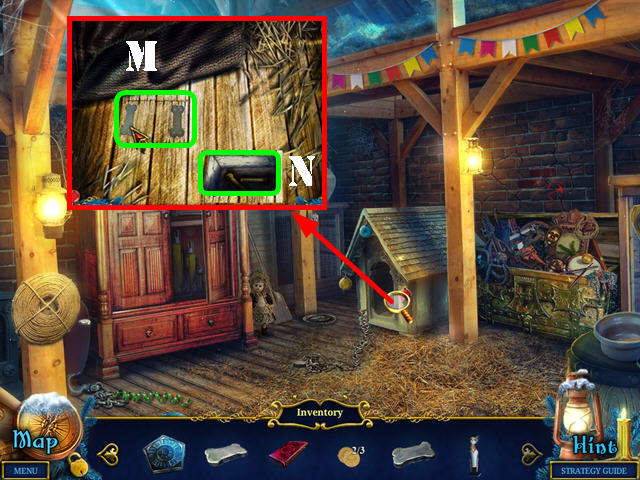
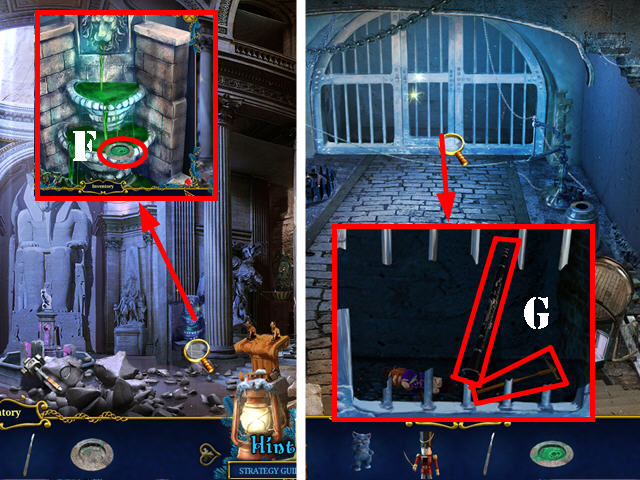
- Zoom into the table; use the OIL CAN on the cage. Open the cage and place the NUTCRACKER in it. Take the FILE (E).
- Zoom into the stove; use the FILE to get the first FLOWER (F).
- Walk down.
- Zoom into the cat; use the FILE on the shackle and take the CAT (G).
- Return to the Palace Gates; use the NUTCRACKER on the rat and take the second FLOWER (H).
- Return to the Garden Entrance.

- Zoom into the tree and use the CAT on it to retrieve the third FLOWER (I).
- Zoom into the door; use the FILE to get the fourth FLOWER (J).
- Take a closer look at the gate; put the 4 FLOWERS on the stems (K).
- Go through the gate to reach the Garden.
Chapter 3: Crossroads
- Touch anywhere on the scene.
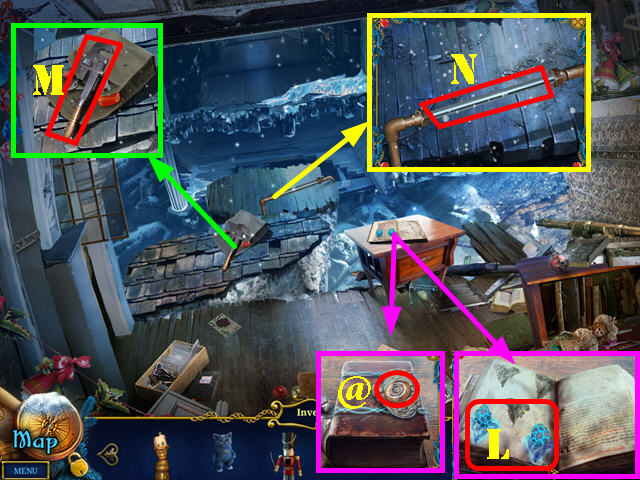
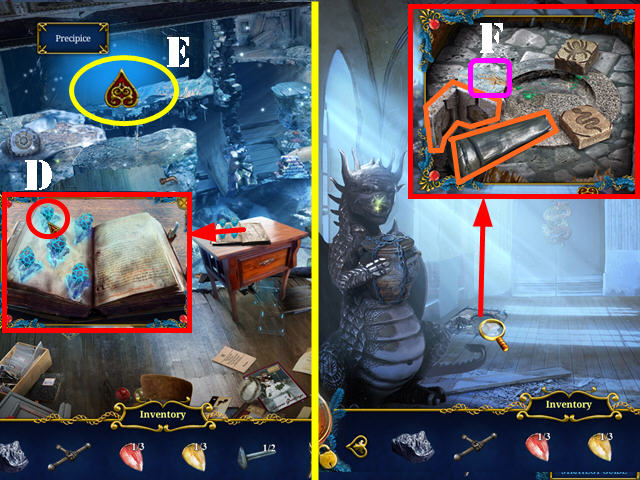
- Zoom into the nutcracker; take the AMUET (L); the nutcracker needs to be fixed.
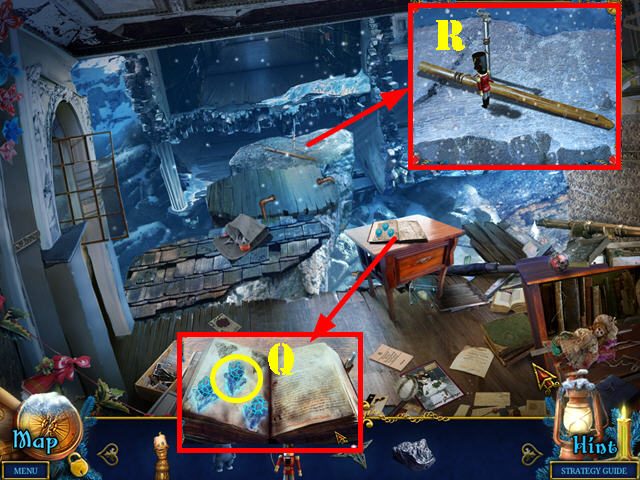
- Look at the fountain; take the MELTING FORM and the METAL HANDLE (M).
- Zoom into the nest; take the 1/3 MECHANISM PART (N).
- Go forward to the Crossroads.
- Touch anywhere on the scene.
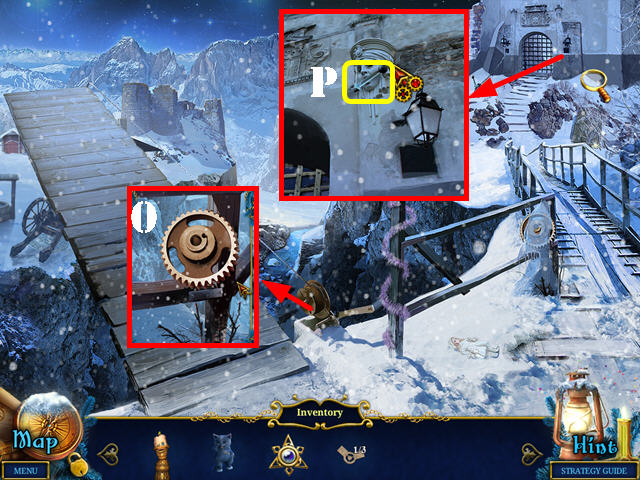
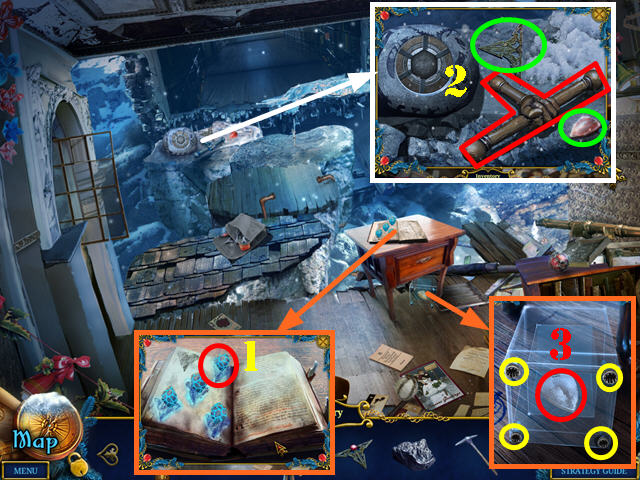
- Zoom into the frozen gear; use the CANDLE to melt the ice; take the 1/2 GEAR (O).
- Zoom into the gate; use the CAT to retrieve the LEVER (P).
- Return to the Kitchen Door.
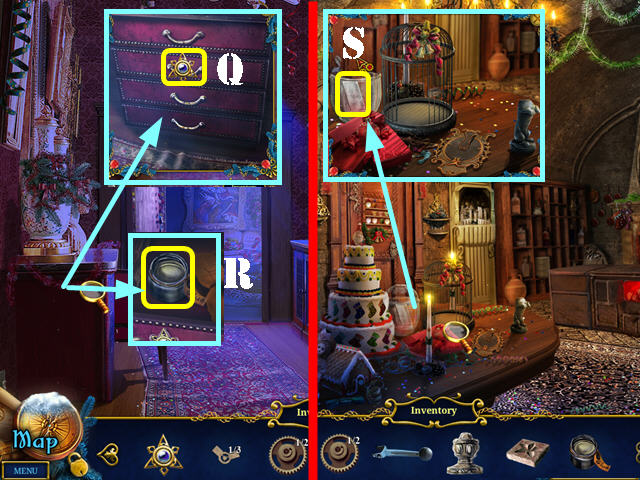
- Take a closer look at the dresser; put the AMULET on the lock (Q) and take the GLUE (R).
- Return to the Kitchen.
- Zoom into the table; put the METAL HANDLE on the glass jar; take the SILVER BAR (S).
- Return to the Garden.
- Zoom into the nutcracker and use the GLUE on the broken arm (T); attach the arm and take the NUTCRACKER.
- Go forward to the Crossroads.
- Zoom into the rat and use the NUTCRACKER on him (U).
- Touch the lever to break it off (V); put the LEVER on the mechanism and pull it down.
- Go through the gate (W) to access the Library Doors.
- Touch anywhere on the scene.
- Zoom into the snowman; take the 2/2 GEAR (X).
- Walk down to the Crossroads.
- Zoom into the bridge control panel; put the 2 GEARS on it (A).
- Go to the Valley (B).
- Take a closer look at the cannon; take the 2/3 MECHANISM PART and the HARE FIGURINE (C).
- Go to the Porch (D).
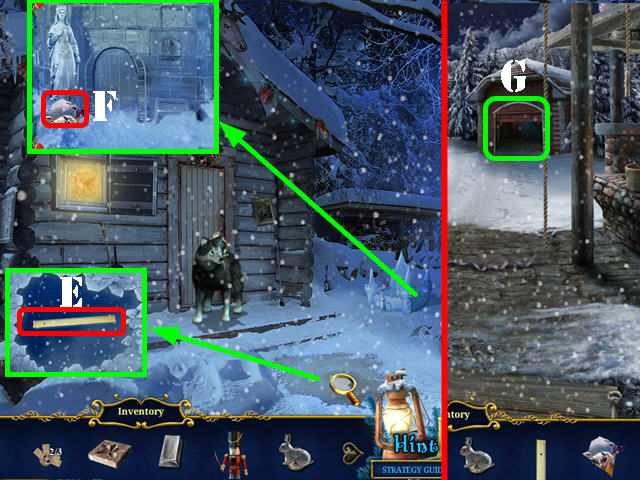
- Zoom into the frozen puddle; break the ice and take the RULER (E).
- Take a closer look at the ice castle; take the first PICTURE FRAGMENT (F).
- Walk down and go into the Kennel (G).
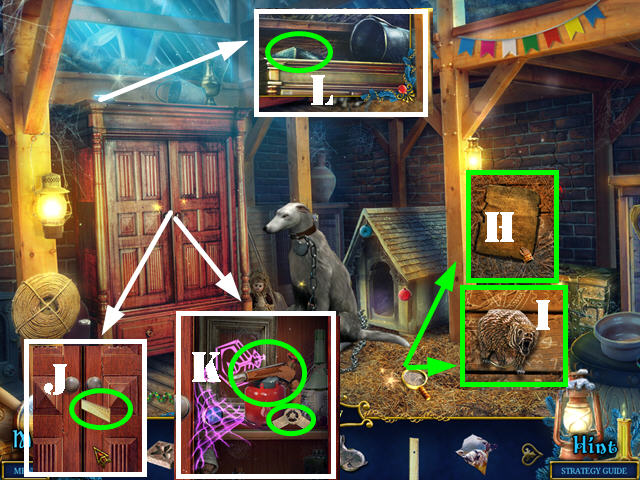
- Zoom into the hay and remove it; read the note (H).
- Grab the BEAR FIGURINE (I).
- Zoom into the cabinet and slide the RULER in between the doors (J).
- Take the WELDER and the 3/3 MECHANISM PART (K).
- Zoom into the top of the cabinet; use the CAT to retrieve the MOON METAL BAR (L).
- Return to the Library Doors.
- Zoom into the mouse hole; use the WELDER on the bars. Place the NUTCRACKER in the hole and take the LIBRARY KEY (M).
- Open the bag and take the GOLD BAR (N).
- Take the WHEEL (O).
- Return to the Valley.
- Zoom into the forge; take the COPPER BAR (P).
- Place the MELTING FORM over the hot coal (Q); then place the GOLD BAR, SILVER BAR, MOON METAL BAR, and COPPER BAR, one by one into the mold and touch the tongs twice (R).
- Take the 4 METAL STARS (S).
- Return to the Kennel.
- Zoom into the dog’s lock; insert the 4 METAL STARS into the slots (T). Take the HOUND.
- Return to the Porch.
- Zoom into the wolf and use the HOUND to scare him away (U).
- Take a closer look at the window; take the SILVER HEAD (V).
- Return to the Kitchen.
- Zoom into the table; put the SILVER HEAD on the broken statue; take the SILVER STATUETTE (W).
- Return to the Kennel.
- Zoom into the chest; place the SILVER STATUETTE on top of the chest to activate a HOS (X).
- Play the HOS.
- Place the picture (1) in the frame (2); take the picture in frame.
- Dab the glue (3) on the mug (4); place the handle (5) on the mug and take the wooden mug.
- Break the bottle (6) with the hammer (7) and take the scroll.
- You will receive the second PICTURE FRAGMENT.
- Return to the Garden.
- Zoom into the arbor; place the 3 MECHANISM PARTS on the door to activate a puzzle.
- Choose one of the colored balls (A) to drop it into the holes. If the ball falls into the hole of the same color, it will close. Close all the holes to win the game.
- To solve the puzzle, choose the balls in this sequence (this solution may be random):
- Red, Red, Green, Blue, Blue, Red, Yellow, Any Color.
- Blue, Yellow, Green, Red, Green, Green, Yellow, Green.
- Red, Blue, Blue, and Red.
- Completing this puzzle, activate a HOS.

- Play the HOS.
- Cut the orange (B) with the knife (C) and take the orange slices.
- Remove the nail (D) with the nail puller (E) and take the nail.
- Use the scissors (F) on the paper (G) and take the paper snowflake.
- You will receive the FOX.
- Return to the Porch and then go into the Hunting Lodge.
Chapter 4: Hunting Lodge
- Touch anywhere on the scene.
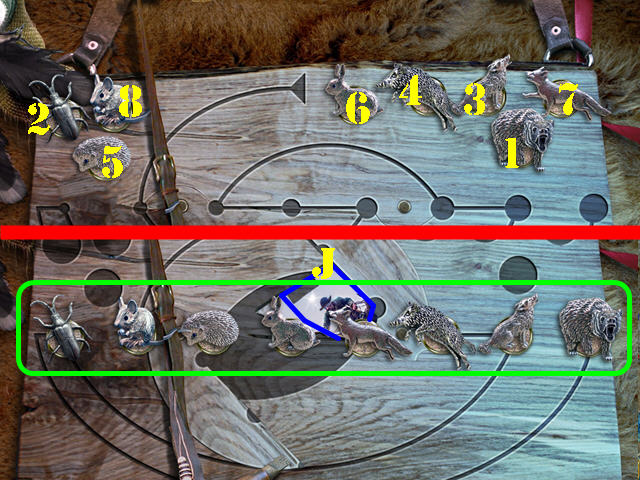
- Zoom into the board above the bed; add the BEAR FIGURINE, HARE FIGURINE, and the FOX on the board to activate a puzzle.
- Place the animals from smallest to largest on the board.
- To solve the puzzle, select the animals in the order shown on the screenshot (1-8).
- Take the third PICTURE FRAGMENT (J).

- Zoom into the chest; place the 3 PICTURE FRAGMENTS on it (K).
- Open the chest; take the CANNONBALL and the GUNPOWDER (L).
- Return to the Valley.
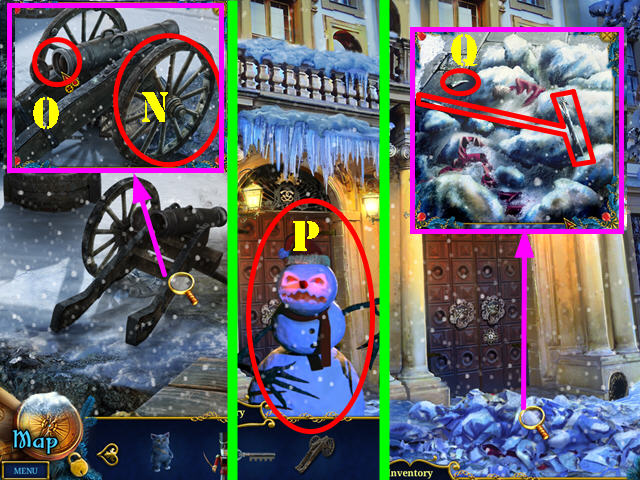
- Zoom into the cannon; put the WHEEL to it (N).
- Place the CANNONBALL into the cannon and then add the GUNPOWDER (O). Take the CANNON.
- Return to the Library Doors.
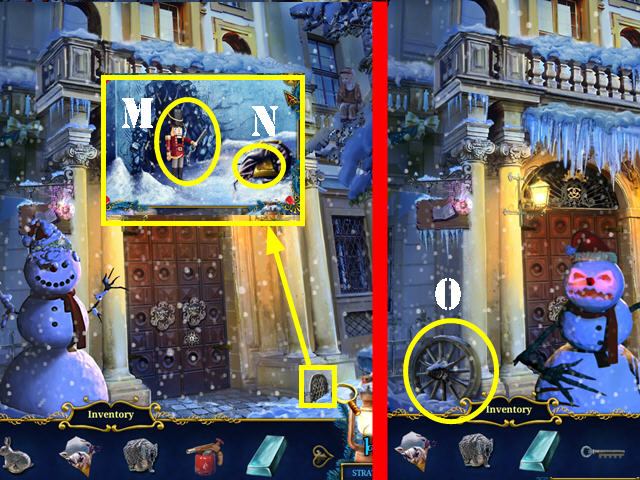
- Use the CANNON on the snowman (P).
- Look at the snowman’s remains on the ground; take the STICKS and the FANG (Q).
- Return to the Hunting Lodge.
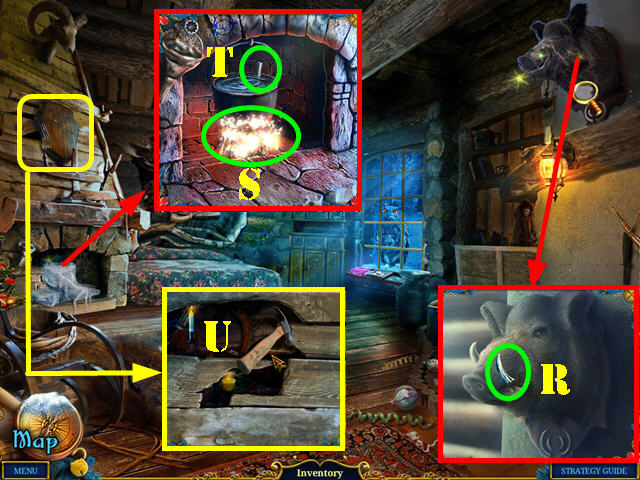
- Zoom into the boar’s head; place the FANG in its mouth to receive the FIRE RUNE (R).
- Zoom into the fireplace; put the STICKS in it (S) and light it with the CANDLE.
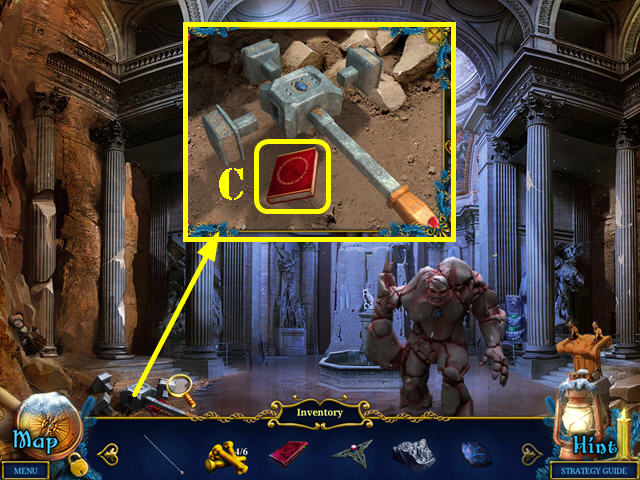
- Take the HAMMER (T).
- Zoom into the plaque and remove it. Use the HAMMER to remove the boards and activate a HOS (U).
- Play the HOS.
- Cut the rope (9) with the scissors (10) and take the saber.
- Use the pen (11) on the paper (12) and take the 16.
- Open the box (13) and take the buttons.
- You will receive the 1/6. 2/6, and 3/6 CONTROLLERS.
- Return to the Crossroads.
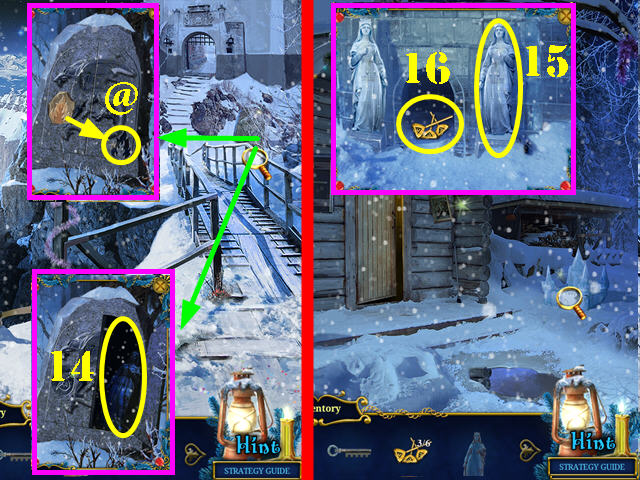
- Zoom into the rock and remove the weeds; place the FIRE RUNE in the niche (@) and take the QUEEN STATUE (14).
- Return to the Porch.
- Zoom into the icy castle; put down the QUEEN STATUE (15).
- Take the 4/6. 5/6, and 6/6 CONTROLLERS. (16).
- Return to the Library Doors.
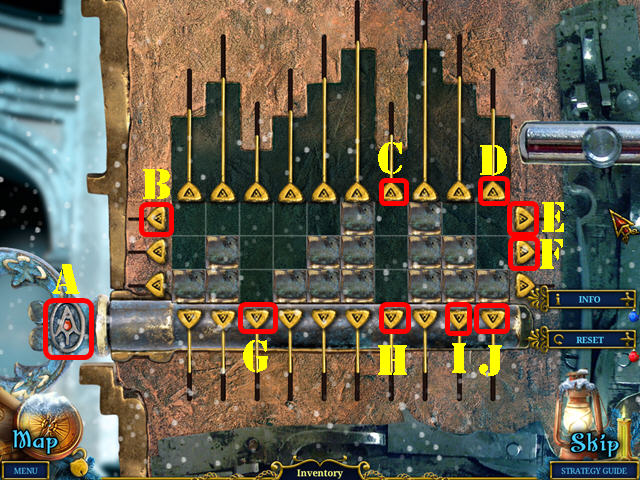
- Take a closer look at the door; use the LIBRARY KEY in the lock.
- Place the 6 CONTROLLERS on the door to activate a puzzle. Select the controllers to move a line or column.
- To solve the puzzle, please make the following moves: F, G x 2, F, G x 2, E x 3, F, H, E, H, E, C, B, D, B, I, J, I, E, and A.
- Go through the door to access the First Floor of the Library.
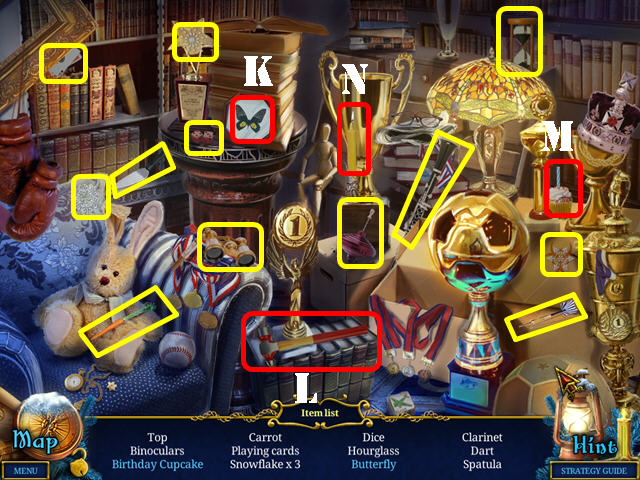
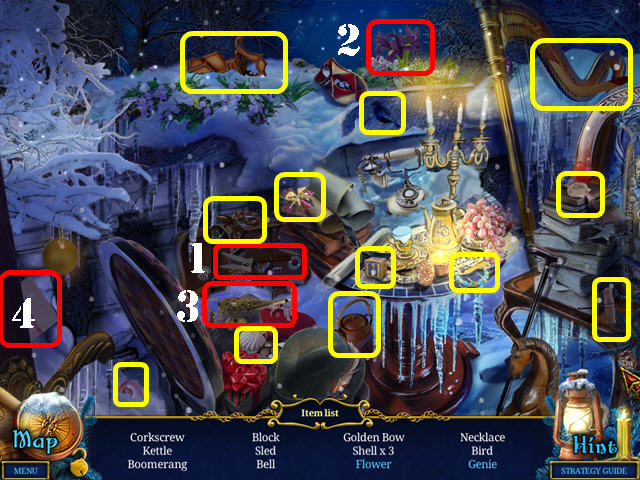
- Play the HOS.
- Break the glass (K) with the hammer (L) and take the butterfly.
- Light the candle on the cupcake (M) with the lit candle (N) and take the birthday cupcake.
- You will receive the PALETTE KNIFE.
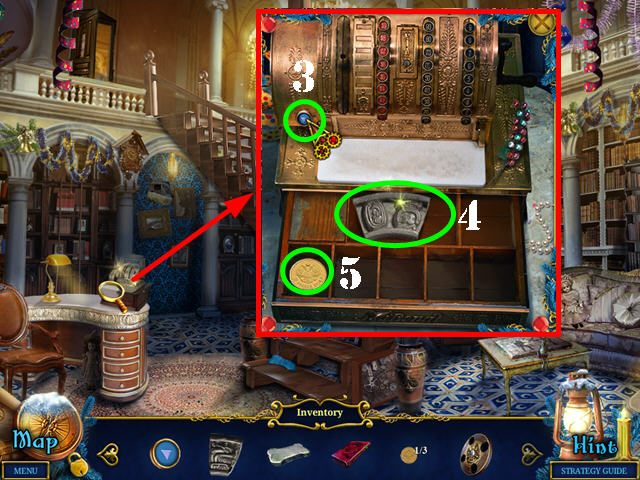
- Zoom into the cash register; look at the note (O). Take the PIECE OF A CHARM (P) and the MAGICAL BRUSH (Q).
- Zoom into the steps; take the KNITTING NEEDLE (R).
- Examine the wall; tear off the wallpaper; note the clue (S) and take the first MECHANISM PART (T).
- Walk down.
- Zoom into the ground; use the PALETTE KNIFE on the brick; take the second MECHANISM PART (U).
- Return to the First Floor of the Library.
- Zoom into the mechanism (V); add the 2 MECHANISM PARTS in the slots to activate a puzzle.
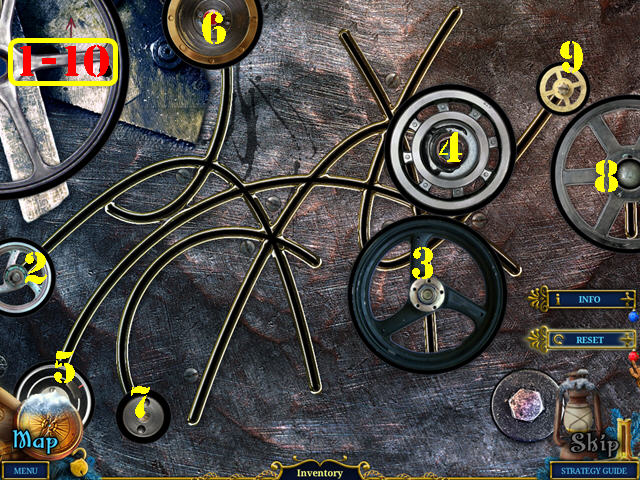
- Touch the gears to move them around until all the pieces are connected and spin. Some pieces may have to be moved more than once.
- To solve the puzzle, select the gears in the order shown in the screenshot (1-10). Solving this puzzle lowers the staircase.
- Go through the top door to access the Second Floor of the Library.
Chapter 5: Second Floor of the Library
- Touch anywhere on the scene. Zoom into the left window; open it and send the CAT through it to activate a HOS.
- Play the HOS.
- Use the pruning shears (1) on the flowers (2); take the flower.
- Rub the lamp (3) with the cloth (4) and take the genie.
- You will receive the CORKSCREW.
- Zoom into the table; use the CANDLE to melt the ice; take the first METAL DISK (5).
- Return to the Porch.
- Zoom into the barrel; remove the cork (6) with the CORKSCREW and take the PENTAGON AMULET (7).
- Return to the Library Doors.
- Zoom into the sign; use the MAGICAL BRUSH on the cobwebs and take the first KNIGHT FIGURINE (8).
- Return to the Kennel.
- Zoom into the cabinet; use the MAGICAL BRUSH on the cobwebs (A) and take the CASH REGISTER BUTTON.
- Zoom into the bowl; use the MAGICAL BRUSH on the cobwebs (B); take the first MAYAN TILE and the first LITTLE BONE.
- Look inside the dog house; use the MAGICAL BRUSH on the cobwebs (C), remove the cloth, and take the WOODEN HANDLE.
- Return to the Hunting Lodge.
- Zoom into the window; use the MAGICAL BRUSH on the cobwebs (1) and take the BOOK.
- Zoom into the chest; use the MAGICAL BRUSH on the cobwebs (2) and take the 1/3 COIN.
- Walk down to the Porch and zoom into the picture.
- Remove the bear picture; insert the WOODEN HANDLE into the niche and take the second METAL DISK (3).
- Return to the First Floor of the Library.
- Zoom into the cash register; place the CASH REGISTER BUTTON in the slot (3).
- Press the button; take the second MAYAN TILE (4) and the 2/3 COIN (5).
- Return to the Valley.
- Zoom into the manhole cover and place the 2 MAYAN TILES on it (6).
- Take the third METAL DISK and the second LITTLE BONE (7).
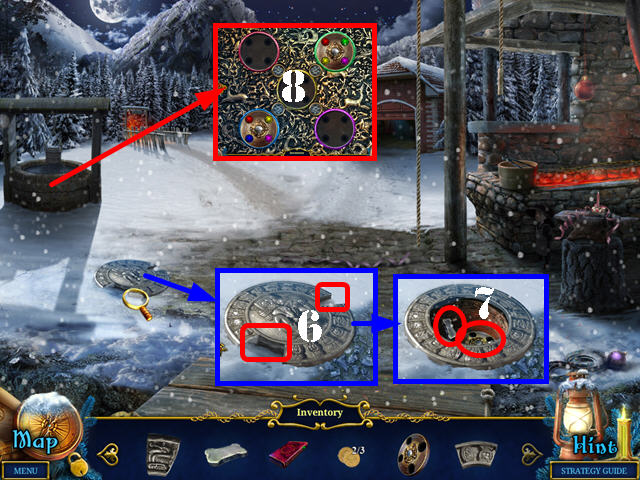
- Zoom into the well; place the 3 METAL DISKS on it to activate a puzzle (8).
- Assemble all the balls of one color into their matching rings. Select a disk to spin it or select the button in between the disks to swap the pieces.
- To solve the puzzle, please make the following moves:
- E, F, G, H, A, E, C, G, D, H, B, F, I, E, F, G, H, C x 2.
- A x 2, B x 2, D x 2, E, F, H, G, I x 3, G, E, F, and H.
- Zoom into the drain; take the second KNIGHT FIGURINE (J).
- Return to the First Floor of the Library.
- Zoom into the table and use the NUTCRACKER on the rat (K).
- Place the 2 KNIGHT FIGURINES in the slots (green) to activate a puzzle.
- Encircle as many of your opponent’s flags (red) as possible.
- Select an empty hole to place your flag (blue) on it.
- The solution to this puzzle is random; the screenshot displays a winning board (L).
- Take the CAT STATUETTE (@).
- Return to the Kennel.
- Zoom into the dog house; insert the 2 LITTLE BONES into the slots (M).
- Take the 1/6 and the 2/6 GOLDEN RIVETS (N).
- Return to the Well.
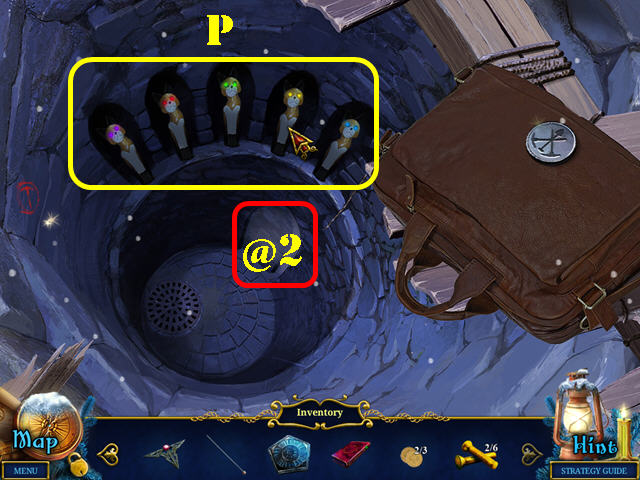
- Zoom into the niche; place the CAT STATUETTE in the niche.
- Select two cat statuettes to swap their positions until all the eye colors are in the right place.
- Please look at the screenshot for the solution (purple, red, green, yellow, and blue) (P).
- Go to the Temple (@2).
- Touch anywhere on the scene.
- Zoom into the pedestal; take the MINER’S BADGE (Q).
- Walk down to the Well.
- Place the MINER’S BADGE in the slot (R).
- Take the 3/3 COIN and the GLOVES (S).
- Return to the Hunting Lodge.
- Zoom into the window sill; place the 3 COINS in the slots (T).
- Take the 3/6 and 4/6 RIVETS (U).
- Return to the Second Floor of the Library.
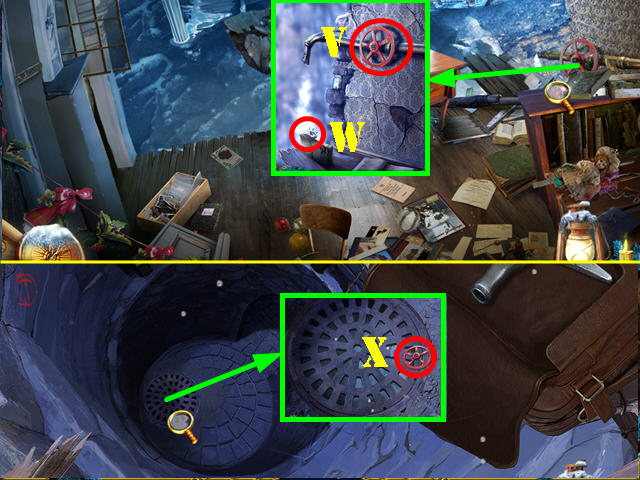
- Zoom into the valve; use the GLOVES to get the VALVE (V) and the PIECE OF ORE (W).
- Return to the Well.
- Zoom into the drain; place the VALVE in the slot to activate a HOS (X).
- Break the ice (1) with the ice pick (2) and take the cherries.
- Place the flower (3) on the stem (4) and take the flower.
- You will receive the NET.
Chapter 6: The Temple
- Return to the Second Floor of the Library.
- Zoom into the floating island; use the NET to pull it closer (A).
- Use the NUTCRACKER on the net and take the GRAVITATION STONE (B).
- Return to the Temple.
- Zoom into the hammer; place the GRAVITATION STONE on the hammer and take the second BOOK (C).
- Return to the First Floor of the Library.
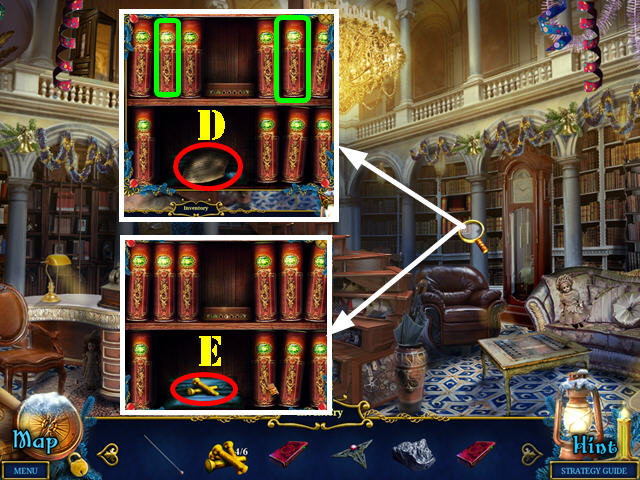
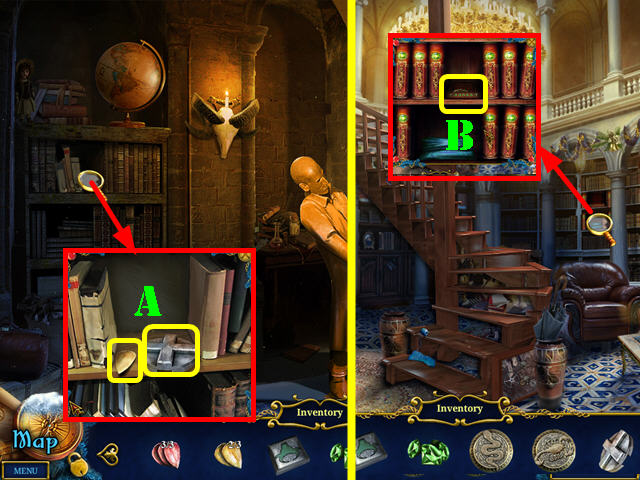
- Zoom into the bookcase; insert the 2 BOOKS in the empty slots (green) and take the note (D).
- Take the 5/6 and the 6/6 RIVETS (E).
- Return to the Temple.
- Zoom into the hammer; touch it 3 times and add the 6 RIVETS to it (F).
- Hit the rock monster with the HAMMER 3 times (G).
- Zoom into the rock monster’s remains; take the 2 GRAVITATION STONES (H).
- Zoom into the center fountain and insert the PENTAGON AMULET into the slot (I).
- Zoom into the left fountain; take the ROUND KEY (J). Use the KNITTING NEEDLE in the lion’s mouth (K).
- Return to the Second Floor of the Library.
- Zoom into the desk; place the ROUND KEY on the book (@); place the 2 GRAVITATION STONES on the left page and exit the close-up scene (L).
- Zoom into the first floating island; take the PIPE WRENCH (M).
- Zoom into the second floating island; use the PIPE WRENCH on the pipe (N) and take the PIPE.
- Return to the Temple.
- Zoom into the fountain; place the PIPE (O) and take the GRAVITATION STONE (P).
- Return to the Second Floor of the Library.
- Zoom into the desk; place the GRAVITATION STONE on the left page and exit the close-up scene (Q).
- Zoom into the floating island; use the NUTCRACKER to cut the rope and take the HANDLE (R).
- Return to the Well.
- Place the HANDLE on the pickax head; take the PICKAX (S).
- Zoom into the wall; use the PICKAX on the brick 2 times and take the DRAGON EGG (T).
- Return to the Kennel.
- Zoom into the wall; use the PICKAX on the wall 2 times and take the STONE GEAR (U).
- Return to the Crossroads.
- Zoom into the dragon stone; insert the DRAGON EGG into the niche (V) and take the STONE GEAR (W).
- Return to the Temple.
- Zoom into the fountain; place the 2 STONE GEARS on the mechanism (X).
- Examine the center fountain; take the GRAVITATION STONE (Y).
- Return to the Second Floor of the Library.
- Zoom into the desk; place the GRAVITATION STONE on the left page and exit the close-up scene (1).
- Zoom into the floating island; take the 1/3 RED SCALE, the HEX KEY, and the second PIECE OF A CHARM (2).
- Zoom into the glass cube; use the HEX KEY on the screws (yellow).
- Take the 1/3 GOLDEN SCALE (3).
- Return to the Library Doors.
- Zoom into the sign.
- Use the HEX KEY on the screw to receive the 1/2 TRIANGLE DOWEL (4).
Chapter 7: The Precipice
- Return to the Hunting Lodge.
- Zoom into the fireplace; use the HEX KEY on the screw to receive the FUNNEL (A).
- Zoom into the floor; break the floorboard with the PICKAX twice. Place the 2 PIECES OF A CHARM on the chest (B).
- Take the GRAVITATION STONE (C).
- Return to the Second Floor of the Library.
- Zoom into the desk; place the GRAVITATION STONE on the left page (D).
- Go forward to the Precipice (E).
- Zoom into the ground; take the WEDGE and the MOLD (orange).
- Use the CANDLE on the frozen tile (F).
- Return to the Valley.
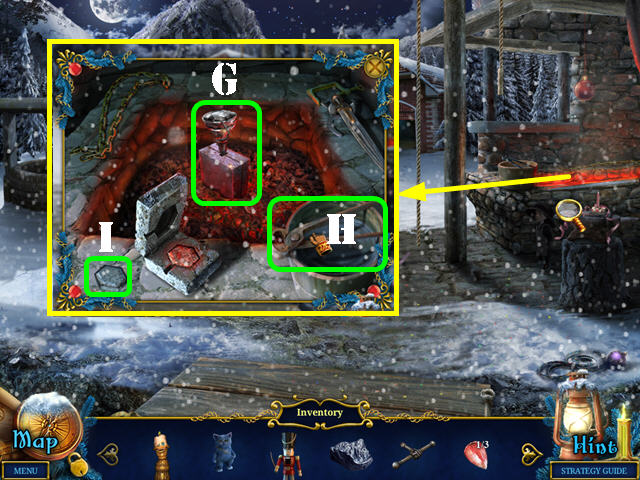
- Zoom into the forge; place the MOLD over the coals and then place the FUNNEL in the mold (G).
- Put the PIECE OF ORE in the funnel; touch the tongs (H).
- Touch the tongs 2 more times and take the HEXAGON (I).
- Return to the Second Floor of the Library.
- Zoom into the floating island; place the HEXAGON in the niche and take the PATTERNED AMULET (J).
- Go forward to the Precipice.
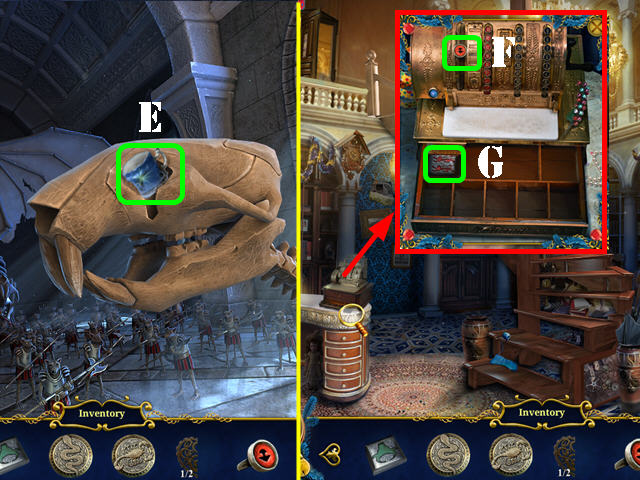
- Examine the left dragon; place the PATTERNED AMULET on his nose (K). Take the 2/2 TRIANGLE DOWEL (L).
- Return to the Kitchen Door.
- Zoom into the right door; place the 2 TRIANGLE DOWELS on the lock (M); go through the door to reach the Stairwell.
- Take the 2/3 GOLDEN SCALE (N).
- Go forward to the Dungeon (O).
- Zoom into the right cage; use the CAT on it (P).
- Examine the fallen cage; take the 2/3 RED SCALE and the ANIMAL TILE (Q).
- Zoom into the stump; take the 3/3 RED SCALE, the AXE, and the GREEN STONES (R).
- Return to the Kennel.
- Zoom into the post; place the WEDGE behind the gear connector. Use the AXE on the wedge to receive the GEAR CONNECTOR (S).
- Look on the ground; take the SNAKE AMULET (T).
- Return to the Stairwell.
- Zoom into the torch; remove the golden panel (1) and then remove the screw (2) with the HEX KEY. Remove the silver panel (3).
- Place the GEAR CONNECTOR on the mechanism (4) and flip the torch (5) to reveal a secret door.
- Enter the Alchemist’s Room.
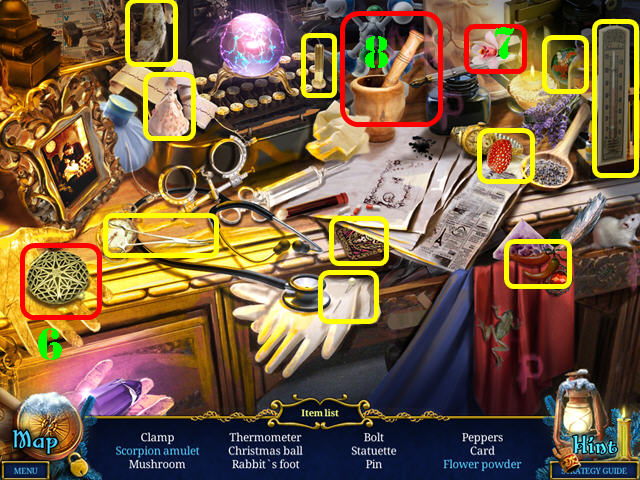
- Play the HOS.
- Open the case (6) and take the scorpion amulet.
- Place the flower (7) in the mortar (8) and take the flower powder.
- You will receive the SCORPION AMULET.
- Take a closer look at the shelf; take the 3/3 GOLDEN SCALE and the CROSS KEY (A).
- Return to the First Floor of the Library.
- Zoom into the bookcase; place the GREEN STONES on the chest and take the 1/2 HEART PIECE (B).
- Return to the Precipice.

- Examine the left dragon; place the CROSS KEY in the lock and take the CASH REGISTER BUTTON (C).
- Zoom into the back door; place the 3 GOLDEN SCALES and the 3 RED SCALES on the door (D).
- Go forward to the Throne Room.
Chapter 8: The Throne Room
- Take the CUP (E).
- Return to the First Floor of the Library.
- Zoom into the cash register; place the CASH REGISTER BUTTON on the machine (F).
- Press the button and take the second ANIMAL TILE (G).
- Return to the Stairwell.
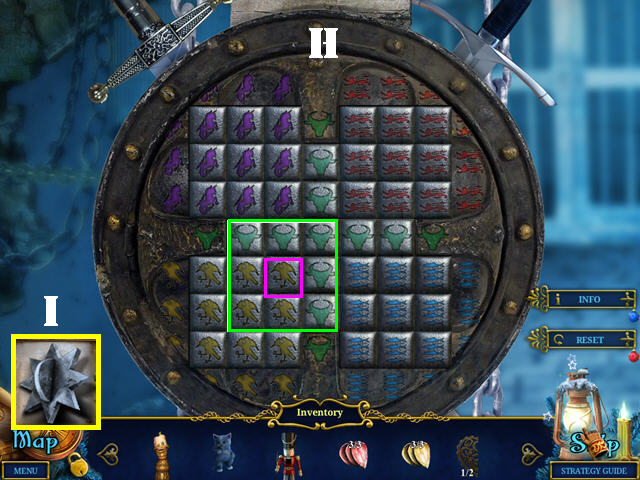
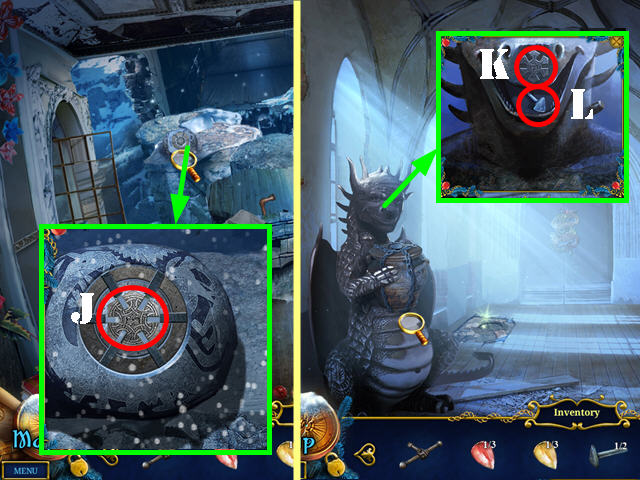
- Zoom into the puzzle; place the 2 ANIMAL TILES on it to activate a puzzle.
- Place the tiles over into the right spots; use the etched designs as a clue.
- Click on a tile (purple) and all the surrounding pieces will rotate (green).
- The puzzle solution is random; the screenshot displays the final image (H).
- Take the SILVER STAR (I).
- Return to the Precipice.
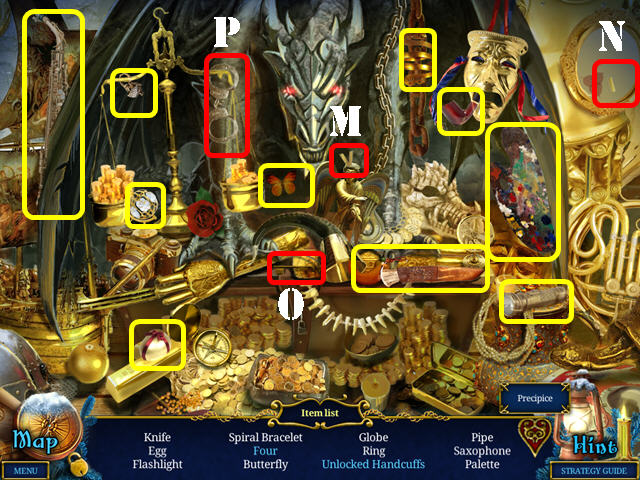
- Zoom into the left dragon; insert the SILVER STAR in the lock (J).
- Take the 2/2 HEART PIECE (K).
- Zoom into the right dragon; place the HEART PIECES in the niche to activate a HOS (L).
- Play the HOS.
- Place the V (M) on the mirror (N) and take the four.
- Use the key (O) on the handcuffs (P); take the unlocked handcuffs.
- You will receive the SKULL RING.
- Return to the Dungeon.

- Zoom into the right cage; place the SKULL RING on the locking mechanism (Q).
- Take the second CUP (R).
- Return to the Kitchen.
- Zoom into the shelf; place the 2 CUPS on it to activate a puzzle (S).
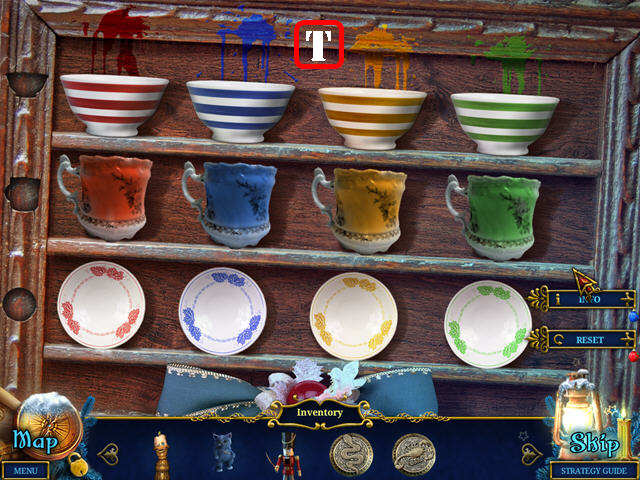
- Place the dinnerware on the shelf according to the splashes of paint.
- Select two items that have something in common (color or style) to swap them.
- Please look at the screenshot for the solution (T). Solving this puzzle activates a HOS.
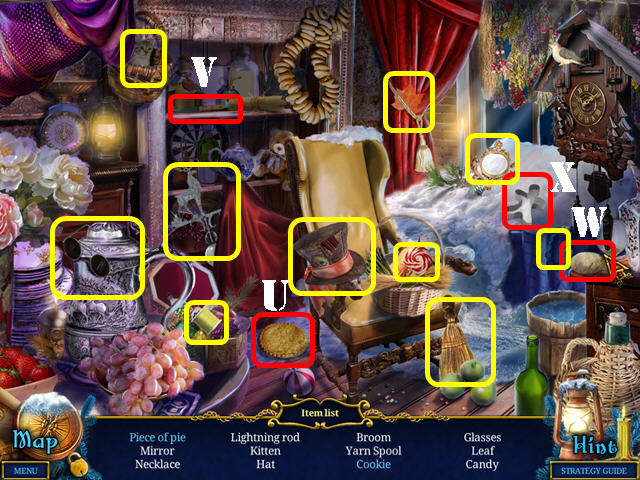
- Play the HOS.
- Cut the pie (U) with the knife (V) and take the piece of pie.
- Place the dough (W) in the cookie cutter (X) and take the cookie.
- You will receive the WEATHERVANE.
- Return to the Dungeon.
- Zoom into the mice; use the WEATHERVANE on the device. Take the SCALPEL (A).
- Zoom into the gate; take the note (B).
- Zoom into the left cage; use the CAT on it (C).
- Inspect the fallen cage; take the SPIDER AMULET (D).
- Return to the Precipice.
- Zoom into the floor.
- Place the SNAKE AMULET, SPIDER AMULET, and the SCORPION AMULET (green) on the stones.
- Take the STONE TRAY (E).
- Return to the Temple.
- Zoom into the fountain; use the STONE TRAY in the fountain and take the ACID (F).
- Return to the Dungeon.
- Zoom into the gate; use the ACID on the bars. Take the FLUTE and the MALLET (G).
- Return to the Throne Room.

- Use the FLUTE on the scene to get rid of the army of mice.
- Take the SMALL SCREWDRIVER (H).
- Return to the Alchemist’s Room.
- Zoom into the toy repair shop (I).
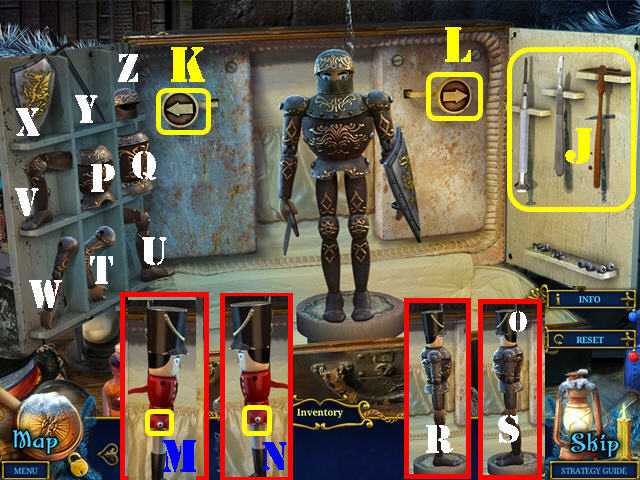
- Place the SCALPEL, MALLET, and SMALL SCREWDRIVER (J). Place the NUTCRACKER on the hook to activate a puzzle.
- Touch the body and remove the arm.
- Press the left arrow (K); touch the screw (M) and remove the arm. Touch the screw and then remove the leg.
- Touch the right arrow twice (L); touch the screw and remove the other leg (N).
- Face the nutcracker forward and put the front breastplate on (P). Face the nutcracker backwards and put the back breastplate on (Q).
- Turn it sideways and place two rivets on it (R). Turn it to the opposite side and place the rivets on it (S). Put the leg (U) on and then place one rivet on it. Put the arm (T) on and then place one rivet on it.
- Turn it sideways in the opposite way. Put the leg (V) on and then place one rivet on it. Put the arm on (W) and then place one rivet on it.
- Place the shield on it (X) and face it forward. Remove the hat (O). Place the helmet (Z) on it and then give it the sword (Y).
- Take the ARMORED NUTCRACKER.
- Return to the Throne Room.

- Use the ARMORED NUTCRACKER on the scene. You will receive the ARMORED NUTCRACKER, the PRINCESS, and the MAGIC WAND (1).
- Return to the Christmas Hall.
- Zoom into the boxes; place the ARMORED NUTCRACKER and the PRINCESS in their respective boxes. Use the MAGIC WAND on the nutcracker and the princess (2).
- Congratulations, you have completed Christmas Stories: Nutcracker!


 Mystery Age: The Imperial Staff Walkthrough, Guide, & Tips
 The Seawise Chronicles: Untamed Legacy Walkthrough, Guide, & Tips
 Scarytales: All Hail King Mongo Walkthrough, Guide, & Tips
 Tales of Terror: Crimson Dawn Walkthrough, Guide, & Tips
 Shaban Walkthrough, Guide, & Tips