Fairly Twisted Tales: The Price of a Rose Walkthrough, Guide, & Tips
Fairly Twisted Tales: The Price of a Rose Walkthrough

Welcome to the Fairly Twisted Tales: The Price of a Rose Walkthrough
To save her father, Bella vowed to stay with the beast, but is he truly evil? Help Bella follow her heart!
Whether you use this document as a reference when things get difficult or as a road map to get you from beginning to end, we’re pretty sure you’ll find what you’re looking for here.
This document contains a complete Fairly Twisted Tales: The Price of a Rose game walkthrough featuring annotated screenshots from actual gameplay!
We hope you find this information useful as you play your way through the game. Use the walkthrough menu below to quickly jump to whatever stage of the game you need help with.
Remember to visit the Big Fish Games Forums if you find you need more help. Have fun!
This walkthrough was created by Rebekah, and is protected under US Copyright laws. Any unauthorized use, including re-publication in whole or in part, without permission, is strictly prohibited.
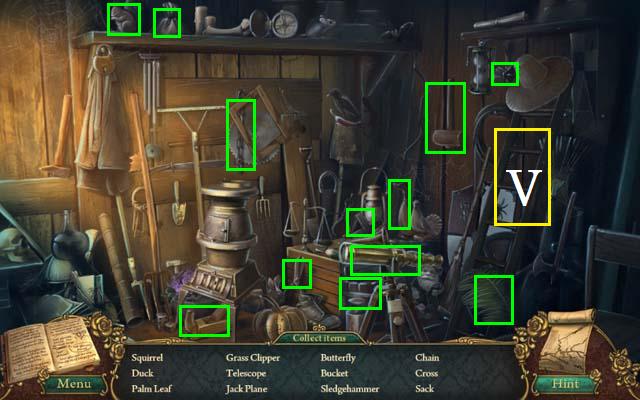
General Tips

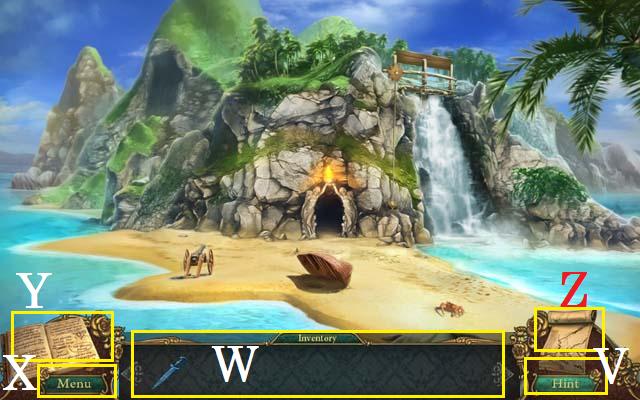
- This is the official guide for Fairly Twisted Tales: The Price of a Rose.
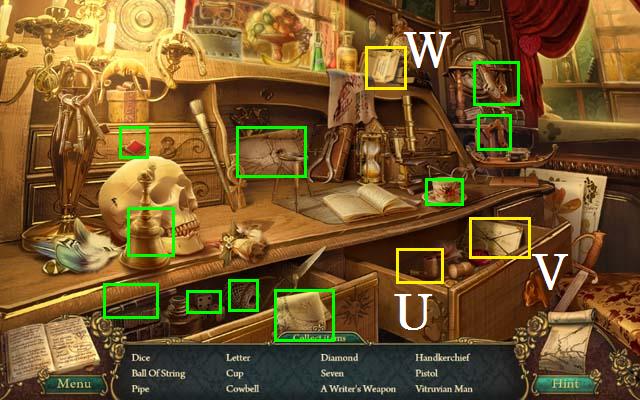
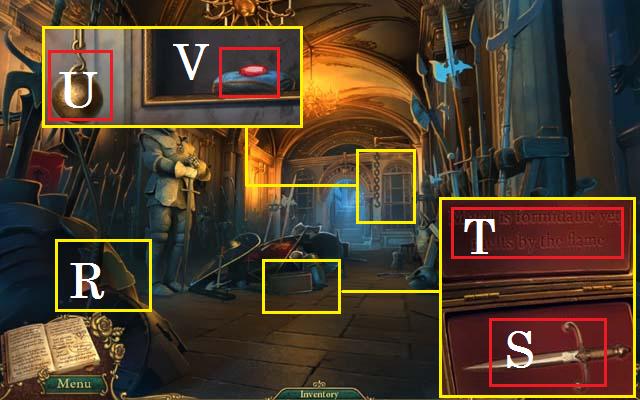
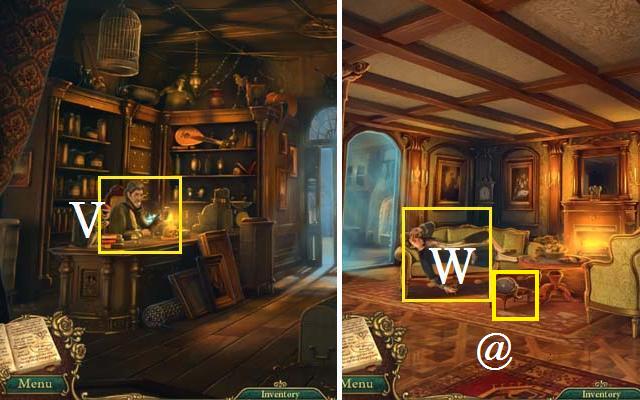
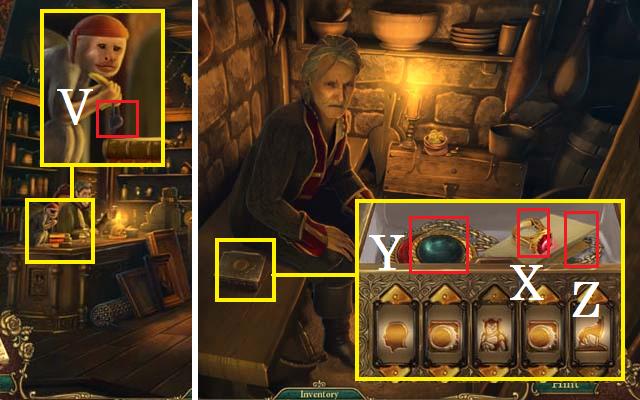
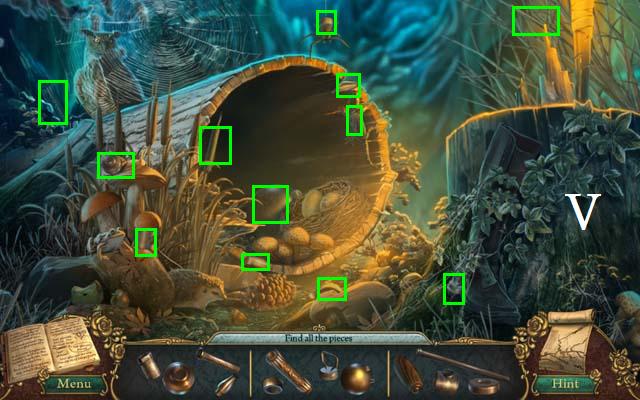
- Use the Hint Button (V) if you need additional help.
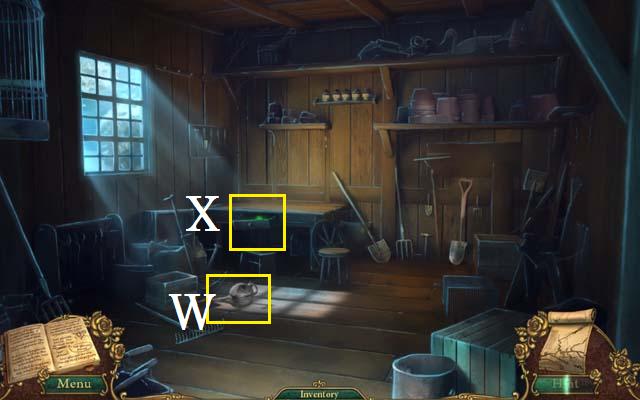
- Your Inventory bar (W) will hold items until they are needed.
- Zoom into glowing or sparkling scenes to trigger Hidden Object Scenes. In this guide we will use the acronym ‘HOS’ for Hidden Object Scenes.
- Some HOS require additional actions to unlock all of the items. All hidden objects are marked in green unless otherwise noted.
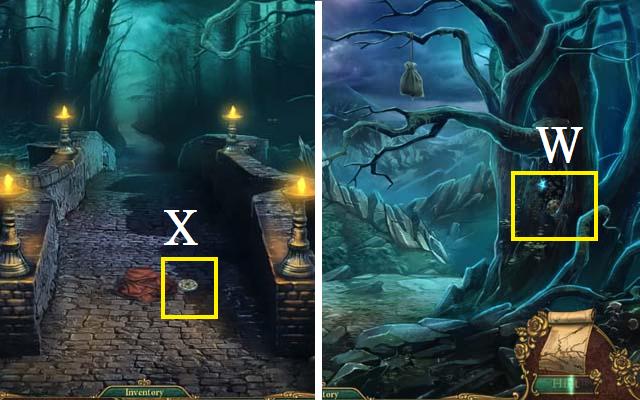
- Click on the Menu (X) button to exit, pause, or resume the game. You can also adjust your options (sound, music, and screen size).
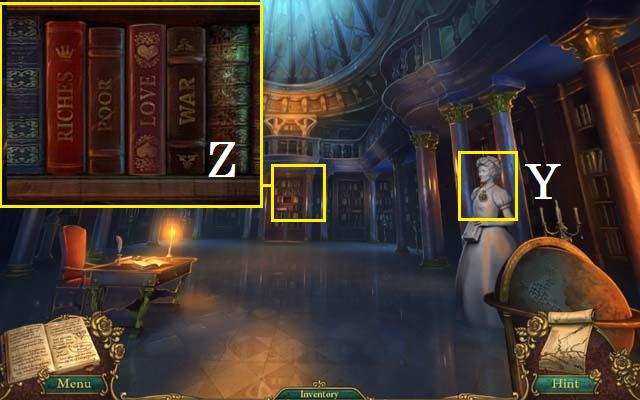
- Use your Journal (Y) for additional help with puzzles and tasks.
- You will need to collect five ancient scroll texts to win the game. They are all marked in this guide.
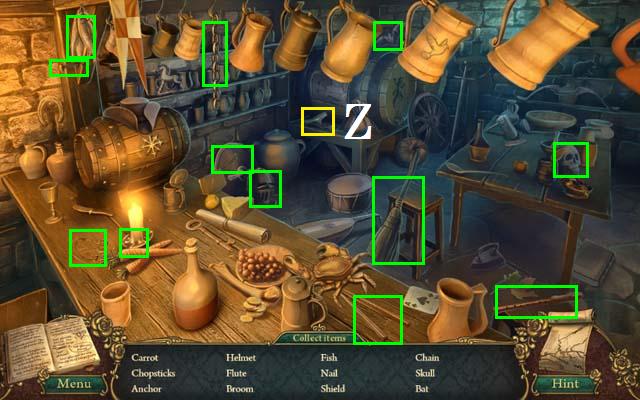
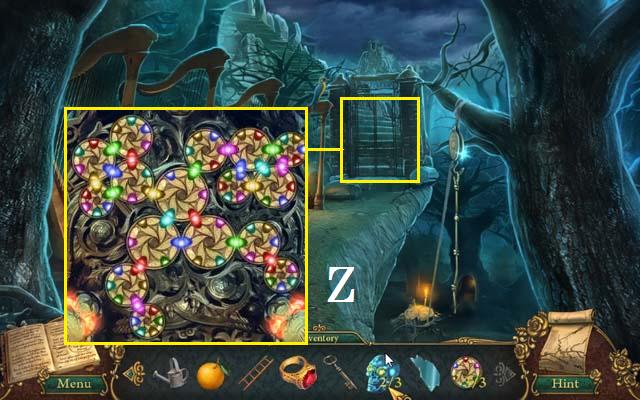
- You can use the Map (Z) to travel between locations once they have been unlocked.
- You will not need to follow the exact path of this guide; however, some actions are required before others can be performed.
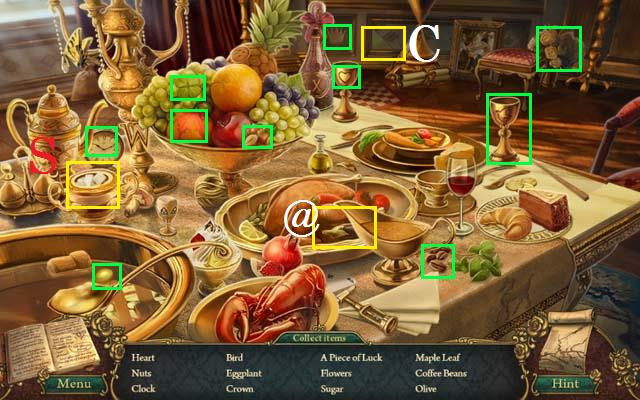
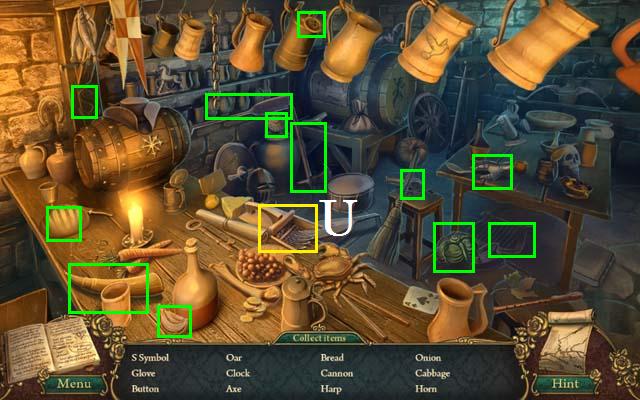
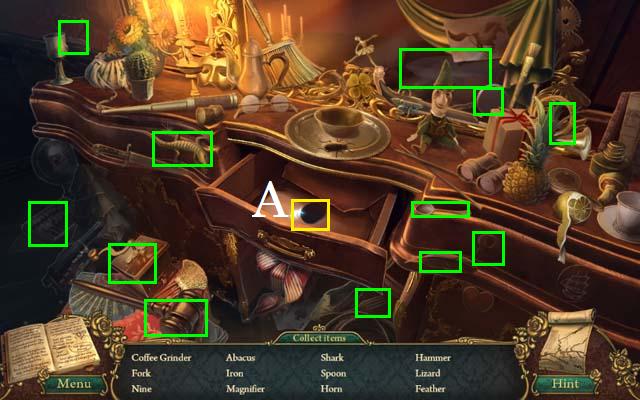
Chapter 1: The Beach
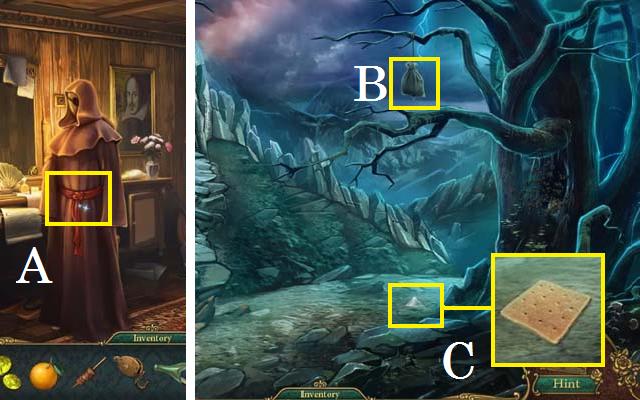
- Collect the SHELL (A).
- Zoom into the sand; use the SHELL to uncover the GOGGLES (B). Collect the GOGGLES.
- Enter the Cave.
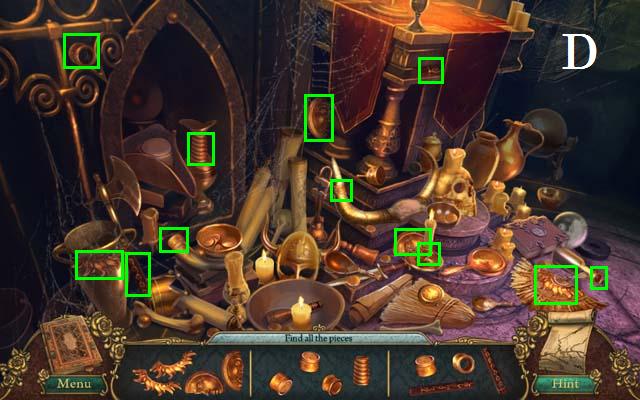
- Hold the GOGGLES out in front of you and then enter the water (C) to play a HOS.
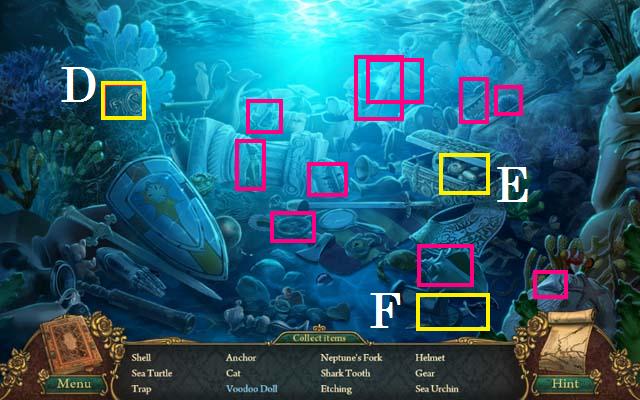
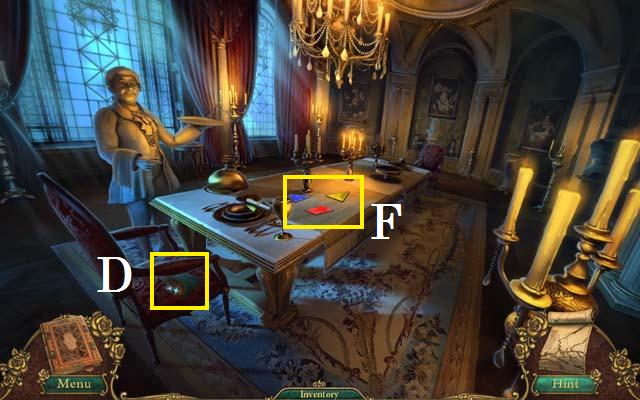
- Tap the combination numbers (D) to unlock and open the chest and reveal the Voodoo Doll (E).
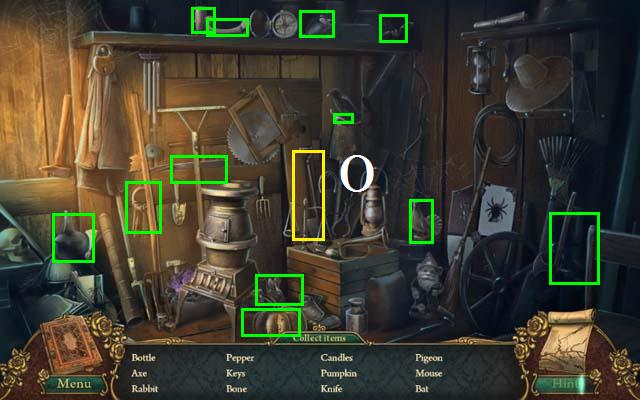
- Collect all of the items (pink) listed.
- Collect the RUSTY KNIFE (F) to have it placed in your inventory.
- Exit the Cave.
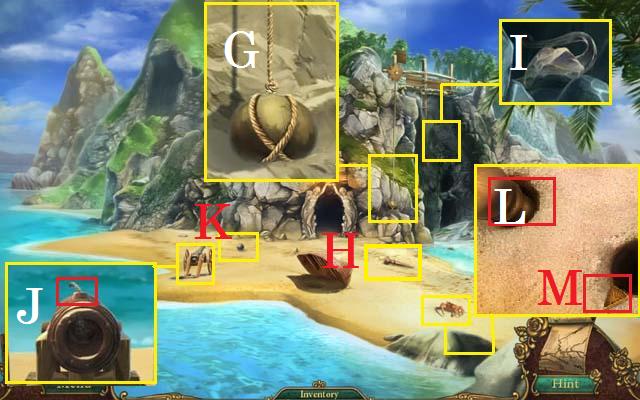
- Zoom into the rope; use the RUSTY KNIFE to cut the rope (G).
- Collect the WOODEN PEG (H).
- Zoom into the cliff; collect the FLINT AND STEEL (I).
- Zoom into the cannon; light the fuse (J) with the FLINT AND STEEL.
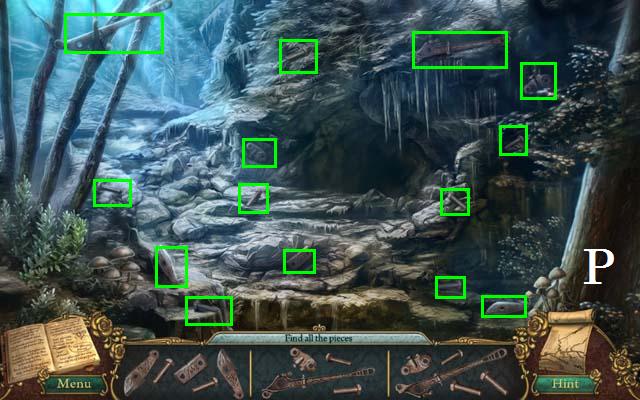
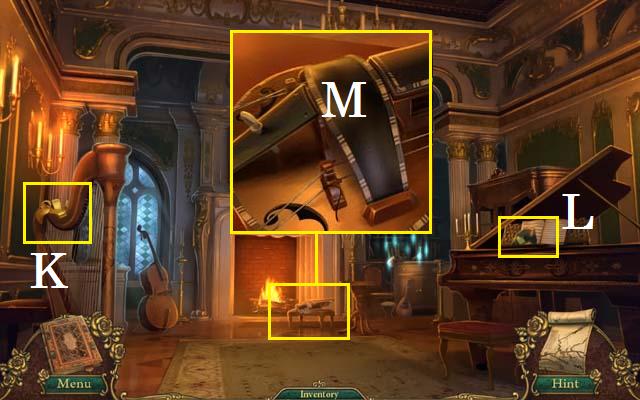
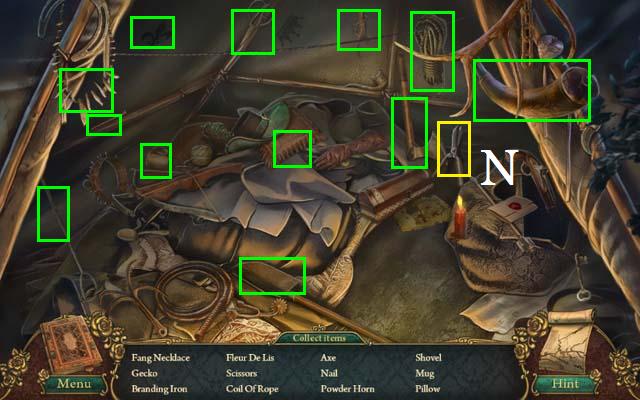
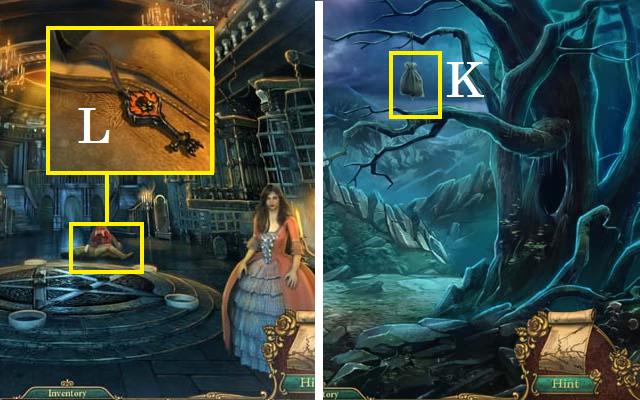
- Collect the CANNONBALL (K).
- Zoom into the crab; place the WOODEN PEG in the hole (L) and then collect the PUZZLE PIECE (M).
- Enter the Cave.
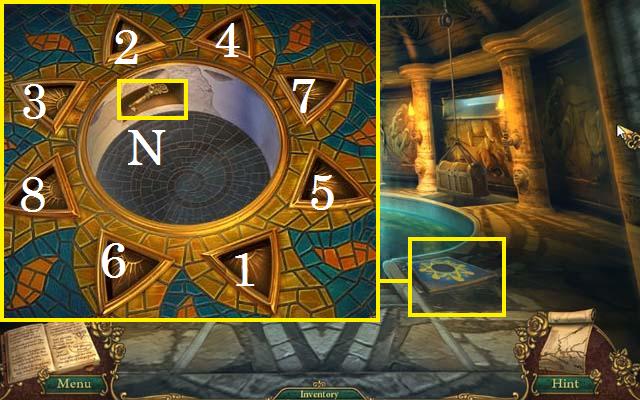
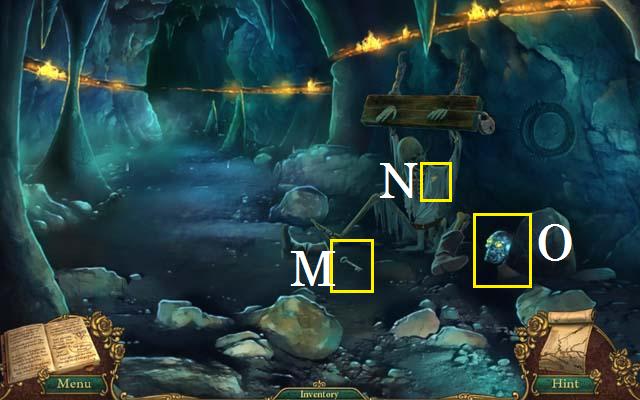
- Zoom into the ground; place the PUZZLE PIECE in the open slot. Press the buttons in order of 1-8.
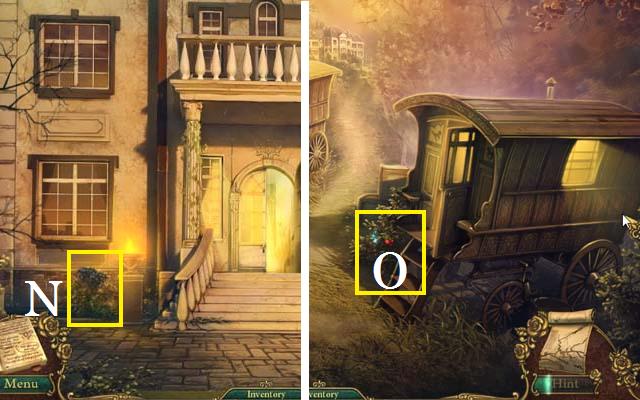
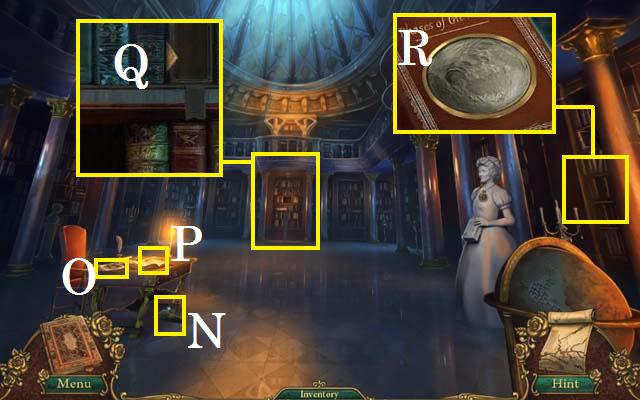
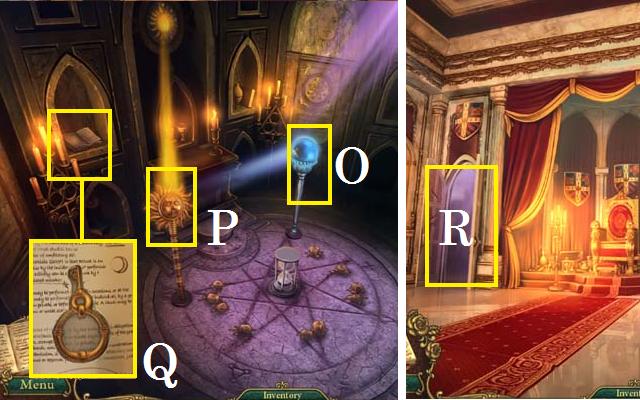
- Collect the CHEST KEY (N).
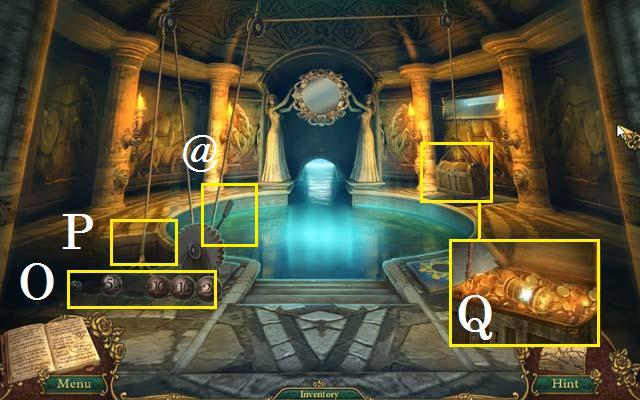
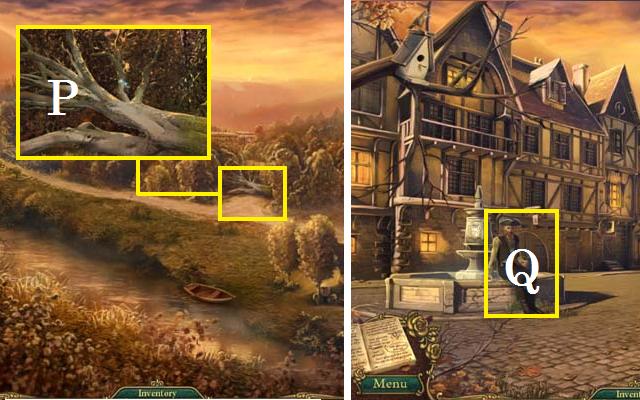
- Place the CANNONBALL in the line (O).
- Place the 8, 5, and 1 pound cannonballs on the scale (P) and pull the lever (@) to access the chest.
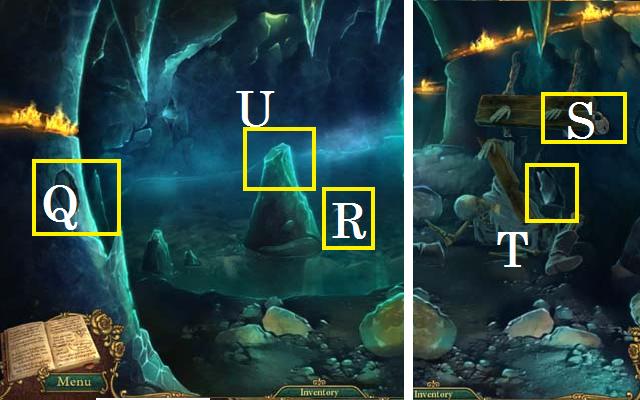
- Zoom into the chest; unlock the chest with the CHEST KEY and then collect the ANCIENT SCROLL (Q).
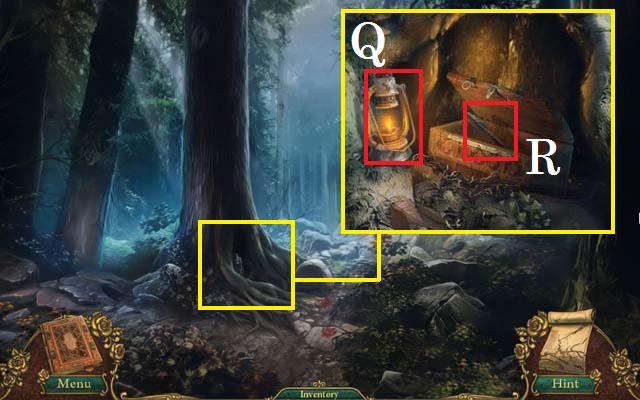
Chapter 2: The Fouquet’s House
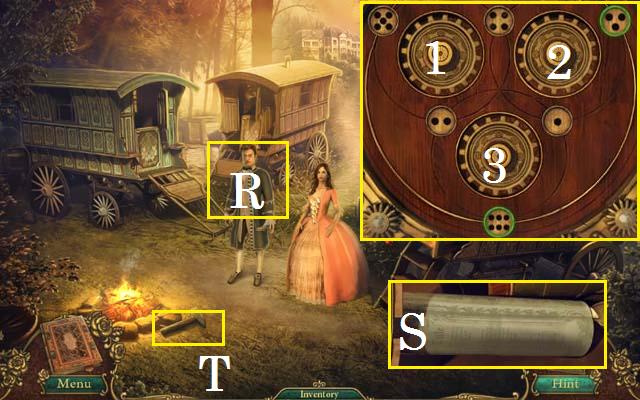
- Give the ANCIENT SCROLL to Raphael (R).
- Zoom into the ANCIENT SCROLL; use the following sequence to set the correct arrangement: 2, 2, 1, 1, 2, 1, 1.
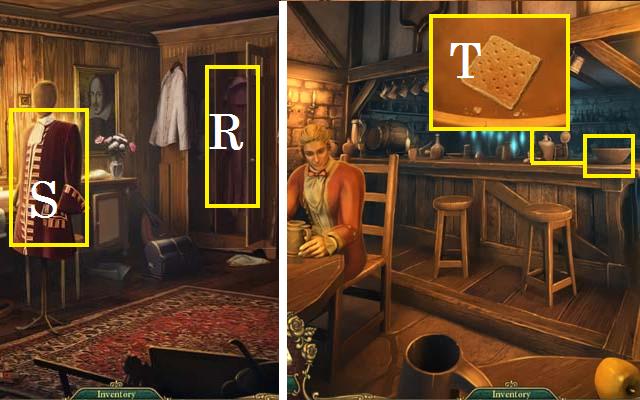
- Collect the opened ANCIENT SCROLL (S).
- Collect the HAMMER (T).
- Enter the Caravan.
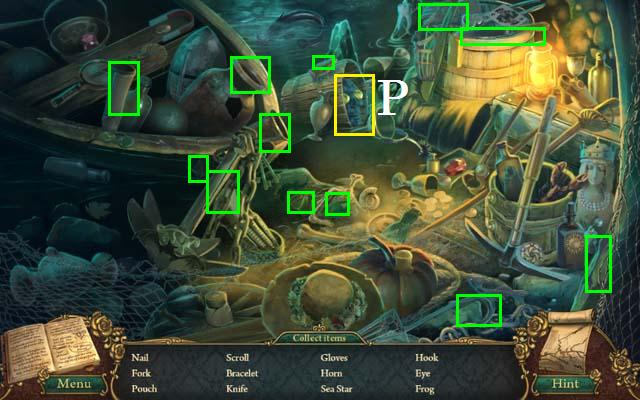
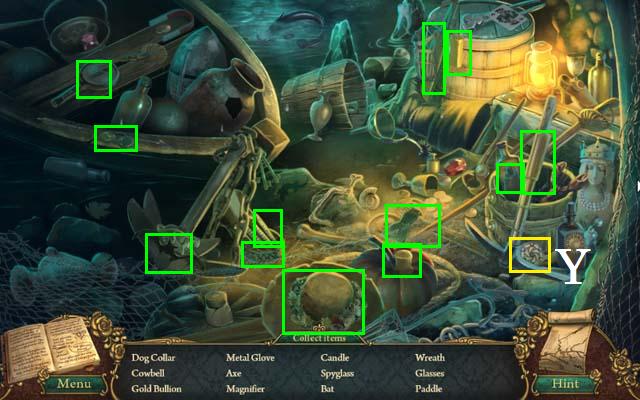
- Zoom into the sparkles to play a HOS.
- Open the drawer to locate the Pipe (U) and Letter (V).
- Collect the remaining items on the list.
- Collect the INVITATION (W).
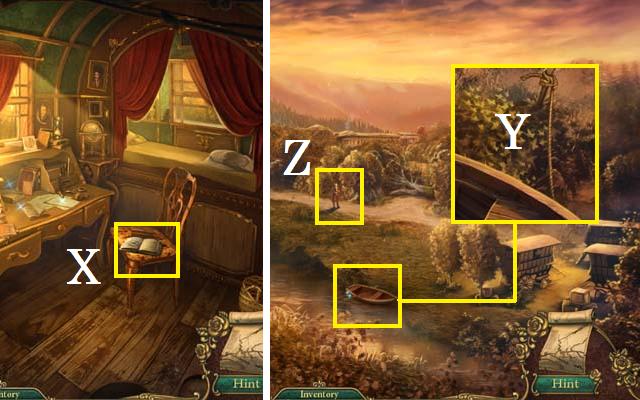
- Examine the book (X).
- Exit the Caravan and then take the path to the Road.
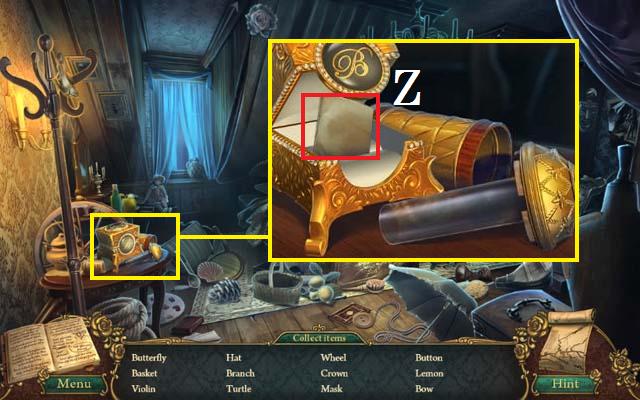
- Zoom into the boat; collect the ROPE (Y).
- Speak with Malget (Z).
- Take the Road to the Fouquet’s Property.
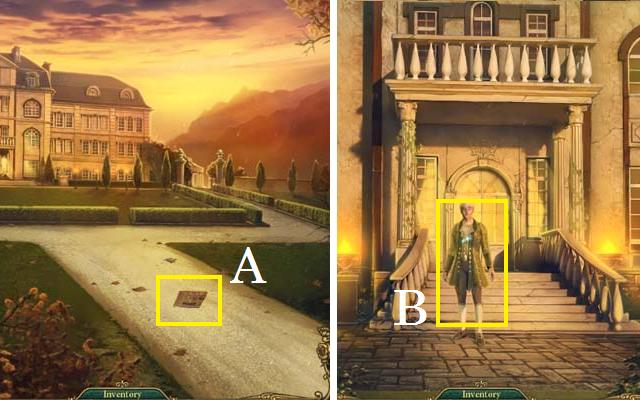
- Collect the paper (A).
- Continue to move forward to the Front Porch.
- Give the Doorman (B) your INVITATION.
- Enter the Entry Foyer.
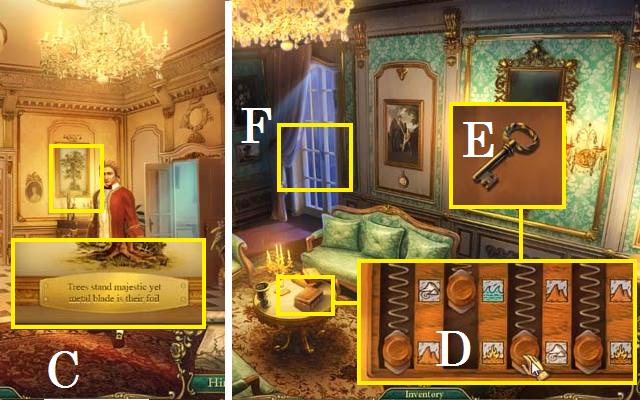
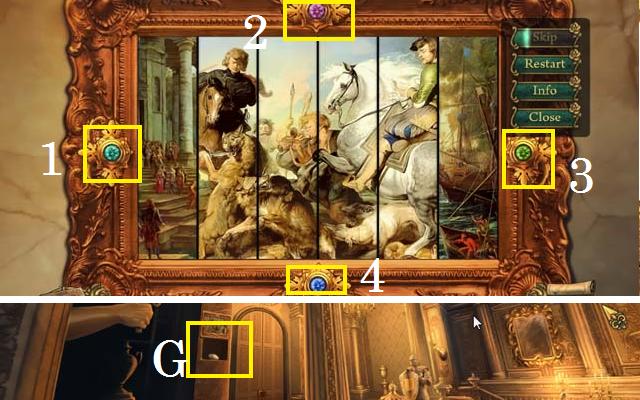
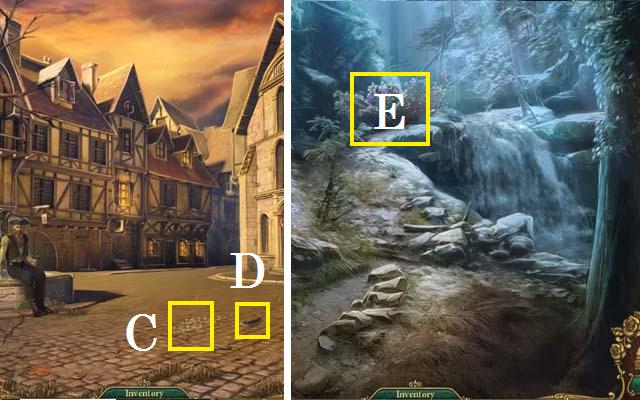
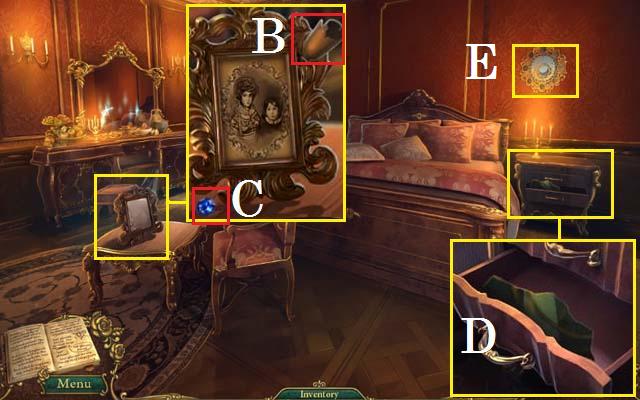
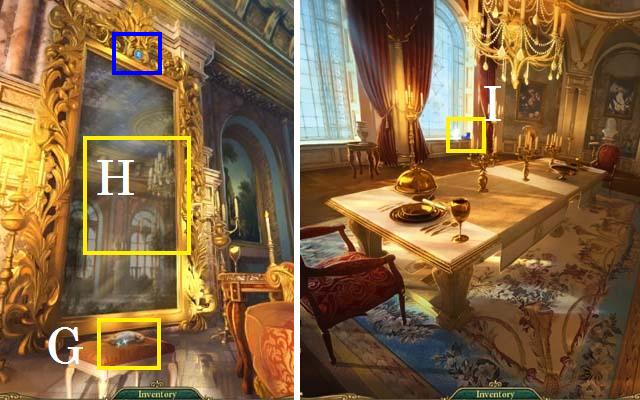
- Speak with all of the people. Zoom into the painting; hold the ANCIENT SCROLL over the first set of text (C).
- Enter the Salon.
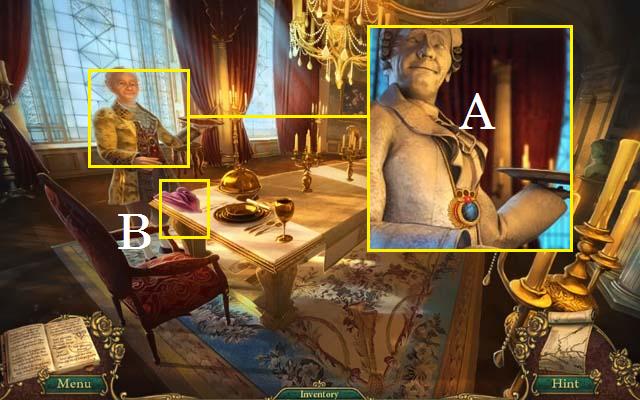
- Speak with everyone in the room. Exit the Salon and then enter the Dining Room.
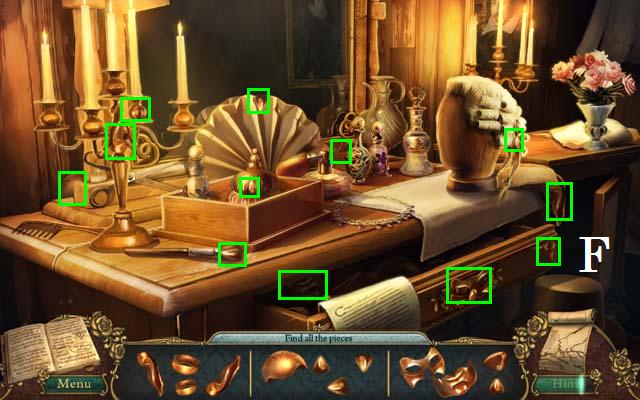
- Speak with both men to receive the LOCKBOX PIECE.
- Return to the Salon.
- Zoom into the box; place the LOCKBOX PIECE in the slot and then arrange the pieces as shown in the screenshot (D).
- Collect the letter and the BACKDOOR KEY (E).
- Zoom into the backdoor (F); open the lock with the BACKDOOR KEY and then exit to the Fouquet Backyard.
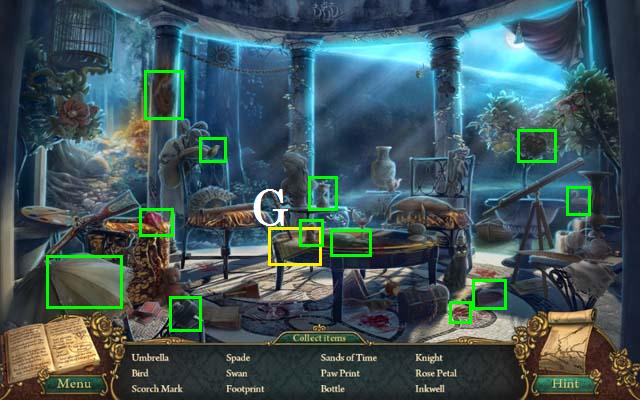
- Zoom into the gazebo to trigger a HOS.
- Collect all of the items on the list.
- Collect the Diary Page (G) to have it added to your Journal.
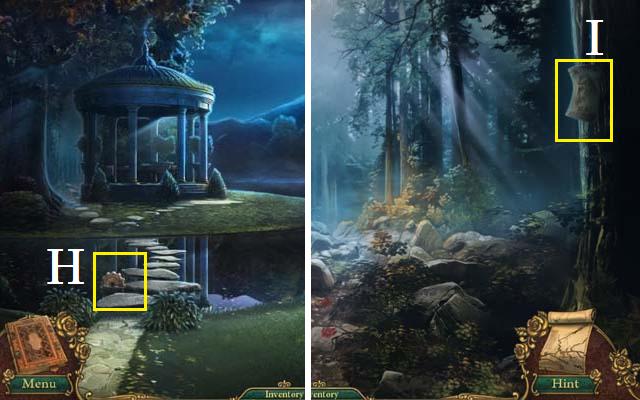
- Back up to the Fouquet Backyard and collect the BIG GEAR (H).
- Take the path forward to the Forest Entrance.
- Collect the poster (I).
- Move forward to the Hunter’s Camp.
- Zoom into the sparkles to play a HOS.
- Collect all of the items on the list.
- Collect the UNLIT TORCH (J).
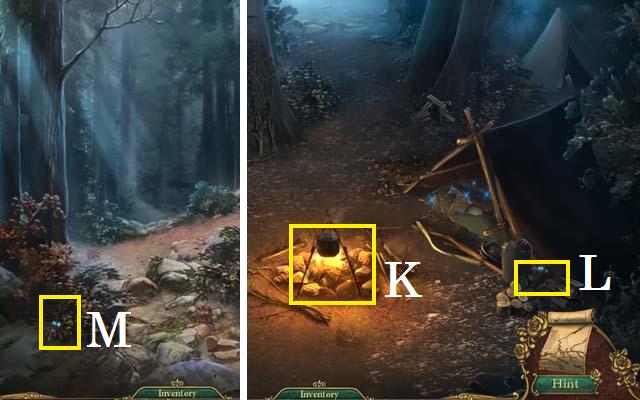
- Place the UNLIT TORCH over the fire (K) to receive the LIT TORCH.
- Collect the MEDIUM-SIZED GEAR (L).
- Take the Forest Path.
- Collect the SUN DISK LEFT HALF (M).
- Continue to the Waterfall.
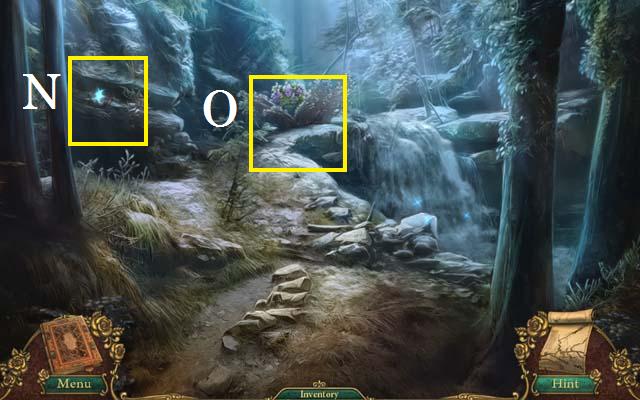
- Collect the SMALL GEAR (N).
- Examine the bush (O) to rouse the snake.
- Use the LIT TORCH to scare away the snake.
- Zoom into the sparkles to trigger a HOS.
- Collect all of the pieces pictured on the list to receive the BOLT CUTTER. (P).
- Return to the Forest Entrance.
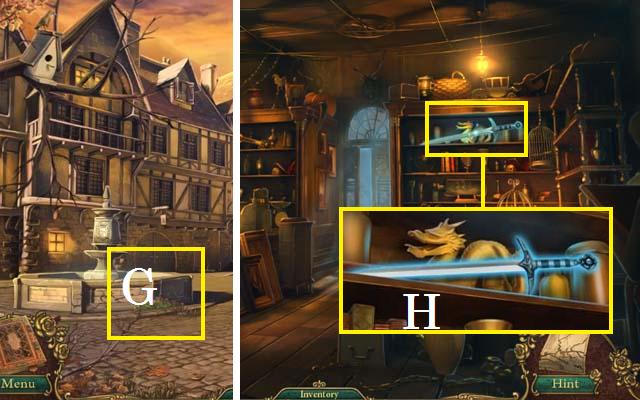
- Zoom into the tree; light the lamp (Q) with the LIT TORCH. Cut the chains with the BOLT CUTTER and then collect the SPEAR (R).
- Return to the Forest Path and then take the trail to the Northern Trail.

- Zoom into the mechanism; place the BIG GEAR, MEDIUM-SIZED GEAR, and the SMALL GEAR in the mechanism.
- Use the SPEAR as the lever (S) and the ROPE on the top gear (blue). Arrange the gears as they are shown in the screenshot and pull the lever.
- Take the trail to the Snow-Covered Trail.
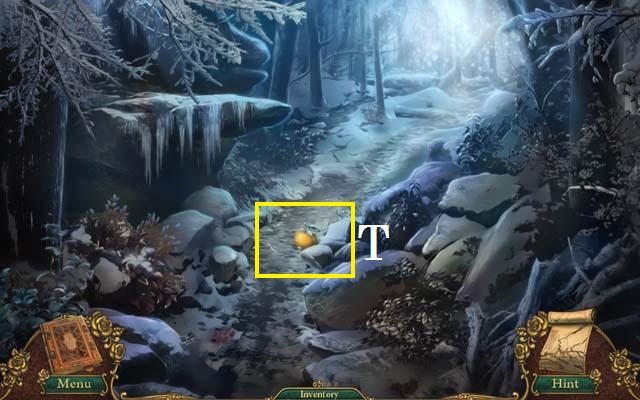
- Collect the ORANGE (T).
- Move forward to the Castle Lane and then continue to the Castle Approach. Take a right to the Garden Trellis and continue to the Fountain.
Chapter 3: The Castle
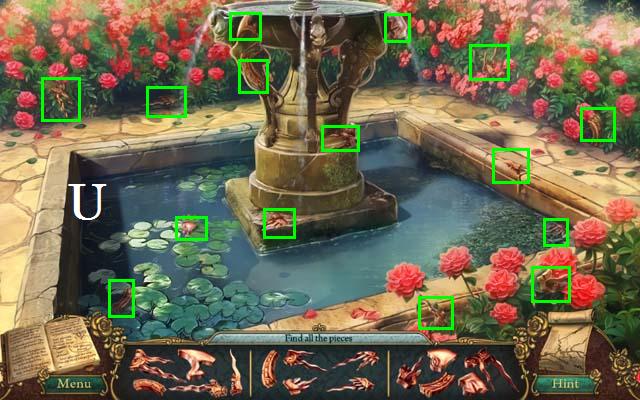
- Zoom into the sparkles to play a HOS.
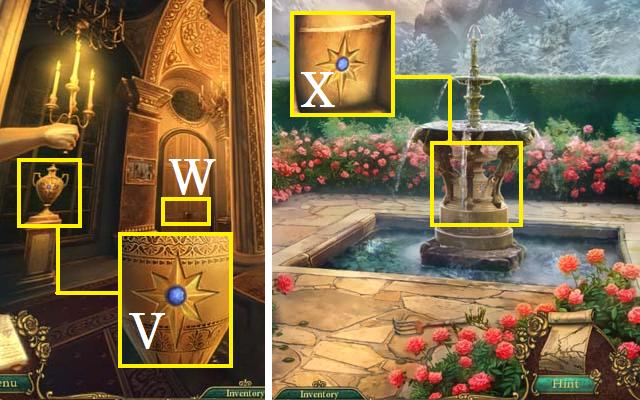
- Collect all of the pieces on the list to receive the SUNDISK RIGHT HALF (U).

- Collect the EMPTY WATERING CAN (V).
- Dip the EMPTY WATERING CAN into the fountain (W) to receive the FULL WATERING CAN.
- Move to the Toolshed Area.
- Collect the GARDEN GLOVES (X), IRON BALL (Y), and the GLASS CUTTER (Z).
- Return to the Castle Approach and then move to the Castle Gates.
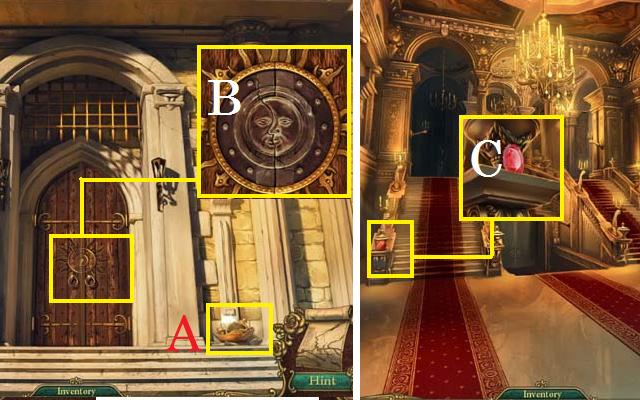
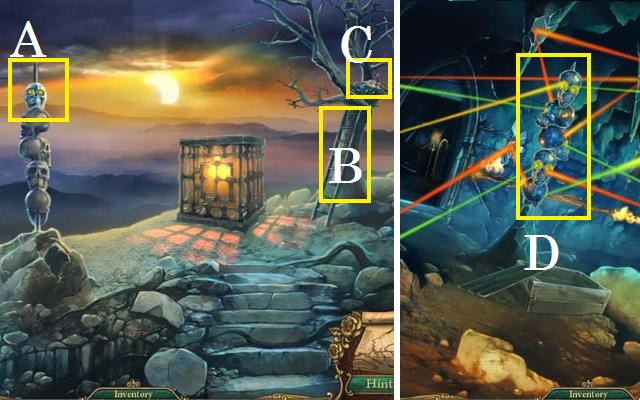
- Smash the pot with the HAMMER to collect the HANDLE (A).
- Zoom into the door; place the SUN DISK RIGHT HALF and the SUNDISK LEFT HALF in the slot (B).
- Enter the Main Hall.
- Zoom into the banister; collect the first RUBY (C).
- Enter the Dining Room.
- Collect the first PORTRAIT FRAGMENT (D).
- Use the HAMMER to break the glass bowl. Use the GLASS CUTTER on the bowl fragments to cut three pieces of STAINED GLASS (F) and then collect them.
- Exit the Dining Room. Move to the Staircase Landing.
- Zoom into the painting; press the buttons in the following order to set the correct arrangement: 3 and then 1.
- Collect the first DIAMOND (G).
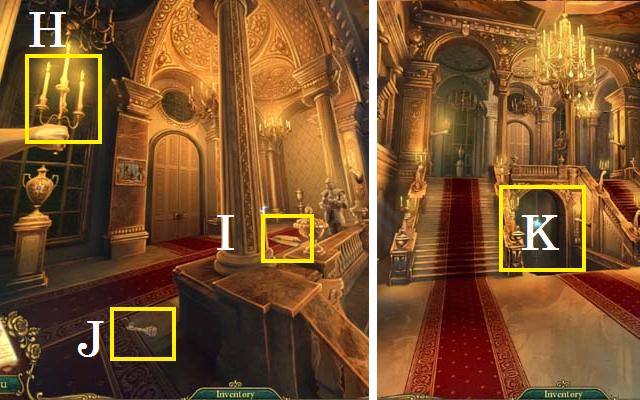
- Light the candles (H) with the LIT TORCH.
- Collect the SHIELD (I) and the THRONE ROOM KEY (J).
- Return to the Main Hall.
- Use the THRONE ROOM KEY to open up the door (K).
- Enter the Throne Room.
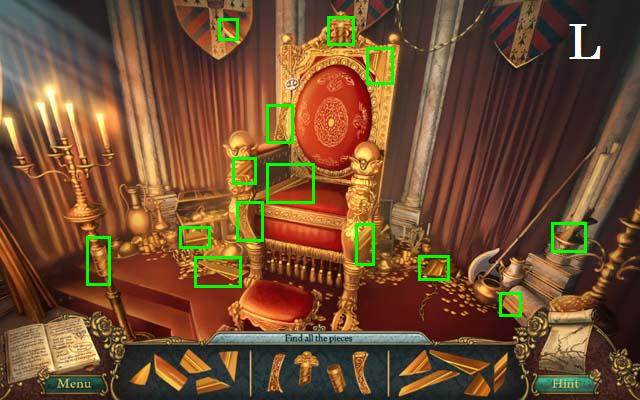
- Zoom into the sparkles to play a HOS.
- Collect all of the pieces to receive the SWORD (L).
- Shake the shield (M) and then collect the second DIAMOND (N).
- Zoom into the painting; place the HANDLE (O) at the top of the frame.
- Zoom into the door; place the SWORD in the knight’s left hand (P) and the SHIELD in his right hand (Q).
- Enter the Armory.
- Collect the second PORTRAIT FRAGMENT (R).
- Zoom into the junk pile; open the box lid and collect the DAGGER (S). Place the ACIENT SCROLL over the second set of text (T).
- Zoom into the window; hang the IRON BALL on the chain (U) and collect the second RUBY (V).
- Return to the Staircase Landing.
- Zoom into the urn; use the DAGGER to collect the first GOLDEN STAR (V).
- Examine the door lock (W).
- Return to the Fountain.
- Zoom into the fountain; use the DAGGER to collect the second GOLDEN STAR (X).
- Return to the Throne Room.
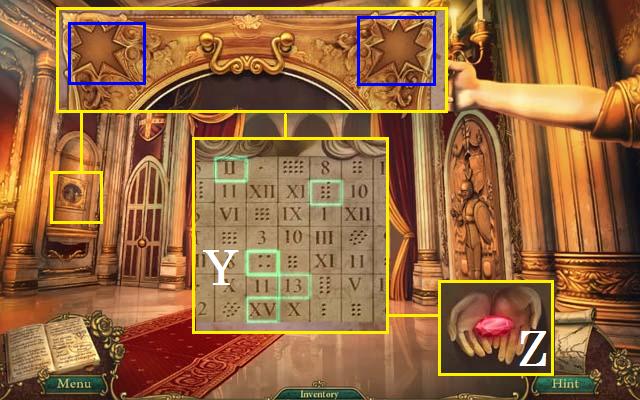
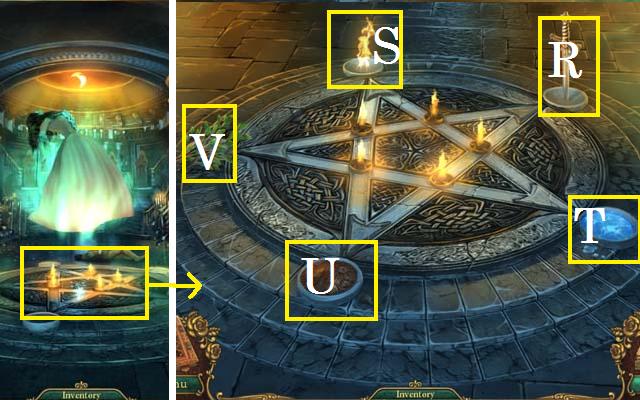
- Zoom into the painting; place both GOLDEN STARS in the slots (blue).
- Highlight the squares as they are shown in the screenshot (Y). Collect the third RUBY (Z).
- Return to the Dining Room.
- Zoom into the butler; place the three RUBIES in the necklace (A) to receive the CHAPEL KEY.
- Collect the CLOTH (B).
- Zoom into the sparkles to play a HOS.
- Remove the lid to reveal the Sugar (S).
- Remove the lid to reveal the Eggplant (@).
- Collect the remaining items on the list.
- Collect the Green Glass (C) and receive the STAINED GLASS.
- Return to the Main Hall.
- Unlock the door (D) with the CHAPEL KEY.
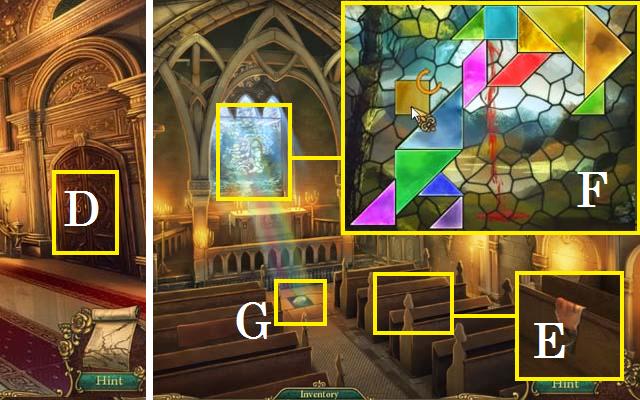
- Enter the Chapel.
- Zoom into the pew; collect the third PORTRAIT FRAGMENT (E).
- Zoom into the window; place the four STAINED GLASS pieces in the puzzle. Arrange the pieces as shown in the screenshot (F).
- Collect the third DIAMOND (G).
- Return to the Armory.
- Zoom into the knight (H); place the three DIAMONDS in his necklace to receive the TREASURE ROOM KEY.
- Zoom into the gate (I) and open it with the TREASURE ROOM KEY.
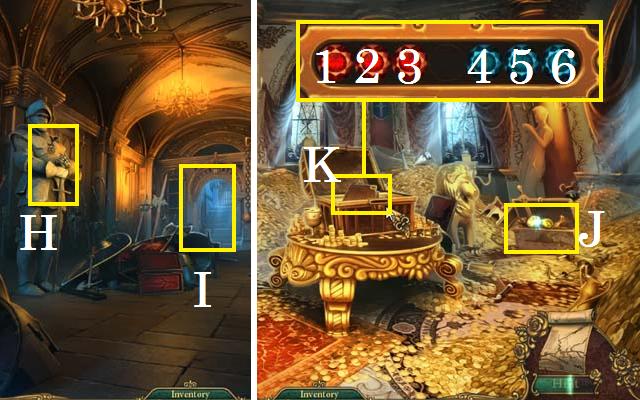
- Enter the Treasure Room.
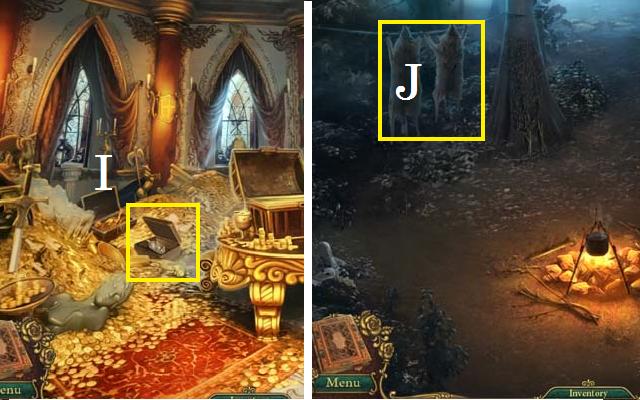
- Collect the CANARY DIAMONDS (J).
- Zoom into the chest; move the gems in the following order: 4, 3, 2, 4, 5, 6, 3, 2, 1, 4, 5, 6, 2, 3, and 6.
- Collect the BOOK OF RICHES (K).
- Return to the Staircase Landing.
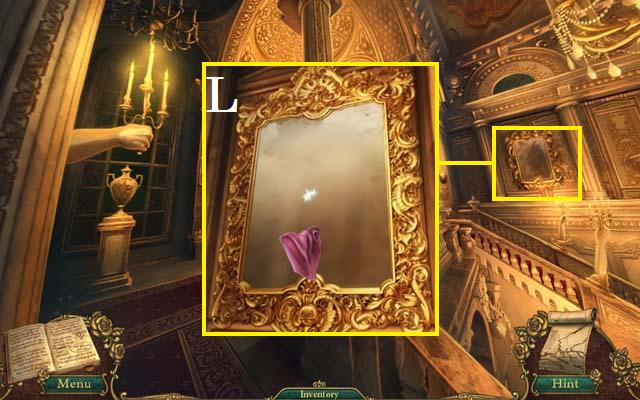
- Zoom into the mirror; clean the mirror (L) with the CLOTH and zoom in again to watch a clue.
- Return to the Hunter’s Camp.
- Zoom into the sparkles to play a HOS.
- Collect all of the items on the list.
- Collect the SAW (M).
- Return to the Fouquet Backyard.
- Speak with everyone to receive JACQUES’ LOVE LETTERS.
- Return to the Front Porch.
- Use the FULL WATERING CAN on the blackberry bush and collect the BLACKBERRIES (N).
- Return to the Caravan Camp.
- Use the GARDEN GLOVES to collect the RASPBERRIES (O).
- Return to the Road.
Chapter 4: The Town
- Zoom into the fallen tree; use the SAW to remove the tree (P).
- Take the path to the Town Square.
- Speak with the Pirate (Q). Give him the ORANGE in exchange for the MEAT STICK.
- Enter the Theater Backstage.
- Open the closet and collect the CLOAK (R).
- Place the CLOAK on the mannequin (S).
- Exit the Theater Backstage and head towards the Downtown. Enter the Tavern.
- Speak with Jacques.
- Zoom into the bowl; collect the CRACKER (T).
- Zoom into the sparkles to play a HOS.
- Collect the items on the list.
- Collect the BLUEBERRY SCOOP (U).
- Exit the Tavern and enter the Curio Shop.
- Speak with the shopkeeper (V).
- Exit the Curio Shop and move to the Crossroads. Enter Raphael’s Foyer.
- Speak with Raphael (W).
- Collect the PULLEY (@).

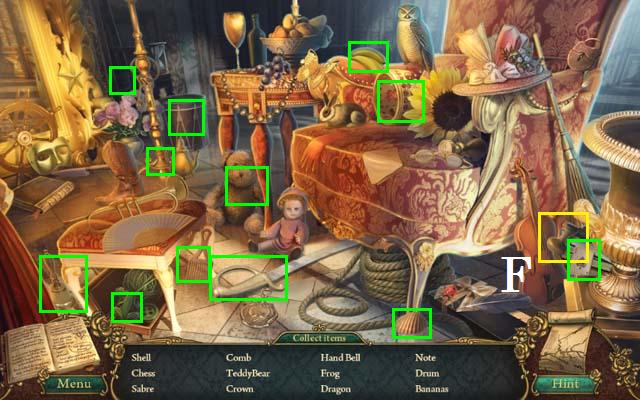
- Zoom into the top of the stairs to trigger a HOS.
- Collect all of the items on the list (X).
- Zoom into the table; open the box, collect the letter (Z) and receive the ROSE.
- Enter the Kitchen.
- Speak with Caprice (A) and give her JACQUES’ LOVE LETTERS.
- Exit Raphael’s House and move to the Town Gates.
- Zoom into the barrels; open the birdseed barrel with the HAMMER and collect the BIRDSEED (B).
- Return to the Town Square.
- Place the BIRDSEED on the ground (C). Move forward one scene and return to the Town Square. Collect the BLACKBIRD FEATHER (D).
- Return to the Waterfall.
- Use the BLUEBERRY SCOOP to collect the BLUEBERRIES (E).
- Return to the Staircase Landing in the Castle.
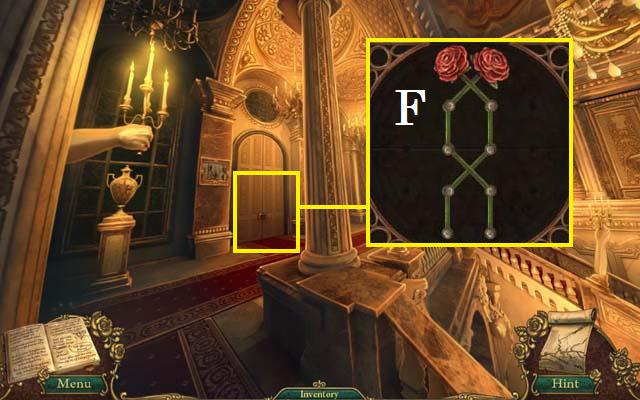
- Zoom into the door; place the ROSE in the puzzle and arrange the roses as shown in the screenshot (F).
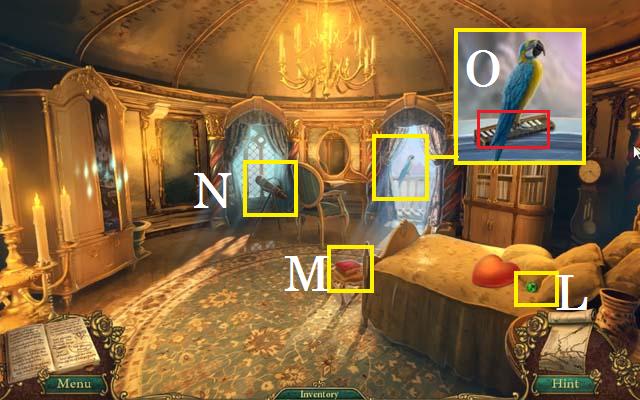
- Enter the Upper Hall and then the Music Room.

- Zoom into the sparkles to play a HOS.
- Open the drawer to locate the Pliers (I).
- Collect the WHEEL (J).
- Collect the SILK RIBBON (K) and the fourth PORTRAIT FRAGMENT (L).
- Zoom into the foot stool; place the WHEEL in the instrument (M).
- Exit the Music Room and enter the Library.
- Collect the fifth PORTRAIT FRAGMENT (N) and the SMALL PORTRAIT (O).
- Examine the book (P).
- Zoom into the bookcase; collect the CLAIM CHECK (Q).
- Zoom into the side bookcase; collect the FULL MOON SYMBOL (R).
- Return to the Curio Shop.
- Give the shopkeeper the CLAIM CHECK to receive the BOOK OF THE POOR.
- Exit the shop and speak with Anne. Return to the Kitchen in Raphael’s House.
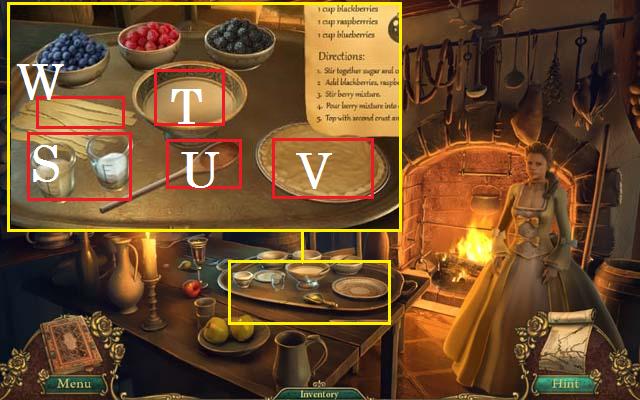
- Zoom into the table; place the BLUEBERRIES, BLACKBERRIES, and the RASBERRIES in the little bowls. Pour the sugar and cornstarch (S) in the big bowl (T). Stir them together with the spoon (U).
- Pour all of the berries in the bowl and stir it all together. Pour the mixture into the pie crust (V) followed by the top crust (W) to receive the THREE-BERRY PIE.
- Return to the tavern. Give Jacques the THREE-BERRY PIE.
- Return to the Fouquet Front Porch. Speak with Baron Fouquet.
- Return to the Kitchen in Raphael’s House. Speak with Caprice.
- Return to the Tavern.
- Zoom into the sparkles to play a HOS.
- Collect all of the items on the list.
- Collect the BROKEN BOTTLE (Z).
- Return to the Town Gates and speak with the child.
- Return to the Upper Hall in the Castle and enter the Guardian’s Room.
- Zoom into the sparkles to play a HOS.
- Collect all of the items on the list.
- Open the drawer and move the panel. Collect the NEW MOON (A).
- Zoom into the table; collect the clue (B) and place the SMALL PORTRAIT in the frame. Collect the first SAPPHIRE (C).
- Zoom into the nightstand; collect the sixth PORTRAIT FRAGMENT (D).
- Zoom into the clock (E); place the NEW MOON and the FULL MOON SYMBOL in the clock.
- Exit the room.
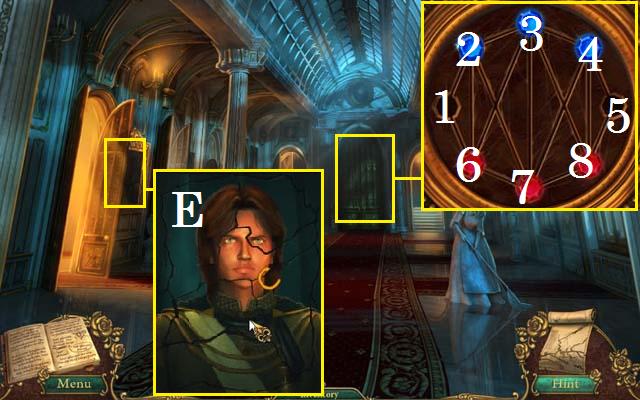
- Zoom into the painting; place all six PORTRAIT FRAGMENTS in the frame and arrange them as shown in the screenshot (E) and receive the KEY PUZZLE PIECE.
- Zoom into the door; place the KEY PUZZLE PIECE in the lock.
- Use the following sequence to solve this puzzle: move 4 to 5, 7 to 4, 2 to 7, 6 to 2, 3 to 6, 8 to 3, and 5 to 8.
- Enter the Ballroom.
- Zoom into the sparkles to play a HOS.
- Collect all of the items on the list.
- Collect the CRANK (F).
- Zoom into the ballroom mirror.
- Collect the RABBIT FOOT (G).
- Use the FULL WATERING CAN on the mirror (H) and clean it with the CLOTH. Zoom into the mirror to watch a clue. Collect the second SAPPHIRE (blue).
- Move to the Dining Room.
- Use the SILK RIBBON to tie back the curtain and then collect the third SAPPHIRE (I).
- Move to the Upper Hall.

- Zoom into the maid (J); place all three SAPPHIRES in her necklace to receive the MOP.
- Enter the Winding Staircase.
- Use the MOP on the stairs (K).
- Climb the stairs to the Princess’ Tower.
- Move the pillow and collect the first EMERALD (L).
- Collect the BOOK OF LOVE (M).
- Examine the telescope (N).
- Zoom into the window; feed the CRACKER to the parrot and then collect the INSTRUMENT KEYBOARD (O).

- Zoom into the sparkles to play a HOS.
- Collect all of the items on the list.
- Collect the BUTTERFLY NET (P).
- Return to the Music Room.
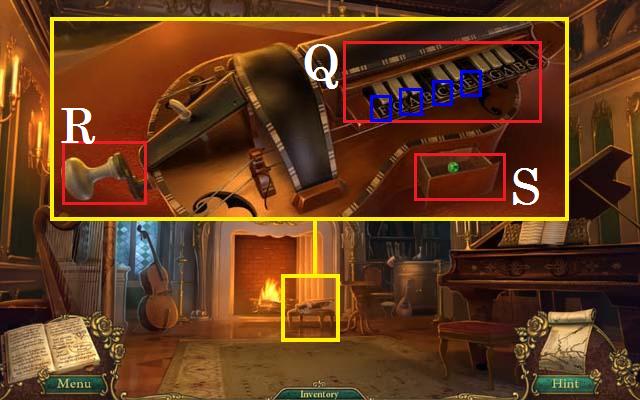
- Zoom into the footstool; place the INSTRUMENT KEYBOARD (Q) and the CRANK (R) on the instrument.
- Spin the crank and play the keys in the following order: F, A, C, E (blue). Collect the second EMERALD (S).
- Move to the Fountain.
- Use the BUTTERFLY NET to collect the FLYING KEY (T).
- Move to the Toolshed Area.
- Zoom into the toolshed door (U); unlock the door with the FLYING KEY.
- Enter the Toolshed.
- Zoom into the sparkles to play a HOS.
- Collect all of the items on the list.
- Collect the LADDER (V).
- Collect the OIL CAN (W).
- Open the table drawer; collect the third EMERALD (X).
- Return to the Library.
- Zoom into the statue (Y); place all three EMERALDS in her necklace to receive the CHRONICLE OF WAR.
- Zoom into the back bookcase; place the BOOK OF RICHES, the BOOK OF THE POOR, the BOOK OF LOVE, and the CHRONICLE OF WAR on the shelf.
- Arrange the books as they are shown in the screenshot (Z).
Chapter 5: The Altar Room
- Enter the Secret Hallway.
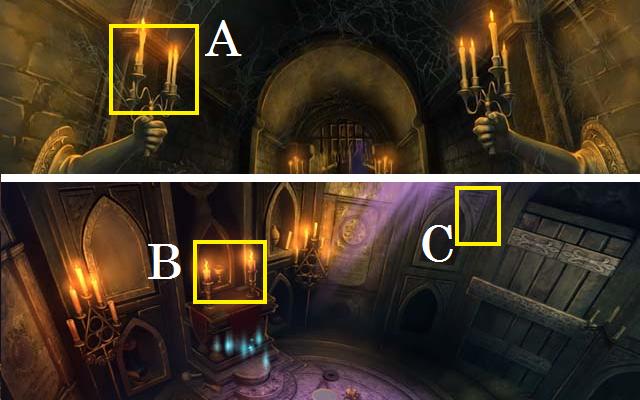
- Light the candles (A) with the LIT TORCH.
- Enter the Altar Room.
- Light the candles (B) with the LIT TORCH.
- Use the HAMMER on the panel (C) to open the door.
- Zoom into the sparkles to play a HOS.
- Collect all of the pieces to receive the SUN STAFF (D).
- Return to the Tavern.
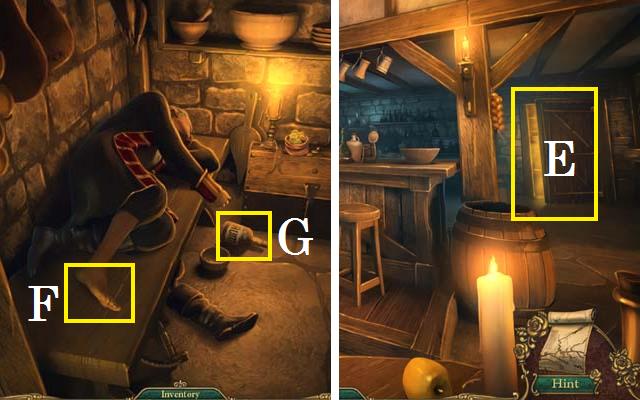
- Use the OIL CAN on the door (E).
- Enter the Backroom.
- Use the BIRD BLACKFEATHER on Malget’s foot (F) and collect the RUM (G).
- Move to the Town Gates.
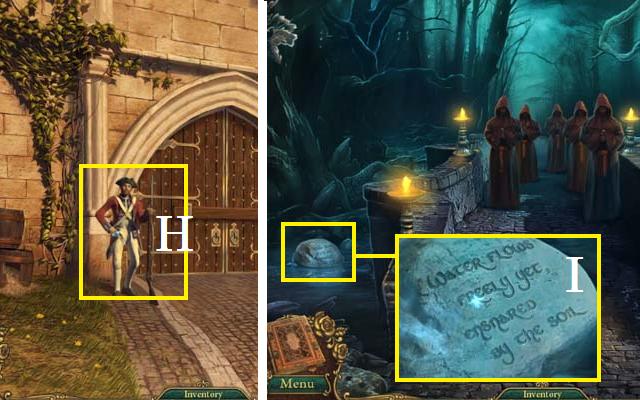
- Give the officers (H) the RUM.
- Enter the Bridge.
- Zoom into the rock; place the ANCIENT SCROLL over the third set of text (I).
- Return to the Curio Shop.
- Give the RABBIT’S FOOT to the shopkeeper.
- Zoom into the sparkles to play a HOS.
- Collect all of the items on the list.
- Collect the RED SHASH (J).
- Return to the Theater Backstage.
- Place the RED SHASH on the mannequin (K).
- Return to the Ballroom in the Castle.
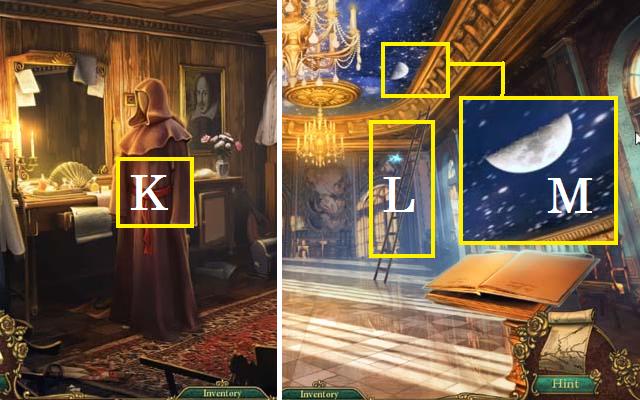
- Use the LADDER (L) to reach the celling and zoom in; collect the HALF MOON (M).
- Return to the Guardian’s Room.

- Zoom into the clock; place the HALF MOON in the clock and use the following sequence to solve this puzzle: press the first moon (1) and wait for the clock to stop spinning. Press the second moon (2). Continue with 3 through 8.
- Collect the MOON SCEPTER (N).
- Enter the Altar Room.
- Place the MOON SCEPTER (O) and the SUN STAFF (P) on the floor.
- Zoom into the book; collect the CHAMBER KEY (Q).
- Return to the Throne Room.
- Zoom into the chamber door (R); use the CHAMBER KEY to open the lock.
- Enter the Chamber Room.
- Zoom into the sparkles to play a HOS.
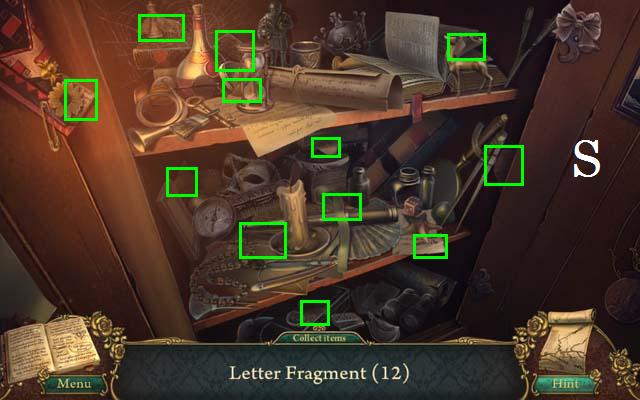
- Collect all of the LETTER FRAGMENTS (S).
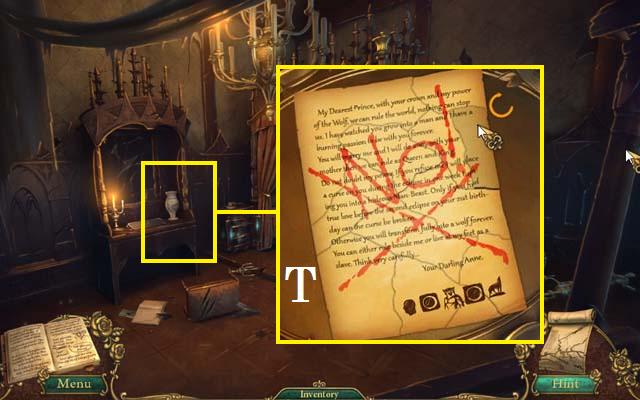
- Zoom into the desk; place the LETTER FRAGMENTS on the tray and then arrange them as they are shown in the screenshot (T).
- Return to the Caravan.
- Zoom into the sparkles to play a HOS.
- Collect all of the items on the list.
- Collect the BANANA (U).
- Return to the Curio Shop.
- Zoom into the monkey; give the BANANA to the monkey and collect the EYE PATCH (V).
- Return to the Tavern and enter the Backroom.
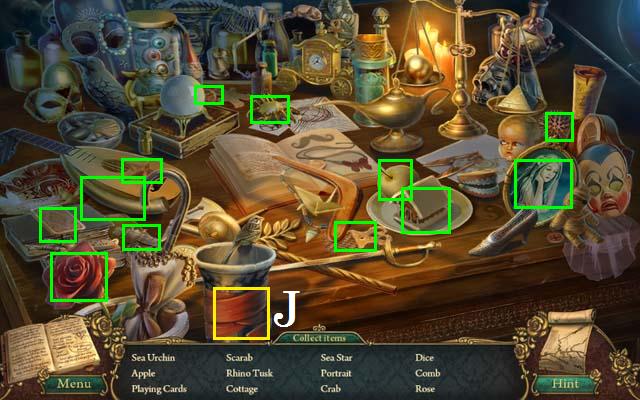
- Zoom into the box; set the dials as they are shown in the screenshot. Collect the ENCHANTED RING (X), ELCIPSE (Y), and the letter (Z).
- Return to the Theater Backstage.
- Place the EYE PATCH and the ECLIPSE on the mannequin (A) to receive the DISGUISE.
- Return to the Bridge past the Town Gates.
- Hold the DISGUISE out in front of you and take the Scary Path.
- Use the BROKEN BOTTLE to cut open the bag (B).
- Zoom into the flour pile; use the FULL WATERING CAN on the flour to make a CRACKER (C). Collect the CRACKER.
- Move to the Forest Clearing.
- Zoom into the sparkles to play a HOS.
- Collect all of the pieces to receive the ROPE (E).

- Zoom into the tree; place the ANCIENT SCROLL over the fourth set of text (F).
- Return to the Scary Path and move to the Sound Garden.
- Hang the PULLEY, then the ROPE on the tree (G).
- Feed the parrot (H) the CRACKER.
- Zoom into the plaque; spell out the word F. E. E. D as shown in the screenshot (I).
- Take the rope down to the Forest Clearing. Hint: click on the pulley, not the rope.
Chapter 6: The Cave
- Enter the Cave Entrance.
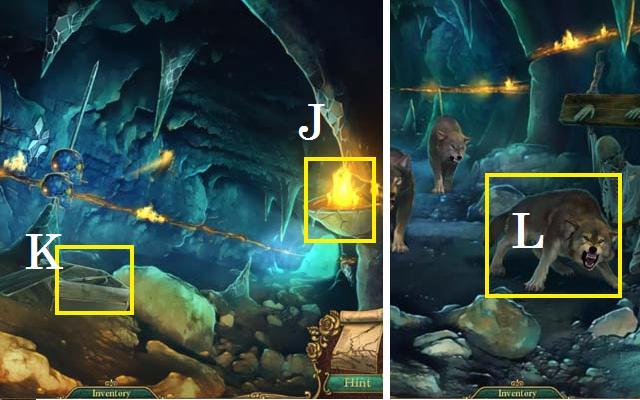
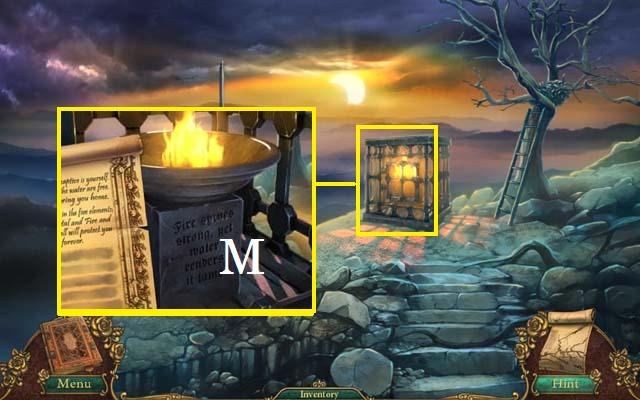
- Light the oil (J) with the LIT TORCH.
- Open the crate and collect the BOAT HOOK (K).
- Move to the Underground Corridor.
- Feed the MEAT STICK to the wolves (L).
- Remove the skeleton’s boot and collect the SKELETON KEY (M).
- Read the letter (N).
- Move the rock. Place the CANARY DIAMONDS in the skull and then collect the first CRYSTAL SKULL (O).
- Move forward to the Underground River.
- Zoom into the sparkles to play a HOS.
- Collect all of the items in the list.
- Collect the second CRYSTAL SKULL (P).
- Place the ECLIPSE in the slot (Q).
- Use the BOAT HOOK to collect the JAILER’S KEYS (R).
- Move back to the Underground Corridor.
- Use the JAILER’S KEYS to unlock the stocks (S).
- Collect the MIRROR SHARD (T).
- Return to the Underground River.
- Place the MIRROR SHARD on the stalagmite (U).
- Zoom into the sparkles to play a HOS.
- Collect all of the items on the list.
- Collect the third PUZZLE PIECE (Y).
- Return to the Forest Clearing.
- Zoom into the sparkles to play a HOS.
- Collect all of the pieces to receive the BUG SPRAY (V).
- Return to the Scary Path.
- Use the BUG SPRAY on the bugs and then collect the first PUZZLE DISK (W).
- Return to the Bridge.
- Move the cloak and collect the second PUZZLE DISK (X).
- Return to the Sound Garden.
- Zoom into the gate; place the three PUZZLE PIECES on the gate and arrange them as shown in the screenshot (Z).
- Climb up to Skull Mountain.
- Collect the third CRYSTAL SKULL (A).
- Place the LADDER under the tree (B).
- Collect the EAGLE’S FEATHER (C).
- Return to the Cave Entrance.
- Place the three CRYSTAL SKULLS on the pole (D) and arrange them as they are shown in the screenshot.
- Enter the Inner Sanctum. Return to Raphael’s House.
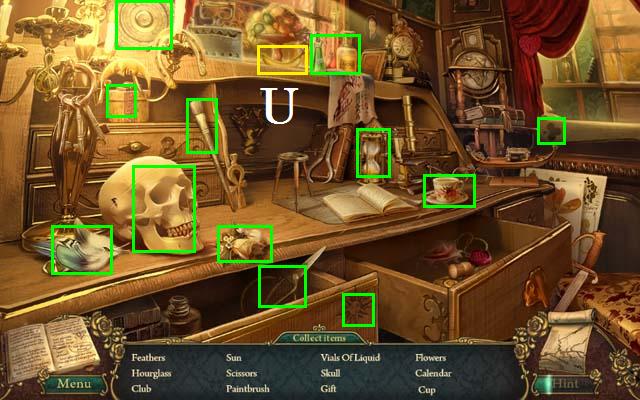
- Zoom into the sparkles to play a HOS.
- Open the chest to reveal the Knitting Needles (@).
- Collect all of the items on the list.
- Collect the SCISSORS (E).
- Return to the Theater Backstage.
- Zoom into the sparkles to play a HOS.
- Collect all of the pieces to receive the EVIL MASK (F).
- Exit to the Town Square.
- Collect the WOLFSBANE (G).
- Return to the Curio Shop.
- Give the EVIL MASK to the shopkeeper.
- Zoom into the shelf; collect the ENCHANTED SWORD (H).
- Return to the Treasure Room.
- Open the box with the SKELETON KEY and then collect the SILVER INGOT (I).
- Move to the Hunter’s Camp.
- Use the SCISSORS to cut the ROPE OF WOLF FUR from the wolf pelts (J).
- Return to the Scary Path.
- Use the ENCHANTED SWORD to cut down the SACK (K).
- Move to the Inner Sanctum.
- Zoom into the man; collect the KEY NECKLACE (L).
- Try to exit through the open door.
- Return to Skull Mountain.
- Zoom into the cage; open the lock with the KEY NECKLACE.
- Hold the ANCIENT SCROLL over the last set of text (M).
- Return to the Hunter’s Camp.
- Zoom into the sparkles to play a HOS.
- Collect all of the items on the list.
- Collect the HEDGE CLIPPERS (N).
- Return to the Toolshed.
- Zoom into the sparkles to play a HOS.
- Collect all of the items on the list.
- Collect the SHOVEL (O).

- Return to the Castle Approach.
- Use the HEDGE CLIPPERS to cut the ORANGE TREE SAPLING (P).
- Return to the Castle Lane.
- Use the SHOVEL to loosen the dirt (Q). Use the SACK on the loose dirt to collect the SACK OF SOIL.
- Return to the Inner Sanctum.
- Zoom into the ground; use the LIT TOARCH on the sword (R), the FULL WATERING CAN on the fire (S), the SACK OF SOIL on the water (T), the ORANGE TREE SAPLING on the dirt (U), and the ENCHANTED SWORD on the branch (V).
- Place the ANCIENT SCROLL in the middle of the altar.
- Give the ENCHANTED RING to Bella.
- Congratulations! You have completed Fairy Twisted Tales: The Price of a Rose!


 Shiver: Moonlit Grove Walkthrough, Guide, & Tips
 The Dragon Dance Walkthrough, Guide, & Tips
 Little Noir Stories: The Case of the Missing Girl Walkthrough, Guide, & Tips
 Journalist Journey: The Eye of Odin Walkthrough, Guide, & Tips
 Myths of the World: Chinese Healer Walkthrough, Guide, & Tips