Myths of the World: Chinese Healer Walkthrough, Guide, & Tips
Myths of the World: Chinese Healer Walkthrough

Welcome to the Myths of the World: Chinese Healer Walkthrough
The Emperor’s son has a mysterious illness. As legendary healer Daiyu, you’re called to the palace to save him, but you end up having to save yourself!
Whether you use this document as a reference when things get difficult or as a road map to get you from beginning to end, we’re pretty sure you’ll find what you’re looking for here.
This document contains a complete Myths of the World: Chinese Healer game walkthrough featuring annotated screenshots from actual gameplay!
We hope you find this information useful as you play your way through the game. Use the walkthrough menu below to quickly jump to whatever stage of the game you need help with.
Remember to visit the Big Fish Games Forums if you find you need more help. Have fun!
This walkthrough was created by Margie B, and is protected under US Copyright laws. Any unauthorized use, including re-publication in whole or in part, without permission, is strictly prohibited.
General Tips
- This is the official guide for Myths of the World: Chinese Healer.
- Open the scroll to view the map, objectives and journal.
- Travel to a location by selecting it on the map. An exclamation point indicates the location has an active objective.
- Your inventory is located in the lower panel; select an item to use it. The panel auto-hides; move your mouse down to bring it up. You can lock the inventory panel in place with the lock.
- Hints are unlimited, but you must wait for the button to refill.
- Hidden-object puzzles are referred to as HOPs in this walkthrough. Items listed in yellow are hidden, or they require additional actions to locate. Interactive items in HOPs are color-coded.
- Mini-games and HOPs are sometimes randomized; your solution may vary.
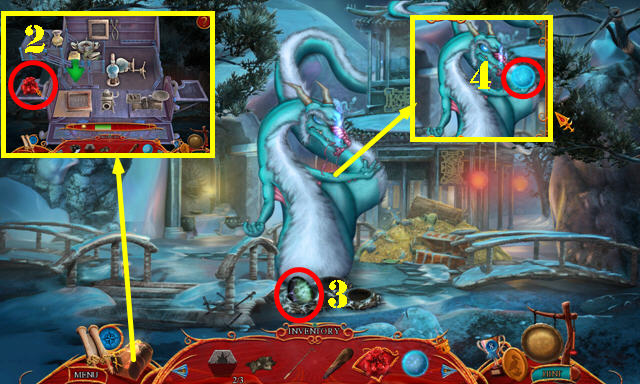
Chapter 1: The Road to Imperial City

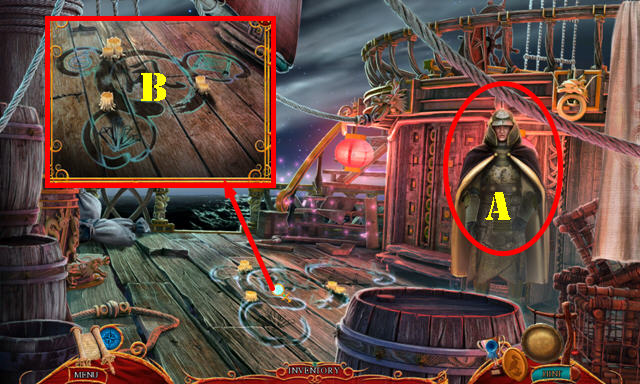
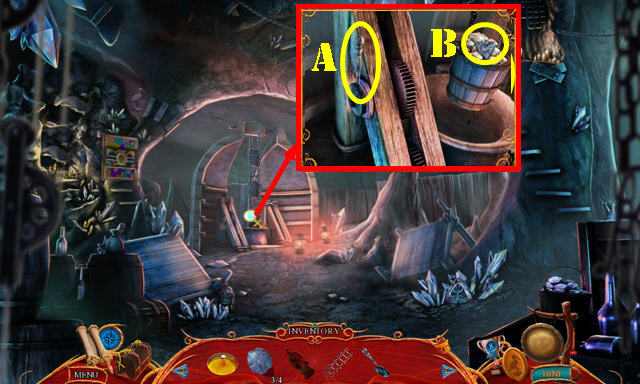
- Talk to the guard (A).
- Examine the symbols for a clue (B).
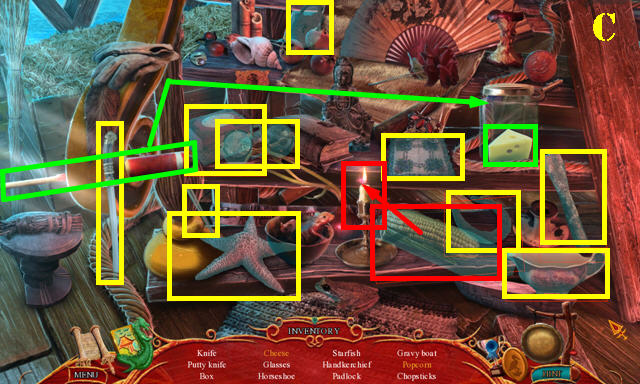
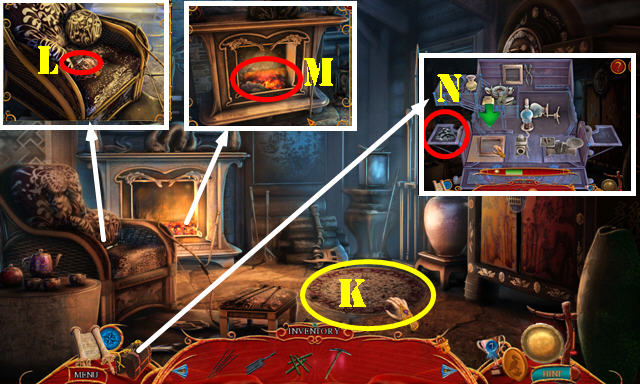
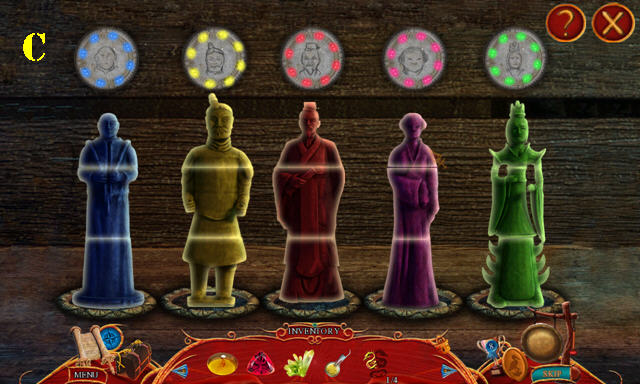
- Play the HOP to receive the KNIFE (C).
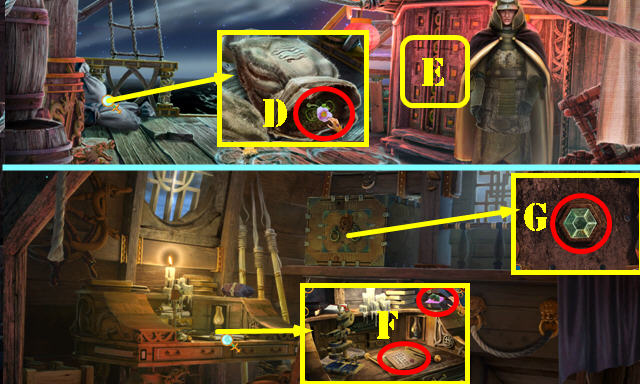
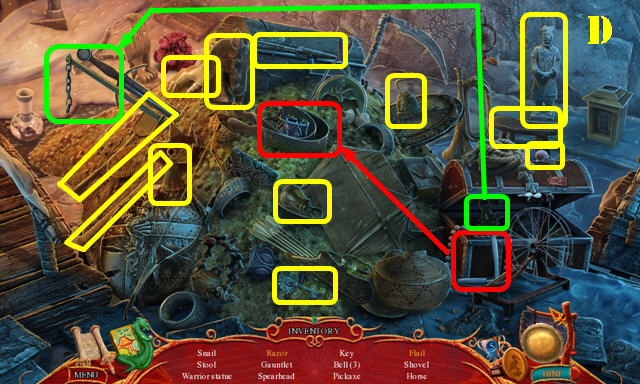
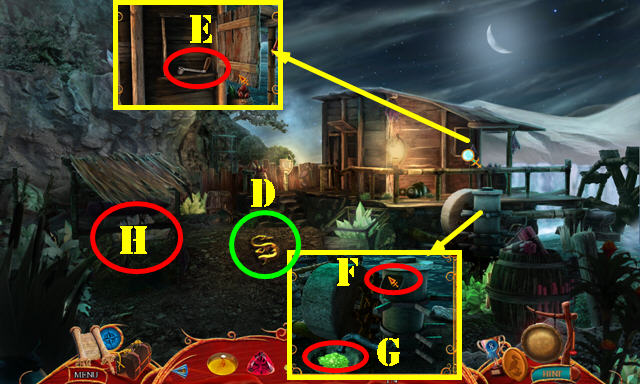
- Zoom into the sacks; cut the SACK with the KNIFE; take the WIND FLOWER and the CHEST LOCK PIECE 1/2 (D).
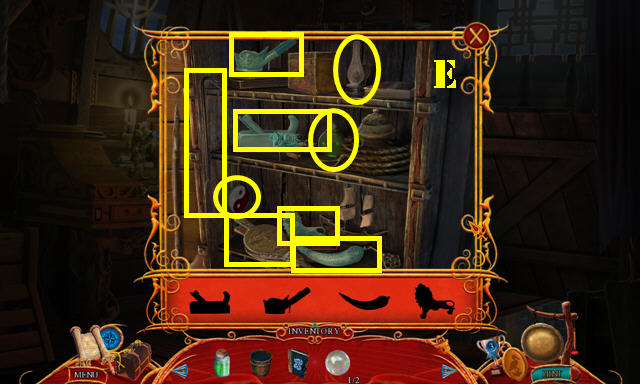
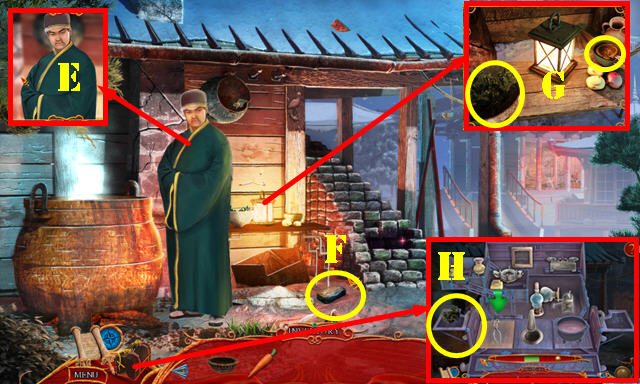
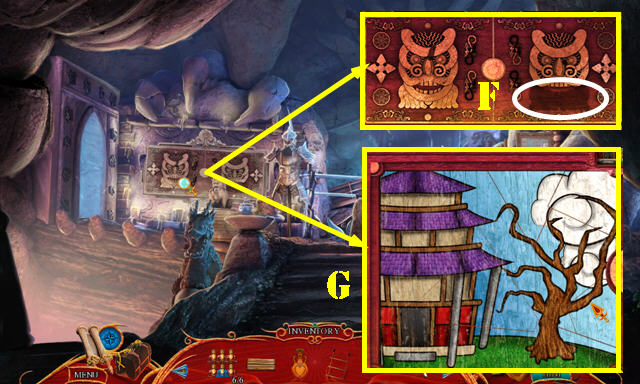
- Enter the Ship’s Quarters (E).
- Examine the desk; take the IMPERIAL LETTER and the CHEST LOCK PIECE 2/2 (F).
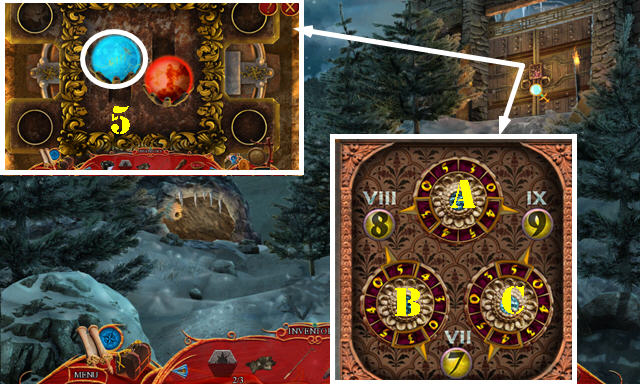
- Zoom into the chest and place the 2 CHEST LOCK PIECES in the slot to activate a puzzle (G).
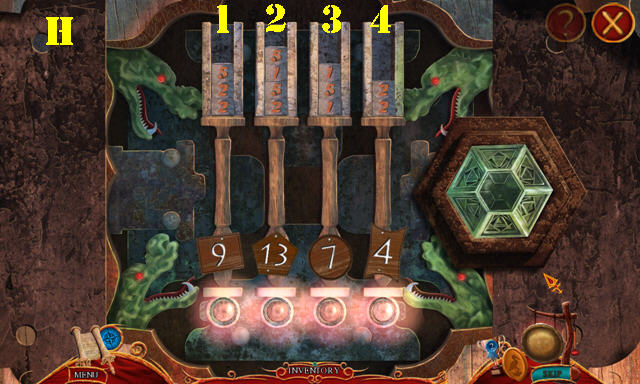
- Move the weights so that each column adds up to the number on the block below it. Select a number and then select a tube to drop it in there.
- To solve the puzzle (H), please follow the steps below.
- Move 5, 1, and 5 from column 4 to column 3. Move 2 and 2 from column 2 to column 4.
- Move 5, 5, and 2 from column 1 to column 2. Move 1 from column 1 to column 3.
- Move 2 from column 4 to column 1. Move 2 and 5 from column 2 to column 1.
- Move 1 from column 3 to column 2. Move 5 from column 3 to column 2.
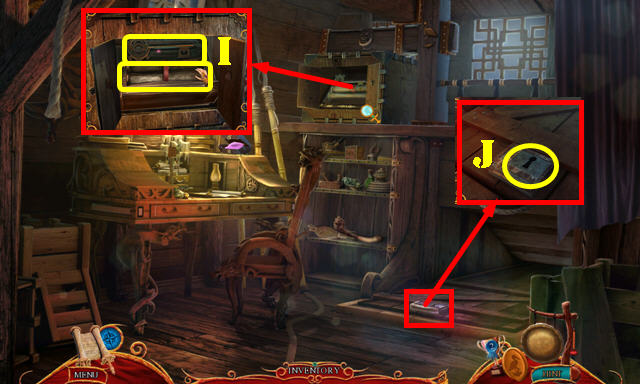
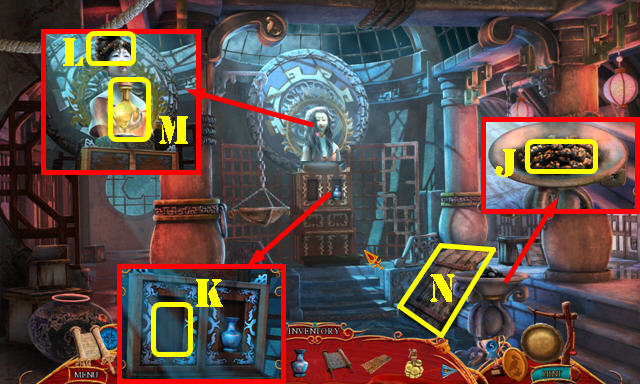
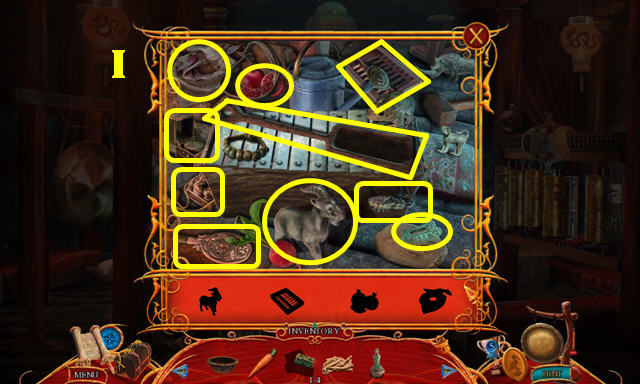
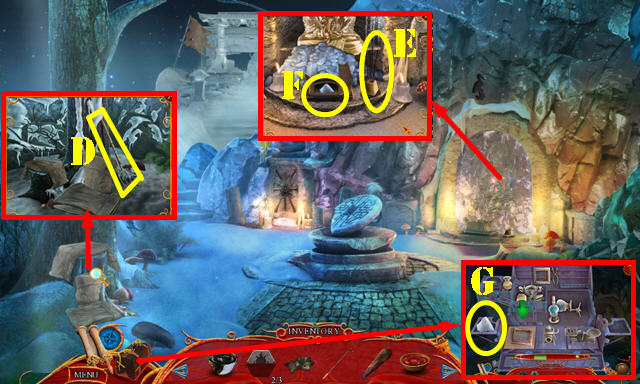
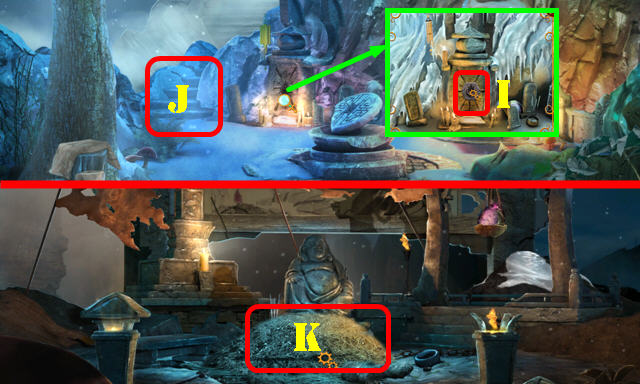
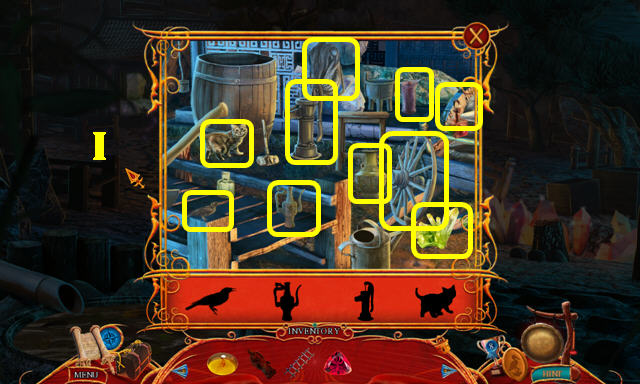
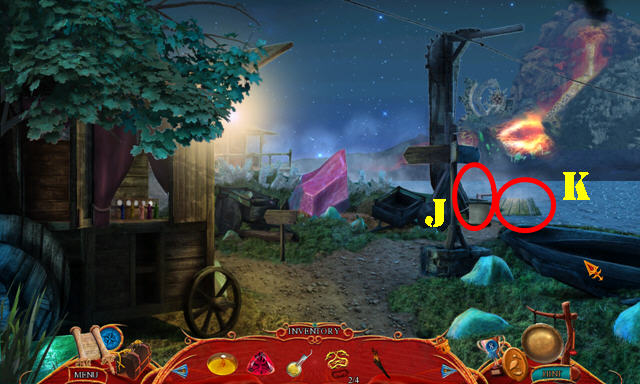
- Zoom back into the chest. Take the SCROLL OF CURRENTS and the CARGO KEY (I).
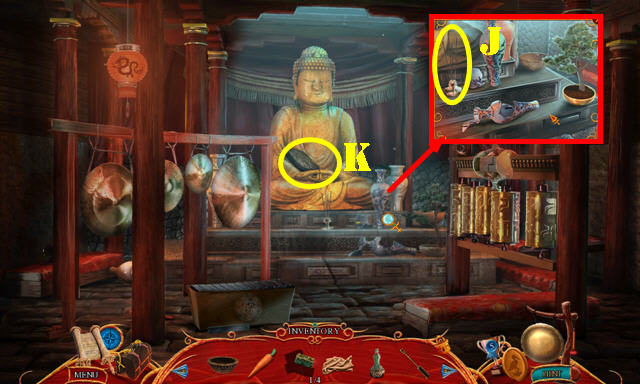
- Zoom into the lock and use the CARGO KEY in it; turn the key and go into the Cargo Hold (J).
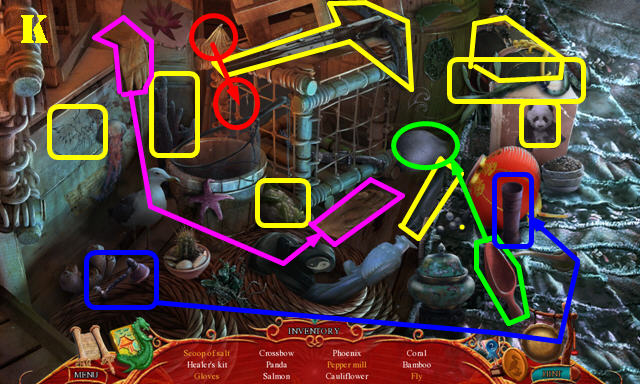
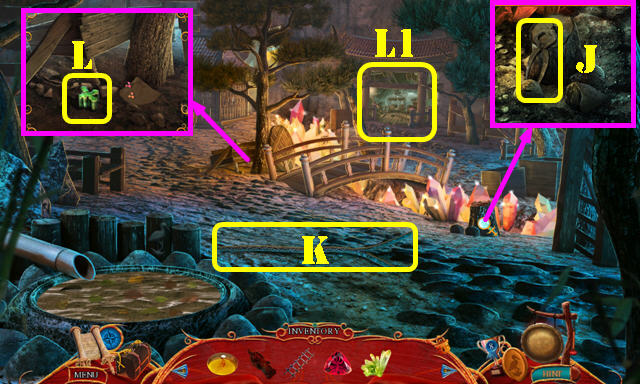
- Play the HOP to receive the HEALER’S KIT (K).

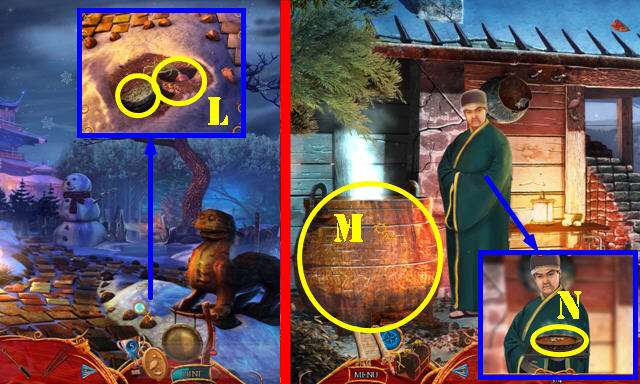
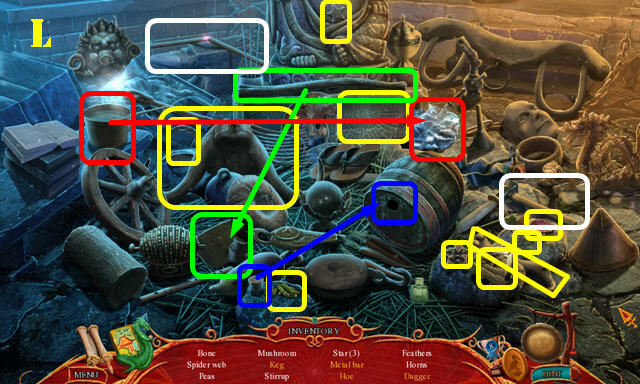
- Open the Healer’s Kit and put down the WIND FLOWER (L).
- Touch the item the arrow is pointing to (purple) when the ball is on the green line (L1).
- You will receive the WIND FLOWER ESSENCE.
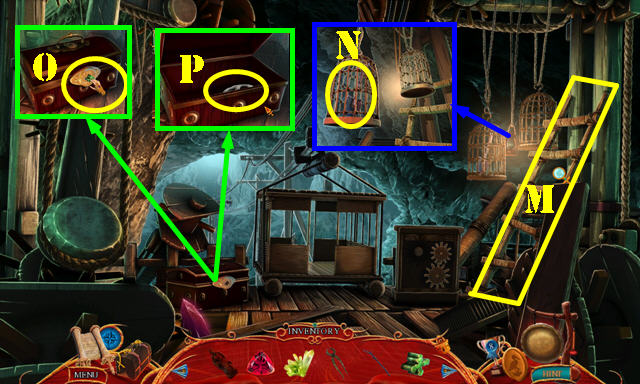
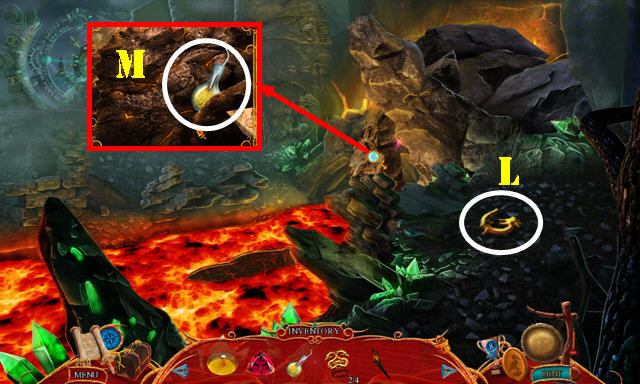
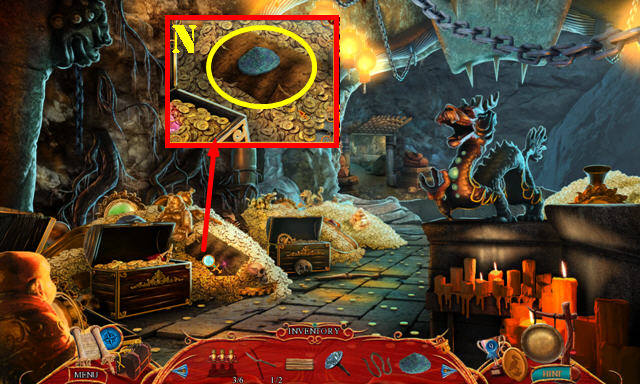
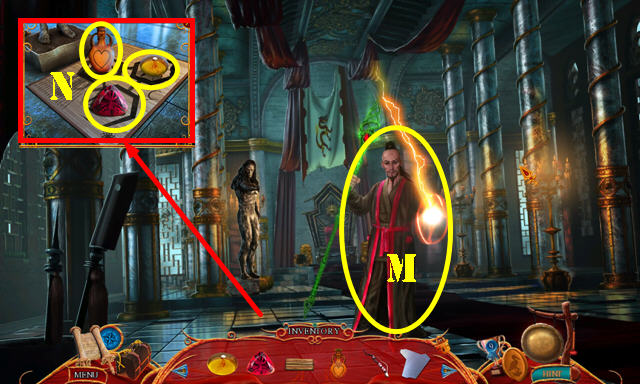
- Take the CRYSTAL OF AIR (M).
- Grab the ACID (N).
- Return to the Ship’s Deck.
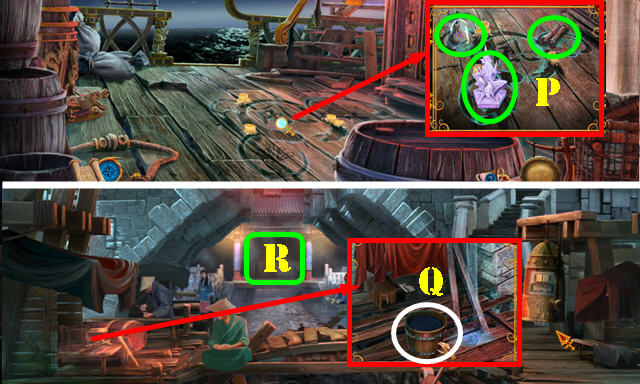
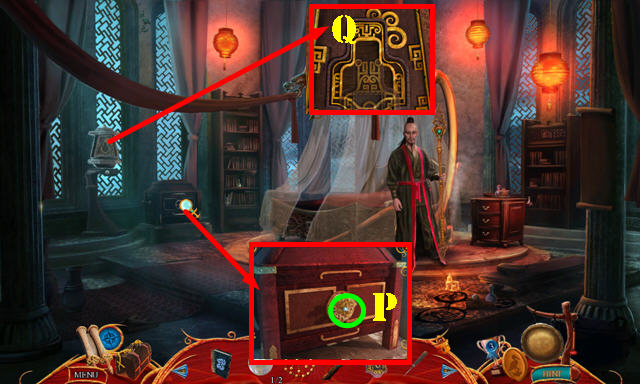
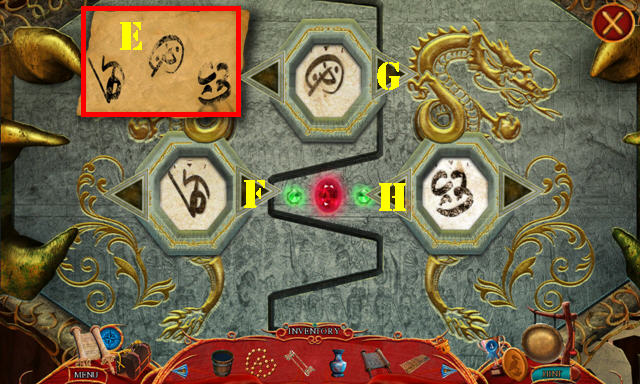
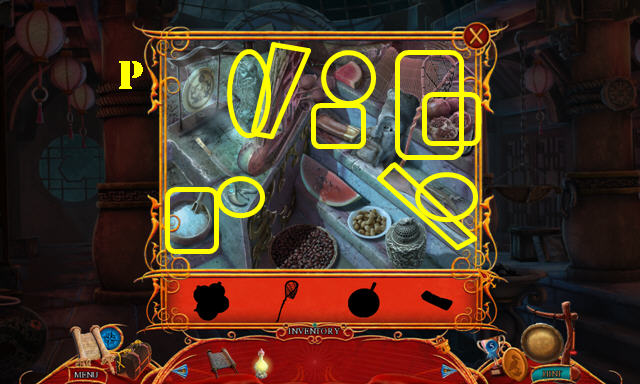
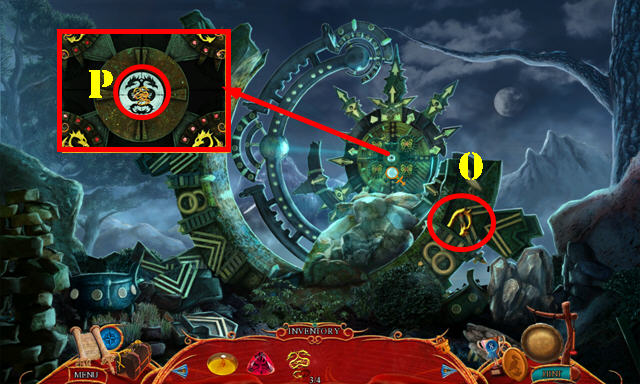
- Zoom into the symbols on the ground; place the CRYSTAL OF AIR, the WIND FLOWER ESSENCE, and the SCROLL OF CURRENTS (P).
- Go forward after the cut scene.
- Talk to Bo.
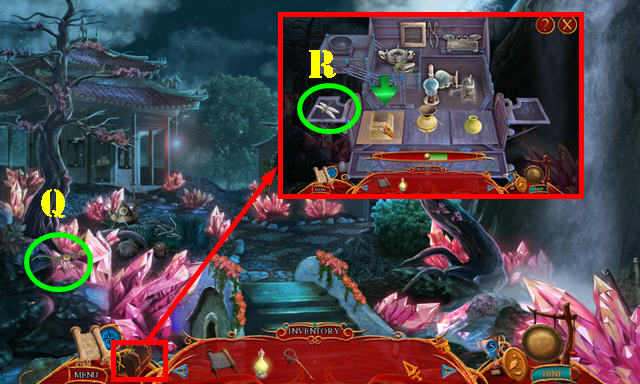
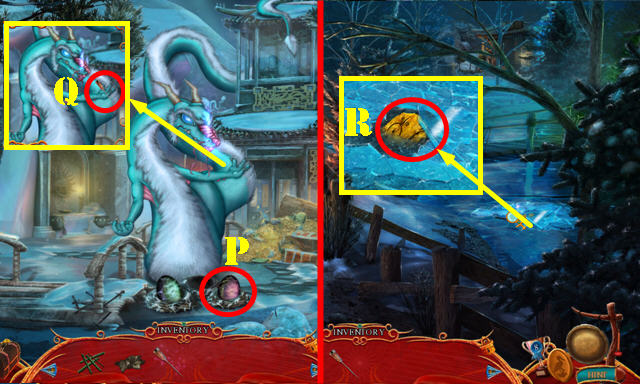
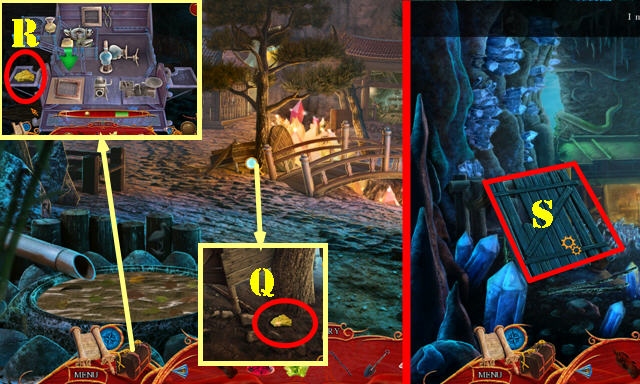
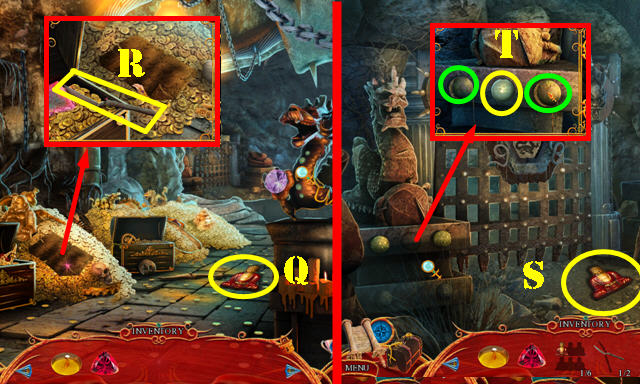
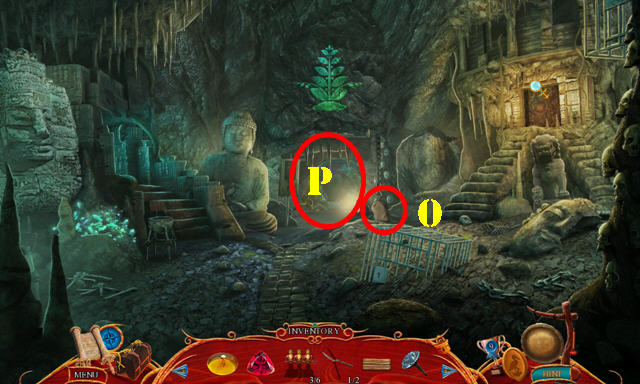
- Examine the ground; take the BUCKET OF WATER (Q).
- Go to the Palace Lobby (R).
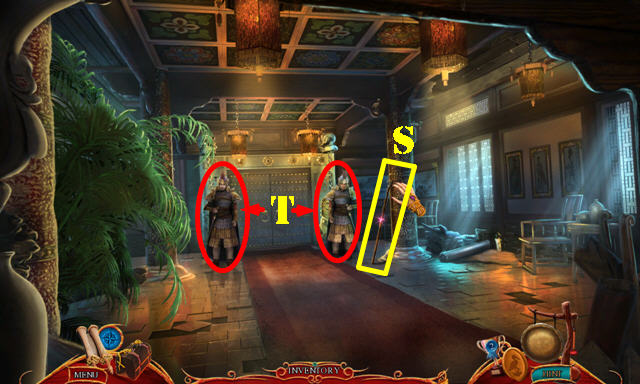
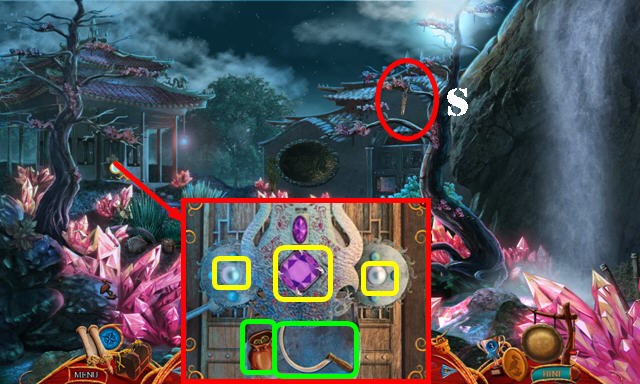
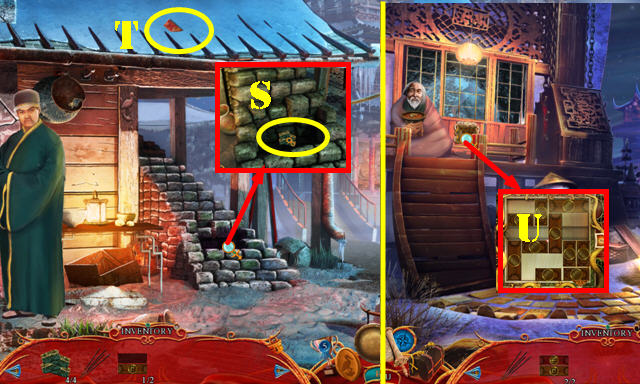
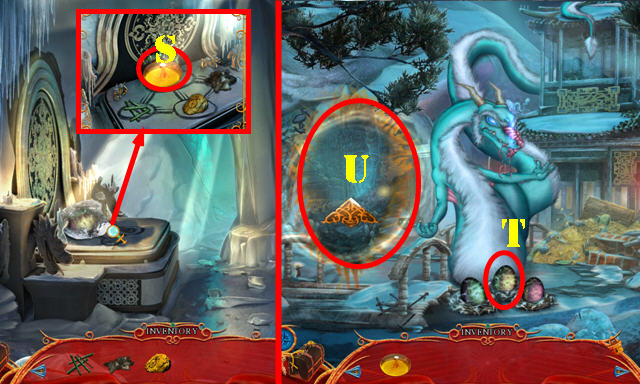
- Take the WOODEN POLE (S).
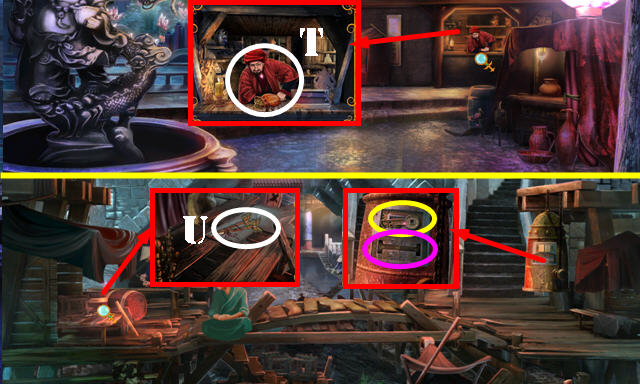
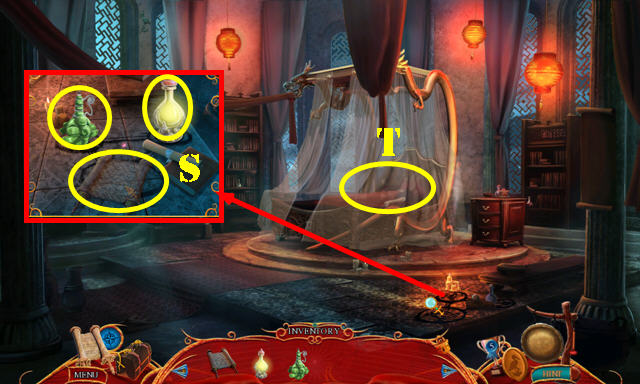
- Zoom into either guard and give one of them the IMPERIAL LETTER (T).
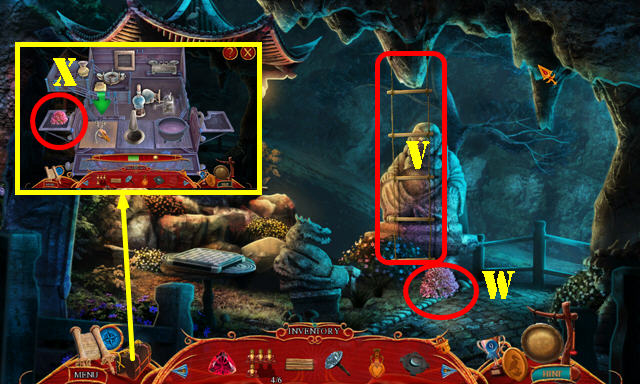
- Go through the door to reach the Ivory Tower.
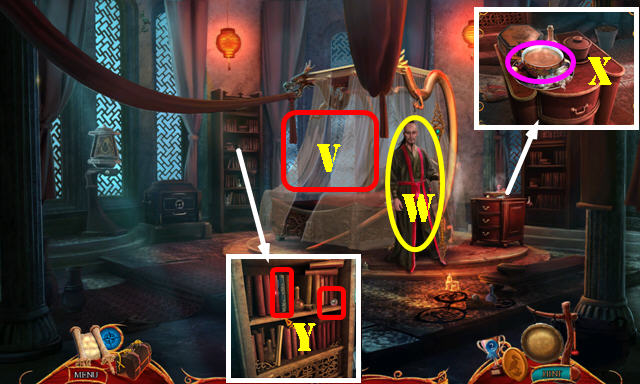
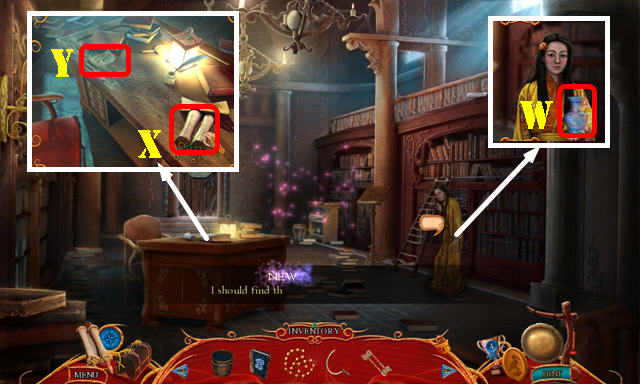
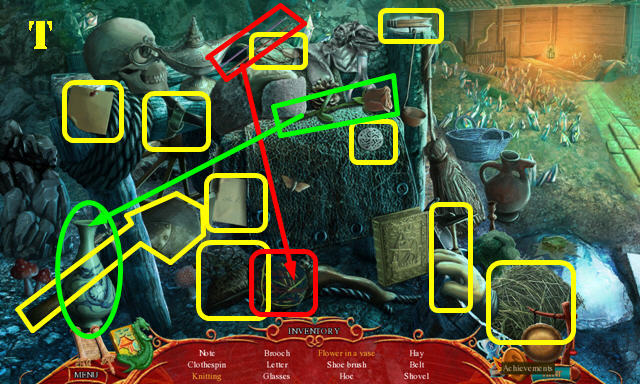
- Zoom into the bed (V).
- Talk to the man (W).
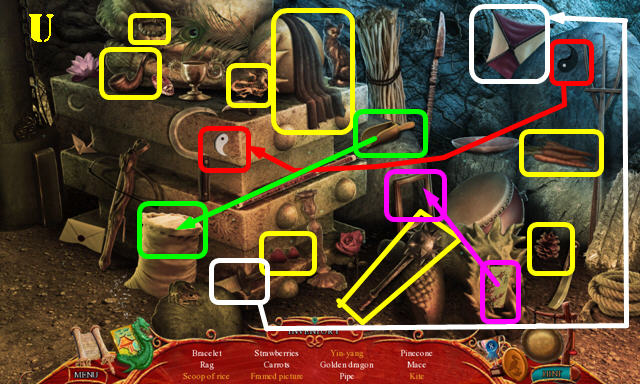
- Zoom into the dresser drawer and take the SOUP (X).
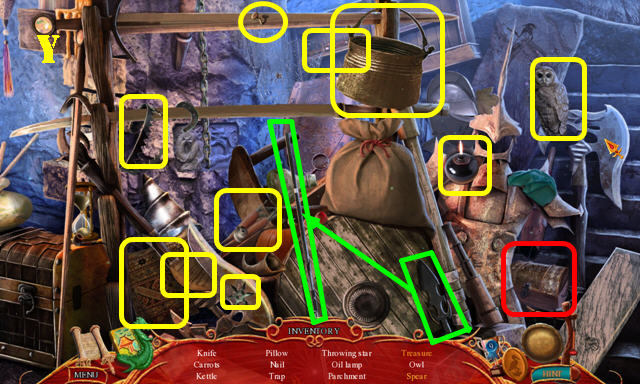
- Examine the bookcase; take the PEARL 1/2 and LEI’S NOTES (Y).
- Return to the Docks.
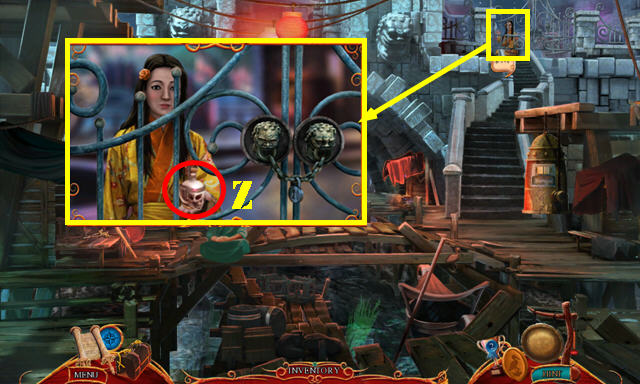
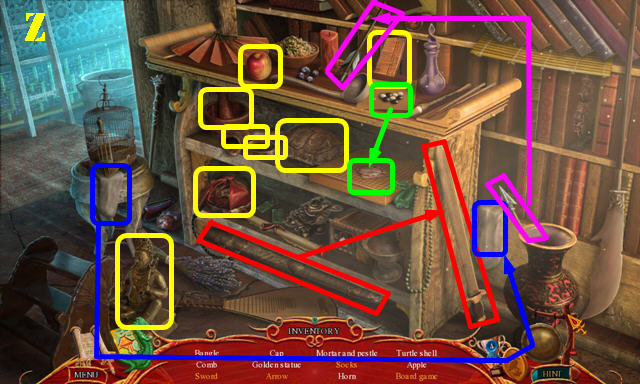
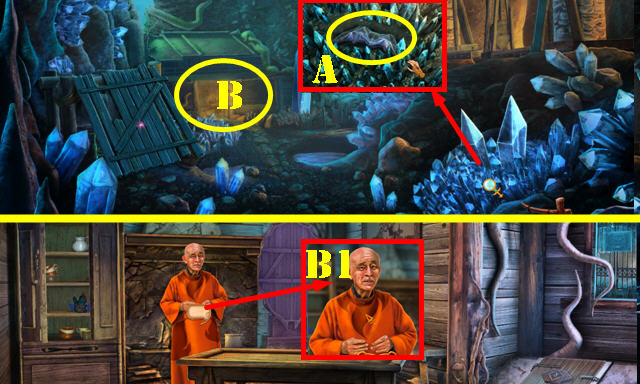
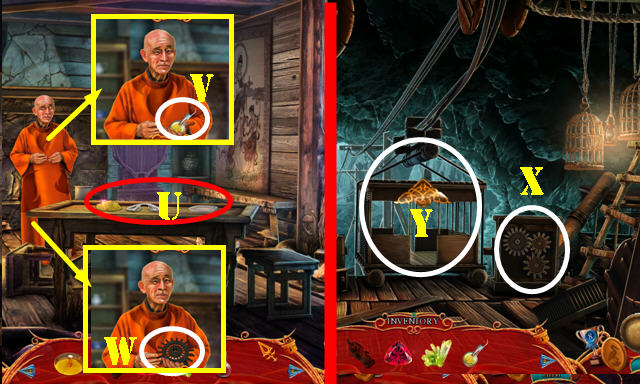
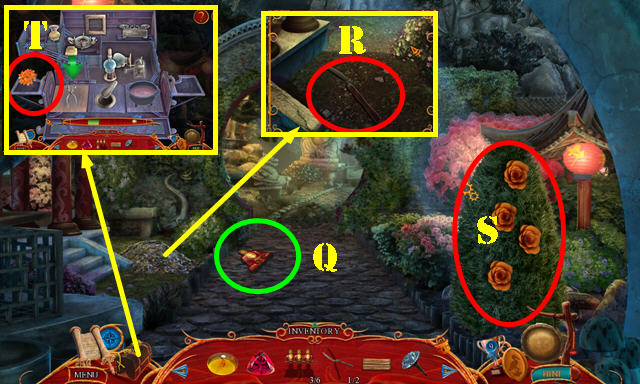
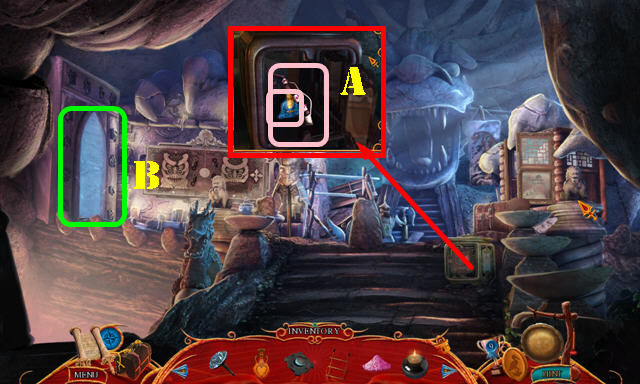
- Talk to Bo and take the POISON ESSENCE (Z).
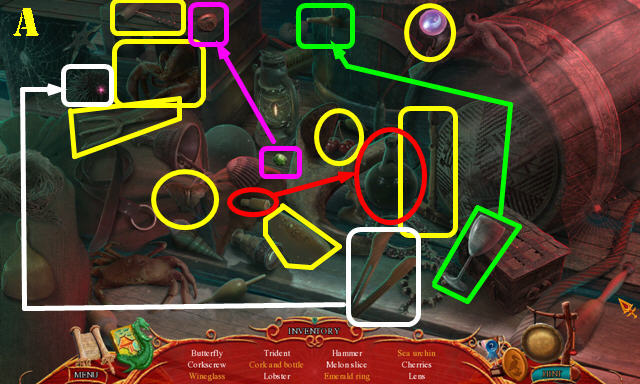
- Play the HOP to receive the LENS (A).
- Return to the Ship’s Quarters.
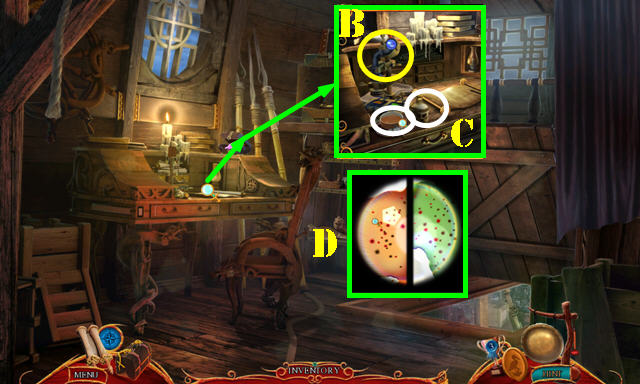
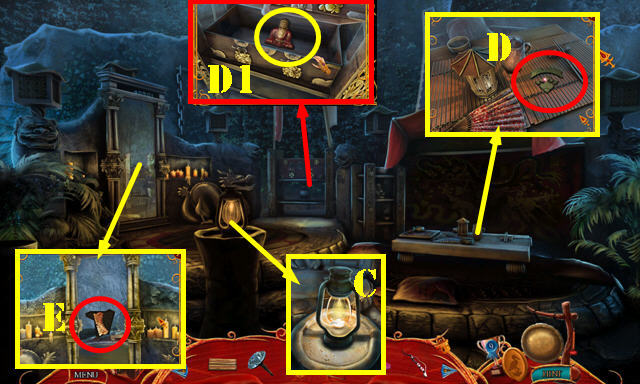
- Zoom into the desk and place the LENS on the microscope (B).
- Place the SOUP and the POISON ESSENCE on the desk (C).
- Zoom into the microscope and touch the sample twice (D).
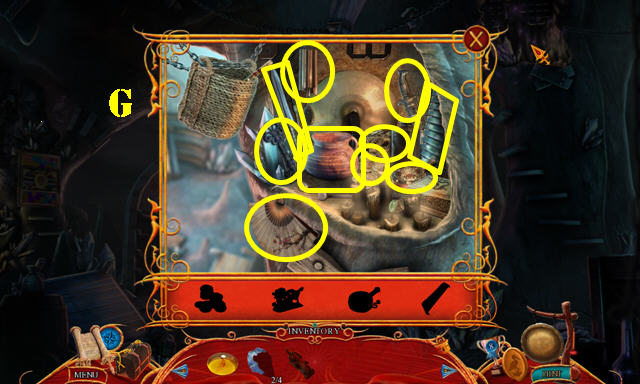
- Play the HOP to receive the CROWBAR (E).
- Return to the Docks.
Chapter 2: The Library
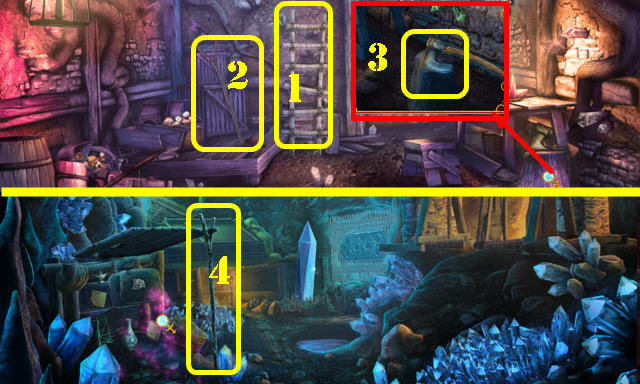
- Zoom into the gate; use the ACID on the lock and then use the CROWBAR on it (F).
- Go through the gate to reach the Square.
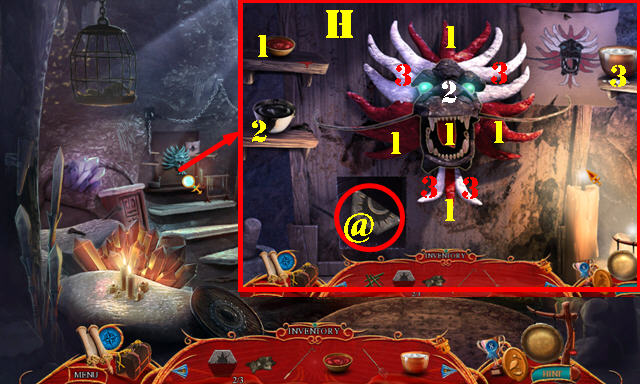
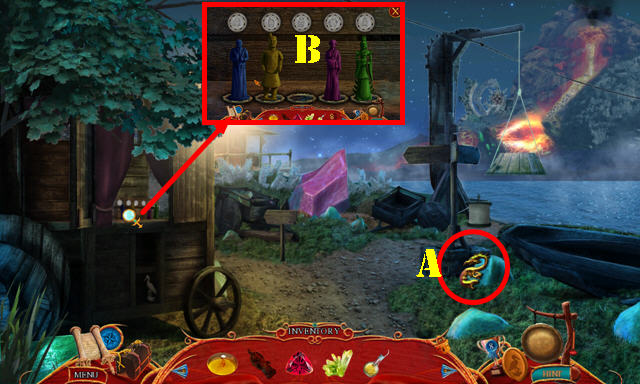
- Talk to Bo and take the PUPPET SHOW TOKEN 1/2 (G).
- Talk to the man (H).
- Take the EMPRESS’ HEADDRESS (I).
- Return to the Palace Lobby.
- Examine the tile floor; use the CROWBAR on the loose tile and take the PUPPET SHOW TOKEN (J).
- Return to the Square.
- Zoom into the stage and use the 2 PUPPET SHOW TOKENS in the slots (K).
- Take the SHRINE LOCK PIECE (L) and the ROPE (M).
- Use the ROPE on the curtains to activate a HOP (N).
- Play the HOP to receive the AWL (O).
- Return to the Ivory Tower.
- Zoom into the drawer; use the AWL to get the PEARL 2/2 (P).
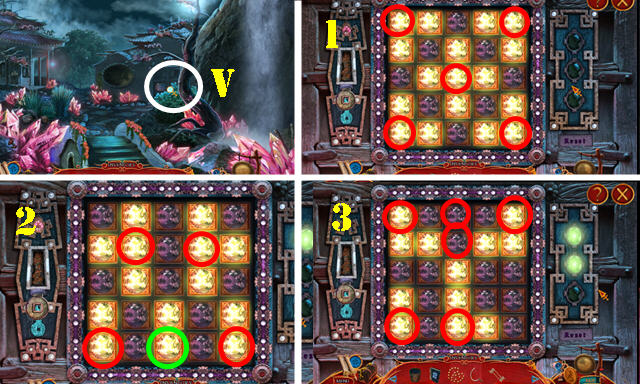
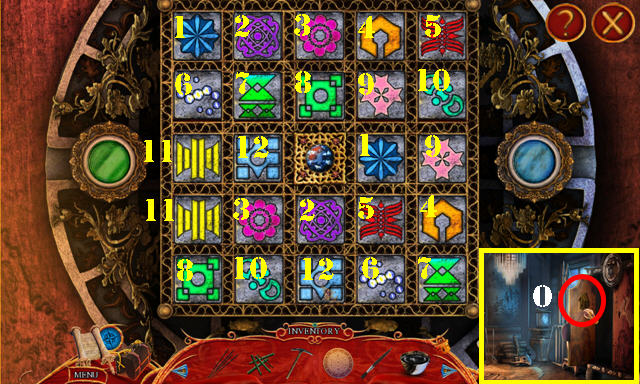
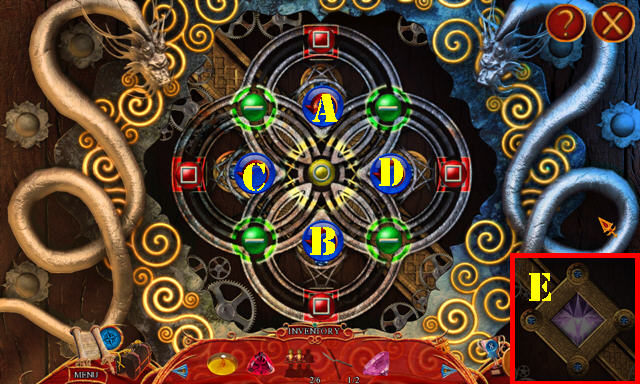
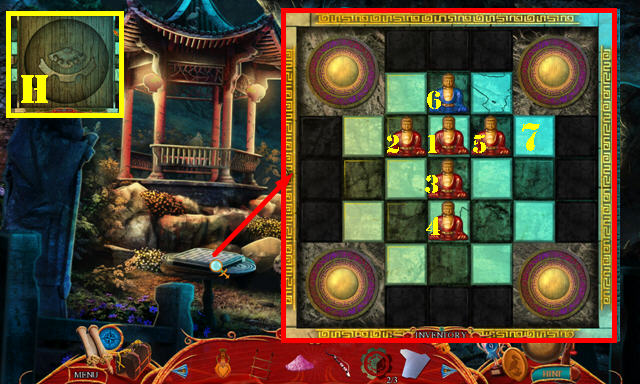
- Zoom into the shrine and place the SHRINE LOCK PIECE on it to activate a puzzle (Q).
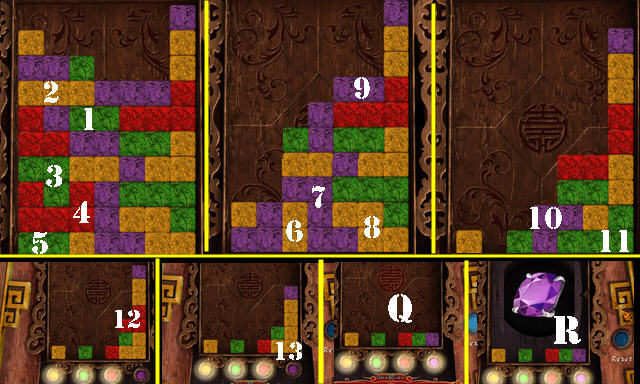
- Select two or more blocks of the same color to eliminate then until the blocks at the bottom match the circles. The circles will light up when the right blocks are above them.
- To solve the puzzle, select the blocks in the order shown on the screenshot (1-13). Screenshot (Q) shows the final solution.
- Take the GREENHOUSE LOCK PIECE (R).
- Return to the Square and then go forward to the Crystal Garden.
- Zoom into the door; place the GREENHOUSE LOCK PIECE and the two PEARLS on it (yellow).
- Take the SACK OF GOLD and the SICKLE (green).
- Use the WOODEN POLE to get the SCISSORS (S).
- Walk down.
- Zoom into the man; give him the SACK OF GOLD to receive the MURAL ELEMENT (T).
- Walk down.
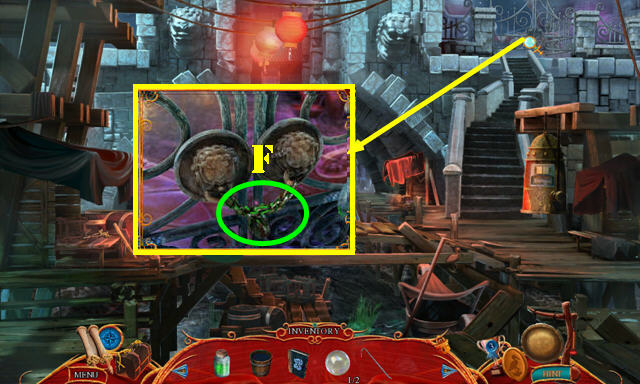
- Zoom into the ground; cut the strings with the SCISSORS to get the PAIR OF CHOPSTICKS (U).
- Zoom into the mural and place the MURAL ELEMENT on it (purple; take the UNDERGROUND LIBRARY KEY (yellow).
- Return to the Crystal Garden.
- Zoom into the door and place the UNDERGROUND LIBRARY KEY in the lock (V) to activate a puzzle.
- Turn off all the lights by pressing on the right buttons. You must solve three rounds of this puzzle to win the game.
- Please look at the screenshot for the 3 solutions (1-3). Select the buttons marked in red first, and then select the one marked in green last.
- Enter the Library.
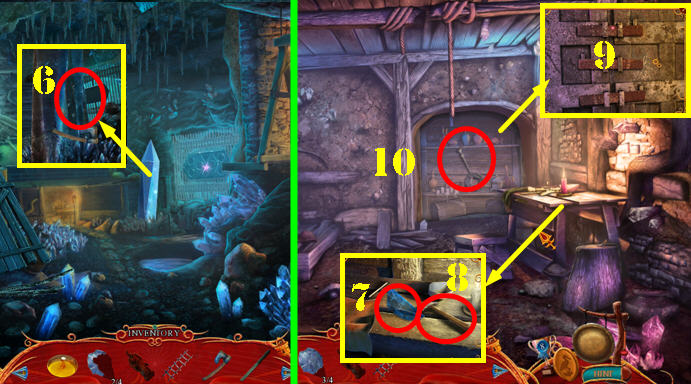
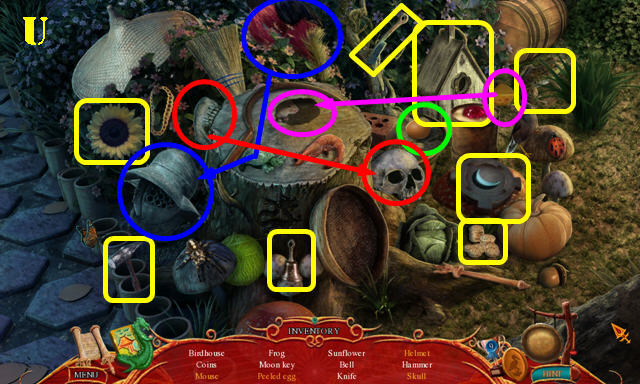
- Talk to Bo and take the VASE (W).
- Zoom into the desk and take the SCROLL OF HEALING (X).
- Look at, and then take the note (Y).
- Play the HOP to receive the comb (Z).
- Walk down.
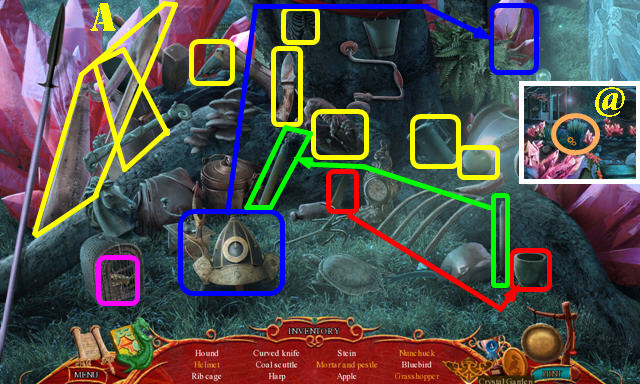
- Cut the grass with the SICKLE to activate a HOP (@).
- Play the HOP to receive the CARVING KNIFE (A).
- Return to the Library.

- Zoom into the desk and then on the corner; use the CARVING KNIFE on the rotten wood to get the ROTTEN WOOD (B).
- Open the Healer’s Kit and put down the ROTTEN WOOD (C).
- Touch the item the arrow is pointing to when the ball is on the green line.
- You will receive the WOOD-ROTTING ESSENCE.
- Zoom into the stand; place LEI’S NOTES on it (D). Touch the pages for a clue.
- Zoom into the back door for a puzzle.
- Use the arrows to move the symbols in the slots using the clue as a reference (E).
- To solve the puzzle, select the buttons in this order: Fx3, Gx4, and Hx3 for the first part of the puzzle.
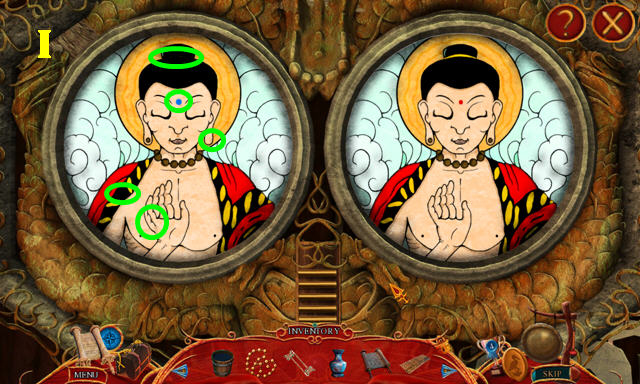
- Select the areas marked in green to find the 5 differences between the 2 images (I).
- Go through the door to access the Shrine.
- Zoom into the container and use the BUCKET OF WATER on the coals (J).
- Examine the cabinet and put down the VASE (K).
- Zoom into the statue and use the items on the hair in order of appearance: the COMB, the PAIR OF CHOPSTICKS and the EMPRESS’ HEADDRESS (L).
- Take the DIVINE ESSENCE (M).
- Use the WOOD-ROTTING ESSENCE on the boards to activate a HOP (N).
- Play the HOP to receive the NET (P).
- Return to the Crystal Garden.
- Use the NET to catch the DRAGONFLY (Q).
- Open the Healer’s Kit and put down the DRAGONFLY (R).
- Touch the item the arrow is pointing to when the ball is on the green line.
- You will receive the DRAGONFLY ESSENCE.
- Return to the Ivory Tower.
- Zoom into the floor; put down the DRAGONFLY ESSENCE, the SCROLL OF HEALING, and the DIVINE ESSENCE (S) to get the ELIXIR OF HEALING.
- Use the ELIXIR OF HEALING on the Prince (T).
- Walk down for a cut scene. Speak with the guard.
Chapter 3: The Blue Dragon
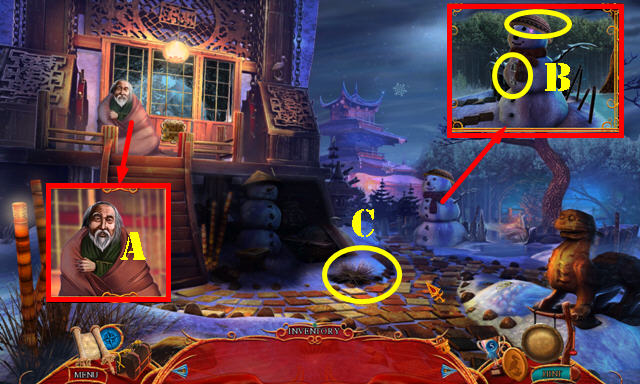
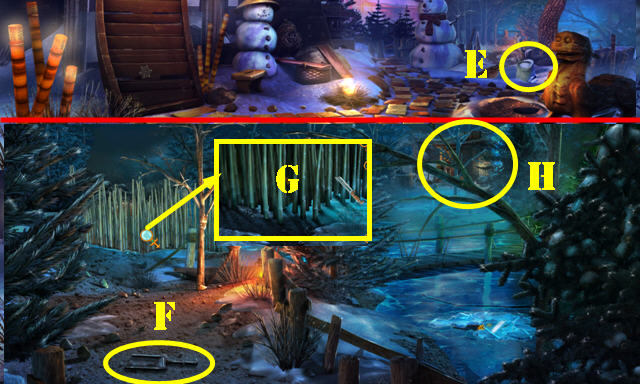
- Talk to the old man (A).
- Zoom into the snowman; take the FLINT STONES and the WOODEN BOWL (B).
- Place the FLINT STONES on the pit to activate a HOP (C).
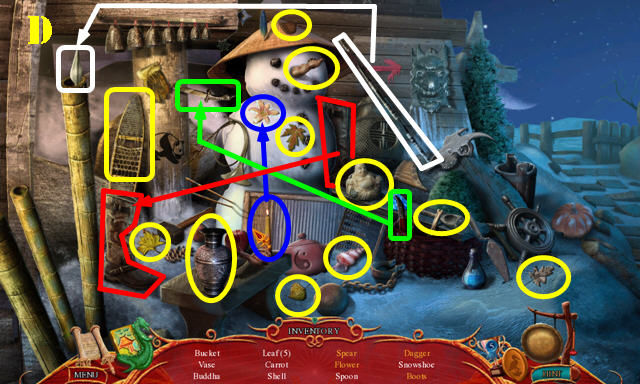
- Play the HOP to receive the CARROT (D).
- Go forward to the Cook’s Cottage.
- Talk to the man (E).
- Take the BRICK 1/4 (F).
- Zoom into the table; take the PARSLEY and the RAG (G).
- Open the Healer’s Kit and put down the PARSLEY (H).
- Touch the item the arrow is pointing to when the ball is on the green line.
- You will receive the PARSLEY EXTRACT.
- Go forward to the Temple.
- Play the HOP to receive the SHOVEL (I).
- Examine the shelf and take the INCENSE STICKS (J).
- Take the BRICK 2/4 (K).
- Walk down twice.
- Zoom into the snow and use the SHOVEL in it 3 times; take the BRICK 3/4 and the ONION (L).
- Return to the Cook’s Cottage.
- Place the PARSLEY EXTRACT, the CARROT, and the ONION in the pot (M).
- Place the WOODEN BOWL on the tray. Use the RAG to get the SOUP (N).
- Walk down.

- Zoom into the old man and give him the SOUP to receive the PRAYER WHEEL (O).
- Return to the Temple.
- Zoom into the mechanism and place the PRAYER WHEEL on it to activate a puzzle (P).

- Rotate the cubes with the arrows (1-10) until the symbols on them match the red buttons.
- The beginning configuration is random, the screenshot shows the final solution (P1).
- Take the BRICK 4/4 and the WOODEN GEAR 1/2 (R).
- Walk down.
- Zoom into the steps; use the 4 BRICKS on them (S).
- Take the WOODEN GEAR 2/2 (T).
- Walk down.
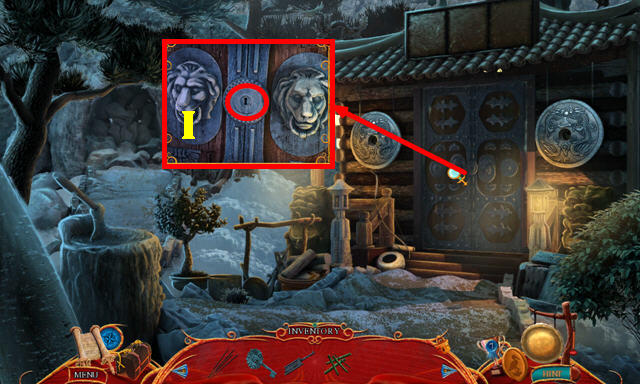
- Zoom into the door and place the 2 WOODEN GEARS on it to activate a puzzle (U).
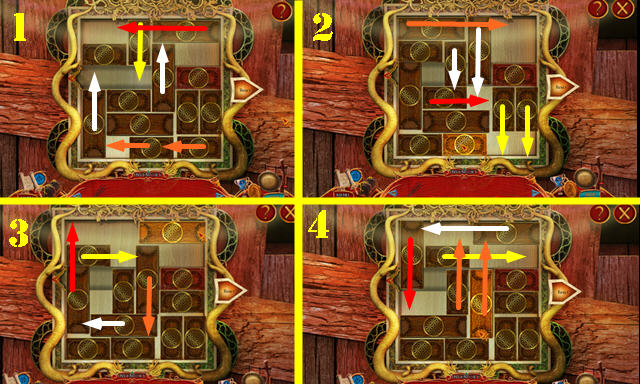
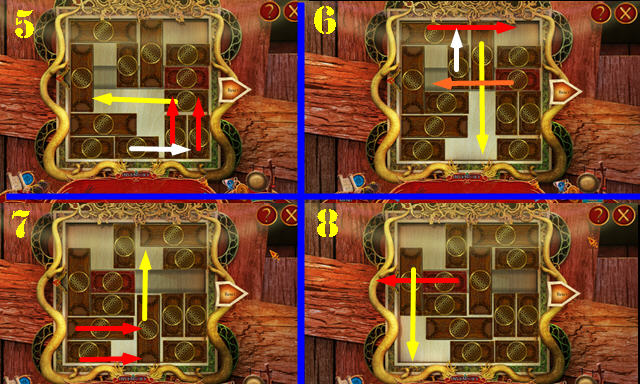
- Slide the blocks out of the way so the red block can go out the exit.
- Follow the steps on the screenshots (1-8), and move the blocks in the direction of the arrows in this order: Yellow, Red, White, and Orange.
- Go through the door to access the Dragon’s Lair.
Chapter 4: Three Magic Eggs
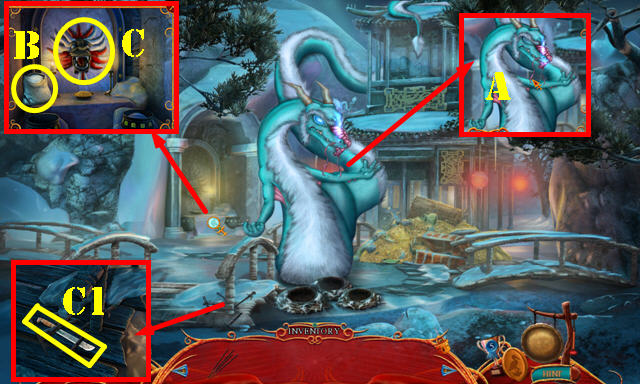
- Talk to the dragon (A).
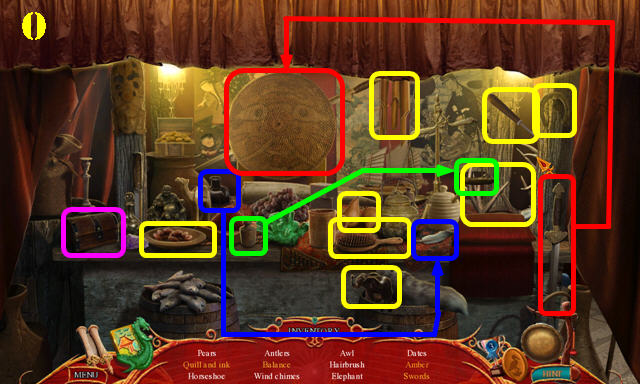
- Zoom into the table and take the BAG OF SALT (B).
- Touch the mask for a clue (C).
- Zoom into the bridge; remove the nails and take the SERRATED DAGGER (C1).
- Play the HOP to receive the HUNTER’S SHACK KEY (D).
- Walk down.
- Put down the BAG OF SALT (E).
- Go forward on the right to the Frozen Pond.
- Take the INCENSE SHOVEL (F).
- Zoom into the bamboo and cut it with the SERRATED DAGGER to get the BAMBOO PILE (G).
- Go to the Hunter’s Shack (H).
- Zoom into the door; use the HUNTER’S SHACK KEY in the lock (I).
- Turn the key and go through the door.
- Play the HOP to receive the PICKAXE (J).
- Take the RUG (K).
- Examine the chair and take the FINE BRUSH (L).
- Zoom into the fireplace; use the INCENSE SHOVEL in it to get the CHARRED REMAINS (M).
- Open the Healer’s Kit and put down the CHARRED REMAINS (N).
- Touch the item the arrow is pointing to when the ball is on the green line.
- You will receive the BLACK PAINT.
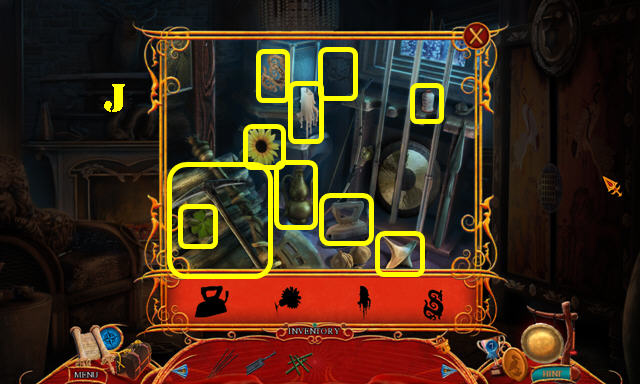
- Zoom into the cabinet door for a puzzle.
- Flip the tiles to see what’s behind them; match all the pairs of symbols.
- Please look at the screenshot for the solution (1-12).
- Take the LEATHER GLOVES (O).
- Walk down.

- Zoom into the rocks; use the PICKAXE on them and go into the Cave (P).
- Examine the altar for a clue (Q).
- Take the CLIFF ELEMENT 1/3 (R).
- Walk down twice and go left to reach the Pine Forest.
- Zoom into the bear; use the LEATHER GLOVES on the trap and take the BEAR FUR (S).
- Take the CLIFF ELEMENT 2/3 (T).
- Take the HONEY on the ground (not pictured).
- Go into the Troll’s Cave (V).
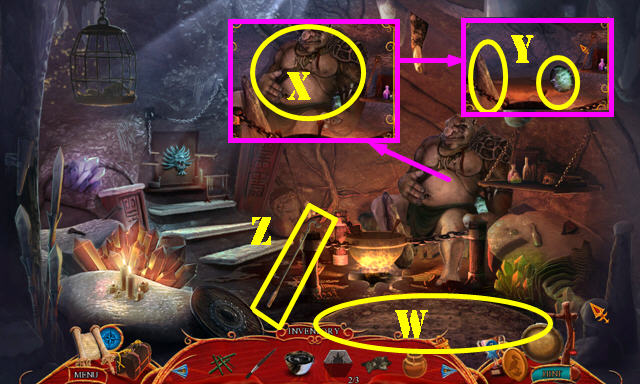
- Put down the RUG (W).
- Zoom into the troll and use the HONEY on him (X).
- Examine the wall; take the DRAGON’S EGG and the CLUB (Y).
- Take the REACHING ROD (Z).
- Return to the Dragon’s Lair.
- Play the HOP to receive the RED MINERAL (1).
- Open the Healer’s Kit and put down the RED MINERAL (2).
- Touch the item the arrow is pointing to when the ball is on the green line.
- You will receive the RED PAINT.
- Place the DRAGON’S EGG in the nest (3) and take the ORB (4).
- Return to the Pine Forest.
- Zoom into the door and place the ORB in the hand (5).
- Rotate the dials until the sun between them matches the designated numbers.
- To solve the puzzle, select the orbs in this order: Ax5, Bx4, and Cx7.
- Go to the Foot of the Mountain.
- Zoom into the base of the tree; take the PITCHFORK (D).
- Zoom into the ice and break it with the CLUB. Place the INCENSE STICKS in the holder (E) and take the WHITE POWDER (F).
- Open the Healer’s Kit and put down the WHITE POWDER (G).
- Touch the item the arrow is pointing to when the ball is on the green line.
- You will receive the WHITE PAINT.
- Return to the Troll’s Cave.
- Zoom into the fresco; put down the BLACK PAINT, the FINE BRUSH, the WHITE PAINT, and the RED PAINT to activate a puzzle.
- Dip the brush in the paint and then color the desired area according to the clue on the paper.
- Please look at the screenshot for the solution (H). Don’t forget to paint the tongue red.
- Take the CLIFF ELEMENT 3/3 (@).
- Return to the Foot of the Mountain.
- Zoom into the shrine and place the 3 CLIFF ELEMENTS in the slot (I).
- Go to the Mountain Top (J).
- Use the PITCHFORK on the hay 3 times to activate a HOP (K).
- Play the HOP to receive the FEATHERS (L).
- Walk down.
- Zoom into the base of the tree; use the FEATHERS on the sacks to receive the PILLOWS (M).
- Go to the Mountain Top.
- Put down the PILLOWS (N).
- Use the REACHING ROD on the egg (O); take the DRAGON’S EGG (yellow).
- Return to the Dragon’s Lair.
- Place the DRAGON’S EGG in the nest (P) and take the ICEPICK (Q).
- Return to the Frozen Pond.
- Zoom into the ice; use the ICE PICK on it and take the GOLD NUGGET (R).
- Return to the Cave.
- Zoom into the altar; put down the BAMBOO STICKS, the BEAR FUR, and the GOLD NUGGET. Take the MOSQUITO FOSSIL and the DRAGON’S EGG (S).
- Return to the Dragon’s Lair.
- Place the DRAGON’S EGG in the nest (T).
- Go through the portal (U).
Chapter 5: The Flame Master

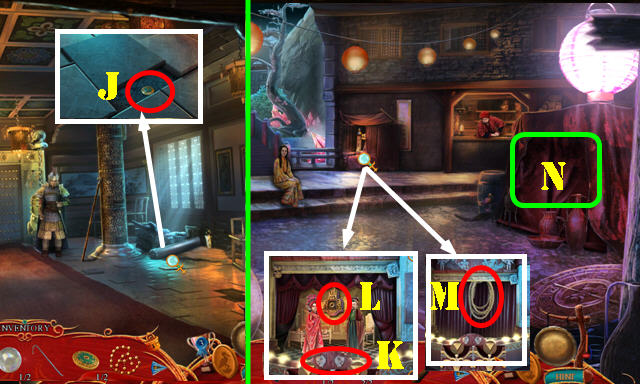
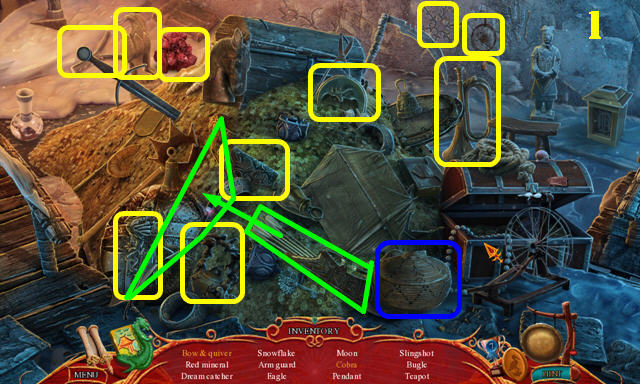
- Zoom into the crystals; remove the 2 large ones and take the CRYSTAL PIECE 1/4 (A).
- Go to the Farm Interior (B).
- Talk to the man (B1).
- Play the HOP to receive the PULLEY (C).

- Zoom into the cabinet; move the statue and take the PORCELAIN FIGURE (D).
- Examine the picture; touch it (E) to take the CRYSTAL PIECE 2/4.
- Walk down.
- Zoom into the elevator and place the PULLEY on it (F).
- Take the elevator to the Cavern Ceiling.
- Play the HOP to receive the TRAPDOOR KEY (G).

- Examine the well and take the WOODEN HANDLE (H).
- Return to the Farm Interior.
- Zoom into the trapdoor; use the TRAPDOOR KEY in the lock (I). Remove the door for a puzzle.

- Move the tiles to the right spots by pressing on the buttons in the right order.
- Select a tile and then an adjacent empty spot (1-9) to move it there.
- The solution to this puzzle is random; the screenshot shows the final image (J).
- Go through the trapdoor to access the Farm Cellar.

- Take the LADDER (1) and the SUPPORTING BRANCH (2).
- Zoom into the stump; place the WOODEN HANDLE on the hatchet head to get the HATCHET (3).
- Return to the Farm.
- Use the SUPPORTING BRANCH on the plank to activate a HOP (4).
- Play the HOP to receive the FILE (5).
- Zoom into the crystal; use the HATCHET to get the CRYSTAL CHUNK (6).
- Return to the Farm Cellar.
- Zoom into the table; place the CRYSTAL CHUNK on it (7).
- Use the hammer (8) on the chunk and then touch the crystal to receive the CRYSTAL PIECE 3/4.
- Zoom into the door; use the FILE on the latches (9) and take the CRYSTAL WELL HANDLE (10).
- Return to the Cavern Ceiling.
- Zoom into the well and place the CRYSTAL WELL HANDLE on it (A).
- Pull the handle twice and take the CRYSTAL PIECE 4/4 (B).

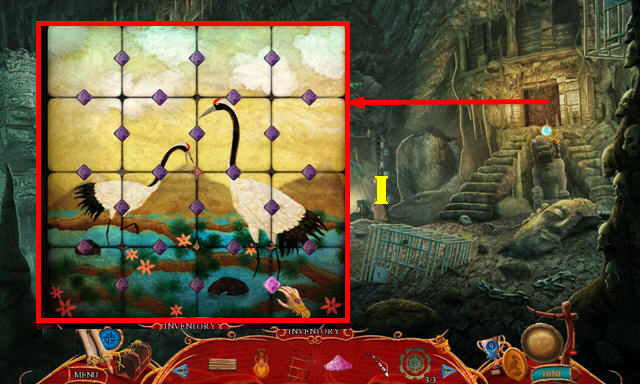
- Zoom into the wall; place the 4 CRYSTAL PIECES in the slot to activate a puzzle (C).
- Reassemble the stained glass. Grab a piece and then place it in the right spot.
- Please look at the screenshot for the solution (D).
- Take the AMARANTHINE JEWEL (E).
- Walk down.

- Zoom into the door for a puzzle.
- Select the symbols in the order shown on the clue to solve the first puzzle (1-6).
- Touch the ‘X’ to activate the second part of the puzzle. In this puzzle, you must use the buttons at the bottom, to move the pebbles into the right spots.
- Select the buttons in this order to solve the second part of the puzzle: Hx2, G, F, Hx3, Gx3, Hx2, G, Fx5, G, and Hx4.
- Go forward to the Foundry.
- Play the HOP to receive the LIGHT CRYSTAL (I).
- Zoom into the ground; take the WIRE CUTTERS (J).
- Take the STRONG SUPPORTING BRANCH (K).
- Zoom into the bench; take the ORNATE BUTTON (L).
- Go to the Cargo Tram (L1).
- Place the LADDER against the wall (M).
- Zoom into the cage and use the WIRE CUTTERS to cut the bars; take the GARDEN SHOVEL (N).
- Zoom into the chest; place the ORNATE BUTTON on it (O) and push it in. Take the WICK (P).
- Walk down.
- Zoom into the bench; use the GARDEN SHOVEL on the ground and take the SULFUR ROCK (Q).
- Open the Healer’s Kit and put down the SULFUR ROCK (R).
- Touch the item the arrow is pointing to when the ball is on the green line.
- You will receive the SULFUR POWDER.
- Walk down.
- Use the STRONG SUPPORTING BRANCH on the door to activate a HOP (S).
- Play the HOP to receive the EMPTY FLASK (T).
- Return to the Farm Interior.
- Place the WICK, SULFUR POWDER, and EMPTY FLASK on the table (U).
- Take the EXPLOSIVE from the man (V) to trigger a cut scene, then take the COG (W) after the cut scene.
- Return to the Cargo Tram.
- Place the COG in the mechanism (X).
- Take the lift to the Jade Plantation (Y).
Chapter 6: The Jade Plantation
- Take the JADE KEY 1/4 (A).
- Zoom into the cart and place the PORCELAIN FIGURINE on it to activate a puzzle (B).
- Arrange the figurines according to the image in the picture above it. Select two sections to swap their positions.
- Please look at the screenshot for the solution (C).
- You will receive the SHACK CABINET KEY.
- Go forward to the River.
- Take the JADE KEY 2/4 (D).
- Zoom into the cabinet; use the SHACK CABINET KEY in the lock and take the FERRY CRANK (E).
- Zoom into the mechanism and insert the LIGHT CRYSTAL in it (F); take the LIGHT CRYSTAL DUST (G).
- Use the LIGHT CRYSTAL DUST in the dark spot to activate a HOP (H).

- Play the HOP to receive the BURNING TORCH (I).
- Walk down.
- Place the FERRY CRANK on the mechanism (J).
- Go forward to the Lava River (K).
- Take the JADE KEY 3/4 (L).
- Zoom into the rocks and put down the EXPLOSIVE. Use the BURNING TORCH on the explosive’s wick (M).
- Go forward to the Jade Portal.
- Take the JADE KEY 4/4 (O).
- Zoom into the lock; place the 4 JADE KEYS in the lock (P).
- Go through the portal.
- Take the CHECKERS TOKEN 1/6 (Q).
- Zoom into the chest; take the GARDEN SHEARS 1/2 (R).
- Go forward to the Dragon Gate.
- Take the CHECKERS TOKEN 2/6 (S).
- Zoom into the base of the statue; push both buttons (green) and take the DRAGON CHEST ORB (T).
- Play the HOP to receive the GATE PIECE (U).
- Walk down.

- Zoom into the dragon; place the DRAGON CHEST ORB in the slot (green) and take the GEM (V).
- Go forward.
- Place the GATE PIECE on the lock (W). Zoom into the lock to activate a puzzle.
- Use the arrow buttons to rotate the pebbles until they are in their matching spots.
- To solve the puzzle, select the arrow buttons in this order: Ax2, Bx2, D, and AX3.
- Place the GEM in the slot (E).
- Go forward to the Dragon Courtyard.
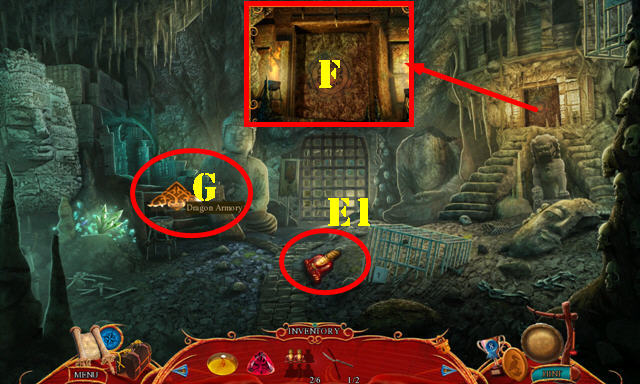
- Pick up the CHECKERS TOKEN 3/6 (E1).
- Zoom into the door (F).
- Go to Dragon Armory (G).
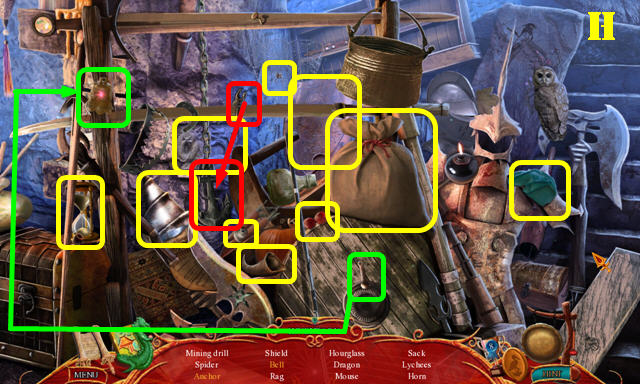
- Play the HOP to receive the MINING DRILL (H).
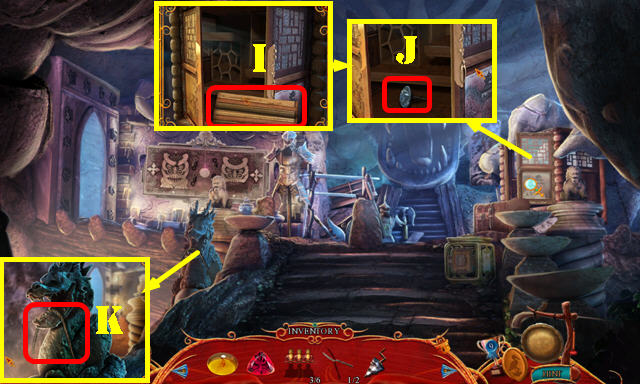
- Zoom into the cabinet and open it; take the RITUAL SCROLL (I) and the DIAMOND CUTTER (J).
- Examine the statue and take the PIECE OF ROPE (K).
- Walk down.
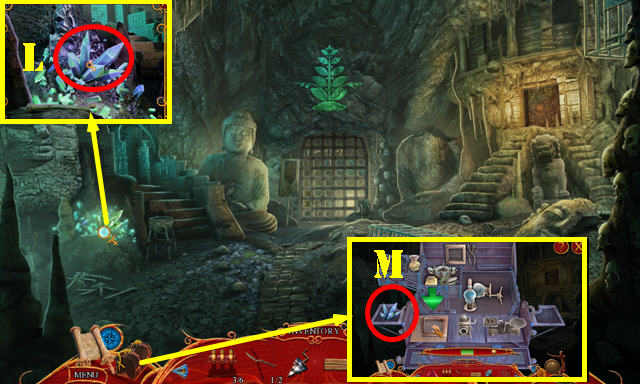
- Zoom into the crystals; use the MINING DRILL on them and take the HEAVY CRYSTAL (L).
- Open the Healer’s Kit and put down the HEAVY CRYSTAL (M).
- Touch the item the arrow is pointing to when the ball is on the green line.
- You will receive the WEIGHT POWDER.
- Return to the Dragon Plateau.
Chapter 7: The Finale
- Zoom into the sack; place the WEIGHT POWDER and then the PIECE OF ROPE on it; take the SACK (N).
- Return to the Dragon Courtyard.
- Place the SACK on the hook (O).
- Go through the gate to the Dragon Garden (P).
- Pick up the CHECKERS TOKEN 4/6 (Q).
- Examine the pile of leaves; remove them and take the GARDEN SHEARS 2/2 (R).
- Use the GARDEN SHEARS on the bush to receive the MOON LILY (S).
- Open the Healer’s Kit and put down the MOON LILY (T).
- Touch the item the arrow is pointing to when the ball is on the green line.
- You will receive the HEALING POTION.
- Play the HOP to receive the MOON KEY (U).
- Go forward to the Dragon Statue Park.
- Take the ROPE LADDER (V).
- Take the VALERIAN FLOWER (W).
- Open the Healer’s Kit and put down the VALERIAN FLOWER (X).
- Touch the item the arrow is pointing to when the ball is on the green line.
- You will receive the SLEEPING POWDER.
- Return to the Dragon Armory.
- Play the HOP to receive the OIL LAMP (Y).
- Zoom into the display case and use the MOON KEY on it. Take the WAND and the CHECKERS TOKEN 5/6 (A).
- Go through the left door to reach the Dragon Arcane (B).
- Zoom into the lamp and use the OIL LAMP on it (C).
- Examine the table; take the LOCK PIECE 1/3 (D).
- Zoom into the chest and take the CHECKERS TOKEN 6/6 (D1).
- Zoom into the mirror and use the DIAMOND CUTTER on it; take the MIRROR PIECE and the BAS RELIEF PIECE (E).
- Walk down.
- Zoom into the bas relief and place the BAS RELIEF PIECE on it to activate a puzzle (F).
- Arrange the tiles into the right spots until the right image is complete. Pieces placed correctly will lock in place.
- Please look at the screenshot for the solution (G).
- You will receive the LOCK PIECE 2/3.
- Return to the Dragon Statue Park.
- Zoom into the board and place the 6 CHECKER TOKENS on it to activate a puzzle.
- Jump statues until only one remains. A statue can only jump over another statue to an empty space. Select a statue and then select an arrow in the direction you want to move.
- To solve the puzzle, jump the pieces in this order: 1 over 5, 4 over 3, 2 over 1, 7, over 5 and 6 over 1.
- Take the LOCK PIECE 3/3 (H).
- Return to the Dragon Courtyard.
- Zoom into the door and place the LOCK PIECE on it to activate a puzzle.
- Use the buttons to move the tiles until the picture is complete.
- Please look at the screenshot for the solution (I).
- Go through the door to reach the Palace Lobby.
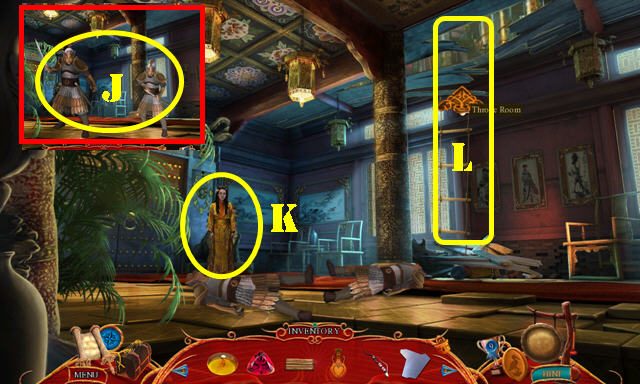
- Use the SLEEPING POWDER on the guards (J).
- Talk to Bo (K).
- Place the ROPE LADDER on the hole and go up to the Throne Room (L).
- Use the MIRROR PIECE on Jinhai (M).
- Use the WAND on Jinhai.
- Zoom into the floor and put down the RITUAL SCROLL. Place the MOSQUITO FOSSIL, the AMARANTHINE JEWEL, and the HEALING POTION on the scroll (N).
- Congratulations, you have completed Myths of the World: Chinese Healer Collector’s Edition!


 Nightfall: An Edgar Allan Poe Mystery Tips & Tricks, Guide, & Tips
 Scarytales: All Hail King Mongo Walkthrough, Guide, & Tips
 Mystery Trackers: Black Isle Walkthrough, Guide, & Tips
 Whispers: Revelation Walkthrough, Guide, & Tips
 Dark Alleys: Penumbra Motel Walkthrough, Guide, & Tips