League of Light: Dark Omens Walkthrough, Guide, & Tips
League of Light: Dark Omens Walkthrough

Welcome to the League of Light: Dark Omens Walkthrough
The mysterious League of Light has chosen you as their newest member. Are you up to your first assignment?
Whether you use this document as a reference when things get difficult or as a road map to get you from beginning to end, we’re pretty sure you’ll find what you’re looking for here.
This document contains a complete League of Light: Dark Omens game walkthrough featuring annotated screenshots from actual gameplay!
We hope you find this information useful as you play your way through the game. Use the walkthrough menu below to quickly jump to whatever stage of the game you need help with.
Remember to visit the Big Fish Games Forums if you find you need more help. Have fun!
This walkthrough was created by BrownEyedTigre, and is protected under US Copyright laws. Any unauthorized use, including re-publication in whole or in part, without permission, is strictly prohibited.
General Tips

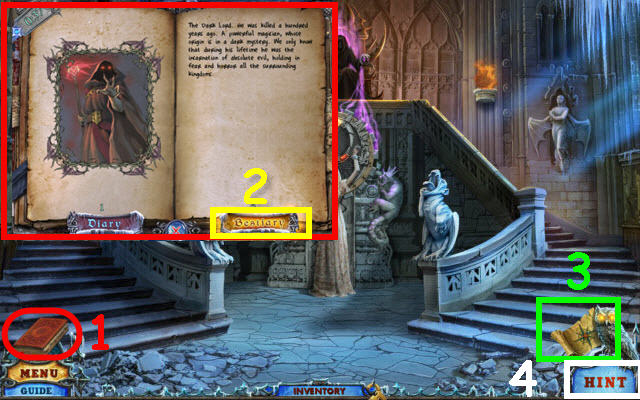
- This is the official guide for League of Light: Dark Omens.
- Select Options to adjust Music, Sound and Ambient Volume. You may also adjust Gamma, Full Screen, and Custom Cursors.
- You may choose between Casual, Advanced and Hardcore.
- Hidden-object puzzles are referred to as HOPs in this guide. Items listed in yellow are hidden, or they require additional actions to locate. Interactive items in HOPs are color-coded.
- Puzzles may be skipped after a short wait.
- Open your diary (1) to view your story updates and stored clues. Select the Bestiary tab (2) to read about the different creatures.
- Select the Map (3) to see what locations have tasks to complete. You can also fast travel to any location by selecting the desired area on the map.
- You may select the Hint button (4) for help in game play or HOP areas.
Chapter 1: Village of Sorrow’s Well

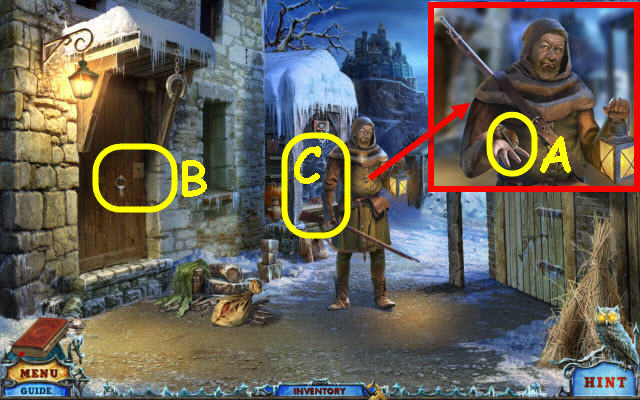
- Speak to Elton; take the KEY (A).
- Examine the door and use the KEY on the lock (B); enter the building.
- Speak with Elton to trigger a HOP.
- Examine the stall to access a HOP (C).

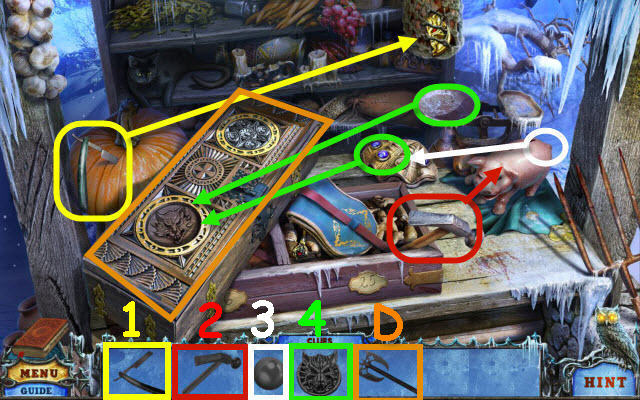
- Play the HOP.
- Find and use the items in the order numbered in the find list.
- You will receive the AXE (D).

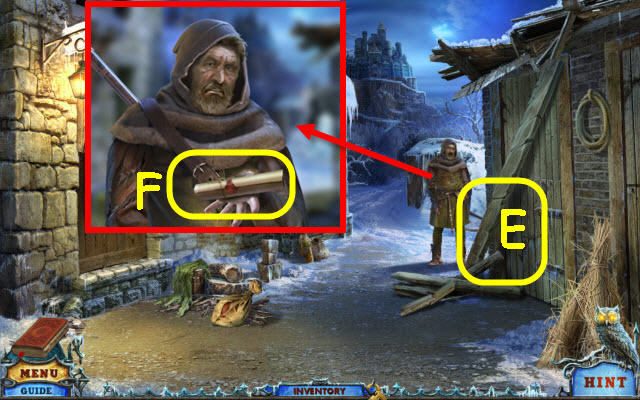
- Examine the board and use the AXE on it (E).
- Speak to Elton; take the map (F). The map will now be added to the bottom right above the hint button.

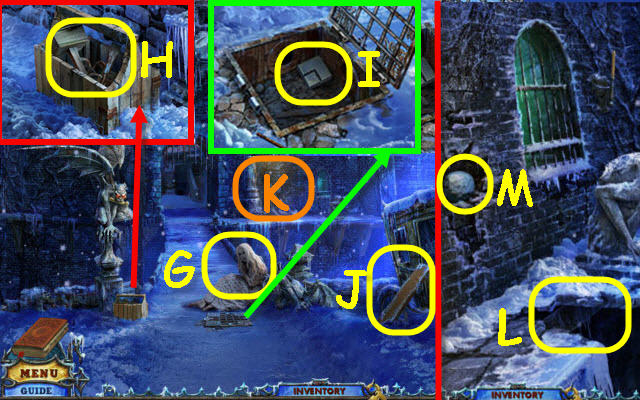
- Speak to Penelope (G).
- Examine the toolbox; take the MALLET AND CHISEL (H).
- Examine the grate and use the MALLET AND CHISEL on it. Open the grate; take the PUZZLE PART 1/2 (I).
- Take the BOARD (J).
- Go right on the ledge (K).
- Select anywhere in the scene and then place the BOARD on the gap (L).
- Take the CANNONBALL (M).
- Back out.

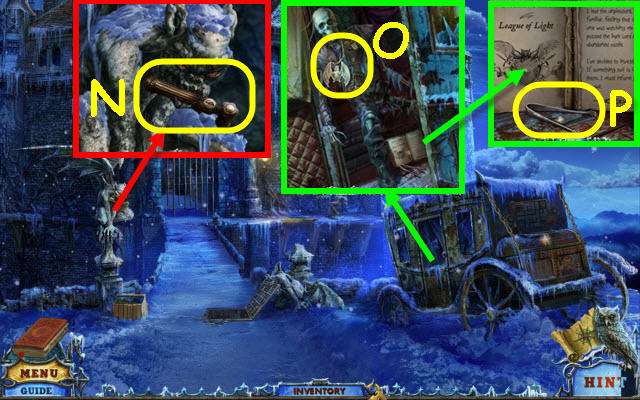
- Examine the gargoyle and use the CANNONBALL on it; take the HANDLE (N).
- Examine the carriage door and place the HANDLE on it; pull the handle. Take the BAT (O).
- Zoom into the book; take the TONGS (P).
- Go right on the ledge.

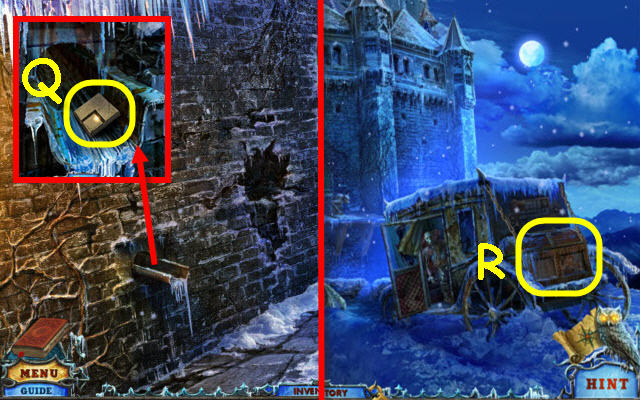
- Examine the drain spout and use the TONGS to get the PUZZLE PART 2/2 (Q).
- Back out.
- Examine the trunk and place the 2 PUZZLE PARTS on it to trigger a puzzle (R).

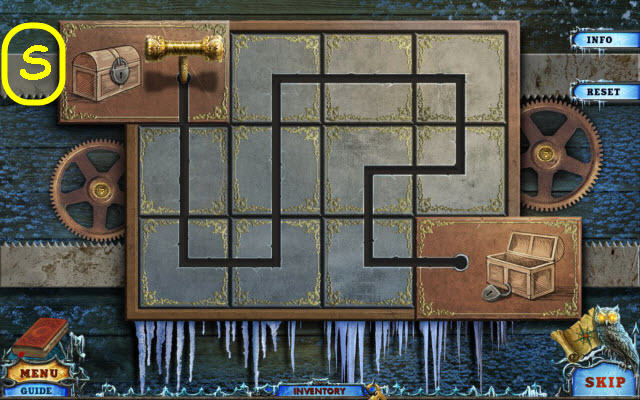
- Turn the squares to slide the handle to the open trunk.
- See screenshot for solution (S).
- Examine the opened trunk to access a HOP.

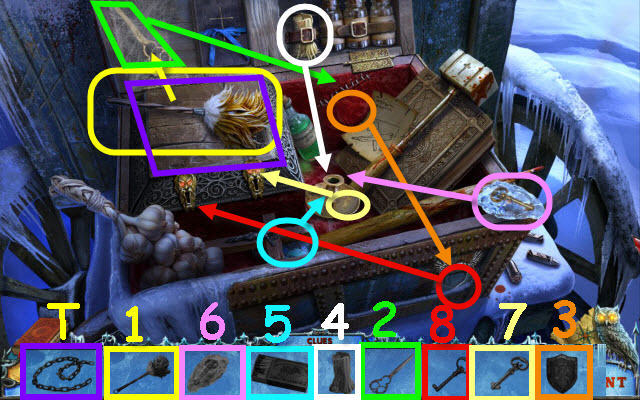
- Play the HOP.
- Find and use the items in the order numbered in the find list.
- You will receive the CHAIN (T).
- Go right on the ledge.

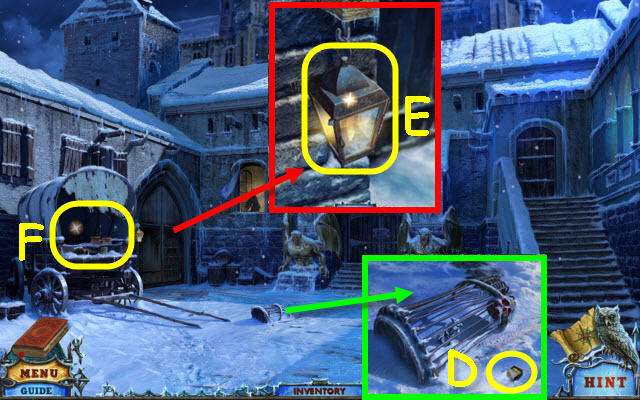
- Place the CHAIN on the window bars (U).
- Examine the gargoyle; use the MALLET AND CHISEL on the cement (V).
- Push the gargoyle; take the STICK 1/2 (W).
- Go through the window.

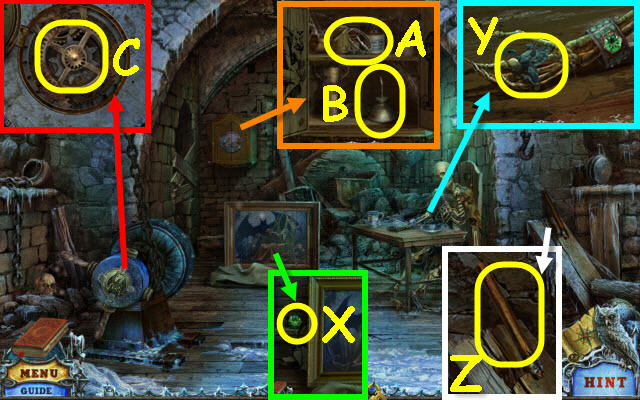
- Remove the cloth and examine the painting; take the GEM (X).
- Examine the table and place the GEM in the bracelet; take the GRIFFIN (Y).
- Examine the beam; take the STICK 2/2 (Z).
- Examine the cabinet and place the GRIFFIN on it; take the SILVER ITEMS 1/5 (A) and OILER (B).
- Examine the winch and place the BAT on it; use the OILER on the gears (C).
- Place the 2 STICKS on the winch and turn the wheel.
- Go forward.


- Examine the cage; take the MATCHES (D).
- Examine the door and zoom into the lantern; open the lantern door. Use the MATCHES on the wick; take the LANTERN (E).
- Use the LANTERN on the carriage (F).
- Examine the carriage to access a HOP.

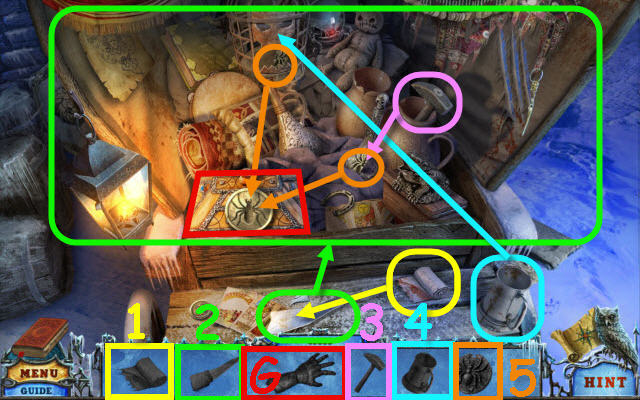
- Play the HOP.
- Find and use the items in the order numbered in the find list.
- You will receive the GAUNTLET (G).

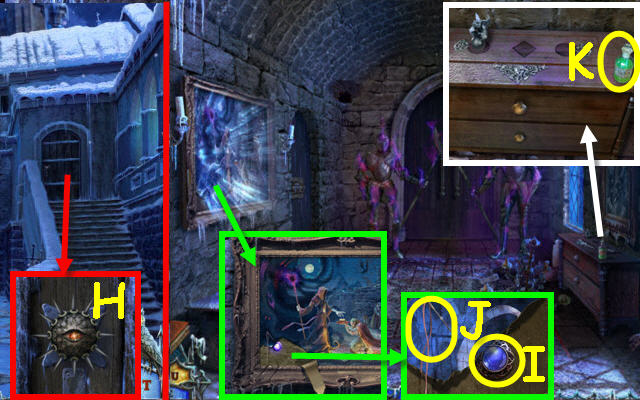
- Examine the door and use the GAUNTLET on the handle (H).
- Enter through the newly-opened door.
- Examine the painting and peel back the corner. Zoom into the corner; take the BLUE GEM 1/2 (I) and NEEDLE (J).
- Examine the chest of drawers; take the ACID (K).
- Back out.

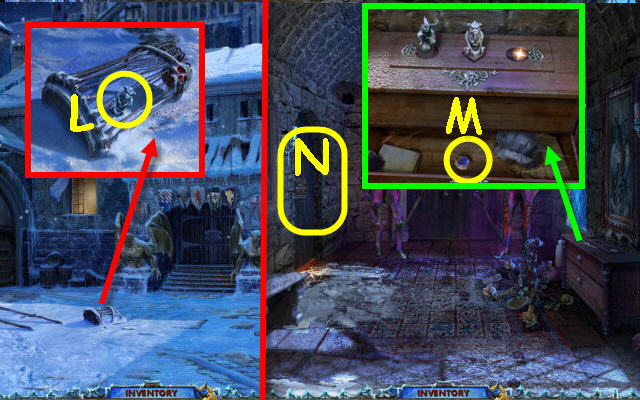
- Examine the cage and use the ACID on it; take the GARGOYLE (L).
- Go up the stairs.
- Examine the chest of drawers and place the GARGOYLE on it; take the BLUE GEM 2/2 (M).
- Examine the door and place the 2 BLUE GEMS on it to trigger a puzzle (N).

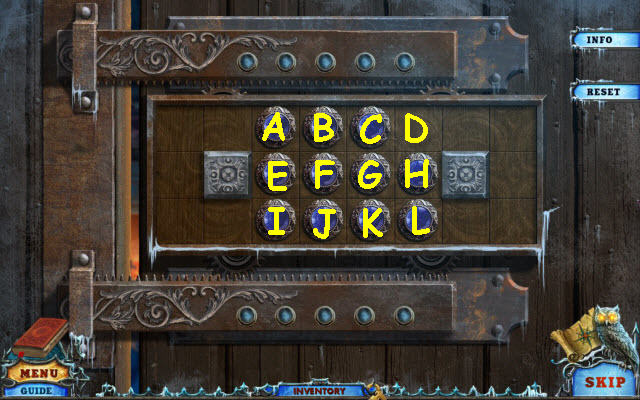
- Jump the gems to remove them.
- To solve the puzzle, move the gems as follows: B to D, J to B, L to J, D to L, I to K, L to J, A to C, C to K, K to I, and I to A.
- Go through the newly-opened door.

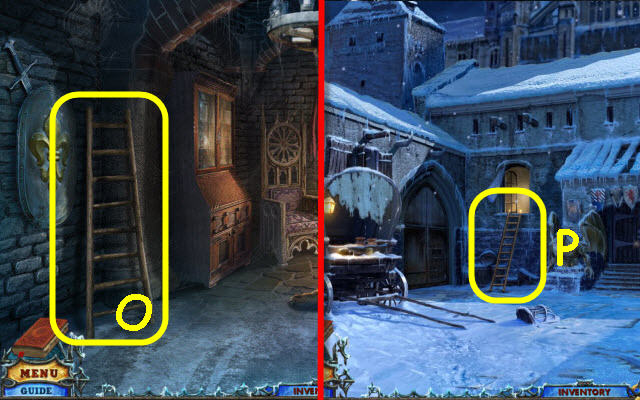
- Take the LADDER (O).
- Back out twice.
- Place the LADDER under the window (P).
- Go up the ladder through the window.
Chapter 2: Banshee

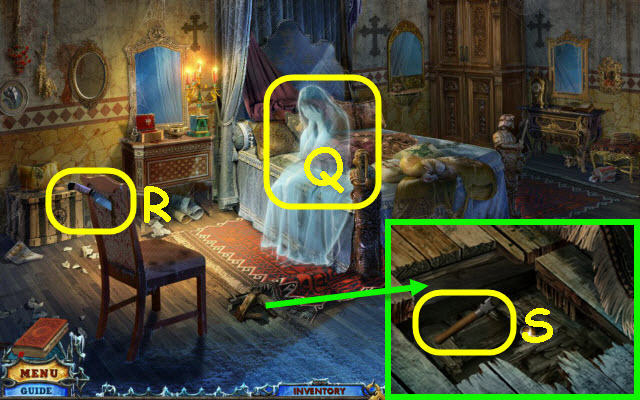
- Attempt to speak to the banshee (Q).
- Take the KNIFE (R).
- Examine the hole in the floor and move the two boards; take the GLASS CUTTER (S).
- Back out; go up the stairs on the right and then through the door on the left.

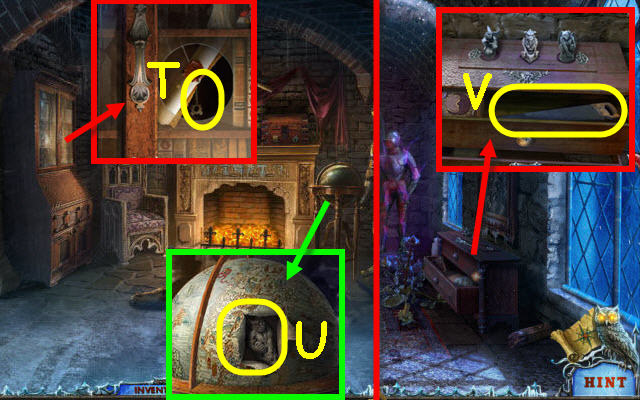
- Examine the cabinet and use the GLASS CUTTER on the glass; take the 2nd bestiary scroll and the KEY (T).
- Examine the globe and turn it. Use the KNIFE on the X; take the GARGOYLE (U).
- Back out.
- Examine the chest of drawers and place the GARGOYLE on it; take the SAW (V).
- Back out.

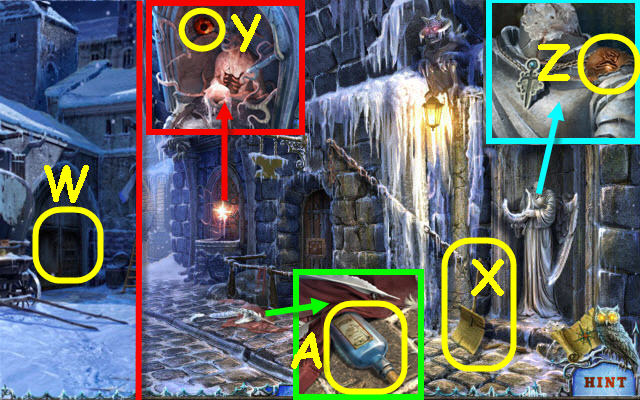
- Examine the left door; use the SAW on it (W).
- Go left through the newly-opened door.
- Take the SNOW SHOVEL (X).
- Examine the fountain; take the RUBY EYE (Y).
- Examine the statue; take the LEATHER FACE 1/2 (Z).
- Examine the cloth and move it; read the note and take the SILVER IDENTIFIER (A).
- Attempt to go up the path on the left.
- Back out; go up the stairs and through the left door.

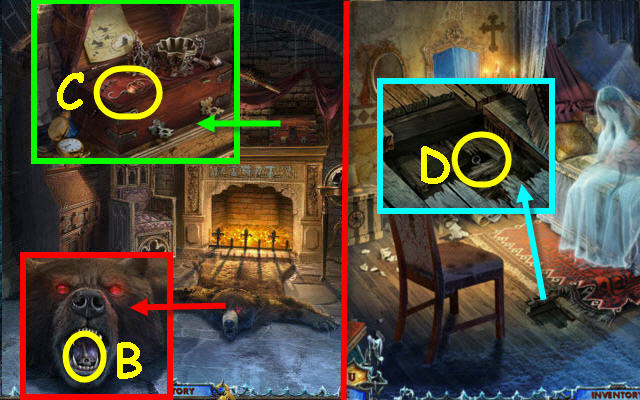
- Examine the bear and place the RUBY EYE in the socket; take the 2nd KEY (B).
- Examine the chest and use the 2 KEYS in the locks; take the HOOK (C).
- Back out twice and go up the ladder.
- Examine the hole in the floor; use the HOOK to get the SWORD PENDANT (D).
- Back out and go left.

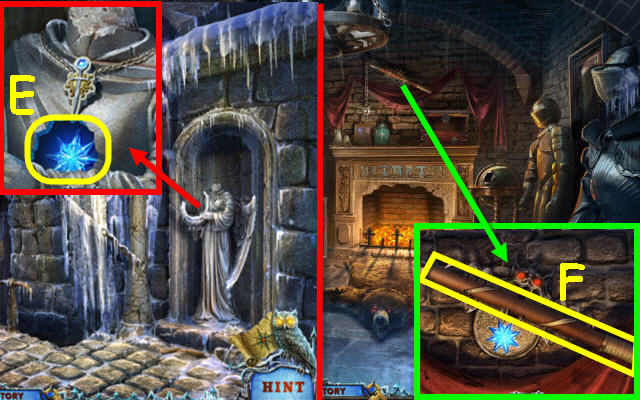
- Examine the statue and place the SWORD PENDANT on the necklace; take the BLUE STAR (E).
- Back out; go up the stairs and through the left door.
- Examine the flail and place the BLUE STAR on the lock; take the FLAIL (F).
- Back out twice.
- Examine the wagon to access a HOP.

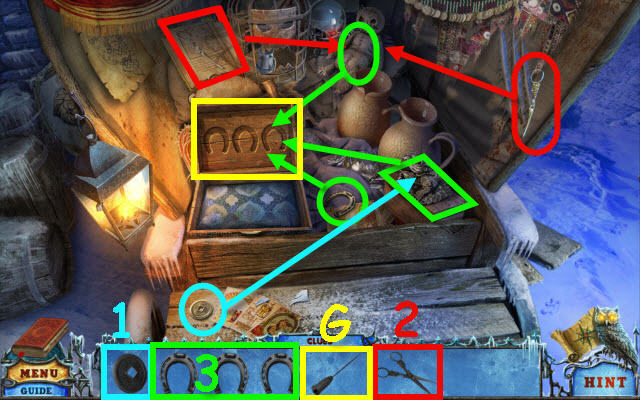
- Play the HOP.
- Find and use the items in the order numbered in the find list.
- You will receive the ICE PICK (G).
- Go left.

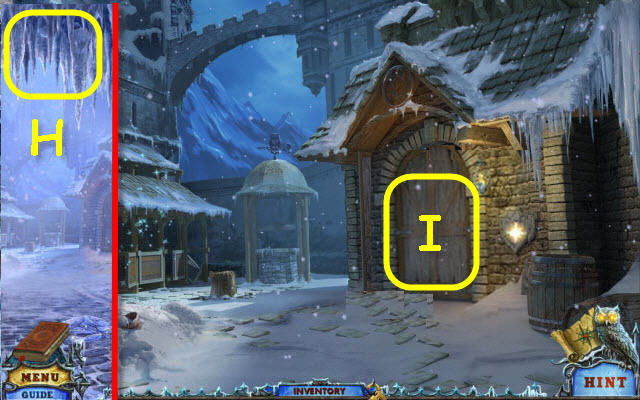
- Use the FLAIL on the icicles (H).
- Go up the path on the left.
- Select the door two times (I).

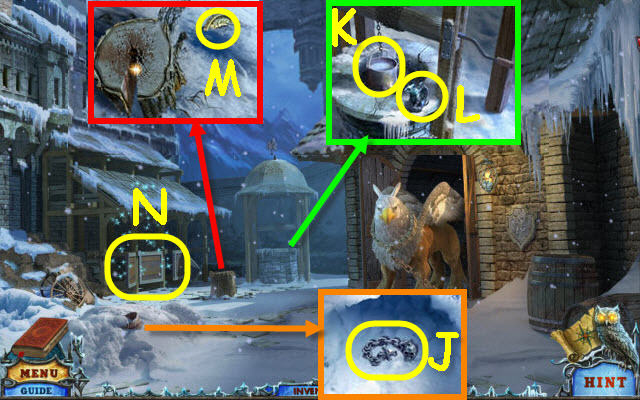
- Examine the snow pile and use the SNOW SHOVEL on it; take the SILVER ITEMS 2/5 (J).
- Examine the well; use the ICE PICK on the icy handle and turn it. Take the ICE BUCKET (K) and the SILVER ITEMS 3/5 (L).
- Examine the stump; take the HEART HALF (M).
- Open the stall door to trigger a HOP (N).
- Examine the opened stall to access a HOP.

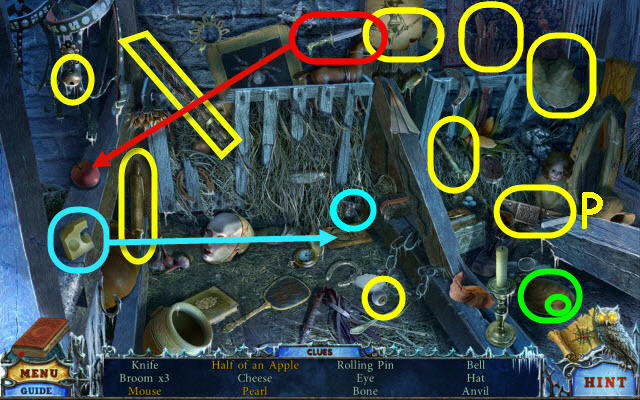
- Play the HOP.
- You will receive the ANVIL (P).
- Back out.

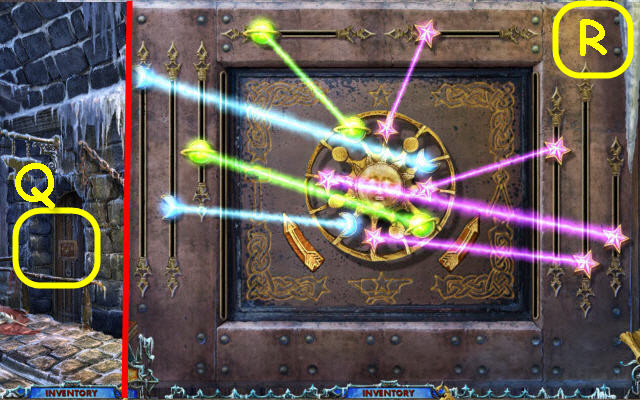
- Examine the door and place the ANVIL on it to trigger a puzzle (Q).
- Line up all the matching symbols with no intersecting lines to light them up.
- See screenshot for positions (R).
- Enter the newly-opened armory.

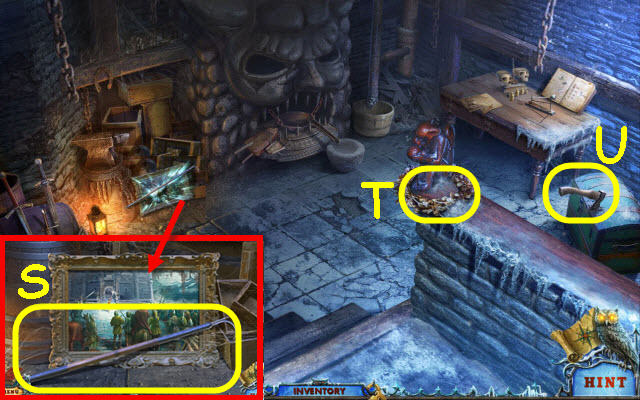
- Examine the painting; take the HOOK (S).
- Take the MISTLETOE (T) and AXE (U).
- Back out and go up the left.

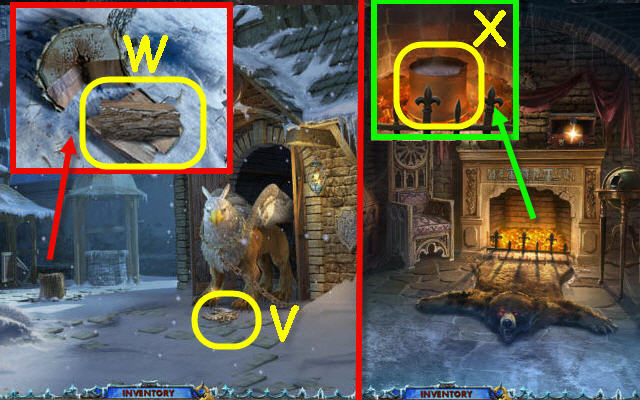
- Examine the emblem and use the HOOK on it to get the EAGLE EMBLEM (V).
- Examine the stump and use the AXE on it; take the FIREWOOD (W).
- Back out twice; go up the stairs and into the room on the left.
- Examine the fireplace and place the ICE BUCKET in it; take the BUCKET OF WATER (X).
- Back out twice and go left.

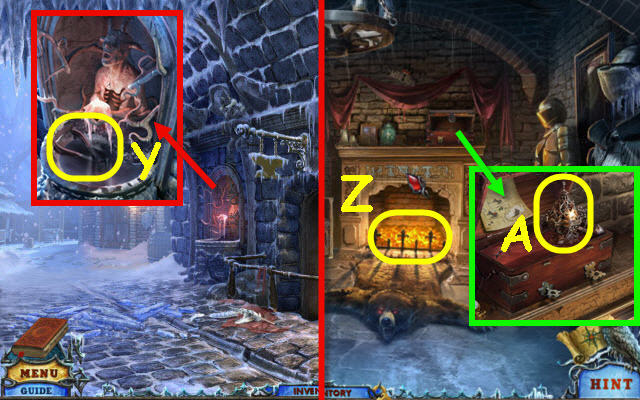
- Examine the fountain and use the BUCKET OF WATER on it; take the TONGS (Y).
- Back out; go up the stairs and then left.
- Examine the fireplace and use the TONGS in it to get COAL (Z).
- Examine the chest and place the COAL and then the MISTLETOE in the censer; take the CENSER (A).
- Back out twice and go up the ladder.

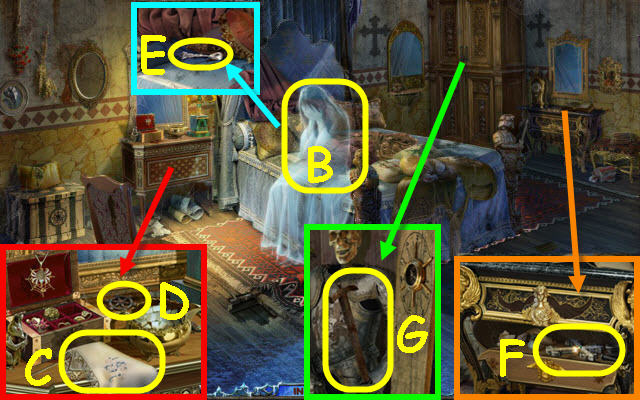
- Use the CENSER on the banshee (B).
- Examine the left dresser; take the SHAWL (C) and VALVE (D).
- Examine the pillows and move them; take the SILVER ITEMS 4/5 (E).
- Examine the right dresser and open the bottom panel; take the CROSS (F).
- Examine the armoire and open it; take the HAMMER (G).
- Back out and go to the left twice.

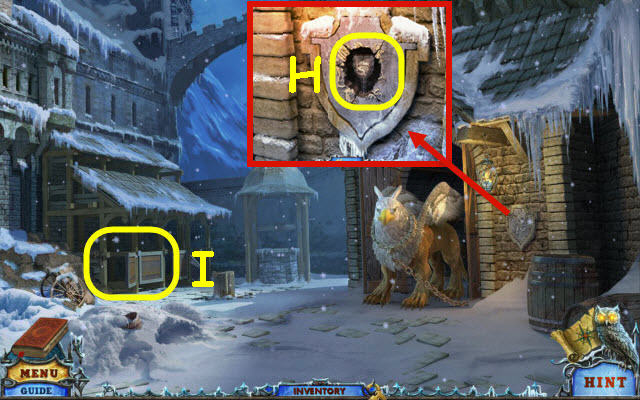
- Examine the crest and use the HAMMER on it; take the SILVER ITEMS 5/5 (H).
- Examine the stalls to access a HOP (I).

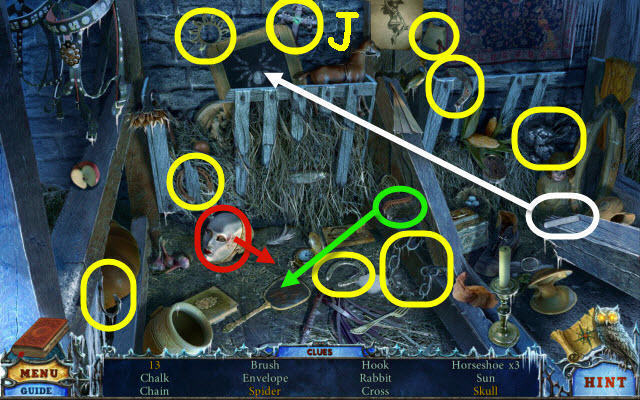
- Play the HOP.
- You will receive the 2nd CROSS (J).
- Back out and enter the armory.

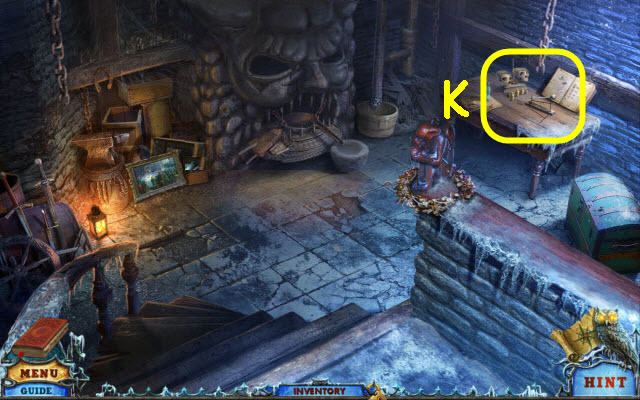
- Examine the table and place the SILVER IDENTIFIER and the 5 SILVER ITEMS on it (K).
- You will trigger a puzzle.

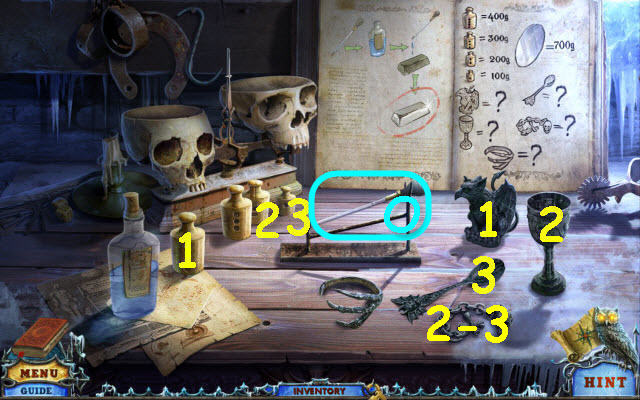
- Select the dropper (O) twice to fill it and use it on the items.
- Place the silver items and weights on the skull scales to get the weight of each. See screenshot for matching weights and items.
- You will earn PURE SILVER ITEMS.
- Back out of close-up.

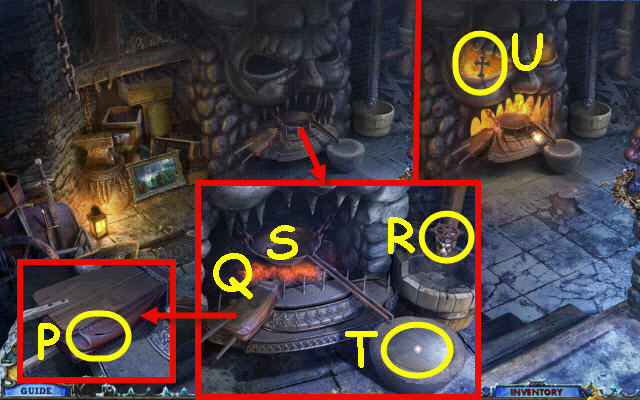
- Examine the furnace and zoom into the bellows. Take the 3rd bestiary scroll and use the NEEDLE on the bellows (P).
- Place the FIREWOOD under the pan and light with the MATCHES (Q).
- Place the VALVE on the stem; turn the VALVE (R).
- Place the PURE SILVER ITEMS in the pans (S) and use the bellows.
- Use the TONGS on the melted silver; take the MIRROR (T).
- Examine the eye; take the 3rd CROSS (U).
- Back out twice and go up the ladder.

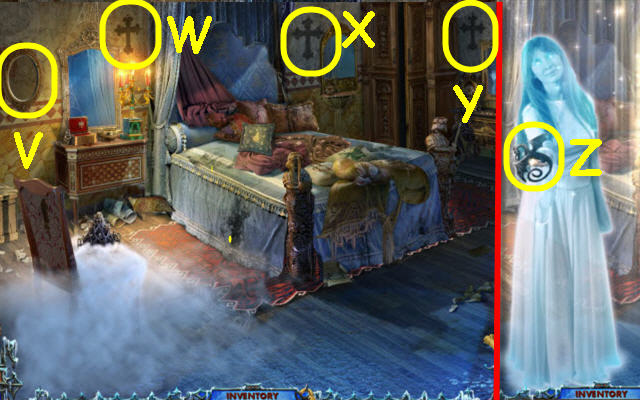
- Place the MIRROR in the frame (V).
- Examine the 3 cross outlines and place one of the 3 CROSSES on each (W-X-Y).
- Take the DRAGON (Z).
- Back out and go up the stairs.
Chapter 3: Griffin

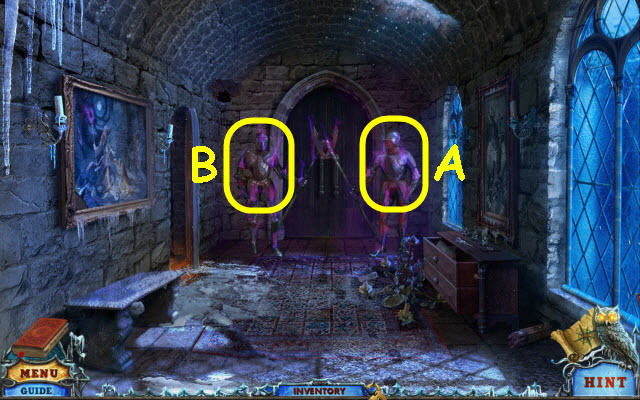
- Examine the guard on the right and place the EAGLE EMBLEM on it (A).
- Examine the guard on the left and place the DRAGON on it (B).
- Go forward.

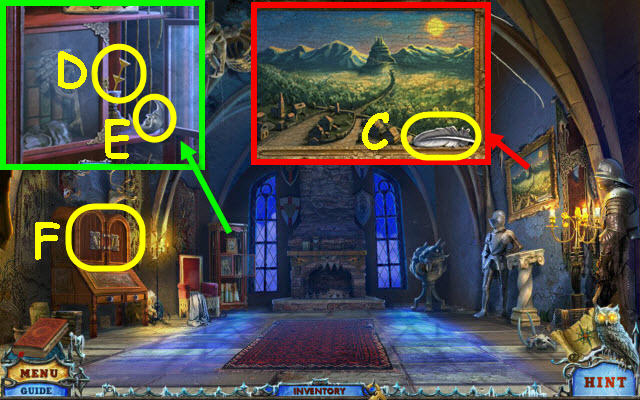
- Examine the painting; take the FEATHER (C).
- Examine the curio cabinet; take the RUNE 1/4 (D) and MOON (E).
- Examine the desk (F) and place the FEATHER in the slot to trigger a HOP.
- Examine the desk to access a HOP.

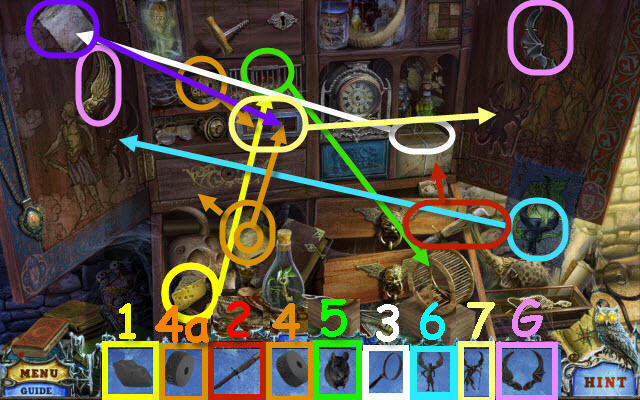
- Play the HOP.
- Find and use the items in the order numbered in the find list.
- To solve the puzzle (4), rotate the tumblers to match the clue from the magnifier (3). From left: skull, triangle, beaker and diamond.
- You will receive the WINGS (G).
- Back out.

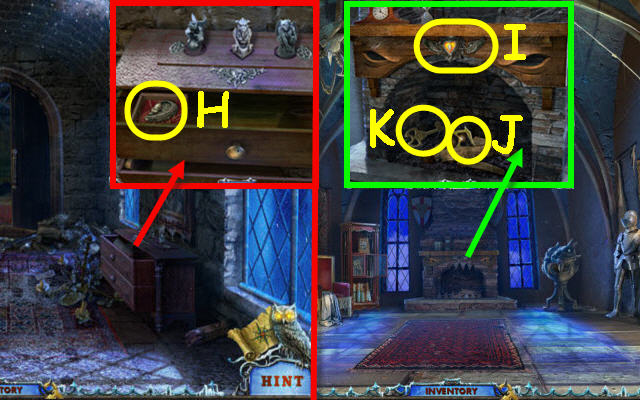
- Examine the chest of drawers and place the MOON on the book; take the 2nd HEART HALF (H).
- Go forward.
- Examine the fireplace and zoom into the wings; place the 2 HEART HALVES in the center (I).
- Take the RUNE 2/4 (J) and GRIFFIN KEY (K).
- Back out twice and go up the ladder.

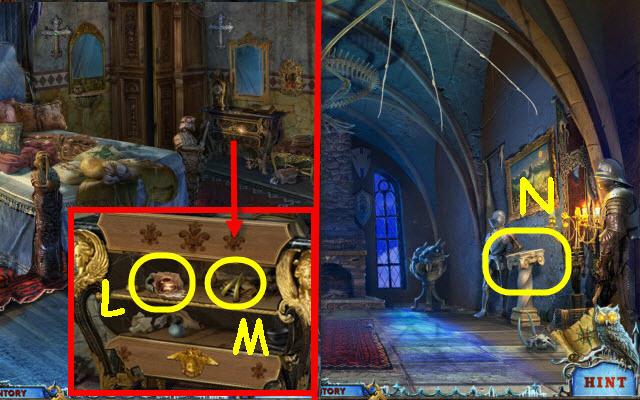
- Examine the dresser and place the WINGS on the top drawer; take the LEATHER FACE 2/2 (L) and RUNE 3/4 (M).
- Back out; go up the stairs and then go forward.
- Examine the bookstand and place the 2 LEATHER FACES on the book to trigger a puzzle (N).

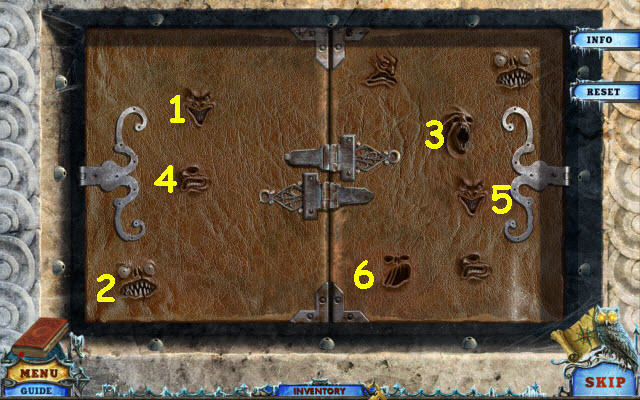
- Select the faces as they appear.
- To solve the puzzle, select the faces in the order marked (1-6).
- You will receive the 4th bestiary scroll.
- Take the RUNE 4/4.

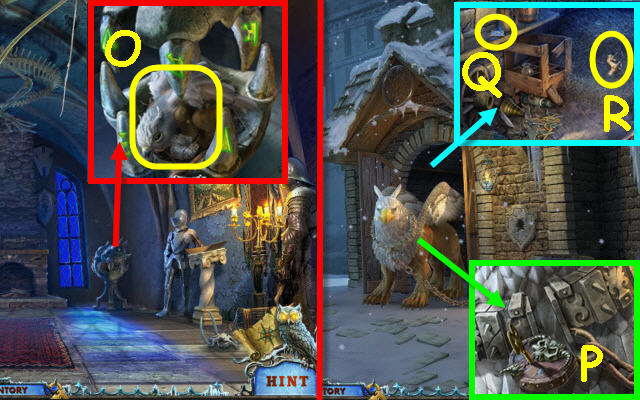
- Examine the cage and use the 4 RUNES on the teeth. Place the SHAWL on the griffin’s leg; take the GRIFFIN HATCHLING (O).
- Back out twice and then go left twice.
- Give the GRIFFIN HATCHLING to the griffin. Examine the griffin; open the lock and place the GRIFFIN KEY in it (P).
- Examine the barn and knock over the bell; take the PHOENIX RUNE 1/3 (Q) and the UNICORN (R).
- Back out twice.

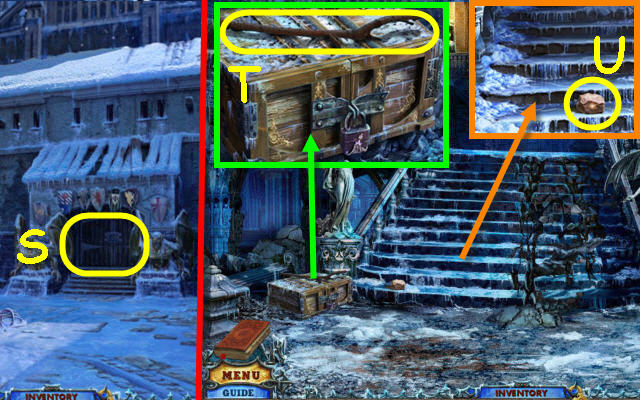
- Examine the door and place the UNICORN on the lock (S).
- Go forward.
- Examine the trunk; take the STICK (T).
- Examine the stairs; take the STONE (U).
- Back out and go left twice.

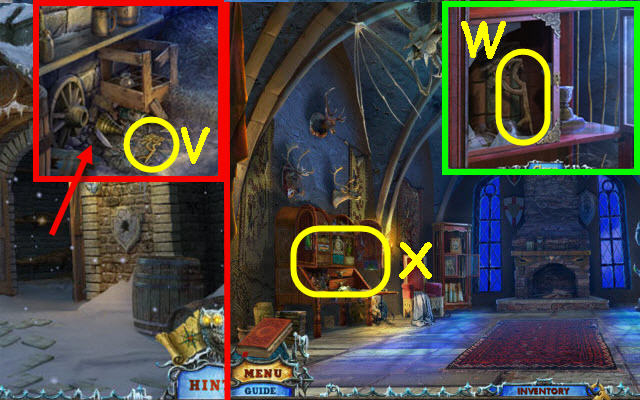
- Examine the barn and use the STICK on the glass; take the SIGN PART (V).
- Back out twice; go up the stairs and then forward.
- Examine the curio cabinet and use the STONE on the glass; take the 2nd SIGN PART (W).
- Examine the desk to access a HOP (X).

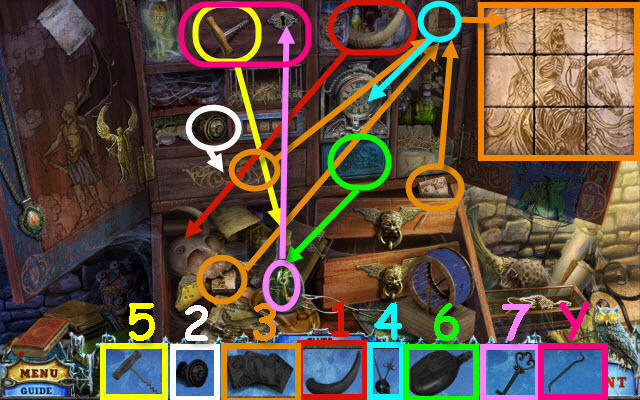
- Play the HOP.
- Find and use the items in the order numbered in the find list.
- To solve the puzzle (4), see inset on screenshot for solution.
- You will receive the CROWBAR (Y).
- Back out twice and go forward.

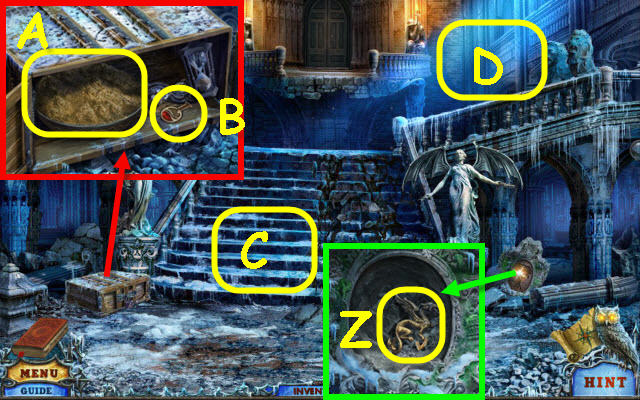
- Examine the stone and place the 2 SIGN PARTS in the recess; take the CHIMERA 1/2 (Z).
- Examine the trunk and use the CROWBAR on the lock; take the SAND (A) and RED FLASK (B).
- Examine the stairs and place the SAND on the ice (C).
- Go up on the right (D).

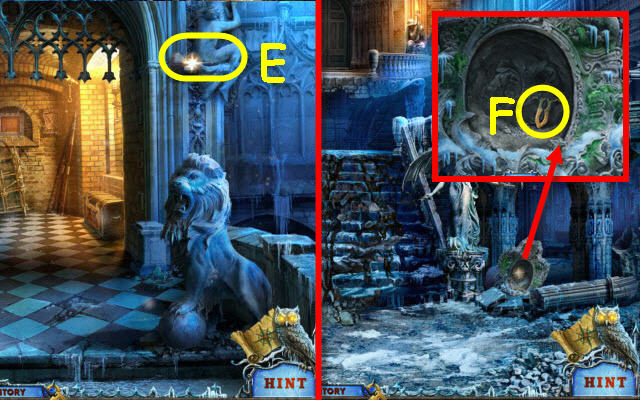
- Examine the ledge; take the DUSTER (E).
- Back out.
- Examine the stone and use the DUSTER on it; take the TONGUE SYMBOL (F).
- Go up on the right and attempt to go forward.

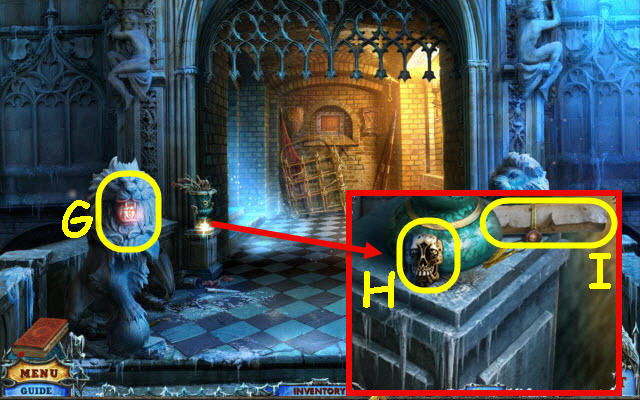
- Examine the lion on the left and place the TONGUE SYMBOL on its tongue (G).
- Examine the vase; take the SKULL (H) and the 5th bestiary scroll (I).
- Go left through the arch.

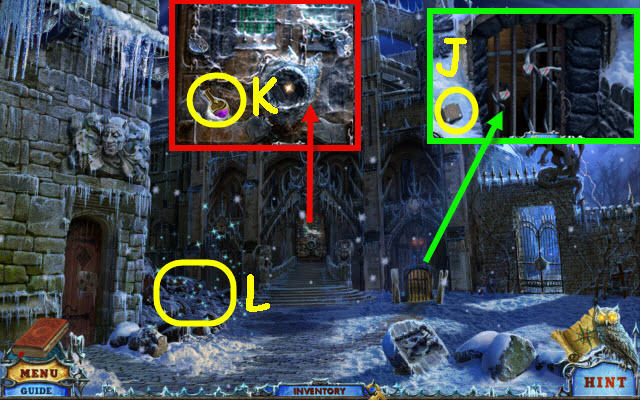
- Examine the smaller gated doorway; take the RUNE (J).
- Examine the castle door; take the PURPLE FLASK (K).
- Examine the boulders to access a HOP (L).

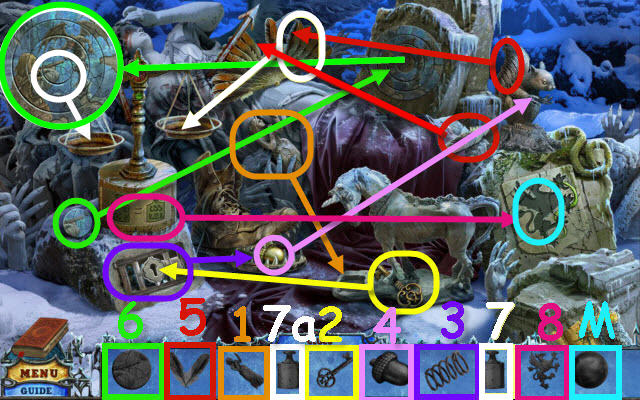
- Play the HOP.
- Find and use the items in the order numbered in the find list.
- To solve the puzzle (6), select the dials to rotate them. They will automatically stop when correct.
- You will receive the STONE SPHERE (M).
- Back out.

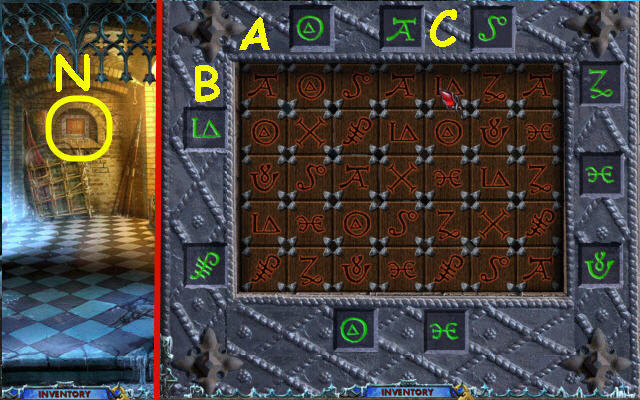
- Examine the rune board and place the RUNE on it to trigger a puzzle (N).
- Move the columns and rows so that one matching rune is in line with an outside rune.
- To solve the puzzle, move the following: Column C down 2 runes, A up 1 rune, and row B right 3 runes.
- Take the FLUTE.
- Go left.

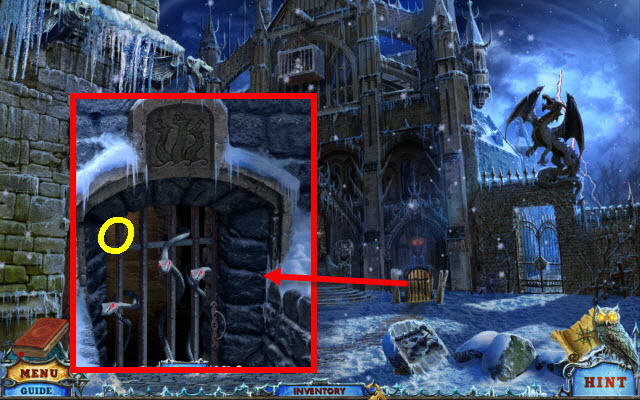
- Examine the smaller gated doorway and use the FLUTE on the snakes (O).
- Go forward through the newly-opened doorway.
Chapter 4: Castle

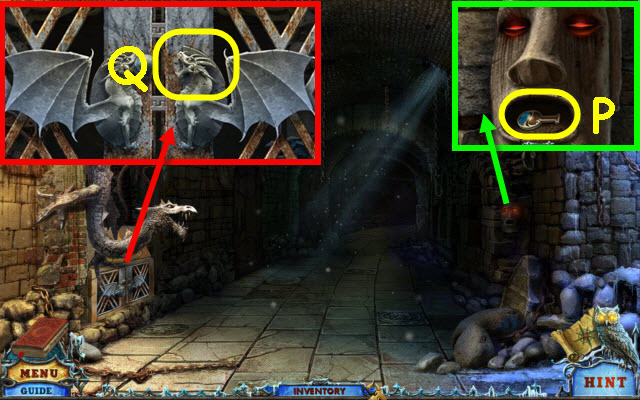
- Examine the face; take the BLUE FLASK (P).
- Examine the dragon doors and place the STONE SPHERE in the right dragon’s mouth to trigger a puzzle (Q).

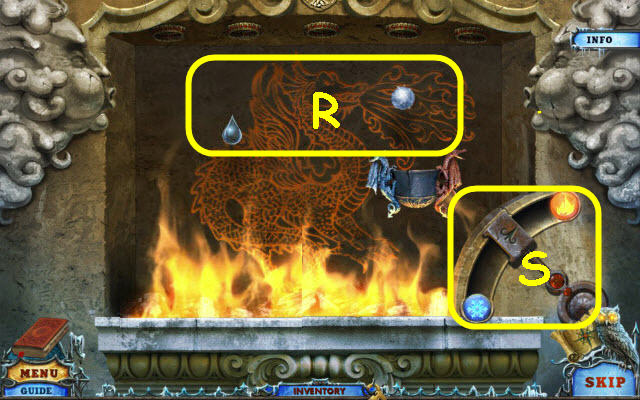
- Catch the snowballs and raindrops (R).
- The meter will rise up with each fireball you successfully miss (S).

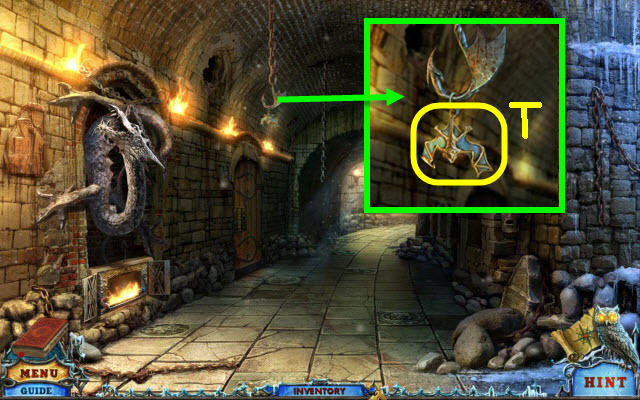
- Examine the hook; take the BAT 1/2 (T).
- Go forward.

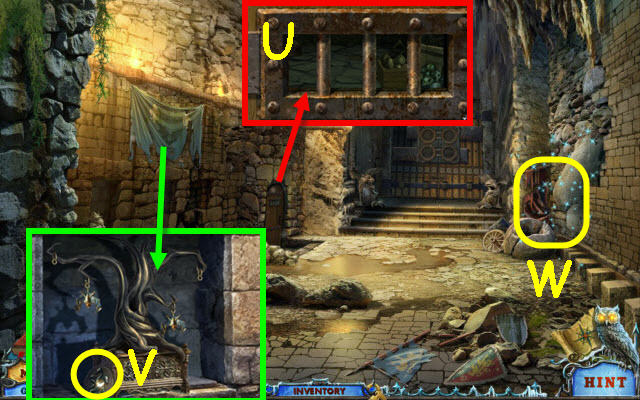
- Examine the door and open the panel; move your cursor around to look inside the room (U).
- Remove the cloth and examine the cubby; take the HYDRA COIN (V).
- Examine the far right corner to access a HOP (W).

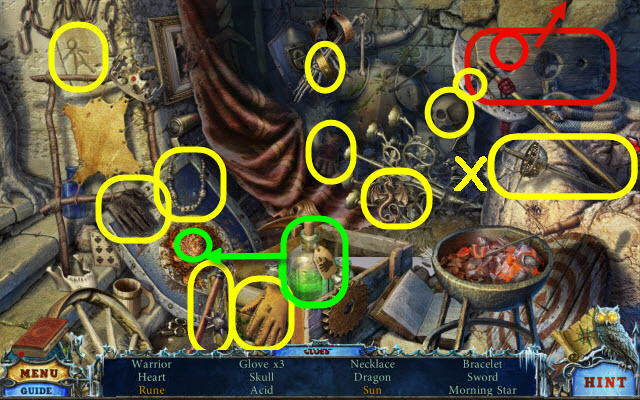
- Play the HOP.
- You will receive the SWORD (X).

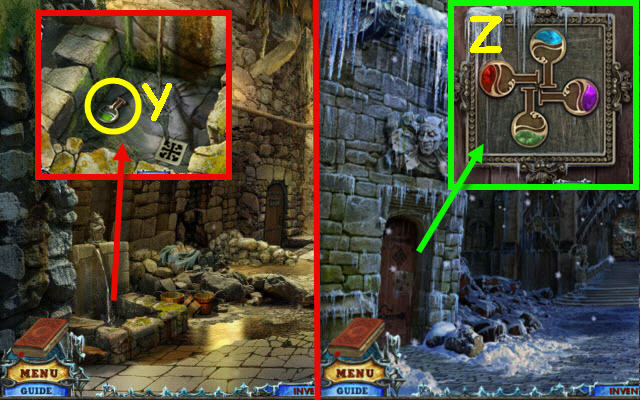
- Examine the fountain and use the SWORD on the drain; take the GREEN FLASK (Y).
- Back out twice.
- Examine the left door and place the GREEN, BLUE, RED and PURPLE FLASK on the lock (Z).
- Go left through the newly-opened door.

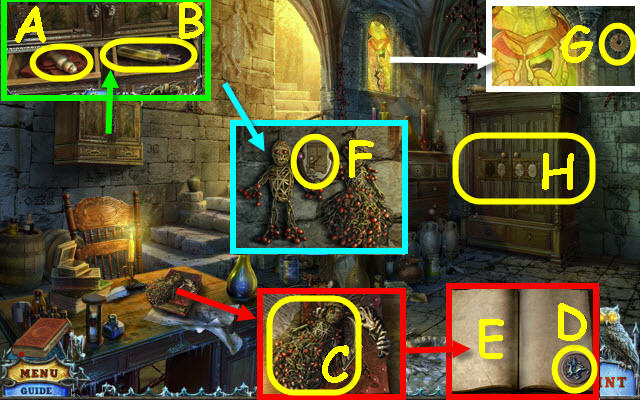
- Examine the cabinet and open the bottom two drawers. Take the JAR (A) and OIL (B).
- Examine the book; take the DOLL (C).
- Place the SKULL on the book cover; take the GRIFFIN COIN (D) and then examine the left page of the book (E).
- Examine the doll and place the DOLL next to it; take the WOODEN TOKEN (F).
- Examine the window; take the GEAR 1/3 (G).
- Examine the armoire and place the WOODEN TOKEN on it to trigger a puzzle (H).

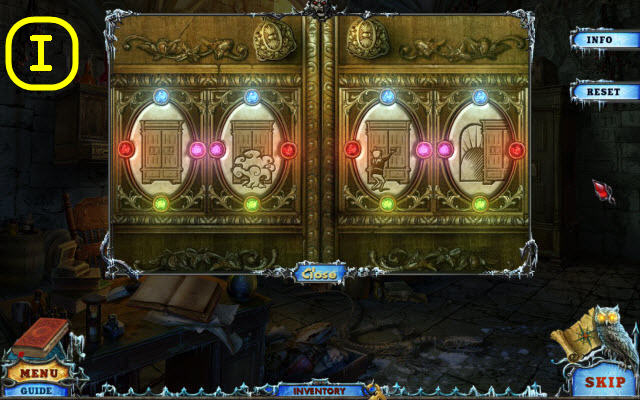
- Arrange the plates in chronological order.
- See screenshot for solution (I).
- Go down through the newly-opened passage.

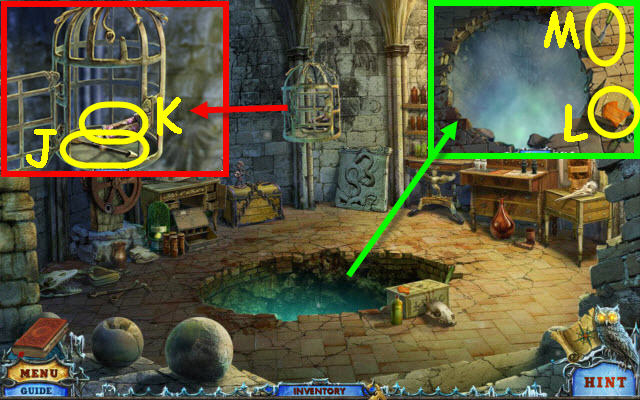
- Examine the cage and use the OIL on the lock. Open the cage door; take the ARROW (J) and scroll (K).
- Examine the pit; take the STAINED GLASS 1/3 (L) and CHISEL (M).
- Back out and go up the stairs.

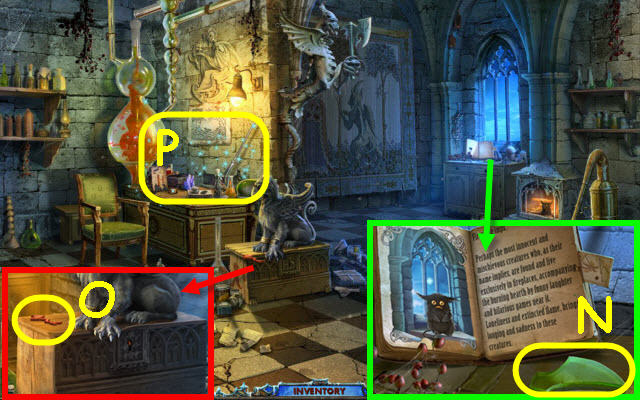
- Examine the book and select the left page to get the 6th bestiary scroll; take the STAINED GLASS 2/3 (N).
- Examine the trunk; take the STAINED GLASS 3/3 (O).
- Examine the table to access a HOP (P).

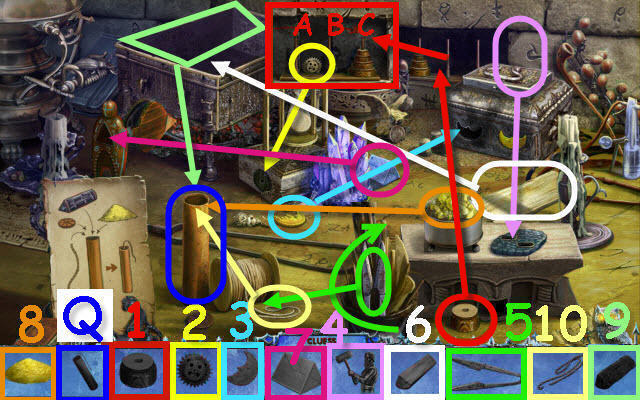
- Play the HOP.
- Find and use the items in the order numbered in the find list.
- Place the disk (1) on the spindle to trigger a puzzle.
- Move the disks from the left to the right spindle.
- Labeling the 3 spindles from left to right A, B, and C, move the top weight in the stack in the following order: A-B, B-C, A-B, C-B, B-A, B-C, A-B, B-C, A-B, C-B, B-A, C-B, A-B, B-C, B-A, C-B, B-A, B-C, A-B, B-C, A-B, C-B and B-A.
- B-C, A-B, B-C, A-B, C-B, B-A, C-B, A-B, B-C, B-A, C-B, B-A, C-B, A-B, B-C, A-B, C-B, B-A , B-C, A-B, B-C, B-A, C-B, B-A, C-B, A-B, B-C and B-A.
- C-B, B-A, B-C, A-B, B-C, A-B, C-B, B-A, B-C, A-B, B-C, A-B, C-B, B-A, C-B, A-B, B-C, B-A, C-B, B-A, B-C, A-B, B-C, A-B, C-B, B-A, B-C, A-B and B-C.
- You will receive the DYNAMITE (Q).

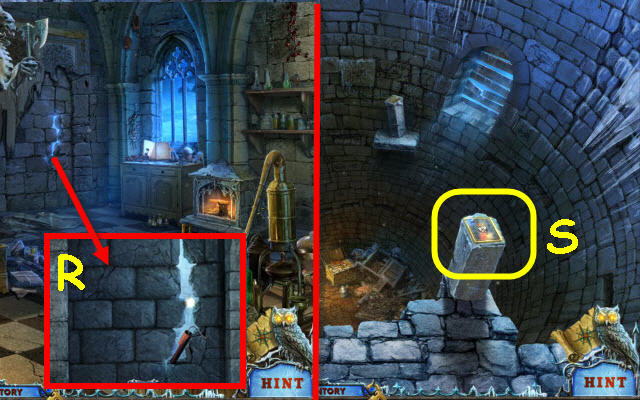
- Remove the tapestry and examine the wall. Place the DYNAMITE in the crack and use the MATCHES on the dynamite (R).
- Go through the hole in the wall.
- Examine the pedestal to trigger a puzzle (S).

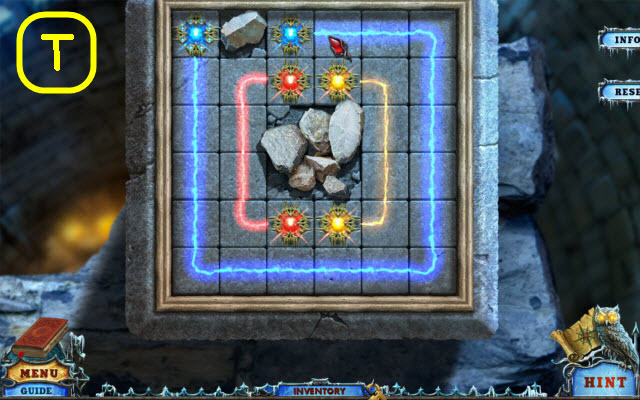
- Connect the matching colored gems.
- See screenshot for solution (T).
Chapter 5: Tower

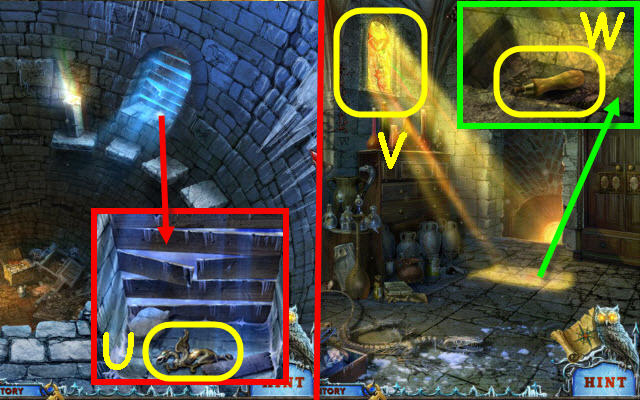
- Examine the window and move the board and rock; take the CHIMERA 2/2 (U).
- Back out twice.
- Examine the window and place the 3 STAINED GLASS on it (V).
- Examine the floor and use the CHISEL on the stone; take the HANDLE (W).
- Back out twice.

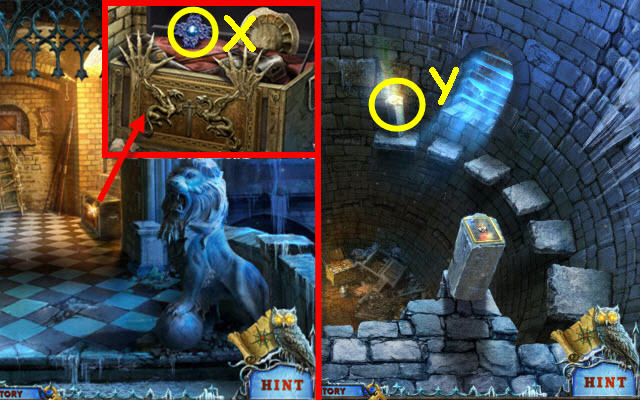
- Examine the chest and place the 2 CHIMERAS on the front panel; take the BLUE STAR (X).
- Go left two times and then up the stairs. Go through the hole in the wall.
- Examine the second pedestal and place the BLUE STAR on it to trigger a puzzle (Y).

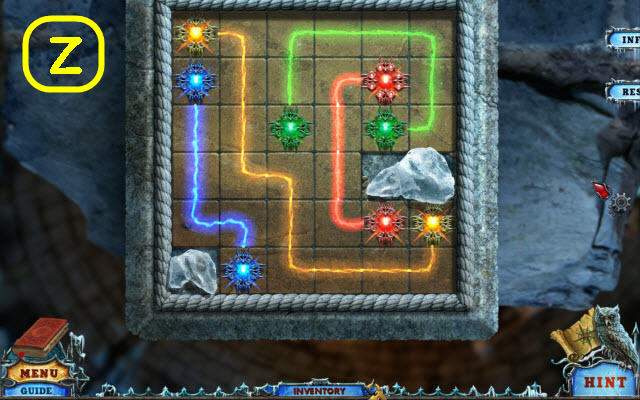
- Connect the matching colored gems.
- See screenshot for solution (Z).

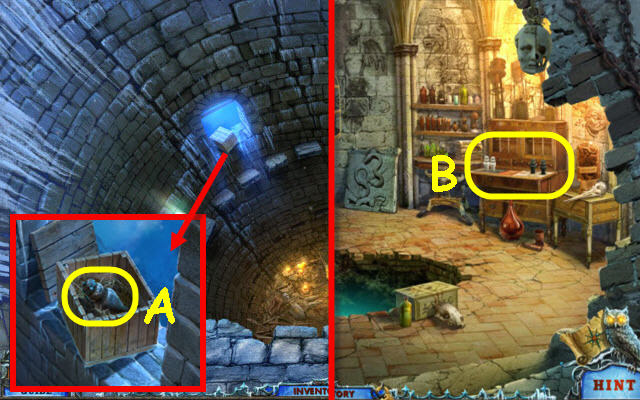
- Examine the crate and use the CHISEL on it. Remove the straw three times; take the 2nd JAR (A).
- Back out twice and go forward down the passage.
- Examine the hutch and place the 2 JARS on it to trigger a puzzle (B).

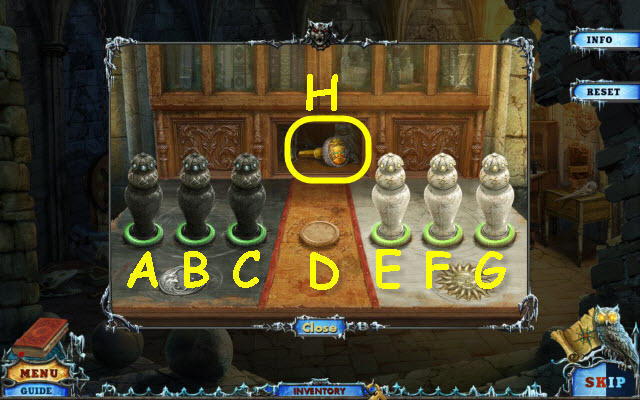
- Switch the white and black jars.
- To solve the puzzle, select the following jars: C, E, F, D, B, A, C, E, G, F, D, B, C, E and D.
- Take the 2nd HANDLE (H).
- Back out.

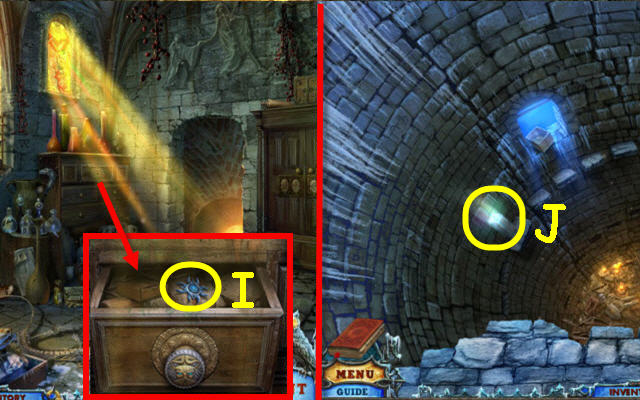
- Examine the chest of drawers and place the round HANDLE on the drawer; take the TURQUOISE STAR (I).
- Go up the stairs and through the wall.
- Examine the third pedestal and place the TURQUOISE STAR on it to trigger a puzzle (J).

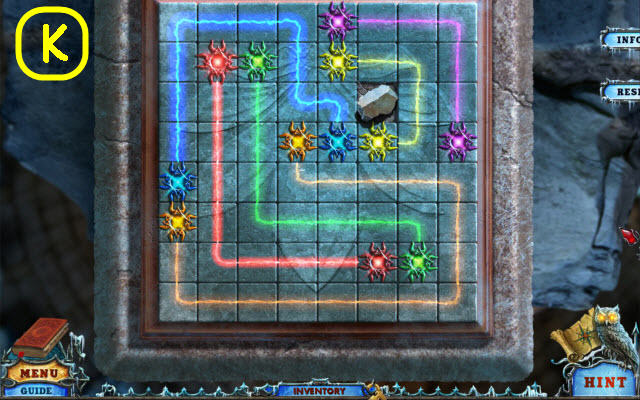
- Connect the matching colored gems.
- See screenshot for solution (K).
- Examine the bottom of the tower to access a HOP.

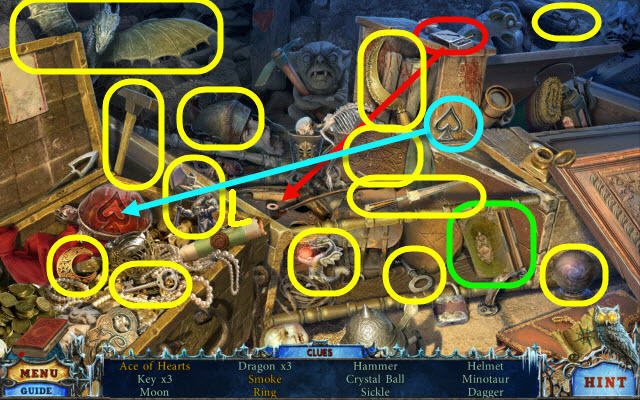
- Play the HOP.
- You will receive the MINOTAUR (L).
- Back out twice and go forward down the passage.

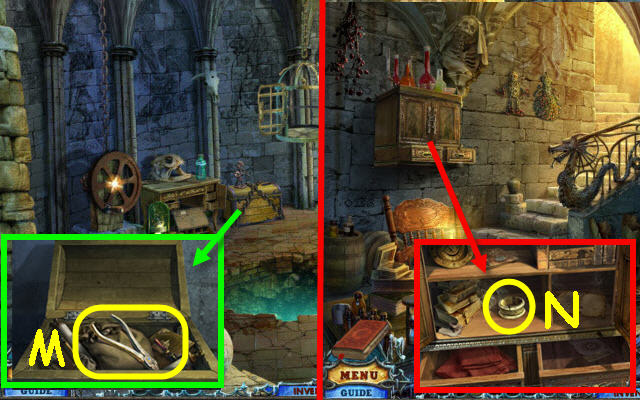
- Examine the trunk and place the MINOTAUR on it; take the NIPPERS (M).
- Back out.
- Examine the cabinet and use the NIPPERS on the wire. Open the doors; take the BRACELET (N).
- Go up the stairs.

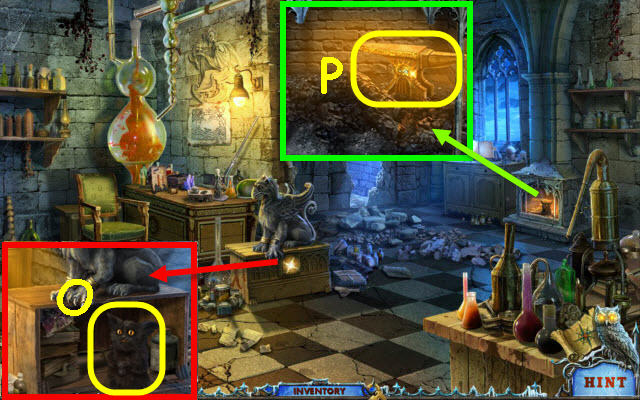
- Examine the chest and put the BRACELET on the griffin; take the IMP (O).
- Examine the fireplace and place the IMP in it; take the ANVIL (P).
- Back out and go forward down the passage.

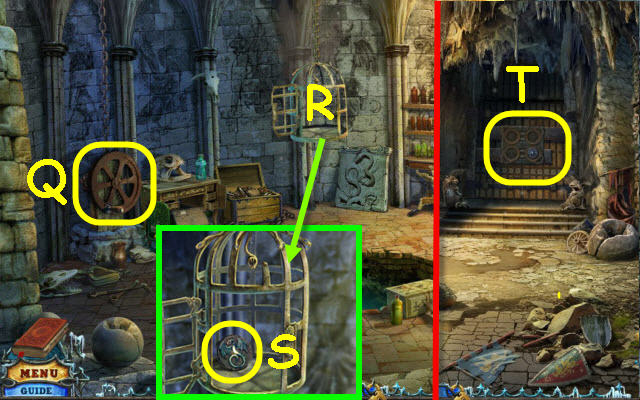
- Examine the winch and place the HANDLE on it (Q).
- Examine the cage and place the ANVIL in it (R).
- Turn the winch handle and examine the cage. Open the cage; take the DRAGON EMBLEM (S).
- Back out twice and go forward twice through the small gated doorway.
- Examine the door and place the DRAGON EMBLEM, HYDRA COIN and GRIFFIN COIN on the lock (T).
- Go forward.
Chapter 6: Hydra

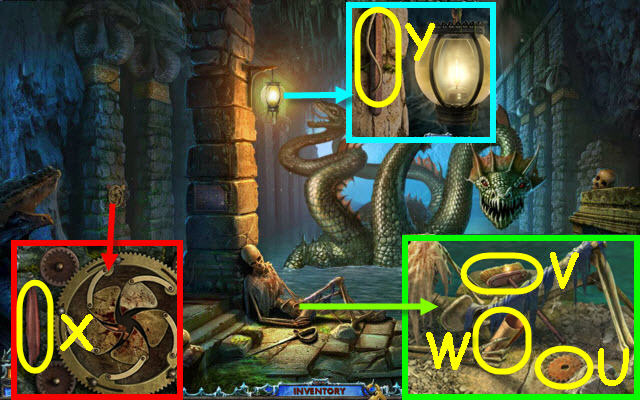
- Examine the skeleton and move the stone. Take the GEAR 2/3 (U), the BRUSH (V) and the 7th bestiary scroll (W).
- Examine the mechanism; take the RAG (X).
- Examine the lantern; take the BOWSTRING (Y).
- Back out.

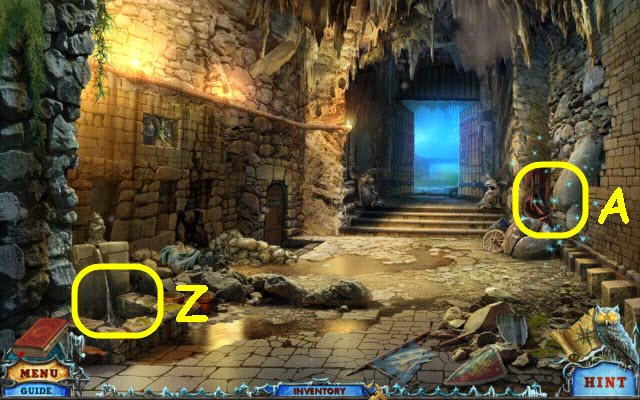
- Examine the fountain and use the BRUSH on the water; receive a WET BRUSH (Z).
- Examine the far right wall to access a HOP (A).

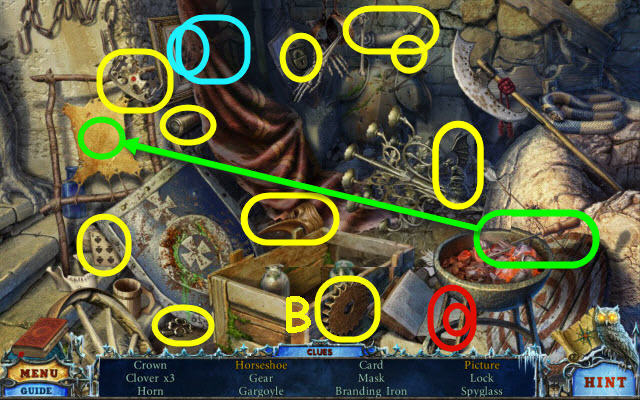
- Play the HOP to receive the GEAR 3/3 (B).
- Go forward.

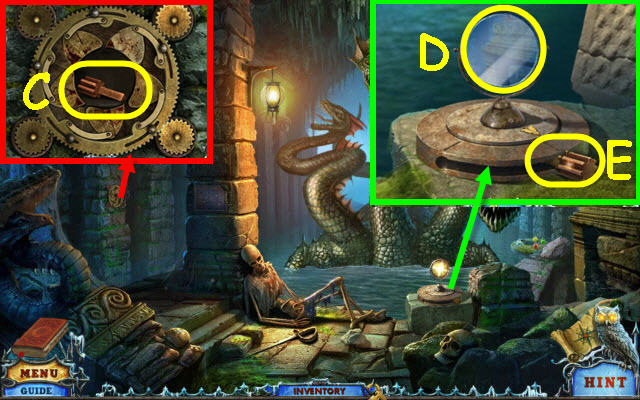
- Examine the mechanism and place the 3 GEARS on it; take the HANDLE (C).
- Examine the mirror and use the WET BRUSH on it (D).
- Place the HANDLE in the slot and slide it (E).

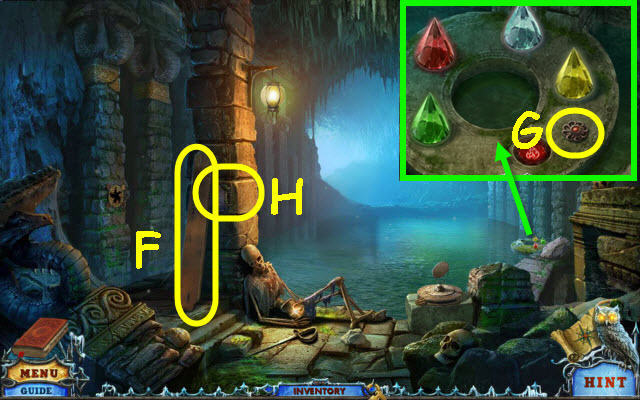
- Take the PLANK (F).
- Examine the stone disk; take the STONE FLOWER (G).
- Examine the pillar and place the STONE FLOWER on it to trigger a puzzle (H).

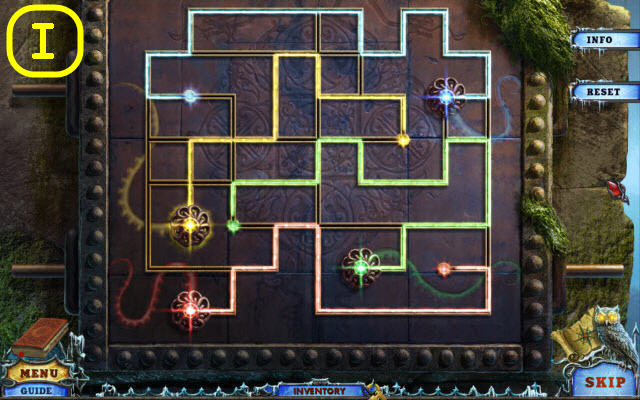
- Connect the colored gems with the matching colored dots.
- See screenshot for solution (I).
- Go forward.

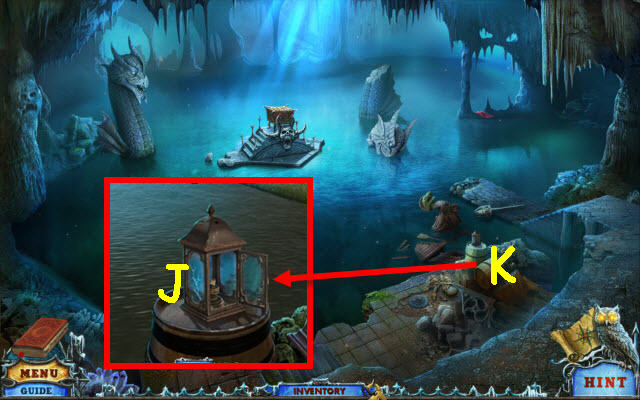
- Select anywhere in the scene.
- Examine the barrels; open the lantern and use the MATCHES on it to trigger a HOP (J).
- Examine the barrels to access a HOP (K).

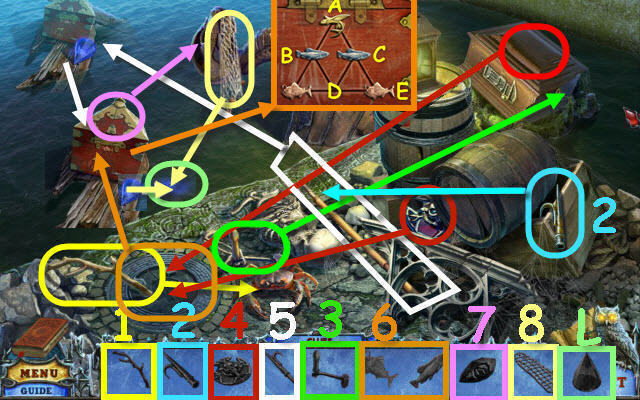
- Play the HOP.
- Find and use the items in the order numbered in the find list.
- To solve the fish puzzle (6), select the following fish: C, A, B, D, C, E and D.
- You will receive the BLUE CRYSTAL (L).
- Back out.

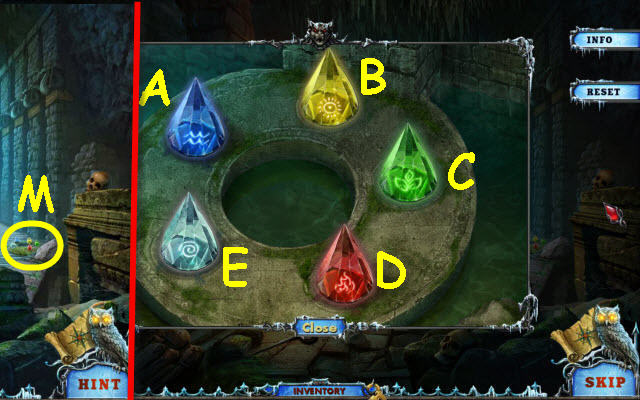
- Examine the stone disk and place the BLUE CRYSTAL on the empty slot to trigger a puzzle (M).
- To solve the puzzle, switch the following: A to D, E to B and B to C.

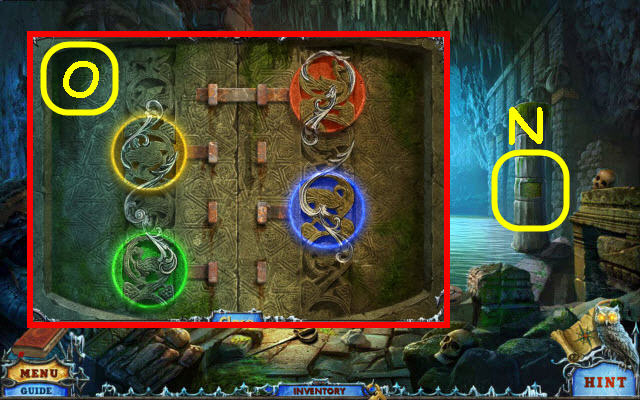
- Examine the pillar and use the WET BRUSH on it (N).
- Turn the disks to complete the pattern.
- See screenshot for solution (O).

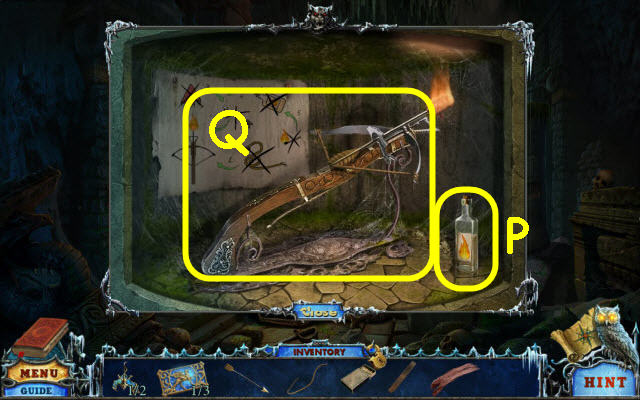
- In this order; place the BOWSTRING, ARROW, RAG, lighter fluid (P) and MATCHES on the crossbow.
- Take the FLAMING CROSSBOW (Q).
- Go forward.

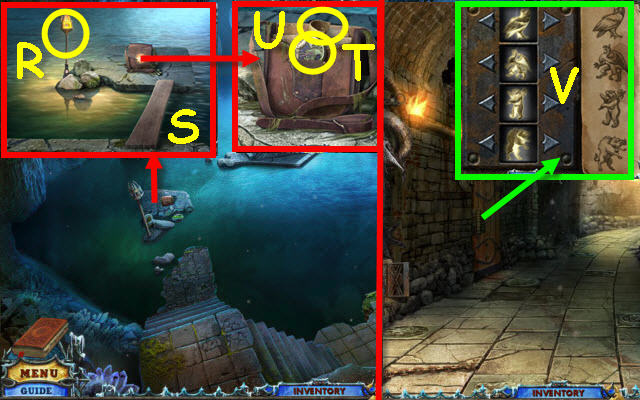
- Examine the torch and use the FLAMING CROSSBOW on it (R).
- Place the PLANK across the gap (S).
- Examine the satchel and open it; take the LOCK TOKEN 1/3 (T) and CODE (U).
- Back out three times.
- Examine the door and place the CODE on it; rotate the tumblers to match the code (V).
- Go through the newly-opened door.

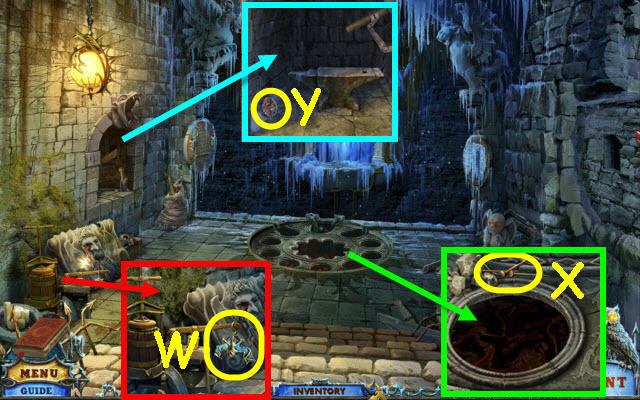
- Examine the churn; take the BAT 2/2 (W).
- Examine the lava pit; take the NAILS (X).
- Examine the alcove; take the 8th bestiary scroll and LOCK TOKEN 2/3 (Y).
- Back out and go forward.

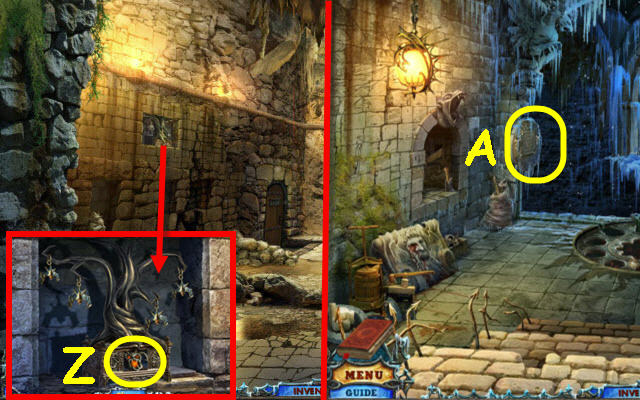
- Examine the recess and place the 2 BATS on the tree; take the SKULL (Z).
- Back out and go left through the door.
- Examine the left stone disk and place the SKULL on it to trigger a puzzle (A).

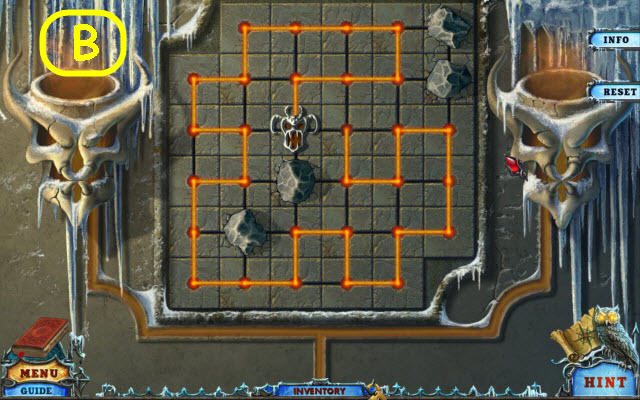
- Guide the skull through all the points.
- See screenshot for solution (B).

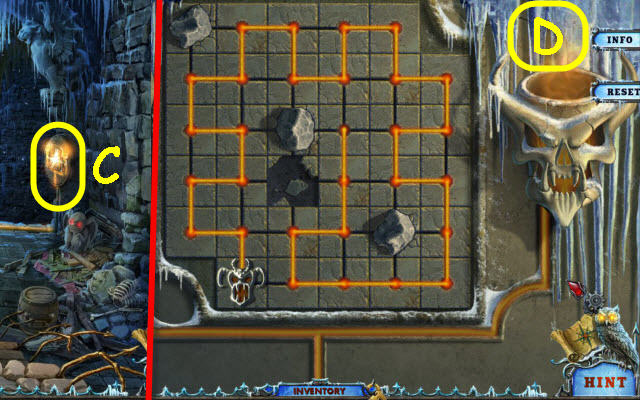
- Examine the right stone disk and then zoom in to trigger a puzzle (C).
- Guide the skull through all the points.
- See screenshot for solution (D).
- Go forward.
Chapter 7: Ice Giants

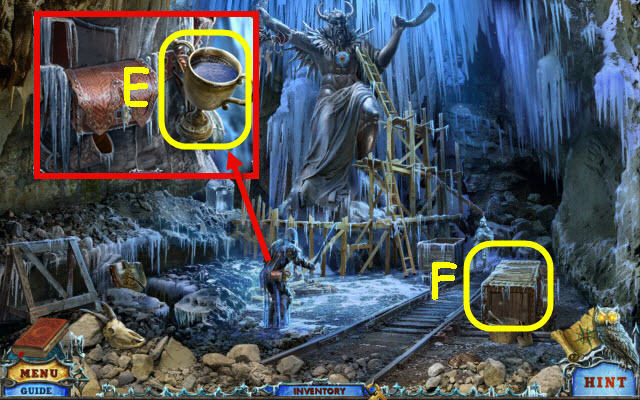
- Examine the frozen man; take the CUP OF ICE (E).
- Examine the crate to access a HOP (F).

- Play the HOP to receive the DIAMOND (G).
- Back out.


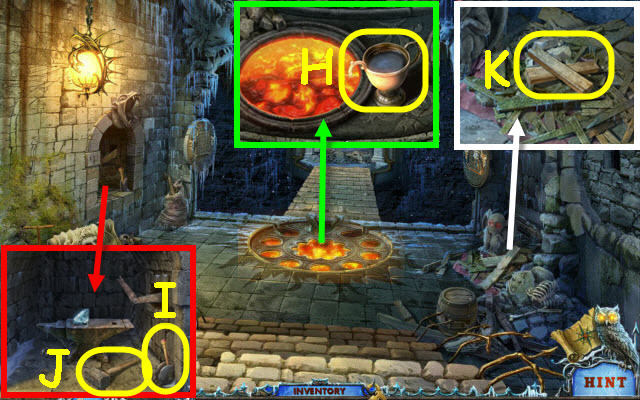
- Examine the lava ring and place the CUP OF ICE on it; take the CUP OF WATER (H).
- Examine the alcove and place the DIAMOND on the anvil. Pull the lever (I); take the HAMMER (J).
- Examine the debris and move the broken boards; take the BOARDS (K).
- Go forward.

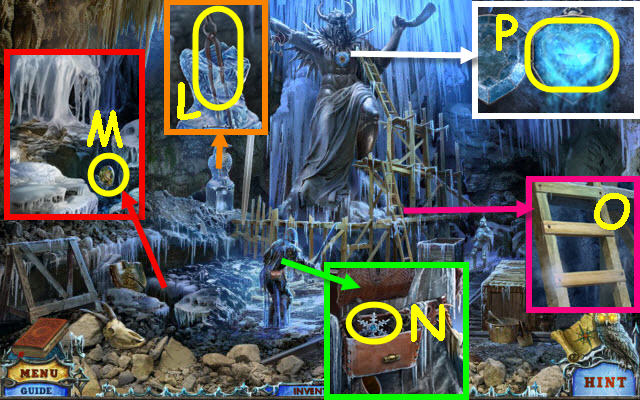
- Examine the ice sculpture and use the HAMMER on it; take the TONGS (L).
- Examine the crack; use the TONGS to get the LOCK TOKEN 3/3 (M).
- Examine the frozen man and use the CUP OF WATER on the satchel latch. Open the latch; take the SNOWFLAKE (N).
- Examine the broken ladder and use the BOARDS, NAILS and HAMMER on it (O).
- Examine the medallion and place the SNOWFLAKE on it; take the FROZEN HEART (P).
- Back out twice and then go forward three times.

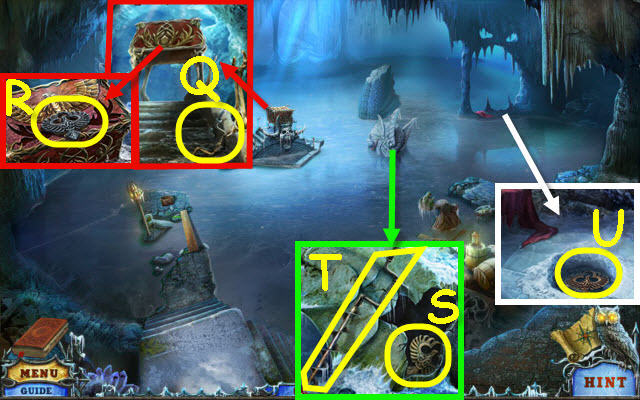
- Use the FROZEN HEART anywhere in the scene.
- Examine the stairs; take the DRILL WITHOUT A BIT (Q).
- Examine the chest; take the PHOENIX 1/3 (R).
- Examine the hydra head and use the HAMMER on the hole; take the PHOENIX 2/3 (S).
- Place the DRILL WITHOUT A BIT on the bit; take the ICE DRILL (T).
- Examine the cloth; use the ICE DRILL on the ice and take the PHOENIX 3/3 (U).
- Back out three times; go left through the door and then forward.

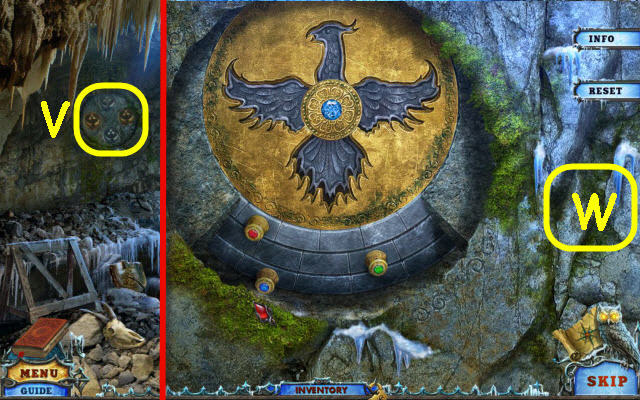
- Examine the disk and place the 3 PHOENIX in the slots to trigger a puzzle (V).
- Slide the rings on the bottom to complete the phoenix.
- See screenshot for solution (W).
- Take the PHOENIX RUNE 2/3 and FEATHERS.
- Back out twice and go forward three times.

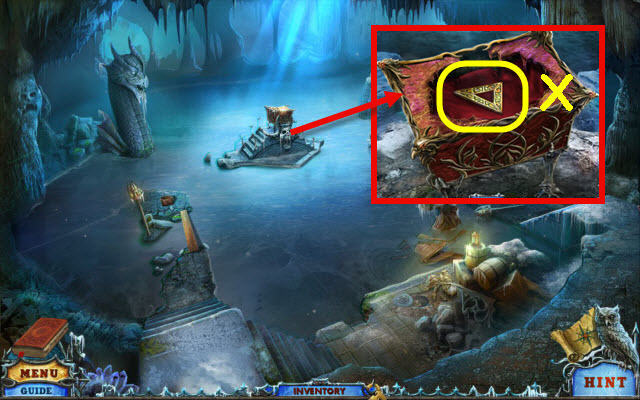
- Examine the stairs; zoom into the chest and place the FEATHERS on it. Take the note and triangle key (X).
- Neither of the items collected will remain in inventory.

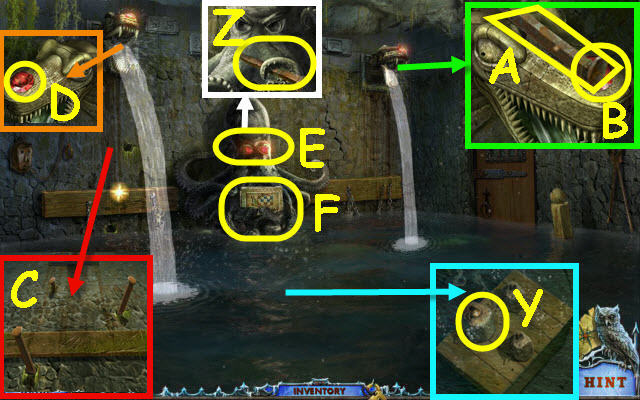
- Examine the water; take the STONE (Y).
- Examine the octopus; take the SPIKES 1/2 (Z).
- Examine the right fountain head; take the SPIKES 2/2 (A) and RED DIAMOND 1/2 (B).
- Examine the wall under the left fountain head and place the 2 SPIKES in the holes; use the STONE on them (C).
- Examine the left fountain head; take the RED DIAMOND 2/2 (D).
- Examine the octopus; place the 2 RED DIAMONDS in the eye sockets (E).
- Examine the board to trigger a puzzle (F).

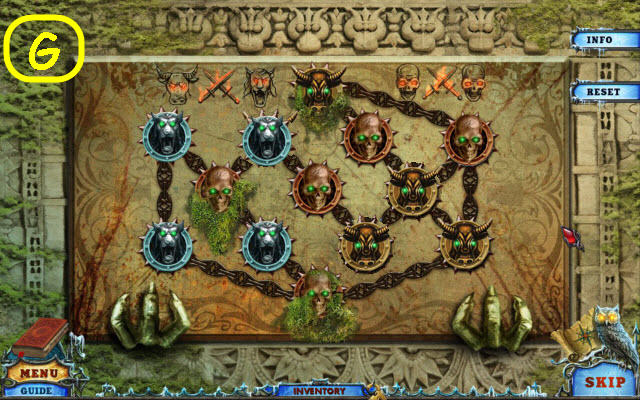
- Swap the heads to light all the eyes green.
- See screenshot for solution (G).
- Take the KEY.
- Go right and then back out twice.

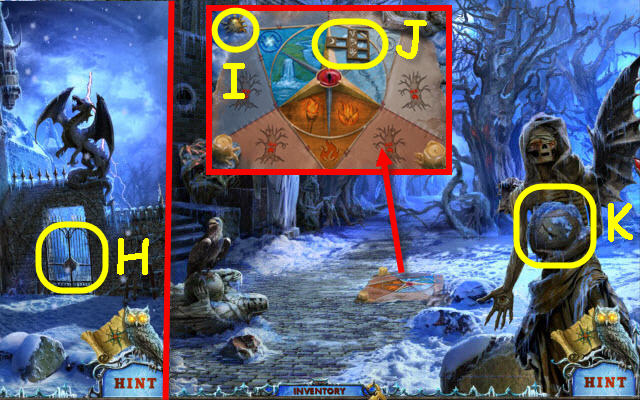
- Examine the gate and place the 3 LOCK TOKENS on it. Use the KEY on the lock (H).
- Go right through the newly opened gate.
- Examine the diagram; take the GOLD BEETLE (I) and SIGN FRAMES 1/3 (J).
- Examine the statue and select the broken stone. Place the GOLD BEETLE on it to trigger a puzzle (K).

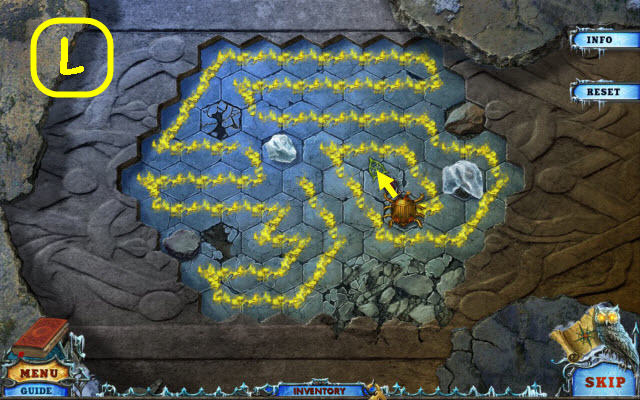
- Choose a path to cover all the tiles with the beetle.
- See screenshot for solution (L).
- Take the WATER EMBLEM and VIOLET RING.
- Go through the door on the left.

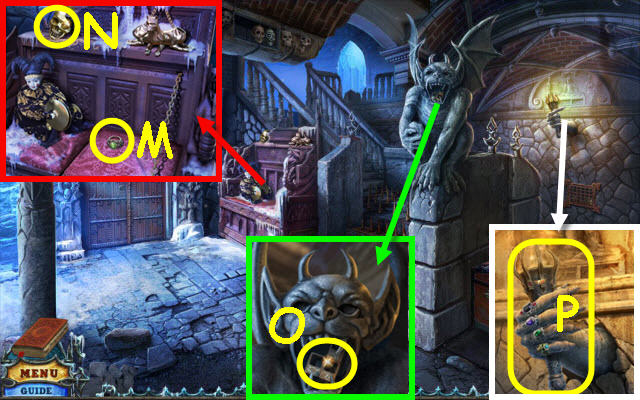
- Examine the settee; take the GREEN RING (M) and SKULL (N).
- Examine the gargoyle; take the SIGN FRAMES 2/3 (O).
- Examine the torch and place the GREEN RING and VIOLET RING on the fingers; take the TORCH (P).
- Back out.

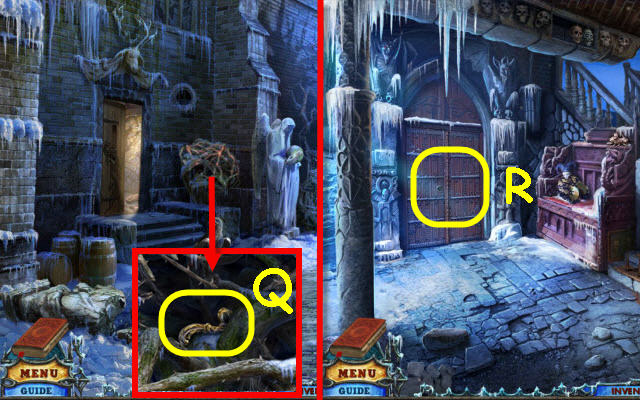
- Examine the brambles and use the torch on it; take the HANDLE (Q).
- Go left through the door.
- Examine the door and place the HANDLE on it; pull the handle (R).
- Go through the newly-opened door.

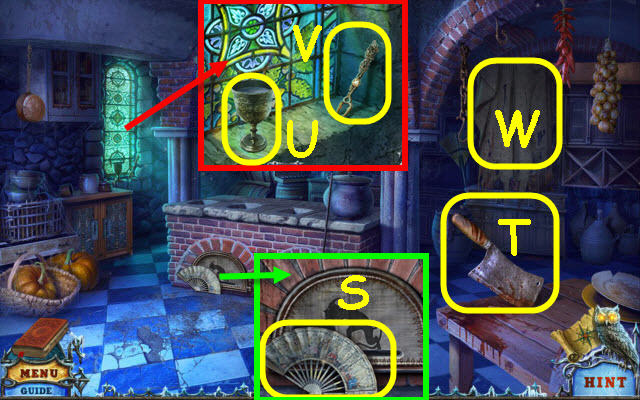
- Examine the oven; take the FAN (S).
- Take the BLUNT KNIFE (T).
- Examine the window; take the GOBLET (U) and FORK (V).
- Remove the cloth and examine the cupboard to access a HOP (W).

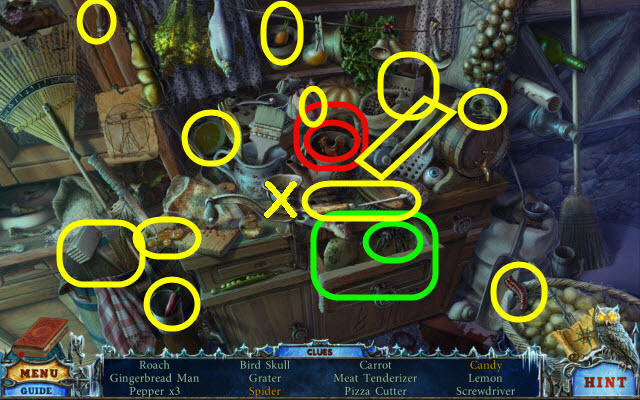
- Play the HOP.
- You will receive the SCREWDRIVER (X).
- Back out.

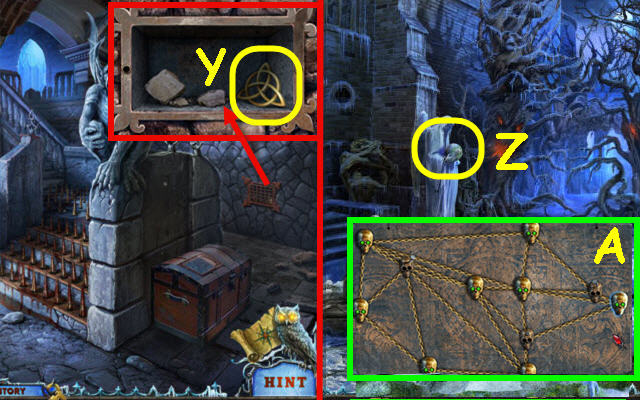
- Examine the grate and use the SCREWDRIVER on it; take the TRINITY SYMBOL (Y).
- Back out.
- Examine the angel statue and place the TRINITY SYMBOL in the center to trigger a puzzle (Z).
- Untangle the lines so that none cross.
- See screenshot for one solution (A).
- Take the FIRE SIGN and 2nd FORK.
- Go left twice to the kitchen.
Chapter 8: Dryads

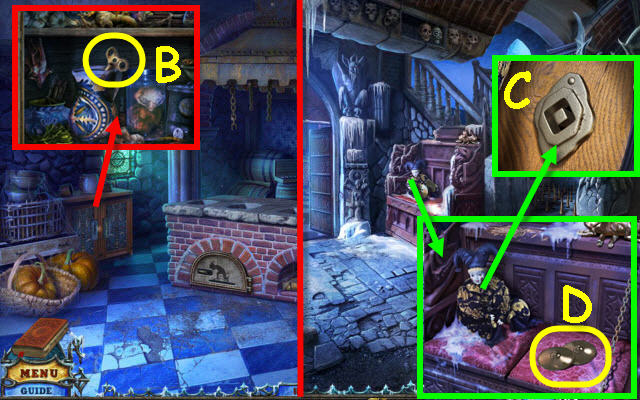
- Examine the cabinet and place the 2 FORKS on the doors; take the KEY (B).
- Back out.
- Examine the settee and zoom into the doll. Place the KEY in the slot (C); take the CYMBALS (E).
- Back out.

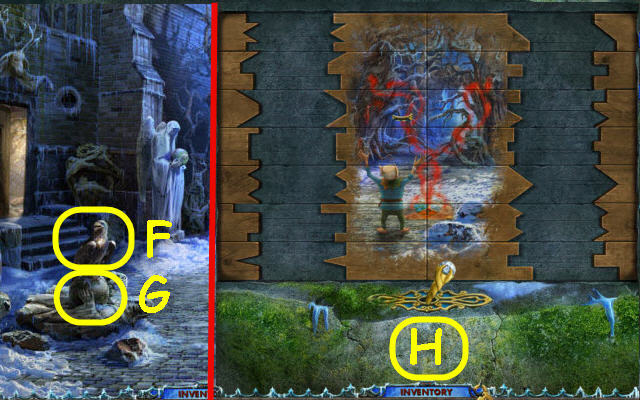
- Use the CYMBALS on the bird (F).
- Examine the statue to trigger a puzzle (G).
- Swap the outer wood panel to match the inner panels.
- See screenshot for solution (H).
- Take the AIR SIGN and SCREW.

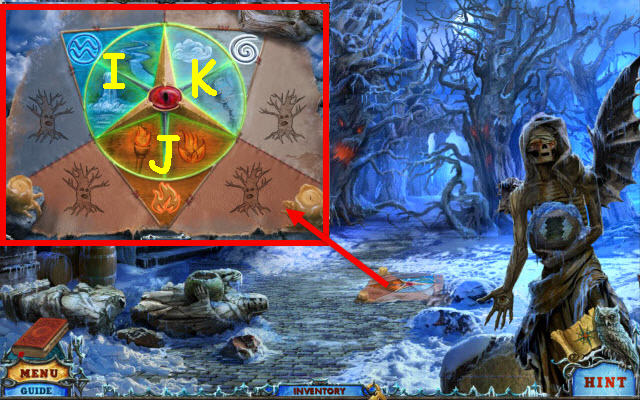
- Examine the board and place the WATER EMBLEM in its matching slot and use the GOBLET on the emblem (I).
- Place the FIRE SIGN in its matching slot and use the TORCH on the sign (J).
- Place the AIR SIGN in its matching slot and use the FAN on the sign (K).
- Go forward.

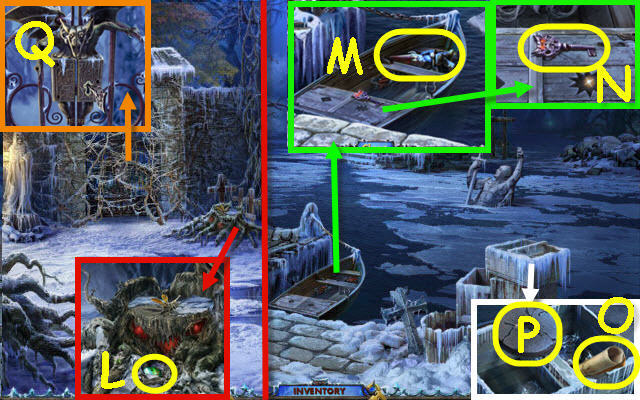
- Examine the crosses; take the GARGOYLE EYE 1/2 (L).
- Go up the path on the right.
- Examine the boat; take the GNOME (M).
- Examine the compartment; take the KEY (N).
- Examine the crates; take the 9th bestiary scroll (O).
- Use the BLUNT KNIFE on the grindstone (P) to receive a SHARP KNIFE.
- Back out.
- Examine the gate and use the SHARP KNIFE on the brambles. Use the KEY on the lock and turn it (Q).
- Go forward.

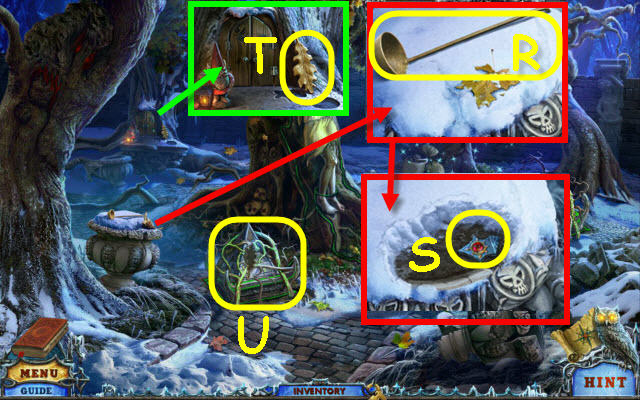
- Examine the vase; take the LADLE (R).
- Dig three times in the snow; take the CROWN PIECE 1/3 (S).
- Examine the tree house; take the OAK LEAF (T).
- Examine the left pyramid and place the OAK LEAF on it to trigger a puzzle (U).

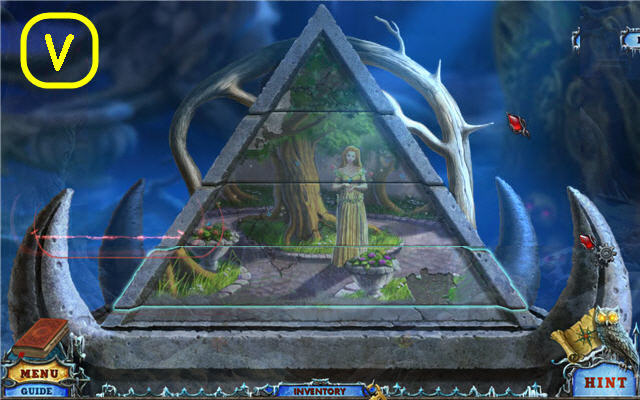
- Scroll through the pyramid sections to complete the picture.
- See screenshot for solution (V).
- Examine the tree to the right of the Dryad to access a HOP.

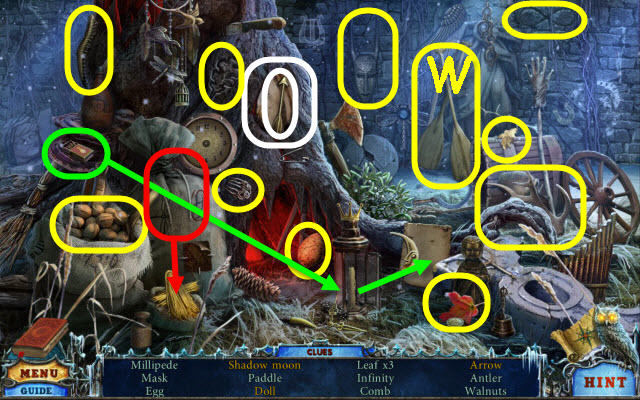
- Play the HOP.
- You will receive the OARS (W).
- Back out twice and then go left twice into the kitchen.

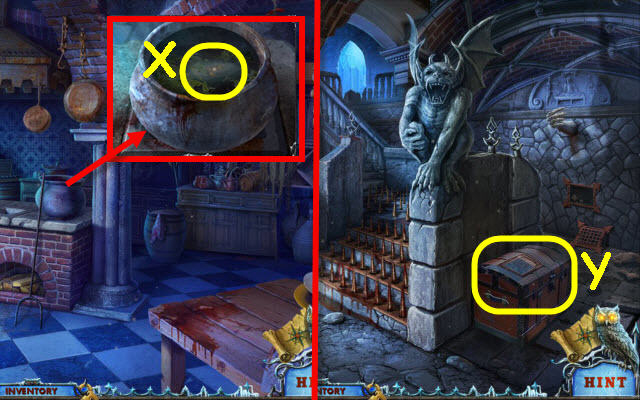
- Examine the kettle and remove the lid; use the LADLE to get the SIGN FRAMES 3/3 (X).
- Back out.
- Examine the trunk and place the 3 SIGN FRAMES on the lid to trigger a puzzle (Y).

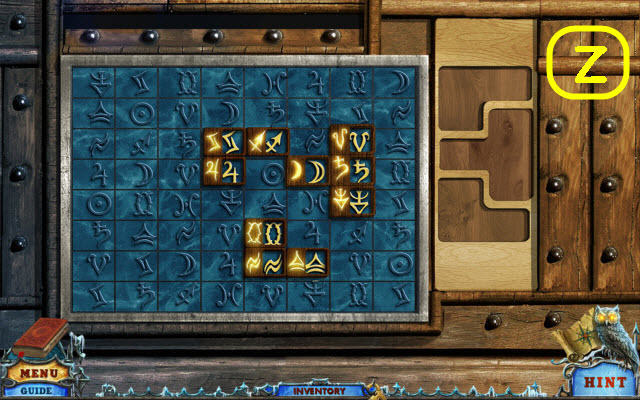
- Place the frames to match the symbols.
- See screenshot for solution (Z).
- Examine the opened trunk and take the HANDLE.
- Back out; go forward and then go up the path on the right.

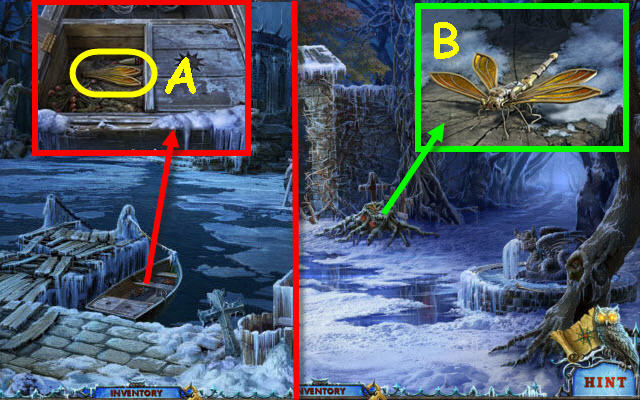
- Examine the boat and zoom into the compartment; use the HANDLE on the left lid. Open the lid; take the DRAGONFLY WINGS (A).
- Back out.
- Examine the crosses and zoom into the dragonfly. Place the DRAGONFLY WINGS on it; take the DRAGONFLY (B).
- Go up the path on the right.

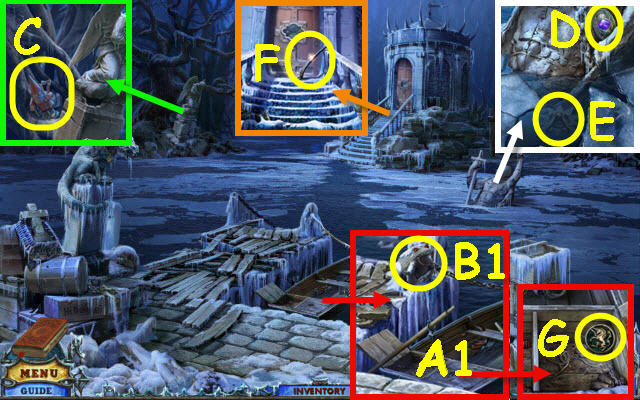
- Examine the boat and place the OARS in it (A1).
- Use the DRAGONFLY on the stone monster (B1).
- Examine the angel statue; take the 2nd GNOME (C).
- Examine the statue in the water; take the NECKLACE PART 1/3 (D).
- Use the LADLE to get the HANDLE (E).
- Examine the stairs; take the WRENCH HALF (F).
- Examine the boat; zoom into the compartment and place the HANDLE on the lid. Open the lid and take the UNICORN COIN (G).
- Back out.

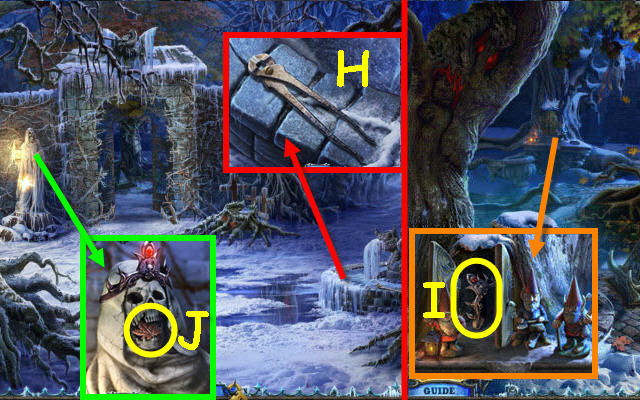
- Examine the fountain and place the WRENCH HALF and SCREW on the wrench half. Use the SCREWDRIVER on the screw; take the BOLT CUTTERS (H).
- Go forward.
- Examine the tree house and place the 2 GNOMES on the stoop; take the DIADEM (I).
- Back out.
- Examine the statue and place the DIADEM on its head; take the MAPLE LEAF (J).
- Go up the path on the right.

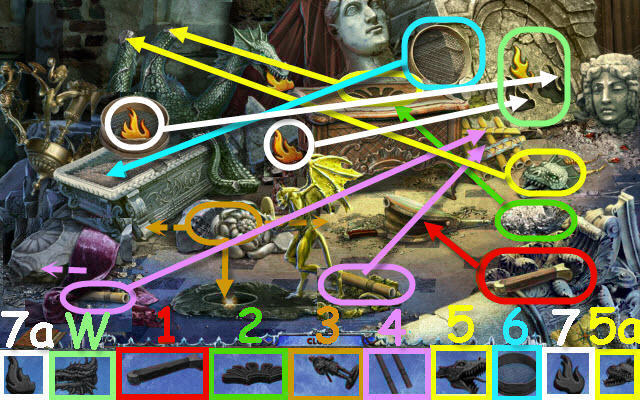
- Examine the gargoyle; use the BOLT CUTTERS to get the GRIFFIN COIN (K).
- Examine the door and zoom into the door panel. Place the UNICORN COIN and GRIFFIN COIN on it to trigger a puzzle (L).

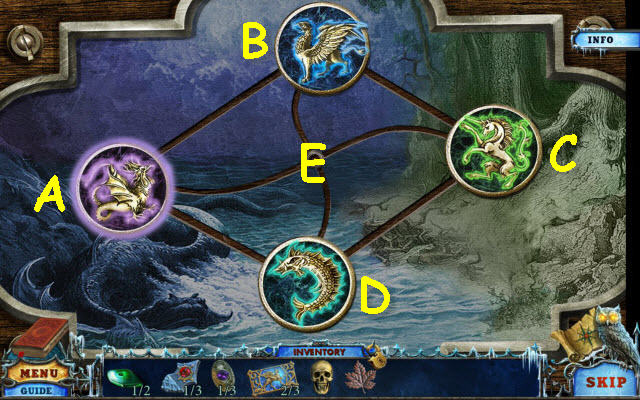
- Slide the tokens to their appropriate surroundings.
- To solve the puzzle, select the following: D, C, E, B, A and E.
- Examine the opened door to access a HOP.

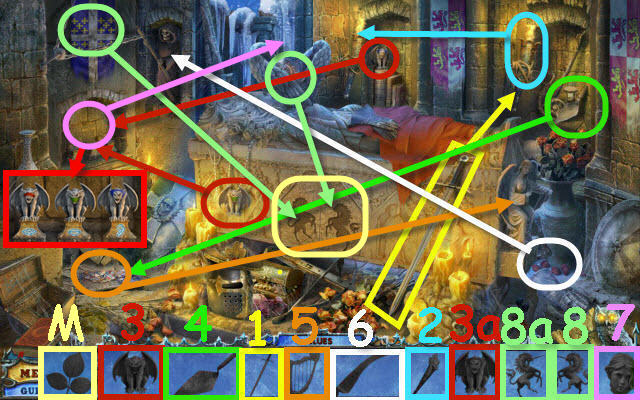
- Play the HOP.
- Find and use the items in the order numbered in the find list.
- Place the gargoyles 3 and 3a in the alcove to trigger a puzzle. To solve the puzzle, arrange the gargoyles from left as follows: red, green and blue.
- You will receive the POISON IVY (M).
- Back out and then go forward.

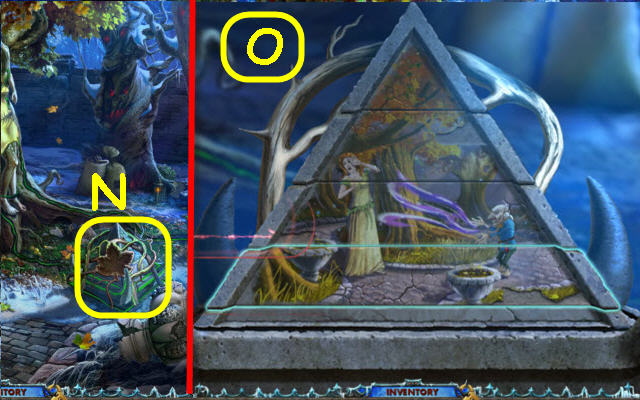
- Examine the center pyramid and place the MAPLE LEAF on it to trigger a puzzle (N).
- Scroll through the pyramid sections to complete the picture.
- See screenshot for solution (O).

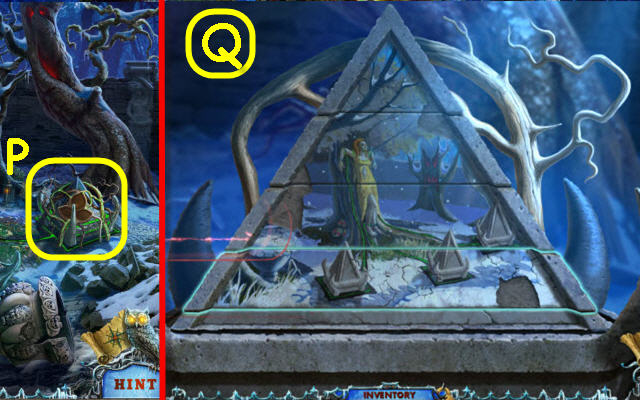
- Examine the right pyramid and place the POISON IVY on it to trigger a puzzle (P).
- Scroll through the pyramid sections to complete the picture.
- See screenshot for solution (Q).

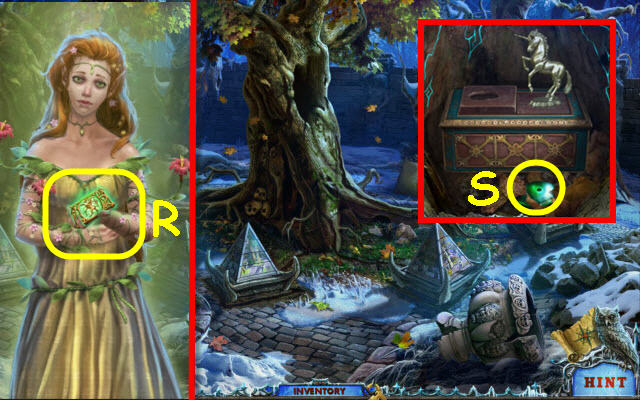
- Take the PHOENIX RUNE 3/3 (R).
- Examine the tree hollow and move the leaves; take the GARGOYLE EYE 2/2 (S).
- Back out.
Chapter 9: Dark Lord

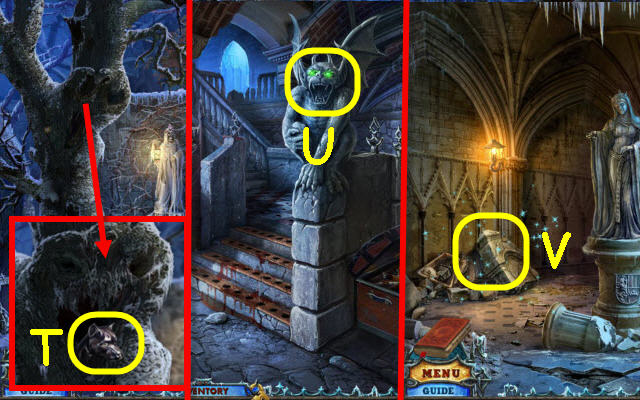
- Examine the tree; take the DOG HEAD (T).
- Back out and enter the building.
- Examine the gargoyle and place the 2 GARGOYLE EYES in the sockets (U).
- Go up the stairs.
- Examine the debris to access a HOP (V).


- Play the HOP.
- Find and use the items in the order numbered in the find list.
- To solve the puzzle (2), smack any figure that pops up that does not wear a crown.
- You will receive the DRAGON HEAD (W).

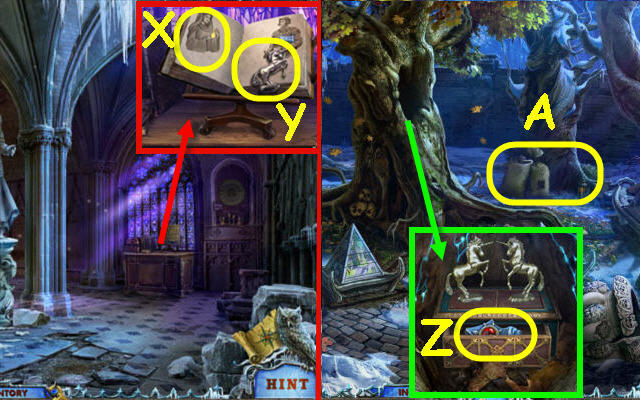
- Examine the table and open the book; select the left page to get the 10th bestiary scroll (X) and take the UNICORN STATUETTE (Y).
- Back out twice and go forward twice to the Dryad tree.
- Examine the tree hollow and place the UNICORN STATUETTE in the left slot; take the CROWN PIECE 2/3 (Z).
- Examine the tree to access a HOP (A).

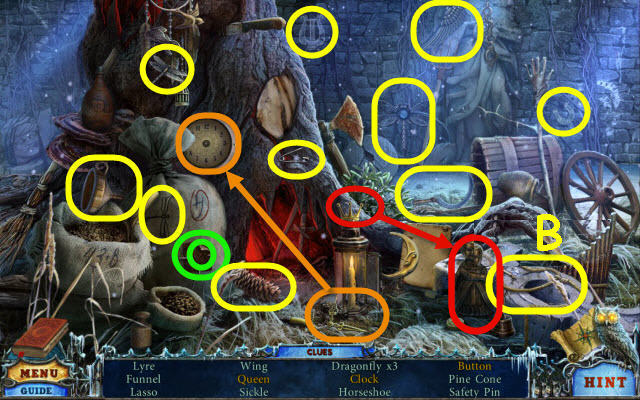
- Play the HOP.
- You will receive the LASSO (B).
- Back out and go up the path on the right.

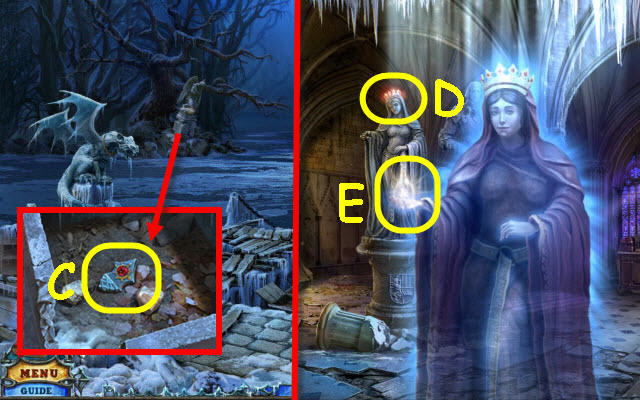
- Examine the angel statue and use the LASSO on it. Zoom into the statue base; take the CROWN PIECE 3/3 (C).
- Back out twice, enter the building and go up the stairs.
- Examine the left statue and place the 3 CROWN PIECES on her head (D).
- Take the VIAL OF LIGHT (E).
- Back out three times.

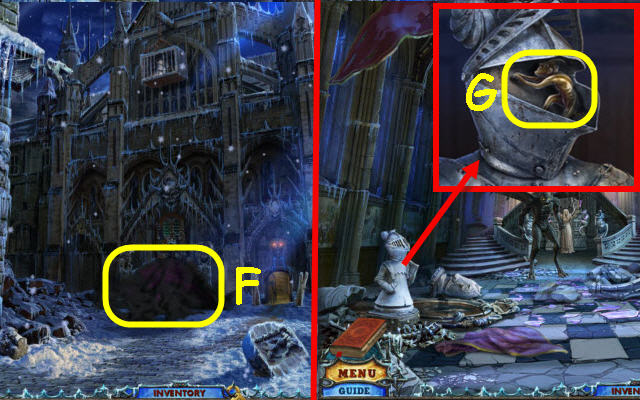
- Use the VIAL OF LIGHT on the smoke (F).
- Go forward into the newly- opened castle.
- Examine the left armor and open the face guard; take the DEVIL (G).
- Back out and go through the gate on the right. Enter the building and go left into the kitchen.

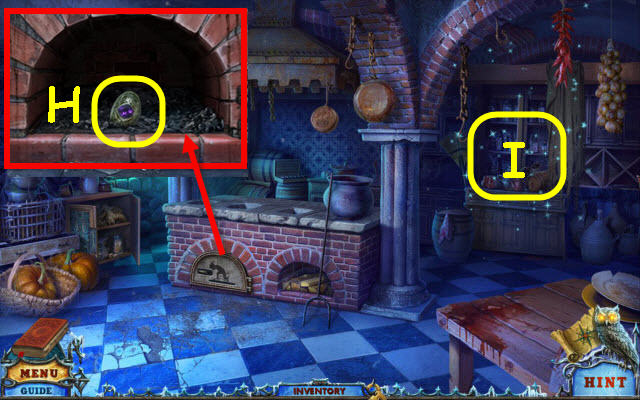
- Examine the furnace and place the DEVIL on the door; take the NECKLACE PART 2/3 (H).
- Examine the cupboard to access a HOP (I).

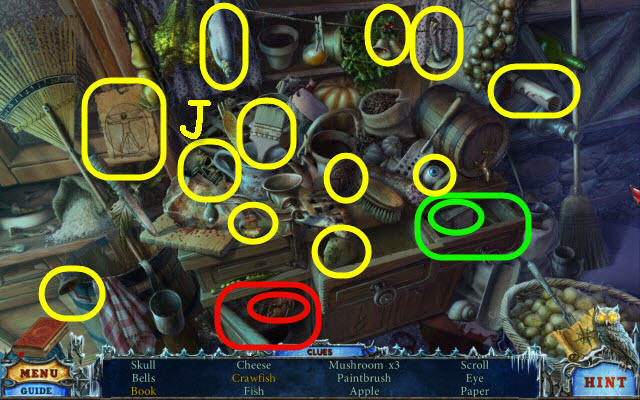
- Play the HOP.
- You will receive the 2nd SKULL (J).
- Back out.

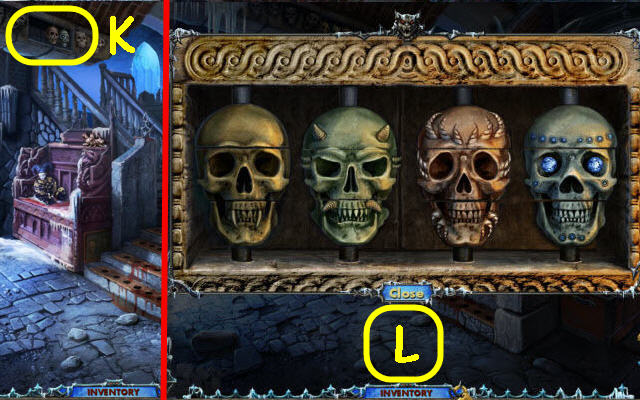
- Examine the skulls and place the 2 SKULLS on the spindles to trigger a puzzle (K).
- Rotate the skull sections to complete each skull.
- See screenshot for solution (L).
- Take the CANDLES.
- Go up the stairs.

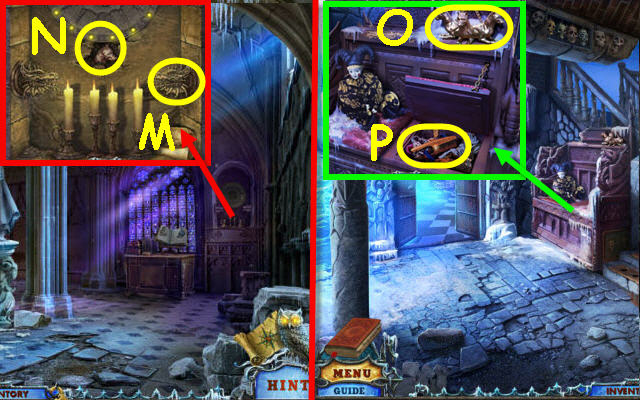
- Examine the alcove and place the DRAGON HEAD on the right (M).
- Place the CANDLES in the holders; take the 2nd DOG HEAD (N).
- Back out.
- Examine the settee and place the 2 DOG HEADS on the dogs (O); take the BRUSH (P).
- Back out twice and enter the castle.

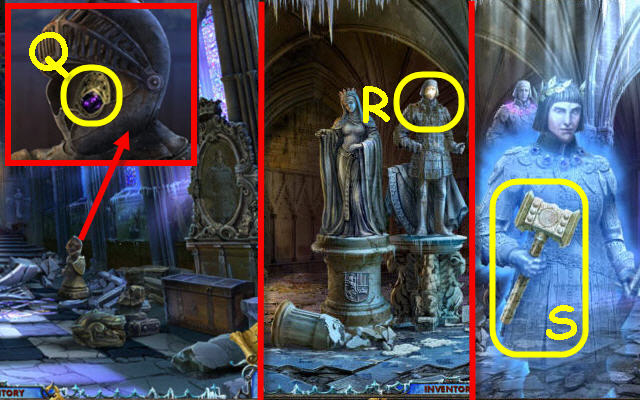
- Examine the armor on the right and use the BRUSH on the face guard. Lift the face guard; take the NECKLACE PART 3/3 (Q).
- Back out and go through the gate on the right. Enter the building and go up the stairs.
- Examine the statue on the right and place the 3 NECKLACE PARTS in the slots (R).
- Take the HAMMER OF JUSTICE (S).
- Back out three times and enter the castle.

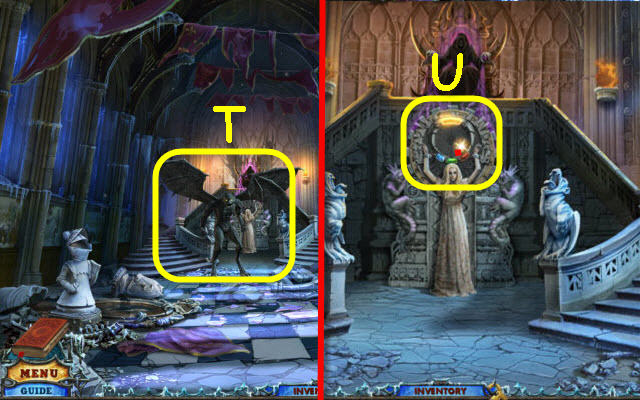
- Use the HAMMER OF JUSTICE on the beast (T).
- Go forward.
- Examine the ring above Penny and place the 3 PHOENIX RUNE STONES on the bottom to trigger a puzzle (U).

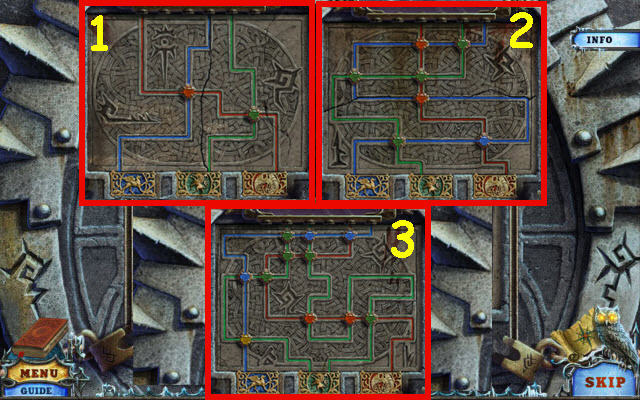
- Select the runes in the correct order.
- See screenshot for solution (V).
- Set 1: Green, after it hits the green energy button push red, after red energy button is clears push blue.
- Set 2: Green, wait until the green is all the way to the top then push blue, when the blue is approaching the blue energy button immediately select the red.
- Set 3: Green, when the left green beam approaches the third bend immediately select the blue so that the green and blue arrive at the yellow button together.
- Congratulations, you have completed League of Light: Dark Omens.




 Midnight Mysteries: Ghostwriting Walkthrough, Guide, & Tips
 Christmas Eve: Midnight's Call Walkthrough, Guide, & Tips
 Haunted Legends: The Stone Guest Walkthrough, Guide, & Tips
 Mayan Prophecies: Blood Moon Walkthrough, Guide, & Tips
 Death Upon an Austrian Sonata: A Dana Knightstone Novel Walkthrough, Guide, & Tips