Death Upon an Austrian Sonata: A Dana Knightstone Novel Walkthrough, Guide, & Tips
Death Upon an Austrian Sonata: A Dana Knightstone Novel Walkthrough

Welcome to the Death Upon an Austrian Sonata: A Dana Knightstone Novel Walkthrough
Travel to Austria in search of a mysterious ghost and her violin in the most exciting Dana Knightstone novel yet.
Whether you use this document as a reference when things get difficult or as a road map to get you from beginning to end, we’re pretty sure you’ll find what you’re looking for here.
This document contains a complete Death Upon an Austrian Sonata: A Dana Knightstone Novel game walkthrough featuring annotated screenshots from actual gameplay!
We hope you find this information useful as you play your way through the game. Use the walkthrough menu below to quickly jump to whatever stage of the game you need help with.
Remember to visit the Big Fish Games Forums if you find you need more help. Have fun!
General Tips

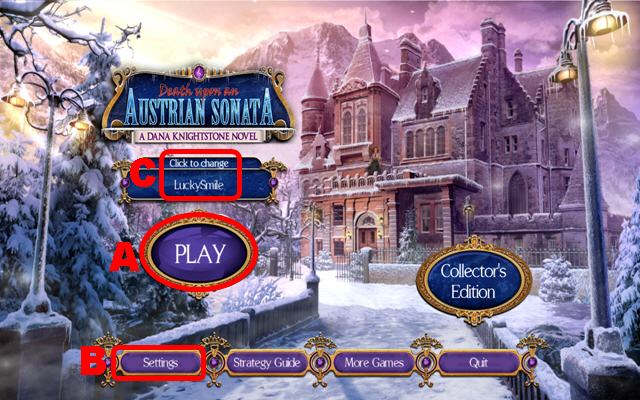
- This is the official guide for Death Upon an Austrian Sonata: A Dana Knightstone Novel.
- Press Play (A) to start the game.
- Select Settings (B) to adjust the sound volume and the display mode.
- Press your current profile (C) to delete, edit or create a new profile.
- You can choose from three different grades of difficulty, namely casual, advanced, and hardcore mode.
- Hidden Objects Scenes will be referred to as HOS throughout this guide.
- Please keep in mind that some of the HOS items can be randomized.
Chapte 1: Sebastian’s Manor

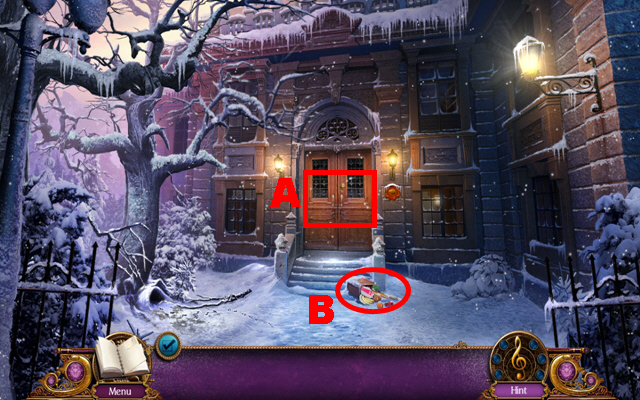
- Zoom into the door (A) to activate a cutscene.
- Zoom into the groceries (B).
- Play the HOS.

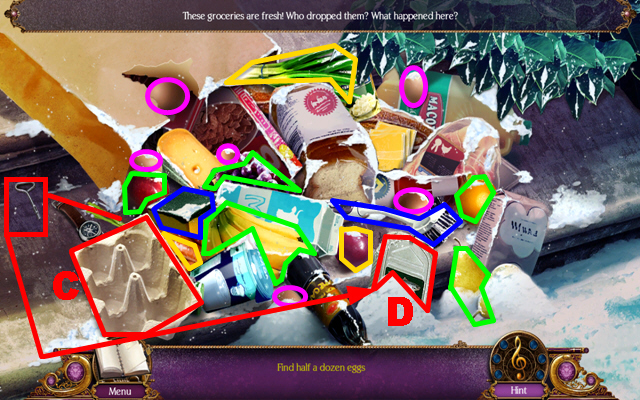
- Remove the leaves and rip open the bag; collect the six eggs marked in purple, put them into the box, and take the half a dozen eggs (C).
- Collect five fruits marked in green.
- Collect three vegetables marked in yellow.
- Collect two cleaning tools marked in blue.
- Take the opener, put it on the can of sardines, pull the opener, and take the open can of sardines (D).
- The SARDINES will be acquired.

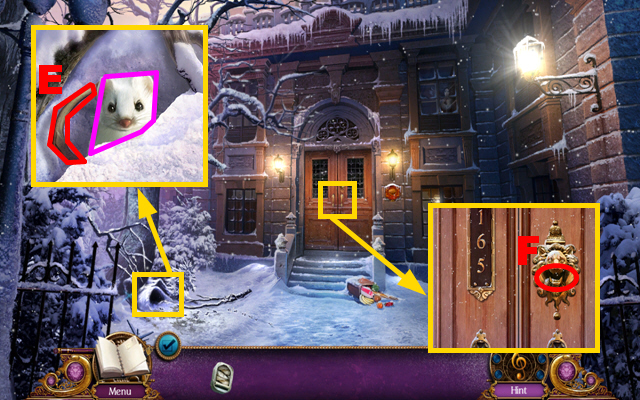
- Zoom into the burrow; try to take the brass knocker (E).
- Give the SARDINES to the ermine marked in purple and take the BRASS KNOCKER (E).
- Zoom into the door; put the BRASS KNOCKER into the lion’s mouth (F) to activate a cutscene.

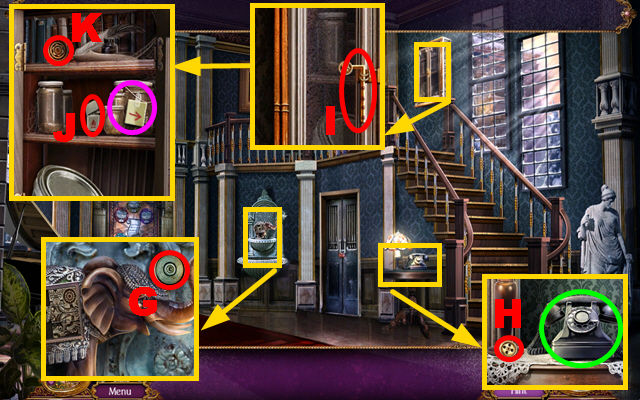
- Zoom into the fountain; take the 1/10 GEAR (G).
- Zoom into the side table; pick up the phone marked in green and take the 2/10 GEAR (H).
- Zoom into the cabinet; pull the handle (I), open the door, and move aside the jars marked in purple.
- Take the LIGHTER (J) and the 3/10 GEAR (K).
- Move forward to the hallway.

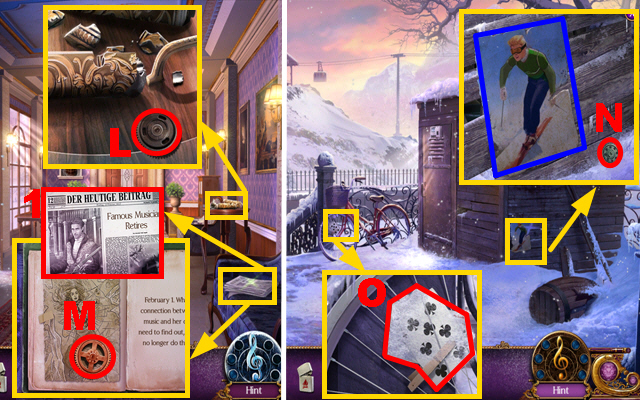
- Zoom into the newspaper and take the NEWSPAPER (1); turn the pages of the book twice and take the 4/10 GEAR (M).
- Zoom into the side table and take the 5/10 GEAR (L).
- Turn left.
- Zoom into the poster; remove the poster marked in blue and take the 6/10 GEAR (N).
- Zoom into the bicycle; wipe away the snow and take the playing cards (O) to get the code for the bicycle lock.
- Walk down twice.

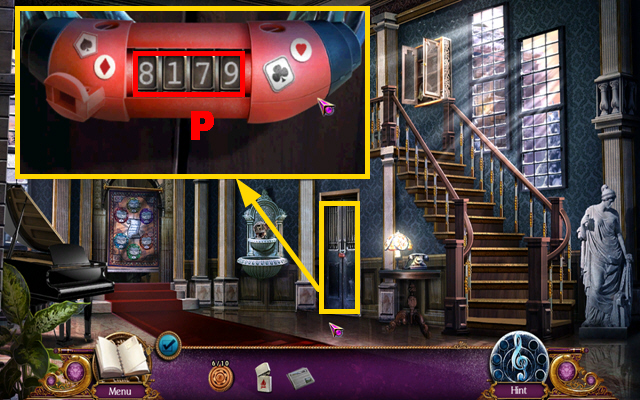
- Zoom into the storage room; enter the code 8179 to open the lock (P).
- Zoom into the storage room once more.
- Play the HOS.

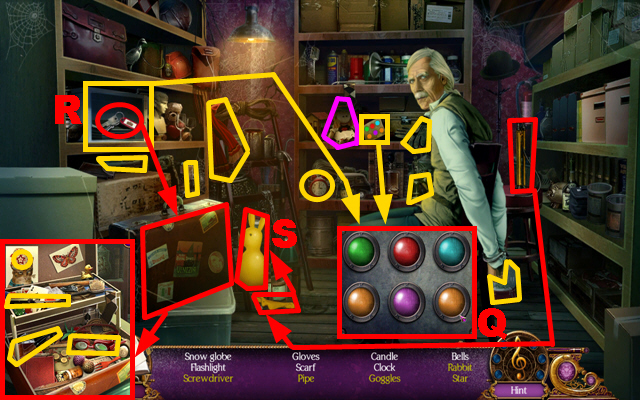
- Move aside the doll marked in purple to get the code for the safe.
- Zoom into the safe and press the buttons to set the correct colors (Q).
- Take the key (R), use it to open the luggage, and zoom into the luggage.
- Take the pump, use it to inflate the balloon, and take the rabbit (S).
- The SCREWDRIVER will go into inventory.
- Walk down, move forward, and turn left.

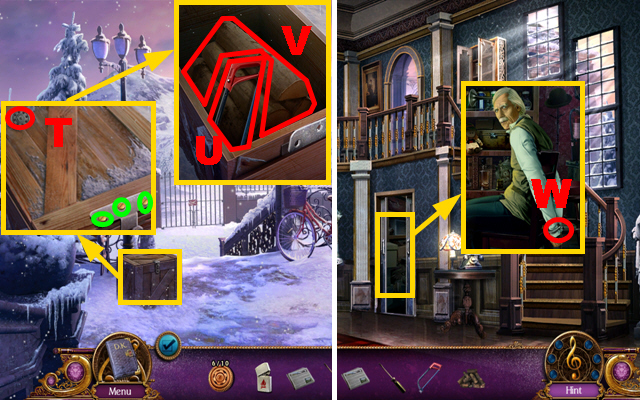
- Zoom into the crate; take the 7/10 GEAR (T) and use the SCREWDRIVER to remove the screws marked in green.
- Open the crate; take the HACKSAW (U) and the LOGS (V).
- Walk down twice.
- Zoom into the storage room; cut the bonds (W) with the HACKSAW to free the butler.
- The ROOM KEY will be acquired.
- Move forward.

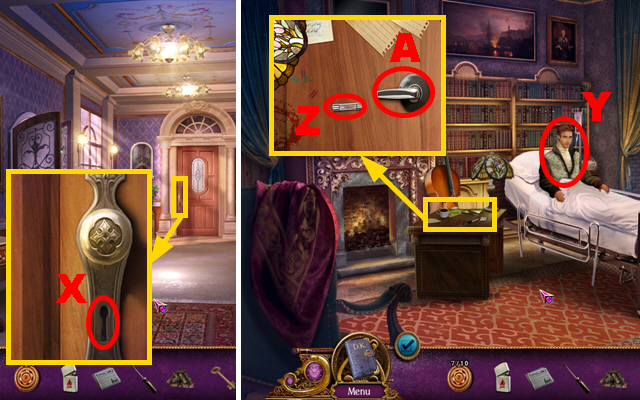
- Zoom into the door; put the ROOM KEY into the lock (X) to open the door.
- Move forward.
- Talk to Sebastian (Y).
- Zoom into the desk; take the 1/5 FUSE (Z) and the DOOR HANDLE (A).
- Walk down twice.

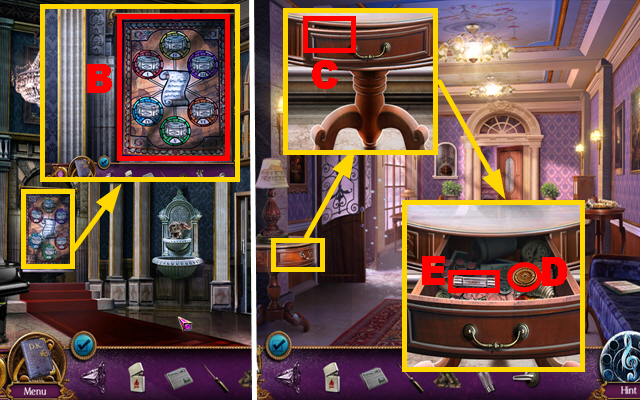
- Zoom into the tapestry and then remove it (B).
- Go to the hallway.
- Zoom into the side table on the left; try to open the drawer; use the SCREWDRIVER to pry open the drawer (C).
- Take the 8/10 GEAR (D) and the 2/5 FUSE (E).
- Walk down twice.

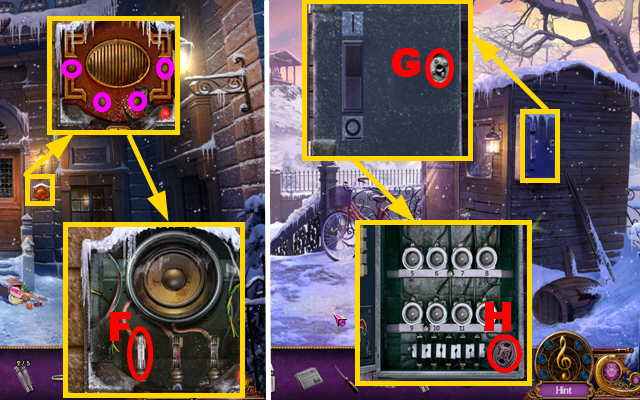
- Zoom into the intercom; use the SCREWDRIVER on the screws marked in purple four times to remove the lid.
- Take the 3/5 FUSE (F).
- Move forward twice and turn left.
- Zoom into the circuit breaker; put the DOOR HANDLE into the slot (G) and turn it to open the door.
- Take the 9/10 GEAR (H).
- Walk down twice.

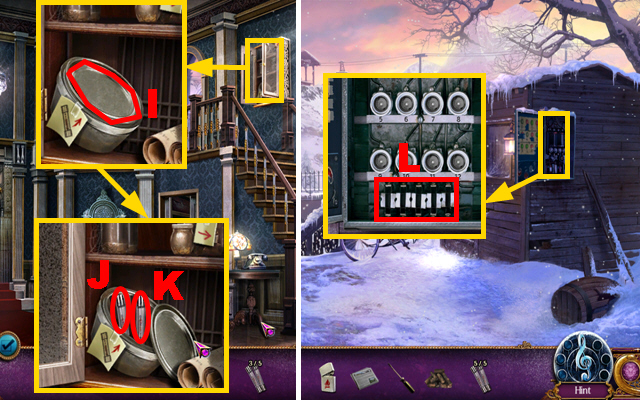
- Zoom into the cabinet; use the SCREWDRIVER to pry open the box (I).
- Take the 4/5 FUSE (J) and the 5/5 FUSE (K).
- Move forward and turn left.
- Zoom into the circuit breaker; add the 5 FUSES to it (L) and play the mini-game.

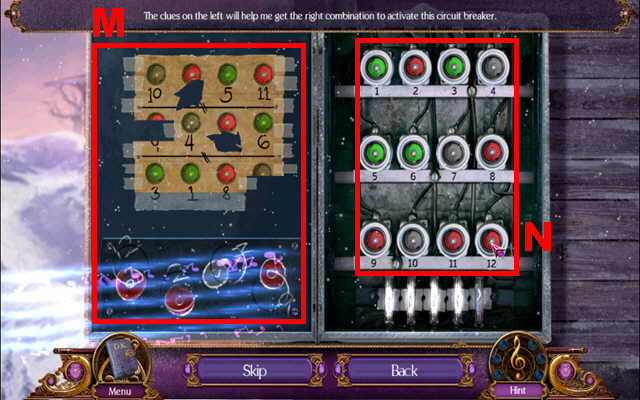
- Rearrange the clues on the left side (M).
- Click on the bulbs to change their color between green, red, and gray.
- The screenshot displays the correct solution (N).
- Zoom into the shed and play the HOS.

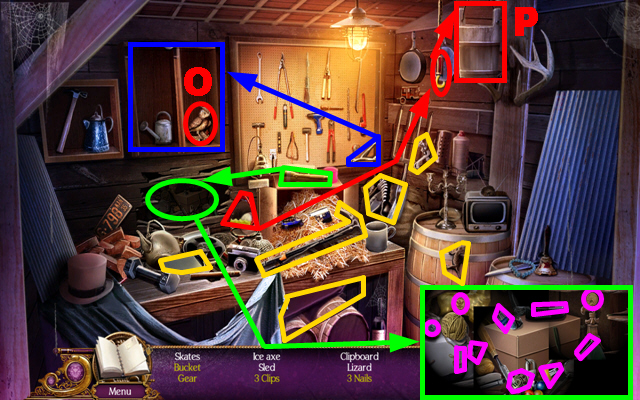
- Take the handle marked in blue and put it on the cabinet.
- Open the cabinet and take the owl (O).
- Take the red handle, connect it to the hook, pull the handle, and take the bucket (P).
- Take the flashlight and use it to examine the dark hole; take the gear, the 3 clips, the 3 nails, and the 3 coins marked in purple.
- The 10/10 GEAR will go into inventory.
- Walk down.

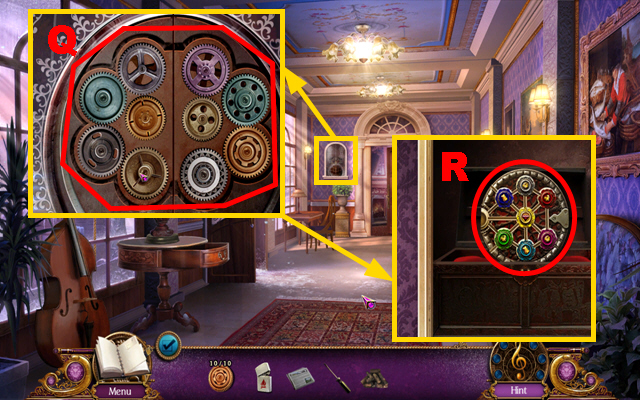
- Zoom into the glass display; add the 10 GEARS to the panel and play the mini-game.
- Put the 10 gears into the correct positions (Q).
- Take the EMBLEM (R).
- Walk down.

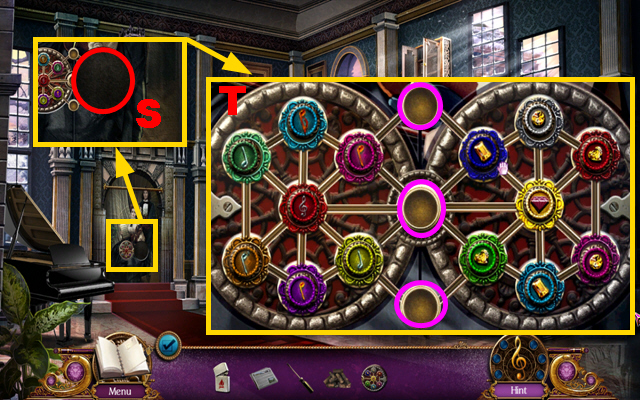
- Zoom into the tapestry; put the EMBLEM into the slot (S) and play the mini-game.
- Drag the buttons into the correct slots along the lines.
- Use the three central slots marked in purple for buttons you want to set aside.
- Each button has a corresponding slot with a matching color and a symbol.
- The screenshot displays the correct solution (T).
- Move into the parlor.

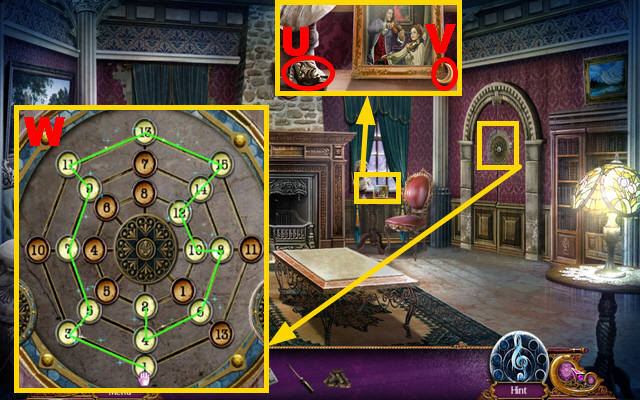
- Try to talk to the ghost.
- Zoom into the table by the window; take the TILES (U) and the MOON (V).
- Zoom into the wall and play the mini-game.
- Connect the number buttons, starting with 2 and ending with 1, to solve this puzzle (W).
- Walk down.

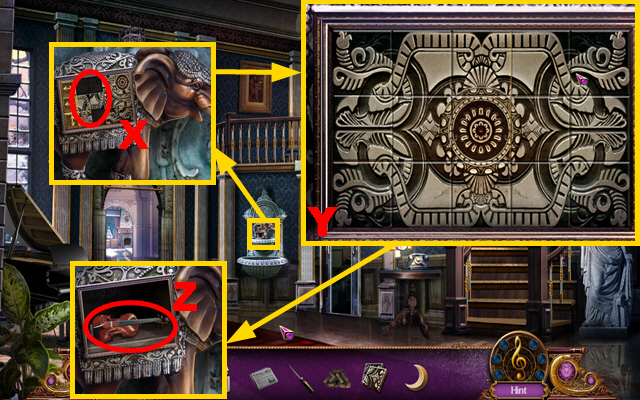
- Zoom into the fountain; put the TILES on the elephant (X) to play a mini-game.
- Swap the pieces to recreate a coherent picture.
- Move the golden tiles to see the picture parts they cover.
- The screenshot displays the correct solution (Y).
- Take the FIGURINE (Z).
- Go to the parlor.

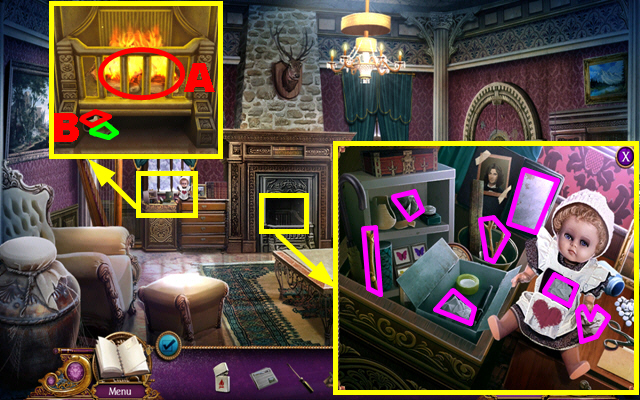
- Zoom into the basket and play the HOS.
- Open the box, the doll, and the case.
- Collect the paper pieces and the twigs marked in purple.
- The PAPER AND TWIGS will be acquired.
- Zoom into the fireplace; put the PAPER AND TWIGS, the NEWSPAPER, and the LOGS into the fireplace.
- Use the LIGHTER on the fireplace (A), scare away the rat marked in green, and take the STAR (B).

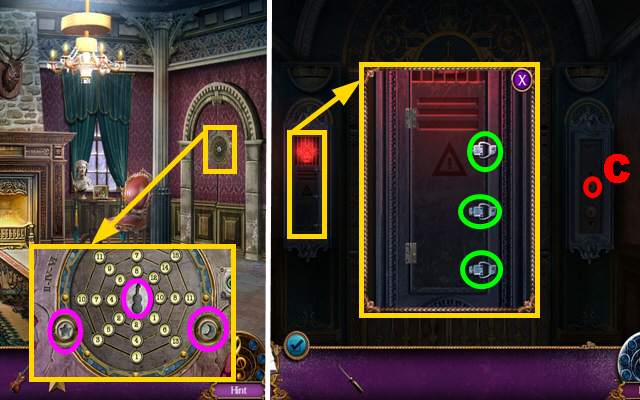
- Zoom into the wall; put the MOON, the FIGURINE, and the STAR into the slots marked in purple.
- Enter the elevator and press the up button (C).
- Zoom into the emergency power; use the SCREWDRIVER to pry open the latches marked in green three times.
- Open the panel; zoom into it, and play a mini-game.

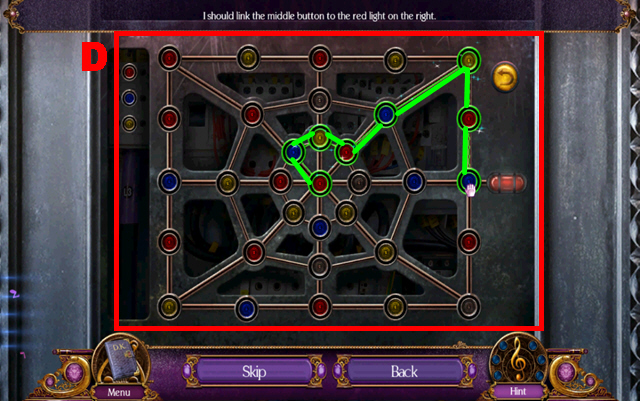
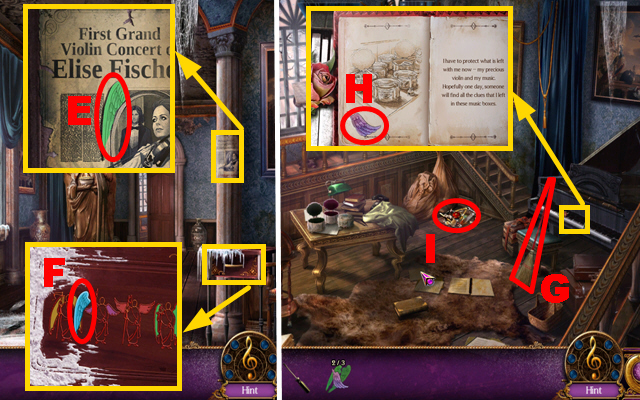
- You can only jump from red lights to blue lights, from blue lights to yellow lights, and from yellow lights to red lights.
- Connect the central button to the red light on the right to complete this puzzle (D).
- Move forward.

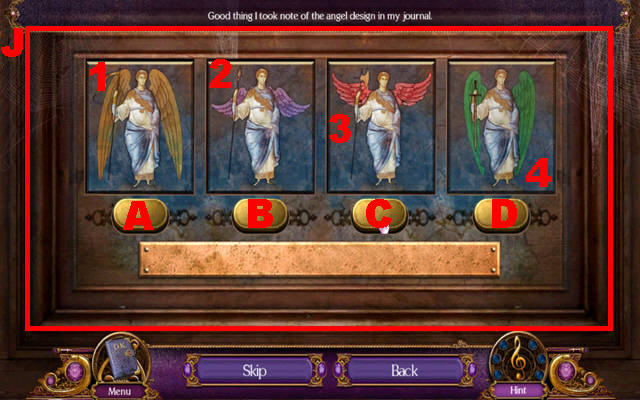
- Zoom into the poster; take the 1/3 ANGEL’S WING (E).
- Zoom into the side table; remove the snow, take the 2/3 ANGEL’S WING (F), and make note of the pattern.
- Move forward.
- Take the broom (G).
- Zoom into the piano; turn the pages of the book twice and take the 3/3 ANGEL’S WING (H).
- Zoom into the junk pile (I) and play the mini-game.

- Remove the items from top to bottom.
- Put the 3 ANGEL’S WINGS into the slots after you have removed every item.
- The initial position and color of the wings is random.
- Consider that the button A changes the wings of angels 2 and 4, button B changes the wings of angels 1 and 3, button C changes the wings of angel 4, and button D changes the wings of angel 1.
- Use the buttons A and B to set the wings correctly for the angels 2 and 3. Now you can use buttons C and D to set the wings correctly for the angels 1 and 4.
- The screenshot displays the correct solution (J).
- Walk down.

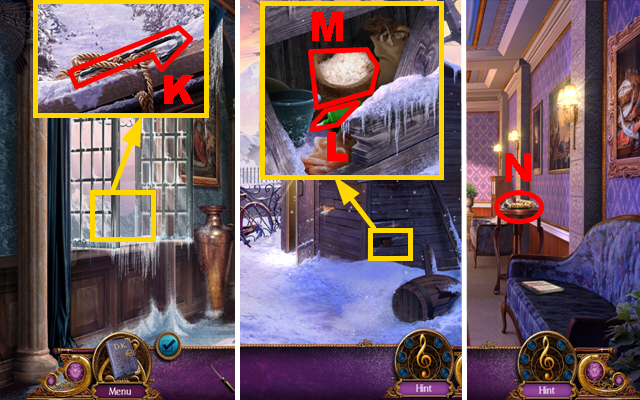
- Zoom into the window; pull the rope three times and take the CROWBAR (K).
- Walk down, press the down button, move forward, walk down, go upstairs, and turn left.
- Zoom into the hole; use the CROWBAR to remove the boards; take the GLUE (L) and the SALT (M).
- Walk down.
- Zoom into the side table on the left (N), add the GLUE to the broken beer stein, and play the mini-game.

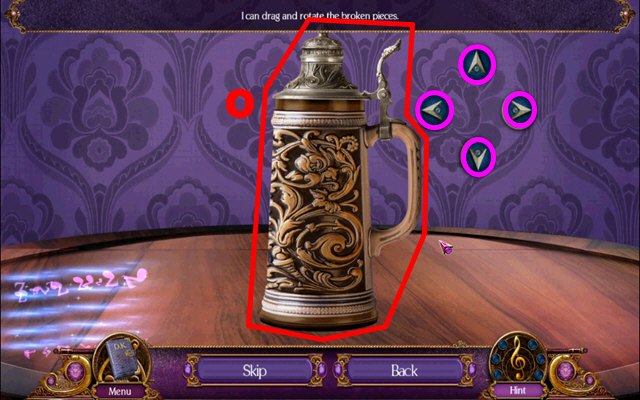
- Rotate pieces and drag them into the fitting holes.
- Turn the beer stein around by pressing the buttons marked in purple.
- The screenshot displays the correct solution (O).
- The BEER STEIN goes into inventory.
- Walk down.

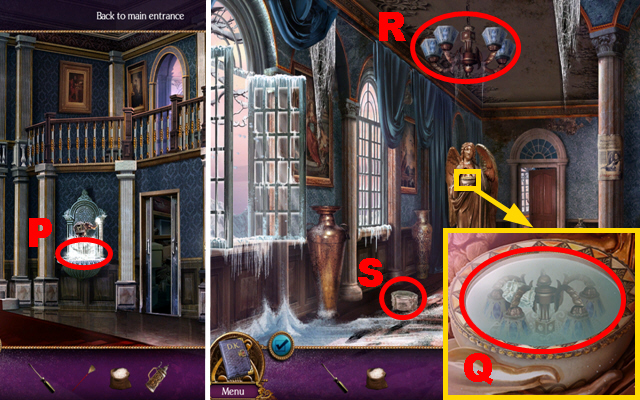
- Put the BEER STEIN into the fountain (P) to acquire the WATER.
- Move forward twice, push the up button, and move forward.
- Zoom into the angel; pour the WATER into the bowl (Q).
- Poke the chandelier (R) with the BROOM three times.
- Zoom into the box (S) to play a mini-game.

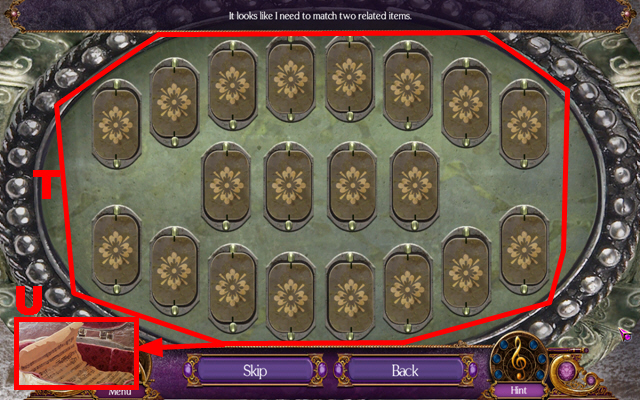
- Find all pairs to solve this puzzle (T).
- The position of the pairs is random.
- Take the MUSIC SHEET (U).
- Move forward.

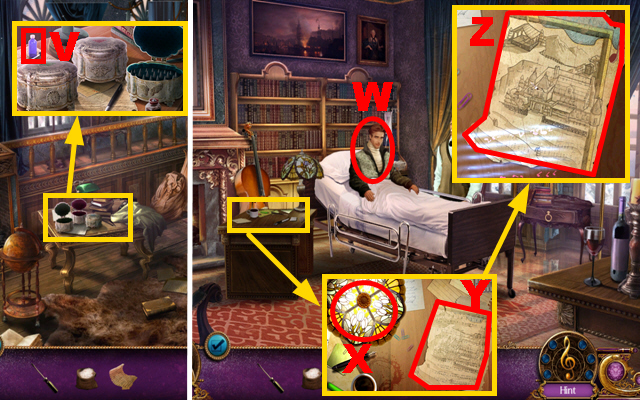
- Zoom into the table; close the first two boxes, open the third box, and take the SOLVENT (V).
- Walk down twice, press the down button, move forward, walk down, go upstairs, and move forward.
- Give the MUSIC SHEET to Sebastian (W).
- Zoom into the desk; put the MUSIC SHEET on the desk (Y) and turn on the light (X).
- Use the SOLVENT on the music sheet to activate a mini-game.
- Pour solvent on the music sheet (Z) four times; take the music sheet to activate a cutscene.
- Walk down and move forward twice.

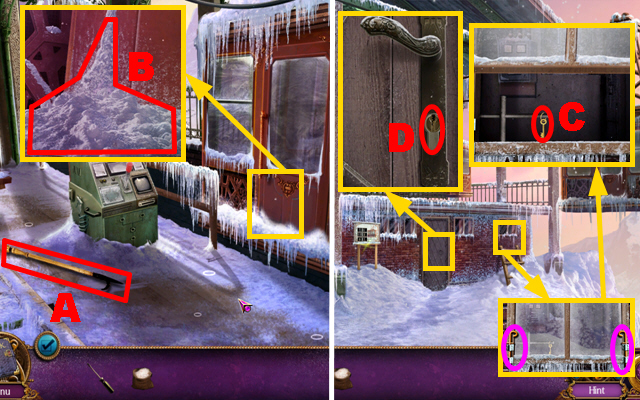
- Take the HOOK (A).
- Zoom into the door; use the SALT on the ice (B) to open the door.
- Walk down.
- Zoom into the window; pull both latches marked in purple and open the window.
- Use the HOOK to acquire the KEY (C).
- Zoom into the door; put the KEY into the lock (D) to open the door.

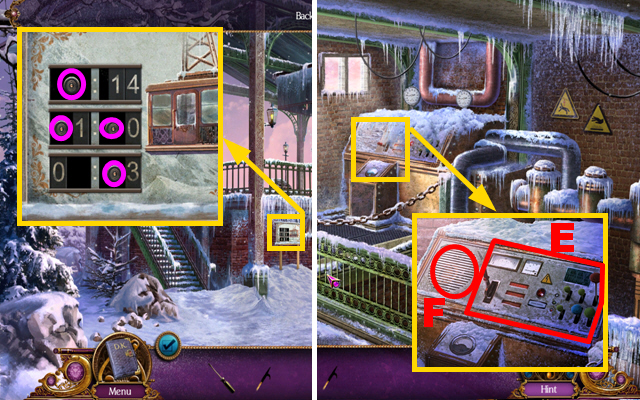
- Zoom into the schedule; move aside the number plates and take the 1/4, 2/4, 3/4, and the 4/4 MACHINE PARTS marked in purple.
- Enter the machinery room.
- Zoom into the power generator; use the SALT on the generator (E) to remove the ice.
- Remove the cover (F).
- Zoom into the engine to play a mini-game.

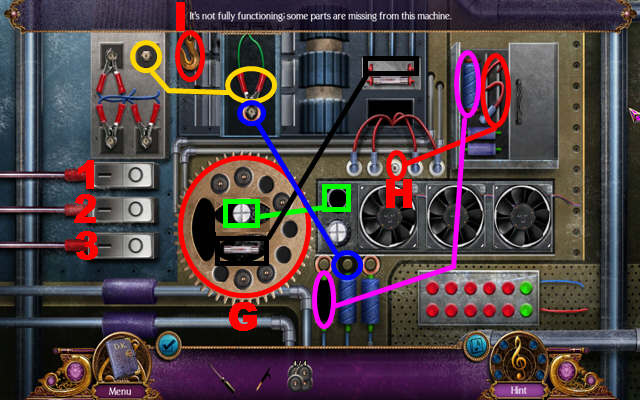
- Put the 4 MACHINE PARTS into the valve slots (G).
- Turn the valve and put the screw into the slot marked in green.
- Turn the valve a little further and put the fuse into the niche marked in black.
- Open the door of the box; put the wire into the remaining open spot (H) and the battery into the slot marked in purple.
- Press the three buttons 1-3.
- Pull the hook (I); put the clamp on the rod marked in yellow.
- Put the ring into the niche marked in blue.
- The power generator will now work.

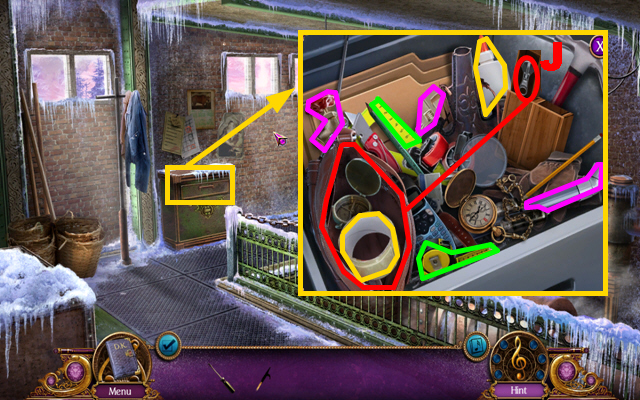
- Zoom into the drawer. Pull the tiny drawer and take the zipper (J).
- Open the bag with the zipper.
- Take 2 adhesives marked in yellow.
- Find 2 measuring tools marked in green.
- Find 3 plumbing tools marked in purple.
- The WRENCH will go into inventory.

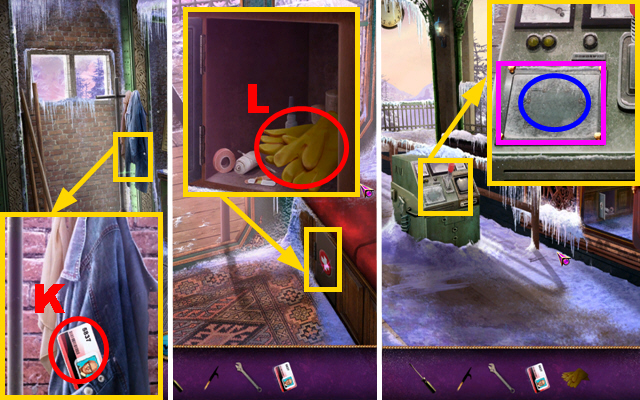
- Zoom in on the jacket; pull and take the ID CARD (K).
- Walk down, go to the boarding area, and enter the gondola.
- Zoom into the first aid compartment; open the door and take the GLOVES (L).
- Move forward.
- Zoom into the control panel; use the WRENCH to remove the cover marked in purple.
- Use the GLOVES on the wiring marked in blue to play a mini-game.

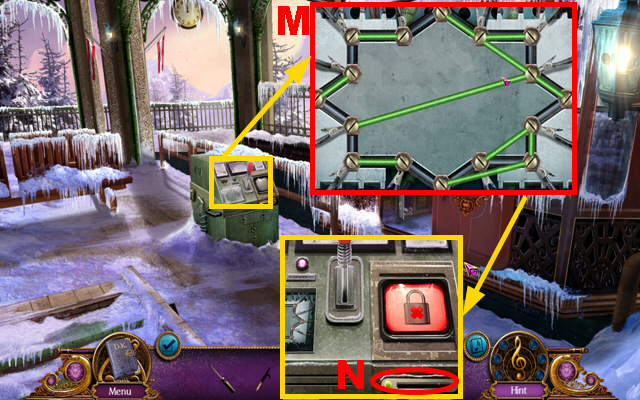
- Swap the screws to untangle the wires.
- The screenshot displays the correct solution (M).
- Put the ID CARD into the slot (N).
- Enter the gondola.

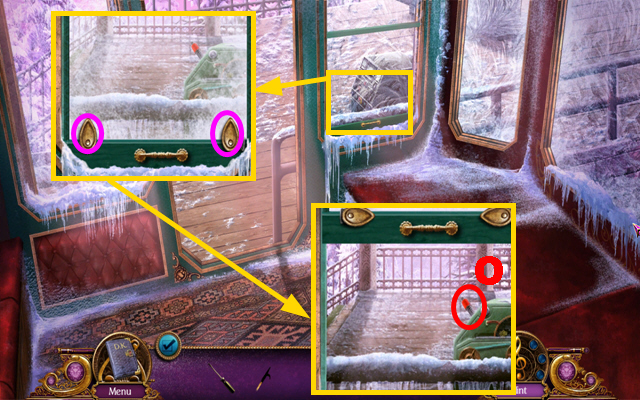
- Zoom into the window; turn the two latches marked in purple and open the window.
- Use the HOOK to pull the lever (O).
Chapte 2: Crash Site

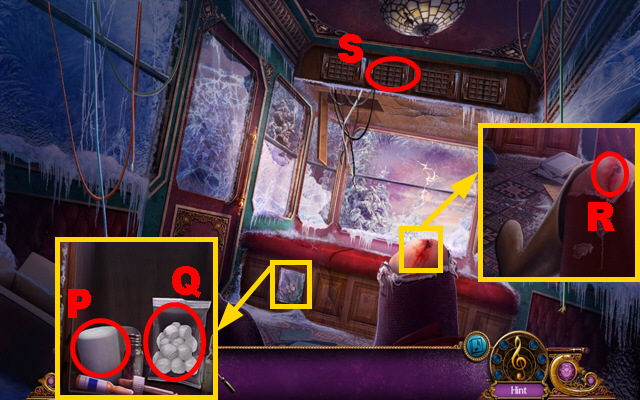
- Interact with Elise.
- Zoom into the first aid compartment; use the SCREWDRIVER to remove the door.
- Take the BANDAGE (P) and the COTTON (Q).
- Zoom into your knee; use the COTTON on the wound two times (R); then use the BANDAGE on the knee three times to patch the wound.
- Zoom into the overhead bin (S) and play the HOS.

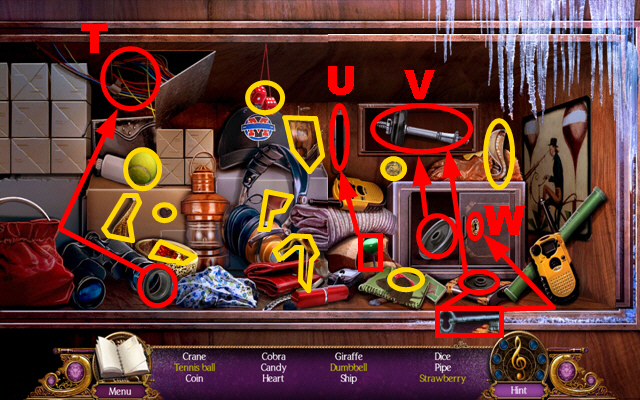
- Drag the cabinet door to get access to the whole cabinet.
- Take the tape and use it to insulate the wires (T).
- Take the lever, put it into the slot (U), and pull the lever.
- Take the first weight and put it on the dumbbell (V).
- Use the key located below the first weight and put it into the safe’s lock (W). Take the second weight, put it on the dumbbell, and take the dumbbell (V).
- The DUMBBELL will be acquired.

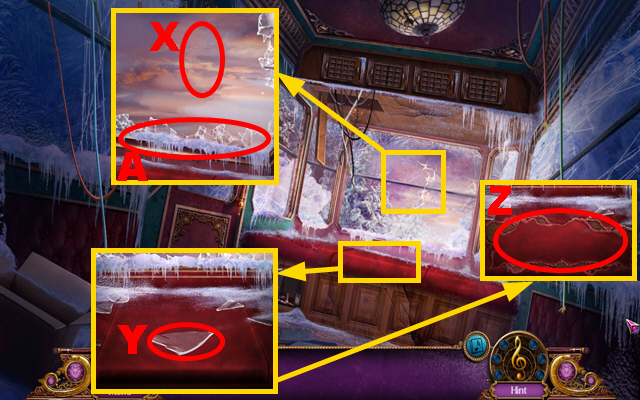
- Zoom into the window; use the DUMBBELL to break the glass (X).
- Zoom into the seat; take the GLASS SHARD (Y) and use the GLASS SHARD to cut the seat.
- Take the TORN SEAT CLOTH (Z).
- Zoom into the window; put the TORN SEAT CLOTH on the lower shards (A).
- Move forward.

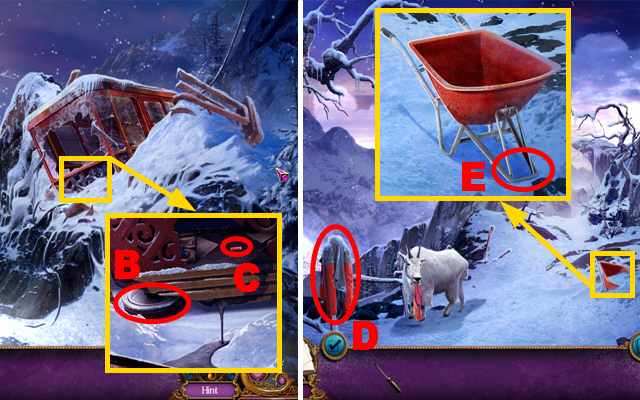
- Zoom into the gondola; take the WHEEL (B) and the 1/2 BULLET (C).
- Move forward.
- Take the JACKET (D).
- Zoom into the wheelbarrow; remove the snow, add the WHEEL to the wheelbarrow (E), and take the WHEELBARROW.
- Move forward.

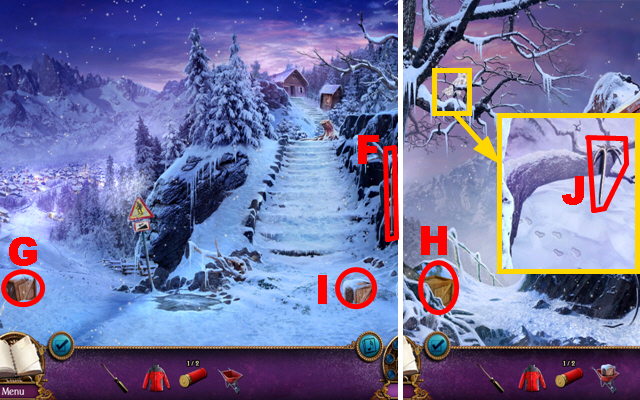
- Take the CANE (F). Use the WHEELBARROW to load the crate (G).
- Walk down twice.
- Unload the WHEELBARROW WITH CRATE onto the first crate (H).
- Move forward twice.
- Use the WHEELBARROW to load the crate (I).
- Walk down twice.
- Unload the WHEELBARROW WITH CRATE onto the other two crates (H).
- Zoom into the tree; use the CANE to acquire the GRAPPLING HOOK (J).
- Move forward twice.

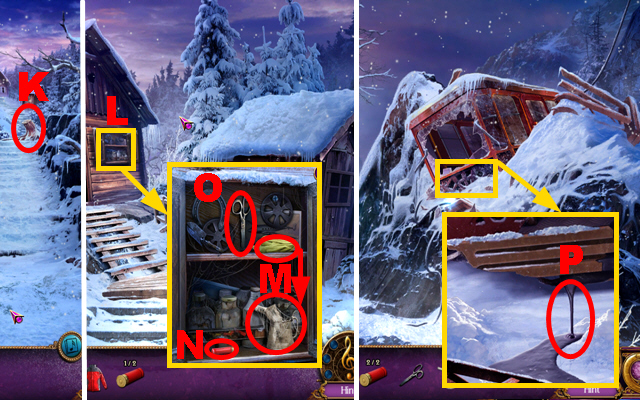
- Throw the GRAPPLING HOOK onto the tree stump (K).
- Move forward.
- Open the cabinet (L) and zoom into it; use the rag on the empty oil can (M).
- Take the 2/2 BULLET (N), the EMPTY OIL CAN, and the SCISSORS (O).
- Walk down three times.
- Zoom into the gondola; fetch the leaking oil (P) with the EMPTY OIL CAN to acquire the FILLED OIL CAN.
- Move forward three times.

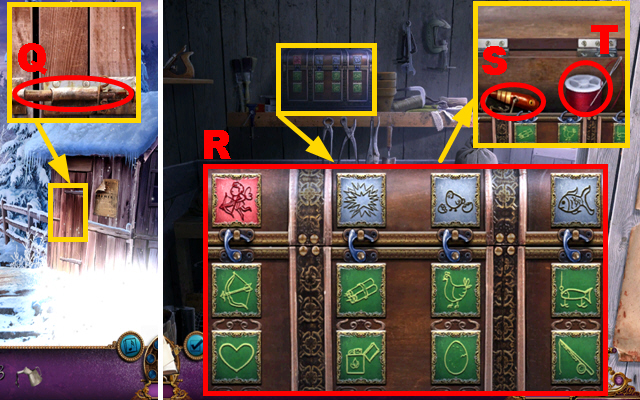
- Zoom into the shed; pour the FILLED OIL CAN over the sliding lock (Q) to open the door.
- Zoom into the chest to play a mini-game.
- Change the gray and the green tiles by pressing them to create related sets.
- The screenshot displays the correct solution (R).
- Take the FISHING HOOK (S) and the THREAD (T).

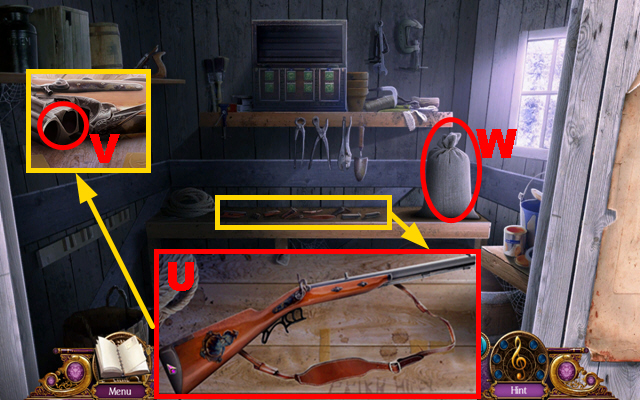
- Zoom into the shotgun pieces to play a mini-game.
- Rotate the shotgun pieces and put them correctly into the shotgun silhouette to solve this puzzle (U).
- Load the gun with the 2 BULLETS (V) and take the SHOTGUN.
- Use the SCISSORS to open the sack of grain and take the GRAIN (W).

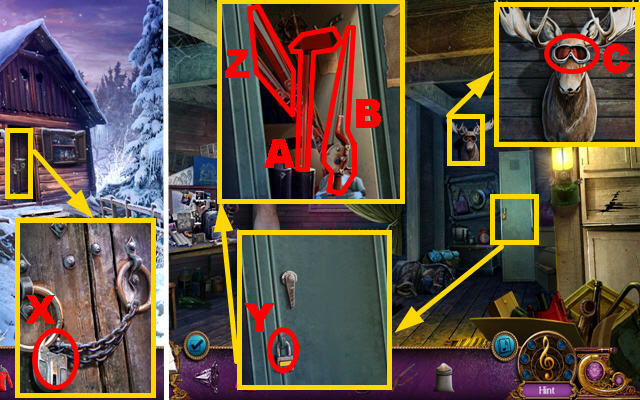
- Zoom into the door; use the SHOTGUN to break the steel chain (X).
- Move forward.
- Zoom into the locker; use the SHOTGUN to break the lock (Y). Open the locker; take the SKI (Z) and the AXE (A).
- Connect the FISHING HOOK to the fishing rod (B) and take the FISHING ROD.
- Zoom into the moose; use the FISHING ROD on the moose (C) to acquire the GOGGLES.
- Walk down twice.

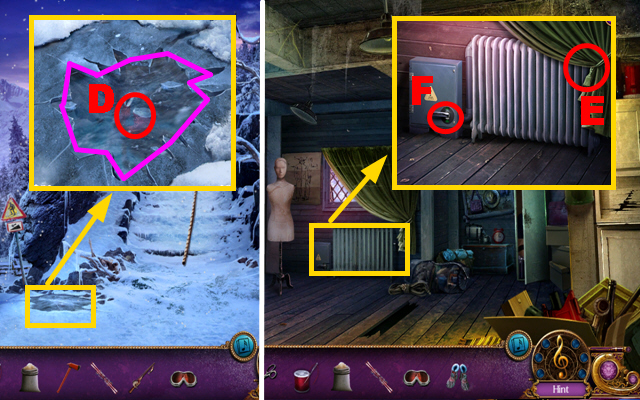
- Zoom into the icy pond; use the AXE to break the ice marked in purple and cast the FISHING ROD into the water (D) to acquire the WET BOOTS.
- Move forward twice.
- Zoom into the radiator; cut the curtain with the SCISSORS to acquire the CLOTH (E).
- Pry open the circuit breaker with the SCREWDRIVER (F).
- Zoom into the circuit breaker to play a mini-game.

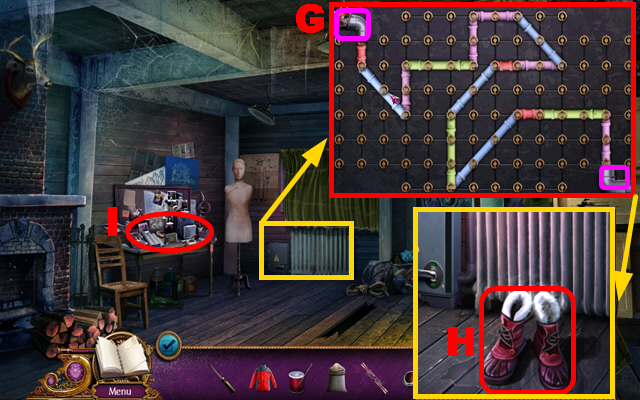
- To solve this puzzle (G), drag and rotate the pipes to connect the openings marked in purple.
- Put the WET BOOTS in front of the radiator (H) and take the BOOTS.
- Play the HOS (I).

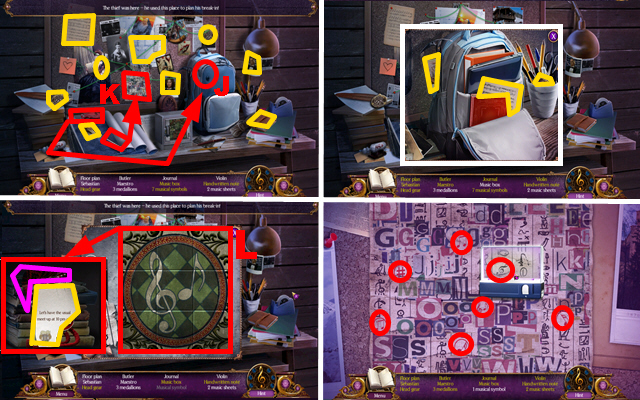
- Use the cutter marked in red to open the backpack (J).
- Zoom into the backpack; take the music sheet, the medallion, and the music box marked in yellow.
- Take the scanning device and use it on the poster (K); collect the seven musical symbols marked in red.
- Zoom into the safe; swap pieces to create a coherent picture (L); take the handwritten note marked in yellow and the head gear marked in purple.
- The HEAD GEAR and the THIEF’S NOTE will be acquired.
- Walk down three times.

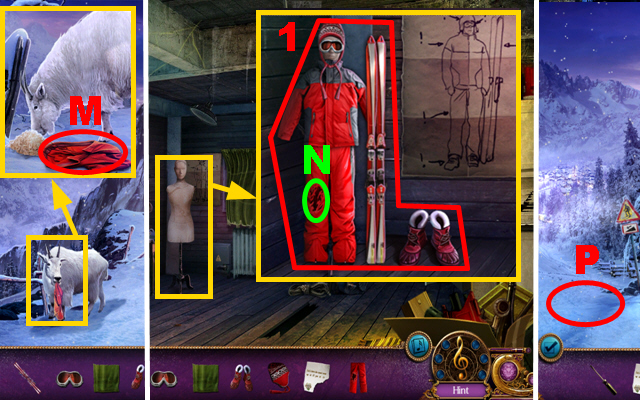
- Zoom into the goat; give the GRAIN to the goat and take the TROUSERS (M).
- Move forward three times.
- Zoom into the mannequin; put the TROUSERS, GOGGLES, HEAD GEAR, JACKET, SKI, and the BOOTS on it.
- Put the CLOTH on the trousers (N) and sew it with the THREAD. Take the SKI SET (1).
- Walk down twice.
- Use the SKI SET on the slippery slope (P).
Chapte 3: Austrian Town

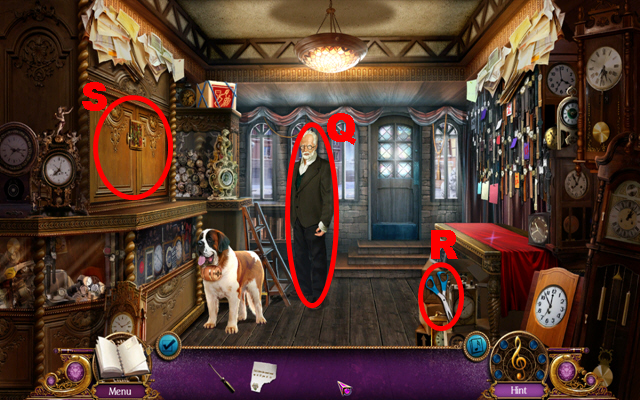
- Show the THIEF’S NOTE to the clockmaker (Q).
- Take the SCISSORS (R).
- Zoom into the shelf (S) and play the HOS.

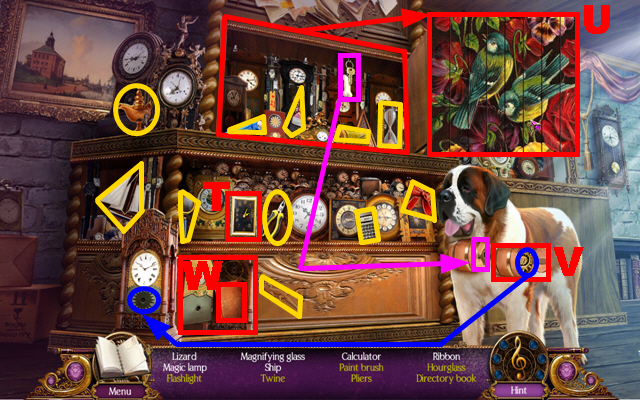
- Move the clock to the left side (T).
- Zoom into the upper cabinet and recreate the picture (U).
- Take the key and put it into the lock marked in purple.
- Take the sun (V) and put it into the clock’s slot marked in blue.
- Open the clock and take the directory book (W).
- The DIRECTORY will be acquired.

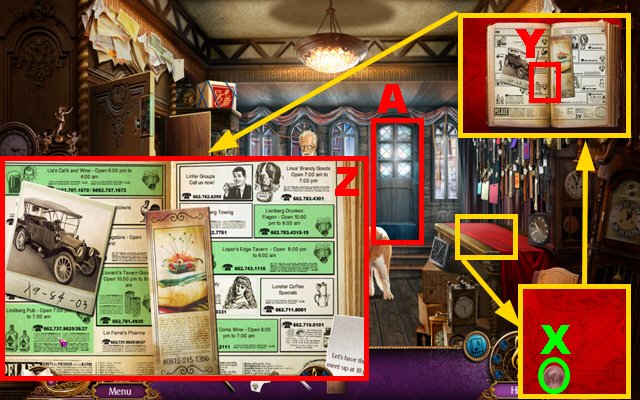
- Zoom into the desk; take the first COIN (X) and put the DIRECTORY on the desk.
- Open the directory and put the THIEF’S NOTE on it (Y) to play a mini-game.
- To solve this puzzle (Z), select locations that match the thief’s note.
- Open the door (A).
- Move forward.

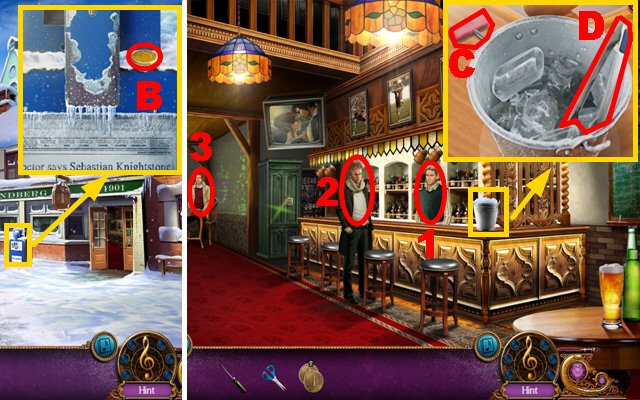
- Zoom into the newspaper stand; take the second COIN (B).
- Turn right to enter the pub.
- Zoom into the ice bucket; take the CORKSCREW (C) and the TONGS (D).
- Talk to the bartender (1), the charming man (2), and the customer (3).
- Walk down and move forward.

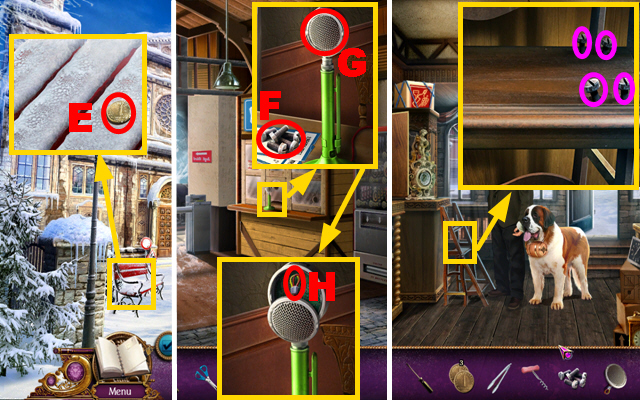
- Zoom into the bench; take the third COIN (E).
- Turn right.
- Zoom into the speaker; take the SCREWS (F) and use the SCREWDRIVER on the speaker to pry it open (G).
- Use the SCISSORS to cut the wires (H) and to acquire the SPEAKER PIECE.
- Walk down three times.
- Zoom into the stepladder; put the SCREWS into the spots marked in purple and use the SCREWDRIVER to tighten the screws.
- Zoom into the box to play a mini-game.

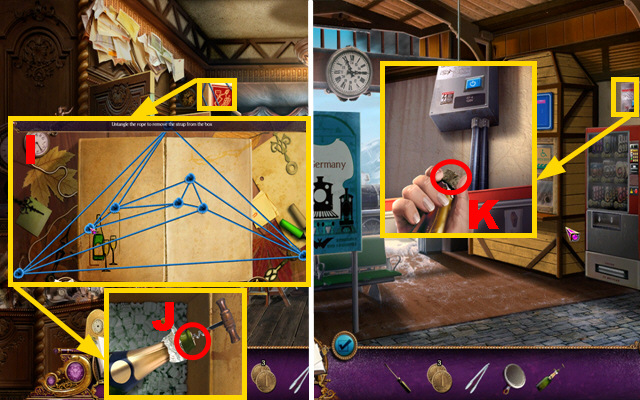
- Untangle the rope to free the box (I).
- Open the box, shake the bottle, and put the CORKSCREW into the cork (J).
- Pull the corkscrew twice and take the CHAMPAGNE.
- Move forward twice and turn right.
- Zoom into the power box; hold the CHAMPAGNE next to the power box and remove the cork of the champagne (K).
- Walk down twice.

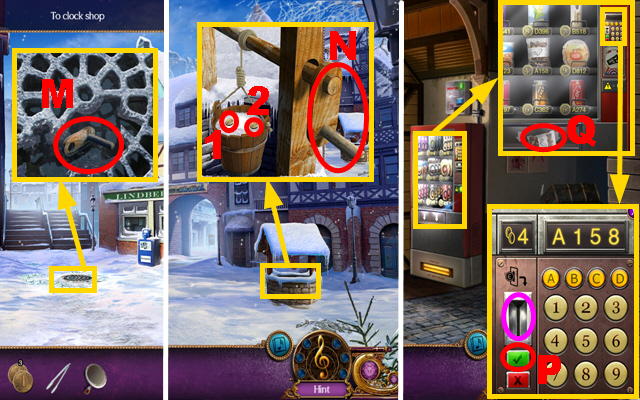
- Zoom into the grate; use the TONGS on the grate (M) to acquire the WINDER.
- Move forward.
- Zoom into the well; add the WINDER to the well (N). Turn the winder; take the fourth COIN (1) and the fifth COIN (2).
- Turn right.
- Zoom into the vending machine and then zoom into the control pad; insert 4 COINS into the slot marked in purple.
- Enter the code A158, press the confirmation checkmark (P), and take the PEANUTS (Q).
- Walk down twice and turn right.

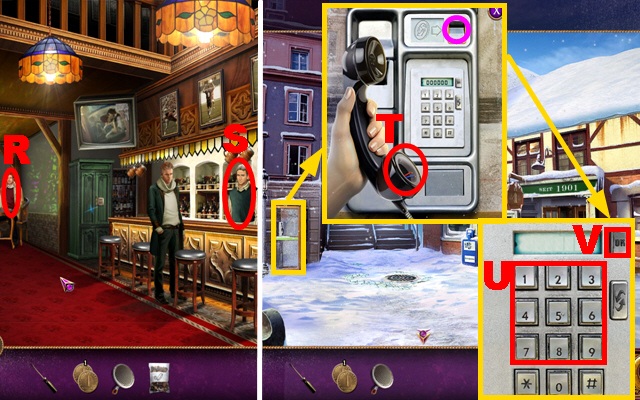
- Give the PEANUTS to the customer (R).
- Talk to the barkeeper (S) to acquire the waiter’s number.
- Walk down.
- Zoom into the payphone; lift the receiver and add the SPEAKER PIECE to it (T).
- Put 1 COIN into the slot marked in purple, enter the number 9425395 into the number pad (U), and press OK (V).
- Turn right.

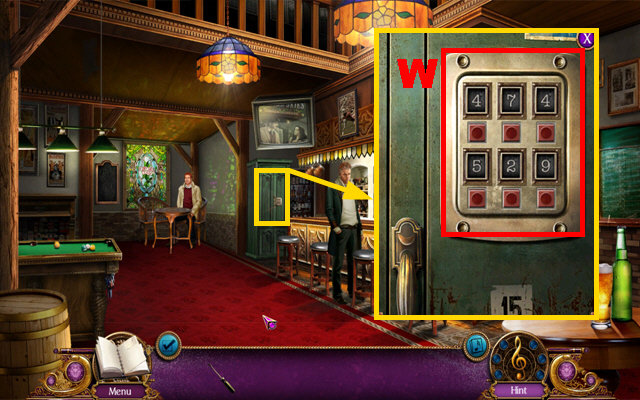
- Zoom into the cabinet; enter the code 474529 (W) to open the cabinet.
- Play the HOS.

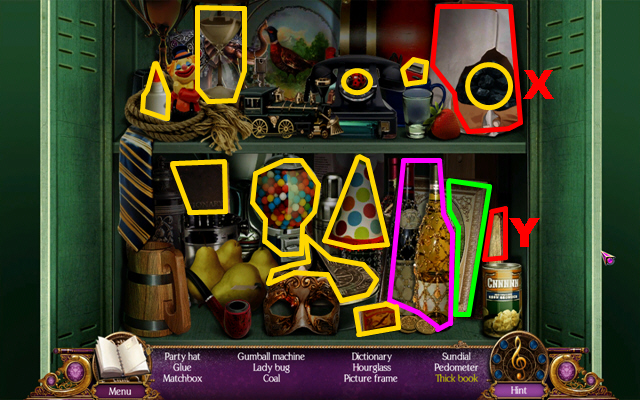
- Rip open the bag (X).
- Move aside the bottles marked in purple.
- Take the picture frame marked in green and the thick book behind it (Y).

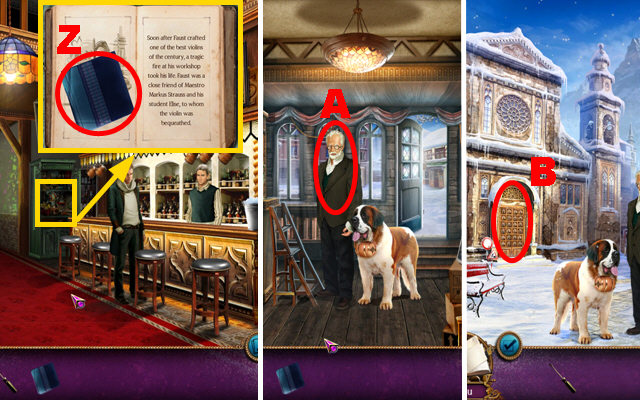
- Open the book, turn the pages once, and take the THIEF’S HANDKERCHIEF (Z).
- Walk down twice.
- Give the THIEF’S HANDKERCHIEF to the clockmaker (A).
- Zoom into the chapel’s door (B) to play a mini-game.

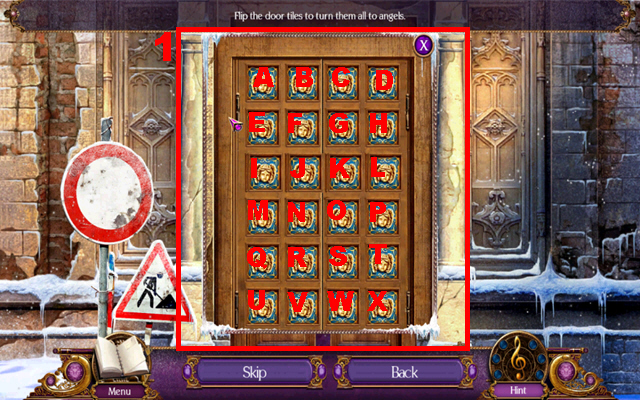
- Press the door tiles so that each tile shows an angel.
- To solve this puzzle (1), press the tiles in the following sequence: H, E, B, U, R, X, U, R, U, O, N, J, H, K, D, E, B, and A.

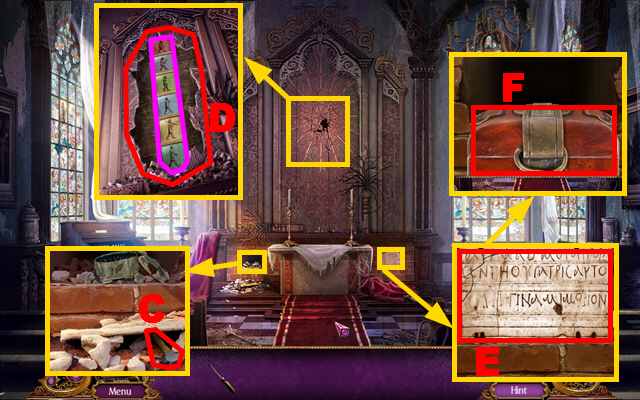
- Interact with the ghost.
- Zoom into the pile of rocks; take the HAMMER (C).
- Zoom into the mural; use the HAMMER three times to break it (D) and make note of the mural marked in purple.
- Zoom into the stone slab; use the HAMMER on it twice to break it (E).
- Pull out the chest and zoom into the chest (F) to play a mini-game.

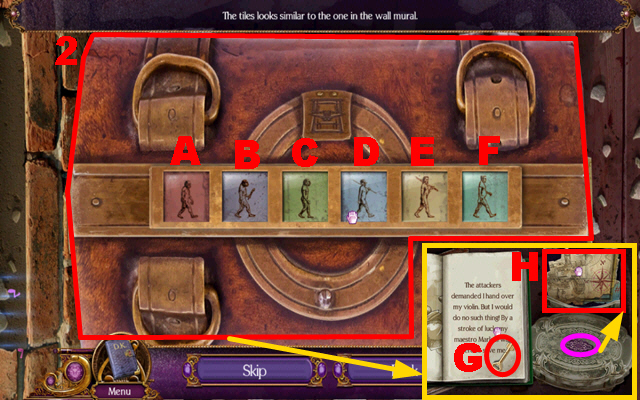

- Press a tile to change the picture of one or more tiles.
- The initial position of the tiles is random.
- The screenshot displays the correct solution (2).
- Zoom into the chest; turn the pages of the book twice and take the SMALL KEY (G).
- Use the SMALL KEY to open the box marked in purple and take the MUSIC SHEET (H).
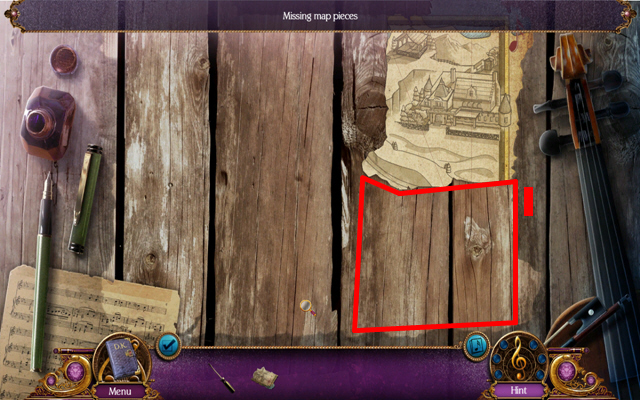
- Add the MUSIC SHEET to the map (I).
Chapte 4: Train to Germany

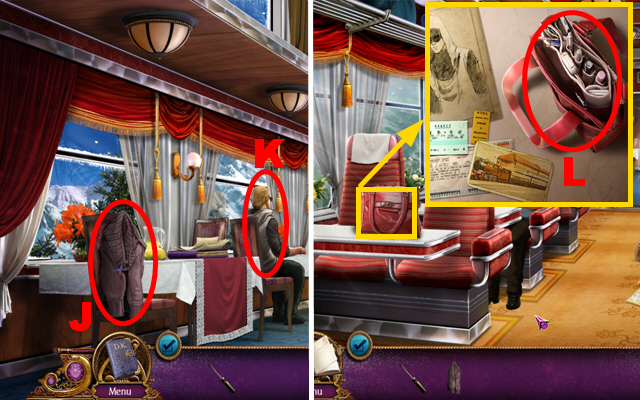
- Move forward.
- Take the JACKET (J).
- Try to zoom into the thief (K).
- Walk down.
- Zoom into your table and then zoom into your bag (L) to play a HOS.

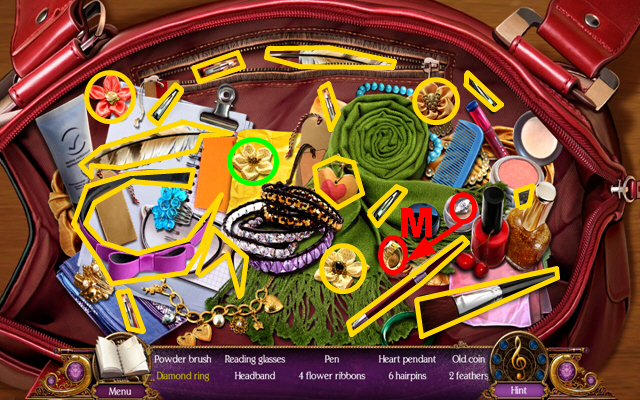
- Open the box and take the diamond, put the diamond into the setting, and then take the diamond ring (M).
- Move aside the paper and the notepad.
- The READING GLASSES will be acquired.

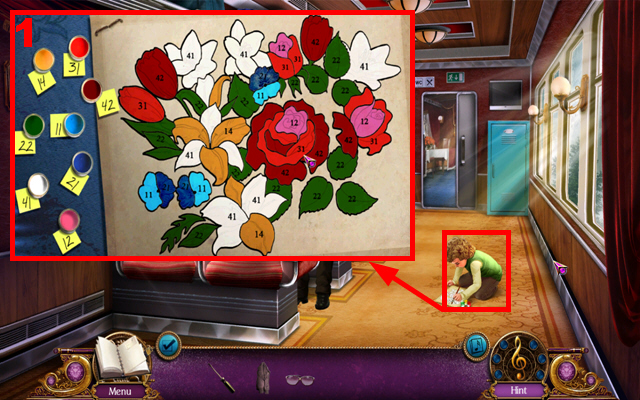
- Talk to the boy to activate a mini-game.
- To solve this puzzle (1), color the painting based on the numbers.
- The PAINTBRUSH will go into inventory.

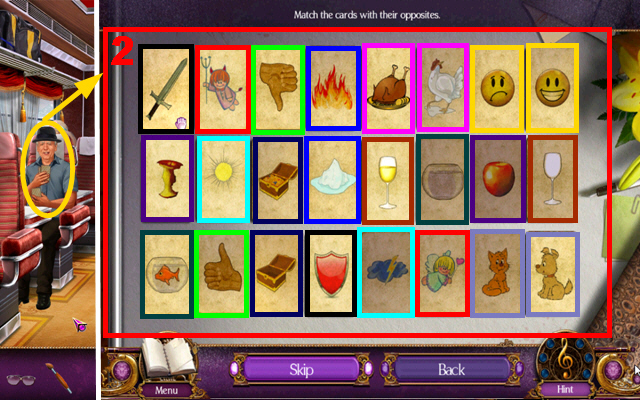
- Talk to the man to activate a mini-game.
- Match each card with its opposite.
- The position of the cards is random; match the cards outlined in the same color (2).
- The HAT will go into inventory.
- Move forward.

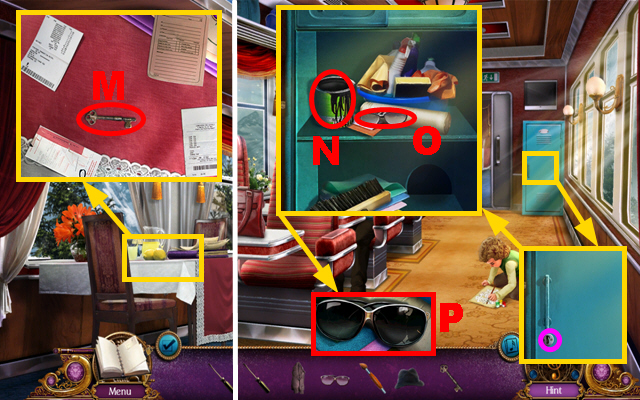
- Zoom into the front table; move the sheets aside and take the LOCKER KEY (M).
- Walk down.
- Zoom into the locker; put the LOCKER KEY into the lock marked in purple to open it.
- Use the SCREWDRIVER to open the can of paint (N) and put the READING GLASSES next to it (O).
- Dip the PAINTBRUSH into the can of paint and paint the READING GLASSES (P) with it to acquire the SHADES.

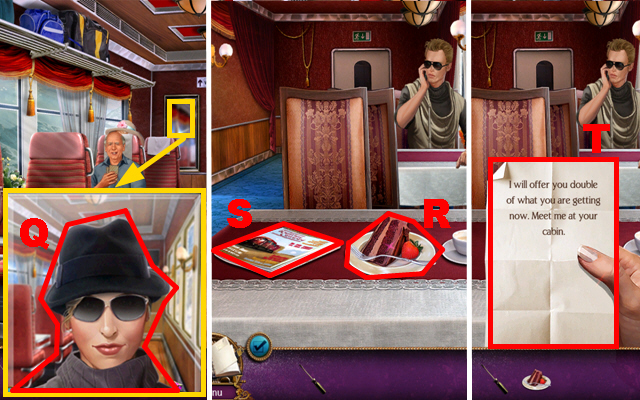
- Zoom into the mirror; put on the JACKET, the HAT, and the SHADES (Q).
- Move forward and go to the table near the thief.
- Take the cake (R); take the magazine and then read it (S).
- Take the NOTE FOR THIEF (T).
- Walk down twice.

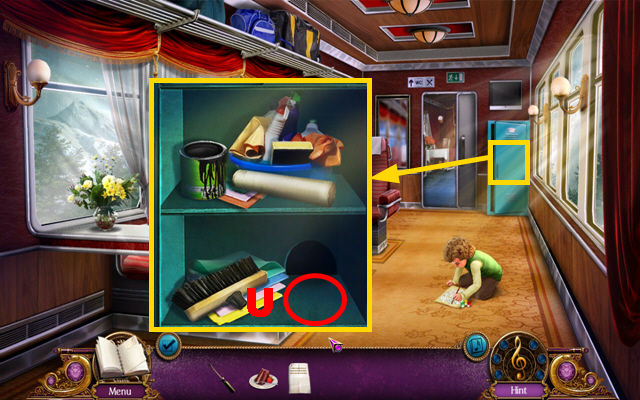
- Zoom into the locker; put the CAKE in front of the hole twice (U).
- Move upstairs.
- Play the HOS.

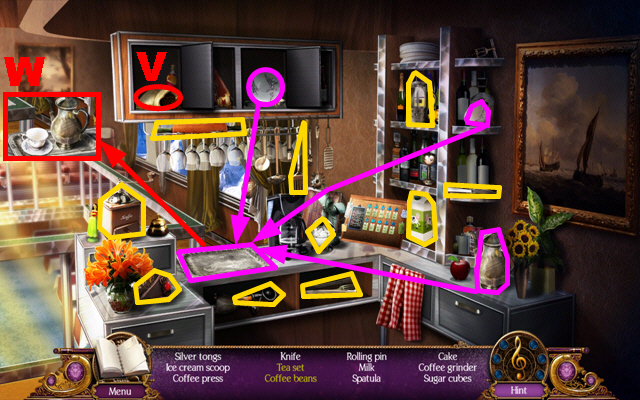
- Open both doors of the cupboard and take the coffee beans (V).
- Take the dish, cup, and teapot, and put them onto the tray marked in purple.
- Take the tea set (W).
- The COFFEE-MAKING SET will go into inventory.

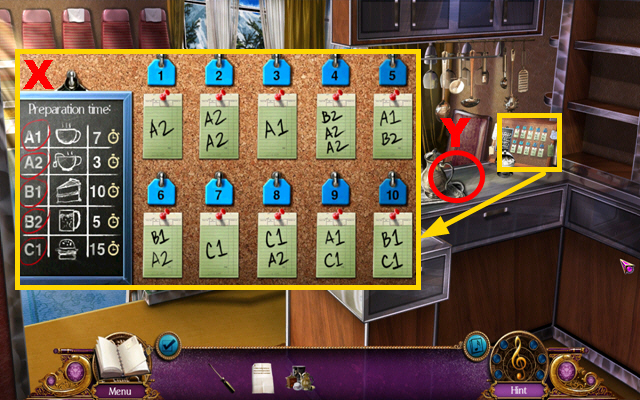
- Zoom into the sheets to play a mini-game.
- Swap the sheets so the preparation time from each order will go from lowest to highest.
- The screenshot displays the correct solution (X).
- The THIEF’S ORDER SHEET will be acquired.
- Zoom into the bar counter (Y) to play a mini-game.

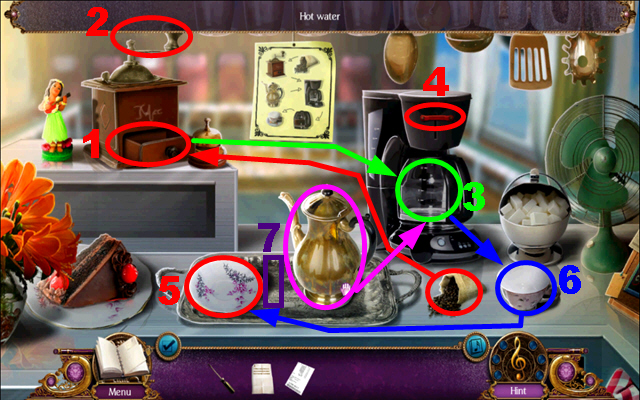
- Put the COFFEE-MAKING SET on the counter.
- Put the coffee beans into the coffee grinder (1) and turn the grinder’s lever (2). Take the ground coffee and fill it into the coffeepot (3).
- Take the teapot and pour the hot water into the coffeepot (3). Press the coffee maker switch (4).
- Put the NOTE FOR THIEF on the dish (5). Pour the coffee into the cup (6). Put the cup on the dish (5).
- Put the THIEF’S ORDER SHEET on the tray (7).
- Walk down, go downstairs, and move forward.

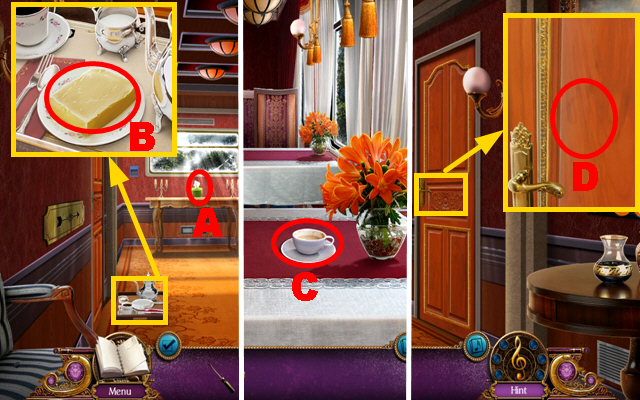
- Take the TISSUE (A).
- Zoom into the food tray; take the BUTTER (B).
- Walk down and go to the table near the thief.
- Clean the cup with the TISSUE (C) and take the CLEAN CUP.
- Walk down and go to the cabin.
- Zoom into the door; use the CLEAN CUP to eavesdrop on the door (D).
- Walk down twice.

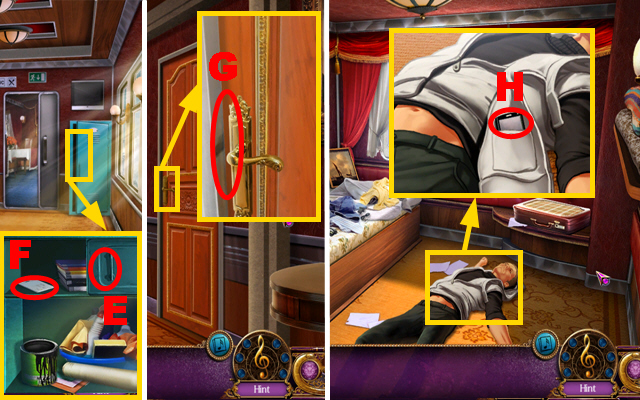
- Zoom into the worker’s locker; grease the small cabinet with the BUTTER, move the door aside (E), and take the CARD (F).
- Move forward twice.
- Zoom into the door; use the CARD to open the door (G).
- Turn right.
- Interact with Elise.
- Zoom into the thief; open the jacket, pull out the phone, and take the PHONE (H).

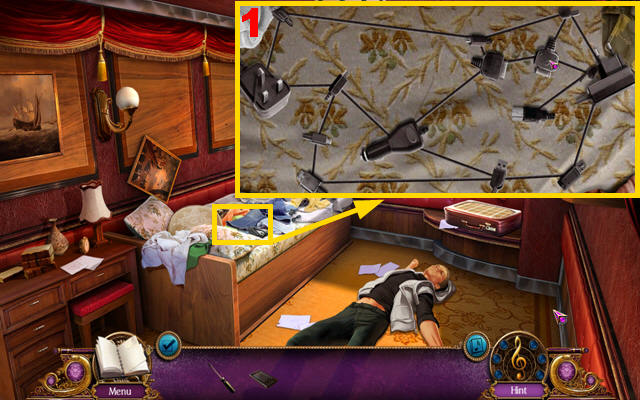
- Zoom into the bed; move aside all the clothes and zoom into the charger to play a mini-game.
- To solve this puzzle (1), move the different parts of the charger around to untangle the wires.
- The CHARGER will be acquired.
- Walk down.

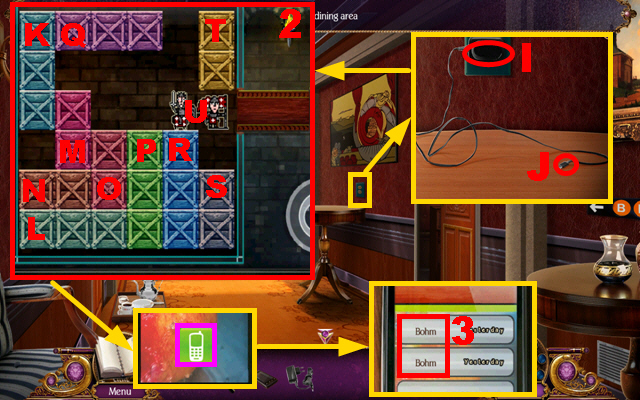
- Zoom into the outlet; connect the CHARGER to the outlet (I) and connect the PHONE to the charger (J).
- Zoom into the phone to play a mini-game. Move around the sliders so that the general and his knights can leave the castle.
- To solve this puzzle (2), move the sliders in the following order: L right 3x, K down 3x, U left, O down 2x, Q left 3x, P up, R up 2x, T up, S up, N right 2x, O down, U right, K up 2x, L left 3x, P down 3x, R down, U right, M up 2x, Q right 2x, M up, U left, and P up 2x.
- L right 3x, N left, S down, T down, Q right, K down 2x, U left, O up 3x, N left 2x, U right, K up 3x, N left, L left 3x, P down 2x, R down 2x, S down, U right 2x, O down, Q left, T up, and U right.
- Press the phone log marked in purple and make note of the name (3).
- Turn right.

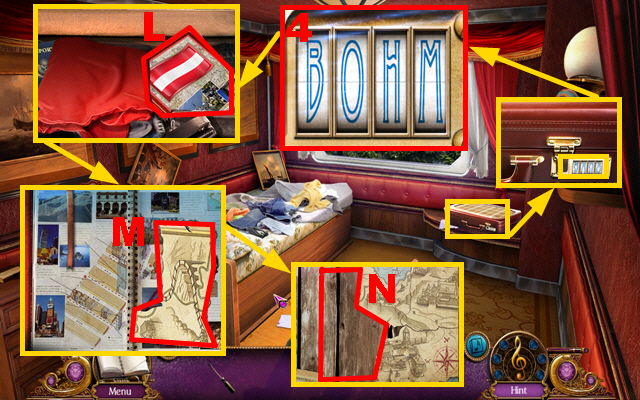
- Zoom into the briefcase and then zoom into the briefcase lock to play a mini-game.
- To solve this puzzle (4), switch the pieces of the lock to create the name ‘BOHM’.
- Zoom into the thief’s travel book (L); turn the pages once and take the MUSIC SHEET (M).
- Put the MUSIC SHEET into the correct place (N).
Chapte 5: The Conservatory

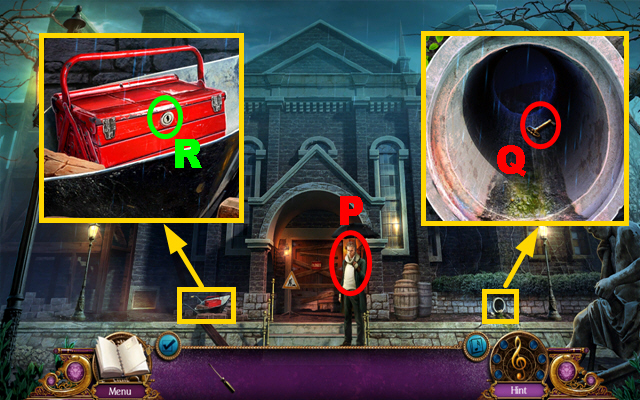
- Talk to the man (P) to acquire the UMBRELLA.
- Zoom into the drain; use the UMBRELLA to get the KEY (Q).
- Zoom into the toolbox; put the KEY into the lock (R) to open the toolbox.
- Play the HOS.

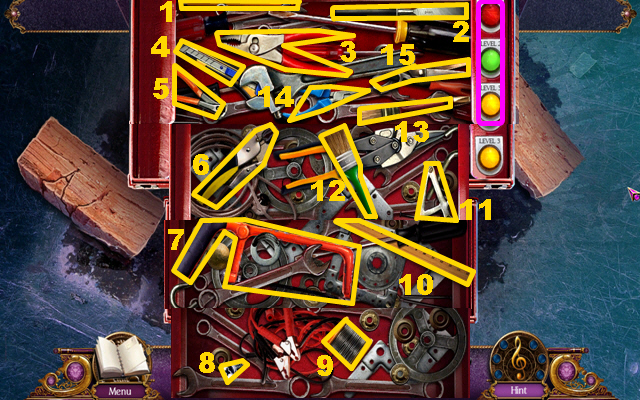
- Use the buttons marked in purple to switch between different levels.
- Collect all items from the list (1-15).
- The RULER will be acquired.

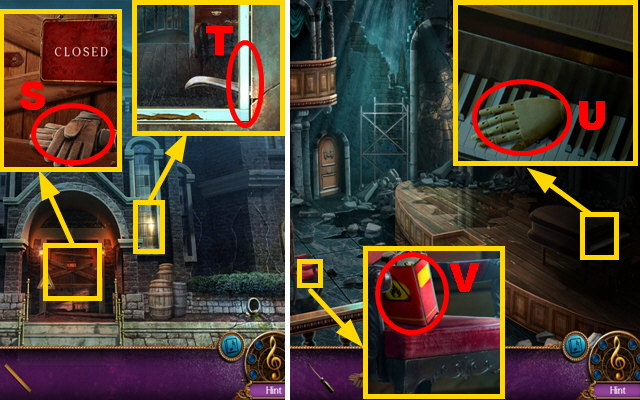
- Zoom into the door; take the GLOVES (S).
- Zoom into the window; use the RULER to open the window (T).
- Move forward. Interact with Elise.
- Zoom into the piano; try to press the piano keys and take the 1/5 MANNEQUIN PART (U).
- Zoom into the chair; take the LIGHTER FLUID (V).
- Move forward.

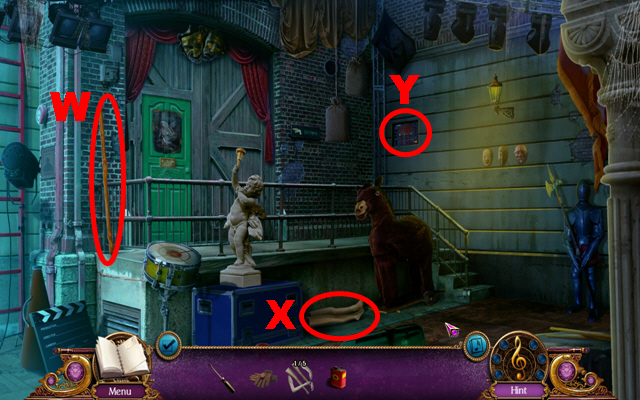
- Take the STICK (W), the 2/5 and the 3/5 MANNEQUIN PARTS (X).
- Zoom into the control panel (Y) to play a mini-game.

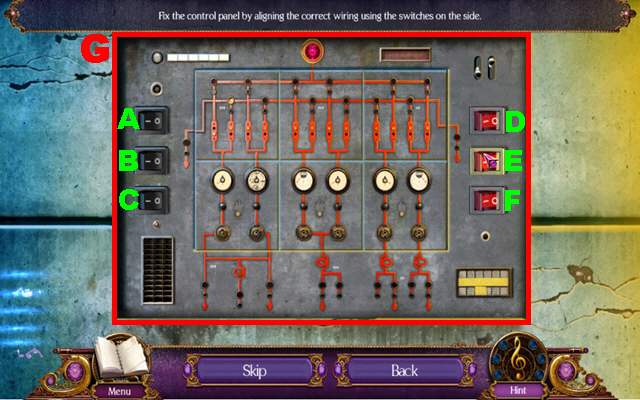
- Press the switches A-F on each side to connect the wiring correctly (G).
- The initial positions of the panel pieces are random.
- The stage lights are working now.
- Walk down.

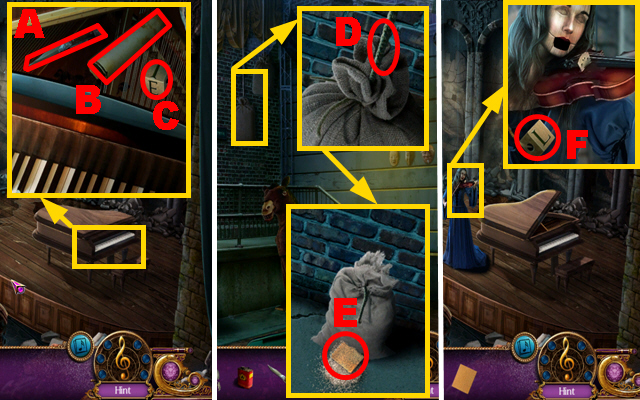
- Zoom into the piano; use the STICK to keep the piano opened. Take the PEN KNIFE (A), the note (B), and the 1/2 LETTER CUBE (C).
- Move forward.
- Zoom into the sandbag; cut the rope with the PEN KNIFE (D). Zoom into the sandbag once more; cut it open with the PEN KNIFE twice and take the SANDPAPER (E).
- Walk down.
- Zoom into the violinist; take the 2/2 LETTER CUBE (F).
- Move forward.

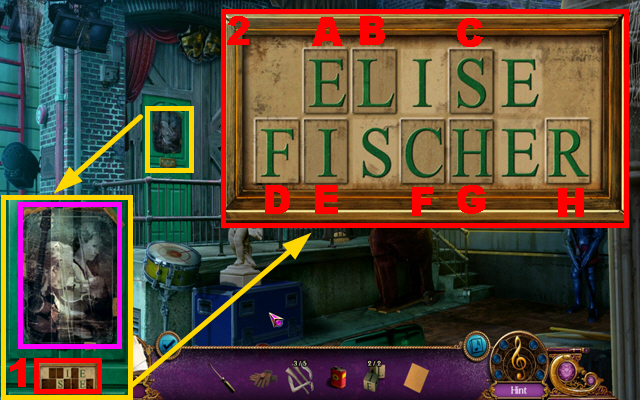
- Zoom into the door; take the faded poster marked in purple and add the 2 LETTER CUBES to the plate (1) to activate the mini-game.
- The initial position of the letter cubes is random.
- Pressing a letter cube may affect one or more cubes; use this to your advantage.
- To solve this puzzle (2), press the letter cubes A-H to create the name Elise Fischer.
- Move forward.

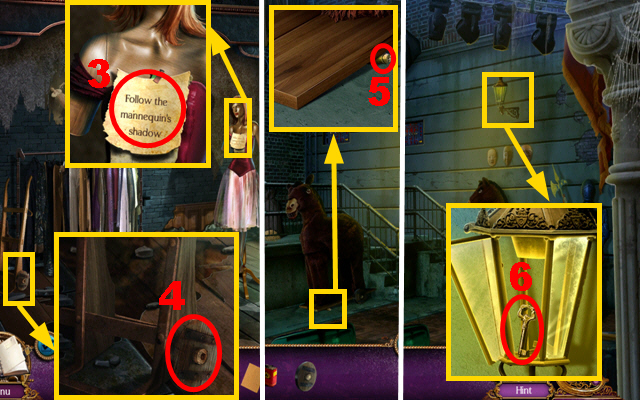
- Interact with Elise. Zoom into the mannequin; take the note (3).
- Zoom into the trolley; use the SANDPAPER to sand the rusted wheel (4). Use the SCREWDRIVER on the wheel to acquire the WHEEL.
- Walk down.
- Zoom into the horse on wheels; add the WHEEL to the board (5) and move the horse twice.
- Zoom into the lamp; open it and use the GLOVES to acquire the KEY (6).
- Move forward.
- Zoom into the dressing table and play the HOS.

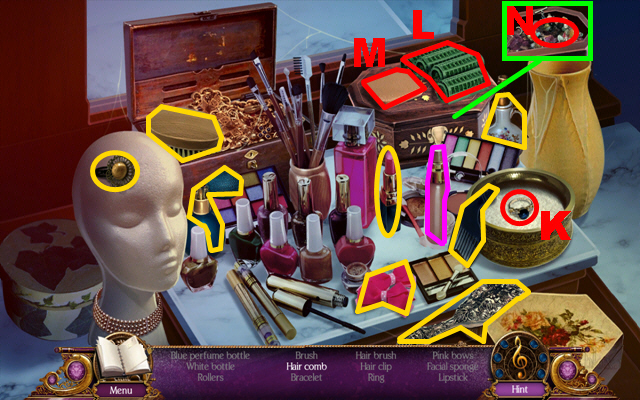
- Remove the wig, and move aside the bottle marked in purple.
- Open the powder casket and remove the powder; take the ring (K).
- Take the rollers (L) and the facial sponge (M); open the box below them and take the bracelet (N).
- The LIPSTICK will be acquired.

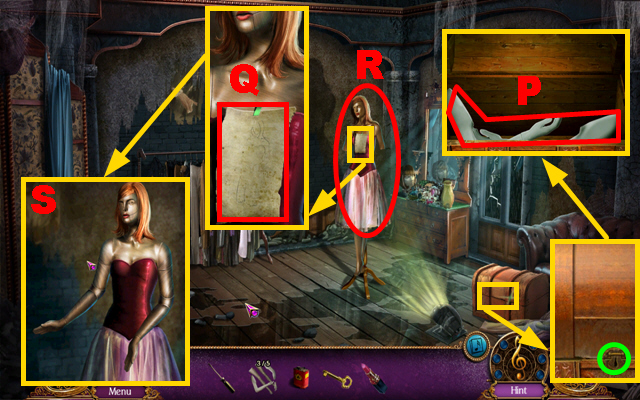
- Zoom into the chest; put the KEY into the lock marked in green to open the chest.
- Take the 4/5 and the 5/5 MANNEQUIN PARTS (P).
- Zoom into the mannequin; use the LIPSTICK on the paper (Q) and take the mannequin pose guide.
- Add the 5 MANNEQUIN PARTS to the mannequin (R) to play a mini-game.
- Rearrange the mannequin parts by pressing on them to create the correct pose (S).

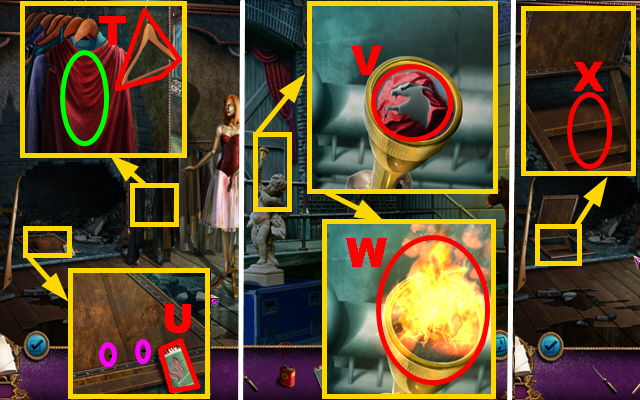
- Move aside the clothes rack.
- Zoom into the clothes rack; take the HANGER (T) and tear the costume marked in green to acquire the TORN CLOTH.
- Zoom into the wall; take the MATCHES (U) and put the HANGER into the slots marked in purple.
- Walk down.
- Zoom into the angel; put the TORN CLOTH into the torch (V) and pour the LIGHTER FLUID into the torch.
- Light the torch with the MATCHES and take the TORCH (W). Move forward.
- Zoom into the wall; use the TORCH to illuminate the downstairs passage (X).

- Use the TORCH to light all the lamps marked in purple.
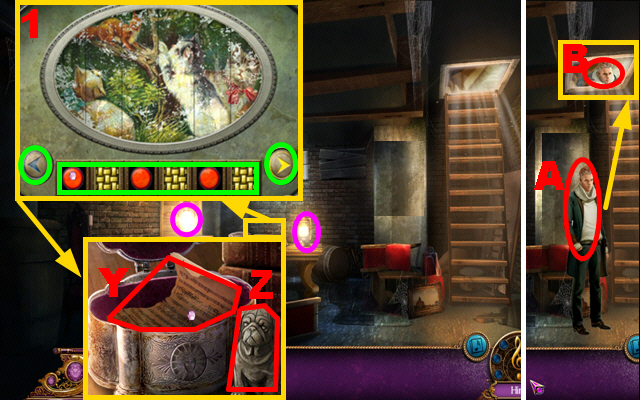
- Zoom into the table to play a mini-game. To solve this puzzle (1), recreate the picture by pressing the buttons marked in green.
- You can switch between the buttons related to the picture parts by pressing the arrow buttons.
- Take the MUSIC SHEET (Y) and the STONE FIGURINE (Z).
- Talk to the charming man (A). Talk to the charming man once more (B).

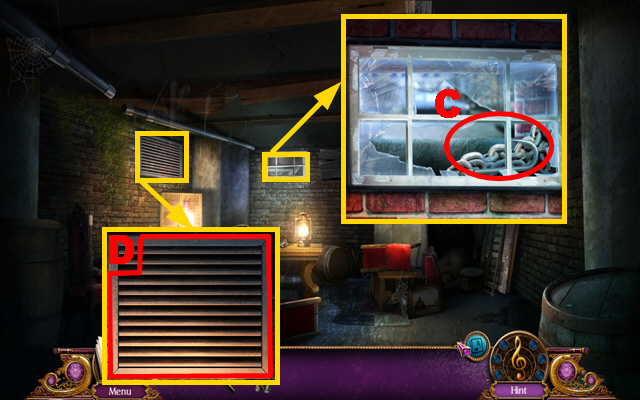
- Zoom into the window; use the STONE FIGURINE to break the glass and then take the CHAIN WITH HOOKS (C).
- Zoom into the vent; connect the CHAIN WITH HOOKS to it to rip out the lid (D).
- Move forward.
Chapte 6: Under the Well

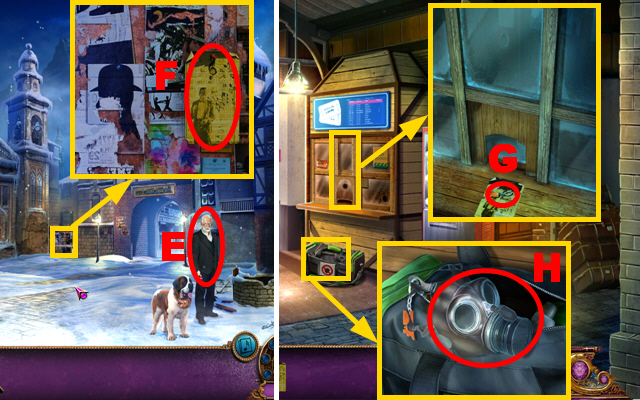
- Talk to the clockmaker (E). Zoom into the board; take the POSTER (F).
- Go to the train station.
- Zoom into the ticket booth; put the POSTER on the booth; knock against the glass, pull the poster, and take the KEYCHAIN (G).
- Zoom into the bag; put the KEYCHAIN on the bag, pull the keychain, and take the GAS MASK (H).
- Walk down.

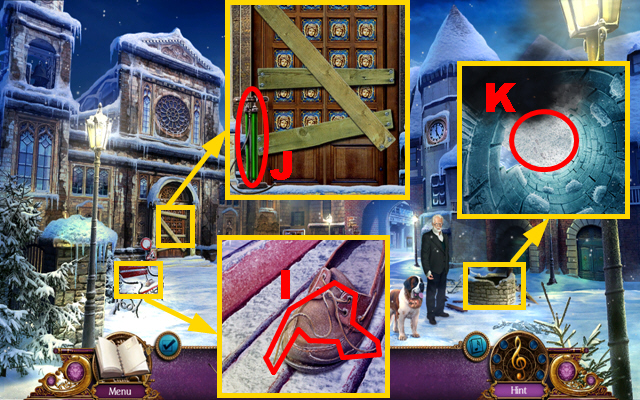
- Zoom into the bench; take the SHOELACE (I).
- Zoom into the chapel’s door; take the AIR PUMP (J).
- Zoom into the well; use the GAS MASK to climb down the well (K).

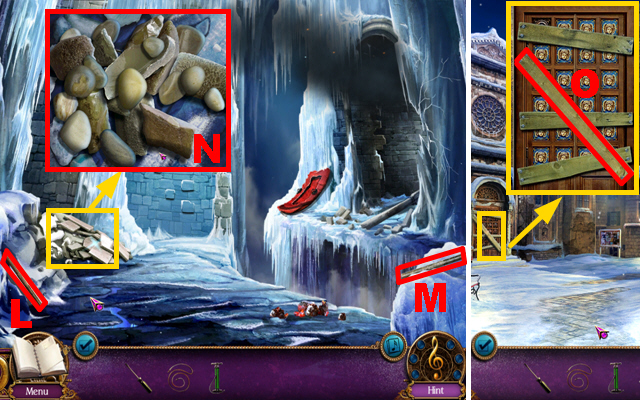
- Take the 1/6 (L) and the 2/6 STEEL RODS (M).
- Zoom into the rocks; remove 25 rocks (N) from top to bottom to acquire the HAMMER.
- Go upstairs.
- Zoom into the chapel’s door; remove a plank with the HAMMER (O) to acquire the PLANK.
- Go down the well.

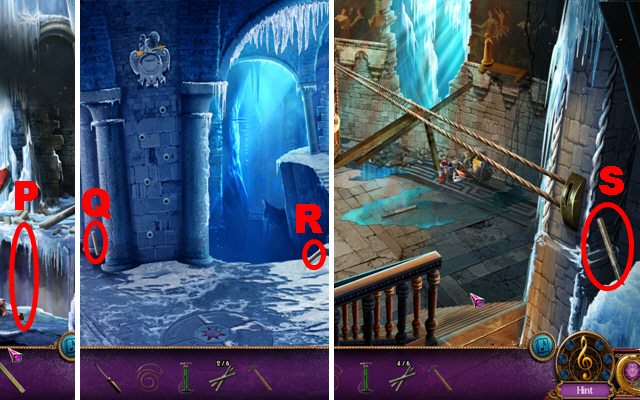
- Put down the PLANK to cross the gap (P).
- Turn right.
- Take the 3/6 STEEL ROD (Q) and take the 4/6 STEEL ROD (R).
- Move forward.
- Take the 5/6 STEEL ROD (S).
- Walk down twice, go upstairs, and move forward.

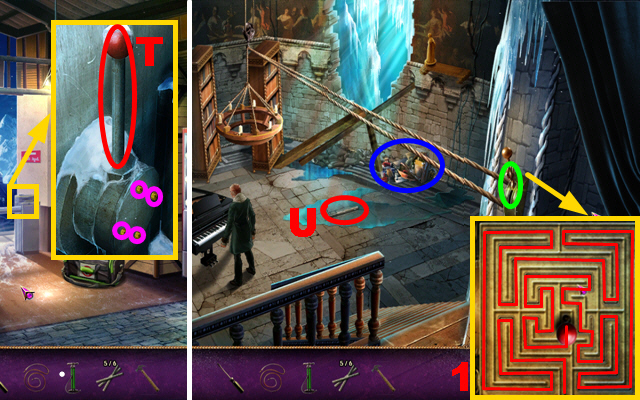
- Zoom into the gate; use the SCREWDRIVER to remove the screws marked in purple and take the LEVER (T).
- Walk down, go down the well, turn right, and move forward.
- Put the LEVER into the niche marked in green and play a mini-game.
- To solve this puzzle (1), move the red lever into the empty slot in the middle of the board.
- Interact with Elise. Take the 6/6 STEEL ROD (U).
- Zoom into the backpack marked in blue and play the HOS.

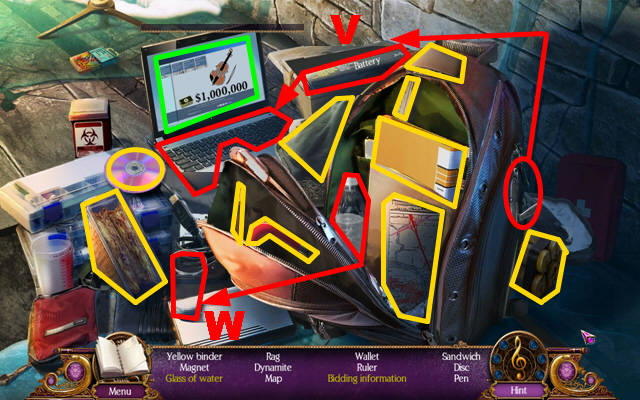
- Open the front pocket of the backpack.
- Take the pocket knife, use it to cut the box, and open the box (V).
- Open the laptop, take the battery, put the battery into the laptop, and take the bidding information marked in green.
- Take the bottle, pour the water into the glass, and take the filled cup (W).
- The MAGNET TIED TO STRING will go into inventory.
- Walk down.

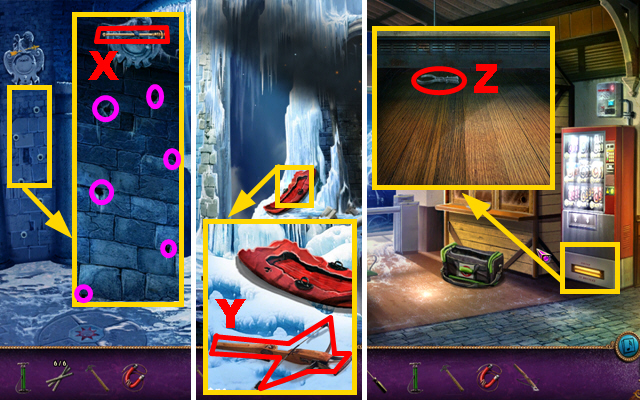
- Zoom into the wall; put the 6 STEEL RODS into the slots marked in purple and take the ARROW (X).
- Walk down.
- Zoom into the boat; put the ARROW into the crossbow (Y) and take the LOADED CROSSBOW.
- Go upstairs and move forward.
- Zoom into the vending machine; use the MAGNET TIED TO STRING to acquire the TONGS (Z).
- Walk down and climb down the well.

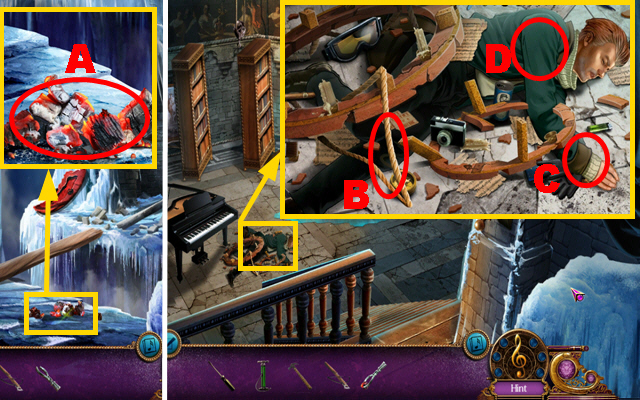
- Zoom into the burning ember; use the TONGS to pick up the burning embers (A) to acquire the TONGS HOLDING EMBER.
- Turn right and move forward.
- Zoom into Bohm; use the TONGS HOLDING EMBER to burn the rope (B); the ROPE will go into inventory.
- Use the ROPE on Bohm (C).
- Search Bohm (D) to play the HOS.

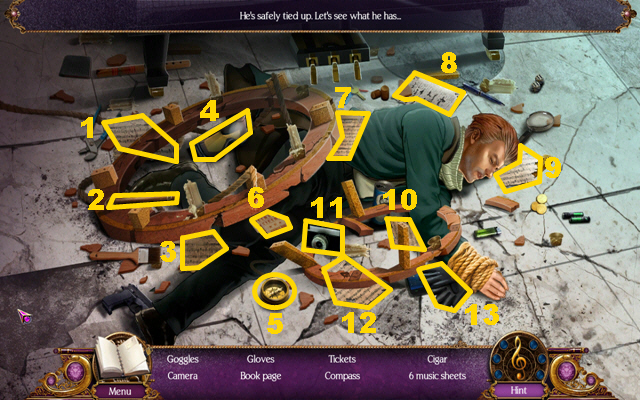
- Find the items listed (1-13).
- The BOOK PAGE will go into inventory.

- Zoom into the piano; turn the pages of the book twice and add the BOOK PAGE to it (E).
- Shoot the LOADED CROSSBOW at the figurine (F).
- Zoom into the wall; take the STONE SLAB (G).
- Walk down.
- Zoom into the statue; put the STONE SLAB into the panel (H) to play a mini-game.

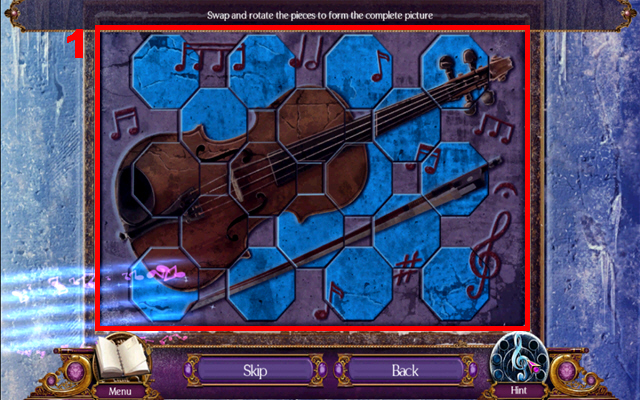
- To solve this puzzle (1), swap and rotate the picture pieces to recreate an image of the violin.
- The fixed parts are a good indication on how to place the pieces.
- Move through the opening on the right to the mausoleum.

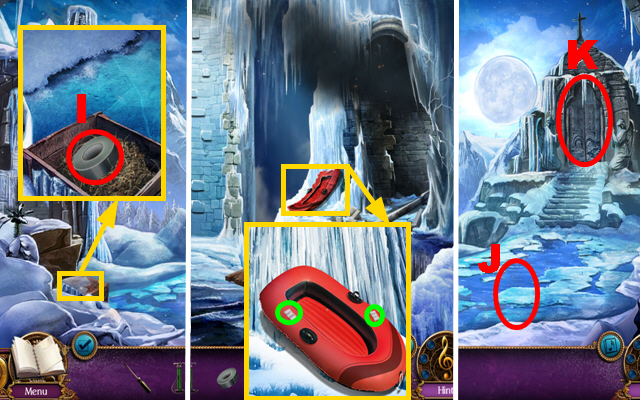
- Zoom into the box; use the HAMMER to open the box and take the TAPE (I).
- Walk down twice.
- Zoom into the boat; patch the BOAT with the TAPE marked in green. Use the AIR PUMP to inflate the boat and take the RAFT.
- Turn right and enter the mausoleum.
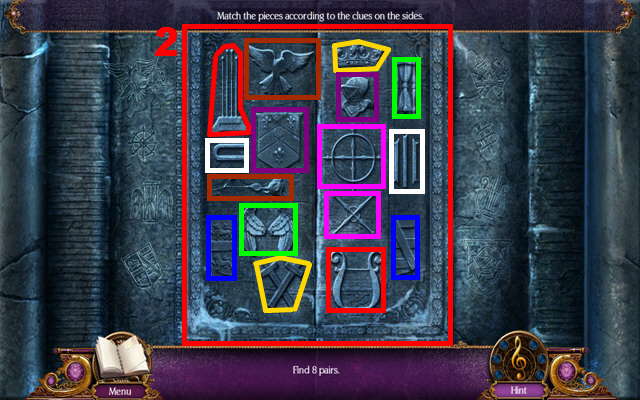
- Use the RAFT to cross the ice pool (J). Zoom into the mausoleum (K) to play a mini-game.


- Match related pieces to solve this puzzle.
- Related pieces are color coordinated in the screenshot (2).

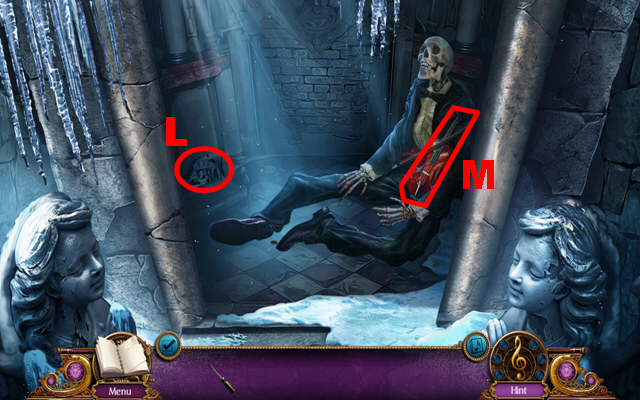
- Take the secret photo (L).
- Take the violin (M).
- Congratulations, you have completed Death Upon an Austrian Sonata: A Dana Knightstone Novel.



 3 Cards to Dead Time Walkthrough, Guide, & Tips
 Weird Park: Broken Tune Walkthrough, Guide, & Tips
 Mystery Case Files: Shadow Lake Walkthrough, Guide, & Tips
 Dark Dimensions: Shadow Pirouette Walkthrough, Guide, & Tips
 Elixir of Immortality Walkthrough, Guide, & Tips