Mysteries of the Mind: Coma Walkthrough, Guide, & Tips
Mysteries of the Mind: Coma Walkthrough

Welcome to the Mysteries of the Mind: Coma Walkthrough
Fight your way out of a coma by exploring your deepest memories!
Whether you use this document as a reference when things get difficult or as a road map to get you from beginning to end, we’re pretty sure you’ll find what you’re looking for here.
This document contains a complete Mysteries of the Mind: Coma game walkthrough featuring annotated screenshots from actual gameplay!
We hope you find this information useful as you play your way through the game. Use the walkthrough menu below to quickly jump to whatever stage of the game you need help with.
Remember to visit the Big Fish Games Forums if you find you need more help. Have fun!
This walkthrough was created by Rebekah, and is protected under US Copyright laws. Any unauthorized use, including re-publication in whole or in part, without permission, is strictly prohibited.
General Tips

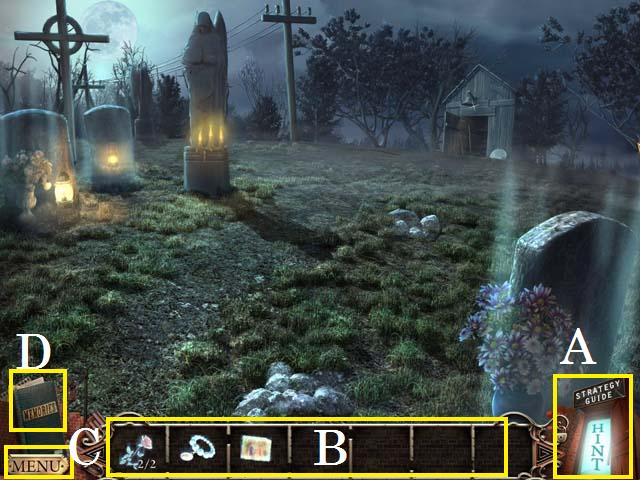
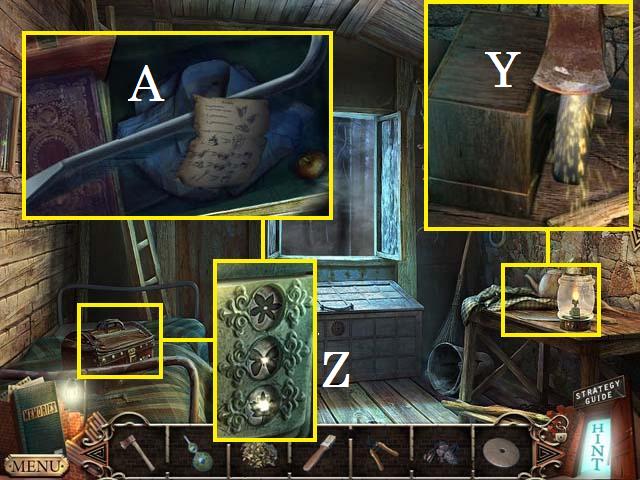
- This is the official guide for Mysteries of the Mind: Coma.
- Use the Hint Button (A) if you need additional help.
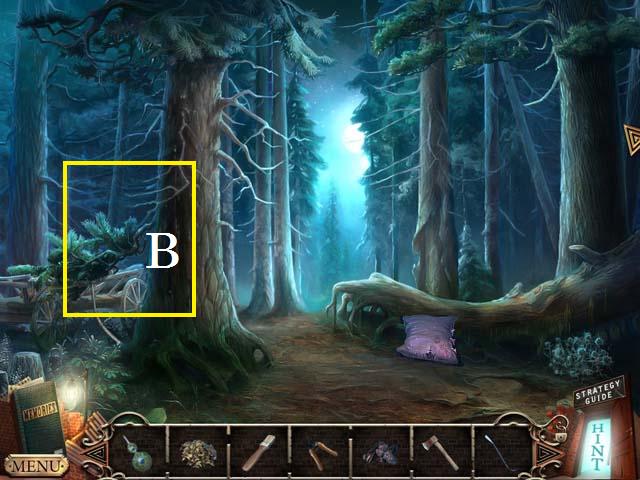
- Your Inventory bar (B) will hold items until they are needed.
- Zoom into sparkling scenes to trigger Hidden Object Scenes. In this guide we will use the acronym ‘HOS’ for Hidden Object Scenes.
- The items in the HOS are random. All hidden objects are marked in green unless otherwise noted.
- Click on the Menu (C) button to exit or pause the game. You can also adjust your options (sound, music, and screen size).
- Use your Journal (D) for additional help with puzzles.
- Many of the puzzle solutions are random. The solutions provided in this guide are possible solutions.
- You will not need to follow the exact path of this guide; however, some actions are required before others can be performed.
Dream 1: Your Mother
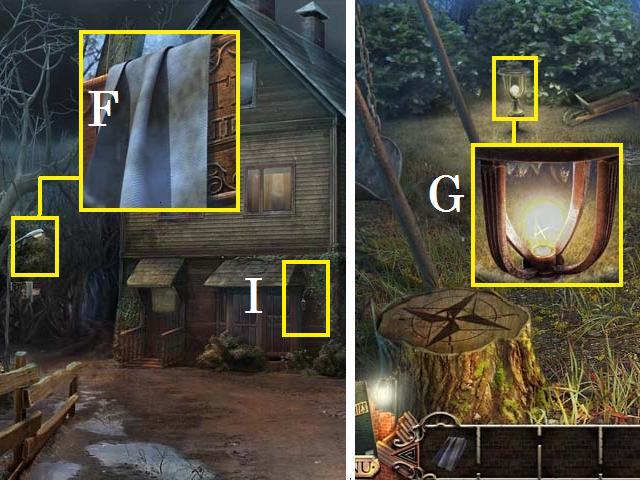
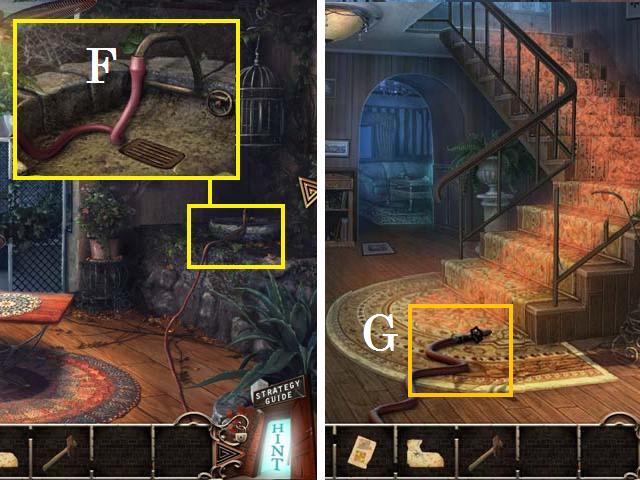
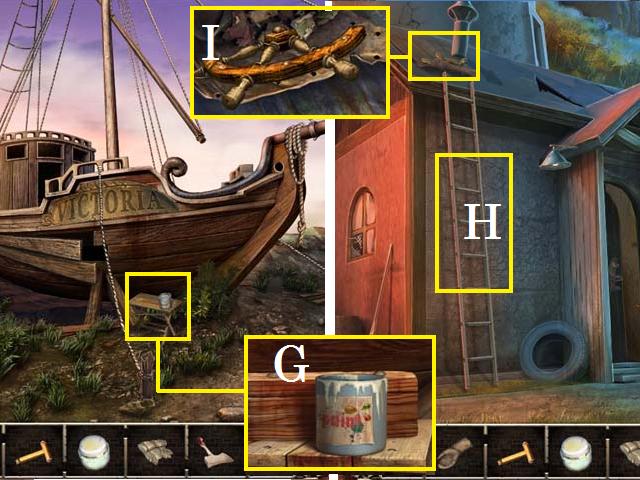
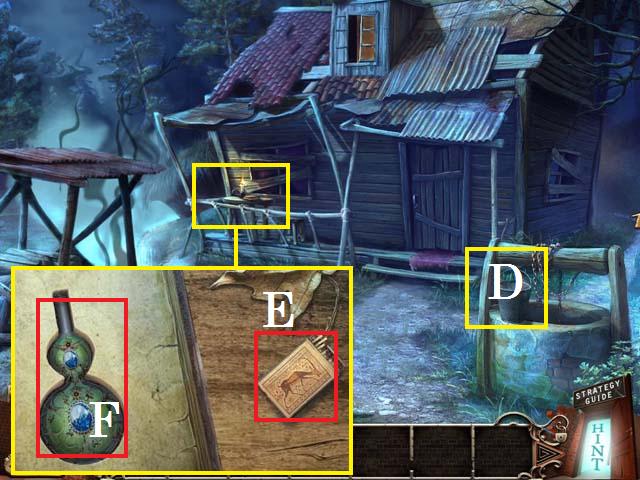
- Zoom into the street sign; collect the CLOTH PIECE (F).
- Move to the back of the house and enter the playground.
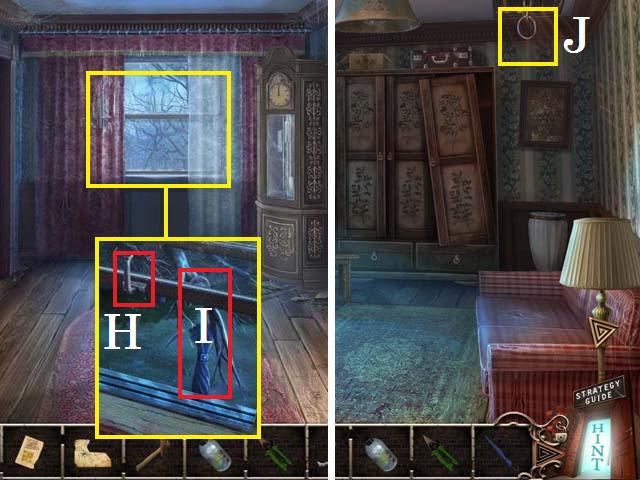
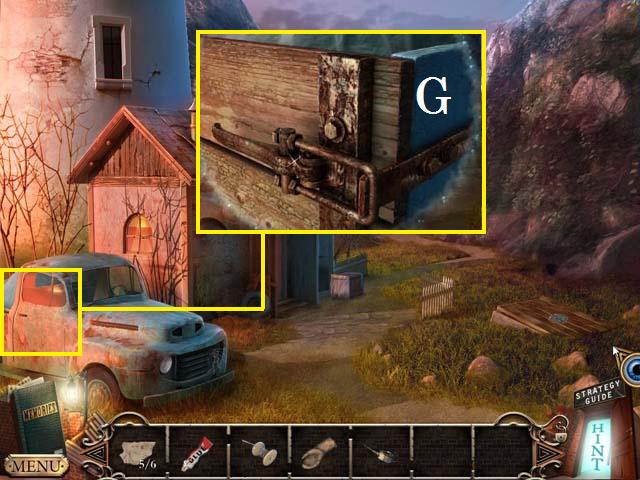
- Zoom into the light; remove the LIGHT BULB (G) with the CLOTH PIECE.
- Return to the front of the house.
- Zoom into the porch light; place the LIGHT BULB in the socket (I).
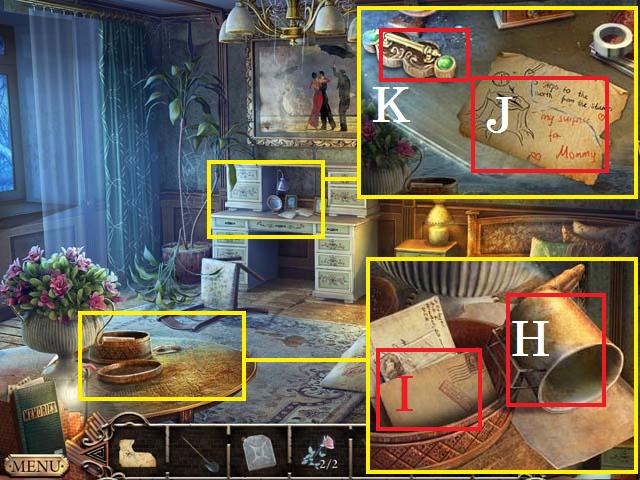
- Zoom into the sparkles to play a HOS.
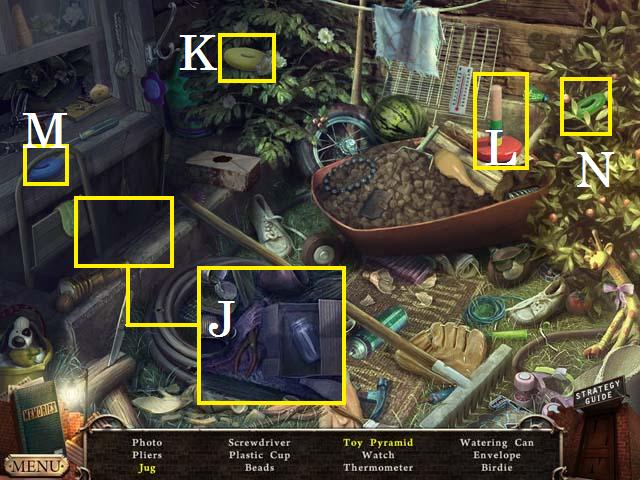
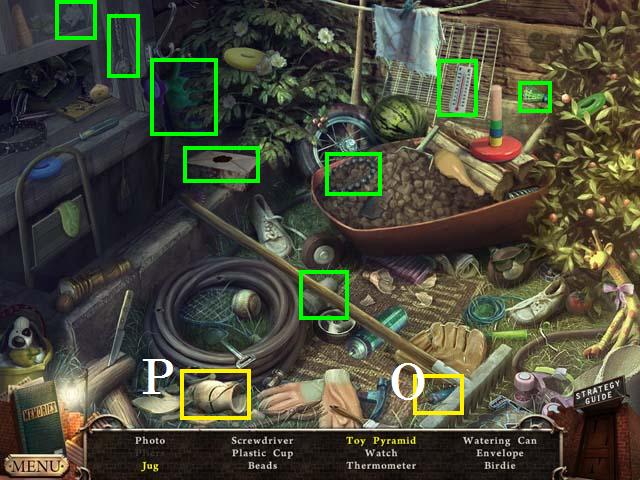
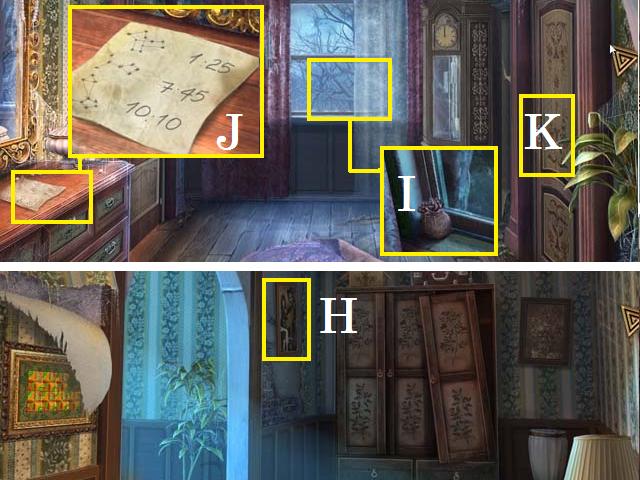
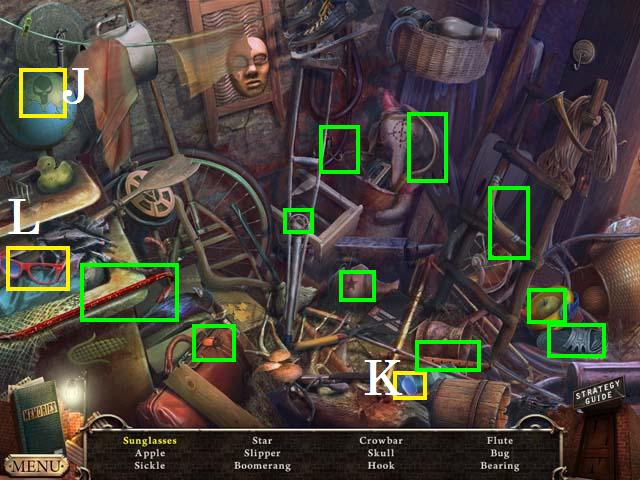
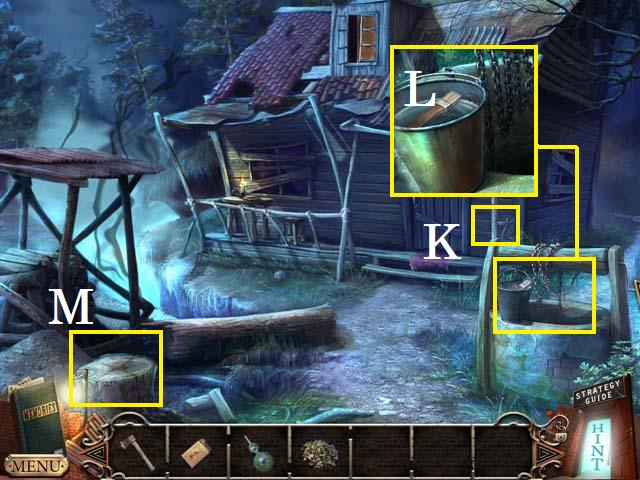
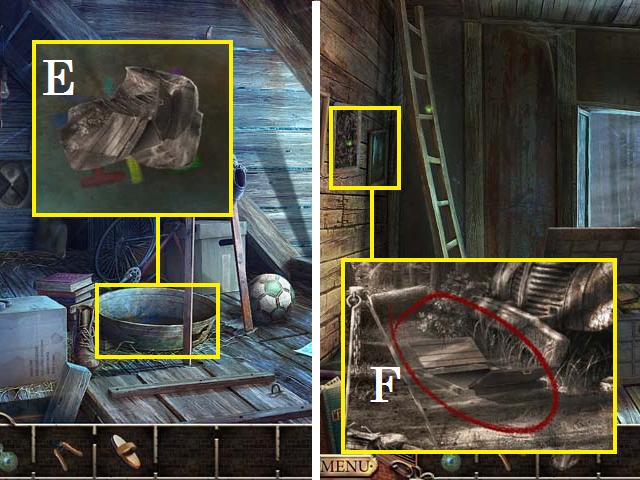
- Zoom into the window well; collect the Pliers (J).
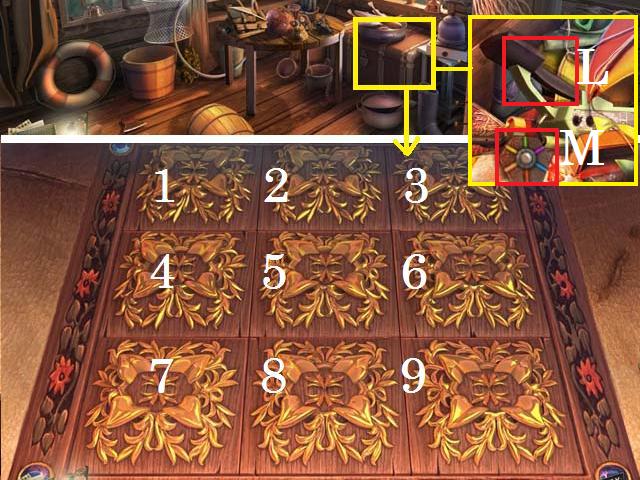
- Place the yellow ring (K) on the post (L), followed by the blue ring (M), and finishing with the green ring (N) for the Toy Pyramid.
- Use the glue (O) to fix the Jug (P).
- Collect the remaining items marked in green to receive the PLIERS.
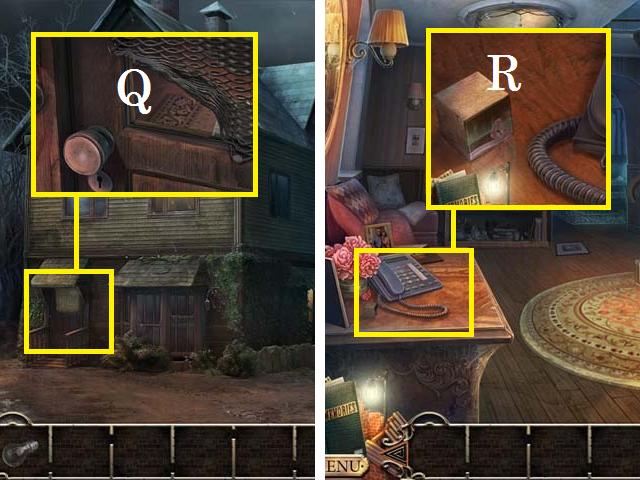
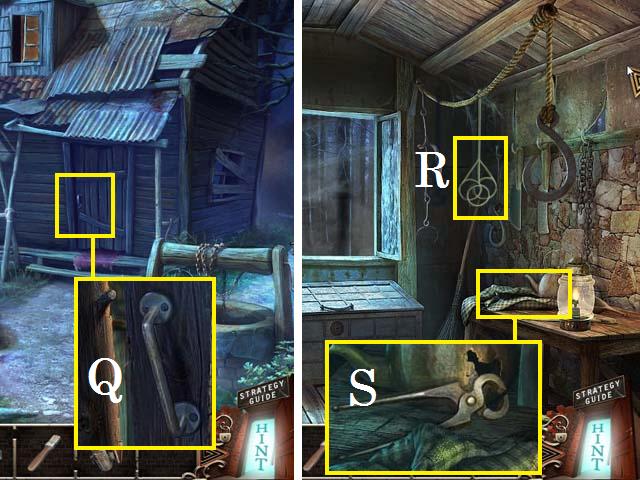
- Zoom into the front door; use the PLIERS to pry back the mesh (Q) and open the door.
- Enter the house.
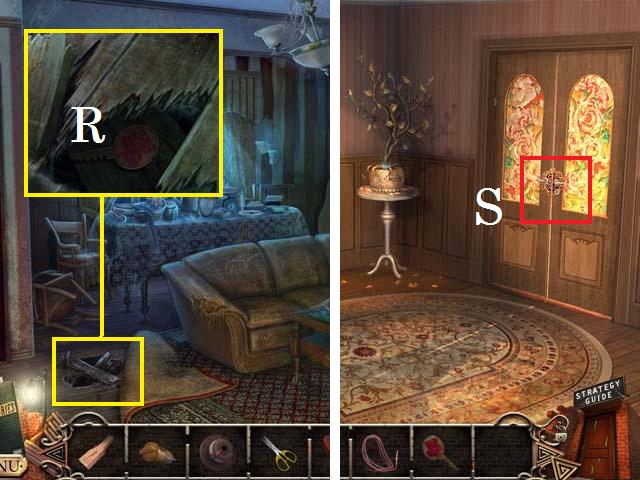
- Zoom into the desk; collect the first CUBE (R).
- Move forward to the living room.
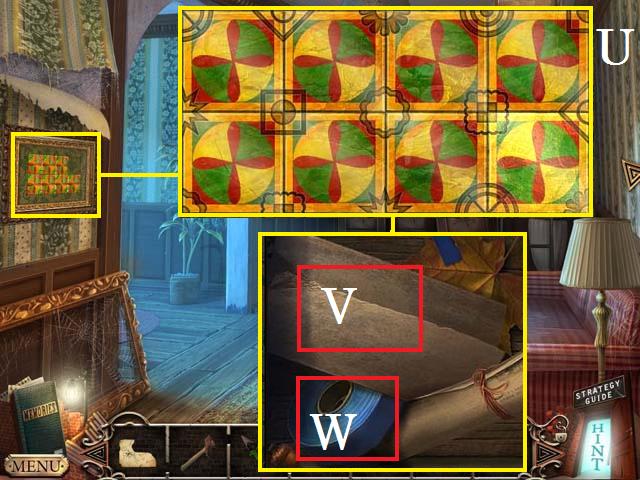
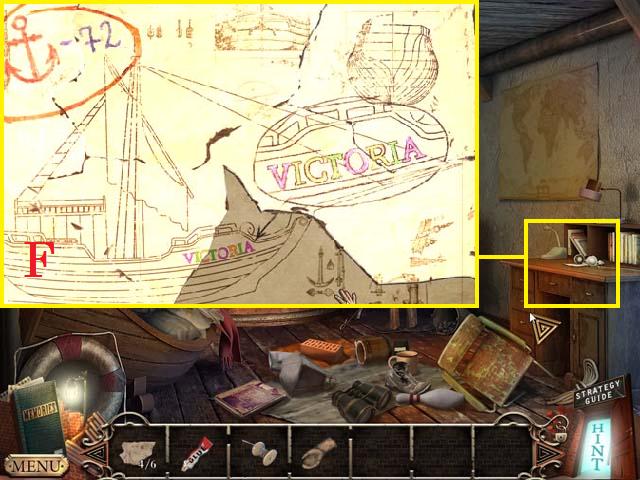
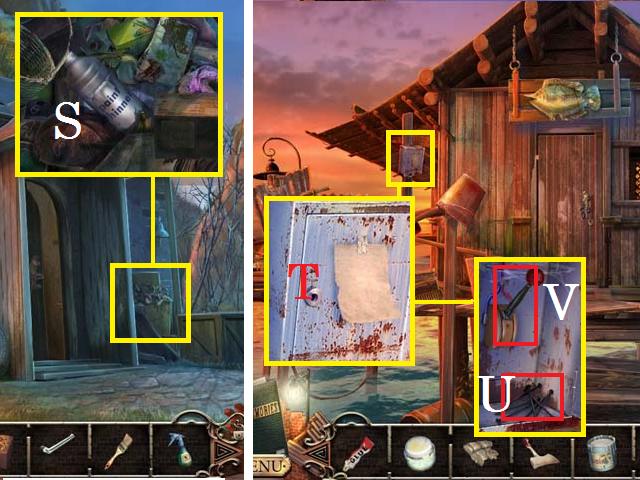
- Zoom into the table; collect the letter (S) and the second CUBE (T).
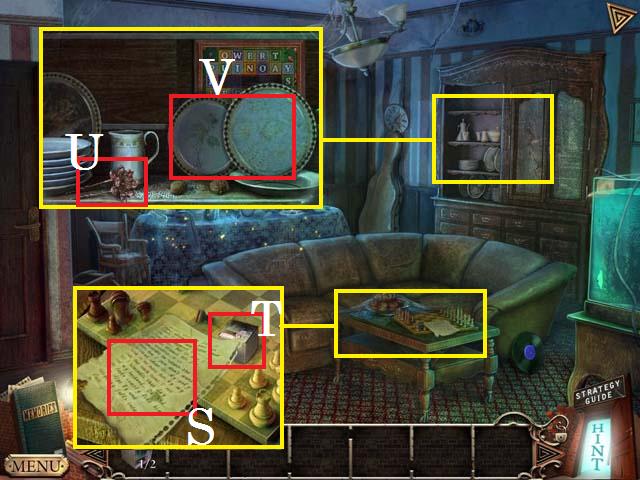
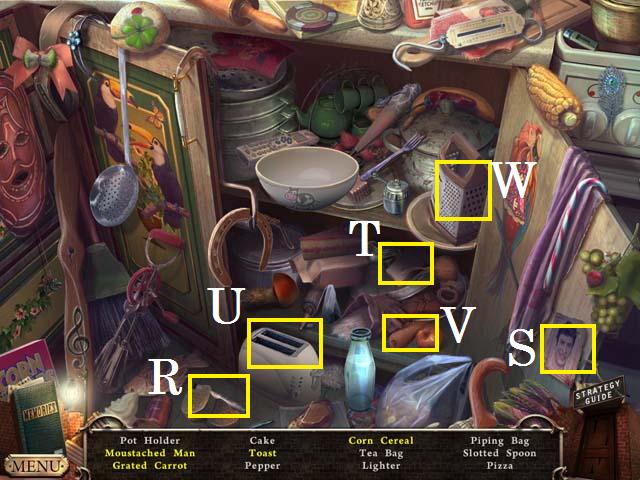
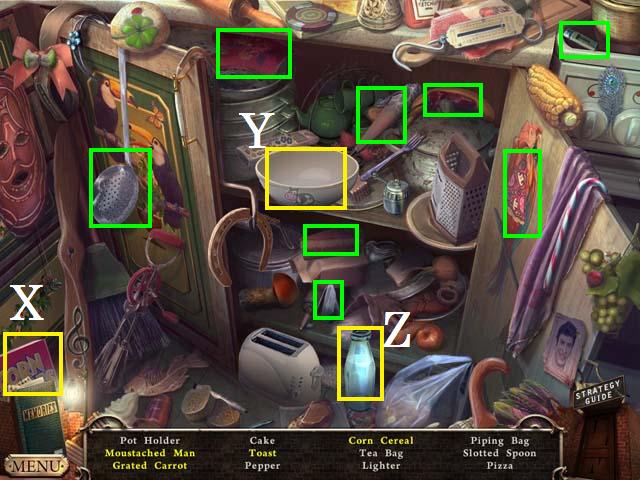
- Zoom into the china hutch; collect the HAIR PIN (U) and move the plates (V).
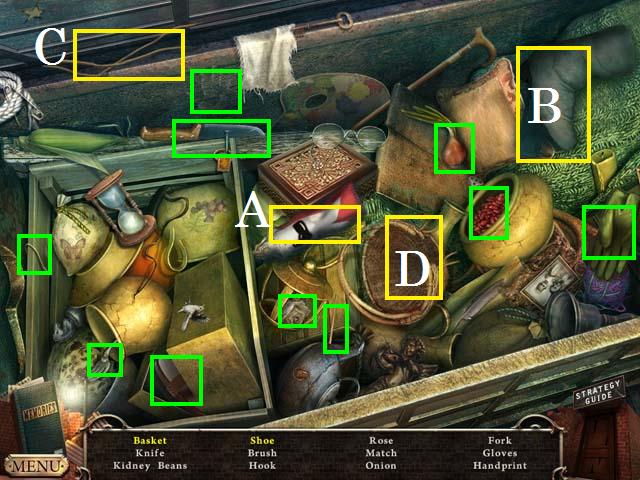
- Zoom into the sparkles to play a HOS.
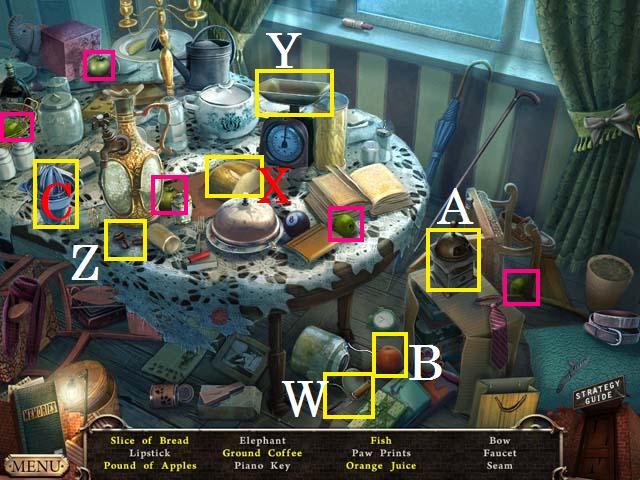
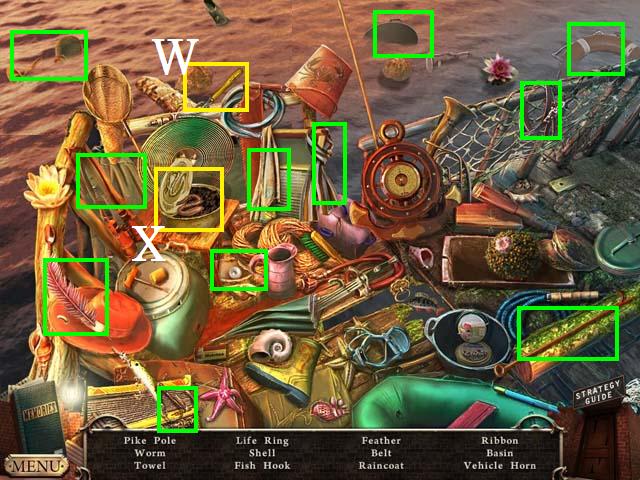
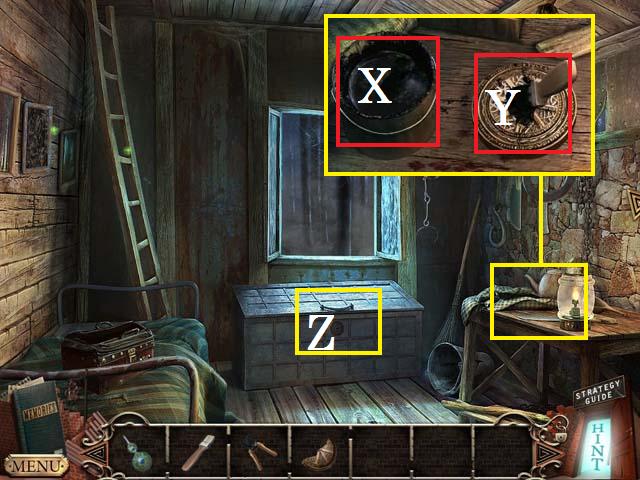
- Use the knife (W) to cut a Slice of Bread (X).
- Place the five apples (pink) on the scale (Y) for the Pound of Apples.
- Place the coffee beans (Z) in the coffee grinder (A) for the Ground Coffee.
- Place the orange (B) on the juicer (C) to get the Orange Juice.
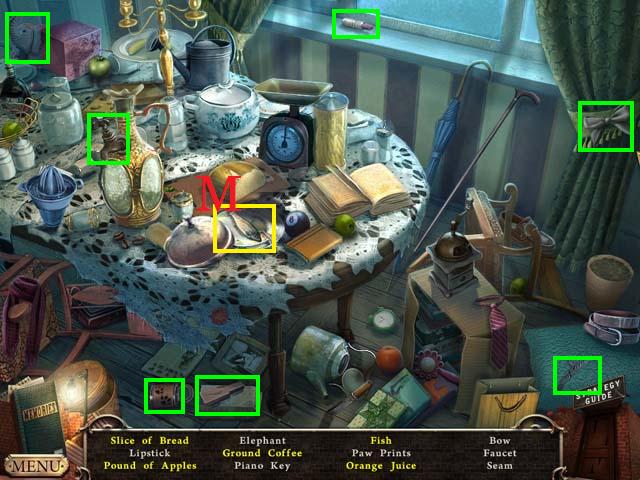
- Open the lid to locate the Fish (M).
- Collect the remaining items to receive the PIANO KEY.
- Return to the entryway and take a right to the hall.
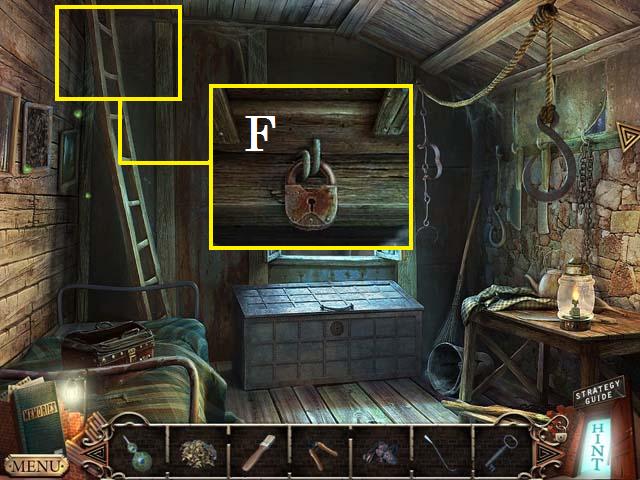
- Zoom into the desk; collect the SCREWDRIVER (D).
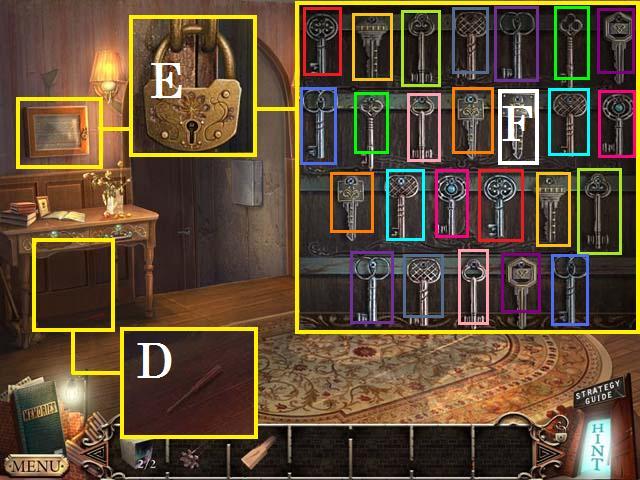
- Zoom into the locked key box; open the lock (E) with the HAIR PIN.
- Zoom back into the box; collect the matching keys as shown in the screenshot. Collect the WORKSHOP KEY (F).
- Exit the house and return to the backyard.
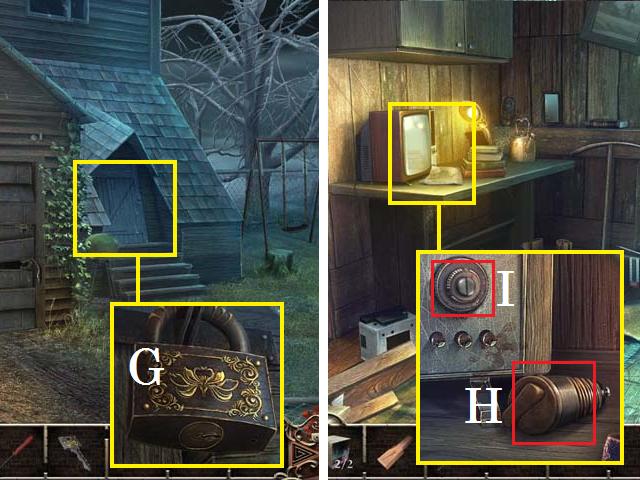
- Zoom into the workshop door; use the WORKSHOP KEY to open the lock (G).
- Enter the workshop.
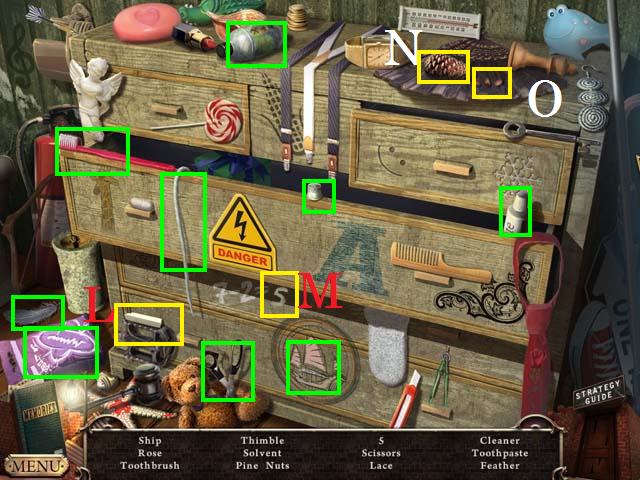
- Zoom into the desk; collect the instructions and the FUSE (H). Use the SCREWDRIVER to remove the SWITCH (I).
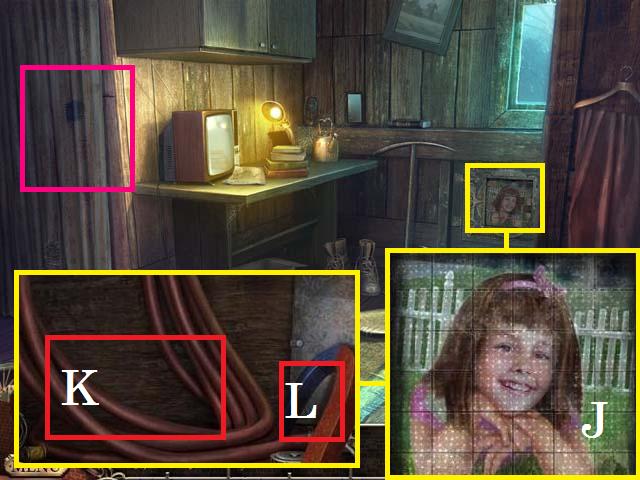
- Zoom into the wall panel; place both CUBES in the puzzle. See the screenshot for the final image (J).
- Collect the HOSE (K) and the MAGNET (L).
- Open the curtain (pink).
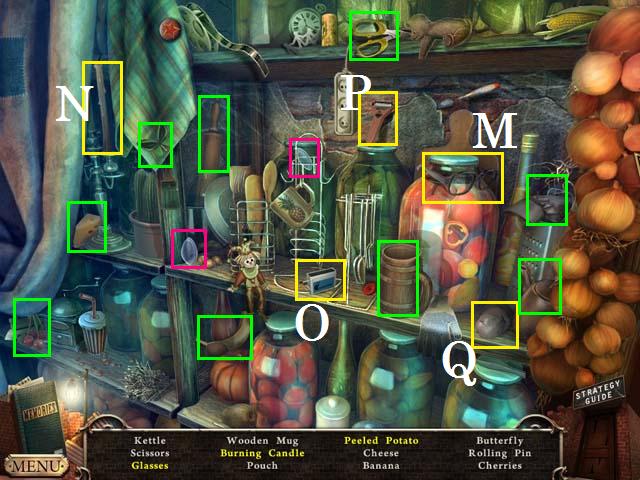
- Zoom into the sparkles to play a HOS.
- Place the two lenses (pink) in the Glasses (M).
- Light the candle (N) with the matches (O) to get the Burning Candle.
- Use the peeler (P) to get the Peeled Potato (Q).
- Collect the remaining items to receive the SCISSORS.
- Return to the living room.
- Zoom into the floor; use the MAGNET to collect the SOLARIUM KEY (R).
- Return to the hall.
- Use the SOLARIUM KEY to unlock the door (S) and enter the solarium.
- Zoom into the sparkles to play a HOS.
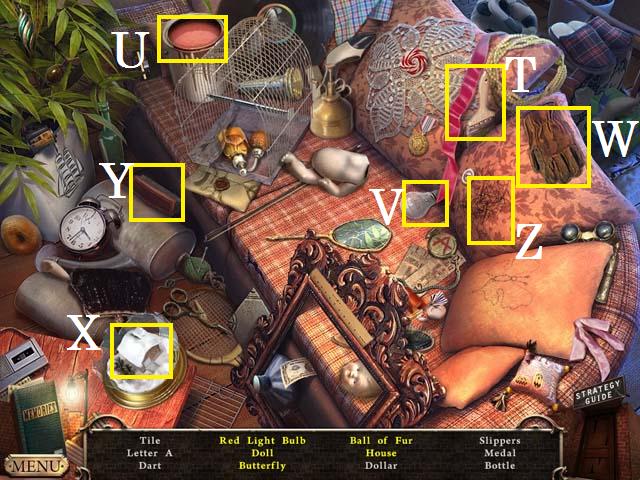
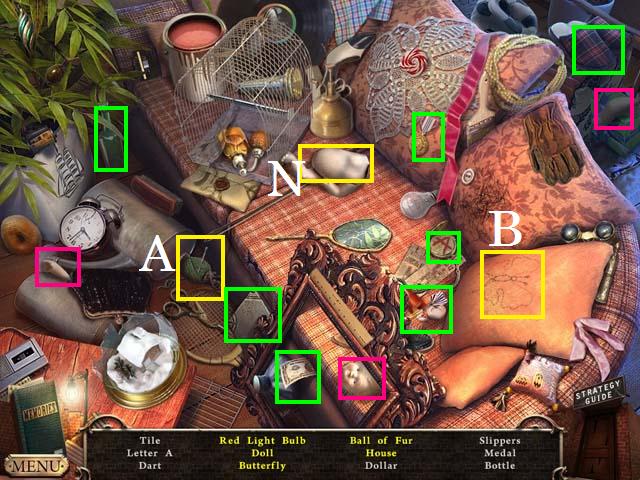
- Dip the brush (T) in the paint (U) and then paint the Red Light Bulb (V).
- Use the glove (W) to collect the House (X).
- Use the brush (Y) to collect the Ball of Fur (Z).
- Use the thread (A) on the pillow (B) to receive the Butterfly.
- Place the three doll parts (pink) on the Doll (N).
- Collect the remaining items to receive the BLANK TILE.
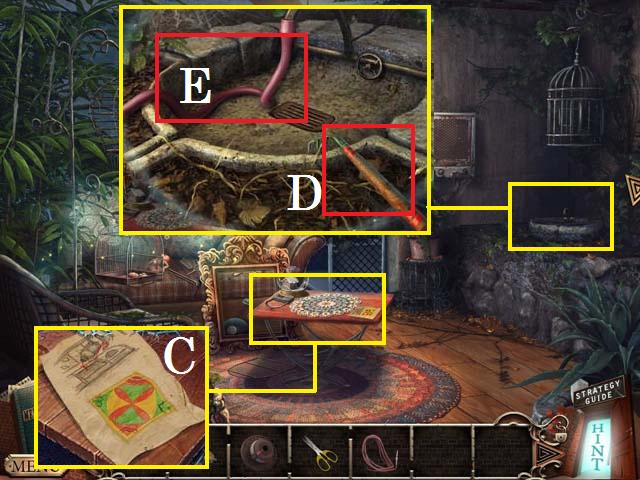
- Zoom into the table; collect the PICTURE SAMPLE (C).
- Zoom into the faucet; collect the RAKE (D) and place the HOSE (E).
- Return to the playground.
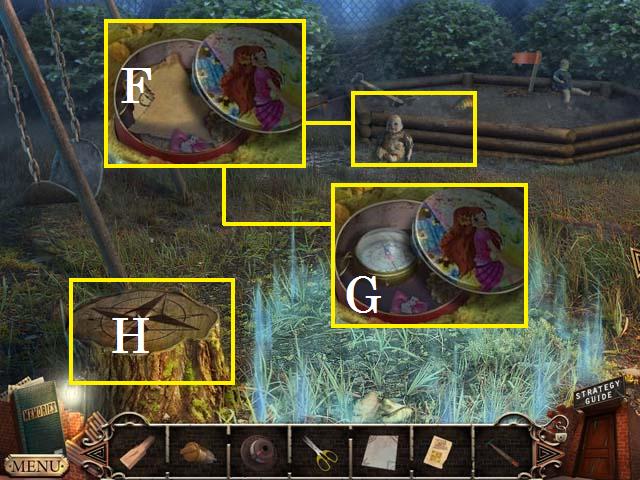
- Zoom into the sandbox; use the RAKE to remove the spider web. Brush away the leaves and open the can. Collect the PIECE OF MAP (F) and the COMPASS (G).
- Place the COMPASS on the tree stump (H).
- Return to the hall.
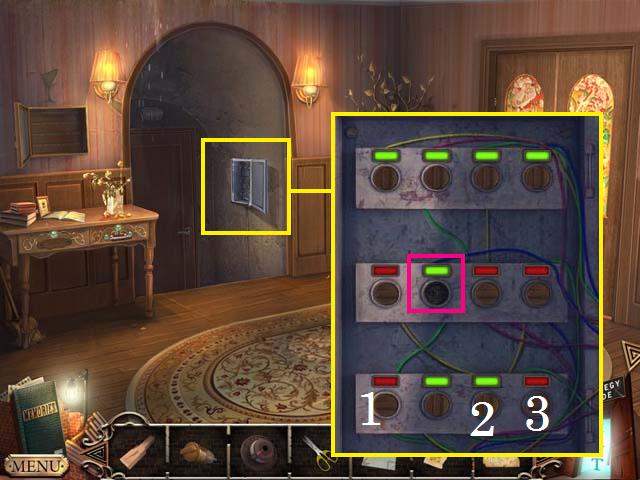
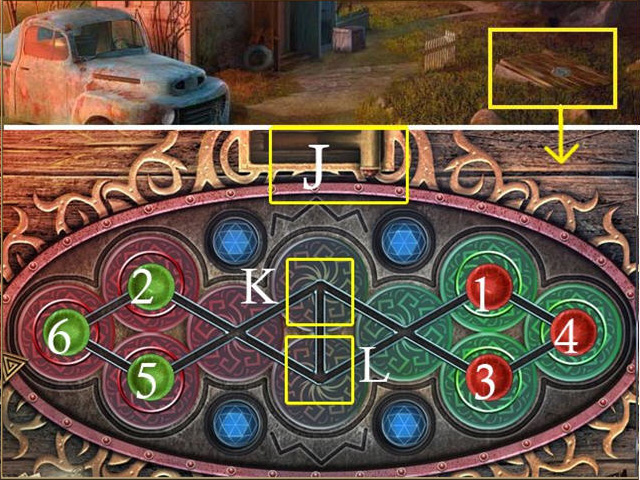
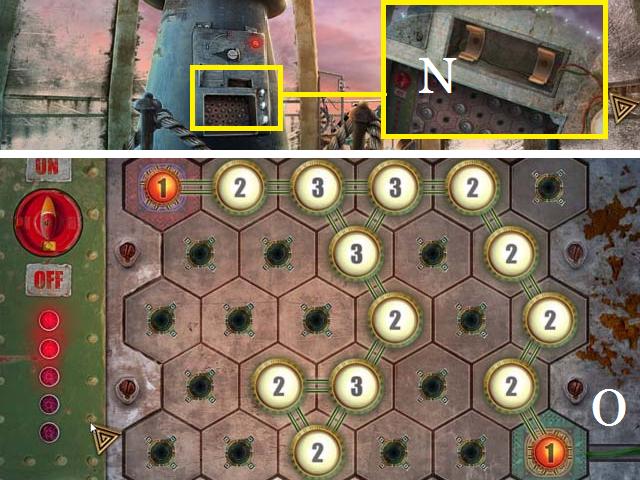
- Zoom into the fuse box; place the FUSE in the open space (pink). The starting positions are random. From the positions shown in the screenshot, turn the fuses in order of 1-3 to turn all the lights green.
- Enter the garage.
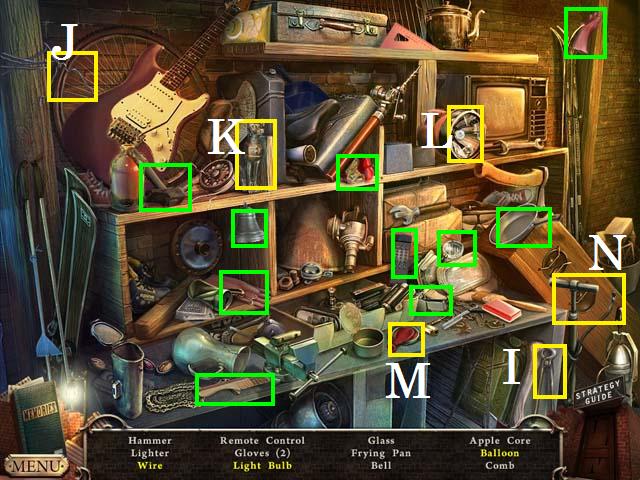
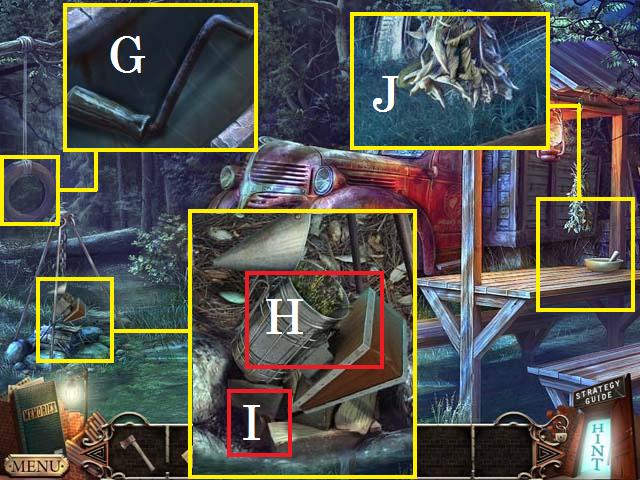
- Zoom into the sparkles to play a HOS.
- Use the pliers (I) to break off a piece of Wire (J).
- Smash the light with the cat statue (K) to reveal the Light Bulb (L).
- Place the Balloon (M) on the pump (N) and fill the Balloon.
- Collect the remaining items to receive the HAMMER.
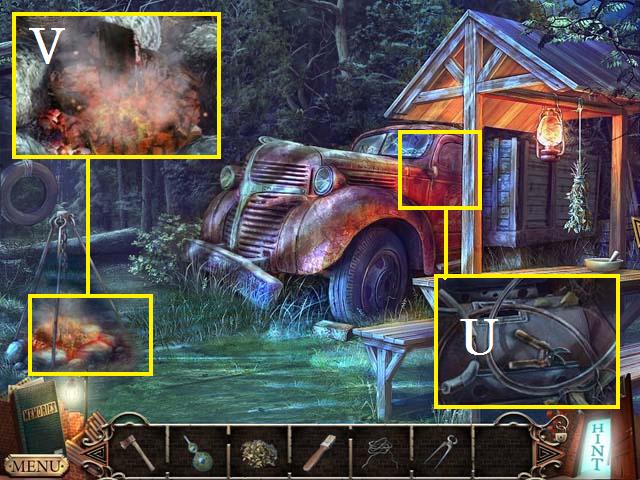
- Zoom into the workbench; collect the OIL CAN (O). Zoom into the wallet (P) and search through it to collect clues.
- Return to the living room.
- Zoom into the kitchen door; use the OIL CAN on the handle (Q). Turn the handle and enter the kitchen.
- Zoom into sparkles to play a HOS.
- Use the pen (R) to turn the photograph (S) into the Moustached Man.
- Place the bread (T) in the toaster (U) to get Toast.
- Drag the carrot (V) across the grater (W) to get the Grated Carrot.
- Pour the cereal (X) in the bowl (Y), followed by the milk (Z), to get the Cold Cereal.
- Collect the remaining items to receive the POT HOLDER.
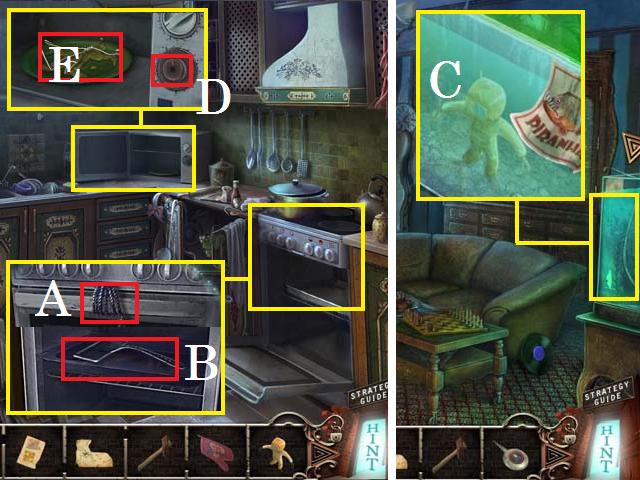
- Zoom into the oven; cut the rope (A) with the SCISSORS to open the door, and then collect the SCOOP NET (B).
- Return to the living room.
- Zoom into the fish tank; use the SCOOP NET to fish out the WAX DIVER (C).
- Return to the kitchen.
- Zoom into the microwave; replace the SWITCH (D) and place the WAX MAN inside. Use the POT HOLDER to collect the WIRE (E).
- Return to the solarium.
- Zoom into the faucet; place the WIRE on the hose (F).
- Return to the entryway, grab the hose (G) to put out the flames.
- Climb the stairs to the upstairs landing.
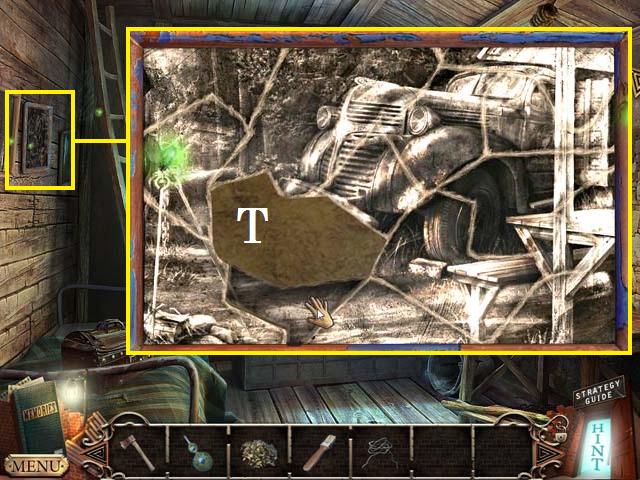
- Zoom into the photo (H).
- Move into the upstairs hall.
- Zoom into the window; collect the NAILS (I).
- Zoom into the table; collect the note (J).
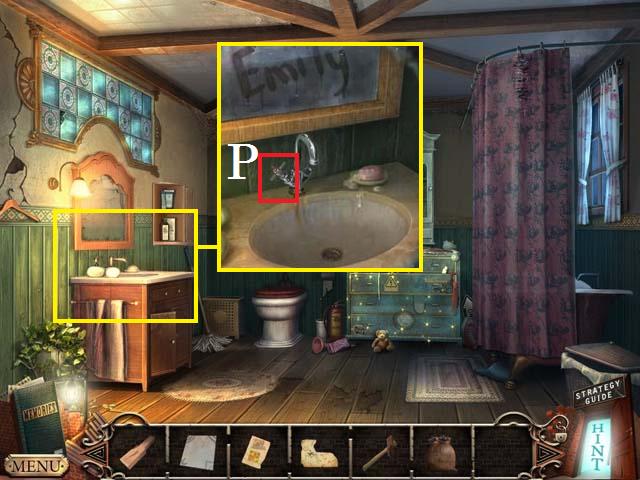
- Take the door (K) to the bathroom.
- Zoom into the sparkles to play a HOS.
- Use the chalk (L) to draw the 5 (M).
- Shake the pinecone (N) to get the Pine Nuts (O).
- Collect the remaining items to receive the SOLVENT.
- Zoom into the sink; turn on the faucet (P).
- Return to the living room.
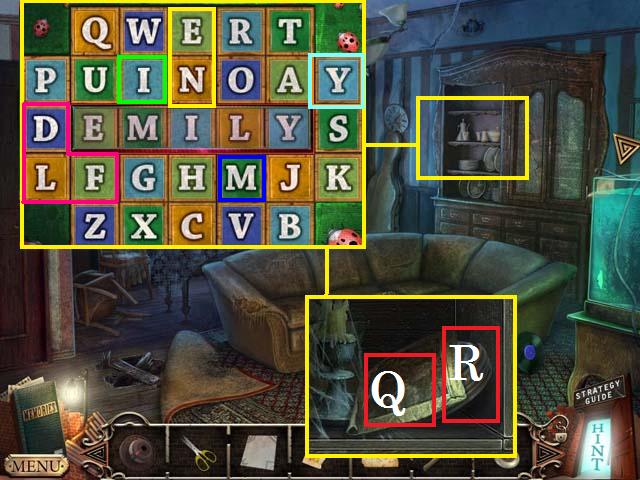
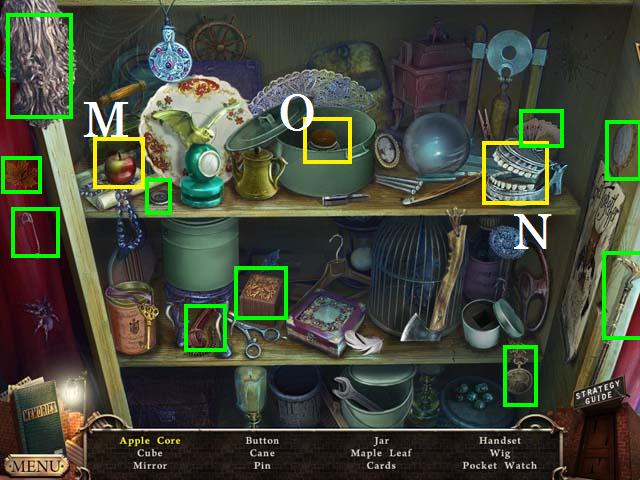
- Zoom into the china hutch and then the puzzle.
- Spell out E. M. I. L. Y. Hint: you can start by moving the ‘D’, ‘L’, and ‘F’ (pink) in a clockwise turn until only the ‘L’ is in the center.
- Move the ‘L’ all the way to the right. Next move the ‘M’ (blue) into the center and all the way to the left. Move the ‘I’ (green) into the center and to the right, next to the ‘L’. Move the ‘M’ all the way over to the right. Move the ‘N’ and ‘E’ (green) into the center and all the way over to the left until just the ‘E’ is in the center.
- Move all of the letters to the left then rotate the ‘Y’ (light blue) into the center to spell out EMILY.
- Collect the newspaper (Q) and the LENS (R).
- Enter the kitchen.
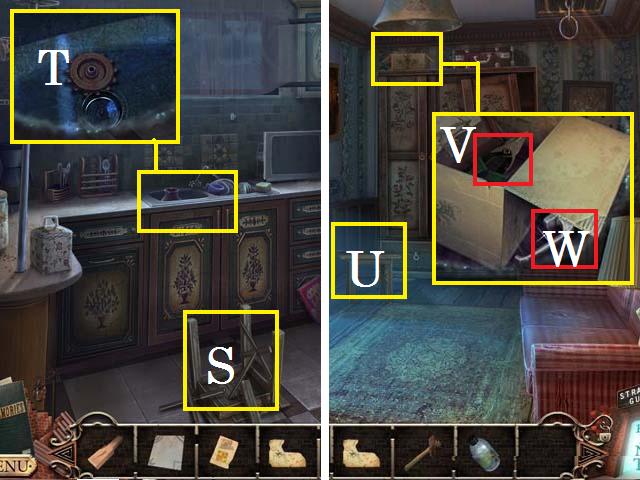
- Zoom into the broken stool; place the HAMMER and the NAILS on it to fix it. Collect the STOOL (S).
- Zoom into the sink; move the dirty dishes and collect the GEAR (T).
- Return to the upstairs landing.
- Place the STOOL in front of the cabinet (U).
- Zoom into the box and move the drawing, then collect the SHEARS (V) and the WINDOW HANDLE (W).
- Move to the upstairs hall.
- Zoom into the window; place the WINDOW HANDLE (H) and collect the UMBRELLA (I).
- Return to the landing.
- Using the UMBRELLA, pull down the attic stairs (J) and enter the attic.
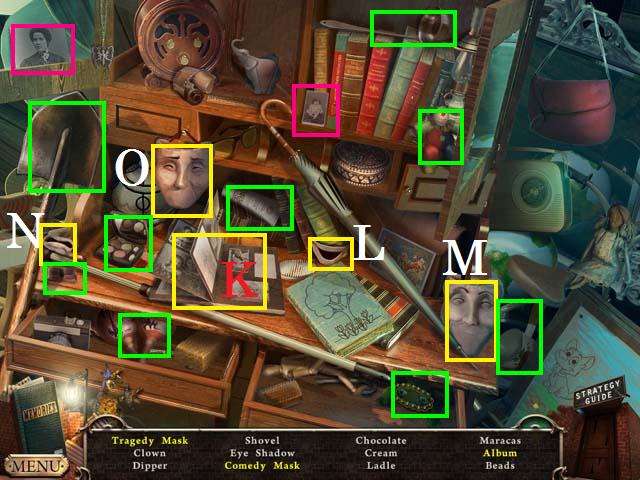
- Zoom into the sparkles to play a HOS.
- Place the two photos (pink) in the Album (K).
- Place the smile (L) on the Comedy Mask (M).
- Place the frown (N) on the Tragedy Mask (O).
- Collect the remaining items to receive the SHOVEL.
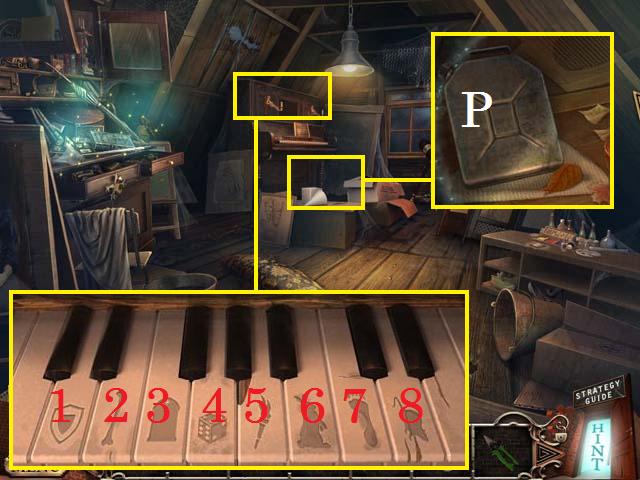
- Zoom into the piano; place the PIANO KEY in the empty space.
- Play the keys in the following sequence: 6, 8, 1, 7, 4, 5, 2, and 3.
- Zoom back into the piano; collect the FUEL CAN (P).
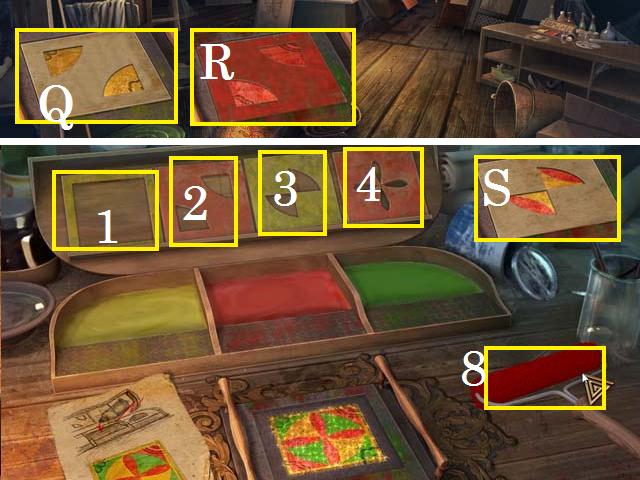
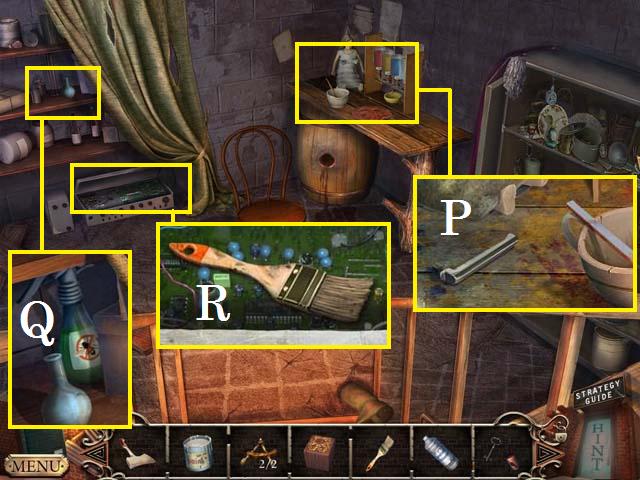
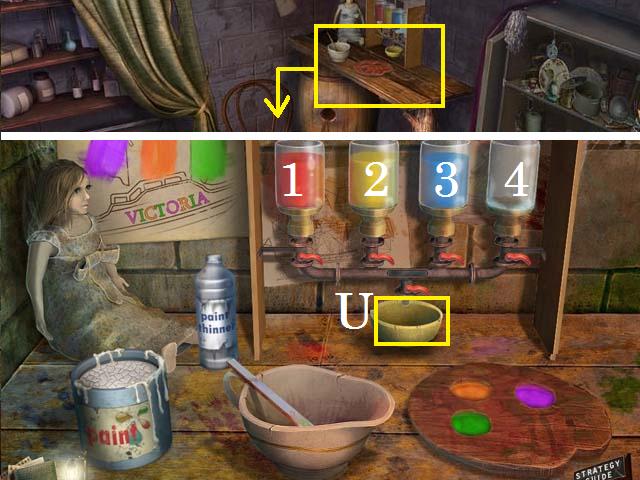
- Zoom into the shelf; place the BLANK TILE and the PICTURE SAMPLE on the table. Pour the SOLVENT into the paints.
- Place the (1) template over the tile and paint it yellow with the roller (8). Place the (2) template, rotate it as it is shown in the screenshot (Q), and paint the tile green.
- Rotate the template as it is shown in the screenshot (R) and paint the tile red. Take the (3) template, position it as shown in the screenshot (S), and paint the tile green.
- Rotate the (3) template and paint it yellow. Finish by using the (4) template and paint the tile red. Collect the PAINTED TILE.
- Return to the landing.
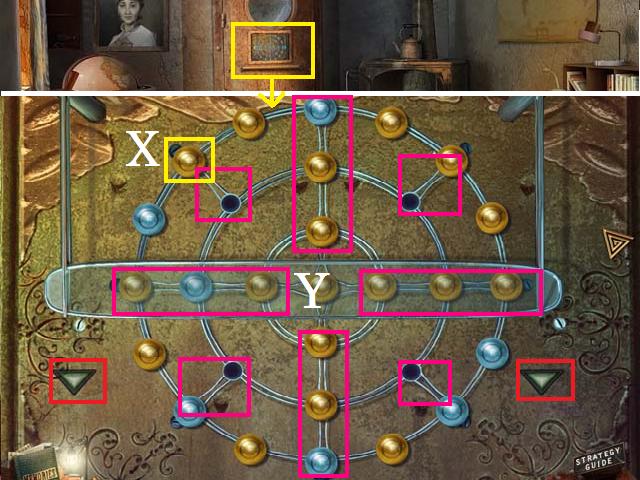
- Zoom into the panel; place the PAINTED TILE in the puzzle. Use the screenshot (U) for the final arrangement.
- Collect the note (V) and the INSULATING TAPE (W).
- Return to the downstairs entryway.
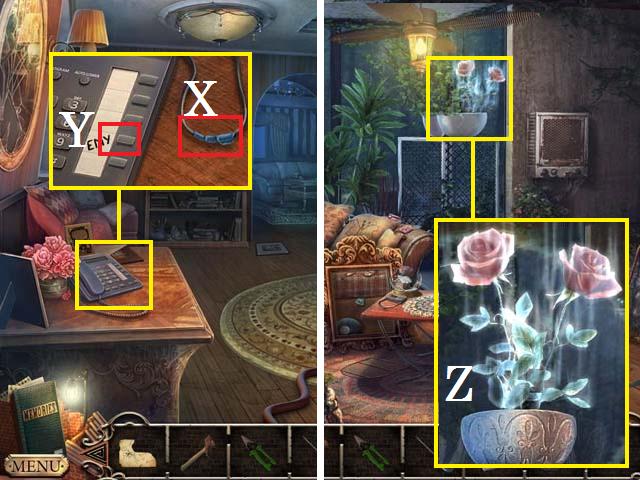
- Zoom into the phone; fix the wires (X) with the INSULATING TAPE and then press the speed dial button (Y).
- Return to the solarium.
- Zoom into the planter; remove the two ROSES (Z) with the SHEARS.
- Return to the attic.
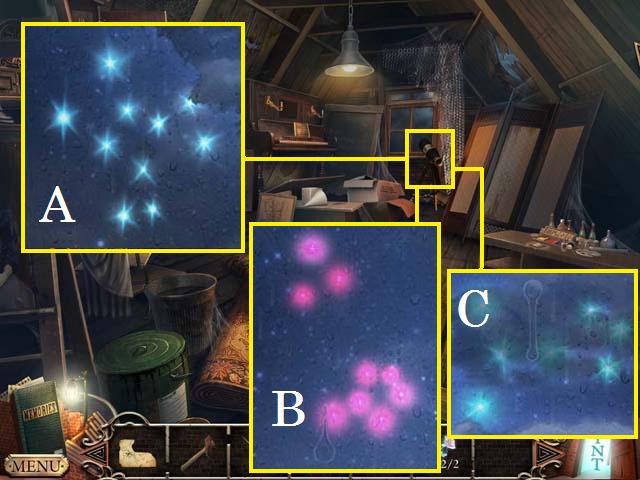
- Zoom into the telescope and place the LENS on it.
- One constellation can be found by moving the dials all the way down and to the left (A). The next one is slightly above the first (B). Move to the right until you see the third constellation (C) and then move slightly down.
- Return to the upstairs hall.
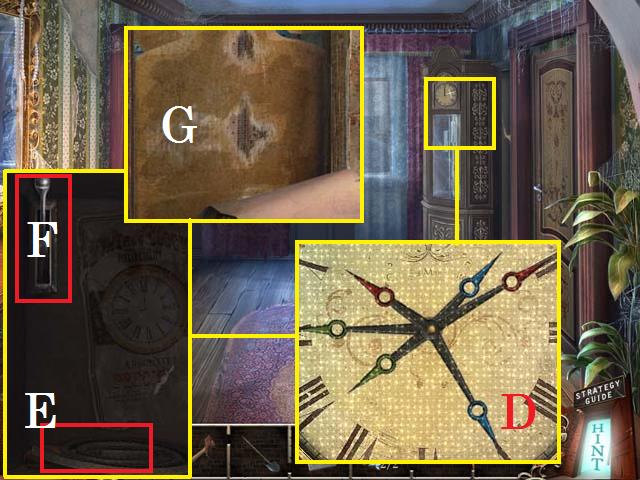
- Zoom into the clock; arrange the hands as shown in the screenshot (D).
- Collect the BELT (E) and pull the lever (F).
- Zoom into the wall; use the HAMMER to open the doorway (G) to the bedroom.
- Enter the bedroom and zoom into the table; collect the FUNNEL (H) and the letter (I).
- Zoom into the dresser; place the PIECE OF MAP on the dresser (J) and collect the MAP. Take the DRAWER HANDLE (K).
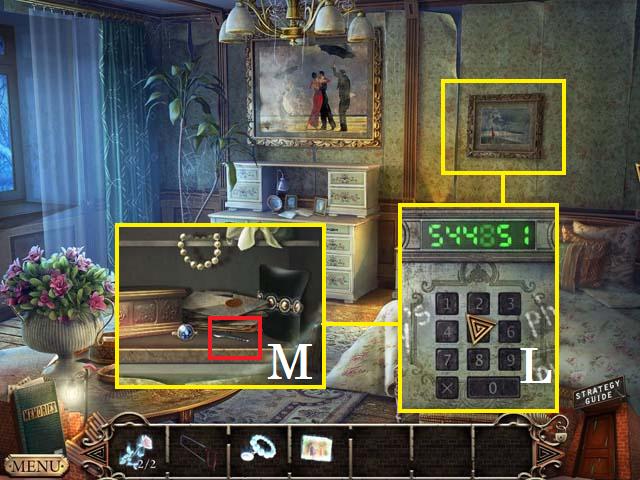
- Remove the painting and then zoom into the wall safe; punch in the number 544851 (L).
- Collect the IGNITION KEY (M).
- Return to the downstairs hall.
- Zoom into the desk; place the DRAWER HANDLE (N) on it and collect the HACKSAW (O).
- Zoom into the plant; use the HACKSAW on the branch (P) and collect the PEARL BRACELET (Q).
- Return to the playground.

- Use the SHOVEL on the ground to uncover the jar. Open the jar (S) and collect the CHILD’S DRAWING.
- Back up one scene.
- Zoom into the panel; place the GEAR and BELT in the panel and then press the up button (T).
- Enter the garage.
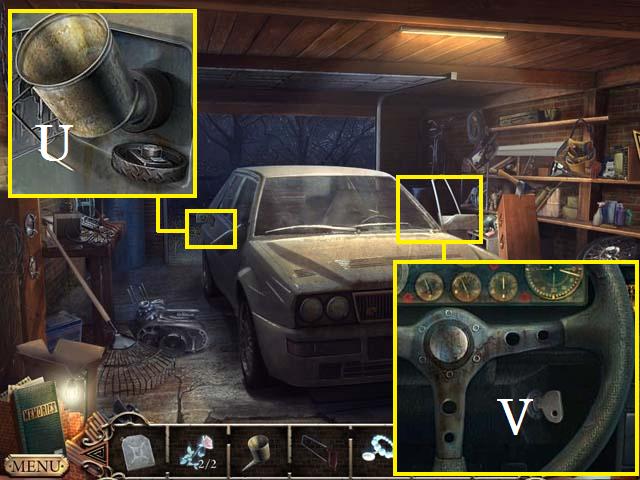
- Zoom into the gas tank; place the FUNNEL (U) in it and pour the FUEL CAN into the tank.
- Zoom into the car; Place the IGNITION KEY in the ignition (V). Turn the key to head to the cemetery.
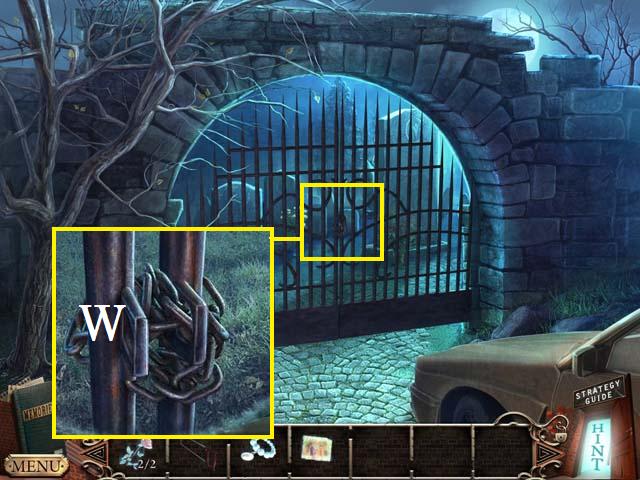
- Zoom into the gate; use the HACKSAW on the chain (W) and enter the cemetery.
- Move forward to the barn.
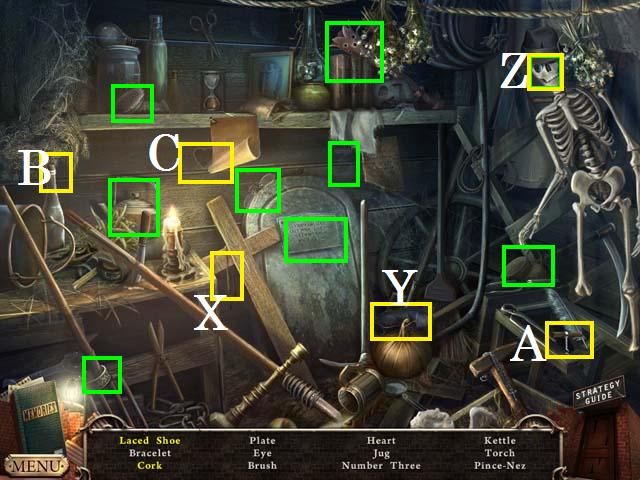
- Zoom into the sparkles to play a HOS.
- Place the lace (X) on the shoe (Y) to get the Laced Shoe.
- Move the hat to reveal the Eye (Z).
- Use the corkscrew (A) to remove the Cork (B).
- Move the letter to reveal the Heart (C).
- Collect the remaining items to receive the BRUSH.
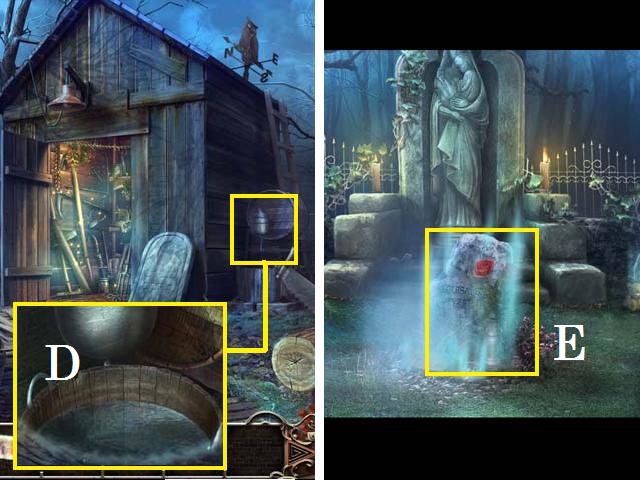
- Zoom into the cask; place the BRUSH in the water (D) to receive the WET BRUSH.
- Take a left to your mother’s grave stone.
- Zoom into the grave stone (E); clean it with the WET BRUSH.
- Place the PEARL BRACELET, CHILD’S DRAWING, and the ROSES on the grave.
Dream 2: Your Grandpa
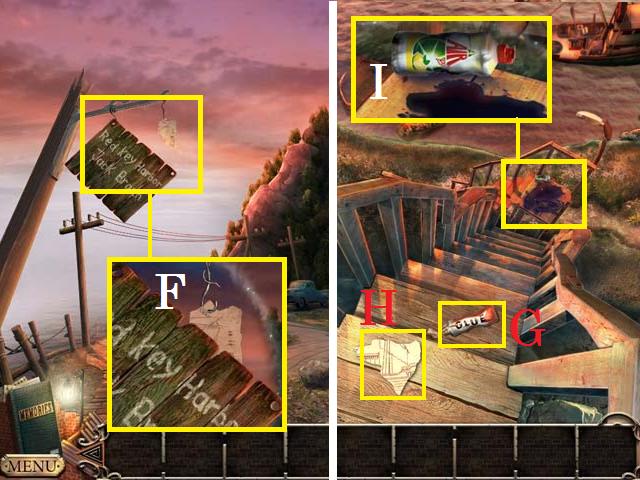
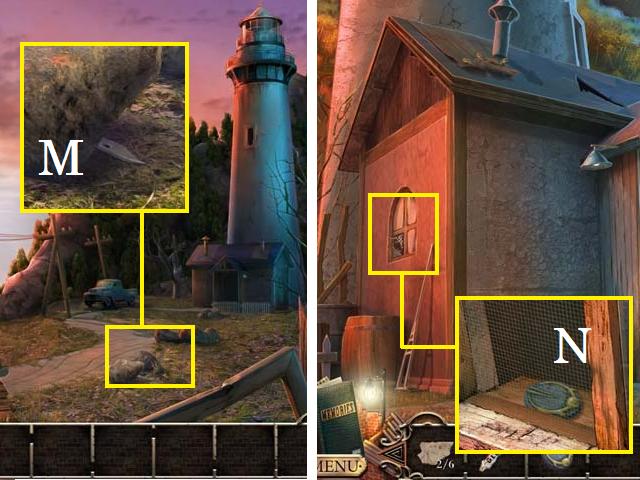
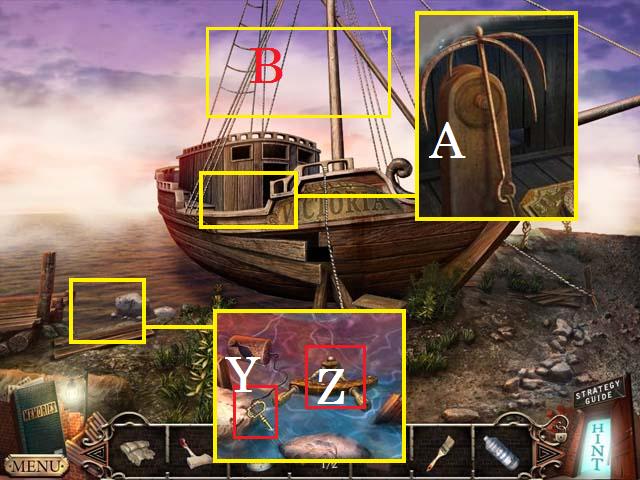
- Examine the sign; collect the first BLUEPRINT PIECES (F).
- Take the walkway to the left.
- Collect the GLUE (G) and the second BLUEPRINT PIECES (H).
- Zoom into the landing; collect the CLEANSER (I).
- Return to the first scene. Move to the right towards the lighthouse. Move forward again to the lighthouse door.
- Zoom into the sparkles to play a HOS.
- Spin the globe to reveal the Skull (J).
- Place the lens (K) in the Sunglasses (L).
- Collect the remaining items to receive the CROWBAR.
- Return to the first scene.
- Zoom into the stone; use the CROWBAR to move the stone. You will receive the KNIFE (M).
- Return to the lighthouse door.
- Zoom into the window; use the KNIFE to cut the screen and collect the PUZZLE PIECE (N).
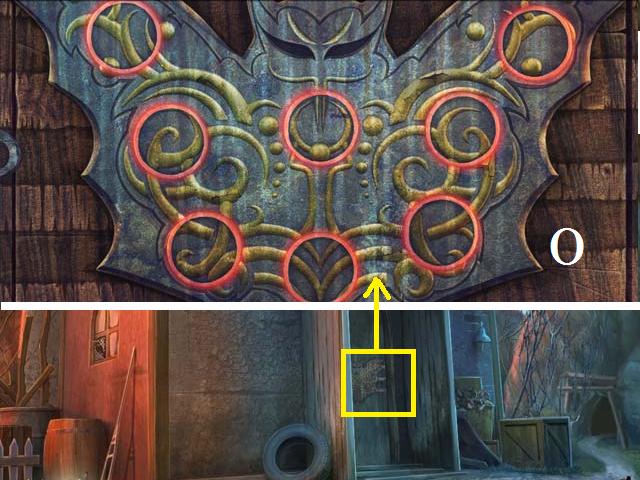
- Zoom into the door; place the PUZZLE PIECE in the empty slot and arrange the disks as they are shown in the screenshot (O). Hint: right click the disks to rotate them.
- Enter the lighthouse ground level.
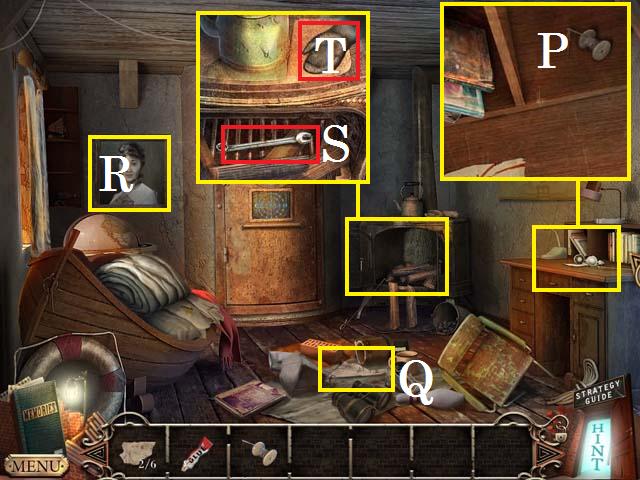
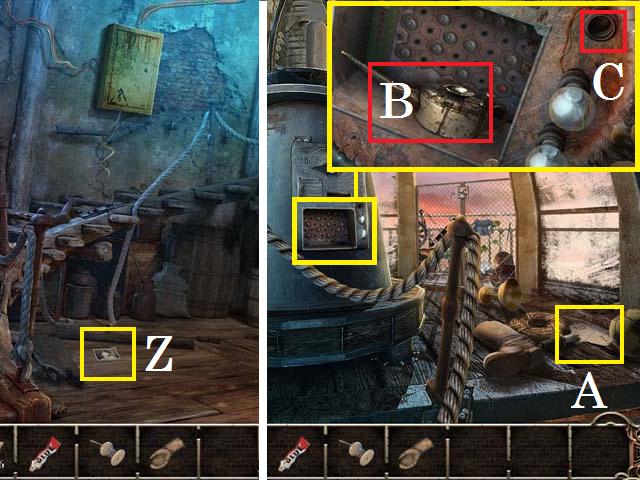
- Zoom into the desk; collect the NEEDLE AND THREAD (P).
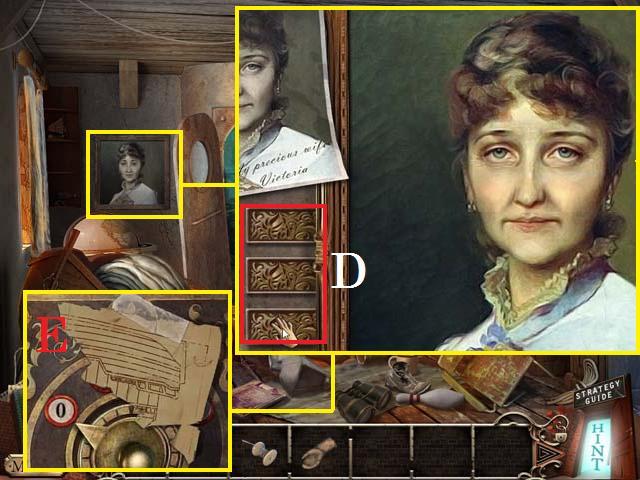
- Move the items on the floor to reveal the third BLUEPRINT PIECES; take it (Q).
- Examine the painting (R).
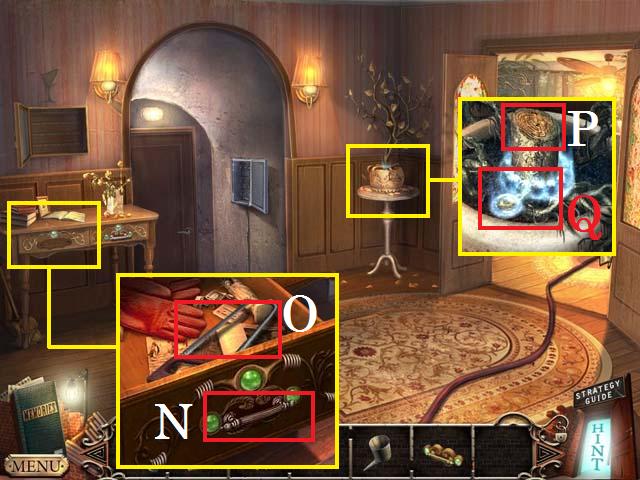
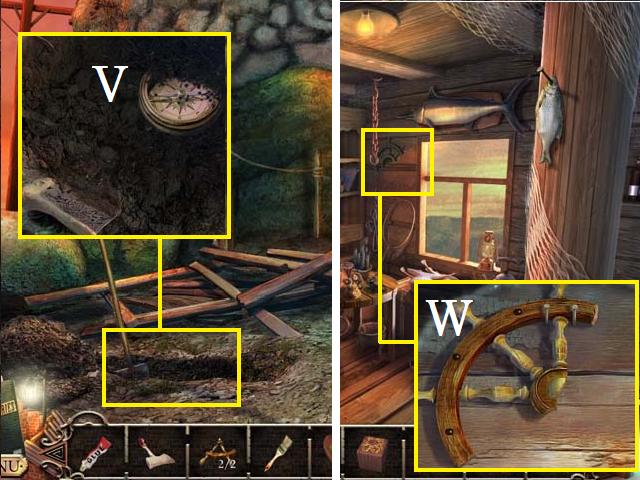
- Zoom into the wood stove; move the wood to reveal the WRENCH (S); collect it.
- Take the WORK GLOVE (T).
- Exit the lighthouse and back up one scene.
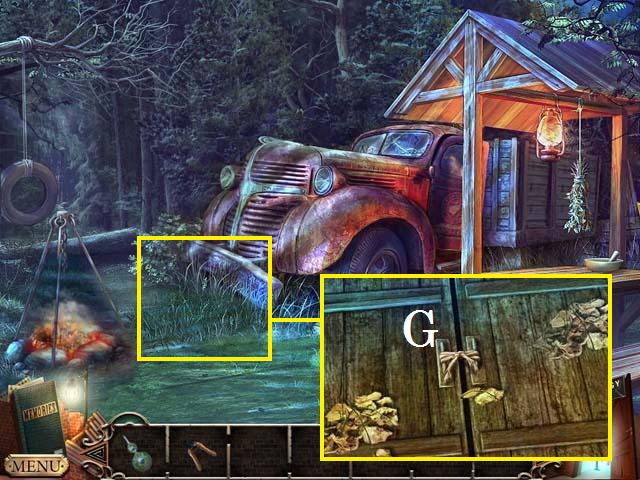
- Zoom into the truck’s grill; use the WRENCH to remove the grill. Collect the fourth BLUEPRINT PIECE (U) and the PUZZLE PIECE (V).
- Use the WORK GLOVE to remove the LIGHT BULB (W).
- Return to the lighthouse ground level.
- Zoom into the door lock; place the PUZZLE PIECE in the lock.
- Use the arrows (red) to rotate the rings. You can move the marbles from ring to ring along the eight access points (pink).
- Rotate the rings until a yellow marble (X) can be moved from the outer ring into the middle ring along one of the access points. The middle ring does not rotate and is a good place to place the yellow marbles.
- Rotate the rings until you can move one of the yellow marbles out of the middle line (Y). Try to remove all of the yellow marbles, replacing them with blue ones, from the center out. Just keep focused on your center line. You may have to swap your marbles several times until you have them in the correct line.
- Enter the stairwell.
- Collect the photo (Z).
- Climb the stairs to the lens room.
- Move the items on the floor to reveal the fifth BLUEPRINT PIECE (A); collect it.
- Zoom into the panel; collect the OIL CAN (B) and place the LIGHT BULB on the light (C).
- Return to the ground level.
- Zoom into the painting; use the levers (D) to change the eyes, nose, and lips as they are shown in the screenshot.
- Collect the sixth BLUEPRINT PIECE (E).
- Zoom into the desk; place all six BLUEPRINT PIECES on the desk and zoom in. Arrange the pieces as they are shown in the screenshot (F).
- Exit the lighthouse and back up one more scene.
- Zoom into the back of the truck.
- Use the OIL CAN on the latch (G).
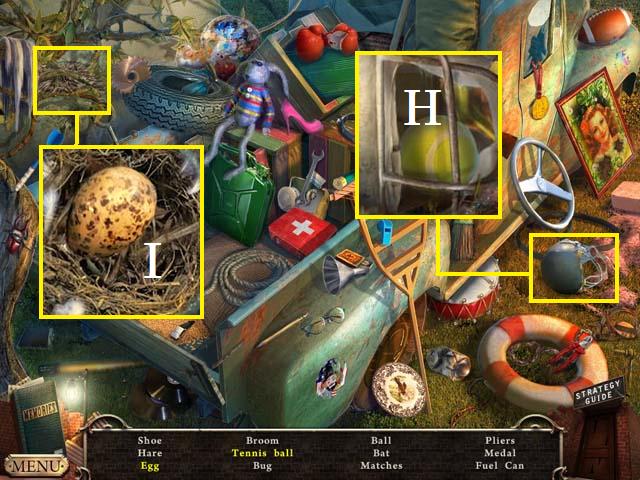
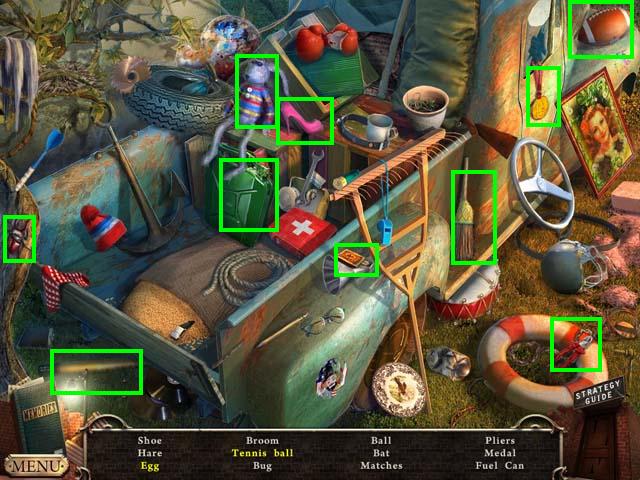
- Zoom into the sparkles to play a HOS.
- Zoom into the helmet to find the Tennis Ball (H).
- Zoom into the nest to find the Egg (I).
- Collect the remaining items to receive the PLIERS.
- Return to the lens room in the lighthouse.
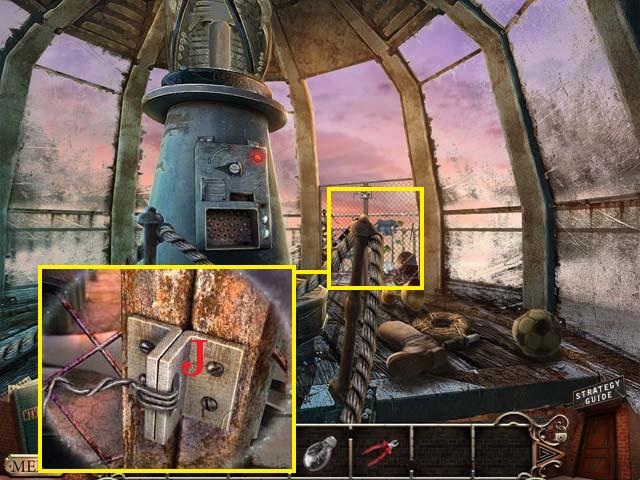
- Zoom into the window.
- Use the PLIERS to remove the wire (J).
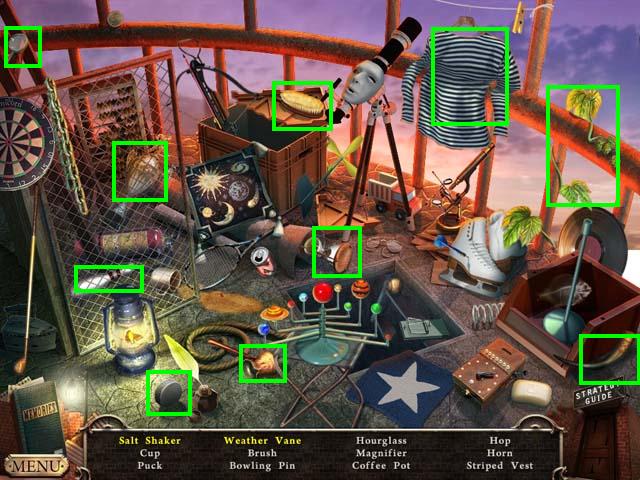
- Zoom in to trigger a HOS.
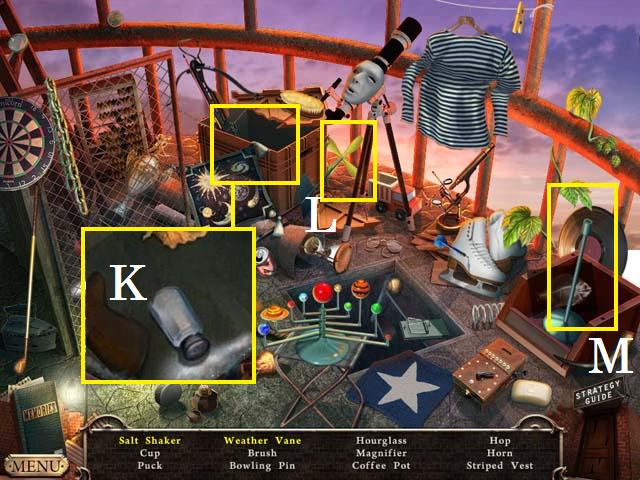
- Zoom into the crate to find the Salt Shaker (K).
- Place the part (L) on the Weather Vane (M).
- Collect the remaining items to receive the BRUSH.
- Exit the lighthouse.
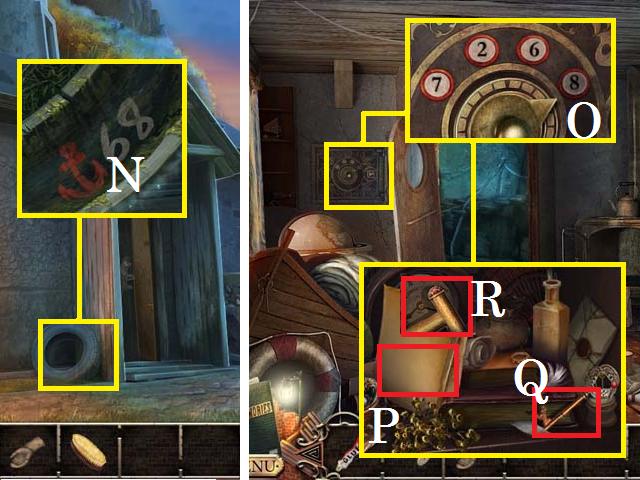
- Zoom into the tire; place the CLEANSER on the tire and clean it with the BRUSH to reveal the code (N).
- Enter the lighthouse.
- Zoom into the wall safe; enter the code 7268 (O) and then open the safe. Collect the note (P), the CELLAR KEY (Q), and the LEVER (R).
- Enter the stairwell.
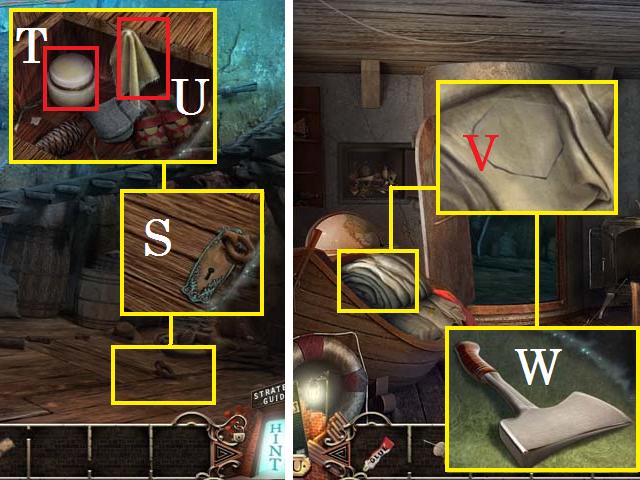
- Zoom into the cellar; open the lock (S) with the CELLAR KEY. Collect the PHOSPHORESCENT POWDER (T) and the CANVAS (U).
- Back up one scene.
- Zoom into the boat; place the CANVAS on the SAIL (V). Use the NEEDLE AND THREAD to fix the patch; collect the SAIL.
- Take the AXE (W).
- Exit the lighthouse and take the path to the right to the mine entrance.
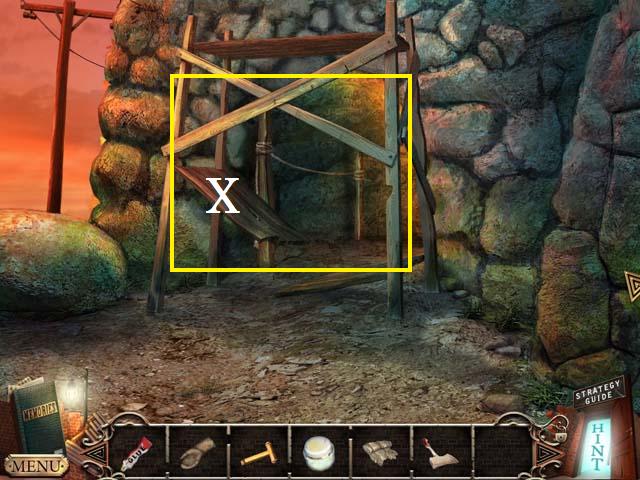
- Zoom into the scaffolding (X).
- Use the AXE to remove the scaffolding.
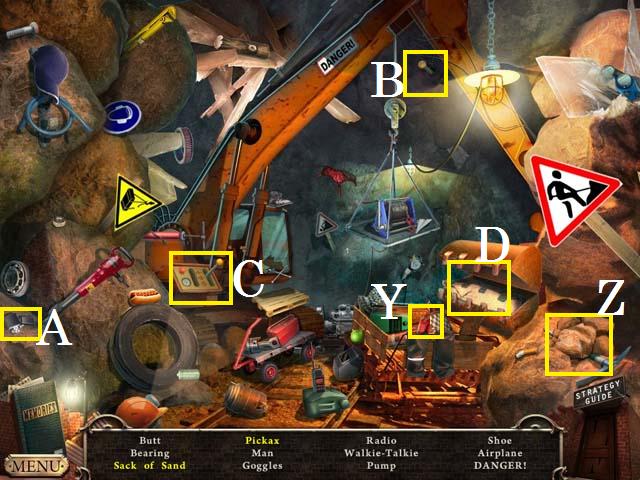
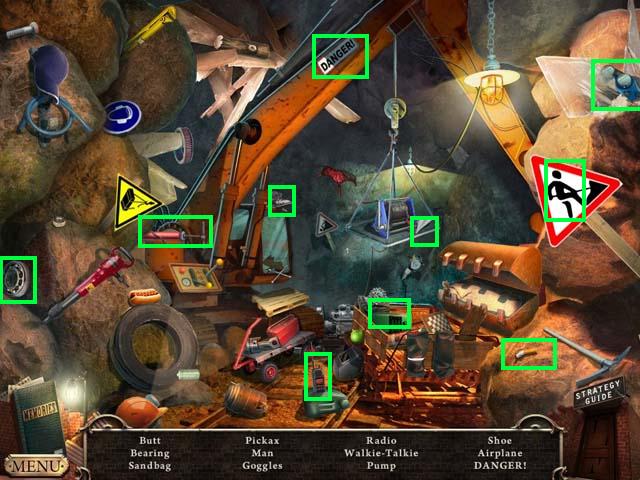
- Zoom into the sparkles to play a HOS.
- Place the dynamite (Y) next to the Pick Ax (Z) and light the dynamite with the lighter (A).
- Place the lever (B) in the panel (C) and pull it to reveal the Sack of Sand (D).
- Collect the remaining items to receive the SANDBAG.
- Return to the first scene and take the wooden path on the left.
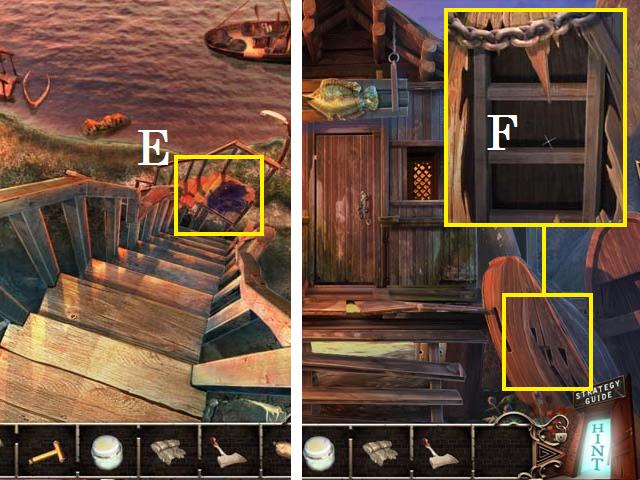
- Zoom into the landing (E); pour the SANDBAG over the oil.
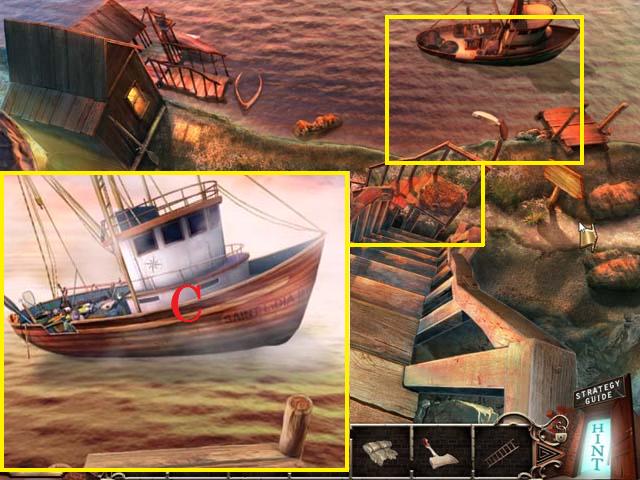
- Descend the stairs to the Fisherman’s hut exterior.
- Zoom into the boat; use the AXE to remove the bottom and collect the LADDER (F).
- Back up one scene and take a left to the ship.
- Zoom into the boat; collect the DRIED PAINT (G).
- Return to the lighthouse door.
- Place the LADDER on the wall (H).
- Zoom into the roof; collect the first STEERING WHEEL SECTION (I).
- Back up one scene.
- Zoom into the latch; place the LEVER (J) in the puzzle.
- You can win this puzzle by first moving the (1) green ball to the center position (K) and replace it with the (2) red ball. Move the (3) green ball to the original position of the (2) red ball.
- Move the (4) red ball to the original position of the (3) green ball. Slide the (1) green ball into the far right corner. Move the (5) green ball into the original position of the (1) red ball and the (6) green ball to the lower center position (L).
- Now slide all of the green balls to the right side and all of the red balls to the left.
- Enter the storm cellar.
- Zoom into the sparkles to play a HOS.
- Place the apple (M) in the teeth (N) to get the Apple Core.
- Remove the pan lid to reveal the Jar (O).
- Collect the remaining items to receive the CUBE.
- Zoom into the desk; collect the letter and the HANDLE (P).
- Zoom into the shelf; collect the INSECT REPELLANT (Q).
- Zoom into the radio; collect the BRUSH (R).
- Return to the lighthouse door.
- Zoom into the crate; spray the INSECT REPELLANT on it. Use the WORK GLOVE to move the items out of the way; collect the SOLVENT (S).
- Return to the Fisherman’s hut exterior.
- Zoom into the panel; place the HANDLE on the door (T). Collect the NAILS (U) and pull the switch (V).
- Zoom into the sparkles to play a HOS.
- Use the can opener (W) on the can to reveal the Worm (X).
- Collect the remaining items to receive the PIKE POLE.
- Back up one scene and take a right to the ship.
- Zoom into the water; use the PIKE POLE to fish out the FISHERMAN’S HUT KEY (Y) and the second STEERING WHEEL SECTION (Z).
- Zoom into the ship; collect the GRAPNEL (A).
- Place the SAIL on the boat (B).
- Back up one scene.
- Zoom into the tug boat.
- Use the GRAPNEL to pull the boat (C) in.
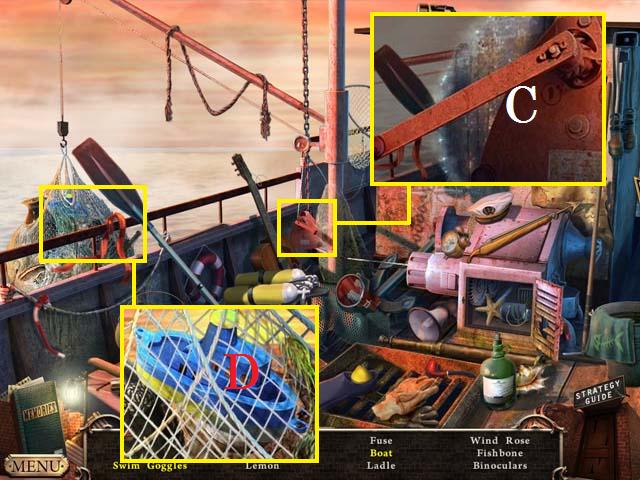
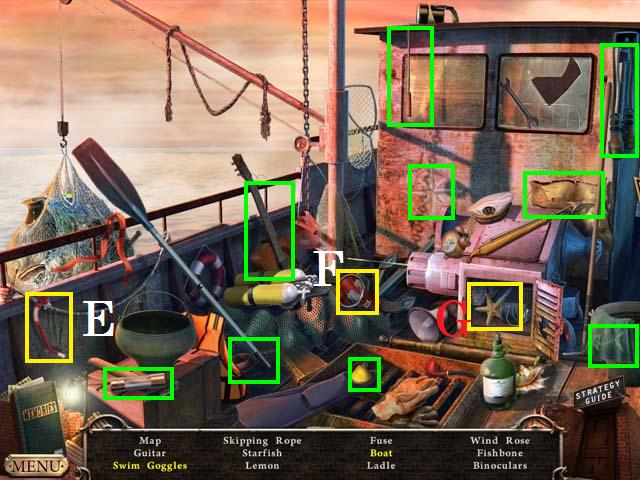
- Zoom into the sparkles to play a HOS.
- Zoom into the crane handle (C) and spin it.
- Zoom into the net to find the Boat (D).
- Place the air tube (E) with the Swim goggles (F).
- Open the vent to reveal the Starfish (G).
- Collect the remaining items to receive the FUSE.
- Return to the Fisherman’s hut exterior.
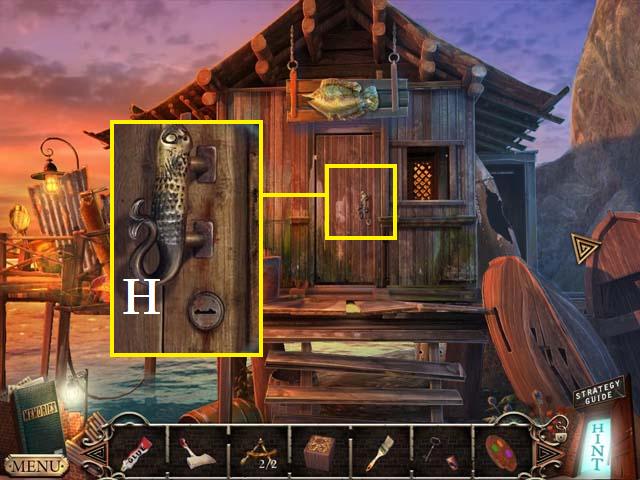
- Zoom into the door; unlock the door (H) with the FISHERMAN’S HUT KEY.
- Enter the fisherman’s hut.
- Zoom into the sparkles to play a HOS.
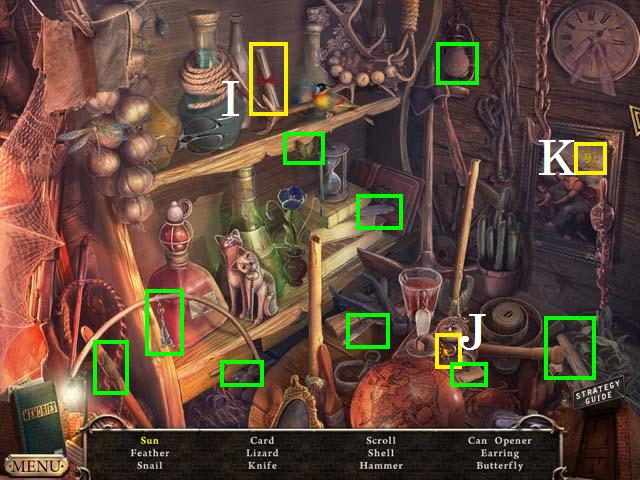
- Move the bottle to reveal the Scroll (I).
- Place the sun part (J) with the Sun (K).
- Collect the remaining items to receive the HAMMER.
- Zoom into the chest; place the CUBE in the slot and use the following sequence to win this puzzle: 4, 8, 7, 9, 6, 5, 1, and 2. The puzzle may be random.
- Zoom into the chest; collect the METAL DETECTOR (L) and the TRANSISTOR (M).
- Return to the lens room in the lighthouse.
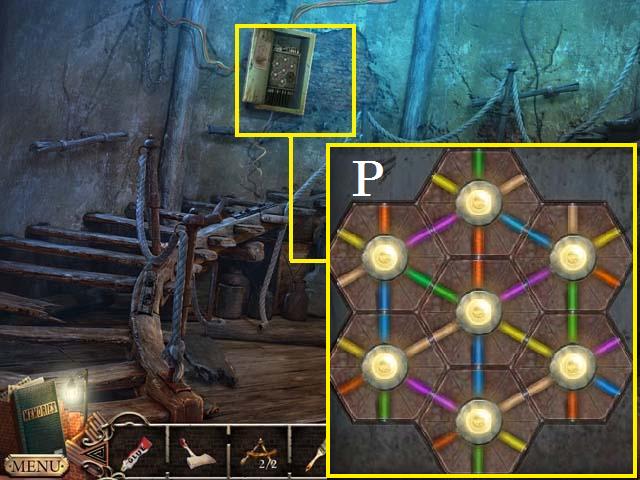
- Zoom into the panel; place the FUSE (N) in it and zoom into the panel to trigger a puzzle. See the screenshot (O) for a winning combination.
- Exit back to the stair well.
- Zoom into the panel.
- Place the TRANSISTOR in the open slot and arrange the disks as shown in the screenshot (P).
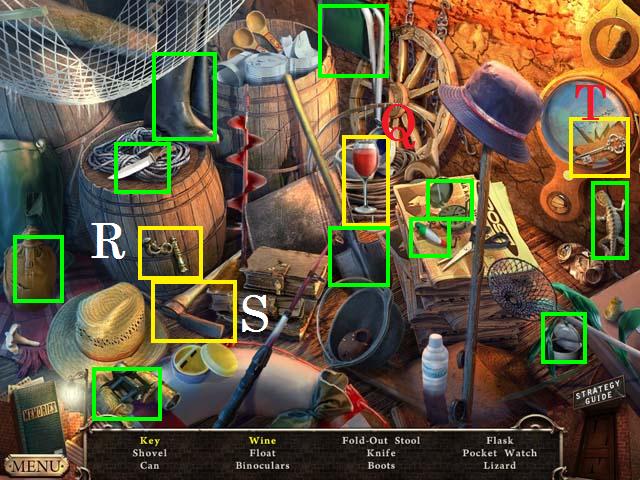
- Zoom into the sparkles to play a HOS.
- Place the Wine Glass (Q) under the spout (R) to get the Wine.
- Use the pick AXE (S) to break the glass and find the Key (T).
- Collect the remaining items to receive the SHOVEL.
- Return to the cellar.
- Zoom into the desk; place the DRIED PAINT, SOLVENT, and the PHOSPHORESCENT POWDER on the desk.
- Mix the (1), (3), and (4) paints to get the purple. Pick up the bowl (U) to mix the paint. Mix the (1), (2), and (4) paints to get the orange. Mix the (2), (3), and (4) paints to get the green. Receive the PAINT.
- Return to the mine entrance.
- Place the METAL DETECTOR out in front of you. Move the detector all the way down and to the right. Move up three times, left nine times, and up three times.
- Use the SHOVEL on the dirt and zoom in; collect the COMPASS (V).
- Return to the Fisherman’s hut.
- Zoom into the steering wheel part; place the GLUE and the two STEERING WHEEL SECTIONS on it and collect the STEERING WHEEL (W).
- Return to the ship.
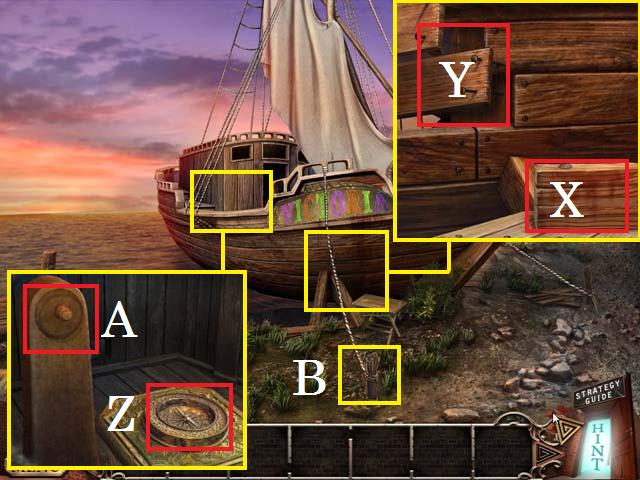
- Zoom into the side of the ship; place the PAINT and BRUSH on the shelf (X). Place the NAILS on the board and use the HAMMER on the nails (Y).
- Zoom into the ship; place the COMPASS (Z) and put the STEERING WHEEL (A) in place.
- Cut the ropes (B) with the AXE.
Dream 3: Your Soul
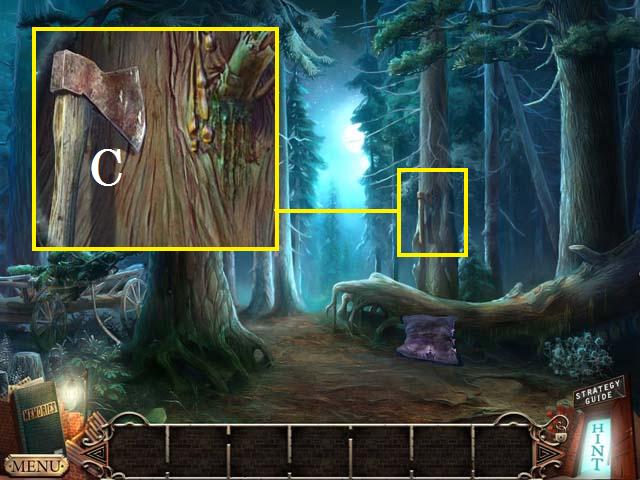
- Zoom into the tree; grab the BLUNT AXE (C).
- Move forward to the front of the cabin.
- Knock the bucket (D) into the well.
- Zoom into the table; collect the MATCHES (E). Open the book, turn the page and collect the ELIXIR OF LIFE (F).
- Move to the rear of the cabin.
- Zoom into the tire; collect the note and the WELL HANDLE (G).
- Zoom into the fire pit; collect the BEE SMOKER (H) and light the fire (I) with the MATCHES.
- Zoom into the table; collect the DRY LEAVES (J).
- Return to the front of the cabin.
- Place the WELL HANDLE on the well (K).
- Zoom into the well; collect the BRUSH (L).
- Zoom into the stump (M); set the BEE SMOKER down and light it with the MATCHES.
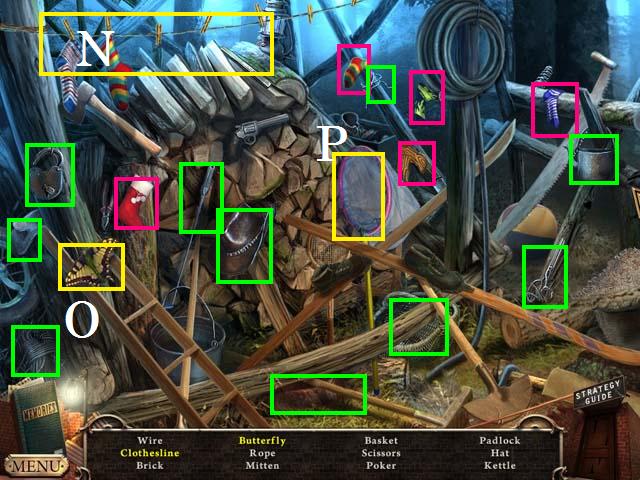
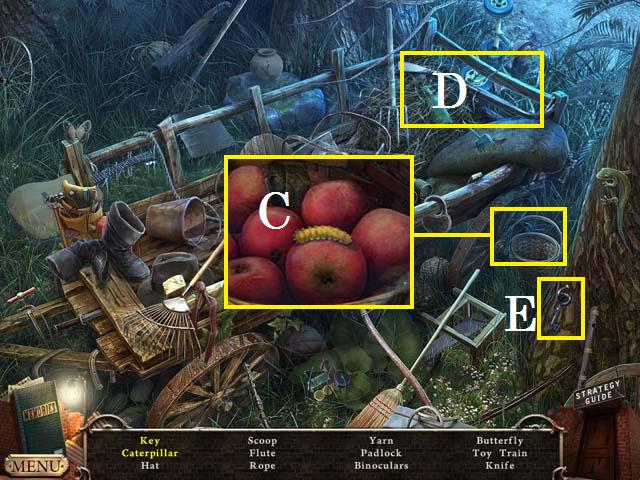
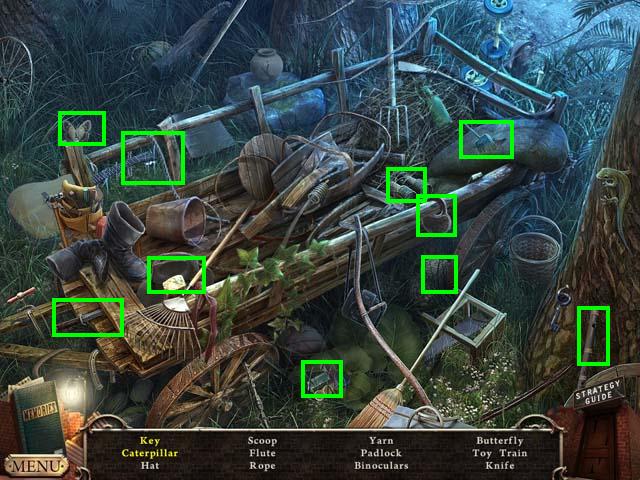
- Zoom into the sparkles to play a HOS.
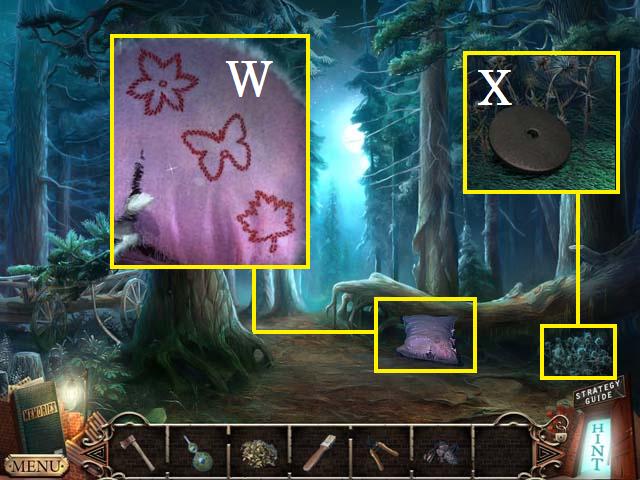
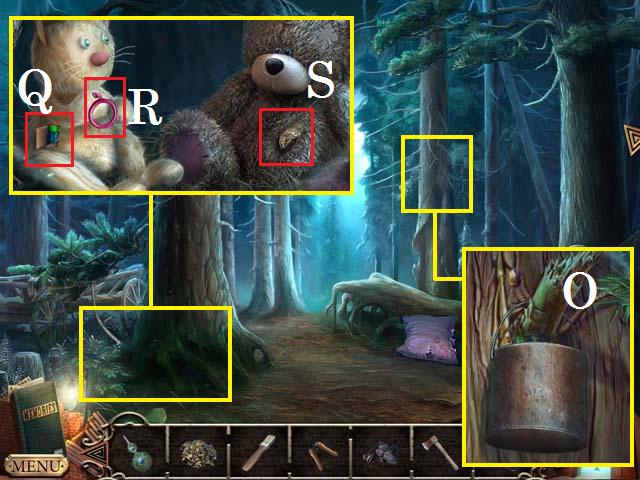
- Place the five socks (pink) on the Clothesline (N).
- Collect the Butterfly (O) with the net (P).
- Collect the remaining items to receive the WIRE.
- Zoom into the door; open the latch (Q) with the WIRE and open the door.
- Enter the cabin.
- Collect the CARPET BEATER (R).
- Zoom into the desk; collect the PINCERS (S).
- Zoom into the photo; arrange the pieces as shown in the screenshot (T).
- Return to the rear of the cabin.
- Zoom into the truck; use the WIRE to open the door and collect the GARDEN SHEARS (U).
- Zoom into the fire; collect a piece of COAL (V) with the PINCERS.
- Return to the forest.
- Zoom into the pillow; use the CARPET BEATER on the pillow to reveal the code (W).
- Zoom into the bush; clear the brush with the GARDEN SHEARS and collect the GRINDSTONE (X).
- Return to the cabin.
- Zoom into the desk; place the GRINDSTONE on the wheel (Y). Use the BLUNT AXE on the wheel to get the SHARPENED AXE.
- Zoom into the bag; change the buttons (Z) to the code shown in the screenshot.
- Zoom back into the open bag; collect the note and the NAIL PULLER (A).
- Return to the forest.
- Chop the tree branch (B) with the SHARPENED AXE.
- Zoom into the sparkles to play a HOS.
- Zoom into the basket to locate the Caterpillar (C).
- Use the crowbar (D) to remove the nail from the Key (E).
- Collect the remaining items to receive the ATTIC KEY.
- Return to the cabin.
- Zoom into the attic door; use the ATTIC KEY to unlock the lock (F).
- Go up into the attic.
- Collect the BUCKET (G).
- Zoom into the window; collect the instructions and the RAT REPELLANT (H).
- Zoom into the dresser; collect the LOCK PARTS (I).
- Use the NAIL PULLER to remove the panel (J).
- Examine the panel and then zoom out and turn the light (K) off.
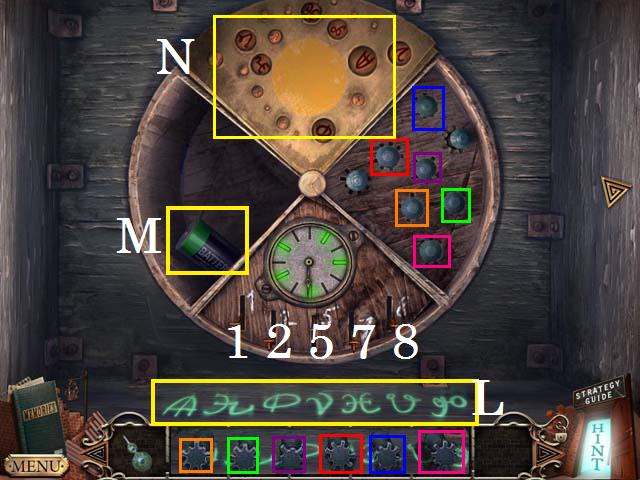
- Zoom back into the panel: press the buttons (N) in the order shown on the panel (L).
- Put the LOCK PARTS on the board. Place the parts in their corresponding slots (color coded). Pull the levers in this order: 8, 5, 2, 7, 1, and 5.
- Collect the BATTERY (M).
- Return to the forest.
- Zoom into the tree; place the BUCKET under the sap (O) and collect the MAPLE SYRUP.
- Zoom into the base of the tree; place the RAT REPELLANT next to the rats. Insert the BATTERY (Q) and pull the cord (R). Move the bear closer and then slice it open with the GARDEN SHEARS.
- Collect the PUZZLE PIECE (S).
- Return to the rear of the cabin.
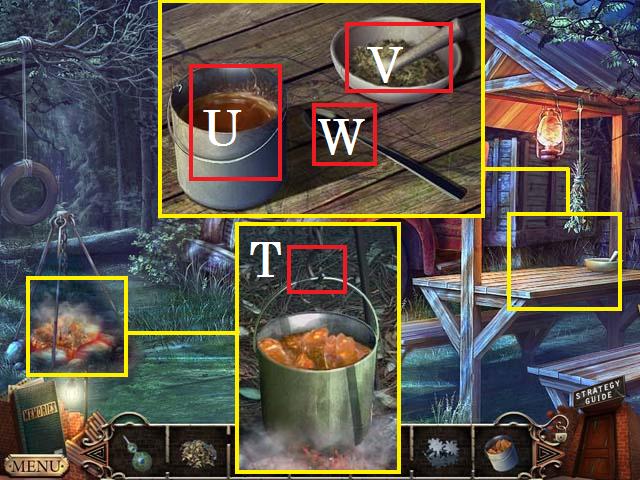
- Zoom into the fire; place the MAPLE SYRUP on the hook (T) and collect the BUCKET OF HOT SYRUP.
- Zoom into the table; place the BUCKET OF HOT SYRUP on the table (U). Place the DRIED LEAVES in the mortar (V), followed by the COAL. Pick up the spoon (W) to stir the mixture.
- Take the BUCKET OF GLUE.
- Return to the cabin.
- Zoom into the desk; place the BUCKET OF GLUE on the desk (X). Place the PUZZLE PIECE next to its other half (Y). Dip the BRUSH into the GLUE and receive the fixed PUZZLE PART.
- Zoom into the chest (Z); place the PUZZLE PART in the lock.
- Zoom into the sparkles to play a HOS.
- Use the glue (A) to repair the Shoe (B).
- Use the twigs (C) to repair the Basket (D).
- Collect the remaining items to receive the BRUSH.
- Go back up to the attic.
- Zoom into the pan; use the BRUSH on the dirty water and collect the PHOTO FRAGMENT (E). Pay attention to the code.
- Go back downstairs.
- Zoom into the photo; place the PHOTO FRAGMENT as shown (F).
- Return to the rear of the cabin.
- Zoom into the cellar door; cut the rope (G) with the GARDEN SHEARS.
- Zoom into the sparkles to trigger a HOS.
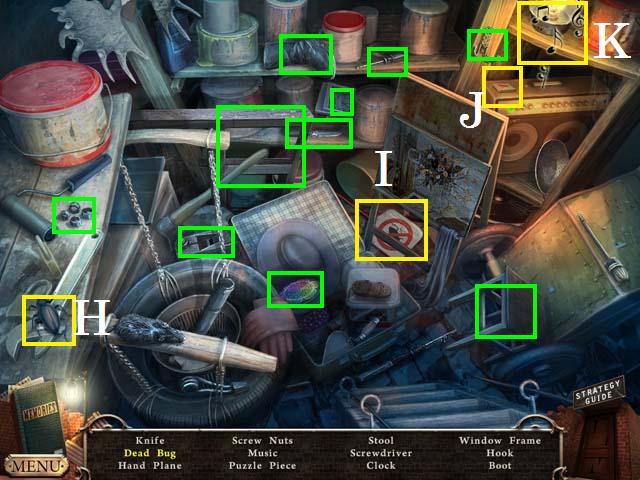
- Squash the bug (H) with the swatter (I) to get the Dead Bug.
- Turn on the radio (J) to make the Music (K).
- Collect the remaining items to receive the PUZZLE PIECE.
- Return to the attic.
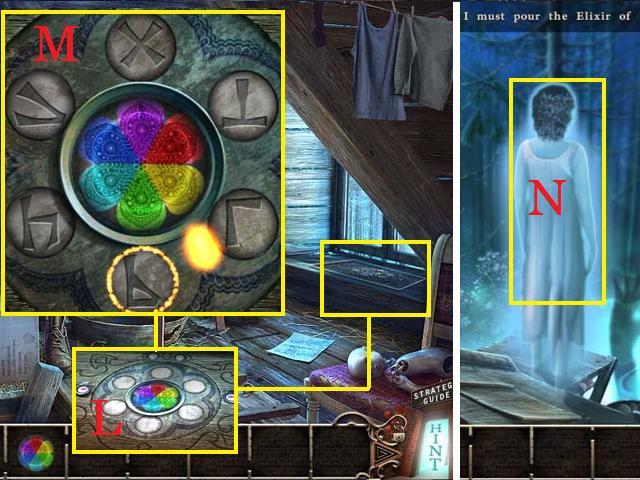
- Zoom into the window; place the PUZZLE PIECE in the center (L) and zoom in again. Set the symbols as they are shown in the screenshot (M).
- Look out the open window.
- Pour the ELIXIR OF LIFE on your spirit (N).
- Congratulations! You have completed: Mysteries of the Mind: Coma!


 Anka Walkthrough, Guide, & Tips
 Age of Enigma: The Secret of the Sixth Ghost Walkthrough, Guide, & Tips
 Travel League: The Missing Jewels ™ Walkthrough, Guide, & Tips
 Death at Cape Porto: A Dana Knightstone Novel Walkthrough, Guide, & Tips
 Nightfall: An Edgar Allan Poe Mystery Tips & Tricks, Guide, & Tips