Age of Enigma: The Secret of the Sixth Ghost Walkthrough, Guide, & Tips
Age of Enigma: The Secret of the Sixth Ghost Walkthrough

Welcome to the Age of Enigma: The Secret of the Sixth Ghost Walkthrough!
Help the ghostly inhabitants of a haunted house as you venture into the beyond and discover the secret of the 6th ghost!
Whether you use this document as a reference when things get difficult or as a road map to get you from beginning to end, we’re pretty sure you’ll find what you’re looking for here.
This document contains a complete Age of Enigma: The Secret of the Sixth Ghost game walkthrough featuring annotated screenshots from actual gameplay!
We hope you find this information useful as you play your way through the game. Use the walkthrough menu below to quickly jump to whatever stage of the game you need help with.
Remember to visit the Big Fish Games Forums if you find you need more help. Have fun!
This walkthrough was created by BrownEyedTigre, and is protected under US Copyright laws. Any unauthorized use, including re-publication in whole or in part, without permission, is strictly prohibited.
General Tips

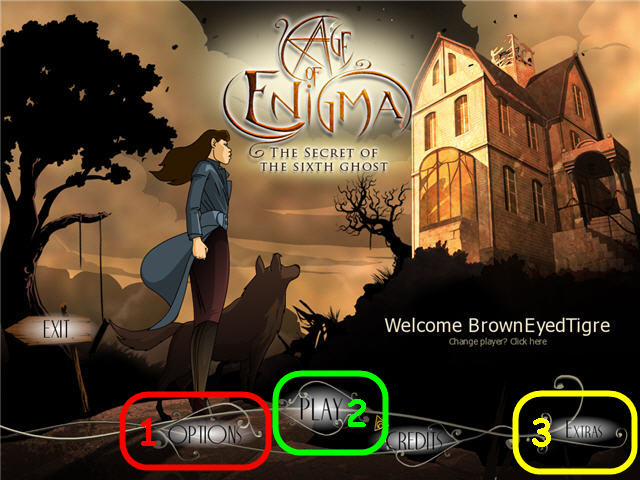
- Click on Options (1) to adjust the Music and SFX Volume, Full Screen, Windowed Mode and System Cursor.
- After you click Play (2), you may choose your difficulty level.
- Casual Mode has less dialog and active zones are highlighted, Adventure mode has more dialog, you are free to roam and no highlights.
- Click on Extras (3) to play the 25 mini-games from the game. You will unlock them as you complete them.

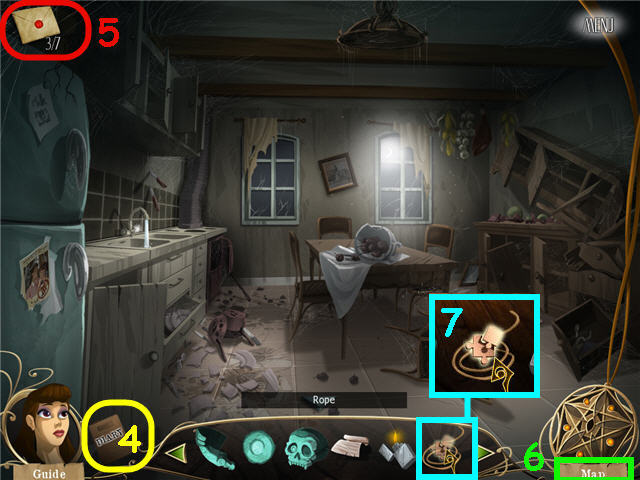
- Click on the Diary (4) to get story updates and access the guide. The Diary will open when there is a new update.
- Collect the 7 hidden envelopes (5) to get diary updates.
- Click on the Map (6) in the lower right to see where you are and what areas are left to explore.
- A hand cursor means you can pick up an item.
- A magnifying glass cursor means you can look closer at an area.
- A gear cursor signifies you can interact with the item.
- You can combine inventory items if a puzzle piece (7) appears over the item when you place your cursor over it.
- A puzzle piece cursor signifies you need to use an inventory item there.
- Puzzles may be skipped. When skipping a puzzle you will have the option of using a Joker (you get two for each puzzle) to make the puzzle easier or you can skip the puzzle.
- Click on menu to exit the game.
Chapter 1- Yumanco

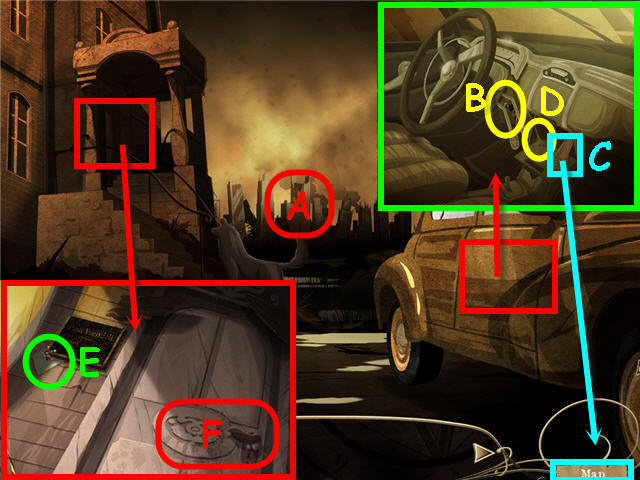
- Examine the skyline (A) to get a diary update.
- Click on the car door; remove the CAR KEYS (B) from the ignition.
- Use the CAR KEYS on the glove box; take the MAP (C) it will go to the lower right map area) and the KEY (D).
- Walk to the entrance; take the ENVELOPE 1 of 7 (E).
- Use the KEY on the lock (F) and enter.

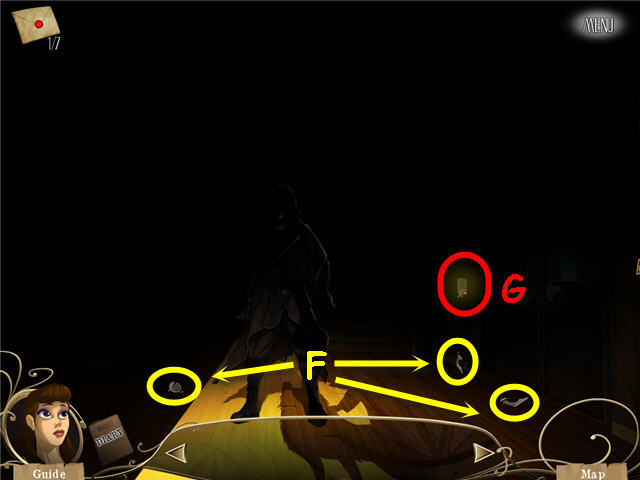
- Pick up the PIECES OF LIGHT SWITCH (F) to get a REPAIRED SWITCH.
- Use the REPAIRED SWITCH on the junction box (G); click on the switch.
- Head left into the living room.

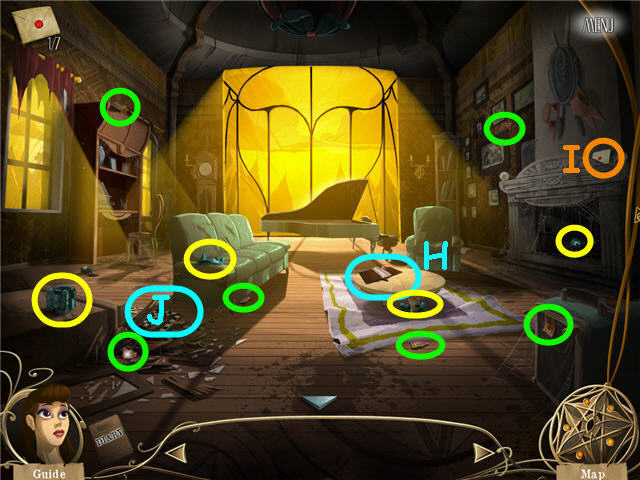
- Pick up the PIECE OF SATUETTE (in yellow).
- Pick up the 6 TORN PAGES (in green) to get a BOOK.
- Examine the torn book (H) and place the BOOK in the binder. Note the directions and items needed for the statue.
- Take the ENVELOPE 2 OF 7 (I).
- Examine the rubble (J); click on the box to trigger a puzzle.

- Arrange the pieces to complete the symbol by swapping any two squares. See screenshot (K) for solution.
- Take the KAPANGYA EYE from the opened box.
- Exit the room and walk straight to the corridor.

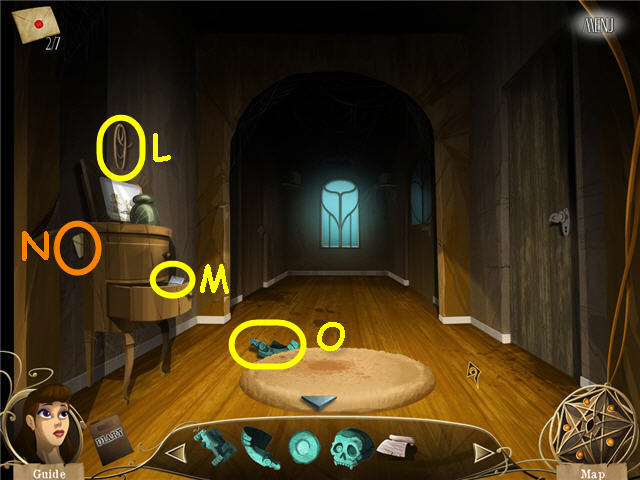
- Remove the painting on the left; take the ROPE (L).
- Open the bottom drawer; take the EMPTY LIGHTER (M).
- Take the ENVELOPE 3 of 7 (N).
- Take the PIECE OF STATUETTE (O).
- Head into the closet on the left.

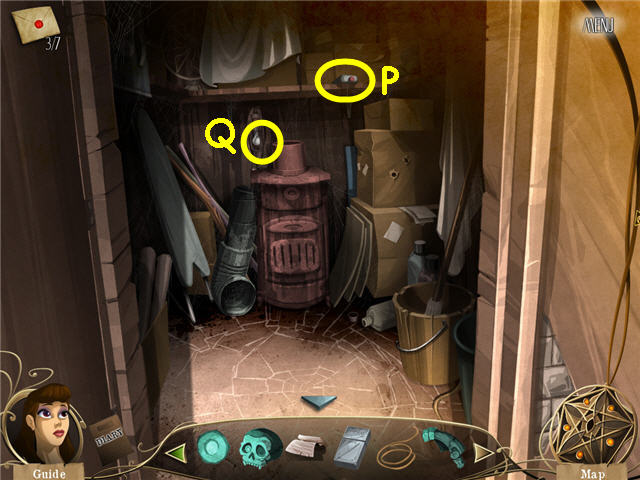
- Take the LIGHTER FLUID (P) and the LIGHT BULB (Q).
- In inventory, combine the LIGHTER FLUID with the EMPTY LIGHTER to get a RELOADED LIGHTER.
- Exit the room and head right across the hall into the kitchen.

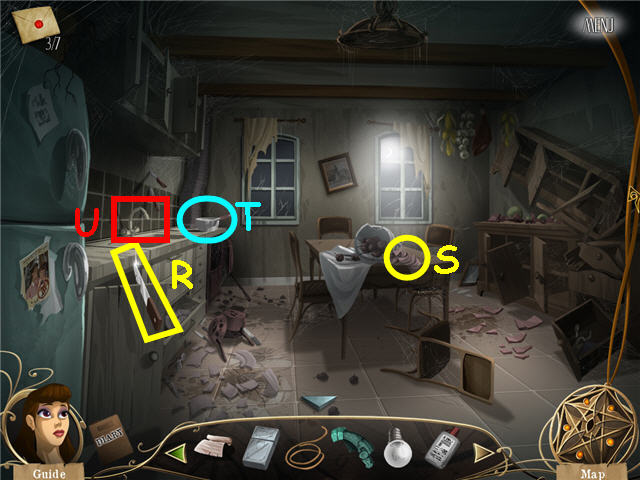
- Take the KNIFE (R), RAG (S) and the EMPTY SAUCEPAN (T).
- Turn on the faucet (U) and use the EMPTY SAUCEPAN on the water to get a SAUCEPAN FULL OF WATER.
- Exit the room and head back to the main hall.

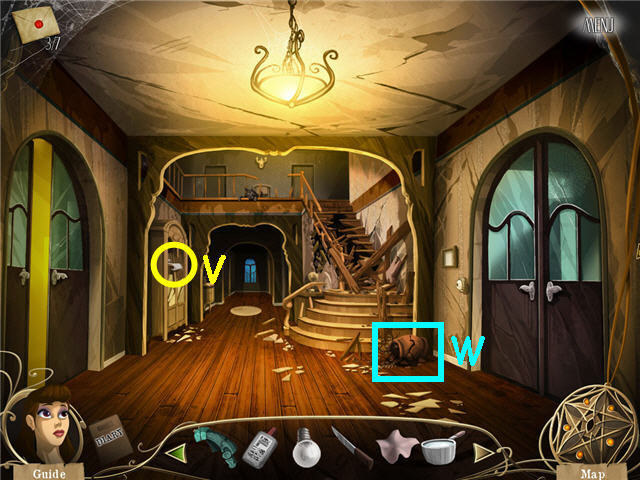
- Take the SCORE (V).
- Use the KNIFE on the vase (W) to automatically get TWIGS.
- In inventory, combine the ROPE and TWIGS to get TINDER WOOD.
- Head into the living room.
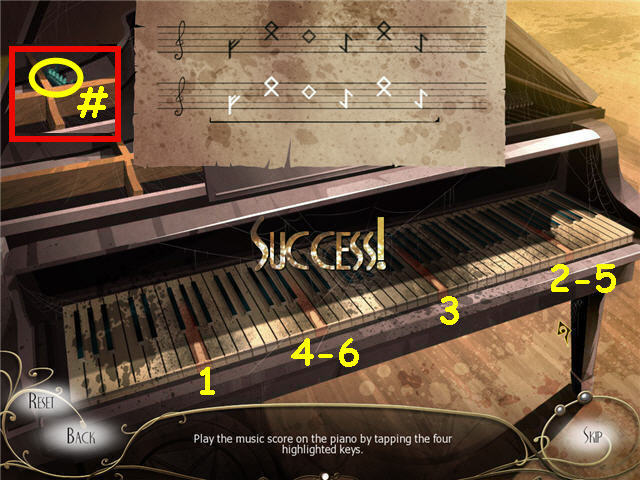
- Examine the piano; place the SCORE on the stand to trigger a puzzle.


- Duplicate the notes on the music sheet by pressing the correct highlighted keys.
- Solution: Press the highlighted keys from left to right; 1-4-3-2-4-2.
- Take the PIECE OF STATUETTE (#) from the top of the piano.
- Back out and examine the book on the table.

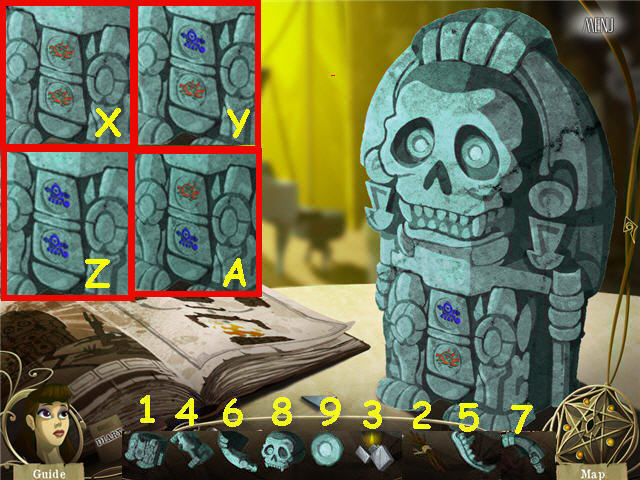
- Assemble the statuette by placing the pieces according to the instructions in the book. See screenshot for order of assembly.
- Activate the Kapangya by following the Incan Warrior’s instructions and clicking on the correct stones in the statues midsection and then pressing its right eye to enter.
- Solution to activate the Kapangya: Elevation (X), Illumination (Y), Quake (Z), Eclipse (A).
- Automatically get the KAPANGYA added to your inventory after all 4 activations.
- Click on the stack of cubes to the right of Yumanco to activate a puzzle.

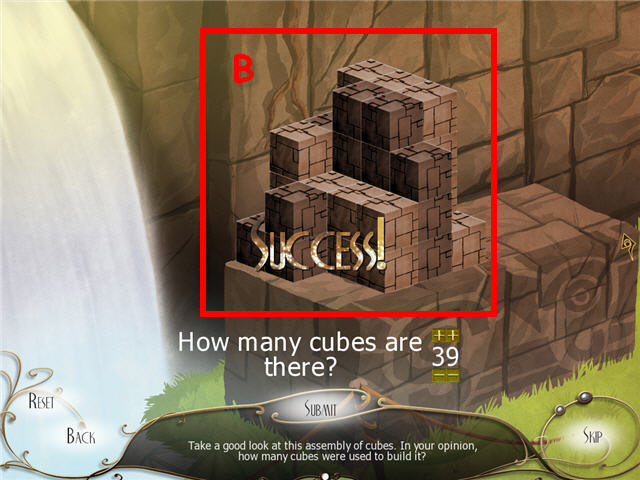
- Calculate the total number of cubes that are in the stack (B).
- Solution: 39.

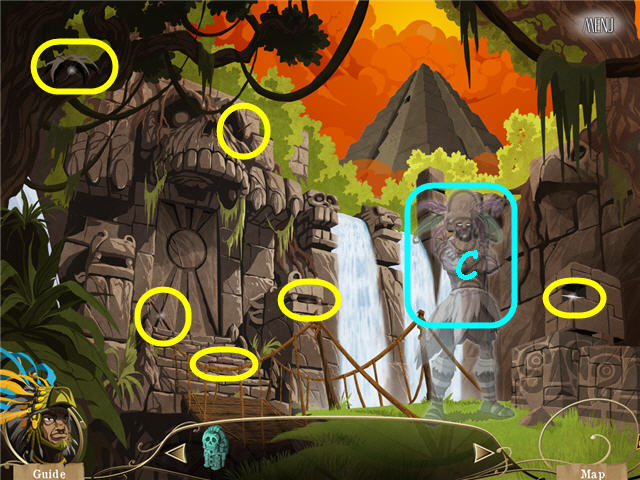
- Take the 6 INCOMPLETE SPEAR pieces (in yellow) to get the REPAIRED SPEAR.
- Give the REPAIRED SPEAR to Yumanco (C).
- Use the KAPANGYA on the door (D).

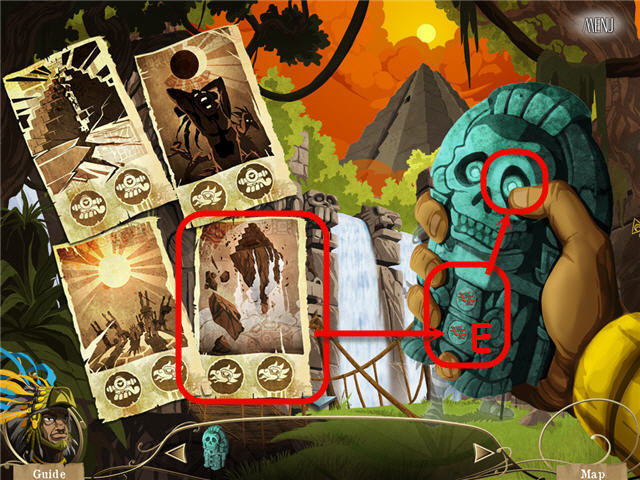
- Enter the elevate power code (E) on the KAPANGYA to open the door, click the eye when set.
- Enter into the temple.

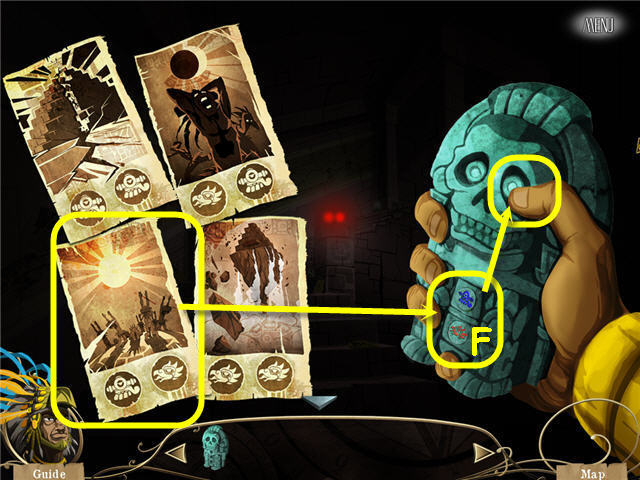
- Use the KAPANGYA anywhere in the room.
- Enter the illumination power code (F) on the KAPANGYA to light up the room, click the eye when set.

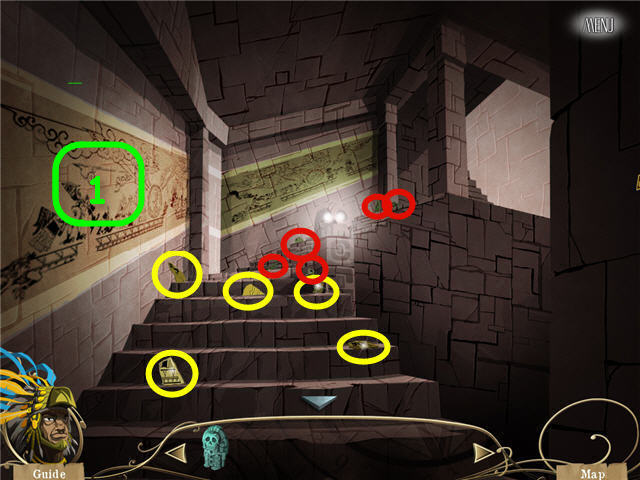
- Pick up the INCOMPLETE PIECES OF FRESCO (in yellow) to get a COMPLETE PIECES OF FRESCO.
- Pick up the INCOMPLETE PIECES OF FRESCO (in red) to get a COMPLETE PIECES OF FRESCO.
- Place the yellowish COMPLETE PIECES OF FRESCO on the side wall fresco (1) to trigger a puzzle.

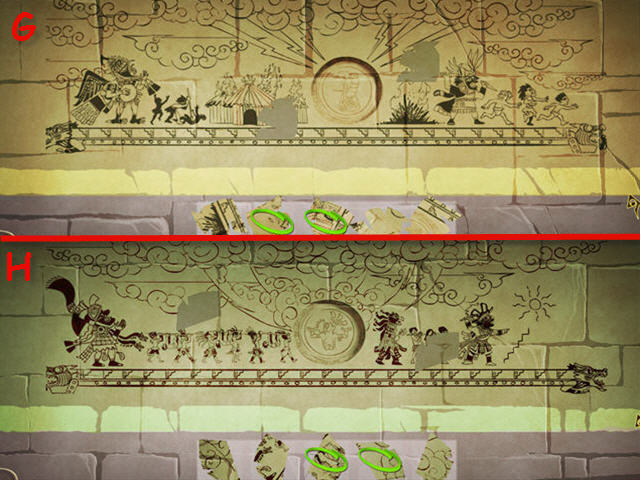
- Choose the correct two pieces to complete the fresco and click submit.
- See screenshot (G) for my solution; the pieces are random so your pieces can differ from mine.
- Take the 1ST GREAT SORROW medallion from the wall when complete.
- Place the COMPLETE PIECES OF FRESCO on the back wall fresco to trigger a puzzle.
- Choose the correct two pieces to complete the fresco and click submit.
- See screenshot (H) for my solution; the pieces are random so your pieces may differ from mine.
- Take the 2nd GREAT SORROW medallion from the wall when complete.
- Walk up the stairs.

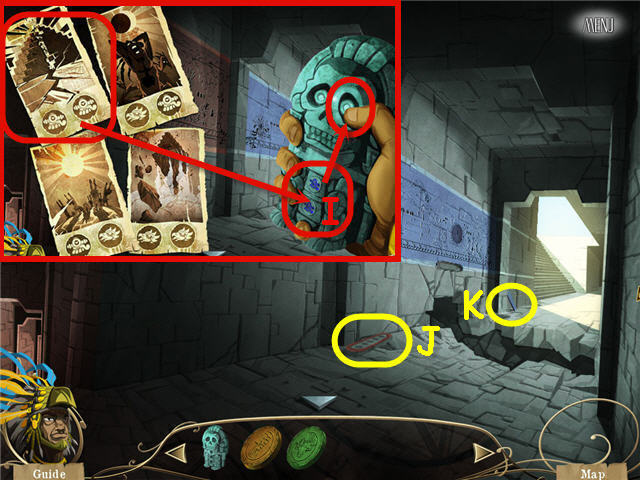
- Use the KAPANGYA on the ceiling; enter the quake power code (I) on the KAPANGYA to cover the gap in the floor, click the eye when set.
- Pick up the pink CARTRIDGE (J) and the blue CARTRIDGE (K).
- Place the pink CARTRIDGE in the slot under the pink fresco to trigger a puzzle.

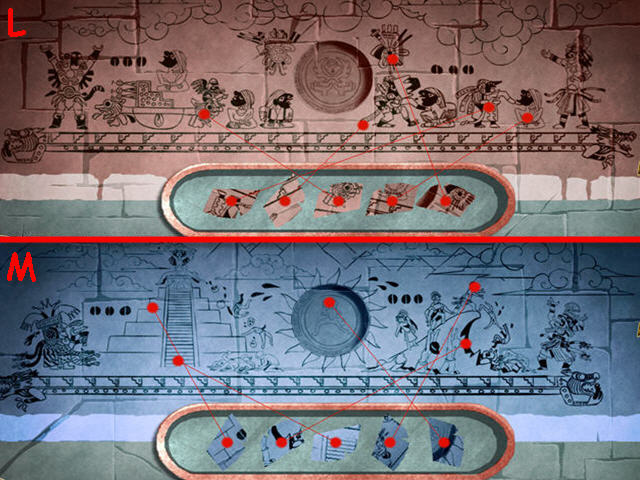
- Complete the fresco by clicking on a piece and then clicking on the area it is located on the fresco. After finding the location of all 5, click submit. See screenshot (L) for solution.
- The pieces are random and your solution may differ from mine.
- Take the 3rd GREAT SORROW.
- Place the blue CARTRIDGE in the slot under the blue fresco to trigger a puzzle.
- Complete the fresco by clicking on a piece and then clicking on the area it is located on the fresco. See screenshot (M) for solution.
- Take the 4th GREAT SORROW.
- Head up the stairs to the tip of the pyramid.

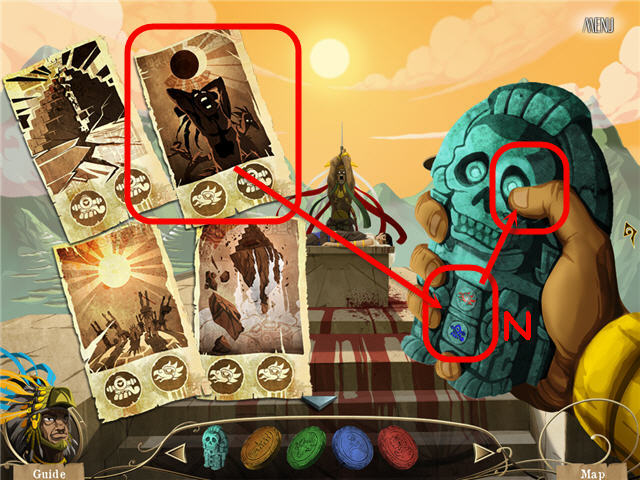
- Use KAPANGYA on the altar; choose eclipse power (N).
- Examine the altar.

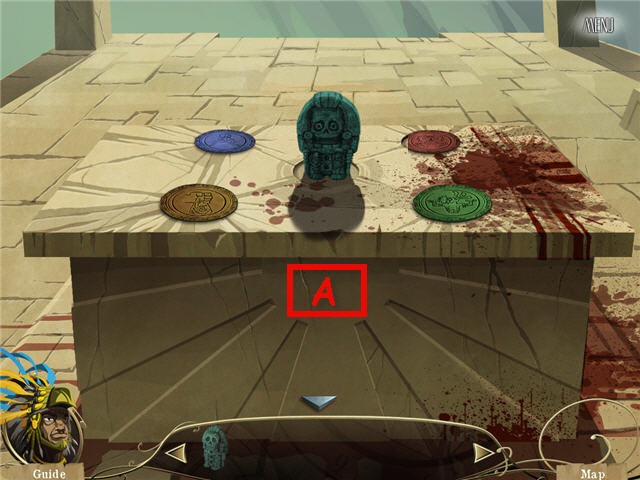
- Place the 1st, 2nd, 3rd and 4th GREAT SORROW on the altar counter-clockwise starting at the bottom left.
- Place the KAPANGYA in the center. See screenshot (A) for solution.
Chapter 2 – Natsumi

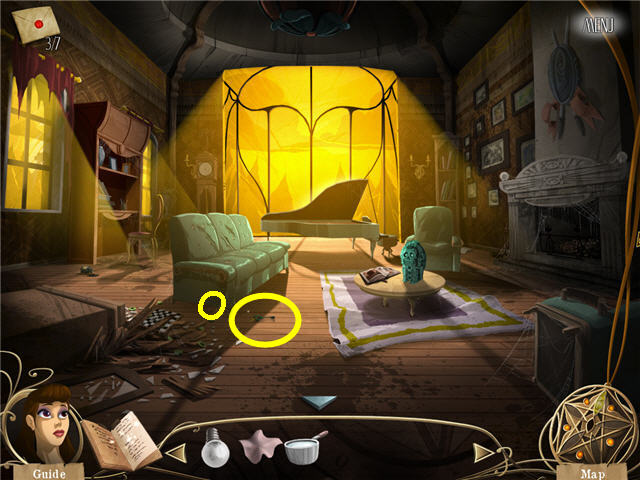
- Take the BASEMENT KEY (O).
- Exit the room.
- Step forward and examine the basement door.
- Use the BASEMENT KEY on the hole and walk down the stairs.

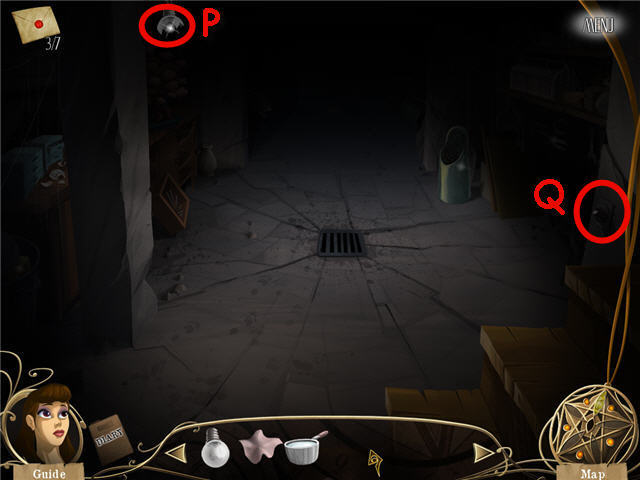
- Use the RAG on the broken bulb (P).
- Place the LIGHT BULB in the socket.
- Flip the switch (Q).

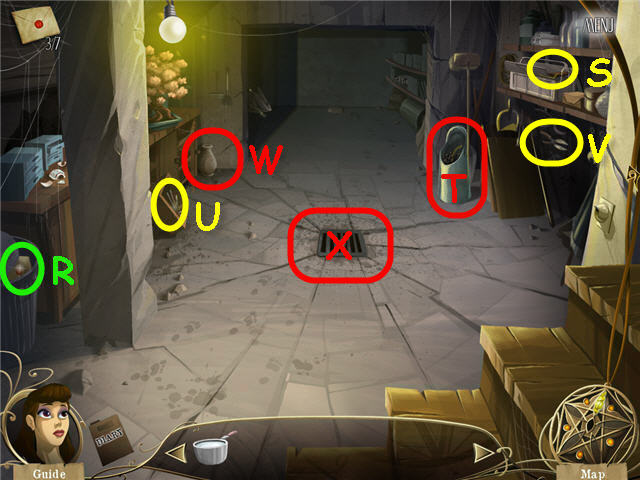
- Take the ENVELOPE 4 OF 7 (R).
- Open the toolbox and take the HAMMER (S).
- Knock over the vase (T).
- Take the SCREWDRIVER (U) and the BROKEN PRUNING SHEARS (V).
- Use the HAMMER to break the vase (W) and take the PAPER.
- Examine and use the SCREWDRIVER on the grate (X) to trigger a puzzle.

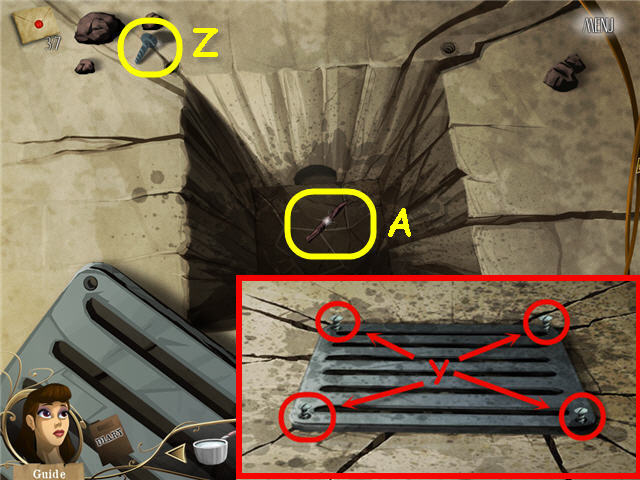
- Unscrew the 4 screws (Y).
- Right-click to loosen, left-click to tighten. Turning one screw may turn another.
- Solution: Right click on the screws in the following order until they are fully unscrewed; lower right, lower left, upper right, upper left, lower left, upper right, lower right, lower left, lower right.
- Take the BOLT (Z) and CHARCOAL (A).
- In Inventory, combine the BOLT and the BROKEN PRUNING SHEARS to get PRUNING SHEARS.

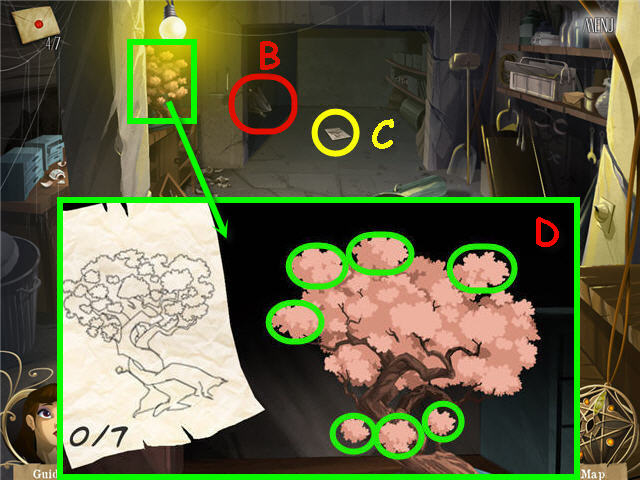
- Click on Natsumi (B).
- Give Natsumi the PAPER and CHARCOAL.
- Take the SKETCH (C).
- Use the PRUNING SHEARS on the bonsai to trigger a puzzle.
- Trim the bonsai to look like the sketch.
- Click on the seven areas to be trimmed. See screenshot for solution (D).
- Walk to the Zen garden.
- Click on the center stone to trigger a puzzle.

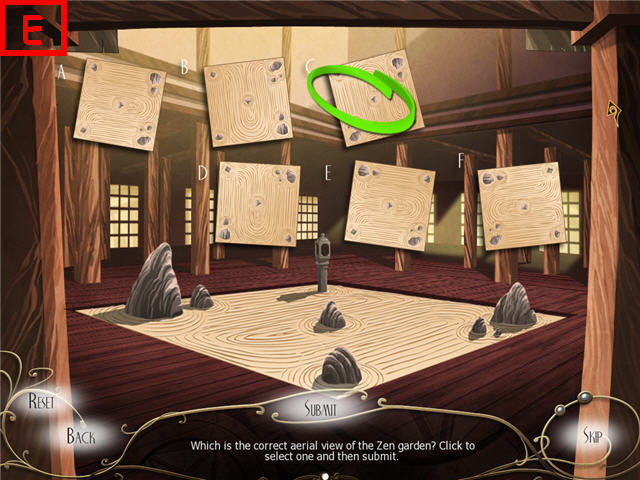
- Click on the correct aerial view of the Zen garden and click submit. See screenshot for solution (E).
- Click on the center windows across the Zen garden twice to enter the bridal suite.

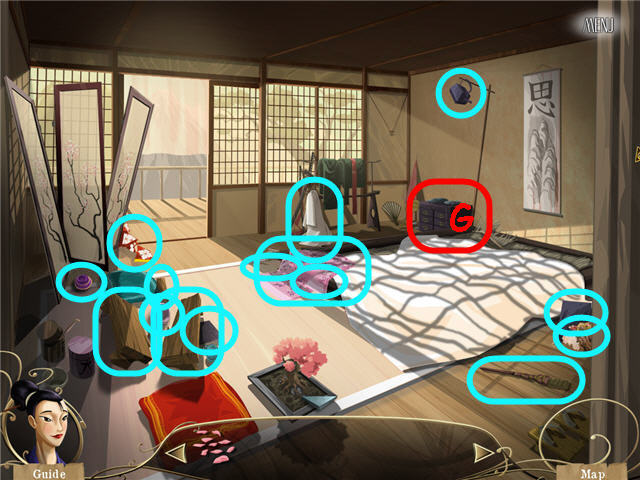
- Tidy up the room by picking up all the items marked in cyan in the screenshot.
- Get the PART OF KIMONO (3 of them), TEAPOT, TABLE, BOWL (2 of them), TEAPOT STAND, INCOMPLETE INCENSE HOLDER, INCENSE STICK, EXTINGUISHED TORCH, MEAL and EMPTY BENTO.
- Click on the room divider to straighten.
- In inventory, combine the INCENSE STICK and the INCOMPLETE INCENSE HOLDER to get an INCENSE HOLDER.
- In inventory, combine the MEAL and the EMPTY BENTO to get the FULL BENTO.
- Examine the nightstand (G) to trigger a puzzle.

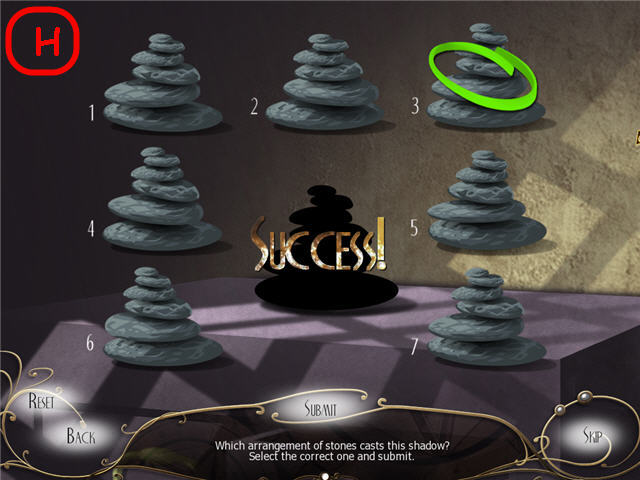
- Choose the stone arrangement that casts the shadow in the center. See screenshot for solution (H).
- Back out to the Zen garden.
- Use the EXTINGUISHED TORCH on the burning lantern to get a BURNING TORCH.
- Back out to the exterior.

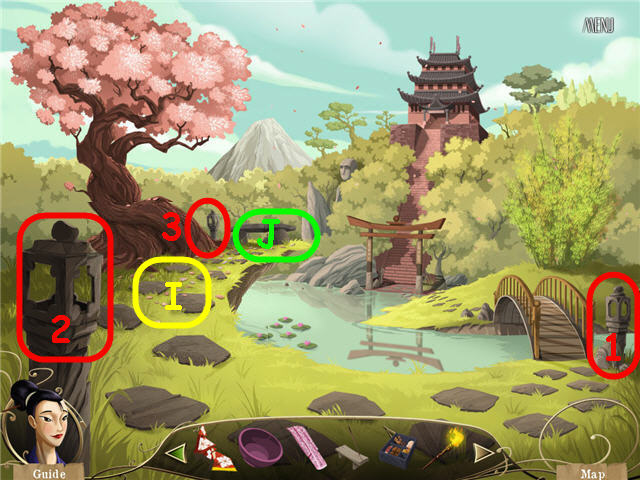
- Light the lanterns with the BURNING TORCH in the correct order.
- Solution: Light the far right, lower left and the one by the bench.
- Take the PETALS (I).
- Click on the bench (J) to trigger a puzzle.

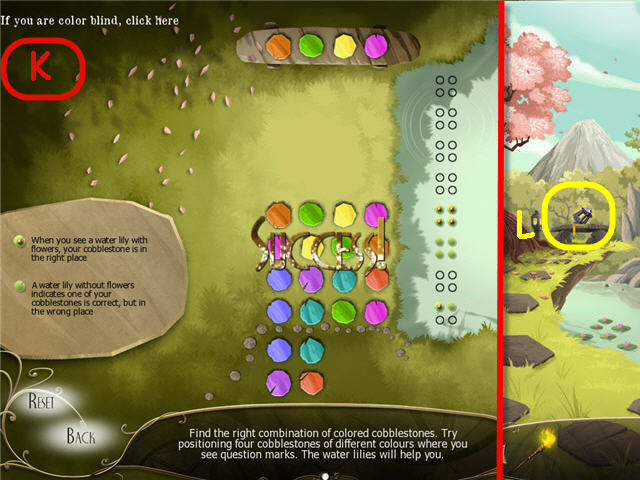
- Find the correct combination of cobblestones by placing them on the question marks.
- Use the guide on the right to see which ones are in the correct spot.
- The solution is random. See screenshot (K) for my solution.
- Take the OIL LAMP (L).
- Head to the Zen garden and enter into the middle windowed doors to the bridal suite.

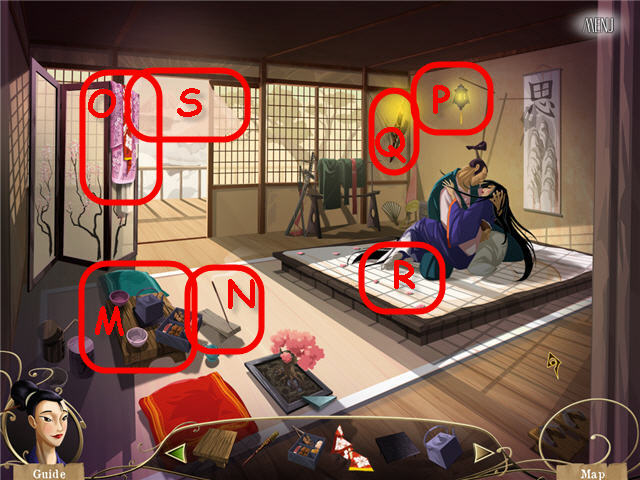
- Place the items back in the room in the proper places.
- Click on the bed anytime to see the proper placement of items.
- Place the TABLE (M) then place the TEAPOT STAND, TEAPOT, both BOWLS and FULL BENTO on the TABLE.
- Place the INCENSE HOLDER next to the table (N) and use the BURNING TORCH to light it.
- Hang the white, pink and then the red PART of KIMONO on the room divider (O).
- Place the OIL LAMP over the bed (P) and light it with the BURNING TORCH.
- Hang the BURNING TORCH on the wall (Q).
- Place the PETALS on the bed (R).
- Click on the curtains (S).
Chapter 3 – Samuel Murray

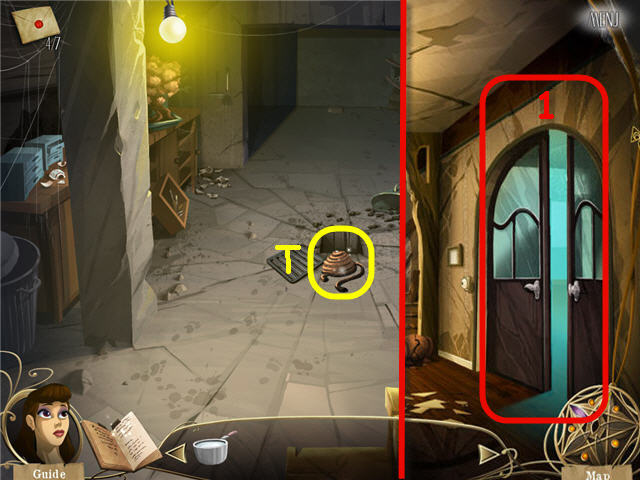
- Take the ROPE (T).
- Exit the basement and back to the main hall.
- Enter into the dining room (1) on the right.

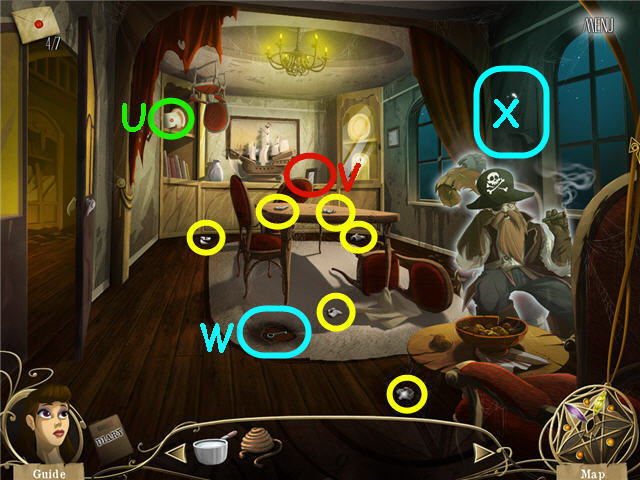
- Take the ENVELOPE 5 OF 7 (U).
- Pick up the 6 PIECES OF VASE (in yellow) to get a VASE.
- Take the PICTURE FRAME (V).
- Place the VASE where the picture frame was.
- Use the SAUCEPAN FULL OF WATER on the fire and take the DISPLAY CABINET KEY (W).
- Place the PICTURE FRAME on the wall (X).

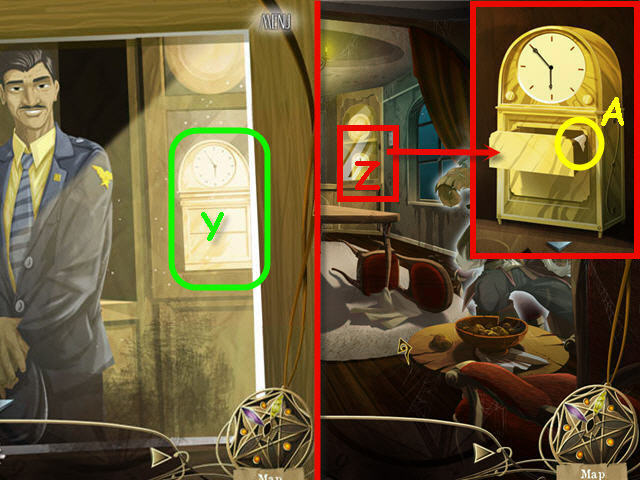
- Click on the blacked out clock face (Y) and note the time; 5:55.
- Use the DISPLAY CABINET KEY on the cabinet (Z).
- Examine the opened cabinet.
- Set the clock to 5:55 by using the click knobs to the left and right of the face.
- Take the TORN PAGE (A) and back out.

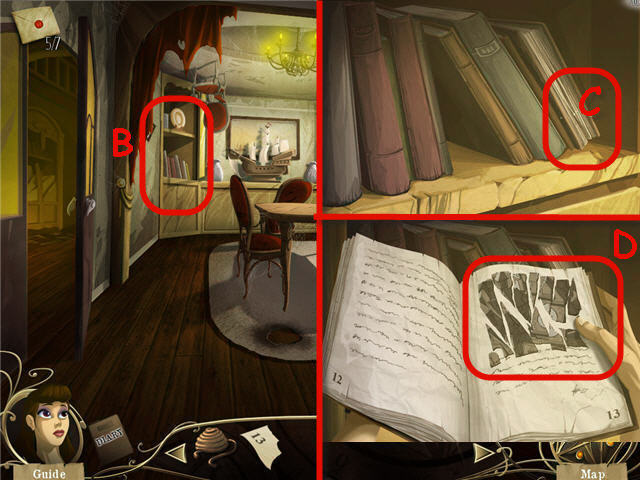
- Examine the bookshelf on the left (B).
- Place the TORN PAGE on the right book (C).
- Click on the picture to trigger a puzzle (D).

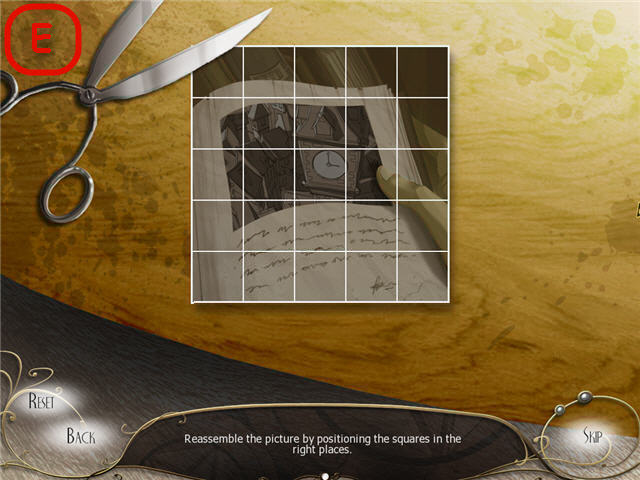
- Arrange the photo pieces to complete the picture.
- Click on any two pieces to swap them. See screenshot for solution (E).
- Note the time on the clock in the photo; 3:00.
- Back out and examine the clock in the cabinet.

- Set the clock to the time from the photo in the book.
- Solution: 3 o’clock (F).
- Take the BOAT MAST (G).
- Back out and examine the model ship.

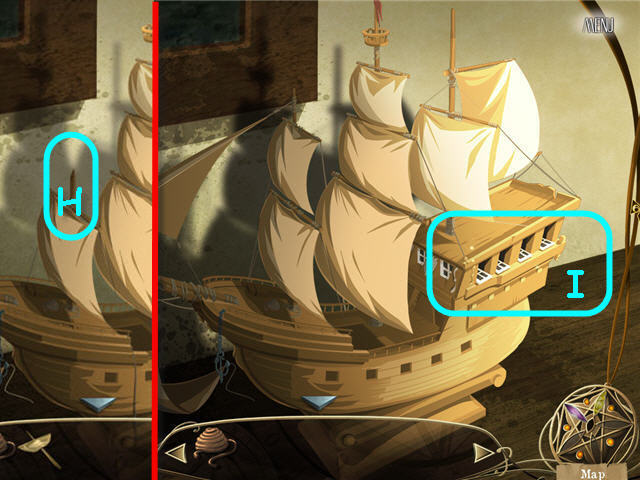
- Place the BOAT MAST on the ship (H).
- Examine the ships windows (I) to trigger a puzzle.

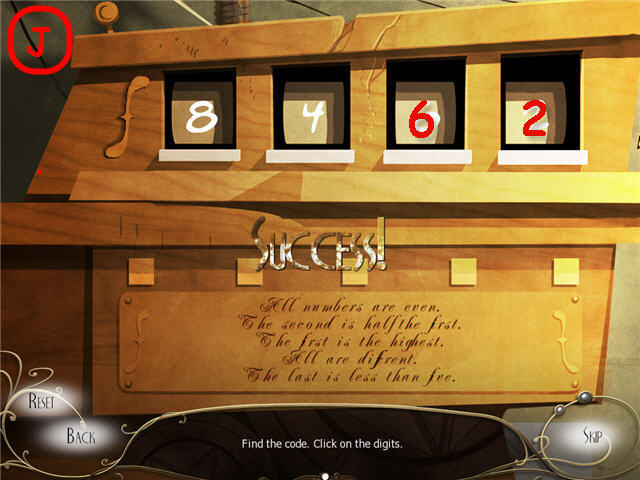
- Find the correct code by deciphering the verse underneath.
- Solution: 8-4-6-2. See screenshot for solution (J).
- Take the TREASURE.
- Back out and give the TREASURE to Samuel.

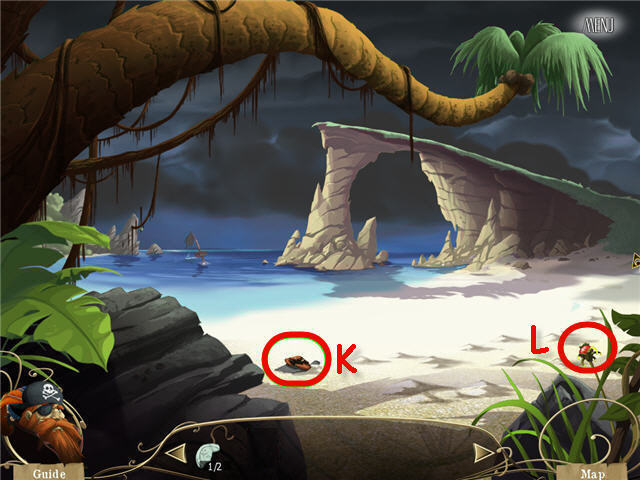
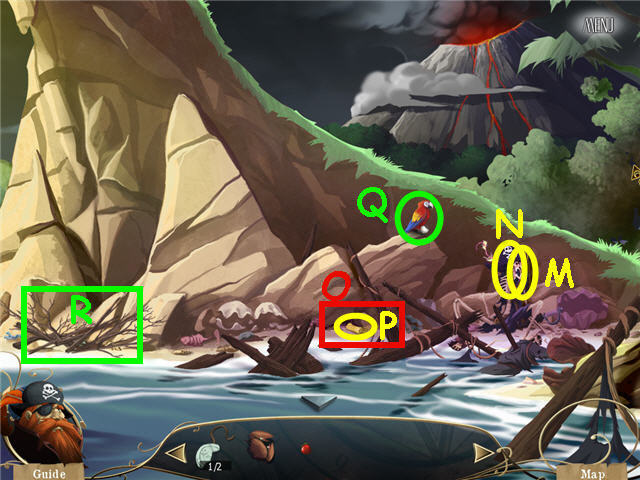
- Catch the CRAB (K) as he runs across the rock.
- Take the BERRY (L).
- Head right to the creek.


- Take the STRAP (M) and the HOLLOW REED (N).
- In Inventory, combine the BERRY and the HOLLOW REED to get a BLOWPIPE.
- Place the CRAB in the hole (O) and take the TREASURE MAP (P).
- Click on the parrot (Q) to shoo him away.
- Examine the pile of branches (R) twice to trigger a puzzle.

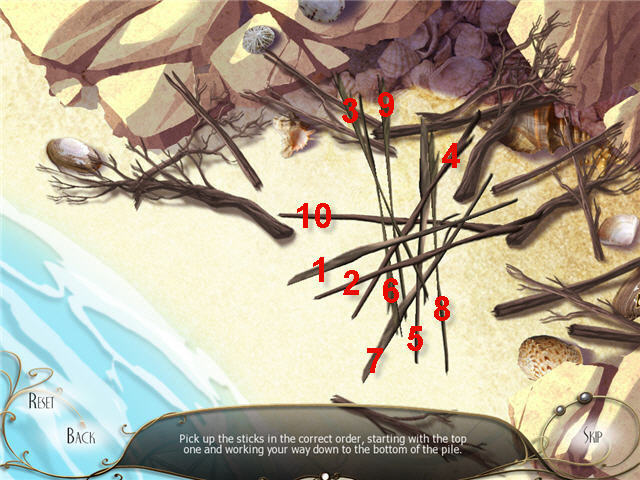
- Remove the sticks by taking the top one off till you reach the bottom.
- The layout of the sticks is random. See screenshot for my solution.
- Take the SHOVEL HANDLE when complete.
- Back out to the beach.

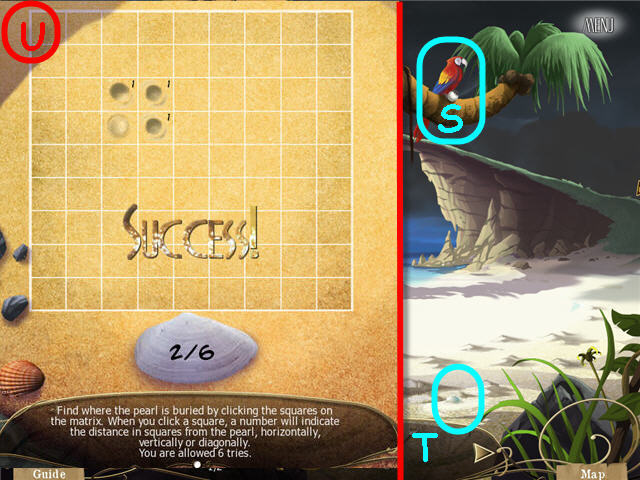
- Use the BLOWPIPE on the parrot (S).
- Click on the dropped pearl (T) to trigger a puzzle.
- Find the buried pearl by clicking on a square.
- The number on the square indicates how many squares away the pearl is located. You get 6 tries and then it will reset. See screenshot (U) for my solution.
- Automatically get the PEARL when complete.
- Head out to the seafloor.

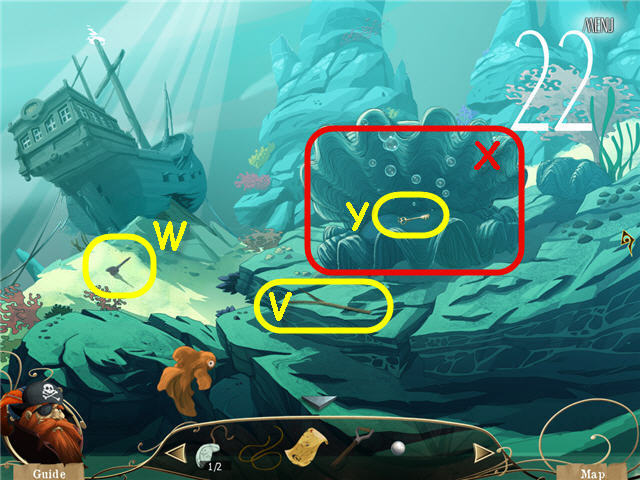
- Take the STICK (V) and the SHOVEL HEAD (W).
- Use the STICK to prop up the shell (X) when it opens.
- Place the PEARL on the key (Y) and automatically get the KEY.
- If you run out of air before you are finished, you will return to the beach and can try again.
- Return to the beach when complete.
- In Inventory, combine the SHOVEL HEAD and the SHOVEL HANDLE to get a SHOVEL.
- Place the TREASURE MAP on the beach to trigger a puzzle.

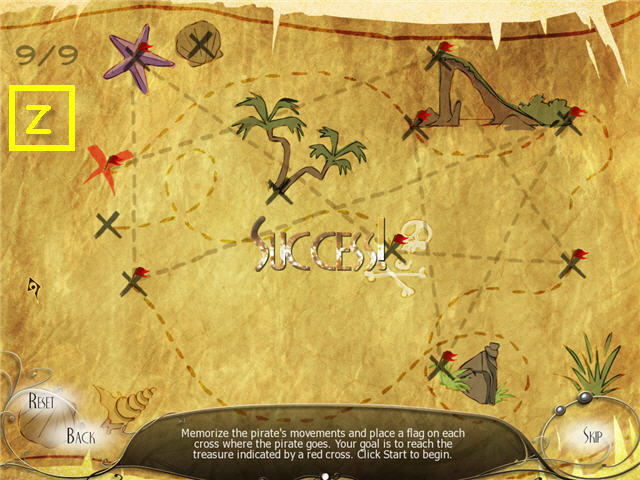
- Watch the pirate and duplicate his movements.
- See screenshot (Z) for my solution, the movements are random.
- Use the SHOVEL on the X in the sand and get a BROKEN SHOVEL.
- In inventory, combine the BROKEN SHOVEL and STRAP to get a STRENGTHENED SHOVEL.
- Use the STRENGTHENED SHOVEL on the X in the sand.

- Use the KEY on the chest.
- Examine the chest; take the HALF LOCKET (A).
- Take the HOOK (B).
- In inventory, combine the HOOK and ROPE to get a GRAPPLE.
- Exit to the hall.
Chapter 4 – Neferes

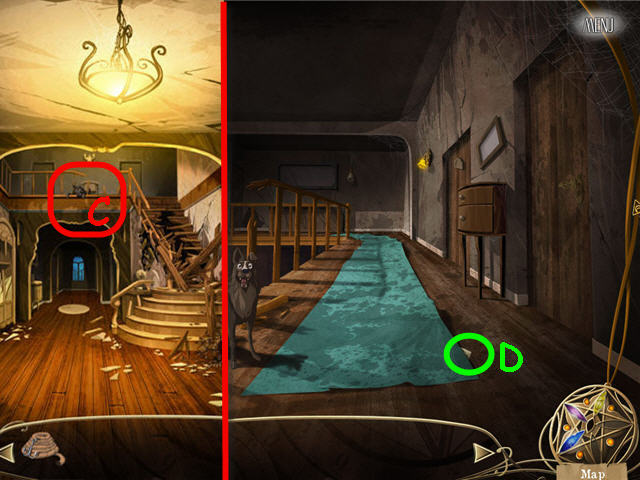
- Use the GRAPPLE on the balcony (C); climb up.
- Take the ENVELOPE 6 OF 7 (D).
- Head right into the bathroom.

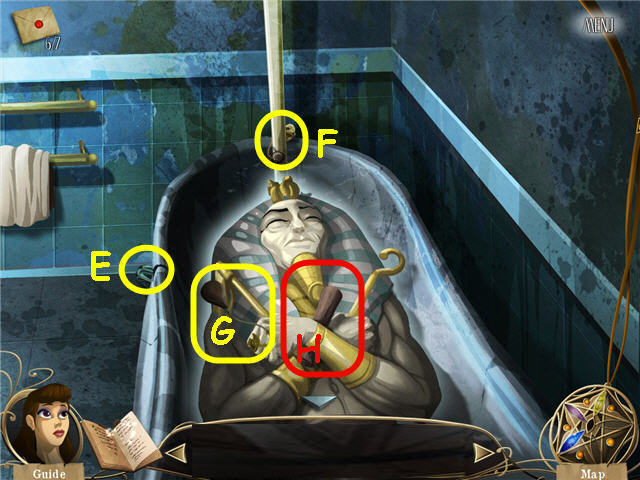
- Open the shower curtain and examine the bathtub.
- Take the INCOMPLETE GREEN BOTTLE (E), INCOMPLETE BLUE BOTTLE (F) and INCOMPLETE RED BOTTLE (G).
- Examine the scroll in the pharaoh’s hand.
- Exit out of the tub.

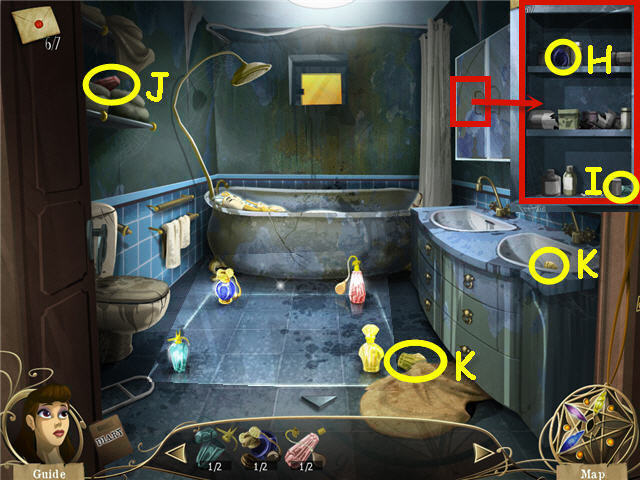
- Examine the cabinets; open the left cabinet door.
- Take the INCOMPLETE BLUE BOTTLE (H) to get a BLUE BOTTLE.
- Take the INCOMPLETE GREEN BOTTLE (I) to get a GREEN BOTTLE.
- Back out of the close-up.
- Take the INCOMPLETE RED BOTTLE (J) to get a RED BOTTLE.
- Take the 2 INCOMPLETE YELLOW BOTTLES (K) to get a YELLOW BOTTLE.
- Place the bottles on the floor in the order of the parchment in the pharaoh’s hand.
- Clockwise from the upper left; BLUE BOTTLE, RED BOTTLE, YELLOW BOTTLE and GREEN BOTTLE. See screenshot for layout.
- Click on the floor to trigger a puzzle.


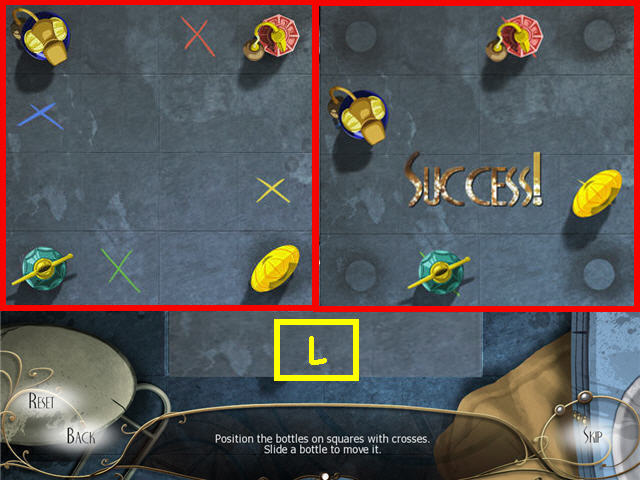
- Move the bottles to their matching colored cross by sliding the bottles. See screenshot for solution (L).
- Solution: Move the perfume bottles in the following order; Yellow – Up, Left, Down and Right; Green – Right; Blue – Down; Red – Left; Green – Left; Blue – Up; Red – Right; Green – Up; Red – Left; Green – Down.

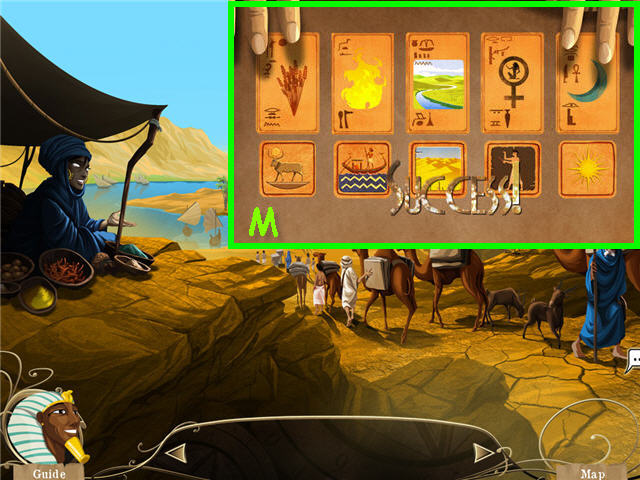
- Speak to the merchant and examine her area.
- Click on the area in front of her to trigger a puzzle.
- Match the bottom pictures with the cards. The clue is to explain life’s secrets.
- Solution: Life’s secret is conflict, so the pictures should depict opposites. See screenshot for solution (M).
- Get the MAZE KEY when complete.
- Head to the pyramid entrance.

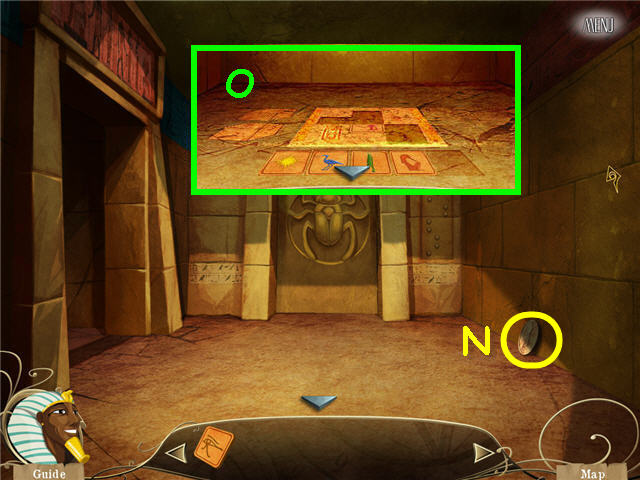
- Take the HATHOR medallion (N).
- Enter the key room on the left.
- Examine the floor (O).
- Place the MAZE KEY on the bottom empty tile space to trigger a puzzle.

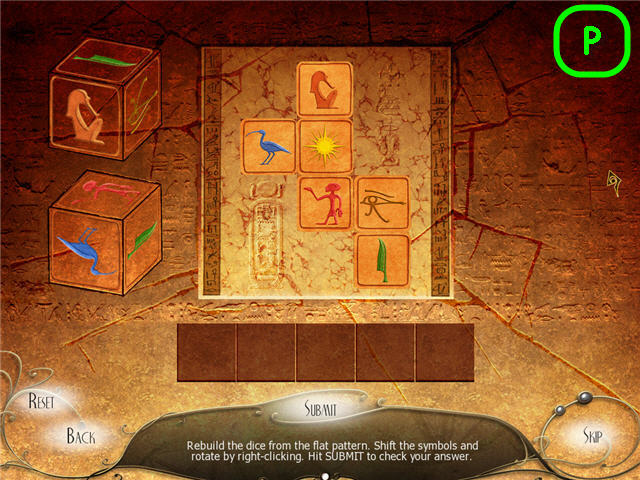
- Place the tiles underneath the grid to the correct spot on the grid to reconstruct the sides of the cubes on the left.
- See screenshot for solution (P).
- Click on the pedestal in the center of the room when complete.

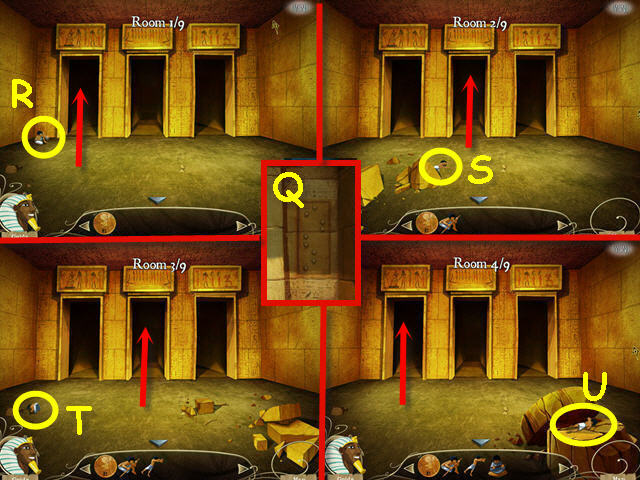
- The code map (Q) for the maze is located on the right side of the entrance. The position of the dots is the key to which doorway you enter.
- Enter the maze.
- Take the FIGURINE (R); head into the left doorway.
- Take the FIGURINE (S); head into the middle doorway.
- Take the FIGURINE (T); head into the middle doorway.
- Take the FIGURINE (U); head into the left doorway. See next screenshot for next moves.

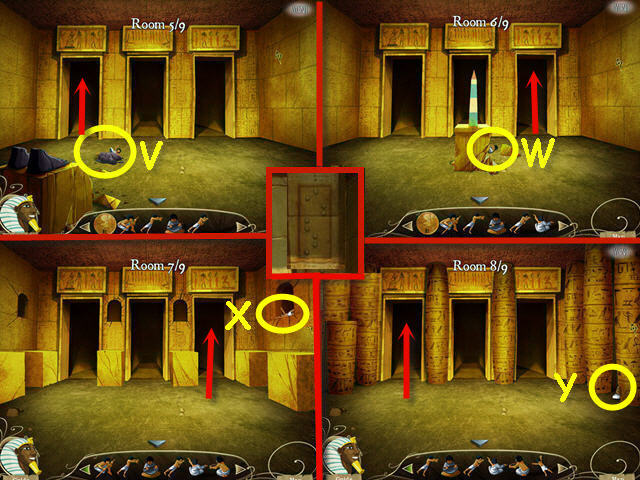
- Take the FIGURINE (V); head into the left doorway.
- Take the FIGURINE (W); head into the right doorway.
- Take the FIGURINE (X); head into the right doorway.
- Take the FIGURINE (Y); head into the left doorway. See next screenshot for next move.

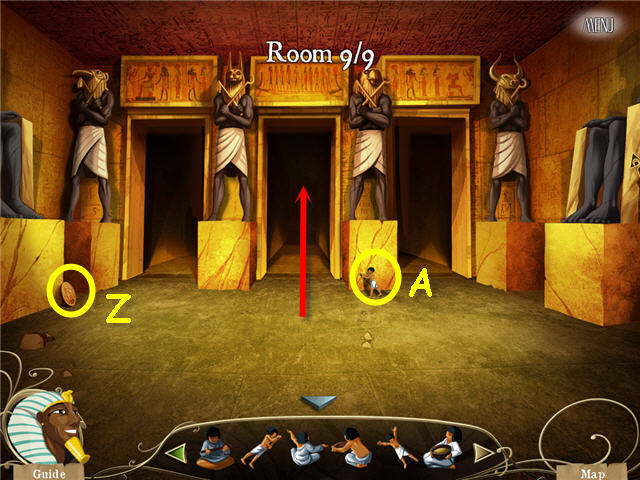
- Take the AMON medallion (Z).
- Take the FIGURINE (A); head into the middle doorway.
- Examine the boat in the left corner of the room.

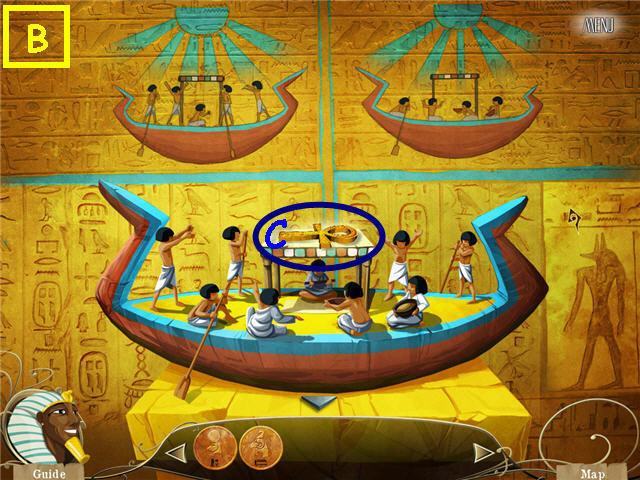
- Place the FIGURINES in the boat as depicted on the drawings above the boat.
- See screenshot (B) for placement.
- Take the ankh KEY (C).
- Back out of the close-up.
- Examine the ankh impression on the left doorway; place the KEY in the ankh indentation.
- Head left into the tomb.

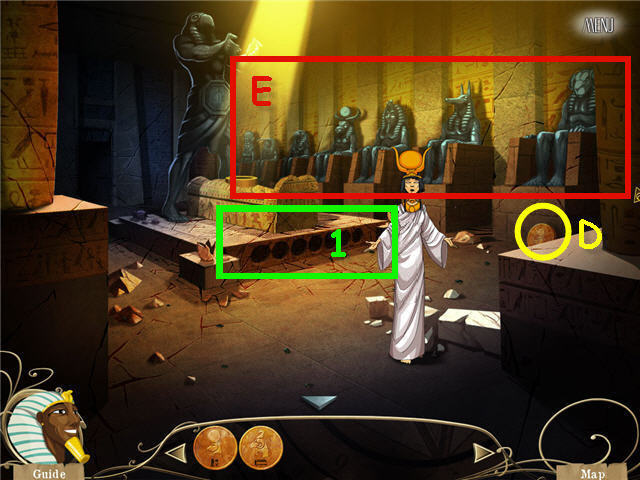
- Take the ISIS (D) medallion.
- Click on each statue (E) to note the order of the gods.
- Examine the base of the sarcophagus (1).

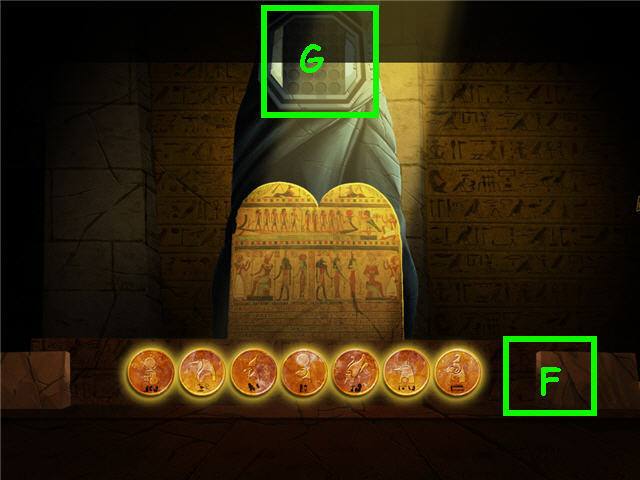
- Arrange the medallions, using the three in inventory also, in the order of the statues along the right wall of the room.
- Solution: From left, ISIS, Thot, Horus, HATHOR, Osiris, Anubis and AMON. See screenshot (F) for solution.
- Examine the mechanism panel (G) on the top of the statue to trigger a puzzle.

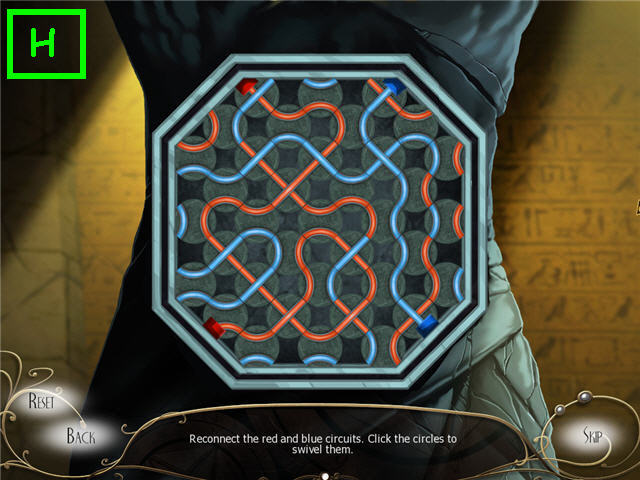
- Connect the red and the blue circuits with a continuous flow by rotating the circles.
- See screenshot (H) for solution.

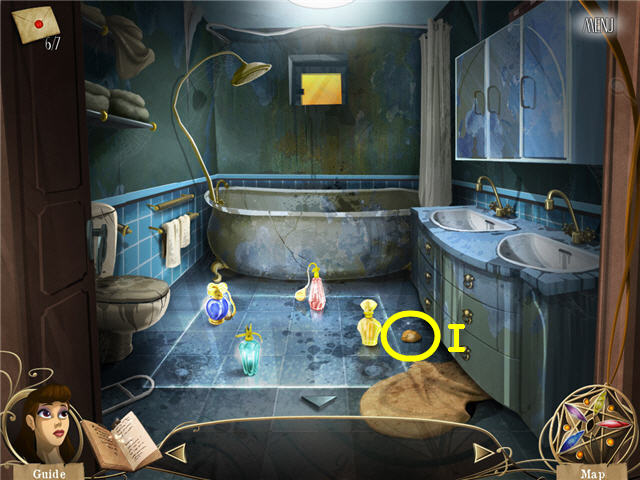
- Take the OCHRE CHALK (I).
- Back out of the room.
Chapter 5 – The Monk

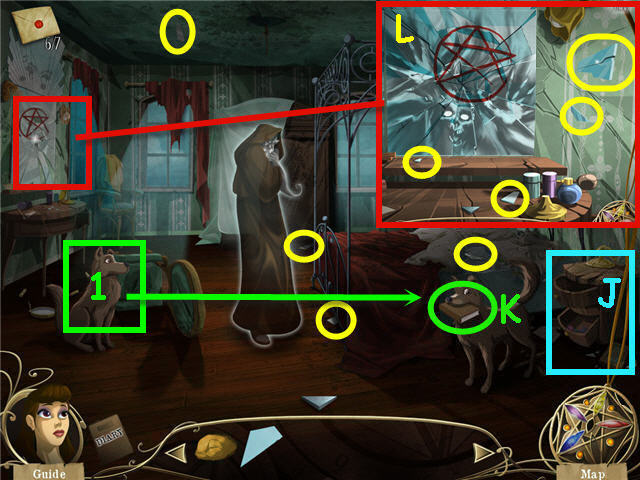
- Enter the bedroom.
- Examine the nightstand (J) and click on the drawer.
- Speak to the monk.
- Click on Isaac, the dog (1) and take the BIBLE (K).
- Give the BIBLE to the monk and get a MIRROR FRAGMENT.
- Click on the bedspread to move it.
- Collect the 4 MIRROR FRAGMENTS circled in yellow.
- Examine the mirror and take the remaining 4 MIRROR FRAGMENTS circled in yellow (L).
- Place the 9 MIRROR FRAGMENTS on the matching shaped slots on the mirror.
- Click on the mirror when complete to trigger a puzzle.

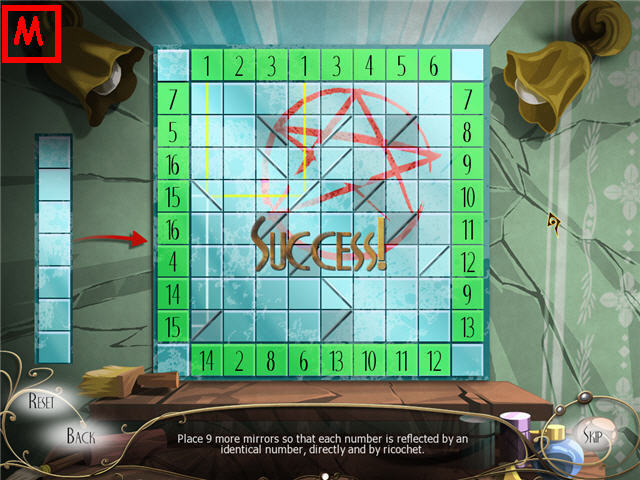
- Place the mirrors on the left on the grid so that each number is reflected by an identical number.
- See screenshot (M) for solution.

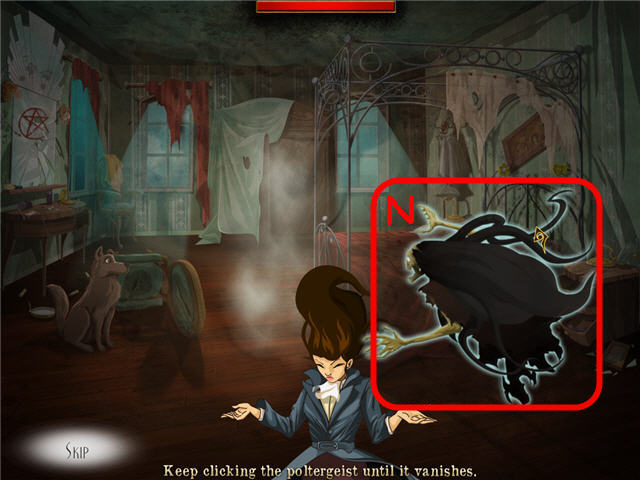
- Click on the poltergeist (N) till he disappears.
- The poltergeists health meter is located on the top of the screen.

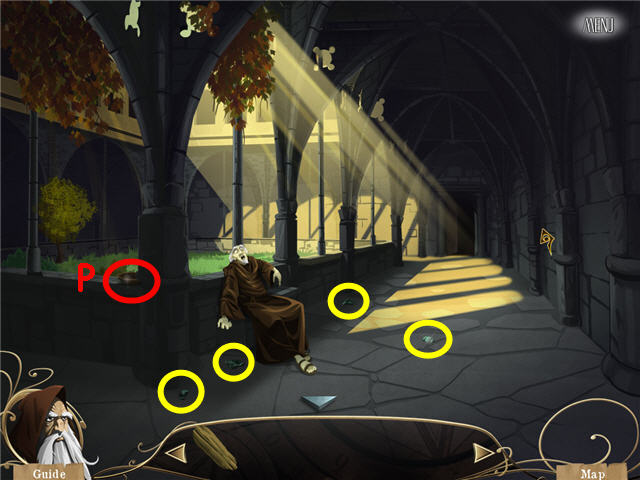
- Head forward to the cloister and speak to the abbot.
- Take the PLATE (P).
- Pick up the bottle fragments (in yellow) and get an EMPTY BOTTLE.
- Head forward to the jail.

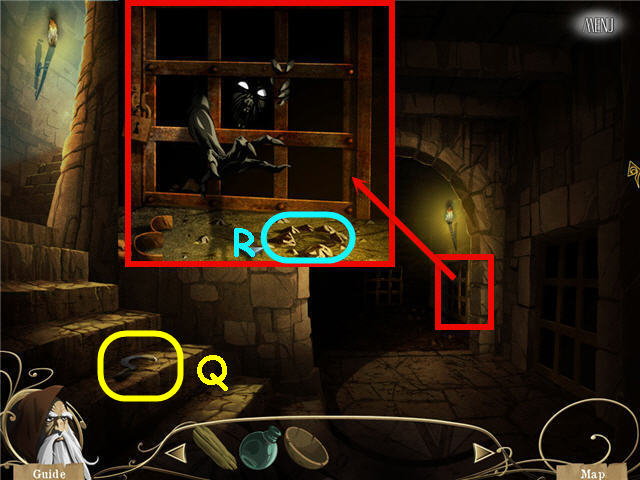
- Take the SICKLE (Q).
- Examine the jail cell and speak to the prisoner.
- Place the PLATE on the ground (R).
- Head back to the countryside to get a plant that looks like a snake head.

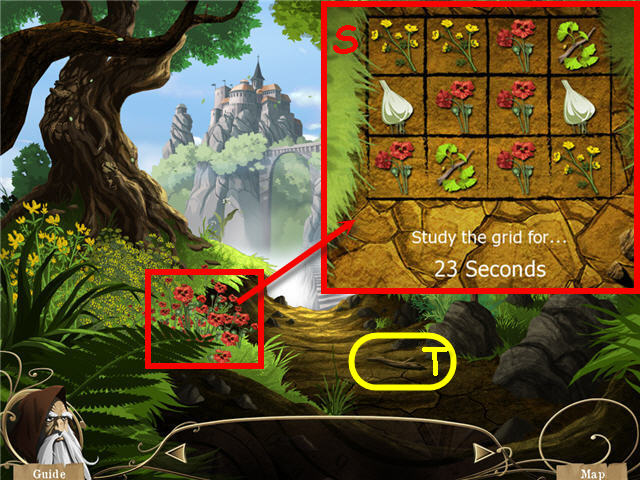
- Use the SICKLE on the red flower to trigger a puzzle.
- Study the grid (S) and then click on the squares that match the question asked. The placements are random.
- Take the PIECE OF WOOD (T).
- Use the SICKLE on the PIECE OF WOOD to get a PESTLE.
- Head to the jail and give the prisoner the RED FLOWER.
- Place the RED FLOWER in the plate.
- Use the PESTLE on the plate to trigger a puzzle.

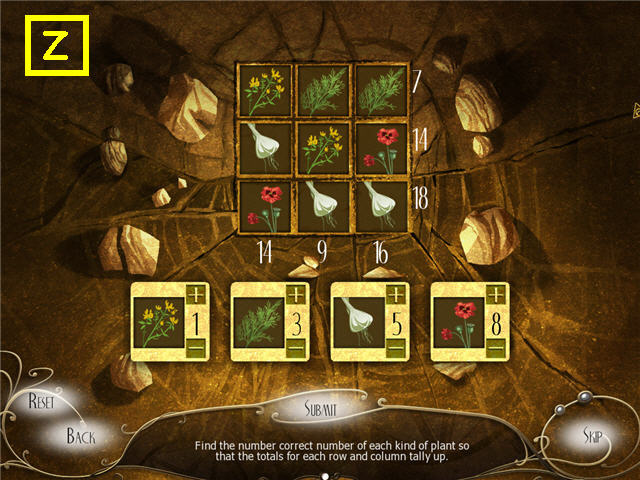
- Find the value of each plant so that they add up to the numbers on the right and bottom.
- Enter the value in the tiles below the grid and click submit.
- See screenshot (U) for my solution, the puzzle is random.
- Head back to the countryside to get a plant that looks like a fan.

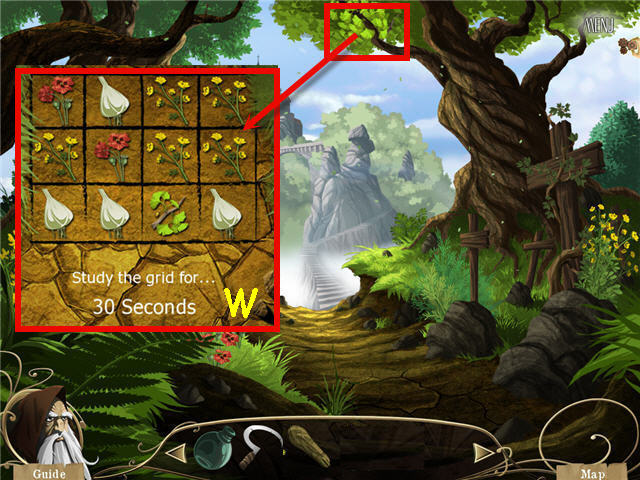
- Use the SICKLE on the fan shaped plant to trigger a puzzle.
- Study the random grid (W) and answer the question.
- Get the BRANCH when complete.
- Head to the jail and hand the BRANCH to the prisoner.
- Place the BRANCH in the plate.
- Use the PESTLE on the plate to trigger a puzzle.

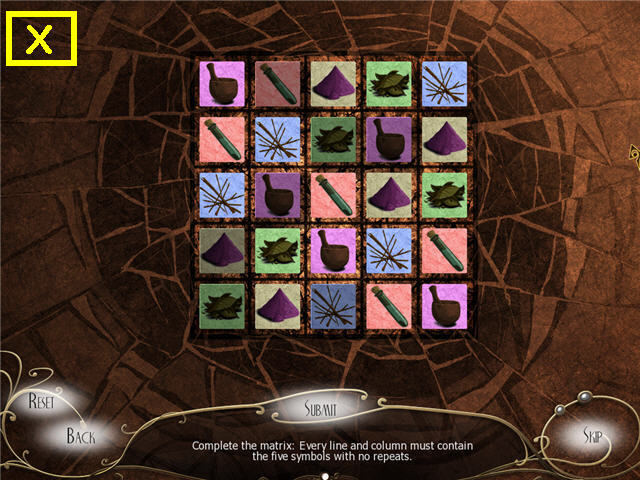
- Place the symbols on the grid so that there are no duplicates in any column or row.
- The original layout is random; see screenshot (X) for my solution.
- Head back to the countryside to get a foul smelling white plant. .

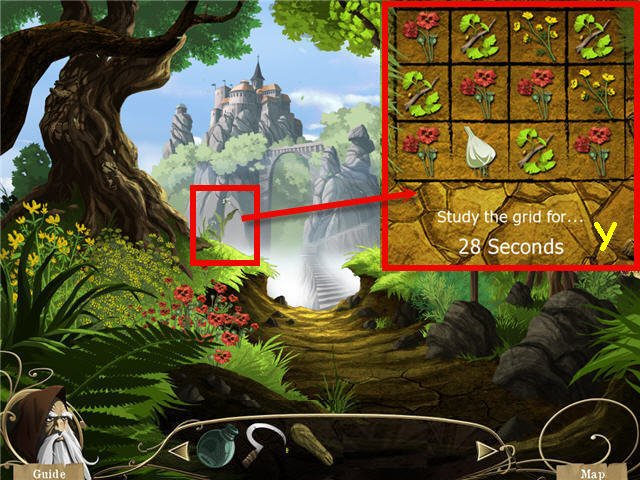
- Use the SICKLE on the white flower to trigger a puzzle.
- Study the random grid (Y) and answer the question.
- Get the STRONG SMELLING PLANT when complete.
- Head to the jail and hand the STRONG SMELLING PLANT to the prisoner.
- Place the STRONG SMELLING PLANT in the plate.
- Use the PESTLE on the plate to trigger a puzzle.


- Find the value of each plant so that they add up to the numbers on the right and bottom.
- Enter the value in the tiles below the grid and click submit.
- See screenshot (Z) for my solution, the puzzle is random.
- Head back to the countryside.

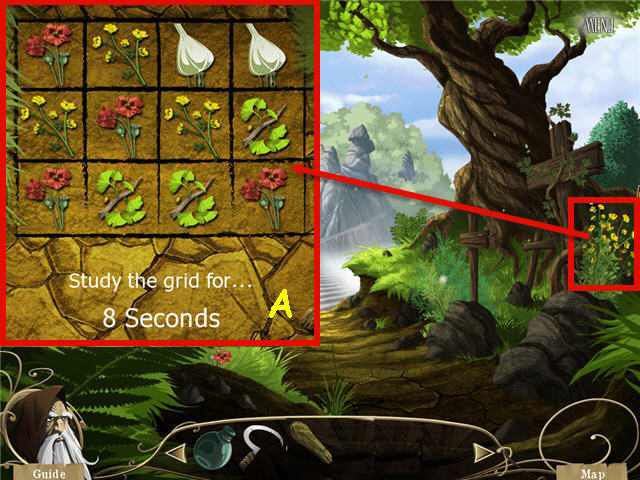
- Use the SICKLE on the yellow flower by the crosses to trigger a puzzle.
- Study the random grid (A) and answer the question.
- Get the YELLOW FLOWER when complete.
- Head to the jail and hand the YELLOW FLOWER to the prisoner.
- Place the YELLOW FLOWER in the plate.
- Use the PESTLE on the plate to trigger a puzzle.

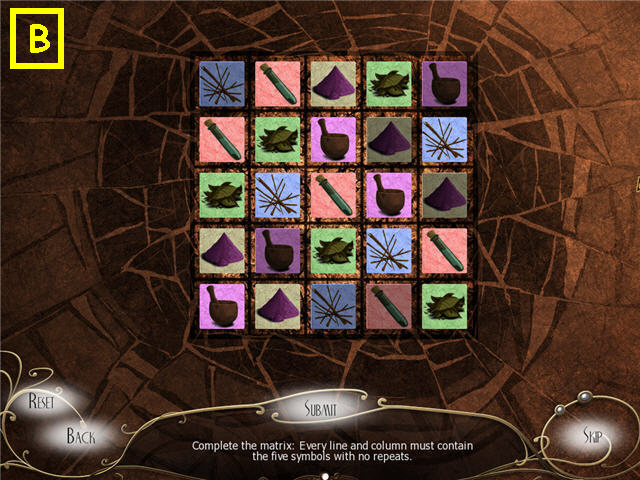
- Place the symbols on the grid so that there are no duplicates in any column or row.
- The original layout is random; see screenshot (B) for my solution.

- Take the PREPARATION (C).
- Give the PREPARATION to the prisoner.
- Give the EMPTY BOTTLE to the prisoner.
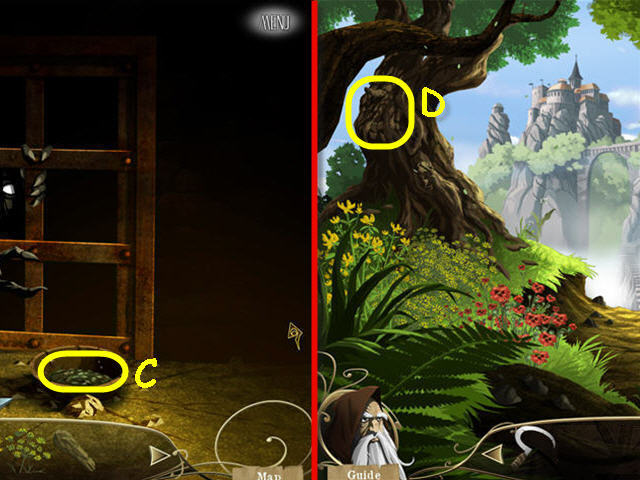
- Head to the countryside to get a cork.
- Use the SICKLE on the tree (D) to get a CORK.
- In Inventory, use the SICKLE on the CORK to get a CAP.
- Head back to the jail.
- Give the prisoner the CAP and get the BOTTLE CONTAINING CURE.
- Head back to the monk.
- Give the BOTTLE CONTAINING CURE to the abbott.

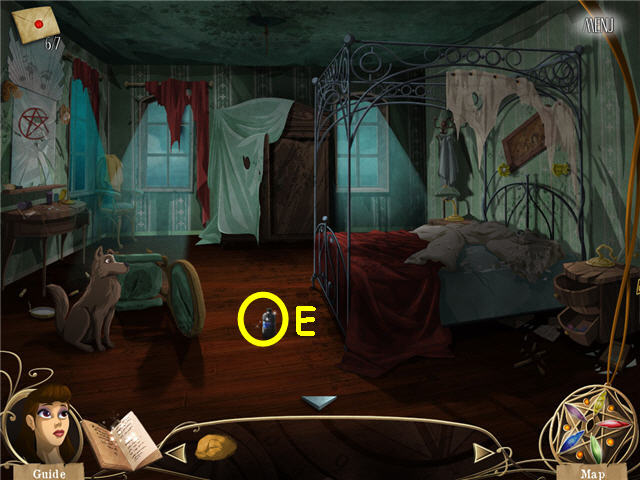
- Take the FLASK OF HOLY WATER (E).
- Exit the room and walk to the attic door.
Chapter 6 – Nathan

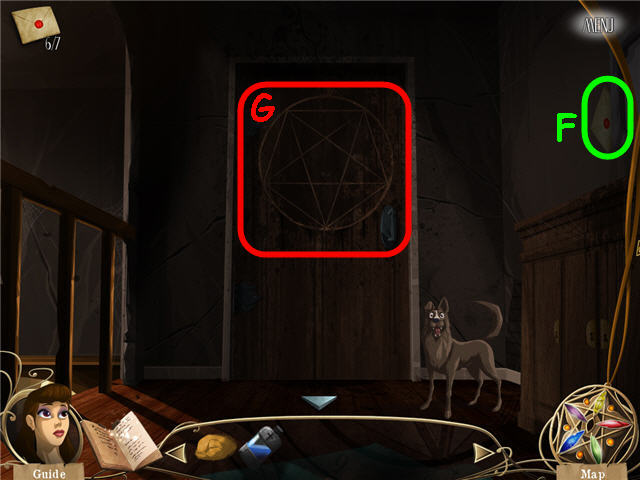
- Take the ENVELOPE 7 OF 7 (F).
- Use the OCHRE CHALK on the pentagram (G) to trigger a puzzle.

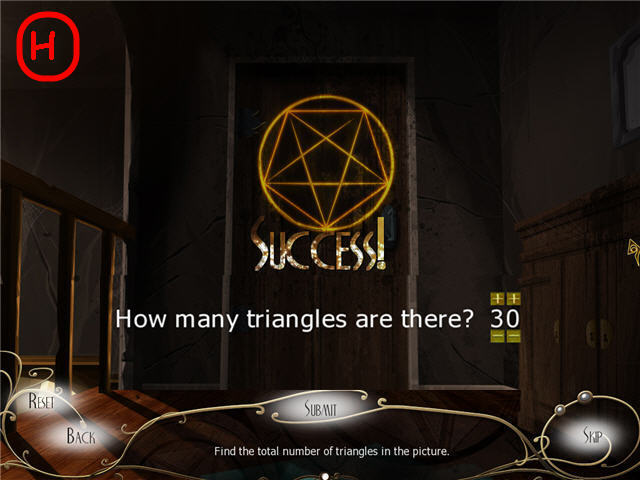
- Enter the correct number of triangles found in the symbol.
- Note that one of the lines in the pentagram is not complete.
- Solution: 30. See screenshot (H) for solution.
- Use the FLASK OF HOLY WATER on the symbol.
- Walk to the attic and automatically get the SOUL PENDENT.

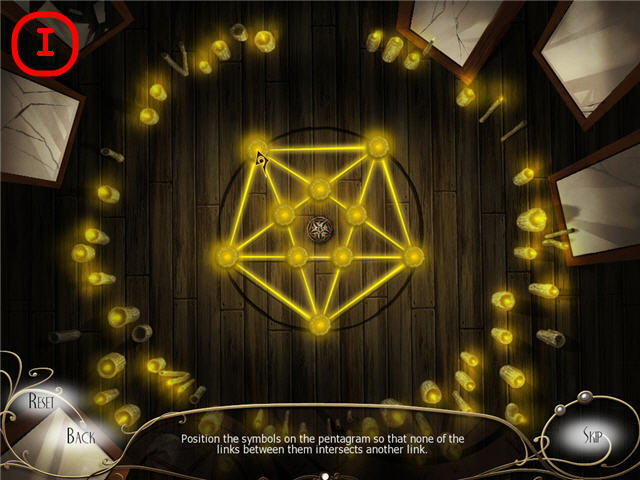
- Examine the ritual ring.
- Place the SOUL PENDANT in the center to trigger a puzzle.
- Detangle the lines so that none of them cross and they reconstruct the pentagram symbol. See screenshot (I) for solution.

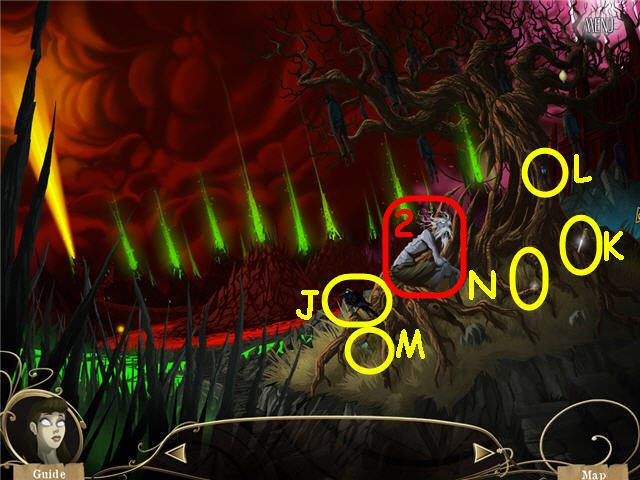
- Speak with Seth (2).
- Take the INJURED CROW (J), KNIFE (K). BEETLE (L), EMPTY HOURGLASS (M) and INCOMPLETE WALKING STICK 1 of 3 (N).
- Head straight twice to the river.

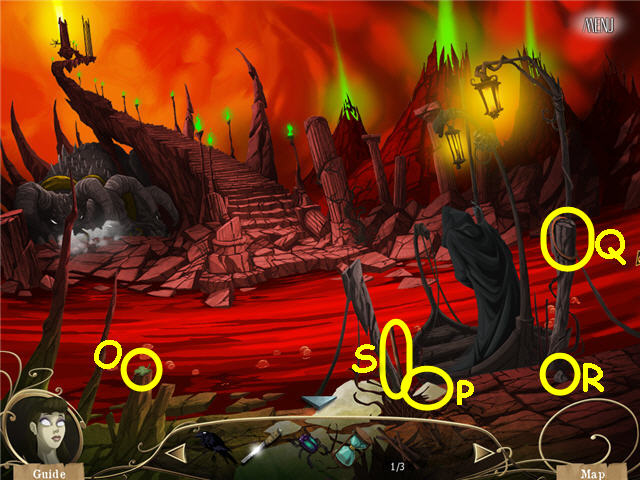
- Take the FOUR LEAF CLOVER (O), SAND (P), STRING (Q), STONE (R), and INCOMPLETE WALKING STICK 2 OF 2 (S) .
- In Inventory, combine the SAND and the EMPTY HOURGLASS to get an HOURGLASS.
- Back out to soul valley.

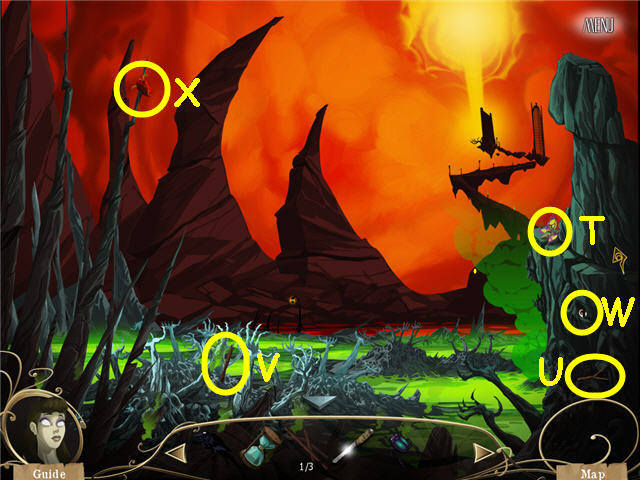
- Take the BUTTERFLY WING (T), STICK (U), and the INCOMPLETE WALKING STICK 3 of 3 (V) to get a WALKING STICK.
- Use the KNIFE on the cliff to get an EYEBALL (W).
- Take the HEART (X).
- In inventory, combine the STICK, STRING and STONE to get an ARMED SLINGSHOT.
- Back out to the tree of the hanged.

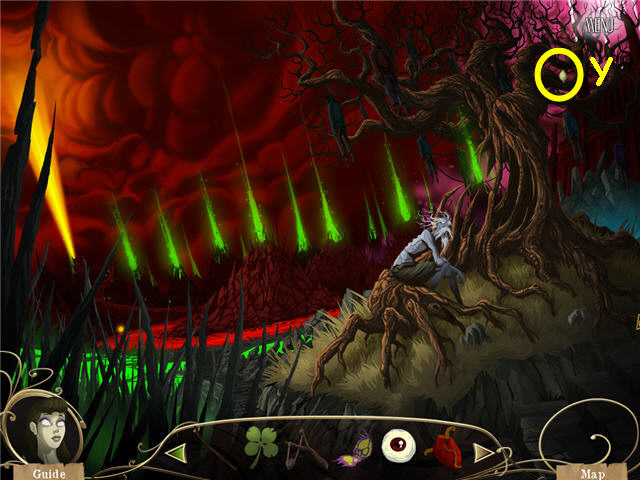
- Used the ARMED SLINGSHOT on the lemon (Y) and take the fallen LEMON from the ground.
- Head to soul valley.

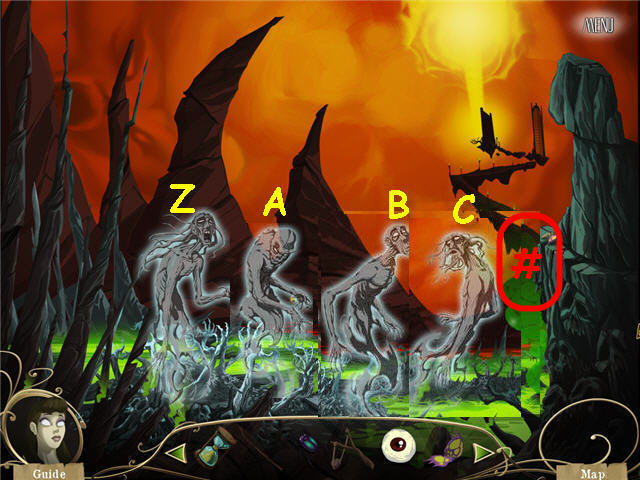
- Click on the hands on the bottom to raise a soul (Z) and give the soul a HEART, a FOUR LEAF CLOVER and a BEETLE.
- Click on the hands to raise a soul (A) and give him an EYEBALL, INJURED CROW and an HOURGLASS.
- Click on the hands to raise a soul (B) and give the soul a BUTTERFLY WING and the WALKING STICK.
- Use the LEMON on the foul smoke (#) to get a ROTTEN LEMON.
- Give the ROTTEN LEMON to the soul.
- Click on the hands to raise a soul (C).
- Head back to the tree of the hanged and speak to Seth.
- Automatically get a GOLD COIN.
- Head forward twice to the River Styx.

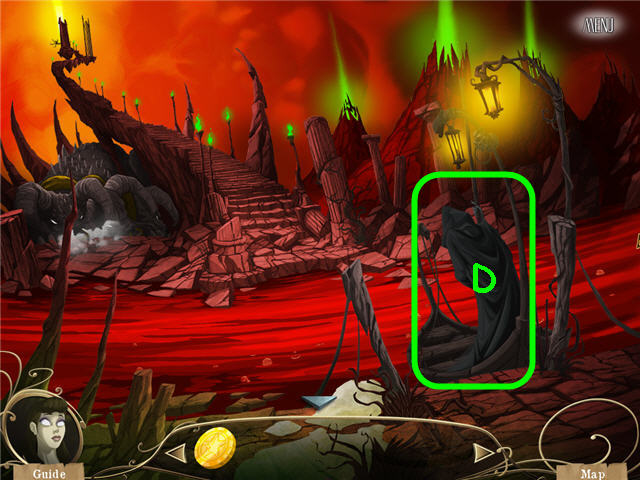
- Give the GOLD COIN to the boat man (D).
- Click on the wall on the top of the stairs to trigger a puzzle.

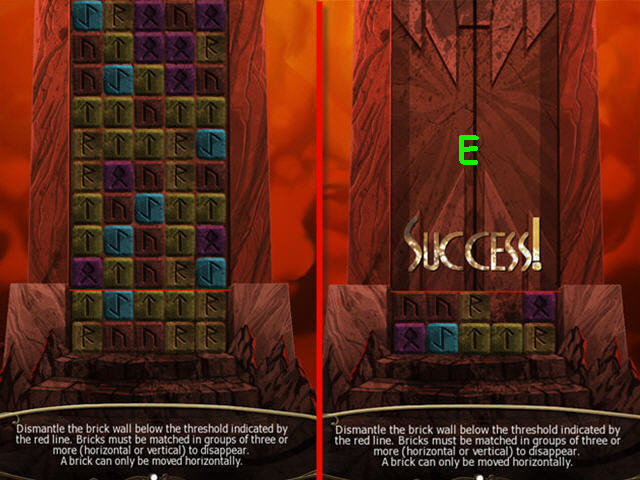
- Click and drag a block to make sets of three blocks to remove them.
- All bricks must be removed to below the red line to complete the puzzle (E).
- You may only move a brick horizontally but you can move a brick more than one space over and you can drop them into an empty space to fall to a lower column.
- Congratulations! You have successfully completed Age of Enigma: The Secret of the Sixth Ghost.




 Emberwing: Lost Legacy Walkthrough, Guide, & Tips
 Gravely Silent: House of Deadlock Walkthrough, Guide, & Tips
 Sunken Secrets Tips and Tricks, Guide, & Tips
 Phenomenon Meteorite Walkthrough, Guide, & Tips
 Bridge to Another World: The Others Walkthrough, Guide, & Tips