Phenomenon Meteorite Walkthrough, Guide, & Tips
Phenomenon Meteorite Walkthrough

Welcome to the Phenomenon: Meteorite Walkthrough
Discover the secrets of your family’s past on a mystical island!
Whether you use this document as a reference when things get difficult or as a road map to get you from beginning to end, we’re pretty sure you’ll find what you’re looking for here.
This document contains a complete Phenomenon: Meteorite game walkthrough featuring annotated screenshots from actual gameplay!
We hope you find this information useful as you play your way through the game. Use the walkthrough menu below to quickly jump to whatever stage of the game you need help with.
Remember to visit the Big Fish Games Forums if you find you need more help. Have fun!
This walkthrough was created by prpldva, and is protected under US Copyright laws. Any unauthorized use, including re-publication in whole or in part, without permission, is strictly prohibited.
General Tips

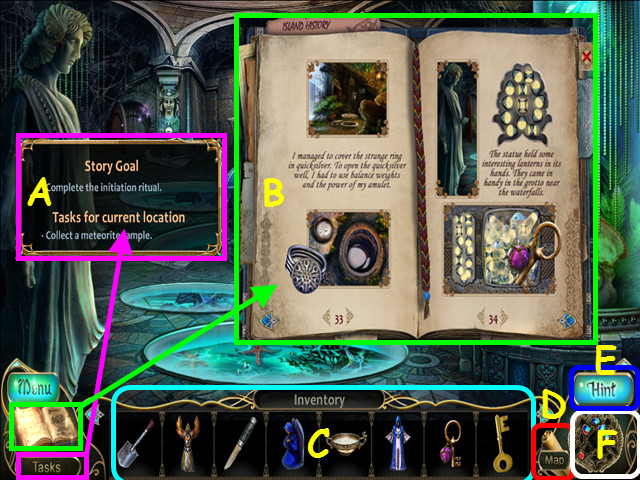
- Select the ‘Tasks’ button to see your current task (A).
- Look in your journal to read the island’s history, the adventure’s events, and diagrams (B).
- Your inventory (C) is located in the lower panel; select an item to use it.
- Select the scroll to view the map (D).
- Hints are unlimited, but you must wait for the meter to refill (E).
- Collect abilities to add gems to your Amulet of Elements. Use the Amulet on controllers to open new locations (F).

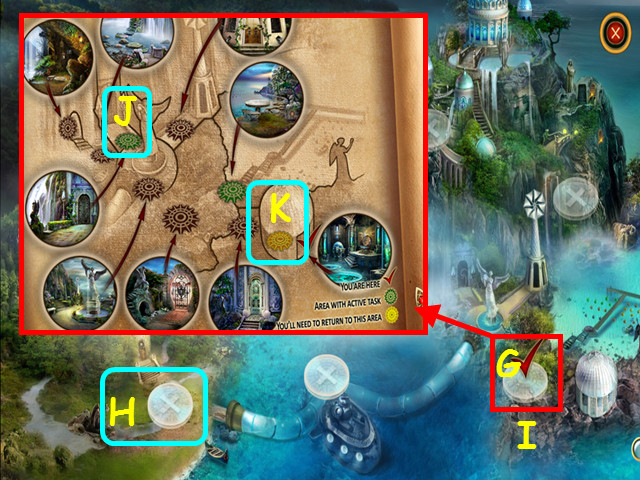
- Select the scroll from the menu bar to access the maps.
- A red check indicates your current location (G).
- An ‘X’ indicates a closed section (H).
- Select a white disc to open a secondary, close-up map (I).
- Green discs indicate a location with available tasks (J).
- Yellow discs indicate future tasks will be available (K).
- Select a disc to travel to that location.

- Hidden-object puzzles are referred to as ‘HOP’ in this guide.
- Mini-games and HOPs are sometimes randomized; your solution may vary.
- Items listed in yellow are hidden, or require addition actions to locate (L).
- Items listed in red are hidden by time (M).
- Select a time keeping device or method to time travel (N).
- Select an item in the list to play a word jumble on the analyzer instead of finding it in the scene (O).
Chapter 1: Returning Home

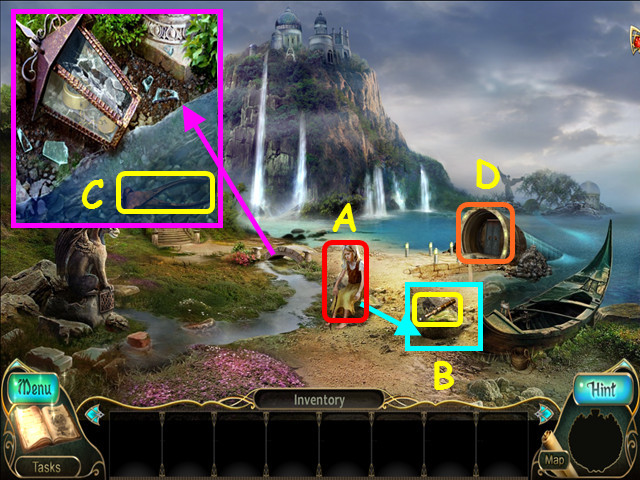
- You will have the option of some interactive help.
- Talk to Gloria (A).
- Take the TELESCOPE BODY (B).
- Look near the bridge and take the NIPPERS (C).
- Note the underwater tunnel (D).

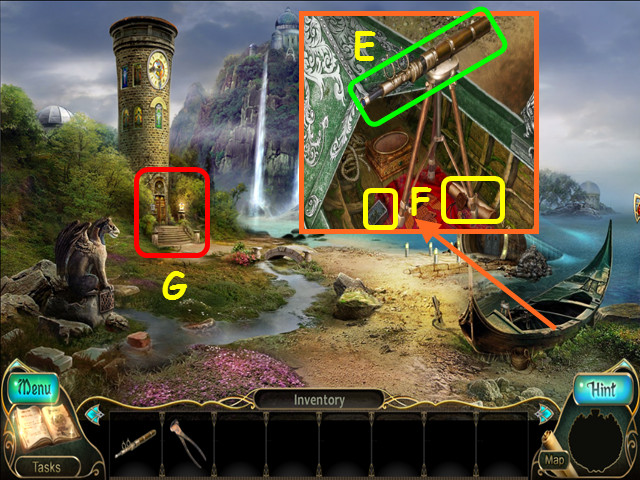
- Look at the gondola and place the TELESCOPE BODY on the stand (E).
- Take the MATCHES and the scroll (F).
- Walk to the clock tower (G).

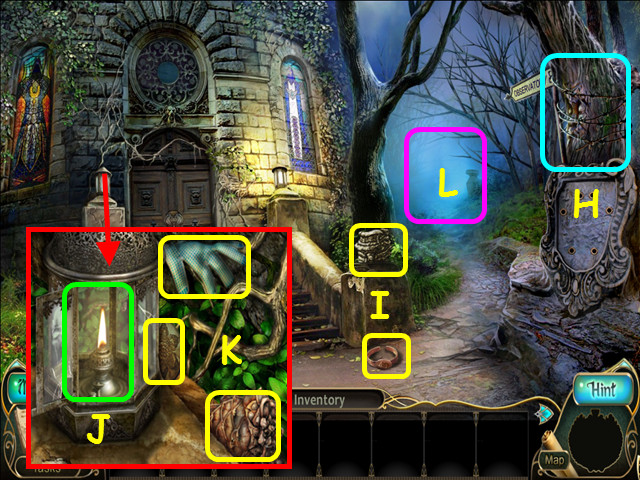
- Zoom into the carved tree and use the NIPPERS on the barbed wire (H).
- Take the LEFT BRACELET and the MONSTER’S HORN (I).
- Look at the unlit lamp, open the cover, and use the MATCHES on the wick (J).
- Take the GLOVE, DISK, and the PINECONE (K).
- Walk toward the back of the tower (L).

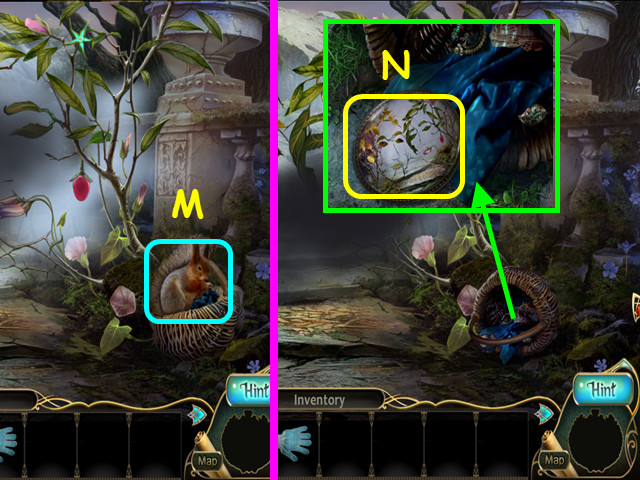
- Give the PINECONE to the squirrel (M).
- Look in the overturned basket and take the ORNAMENT (N).
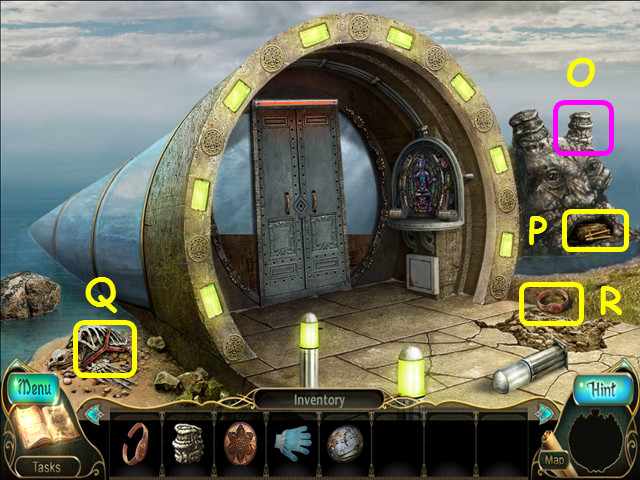
- Walk down twice, then walk to the underwater tunnel.


- Place the MONSTER’S HORN on the monster (O).
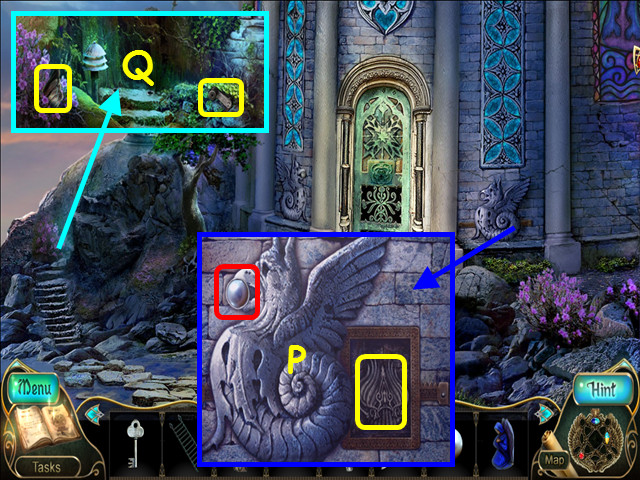
- Take the ROPE LADDER (P).
- Take the 1st BRACKET (Q).
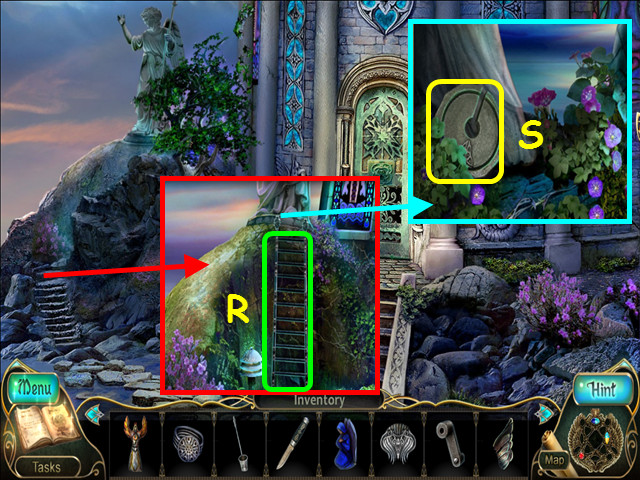
- Take the RIGHT BRACELET (R).
- Walk down.

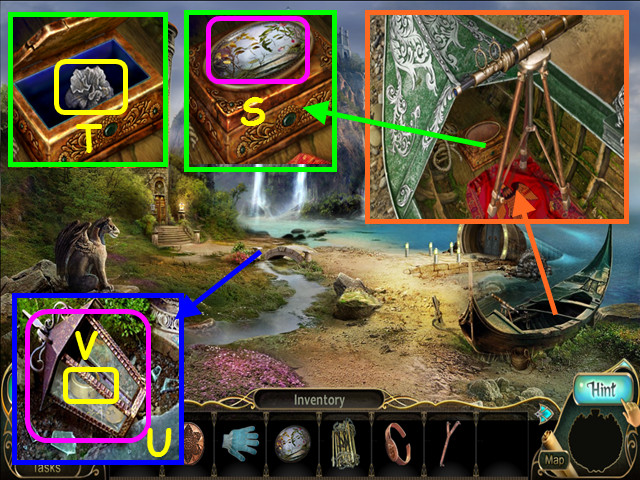
- Look in the gondola, look at the box, and place the ORNAMENT in the cover (S).
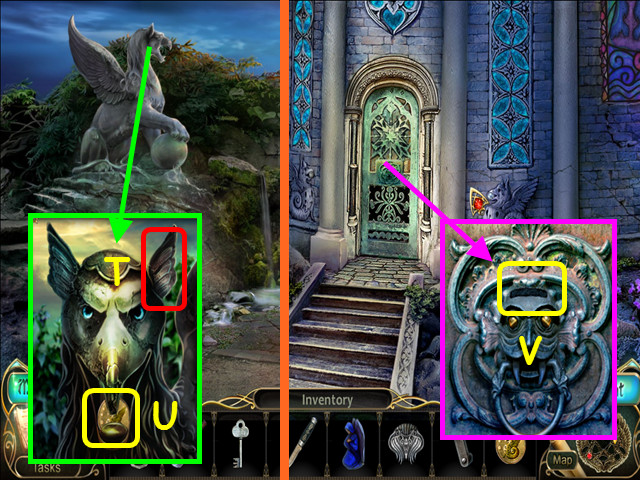
- Take the STONE FLOWER (T).
- Look near the bridge; use the GLOVE to remove the glass (U).
- Take the EYEPIECE (V).

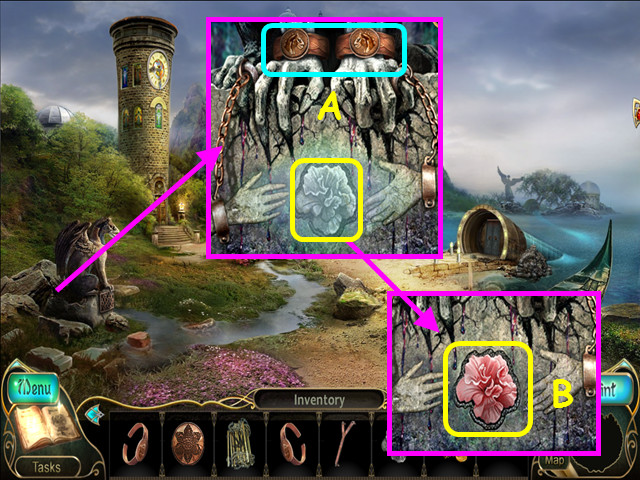
- Look at the gargoyle; place the LEFT BRACELET and the RIGHT BRACELET on the arms (A).
- Place the STONE FLOWER in the indentation. Once it changes, take the PINK FLOWER (B).
- Walk to the clock tower, then go to the back of the clock tower.

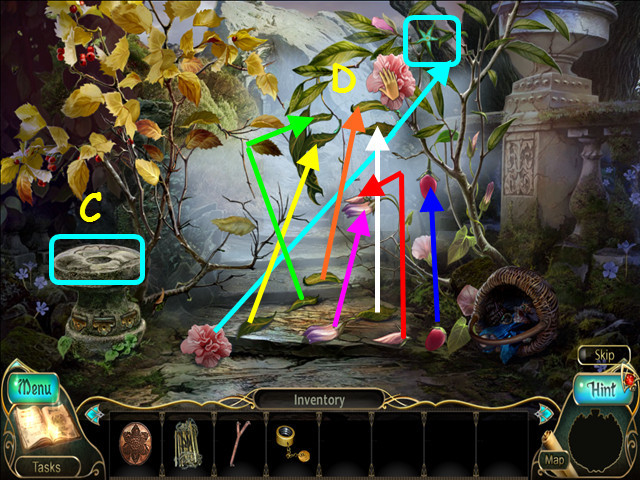
- Place the PINK FLOWER on the flowerpot (C).
- Return the fallen leaves and flowers to the bush (D).
- Select an item to see the possible locations.
- Talk to Gloria when she appears.
- Walk forward.

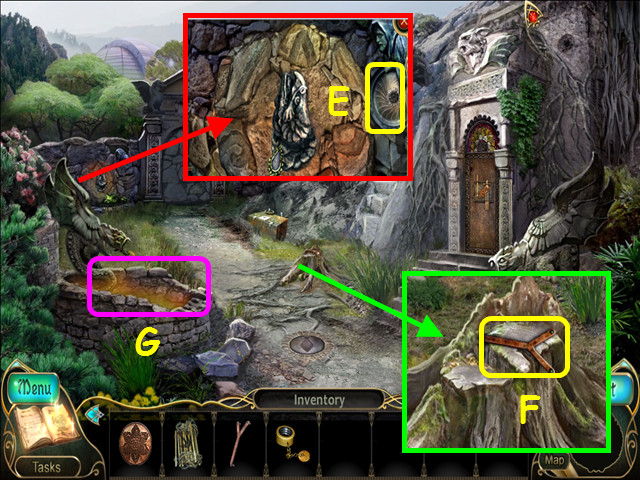
- Look at the fountain and take the PLATE (E).
- Look at the tree stump and take the 2nd BRACKET (F).
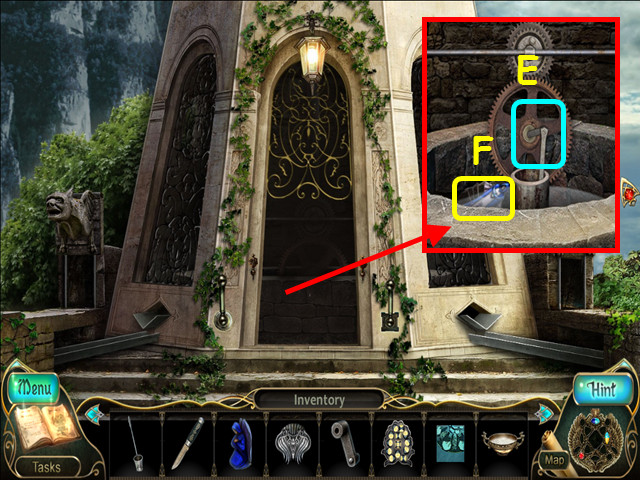
- Use the ROPE LADDER on the well (G).
- Look in the well for a HOP.

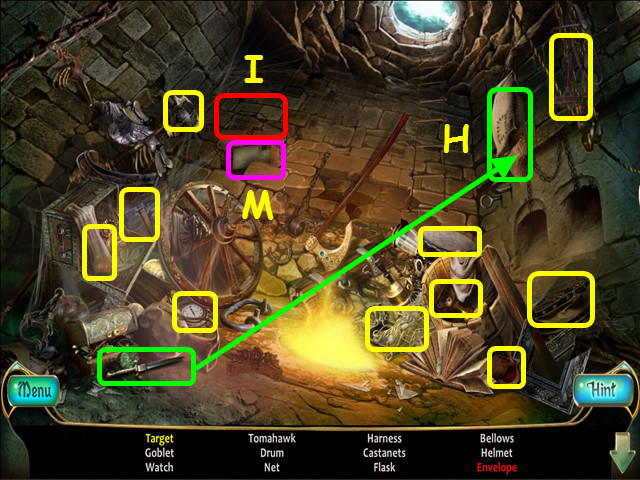

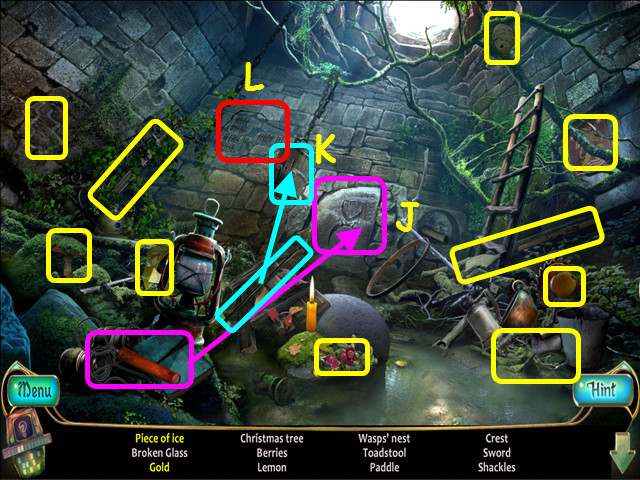
- Play the HOP.
- Use the knife on the burlap sack to find the target (H).
- Select the hash marks to use the time portal (I).
- Use the dynamite on the stone wall to find the gold (J).
- Use the crowbar on the bucket to find the ice (K).
- Select the hash marks to return to the present (L).
- Take the envelope from the wall (M).
- You will earn the BELLOWS.
- Walk down twice.

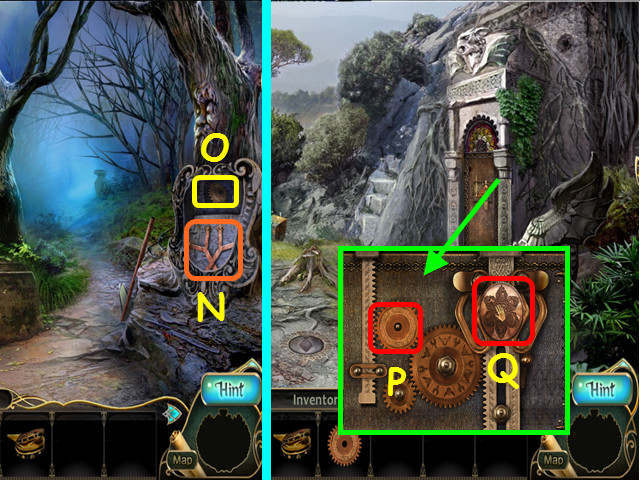
- Place the 2 BRACKETS on the panel (N).
- Take the GEAR (O).
- Walk to the back of the tower, then walk forward.
- Look at the door; place the GEAR on the peg (P) and the DISK on the circle (Q) for a mini-game.

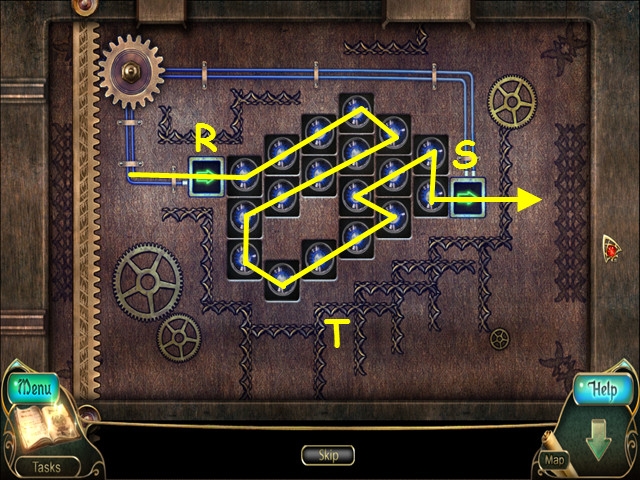

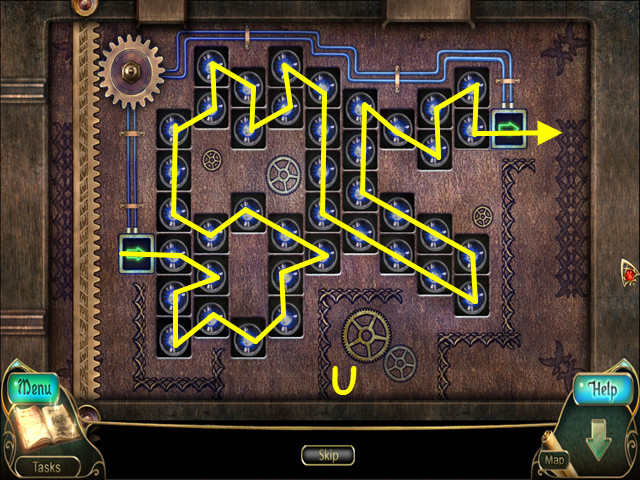
- Start at the left green arrow (R) and drag a line through all the lights to end up at the right green arrow (S).
- There are 2 boards to solve. The first board’s solution is shown here (T).
- The second solution is shown here (U).
- Walk right to enter the crypt.

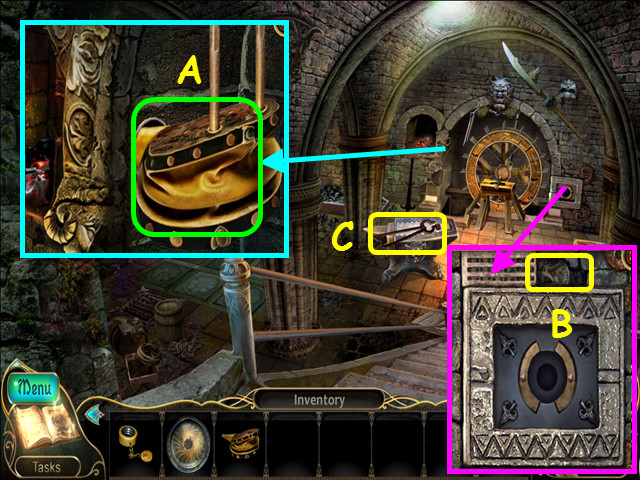
- Look at the furnace and place the BELLOWS in the opening (A).
- Look at the water control valve and take the ZIPPER PULL (B).
- Take the tongs (C).

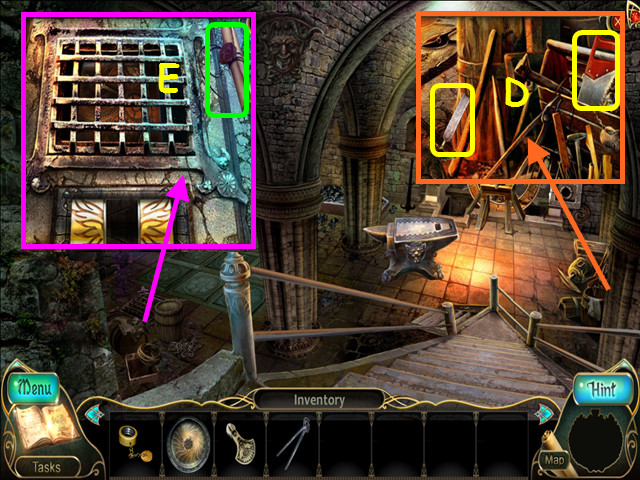
- Look at the tool bench; take the SAW and the CHISEL (D).
- Look at the secret hatch and take the scroll (E).
- Walk down.

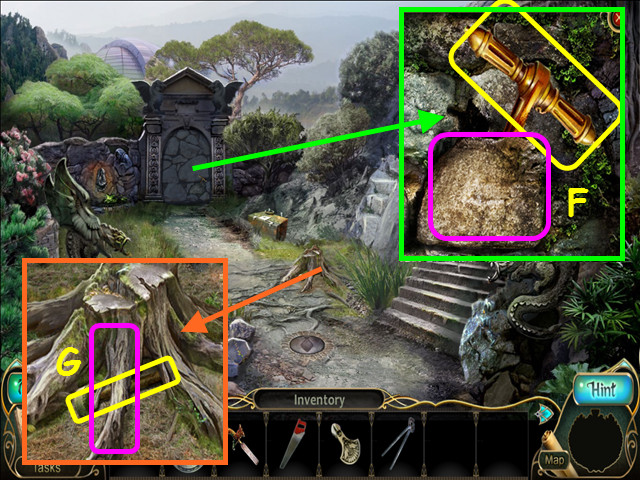
- Look at the walled-up-gate and use the CHISEL to move the rock, then take the LEVER (F).
- Look at the tree stump and use the SAW on the root, then take the MALLET (G).
- Walk down twice.

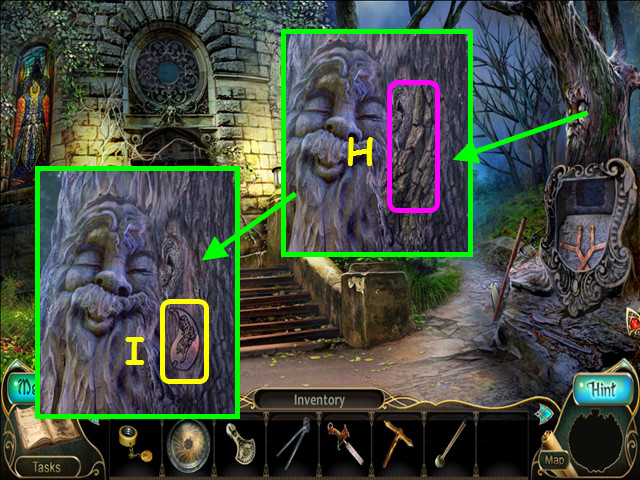
- Look at the carved tree, use the CHISEL on the bark (H).
- Take the TIGER TEAR (I).
- Walk to the back of the tower, go forward, and then enter the crypt.

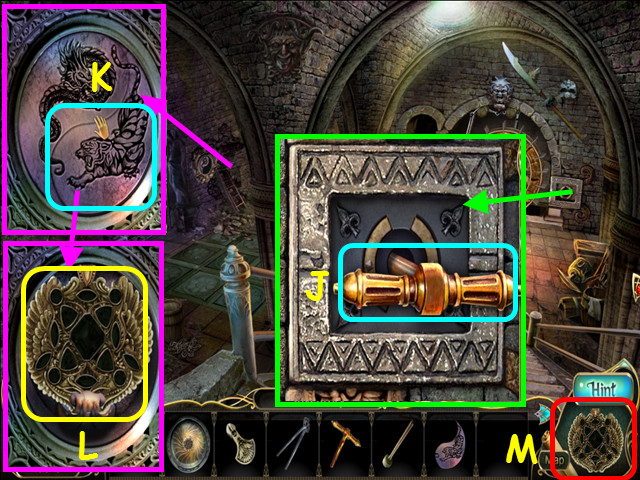
- Look at the water control valve and place the LEVER in the opening (J).
- Look at the gate mechanism and place the TIGER TEAR in the opening (K).
- Take the AMULET OF THE ELEMENTS (L).
- The AMULET will sit in the lower right of your menu bar (M).
- Walk left to the secret room.

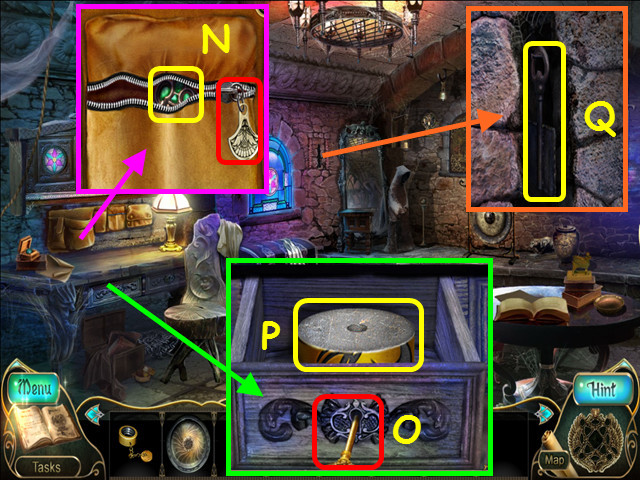
- Look at the zipped pocket and use the ZIPPER PULL on the zipper, and then take the DESK KEY (N).
- Look at the drawer and use the DESK KEY in the lock (O).
- Take the CYLINDER (P).
- Look at the crack in the wall, use the TONGS in the crack to get the TONGS WITH BLANK KEY (Q).

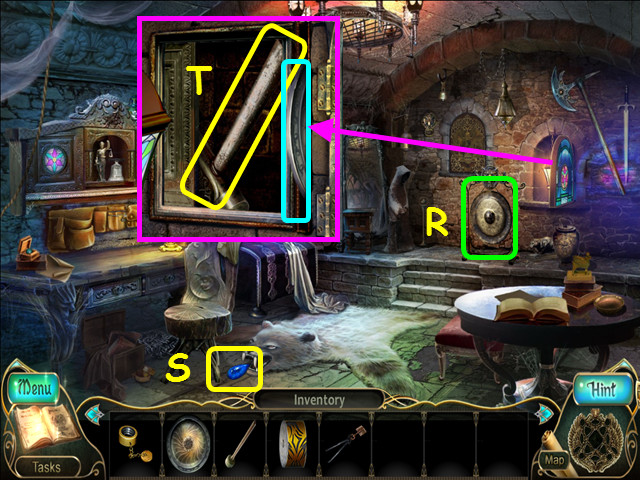
- Use the MALLET on the gong (R).
- Take the CRYSTAL TEAR (S).
- Look at the niche, place the PLATE in the slot, and then take the HAMMER (T).
- Walk down.

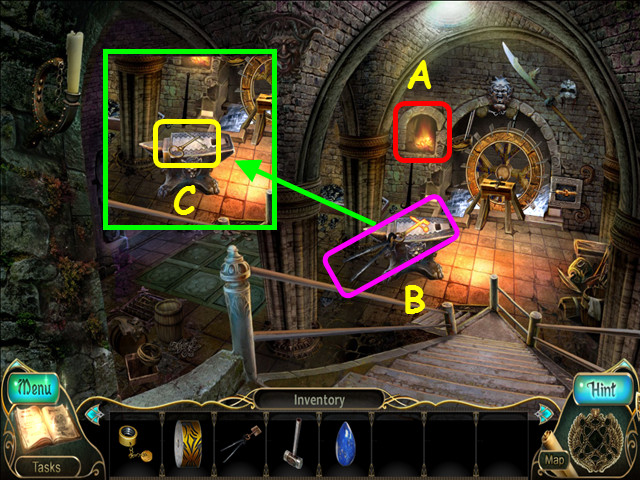
- Use the TONGS WITH BLANK KEY in the furnace (A).
- Use the HAMMER on the anvil (B).
- You will earn the ability to control fire.
- Take the KEY TO SECRET COMPARTMENT (C).

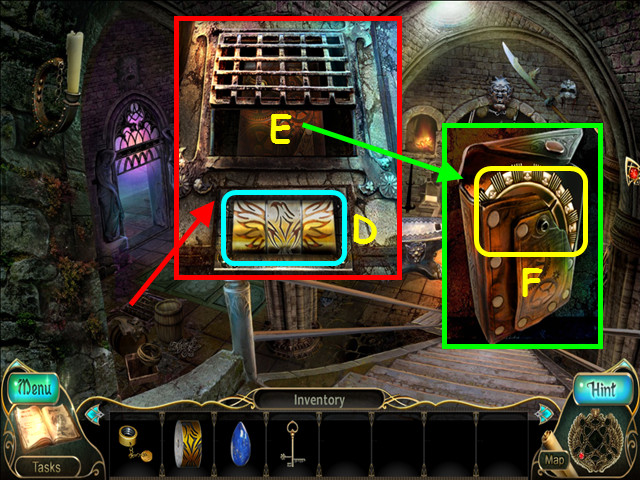
- Look at the secret hatch and place the CYLINDER in the opening.
- Turn the center cylinder to complete the bird symbol (D).
- Look at the satchel (E), open it and take the WHEEL OF TIME (F).
- Walk to the left.

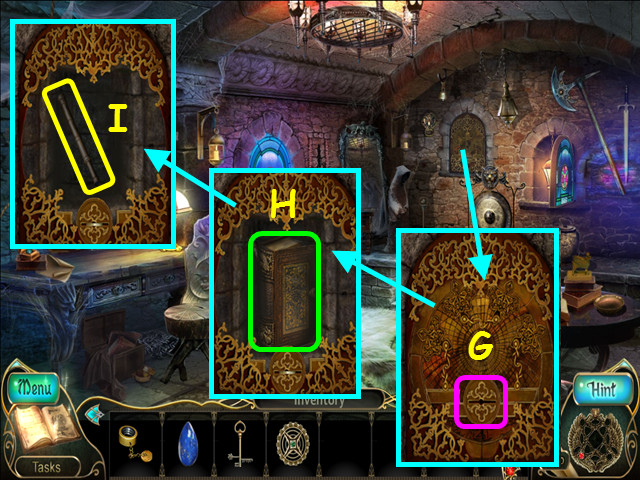
- Look at the compartment and use the KEY TO SECRET COMPARTMENT on the slot (G).
- Read the book (H) and take the TELESCOPE (I).
- Walk down twice.

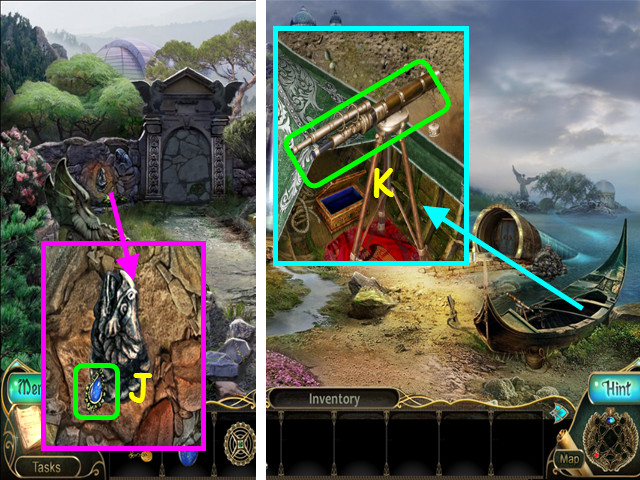
- Look at the spring with fountain and place the CRYSTAL TEAR in the niche (J).
- You have earned the ability to control air and water.
- Walk down 3 times.
- Look at the gondola, place the TELESCOPE and the EYEPIECE on the telescope base (K).
- Place the WHEEL OF TIME on the completed telescope.

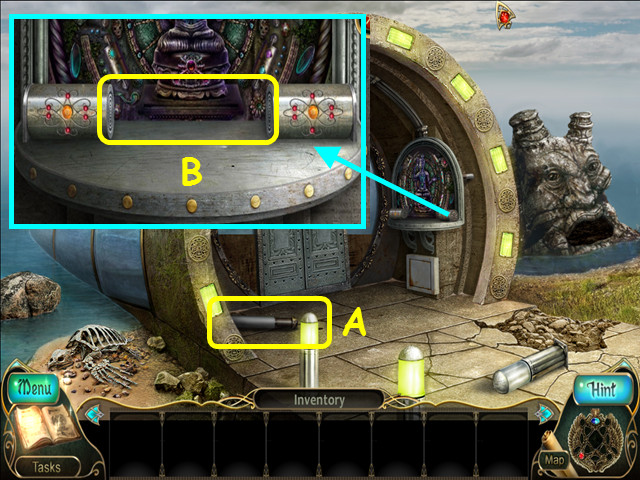
- Take the CRYPTEX (A).
- Look at the deity altar and place the CRYPTEX in the opening for a mini-game (B).

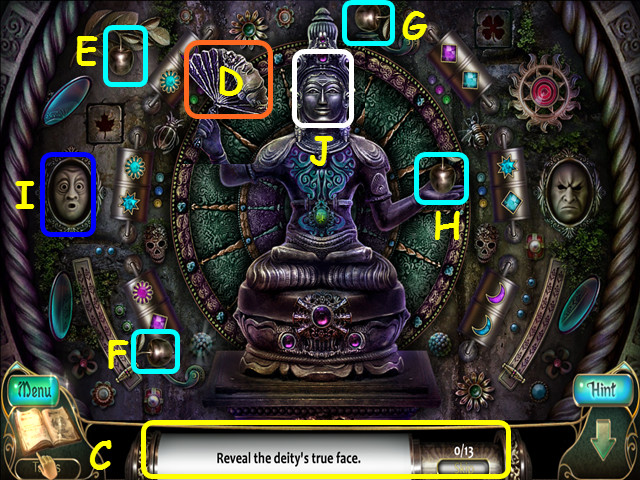

- Follow the instructions in the lower panel (C) to work your way through the device.
- Move the fan twice to reveal the deity’s true face (D).
- Offer the deity the golden fruit by pulling on the apple (E) until it falls.
- Flip the first lever (F), then the second lever (G), so the apple lands in the open hand (H).
- To turn the cynic’s face from fear to wonder, select the left mask 3 times (I).
- Select the deity’s face to summon the deity’s radiant smile (J).
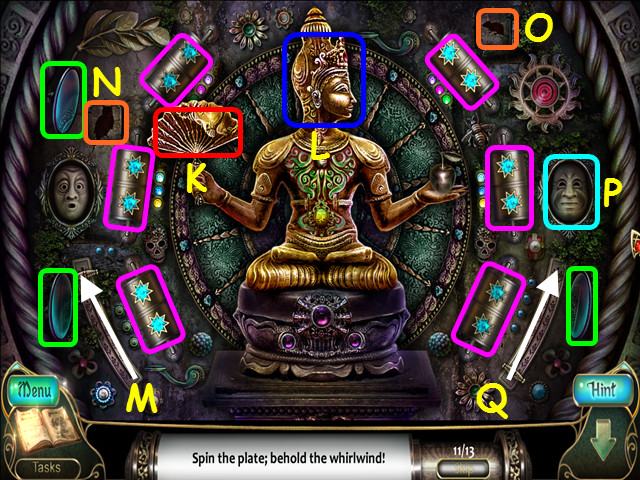
- Select the fan twice to cover the beetle (K).
- Select the each of the 3 mirrors twice to cover the deity in gold (green).
- Select the deity’s face to turn it towards the sun (L).
- Push the left lever up (M).
- Press the left square until the owl is showing (N), then press the right square until the mouse is visible (O).
- Turn the 6 cylinders until each show 2 stars (pink).
- Press the right mask 3 times (P).
- Push up the right lever (Q).
- Take the CONTROLLER FOR THE AMULET OF THE ELEMENTS from behind the deity.

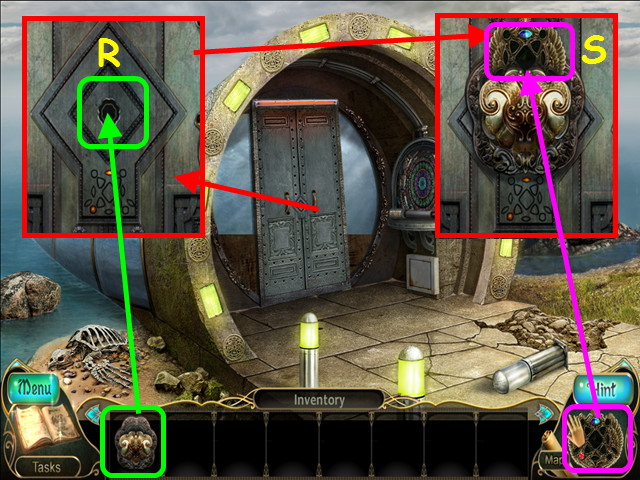
- Look at the door and place the CONTROLLER FOR THE AMULET OF THE ELEMENTS on the lock (R).
- Place the AMULET from your menu bar into the controller (S).
- Enter the tunnel.

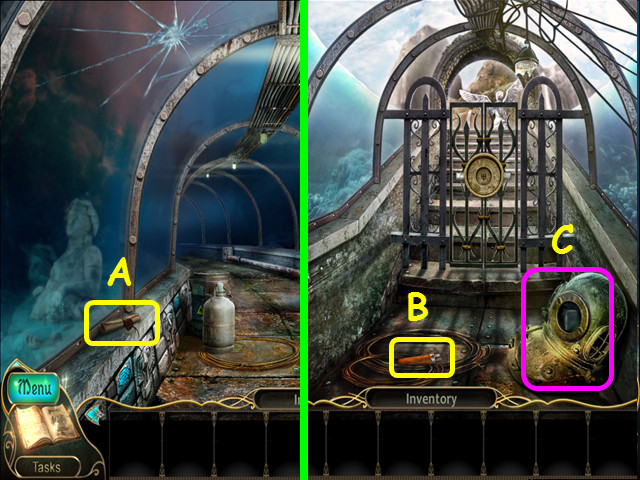
- Take the scroll (A).
- Walk forward twice.
- Take the LOCKPICK (B).
- Note the diving helmet (C).
- Walk down 4 times, walk to the clock tower, go to the back of the tower, and then walk forward.

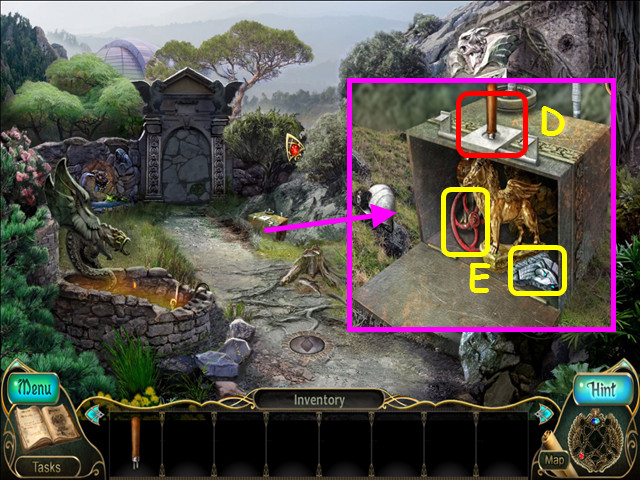
- Look at the trolley and use the LOCK PICK on the lock (D).
- Take the VALVE and the LION CARVING FRAGMENT (E).
- Walk down 3 times, go towards the underwater tunnel, and then enter the tunnel.

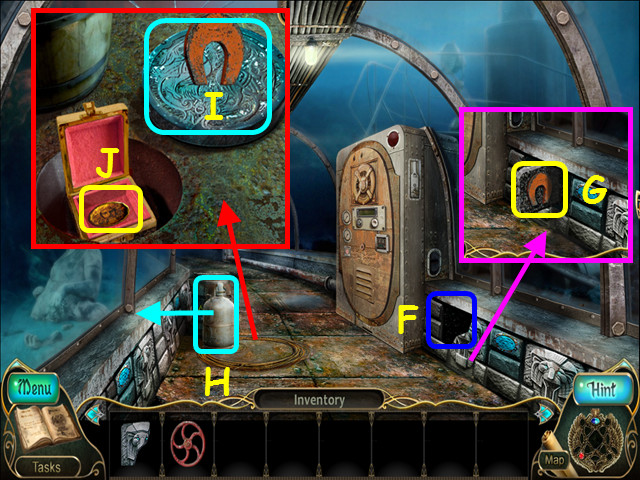
- Place the LION CARVING FRAGMENT in the wall (F).
- Take the MAGNET (G).
- Move the canister and look at the floor (H).
- Use the MAGNET to remove the hatch (I).
- Open the box and take the TOKEN (J).
- Walk forward.

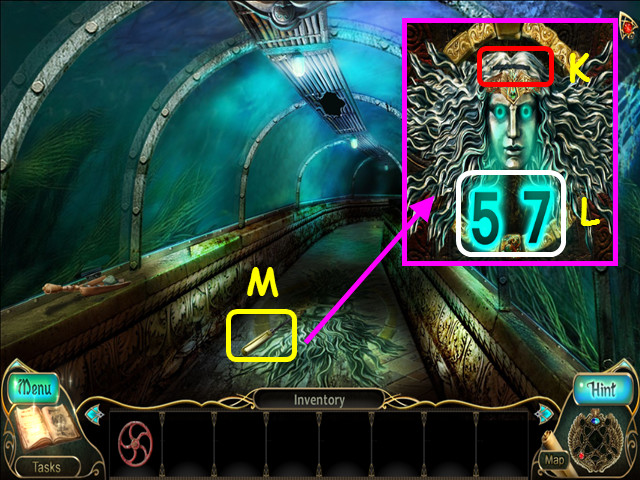
- Look at the floor mosaic and place the TOKEN in the slot (K).
- Note the number 57 that flashes (L).
- Take the SCREWDRIVER (M).
- Walk forward.

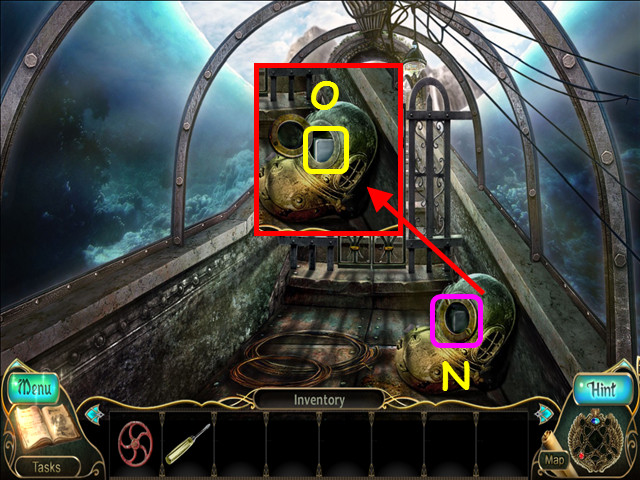
- Use the SCREWDRIVER on the diving helmet (N).
- Take the CHIP (O).
- Walk down twice.

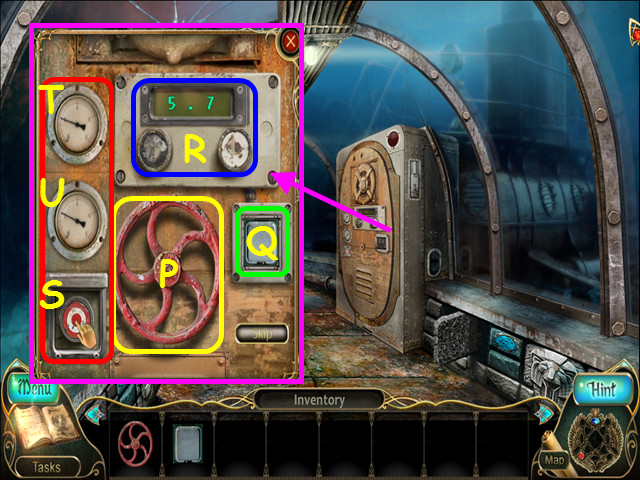
- Look at the bathyscaphe door and place the VALVE on the center opening (P).
- Place the CHIP into the holder (Q).
- Press the 2 buttons to change the number to 57 (R).
- Press the red button (S) to set the pressure on the top dial (T) to any number. Press the red button again to set the lower dial (U) to the same number.
- Look in the bathyscaphe door for a HOP.

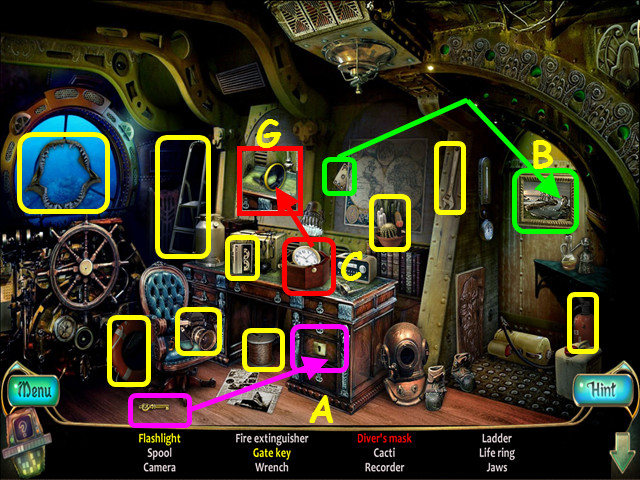

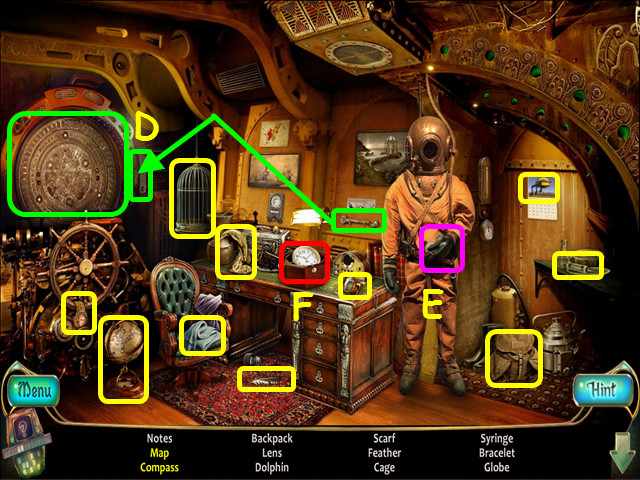
- Play the HOP.
- Use the key on the drawer to find the flashlight (A).
- Remove the painting, then use the key card on the lock to find the gate key (B).
- Select the clock to time travel (C).
- Use the lever on the window control to find the map (D).
- Move the glove to find the compass (E).
- Select the clock to return to the present (F).
- Take the diver’s mask from the desk where the clock was previously (G).
- You will earn the KEY TO THE TUNNEL EXIT.
- Walk forward twice.

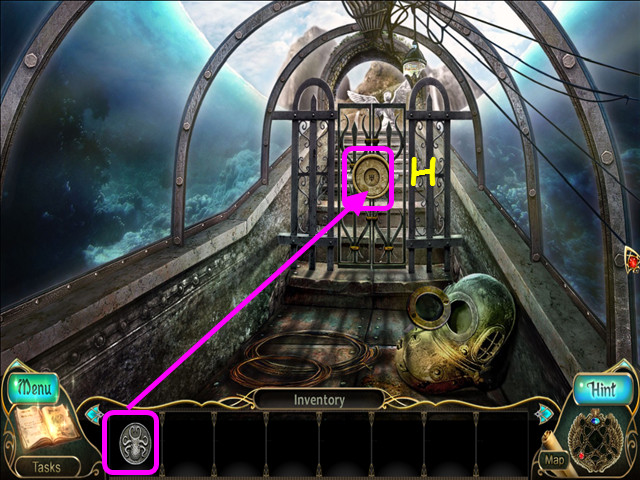
- Use the KEY TO THE TUNNEL EXIT in the lock (H).
- Walk forward.
Chapter 2: The Initiation Ritual

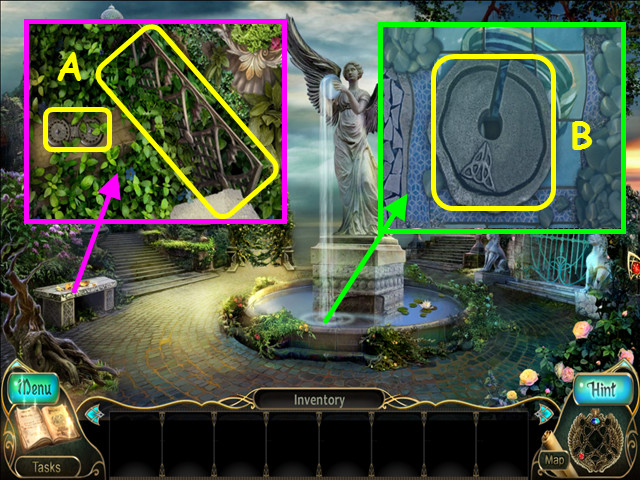
- Look at the bench; take the 1st PUMP STATION DECORATION and the GRILL (A).
- Look at the mosaic in the fountain and take the DISKS 1/3 (B).

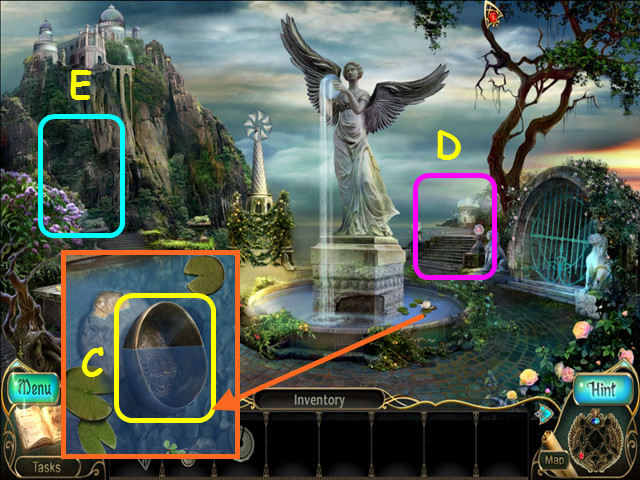
- Look at the water lilies in the fountain and take the PLAIN BOWL (C).
- Note the stairs to the sea (D).
- Walk left to the temple entrance (E).

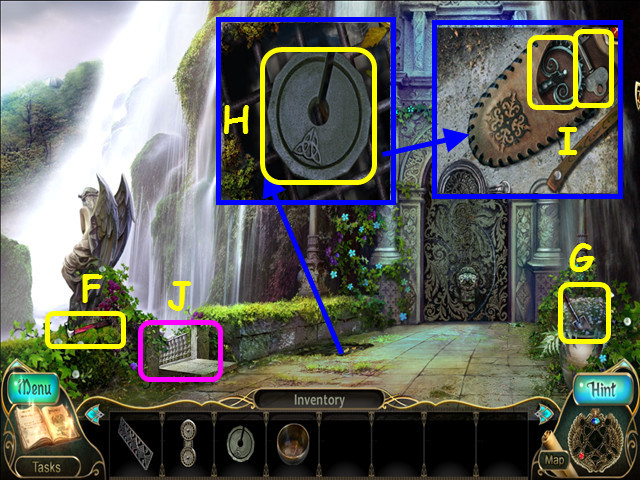
- Take the HAMMER (F).
- Take the SMALL SHOVEL (G).
- Look at the drain and take the DISKS 2/3 (H).
- Pull up the pouch, open it, then take the CHEST KEY and the SHOWCASE KEY (I).
- Walk left to go downstairs (J).

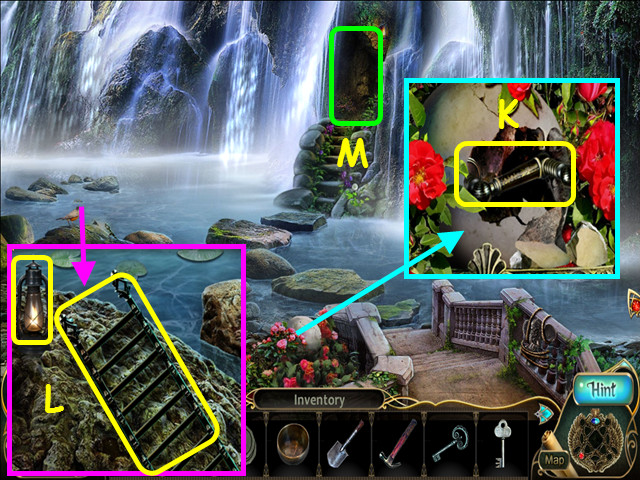
- Look at the plaster ball; use the HAMMER to break it open, then take the 1st LEVER (K).
- Look behind the stone; take the LAMP and the LADDER (L).
- Walk forward to the cave entrance (M).

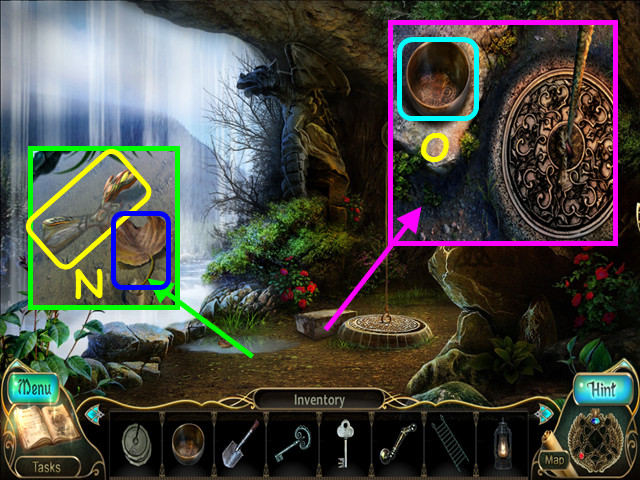
- Look at the puddle, move the leaf, then take the 1st DOLL (N).
- Look at the trapdoor and place the PLAIN BOWL on the rock (O).
- Walk down 3 times, then go right on the stairs to the sea.

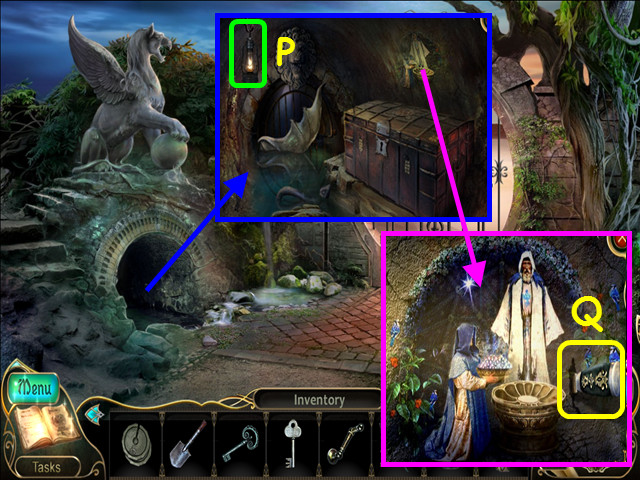
- Look in the tunnel and hang the LAMP on the hook (P).
- Look at the painting on the wall and take the KNIFE (Q).

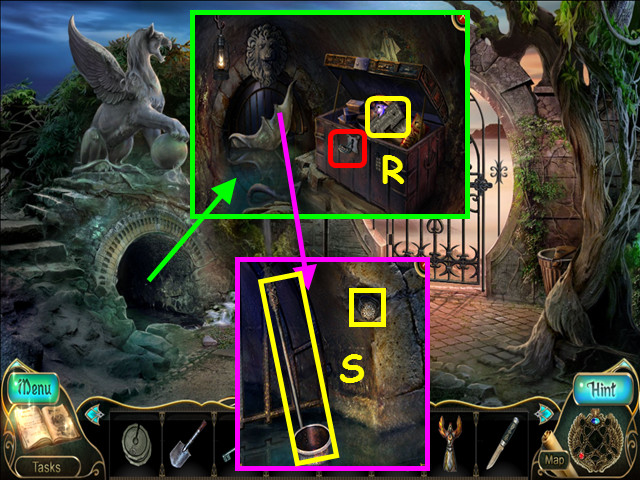
- Use the CHEST KEY in the chest’s lock, then take the 2nd PUMP STATION DECORATION (R).
- You will earn the ability to control water and earth.
- Look at the drain grill; take the LADLE and the RING WITHOUT JEWELS (S).
- Walk down, then go to the left twice.

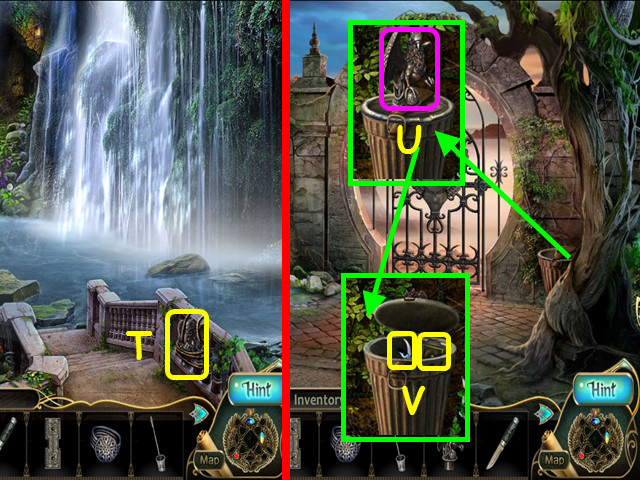
- Use the KNIFE to cut the rope on the railing and take the GRIFFIN (T).
- Walk down twice, then take the stairs to the sea.
- Look at the garbage can and place the GRIFFIN on the top (U).
- Take the SHEARS and the 2nd LEVER (V).
- Walk down.

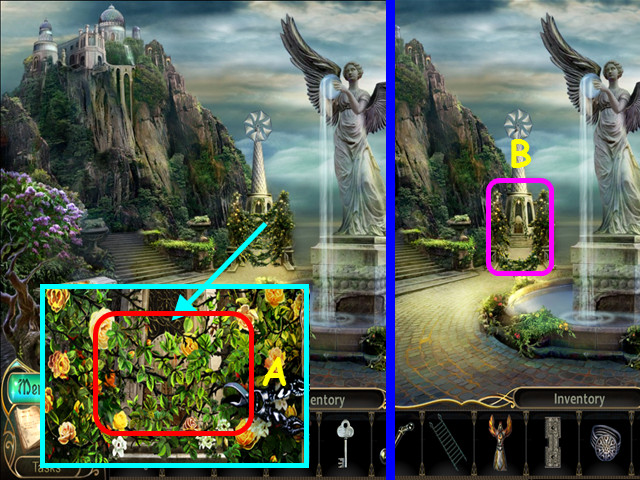
- Look at the rose bushes and use the SHEARS on the roses (A).
- Walk to the wind-driven pumping station (B).

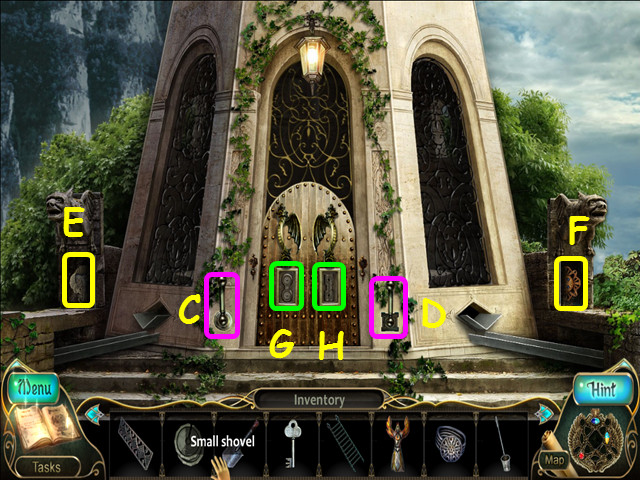
- Place the 1st LEVER (with the round end) in the round opening (C).
- Place the 2nd LEVER (with the square end) in the square opening (D).
- Take the CONTROLLER (E) and the PENDANT (F).
- Place the 1st PUMP STATION DECORATION (with the round ends) in the left door (G).
- Place the 2nd PUMP STATION DECORATION (with the square ends) in the right door (H).
- Walk down, then take the stairs to the sea.

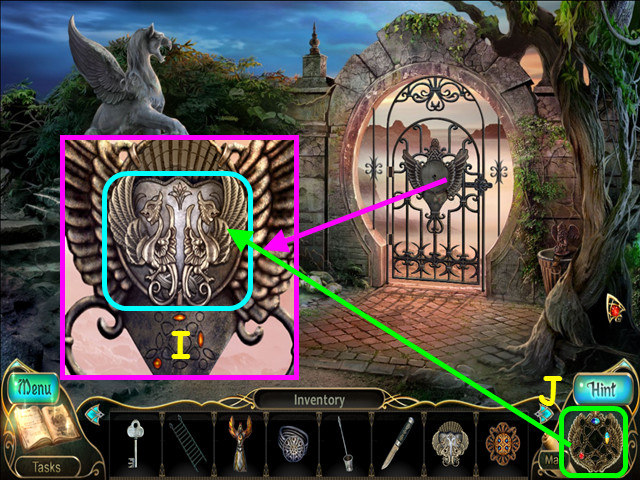
- Look at the gate and place the CONTROLLER on the latch (I).
- Use your AMULET in the controller (J).
- Walk forward.

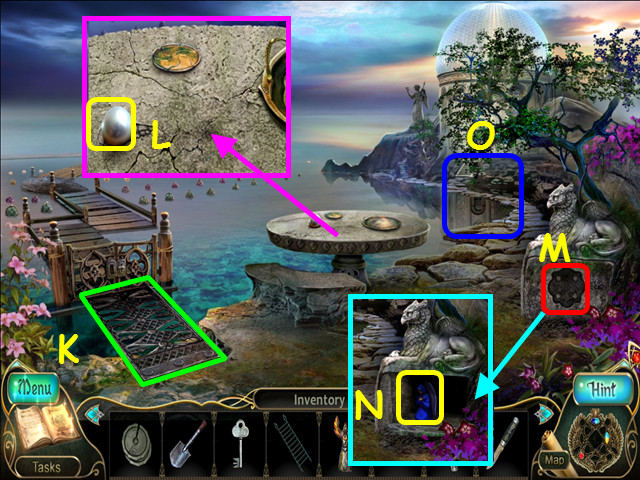
- Place the GRILL over the water (K).
- Look at the table and use the KNIFE to take the BIG PEARL (L).
- Place the PENDANT in the niche (M), then take the 2nd DOLL (N).
- Walk forward to the pearl museum (O).

- Look at the seahorse and place the BIG PEARL in his mouth, then take the CONTROLLER (P).
- Look at the stairs; take the EAR and the CRANK (Q).

- Place the LADDER on the wall (R).
- Look at the statue and take the DISKS 3/3 (S).
- Walk down twice.

- Look at the monster and place the EAR on his head (T).
- Take the COIN (U).
- Walk forward twice.
- Look at the door and use the COIN in the slot (V).
- Enter the pearl museum.

- Open the shell and take the PANEL WITH LANTERNS (A).
- Look at the museum showcase and use the SHOWCASE KEY in the lock (B).
- Take MOSAIC PIECE (C).
- Take the BOWL FOR PEARLS (D).
- Walk down 4 times, then go to the wind-driven pumping station.


- Look at the pumping station machinery and place the CRANK on the gears (E).
- You will earn the ability to control air, water, and earth.
- Take the 3rd DOLL (F).
- Walk down, go left twice, and then go forward to the cave entrance.

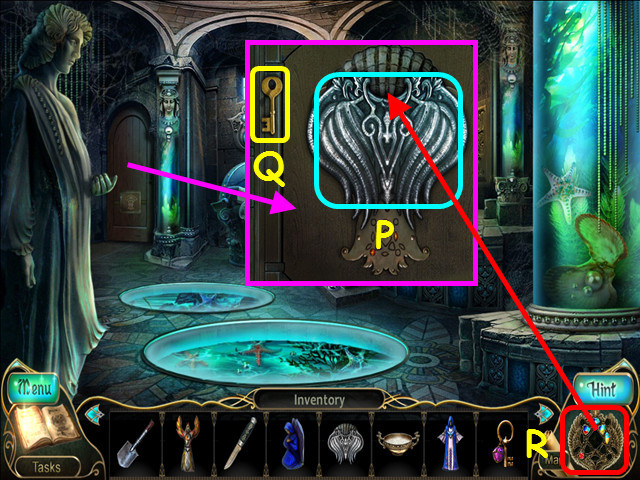
- Place the 3 DISKS on the rope (G).
- Look in the cave trapdoor and use the AMULET on the controller (H).
- Use the LADLE to put some quicksilver in the bowl (I).
- Use the RING WITHOUT JEWELS in the bowl to get the QUICKSILVER RING (J).
- Look at the lantern panel for a mini-game (K).

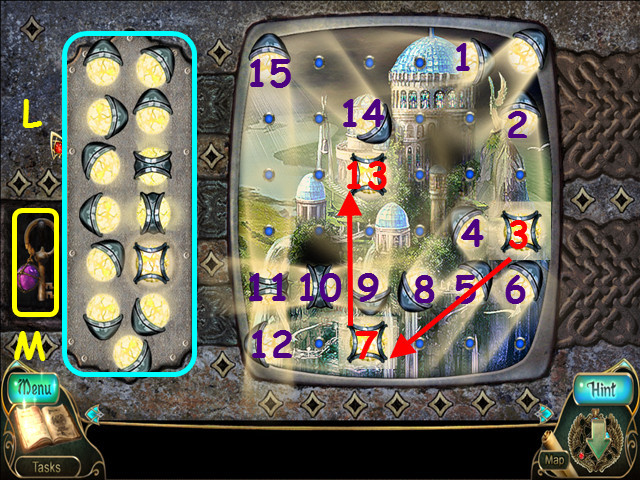
- Place the PANEL WITH LANTERNS on the left to trigger the mini-game (L).
- Place the lights to light the entire picture. You can only place lights on the visible blue dots.
- You can move lights after they have been placed.
- Place the lights in numerical order (1-15).
- Note that the 4-way lamp is moved from position 3 to 7, and again to 13.
- Take the FLOAT KEY (M).
- Walk down 3 times.

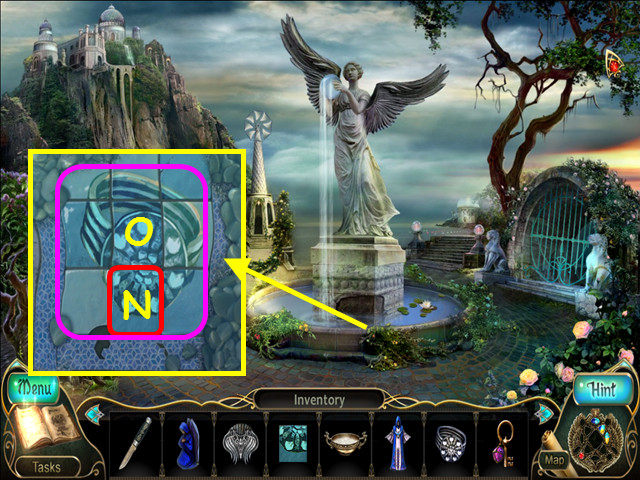
- Look at the mosaic in the fountain and place a MOSAIC PIECE in the open space (N).
- Place the QUICKSILVER RING on the mosaic (O).
- You will earn the ability to control air, water, and fire.
- Take the stairs to the sea, then walk forward 3 times.


- Look at the door and place the CONTROLLER on the door (P).
- Take the DIARY KEY (Q).
- Use the AMULET on the controller (R).
- Look in the back room for a HOP.

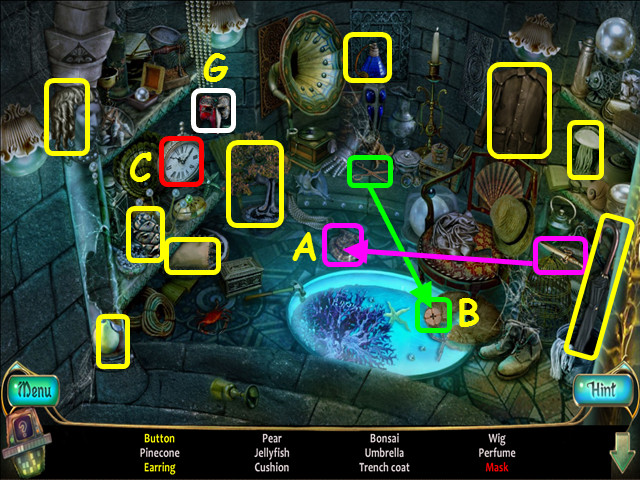

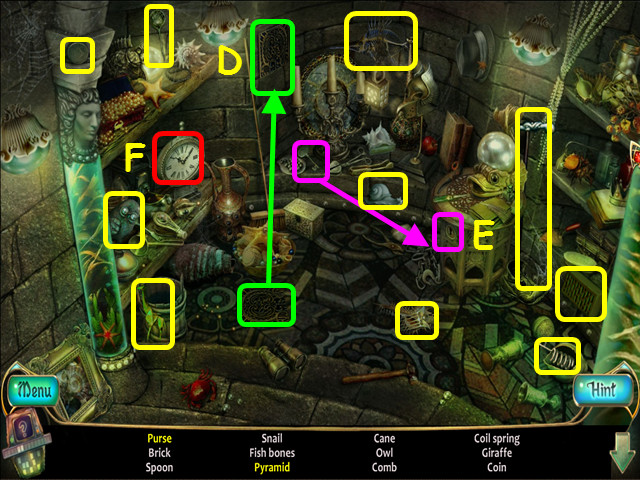
- Play the HOP.
- Use the knife on the shell to find the earring (A).
- Use the scissors to cut off the button (B).
- Select the clock to time travel (C).
- Place the slab on the wall to find the pyramid (D).
- Use the key on the drawer to find the purse (E).
- Select the clock to return to the present (F).
- Take the mask (G).
- You will earn the COIL SPRING.
- Walk down twice.

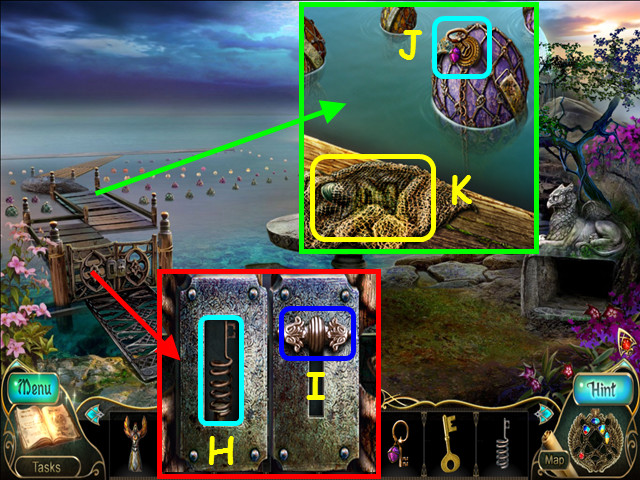
- Look at the gate lock and place the COIL SPRING in the left opening (H).
- Pull down the lever on the right (I).
- Look at the bamboo walkway and use the FLOAT KEY on the float (J), then take the NET WITH THE PEARL SHELLS (K).

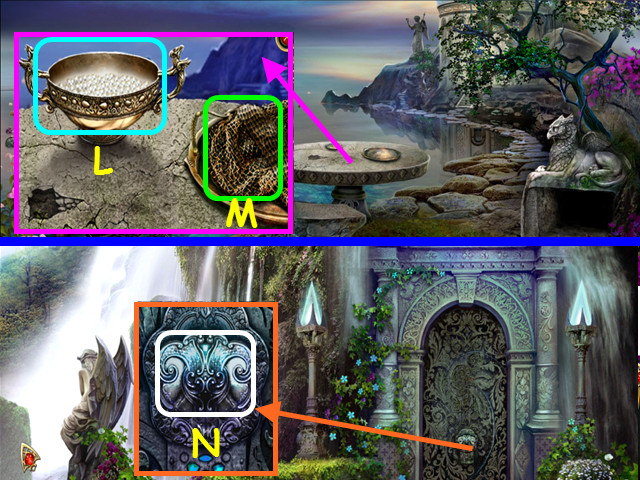
- Look at the table and place the BOWL FOR PEARLS on the circle (L).
- Place the NET WITH THE PEARL SHELLS on the tray (M).
- Use the KNIFE on the net.
- Take the BOWL OF PEARLS.
- Walk down twice, then walk to the left.
- Look at the door and use the AMULET on the controller (N).
- Enter the temple.

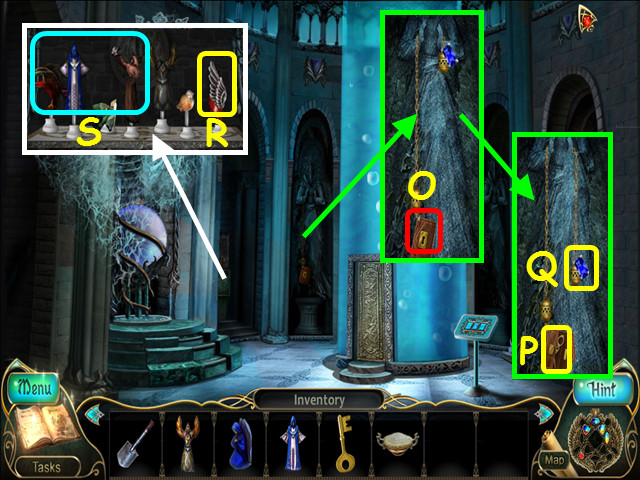
- Look at the statue and use the DIARY KEY in the lock (O).
- Take the SCISSORS from the pouch (P).
- Take the SAPPHIRE (Q).
- Look at the shadow play and use the SCISSORS to take the 1st WING (R).
- Place the 3 DOLLS on the stand (S).

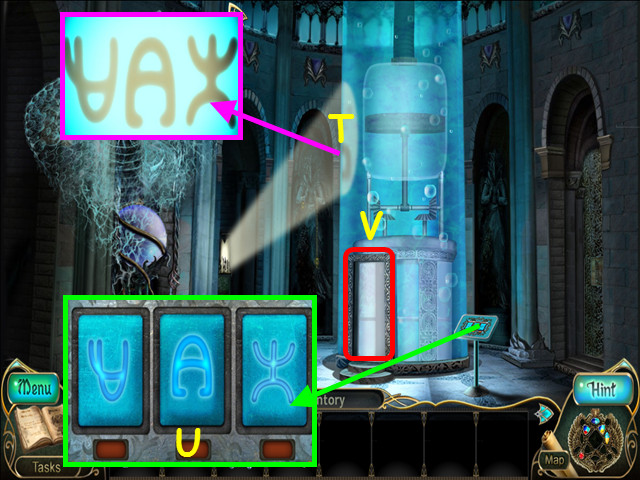
- Look at the shadow codes (T).
- Look at the elevator control and ether the shadow codes (U).
- Enter the elevator (V).

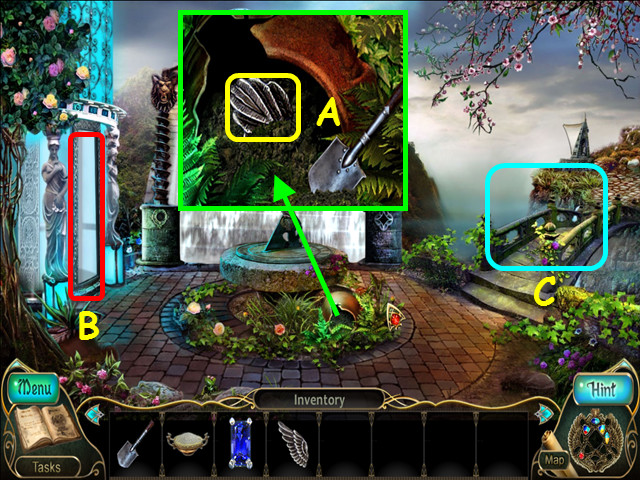
- Look at the pot and use the SMALL SHOVEL to uncover the TAIL (A).
- Note the elevator entrance (B).
- Walk to the right across the bridge (C).

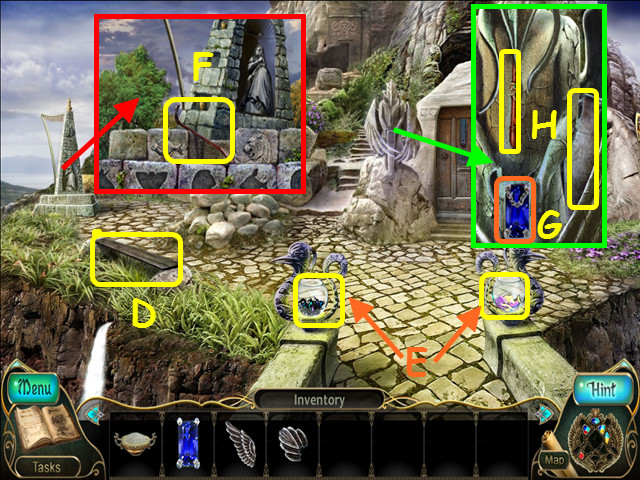
- Take the PLANK (D).
- Take the 2 BOWLS WITH GLASS PARTS (E).
- Look at the Aeolian harp and take the CROWBAR (F).
- Look at the guard, place the SAPPHIRE in the rectangle (G), and take the REED PIPE and the AMPHORA (H).
- Walk down.

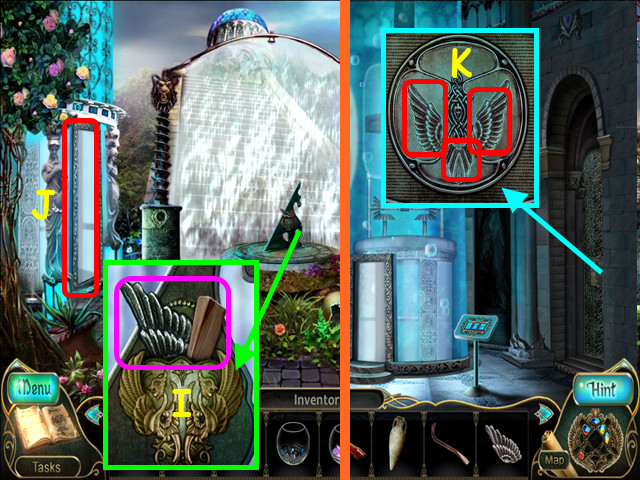
- Look at the sundial and use the CROWBAR to take the 2nd WING (I).
- Enter the elevator (J).
- Look at the door; place the 2 WINGS and the TAIL in the indentations (K).
- This will open a mini-game.

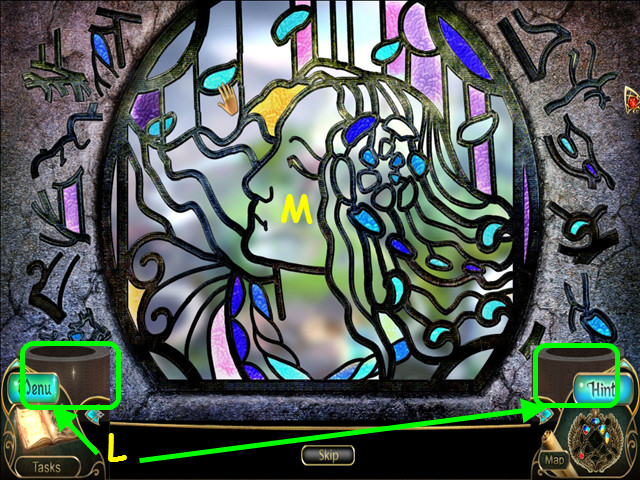

- Place the 2 BOWLS WITH GLASS PARTS on the left and right stands to activate the mini-game (L).
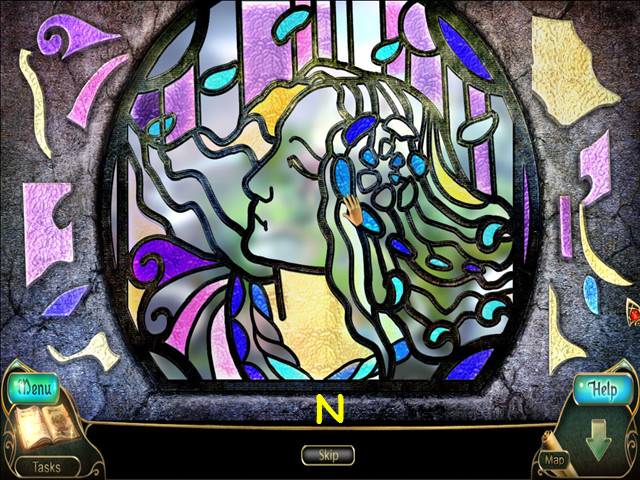
- Place the lead pieces to form the picture (M).
- Place the glass pieces into the picture (N).
- Look at the door for a HOP.

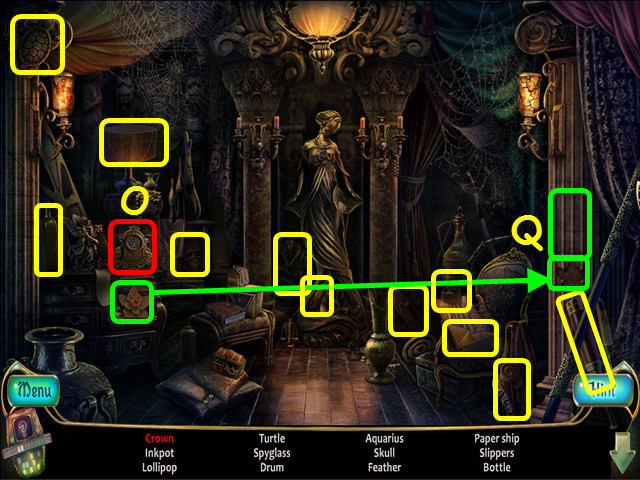

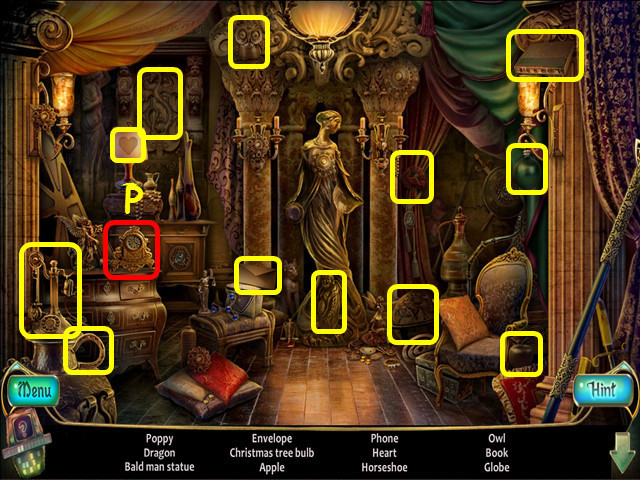
- Play the HOP.
- Select the clock to time travel (O).
- Select the clock to return to the present time (P).
- Place the flower in the indentation to find the crown (Q).
- You will earn the CROWN.

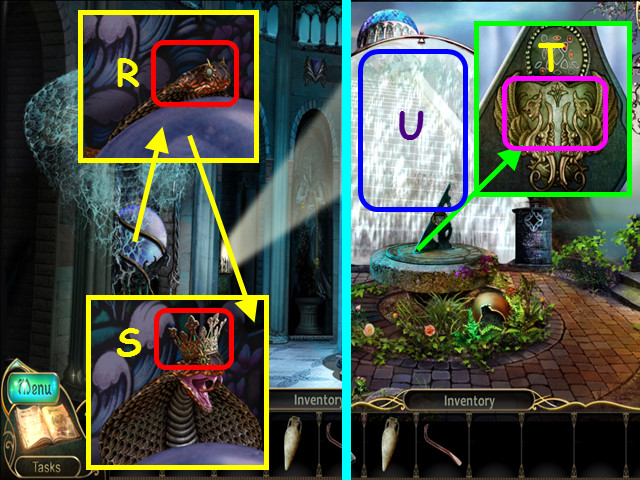
- Look at the altar and use the REED PIPE on the snake (R).
- Place the CROWN on the snake (S).
- You will earn the ability to control water.
- Enter the elevator.
- Look at the sundial and use the AMULET in the controller (T).
- Walk up the staircase (U).
Chapter 3: The Temple Trials

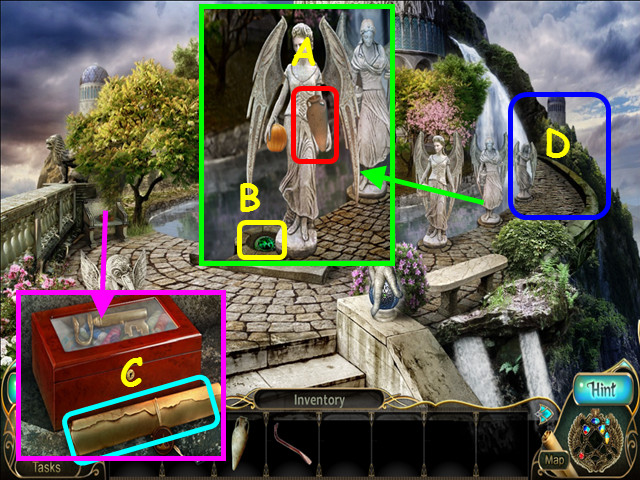
- Look at the statues and place the AMPHORA on the left statue (A).
- Take the GREEN CRYSTAL (B).
- Look at the bench and take the scroll (C).
- Walk to the path behind the tower (D).

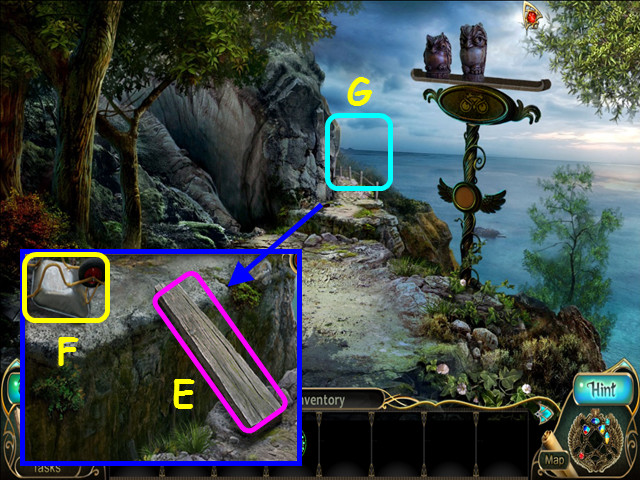
- Look at the ravine and place the PLANK over the opening (E).
- Take the WHEELBARROW (F).
- Walk forward to the plateau (G).

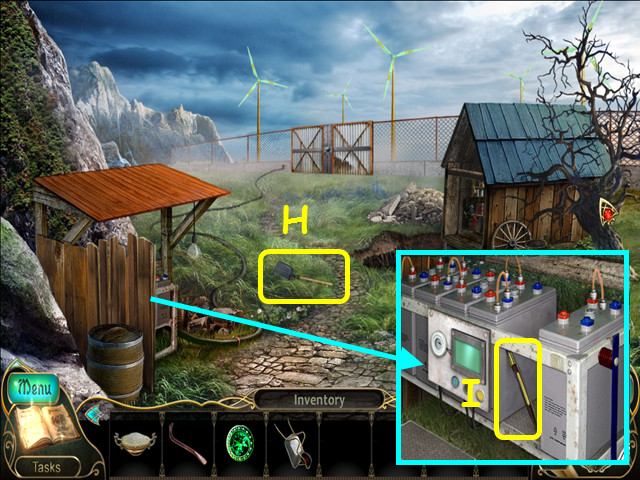
- Take the SHOVEL (H).
- Look at the battery and take the GLASS CUTTER (I).
- Walk down twice.

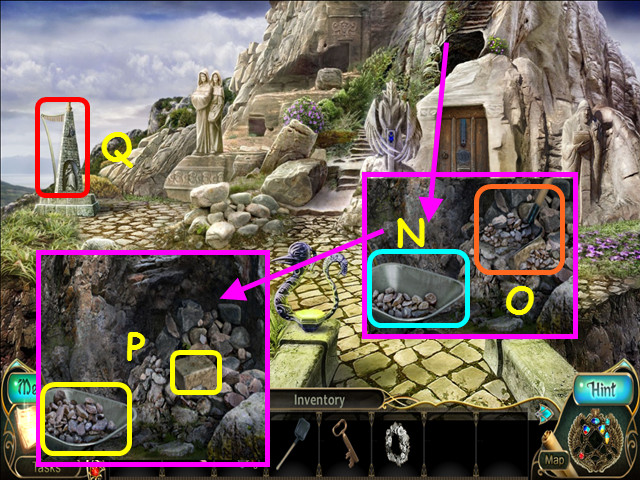
- Look at the bench; use the GLASS CUTTER on the lid, then take the KEY (J).
- Note the path to the main tower (K).
- Walk down.

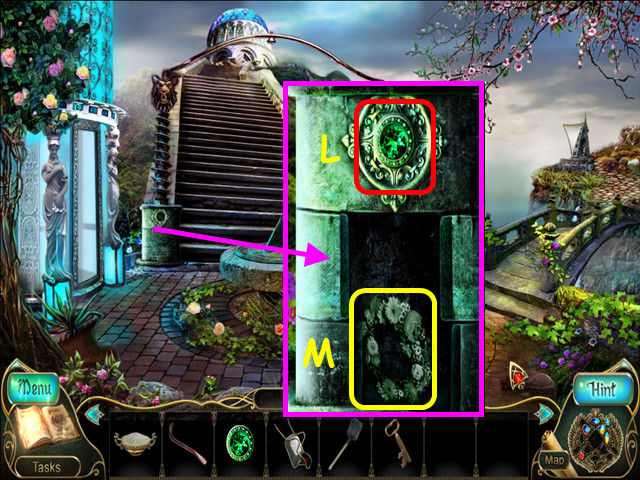
- Look at the left pedestal and place the GREEN CRYSTAL in the opening (L).
- Take the WREATH (M).
- Walk to the right.


- Look at the rubble behind the cell; place the WHEELBARROW on the left (N) and use the SHOVEL on the rocks (O).
- You will earn the ability to control earth.
- Take the WHEELBARROW WITH STONES and the HARP BRICK (P).
- Look at the Aeolian harp for a mini-game (Q).

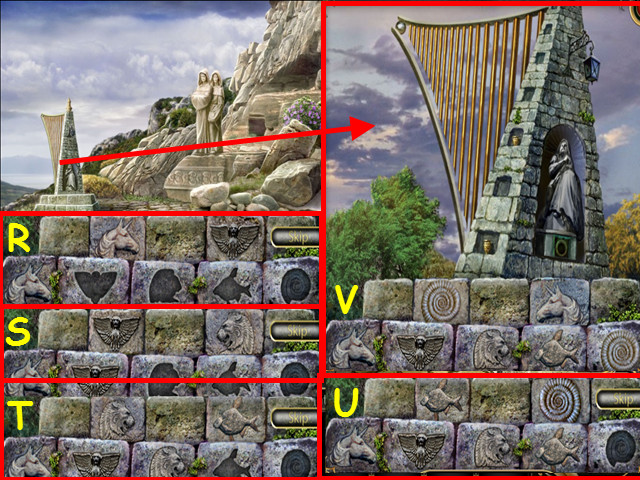
- Place the HARP BRICK in the opening to trigger the mini-game.
- Change the top stones to the unicorn and the sphinx (R).
- Change the top stones to the sphinx and the lion (S).
- Change the top stones to the lion and the fish (T).
- Change the top stones to the fish and the snail (U).
- Change the top stone to the snail and the unicorn (V).
- You will earn the ability to control air.
- Walk down, then go up the staircase.

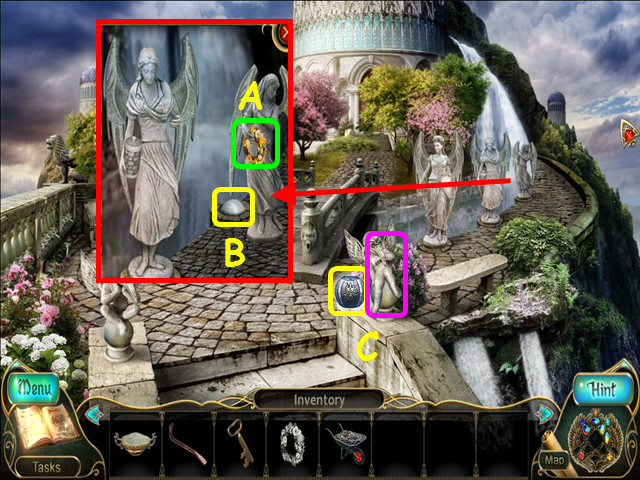
- Look at the statues and give the WREATH to the right statue (A).
- Take the STONE BALL (B).
- Use the STONE BALL on the cherub, then take the PEDESTAL (C).
- Walk behind the tower, then go forward to the plateau.

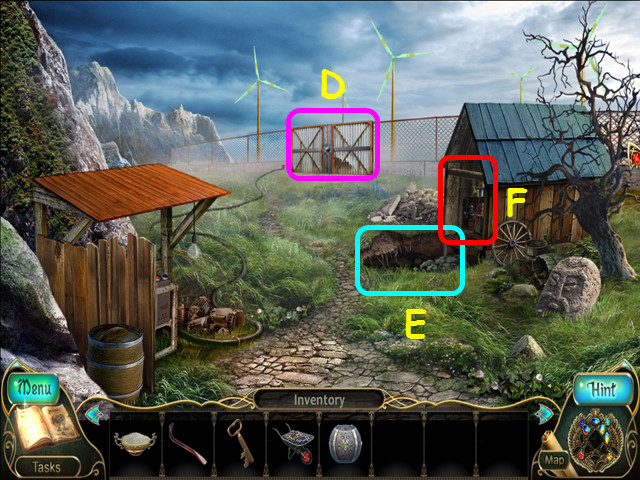
- Zoom into the gate and use the AMULET in the controller (D).
- Use the WHEELBARROW WITH STONES in the opening (E).
- Look in the workshop for a HOP (F).

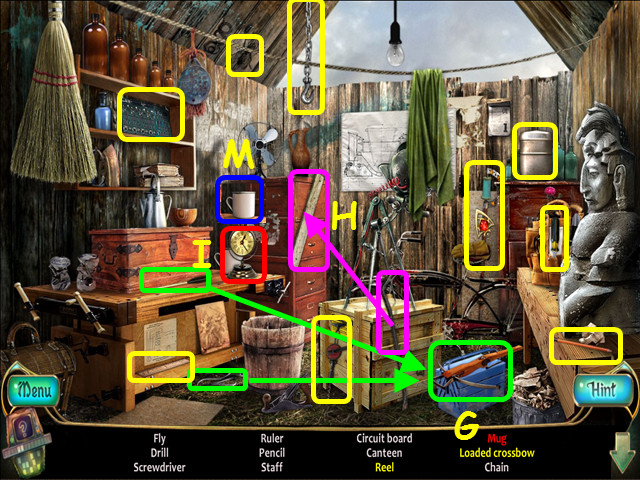

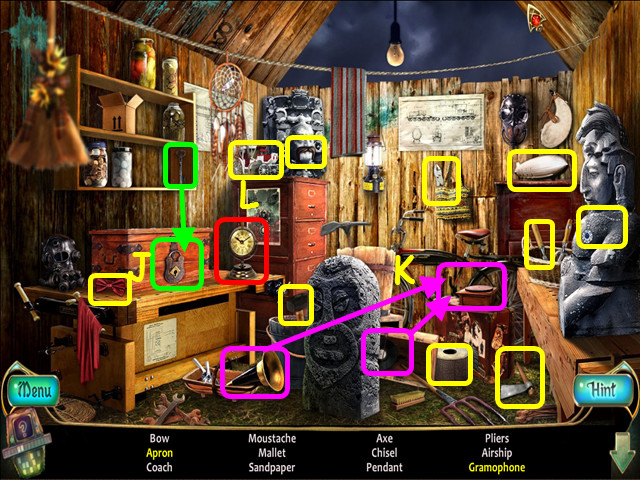
- Play the HOP.
- Place the arrow and line on the bow to make the loaded crossbow (G).
- Use the crowbar on the board to find the reel (H).
- Select the clock to time travel (I).
- Use the key on the chest to find the apron (J).
- Place the horn and the record on the base to make the gramophone (K).
- Select the clock to return to the present (L).
- Take the MUG (M).
- You will earn the STAFF.

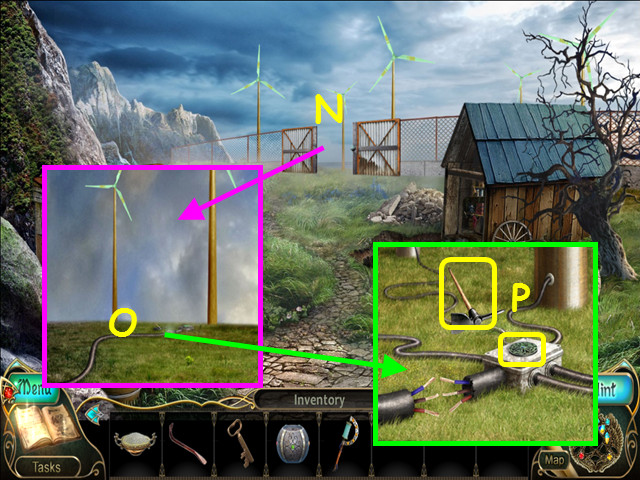
- Look at the gates (N), then look at the damage cable (O).
- Take the PICK and the PENDANT (P).
- Walk down 3 times, then walk to the right.

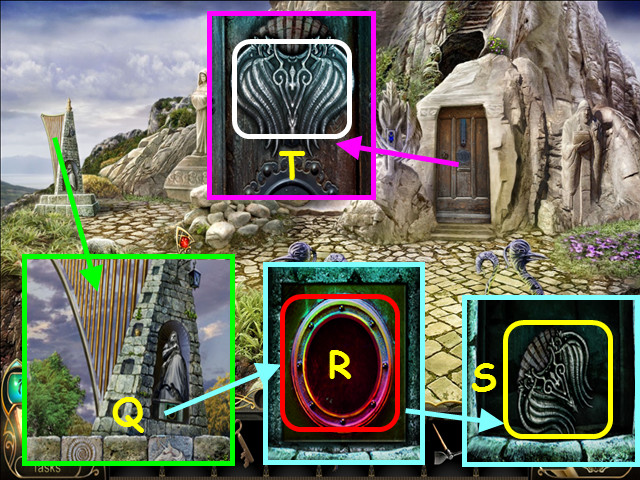
- Look at the Aeolian harp, zoom into the niche (Q), and place the PENDANT in the circle (R).
- Take the CONTROLLER (S).
- Look at the cell door, place the CONTROLLER on the door, then use the AMULET on the controller (T).
- Enter the cell.

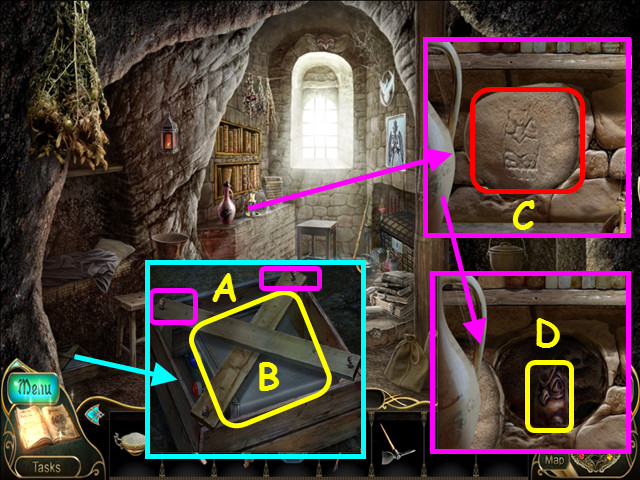
- Look at the box under the bench and use the CROWBAR to remove the boards (A).
- Take the BATTERY (B).
- Look at the desk and use the PICK to remove the stone (C).
- Take the OWL (D).

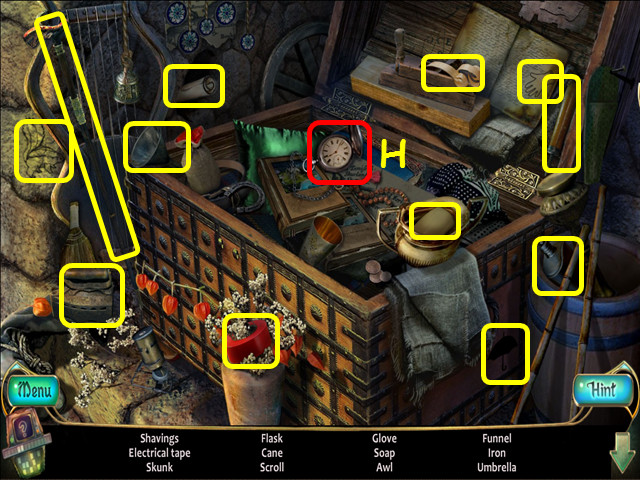
- Take the ELECTRIC CUTTER (E).
- Look at the chest and use the KEY in the lock (F).
- Select the open chest for a HOP.

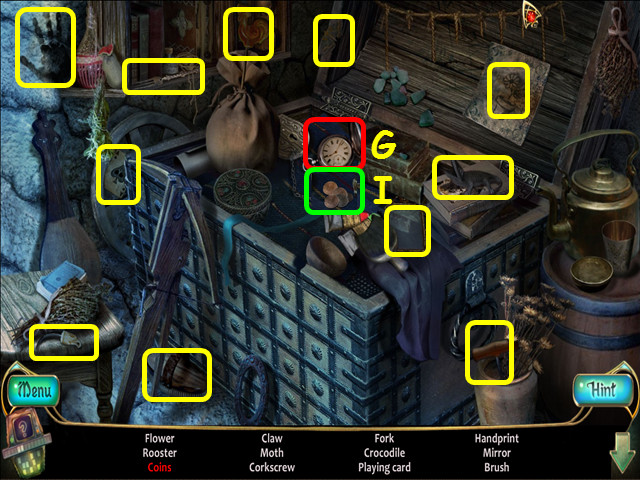


- Play the HOP.
- Select the pocket watch to time travel (G).
- Select the same pocket watch to return to the present (H).
- Take the coins (I).
- You will earn the ELECTRICAL TAPE.
- Walk down twice, go up the stairs, the take the path behind the tower.

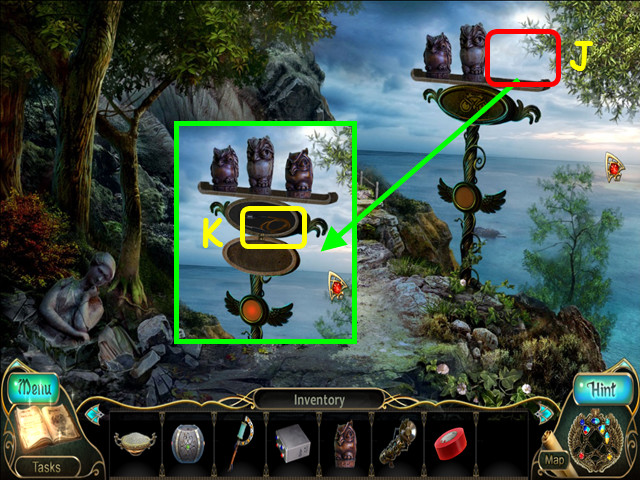
- Place the OWL on the totem (J).
- Take the CABLE (K).
- Walk forward.

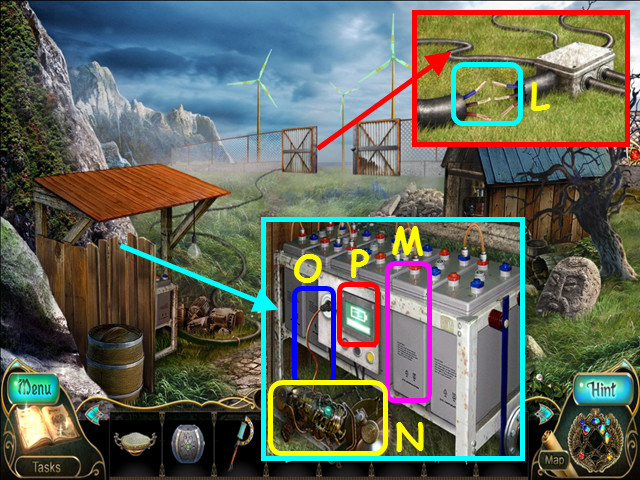
- Look at the gates, zoom into the cables and use the ELECTRICAL TAPE on the cut wires (L).
- You will earn the ability to control air and fire.
- Look at the shelter and place the BATTERY in the holder (M).
- Place the ELECTRIC CUTTER on the platform (N).
- Use the CABLE on the cutter (O).
- Once the meter (P) is full, take the CHARGED ELECTRIC CUTTER.
- Walk down 3 times, then enter the elevator. Walk down twice, take the stairs to the sea, then walk forward 3 times to the pearl museum.

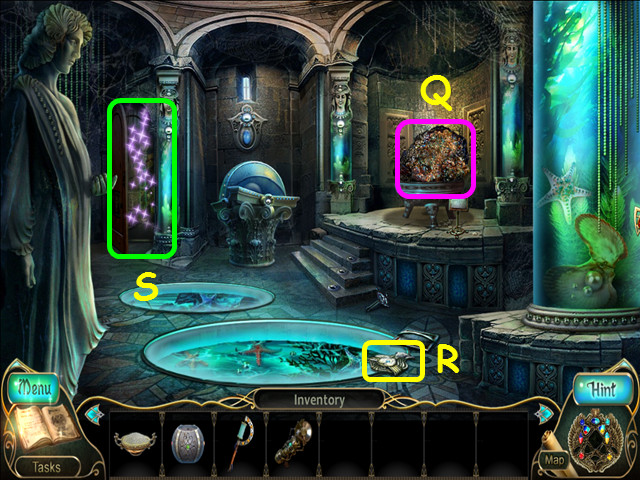
- Use the CHARGED ELECTRIC CUTTER on the meteorite (Q).
- You will earn the EARTH CORNERSTONE.
- Take the CONTROLLER (R).
- Look in the back room for a HOP (S).

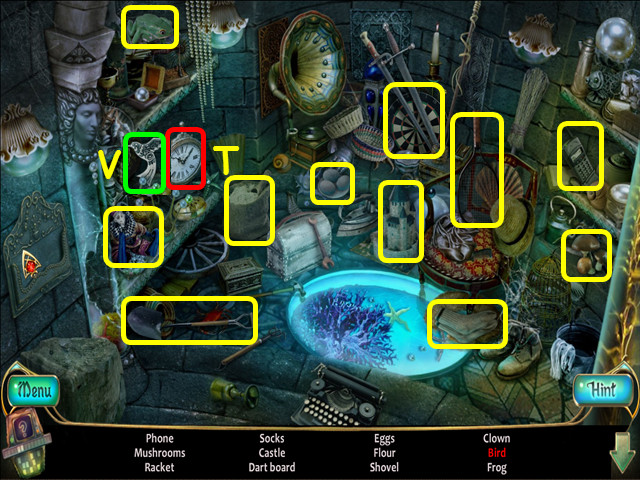

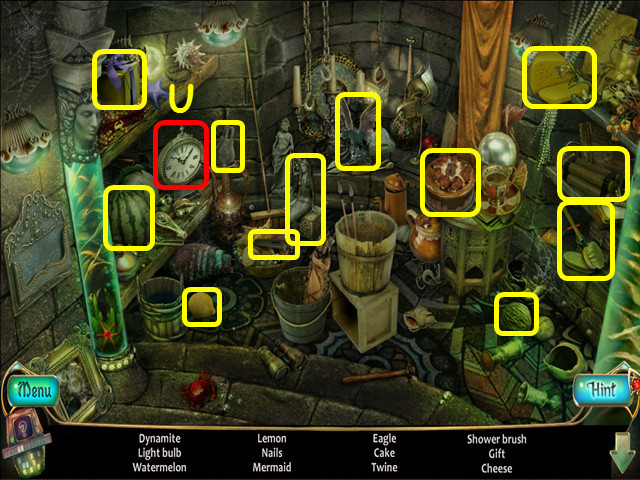
- Play the HOP.
- Select the clock to time travel (T).
- Select the matching clock to return to the present (U).
- Take the bird (V).
- You will earn the 1st BIRD.
- Walk down 4 times, go left, enter the temple, enter the elevator, go up the stairs, then walk forward to the main tower.

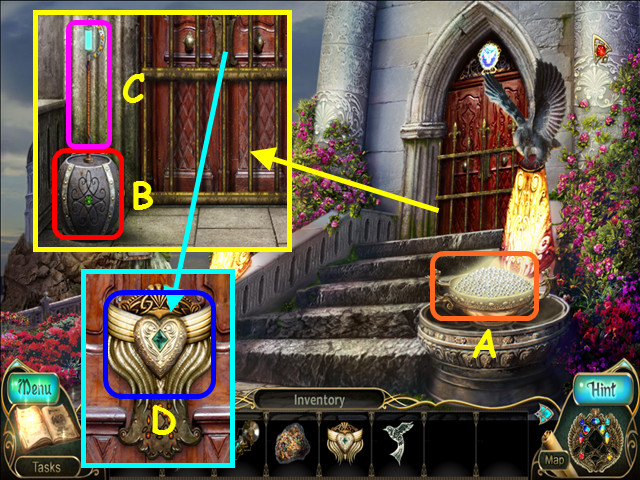
- Place the BOWL OF PEARLS in the receptacle (A).
- Look at the door and place the PEDESTAL on the disk (B).
- Place the STAFF in the pedestal (C).
- Look at the door, place the CONTROLLER on the lock, then use the AMULET in the controller (D).
- Walk forward to enter the tower.

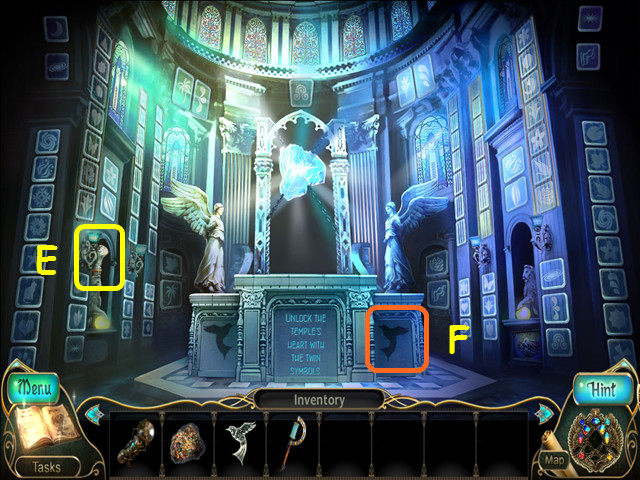
- Take the SHEAF (E).
- Place the 1st BIRD on the right side of the pedestal (F).
- Walk down twice.

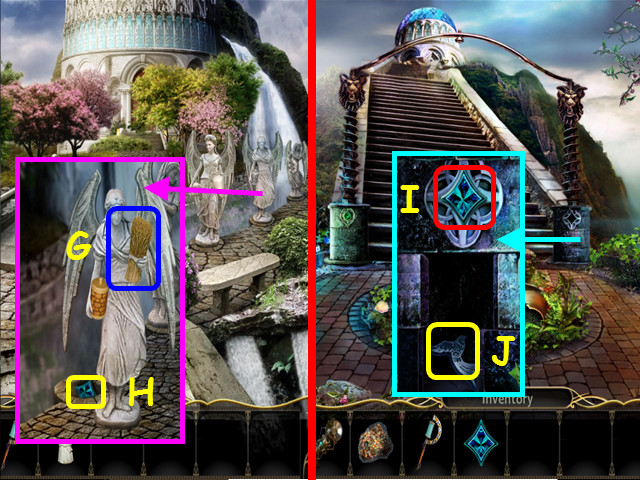
- Look at the statues and place the SHEAF on the middle statue (G).
- Take the CYAN CRYSTAL (H).
- Walk down.
- Look at the right pedestal and place the CYAN CRYSTAL in the opening (I).
- Take the 2nd BIRD (J).
- Walk forward 3 times to enter the tower.

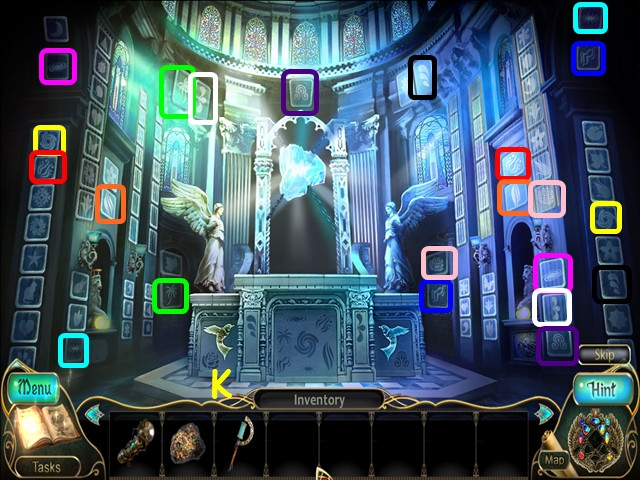
- Place the 2nd BIRD on the left side of the pedestal (K).
- Locate the 11 matching pairs of tiles throughout the room (color-coded).
- Tip – the symbols you need to find appear on the pedestal with the birds.
- You will earn the ability to control earth, air and fire.

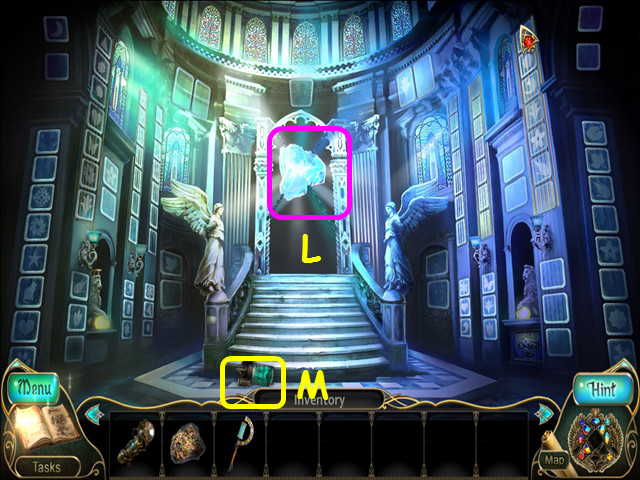
- Use the CHARGED ELECTRIC CUTTER on the meteorite to get the WATER CORNERSTONE (L).
- Take the SPARE PART (M).
- Walk down 3 times, walk to the right, and then enter the cell.

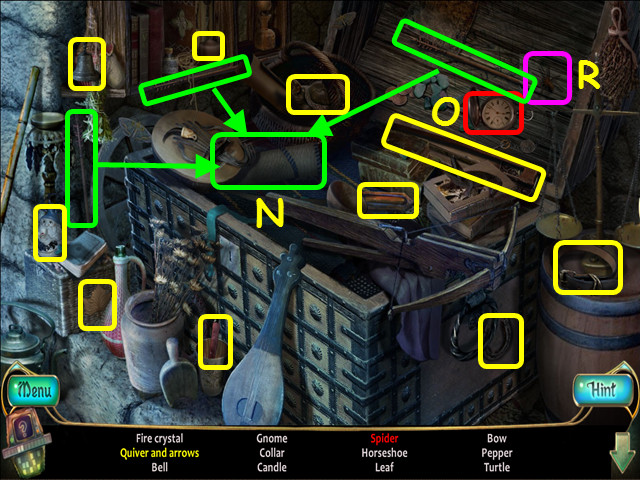

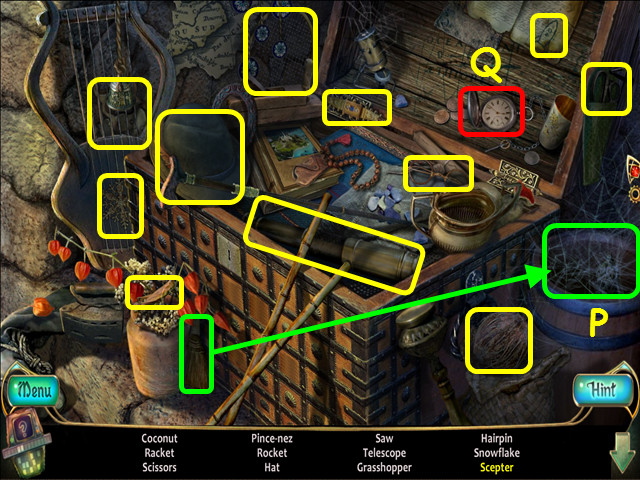
- Select the chest for a HOP.
- Place the 3 arrows in the quiver to make the quiver and arrows (N).
- Select the pocket watch to time travel (O).
- Use the broom on the cobwebs to find the scepter (P).
- Select the pocket watch to return to the present (Q).
- Take the spider (R).
- You will earn the FIRE CRYSTAL.
- Walk down twice, go up the stairs, then go forward to the tower.

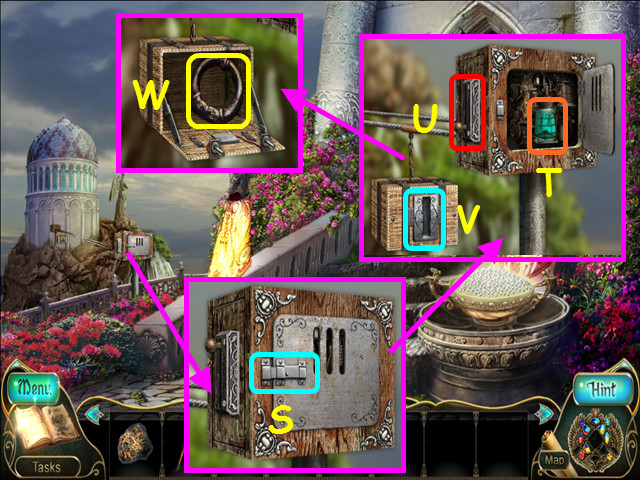
- Look at the device and pull the lever to open the compartment (S).
- Place the SPARE PART inside the device (T).
- Pull down the knob (U).
- Use the FIRE CRYSTAL in the indentation (V).
- Take the RING (W).
- Enter the tower.

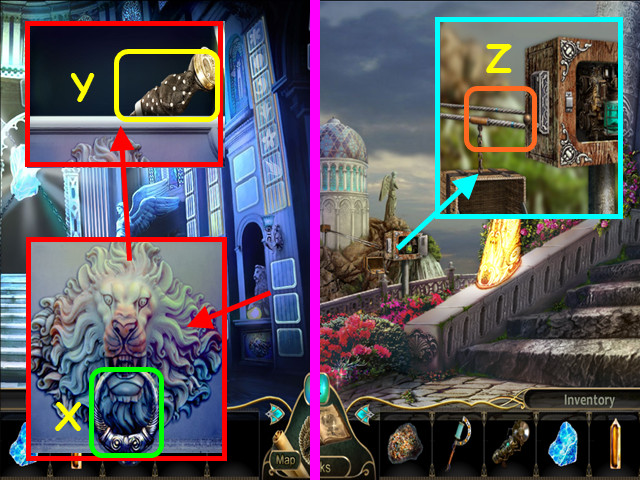
- Look at the lion and place the RING in his mouth (X).
- Take the MACHETE (Y).
- Walk down.
- After the cut scene, look at the device and use the MACHETE on the rope (Z).
Chapter 4: The Clockmaker

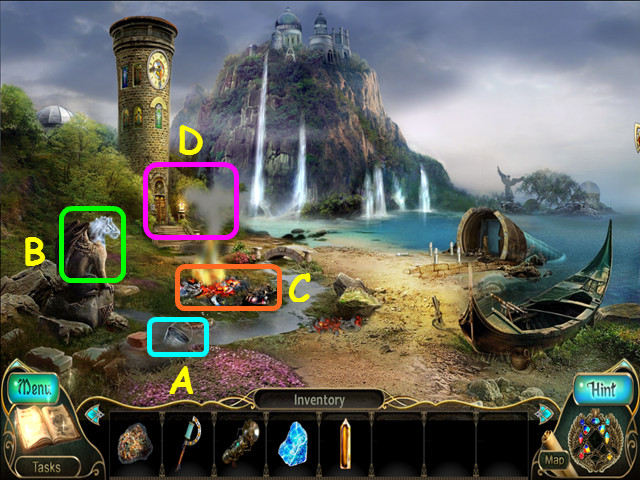
- Pick up the bucket to earn the ability to control water and fire (A).
- Note the gargoyle (B) and the burnt area (C).
- Walk to the clock tower (D).

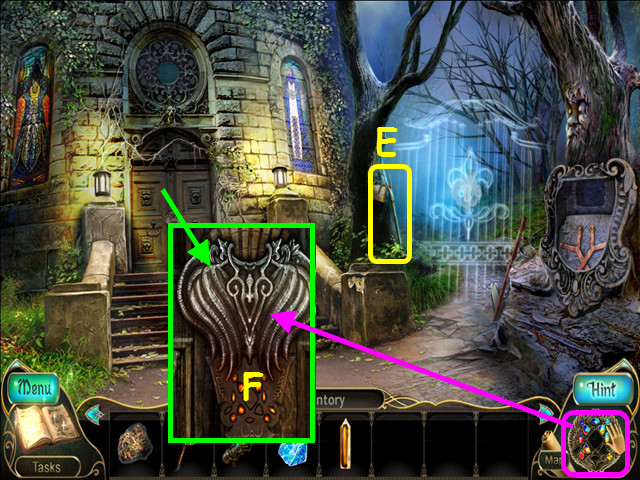
- Take the BOAT HOOK (E).
- Look at the tower door and use the AMULET in the controller (F).
- Enter the tower.

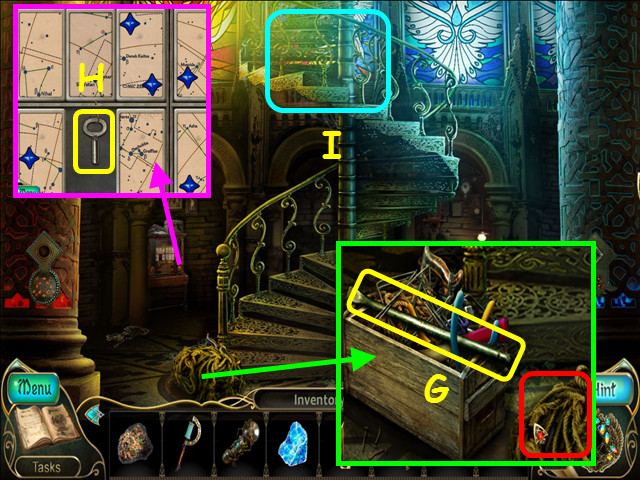
- Look at the toolbox, remove the rope, and take the CROWBAR (G).
- Look at the card index and take the SMALL KEY (H).
- Go up the stairs (I).

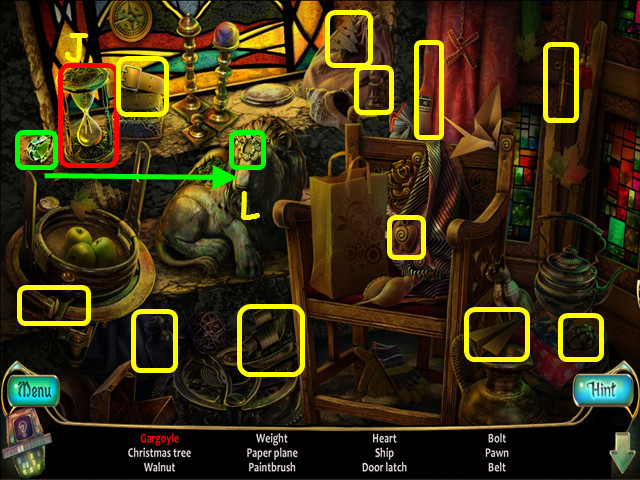

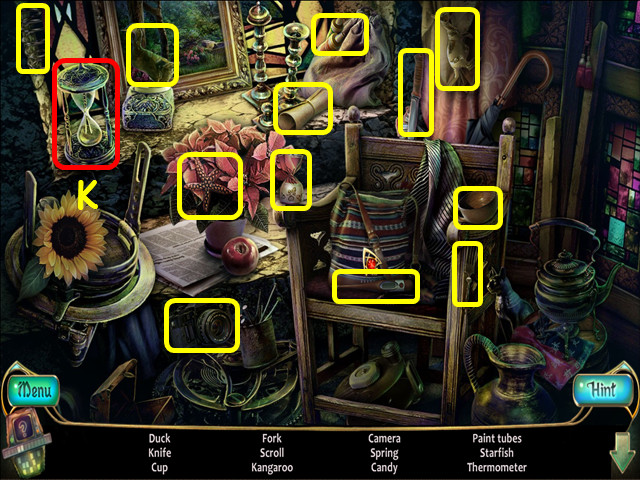
- Select the folding screen on the right for a HOP.
- Select the hourglass to time travel (J).
- Select the hourglass to return to the present (K).
- Place the gem in the lion’s head to find the gargoyle (L).
- You will earn the GOLDEN BAS-RELIEF.
- Walk down 3 times.

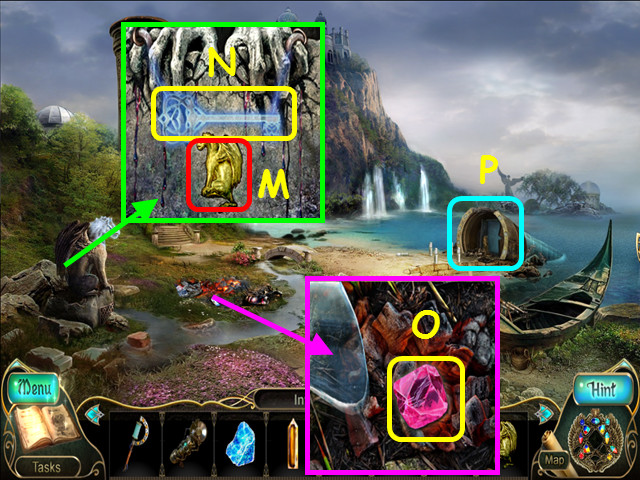
- Look at the gargoyle and place the GOLDEN BAS-RELIEF in the indentation (M).
- Take the SHADOW KEY (N).
- Look at the burnt area, use the BOAT-HOOK on the debris, and then take the RUBIES 1/4 (O).
- Walk to the underwater tunnel (P).

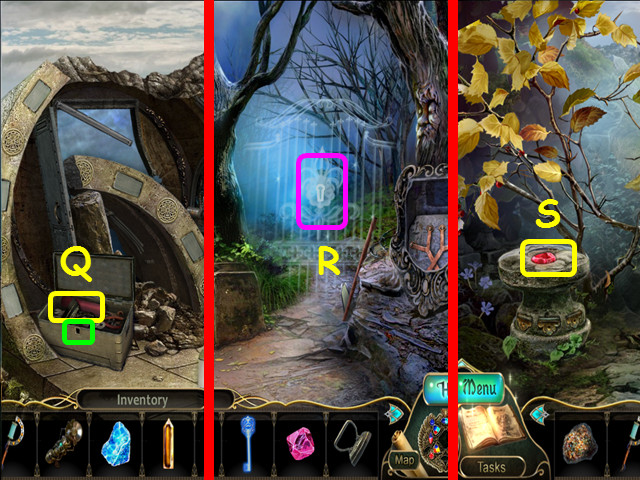
- Use the SMALL KEY on the chest to get the IRON (Q).
- Walk down, then go forward to the clock tower.
- Use the SHADOW KEY on the gate (R).
- Walk to the back of the tower.
- Take the RUBIES 2/4 (S).
- Walk forward, enter the crypt, and walk left to the secret room.

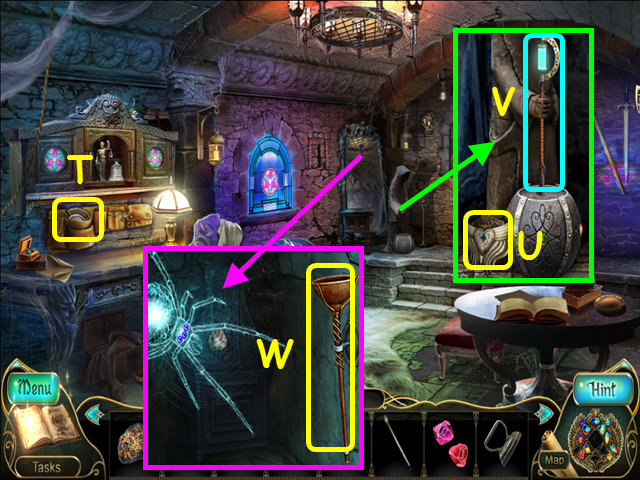
- Zoom into the pocket and take the LENS (T).
- Look at the support and take the CONTROLLER (U).
- Use the STAFF on the sphere (V).
- You will earn the ability to control air and earth.
- Look in the mirror and take the UNLIT TORCH (W).
- Walk down.

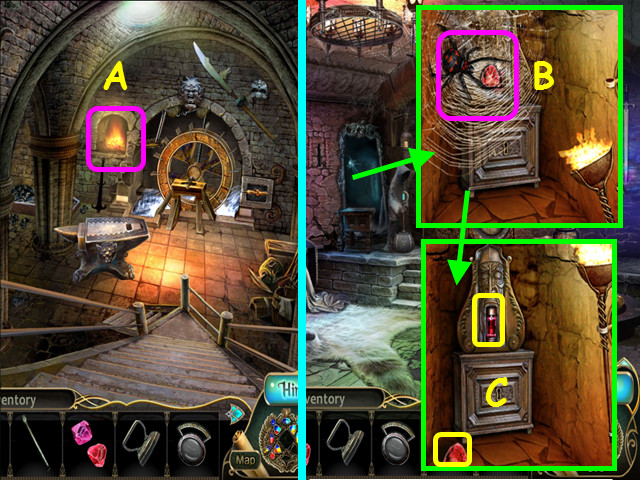
- Use the UNLIT TORCH in the furnace to get the LIT TORCH (A).
- Walk to the left.
- Look in the mirror and use the LIT TORCH on the spider (B).
- Take the RUBIES 3/4 and the SWITCH COMPONENT (C).
- Walk down twice.

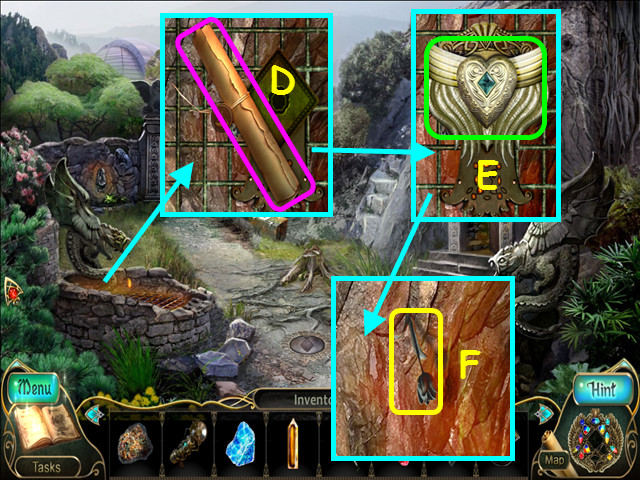
- Look in the well and take the scroll (D).
- Place the CONTROLLER on the lock and use the AMULET in the controller (E).
- Take the TULIP (F).
- Look in the well for a HOP.

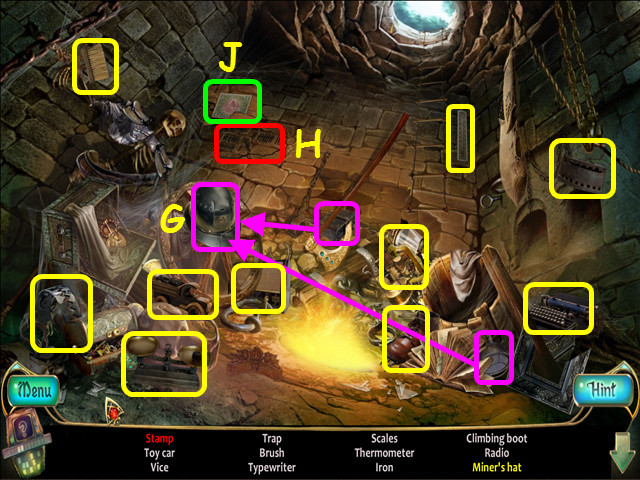

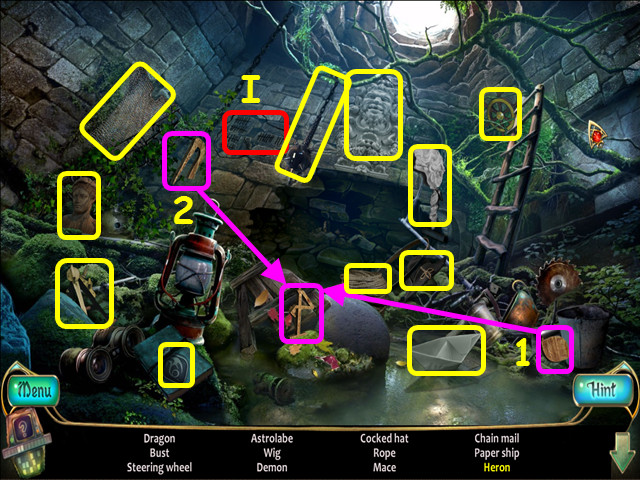
- Play the HOP.
- Place the battery and the light on the helmet to make the miner’s hat (G).
- Select the hash marks to time travel (H).
- Place the 2 pieces on the legs in numerical order (1-2) to make the heron.
- Select the hash marks to return to the present (I).
- Take the stamp (J).
- You will earn the DRAGON EMBLEM.

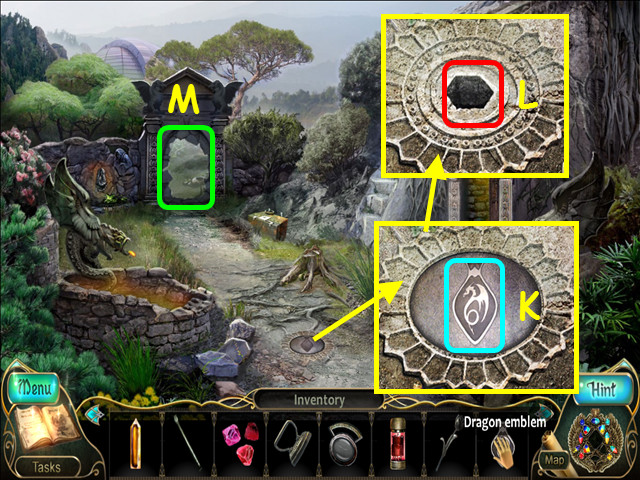
- Look at the ground and place the DRAGON EMBLEM in the indentation (K).
- Place the FIRE CRYSTAL in the opening (L).
- You will earn the ability to control earth, water, and fire.
- Walk forward to the observatory (M).

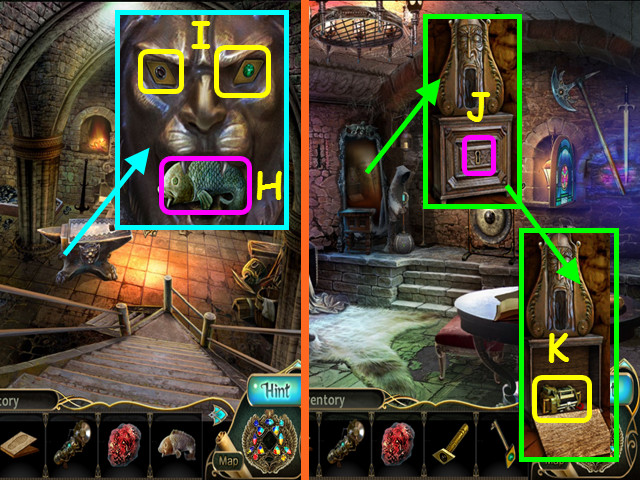
- Look at the monument and place the TULIP in the stand (N).
- Take the RUBIES 4/4 (O).
- Zoom into the door and use the AMULET in the controller (P).
- Enter the observatory, talk to Gloria, and then exit. Walk right to the bridge.

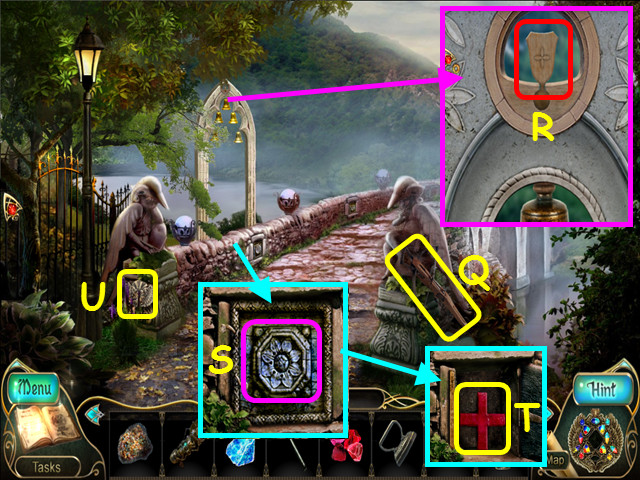
- Take the CROSSBOW (Q).
- Look at the bell tower and use the CROSSBOW on the target (R).
- Look at the hidden area and use the CROWBAR to open the panel (S).
- Take the GREEN CROSS (T).
- Take the CONTROLLER (U).
- Walk forward.

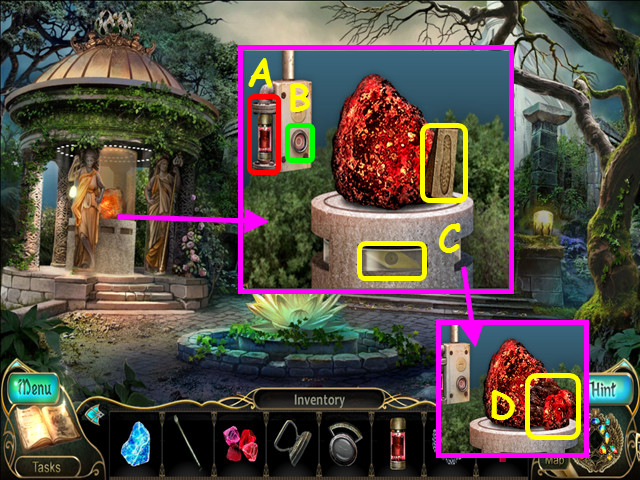
- Look at the flask and place the SWITCH COMPONENT in the holder (A), then push the button (B).
- Take the PEDAL and the VALVE HANDLE (C).
- Use the CHARGED ELECTRIC CUTTER on the meteorite to get the FIRE CORNERSTONE (D).
- Walk down twice.

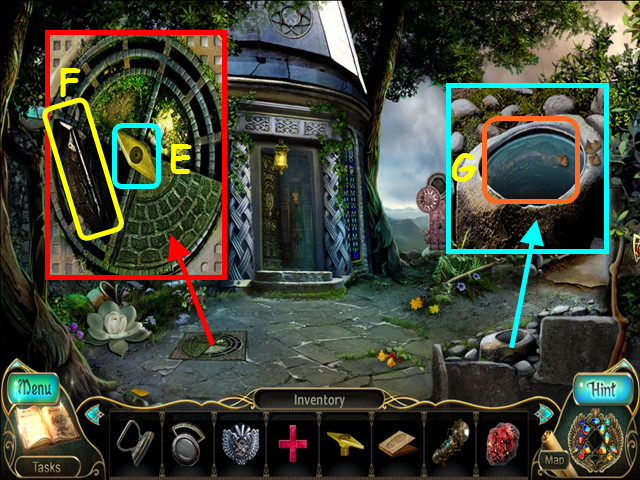
- Look at the damaged trap-door and use the VALVE HANDLE in the center (E).
- Take the GRIP (F).
- Look in the stone well and use the GRIP to get the SMALL FISH (G).
- Walk down and enter the crypt.


- Look at the anvil and place the SMALL FISH in the cat’s mouth (H).
- Take the EYEPIECE and the KEY TO THE CHEST (I).
- Walk left to the secret room.
- Look in the mirror, use the KEY TO THE CHEST in the lock (J).
- Take the HOIST (K).
- Walk down 4 times and enter the clock tower.

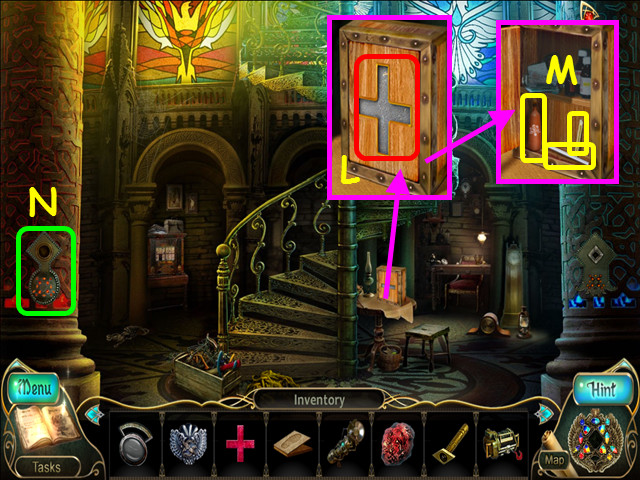
- Look at the first-aid kit and place the GREEN CROSS in the center (L).
- Take the POTION, TEST TUBE, and the NEEDLE (M).
- Zoom into the left pillar and place the CONTROLLER in the circle (N).
- Go up the stairs.

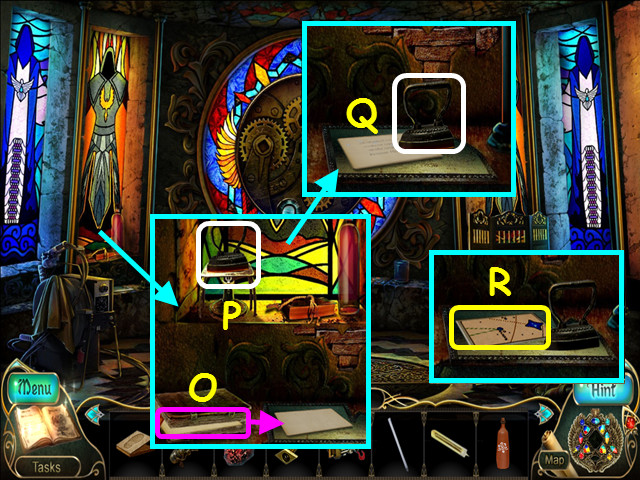
- Look at the windowsill and pull the paper from the book (O).
- Place the IRON on the burner (P).
- Take the HOT IRON and use it on the paper (Q).
- Take the CARD (R).
- Walk down.

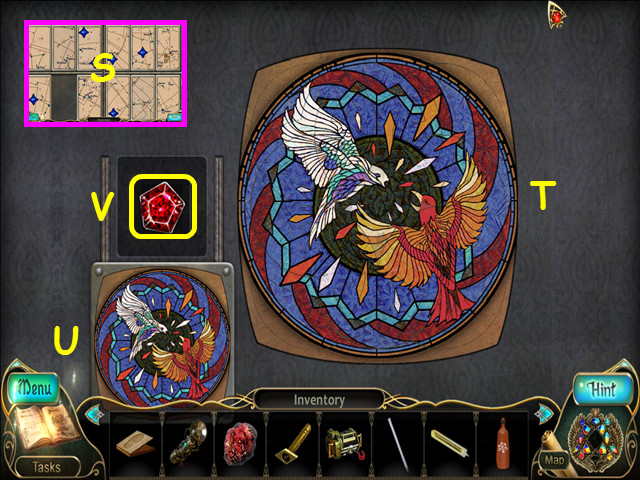
- Look at the card index for a mini-game.
- Place the CARD in the open space to trigger the mini-game (S).
- Swap the pieces in the right area (T) to recreate the picture on the left (U).
- Select a piece to see the highlighted locations it can move to; as you correctly place pieces, more will become available.
- Take the POLISHED RUBY (V).
- Walk down, go to the back of the tower, and then walk forward twice.

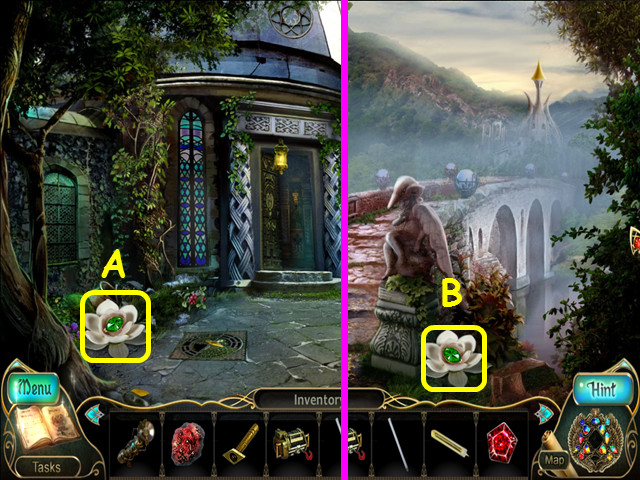
- Use the POTION on the flower, then take the RIGHT CAT’S EYE (A).
- Walk to the right.
- Use the POTION on the flower, then take the LEFT CAT’S EYE (B).
- Walk down, then enter the observatory.

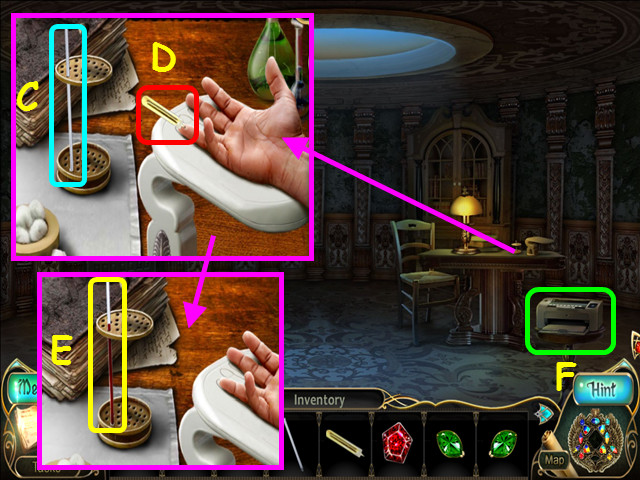
- Look at the table and place the TEST TUBE in the holder (C).
- Use the NEEDLE on your finger (D).
- Take DNA SAMPLE (E).
- Look at the printer for a mini-game (F).

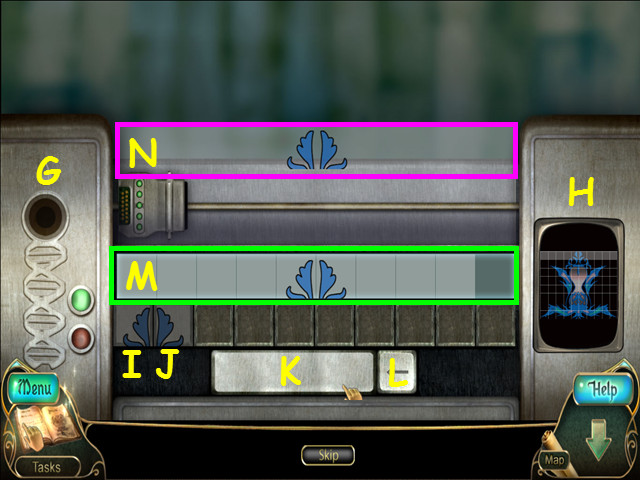
- Use DNA SAMPLE in the receptacle (G).
- Press the keys to recreate the pattern (H).
- Different tiles will appear for each line in your game as you type each line correctly.
- What you are typing will appear in the center (M); if you make a mistake, use the backspace (L).
- As you type each line correctly, a portion of the pattern will print (N).
- For the example first line shown here, press: K x 4, I, J, and K x 4.
- This mini-game is randomly generated. The keys will appear in different orders.
- You will earn the SHEET WITH CODE IMAGE.

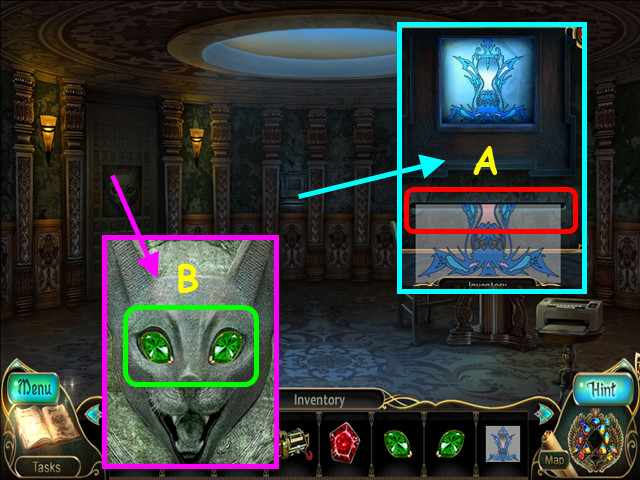
- Look at the ladder lift and inset the SHEET WITH CODE IMAGE (A).
- Look at the door and place the LEFT CAT’S EYE and the RIGHT CAT’S EYE in the eye sockets (B).
- Look in the room for a HOP.

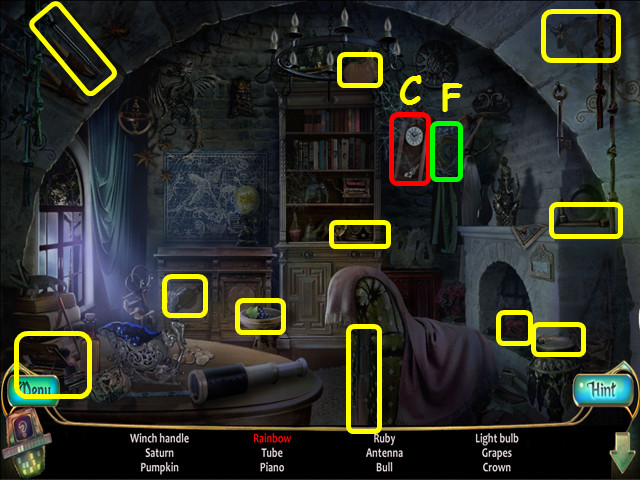

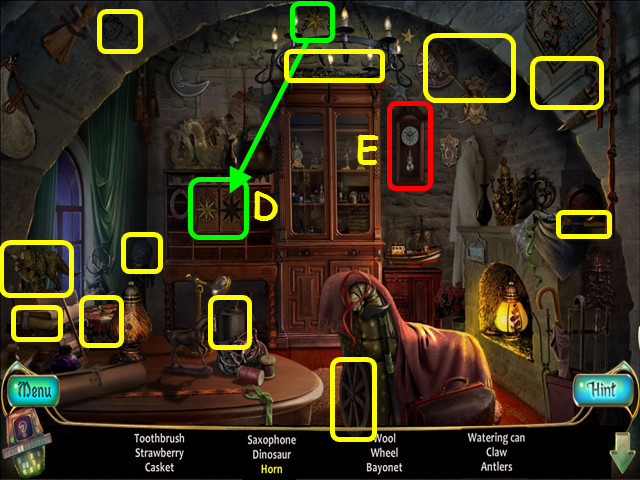
- Play the HOP.
- Select the clock to time travel (C).
- Place the star in the door to find the horn (D).
- Select the clock to return to the present (E).
- Take the rainbow (F).
- You will earn the HOIST HANDLE.
- Go up the stairs.

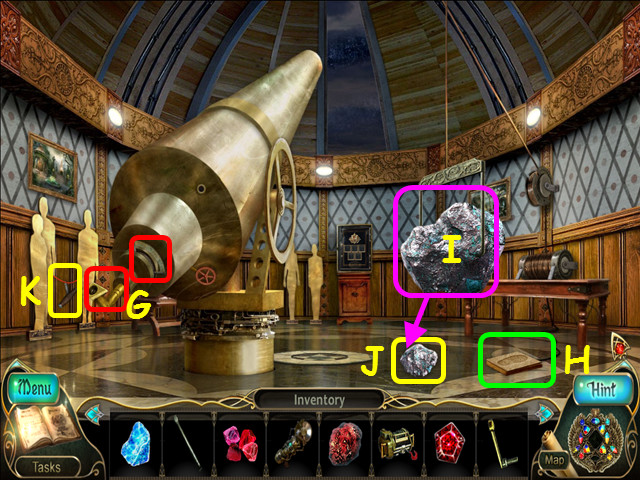
- Place the LENS and the EYEPIECE on the telescope (G).
- Place the PEDAL on the cord and push it down (H).
- Use the CHARGED ELECTRIC CUTTER on the meteorite (I).
- Take the AIR CORNERSTONE (J).
- Take the CONTACT BREAKER (K).
- Walk down twice, go right, and forward.

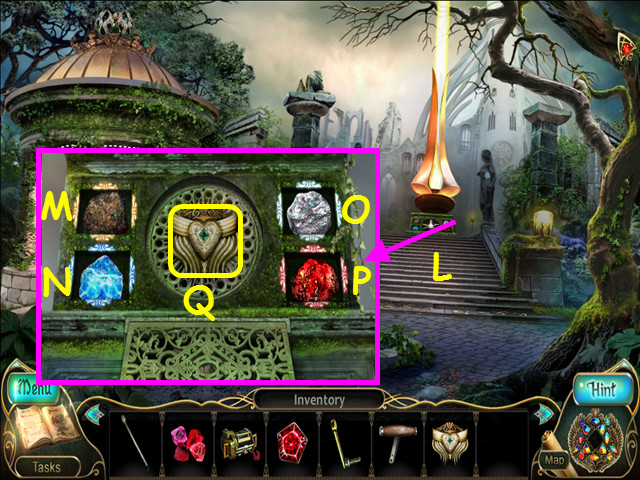
- Zoom into the monument (L).
- Place the EARTH CORNERSTONE in the upper left compartment (M).
- Place the WATER CORNERSTONE in the lower left compartment (N).
- Place the AIR CORNERSTONE in the upper right compartment (O).
- Place the FIRE CORNERSTONE in the lower right compartment (P).
- Take the CONTROLLER (Q).
- You will earn the ability to control earth and fire.
- Walk down 5 times and enter the clock tower.

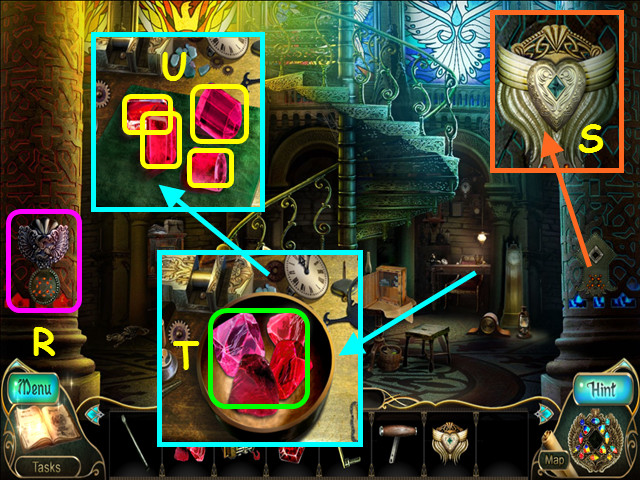
- Zoom into the left pillar and use the AMULET in the controller (R).
- Look at the right pillar and place the CONTROLLER on the lock, then use the AMULET in the controller (S).
- Look at the watchmaker’s table and place the 4 RUBIES in the bowl (T).
- Take the 4 POLISHED RUBIES (U).
- You should now have 5 POLISHED RUBIES.
- Go up the stairs.

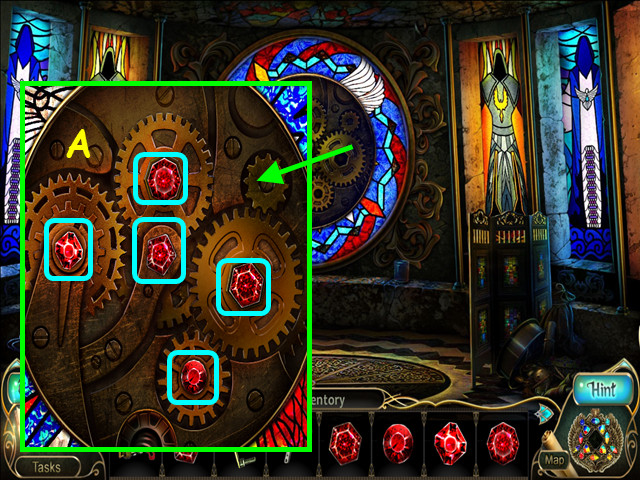
- Look at the clock and place the 5 POLISHED RUBIES in the gears (A).
- Use the shape of each ruby as a guide.
- You will earn the ability to control air, water, earth, and fire.

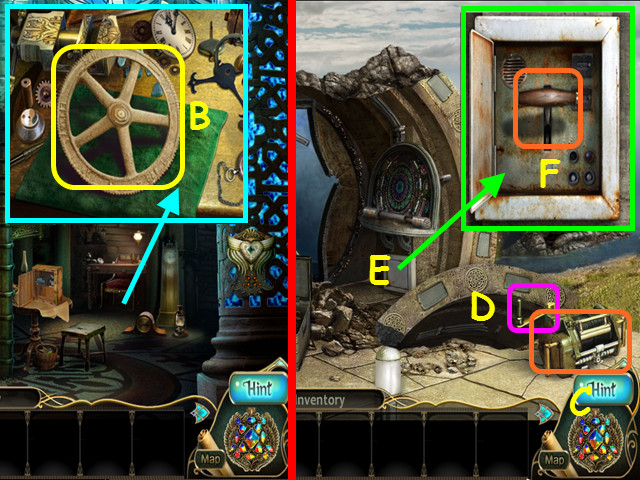
- Look at the table and take the TELESCOPE CONTROL (B).
- Walk down twice and go to the underwater tunnel.
- Use the hoist on the rubble (C).
- Use the HOIST HANDLE on the hoist (D).
- Look at the wiring closet and use the CROWBAR on the cover (E).
- Place the CONTACT BREAKER in the slot and pull it down (F).
- Enter the underwater tunnel.

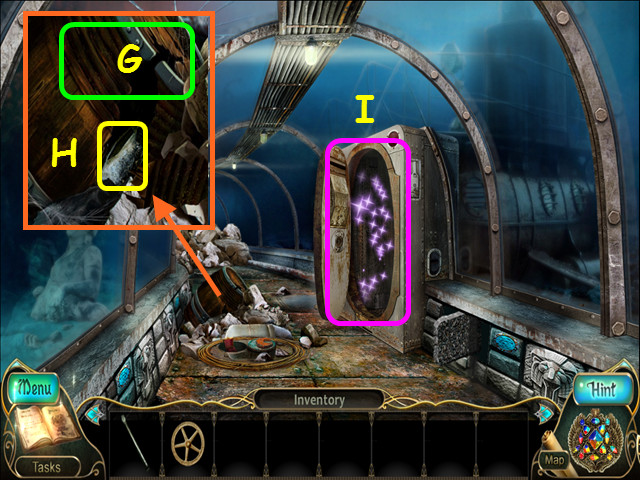
- Look at the rubble and use the CROWBAR on the barrel (G).
- Take the BRICK FOR THE LOTUS (H).
- Look in the bathyscaphe for a HOP (I).

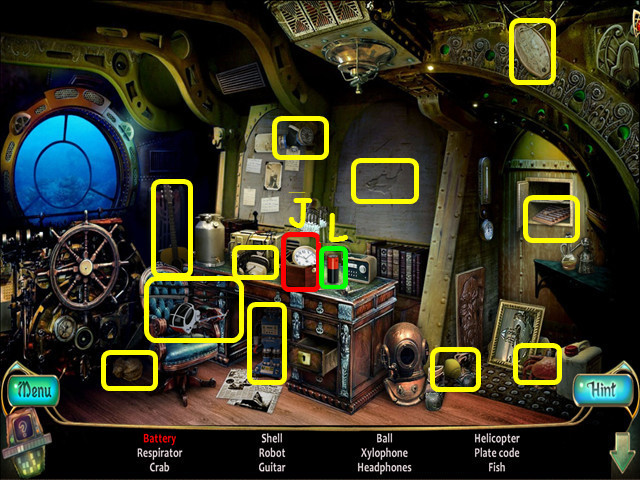

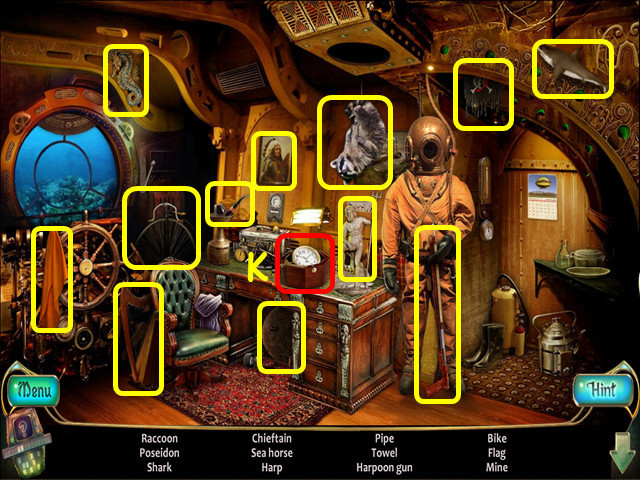
- Play the HOP.
- Select the clock to time travel (J).
- Select the clock to return to the present (K).
- Take the battery (L).
- You will earn the CODE.
- Walk down twice, go forward, and then go to the back of the tower. Walk forward twice, enter the observatory, and go up the stairs.

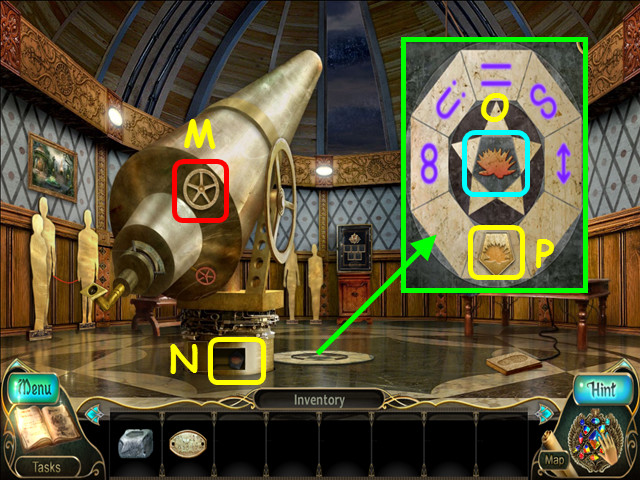
- Place the TELESCOPE CONTROL on the telescope (M).
- Take the PENTAGON (N).
- Look at the floor and place the PENTAGON in the center (O).
- Take the LOTUS TILE (P).
- Walk down twice, go to the right, and forward to the destroyed temple.

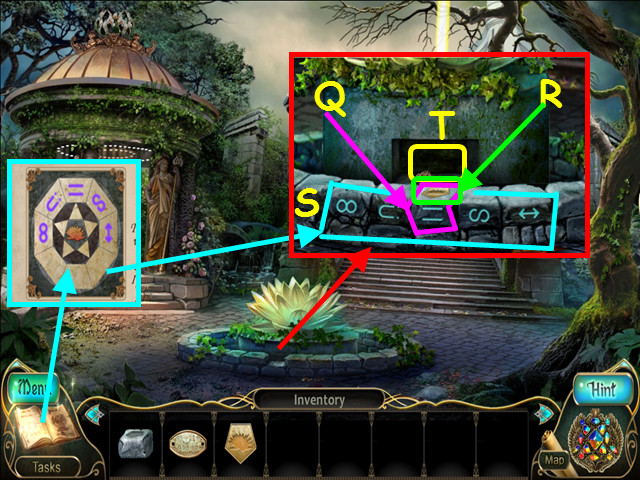
- Look at the lotus and place the BRICK FOR THE LOTUS in the opening (Q).
- Place the LOTUS TILE in the brick (R).
- Change the symbols to match the symbols from the floor in the observatory (S).
- Take the SAFE KEY (T).
- Walk down twice, enter the observatory, and go up the stairs.

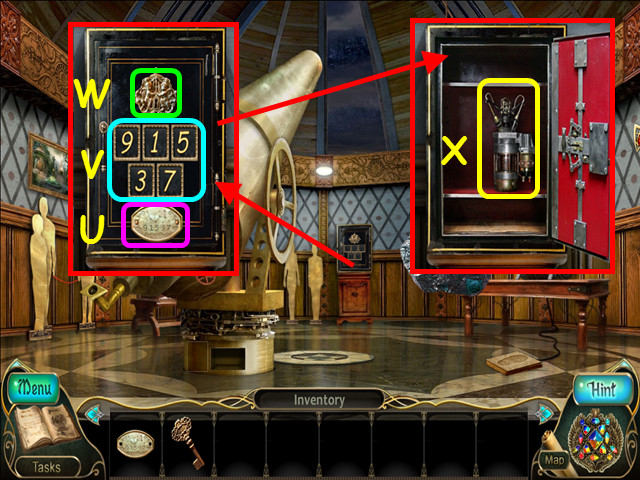
- Look at the safe and place the CODE at the bottom (U).
- Change the numbers to match those on the code plaque (V).
- Use the SAFE KEY in the lock (W).
- Take the STARTER (X).
- Walk down twice, go to the right, and forward to the destroyed temple.

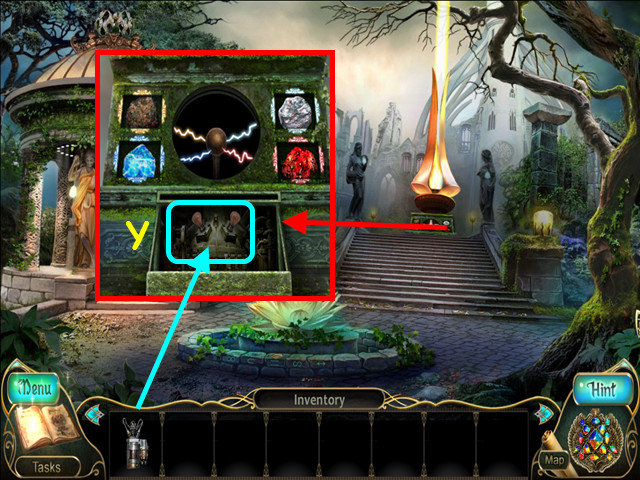
- Look at the base of the monument and place the STARTER in the machinery (Y).
- Congratulations, you have completed Phenomenon Meteorite.




 Grim Tales: The Vengeance Walkthrough, Guide, & Tips
 Rhianna Ford and the DaVinci Letter Walkthrough, Guide, & Tips
 Queen's Tales: Sins of the Past Walkthrough, Guide, & Tips
 Dark Tales: Edgar Allan Poe's The Masque of the Red Death Walkthrough, Guide, & Tips
 Off the Record: The Final Interview Walkthrough, Guide, & Tips