PuppetShow Destiny Undone Walkthrough, Guide, & Tips
PuppetShow Destiny Undone Walkthrough

Welcome to the PuppetShow: Destiny Undone Walkthrough
A wonderful story of the citizens of Joyville. Can you change their destiny? You will see – nothing is impossible.
Whether you use this document as a reference when things get difficult or as a road map to get you from beginning to end, we’re pretty sure you’ll find what you’re looking for here.
This document contains a complete PuppetShow: Destiny Undone game walkthrough featuring annotated screenshots from actual gameplay!
We hope you find this information useful as you play your way through the game. Use the walkthrough menu below to quickly jump to whatever stage of the game you need help with.
Remember to visit the Big Fish Games Forums if you find you need more help. Have fun!
This walkthrough was created by MargieB, and is protected under US Copyright laws. Any unauthorized use, including re-publication in whole or in part, without permission, is strictly prohibited.
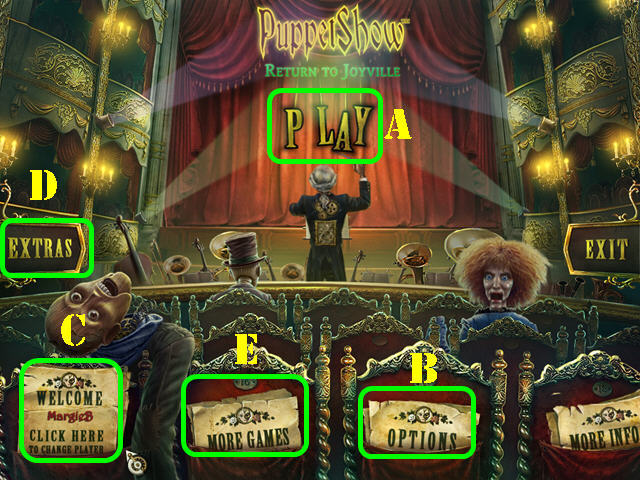
General Tips

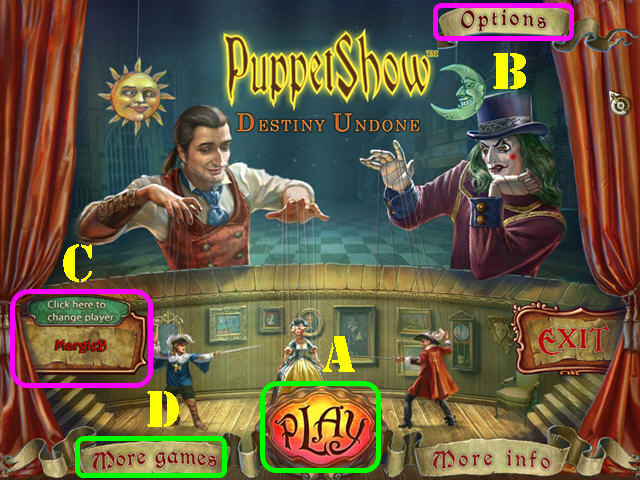
- This is the Official Guide for PuppetShow: Destiny Undone.
- Select ‘Play’ (A) to begin your quest.
- The ‘Options’ (B) button allows you to adjust the screen, music, cursor, game mode, and sound.
- You can manage your player profiles here (C).
- Select ‘More Games’ (D) to view other titles from this developer.
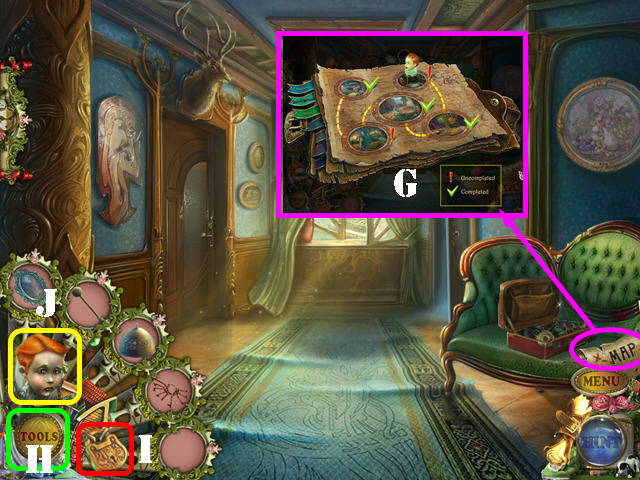
- Use the Map (G) to travel directly to a location.
- This guide will refer to Hidden-object Puzzles as ‘HOP’. Items listed in orange in HOPs require an extra step. Some of the find lists may be random; our lists may vary from yours.
- Inventory items will go into the Tools tab (H). If it’s full, use the arrows on each end of the Tools section to scroll through your items. You can lock the tools by pressing on the lock (I).
- Use your puppet helper (J) to help you with hard to reach areas. Your puppet helper will become animated when you’re in a location that it can be used in.
Chapter 1: Welcome to Joyville!
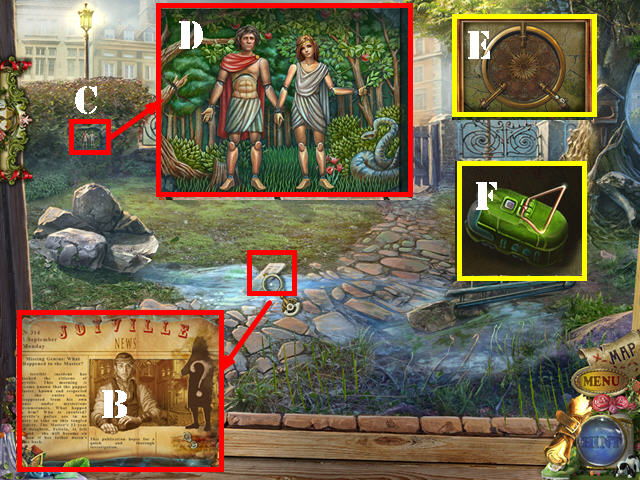
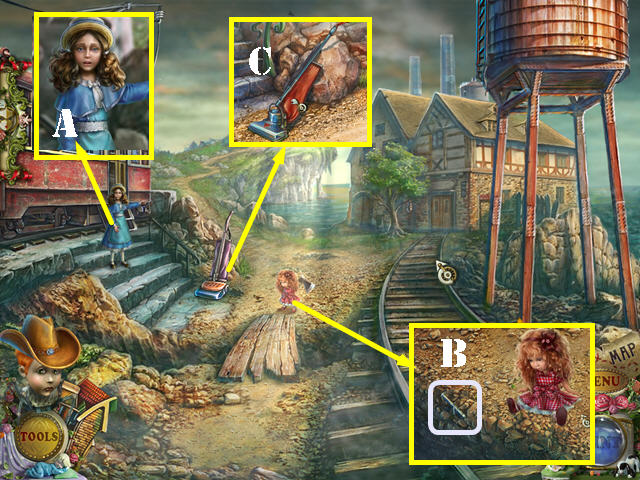
- Talk to Felicia.
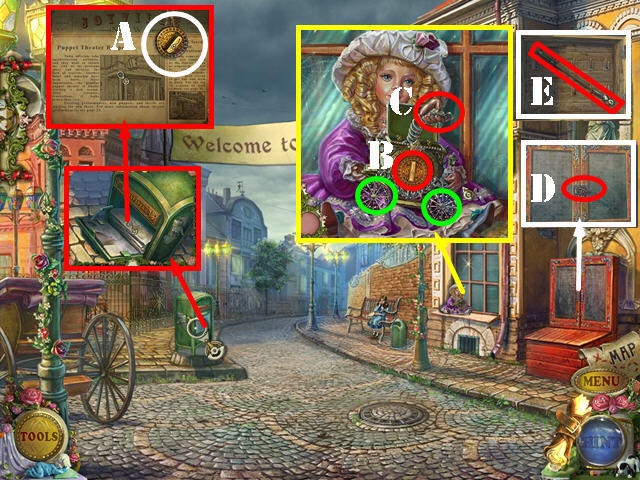
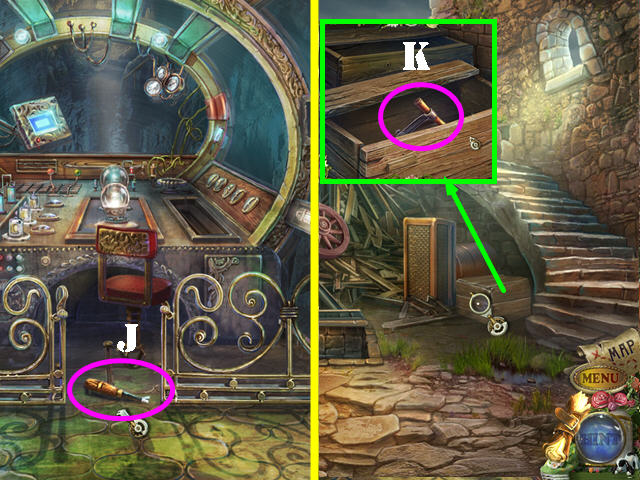
- Zoom into the newspaper stand and then open it. Take the HANDLE (A).
- Zoom into the window sill; press the two wheels (green) and insert the HANDLE into the niche (B).
- Take the LIGHTER (C).
- Zoom into the cabinet and burn the rope with the LIGHTER (D). Open the doors and take the HOOK (E).
- Go forward.
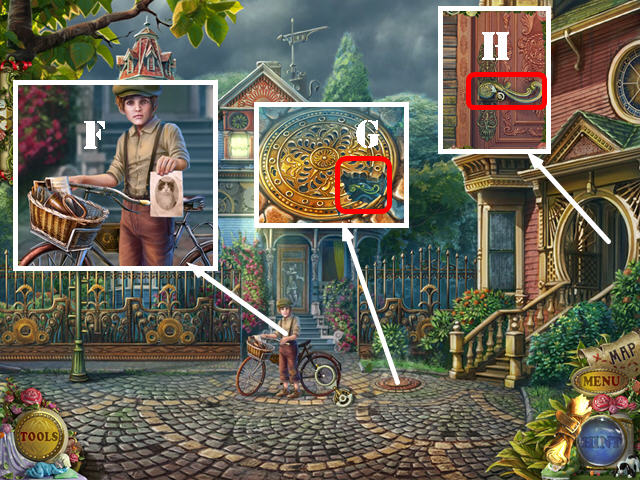
- Talk the boy (F).
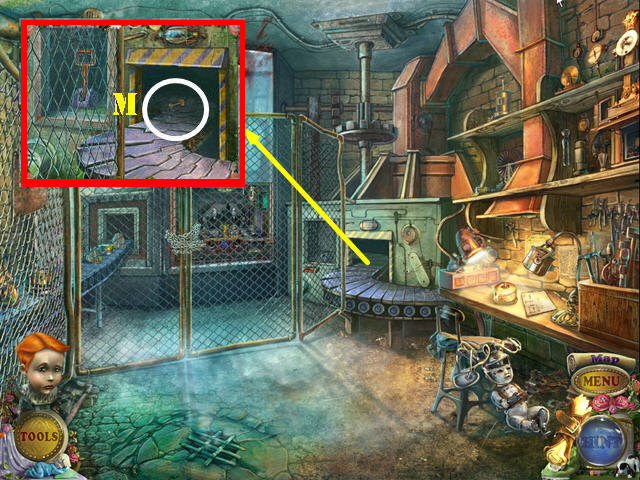
- Zoom into the manhole cover; use the HOOK to get the HANDLE (G).
- Zoom into the door and place the HANDLE on the door; pull the handle and go through the door (H).
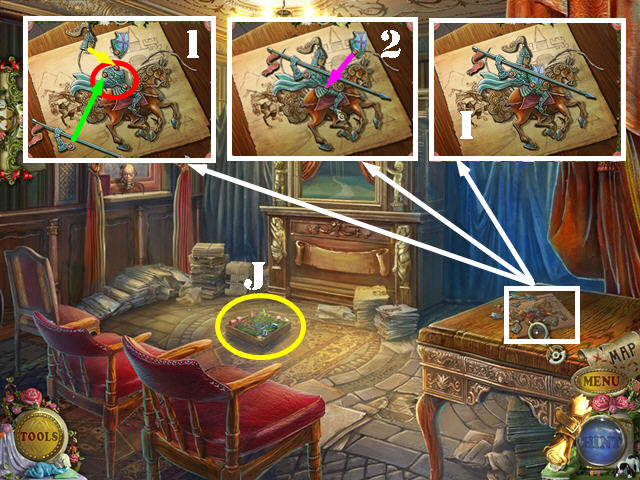
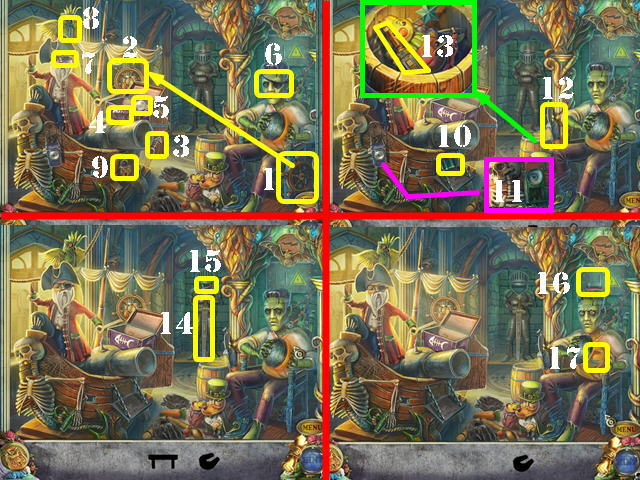
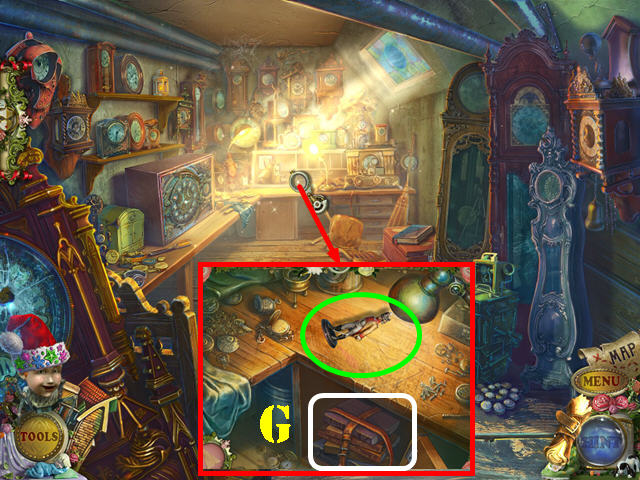
- Zoom into the table and assemble the knight as shown on the screenshot (1-2).
- Take the KNIGHT (I).
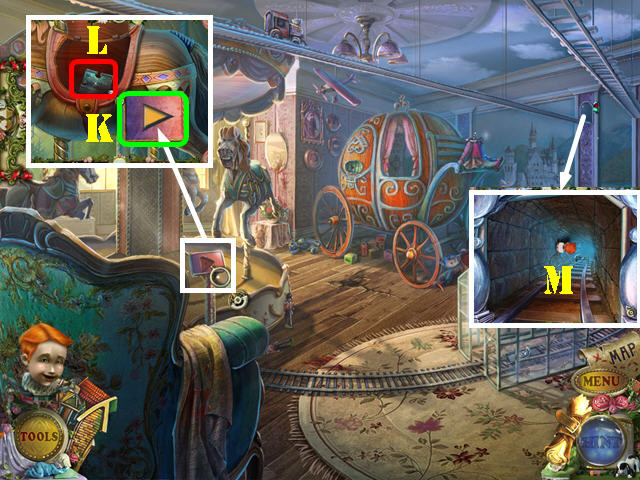
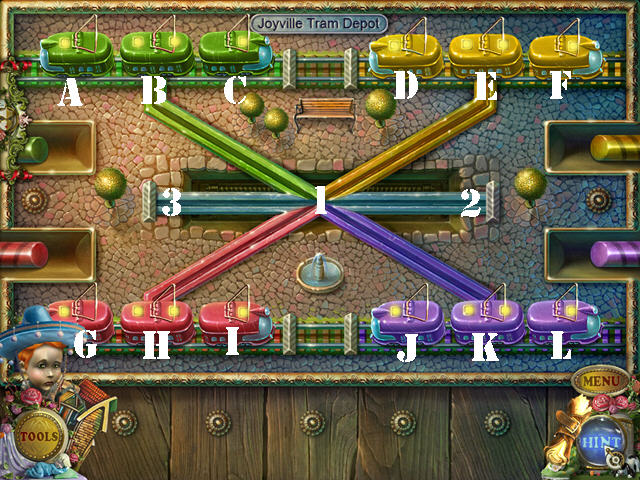
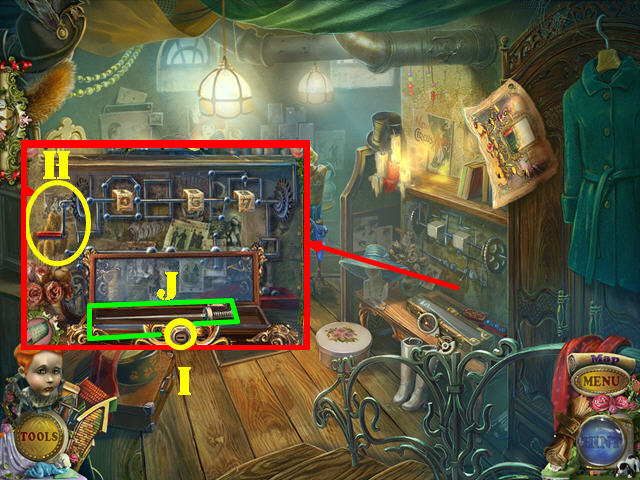
- Zoom into the train tracks to activate a puzzle (J).
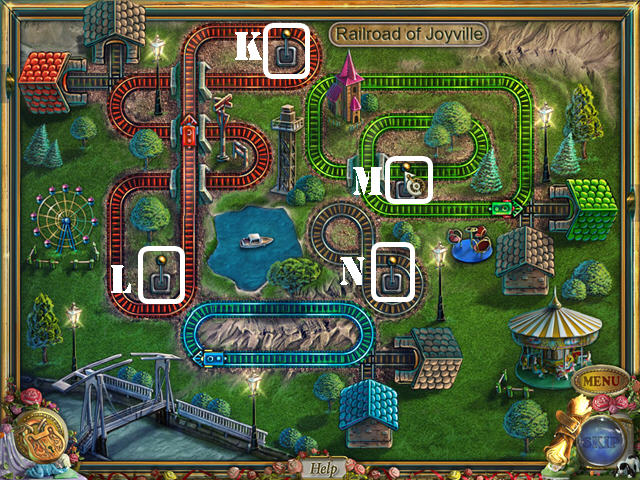
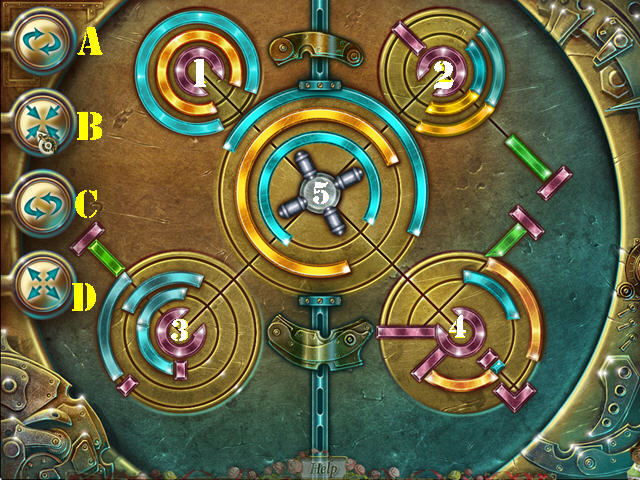
- Use the levers (K-M) to switch the railroad tracks until all the trains are on the railroads of the same color.
- To solve the puzzle, please follow these steps: select lever (N) and then select it again twice after the green locomotive is on the brown tracks.
- Select lever (L) and then select it again twice after the blue locomotive is on the blue tracks.
- Select lever (K) and then select it again twice after the red locomotive is on the red tracks.
- Select lever (M) and wait until the green locomotive is on the green tracks.
- Move the notes aside and take the DRAGON.
- Open the curtains and go through them to access the kitchen.
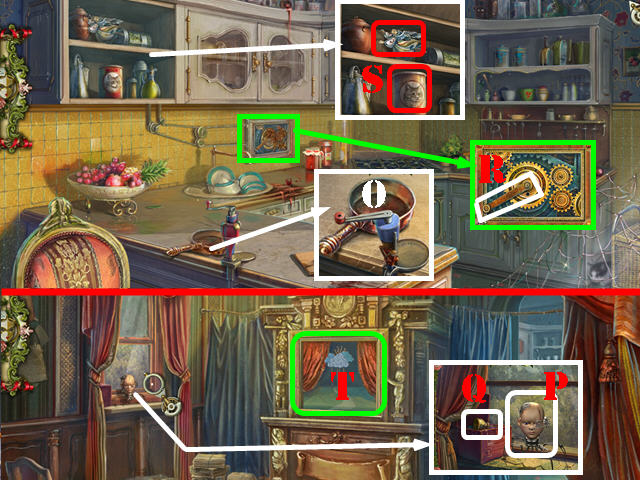
- Zoom into the counter and take the FRYING PAN (O).
- Walk down.
- Zoom into the window; use the FRYING PAN on the puppet (P) and take the OILCAN (Q).
- Return to the kitchen.
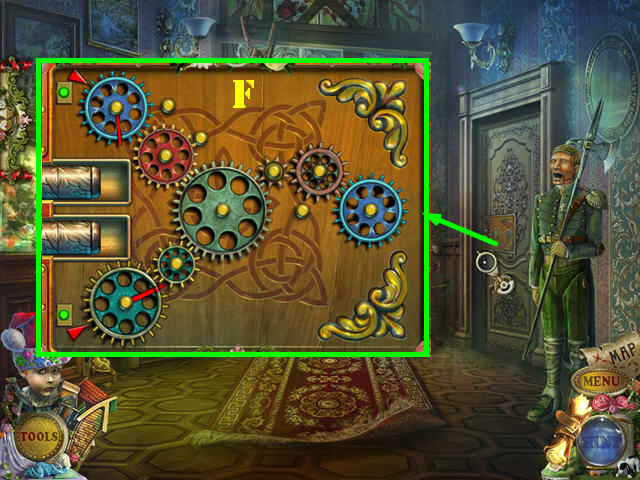
- Zoom into the rusty gears; use the OILCAN on them and pull the handle (R).
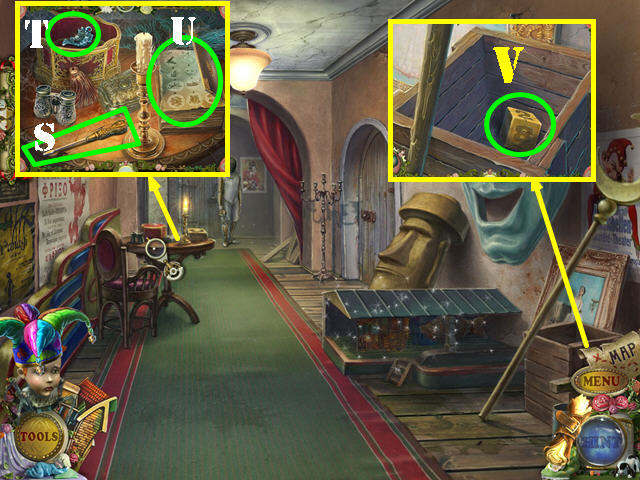
- Look into the cabinet; take the ANGEL and the CAN (S).
- Walk down.
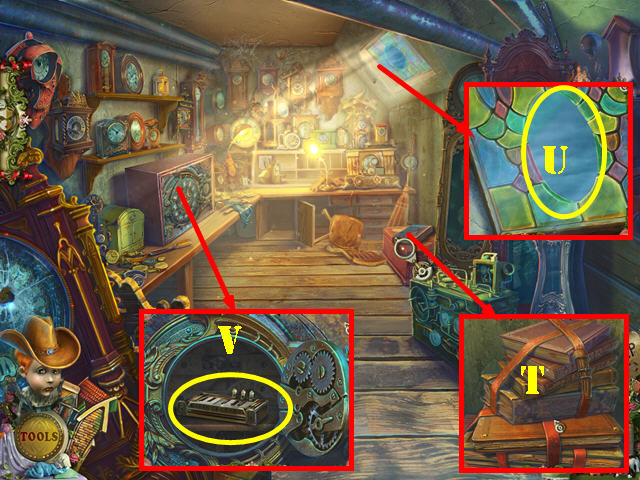
- Zoom into the stage (T).
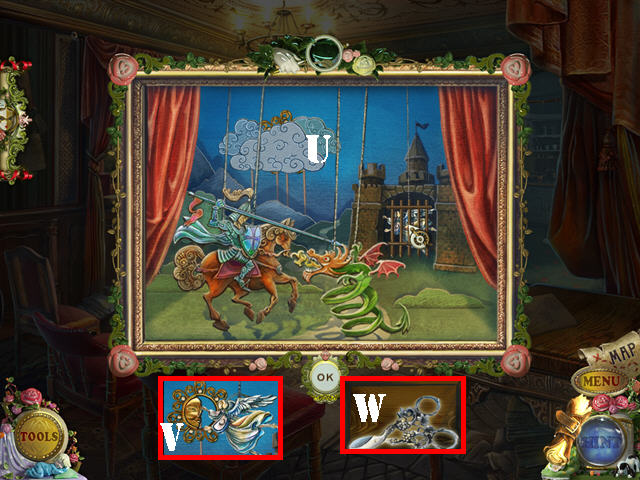
- Place the ANGEL, the DRAGON, and the KNIGHT on the stage to activate the puzzle. If you didn’t place them correctly the first time, just swap two characters until they are in the same positions shown in the screenshot (U).
- Take the SUN (V) and then the SCISSORS (W).
- Return to the kitchen.
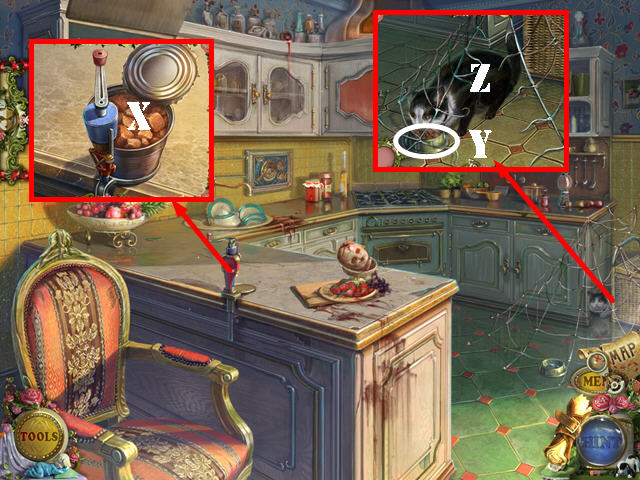
- Zoom into the can opener; place the CAN on it and pull the handle. Open the lid and take the OPENED CAN (X).
- Zoom into the net and cut it with the SCISSORS. Place the OPENED CAN on the dish (Y) and take the CAT (Z).
- Walk down twice.

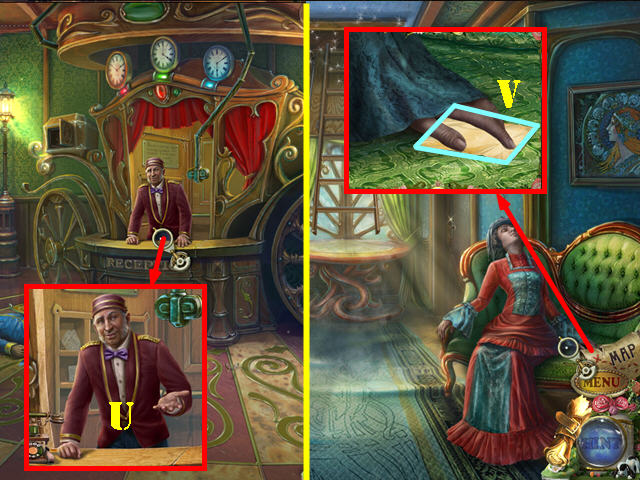
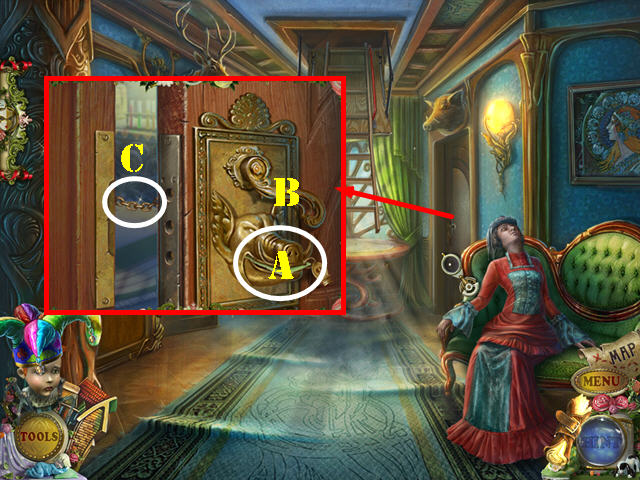
- Zoom into the boy; give him the CAT and then take the HORN (A).
- Zoom into the statue; place the HORN in its hand (B) and take the KEY (C).
- Zoom into the door; use the KEY in the lock (D). Turn the key twice and pull the handle (E).
- Go through the door.
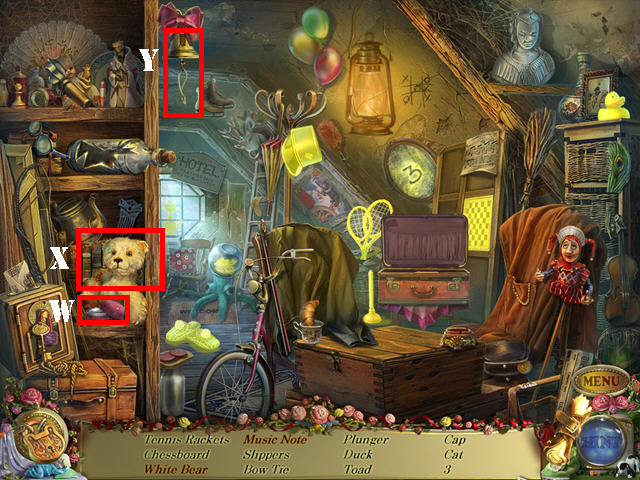
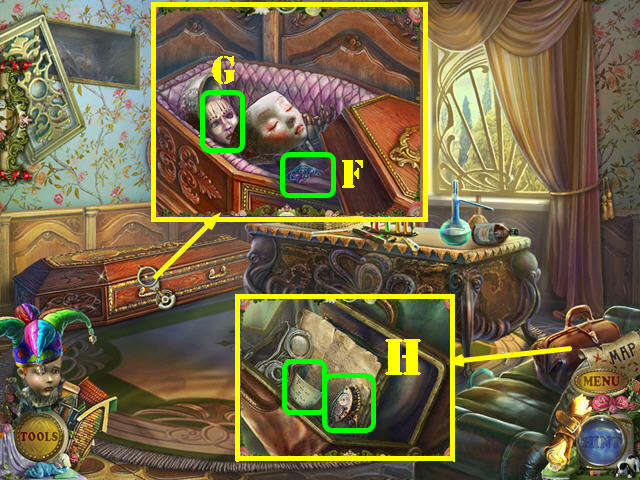
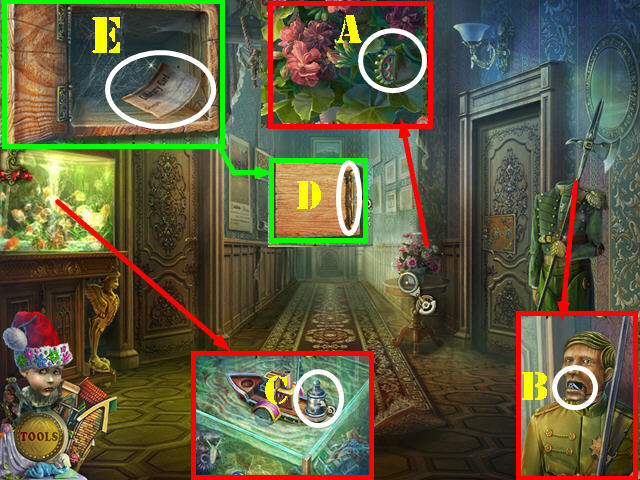
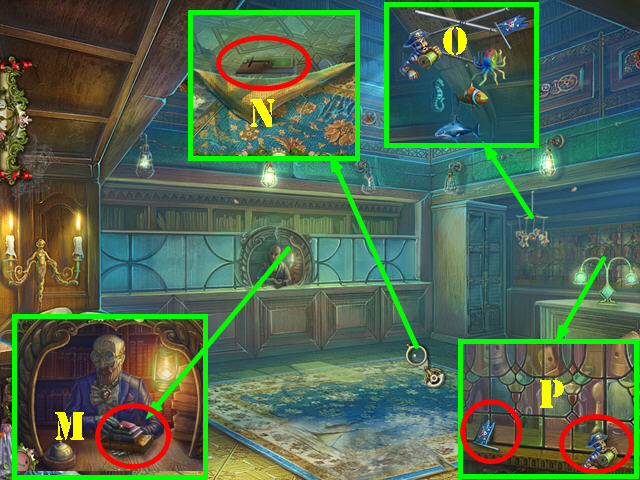
- Zoom into the couch; take the photo and the RED DOLL (F).
- Open the cabinet doors to activate the HOP (G).
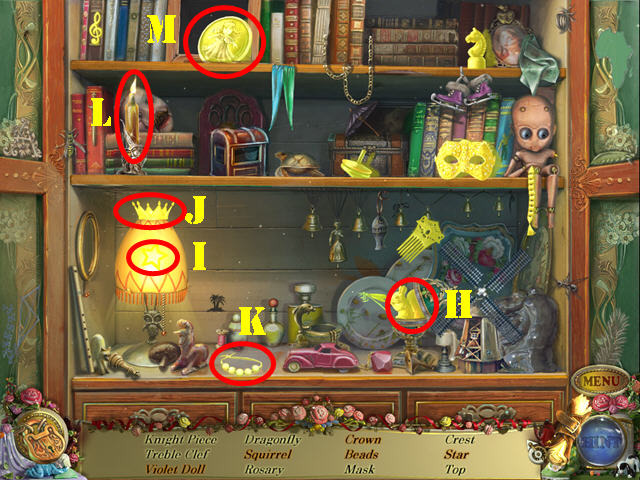
- Open the egg and take the squirrel (H).
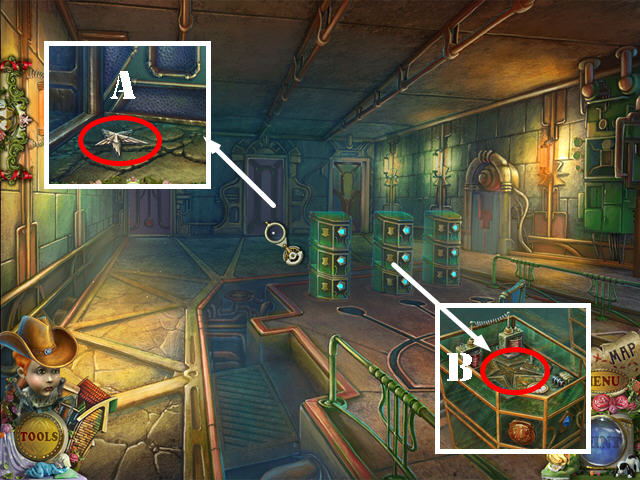
- Turn on the lamp; take the star (I) and the crown (J).
- Touch the beads 3 times and take the beads (K).
- Touch the candle (L) and take the violet doll (M).
- You will receive the VIOLET DOLL.
- Go through the right door.
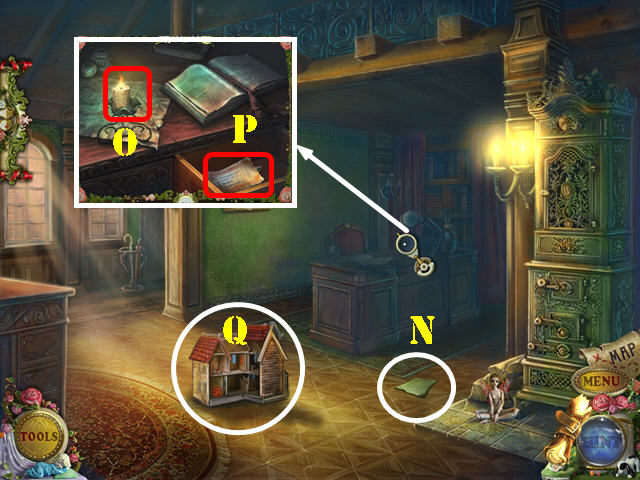
- Take the note (N).
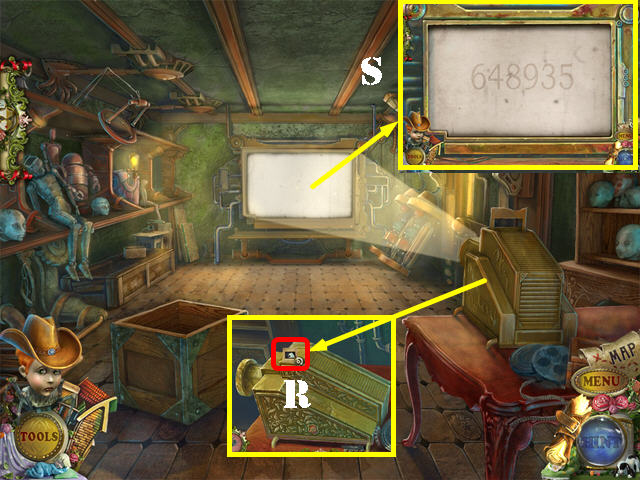
- Zoom into the desk; light the candle (O) with the LIGHTER.
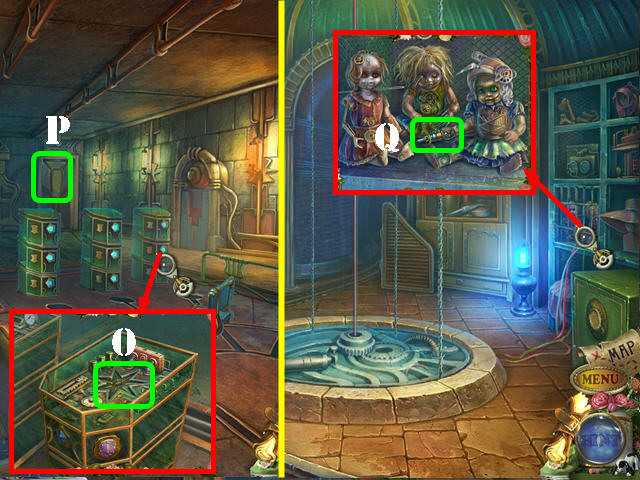
- Open the drawer; take the HOTEL RECEIPT (P) and the BUTTON below it.
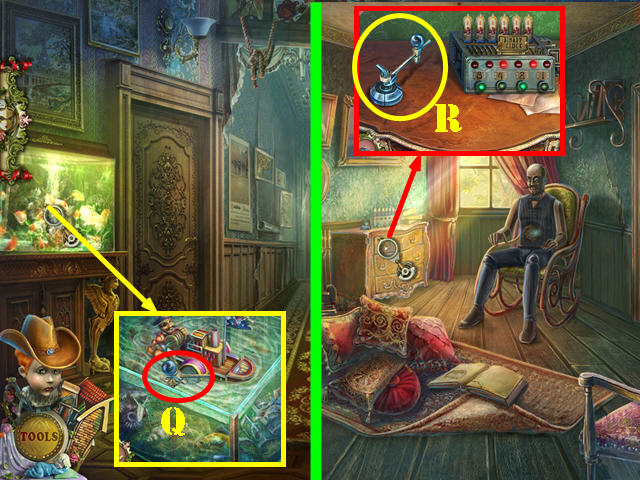
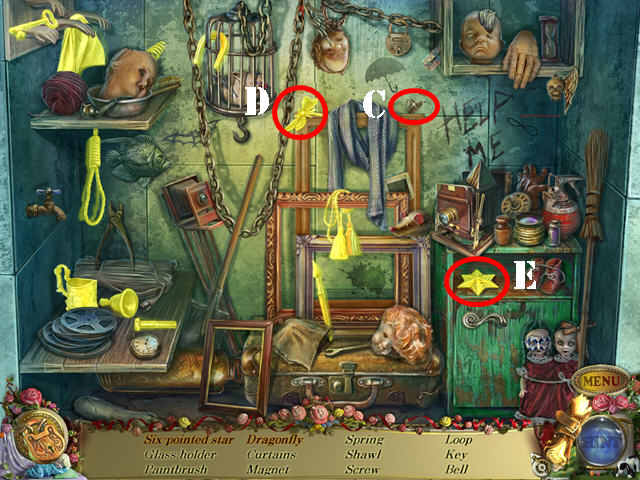
- Zoom into the doll house to activate a puzzle (Q).
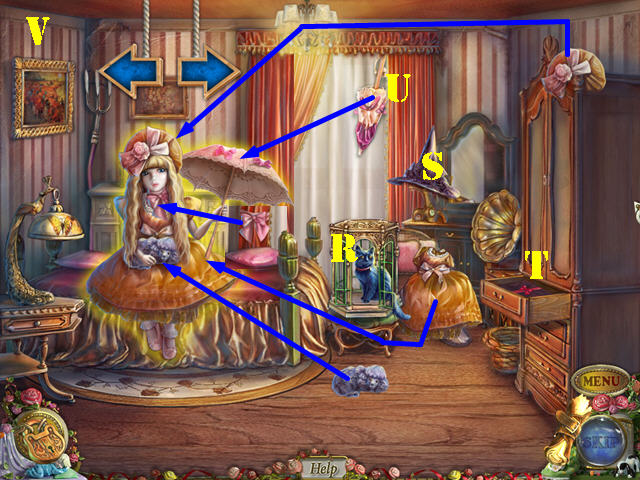

- Use the arrows in the upper left to rotate the dolls.
- Open the cage (R), touch the crow to get the hat (S), open the drawer to get the dress (T), open the right curtain to get the umbrella (U).
- Please look at the screenshots for the solution (V-W).
- Take the GREEN DOLL.
- Walk down.
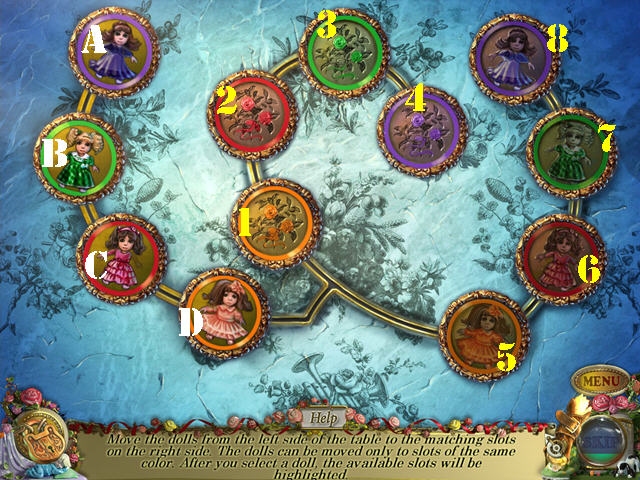
- Zoom into the round table.
- Put down the GREEN DOLL, the VIOLET DOLL, and the RED DOLL to activate a puzzle.
- Move the dolls to their matching slot. The dolls can only land on the tokens of the same color.
- To solve the puzzle, select the tokens in this order: To solve the puzzle, select the tokens in this order: D-1, C-6, 1-D, 6-2, D-1, B-7, 1-D, 2-6, D-5, A-4, 5-1, 6-C, 1-5, C-2, 5-1, 7-B, 1-5, 2-C, 5-D, 4-8, D-5, C-2, 5-1, B-7, 1-D, 2-6, D-5.
- Take the note (red) and then pull the switch (E).
- You will be prompted to name your puppet helper. Name your puppet helper and press OK.
- Select the puppet (F) and then zoom into the vent. Place the puppet in the vent (G).
- Open the box and take the HANDLE PART (H).
- Play the HOP.
- Touch the windmill and take the butterfly (I).
- Touch the car and take the engine (J).
- You will receive the TRAIN PART.
- Go through the left curtain.
- Zoom into the control panel; place the BUTTON on it and press it (K).
- Open the bag and take the PICTURE PIECE (L).
- Zoom into the vent and place your puppet helper in it to get the TRAIN PART (M).
- Return to the office.
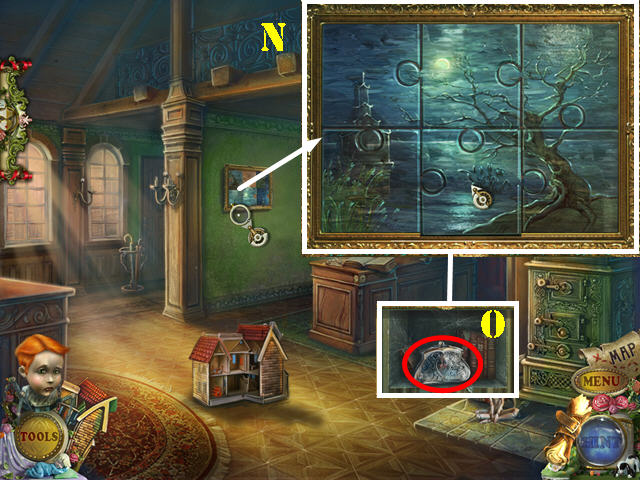
- Zoom into the puzzle on the wall and place the PICTURE PIECE on it to activate the puzzle.
- Swap the pieces around until you form the right image. Correct pieces will lock in place.
- Please look at the screenshot for the solution (N).
- Take the PURSE and the HANDLE PART behind it (O).
- Return to the carousel room.
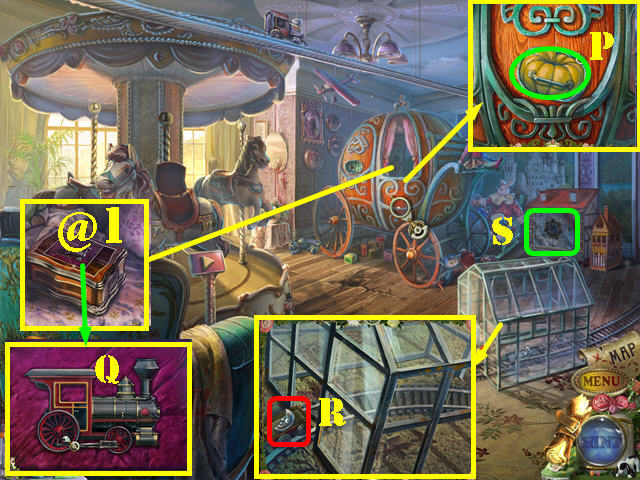
- Zoom into the coach and place the 2 HANDLE PARTS in the slots and pull the handle (P).
- Open the box (@1) and zoom into it; place the 2 TRAIN PARTS on it and take the TRAIN (Q).
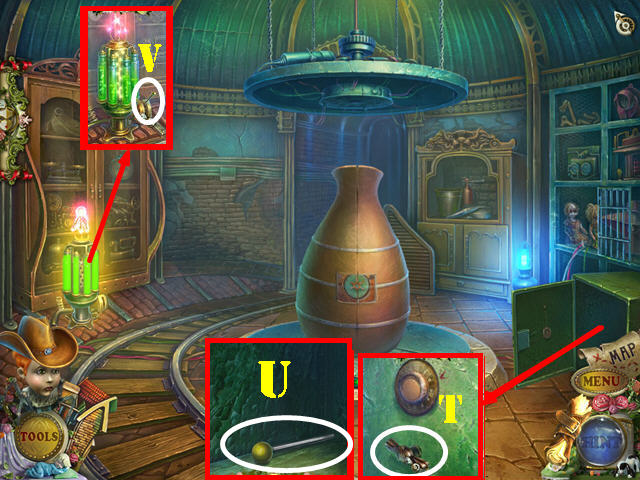
- Zoom into the glass house and try to use your puppet helper in the glass house. Place the TRAIN in the glass house and then take the MOON (R).
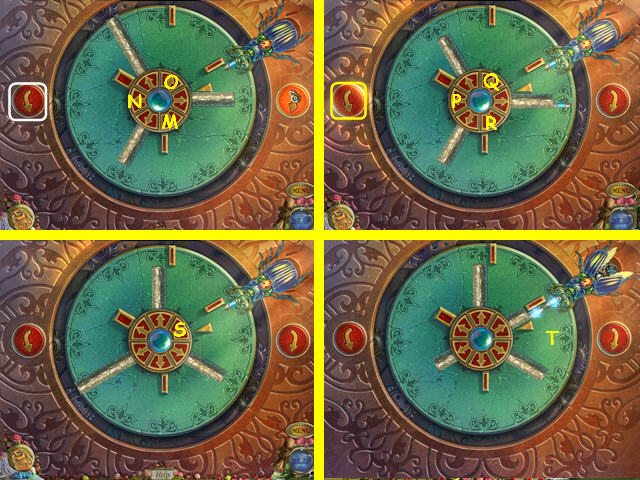
- Zoom into the tiny house (S) and place the MOON and the SUN in the slot to activate a puzzle.
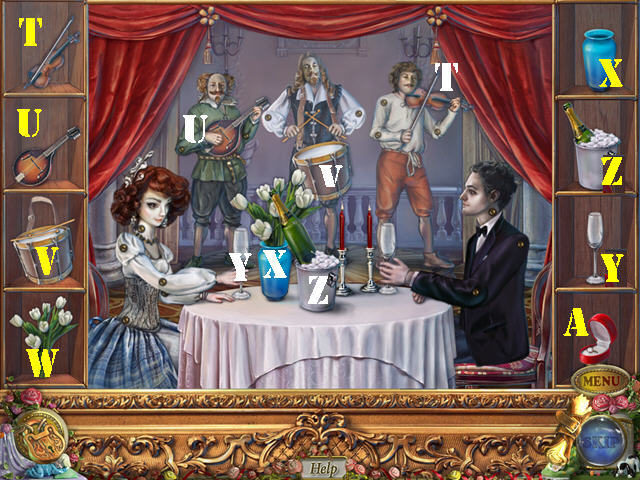
- Place the items into the right areas on the scene.
- Give the instruments to the musicians (T, U, and V).
- Give the flowers (W) to the man at the table.
- Place the vase on the table (X).
- Place the glass (Y) on the table, followed by the ice bucket (Z).
- Give the ring to the man (A).
- Take the RING.
- Walk down.
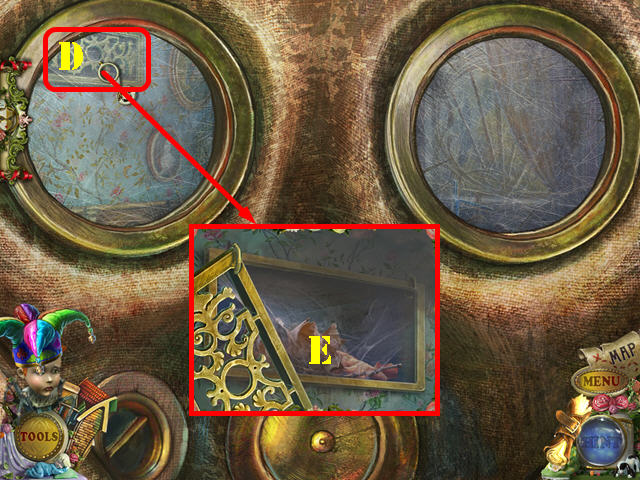
- Zoom into the window and then zoom into the lock. Insert the RING into the lock and go out the window.
- Zoom into the coach.
- Talk to the boy.
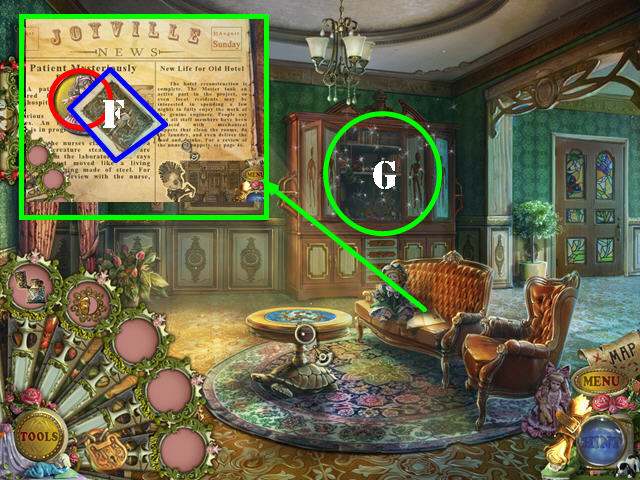
- Examine the newspaper and then open it (B).
- Zoom into the puzzle (C).
- Select the joints to reposition them until they look like the image in the screenshot (D).
- Slide the 3 latches (E) and then touch the center.
- Take the GREEN TRAM (F).
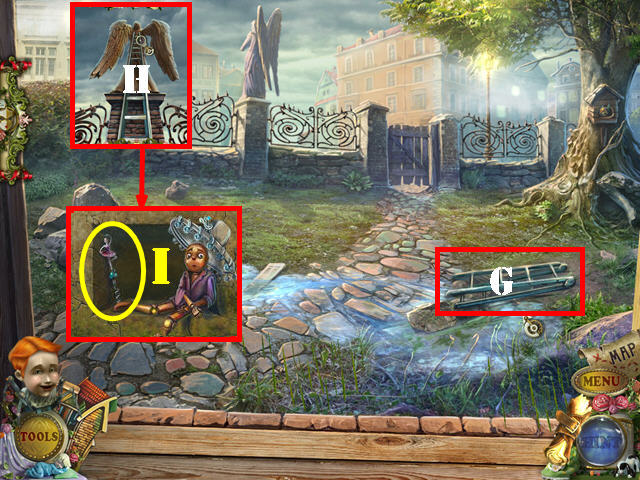
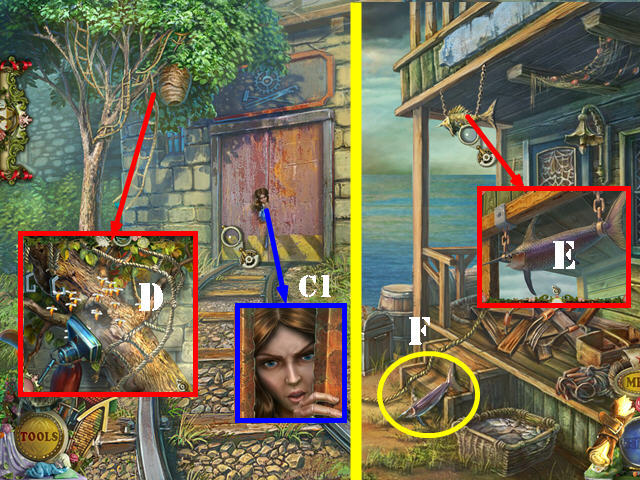
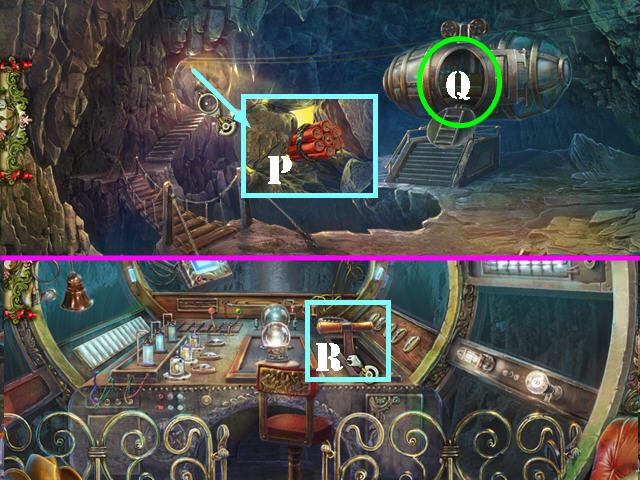
- Take the LADDER (G).
- Zoom into the angel statue and place the LADDER on it (H).
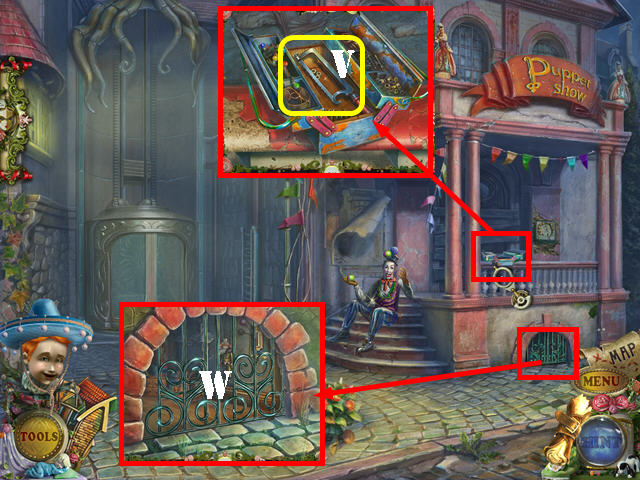
- Take the CORKSCREW (I).
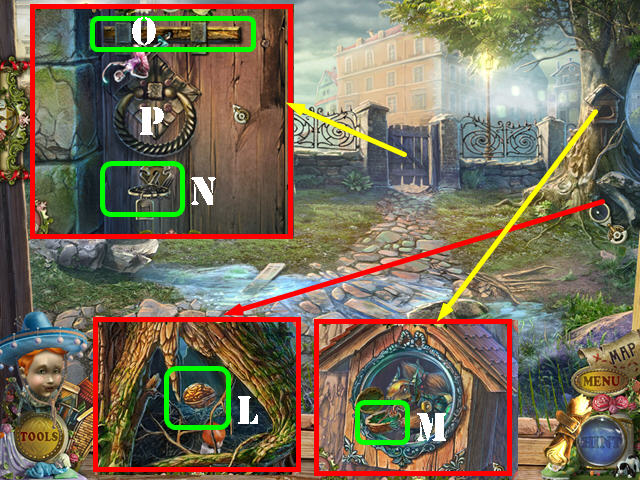
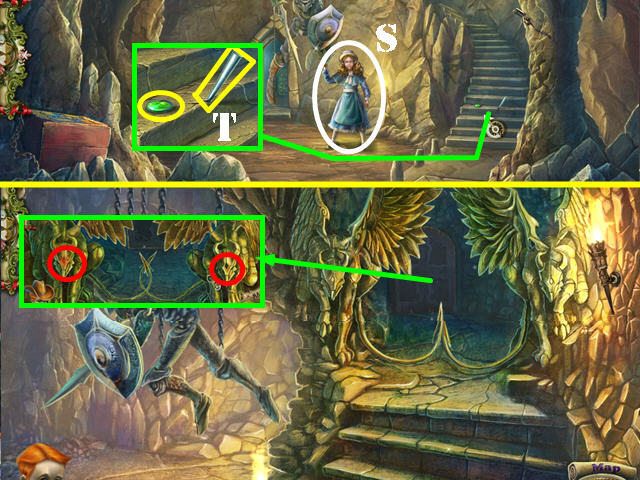
- Zoom into the tree hole and use your puppet helper in it to retrieve the NUT (L).
- Zoom into the birdhouse; give the NUT to the squirrel and take the KEY (M).
- Zoom into the gate; use the KEY in the lock and turn it (N).
- Use the CORKSCREW on the latch (O) and touch the doorknocker (P).
- Go through the gate.
Chapter 2: The Tram
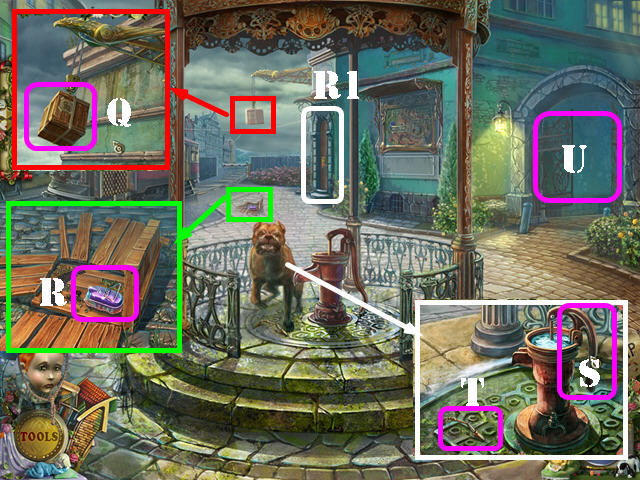
- Talk to Felicia.
- Zoom into the box and use your puppet helper on it (Q).
- Zoom into the fallen box and take the VIOLET TRAM (R).
- Examine the doorway (R1).
- Zoom into the dog; pull the handle (S) and take the GAS BURNER PART (T).
- Go through the gate (U).
- Zoom into the toolbox; take the SAW (V).
- Zoom into the grate and use your puppet helper on it to pull the lever and activate the HOP (W).
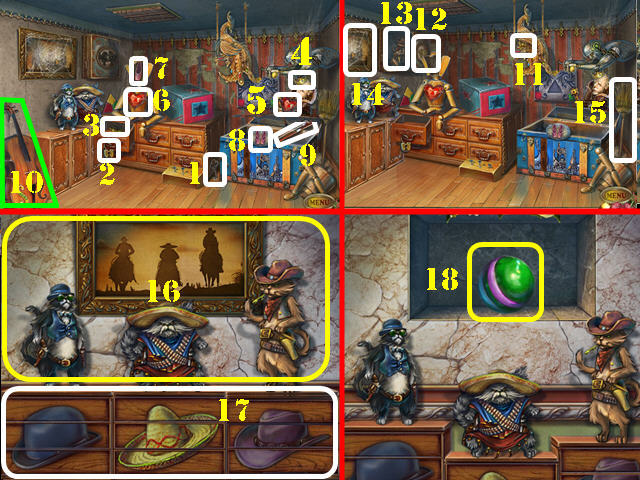
- Play the HOP.
- Use the key (1) in the lock (2) and take the crown (3).
- Place the crown on the head (4) and take the heart (5).
- Place the heart in the slot (6) and take the pointe (7).
- Place the pointe in the slot (8) and take the violin bow (9).
- Use the violin bow on the cello (10) and take the crab (11).
- Place the crab in the slot (12) and take the cat (13).
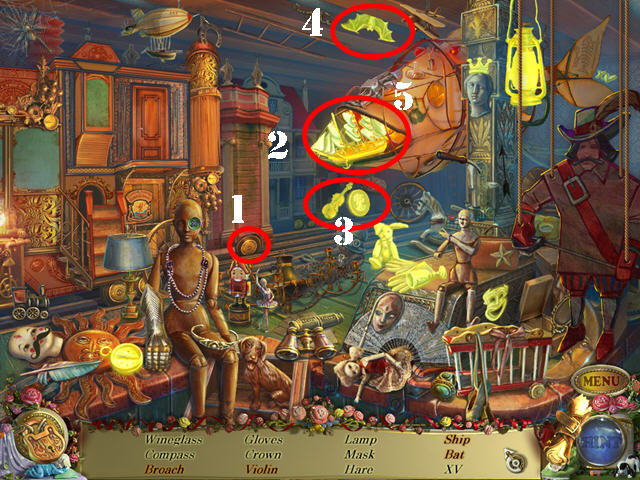
- Zoom into the picture and remove the cobwebs (14) with the broom (15). Put the cat down.
- Position the cats (16) according to the clue on the picture. Hint: look at the shape of the hats. Select two cats to swap their positions to complete the first part of the puzzle.
- Select a slot and all available slots will be highlighted; move a picture fragment to the right slot. Swap the hat pieces until they form the image on the screenshot (17) to solve the second part of the puzzle.
- Take the JUGGLING BALL (18).
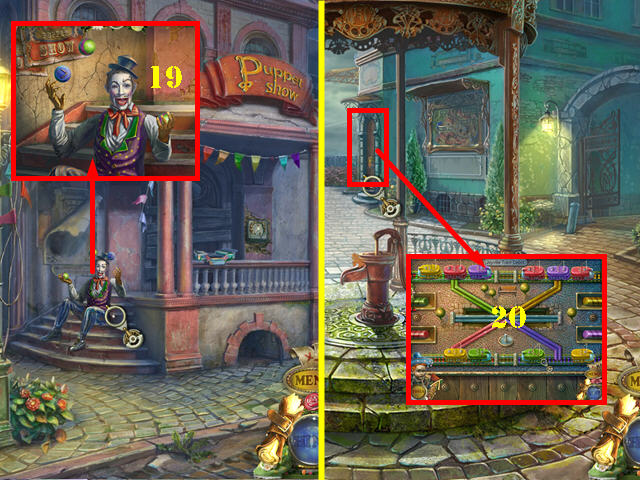
- Zoom into the juggler and give him the JUGGLING BALL to receive the BUTTON (19).
- Walk down.
- Zoom into the doorway; place the VIOLET TRAM and the GREEN TRAM on the puzzle (20) to activate it.
- Move the trams to the tracks of the matching color.
- To solve the puzzle, swap the pieces in this order: K-1, 1-2, J-K, K-1, 1-3, E-1, 1-K, K-J, B-1, 1-E, A-B, B-1, 1-K, 3-1, 1-B, B-A, C-B, B-1, 1-3, H-1, 1-B, I-H, H-1, B-C, 1-B, 3-1, 1-H, H-I.
- B-1, 1-3, C-B, B-1, 1-H, 3-1, 1-B, B-C, 2-1, 1-B, K-1, 1-2, E-1, 1-3, F-E, E-1, 1-K, H-1, 1-E, E-F, D-E, E-1, 1-H, 2-1, 1-E, E-D, H-1, 1-2, G-H, H-1, 1-E, 2-1, 1-H, H-G, I-H, H-1, 1-2, K-1, 1-H.
- H-I, 3-1, 1-H, L-K, K-1, 1-3, 2-1, 1-K, K-l, J-K, K-1, 1-2, E-1, 1-K, K-J, 2-1, 1-K, F-E, E-1, 1-2, 3-1, 1-E, E-F, 2-1, and 1-E.
- Go through the door.

- Zoom into the beltline and use your puppet helper in it to get the GAS BURNER PART (M).
- Zoom into the burner on the table. Place the 2 GAS BURNER PARTS to it. Take the GAS BURNER (Q).
- Zoom into the chain; use the GAS BURNER on the chain (R).
- Walk down.
- Zoom into the grating; use the GAS BURNER on it and open the grating (S).
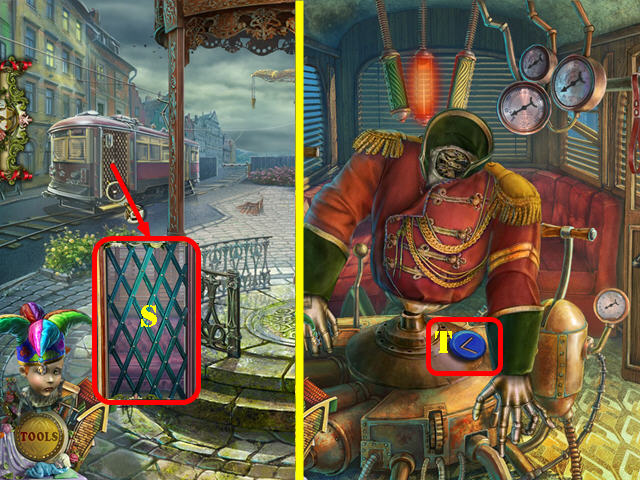
- Enter the tram.
- Take the BUTTON (T).
- Return to the workshop.
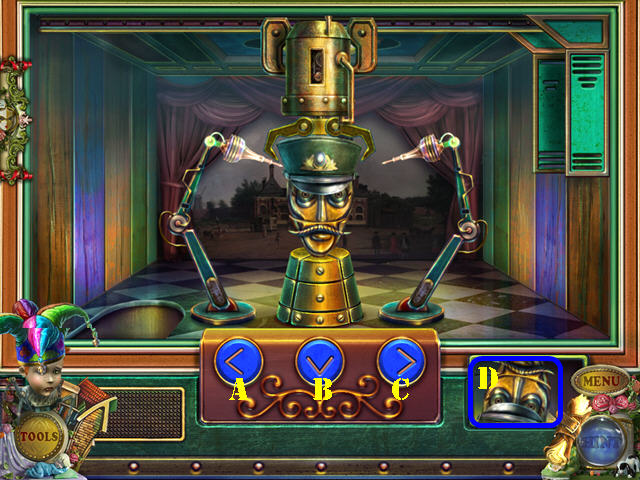
- Zoom into the mechanism and place the 2 BUTTONS in the slot to activate a puzzle.
- Assemble the head correctly by selecting the right buttons.
- To solve the puzzle, select the buttons in this order: A, B, C, B, C, B, A, B, Cx2, B, A, and B.
- Take the HEAD (D).
- Return to the tram.
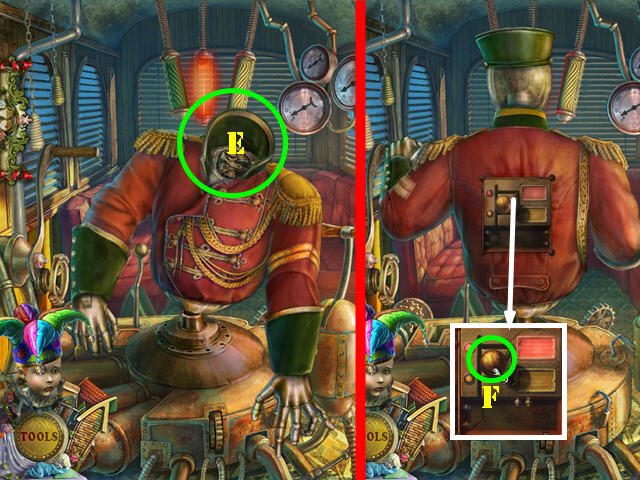
- Place the HEAD on the puppet (E).
- Zoom into the controls and pull the lever (F). Exit the tram once it stops.
Chapter 3: The Hotel

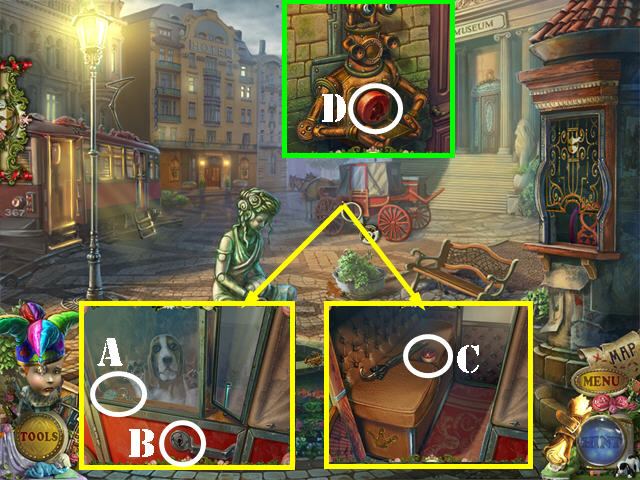
- Zoom into the hotel door.
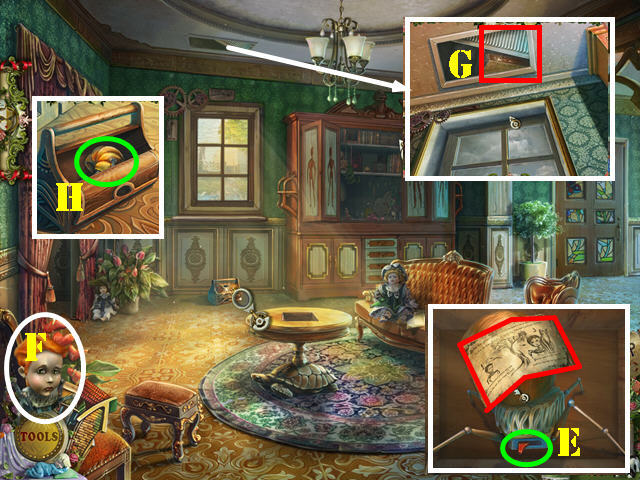
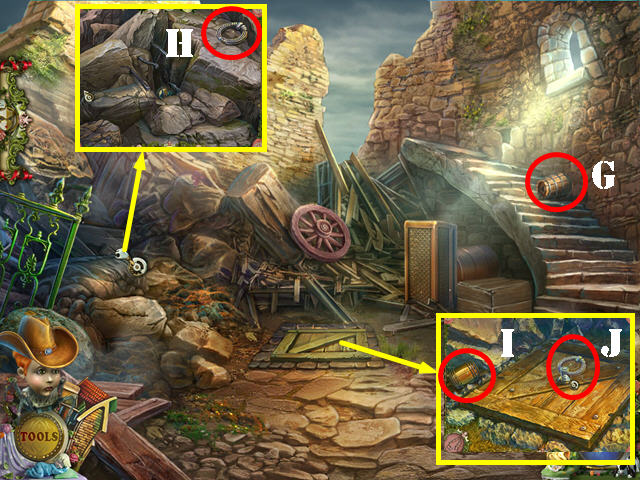
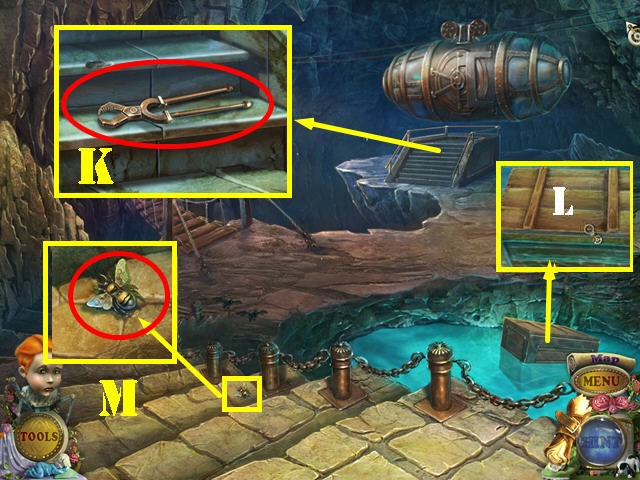
- Zoom into the bench; take the JACK SCREW (G).
- Examine the grate; use the JACK SCREW on the grate. Use the LIGHTER on the lamp (H).
- Use your puppet helper on the scene and take the TICKET ROLL (I). Place the TICKET ROLL on the device (J): touch it and take the TICKET.
- Examine the museum door; place the TICKET in the robot’s mouth to activate a HOP (K).
- Play the HOP.
- Place the helm (1) on the peg (2); touch the helm and take the fish skeleton (3).
- Put the fish skeleton in the slot (4) and take the bulb (5).
- Place the eye patch (6) on the pirate (7) and take the key (8).
- Use the key in the lock (9) and take the battery (10). Examine the flashlight and place the battery and the bulb in it (11). Take the flashlight.
- Place the flashlight on the hook (12); zoom into the barrel and take the sword (13).
- Give the sword to the knight (14) and take the lever (15).
- Place the lever in the mechanism (16); pull it and take the MAGNET (17).
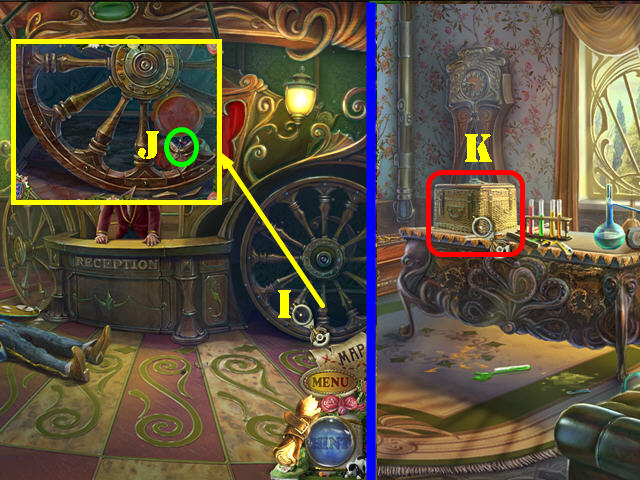
- Zoom into the carriage; use the MAGNET on the KEY (A) and then take it.
- Use the KEY in the lock (B).
- Zoom back into the coach and take the BELL BUTTON (C).
- Zoom into the hotel door and place the BELL BUTTON in the slot (D). Push the button and go through the door.
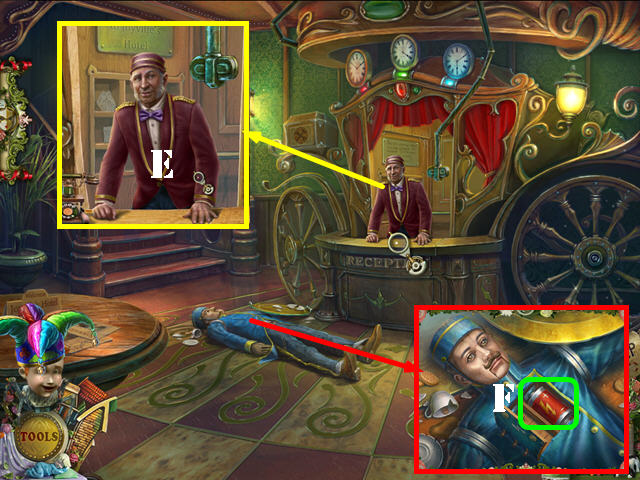
- Talk to the concierge and give him the HOTEL RECEIPT (E). He will tell you to go to Room no. 7.
- Examine the puppet; open the compartment and take the BATTERY (F).
- Walk down.
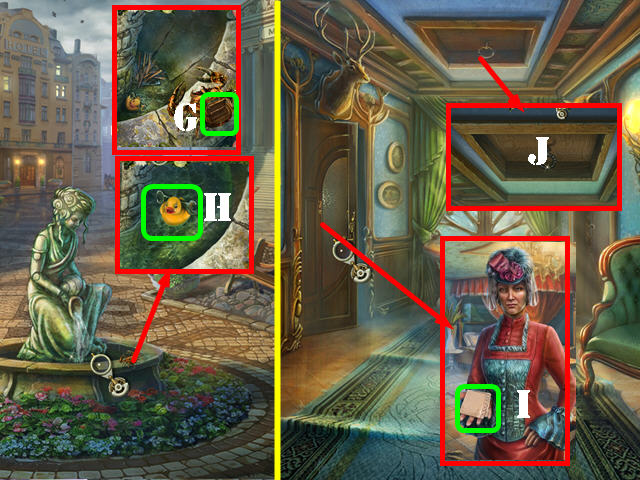
- Examine the fountain; place the BATTERY in the crab (G) and take the WRENCH (H).
- Return to the hotel lobby. Go up the steps.
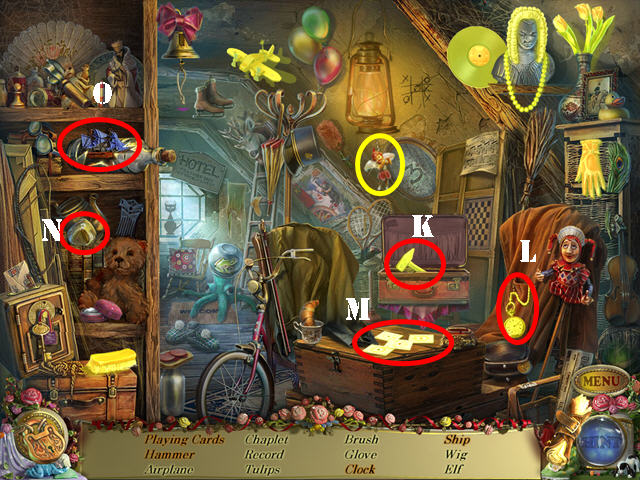
- Examine the left door and talk to Gabriella. Give her the PURSE and take the note (I).
- Examine the hatch (J); use your puppet helper on it to activate a HOP.
- Play the HOP.
- Open the suitcase and take the hammer (K).
- Pull the chain and take the clock (L).
- Touch the shirt sleeve and take the playing cards (M).
- Break the bottle with the stone (N) and take the ship (O).
- You will receive the HAMMER.
- Walk down.
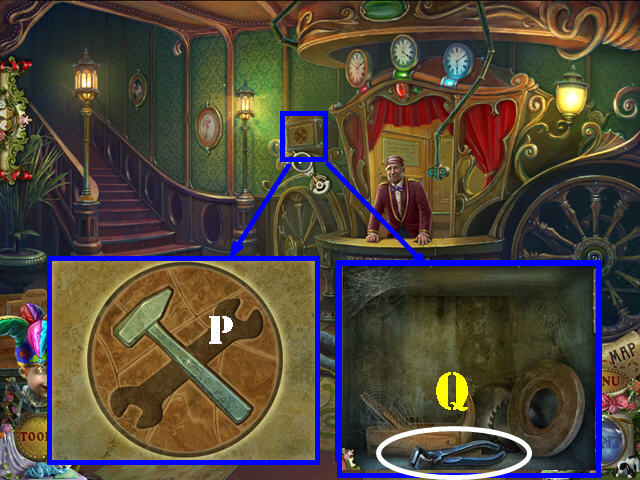
- Zoom into the safe; insert the HAMMER and the WRENCH into the slots (P).
- Take the BOLT CUTTERS(Q).
- Return to the tram.
- Zoom into the puppet’s back and pull the lever (R).
- Get out of the tram and go through the right gate.
- Talk to the girls (S).
- Examine the box and open it; take the ELEVATOR BUTTON and the COIN (T).
- Return to the tram. Zoom into the puppet’s back and pull the lever (R). Get out of the tram once it stops.
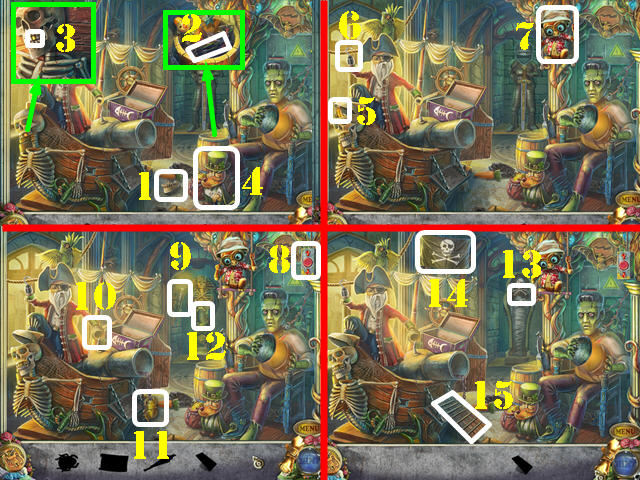
- Play the HOP.
- Move the items and take the jaw (1).
- Zoom into the barrel; move the items aside and take the tongs (2).
- Zoom into the skeleton and put the jaws on it. Pull the tooth with the tongs (3).
- Give the tooth to the leprechaun to get the hook (4).
- Take the banana (5).
- Place the hook on the pirate’s hand (6) and give the banana to the monkey (7).
- Press the button (8) and take the torch (9).
- Place the torch in the pirate’s hand (10) and take the scarab (11).
- Place the scarab in the slot (12) and take the flag (13).
- Place the flag on the ship (14) and take the WOODEN BRIDGE (15).
- Return to the hotel lobby.
- Talk to the concierge and give him the COIN (U) to receive the PUNCH CARD KEY.
- Go up the steps.
- Zoom into Rossi’s hand and take the note (V).
- Play the HOP.
- Use the powder (W) on the bear (X) and take the white bear.
- Ring the bell (Y) to get the music note.
- You will receive the CHIP 1/3.
- Examine the right door; insert the PUNCH CARD KEY in the lock (A) and pull the handle (B). Cut the chain with the BOLT CUTTERS (C).
- Go through the door to automatically wear a gas mask.
Chapter 4: Cricks’ Apartment
- Zoom into the vent (D); use the BOLT CUTTERS on the vent.
- Use the LIGHTER in the vent (E).
- Zoom into the coffin and open it; take the chip 2/3 (F).
- Cut the head with the SAW and take the MASK (G).
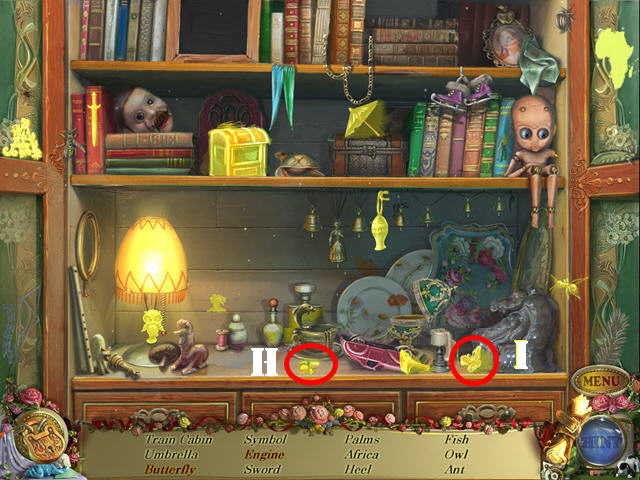
- Zoom into the bag and open it. Take the BUTTERFLY and the COMPUTER PAPER (H).
- Walk down twice.
- Examine the wheel (I) and use the SAW on the cracked piece. Use your puppet helper on the wheel.
- Insert the BUTTERFLY in the slot and take the CHIP 3/3 (J).
- Go upstairs and then go through the right door.
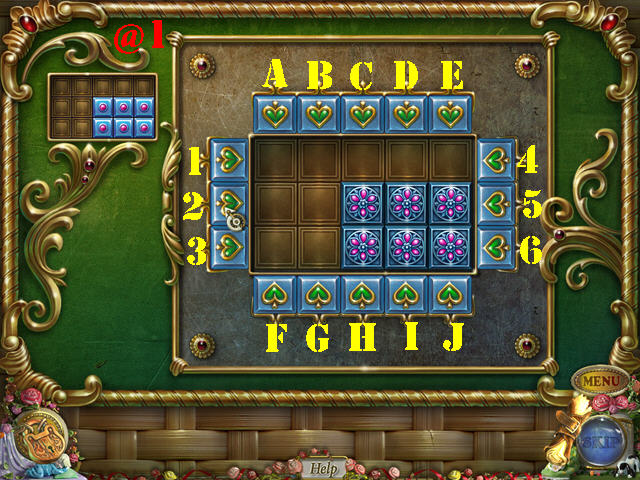
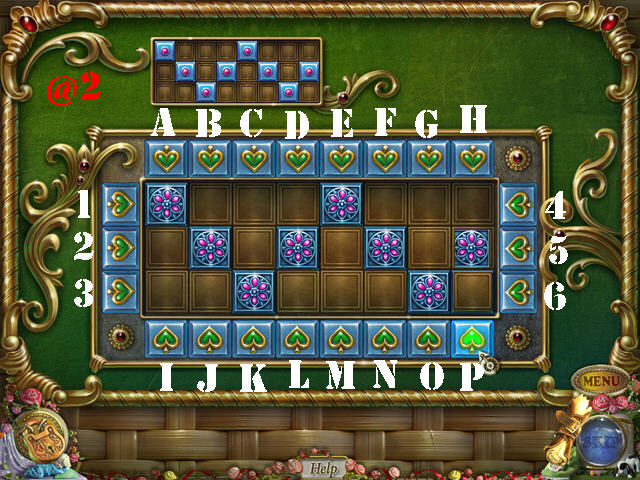
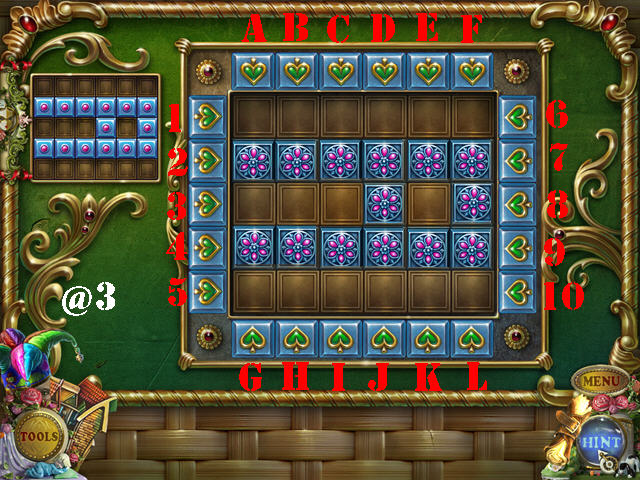
- Zoom into the basket (K); place the 3 CHIPS on the board to activate a puzzle.
- Arrange the chips according to the clue in the upper left. Use the buttons to move the chips around the board.
- To solve the first round (@1), please follow these steps: A, 4, 4, 3, C, C, G, 2, A, 2, and 2.
- To solve the second round (@2), please follow these steps: 2, 3, 3, 3, A, A, 3, 3, 4, 5, A, 3, 3, I, K, 6, 6, 6, 2, 2, 2, 2, F, G, 1, 1, 1, 1, 1, H, H, 4, 4, 4, 4, 4, J, L, M, M, N, and P.
- To solve the third round (@3), please follow these steps: A, A, A, 4, 4, E, 4, 7, 7, C, D, 10, F, 4, K, K, 3, J, J, D, G, H, I, L, 7, 7, 7, 1, 1, C, D, E, F, 3, F, L, I, I, 10, I, 1, 1, 1, F, F, and L.
- You will receive the LEVER.
- Return to the tram. Zoom into the puppet’s back and pull the lever. Get out of the tram and go through the right gate.
- Zoom into the device; insert the MASK in it and touch it (M).
- Zoom into the ladder; insert the LEVER in the slot and pull it (N).
- Examine the balcony and use the SAW on the plank (O).
- Enter the elevator.

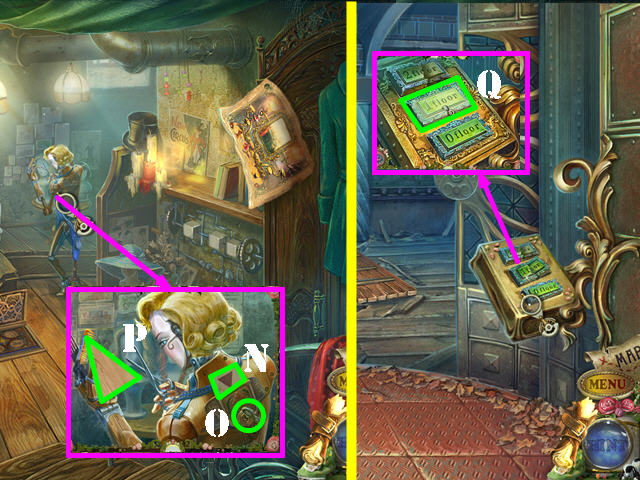
- Zoom into the bag and open it. Move the yarn ball; take the STAMP and the KEY (P).
- Examine the control panel and insert the ELEVATOR BUTTON in the slot (Q) and press the button.
- Place the WOODEN BRIDGE on the ground (R) and go forward.
- Zoom into the table; take the SCREWDRIVER (S).
- Open the box and take the FISH 1/3 (T).
- Open the book; take the note (U) and the GEAR 1/2 below it.
- Look in the crate; take the CUBE (V).
- Play the HOP.
- Touch the button (1) and then the set (2); take the violin and the picture (3). Take the bat (4).
- Open the mouth and take the ship (5).
- You will receive the BALLERINA FIGURINE.
- Zoom into the right door; use the STAMP on the lock. Go through the door.
- Zoom into the pipe; use your puppet helper on it and take the FISH 2/3 (A).
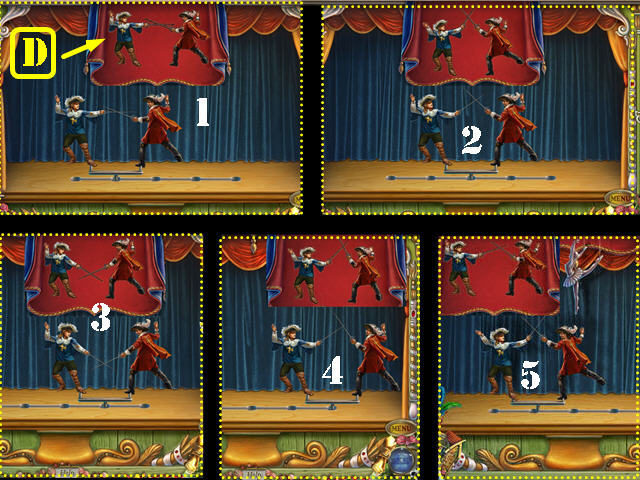
- Zoom into the stage to activate a puzzle.
- Move the heads and the arms of each man until they are positioned the same as the image on the curtain (D).
- Please look at the screenshot for the 5 solutions (1-5).
- Take the BALLERINA FIGURINE.
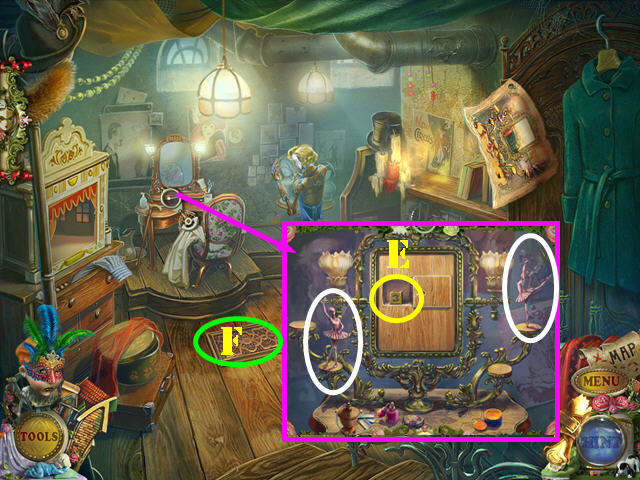
- Zoom into the mirror and place the 2 BALLERINA FIGURINES on the stands (white).
- Take the CUBE (E).
- Open the trapdoor (F) and zoom into it to activate a puzzle.

- Find the correct combination 3 separate times to open the chest. Hint: the solution is your journal.
- Select the blue buttons to rotate the figures on the wheels.
- Please look at the screenshot for the solution and find the sets in the order shown (1-3).
- Remove the items and take the CARD (G).
- Zoom into the table; place the 2 CUBES on the top bar and turn the handle (H). Note the combination on the cubes: 057.
- Use the SCREWDRIVER on the screw (I) and take the SWORD (J).
- Walk down.
- Take a closer look at the swordsman and use the SWORD on the scene to activate a puzzle.
- Defeat the swordsman by stabbing him in unprotected areas of the body.
- To solve the puzzle, select the body parts in this order: J, L, J, L, J, and L.
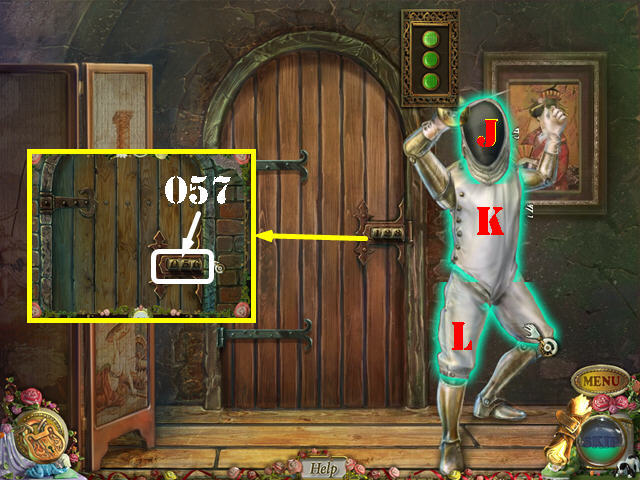
- Zoom into the door and change the tumblers to (057).
- Go forward.
Chapter 5: Felicia
- Examine Felicia and cut the ropes with the SWORD (M).
- Take the PIECE OF PLYWOOD (N).
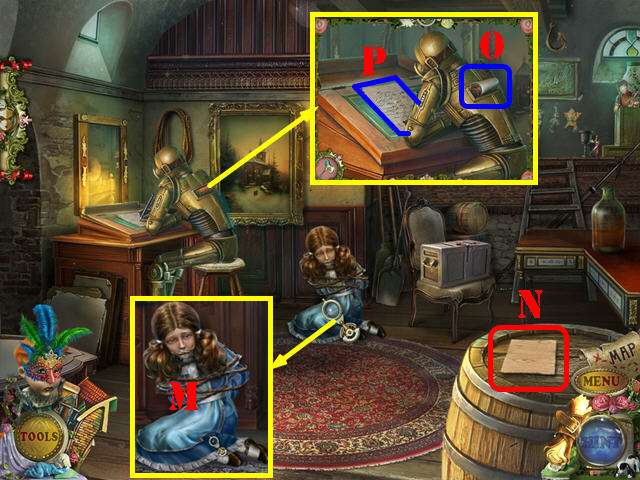
- Zoom into the robot and insert the COMPUTER PAPER in the slot (O).
- Take the letter (P).
- Play the HOP.
- Place the head (Q) on the doll (R) and take Gemini.
- Remove the flowers; take the fish (S).
- Remove the web and take the spool (T).
- Rip the picture and take the train (U).
- You will receive the FISH 3/3.
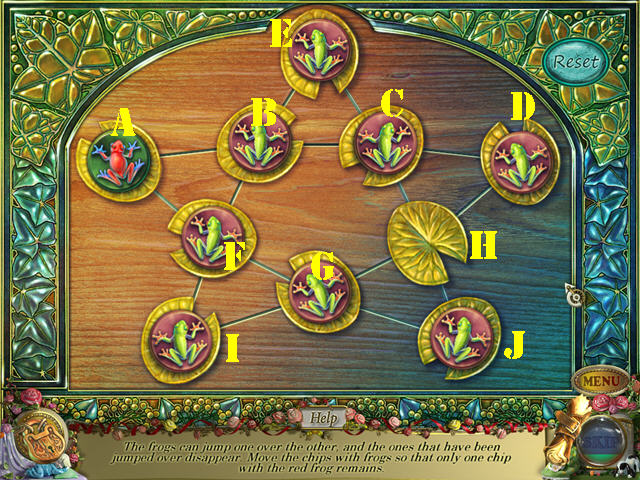
- Examine the crate and place the 3 FISH in the slots to activate a puzzle.
- Jump the frogs over the other ones to make them disappear. Keep jumping frogs until all of them are gone except the red frog.
- To solve the puzzle, select the chips in this order: E-H, F-E, J-C, I-H, D-B, E-F, A-G, G-D.
- Take the ELEVATOR BUTTON.
- Walk down.

- Play the HOP.
- Pull the lever (J); take the guard head (K) and the mouse (L).
- Move the stage; take the umbrella and the bow (M).
- You will receive the GUARD HEAD.
- Go through the right door.
- Zoom into the puppet; remove the card and place the CARD in the slot (N). Put the PIECE OF PLYWOOD in the hand.
- Insert the KEY in the keyhole (O) and turn the key.
- Take the TRIANGLE (P) and the WIRE below it.
- Walk down twice to enter the elevator.
- Zoom into the control panel; remove the center button and place the ELEVATOR BUTTON in its place (Q). Press the button and walk down once the elevator stops.
- Play the HOP.
- Open the drawer and take the hammer (1).
- Use the hammer on the nails (2) and take the puzzle (3).
- Zoom into the chest (4) and place the puzzle on it. Swap two adjacent pieces until you recreate the picture (5). Take the star.
- Place the star in the slot (6); take the cello accessory (7).
- Place the cello accessory on the cello and take the fuse (8).
- Place the triangle (9) in the slot (10).
- Put the fuse in the mechanism to receive the HANDLE (11).
- Go up the ladder.
- Zoom into the flowers; take the GEAR 2/2 (A).
- Examine the body; place the GUARD HEAD on it and take the PANEL LAMP (B).
- Examine the tank and take the LIQUID (C).
- Zoom into the poster and remove it. Use the HANDLE on the panel and then pull it (D).
- Take the LIBRARY CARD (E).
- Zoom into the right door and place the 2 GEARS on it to activate a puzzle.
- Place the gears on the correct pegs.
- Please look at the screenshot for the solution (F).
- Go through the door.
- Zoom into the table; take the SOLDIER (green).
- Use your puppet helper to open the door; take the BOOKS (G).
- Walk down and go through the left door.
- Talk to the mechanical girl (H).
- Zoom into the table and take the SOLDIER (I).
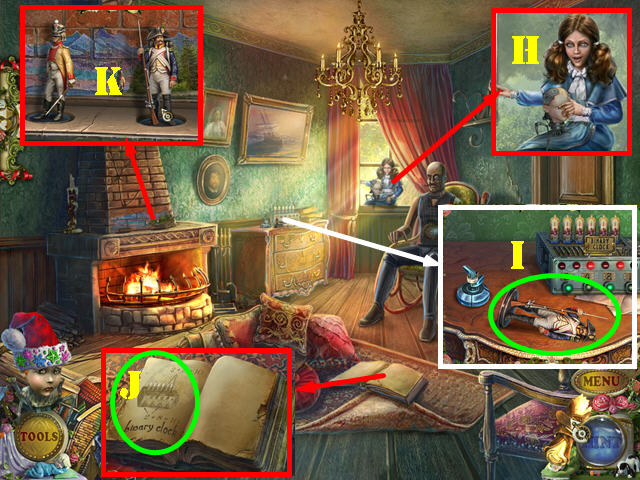
- Zoom into the book and put down the LIQUID. Remove the cap and pour the liquid on the left page. Note the equation (J).
- Zoom into the mantle and put down the 2 SOLDIERS (K).
- Go through the fireplace to access the secret room.
- Zoom into the table; give the LIBRARY CARD to the librarian and take the BOOKS (M).
- Zoom into the carpet’s edge and flip it; take the CONTROL PANEL PART (N).
- Examine the mobile and use your puppet helper on it (O). Zoom into the window; take the FLAG and the PIRATE (P).
- Walk down twice.
- Zoom into the tank; place the PIRATE and the FLAG on the ship and take the GLASS CUTTER PART (Q).
- Go through the left door.
- Zoom into the table; place the GLASS CUTTER PART on the device and take the GLASS CUTTER (R).
- Return to the secret room.
- Zoom into the window and use the GLASS CUTTER on it; take the STAINED-GLASS PIECE (S).
- Return to the watchmaker’s room.
- Zoom into the book and place the 2 sets of BOOKS on them (T).
- Zoom into the stained glass window and place the STAINED-GLASS PIECE on it (U).
- Zoom into the clock and turn the hands to 10:10. Take the PIANO (V).
- Walk down and go through the left door.
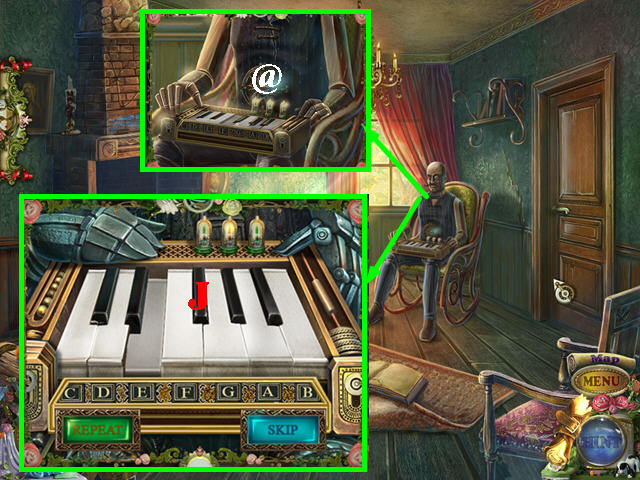
- Zoom into the puppet; place the PIANO in its lap (@); zoom into the piano to activate a puzzle.
- Repeat the melody on the piano.
- First round solution: G, A, J, G, and E.
- Second round solution: E, G, J, G, and E.
- Third round solution: G, A, J, G, E, J, D, D, and G.
- Solving this puzzle activates a HOP; play it.
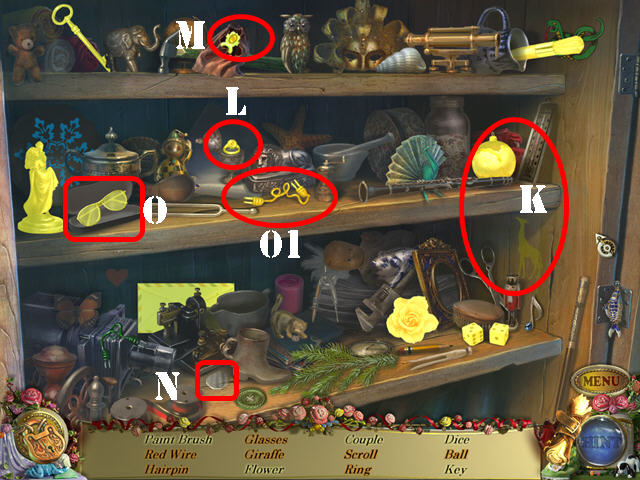
- Move the curtains; take the ball and the giraffe (K).
- Open the egg and take the ring (L).
- Open the pouch and take the hairpin (M).
- Place the lens (N) in the glasses (O) and take the glasses.
- Take the red wire (O1).
- You will receive the WIRE.
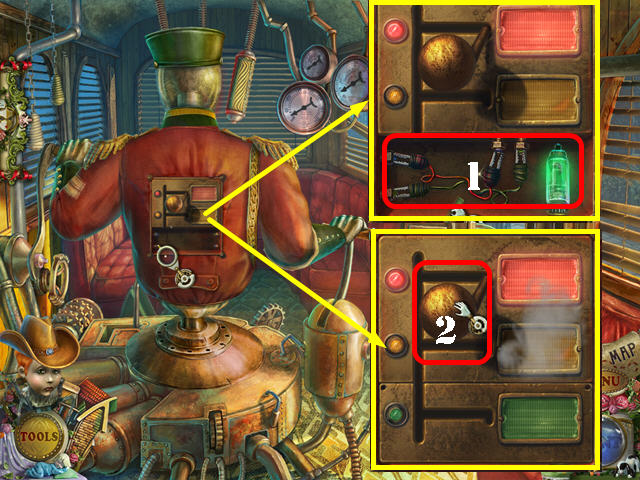
- Return to the tram.
- Zoom into the back of the puppet; insert the 2 WIRES, the PANEL LAMP, and the CONTROL PANEL PART (1).
- Pull the lever twice and exit the tram once it stops (2).
Chapter 6: The Shack
- Talk to Felicia (A).
- Examine the doll and touch her; take the CANNON (B).
- Zoom into the VACUUM CLEANER and take it (C).
- Go towards the house.
- Take a closer look at the door (C1).
- Zoom into the wasp’s net and use the VACUUM CLEANER on the wasps; take the ROPE LADDER (D).
- Walk down and go forward on the left.
- Zoom into the fish and use the SAW on it (E). Take the FISH KEY (F).
- Go towards the lighthouse.
- Take the LEAKY BUCKET (G).
- Touch the rocks and then zoom into them. Take the HANDLE (H).
- Examine the hatch and take the BARREL 1/2 (I).
- Place the HANDLE on the latch; pull it and go down (J).
- Examine the steps; take the PLIERS (K).
- Zoom into the box and use your puppet helper on it (L).
- Zoom into the ground; take the FLY (M).
- Walk down.

- Examine the stones; use the PLIERS to retrieve the BUTTON (R).
- Walk down.
- Zoom into the chest; insert the FLY into the slot (S).
- Zoom into the chest and add the CANNON to it to activate a puzzle.
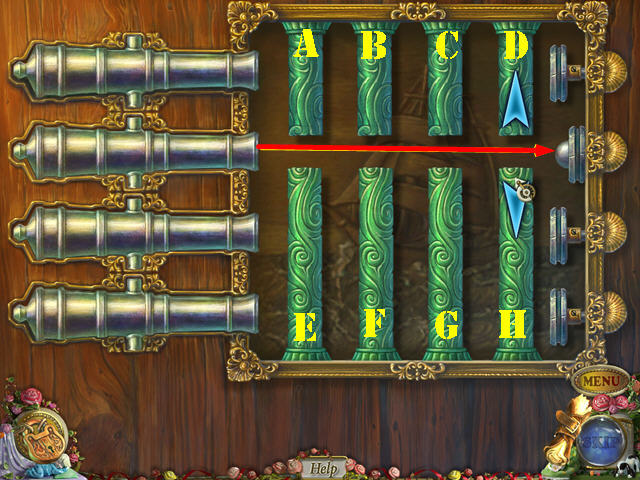
- Select the arrows on each cannon to move the rods up and down. Make a clear path so the cannon can shoot at each one of the four targets.
- To solve the puzzle, select the cannons in this order: E, D, F, H, Ex2, Fx3, Dx2, Ax2, Bx2, D, Ax2, and Bx3.
- You will receive the HARPOON GUN.
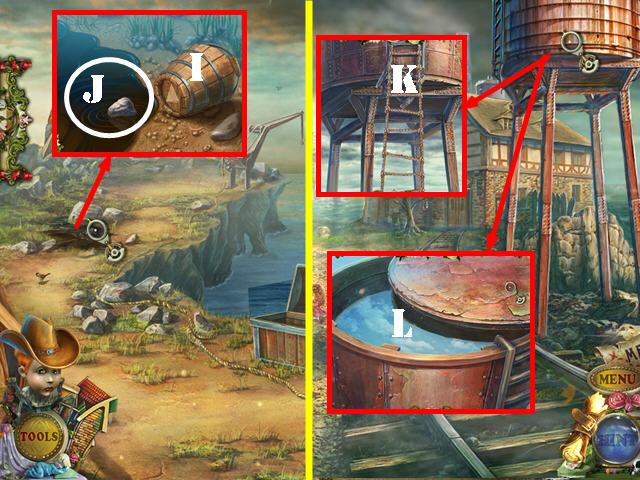
- Zoom into the tar spill and put down the LEAKY BUCKET (I).
- Place the TRIANGLE in the tar (J) and take the BUCKET.
- Walk down.
- Zoom into the water tower and use the ROPE LADDER on it (K).
- Take a closer look at the top; open it and place the BUCKET in to receive the BUCKET WITH WATER (L).
- Go towards the house.
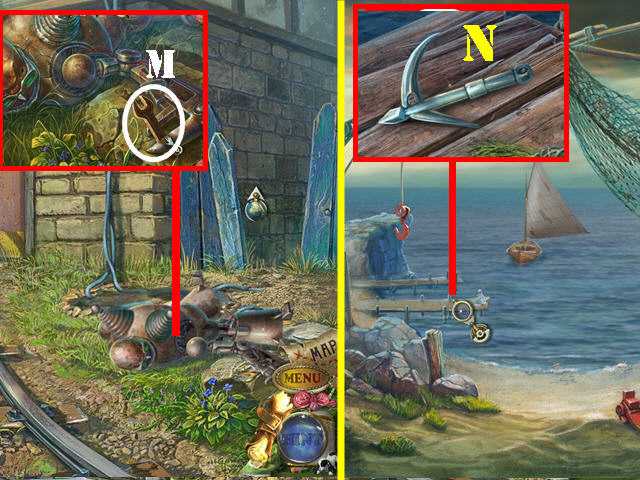
- Use the BUCKET WITH WATER on the robot. Zoom into the robot and take the WRENCH (M).
- Go forward on the right.
- Zoom into the pier; take the HARPOON (N).
- Zoom into the boat and put the HARPOON GUN on the sand; use the HARPOON on gun and pull the lever (O).
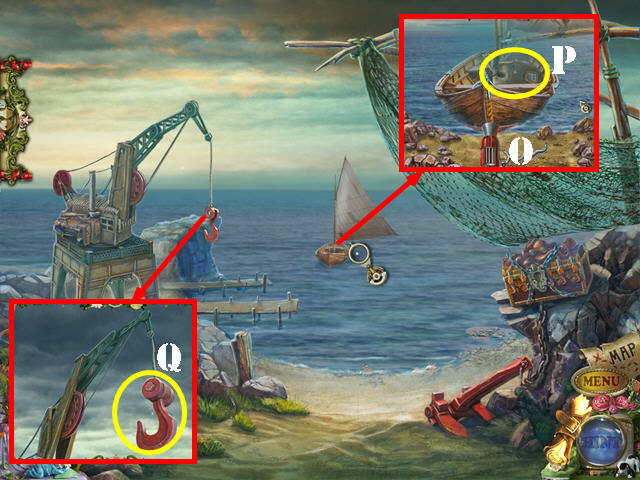
- Take the BAG (P).
- Examine the crane; use the WRENCH to get the HOOK (Q).
- Return to the shack.
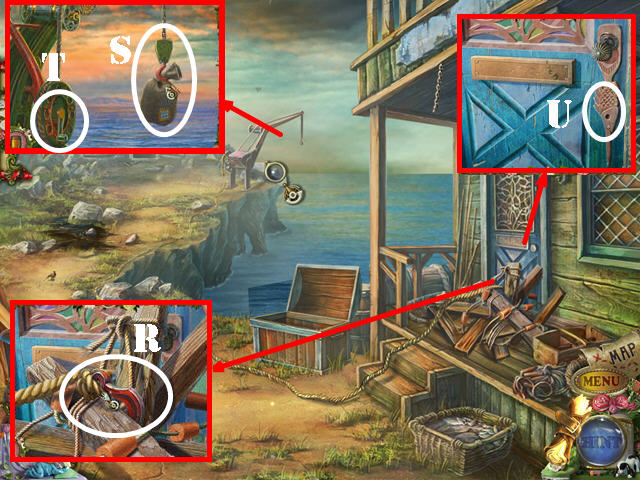
- Zoom into the door; place the HOOK on the ropes and touch it (R).
- Examine the crane and place the BAG on the hook (S).
- Pull the handle (T).
- Zoom into the door and insert the FISH KEY into the keyhole to activate a HOP (U).
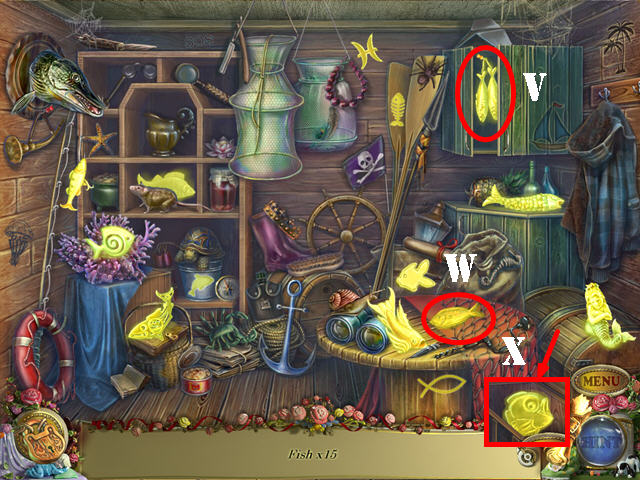
- Play the HOP.
- Find the 15 fish in the scene.
- Open the cabinet door (V), move the hat (W), and open the chest (X)(remove the mermaid first) to retrieve the hidden fish.
- You will receive the OCTOPUS.
- Return to the beach.
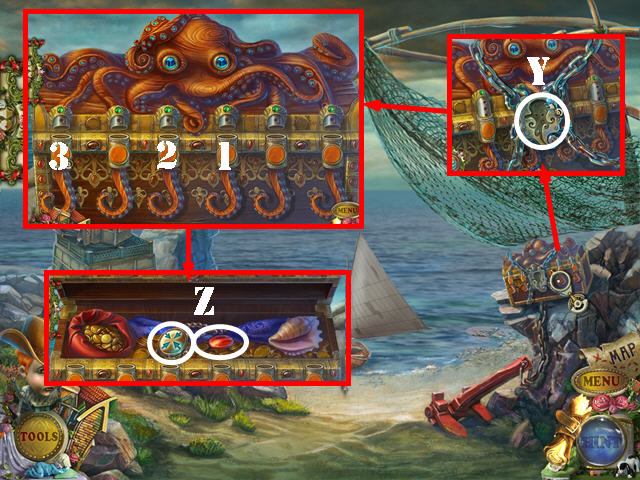
- Zoom into the chest and insert the OCTOPUS in the lock (Y). Zoom back into the chest to activate a puzzle.
- Choose the right combination of tentacles to open the chest.
- To solve the puzzle, select the buttons in the right order (1-3).
- Take the BUTTON and the JEWEL (Z).
- Return to the shack.
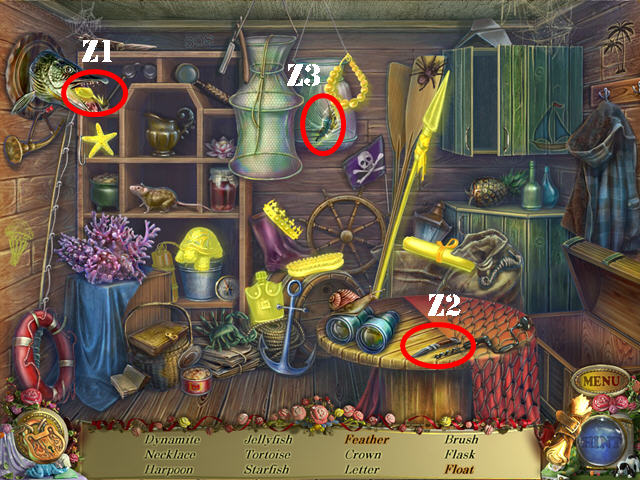
- Play the HOP.
- Open the crocodile’s jaw and take the float (Z1).
- Cut the mesh with the knife (Z2) and take the feather (Z3).
- You will receive the DYNAMITE.
- Go into the lighthouse and then down the hatch.
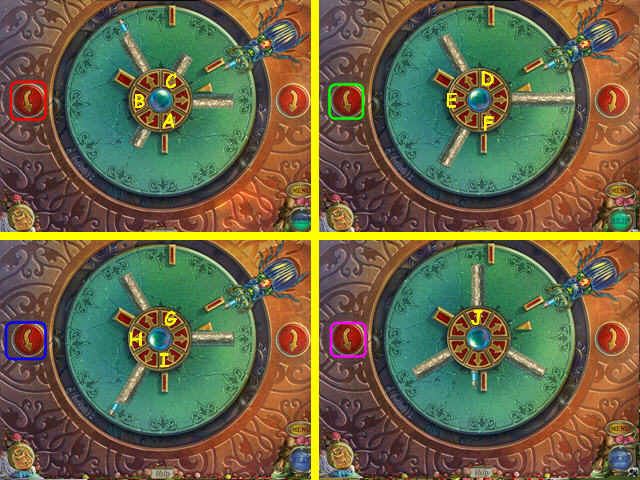
- Zoom into the mechanism and place the 2 BUTTONS on it to activate a puzzle.
- The solution to this puzzle is random. However, you can follow the steps below to solve the puzzle. The only thing that differs is that the amount of times you press the buttons changes each time, but the order in which the buttons must be selected are always the same.
- Press А until the line that connects the 1 and 5 circles opens, and the gray capsule moves to the edge of circle 5.
- Press D until the green bar on the 2 circle reaches the pink one at the end of the line.
- Press C until the blue rings of the 2 circle reach the pink bar inside the circle.
- Press A until the blue and yellow rings connect inside the 2 circle and the gray capsule moves to the edge of circle 5.
- Press A until the line that connects the 3 circle and the pink element opens.
- Press D until the green bar inside the 3 circle connects with the pink element outside the circle, at the end of the line.
- Press C until the line that connects the 3 and 5 the circles appears, and the gray capsule moves to the edge of circle 5.
- Press C until the orange circle moves all the way to the small blue stopper.
- Press D until the green bar connects with the pink element at the end of the line outside the 4 circle.
- Press A until the line that connects the 4 and the 5 circle opens, and the gray capsule moves to the edge of circle 5.
- Press A until the 5 circle opens in line with one of the gray capsules, then press B to move the capsule to the center of circle 5. Do this for the remaining 3 capsules.
- Go into the train.
- Take the NAIL DRAWER (J).
- Exit to the left and walk down.
- Zoom into the crate and use the NAIL DRAWER on it. Take the LEVER (K).
- Go down the hatch.
- Zoom into the stones and put down the DYNAMITE (P).
- Light the fuse with the LIGHTER.
- Go into the train (Q).
- Place the LEVER in the slot and pull it (R).
Chapter 7: The Finale
- Talk to the mechanical girl (S).
- Zoom into the steps; take the JEWEL and the SYRINGE PART (T).
- Go up the steps.
- Zoom into the winged predators; place the 2 JEWELS in the slots (red) to activate a HOP.
- Play the HOP.
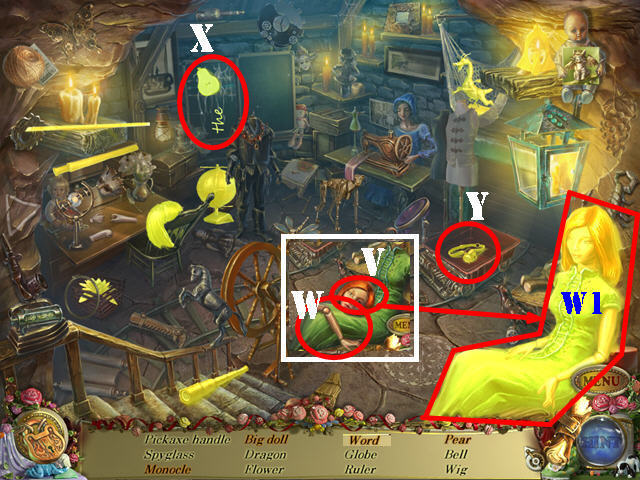
- Place the head (V) and the arm (W) on the body; take the big doll (W1).
- Slide the board; take the pear and the word (X).
- Move the item in the trolley and take the monocle (Y).
- You will receive the HANDLE.
- Walk down.
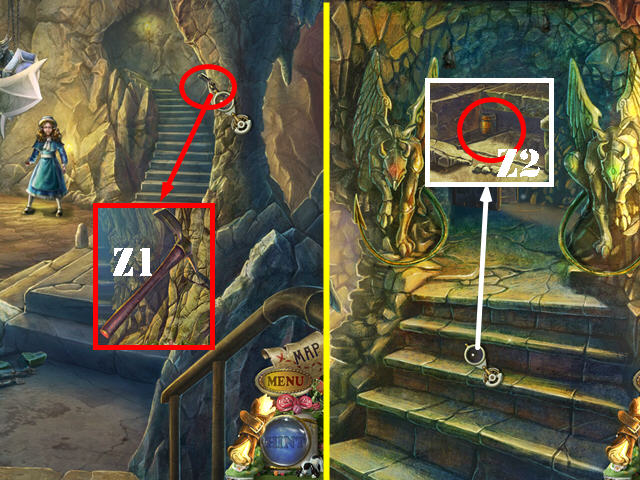
- Zoom into the axe head and place the HANDLE on it; take the PICKAXE (Z1).
- Go up the steps.
- Zoom into the steps and use the PICKAXE on them; take the BARREL 2/2 (Z2).
- Walk down.
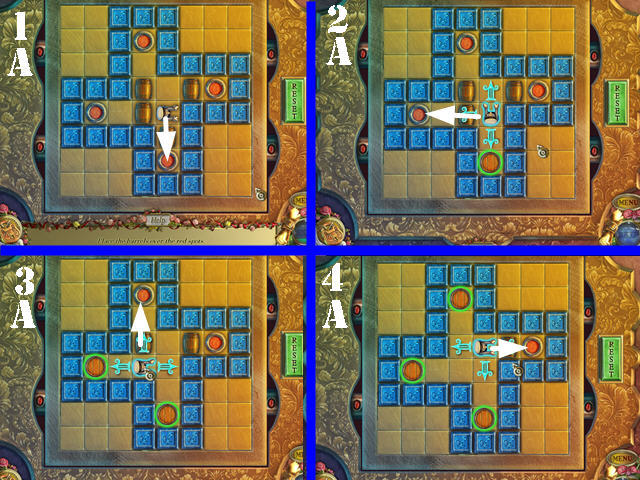
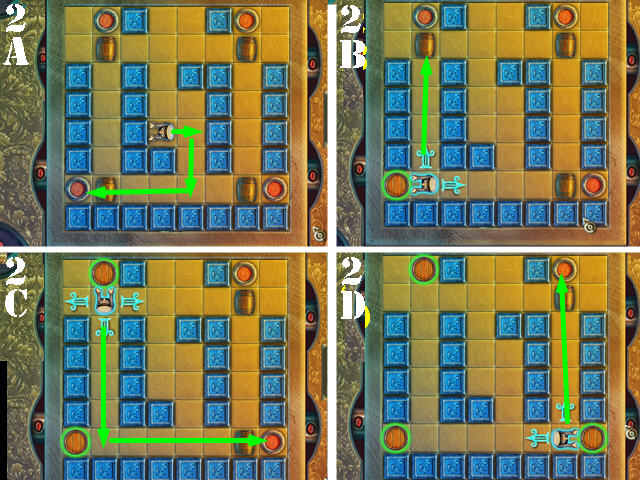
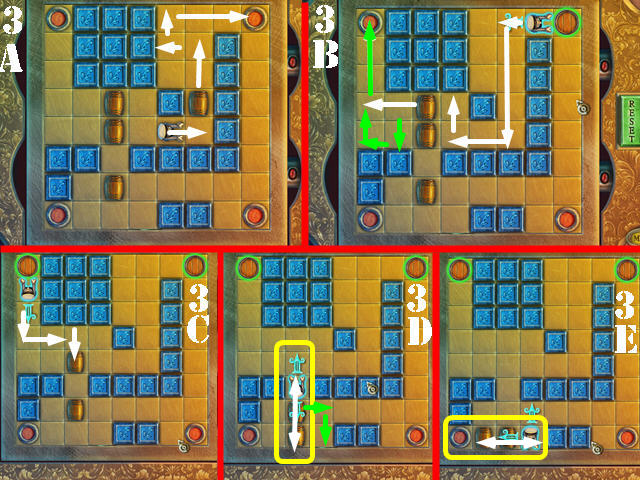
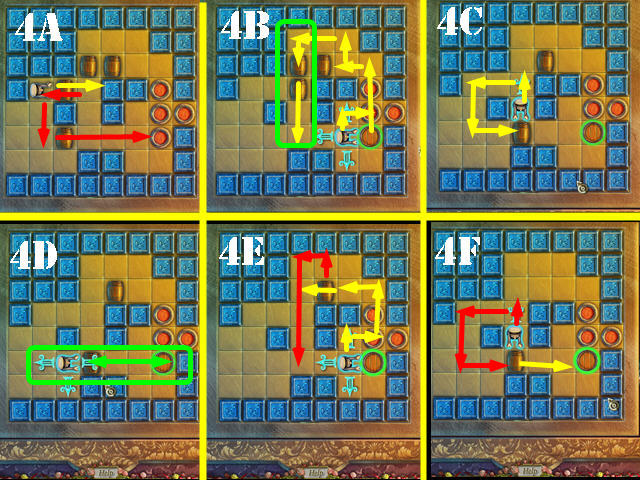
- Zoom into the chest; place the 2 BARRELS on it to activate a puzzle.
- Place the barrels on the red spots. Touch the little man, and then select an arrow, to move in that direction.
- There are 4 rounds to solve. Use the reset button on the side to start over your current round.
- To solve the puzzle, move the pieces in the order shown on the screenshots. There are 4 rounds to solve.
- Please note than in round 3D, you will place 2 of the barrels in the same red spot (lower left corner). As you move the barrels, two of them will be on top of each other, go up and then down (yellow) to move them both as needed. When you get to 3E, go back and forth on the barrels (yellow) as needed until both barrels are in the lower left red spot.
- Please note that in round 4B and 4D (green), two barrels will be on top of each other, go up and then down, or back and forth, as needed to move them both into place.
- Take the BOTTLE OF ACID.
- Go up the steps.
- Zoom into the chains and use the BOTTLE OF ACID on them.
- Play the HOP.
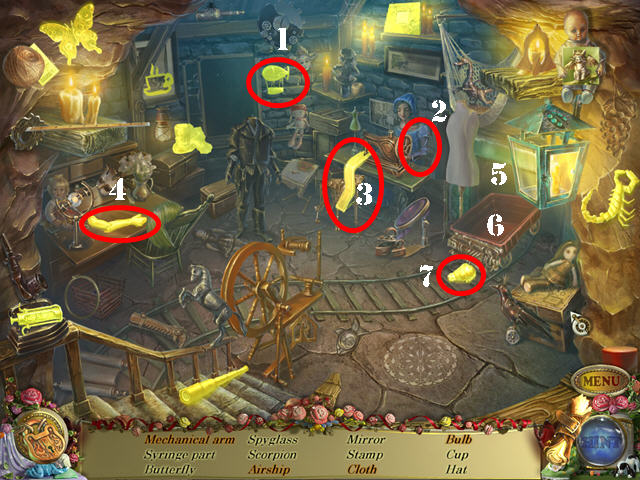
- Move the board and take the airship (1).
- Touch the arm (2) and take the cloth (3).
- Touch the body parts and take the mechanical arm (4).
- Remove the panel (5) and move the trolley (6); take the bulb (7).
- You will receive the SYRINGE PART.
- Walk down.
- Examine the puppet; touch the face and take the RED BUTTON (8).
- Zoom into the knight; remove the cap; insert the 2 SYRINGE PARTS into the holes (9).
- Touch the syringe to get the FUEL.
- Go through the doorway to access the factory (10).
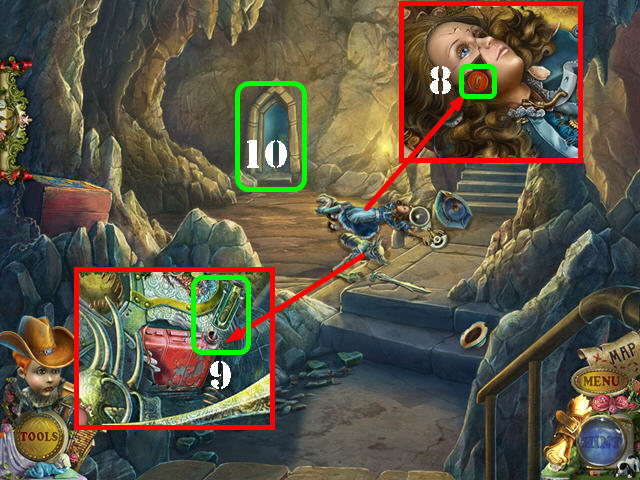
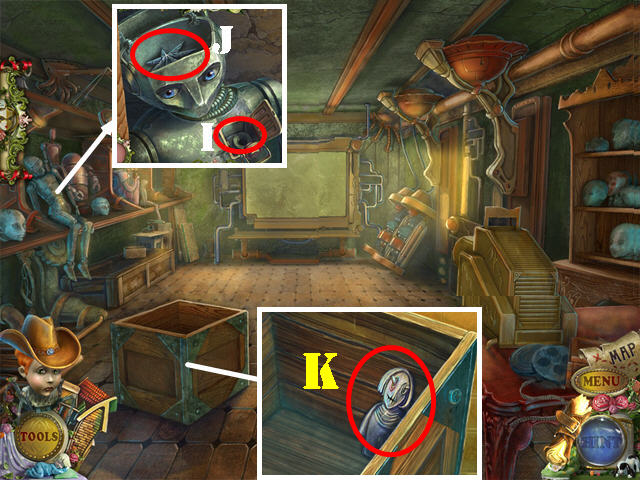
- Zoom into the door and take the FIVE-POINTED STAR (A).
- Zoom into the center console; place the FIVE-POINTED STAR in the slot to activate a HOP (B).
- Play the HOP.
- Place the wing (C) on the dragonfly (D) and take it.
- Move the book and take the six-pointed star (E).
- You will receive the SIX-POINTED STAR.

- Zoom into the left console; place the SIX-POINTED STAR in the slot to unlock the left door (F).
- Go through the left door (G).
- Examine the doll; open the top and place the FUEL in it (I).
- Take the SEVEN-POINTED STAR (J).
- Zoom into the crate; take the KEY (K).
- Walk down.
- Play the HOS.
- Place the wing (L) on the skull (M) and take the winged skull.
- Move the cloth and take the spider (N).
- Take the film slide (N1).
- You will receive the FILM SLIDE.
- Zoom into the right console; place the SEVEN-POINTED STAR in the slot to unlock the right door (O).
- Go through the right door (P).
- Examine the cage and insert the KEY into the lock; take the BEETLE (Q).
- Walk down and go through the left door.
- Zoom into the shadow graph; insert the FILM SLIDE in the slot (R).
- Zoom into the screen to receive the code (S).
- Walk down and go through the right door.
- Zoom into the safe and turn the handle (T). Note: the safe will not open until you see the code on the shadow graph.
- Take the LEVER (U).
- Examine the mechanism and insert the LEVER into the slot (V) and pull the lever.
- Examine the device; place the RED BUTTON and the BEETLE on it to activate a puzzle.
- Use the arrows and buttons to move the bars until the blue crystal meets the crystal the beetle is holding.
- The red buttons with arrows on the left and right, rotate the ring. Use the arrows in the center of the ring to move the bars in and out of the way.
- To solve the puzzle, please follow these steps: from the start position (not shown), press the left button (red). Press Ax3, Bx2, Cx1, then press the left button 2 times (red).
- Dx2, Ex3, Fx2, left button x 2 (green), Gx2, Hx2, Ix2, left (blue).
- Jx1 and the left button (pink).
- Mx3, Nx2, Ox2, left button x 2 (white).
- Px3, Qx2, Rx2, left button (yellow) and Sx2.
- The solution is shown here (T).
- Zoom into the Master; use your puppet helper on him to view the cut scene.
- Congratulations, you have completed PuppetShow: Destiny Undone.


 Valerie Porter and the Scarlet Scandal Walkthrough, Guide, & Tips
 Pahelika: Revelations Walkthrough, Guide, & Tips
 The Keepers: Lost Progeny Walkthrough, Guide, & Tips
 House of 1000 Doors: Family Secrets Walkthrough, Guide, & Tips
 Fairway Solitaire HD Tips and Tricks, Guide, & Tips