Macabre Mysteries: Curse of the Nightingale Walkthrough, Guide, & Tips
Macabre Mysteries: Curse of the Nightingale Walkthrough
Welcome to the Macabre Mysteries: Curse of the Nightingale Walkthrough!
Explore the Nightingale Theater, which was ravaged by a devastating fire 40 years ago, and uncover a dark mystery!
Whether you use this document as a reference when things get difficult or as a road map to get you from beginning to end, we’re pretty sure you’ll find what you’re looking for here.
This document contains a complete Macabre Mysteries: Curse of the Nightingale game walkthrough featuring annotated screenshots from actual gameplay!
We hope you find this information useful as you play your way through the game. Use the walkthrough menu below to quickly jump to whatever stage of the game you need help with.
Remember to visit the Big Fish Games Forums if you find you need more help. Have fun!
This walkthrough was created by BrownEyedTigre, and is protected under US Copyright laws. Any unauthorized use, including re-publication in whole or in part, without permission, is strictly prohibited.
General Tips

- This is an Interactive Hidden Object Game.
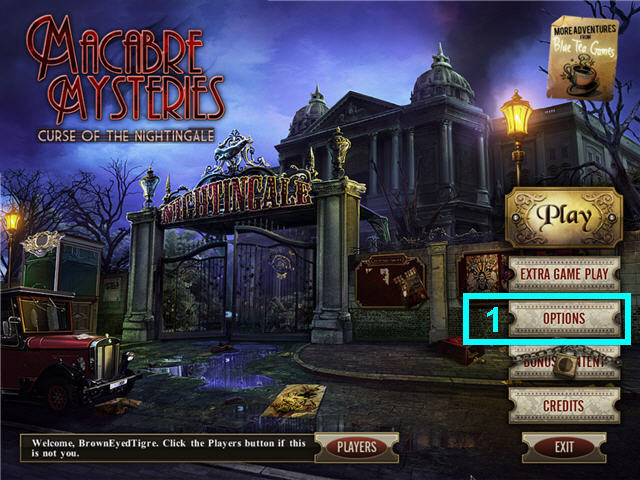
- Click on Options (1) to adjust the Volume, System Cursor and Screen Size.
- There are 20 Macabre Items (morphing items) to find to increase the speed of your hint refills; these will be circled in cyan and marked with the ‘@’ symbol in the screenshots.
- The Macabre Items will appear in a room after a series of actions have been completed first; you may not find the item until you have been in a room for a few times.
- You can interact with the bugs and the animals in the scenes.
- A hand cursor means you can pick up the item.
- A magnifying glass cursor signifies an area you can inspect closer.

- All inventory items are circled in yellow in the screenshots.
- The cursor will freeze as a penalty for excessive random clicking.
- Drag an inventory item to the hint button to see where that item can be used.
- Puzzles may be skipped. Skipping a puzzle will disable the hint button for 5 minutes.
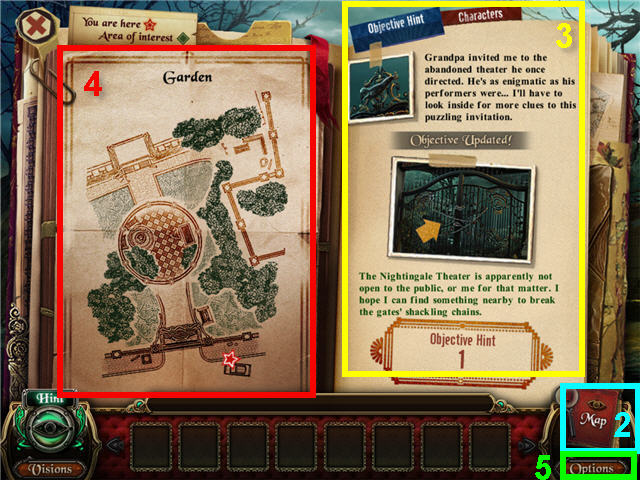
- Click on the map (2) to access the Map, Objective Hints, and Tasks.
- An exclamation point on the map means there is a new entry. You current objective will be listed along with a little hint (3).
- The Map (4) will show your current location and areas of interest.
- Click on Options (5) on the bottom right to exit the game.
Chapter 1- The Nightingale

- Click on the apparition and head to the left.
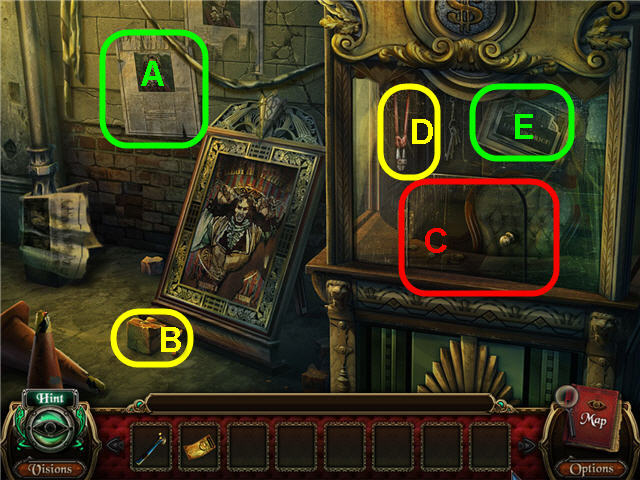
- Examine the notice (A) to get a character update.
- Take the BROKEN BRICK (B) and use it on the glass (C); take the BOLT CUTTER (D) and click on the sign (E).
- Back out.

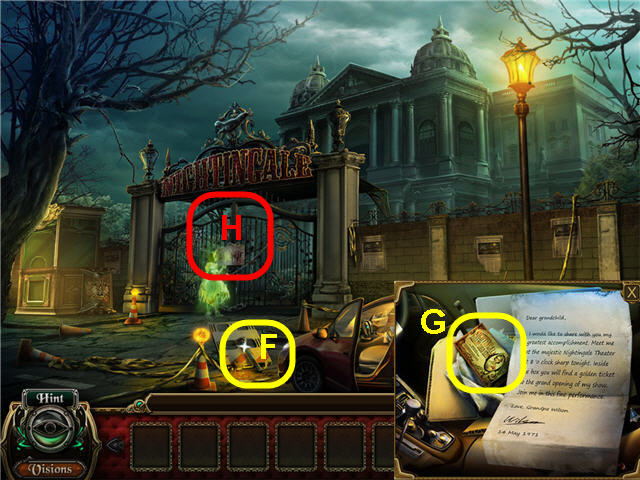
- Take the HAMMER (F).
- Examine the car; take the GOLDEN TICKET – NIGHTINGALE’S MASTERPIECE SHOW (G).
- Examine the gates (H); use the HAMMER on the lock and the BOLT CUTTER on the chain.
- Head through the gates and click on the fountain to access a Hidden Object Scene.

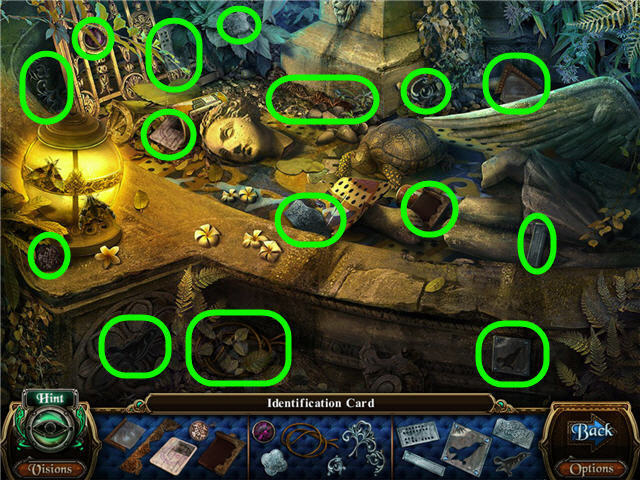
- Find the fragmented pieces and get an ACCESS CARD.
- Head forward and then to the right.

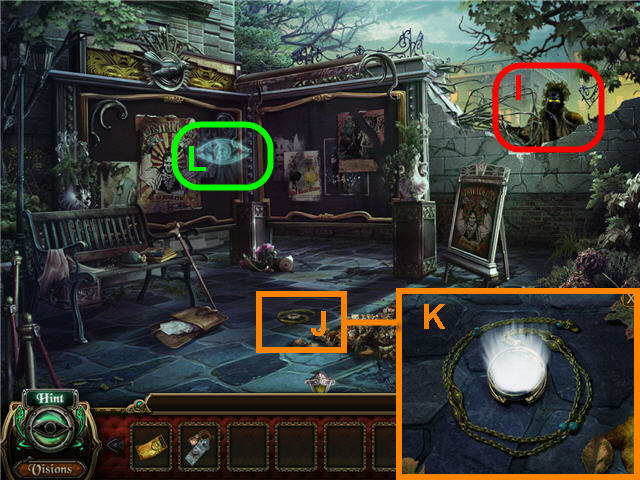
- Examine the large figure (I).
- Examine the monocle (J); click on it (K).
- Click on the eye (L) to access a Hidden Object Scene.

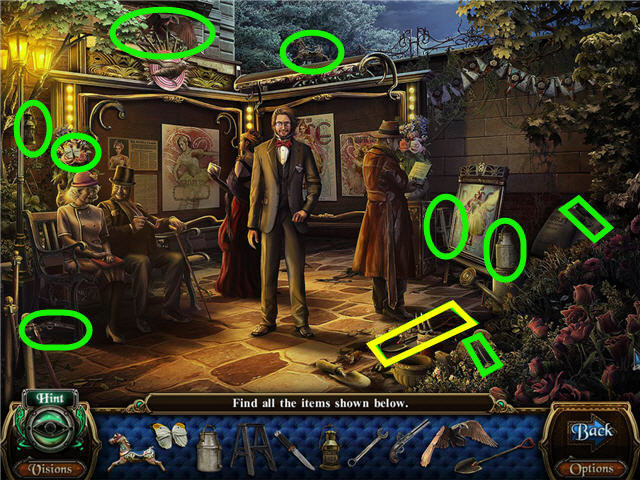
- Find the fragmented pieces and take the SHOVEL.
- Back out.

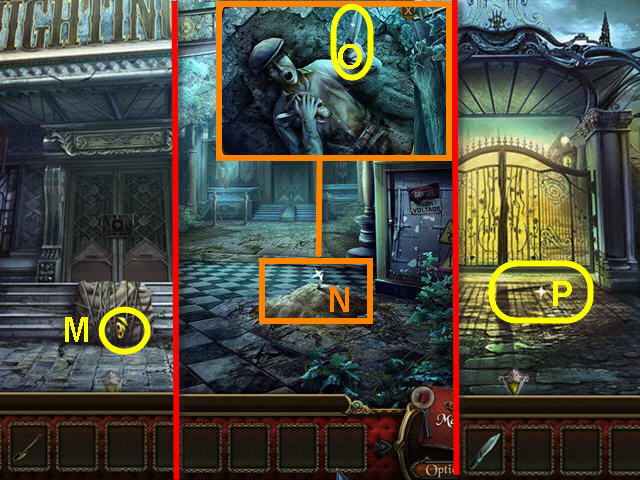
- Examine the sack and take the ELECTRICAL TAPE (M).
- Back out.
- Use the SHOVEL on the dirt (N) and take the SHARP KNIFE (O).
- Back out.
- Click on the gate; take the METAL ROD (P).
- Examine the brochure rack on the left to access a Hidden Object Scene.

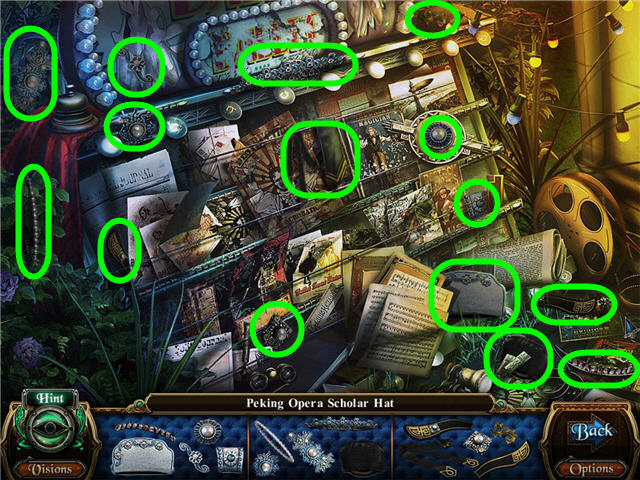
- Find the fragmented pieces and get an ORIENTAL PERFORMING MASK COLLECTION (1 of 5).
- Back out.

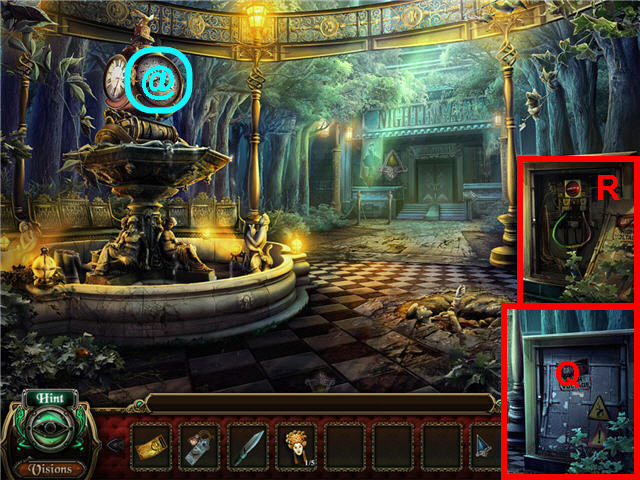
- Use the METAL ROD on the generator (Q); use the ELECTRICAL TAPE on the wires (R).
- Click on the MACABRE ITEM 1 of 20 (@).
- Head forward.

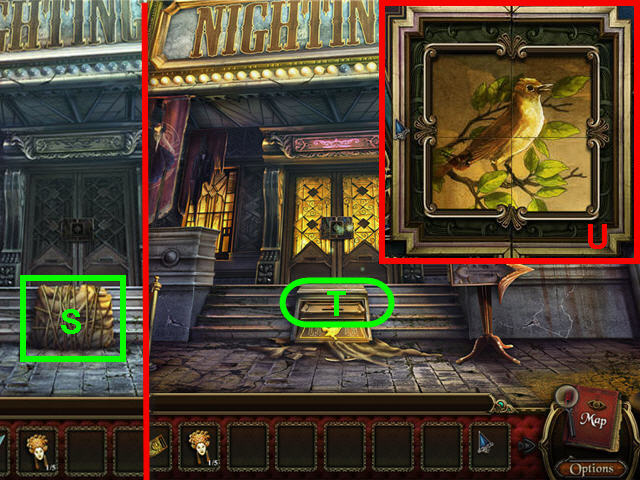
- Examine the gunny sack (S); use the SHARP KNIFE on the twine and use the ACCESS CARD on the slot (T).
- Examine the door to trigger a puzzle.
- Click on the panels to find the 4 panels that can be matched to complete a picture.
- See screenshot for solution (U).

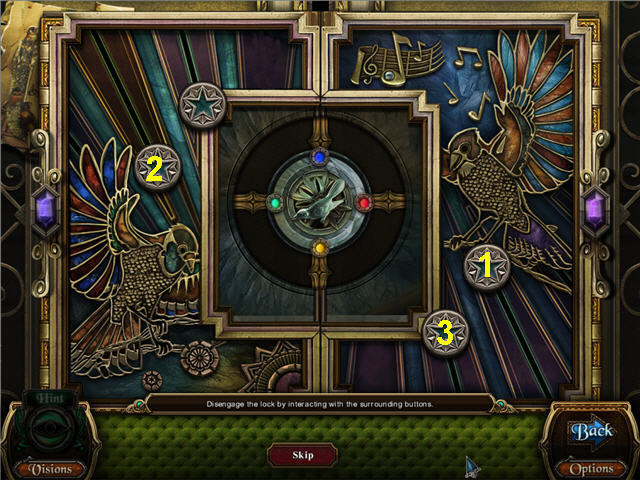
- Click on the star button to light up the 4 lights in the center.
- Each button lights up or turns off 2 or more lights.
- Click on the buttons in the order shown in the screenshot to solve the puzzle.
- Back out of the close-up, head right and click on the bench to trigger a Hidden Object Scene.

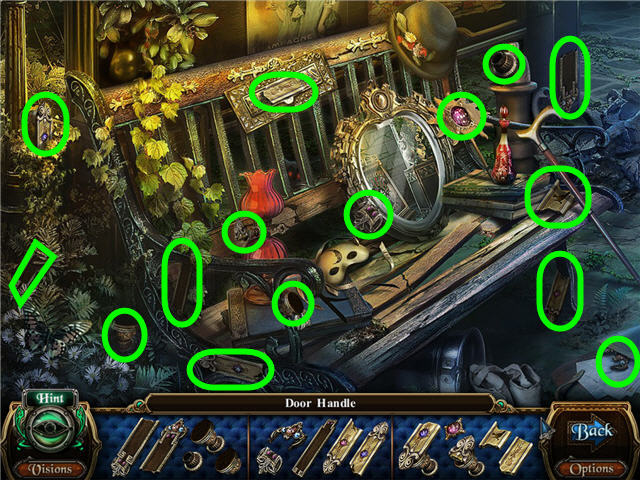
- Find the fragmented pieces and get DOOR HANDLES.
- Back out and take a closer look at the door; place the DOOR HANDLES on the door and enter.

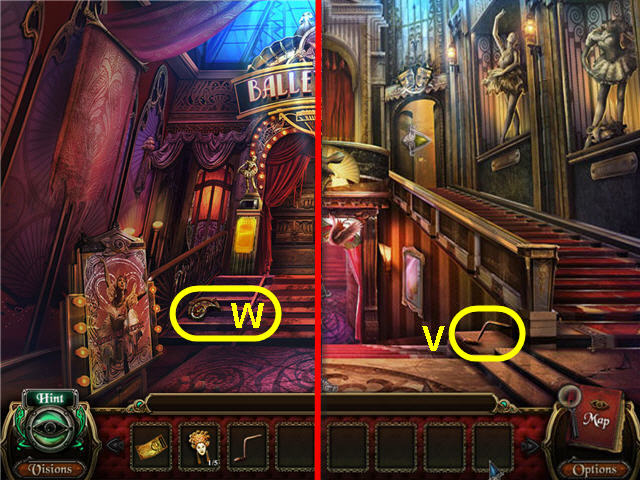
- Pick up the GRAMOPHONE CRANK (V).
- Head straight and take the BIRD EMBLEM HALF (W).
- Back out and head up the right staircase.
- Head into the room on the left and click on the table to access a Hidden Object Scene.

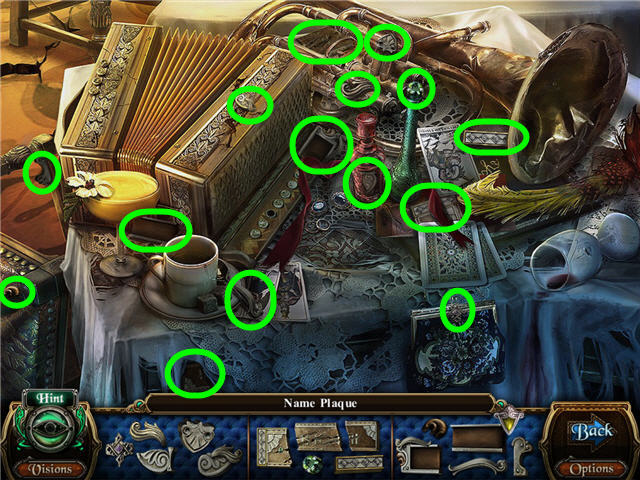
- Find the fragmented pieces.
- Get a NAME PLAQUE.

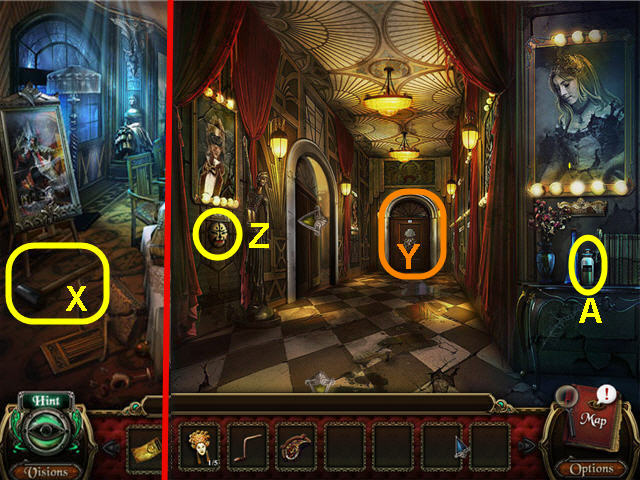
- Take the SLEDGEHAMMER (X).
- Back out.
- Examine the door (Y).
- Take the ORIENTAL PERFORMING MASK COLLECTION 2 of 5 (Z).
- Take the RUST REMOVER (A).
- Back out.

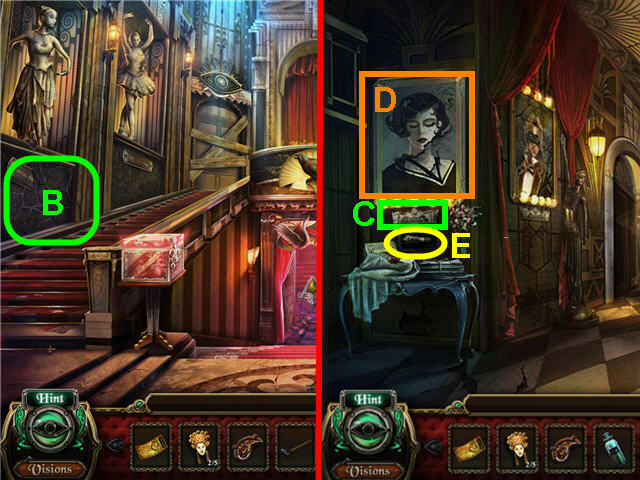
- Use the SLEDGEHAMMER on the wall (B); take the SEVERED PORTRAIT PIECE.
- Head up the right staircase.
- Place the NAME PLAQUE under the portrait (C).
- Place the SEVERED PORTRAIT PIECE on the portrait (D) and take the PERFUME VIAL (E).
- Back out and head up the left staircase.

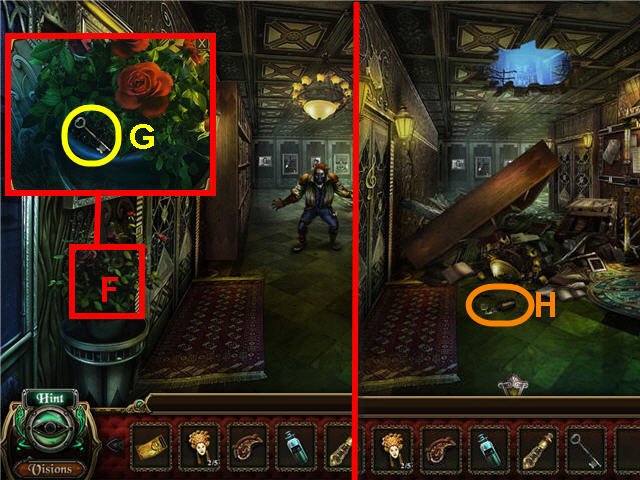
- Examine the flowers (F); take the CRYSTAL BOX KEY (G).
- Try and back out.
- Click on the pills (H) and back out.
Chapter 2 – Peking Opera Show

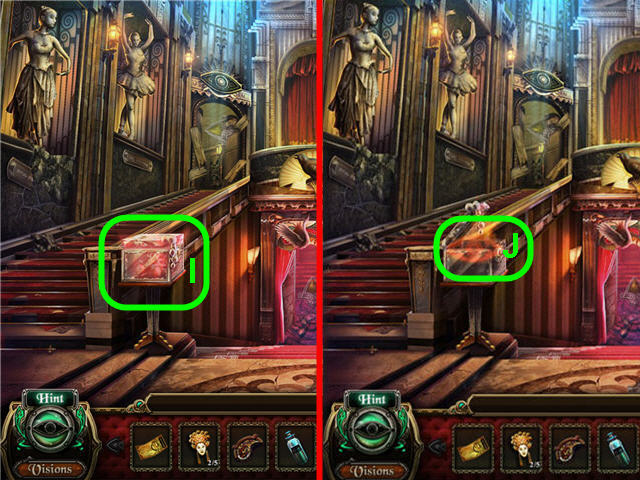
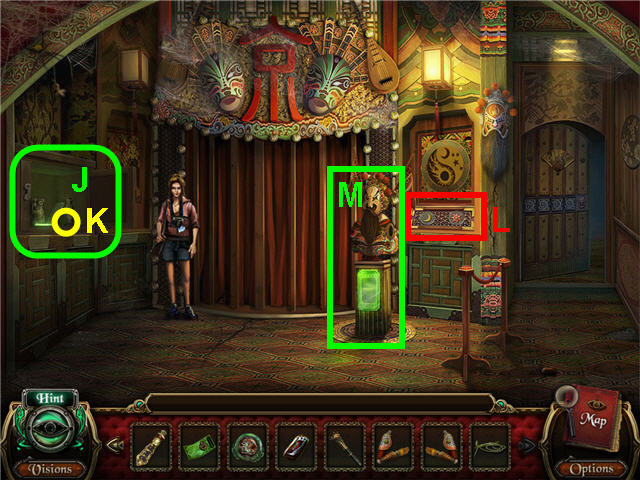
- Use the CRYSTAL BOX KEY on the crystal box (I).
- Click on the eye (J) to trigger a puzzle.

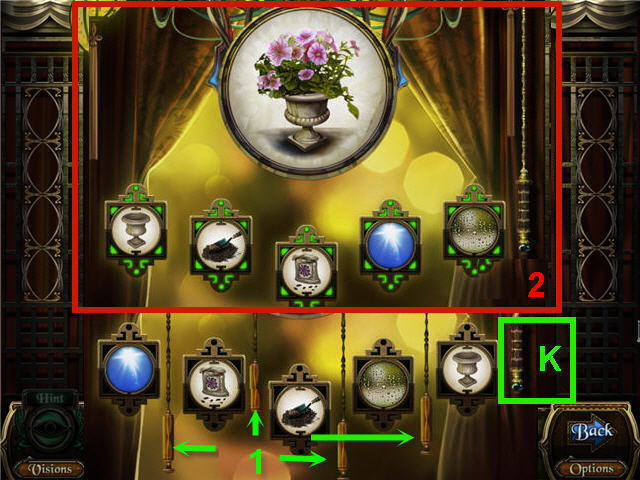
- Arrange the pictures in the correct in order to make the flowers grow.
- Pull the cords (1) in between each picture to switch the order of the pictures; pull the far right cord (K) when complete. See screenshot (2) for solution.
- Solution: planter, dirt, seeds, sun, water. Pull the cords in this order: 4, 1, 2, 3, 1, 2, 1.
- Get the GREEN TICKET – PEKING OPERA SHOW.
- Click on the headless ballerina statue on the right to access a Hidden Object Scene. .

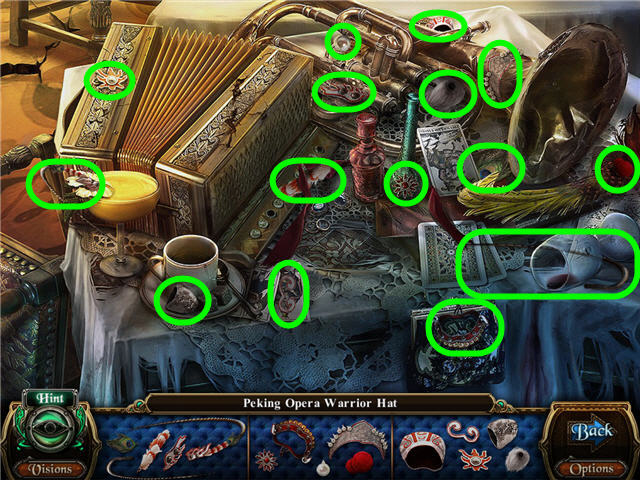
- Find the fragmented pieces and get a GRAMOPHONE SPEAKER.
- Head up the right staircase and into the left room.
- Click on the table to access a Hidden Object Scene.


- Find the fragmented pieces.
- Get an ORIENTAL PERFORMING MASK COLLECTION 3 OF 5.

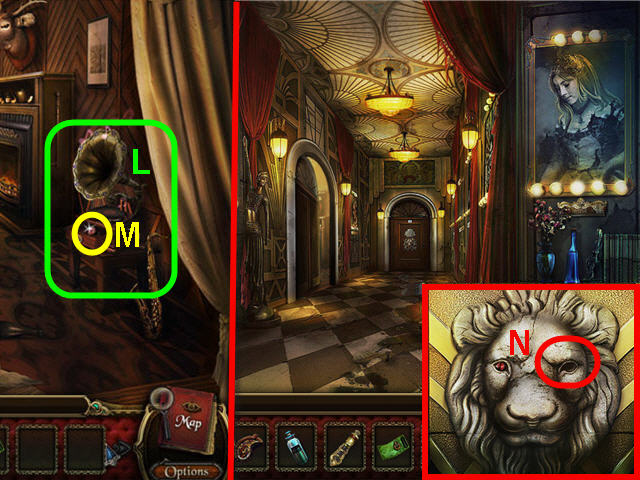
- Place the GRAMOPHONE CRANK and GRAMOPHONE SPEAKER on the gramophone (L).
- Take the RUBY (M) and back out.
- Examine the door; place the RUBY in the eye socket (N).
- Click on the opened center to trigger a puzzle.

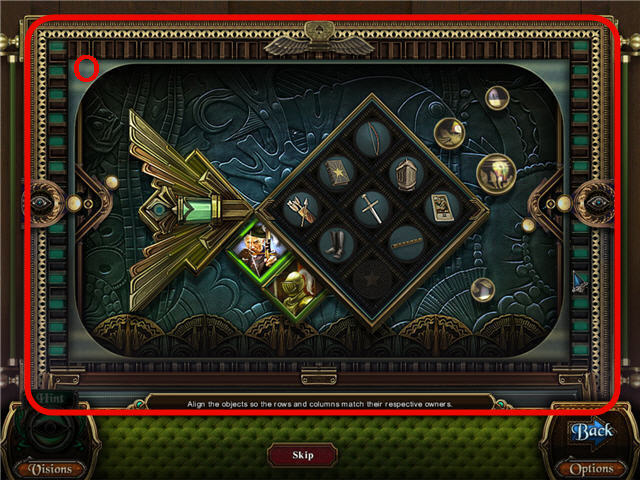
- The goal is to arrange the correct objects in the column that belongs with the archer and the knight.
- Click on any object that is next to the empty space to move it to that space.
- The order is not important, just that they are in the correct row. See screenshot (O) for solution.
- Head straight.
- Click on the hutch on the far left to access a Hidden Object Scene.

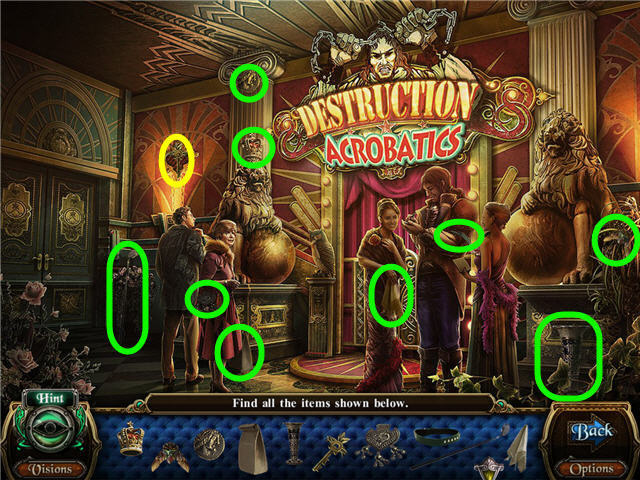
- Find the fragmented pieces.
- Get a PHOENIX PLATE.

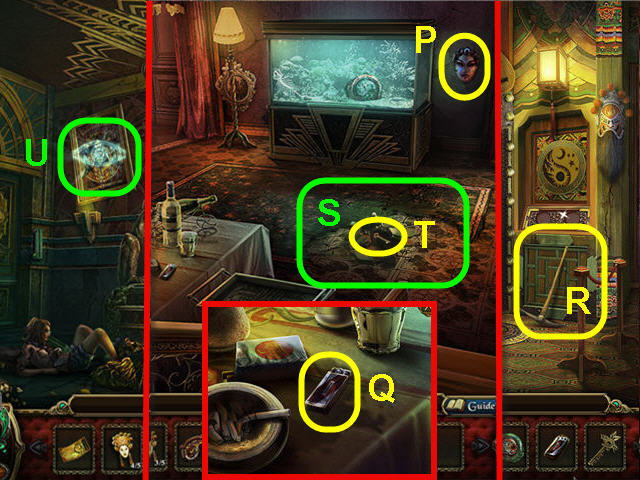
- Take the ORIENTAL PERFORMING MASK COLLECTION 4 OF 5 (P).
- Examine the table; take the LIGHTER (Q).
- Head right and take the PICKAXE (R).
- Back out and use the PICKAXE on the floor (S); take the BLACK-TINTED KEY (T).
- Head left.
- Speak to the girl.
- Click on the eye (U) to access a Hidden Object Scene.


- Find the fragmented pieces and take the POWDER ROOM KEY.
- Back out and head right.
- Use the POWDER ROOM KEY on the door on the right and enter.

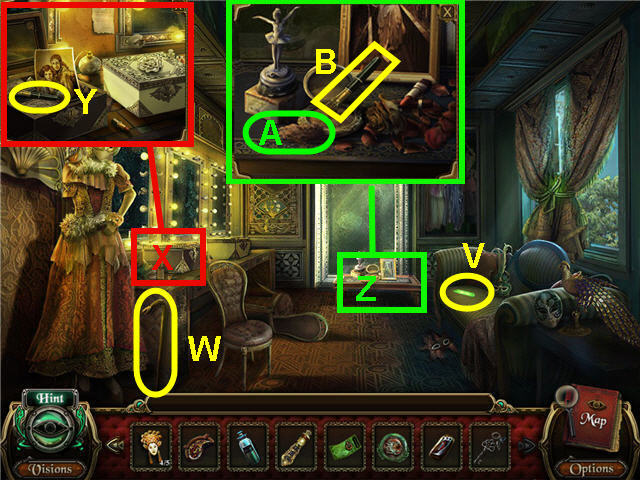
- Take the LIGHT STICK (V) and the LONG CROWBAR (W).
- Examine the black box (X); use the BLACK-TINTED KEY on the box; take the UNPOWDERED BRUSH (Y) and click on the picture.
- Examine the table (Z); click on the ballerina and use the UNPOWDERED BRUSH on the powder (A) and take the POWDER BRUSH (B).
- Back out two times and head left.

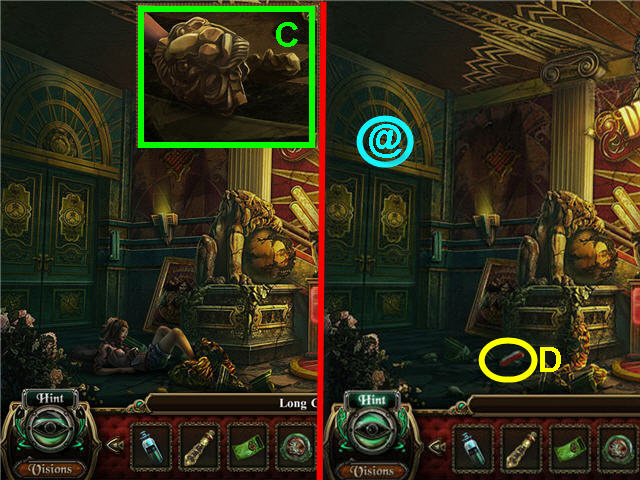
- Examine the girl’s foot; use the LONG CROWBAR on the debris (C).
- Talk to the girl and get a SUN EMBLEM.
- Take the ROPE-CUTTING KNIFE (D).
- Click on the MACABRE ITEM 2 of 20 (@).
- Back out and head right.

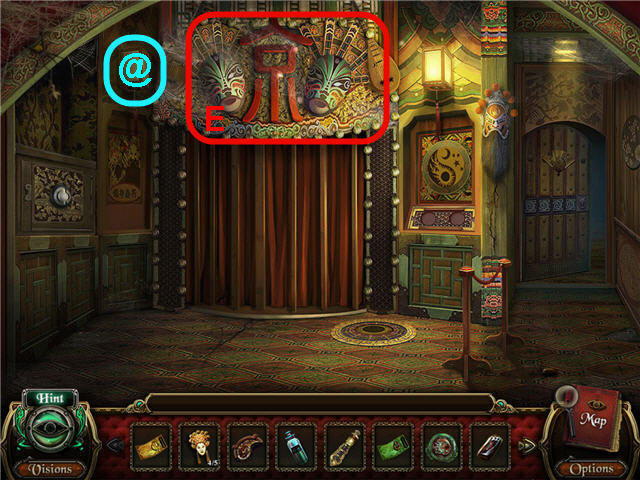
- Click on the MACABRE ITEM 3 of 20 (@).
- Examine the masks (E) to access a Hidden Object Scene.

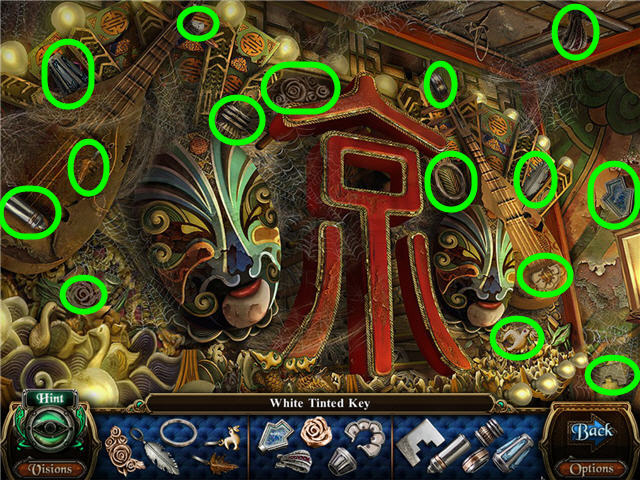
- Find the fragmented pieces and get a WHITE-TINTED KEY.
- Head right.
- Examine the mannequin on the left to access a Hidden Object Scene.

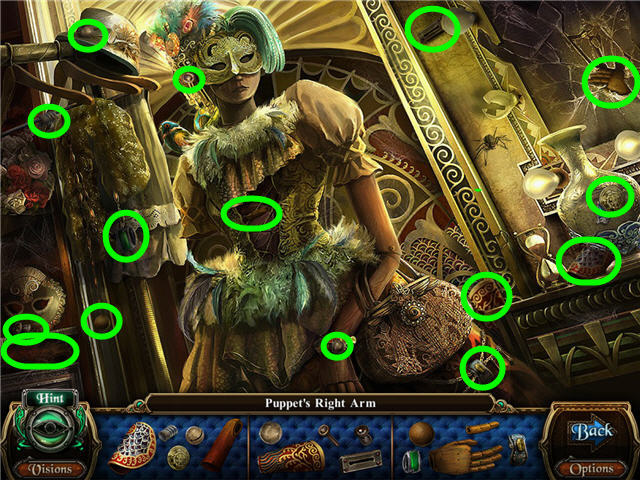
- Find the fragmented pieces.
- Get a PUPPET’S RIGHT ARM.

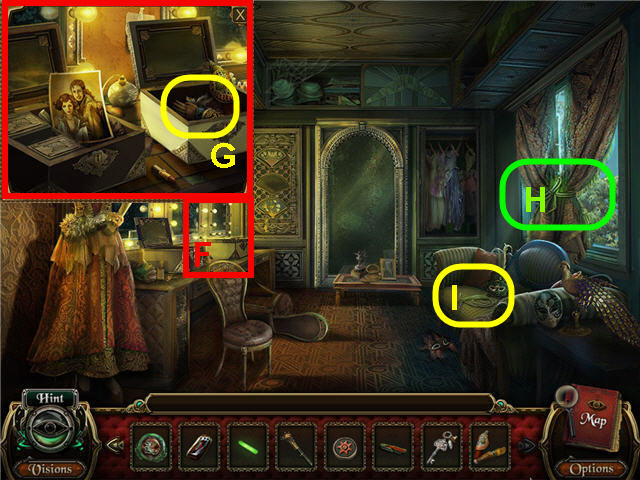
- Examine the white box (F); use the WHITE-TINTED KEY on the box.
- Take the PUPPET’S LEFT ARM (G).
- Use the ROPE-CUTTING KNIFE on the curtains (H); take the ROPE (I).
- Look out the window and click on the man.
- Back out.

- Talk to the girl.
- Use the LIGHT STICK on the safe (J); take the MOON EMBLEM (K).
- Use the SUN EMBLEM and MOON EMBLEM on the sockets (L).
- Place the PUPPET’S RIGHT ARM and PUPPET’S LEFT ARM on the ticket taker (M).
- Examine the ticket taker pedestal and use the GREEN TICKET – PEKING OPERA SHOW.
- Head straight and click on the stage to access a Hidden Object Scene.

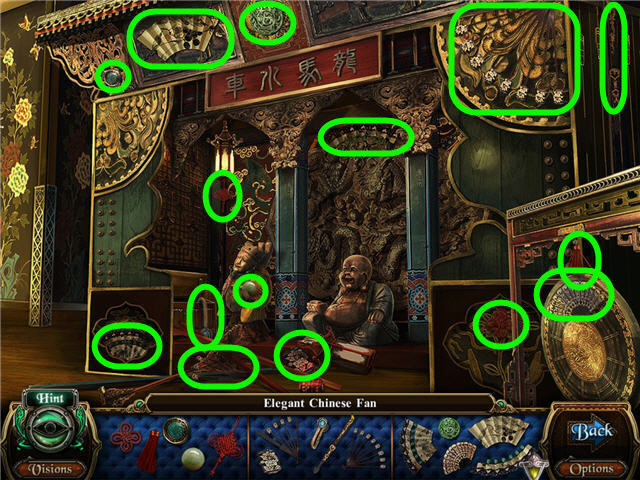
- Find the fragmented pieces and get an ELEGANT CHINESE FAN.
- Back out and head right.
Chapter 3 – Acrobatic Destruction Show

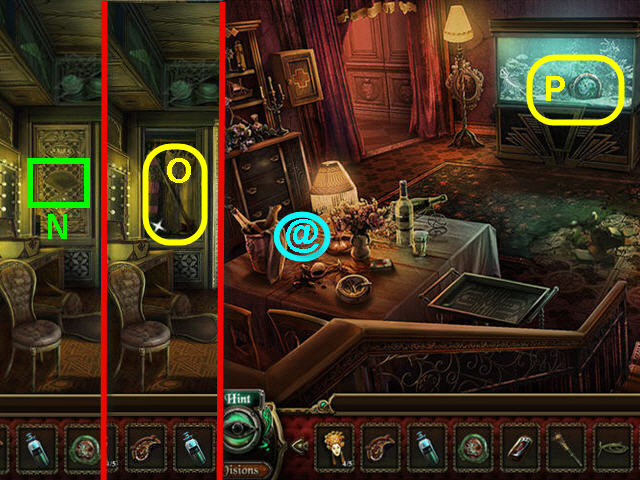
- Place the ELEGANT CHINESE FAN on the slot (N); take the FISHING ROD (O).
- Back out two times.
- Use the FISHING ROD on the aquarium to get a DRAGON PLATE (P).
- Click on the MACABRE ITEM 4 of 20 (@).
- Head right and forward.

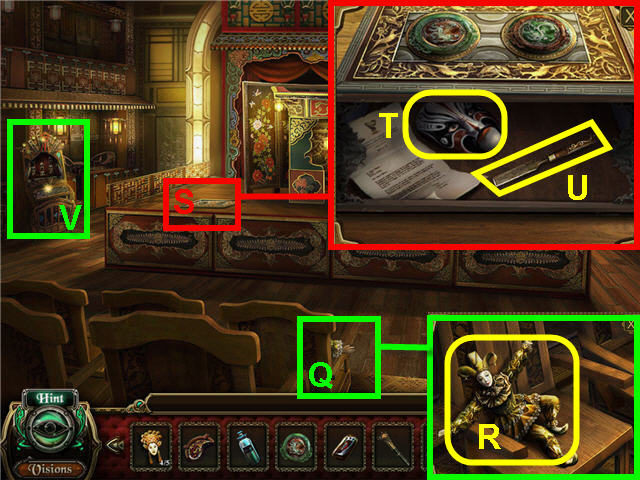
- Examine the chair (Q); take the CLOWN DOLL COLLECTION 1 OF 5 (R).
- Examine the stage floor (S); place the PHOENIX PLATE on the left and the DRAGON PLATE on the right.
- Take the ORIENTAL PERFORMING MASK COLLECTION 5 OF 5 (T), and the SMALL CHISEL (U); click on the note.
- Examine the display (V) to trigger a puzzle.

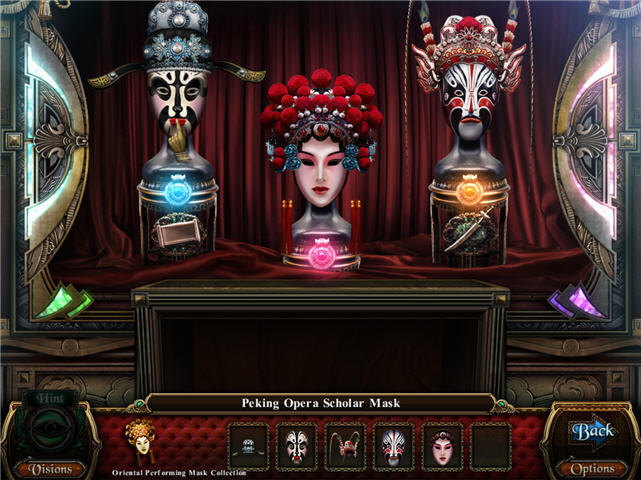
- Arrange the masks and headdresses to match the base. See screenshot for solution.
- Take the DANCING FIGURINE COLLECTION 1 OF 4.
- Back out and take a closer look at the masks above the stage entrance to access a Hidden Object Scene.

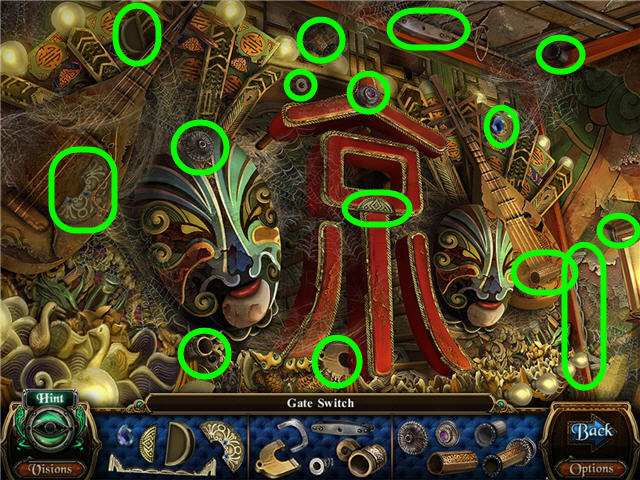
- Find the fragmented pieces and get a DOOR SWITCH.
- Back out and take a closer look at the hutch on the left to access a Hidden Object Scene.

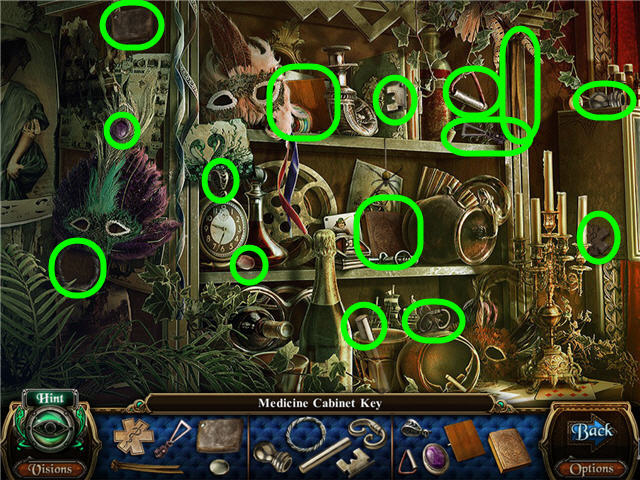
- Find the fragmented pieces.
- Get a MEDICINE CABINET KEY.

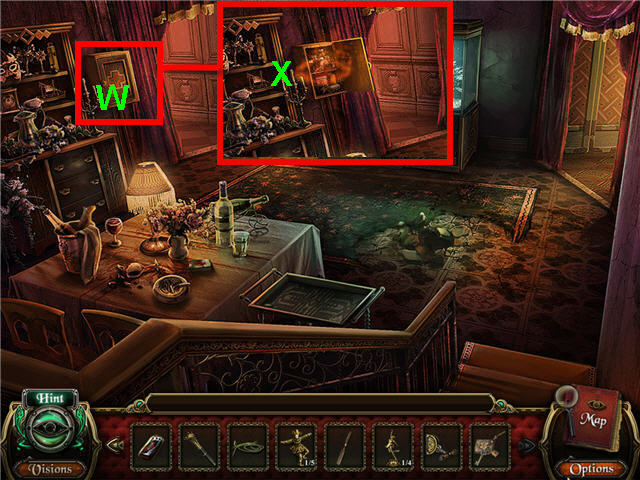
- Use the MEDICINE CABINET KEY on the medicine cabinet (W).
- Click on the eye (X) to trigger a puzzle.

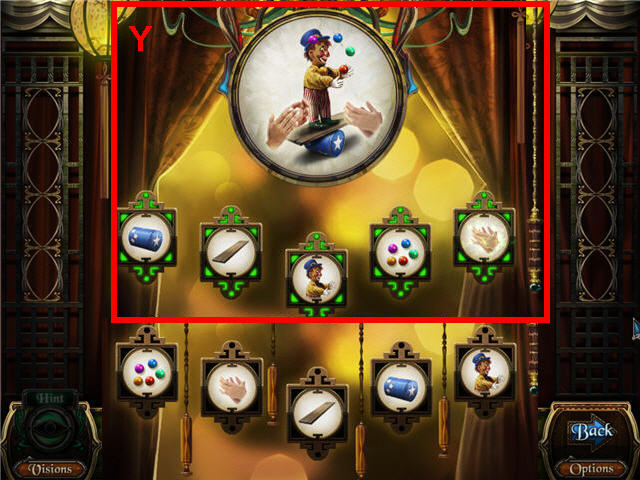
- Arrange the pictures to complete the circus performance.
- Solution: roller, board, clown, balls, applause. Pull the cords in this order: 3, 1, 2, 4, 3, 1, 4.
- See screenshot (Y) for solution.
- Get a RED TICKET – ACROBATIC DESTRUCTION SHOW.
- Head left.

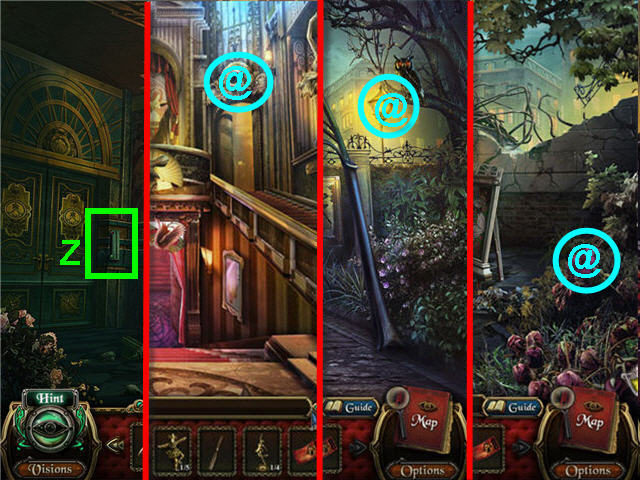
- Use the DOOR SWITCH on the slot (Z).
- Back out 3 times and click on the MACABRE ITEM 5 OF 20 (@).
- Back out 3 times and click on the MACABRE ITEM 6 of 20 (@).
- Back out, head forward, go right and click on the MACABRE ITEM 7 of 20 (@).
- Back out, go forward, head up the right staircase, forward, and left twice.

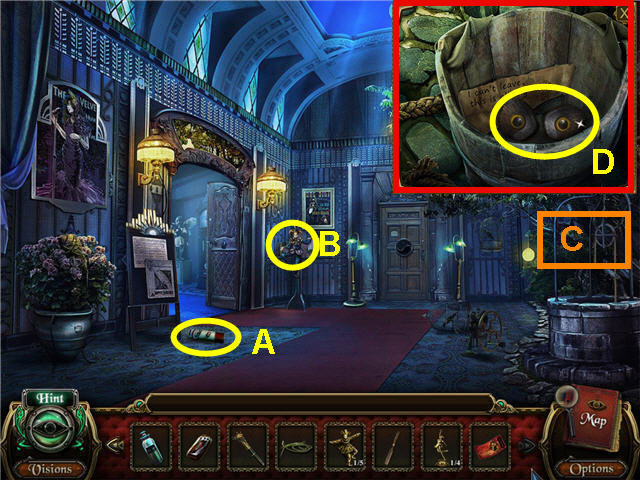
- Take the PESTICIDE (A) and the CLOWN DOLL COLLECTION 2 OF 5 (B).
- Use the ROPE on the pulley (C) and take a closer look at the bucket in the well; take the OWL EYE (D).
- Head left and take a closer look at the right table to access a Hidden Object Scene.

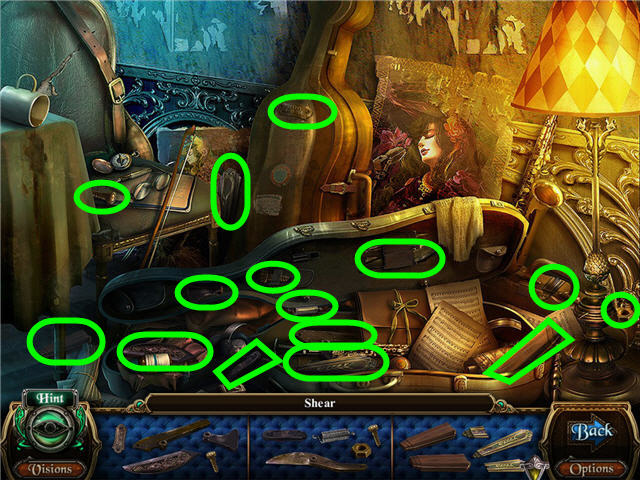
- Find the fragmented pieces.
- Get the GARDEN SHEARS.

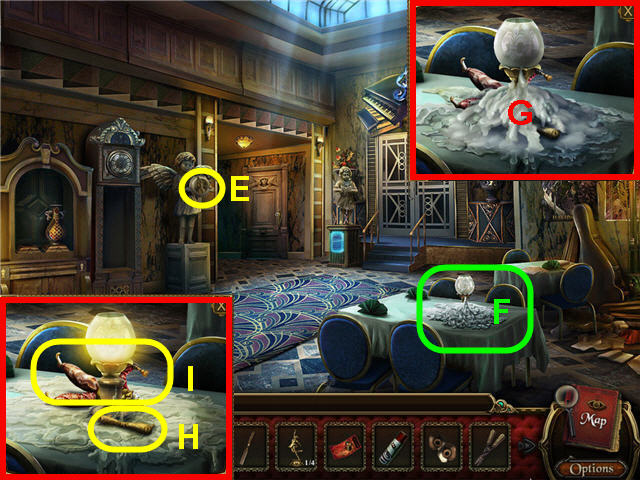
- Take the MUSIC INSTRUMENTS COLLECTION 1 OF 5 (E).
- Examine the table (F); use the LIGHTER on the wax (G).
- Take the CHEST HANDLE (H) and the CLOWN DOLL COLLECTION 3 OF 5 (I).
- Back out.

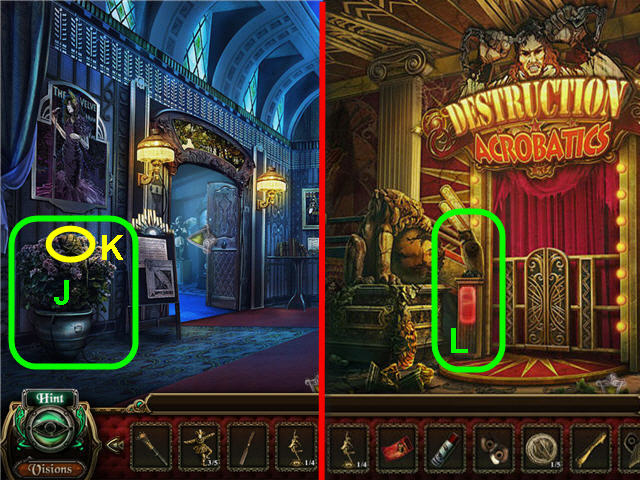
- Use the GARDEN SHEARS on the plant (J); take the OWL WINGS (K).
- Back out.
- Place the OWL EYE and OWL WINGS on the ticket taker (L).
- Examine the ticket taker and place the RED TICKET – ACROBATIC DESTRUCTION SHOW in the slot.
- Head straight and take a closer look at the left side of room to access a Hidden Object Scene.

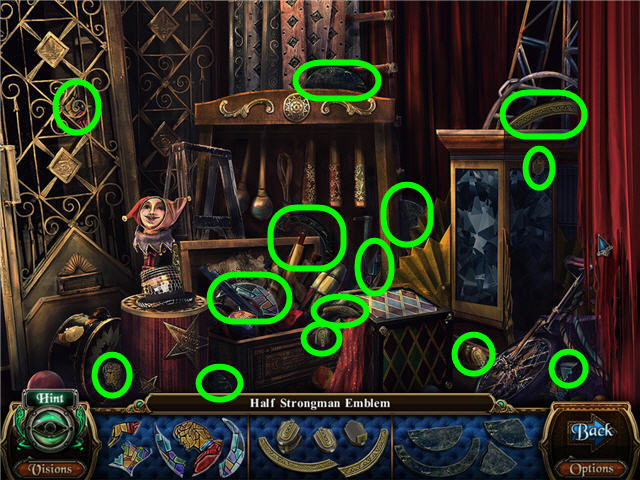
- Find the fragmented pieces and get a STRONGMAN EMBLEM HALF.
- Back out; talk to the mayor and head left.

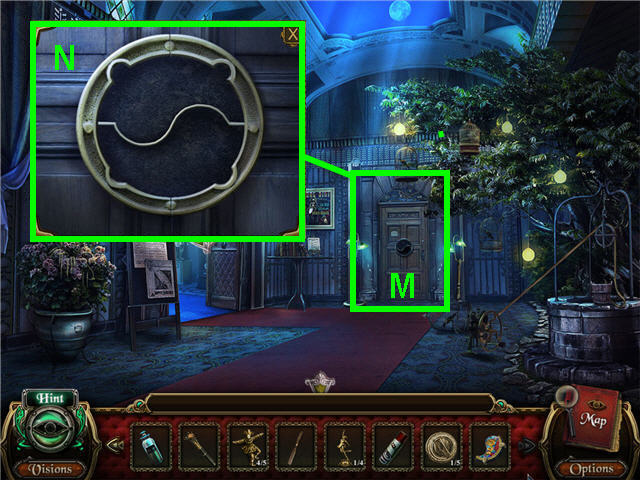
- Examine the door (M); place the STRONGMAN EMBLEM HALF and BIRD EMBLEM HALF on the lock (N).
- Examine the lock to trigger a puzzle.

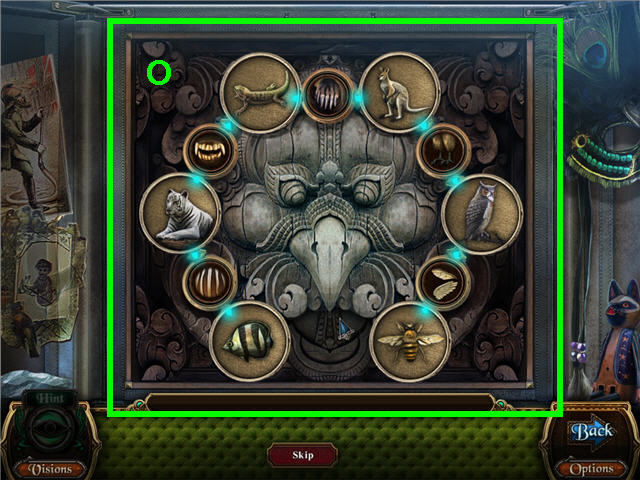
- Arrange the animals on the larger disks according to their characteristics on the smaller disks.
- Click on a smaller disk to switch the connecting larger disks. See screenshot for solution (O).

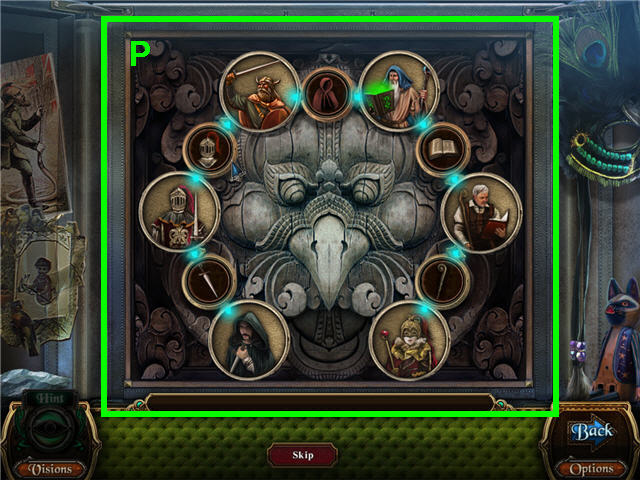
- Arrange the characters on the larger disks according to their characteristics on the smaller disks.
- See screenshot for solution (P).
- Head straight and take a closer look at the window to access a Hidden Object Scene.

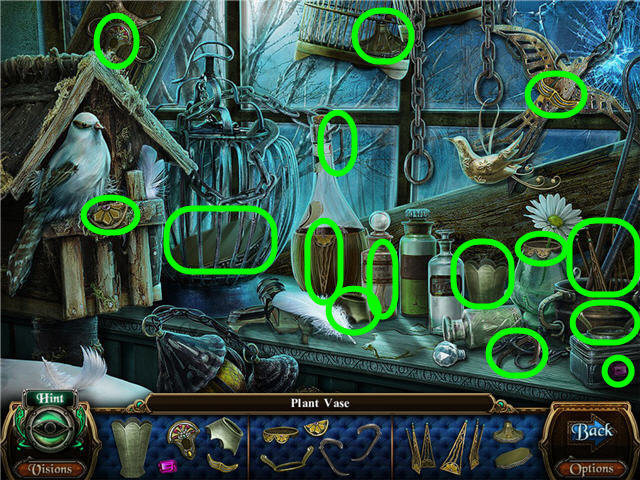
- Find the fragmented pieces.
- Get a PLANT VASE.

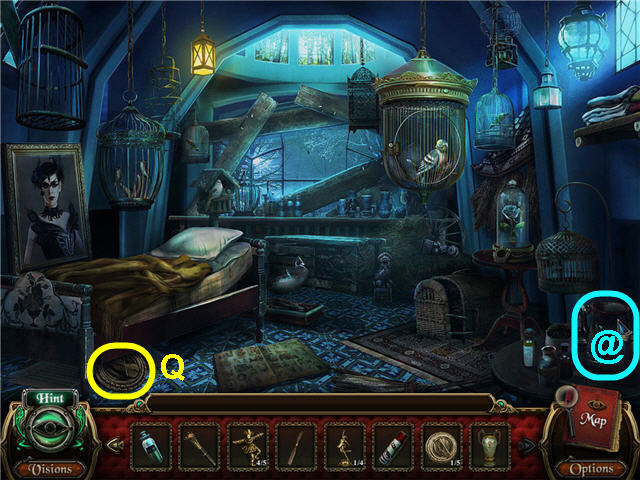
- Move the blanket and take the MUSIC INSTRUMENT COLLECTION 2 OF 5 (Q).
- Click on the MACABRE ITEM 8 OF 20 (@).
- Back out, head left and take a closer look at the table on the right to access a Hidden Object Scene.

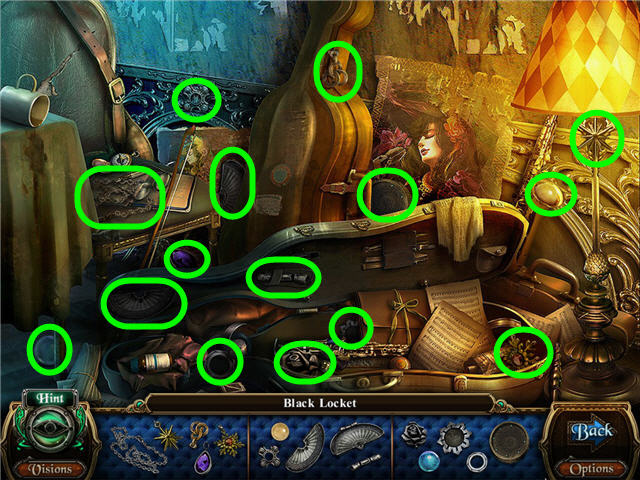
- Find the fragmented pieces.
- Get a BLACK LOCKET.

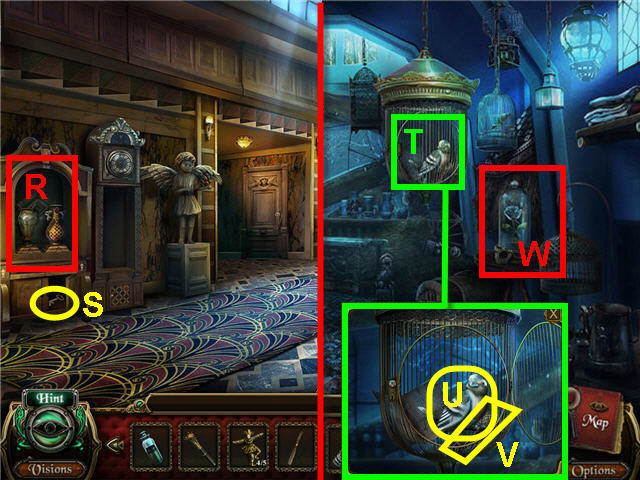
- Place the PLANT VASE in the alcove(R) and take the KEY (S).
- Back out and head straight.
- Take a closer look and use the BIRDCAGE KEY on the birdcage (T); take a closer look again and take the BIRD FIGURINE (U), the CHEST KEY (V) and click on the note.
- Use the BLACK LOCKET on the glass case (W); click on the eye.

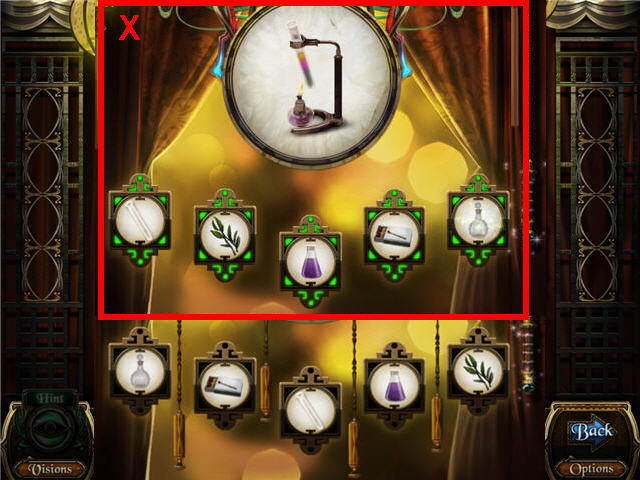
- Arrange the pictures to complete the actions to create a potion.
- Solution: test tube, plant, purple liquid, matches, decanter. Pull the cords in this order: 1, 3, 2, 4, 3, 1, 2, 1, 3, 4. See screenshot (X) for solution.
- Get a BLUE TICKET – THE VELVET DIVA SHOW.
- Back out two times and head forward.
Chapter 4 – The Velvet Diva Show

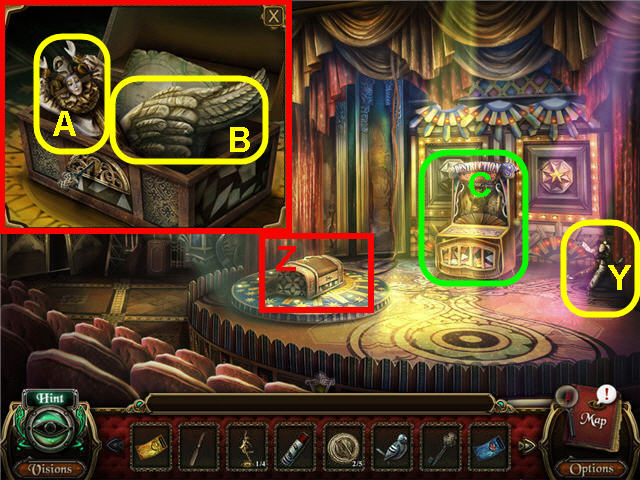
- Take the CLOWN DOLL COLLECTION 4 OF 5 (Y).
- Take a closer look and place the CHEST HANDLE and use the CHEST KEY on the chest (Z).
- Take the CLOWN DOLL COLLECTION 5 OF 5 (A), the LEFT ANGEL WING (B), and click on the letter.
- Examine the display case (C) to trigger a puzzle.

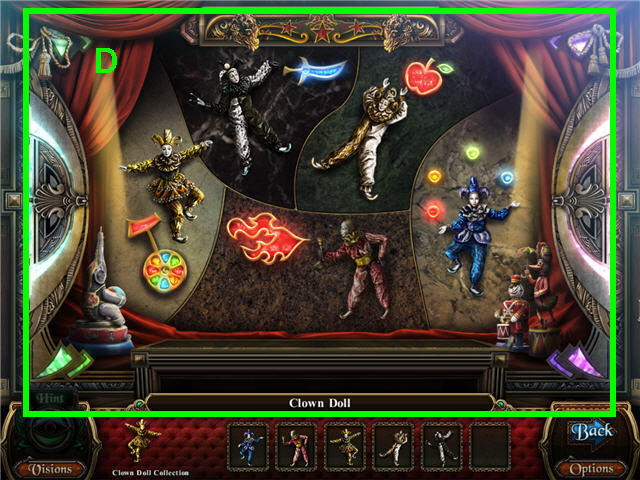
- Arrange the clowns according to the activities portrayed.
- Click on any two clowns to switch them. See screenshot (D) for solution.
- Take the DANCING FIGURINE COLLECTION 2 OF 4.
- Back out, head left, and go straight.
- Examine the window to access a Hidden Object Scene.

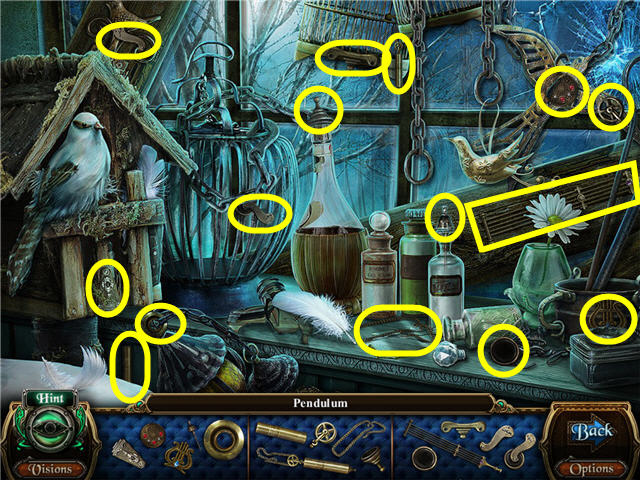
- Find the fragmented pieces and get a PENDULUM.
- Back out and head left.

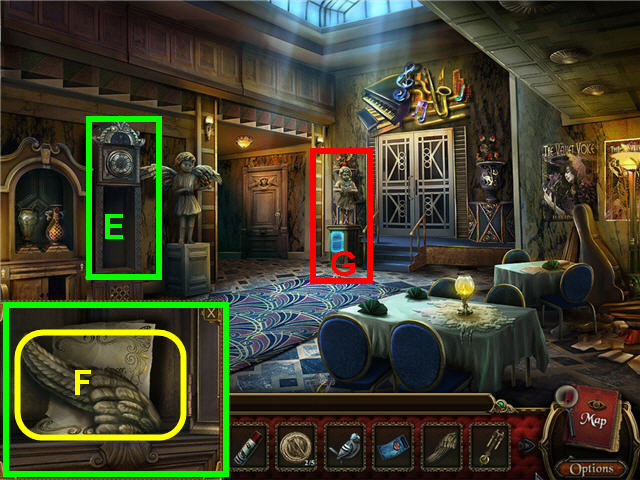
- Place the PENDULUM on the clock (E); take the RIGHT ANGEL WING (F) and click on the note.
- Place the LEFT ANGEL WING and the RIGHT ANGEL WING on the ticket taker (G).
- Examine the ticket taker and place the BLUE TICKET – THE VELVET DIVA SHOW in the slot.
- Head forward.

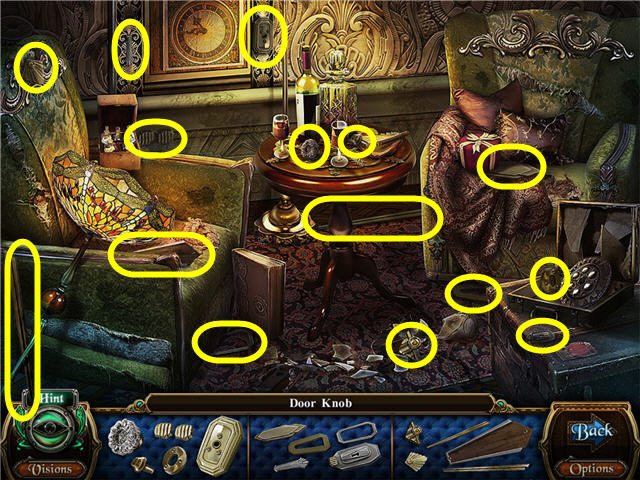
- Examine the chair on the left to access a Hidden Object Scene.
- Find the fragmented pieces.
- Get a DOOR KNOB.

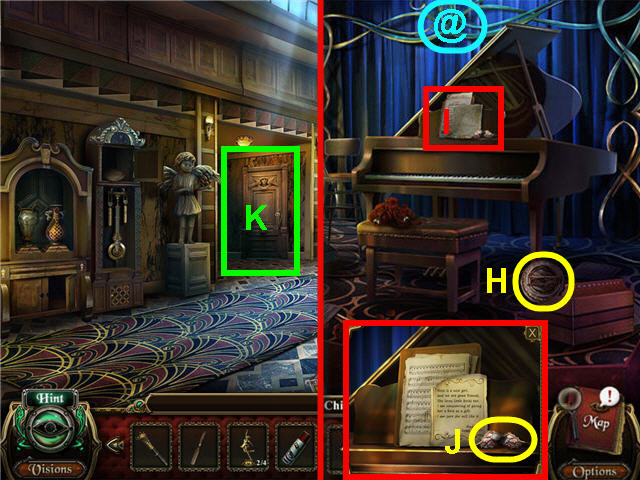
- Click on the MACABRE ITEM 9 OF 20 (@).
- Take the MUSIC INSTRUMENT COLLECTION 3 OF 5 (H).
- Examine the sheet music (I); take the RUBY BUTTERFLY WING (J) and click on the note.
- Back out.
- Use the DOOR KNOB on the door (K) and enter.
- Click on the eye to the right of the stairs to access a Hidden Object Scene.

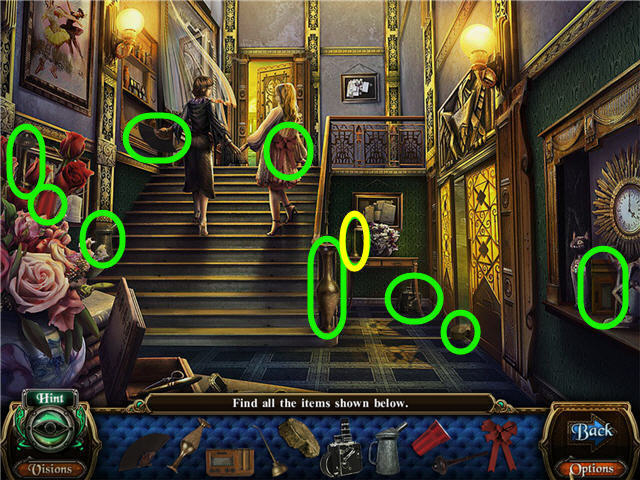
- Find the items shown.
- Take the OIL CAN.

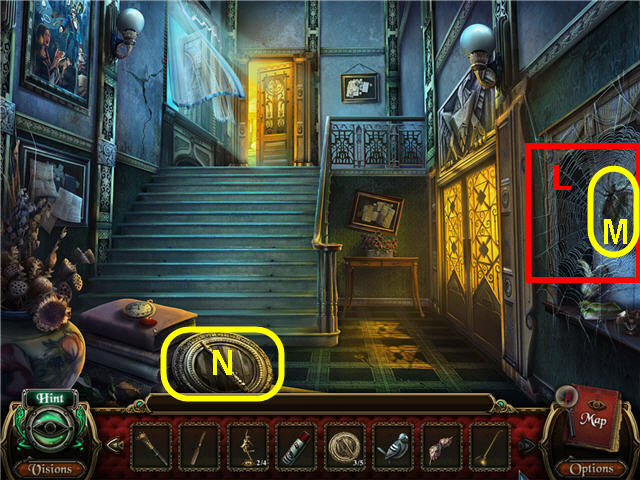
- Use the PESTICIDE on the spider (L); take the MUSIC INSTRUMENTS COLLECTION 4 OF 5 (M).
- Take the MUSIC INSTRUMENTS COLLECTION 5 OF 5 (N).
- Head up the stairs and straight into the music room.
- Examine the music display case to trigger a puzzle.

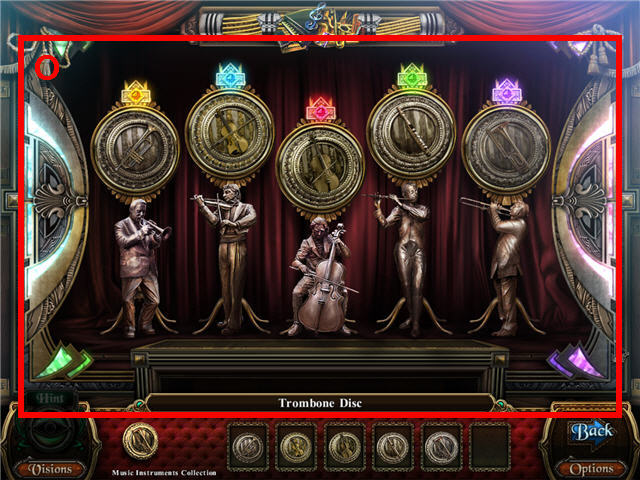
- Arrange the disks so that the correct instrument is located above the correct musician. See screenshot (O) for solution.
- Take the DANCING FIGURINE COLLECTION 3 OF 4.
- Examine the chair on the left to access a Hidden Object Scene.

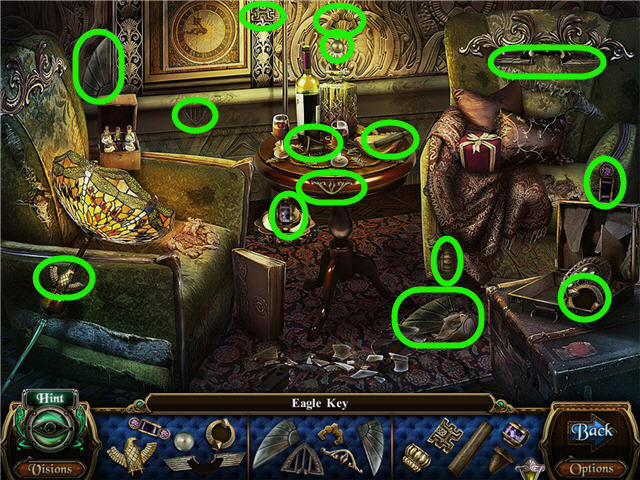
- Find the pieces and get an EAGLE KEY.
- Back out and head into the left doorway.

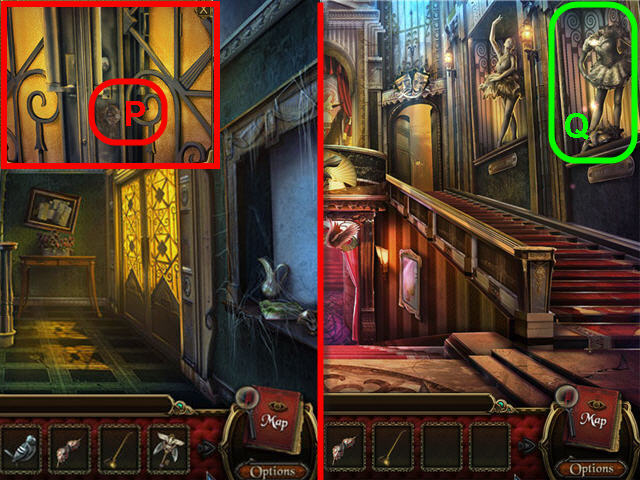
- Examine the door; use the RUST REMOVER and EAGLE KEY on the lock (P).
- Enter through the newly-opened door and back out once.
- Examine the headless ballerina (Q) to access a Hidden Object Scene.

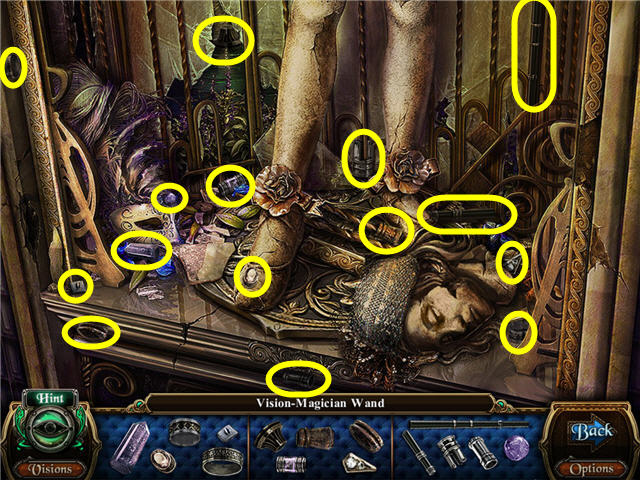
- Find the pieces and get a VISION-MAGICIAN WAND.
- Head up the left staircase.

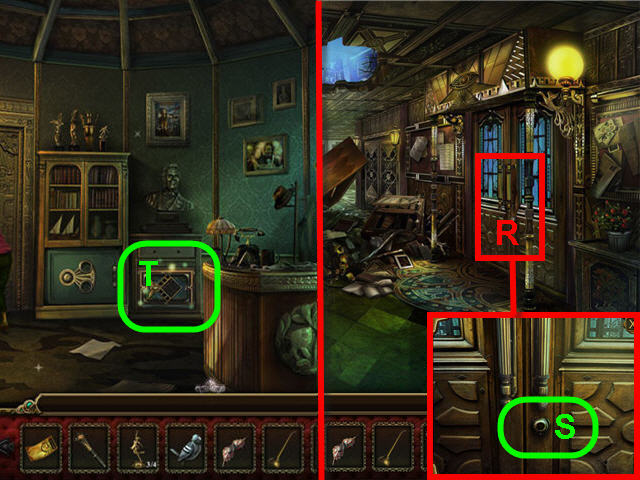
- Examine the door (R) and use the SMALL CHISEL and the VISION-MAGICIAN WAND on the lock (S).
- Head right through the doors.
- Talk to the mayor.
- Examine the pedestal (T) beneath the bust to trigger a puzzle.

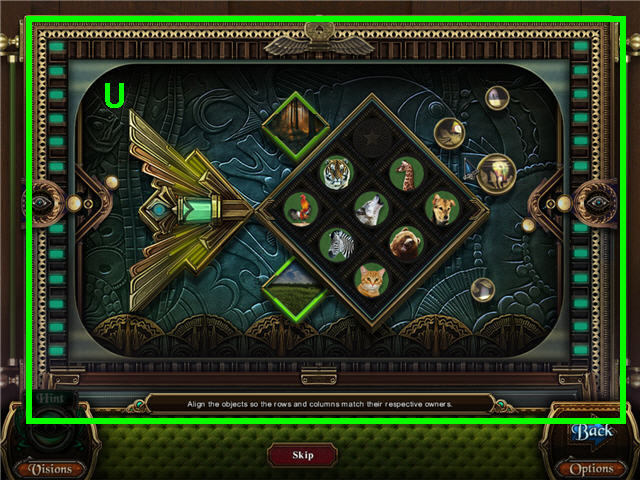
- Arrange the animals in the correct row or column matching their habitat.
- See screenshot (U) for solution.
- Take the SAPPHIRE BUTTERFLY WING.

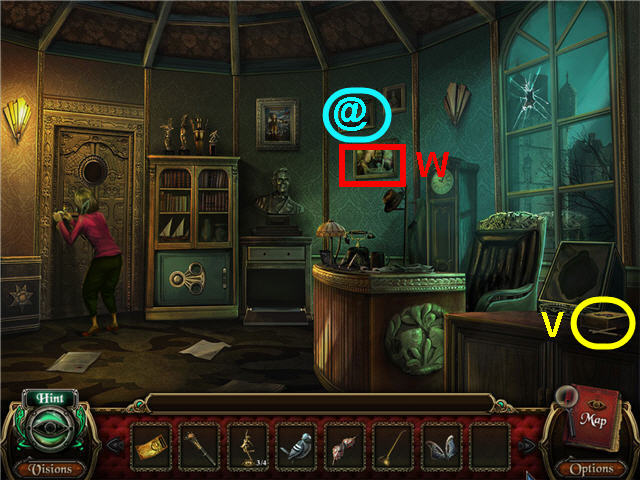
- Click on the MACABRE ITEM 10 OF 20 (@).
- Take the BOX OF MATCHES (V).
- Click on the photo (W) and the note on the floor.
- Examine the desk to access a Hidden Object Scene.

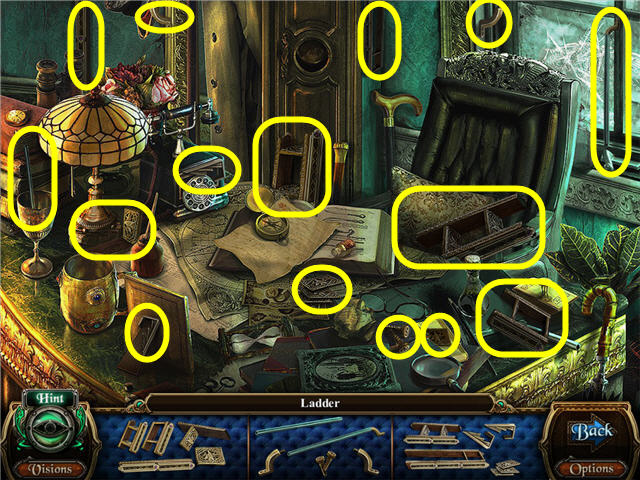
- Find the pieces and get a LADDER.
- Back out.

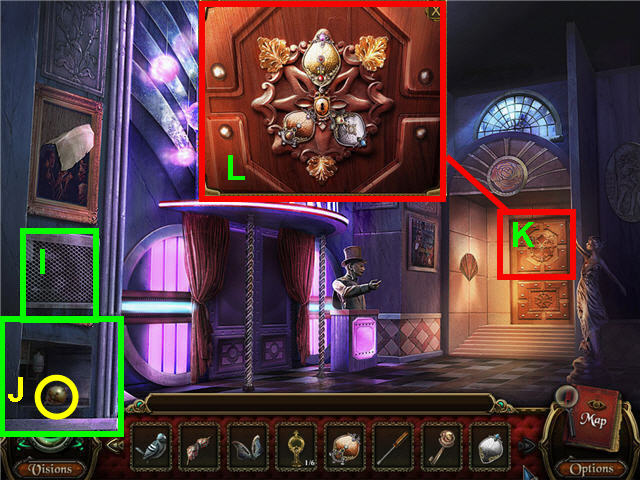
- Use the LADDER on the hole (X) in the ceiling and head up.
- Use the OIL CAN and the BOX OF MATCHES on the lamp (Y).

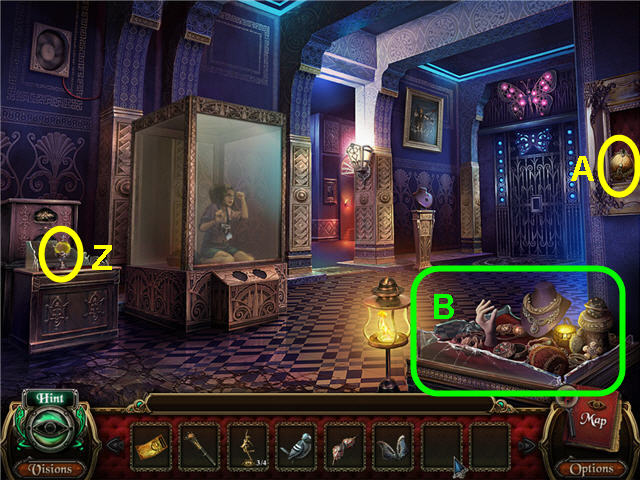
- Take the CRYSTAL BALL COLLECTION 1 OF 6 (Z).
- Take the COPPER PETAL (A).
- Head left and back out if there is no hidden object scene in the display case on the lower right.
- Examine the display case (B) to access a Hidden Object Scene.

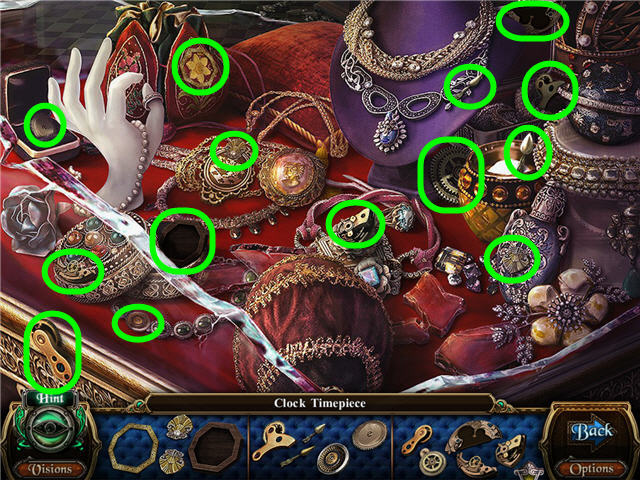
- Find the pieces and get a CLOCK TIMEPIECE.
- Head into the left room.
Chapter 5 – Magician HOG-DINI Show

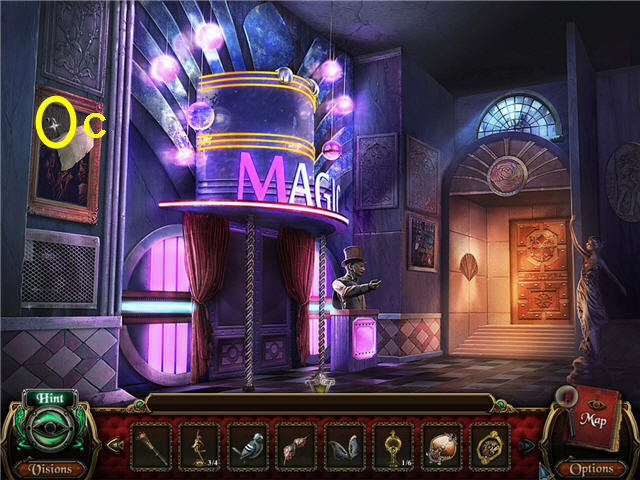
- Take the DRAWER HANDLE (C).
- Back out two times and head right.

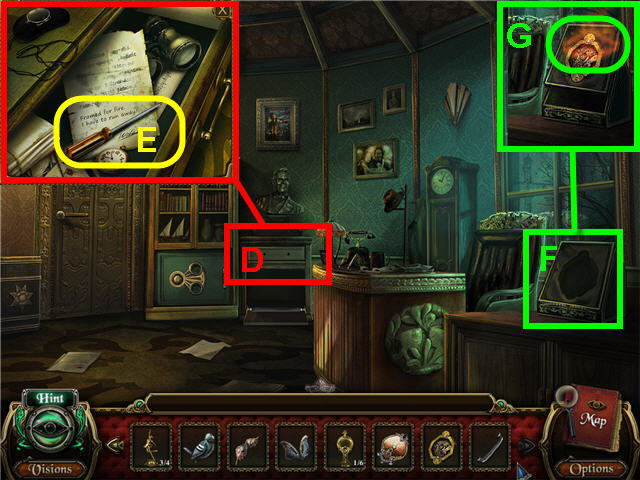
- Place the DRAWER HANDLE on the drawer (D); open the drawer and take the SCREWDRIVER (E) and click on the note.
- Place the CLOCK TIMEPIECE on the box (F).
- Click on the eye (G) to trigger a puzzle.

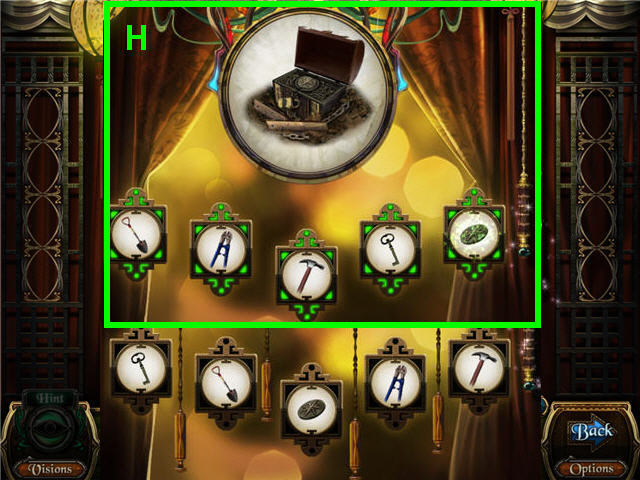
- Arrange the pictures to complete the actions completed in the game to discover and unlock the treasure chest.
- Solution: shovel, bolt cutter, hammer, key, sun emblem. Pull the cords in this order: 3, 1, 2, 3, 1, 4, 3. See screenshot (H) for solution.
- Get a WHITE ROSE KEY.
- Examine the desk to access a Hidden Object Scene.

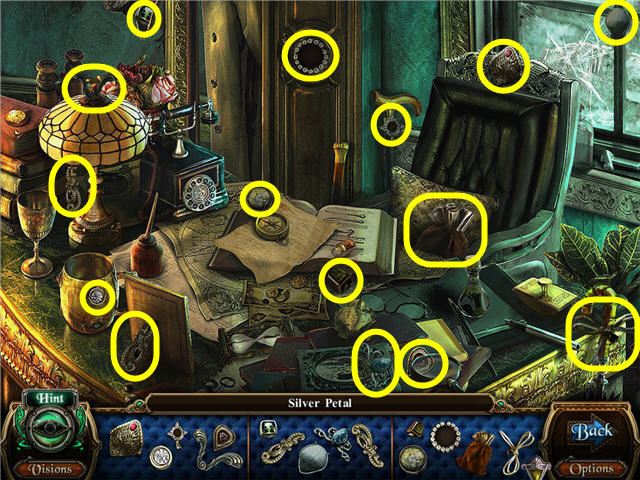
- Find the pieces and get a SILVER PETAL.
- Back out, head up and left.


- Use the SCREWDRIVER on the grate (I); take the GOLD PETAL (J).
- Examine the door (K); place the COPPER PETAL, the SILVER PETAL and the GOLD PETAL on the lock (L); use the WHITE ROSE KEY on the keyhole.
- Head through the newly-opened door.
- Examine the bed to access a Hidden Object Scene.

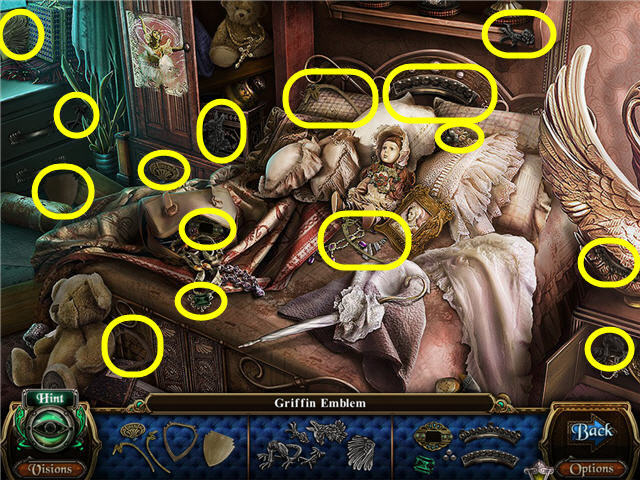
- Find the fragmented pieces.
- Get a GRIFFIN EMBLEM.

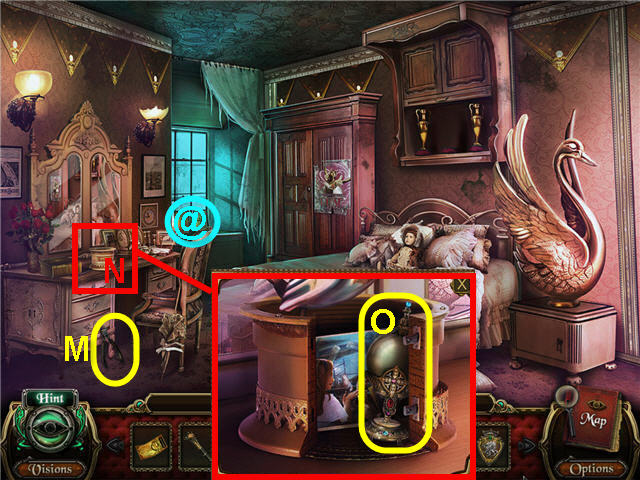
- Take the WIRE CUTTER (M).
- Click on the MACABRE ITEM 11 OF 20 (@).
- Place the BIRD FIGURINE on the music box (N); take a closer look and take the CRYSTAL BALL COLLECTION 2 OF 6 (O).
- Back out two times.

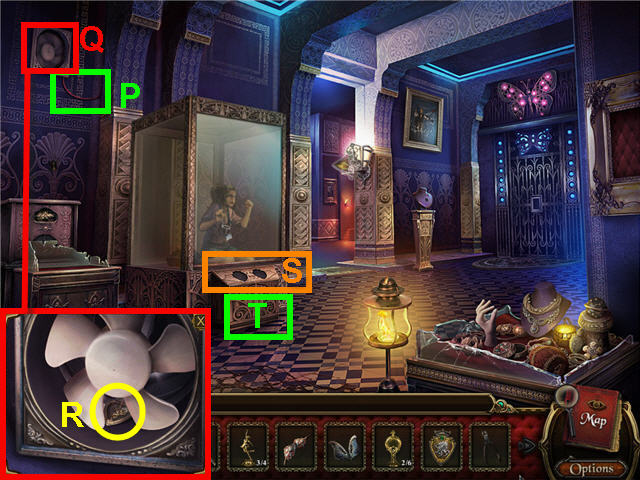
- Use the WIRE CUTTER on the wire (P).
- Examine the fan (Q); take the MANTICORE EMBLEM (R).
- Place the MANTICORE EMBLEM and the GRIFFIN EMBLEM on the slots (S).
- Examine the bottom panel (T) to trigger a puzzle.

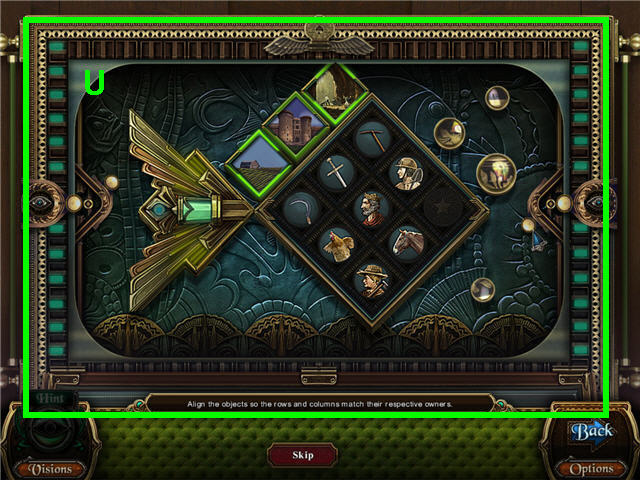
- Arrange the objects so that they appear in the column with the same theme. See screenshot (U) for solution.
- Talk to the girl.
- Click on the broken display case in the lower right to access a Hidden Object Scene.

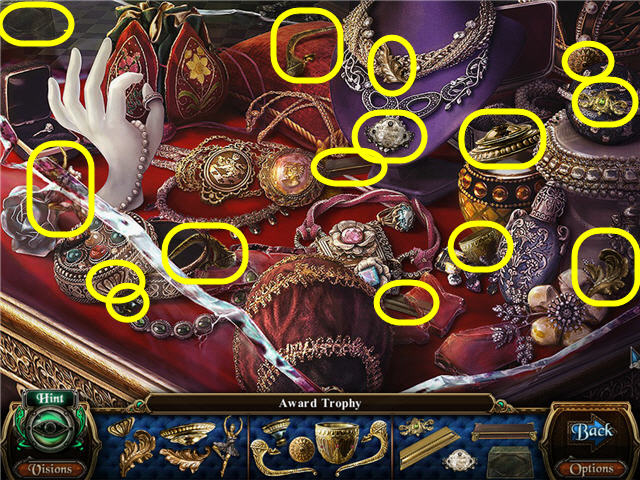
- Find the pieces and get an AWARD TROPHY.
- Head left and through the right door.

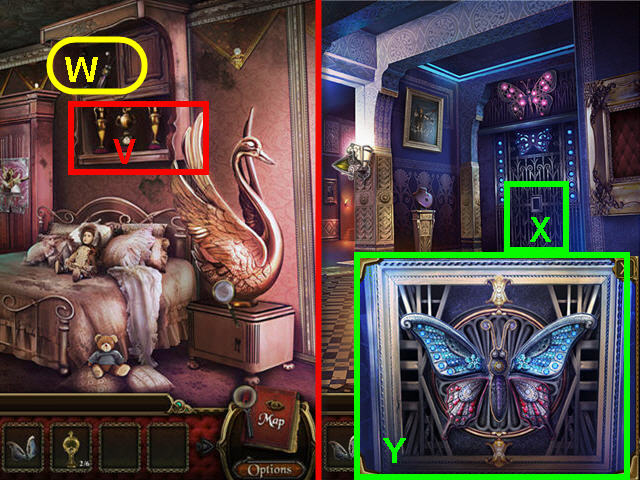
- Place the AWARD TROPHY on the shelf (V); take the BUTTERFLY BODY (W).
- Back out two times.
- Examine the gates (X); place the RUBY BUTTERFLY WINGS, SAPPHIRE BUTTERFLY WINGS and BUTTERFLY BODY on the lock (Y).
- Enter through the newly opened gates.

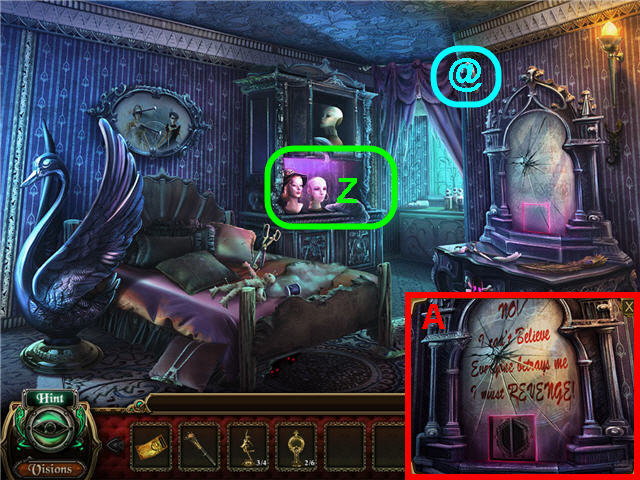
- Click on the MACABRE ITEM 12 of 20 (@).
- Click on the mannequins (Z).
- Take a closer look and use the POWDER BRUSH on the mirror (A).
- Examine the bed to access a Hidden Object Scene.

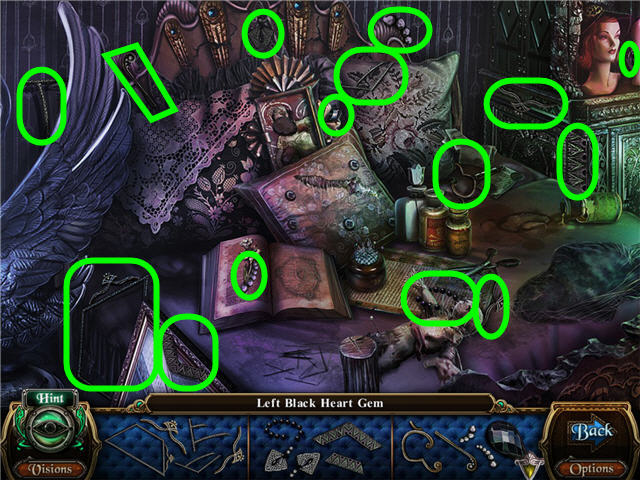
- Find the fragmented pieces and get a LEFT BLACK HEART GEM.
- Back out, head left and forward.
- Examine the bed to access a Hidden Object Scene.

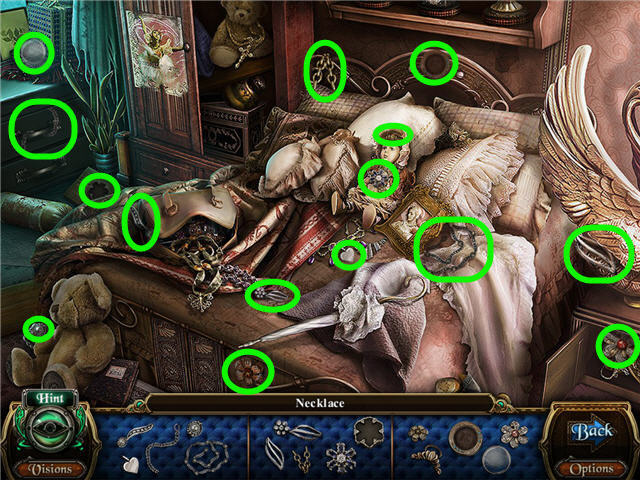
- Find the fragmented pieces and get a NECKLACE.
- Back out two times.

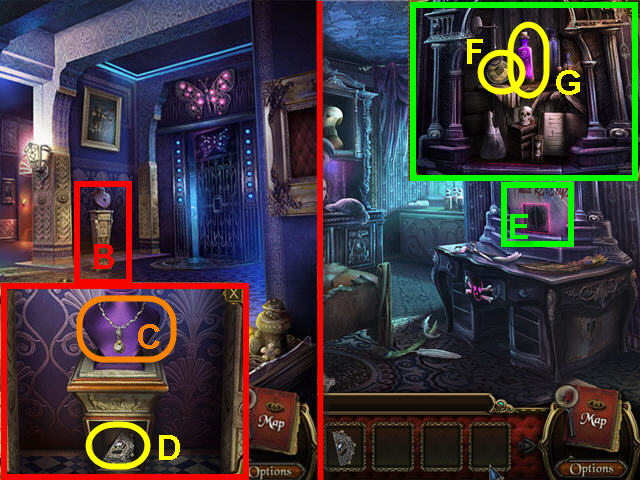
- Examine the pedestal (B); place the NECKLACE on the bust (C) and take the RIGHT BLACK HEART GEM (D).
- Head straight.
- Examine the mirror (E); place the RIGHT BLACK HEART GEM and LEFT BLACK HEART GEM in the slots; take the HEART COIN (F) and POISON BOTTLE (G).
- Back out, head left and go straight.
- Click on the eye on the wardrobe to access a Hidden Object Scene.

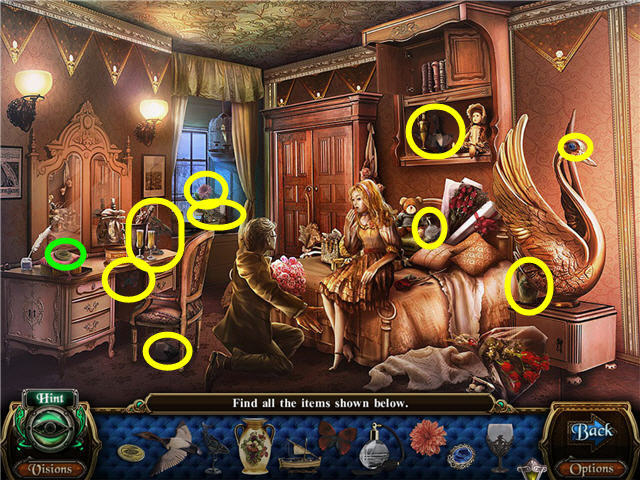
- Find the items shown and take the EYE COIN.
- Back out three times and head right.
- Examine the desk to access a Hidden Object Scene.

- Find the fragmented pieces.
- Get a CRYSTAL BALL COLLECTION 3 OF 6.


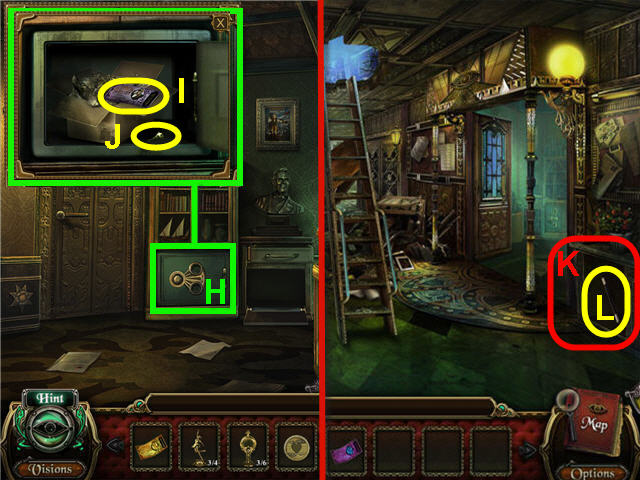
- Examine the safe (H); use the HEART COIN and the EYE COIN on the slots and take the PURPLE TICKET – MAGICIAN HOG-DINI SHOW (I) and the CABINET KEY (J).
- Back out.
- Use the CABINET KEY on the cabinet (K); take the MAGIC WAND (L).
- Head up and left.

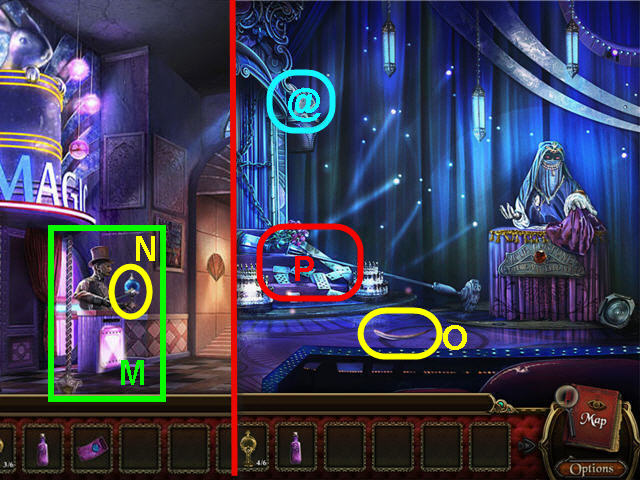
- Place the MAGIC WAND on the ticket taker (M); take the CRYSTAL BALL COLLECTION 4 OF 6 (N).
- Examine the ticket taker; place the PURPLE TICKET – MAGICIAN HOG-DINI SHOW in the slot.
- Head left into the newly-opened doors.
- Take the SWAN FEATHER (O).
- Click on the MACABRE ITEM 13 OF 20 (@).
- Examine the stairs (P) to access a Hidden Object Scene.

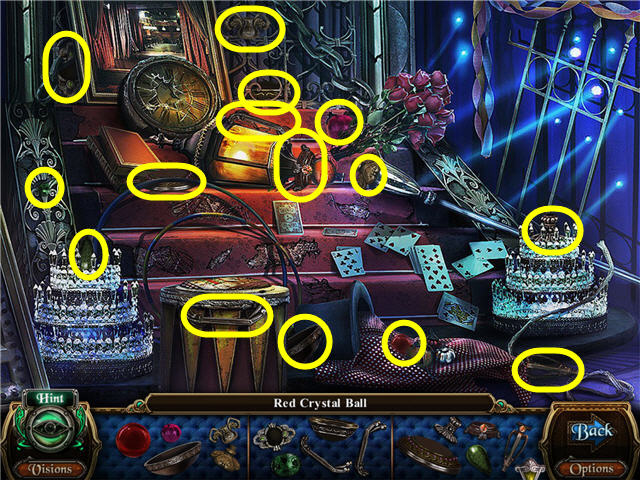
- Find the fragmented pieces and get a CRYSTAL BALL COLLECTION 5 OF 6.
- Back out four times, up the right staircase and head left.

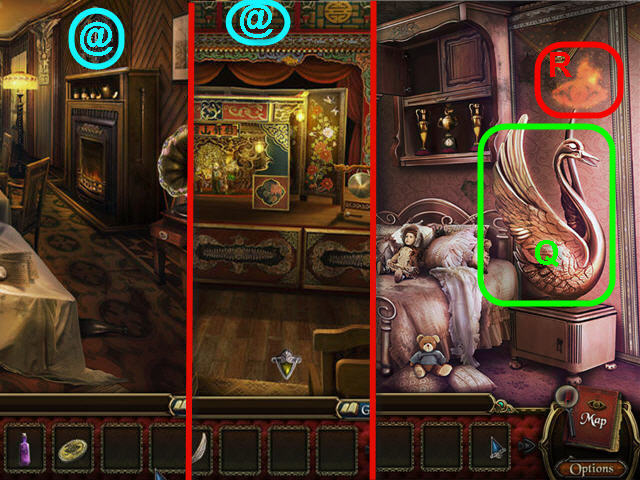
- Click on the MACABRE ITEM 14 OF 20 (@).
- Back out, head straight, right and straight.
- Click on the MACABRE ITEM 15 OF 20 (@).
- Back out four times, up the left staircase, up the ladder, left and straight.
- Place the SWAN FEATHER on the swan (Q).
- Click on the eye (R) to trigger a puzzle.

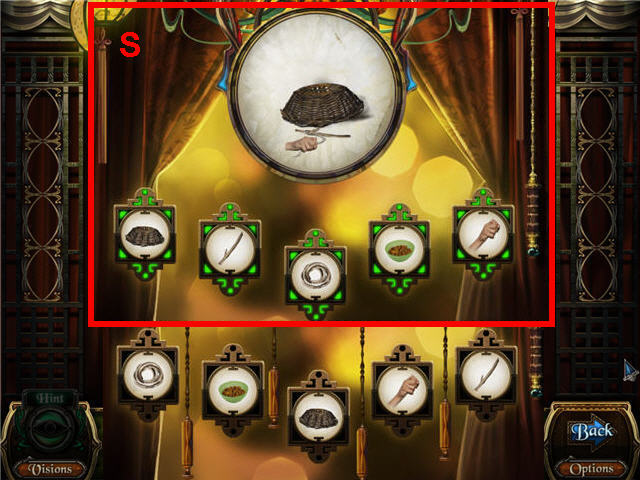
- Arrange the pictures in the correct order to capture the bird.
- Solution: basket, stick, rope, bowl, hand. Pull the cords in this order: 2, 3, 4. See screenshot (S) for solution.
- Back out two times and head straight.

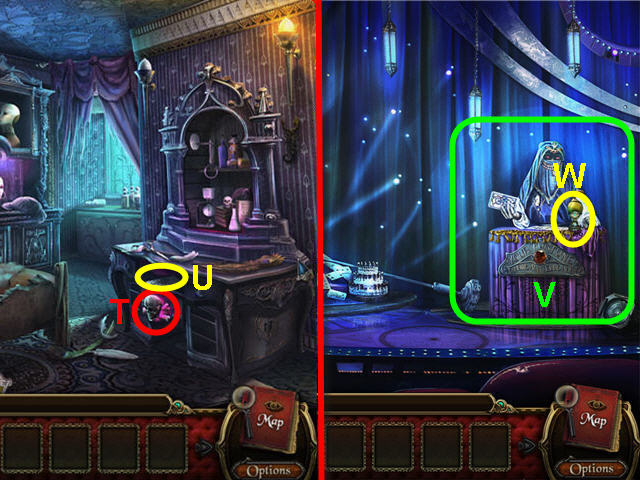
- Place the SKULL GEM on the skull slot (T); take the TAROT CARD (U).
- Back out, head left two times.
- Place the TAROT CARD on the fortune teller (V); take the CRYSTAL BALL COLLECTION 6 OF 6 (W).
- Examine the crystal ball display on the left to trigger a puzzle.

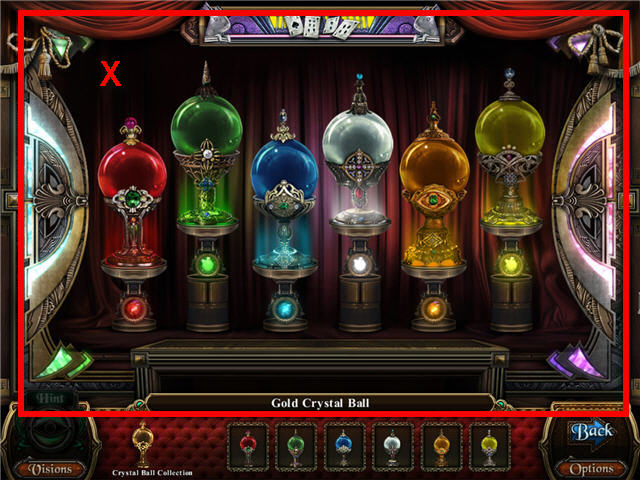
- Arrange the crystals to match the colors of the gem on the base.
- Solution: red, green, blue, white, orange, yellow. See screenshot (X) for solution.
- Take the DANCING FIGURINE COLLECTION 4 OF 4.
- Back out four times and head straight.
- Examine the dance display on the right to trigger a puzzle.

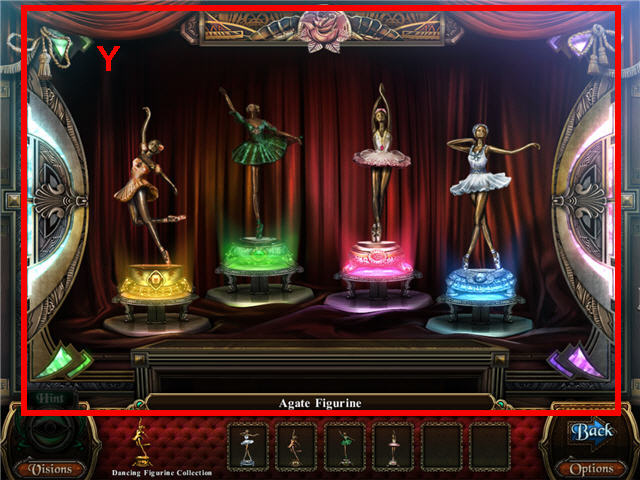
- Arrange the ballerinas to match the colors of the base.
- Solution: yellow, green, pink, and blue. See screenshot (Y) for solution.
- Take the BATTERY.
Chapter 6 – Nightingale’s Masterpiece Show

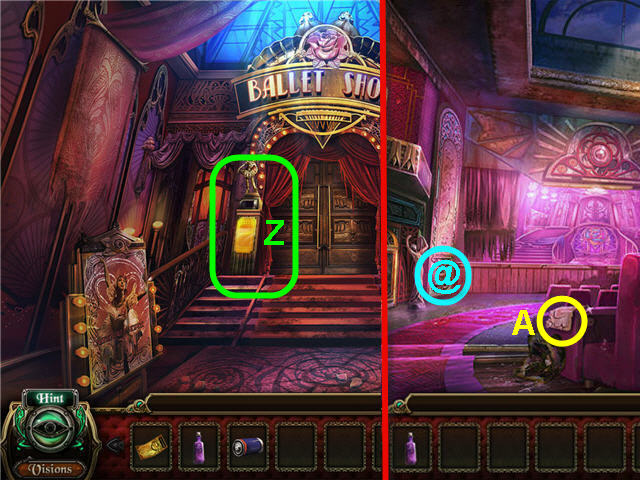
- Place the BATTERY and the GOLDEN TICKET – NIGHTINGALE’S MASTERPIECE SHOW on the ticket taker (Z).
- Head straight.
- Take the SAND PAPER (A).
- Head straight and then back out.
- Click on the MACABRE ITEM 16 OF 20 (@).
- Head straight.

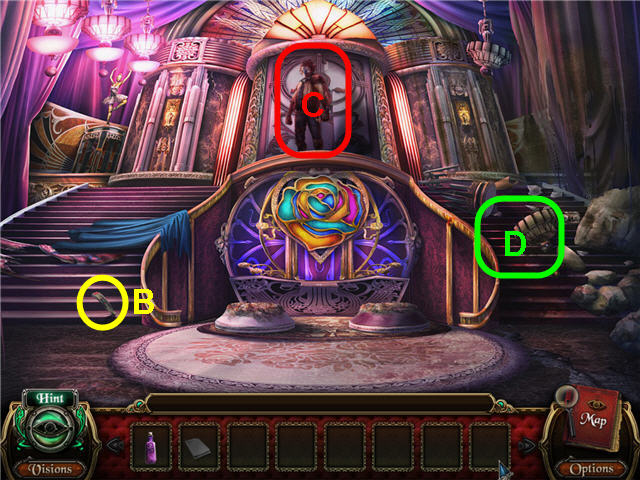
- Take the BOX CUTTER (B).
- Use the POISON BOTTLE on Andreas (C).
- Examine the right staircase (D) to access a Hidden Object Scene.

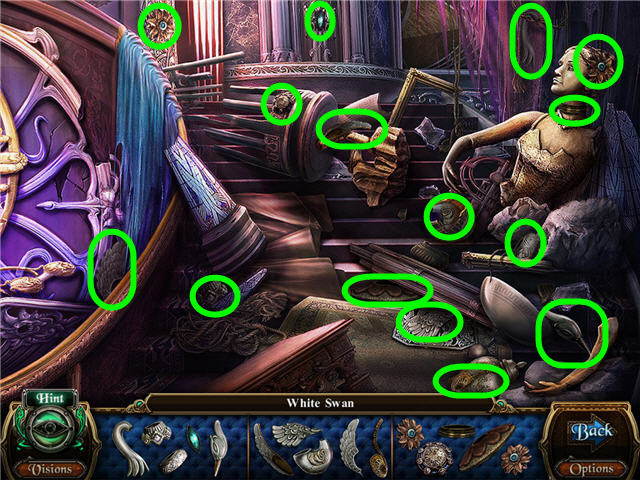
- Find the fragmented pieces and get a WHITE SWAN.
- Back out.

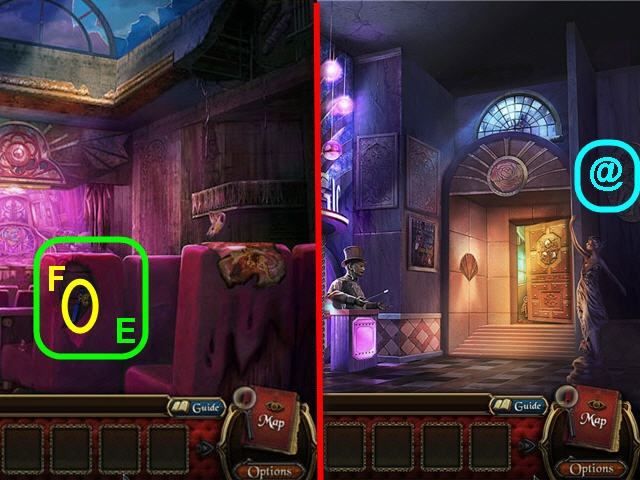
- Use the BOX CUTTER on the seat (E); take the WATER HANDLE (F).
- Back out twice, up left staircase, up ladder, left.
- Click on the MACABRE ITEM 17 OF 20 (@).
- Head left.
- Examine the stairs to access a Hidden Object Scene.

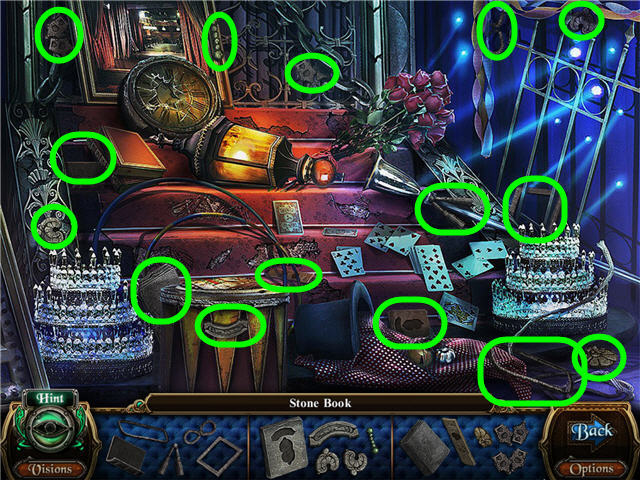
- Find the fragmented pieces and get a STONE BOOK.
- Back out two times, head into the butterfly doorway.
- Examine the bed to access a Hidden Object Scene.

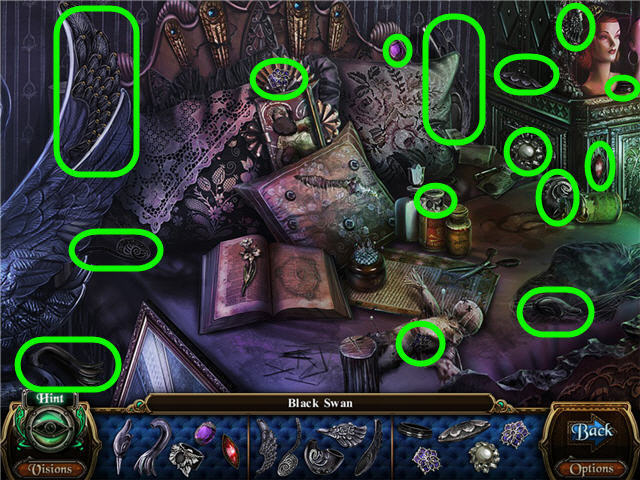
- Find the fragmented pieces and get a BLACK SWAN.
- Back out three times, straight three times.

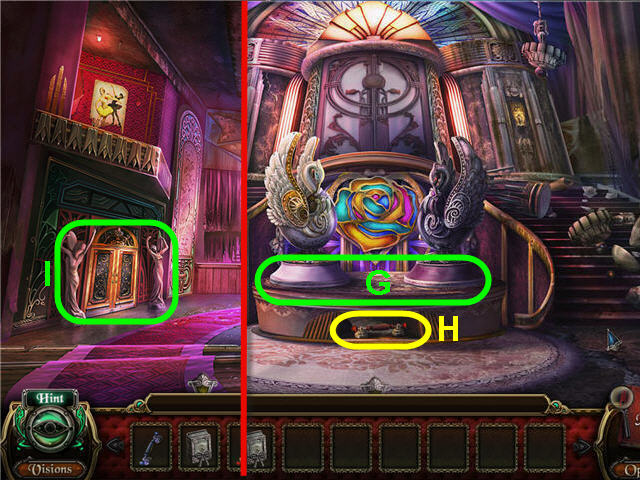
- Use the SAND PAPER on the pedestals (G).
- Place the WHITE SWAN on the left pedestal and the BLACK SWAN on the right; take the FIRE HANDLE (H) and click on the note.
- Back out.
- Take a closer look and place the WATER HANDLE and FIRE HANDLE on the door (I).
- Head straight and take a closer look at the right staircase to access a Hidden Object Scene. .

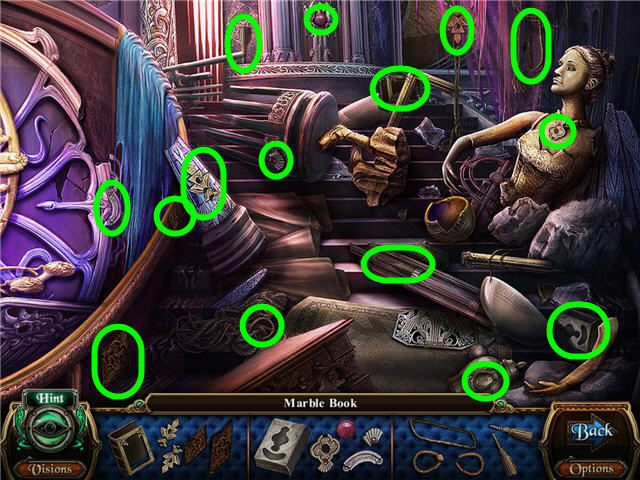
- Find the fragmented pieces and get a MARBLE BOOK.
- Back out and head left.

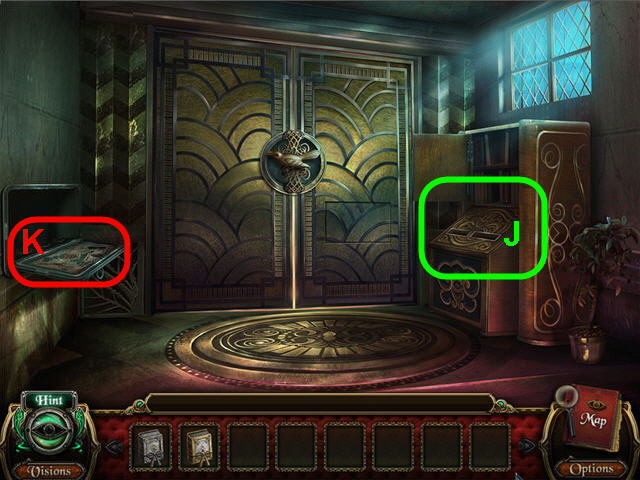
- Place the STONE BOOK and MARBLE BOOK in the repository (J).
- Examine the map (K).
- Back out five times.
- Examine the fountain to access a Hidden Object Scene.

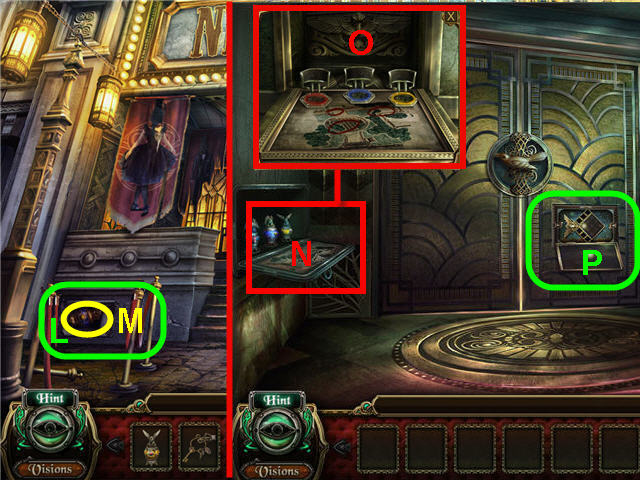
- Find the fragmented pieces and get a YELLOW EAGLE LAMP.
- Back out.
- Examine the brochure rack to access a Hidden Object Scene.

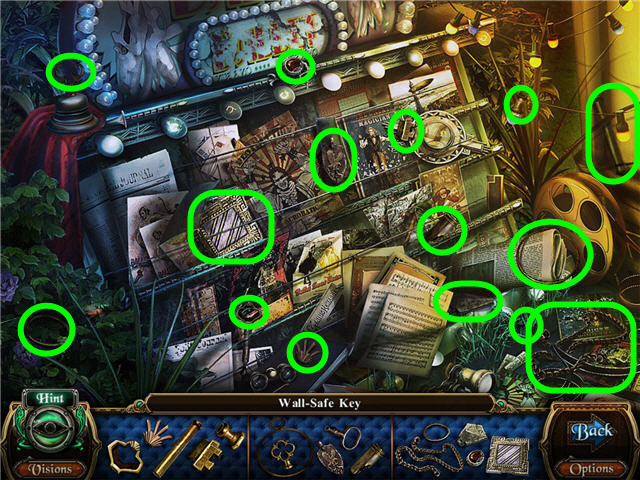
- Find the fragmented pieces and get a WALL-SAFE KEY.
- Back out, head forward and go right.
- Examine the bench to access a Hidden Object Scene.

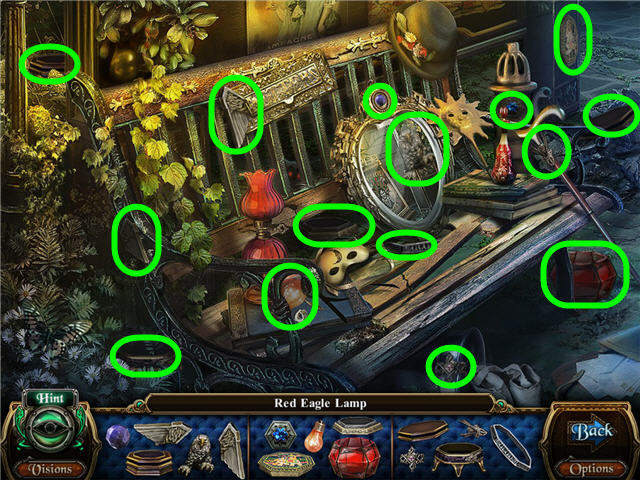
- Find the fragmented pieces and get a RED EAGLE LAMP.
- Back out.


- Use the WALL-SAFE KEY on the safe (L); take the BLUE EAGLE LAMP (M).
- Head forward three times and go left.
- Examine the map (N) and place the YELLOW EAGLE LAMP, RED EAGLE LAMP, and BLUE EAGLE LAMP in the slots (O).
- Examine the door panel (P) to trigger a puzzle.

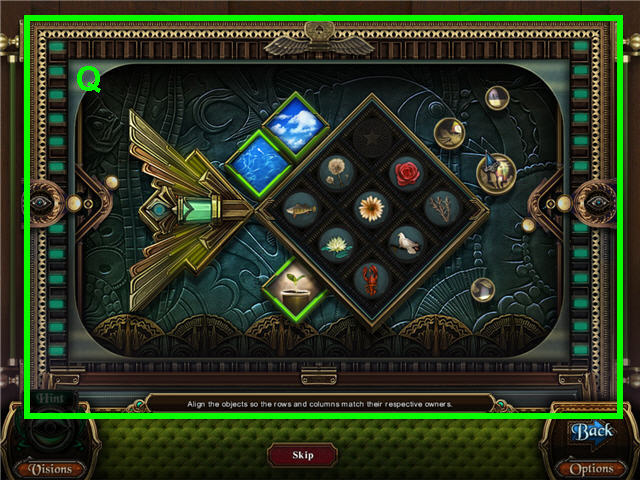
- Arrange the objects so that they appear in the column or row with the same theme. See screenshot (Q) for solution.
- Head straight.
- Back out three times.

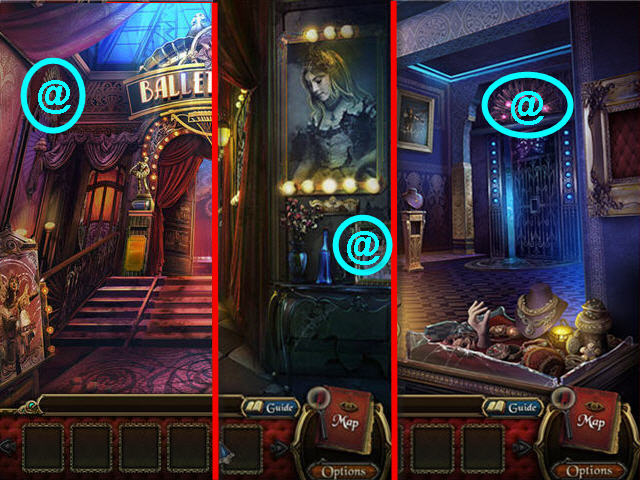
- Click on the MACABRE ITEM 18 OF 20 (@).
- Back out, up the right staircase.
- Click on the MACABRE ITEM 19 OF 20 (@).
- Back out, head up the left staircase, head up the ladder.
- Click on the MACABRE ITEM 20 OF 20 (@).
- Back out two times, up the right staircase, straight, right and straight.
- Examine the stage to access a Hidden Object Scene.

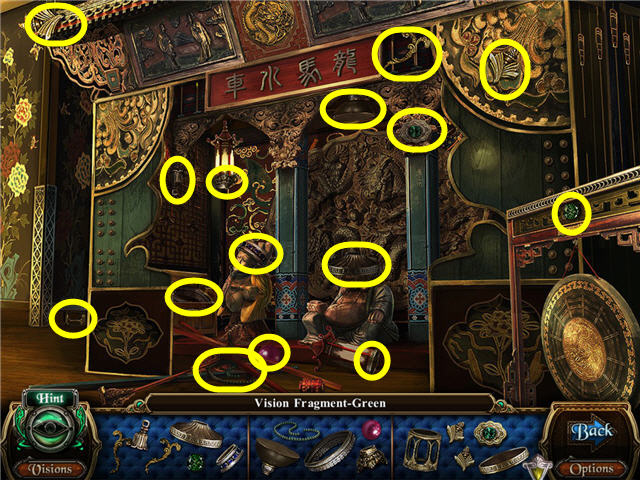
- Find the fragmented pieces and get a GREEEN VISION FRAGMENT.
- Back out two times, head left and straight.
- Examine the left door to access a Hidden Object Scene.

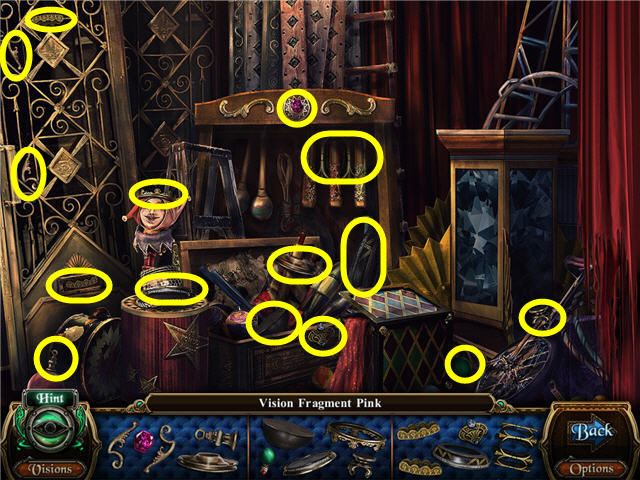
- Find the fragmented pieces and get a PINK VISION FRAGMENT.
- Back out; head left two times and straight.
- Examine the left chair to access a Hidden Object Scene.

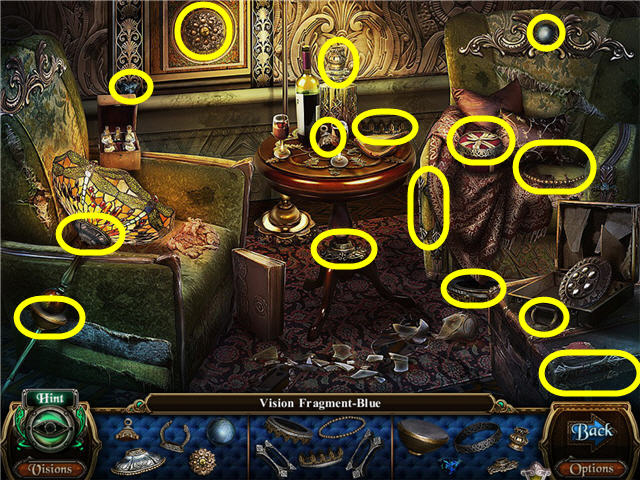
- Find the fragmented pieces and get a BLUE VISION FRAGMENT.
- Back out six times, head up the left staircase, up the ladder and left two times.
- Examine the stairs to access a Hidden Object Scene.

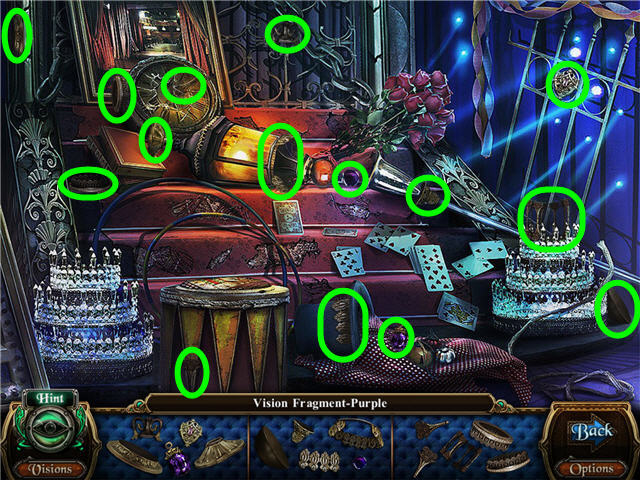
- Find the fragmented pieces and get a PURPLE VISION FRAGMENT.
- Back out four times, head straight three times.

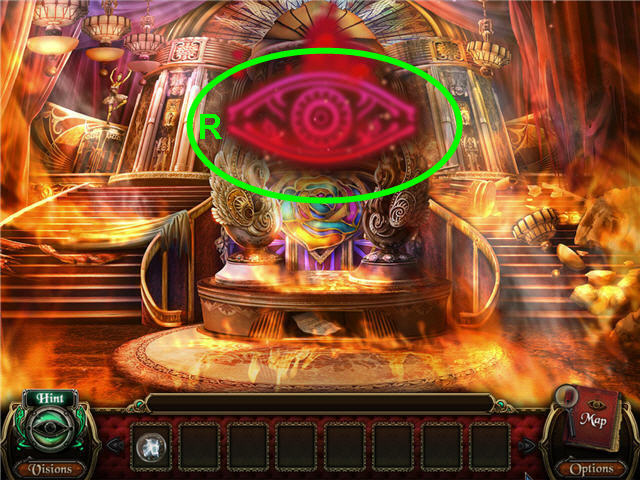
- Click on the eye (R).
- Get the NIGHT OF THE FIRE VISIONS.
- Back out, head left and up the stairs.

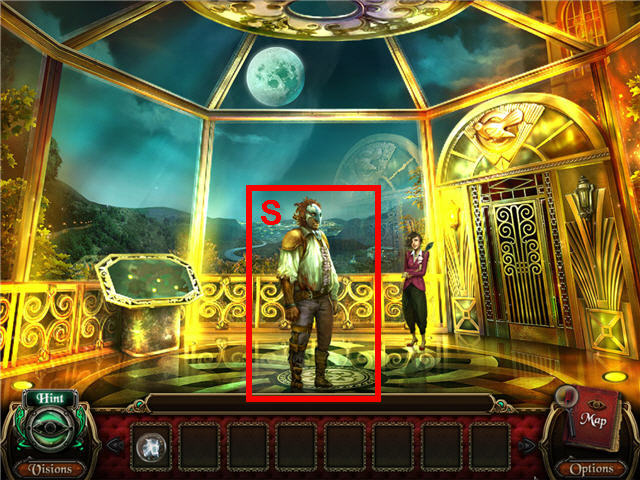
- Give the NIGHT OF THE FIRE VISIONS to Andreas (S).
- Congratulations! You have completed Macabre Mysteries Curse of the Nightingale Standard Edition!






 Snark Busters: Welcome to the Club Walkthrough, Guide, & Tips
 Dead Reckoning: Brassfield Manor Walkthrough, Guide, & Tips
 Midnight Mysteries: The Salem Witch Trials Walkthrough, Guide, & Tips
 Drawn: Trail of Shadows Walkthrough, Guide, & Tips
 Cadenza: Music, Betrayal and Death Walkthrough, Guide, & Tips