Cadenza: Music, Betrayal and Death Walkthrough, Guide, & Tips
Cadenza: Music, Betrayal and Death Walkthrough

Welcome to the Cadenza, Music, Betrayal, and Death Walkthrough
You’ve returned from school to visit your father at his famous Jazz Pepper Club during Mardi Gras, but everyone is hypnotized. Have they heard the wrong note?
Whether you use this document as a reference when things get difficult or as a road map to get you from beginning to end, we’re pretty sure you’ll find what you’re looking for here.
This document contains a complete Cadenza, Music, Betrayal, and Death game walkthrough featuring annotated screenshots from actual gameplay!
We hope you find this information useful as you play your way through the game. Use the walkthrough menu below to quickly jump to whatever stage of the game you need help with.
Remember to visit the Big Fish Games Forums if you find you need more help. Have fun!
This walkthrough was created by prpldva, and is protected under US Copyright laws. Any unauthorized use, including re-publication in whole or in part, without permission, is strictly prohibited.
General Tips
- This is the official guide for Cadenza: Music, Betrayal, and Death.
- This guide will not mention each time you have to zoom into a location; the screenshots will identify each location.
- Hidden-object puzzles are referred to as HOPs in this guide. Items listed in red are hidden or they require additional actions. Interactive items in HOPs are color-coded.
- Mini-games and HOPs are sometimes randomized; your solution may vary.
Chapter 1: Chestnut Street

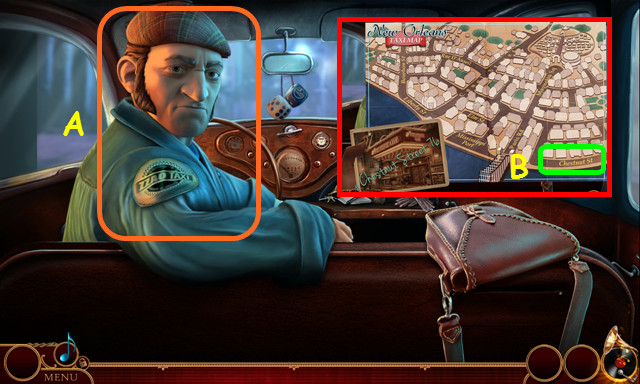
- Talk to the driver (A).
- Select Chestnut Street on the map (B).

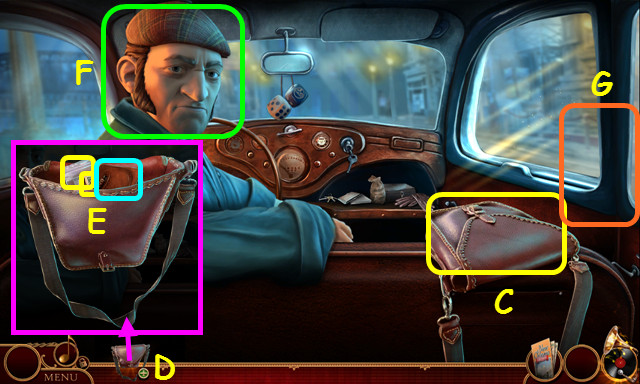
- Take the PURSE (C).
- Select and open the PURSE (D).
- Take the JOURNAL, MONEY, and PAIN MEDICINE (E).
- Give the MONEY to the driver (F).
- Exit the taxi (G).

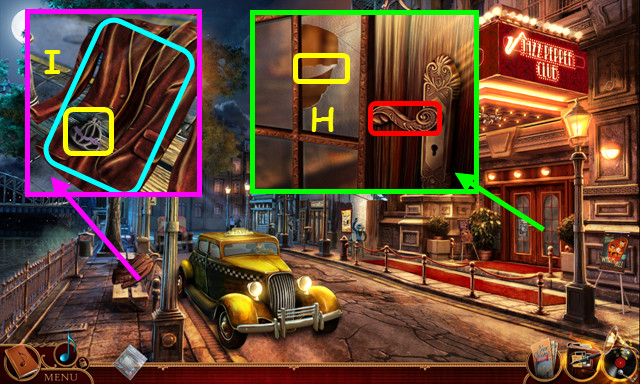
- Try the handle. After the poster falls, take the GLASS SHARD (H).
- Move the jacket; use the GLASS SHARD on the purse; take the COIN (I).

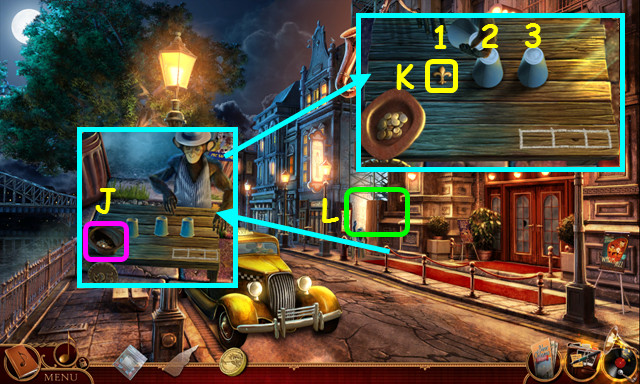
- Place the COIN in the hat (J).
- Watch the cups and select where the Fleur-de-lis ends up 3 times.
- Solution: 1, 2, and 3.
- Take the FLEUR-DE-LIS MEDALLION (K).
- Enter the Alley (L).

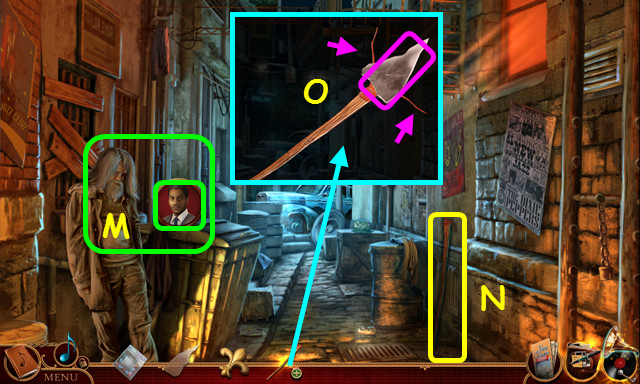
- Talk to the man; select topics, as they appear (M).
- Take the LONG STICK (N).
- Look at the LONG STICK; place the GLASS SHARD on the end and tie the 2 red strings to make the IMPROVISED SPEAR (O).

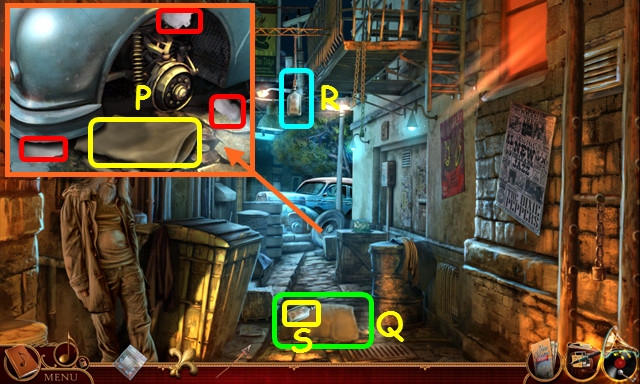
- Select the 3 pieces of stuffing (red); take the PILLOW (P).
- Place the PILLOW on the ground (Q).
- Use the IMPROVISED SPEAR on the bottle (R).
- Take the EMPTY BOTTLE (S).
- Walk down.

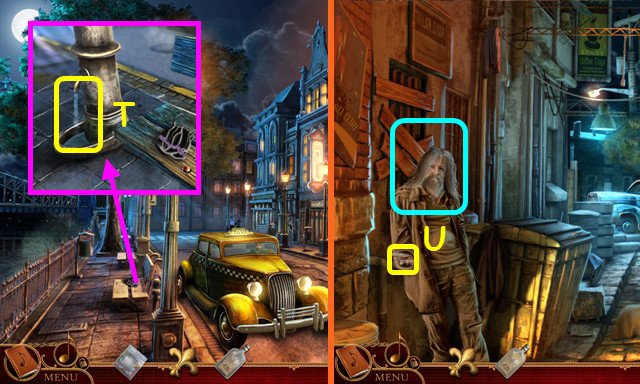
- Use the EMPTY BOTTLE on the fountain to get the BOTTLE OF WATER (T).
- Combine the BOTTLE OF WATER and the PAIN MEDICINE to make the HEADACHE TONIC.
- Return to the Alley.
- Give the HEADACHE TONIC to the man; take the OLD KEY (U).
- Walk down.

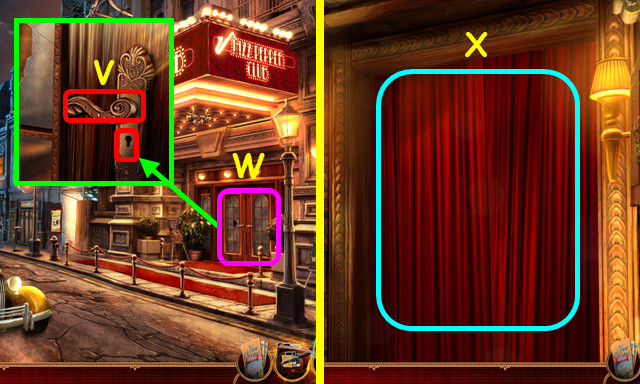
- Use the OLD KEY in the lock and open the door (V).
- Walk to the Club Entrance (W).
- Open the curtains and walk forward to the Jazz Pepper Club (X).

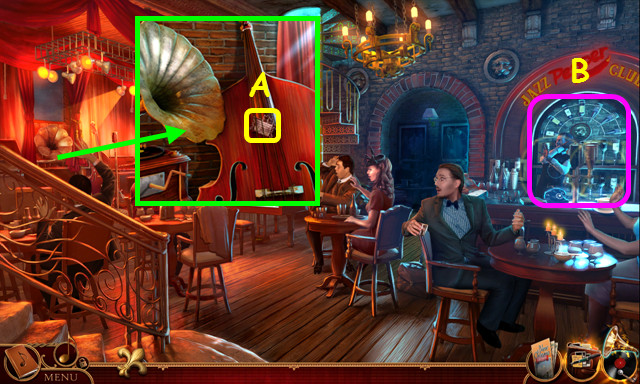
- Take the 1/2 METAL NOTES (A).
- Select the bar (B).

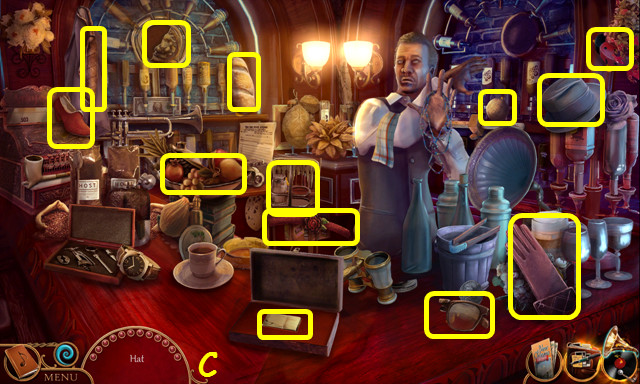
- Play the HOP to earn the LIGHTER (C).
- Open the LIGHTER and select it to make the LIT LIGHTER.

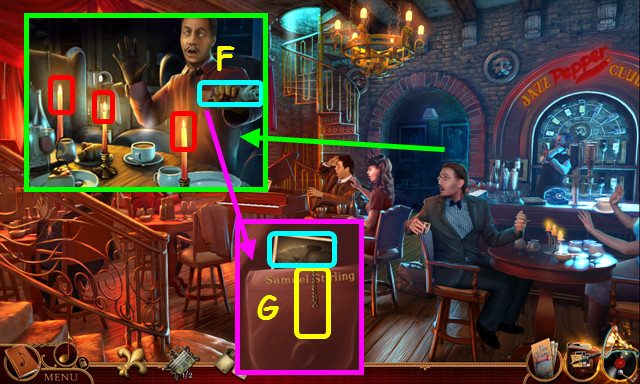
- Use the LIT LIGHTER on the 3 candles (red).
- Read the note and paper (F).
- Look at the photo; pull the chain and take DADDY’S RING (G).
- Walk down.

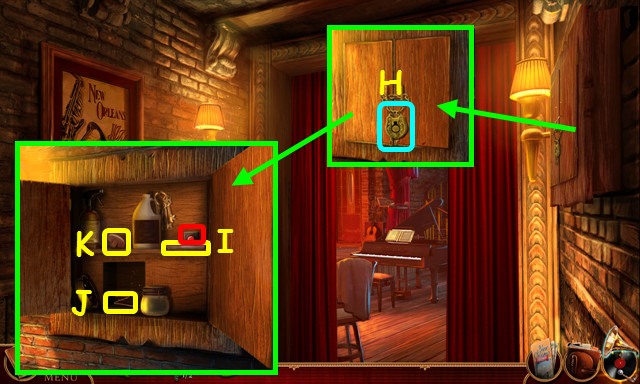
- Use DADDY’S RING on the lock; open the cabinet doors (H).
- Take the POCKET KNIFE and press the red button (I).
- Take the WIRE (J).
- Move the bottles; take the BROKEN HANDLE (K).
- Look at the POCKET KNIFE; press the button to open it.
- Look at the WIRE; bend it twice to make the WIRE HOOK.
- Walk forward.

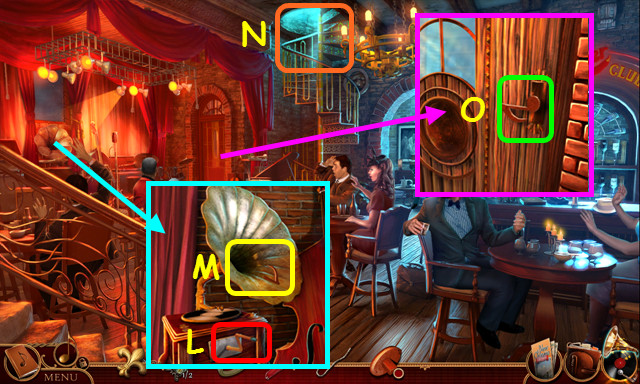
- Turn the handle (L).
- Use the WIRE HOOK on the opening; take the HANDLE PART (M).
- Look at the BROKEN HANDLE; add the HANDLE PART to it to make the NOTE HANDLE.
- Note the stairs to Daddy’s Office (N).
- Use the NOTE HANDLE to open the door; enter the Backstage (O).

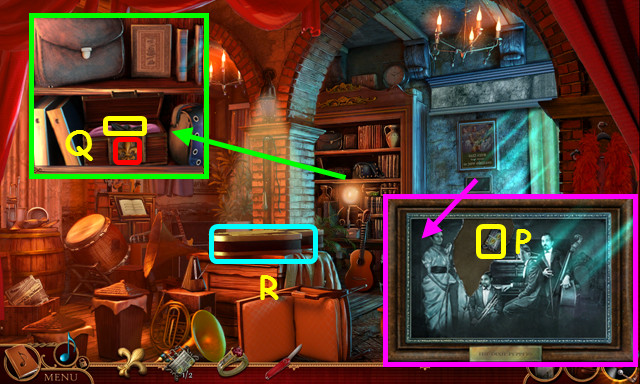
- Open the curtain, touch the photo 6 times, remove the photo piece, and take the 2/2 METAL NOTES (P).
- Place the FLEUR-DE-LIS MEDALLION in the lock, open the box and take the 1/2 ORNAMENT PIECE (Q).
- Select the box again to reveal the aquarium mini-game.
- Select the saxophone case (R).

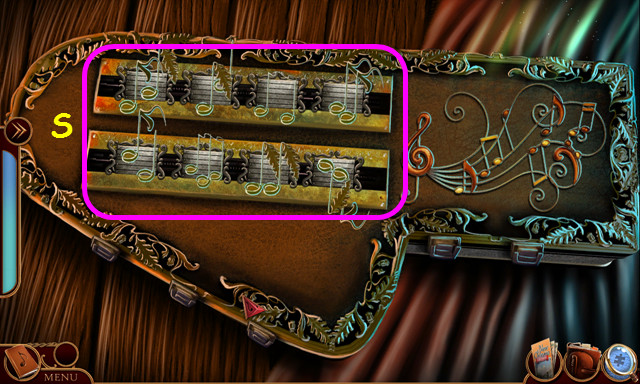
- Place the 2 METAL NOTES in the openings.
- Swap the pieces to complete all the notes (S).
- Take the SAXOPHONE CASE.

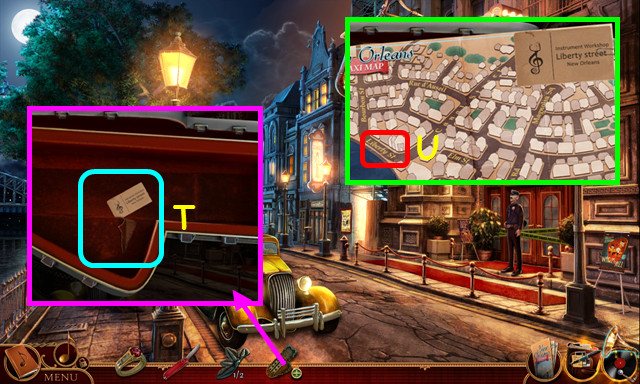
- Open the SAXOPHONE CASE; look at the clipping and photo.
- Use the POCKET KNIFE on the case; take the business card (T).
- Select Liberty Street on the map (U).
Chapter 2: Liberty Street

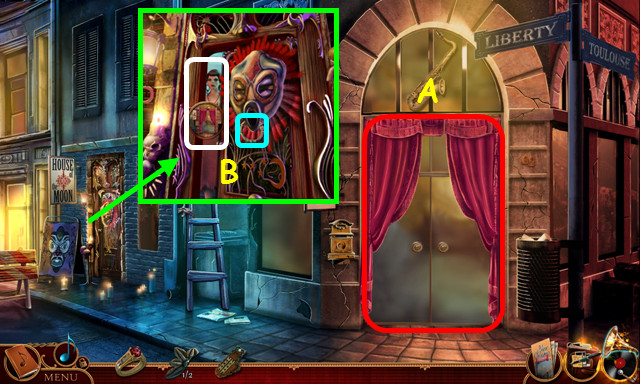
- Walk to the right.
- Try the doors (A).
- Use the doorknocker and ask about the doors (B).
- Select the doors in order: left, left, right, left, and right.
- Enter the Instrument Workshop.

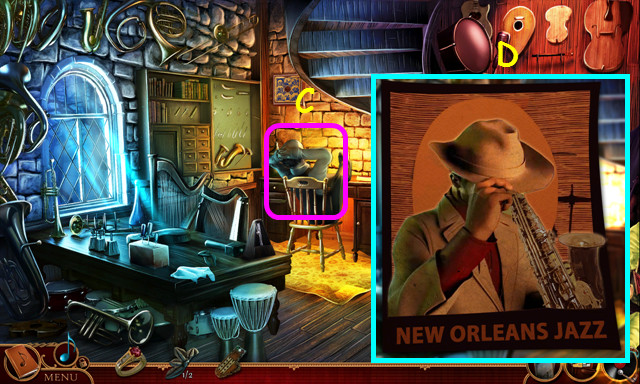
- Talk to Curly; give him the SAXOPHONE CASE (C).
- Restore the poster (D).

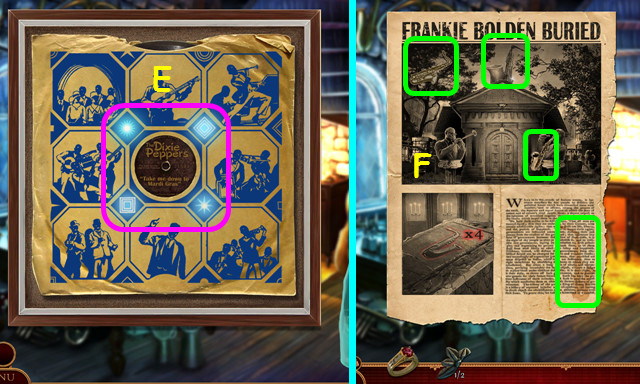
- Select the scenes to restore the symbols (E).
- Locate the 4 saxophones (F).
- Curly tells you the serial number SA001DP.

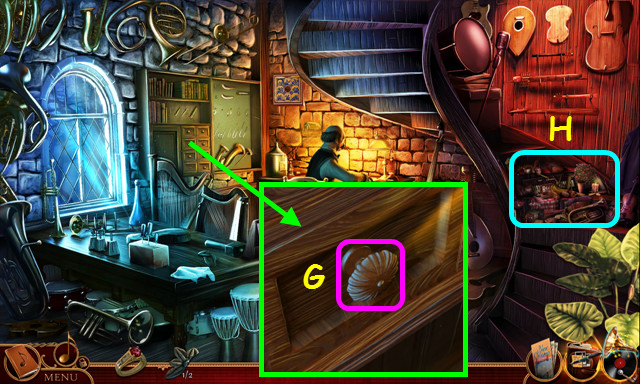
- Try to open the drawer (G).
- Select the stairs (H).

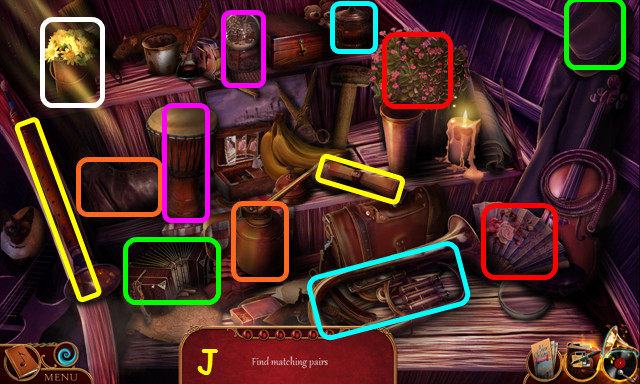
- Play the HOP to earn the PLIERS (J).
- Move items to find the matching pairs (color-coded).

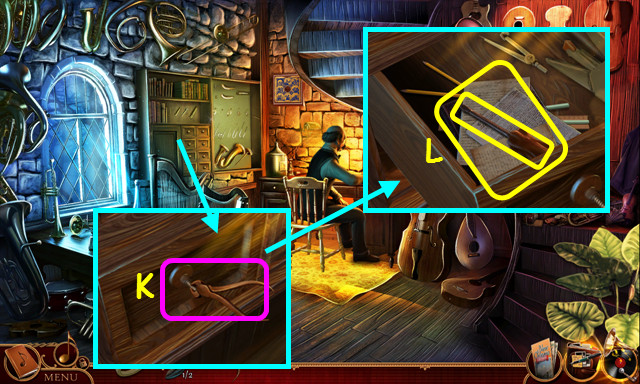
- Use the PLIERS to open the drawer (K).
- Take the SCREWDRIVER, move the papers, and take the RECORD BOOK (L).

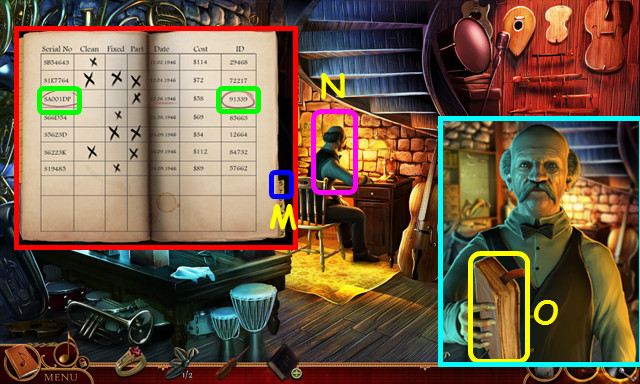
- Open the RECORD BOOK and select the ‘S’ tab (M).
- Turn the pages and then select SA001DP and the final entry in the row (green).
- Give the RECORD BOOK to Curly (N).
- Take the book (O).

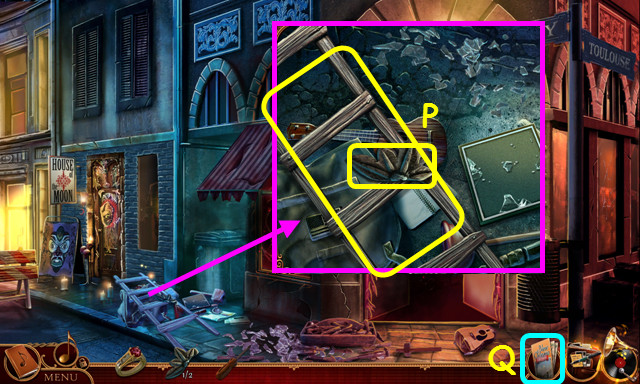
- Take the 2/2 ORNAMENT PIECE and LADDER (P).
- Select the map; return to the Alley (Q).

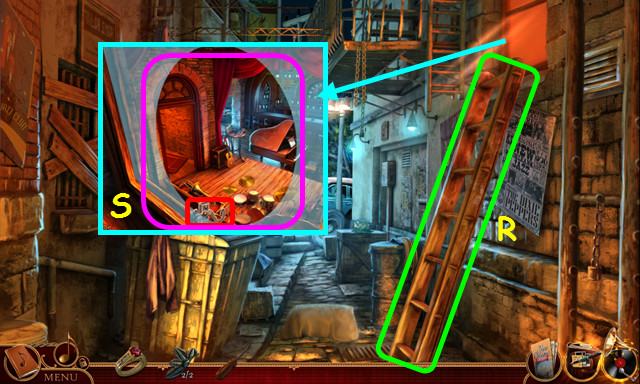
- Place the LADDER under the window (R).
- Use DADDY’S RING on the glass; open the latch (S).
- Enter the window and walk down.

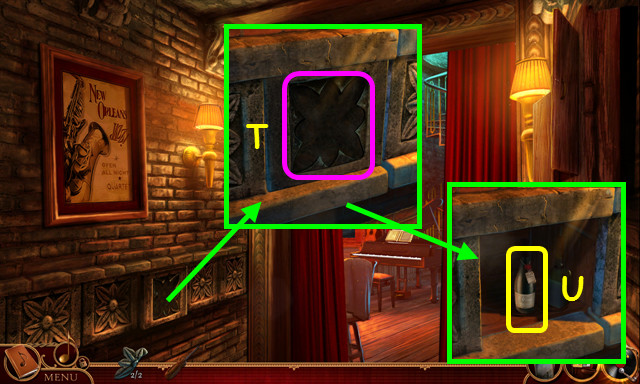
- Place the 2 ORNAMENT PIECES in the tile (T).
- Push the tile; take the WINE (U).
- Look at the WINE; read the tag to see the date July 15, 1931.
- Walk forward and go up the stairs.

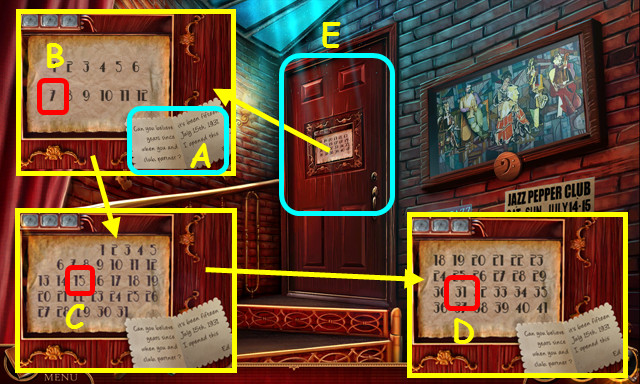
- Based on the date from the card (A), select the 7 (B), the 15 (C), and the 31(D).
- Enter Daddy’s Office (E).

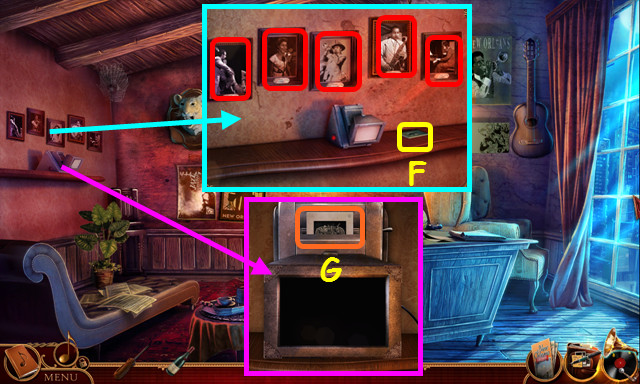
- Look at each of the photos (red).
- Select the slide (F).
- Select the projector and push the slide (G).

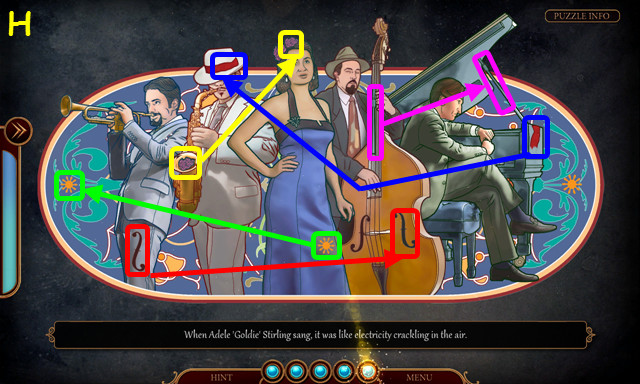

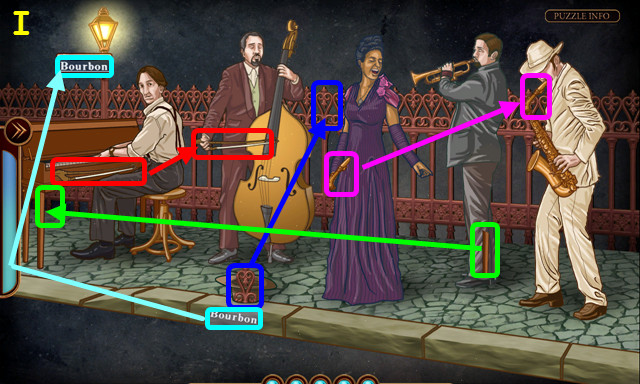
- Move the misplaced pieces to the correct locations (color-coded) (H-I).
- Take the 1/2 TIGER EYE that comes out of the projector.

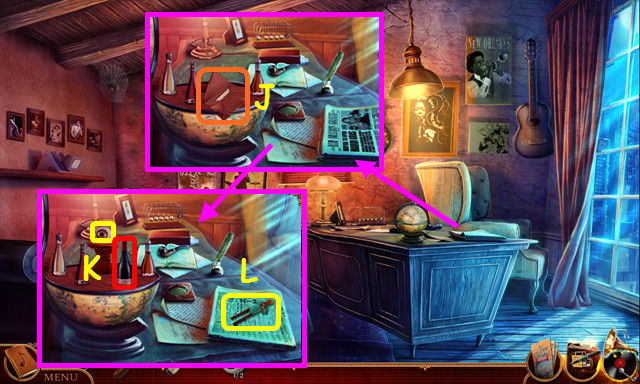
- Open the globe; read the note (J).
- Place the WINE in the globe; take the 2/2 TIGER EYE (K).
- Read the paper; take the MUSIC FIGURINE (L).
- Travel to the Backstage.

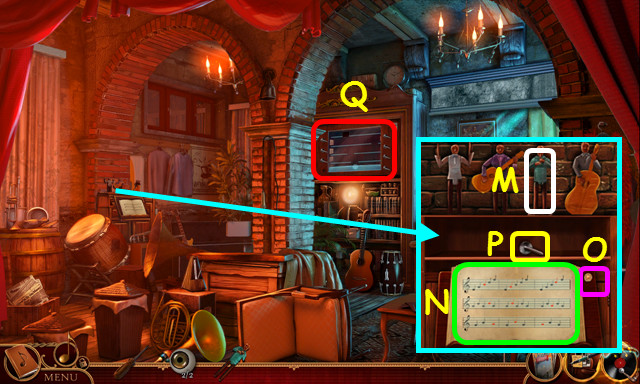
- Place the MUSIC FIGURINE on the shelf (M).
- Swap the notes as shown (N).
- Press the button (O).
- Take the AQUARIUM HANDLE (P).
- Select the aquarium (Q).

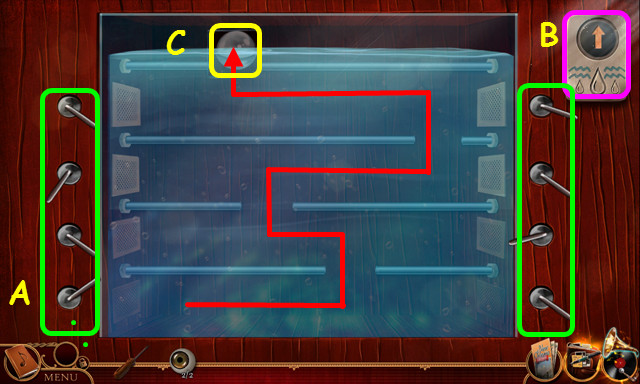
- Place the AQUARIUM HANDLE (A).
- Use the handles to move the glass ball to the opening (green), then push the button (B).
- Repeat the process to move the glass ball to the opening (C).
- Take the GLASS BALL.
- Open the GLASS BALL and take the GOLD CLEF.
- Walk down and go up the stairs.

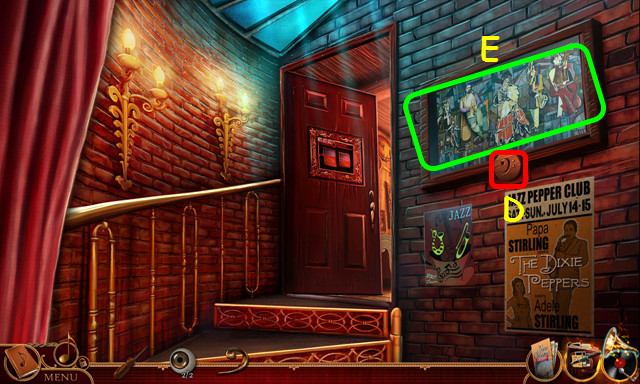
- Place the GOLD CLEF in the frame (D).
- Select the painting (E).

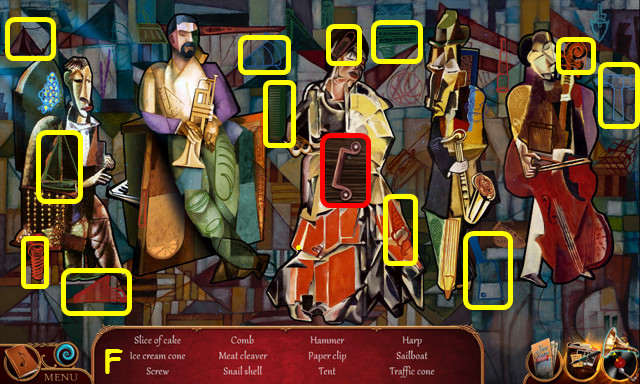
- Play the HOP to earn the DRAWER HANDLE (F).
- Walk forward.

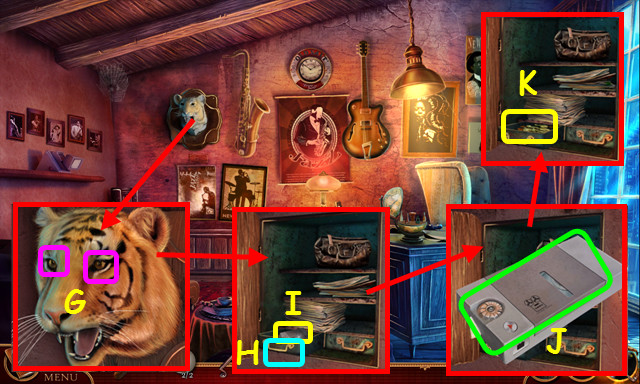
- Place the 2 TIGER EYES in the tiger’s head (G).
- Move the tiger head and place the DRAWER HANDLE (H).
- Open the drawer; take the recorder (I) and select it (J).
- Take the PROTECTION AMULET (K).
- Travel to Liberty Street.
Chapter 3: Rue d’ Auseil

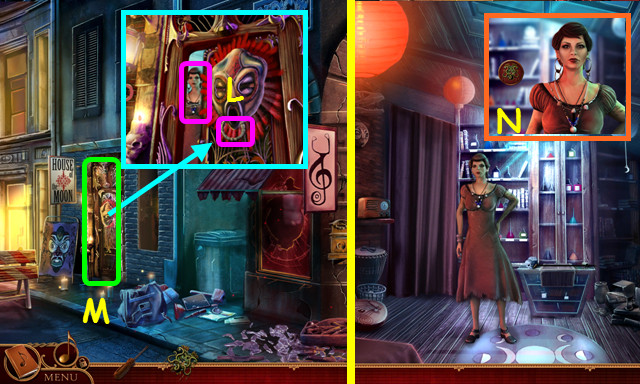
- Select the doorknocker; give the woman the PROTECTION AMULET (L).
- Enter the House of the Moon (M).
- Talk to Luna thoroughly (N).
- Return to the Instrument Workshop.

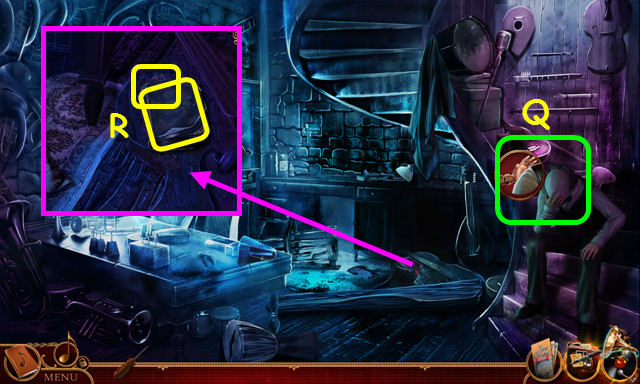
- Talk to Curly (Q).
- Take the BURNT BOOK and ASHES (R).
- Look at the BURNT BOOK to see the damage.
- Return to the House of the Moon.

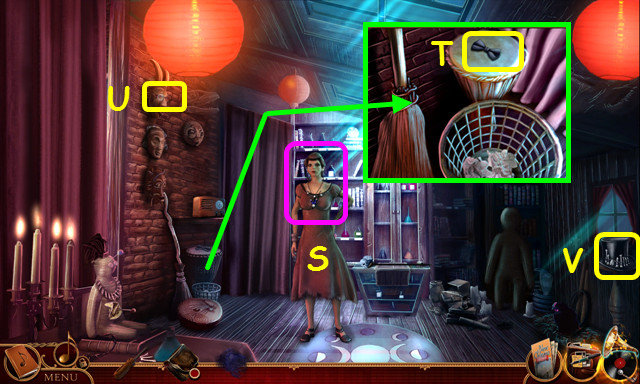
- Give the ASHES to Luna, and talk to her (S).
- Take the BOW TIE (T), GLASSES (U), and TOP HAT (V).

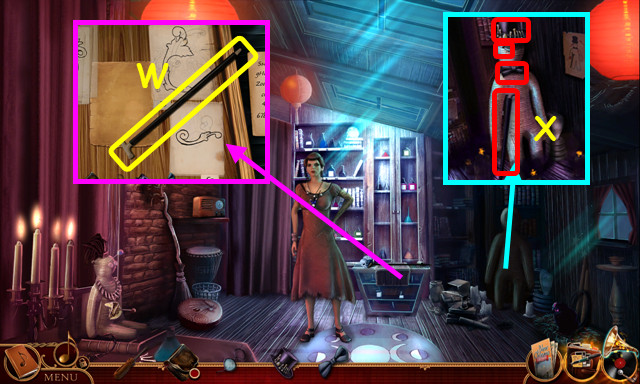
- Take the CANE and note the amulet mini-game (W).
- Place the CANE, BOW TIE, GLASSES, and TOP HAT on the doll (X).
- Select the doll.

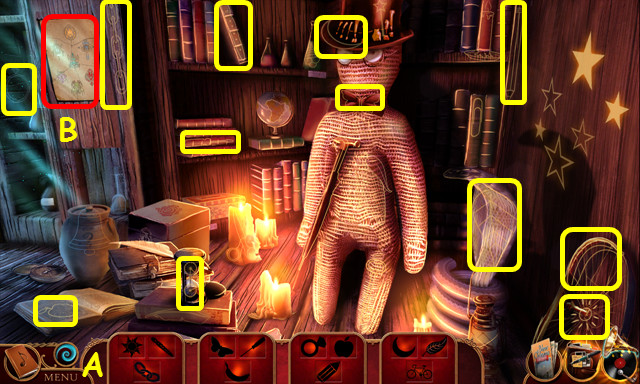
- Play the HOP (A).
- Place the 4 pieces on the wall; take the AMULET CLUES (B).
- Select the amulet mini-game.

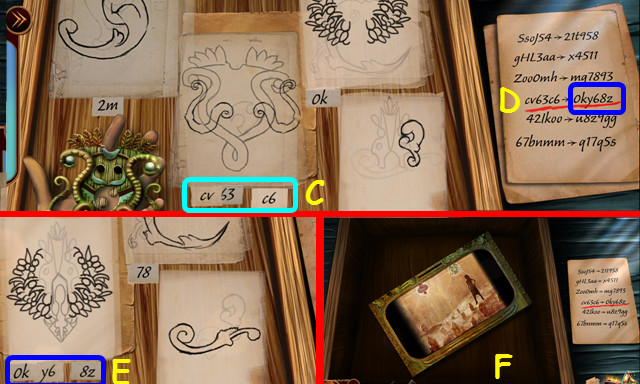
- Place the AMULET CLUES on the right.
- Find the 3 pages that make the amulet (C).
- Look at the amulet code (D) and select the pages that make that code (E).
- Select the box (F).

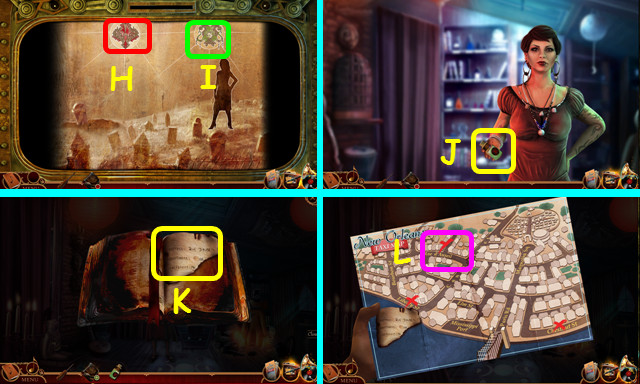
- Select the red amulet (H) and green amulet (I).
- Talk to Luna; take the RESTORATION SOLUTION (J).
- Open the BURNT BOOK; use the RESTORATION SOLUTION on it; take the address (K).
- Select Rue d’ Auseil (L).

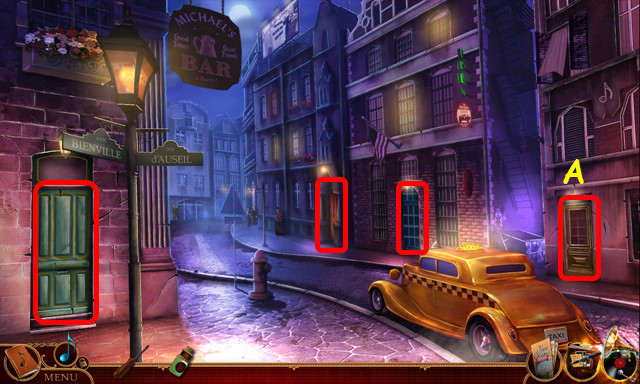
- Select all the doors (red).
- Enter number 20 door (A). The 4th door you select will be #20.

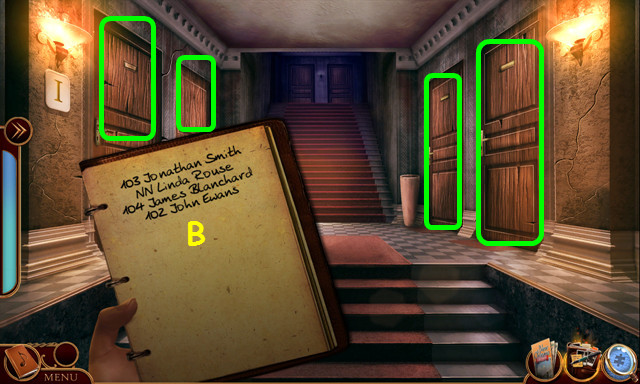
- Select the address.
- Select each door (green) to note the occupants on the paper (B).
- Go up the stairs and go left.

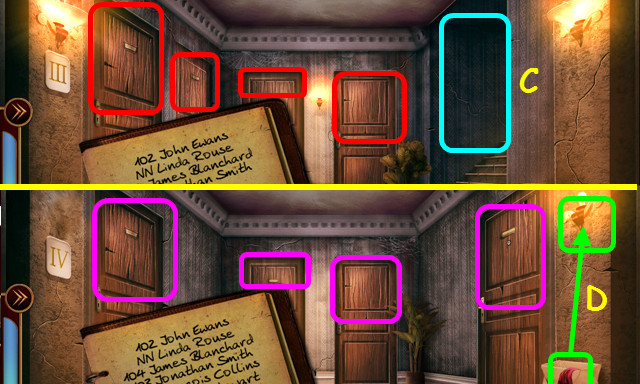
- Look at each of the doors (red).
- Go up the stairs (C).
- Look at each of the doors (pink).
- Use the rag to take the bulb (D).
- Walk down twice.

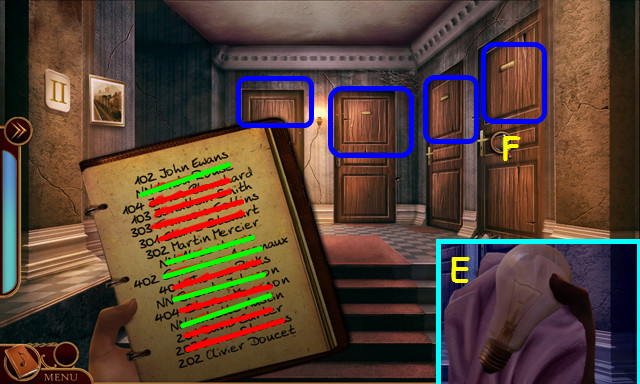
- Select the bulb (E).
- Look at each door (blue).
- Cross off apartments that not ending in 2 (red).
- Cross off all the women (green).
- Select 202 and look at the lock (F).
- Walk down.

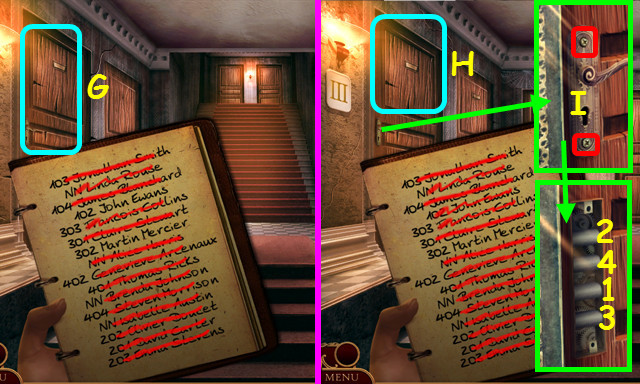
- Select 102 and look at the lock (G).
- Walk forward and left.
- Select 302 and listen at the lock (H).
- Select the lock again and use the SCREWDRIVER on the 2 screws (I).
- Remove the lock plate and select the bars in numerical order (1-4).
- Enter Frankie’s Apartment.

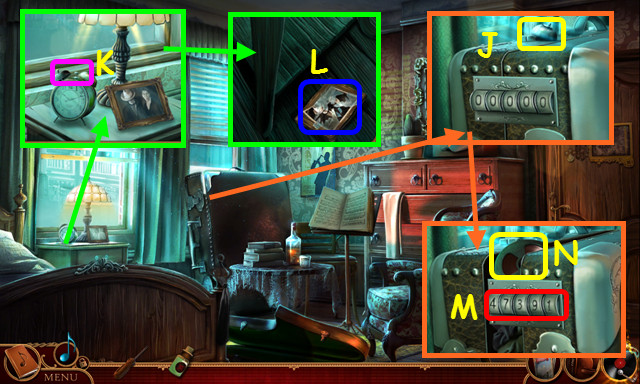
- Take the CLOCK BELL (J).
- Place the CLOCK BELL on the clock; select the clock (K).
- Pan down and take the photo to find the code 47391 (L).
- Enter the code (M).
- Open the case and take the TAPE RECORDER REEL (N).

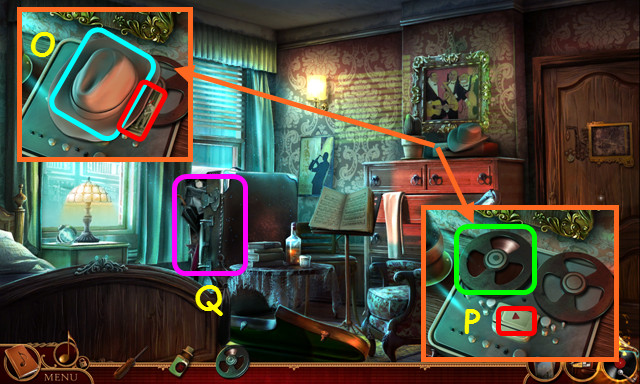
- Move the hat and look at the photo (O).
- Place the TAPE RECORDER REEL on the machine and press the play button (P).
- Select the suitcase (Q).

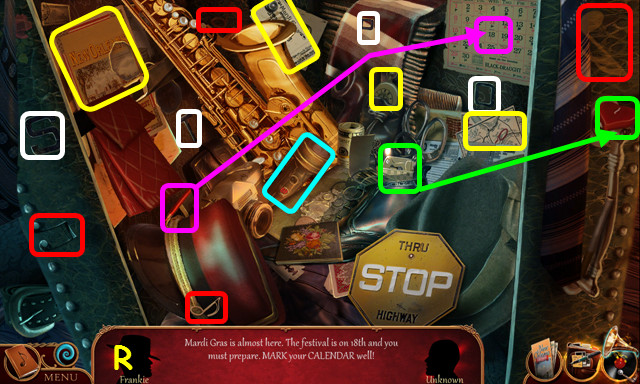
- Play the HOP to earn the MARDI GRAS PASS (R).
- Find the items using the clues.

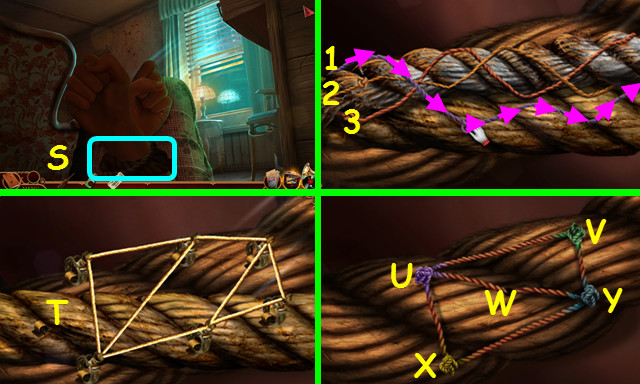
- Select the ropes (S).
- Slide the knots in numerical order (1-3).
- Select the ropes again.
- Move the clips so none of the strings cross each other (T).
- Select the ropes once more.
- Move the knots to the correct corner: Y, V, U, X, Y, W, U, V, Y, W.

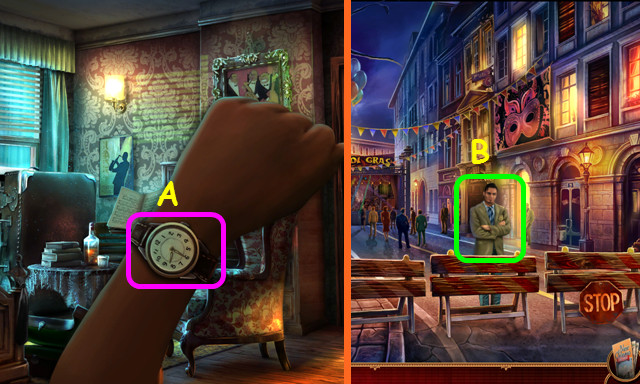
- Select the watch (A).
- Return to Liberty Street and walk left.
- Give the MARDI GRAS PASS to the guard (B).
- Walk forward. After the cut-scene, walk forward again.

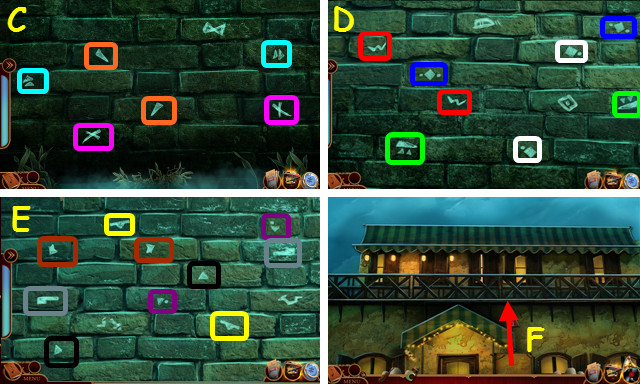
- Select the wall while underwater.
- Select matching pairs of symbols (color-coded) (C, D, E).
- Walk forward to climb out (F).
Chapter 4: Mississippi Riverside

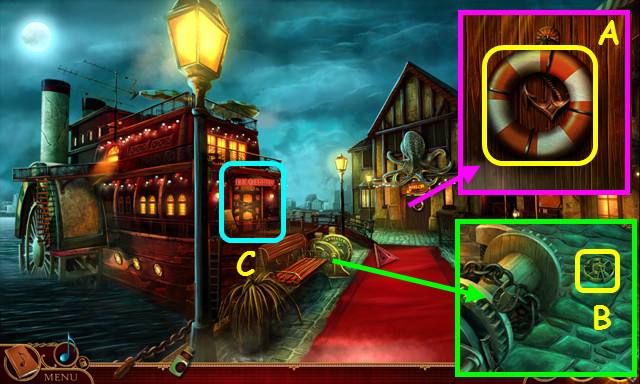
- Take the 1/2 LIFESAVER and knock on the door (A).
- Take the STEAMBOAT WHEEL (B).
- Climb aboard the steamboat (C).

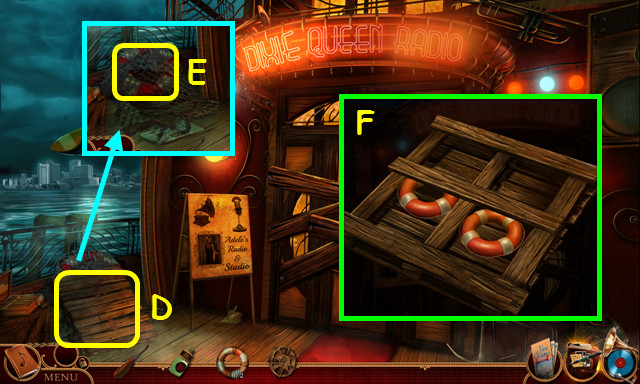
- Take the WOODEN PALLET (D).
- Move the net and take the 2/2 LIFESAVER (E).
- Place the 2 LIFESAVERS in the WOODEN PALLET to make the RAFT (F).

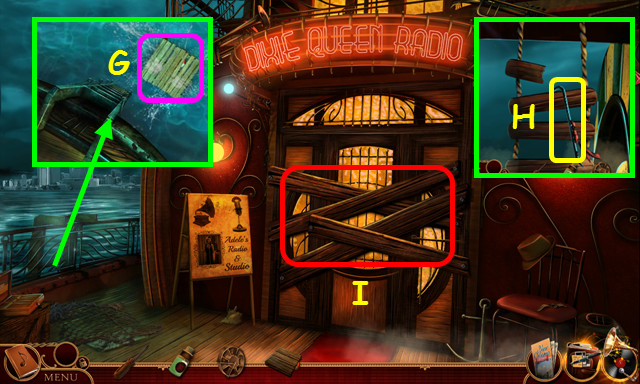
- Place the RAFT in the water (G).
- Walk left.
- Take the PRY BAR (H).
- Use the PRY BAR on the boards (I).
- Enter the Steamboat Lounge.

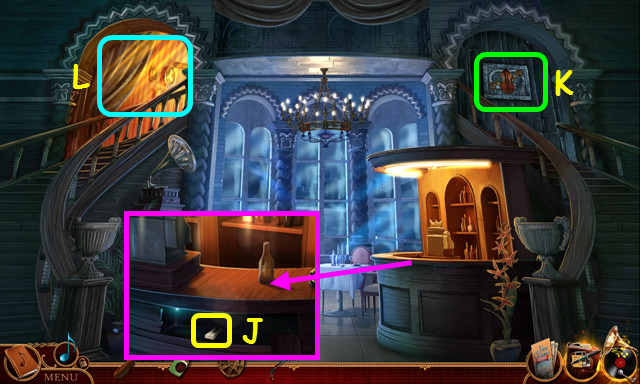
- Use the PRY BAR on the board; take the 1/2 PIANO KEYS (J).
- Note the door mini-game (K).
- Enter the Steamboat Studio (L).

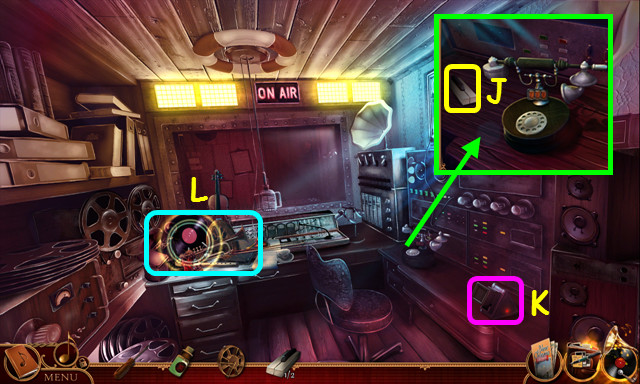
- Take the 2/2 PIANO KEYS (M).
- Note the slide projector (N).
- Select the desk (O).

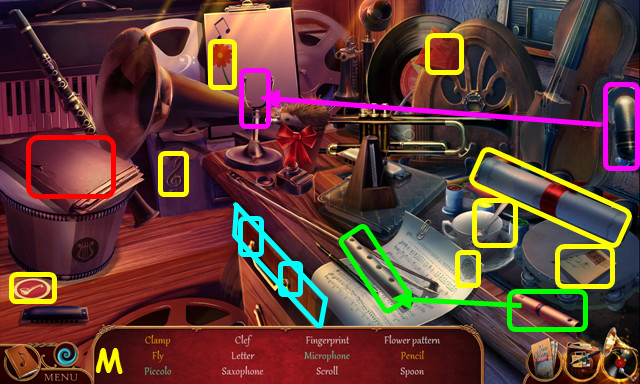
- Play the HOP to earn the TUNING FORK (M).
- Walk down and select the door mini-game.

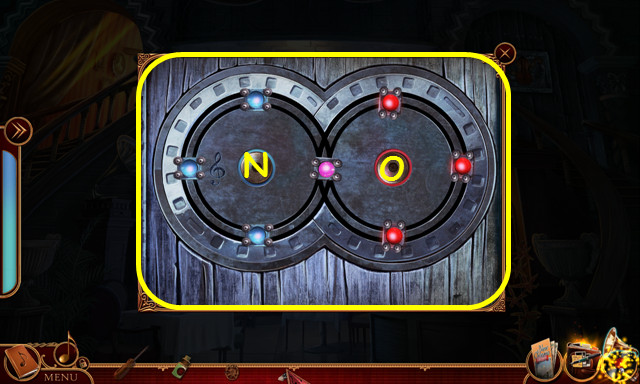
- Place the TUNING FORK in the violin.
- Solution: N, Ox2, Nx2, O, and N.
- Enter the Steamboat Radio.

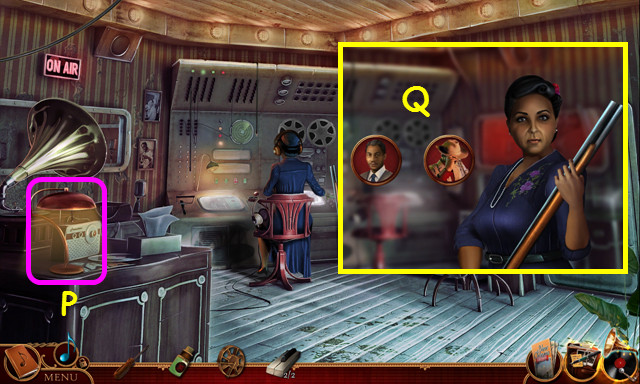
- Turn on the lamp (P).
- Talk to Aunt Adele (Q).

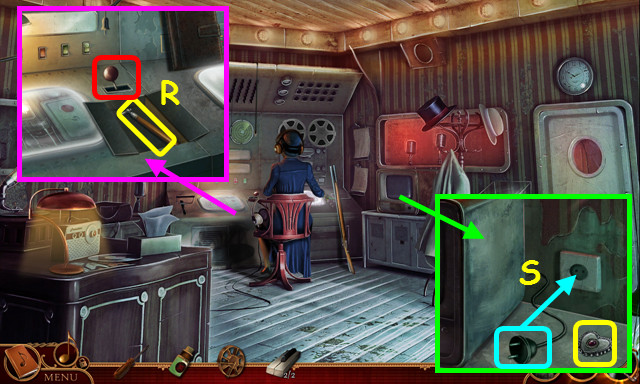
- Move the knob and take the TUNING HAMMER (R).
- Take the HEART MEDALLION and plug in the cord (S).
- Walk down.

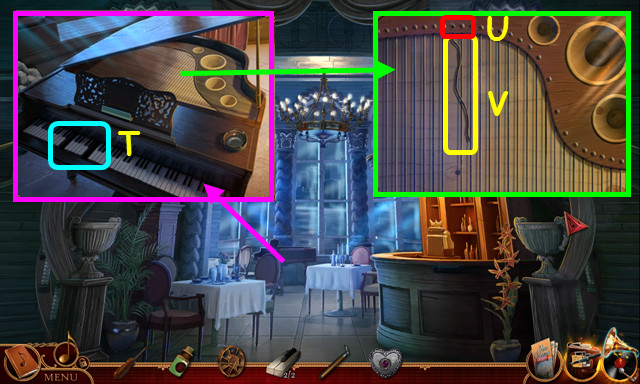
- Place the 2 PIANO KEYS on the piano (T).
- Use the TUNING HAMMER on the strings (U).
- Take the PIANO WIRE (V).

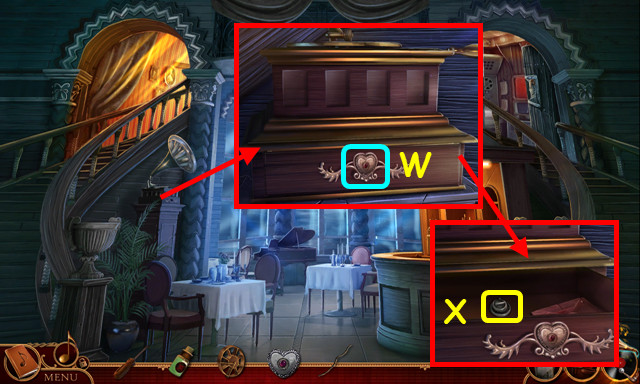
- Place the HEART MEDALLION in the opening (W).
- Open the drawer, move the items, look at the photo, and take the TV KNOB (X).
- Enter the Steamboat Radio.

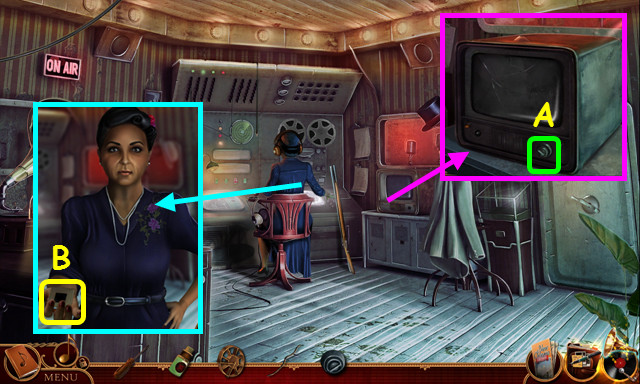
- Place the TV KNOB on the television (A).
- Talk to Aunt Adele and take ADELE’S SLIDE (B).

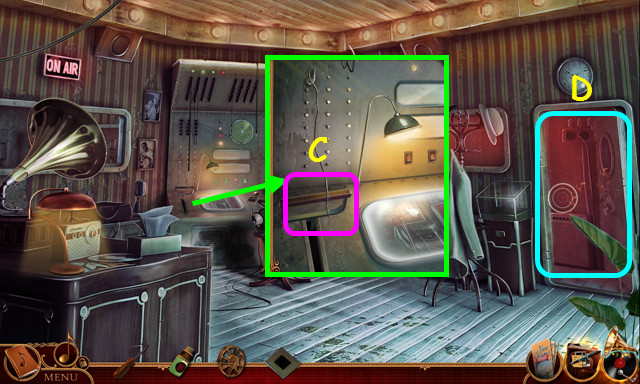
- Use the PIANO WIRE on the lever (C).
- Select the door (D).

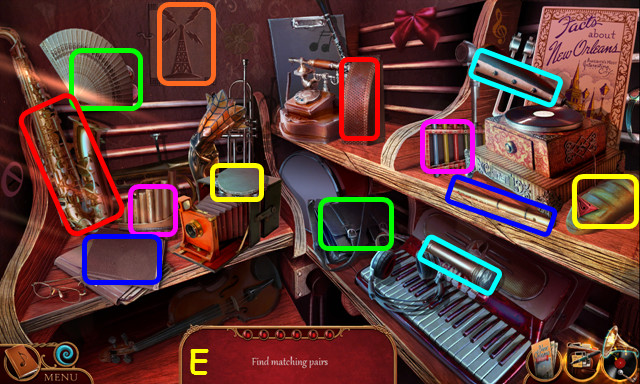
- Play the HOP to earn the PORTABLE RADIO (E).
- Select the PORTABLE RADIO from your inventory.

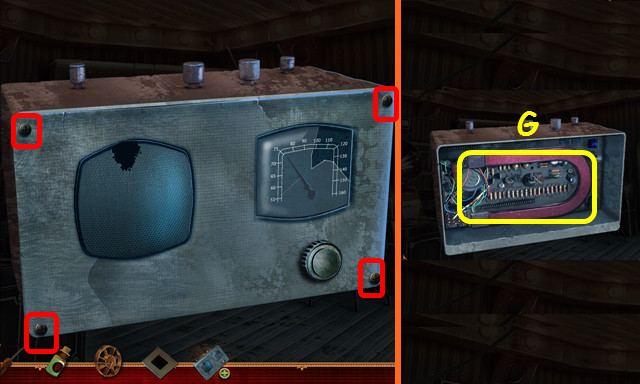
- Use the SCREWDRIVER on the 4 screws (red).
- Remove the cover and take the MAGNET (G).
- Return to the Steamboat Studio and select the projector.

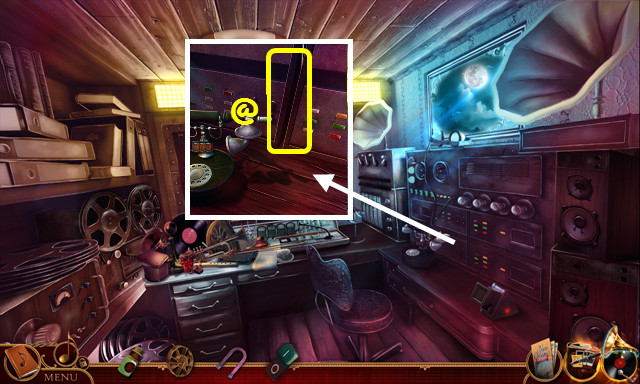
- Place ADELE’S SLIDE in the top and push it into the projector (H).
- Move the items to the correct locations (color-coded).
- There are 2 scenes to complete (I, J).
- Take the TV BUTTON (K).


- Use the MAGNET on the crevice to get the MAGNET WITH ANTENNA (@).
- Look at the MAGNET WITH ANTENNA and take the ANTENNA.
- Return to Steamboat Radio.

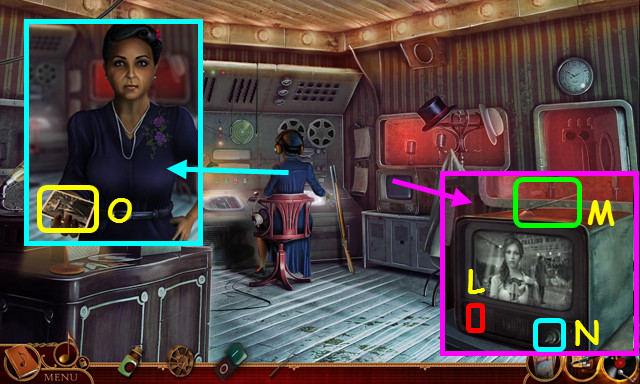
- Place the TV BUTTON on the left and press it (L).
- Place the ANTENNA on the top (M).
- Turn the right knob 3 TIMES (N).
- Select the antenna 3 times.
- Talk to Aunt Adele to get the telephone number; look at the photo (O).
- Return to the Steamboat Radio.

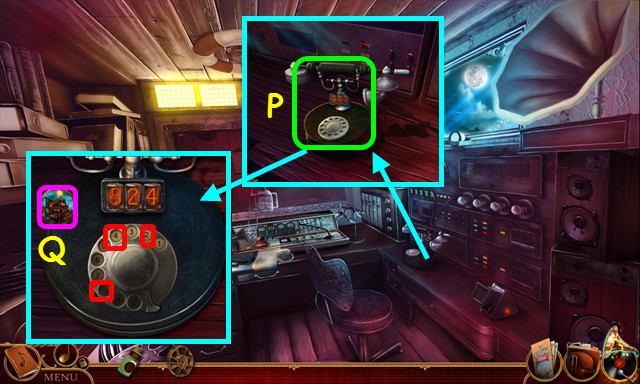
- Select the phone (P).
- Select 8, 2, and then 4 (red).
- Talk to the dispatcher (Q).
- Walk down twice and enter the taxi.
- Select Liberty Street on the map.
- Walk forward twice.
Chapter 5: Mardi Gras Stage

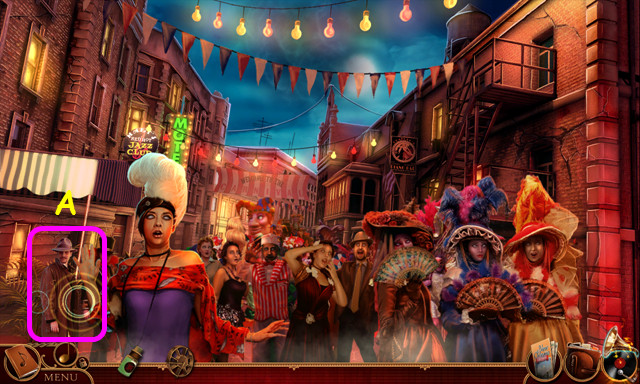
- Walk forward twice.
- After the cut-scene, pan left twice.
- Select the detective (A).

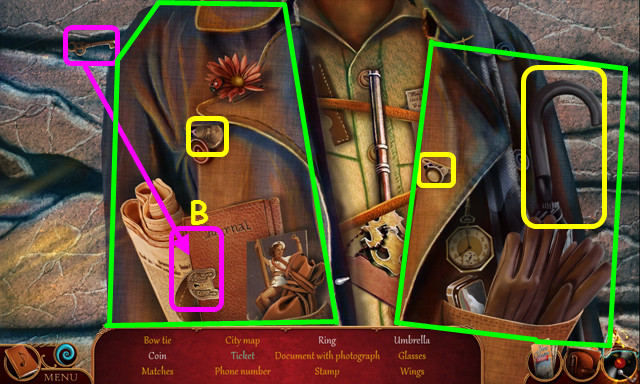

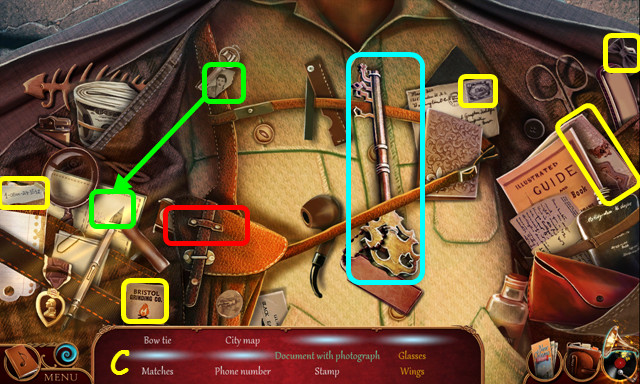
- Locate the items and the key fragments beneath them (yellow).
- Open the journal for the ticket (B).
- Open both sides of the jacket (green).
- Find the remaining items and key fragments (C).
- You will earn the DETECTIVE’S KEY.
- Look at the DETECTIVE’S KEY; read the address on the tag.
- Return to Rue d’ Auseil.

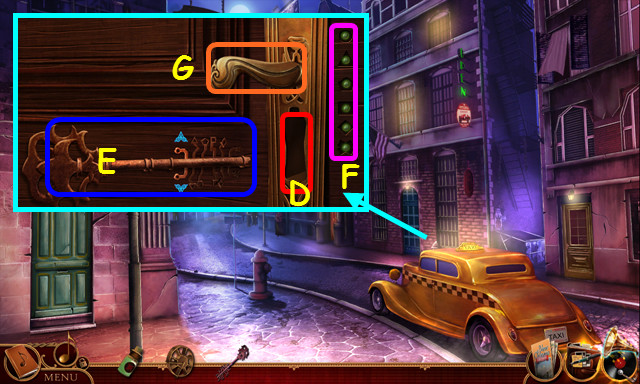
- Use the DETECTIVE’S KEY on the lock (D).
- Move the key fragments up or down to fit the lock (E).
- Once you have moved all 5, the key will try the lock.
- The green lights will indicate if all the fragments are correct (F).
- This mini-game is randomly generated.
- Pull the handle (G).
- Enter the Detective’s Office.

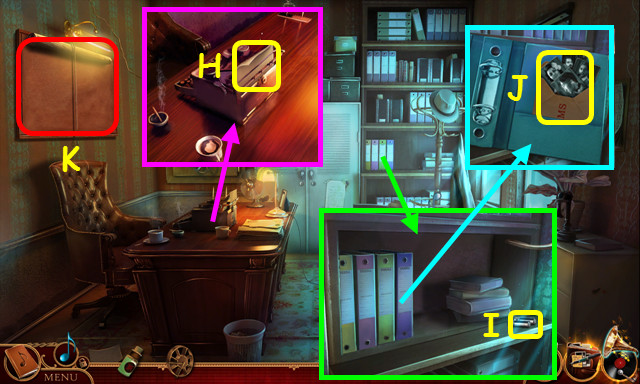
- Take the DETECTIVE’S NOTE (H).
- Take the BATTERIES (I).
- Look at each folder and remove all the papers; take the VICTIM’S PHOTOS and the SUSPECT’S PHOTOS (J).
- Look at the DETECTIVE’S NOTES and tear them up to make the DETECTIVE’S NOTE PIECES.
- Select the bulletin board (K).

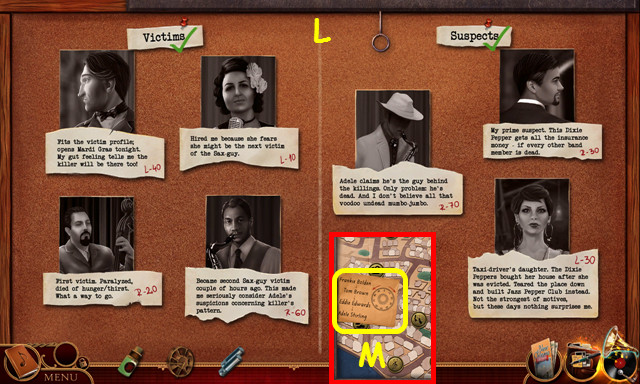
- Place the VICTIM’S PHOTOS, the SUSPECT’S PHOTOS, and the DETECTIVE’S NOTE PIECES on the board.
- Swap the photos and the notes to the correct locations (L).
- Look at the suspect photos.
- Take the safe combination and note the map (M).

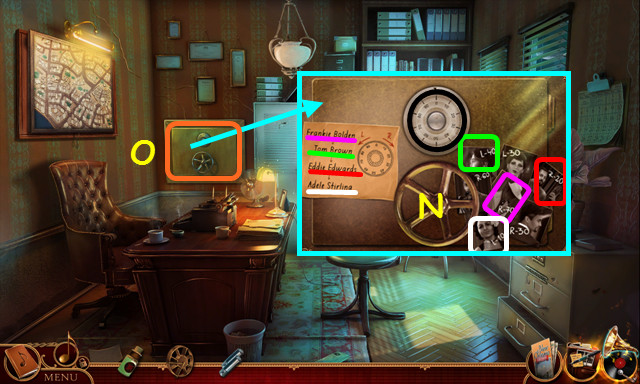
- Turn the safe dial (black) right to70, left to 40, right to 20, and left to 10.
- Turn the valve (N).
- Select the open safe (O).

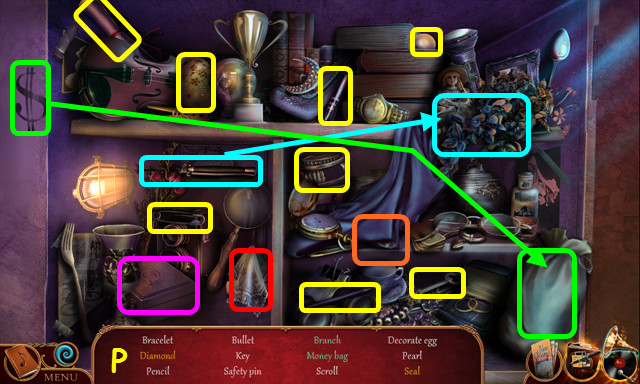
- Play the HOP to earn the DETECTIVE’S TOOLBOX (P).
- Open the DETECTIVE’S TOOLBOX; take the FINGERPRINT KIT and the DICTATION MACHINE.

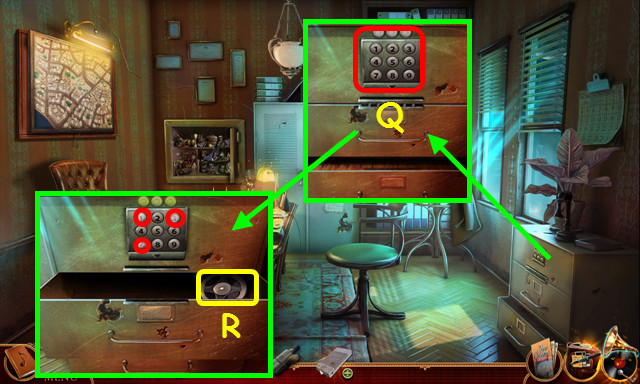
- Use the FINGERPRINT KIT on the keypad (Q).
- Use the 3 marked numbers for the combination. Solution: 7, 1, and 3.
- Open the drawer; take the DETECTIVE’S TAPE (R).

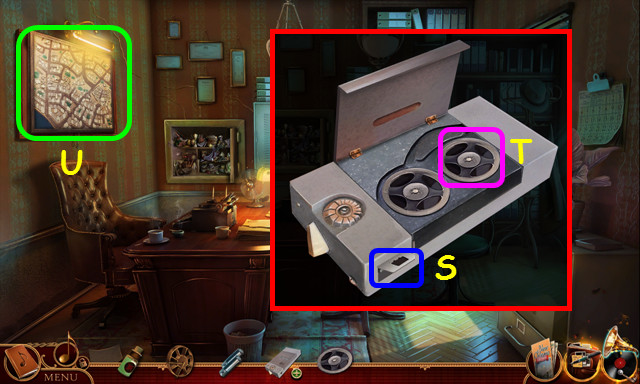
- Open the panel on the DICTATION MACHINE; insert the BATTERIES; close the panel (S).
- Open the cover; place the DETECTIVE’S TAPE inside and close the cover (T).
- Select the map (U).

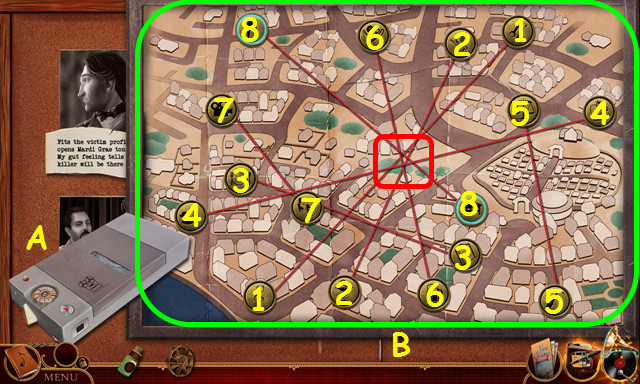
- Place the DICTATION MACHINE on the left (A).
- Connect the sets of locations (B) based on the clues (1-8), and then select the center (red).
Chapter 6: The Zeppelin

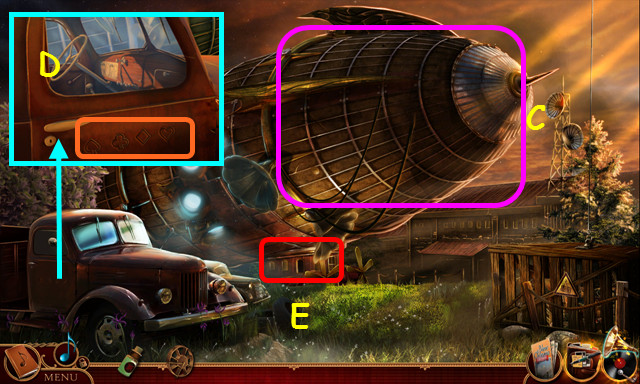
- Look at the zeppelin (C).
- Look at the symbols on the door (D).
- Enter the Zeppelin Interior (E).

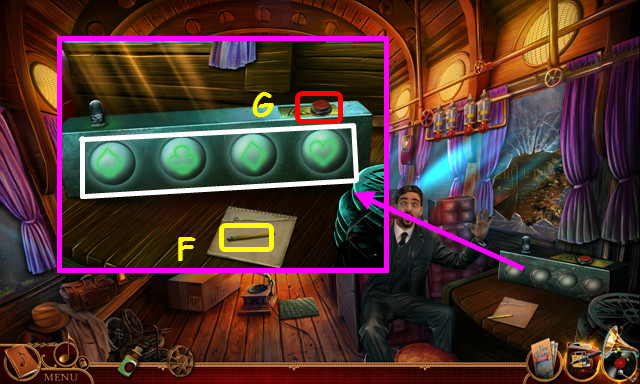
- Take the BROKEN PENCIL (F).
- Change the symbols to match the truck door; press the red button (G).
- Walk down and select the debris on the right.

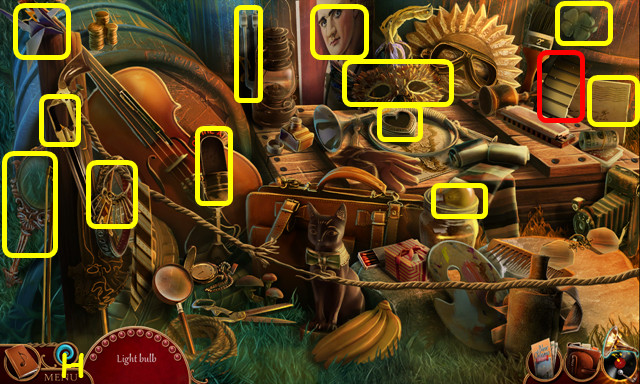
- Play the HOP to earn the COLUMN TILE (H).
- Enter the Zeppelin Interior.

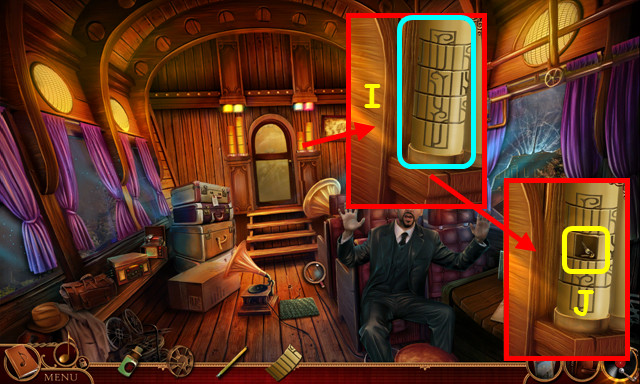
- Place the COLUMN TILE on the column; turn the rings to complete the pattern (I).
- Take the TRUCK KEYS (J).
- Walk down.

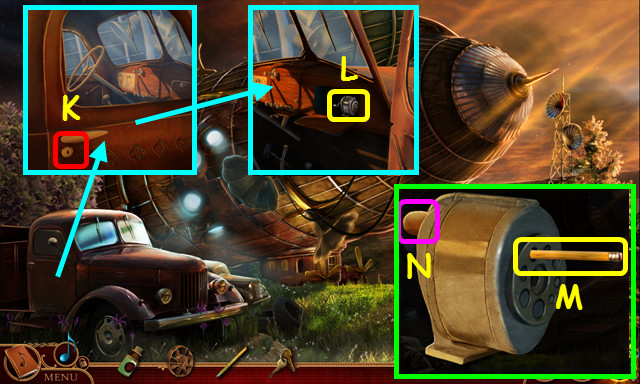
- Use the TRUCK KEYS in the lock; open the door (K).
- Open the glove box; take the PENCIL SHARPENER (L).
- Look at the PENCIL SHARPENER, place the BROKEN PENCIL inside (M), and push the lever (N).
- Take the PENCIL.
- Walk forward.

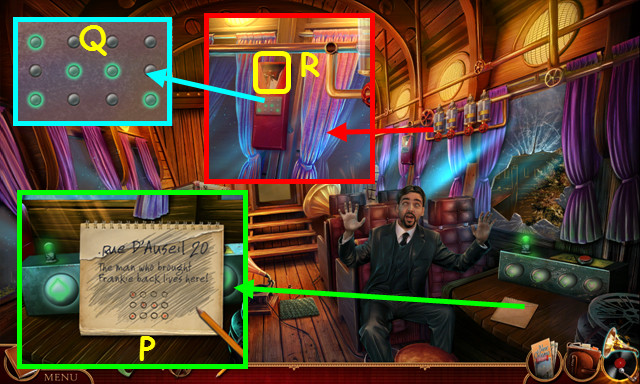
- Look at the pad; use the PENCIL on the pad; take the address and note the code (P).
- Enter the code from the paper (Q).
- Open the compartment; take the AXE (R).

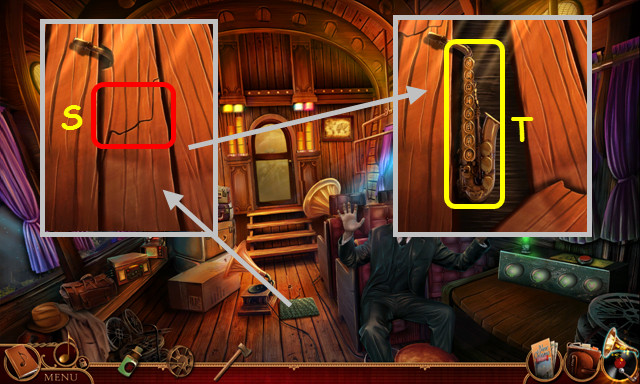
- Remove the mat; use the AXE on the crack 3 times (S).
- Take the MODEL SAXOPHONE (T).
- Travel to Frankie’s Apartment and select the door on the right.

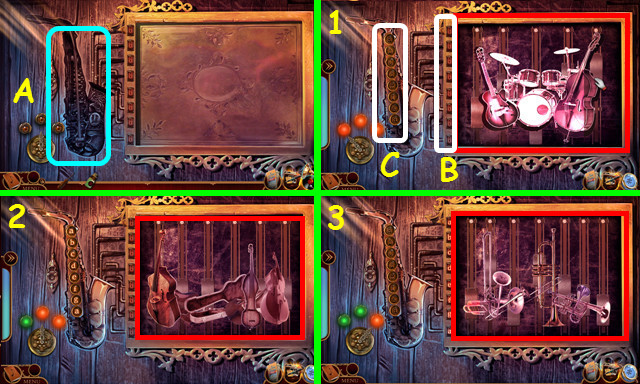
- Place the MODEL SAXOPHONE in the indentation (A).
- Restore the picture of the instruments (red) by sliding the pieces up, down, left, and right.
- Watch the sequence of 4 letters (notes) on the frame (B), and then replay them on the saxophone (C).
- The sequences are randomly generated. There are 3 levels to complete (1-3).
- Walk forward.

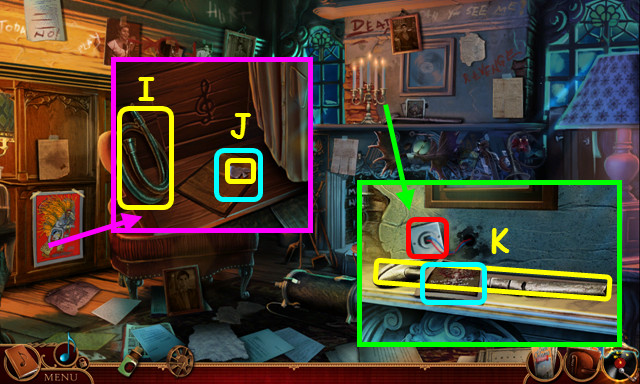
- Open the compartment; take the VACUUM CLEANER HOSE (I).
- Move the shirts aside; read the note and take the 1/2 SPADE EMBLEM (J).
- Replace the plug, look at the photo, and take the BROKEN VACUUM PIPE (K).

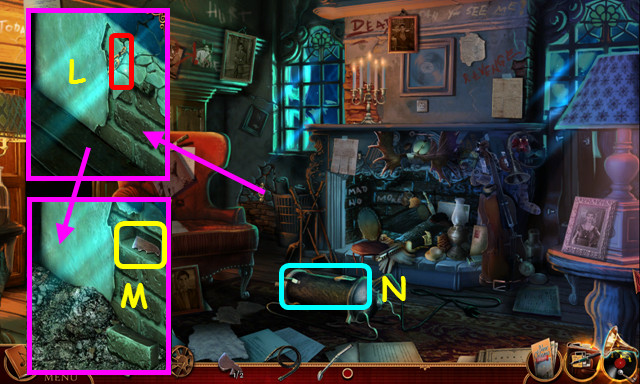
- Pull the clef (L).
- Remove the brick and take the 2/2 SPADE EMBLEM (M).
- Place the VACUUM CLEANER HOSE on the vacuum (N).

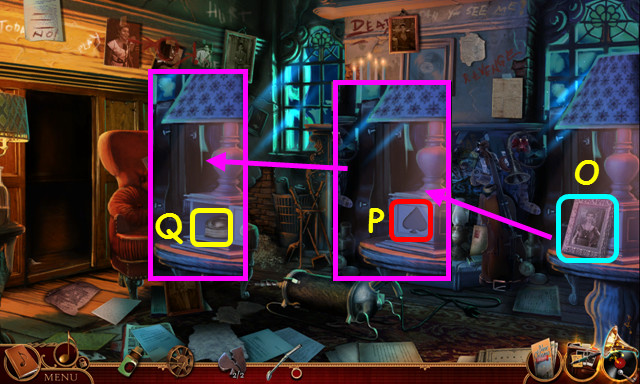
- Look at the photo (O).
- Place the 2 SPADE EMBLEMS on the lamp base (P).
- Take the DUCT TAPE (Q).
- Look at the BROKEN VACUUM PIPE, bend the pipe, and use the DUCT TAPE on the break to make the VACUUM CLEANER PIPE.

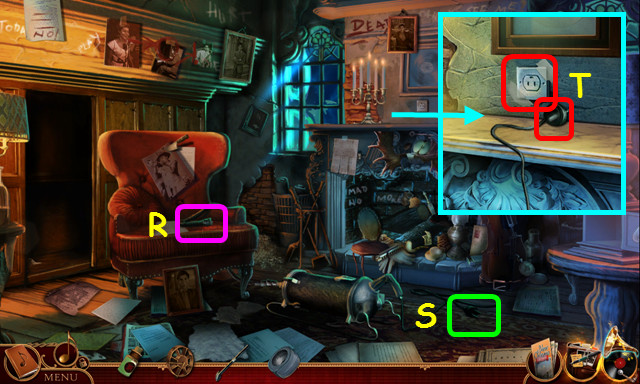
- Place the VACUUM CLEANER PIPE on the hose (R).
- Select the cord (S).
- Use the DUCT TAPE on the outlet; plug in the cord (T).

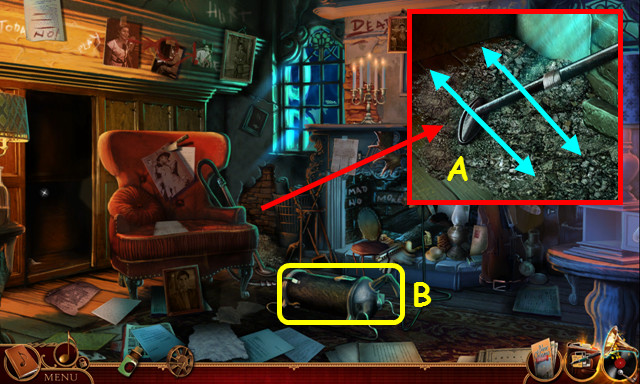
- Move the vacuum over the ashes (A).
- Take the FULL VACUUM CLEANER (B).
- Open the FULL VACUUM CLEANER; take the TREBLE CLEF.

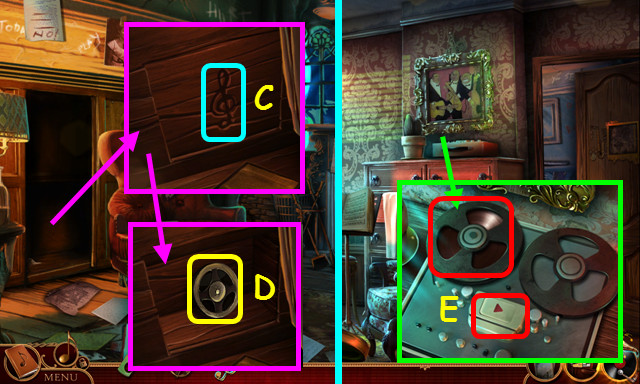
- Place the TREBLE CLEF on the panel (C).
- Take the TAPE RECORDER REEL (D).
- Walk down.
- Remove the old tape; place TAPE RECORDER REEL on the player and push play (E).
- Walk forward and select the fireplace.

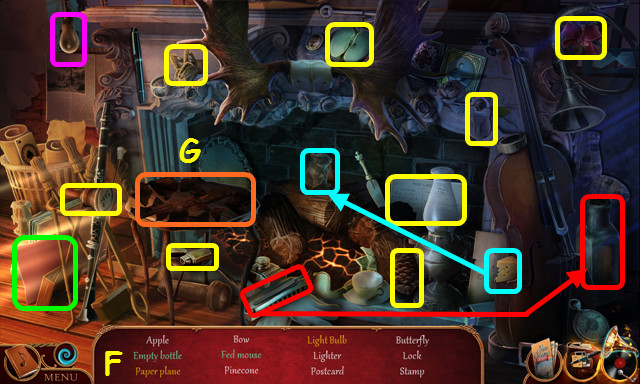
- Play the HOP (F).
- Select the pieces from the table (G).

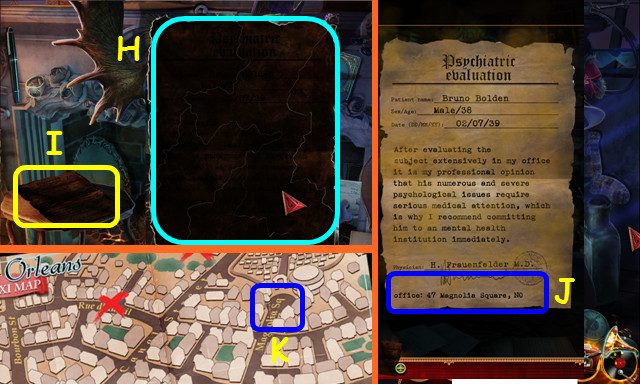
- Assemble the burnt document (H).
- Take the BURNT DOCUMENT from the table (I).
- Look at the BURNT DOCUMENT; use the RESTORATION SOLUTION on it.
- Read the paper to find the address (J).
- Select Magnolia Square (K).
Chapter 7: Magnolia Square

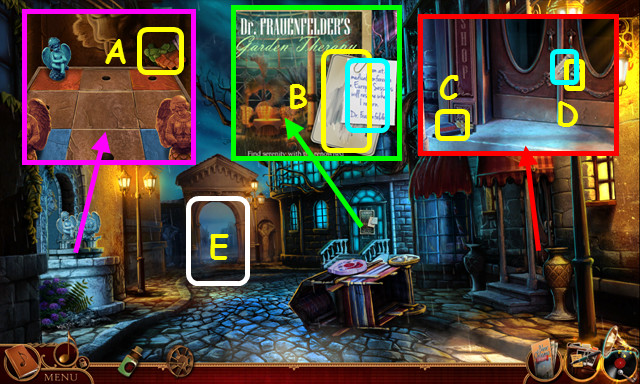
- Take the 1st CLOWN’S HAIR and note the angels’ mini-game (A).
- Read the note and take the 1/4 BLURRED RORSCHACH CARD (B).
- Take the CLOWN’S HAT (C).
- Read the note and take the STONE ANGEL FIGURINE (D).
- Walk forward to the Graveyard (E).

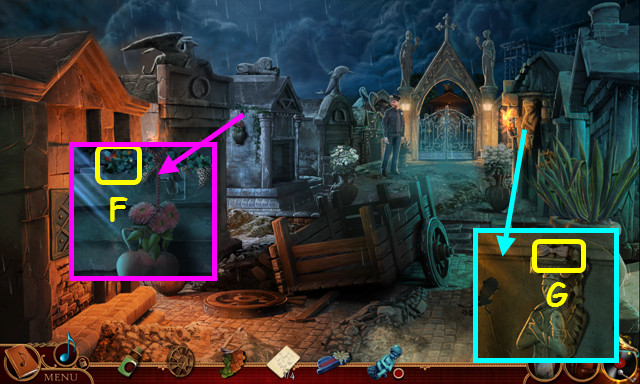
- Take the 2nd CLOWN’S HAIR (F).
- Take the CLOWN BOW TIE (G).
- Travel to the Mesmerized Crowd.

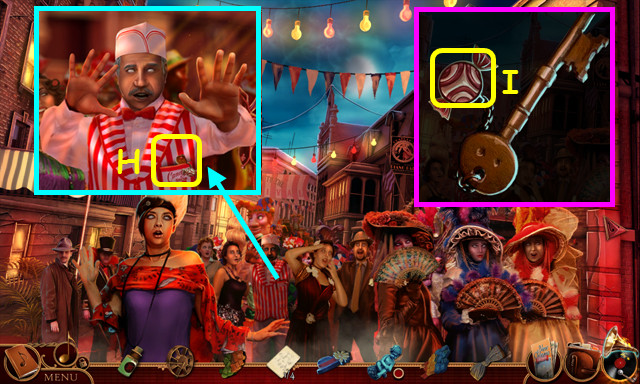
- Take the CANDY SHOP KEY (H).
- Look at the CANDY SHOP KEY and take the 1/3 CANDY EMBLEM (I).
- Return to Magnolia Square.

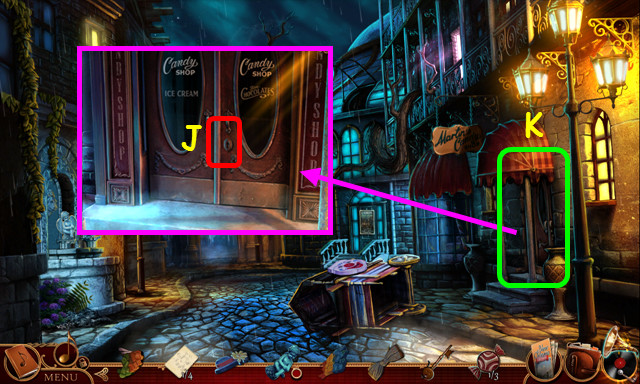
- Use the CANDY SHOP KEY on the lock; open the doors (J).
- Enter the Candy Shop (K).

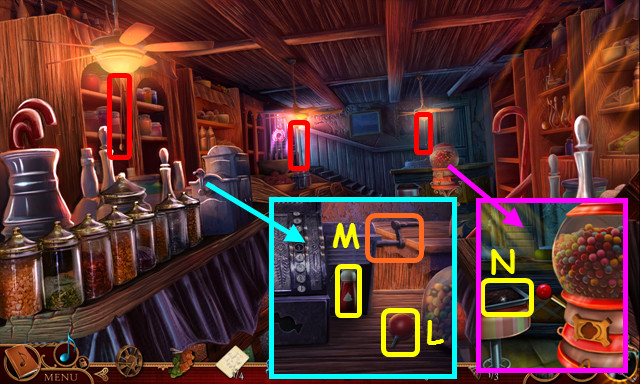
- Turn on the lights (red).
- Take the CLOWN’S NOSE (L).
- Turn the lever; take the WHIPPED CREAM (M).
- Take the CASSEROLE DISH WITH CANDY (N).

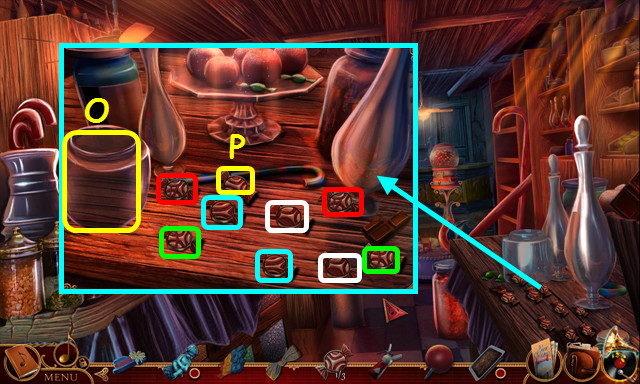
- Take the EMPTY JAR (O).
- Remove pairs of candies (color-coded).
- Take the 2/3 CANDY EMBLEM (P).
- Walk down.

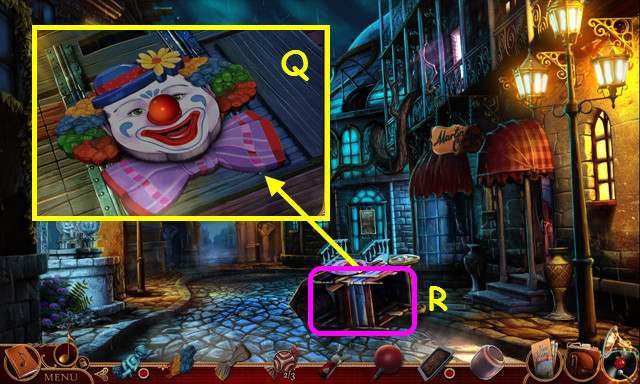
- Place the 1st CLOWN’S HAIR, the 2nd CLOWN’S HAIR, the CLOWN’S HAT, the CLOWN’S NOSE, and CLOWN’S BOW TIE on the face (Q).
- Push the nose.
- After the fireworks, select the cart (R).

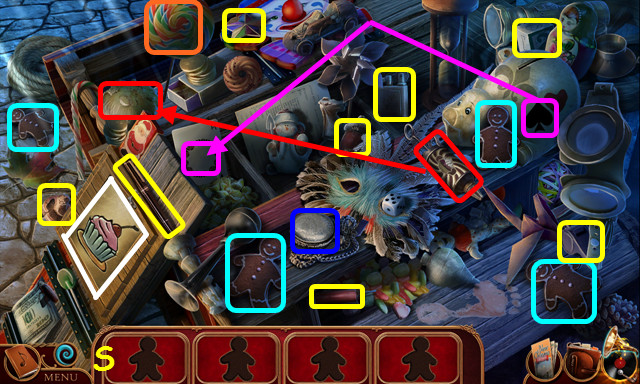
- Play the HOP to earn the 3/3 CANDY EMBLEM (S).
- Enter the Candy Shop.

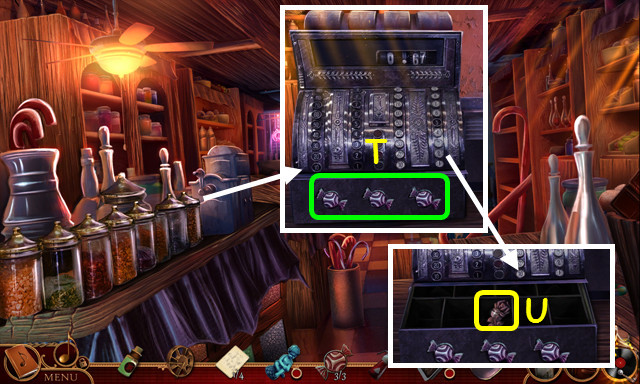
- Place the 3 CANDY EMBLEMS on the register (T).
- Open the drawer and take the ROSE ORNAMENT (U).
- Walk down and forward.

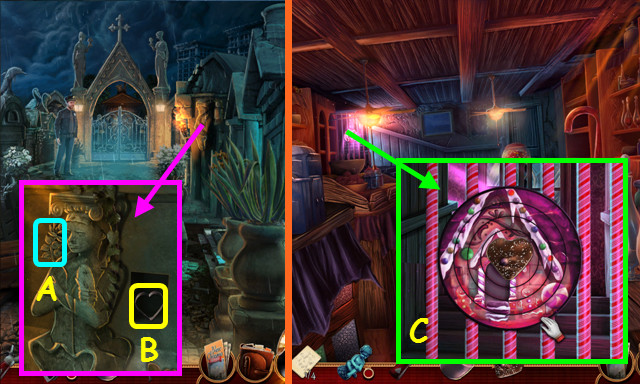
- Place the ROSE ORNAMENT on the wall (A).
- Take the HEART STENCIL (B).
- Look at the CASSEROLE DISH WITH CANDY and use the HEART STENCIL to make the CANDY HEART.
- Return to the Candy Shop.
- Place the CANDY HEART in the lock and rotate the rings to complete the picture (C).
- Go Upstairs.

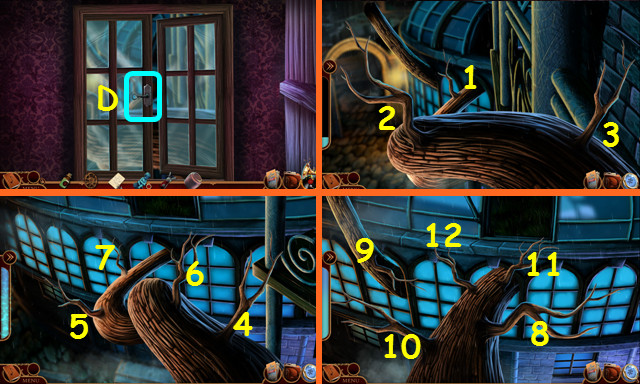
- Open the window (D).
- Select the branches (1-3), (4-7), (8-12).

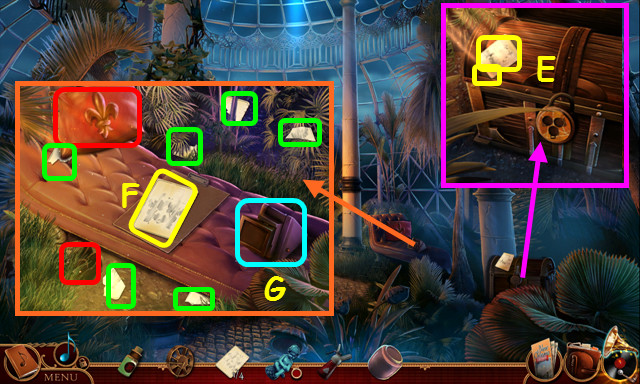
- Take the 2/4 BLURRED RORSCHACH CARD and the PSYCHIATRIST’S SLIDE (E).
- Move the slippers and the pillow (red).
- Select the card pieces (green).
- Take the 3/4 BLURRED RORSCHACH CARD (F).
- Use the PSYCHIATRIST’S SLIDE on the projector; select the projector (G).

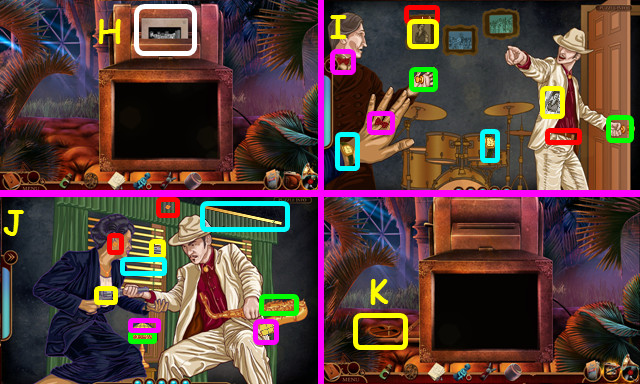
- Push the slide into the projector (H).
- Move the items to the correct locations (color-coded) (I, J).
- Take the 1/3 MEDALLION PART (K).

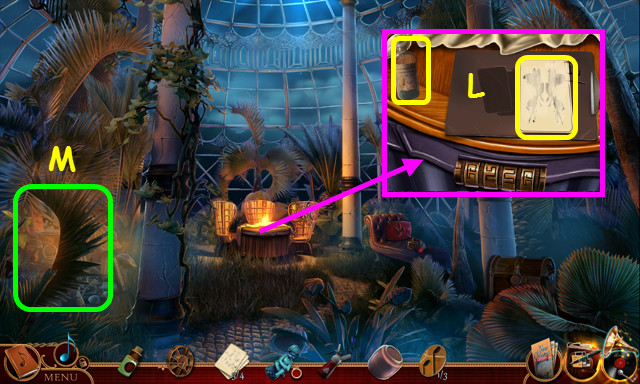
- Take the INK RESTORER and the 4/4 BLURRED RORSCHACH CARD (L).
- Look at the INK RESTORER; wipe the label.
- Move the branch; select the debris (M).

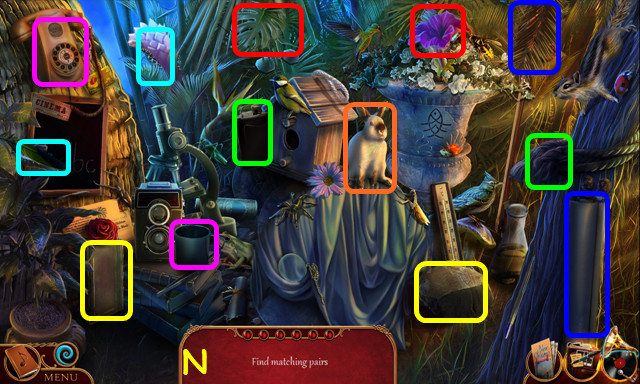
- Play the HOP to earn the HERBICIDE (N).
- Return to the Graveyard.

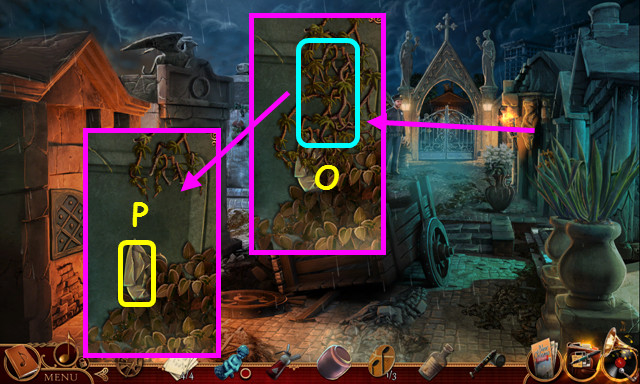
- Use the HERBICIDE on the vines (O).
- Take the WRAPPED STONE OBJECT (P).
- Open the WRAPPED STONE OBJECT to find the ANGEL WINGS.
- Look at the STONE ANGEL FIGURINE and attach the ANGEL WINGS to complete the STONE ANGEL FIGURINE.
- Walk down and select the angels’ mini-game.

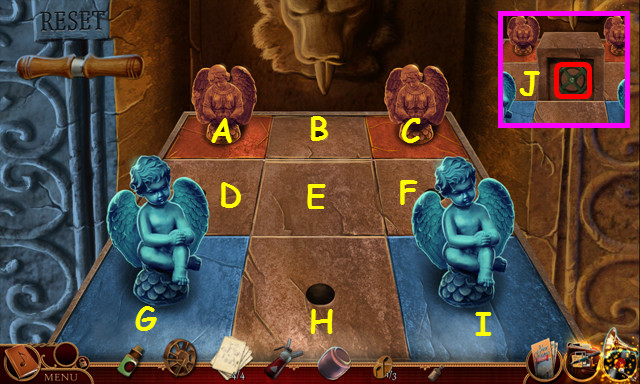
- Place the STONE ANGEL FIGURINE on the board.
- Solution: (A-F), (G-B), (F-G), (I-D), (C-H), (D-C), (B-I). (H-A), (G-B), (A-F), (F-G), (C-H), (H-A), (I-D), (D-C), and (B-I).
- Turn the wheel (J).

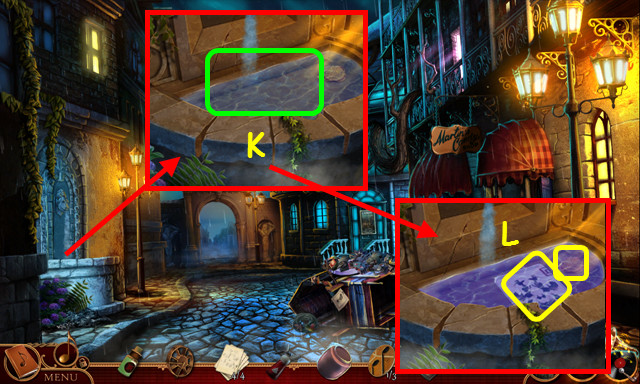
- Pour the INK RESTORER into the water; place the 4 BLURRED RORSCHACH CARDS in the water (K).
- Take the RORSCHACH CARDS and the COIN (L).
- Enter the Candy Shop.

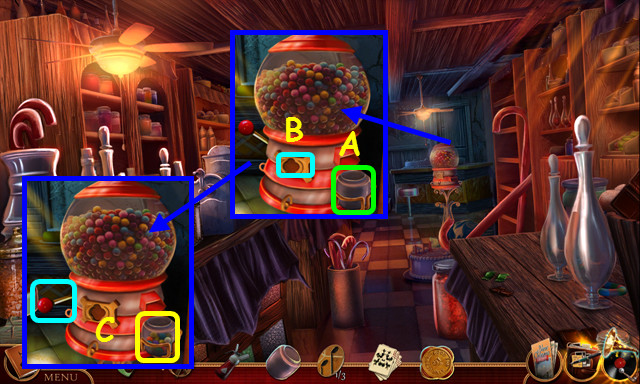
- Place the EMPTY JAR in the holder (A).
- Place the COIN in the slot (B).
- Pull the lever; take the CANDY JAR (C).
- Go up the stairs.

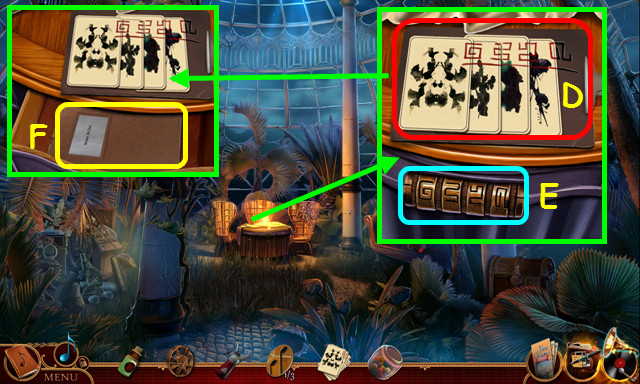
- Place the RORSCHACH CARDS on the board; swap the cards to complete the code (D).
- Turn the dials to match the cards (E).
- Open the drawer; take BRUNO’S FILE (F).
- Open BRUNO’S FILE, read the evaluation and take the 2/3 MEDALLION PART.
- Walk down twice.

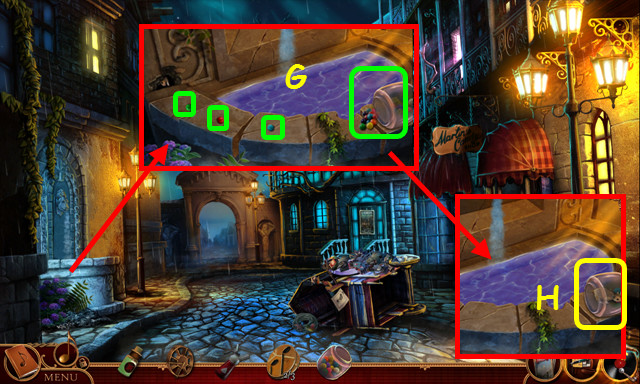
- Place the CANDY JAR on the fountain and move 3 pieces of candy (G).
- Take the MOUSE IN A JAR (H).
- Walk forward.

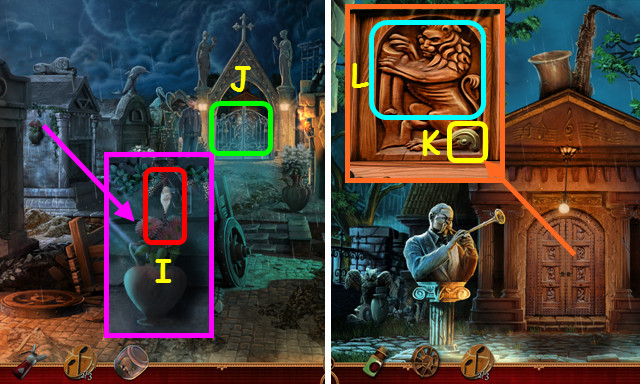
- Use the WHIPPED CREAM on the rope, followed by the MOUSE IN A JAR (I).
- Open the gates and walk forward (J).
- Look at the door and pan left; take the 1st STONE CADENZA SYMBOL (K).
- Push the lion (L).

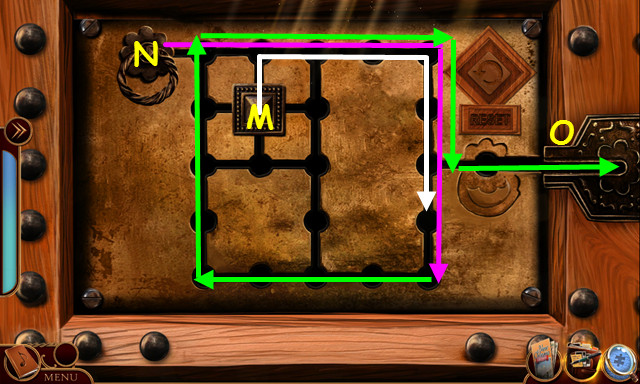
- Use the block (M) to guide the handle (N) to the slot (O).
- Move the handle right and down (pink).
- Move the block up, right, and down (white).
- Move the handle left, up, right, down, and right (green).
- Pan right and press the eagle.

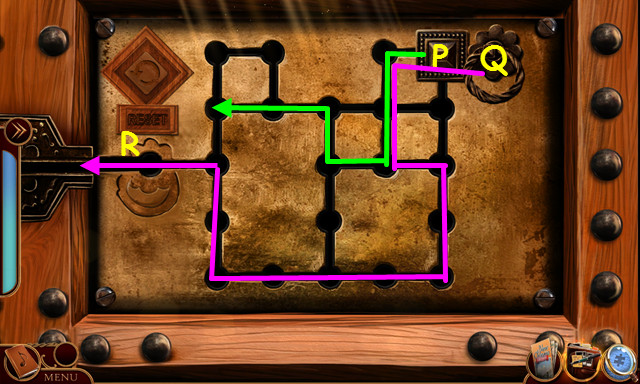
- Use the block (P) to guide the handle (Q) to the slot (R).
- Move the block left, down, left, up, and left (green).
- Move the handle left, down, right, down, left, up, and left (pink).
- Turn the 2 handles and go forward.

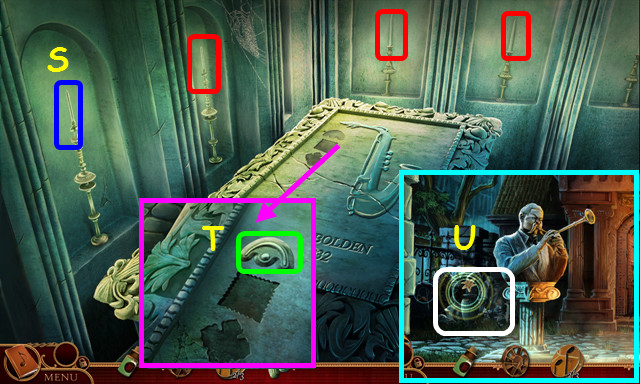
- Take the lit candle (S) and use it on the other candles (red).
- Place the 1st STONE CADENZA SYMBOL on the lid and push it (T).
- Select the shrine on the left (U).

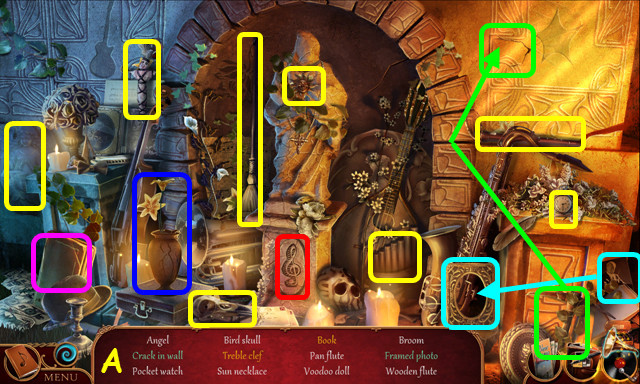
- Play the HOP to earn the STONE VASE (A).
- Collect the items and the flowers behind them.
- Look at the STONE VASE and take the YELLOW LILIES; take the 2nd STONE CADENZA SYMBOL from inside the vase.
- Walk forward.

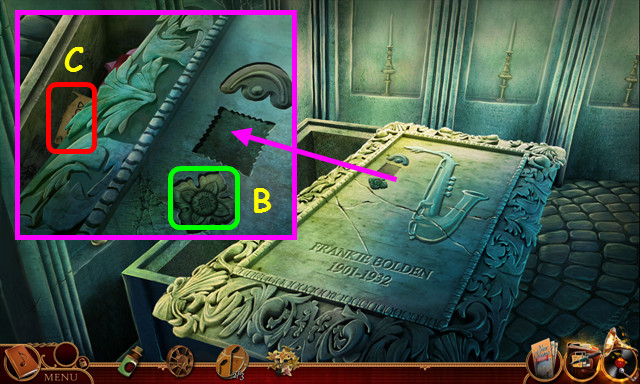
- Place the 2nd STONE CADENZA SYMBOL on the lid and press (B).
- Read the code (C).
- Walk down twice.

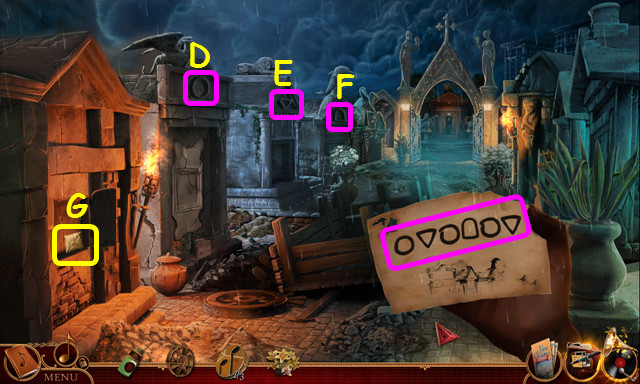
- Press the symbols: D, E, D, F, D, and E.
- Take the 3rd STONE CADENZA SYMBOL (G).
- Walk forward twice.

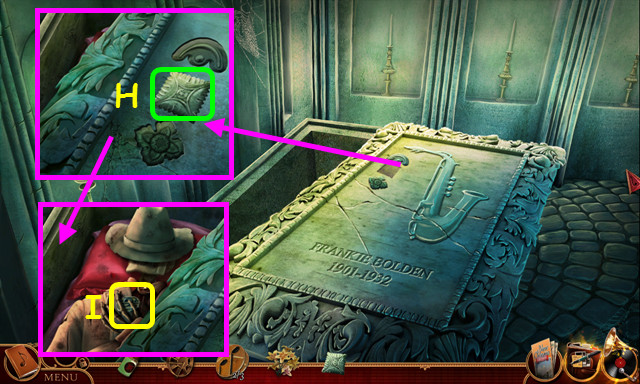
- Place the 3rd STONE CADENZA SYMBOL on the lid and press it (H).
- Take the 3/3 MEDALLION PART (I).
- Return to the Psychiatrist’s Office.

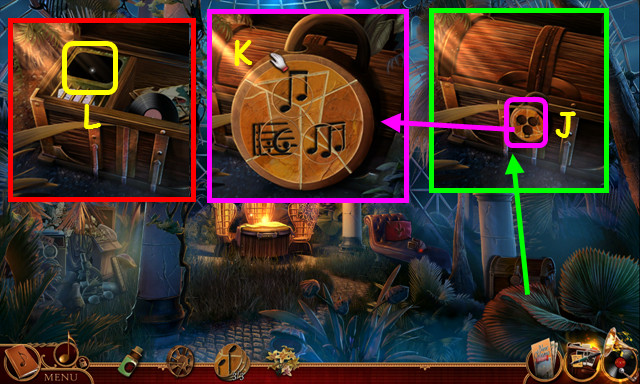
- Place the 3 MEDALLION PARTS on the lock (J).
- Rotate the parts to complete the notes and rotate the dial (K).
- Open the chest and select the device (L).

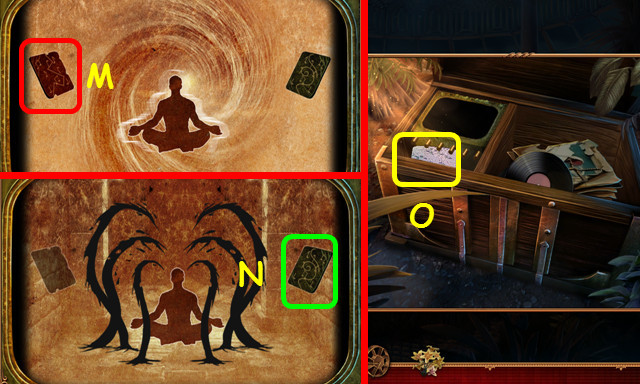
- Select the red card (M), and then the green card (N).
- Take the photo and the SONG OF STONE TABLET (O).
- Walk down.

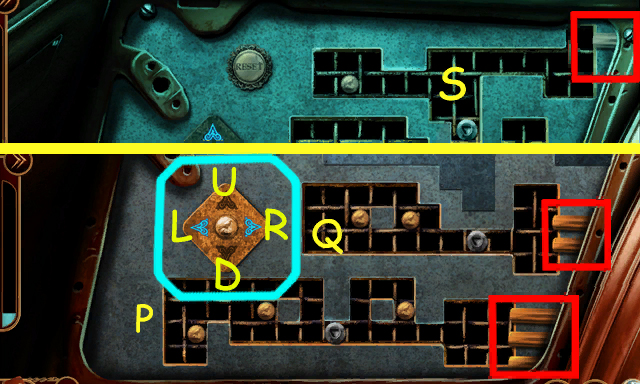
- Remove the door panel.
- Use the arrows (blue) to move the marked token; use it to guide the beads to the end points (red).
- Solution (P): Lx2, Ux3, Lx5, Dx3, Rx13, Dx1, Rx1, Ux1, Lx14, Ux1, Lx2,Dx1, Rx14, Ux1, Rx1, Dx1, Lx1, Dx1, Rx1, Ux1, Lx8, Ux3, Lx2, Ux3, Lx1, Dx5, Ux2, Lx2, Dx3, and Rx13.
- Solution (Q): Lx1, Dx1, Rx1, Dx1, Lx6, Dx2, Lx2, Ux2, Rx7, Dx1, Rx1, Ux1, Lx9, Ux2, Rx2, Dx1, Ux1, Lx2, Dx2, and Rx8.
- Solution (S): Ux2, Lx8, Ux1, Lx2, Dx1, Rx9, Dx1, Rx1, Ux1, Lx1, Ux1, Rx5, Dx1, Rx1, and Ux1.
- Return to the House of the Moon.

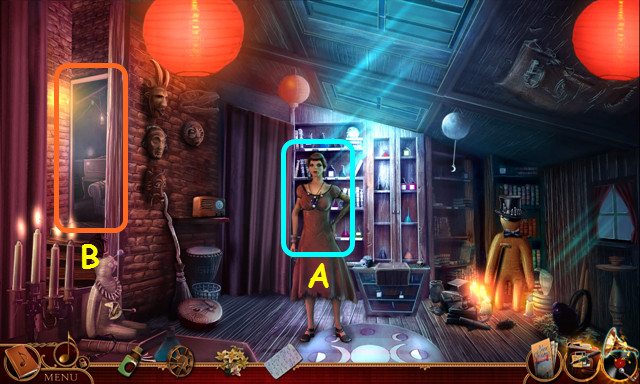
- Show Luna the SONG OF STONE TABLET and talk to her thoroughly (A).
- Walk to the Upper Floor (B).

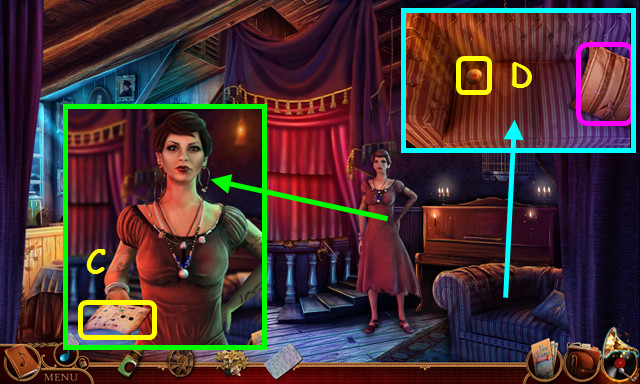
- Talk to Luna and take the recipe (C).
- Move the cushion and take the STONE EYE (D).
- Walk left to the Balcony.

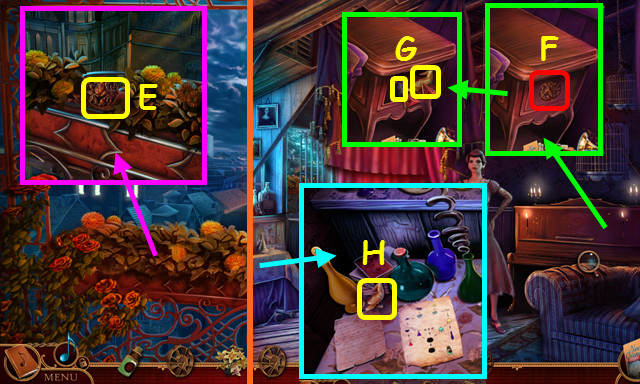
- Move the flowers; take the ROSE EMBLEM (E).
- Walk down.
- Place the ROSE EMBLEM on the drawer (F).
- Open the drawer; take the MARBLE EGG and the 1/2 GOLD BIRD (G).
- Take the 2/2 GOLD BIRD and note the potions area (H).
- Walk to the Balcony.

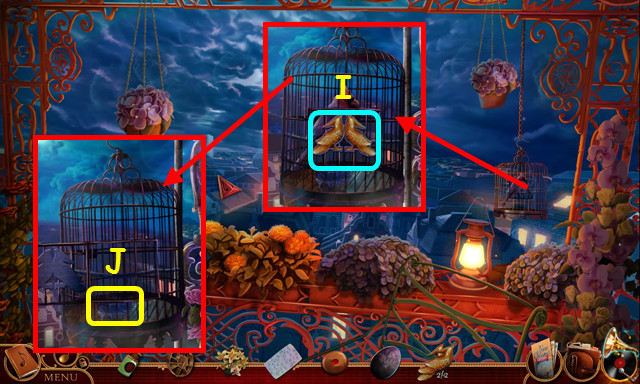
- Place the 2 GOLD BIRDS on the cage (I).
- Open the cage and take the BLUE PALM LEAF (J).
- Walk down and select the potions area.

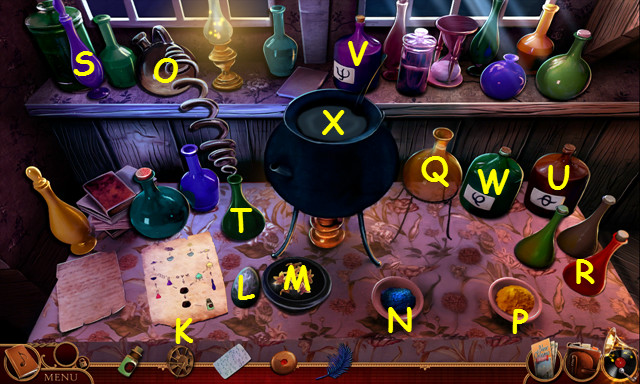
- Read the recipe (K).
- Place the STONE EGG (L).
- Place the YELLOW LILIES in the mortar (M) and use the stone egg on it.
- Place the BLUE PALM LEAF in the mortar and use the stone egg on it.
- Place the blue powder (N) in the flask (O).
- Place the yellow powder (P) in the flask (Q).
- Use the red bottle (R) on the blue flask (O).
- Use the purple bottle (S) on the yellow flask (Q).
- Select the bottle (T) and the former yellow flask (Q).
- Select the brown jug (U), the purple jug (V), and the green jug (W).
- Pour the RESTORATION SOLUTION in the cauldron (X).
- Dip the SONG OF STONE TABLET into the cauldron to make the SONG OF WATER TABLET.
- Walk down.

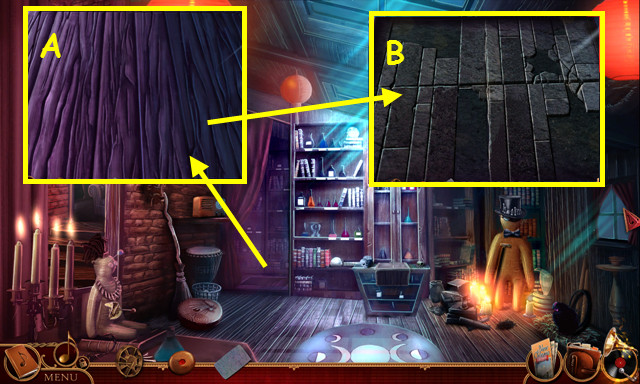
- Open the wood panel (A).
- Open the second panel (B).
- Enter the Cellar.

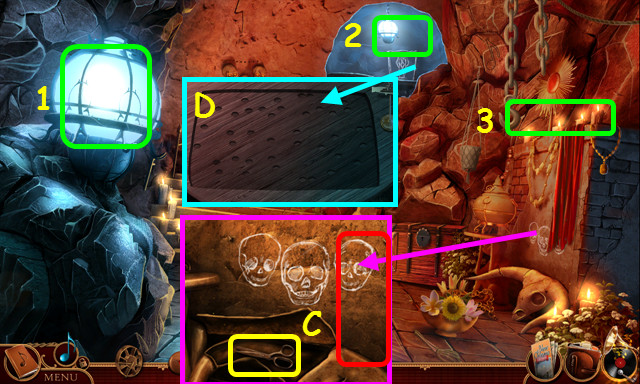
- Select the lights (1-3).
- Move the curtain, open the bone, and take the SCISSORS (C).
- Place the SONG OF WATER TABLET on the table (D).
- Travel to the Mardi Gras Stage.

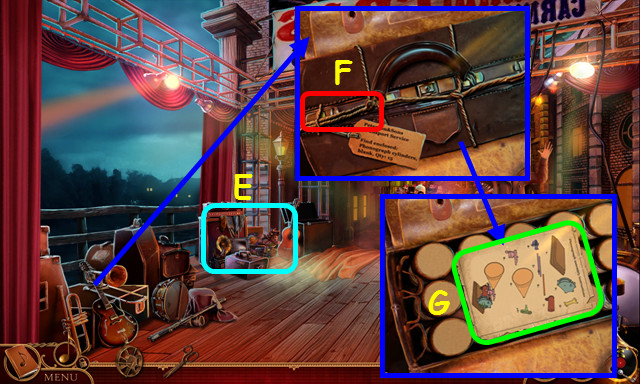
- Note the upper-left corner of the stage (E).
- Use the SCISSORS on the twine (F).
- Open the case and read the instructions (G).

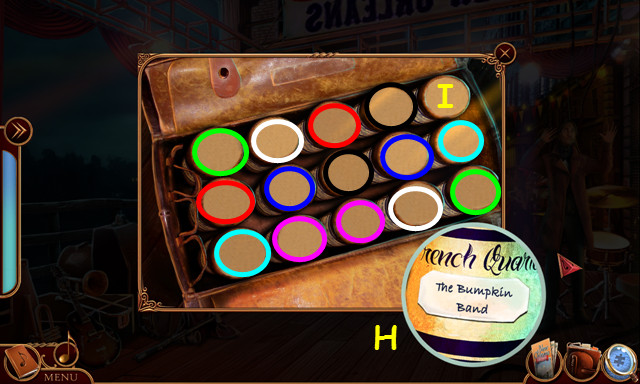
- Hover your mouse over a cylinder to read the name (H).
- Select matching pairs of cylinders (color-coded).
- Take the PHONOGRAPH RECORD (I).
- Open the PHONOGRAPH RECORD and take out the EMPTY PHONOGRAPH CYLINDER.
- Select the upper left corner of the stage.

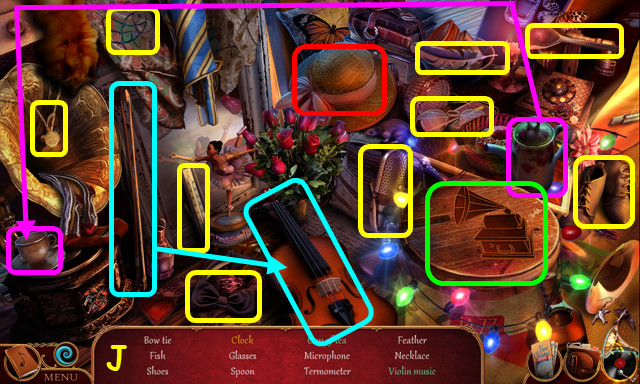

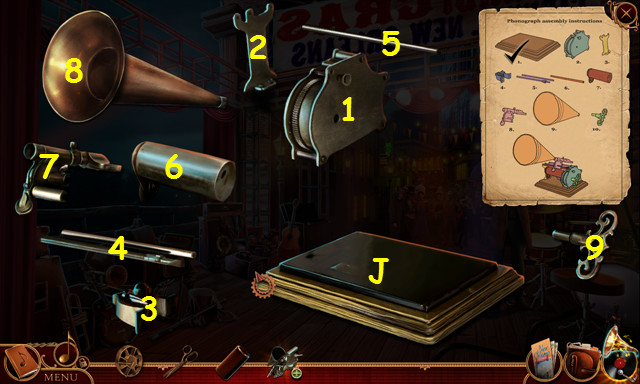
- Play the HOP to earn the PHONOGRAPH PARTS (J).
- Look at the PHONOGRAPH PARTS in your inventory.
- Place the parts in numerical order (1-9) on the platform (K).
- This will make the RECORDING EQUIPMENT.
- Travel to the Balcony.

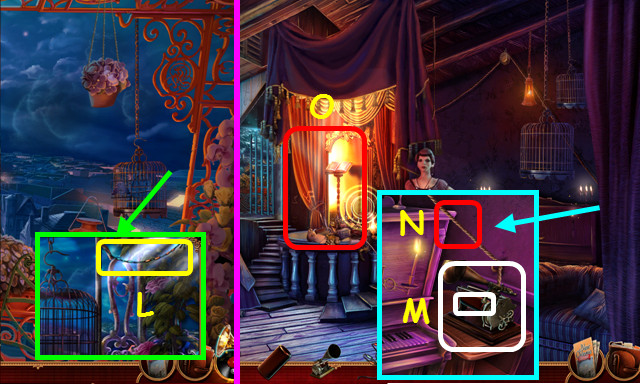
- Use the SCISSORS twice to take the COLORED STRING (L).
- Walk down.
- Place the RECORDING EQUIPMENT on the table; place the EMPTY PHONOGRAPH CYLINDER on the recording equipment (M).
- Use the SCISSORS on the rope (N).
- Select the platform (O).

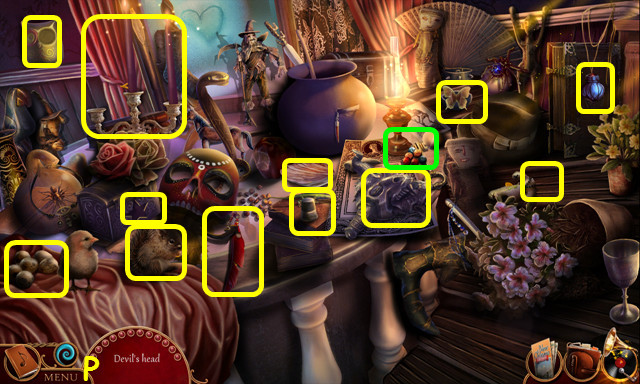
- Play the HOP to earn the BEADS (P).
- Place the BEADS on the COLORED STRING to make the NECKLACE.
- Return to the Cellar.

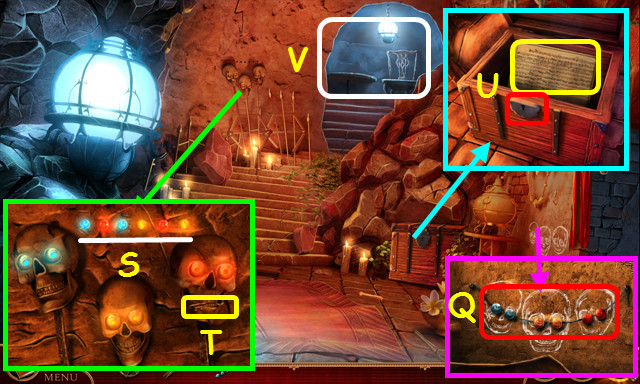
- Place the NECKLACE (Q) and STONE EYE (R).
- Swap the eyes to match the necklace (S). Press the eyes in the sequence on the wall.
- Take the CHEST KEY (T).
- Use the CHEST KEY in the lock, open the chest, move the papers, and take the NOTE SHEET (U).
- Select the alcove (V).

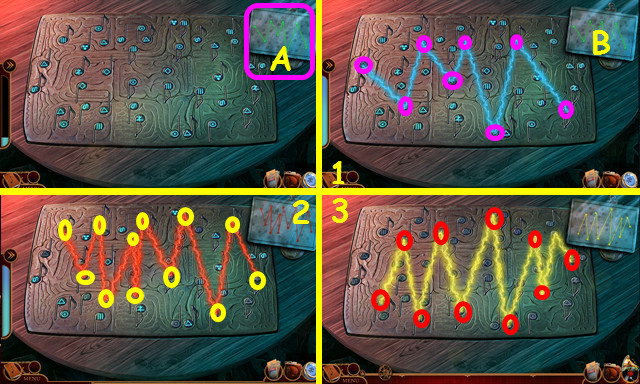
- Hang the NOTE SHEET on the clip (A).
- Select the notes on the tablet that correspond to the points on the paper (B).
- There are 3 patterns to complete.
- Take the SONG OF WATER TABLET.
- Walk to the Upper Floor.

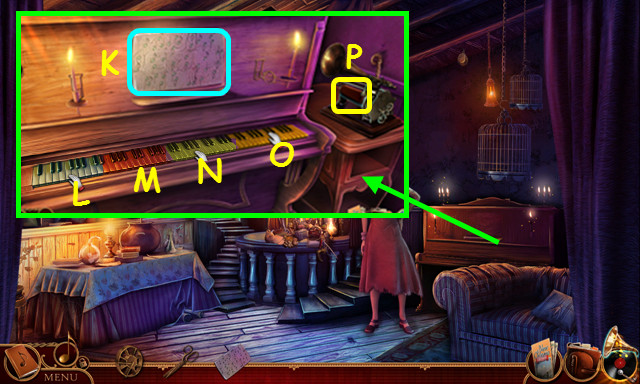
- Place the SONG OF WATER TABLET on the music stand of the piano (K).
- Watch and repeat the sequences of piano keys.
- There are 3 sets of 4 keys.
- Sequences: (M, M, L. M), (M ,N, M, N), and (O, N, L, N).
- Take the RECORDED SONG OF WATER (P).
- After talking to Luna, walk down.

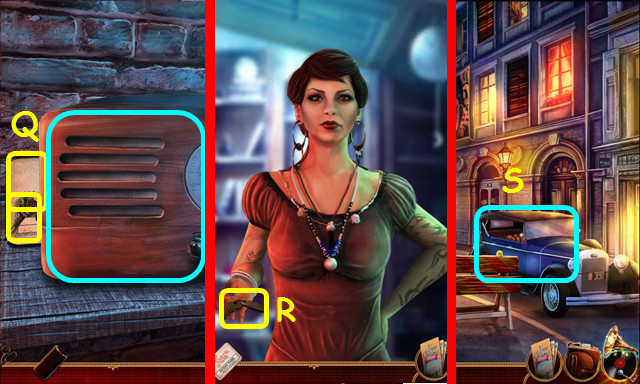
- Move the radio; take the HAIRPIN and the SAILOR’S CLUB PASS (Q).
- Take the CAR KEYS (R).
- Walk down and left.
- Use the CAR KEYS on the car (S).

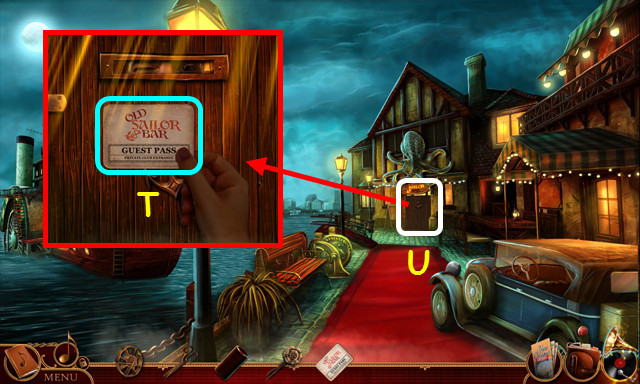
- Use the SAILOR’S CLUB PASS on the door (T).
- Enter the Old Sailor Bar (U).

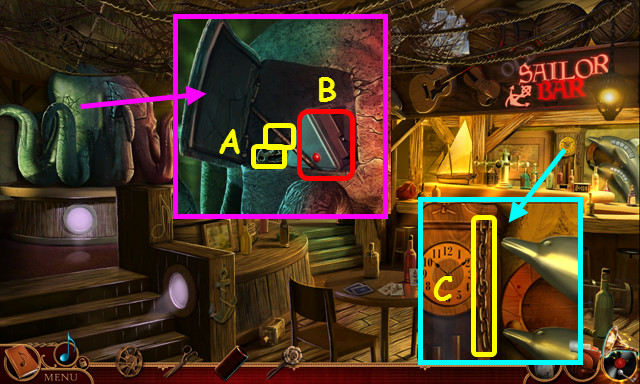
- Talk to the sailor thoroughly.
- Open the panel; take the WINCH KEY and the 1/3 CHAIN (A).
- Note the projector (B).
- Take the 2/3 CHAIN (C).

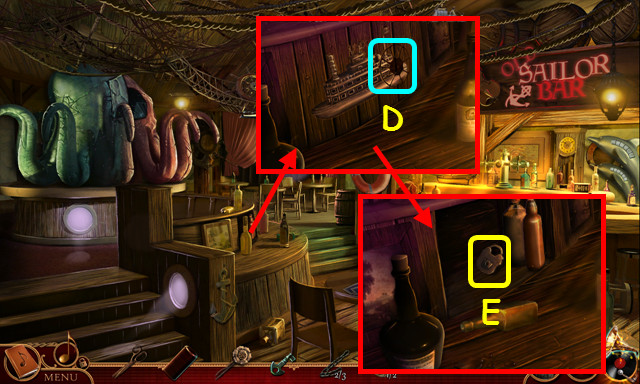
- Place the STEAMBOAT WHEEL on the steamboat (D).
- Move the bottles; take the 1/2 PADLOCK (E).
- Walk down.

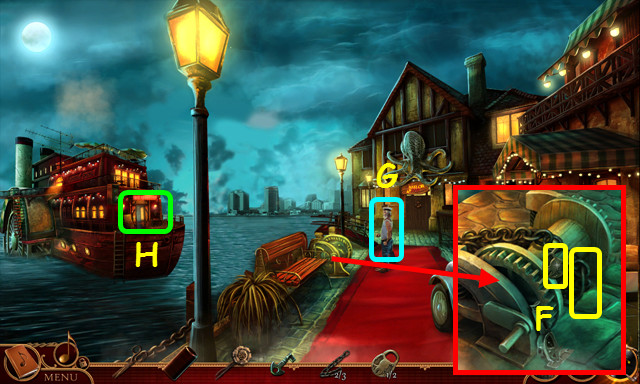
- Use the WINCH KEY on the lock; take the 3/3 CHAIN and the 2/2 PADLOCK (F).
- Use the 2 PADLOCKS on the 3 CHAINS to make the LONG CHAIN.
- Give the LONG CHAIN to the sailor (G).
- Enter the Steamboat Lounge (H).

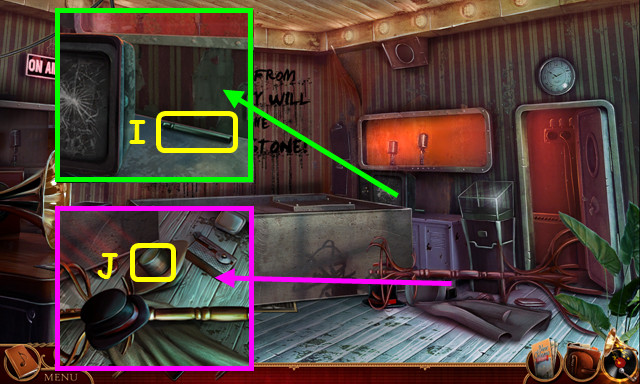
- Walk up the right stairs to the Steamboat Radio.
- Move the TV and take the JACK HANDLE (I).
- Move the hat and recorder; take the PROJECTOR LENS (J).
- Walk down twice.

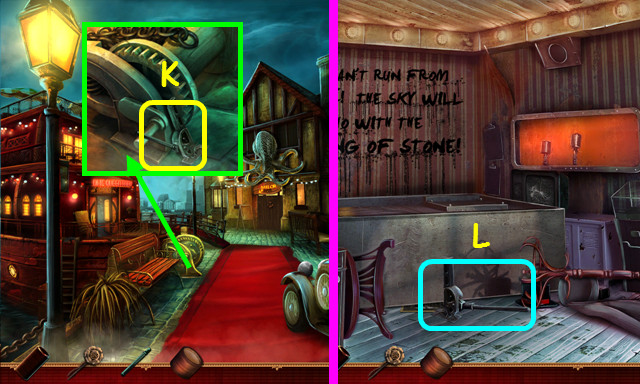
- Place the JACK HANDLE on the jack part to make the JACK (K).
- Return to the Steamboat Radio.
- Place the JACK next to the console and use the handle twice (L).

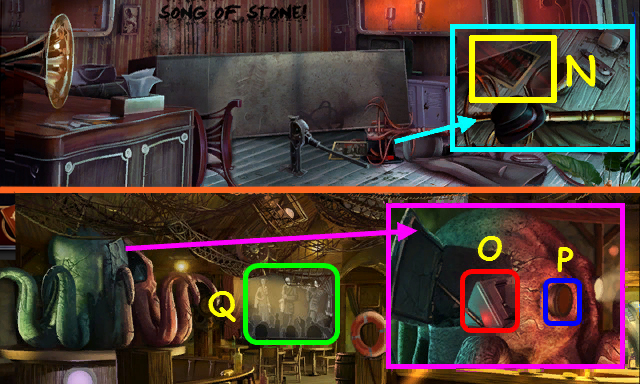
- Take the DAMAGED PAPER, the VALVE, and the SAILOR SLIDES (N).
- Return to the Old Sailor Bar.
- Place the SAILOR SLIDES in the projector (O).
- Remove the burnt lens; place the PROJECTOR LENS in the opening (P).
- Pull down the screen, and then select the screen (Q).

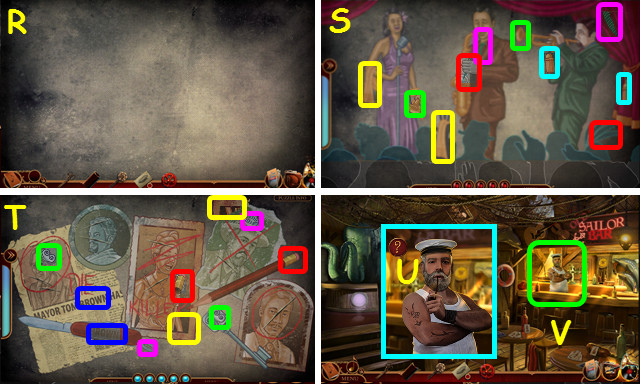
- Select the blank screen (R).
- Move the items to the correct locations (color-coded) (S, T).
- Talk to the sailor (U).
- Select the sailor behind the bar (V).

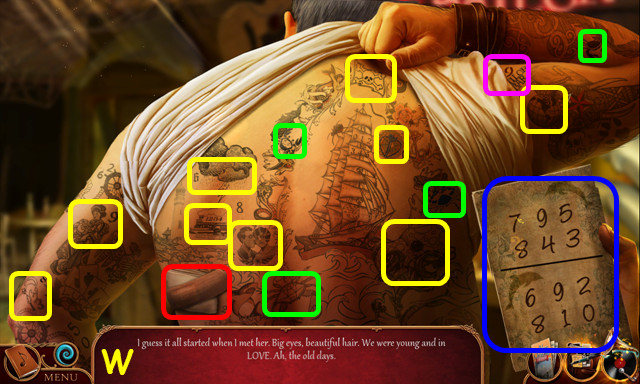
- Play the HOP (W).
- You will earn the SAFE CODE.

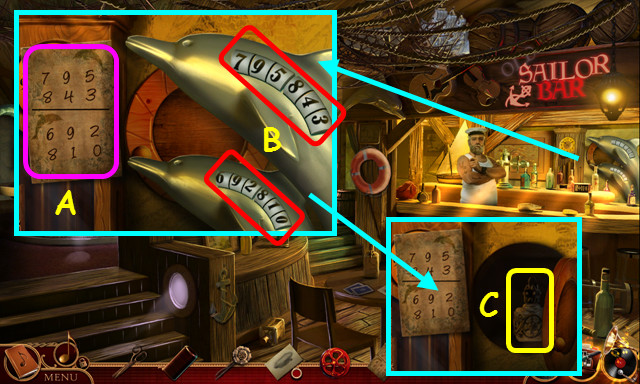
- Place the SAFE CODE next to the dolphins (A).
- Change the numbers to match the code (B).
- Open the door; take the INK RESTORATION SOLUTION (C).
- Look at the DAMAGED PAPER; use the INK RESTORATION SOLUTION on the smear.
- Travel to the Zeppelin Interior.

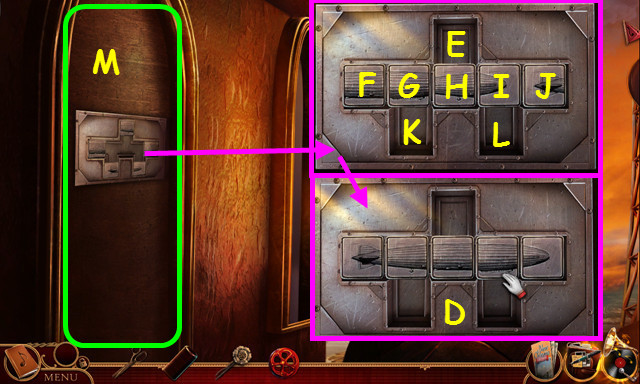
- Move the blocks to complete the zeppelin (D).
- Solution: (I-L), (H-E), (G-I), (E-K), (I-E), (J-G), (L-J), (E-L), (G-E), (F-I), (E-F), (K-G), (I-H), and (L-I).
- Open the door and walk left (M).

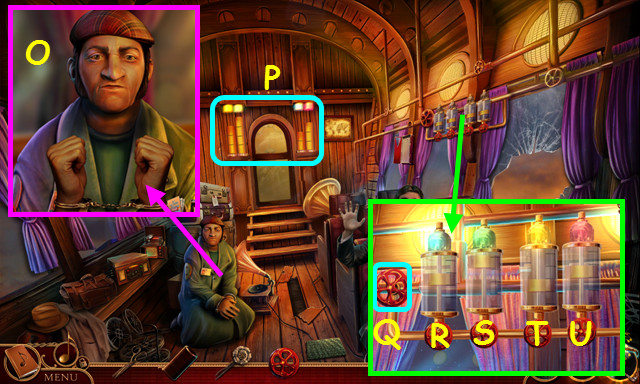
- Give the HAIRPIN to the Taxi Driver and talk to him (O).
- Note the cylinder’s height and the color above each (P).
- Place the VALVE on the device and turn it (Q): Rx1, Sx3, Tx2, and Ux2.
- Walk forward.

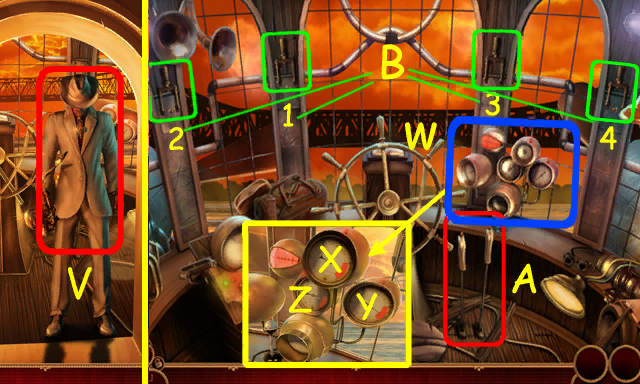
- Talk to the man in white (V).
- In the Zeppelin Cockpit (B), click on gauges (W): X, Y, Z.
- Work the levers (A) 4 times and pull down switches 1-4 (B).

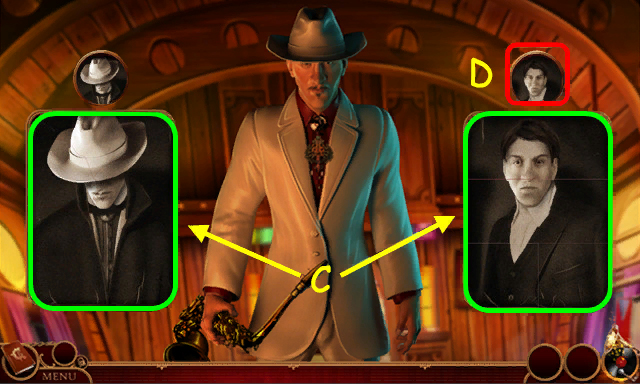
- Restore the 2 photos (C).
- Select the conversation icon on the right (D).

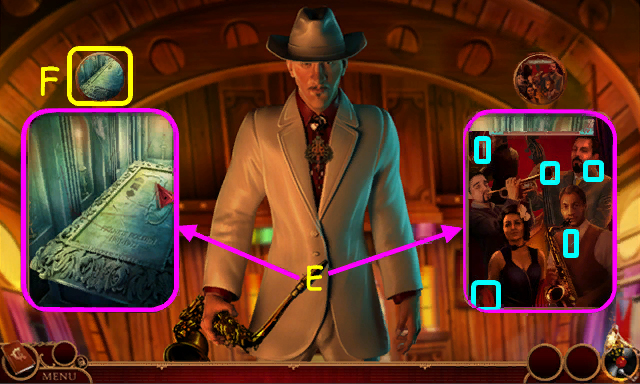
- Restore the 2 photos (E).
- Select the conversation icon on the right (F).

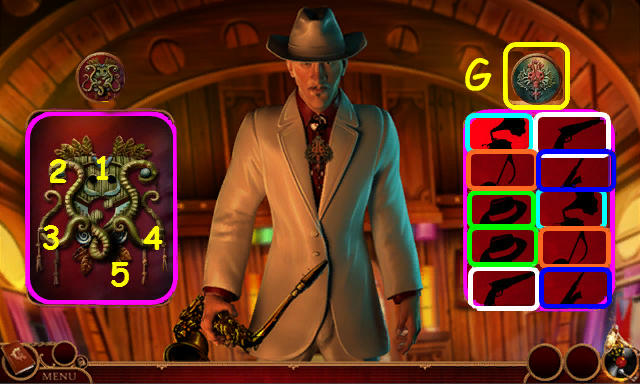

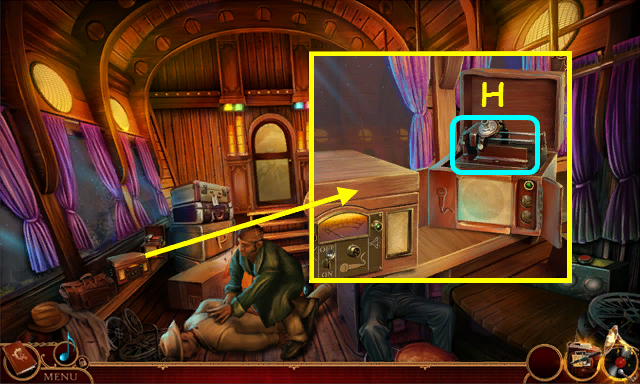
- Select the amulet pieces 1-4.
- Select matching pairs to uncover the amulet (color-coded).
- Select the left speech icon (G).
- Place the RECORDED SONG OF WATER on the device (H).
- Congratulations! You have completed Cadenza: Music, Betrayal, and Death!


 Lost Legends: The Weeping Woman Walkthrough, Guide, & Tips
 Enigma Agency: The Case of Shadows Walkthrough, Guide, & Tips
 Dreampath: The Two Kingdoms Walkthrough, Guide, & Tips
 Haunting Mysteries: The Island of Lost Souls Walkthrough, Guide, & Tips
 Tales from the Dragon Mountain: The Strix Walkthrough, Guide, & Tips