Dark Strokes: The Legend of the Snow Kingdom Walkthrough, Guide, & Tips
Dark Strokes: The Legend of the Snow Kingdom Walkthrough

Welcome to the Dark Strokes: The Legend of the Snow Kingdom Walkthrough
Enter the enchanted realm of the Snow Kingdom!
Whether you use this document as a reference when things get difficult or as a road map to get you from beginning to end, we’re pretty sure you’ll find what you’re looking for here.
This document contains a complete Dark Strokes: The Legend of the Snow Kingdom game walkthrough featuring annotated screenshots from actual gameplay!
We hope you find this information useful as you play your way through the game. Use the walkthrough menu below to quickly jump to whatever stage of the game you need help with.
Remember to visit the Big Fish Games Forums if you find you need more help. Have fun!
This walkthrough was created by David Becker, and is protected under US Copyright laws. Any unauthorized use, including re-publication in whole or in part, without permission, is strictly prohibited.
General Tips
- This is the official guide for Dark Strokes: The Legend of the Snow Kingdom.
- This guide will not mention each time you have to zoom into a location; the screenshots will show each zoom scene.
- We will use the acronym HOP for Hidden-object puzzles. Interactive items will be color-coded.
- Use the map to travel to a location.
Chapter 1: The Clearing

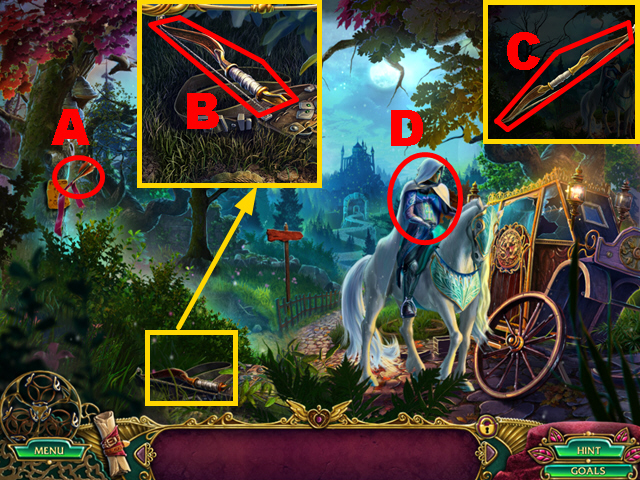
- Take the ARROW (A).
- Remove 2 twigs; take the BOW (B).
- Place the ARROW on the BOW (C) to acquire the BOW AND ARROW.
- Use the BOW AND ARROW (D).

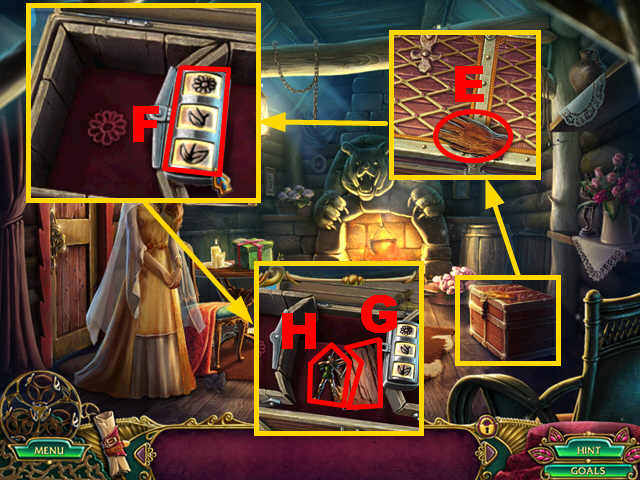
- Take the GLOVE (E); open the chest.
- Remove 5 items; enter the correct code (F).
- Take the PIECE OF PAPER (G) and HUNTER FIGURINE (H).

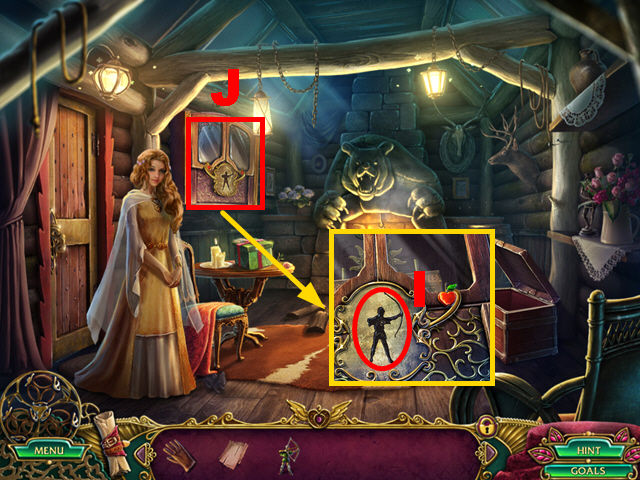
- Place the HUNTER FIGURINE (I).
- Examine the cupboard (J).

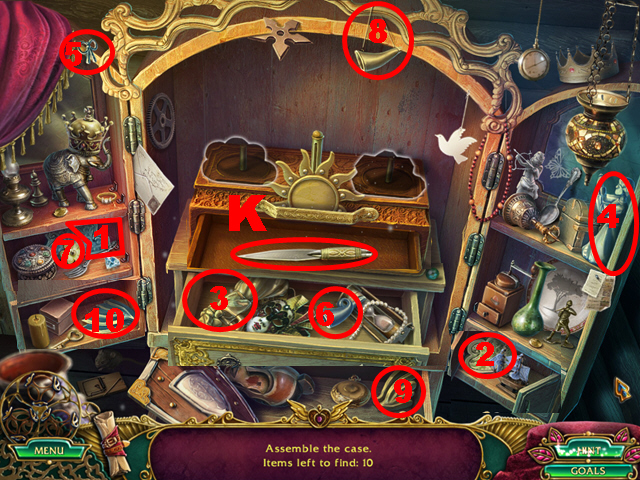
- Play the HOP.
- Solution: 1-10.
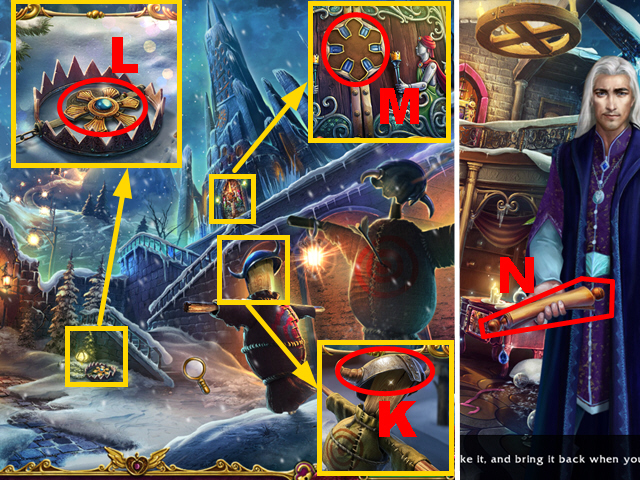
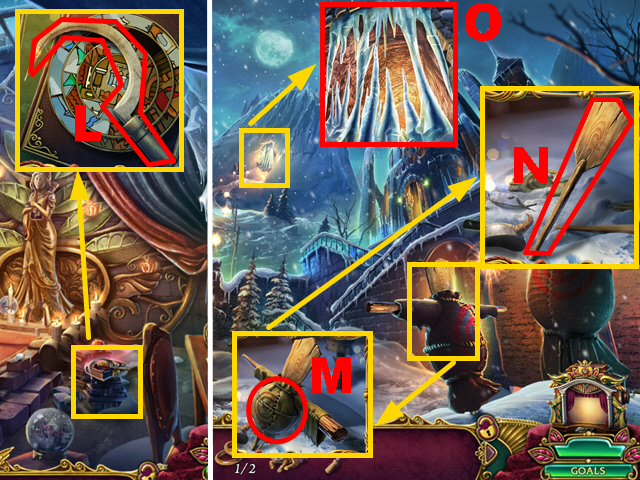
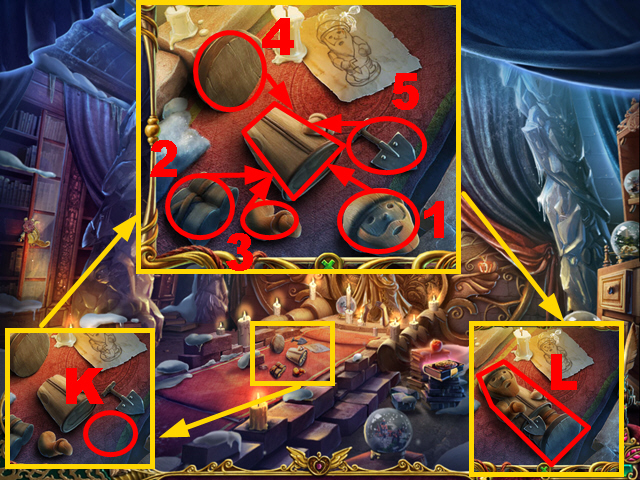
- Take the KNIFE (K).

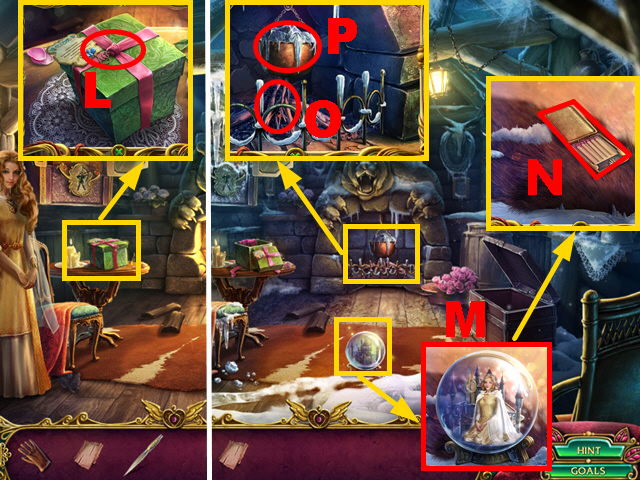
- Use the KNIFE (L).
- Take the snow globe (M) and MATCHES (N).
- Use the PIECE OF PAPER and MATCHES (O); collect the HOT WATER with the GLOVE (P).

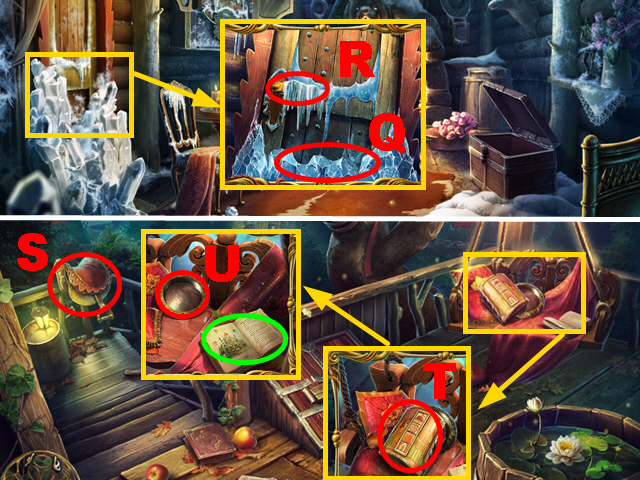
- Use the HOT WATER (Q); pull the handle (R).
- Turn left.
- Take the SADDLE (S), CASE (T), and BOWL (U); read the book (green).
- Turn left.

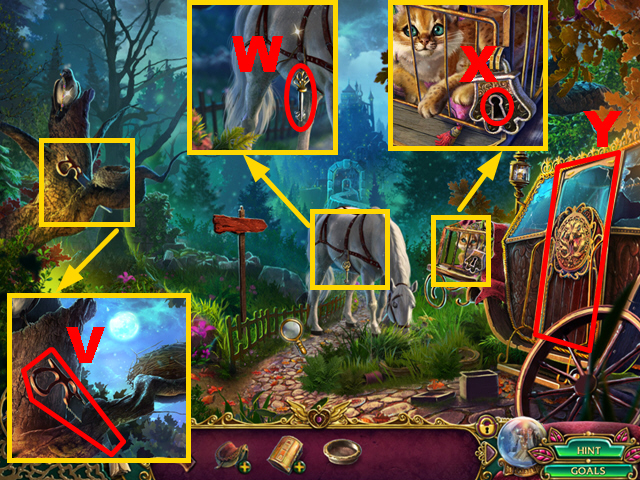
- Take the SAW (V) and CAGE KEY (W).
- Use the CAGE KEY (X); turn the key twice.
- Open the door (Y).

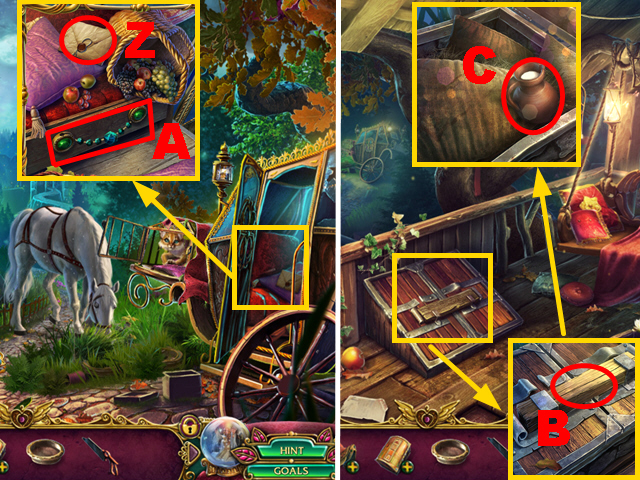
- Read the letter (Z); try to open the drawer (A).
- Walk down.
- Use the SAW (B); take the CREAM (C).
- Turn left.

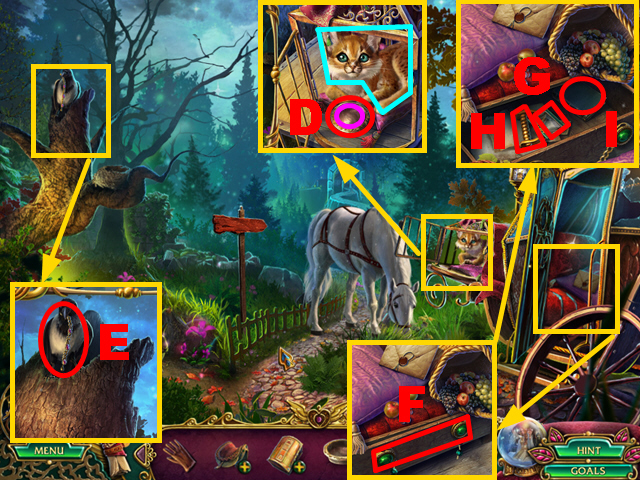
- Place the BOWL (D); use the CREAM (purple).
- Take the LYNX (blue).
- Use the LYNX (E) to acquire the CHAIN.
- Place the CHAIN (F).
- Take the STORY SLIDES (G) and STIRRUP (H).
- Read the book (I).

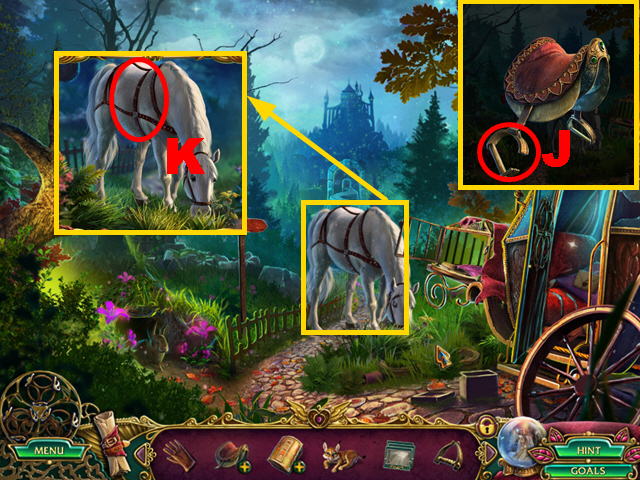
- Place the STIRRUP on the SADDLE (J).
- Place the SADDLE (K).
- Move forward.

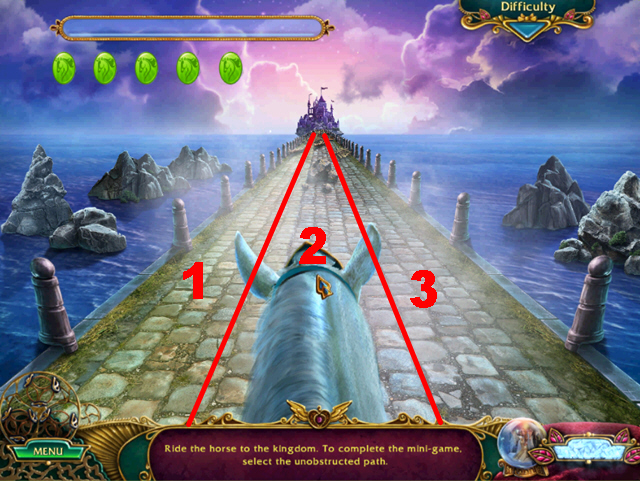
- Play the mini-game.
- The solution for hard and casual mode are the same; the horse will move quicker in hard mode.
- To solve this puzzle, switch between paths 1-3 to avoid obstacles.

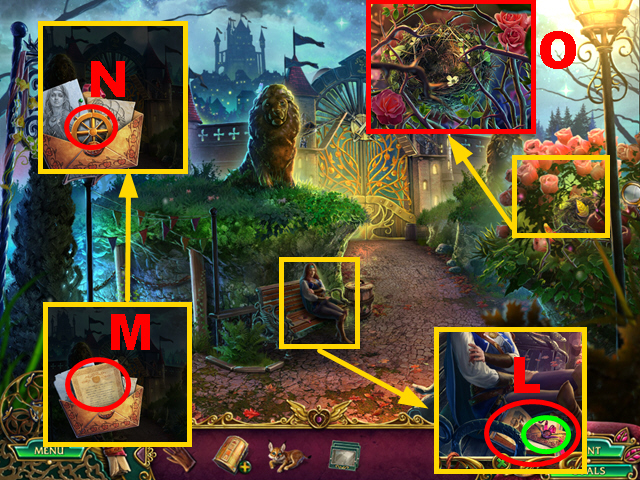
- Take the LETTER (green); read the book (L).
- Open the LETTER; take the note (M) and SHIP’S WHEEL (N).
- Remove the twigs with the GLOVE (O) to acquire GOLDEN LEAF 1/3.
- Turn left.

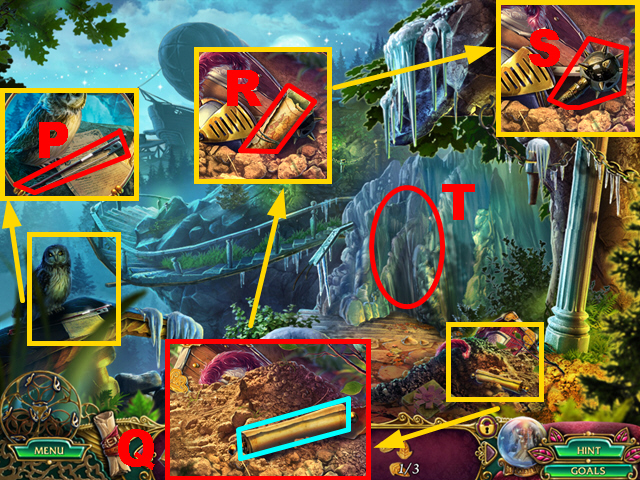
- Talk to the man.
- Take the VIOLIN BOW (P).
- Read the scroll (blue); use the LYNX (Q).
- Take the map (R) and MACE (S).
- Use the MACE three times (T).
- Move forward.

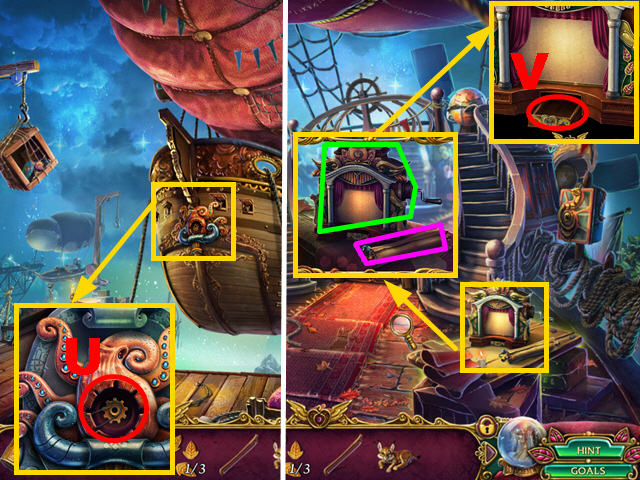
- Place the SHIP’S WHEEL (U).
- Move forward.
- Read the scroll (purple); take the device (green).
- Place the STORY SLIDES (V); you receive the LEVER.
- Walk down.

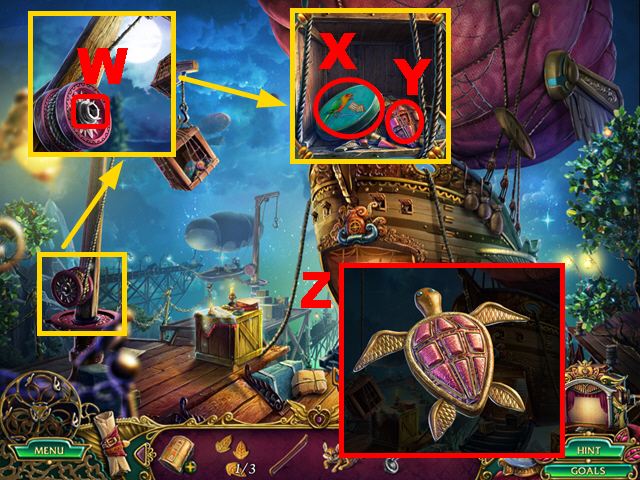
- Place the LEVER (W); take the BROKEN TURTLE (X) and CRACKERS (Y).
- Assemble the BROKEN TURTLE correctly (Z) to acquire the TURTLE.
- Move forward.

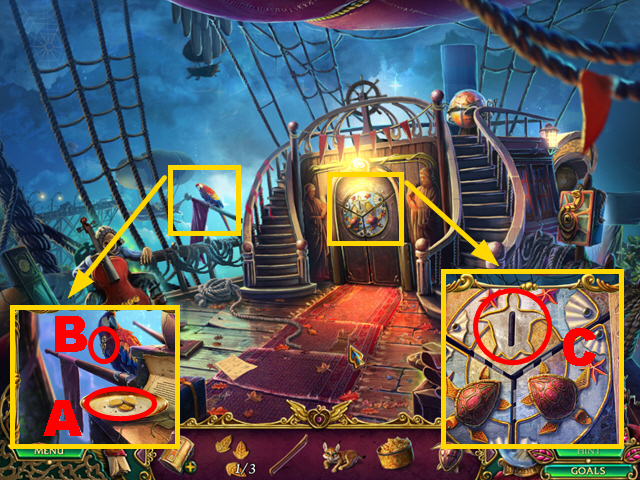
- Place the CRACKERS (A); take the COMPASS ARROW (B).
- Place the TURTLE (C).

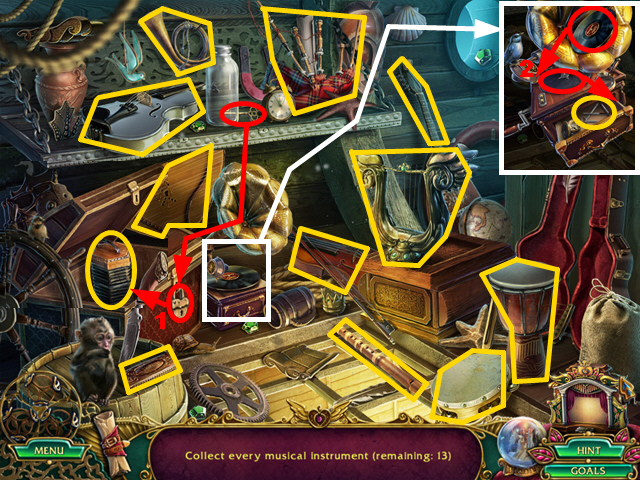
- Play the HOP.
- Solution: 1-2.
- You receive the LIRA.

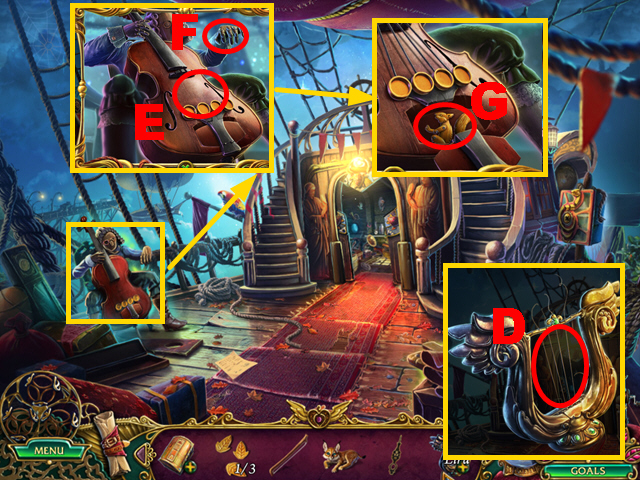
- Take 4 CELLOS STRINGS from the LIRA (D).
- Place 4 CELLO STRINGS (E) and VIOLIN BOW (F).
- Take the SQUIRREL FIGURINE (G).
- Walk down.

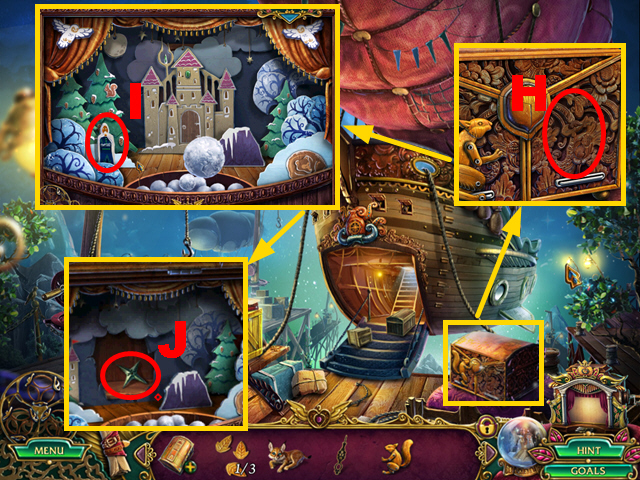
- Place the SQUIRREL FIGURINE (H).
- Play the mini-game.
- To solve this puzzle, hit the wizard (I) with snowballs five times.
- Take the COMPASS STAR (J).

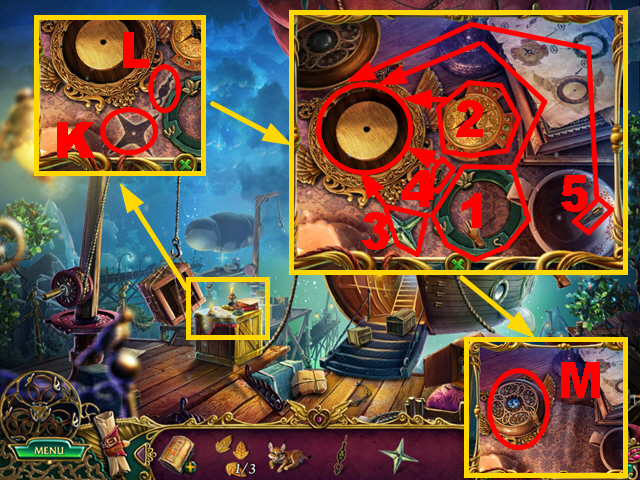
- Place the COMPASS STAR (K) and COMPASS ARROW (L).
- Assemble the compass correctly: 1-5.
- Close the compass; take the COMPASS (M).
- Move forward.

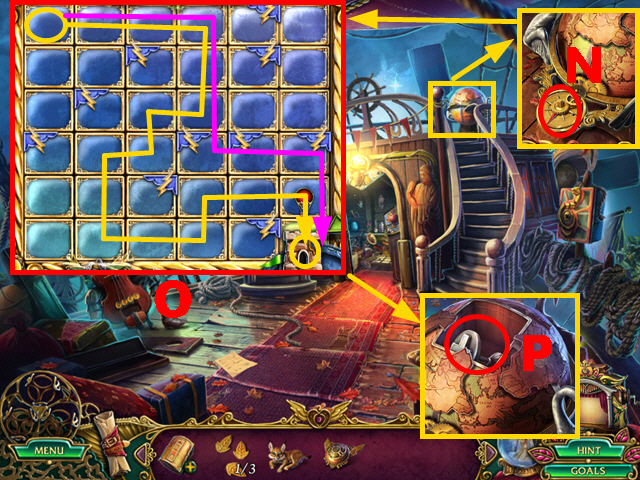
- Place the COMPASS (N).
- Play the mini-game (O).
- Hard solution: Yellow line.
- Casual solution: Purple line.
- Take the FIRST-AID KIT KEY (P).

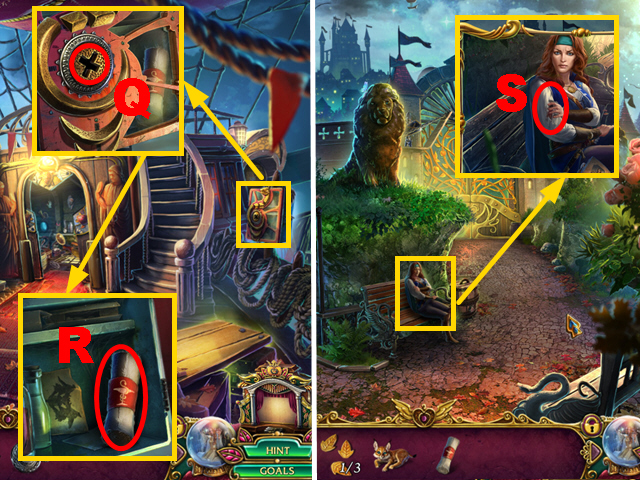
- Use the FIRST-AID KIT KEY (Q); take the BANDAGE (R).
- Walk down three times.
- Use the BANDAGE (S); you receive the GATE KEY.
Chapter 2: The Fair

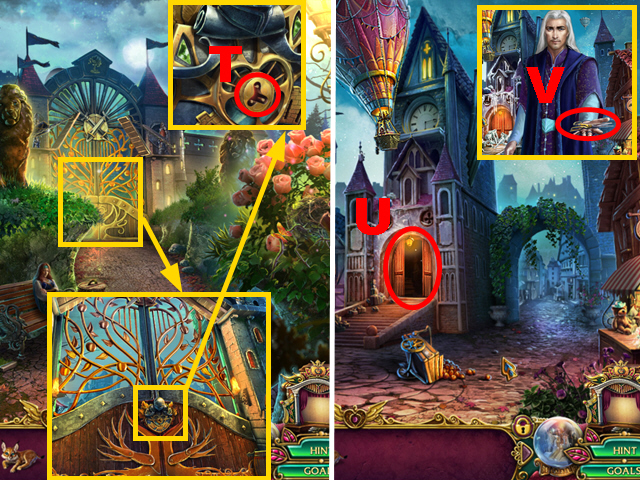
- Use the GATE KEY (T); turn it.
- Move forward.
- Examine the door (U); try to open it.
- Take the SCISSORS (V).

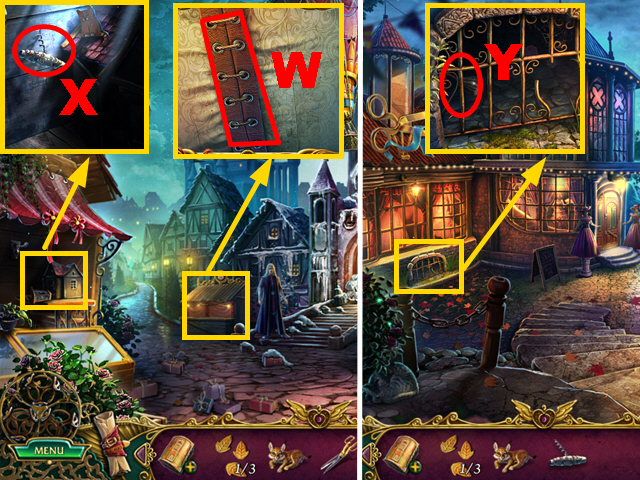
- Use the SCISSORS (W).
- Take the CORKSCREW (X).
- Turn right.
- Collect the FEATHER DUSTER with the LYNX (Y).
- Walk down, turn left.

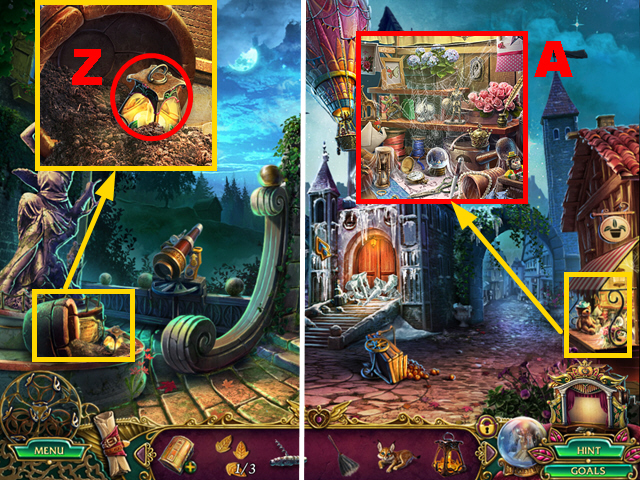
- Take the LANTERN (Z).
- Walk down.
- Use the FEATHER DUSTER (A).

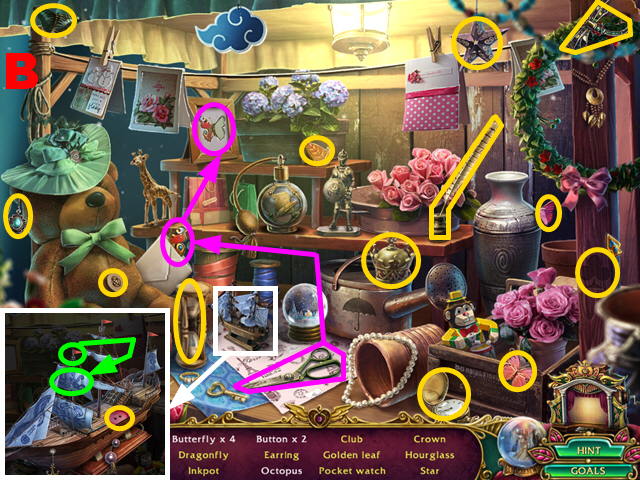
- Play the HOP.
- You receive GOLDEN LEAF 2/3 (B).

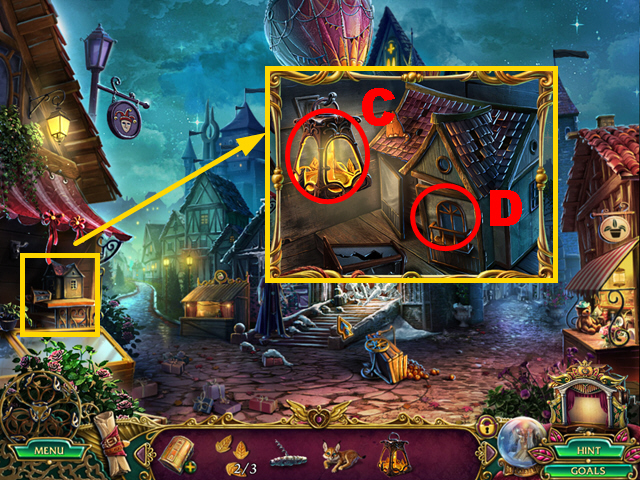
- Place the LANTERN (C).
- Examine the house (D).

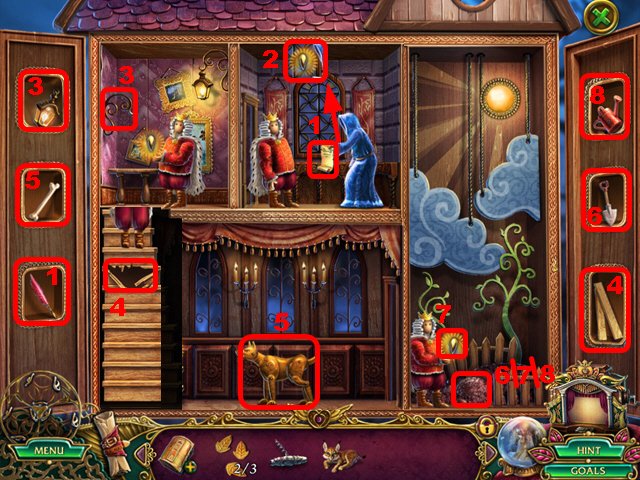
- Play the mini-game.
- Solution: 1-8.
- You receive the GOLDEN LEAF 3/3.
- Turn left.

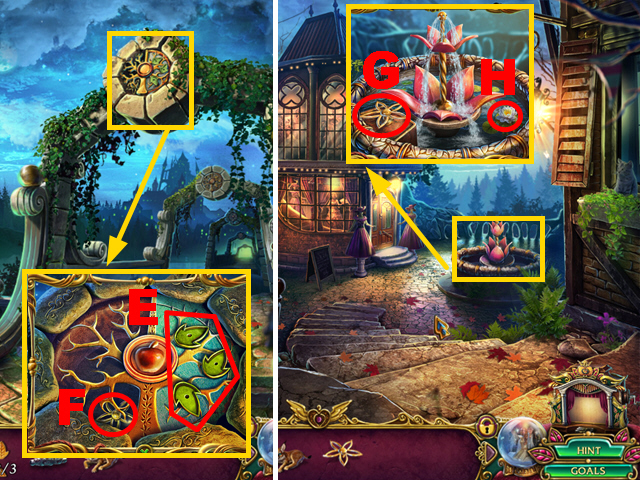
- Place 3 GOLDEN LEAVES (E); take the VALVE HANDLE (F).
- Walk down, turn right.
- Place the VALVE HANDLE (G); turn it.
- Take the WATER LILY (H).
- Walk down.

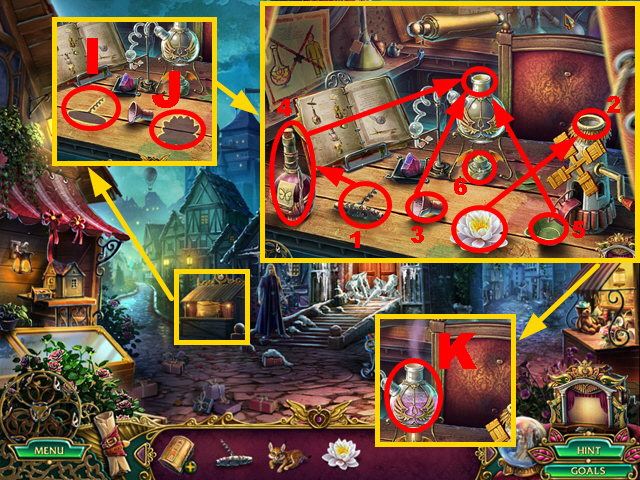
- Place the CORKSCREW (I) and WATER LILY (J).
- Mix the potion: 1-6.
- Take the LEVITATION POTION (K).

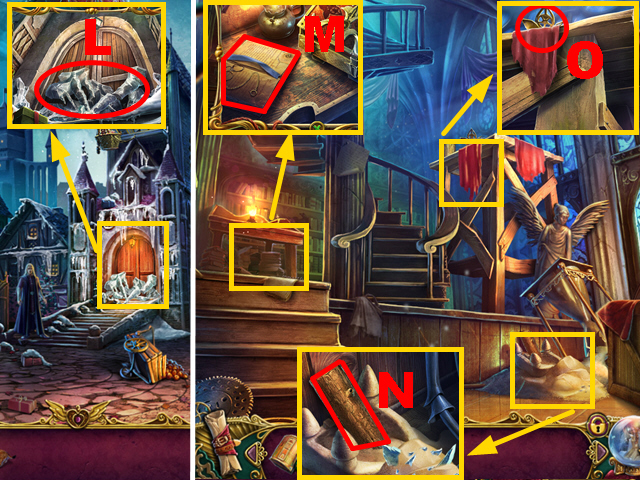
- Use the LEVITATION POTION (L).
- Move forward.
- Read the book (M).
- Take the LOG (N).
- Use the LYNX to acquire BUTTERFLY 1 (O).
- Go upstairs.

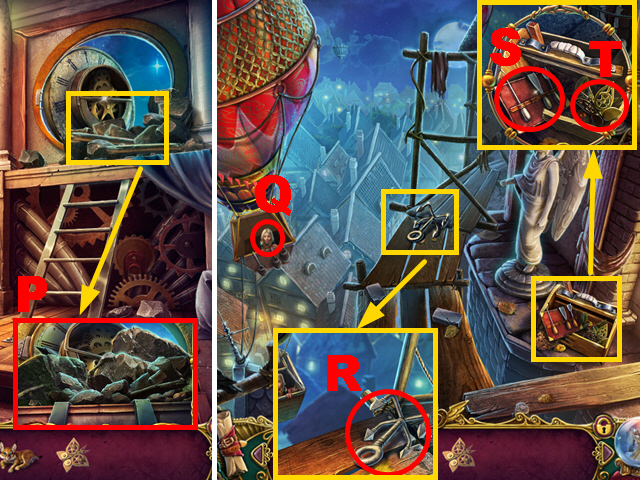
- Use the LEVITATION POTION (P).
- Move forward.
- Talk to the girl (Q).
- Take the HOOK (R), TOOL SET (S), and BUTTERFLY 2 (T).
- Walk down three times, turn left.

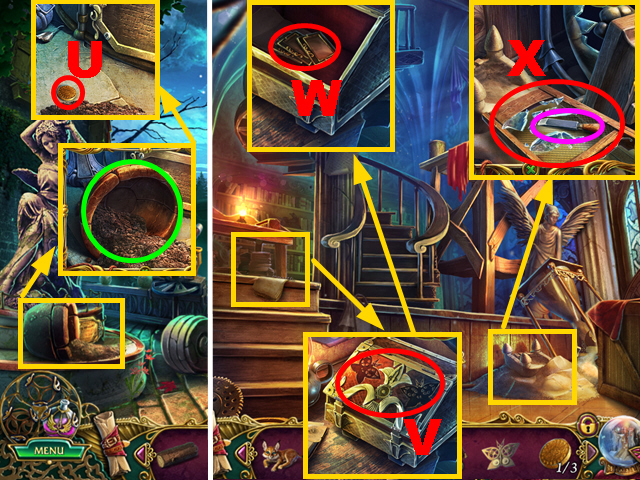
- Use the LEVITATION POTION (green); take COIN 1/3 (U).
- Walk down, move forward.
- Place BUTTERFLY 1 and BUTTERFLY 2 (V); take the STORY SLIDES (W).
- You receive the SIEVE.
- Use the SIEVE (X); take the CHISEL (purple).
- Go upstairs.

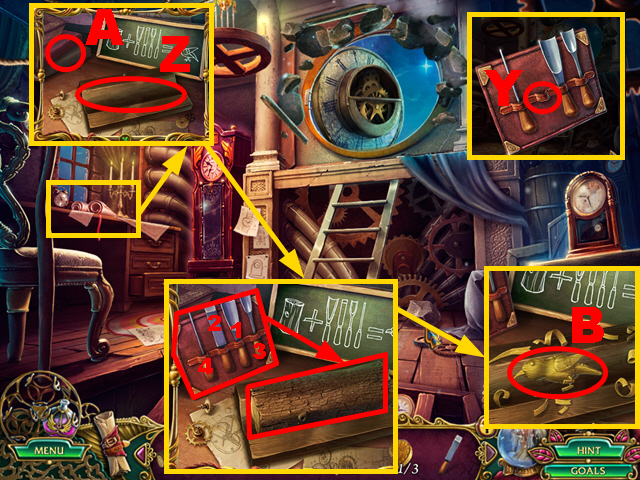
- Place the CHISEL on the TOOL SET (Y) to acquire the TOOLS.
- Place the LOG (Z) and TOOLS (A).
- Play the mini-game.
- Use the tools: 1-4.
- Take the CUCKOO (B).

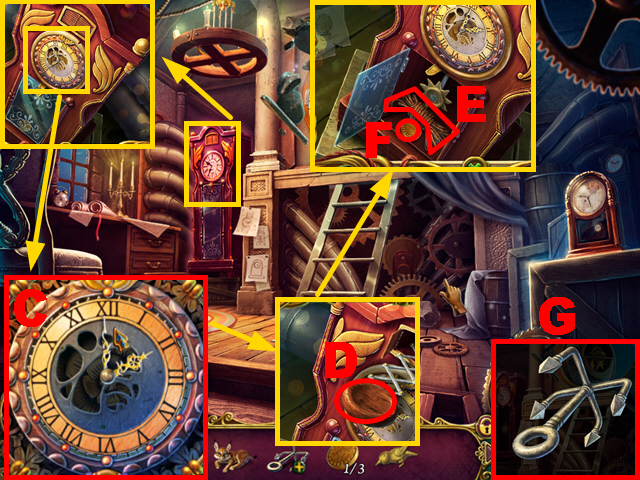
- Enter the correct time (C).
- Place the CUCKOO (D); take the ROPE (E) and COIN 2/3 (F).
- Connect the ROPE to the HOOK (G) to acquire the GRAPPLING HOOK.
- Move forward.

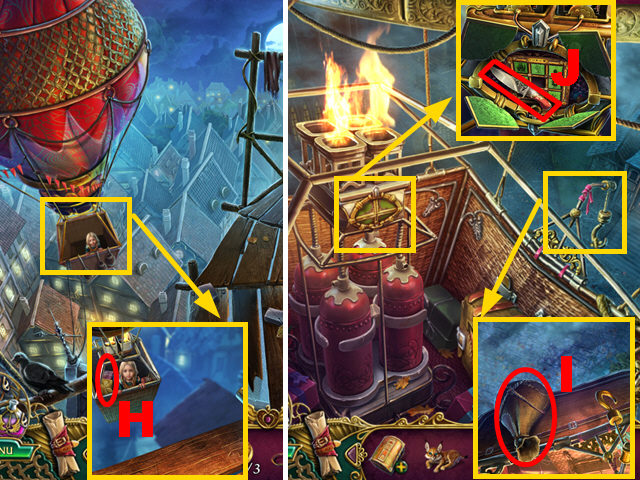
- Throw the GRAPPLING HOOK (H).
- Take the SACK OF SAND (I).
- Open the compartment; take the KNIFE (J).

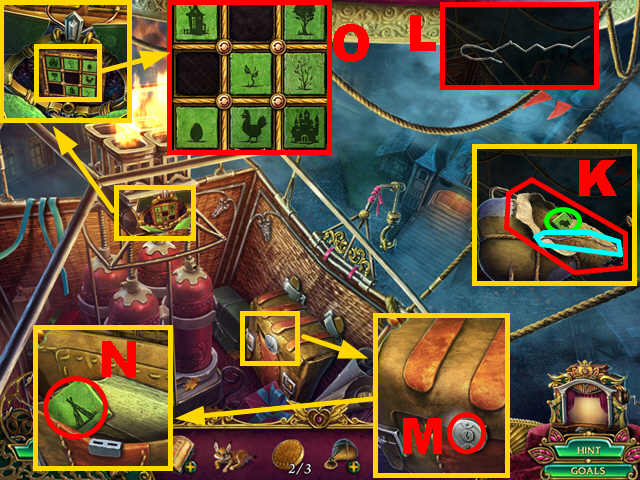
- Open the SACK OF SAND with the KNIFE (K); take the PUZZLE PIECE 1 (green) and WIRE (blue).
- Bend the WIRE twice; take the LOCK PICK (L).
- Place the LOCK PICK (M); open the bag.
- Take PUZZLE PIECE 2 (N).
- Place PUZZLE PIECE 1 and PUZZLE PIECE 2 (O).

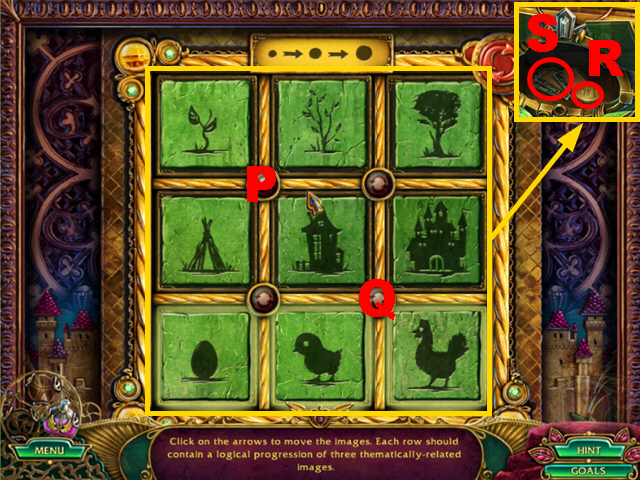
- Play the mini-game.
- Solution: P, Q, P.
- Take COIN 3/3 (R) and the STORY SLIDES (S); you acquire the ROPE.

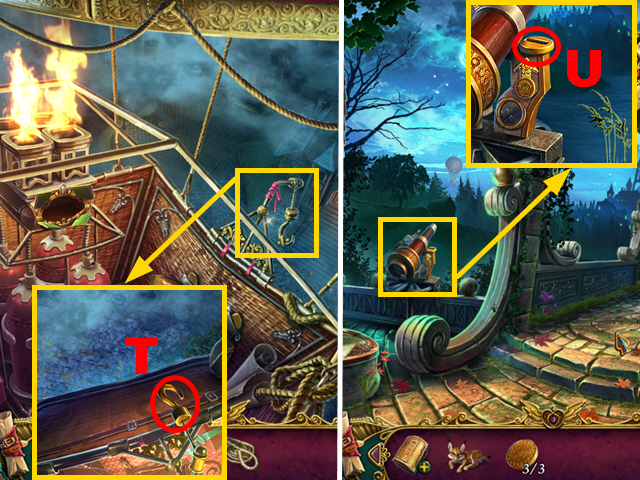
- Use the ROPE (T).
- Climb down.
- Turn left.
- Place 3 COINS (U).

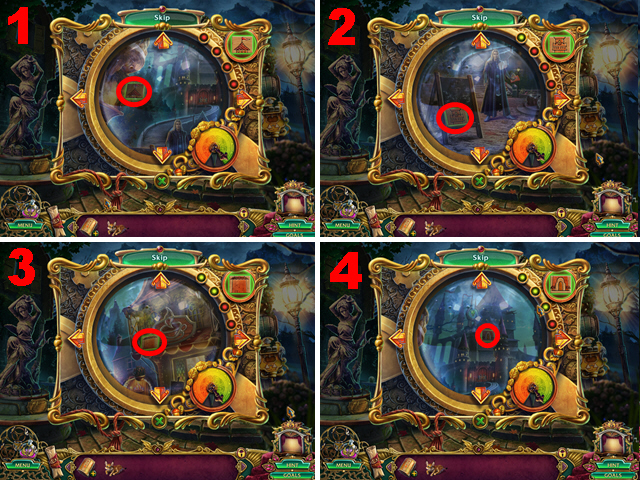
- Play the mini-game.
- Solution: 1-4.

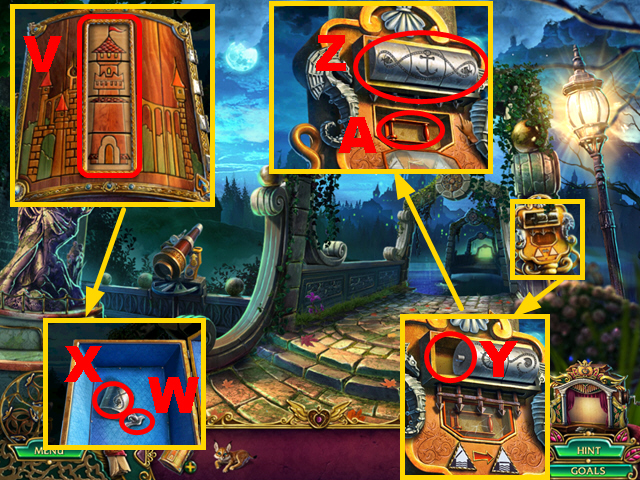
- Create the correct tower image on the CASE (V).
- Take the PIGEON (W) and BRIDGE CONTROL PART (X).
- Place the BRIDGE CONTROL PART (Y).
- Assemble the parts correctly (Z).
- Turn the lever (A).
- Move forward.
Chapter 3: The Square

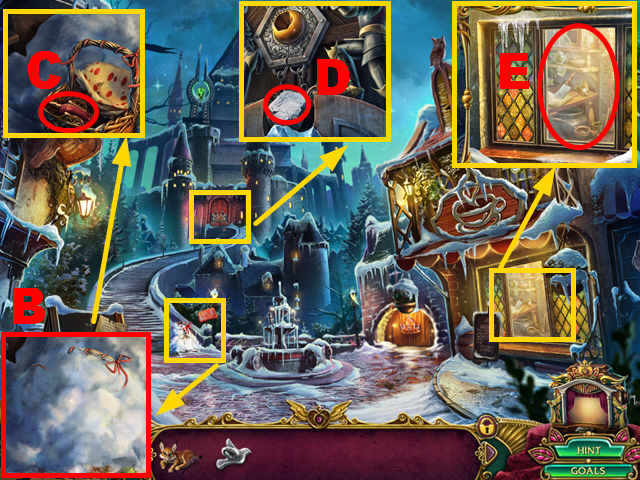
- Use the LYNX (B).
- Remove the cloth; take SMALL CANNON 1/2 (C).
- Take the STONE (D).
- Use the STONE three times (E).

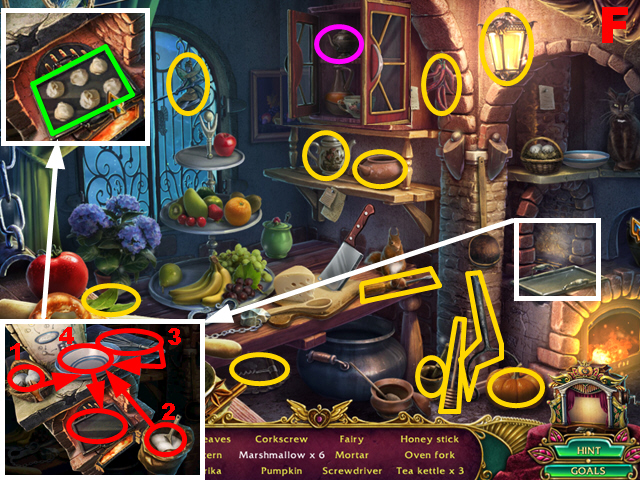
- Play the HOP.
- You receive the SCREWDRIVER and FAIRY 1 (F).
- Walk down.

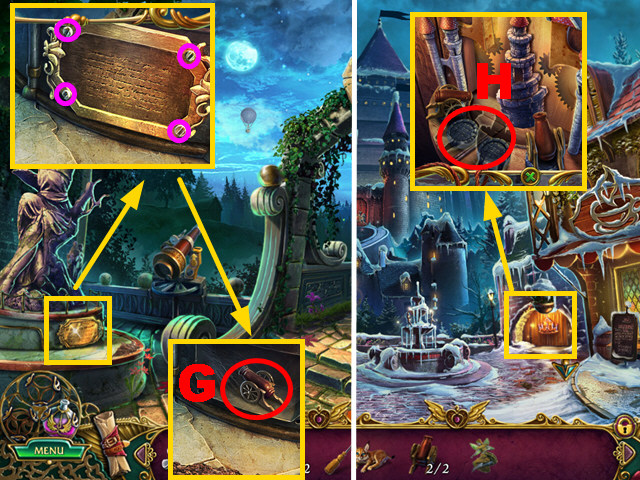
- Use the SCREWDRIVER (purple); take SMALL CANNON 2/2 (G).
- Move forward.
- Place 2 SMALL CANNONS (H).
- Move forward.

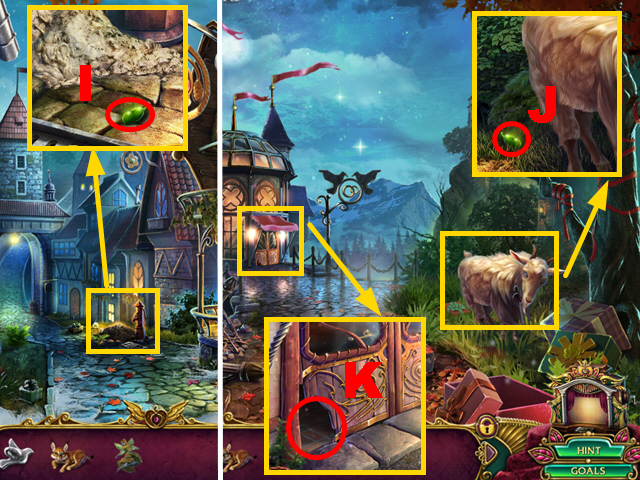
- Take BEAN 1/4 (I).
- Turn left.
- Take BEAN 2/4 (J).
- Use the LYNX (K).
- Move forward.

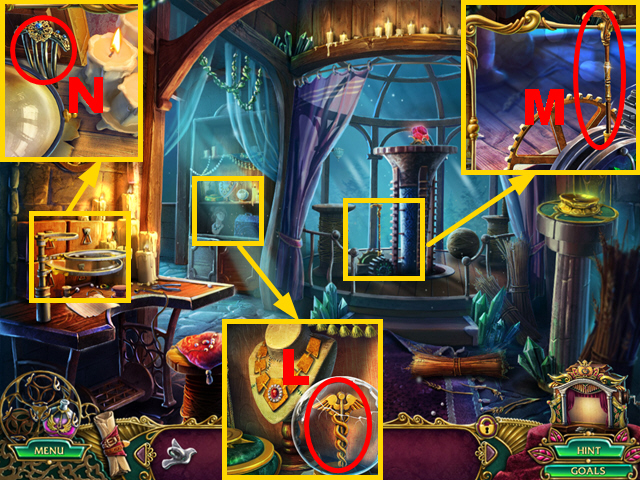
- Take the CADUCEUS (L).
- Move the lever (M) to acquire the BROKEN LEVER.
- Take the COMB (N).
- Walk down.

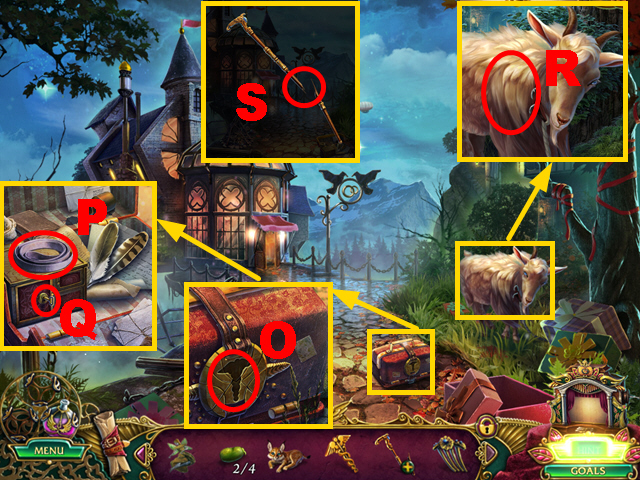
- Place the CADUCEUS (O); open the bag.
- Take the BINDER (P); try to take the key (Q).
- Use the COMB (R) to acquire the WOOL.
- Repair the BROKEN LEVER with the BINDER (S) to acquire the LEVER.
- Move forward.

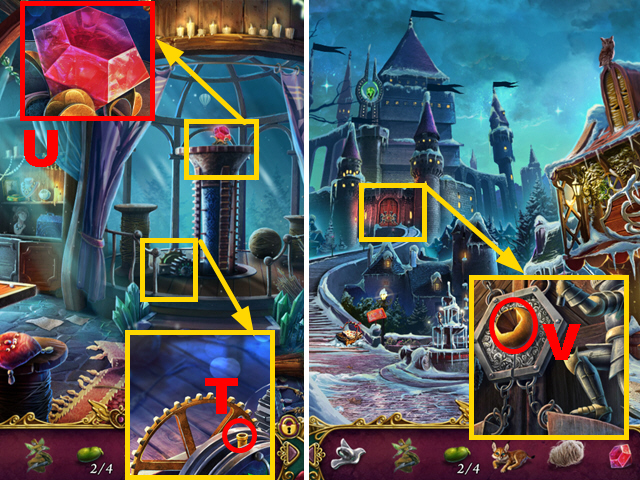
- Place the LEVER (T); pull it.
- Take the DIAMOND (U).
- Walk down three times.
- Place the DIAMOND (V).
- Turn left.

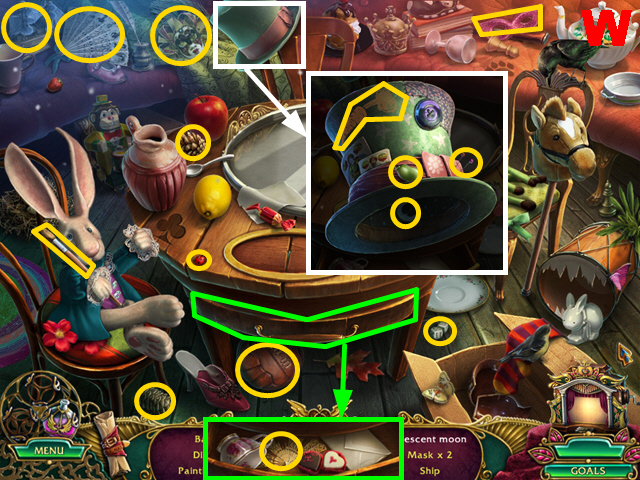
- Play the HOP.
- You receive the BROKEN FAN and BEAN 3/4 (W).

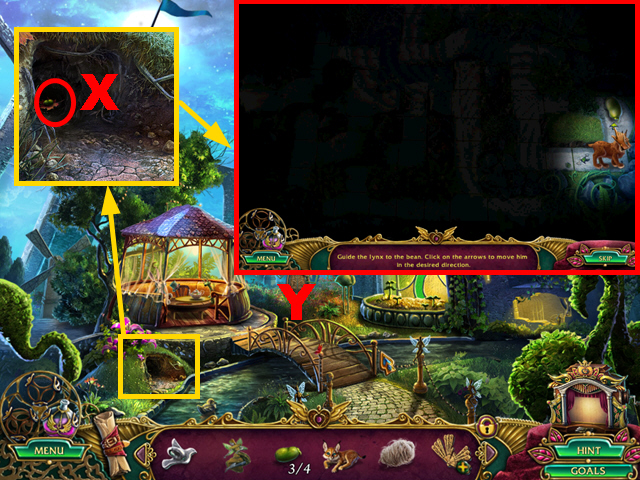
- Place the LYNX (X).
- Play the mini-game.
- Solution (Y): Right, down, right, up x2, left, down, right, down x2, right, up.
- This solution for both hard and casual difficulty.
- You receive BEAN 4/4.

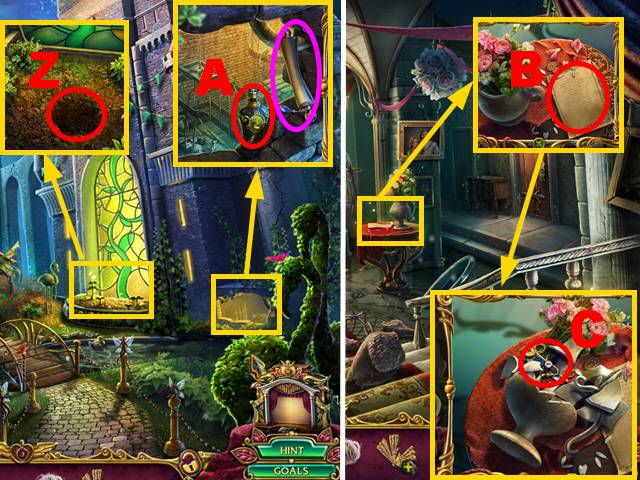
- Take the GROWTH POTION (Z); read the scroll (purple).
- Use 4 BEANS and the GROWTH POTION (A).
- Climb up.
- Read the note (B).
- Turn over the vase and remove two shards; take the TAILOR SHOP KEY (C).
- Walk down four times, turn right.

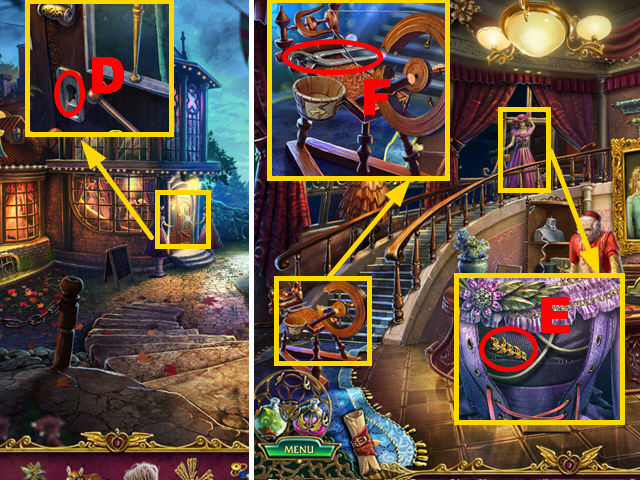
- Use the TAILOR SHOP KEY (D); turn it.
- Move forward.
- Remove the ribbon; take the GOLDEN TWIG (E).
- Take the PLIERS (F).
- Go to the Fair.

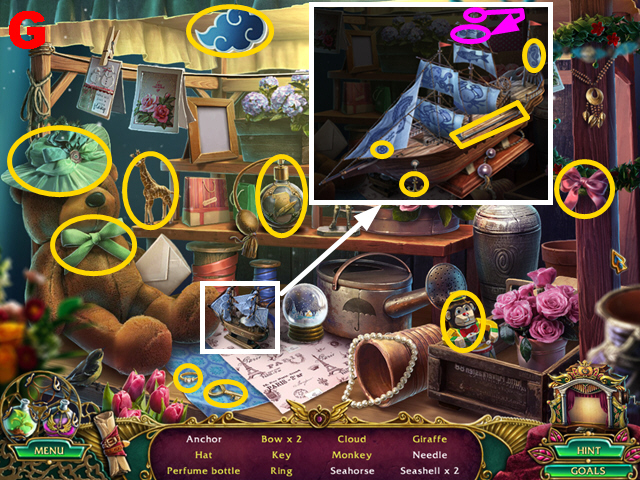
- Play the HOP.
- You receive the NEEDLE and BOTTLE (G).

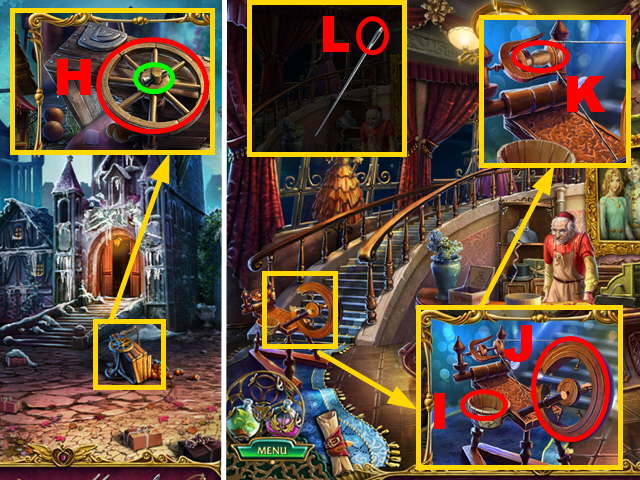
- Use the PLIERS (green); take the WHEEL (H).
- Go to the Ticket Office.
- Place the WOOL (I); replace the broken wheel with the WHEEL (J).
- Take the THREAD (K).
- Place the THREAD on the NEEDLE (L) to acquire the NEEDLE AND THREAD.
- Move forward.

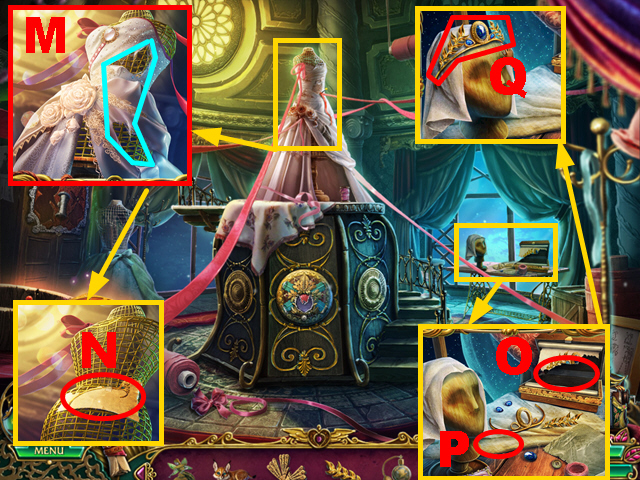
- Use the NEEDLE AND THREAD (blue); take the CORONATION GOWN (M).
- Take the SCHEMATIC FRAGMENT (N).
- Place the SCHEMATIC FRAGMENT (O) and GOLDEN TWIG (P).
- Assemble the tiara correctly (Q); take the TIARA.
- Walk down.

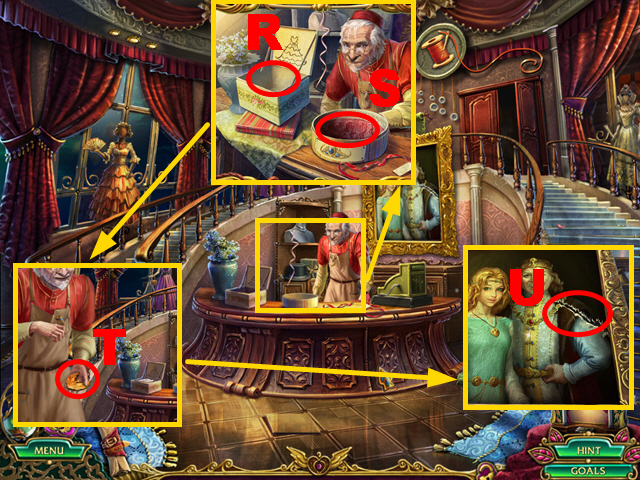
- Place the CORONATION GOWN (R) and TIARA (S).
- Take the PHOENIX (T).
- Tear apart the canvas (U).
- Move forward.

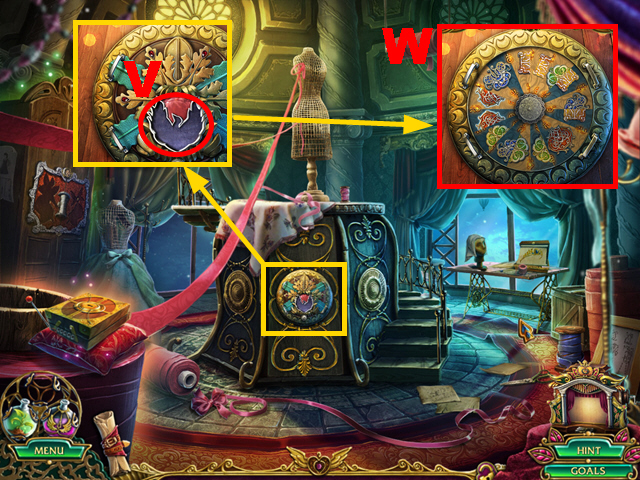
- Place the PHOENIX (V).
- Examine the device (W).

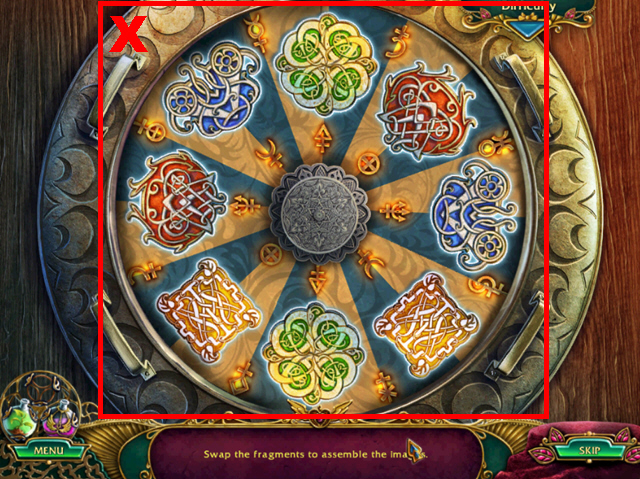

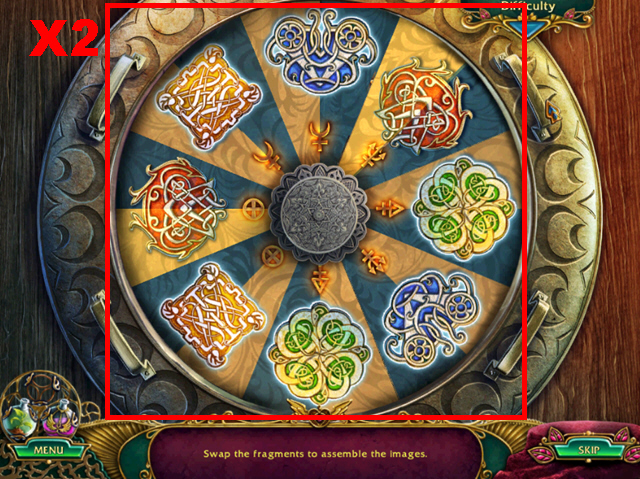
- Play the mini-game.
- Hard solution: (X).
- Casual solution (X2).
- Move forward.
Chapter 4: The Room with the Mirror

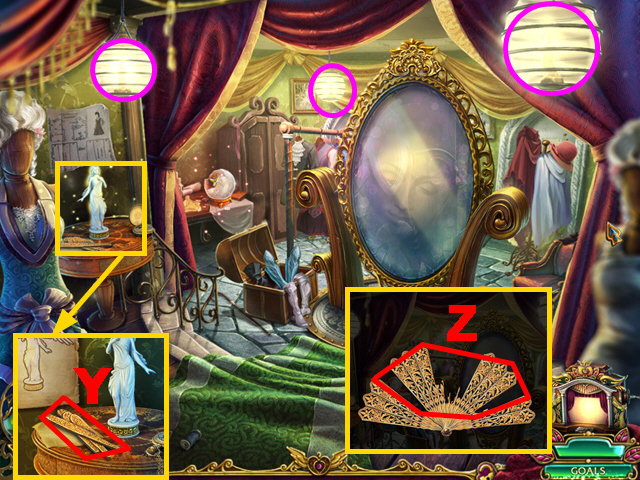
- Switch on the lamps (purple).
- Take the WOODEN FEATHERS (Y).
- Open the BROKEN FAN; place the WOODEN FEATHERS (Z) to acquire the FAN.

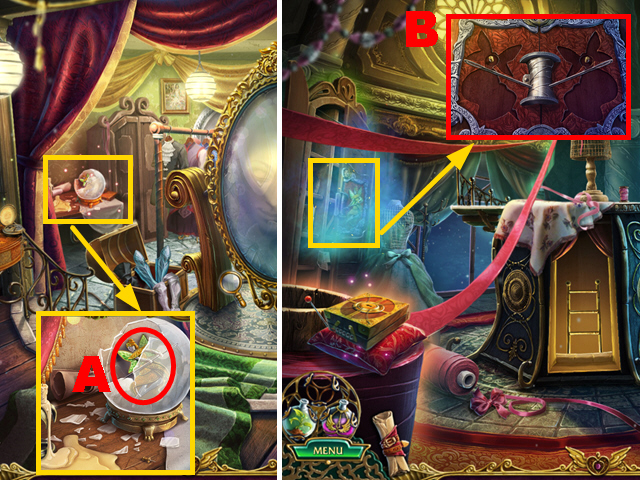
- Take the FAIRY 2 (A).
- Walk down.
- Place the FAIRY 1 and FAIRY 2 (B).

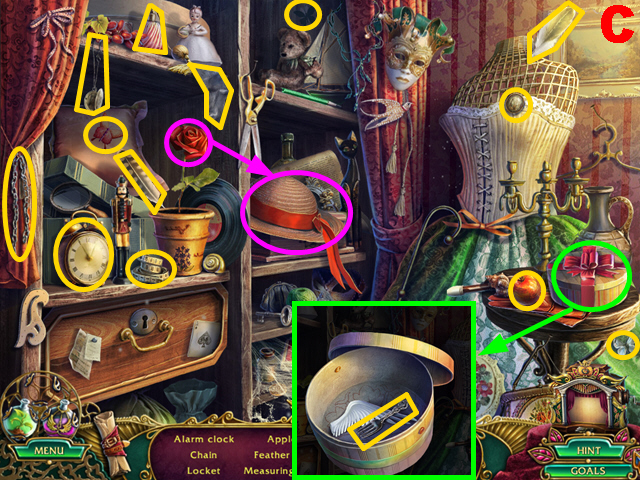
- Play the HOP.
- You receive the FORK (C).
- Move forward.

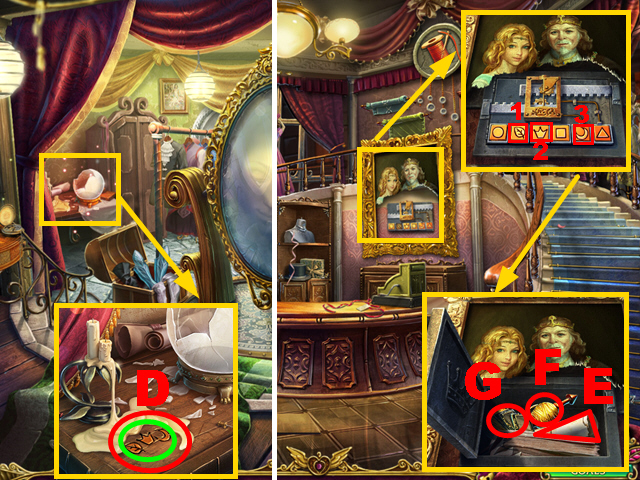
- Use the FORK (D); make note of the symbols (green).
- Walk down twice.
- Activate symbols: 1-3.
- Read the scroll (E); take the MAGIC SPINDLE (F) and STORY SLIDES (G).
- You receive the SMALL KEY.
- Move forward.

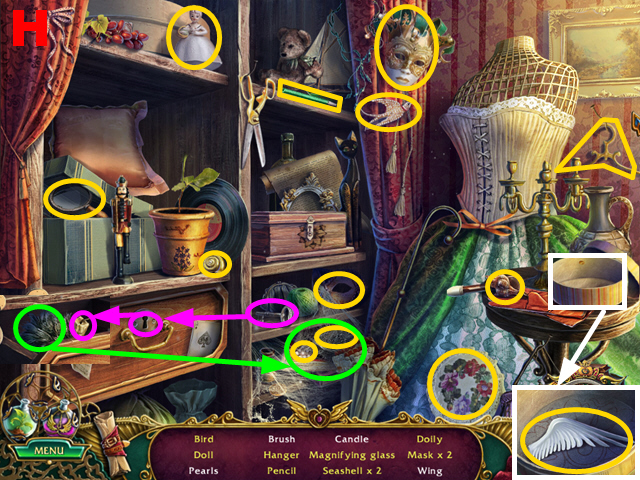
- Play the HOP.
- You receive the BRUSH and WING 1/2 (H).

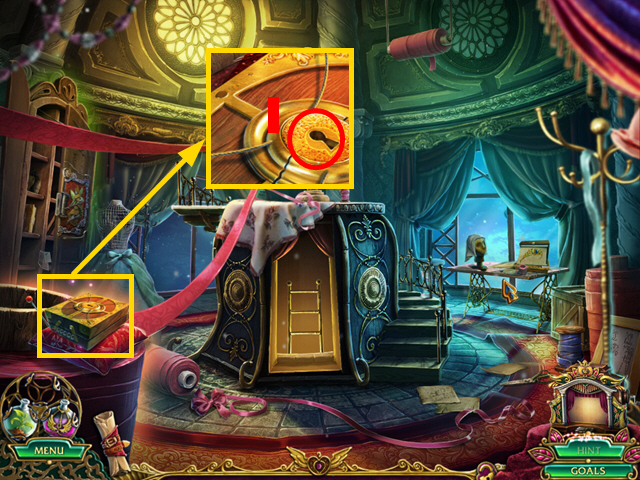
- Use the SMALL KEY (I).
- Turn it twice.

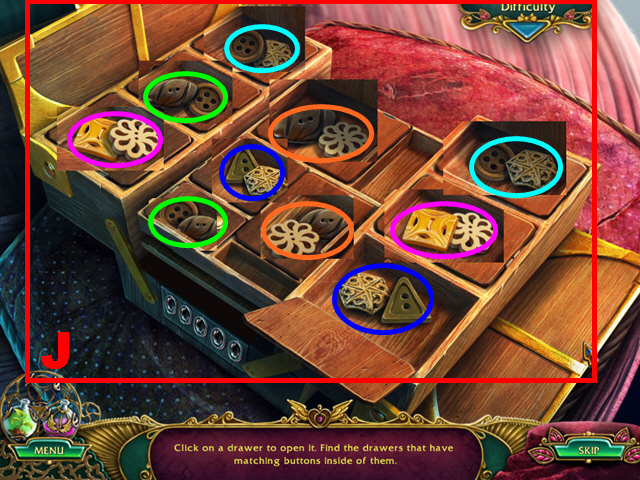

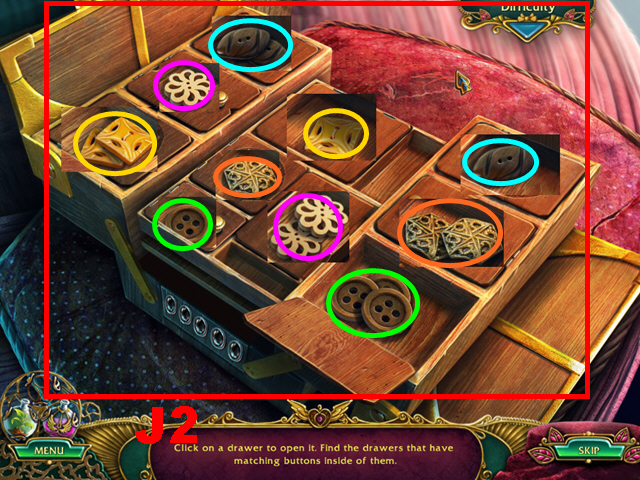
- Play the mini-game.
- Hard solution: (J).
- Casual solution: (J2).

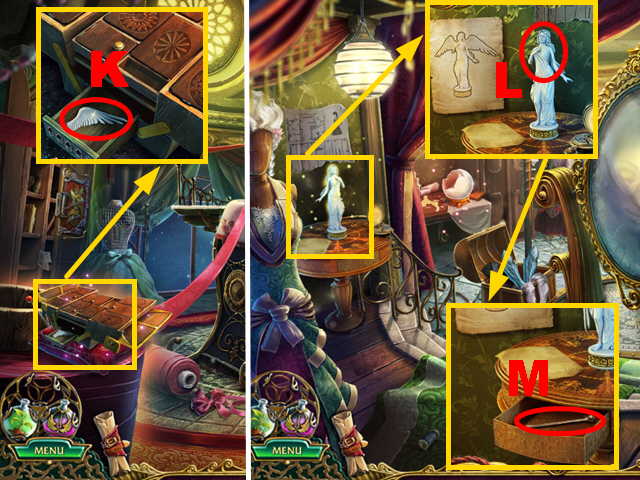
- Take WING 2/2 (K).
- Move forward.
- Place 2 WINGS (L); pull the wings.
- Take the CROCHET HOOK (M).
- Walk down twice.

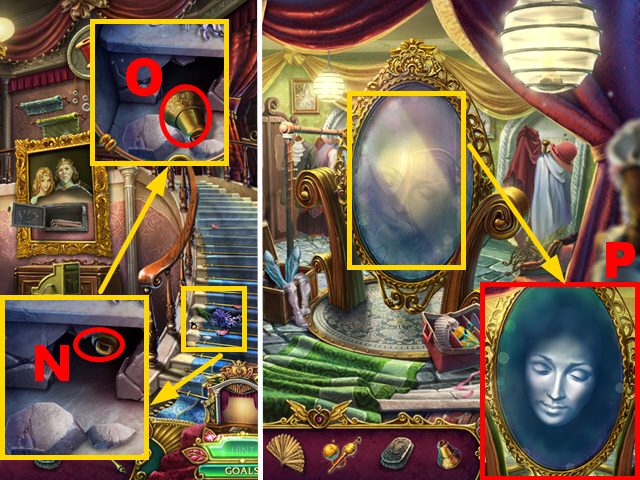
- Use the CROCHET HOOK (N); take the BELL (O).
- Move forward twice.
- Use the BELL (P).

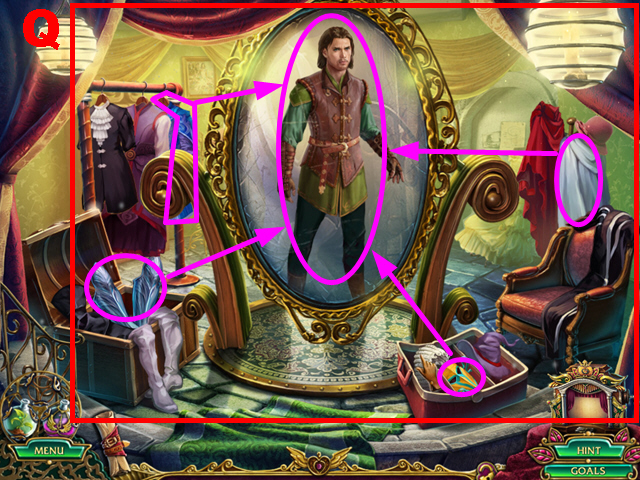
- Dress yourself correctly (Q).
- Go to the Passage, move forward.

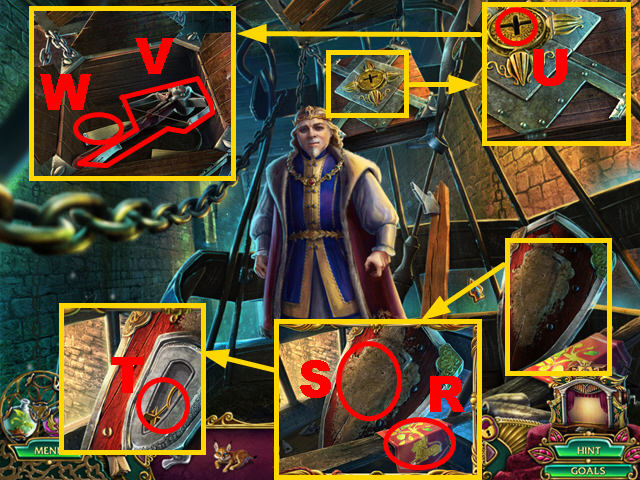
- Take the BANNER (R); clean the shield with the BRUSH (S).
- Take the CRATE KEY (T).
- Place the CRATE KEY (U); turn it.
- Take the CROSSBOW (V) and BELT (W).

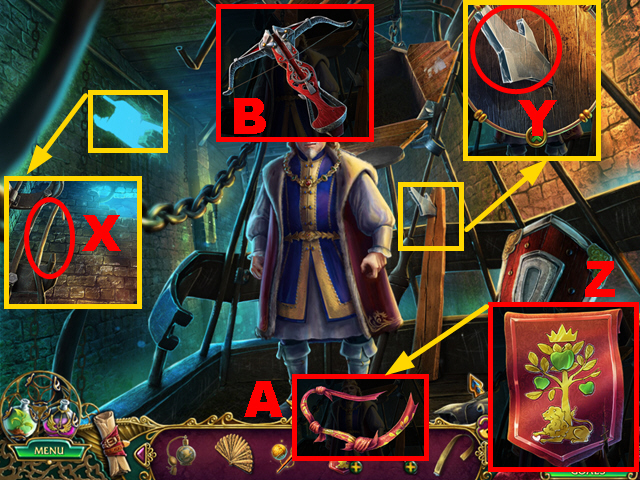
- Move the rod twice (X); take the ROD.
- Place the BELT (Y); take the GLASS SHARD.
- Use the GLASS SHARD (Z); tie the ripped banner.
- Take the ROPE (A).
- Place the ROD and ROPE on the CROSSBOW (B) to acquire the CROSSBOW WITH AN ARROW.

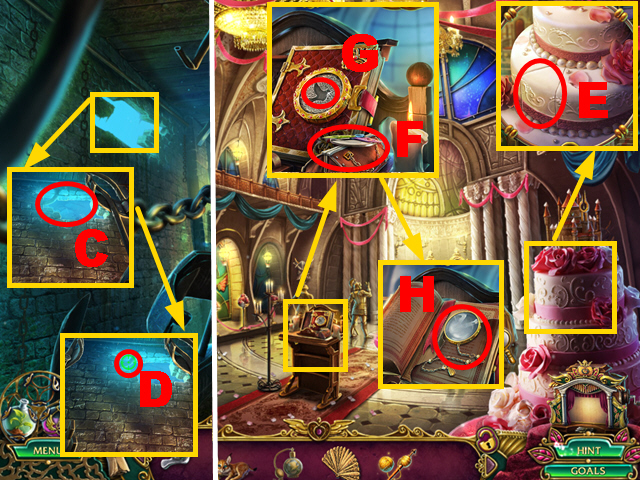
- Use the CROSSBOW WITH AN ARROW (C); shoot it (D).
- Turn left, move forward, turn left.
- Take the PIECE OF CAKE (E) and PURSE (F).
- Place the PIGEON (G); take the MONOCLE (H).

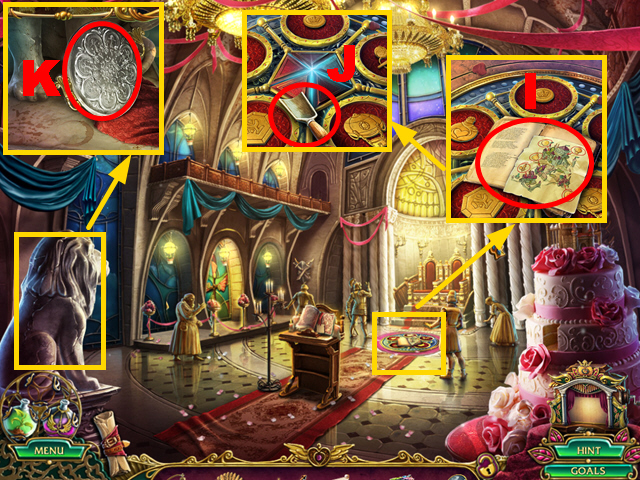
- Read the book (I); take the SCOOP (J).
- Take the TRAY (K).
- Go to the Street.

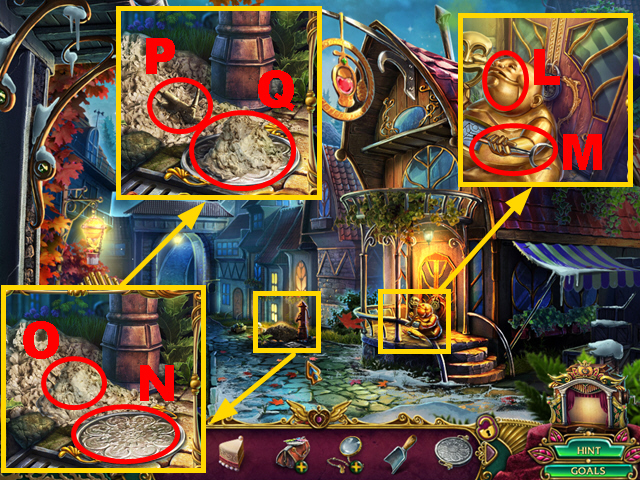
- Use the PIECE OF CAKE (L); take the OVEN FORK (M).
- Place the TRAY (N); use the SCOOP three times (O).
- Take the CHILD FIGURINE (P) and CLAY (Q).
- Walk down.

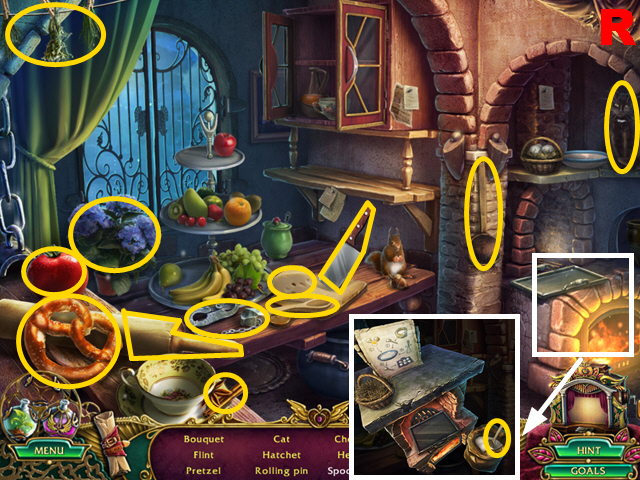
- Play the HOP.
- You receive the FLINT and CINNAMON (R).

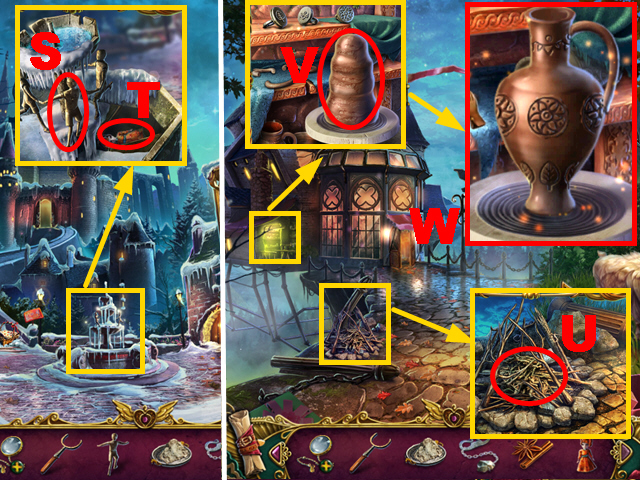
- Place the CHILD FIGURINE (S); take the PRINCESS FIGURINE 2 (T).
- Turn right, turn left.
- Use the FLINT and FAN (U).
- Place the CLAY (V).
- Rotate the vase and mold it; apply the correct patterns and decoration (W).
- You receive the CLAY VASE.

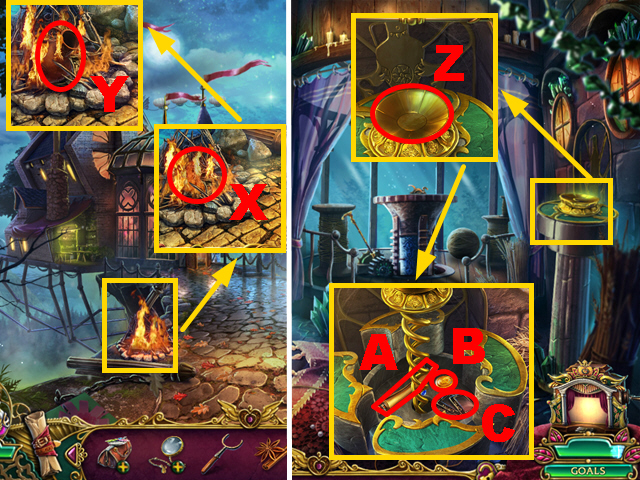
- Place the CLAY VASE (X); collect the VASE with the OVEN FORK (Y).
- Move forward.
- Place the VASE (Z).
- Read the scroll (A); take the GOLDEN COIN (B) and STORY SLIDES (C).
- You receive the CAKE.
- Walk down twice.

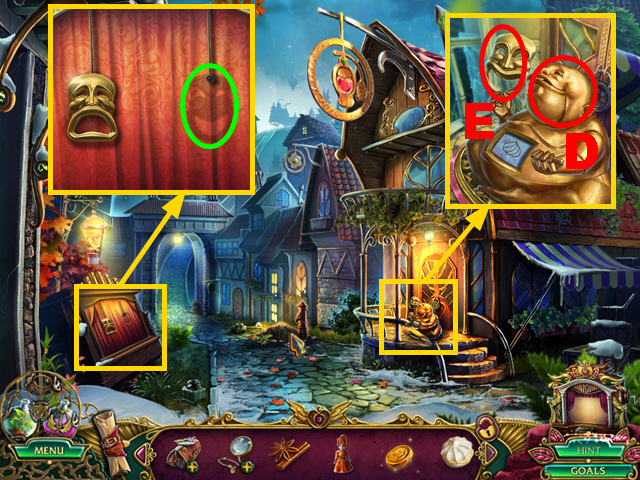
- Use the CAKE (D); take the THEATER MASK (E).
- Place the THEATER MASK (green).

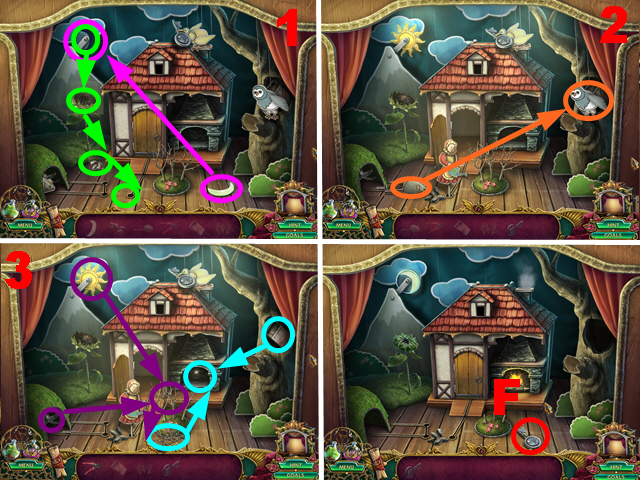
- Play the HOP.
- Solution: 1-3.
- Take the PERFUME SHOP KEY (F).
Chapter 5: The Perfume Shop

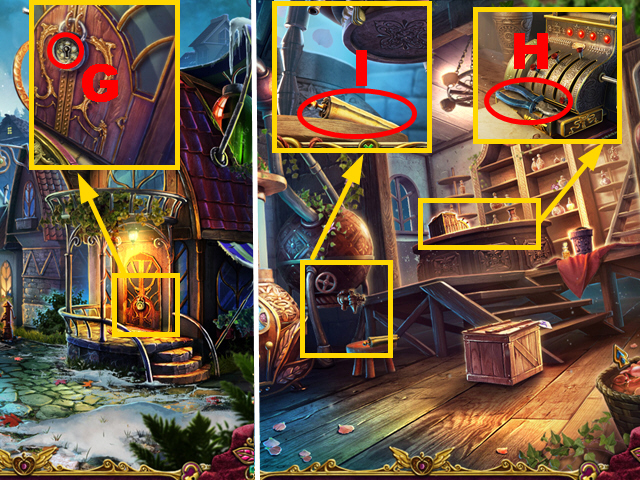
- Place the PERFUME SHOP KEY (G); turn it twice.
- Turn right.
- Take the PLIERS (H) and scroll (I).
- Go to the Cliff Edge.

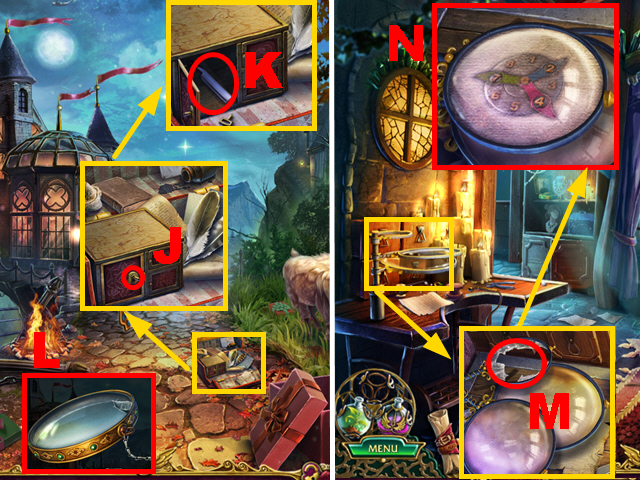
- Use the PLIERS (J); take the SHARP RAZOR (K).
- Cut the MONOCLE with the SHARP RAZOR (L) to acquire the LENS.
- Move forward.
- Place the LENS (M).
- Move the three lenses once; make note of the code (N).

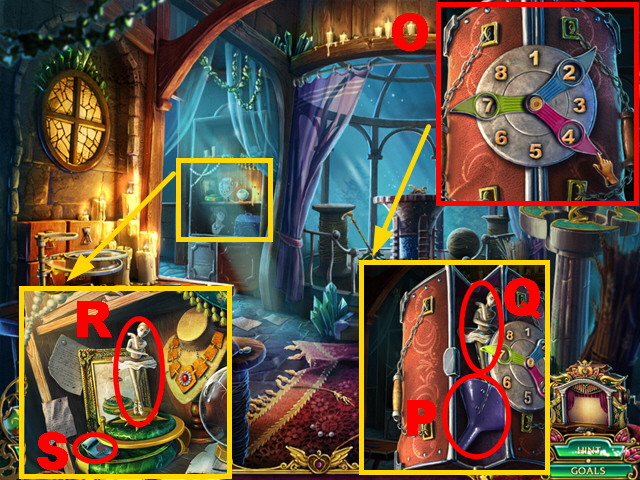
- Enter the correct code on the PURSE (O); open it.
- Take the FUNNEL (P) and BALLERINA (Q).
- Place the BALLERINA (R); take the ROSE SEEDS (S).
- Go to the Perfume Shop.

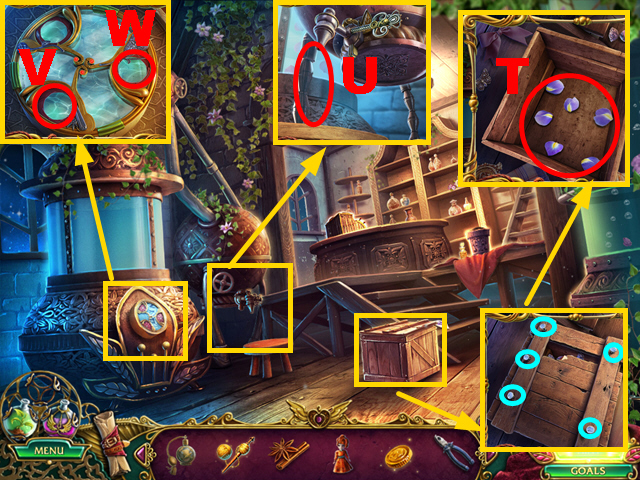
- Use the PLIERS (blue); remove 9 items.
- Take 6 IRIS PETALS (T).
- Place the BOTTLE and FUNNEL (U).
- Open the device; place the CINNAMON (V) and 6 IRIS PETALS (W).

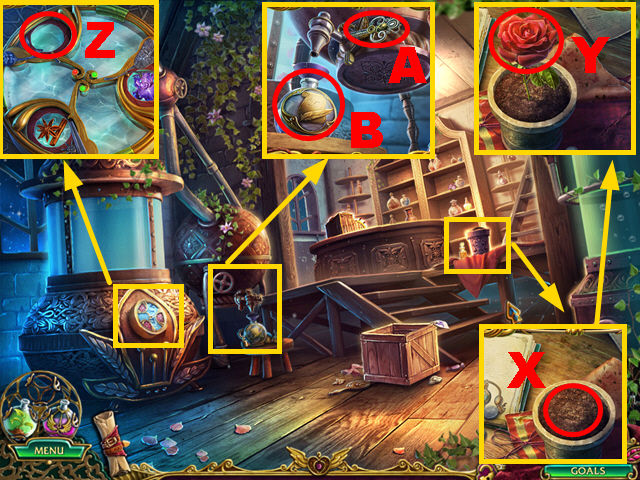
- Use the ROSE SEEDS and GROWTH POTION (X); collect the ROSE PETALS with the SHARP RAZOR (Y).
- Place the ROSE PETALS (Z).
- Turn the lever (A); take the REVEALING POTION (B).

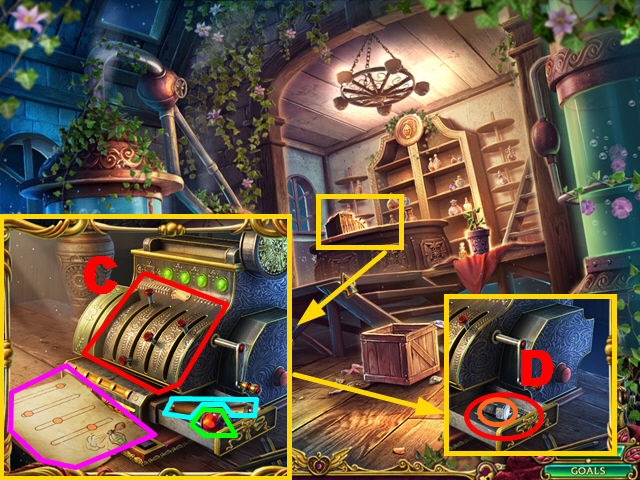
- Use the REVEALING POTION (purple); align the switches correctly (C).
- Read the scroll (blue); take the LOVE POTION (green), NUT (orange), and STORY SLIDES (D).
- You receive the HAND RAKE.
- Go to the Garden.

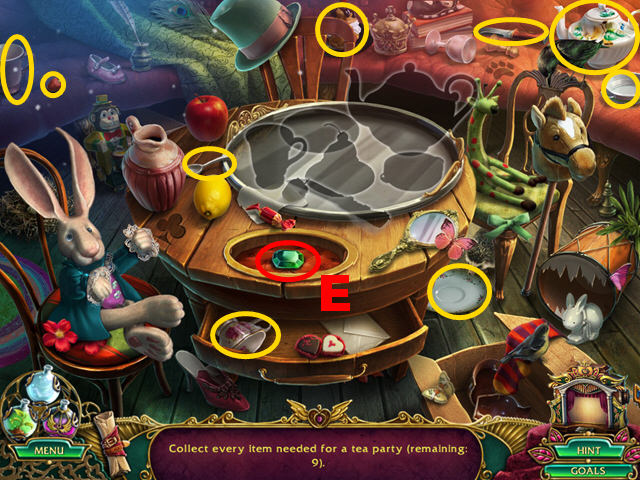
- Play the HOP.
- Take the EMERALD (E).

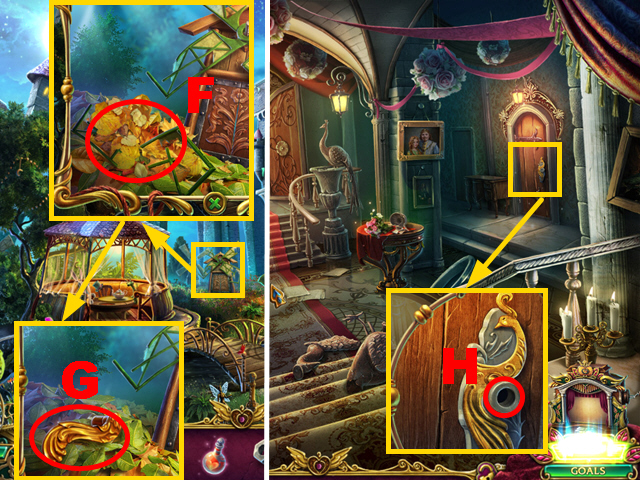
- Use the HAND RAKE (F); take the HANDLE (G).
- Move forward.
- Place the HANDLE (H); pull the handle.
- Turn right.

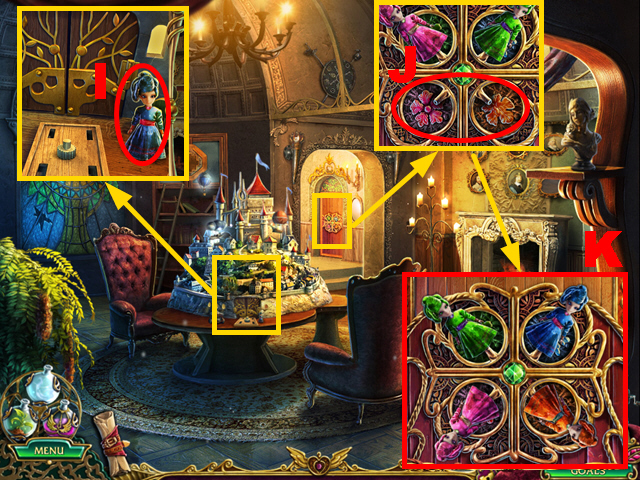
- Take the PRINCESS FIGURINE 1 (I).
- Place 2 PRINCESS FIGURINES (J).
- Align the figurines correctly (K).
- Move forward.

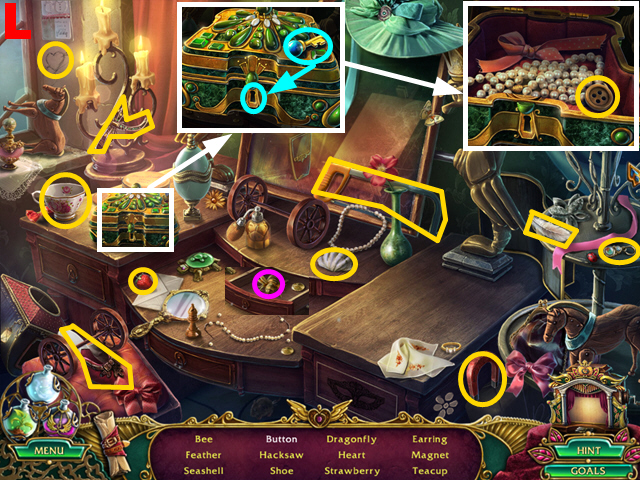
- Play the HOP.
- You receive the MAGNET and HACKSAW (L).

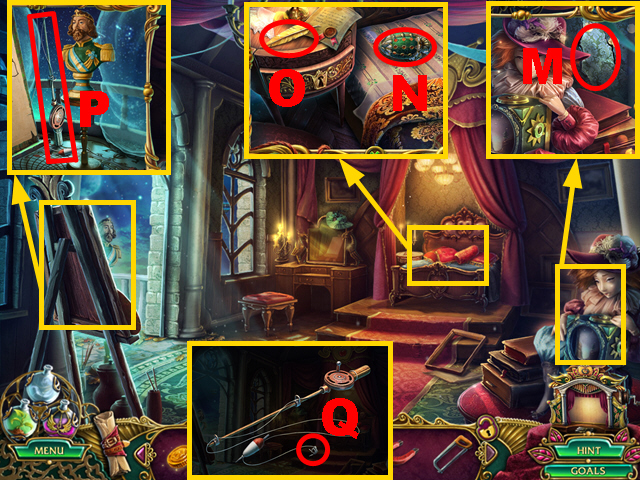
- Rip open the pillow (M).
- Remove 4 pillows; take the EGG-SHAPED CASE (N) and GOLD PEN (O).
- Take the FISHING ROD (P).
- Place the MAGNET on the FISHING ROD (Q) to acquire the FISHING ROD WITH MAGNET.
- Walk down.

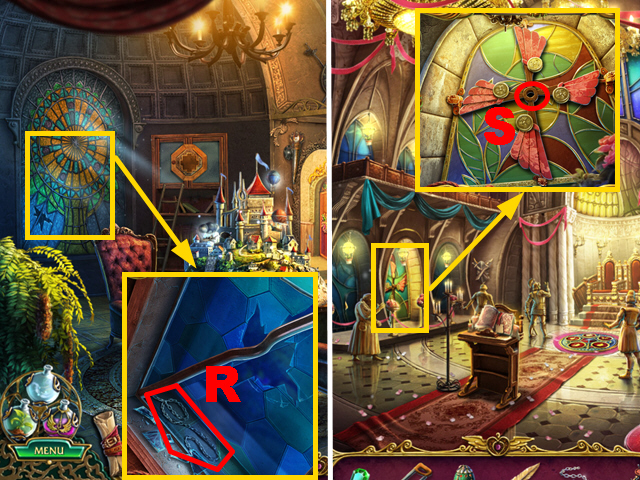
- Collect the CHAIN with the FISHING ROD WITH MAGNET (R).
- Walk down, turn left.
- Collect the MILL BLADES with the HACKSAW (S).
- Walk down twice.

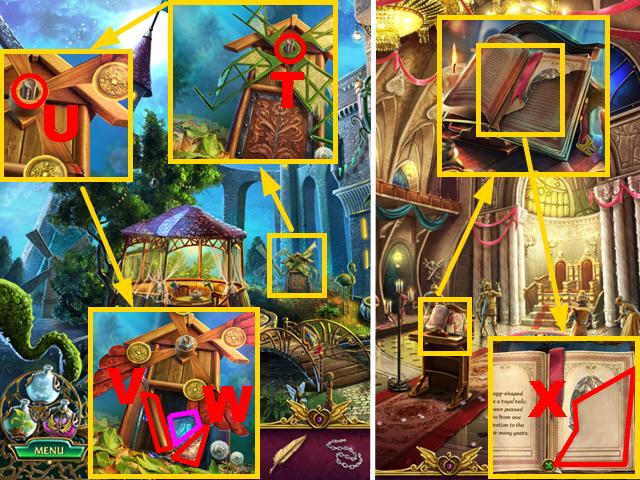
- Place the MILL BLADES (T) and NUT (U).
- Read the scroll (V); take the TORN PAGE (W) and MAGIC STONE (purple).
- Move forward, turn left.
- Place the TORN PAGE (X).

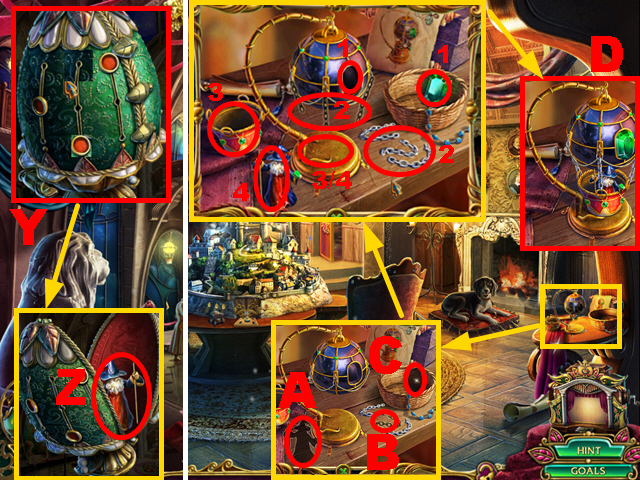
- Arrange the switches on the EGG-SHAPED CASE correctly (Y); take the WARLOCK FIGURINE (Z).
- Walk down, turn right.
- Place the WARLOCK FIGURINE (A), CHAIN (B), and EMERALD (C).
- Solution: 1-4.
- Take the BALLOON (D).
- Walk down, turn left.

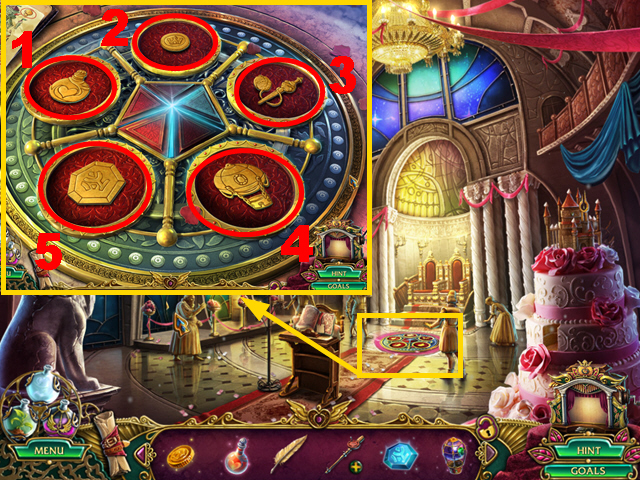
- Place the LOVE PERFUME (1), GOLDEN COIN (2), MAGIC SPINDLE (3), BALLOON (4), and MAGIC STONE (5).
- Move forward.

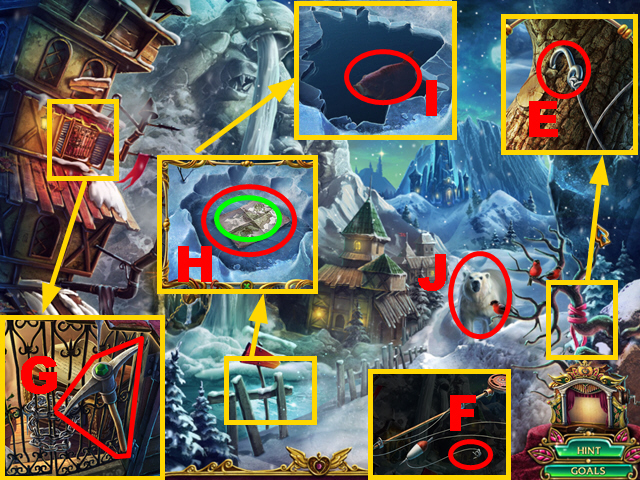
- Take the HOOK (E).
- Place the HOOK on the FISHING ROD (F) to acquire the FISHING ROD WITH HOOK.
- Take the PICKAXE (G).
- Take the MAP (green); use the PICKAXE (H).
- Collect the FISH with the FISHING ROD WITH HOOK (I).
- Give the FISH to the bear (J).
- Move forward.

- Remove the helmet (K).
- Use the LEVITATION POTION; take the SUN FIGURINE (L).
- Place the SUN FIGURINE (M).
- Turn right.
- Take the CONTRACT (N).

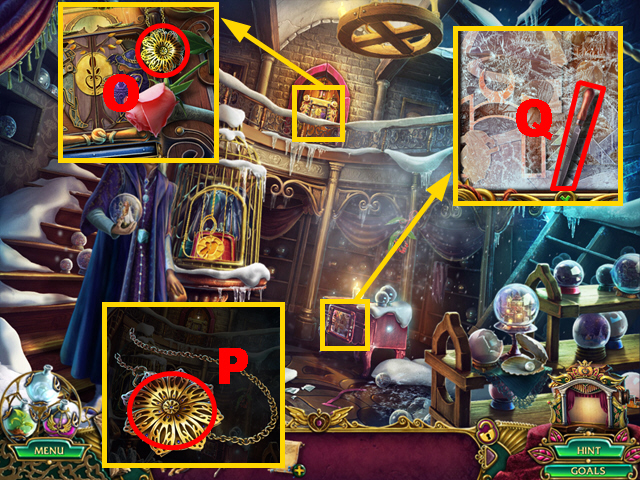
- Take the WARLOCK’S LOCKET (O).
- Open the WARLOCK’S LOCKET (P).
- Take the FILE (Q).
- Walk down twice.

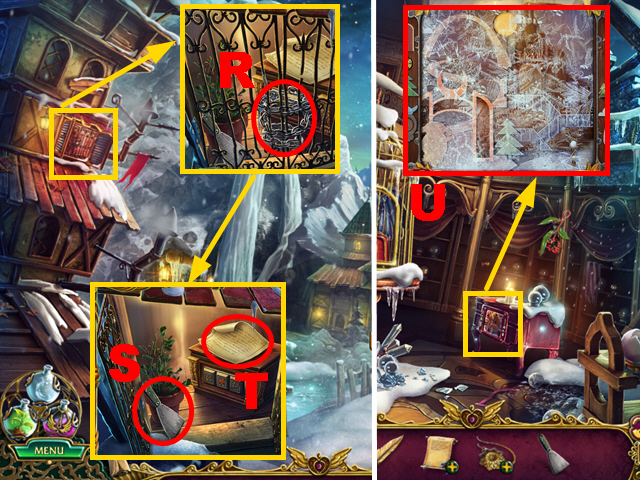
- Use the FILE (R).
- Take the SPATULA (S); read the note (T).
- Move forward, turn right.
- Use the SPATULA three times (U).

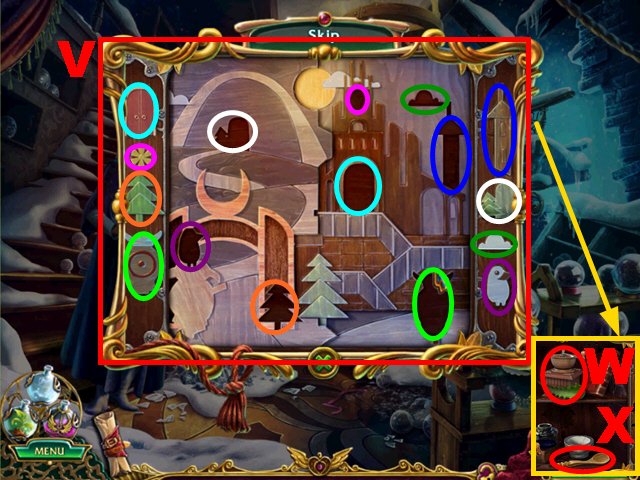
- Play the mini-game.
- Place the figurines correctly (V).
- Take the COFFEE GRINDER (W) and TEASPOON (X).

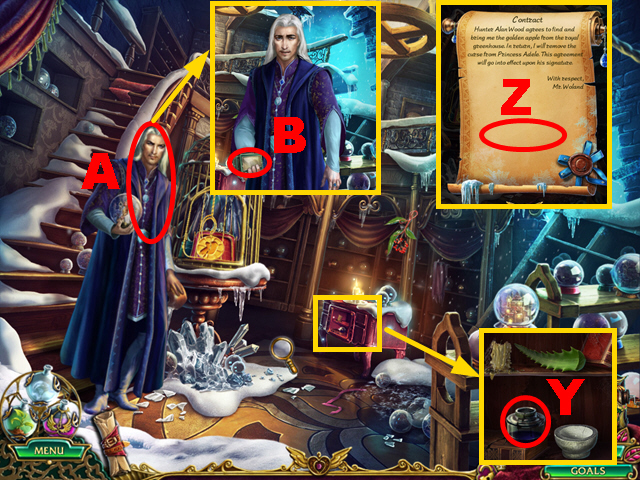
- Place the GOLD PEN (Y) to acquire the PEN WITH INK.
- Sign the CONTRACT with the PEN WITH INK (Z) to acquire the SIGNED CONTRACT.
- Give the SIGNED CONTRACT to the man (A).
- Take the STORY SLIDES (B); you receive the DRAWER KEY.
- Go to the Princess’s Bedroom.

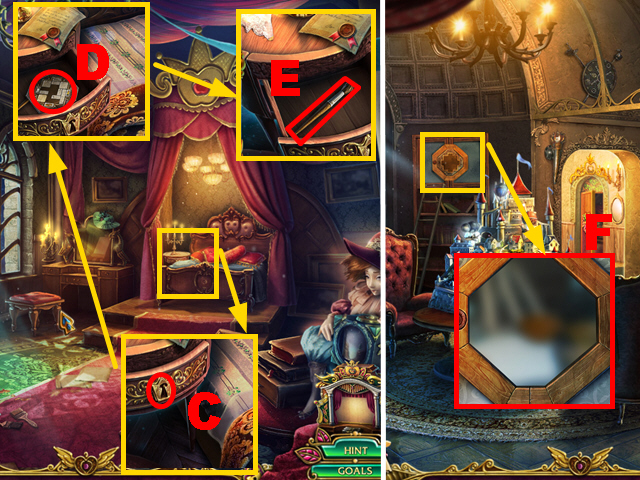
- Place the DRAWER KEY (C); turn it.
- Take the PUZZLE FRAGMENTS (D) and PAINTBRUSH (E).
- Walk down.
- Place the PUZZLE FRAGMENTS (F).

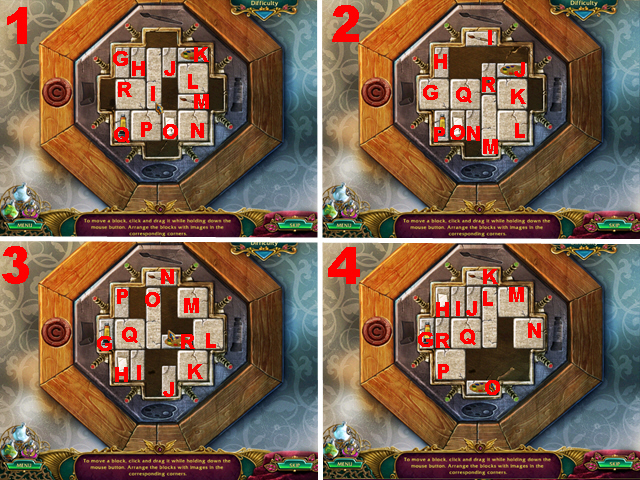
- Play the mini-game.
- Hard solution (1): O-down, I-up, R-left, M-left x3, L-down, K-down, J-down x3, I-right, M-up, H-right, H-up, M-up, P-up x2, O-left, O-up, O-left, J-down, J-left, I-down x4, H-right, H-down x2, M-up, M-right, M-up.
- Hard solution (2): Q-up x2, N-down, G-right x2, P-up x2, P-left, O-left, O-up x2, N-up, N-left x2, G-down x2, Q-down x2, R-up, Q-up x2, G-up x2, N-right, O-down x2, G-left, M-left, L-left, K-left, M-up, K-right x2, R-down x2, J-left, L-right, R-down x2, J-down, Q-right x3, M-up x2, R-down, J-down.
- Hard solution (3): O-down x3, R-up, R-left, R-up, J-up x3, J-right, R-down, M-left x3, J-up x2, J-left, L-left, L-up x2, K-up x2, K-right, R-right, R-down x3, O-up, K-left, K-down, M-down, J-down, L-up, K-up, K-right, J-down, J-right, O-down, J-left, K-left, K-down, L-down, M-up, R-right, J-down x3, K-left, K-up, K-right x2, L-left, O-up, L-right, J-up x5, O-right, Q-right, H-up x2, I-left, Q-down x2, M-down x2, J-left x2, O-up x2, Q-right, I-right, J-right, P-right, H-up x2, I-left, I-up x2, Q-left x2, R-left x2, R-down.
- Hard solution (4): N-left, N-down x2, M-down x2, M-right, L-down x2, J-right x3, L-up x2, P-right x2, R-down x2, R-right, H-down x4, I-left, Q-up x2, G-right x3, H-up x2, H-left, I-down x2, Q-left, G-left, R-left, G-down x2, L-left, J-left x2, M-left, M-up x2, N-up x2, N-right, P-right, P-up x2, G-right x4, L-down x2, L-left, J-left, P-down x2, P-left, N-left x3, G-up x2, G-right.

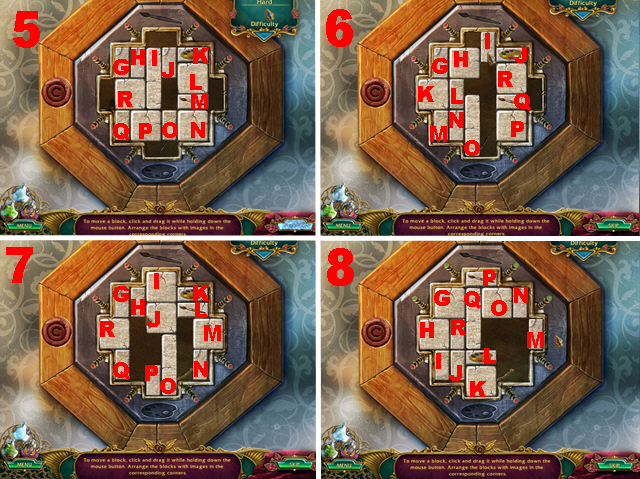
- Casual solution (5): R-left, I-up, P-up, O-down, O-left, J-down x5, I-right, I-down x2, P-up, H-right, H-up, H-right, P-up x2, O-up x3, O-left, J-left, J-up, J-left, I-down x2, I-left.
- Casual solution (6): I-down x6, H-right, H-up, R-left x2, J-down x2, L-up x2, J-right, R-right, L-down, L-right, N-up x4, Q-right, I-up x2, N-down x4, L-left, L-up, R-left, J-left, J-up x2, Q-left, Q-up x2, P-up x2, P-right, I-down, I-right x2, O-right, N-right, N-down.
- Casual solution (7): H-down x4, J-left, O-up, O-right, J-right, P-right, H-right, H-down, J-down x2, I-down x2, G-right, G-down x4, I-up, I-left x2, L-left x2, L-up x2, K-left x2, J-up x2, G-up x2, H-up, H-left, O-up x2, P-up, P-right, J-down x4, K-down x4, O-left x2, M-left x2, M-up x2, N-up x4, P-up x2, P-right x2.
- Casual solution (8): L-right, L-up x2, K-up, K-right x2, Q-down x3, L-left, O-left, N-left, K-up x2, Q-right, J-right, J-down, R-down, R-right, I-right, H-right, K-down x2, N-right, O-right, H-left, I-up x2, L-right x2, R-up x3, J-up, J-left x2, Q-left, L-left x2, K-up x2, Q-right, J-down x2, J-right, J-down, L-left, L-down x2, R-down x2, R-left, O-left, N-left, K-down x2, Q-up, N-right, N-down x2, O-right x2, Q-up x2, J-right, J-up, L-down, Q-left, J-up x4, L-right, L-down.

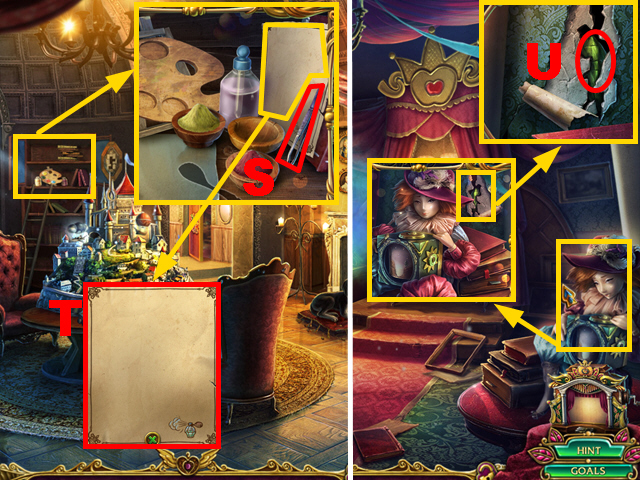
- Take the TWEEZERS (S); use the REVEALING POTION (T).
- Move forward.
- Collect the GREEN STONE with the TWEEZERS (U).

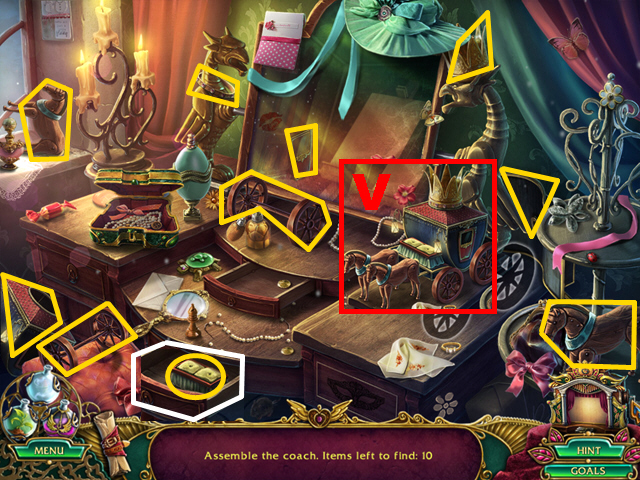
- Play the HOP.
- Take the COACH (V).

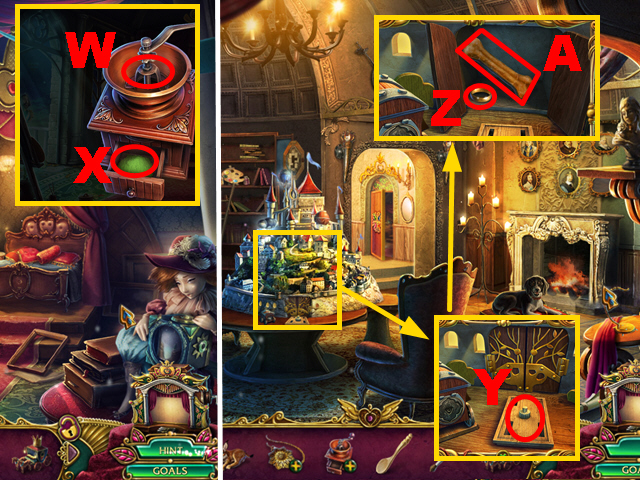
- Put the GREEN STONE into the COFFEE GRINDER (W); take the GREEN POWDER (X).
- Walk down.
- Place the COACH (Y); take WEDDING RING 1/2 (Z) and the BONE (A).

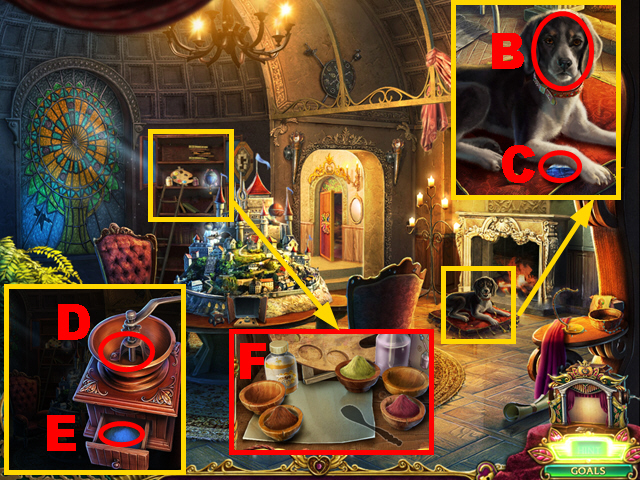
- Give the BONE to the dog (B); take the BLUE STONE (C).
- Place the BLUE STONE in the COFFEE GRINDER (D); take the BLUE POWDER (E).
- Place the TEASPOON, BLUE POWDER, and GREEN POWDER (F).

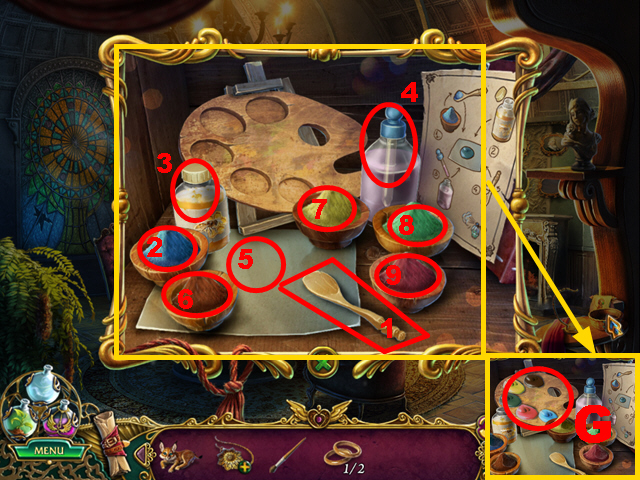
- Solution: 1, 2, 3, 3, 4, 1, 5, 1, 6, 3, 4, 1, 5, 1, 7, 3, 4, 1, 5, 1, 8, 3, 4, 1, 5, 1, 9, 3, 4, 1, 5.
- Take the PALETTE WITH PAINTS (G).
- Move forward.

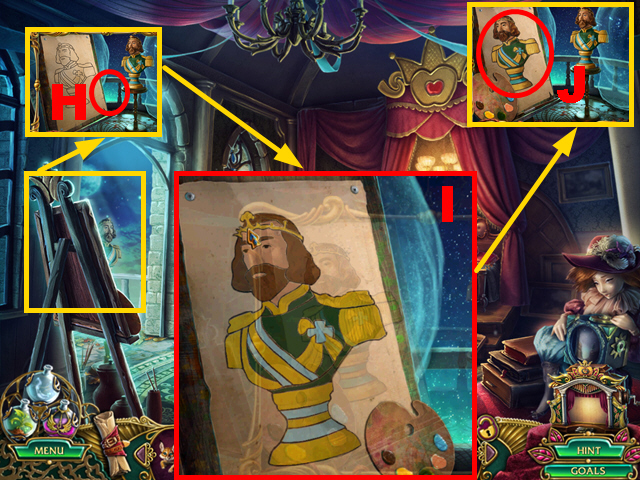
- Place the PALETTE WITH PAINTS and PAINTBRUSH (H).
- Play the mini-game.
- Solution: (I).
- Take the KING’S PORTRAIT (J).
- Walk down.

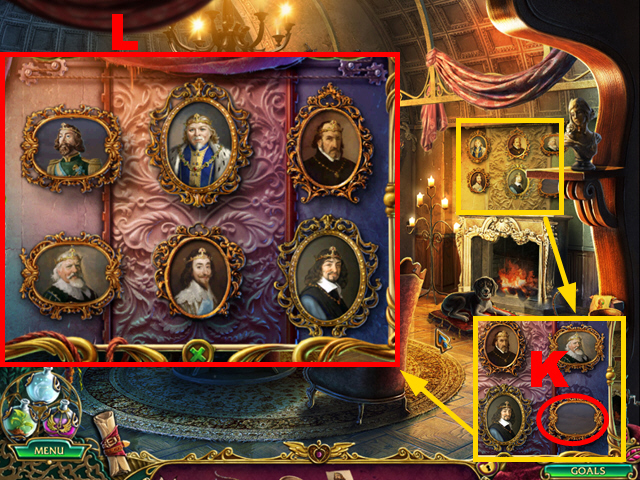
- Place the KING’S PORTRAIT (K).
- Arrange the portraits correctly (L).
- Turn right.
Chapter 6: The Dungeon

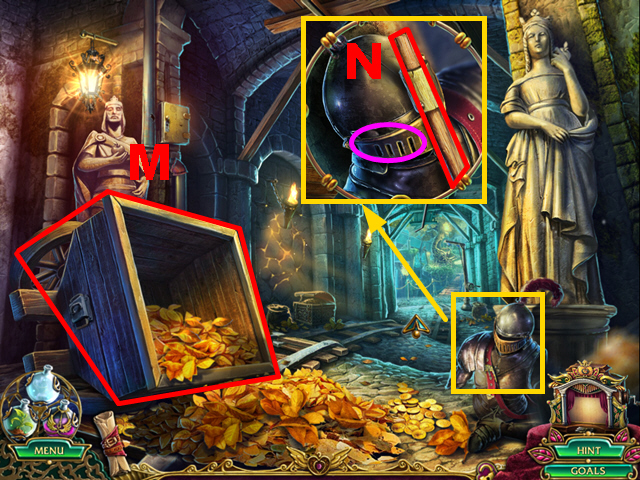
- Use the LEVITATION POTION (M).
- Take the SHOVEL HANDLE (N); open the helmet visor (purple).
- Move forward.

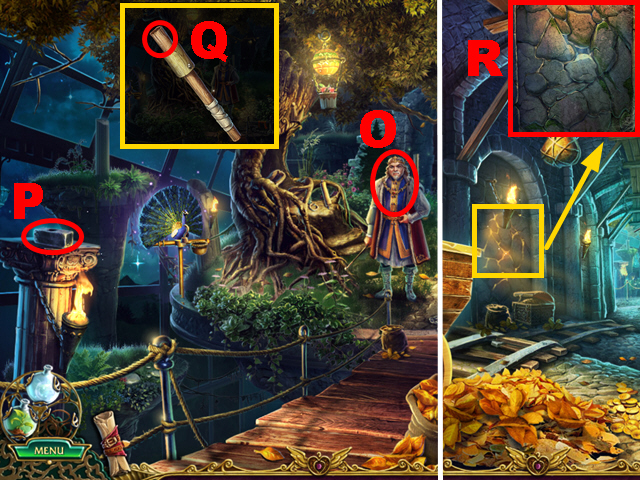
- Talk to the king (O).
- Take the HAMMER HEAD (P).
- Place the HAMMER HEAD on the SHOVEL HANDLE (Q) to acquire the SLEDGEHAMMER.
- Walk down.
- Use the SLEDGEHAMMER three times (R).

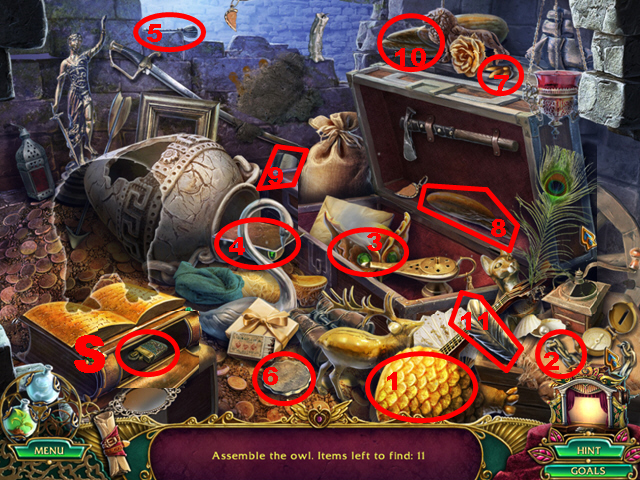
- Play the HOP.
- Solution: 1-11.
- Take the LIGHTER (S).

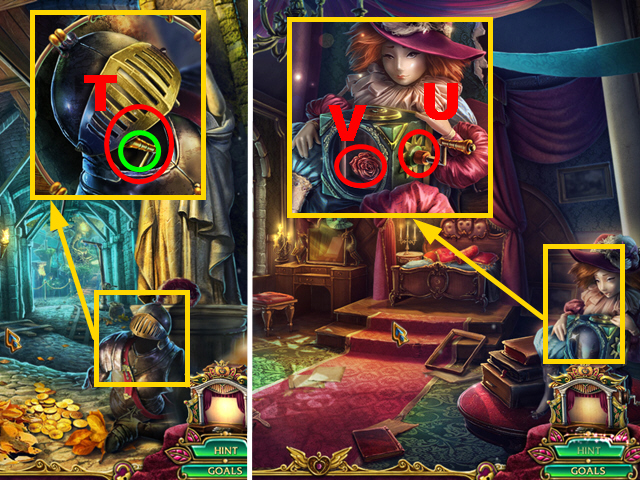
- Use the LIGHTER (T); take the MUSIC BOX HANDLE (green).
- Walk down, turn left.
- Place the MUSIC BOX HANDLE (U); take the ROSE (V).
- Walk down.

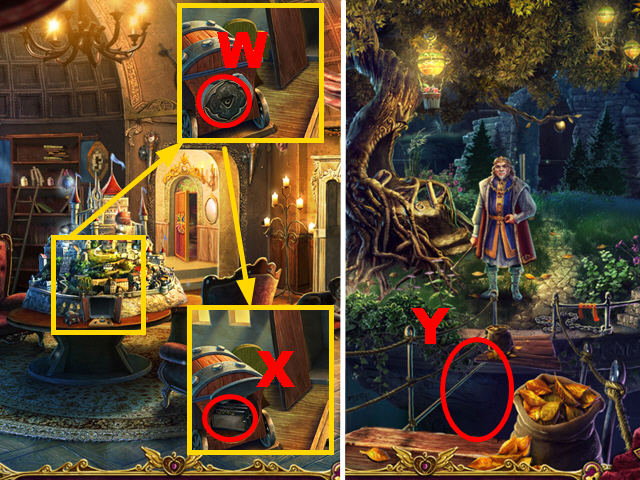
- Place the ROSE (W); take the STORY SLIDES (X).
- You receive the PLANKS.
- Turn right, move forward.
- Use the PLANKS (Y).

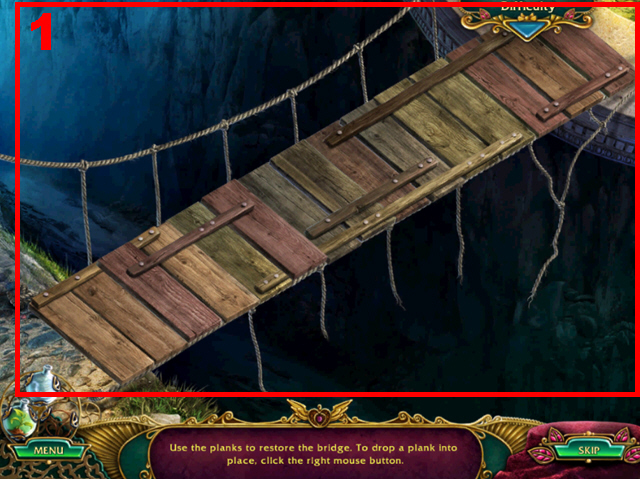

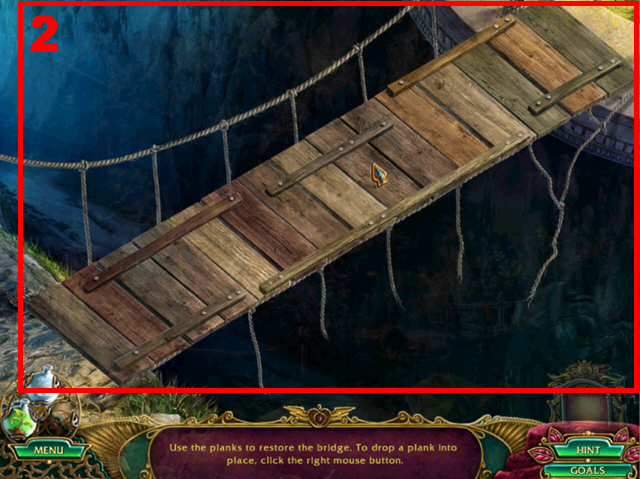
- Play the mini-game.
- Hard solution: (1).
- Casual solution: (2).

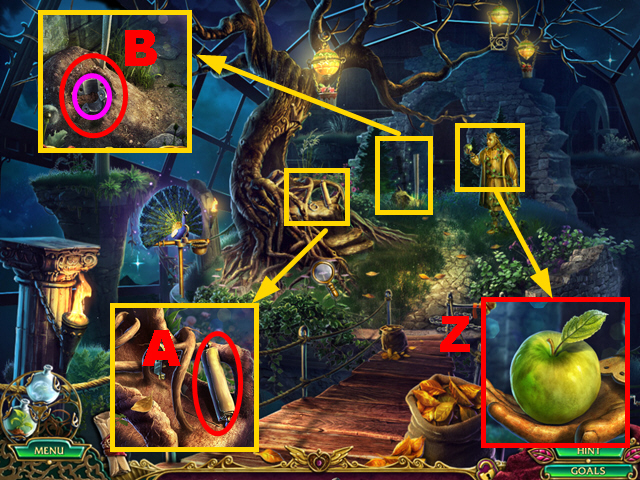
- Take the MAGIC APPLE (Z).
- Read the scroll (A).
- Use the LYNX (B); take the PIPE CLAMP (purple).
- Walk down, try to walk down.

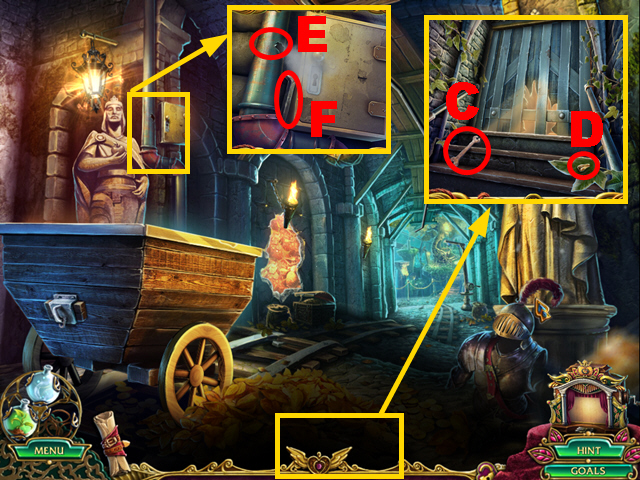
- Take the PIPE WRENCH (C) and GRAPE SEED (D).
- Use the PIPE CLAMP and PIPE WRENCH (E); take the RAILROAD SPIKE (F).
- Move forward.

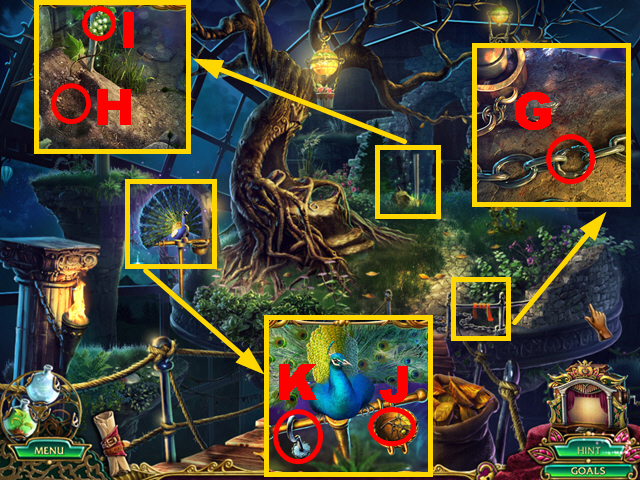
- Use the RAILROAD SPIKE and SLEDGEHAMMER (G) to acquire the CHAIN.
- Use the GRAPE SEED and GROWTH POTION (H); take the GRAPES (I).
- Place the GRAPES (J); take the PIRATE’S HOOK (K).
- Walk down.

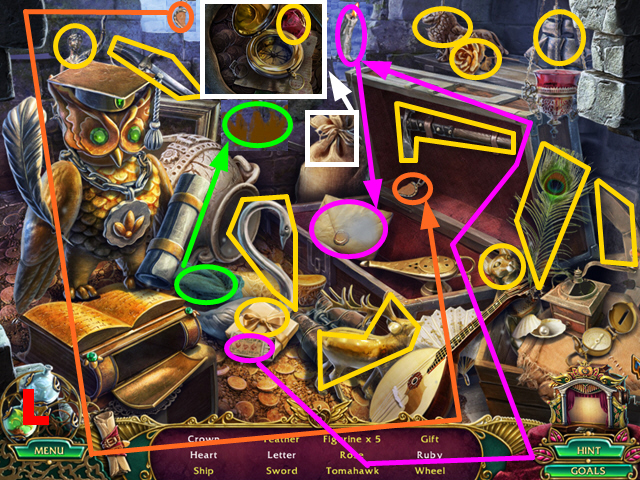
- Play the HOP.
- You receive the TOMAHAWK (L).

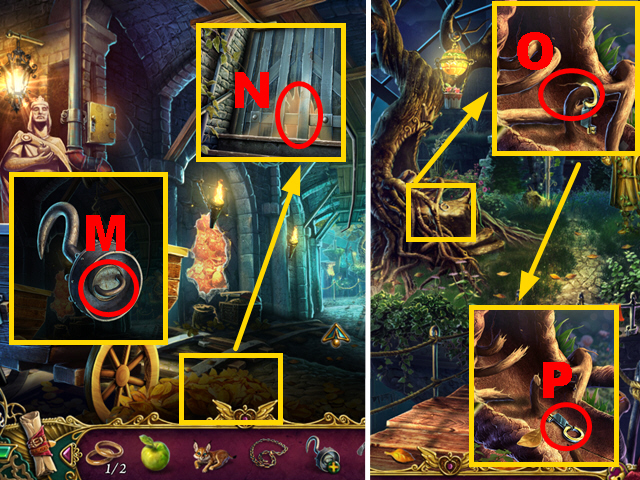
- Connect the CHAIN to the PIRATE’S HOOK (M) to acquire the CHAIN WITH HOOK.
- Place the CHAIN WITH HOOK (N).
- Move forward.
- Use the TOMAHAWK (O); take the CABINET KEY (P).
- Walk down.

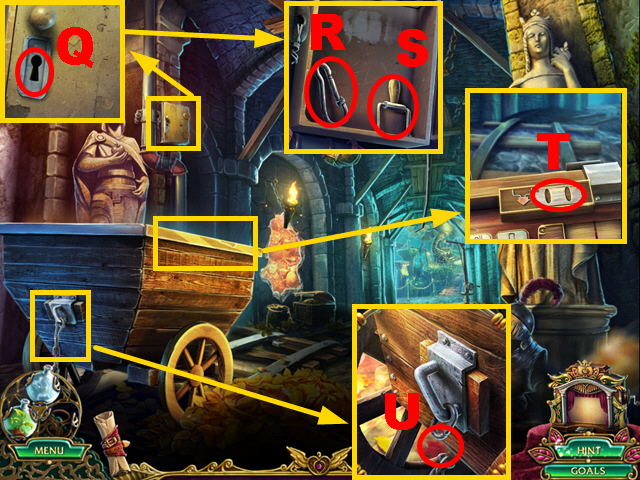
- Place the CABINET KEY (Q); turn it twice.
- Take the CARBINE (R) and SWITCH (S).
- Place the SWITCH (T).
- Place the CARBINE (U).

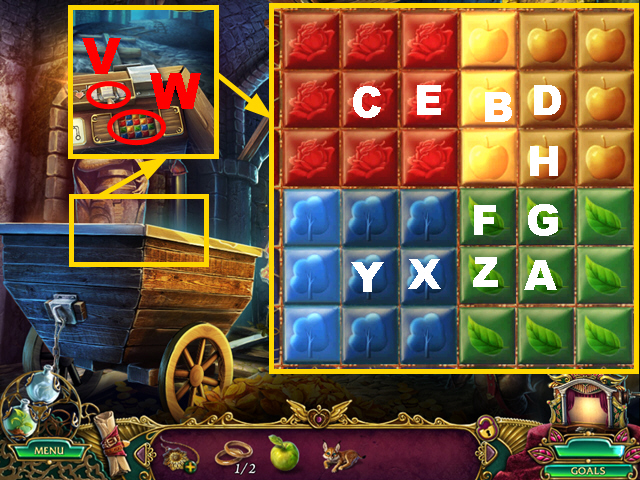
- Turn the switch (V); examine the compartment (W).
- Play the mini-game.
- Solution: Xx3, Y, Zx2, Yx2, Xx2, Zx2, Ax2, Bx4, Cx3, Dx4, Ex4, Xx2, Fx3, Dx4, B, Dx2, B, Gx4, A, Zx2, Ax2, Z, Dx2, Gx3, Dx4, Ax2, Hx2, G, Hx4.
- Go to the Storage.

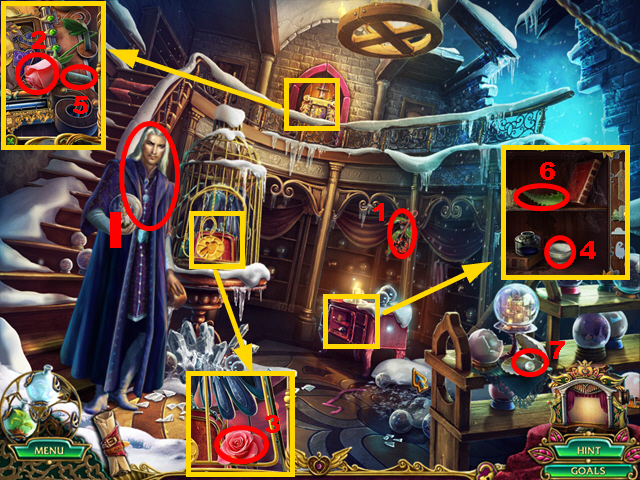
- Give the MAGIC APPLE to the man (I).
- Find the correct ingredients: 1-7.

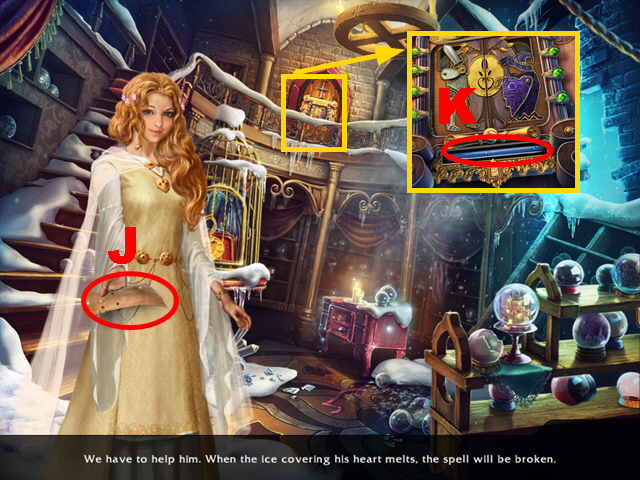
- Take the PUNCH CARD (J).
- Place the PUNCH CARD (K).

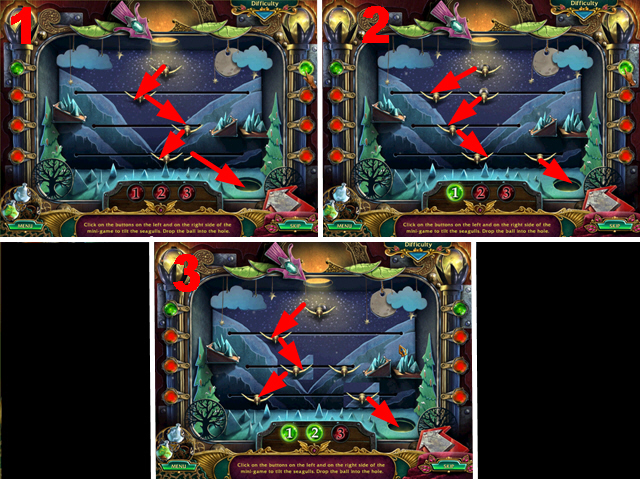
- Play the mini-game.
- Solution: 1-3.
- The difficulty grades only differ in the figurines movement speed.
- Move forward.
Chapter 7: The Secret Room

- Take the SICKLE (L).
- Walk down twice.
- Use the SICKLE three times (M); take the OAR (N).
- Use the OAR three times (O).
- Move forward.

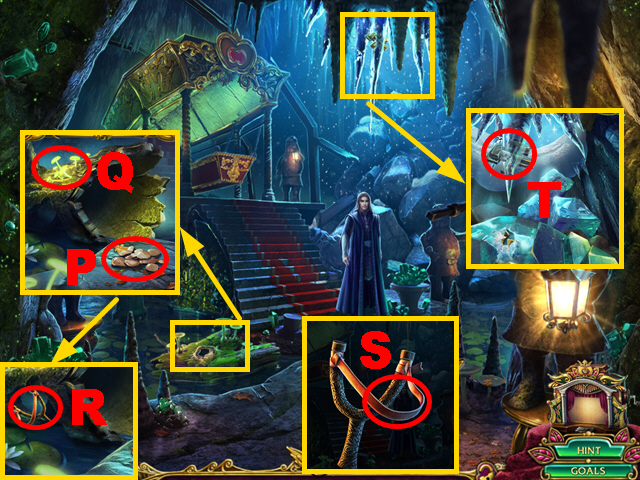
- Take the PEBBLES (P); use the GROWTH POTION (Q).
- Use the LYNX to collect the SLINGSHOT (R).
- Put the PEBBLES into the SLINGSHOT (S) to acquire the LOADED SLINGSHOT.
- Shoot the LOADED SLINGSHOT (T) to acquire the LOCK FRAGMENT.
- Walk down twice.

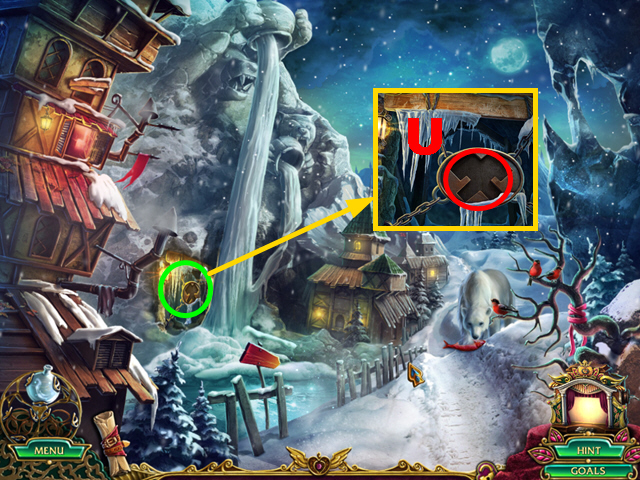
- Place the LOCK FRAGMENT (U).
- Examine the cave (green).

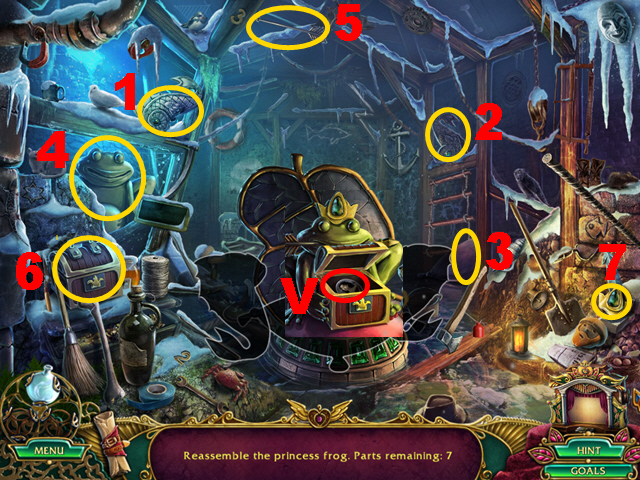
- Play the HOP.
- Solution: 1-7.
- Take the PORTRAIT OF AURORA (V).

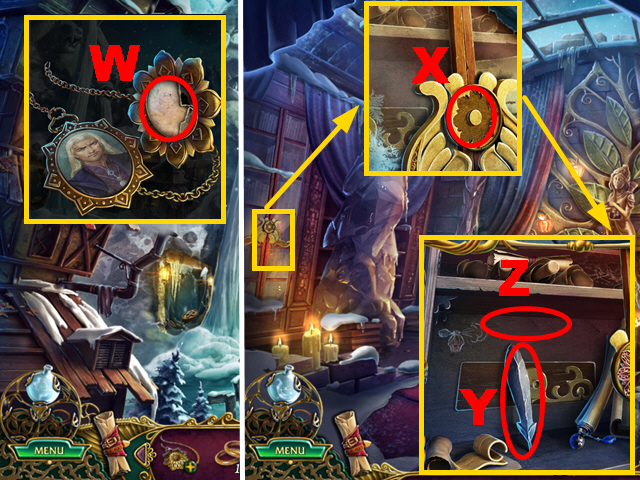
- Put the PORTRAIT OF AURORA into the WARLOCK’S LOCKET (W) to acquire the PENDANT.
- Go to the Secret Room.
- Place the PENDANT (X).
- Take FEATHER 1/2 (Y); use the REVEALING POTION (Z).
- Walk down three times.

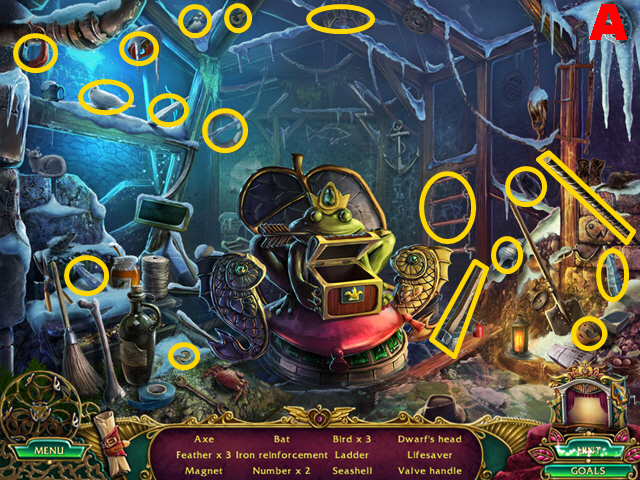
- Play the HOP.
- You receive the DWARF’S HEAD and FEATHER 2/2 (A).

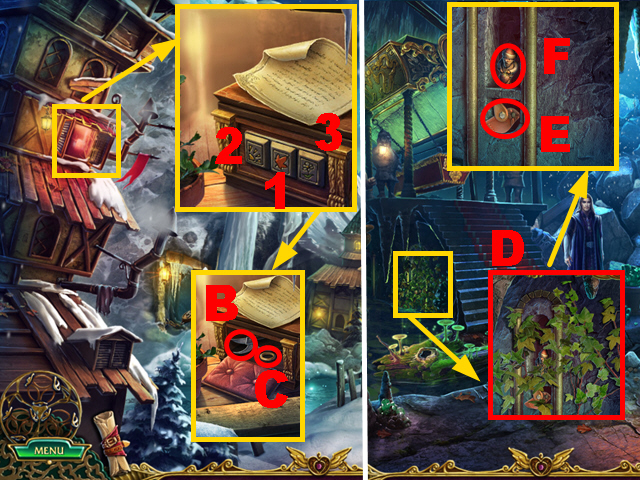
- Activate symbols 1-3.
- Take the PRUNING SHEARS (B) and WEDDING RING 2/2 (C).
- Move forward twice.
- Use the PRUNING SHEARS (D); take the BIRD FIGURINE (E) and DWARF FIGURE 1/4 (F).
- Walk down, turn right.

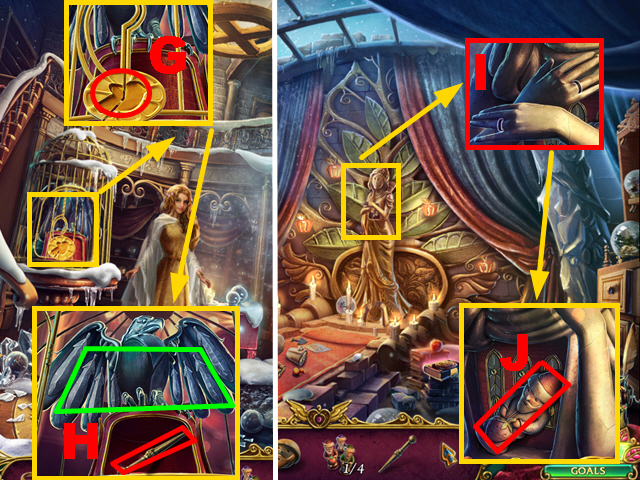
- Place the BIRD FIGURINE (G); place 2 FEATHERS (green).
- Take the ICE PICK (H).
- Move forward.
- Place 2 WEDDING RINGS (I); take DWARF FIGURE 2/4 (J).

- Place the DWARF’S HEAD (K).
- Assemble the dwarf: 1-5.
- Take DWARF FIGURE 3/4 (L).
- Walk down twice, turn left.

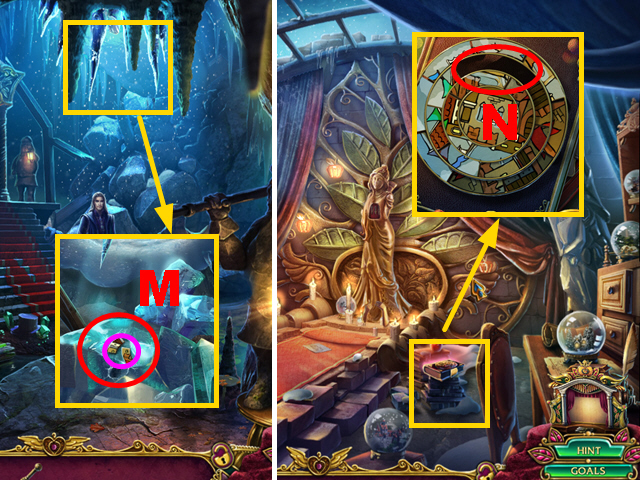
- Use the ICE PICK three times (M); take the BOOK COVER PARTS (purple).
- Go to the Secret Room.
- Place the BOOK COVER PARTS (N).

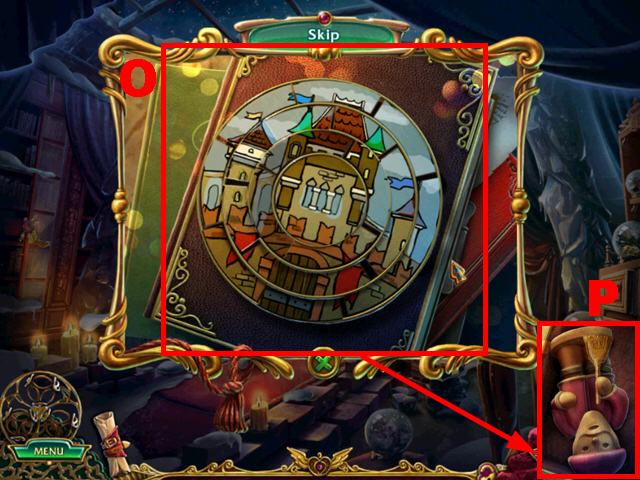
- Play the mini-game.
- Solution: (O).
- Take DWARF FIGURE 4/4 (P).
- Walk down twice, move forward.

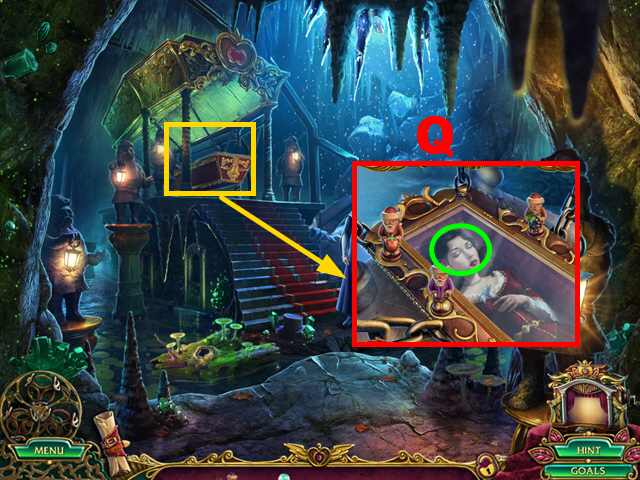
- The man will talk to you; you receive the LIFE ELIXIR.
- Place 4 DWARF FIGURES (Q).
- Use the LIFE ELIXIR (green).
- Congratulations, you have completed Dark Strokes: The Legend of the Snow Kingdom.





 Fabled Legends: The Dark Piper Walkthrough, Guide, & Tips
 Surface: The Pantheon Walkthrough, Guide, & Tips
 The Agency of Anomalies: Cinderstone Orphanage Walkthrough, Guide, & Tips
 Theatre of Shadows: As You Wish Walkthrough, Guide, & Tips
 Big City Adventure: Vancouver Walkthrough, Guide, & Tips