The Agency of Anomalies: Cinderstone Orphanage Walkthrough, Guide, & Tips
The Agency of Anomalies: Cinderstone Orphanage Walkthrough

Welcome to the The Agency of Anomalies: Cinderstone Orphanage Walkthrough!
Save the souls of prodigy children and their caretaker who disappeared during the fire in The Agency of Anomalies: Cinderstone Orphanage!
Whether you use this document as a reference when things get difficult or as a road map to get you from beginning to end, we’re pretty sure you’ll find what you’re looking for here.
This document contains a complete The Agency of Anomalies: Cinderstone Orphanage game walkthrough featuring annotated screenshots from actual gameplay!
We hope you find this information useful as you play your way through the game. Use the walkthrough menu below to quickly jump to whatever stage of the game you need help with.
Remember to visit the Big Fish Games Forums if you find you need more help. Have fun!
This walkthrough was created by Margie B, and is protected under US Copyright laws. Any unauthorized use, including re-publication in whole or in part, without permission, is strictly prohibited.
General Tips

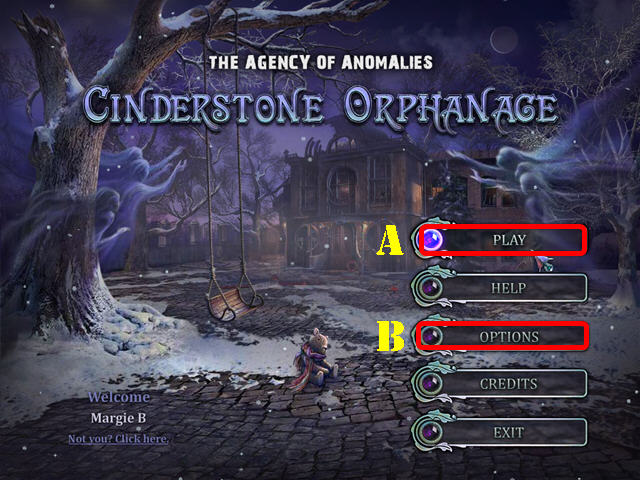
- This is the official Guide for The Agency of Anomalies: Cinderstone Orphanage Standard Edition!
- Press on Play (A) to begin your adventure
- Select Options (B) for Sound, Music, Full, Wide Screen and Custom Cursor settings.
- In this guide, we will refer to Hidden Object Scenes as ‘HOS’ and Hidden Object Puzzles as ‘HOP’. Objects listed in red in a HOS require an action to be performed before they become available.
- Puzzles can be skipped once the Skip button has refilled. Press on ‘Replay’ to reset a puzzle to its original state.
- Select the Notebook in the lower left and choose the Story tab and Docs tab.
- Selecting the Anomalous Activity Detector, or ‘AAD’, in the lower right will show you a hint.
- The Abilities are stored in the Nexus located above the ADD in the lower right. The device will glow when you have to use one of the powers.
- The Ability to enlarge objects is yellow. The X-Ray Vision Ability allows you to see through objects, and is blue. The Telekinesis Ability allows you to lift heavy objects, and is red. The Restoration Ability allows you to repair objects, and is green. The Ability to make pictured objects real is purple.
Chapter 1: The Orphanage

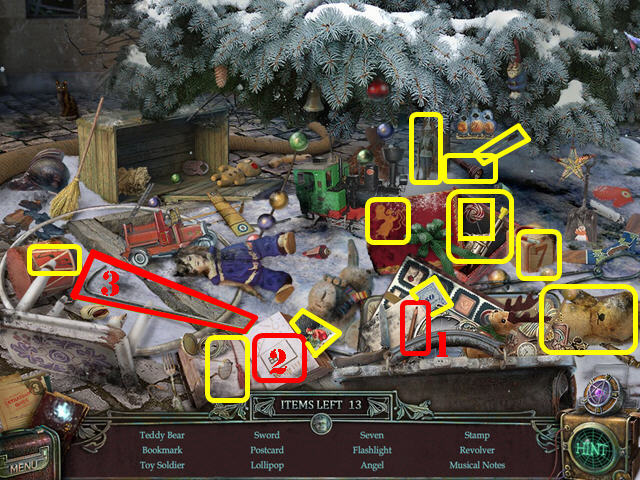
- Play the HOS in the lower right.
- Use the pencil (1) on the book page; take the house (2).
- Take the GAFF (3).

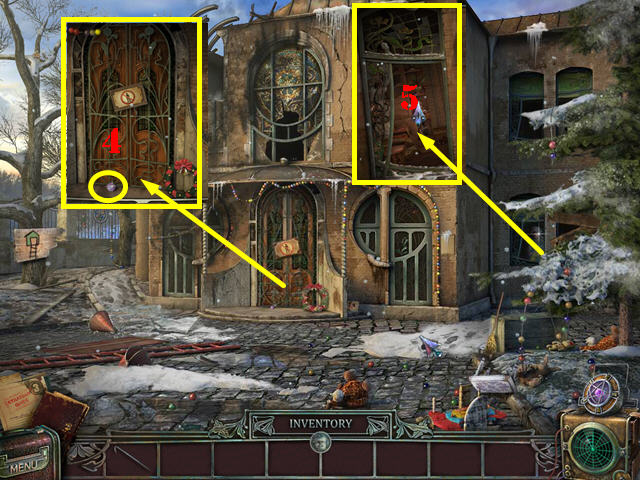
- Zoom into the door and pick up the GLOWING HANDLE (4).
- Zoom into the window; break the window with the GAFF (5).
- Go through the window.

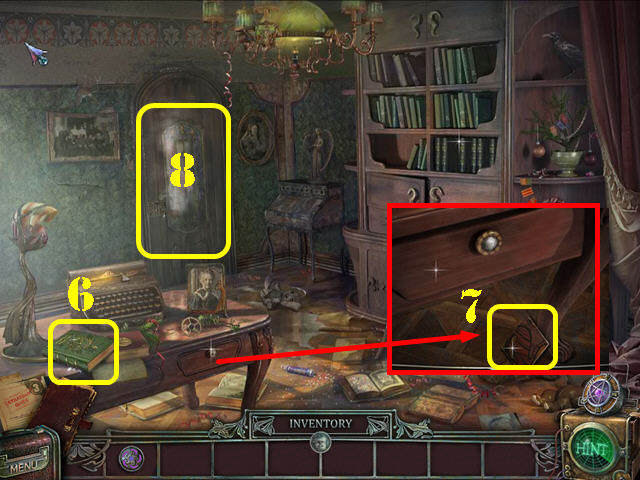
- Take the VOLUME 9 (6).
- Examine the drawer and take the PATTERNED TILE (7).
- Examine the door and put the GLOWING HANDLE on it to activate a puzzle (8).

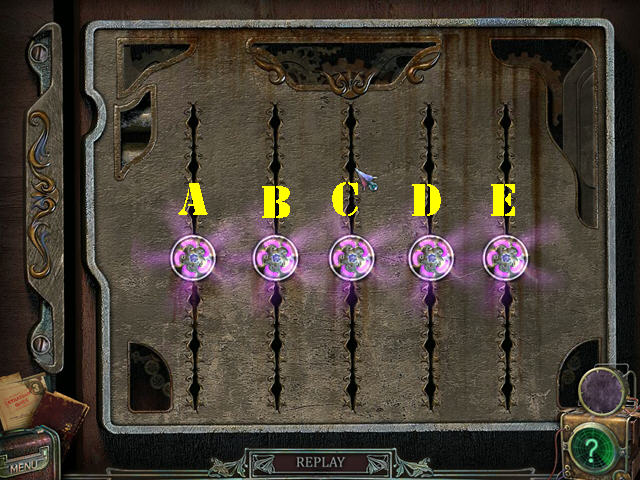
- Your goal is to slide the handles so they stay in the middle.
- To solve the puzzle, move the handles in this order: Slide C to the center, Slide D to the center, Slide E to the center, Slide C to the center, Slide B to the center, and Slide A to the center.
- Go through the door.

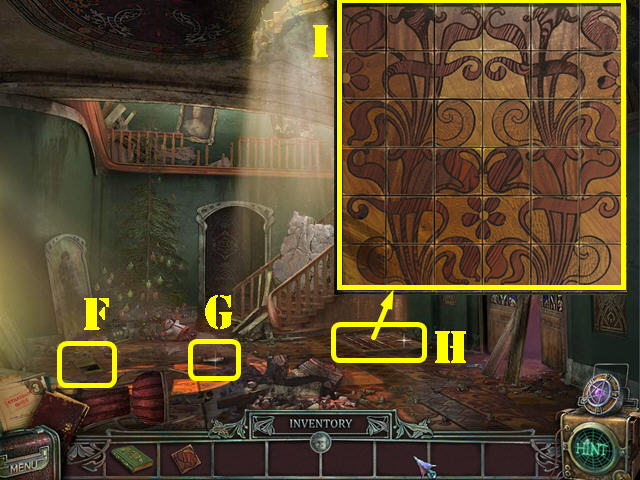
- Take the Secret Material (F) and the SWITCH HANDLE (G).
- Examine the trapdoor; put the PATTERNED TILE on the floor to activate a puzzle (H).
- Arrange the tile pattern correctly. Press on two pieces to swap their positions.
- Please look at the screenshot for the solution (I).
- Go through the hole in the floor.

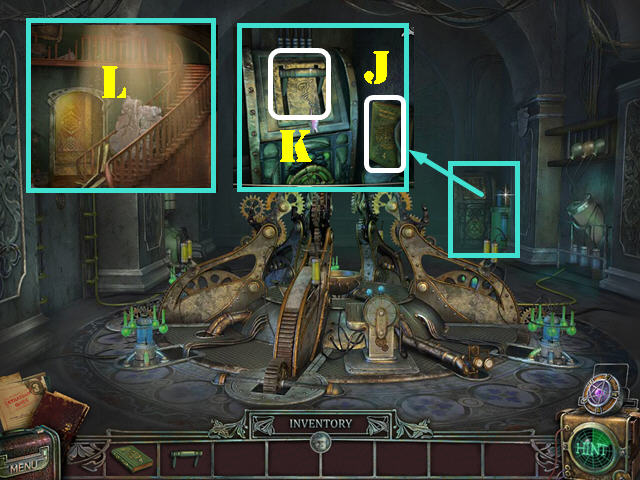
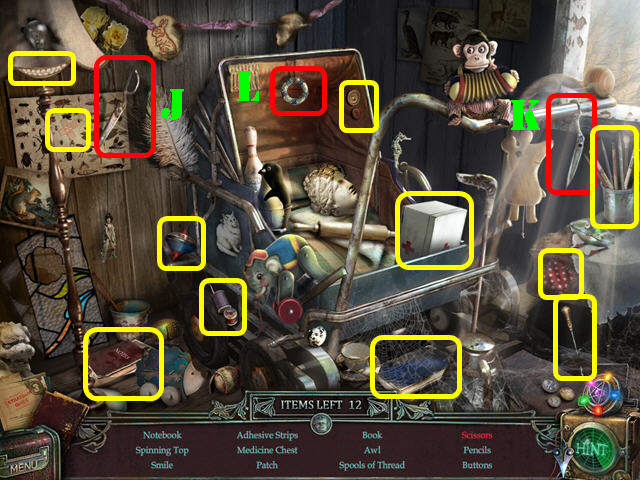
- Examine the device in the back; take VOLUME 4 (J).
- Put the SWITCH HANDLE on the device (K); press on the switch handle to turn on the lights in the orphanage (L).
- Exit this scene and go through the back door.

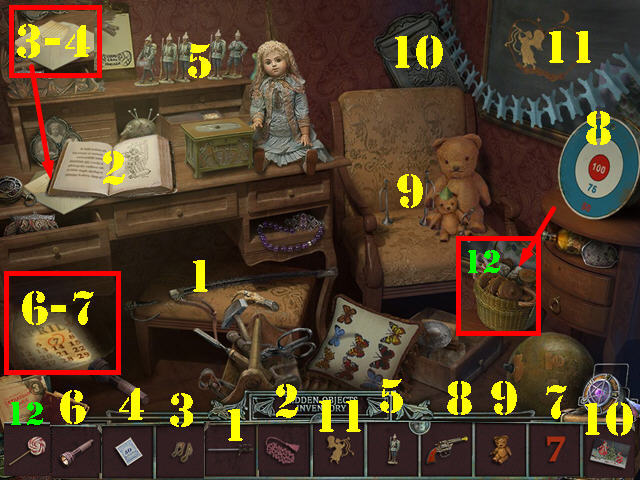
- Play the HOP.
- Put the items back in their place.
- Please look at the screenshot for the solution (M).
- You will earn the SCREWDRIVER.

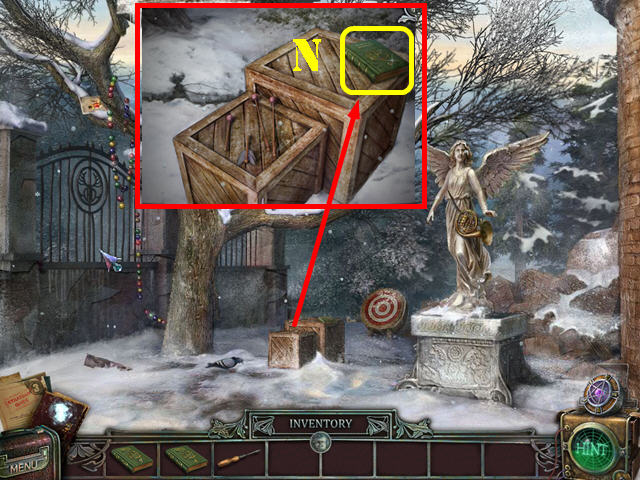
- Exit the orphanage and go left.
- Examine the crates; take VOLUME 6 (N).

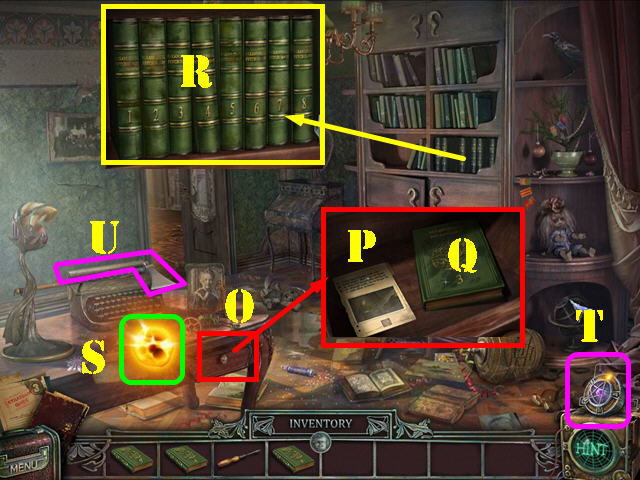
- Go back to the library.
- Zoom into the drawer (O); use the SCREWDRIVER on the drawer to open it.
- Take the Secret Material (P) and the VOLUME 3 (Q).
- Examine the bookcase; put the VOLUME 3, VOLUME 4, VOLUME 6, and VOLUME 9 on the shelf (R).
- Take the Ability to enlarge objects (S).
- Select the Nexus (T) and then press on the axe on the typewriter; take the AXE (U).
- Go through the door.

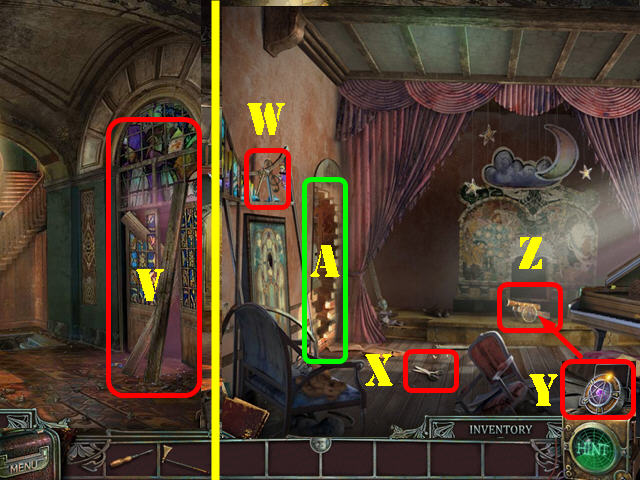
- Use the AXE on the boarded-up door 3 times (V).
- Go through the door.
- Take the NOTE KEY (W) and the SCISSORS (X).
- Select the Nexus (Y) and then use the ability to enlarge objects on the cannon(Z).
- Press on the cannon to blow a hole through the wall; go through the hole (A).

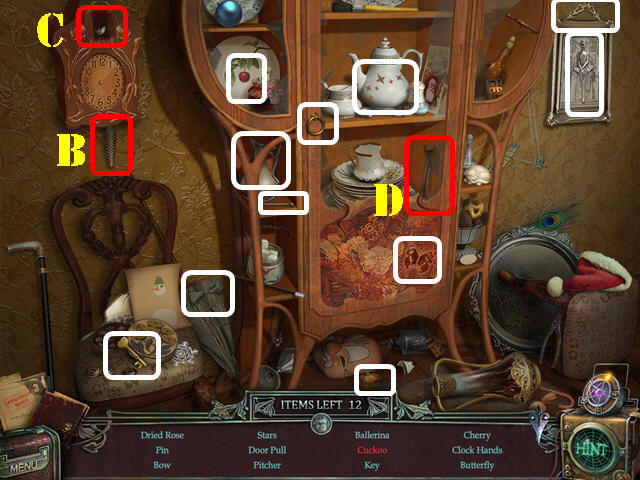
- Play the HOS.
- Find the items listed.
- Pull on the clock weight (B); take the cuckoo (C).
- Take the WRENCH (D).
- Go through the right door.

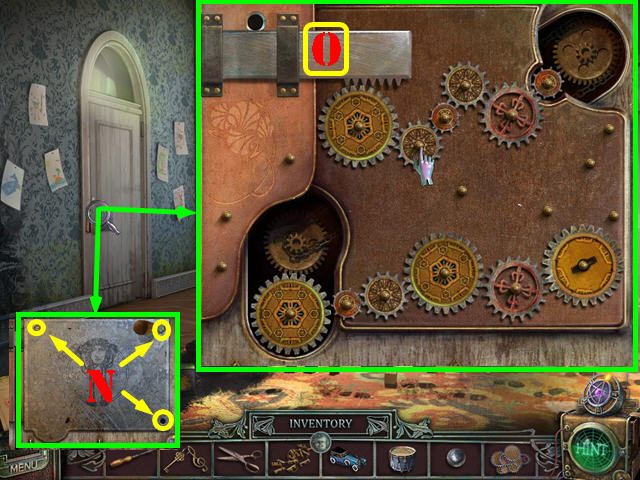
- Take the BLUE TOY CAR (E).
- Look at the box; remove the top and take the YELLOW KEYS (F).
- Select the Nexus (G) and then use the Ability to enlarge objects on the drum on the tree.
- Take the DRUM (I).
- Go right.

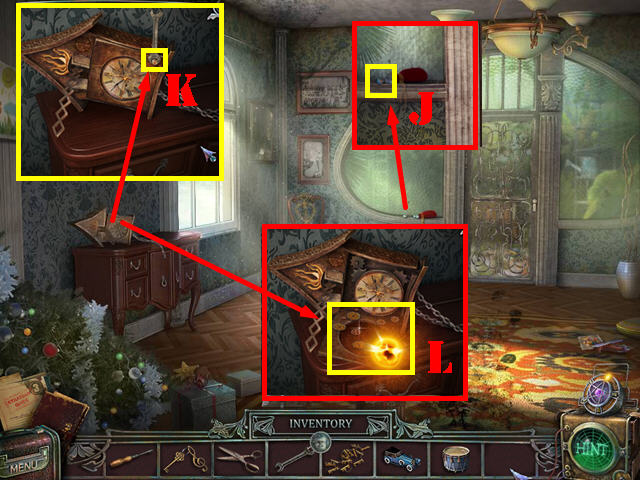
- Zoom into the door and take the BALL BEARING (J).
- Examine the clock; use the WRENCH on the bolt to remove the cover (K).
- Use the Ability to enlarge objects on the gears; take the GEARS (L).
- Walk down.


- Zoom into left door; use the SCREWDRIVER to remove the screws (N).
- Put the GEARS on the panel to activate a puzzle.
- Place the gears onto the pins as shown in the screenshot (O).
- Go through the door.

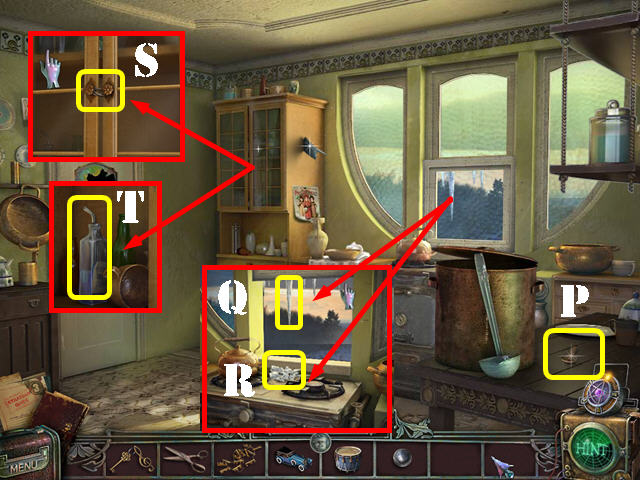
- Take the KEY (P).
- Look at the window and open it; press on the icicle (Q) and take the ICICLE (R).
- Zoom into the cupboard; cut the knot with the SCISSORS (S).
- Take the GLASS CLEANER (T).
- Walk down 4 times and go through the left door.

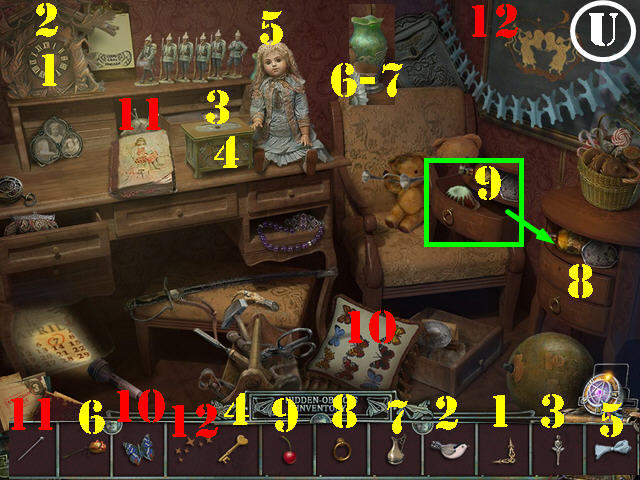
- Play the HOS.
- Put the items back in their place.
- Please look at the screenshot for the solution (U).
- The TOY FISHING POLE will be added to inventory.

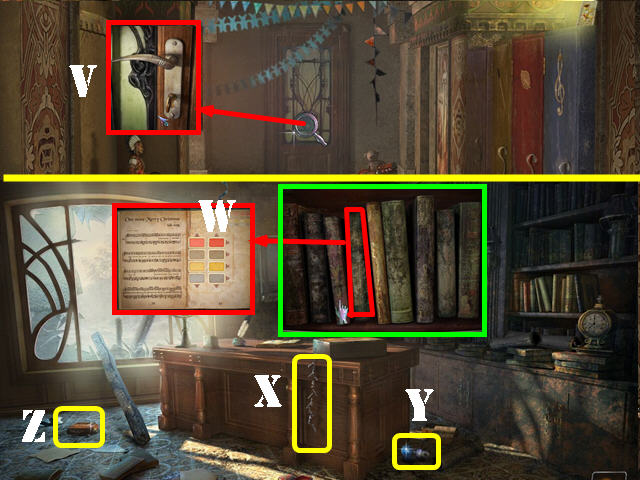
- Examine the back door; insert the KEY into the keyhole and go through the back door (V).
- Take the BLUE KEYS (X) and the MACHINE PART 3 (Y).
- Examine the bookcase; open the 4th book and take the PART OF MUSIC SHEET (W).
- Examine the box; put the BALL BEARING in it to activate a puzzle (Z).

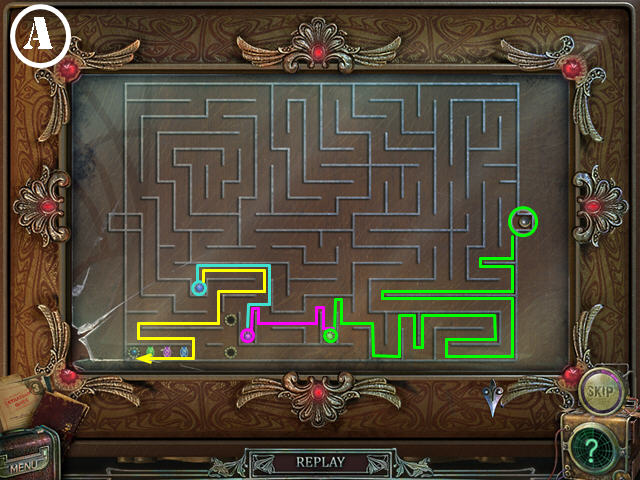

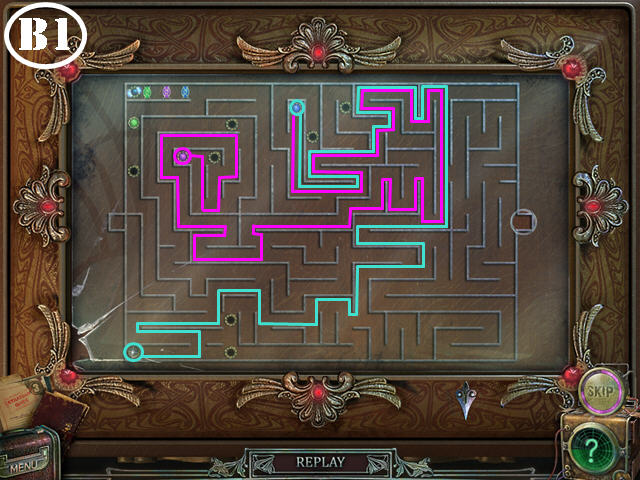

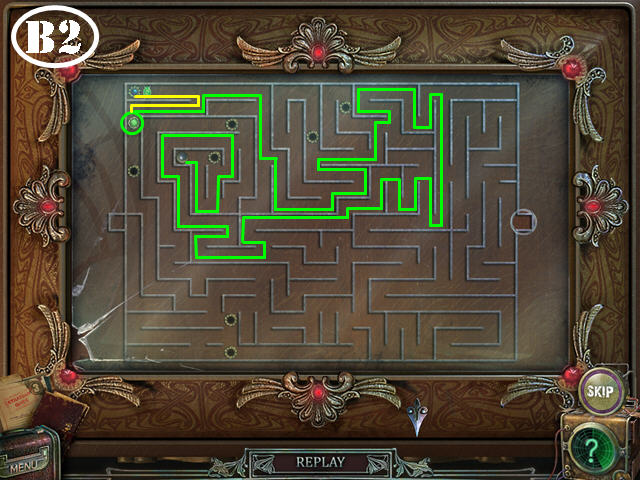

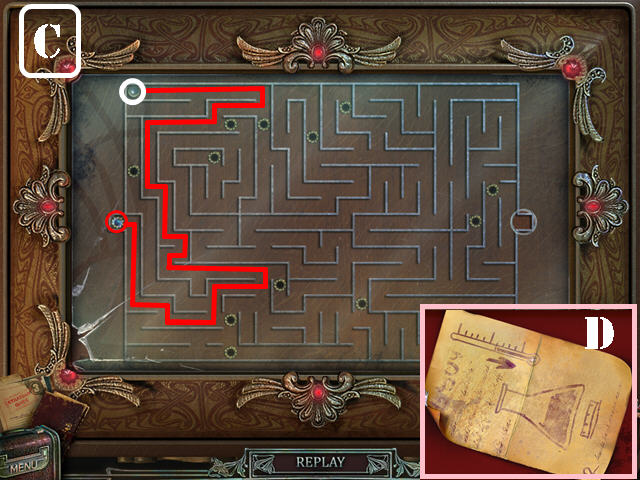
- Drag the ball through the maze until it reaches the goal. The goal is blocked by colored gates, which will unlock when the ball touches a matching-colored button. Avoid the holes or the ball will be reset to its original position.
- The gems that are being blocked by colored diamonds will unlock after the ball hits the matching colored ball.
- There are 3 stages to this puzzle.
- Follow the steps in the screenshot (green, purple, blue, and yellow) to solve the first stage (A).
- Follow the steps (blue and purple) in the screenshot to solve the first part of the second stage (B1).
- Follow the steps (green and yellow) in the screenshot to solve the second part of the second stage (B2).
- Follow the steps (red) in the screenshot to solve the last stage (C).
- Take the PART OF RECIPE (D).
- Walk down.

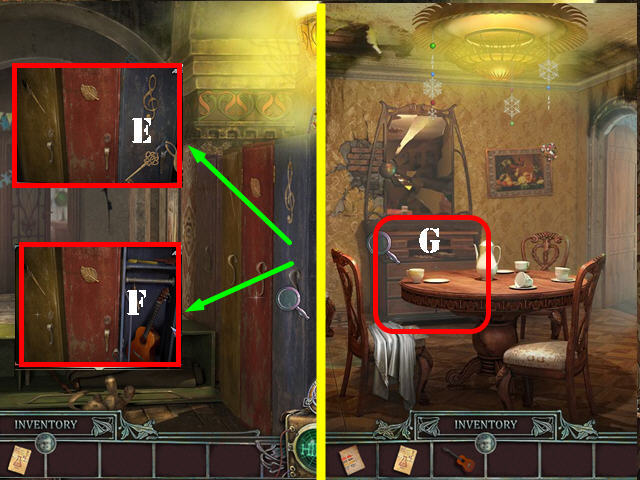
- Zoom into the lockers; insert the NOTE KEY into the blue locker (E) and take the GUITAR (F).
- Return to the dining room.
- Zoom into the desk (G); place the BLUE KEYS and the YELLOW KEYS on the desk to activate a puzzle.

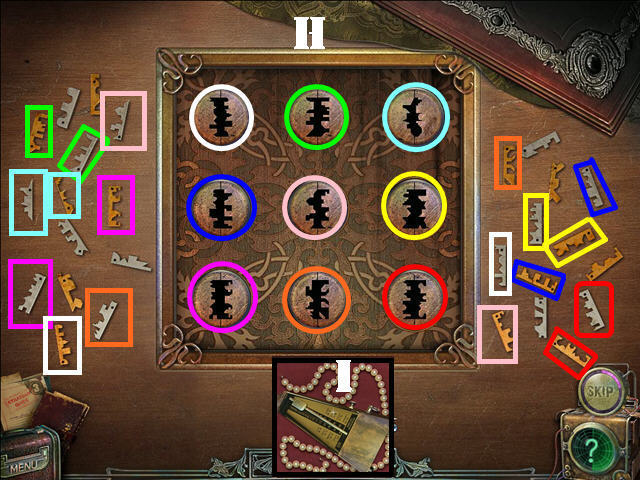
- Put the key halves into the right locks.
- See screenshot for solution (H).
- Take the METRONOME (I).
- Go back outside.

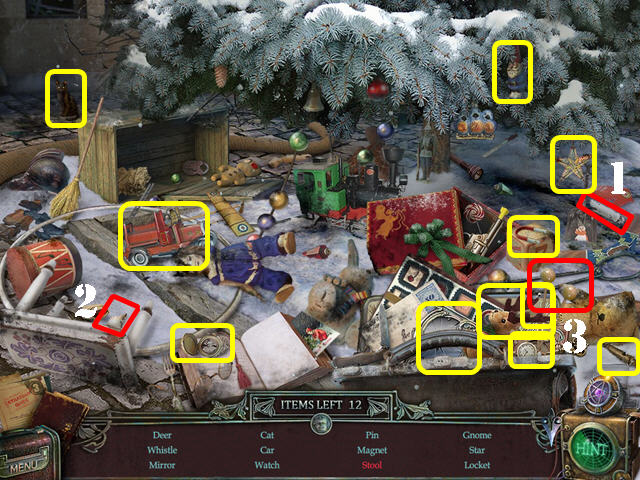
- Play the HOS.
- Drag the stool leg piece (1) to the broken stool (2); take the stool.
- Take the DRUMSTICKS (3).
- Go left.

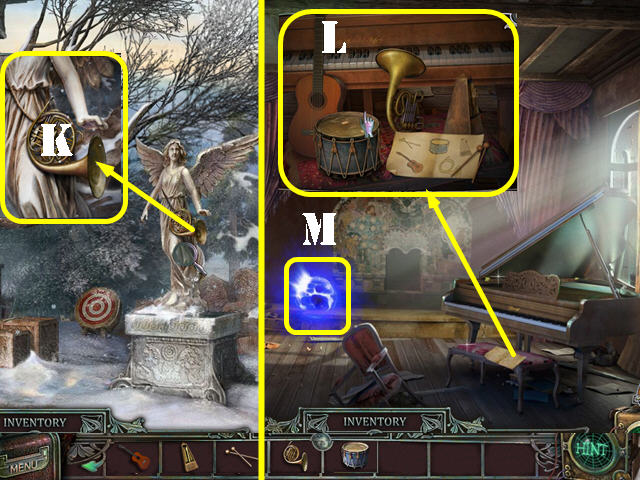
- Examine the statue; cut the rope with the SCISSORS and take the HORN (K).
- Return to the piano room.
- Examine the piano; put the DRUMSTICKS, HORN, DRUM, GUITAR, and METRONOME on the bench (L).
- Take the X-Ray Vision Ability.

- Return to the kitchen.
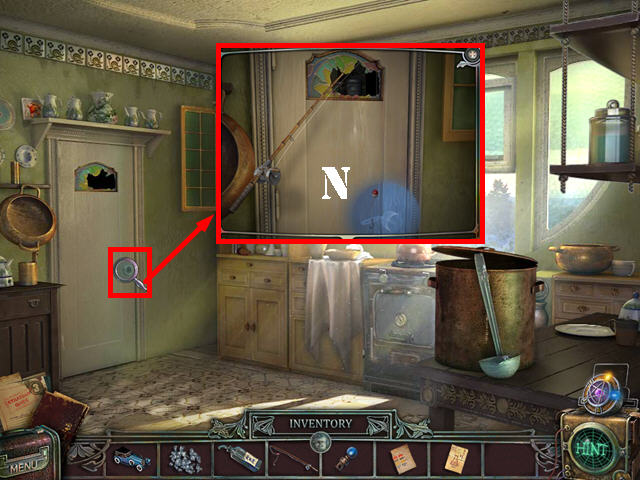
- Look at the door; use the X-Ray Vision Ability to see through the lock.
- Use the TOY FISHING POLE through the broken glass (N); go through the door.

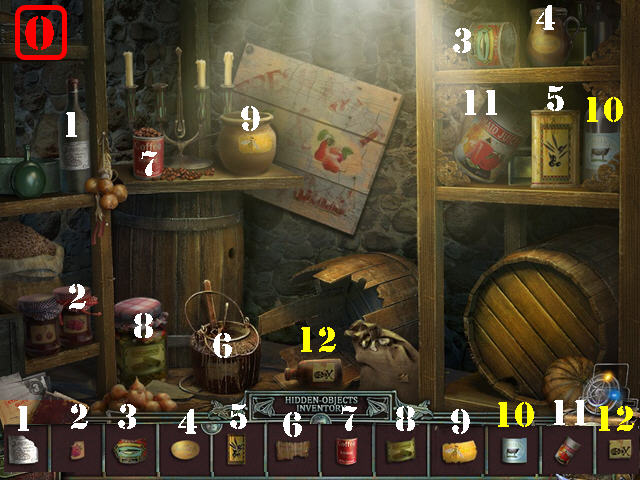
- Play the HOP.
- Put the items back in their place.
- See screenshot for solution (O).
- The DILUTED ACID will be added to inventory.

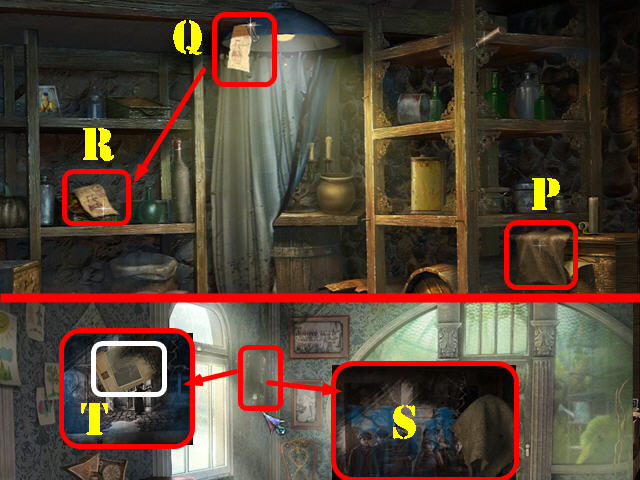
- Take the RAG (P) and the PAPER CLIP attached to the recipe part (Q).
- Grab the PART OF RECIPE that falls on the shelves (R).
- Walk down twice and go right.
- Examine the painting; use the GLASS CLEANER on the glass and then wipe it with the RAG (S).
- Use the X-Ray Vision Ability on the painting and take the Secret Material (T).
- Walk down twice.

- Zoom into the cupboard; use the PAPER CLIP on the lock to activate a puzzle.
- Raise the cylinders with the use of the paper clip; use the etchings on the metal as a clue. You have to move the tumblers to the key line; they will turn silver when placed correctly.
- See screenshot for solution (U).
- Take the BEAKER (V).


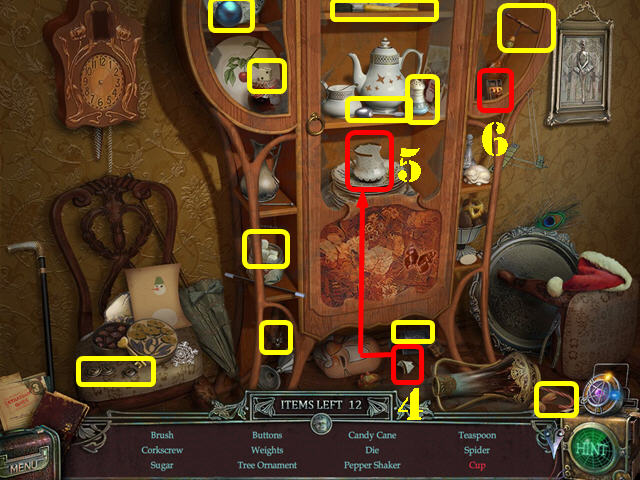
- Play the HOS.
- Put the broken cup piece (4) on the broken cup (5); take the cup.
- Take the MATCHES (6).
Chapter 2: The Gazebo

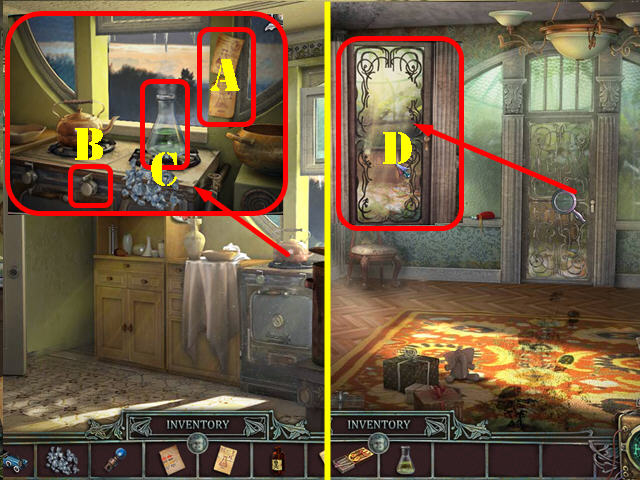
- Go to the kitchen.
- Examine the stove; put the 2 RECIPE PARTS on the wall (A).
- Press on the knob (B). Put the MATCHES on the burner; put the BEAKER on the burner (C).
- Pour the DILUTED ACID into the beaker.
- Put the ICICLE below the beaker to cool down the solution; take the CONCENTRATED ACID.
- Walk down and then go right.
- Examine the back door; put the CONCENTRATED ACID on the door (D).
- Go through the door.

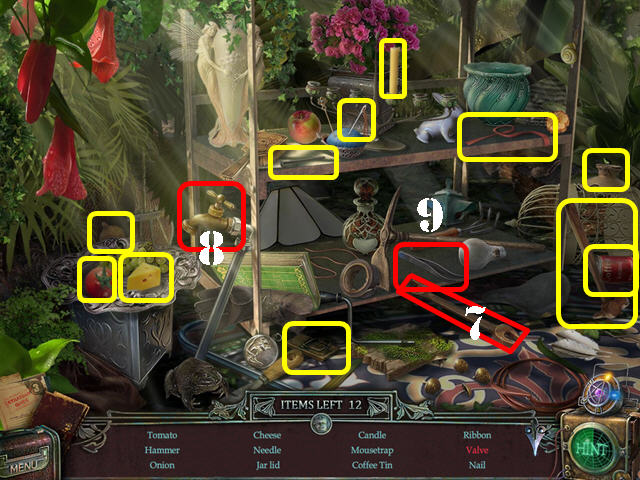
- Play the HOS.
- Use the wrench (7) on the faucet (8) and take the valve.
- Take the TWEEZERS (9).
- Go left.

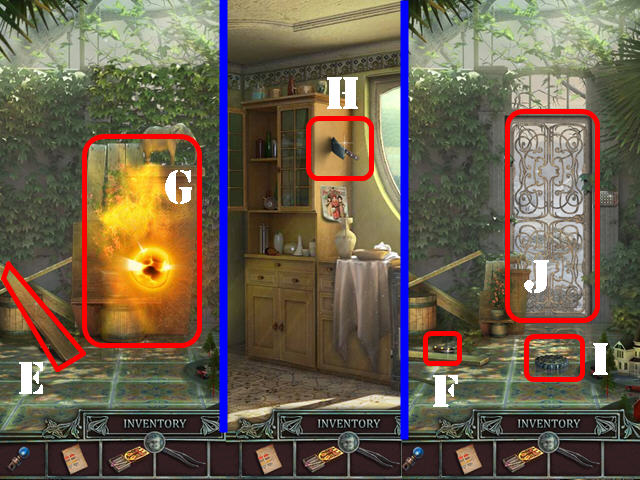
- Select the board (E) and take the KNIFE HANDLE (F).
- Use the ability to shrink objects on the potted plant and the boards (G).
- Go back to the kitchen.
- Put the KNIFE HANDLE on the blade and take the KNIFE (H).
- Return to the greenhouse and enter the door on the left.
- Use the KNIFE on the ivy on the door 3 times (J).
- Take the MACHINE PART 1 (I).

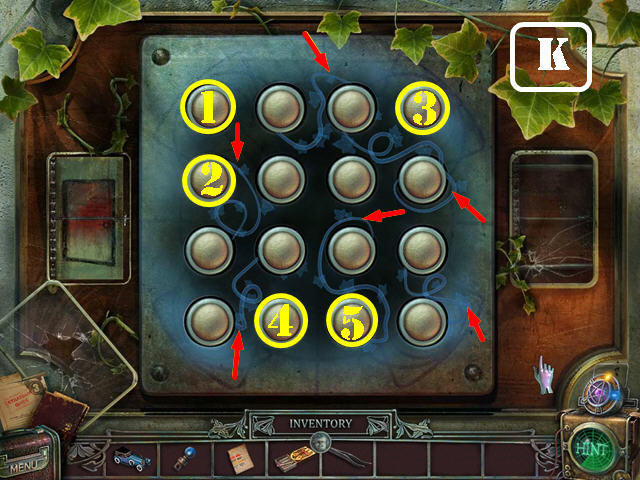
- Examine the keypad; use the X-Ray Vision Ability on the keypad.
- Remove the 6 ivy pieces around the buttons with the TWEEZERS to activate a puzzle (red arrows).
- Press on the buttons until they are all lit up. Pressing on a button affects the surrounding ones.
- To solve the puzzle, press on the buttons in the order shown in the screenshot (K).
- Go through the door.

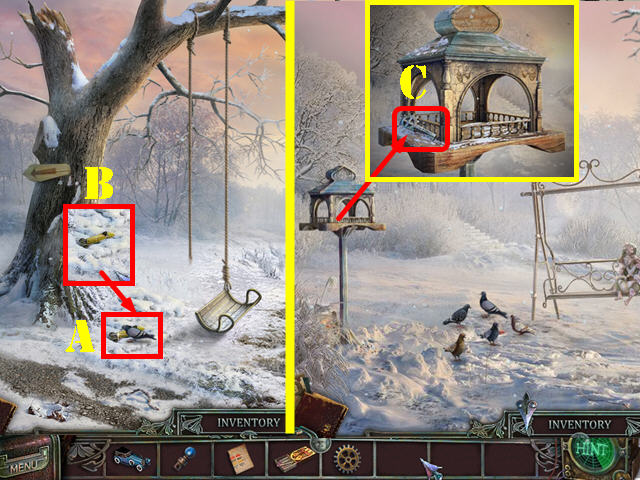
- Touch the pigeon (A) and take the YELLOW TOY CAR (B).
- Go left.
- Examine the birdhouse; take the GEAR KEY (C).
- Go over the bridge on the right and go forward towards the gate.

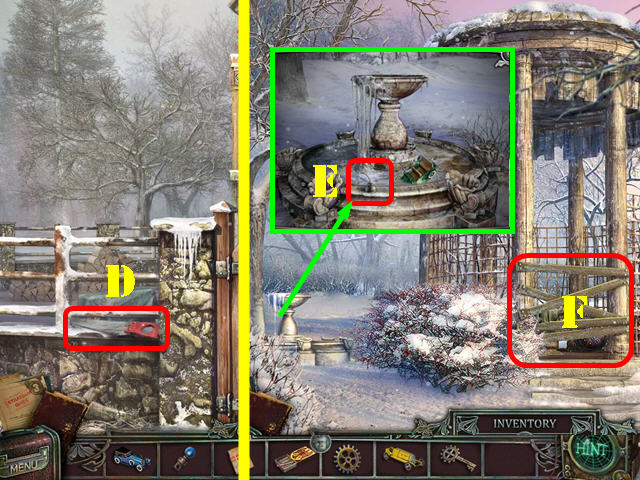
- Take the HACKSAW (D).
- Walk down twice and go towards the gazebo.
- Examine the fountain; take the OIL CAN (E).
- Use the HACKSAW on the boards 3 times to activate a HOP (F).

- Play the HOP.
- Put the items back in their place.
- See screenshot for solution (G).
- The BROOM will be added to inventory.
- Walk down 4 times.

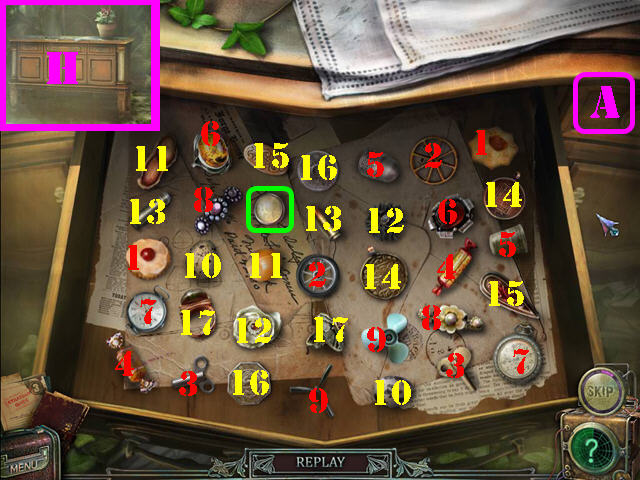
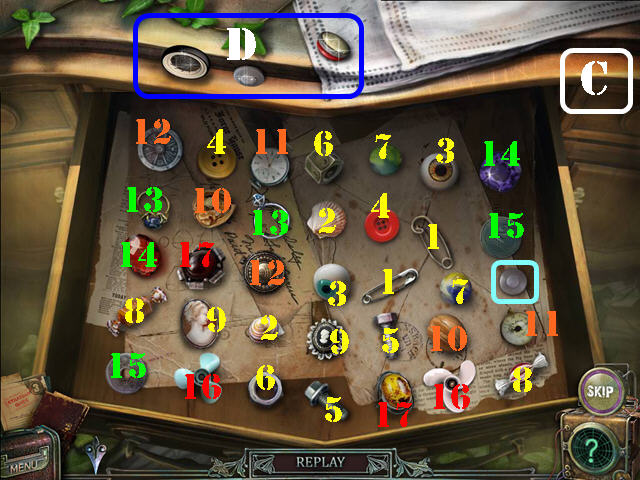
- Zoom into the cabinet (H); use the GEAR KEY in the lock to trigger a puzzle.
- Select two items that have something in common to eliminate them from the drawer.
- See screenshot for the first solution (A).
- Select the last piece (green).

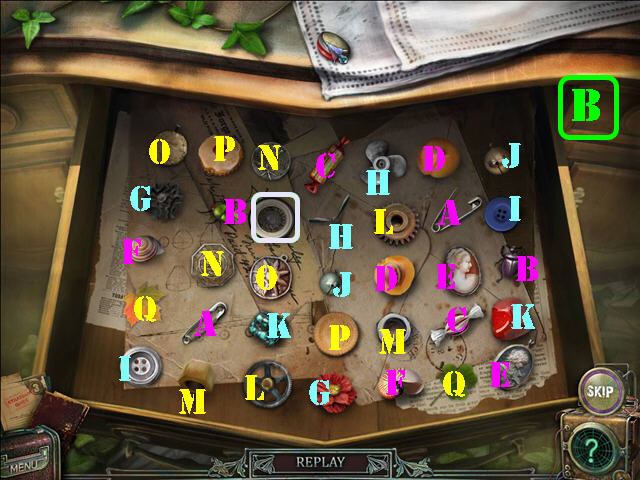
- See screenshot for the second solution (B).
- Select the last piece (white).


- See screenshot for the third solution (C).
- Select the last piece (blue).
- Take the TOY CAR PARTS (D).

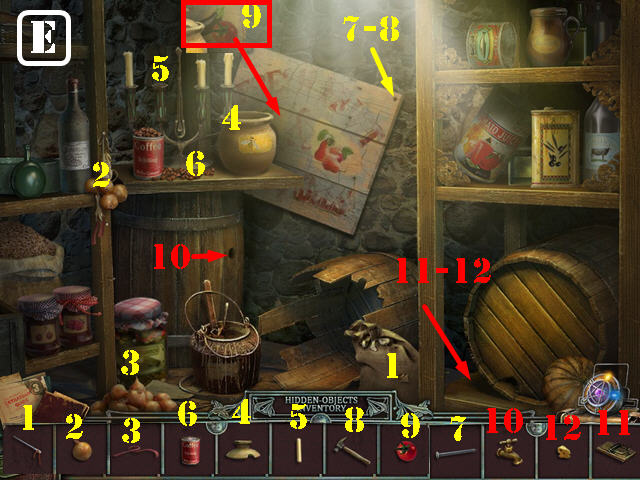
- Go back to the pantry.
- Play the HOP.
- Put the items back in their place.
- See screenshot for solution (E).
- The CRACKERS will be added to inventory.

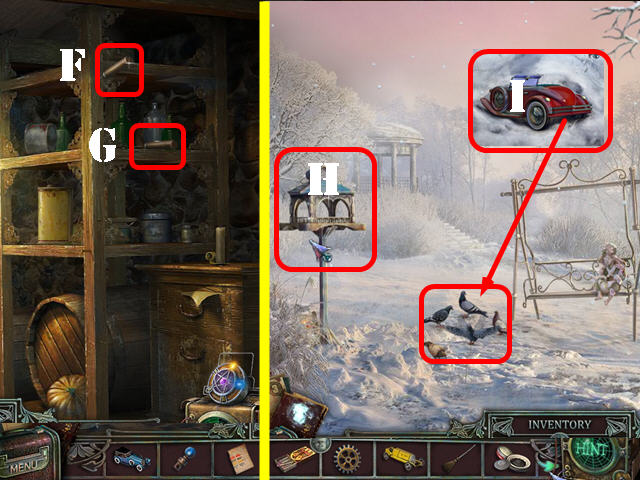
- Use the OIL CAN on the ice pick (F).
- Take the ICE PICK (G).
- Go back to the birdhouse area.
- Zoom into the birdhouse; put the CRACKERS in it (H).
- Examine the ground; use the BROOM on the snow 4 times and take the BROKEN TOY CAR (I).
- Go towards the gazebo.

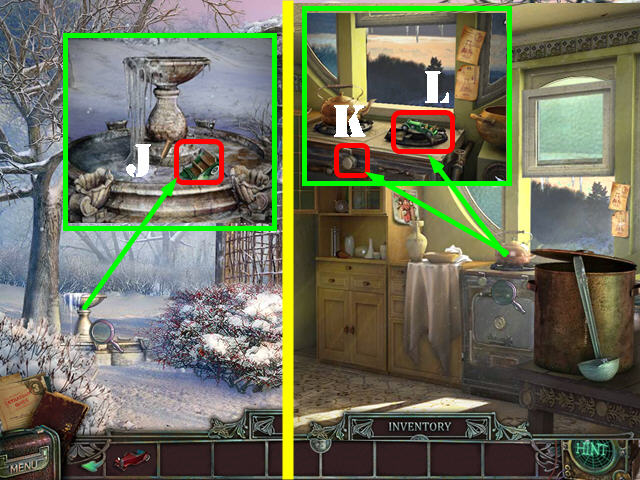
- Examine the fountain; use the ICE PICK on the ice and take the ICE TOY CAR (J).
- Go back to the kitchen.
- Examine the stove; turn it on (K) and add the MATCHES to the burner.
- Put the ICE TOY CAR on the fire; take the GREEN TOY CAR (L).

- Walk down; go right and then through the door.
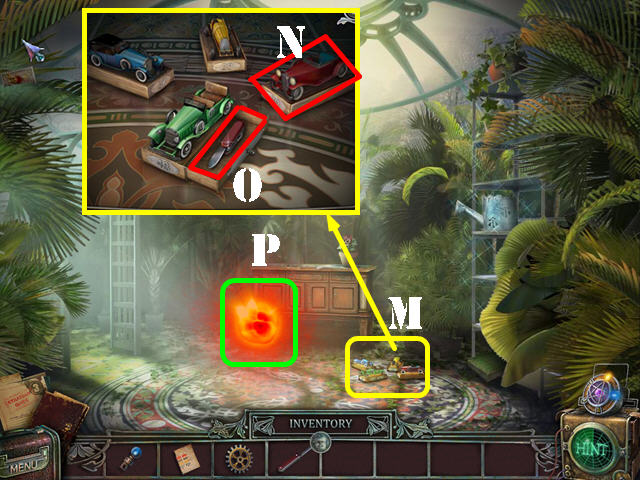
- Zoom into the boards; put the BROKEN TOY CAR, the YELLOW TOY CAR, the BLUE TOY CAR, and the GREEN TOY CAR on the boards (M).
- Put the TOY CAR PARTS on the broken car (N).
- Take the PENKNIFE (O).
- Take the Telekinesis Ability (P); this Ability gives you power to move and lift heavy objects.

- Play the HOS.
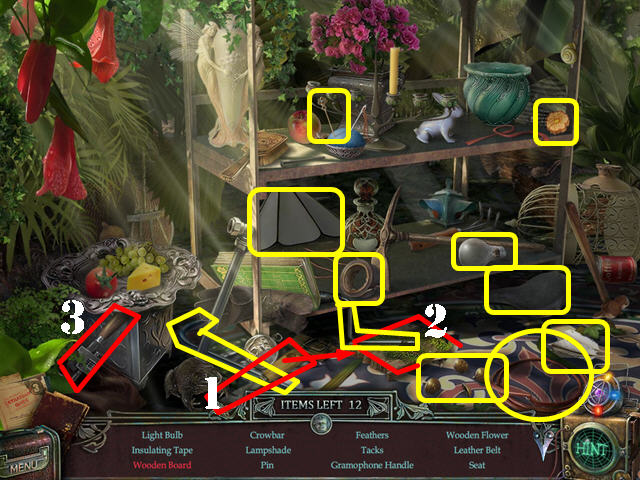
- Use the palette knife (1) on the moss (2); take the wooden board.
- Take the WRENCH (3).

- Go left and then go forward.
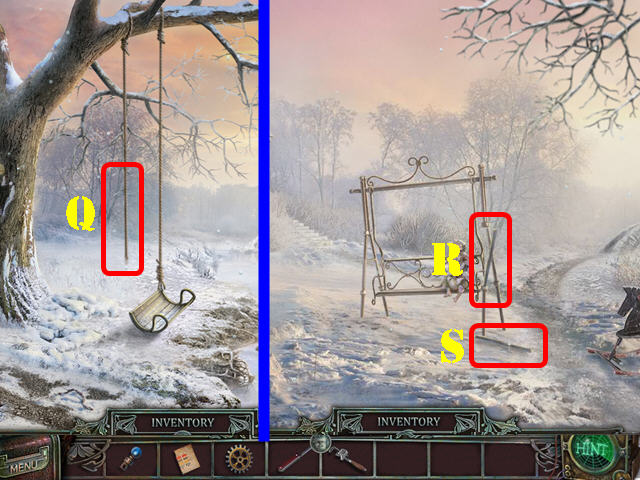
- Use the PENKNIFE to cut the ROPE (Q).
- Go left.
- Use the WRENCH to remove the pipe on the swing (R); take the PIPE on the ground (S).

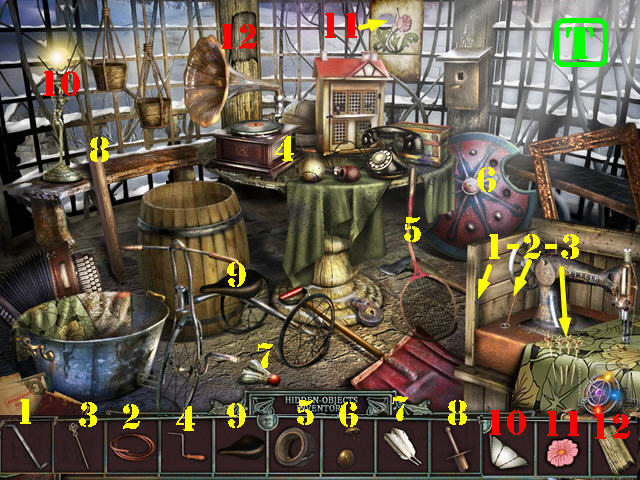
- Go to the gazebo.
- Play the HOP.
- Put the items back in place.
- See screenshot for the solution (T).
- The SCOOP NET will be added to inventory.

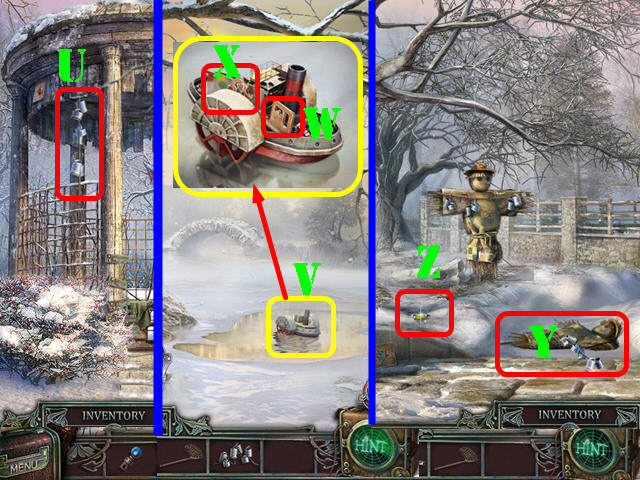
- Put the PENKNIFE on the TIN CANS to add them to inventory (U).
- Walk down twice.
- Use the SCOOP NET on the tugboat (V); take the DOVECOTE KEY (W) and the BLURRY PICTURE (X).
- Go left and go over the bridge.
- Put the PIPE, ROPE, and TIN CANS on the scarecrow (Y).
- Use the Telekinesis Ability on the scarecrow.
- Take the MACHINE PART 4 on the ground (Z).
- Go forward.

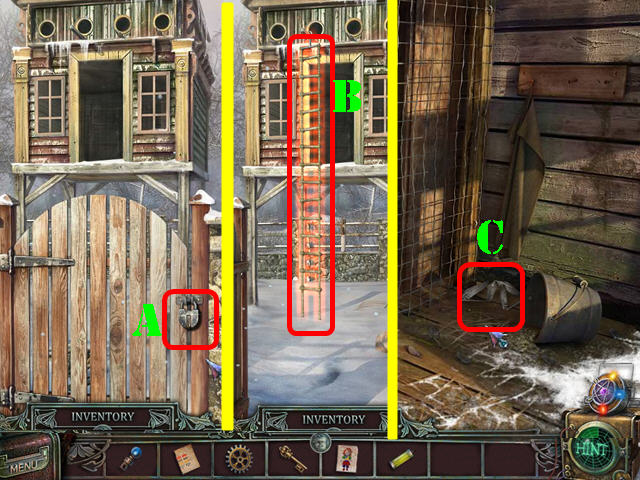
- Put the DOVECOTE KEY in the lock (A).
- Use the Telekinesis Ability on the ladder (B).
- Enter the dovecote.
- Take the FEATHERS (C).

- Walk down 6 times.
- Play the HOS.
- Touch the plant (D); take the bumblebee (E).
- Take the BOWSTRING (F).

- Return to the dining room.
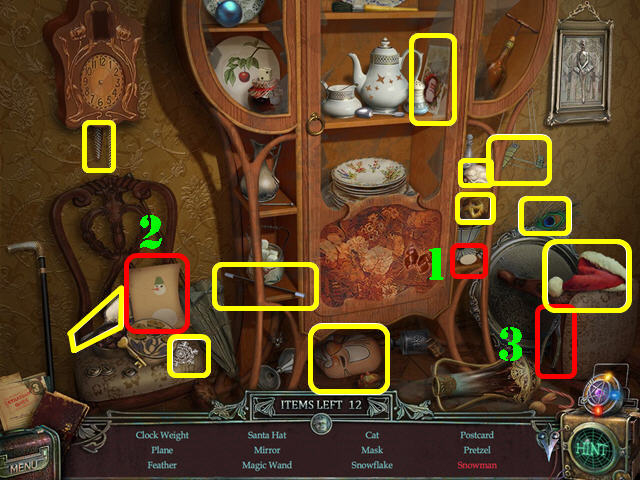
- Play the HOS.
- Put the snowball (1) on the drawing (2); take the snowman.
- Take the PLIERS (3).


- Return to the dovecote.
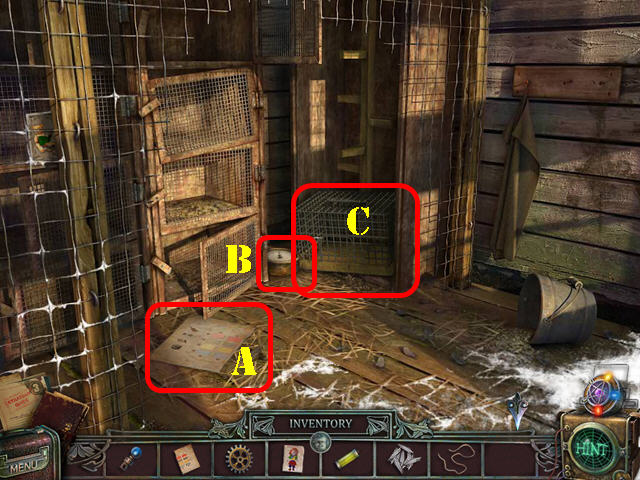
- Use the PLIERS to remove the wire fence.
- Take the PART OF MUSIC SHEET (A), MACHINE PART 2 (B), and the EMPTY CAGE (C).

- Go back to the piano room.
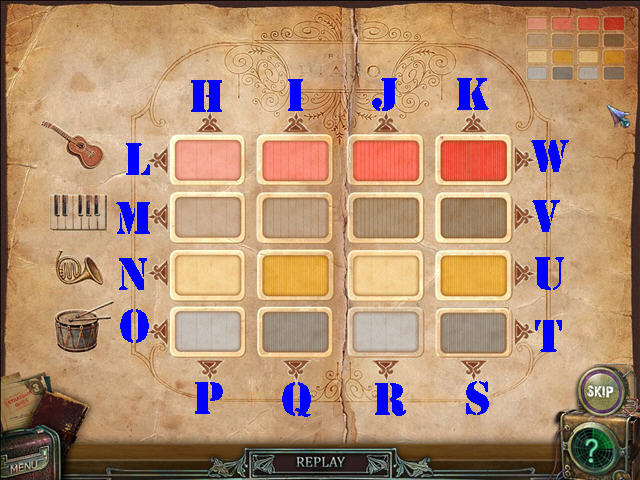
- Examine the stand on the piano; put the 2 PARTS OF MUSIC SHEET on the stand.
- Use the arrows to arrange the rectangles into the same order as the image in the upper right corner.
- To solve the puzzle, press on the arrows in this order: O, M, N, H x 3, I, J x 2, V, K, P, L, H, W, H x 3, N, P, N H, V, P x 2, O, H x 2, R x 2, T x 2, J x 2, S x 2, O, K x 2, S. T, K, R, O, J, Q, P, T, H, I, T, P, O, H, and O.

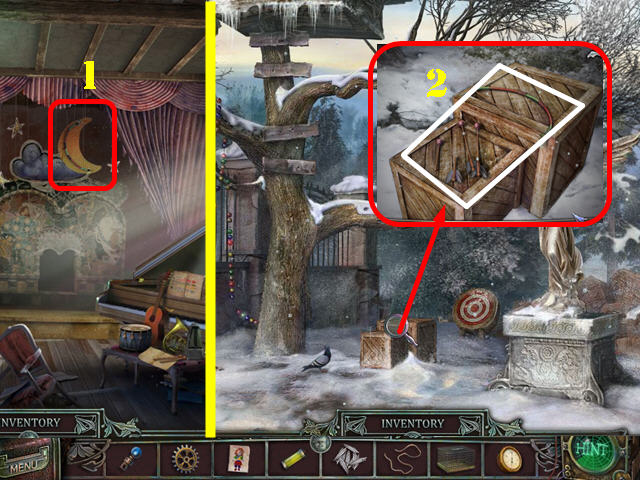
- Use the Telekinesis Ability on the moon shape to obtain the Bow (1).
- Return to the front entrance and go left.
- Zoom into the crates; put the BOW, the FEATHERS, and the BOWSTRING on the crates.
- Take the ARCHERY SET (2).
- Zoom into the tree house; put the ARCHERY SET on it to activate a puzzle.

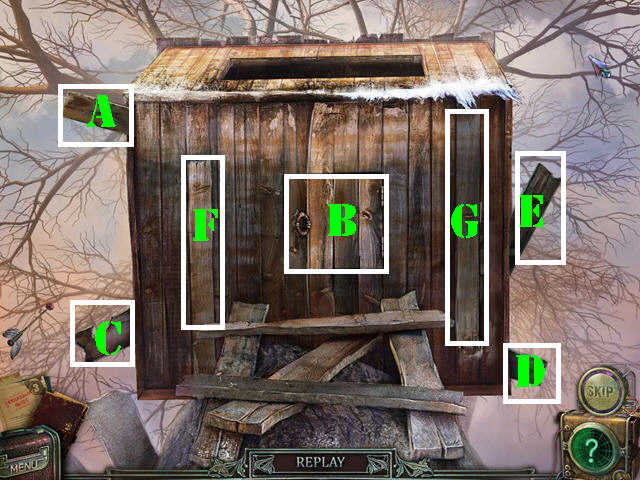
- Shoot the planks in the same order shown in the game.
- Round 1 solution: A and B.
- Round 2 solution: C, D, B, and E.
- Round 3 solution: A, E, C, D, F, G, and B.
- Enter the tree house.
Chapter 3: The Tree House

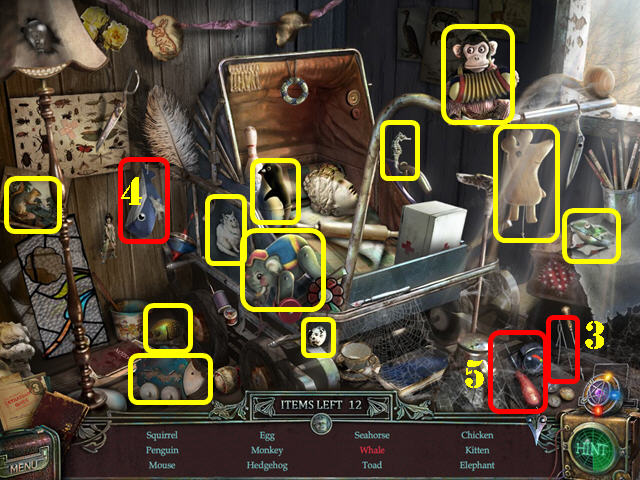
- Play the HOS.
- Use the needle (3) on the torn whale (4); take the whale.
- Grab the ALTIMETER (5).

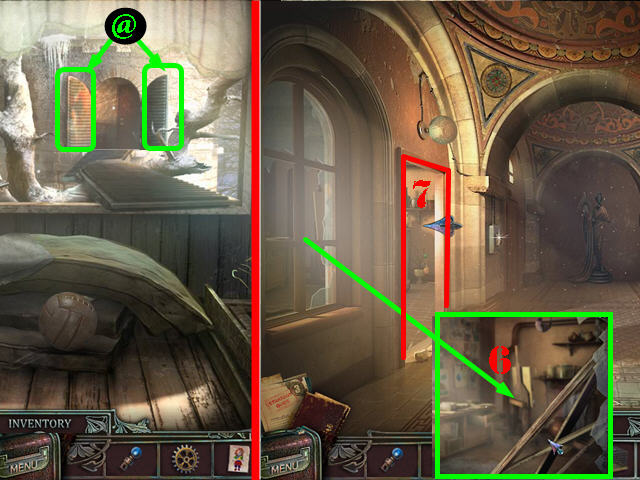
- Use the Telekinesis Ability on each of the two shutters (@) to form a bridge.
- Go forward and go through the open door.
- Examine the broken window; use the Telekinesis Ability on the boards (6).
- Go through the left door (7).

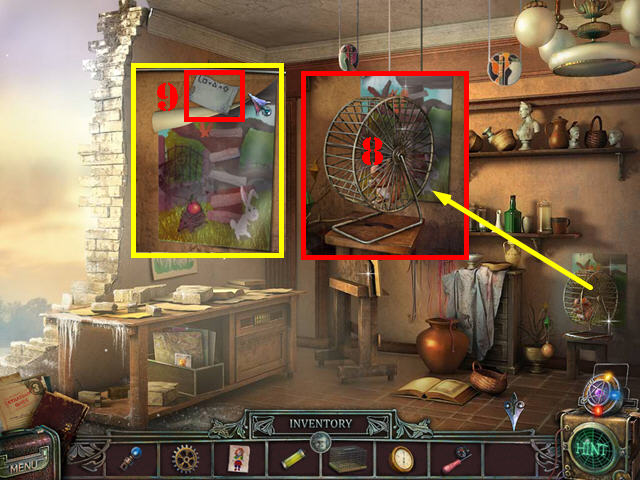
- Examine the stool; take the CAGED SQUIRREL (8).
- Press on the poster and take the PART OF CODE (9).

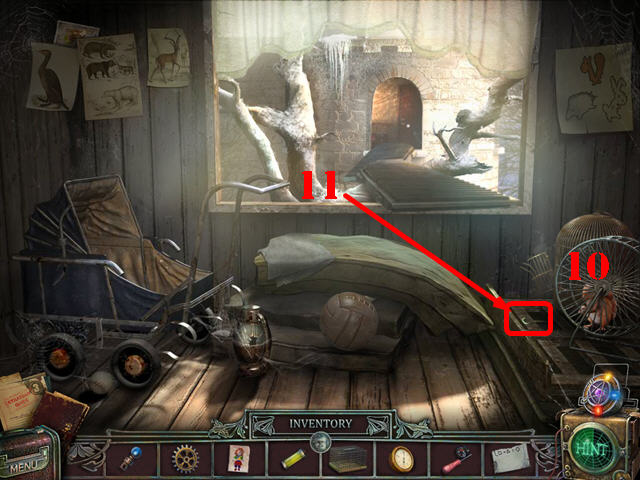
- Return to the tree house.
- Put the CAGED SQUIRREL next to the birdcage (10).
- Take the CAGE HOOK (11).
- Go forward.

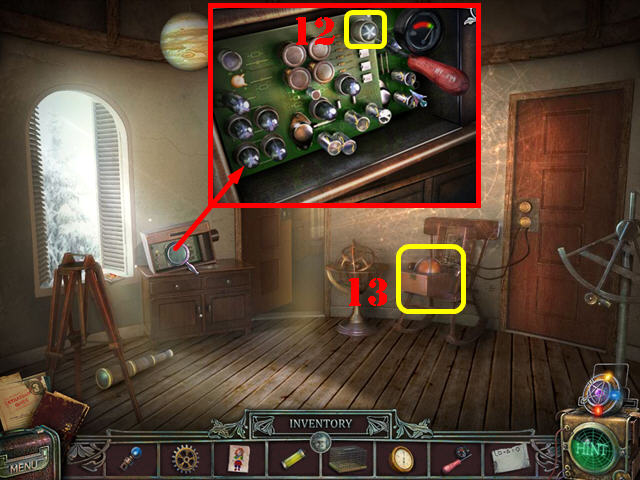
- Examine the device; use the ALTIMETER on the fuse in the upper right (12).
- Pull the fuse out with the CAGE HOOK and take the FUSE.
- Look at the box on the chair (13); put the FUSE on the device to activate a puzzle.

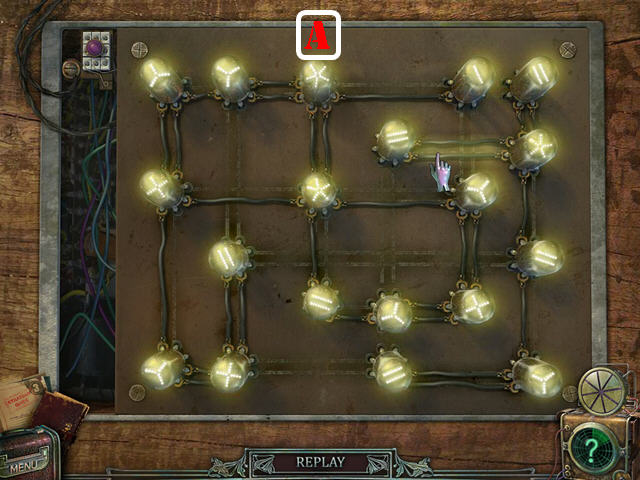
- Press on the wires to activate them. Activate the correct wires that match the number of lines on the fuse.
- See screenshot for solution (A).
- Go through the right door.

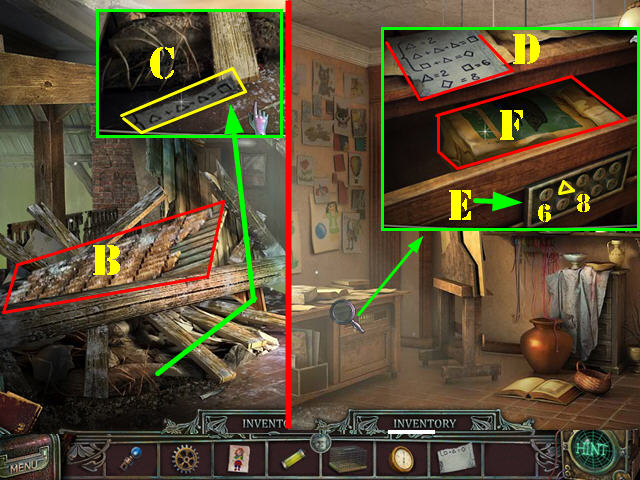
- Use the Telekinesis Ability on the plank (B).
- Examine the pile of wood; take the PART OF CODE (C).
- Go back to the art room.
- Examine the drawer; put the 2 PARTS OF CODE on the drawer (D).
- Press on the following buttons to open the drawer: triangle, 6, and 8 (E).
- Take the HEDGEHOG FOOD (F).
- Walk down twice and go through the right door.

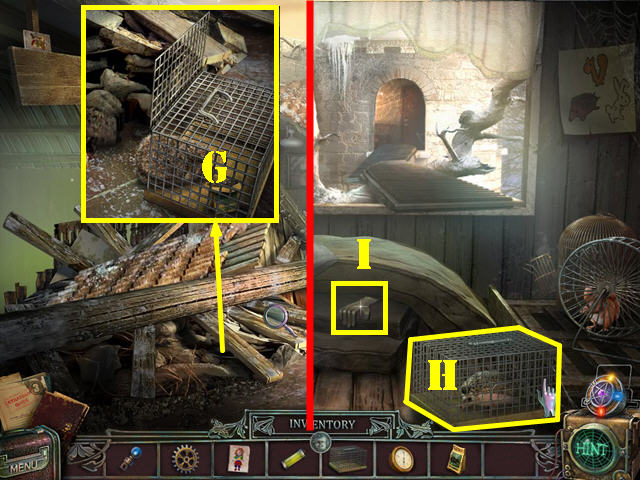
- Zoom into the pile of wood and put the EMPTY CAGE on the ground (G).
- Place the HEDGEHOG FOOD in the cage.
- Take the CAGED HEDGEHOG.
- Go back to the tree house.
- Put the CAGED HEDGEHOG next to the cages (H).
- Take the RUBBER GLOVE (I).
- Go forward and then go through the left door.

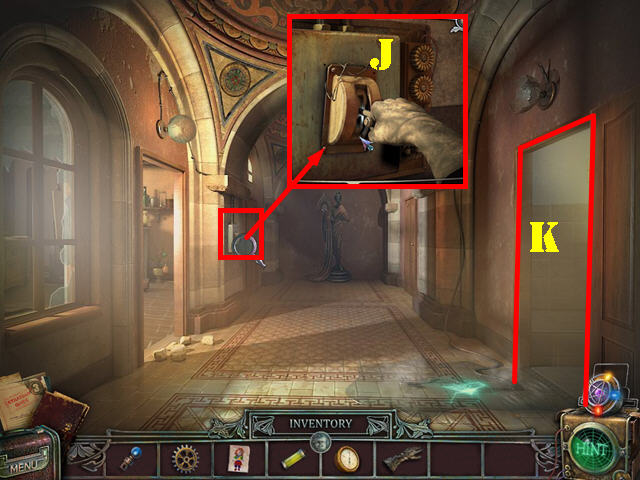
- Look at the switch; put the RUBBER GLOVE on it to pull the switch (J).
- Go through the right door (K).

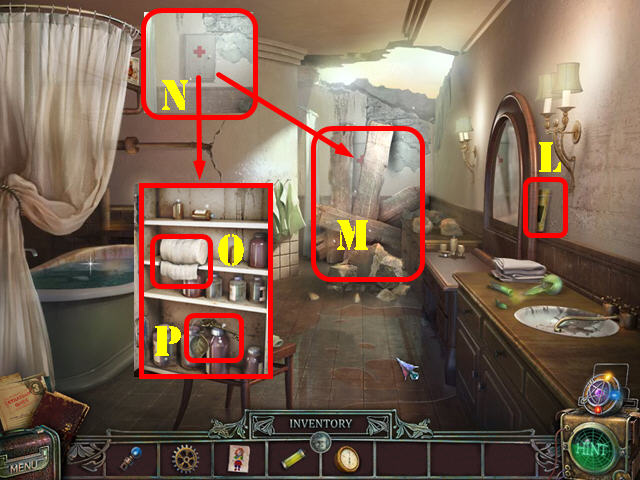
- Take the Secret Material (L) behind the mirror.
- Use the Telekinesis Ability on the boards in the back (M).
- Examine the first aid kit (N); open it and take the BANDAGE (O) and the LEAF KEY (P).

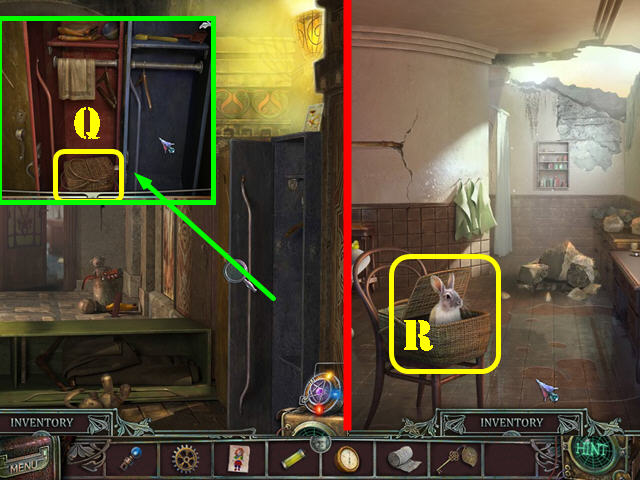
- Return to the locker room inside the orphanage.
- Zoom into the lockers; use the LEAF KEY on the red door and take the BASKET (Q).
- Return to the bathroom.
- Put the BANDAGE on the rabbit.
- Put the bunny in the BASKET and take the RABBIT (R).

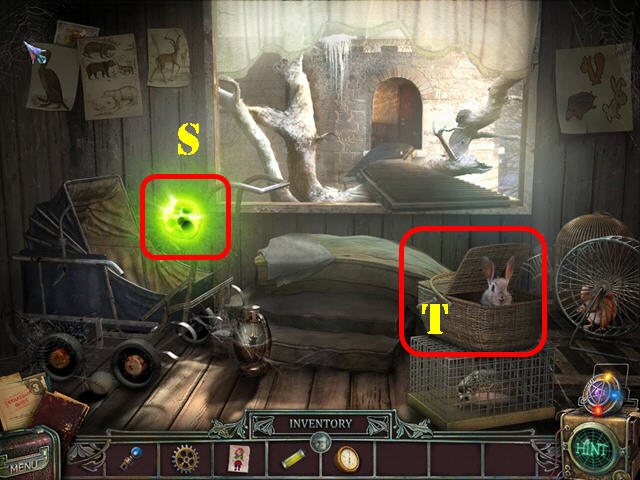
- Go back to the tree house.
- Put the RABBIT on top of the cage (T).
- Take the Restoration Ability(S).

- Go back to the bathroom.
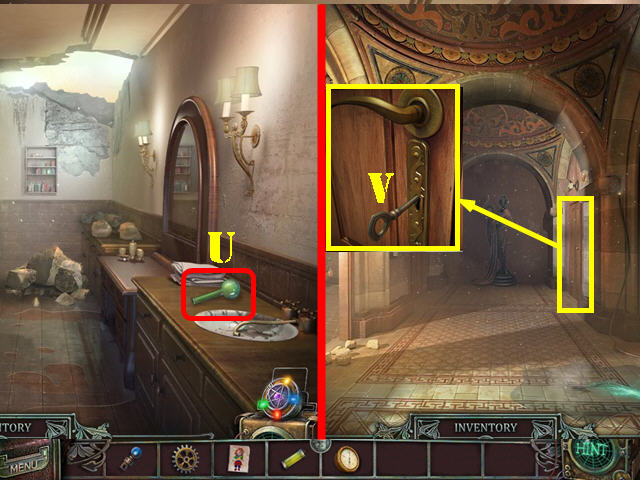
- Use the Restoration Ability on the machine part; take the MACHINE PART 5 (U).
- Walk down.
- Zoom into the far right door; use the Restoration Ability on the missing doorknob (V).
- Turn the key and go into the library.
Chapter 4: The Library

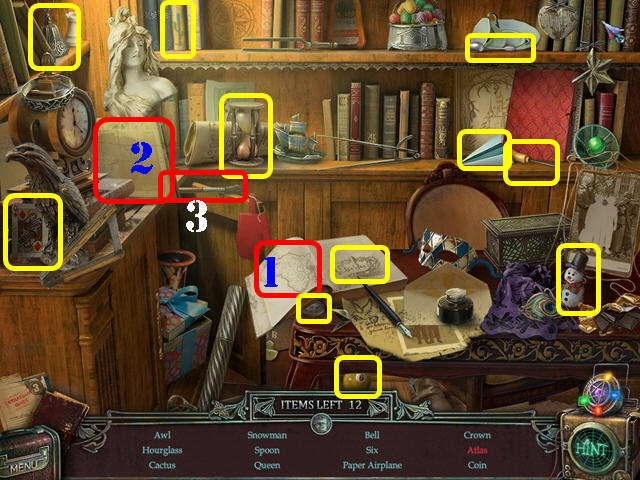
- Play the HOS.
- Move Africa (1) over to the map (2); take the Atlas.
- Grab the BRUSH (3).

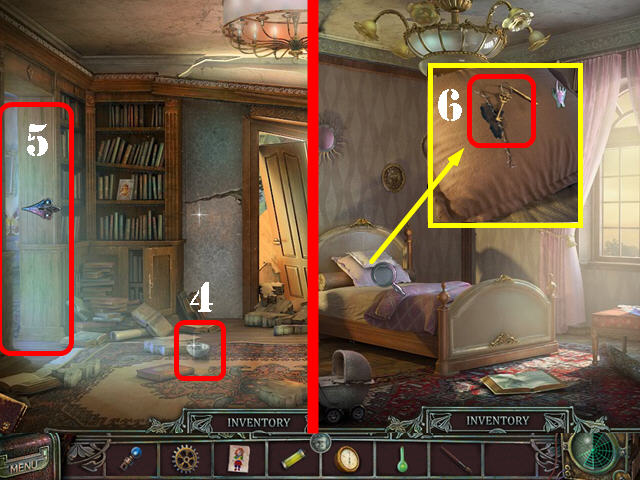
- Take the PALETTE (4).
- Go left to reach the bedroom (5).
- Examine the pillows; press on the top pillow and take the BRUSH KEY (6).

- Go back to the lockers.
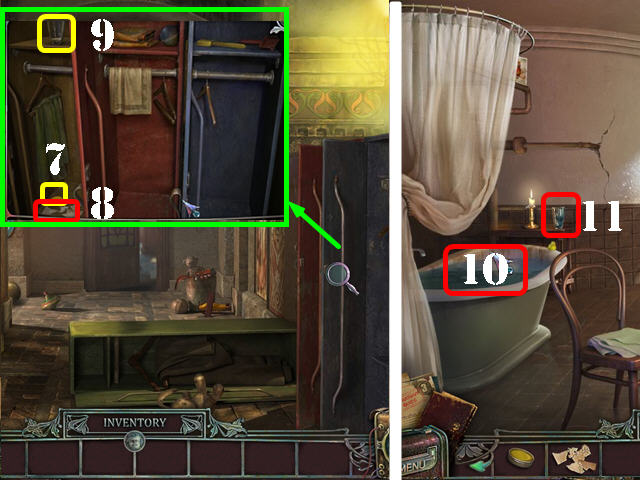
- Zoom into the lockers; use the BRUSH KEY on the left door; take the YELLOW PAINT (7), PICTURE PIECES (8), and the GLASS (9).
- Go back to the bathroom.
- Put the GLASS in the tub (10) and take the GLASS FILLED WITH WATER (11).

- Go back to the tree house.
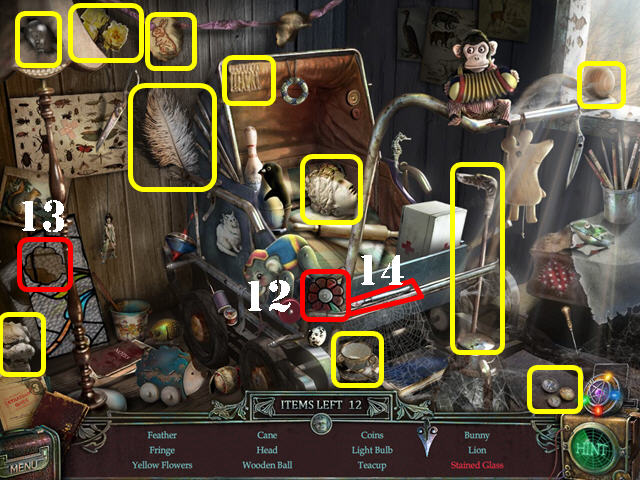
- Play the HOS.
- Drag the stained glass flower (12) to the incomplete stained glass (13); take the stained glass.
- Take the SCALPEL (14).

- Return to the library.
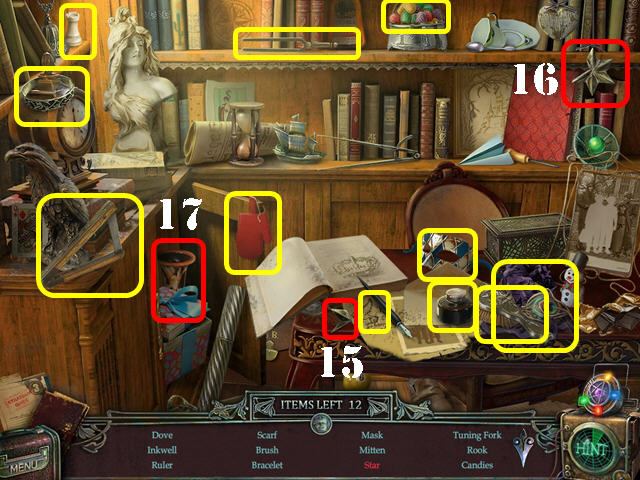
- Play the HOS.
- Drag the star fragment (15) to the broken star (16); take the star.
- Grab the VASE PIECE 1 (17).

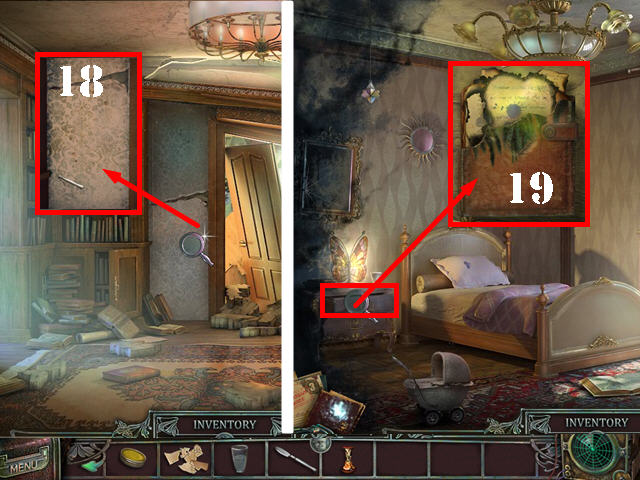
- Examine the wallpaper; use the SCALPEL on the wallpaper to obtain the CANVAS (18).
- Go left.
- Open and then examine the drawer; use the Restoration Ability on the organizer (19).
- Open the organizer and put the PICTURE PIECES on the page to activate a puzzle.

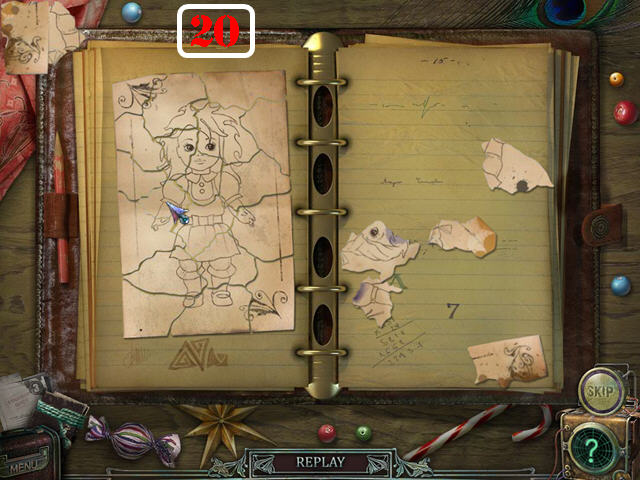
- Drag the pieces on the right over to the left page. Put the pieces of paper in the right spots. Note – Not all pieces will be used.
- See screenshot for the solution (20).
- Take the DOLL IMAGE.

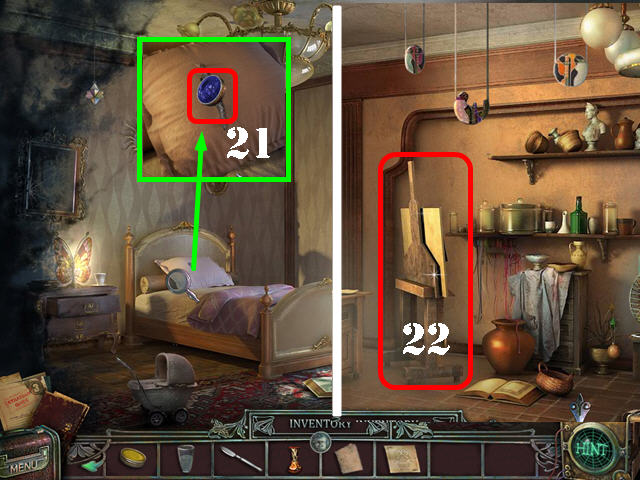
- Examine the pillow; cut it open with the SCALPEL and take the BLUE PAINT (21).
- Go back to the art room and zoom into the easel (22).

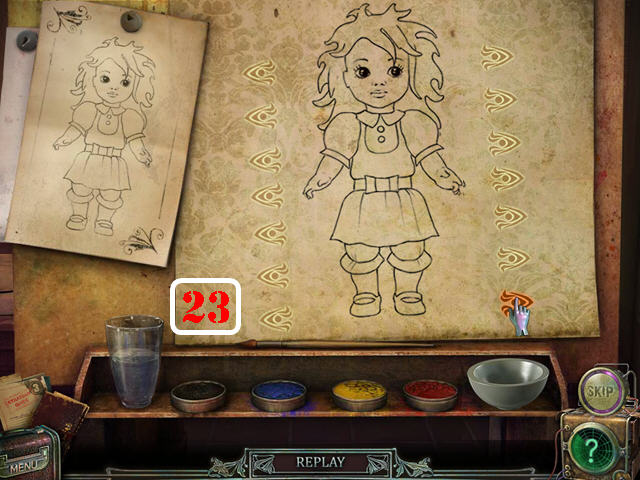

- Put the BLURRY PICTURE, the BRUSH, the BLUE PAINT, the YELLOW PAINT, the CANVAS, the DOLL IMAGE, the GLASS FILLED WITH WATER, and the PALETTE on the easel to activate a puzzle.
- Click on the arrows to change the doll’s image.
- See screenshot for the solution (23).
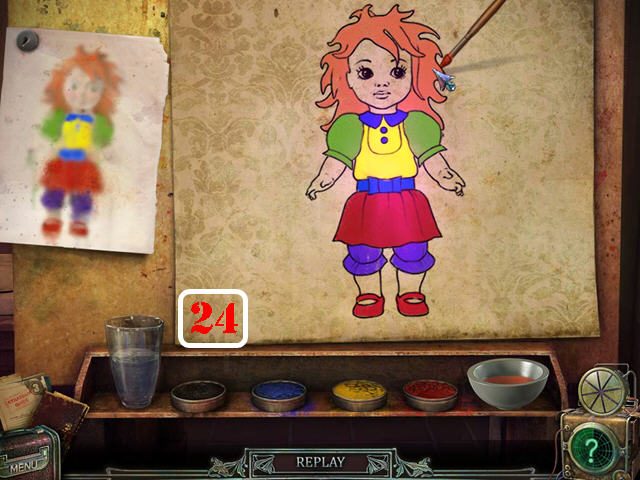
- For the second part of the puzzle, paint the picture with the right colors.
- To mix colors, add them to the white bowl and then add put them on the picture.
- Mix yellow and red to make orange. Mix blue and yellow to make green. Mix red and blue to create purple.
- Dip the brush into the water to clean the brush or just dip it into another color.
- See screenshot for solution (24).

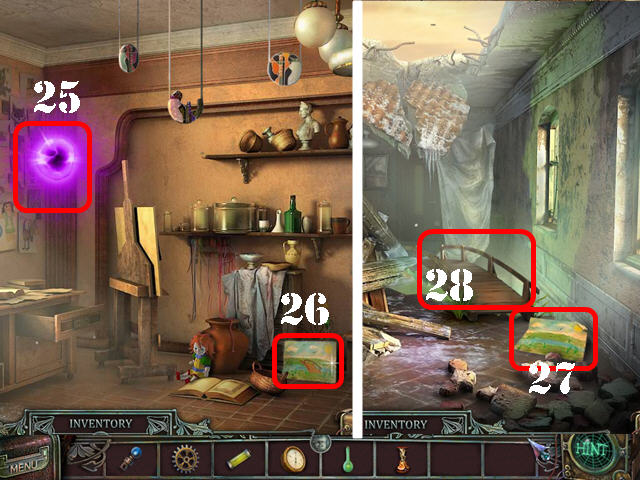
- Take the Ability to make pictured objects real (25).
- Take the BRIDGE PAINTING (26).
- Walk down twice and go through the right door.
- Put the BRIDGE PAINTING on the ground (27); use the Ability to make pictured objects real on the bridge painting.
- Go over the bridge (28).

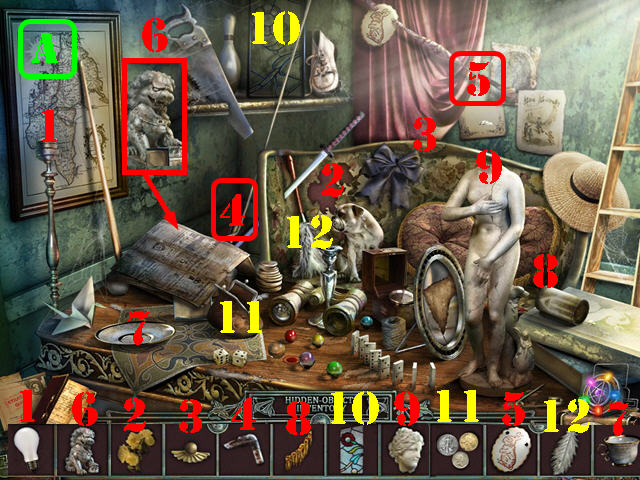
- Play the HOP.
- Put the items back into the right spots.
- See screenshot for the solution (A).
- You will earn the first PIECE OF PLAQUE.

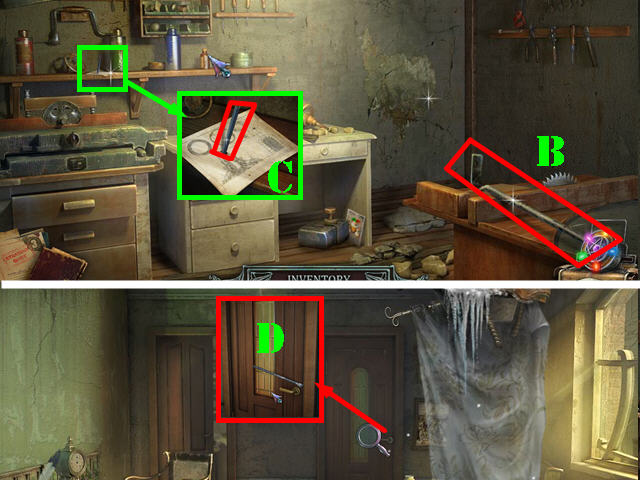
- Go through the left door.
- Take the CROWBAR (B).
- Look at the shelf; take the PENCIL (C).
- Walk down.
- Examine the right door and use the CROWBAR to open the door; go through it (D).

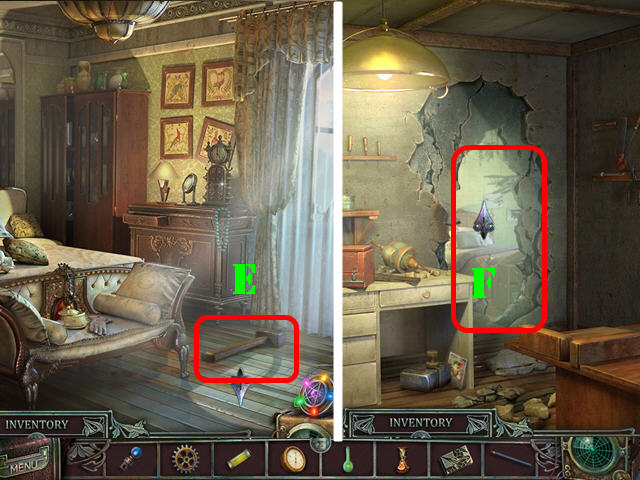
- Use the Restoration Ability on the sledgehammer; take the SLEDGEHAMMER (E).
- Walk down and go through the left door.
- Break down the wall with the SLEDGEHAMMER 2 times; go through the broken wall to access the boy’s room (F).
Chapter 5: The Boy’s Room

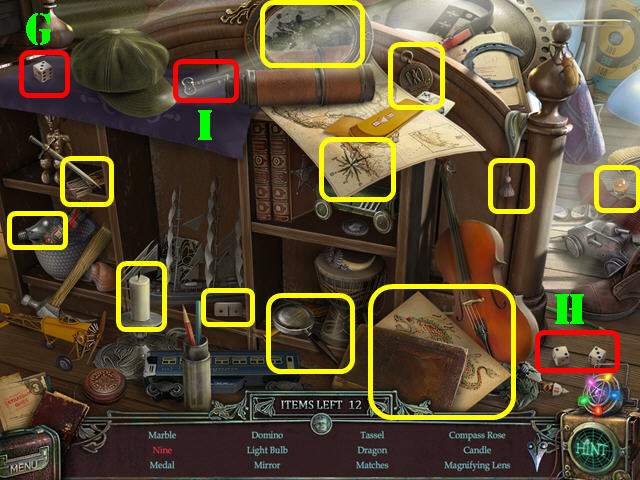
- Play the HOS.
- Drag the die (G) to the dice (H); take the Nine.
- Grab the BOX KEY (I).

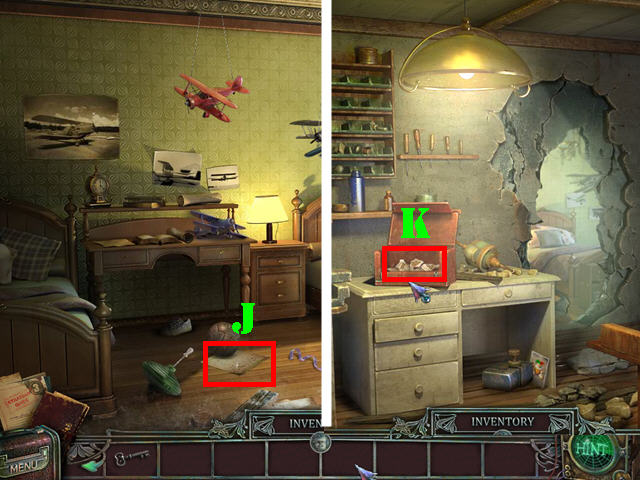
- Take the DRAWING PAPER (J).
- Walk down.
- Use the BOX KEY on the small box; take the PAINTED VASE PIECES from inside the box (K).
- Walk down.

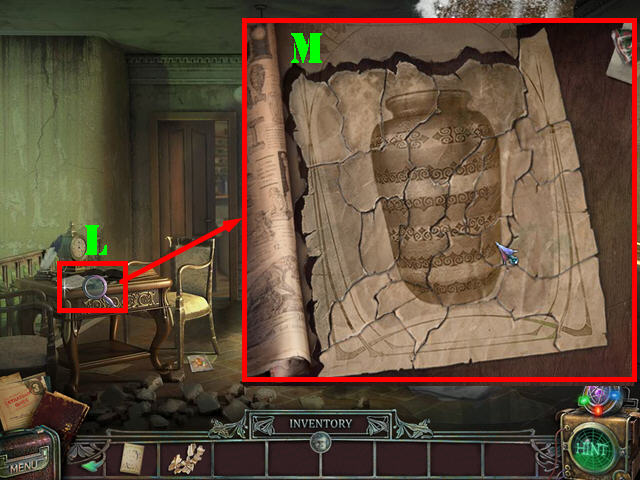
- Examine the desk (L); put the PAINTED VASE PIECES on the desk to activate a puzzle.
- Arrange the picture pieces as shown in the screenshot (M).
- Take the MAGAZINE PAGE.
- Go through the right door.

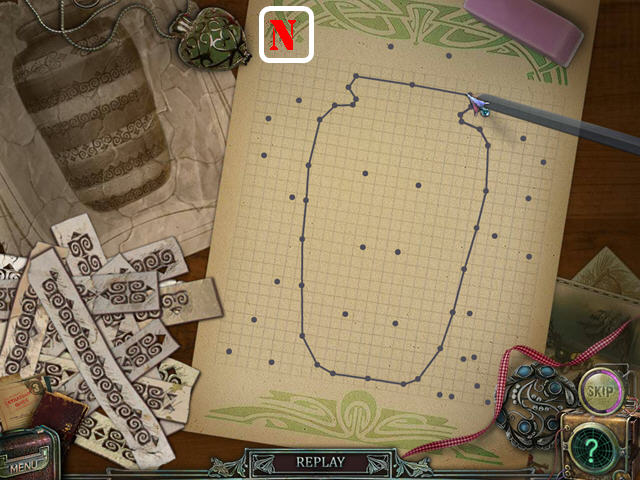
- Examine the tray on the bed; put the PENCIL, DRAWING PAPER, and the MAGAZINE PAGE on the tray to activate a puzzle.
- Connect the dots to form the outline of the vase. Press the pencil onto one of the lighter dots to draw a line on the paper.
- See screenshot for solution (N).

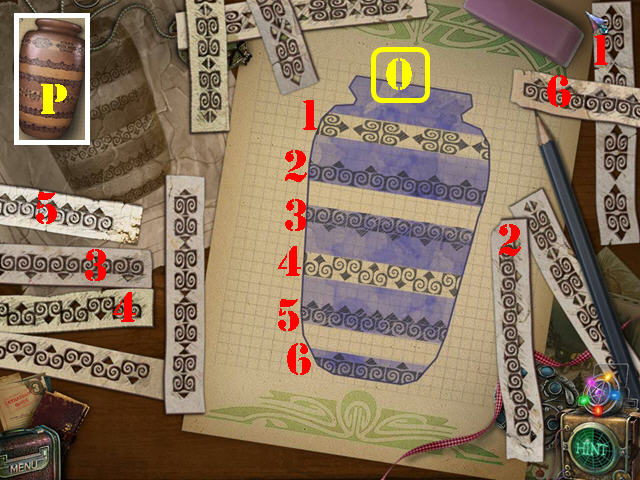
- For the second part of the puzzle, drag the strips to the right areas on the vase. Place the design on the vase and press on it once it is in the right spot.
- Press on a design to erase it, or simply put another design over it.
- See screenshot for the solution (O).
- Use the Ability to make pictured objects real on the vase picture; take the VASE PIECE 3 (P).

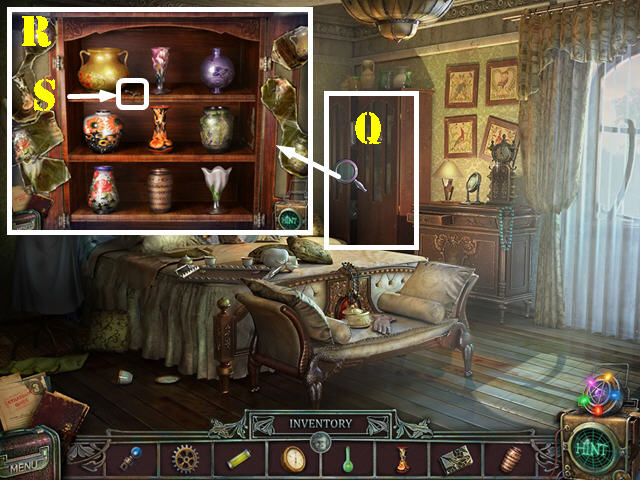
- Examine the wardrobe (Q); use the Restoration Ability on the broken vase in the upper left.
- Put VASE PIECE 1 and VASE PIECE 3 on the shelf to activate a puzzle.
- Arrange the vases using the torn pictures on the sides as a clue.
- Press on any two vases to swap their positions.
- See screenshot for solution (R).
- Take the CLOCK KEY (S).

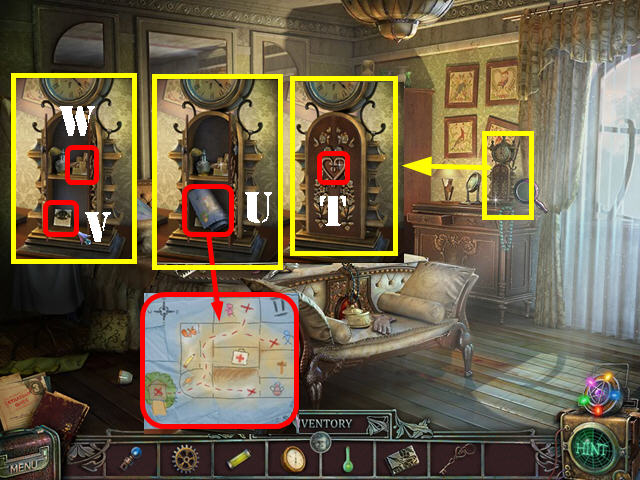
- Look at the clock; use the CLOCK KEY in the lock (T).
- Take the MAP (U), the second PIECE OF PLAQUE (V), and the TILES (W).
- Walk down.

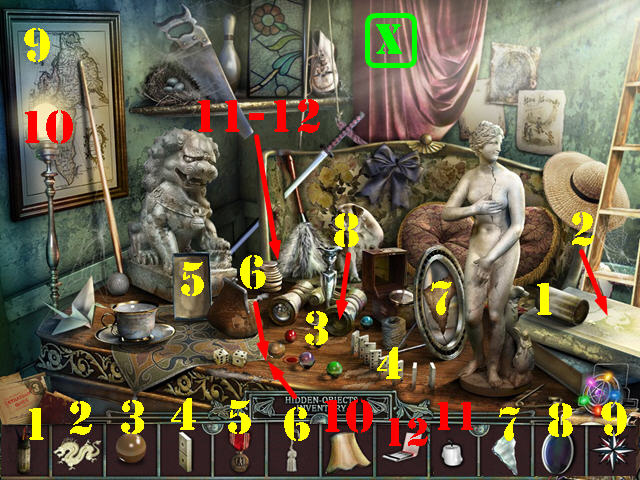
- Play the HOP.
- Put the items back in their place.
- See screenshot for solution (X).
- The OVERLAY PIECE 1 will be added to inventory.
- Go through the left door and then go through the hole in the wall.

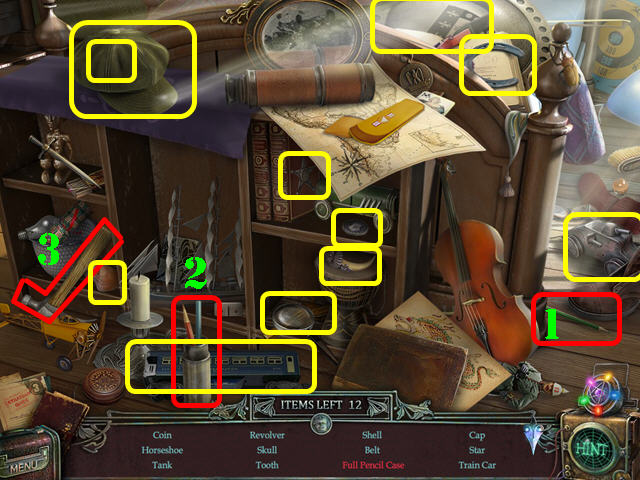
- Play the HOS.
- Drag the pencil (1) to the pencil case (2); take the full pencil case.
- Take the HAMMER (3).

- Return to the library.
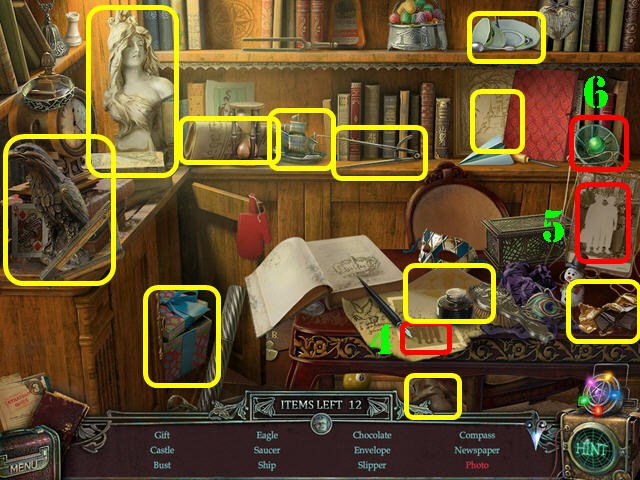
- Play the HOS.
- Drag the people (4) to the frame (5); take the photo.
- Take the PART OF MACHINE 6 (6).
- Go left.

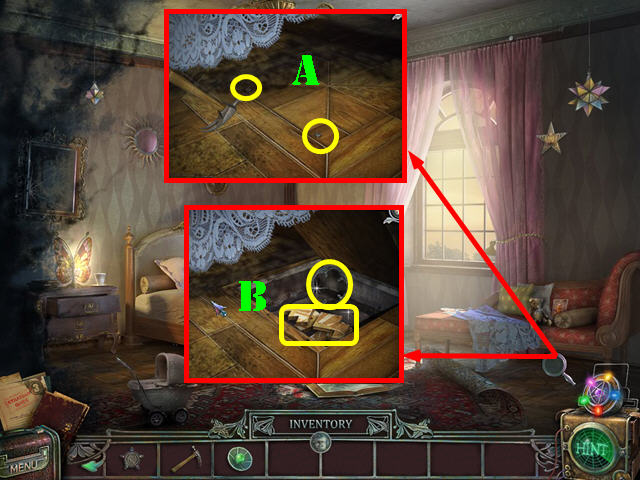
- Examine the floor; use the HAMMER to remove the 2 nails (A).
- Take the TILES and the OVERLAY PIECE 5 (B).
- Go back to the boy’s room.

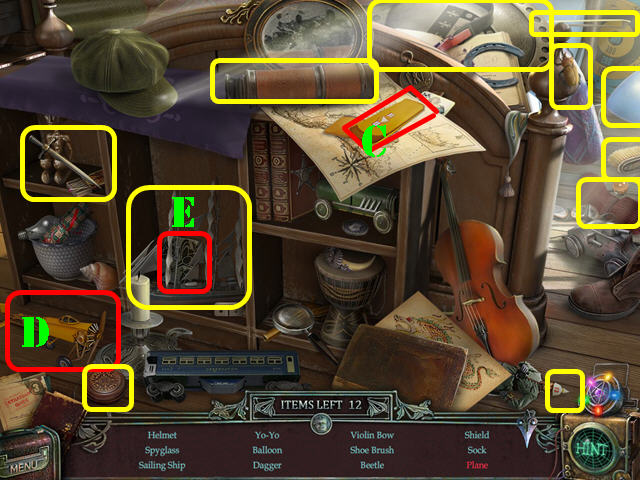
- Play the HOS.
- Drag the wings (C) to the airplane (D); take the plane.
- Take the third PIECE OF PLAQUE (E).

- Press on the poster and zoom into it (F); put the 2 TILES on the board to activate a puzzle.
- Insert the tiles into the right spots.
- See screenshot for solution (H).
- Take the OVERLAY PIECE 4 (I).

- Go back to the tree house.
- Play the HOS.
- Drag the scissor half (J) to the other scissor half on the right (K); take the scissors.
- Take the OVERLAY PIECE 3 (L).
- Walk down.

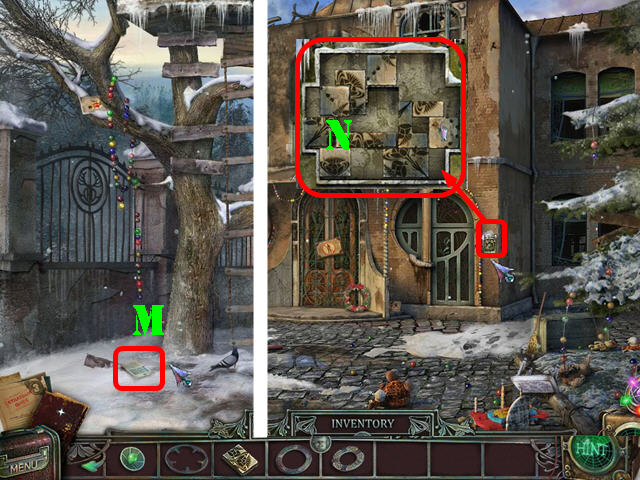
- Take the Secret Material (M) on the ground.
- Walk down.
- Examine the device; put the 3 PIECES OF PLAQUE on the board to activate a puzzle (N).

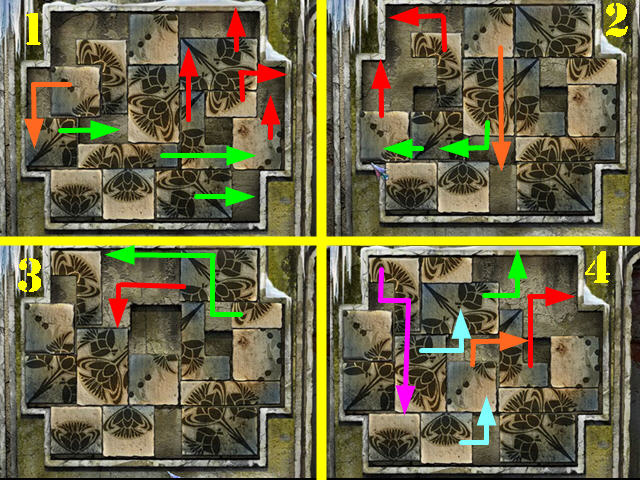

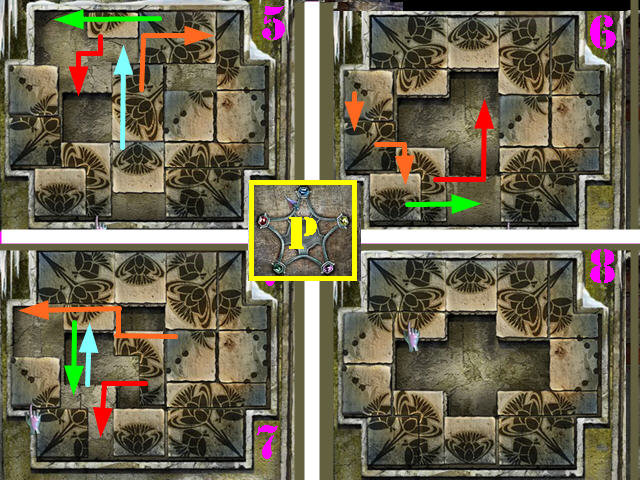
- Examine the device; put the 3 PIECES OF PLAQUE on the board to activate a puzzle (N).
- Arrange the pieces according to the tablet at the top. Follow the order of the arrows on each section of the 2 screenshots (1 through 8) and drag the pieces in this order: Red, Green, Orange, Light Blue, and Purple.
- Section 8 of the screenshot shows the final image.
- Take the OVERLAY PIECE 2 (P).


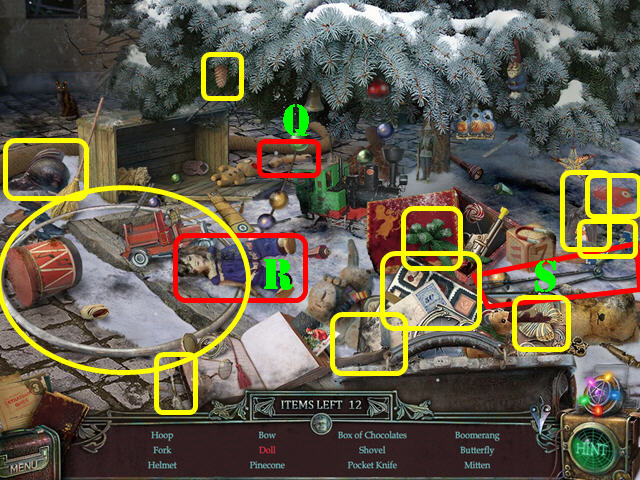
- Play the HOS.
- Drag the arm (Q) to the doll (R); take the doll.
- Take the COAL TONGS (S).

- Return the basement.
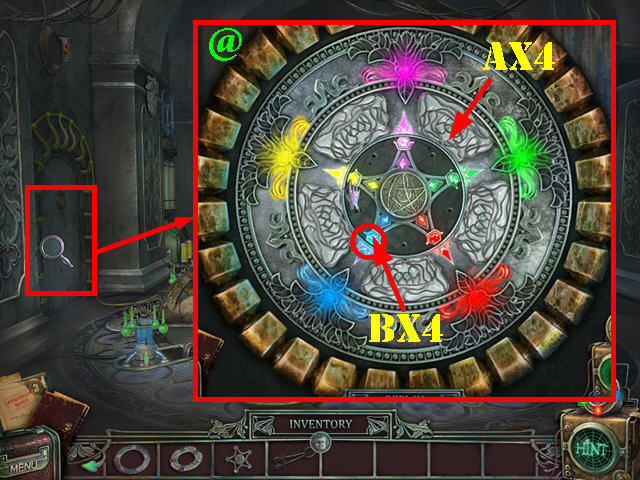
- Examine the left door.
- Put the OVERLAY PIECES 1 through 5 on the door to activate a puzzle.
- Spin the rings to form the right image. Spinning a ring affects others.
- Spin the rings in the order shown in the screenshot (@).
- Go through the left door.

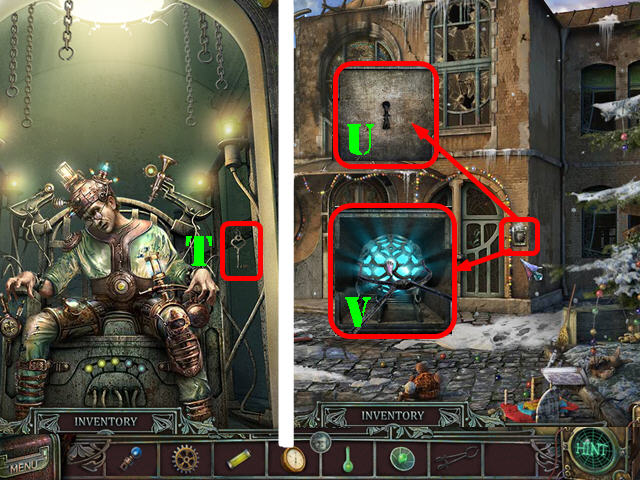
- Take the KEY (T).
- Go to the front entrance.
- Examine the panel; put the KEY in the keyhole (U) and put the COOL TONGS on the fireball (V).
- Press on the tongs to obtain the FIREBALL.

- Go back to the basement.
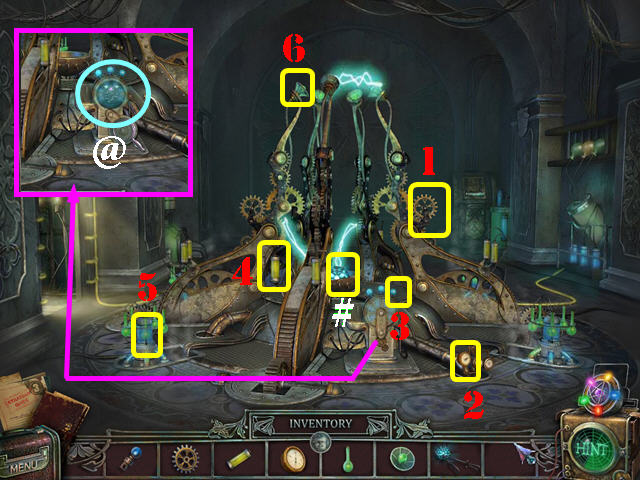
- Put the MACHINE PART 1 (1), MACHINE PART 2 (2), MACHINE PART 3 (3), MACHINE PART 4 (4), MACHINE PART 5 (5) and MACHINE PART 6 (6) into the right areas on the machine.
- Put the FIREBALL on the machine (#).
- Press on the small device at the bottom of the machine to activate a puzzle (@).

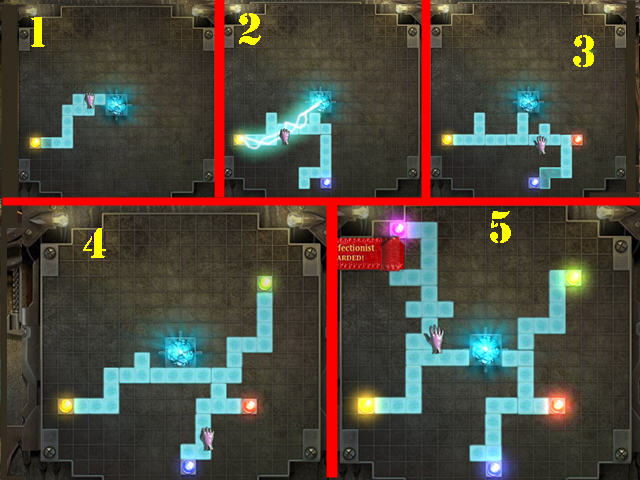
- Use the elements to connect each of the colored buttons to the blue sphere. You’ll have to arrange the elements and change the combination every time the new button appears on the screen.
- You must solve 5 rounds of this puzzle.
- Please refer to section 1 through 5 on the screenshot for the solutions for all 5 rounds.
- Congratulations, you have completed The Agency of Anomalies: Cinderstone Orphanage


 The Mysterious Past of Gregory Phoenix Walkthrough, Guide, & Tips
 Sea Legends: Phantasmal Light Walkthrough, Guide, & Tips
 The Torment of Whitewall Walkthrough, Guide, & Tips
 Treasure Seekers: Follow the Ghosts Collector's Edition Walkthrough, Guide, & Tips
 Dark Strokes: The Legend of the Snow Kingdom Walkthrough, Guide, & Tips