Ominous Objects: Family Portrait Walkthrough, Guide, & Tips
Ominous Objects: Family Portrait Walkthrough
Welcome to the Ominous Objects: Family Portrait Walkthrough
A father returns home to find his children missing – all but one, who refuses to say a word…
Whether you use this document as a reference when things get difficult or as a road map to get you from beginning to end, we’re pretty sure you’ll find what you’re looking for here.
This document contains a complete Ominous Objects: Family Portrait game walkthrough featuring annotated screenshots from actual gameplay!
We hope you find this information useful as you play your way through the game. Use the walkthrough menu below to quickly jump to whatever stage of the game you need help with.
Remember to visit the Big Fish Games Forums if you find you need more help. Have fun!
This walkthrough was created by David Becker, and is protected under US Copyright laws. Any unauthorized use, including re-publication in whole or in part, without permission, is strictly prohibited.
General Tips
- This is the official guide for Ominous Objects: Family Portrait.
- Hidden-object puzzles are referred to as HOPs. This guide will not show screenshots of the HOPs, however, it will mention when an HOP is available and the inventory item you’ll collect from it.
- This guide will not mention each time you have to zoom into a location; the screenshots will show each zoom scene.
- Use the map to travel to a location.
Chapter 1: The Estate Entrance

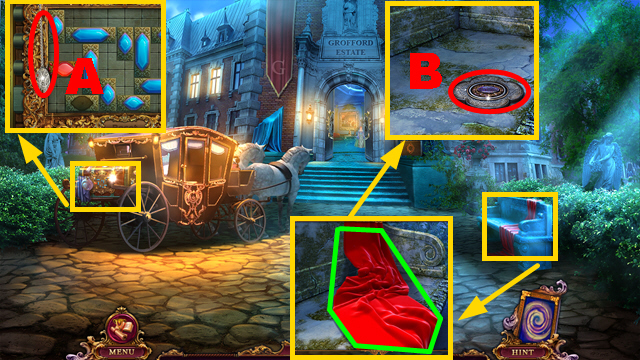
- Take the PALETTE (A).
- Remove the blanket (green); take the JEWELED BROOCH (B).
- Try to move forward.

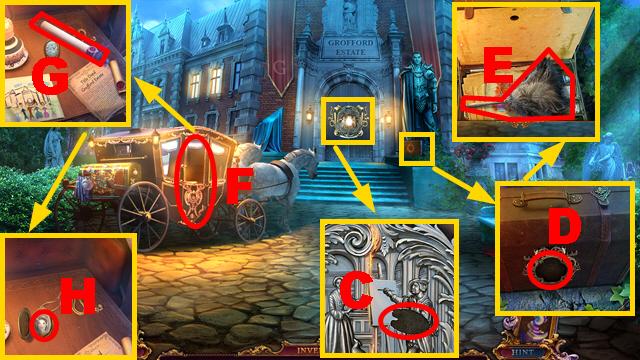
- Place the PALETTE (C) and JEWELED BROOCH (D).
- Take the DUSTER (E).
- Open the door (F); take the map (G).
- Open the medallion; take the PENDANT OF ELIZABETH (H).
- Move forward.

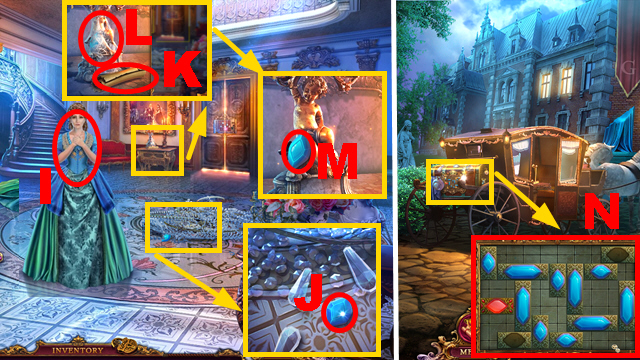
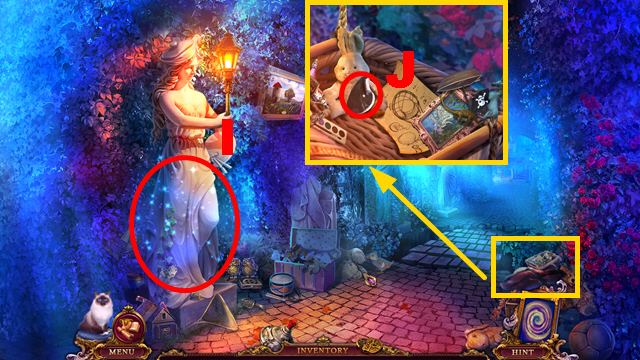
- Talk to the woman (I).
- Remove 3 shards; take CRYSTAL 1/2 (J).
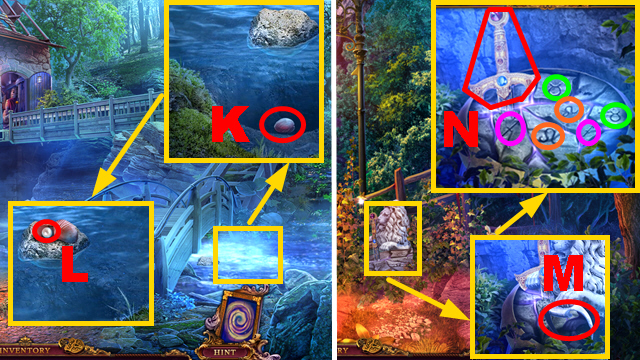
- Take PAGE 1/3 (K); use the DUSTER (L).
- Take CRYSTAL 2/2 (M).
- Walk down.
- Place 2 CRYSTALS (N).

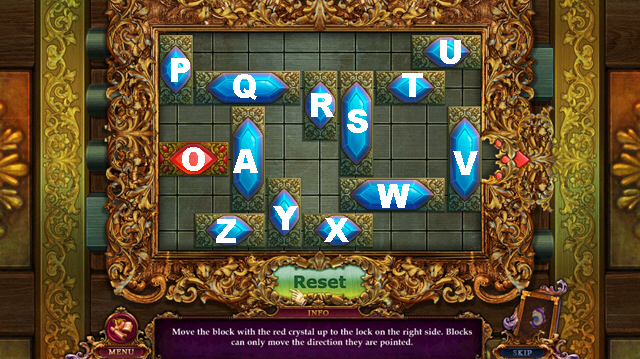
- Play the mini-game.
- Solution: U-left, V-up x2, W-right, X-right x3, S-down x2, R-down x3, Q-right x2, A-up x2, O-right x3, A-down x2, Q-left x2, S-up x3, O-right x5.

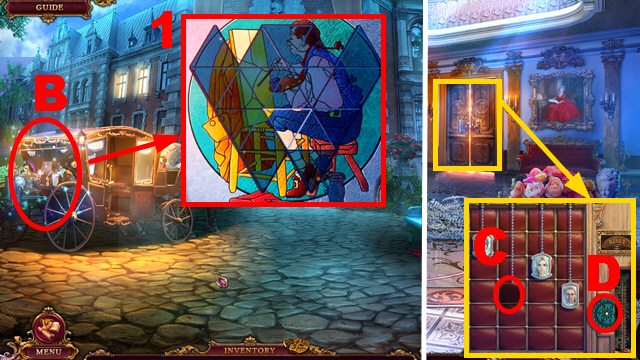
- Play the HOP (B) to receive the COG.
- Solution for the HOP mini-game: (1).
- Move forward.
- Place the PENDANT OF ELIZABETH (C) and COG (D).

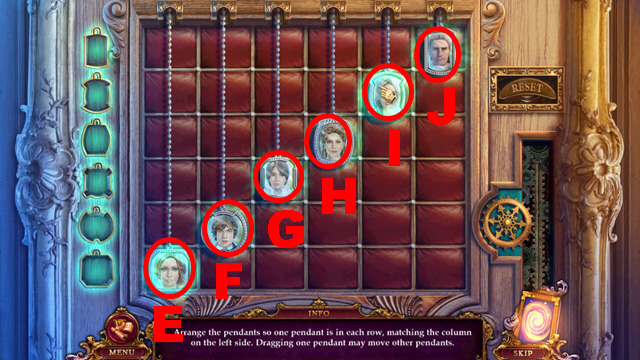
- Play the mini-game.
- Solution: E-down, H-down x2, H-up x3, J-up x3, I-up x4.
- Move forward.

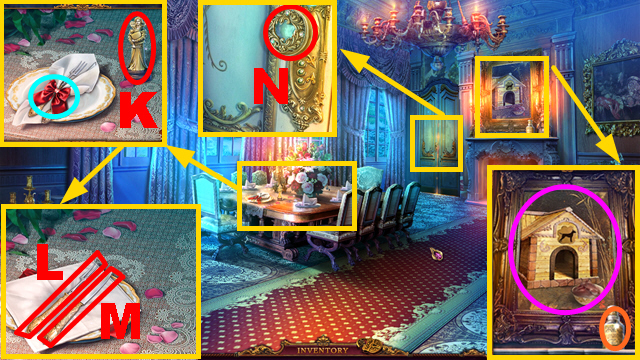
- Open the ribbon (blue); take QUEEN 1/2 (K).
- Take the FORK (L) and BUTTER KNIFE (M).
- Turn the knob (N).
- Take the SMELLING SALTS (orange); use the BUTTER KNIFE (purple) to acquire the CANVAS.
- Walk down.

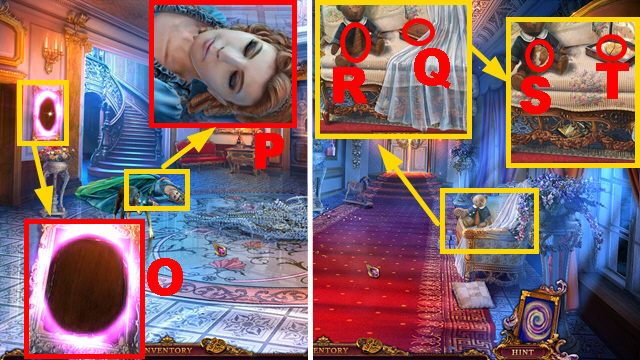
- Place the CANVAS (O).
- Use the SMELLING SALTS (P).
- Go upstairs.
- Remove the blanket; open the box (Q) and teddy (R).
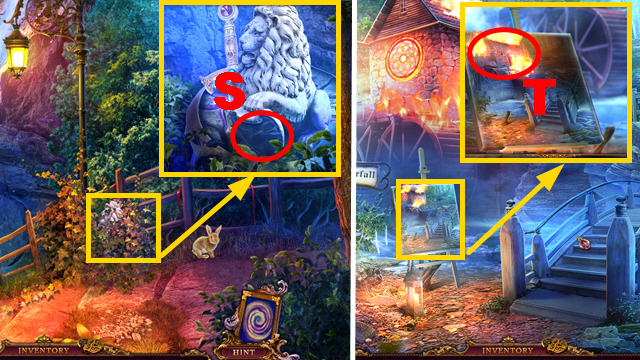
- Take WILLIAM’S PORTRAIT (S) and the MAP TILE (T).
- Enter Leia’s Room.

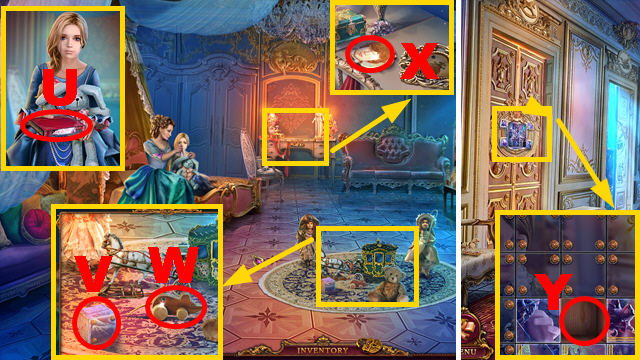
- Take the 1ST VOLUME (U).
- Take the CUBE (V), TOY MOUSE (W), and BRANDON’S PORTRAIT (X).
- Walk down.
- Place the CUBE (Y).

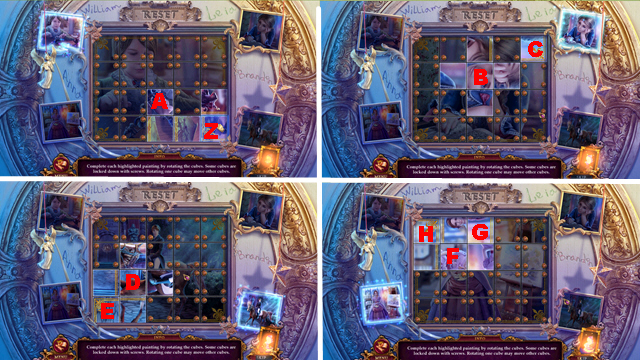
- Play the mini-game.
- Solution: Zx3, Ax3, Bx3, Cx3, Dx3, Ex3, Fx3, Gx3, Hx3.
- Enter the Playroom.

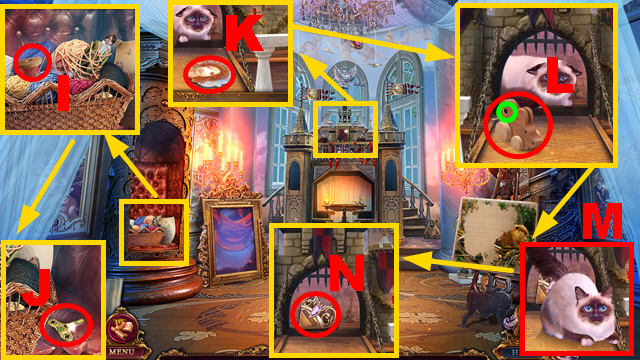
- Take the THREAD (I); remove the note.
- Take the WIND-UP KEY (J) and ANNA’S PORTRAIT (K).
- Place the TOY MOUSE (L); use the WIND-UP KEY (green).
- Take Mr. Jenkins (M) and MEDALLION PART 1/3 (N).

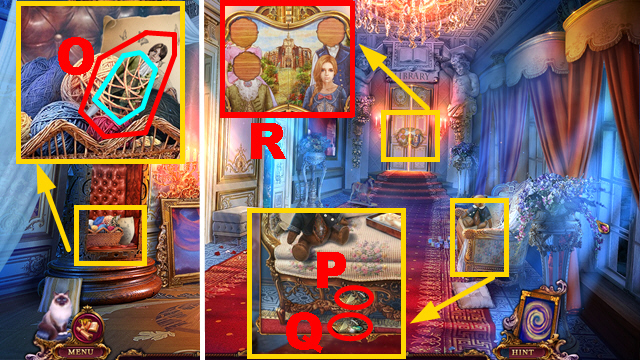
- Use Mr. Jenkins (blue); take the WILLIAM DOLL (O).
- Walk down.
- Use Mr. Jenkins (P); take MEDALLION PART 2/3 (Q).
- Place ANNA’S PORTRAIT, WILLIAM’S PORTRAIT, and BRANDON’S PORTRAIT (R).
- Arrange the portraits correctly (S).
- Enter the Library.
Chapter 2: The Library

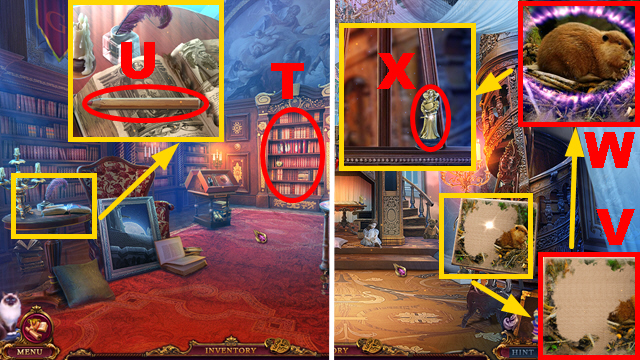
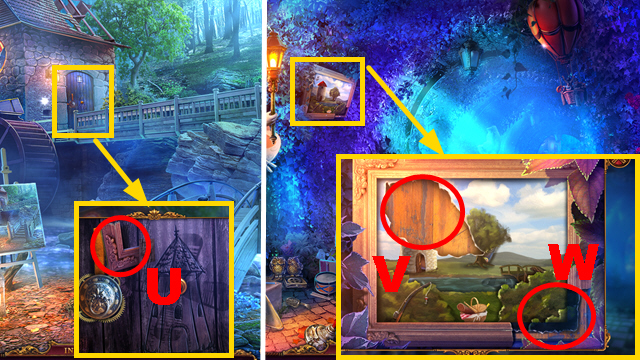
- Examine the bookshelf (T).
- Take the PENCIL (U).
- Go to the Playroom.
- Complete the painting with the PENCIL (V); take the BEAVER (W) and QUEEN 2/2 (X).

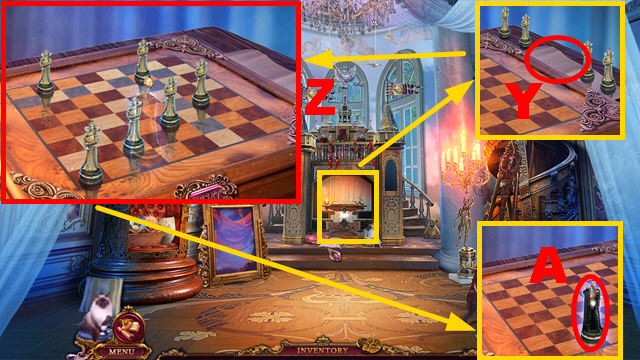
- Place 2 QUEENS (Y).
- Play the mini-game.
- Solution: (Z).
- Take the MYSTERIOUS DOLL (A).
- Go to Leia’s Room.

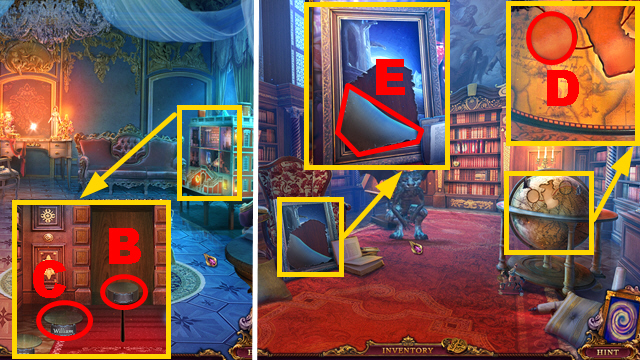
- Place the MYSTERIOUS DOLL (B) and WILLIAM DOLL (C).
- Go to the Library.
- Place the MAP TILE (D).
- Use the THREAD (E).

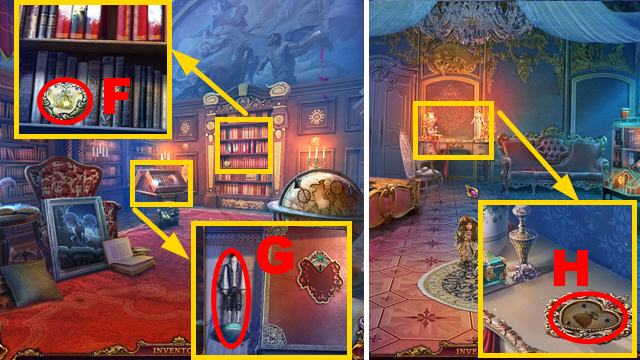
- Take the GOLDEN HEART (F) and BRANDON DOLL (G).
- Go to Leia’s Room.
- Place the GOLDEN HEART (H).

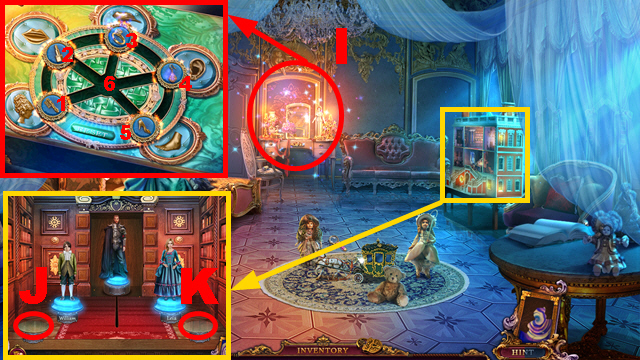
- Play the HOP (I) to receive the ANNA DOLL.
- Solution for the HOP mini-game: 4-6-1-2-3-6-5-4-6-1-2-3-4-6.
- Place the ANNA DOLL (J) and BRANDON DOLL (K).

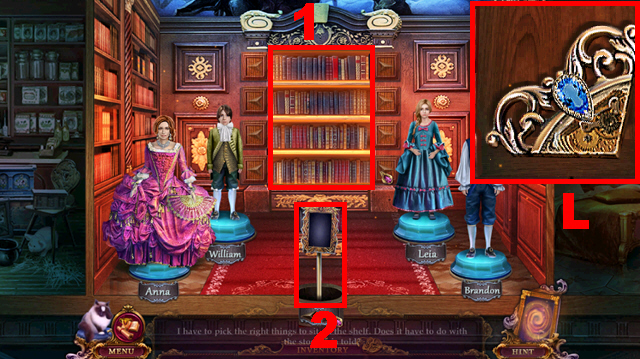
- Play the mini-game.
- Solution: (1-2).
- Take MEDALLION PART 3/3 (L).
- Go to the Library.

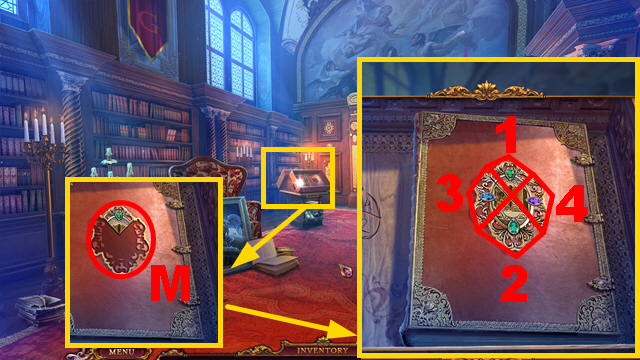
- Place 3 MEDALLION PARTS (M).
- Activate medallion parts 1-4.

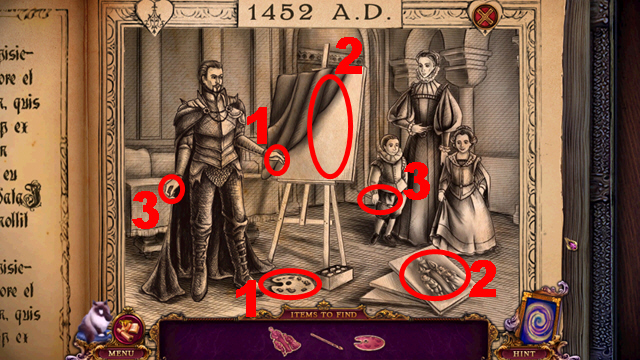

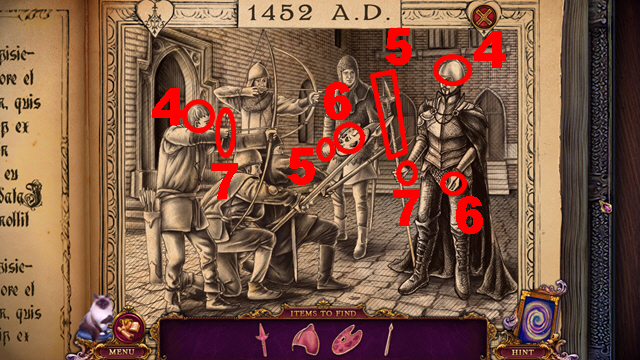

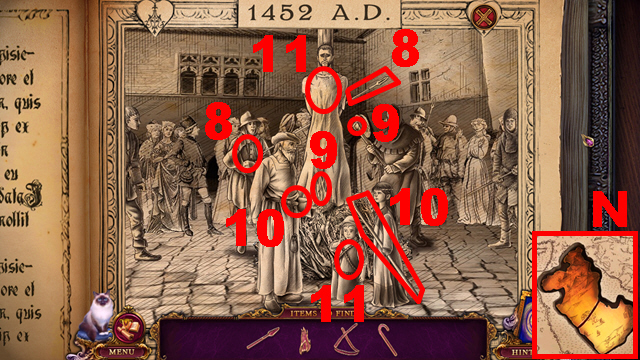
- Play the mini-game.
- Solution: 1-11.
- Take the CONTINENT (N).

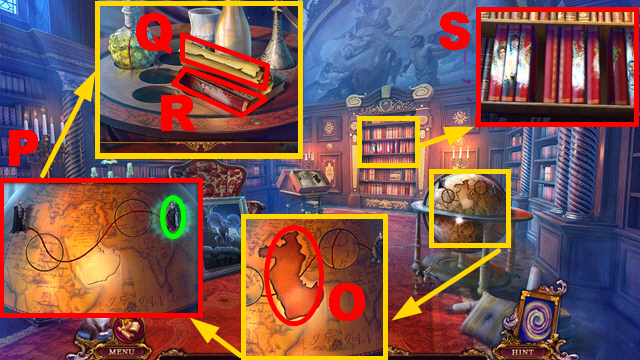
- Place the CONTINENT (O).
- Arrange the tiles correctly (P); move the figurine (green).
- Take PAGE 2/3 (Q) and VOLUME 2 (R).
- Place the 1ST VOLUME and VOLUME 2 (S).

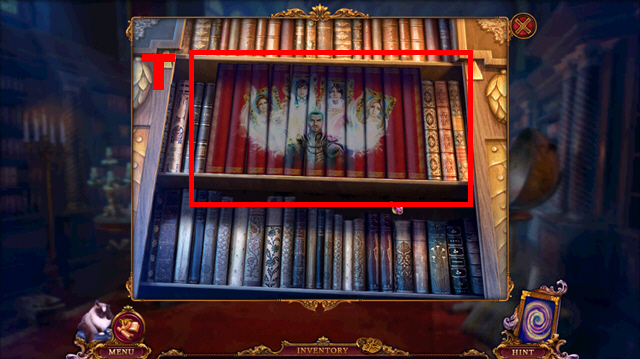
- Play the mini-game.
- Solution: (T).

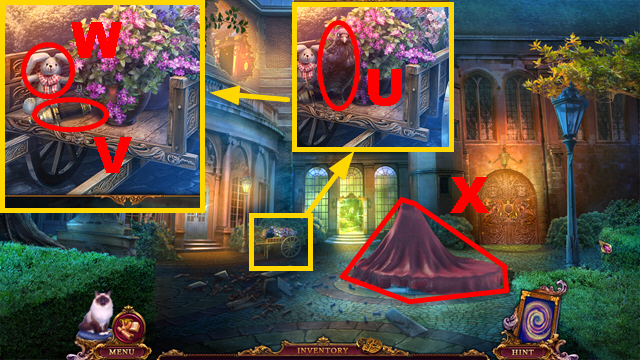
- Use Mr. Jenkins (U); take LEIA’S BUNNY (W) and the EYEPIECE (V).
- Remove the tarp (X).

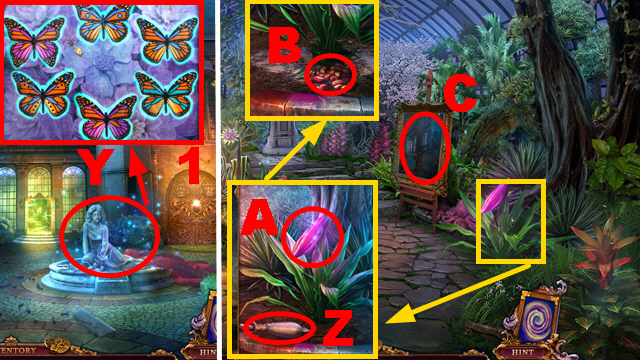
- Play the HOP (Y) to receive the FILLED PITCHER. Solution for the HOP mini-game: (1).
- Move forward.
- Take DOOR HANDLE 1/2 (Z); use the FILLED PITCHER (A).
- Take the SEEDS (B).
- Examine the portrait (C).

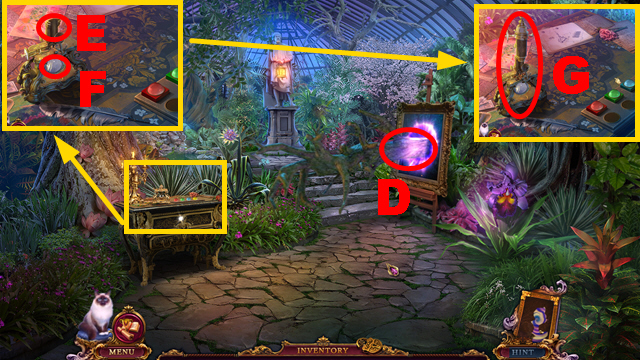
- Use the BEAVER (D).
- Place the EYEPIECE (E) and SEEDS (F).
- Examine the microscope (G).

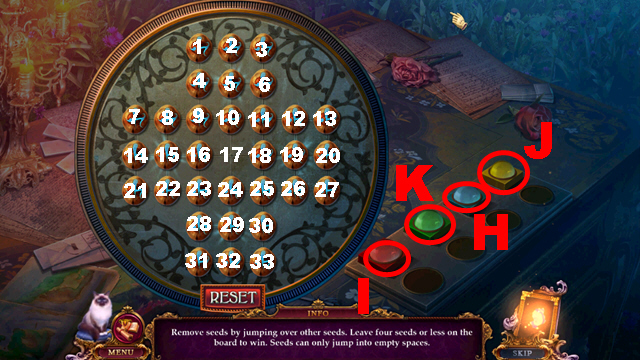
- Play the mini-game.
- Solution: 5-17-12-10-3-11-1-3-18-6-3-11-10-12-16-18-4-16-23-9-25-11-31-23-33-25-14-16-20-18-29-17-16-28-18-30-21-23-27-25-28-16-30-18-16-4-18-6-7-9-13-11-4-16-6-18.
- Push the buttons H-I-J-K.

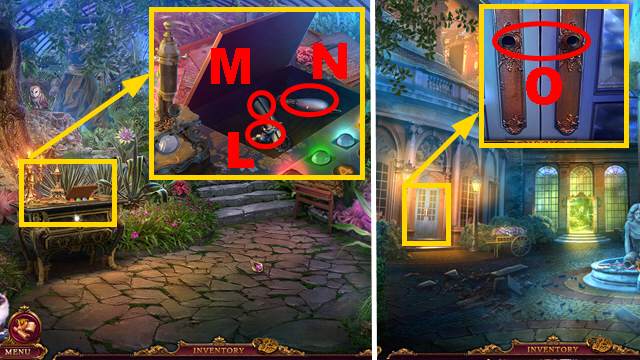
- Take COACHMAN (L), PAGE 3/3 (M), and DOOR HANDLE 2/2 (N).
- Walk down.
- Place 2 DOOR HANDLES (O).
- Enter the Kitchen.
Chapter 3: The Kitchen

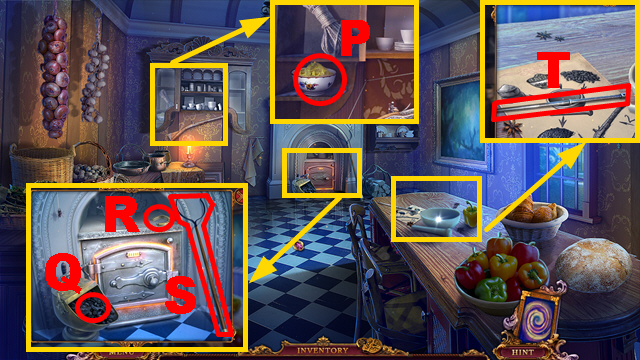
- Open the door; take the SULFUR (P).
- Take the COALS (Q), HORSESHOE (R), and FORK (S).
- Take the RAMROD (T).
- Go to the Greenhouse.

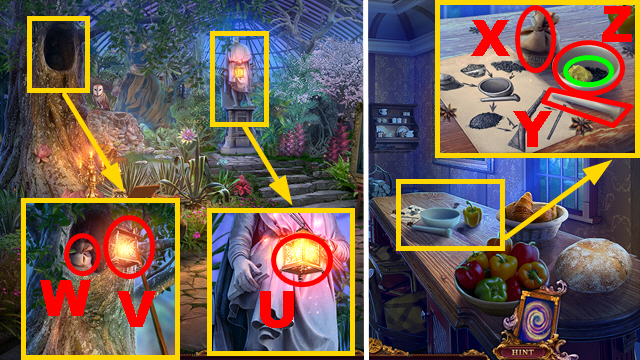
- Use the FORK to collect the HANGING LANTERN (U).
- Use the HANGING LANTERN (V) and Mr. Jenkins (W).
- You receive the SALTPETER.
- Go to the Kitchen.
- Use the COALS and SULFUR (green); place the SALTPETER (X).
- Open the bag with the FORK; pour the saltpeter into the bowl.
- Pound the ingredients with the pestle (Y).
- Take the GUNPOWDER (Z).

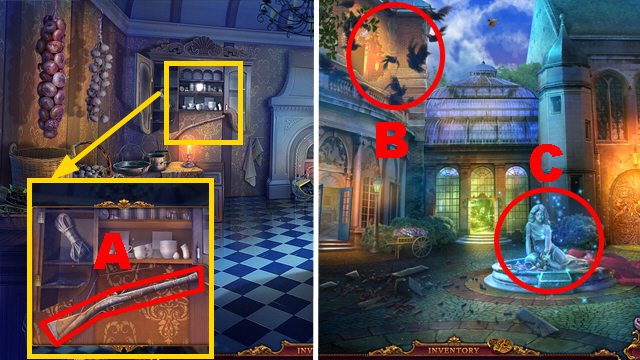
- Use the GUNPOWDER and RAMROD (A) to acquire the LOADED GUN.
- Walk down.
- Use the LOADED GUN (B).
- Play the HOP (C) to receive the HOOK.
- Enter the Kitchen.

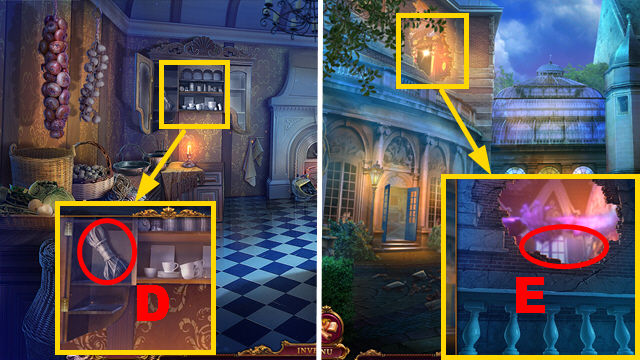
- Use the HOOK (D) to acquire the GRAPPLING HOOK.
- Walk down.
- Use the GRAPPLING HOOK (E).
- Climb up.

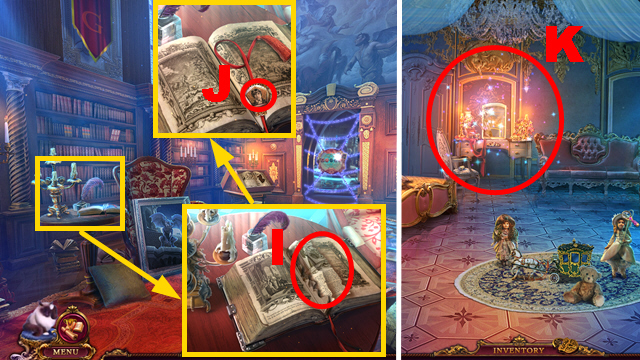
- Place 3 PAGES (I); turn three pages.
- Take BRANDON’S PORTRAIT (J).
- Go to Leia’s Room.
- Play the HOP (K) to receive the TOY HORSE.

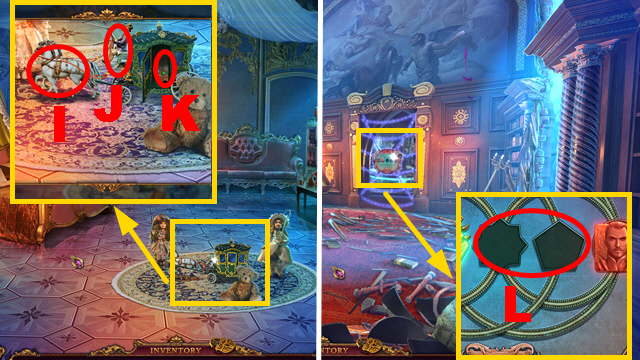
- Place the TOY HORSE (I) and COACHMAN (J).
- Take the PALETTE (K).
- Go to the Library.
- Place the PALETTE and BRANDON’S PORTRAIT (L).

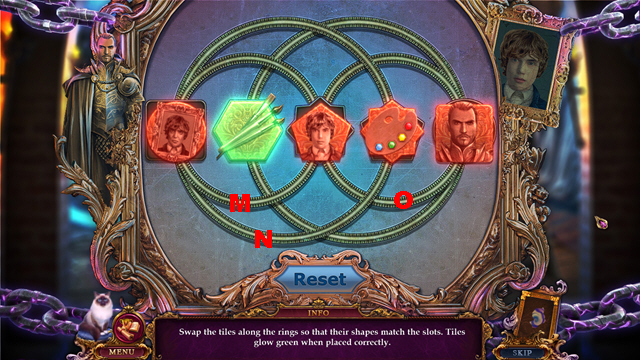
- Play the mini-game.
- Solution: M-N-O-M.

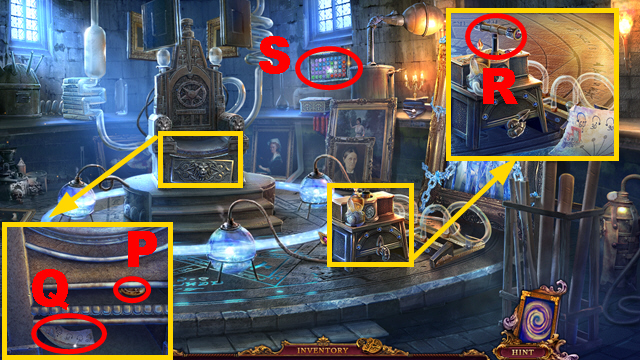
- Remove the plate; use Mr. Jenkins (P) to acquire STABLE TILE 1/2.
- Take the INSTRUCTIONS (Q).
- Grab the lever (R).
- Examine the panel (S).

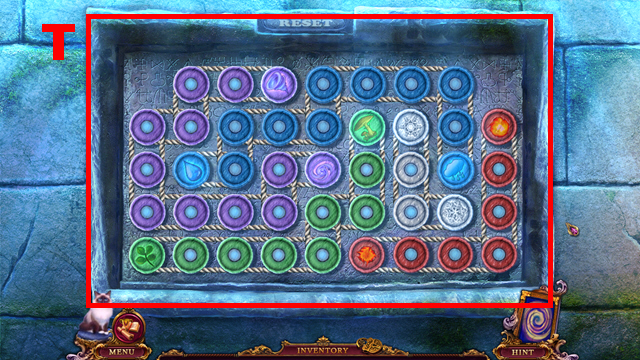
- Play the mini-game.
- Solution: (T).

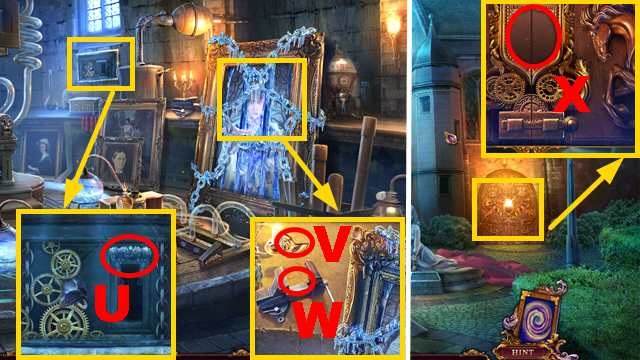
- Pull the lever (U).
- Put the tile (V) into the device (W) to acquire STABLE TILE 2/2.
- Go to the Garden.
- Place 2 STABLE TILES (X).
- Enter the Stable.

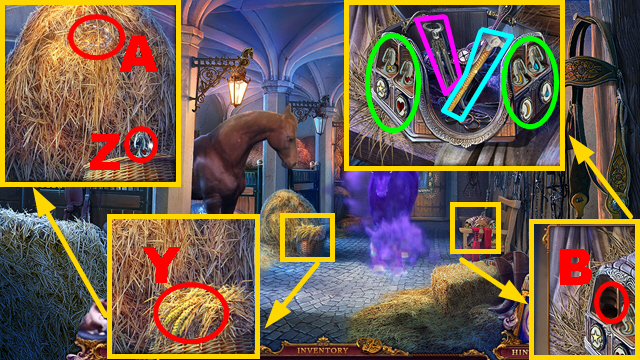
- Take the HAY (Y) and HORSE HEART TILE (Z); use Mr. Jenkins (A) to acquire the CHAINS.
- Place the HORSE HEART TILE (B).
- Arrange the horse tiles correctly (green).
- Take the PLIERS (purple) and HAMMER (blue).

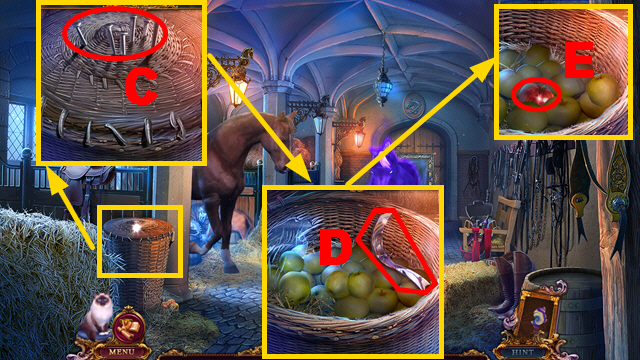
- Use the PLIERS (C) to acquire the NAIL.
- Take the HORSE TILE (D).
- Remove two apples; take the APPLE (E).

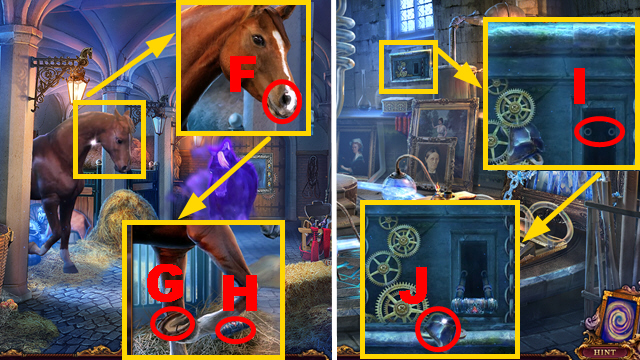
- Use the APPLE (F).
- Use the PLIERS, HORSESHOE, NAIL, and HAMMER (G); take the LEVER (H).
- Go to the Secret Laboratory.
- Place the LEVER (I); pull it.
- Take the FLINT (J).

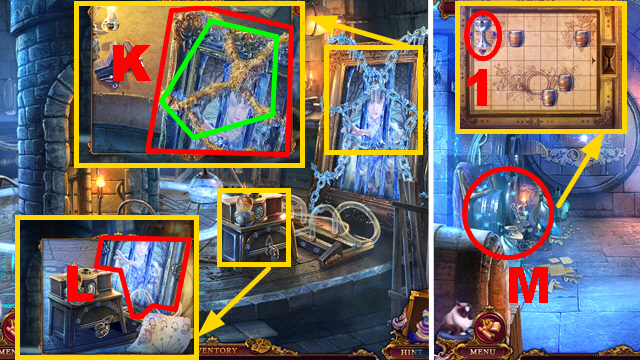
- Use the HAY and FLINT (green); take BRANDON’S PAINTING (K).
- Place BRANDON’S PAINTING (L).
- Enter the Cellar.
- Play the HOP (M) to receive the FIREWORKS. To solve the HOP mini-game, move the goblet (1) down-right-up-right-down-right.

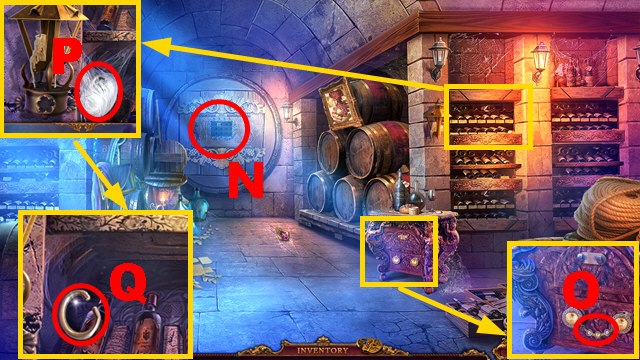
- Examine the panel (N).
- Try to open the drawer (O).
- Use the FLINT (P); take the HANDLE (Q).

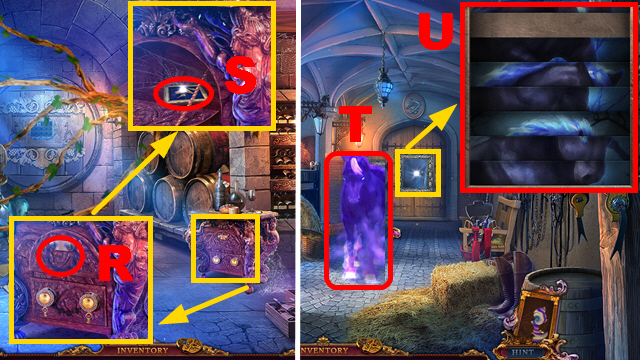
- Place the HANDLE (R); open the compartment.
- Take MISSING PIECE 1/2 (S); close the compartment.
- Go to the Stable.
- Use the FIREWORKS (T).
- Place the HORSE TILE (U).

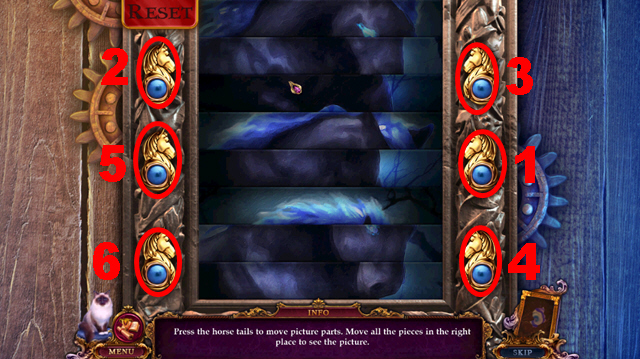
- Play the mini-game.
- Solution: 1-6.
- Move forward.
Chapter 4: The Smithy

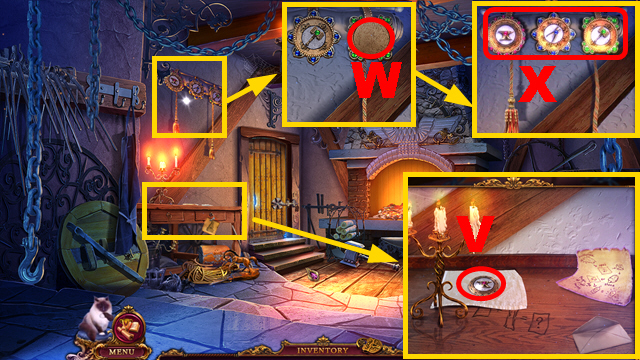
- Open the letter and handkerchief; take the TILE (V).
- Place the TILE (W).
- Arrange the tiles correctly (X).

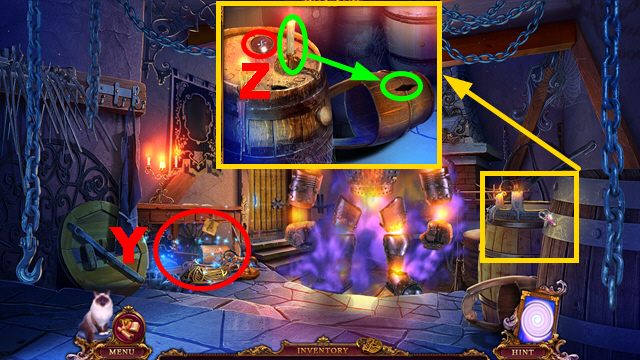
- Play the HOP (Y) to receive the HANDLE.
- Take the PUZZLE TILE (Z); use the candle (green).
- Go to the Secret Laboratory.

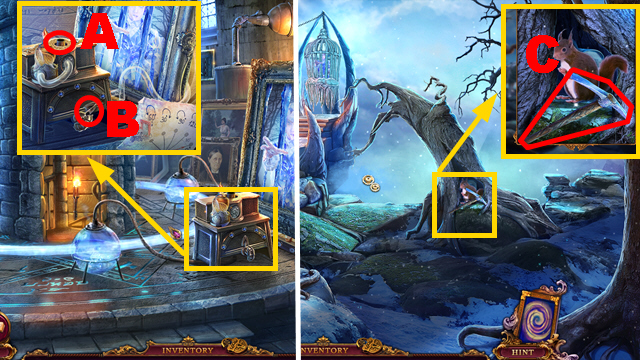
- Place the HANDLE (A); move the arrow (B) four times.
- Take the PICKAXE (C).

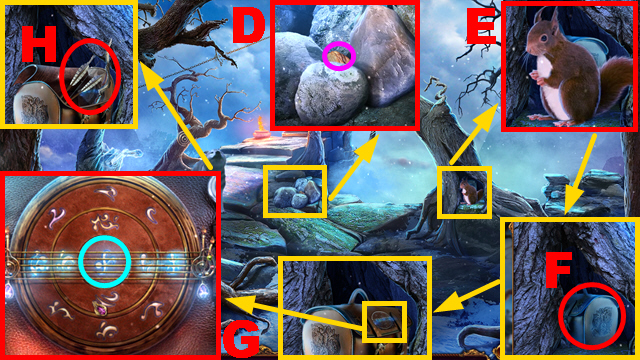
- Use the PICKAXE (D); take the NUT (purple).
- Use the NUT (E); pull the bag (F).
- Place the PUZZLE TILE (blue).
- Arrange the puzzle tiles correctly (G); take the BOW WITH ARROWS (H).

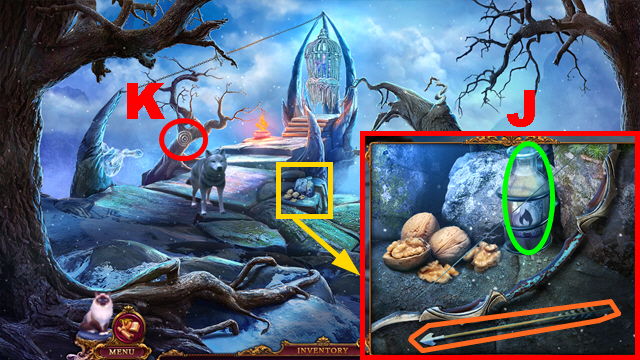
- Place the BOW WITH ARROWS (J); dip the arrow (orange) into the oil (green).
- Light the arrow with the FLINT; take the BOW WITH FLAMING ARROWS.
- Use the BOW WITH FLAMING ARROWS (K).

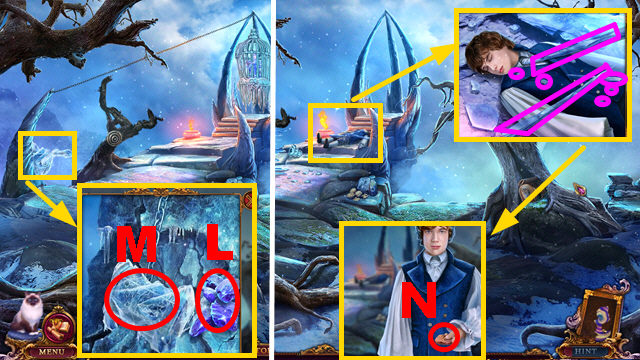
- Remove the debris (L); use the PICKAXE (M).
- Remove the ice (purple) to acquire the ICE.
- Take the BUTTON (N).
- Go to the Stable.

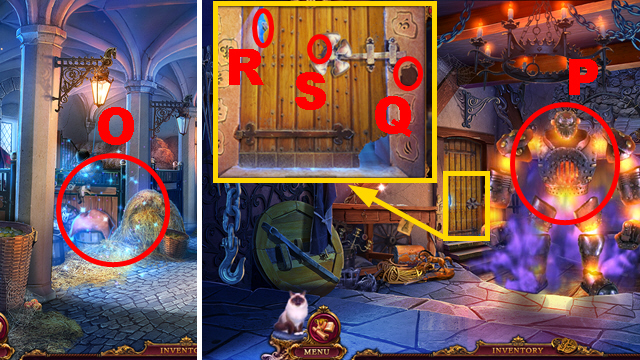
- Play the HOP (O) to receive the MAGNET.
- Move forward.
- Use the ICE (P).
- Place the BUTTON (Q); use Mr. Jenkins (R) to receive the PETAL.
- Place the PETAL (S).

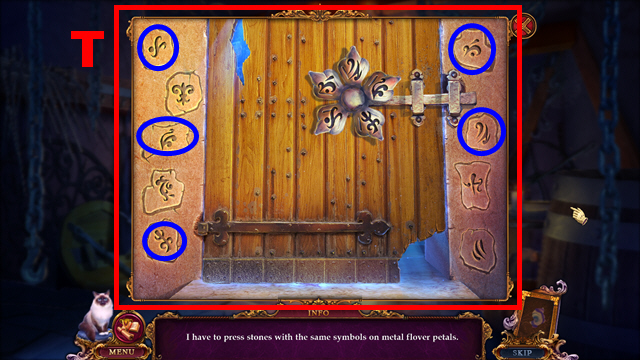
- Play the mini-game.
- Solution (T): activate 5 symbols (blue).
- Turn left.

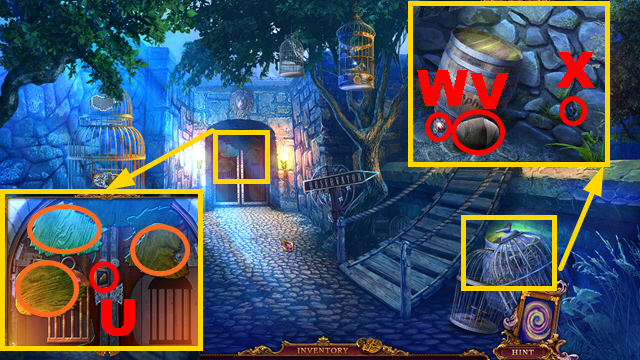
- Take MISSING PIECE 2/2 (U); remove the leaves (orange).
- Remove 3 cages; take the STONE (V) and METAL FLOWER (W).
- Use Mr. Jenkins (X) to acquire BALL 1/2.
- Go to the Secret Laboratory.

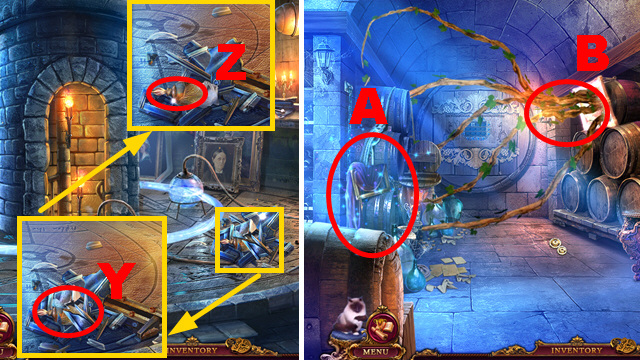
- Use the MAGNET (Y); take the FIRE PAINT (Z).
- Move forward.
- Play the HOP (A) to receive the ACID.
- Use the ACID (B).

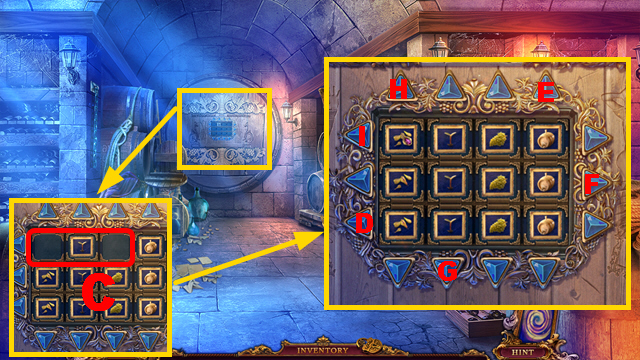
- Place 2 MISSING PIECES (C).
- Play the mini-game.
- Solution: D-D-D-E-E-F-G-H-H-I-I-I.

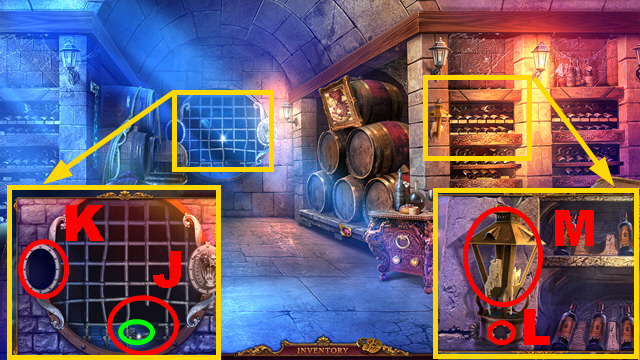
- Use Mr. Jenkins (J); take the LION TILE (green).
- Place the LION TILE (K).
- Place the METAL FLOWER (L); take the LAMP (M).
- Move forward.

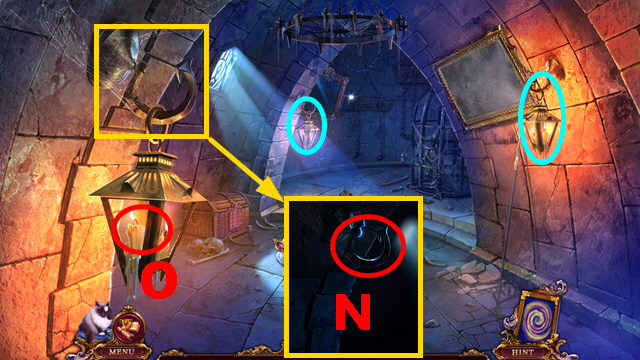
- Place the LAMP (N); light it with the FLINT (O).
- Light two more lamps with the FLINT (blue).

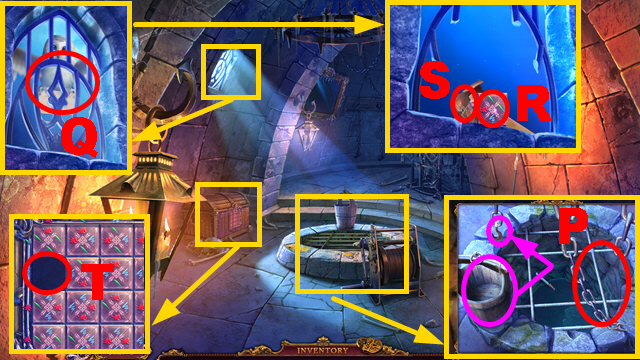
- Place the CHAINS (P); connect the bucket to the hook (purple).
- Put Mr. Jenkins into the bucket to acquire the RASP.
- Use the RASP (Q); open the letter.
- Take the MISSING PIECE (R); inspect the photo (S).
- Place the MISSING PIECE (T).

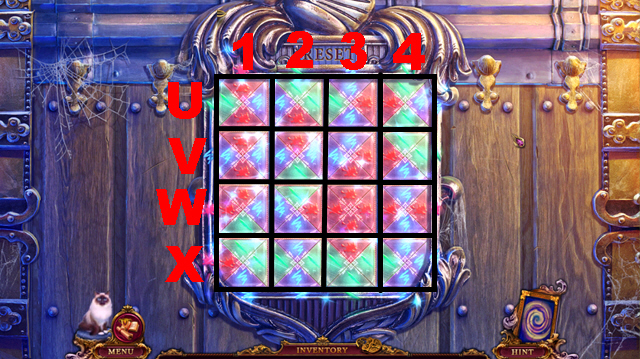
- Play the mini-game.
- Solution: U1-X3-V4-W4-X4-W2-U2-W1-V2-V3-U3-U4-X1-X2-U1-W4-V3-X4-U2-U3-U1-W3-X1-X4-U2-W3-V1-X1-U2-V1.

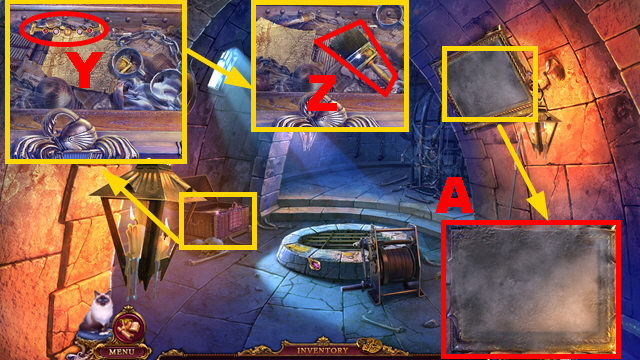
- Take the CHAIN HANDLE (Y).
- Remove three items; take the BRUSH (Z).
- Clean the painting with the BRUSH (A).
- Walk down.

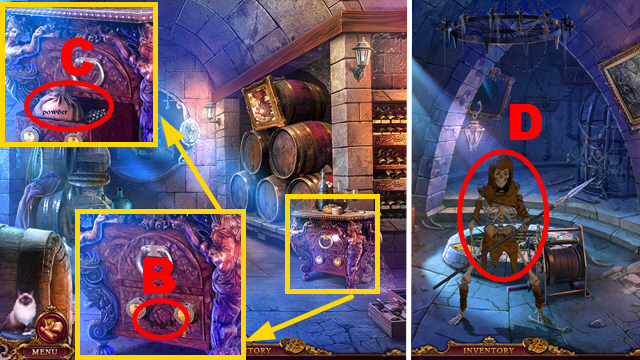
- Place the CHAIN HANDLE (B); open the drawer.
- Take the gunpowder and bullets (C) to acquire the LOADED GUN.
- Move forward.
- Use the LOADED GUN (D).

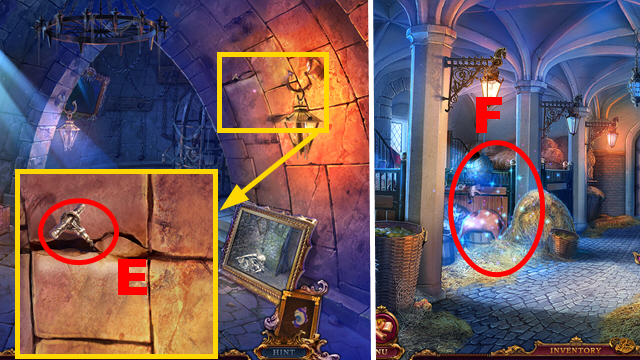
- Take the CORKSCREW (E).
- Go to the Stable.
- Play the HOP (F) to receive the METAL STATUE.
- Move forward.

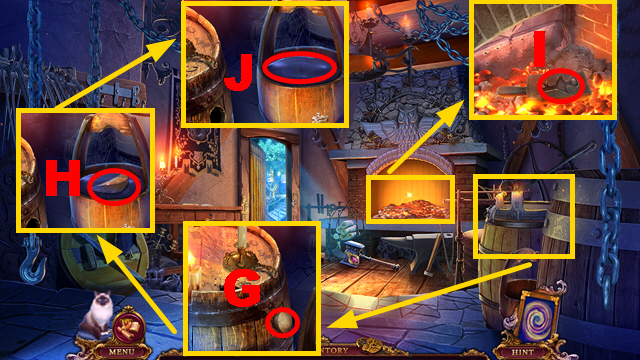
- Use the CORKSCREW (G); take the WING (H).
- Place the METAL STATUE (I); take the BURNING KEY.
- Place the BURNING KEY (J) to receive the CAGE KEY.
- Turn left.

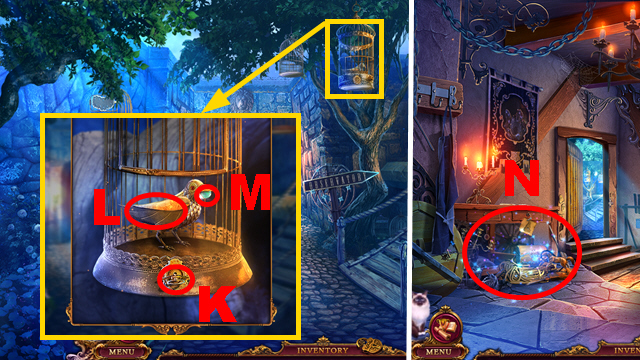
- Place the CAGE KEY (K) and WING (L); take the OPAL (M).
- Walk down.
- Play the HOP (N) to receive the CROWBAR.
- Turn left.

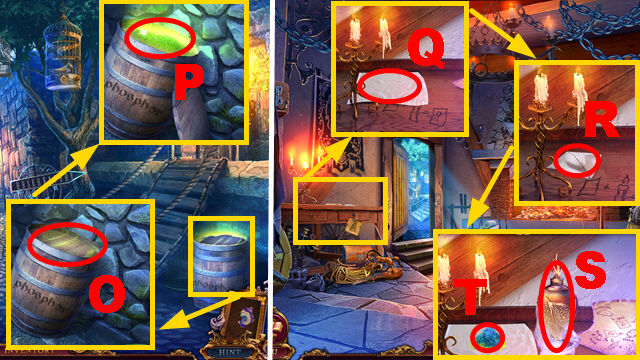
- Use the CROWBAR (O); take the PHOSPHOR (P).
- Walk down.
- Place the OPAL and PHOSPHOR (Q); fold the handkerchief.
- Use the STONE (R).
- Place the FIRE PAINT (S); insert the powder (T) into the paint.
- Take the LIGHT PAINT.
- Go to the Dungeon.

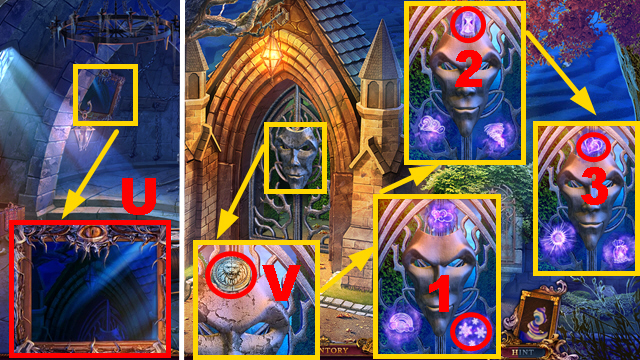
- Use the LIGHT PAINT (U).
- Take the LION TILE (V).
- Choose the correct answers: 1-3.
Chapter 5: The Maze

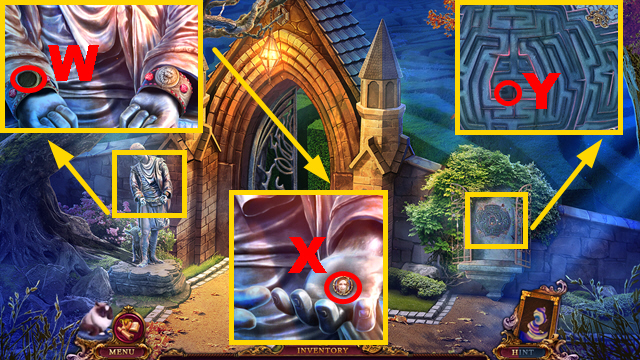
- Place the LION TILE (W); push it three times.
- Take the ANNA TILE (X).
- Place the ANNA TILE (Y).

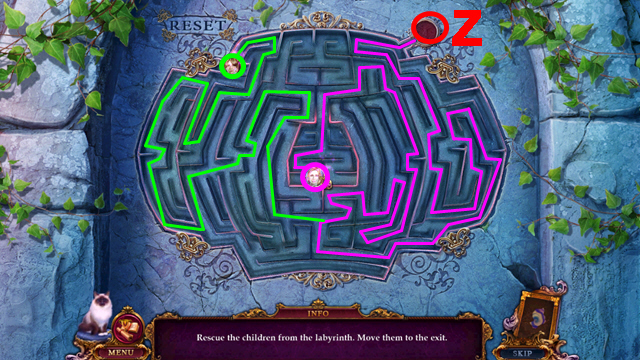
- Play the mini-game.
- To solve this puzzle, move the children along the colored lines to the exit (Z).
- As soon as both colored lines meet, the path is the same for both children.
- You receive the WING TILE.
- Go to the Dovecote.

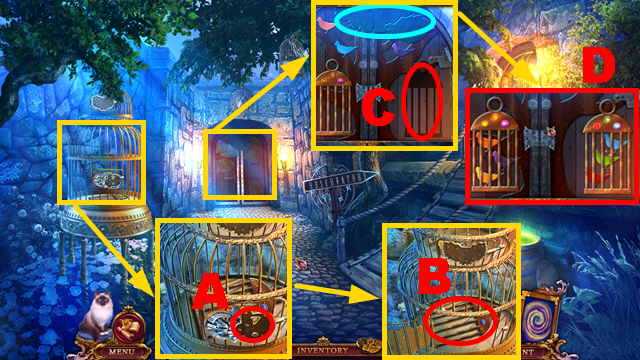
- Place the WING TILE (A); take the CAGE (B).
- Place the CAGE (C); remove the leaves (blue).
- Arrange the doves correctly (D).
- Move forward.

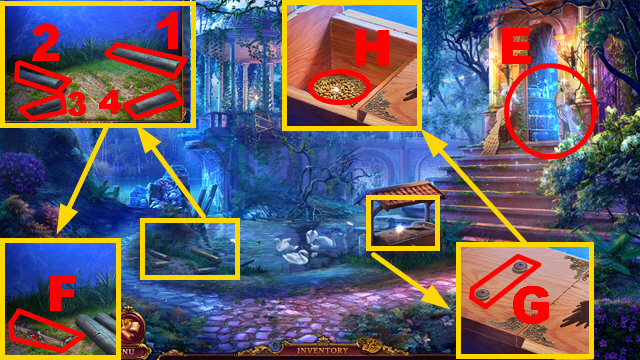
- Play the HOP (E) to receive the HOOK.
- Assemble the logs: 1-4.
- Take the HANDLE (F).
- Place the HANDLE (G); take the GRAIN (H).

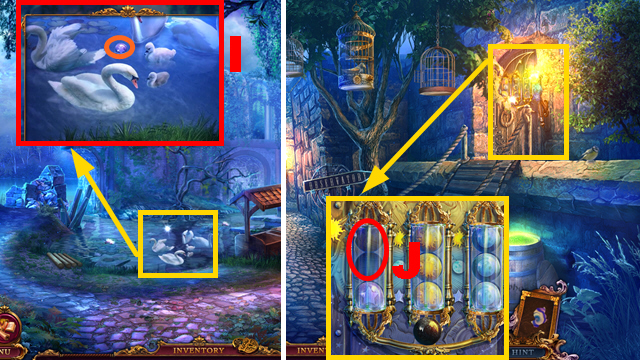
- Use the GRAIN (I); collect BALL 2/2 (orange) with the HOOK.
- Walk down.
- Place 2 BALLS (J).

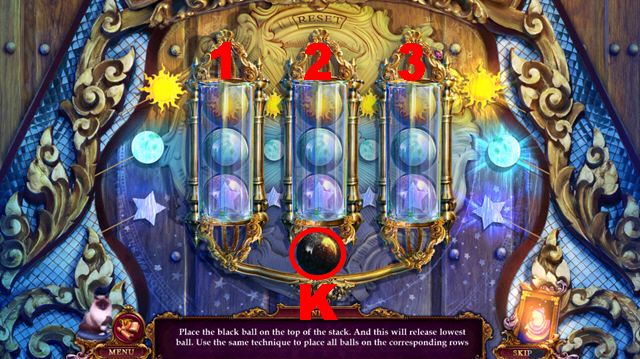
- Play the mini-game.
- Solution: K3-K1-K2-K1-K3-K3-K2-K2-K3.
- Turn right.

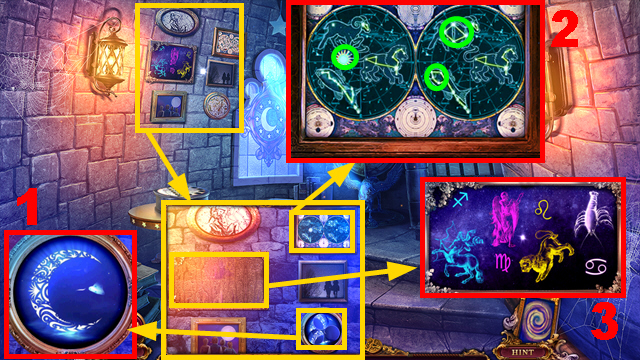
- Arrange image (1) to acquire CODE 1/2.
- Identify 3 differences (green) in image (2) to acquire CODE 2/2.
- Remove dust from the note and arrange it correctly (3); take the NOTE.

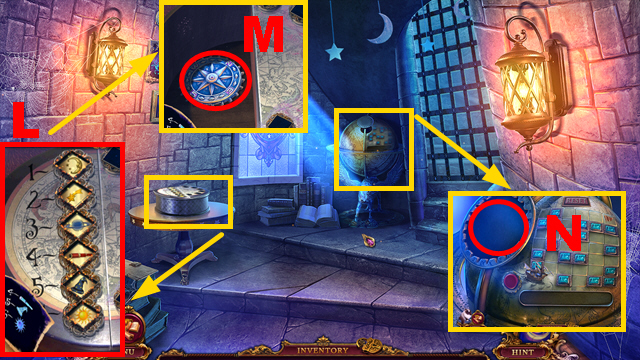
- Enter the correct symbols (L).
- Take the COMPASS (M).
- Place the COMPASS (N).

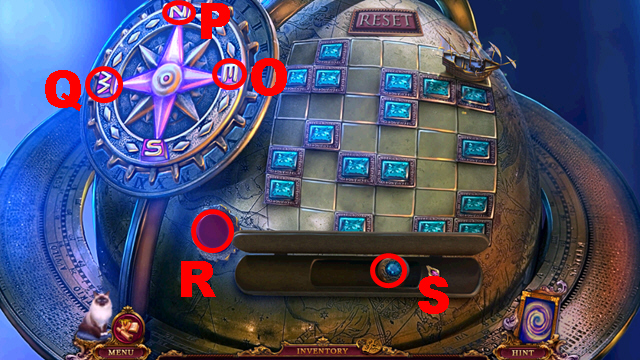
- Play the mini-game.
- Solution: O-P-Ox3-Px2-Qx2-Px3-Ox3-R.
- Pull the lever (S).
- Go upstairs.

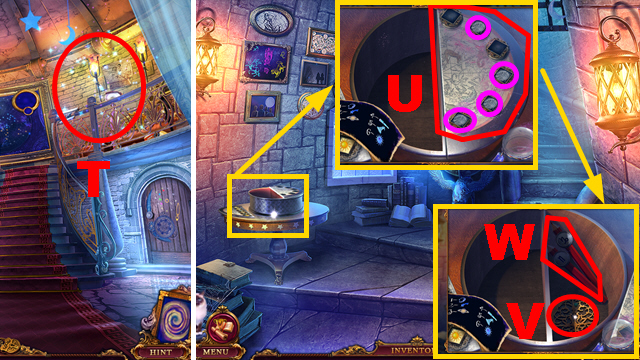
- Play the HOP (T) to receive the STARDUST.
- Walk down.
- Use the STARDUST (U); push 4 buttons (purple).
- Take the ASTROLABE PART (V) and PENCILS (W).
- Move forward.

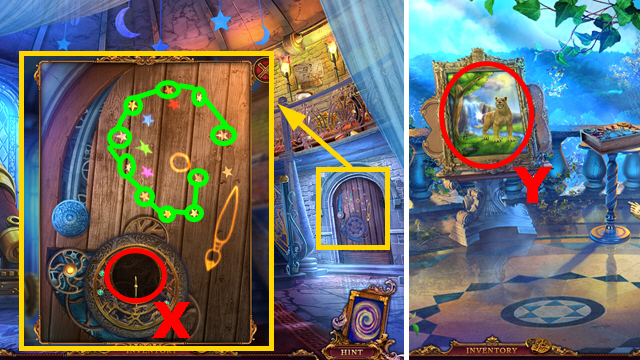
- Place the ASTROLOBE PART (X).
- Connect the stars (green).
- Enter the Balcony.
- Examine the painting (Y).

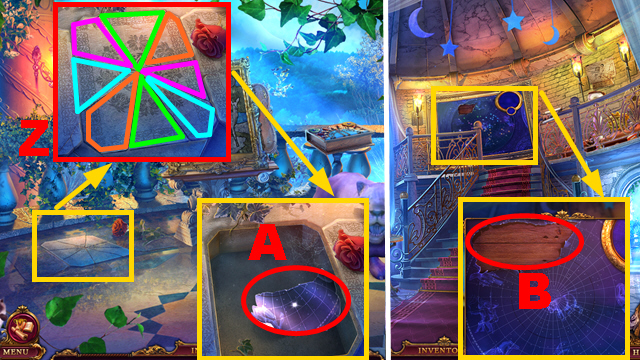
- Match 4 pairs framed in the same color (Z).
- Take the PART OF STAR MAP (A).
- Walk down.
- Place the PART OF STAR MAP (B).

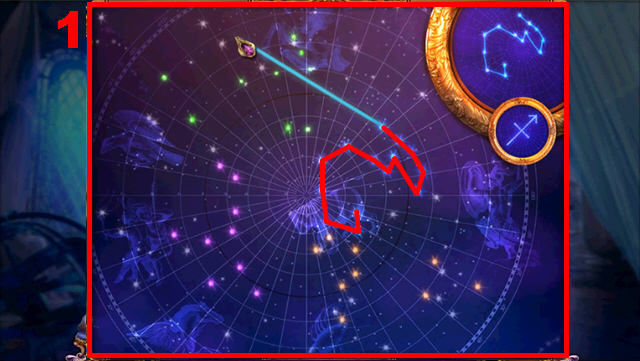

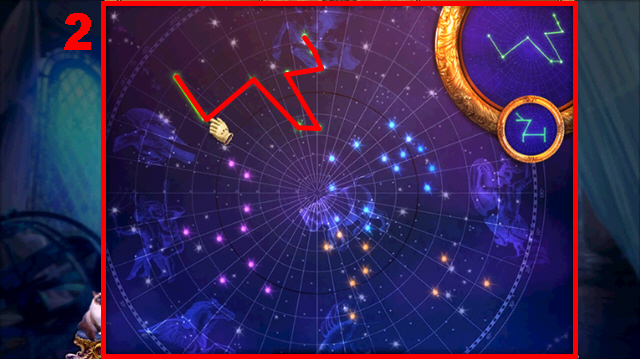

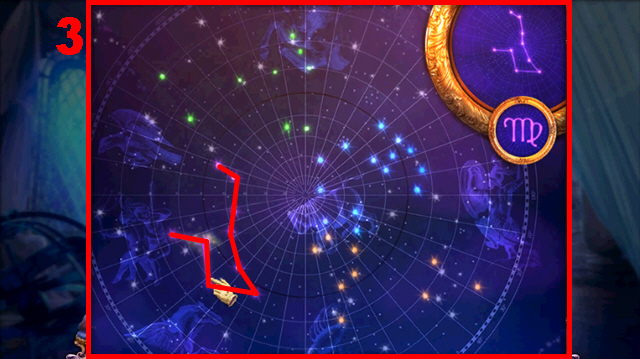

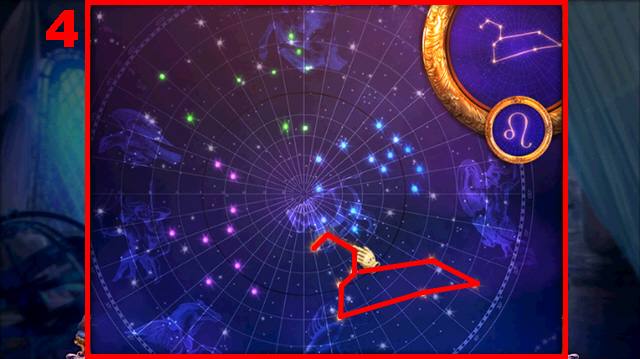
- Play the mini-game.
- Solution: 1-4.

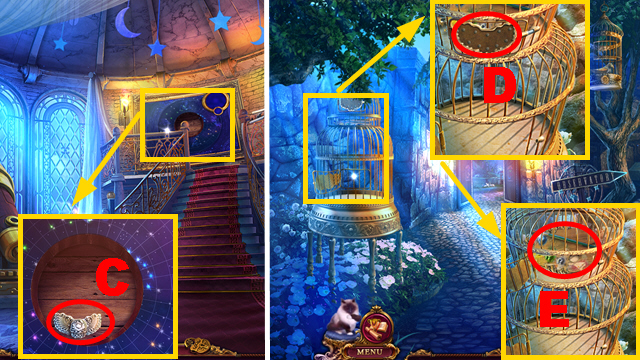
- Take the LOCK PART (C).
- Walk down twice.
- Place the LOCK PART (D); take the BRUSH (E).
- Turn right, move forward.

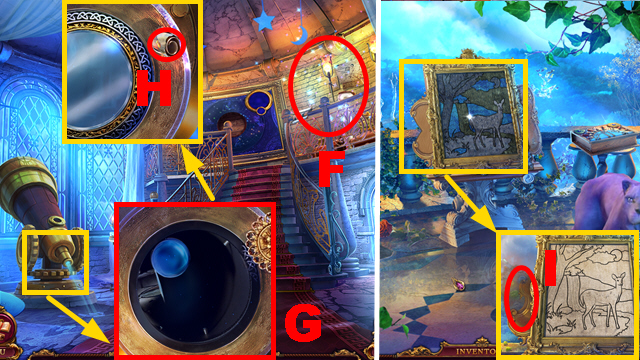
- Play the HOP (F) to receive the LENS.
- Place the LENS (G); take the PICTURE PIECE (H).
- Turn right.
- Place the BRUSH (I).

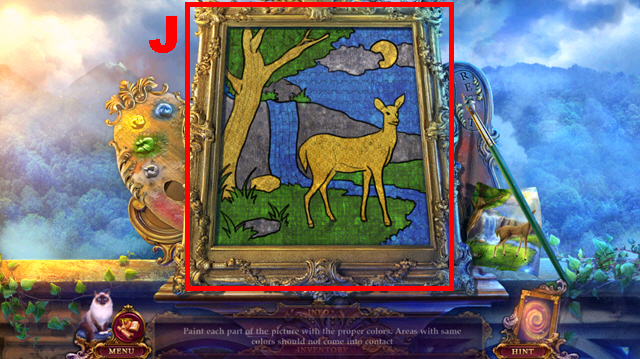
- Play the mini-game.
- Solution: (J).

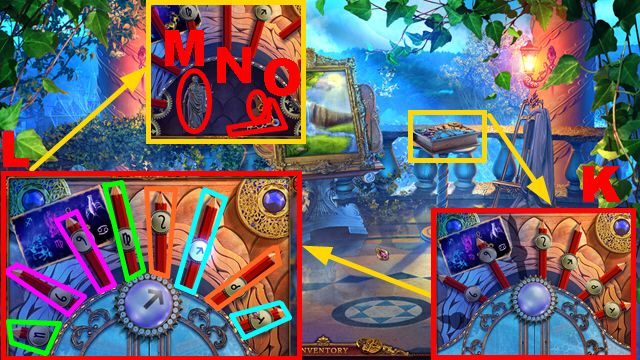
- Place the PENCILS (K).
- Play the mini-game.
- Select 4 pencil pairs framed in the same color (L).
- Take THEMIS (M), the CLOCK HANDS (O), and RUNE BOOK 1/4 (N).
- Walk down.

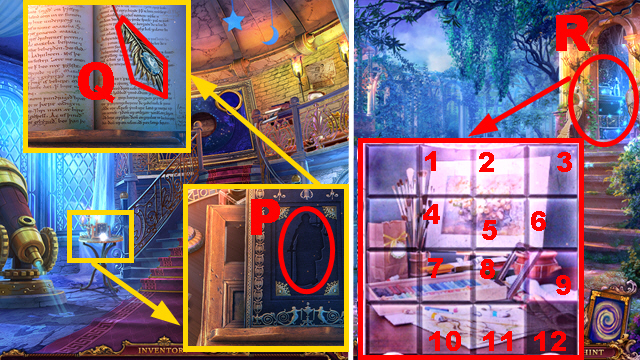
- Place THEMIS (P): take the FEATHER (Q).
- Go to the Poultry Yard.
- Play the HOP (R) to receive the VINES. Solution for the HOP mini-game: 11-10-7-8-9-6-5-4-7-8-9-6-5-4-7-8-9-6-5-4-7-8-9-6-5-2-1-4-5-8-7-4-5-8-9-8-7-10-11-12-9-6-5-8-9-6-5-4-7-10-11-8-9-12-11-10-7-4-5-8-9-12.

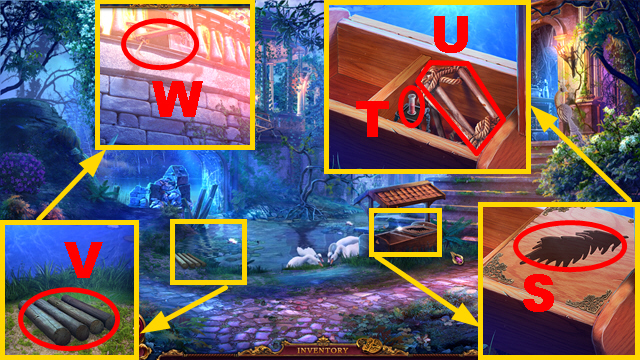
- Place the FEATHER (S); take the RED PAINT (T) and ROPE-LADDER (U).
- Use the VINES (V).
- Use Mr. Jenkins and the ROPE-LADDER (W).
- Move forward.
Chapter 6: The Arbor

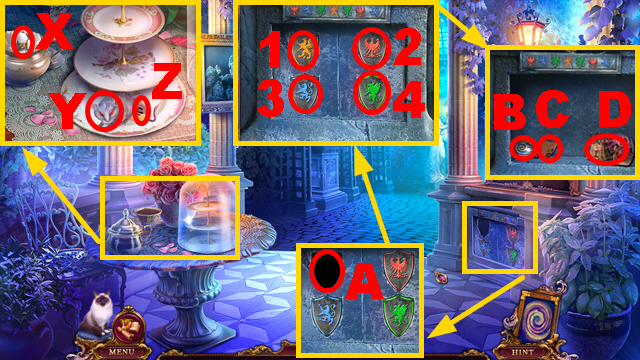
- Remove the lid and glass; take the BLAZON (X).
- Use Mr. Jenkins (Y); take the COOKIE (Z).
- Place the BLAZON (A).
- Select the blazons: 2-3-4-1-4-2-3.
- Take the WATER MEDALLION (B) and RUNE BOOK 2/4 (C); inspect the photo (D).
- Move forward.

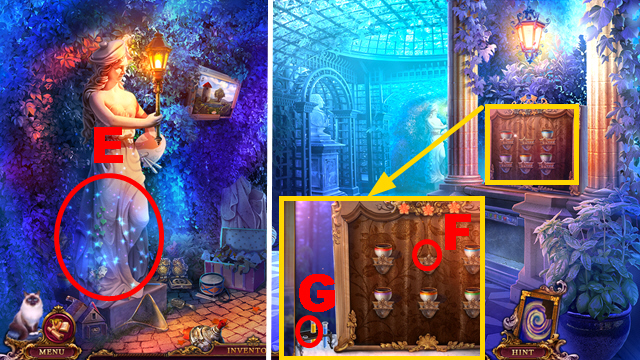
- Play the HOP (E) to receive the CUP.
- Walk down.
- Place the CUP (F) and RED PAINT (G).

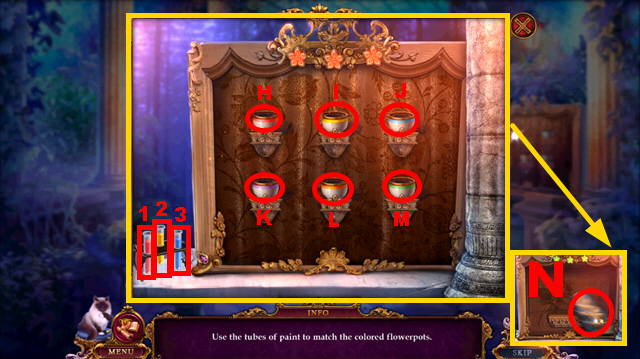
- Play the mini-game.
- Solution: 1-H, 2-I, 3-J, 1-K, 3-K, 1-L, 2-L, 2-M, 3-M.
- Take the FABRIC (N).
- Move forward.

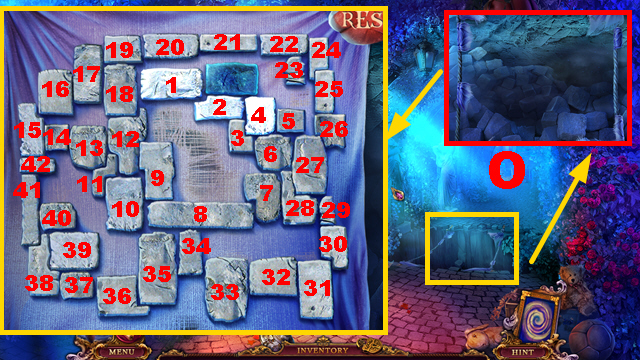
- Place the FABRIC (O).
- Play the mini-game.
- Solution: 1-42.
- Move forward.

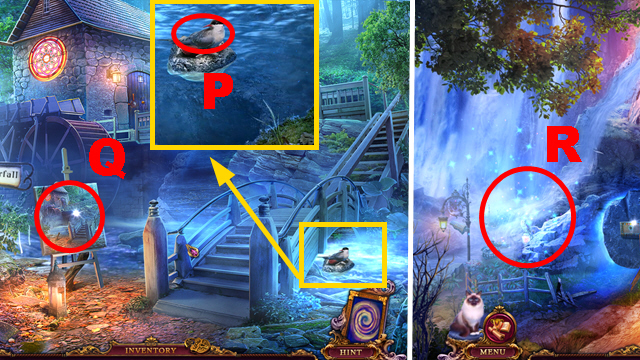
- Use the COOKIE (P).
- Examine the painting (Q).
- Turn left.
- Play the HOP (R) to receive the THINNER.

- Remove the leaves three times; touch the statue (S).
- Walk down.
- Apply the THINNER (T).

- Take the FRAME PART (U).
- Walk down.
- Place the PICTURE PIECE (V) and FRAME PART (W).

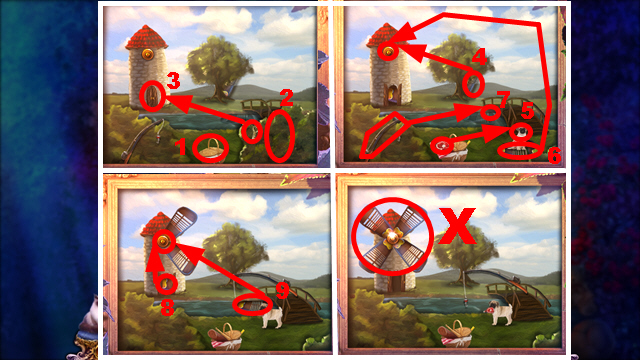
- Play the mini-game.
- Solution: 1-9.
- Take the WINDMILL (X).
- Move forward.

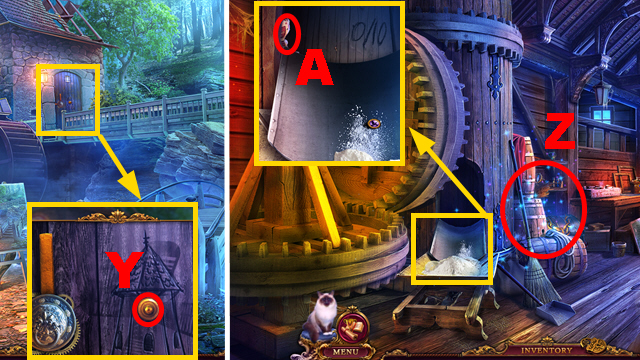
- Place the WINDMILL (Y).
- Enter the Windmill Interior.
- Play the HOP (Z) to receive the TILE.
- Take the GOBLET (A).

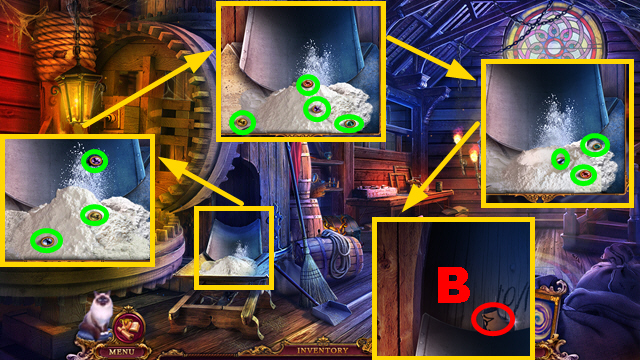
- Remove the powder; collect 10 TILES (green).
- Take RUNE BOOK 3/4 (B).
- Walk down.

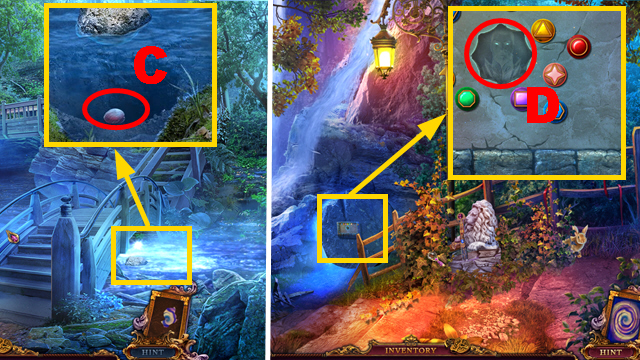
- Put the GOBLET into the water (C) to acquire the GOBLET OF WATER.
- Turn left.
- Place the TILE (D).

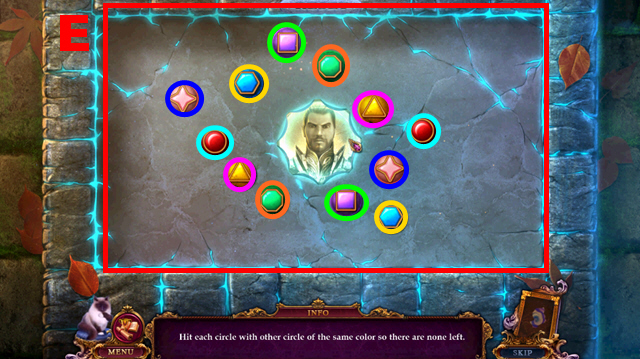
- Play the mini-game.
- Let balls of the same color collide to solve the puzzle (E).
- Enter the Cave.

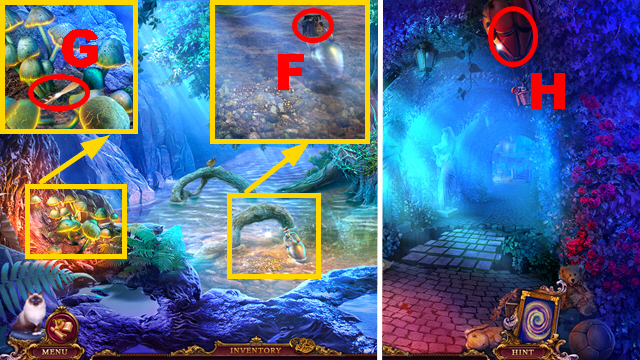
- Open the bottle (F).
- Move aside the mushrooms; take the DART (G).
- Walk down three times.
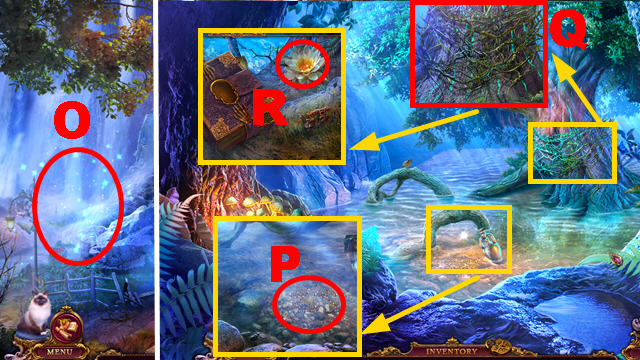
- Throw the DART (H).

- Play the HOP (I) to receive the NET.
- Remove two items; take the STATUE PART (J).
- Move forward.

- Use the NET (K).
- Open the shell; take the PEARL (L).
- Turn left.
- Place the STATUE PART (M).
- Select 3 pairs of runes framed in the same color; take the SWORD (N).

- Play the HOP (O) to receive the SIEVE.
- Enter the Cave.
- Use the SIEVE (P) to acquire the GOLD and RUNE BOOK 4/4.
- Use the SWORD (Q); take the LILY (R).
- Go to the Windmill Interior.

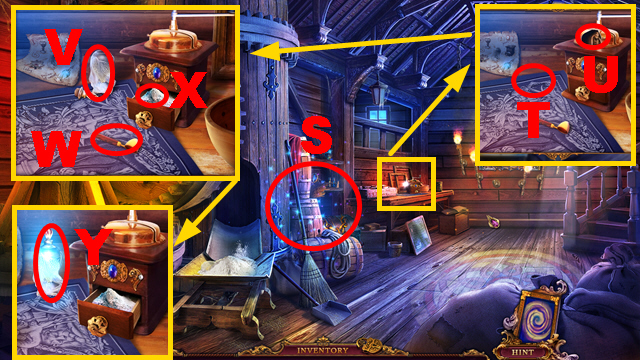
- Play the HOP (S) to receive the TORCH.
- Place the LIGHT PAINT (T) and PEARL (U).
- Use the GOBLET OF WATER and LILY (V); use the scoop (W) to put the powder (X) into the paint.
- Take the WATER PAINT (Y).

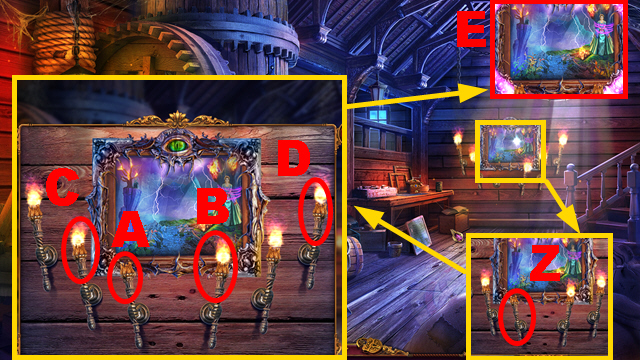
- Place the TORCH (Z).
- Play the mini-game.
- Solution: A-B-A-C-D.
- Use the WATER PAINT (E).
- Enter the painting.

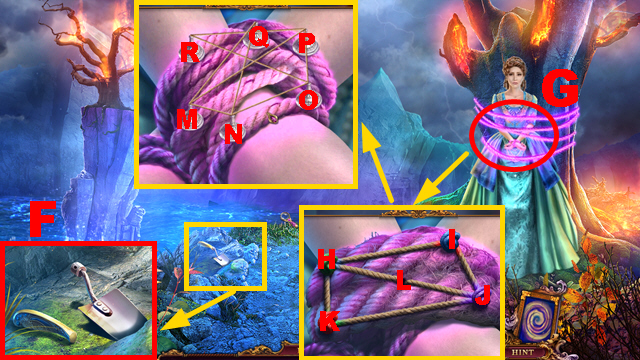
- Grab the scoop (F).
- Play the mini-game (G).
- Solution: H-I-J-L-H-K-J-I-H-L.
- Play the mini-game.
- Solution: M-Q-M-R-N-R-M-R-M-N-O-N.

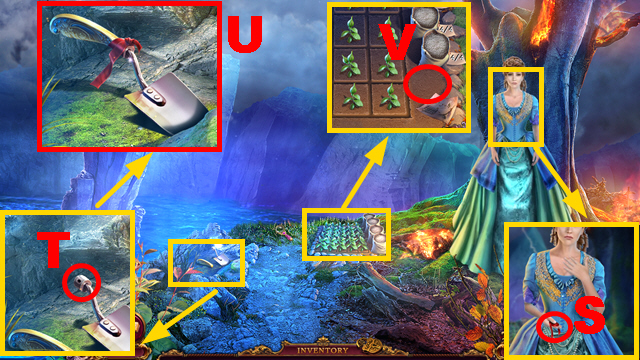
- Take the RIBBON (S).
- Place the RIBBON (T); take the SCOOP (U).
- Place the SCOOP (V).

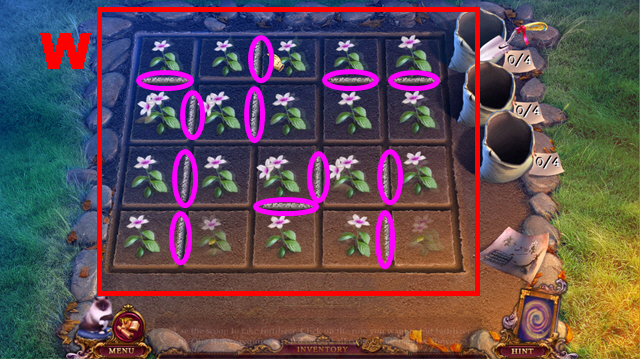
- Play the mini-game.
- Solution (W): Apply the fertilizer on the correct spots (purple).

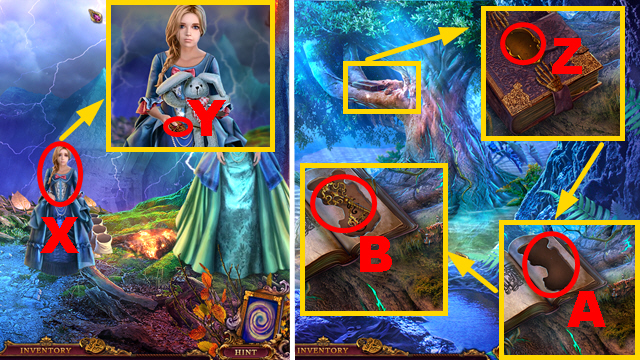
- Use LEIA’S BUNNY (X); talk to Leia.
- Take the BOOK TILE (Y).
- Go to the Cave.
- Place the BOOK TILE (Z) and 4 RUNE BOOKS (A).
- Take the KEY WITH FIRE FOB (B).
Chapter 7: Back at the Dining Room

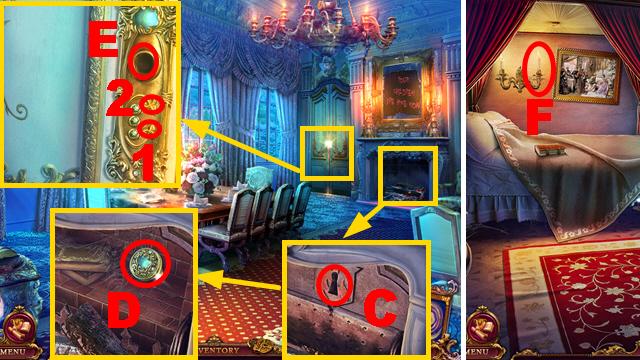
- Use the KEY WITH FIRE FOB (C); take the KNOB (D).
- Place the KNOB (E); select the arrows: 1-2-1.
- Move forward.
- Take the CHANDELIER (F).

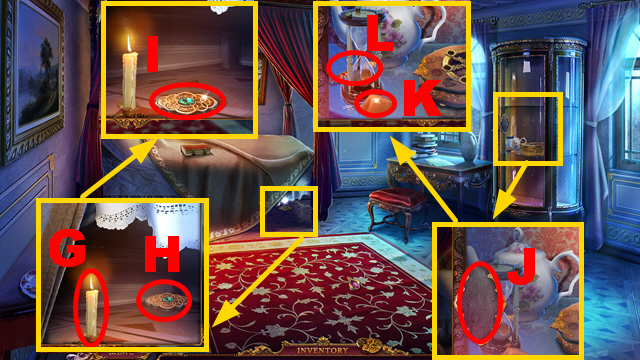
- Place the CHANDELIER (G); use Mr. Jenkins (H).
- Take the TILE (I).
- Place the TILE (J); take the SAND (K) and WEIGHT (L).

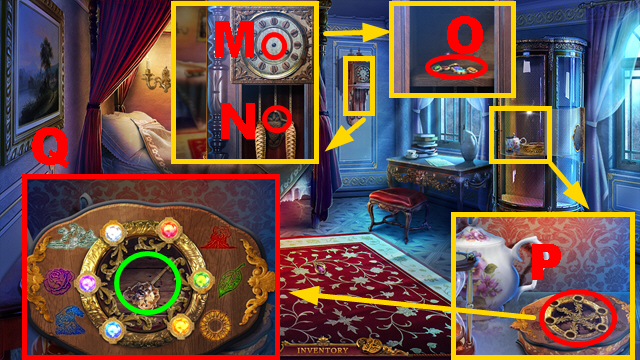
- Place the CLOCK HANDS (M) and WEIGHT (N).
- Take the CRYSTALS (O).
- Place the CRYSTALS (P).
- Arrange the crystals correctly (Q); take the KEY (green).
- Walk down twice.

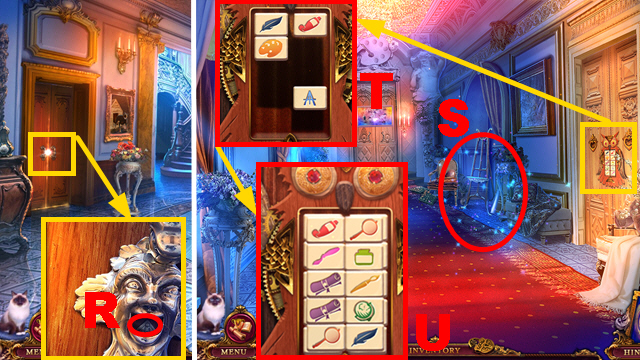
- Place the KEY (R).
- Turn left.
- Play the HOP (S) to receive the MAHJONG TILES.
- Place the MAHJONG TILES (T).
- Play the mini-game.
- Select pairs of similar tiles (U) until all tiles are gone.
- Enter the Cabinet.

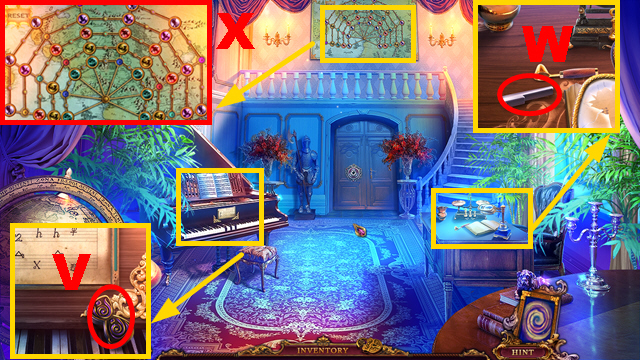
- Take the TIME MEDALLION (V) and PIANO KEY 1/3 (W).
- Place 10 TILES (X).

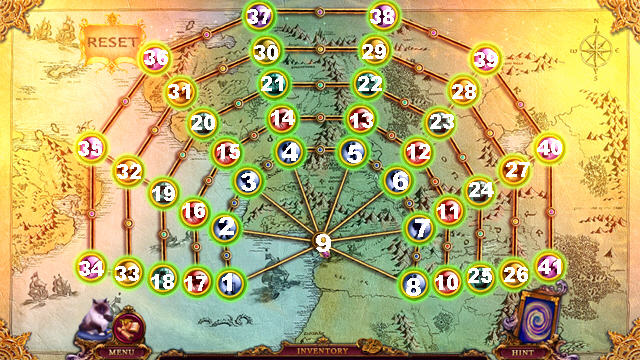
- Play the mini-game.
- Solution: 1-17-18-33-34-35-36-37-38-39-40-41-26-27-28-29-30-31-32-33-34-35-36-37-38-39-40-41-26-27-28-29-30-31-32-33-34-35-36-37-38-39-40-41-26-27-28-29-30-37-38-29-30-37-38-39-28-29-30-31-36-37-38-39-40-27-28-29-30-31-32-35-36-37-38-39-40-41-26-27-28-29-30-31-32-33.
18-19-32-33-34-35-32-19-16-17-18-33-32-19-20-15-3-2-1-17-18-19-16-2-3-15-16-17-18-33-32-31-20-15-16-19-32-31-20-21-14-13-22-29-30-21-14-13-22-29-30-21-14-13-22-23-12-11-24-25-10-11-12-23-22-13-12-11-24-27-28-23-12-11-24-23-12-11-10-25-26-27-24-25-10-11-24-27-26-25.
10-11-24-27-26-25-24-11-10-25-24-11-10-25-26-27-24-25-10-11-24-27-26-25-10-11-12-13-22-23-24-25-10-11-12-23-24-25-10-11-24-25-10-11-12-23-28-27-26-25-10-8-9-1-17-18-19-16-2-1-17-18-19-16-2-1-17-18-19-20-15-3-9-1-2-16-15-20-19-16-2-3-4-5-13-14-15-3-4-14-21-20-15-3-4-14-21-20-15-16-2-9.
5-6-7-11-24-23-12-6-5-13-22-23-12-6-5-13-22-23-12-13-5-4-9-6-7-11-24-25-10-8-7-11-24-25-10-11-12-6-5-9-8-10-11-12-6-9-8-10-11-7-9-8-10-11-7-9.

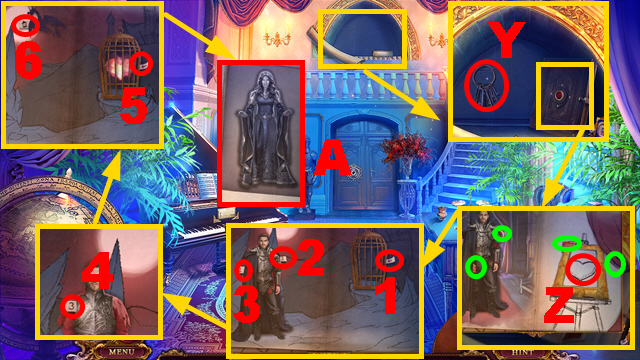
- Take the KEYS (Y); open the book.
- Remove the curtain; turn the left page.
- Place 4 heart pieces (green) on the canvas (Z).
- Select items 1-6.
- Take the DOOR TILE (A).
- Walk down.

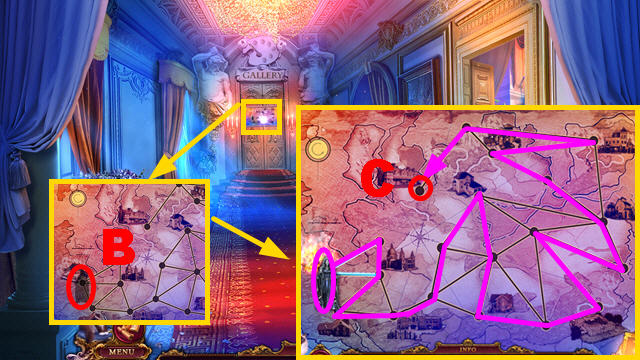
- Place the DOOR TILE (B).
- Play the mini-game.
- Follow the line (purple) to lead the figure to the goal (C).
- Enter the Picture Gallery.

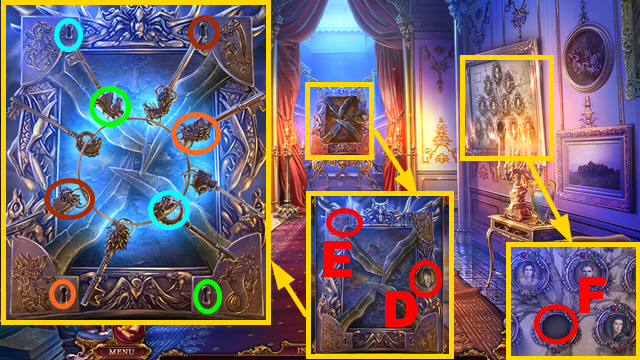
- Take BRANDON’S PORTRAIT (D); use the KEYS (E).
- Insert the keys in holes framed in the same color.
- Place BRANDON’S PORTRAIT (F).

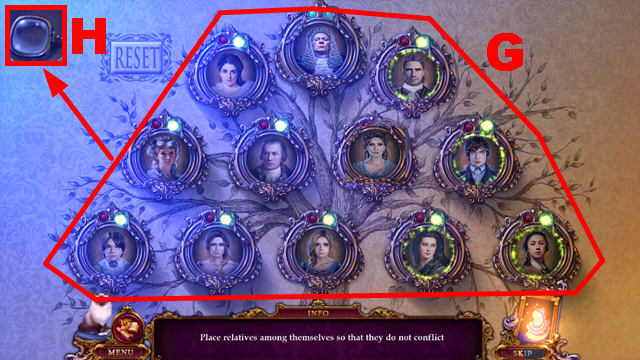
- Play the mini-game.
- Solution: (G).
- Take the MAGNIFIER (H).
- Go to the Cabinet.

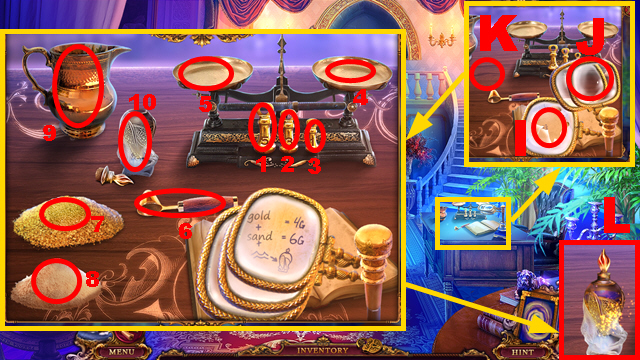
- Place the MAGNIFIER (I); move 2 magnifiers (J).
- Place the GOLD, SAND, and WATER PAINT (K).
- Play the mini-game.
- Solution: 2-4-3-4-6-7-5-6-7-5-4-2-4-3-1-4-3-4-6-8-5-6-8-5-6-8-5-9-10.
- Take the TIME PAINT (L).
- Walk down.

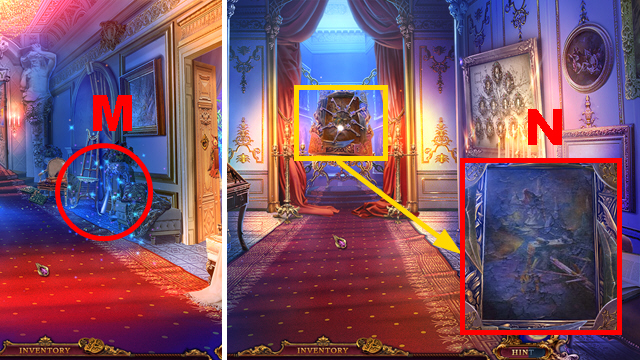
- Play the HOP (M) to receive the SUN MEDALLION.
- Move forward.
- Use the TIME PAINT (N).
- Move forward.

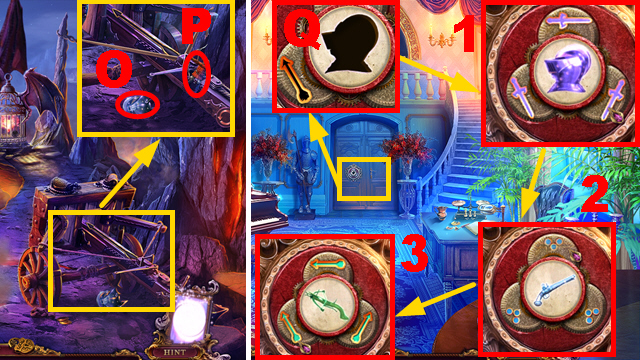
- Take the DOOR TILE (O) and ARCHER 1/2 (P).
- Go to the Cabinet.
- Place the DOOR TILE (Q).
- Choose the correct symbols (1-3).
- Move forward.

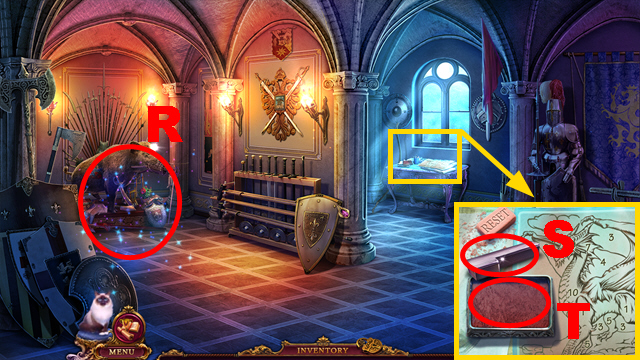
- Play the HOP (R) to receive the PENCILS.
- Take PIANO KEY 2/3 (S); place the PENCILS (T).

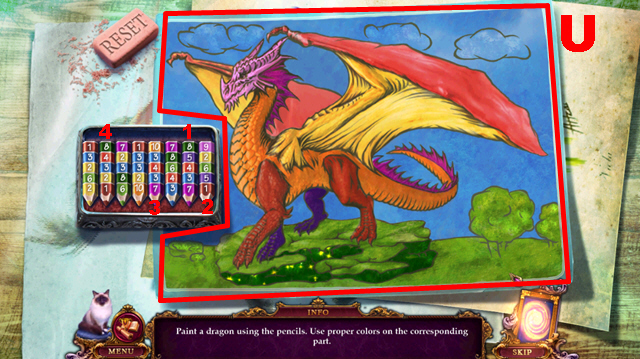
- Play the mini-game.
- Use pencils 1-4 to complete the painting (U).

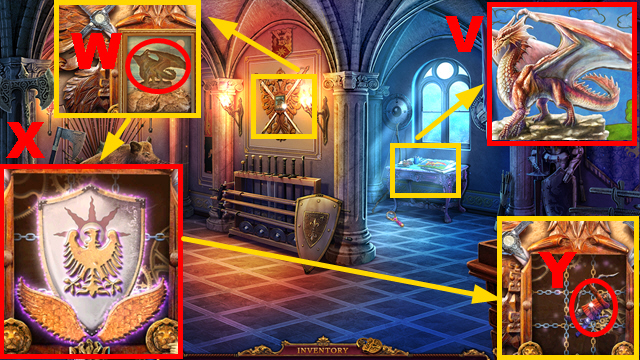
- Take the DRAGON (V).
- Place the DRAGON (W).
- Select the correct shield (X); take ARCHER 2/2 (Y).
- Go to the Picture Gallery.

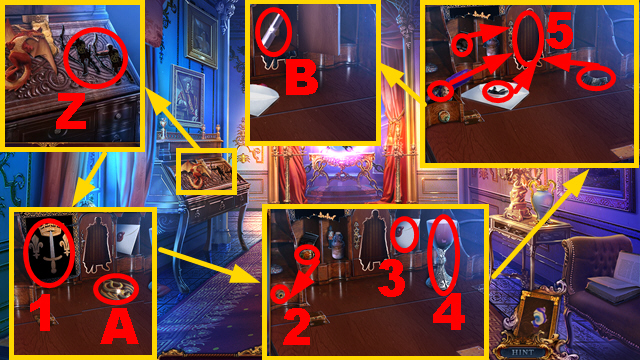
- Place 2 ARCHERS (Z); open the door.
- Take the DRAGON TILE (A).
- Complete the figurine: 1-5.
- Take PIANO KEY 3/3 (B).
- Walk down, turn right.

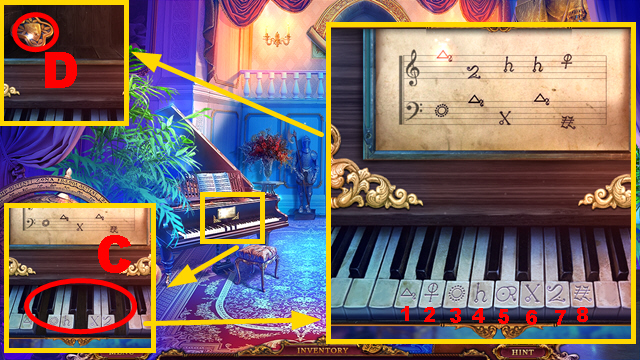
- Place 3 PIANO KEYS (C).
- Select piano keys: 1-7-4-4-2-3-1-6-1-8.
- Take the COLLAR TILE (D).
- Move forward.

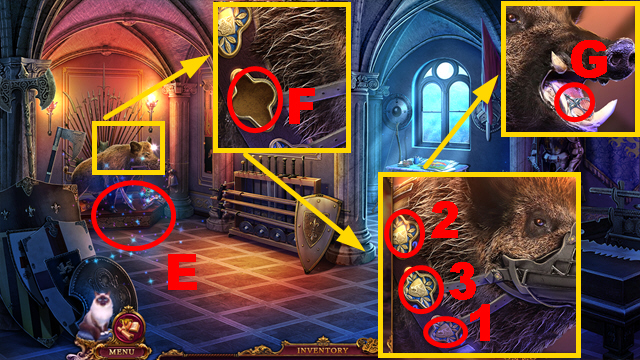
- Play the HOP (E) to receive the FIRE MEDALLION.
- Place the COLLAR TILE (F); select tiles 1-3.
- Take the SCISSORS (G).
- Go to the Marshall’s Portrait.

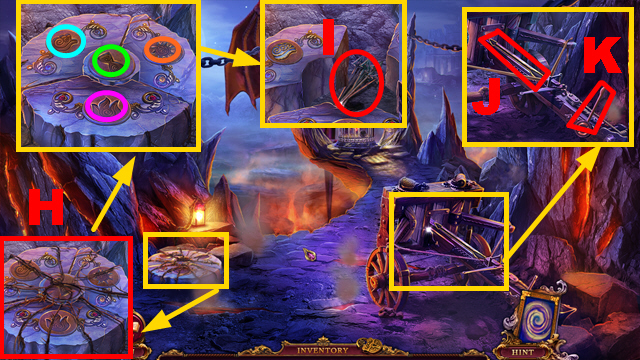
- Use the SCISSORS (H).
- Place the TIME MEDALLION (green), WATER MEDALLION (blue), FIRE MEDALLION (purple), and SUN MEDALLION (orange).
- Take the ARROW (I).
- Place the ARROW (J); pull the lever (K).

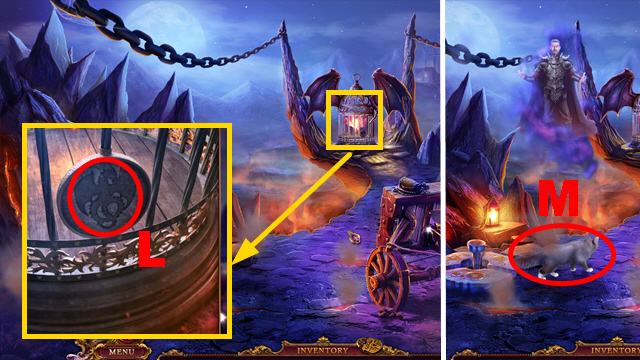
- Try to place the DRAGON TILE (L).
- Give the DRAGON TILE to Mr. Jenkins (M).
- Congratulations, you have completed Ominous Objects: Family Portrait.





 Time Mysteries: The Final Enigma Walkthrough, Guide, & Tips
 Drawn: Dark Flight ® Walkthrough, Guide, & Tips
 Otherworld: Shades of Fall Walkthrough, Guide, & Tips
 Agatha Christie: Dead Man's Folly Walkthrough, Guide, & Tips
 Dracula: Love Kills Walkthrough, Guide, & Tips