Time Mysteries: The Final Enigma Walkthrough, Guide, & Tips
Time Mysteries: The Final Enigma Walkthrough
Welcome to the Time Mysteries: The Final Enigma Walkthrough
Join Esther as she attempts to influence the past in order to change the future and learn the secrets of the Ambrose family!
Whether you use this document as a reference when things get difficult or as a road map to get you from beginning to end, we’re pretty sure you’ll find what you’re looking for here.
This document contains a complete Time Mysteries: The Final Enigma game walkthrough featuring annotated screenshots from actual gameplay!
We hope you find this information useful as you play your way through the game. Use the walkthrough menu below to quickly jump to whatever stage of the game you need help with.
Remember to visit the Big Fish Games Forums if you find you need more help. Have fun!
This walkthrough was created by Lucky Smile, and is protected under US Copyright laws. Any unauthorized use, including re-publication in whole or in part, without permission, is strictly prohibited.
General Tips

- This is the official guide for Time Mysteries: The Final Enigma.
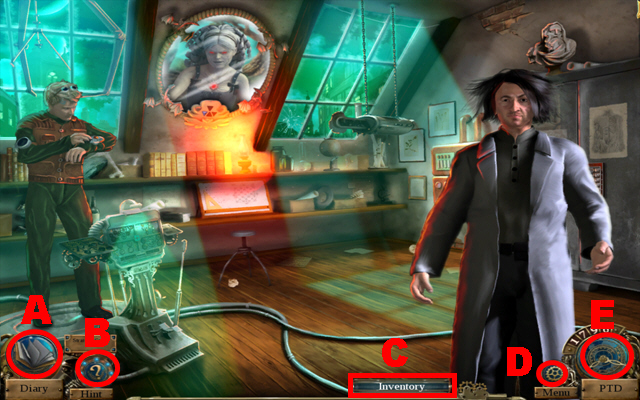
- The diary (A) displays all the information you have gathered so far.
- Select the button (B) to get a hint whenever you need help.
- The inventory (C) stores all the items you collect throughout the game.
- Select the menu (D) to leave the game and to adjust sound and display mode.
- Access the time machine (E) to travel between different time periods.
- Items in Hidden-object scenes are randomized except for the inventory items.
- Hidden-object scenes will be referred to as HOS throughout this guide.
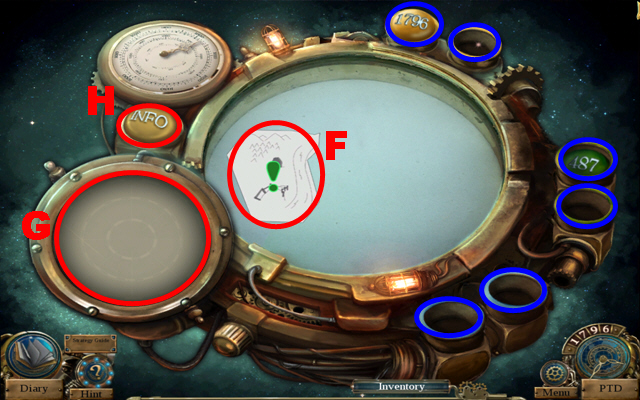
- Activate the different crystals marked in blue to review in which time zones there are tasks to fulfill; green exclamation points indicate active objectives.
- The central display (F) shows the locations and tasks within the currently activated time zone.
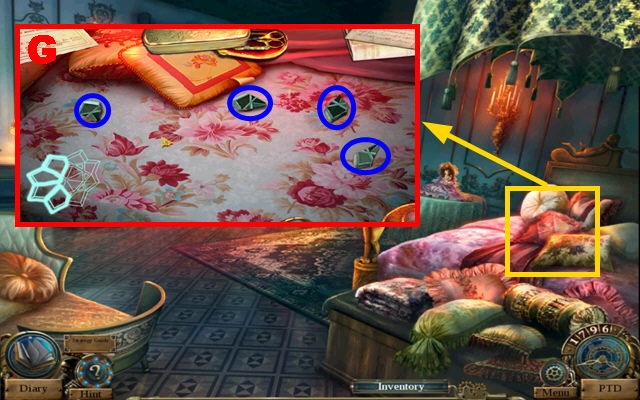
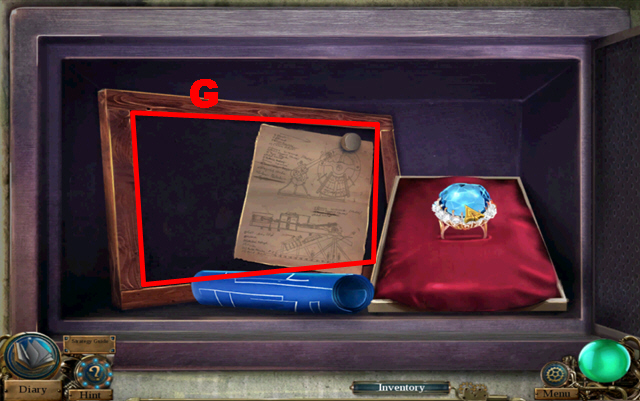
- Access the currently activated time zone and location through the display (G).
- Select the button (H) to learn more about the time machine.
Chapter 1: Your Room

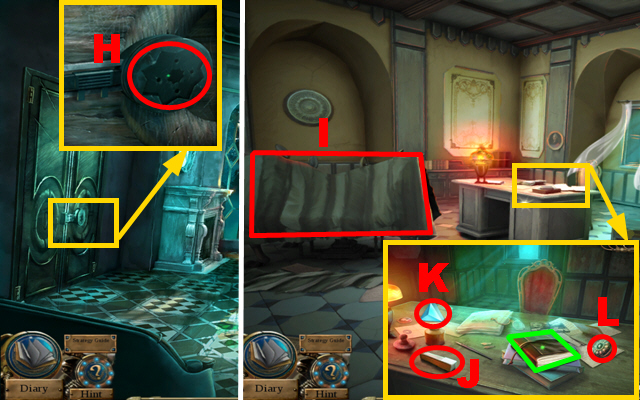
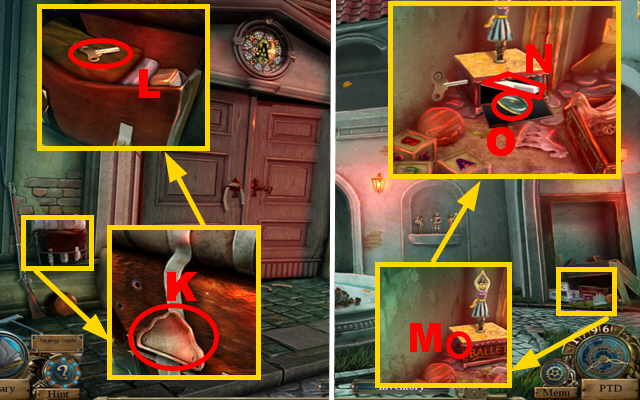
- Zoom into the desk; take the MEDALLION (I).
- Zoom into the wall; rip it open twice (J).
- Zoom into the bag and open it; take the 1/4 WOODEN PUZZLE (K).
- Zoom into the window; take the ROOM KEY (L).
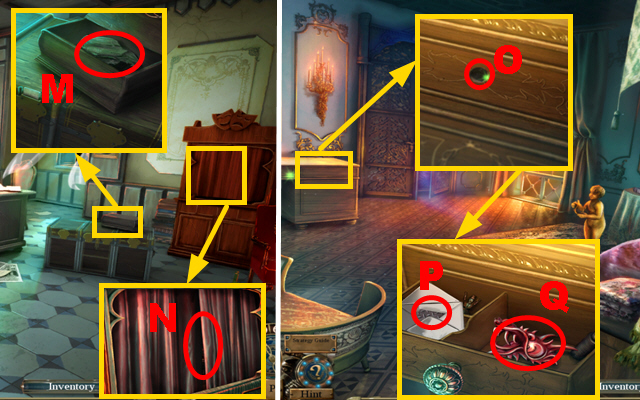
- Zoom into the door and put the ROOM KEY into the lock (M); turn the key once and press the handle (N).
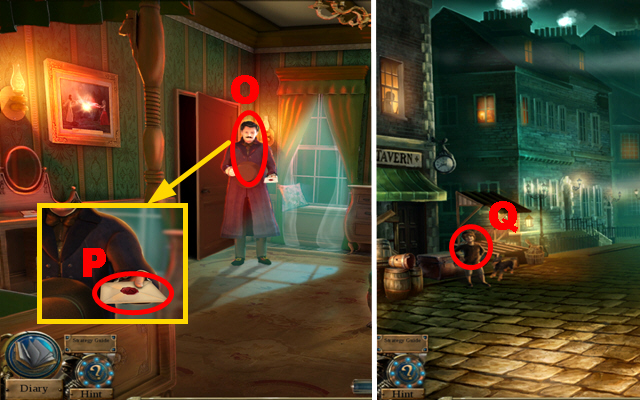
- Talk to the man (O).
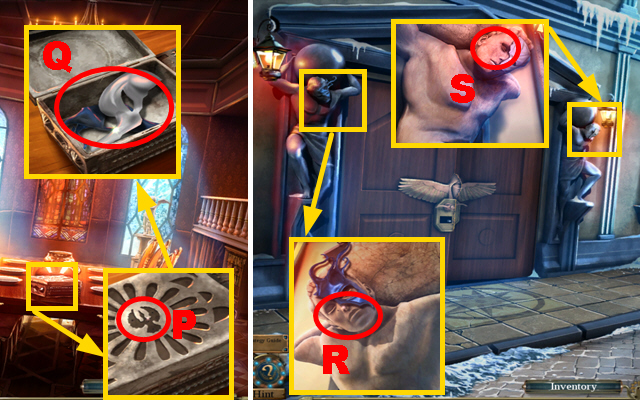
- Take the letter (P).
- Go to Uncle Sean’s house.
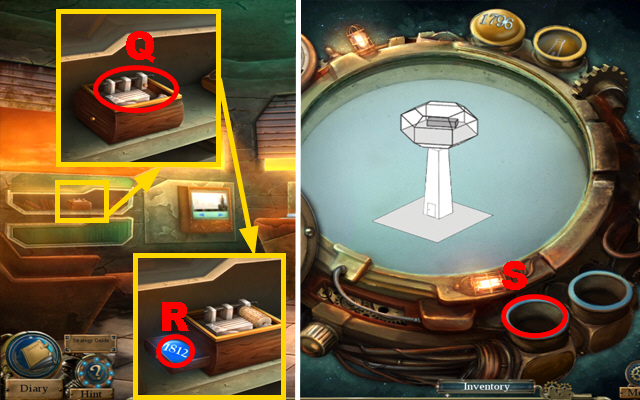
- Talk to the boy (Q).
- Go to Uncle Sean’s house.
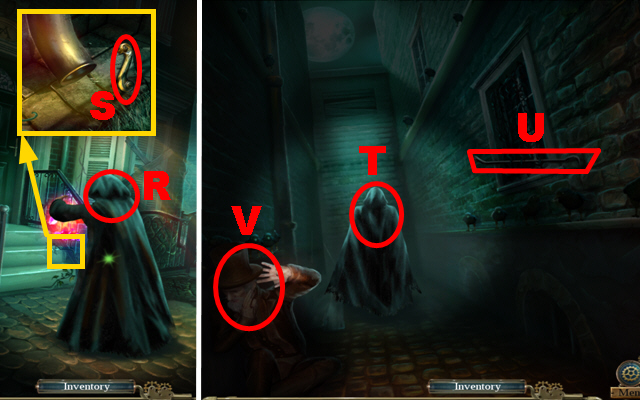
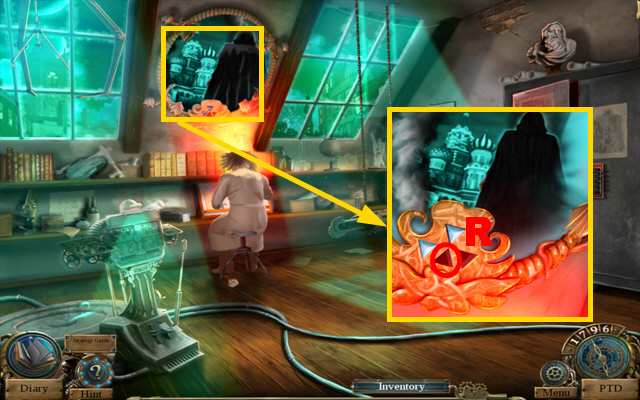
- Talk to the hooded person (R).
- Zoom into the flower; take the HANDLE (S).
- Go to the Alley.
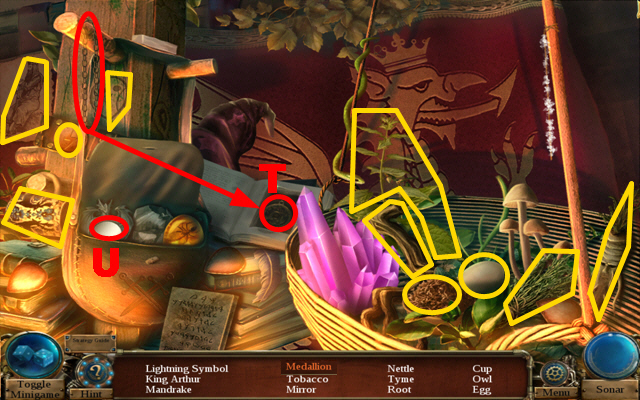
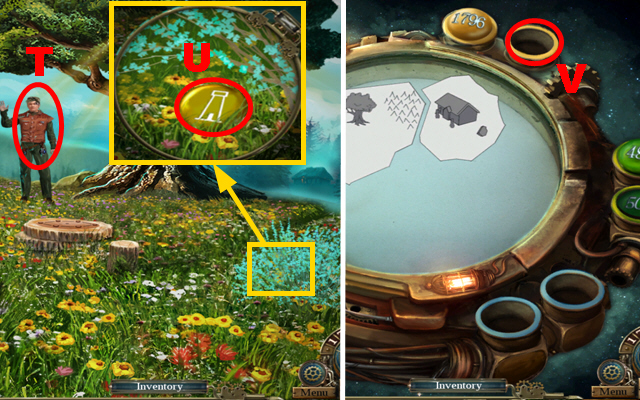
- Talk to the hooded person (T).
- Take the CROWBAR (U).
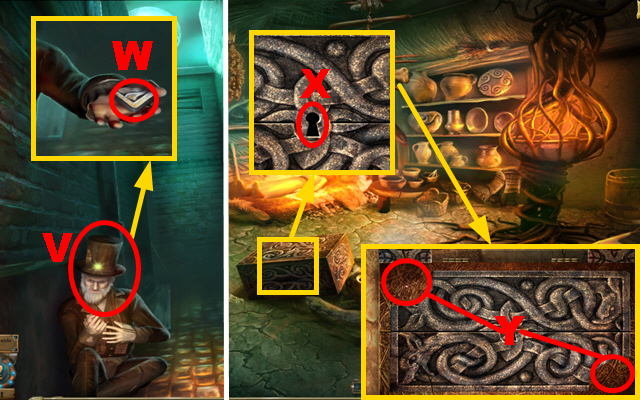
- Talk to the man (V).
- Walk down twice.
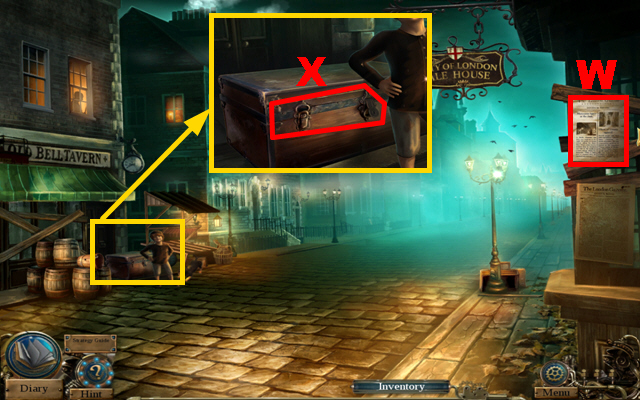
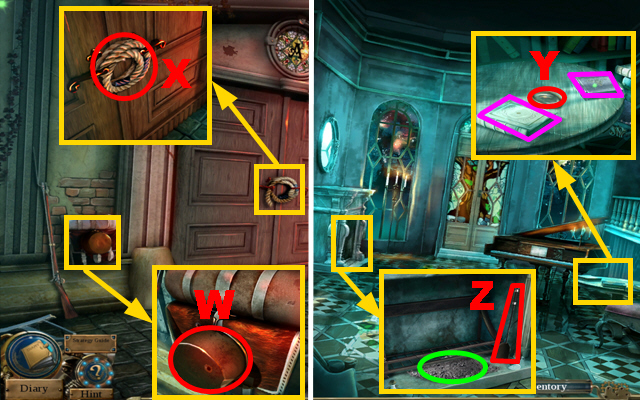
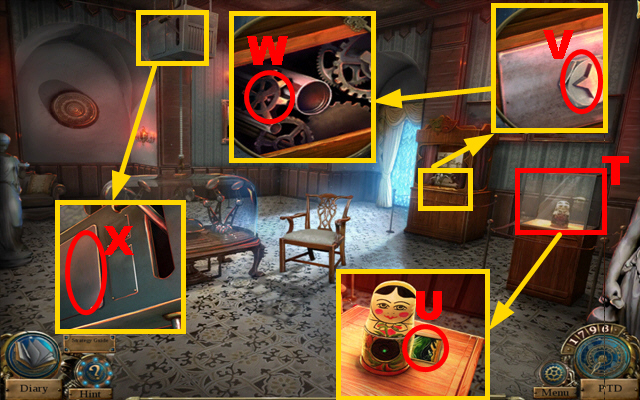
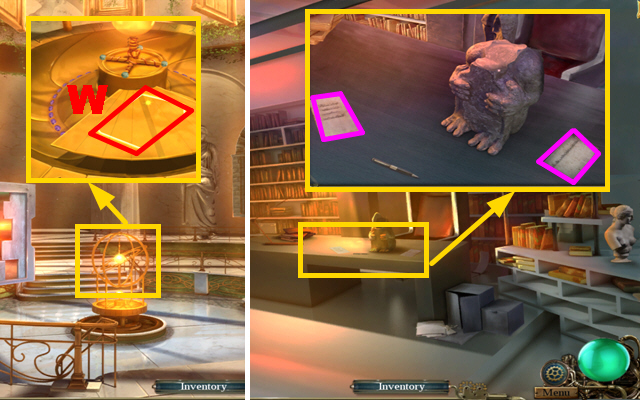
- Take a closer look at the poster (W).
- Zoom into the crate; use the CROWBAR to pry open the crate (X).
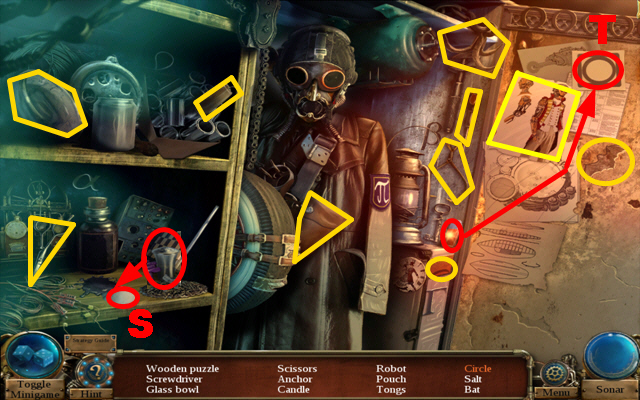
- Play the HOS.
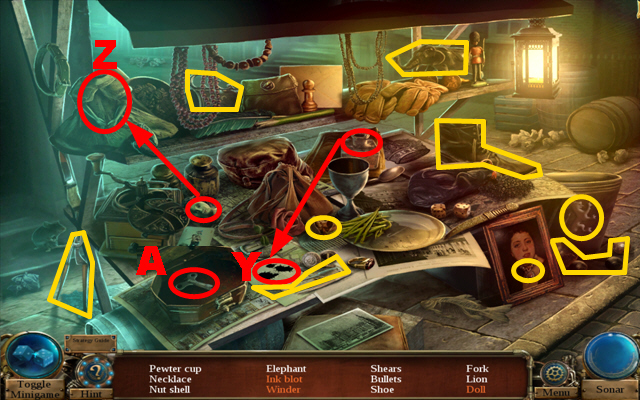
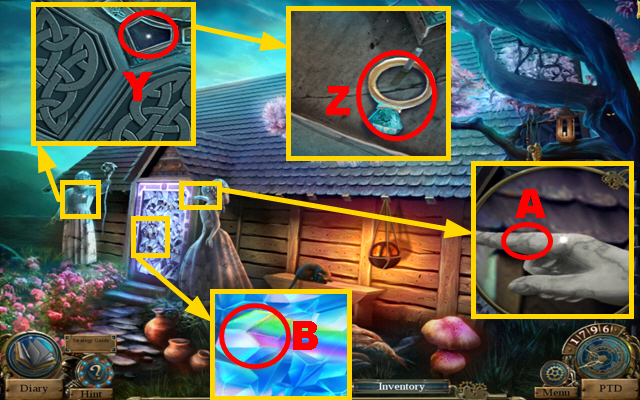
- Use the Inkwell on the blank page to create an Ink Blot (Y).
- Take the doll’s head, put it on the doll, and take the doll (Z).
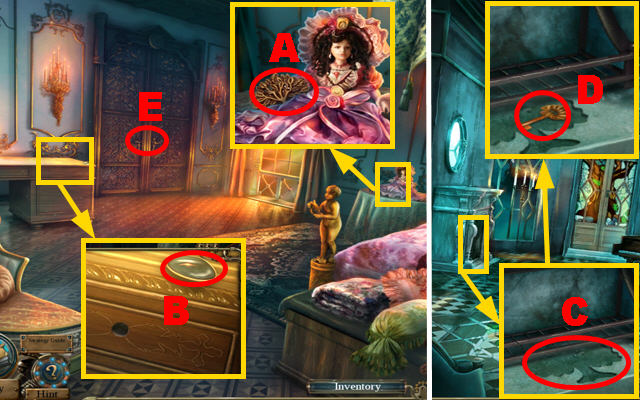
- Open the box and take the winder (A).
- You will receive the SHEARS.
- Move forward.
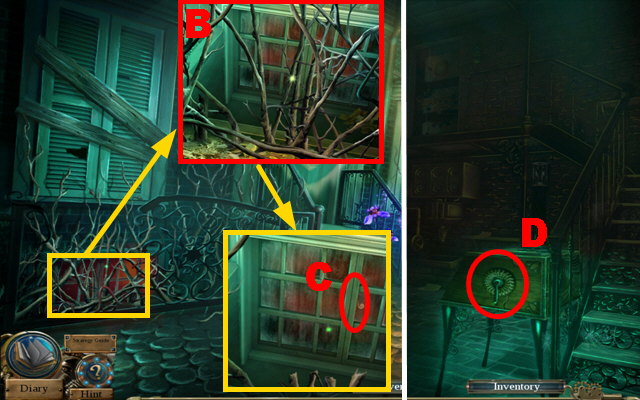
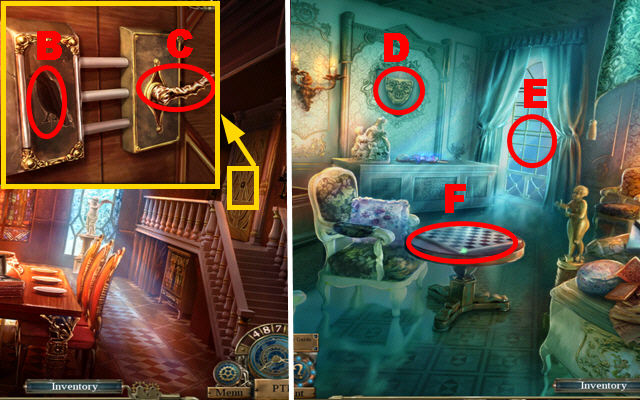
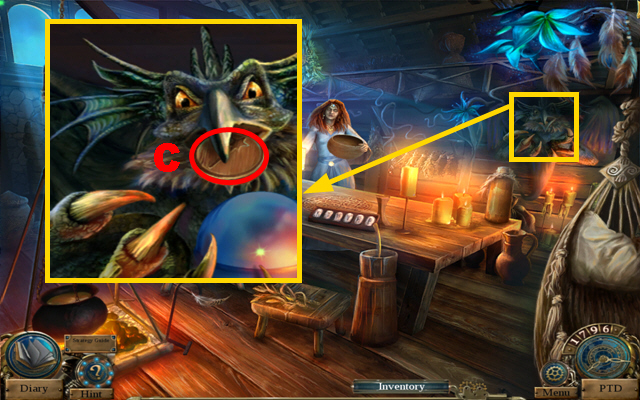
- Zoom into the branches and use the SHEARS to remove the branches (B); use the CROWBAR to pry open the window (C).
- Go to the Basement.
- Zoom into the device (D) to play a mini-game.
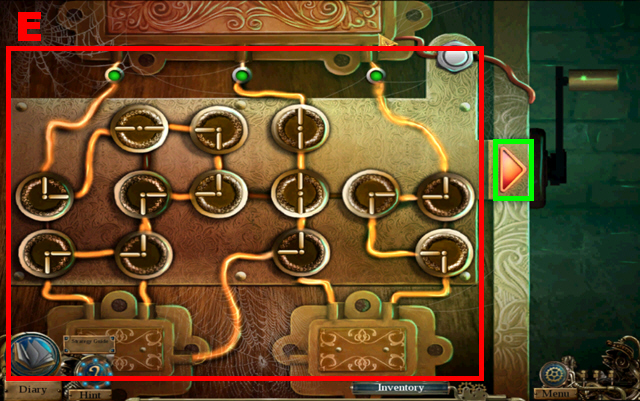
- To solve this puzzle (E), turn the fuses so that the electricity is flowing again.
- Select the button marked in green to complete this mini-game.
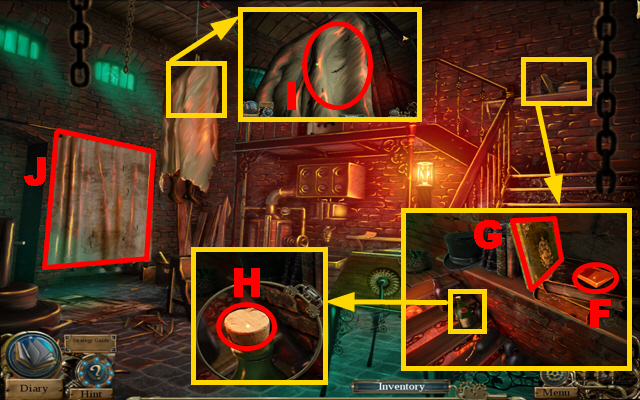
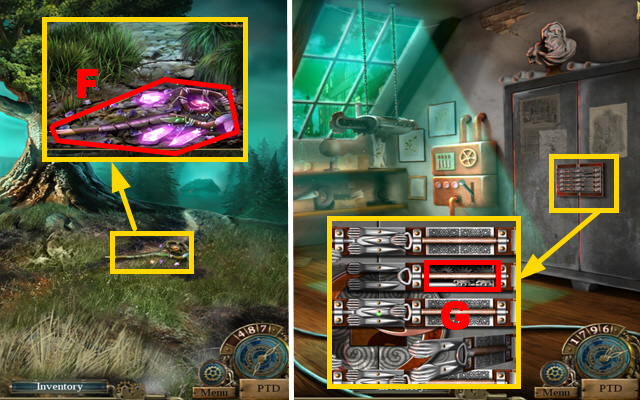
- Zoom into the shelf; take the 2/4 WOODEN PUZZLE (F), take a closer look at the book (G), and zoom into the bottle.
- Take the CORK (H).
- Zoom into the hanging figure; remove the cloth (I).
- Remove the blanket (J).
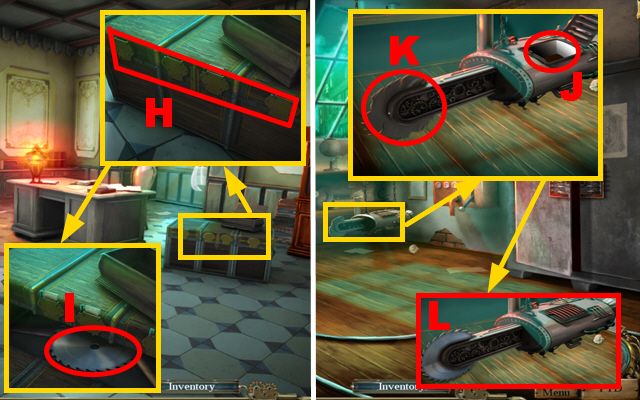
- Play the HOS.
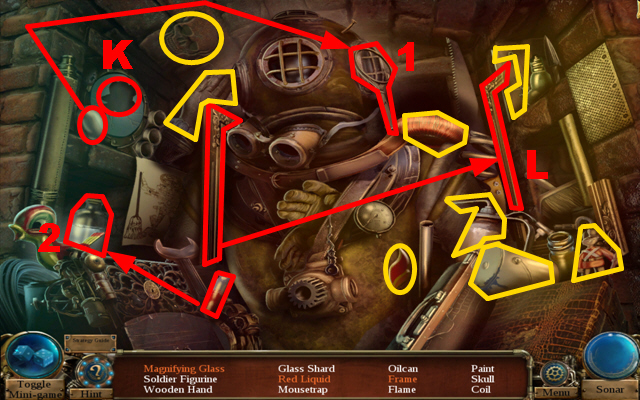
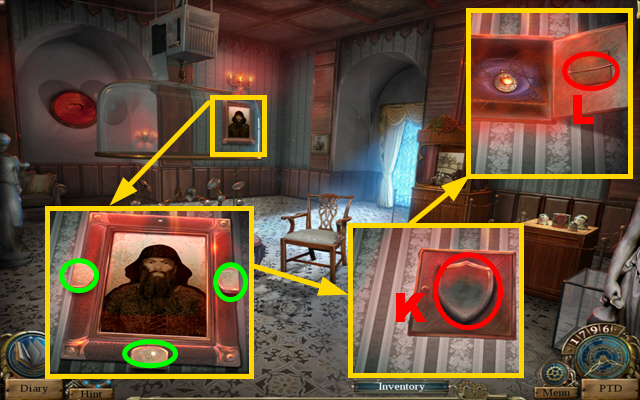
- Hit the mirror and take the glass shard (K).
- Take the first half of the frame, connect it to the second half of the frame, and take the frame (L).
- Take the lens, put it into the magnifying glass, and take the magnifying glass (1).
- Take the pipette, pour it into the bottle, and take the red liquid (2).
- You will receive the EMPTY OILCAN.
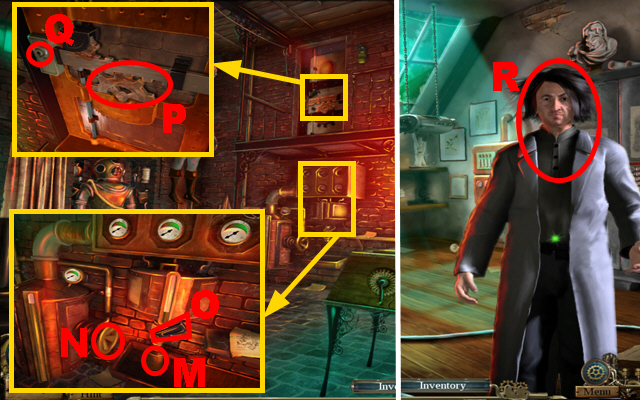
- Zoom into the oil tank and put down the EMPTY OILCAN (M); turn the valve (N) and press the handle (O).
- Take the FULL OILCAN.
- Zoom into the door; pour the FULL OILCAN over the rusty gears (P).
- Put the HANDLE into the niche (Q) and press the handle.
- Go upstairs.
- Talk to the man (R).
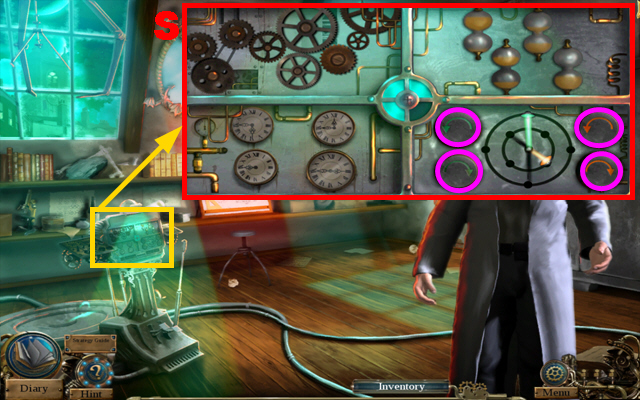
- Zoom into the time machine to play a mini-game.
- To solve this puzzle (S), put the 2 gears, the 2 hourglasses, and the 2 clocks into the correct positions.
- Rotate the 2 clock hands into the correct positions by pressing the buttons marked in purple.
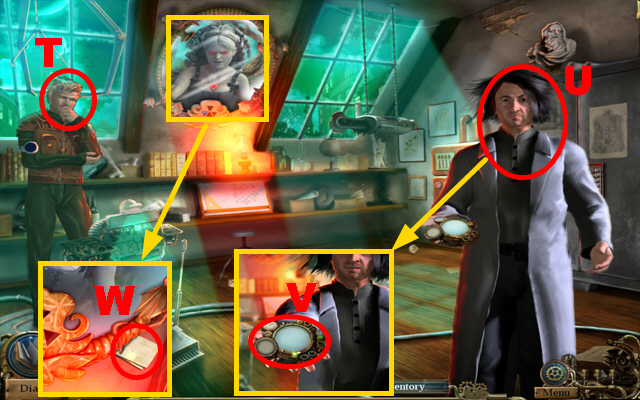
- Talk to the man (T).
- Talk to Uncle Sean (U) and take the time machine device (V).
- Zoom into the mirror; take and read the note (W).
- Travel to the year 487.
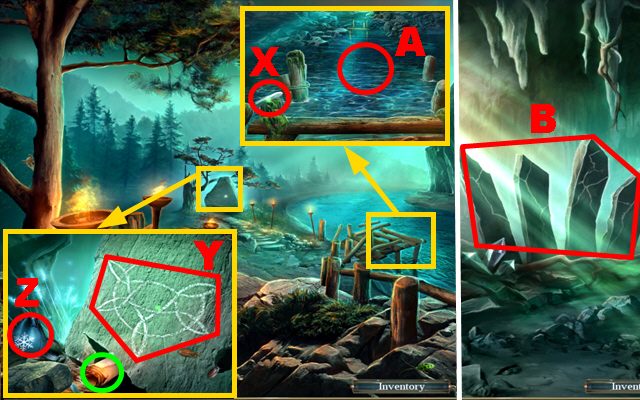
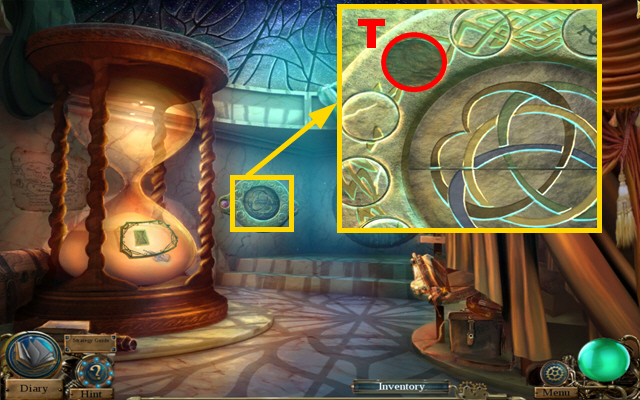
- Zoom into the landing stage; take the CHALK (X).
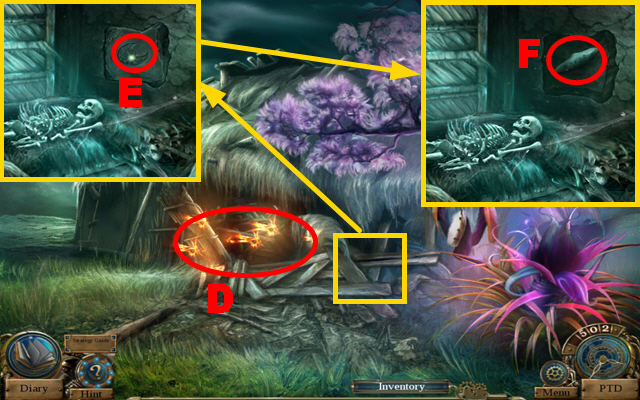
- Zoom into the large rock and move aside the stone; finish the drawing with the CHALK (Y).
- Read the note marked in green and take the FROST POWDER (Z).
- Zoom into the landing stage; pour the FROST POWDER over the water (A).
- Go to the Cave.
- Zoom into the rocks (B) to play a mini-game.
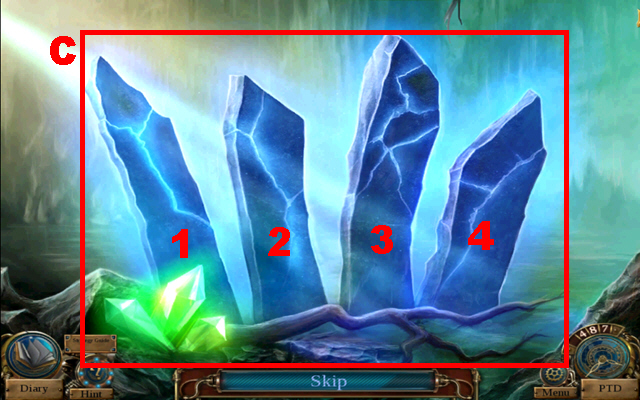
- To solve this puzzle (C), press the four rocks in the correct sequence three times; the correct sequences are listed below.
- First sequence: 2, 3, 1, and 4.
- Second sequence: 4, 2, 1, and 3.
- Third sequence: 1, 4, 3, and 2.
- Go to the Cliff.
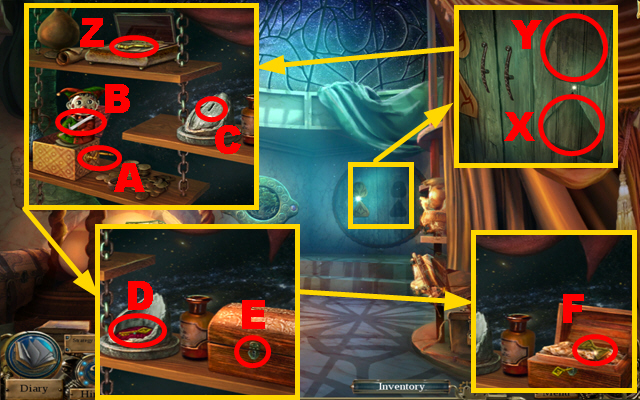
- Play the HOS.
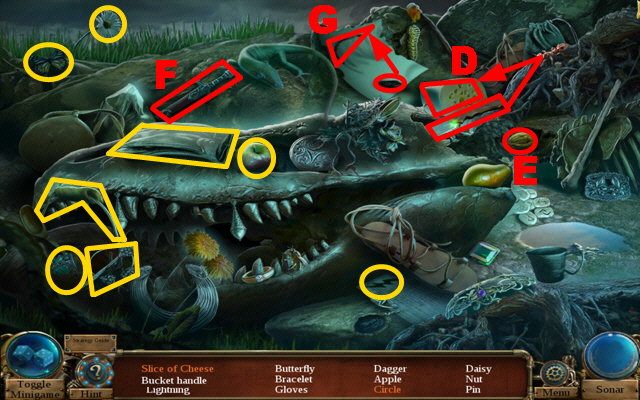
- Take the knife, use it to cut the cheese, and take the slice of cheese (D).
- Remove the soil and take the nut (E).
- Remove the blanket and take the dagger (F).
- Take the coal, use it to finish the drawing, and take the circle (G).
- You will receive the BUCKET HANDLE.
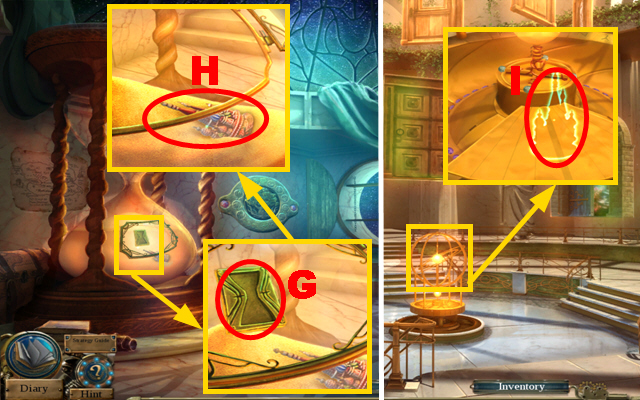
- Travel to the Street in the year 1796.
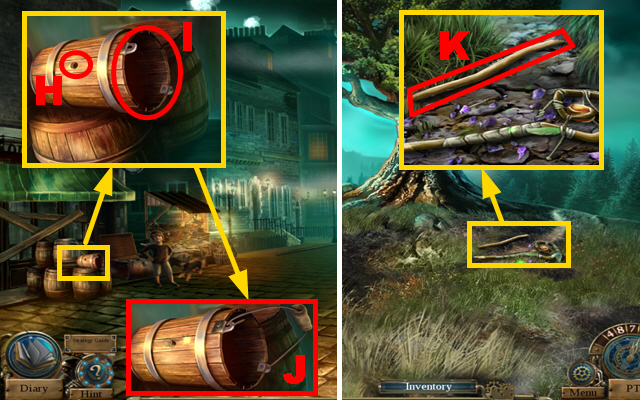
- Zoom into the bucket; put the CORK into the hole (H), connect the BUCKET HANDLE to the bucket (I), and take the BUCKET (J).
- Travel to the Cliff in the year 487.
- Zoom into the staff; take the TOUGH BRANCH (K).
- Walk down.
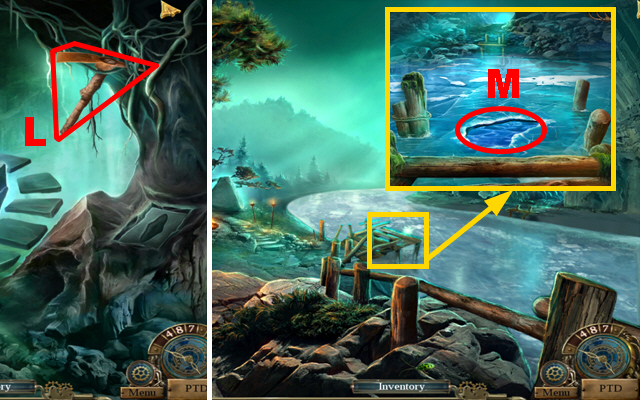
- Connect the TOUGH BRANCH to the pickaxe head and take the PICKAXE (L).
- Walk down.
- Zoom into the landing stage and break the ice with the PICKAXE three times; put the BUCKET into the water (M) to acquire the BUCKET OF WATER.
- Move forward twice.
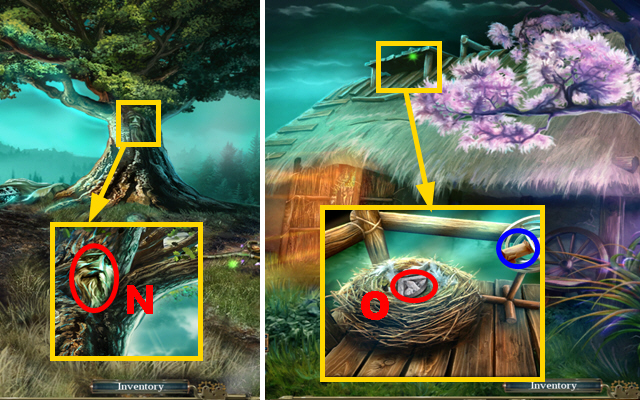
- Zoom into the tree; pour the BUCKET OF WATER over the face (N).
- Go to Merlin’s Hut.
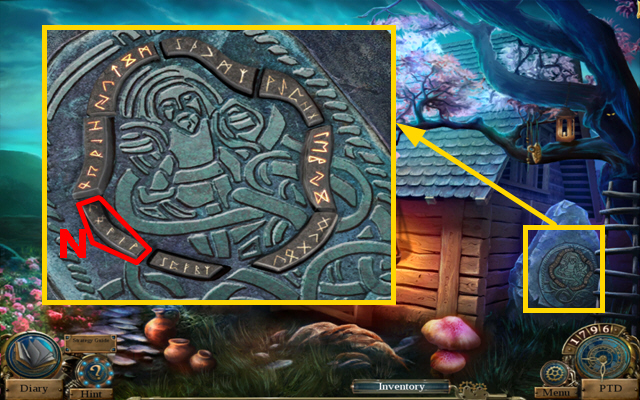
- Zoom into the roof; take the DRAGON CARVING (O) and read the note marked in blue.
- Enter the Hut.
Chapter 2: Inside Merlin’s Hut

- Zoom into the woman; take the VINES STONE (P).
- Zoom into the pot and put the VINES STONE into the niche (Q); take the DRAGON KEY (R) and the MAGIC CRYSTALS (S).
- Play the HOS.
- Open the book, take the chain, connect the chain to the amulet, and take the medallion (T).
- Open the bag and take the mirror (U).
- You will receive the TOBACCO.
- Travel to the Alley in the year 1796.
- Give the TOBACCO to the man (V) and take the DRAGON CARVING (W).
- Travel to Merlin’s Hut in the year 487.
- Zoom into the chest and put the DRAGON KEY into the lock (X).
- Turn the key once and put down the 2 DRAGON CARVINGS (Y).
- Play the mini-game.
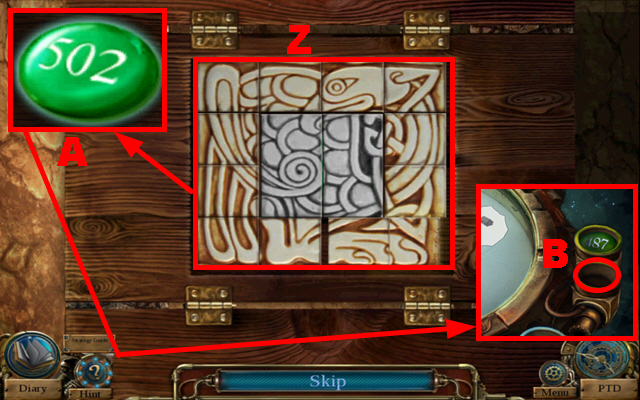
- To solve this puzzle (Z), swap adjacent tiles to recreate the picture.
- Take the TIME CRYSTAL (A).
- Put the TIME CRYSTAL into the slot (B).
- Travel to the year 502.
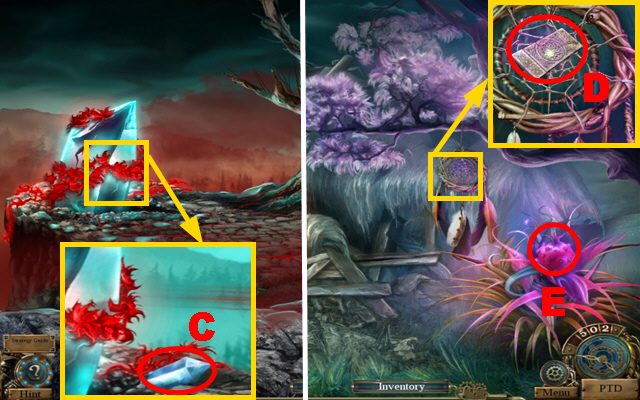
- Zoom into the large crystal; take the CRYSTAL SHARD (C).
- Go to Merlin’s Hut.
- Zoom into the dreamcatcher; take the ENGRAVED BROOCH (D).
- Remove two leaves from the plant and take the MAGIC FRUIT (E).
- Travel to the Cliff in the year 487.
- Zoom into the staff; connect the MAGIC CRYSTALS to the staff and take the MAGIC STAFF (F).
- Travel to the year 1796 and go upstairs in Uncle Sean’s house.
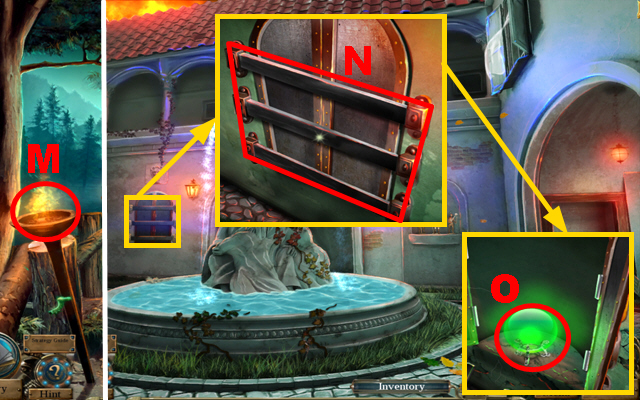
- Zoom into the cabinet; put down the ENGRAVED BROOCH (G).
- Play the mini-game.
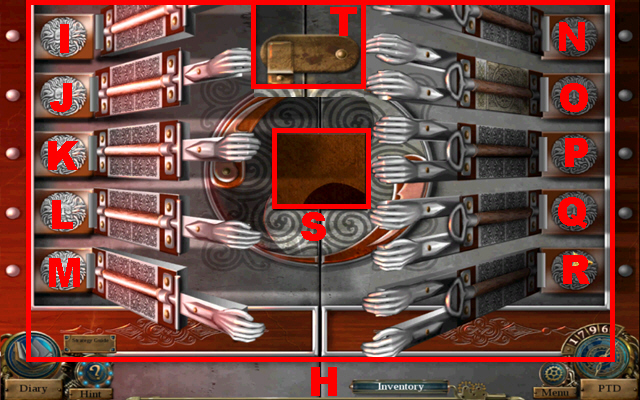
- To solve this puzzle (H), all the bars have to be open at the same time.
- Press the hands in the following sequence: J, L, R, N, O, Q, N, R, O, R, N, L, R, P, K, M, N, O, K, and I.
- Take the 3/4 WOODEN PUZZLE (S).
- Open the latch (T).
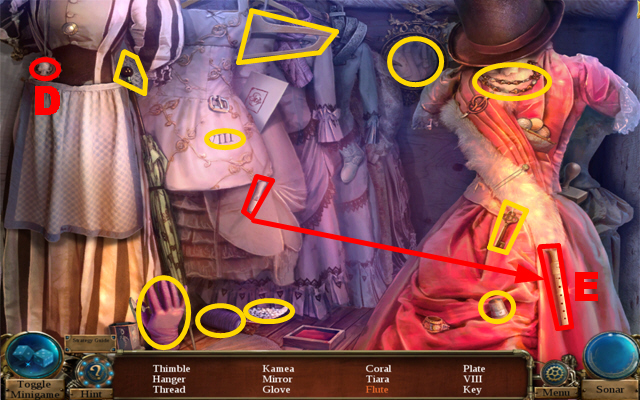
- Play the HOS.
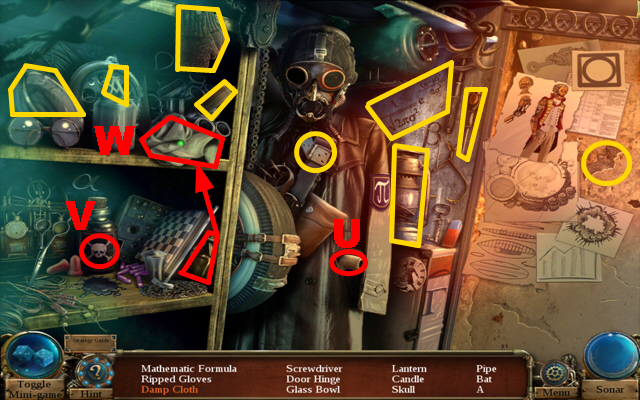
- Open the pocket and take the pipe (U).
- Remove the paper and take the skull (V).
- Take the bottle, pour it over the cloth, and take the damp cloth (W).
- You will receive the LETTER A.
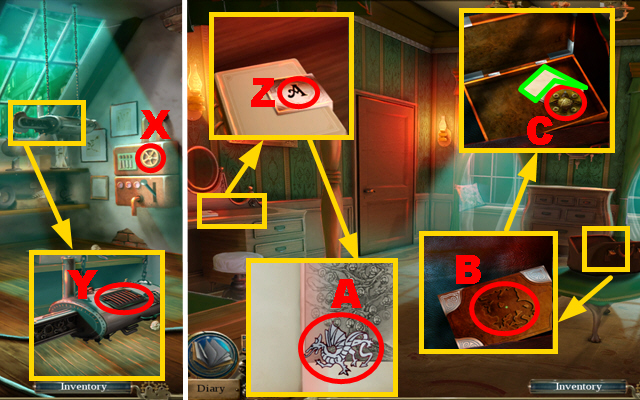
- Turn the valve (X).
- Zoom into the device; open the lid (Y).
- Go to your Room.
- Zoom into the desk and put the LETTER A into the slot (Z); read the book, turn the pages, and take the DRAGON SHAPE (A).
- Zoom into the bag and put the DRAGON SHAPE into the slot (B); open the box, take the BUTTERFLY CATCHER (C), and read the note marked in green.
- Travel to Merlin’s Hut in the year 502.
- Use the BUTTERFLY CATCHER to remove the butterflies (D).
- Zoom into the hut and remove the debris; put the MEDALLION into the niche (E) and take the RUNE STONE (F).
- The MEDALLION will go back into the inventory.
- Travel to the Cave in the year 487.
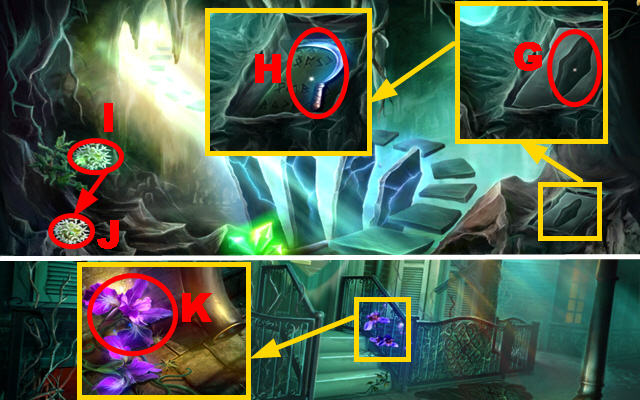
- Zoom into the cave wall and put the RUNE STONE into the niche (G); take the SILVER SICKLE (H).
- Use the SILVER SICKLE to cut away the flower (I) and take the CAVE FLOWER (J).
- Travel to the entrance of Uncle Sean’s House in the year 1796.
- Zoom into the flower and use the SILVER SICKLE to cut away the flower; take the MAGIC FLOWER (K).
- Travel to the entrance of Merlin’s Hut in the year 487.
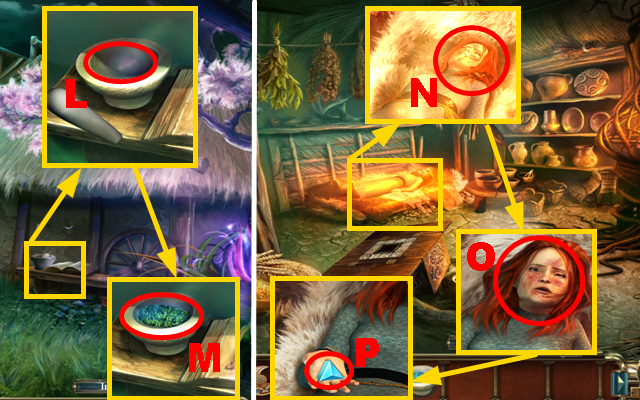
- Zoom into the wooden bench; put the MAGIC FLOWER, the CAVE FLOWER, the MAGIC FRUIT, and the CRYSTAL SHARD into the mortar (L).
- Use the pestle to pound the ingredients three times and take the HEALING SALVE (M).
- Move forward.
- Zoom into Nimue and use the MAGIC STAFF to remove the magic aura (N); spread the HEALING SALVE over her face (O).
- Take the VISION CRYSTAL (P).
- Travel to Merlin’s Hut in the year 502.
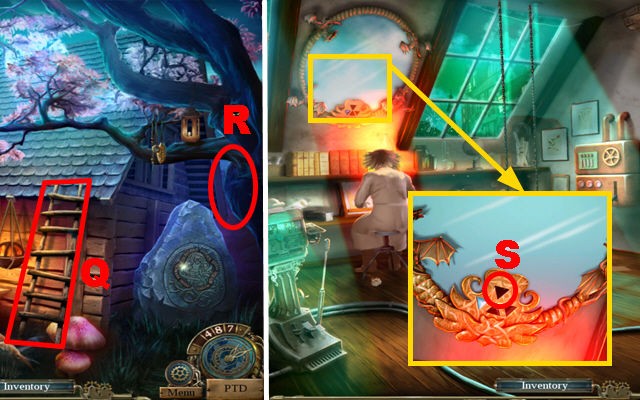
- Take the ladder (Q) and put it next to the tree (R).
- Travel to Uncle Sean’s House in the year 1796 and go upstairs.
- Zoom into the mirror and put the VISION CRYSTAL into the slot (S).
- Travel to the Merlin’s Hut in the year 502 and walk down.
- Talk to Michael (T).
- Zoom into the flowers; take the FUTURE TIME CRYSTAL (U).
- Access the time machine.
- Put the FUTURE TIME CRYSTAL into the slot (V).
- Travel to the distant future.
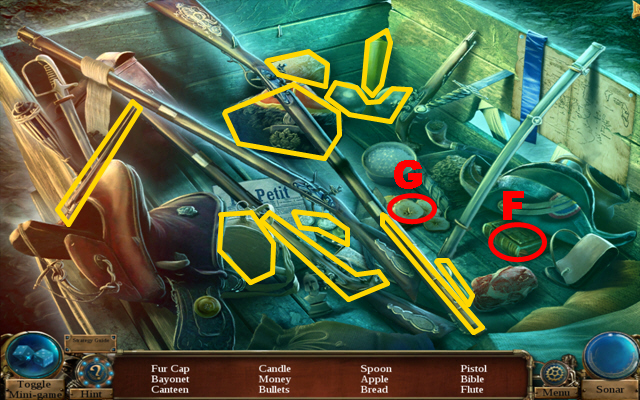
- Play the HOS.
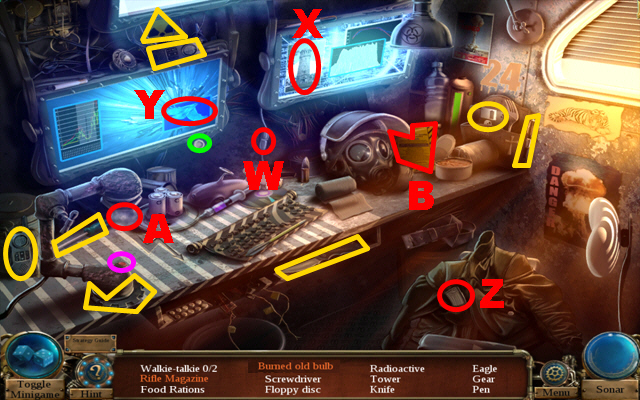
- Connect the cord to the outlet (W) and take the tower (X).
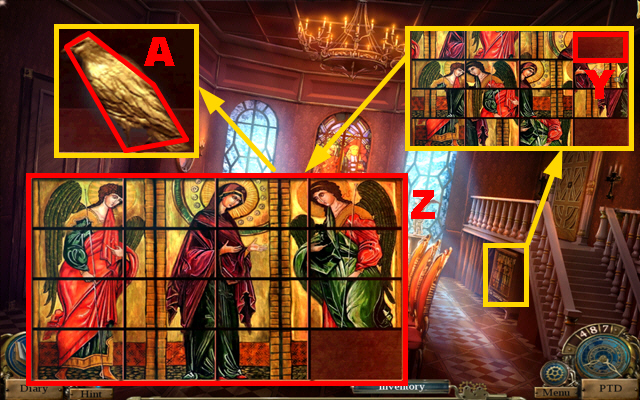
- Select the button marked in green to turn the channel and take the eagle (Y).
- Open the jacket and take the rifle magazine (Z).
- Select the button marked in green to turn on the lamp and take the broken old bulb (A).
- Move aside the helmet and take the food rations (B).
- You will receive the SCREWDRIVER.
- Move forward.
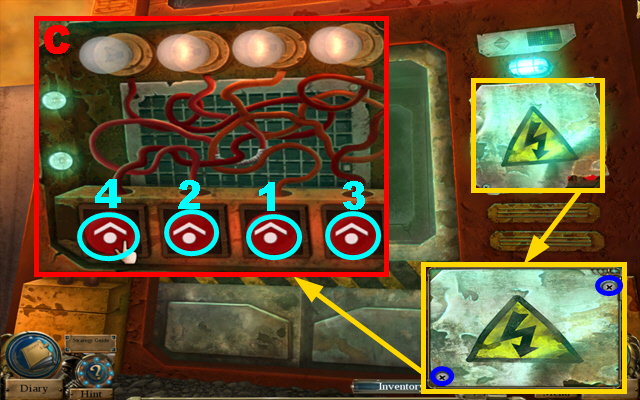
- Zoom into the panel and remove the screws marked in blue with the SCREWDRIVER.
- Play the mini-game.
- To solve this puzzle (C), press the switches in sequence 1-4.
- Move forward.
Chapter 3: Inside the Tower
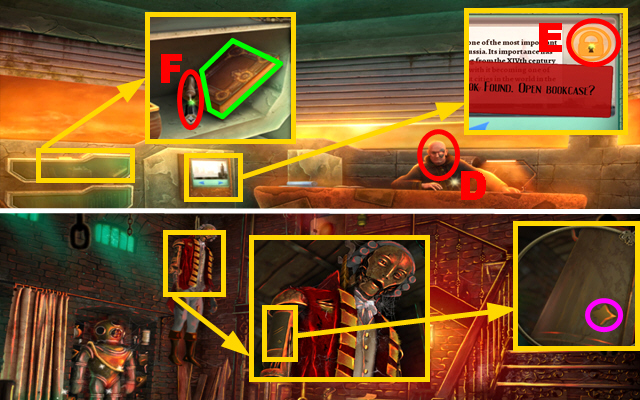
- Talk to the man (D).
- Zoom into the computer and press the left arrow twice; select the lock button (E).
- Zoom into the bookcase; take the NUT DRIVER (F) and read the book marked in green.
- Travel to the Basement of Uncle Sean’s House in the year 1796.
- Zoom into the robot and then zoom into the arm; use the NUT DRIVER to remove the nut in purple.
- Play the HOS.
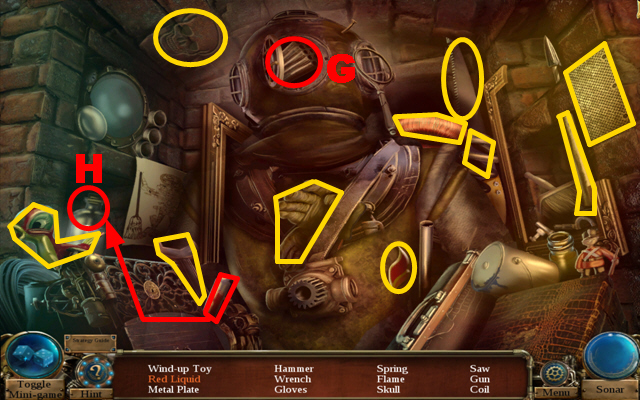
- Open the helmet and take the gun (G).
- Take the tube, pour it into the glass, and take the red liquid (H).
- You will receive the WRENCH.
- Walk down twice.
- Play the HOS.
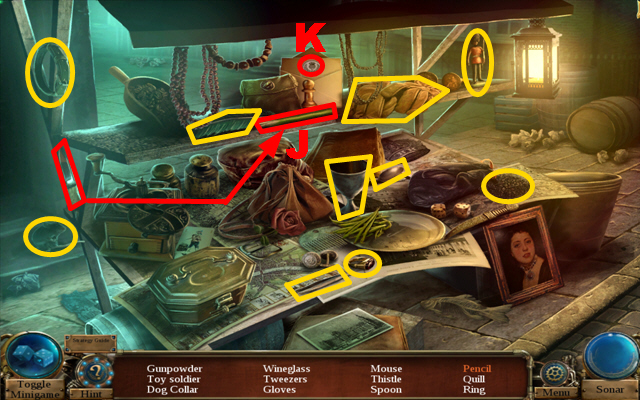
- Take the knife, use it to sharpen the pencil, and take the pencil (J).
- Open the letter and take the thistle (K).
- You will receive the TWEEZERS.
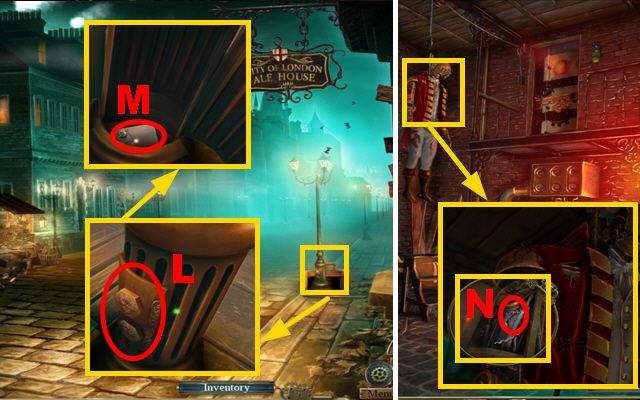
- Zoom into the street lamp and remove the lid with the WRENCH (L); take the MUSIC BOX PLATE (M).
- Go to the Basement in Uncle Sean’s house.
- Zoom into the robot and then zoom into the arm; use the TWEEZERS to acquire the CLOCK DIAL (N).
- Go to your Room.
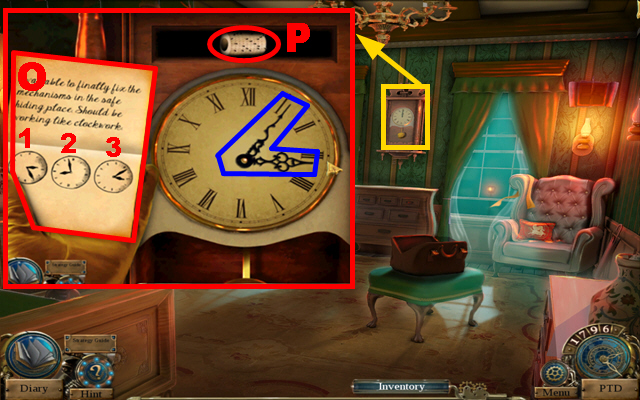
- Zoom into the clock and put down the CLOCK DIAL.
- Play the mini-game.
- To solve this puzzle, set the clock dials marked in blue according to the times 1-3 on the note (O).
- Take the CYLINDER (P).
- Travel to the Tower in the distant future.
- Zoom into the bookcase; put the CYLINDER and the MUSIC BOX PLATE into the music box (Q).
- Take the TIME CRYSTAL (R).
- Access your time machine.
- Put the TIME CRYSTAL into the slot (S).
- Travel to the year 1812.
- Play the HOS.

- Remove the blanket.
- Open the bag twice and take the cross (T).
- Take the sabre, put it into its holder, and take the sabre (U).
- Take the knife, use it to cut the meat, and take the slice of meat (V).
- You will receive the SABRE.
- Zoom into the bag; remove the pot (W).
- Zoom into the door; cut the rope (X) with the SABRE and open the door.
- Go inside the House.
- Zoom into the table; read the 2 books marked in purple and take the 1/3 SMALL MIRROR (Y).
- Zoom into the fireplace; take the shovel (Z) and use it to remove the ashes marked in green.
- Go to the Bedroom.
- Zoom into the doll and tip it; take the TREE SHAPE (A).
- Zoom into the desk; take the 2/3 SMALL MIRROR (B).
- Walk down.
- Zoom into the fireplace and put the TREE SHAPE into the niche (C); take the WARDROBE KEY (D).
- Go to the Bedroom.
- Use the WARDROBE KEY to open the wardrobe (E).
- Play the HOS.
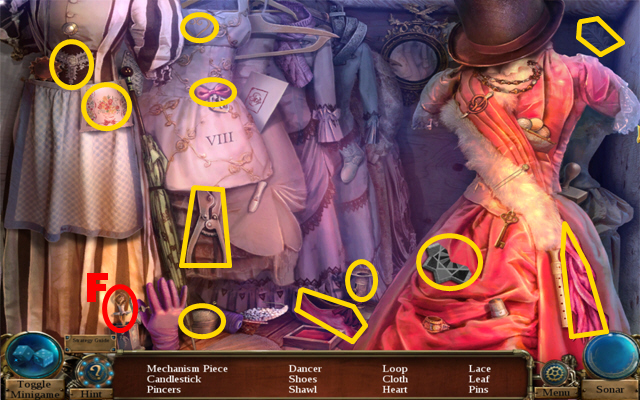
- Open the box and take the dancer (F).
- You will receive the 1/2 MECHANISM PIECE.
- Zoom into the bed to play a mini-game.
- Remove all the objects and collect the four pieces marked in blue to solve this puzzle (G).
- You will receive the 2/2 MECHANISM PIECE.
- Walk down.
- Zoom into the left door; put the 2 MECHANISM PIECES into the slot (H).
- Enter the Workshop.
- Remove the blanket (I).
- Zoom into the desk and read the book marked in green; take the 1/3 PIANO KEY (J), the VISION CRYSTAL (K), and the DRAWER KNOB (L).
- Zoom into the chest and open the box; take the COAL (M).
- Zoom into the puppet theater; remove the curtain (N).
- Go to the Bedroom.
- Zoom into the desk and put the DRAWER KNOB into the slot (O); open the drawer and then open the letter.
- Take the 1/3 METAL PLATE (P) and the DRAGON HEAD (Q).
- Travel to Uncle Sean’s House in the year 1796 and go upstairs.
- Zoom into the mirror; put the VISION CRYSTAL into the slot (R).
- Play the HOS.
- Turn the salt shaker and take the salt (S).
- Take the eraser, use the eraser on the note, and take the circle (T).
- You will receive the 4/4 WOODEN PUZZLE.
- Go to your Room.
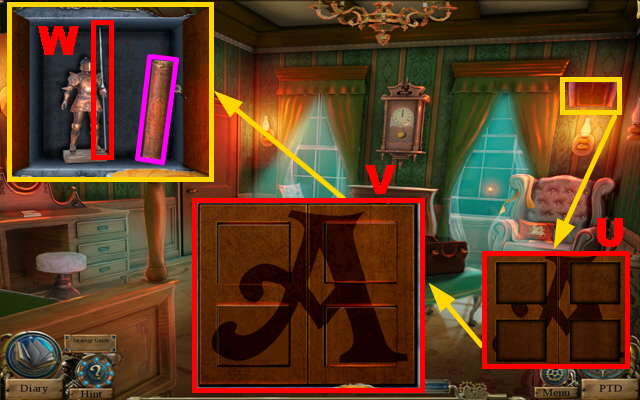
- Zoom into the wall and put down the 4 WOODEN PUZZLES (U).
- Play the mini-game.
- To solve this puzzle (V), swap adjacent puzzle pieces to recreate the letter ‘A’.
- Take the LANCE (W) and read the book marked in purple.
- Travel to the Workshop in the year 1812.
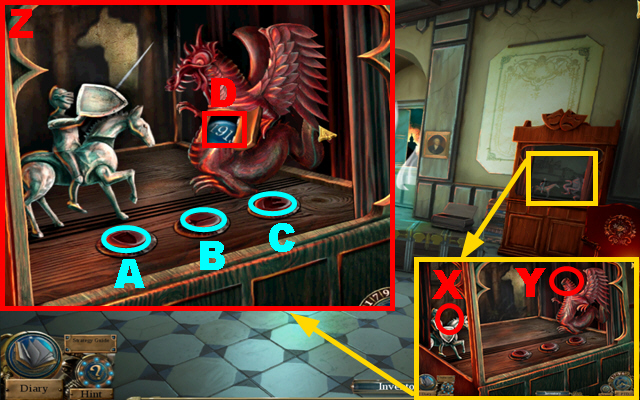
- Zoom into the puppet theater; place the LANCE (X) and the DRAGON HEAD (Y).
- Play the mini-game.
- To solve this puzzle (Z), Select the buttons A-C in the following sequence: C, A, C, and B.
- Take the TIME CRYSTAL (D).
- Access your time machine.
Chapter 4: Year 1913
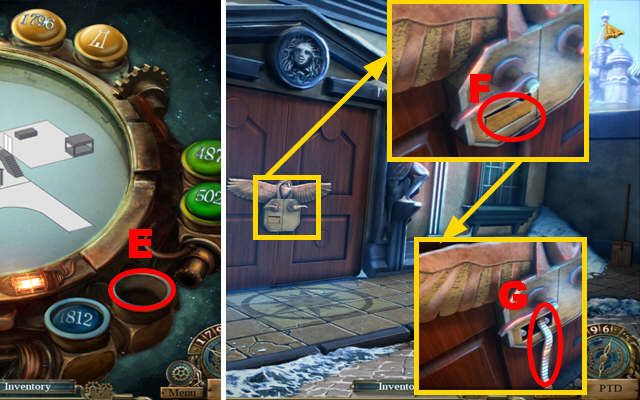
- Put the TIME CRYSTAL into the slot (E).
- Travel to the year 1913.
- Zoom into the door and remove the plate (F); take the CHAIN (G).
- Travel to the base of the Tower in the distant future.
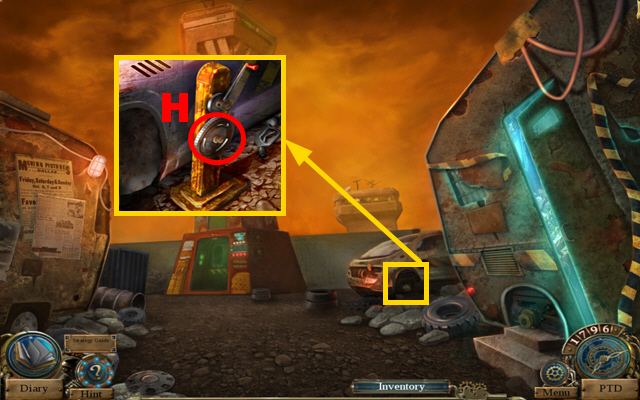
- Zoom into the car; connect the CHAIN to the mechanism (H).
- Play the HOS.
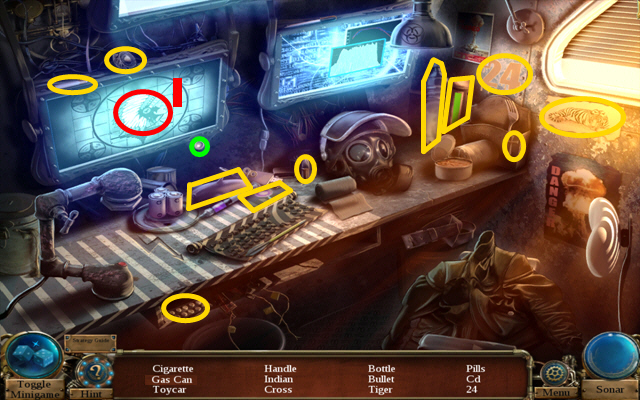
- Select the button marked in green and take the Indian (I).
- You will receive the GAS CAN.
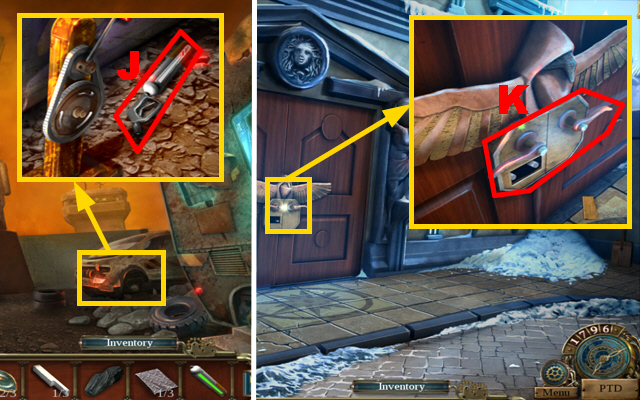
- Zoom into the car; pour the GAS CAN into the torch (J) and take the INDUSTRIAL TORCH.
- Travel to the year 1913.
- Zoom into the door; use the INDUSTRIAL TORCH to remove the lock (K).
- Open the door.
- Go inside.
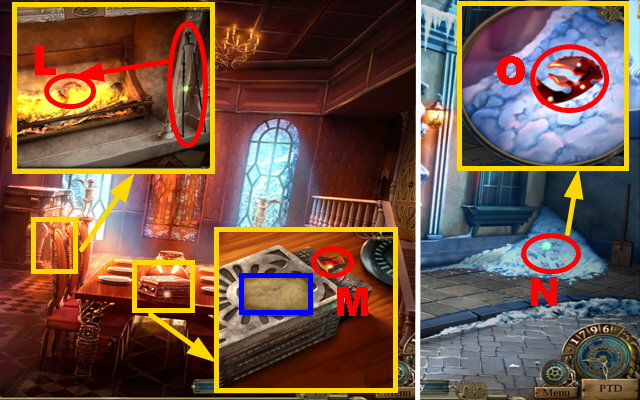
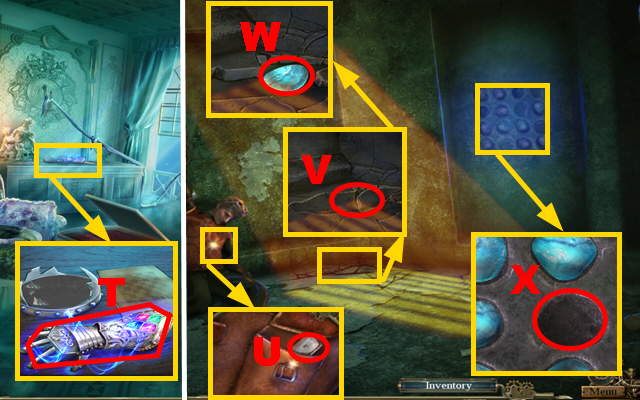
- Zoom into the fireplace; take the tongs and use them to acquire the HOT STONE LOCK (L).
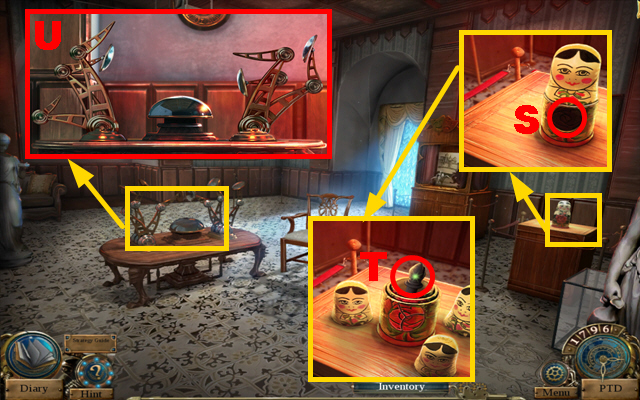
- Zoom into the table and read the note marked in blue; take the 1/3 RUSSIAN DOLL LOCK (M).
- Walk down.
- Put the HOT STONE LOCK into the snow (N).
- Zoom into the snow; take the STONE LOCK (O).
- Go inside.
- Zoom into the box and put the STONE LOCK into the niche (P); open the box and take the WHITE MASK and the BLUE MASK (Q).
- Walk down.
- Zoom into the left statue; put down the BLUE MASK (R).
- Zoom into the right statue; put down the WHITE MASK (S).
- Move forward and enter the Showroom.
- Remove the glass cabinet (T).
- Zoom into the doll; take the PUZZLE LOCK PIECE (U).
- Zoom into the showcase and use the NUT DRIVER to remove the nut (V).
- Remove the nut and the lid and take the GEARS (W).
- Zoom into the device and remove the lid (X).
- Walk down.
- Zoom into the cabinet and put down the PUZZLE LOCK PIECE (Y).
- Play the mini-game.
- To solve this puzzle (Z), move the tiles around the empty spot to recreate the correct picture.
- Take the LOCK PART (A).
- Zoom into the right door and put the LOCK PART into the niche (B); press the handle (C) to open the door.
- Enter the Bedroom.
- Take the SHIELD (D).
- Open the window (E).
- Zoom into the chessboard (F).
- Play the HOS.
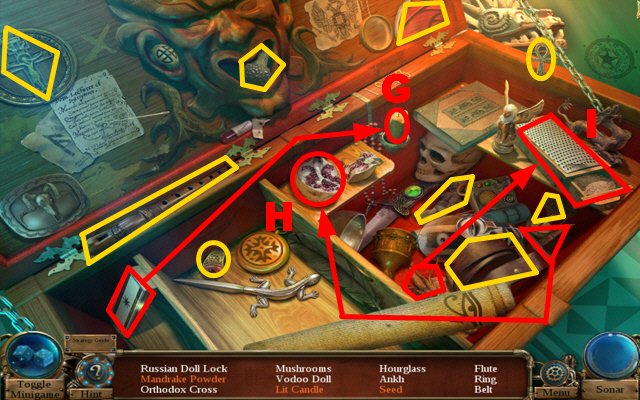
- Take the matches, use them to light the candle, and take the lit candle (G).
- Take the hammer, use it to break the fruit, and take the seed (H).
- Take the root, grind it on the grater, and take the grated ginger (I).
- You will receive the 2/3 RUSSIAN DOLL LOCK.
- Travel to the Cliff in the year 487.
- Play the HOS.
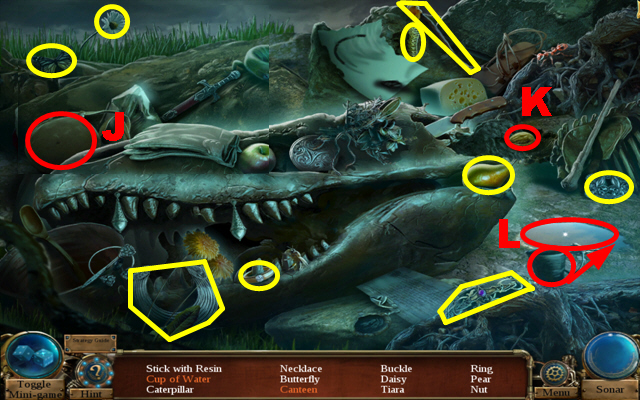
- Remove the blanket and take the canteen (J).
- Remove the soil and take the nut (K).
- Take the cup, put it into the water (L), and take the cup of water.
- You will receive the STICK WITH RESIN.
- Travel to the Front of the House in the year 1913.
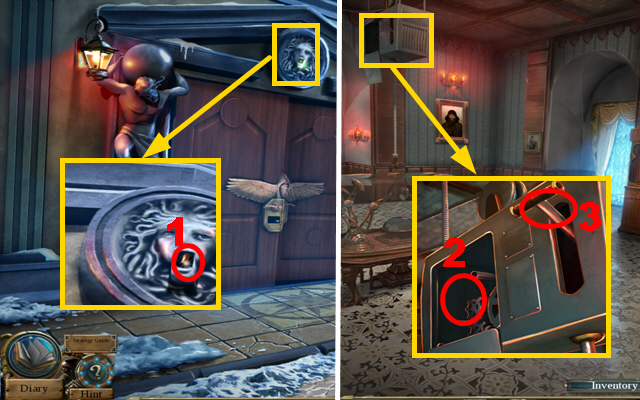
- Zoom into the plate; use the STICK WITH RESIN to acquire the BLACK ROOK (1).
- Go to the Showroom.
- Zoom into the device; put down the GEARS (2).
- Pull the handle (3).
- Walk down and enter the Bedroom.
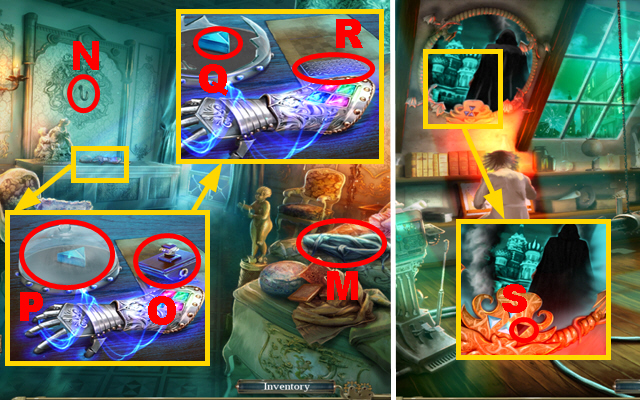
- Create a rope with the blankets on the bed (M) and connect the rope to the hook (N).
- Zoom into the dresser; take the stamp (O) and use it to break the glass display twice (P).
- Take the VISION CRYSTAL (Q) and the 2/3 METAL PLATE (R).
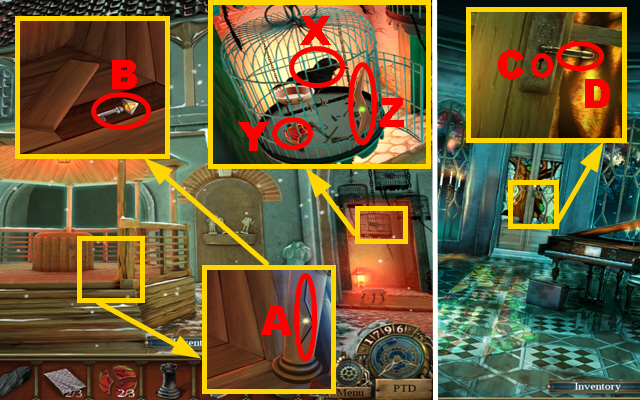
- Travel to Uncle Sean’s House in the year 1796 and go upstairs.
- Zoom into the mirror; put the VISION CRYSTAL into the slot (S).
- Travel to the Bedroom in the year 1913 and enter the Garden.
- Zoom into the cages and then play the HOS.
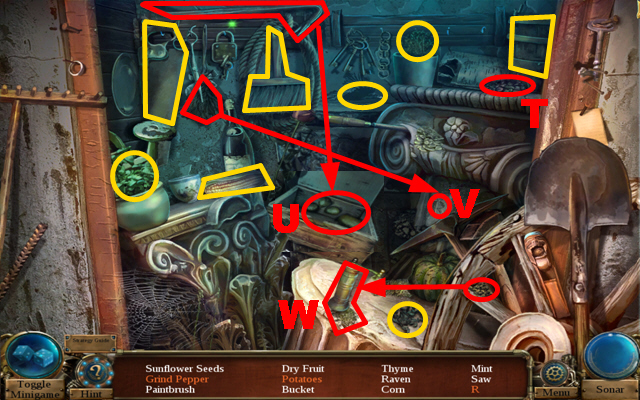
- Remove the cloth and take the dry fruit (T).
- Take the crowbar, use it to open the crate, and take the potatoes (U).
- Take the duster, use it to remove the dust, and take the letter ‘R’ (V).
- Take the pepper, put it into the grinder, and take the grind pepper (W).
- You will receive the CORN.
- Zoom into the bird cage and open the door; give the CORN to the raven (X).
- Take the 3/3 RUSSIAN DOLL LOCK (Y) and the GAZEBO LOCK (Z).
- Zoom into the gazebo and put the GAZEBO LOCK into the niche (A); remove the board and take the GARDEN KEY (B).
- Travel to the Dining Room in the year 1812.
- Zoom into the door and put the GARDEN KEY into the lock (C); press the handle (D).
- Enter the Garden.
Chapter 5: The Garden in 1812
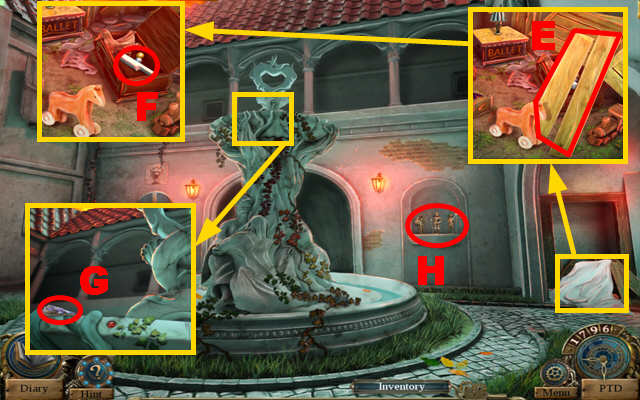
- Zoom into the blanket and remove the blanket; remove the planks (E) and take the 2/3 PIANO KEY (F).
- Zoom into the fountain; take the GUARD PLATE (G).
- Zoom into the compartment (H) to play a mini-game.
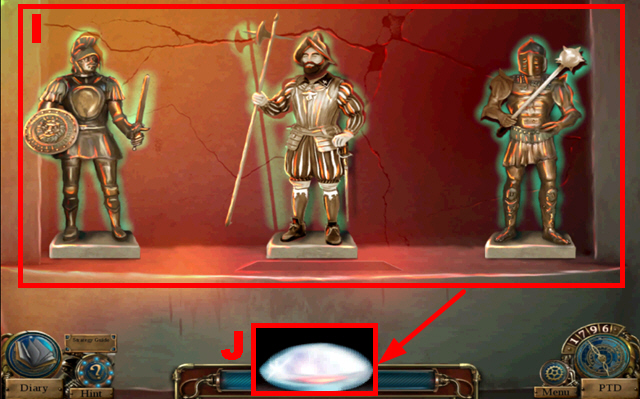
- To solve this puzzle (I), swap the weapons and heads of the figures to create the correct poses.
- Take the LENS (J).
- Walk down twice.
- Zoom into the bag and put the GUARD PLATE into the niche (K); open the bag and take the WINDER (L).
- Move forward twice.
- Zoom into the toys and put the WINDER into the slot (M); turn the winder twice.
- Take the 3/3 PIANO KEY (N) and the 3/3 SMALL MIRROR (O).
- Walk down.
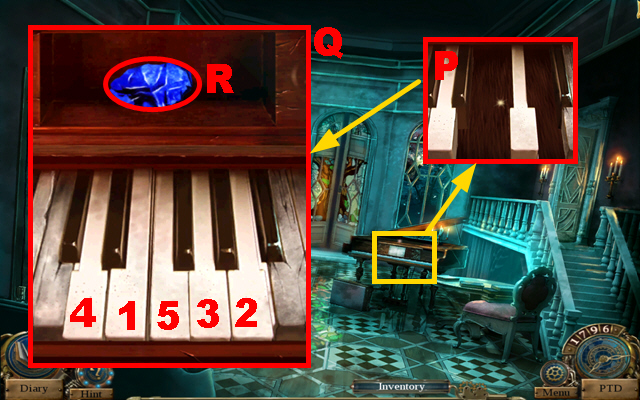
- Zoom into the piano; put down the 3 PIANO KEYS (P) and play the mini-game.
- To solve this puzzle (Q), press the piano keys in sequence 1-5.
- Open the compartment and take the GEM PIECE (R).
- Travel to the Showroom in the year 1913.
- Zoom into the doll; put the 3 RUSSIAN DOLL LOCKS into the slot (S).
- Remove three doll heads and take the BLACK BISHOP (T).
- Zoom into the device; put down the 3 SMALL MIRRORS (U).
- Play the mini-game.
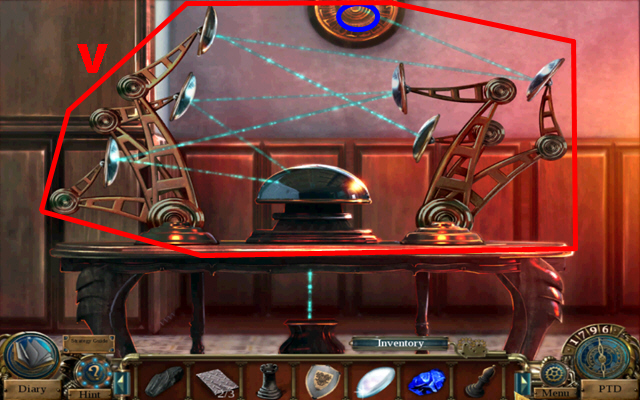
- To solve this puzzle (V), readjust the mirrors so that the ray of light reaches the spot on the wall marked in blue.
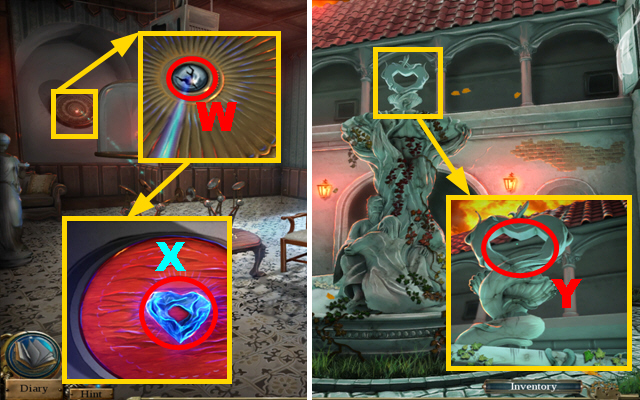
- Zoom into the wall and put the LENS into the spot (W); take the FOUNTAIN HEART (X).
- Travel to the Garden in the year 1812.
- Zoom into the fountain; put the FOUNTAIN HEART and the GEM PIECE into the niche (Y).
- Travel to the Garden in the year 1913.
- Zoom into the figures; take the MACE (Z), the SPEAR (A), and the SWORD (B).
- Zoom into the fountain; put the SWORD into the slot (C), the SPEAR into the slot (D), and the MACE into the slot (E).
- Take the WHITE KING (F).
- Walk down.
- Zoom into the chessboard; put the BLACK ROOK on the field (G), the BLACK BISHOP on the field (H), and the WHITE KING on the field (I).
- Take the DEMON SEAL (J).
- Walk down and turn left.
- Zoom into the portrait and press the DEMON SEAL on the 3 plates marked in green.
- Put the SHIELD on the shape (K) and open the door.
- Read the note (L).
- Go to the Garden.
- Play the HOS.
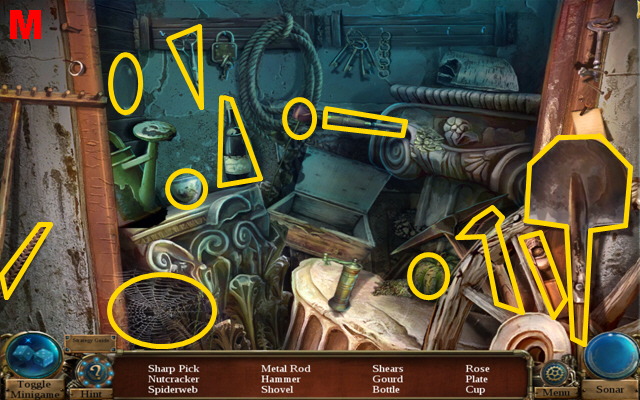
- Collect the 12 items marked in yellow (M).
- You will receive the SHARP PICK.
- Travel to Merlin’s Hut in the year 502.
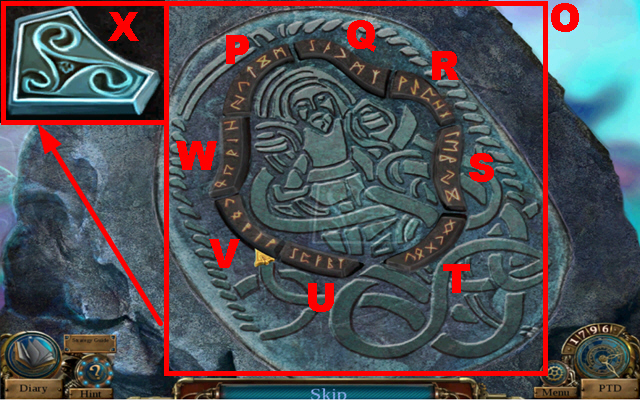
- Zoom into the rune stone; use the SHARP PICK to pry out the rune (N).
- Play the mini-game.
- All the runes have to be activated at the same time to solve this puzzle (O).
- Press the runes in the following sequence to complete this puzzle: U, Q, W, T, R, T, R, P, V, P, T, P, V, Q, T, P, Q, U, S, T, R, P, W, T, and V.
- Take the TRISKELE SYMBOL (X).
- Zoom into the Merlin statue and put the TRISKELE SYMBOL into the slot (Y); take the RING (Z).
- Zoom into the Viviane statue; put the RING on the finger (A).
- Zoom into the door; press the gem (B).
- Go inside.
- Zoom into the creature; take the MAGIC SEAL (C).
- Travel to the Bedroom in the year 1812.
- Play the HOS.
- Open the amulet and take the cameo (D).
- Take one half of the flute, connect it to the other half of the flute, and take the flute (E).
- You will receive the 3/3 METAL PLATE.
- Walk down twice.
- Play the HOS.
- Move the hat and take the bible (F).
- Remove the cloth and take the apple (G).
- You will receive the CANDLE.
- Go to the Workshop.
- Zoom into the chest and put down the 3 METAL PLATES (H); open the chest and take the CIRCULAR SAW (I).
- Travel to Uncle Sean’s House in the year 1796 and go upstairs.
- Zoom into the saw; put the COAL into the compartment (J) and replace the old saw with the CIRCULAR SAW (K).
- Take the SAW PROTOTYPE (L).
- Travel to the Meadow in the year 487.
- Hold the CANDLE next to the torch (M) to acquire the BURNING CANDLE.
- Travel to the Garden in the year 1812.
- Zoom into the boarded window and use the SAW PROTOTYPE to cut through the 3 boards (N); open the window, remove the blanket, and take the CRYSTAL BALL (O).
- Travel to Merlin’s Hut in the year 502.
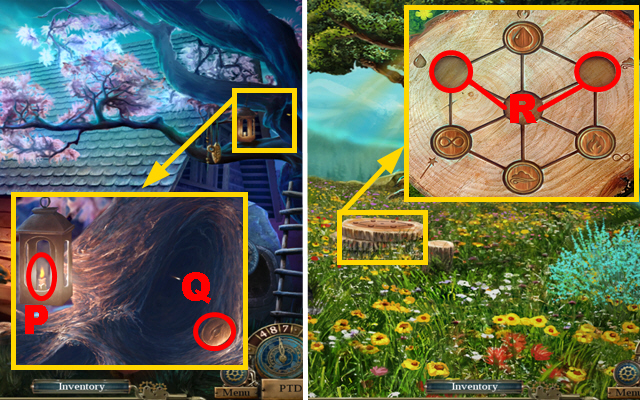
- Zoom into the tree and put the BURNING CANDLE into the lantern (P); take the EARTH SEAL (Q).
- Walk down.
- Zoom into the wooden plate; put down the MAGIC SEAL and the EARTH SEAL (R).
- Play the mini-game.
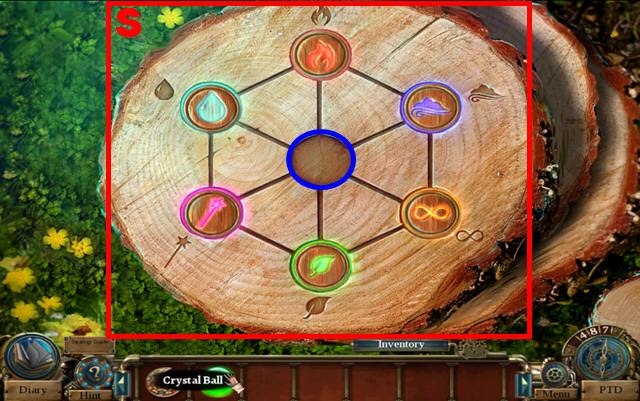
- To solve this puzzle (S), move the seals around until each seal is in its correct position.
- Tiles can only be moved into an adjacent, empty spot.
- The symbols next to the slots indicate which seal has to be placed there.
- Put the CRYSTAL BALL into the central spot marked in blue when the puzzle is completed.
- You will receive MERLIN IN A CRYSTAL BALL.
- Travel to the Bedroom in the year 1913.
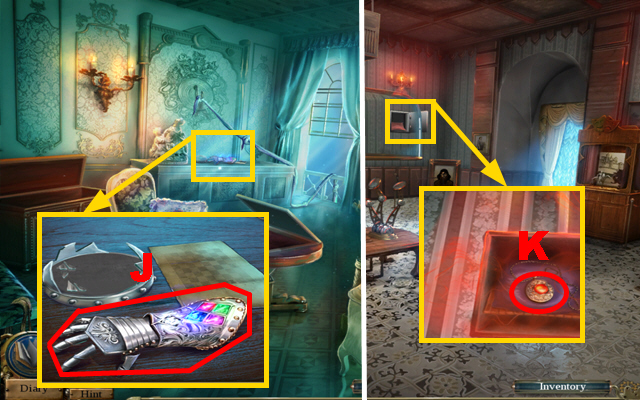
- Zoom into the dresser; use MERLIN IN A CRYSTAL BALL on the gauntlet (T).
- Zoom into Michael and open the pocket; take MICHAEL’S KNIFE (U).
- Zoom into the floor and use MICHAEL’S KNIFE to break open the crack (V); remove the stones and take the LODESTONE (W).
- Zoom into the wall; put the LODESTONE into the niche (X).
- Play the mini-game.
Chapter 6: The Time Museum
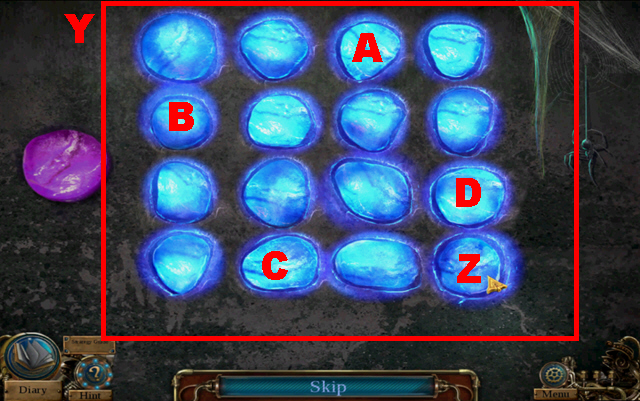
- To solve this puzzle (Y), press the stones in the following sequence: Z, A, B, C, D, and Z.
- Turn right twice.
- Play the HOS.
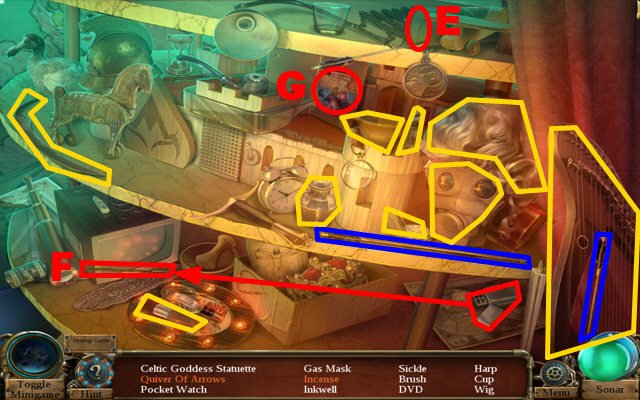
- Collect the 2 arrows marked in green, put them into the quiver, and take the quiver of arrows (E).
- Take the lighter, use it to light the incense, and take the incense (F).
- Open the booklet and take the DVD (G).
- You will receive the CELTIC GODDESS STATUETTE.
- Walk down.
- Zoom into the globe; put the MEDALLION into the niche (H).
- Put the CELTIC GODDESS STATUETTE into the shape (I).
- Go to the Celtic Times and enter Merlin’s Hut.
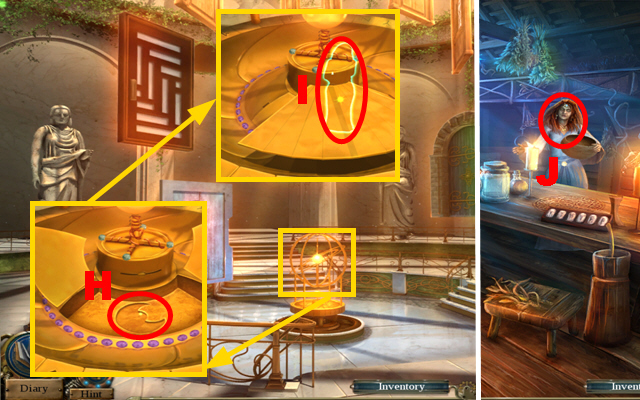
- Talk to Nimue (J).
- Play the HOS.
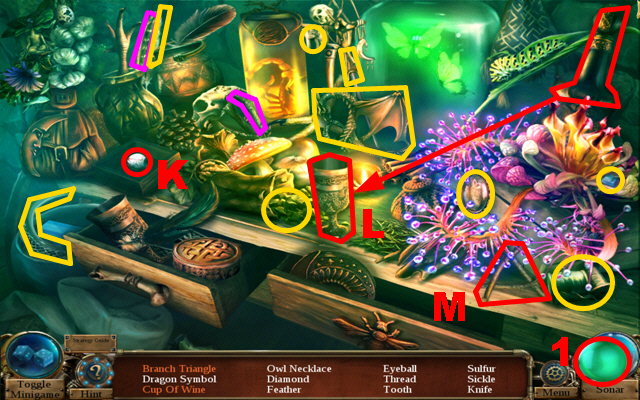
- Open the box and take the eyeball (K).
- Take the bottle, pour it into the cup, and take the cup of wine (L).
- Take the 2 branches marked in purple, put them down (M), and take the branch triangle.
- You will receive the DIAMOND.
- Activate Merlin’s ball (1) and go to the Time Museum Chamber.
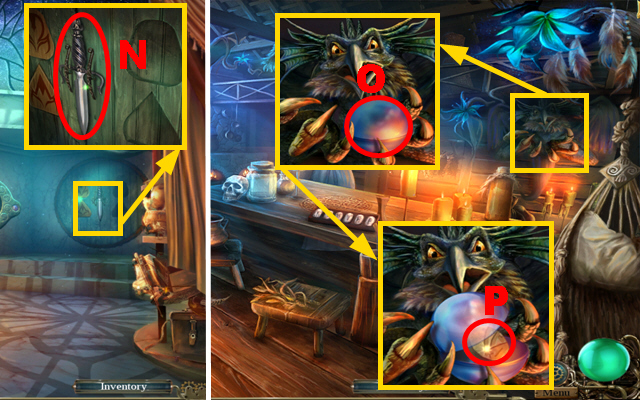
- Zoom into the wall; take the CELTIC DAGGER (N).
- Walk down, go to Celtic Times, and enter Merlin’s hut.
- Zoom into the creature and use the CELTIC DAGGER to open the glass container (O); take the CHEST TOKEN (P).
- Return to the Time Museum Chamber.
- Play the HOS.
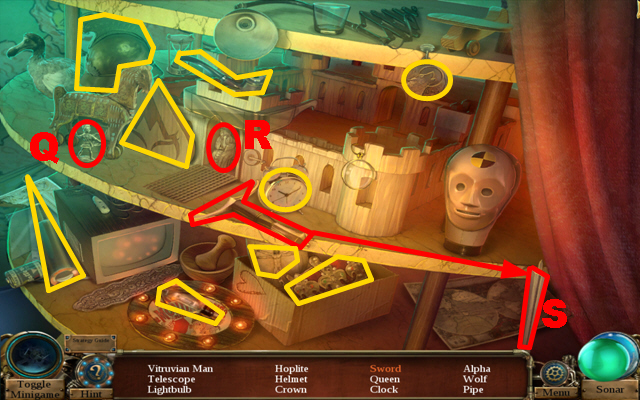
- Open the horse and take the hoplite (Q).
- Open the gate and take the queen (R).
- Take one half of the sword, connect it to the other half of the sword, and take the sword (S).
- You will receive the ALPHA.
- Zoom into the token panel.
- Put the CHEST TOKEN into the slot (T).

- To solve the first part of the puzzle, Select the buttons in sequence 1-5.
- To solve the second part of the puzzle (U), swap the tiles to create the correct pattern.
- To solve the third part of the puzzle (V), rotate the circle parts to create the correct picture.
- Take the OMEGA (W).
- Zoom into the wall; put the ALPHA in the slot (X) and the OMEGA into the slot (Y).
- Take the handle (Z), put the handle into the box (A), and turn the handle.
- Take the sword (B) and put the sword into the slot (C).
- Take the key (D) and put the key into the lock (E).
- Take the HOURGLASS TOKEN (F).
- Zoom into the glass display and put the HOURGLASS TOKEN into the niche (G); open the panel and take the MOSCOW CHURCH FIGURINE (H).
- Walk down.
- Zoom into the globe; put the MOSCOW CHURCH FIGURINE into the shape (I).
- Go to Moscow 1913.
- Zoom into the dresser and put the DIAMOND into the slot marked in purple; take the MAGIC GLOVE (J).
- Go to the Showroom.
- Zoom into the safe; take the CURSED MEDALLION (K) with the MAGIC GLOVE.
- Go to Celtic Times and enter Merlin’s Hut.
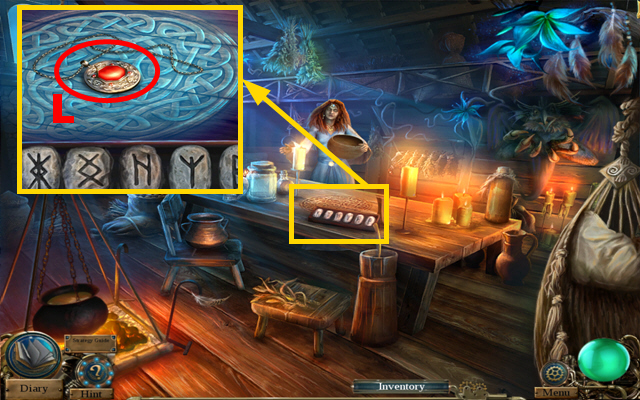
- Zoom into the table; put down the CURSED MEDALLION (L).
- Play the HOS.
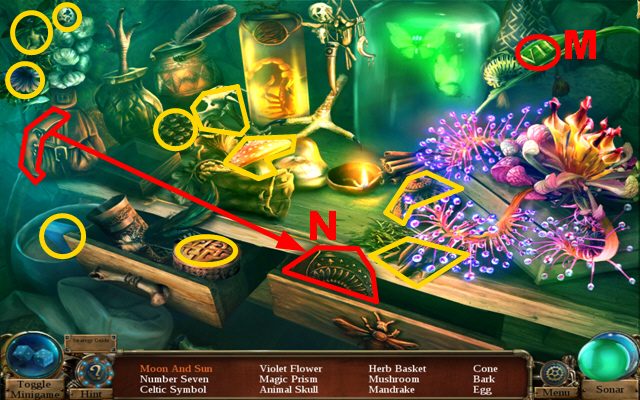
- Move aside the caterpillar and take the number seven (M).
- Take the moon, connect it to the sun, and take the moon and sun (N).
- You will receive the PRISM.
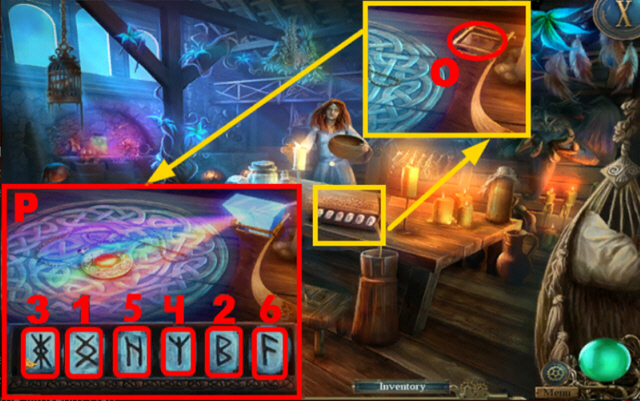
- Zoom into the table; put down the PRISM (O).
- Play the mini-game.
- To solve this puzzle (P), press the stones in sequence 1-6.
- Go to Moscow 1913.
- Play the HOS.

- Open the book and take the cathedral (Q).
- Open the pocket watch and take half past four (R).
- Take the lizard knife, use it to pry out the jewel (S), and take the jewel.
- You will receive the COMMUNICATOR.
- Go to the Time Museum Hall.
- Zoom into the globe; put the COMMUNICATOR into the shape (T).
- Go to the Future.
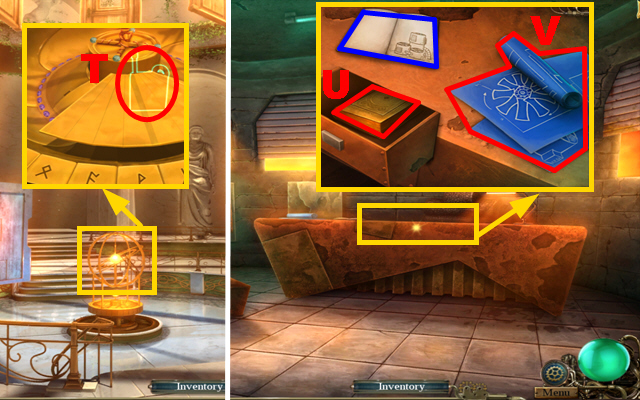
- Zoom into the desk and open the drawer; read the note marked in blue and take the OLD BOOK (U) and the BLUEPRINTS (V).
- Go to the Time Museum Hall.
- Zoom into the globe; put the OLD BOOK into the shape (W).
- Enter the Unknown Times.
- Zoom into the desk; read the 2 notes marked in purple.
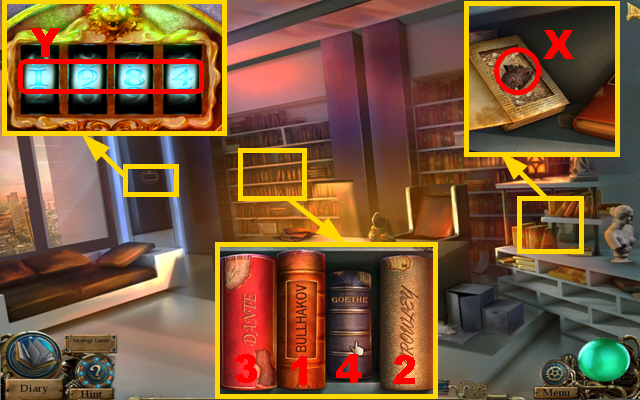
- Zoom into the right bookshelf and open the Shakespeare book; take the GARGOYLE HEAD (X).
- Zoom into the left bookshelf and play the mini-game.
- To solve this puzzle, press the books in sequence 1-4.
- Zoom into the door; enter the code 1984 (Y).
- Play the HOS.
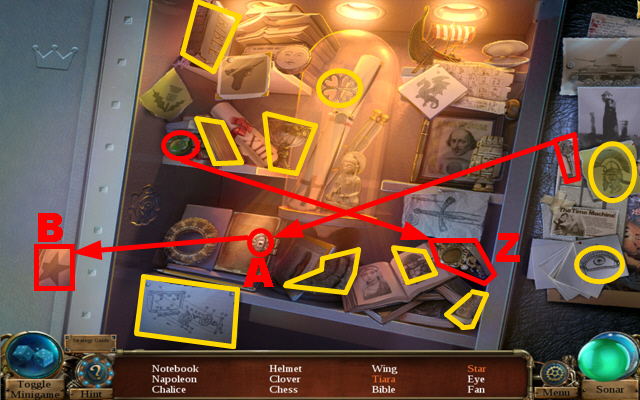
- Take the gem, put it into the tiara, and take the tiara (Z).
- Take the key and put it into the lock (A) and turn the key twice; take the star (B).
- You will receive the GARGOYLE WING.
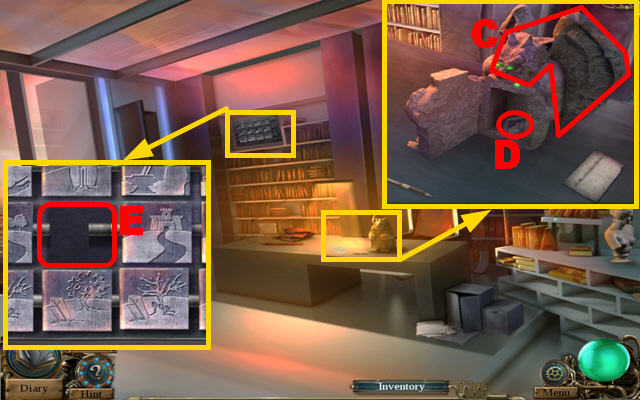
- Zoom into the desk; put down the GARGOYLE HEAD and the GARGOYLE WING (C).
- Take the STORY PUZZLE (D).
- Zoom into the panel; put down the STORY PUZZLE (E).
- Play the mini-game.
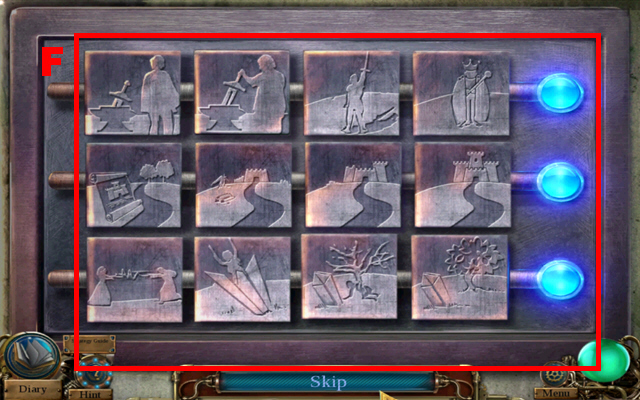
- To solve this puzzle (F), turn the cubes in all the 3 rows to create coherent stories.
- Put down the BLUEPRINTS (G).
- Congratulations, you have finished Time Mysteries: The Final Enigma.


 Redemption Cemetery: Clock of Fate Walkthrough, Guide, & Tips
 The Return of Monte Cristo Walkthrough, Guide, & Tips
 Fiction Fixers: Alice in Wonderland Walkthrough, Guide, & Tips
 Big Fish Casino Craps Tips and Tricks, Guide, & Tips
 Dark Ritual Walkthrough, Guide, & Tips