Surface: The Pantheon Walkthrough, Guide, & Tips
Surface: The Pantheon Walkthrough

Welcome to the Surface: The Pantheon Walkthrough
It should have been a tremendous achievement, but the tunnel through the Ridge of Leviathan became the site of a great disaster. What really happened that day?
Whether you use this document as a reference when things get difficult or as a road map to get you from beginning to end, we’re pretty sure you’ll find what you’re looking for here.
This document contains a complete Surface: The Pantheon game walkthrough featuring annotated screenshots from actual gameplay!
We hope you find this information useful as you play your way through the game. Use the walkthrough menu below to quickly jump to whatever stage of the game you need help with.
Remember to visit the Big Fish Games Forums if you find you need more help. Have fun!
This walkthrough was created by BrownEyedTigre, and is protected under US Copyright laws. Any unauthorized use, including re-publication in whole or in part, without permission, is strictly prohibited.
General Tips

- This is the official guide for Surface: The Pantheon.
- This guide will not mention each time you have to zoom into a location; the screenshots will show each zoom scene.
- We will use the acronym HOP for Hidden-object puzzles. Interactive items will be color-coded and you will need to use Inventory items to complete them.
- The HOP lists may be random; our lists may vary from yours.
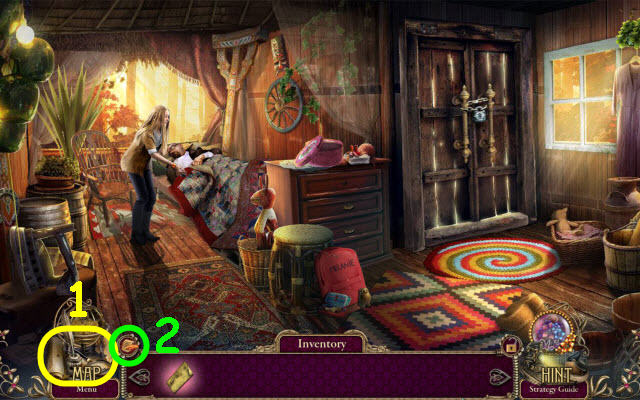
- Use the map (1) to fast travel to a location.
- Select the note pad (2) to check your current task.
Chapter 1: Tunnel
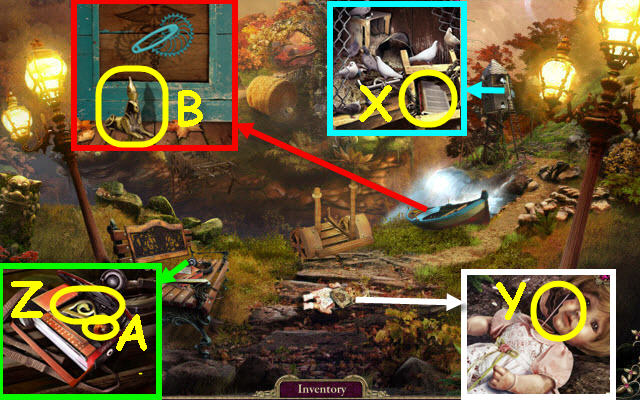
- You receive a LOCKET.
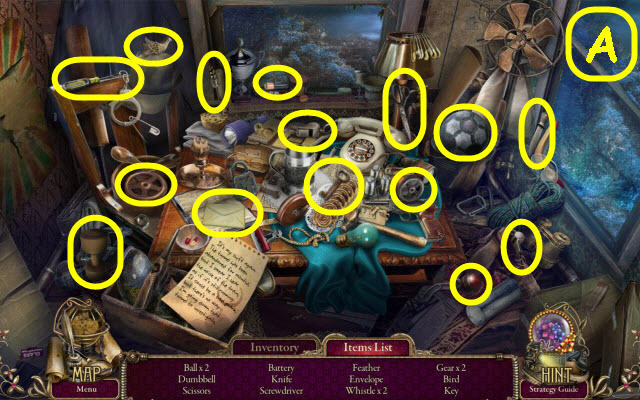
- Examine the booth to access a HOP.
- Play the HOP.
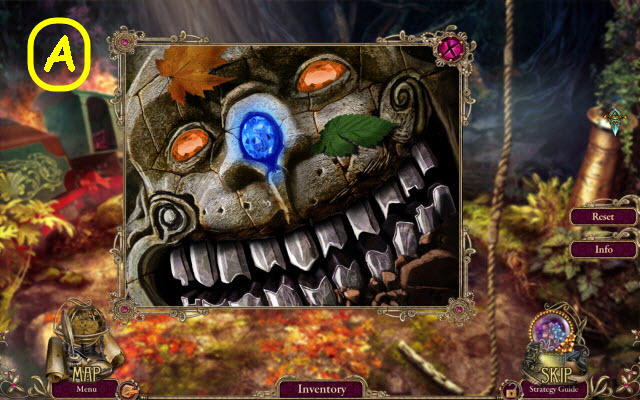
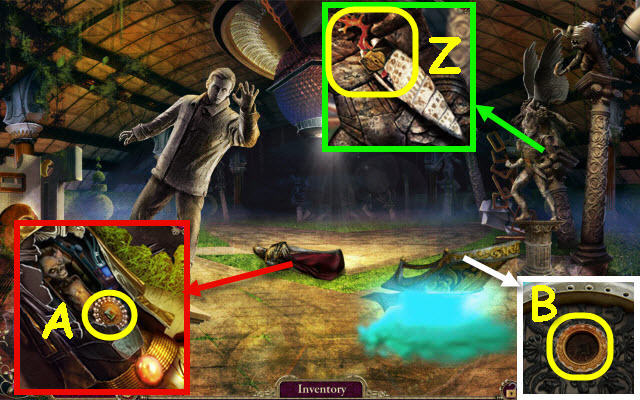
- You receive the KEY (A).

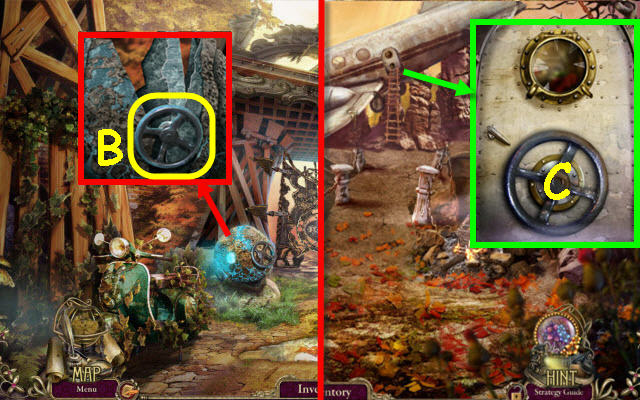
- Use the KEY on the lock; turn it (B).
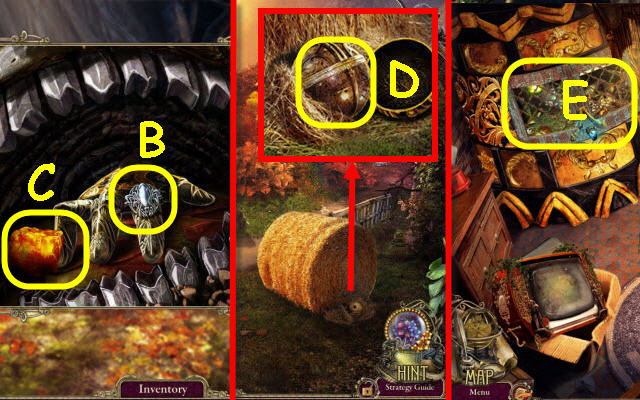
- Go forward and receive a TICKET.
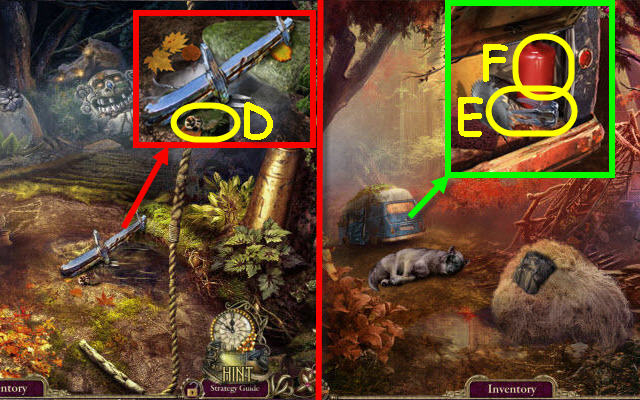
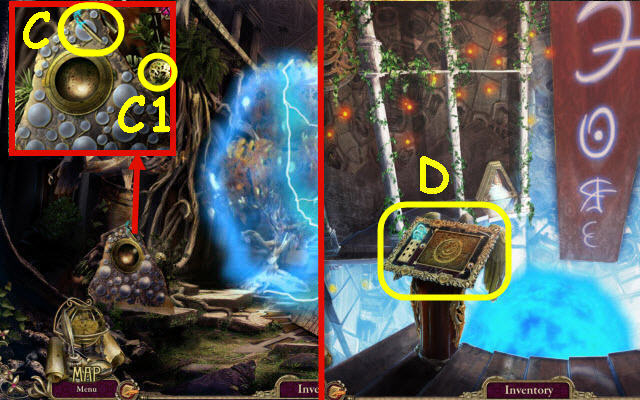
- Take the CAN (C).
- Take the BATTERY 1/3 (D).
- Use the CAN on the oil; receive an OIL CAN (E).
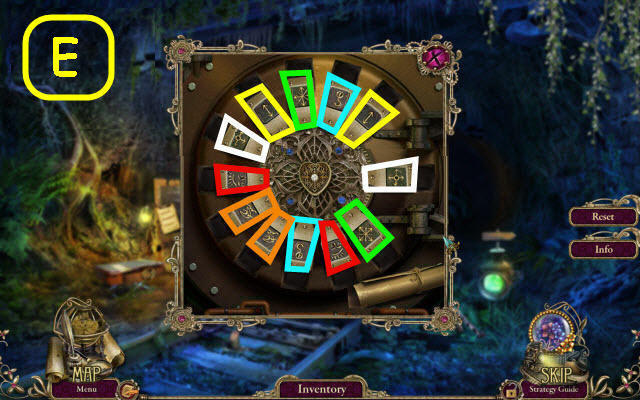
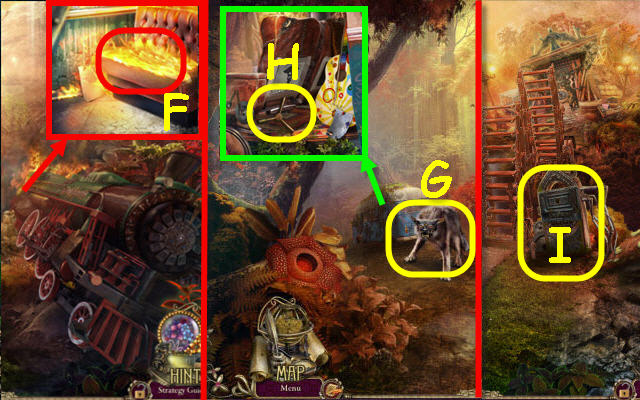
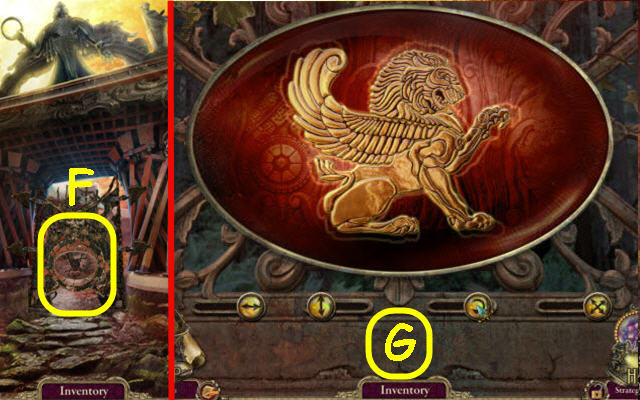
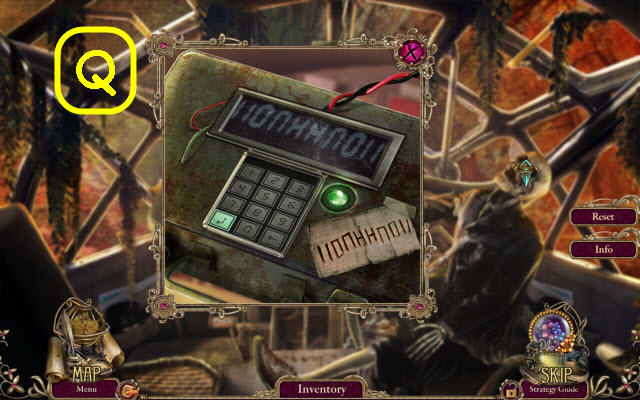
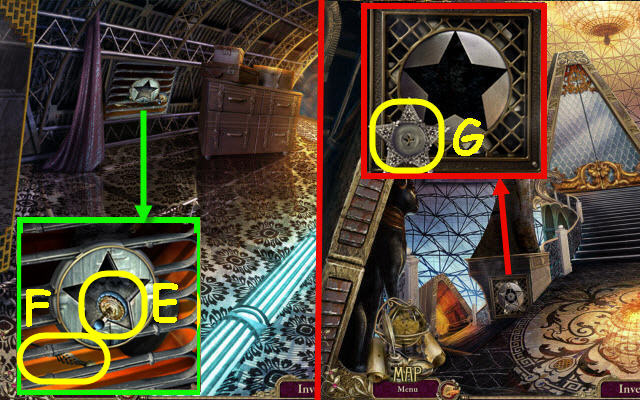
- Use the OIL CAN on the lock to trigger a puzzle (F).
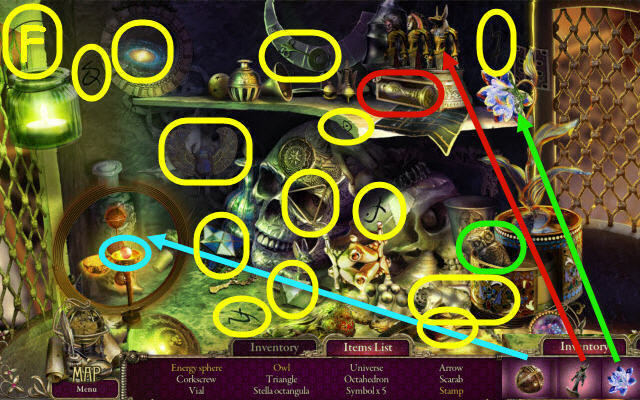
- Light up all the lights.
- Select the following: C, D, A and B.
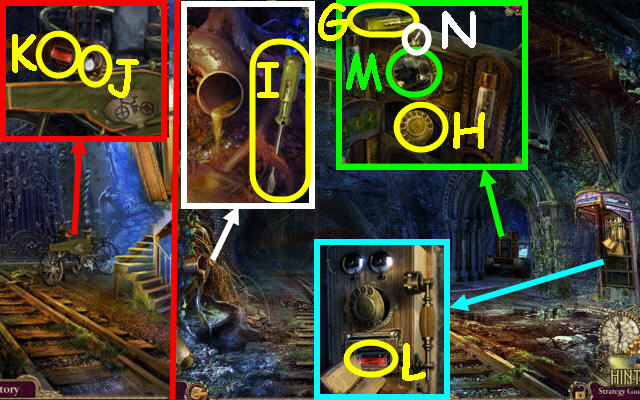
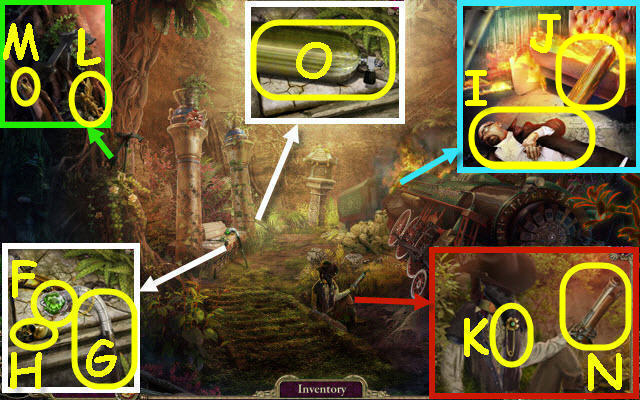
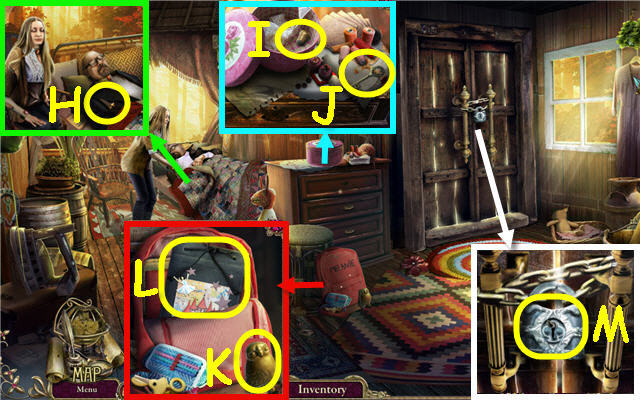
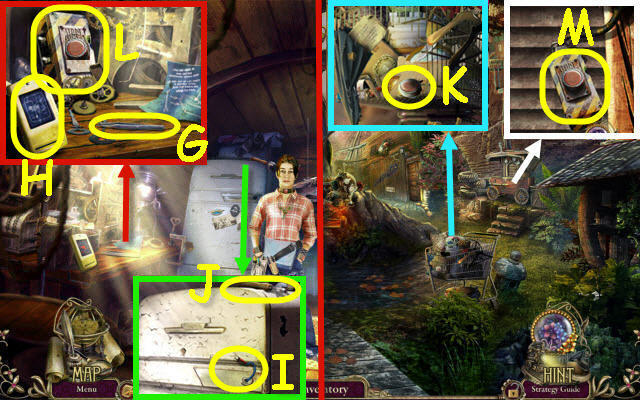
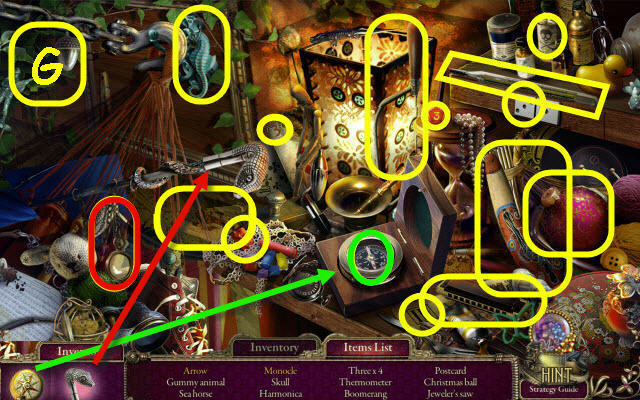
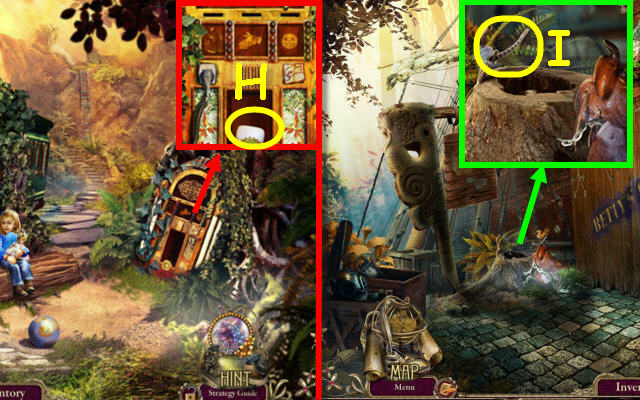
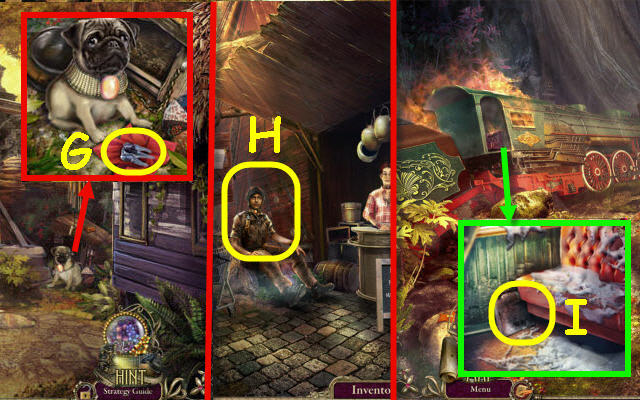
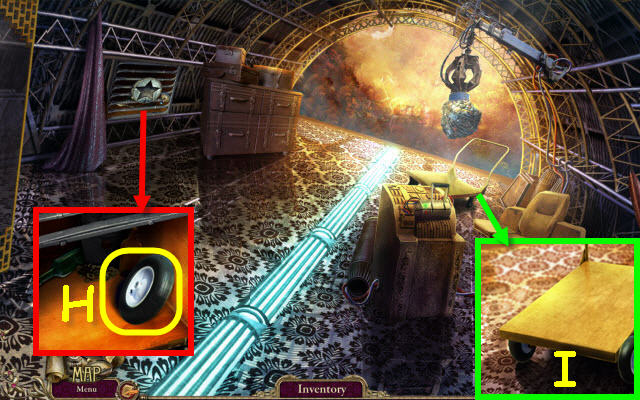
- Take the SCREWDRIVER HANDLE (G) and DIAL (H).
- Place the SCREWDRIVER HANDLE on the shaft; select it twice to get a SCREWDRIVER (I).
- Back out.
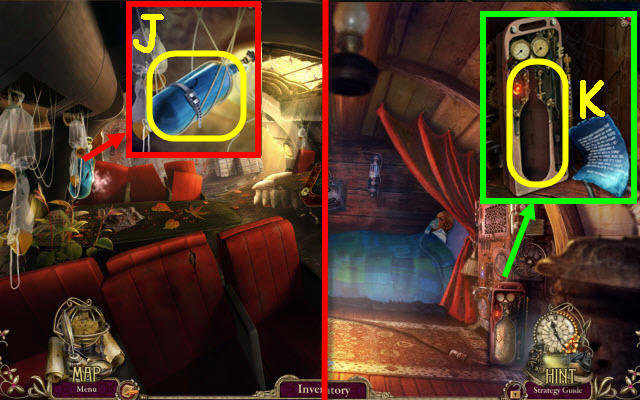
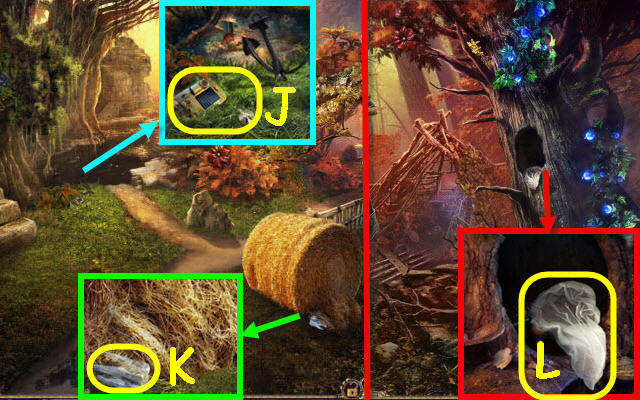
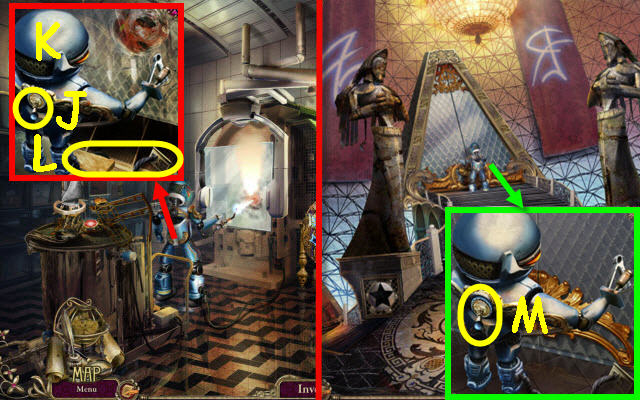
- Use the SCREWDRIVER on the panel; take the BULB (J) and BATTERY 2/3 (K).
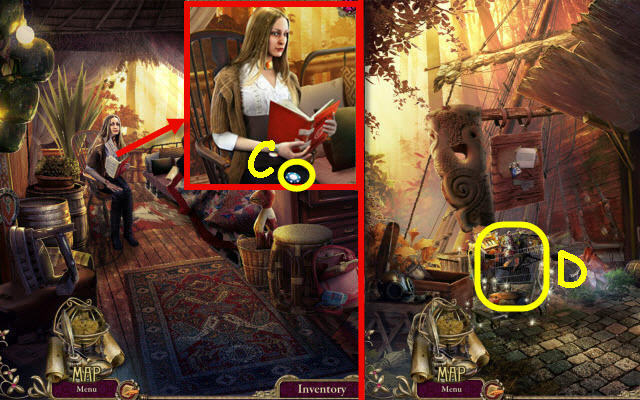
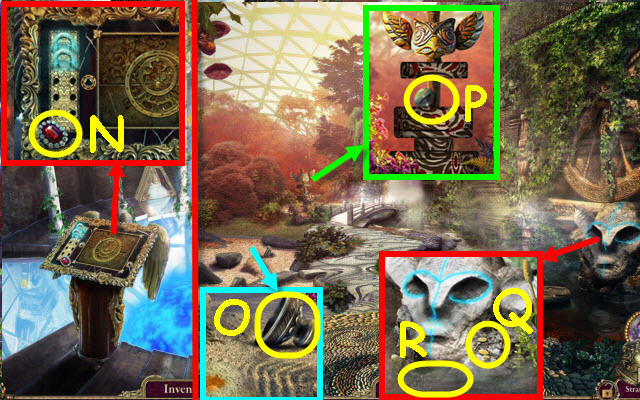
- Go forward.
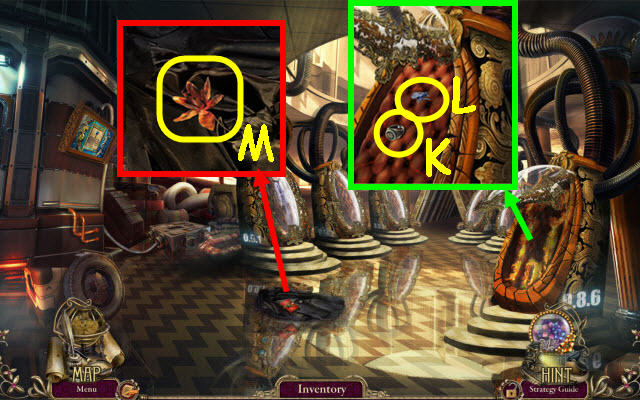
- Remove the dial; place the DIAL on it. Lift the receiver and dial 911; take the BATTERY 3/3 (L).
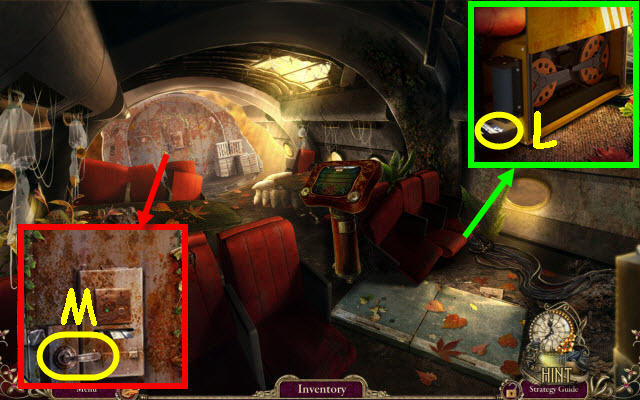
- Place the BULB in the socket (M) and the BATTERY in the compartment; flip the switch (N).
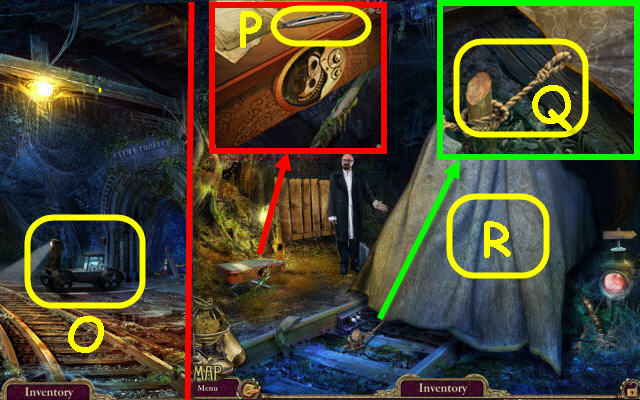
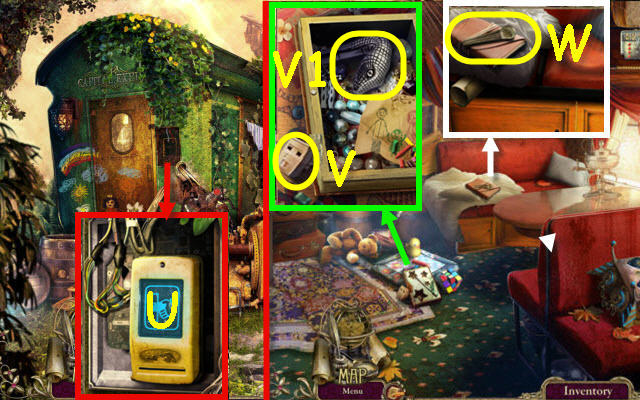
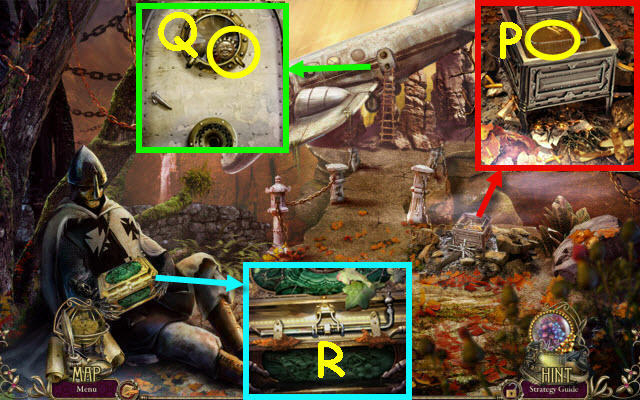
- Select the trolley (O).
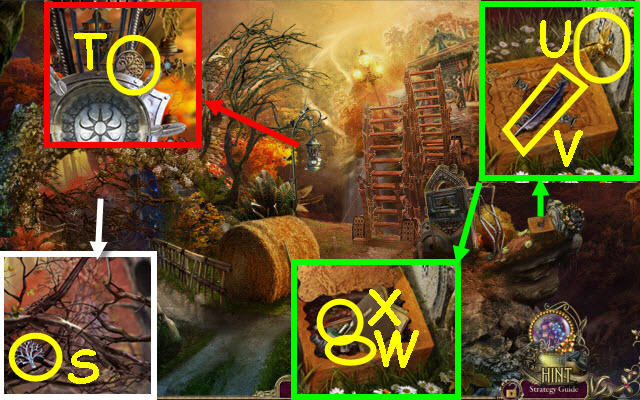
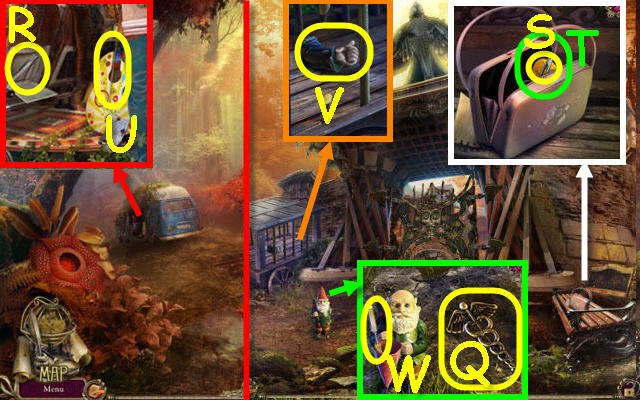
- Take the UTILITY KNIFE (P).
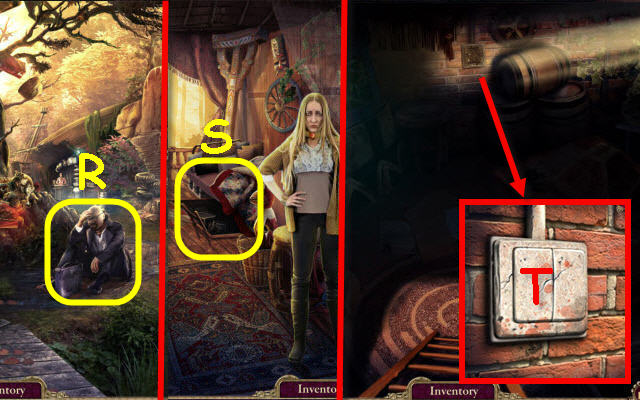
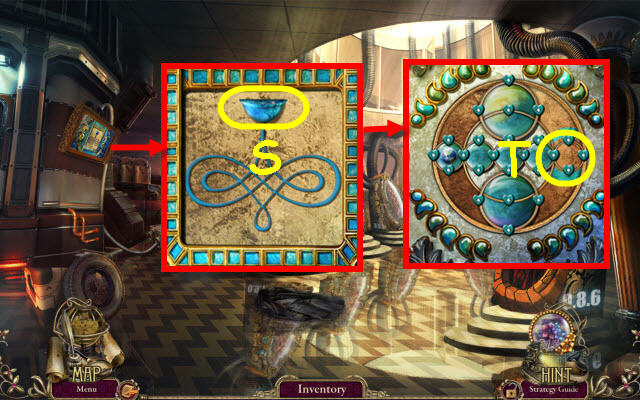
- Use the UTILITY KNIFE on the rope (Q); remove the cover (R).
- Take the BICYCLE BADGE (S).
- Back out twice.
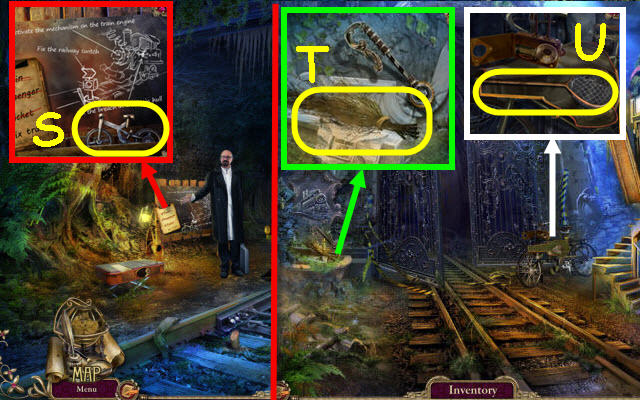
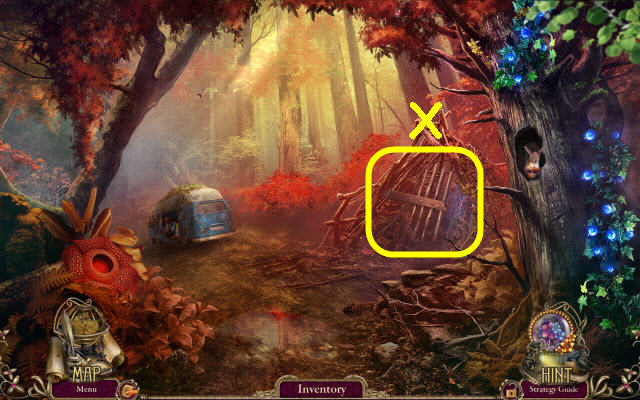
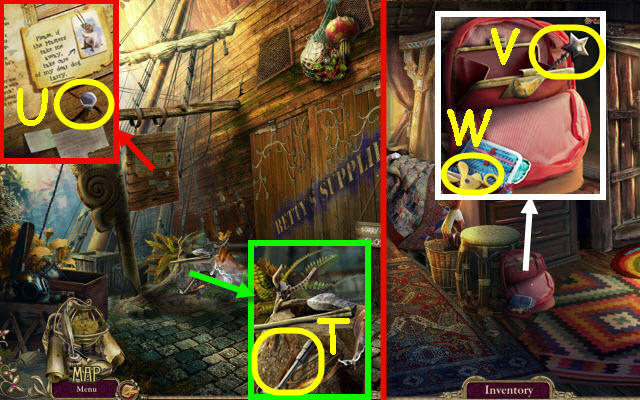
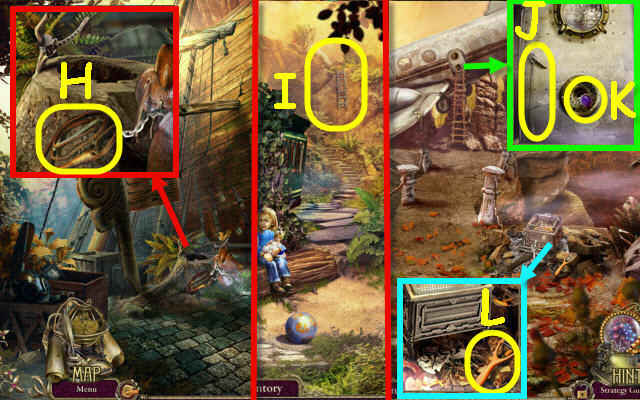
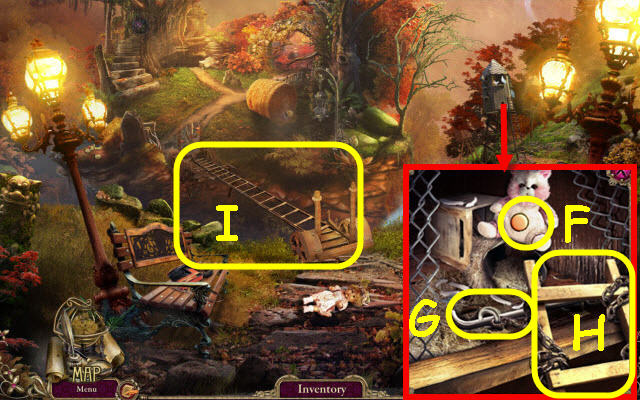
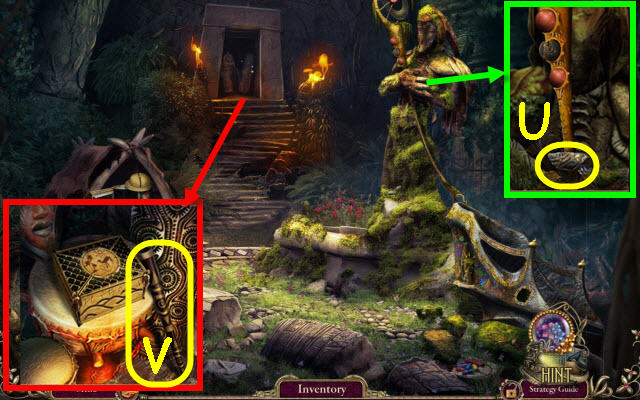
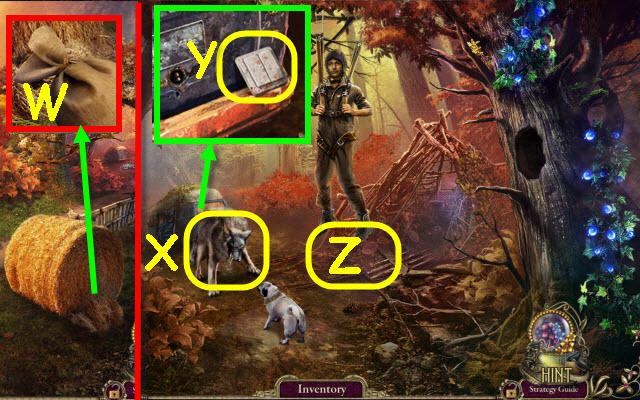
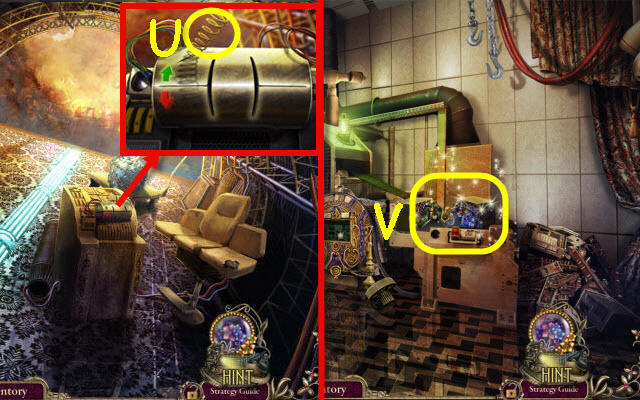
- Use the ROPE on the branches; take the BROOM (T).
- Use the BICYCLE BADGE on the case; take the NET (U).
- Go forward.
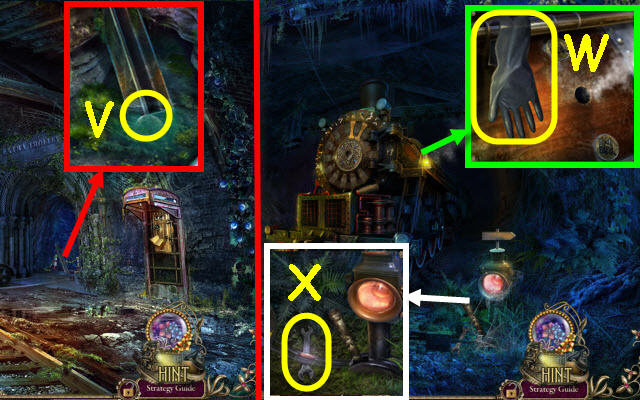
- Use the NET to get the TRAIN RIVET (V).
- Go forward.
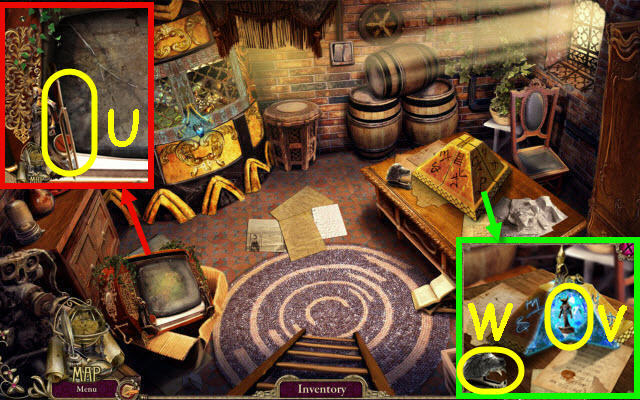
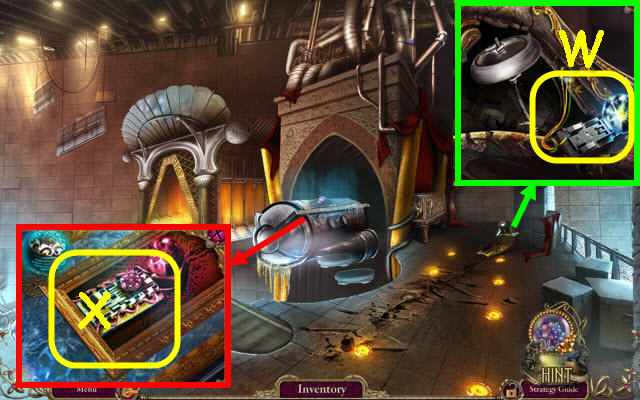
- Take the WELDING GLOVE (W).
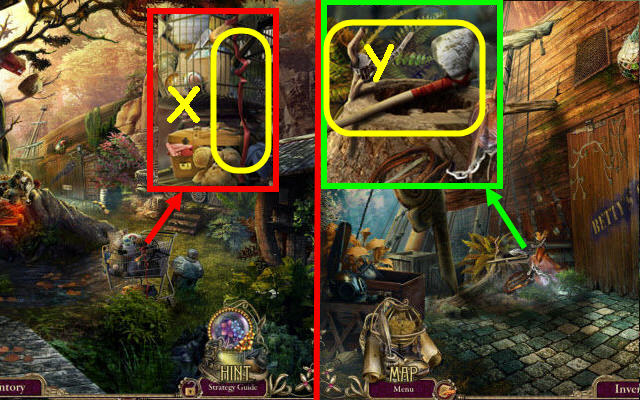
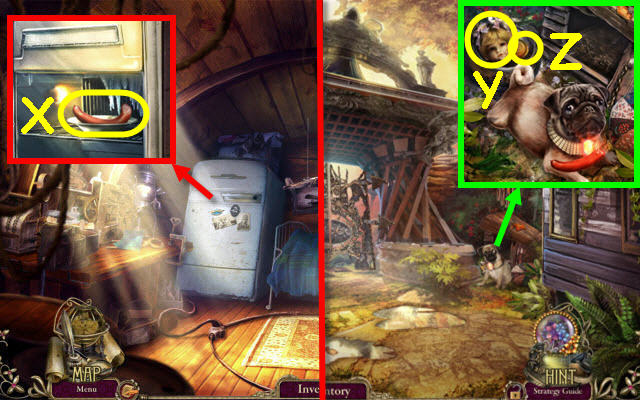
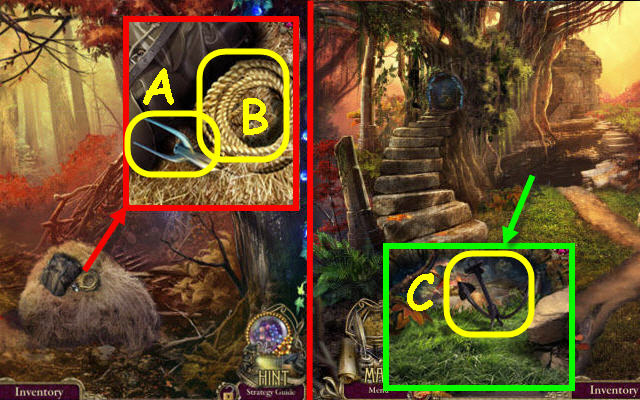
- Use the BROOM on the web and select the lever twice. Use the WELDING GLOVE to get the WRENCH (X).
- Back out twice.
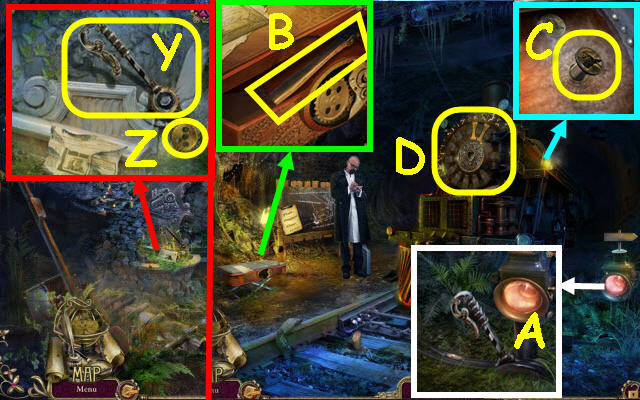
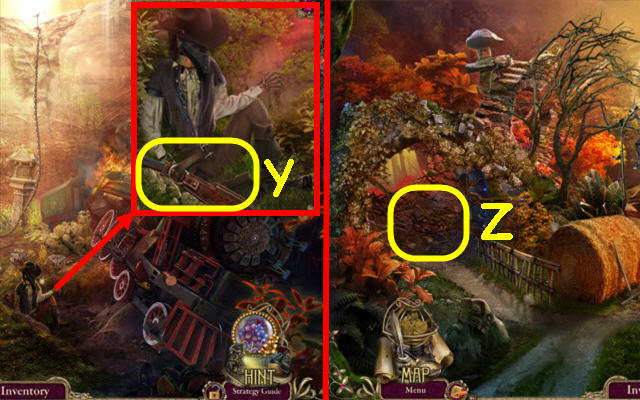
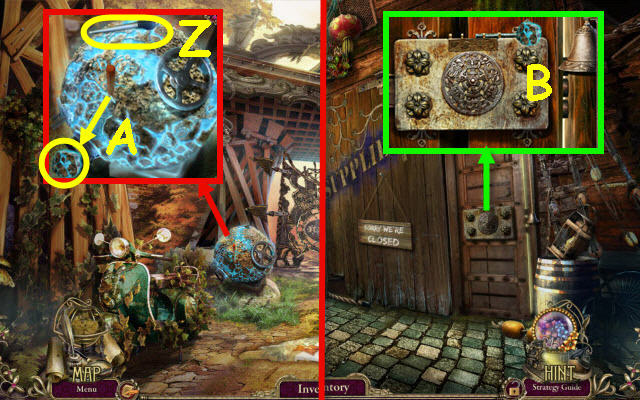
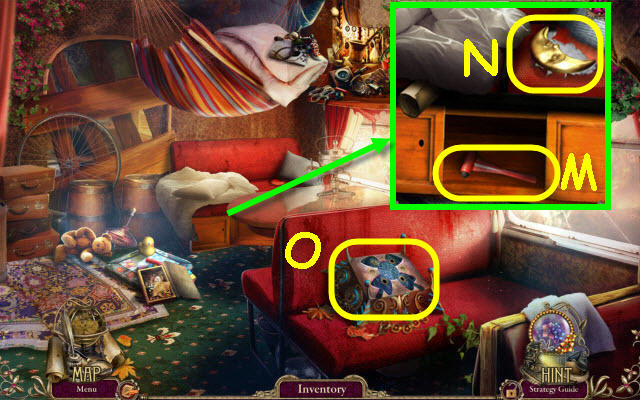
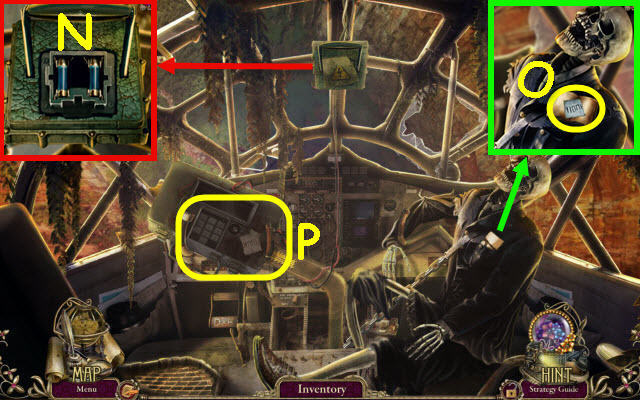
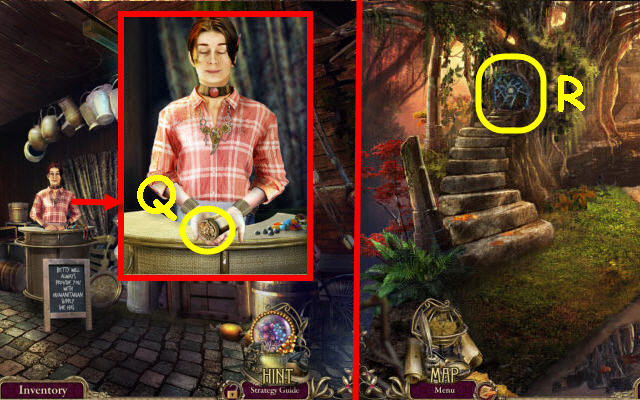
- Use the WRENCH on the bolt; receive a LEVER FOR THE RAILWAY SWITCH (Y) and take the GEAR (Z).
- Go forward twice.
- Place the LEVER FOR THE RAILWAY SWITCH on the mechanism; pull the lever (A).
- Place the GEAR on the lock; take the HAMMER (B).
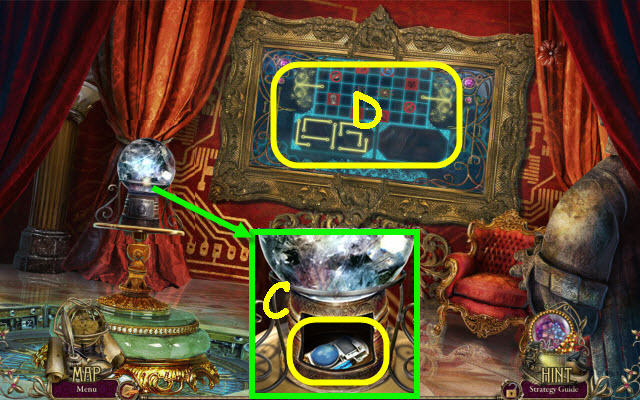
- Place the TRAIN RIVET in the hole; use the HAMMER on it (C).
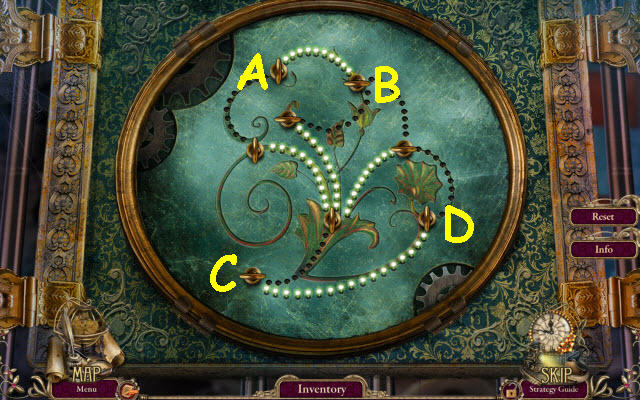
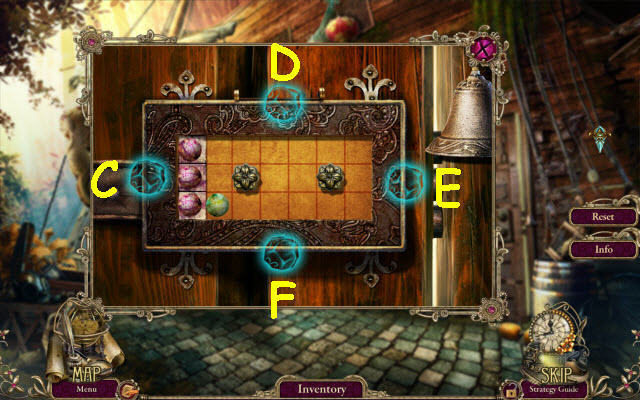
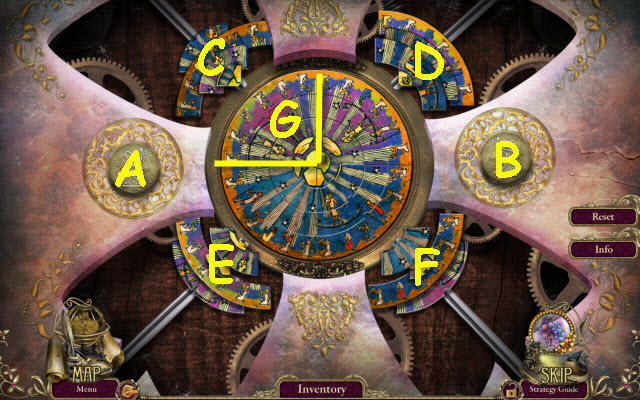
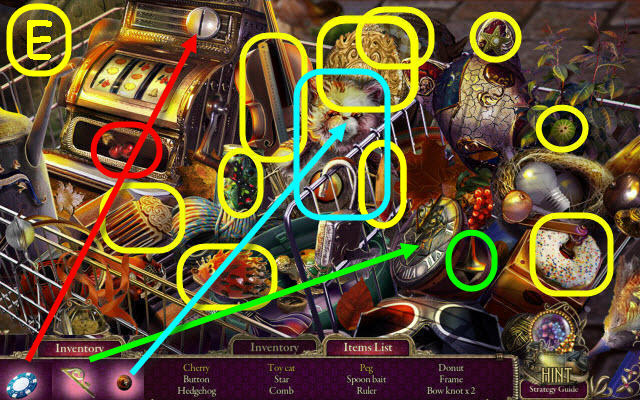
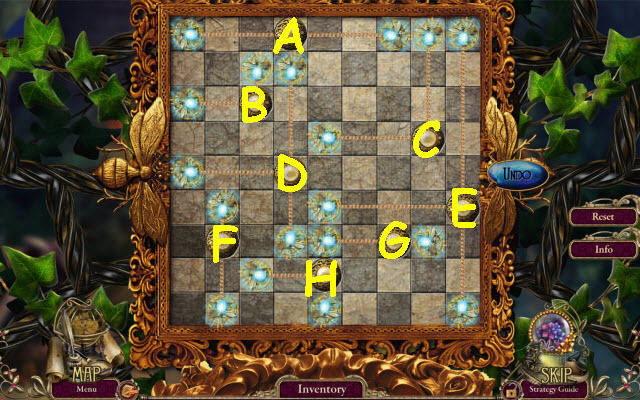
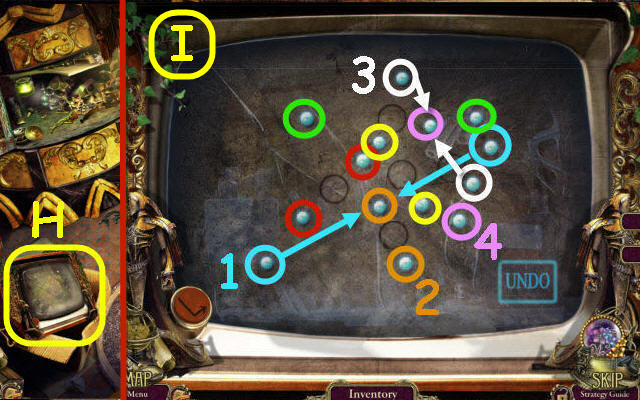
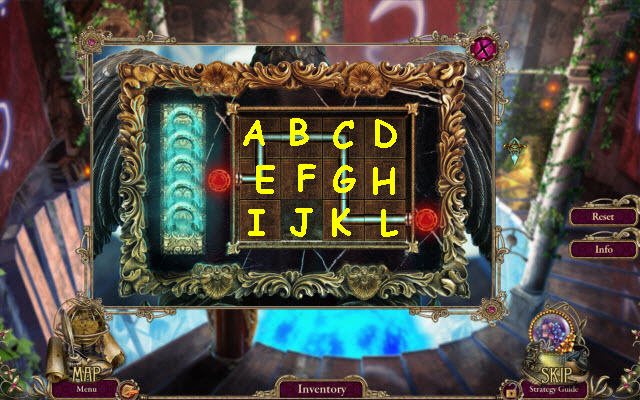
- Place the LOCKET in the slot to trigger a puzzle (D).
- Find the matching pairs.
- See screenshot for solution (E).
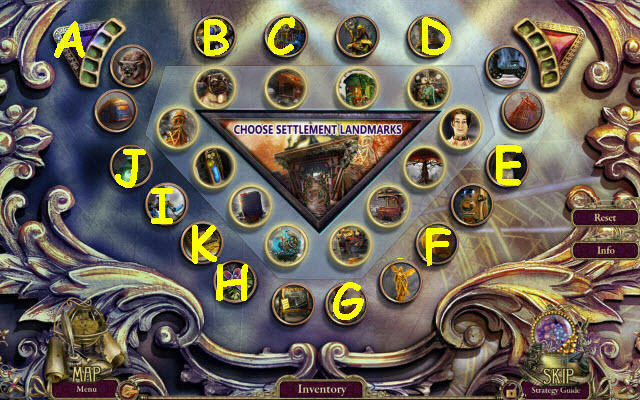
Chapter 2: Stone Trap
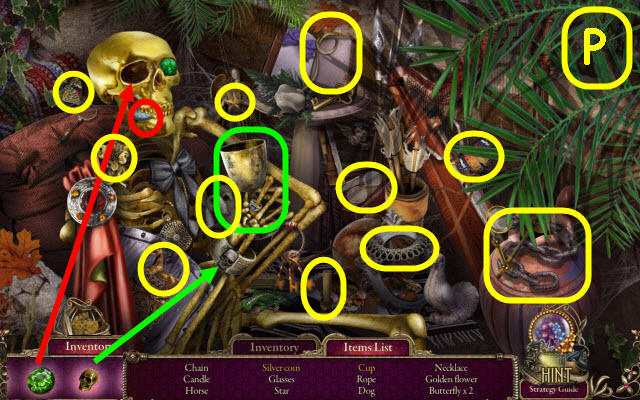
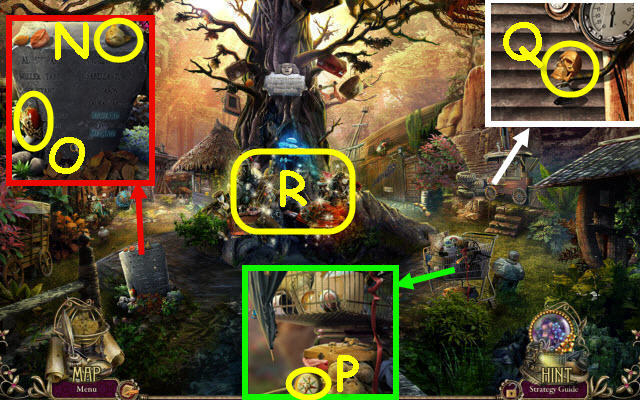
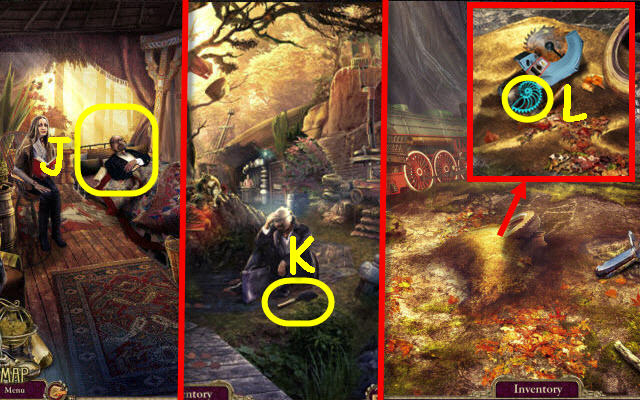
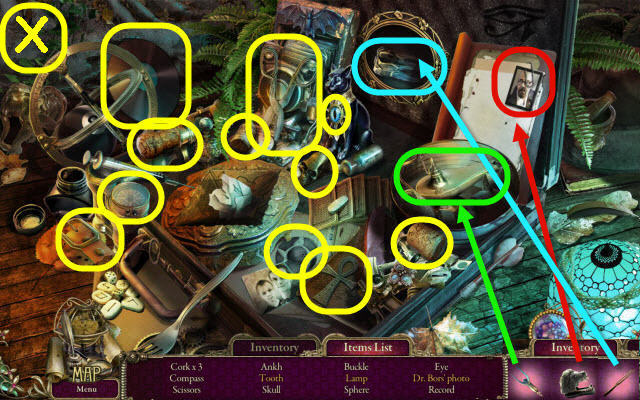
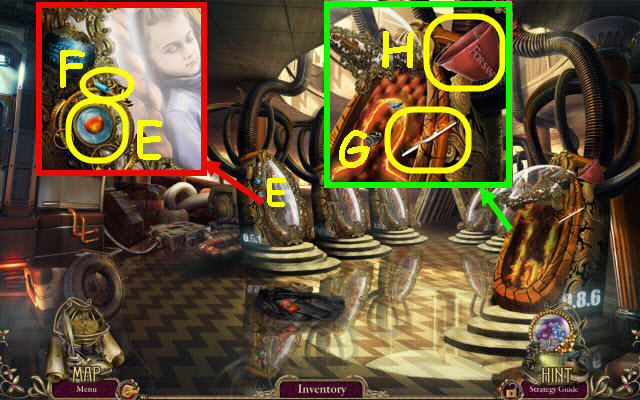
- Take the EMERALD EYE (F), CANE (G) and SKULL MEDALLION (H).
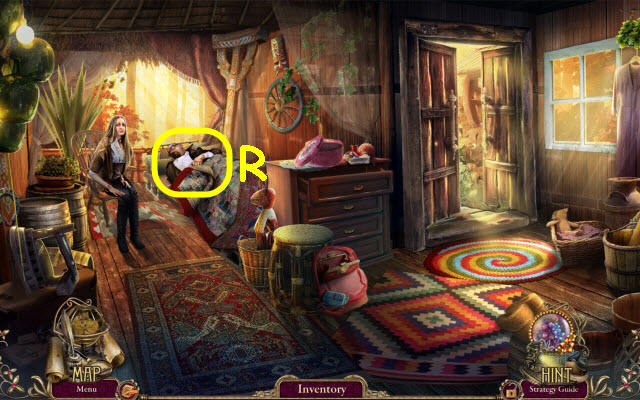
- Take DR. BORS (I) by moving him 4x.
- Use the CANE to get the GAS TANK (J).
- Take the PIN (K).
- Take the FIGURINE 1/3 (L).
- Use the PIN on the bullet; take the BULLET (M).
- Place the BULLET in the musket; take the MUSKET (N).
- Use the GAS TANK on the crack and the MUSKET on the tank (O).
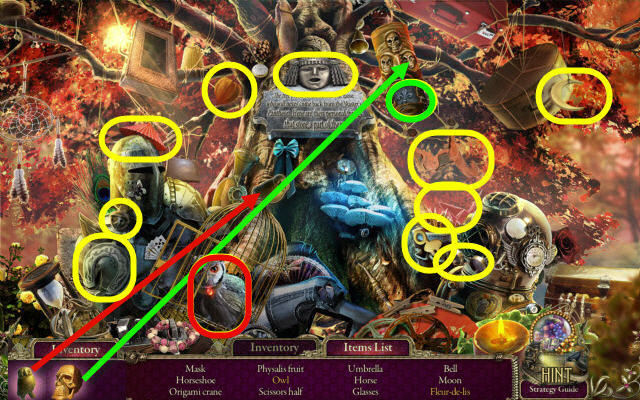
- Examine the sarcophagus to access a HOP.
- Play the HOP.
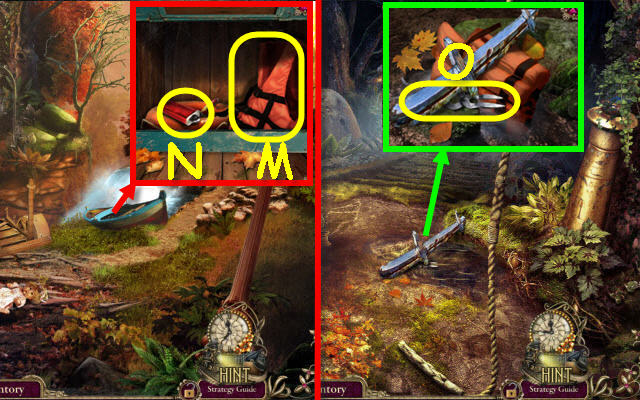
- You receive a CHAIN (P).
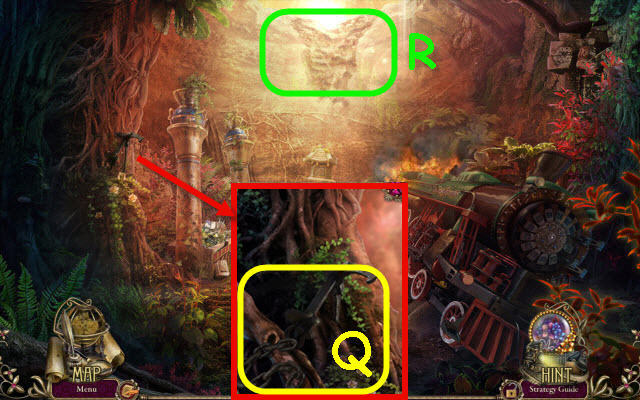
- Place the CHAIN on the hook; take the GRAPPLING HOOK (Q).
- Use the GRAPPLING HOOK on the opening (R).
- Go up.
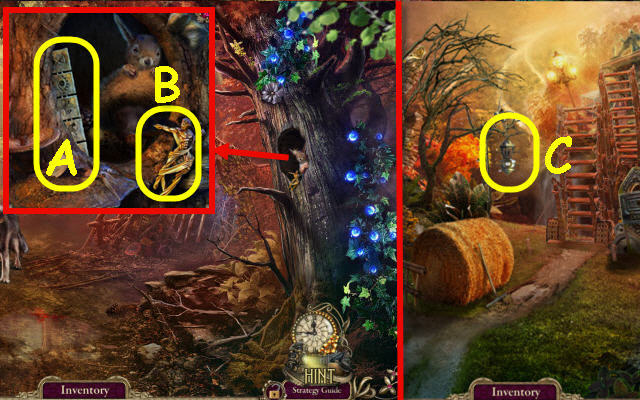
- Take the TREE INSIGNIA (S).
- Take the MEDALLION (T).
- Take the FIGURINE 2/3 (U) and FEATHER (V).
- Place the MEDALLION and then the TREE INSIGNIA on the box; select the book. Take the VAN KEY (W) and BLADE (X).
- Back out.
- Use the BLADE on the belt; take the MACHETE (Y).
- Go up.
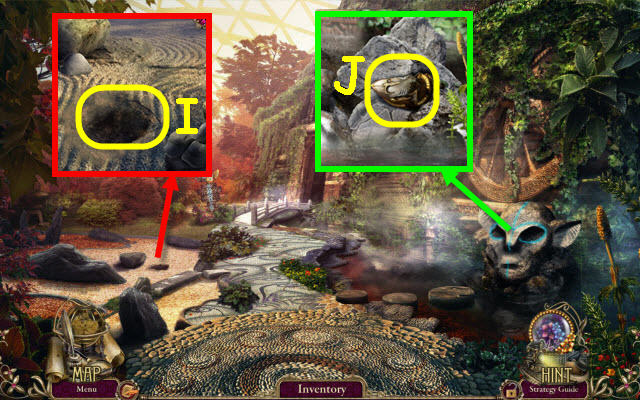
- Use the MACHETE on the thicket (Z).
- Go left.
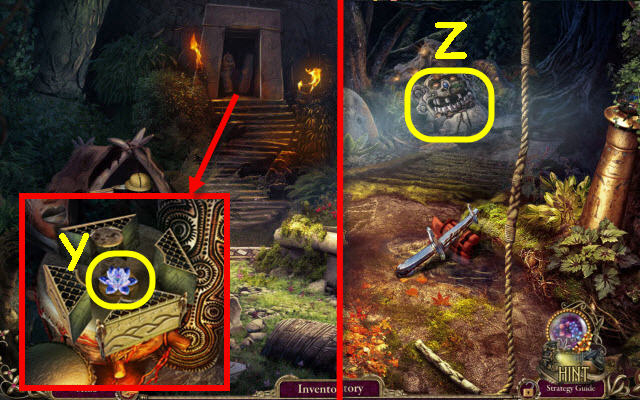
- Take the CODE PLATE (A) and FIGURINE 3/3 (B).
- Back out.
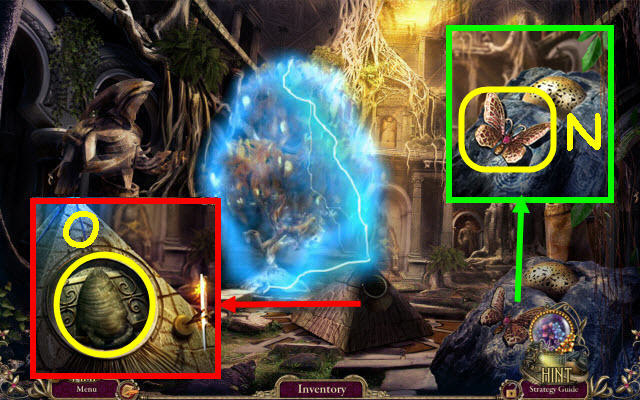
- Place the FIGURINE on the lantern to trigger a puzzle (C).
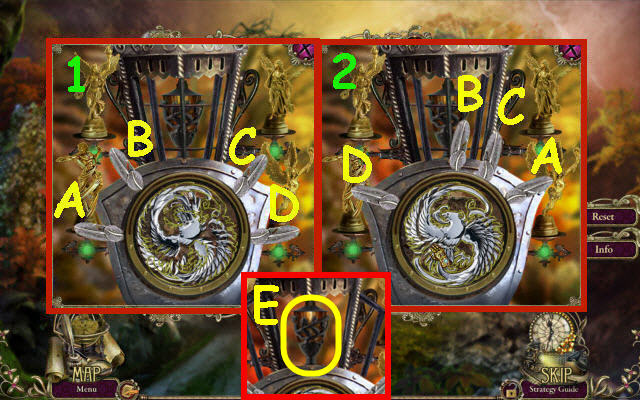
- Complete the image.
- See screenshot for feather (A-D) positions before (1) and after (2).
- Take the TORCH (E).
- Back out.
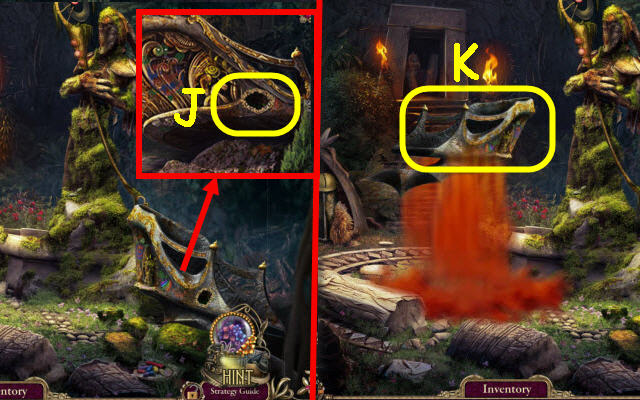
- Use the TORCH on the fire (F); receive a BURNING TORCH.
- Go to Thicket.
- Use the BURNING TORCH on the beast (G).
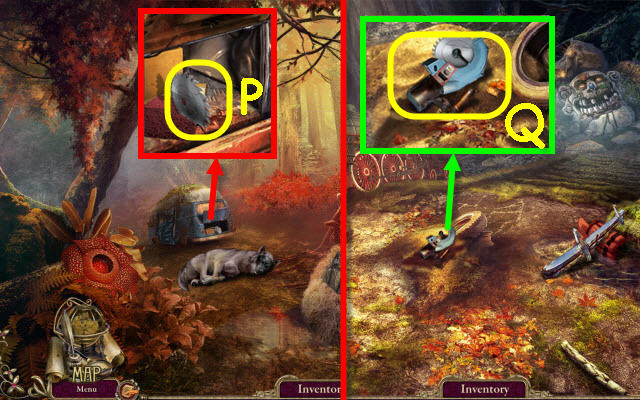
- Use the VAN KEY on the van; read the note and take the VALVE (H).
- Back out.
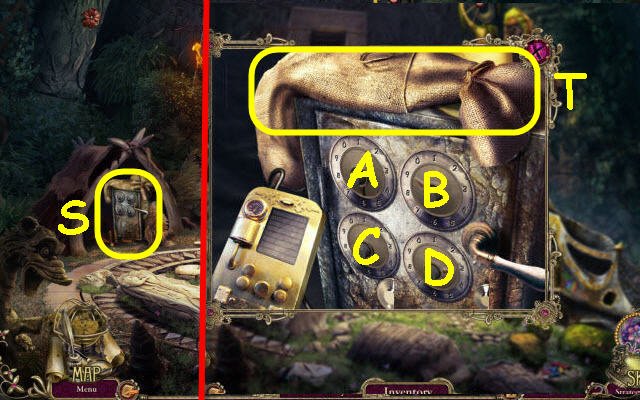
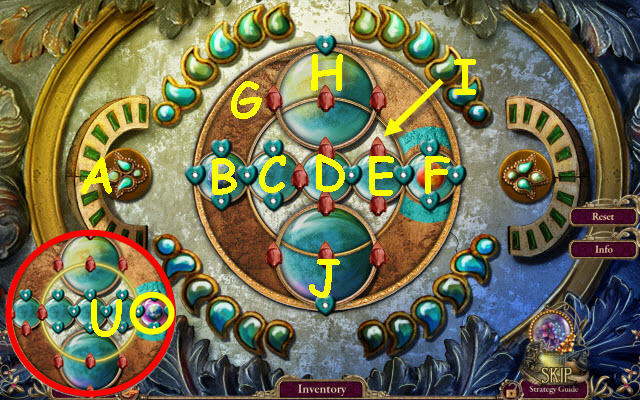
- Select the handle twice. Place the VALVE and then the CODE PLATE on it to trigger a puzzle (I).
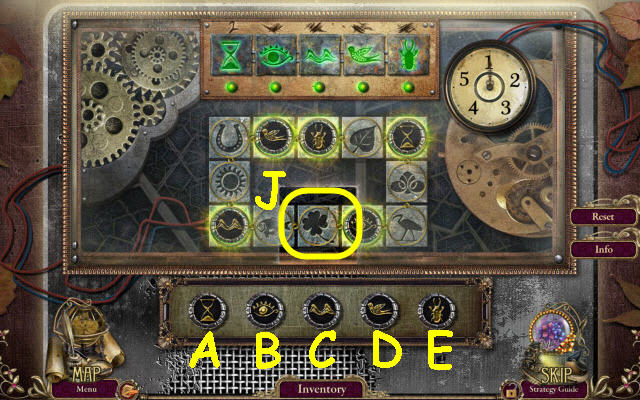
- Place the disks in the slot (J) so they land on their matching symbol when lit.
- Place the following disks when the timer reaches the number as follows: A-2, B-1, C-3, D-2 and E-4. It is easiest to do one at a time and wait for it to come around again.
- Cross the bridge.
- Take the WEIGHT (K) and SEAT LEVER (L).
- Take the APPLE (M); read the note.
- Go to Thicket.
- Place the SEAT LEVER in the slot and move it; take the BRUSH (N).
- Give the APPLE to the squirrel; take the RECORD (O).
- Back out.
- Use the BRUSH on the mud; take the RAKE (P).
- Go forward.
- Use the RAKE on the dirt; take the MEDICAL BADGE (Q).
- Go to Thicket.
- Place the MEDICAL BADGE on the panel; take the TWEEZERS (R).
- Go to Settlement entrance.
- Use the TWEEZERS on the zipper; take the RUNE STONE (S) and NAIL SCISSORS (T).
- Go to Thicket.
- Use the NAIL SCISSORS to get a GUITAR STRING (U).
- Go to Settlement entrance.
- Use the GUITAR STRING on the bars; take the PLASTER ARM (V).
- Place the PLASTER ARM on the gnome; take the CHISEL (W).
- Go to Thicket.
- Use the CHISEL on the latch (X).
- Examine the opened hut to access a HOP.
- Play the HOP.
- You receive a BELL (Y).
- Go to Pit.
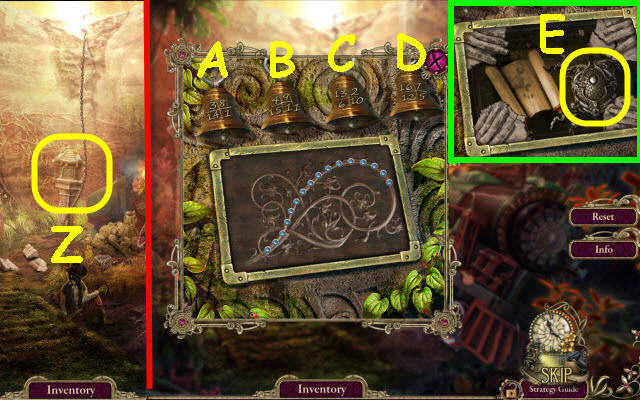
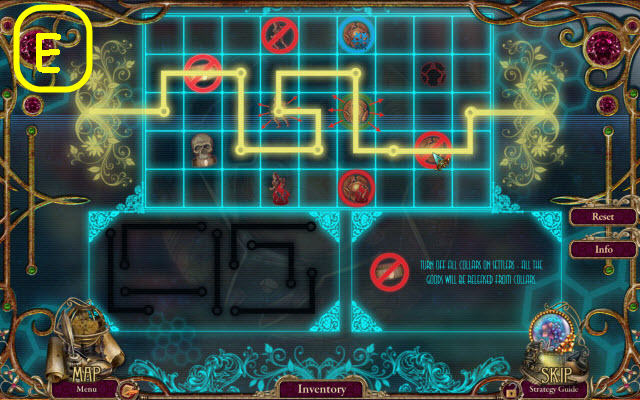
- Place the BELL on the pedestal to trigger a puzzle (Z).
- Ring the bells in correct order.
- Ring the following bells: A, C, A, B, D, C, D, A, B, C, B, D, C, A, B and D.
- Place the RUNE STONE in the slot; take the MASTER’S KEY (E).
- Go to Settlement entrance.
- Place the MASTER’S KEY on the gate to trigger a puzzle (F).
- Slide the bars to complete the image.
- See screenshot for position of bars (G).
Chapter 3: Hut
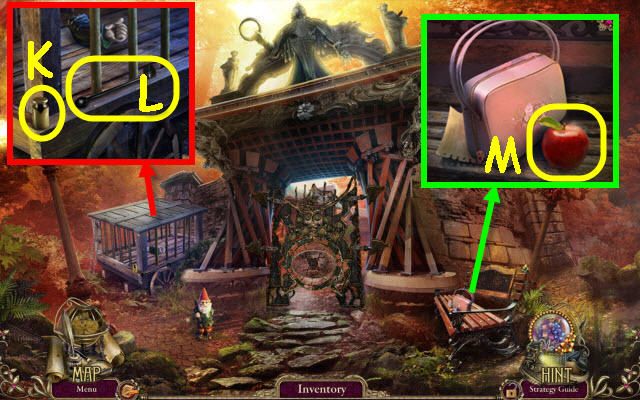
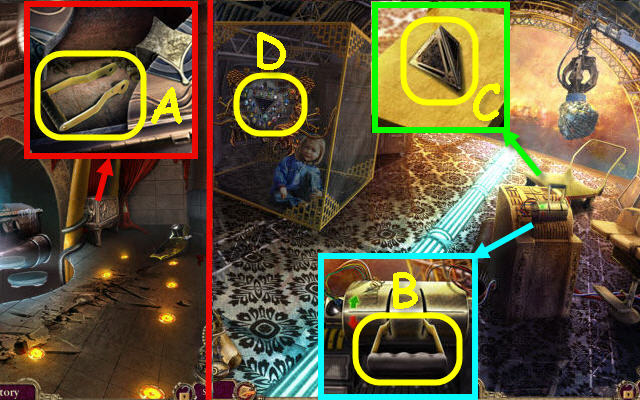
- Take the PLIERS (H).
- Remove the lid; take the THIMBLE (I) and KEY (J).
- Take the OWL ORNAMENT (K).
- Use the THIMBLE on the needle; take the book (L).
- Use the PLIERS and then the KEY on the lock; turn the key (M).
- Go through the door.
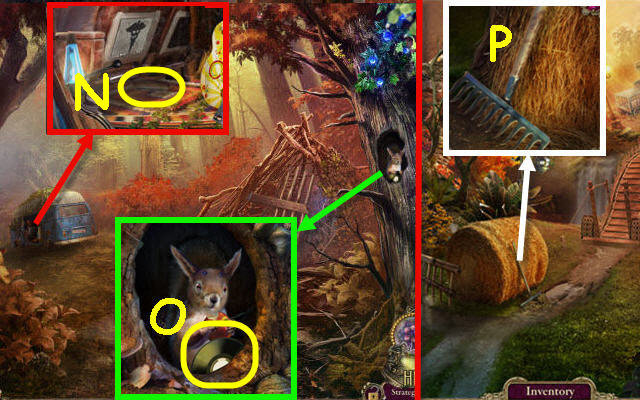
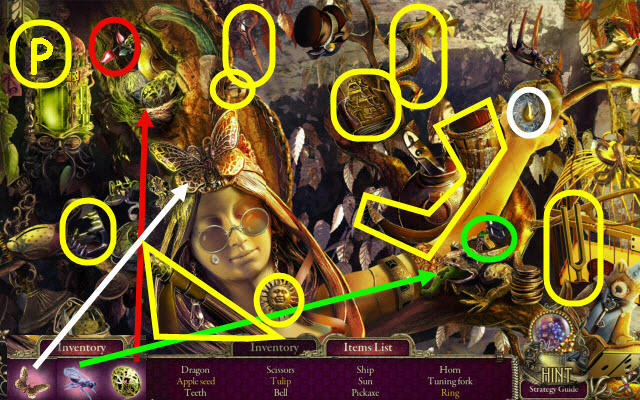
- Move the leaves; select the gravestone. Take the CAT EMBLEM (N) and MASTER’S STONE 1/3 (O).
- Take the COMPASS (P).
- Take the CLAY SKULL (Q).
- Examine the debris to access a HOP (R).
- Play the HOP.
- You receive a SCISSORS HALF (S).
- Go forward up the right of the tree.
- TAKE THE HEX KEY (T).
- Use the HEX KEY on the bolt; take the BOLT (U).
- Go to Hut.
- Place the CAT EMBLEM on the clutch; take the WAND (V).
- Place the SCISSORS HALF and BOLT on the scissors; take the CHILD’S SCISSORS (W).
- Go to Square.
- Use the CHILD’S SCISSORS to get the RIBBON (X).
- Go to Supply store yard.
- Use the RIBBON on the broken axe; take the STONE AXE (Y).
- Back out and go up on the left.
- Take the TURKEY BASTER (Z).
- Use the STONE AXE on the spike; take the MAGNET FRAGMENT (A).
- Go to the Supply store yard.
- Use the MAGNET FRAGMENT on the panel to trigger a puzzle (B).
- Guide the balls to the squares.
- Select F, E, F, C, F, C, D, C, E, F, C, D, C, E, F, C, D, E, F, C, D, C, F and C.
- Go through the door.
- Read the note; take the WATCHMAKER’S TWEEZERS (G) and SCANNER (H).
- Use the WATCHMAKER’S TWEEZERS to get the WIRE (I).
- Take the CAN OPENER (J).
- Go to Square.
- Use the CAN OPENER on the cart; take the RED BUTTON (K).
- Go to Supply store.
- Place the WIRE and RED BUTTON on the controls; take the LIFT CONTROLLER (L).
- Go to Square.
- Place the LIFT CONTROLLER on the panel; press the button to trigger a puzzle (M).
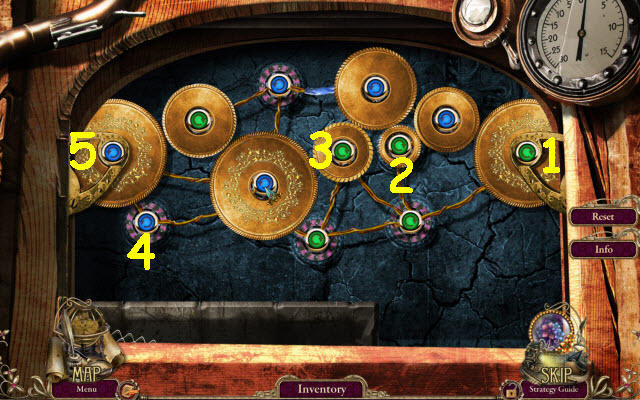
- Place the gears and set the arrows so the gears spin.
- Select the arrows in the order shown (1-5) and then place the gears.
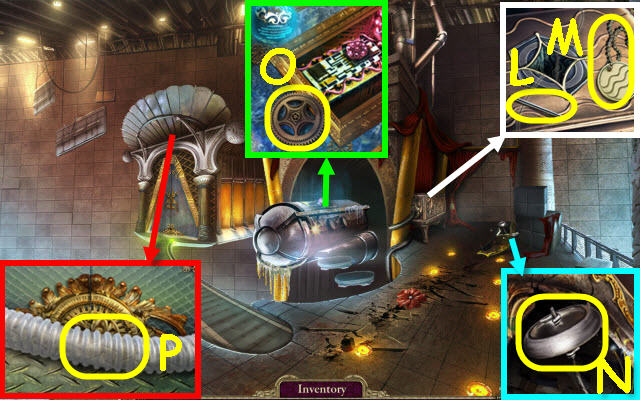
- Go up to Capital Express clearing (N).
- Take the FOOTPLATE (O).
- Take the DRAWER HANDLE (P).
- Take the SPARK PLUG (Q).
- Go to the Hut.
- Place the DRAWER HANDLE on the drawer; take the ADHESIVE TAPE (R).
- Go to Gates.
- Place the FOOTPLATE and the SPARK PLUG on the motorcycle (S). Select the motorcycle; take the MASTER’S STONE 2/3 (T).
- Go to Capital Express clearing.
Chapter 4: Train
- Place the SCANNER and the ADHESIVE TAPE on the panel. Use the TICKET on the scanner (U).
- Enter the train.
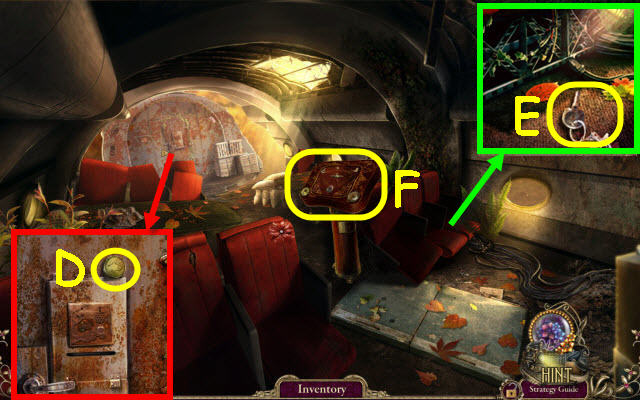
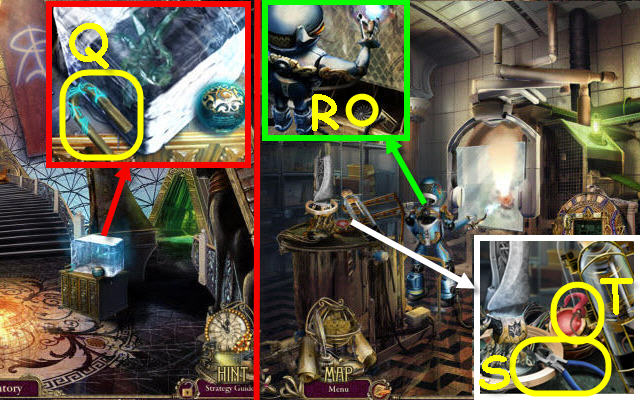
- Take the ADAPTER (V).
- Place the WAND on the book; examine the drawing and take the SNAKE’S HEAD (V1).
- Take the FRIDGE HANDLE (W).
- Go to Supply Store.
- Place the FRIDGE HANDLE on the fridge and select it; take the SAUSAGE (X).
- Go to the Gates.
- Give the SAUSAGE to the dog; take the DOLL’S HEAD (Y) and SMILEY TOKEN (Z).
- Go to Capital Express clearing.
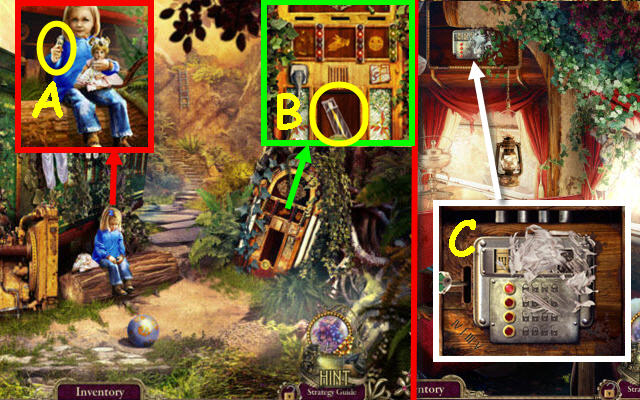
- Put the DOLL’S HEAD on the doll; take the CODE LOCK PART (A).
- Place the ADAPTER in the socket and plug in the cord. Place the SMILEY TOKEN in the right slot; take the TOOTHBRUSH (B).
- Enter the train.
- Use the TOOTHBRUSH and CODE LOCK PART on the lock to trigger a puzzle (C).
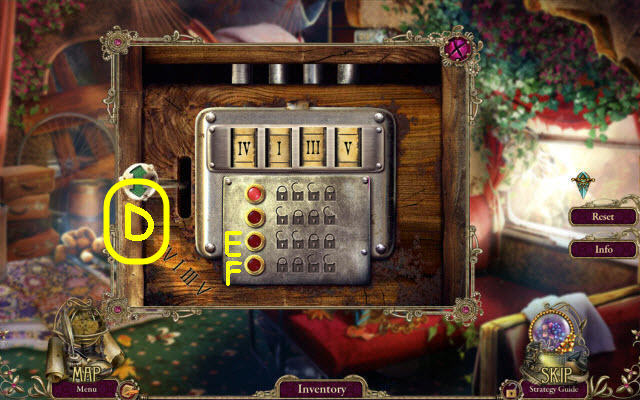
- Set the correct code.
- Select the following: E, D, F, Dx2.
- Examine the cupboard to access a HOP.
- Play the HOP.
- You receive a JEWELER’S SAW (G).
- Go to Supply store yard.
- Use the JEWELER’S SAW on the chain; take the WHIP (H).
- Go to Capital Express clearing.
- Use the WHIP on the ladder (I).
- Go up the ladder.
- Take the WIRE HOOK (J) and MASTER’S STONE 3/3 (K).
- Take the POTATO PEELER (L).
- Go to Capital Express car.
- Use the WIRE HOOK on the cabinet; take the EMERGENCY MALLET (M).
- Use the POTATO PEELER on the cushion; take the MOON AMULET (N).
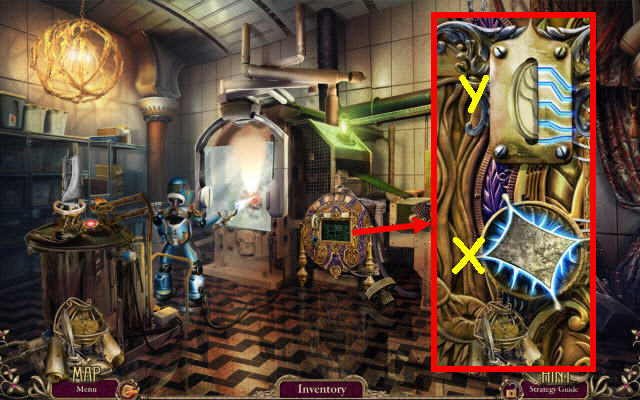
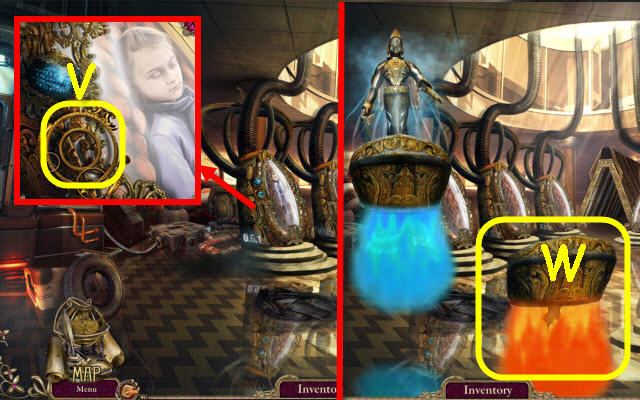
- Examine the device and place the MASTER’S STONE on it to trigger a puzzle (O).
- Complete the image.
- Select the following: C, Ax2, D, A, C, Ax2, E, B, G, Bx2, E, A, F, A, F, Ax2, C, D, A, C, A, C, B, Gx2, A, C, D, A, E, B, E, A, C, F, B, F, G, Ax2, C, A, G, A, C, Bx2 and D.
- Take the LIGHTER and FUSE.
- Go to Cliff.
- Use the LIGHTER on the twigs; use the TURKEY BASTER to get OIL (P).
- Use the EMERGENCY MALLET on the glass; take the SUN AMULET (Q).
- Use the OIL on the lock; select the lock (R).
- Examine the box to access a HOP.

- Play the HOP.
- You receive an ANTI-MAGNET (A).
- Go to Gates.
- Use the ANTI-MAGNET on the stone; take the VALVE (B).
- Go to Cliff.
- Place the VALVE on the door; turn it (C).
- Enter the plane.
- Take the HANDS TOKEN (D).
- Take the AIR HOSTESS KEY (E).
- Use the AIR HOSTESS KEY on the console to trigger a puzzle (F).
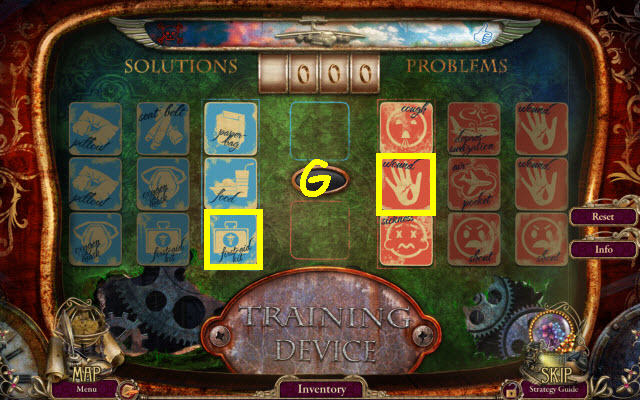
- Match the solutions to the problems.
- Selecting the reset button will give you a new board.
- Matching pairs: Sleep-pillow/food, hunger-food/water, air pocket-seat belt/paper bag/smile, depressurization-oxygen mask/seat belt, cough-water/oxygen mask/first aid kit, wound-first aid kit/water, sickness-paper bag/first aid kit/water, shout-smile (G).
- Back out twice.
- Place the HANDS TOKEN in the center slot; take the SOAP (H).
- Go to Supply store yard.
- Use the SOAP on the band; take the CLAMPBAND (I).
- Go to the Airplane.
- Place the CLAMPBAND on the tank; take the OXYGEN TANK (J).
- Go to Supply store.
- Place the OXYGEN TANK in the holder (K) and receive the BLACK BOX.
- Go to the Airplane.
- Place the BLACK BOX by the seats; take the PILOT’S ID CARD (L).
- Use the PILOT’S ID CARD on the lock; turn the handle (M).
- Go forward.
- Remove the paper and place the FUSE in the left slot. Pull the lever (N).
- Select the paper; take the PAPER (O).
- Place the PAPER on the controls to trigger a puzzle (P).
- Duplicate the code from the paper.
- Select 1, 0, 7, 4, 4, 7, 0 and 1 and then the bottom left button (Q).
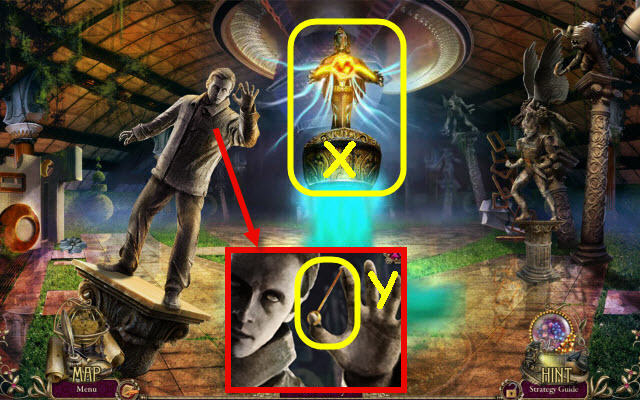
- Take the NEUROSTIMULANT.
- Go to Hut.
- Use the NEUROSTIMULANT on Bors (R).
- Speak to Bors.
Chapter 5: Briefcase
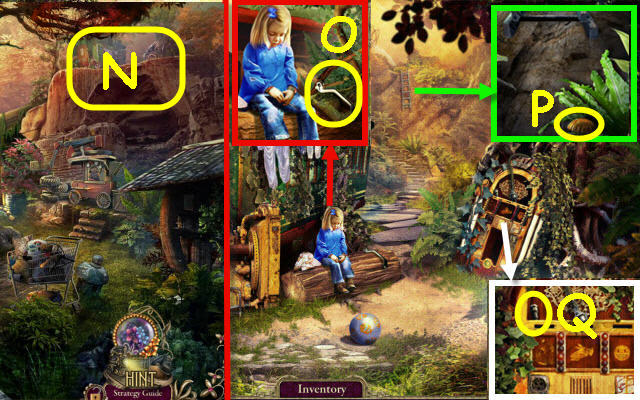
- Speak to Shauna; take SHAUNA’S KEY (S).
- Go out the door and up the right.
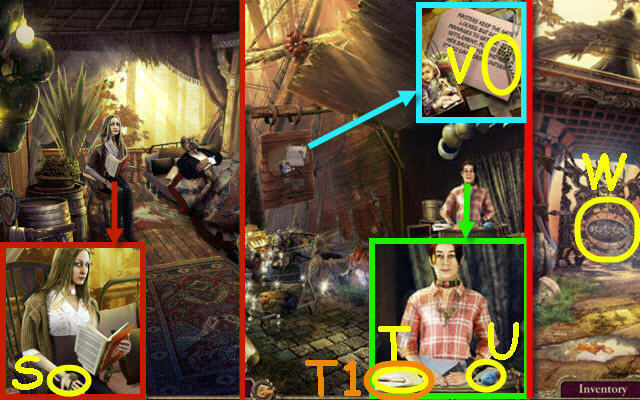
- Speak to Betty; take the PEN (T), PAPER (T1) and MODELING CLAY (U).
- Take BETTY’S KEY (V).
- Back out and go forward on the left.
- Place SHAUNA’S KEY and BETTY’S KEY in the keyholes to trigger a puzzle (W).
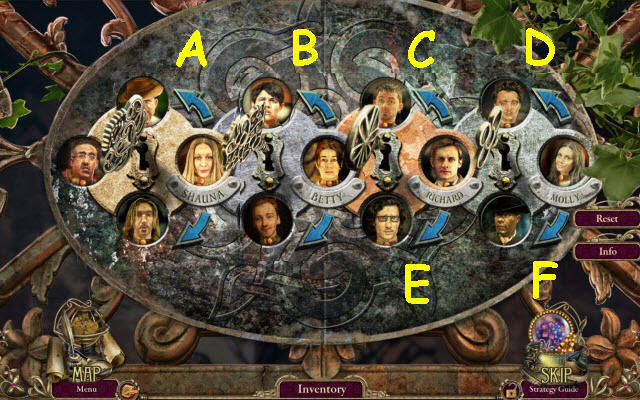
- Place the proper images to their names.
- Select the following: A, Bx2, D, E, Fx2 and C.
- Go forward.
- Take the BOOK HALF (X).
- Take the note; take the KNITTING NEEDLE (Y).
- Use the KNITTING NEEDLE in the hole; take the SUNDIAL PART (Z) and GLASS EYE (A).
- Take the SPHINX FIGURINE (B).
- Go to Hut.
- Give the BOOK HALF to Shauna; take the PLAYING CHIP (C).
- Go to Supply store.
- Examine the cart to access a HOP (D).
- Play the HOP.
- You receive the TOY CAT (E).
- Go to Bridge.
- Place the TOY CAT by the birds; push the button (F).
- Remove the bar (G); take the LADDER (H).
- Place the LADDER across the chasm (I).
- Go forward.
- Take the LISTENING DEVICE (J).
- Take the DIAMOND TOOTH 1/5 (K).
- Go right up the path.
- Take the NET (L).
- Go to Square.

- Use the NET to get the BUTTERFLY (M).
- Go to Rocks.
- Place the BUTTERFLY on the flower (N).
- Use the MODELING CLAY on the medallion; take the MEDALLION IMPRINT (O).
- Place the PAPER on the slot; use the PEN on the paper. Take the SLOT IMAGE (P).
- Go to Supply store.
- Give the SLOT IMAGE and MEDALLION IMPRINT to Betty; take the MEDALLION (Q).
- Go to Rocks.
- Place the MEDALLION in the slot to trigger a puzzle (R).
- Shoot the bugs in the spaces.
- Select the bugs in the following order: E, D, C, A, B, F, H, Ex2 and G.
- Go upstairs.
- Place the LISTENING DEVICE on the safe to trigger a puzzle (S).
- Take the SACK (T).
- Set the dials to the loudest setting.
- Set the dials as follows: A-6, B-9, C-8 and D-3.
- Take the DART and DIAMOND TOOTH 2/5.
- Take the MECHANICAL FINGER (U).
- Place the DART in the pipe; take the BLOWGUN (V).
- Back out.
Chapter 6: Platform
- Use the SACK on the hay; take the SACK OF HAY (W).
- Go to Hermit’s van.
- Use the BLOWGUN on the beast (X).
- Take the SWITCH (Y).
- Use the SACK OF HAY under the man (Z).
- Take the ROCKET INSIGNIA (A) and ROPE (B).
- Back out.
- Place the ROPE on the grapple hook (C).
- Go forward.
- Take the LOCK BUTTON (D).
- Go to Hermit’s van.
- Place the LOCK BUTTON on the lock and turn it. Take the DIAMOND TOOTH 3/5 (E) and FIRE EXTINGUISHER (F).
- Go to Gates.
- Select Larry and then the bow; take the DIAMOND TOOTH 4/5 (G).
- Go to Supply store; receive a SIGNAL FLARE from the man (H).
- Go to Train cave.
- Use the FIRE EXTINGUISHER on the fire; take the BRIEFCASE (I).
- Go to the Hut.
- Give the BRIEFCASE to Bors (J).
- Take the SHOVEL (K).
- Go to Train cave.
- Use the SHOVEL to get SAND; take the SNAIL-SHAPED GEAR (L).
- Go to the Bridge.
- Place the SNAIL-SHAPED GEAR on the door; take the LIFE JACKET (M) and FUEL (N).
- Go to Train cave.
- Place the LIFE JACKET under the bumper and pull the cord; take the TONGS (O).
- Go to Hermit’s van.
- Use the TONGS to get the CIRCULAR SAW BLADE (P).
- Go to Train cave.
- Remove the blade and place the CIRCULAR SAW BLADE and FUEL on the saw. Take the CIRCULAR SAW (Q).
- Go to the Square.
- Give the CIRCULAR SAW to Bors (R).
- Go down the hatch (S).
- Use the SIGNAL FLARE anywhere.
- Place the SWITCH on the panel; push the button (T).
- Take the FORKED ROD (U) and press the button.
- Place the SPHINX FIGURINE on the pyramid; take the MASKED MASTER STATUETTE (V) and STAPLE REMOVER (W). Read the note.
- Go to Square.
- Examine the briefcase to access a HOP.
- Play the HOP.
- You receive a DIAMOND TOOTH 5/5 (X).
- Go to Ruins.
- Place the SAND in the box; take the CRYSTAL FLOWER (Y).
- Go to Train Cave.
- Place the DIAMOND TOOTH in the mouth to trigger a puzzle (Z).
- Arrange the teeth in the correct order.
- See screenshot for solution (A).
- Place the MECHANICAL FINGER on the hand; take the MASTER’S RING (B) and RED ORE (C).
- Go to Rocks.
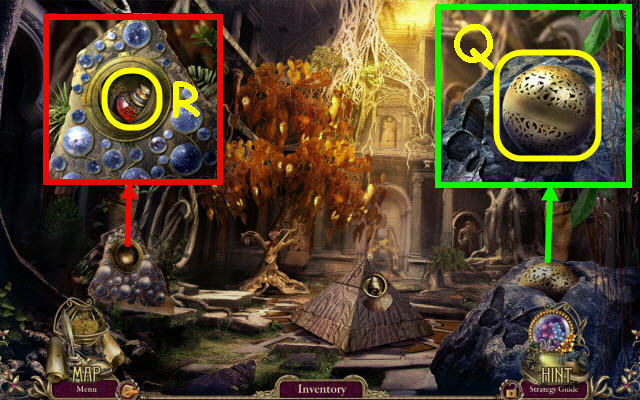
- Use the MASTER’S RING on the sphere and turn it; take the UNIVERSE ATLAS (D).
- Go to Hut basement.
- Place the RED ORE on the lock (E).
- Examine the cabinet to access a HOP.
- Play the HOP.
- You receive the ENERGY SPHERE (F).
- Go to Ruins.
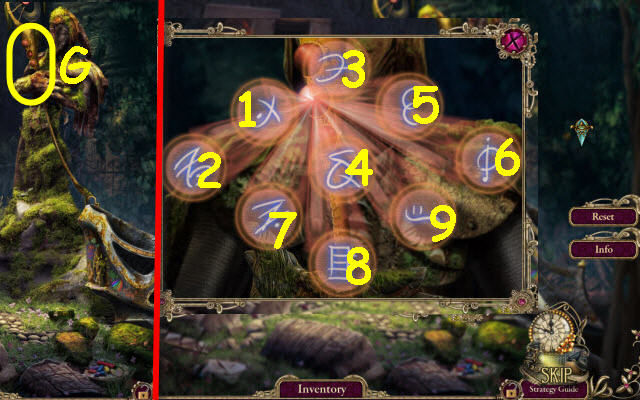
- Place the ENERGY SPHERE on the scepter to trigger a puzzle (G).
- Select the symbols in correct order.
- See screenshot for order (1-9).
- Go to Hut basement.
- Select the button to trigger a puzzle (H).
- Form pairs of balls to join in the circles.
- See screenshot for matches (I). Do the numbered ones first in order (1-4).
- Take the POWER UNIT.
- Go to Ruins.
- Examine the note; place the POWER UNIT on the platform (J).
- Select the platform (K).
Chapter 7: Bors
- You will receive a COLLAR.
- Take the BLUNT NAIL (L) and SYMBOL (M).
- Use the BLUNT NAIL on the wheel; receive a SHARP NAIL (N).
- Take the GEAR (O).
- Select the door twice; use the SHARP NAIL on the tube (P).
- Go through the door.
- Take the METAL U 1/3 (Q).
- Go up the right.
- Take the PROPELLER (R).
- Take the CUTTERS (S) and HOOK (T).
- Back out; go into the Loading bay on the left.
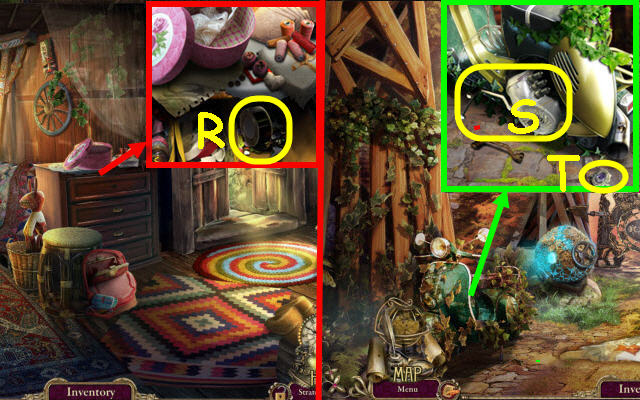
- Use the CUTTERS to get a SPRING (U).
- Go to the Technology center.
- Examine the table to access a HOP (V).

- Play the HOP.
- You receive an EMPTY PRISM (W).
- Place the EMPTY PRISM in the slot (X).
- Place the SYMBOL on the top left to trigger a puzzle (Y).
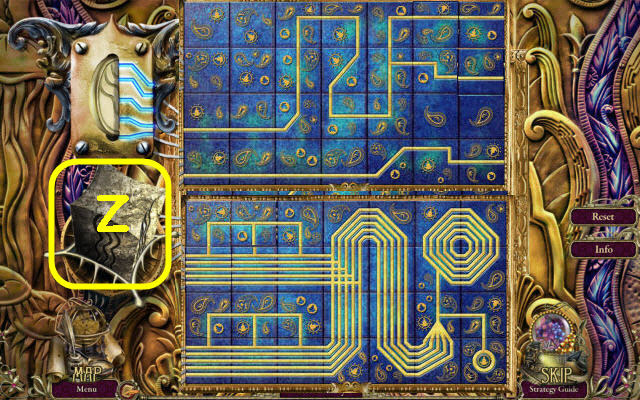
- Arrange the squares to complete the pattern on both sides.
- See screenshot for solution.
- Take the PRISM KEY (Z).
- Go to Landing area.
- Place the PRISM KEY on the cabinet; take the LEVER (A).
- Go to Loading bay.
- Place the LEVER on the mechanism; pull it (B).
- Take the INTERFACE PYRAMID (C).
- Place the INTERFACE PYRAMID on the panel to trigger a puzzle (D).
- Place the safe tokens in the center.
- Select the following: A, B, C, D, E, F, G, H, I, J, Ax3 and K.
- Take the ROBOT SWITCH (E).
- Use the HOOK on the key; pull twice and take the CROSS KEY (F).
- Back out.
- Use the CROSS KEY on the grate; take the STAR KEY (G).
- Return to Loading Bay.
- Use the STAR KEY on the grate; take the WHEEL (H).
- Place the WHEEL on the cart; take the CART (I).
- Go to Technology center.
- Place the ROBOT SWITCH on the robot; flip the switch (J).
- Use the CART on the robot; take the CART WITH ROBOT (K) and CABLE (L).
- Back out.
- Place the CART WITH ROBOT by the door; use the CABLE on it and flip the switch (M).
- Go forward.
- Take the RUBY (N).
- Go forward on the right path.
- Take the BOWL (O).
- Take the DIAL (P).
- Take the CROP CIRCLES SYMBOL (Q). Use the BOWL on the water; get HOT WATER (R).
- Back out.

- Place the DIAL on the lock and turn it. Take the BLACK TANK (S) and METAL U 2/3 (T).
- Back out.
- Use the HOT WATER on the ice; take the FISH-HEADED FIGURINE (U).
- Go to Technology center.
- Place the BLACK TANK in the holder. Press the button; take the MECHANICAL HAND (V).
- Go to Landing area.
- Use the MECHANICAL HAND to get the POWER ELEMENT (W).
- Place the POWER ELEMENT on the capsule (X).
- Examine the capsule to access a HOP.

- Play the HOP.
- You receive an ARCHEOLOGIST’S BRUSH (Y).
- Go to Pleasure gardens.
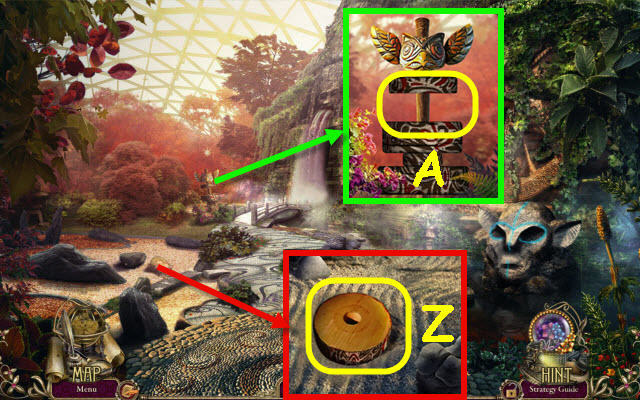
- Use the ARCHEOLOGIST’S BRUSH on the sand; take the TOTEM PIECE (Z).
- Place the TOTEM PIECE on the totem to trigger a puzzle (A).
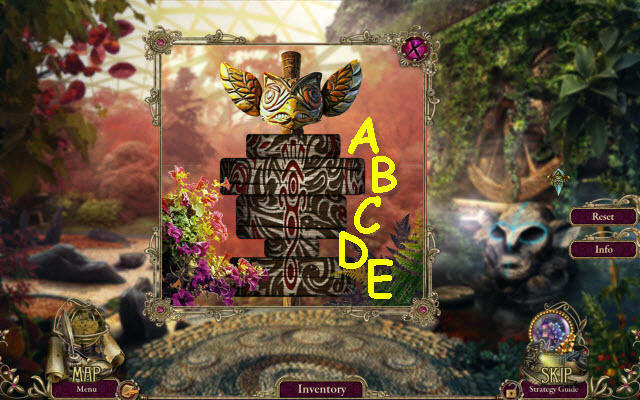
- Rotate the pieces to complete the pattern.
- Select the following: Ax3, B, Cx2, Dx4 and Ex5.
- Enter the temple.
Chapter 8: Temple
- Take the METAL U 3/3 (C) and EGG (C1).
- Go to Core corridor.
- Place the METAL U on the mechanism to trigger a puzzle (D).
- Connect the pipes.
- Select the following: K, J, I, E, A, B, C, D, H, L, K, G, C, D, H, L, K, G, F, J, I, E, A, B, C, G, H, D, C, G, F, E, A, B, F, G, H, D, C, B, F, J, I, E, F, G, C, B, F, G, C, B, F, E, A, B, C, G, F, B, A, E, F, G, C, B, F, J, K, G, C, B, F, G, C, D, H, G, C, B, F, G, C, D, H, G, C, D, H, G, K and J.
- Enter the left staircase doorway.
- Take the SPHERE WITH EVIL PLANET (E) and GLOWING CHALK (F).
- Take the BURNING SPLINTER (G) and BUCKET (H).
- Go to Pleasure gardens.
- Use the BUCKET to get SAND (I).
- Use the GLOWING CHALK on the head; take the MASTER’S MASK (J).
- Go to Departure zone.
- Use the SAND on the fire; take BORS’ RING (K) and CRYSTAL FLY (L).
- Use BORS’ RING on the lock; take the notebook and METAL FLOWER (M).
- Go to Master’s temple.
- Place the METAL FLOWER by the butterfly; take the BUTTERFLY (N).
- Place the BURNING SPLINTER in the holder and then the MASTER’S MASK in the recess (O).
- Examine the tree to access a HOP.
- Play the HOP.
- You receive a PICKAXE (P).
- Use the PICKAXE on the stone; take the MEMORY SPHERE (Q).
- Use the MEMORY SPHERE in the recess and select it; take the ANCESTOR’S BLOOD (R).
- Go to Departure zone.
- Place the ANCESTOR’S BLOOD in the receptacle (S).
- Place the SPHERE WITH EVIL PLANET in the circle to trigger a puzzle (T).
- Move the earth to the red planet.
- Select the following: E, A, H, Ax2, D, A, F, Ax2, G, A, J, Ax2, G, A, B, A, H, Ax2, G, Ax2, E, A, E, A, I and Ax2.
- Take the SPHERE WITH EARTH (U).
- Place the SPHERE WITH EARTH in the mechanism (V).
- Select the platform (W).
- Use the COLLAR on the statue (X).
- Take the LUCKY PIN (Y).
- Use the LUCKY PIN on the lock; take the STRANGE DAGGER (Z).
- Use the STRANGE DAGGER on the mask; take the MEDALLION (A).
- Place the MEDALLION in the slot (B).
- Open the panel; take the REMOTE CONTROL (C).
- Use the REMOTE CONTROL on the mirror and then examine the mirror to trigger a puzzle (D).
- Make a path through all the needed icons.
- See screenshot for solution (E).
- Congratulations! You have successfully completed Surface: The Pantheon.


 Grim Tales: The Legacy Walkthrough, Guide, & Tips
 Island: The Lost Medallion Walkthrough, Guide, & Tips
 Awakening: The Dreamless Castle Walkthrough, Guide, & Tips
 May's Mysteries: The Secret of Dragonville Walkthrough, Guide, & Tips
 Nemo's Secret: Vulcania Walkthrough, Guide, & Tips