Dark Cases: The Blood Ruby Walkthrough, Guide, & Tips
Dark Cases: The Blood Ruby Walkthrough
Welcome to the Dark Cases: The Blood Ruby Walkthrough
Your father was murdered while he was investigating a crime. Travel back through time to save him!
Whether you use this document as a reference when things get difficult or as a road map to get you from beginning to end, we’re pretty sure you’ll find what you’re looking for here.
This document contains a complete Dark Cases: The Blood Ruby game walkthrough featuring annotated screenshots from actual gameplay!
We hope you find this information useful as you play your way through the game. Use the walkthrough menu below to quickly jump to whatever stage of the game you need help with.
Remember to visit the Big Fish Games Forums if you find you need more help. Have fun!
This walkthrough was created by David Becker, and is protected under US Copyright laws. Any unauthorized use, including re-publication in whole or in part, without permission, is strictly prohibited.
General Tips
- This is the official guide for Dark Cases: The Blood Ruby.
- This guide will not mention each time you have to zoom into a location; the screenshots will show each zoom scene.
- We will use the acronym HOP for Hidden-object puzzles. Interactive items will be color-coded and some will be numbered; please follow the numbers in sequence.
- The HOP lists may be random; our lists may vary from yours.
- Use the map to travel to a location.
Chapter 1: Escaping the Murder Scene

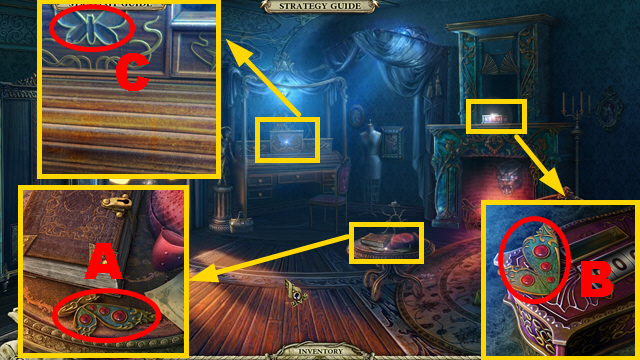
- Take the BUTTERFLY HALF (A).
- Take the BUTTERFLY HALF (B).
- Combine the 2 BUTTERFLY HALVES to create the BUTTERFLY.
- Insert the BUTTERFLY into the niche (C).

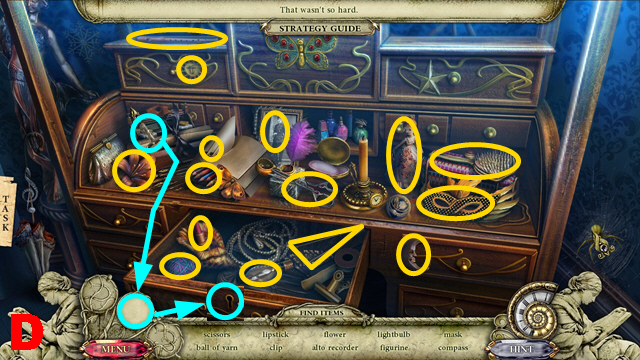
- Play the HOP.
- You receive the CLIP and the SCISSORS (D).

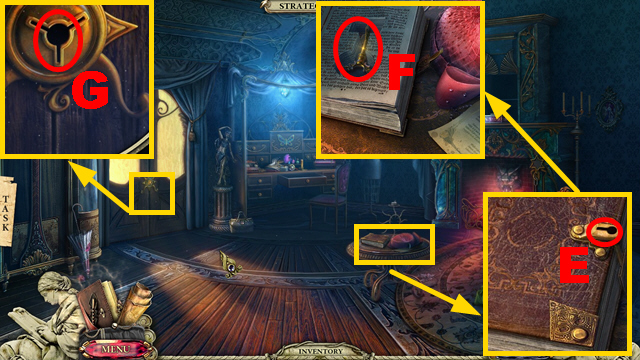
- Insert the CLIP into the lock (E); take the DOOR KEY (F).
- Insert the DOOR KEY into the lock (G); turn the key.
- Enter the Guest Room.

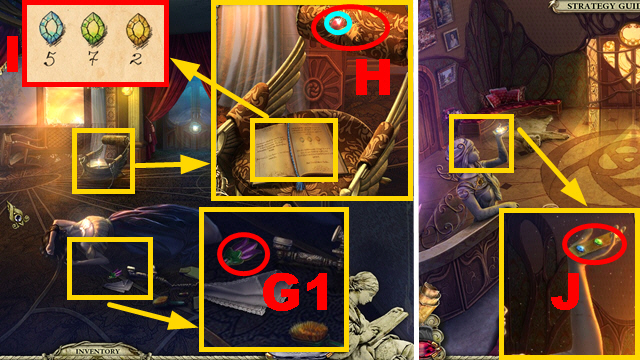
- Take the FLOWER SYMBOL (G1).
- Note the code (I); cut the seam with the SCISSORS (H) and take RED GEM 1/5 (blue).
- Go to the Lobby.
- Take the GEM PLATE (J).
- Go to the Boudoir.

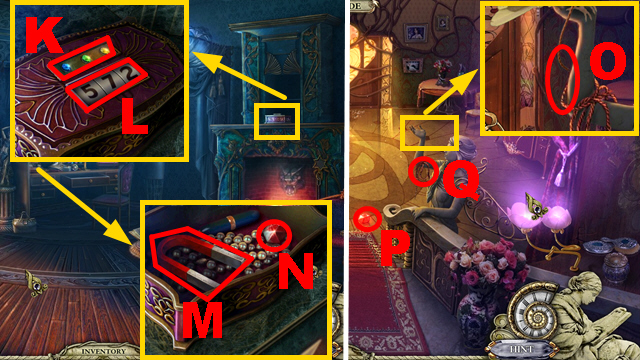
- Insert the GEM PLATE into the niche (K) and enter the correct code (L); take the MAGNET (M) and RED GEM 2/5 (N).
- Go to the Lobby.
- Cut the rope with the SCISSORS (O).
- Take RED GEM 3/5 (P) and the COILED ROPE (Q).
- Combine the MAGNET and the COILED ROPE to acquire the MAGNET ON A ROPE.
- Walk down.

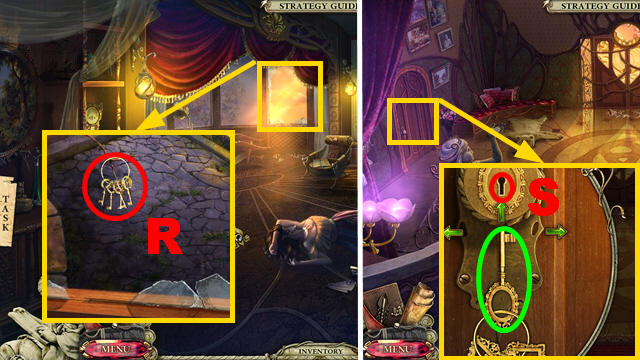
- Collect the KEY RING with the MAGNET ON A ROPE (R).
- Turn right.
- Insert the correct key (green) of the KEY RING into the lock (S).
- Enter the Kitchen.

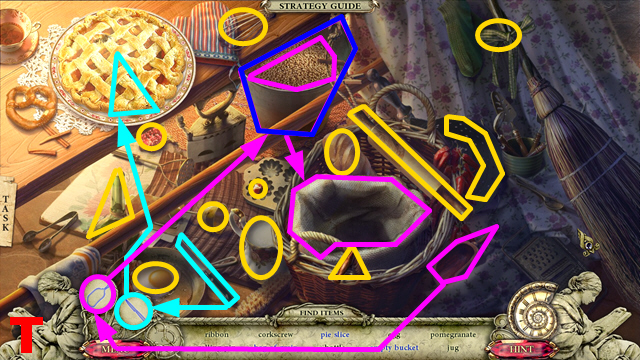
- Play the HOP.
- You receive RED GEM 4/5 and the EMPTY BUCKET (T).

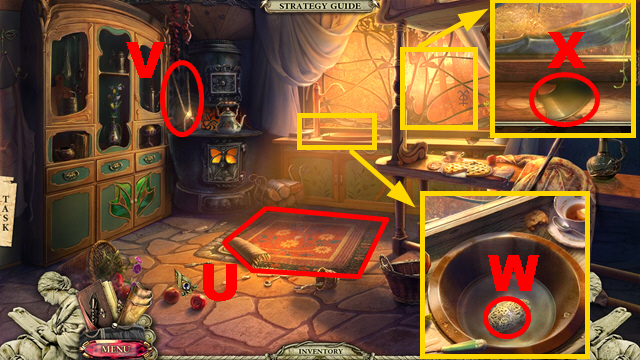
- Remove the carpet (U).
- Take the BLACKSMITH TONGS (V).
- Take the WET SPONGE (W).
- Take the RECORD PIECE (X).
- Walk down.

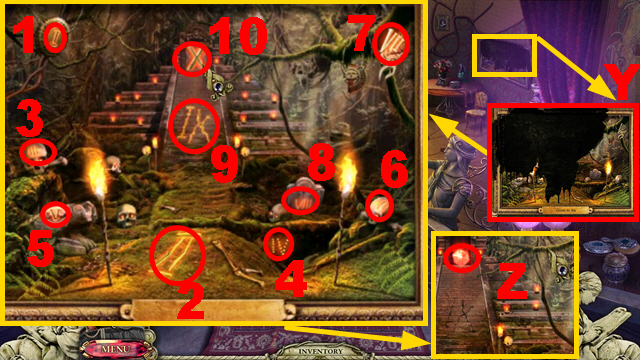
- Clean the portrait with the WET SPONGE (Y) three times.
- Solution: 1-10.
- Take RED GEM 5/5 (Z).
- Walk down.

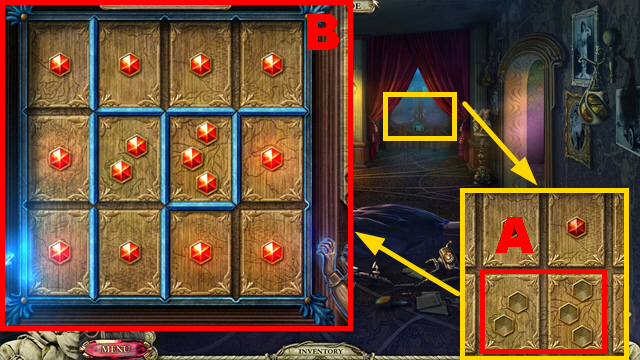
- Insert the 5 RED GEMS into the slots (A).
- Play the mini-game.
- To solve this puzzle (B), place the blue bars correctly.
- Enter the Study.

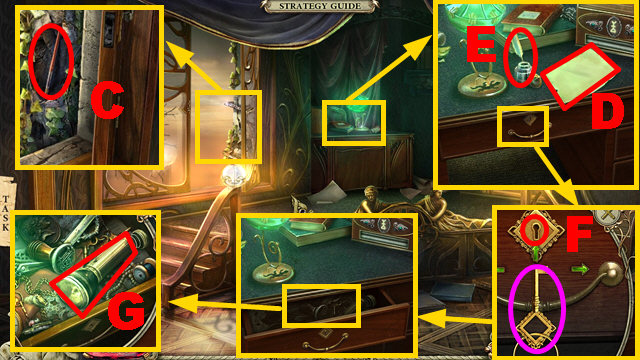
- Remove the stone; take the BRUSH behind it (C).
- Take the SHEET OF PAPER (D); take the INKPOT (E).
- Insert the correct key (purple) of the KEY RING into the lock (F); take the FLASHLIGHT WITHOUT A BATTERY (G).
- Go to the Kitchen.

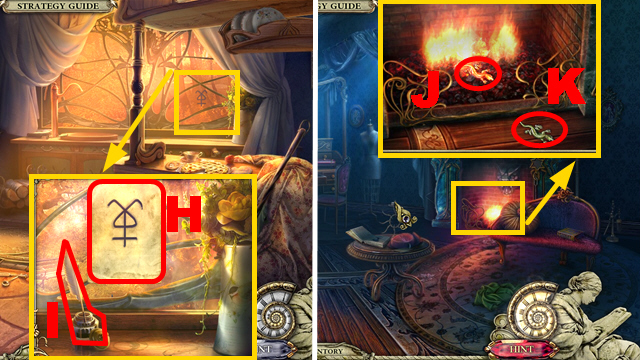
- Put down the SHEET OF PAPER (H), the INKPOT (I), and use the quill pen to draw on the paper sheet; take the MYSTERIOUS SYMBOL.
- Go to the Boudoir.
- Pull out the lizard with the BLACKSMITH TONGS (J); take the LIZARD (K).
- Go to the Study.

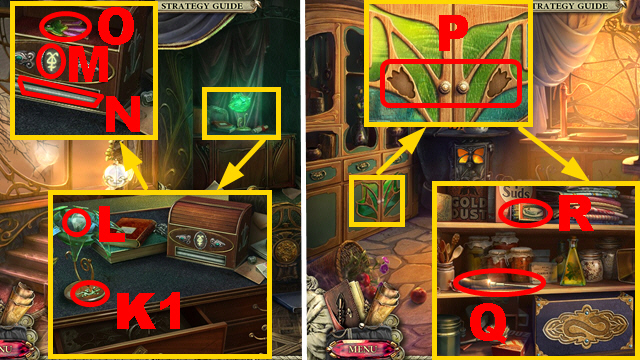
- Insert the LIZARD into the slot (K1); take the LIGHT BULB (L).
- Choose the correct symbol (M); insert the MYSTERIOUS SYMBOL into the box (N) and take the FLOWER SYMBOL (O).
- Go to the Kitchen.
- Insert the 2 FLOWER SYMBOLS into the slots (P); take the SCREWDRIVER (Q) and the MATCHES (R).
- Go to the Study.

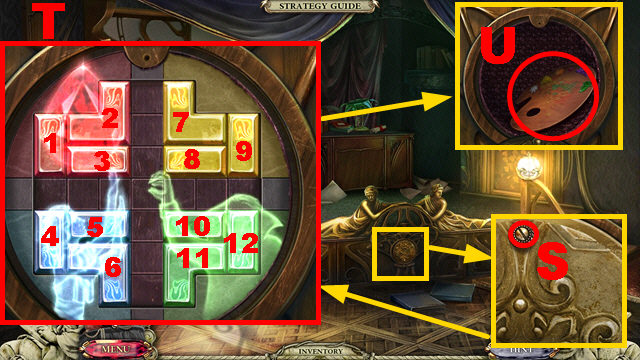
- Remove the screw with the SCREWDRIVER (S).
- Play the mini-game.
- Solution: (T): 9 up x3, 6 up x1, 2 right x1, 2 up x1, 1 right x1, 11 left x1, 4 left x1, 6 left x1, 3 right x1, 6 right x1, 2 down x1, 12 up x1, 5 right x2, 7 right x1, 8 down x2, 7 down x1, 10 down x1, 11 down x2, 4 left x2, 12 left x2, 12 up x1, 12 left x1, 10 up x3, 5 left x1, 5 up x2.
- 5 left x1, 7 up x2, 7 right x2, 8 right x2, 11 down x1, 4 down x1, 5 down x2, 7 up x1, 7 left x2, 2 up x1, 1 up x3, 8 down x1, 8 right x1, 5 down x1, 5 right x3, 11 right x2, 11 down x1, 4 down x2, 12 down x3, 7 down x1, 7 right x1, 10 left x2, 10 down x2, 7 left x1, 1 left x1.
- 1 up x1, 1 left x3, 2 left x1, 9 down x2, 6 right x1, 2 up x1, 2 left x1, 2 up x1, 2 left x2, 2 up x1, 3 down x2, 3 left x2, 7 right x1, 7 up x3, 9 left x3, 9 up x1, 11 up x1, 5 left x1, 5 up x3, 8 up x1, 8 right x2, 8 up x2, 9 down x1, 9 left x1, 5 left x1, 5 down x2, 5 right x2, 5 down x1.
- 9 right x2, 9 down x1, 7 down x2, 6 left x2, 6 up x1, 8 up x2, 7 right x2, 9 down x1, 6 down x3, 6 left x1, 7 left x1, 7 up x1, 7 left x1, 8 down x3, 7 up x1, 7 right x1, 9 up x3, 9 right x2, 9 up x1, 8 left x1, 8 up x2, 5 up x2, 11 right x2, 6 down x2, 10 right x2, 6 up x1, 11 up x1.
- 11 right x1, 6 right x1, 12 right x1, 12 down x1, 12 right x1, 10 left x2, 6 up x1, 6 left x1, 12 right x1, 6 down x2, 6 left x1, 5 left x3, 5 down x1, 5 left x1, 12 left x1, 12 up x4, 11 left x1, 11 down x1, 12 down x2, 12 right x3, 12 down x1, 10 right x4, 10 down x1.
- Take the PALETTE (U).
- Combine the BRUSH and the PALETTE to receive the BRUSH AND PALETTE.
- Go to the Kitchen.

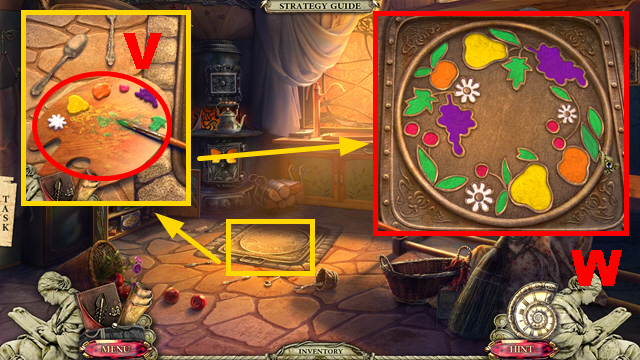
- Put down the BRUSH AND PALETTE (V).
- Play the mini-game.
- To solve this puzzle (W), paint the elements correctly.
- Enter the Basement.
Chapter 2: The Basement

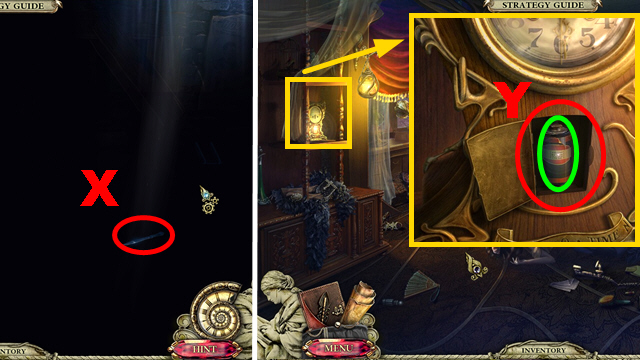
- Take the PAPER KNIFE (X).
- Go to the Guest Room.
- Open the compartment with the PAPER KNIFE (Y); take the BATTERY (green).
- Combine the FLASHLIGHT WITHOUT A BATTERY and the BATTERY to receive the WORKING FLASHLIGHT.
- Go to the BASEMENT.

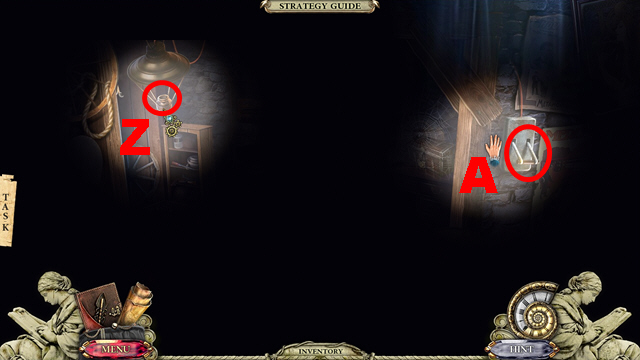
- Use the WORKING FLASHLIGHT to insert the LIGHT BULB into the lamp (Z); push the handle (A).

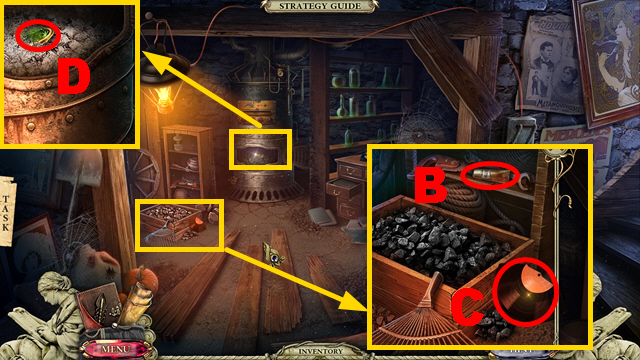
- Take the GLUE (B); take the RECORD PIECE (C).
- Take the GREEN STONE (D).
- Walk down twice.

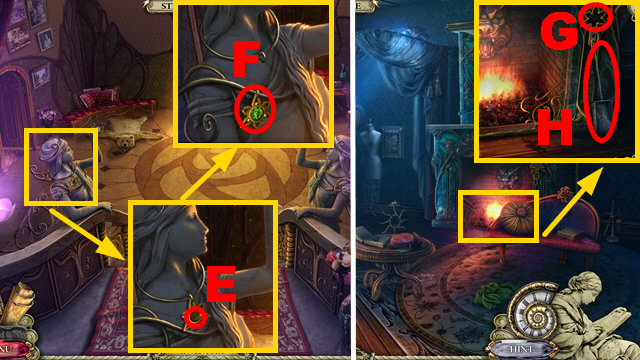
- Insert the GREEN STONE into the amulet (E); take the STAR AMULET (F).
- Go to the Boudoir.
- Insert the STAR AMULET into the niche (G); take the SCOOP (H).
- Go to the Basement.

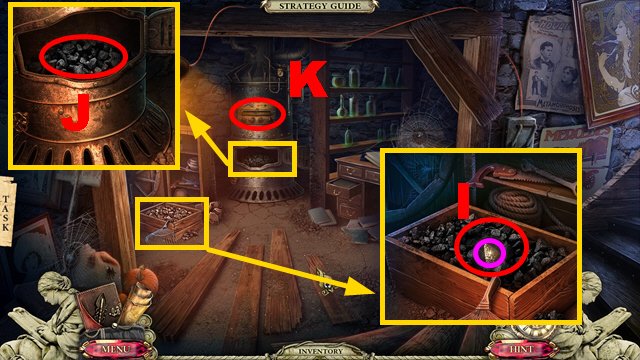
- Put the SCOOP into the coal to acquire the SCOOP OF COAL (I); take the WEIGHT (purple).
- Pour the SCOOP OF COAL into the oven (J); light the coal with the MATCHES.
- Play the mini-game (K).

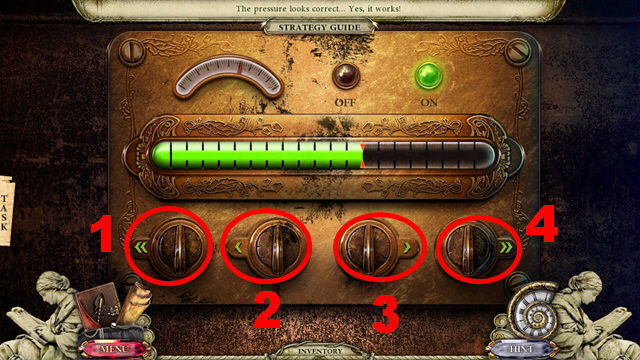
- Solution: 4, 3, 2, 1, 3, 2, 4, 2.
- Walk down.

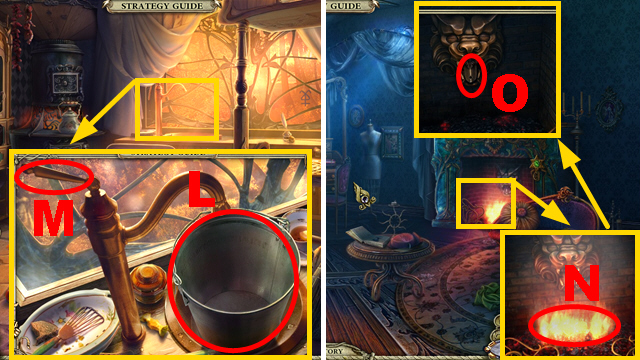
- Put down the EMPTY BUCKET (L); turn the faucet (M) and take the BUCKET OF WATER.
- Go to the Boudoir.
- Pour the BUCKET OF WATER over the fire (N); connect the WEIGHT to the tiger (O).
- Enter the Attic.

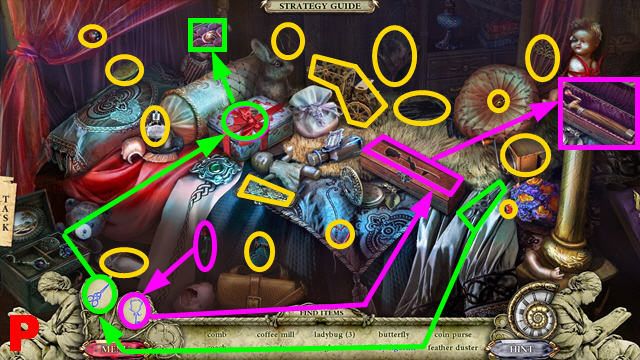
- Play the HOP.
- You receive the WOMAN FIGURINE and the FEATHER DUSTER (P).
- Go to the Basement.

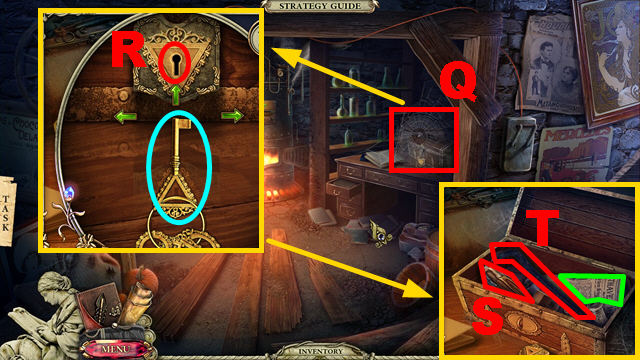
- Remove the cobwebs with the FEATHER DUSTER (Q).
- Insert the correct key (blue) of the KEY RING into the lock (R); take the HEADLESS FIGURINE (S), the CROWBAR (T), and read the newspaper (green).
- Go to the Attic.

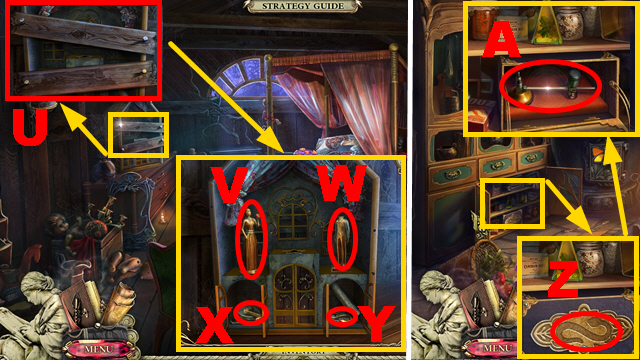
- Remove the nails with the CROWBAR four times (U); put down the LADY FIGURINE (V) and the HEADLESS FIGURINE (W).
- Take the CRANK (X) and the METAL SNAKE (Y).
- Go to the Kitchen.
- Insert the METAL SNAKE into the niche (Z); take the GLASS CUTTER (A).
- Go to the Guest Room.

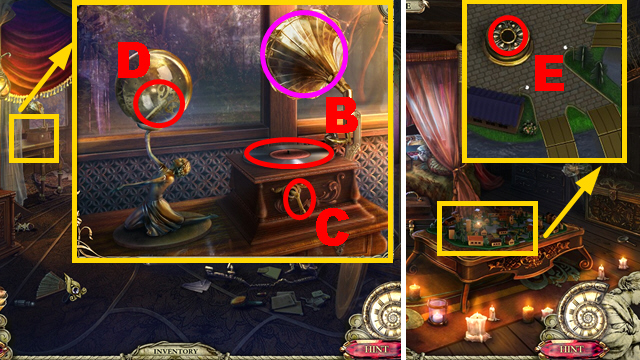

- Put down the 2 RECORD PIECES (B); apply the GLUE to the record.
- Connect the CRANK to the device (C); turn the crank.
- Turn the gramophone (purple); take the WINDING KEY (D).
- Go to the Attic.
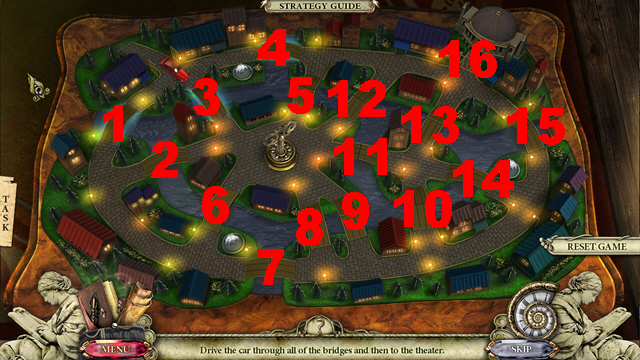
- Insert the WINDING KEY into the slot (E); turn the key.
- Play the mini-game.
- Solution: 1-16.

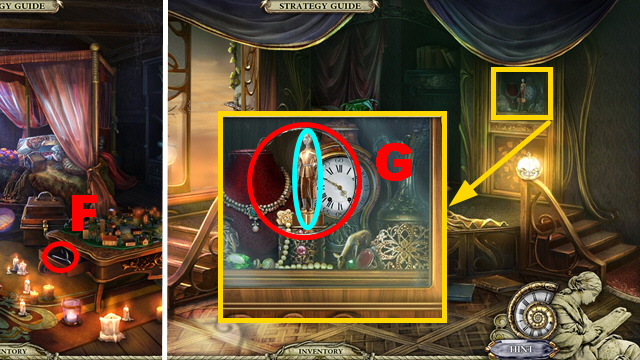
- Take the HOOK (F).
- Go to the Study.
- Cut the glass with the GLASS CUTTER (G); take the BOY FIGURINE (blue).
- Go to the Attic.

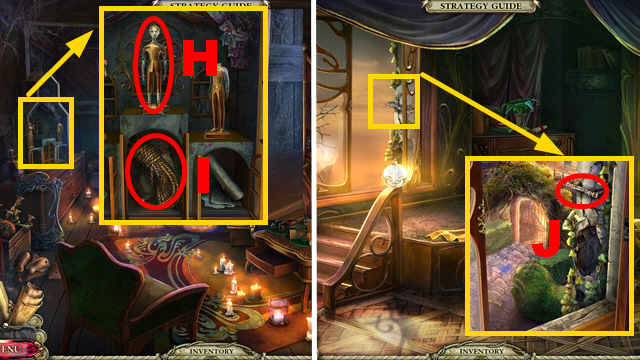
- Put down the BOY FIGURINE (H); take the ROPE (I).
- Combine the HOOK and the ROPE to receive the ROPE WITH A HOOK.
- Go to the Study.
- Connect the ROPE WITH A HOOK to the wall (J).
- Move forward to the Garden.
Chapter 3: The Garden

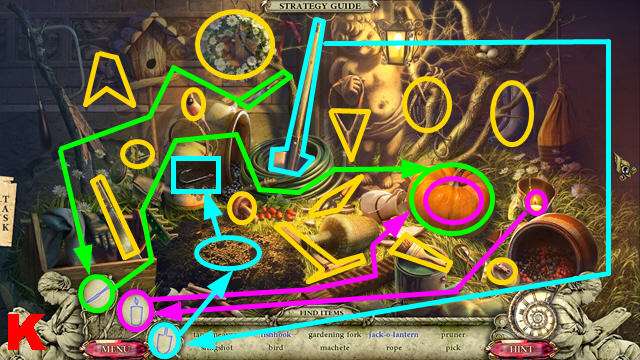
- Play the HOP.
- You receive the FISHHOOK and the RUSTY MACHETE (K).

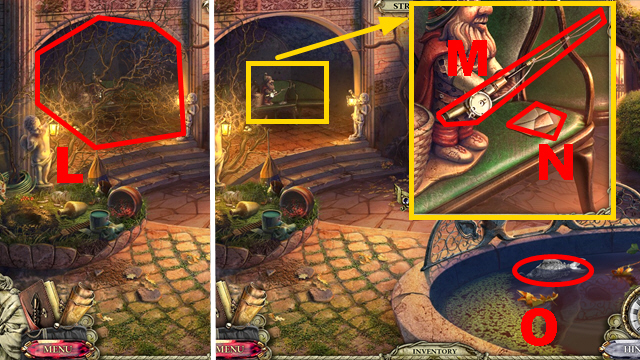
- Cut the branches with the RUSTY MACHETE three times (L).
- Take the ROD WITHOUT HOOK (M); read the letter (N).
- Combine the HOOK and the ROD WITHOUT HOOK to receive the FISHING ROD.
- Collect the SILVER FISH with the FISHING ROD (O).

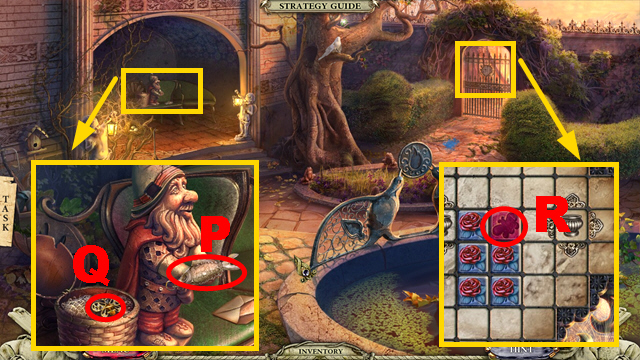
- Give the SILVER FISH to the gnome (P); take the DIAMOND BEE (Q).
- Insert the DIAMOND BEE into the niche (R).
- Play the mini-game.

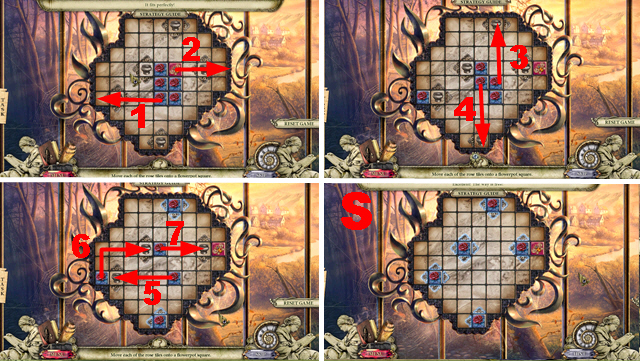
- Solution (S): 1-7.
- Move forward and turn left.

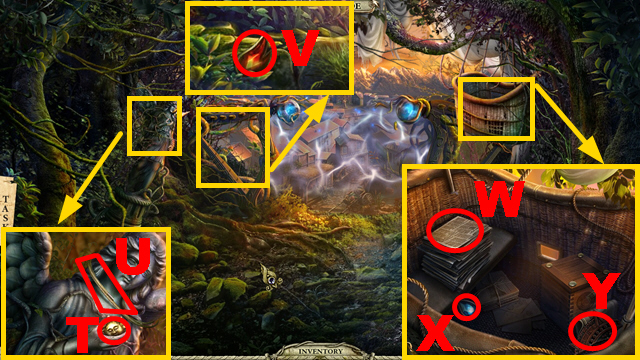
- Take the SUN DISC (T); take HARP STRING 1/3 (U).
- Take the FLAME TOKEN (V).
- Read the paper (W); take the WATER TOKEN (X) and the PATTERN FRAGMENT (Y).
- Walk down.

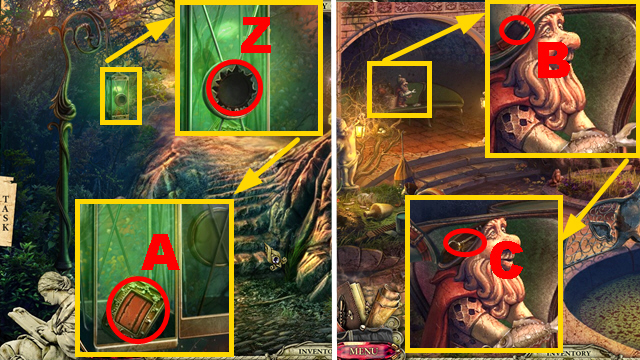
- Insert the SUN DISC into the slot (Z); take the HAT BUCKLE (A).
- Walk down.
- Put the HAT BUCKLE into the niche (B); take the CAR KEY (C).
- Move forward.

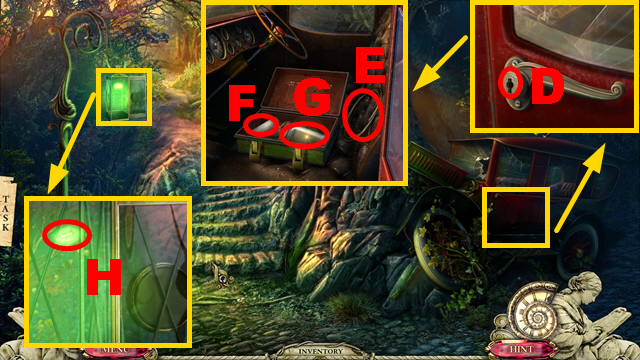
- Insert the CAR KEY into the lock (D).
- Take HARP STRING 2/3 (E); open the medicine box.
- Take the BANDAGE (F); take the GLASS JAR (G).
- Collect the firefly with the GLASS JAR (H) to receive the JAR WITH FIREFLY.
- Walk down.

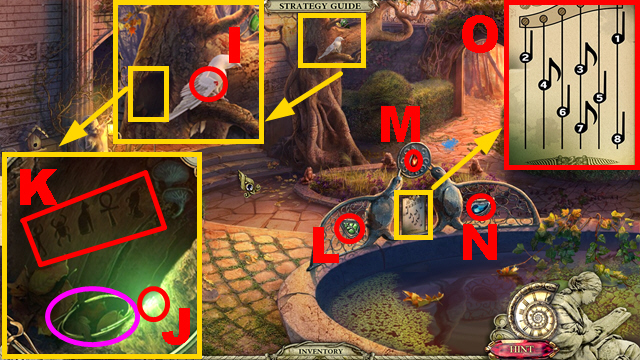
- Put the BANDAGE on the raven (I) to receive the LEAF TOKEN.
- Put the JAR WITH FIREFLY into the niche (J); make note of the code (K) and take HARP STRING 3/3 (purple).
- Insert the LEAF TOKEN (L), FLAME TOKEN (M), and WATER TOKEN (N) into the niches.
- Take the LEFT HARP NOTES (O).
- Move forward.

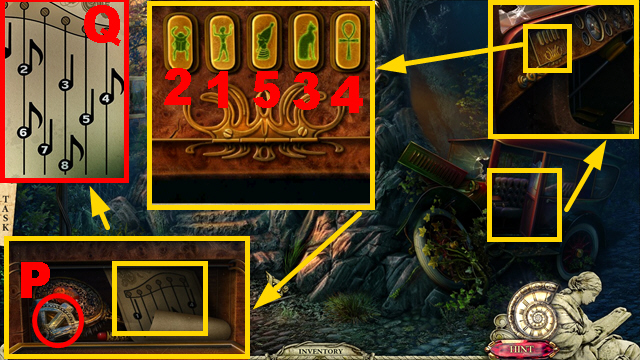
- Use the code you just noted to open this compartment.
- Solution: 1-5.
- Take the WHEEL FRAGMENT (P); take the RIGHT HARP NOTES (Q).
- Turn left.

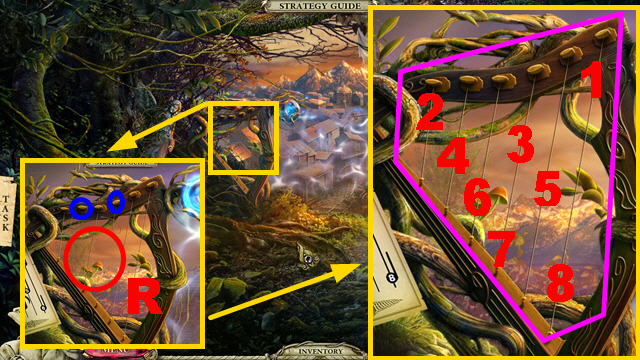
- Connect 2 HARP STRINGS to the left harp (R); tighten the strings (blue).
- Put down the LEFT HARP NOTES (purple).
- Play the mini-game.
- Solution: 1-8.

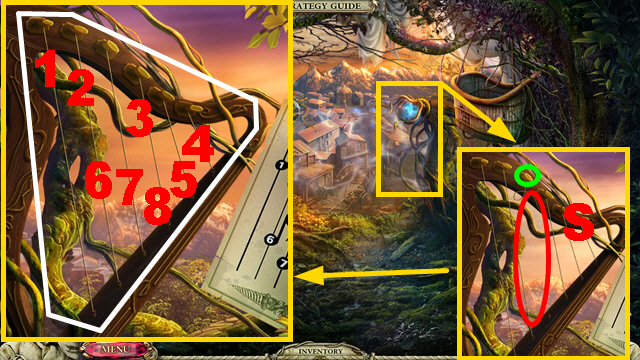
- Connect the HARP STRING to the right harp (S); tighten the string (green).
- Put down the RIGHT HARP NOTES (white).
- Play the mini-game.
- Solution: 1-8.
- Move forward.

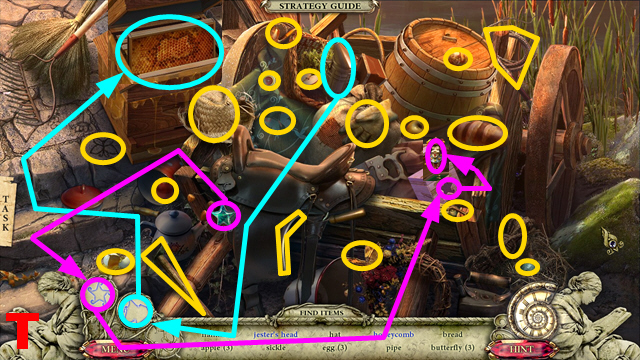
- Play the HOP.
- You receive the HONEYCOMB and the JESTER HEAD (T).

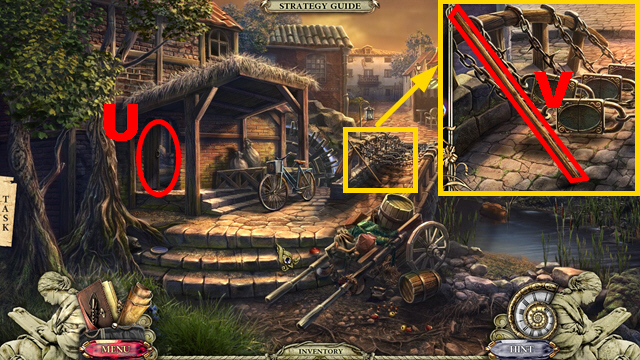
- Open the door (U).
- Take the STAFF (V).
- Go through the door.

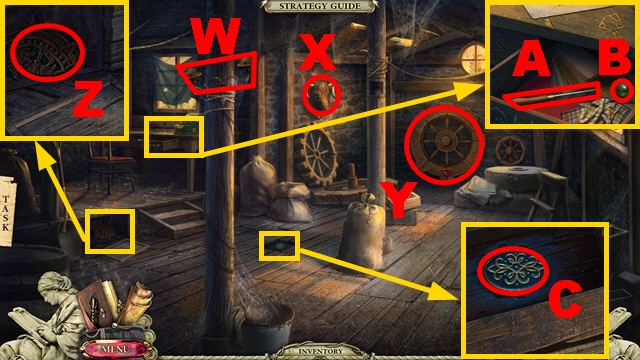
- Activate elements W, Xx3, Y; take the PATTERN FRAGMENT (Z).
- Activate elements Wx2, X; take the CHISEL (A) and BALL 1/4 (B).
- Activate elements Xx2, Yx2; take BRIDGE SEAL 1/5 (C).

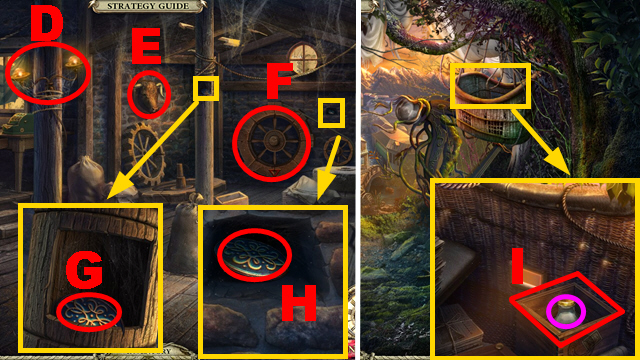
- Activate elements D, Fx3; take BRIDGE SEAL 2/5 (G).
- Activate elements Dx2, Ex3; take BRIDGE SEAL 3/5 (H).
- Walk down twice.
- Open the box with the CHISEL (I); take the MILK BOTTLE (purple).
- Move forward.

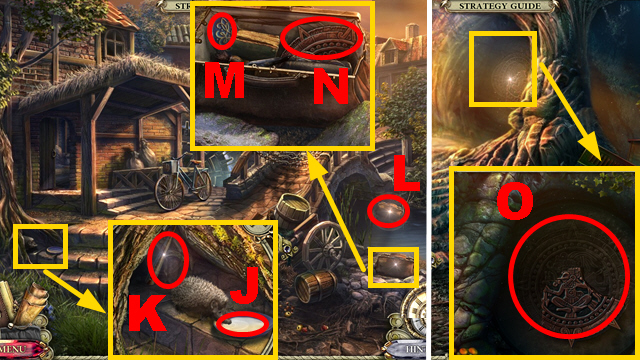
- Pour the MILK BOTTLE into the bowl (J); take the GAFF HOOK (K).
- Combine the GAFF HOOK and the STAFF to receive the GAFF.
- Pull in the bag with the GAFF (L); open the bag.
- Take BRIDGE SEAL 4/5 (M); take the PATTERN FRAGMENT (N).
- Walk down twice.
- Insert the 3 PATTERN FRAGMENTS into the niche (O).
- Enter the cave.

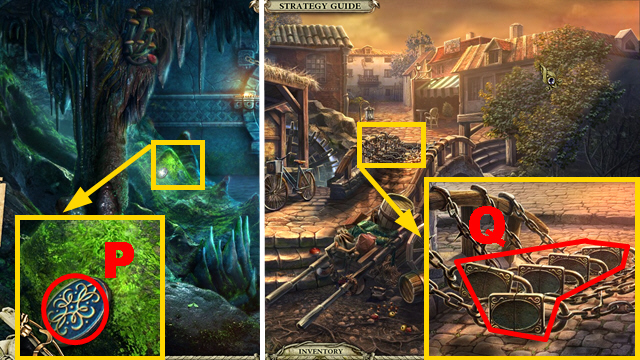
- Take BRIDGE SEAL 5/5 (P).
- Go to the Bridge.
- Insert the 5 BRIDGE SEALS into the slots (Q).
- Go across the bridge.
Chapter 4: The Town Outskirts

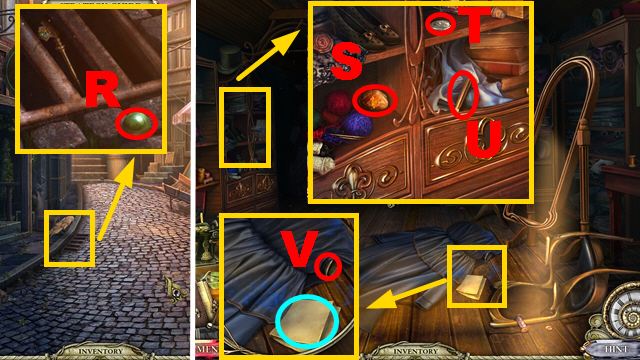
- Take BALL 2/4 (R).
- Enter the Atelier.
- Take the AMBER (S), DIME 1/5 (T), and the CRYPTIC MACHINE HANDLE (U).
- Read the note (blue); take COPPER TRUMPET 1/2 (V).
- Walk down and move forward to the Central Square.

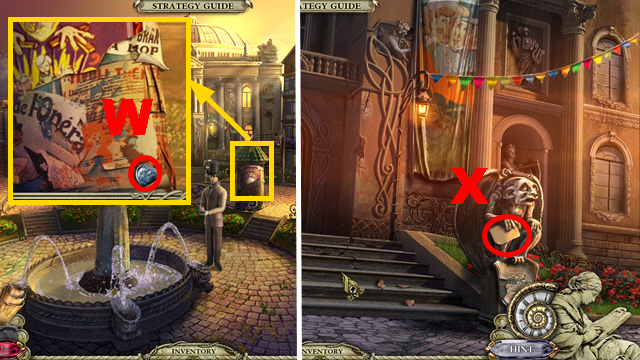
- Take DIME 2/5 (W).
- Move forward.
- Read the note (X).
- Walk down and turn right.

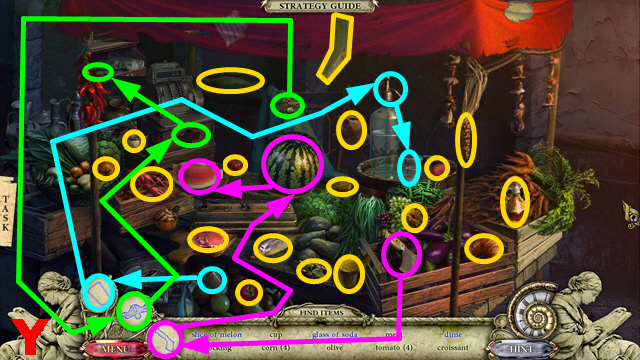
- Play the HOP.
- You receive the TOMATOES and DIME 3/5 (Y).
- Move forward.

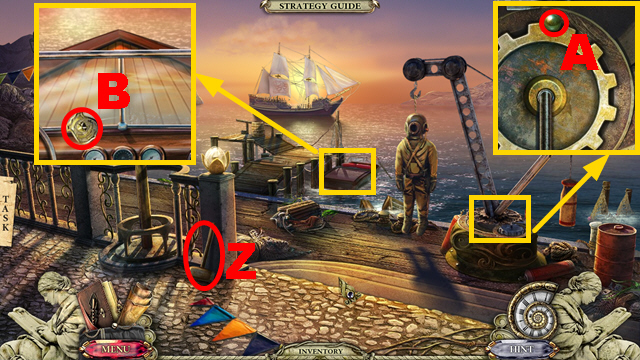
- Take the MALLET (Z).
- Take BALL 3/4 (A).
- Take the SERVE BADGE (B).
- Walk down.

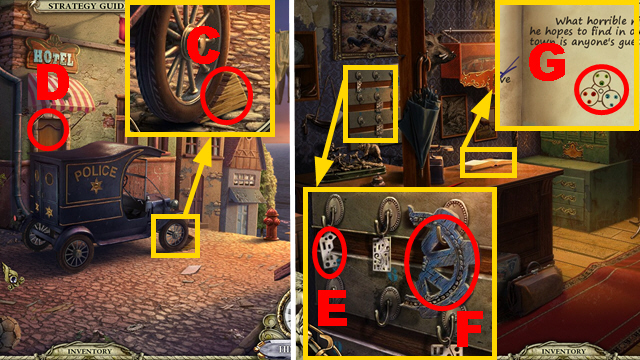
- Hit the wedge with the MALLET (C).
- Open the door (D).
- Go through the door.
- Take the HALF OF KEY (E) and the WHEEL FRAGMENT (F).
- Combine the 2 WHEEL FRAGMENTS to receive the WHEEL.
- Make note of the code (G).
- Go to the Watermill.

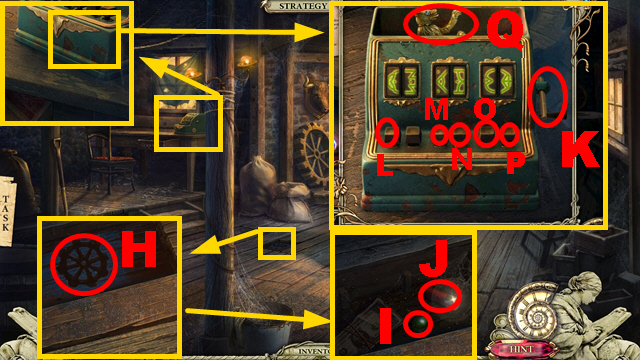
- Insert the WHEEL into the niche (H); take BALL 4/4 (I) and SHOTGUN SHELL 1/2 (J).
- Connect the CRYPTIC MACHINE HANDLE to the device (K); turn the handle.
- Solution: Lx2, M, Nx4, Ox5, Px3.
- Take the HERALDIC BEAR (Q).
- Go to the Town Outskirts.

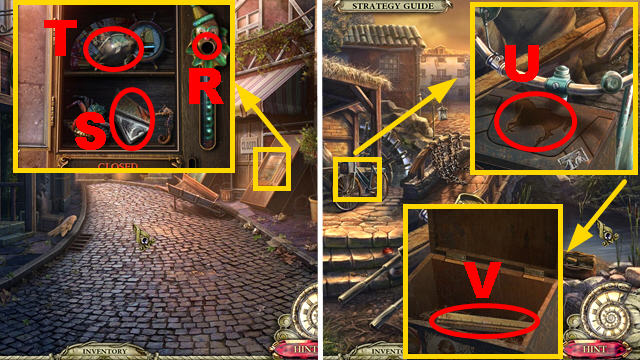
- Insert the 4 BALLS into the slot (R); take the BASS-RELIEF FRAGMENT (S) and the HORSE (T).
- Walk down.
- Insert the HORSE into the niche (U); take the RULER (V).
- Go to the Eastern Street.

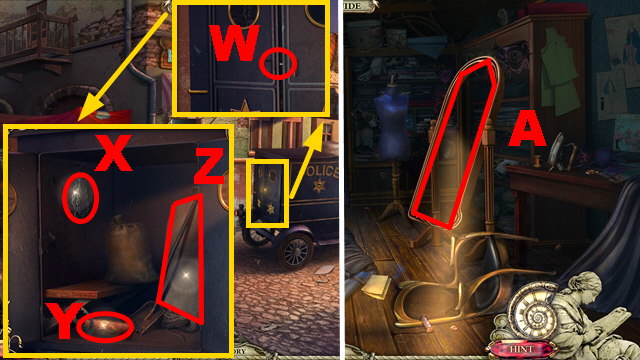
- Put the RULER between the door (W); open the door.
- Take the CHAIN (X), GAS CAN (Y), and MIRROR (Z).
- Go to the Atelier.
- Connect the MIRROR to the stand (A).

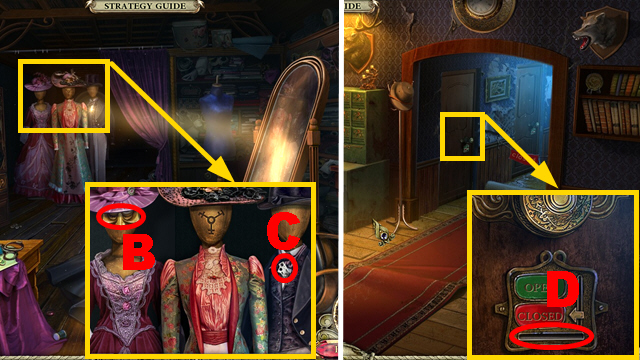
- Take the MASK HALF (B); take the HALF OF KEY (C).
- Combine the 2 HALVES OF KEY to receive the ROOM KEY.
- Go to the Hotel.
- Insert the ROOM KEY into the slot (D).
- Enter the room.

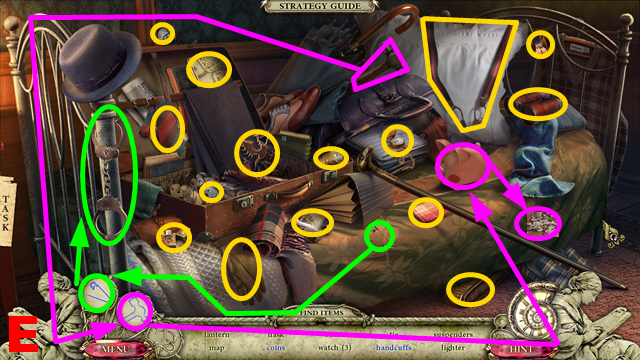
- Play the HOP.
- You receive the HERALDIC GRYPHON and the MUSICAL NOTE (E).

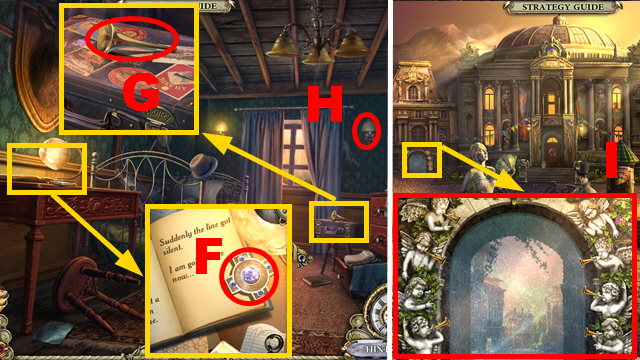
- Turn the page; take FREEDOM KEY 1/2 (F).
- Take COPPER TRUMPET 2/2 (G).
- Turn on the lamp (H).
- Go to the Central Square.
- Put down the 2 COPPER TRUMPETS (I).
- Play the mini-game.

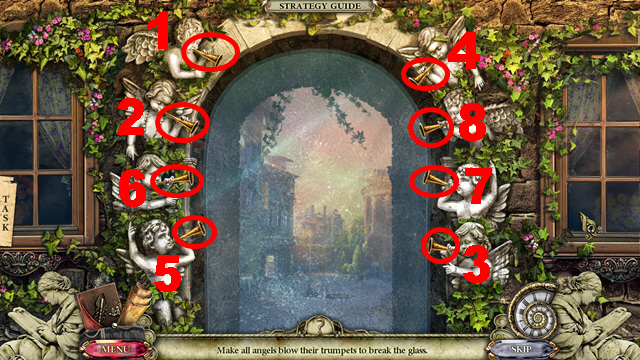
- Solution: 1-8.
- Turn left.

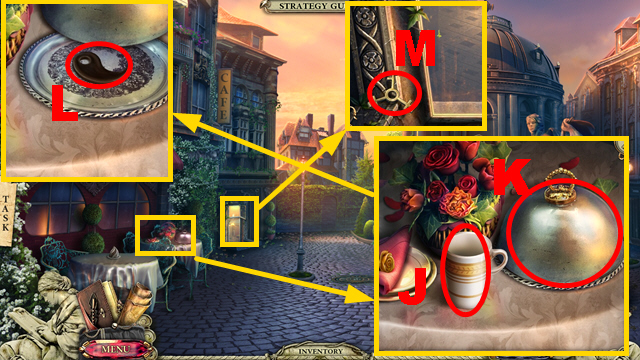
- Take the CUP (J); remove the cover (K).
- Take the YIN (L).
- Take the STAMP (M).
- Move forward.

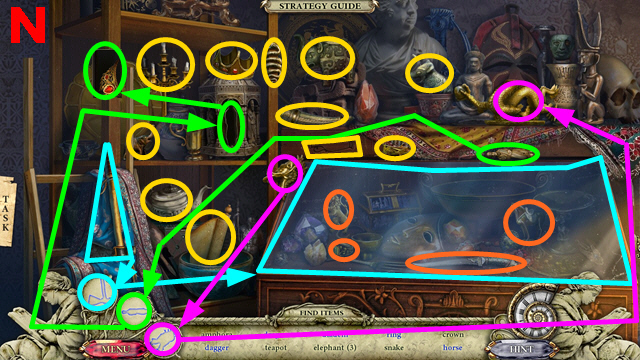
- Play the HOP.
- You receive the GOLD DIADEM and the HERALDIC LION (N).
- Go to the Atelier.

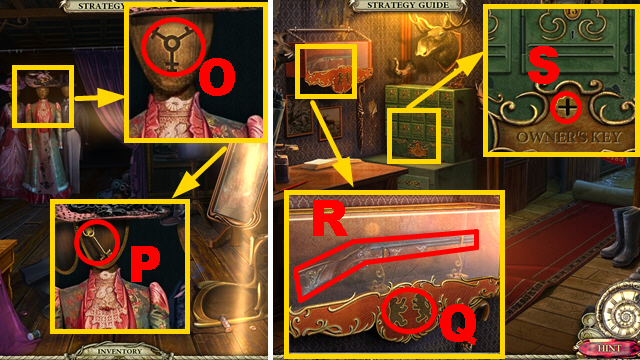
- Insert the STAMP into the niche (O); take the HOTELIER KEY (P).
- Go to the Hotel.
- Insert the HERALDIC BEAR and HERALDIC LION into the slots (Q); take the UNCHARGED SHOTGUN (R).
- Insert the HOTELIER KEY into the lock (S).
- Play the mini-game.

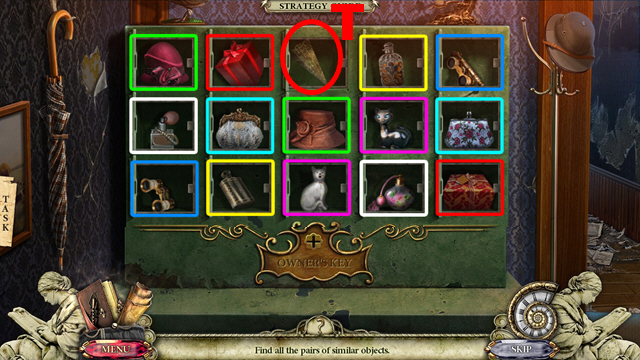
- To solve this puzzle, find pairs framed in the same color.
- Take the FAN SEGMENT (T).
- Walk down twice.

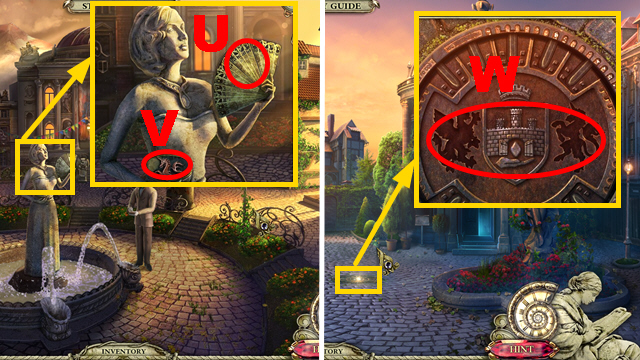
- Insert the FAN SEGMENT into the fan (U); take the HERALDIC UNICORN (V).
- Go to the Western Street.
- Insert the HERALDIC GRYPHON and HERALDIC UNICORN into the niches (W).
- Go down to the Sewer.
Chapter 5: The Sewer

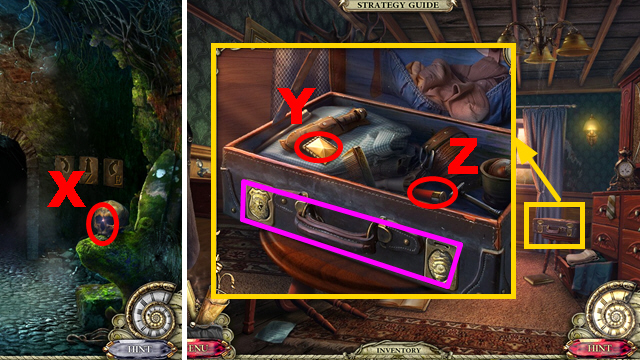
- Take the PROTECTION BADGE (X).
- Go to the Hotel Room.
- Insert the SERVE BADGE and PROTECTION BADGE into the slots (purple); take the STRANGE CRYSTAL (Y) and SHOTGUN SHELL 2/2 (Z).
- Combine the 2 SHOTGUN SHELLS and the UNCHARGED SHOTGUN to receive the LOADED SHOTGUN.
- Go to the Underground Tunnel.

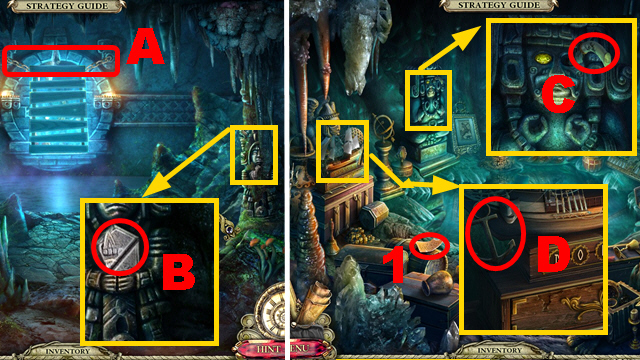
- Fire the LOADED SHOTGUN at the gate twice (A).
- Take the BASS-RELIEF FRAGMENT (B).
- Move forward.
- Take the OBSIDIAN DAGGER (C).
- Take the ANCHOR (D).
- Read the note (1).
- Combine the ANCHOR and the CHAIN to receive the ANCHOR ON A CHAIN.
- Go to the Western Street.

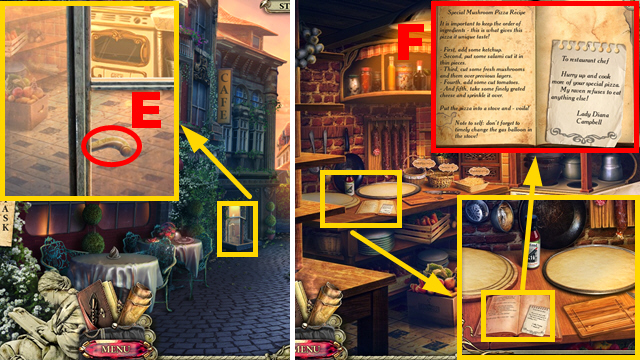
- Open the window with the ANCHOR ON A CHAIN (E).
- Turn left.
- Read the recipe (F).
- Go to the Sewer.
- Choose the following directions: right, forward, left, forward, right, forward.

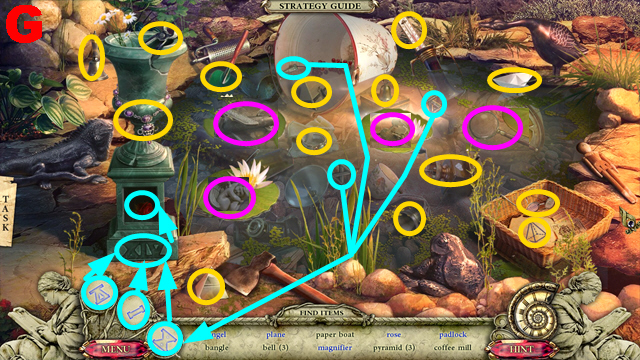
- Play the HOP.
- You receive the MAGNIFYING GLASS and the ROSE (G).

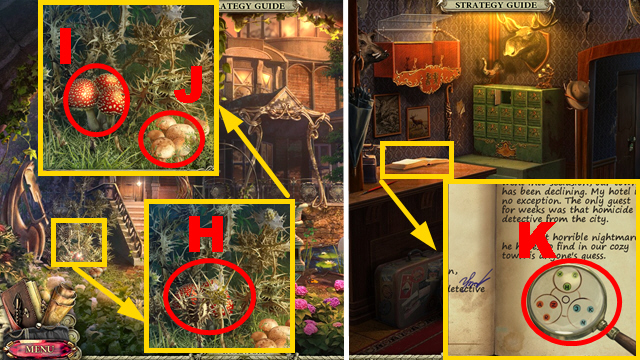
- Cut the branches with the OBSIDIAN DAGGER (H); take the POISONOUS MUSHROOMS (I) and the MUSHROOMS (J).
- Go to the Hotel.
- Put the MAGNIFYING GLASS on the code (K).
- Move forward.

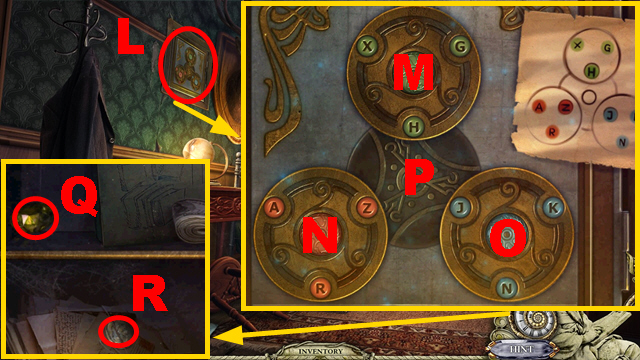
- Play the mini-game (L).
- Solution: O, Mx2, P, Ox2, Nx2, M, P, M, N, P, N, P, Mx2, Nx2, O.
- Take the YELLOW CRYSTAL (Q) and DIME 4/5 (R).
- Go to the Cave.

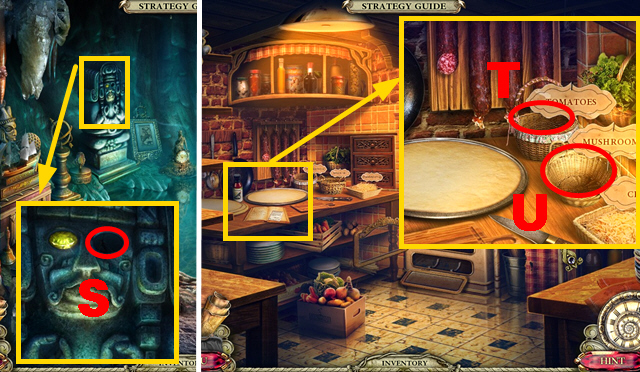
- Insert the YELLOW CRYSTAL into the niche (S).
- Go to the Restaurant Kitchen.
- Put down the TOMATOES (T) and MUSHROOMS (U).

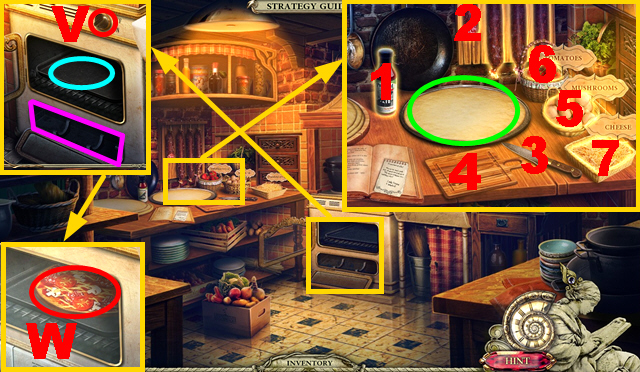
- Solution: 1, 2, 3, 4, 5, 3, 4, 6, 3, 4, 7.
- Take the RAW PIZZA (green).
- Insert the GAS CAN into the niche (purple); turn the button (V).
- Put the RAW PIZZA into the oven (blue); take the PIZZA (W).
- Go to the Town Outskirts.

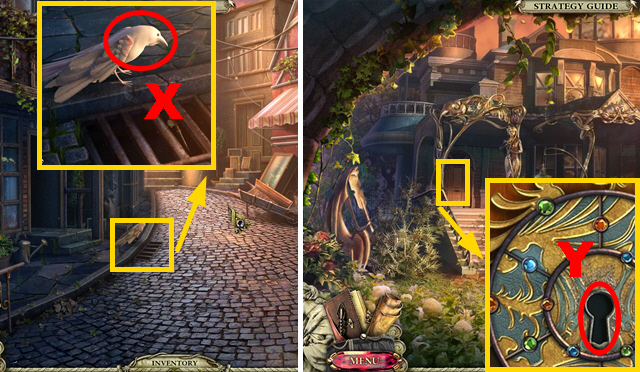
- Give the PIZZA to the raven (X) to receive the JEWELER KEY.
- Go to the Jeweler’s Garden.
- Insert the JEWELER’S KEY into the lock (Y).
- Enter the Jeweler’s House.

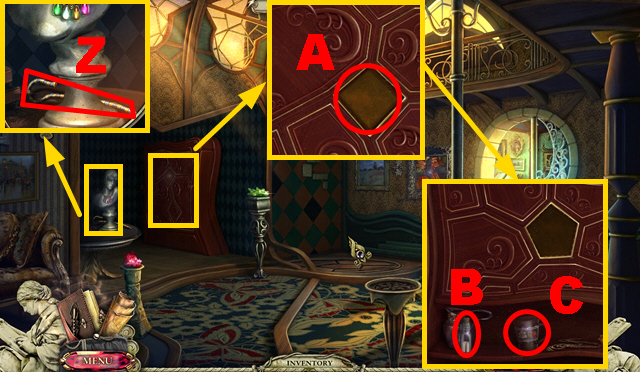
- Take the PHARAOH SCEPTER (Z).
- Insert the STRANGE CRYSTAL into the niche (A); take the MERCURY (B) and the CUP (C).
- Go to the Restaurant Kitchen.

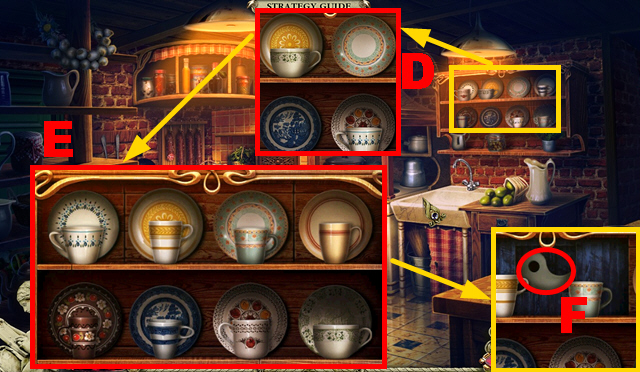
- Put down the 2 CUPS (D).
- Play the mini-game.
- Swap the cups correctly (E).
- Take the YANG (F).
- Combine the YIN and YANG to receive the YIN-YANG SYMBOL.
- Go to the Museum.

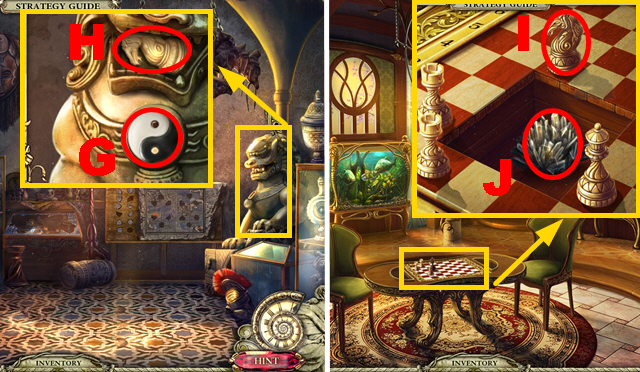
- Insert the YIN-YANG SYMBOL into the slot (G); take the WHITE KNIGHT (H).
- Go to the Jeweler’s House and turn right.
- Put down the WHITE KNIGHT (I); take the CLUSTER OF CRYSTALS (J).
- Walk down.

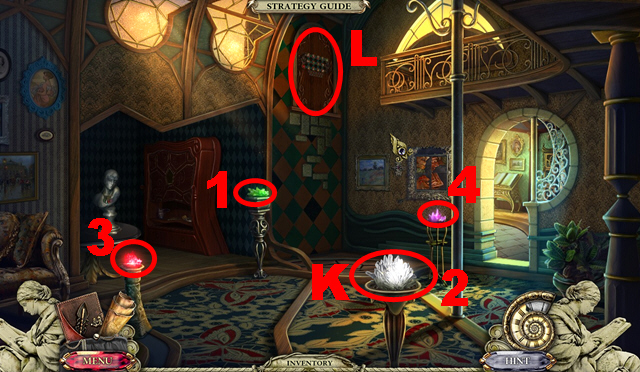
- Put down the CLUSTER OF CRYSTALS (K).
- Activate the crystals (1-4).
- Play the mini-game (L).

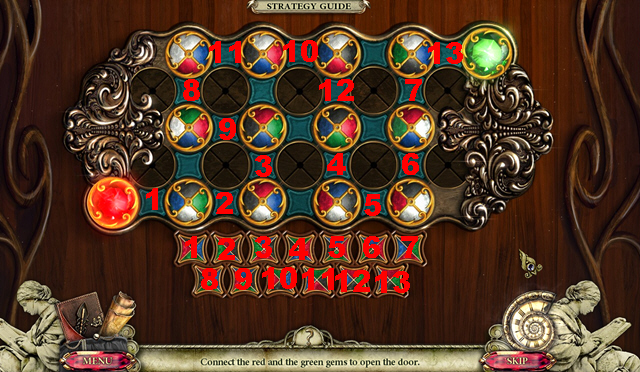
- Solution: 1-13.
- Go upstairs.

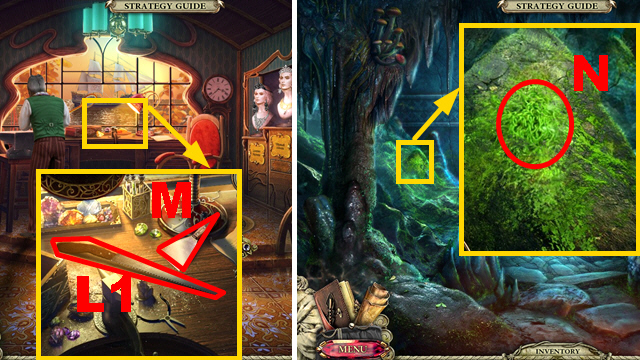
- Take the RAZOR SAW (L1); take the SCRAPER (M).
- Go to the Underground Tunnel.
- Collect the GLOWING MOSS with the SCRAPER (N).
- Go to the Hotel Room.

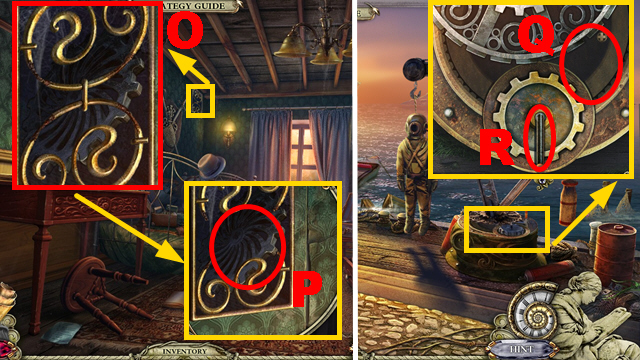
- Cut the grate with the RAZOR SAW four times (O); take the GEAR (P).
- Go to the Harbor.
- Connect the GEAR to the mechanism (Q); turn the lever (R).
- Go underwater.

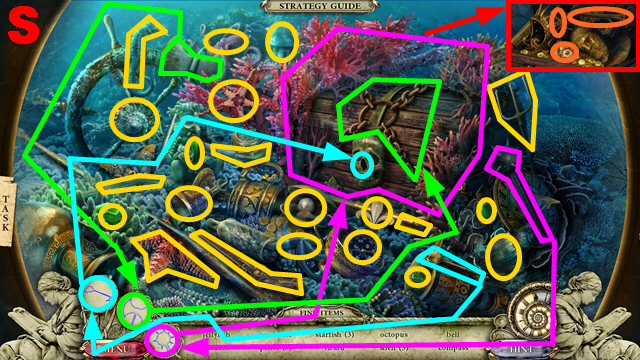
- Play the HOP.
- You receive the FLEUR-DE-LIS and the GOLDEN NUGGET (S).
- Go to the Atelier.

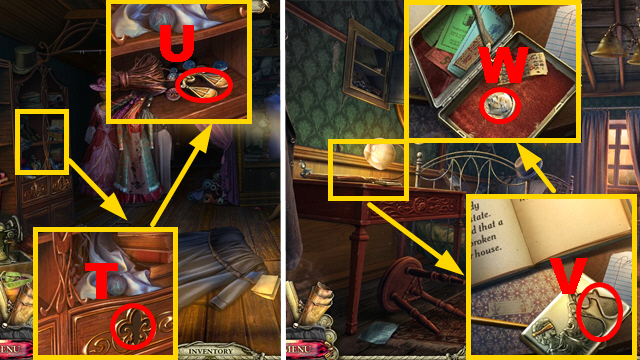
- Insert the FLEUR-DE-LIS into the niche (T); take the SCALES SYMBOL (U).
- Go to the Hotel Room.
- Insert the SCALES SYMBOL into the slot (V); take DIME 5/5 (W).
- Go to the Harbor.

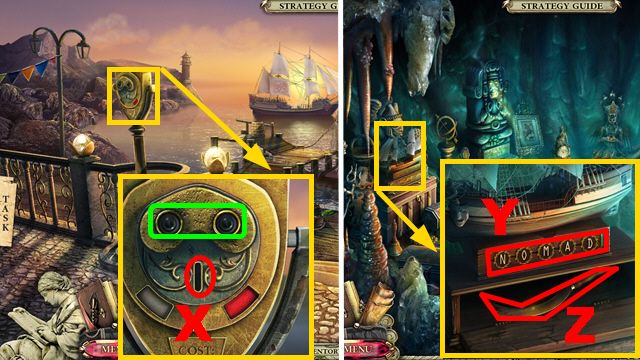
- Insert the 5 DIMES into the slot (X); look through the glasses (green).
- Go to the Cave.
- Solution (Y); take the BRONZE SICKLE (Z).
- Go to the Sunken Ship.

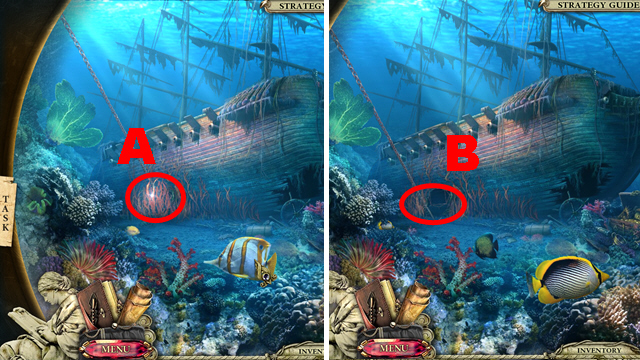
- Cut the corals with the BRONZE SICKLE (A).
- Play the mini-game (B).

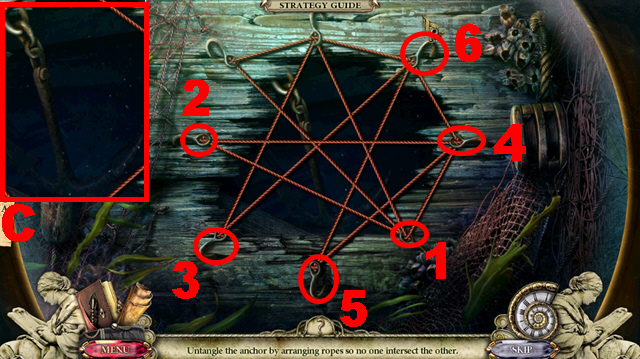
- Solution: 1-2, 1-3, 4-5, 1-4, 6-4.
- Raise the anchor (C).
- Walk down.
Chapter 6: The Ship Deck

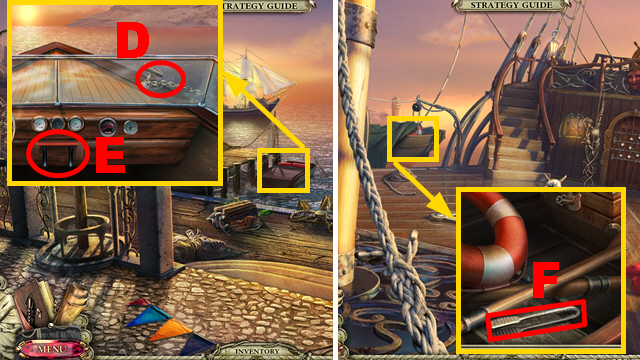
- Pull up the anchor (D); pull the handle (E).
- Take the KITCHEN TONGS (F).
- Go to the Sunken Ship.

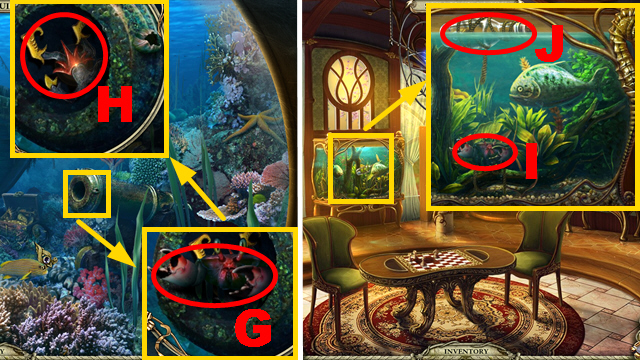
- Acquire the CRAB with the KITCHEN TONGS (G); take the JESTER BODY (H).
- Go to the Jeweler’s Living Room.
- Put the CRAB into the tank (I); take the GLASS EYE (J).
- Combine the JESTER HEAD and the JESTER BODY to receive the DANCING JESTER.
- Go to the Ship Deck.

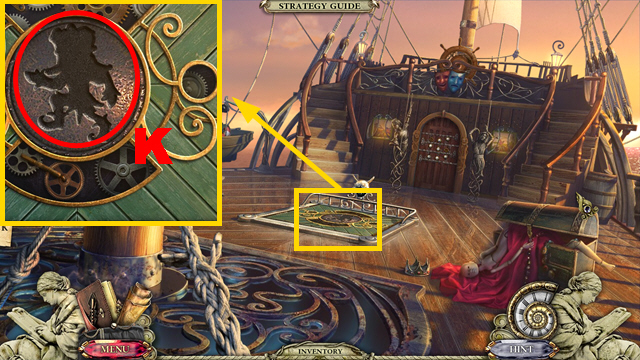
- Insert the DANCING JESTER into the niche (K).
- Go down to the Cargo Hold.

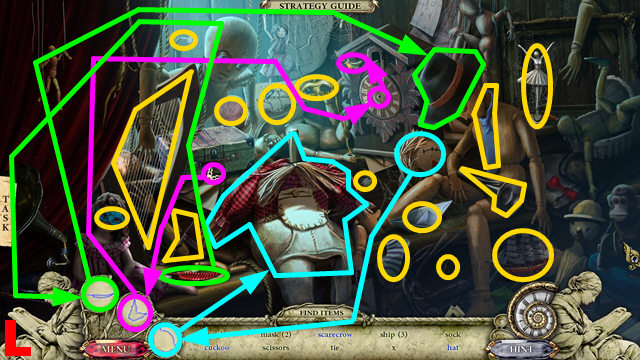
- Play the HOP.
- You receive the MUSICAL NOTE and the MEDIUM GLOBE (L).
- Walk down.

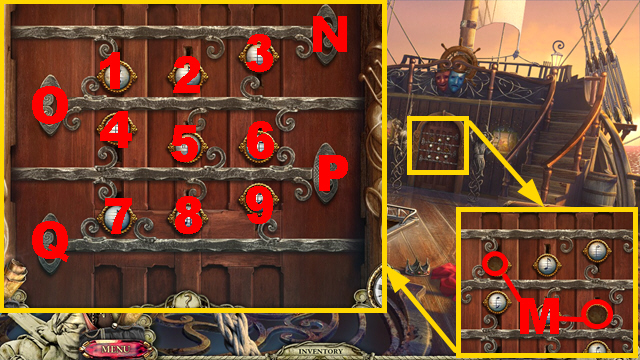
- Insert the 2 MUSICAL NOTES into the niches (M).
- Play the mini-game.
- Solution: N1, O56, P7, Q9, P8, Q7, P9, Q8, P456, O13, N23, P.
- Enter the Captain’s Cabin.

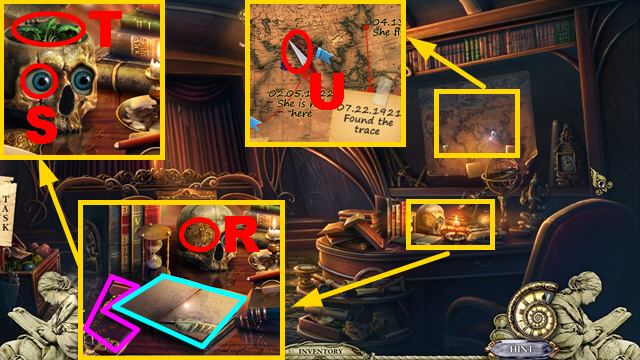
- Take the POSTER FRAGMENT (purple); read the book (blue).
- Remove the plate (R); insert the GLASS EYE into the niche (S); take the MANDRAKE (T).
- Take the MAGNETIC NEEDLE (U).
- Go to the Central Square.

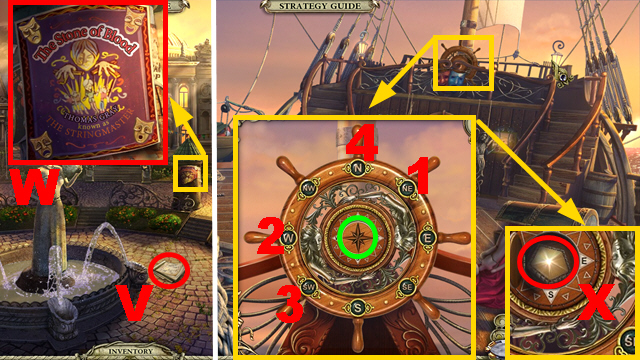
- Read the note (V).
- Connect the POSTER FRAGMENT to its missing part (W).
- Go to the Ship Deck.
- Connect the MAGNETIC NEEDLE to the steering wheel (green).
- Solution: 1-4.
- Take the STRANGE CRYSTAL (X).
- Go to the Jeweler’s House.

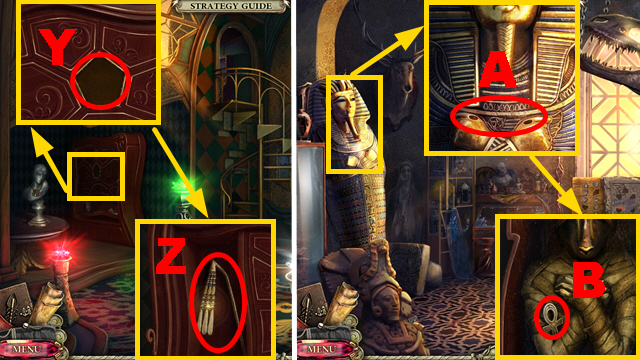
- Insert the STRANGE CRYSTAL into the slot (Y); take the PHARAOH WHIP (Z).
- Go to the Museum.
- Connect the PHARAOH SCEPTER and the PHARAOH WHIP to the statue (A); take the ANKH (B).
- Go to the Captain’s Cabin.

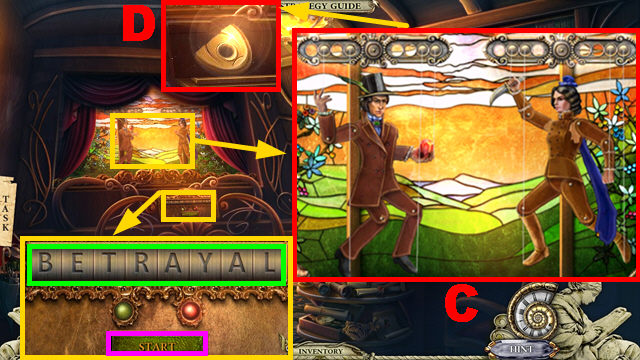
- Enter the correct code (green); push the button (purple).
- Play the mini-game.
- Solution (C).
- Take the MASK HALF (D).
- Go to the Theater Entrance.

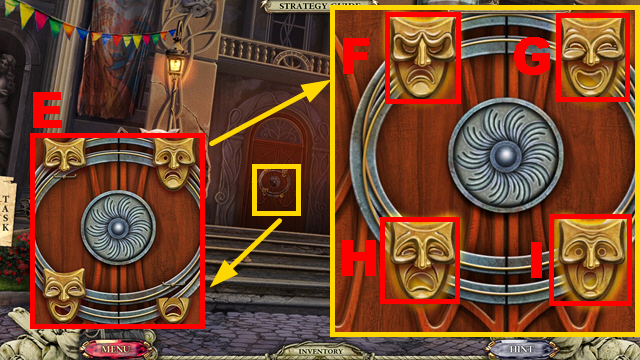
- Put down the 2 MASK HALVES (E).
- Play the mini-game.
- Solution: H, G, F, H, I, H, F.
- Enter the Foyer.

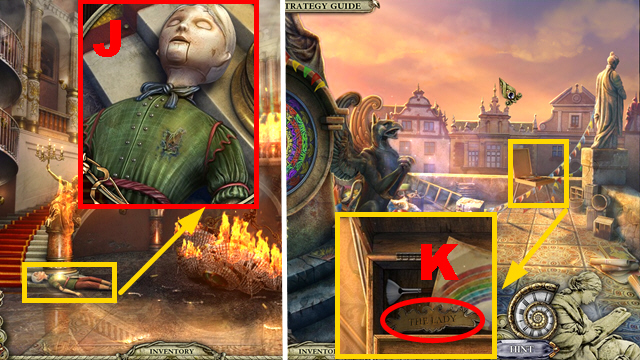
- Take the BROKEN PUPPET (J).
- Go upstairs.
- Take the PICTURE NAME (K).

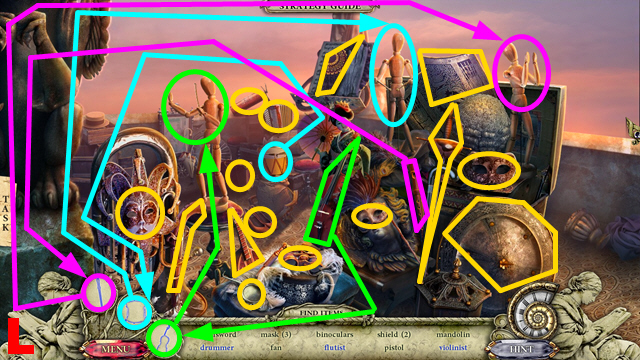
- Play the HOP.
- You receive the EXTINGUISHER and the OIL CAN (L).
- Go to the Jeweler’s House.

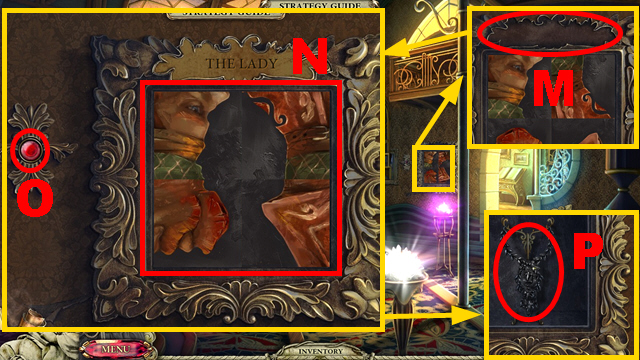
- Insert the PICTURE NAME into the slot (M).
- Play the mini-game.
- Solution (N); push the button (O).
- Take the BLACK NECKLACE (P).
- Go upstairs.

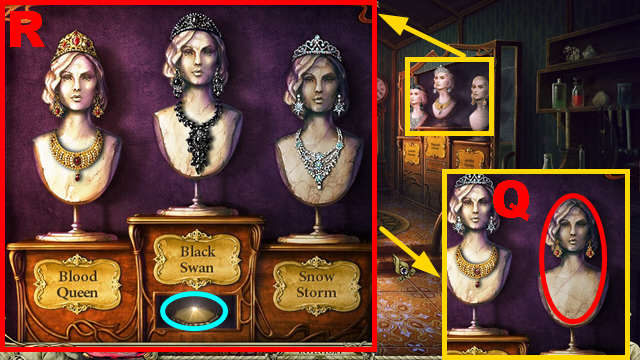
- Connect the GOLD DIADEM and BLACK NECKLACE to the bust (Q).
- Play the mini-game.
- Solution (R).
- Take the STRANGE CRYSTAL (blue).
- Walk down.

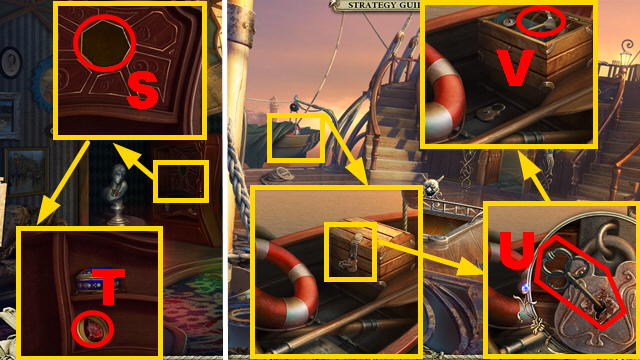
- Insert the STRANGE CRYSTAL into the niche (S); take the SYMBOL OF RUBY (T).
- Go to the Ship Deck.
- Pour the OIL CAN over the key (U); turn the key.
- Take the HAMMER (V).
- Go to the Foyer.

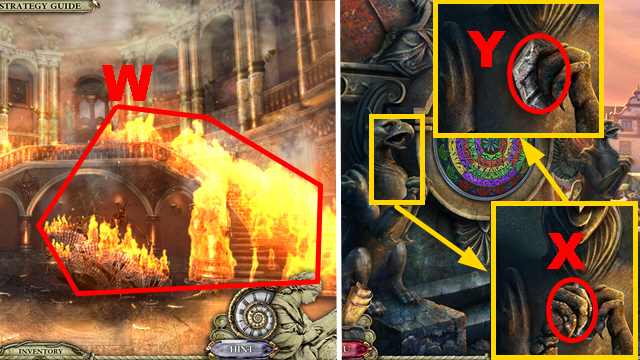
- Put out the fire with the EXTINGUISHER (W).
- Go upstairs.
- Hit the statue with the HAMMER (X); take the BASS-RELIEF FRAGMENT (Y).
- Go to the Museum.

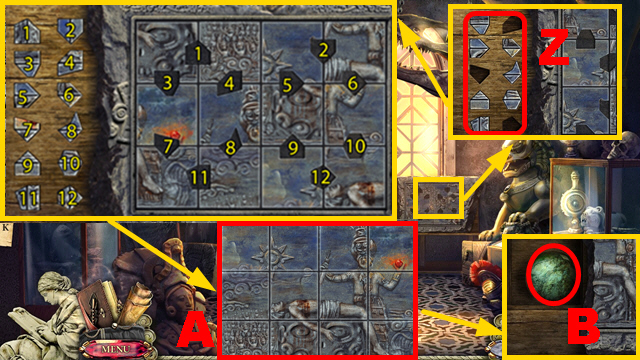
- Put down the 3 BASS-RELIEF FRAGMENTS (Z).
- Play the mini-game.
- Solution part one: 1-12.
- Solution part two: (A).
- Take the LARGE GLOBE (B).
- Go to the Jeweler’s Living Room.

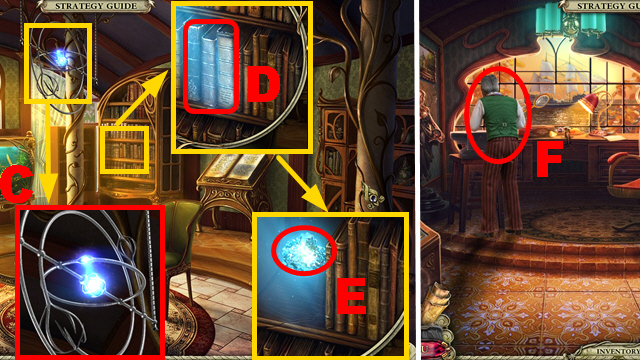
- Insert the LARGE GLOBE and MEDIUM GLOBE into the device (C).
- Remove three books (D); take the ROUGH BLUE CRYSTAL (E).
- Go to the Jeweler’s Lab.
- Give the ROUGH BLUE CRYSTAL to the jeweler (F) to receive the BLUE CRYSTAL.
- Go to the Cave.

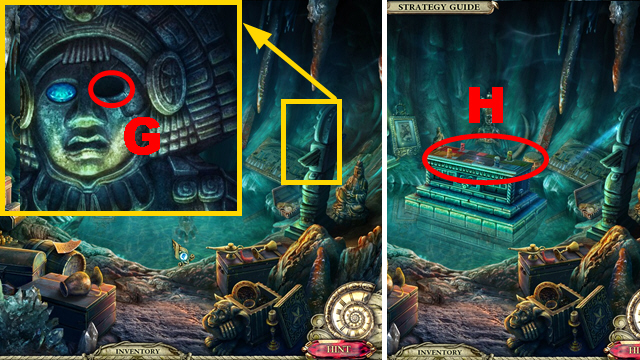
- Insert the BLUE CRYSTAL into the niche (G).
- Play the mini-game (H).

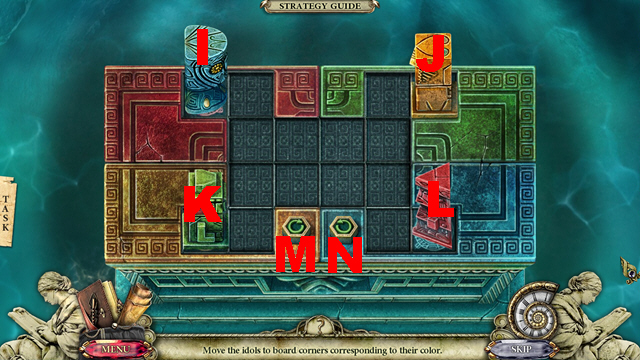
- Solution: I, J, K, L, N, J, K, M, K, J, N, K, J, Nx2, I, L, N, I, L, M, I, L, N, I, J, K, L.

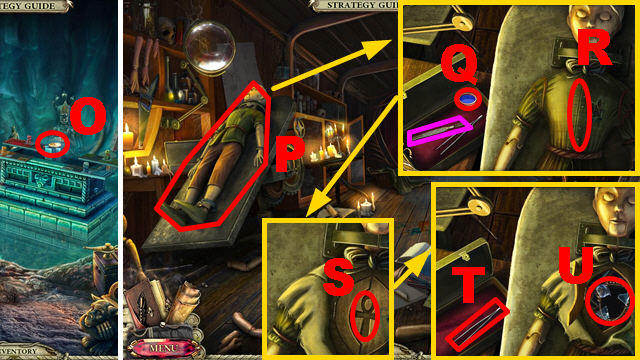
- Take the SYMBOL OF DEATH (O).
- Go to the Cargo Hold.
- Put down the BROKEN DOLL (P).
- Take the BLUE PAINT (Q).
- Cut the doll (R) with the scalpel (purple); insert the ANKH into the slot (S).
- Remove three glass shards (U) with the tweezers (T).
- Go to the Theater Roof.

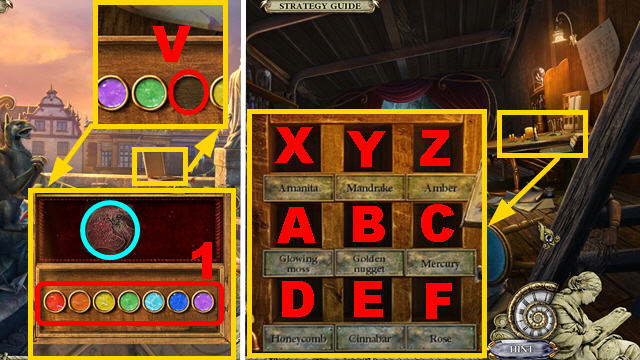
- Put down the BLUE PAINT (V).
- Solution (1).
- Take the CINNABAR (blue).
- Go to the Cargo Hold.
- Put down the POISONOUS MUSHROOMS (X), MANDRAKE (Y), AMBER (Z), GLOWING MOSS (A), GOLDEN NUGGET (B), MERCURY (C), HONEYCOMB (D), CINNABAR (E), and ROSE (F).
- Play the mini-game.

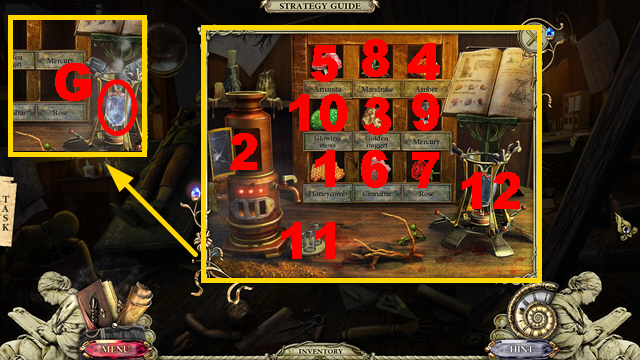
- Solution: 1, 2, 3, 2, 4, 2, 5, 2, 6, 2, 7, 2, 8, 2, 9, 2, 10, 2, 11, 12.
- Take the GLASS HEART (G).

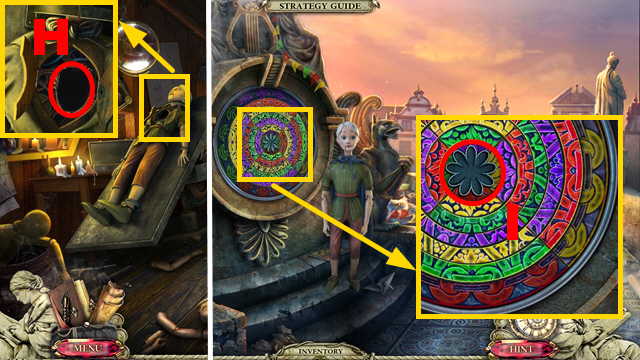
- Insert the GLASS HEART into the doll (H).
- Go to the Theater Roof.
- You receive the WINDOW KEY.
- Insert the WINDOW KEY into the slot (I).
- Play the mini-game.

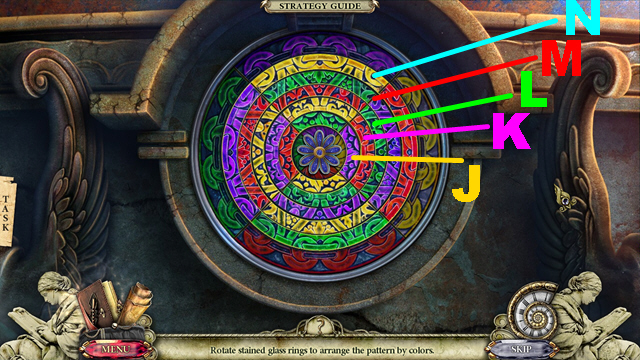
- Solution: Jx3, L, K, N, K, M, J, L.
- Walk down.

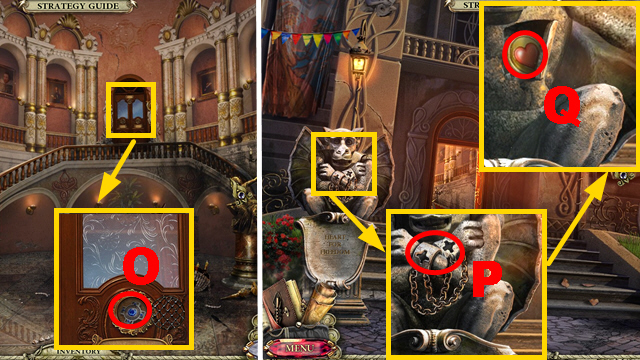
- Take FREEDOM KEY 2/2 (O).
- Walk down.
- Insert the 2 FREEDOM KEYS into the handcuffs (P); take the SYMBOL OF LOVE (Q).
- Move forward.

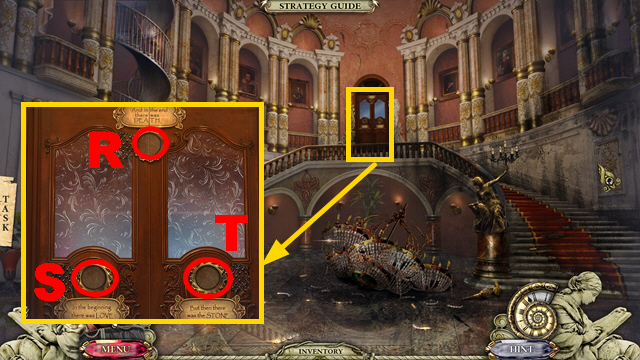
- Insert the SYMBOL OF DEATH (R), SYMBOL OF LOVE (S), and SYMBOL OF RUBY (T) into the slots.
- Congratulations, you have completed Dark Cases: The Blood Ruby.


 Nikopol: Secrets of the Immortals Walkthrough, Guide, & Tips
 Time Builders: Pyramid Rising 2 Walkthrough, Guide, & Tips
 Dark Tales: ™ Edgar Allan Poe's The Black Cat Walkthrough, Guide, & Tips
 Lost Souls: Enchanted Paintings Walkthrough, Guide, & Tips
 Surface: The Pantheon Walkthrough, Guide, & Tips