Mystery of the Ancients: The Curse of the Black Water Walkthrough, Guide, & Tips
Mystery of the Ancients: The Curse of the Black Water Walkthrough
Welcome to the Mystery of the Ancients: The Curse of the Black Water Walkthrough
Uncover Poseidon’s ancient secrets hidden under the town of Black Water!
Whether you use this document as a reference when things get difficult or as a road map to get you from beginning to end, we’re pretty sure you’ll find what you’re looking for here.
This document contains a complete Mystery of the Ancients:The Curse of the Black Water game walkthrough featuring annotated screenshots from actual gameplay!
We hope you find this information useful as you play your way through the game. Use the walkthrough menu below to quickly jump to whatever stage of the game you need help with.
Remember to visit the Big Fish Games Forums if you find you need more help. Have fun!
This walkthrough was created by LuckySmile, and is protected under US Copyright laws. Any unauthorized use, including re-publication in whole or in part, without permission, is strictly prohibited.
General Tips

- This is the official guide for Mystery of the Ancients: The Curse of the Black Water.
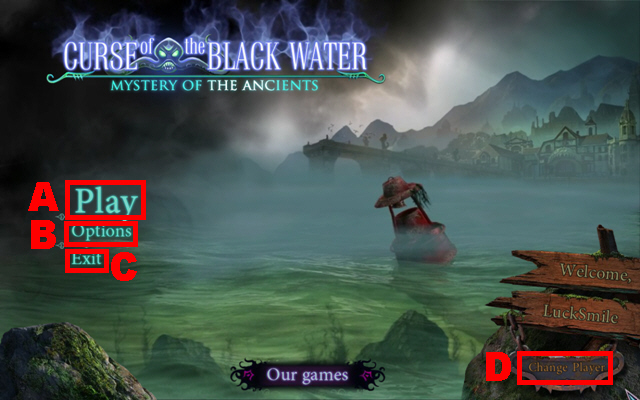
- Press Play (A) to start the game.
- Select Options (B) to adjust the volume and the display mode of the game.
- Press Exit (C) to leave the game.
- Select Change Player (D) to edit, create, or delete any profiles.
- There are three modes of difficulty: casual, advanced, and hardcore.
- Hidden Objects scenes will be referred to as HOS throughout this guide.
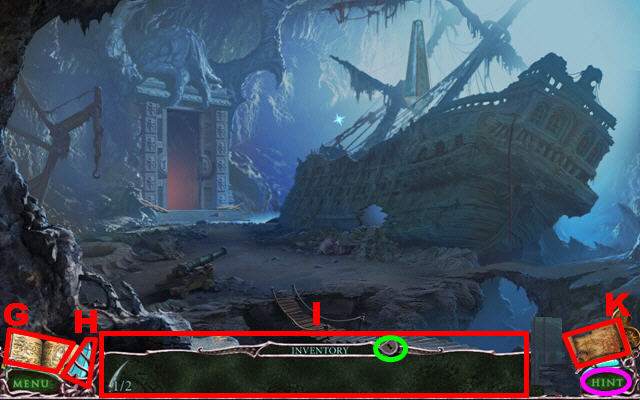
- The diary (G) includes important notes and story details.
- Activate the crystal (H) to get rid of the curse.
- You can pick and use inventory items from the inventory tray (I). Select the padlock marked in green to lock and unlock the tray.
- Access the map (K) to review your current location, to switch to the general map, and to check for available locations.
- Press the hint button marked in purple to get help for a current task; during mini-games and puzzles this button will serve as a skip button.
Chapter 1: Lost Archeologists
- Zoom anywhere to activate a cut-scene.
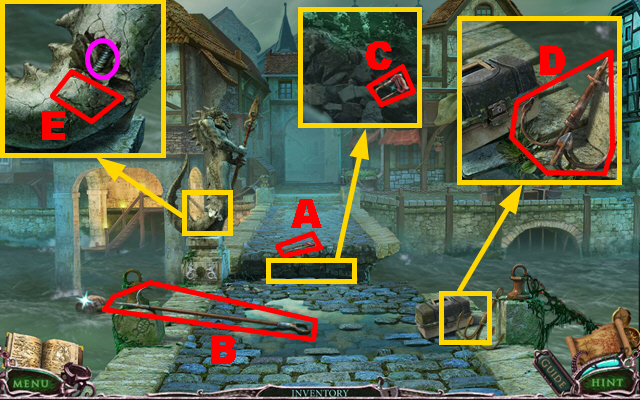
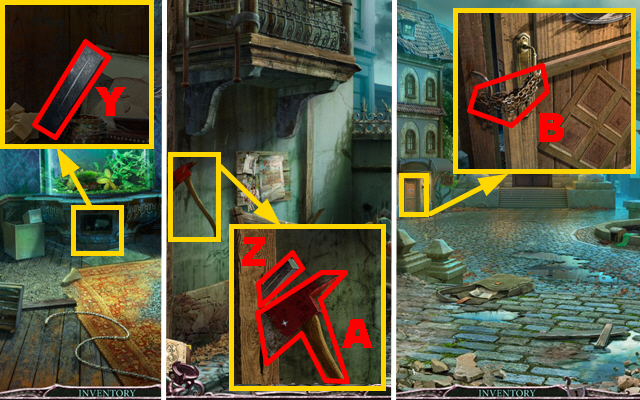
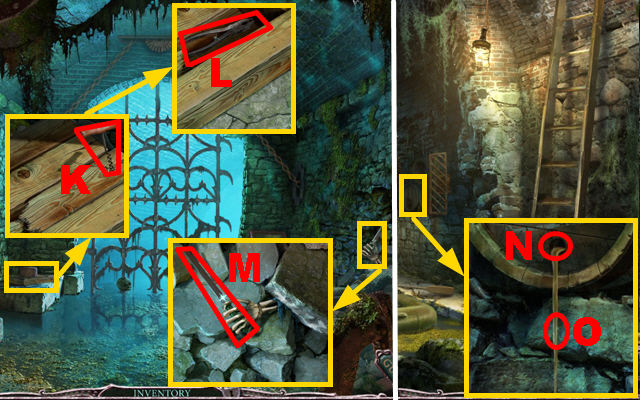
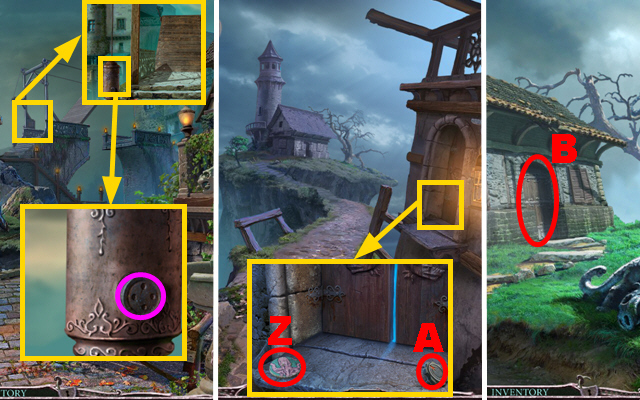
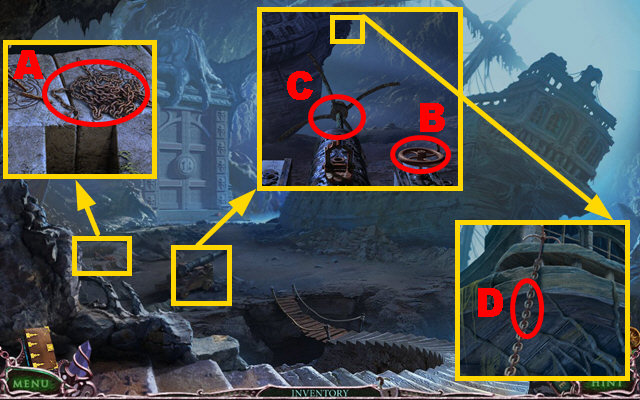
- Try to take the hacksaw (A); it will fall into the water.
- Take the HARPOON (B).
- Zoom into the gap; use the HARPOON to get the HACKSAW (C).
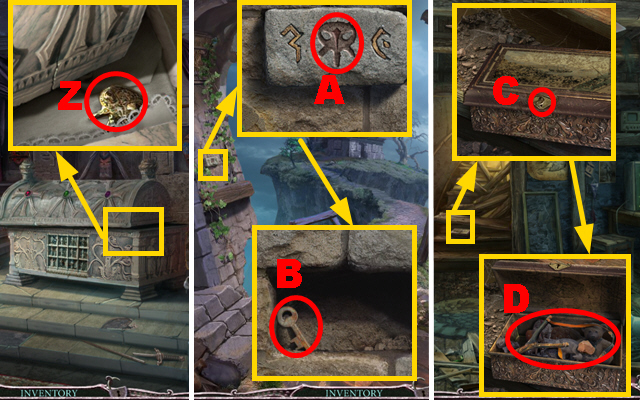
- Zoom into the box; take the ANCHOR (D).
- Zoom into the statue; use the ANCHOR to break away some stone (E) and then pry the metal bar marked in purple with the HACKSAW.
- Move forward.
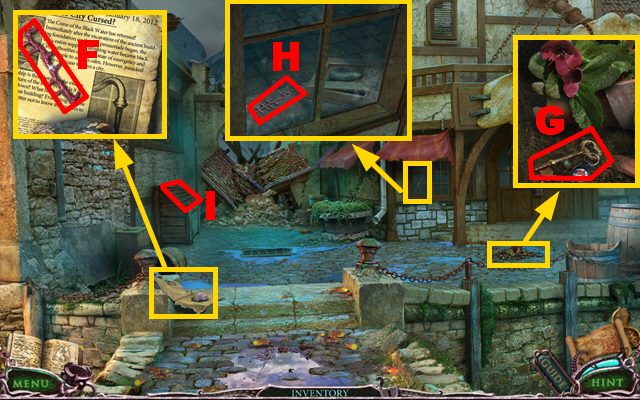
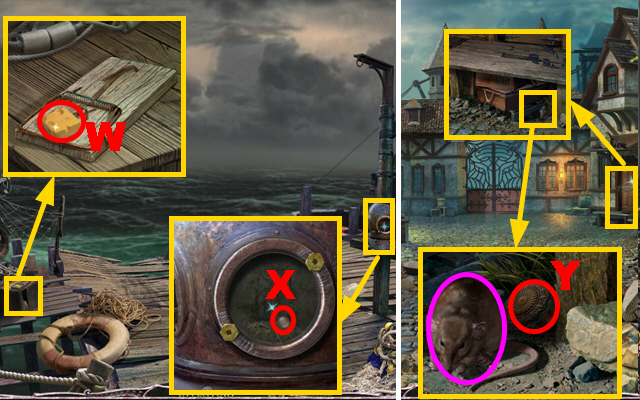
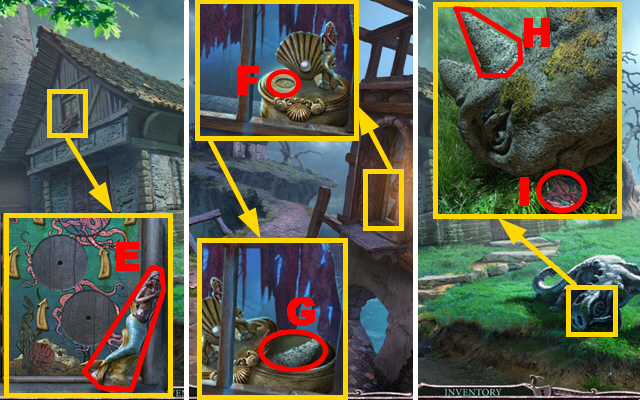
- Zoom into the newspaper; take the 1/3 CORAL (F) and read the article.
- Zoom into the broken flower pot; take the FISHING SHOP KEY (G).
- Zoom into the window; use the ANCHOR to break it and take the 2/3 CORAL (H).
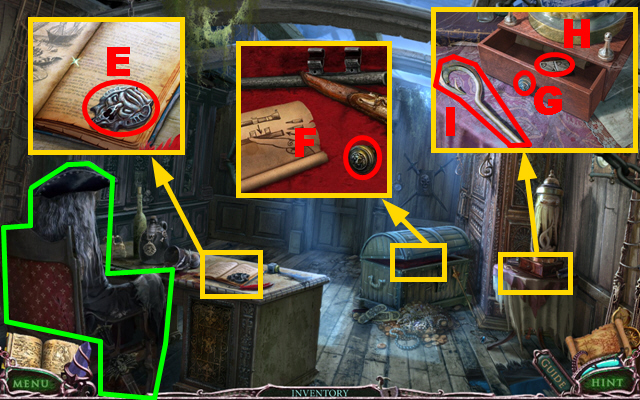
- Open the box (I) and play the HOS.
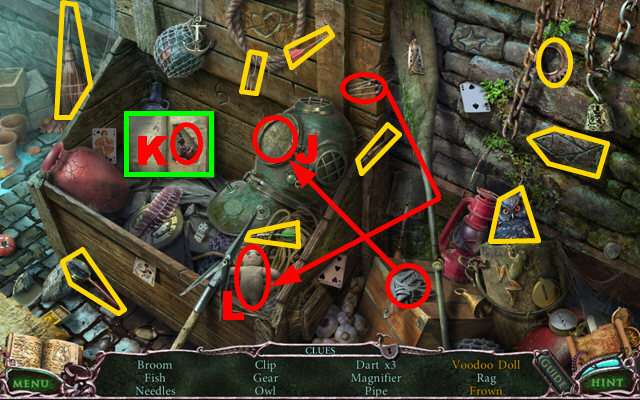
- Take the rag, clean the helmet, and take the frown (J).
- Open the book marked in green and take the pipe (K).
- Take the needles, put them into the doll, and take the voodoo doll (L).
- The CLIP will go into inventory.
- Walk down.
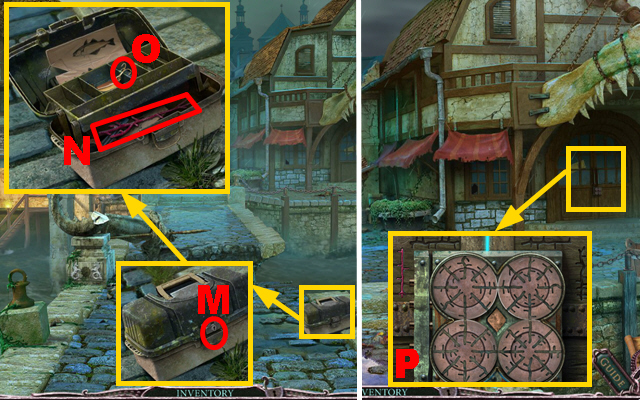
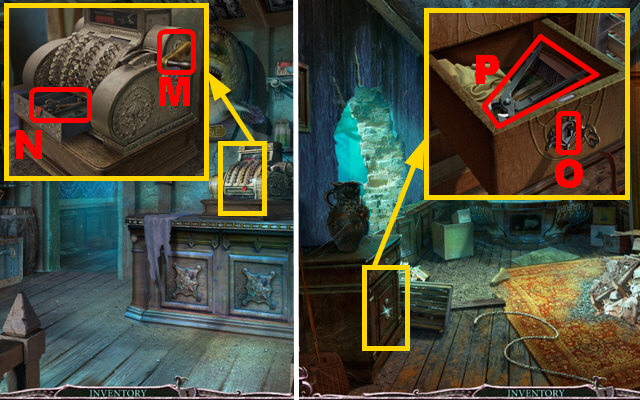
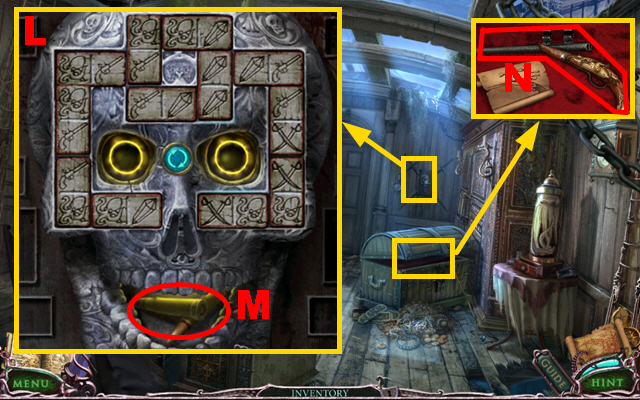
- Zoom into the box; put the CLIP into the lock and open the box (M).
- Take the 3/3 CORAL (N) and the HOOK (O).
- Move forward.
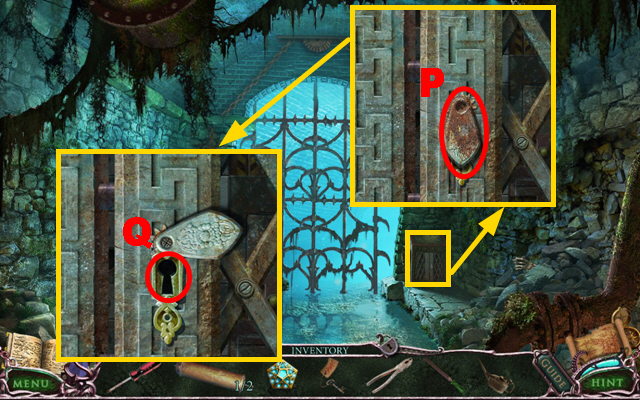
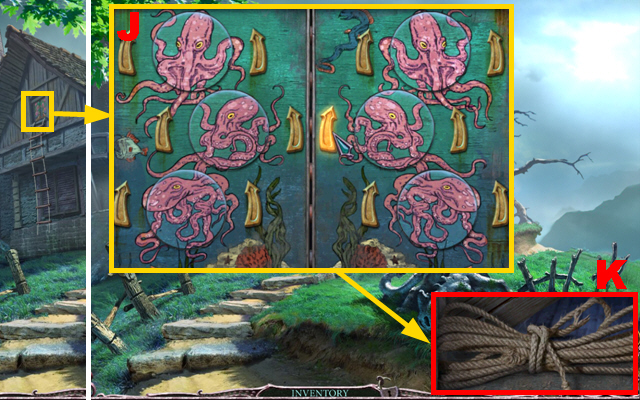
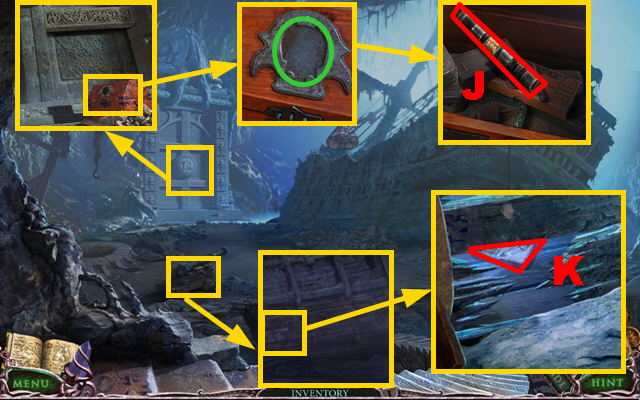
- Zoom into the door; add the 3 CORALS to the board (P) and play the mini-game.
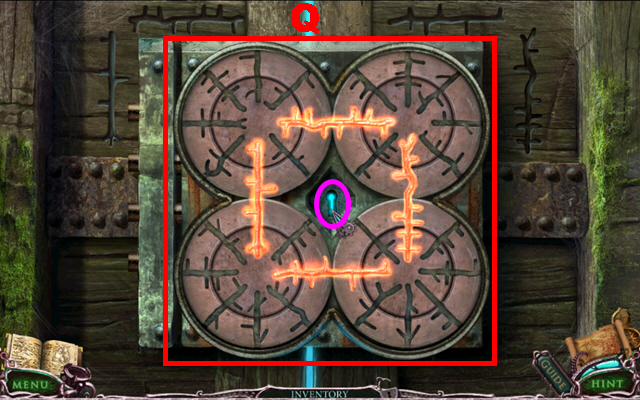
- Each coral has to be placed correctly into the slots connecting the circles.
- The circle parts can be rotated separately.
- The screenshot displays the correct solution (Q).
- Put the FISHING SHOP KEY into the lock marked in purple and turn it once to open the door.
- Move forward to enter the fishing shop.
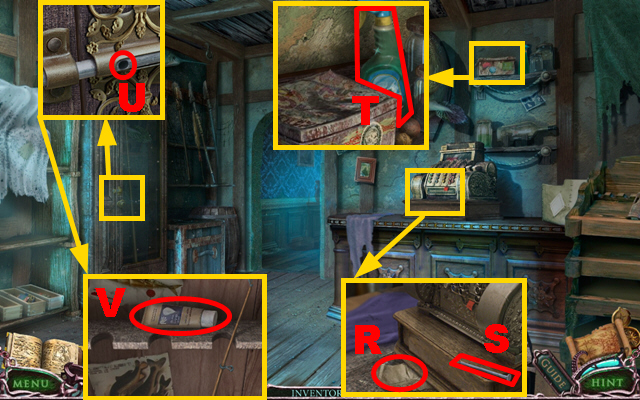
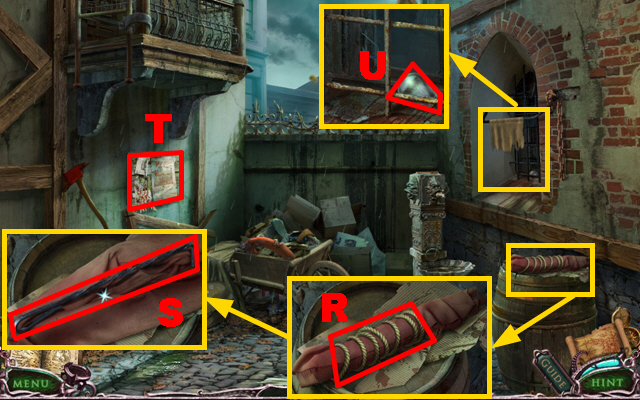
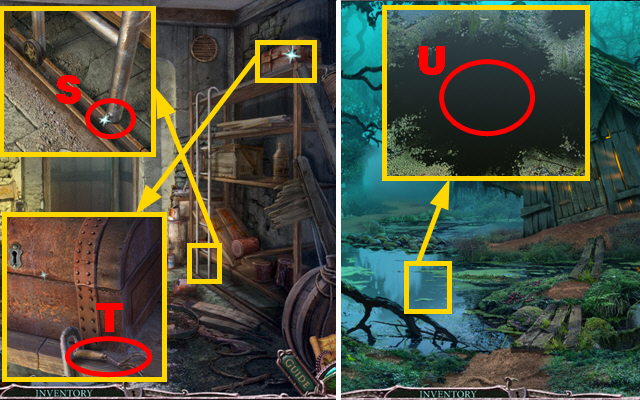
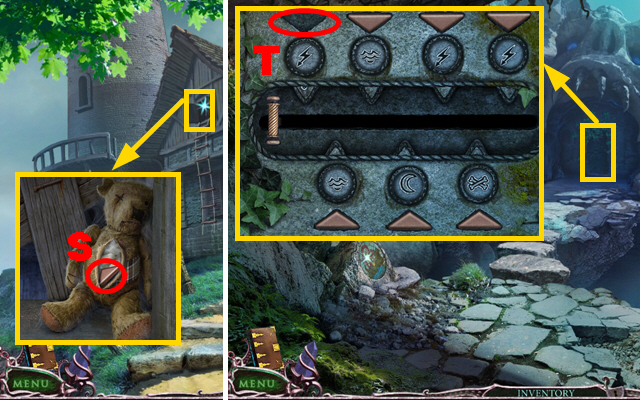
- Zoom into the register; take the note (R) and the NAIL (S).
- Zoom into the shelf; take the CLEANER (T).
- Zoom into cabinet: put the NAIL into the latch (U) and move the nail to open the cabinet.
- Zoom into the cabinet; take the HAND CREAM (V).
- Move forward.
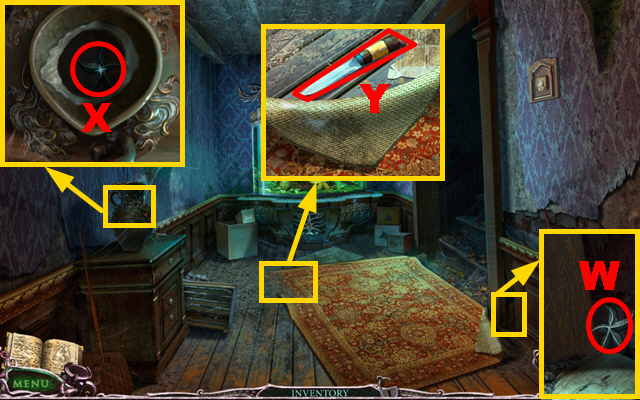
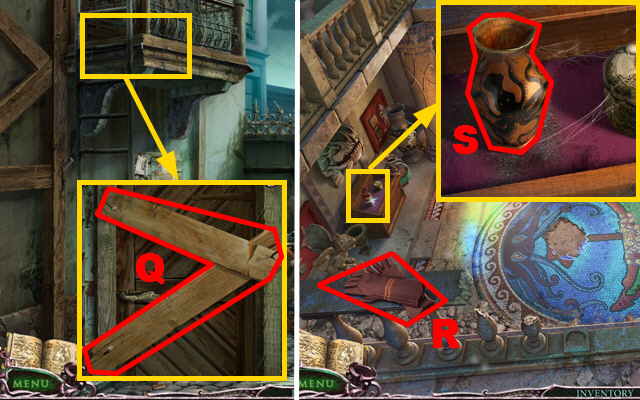
- Chase away the mouse and zoom into the broken wall; remove a piece of wood and take the 1/3 STARFISH (W).
- Zoom into the vase; put the HAND CREAM on the rim and take the 2/3 STARFISH (X).
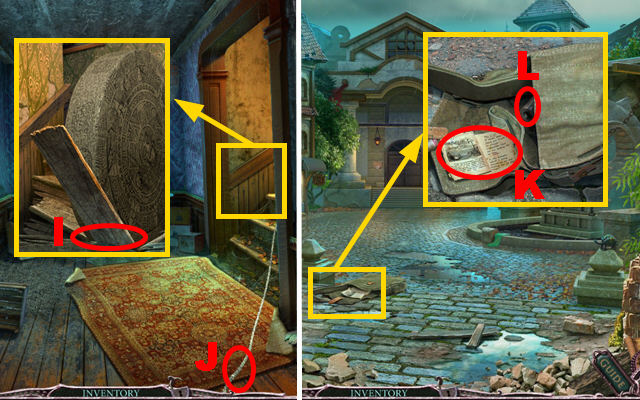
- Zoom into the rug; remove it and take the KNIFE (Y).
- Walk down.
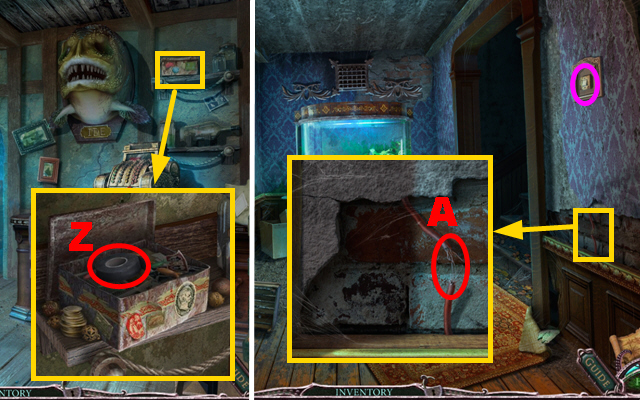
- Zoom into the shelf; pry the box with the KNIFE and open it; take the INSULATING TAPE (Z).
- Move forward.
- Zoom into the wire; use the INSULATING TAPE to fix the wire (A).
- Press the switch marked in purple.
- Turn right.
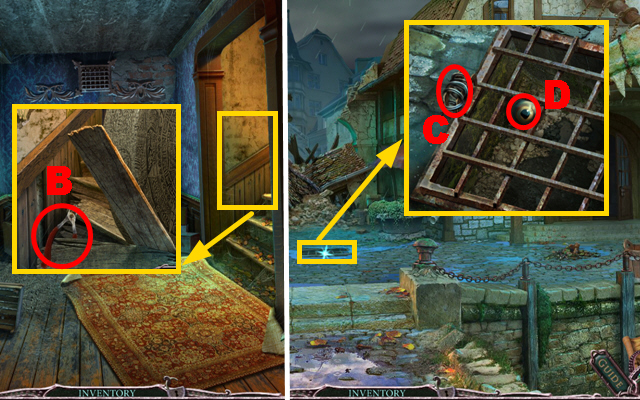
- Zoom into the staircase; take the CUTTERS (B).
- Walk down twice.
- Zoom into the drain; cut the metal wire (C) with the CUTTERS, open the grid, and take the FISH EYE (D).
- Move forward.
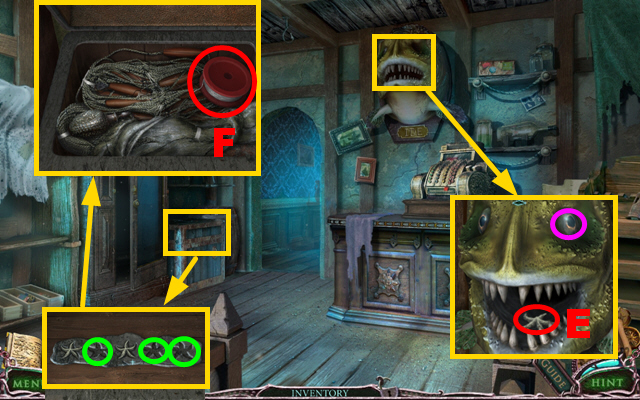
- Zoom into the large fish; put the FISH EYE into the slot marked in purple and take the 3/3 STARFISH (E).
- Zoom into the chest; put the 3 STARFISH into the slots marked in green and open the chest.
- Take the FISHING LINE (F).
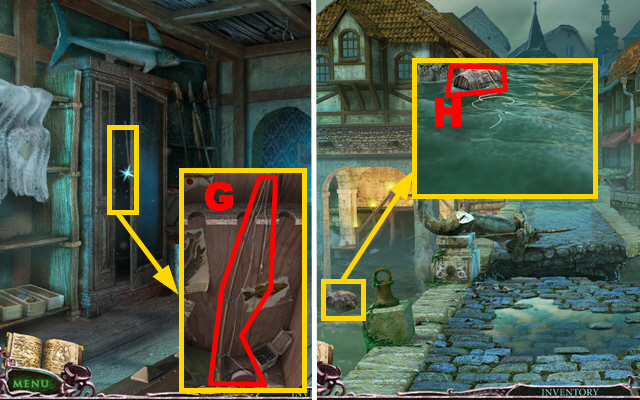
- Zoom into the cabinet; put the FISHING LINE and the HOOK on the rod (G); take the FISHING ROD.
- Walk down twice.
- Zoom into the barrel; reel in the barrel (H) with the FISHING ROD to acquire the ROPE.
- Move forward three times.
- Zoom into the staircase; attach the ROPE to the board (I).
- Pull the ROPE (J).
- Turn left.
- Zoom into the bag; take the notes (K) and the 1/2 CYLINDER (L).
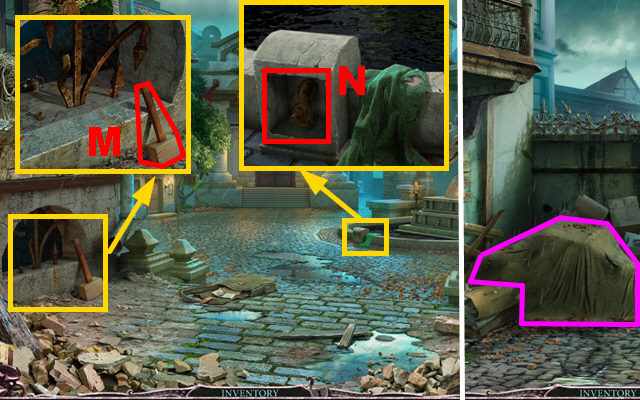
- Zoom into the window; take the MALLET (M).
- Zoom into the fountain; open the compartment (N).
- Move forward.
- Remove the blanket marked in purple and play the HOS.
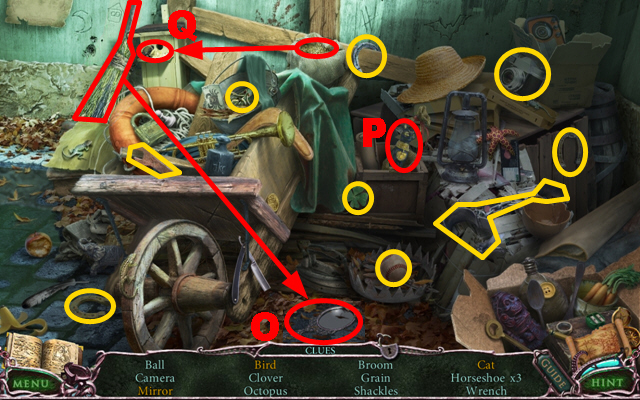
- Take the broom, use it to remove the leaves, and take the mirror (O).
- Open the sack and take the cat (P).
- Take the bird food, put it on the aviary, and take the bird (Q).
- The 1/3 OCTOPUS will go into inventory.
- Zoom into the barrel; use the KNIFE to cut the rope (R), remove the blanket and take the POKER (S).
- Read the note on the board (T).
- Zoom into the window; take the LIGHT BULB (U).
- Walk down.
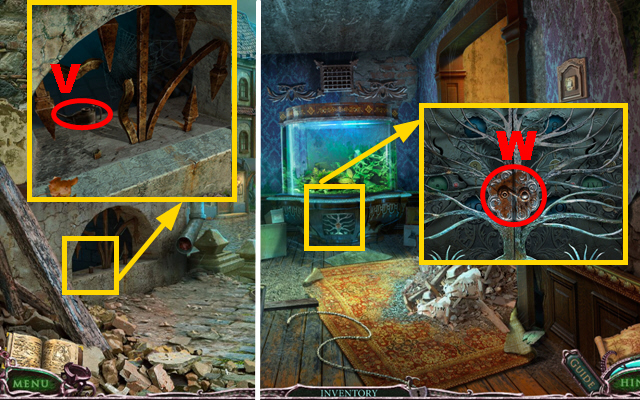
- Zoom into the window; use the POKER on the oiler and take the OILER (V).
- Walk down.
- Zoom into the aquarium; use the OILER on the lock (W).
- Press the lock and open the lid.
- Play the mini-game.
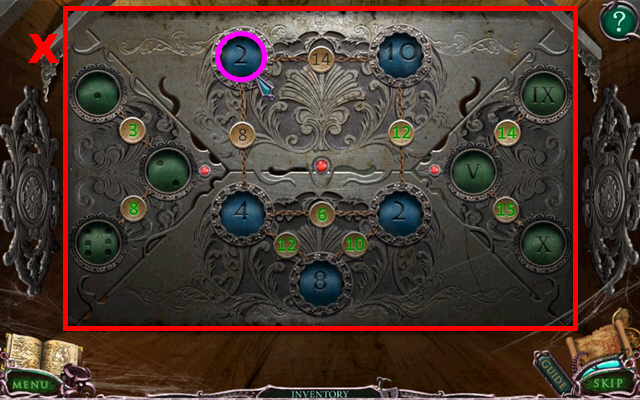
- The sum of two cells has to equal the number that’s between them.
- Numbers can be changed by pressing the number cells.
- To solve this puzzle (X), set the number cells correctly and change the number cell marked in purple to the number 4.
- Zoom into the aquarium; take the WEDGE (Y).
- Turn left and move forward.
- Zoom into the axe; put the WEDGE next to the axe and use the MALLET on the wedge (Z).
- Take the AXE (A).
- Walk down.
- Zoom into the left door; use the AXE to break the chain (B).
- Go through the left door.
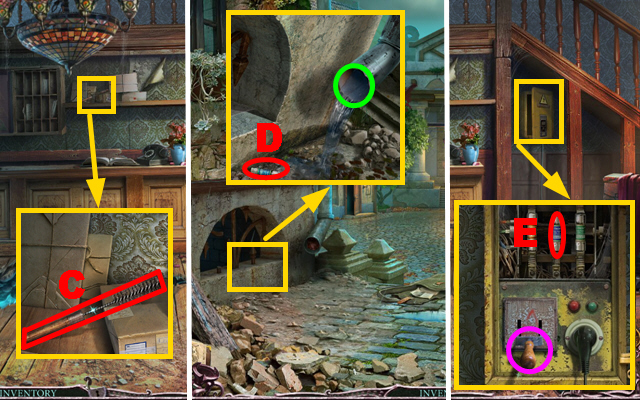
- Zoom into the shelf; take the BRUSH (C).
- Walk down.
- Zoom into the window; use the BRUSH to remove the leaves from the gutter marked in green and take the FUSE (D).
- Go through the left door.
- Zoom into the box; remove the broken fuse and put the FUSE in its place (E).
- Press the lever marked in purple.
- Go down the ladder.

- Zoom into the lamp; put the LIGHT BULB into the slot (F).
- Play the HOS.
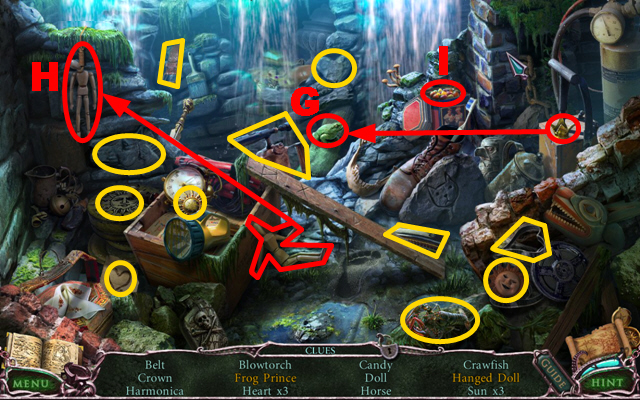
- Take the crown, put it on the frog, and take the frog prince (G).
- Take the doll, put it into the rope, and take the hung doll (H).
- Open the box and take the candy (I).
- The BLOWTORCH will go into inventory.
- Go up, walk down, and move forward.
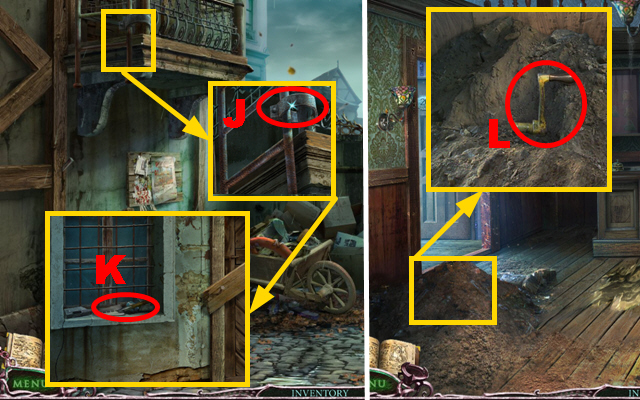
- Zoom into the balcony; use the BLOWTORCH on the metal ladder (J).
- Zoom into the balcony; take the SHOVEL (K).
- Walk down and go through the left door.
- Zoom into the pile of earth; use the SHOVEL to remove the earth and take the REGISTER HANDLE (L).
- Walk down three times.
- Zoom into the register; put the REGISTER HANDLE on it (M) and take the DRESSER KEY (N).
- Move forward.
- Zoom into the dresser; put the DRESSER KEY into the lock (O) and open the drawer.
- Take the PLIERS (P).
- Turn left and move forward.
- Zoom into the balcony and then zoom into the door; use the PLIERS to remove the boards (Q).
- Go through the door.
- Take the GLOVES (R).
- Zoom into the left showcase; take the EMPTY VASE (S).
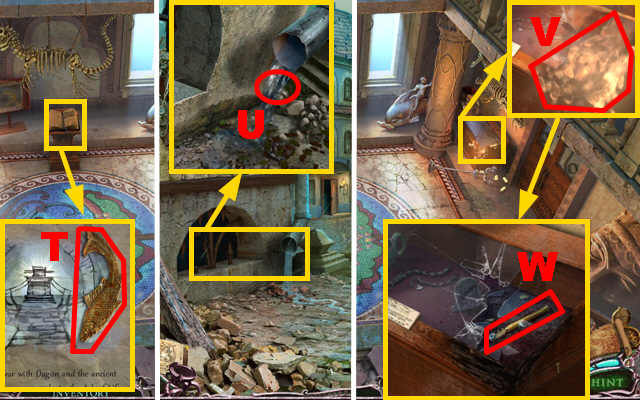
- Zoom into the book; turn the pages eight times and take the first FISH (T).
- Walk down twice.
- Zoom into the window; hold the EMPTY VASE below the gutter (U) to acquire the VASE WITH WATER.
- Move forward and go up the ladder.
- Zoom into the right showcase; use the VASE WITH WATER to extinguish the flames (V).
- Use the GLOVES to remove the shards; take the GLASS CUTTER (W).
- Walk down twice and go through the left door.
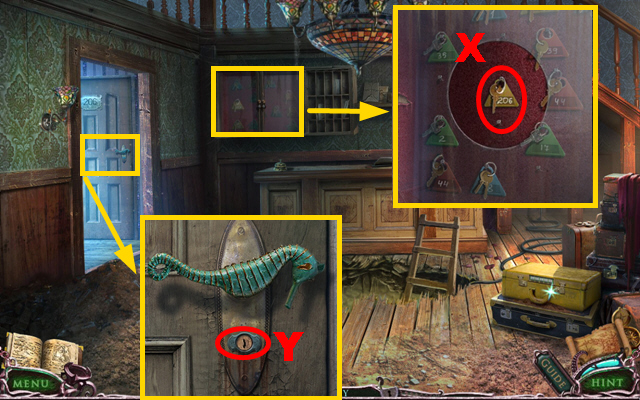
- Zoom into the key showcase; cut the glass with the GLASS CUTTER and take the KEY TO ROOM 206 (X).
- Zoom into the left door; put the KEY TO ROOM 206 into the lock (Y).
- Go through the door.
- Play the HOS.
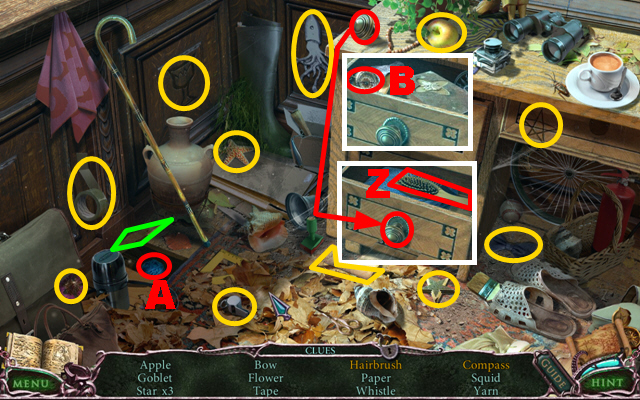
- Take the knob, put it onto the second drawer, open the drawer, and take the hairbrush (Z).
- Pull the board marked in green and take the yarn (A).
- Open the top drawer and take the compass (B).
- The PAPER will be acquired.
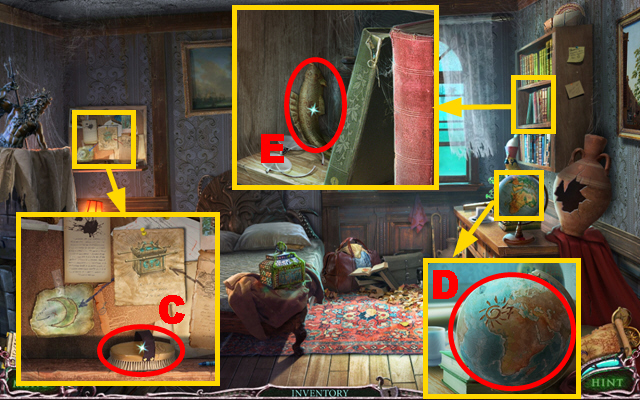
- Zoom into the left board and take the BRUSH (C).
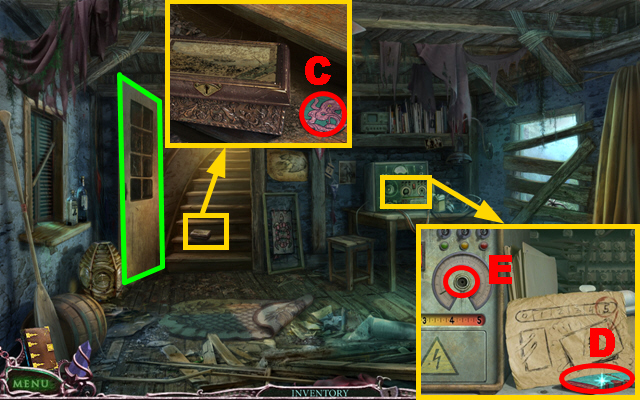
- Zoom into the globe, turn it four times (D), and make note of the numbered symbols. (There are four numbered symbols on the globe. Numbers = 7, 5, 3, 1.
- Zoom into the bookshelf and take the second FISH (E).
- Walk down.
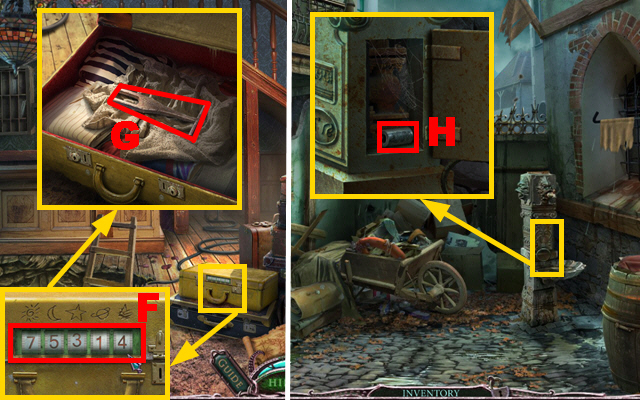
- Zoom into the suitcase; enter the code 7-5-3-1-4 (F) to open it.
- Zoom into the suitcase; take the WATER COLUMN KEY (G).
- Walk down and move forward.
- Zoom into the water column; put the WATER COLUMN KEY into the slot and take the 2/2 CYLINDER (H).
- Walk down, go through the left door, and go down the ladder.
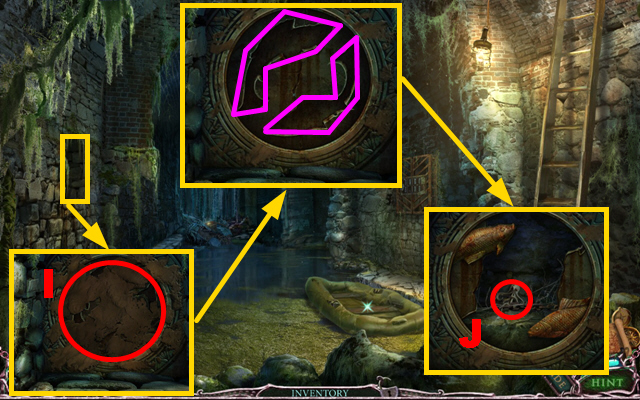
- Zoom into the left wall; remove the plants four times, use the CLEANER and the BRUSH on the plate (I).
- Put the first FISH and the second FISH into the slots marked in purple and take the 2/3 OCTOPUS (J).
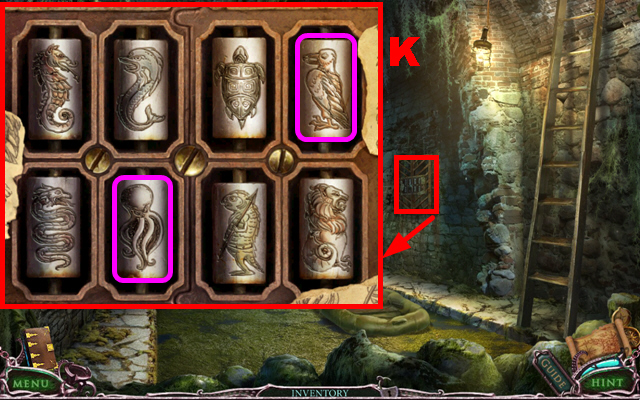
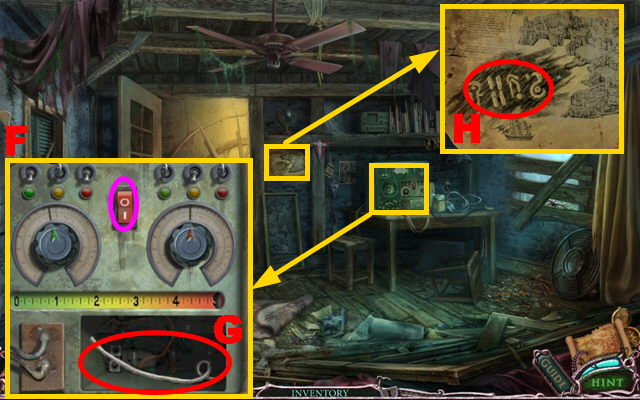
- Zoom into panel; add the 2 CYLINDERS to the slots marked in purple, and play the mini-game.
- Set the images on the rollers according to the hints on the pieces of paper.
- The rollers can be turned by pressing on them.
- The screenshot displays the correct solution (K).
- Zoom into the panel; take the 3/3 OCTOPUS (L).
- Go up the ladder and go through the door.
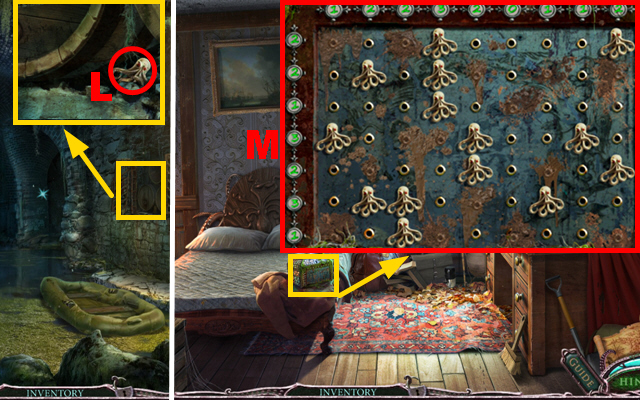
- Zoom into the box; add the 3 OCTOPUSES to it.
- Play the mini-game.
- Arrange the octopuses on the grid so that they equal the number at each row and column.
- The screenshot displays the correct solution (M).
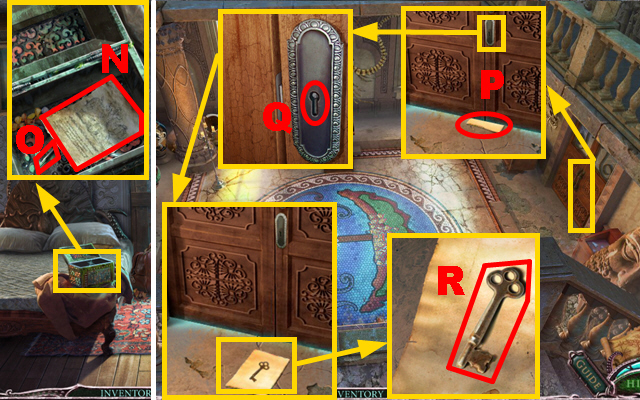
- Zoom into the box; take the notes (N) and the DAGGER (O).
- Walk down twice, move forward, and go up the ladder.
- Zoom into the door; put the paper on the floor (P).
- Zoom into the lock; put the DAGGER into the lock (Q).
- Pull the paper. Zoom into the paper; take the KEY (R).
- Zoom into the lock; put the KEY into the lock.
- Turn right.
Chapter 2: In Darkness
- Move forward.
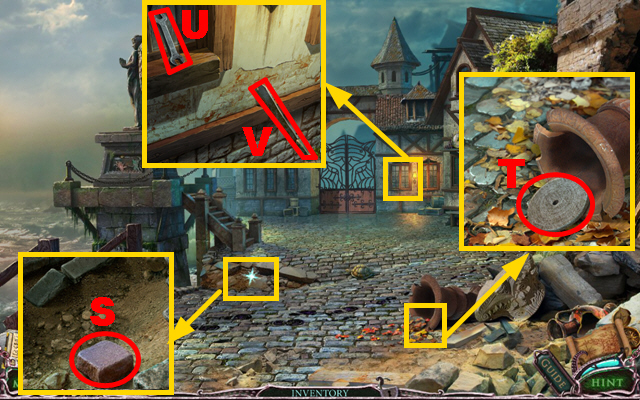
- Zoom into the floor; take the STONE (S).
- Zoom into the debris; remove the leaves three times and take the GRINDSTONE (T).
- Zoom into the window; take the WRENCH (U) and the BLUNT MACHETE (V).
- Turn left.
- Zoom into the box; take the CHEESE (W).
- Zoom into the diving helmet; use the WRENCH on the helmet and take the 1/2 PEARL (X).
- Walk down.
- Zoom into the door and then zoom into the stairs; give the CHEESE to the rat marked in purple and take the HANDLE (Y).
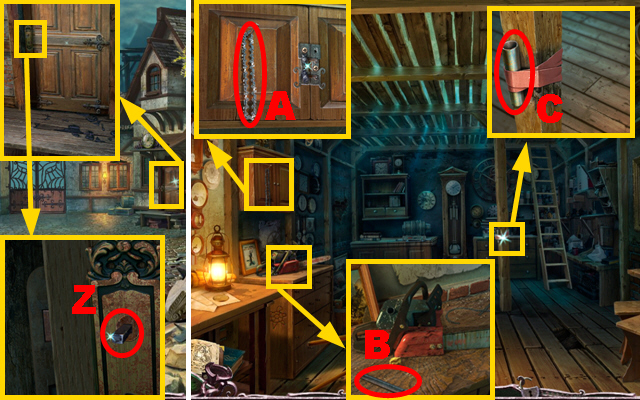
- Zoom into the door and then zoom into the lock; put the HANDLE on the door (Z).
- Go through the door.
- Zoom into the cupboard; take the CHAIN (A).
- Zoom into the chainsaw; take the VISE HANDLE (B).
- Zoom into the support beam; take the METAL TUBE (C).
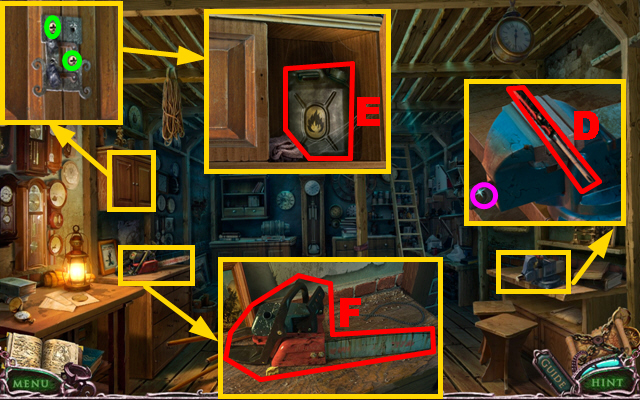
- Zoom into the vise grip; put the VISE HANDLE into the opening marked in purple and take the SCREWDRIVER (D).
- Zoom into the cupboard; use the SCREWDRIVER to remove the two screws marked in green and take the GASOLINE (E).
- Zoom into the chainsaw; remove the old chain and put the CHAIN on the chainsaw.
- Put the GASOLINE into the chainsaw and take the CHAINSAW (F).
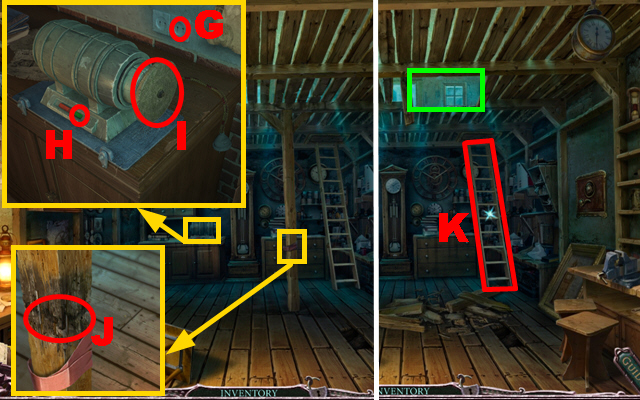
- Zoom into the device; put the GRINDSTONE on it and put the plug into the outlet (G).
- Press the green button (H) and use the BLUNT MACHETE on the grindstone (I) to acquire the SHARP MACHETE.
- Zoom into the support beam; use the CHAINSAW to saw through the support beam (J).
- Move the ladder (K) next to the opening marked in green.
- Go up the ladder.
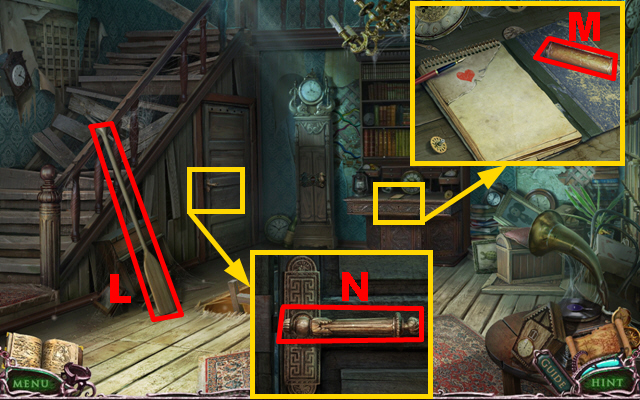
- Take the 1/2 OAR (L).
- Zoom into the desk; take the 1/2 WEIGHT (M).
- Zoom into the door; press the handle (N) to open it.
- Play the HOS.
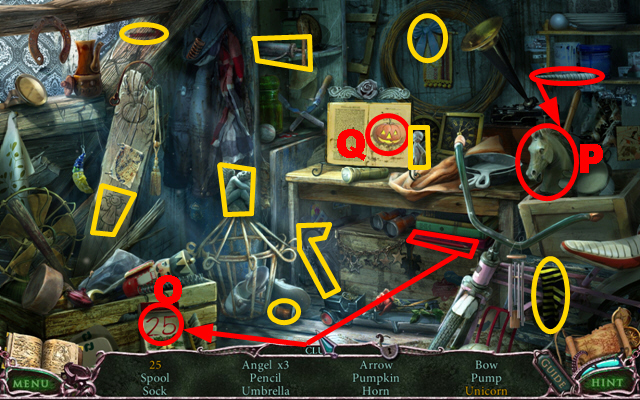
- Take the red pencil, use it on the notepad, and take the 25 (O).
- Take the horn, put it on the horse, and take the unicorn (P).
- Turn the pages of the book twice and take the pumpkin (Q).
- The AIR PUMP will go into inventory.
- Walk down and turn left.
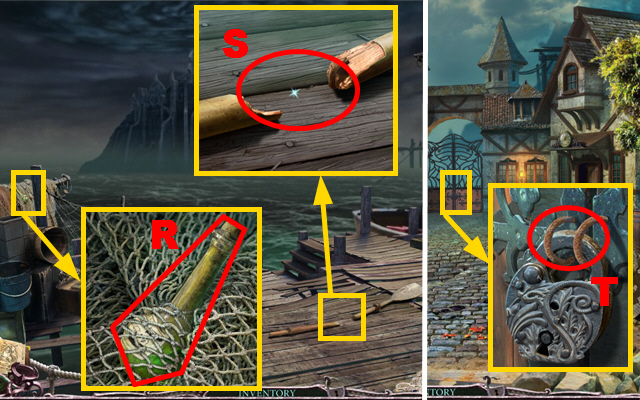
- Zoom into the net; cut the net with the SHARP MACHETE and take the ACID (R).
- Zoom into the paddle; use the METAL TUBE to connect the two parts of the oar (S) and take the 2/2 OAR.
- Walk down.
- Zoom into the gate; use the ACID on the padlock (T).
- Move forward.
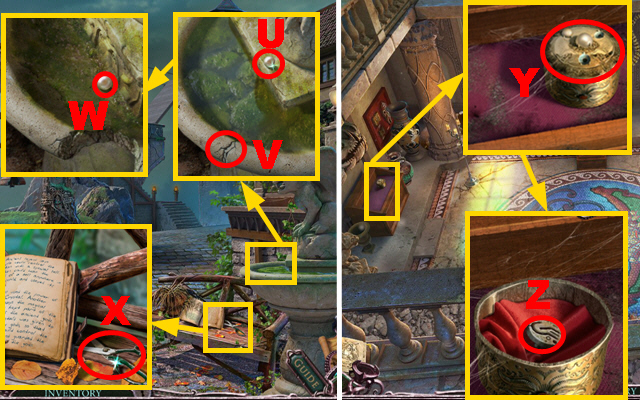
- Zoom into the fountain; try to take the pearl (U); use the STONE to break the fountain (V).
- Take the 2/2 PEARL (W).
- Zoom into the bench; read the book and take the SCISSORS (X).
- Walk down three times.
- Zoom into the left showcase; put the 2 PEARLS into the casket (Y) and take the STONE TOKEN (Z).
- Turn right.
- Zoom into the showcase; open the rubber roll (A) and cut it with the SCISSORS to acquire the RUBBER PATCH.
- Move forward twice.
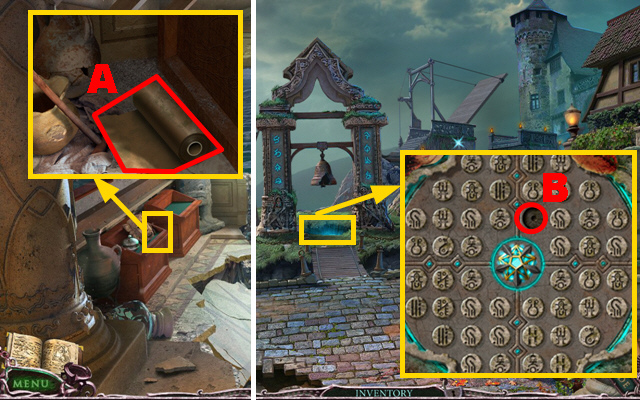
- Zoom into the area below the bell; add the STONE TOKEN to the board (B).
- Play the mini-game.
- Activate matching pairs of stones on the board.
- Activate all stone marks to complete this mini-game (C).
- Take the CRYSTAL marked in purple.
- Turn left.
- Zoom into the stone bench; take the GLUE (D).
- Move forward twice.
- Zoom into the man; take the crystal (E).
- Zoom into the bag; take the map (F) and the SEWER KEY (G).
- Walk down eight times, go through the left door, and go down the ladder.
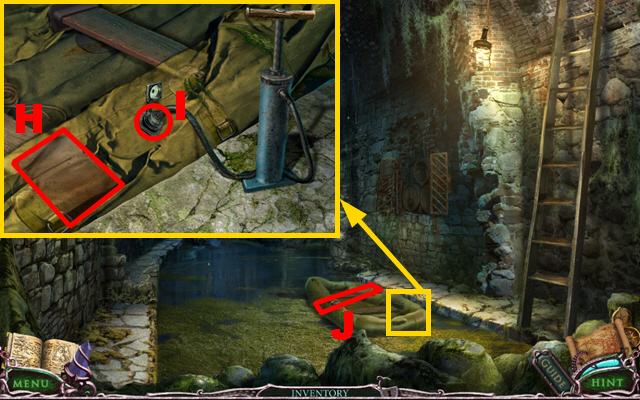
- Zoom into the rubber boat; pour the GLUE around the gap and close the gap (H) with the RUBBER PATCH.
- Connect the PUMP to the opening (I) and press the pump.
- Put the 2 OARS on the rubber boat (J).
- Turn right.
Chapter 3: Hope
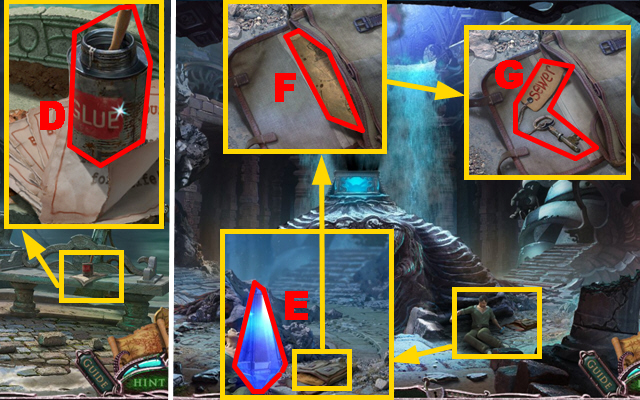
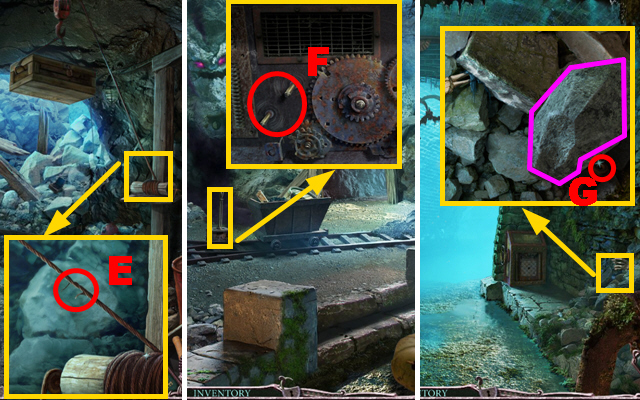
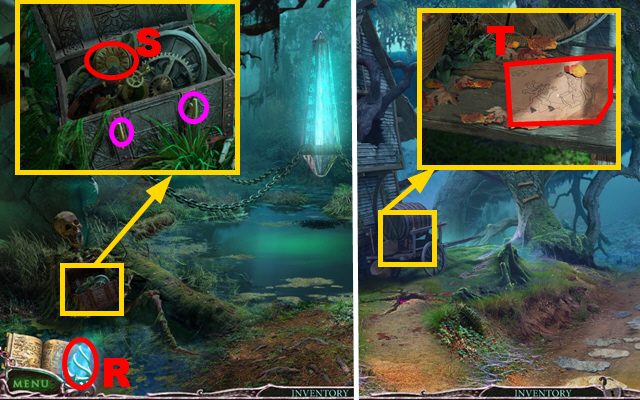
- Zoom into the small crate; take the CORKSCREW (K) and the PLIERS (L).
- Zoom into the skeleton hand; take the FILE (M).
- Walk down.
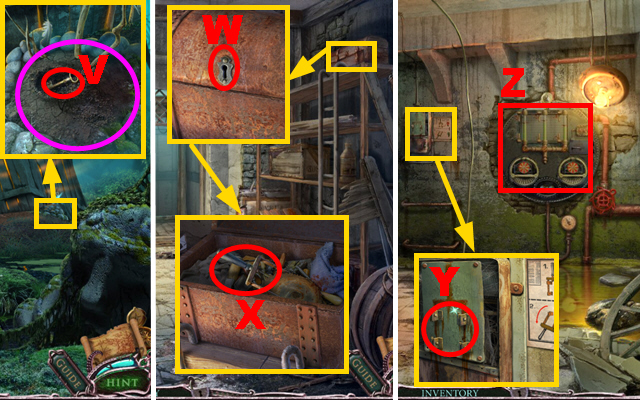
- Zoom into the barrel; use the CORKSCREW to remove the cork (N); put the EMPTY OILER below the liquid (O) to acquire the OILER.
- Turn right.
- Zoom into the device; use the OILER on the rusted lock (P).
- Put the SEWER KEY into the lock (Q) and open the lid.
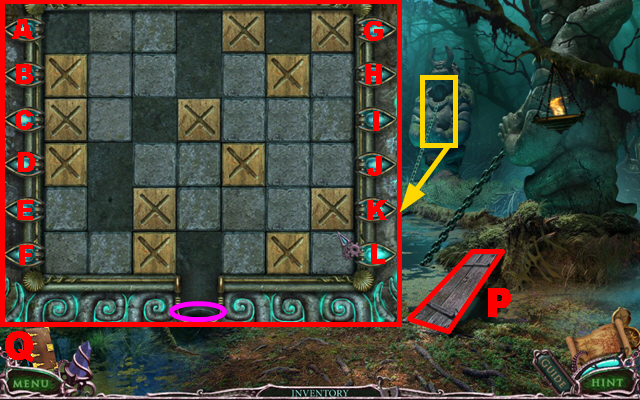
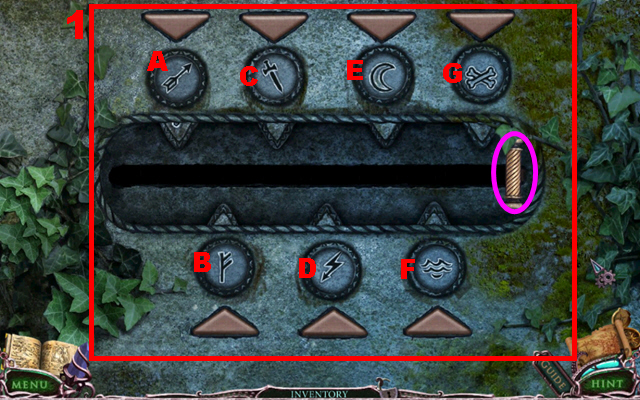
- Play the mini-game.

- Move the gear into the correct position indicated by the yellow.
- The gear can be moved by pressing the arrow buttons (A – H).
- To solve this puzzle (1), press the arrow buttons in the sequences shown below.
- First sequence: G, F, G, C, G, E, C, H, H, and E.
- Second sequence: B, C, B, E, H, F, Cx2, E, H, F, B, D, and G.
- Third sequence: F, A, E, F, D, A, G, F, D, C, A, H, D, G, A, C, F, B, H, Fx2, A, B, H, C, D, F, E, A, D, A, and D.
- Fourth sequence: C, D, A, C, A, and F.
- Move forward.
- Play the HOS.
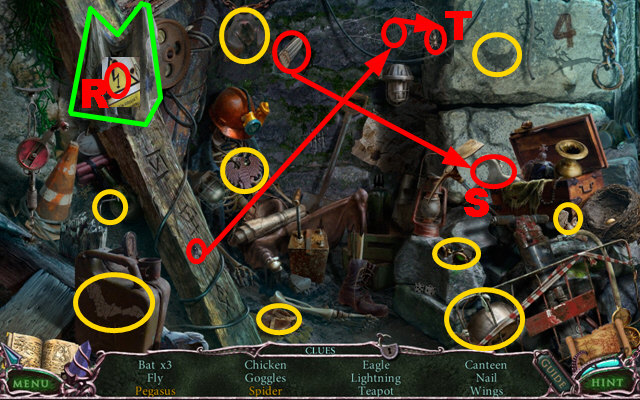
- Remove the rag marked in green and take the lightning (R).
- Take the wings, put them on the horse, and take the Pegasus (S).
- Take the fly, put it on the cobweb, and take the spider (T).
- The EAGLE will go into inventory.

- Zoom into the rock; read the article and take the HEX KEY (U).
- Zoom into the wagon; take the WOODEN HANDLE (V).
- Zoom into the platform; use the HEX KEY to remove the bolts marked in purple and use the PLIERS to remove the nail (W).
- Move forward.
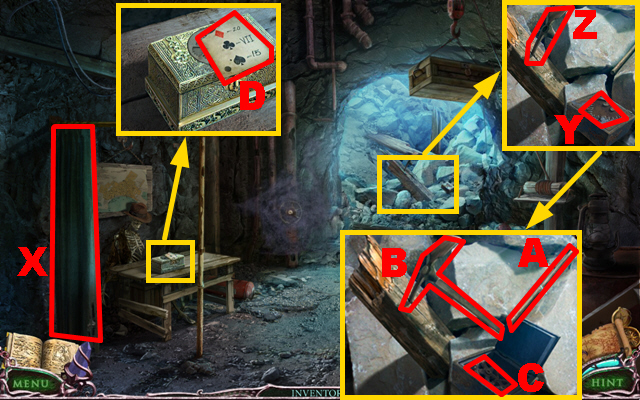
- Remove the curtain (X).
- Zoom into the debris; put the EAGLE into the slot (Y) and combine the WOODEN HANDLE with the part of the pick axe (Z).
- Take the ROD (A), the PICK AXE (B), and the GEARS (C).
- Zoom into the case; take the LIST (D).
- Zoom into the steel cable; use the FILE to cut the cable (E).
- Walk down.
- Zoom into the platform; add the GEARS to the device (F).
- Walk down.
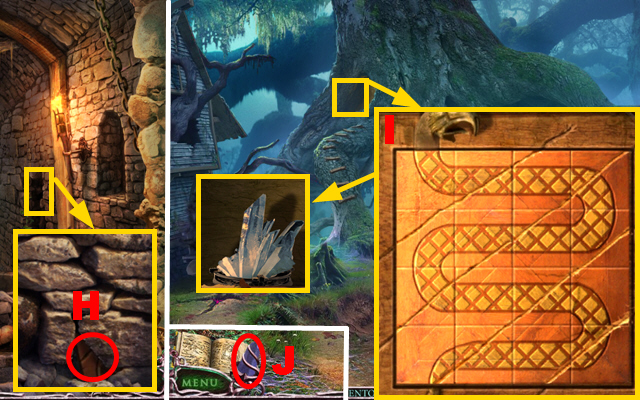
- Zoom into the skeleton hand; use the ROD to remove the rock marked in purple and take the SCRAPER (G).
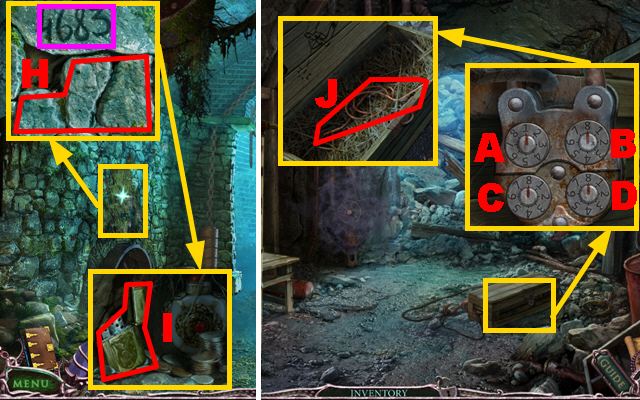
- Zoom into the moss; use the SCRAPER to remove the moss.
- Make note of the code marked in purple, use the PICK AXE to remove the stones (H), and take the LIGHTER (I).
- Move forward twice.
- Zoom into the crate; enter the code 4-6-8-3 (from A – D) into the lock to open it.
- Zoom into the crate; take the FUSE (J).
- Walk down.
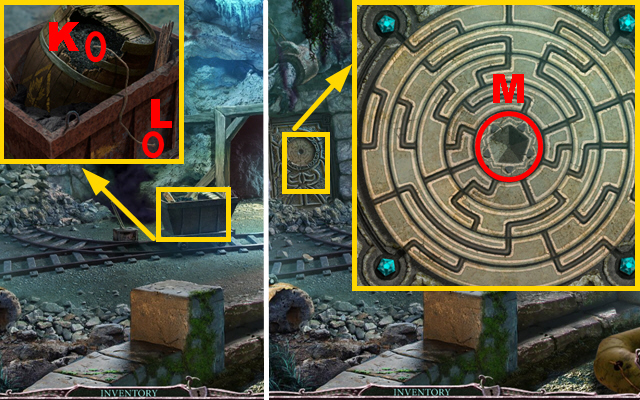
- Zoom into the wagon; put the FUSE into the gunpowder (K) and use the LIGHTER to light the FUSE (L).
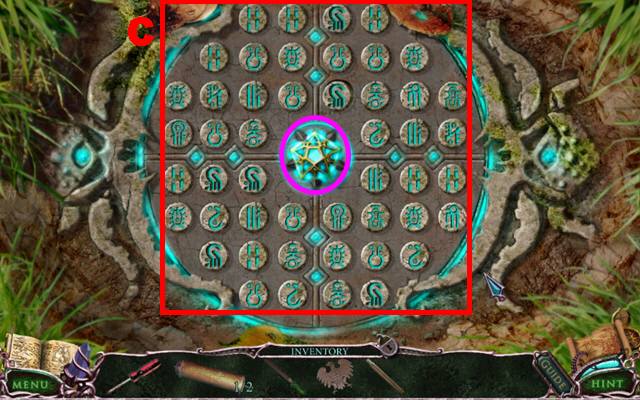
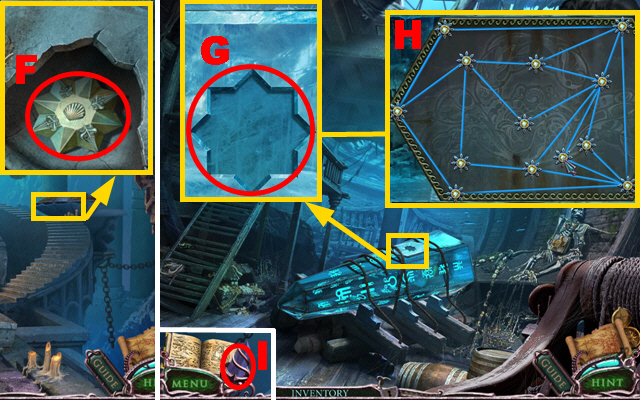
- Zoom into the large door; put the CRYSTAL into the slot (M).
- Play the mini-game.
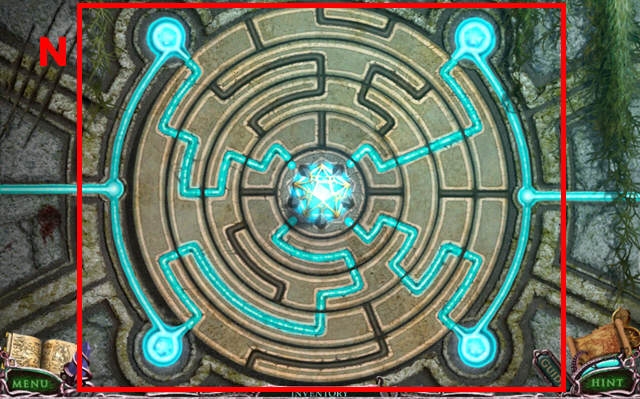
- Connect the central crystal to the four auxiliary crystals.
- The parts of the circle surrounding the central crystal can be rotated by pressing them.
- The screenshot displays the correct solution (N).
- Go through the left door.
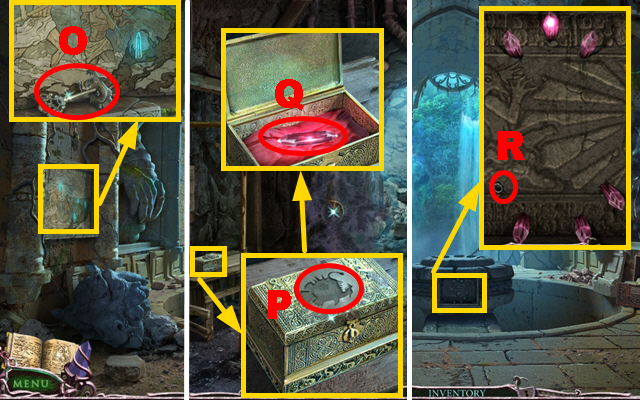
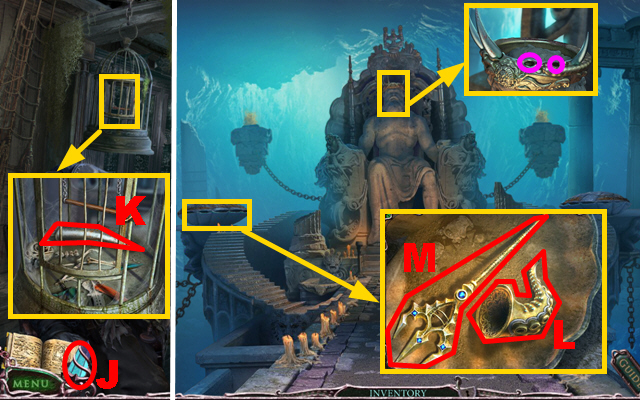
- Zoom into the mural; take the BIG FISH KEY (O).
- Walk down and go through the right door.
- Zoom into the case; put the BIG FISH KEY into the lock (P) and take the CRYSTAL (Q).
- Walk down and go through the left door.
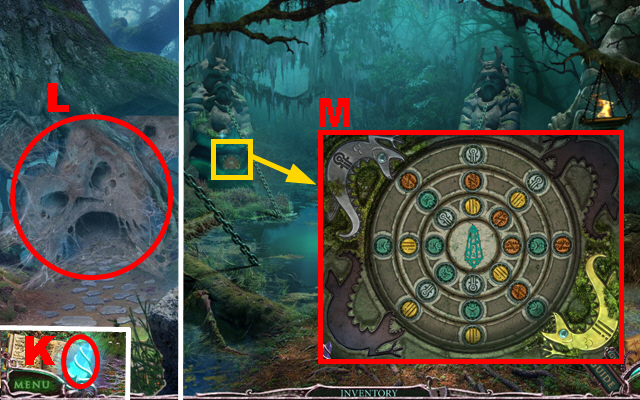
- Zoom into the platform; put the CRYSTAL on the board (R).
- Play the mini-game.
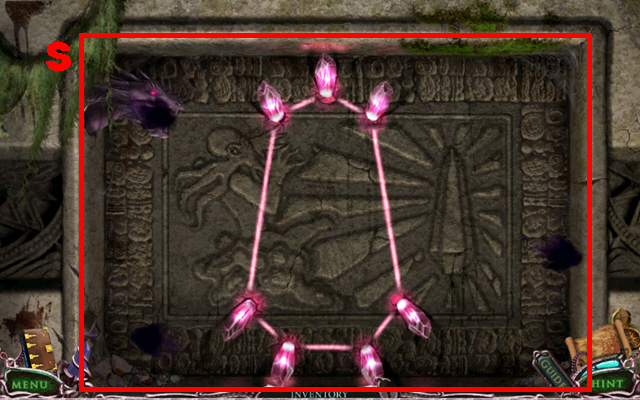
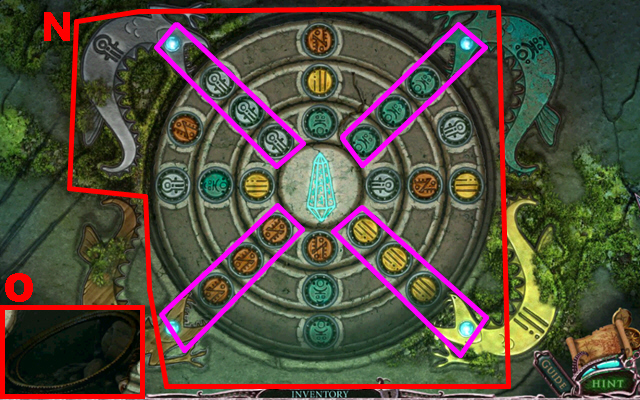
- Connect all the seven crystals to complete the mini-game.
- Keep pressing a crystal to direct the laser, but avoid the moving black obstacles.
- If an obstacle comes close to the laser, stop pressing the crystal momentarily.
- The screenshot displays the correct solution (S).
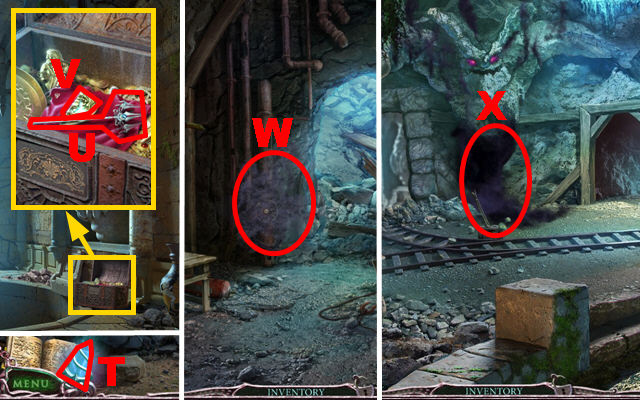
- Press your crystal (T) to activate it.
- Zoom into the chest; take the TRIDENT (U) and the AMULET HALF (V).
- Walk down and go through the right door.
- Press your crystal (T) to remove the curse (W).
- Walk down.
- Press your crystal (T) to remove the curse (X).
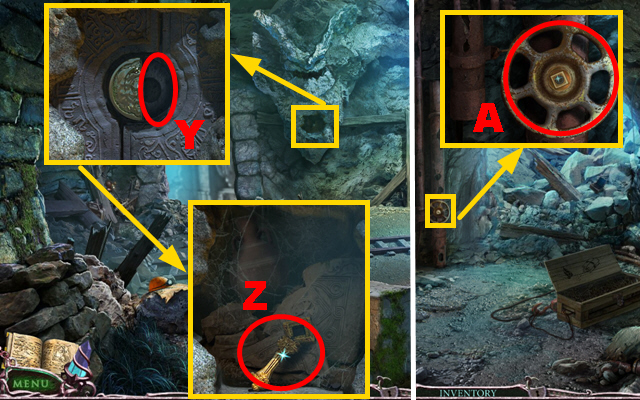
- Zoom into the statue; put the AMULET HALF into the slot (Y) and take the SQUARE WRENCH (Z).
- Go through the right door.
- Zoom into the valve; use the SQUARE WRENCH on the valve and take the VALVE (A).
- Walk down three times, go up the ladder, and walk down.

- Press your crystal (B) to remove the curse (C).
- Zoom into the fountain; put the VALVE onto the device (D).
- Turn the valve and take the SEA HORSE (E).
- Move forward, go up the ladder, turn right, move forward, and go through the right door.
- Zoom into the desk; put the LIST next to the paper scrap (F) and make note of the symbols and numbers.
- Go down the ladder.
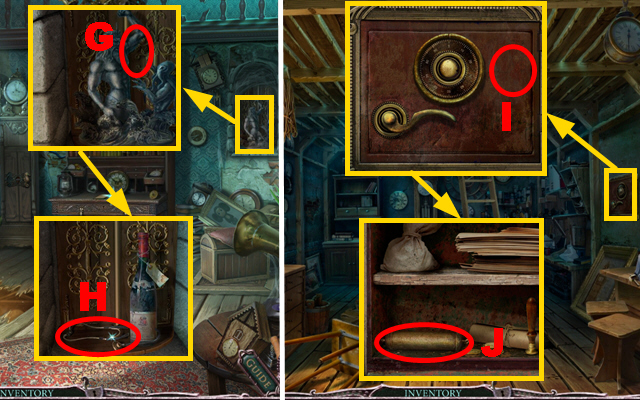
- Zoom into the small compartment; add the TRIDENT to the statue (G) and take the STETHOSCOPE (H).
- Go down the ladder.
- Zoom into the safe; use the STETHOSCOPE on the safe (I) to open it.
- Take the 2/2 WEIGHT (J).
- Go up the ladder.
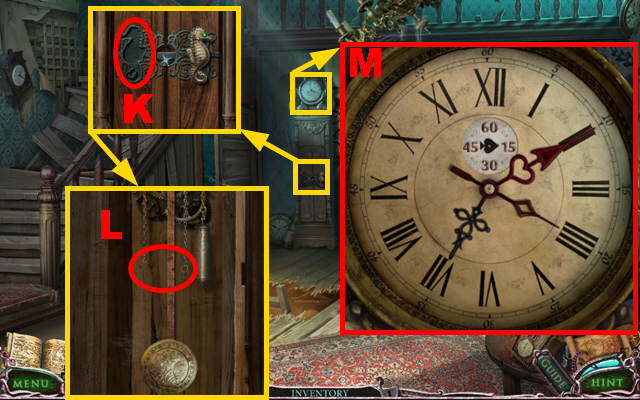
- Zoom into the lower part of the clock; put the SEA HORSE into the slot (K) and add the 2 WEIGHTS to the clock (L).
- Zoom into the upper part of the clock; the screenshot displays the correct positions of the clock hands (M).
- Move forward.
Chapter 4: Swamp Of Sorrows

- Zoom into the compartment; take the TORCH (N) and read the book.
- Zoom into the right wall; take the STEP (O).
- Zoom into the empty torch holder; take the HAMMER (P) and put the TORCH into the holder.
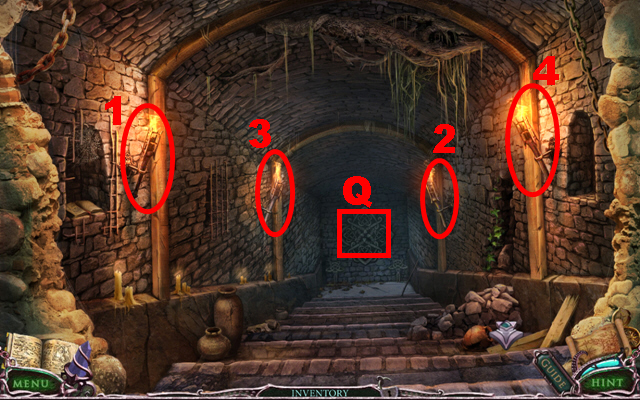
- Push the torches in order (1-4).
- Zoom into the compartment (Q).
- Play the mini-game.
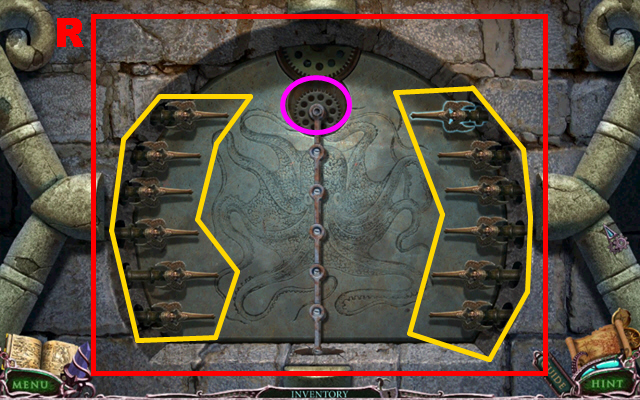
- Press the moving metal stakes marked in yellow to prevent them from reaching the gear.
- The gear has to reach the position marked in purple to complete the puzzle.
- The screenshot displays the correct solution (R).
- Move forward.
- Play the HOS.
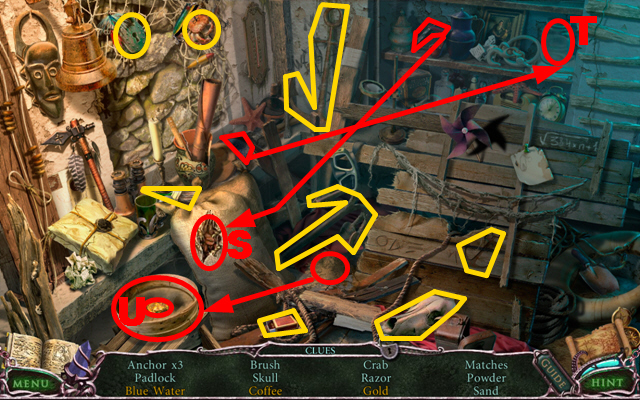
- Take the knife, cut open the sack, and take the coffee (S).
- Take the blue powder, put it into the glass of water, and take the blue water (T).
- Take the sand, put it into the bowl, and take the gold (U).
- The MATCHES will go into inventory.
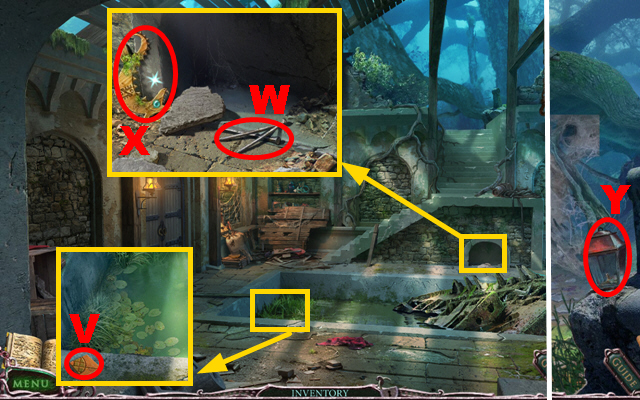
- Zoom into the water; take the 1/2 WOODEN PUZZLE PIECE (V).
- Zoom into the staircase; remove three stones; take the NAILS (W) and the 1/2 METAL LIZARD (X).
- Move forward.
- Take the LAMP (Y).
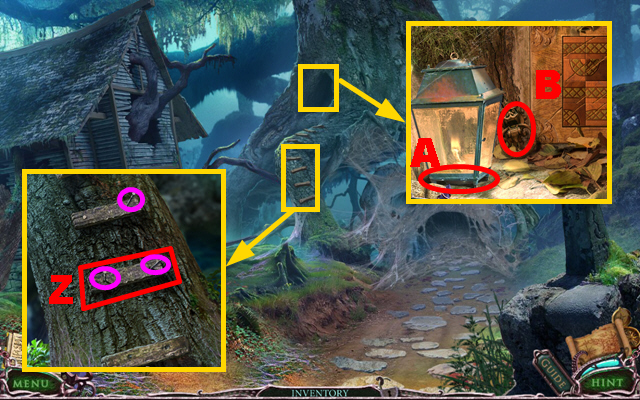
- Zoom into the tree ladder; add the STEP to it (Z), put the NAILS into the steps, and use the HAMMER to secure the nails marked in purple.
- Zoom into the tree top; put the LAMP into the hole (A) and open the lamp.
- Use the MATCHES to light the lamp and take the HANDLE (B).
- Walk down.
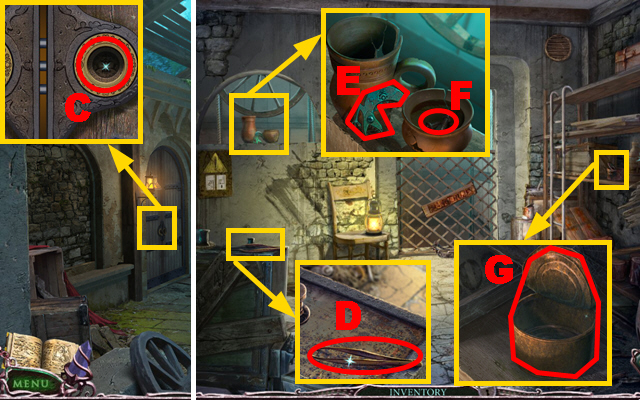
- Zoom into the door; put the HANDLE into the slot (C) to open the door.
- Turn left.
- Zoom into the crate; take the TWEEZERS (D).
- Zoom into the window; take the 2/2 METAL LIZARD (E), remove the lid, and take the SCREWS (F).
- Zoom into the shelf; take the TIN CAN (G).
- Walk down twice.
- Zoom into the right wall; use the TWEEZERS on the crack (H) to acquire the 2/2 WOODEN PUZZLE PIECE.
- Move forward twice.
- Zoom into the tree top; add the 2 WOODEN PUZZLE PIECES to the board and play the mini-game.
- Swap the pieces to recreate the dragon picture.
- Correctly placed pieces will remain fixed.
- The screenshot displays the correct solution (I).
- Use your crystal (J) to charge it.
- Press your crystal (K) to remove the curse (L).
- Move forward twice.
- Zoom into the left statue; add the 2 METAL LIZARDS to it (M).
- Play the mini-game.
- Rotate the three circles until the colors of the stones match the colors of the lizards.
- The stones that count for each lizard are marked in purple.
- The screenshot displays the correct solution (N).
- Take the WHIP (O).
- Walk down three times.
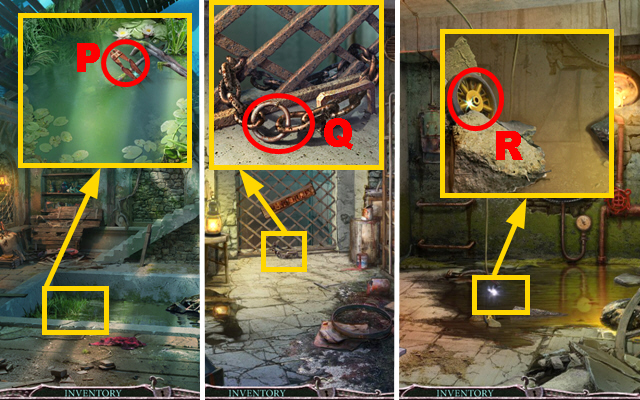
- Zoom into the water; aim the WHIP at the bolt cutter (P) to acquire the BOLT CUTTER.
- Turn left.
- Zoom into the chain; use the BOLT CUTTER to cut the chain (Q).
- Move forward.
- Zoom into the water; take the WHEEL (R).
- Walk down.
- Zoom into the lower part of the ladder; add the WHEEL to the ladder (S) and move the ladder.
- Zoom into the chest; take the HOE (T).
- Walk down and move forward twice.
- Zoom into the lake; put the TIN CAN into the water (U) to acquire the TIN CAN WITH WATER.
- Zoom into the house; water the soil marked in purple with the TIN CAN WITH WATER and use the HOE on the wet soil.
- Take the SMALL KEY (V).
- Walk down twice and turn left.
- Zoom into the chest; put the SMALL KEY into the lock (W) to open the chest.
- Take the KNIFE SWITCH (X).
- Move forward.
- Zoom into the panel; put the KNIFE SWITCH into the slot (Y) and pull the lever.
- Zoom into the large panel (Z) and play the mini-game.
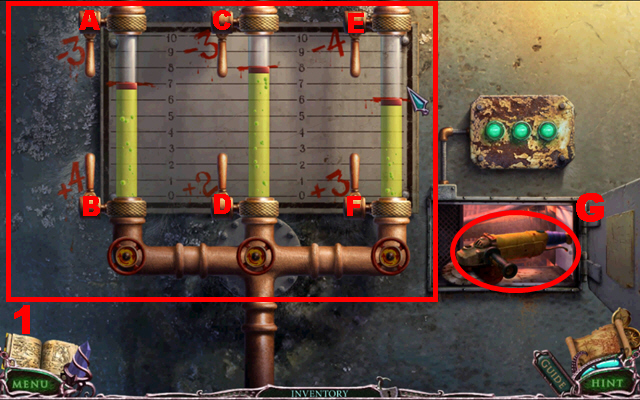
- Press the levers so that each flask is filled according to the red marking.
- To solve this puzzle (1), press the levers A-F in the following sequence: B, Ax2, B, D, C, Dx2, F, Ex2, and Fx2.
- Take the CIRCULAR SAW (G).
- Walk down.
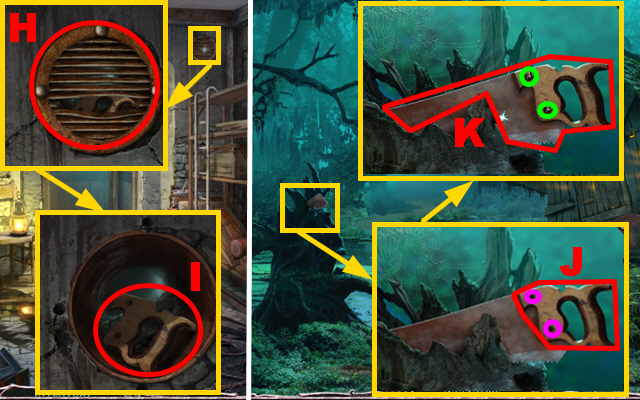
- Zoom into the vent; use the CIRCULAR SAW to remove the grid (H) and take the SAW HANDLE (I).
- Walk down and move forward twice.
- Zoom into the tree trunk; put the SAW HANDLE on the blade (J) and put the SCREWS into the slots marked in purple.
- Use the SCREWDRIVER to tighten the screws marked in green; take the SAW (K).

- Zoom into the door; use the SAW to remove the board (L).
- Play the HOS.
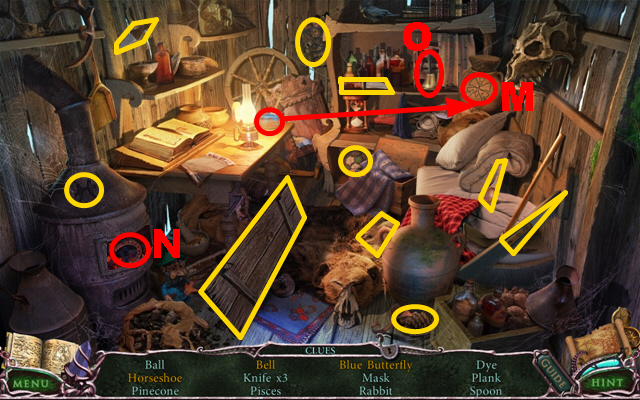
- Take the blue paint, paint the butterfly with it, and take the blue butterfly (M).
- Open the oven and take the horseshoe (N).
- Remove the curtain and take the bell (O).
- The PLANK will be added to inventory.
- Move forward.
- Put down the BOARD to cross the swamp (P).
- Zoom into the right statue and play the mini-game.
- Press the arrow buttons to move all the three crystals to the lower cell marked in purple.
- To solve this puzzle (Q), press the arrows A-L in the following order: G, B, J, C, J, K(x2), D(x2), F(x3), L(x2), Ax2, H, B, I, C, J, D, F, L(x2), G(x3), I, C, J, D, F(x2), and L(x2).
- Use your crystal (R) to charge it.
- Zoom into the chest; press both switches marked in purple and take the SUN (S).
- Walk down twice.
- Press your crystal to remove the curse.
- Zoom into the wheelbarrow; take the PLAN (T).
- Walk down, turn left, and move forward.
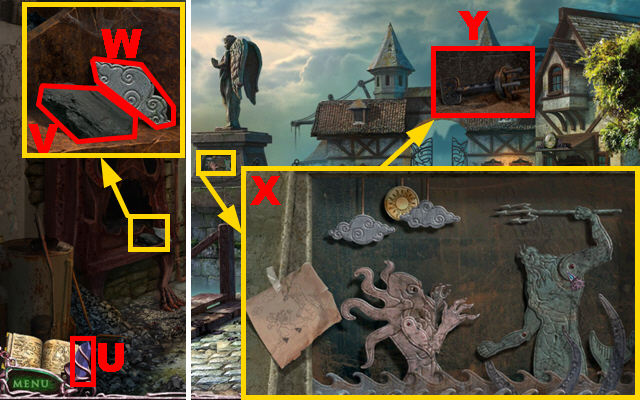
- Use your crystal (U) to remove the curse.
- Zoom into the oven; take the COAL (V) and the CLOUD CHARMS (W).
- Walk down five times.
- Zoom into the statue; put the SUN, the PLAN, and the CLOUDS onto the plate and play the mini-game.
- Rearrange the puzzle pieces according to the picture on the plan.
- Press any puzzle piece to move it.
- The screenshot displays the correct solution (X).
- Take the BRIDGE KEY (Y). Move forward.
- Zoom into the bridge and then zoom into the lock; put the BRIDGE KEY into the lock marked in purple. Turn right.
Chapter 5: Last Step
- Zoom into the window; take the 1/3 WOODEN OCTOPUS (Z) and the RADIO DIAL (A).
- Move forward.
- Open the door (B).
- Move forward.
- Open the door marked in green.
- Try to move forward.
- Zoom into the staircase; remove three boards and take the 2/3 WOODEN OCTOPUS (C).
- Zoom into the radio; take the 1/2 CIRCULAR PUZZLE PIECE (D) and add the RADIO DIAL to the radio (E).
- Play the mini-game.
- Press the power switch marked in purple.
- Set the levers and handles so that the pointer reaches the number 5.
- The screenshot displays the correct solution (F).
- Take the WIRE (G).
- Zoom into the poster; use the COAL on it and make note of the sign sequence (H).
- Walk down twice.
- Zoom into the window; use the WIRE to open it (I) and take the WOODEN EYE (J).
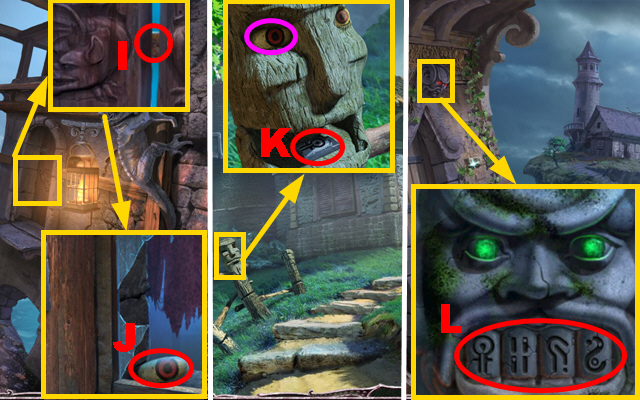
- Move forward.
- Zoom into the statue; put the WOODEN EYE into the slot marked in purple and take the STONE RUNE (K).
- Walk down.
- Zoom into the top of the door; put the STONE RUNE into the slot to play a mini-game.
- Swap runes to create the correct sequence (L).
- Turn left.
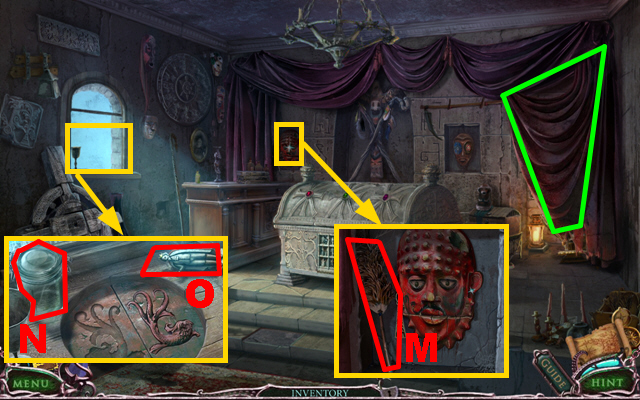
- Zoom into the red mask; take the BRUSH (M).
- Zoom into the window; take the EMPTY JAR (N) and the KING (O).
- Remove the red curtain marked in green.
- Play the HOS.
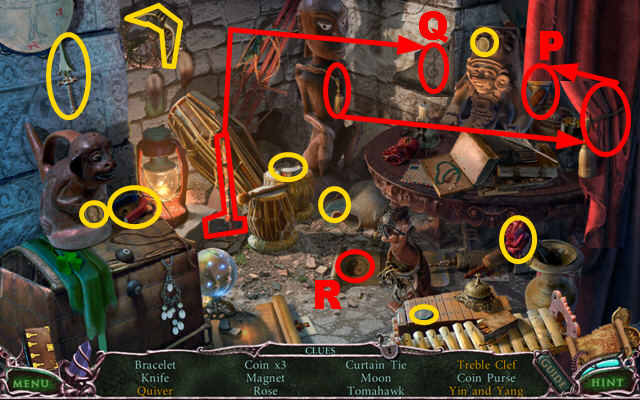
- Take the cord, put it on the curtain, and take the quiver (P).
- Take the axe, use it to break away the stone from the wall, and take the treble clef (Q).
- Press the scroll and take the yin and yang (R).
- The MAGNET will be added to inventory.
- Walk down and move forward twice.
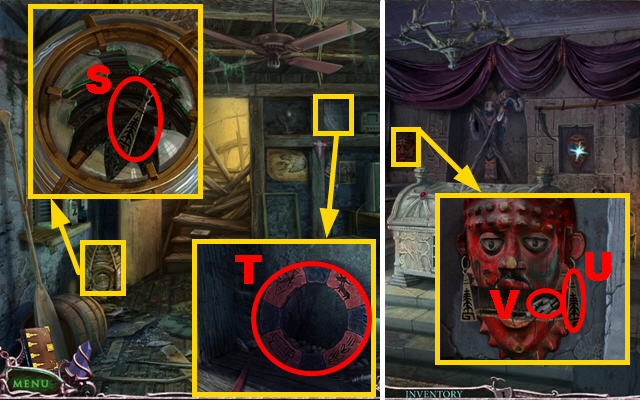
- Zoom into the broken glass container; put the MAGNET on it to acquire the EARRING (S).
- Zoom into the shelf; use the BRUSH to remove the cobwebs and take the WOODEN RING (T).
- Walk down twice and turn left.
- Zoom into the red mask; put the EARRING on the mask (U) and take the KNIGHT (V).

- Zoom into the right mask; add the WOODEN RING to it (W) and turn the ring three times; take the WIZARD (X).
- Zoom into the chest; put the KING, the KNIGHT, and the WIZARD into the empty compartments marked in purple.
- Play the mini-game.
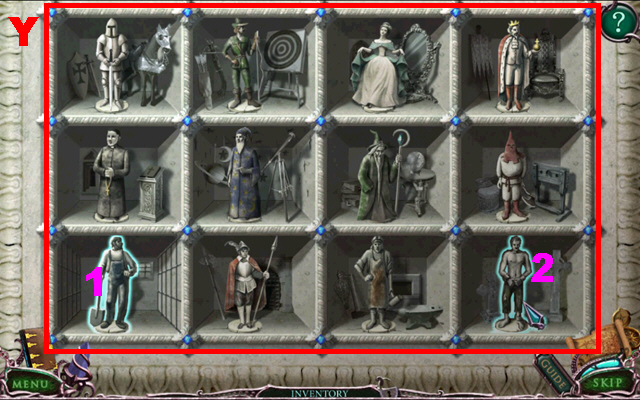
- Swap the statuettes so that each statuette is in the correct compartment.
- Place the statuettes according to the screenshot (Y) and swap the statuettes 1 and 2 to complete this puzzle.
- Zoom into the chest; remove the blanket and take the OCTOPUS (Z).
- Walk down.
- Zoom into the tiny plate; put the OCTOPUS into the slot (A) and take the KEY (B).
- Move forward twice.
- Zoom into the staircase; put the KEY into the lock (C) and take the SLINGSHOT (D).
- Walk down.
- Zoom into the window; use the SLINGSHOT to reach it and take the MERMAID STATUE (E).
- Walk down.
- Zoom into the window; put the MERMAID STATUE onto the casket (F), open it, and take the STONE HORN (G).
- Move forward.
- Zoom into the stone statue; put the STONE HORN into the slot (H) and take the 3/3 WOODEN OCTOPUS (I).
- Zoom into the window; add the 3 WOODEN OCTOPUSES to the board and play the mini-game.
- Swap and rotate octopus pictures to form a coherent picture.
- The screenshot displays the correct solution (J).
- Take the ROPE (K).
- Zoom into the hillside; put the ROPE on the branch (L).
- Climb down the rope.
- Zoom into the mural; take the FISH (M).
- Walk down twice and turn left.
- Zoom into the window; put the FISH into the slot (N) and take the 2/2 CIRCULAR PUZZLE PIECE (O).
- Walk down, move forward and climb down the rope.

- Zoom into the mural; add the 2 CIRCULAR PUZZLE PIECES to it and play the mini-game.
- To solve this puzzle (1), select and swap the puzzle parts to recreate the picture.
- Play the HOS.
- Move the beam marked in green and take the handprint (P).
- Take the moon, put it next to the sun, and take the eclipse (Q).
- Open the trophy and take the ballerina (R).
- The GLASS will go into inventory.
- Walk down.
- Zoom into the window; use the GLASS to cut the teddy bear’s seam, open it, and take the BUTTON (S).
- Climb down the rope.
- Zoom into the entrance; add the BUTTON to the board (T) and play the mini-game.
- The lever marked in purple has to go to the right side to open the entrance.
- Choose the appropriate pictures A-G by pressing the related buttons.
- The screenshot displays the correct solution (1).
- Move forward.
- Zoom into the door and then zoom into the chest; take the CANNON HANDLE (U).
- Zoom into the fountain; press the hook (V), take the WOODEN CARVING (W), and the 1/3 DOMINO (X).
- Zoom into the cannon and then zoom into the ship; put down the EMPTY JAR (Y).
- Put the WOODEN CARVING marked in purple into the jar to acquire the JAR WITH TERMITES.
- Walk down three times and move forward.
- Zoom into the window; use the JAR WITH TERMITES on the boards marked in green and take the HOOK (Z).
- Walk down, climb down the rope, and move forward.
- Zoom into the fountain; combine the HOOK with the chain and take the CHAIN (A).
- Zoom into the cannon; put the CANNON HANDLE (B) and the CHAIN (C) on the cannon.
- Zoom into the deck; climb up the chain (D).
- Turn the skeleton marked in green.
- Zoom into the desk; take the SKULL TOKEN (E) and read the book.
- Zoom into the chest; take the KNOB (F).
- Zoom into the small table; put the KNOB onto the drawer (G) and open the drawer.
- Take the 2/3 DOMINO (H) and the HOOK (I).
- Walk down.
- Zoom into the large door and then zoom into the chest; put the SKULL TOKEN into the slot marked in green and take the RIFLE SCOPE (J).
- Zoom into the cannon and then zoom into the ship; use the HOOK on the domino and take the 3/3 DOMINO (K).
- Climb up the chain.
- Zoom into the skull panel; add the 3 DOMINOES to the board and play the mini-game.
- Put each domino into a slot; touching domino sides have to show the same symbol.
- The screenshot displays the correct solution (L).
- Take the BULLETS (M).
- Zoom into the chest; put the RIFLE SCOPE on the rifle and the BULLETS into the rifle (N); take the SNIPER RIFLE.
- Walk down.
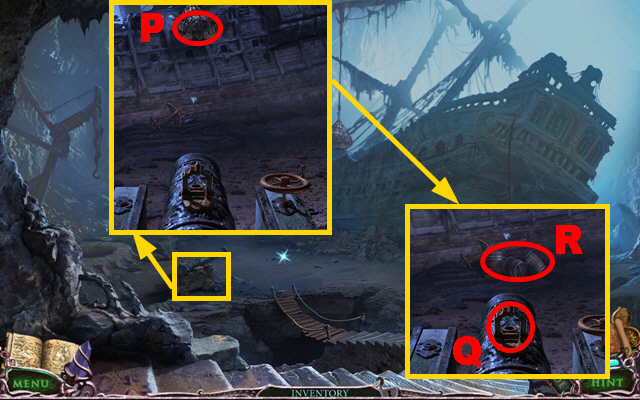
- Zoom into the cannon; use the SNIPER RIFLE to shoot at the barrels of gunpowder (P).
- Shoot the cannon (Q) at the barrels with gunpowder (R).
- Move forward.
- Play the HOS.
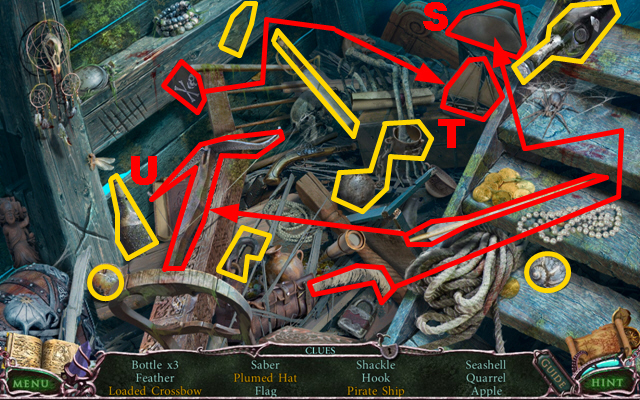
- Take the feather, put it on the hat, and take the plumed hat (S).
- Take the skull flag, put it on the ship, and take the pirate ship (T).
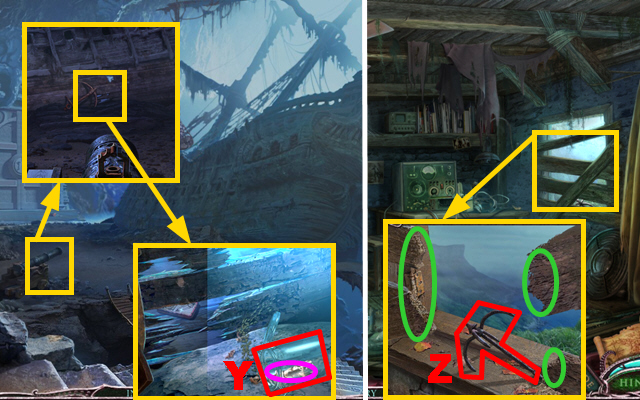
- Take the arrow, put it on the crossbow, and take the loaded crossbow (U).
- The SHACKLES will go into inventory.
- Walk down and climb up the chain.
- Zoom into the jaws; put the SHACKLES between the jaws (V) and take the OCTOPUS (W).
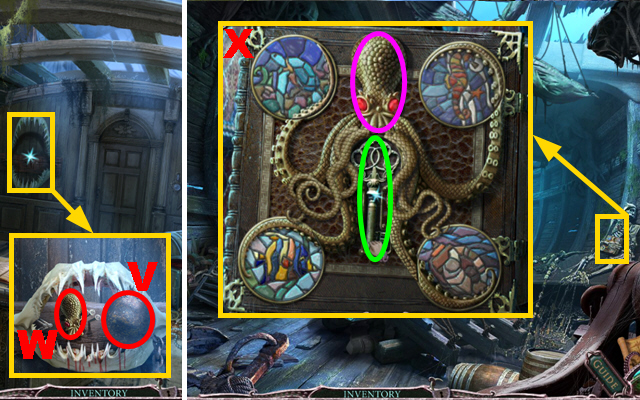
- Walk down and enter the ship.
- Zoom into the skeleton; remove the hands, put the OCTOPUS into the slot marked in purple, and play the mini-game.
- Turn the circle plates to create a coherent pattern.
- The screenshot displays the correct solution (X).
- Take the CAPTAIN’S KEY marked in green.
- Walk down and climb up the chain.
- Zoom into the skeleton; put the CAPTAIN’S KEY into the lock (Y) and take the TRIDENT (Z).
- Walk down.
- Zoom into the large door and then zoom into the lock; put the TRIDENT into the slot (A).
- Move forward.
Chapter 6: Ancient God
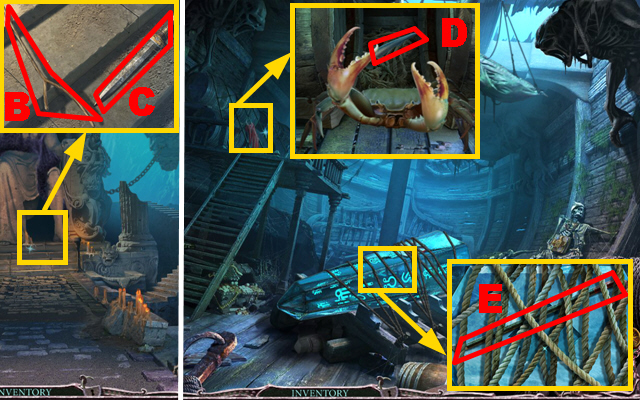
- Zoom into the steps; take the STICK (B) and the SWORD (C).
- Walk down and enter the ship.
- Zoom into the barrels; use the STICK to get rid of the crab and take the 1/2 SPIKE (D).
- Zoom into the large crystal; use the SWORD to cut the rope and take the CROWBAR (E).
- Walk down and go through the large door.
- Zoom into the right shell; use the CROWBAR to open the shell and take the STAR (F).
- Walk down and enter the ship.
- Zoom into the large crystal; put the STAR into the slot (G) and play the mini-game.
- Untangle the star lines so they don’t intersect by moving the stars.
- The screenshot displays the correct solution (H).
- Use your crystal (I) to charge it.
- Climb up the chain.
- Use your crystal (J) to remove the curse.
- Zoom into the cage; open the cage and take the 2/2 SPIKE (K).
- Walk down and move forward.
- Use your crystal to remove the curse.
- Zoom into the statue; put the 2 SPIKES into the slots marked in purple.
- Zoom into the left shell; take the KRAKEN’S HORN (L); use your crystal and take POSEIDON’S TRIDENT (M).
- Move forward.
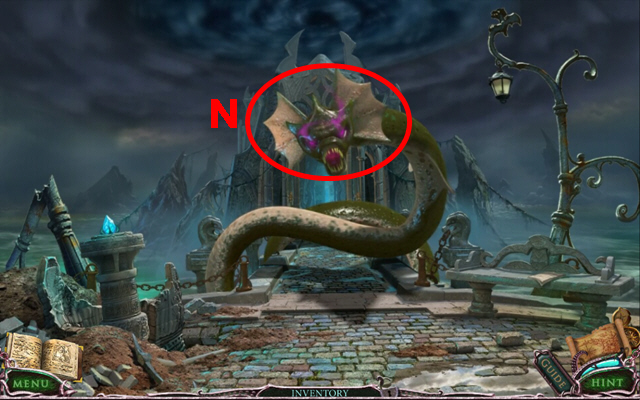
- Use the KRAKEN’S HORN on the creature (N) to defeat it.
- Move forward twice.
- Watch the final cut scene.
- Congratulations, you have completed Mystery of the Ancients: The Curse of the Black Water.


 Dominic Crane's Dreamscape Mystery Walkthrough, Guide, & Tips
 Bluebeard's Castle Walkthrough, Guide, & Tips
 Ominous Objects: Family Portrait Walkthrough, Guide, & Tips
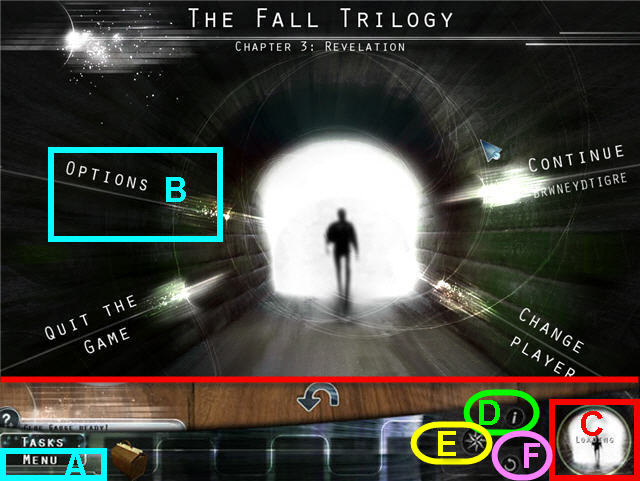 The Fall Trilogy - Chapter 3: Revelation Walkthrough, Guide, & Tips