Unfinished Tales: Illicit Love Walkthrough, Guide, & Tips
Unfinished Tales: Illicit Love Walkthrough
Welcome to the Unfinished Tales: Illicit Love Walkthrough
After the Raven Queen crashes her wedding, Thumbelina must save her prince to reclaim her happy ending!
Whether you use this document as a reference when things get difficult or as a road map to get you from beginning to end, we’re pretty sure you’ll find what you’re looking for here.
This document contains a complete Unfinished Tales: Illicit Love game walkthrough featuring annotated screenshots from actual gameplay!
We hope you find this information useful as you play your way through the game. Use the walkthrough menu below to quickly jump to whatever stage of the game you need help with.
Remember to visit the Big Fish Games Forums if you find you need more help. Have fun!
This walkthrough was created by BrownEyedTigre, and is protected under US Copyright laws. Any unauthorized use, including re-publication in whole or in part, without permission, is strictly prohibited.
General Tips

- Select Options to adjust the Music, Volume, Graphics, Screen Size, Custom Cursor, and Special Effects.
- You may select between Casual, Advanced, and Hardcore Modes.
- Throughout the guide, we will use the acronym ‘HOS’ for Hidden Object Scenes.
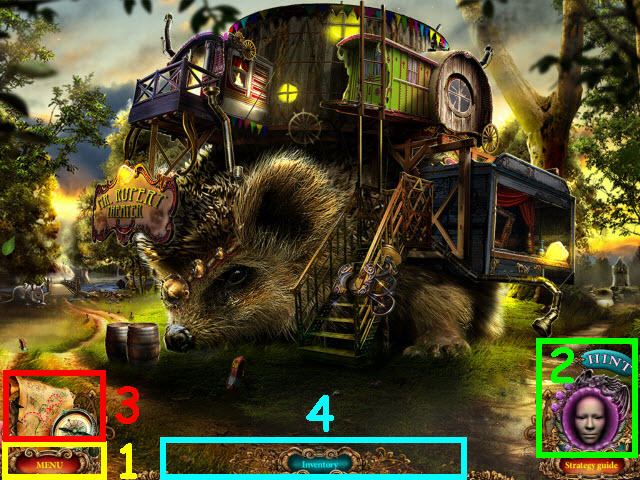
- The main menu button is located here (1).
- Select the Info button on the bottom right to get the objectives for the puzzles.
- Select the Hint button (2) on the bottom right to get a hint in HOS and in the main quest.
- Select the map (3) to move to locations quickly.
- Move your cursor down to the bottom of the screen to raise the Inventory bar (4).
- Inventory items will be marked in all CAPS in the strategy guide.
Chapter 1 – Prison
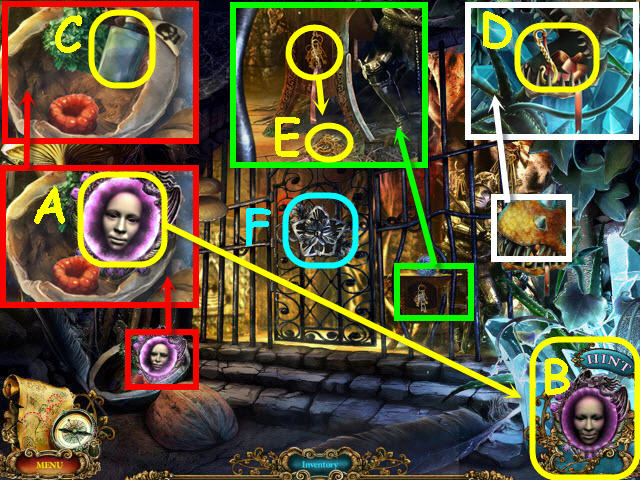
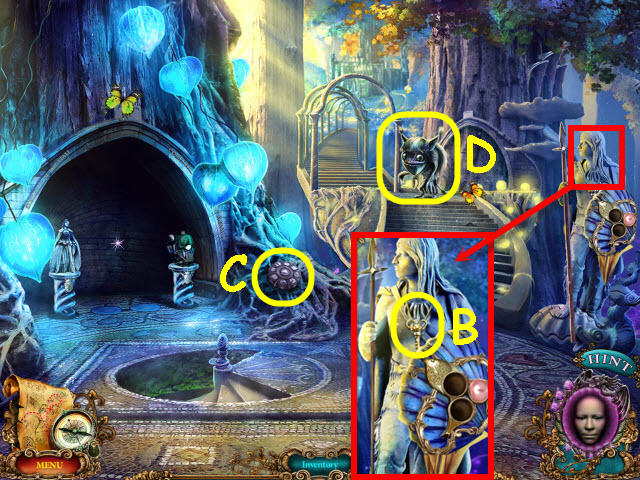
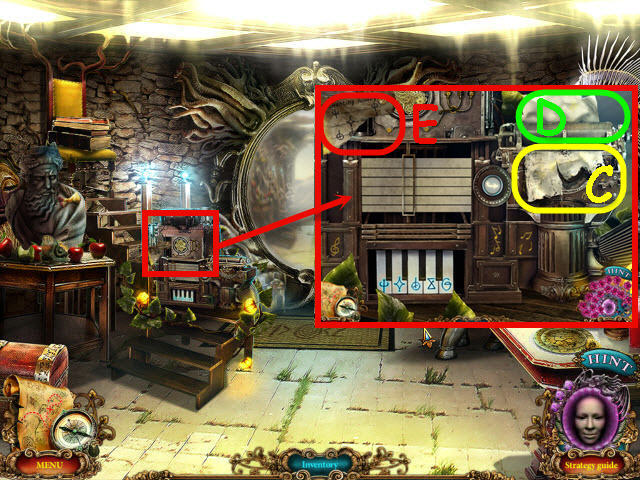
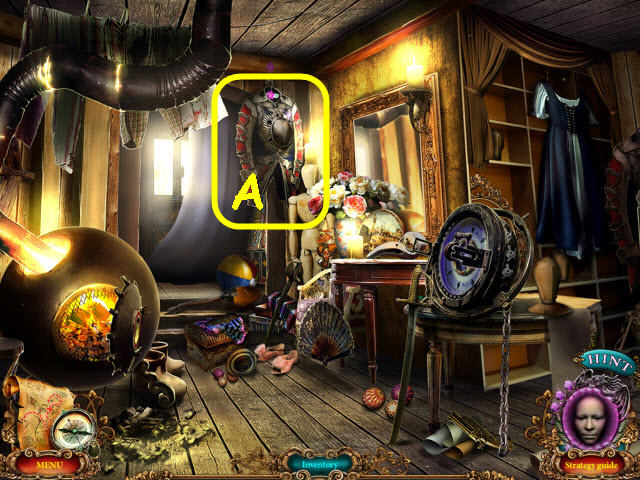
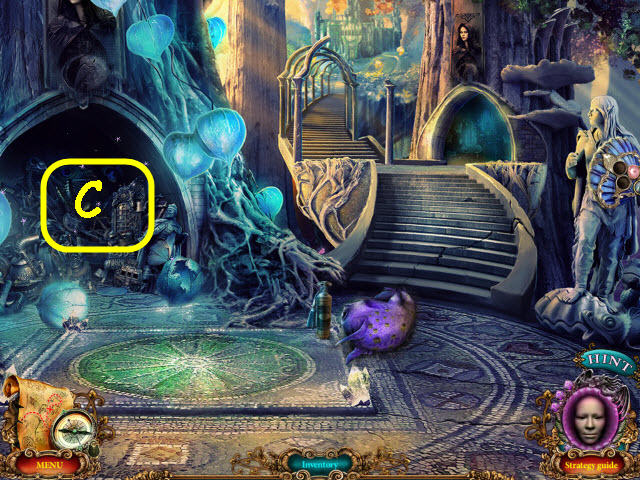
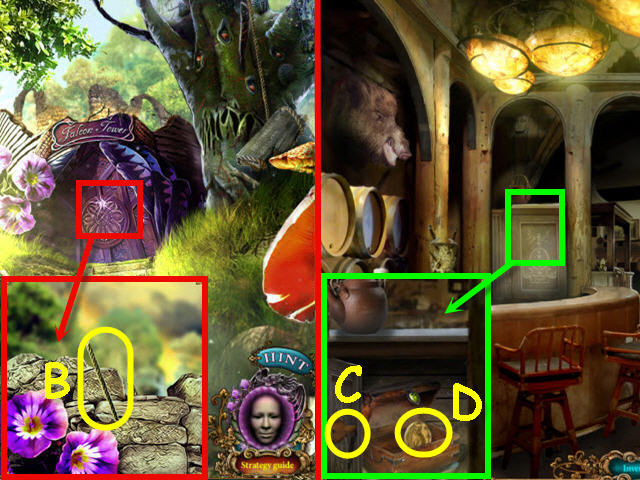
- Examine the shell and take the magic mirror (A). It will be added to your task bar on the bottom right and will give you hints when you select it (B).
- Take the BOTTLE OF POISON (C).
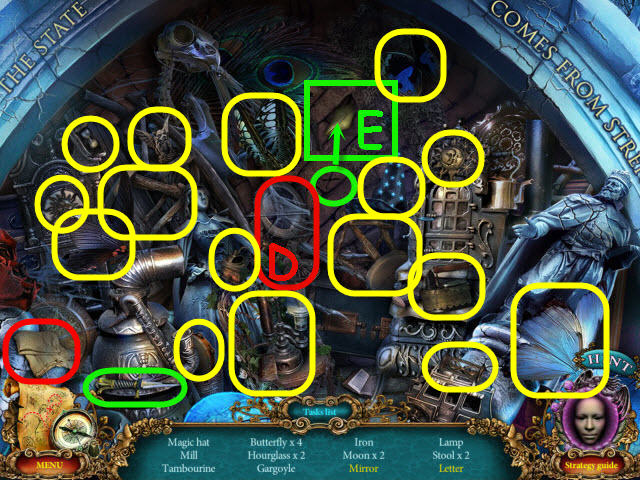
- Examine the plant and use the BOTTLE OF POISON on it; take the HOOK WITH RIBBON (D).
- Examine the keys and use the HOOK WITH RIBBON on them; pull the ribbon and take the BUNCH OF KEYS (E).
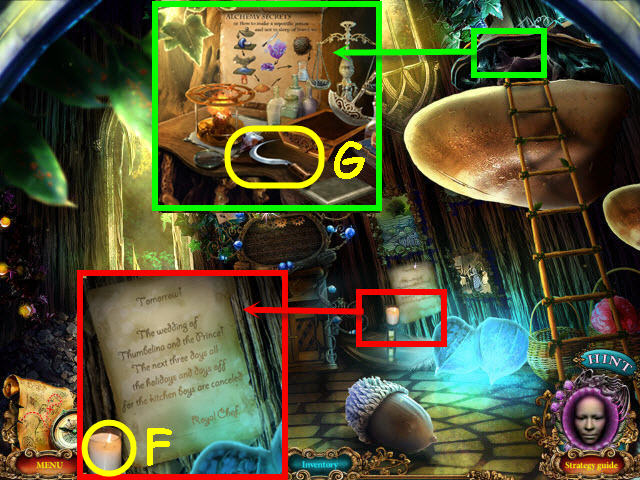
- Examine the door lock and use the BUNCH OF KEYS in the lock; turn the key to trigger a puzzle (F).
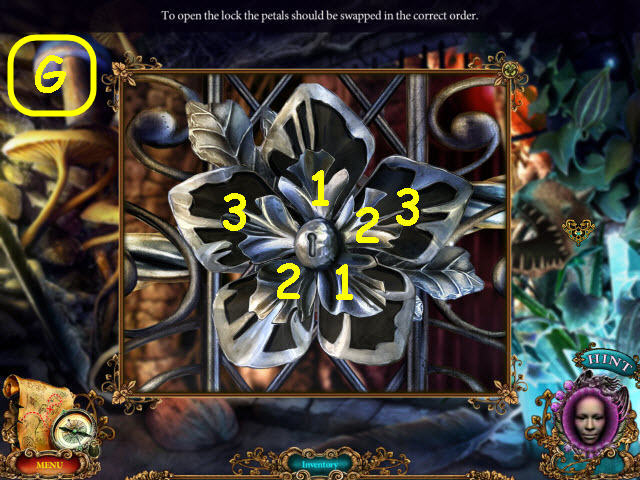
- Swap the petals in the correct order.
- To solve the puzzle, switch the petals in the order indicated in the screenshot (G).
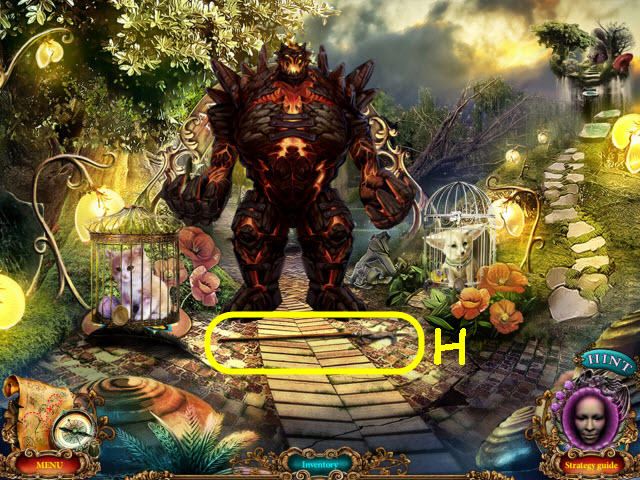
- Go through the cell door to the prison dungeon.
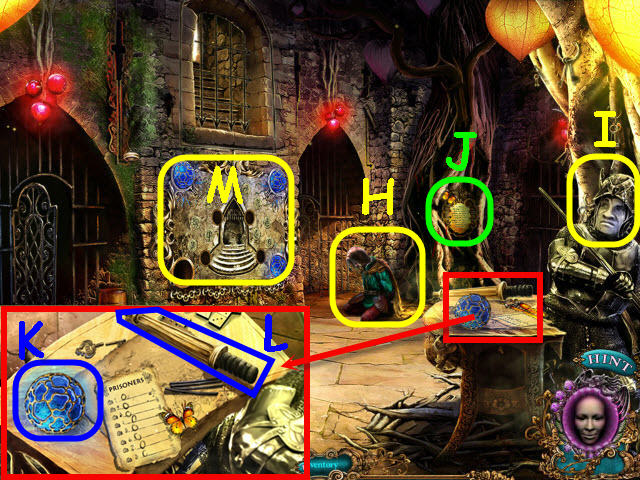
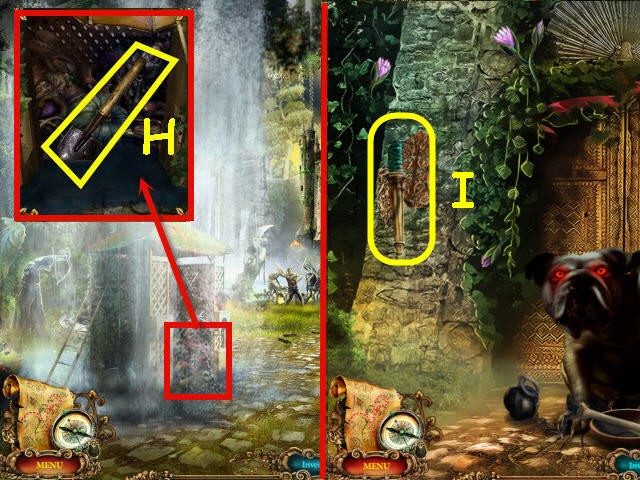
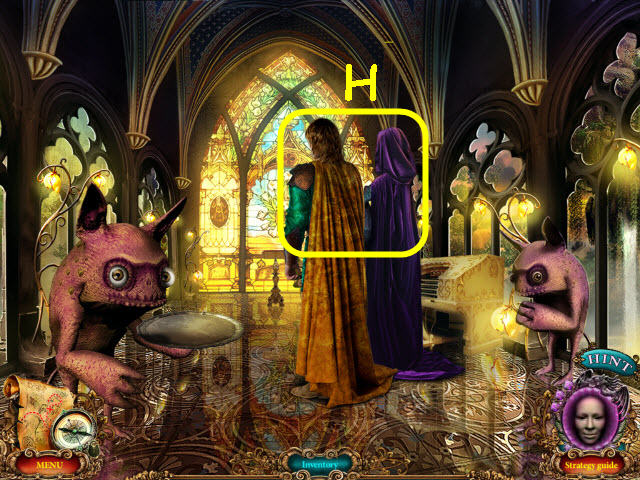
- Examine the Prince (H).
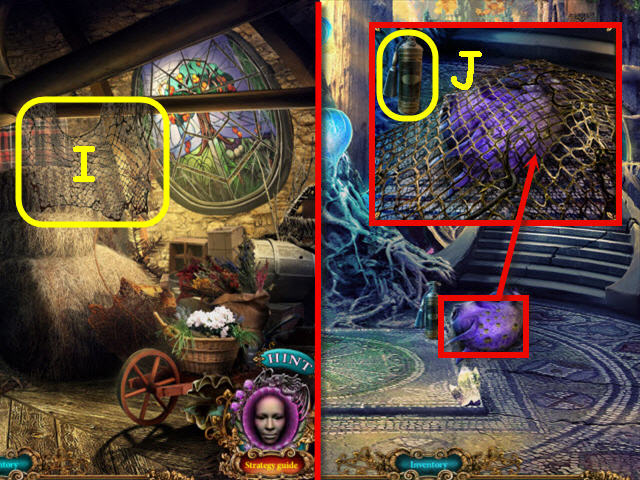
- Examine the guard (I).
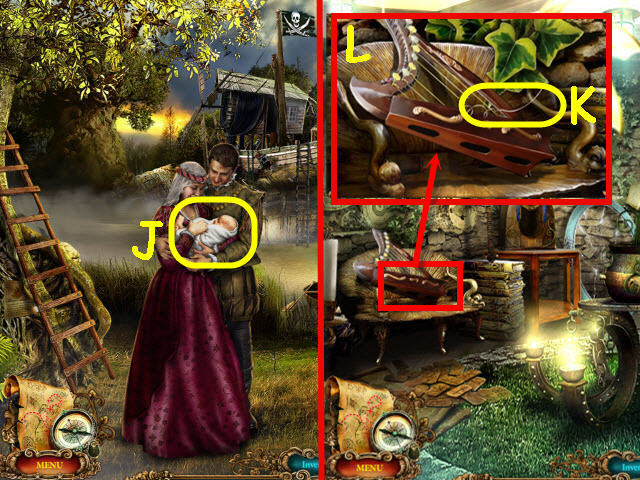
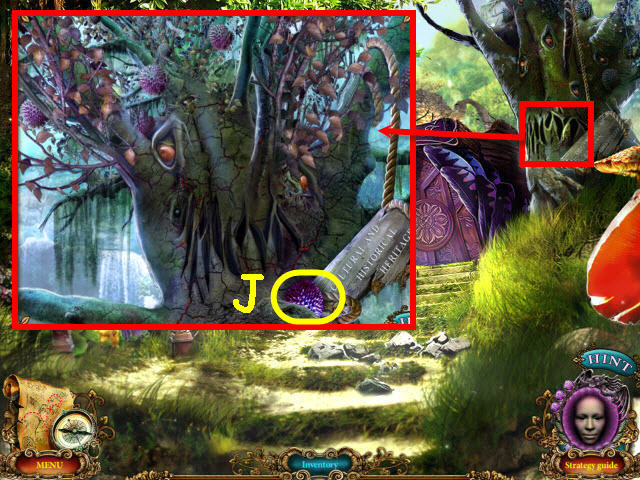
- Read the plaque (J).
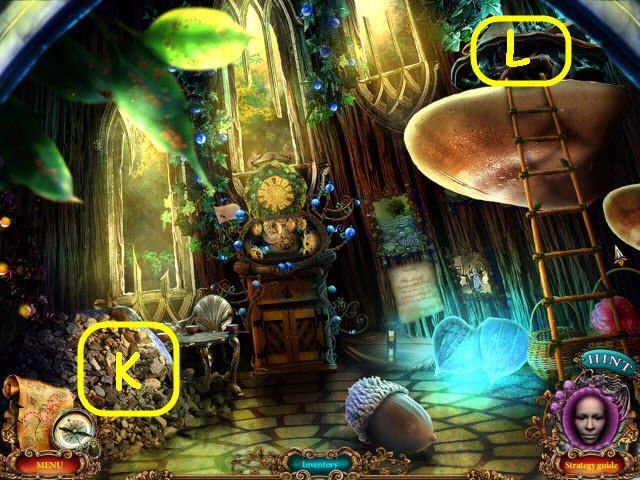
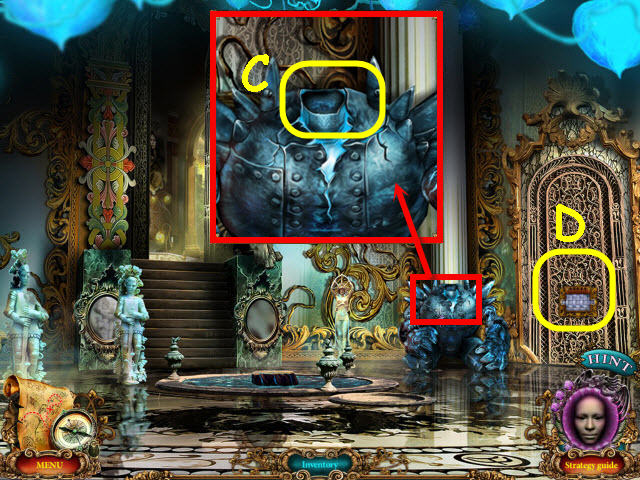
- Examine the table; take the MAGIC ORB (K) and TORCH (L).
- Examine the wall and place the MAGIC ORB in the empty slot to trigger a puzzle (M).
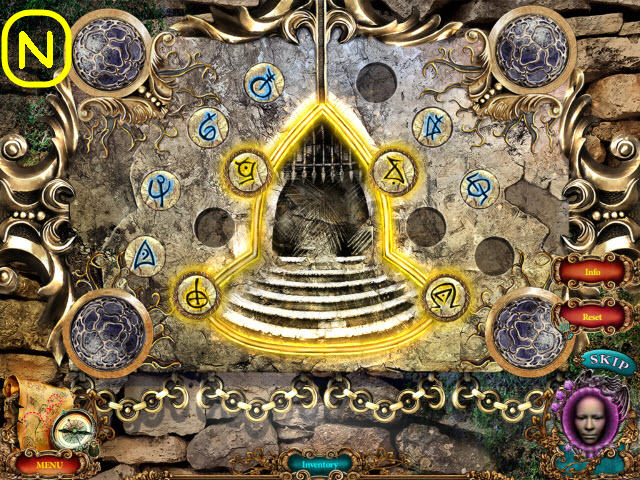
- Place the runes in the slots matching the flashing rune symbols in the slots.
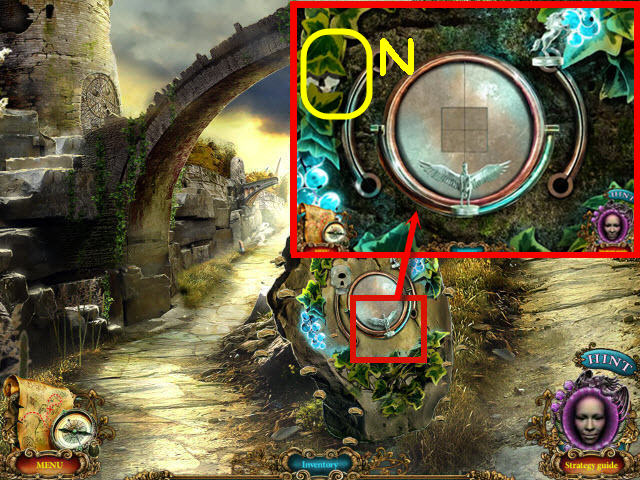
- See screenshot for first solution (N).
- The second part of the puzzle is random; repeat the sequence of the flashing runes.
- Go up to the hall of reflections.
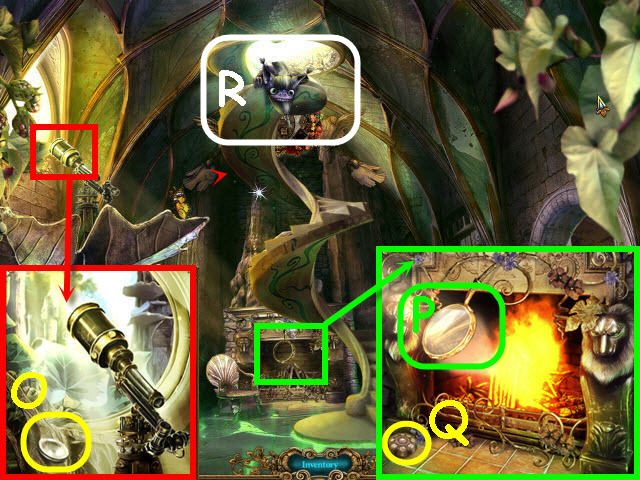
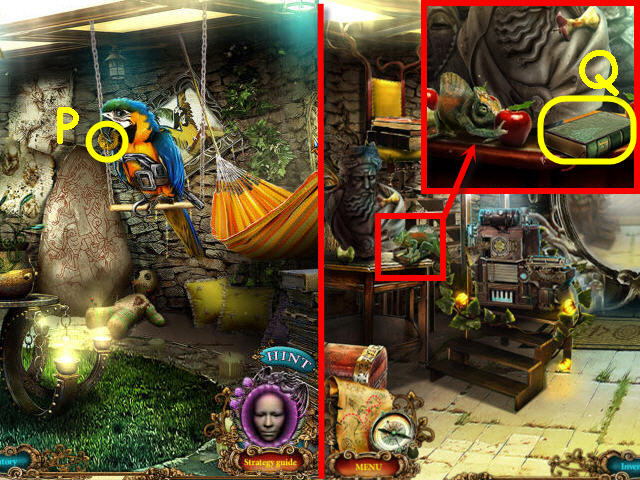
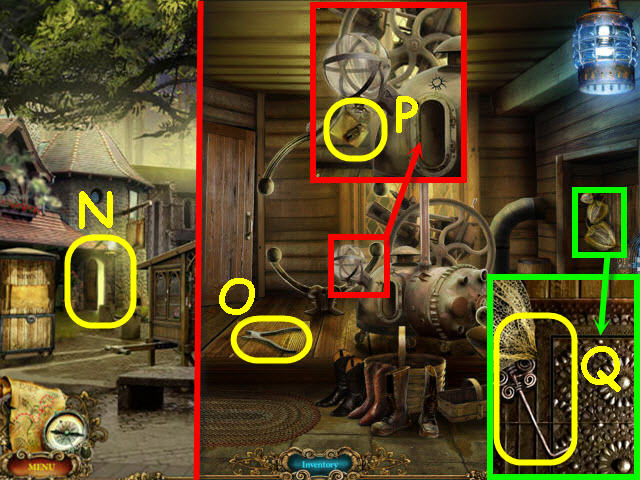
- Examine the telescope; take the LENS (O).
- Examine the fireplace and place the LENS in the holder (P); use the TORCH on the fire to get a BURNING TORCH.
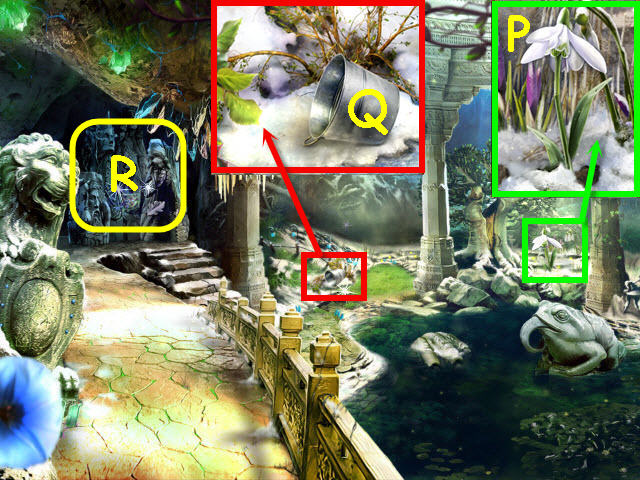
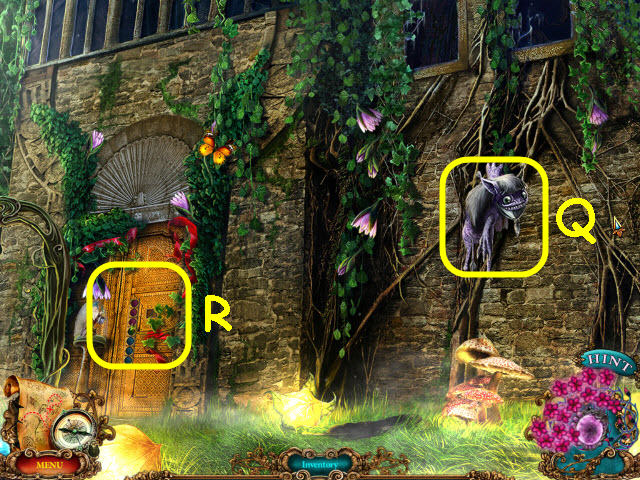
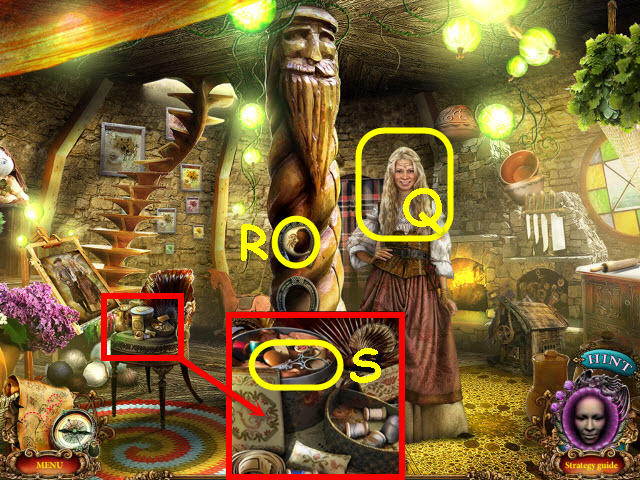
- Take the FLOWER DISC 1/6 (Q).
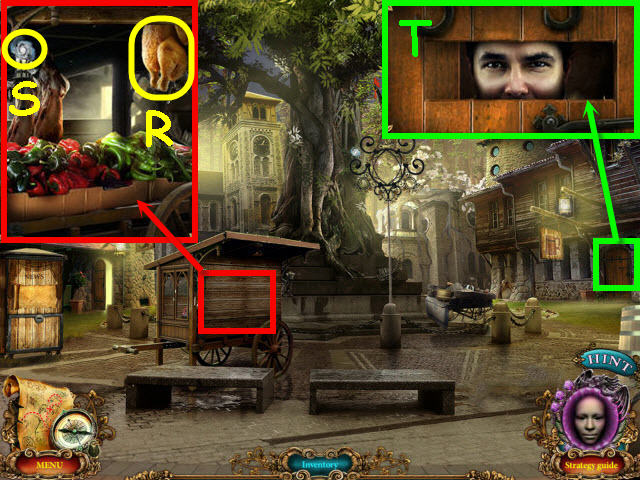
- Select the imp (R).
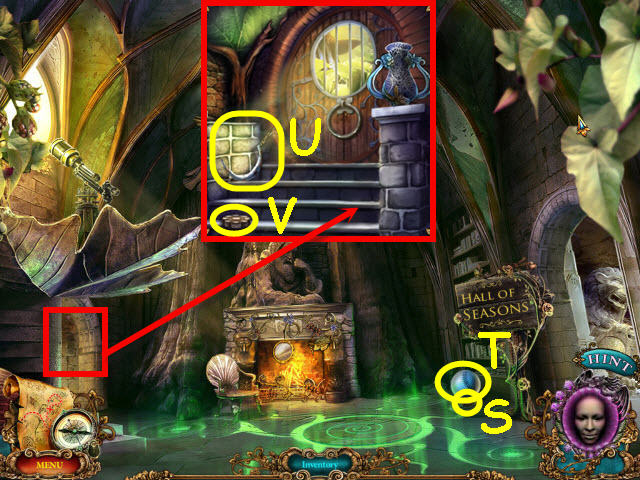
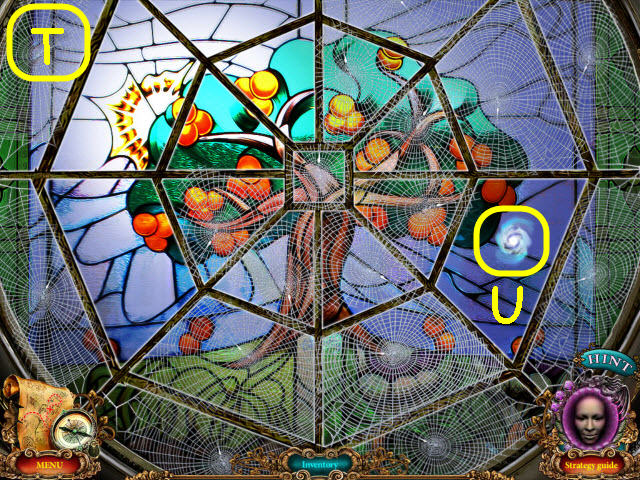
- Take the COAL 1/2 (S), and BASEBALL (T).
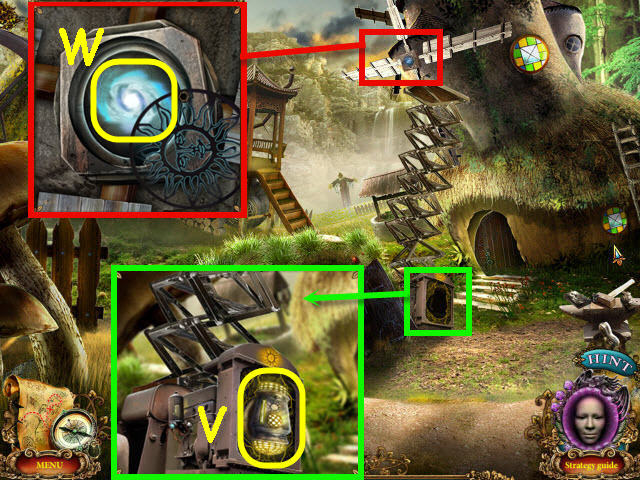
- Examine the left doorway; take the BLUNT SICKLE (U), and the FLOWER DISC 2/6 (V).
- Back out.
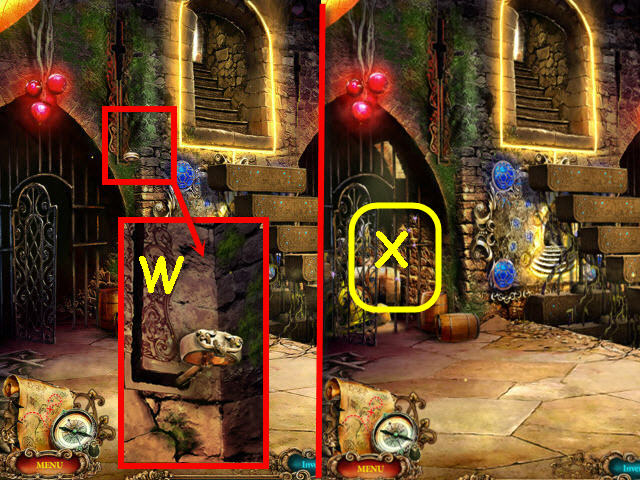
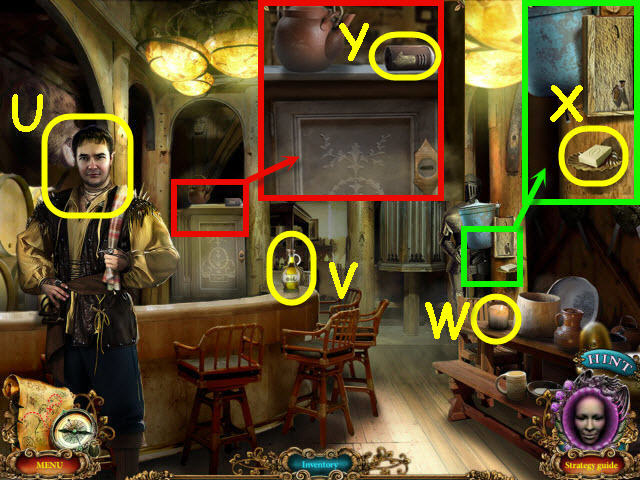
- Examine the torch holder and place the BURNING TORCH in it (W).
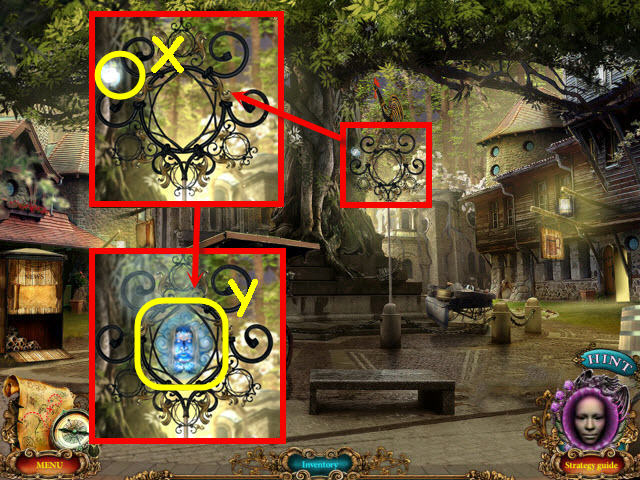
- Examine the lit cell to access a HOS (X).
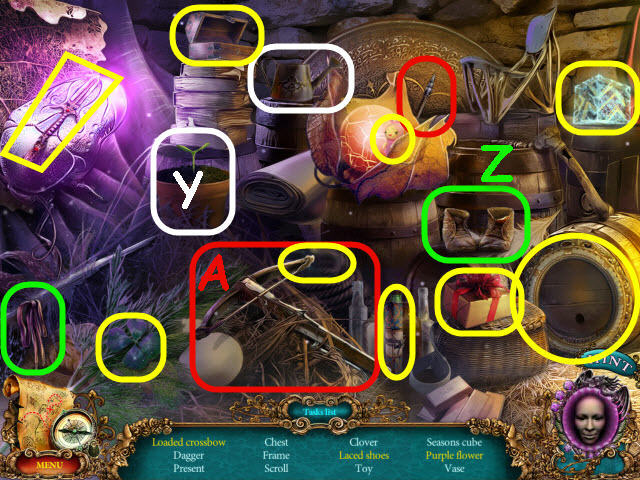
- Find the items listed.
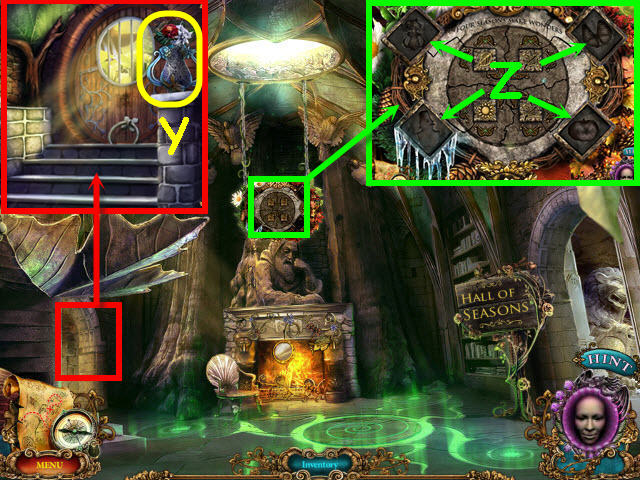
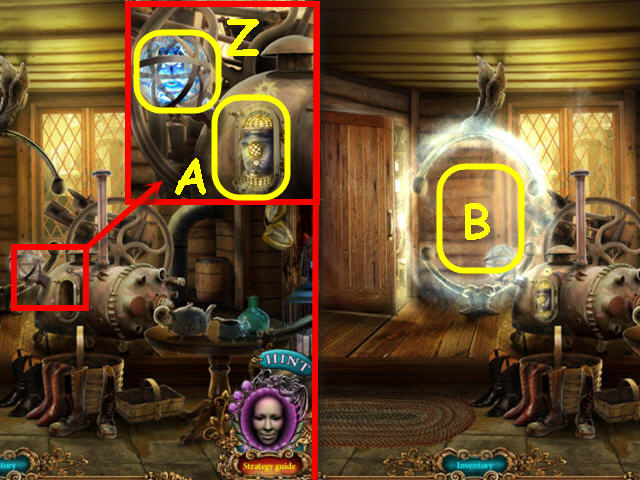
- Use the watering can on the seedling to get a purple flower (Y).
- Place the laces on the shoes to get laced shoes (Z).
- Pull back on the crossbow and then place the arrow on it to get a loaded crossbow (A).
- You will earn a SEASONS CUBE.
- Go up the stairs and then right into the hall of seasons.
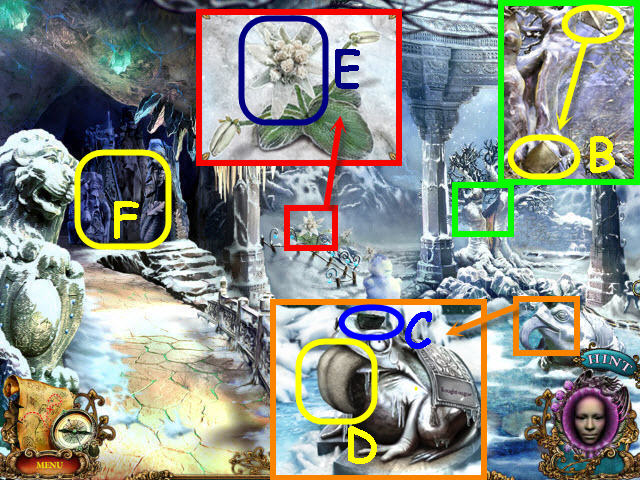
- Examine the tree and use the BASEBALL on the net; take the BUTTERFLY NET (B).
- Examine the frog; take the COAL 2/2 (C).
- Use the BLUNT SICKLE on the tongue (D) to get a SHARPENED SICKLE.
- Examine the flower; use the SHARPENED SICKLE on it to get a SNOW FLOWER (E).
- Examine the idols (F).
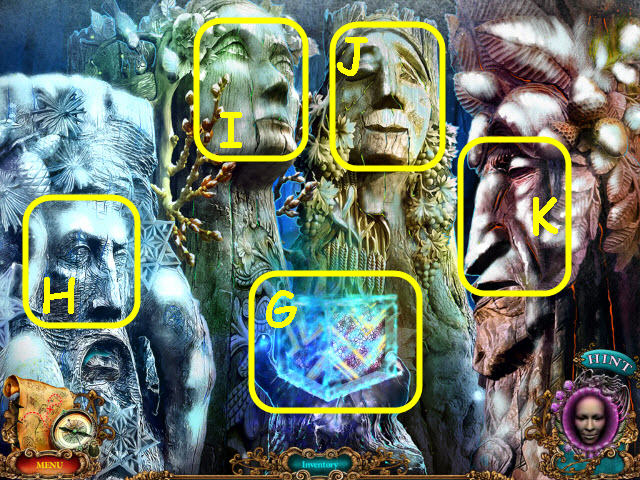
- Place the SEASONS CUBE in the hand (G).
- By selecting the various idols, you can now change the seasons to winter (H), spring (I), summer (J), and fall (K).
- Select the fall idol (K) and back out.
- Examine the flower; use the SHARPENED SICKLE on it to get a MARIGOLD (L).
- Examine the butterfly; use the BUTTERFLY NET on it to get a BUTTERFLY (M).
- Examine the pumpkin and use the SHARPENED SICKLE on it three times; take the JACK-O’-LANTERN (N).
- Examine the idols (O) and select the second from left spring idol and back out.
- Examine the flower; use the SHARPENED SICKLE on it to get a SNOWDROP (P).
- Examine the bucket; take the BUCKET (Q).
- Examine the idol (R) and select the second from right summer idol and back out.
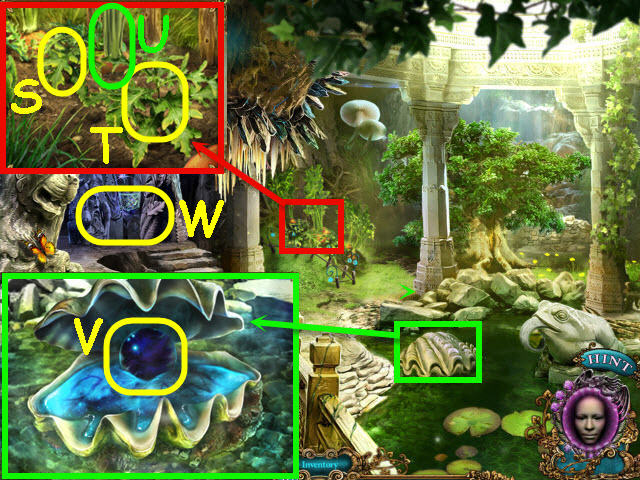
- Examine the garden; remove the two weeds (S-T) and take the CARROT (U).
- Examine the shell and open it; select the pearl (V).
- Examine the idol (W) and select the winter idol on the left and back out.
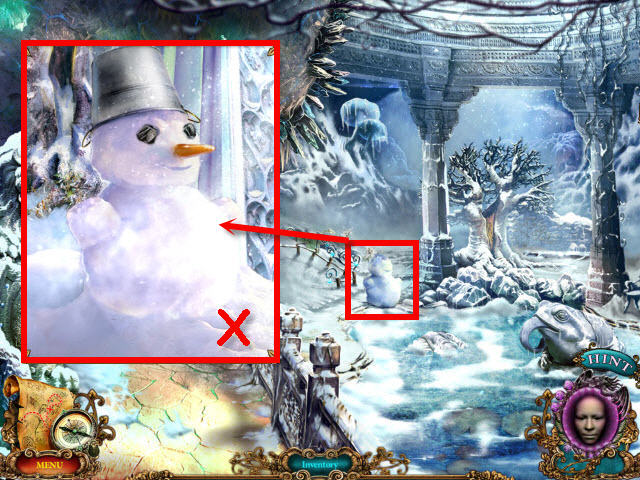
- Examine the snow mound and place the 2 COALS, BUCKET and CARROT on it; take the SNOWMAN (X).
- Back out.
- Examine the doorway and place the MARIGOLD, SNOW FLOWER, and SNOWDROP in the vase; take the FLOWER BOUQUET (Y).
- Examine the hanging and place the BUTTERFLY, JACK-O’-LANTERN, FLOWER BOUQUET, and the SNOWMAN in the matching slots to trigger a puzzle (Z).
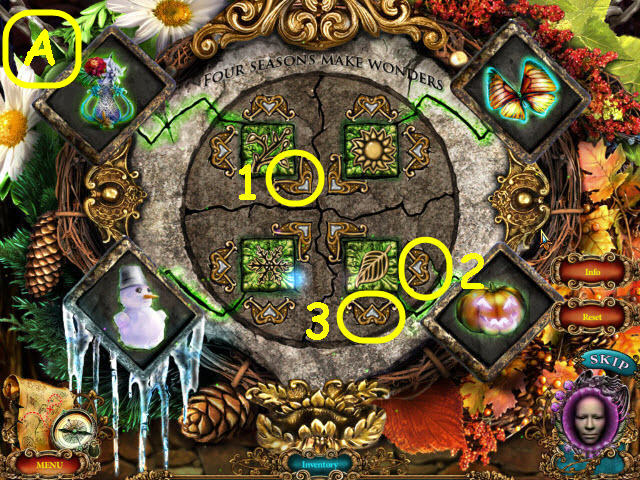
- Change the symbols so that they match the seasons in the corners.
- To solve the puzzle, select the arrows in the order marked on the screenshot (A).
- Go up to the minor gallery.
Chapter 2 – The Palace
- Examine the statue; take the WINDUP KEY (B).
- Take the FLOWER DISC 3/6 (C).
- Select the imp (D).
- Go up the stairs to the palace garden.
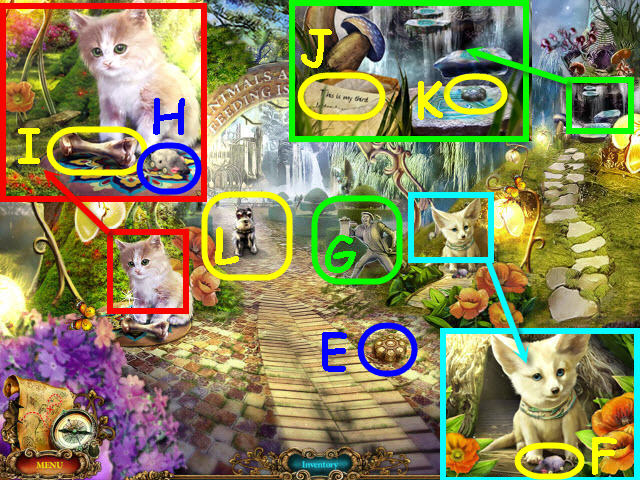
- Take the FLOWER DISC 4/6 (E).
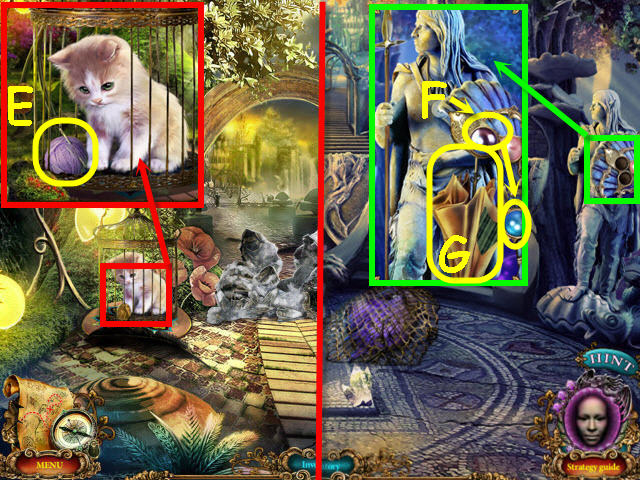
- Examine the fox; take the WINDUP MOUSE (F).
- Examine the herald (G).
- Examine the kitten and place the WINDUP MOUSE to the right of the bone; use the WINDUP KEY on the WINDUP MOUSE (H) and take the BONE (I).
- Examine the end of the upper right path; read the note (J), and take the FLOWER DISC 5/6 (K).
- Examine the dog (L); give him the BONE.
- Go forward to the palace courtyard.
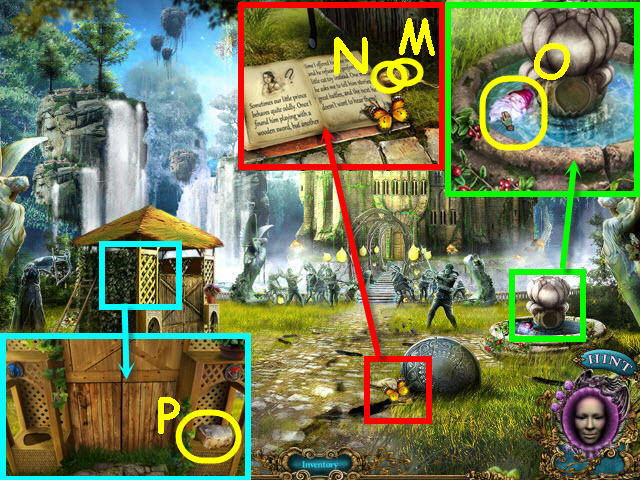
- Examine the shield; take the TEA INFUSER (M), and the FLOWER DISC 6/6 (N).
- Examine the fountain; take the GNOME HEAD (O).
- Examine the pavilion; take the HEAVY BRICK (P).
- Go forward.
- Select the imp (Q).
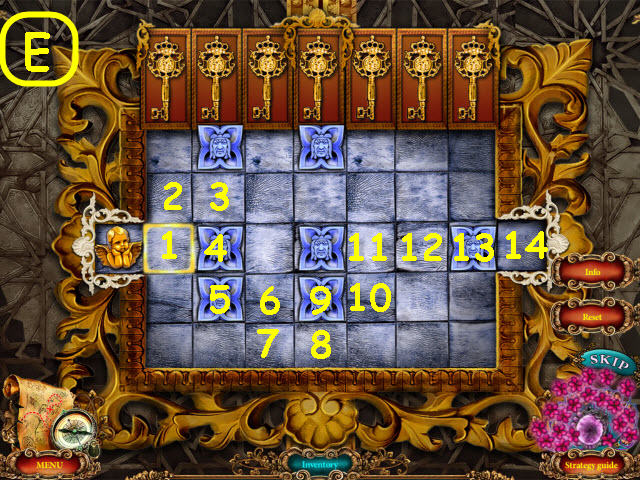
- Examine the door and place the 6 FLOWER DISCS in the slots to trigger a puzzle (R).
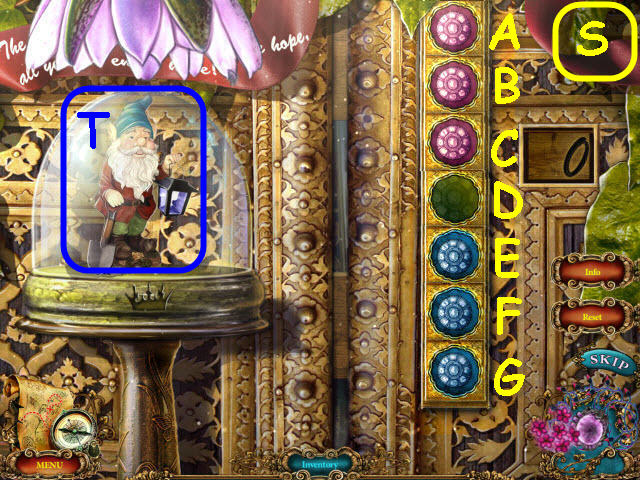
- Move all the red discs up and the blue ones down in 15 moves.
- To solve the puzzle, move the discs to the following spaces: C-D, E-C, F-E, D-F, B-D, A-B, C-A, E-C, G-E, F-G, D-F, B-D, C-B, E-C, and D-E (S).
- Take the DIGGING GNOME (T).
- Go to the minor gallery.
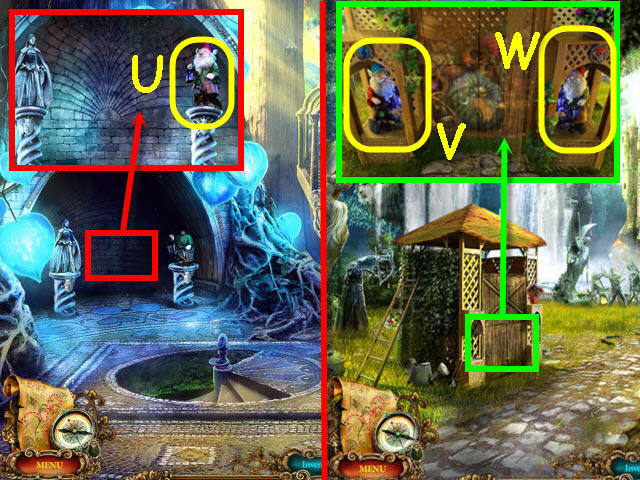
- Examine the alcove and place the GNOME HEAD on the gnome; take the WATERING GNOME (U).
- Go to the palace courtyard.
- Examine the pavilion and place the DIGGING GNOME (V) and WATERING GNOME (W) on their matching pedestals.
- Examine the opened shed to access a HOS.
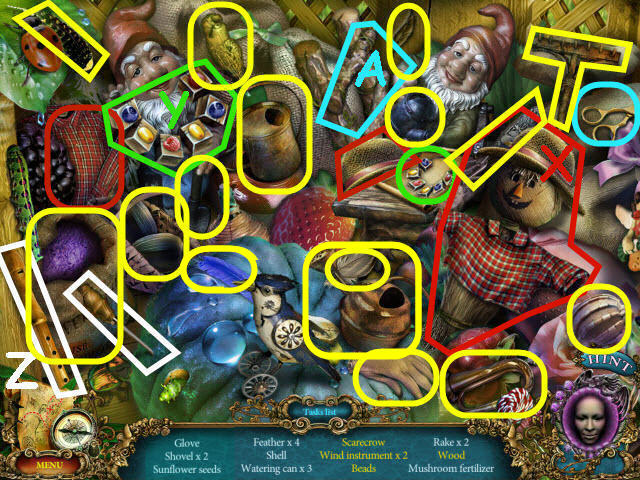
- Find the items listed.
- Place the shirt and hat on the undressed scarecrow to get a scarecrow (X).
- Select the beads to change them to match the order on the paper to get the beads (Y).
- Use the awl on the wood to get a wind instrument (Z).
- Use the scissors on the vines to get wood (A).
- You will get a MUSHROOM FERTILIZER.
- Go forward.
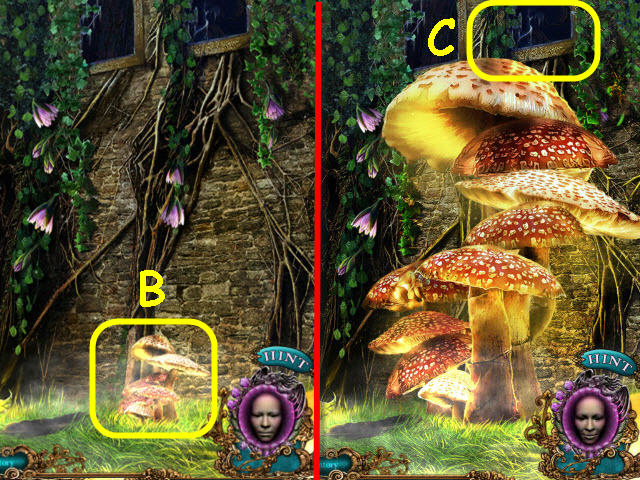
- Use the MUSHROOM FERTILIZER on the mushroom (B).
- Go into the window (C).
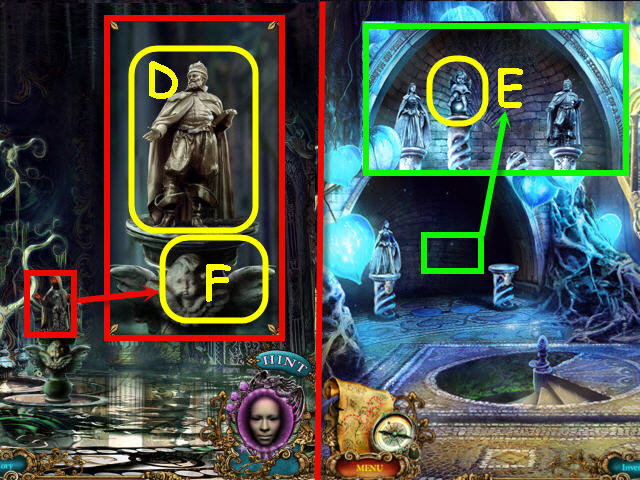
- Examine the pedestal and dust off the statue; take the KING STATUETTE (D).
- Go to the minor gallery.
- Examine the alcove and place the KING STATUETTE on the empty pedestal; take the ANGEL STATUETTE (E).
- Go back to the great mirror hall.
- Examine the pedestal and place the ANGEL STATUETTE on it (F).

- Examine the urn and pull the lever down; take the LILY SYMBOL (G).
- Go to the palace courtyard.
- Examine the fountain, place the LILY SYMBOL in the slot and remove the glass dome; take the GOLDEN WATER LILY (H).
- Go back to the great mirror hall.
- Examine the door and place the GOLDEN WATER LILY in the slot to trigger a puzzle (I).
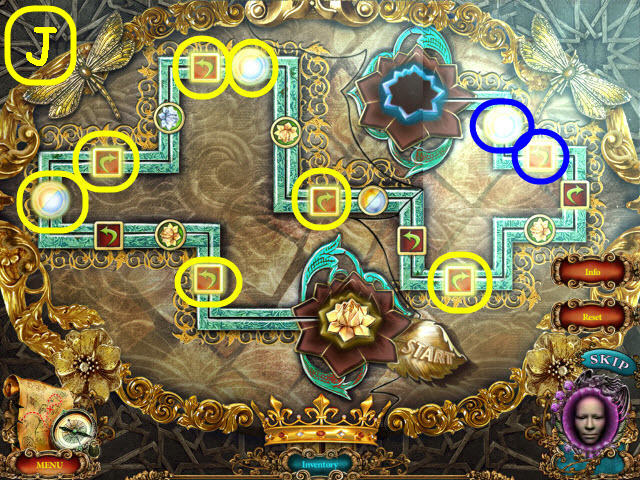
- Transport the lily so that it turns silver at the finish.
- See screenshot for the buttons to highlight (J); press start when complete.
- Go up the stairs to the throne room.
- Throw the HEAVY BRICK at the mirror (K).
Chapter 3 – The Dark Kingdom
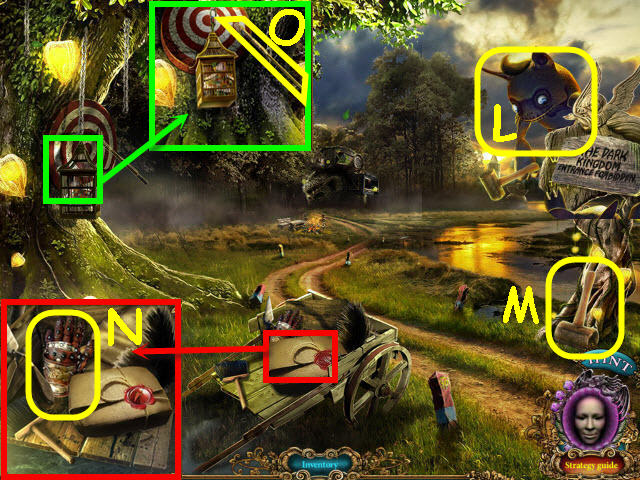
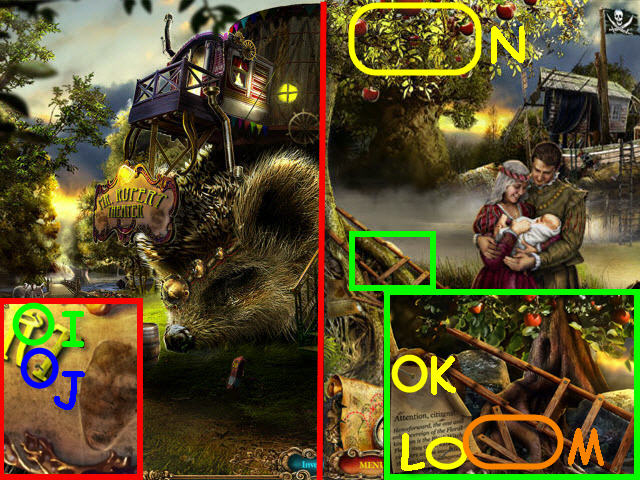
- Select the imp (L); take the MALLET (M).
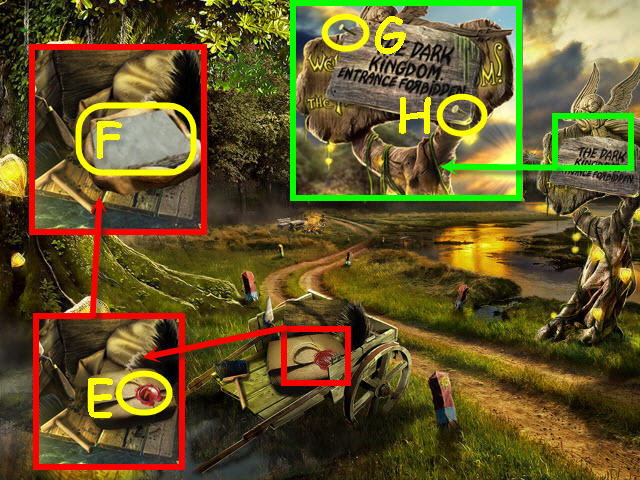
- Examine the cart; take the GAUNTLET (N).
- Examine the cage; take the HARPOON (O).
- Go forward to the travelling theatre and then up the left path to the farmer’s bridge.
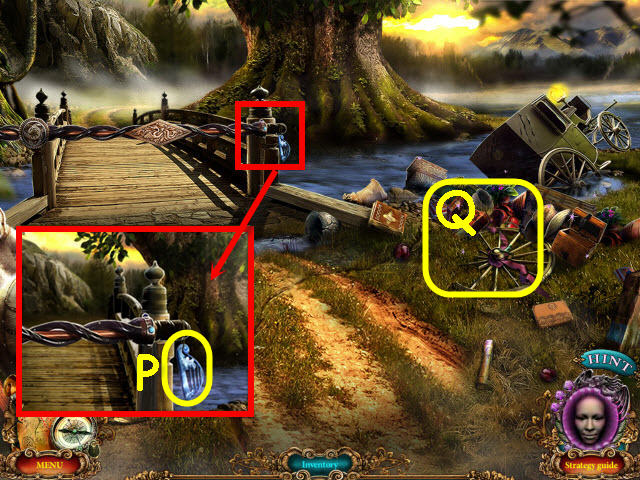
- Examine the railing; take the AMULET HALF (P).
- Examine the carriage contents to access a HOS (Q).
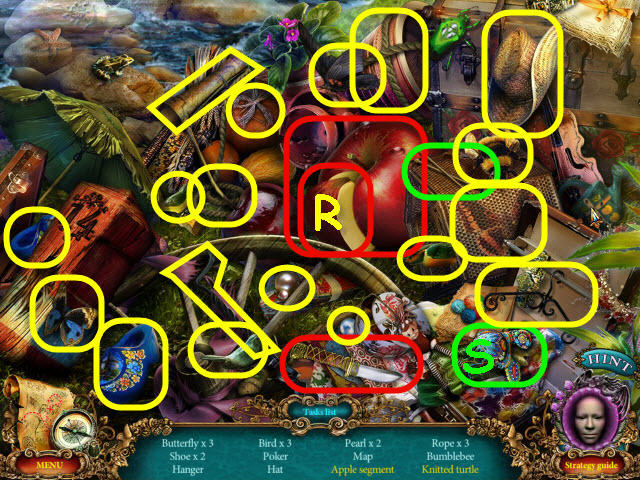
- Find the items listed.
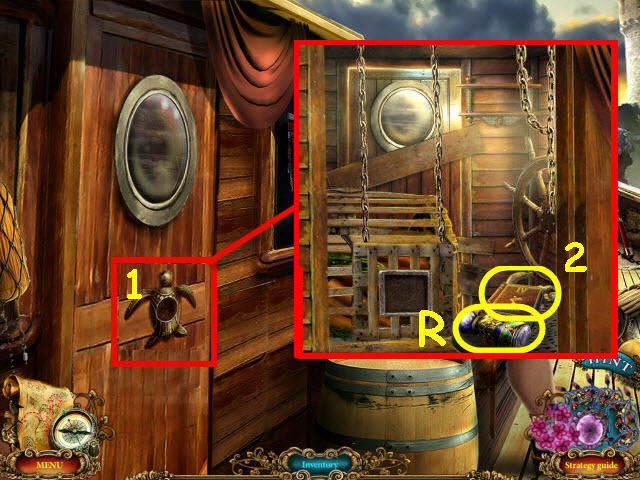
- Use the knife on the apple to get an apple segment (R).
- Place the knitting needles on the half knitted turtle to get a knitted turtle (S).
- You will earn a POKER.
- Back out.
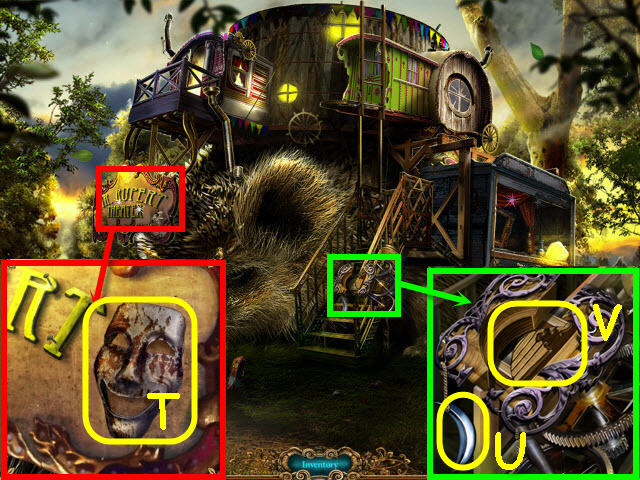
- Examine the sign; take the CHIPPED MASK (T).
- Examine the railing; select the moon (U) and place the AMULET HALF on the lock (V).
- Go up the ladder to the main tent.
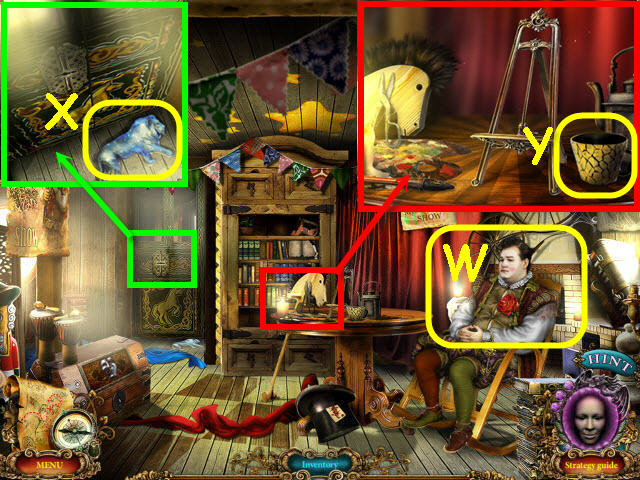
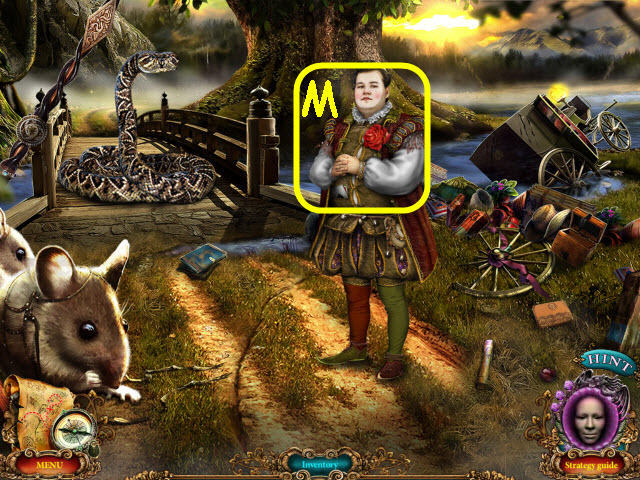
- Speak to Mr. Rupert (W).
- Examine the door; take the LION FIGURE (X).
- Examine the table; take the CUP (Y).
- Back out and go up the path on the right.
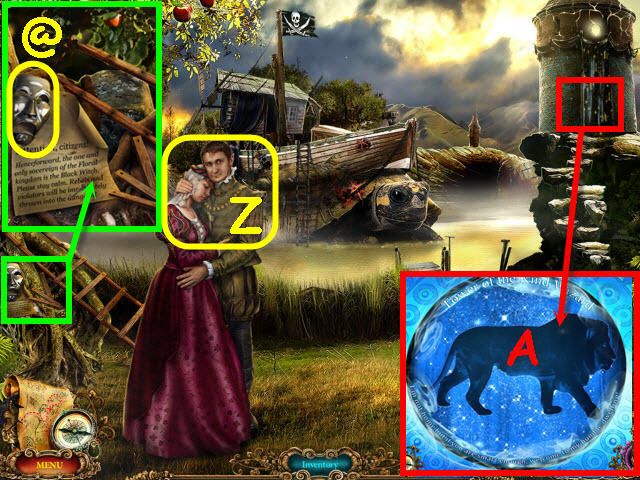
- Speak to the couple (Z).
- Examine the ladder; take the COMEDY MASK(@).
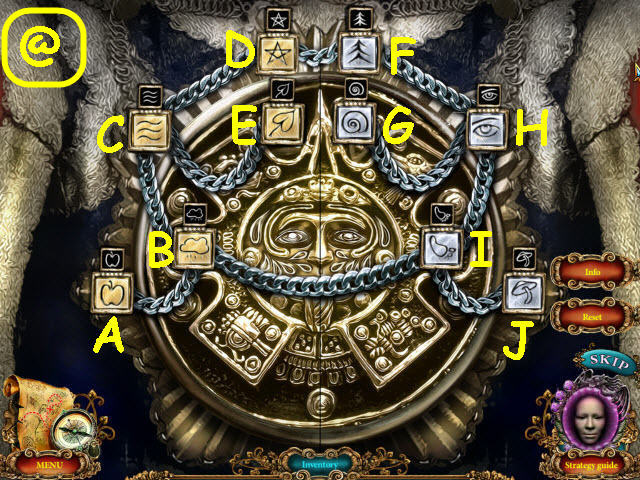
- Examine the tower door and move the curtain; place the LION FIGURE on the door to trigger a puzzle (A).
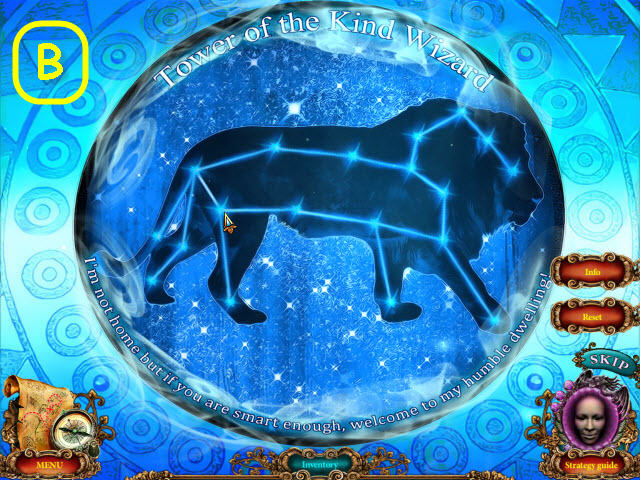
- Complete the constellation by connecting the stars.
- Please look at the screenshot for the solution (B).
- Go through the newly-opened door to the wizard’s tower hall.
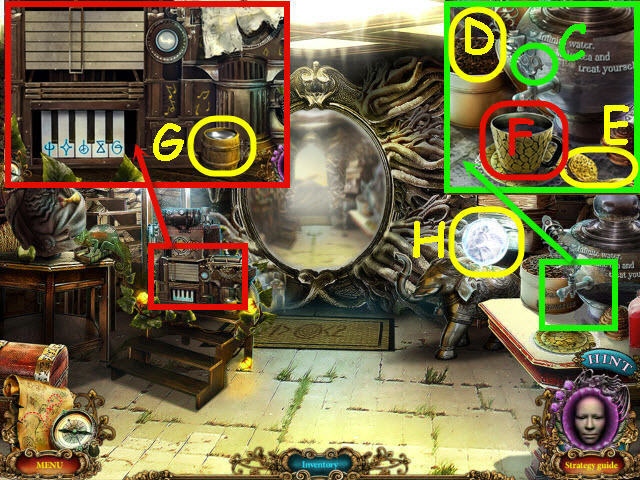
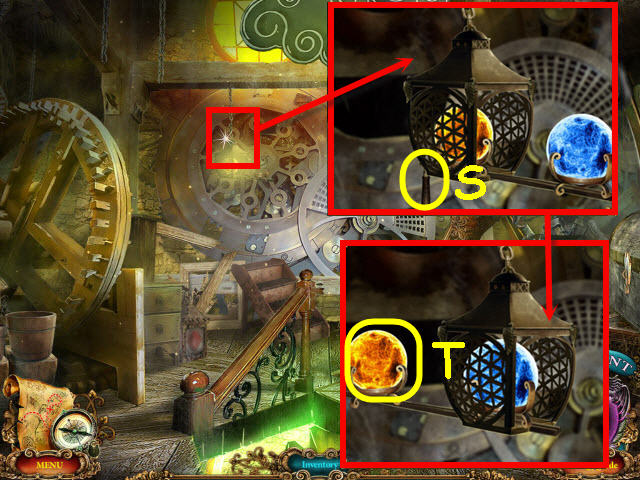
- Examine the tea set; place the CUP on the saucer and turn the tap (C).
- Use the TEA INFUSER on the tea (D); place the filled TEA INFUSER (E) in the CUP and take the CUP OF TEA (F).
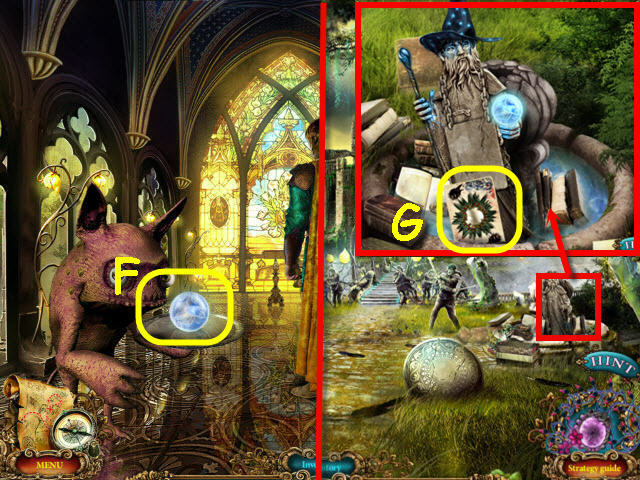
- Examine the musical device; take the SILVER PAINT (G).
- Take the CRYSTAL BALL (H).
- Go straight through the portal to the wizard’s lab.
- Examine the device and place the CRYSTAL BALL in the slot (I).
- Press on the CRYSTAL BALL and take the PRUNING SHEARS (J) after the cutscene; you will automatically get the CRYSTAL BALL.
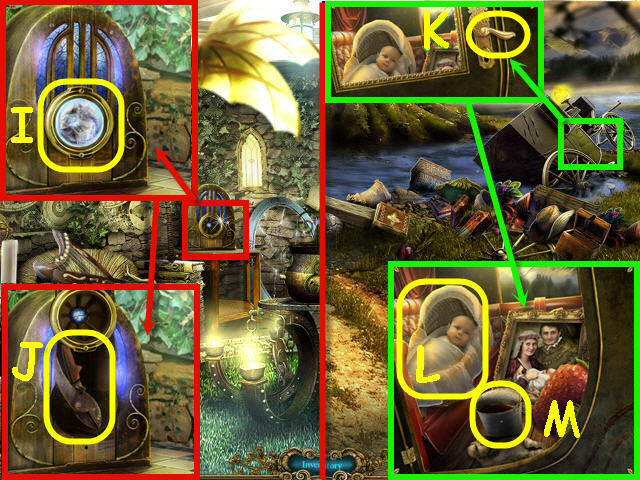
- Go to the farmer’s bridge.
- Examine the carriage and use the CARRIAGE KEY on the lock; turn the key and pull the handle (K).
- Take the ELVEN BABY (L) and the BUCKET OF TAR (M).
- Go to the main tent.
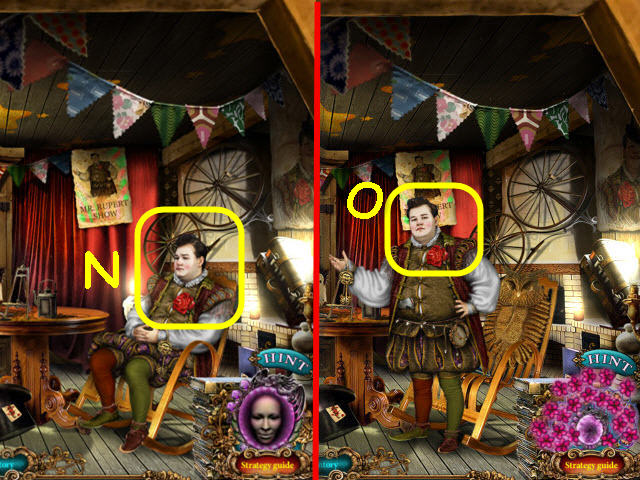
- Give the CUP OF TEA to Mr. Rupert (N).
- Select the standing Mr. Rupert to get the THEATER KEY (O).
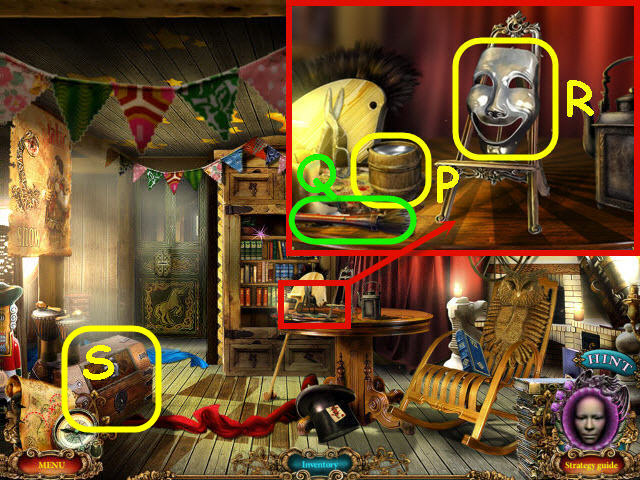
- Examine the table and place the SILVER PAINT on it (P).
- Place the CHIPPED MASK on the easel; dip the paintbrush (Q) in the SILVER PAINT and use the dipped brush on the mask. Take the COMEDY MASK (R).
- Examine the chest and place the COMEDY MASK on the left and the TRAGEDY MASK on the right to trigger a puzzle (S).
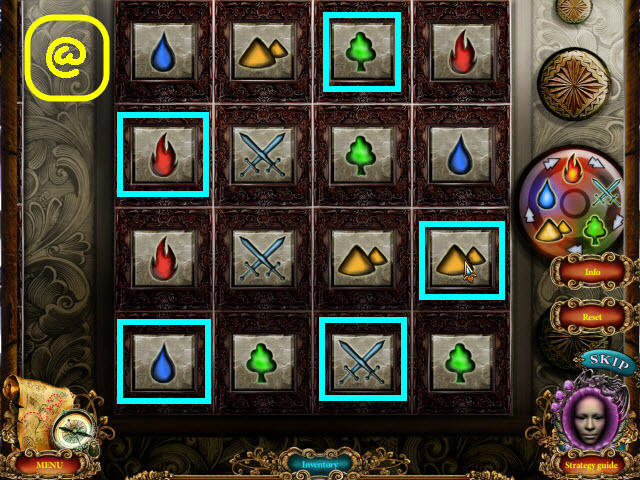
- Place the element tiles on the grids to light up all the elements.
- Please look at the screenshot for the solution (@).
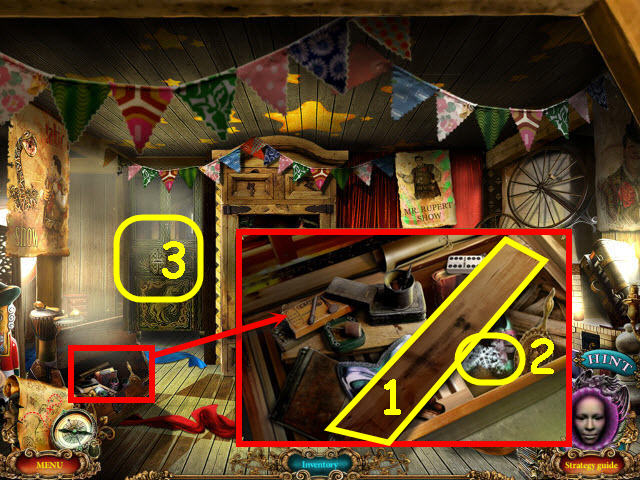
- Examine the chest; take the BOARD (1) and the MAGIC SNOWFLAKE (2).
- Examine the door and use the THEATER KEY on it (3); turn the key.
- Enter into the newly-opened dressing room.
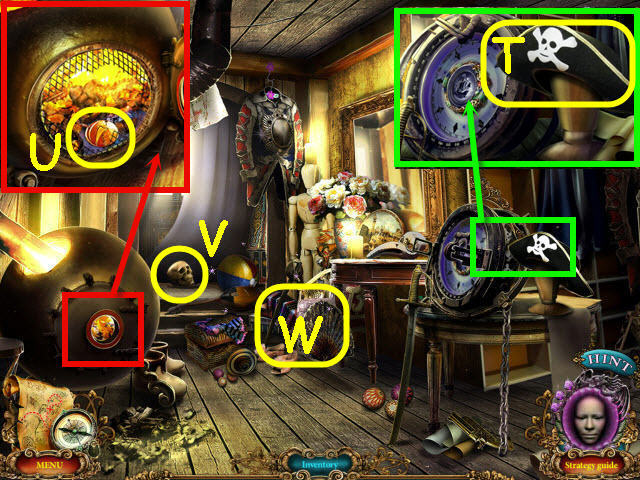
- Examine the compass; take the PIRATE HAT (T).
- Examine the furnace; open the door and use the POKER on the coals. Use the GAUNTLET to take the WITCH’S MEDALLION (U).
- Take the SKULL 1 (V).
- Examine the items on the floor to access a HOS (W).
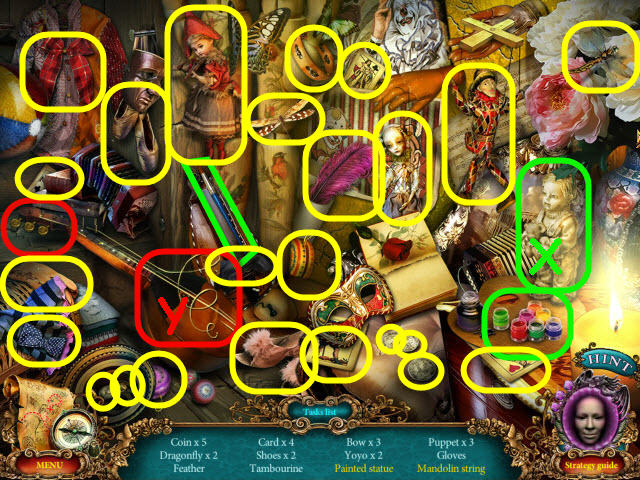
- Find the items listed.
- Dip the paintbrush in the paints to get a painted statue (X).
- Loosen the strings to get the mandolin string (Y).
- You will earn a GOLDEN STRING.
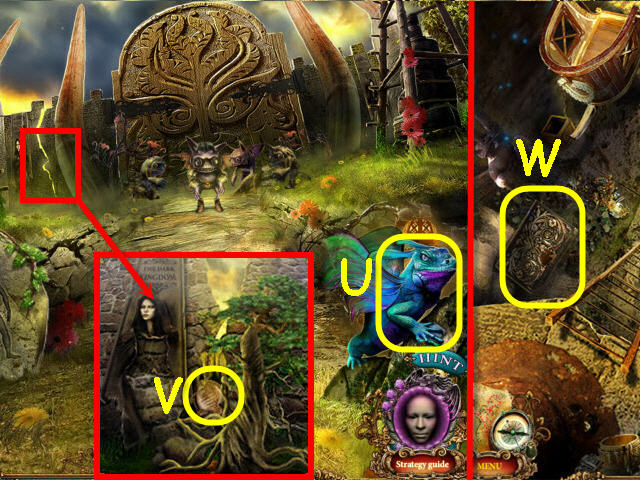
- Go to the forest path.
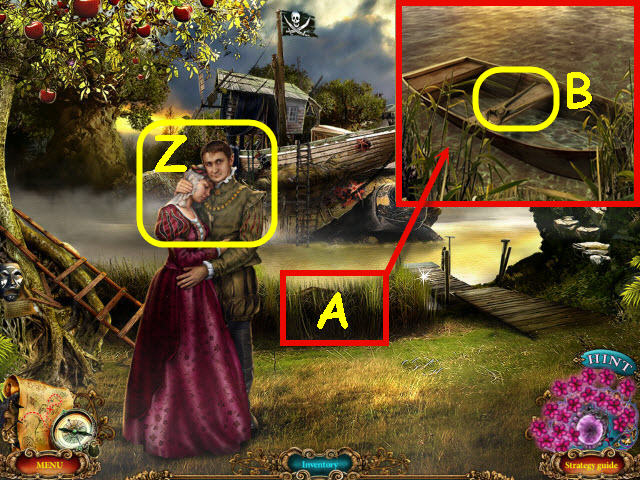
- Give the ELVEN BABY to the couple (Z) and then speak to them.
- Examine the thicket and use the PRUNING SHEARS on them (A).
- Place the BOARD and BUCKET OF TAR inside the boat; take the PLIERS (B).
- Go forward to the turtle ship.
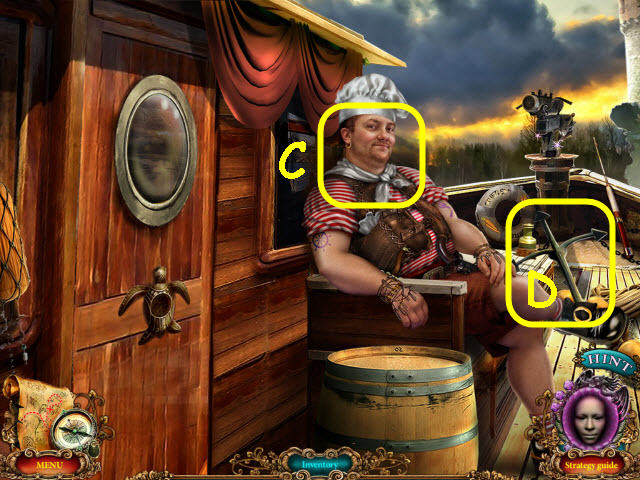
- Speak to the pirate (C).
- Take the ANCHOR (D).
- Go to the forest edge.
- Examine the cart and use the WITCH’S MEDALLION on the package seal (E).
- Open the package; take the SHEET OF PAPER (F).
- Examine the sign; use the PLIERS to get the NAILS 1/6 (G), and NAILS 2/6 (H).
- Go forward.
- Examine the sign; use the PLIERS to get the NAILS 3/6 (I), and the NAILS 4/6 (J).
- Go to the forest path.
- Examine the ladder and use the PLIERS to get the NAILS 5/6 (K), and the NAILS 6/6 (L).
- Place the boards (M) and the 6 NAILS on the ladder; use the MALLET on the NAILS.
- Examine the tree top to trigger a puzzle (N).

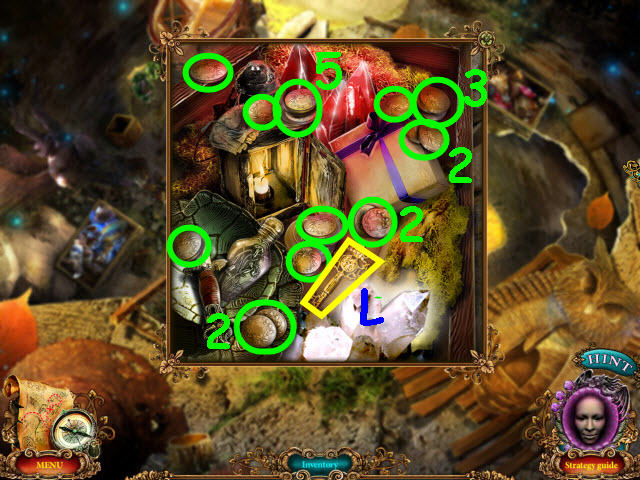
- Collect the 20 apples from the tree.
- The branches will continuously wave and you can also wave your cursor around to move them.
- You do not need to see the apples to collect them. If a branch covers the apple and you know where it is, you can select the area and collect it.
- See screenshot for a few examples (O).
- You will earn APPLES.
- Go to the wizard’s lab.
- Examine the parrot; place the PIRATE HAT on its head and get a GOLDEN COIN (P).
- Back out.
- Examine the chameleon and feed him the APPLES; take the BOOK OF NATURE (Q).
- Go to the turtle ship.
- Examine the door and place the GOLDEN COIN in the lock (1); take the BOOK OF FLAMES (2), and the CAPTAIN’S SEAL (R).
- Go to the main tent.
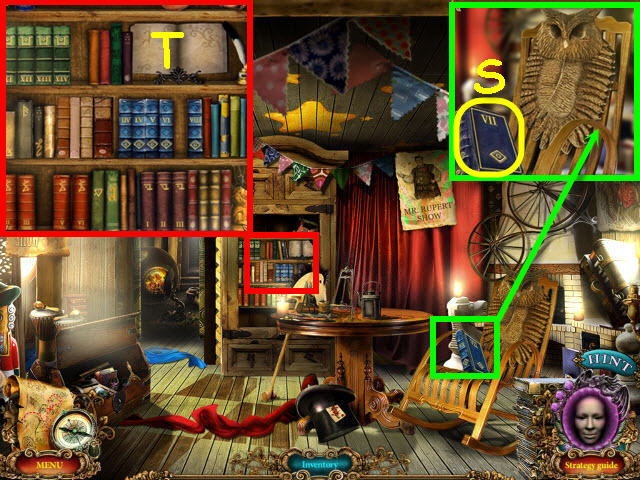
- Examine the chair; take the BOOK OF WINDS (S).
- Examine the bookshelf; place the BOOK OF FLAMES, BOOK OF WINDS, and BOOK OF NATURE on the shelves with their matching colored books to trigger a puzzle (T).
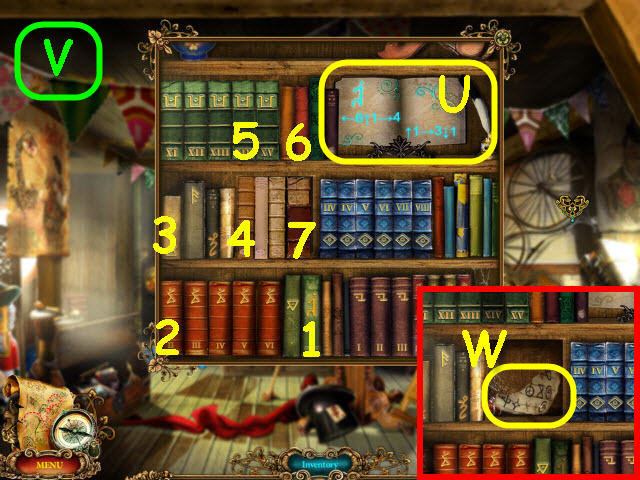
- Push in the books that correspond to the code (U).
- Select the books in the order shown in the screenshot (V).
- Take the SCRAP OF A CODE (W).
- Go forward.
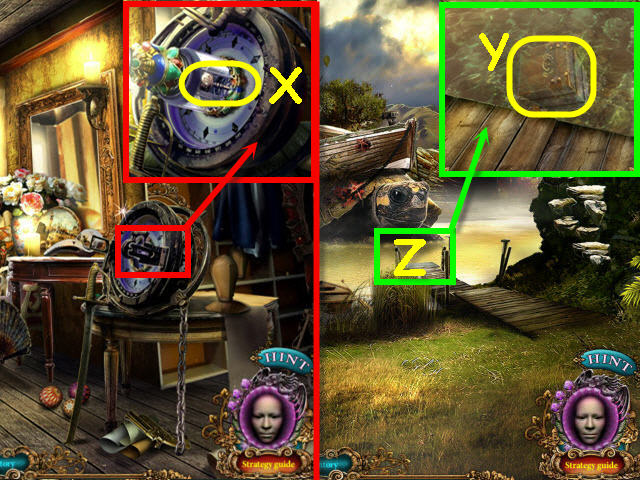
- Examine the compass and place the CAPTAIN’S SEAL in the center; take the PIRATE KEY (X).
- Go to the forest path.
- Examine the end of the pier and use the ANCHOR on the chest (Y); unlock the chest with the PIRATE KEY.
- Examine the end of the pier to access a HOS (Z).
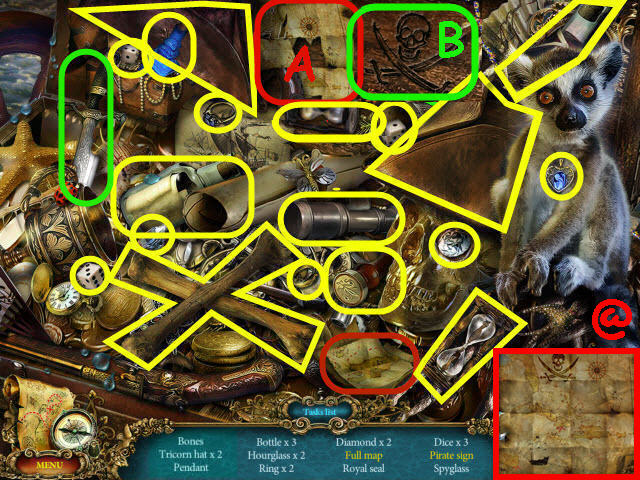
- Find the items listed.
- Place the map piece by the map; rearrange the map pieces to get a full map (A). See the assembled map (@).
- Use the knife to carve the pirate sign (B).
- You will earn a SPYGLASS.
- Go to the wizard’s tower hall.
- Examine the music writer and remove the paper (C).
- Place the SHEET OF PAPER in the upper right (D), and place the SCRAP OF CODE on the upper left (E) to trigger a puzzle.
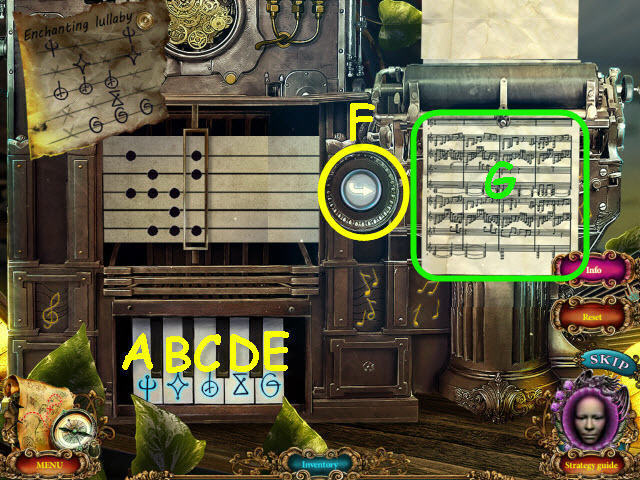
- Write the music by selecting the correct keys.
- To solve the puzzle, select the following keys and buttons: A, C F, B, C, E, F, C, D, E, F, A, B, E, and F.
- Take the MAGICAL NOTES (G).
- Go to the turtle ship.
- Examine the harpoon cannon; place the HARPOON and SPYGLASS on it; pull the lever (H).
- Go to the forest edge.
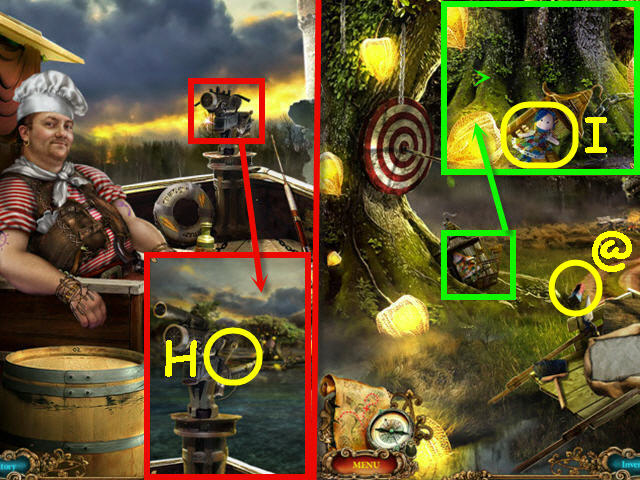
- Examine the cage and open it; take the DOLL (I).
- Select the post (@).
- Go to the forest path.
- Give the DOLL to the couple (J).
- You will receive a SILVER STRING.
- Go to the wizard’s lab.
- Examine the harp; select the loose string to connect it (K) and place the GOLDEN STRING and SILVER STRING on it.
- Take the HARP (L).
- Go to the farmer’s bridge.
- Give the HARP and MAGICAL NOTES to Mr. Rupert (M).
- Go forward across the bridge.
Chapter 4 – Crossroads
- Examine the stone; take the CYCLOP’S SKULL (N).
- Go forward.
- Select anywhere to trigger a cutscene.
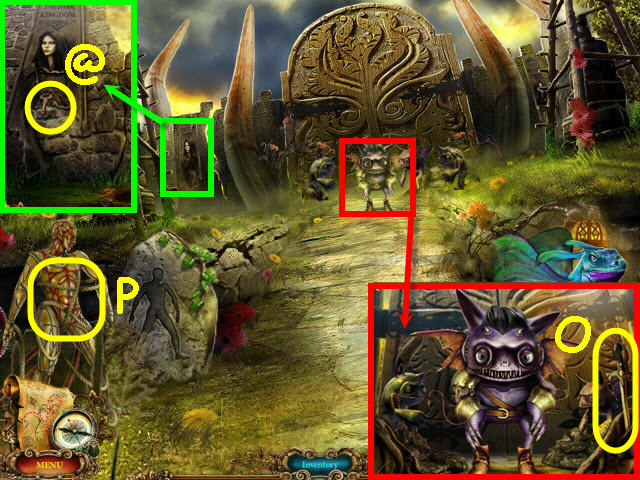
- Examine the sentinel; speak to him and take the SWORD (O).
- Examine the banner and use the SWORD on it; take the SMALL KEY (@).
- Examine the dummy and give him the SWORD to trigger a puzzle (P).
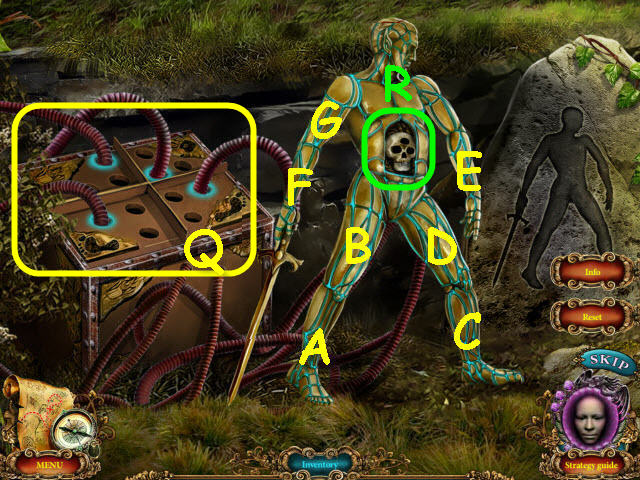
- Set the steam and then arrange the limbs on the dummy to match the stone.
- To set the steam; move the hoses to the indicated holes (Q).
- To set the limbs, select them in the following order: A, F x 2, C, E, G, B, and D.
- Take the THREE-EYED SKULL (R).
- Back out.
- Examine the tower door and place the 3 SKULLS in the slots (S).
- Enter the newly-opened door to the destroyed tower.
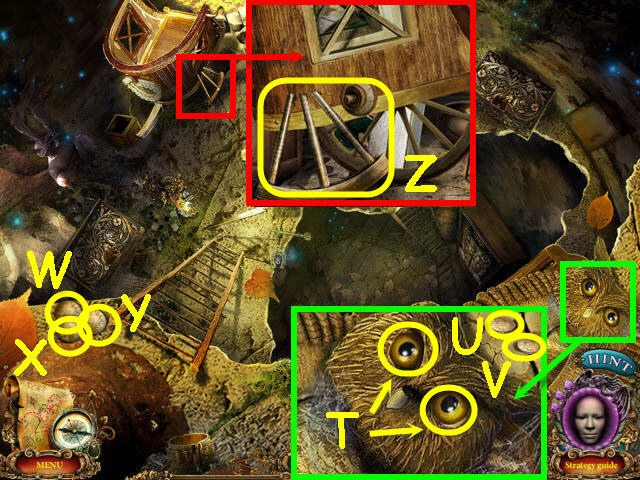
- Examine the owl; take the 2 EYES (T), COINS 1/50 (U) and 2/50 (V).
- Take the COINS 3/50 (W), 4/50 (X), and 5/50 (Y).
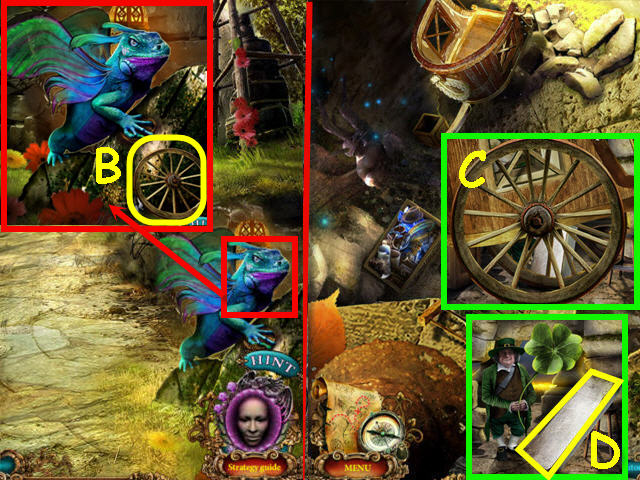
- Examine the carriage; take the WHEEL PART 1/2 (Z).
- Select the map; press the bottom left arrow and then select the main tent.

- Examine the chair; place the 2 EYES on the owl and take the CARROT KEY (A).
- Go to the turtle ship.
- Examine the doorway and place the CARROT KEY on the crate; open the crate. Take the CARROT (B).
- Speak to the pirate; take the NECKTIE (C).
- Go to the wizard’s lab.
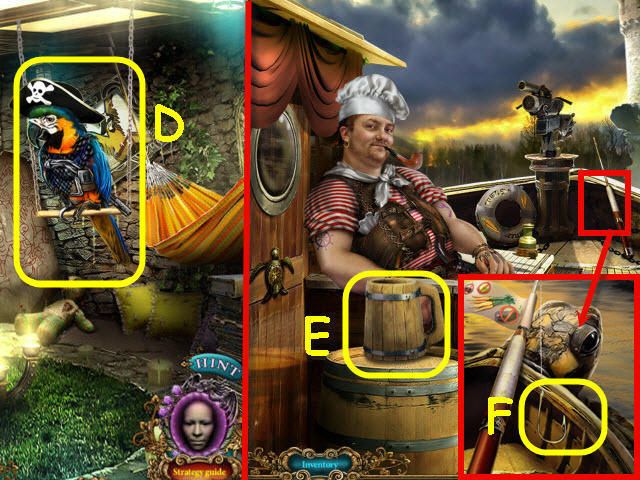
- Examine the parrot and place the NECKTIE on it; take the PARROT (D).
- Go to the turtle ship.
- Give the PARROT to the pirate; take the MUG (E).
- Examine the fishing rod and place the CARROT on the hook (F).
- Go forward to the grotto.
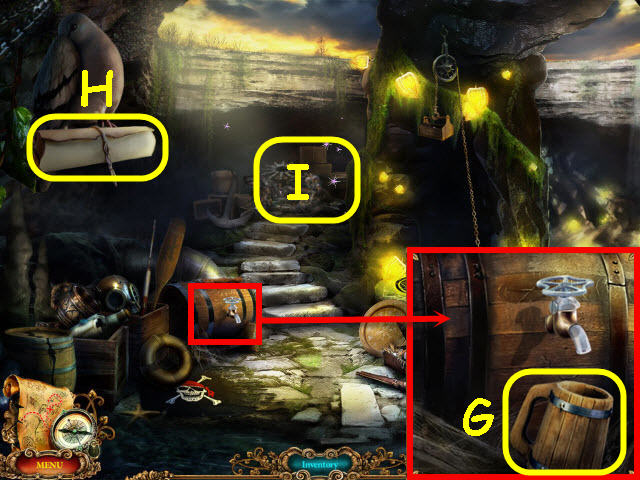
- Examine the barrel and place the MUG under the tap; turn the tap. Take the MUG OF RUM (G).
- Unroll the scroll (H).
- Examine the top of the stairs to access a HOS (I).
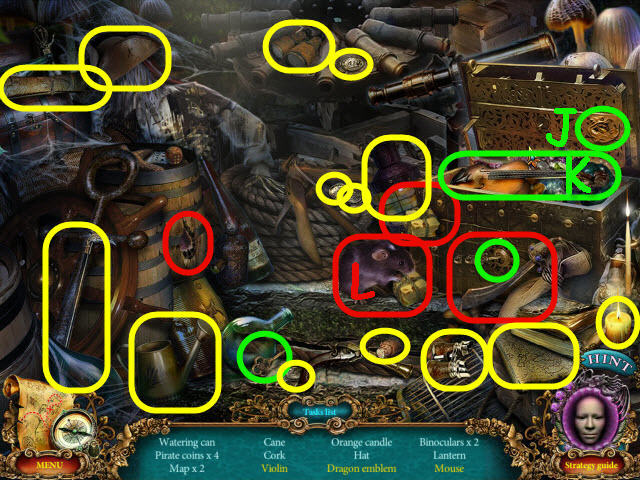
- Find the items listed.
- Use the keys on the trunk to get the dragon emblem (J), and violin (K).
- Use the saber on the rope to drop the cheese to get the mouse (L).
- You will earn a FULL WATERING CAN.
- Go to the wizard’s lab.
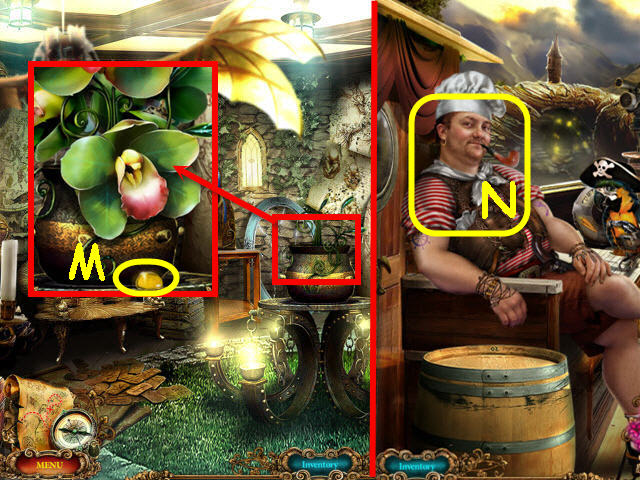
- Examine the plant; use the FULL WATERING CAN on it. Select the flower and take the NECTAR (M).
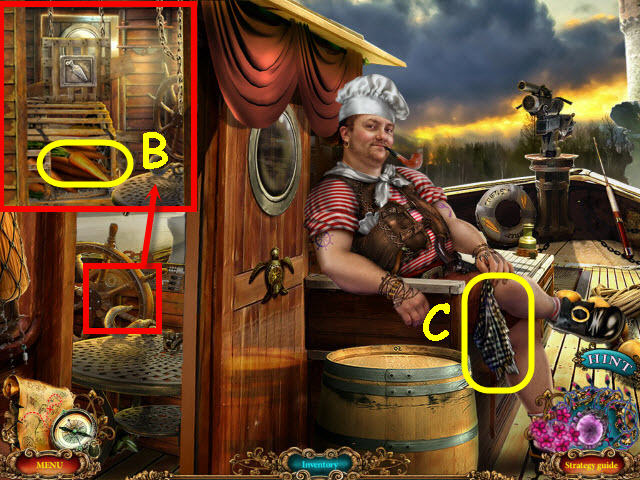
- Go to the turtle ship.
- Give the MUG OF RUM to the pirate; receive a TOBACCO PIPE (N).
- Select the arrow on the top of the map and then select the crossroads.
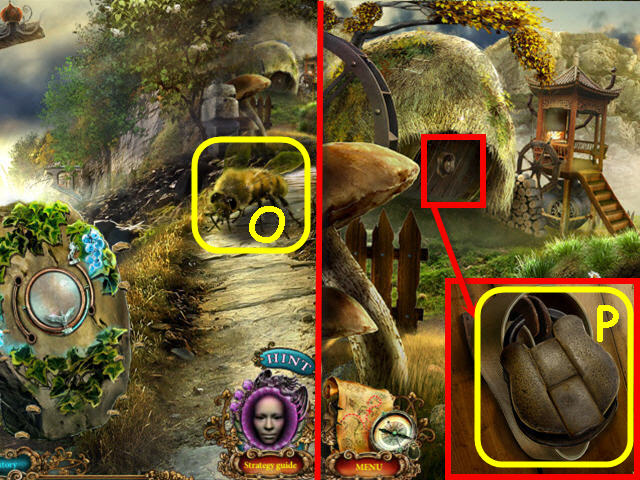
- Give the NECTAR to the bee (O).
- Go up the right path to the farmstead.
- Examine the hut door; take the RUBBER BELT (P).
- Go into the farmhouse on the right.
- Speak to Mary (Q).
- Take the MOON SIGN (R).
- Examine the chair and use the SMALL KEY on the box. Turn the key twice and take the SCISSORS (S).
- Go up the left staircase to the farmhouse attic.
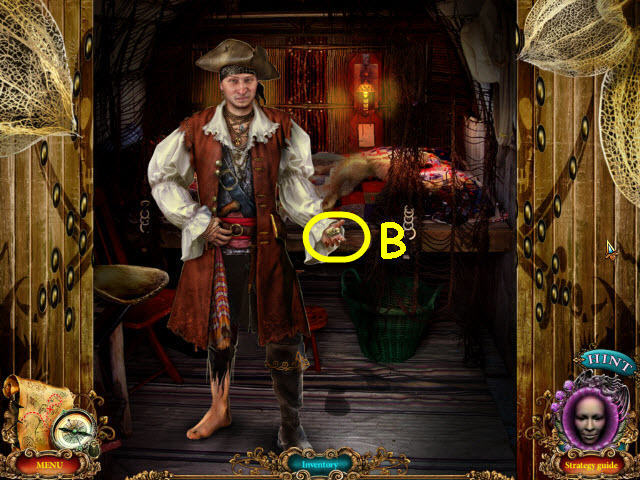
- Examine the pirate and place the TOBACCO PIPE in his hand; take the CLOVER (T).
- Examine the mill; place the RUBBER BELT on it and take the HANDLE (U).
- Examine the cradle; use the SCISSORS on the string and receive a SILVER BAR 1/3 (V).
- Select the lower left arrow on the map, and then select the grotto.
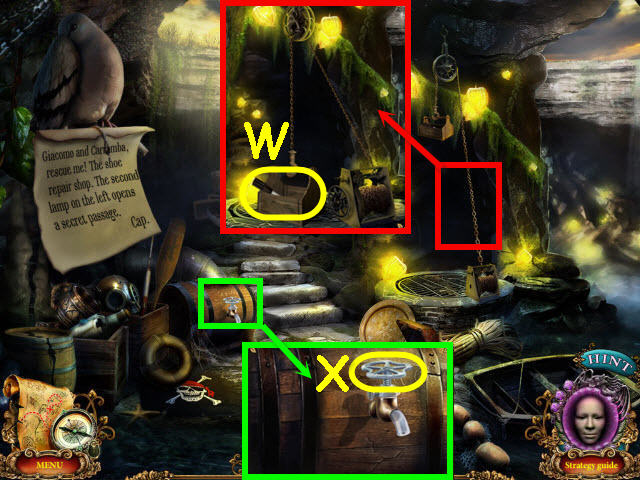
- Examine the pulley; place the HANDLE on it and turn. Take the SCREWDRIVER (W).
- Examine the barrel and use the SCREWDRIVER on the screw; take the VALVE (X).
- Go to the wizard’s lab.
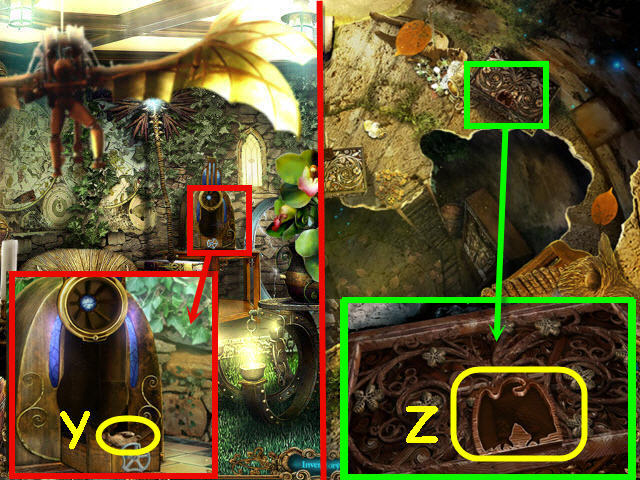
- Examine the case and place the VALVE in the hole; turn the valve and take the BIRD SYMBOL (Y).
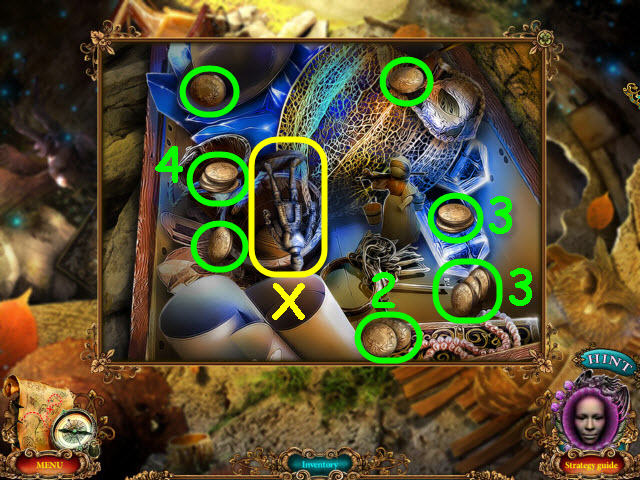
- Select the upper arrow on the map and then the select the destroyed tower.
- Examine the upper right chest and place the BIRD SYMBOL on it (Z).
- Take the 10 COINS circled in green; you will now have COINS 15/50. Note: the numbers marked in green represent the amount of coins in a particular stack.
- Place the CRYSTAL BALL in the case (A).
- Examine the opened chest after the cutscene; take the WINDMILL SIGN (B).
- Go to the farmhouse.
- Examine the small millhouse and hang the WINDMILL SIGN on the hooks (C).
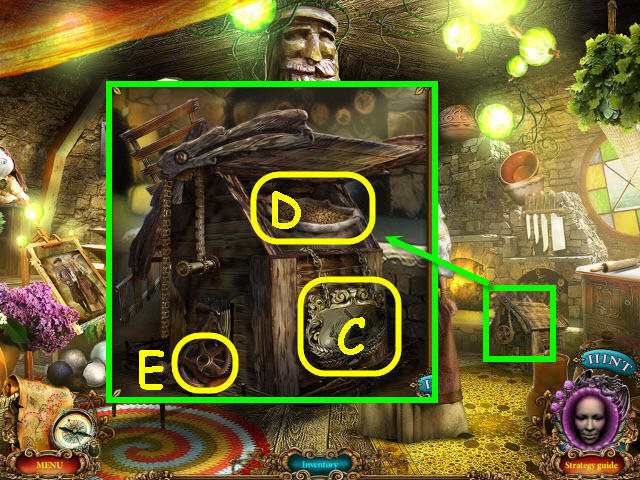
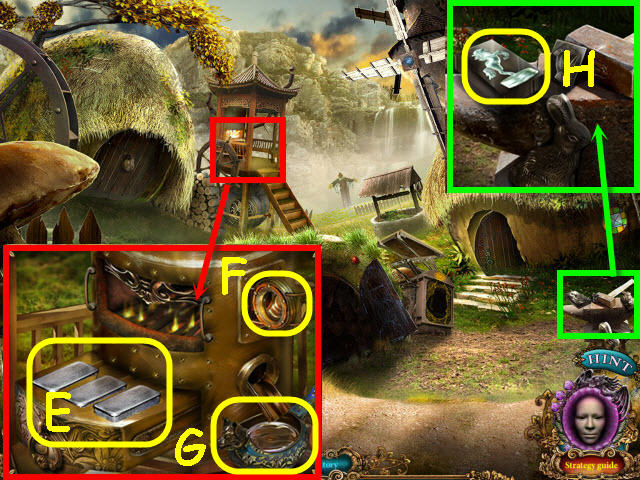
- Place the handle on the gear and crank it three times; take the SACK OF GRAIN (D), and COGWHEEL (E).
- Go upstairs to the farmhouse attic.
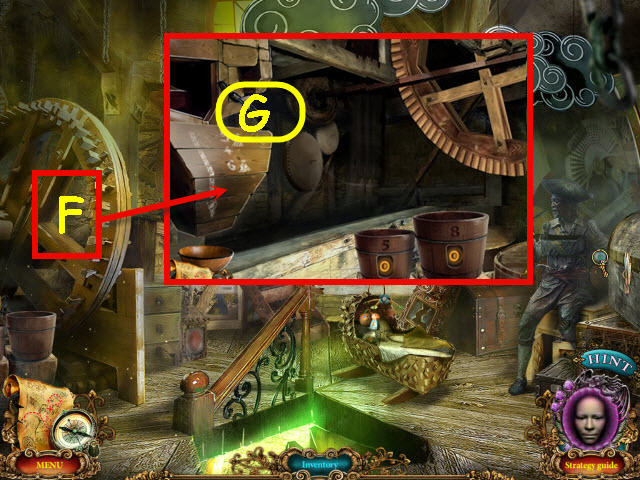
- Examine the mill (F).
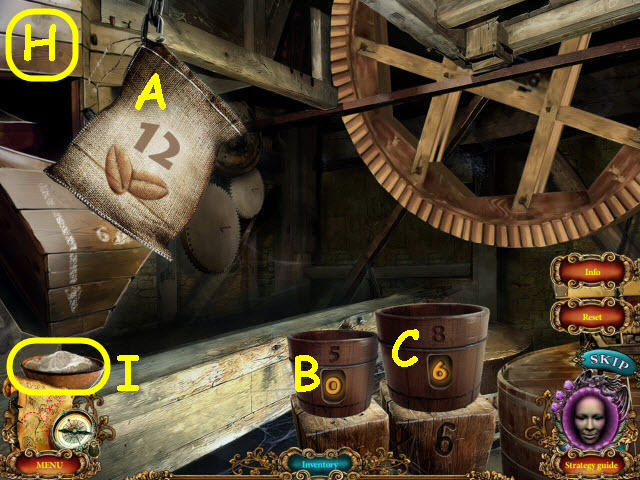
- Place the SACK OF GRAIN by the left bin to trigger a puzzle (G).
- Measure the grain to get 6 kg in the 8 kg bucket.
- To solve the puzzle, select the following: A – C, C – B, B – A, C – B, A – C, and C – B (H).
- Take the FLOUR (I).
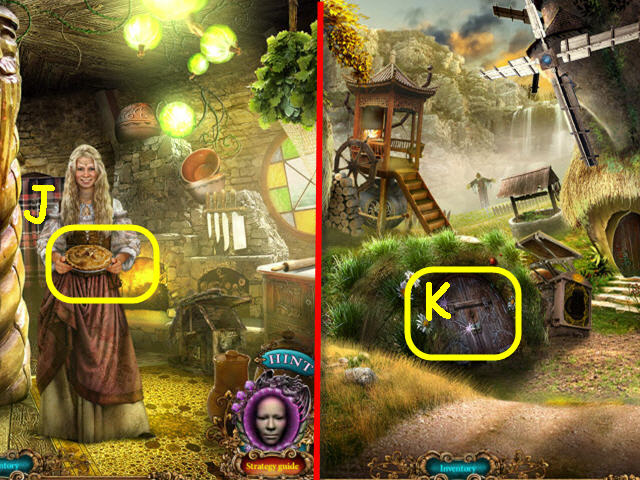
- Back out.
- Give the FLOUR to Mary; take the PIE (J).
- Back out.
- Examine the cellar door and place the COGWHEEL on it (K).
- Examine the opened cellar.
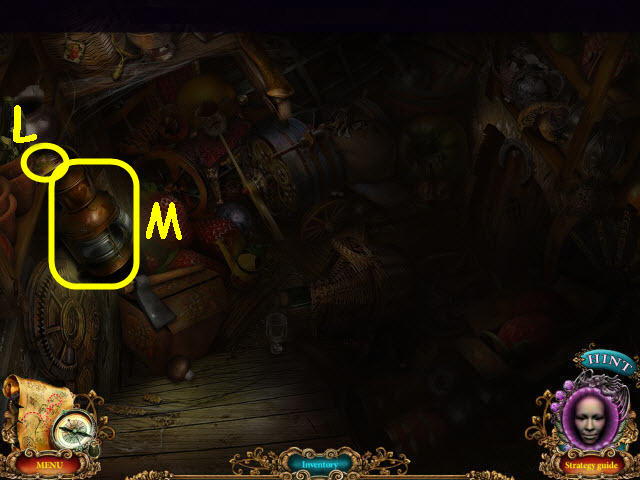
- Use the matches (L) on the lantern (M).
- You will access a HOS.
- Find the items listed.
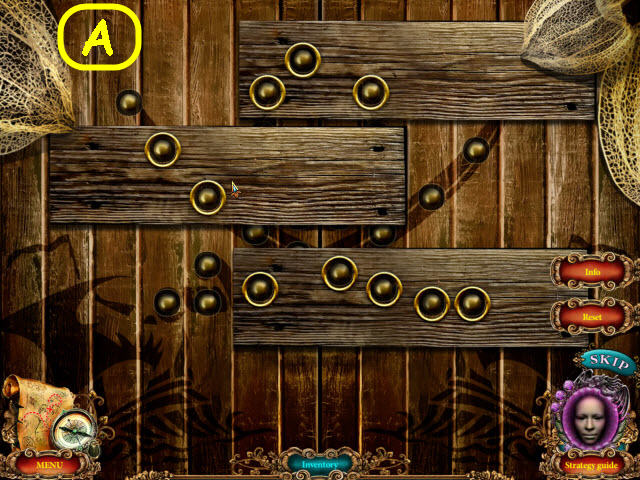
- Use the corkscrew on the cork to get a glass of wine (N).
- You will earn a SPRING.
- Go to the farmhouse attic.
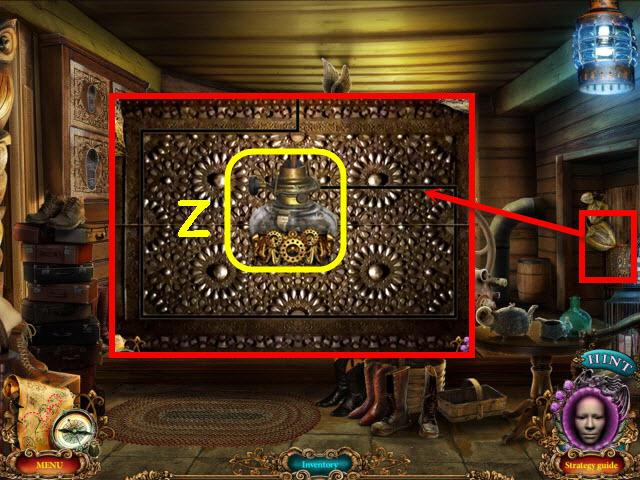
- Examine the statue and place the SPRING by his knee (O); take the BONSAI (P).
- Go to the crossroads.
- Examine the lantern and place the MOON SIGN in the stone slot (Q); take the SIGNAL LIGHT GLOBE (R).
- Go back to the farmhouse attic.
- Examine the semaphore and place the SIGNAL LIGHT GLOBE on the holder; pull the cord (S).
- Take the MAGIC FLAME (T).
- Go to the city gates.
- Examine the dragon; give him the PIE and receive a SILVER BAR 2/3 (U).
- Examine the cracked wall; place the BONSAI in the dirt and take the FISH SYMBOL (V).
- Go to the destroyed tower.
- Examine the left chest and place the FISH SYMBOL on it (W).
- Take the 15 COINS marked in green; you will now have COINS 30/50. Note: the numbers marked in green represent the amount of coins in a particular stack.
- Take the THEATER DOLL (X).
- Select the bottom left arrow on the map, and then select the travelling theatre.

- Examine the theater and place the THEATER DOLL on the stage (Y).
- Place the appropriate accessories with the characters.
- Please look at the screenshot for the solution (Z).
- Take the FACE SIGN.
- Go to the dressing room.
- Examine the jacket (A).
- Place the FACE SIGN in the center to trigger a puzzle.
- Place the silver and gold symbols by their matching symbols.
- To solve the puzzle, switch the following symbols; B – C, C – E, I – B, J – I, B – A, I – B, B – A, F – H, I – H, H – G, J – I, F – D, H – F, H – I, I – J, D – F, F – H, and D – C (@).
- Take the WHEEL PART 2/2.
- Select the upper arrow on the map and then select the city gates.
- Examine the dragon and place the 2 WHEEL PARTS on the broken wheel; take the CARRIAGE WHEEL (B).
- Go to the destroyed tower.
- Examine the carriage and place the CARRIAGE WHEEL on the axle; select the wheel to move the carriage (C).
- Give the CLOVER to the leprechaun; take the SILVER BAR 3/3 (D).
- Go to the farmstead.
- Examine the smelt mill and place the 3 SILVER BARS in the tray (E).
- Place the MAGIC FLAME in the slot (F); take the SCOOP OF SILVER (G).
- Examine the anvil and place the SCOOP OF SILVER in the mold. Use the MAGIC SNOWFLAKE on the filled mold; take the SILVER UNICORN (H).
- Back out.
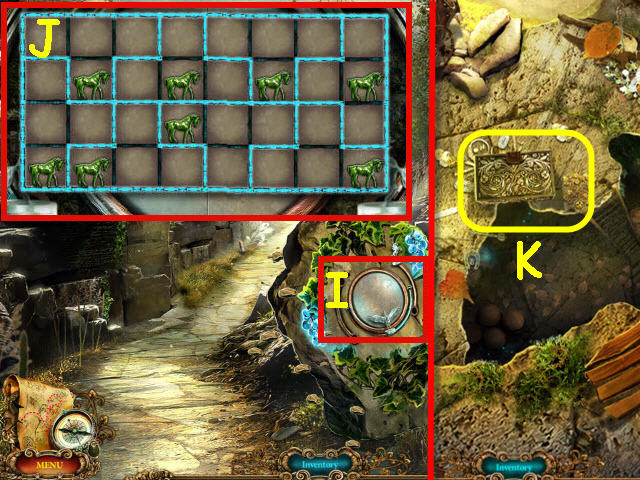
- Examine the center stone; place the SILVER UNICORN on the left slot to trigger a puzzle (I).
- Corral the horses into same shaped enclosures.
- Please look at the screenshot for the solution (J).
- Take the ELEPHANT SYMBOL.
- Go into the destroyed tower.
- Examine the center chest; place the ELEPHANT SYMBOL on it (K).
- Take the 20 COINS marked in green; you will now have COINS 50/50. Note the numbers marked in green represent the amount of coins in a particular stack.
- Take the ROYAL KEY 1/5 (L).
- Go to the city gates.
- Examine the guards; select the center guard and place the 50 COINS in his hand (M).
- Go forward into the floral city.
Chapter 5 – Floral City
- Go into the shoemaker’s shop (N).
- Take the NIPPERS (O).
- Examine the device; take the PASS (P).
- Examine the doorway; take the LOCK PICKS (Q).
- Back out.
- Examine the food cart and use the LOCK PICKS on the lock; turn the picks. Take the ROAST TURKEY (R) and WIND WISP 1/4 (S).
- Examine the tavern door and open the viewer; give the PASS to the man (T).
- Enter the newly-opened tavern.
- Speak to the innkeeper (U).
- Take the SUNFLOWER SEED OIL (V).
- Take the CANDLE (W).
- Examine the wash station; take the SOAP DISH (X).
- Examine the teapot; take the WEIGHT(Y).
- Go to the shoemaker’s shop.
- Examine the doorway; use the SUNFLOWER SEED OIL on the lamp (Z).
- Select the lamp to trigger a puzzle.
- Set the boards so there is a rivet in each hole.
- Please look at the screenshot for the solution (A).
- Speak to the pirate and give him the ROAST TURKEY; take the RING (B).
- Go to the tavern.
- Give the RING to the innkeeper (C); receive a COPPER COIN.
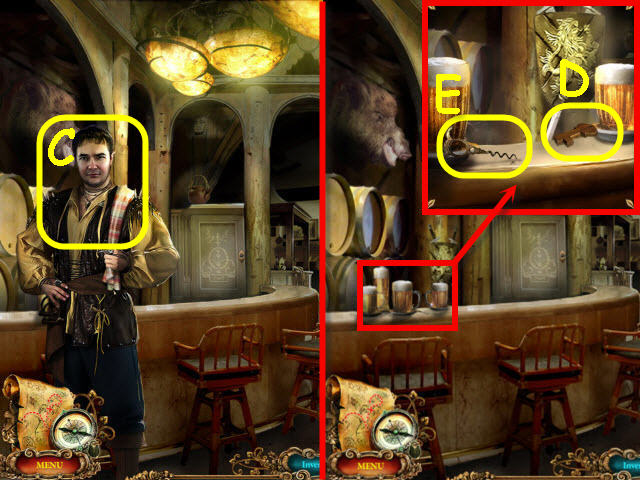
- Examine the counter; take the KITCHEN CLOSET KEY (D), and CORKSCREW (E).
- Back out.
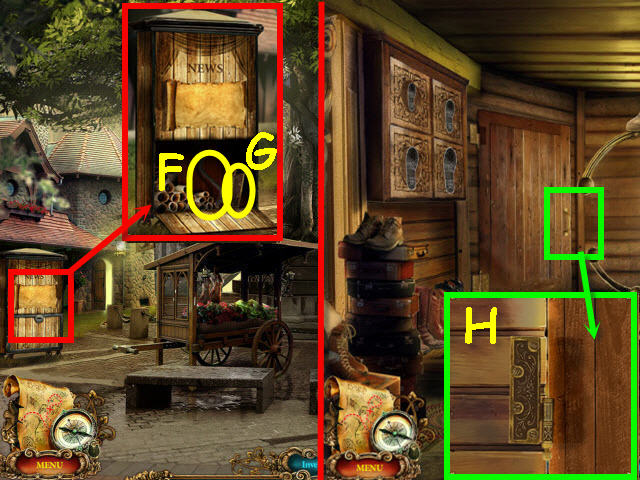
- Examine the newsstand and use the COPPER COIN on the lock; take the HEX KEY (F), and the HINGE (G).
- Go into the shoemaker’s shop.
- Examine the door; place the HINGE on the jamb (H).
- Examine the opened door to access a HOS.
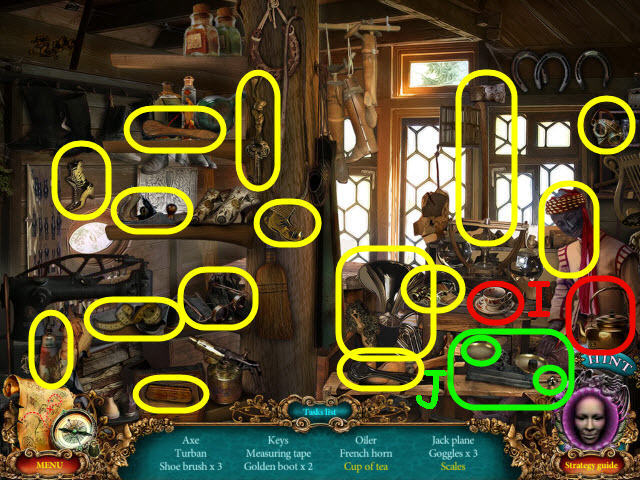
- Find the items listed.
- Use the teakettle on the cup to get a cup of tea (I).
- Place the weight on the scale to get scales (J).
- You will earn a TAPE MEASURE.
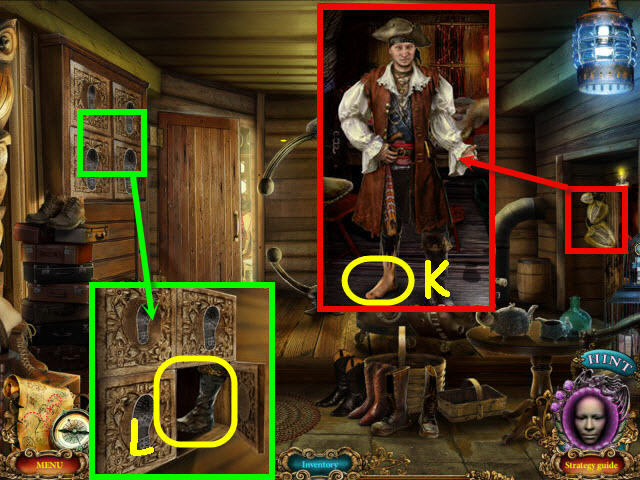
- Examine the doorway; speak to the pirate and use the TAPE MEASURE on his foot (K); you will receive a CAPTAIN’S SHOE SIZE.
- Examine the cabinet and use the CAPTAIN’S SHOE SIZE on it; take the BOOT (L).
- Examine the doorway; give the BOOT to the pirate and receive a LETTER.
- Select the bottom arrow on the map, and then the farmhouse.
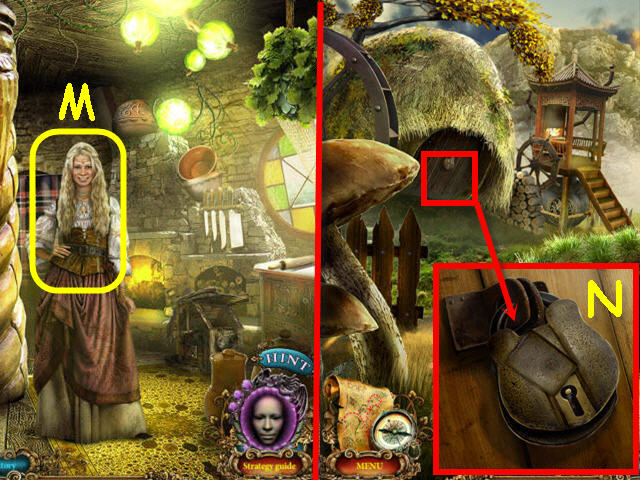
- Give the LETTER to Mary (M); you will receive a BARN KEY.
- Back out.
- Examine the barn; open the cover and use the BARN KEY on the lock (N); turn the key.
- Enter into the newly-opened barn.

- Examine the rafters; take the ROYAL KEY 2/5 (O).
- Use the NIPPERS on the chain to get a STAINED-GLASS PIECE (P).
- Examine the cart; take the DRAINED BATTERY (Q).
- Use the SOAP DISH on the shell; take the BLUE PEARL (R).
- Examine the stained glass and place the STAINED-GLASS PIECE in the empty pane to trigger a puzzle (S).
- Trap the wind by creating webs in the glass panes.
- Tip: I found it easiest to continuously tap with the mouse till the web is complete in a section. Start as far away from the wind as possible so it does not stop your progress.
- See screenshot for one solution (T).
- Take the WIND WISP 2/4 (U).
- Back out.
- Examine the battery charger; place the WEIGHT on the side and the DRAINED BATTERY in the front slot; take the CHARGED BATTERY (V).
- Examine the wings; use the WRENCH on the nut and take the WIND WISP 3/4 (W).
- Select the top arrow on the map and then select the square.
- Examine the weathervane; take the WIND WISP 4/4 (X).
- Place the 4 WIND WISPS in the center; take the WIND MAGIC(Y).
- Go into the shoemaker’s shop.
- Examine the device; place the WIND MAGIC in the sphere (Z) and the CHARGED BATTERY in the slot (A).
- Go through the portal to the minor gallery (B).
- Examine the alcove (C).
- You will access a HOS.
- Find the items listed.
- Use the cloth on the cobwebs to get a mirror (D).
- Use the knife on the X; remove the brick to get the letter (E).
- You will earn a WIZARD’S HAT.
- Go upstairs into the tea room.
- Examine the note; take the CANDLE (F).
- Examine the area on top of the ladder; take the SICKLE (G).
- Back out and go forward to the palace garden.
- Take the HALBERD (H).
- Select the bottom right arrow on the map and then select the barn.
- Use the HALBERD to get the NET (I).
- Select the upper right arrow on the map and then select the minor gallery.
- Examine and use the NET on the minion; take the FIRE EXTINGUISHER (J).
- Go forward up the stairs.
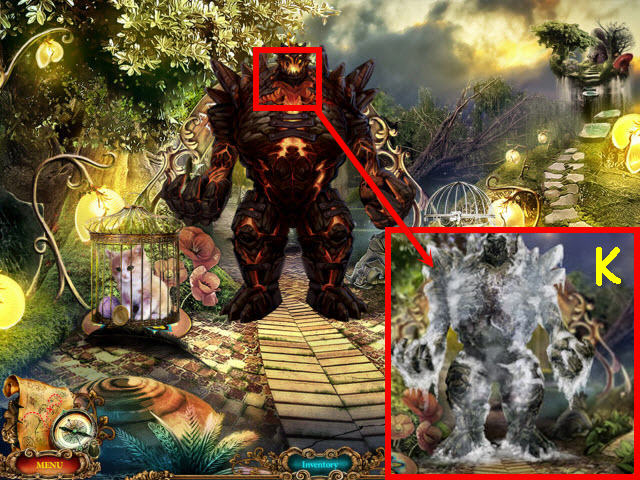
- Examine and use the FIRE EXTINGUISHER on the monster; select the frozen monster (K) to make him crumble.
- Go forward to the palace courtyard.

- Take the WHITE PEARL (L).
- Examine the shield; take the DIRTY STONE (M).
- Use the CORKSCREW on the bottle; take the HEALING OINTMENT (N).
- Examine the pavilion and use the DIRTY STONE on it (@) to receive a GEM.
- Go forward to the castle wall.
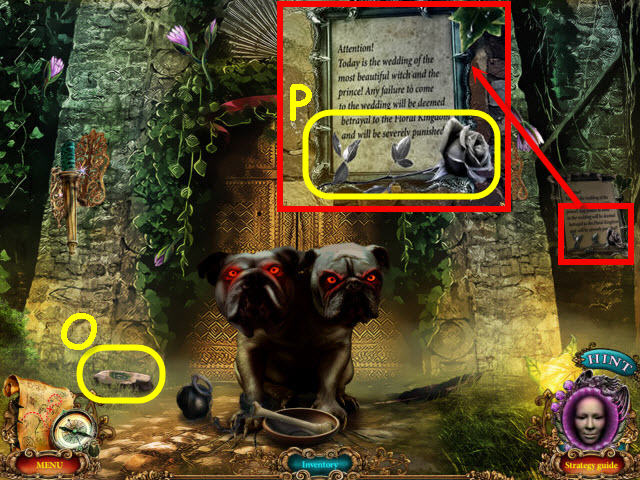
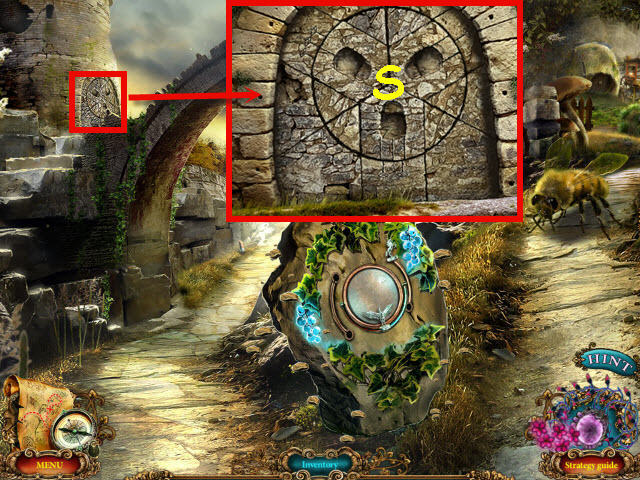
- Take the RUNE STONE (O).
- Examine the notice; take the ROSE (P).
- Go to the palace garden.
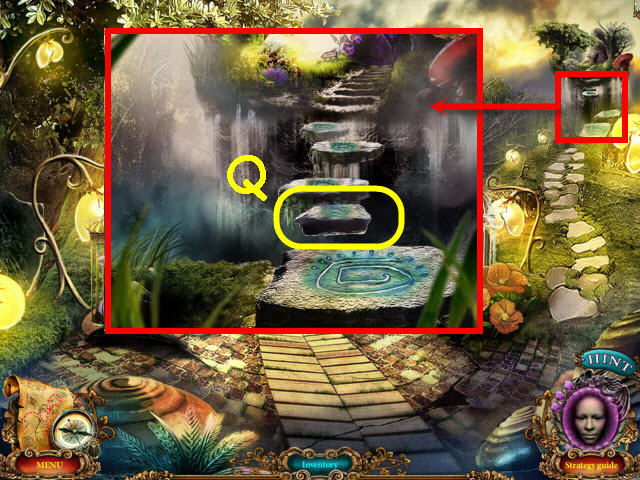
- Examine the path and place the RUNE STONE on it (Q).
- Go up the right path to the falcon tower.
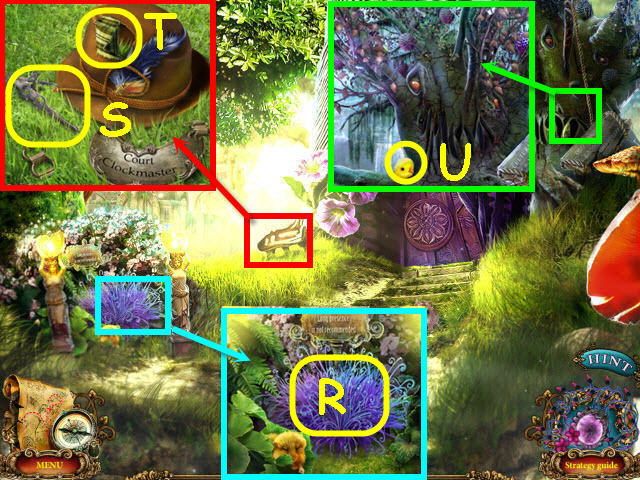
- Examine the grass and use the SICKLE on it; you will receive the DREAM GRASS (R).
- Examine the bench; take the CLOCK HANDS (S) and PATCH (T).
- Examine the tree; take the CHICK HEAD (U).
- Go to the tea room.
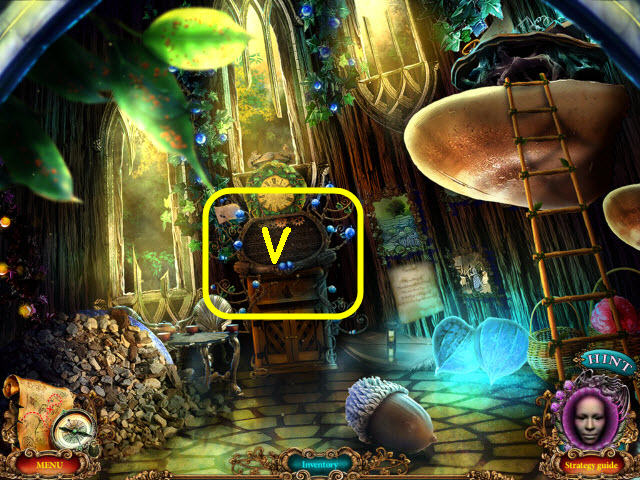
- Examine the device (V).
- Place the CLOCK HANDS on the clock face to trigger a puzzle.
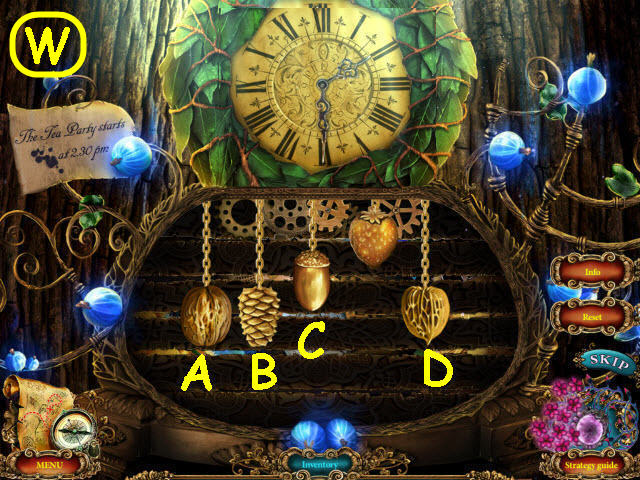
- Set the time to 2:30 by adjusting the weights.
- To solve the puzzle, pull the following parts in this order: D down, C down, B down, and A down (W).
- Take the FOX EMBLEM.
- Go to the palace garden.
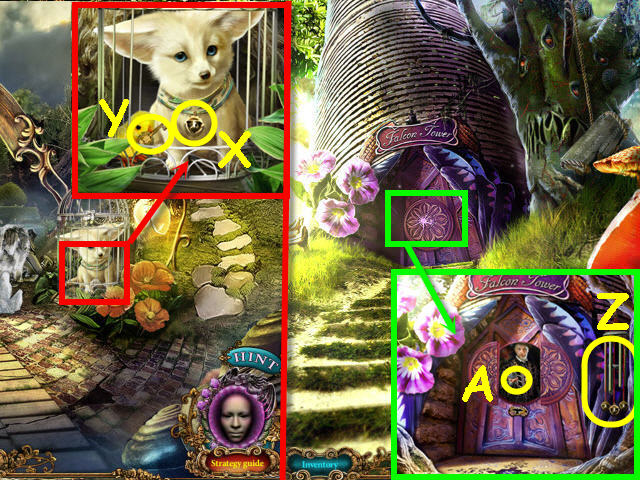
- Examine the fox cage and use the FOX EMBLEM on the lock; take the BELL (X).
- Place the CHICK HEAD on the chicken body; take the ROYAL KEY 3/5 (Y).
- Go up the right to the falcon tower.
- Examine the doorway and place the BELL on the wind chime; ring the BELL (Z).
- Speak to the chamberlain; take the ROYAL SEAL (A).
Chapter 6 – The Witch
- Examine the door; take the IRON ROD (B).
- Go to the tavern.
- Examine the cabinet; use the KITCHEN CLOSET KEY on the lock and turn it twice (C).
- Place the GEM on the box lock; take the CAT EMBLEM (D).
- Go to the palace garden.
- Examine the kitten cage and use the CAT EMBLEM on the lock; take the NEEDLE AND THREAD (E).
- Back out.
- Examine the statue; place the WHITE PEARL and the BLUE PEARL in the slots (F).
- Place the PATCH and NEEDLE AND THREAD on the umbrella; take the UMBRELLA (G).
- Go to the palace courtyard.
- Examine the pavilion and use the UMBRELLA in it; take the SPADE (H).
- Go forward.
- Examine the torch; use the IRON ROD on the fixture to get the TORCH (I).
- Go to the falcon tower.
- Examine the tree and use the TORCH on it; take the NUR-NUR NUT (J).
- Go to the tea room.
- Use the SPADE three times on the pile (K); receive a MUSHROOM.
- Examine the area at the top of the ladder (L).
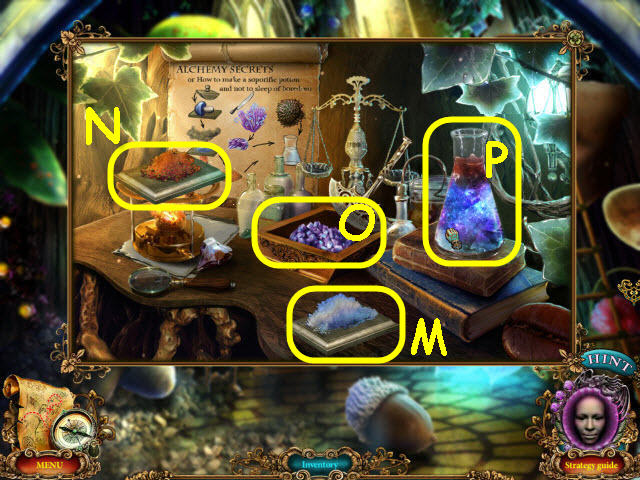
- Place the MUSHROOM on the board and use the ROYAL SEAL on it (M).
- Place the board on the burner (N), and then into the beaker (P).
- Place the DREAM GRASS in the dish and use the cutter on it (O); place in the beaker.
- Place the NUR-NUR NUT in the beaker; take the SLUMBER POTION (P).
- Go to the castle wall.
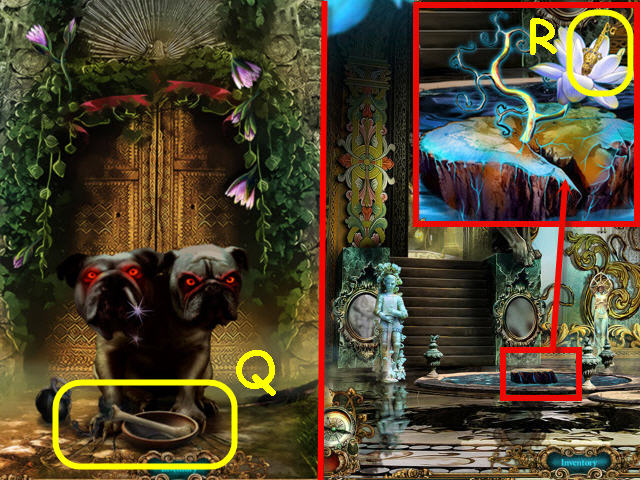
- Examine the dog and put the SLUMBER POTION in the bowl (Q).
- Enter the great mirror hall.
- Examine the tree stump and place the HEALING OINTMENT on it; take the ROYAL KEY 4/5 (R).
- Go up the stairs into the throne room.
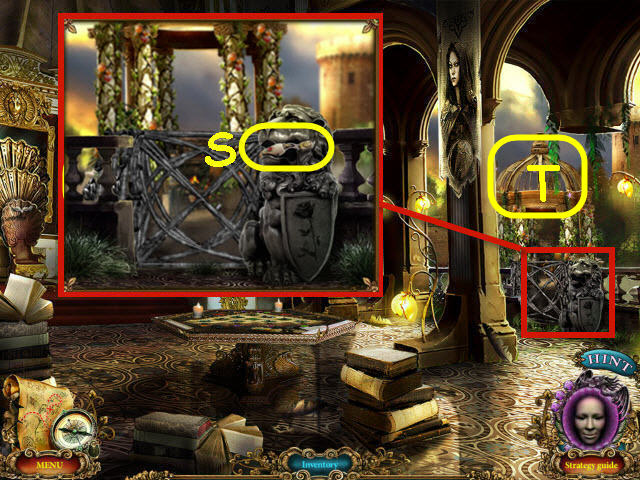
- Examine the lion statue; take the IRON HANDLE (S) and place the ROSE in the lion’s mouth.
- Examine the pavilion to access a HOS (T).
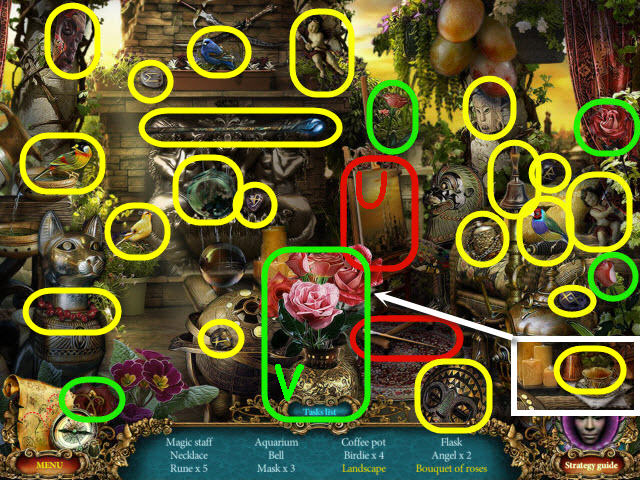
- Find the items listed.
- Use the paintbrush on the easel to get a landscape (U).
- Place the roses in the vase to get a bouquet of roses (V).
- You will earn a WIZARD’S STAFF.
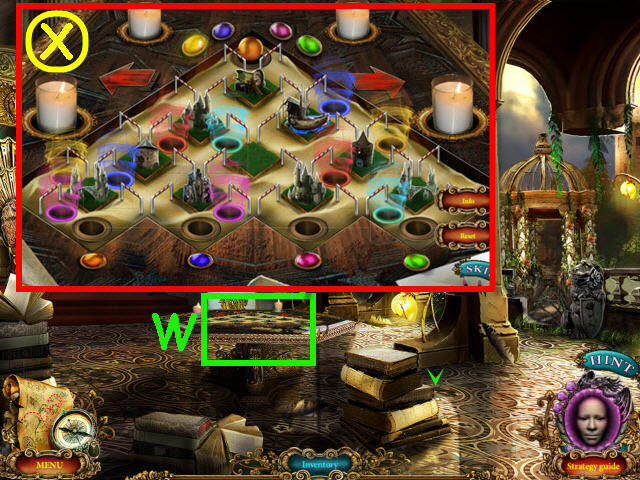
- Examine the table and place the 2 CANDLE items in the outer empty slots to trigger a puzzle (W).
- Lead the colored balls to the matching holes on the bottom.
- To solve the puzzle, select the following arrows; L = left and R = right: Orange ball – R, L, R, L x 2, blue ball – R x 3, pink ball – R, L, R, L, R, green ball – R, L x 2 (X).
- Back out.
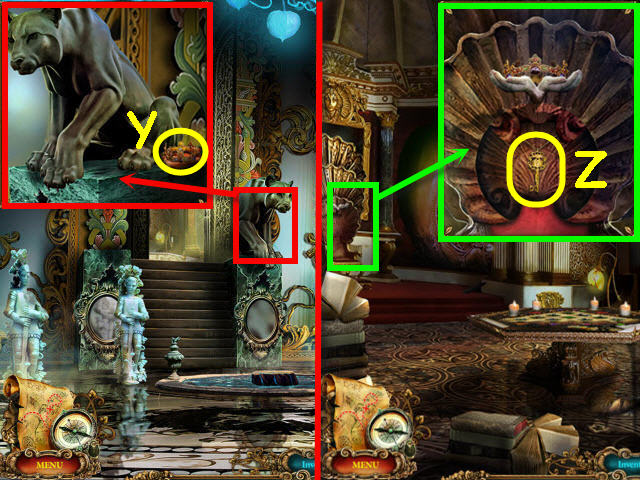
- Examine the statue; take the CROWN (Y).
- Go back to the throne room.
- Examine the throne and place the CROWN in the hands; take the ROYAL KEY 5/5 (Z).
- Go to the tavern.
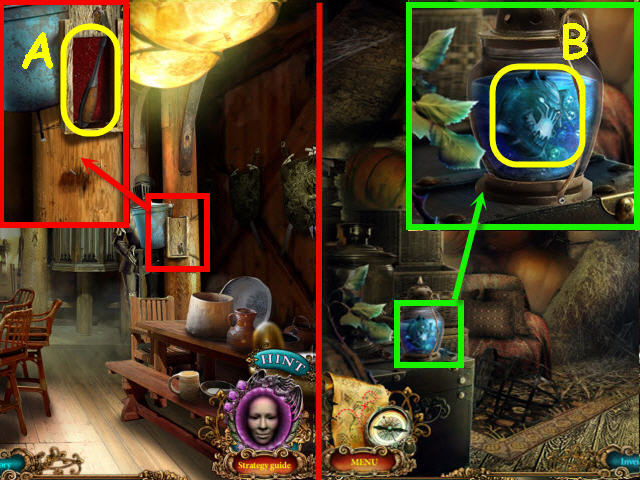
- Examine the washstand; use the IRON HANDLE on the box and open it. Take the SCREWDRIVER (A).
- Select the bottom arrow on the map and then select the barn.
- Examine the jar and use the SCREWDRIVER on it; take the GOLEM HEAD (B).
- Select the top arrow on the map and then go to the great mirror hall.
- Examine the golem and place the GOLEM HEAD on it (C).
- Examine the door and place the 5 ROYAL KEYS in the slots to trigger a puzzle (D).
- Move the angel from the left to the right.
- To solve the puzzle, move the angel to the squares in the order marked (E).
- Go into the ceremony hall.
- Examine the tray and take the WIZARD’S ORB (F).
- Go to the palace courtyard.
- Examine the fountain and place the WIZARD’S HAT, WIZARD’S STAFF, and WIZARD’S ORB on the statue; take the DISPEL MAGIC (G).
- Go to the ceremony hall.
- Use the DISPEL MAGIC on the witch (H).
- Congratulations! You have successfully completed Unfinished Tales: Illicit Love.


 Drawn: Dark Flight ® Walkthrough, Guide, & Tips
 Virtual Villagers: The Tree of Life Walkthrough, Guide, & Tips
 Forest Legends: The Call of Love Walkthrough, Guide, & Tips
 Grave Mania: Pandemic Pandemonium Walkthrough, Guide, & Tips
 Mystery Case Files: Escape from Ravenhearst Walkthrough, Guide, & Tips