Grave Mania: Pandemic Pandemonium Walkthrough, Guide, & Tips
Grave Mania: Pandemic Pandemonium Walkthrough
Welcome to the Grave Mania: Pandemic Pandemonium Walkthrough
Help the Locas capture zombies while traveling the globe. It’s the most fun you’ll ever have in a funeral parlor!
Whether you use this document as a reference when things get difficult or as a road map to get you from beginning to end, we’re pretty sure you’ll find what you’re looking for here.
This document contains a complete Grave Mania: Pandemic Pandemonium game walkthrough featuring annotated screenshots from actual gameplay!
We hope you find this information useful as you play your way through the game. Use the walkthrough menu below to quickly jump to whatever stage of the game you need help with.
Remember to visit the Big Fish Games Forums if you find you need more help. Have fun!
This walkthrough was created by Anino Games, and is protected under US Copyright laws. Any unauthorized use, including re-publication in whole or in part, without permission, is strictly prohibited.
General Tips

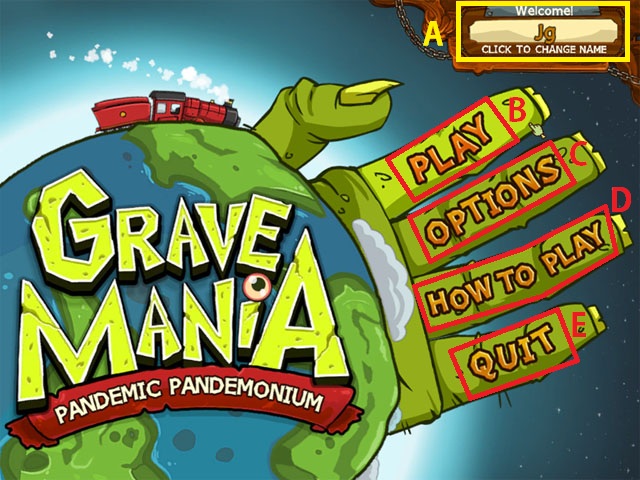
- This is the official guide for Grave Mania: Pandemic Pandemonium.
- To Select, Delete, or Create new player profile, select PROFILE (A).
- To start or continue your undead adventure, select PLAY (B).
- To change volume, switch screen sizes, turn custom cursor on or off, or view credits, select OPTIONS (C).
- To view a comprehensive guide to the world of Grave Mania: Pandemic Pandemonium, select HOW TO PLAY (D).
- Select QUIT (E) to leave the game.

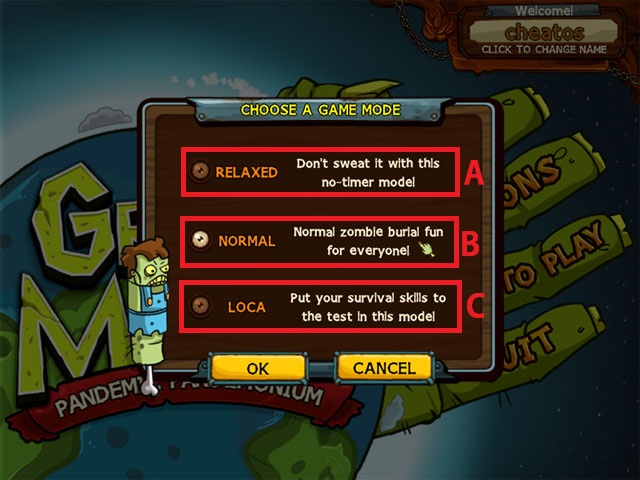
- Starting a game with a new profile will lead you to the Game Mode. Select the difficulty that is right for you.
- (A) Relaxed: All timers for Bonnie levels are turned off. Game is paused during station mini-games.
- (B) Normal: All timers for Bonnie levels are running. Game is paused during station mini-games.
- (C) Loca: All timers for Bonnie levels are running. Game continues to run during station mini-games.
- Left-click on OK to start your adventure or CANCEL to return to the Main Menu.
Game Map

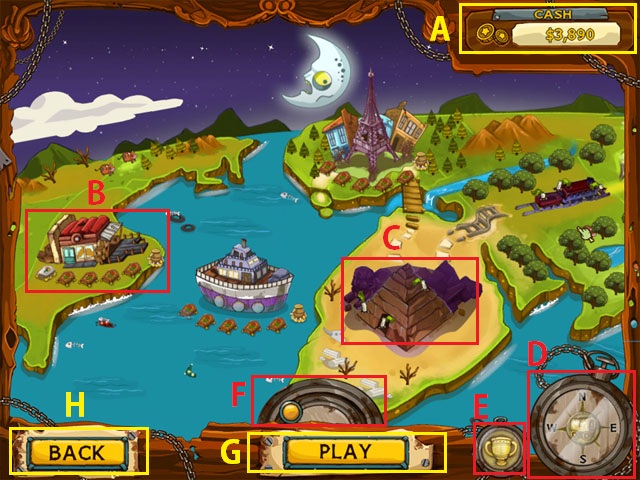
- The game map represents your progress.
- Your disposable cash is displayed here (A).
- Open and completed towns (B) can be selected.
- Locked towns (C) have this purple tint and cannot be selected.
- Select this (D) to open Grave Maniac’s list of chase sequences.
- Open the Achievement list (E) to view the postcards you collected.
- You can drag the map to view other areas in the screen, or you can drag the node like a scroll bar (F).
- Select PLAY (G) to open the last opened town.
- Select BACK (H) to return to the Main Menu.

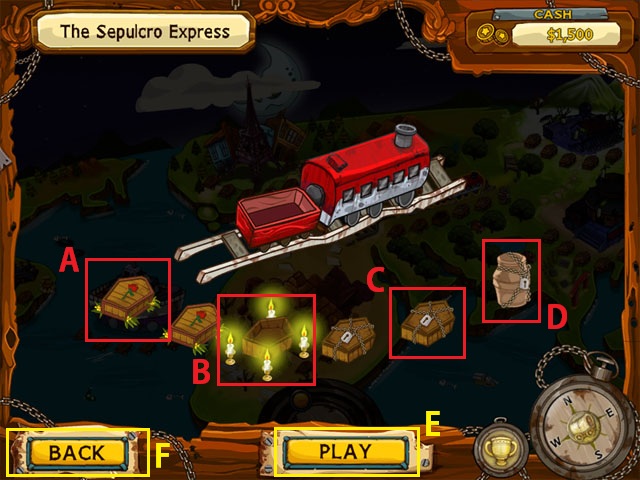
- (A) Completed levels have covered caskets. They change color depending on your score. They can be replayed anytime.
- (B) Last unlocked levels have open caskets.
- (C) Locked levels have chained caskets. You have to complete the unlocked level first to open these.
- (D) Urns are Johnny’s special Graveyard levels. They differ greatly from Bonnie’s Workshop levels.
- Select PLAY (E) to play the last unlocked level.
- Select BACK (F) to return to the Map screen.

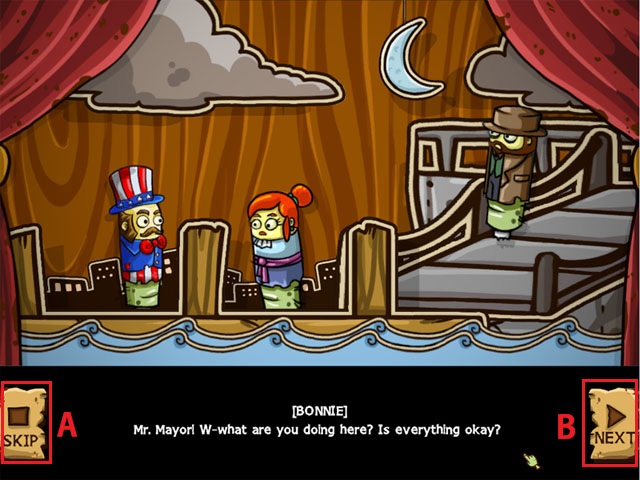
- Select SKIP (A) to end the cutscene.
- Select NEXT (B) to proceed to the next line of dialog.
Bonnie’s Workshop

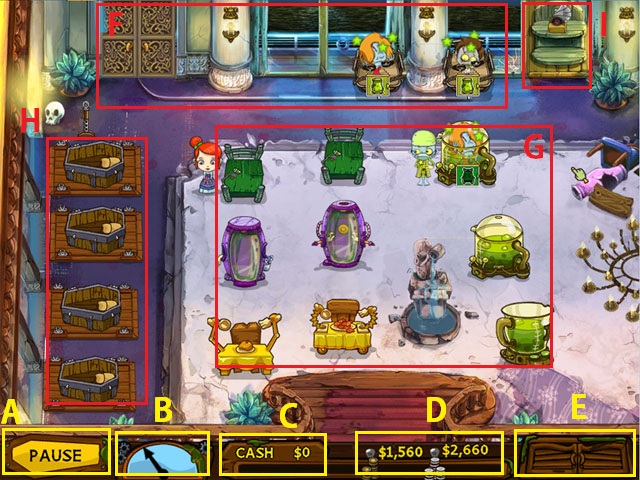
- A good majority of the game takes place in Bonnie’s Workshop.
- Select PAUSE (A) to open the Pause Menu(see Pause Menu).
- Game timer (B) runs from left to right. This is disabled if you selected ‘Relaxed’ in Game Mode.
- Your current cash (C) is displayed here, along with the level’s Goal cash and Expert cash (D) requirements. You can complete the level with the minimum Goal cash.
- The Side-quest window (E) will open when the level has sub-goals that you can complete for bonus cash.
- Captured zombies enter the workshop tied to a stretcher (F).
- Drag and drop zombies on an assortment of processing stations (G).
- When the process is complete, move the zombies onto the caskets (H). Select this station to command Bonnie to throw the zombies out of the shop.
- Use power-up items (I) whenever you like. You can only use them once per level, though.

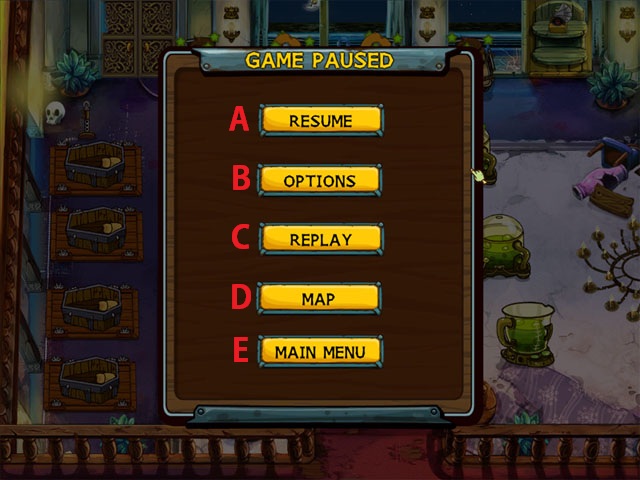
- The Pause menu is available in Bonnie’s Workshop, Johnny’s Graveyard, and the Grave Maniac sequences.
- RESUME (A) returns you into the thick of the action.
- Open the OPTIONS (B) screen to adjust volume, screen size, or toggle custom cursor on/off.
- Select REPLAY (C) to restart your level progress.
- Select MAP (D) to return to the Map screen. Your current level progress will not be saved.
- Select MAIN MENU (E) to return to the Main Menu. Your current level progress will not be saved.

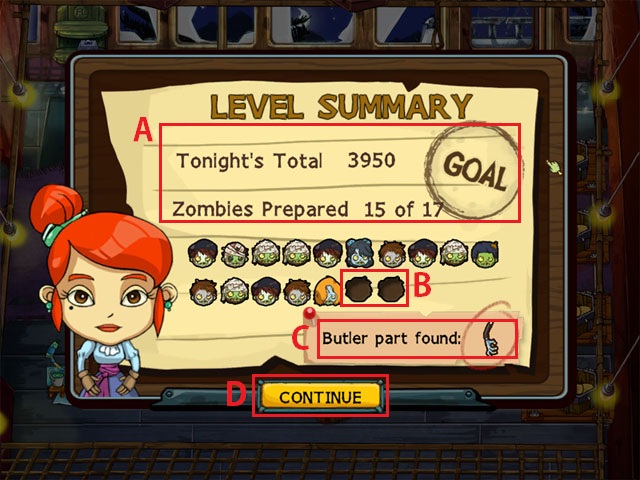
- Level Summary (A) provides you a detailed report of your current performance.
- ‘Zombies Prepared’ features a list of all the zombies you prepared for burial. Zombies that escaped or were shut out of the workshop when the time runs out appear as brown icons (B).
- Butler part you find appears here (C). You can only find this part once.
- To proceed and return to the Level Select screen, select CONTINUE (D).
Shopping Time

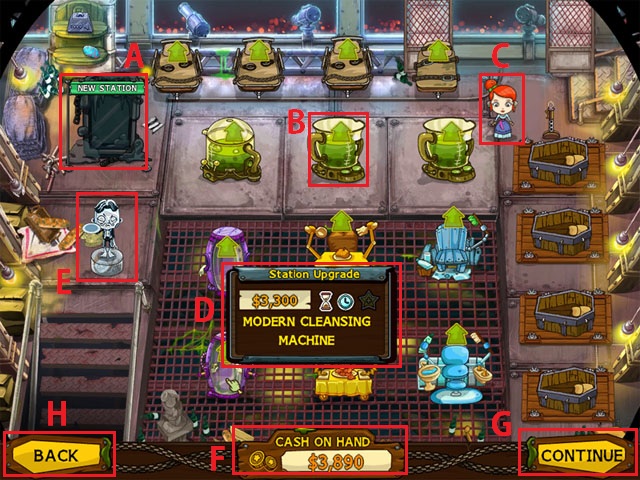
- Before you head into battle, it is recommended that you prepare yourself. Purchase or upgrade as many as you can!
- New stations (A) appear darker. You can only use them in Bonnie’s Workshop if you purchase them.
- Stations with green upward arrows (B) can be upgraded. You can upgrade these stations 3 more times.
- Bonnie can be upgraded as well with better equipment (C).
- To view item information, move your mouse pointer above any available station (D).
- Hourglass: zombie patience runs slower
- Timer: Faster processing
- Star: Extra patience star
- Butler collection (E) can be viewed by selecting the strange zombie statue.
- Cash on hand is displayed here (F). We only accept cash.
- Select CONTINUE (G) to start the day.
- Select BACK (H) to return to Level Select screen.

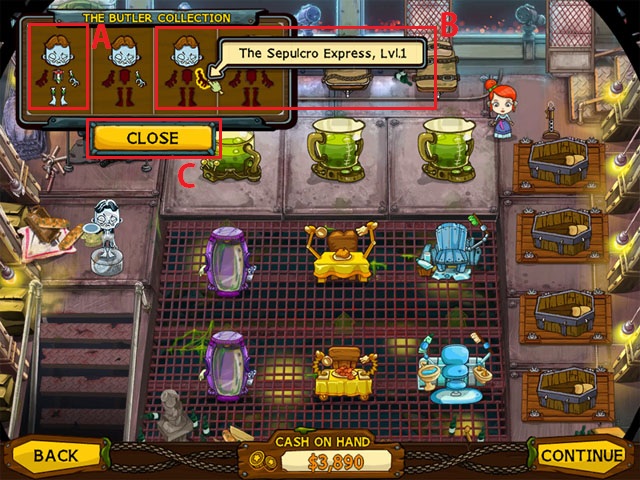
- You can deploy a number of Zombie Butlers by collecting their body parts scattered across multiple levels (A).
- A body part’s location is displayed if you move the mouse pointer above it (B).
- Select CLOSE to hide the Butler Collection menu.

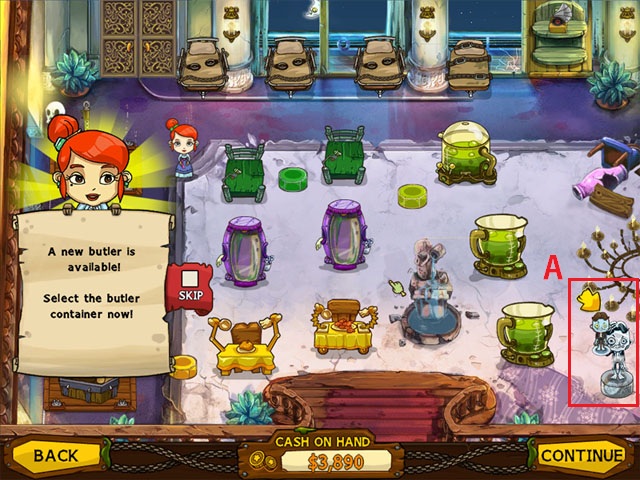
- (A) When you complete a new butler, the statue will display a miniature version of your new helper. Select it to open the Butler menu.

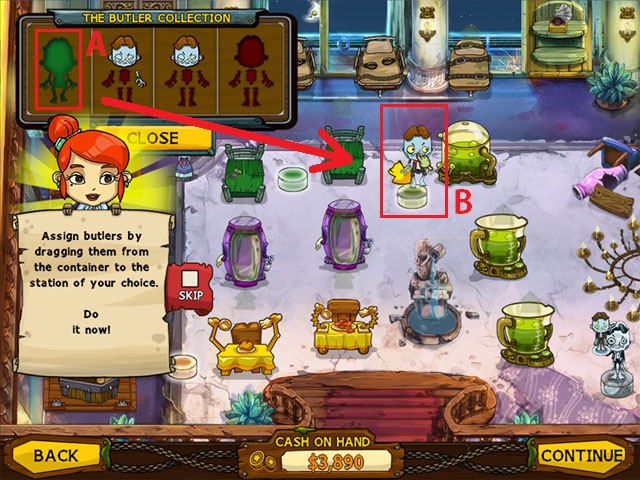
- When a zombie butler is complete, you can drag from the panel (A) back to the workshop stations. Look for the station nodes (B). You can reassign them to any station if you wish.
Johnny’s Graveyard

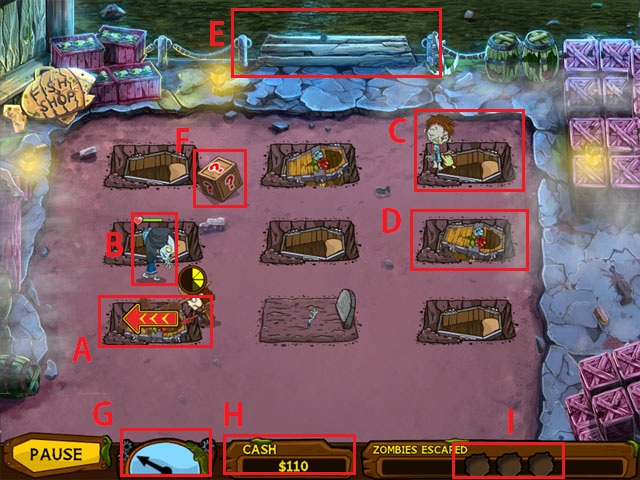
- Objective: To stop any zombies from escaping the graveyard.
- Command Johnny to bury closed caskets. (A) Sometimes a special move is required to speed up the process; just drag the node to the indicated direction.
- Some zombies will try to escape the graveyard (B). Give them a good whack and put them back to their caskets! (C).
- Closed caskets have zombies struggling to escape. (D) Bury them ASAP!
- Don’t let any zombie reach this area (E).
- Knocked out zombies sometimes drop a mystery box (F). Select them to find out what’s inside.
- (G) Level time before sunrise.
- (H) You earn cash every time you whack ($10) or bury ($100) a zombie.
- (I) It’s game over if 3 zombies escape.

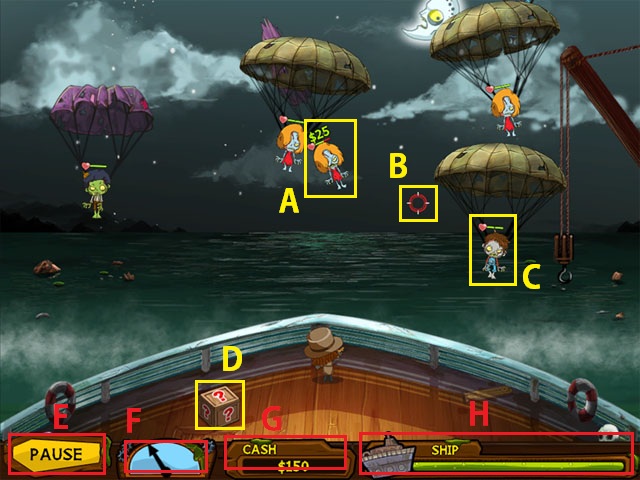
- Objective: Defend the ship from zombies trying to land on the platform.
- Shoot incoming zombies (A) with your slingshot. Use your mouse pointer to move the target (B).
- (C) Some zombies will require multiple shots before they go down.
- (D) Select the power-up button for a temporary ammunition boost.
- (E) Select Pause to suspend the game and open the Paused Menu.
- (F) Level time before sunrise.
- (G) Score for each zombie shot down.
- (H) The vessel’s life. It’s game over when the bar goes empty.

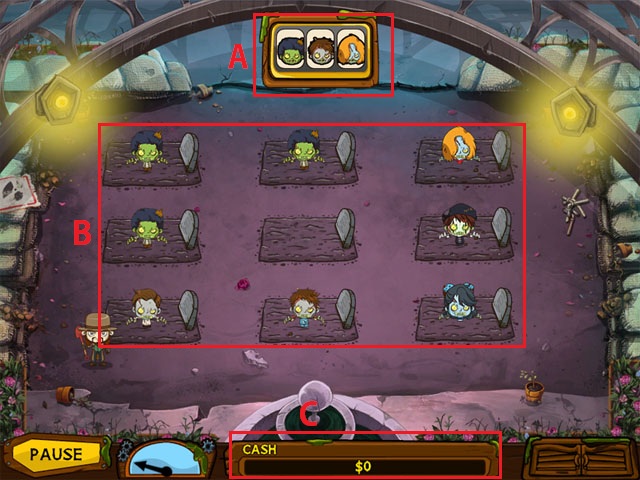
- Objective: Whack the correct zombie based on the sequence guide provided (A).
- (B) Zombies will randomly appear from the graves. Don’t worry, they won’t try to escape.
- (C) Whacking the correct zombie types will earn you points.

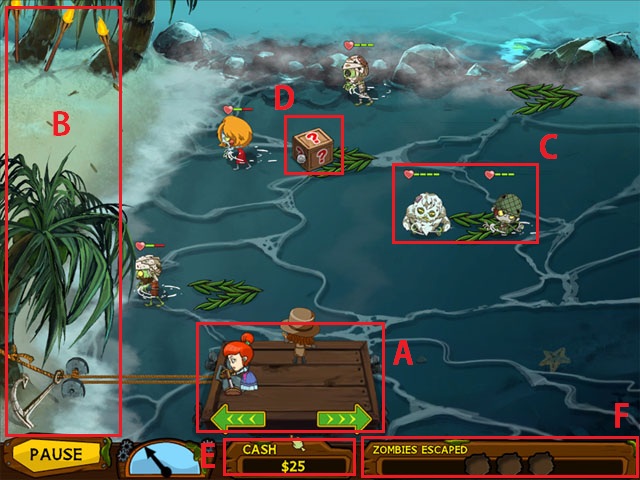
- Objective: Drag Johnny and Bonnie’s platform (A) to defend your turf (B) from invading zombies.
- (C) Watch out for tougher zombies. Shoot them first if you can!
- (D) Select these reward boxes for a short boost.
- (E) Each zombie shot down earns you cash.
- (F) It’s game over when 3 zombies manage to get through your defense.

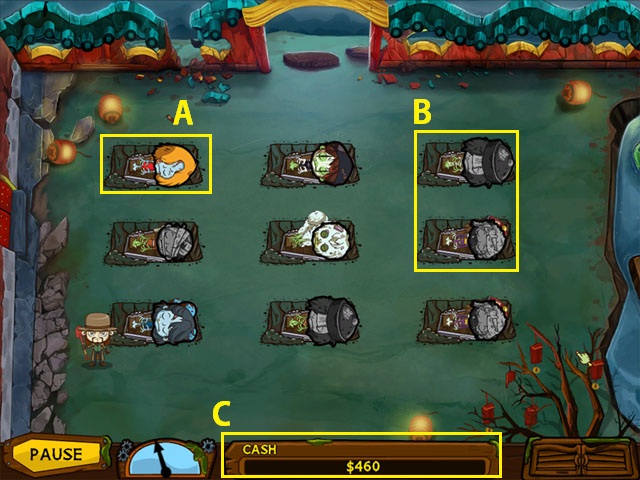
- Objective: Rearrange the grave to match the zombies’ heads to their bodies.
- (A) Zombie heads have color when they match the body.
- (B) To swap zombie heads, select one zombie head and select another head next to it.
- (C) The faster you solve the graveyard puzzle, the higher your score will be.
Grave Mania Chase Scenes

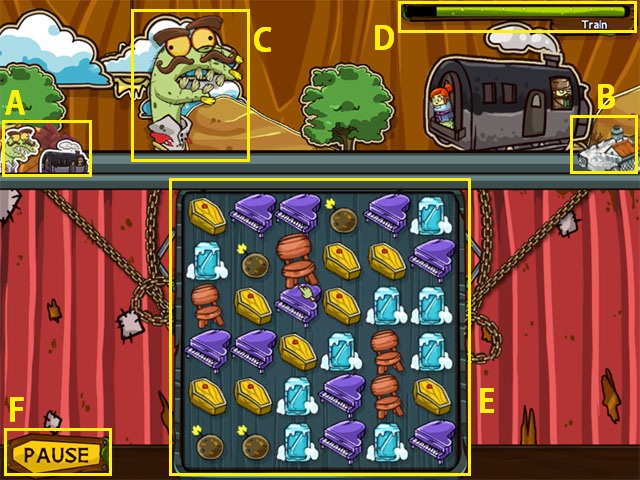
- Escape from the Grave Maniac across 7 locations in a match-3 inspired gameplay.
- The progress meter displays your vehicles distance (A) from the destination (B).
- (C) The Grave Maniac will do whatever he can to take a bite out of your vehicle. Watch out for your vehicle’s life (D).
- (E) Use the board to throw items large and small at the Grave Maniac. Match 3 items of the same type to throw it out. Bigger items hit harder while smaller items hit faster.
- (F) Select the Pause button to open the Pause menu.
Station Activity

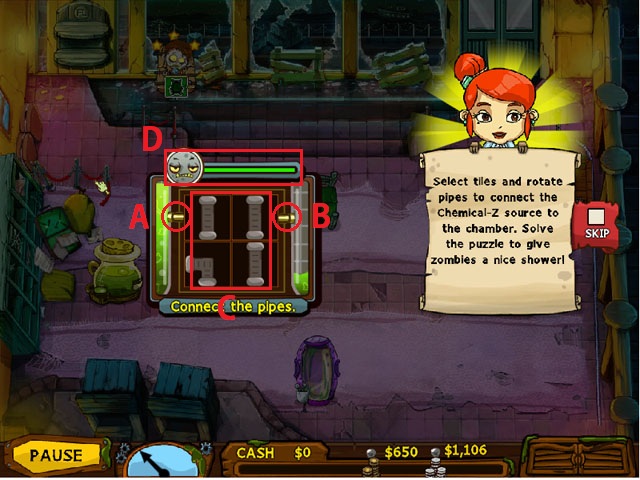
- Connect the Chem-Z tank (A) with the workshop tanks (B).
- Left-click on any tile to rotate it 90-degrees counter-clockwise (C).
- (D) Time left before the zombie goes angry. This timer is disabled in Relaxed mode.

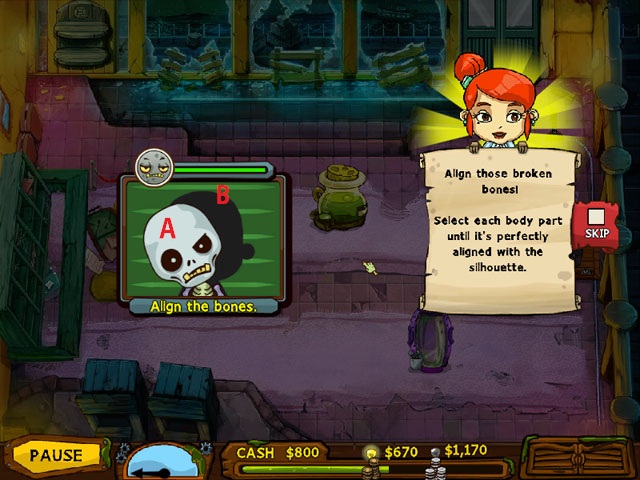
- Left-click on the zombie’s bones (A) to until it fits the silhouette guide behind it (B).

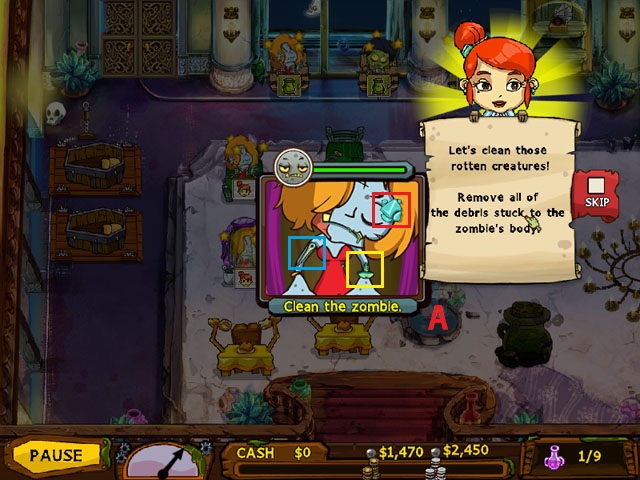
- Find and left-click all unwanted dirt and debris from the zombie (A).

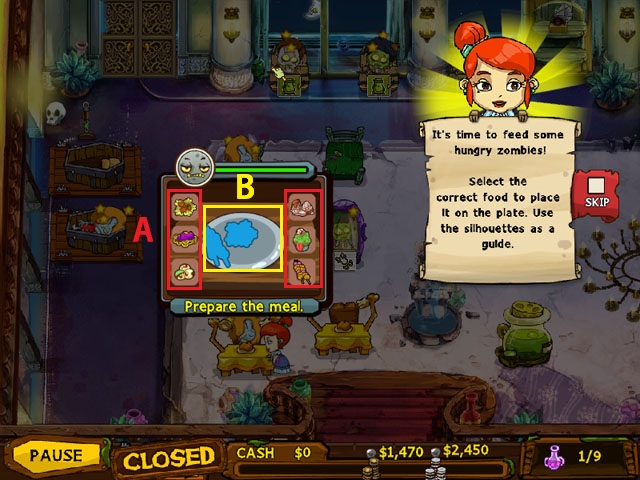
- Select the food (A, in red) that matches the silhouette on the plate (B).

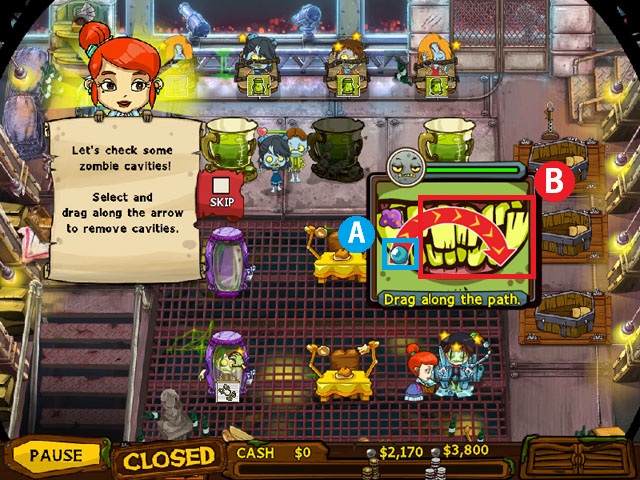
- Brush zombie teeth by dragging the brush node (A) along a predefined direction (B).

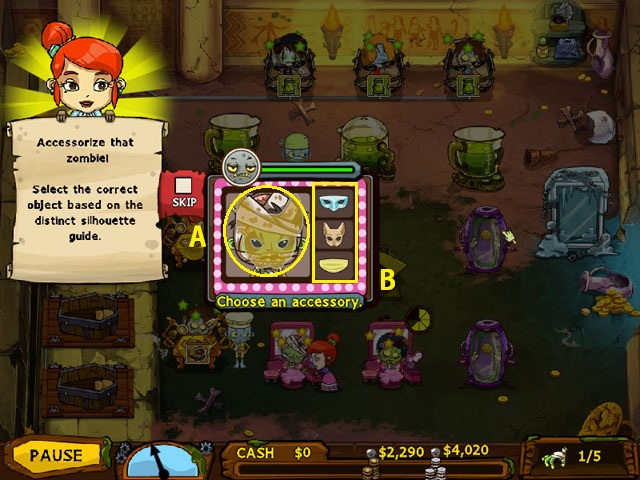
- Based on the guide provided (A), select the matching item from the selection (B).

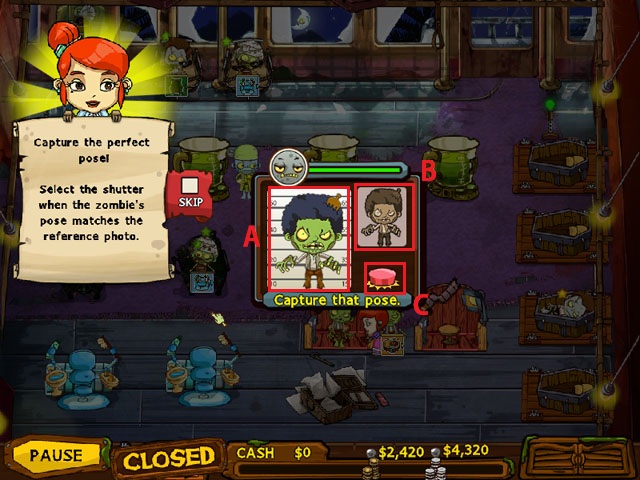
- The Zombology Institute needs your help in filing all the zombies buried. Take a picture of each zombie (A) when they match the pose in the guide (B). Left-click on the shutter button (C) when the guide and the pose match.

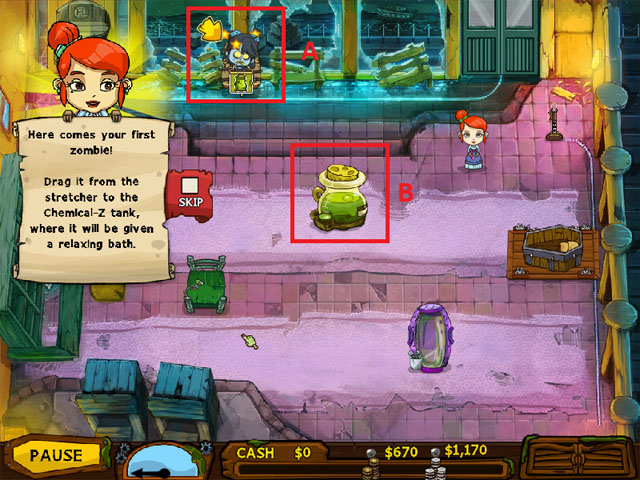
- Select the correct flower from the pile (A) that matches the highlighted space in the bouquet (B).
Achievements

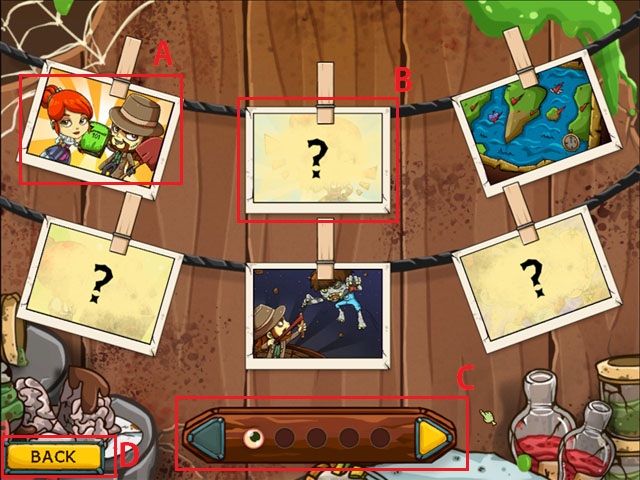
- Each achievement unlocked is represented by fancy little postcards depicting Bonnie and Johnny’s adventures. Collect them all!
- (A) Unlocked postcard
- (B) Locked postcard
- Select the left or right buttons (C) to view other postcards. There 5 sets in all.
- Select BACK (D) to return to the Map screen.
East Pandemic Docks – Bonnie’s Workshop

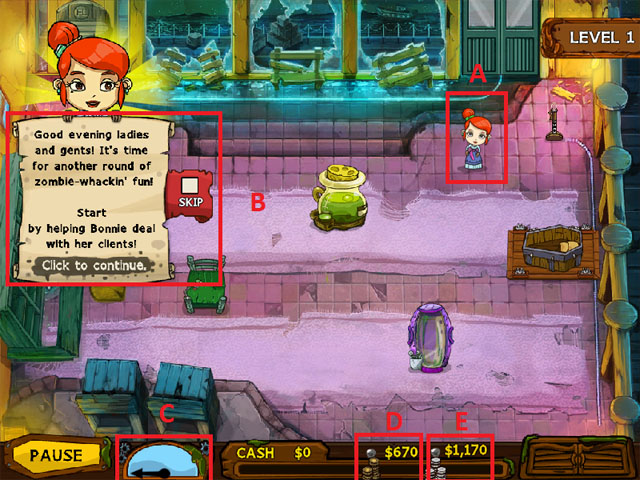
- (A) This is Bonnie, one of the main characters of the game. She is in charge with all activities inside the funeral parlor.
- (B) This is the tutorial level. A tutorial pop-up is displayed. Follow the instructions stated in the tutorial pop-up to proceed.
- (C) This is the Level Timer. It indicates if the level time has started or about to end.
- (D) This is the Goal Score requirement. You need to achieve this score in order to successfully complete the level.
- (E) This is the Expert Score requirement. You can achieve this bonus requirement to obtain a higher record score.


- (A) This is your first client. Every level has a set number of clients. Each will request different stations and tasks. Move them to their desired station quickly. Notice its patience meter (represented by the stars on top of its head), if all stars diminish, the zombie will wake up. It will do a certain action once it wakes up. Each zombie has different behaviors upon waking up, but for the tutorial level, it will only try to escape the parlor.
- (B) This is a Chemical-Z station. Notice the task bubble on the zombie that shows a miniature version of the Chemical – Z station. It means that the zombie must be taken to the station as indicated on its task bubble.

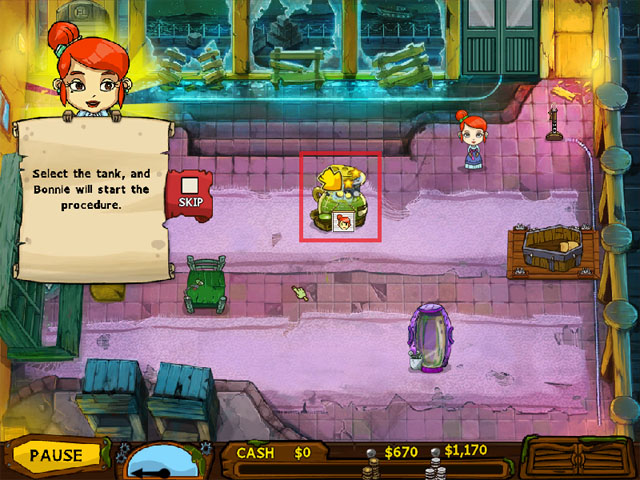
- Click the station so that Bonnie can start processing the task.

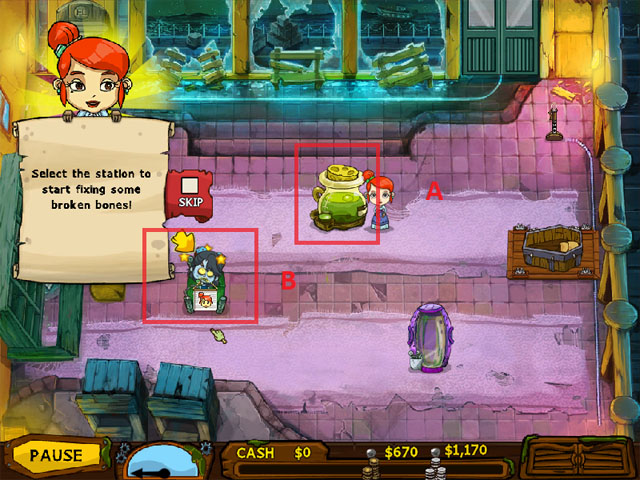
- (A) From the Chemical-Z station, the zombie requests to be transferred to the Bone Fixing station.
- (B) This is the Bone Fixing station. Click the station to start the procedure.

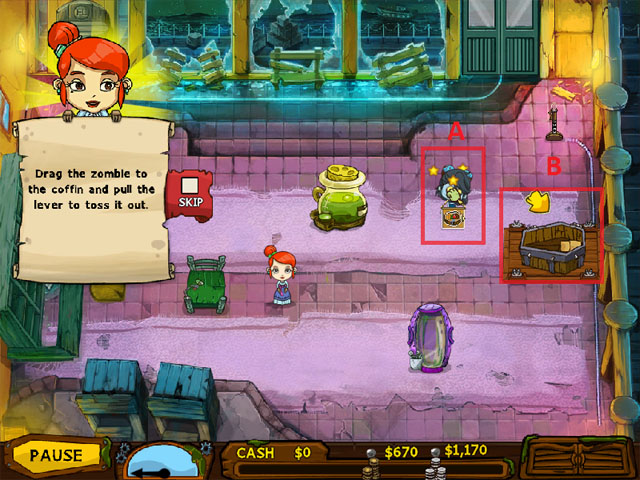
- (A) The zombie requests to be transferred to the Casket station. Drag it to the casket, as indicated on its task bubble.
- (B) This is the Casket station. There is only one casket available for now, but more will be unlocked as you play the game. The casket station will always be the last one requested by the zombies.

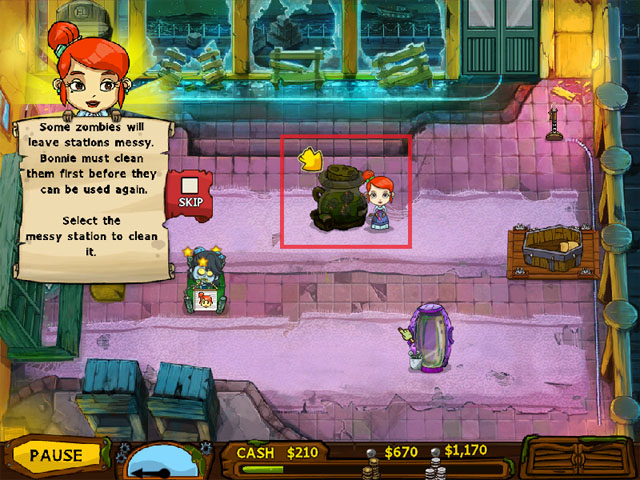
- Stations get messy from time to time due to wear and tear. Bonnie must clean them before they can be used again. Click on a messy station to start cleaning.

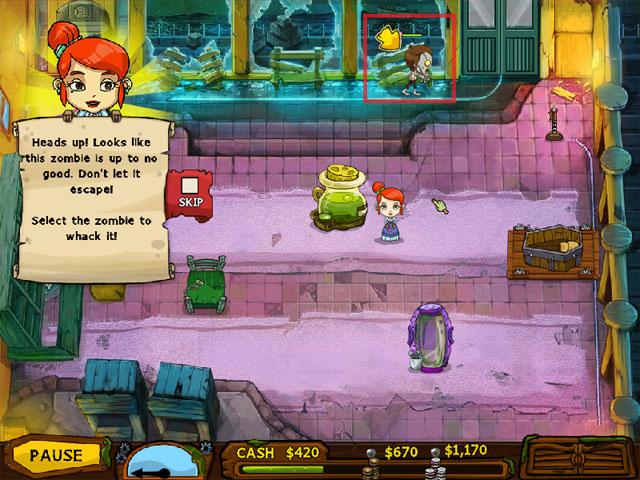
- This zombie woke up and tries to escape the parlor. Click it and Bonnie will attack the zombie to knock it out. Once the zombie is knocked out, bring it to its desired station and proceed as normal.

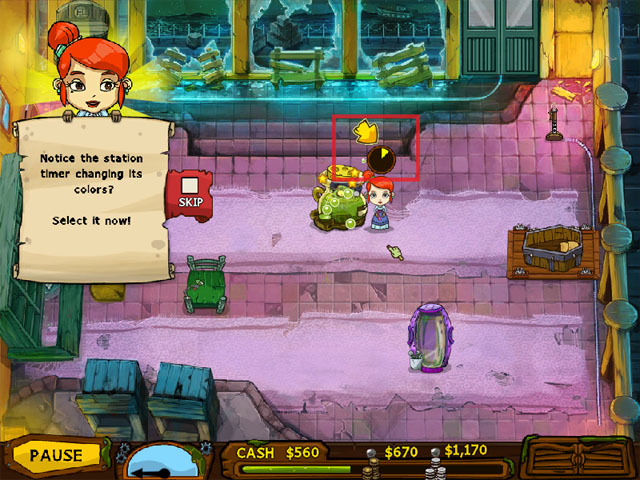
- This is a Process Speed Booster. It can help you by cutting the station processing time by 50%. Watch out for the station processing icon as it will blink for a certain number of times. Once it blinks, click it right away to activate the Process Speed Booster. Do this whenever you have the chance to finish station processes ahead of time.

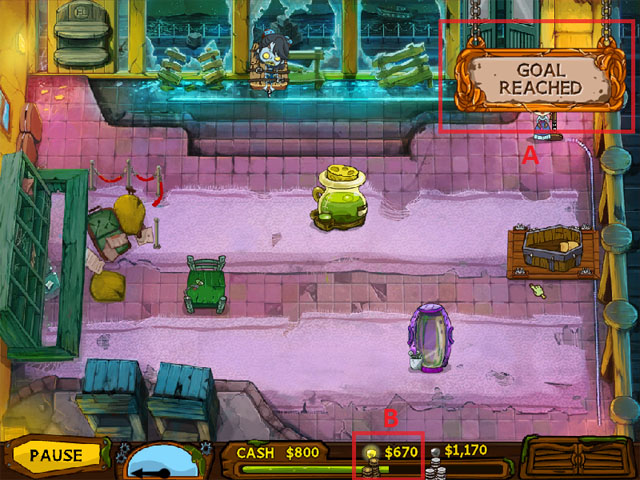
- (A) – This appears once you achieve the level Goal Score.
- (B) – This indicates your current score for the level. In this example, the player has already achieved (or possibly exceeded) the level Goal Score requirement (which is $670).

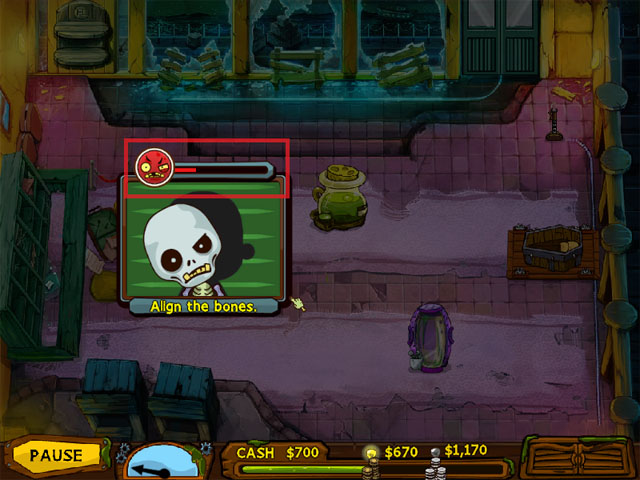
- The micro-game will have different results depending on your performance. If you successfully completed one, you will be given a rating of ‘Ultra-Loca!’ (as pictured above). In addition, the zombie will have an additional star to its patience (revival) meter.


- This is the micro-game timer. It shows how much time is left before the micro-game closes as well as the zombie’s reaction. The timer gradually drains over time.

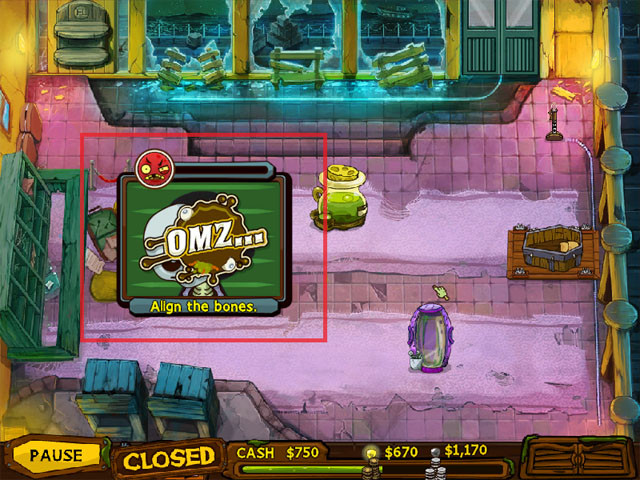
- This is the result if you fail to accomplish the micro-game successfully.

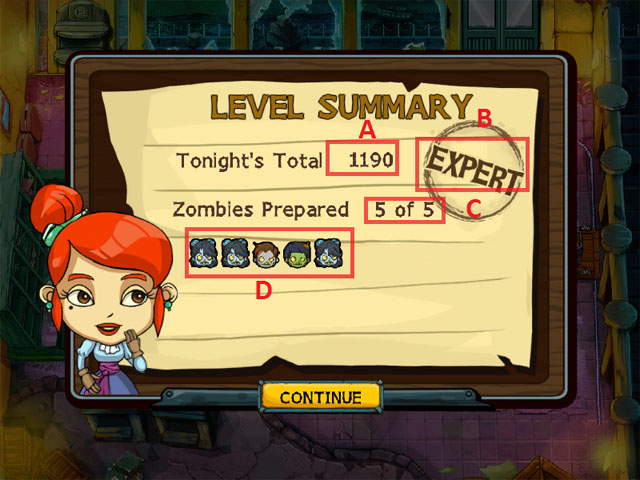
- (A) This is your total score for the level. It is the amount of cash you will obtain as well.
- (B) This is your rating for the current level.
- (C) This is the total number of zombies you have served in the level.
- (D) These are the portrait picture of the actual zombies you have served in the level.

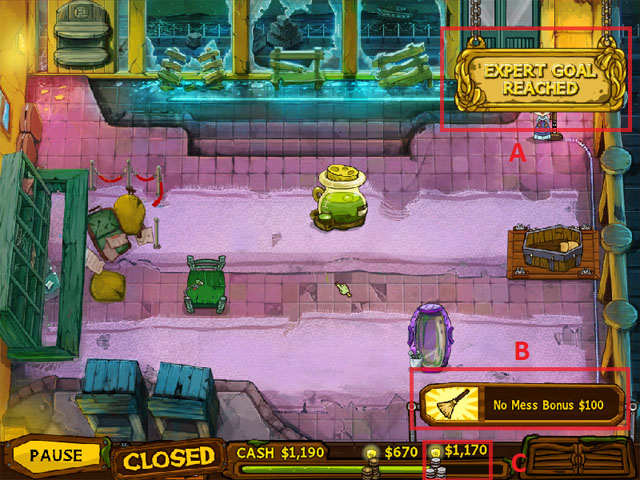
- (A) This shall display if you have achieved an ‘Expert’ rating for the current level.
- (B) You will be given a bonus $100 if you complete the level with no messy stations.
- (C) This shall indicate if you have reached / exceeded the Expert Score requirement.

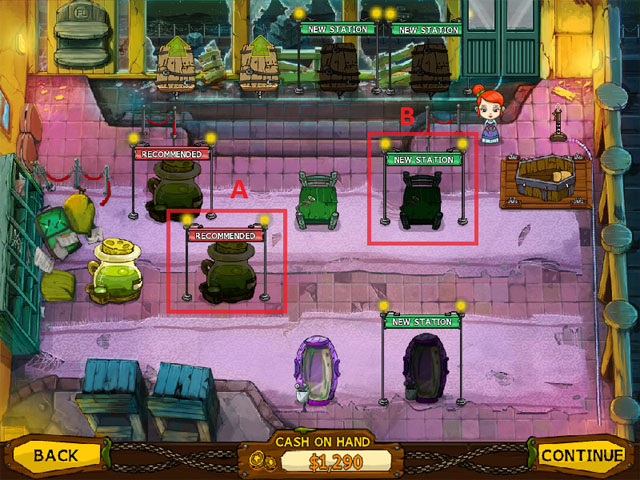
- (A) This is the upgrades screen. Indicated above are recommended stations you can buy. Buying recommended stations can be very helpful in your progression with the game.
- (B) New stations that have been unlocked (or have become available) in this particular level are also indicated.

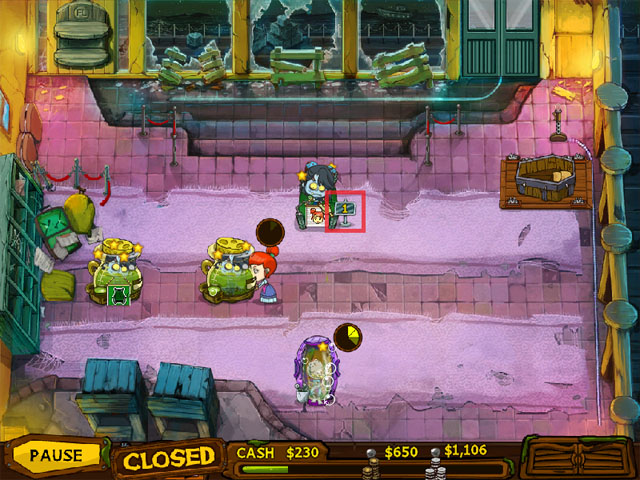
- You can queue for up to 10 tasks. As shown on the above image, Bonnie’s next task is marked with ’1′. It means that it is the 1st task she will do after the current one.

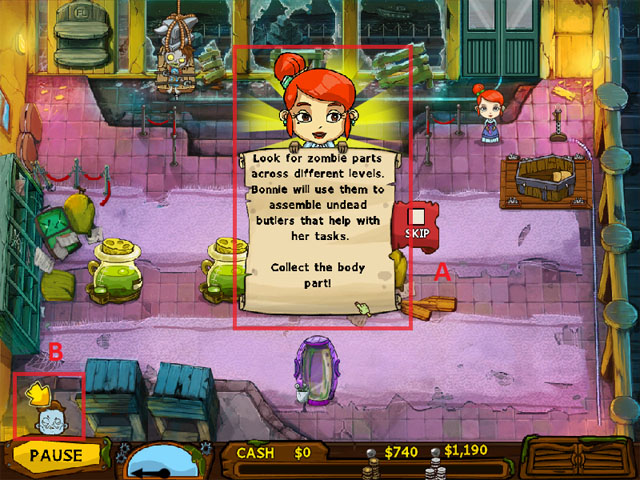
- (A) – This is the pop-up tutorial about collecting zombie butler parts scattered throughout different levels.
- (B) – This is one of several zombie parts that you should collect to assemble a butler. Click to collect the zombie body part. Butlers are very helpful especially when the parlor is overwhelmed with lots of zombies.

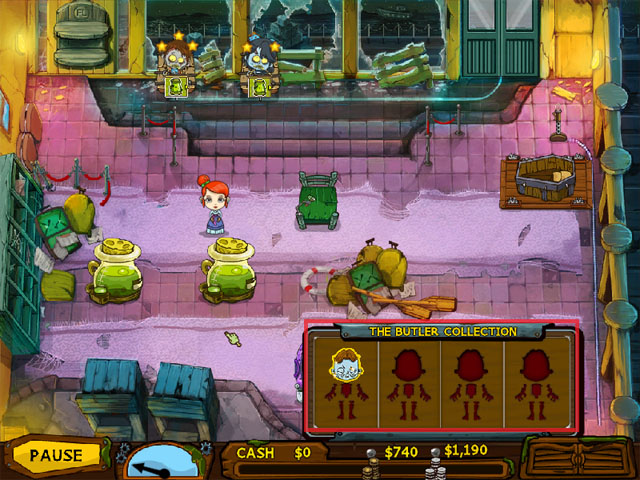
- Every time you collect a zombie body part, it will be added to your ‘Butler Collection’.

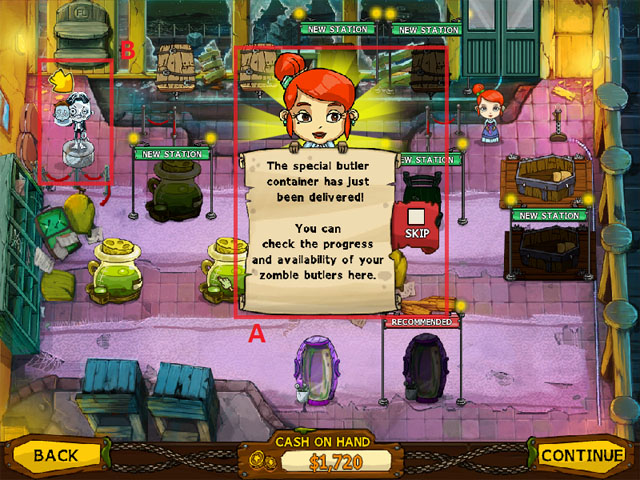
- (A) – This is the tutorial pop-up regarding your ‘Butler Collection’.
- (B) – This is where you will see the parts that are still missing. It can only be viewed in the upgrades screen.

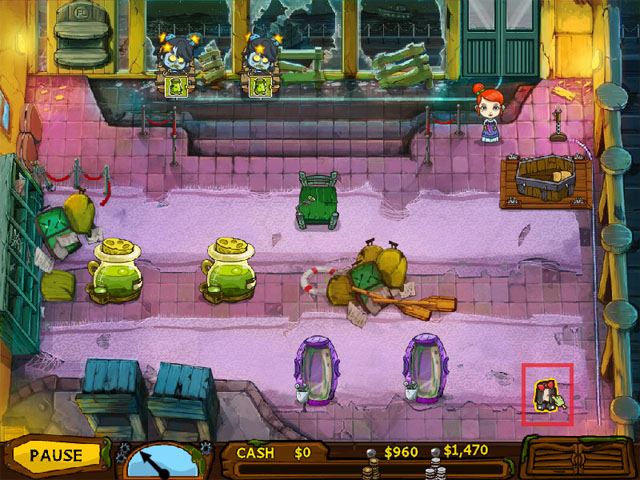
- Collect this zombie part to add it to your ‘Butler Collection’.

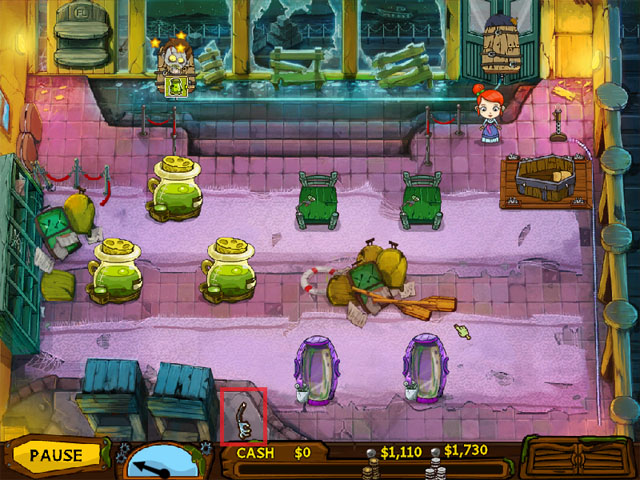
- Collect this zombie part to add it to your ‘Butler Collection’.
R.M.S. Frightanic – Bonnie’s Workshop

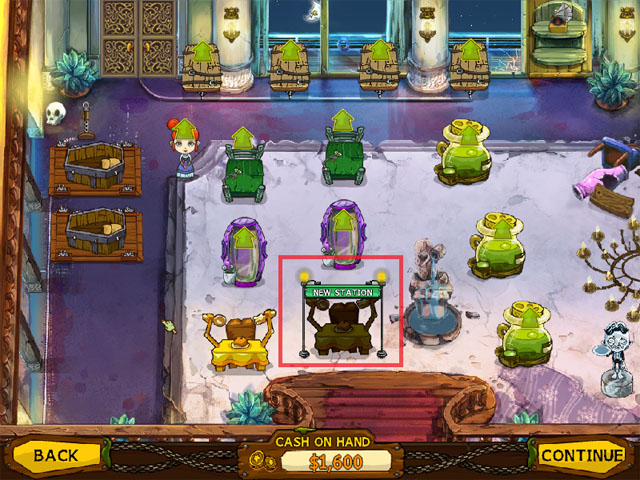
- This is the Feeding Station. It is a brand new station introduced in R.M.S. Frightanic.

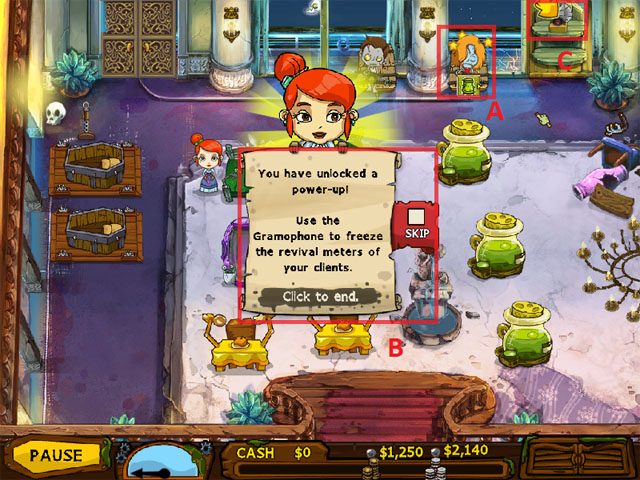
- (A) This is a Zombie Actress, a new zombie type introduced in this location. When it wakes up, it helps other zombies by waking them up as well.
- (B) This is the power-up tutorial. It displays whenever a new power-up is available.
- (C) This is the Gramophone power-up. It is the 1st power-up introduced in the game. It freezes the patience / revival meters of zombies inside the parlor.

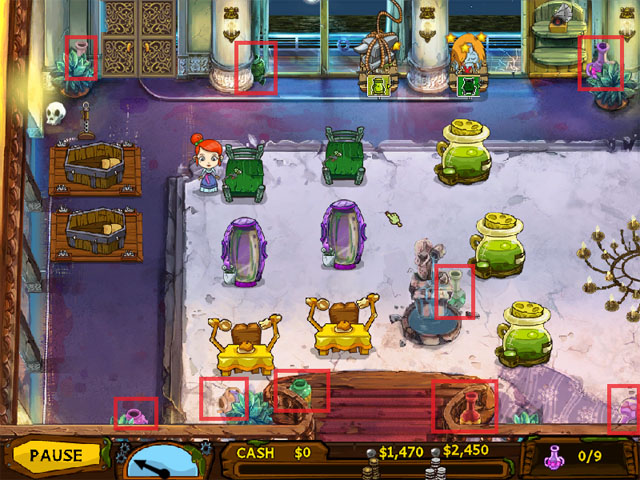
- Collect all jars to complete the level side quest. You will be given a bonus of $100 if you can find all 9 jars. All jar locations are revealed on the image above.

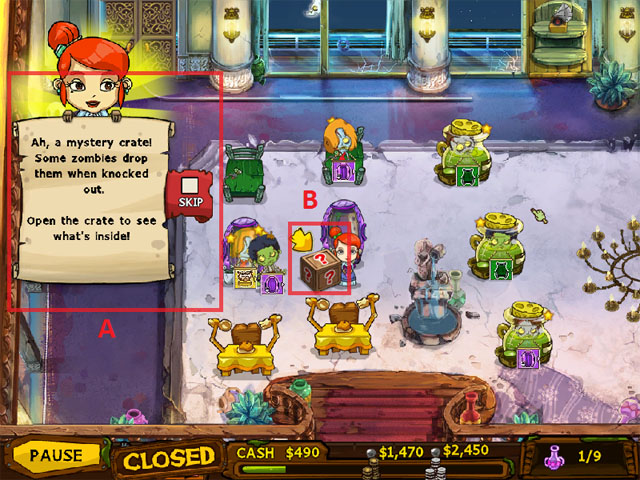
- (A) This is the Mystery Crate tutorial. It states that zombies drop mystery crates when they are knocked out.
- (B) This is the mystery crate. It gives random bonuses to you or for Bonnie. It can be in the form of bonus cash, extended level time, or bonus movement speed / attack damage for Bonnie.

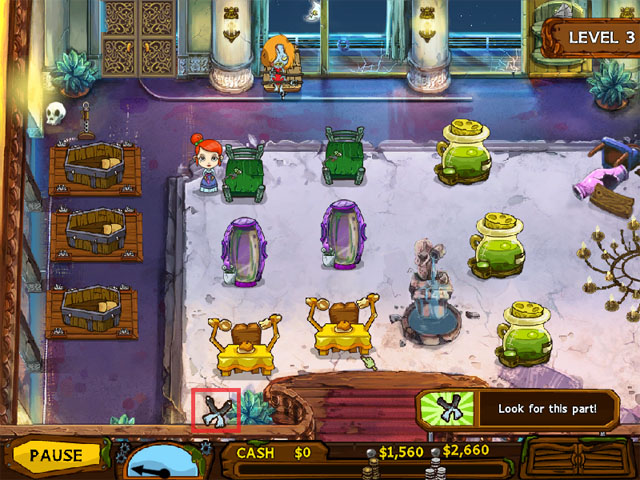
- Collect this zombie part to add it to your ‘Butler Collection’.

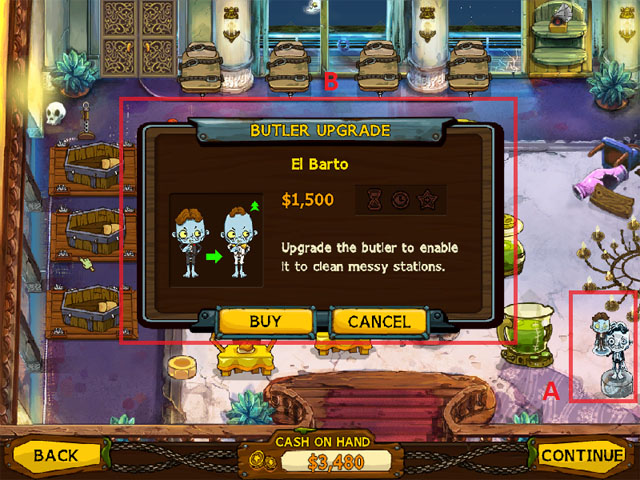
- (A) Pop-up that indicates a new butler is available.
- (B) When a new butler is available for you, a miniature butler will be displayed on the Butler Collection statue.

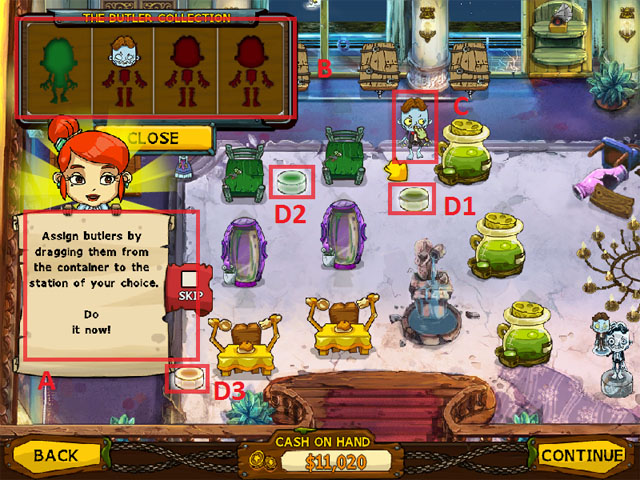
- (A) Butler station assignment tutorial. This describes how you should correctly allocate butlers to your desired station.
- (B) This is the Butler Collection window. This is where your assembled butlers are located when they are not assigned to stations. If you hover on butler parts, it will also display the exact location where you can find the particular part.
- (C) To assign butlers to stations, drag them from the butler collection window to a specific butler platform.
- (D1, D2, D3) These are the butler platforms. Each station type / group has a particular platform.

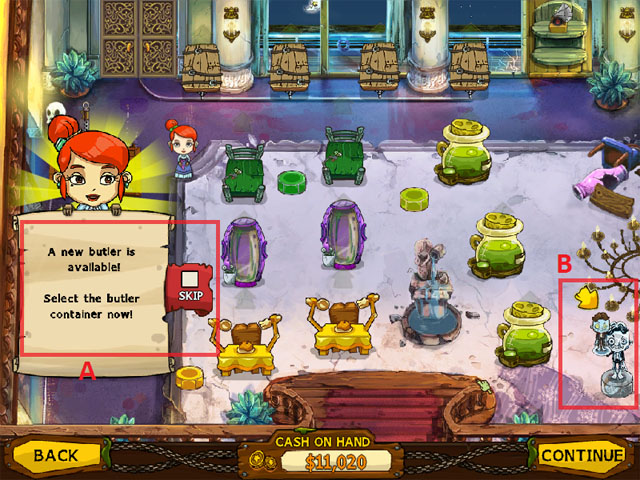
- (A) When a new butler is available for you, a miniature butler will be displayed on the Butler Collection statue.
- (B) If you wish to upgrade a butler, you can do so by opening the Butler Collection and clicking the ‘Upgrade’ button on a particular butler.

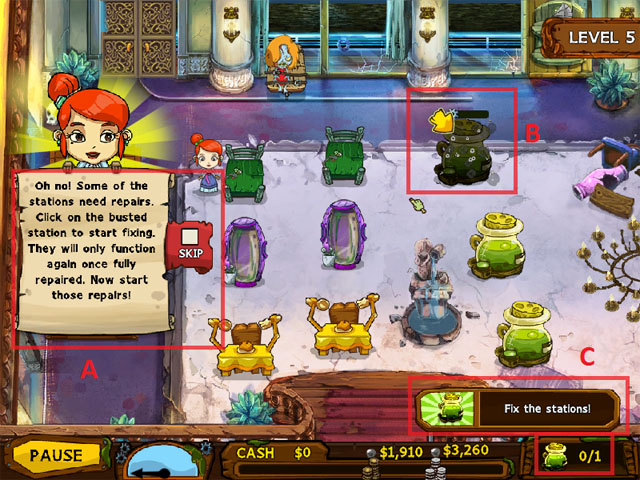
- (A) – This is a side quest tutorial pop-up. It describes what you should do to complete the side quest.
- (B) – This is a station repair side quest for R.M.S. Frightanic, level 5. Click on the indicated Chemical-Z station to start the repairs. While repairing, you can click away to attend to other tasks. If you do, the repairs will be paused and Bonnie will walk away from the Chemical-Z station.
- (C) – This shall indicate the station and the number of stations you need to repair to complete the side quest.

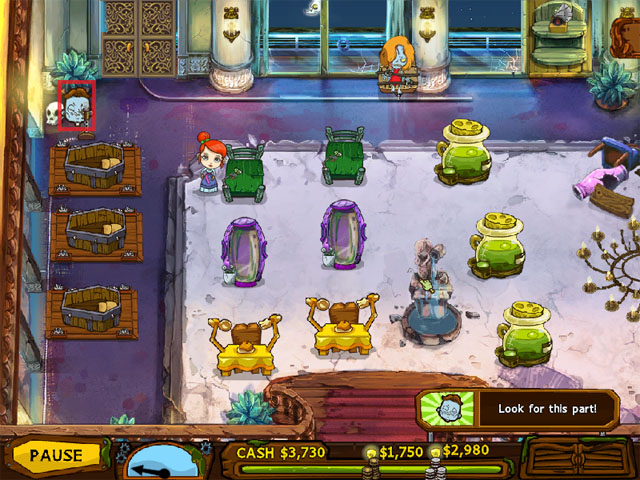
- Collect this zombie part to add it to your ‘Butler Collection’.
Eiffel Tower – Bonnie’s Workshop

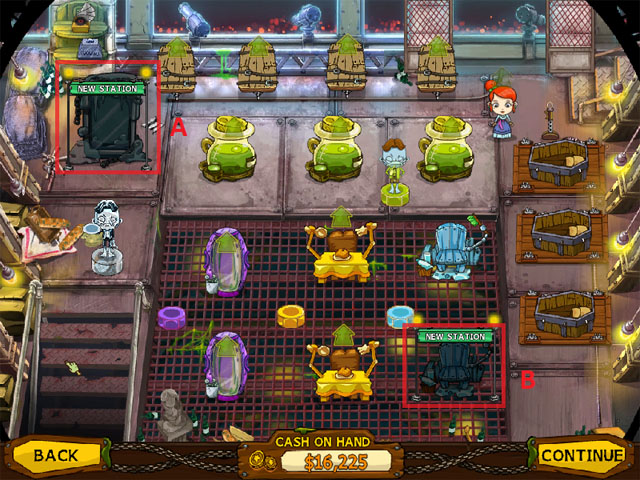
- (A) This is the Freezer. A newly introduced station that if bought, you can temporarily store zombies inside if in need of extra space.
- (B) This is the toothbrush station. A new station introduced here in Eiffel Tower.

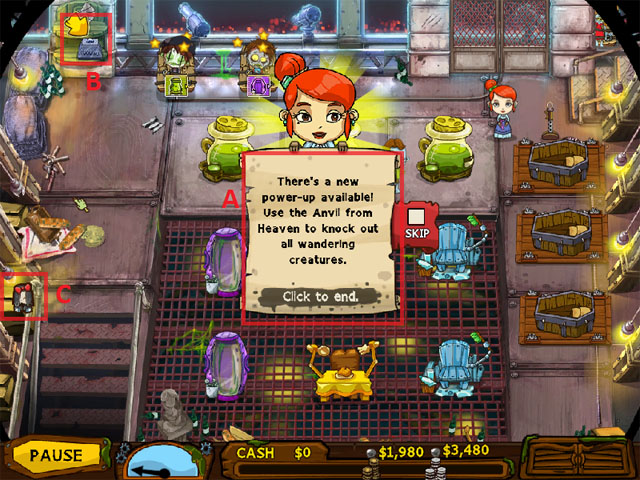
- (A) Tutorial for the new ‘Anvil from Heaven’ power-up.
- (B) The ‘Anvil from Heaven’ icon is added to the power-up shelf.
- (C) Collect this zombie part to add it to your ‘Butler Collection’.

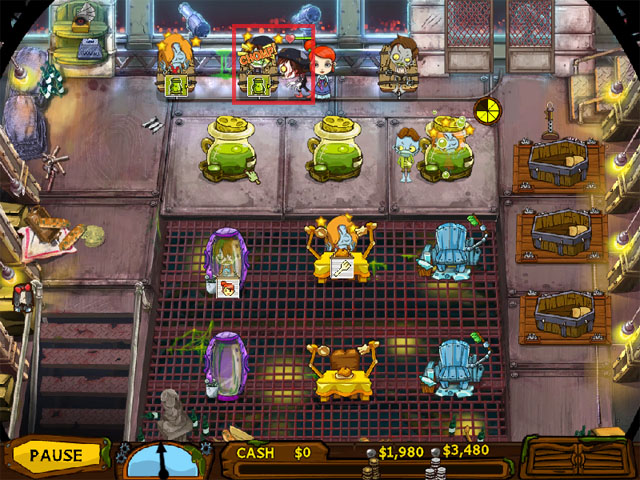
- The Mime zombie is introduced in this level. Like the actress, it also help other zombies wake up.

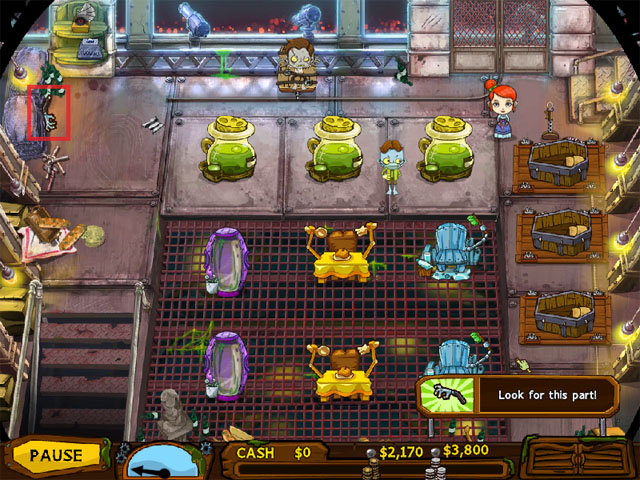
- Collect this zombie part to add it to your ‘Butler Collection’.

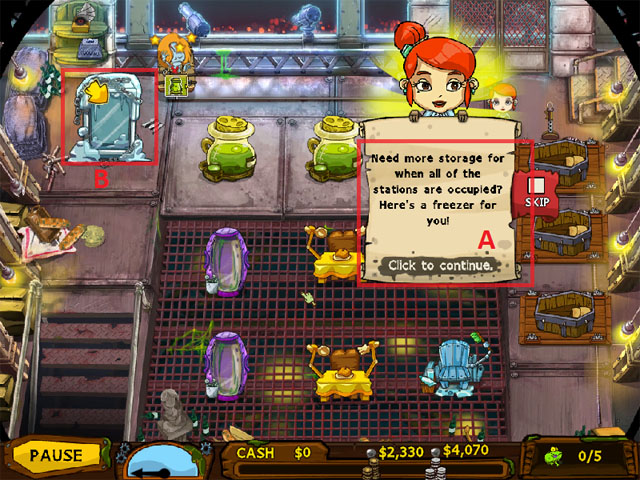
- (A) A tutorial appears once you buy the freezer. It describes what the freezer does for the player.
- (B) The freezer is seen already placed on the level.

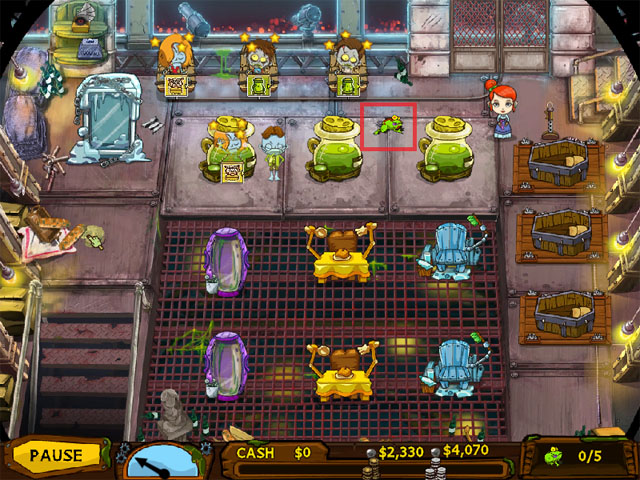
- This is the ‘Undead Critter’ side quest. A couple of critters loiter around the level. You must find and click all of them to collect a bonus reward. For this level, you must find 5 undead frogs.

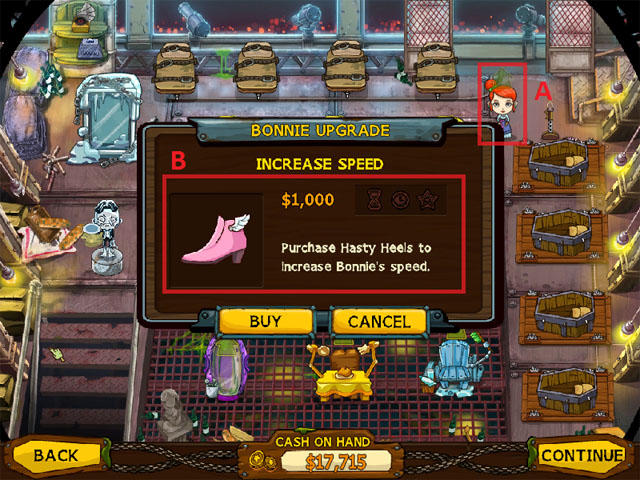
- (A) An upgrade for Bonnie has just been made available for purchase.
- (B) Pictured above is the ‘Hasty Heels’ upgrade for Bonnie.

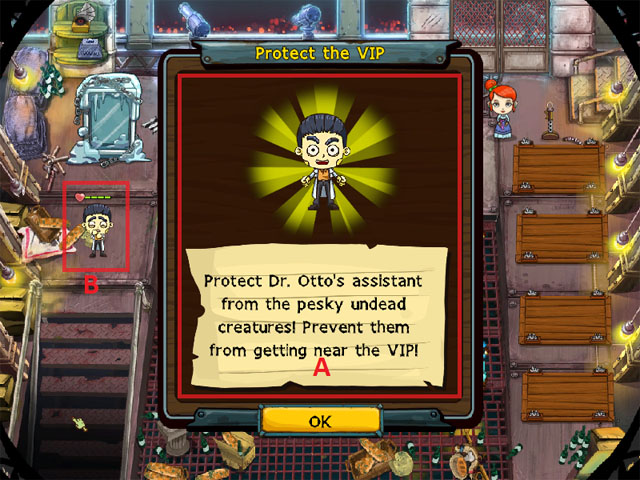
- (A) This is the ‘Protect VIP’ side quest tutorial. It describes what the player must do to complete the side quest.
- (B) This is Dr. Otto, the VIP you must protect throughout the level.

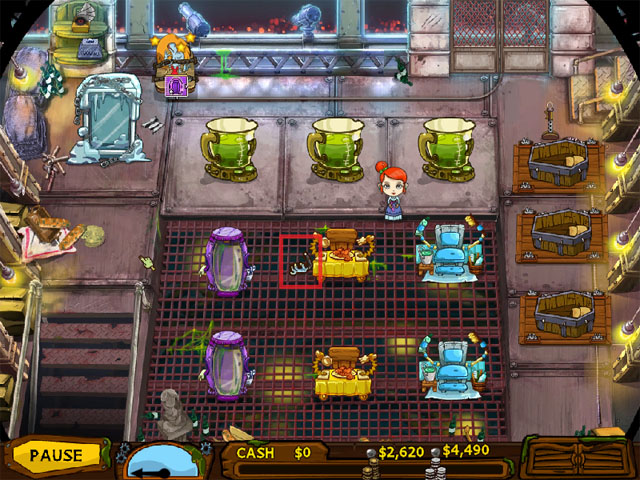
- Collect this zombie part to add it to your ‘Butler Collection’.
Sand King Pyramid – Bonnie’s Workshop

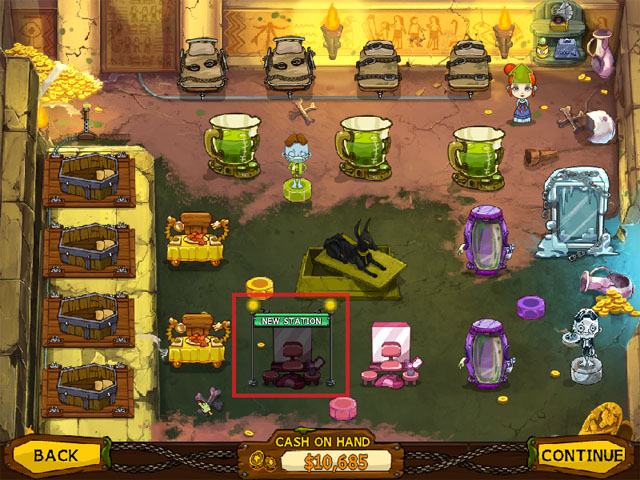
- The (new) ‘Make-up’ station is introduced in this location, the Sand King Pyramid.

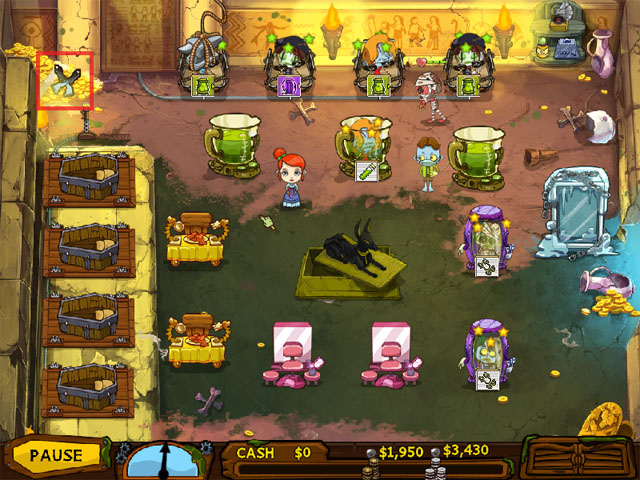
- Collect this zombie part to add it to your ‘Butler Collection’.

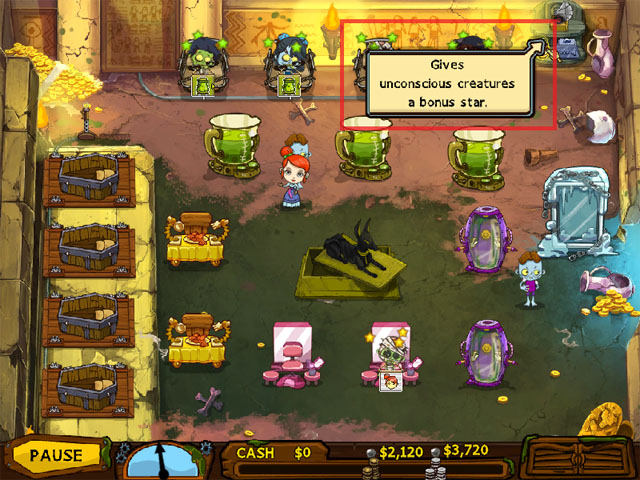
- A new power-up is introduced in this level. The ‘Chamomile Extracts’ will give all zombies a bonus star upon activation.

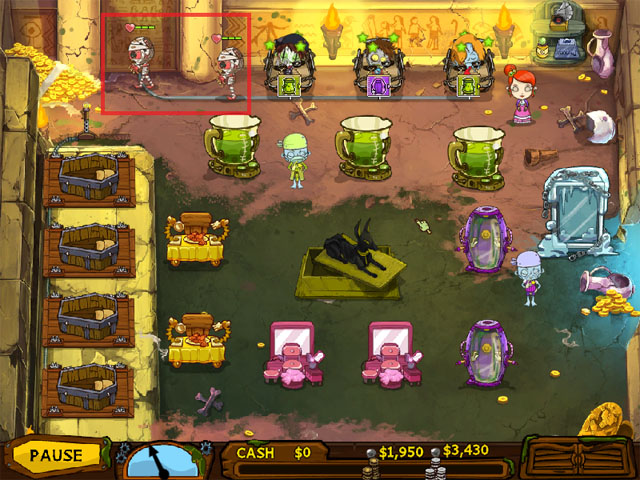
- The Mummy, a new zombie type, is also introduced in the Egyptian Pyramids. It will attack Bonnie once it wakes up.

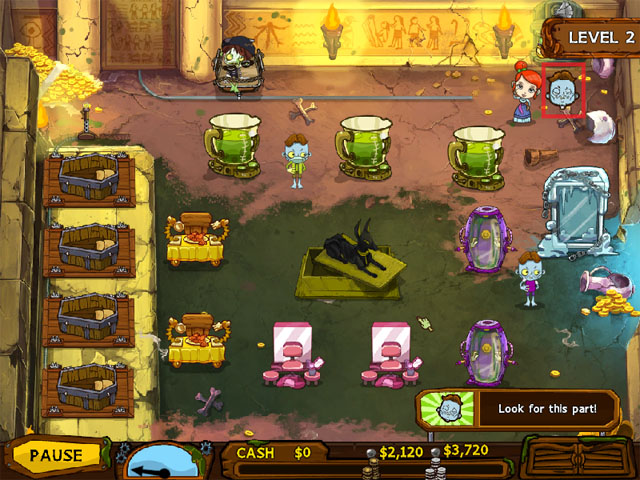
- Collect this zombie part to add it to your ‘Butler Collection’.

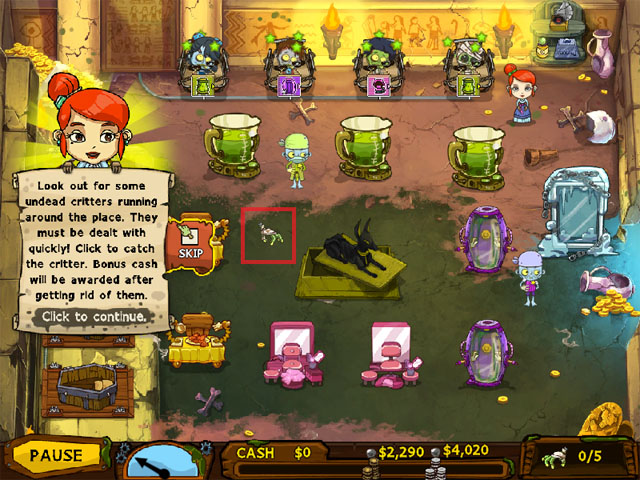
- This is the ‘Undead Critter’ side quest. A couple of critters loiter around the level. You must find and click all of them to collect a bonus reward. For this level, you must find 5 undead Mummy hands.

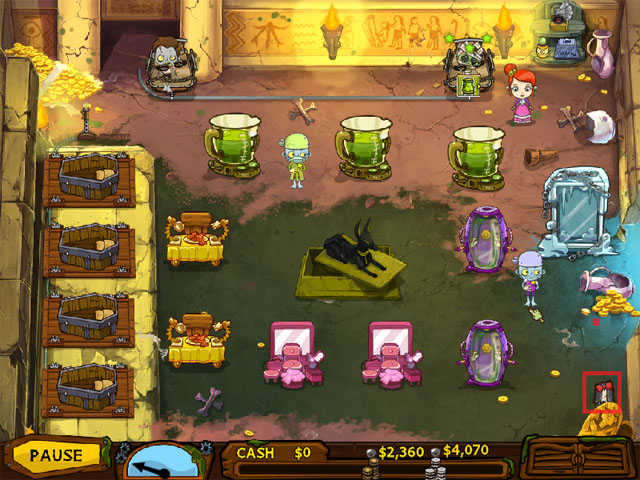
- Collect this zombie part to add it to your ‘Butler Collection’.

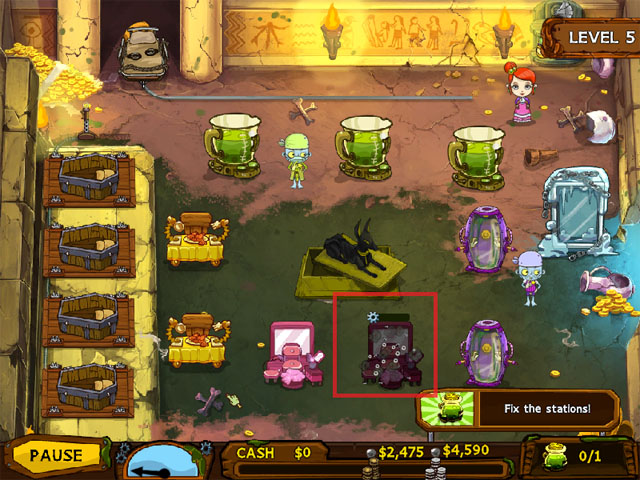
- This is a repair side quest. For this level, you must repair the Make-up station to obtain the bonus cash reward.
The Sepulcro Express – Bonnie’s Workshop

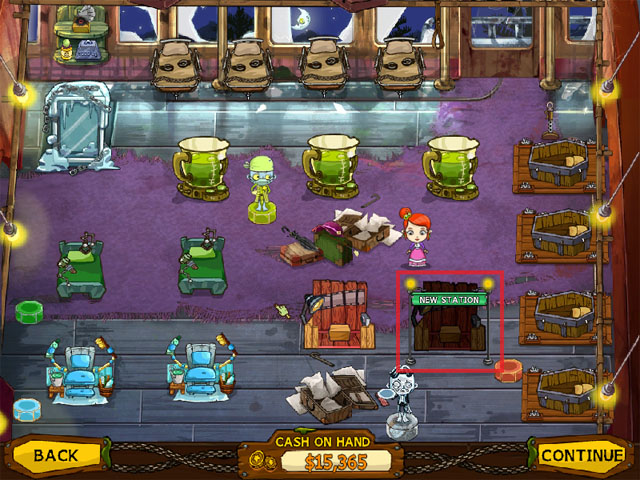
- The ‘Photo Booth’ station is introduced in this location, The Sepulcro Express.

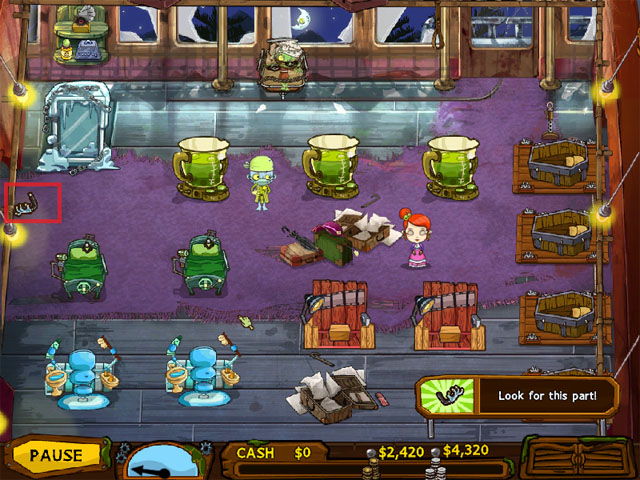
- Collect this zombie part to add it to your ‘Butler Collection’.

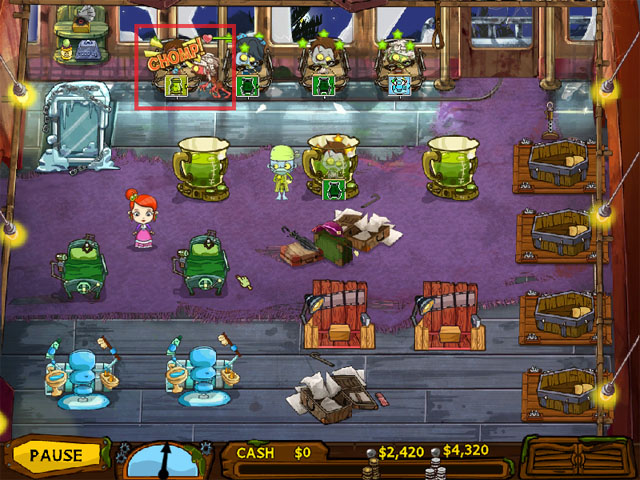
- A new zombie, called ‘Deserted Warrior’, is also introduced in The Sepulcro Express. It also wakes up other zombies once it revives.

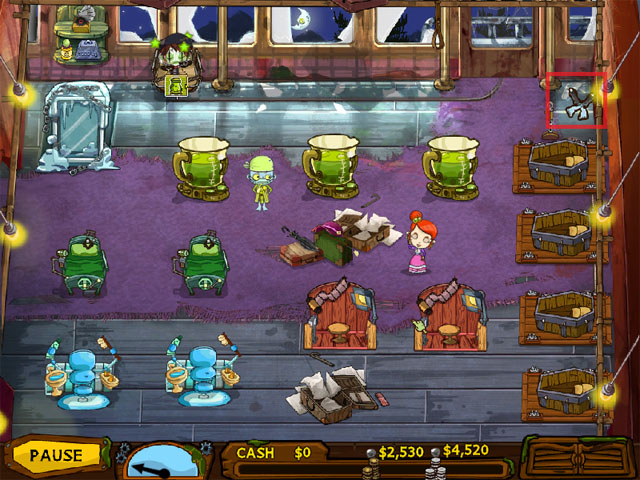
- Collect this zombie part to add it to your ‘Butler Collection’.

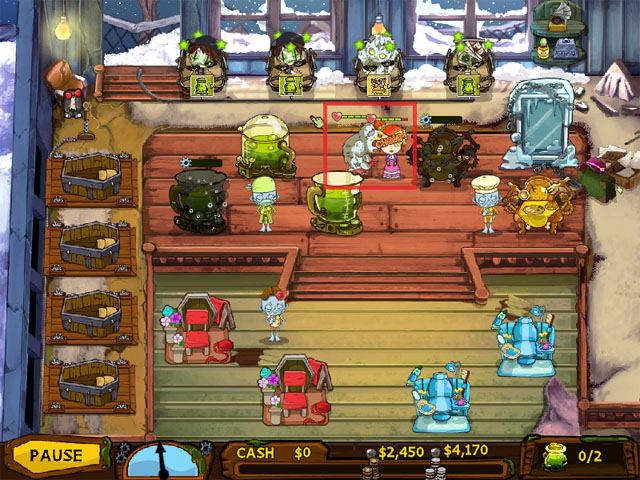
- Here is another Protect VIP side quest. You must protect this steel chemical canister from zombies until the level ends.

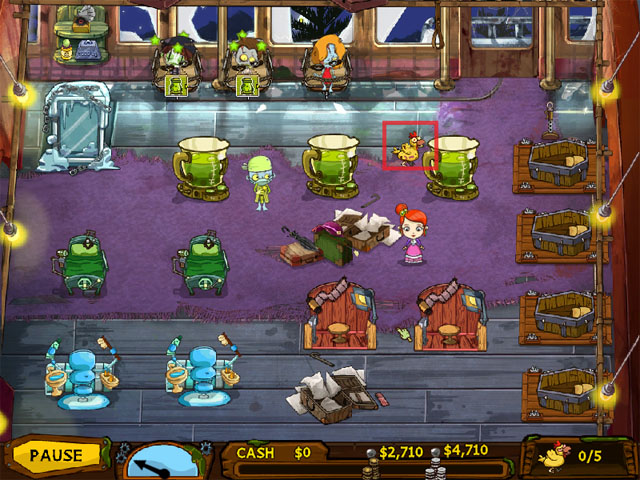
- Here is another Undead Critter side quest. Find all 5 undead chickens to receive bonus cash.

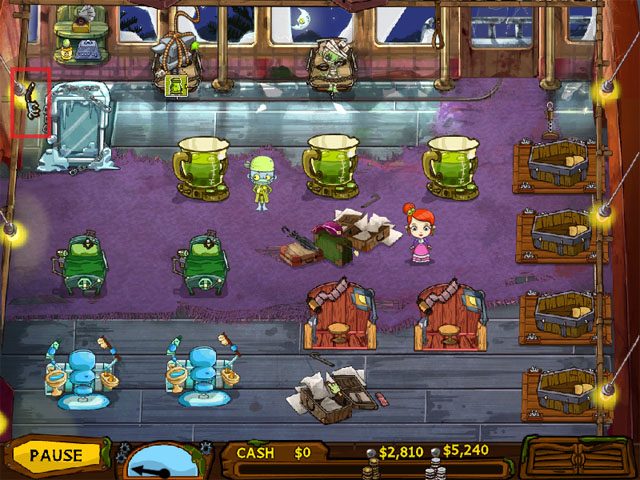
- Collect this zombie part to add it to your ‘Butler Collection’.
Siberian Wasteland – Bonnie’s Workshop

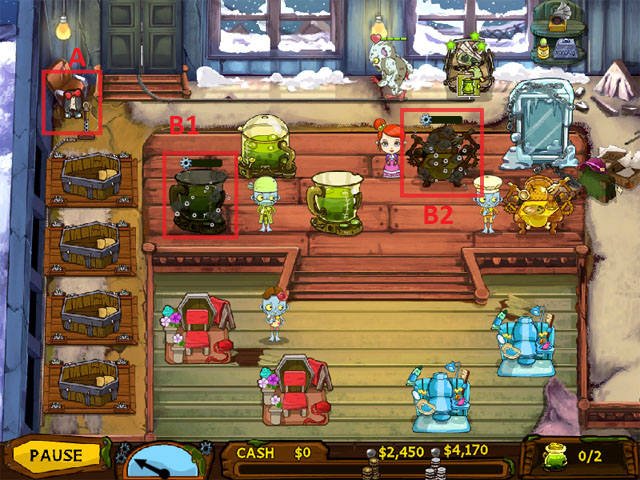
- (A) Collect this zombie part to add it to your ‘Butler Collection’.
- (B1 and B2 If ever you fail to protect Bonnie and Johnny’s carriage from the Match-3 mini-game, the next level you play will have destroyed stations as a consequence. As the story suggests, it turns out that the carriage was containing all the stations, and the couple is bringing them along as they visit towns. When you fail to protect the carriage, the stations inside will be damaged. You must repair before these stations can be used again.


- A new zombie type, the ‘The Zeti’ is introduced in Siberian Wasteland. It will attack Bonnie once it wakes up.

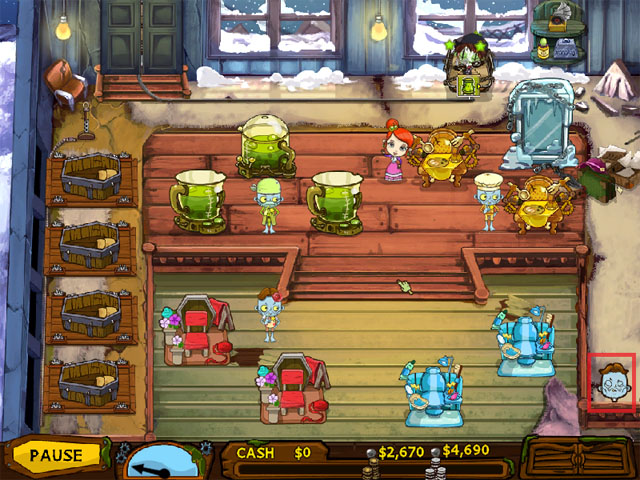
- Collect this zombie part to add it to your ‘Butler Collection’.

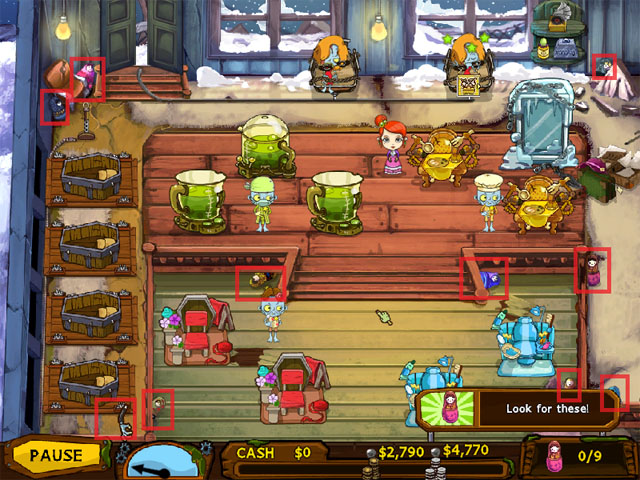
- Here is another side quest where you must find all 9 Matryoshka dolls. All 9 doll locations are indicated on the above image.

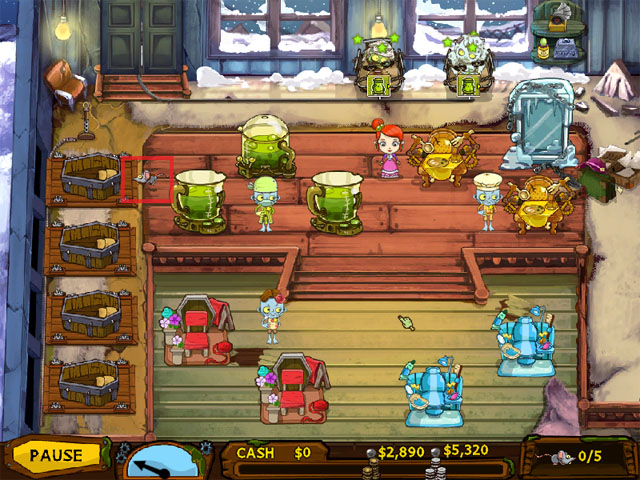
- Here is another Undead Critter side quest. Find all 5 undead rats to receive bonus cash.
Emperor Quay’s Temple – Bonnie’s Workshop

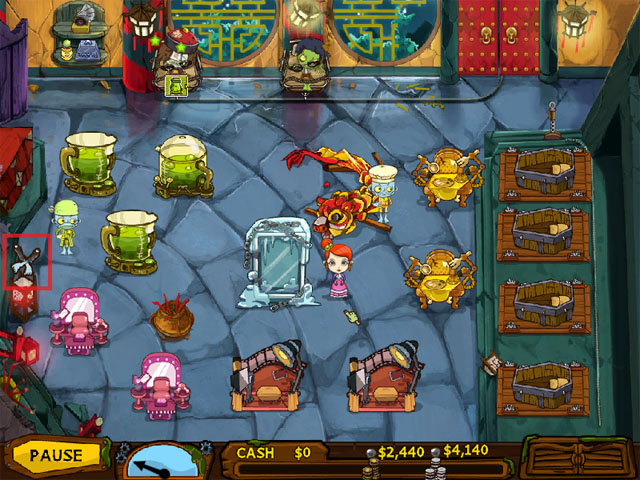
- Collect this zombie part to add it to your ‘Butler Collection’.

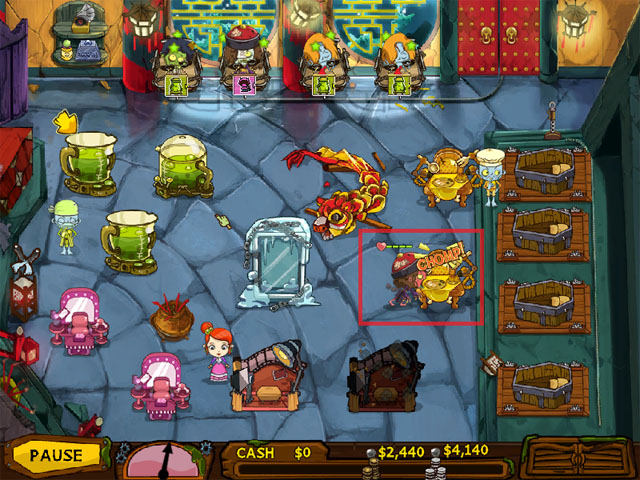
- A new zombie type, Yang Shi (vampire), is introduced in Emperor Quay’s Temple.

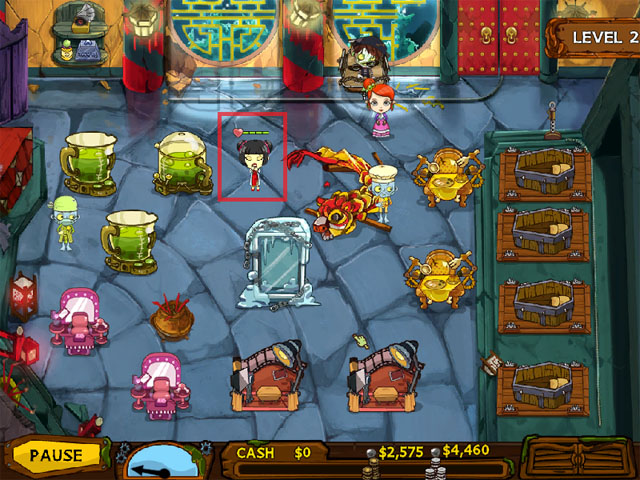
- Protect Dr. Chow throughout the level to complete this ‘Protect VIP’ side quest and receive bonus cash.

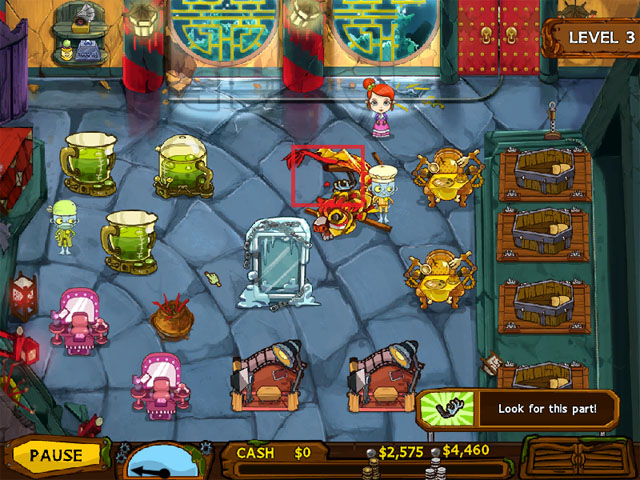
- Collect this zombie part to add it to your ‘Butler Collection’.

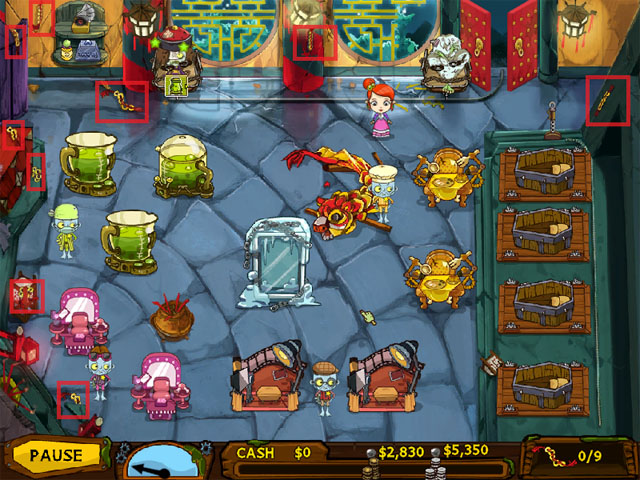
- Here is another side quest where you must find all 9 Emperor Coins. All 9 coin locations are indicated on the above image.
R.O.T. – 10 Flying Fortress – Bonnie’s Workshop

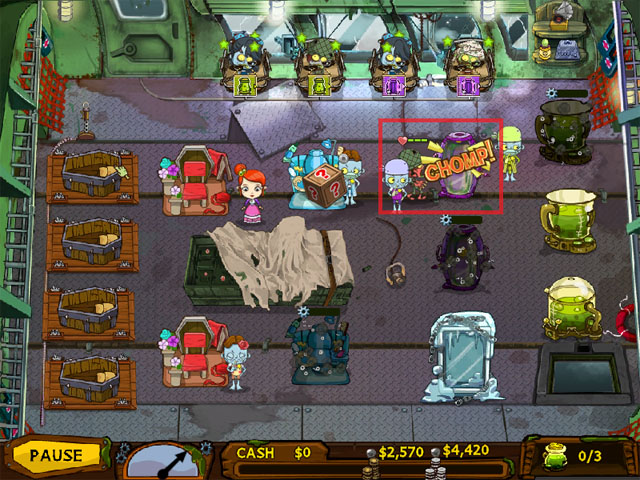
- A new zombie type, ‘Corporal Cadaver’, is introduced in ROT-10 Flying Fortress. It destroys other stations upon waking up.

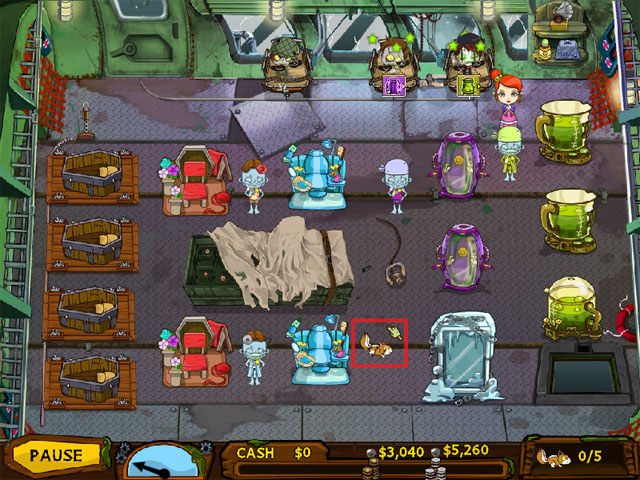
- Here is another Undead Critter side quest. Find all 5 undead squirrels to receive bonus cash.

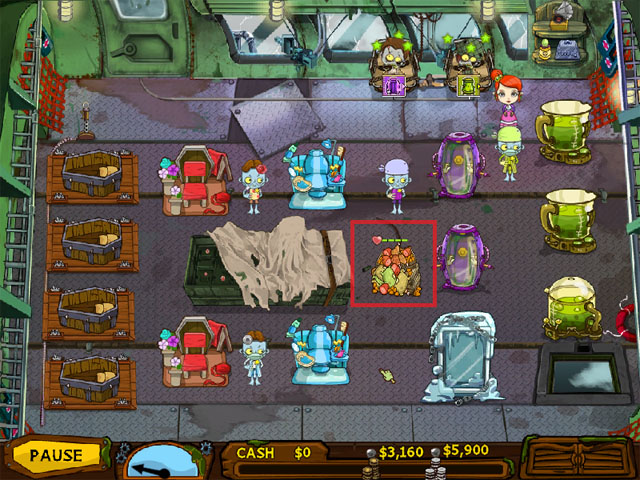
- Here is another Protect VIP side quest. Protect this food crate from zombies until the level ends to receive bonus cash.
Dead Palms Resort – Bonnie’s Workshop

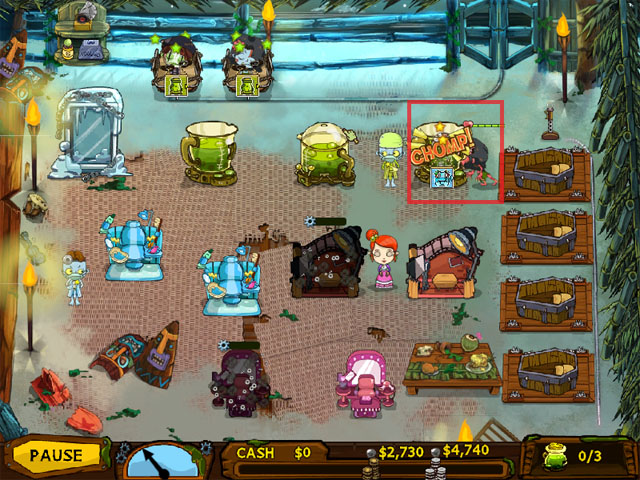
- A new zombie type, the Hula Ghoul, is introduced in Dead Palms Resort. It will wake up other zombies when she revives.

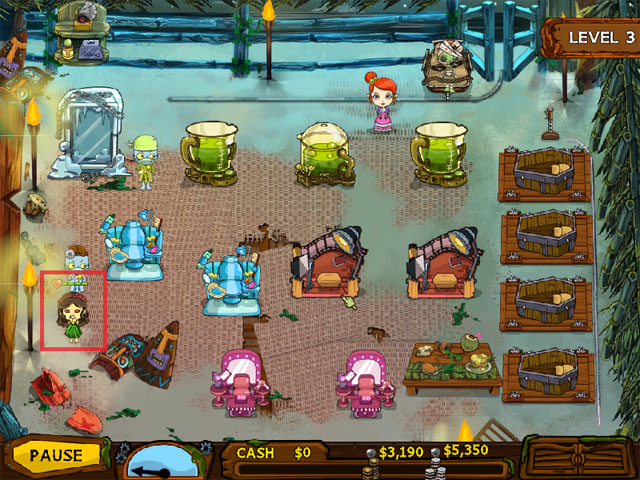
- Here is another Protect VIP side quest. Protect Pele from zombies until the level ends to receive bonus cash.

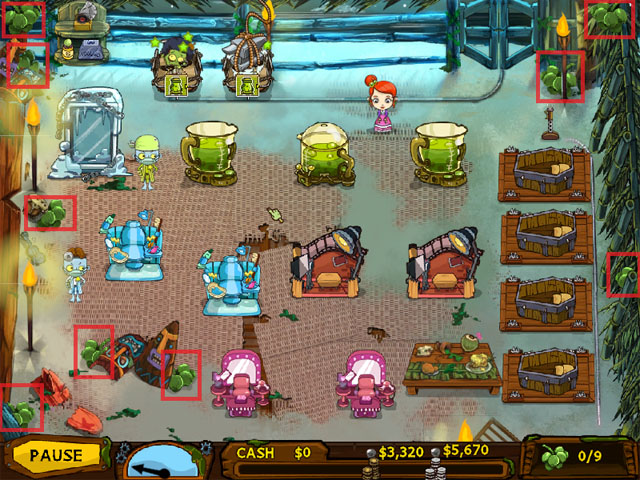
- Here is another side quest where you must find all 9 Coconuts. All 9 coconut locations are indicated on the above image.
Bella Loca Plantation – Bonnie’s Workshop

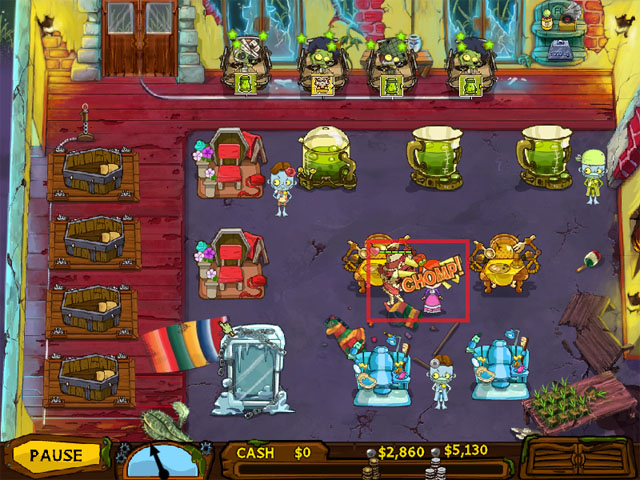
- A new zombie type, El Mariachi, is introduced in Bella Loca Plantation.

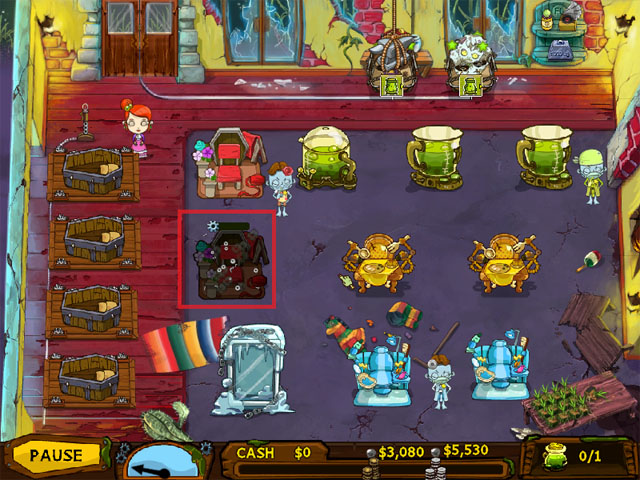
- This is a repair side quest. For this level, you must repair the Flower station to obtain the bonus cash reward.

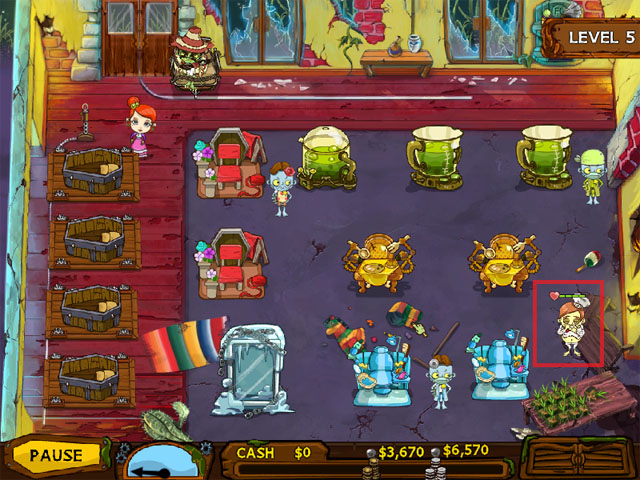
- Here is another Protect VIP side quest. Protect the chef from zombies until the level ends to receive bonus cash.
- Congratulations, you have completed Grave Mania: Pandemic Pandemonium!



 Mystery Case Files: Shadow Lake Walkthrough, Guide, & Tips
 Witches' Legacy: Slumbering Darkness Walkthrough, Guide, & Tips
 Bigfoot: Chasing Shadows Walkthrough, Guide, & Tips
 Fiction Fixers: Alice in Wonderland Walkthrough, Guide, & Tips
 Reincarnations: Uncover the Past Walkthrough, Guide, & Tips