The Fall Trilogy - Chapter 3: Revelation Walkthrough, Guide, & Tips
The Fall Trilogy – Chapter 3: Revelation Walkthrough
Welcome to the The Fall Trilogy – Chapter 3: Revelation Walkthrough!
After a new fall, you wake up in a Victorian house. A letter briefs you for a new mission in the The Fall Trilogy 3: Revelation!
Whether you use this document as a reference when things get difficult or as a road map to get you from beginning to end, we’re pretty sure you’ll find what you’re looking for here.
This document contains a complete The Fall Trilogy – Chapter 3: Revelation game walkthrough featuring annotated screenshots from actual gameplay!
We hope you find this information useful as you play your way through the game. Use the walkthrough menu below to quickly jump to whatever stage of the game you need help with.
Remember to visit the Big Fish Games Forums if you find you need more help. Have fun!
This walkthrough was created by BrownEyedTigre, and is protected under US Copyright laws. Any unauthorized use, including re-publication in whole or in part, without permission, is strictly prohibited.
General Tips


- This is a Puzzle Adventure Game.
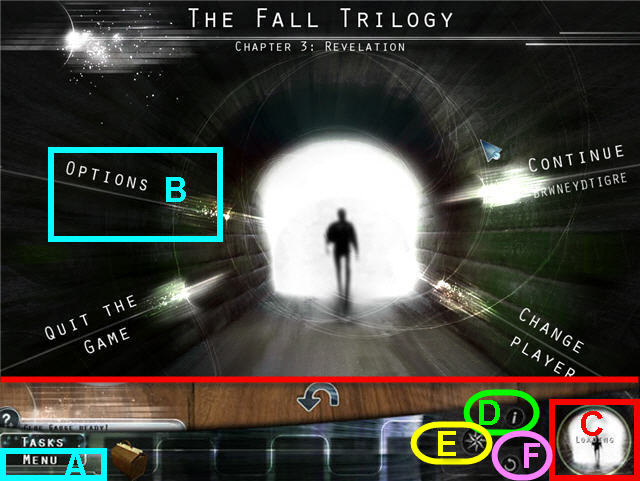
- Click on the Menu (A) or Options (B) button to adjust the Voice, Music and Sound effects level.
- There is a choice of Full Screen, Custom Cursor, or 360 degree free view in the menu options. 360 degree free view is the default in Adventure Mode but can be changed.
- There is an Easy button (C) you can use on some of the puzzles to make them easier and then a Skip button will appear if you still have difficulty.
- You may choose between Casual and Adventure Mode.
- In Casual Mode the Hint and skip button recharge faster and some scenes have added sparkles.
- In Adventure Mode there are fewer sparkles to guide what to do and hints and skips take longer to load.
- Hints can be obtained by clicking on the iris (C) in the bottom right.
- Mini game instructions can be repeated by clicking on the “i” (D) in the lower right.
- Click on the wind rose (E) to access a map.
- Tasks to be completed can be viewed by clicking on the Task button in the bottom left.
- There is a clue gauge above the tasks button that will give you graduated hints.
- Click on the + sign on the clue gauge when it’s charged up and then click on the task you want help on to get a clue.
- After completing a task or puzzle wait for the dialogue on the lower right to stop before exiting the scene so that you know where to go next.
- Some puzzles can be reset with the curved arrow (F) button.
- Press the space bar or the left mouse button to skip a line of dialogue.
- Click on Menu on the bottom left to exit the game.
Chapter 1 – The Patient

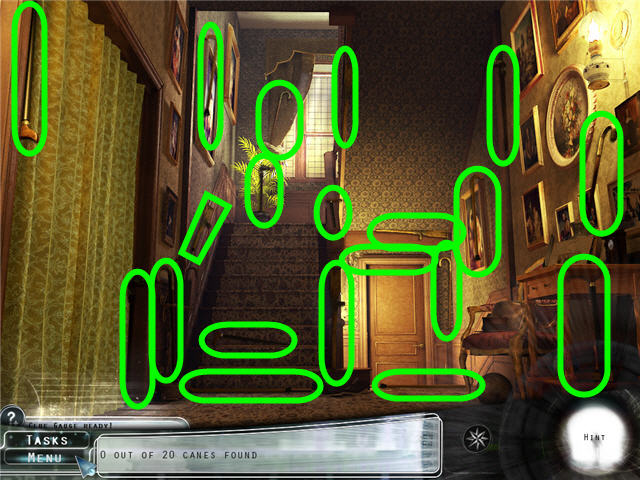
- Watch the flashbacks.
- Find the 20 canes.

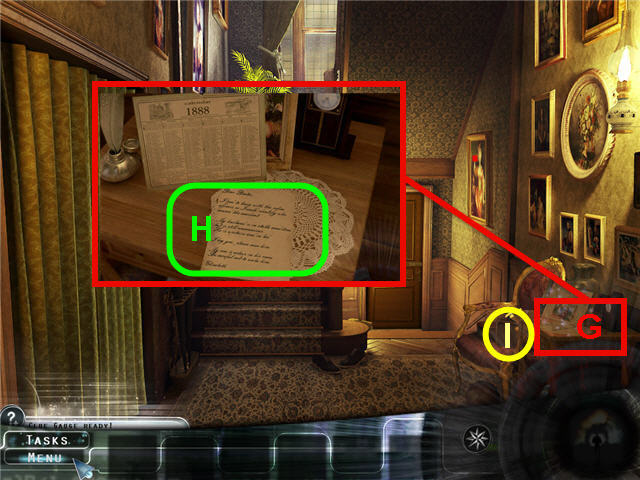
- Look close at the table (G) on the right and read the note (H).
- Take the DOCTOR’S BAG (I) from the chair.
- Head up the stairs and into the patients room on the left.

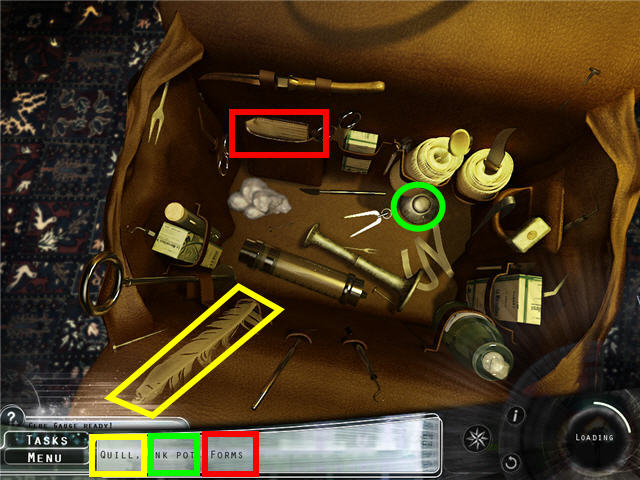
- Find the items listed.
- Head forward into the bathroom.

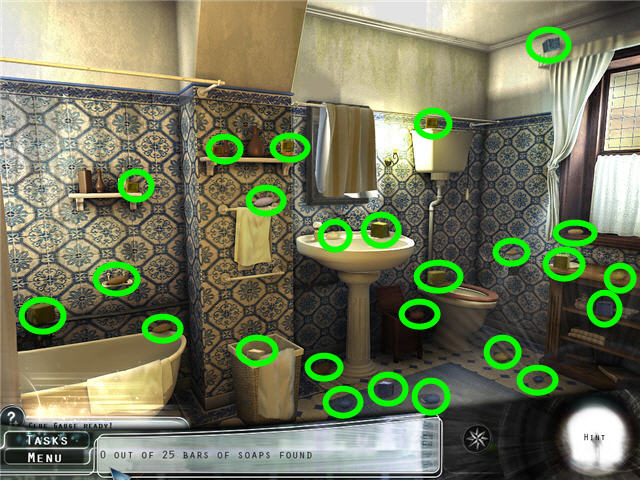
- Find the 25 bars of soap and get SOAP.
- Use the SOAP on the sink.
- Back out of the room to the patient.

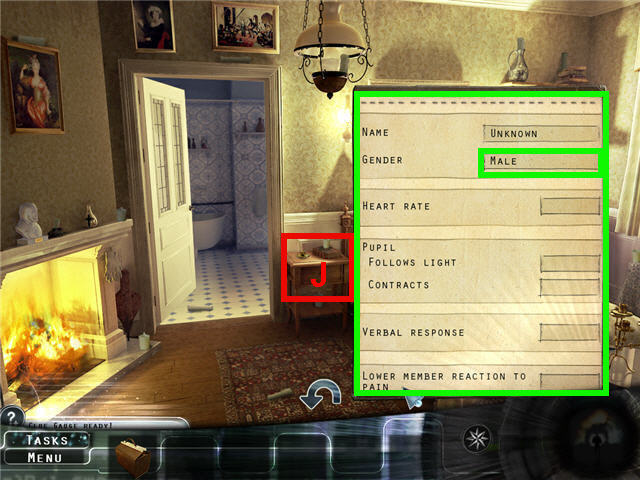
- Choose Male for the gender.
- Click on the nightstand (J) to access a watch puzzle.

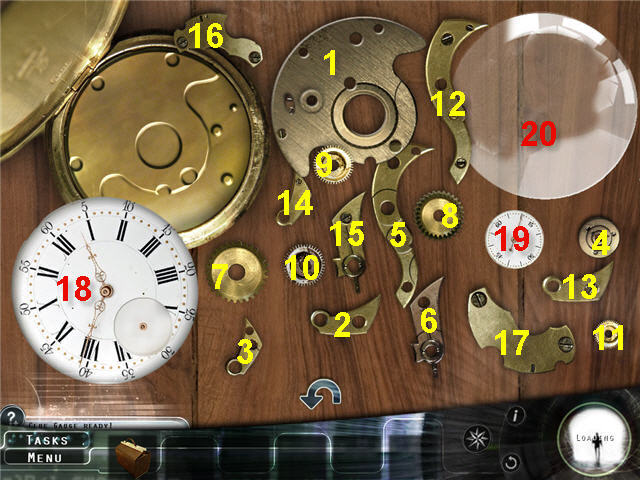
- Assemble the watch.
- When placing the pieces, you will get a gold sparkle when the piece is in the correct spot but this does not mean it is in the correct order.
- When placing a piece and you get black xxx’s you are in the correct spot but in the wrong order.
- See this screenshot for order of assembly, see next screenshot for details.
- Easy Mode; the 1st plate is already placed for you.

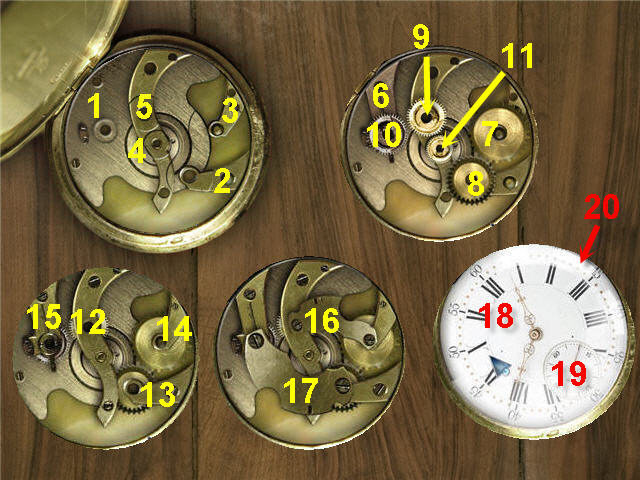
- Solution; see screenshot for step by step solution.
- Numbering of the pieces can be seen on the previous screenshot.
- Easy Mode; the 1st piece is already placed for you.

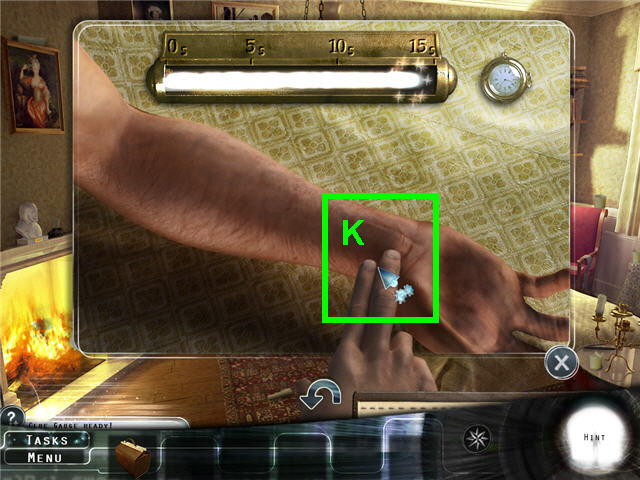
- Look close at the patients arm.
- Find the correct spot (K) to take the pulse. See screenshot for solution.
- Count the beats in the 15 seconds and multiply them by 4 to get the beats per minute.
- Answer to the question; beats per minute – 36.

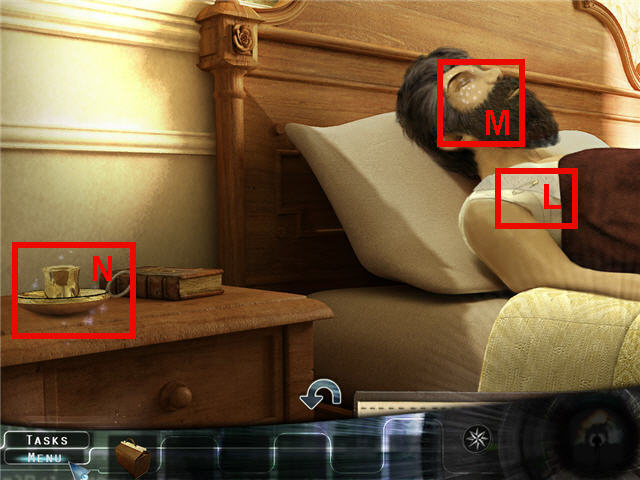
- Look close at the patients head.
- Look close at the safety pin (L) and his eyes (M).
- Click on the candle (N) on the nightstand to trigger a search.

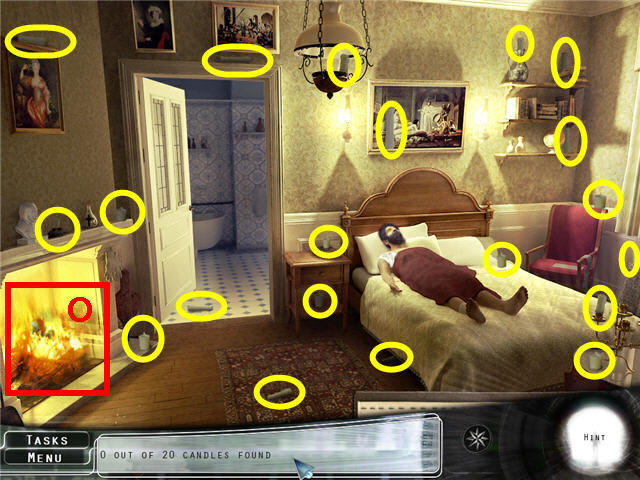
- Find the 20 candles and get a BURNT OUT CANDLE.
- Light the BURNT OUT CANDLE in the fireplace (O) to get a LIT CANDLE.
- Look close at the patients head and click on the eye.

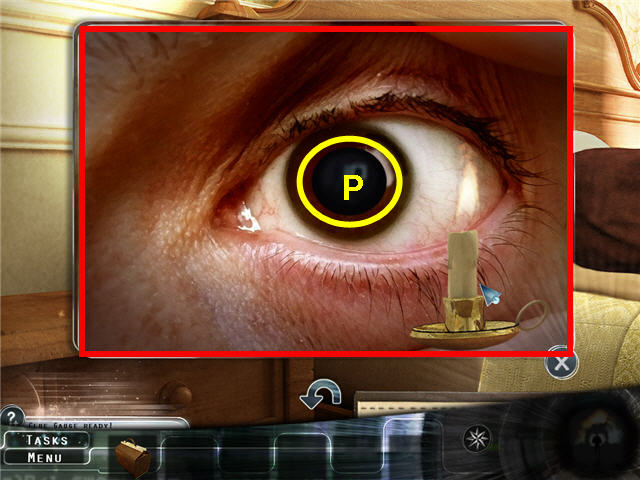
- Use the LIT CANDLE on the patient’s eyes.
- Move the LIT CANDLE back and forth over the pupil (P) of the eye and note the reaction.
- Answers to the questions; Follows light – No, Contracts – Yes.
- Click on the patient’s ear.
- Answer to the question; verbal response – No.

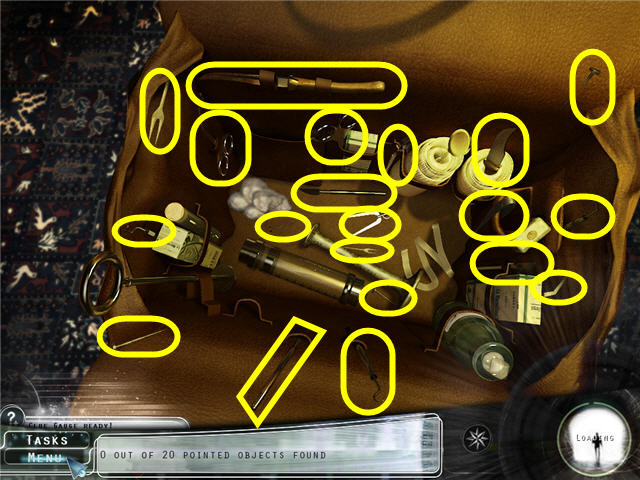
- Find the 20 pointed objects and get a POINTED OBJECT.
- Look close at the patient’s feet.
- Use the POINTED OBJECT on the bottom of the foot.
- Answer to question; reaction to pain – Yes.
- Back out of the room and head downstairs and into the room on the left.

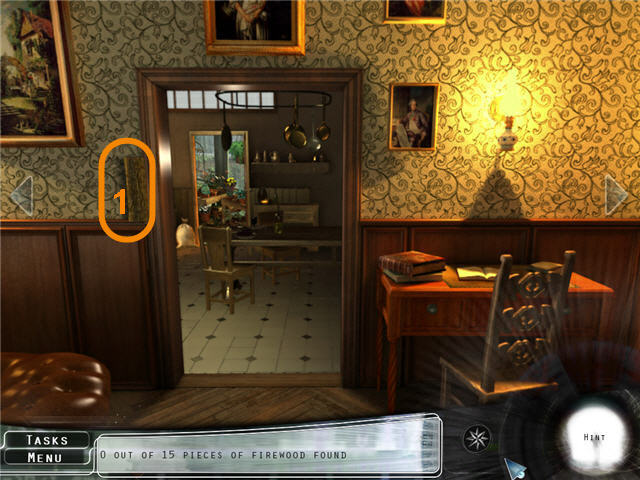
- Click on the right arrow.
- Find 1 Firewood (1).
- Head to the right two times.

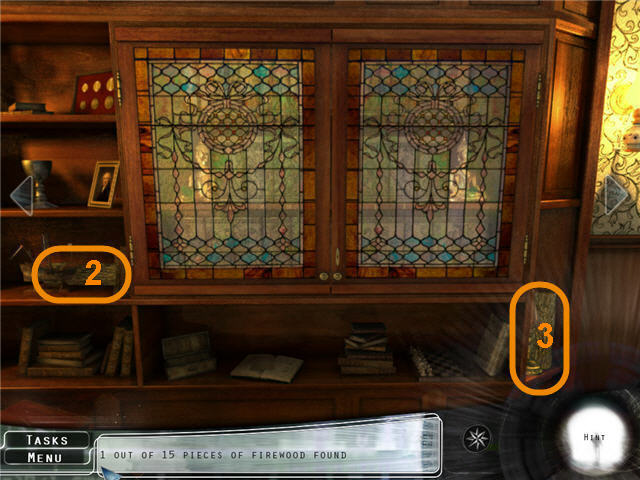
- Find 2 Firewood (2-3).
- Head to the right two times.

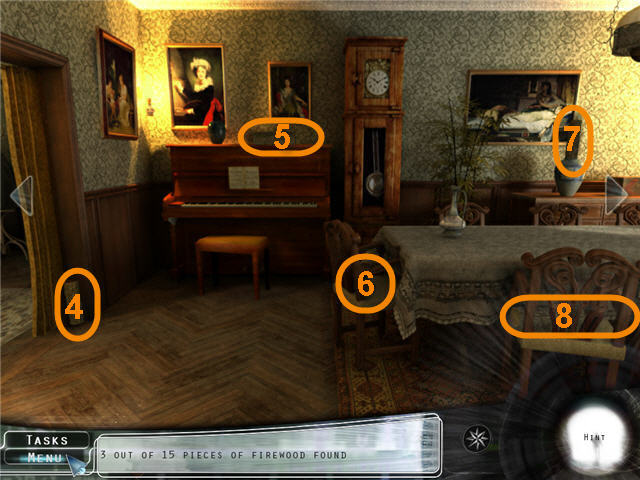
- Find 4 Firewood (4-8).
- Head right one time.

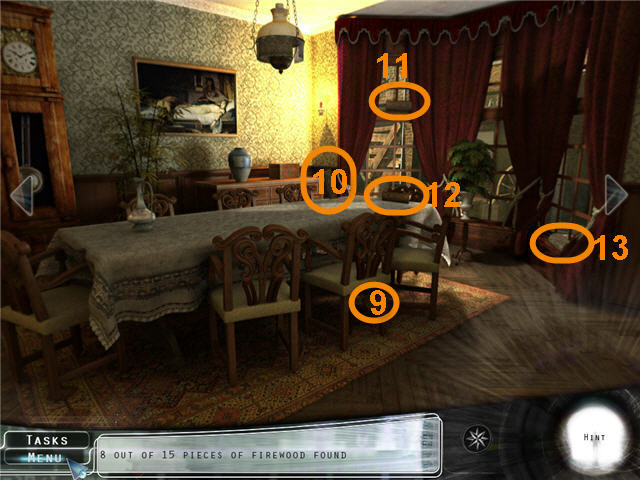
- Find 5 Firewood (9-13).
- Head right one time.

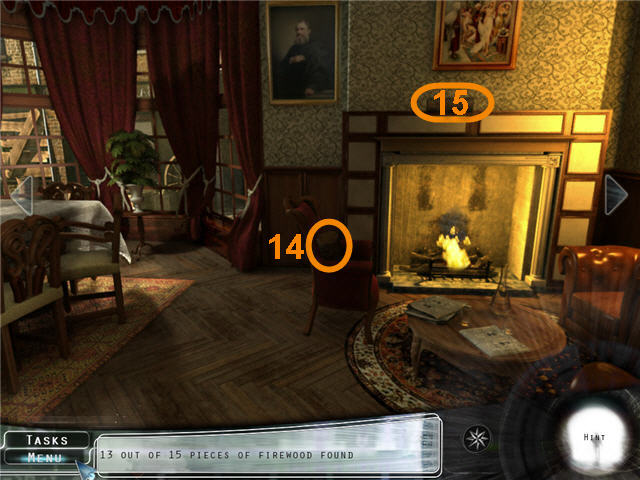
- Find 2 Firewood (14-15).
- Get PIECES OF WOOD added to your inventory.

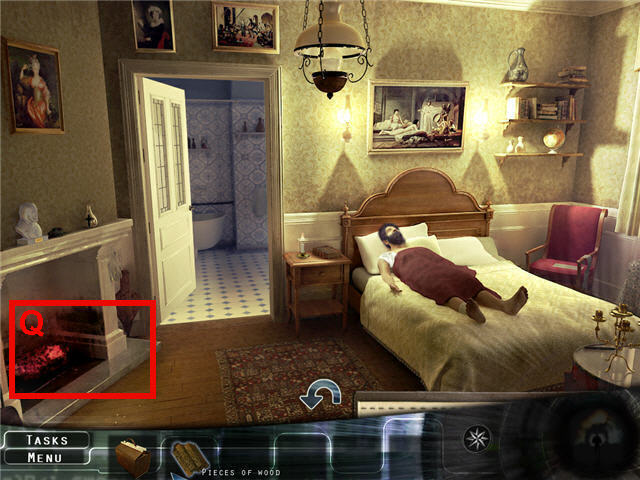
- Head left three times and exit the room, head upstairs and left into the patient’s room.
- Place the PIECES OF WOOD in the fireplace (Q).

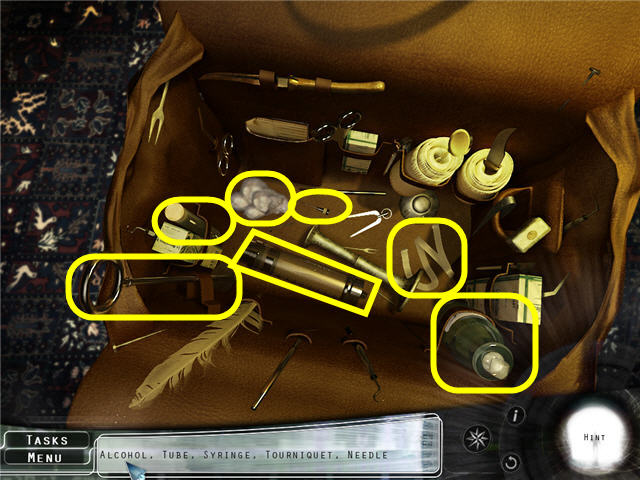
- Find the items listed and get BLOOD TEST SUPPLIES.
- Your list may start out different than in the screenshot, but all items taken will be the same when completed.
- Back out of the room, down the stairs, head left and right into the kitchen.

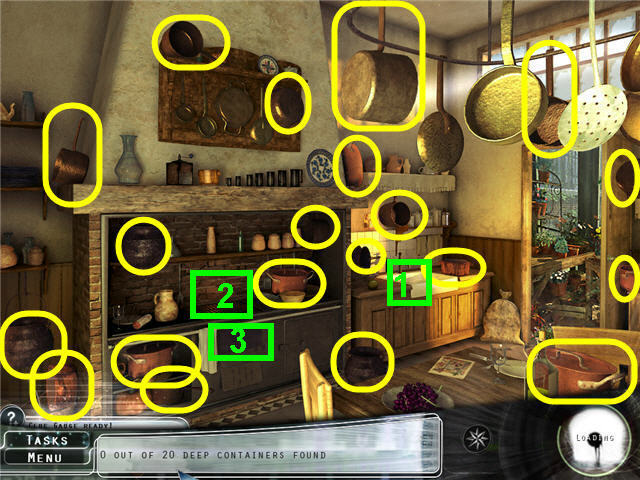
- Find the 20 deep containers and get a POT.
- Place the POT in the sink (1) and get a POT OF WATER.
- Place the POT OF WATER on the stove (2).
- Click on the coal bin (3) under the burner to trigger a new task.
- Head left two times, exit to the entryway and click on the cellar door.
Chapter 2- Locked In

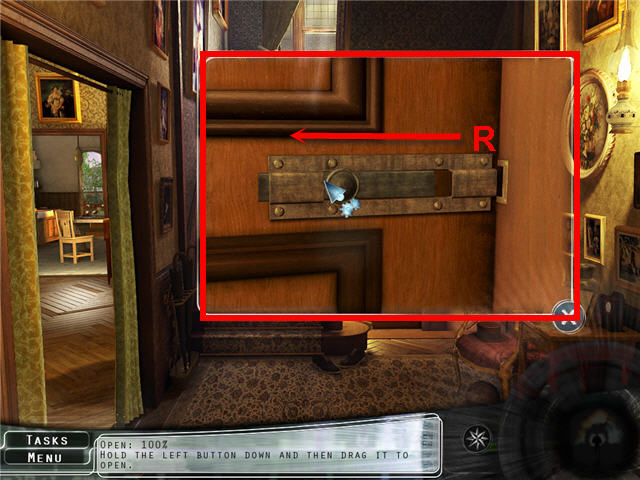
- Click-hold and drag the door lock (R) to the left until you get 100% and then let go.
- Automatically enter into the cellar.

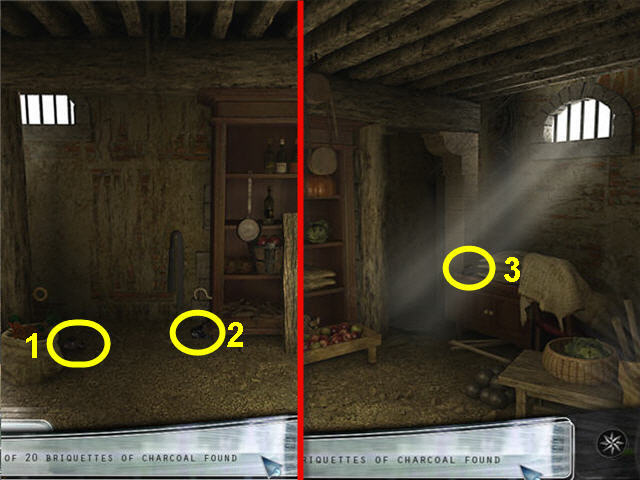
- Find two briquettes (1-2).
- Head right one time.
- Find one briquettes (3).
- Head right one time.

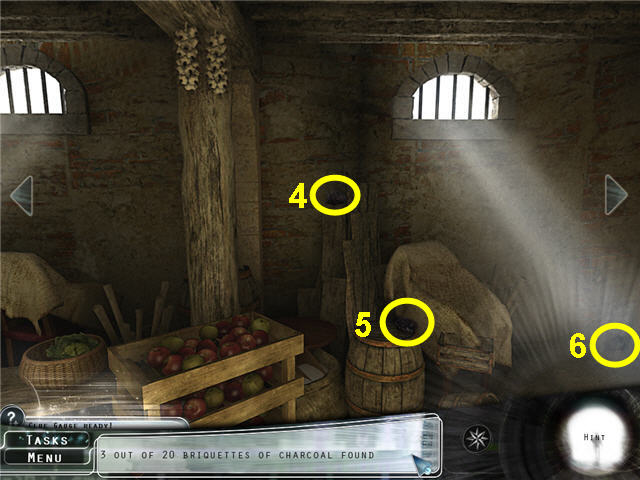
- Find three briquettes (4-6).
- Head right one time.

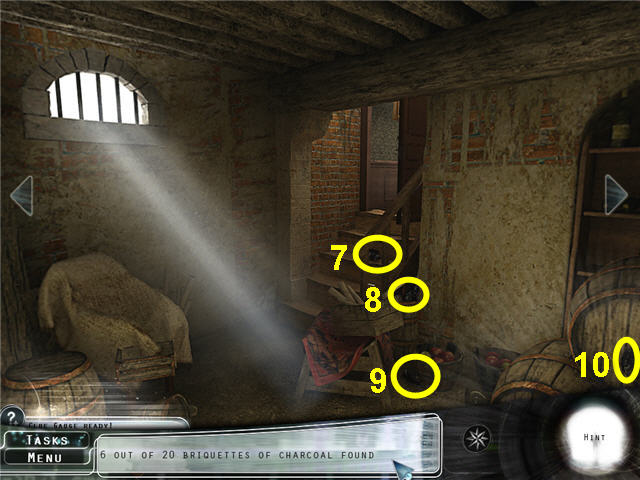
- Find four briquettes (7-10).
- Head right two times.

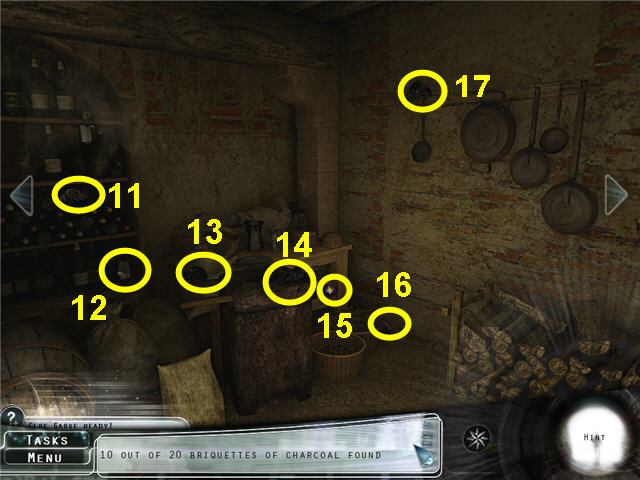
- Find seven briquettes (11-17).
- Head right one time.

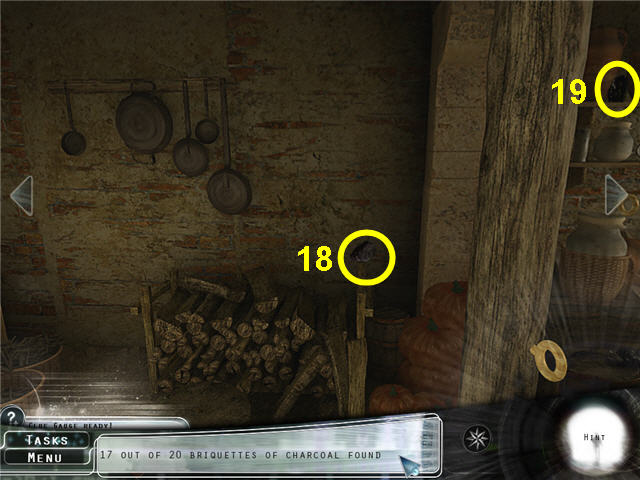
- Find two briquettes (18-19).
- Head right one time.

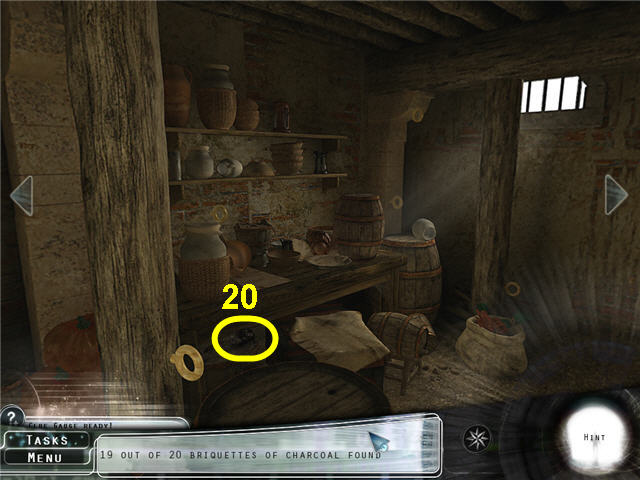
- Find the last briquette (20) and get CHARCOAL BRIQUETTES.
- Click on the door to trigger a task.

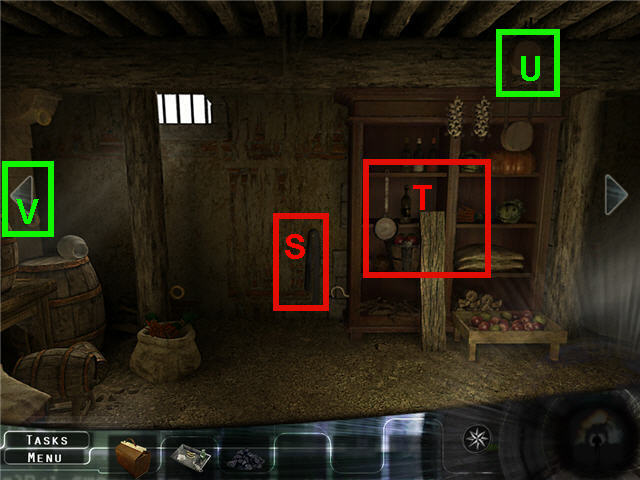
- Head to the left three times.
- Click on the swinging cloth (S) to trigger cupboard hotspot.
- Click on the cupboard (T) to trigger the pulley.
- Click on the pulley (U) to trigger a puzzle.
- Pull the rope to the left arrow (V) and click on the arrow.
- See next screenshot.

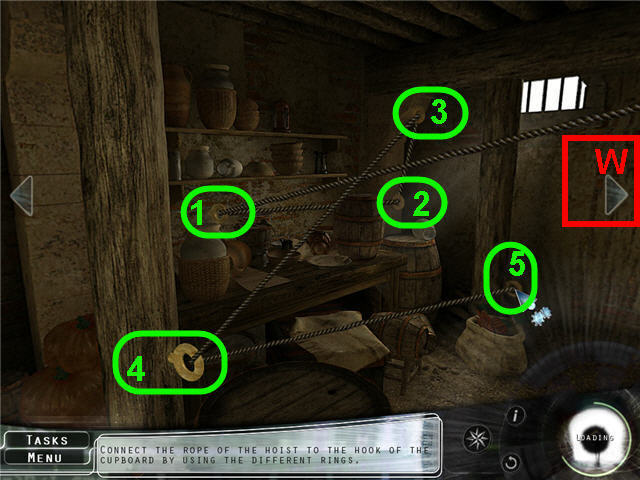
- Click on the hooks in the order marked on the screenshot.
- Click on the right arrow (W) and see next screenshot.

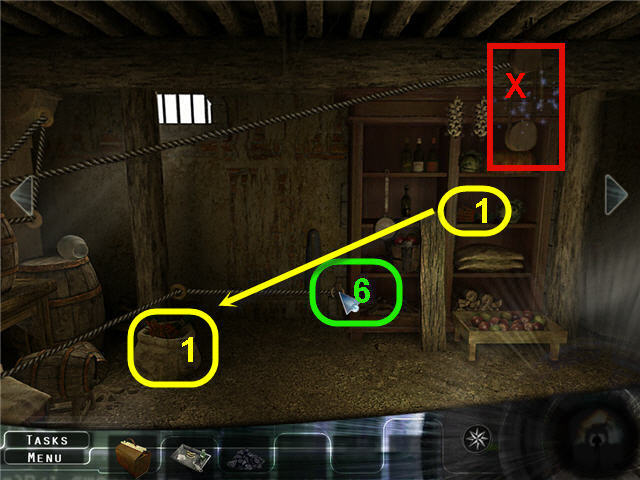
- Click on the hook on the bottom of the cupboard (6).
- Click on the pulley (X) to trigger an activity.
- The object is to empty the cupboard and put the items back to where they belong on the room.
- Place the carrots (1) from the shelf in the bushel on the left.
- Head right one time.

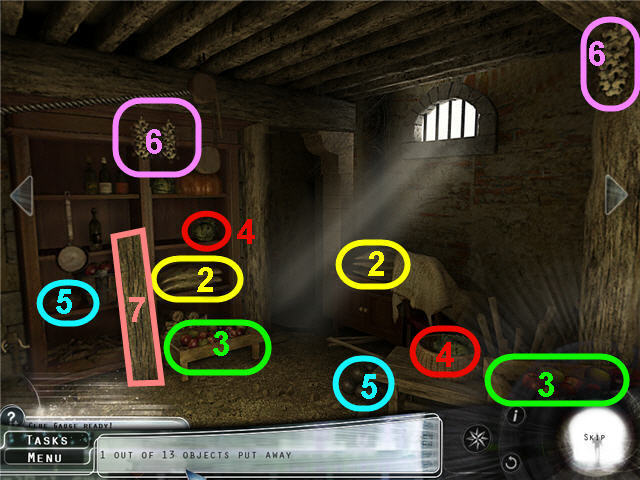
- Place the bags made out of cloth (2) on the pile of bags to the right.
- Place the crate of apples (3) on the crates in the lower right.
- Place the cauliflower (4) in the basket on the right.
- Place the cast iron balls (5) on the pile of balls to the right.
- Place the string of garlic (6) on the pillar on the right.
- Take the wooden board (7) and head right three times.

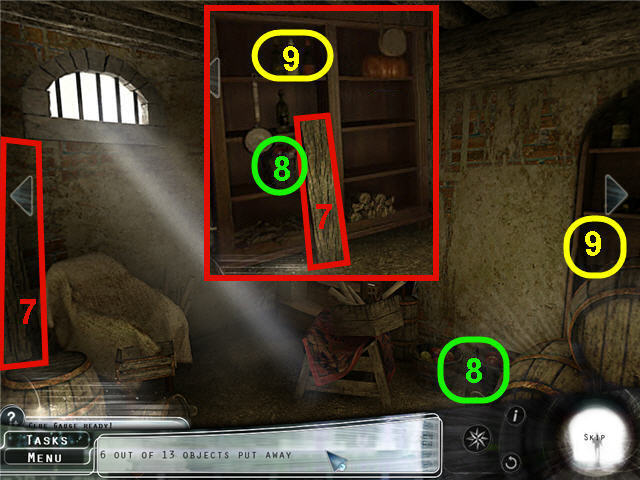
- Place the wooden board (7) and place it on the far left.
- Head left two times, take the bucket of apples (8), head right two times and place the apples to the right of the stairs.
- Head left two times, take the wine bottles (9), head right two times and place the bottles on the right shelves.

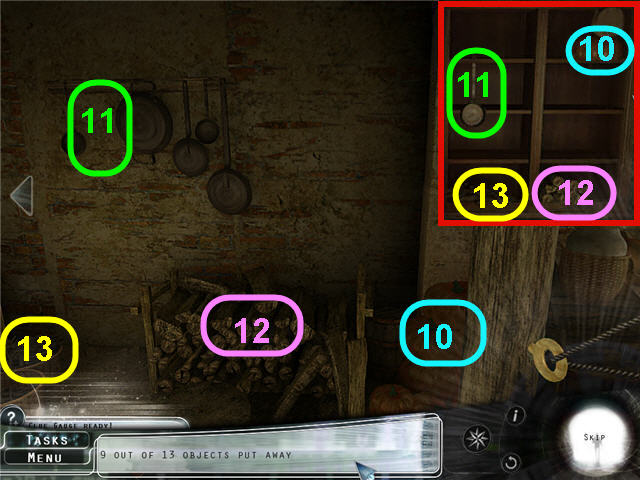
- Head left 3 times and take the pumpkin (10), head left two times and place the pumpkins to the left of the pillar.
- Head right two times, take the frying pan (11), head left two times and hang the pot on the wall.
- Head right two times, take the firewood (12), head left two times and place the firewood on the pile.
- Head right two times, take the small pieces of wood (13), head left two times and place the small pieces of wood in the left baskets.
- Head right two times and click on the pulley to move the empty cupboard.
- Enter through the newly-opened doorway to trigger a puzzle.

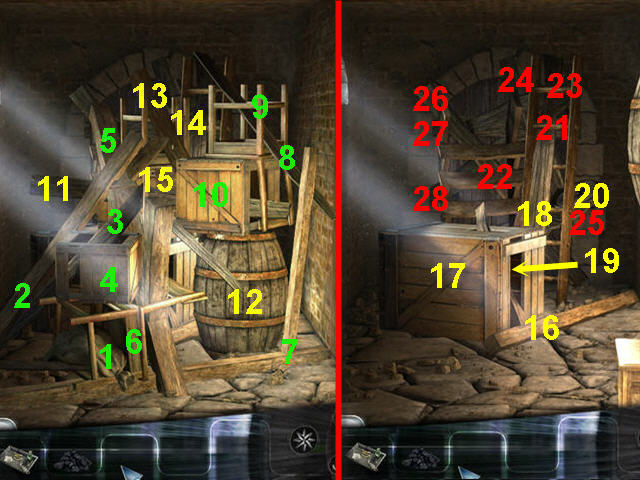
- Clear the objects away from the exit by removing the topmost piece each time. See screenshot for solution.
- Click on the door to enter to the next room.

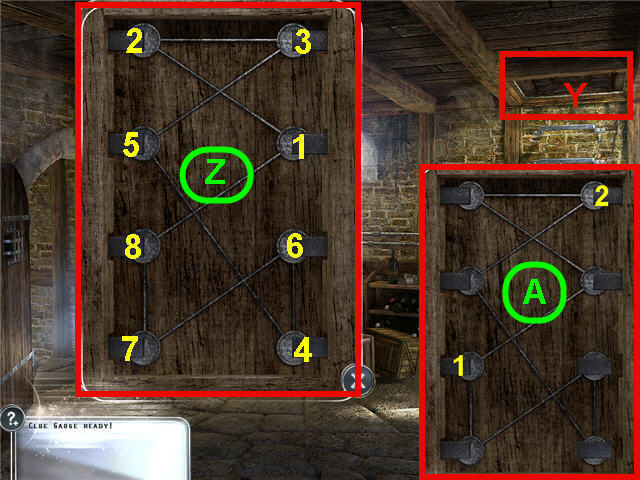
- Click on the trapdoor (Y) to trigger a puzzle.
- The object is to unlock each of the 8 locks.
- Click on a lock to open and close it.
- Opening one lock will lock or unlock any linked lock.
- Normal Mode Solution (Z); see screenshot for order of locks to click on.
- Easy Mode Solution (A); see screenshot for order of locks to click on.
- Click on the gas shutoff under the left window to trigger a puzzle.

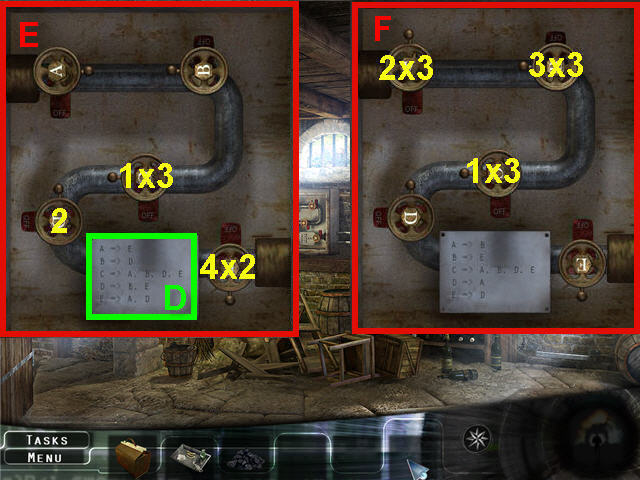
- The object is to shut all the valves off.
- Click on a valve to move it a quarter turn clockwise.
- Turning one valve will turn others. See the code (D) by the valves to note which valves will turn when you click on a certain lettered valve.
- Normal Mode Solution; see screenshot (E) for the order and the number of times of times to click on the valves if more than once.
- Easy Mode Solution; see screenshot (F) for the order and the number of times of times to click on the valves if more than once.
- Head up the trapdoor.
- Click on the door on the left to trigger a task.
- Click on the box of tools on the floor to trigger a puzzle.

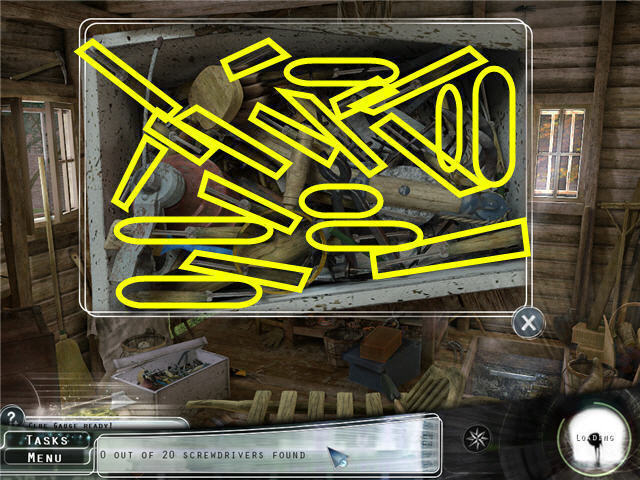
- Find the twenty screwdrivers.
- Get a SCREWDRIVER added to your inventory.

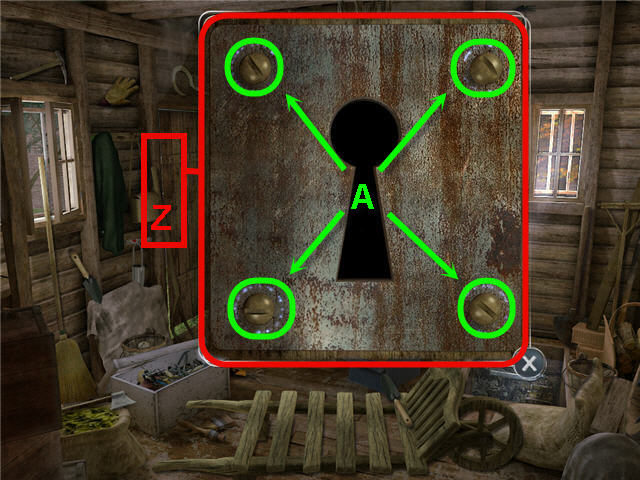
- Click on the door (Z).
- Use the SCREWDRIVER on each of the four screws (A) to trigger a puzzle.

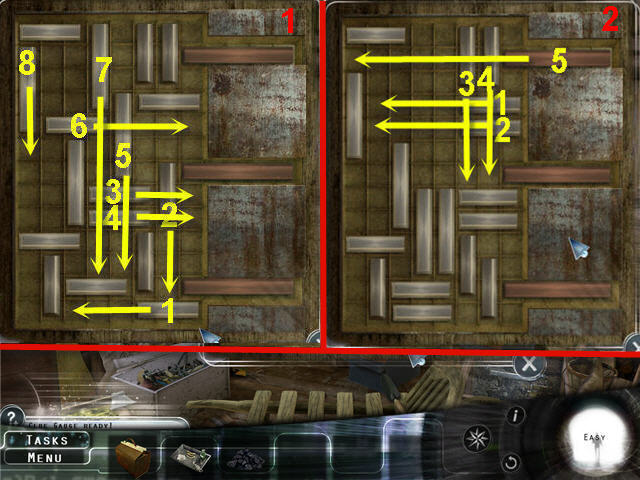
- The goal is to slide the silver bars to free the 3 rust colored locks on the right.
- Normal Mode only Part 1; See screenshot for solution to unlock the top lock, see next screenshot for the bottom two locks.
- For Easy Mode, advance two screenshots.

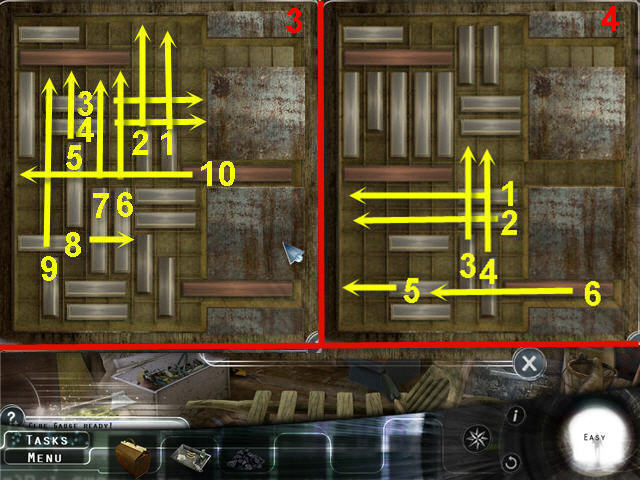
- The goal is to slide the silver bars to free the 3 rust colored locks on the right.
- Normal Mode only part 2; See screenshot for solution to unlock the bottom two locks, see previous screenshot for the top lock.
- For Easy Mode, see next screenshot.

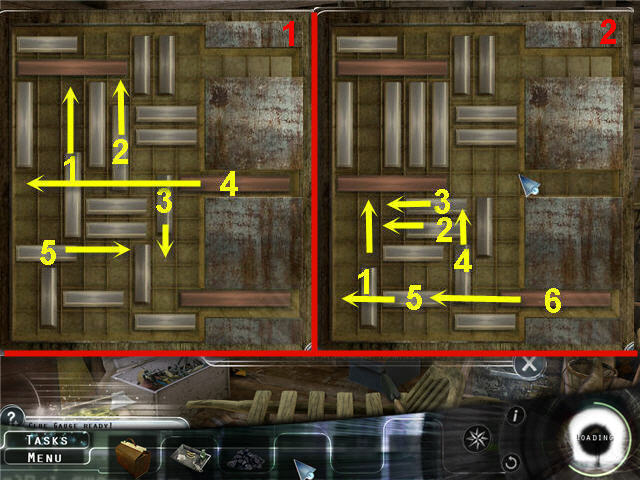
- The goal is to slide the silver bars to free the 2 rust colored locks on the right.
- Easy Mode Only; See screenshot for solution to unlock the bottom two locks, see previous 2 screenshots for Normal Mode.
- Exit the shed, head straight one time and click the left arrow to enter the kitchen.
Chapter 3 – The Attic

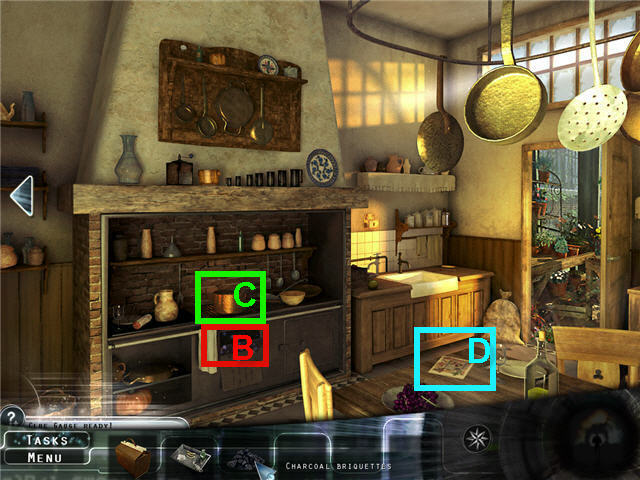
- Place the CHARCOAL BRIQUETTES in the compartment (B) under the burner.
- Place the BLOOD TEST SUPPLIES in the pot (C).
- Click on the magazine (D) to trigger a find the difference puzzle.

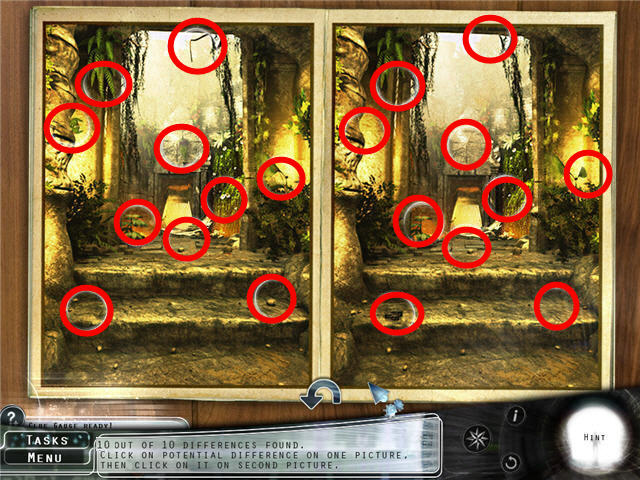
- Find the 10 differences.
- Click on the differences in both pictures; there will be a white circle remaining if correct.

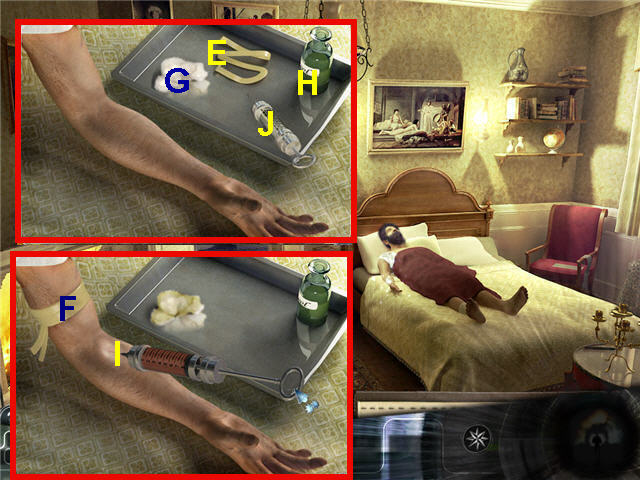
- Click on the steaming pot on the stove and place it in the sink.
- Get a STERILE BLOOD TEST SUPPLIES added to your inventory.
- Head left two times, out the door, up the stairs and left into the patient’s room.
- Click on the patient’s arm.
- Place the tourniquet (E) on the upper arm (F).
- Use the cotton (G) on the antiseptic (H) and use on the patient’s forearm (I).
- Place the syringe (J) on the forearm.
- Click-hold on the syringe in the arm and push into the arm until you get 100% and release.
- Click-hold the end of the plunger on the syringe and pull out until you get 100% and release.
- Take the full syringe to get a BLOOD SAMPLE.

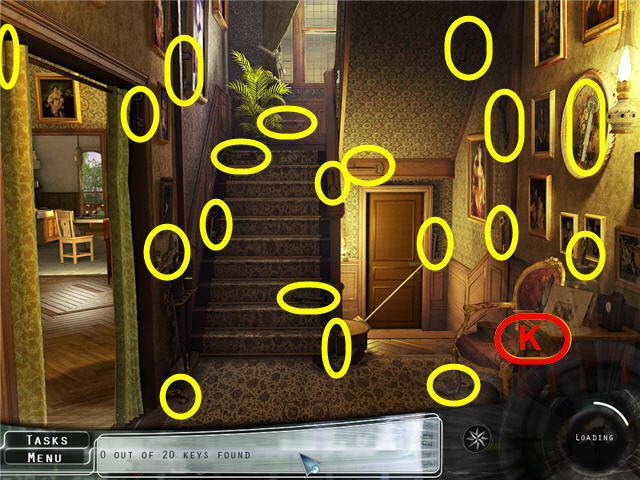
- Back out of the room, head upstairs and click on the attic door to trigger a task.
- Head downstairs two times.
- Find 20 keys.
- Click on the drawer (K) of the right table to find one of the keys.
- Find the remaining 19 keys and get a KEY SET.
- Head up the stairs two times and click on the attic door.

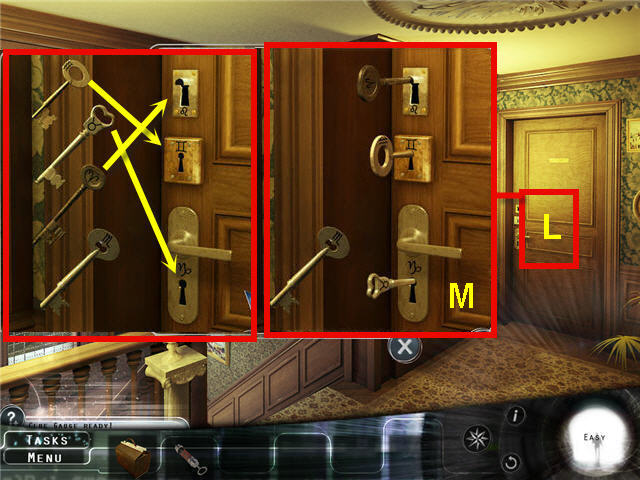
- Back out of the room, head upstairs and click on the attic door (L).
- The goal is to match the KEY SET with its matching keyhole. See screenshot for solution (M).
- The clue is to match the signs based on matching the Fire, Air and Earth zodiac signs.
- Solution; Aquarius key – Gemini lock, Taurus Key – Capricorn lock, Aries key – Leo lock.

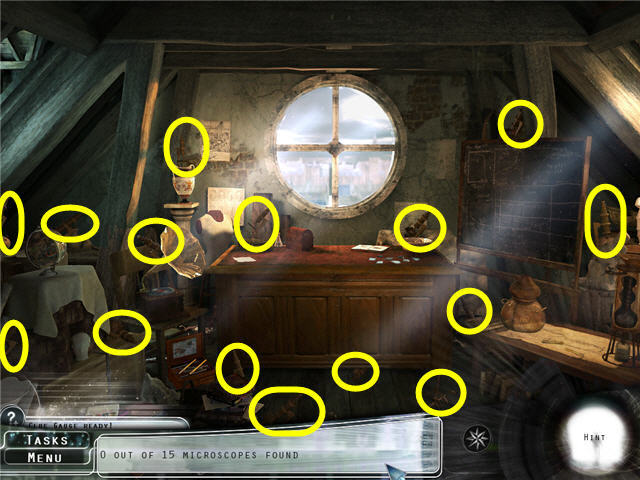
- Find the 15 microscopes.
- Get PIECES OF A MICROSCOPE added to your inventory.
- Look close at the desktop.
- Place the PIECES OF A MICROSCOPE on the desk to trigger a puzzle.

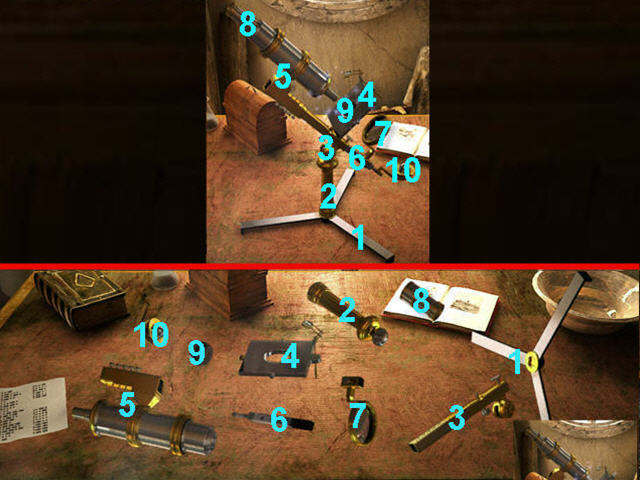
- Assemble the microscope.
- Click-hold the left mouse button to drag a piece into place.
- Normal mode only; click-hold the right mouse button to rotate a piece.
- Easy Mode; the pieces are automatically turned for you. See next screenshot for solution.
- The pieces will stick together when correctly placed.
- See screenshot for order of assembly and solution.

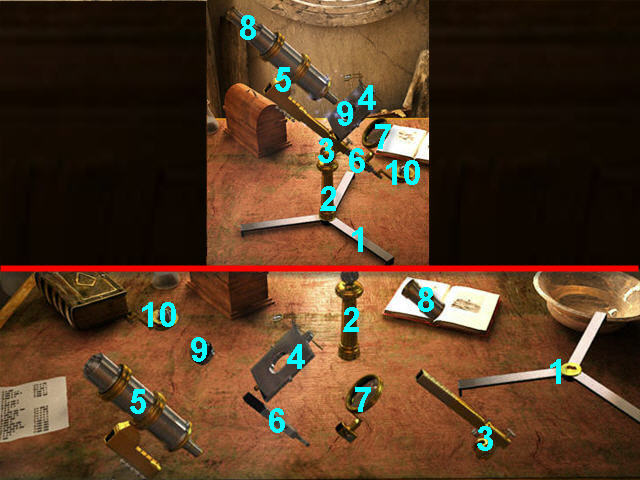
- Assemble the microscope.
- Normal Mode; see previous screenshot.
- Easy Mode only; click-hold the left mouse button to drag a piece into place.
- The pieces will stick together when correctly placed.
- See screenshot for order of assembly and solution.

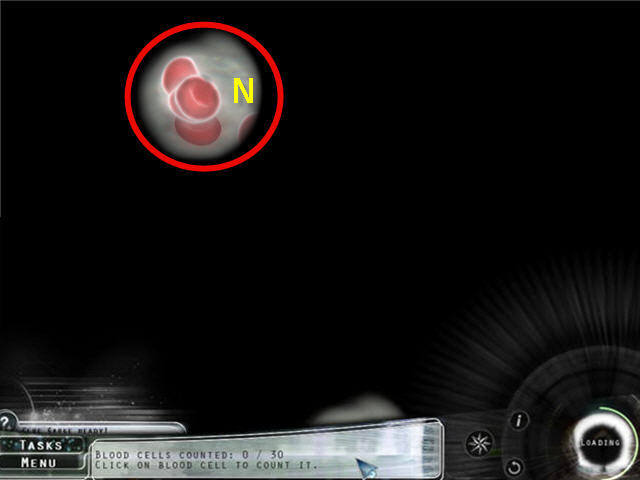
- Place the BLOOD SAMPLE on the microscope to trigger a puzzle.
- The goal is to catch all 30 of the white and red blood cells (N).
- The caught cells will have a white ring around them.
- Normal Mode; the cells move quickly and are more spread out.
- Easy Mode; the cells are a bit closer together and slower.

- Back out two times and head downstairs two times and head left.
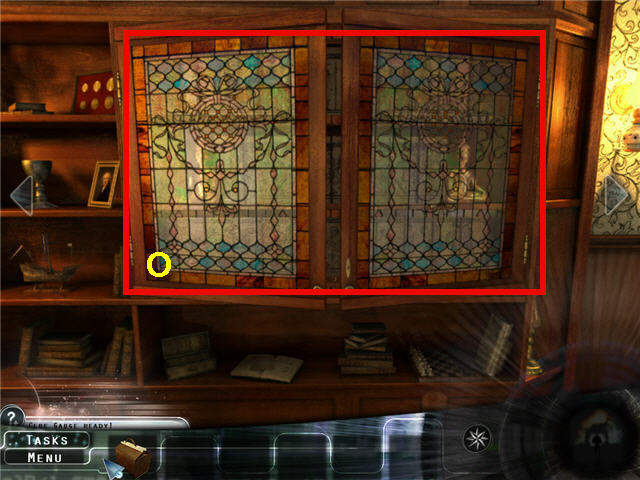
- Turn right two times and click on the stained glass cabinet (O) to trigger a puzzle.

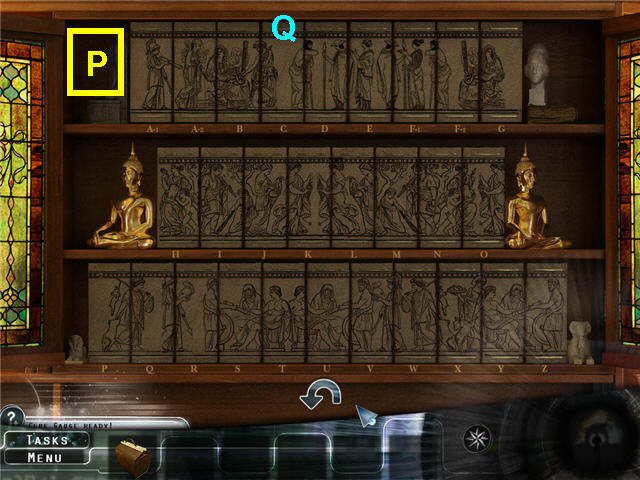
- The goal is to rearrange the books so that they make three long horizontal illustrations.
- Click on any two books to switch them.
- Normal Mode; you need to rearrange all three shelves.
- Easy Mode; you need to rearrange the top two shelves, the third is completed for you.
- See screenshot for solution (P).
- Click on the “C” Book (Q) when complete and get a task.
- Back out, head right, exit the room and click on the cellar door two times.
- Click-hold the lock and move it to the left to open the cellar door.
Chapter 4 – Remedy

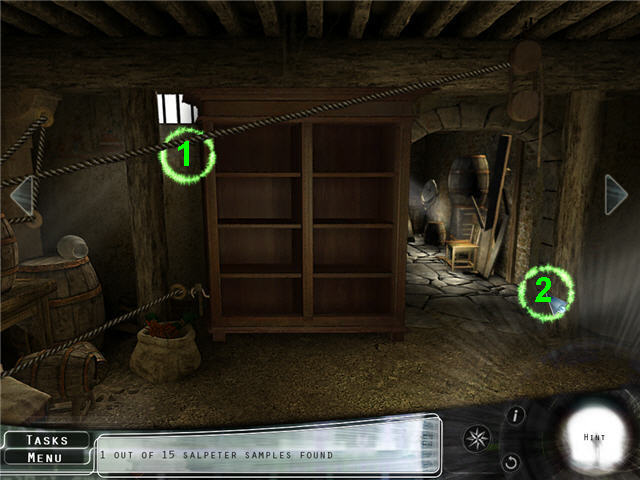
- Find the first two of 15 saltpeter samples (1-2) in the room.
- Move your cursor around the area and note the circle changes.
- The circle will get smaller as you get closer to the saltpeter and will turn green when you can click to get the sample.
- Head right two times.

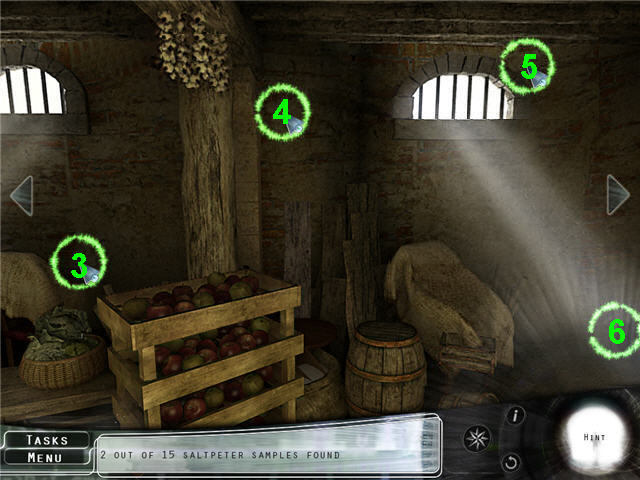
- Find four saltpeter samples (3-6).
- Head right two times.

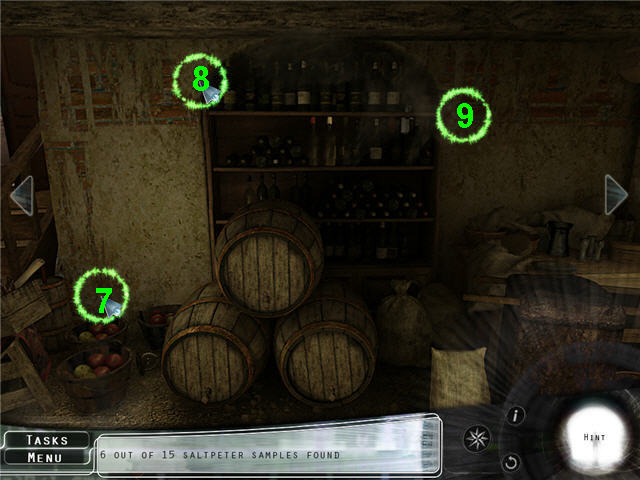
- Find three saltpeter samples (7-9).
- Head right one time.

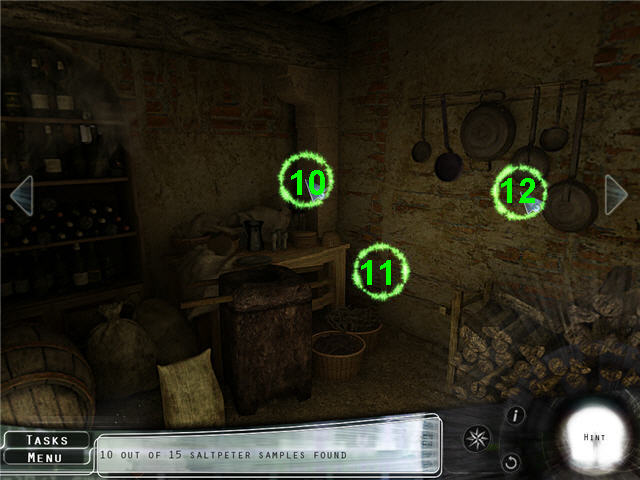
- Find three saltpeter samples (10-12).
- Head right two times.

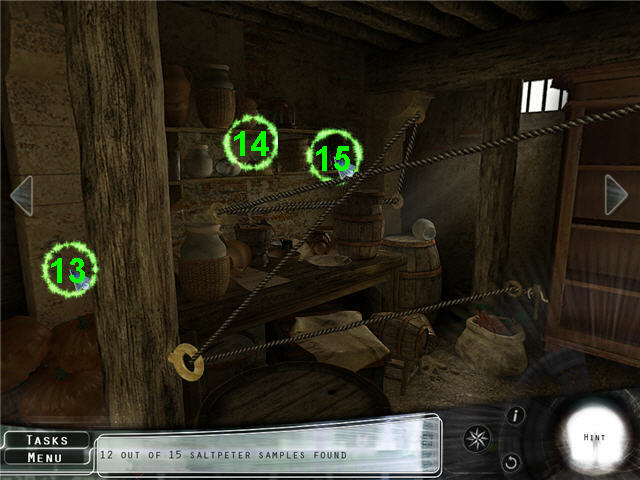
- Find the last three saltpeter samples (13-15).
- Get SALTPETER added to your inventory.
- Head right one time, forward two times, up the hatch and left to the yard.

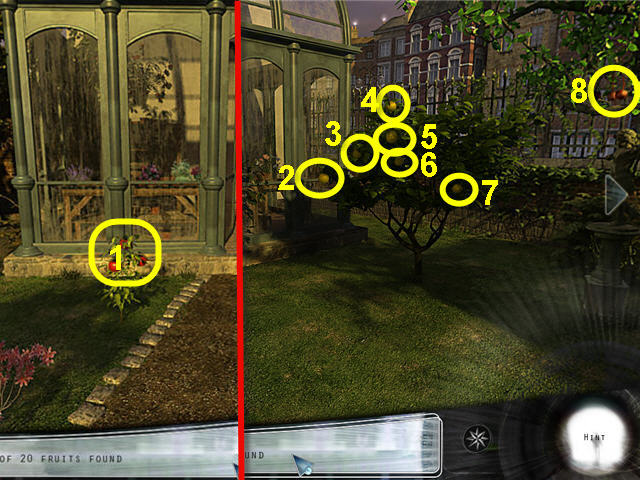
- Find the 1st of 20 fruits (1).
- Head right one time.
- Find 7 fruits (2-8).
- Head right two times.

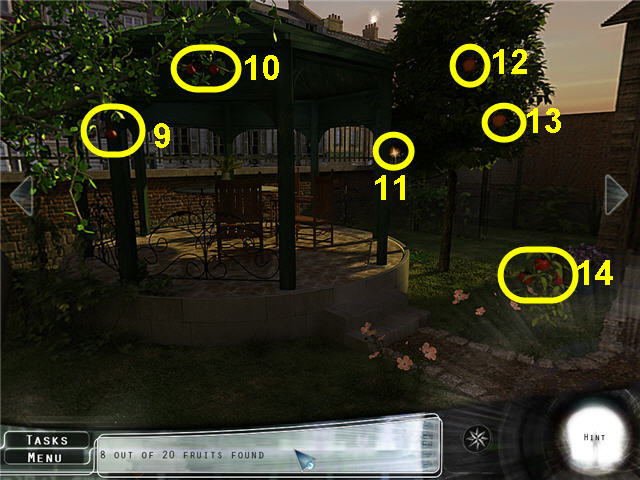
- Find 6 fruits (9-14).
- Head right two times.

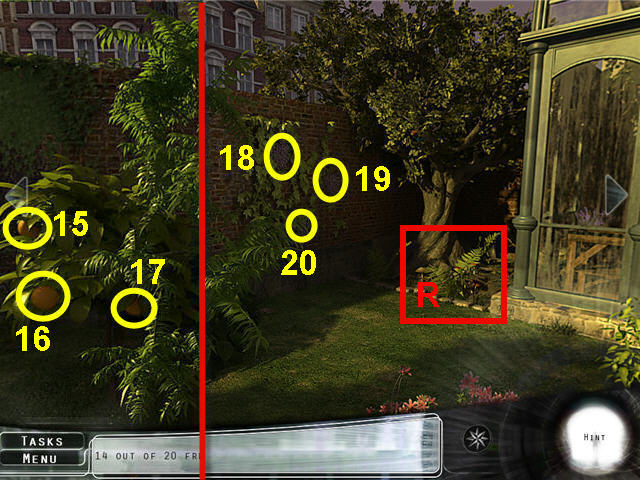
- Find 3 fruits (15-17).
- Head right two times.
- Find 3 fruits (18-20).
- Get FRESH FRUITS added to your inventory.
- Look close at the tree (R) in the corner.

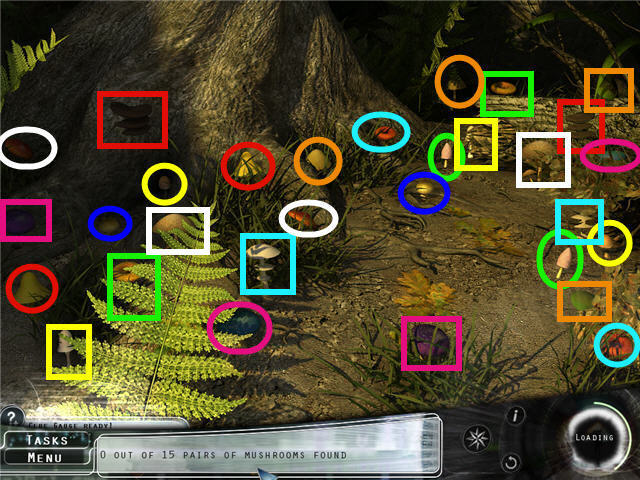
- Find 15 matching pairs of mushrooms. See screenshot for solution.
- Get MUSHROOMS added to your inventory.
- Back out and head right one time and enter the veranda to trigger a new task.
- Exit to the yard and enter the shed.

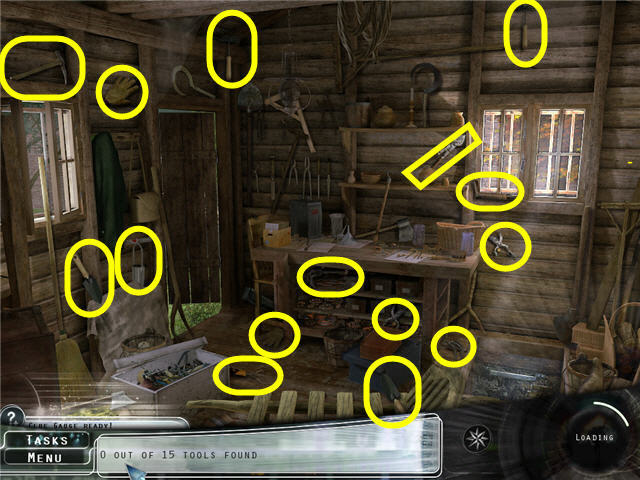
- Find15 tools and get GARDENING TOOLS.
- Exit the shed and enter the veranda.

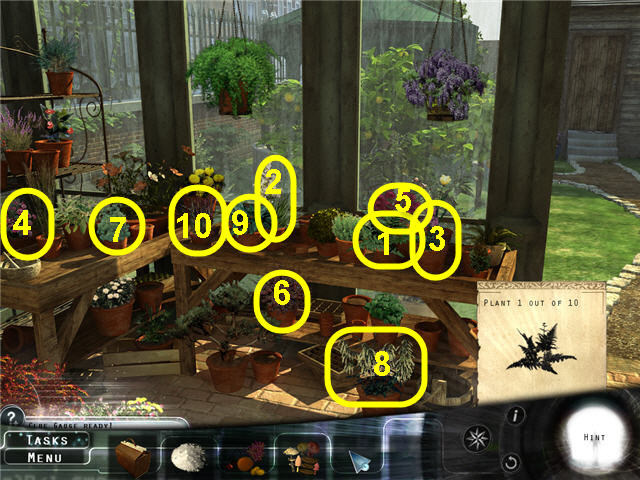
- Find the plants displayed in the popup on the right.
- There are ten plants to find. See screenshot for solution.
- Get MEDICINAL PLANTS added to your inventory.

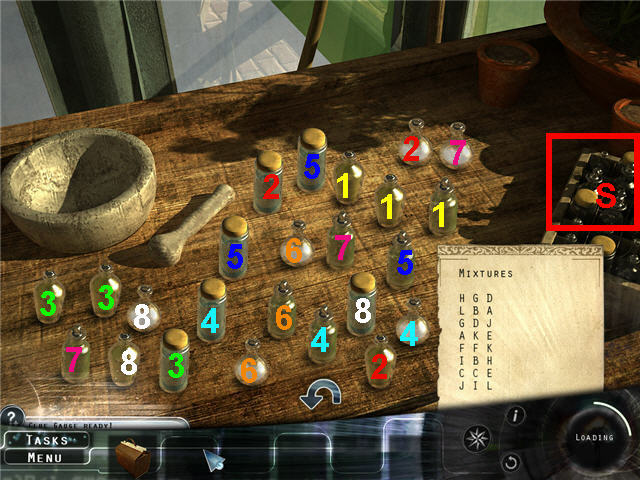
- Place the SALTPETER, FRESH FRUITS, MUSHROOMS, and MEDICINAL PLANTS on the tray of jars (S) on the right.
- Click on the jars and note the letters on the bottom of the jars.
- Click on a set of 3 letters that make up a mixture on the list to eliminate it.
- Continue clicking on sets of 3 until all the mixtures are complete.
- See screenshot for the solution.

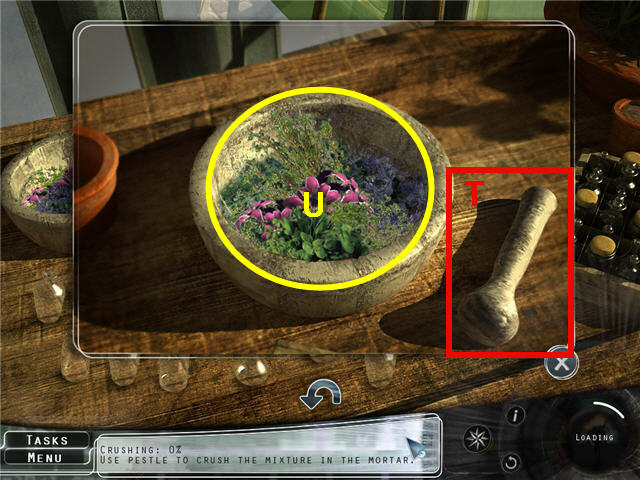
- Pick up the pestle (T) and move it around inside the mortar until all ingredients are ground and the crushing is 100%.
- Take the bowl of MIXTURE TO BE DISTILLED (U).
- Back out one time and head left three times, out the door, up the stairs twice and enter the attic.
Chapter 5 – Awakening

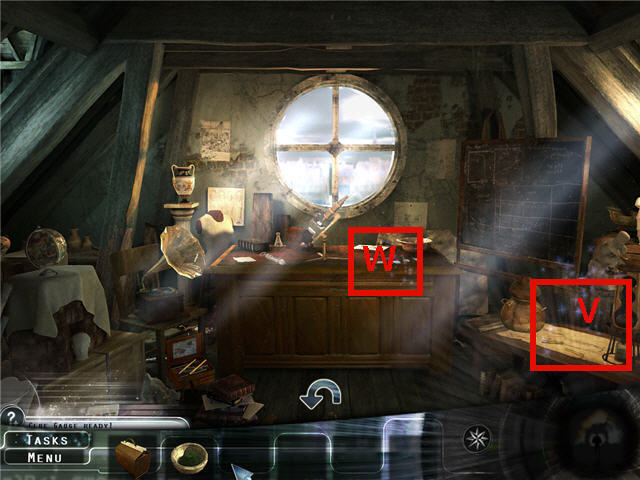
- Click on the table (V) to the right and note we are missing a piece.
- Click on the right side of the desk (W) to trigger a puzzle.

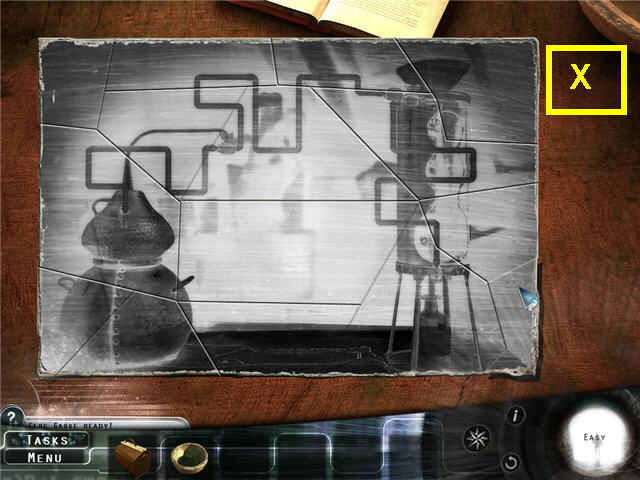
- The goal is to assemble the photograph.
- Click-hold the left mouse button to drag and move a piece.
- Normal Mode only; click-hold the right mouse button to rotate a piece.
- Easy Mode only; the puzzle pieces are already rotated for you.
- The pieces will stick together when correctly positioned.
- Get a PHOTOGRAPHIC PLATE MADE OF GLASS when complete.
- See screenshot for completed puzzle (X).

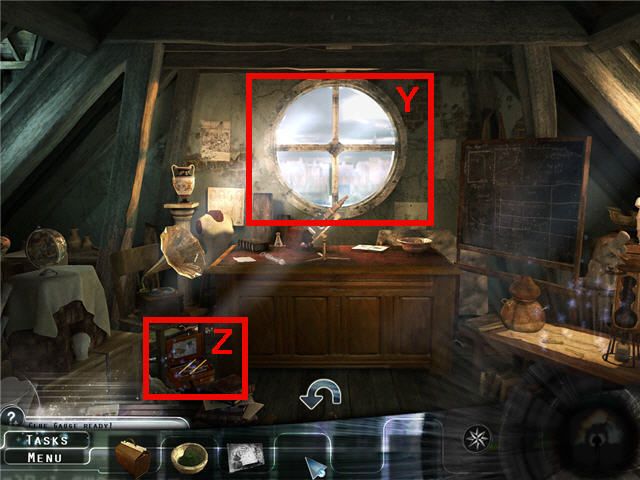
- Place the PHOTOGRAPHIC PLATE MADE OF GLASS on the window (Y) above the desk.
- Click on the toy box (Z) to trigger a task.
- Back out one time; head down the stairs and into the boy’s room on the right.

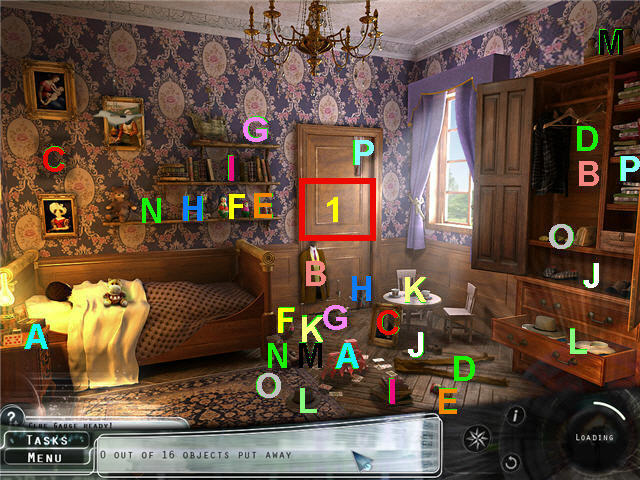
- Click on the closet door (1) to trigger an activity.
- The goal is to place the 16 objects that are on the floor and door in their proper place.
- See screenshot for solution.
- Click on the closet door.

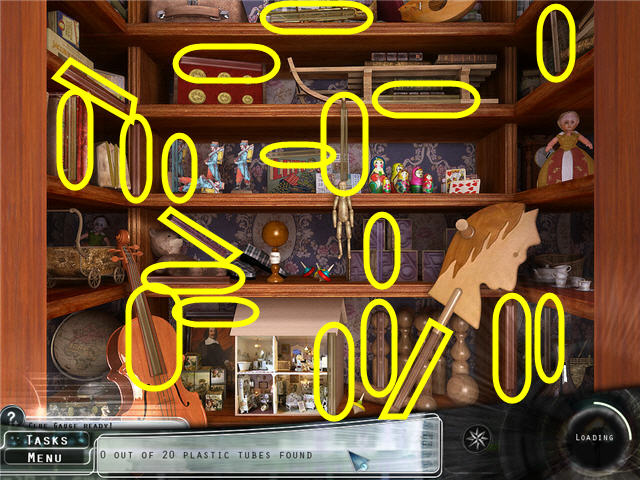
- Find the 20 plastic tubes and get the TUBES FOR STILL.
- Back out, head left, and go upstairs and into the attic.

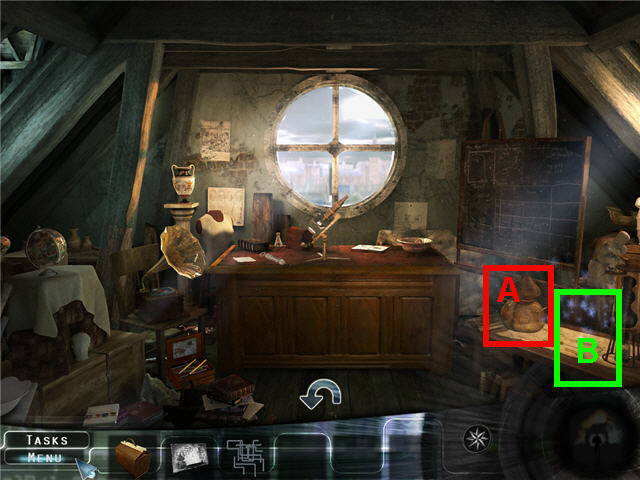
- Place the MIXTURE TO BE DISTILLED in the boiler (A).
- Place the TUBES FOR STILL on the table (B) to trigger a puzzle.

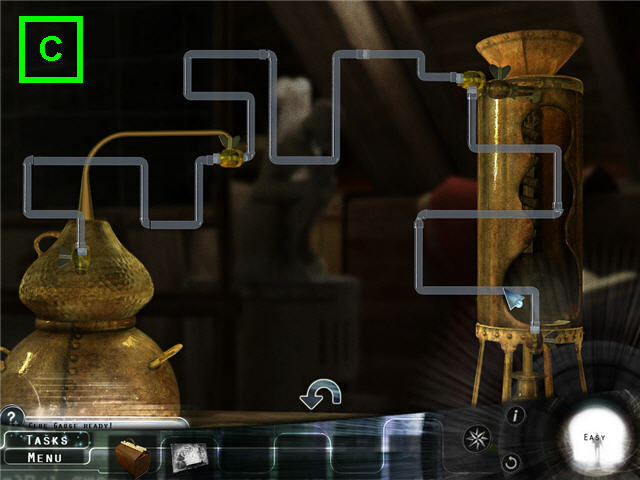
- The goal is to arrange the tubes from the boiler on the left to the container on the right.
- Easy Mode; the first few pieces will be connected for you.
- Get a STILL added to your inventory.
- See screenshot for solution (C).
- Back out and head downstairs two times, head left and then straight onto the kitchen.

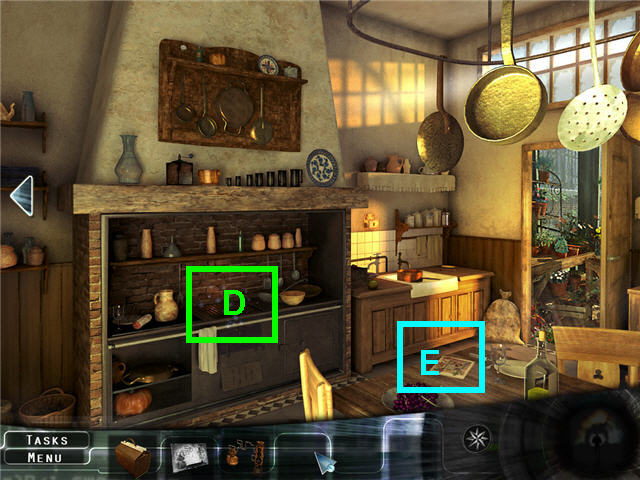
- Place the STILL on the stove (D).
- Look close at the magazine (E) to access a find the differences puzzle.

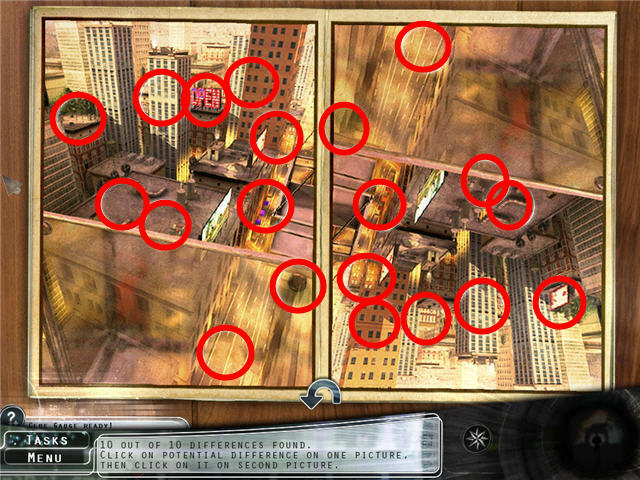
- Find the 10 differences.
- Click on the differences in both pictures, there will be a white circle remaining if correct. See screenshot for solution.
- Click on the bottom right of the still to get the REMEDY.
- Head left two times; out the door, up the stairs and left into the patient’s room.

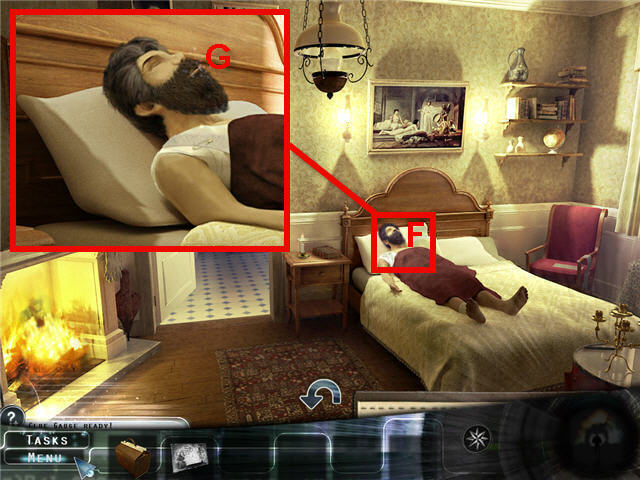
- Look close at the patients head (F).
- Place the REMEDY on the patient’s mouth (G).
- Head into the bathroom.

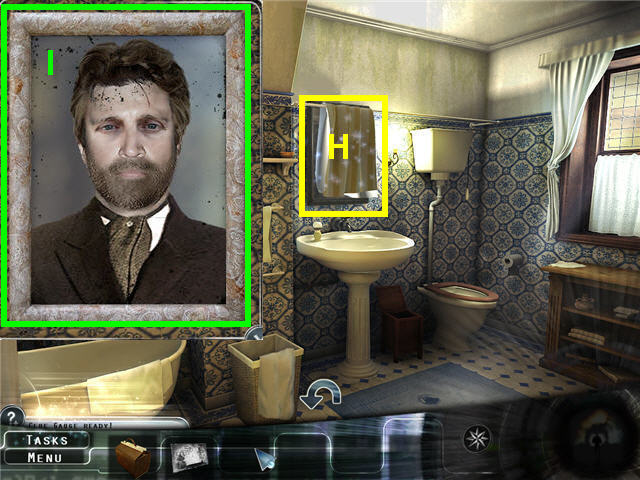
- Click on the sink to turn on the water.
- Move the towel (H) away from the mirror.
- Click on the mirror.
- Click-hold the left mouse button and move it around the mirror to remove the condensation until the bottom meter states 100% (I).
- Congratulations! You have successfully completed The Fall Trilogy – Chapter 3: Revelation.



 The Mirror Mysteries Walkthrough, Guide, & Tips
 Dominic Crane 2: Dark Mystery Revealed Walkthrough, Guide, & Tips
 Nightmares from the Deep: The Cursed Heart Walkthrough, Guide, & Tips
 Haunted Legends: The Secret of Life Walkthrough, Guide, & Tips
 Bedtime Stories: The Lost Dreams Walkthrough, Guide, & Tips